

Page 1

Ultrasonic Cool Mist Humidifier
Model No.: LV400CH
Questions or Concerns?
Please contact us Mon-Fri 9:00AM-5:00PM PST
at (888) 726-8520 or email [email protected]
Page 2

Thank you.
Thank you for purchasing the LV400CH Ultrasonic Cool Mist Humidifier by Levoit. We are
dedicated to providing you with quality products so that you can see a better you. Should
you have any questions or concerns about using your new product, feel free to reach out to
our helpful customer support team at (888) 726-8520 or by email at [email protected]. We
hope you enjoy your new product!
- 2 -
Page 3

Safety Information
IMPORTANT: Please read, understand, and comply with all of the instructions provided in
this manual before using the device. Failure to comply with the instructions given in this
manual and/or using the device in ways other than the ones mentioned in this manual may
result in serious injury and/or damage the product.
• Ensure that the plug fits properly into a polarized power socket.
• Always disconnect from a power source by pulling the plug when not in use.
• DO NOT use this product in wet environments.
• DO NOT use your hand or any other object to cover the nozzle while the unit is on. Doing
so may damage the product.
• DO NOT clean the unit while it is connected to a power source or while it is on.
• Remove the water tank from the base before moving the humidifier.
• DO NOT place the humidifier near sources of heat, such as stove tops, ovens, radiators or
computers.
• DO NOT place the humidifier near any large pieces of furniture or in any high-trac area
where it can be easily knocked over.
• Unplug the unit when not in use, or while cleaning it out.
• DO NOT use cleaning detergents to clean the humidifier; only use distilled white vinegar.
• DO NOT plug in the unit with wet hands.
• DO NOT place foreign objects into the unit’s base or water tank. Do not use other items
as replacement parts for this product.
• Keep the humidifier out of reach from children.
• Only use this air purifier as described in this manual.
• Contact customer service if the unit is damaged or if it is not functioning properly.
- 3 -
Page 4
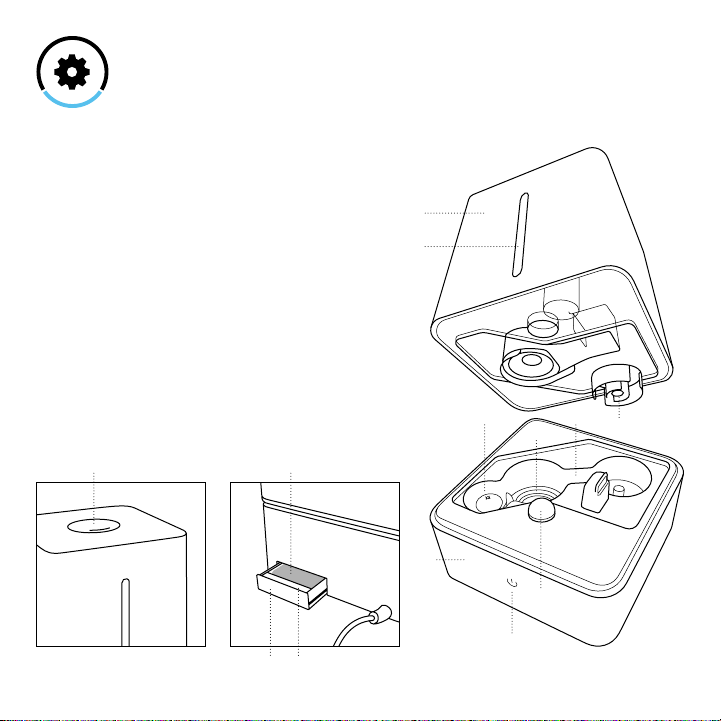
Main Functions
1. Nozzle
2. Water Tank
3. Water Tank Window
4. Water Filter Cap
5. Night-Light
6. Power Button
7. Base
8. Inner Chamber
9. Atomization Chip
10. Water Level Sensor
11. Aroma Box
12. Aroma Pad
13. Filter
2
3
Top Back
1 13
11 12
- 4 -
10
7
6
8
9
5
4
Page 5
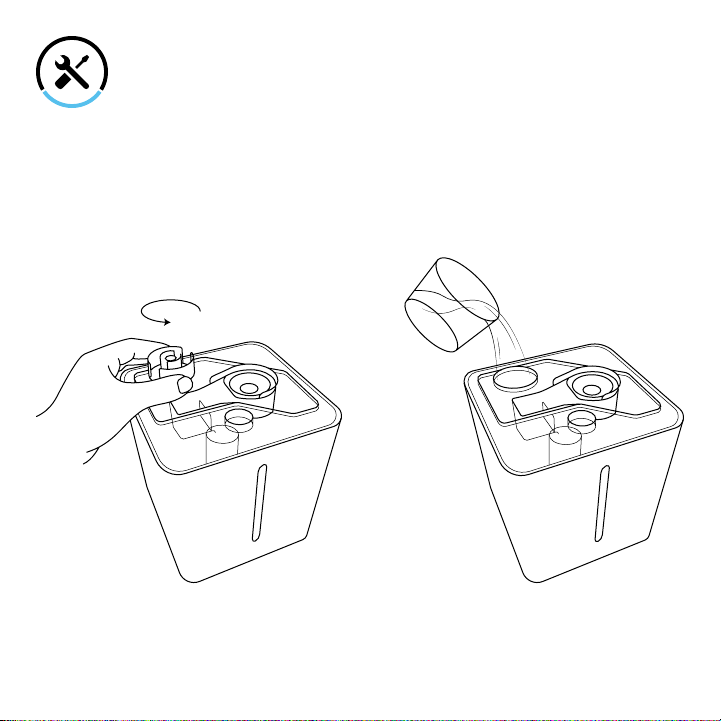
3. Fill the tank with cold or room
Set-Up
1. Remove the water tank from the base.
2. Flip the tank over and unscrew the water
tank cap.
NOTE:
• For best results, fill the water tank with distilled water.
• DO NOT fill the tank with hot water.
• DO NOT add water through the nozzle.
temperature water (use distilled water for
best results). You can gauge how much
water is in the tank by looking through
the water tank window.
4. Replace the cap once you have filled the
tank to your desired level.
5. Carefully place the water tank back on
the base, aligning the water tank window
with the power button.
- 5 -
Page 6
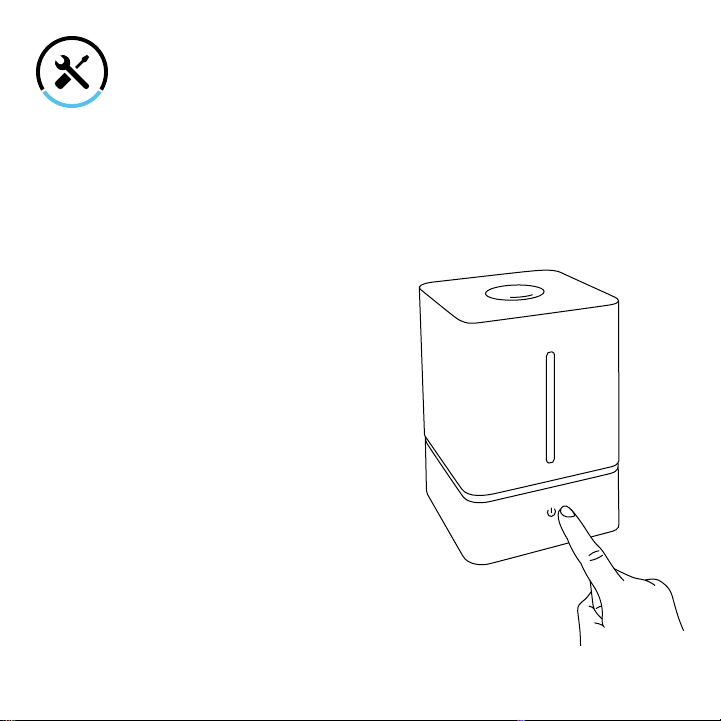
Operation
1. Plug the unit in an electrical outlet.
2. Press the power button once to set the
the humidifier the low mist setting. The
power button will light up blue.
3. Press the power button again to set the
unit to the high mist setting. The power
button will light up purple.
NOTE: While the humidifier is operating,
the power button light will automatically
turn o after 30 seconds of inactivity. To
check or change the current mist setting,
simply press the power button again.
4. (Optional) Press and hold the power
button for 2 seconds to turn on or turn
o the built-in night light.
5. Press the power button once more to
turn o the humidifier.
6. When the water level is low, the power
button will flash red and the unit will
automatically turn o.
7. Unplug the humidifier and refill the
water tank as mentioned in the Set-up
section.
NOTE:
• The nozzle can rotate 360° to diuse
mist in any direction.
• The night-light light will remain on if the
humidifier shuts o due to low water
level.
- 6 -
Page 7
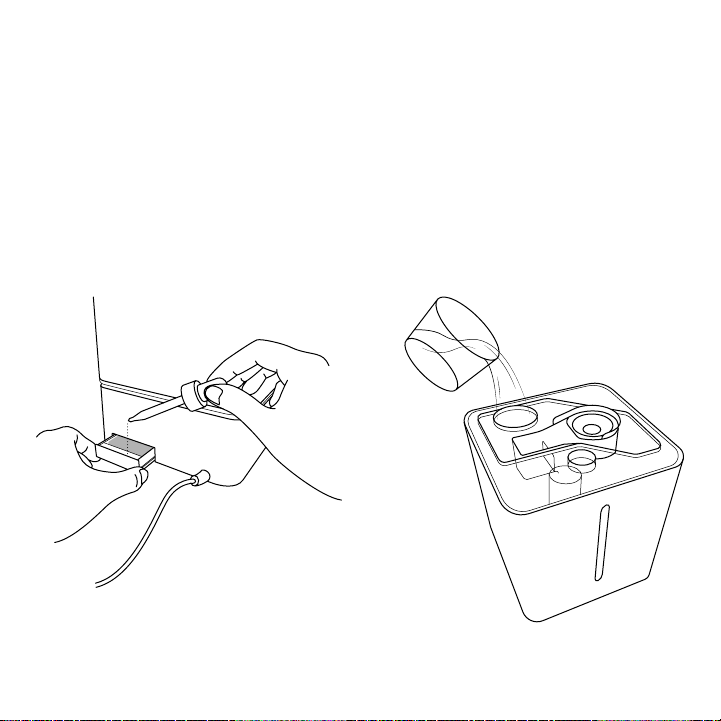
Using the Aroma Box
Your new humidifier can also be used as an
aroma diuser to provide added comfort in
your home.
1. Unplug the humidifier from its power
source.
2. Remove the aroma box from the back of
the base.
3. Add 2-3 drops of essential oil on the
aroma pad.
4. Replace the aroma box. Fill the water
tank with water and place it back on the
base as mentioned in the Set-up section.
5. Plug in and turn on the humidifier to relax
with your favorite fragrance.
- 7 -
Page 8
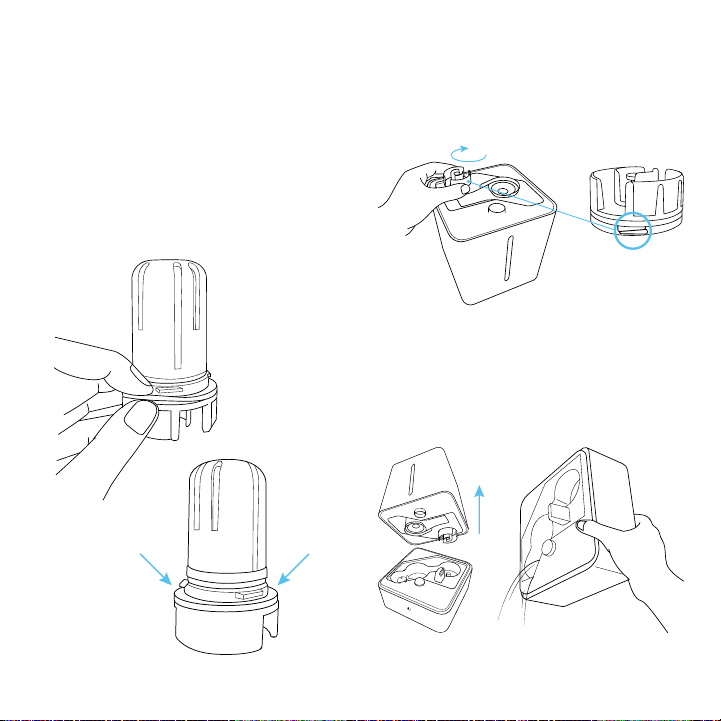
Preventing Water Leaks
When not sealed properly, the water tank
on your new LV400CH Ultrasonic Cool Mist
Humidifier may leak. The following tips will
ensure that your humidifier will operate
smoothly.
1. Make sure the silicone ring around the
water tank cap is secured at all times.
2. Twist the cap counterclockwise to secure
it onto the water tank.
3. When moving the humidifier, remove
the tank from the base and empty any
excess water inside the inner chamber
before moving the base.
- 8 -
Page 9
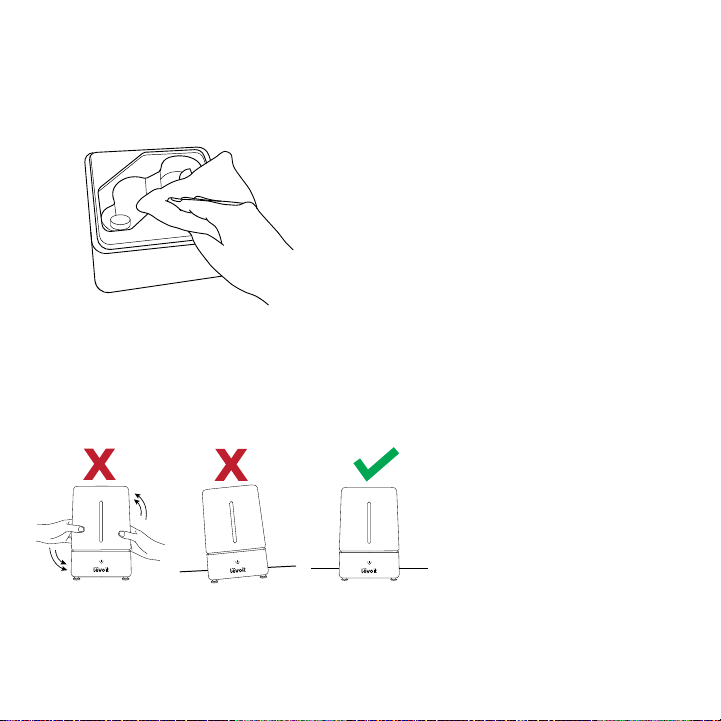
4. Wipe o any excess on water on the
base before placing the tank.
5. DO NOT shake the humidifier or place
it on an inclined surface. Always make
sure to place the humidifier on a flat,
level surface.
- 9 -
Page 10

Care & Maintenance
Make sure the humidifier is completely
unplugged from any power source when
cleaning.
1. Unplug the humidifier.
2. Remove the water tank from the base
and pour out any excess water. Fill
the tank with 2 cups of distilled white
vinegar and 2 cups of water; gently coat
all sides of the water tank.
3. Fill the inner chamber with ½ cup of
distilled vinegar.
4. Allow the vinegar to soak inside of both
the water tank and inner chamber for 30
minutes.
5. Use a soft-bristled brush to clean any
scale buildup inside the water tank or in
the inner chamber.
6. Fill the water tank with 2 cups of distilled
water and set the humidifier on the high
setting for 15 minutes.
7. Dry all parts with a dry, clean cloth. Make
sure all parts of the humidifier are dry
before reassembling and storing in a
covered space.
NOTE: The water in the inner chamber
near the atomizer chip may still be warm
after turning o the unit. Use caution when
pouring out the water.
Cleaning the Water Filter Cap
It is recommended to clean the water filter
cap every 6 months. Remove the water
filter cap and rinse it out with clean water
and allow it to air dry for at least 1 hour.
Replace the cap back onto the water tank
when it is dry.
Removing & Cleaning the Nozzle
1. Remove water tank from the base and
pour out any remaining water.
2. Align the arrow on the nozzle with mark
on the water tank.
3. Slowly flip the water tank over to remove
the nozzle.
4. Scrub the nozzle with a soft-bristled
brush and warm water. Rinse and dry
thoroughly.
5. Replace the nozzle onto the the water
tank.
Cleaning the Aroma Pad
1. To clean the aroma pad, remove it from
the aroma box and rinse under warm
water.
2. Dry the pad with a clean cloth and place
it back into the aroma box.
- 10 -
Page 11
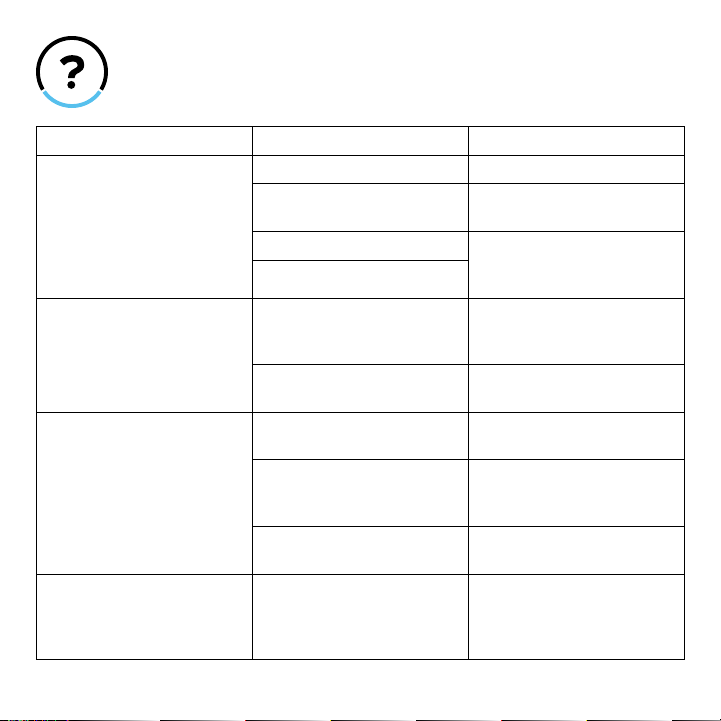
Troubleshooting
Problem Cause Solution
No mist coming out of
nozzle.
Humidifier produces an
unusual smell.
Humidifier makes an
unusual noise.
Mist is coming out from
base.
Unit is not plugged in. Plug into power source.
Unit is not turned on. Press the power button to
No water in tank. Add at least two cups of
Water level low.
Unit is new. Remove the water cap, and
Dirty water, or water has
been in tank for a long time.
Tank is positioned
incorrectly.
Water level low. Add at least two cups of
Unit is not level. Place unit on a flat, level
Water tank is not positioned
correctly.
turn on the unit.
clean water into the water
tank.
place the water tank in a
cool, dry place for 12 hours.
Rinse and clean water tank
and fill with clean water.
Align water tank window
with the power button.
clean water into the water
tank.Add water
surface.
Turn o/unplug the unit,
then align water tank
window with the power
button.
- 11 -
Page 12

Specifications
Customer
Support
Voltage: AC
120V/60Hz
Rated Power: 25W
Eective Range: 10m² (107 ft²)
Water Tank Capacity: 4 L (1.05 gal)
Max Moisture Capacity: 200 mL/h
Package Contents
1 x Ultrasonic Cool Mist Humidifier
1 x User Manual
3 x Aroma Pads
Should you encounter any issues or have
any questions regarding your new product,
feel free to contact our helpful Customer
Support Team. Your satisfaction is our goal!
Levoit Corporation
1202 N. Miller Street, Suite A
Anaheim, CA 92806
Support Hours
Monday - Friday: 9:00am - 5:00pm PST
*Please have your order number ready
before contacting customer support.
- 12 -
Page 13

Warranty
Information
Terms & Policy
Levoit warrants all products to be of the highest
quality in material, craftsmanship and service
for a minimum of 1 year, eective from the
date of purchase. Warranty lengths may vary
between product categories. Levoit will replace
any product found to be defective due to
manufacturer flaws based on eligibility; refunds
are available within the first 30 days of purchase.
This warranty extends only to personal use and
does not extend to any product that has been
used for commercial, rental, or any other use in
which the product is not intended for. There are
no warranties other than the warranties expressly
set forth with each product.
This warranty is non-transferrable. Levoit is not
responsible in any way for any damages, losses
or inconveniences caused by equipment failure or
by user negligence, abuse, or use noncompliant
with the user manual or any additional safety, use,
or warnings included in the product packaging
and manual.
This warranty does not apply to the following:
• Damage due to abuse, accident, alteration,
misuse, tampering or vandalism.
• Improper or inadequate maintenance.
• Damage in return transit.
• Unsupervised use by children under 18 years
of age.
Levoit and its subsidiaries assume no liability
for damage caused by the use of the product
other than for its intended use or as instructed
in the user manual. Some states do not allow
this exclusion or limitation of incidental or
consequential losses so the foregoing disclaimer
may not apply to you. This warranty gives you
specific legal rights and you may also have other
rights which may vary from state to state.
ALL EXPRESSED AND IMPLIED WARRANTIES,
INCLUDING THE WARRANTY OF
MERCHANTABILITY, ARE LIMITED TO THE
PERIOD OF THE LIMITED WARRANTY.
Should your product prove defective within the
specified warranty period, please return the
defective unit in its original packaging with (1)
an original copy of the invoice, (2) your order
confirmation number, (3) and your warranty ID
number.
To find out more about extending your warranty,
visit www.levoit.com/warranty or contact customer
support.
Date of Purchase: ________________
Purchased From: ________________
Order Number: ________________
- 13 -
Page 14

Page 15

Page 16

www.levoit.com
 Loading...