


 Loading...
Lenovo Chromebook 14IGL05 82C10010MH, IdeaPad 3 Chromebook 11IGL05 82BA000RMH, IdeaPad 3 Chromebook 14IGL05 82C10011MH, Chromebook IdeaPad 3 14IGL05 82C1000XMH User manual

User Guide
IdeaPad 3 Chromebook (11", 05) and IdeaPad 3 Chromebook (14",
05)
Read this first
Before using this documentation and the product it supports, ensure that you read and understand the following:
•Important safety information
•Safety and Warranty Guide
•Setup Guide
First edition (February 2020)
© Copyright Lenovo 2020.
LIMITED AND RESTRICTED RIGHTS NOTICE: If data or software is delivered pursuant to a General Services Administration “GSA” contract, use, reproduction, or disclosure is subject to restrictions set forth in Contract No. GS- 35F-05925.

Contents
About this documentation . . . . . . . . . . . . ii
Chapter 1. Meet your Chromebook . . . 1
Front . . . . . . . . . . . . . . . . . . . . 1
Base . . . . . . . . . . . . . . |
. |
. . . . |
. |
2 |
Left . . . . . . . . . . . . . . |
. . . . . . 3 |
|||
Right . . . . . . . . . . . . . . . . . . . . 4 |
||||
Bottom . . . . . . . . . . . . . . . . . . . 5 |
||||
Features and specifications . . . . . |
. |
. . . . |
. |
6 |
Statement on USB transfer rate . . |
. |
. . . . |
. |
7 |
Operating environment . . . . . |
. |
. . . . |
. |
7 |
Chapter 2. Get started with your Chromebook . . . . . . . . . . . . . . . 9
Charge your Chromebook . . . . . . . . . . . |
. 9 |
User interface . . . . . . . . . . . . . . . |
10 |
Connect to Wi-Fi . . . . . . . . . . . . . . |
10 |
Connect to Bluetooth devices . . . . . . . . . |
10 |
Set the power plan . . . . . . . . . . . . . |
11 |
Chapter 3. Navigate the screen . . . . |
13 |
Use the multi-touch screen (for selected |
|
models) . . . . . . . . . . . . . . . . . . |
13 |
Use the special keys . . . . . . . . . . . . . |
14 |
Use the touchpad . . . . . . . . . . . . . . |
15 |
Chapter 4. Use multimedia . . . . . . |
17 |
Use the camera . . . . . . . . . . . . . . . |
17 |
Use audio . . . . . . . . . . . . . . . . . |
17 |
Connect to an external display . . . . . . . . . |
17 |
Chapter 5. Account, login, and |
|
logout . . . . . . . . . . . . . . . . . |
19 |
Types of user account for logging into Chrome . . |
19 |
Become your Chromebook’s owner . . . . . . . |
19 |
Sign in with a Google Account other than the |
|
owner’s . . . . . . . . . . . . . . . . . . |
19 |
Browse as a guest . . . . . . . . . . . . . . |
20 |
Create a supervised account. . . . . . . . . . |
20 |
Sign out . . . . . . . . . . . . . . . . . . |
20 |
Control who can use your Chromebook . . . . . |
20 |
Check a Chromebook’s owner . . . . . . . . . |
21 |
Disable guest login . . . . . . . . . . . . . |
21 |
Lock your Chromebook. . . . . . . . . . . . |
21 |
Shut down your Chromebook . . . . . . . . . |
21 |
Reset your Chromebook . . . . . . . . . . . |
21 |
Get help from Google . . . . . . . . . . . . 22
Chapter 6. Manage files and
folders . . . . . . . . . . . . . . . . . 23
What is Google Drive. . . . . . . . . . . . . |
23 |
Your local storage space . . . . . . . . . . . |
23 |
The Files app . . . . . . . . . . . . . . . . |
23 |
Create folders using the Files app . . . . . . . . |
23 |
Delete unused files . . . . . . . . . . . . . |
23 |
Check the amount of available storage . . . . . . |
23 |
Expand the local storage . . . . . . . . . . . |
24 |
Chapter 7. Language settings. . . . . |
25 |
Change display language . . . . . . . . . . . |
25 |
Add an input method. . . . . . . . . . . . . |
25 |
Switch among input methods . . . . . . . . . |
25 |
Chapter 8. Add and manage apps. . . 27
What is Chrome Web Store . . . . . . . . . . |
27 |
Add apps or extensions. . . . . . . . . . . . |
27 |
Install Android apps . . . . . . . . . . . . . |
27 |
Pin apps to shelf . . . . . . . . . . . . . . |
28 |
Pin Web pages to shelf . . . . . . . . . . . . |
28 |
Chapter 9. Lenovo help and
support . . . . . . . . . . . . . . . . . 29
Lenovo support Web site . . . . . . . . . . . |
29 |
What is a CRU? . . . . . . . . . . . . . . . |
29 |
CRUs for your product model . . . . . . . . . |
29 |
Call Lenovo . . . . . . . . . . . . . . . . |
29 |
Before you contact Lenovo . . . . . . . . |
29 |
Lenovo Customer Support Center . . . . . . |
30 |
Purchase additional services. . . . . . . . . . |
30 |
Appendix A. Important safety information . . . . . . . . . . . . . . . 31
Appendix B. Accessibility, ergonomic, and maintenance
information . . . . . . . . . . . . . . . 45
Appendix C. Compliance
information . . . . . . . . . . . . . . . 49
Appendix D. Notices and
trademarks . . . . . . . . . . . . . . . 61
© Copyright Lenovo 2020 |
i |

About this documentation
•This guide applies to Lenovo product model(s) listed below. Illustrations in this guide may look slightly different from your product model.
Model name |
Machine type (MT) |
IdeaPad 3 CB 11IGL05 |
82BA |
IdeaPad 3 CB 14IGL05 |
82C1 |
•This guide may contain information about accessories, features, and software that are not available on all models.
•The content of the guide is subject to change without notice. To obtain the latest version, go to https:// support.lenovo.com.
Chapter 1. Meet your Chromebook
Note: Your computer might look different from the illustrations in this chapter.
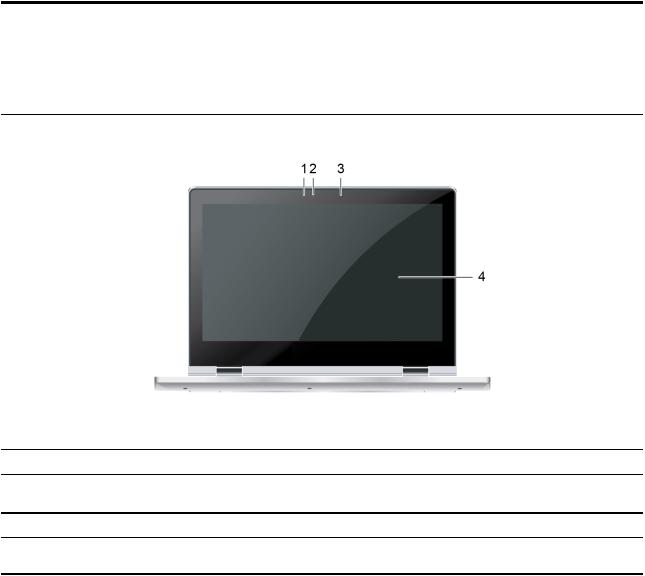
Front
1. |
Camera light |
If the light is on, the camera is in use. |
2. |
Camera |
Capture still and moving images for taking photos, recording videos, |
|
|
and video chatting. |
3. Microphone |
Capture or record sound and voice. |
|
4. |
Screen |
Display text, graphics, and videos. Selected models support multi- |
|
|
touch function. |
© Copyright Lenovo 2020 |
1 |
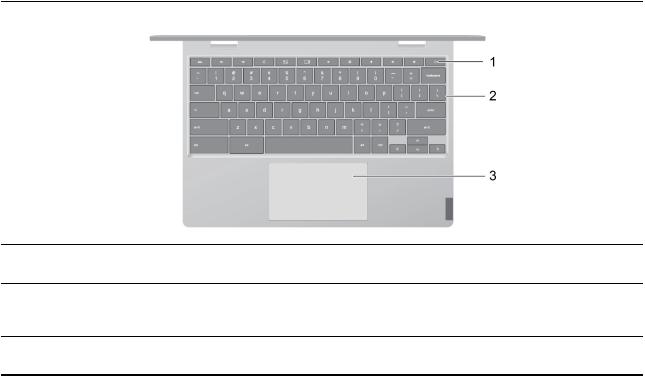
Base
1. |
Power button |
Press the buttonto turn on the computer or put the computer into |
|
|
sleep mode. |
2. |
Keyboard |
Enter characters and interact with programs. |
|
|
Note: The keyboard also includes special keys for changing settings |
|
|
and performing tasks quickly. |
3. |
Touchpad |
Perform finger touch and all the functions of a traditional mouse. |
|
|
Note: The touchpad also supports multi-touch function. |
2 User Guide
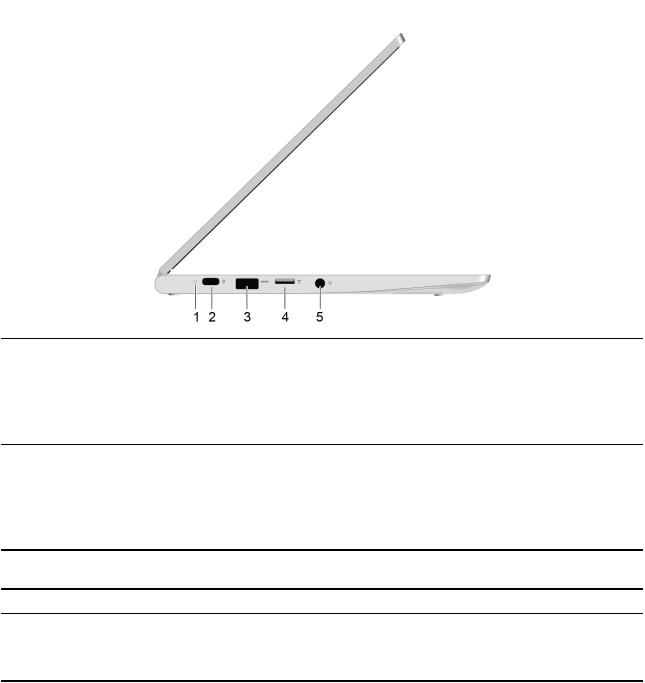
Left
1. Charging light
2. Power connector/USB-CTM connector
3.USB (3.2 Gen 1) Type-A connector
4.microSD card slot
5.Combo audio jack
Indicate whether the computer is connected to ac power.
•Solid red: Connected to ac power; battery capacity 1%-5%
•Solid orange: Connected to ac power; battery capacity 5%-97%
•Solid green: Connected to ac power; battery capacity 97%-100%
•Off: Not connected to ac power
•Connect to power with the included power cord and ac power adapter.
•Connect external display, storage, or data devices.
Note: An appropriate adapter may be needed for connecting external devices.
Connect a USB-compatible device, such as a USB keyboard, a USB mouse, a USB storage device, or a USB printer.
Insert a microSD card into the slot for data transfer or storage.
Connect headphones or headsets with a 3.5 mm (0.14 inch), 4-pole plug.
Note: This jack does not support standalone external microphones. If you use headsets, choose one with a single plug.
Chapter 1. Meet your Chromebook 3
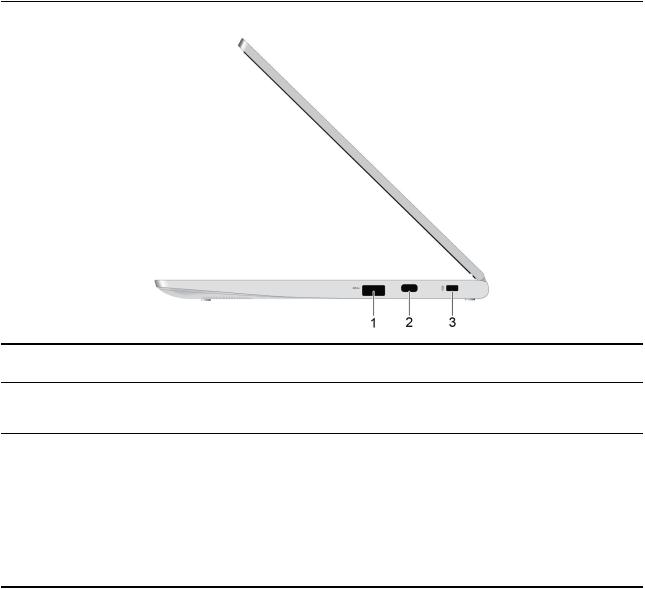
Right
1. USB (3.2 Gen 1) Type-A connector |
Connect a USB-compatible device, such as a USB keyboard, a USB |
|
mouse, a USB storage device, or a USB printer. |
2. USB-CTM connector |
Connect external display, storage, or data devices. |
|
Note: An appropriate adapter may be needed for connecting external |
|
devices. |
3. Security-lock slot |
Lock your computer to a desk, table, or other fixtures through a |
|
compatible security cable lock. |
|
Note: The slot supports cable locks that conform to the Kensington |
|
MicroSaver® lock standards (using T-BarTM locking technology) or |
|
MiniSaver® lock standards (using CleatTM locking technology). You |
|
are responsible for evaluating, selecting, and implementing the |
|
locking device and security feature. Lenovo makes no comments, |
|
judgments, or warranties about the function, quality, or performance |
|
of the locking device and security feature. Cable locks for your |
|
product are available from Lenovo at https://smartfind.lenovo.com/. |
4 User Guide
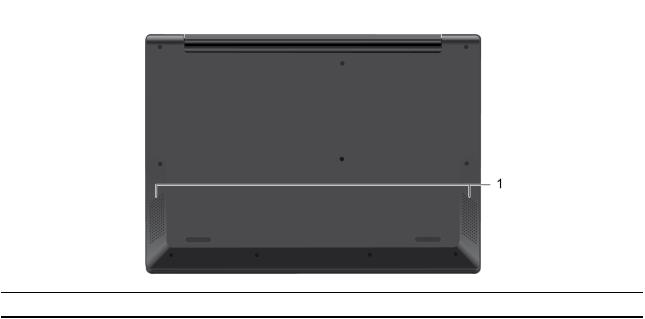
Bottom
1. Speakers |
Produce sound. |
Chapter 1. Meet your Chromebook 5

Features and specifications
Dimensions
ac power adapter
Battery pack
Memory
Storage device
Screen
Connectors and slots
Security features
Wireless features
IdeaPad 3 Chromebook (11”, 05)
•Width: 286.7 mm (11.29 inches)
•Depth: 205.5 mm (8.09 inches)
•Thickness: 18.05 mm (0.71 inches)
IdeaPad 3 Chromebook (14”, 05)
•Width: 328.9 mm (12.94 inches)
•Depth: 234.35 mm (9.23 inches)
•Thickness: 18.8 mm (0.74 inches)
•Input: 100 V ac–240 V ac, 50 Hz–60 Hz
•Output: 15 V dc, 3 A
•Power: 45 W
•Capacity: 42 Wh
•Number of cells: 3
•Type: Low Power Double Data Rate 4 (LPDDR4)
•Number of slots: 0
•Type: Embedded Multi Media Card (eMMC)
•Bus: eMMC
IdeaPad 3 Chromebook (11”, 05)
•Size: 294.64 mm (11.6 inches)
•Display resolution: 1366 × 768 pixels
IdeaPad 3 Chromebook (14”, 05)
•Size: 355.6 mm (14 inches)
•Display resolution
–1920 × 1080 pixels (TN FHD model)
–1366 × 768 pixels (TN HD model)
–1920 × 1080 pixels (IPS FHD model)
•Combo audio jack
•microSD card slot
•USB Type-A connector × 2
•USB-C connector × 2 (one connector support power connector function)
•Security-lock slot
•Bluetooth
•Wireless LAN
Note: The battery capacity is the typical or average capacity as measured in a specific test environment. Capacities measured in other environments may differ but are no lower than the rated capacity (see product label).
6 User Guide
Statement on USB transfer rate
Depending on many factors such as the processing capability of the host and peripheral devices, file attributes, and other factors related to system configuration and operating environments, the actual transfer rate using the various USB connectors on this device will vary and will be slower than the data rate listed below for each corresponding device.
USB device |
Data rate (Gbit/s) |
3.2 Gen 1 |
5 |
3.2 Gen 2 |
10 |
3.2 Gen 2 × 2 |
20 |
Operating environment
Maximum altitude (without pressurization)
3048 m (10 000 ft)
Temperature
•At altitudes up to 2438 m (8000 ft)
–Operating: 5°C to 35°C (41°F to 95°F)
–Storage: 5°C to 43°C (41°F to 109°F)
•At altitudes above 2438 m (8000 ft)
–Maximum temperature when operating under the unpressurized condition: 31.3°C (88°F)
Note: When you charge the battery, its temperature must be no lower than 10°C (50°F).
Relative humidity
•Operating: 8% to 95% at wet-bulb temperature 23°C (73°F)
•Storage: 5% to 95% at wet-bulb temperature 27°C (81°F)
Chapter 1. Meet your Chromebook 7
8 User Guide
Chapter 2. Get started with your Chromebook
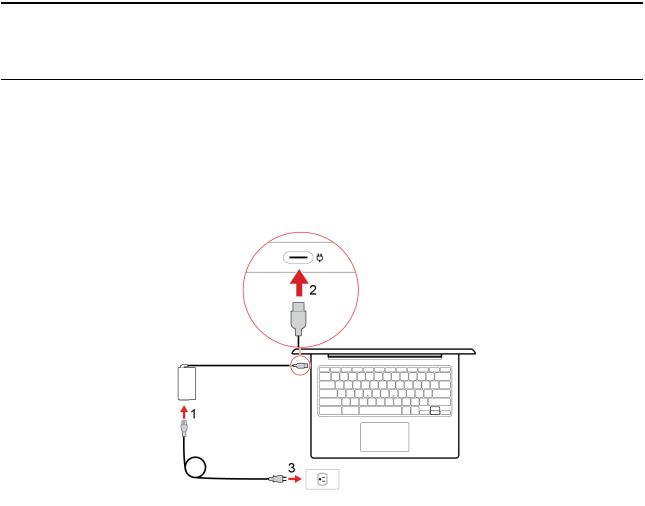
Charge your Chromebook
The USB-C connector on your Chromebook works as the power connector. Plug in the ac power adapter to charge the built-in battery pack and provide power to the Chromebook.
Connect to ac power
CAUTION:
All plugs must be firmly and securely inserted into receptacles.
1.Connect the power cord to the ac power adapter.
2.Plug the power adapter into the power connector of the Chromebook.
3.Plug the power cord into an electrical outlet.
© Copyright Lenovo 2020 |
9 |

User interface
1.Wallpaper
2.Search box and App Launcher
3.Status tray
4.App shelf
5.The Launcher button
Your wallpaper might look different. To change the wallpaper, rightclick a blank area of your desktop and select Set Wallpaper
•Type the name of your device, app, or Web page in the search box.
•Open an app quickly from the App Launcher.
Manage connections, updates, and settings. By default, the time, network connection status, battery status, and your account picture are displayed.
Pin your frequently-used app or Web page to the app shelf for easy access.
Open the search box and App Launcher.
To discover more features and get help, click your account picture and select the question mark ?.
Connect to Wi-Fi
To connect your Chromebook to Wi-Fi:
1.Click your account picture.
2.Click the network icon and turn on the wireless feature.
3.Select an available network to connect. Provide required information, if needed.
Connect to Bluetooth devices
Your Chromebook supports Bluetooth feature. You can connect your Chromebook to a Bluetooth keyboard, mouse, speakers, or other Bluetooth devices.
Note: The Bluetooth devices must be within a short distance, usually 10 meters (33 feet), from the Chromebook.
1. Click your account picture, and then click the Bluetooth icon.
10 User Guide

2. |
Turn on Bluetooth |
. |
3. |
Select the device you want to pair with and follow the on-screen instructions. |
|
Set the power plan
To change the power plan settings:
1. Click your account picture, and then click the settings icon.
2. Click Settings Device Power . 3. Follow the on-screen instructions to change the settings as you desire.
To wake your Chromebook from sleep mode, press the power button or any key on the keyboard.
Chapter 2. Get started with your Chromebook 11
12 User Guide

Chapter 3. Navigate the screen
Use the multi-touch screen (for selected models)
If your computer screen supports multi-touch function, you can navigate the screen with simple touch gestures.
Note: Some gestures might not be available depending on the app you use.
Tap |
|
|
Open an app or perform an action on an open app, such as Copy |
|
|
Save and Delete depending on the app. |
, |
, |
Tap and hold
Open a shortcut menu.
Slide
Scroll through items, such as lists, pages, and photos.
Drag an item to the location you want
Move an object.
Move two fingers closer together
Zoom out.
Move two fingers farther apart
Zoom in.
© Copyright Lenovo 2020 |
13 |
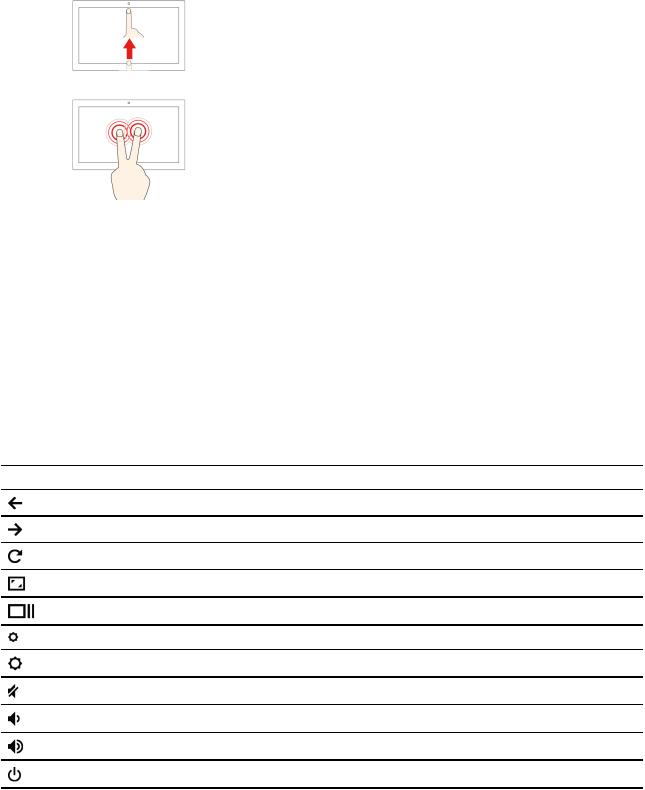
Swipe up from the bottom
Show or hide the app shelf.
Tap with two fingers
Open a shortcut menu.
Tips
•Turn off the computer before cleaning the multi-touch screen.
•Use a dry, soft, and lint-free cloth or a piece of absorbent cotton to remove fingerprints or dust from the multi-touch screen. Do not apply solvents to the cloth.
•The multi-touch screen is a glass panel covered with a plastic film. Do not apply pressure or place any metallic object on the screen, which might damage the touch panel or cause it to malfunction.
•Do not use fingernails, gloved fingers, or inanimate objects for input on the screen.
•Regularly calibrate the accuracy of the finger input to avoid a discrepancy.
Use the special keys
Your Chromebook keyboard works just like a conventional keyboard but with a few special keys.
Special key |
Function |
|
Go to the previous page |
|
Go to the next page |
|
Reload your current page |
|
Hide the tabs and the App Launcher in full-screen mode |
|
Show all windows in overview mode |
|
Decrease the brightness of the computer screen |
|
Increase the brightness of the computer screen |
|
Mute the speakers |
|
Decrease the volume |
|
Increase the volume |
|
Turn on or turn off the computer |
Your Chromebook also supports the following key combinations:
14 User Guide
ctrl + 
alt + 
 + L
+ L
ctrl + alt + ?
To change the keyboard settings:
Take a screenshot
Switch the Caps Lock function
Lock your computer screen
View all keyboard shortcuts
1.Click your account picture, and then click the settings icon.
2.Click Settings Device Keyboard
3.Follow the on-screen instruction to change the settings as you desire.
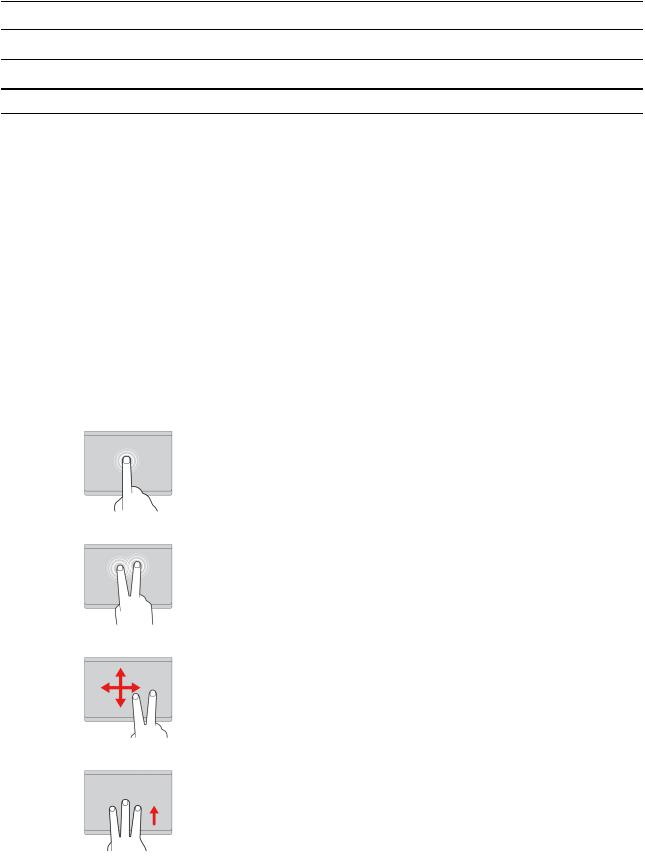
Use the touchpad
You can use the touchpad to perform various touch gestures. The following section introduces some frequently used touch gestures, such as tapping, dragging, and scrolling.
Notes:
•When using two or more fingers, ensure that you position your fingers slightly apart.
•Some gestures are only available when you are using certain apps.
•If the touchpad surface is stained with oil, first turn off the computer. Then gently wipe the touchpad surface with a soft and lint-free cloth moistened with lukewarm water or computer cleaner.
Tap
Tap anywhere on the touchpad with one finger to select or open an item.
Two-finger tap
Tap anywhere on the touchpad with two fingers to display a shortcut menu.
Two-finger scroll
Put two fingers on the touchpad and move them in the vertical or horizontal direction. This action enables you to scroll through the document, Website, or apps.
Swipe three fingers up or down
Put three fingers on the touchpad and move them up or down to see all your open windows.
Chapter 3. Navigate the screen 15
To change the settings:
1.Click your account picture, and then click the settings icon.
2.Click Settings Device Touchpad
3.Follow the on-screen instructions to change the settings as you desire.
16 User Guide
Loading...