


Yoga Book C930
Quick Start Guide

Reading before using your device
Reading first - regulatory information
Device models equipped with wireless communications comply with the radio frequency and safety standards of any country or region in which it has been approved for wireless use. In addition, if your product contains a telecom modem, it complies with the requirements for connection to the telephone network in your country.
Be sure to read the Regulatory Notice for your country or region before using the wireless devices contained in your device. To obtain a PDF version of the Regulatory Notice, refer to the “Downloading publications” section below.
Getting support
To get support on network services and billing, contact your wireless network operator. To learn how to use your device and view its technical specifications, go to http://support.lenovo.com.
Downloading publications
Electronic versions of your publications are available from http://support.lenovo.com
Your User Guide contains detailed information about your device. To access your User Guide, go to http://support.lenovo.com and follow the instructions on the screen.
Legal notices
Lenovo and the Lenovo logo are trademarks of Lenovo in the United States, other countries, or both.
Other company, product, or service names may be trademarks or service marks of others.
Manufactured under license from Dolby Laboratories. Dolby, Dolby Atmos, and the double-D symbol are trademarks of Dolby Laboratories.
LIMITED AND RESTRICTED RIGHTS NOTICE: If data or software is delivered pursuant a General Services Administration “GSA” contract, use, reproduction, or disclosure is subject to restrictions set forth in Contract No. GS-35F-05925.
This manual applies to Lenovo YB-J912F (WLAN) / Lenovo YB-J912L (WLAN + LTE).

1 Device overview
• Read this guide carefully before using your device.
•All pictures and illustrations in this document are for reference only and may differ from the final product.
2
1 |
3
9 |
|
10 |
8 |
4 |
8 |
7 |
|
11 |
6 |
|
6 |
|
|
12 |
|
5 |
13 |
|
|
1 |
Camera |
2 |
Microphone |
3 |
LCD Screen |
4 |
Fingerprint sensor / |
5 |
E Ink Screen |
6 |
Speakers |
|
indicator |
|
|
|
|
7 |
Card tray |
8 |
Charging indicator |
|
|
910 Type-C connector: used for charging and connecting to digital headsets, and so on.
Only 10 can be used to connect an analog headset connector adapter.
11 Power button |
12 Volume up button 13 Volume down button |
1

2 Preparing your device
Installing cards
M
SI
oSD micr 
Install the cards as shown in the figure.
•Power off the device before inserting or removing a card.
•Note that the WLAN version (Lenovo YB-J912F) does not have a Nano-SIM card slot.
Charging your device
Connect your device to a power outlet using the USB cable and power adapter provided.
Charging indicator status
Status |
Position |
Description |
|
|
|
|
|
Blinking fast: |
Left side |
The battery percentage is lower than |
|
(white) |
|
5%, and the device is powered on |
|
|
|
while not connected to a charger. |
|
|
|
|
|
Blinking |
The side the |
The device is connected to a charger |
|
slow: (white) |
adapter is |
and is charging. |
|
|
connected |
|
|
Solid white |
The device is connected to a charger |
||
to |
|||
|
and is fully charged. |
||
|
|
||
|
|
|
2
3 Getting started
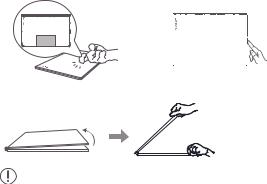
Open the cover using the following two methods:
Opening with Knock To Open
Place the device on a flat surface with its cover facing up, double tap the cover, and it will open automatically.
Opening with the volume down button
Press and hold the volume down button until the cover of your device opens automatically.
Then manually adjust the display opening to a suitable angle.
•Avoid knocking the cover too frequently, and wait at least 15
seconds between attempts.
•To avoid temporary response failure with Knock To Open, avoid pressing on the area around the hinge. In case of failure, fully open the cover to 180 degrees and close it again to restore function.
•The cover may open if it is touched by another object or the table shakes.
•Do not place heavy objects on top of the device.
•The Knock To Open function is unavailable if the device has never been charged before or the battery is lower than 2%.
3
Powering on for the first time
When powering on your device for the
first time, press and hold the power  button until the fingerprint indicator


 lights up. Complete the setup process

 by following to the onscreen instructions.
Setup may include the following steps:
• Accept End User License
Agreement
• Set up your Internet connection
• Create your user account
The battery is set to Ship Mode at the factory, meaning it is unactivated and will not provide power to the device. Connect your device to the power adapter before using it for the first time.
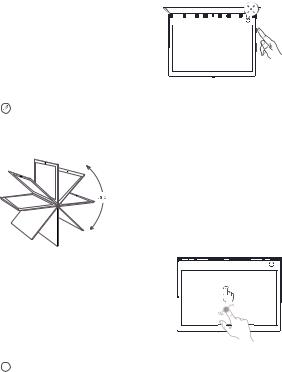
Positioning the display
You can rotate the display up to 360 degrees.
When opened beyond approximately 200 degrees, the LCD screen continues displaying while the E Ink Screen locks and  displays.
Double tap the E Ink Screen with your finger to switch the display from the LCD screen to the E Ink Screen.
If you want to wake the LCD again, double tap it.
 When waking the screen, make sure your other fingers do not touch the screen; otherwise, it may not wake.
4
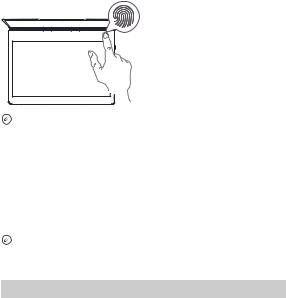
4 Logging in with your fingerprint
Touch the fingerprint sensor to quickly unlock the screen.
It is recommended to follow the onscreen instructions and register your fingerprint when powering on your device for the first time. You can also go to >
>  > Accounts > Sign-in options > Fingerprint to register a fingerprint.
Before using fingerprint functions, you need to set a lock screen password. Go to >
>  > Account > Login Options >
Password to set up.
Registering a fingerprint
Follow the onscreen instructions to register your fingerprint.
1.Fully cover the fingerprint sensor with your finger and press gently for 1 second.
2.Repeat this operation with different areas of the same finger until the fingerprint is successfully registered.
You can register up to 10 fingerprints.
Please keep your finger and the fingerprint sensor surface clean. Water, sweat, and oil may affect fingerprint registration.
Fingerprint indicator status
Status |
Description |
|
|
Solid white |
Registering/identifying a fingerprint. |
|
The device is turning on/off. |
|
|
Off |
The fingerprint sensor is inactive. |
|
|
5

5 Using the E Ink Screen
E Ink Toolbar
In the upper right corner of the E Ink Screen is the E Ink Toolbar as shown below.
Tap the icons to quickly enter the corresponding functions.
To learn more about using the E Ink Screen, you can read the instructions. Tap  > Help > E Ink Display Operation Guide.
|
E Ink |
|
|
|
E Ink |
E Ink |
E Ink Screen Close E Ink |
|||||||||
Keyboard |
|
|
|
Note |
Reader |
Settings |
Toolbar |
|||||||||
|
|
|
|
|
|
|
|
|
|
|
|
|
|
|
|
|
|
|
|
|
|
|
|
|
|
|
|
|
|
|
|
|
|
|
|
|
|
|
|
|
|
|
|
|
|
|
|
|
|
|
|
|
|
|
|
|
|
|
|
|
|
|
|
|
|
|
|
|
|
|
|
|
|
|
|
|
|
|
|
|
|
|
|
|
Bring up |
Current |
|
|
|
|
|
|
|
||||||||
E Ink Toolbar |
|
mode |
|
|
|
|
|
|
|
|||||||
|
|
|
|
|
|
|
|
|
|
|
|
|
|
|
|
|
|
|
|
|
|
|
|
|
|
|
|
|
|
|
|
|
|
|
|
|
|
|
|
|
|
|
|
|
|
|
|
|
|
|
|
|
|
|
|
|
|
|
|
|
|
|
|
|
|
|
|
|
|
|
|
|
|
|
|
|
|
|
|
|
|
|
|
|
E Ink Keyboard
Your E Ink Keyboard is a revolutionary new keyboard using electronic ink display with a standard keyboard layout. You can set the keyboard style and language you prefer.
Modern (Default)
Larger keys provide a better user experience.
Tap  to show the trackpad, and tap any letter or symbol key to switch back to the space bar.
In keyboard mode, you can only tap with your fingers to input content on the E Ink Screen. The Lenovo Precision Pen or other writing instruments are not supported.
6

E Ink Note
When E Ink Note is enabled, you can take a note or sketch immediately, even if your LCD screen is locked. The Lenovo Precision Pen* supports pressure and hover functions, and you can use it to write and draw as you would with a regular pen and paper.
|
|
|
|
|
|
|
|
|
|
|
|
|
|
|
|
|
|
|
|
|
|
|
|
|
|
|
|
|
|
|
|
|
|
|
|
|
|
|
|
|
|
|
|
|
|
|
|
|
|
|
|
|
|
|
|
|
|
|
|
|
|
|
|
|
|
|
|
|
|
|
|
|
|
Creating a new |
|
|
E Ink Note |
|
|
|
|||||||||||||||
|
|
|
1 |
|
|
|
|
|
|
||||||||||||||||||||||
|
|
|
|
note |
|
|
|
|
|
||||||||||||||||||||||
2 |
|
|
|
||||||||||||||||||||||||||||
|
|
|
|
|
|
|
|
|
|
|
|
|
|
|
|
|
|
|
|
Toolbar |
|
|
|
||||||||
|
|
3 notesBrowsing E Ink |
|
|
|
|
|
||||||||||||||||||||||||
|
|
|
|
|
|
|
|
|
|
|
|
|
|
||||||||||||||||||
|
|
|
|
|
|
|
|
|
|
|
|
|
|
|
|
|
|
|
|
|
|
|
|
|
|
|
|
|
|
|
|
Creating a new note
E Ink Note is preset with various note templates. Tap  to create a new note.
Writing in E Ink Note
When writing a new note, the contents will be displayed on the E Ink Screen and saved automatically.
|
|
|
|
|
|
|
|
|
|
|
|
|
|
|
|
|
|
|
|
|
|
|
|
|
|
|
|
|
|
|
|
|
|
|
|
|
|
|
|
|
|
|
|
|
|
|
|
|
|
|
|
|
|
|
|
|
|
|
|
|
|
Input |
|
tools Select |
|
and |
|
Undo |
|
|
and |
|
|
|
||||||||||||||||||
|
|
|
|
|
|
|
||||||||||||||||||||||||
|
|
|
|
Pen/touch |
||||||||||||||||||||||||||
|
|
|
|
|
|
|
|
|
|
|
|
copy |
|
|
|
redo |
|
switch |
||||||||||||
*The Lenovo Precision Pen does not come with all models, and is sold separately. To purchase one, go to http://www.lenovo.com/accessories.
7
 Loading...