

Page 1
S5unyajuesbunualpag
oa¡duwa
IS9M
ap
¡enue¡Ay
/
10¡dua
/
jenuew
p
|
apoyy
Jasp
y
UDISIBA
—
GL!
GOZ
OL
DITA
SWILSASOYIIN
Page 2
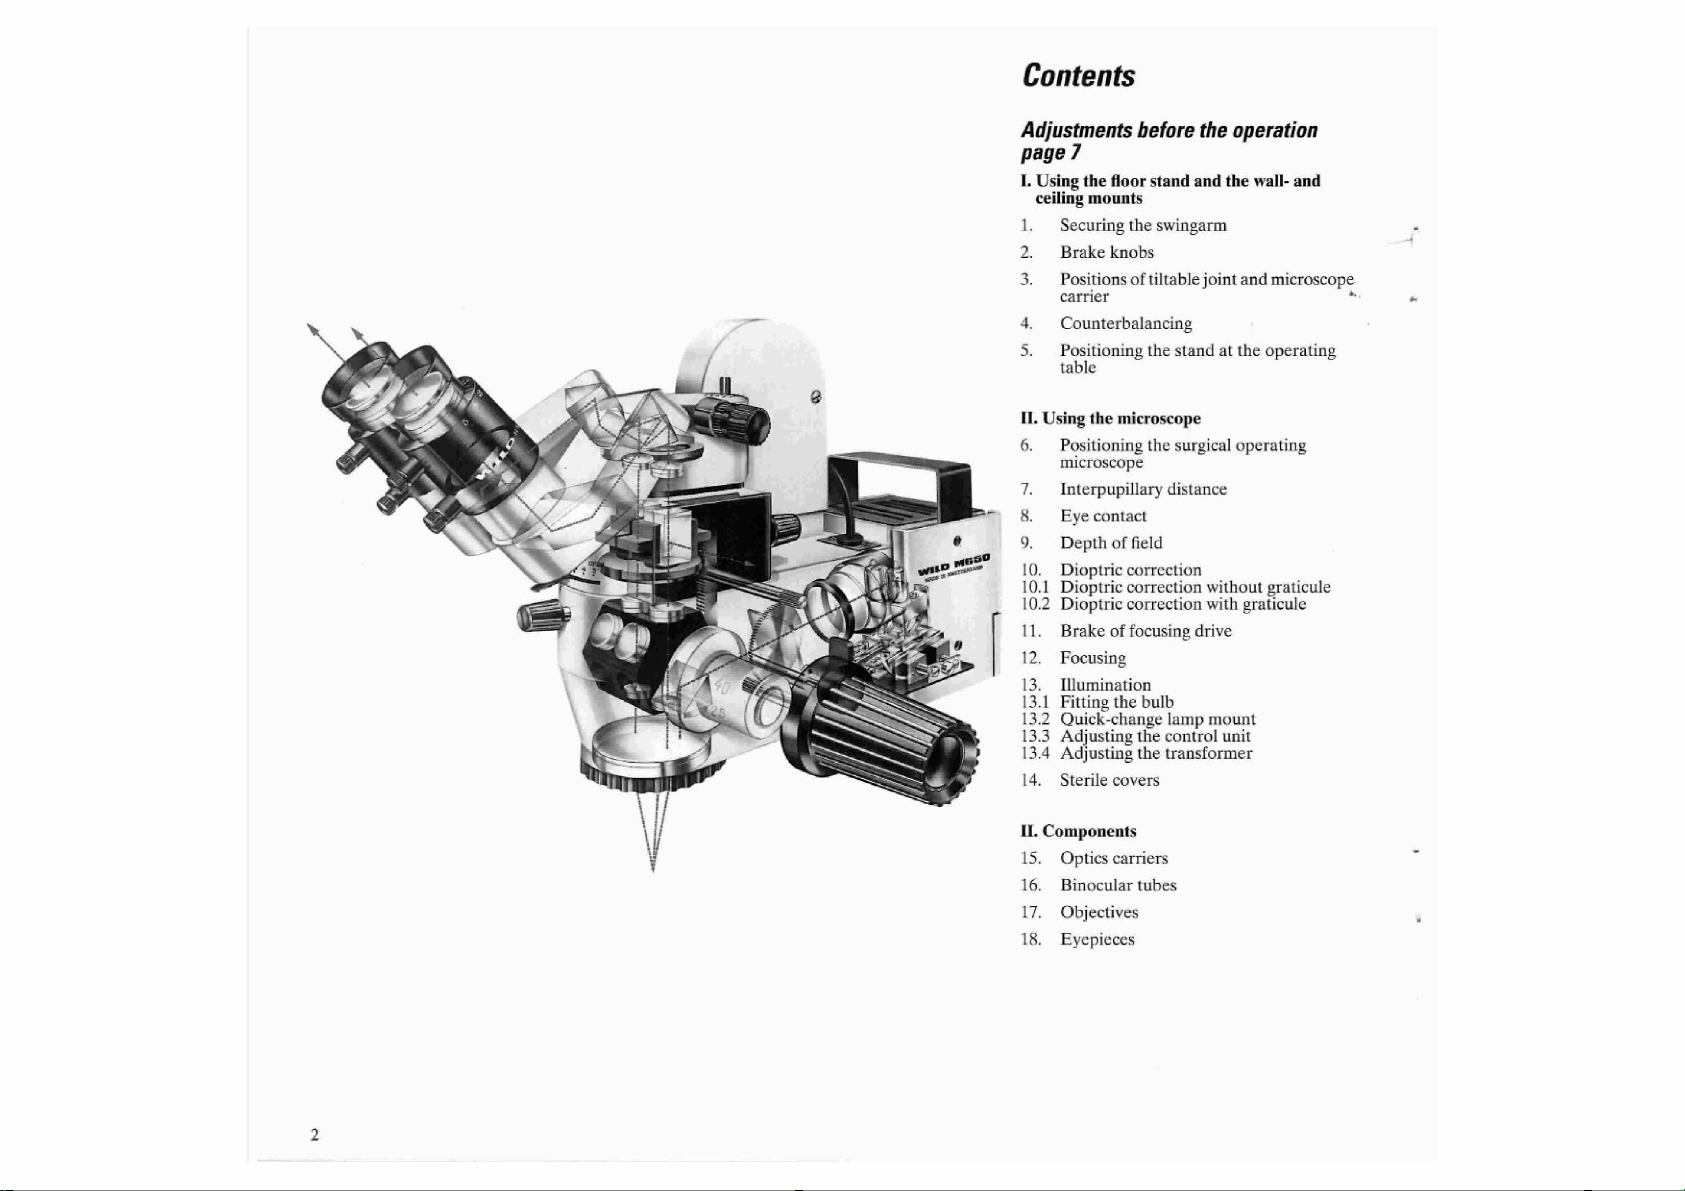
Contents
Adjustments
page
7
I.
Using
the
ceiling
3.
5.
II.
Using
6.
8.
9.
1
.2
2.
3.
3.1
13.2
13.3
13.4
14.
floor
mounts
Securing
Brake
Positions
carrier
Counterbalancing
Positioning
table
Positioning
microscope
Interpupillary
Eye
Depth
Dioptric
Dioptric
Dioptric
Brake
Focusing
Illumination
Fitting
Quick-change
Adjusting
Adjusting
Sterile
the
knobs
oftiltable
the
microscope
contact
of
field
correction
correction
correction
of
focusing
the
covers
before
stand
and
swingarm
the
stand
the
surgical
distance
drive
bulb
lamp
the
control
the
transformer
the
operation
the
wall-
joint
and
at
the
operating
without
with
graticule
mount
unit
and
microscope
R
operating
graticule
IL
Components
15.
Optics
16.
Binocular
17.
Objectives
18.
Eyepieces
carriers
tubes
Page 3
Table
des
matiéres
Inhaltsverzeichnis
Indice
Réglages
I.
Manipulation
de
plafond
1.
Fixation
2
Freins
3.
Positionnement
porte-microscope
F
Contrepoids
5.
Positionnement
à
la
table
IL.
Manipulation
6.
Positionnement
d'opération
7.
Ecartement
8.
Distance
9.
Profondeur
10.
Correction
10.1
Correction
10.2
Correction
Frein
må
+
HD
—aA
Mise
au
13.
Eclairage
13.1
Mise
13.2
13.3
13.4
14.
en
Changeur
Réglage
Réglage
Eléments
préliminaires
des
statifs
du
bras
de
pivotement
d'opération
du
microscope
pupillaire
entre
de
champ
dioptrigue
dioptrique
dioptrique
de
la
commande
point
place
des
rapide
de
l'alimentation
du
transformateur
stérilisables
mural,
mobile
du
joint
du
statif
du
microscope
l'ceil
et
ampoules
d'ampoule
page
Poculaire
sans
avec
de
7
de
sol,
pivotant
par
rapport
réticule
réticule
mise
au
et
du
point
Einstellungen
I.
Bedienung
Deckenstative
1.
Sichern
di
Gelenkbremsen
3.
Schwenkgelenk-
positionen
Gewichtsausgleich
5.
Positionieren
Operationstisch
II.
Bedienung
6.
Positionieren
7.
Augenabstand
8.
Augenkontakt
9.
Scharfentiefe
10.
Dioptriekorrektur
10.1
Dioptriekorrektur
10.2
Dioptriekorrektur
11.
Fokussiertrieb-Bremse
12.
Fokussieren
13.
Beleuchtung
13.1
Einsetzen
13.2
Lampenschnellwechsler
13.3
Regulierung
13.4
Regulierung
14.
Sterile
vor
der
Wand-,
des
Schwenkarmes
des
Mikroskops
der
am
am
Abdeckungen
der
Operation
Boden-,
und
Mikroskopträger-
des
Stativs
am
des
Operationsmikroskops
ohne
Strichplatte
mit
Strichplatie
Glühlampe
Steuergertit
Transformator
S.
7
Ajustes
I.
Manejo
techo
1.
Asegurar
Frenos
3.
Posiciones
del
portamicroscopio
4.
Compensación
Emplazamiento
in
de
operaciones
II.
Manejo
6.
Emplazamiento
operación
7.
Distancia
8.
Contacto
9.
Profundidad
10.
Correcciôn
10.1
Correccién
10.2
Correcciôn
11.
Freno
12.
Enfoque
13.
Illuminaciôn
13.1
Colocaciôn
13.2
Cambiador
13.3
Ajuste
13.4
Ajuste
14.
Cubiertas
previos a la
de
los
estativos
el
brazo
móvil
de
articulación
de
la
articulaciôn
del
del
del
microscopio
del
interocular
ocular
de
campo
de
las
dioptrias
de
las
dioptrias
de
las
dioptrias
del
mando
de
de
la
bombilla
rápido
en
el
aparato
en
el
transformador
esterilizadas
operación
mural,
de
suelo y de
orientable
peso
estativo
microscopio
de
sin
con
enfoque
bombillas
de
mando
en
reticulo
pág.
7
y
la
mesa
de
reticulo
II.
Composants
15.
Corps
16.
Tubes
17.
Objectifs
18.
Oculaires
de
microscope
binoculaires
Il.
Komponenten
15.
Optikträger
16.
Binokulartuben
17.
Objektive
18.
Okulare
11.
Componentes
15.
Portaoptica
16.
Tubos
17.
Objetivos
18.
Oculares
binoculares
Page 4

III.
Accessories
19.
20.
20.1
Tubes
20.2
Stereo
20.3
Cine/TV
20.4
20.5
Focusing
for
20.6
21.
IV.
Assembly
22.
23.
24.
25.
Tiltable
26.
26.1
26.2
27.
28.
29.
30.
31.
32.
180°
dual
stereo
Beam
splitter
for
second
attachment
Phototube
Dual
Leica
Wall
Floor
Ceiling
Optics
Fitting
Fitting
Microscope
Control
Stand
Large
Universal
Regulating
tube
and
photo-
and
attachment
photomicrographic
mount
stand
mount
joint
carrier
to
the
to
the
unit
MS-P,
swingarm
stand
attachment
observer
for
second
framing
MS-A,
MS-C,
microscope
bracket
carrier
cine/
rollable
MS-F
graticule
TV
fixed
with
portable
stand
MS-U
transformer
tubes
systems
carrier
MS-D
observer
(reticle)
|
carrier
rod
V.
Care
of
the
VI.
Optical
data
VII Technical
LEICA
M651
MS-F
surgical
ceiling
with
instruments
data
operating
mount
microscope
Page 5
III.
Accessoires
19.
Dispositif
assistant
20.
Répartiteur
20.1
Tube
20.2
Rallonge
observateur
20.3
Rallonge
20.4
Rallonge
20.5
Réticule
photographiques
20.6
Rallonge
21.
Systèmes
IV.
Montage
22.
Statif
23.
Statif
24.
Statif
25.
Joint
pivotant
26.
Corps
26.1
Montage
b
26.2
Montage
réceptrice
27.
Porte-microscope
28.
Alimentation
29.
Statif
30.
Grand
31.
Statif
32.
Transformateur
d'observation
optique
pour
l’observation
stéréo
pour
deuxième
ciné/
TV
photographique
de
cadrage
photo
et
et
TV
pour
ciné
photomicrographiques
mural
MS-A
de
sol,
roulant
MS-C
de
plafond
de
portatif
statif 4 bras
universel
MS-F
microscope
sur
porte-microscope
sur
support
avec
MS-P
mobile
MS-U
réglable
180°
pour
simultanée
les
rallonges
Leica
colonne
MS-D
IL.
Zubehór
19.
180°-Mitarbeitereinrichtung
20.
Strahlenteiler
20.1
Mitbeobachtertuben
20.2
Stereo-Mitbeobachteransatz
20.3
Kino-/TV-Ansatz
20.4
Photoansatz
20.5
Formatstrichplatte
Kinoansatz
20.6
Dualansatz
21.
Leica-Mikrophotosysteme
IV.
Montage
22.
Wandstativ
23.
Fahrbares
24.
Deckenstativ
25.
Schwenkgelenk
26.
Optiktrager
26.1
Montage
26.2
Montage
MS-A
Bodenstativ
MS-F
an
den
Mikroskoptrager
an
den
Trager
säule
27.
Müikroskopträger
28.
Steuergerät
29.
Stativ
MS-P.tragbar
30.
Grosses
31.
Universalstativ
32.
Reguliertransformator
V.
Pílege
Schwenkarmstativ
MS-U
der
Geráte
zu
Photo-
MS-C
mit
und
Aufnahme-
MS-D
III.
Accesorios
19.
Dispositivo
20.
Divisor
20.1
Tubos
20.2
Dispositivo
observación
Suplemento
20.3
televisión
20.4
Tubo
20.5
20.6
21.
IV.
22.
23.
24.
25.
26.
26.1
26.2
27.
28.
29.
30.
31.
32.
fotográfico
Retículo
formatos
y
de
cine
Suplemento
Sistemas
Montaje
Estativo
Estativo
Estativo
Articulación
Portaóptica
Montaje
Montaje
portamicroscopios
Portamicroscopio
Aparato
Estativo
Estativo
Estativo
Transformador
de
180°
de
rayos
para
observación
estercoscópico
simultánea
de
cámara
con
la
delimitación
para
los
dual
Leica
para
de
pared
de
suelo
de
techo
orientable
en
el
portamicroscopio
en
el
soporte
de
mando
portátil
de
brazo
universal
regulable
para
el
asistente
simultánea
de
para
cine
de
tubos
fotográfico
microfotografía
MS-A
corredizo
MS-C
MS-F
con
columna
MS-P
móvil,
grande,
MS-U
y
los
de
MS-D
V.
Entretien
VI.
Données
VII.
Données
Microscope
sur
statif
de
des
instruments
optiques
techniques
d'opération
plafond
MS-F
LEICA
M651
VL
VII.
Optische
Technische
Daten
Daten
Operationsmikroskop
mit
Deckenstativ
MS-F
LEICA
M651
V.
Cuidado
VI.
Datos
ópticos
VII.
Datos
Microscopio
con
estativo
de
los
técnicos
de
operación
de
techo
instrumentos
LEICA
MS-F
M651
Page 6
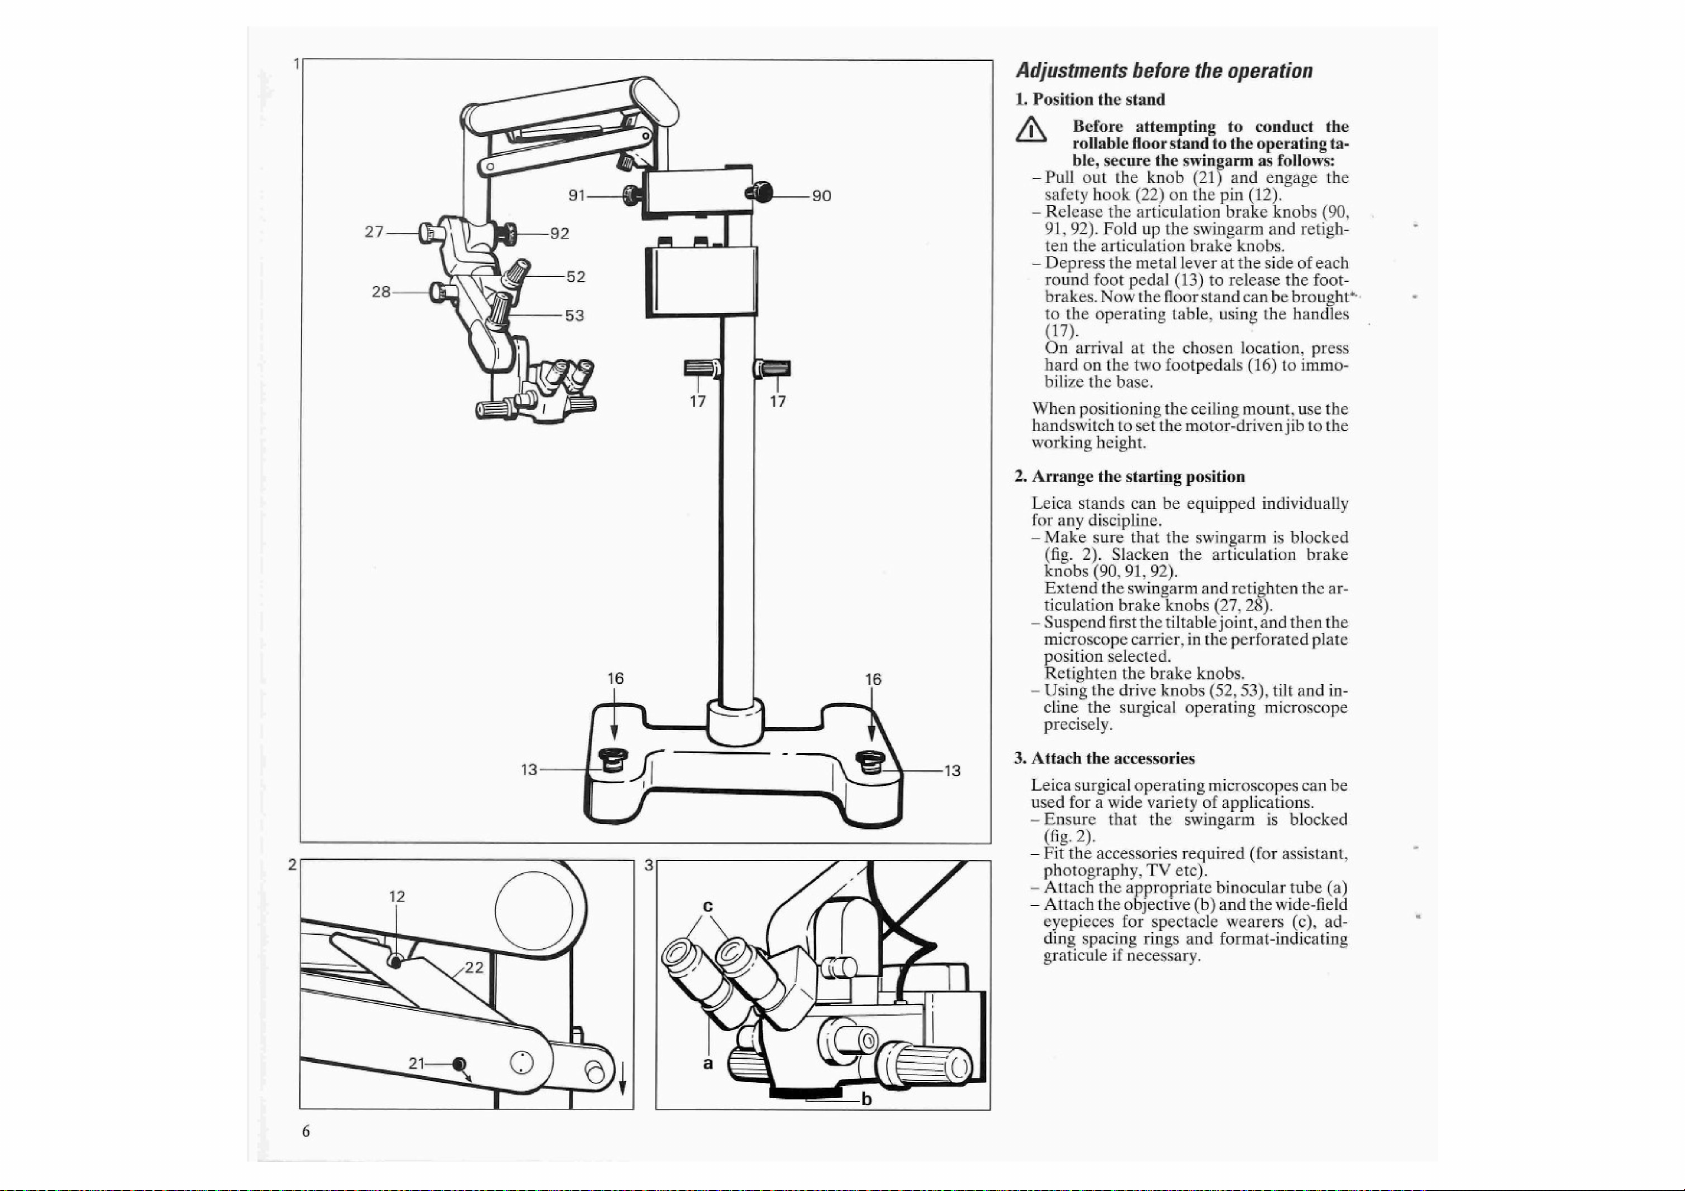
Adjustments
L
Position
A
—
—
—
When
handswitch
working
Before
rollable
ble,
Pull
out
safety
Release
91,
92).
ten
the
Depress
round
brakes.
to
the
17
On
arrival
hard
on
bilize
the
positioning
the
secure
the
hook
the
Fold
articulation
the
foot
Now
operating
the
base.
to
height.
before
stand
floor
pedal
at
the
attempting
stand
the
swingarm
knob
(21)
(22)
on
the
articulation
up
the
swingarm
brake
metal
lever
(13)
the
floor
stand
table,
the
chosen
two
footpedals
the
ceiling
set
the
motor-driven
operation
to
conduct
to
the
operating
as
and
engage
pin
(12).
brake
knobs
and
knobs.
at
the
side
to
release
can
be
using
the
location,
(16)
mount,
follows:
(90,
retigh-
of
each
the
foot-
brought”
handles
press
to
immo-
use
jib
to
the
ta-
the
the
the
Arrange
Leica
for
—
—
—
3.
Attach
Leica
used
—
—
~
—
the
starting
stands
any
discipline.
Make
sure
(fig.
2).
knobs
Extend
ticulation
Suspend
microscope
position
Retighten
Using
cline
precisely.
Ensure
(fig.
Fit
photography,
Attach
Attach
eyepieces
ding
graticule
Slacken
(90,
91,
the
swingarm
brake
first
selected.
the
the
drive
the
surgical
the
accessories
surgical
for a wide
that
2).
the
accessories
the
appropriate
the
objective
for
spacing
if
necessary.
position
can
be
equipped
that
the
the
92).
knobs
the
tiltable
carrier,
in
brake
knobs
operating
operating
variety
the
swingarm
required
TV
etc).
spectacle
rings
and
individually
swingarm
articulation
and
the
knobs.
(52,
microscopes
of
(b)
is
blocked
retighten
(27, 28).
joint,
and
then
perforated
53),
tilt
microscope
applications.
is
blocked
(for
assistant,
binocular
and
wearers
format-indicating
tube
the
wide-field
(c),
brake
the
plate
and
can
ar-
the
in-
be
(a)
ad-
Page 7
Réglages
1.
Positionner
Δ
—
préliminaires
Si
vous
vers
la
bras
Tirer
le
mobile
le
boulon
crochet
(12).
—
Desserrer
92).
Replier
freins
—
Desserrer
sur
la
pédale
À
présent
de
sol
vers
poignées
Resserrer
voulu.
Régler
le
plafond, à la
du
Réglage
da
Les
bras
commutateur.
de
statifs
duellement
-
Vérifier
le
Desserrer
92).
Déployer
freins.
—Placer
-
3.
Mise
Les
s'adaptent à de
—
—
—
—
le
microscope
avoir
dévissé
28).
Revisser
Les
boutons
mettent
une
progressifs
en
place
microscopes
S'assurer
(fig.
2).
Mettre
en
tance,
photographie,
Monter
le
Introduire
grands-angulaires
éventuellement,
et
d'un
réticule
le
statif
voulez
déplacer
table
opératoire
de
la
de
sécurité
freins
le
bras
freins
fixation
de
mobile
de
les
les
(13).
vous
pouvez
la
table
d'opération à l’aide
(17).
les
freins
du
mobile à moteur
hauteur
la
position
Leica
peuvent
pour
chaque
blocage
les
le
joint
ces
du
freins
bras
mobile
pivotant
dans
le
les
boutons
boutons.
de
commande
de
disque
inclinaison
du
microscope
des
accessoires
stéréoscopiques
nombreuses
du
blocage
place
les
accessoires
tube
binoculaire
l'objectif
réglables
d’anneaux
photographique.
le
il
facon
suivante:
(21)
(22)
dans
pivotement
et
resserrer
du
pied
en
déplacer
pied
(16) à l'endroit
de
travail,
initiale
être
réglés
application.
bras
mobile
pivotement
et
resserrer
puis
perforé,
de
sécurité
(52,
et
un
d'opération.
tâches.
du
bras
|
TV
etc.
(a)
(5)
et
les
(c)
d'écartement
statif
de
fixer
et
insérer
le
boulon
(90,
sol
le
91,
faut
les
appuyant
le
statif
des
du
statif
de
au
moyen
indivi-
(fig.
2)
(90,
91,
les
le
porte-
après
(27,
53)
per-
pivotement
Leica
mobile
|
pour
assis-
approprié
oculaires
pourvus,
Einstellungen
Stativ
I.
positionieren
Wenn
rationstisch
den
—
Sie
ziehen
ken den
Bolzen
—
Lésen
Falten
und
ziehen
vor
Sie
das
Schwenkarm
den
Haltebolzen
gelósten
(12)
ein.
Sie
die
Gelenkbremsen
Sie
den
Sie die
der
Bodenstativ
fahren
Sicherheitshaken
Schwenkarm
Gelenkbremsen
fest.
—
Lésen
Sie
die
die
Pedale
Nun
kônnen
Griffen
Treten
Fussbremsen
Beim
Deckenstativ
risch
angetriebenen
Handschalter
Grundposition
Leica-Stative
individuell
-
Kontrolliéren
blockiert
Lésen
Strecken
Sie
die
—
Hängen
skopträger
ten
Lochscheibenposition
Sie
die
Fussbremsen,
(13)
treten.
Sie
(17)
Sie
das
zum
OP-Tisch
am
gewählten
(16)
fest.
senken
auf
Arbeitshóhe.
einstellen
lassen
sich
einrichten.
Sie,
ist
(Bild
Sie die
Sie
2).
Gelenkbremsen
den
Schwenkarm
Gelenkbremsen
Sie
Schwenkgelenk
nacheinander
Sicherheitsknópfe
haben.
Ziehen
Sie
die
fest.
—
Mit
den
schwenken
Sicherheitsknópfe
Triebknôpfen
Sie
das
Opcrationsmikroskop
feindosiert.
3.
Zubehór
montieren
Leica-Operationsmikroskope
sell
ftir
zahlreiche
—
Kontrollieren
blockiert
Montieren
—
rüstungen
TV
usw.
-
Bringen
bus
(a)
Setzen
an
Sie
—
ist
Sie
für
Sie
das
Aufgaben
Sie,
(Bild
2).
die
benòtigten
Assistenz,
den
gewahlten
Objektiv
winkel-Brillentrigerokulare
Distanzringen
und
Photostrichplatte,
Operation
wollen, sichern
wie
Bodenstativ
Auslegearm
ob
(52,
ob
zum
folgt:
(21)
(90,
zusammen
indem
fahren.
Standort
sie
den
fiir
jede
der
Schwenkarm
(90,
und
wieder
fest.
und
in
der
ein,
(27,
28)
53)
neigen
sind
verwendbar.
der
Schwenkarm
Zusatzaus-
Photographie,
Binokulartu-
(b)
und
(c),
Ope-
Sie
und
klin-
(22) im
91,
92).
wieder
Sie
auf
an
den
die
moto-
mittels
Disziplin
91,
92).
ziehen
Mikro-
geeigne-
nachdem
gelóst
wieder
und
univer-
die
Weit-
ev.
mit
ein.
Ajustes
1
Δ
previos a la
Emplazar
Si
suelo
se
el
desea
hasta
hay que
modo
-
Retirar
el
el
gancho
siguiente:
perno
(12).
—
a
los
92).
Plegar
el
frenos
—
Soltar
dales
Ya
estativo
brazo
de
articulación.
los
frenos
(13).
se
puede
de
ciones.
En
el
lugar
dal
(16).
Cuando
brazo
za
da
Instalación
Los
según
—
se
mévil
hasta
alcanzar
haciendo
estativos
las
necesidades
Comprobar
queado
(fig. 2).
Soltar
los
utilice
en
92).
Extender
nos
—
Tras
28),
el
de
articulación.
soltar
colocar
portamicroscopio
del
disco
Apretar
perforado.
de
dad.
—
Con
los
botones
nar y girar
operación.
3.
Montar
los
accesorios
Los
microscopios
pueden
utilizar
-
Comprobar
queado
—
—
—
(fig.
Montar
los
necesiten
grâlicas o de
Colocar
Colocar
gran
gafas
para
el
cl
angulares
(c),
eventualmente
ciadores y retículo
operacion
estativo
trasladar
la
mesa
asegurar
de
de
seguridad
frenos
móvil y volver a tirar
de
conducir
suelo hacia
elegido
un
impulsado
la
uso
del
la
posición
Leica
si
el
frenos
brazo
los
botones
la
articulación
nuevo
poco a poco
en
multitud
si
el
2).
equipos
los
televisión,
tubo
binocular
objetivo
para
de
el
brazo
sujeción
(22)
de
articulación
pedal
con
la
mesa
pisar
los
estativo
por
motor
altura
de
conmutador
básica
se
pueden
de
cada
brazo móvil
de
articulación
móvil y tirar
de
en
la
posición
los
botones
de
mando
el
de
operación
brazo
móvil
suplementarios
ayudantes,
etc.
(b) y los
observadores
con
fotográfico.
el
estativo
operaciones,
mévil
del
(21) y aplicar
en
el
perno
(90,
91,
de
los
+
pisando
las
asas
de
frenos
de
se
trabajo
los
pe-
(17)
opera-
de
pe-
techo,
despla-
desea-
manual.
disponer
disciplina.
está
blo-
(90,
91,
de
los
fre-
seguridad
orientable y el
(27,
adecuada
de
seguri-
(52,
53)
incli-
microscopio
Leica
de
tareas.
está
blo-
que
tomas
foto-
elegido
(a).
oculares
con
anillos
espa-
de
|
el
el
de
se
se
Page 8
“
aq]
11
ju
JO
OS
agegue
SSO[LOTJOU
Da9UBTBG131HTO2
pus
ay]
WIBSUIAS
1
UTEUIAI
Wino
JY}
aq
[JIM
э4оэболони
эзиеедлэзитоо
1500
ULIBSUIMS
ULIPSUIMS
3UT
OU)
"р
pur
(77)
Yooy
Alayes
(Tc)
"HOHIsOd
341
uid
2214
om
]as
-
8011861300
16318108
ou)
SulApealgs
一
“SPIZMUMOP
ээщ
(0)
$180
34440
ㅁ
ULIPSUIMS
80150201
0165031
ло
зрлемап
341
341
9}
91010.1
8010[04
зипилр
[un
‘puey
(ST)
Ag
почил
OU
3002
suo
А]
10301150106
띠
-sopuu
UO
AUB
1BI1
391]
01
(9
241
aged
150106
"76
“DALIP
'16
ㅁ
01
06)
(If)
SUIsn90J
suaunsnfpe
Sgoux
8011
2]
33010
oxLIG
JO
jenpiapuj
FUIUUNI
3
om
ㅁ
41
28)
35[]
-
"S
—
-IE
ase8La
во
'10301340041
6
э4оэзолони
DUE
*aAITD
と
6
[01318]
SOu
TH1LA
э41
ри
эхела
DSDIAOTH
10
шорээлр
1и10[
HOHInOHTB
3]9
10u
oui
8
[1
318
isnfpe
941
Jan
3H1
71
-Ins
suonisod
Are[pidnd19101
24]
10]
aundorp
(59)
941198
ling
oy)
01
198
(SC)
$и3]э2Аэ
put
OH
*23uejsip
241
34]
Чим
asf]
"OS
—
19^3|
-18Se
'P3Iinhar
941
24)
101
TI
Fursn
sdnaaAa
‘э]еыЧолА4е
[0134
a[dIX3H
10
yidap
элэцл
3H1
au)
498Q
‘pure
isnipy
ga
uoas
P]O4
—
IIEad
at
UO
1O
dqny
18
прош
ац}
‘1911198
UO
(OC)
16013101
341
‘(QOL)
чо
иг]
yoIMs
‘ajqeo
UONEUTUINT
03
1306.00
(14)
Iomod
HO1LAAS
341
oy}
243
133840
Uo
ㅁ
07
-
941
UN],
581
—
jadsu
"9
“uonezado
a3pm3
ow)
UI
341
sajng
(ος)
SULMP
ay}
Ίπποι
a3ueyo
[18]
pmoys
dure]
*Átessa9au
uoyguunyu
ay
qmg
то
e
pei
Л
J]
П
odueyo-39mb
(52)
513010473114
ay]
Jo
941
заваш
(4g)
QUI
Аа
SI9NY
‘oeudordde
1unow
и
asueys
MOSU]
dure]
—
-о4-рии
-SULMS
JY]
$1101
JeYI
‘(]
(0)
Os
ου)
Yooy
э^ыр
[οσο
5115020}
Ajayes
suoneiedoid
ολοι
ayy
241
UBI
aseayayy
8циа
UL
Burg
—
—
SUNSIUU-QUE
01
(가)
1900643
UE
*(SMOIB
JM
0 ㅁ
0146341048604
sosardafa
JO
UONDUNÍ)
эц1
341
‘po
juase
18211.
ποῃ!ς
040.1.-
days
—
"SIDAOD
O[L19}$
IY}
WY
—
Page 9

4.
Equilibrer
Il
est
nécessaire
en
fonction
qu'il
reste
—
Détacher
fixer
au
—
Tenir d'une
point
régler
jusqu'à
brement.
.
Réglages
—
Régler
au
point
-
Régler
freins
Si
le
porte-microscope
ne
sont
commande,
—
Régler
bouton
tilles
(63),
ellement
Retourner
—
Régler
levier
laire
ou
6.
Contrôler
—
Brancher
Mettre
l'interrupteur
—
Mettre
avec
le
Remplacer
(86)
si
Pendant
au
moyen
(87).
—
Placer
si
nécessaire.
7.
Dernières
—
Enlever
bras
mobile
(figure
—
Amener
en
position
—
Mettre
sur
6.4.
—
Nettoyer
tibuée,
-
Mettre
le
bras
mobile
d'équilibrer
du
poids
stable
dans
le
crochet
boulon
de
main
du
microscope
que
le
dureté
l'anneau
dureté
91,
92,
équipés
régler
la
d'équilibrage
du
du
p.
(40)
le
système
ce
individuels
la
avec
la
(90,
pas
l'écartement
(55)
et
les
dioptries à l’aide
pour
le
l'assistant.
l'œillère
la
profondeur
(56)
se
trouvant
sur
le
répartiteur
l'éclairage
le
câble
l'appareil
l'éclairage
bouton
nécessaire.
l'opération,
des
manipulations
le
1).
le
le
les
en
(70).
(71).
les
ampoules
du
changeur
filtres
dans
crochet
puisse
dispositif
médiane
changeur
les
oculaires
éléments
le
de
l'équipement
toutes
les
de
sécurité
fixation
bras
aussi
(21).
commande
d'opération
mobile
mouvement
moleté
pivotement
6).
et
le
Joint
d'un
mouvement
les
freins
pupillaire
chirurgien
si
nécessaire.
de
champ à l’aide
sur
le
optique.
de
réseau.
marche
au
interne
de
de
sous
de
remplacer
rapide
les
porte-filtres
sécurité
balancer
de
mise
au
(centre
grossissement
avec
un
stérilisables
bras
mobile
positions.
(22)
et
de
mise
de
l’autre,
balance
de
mise
(41).
avec
pivotant
(93,
avec
des
et
éventu-
tube
binocu-
moyen
tension
la
glissière
la
lampe
d'ampoule
pour
que
librement
point
de
la
flèche)
produit
en
place.
afin
le
au
et
li-
les
de
94).
le
len-
du
de
(43)
le
(40)
(42)
an-
4.
Schwenkarm
Der
stungsgewicht
er
in
jeder
—
Lésen
rasten
—
Halten
einer
Drehen
wichtsausgleichstrieb
Schwenkarm
selbsttátig
5.
Individuelle
—
Regulieren
Fokussiertriebes
—
Regulieren
Schwenkbewegungen
bremsen
Sind
ger
stellen
94)
—
Stellen
Drehknopf
Augenlinsen
ev.
Assistenten
Je
nach
die
-
Regulieren
Hebel
Strahlenteiler.
6.
Beleuchtung
—
Schliessen
Schalten
. — Schalten
dem
Wechseln
im
Schlitten
Während
dem
Lampenwechsel
—
Setzen
haltern
7.
Letzte
—
Lösen
der
(Bild
—
Bringen
Mittelstellung
~
Drehen
(42)
—
Behandeln
beschlagmittel.
—
Bringen
ausbalancieren
Schwenkarm
ausbalanciert
beliebigen
Sie
den
Sie
ihn
Sie
das
Hand
am
Sie
mit
zu
heben
Einstellungen
Sie
Sie
(90,
91, 92,
Schwenkgelenk
nicht
mit
Sie
auch
ein.
Sie
den
(55)
(63)
persónlichem
Augenmuscheln
Sie
(56)
am
kontrollieren
Sie
Sie
den
Sie
Schalter
Schwenkarm
die
Sie
(86)
der
Lampenschnellwechsler
Sie
bei
(43)
ein.
Vorbereitungen
Sie
den
1).
Sie
den
Sie
den
auf
Stufe
Sie
Sie
die
muss
je
nach
werden,
Position
Sicherheitshaken
im
Haltebolzen
Operationsmikroskop
Fokussiertricb
der
anderen
frei
die
mit
die
einem
die
Augenabstand
und
fiir
ein.
stehen
(22)
(21)
(40).
Hand
(25),
schwebt,
oder
Gangleichtigkeit
dem
Gangleichtigkeit
mit
S.
6).
und
Trieb
Gelenkbremsen
die
Dioptrien
den
Bedarf
bis
ohne
zu
senken.
Drehring
den
Gelenk-
Mikroskoptra-
ausgestaitet,
mit
Chirurgen
stůlpen
um.
die
Schárfentiefe
Binokulartubus
das
Netzkabel
Netzschalter
interne
(71)
falls
Operation
Bedarf
(Pfeilmitte).
6.4.
sterilen
Beleuchtung
ein.
nôtig
die
aus.
vor.
Filter
Sicherheitshaken,
frei
bewegt
Fokussiertrieb
Vergrésserungswechsler
die
Okulare
Abdeckungen
an.
(70)
Glühlampen
nehmen
(87)
in
den
werden
mit
mit
oder
Ausrü-
damit
bleibt.
und
ein.
mit
am
Ge-
der
sich
des
(41).
der
(93,
dem
mit
den
und
Sie
dem
am
ein.
mit
Sie
mit
einen
Filter-
damit
kann
(40)
Anti-
an.
in
4.
Equilibrar
Dependiendo
eguilibrar
tenga
en
-
Soltar
jarlo
—
Sujetar
que
(40)
Con
la
trapeso
cile
libremente
.
Ajustes
—
Con
el
cha
del
—
Regular
giro
con
92,
pág.
Si
la
microscopio
mando,
culacion
—
Ajustar
botón
lente
tualmente,
Si
es
—
Ajustar
palanca
divisor
6.
Controlar
—
Conectar
Encender
—
Con
el
naciôn
Si
es
la
corredera
Durante
de
bombilla
bombillas
—
Si
se
filtros
7.
Ultimos
—
Soltar
brazo
(fig.
1).
ー
evar
sición
—
Girar
vel
6.4.
—
Tratar
tiempafiante.
—
Colocar
el
brazo movil
del
peso
el
brazo
cualguier
el
gancho
en
el
perno
una
del
microscopio
mano,
hasta
sin
se
mano
con
otra
(25)
individuales
anillo
giratorio
mando
de
la
marcha
los
frenos
6).
articulación
no
también
(93, 94).
la
distancia
(63)
el
ayudante.
la
Jouve
(56)
en
rayos.
la
iluminacion
el
cable
el
interruptor
(86).
la
operación
con
(87).
colocar
gancho
pueda
mando
(centro
oculares
las
cubiertas
están
(55) y las
retirar
el
sustituir
de
ajustar
giratorio
ocular
necesario,
de
interruptor
interna.
necesario,
necesita,
(43).
preparativos
el
móvil
el
central
el
cambiador
los
del
equipo,
móvil
para
posición.
de
seguridad
sujeciôn
el
girar
el
que
el
levantarse o bajarse.
(41)
enfoque.
de
los
de
articulación
orientable y el
equipados
los
interocular
para
el
cirujano
las
de
tubo
binocular o en
de
red.
de red
(71)
encender
las
efectuar
el
cambiador
un
filtro
seguridad
moverse
de
enfoque
de
la
de
aumentos
con
un
estériles.
hay
gue
se
(22) y enca-
(21).
mando
de
de
operación.
mando
del
brazo
móvil
regular
la
movimientos
(90,
porta-
con
frenos
de
dioptrías
anteojeras.
con
y,
campo
(70).
la
bombillas
un
cambio
rápido
en
el
para
libremente
(40) a la
flecha).
(42)
producto
con
con
ilumi-
porta-
que
que
man-
enfo-
con-
os-
mar-
-
de
91,
un
arti-
el
la
even-
la
el
en
de
el
po-
al
ni-
an-
Page 10
meet
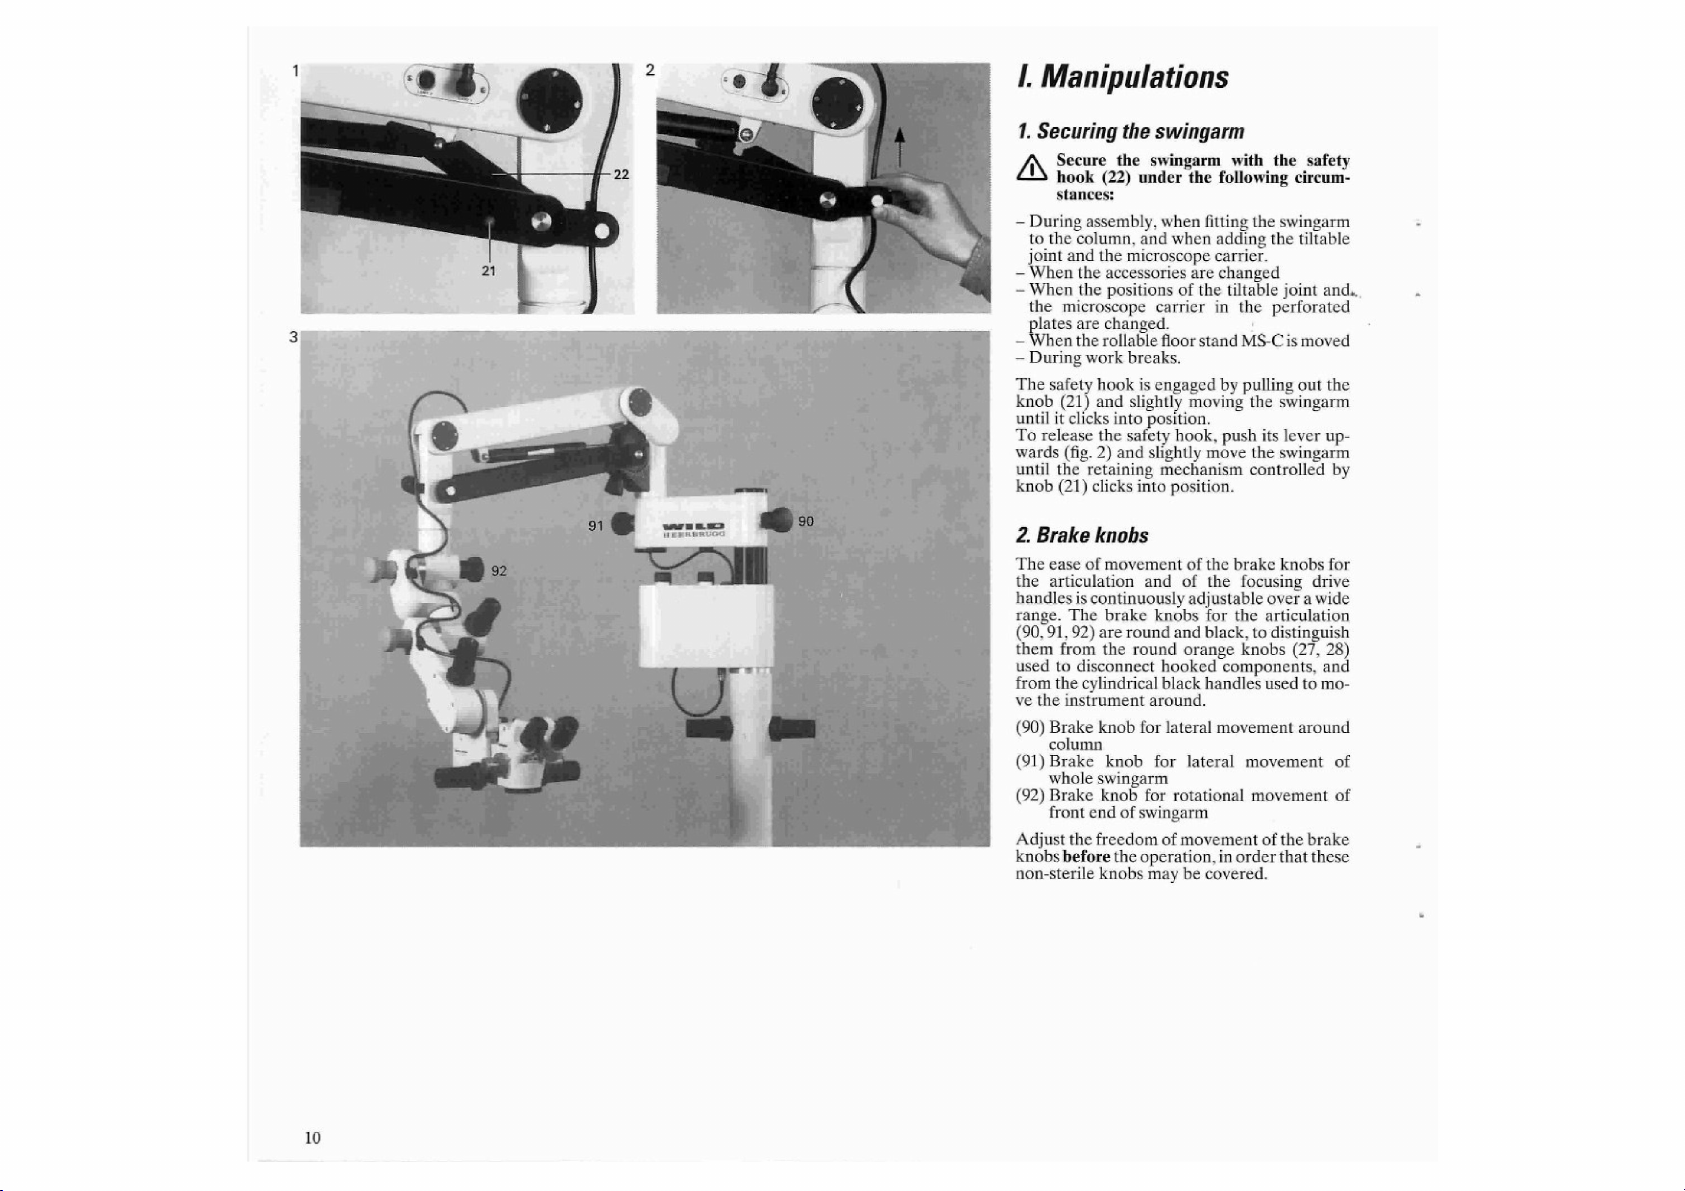
I.
Manipulations
1.
Securing
Secure
hook
stances:
—
During
to
the
joint
—
When
—
When
the
plates
—
When
—
During
The
safety
knob
(21)
until
it
To
release
wards
until
the
knob
(21)
=
2.
Brake
The
ease
the
articulation
handles
range.
(90,
91,
them
from
used
to
from
the
ve
the
(90)
Brake
column
(91)
Brake
whole
(92)
Brake
front
Adjust
knobs
non-sterile
the
the
(22)
assembly,
column,
and
the
microscope
the
accessories
the
positions
microscope
are
changed.
the
rollable
work
breaks.
hook
and
slightly
clicks
into
the
(fig.
safety
2)
and shghtly
retaining
clicks
knobs
of
movement
is
continuously
The
brake
92)
are
round
the
round
disconnect
cylindrical
instrument
knob
knob
swingarm
knob
end
of
the
freedom
before
the
knobs
swingarm
swingarm
under
the
when
and
is
into
for
swingarm
operation,
fitting
when
are
of
the
carrier
floor
stand
engaged
moving
position.
hook,
move
mechanism
position.
of
of
adjustable
knobs
and
orange
hooked
black
around.
the
for
black,
handles
and
lateral
for
lateral
for
rotational
of
movement
may
be
covered.
adding
carrier.
in
the
movement
with
the
following
changed
tiltable
by
push
brake
components,
the
swingarm
the
joint
the
perforated
MS-C
is
pulling
the
swingarm
its
lever
the
swingarm
controlled
knobs
focusing
over a wide
the
articulation
to
distinguish
knobs
used
movement
circum-
(27,
movement
of
order
the
that
in
safety
tiltable
and...
moved
out
the
up-
by
for
drive
28)
and
to
mo-
around
of
of
brake
these
10
Page 11
I.
Manipulation
1.
Fixation
—
Nouvelles
Mise
du
statif.
Montage
microscope.
—
Montage
—
Modification
et
du
forés.
—
Déplacement
—
Pendant
Tirer
dre
le
matiquement
bras
mobile.
Pour
vers
légèrement
bouton
2.
Freins
Les
freins
ment
microscope
freins
se
différencient
qui
sont
porte-microscope
(90)
Frein
(91)
Frein
mobile
(92)
Frein
Les
freins
avant
stérilisables.
du
bras
Dans
les
bras
(22):
en
porte-microscope
le
levier
débloquer:
le
la
de
l'opération,
situations
mobile
installations:
place
du
du
joint
des
accessoires
des
avec
les
pauses.
bouton
de
de
blocage
lorsque
haut
de
dureté
presser
(fig.
le
bras
fixation
de
pivotement
permettent
des
d’opération.
pivotement
des
orangés
du
pivotement
arrière
avant
du
devront
avec
bras
positions
fixation
2).
(21)
mouvements
boutons
et
et
pivotement
car
mobile
permettent
le
du
être
mobile
suivantes,
le
levier
mobile
pivotant
du
dans
le
statif
de
(21)
qui
s'enclenche
l’on
bouge
le
levier
Soulever
jusqu'à
s'enclenche.
de
régler
Les
(90,
91,
92)
de
joint
pivotant.
autour
pivotement
contrôlés
les
boutons
fixer
de
blocage
sur
la
colonne
et
du
porte-
joint
pivotant
les
disques
sol
MS-C
pour
suspen-
légèrement
serrage
du bras
auto-
de
blocage
ou
appuyer
ce
que
individuelle-
pivotants
boutons
sont
noirs
(27,
de
libérer
de
la
colonne
du
mobile
et
réglés
ne
sont
le
per-
le
le
du
des
et
28)
le
bras
pas
AN
I.
Bedienung
1.
Sichern
-
Bei
Einsetzen
säule.
Montieren
skopträger.
—
Beim
—
Beim
gelenk
scheiben.
—
Beim
—
In
Arbeitspausen.
des
In
folgenden
arm
mit
ren:
dem
Neuinstallationen:
des
von
Umriisten
Verändern
und
Mikroskoptráger
Fahren
Zum Emhängen
(21)
herausziehen.
automatisch
Schwenkarmes
Lésen
driicken
Schwenkarm
der
Haltebolzen
2.
Gelenkbremsen
Die
Bremsen
darf
entsprechend
gig
eingestellt
lenkbremsen
von
den
zu
unterscheiden,
und
Schwenkgelenk
(90)
Gelenkbremse
Sáule
(91)
Gelenkbremse
Schwenkarmes
(92)
Gelenkbremse
Schwenkarmes
Die
Bremsen
trolliert
fe
nicht
durch
der
Blockierung:
(Bild
2).
leicht
kônnen
werden.
(90,
Sicherheitsknópfen,
sollten
und
eingestellt
sterilisierbar
Schwenkarmes
Situationen
Sperrhebel
Schwenkarmes
Schwenkgelenk
des
Zubehérs
der
Position
mit
dem
Bodenstativ
des
Sperrhebels
Der
Sperrhebel
leichtes
cin.
anheben
(21)
cinrastet.
dem
von
Die
91,
92)
mit
denen
gelóst
der
Drehbewegung
der
hinten
der
vorn
vor
sind.
Sperrhebel
leicht-
Knöpfe
sind
werden
Drehbewegung
Drehbewegung
der
werden,
ist
der
Schwenk-
(22) zu
blockie-
in
die
Stativ-
und
Mikro-
von
Schwenk-
in
den
Loch-
MS-C
Haltebolzen
Hinfiihren
oder
persònlichen
bis
schwarz,
orange,
Mikroskoptráger
Operation
klinkt
nach
oben
belasten,
schwergan-
für die
um
(27,
kónnen.
um
die
kon-
Knóp-
da
des
bis
Be-
Ge-
sie
28)
die
des
des
|,
Manejo
1.
Asegurar
A
En
mendable
medio
—
Instalaciones
Al
montar
estativo.
Al
montar
portamicroscopio.
—
Al
cambiar
—
Al
cambiar
orientable y del
cos
perforados.
—
Al
desplazar
tivo
de
-
Durante
Para
enganchar
el
perno
bloqueo
poco
el
Para
desbloquear:
hacia
arriba
Levantar o bajar
hasta
que
2.
Frenos
Los
frenos
mente
les,
desde
muy
intensa.
ticulación
renciarlos
anaranjados,
den
soltar
orientable.
(90)
Freno
ratorio
(91)
Freno
ratorio
(92)
Freno
terior
Los
frenos
antes
de
nes
no
el
las
siguientes
inmovilizar
de
la
nuevas:
el
brazo
la
los
las
el
suelo
MS-C
las
pausas.
de
sujeción
encaja
automáticamente
brazo
movil.
(fig.
el
perno
de
articulación
pueden
de
acuerdo a las
la
marcha
Los
(90,
91,
de
los
por
el
portamicroscopio y la
de
articulación
en
torno a la
de
articulación
posterior
de
articulación
del
brazo
deben
la
operación
son
esterilizables.
brazo
movil
situaciones
el
palanca
móvil
articulación
accesorios
posiciones
portamicroscopio
conjunto
la
palanca
girar
2).
ligeramente
de
ser
suave
botones
92)
son
botones
medio
del
móvil
ser
controlados y ajustados
brazo
de
bloqueo
en
la
columna
orientable y el
de
la
articulación
por
medio
de
bloqueo,
(21).
La
al
la
palanca
el
sujeción
ajustados
necesidades
de
de
columna
brazo
debido a que
brazo móvil
(21)
hasta
una
de
los
frenos
negros a fin
seguridad
los
cuales
articulación
del
movimiento
del
movimiento
móvil
del
movimiento
es
reco-
móvil
por
(22):
del
en
los
dis-
del
esta-
retirar
palanca
de
progresiva-
mover
bloqueo
encaje.
persona-
fricción
de
de
dife-
(27,
se
pue-
sus
boto-
de
un
ar-
28)
gi-
gi-
an-
Page 12
ww
m
mr»
EE
RAILS
I.
Using
the
floor
and
ceiling
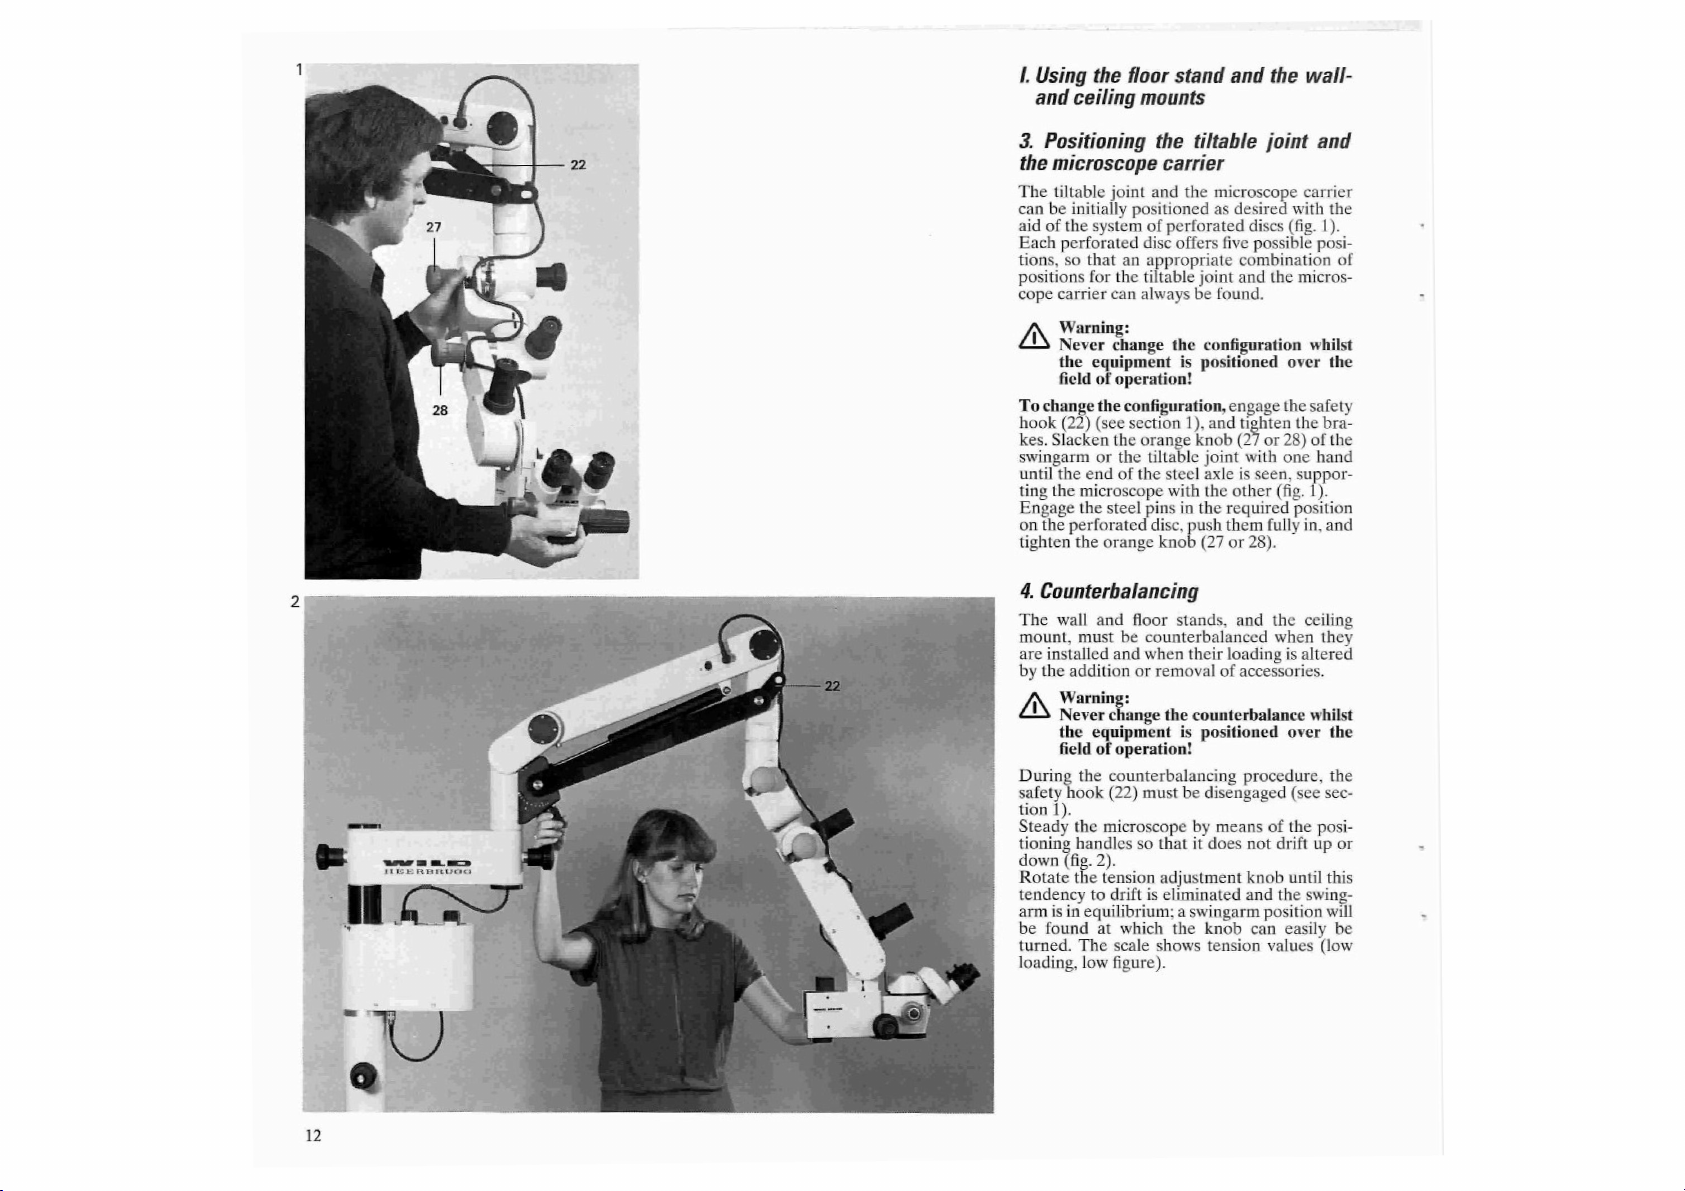
3.
Positioning
the
microscope
The
tiltable
can
be
initially
aid
of
the
Each
perforated
tions,
so
positions
cope
carrier can
Warning:
Never
the
field
To
change
hook
(22) (see
kes.
Slacken
swingarm
until
the
ting
the
Engage
the
on
the
perforated
tighten
the
4.
Counterbalancing
The
wall
mount,
must
are
installed
by
the
addition
A
Never
the
field
During
safety
tion
Steady
tioning
down
Rotate
tendency
arm
turned.
loading,
be
hook
1).
the
handles
(fig.
the
is
in
found
the
The
mounts
joint
positioned
system
of
disc
that
an
appropriate
for
the
tiltable
always
change
equipment
of
operation!
the
configuration,
section
the
orange
or
the
end
microscope
My
equilibrium; a swingarm
low
tiltable
of
the
steel
pins
orange
and
floor
be
counterbalanced
and
when
or
change
equipment
of
operation!
counterbalancing
(22)
must
microscope
so
2).
tension
to
drift
is
at
which
scale
figure).
stand
the
tiltable
carrier
and
the
microscope
as
perforated
offers
five
joint
be
found.
the
configuration
is
positioned
1),
and
knob
joint
steel
axle
with
the
in
the
disc,
push
knob
(27
stands,
their
removal
shows
of
the
counterbalance
is
positioned
be
disengaged
by
means
that
it
does
adjustment
eliminated
the
knob
tension
and
the
joint
desired
with
discs
(fig.
possible
combination
and
the
micros-
over
engage
the
tighten
the
(27
or
28)
with
one
is
seen,
other
required
them
or
loading
suppor-
(fig.
position
fully
28).
and
the
when
is
accessories.
over
procedure,
(see
of
the
not
drift
knob
until
and
the
position
can
easily
values
wall-
and
carrier
the
1).
posi-
of
whilst
the
safety
bra-
of
the
hand
1).
in,
and
ceiling
they
altered
whilst
the
the
sec-
posi-
up
or
this
swing-
will
be
(low
Page 13
I.
Manipulation
sol,
de
plafond
3.
Positionnement
du
porte-microscope
La
position
microscope
rurgien
Chaque
dispositions
lisateur
joint
Modifier
Suspendre
serrer
ton
de
butée
microscope
Engrener
voulue
votant
perforé
quat
4.
Contrepoids
Pour
contrepoids
sera
ajusté
montage
du
du
peut
en
réglant
disque
les
résultent
pivotant
Attention:
Ne
du
(27
les
et
jamais
champ
la
position:
le
levier
les
freins.
serrage
pendant
(fig.
le
joint
du
disque
ou
le
porte-microscope
et
bloquer
ou
28).
statifs
sert à équilibrer
lors
d'un
joint
étre
perforé a cinq
mieux
des
du
modifier
opératoire!
Tourner
orangé
que
1).
mural,
d’une
taire.
Attention:
Ne
jamais
du
champ
de
blocage
le
microscope
pour
vers
le
du
mouvement
la
direction
du
soulevant
dans
le
bouton
valeur
(faible
régler
haut
poids
laquelle
sus
Le
levier
lors
de
Maintenir
sitionnement
place
bouton
_tourné
que
sant
une
facilement
mande.
sur
l’équilibrage
ni
dans
l'équilibre
ou
en
position
La
l'échelle
des
statifs
du
pivotant
adaptée
les
disques
appropriées
différentes
porte-microscope.
de
blocage
(27
l’autre
pivotant
perforé.
le
bouton
de
nouvelle
équipement
le
opératoire!
(22)
ne
du
par
que
le
bras
ni
vers
de
appropriée
soit
le
bras
du
mouvement
ainsi
obtenue
poids,
mural,
joint
pivotant
et
au
perforés
positions.
positions
le
réglage
(22)
d’une
main
ou
28)
main
dans
Presser
contre
de
serrage
sol
et
de
le
bras
installation
complémen-
contrepoids
doit
pas
poids
(cf.
la
poignée
mobile
le
bas
commande
obtenu.
mobile,
on
peut
tourner
peut
petite
valeur).
du
porte-
gré
du
chi-
(fig.
pour
l’uti-
au-dessus
(chap.
le
bou-
jusqu'à
soutient
la
position
le
Joint
le
disque
adé-
plafond,
mobile
au-des-
être
serré
chap.
de
ne
se
(fig.
2).
sera
jusqu'à
En
abais-
on
trouve
très
de
com-
être
I.
de
Bedienung
der
Wand-,
Deckenstative
et
3.
Schwenkgelenk-
Mikroskoptragerpositionen
Die
1).
Les
du
1),
la
le
pi-
le
et
ou
1).
po-
dé-
Le
ce
lue
Position
skopträger
Chirurgen
lung
angepasst
Jede
dass
lenk
und
rianten
Andern
Sperrhebel
anziehen.
Klemmknôpfe,
Hand
stützt
Bolzen
scheibe
kroskopträger
Lochscheibe
Klemmknopf
4.
Gewichtsausgleich
Der
Gewichtsausgleich
cieren
den-
und
stallationen
auriistung
个
Beim
(22)
nicht
Mikroskop
mit
der
nach
wird
dreht,
Durch
lasst
sich
knopf
Der
eingestellte
gelesen
Wert).
von
Schwenkgelenk
kann
dem
mit
Lochscheibe
sich
aus
Mikroskoptrager
cinstellen
Achtung:
Andern
Operationsfeld!
der
Position:
(22)
bis
Anschlag
das
Mikroskop
in
die
einrasten.
individuellen
Hilfe
der
werden
bietet
Kombination
lassen.
der
Einstellung
einhángen
orange,
drehen;
(Bild
gewünschte
Schwenkgelenk
mit
dem
pressen
(27
oder
28)
des
Schwenkarmes
Deckenstativen
und
bei
durchgefiihrt.
Achtung:
Montage
Gewichtsausgleich
tionsfeld!
Gewichtsausgleich
blockiert
Schwenkarm
unten
solange
bis
der
Senken
eine
sehr
leicht
werden
sein
am
Positioniergriff
wegfährt
in
weder
(Bild
die
betreffende
Gewichtsausgleich
oder
Heben
Position
finden,
gedreht
Wert
(wenig
kann
Boden-,
und
und
Mikro-
Bedarf
Lochscheibenverstel-
(Bild
1).
fiinf
Positionen,
von
Schwenkge-
die
geeigneten
nie
(Kap.
1),
(27
oder
28)
die
andere
1).
Position
Daumen
und
entsprechenden
festziehen.
dient
dem
bei
den
Wand-,
und
wird
einer
nie
tiber
dem
soll
der
(vgl.
Kap.
festhalten,
nach
2).
Der
Richtung
erreicht
des
Schwenkarmes
in
der der
werden
kann.
an
der
Gewicht
des
so
Va-
tiber
dem
Bremsen
mit
einer
Hand
der
Loch-
oder
Mi-
gegen
die
Ausbalan-
Bo-
bei
Neuin-
Zusatz-
Opera-
Sperrhebel
1).
da-
oben
noch
Triebknopf
ge-
ist.
Trieb-
Skala
ab-
kleiner
I.
Manejo
suelo y de
3.
Posiciones
de
los
techo
de
orientable y del
La
posicién
portamicroscopio
necesidades
ando
1).
Cada
nes,
posiciones
portamicroscopio
mas
Cambio
Enganchar
1),
apretar
Girar
anaranjados
mano
Encajar
co
perforado.
lación
el
disco
te
correspondiente
4.
Compensacion
La
compensación
lancear
suelo,
de
una
equipos
Para
lanca
desbloqueada
Sujetar
uñadura
razo
ni
hacia
de
mando
encontrar
Bajando o subiendo
trará
do
puede
El
valor
(poco
de
la
articulaciôn
individuales
la
posición
de
manera
adecuada.
Atencion:
iNo
campo
de
con
se
el
orientable o el
perforado y ajustar
el
pared y techo y se
nueva
adicionales.
Atención!
¡No
peso
efectuar
de
el
móvil
abajo
una
ajustado
peso = valor
de
disco
perforado
que
de
la
articulaciôn
se
modificar
de
la
operacion!
posicién:
la
palanca
los
frenos.
una
mano
(27 ó 28)
sostiene
bloqueo
el
perno
en
Apretar
del
brazo
móvil
instalación y después
efectuar
sobre
el
la
compensación
(22)
(véase
microscopio
de
emplazamiento
no
pueda
(fig.
en
el
sentido
la
compensación
posición
ser
en
girado
puede
estativos
la
articulacion
mural,
portamicroscopio
puede
los
con
podrà
nunca
microscopio
la
posición
portamicroscopio
(27 6 28).
del
peso
nunca
campo
capítulo
2).
el
la
fácilmente.
pequeño).
orientable y del
ser
adaptada a las
del
cirujano
discos
perforados
ofrece
cinco
la
combinacion
orientable y del
ajustar
la
el
ajuste
de
bloqueo
los
hasta
con
botones
cl
tope;
deseada
el
pulgar
el
botón
22
de
con
(fig.
peso
tiene
por
de
efectúa
la
de
debe
por
moverse
Luego
correspondiente
brazo
cual
ser
objeto
los
estativos
con
de
compensación
operación!
del
peso,
estar
en
1).
medio
de
de
manera
ni
hacia
se
gira
del
peso.
móvil
el
botón
leído
en
se
de
cambi-
(fig.
posicio-
de
las
variante
sobre
el
(capítulo
apriete
la
otra
4).
del
dis-
la
articu-
contra
de
aprie-
ba-
del
ocasión
montar
del
la
pa-
posición
la
em-
que
el
arriba
el
botón
hasta
encon-
de
man-
la
escala
13
Page 14
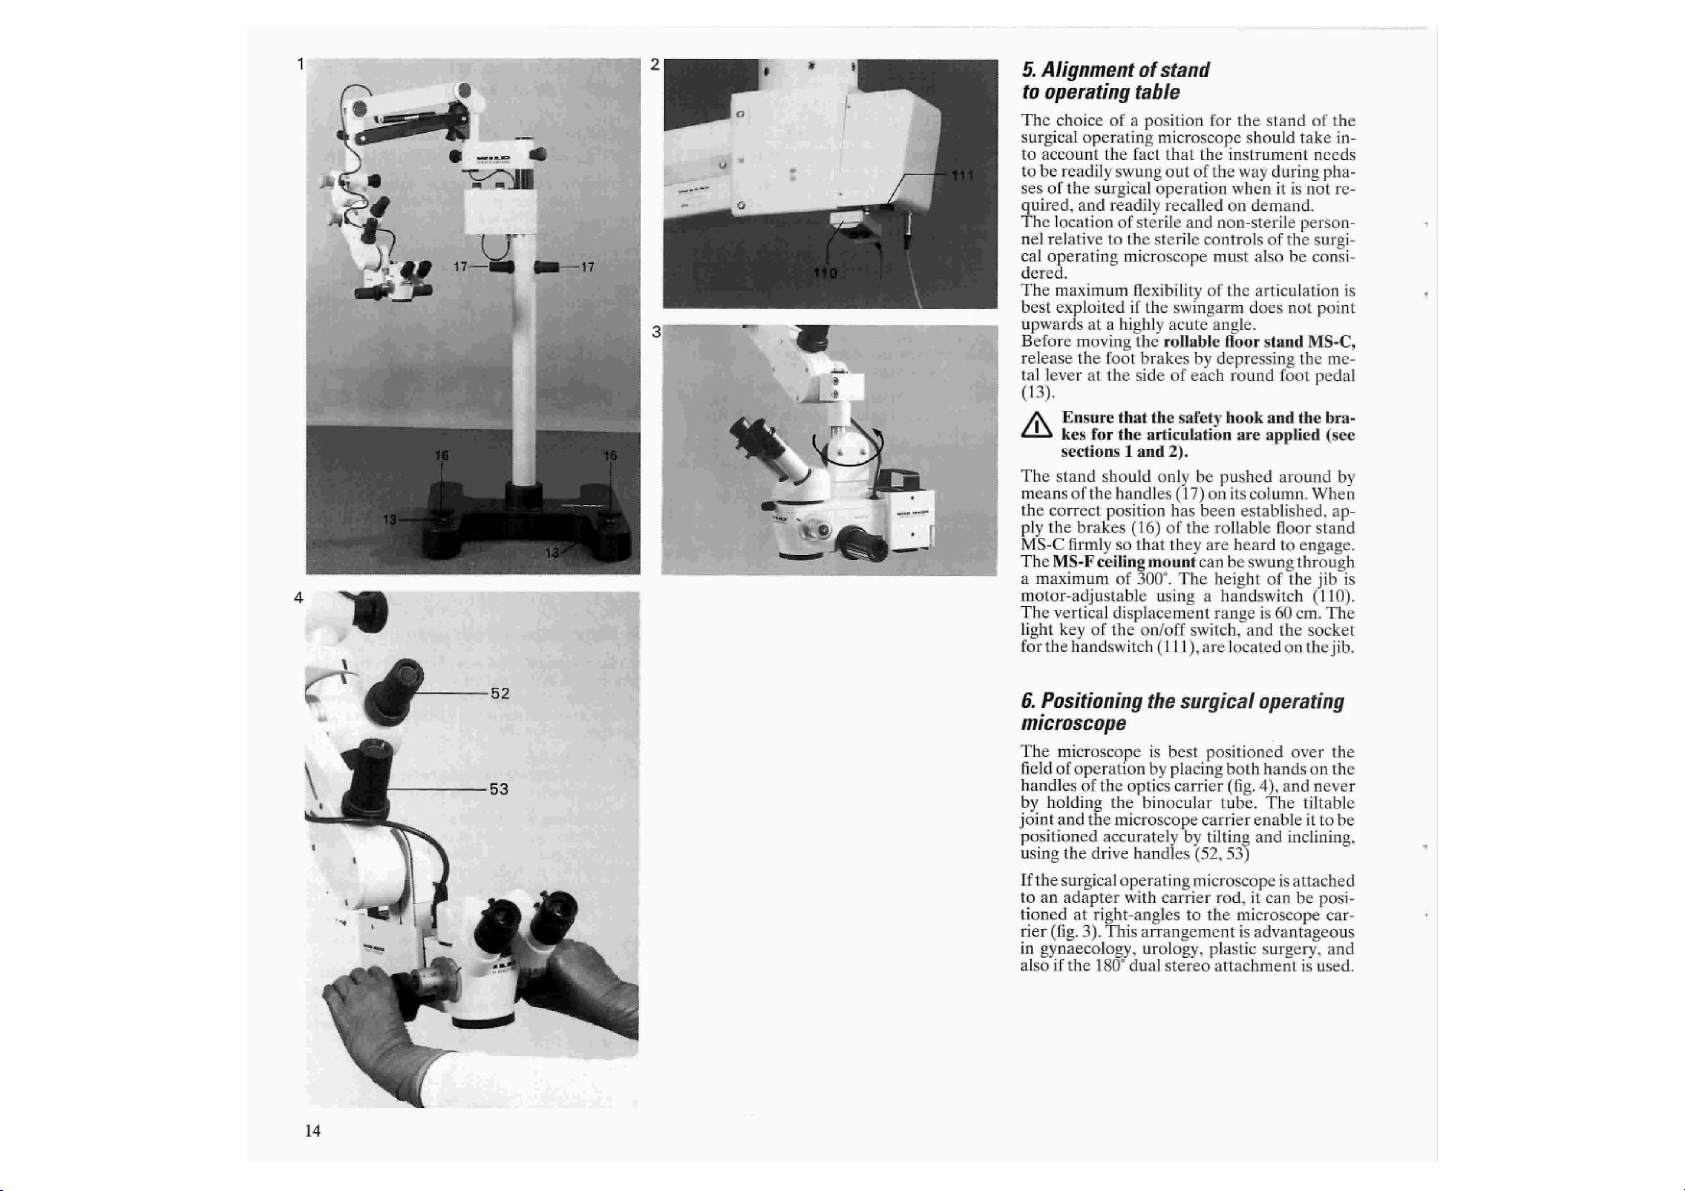
5.
Alignment
to
operating
The
choice
surgical
to
account
to
be
ses
of
quired, and
The
nel
relative
cal
operating
dered.
The
best
upwards
Before
release
tal
lever
(13).
AN
The
means
the
correct
ply
the
MS-C
The
a
maximum
motor-adjustable
The
light
for
the
of a position
operating
the
readily
swung
the
surgical
readily
location
maximum
exploited
stand
MS-F
vertical
of
to
the
microscope
if
at a highly
moving
the
foot
at
the side
Ensure
that the
kes
for
the
sections 1 and
should
of
the
handles
position
brakes
firmly
key
(16)
so
ceiling
of
displacement
of
the
handswitch
of
stand
table
for
the
of
the
and
non-sterile
controls
must
of
angle,
by
depressing
each
safety
be
pushed
on
been
the
rollable
are
can
The
height
range
switch,
are
the
instrument
way
when
on
the
floor
round
hook
are
its
established,
heard
be
located
microscope
fact
thai
out
operation
recalled
sterile
sterile
flexibility
the
swingarm
acute
the
rollable
brakes
of
articulation
2).
only
(17)
has
of
that
they
mount
300°.
using a handswitch
on/off
(111),
stand
should
demand.
does
column.
swung
and
of
take
needs
during
pha-
it
is
not
person-
of
the
surgi-
also
be
consi-
articulation
not
point
stand
MS-C,
the
foot
pedal
and
the
around
floor
to
of
the
60
cm.
the
on
bra-
(see
When
stand
engage.
through
jib
(110).
The
socket
the
jib.
applied
is
the
in-
re-
is
me-
by
ap-
is
14
6.
Positioning
microscope
The
microscope
field
of
operation
handles
by
joint
positioned
using
Ifthe
to
tioned
rier
in
also
of
the
holding
an
gynaecology,
and
the
the
drive
surgical
adapter
at
right-angles
(fig.
3).
if
the
180°
the
accurately
This
the
surgical
is
best
by
placing
optics
carrier
binocular
microscope
operating
by tilting
handles
with
carrier
to
arrangement
urology,
dual
stereo
operating
positioned
both
hands
(fig.
4),
tube.
carrier
enable
(52,
microscope
and
53)
rod,
it
the
microscope
is
advantageous
plastic
surgery,
attachment
over
the
on
the
and
never
The
tiltable
it
to
be
inclining,
is
attached
can be posi-
is
car-
and
used.
Page 15
5.
Positionnement
par
rapport à la
En
positionnant
du
fait
que
hors
difficultés
La
disposition
vêtements
en
fonction
mande
L'angle
pour
Débloquer
de
sol
ZN
Ne
déplacer
spéciales
ment
tenu,
C
jusqu'à
Le
statif
300º.
üquement
plitude
ment
et
d'un
moin
6.
Positionnement
le
du
champ
dans
stérilisés
de
du
microscope
des
joints
garantir
les
MS-C
pour
Bloquer
de
pivotement
on
incontrôlée
let
2).
le
(17)
correct
bloquer
ce
qu'ils
de
plafond
La
hauteur
par
est
de
pourvu
bouton
(111).
d'opération
Pour
positionner
champ
opératoire,
deux
poignées
jamais
par
ments
naison
microscope
a
l'aide
Placé
on
peut
lairement
“disposition
logie,
qu'un
est
utilisé.
le
individuels
du
joint
permettent
des
boutons
sur
un
support
orienter
au
porte-microscope
présente
urologie
dispositif
du
statif
table
d'opération
le
statif,
il
microscope
d'observation
le
champ
des
collaborateurs
l’asepsie
ne
la
mobilité
pédales
déplacer
le
levier
statif
de
la
par
rapport à la
les
freins
s'enclenchent.
du
le
commutateur
60
cm.
d'un
boîtier
de
commande
le
diriger
de
positionnement
tube
de
le
et
chirurgie
d'observation
faut
puisse
ou
de
travail.
ou
non
stérilisés
des
éléments
d'opération.
devra
pas
totale
de
frein
le
statif.
de
serrage
pour
éviter
de
l’instrument
qu’au
moyen
colonne.
MS-F
bras
Le
du
Le
table
(16)
du
statif
peut
se
bras
mobile
pour
avec
microscope
microscope
l'instrument
binoculaire.
basculement
pivotant
de
avec
microscope, perpendicu-
des
et
un
positionnement
commande
colonne
avantages
plastique
tenir
compte
être
poussé
ramené
être
du
(13)
une
des
être
règle
(110).
l'interrupteur
au-dessus
Les
(fig. 3).
pour
sans
portant
des
s'effectue
de
com-
trop
aigu
statif.
du
statif
et
les
freins
oscillati-
(cf.
chap.
poignées
positionne-
étant
ob-
de
sol
MS-
pivoté
sur
automa-
Son
am-
est
égale-
lampe
té-
du
par
(fig.
du
en
les
4),
mais
mouve-
et
d'incli-
porte-
fin
(52
et
53).
réceptrice,
Cette
gynéco-
et
lors-
assistant
5.
Positionieren
am
Operationstisch
Bei
der
das
ken
beriicksichtigt
Auch
zug
Operationsmikroskops
Die
gewáhlt
des
Zum
die
(13)
Das
(17)
richtige
muss
(16)
Das
schwenkt
nen
stellbar.
befinden
schalter
trollampe
6.
Positionierung
unproblematische
des
Mikroskops
der
Standort
auf
die
Winkel
werden,
Stativs
zu
Fahren
Fussbremsen
gelóst
werden.
MW
Sperrhebel
blockiert
Ausschwenken
1
und
Stativ
sollte
an
der
Standort
beim
Bodenstativ
getreten
Deckenstativ
werden.
Handschalter
Der
sich
und
(111).
Positionieren
des
Stativs
des
Hin-
während
werden.
unsteriler
sterilen
Bedienungselemente
Gelenke
um
die
ist
sollten
vóllige
der
gewáhrleisten.
des
Bodenstativs
durch
Treten
und
Gelenkbremsen
sein,
um
ein
zu
2).
Säule
werden,
Hub
ferner
der
vermeiden
nur
an
den
verschoben
am
Opertionstisch
MS-C
bis
MS-F
kann
Der
Auslegearm
(110)
motorisch
beträgt
60
die
Buchse
Betriebsschalter
des
sie
Operationsmikroskops
Zum
Positionieren
Operationsfeld
den
Positioniergriffen
4),
niemals
Schwenkgelenk
lichen
zusätzlich
durch
seitliches
Operationsmikroskops
(52
und
53).
Ist
das
Operationsmikroskop
mit
Aufnahmesáule
winklig
werden
teile
Chirurgie
arbeitercinrichtung.
zum
(Bild3).
für
die
und
des
soll
das
am
Binokulartubus.
und
Mikroskoptráger
eine
Schwenken
befestigt,
Mikroskoptráger
Diese
bei
Verwendung
Anordnung
Gynäkologie,
Mikroskops
Instrument
geführt
mit
Urologie,
Stativs
sollte
Operation
in
zu
spitz
miissen
Pedalen
miissen
(vgl.
Kap.
Griffen
Ist
erreicht,
Bremsen
zu
300°
ist
über
héhenver-
Ausleger
den
Hand-
mit
Kon-
über
dem
an
den
bei-
(Bild
ermóg-
Neigen
Trager
es
recht-
bietet
Vor-
plastische
180°-Mit-
u.a.
be-
des
der
ge-
ei-
des
und
Wegschwen-
der
Personen
zu
beachten.
nicht
Beweglichkeit
MS-C
der
unkontrolliertes
speziellen
werden.
auf
die
einrasten.
bis
cm.
Am
für
werden
Feinpositionierung
und
den
Triebknópfen
an
einem
kann
ausgerichtet
der
5.
Emplazamiento
junto a la
Al
emplazar
entre
rar
del
campo
campo
También
del
a
los
microscopio
Para
los
ángulos
demasiado
Para
deben
mesa
otras
facilmente
personal
cosas,
de
de
trabajo.
se
debe
con
elementos
de
asegurar
de
agudos.
desplazar
aflojar
el
el
observación y recolocarlo
operación.
la
las
los
(13).
A
La
palanca
articulaciones
fin
de
evitar
capitulos 1 y
El
estativo
por
que
canzada
operación
estativo
El
estativo
300°.
lar a motor
(110).
se
halla
y
el
control
6.
Emplazamiento
de
Para
de
la
por
plazamiento
tubo
portamicroscopio
cionado
lateral y de
nes
Si
el
soporte
puede
portamicroscopio
ofrece
gía
plástica y cuando
180”
debe
medio
de
se
La
interruptor
las
encuentran
la
posición
se
deben
de
suelo
de
techo
altura
del
mediante
La
elevación
el
enchufe
(111).
operación
emplazar
operaciôn
medio
binocular.
de
microscopio
ventajas
para
de
(fig.
fino
gracias a los
inclinación
mando
con
situar
el
asistente.
el
(52 y 53).
columna
formando
de
las
La
en
del
estativo
de
operaciones
estativo
plena
el
frenos
de
empuňaduras
MS-C
se
se
que
es
necesario
instrumento
.
tener
en
ropa
de
articulaciones
estativo
giros
2).
ser
en
brazo mévil
para
servicio,
microscopio
dos
cuenta
no
aseptizada
mando
movilidad
de
apretando
blogueo y los
deben
estar
involuntarios
desplazado
la
columna.
correcta
apretar
alcanza
debe
hasta
MS-F
se
un
conmutador
60
el
conmutador
del
microscopio
guiar
empuñaduras
junto a la
los
con
4) y nunca
articulación
permiten,
movimientos
por
medio
de
operación
portamicroscopios,
ángulo
(fig.
3).
ginecología,
se
utiliza
debe
considerar,
poder
para
retirarlo
la
posición
respecto
asépticos
del
estativo
no
deben
suelo
MS-C
los
pedales
frenos
blogueados
(véanse
únicamente
especiales
Una
mesa
frenos
girar
se
puede
cm.
En
el
la
lámpara
sobre
el
el
instrumento
(16)
manual
manual
campo
de
enclavarlos.
puede
tomandolo
orientable y el
además,
Esta
el
el
de
de
los
está
sujeto
recto
disposición
urología,
dispositivo
gi-
en
del
ser
de
las
(17)
vez
del
hasta
regu-
brazo
em-
por
posi-
giro
boto-
con
ciru-
el
se
a
al-
de
de
el
al
se
el
de
Page 16
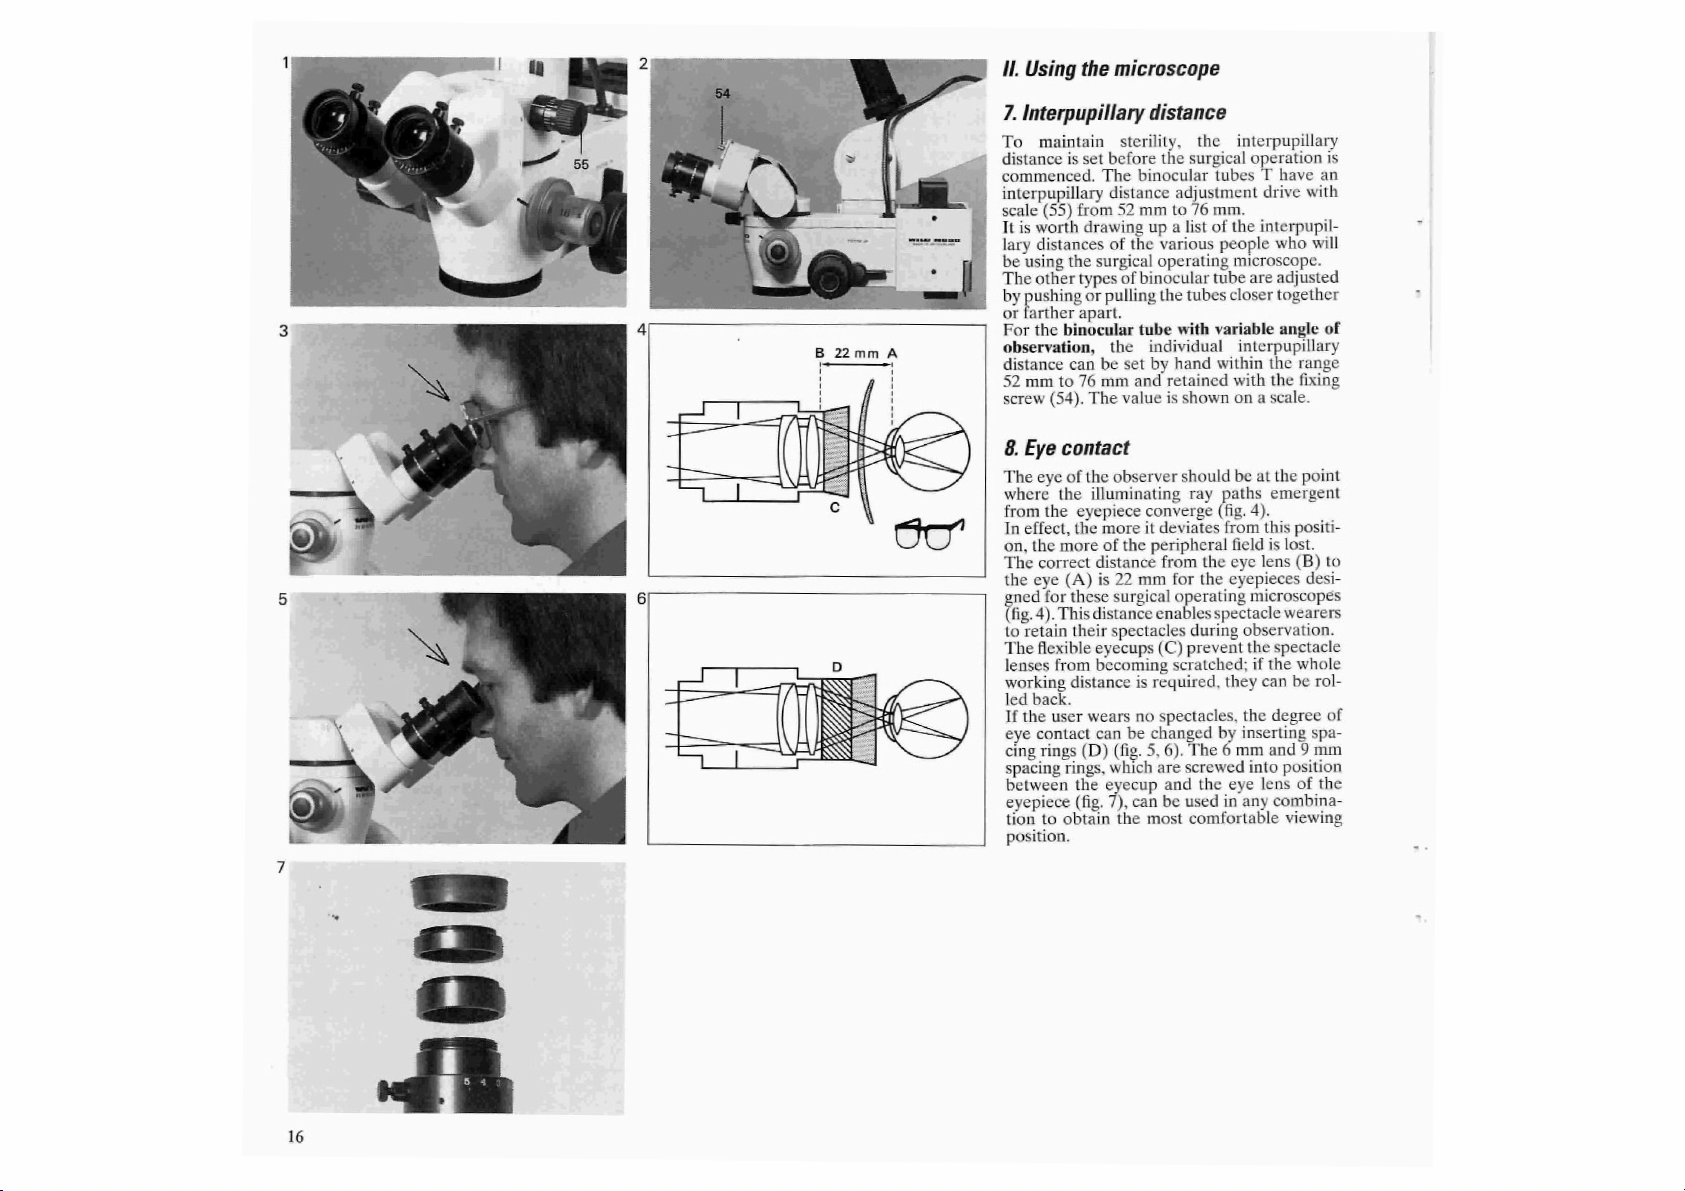
II.
Using
the
microscope
7.
Interpupillary
To
maintain
distance
commenced.
interpupillary
scale (55)
It
lary
be
The
by
or
For
observation,
distance
52
screw
8.
The
where
from
In
on,
The
the
gned
(fig.
to
The
lenses
working
led
If
eye
cing
spacing
between
eyepiece
tion
position.
is
is
worth
distances
using
other
pony
farther
the
binocular
mm
to
(54),
Eye
contact
eye
of
the
the
effect,
the
more
correct
eye
(A)
for
4).
This
retain
flexible
from
back.
the
user
contact
rings
rings,
to
obtain
set
from
drawing
the
types
or
apart.
can
76
The
the
eyepiece
the
these
their
distance
wears
(D)
the
(fig.
distance
sterility,
before
the
The
binocular
distance
of
surgical
pulling
the
be
mm
observer
illuminating
more
of
distance
is
surgical
distance
spectacles
eyecups
becoming
can
(fig.
which
eyecup
7),
52
mm
up a list
the
of
binocular
tube
individual
set
by
and
value
converge
it
the
peripheral
22
mm
is
required,
no
be
changed
5,
can
the
most
adjustment
to
various
operating
the
with
hand
retained
is
deviates
from
for
operating
enables
(C)
scratched;
spectacles,
6).
are
and
be
the
interpupillary
surgical
tubes
shown
should
ray
during
prevent
The 6 mm
screwed
used
comfortable
operation
tubes T have
76
mm.
of
the
people
microscope.
tube
are
closer
variable
interpupillary
within
with
on a scale.
be
paths
(fig.
4).
from
field
the
eye
the
eyepieces
microscopes
spectacle
observation.
the
if
they
the
by
inserting
into
the
eye
in
any
is
an
drive
with
interpupil-
who
will
adjusted
together
angle
of
the
range
the
fixing
at
the
point
emergent
this
positi-
is
lost.
lens
(B)
to
desi-
wearers
spectacle
the
whole
can
be
rol-
degree
of
spa-
and 9 mm
position
lens
of
the
combina-
viewing
16
Page 17
Page 18
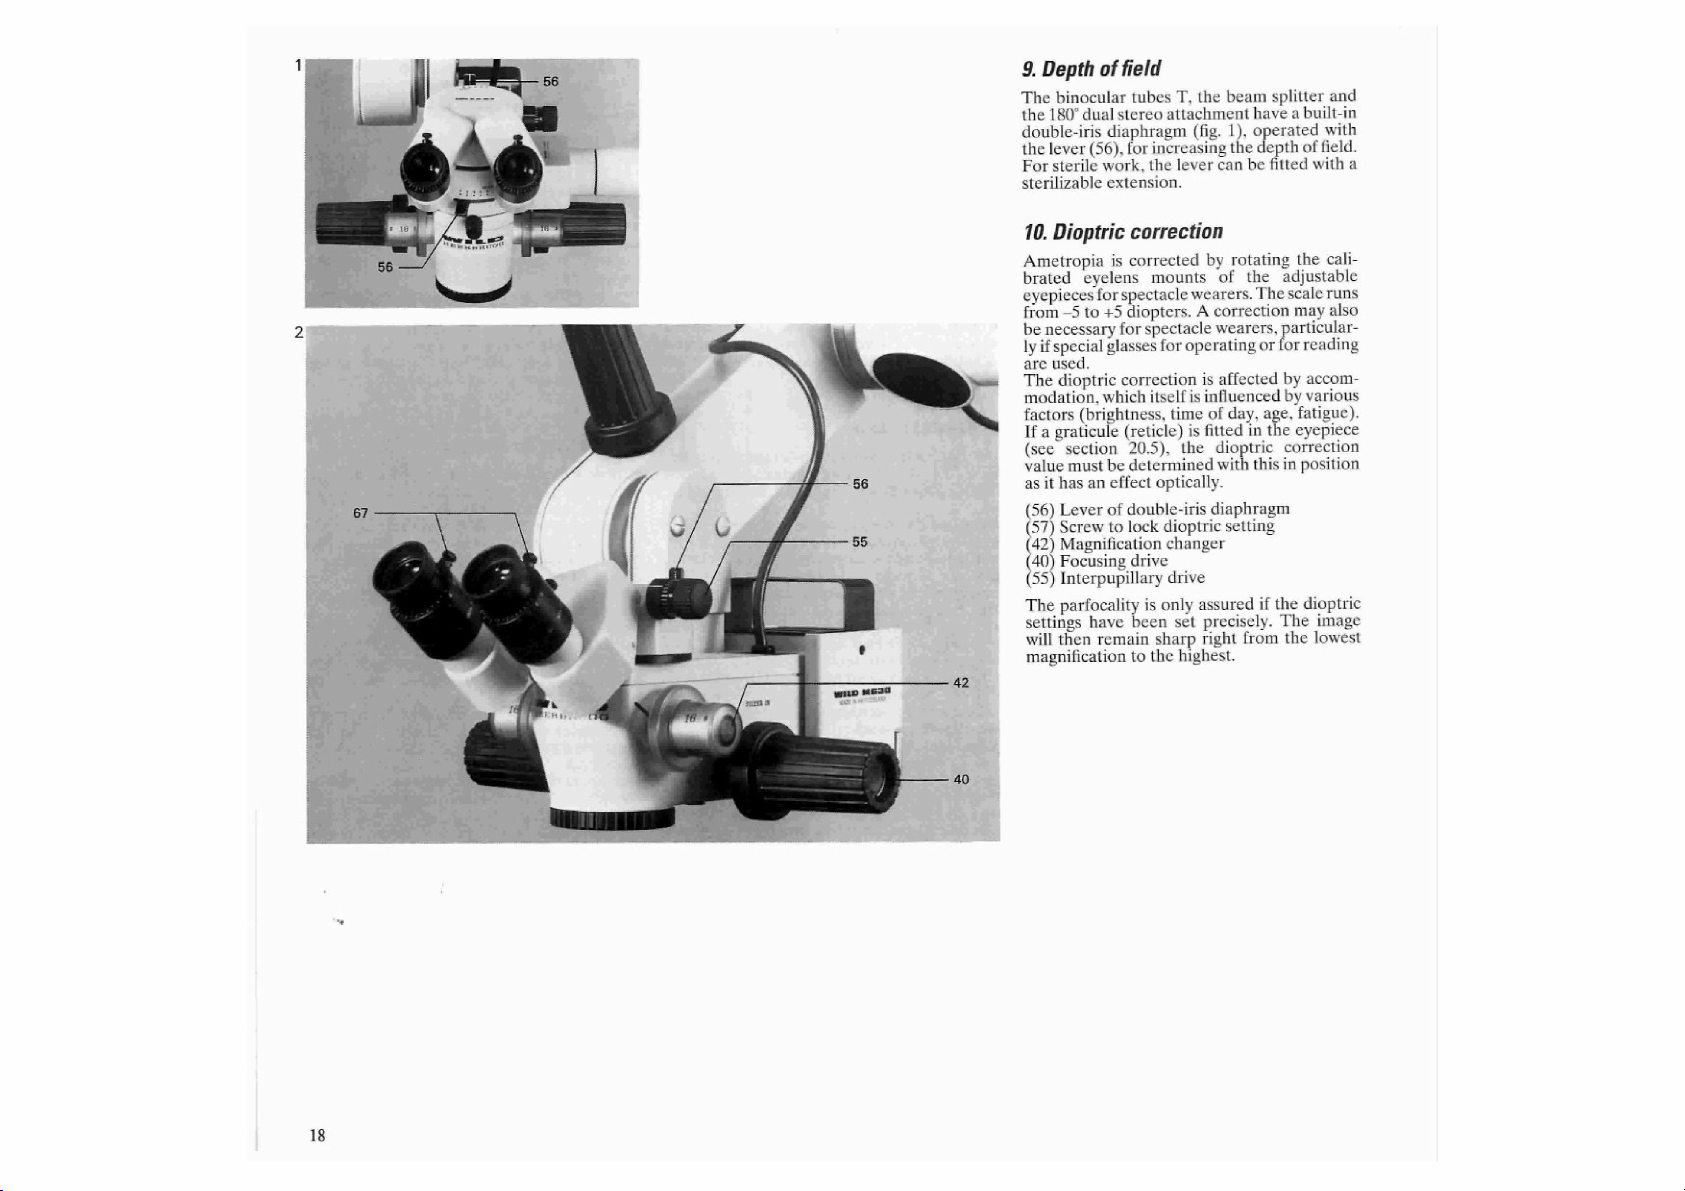
9.
Depth
of
field
The
binocular
the
180°
double-iris
the
lever
For
sterile
sterilizable
10.
Dioptric
Ametropia
brated
eyepieces
from
—5
be
necessary
ly
if
special
are
used.
The
dioptric
modation,
factors
If a graticule
(see
section
value
must
as
it
has
(56)
Lever
57)
Screw
42)
Magnification
40)
Focusing
(55)
Interpupillary
The
parfocality
settings
will
then
magnification
tubes
T,
dual
stereo
diaphragm
(56),
for
work,
extension.
the
attachment
(fig.
increasing
the
lever
correction
is
corrected
eyelens
to
(brightness,
an
have
mounts
for
spectacle
+5
diopters. A correction
for
glasses
correction
which
(reticle)
20.5),
be
determined
effect
of
double-iris
to
lock
remain
spectacle
for
operating
itself
time
the
optically.
dioptric
changer
drive
drive
is
only
been
set
sharp
to
the
highest.
wearers.
is
is
influenced
is
fitted
assured
precisely.
right
beam
have a built-in
1),
operated
the
depth
can
be
by
rotating
of
the
The
wearers,
or
affected
of
day,
age,
in
dioptric
with
this
diaphragm
setting
if
from
splitter
and
with
of
field.
fitted
with
the
cali-
adjustable
scale
runs
may
also
particular-
for
reading
by
accom-
by
various
fatigue).
the
eyepiece
correction
in
position
the
dioptric
The
image
the
lowest
a
18
Page 19
9.
Profondeur
Pour
augmenter
double
diaphragme
bes
binoculaires
au
dispositif
(fig.
Ce
diaphragme
peut
10.
Correction
Les
dioptries
tille
d'œil
à
—5
s'avérer
des
lunettes,
ciales
lecture.
La
correction
accommodation
facteurs
Si
l'oculaire
20.5),
minées
même
(56)
(67)
Pince à vis
de
(42)
Changeur
(40)
Mouvement
point
(55)
Commande
pupillaire
Seule
les
deux
ficace.
ble
grossissement
d'observation
1).
être
prolongé
de
dioptries.
nécessaire
surtout
telles
que
(luminosité,
est
les
valeurs
sans
un
effet
Levier
du
la
lentille
une
dioptrie
yeux
La
précision
de
champ
la
profondeur
iris
T,
au
répartiteur
est
réglé
d'une
dioptrique
seront
réglées à l’aide
l'oculaire;
dioptrique
pourvu
enlever
optique.
double
pour
de
garantit
les
Une
correction
lorsque
s’il
les
lunettes
qui
dépend
heure,
d'un
de
réglage
le
diaphragme
fixer
d'œil
(dioptries)
grossissement
de
commande
de
réglage
parfaitement
une
reste
au
plus
de
incorporé
180°
pour
le
levier
stérilisable.
valeurs
vont
champ,
optique
de
est
par
rallonge
peut
l'utilisateur
s'agit
de
lunettes
d'opération
est
influencée
de
différents
âge,
fatigue).
réticule
(cf.
seront
réticule,
constante,
car
la
important.
iris
monture
de
la
de
l'écartement
corrigée
parfocalisation
du plus
un
aux
tu-
ct
assistant
(56)
qui
la
len-
de
+5
même
porte
spé-
ou
de
par
chap.
déter-
il a lui-
réglable
mise
au
pour
ef-
fai-
9.
Scharfentiefe
Zur
Steigerung
die
Binokulartuben
und
in
die
pelirisblenden
mit
den
Für
ner
werden.
Die
linsen
von
eine
wenn
Lesebrillen
Die
modation
denen
geszeit,
Bei
(vel.
mit
selbst
(56)
(67)
(42)
(40)
(55)
Nur
Augen
Schárfe
hěchsten
betreffenden
sterile
sterilisierbaren
10.
Dioptriekorrektur
Dioptriekorrektur
der
+5
bis—5
Korrektur
spezielle
Dioptriekorrektur
Einfliissen
Alter,
Verwendung
Kap.
Strichplatte
optisch
Hebel
Schraube
stellung
Vergrôsserungswechsler
Fokussiertrieb
Trieb
standes
bei
exakt
wird
der
180°-Mitarbeitereinrichtung
cingebaut
Arbeiten
Okulare
verwendet
beeinflusst,
20.5)
der
zum
bleibt
Vergrósserung
kann
vorgenommen
Dioptrien.
notwendig
Brillen,
unterliegt
Ermiidung).
einer
miissen
ermittelt
wirksam
Doppelirisblende
zum
Fixieren
Verstellen
eingestellter
die
Parfokalität
von
Scharfentiefe
T,
in
den
Strahlenteiler
(Bild
Hebeln
Verlängerung
werden.
dic
der
1).
(56)
dieser
Hebel
wird
mit
den
Auch
mit Brille
sein,
wie
Operations-
wird
durch
ihrerseits
(Helligkeit,
Strichplatte
die
Korrekturwerte
werden,
ist.
der
Dioptrieein-
des
Dioptrie
wirksam.
niedrigsten
konstant.
wurden
Dop-
Sie
werden
bedient.
mit
versehen
Augen-
und
reicht
kann
besonders
oder
die
Akko-
verschie-
Ta-
im
Okular
da
diese
Augenab-
für
beide
Die
bis
9.
in
Para
sido
tubos
el
Estos
ei-
lancas
Estas
longaciones
10.
La
medio
po
anteojos
especialmente
les,
o
La
por
depende
hora
Si
capitulo
lores
a
(56)
(67)
(42)
(40)
(55)
Sólo
mas
zur
parfocalidad.
te
Profundidad
aumentar
incorporados
binoculares
dispositivo
de
son
manipulados
(56)
correspondientes.
palancas
esterilizables.
Correccion
corrección
de
las
desde
como
de
lectura.
corrección
la
se
su
vez,
Palanca
Tornillo
Cambiador
Mando
Mando
ocular
dioptrías para
desde
lentes
+5
hasta
puede
por
acomodación
de
diversos
del
día,
edad,
emplea
un
20,5),
de
corrección
ejerce
del
para
de
para
cuando
se
La nitidez
el
aumento mínimo
de
campo
la
profundidad
diafragmas
T,
en
el
180°
divisor
para
por
pueden
de
si
ejemplo
de
es
una
enfoque
ser
de
las
las
dioptrias
oculares y abarca
—5
dioptrias.
ser
necesaria
se
utilizan
anteojos
las
dioptrías
del
ojo.
factores
cansancio).
retículo
necesario
con
el
retículo,
influencia
diafragma
fijar
el
ajuste
de
aumentos
el
ajuste
de
ajustan
exactamente
ambos
se
de
campo
iris
doble
de
el
rayos y en
asistente
medio
de
provistas
dioptrias
se
efectůa
Aun
una
corrección,
anteojos
de
operación
es
influenciada
la
que, a su
(luminosidad,
en
el
ocular
establecer
ya
que
óptica.
iris
doble
de
las
dioptrías
la
distancia
ojos
se
garantiza
mantiene
al
máximo.
constan-
han
en
los
(fig.
1).
las
pa-
de
pro-
por
un
cam-
usando
especia-
vez,
(véase
los
va-
éste,
inter-
las
mis-
la
19
Page 20
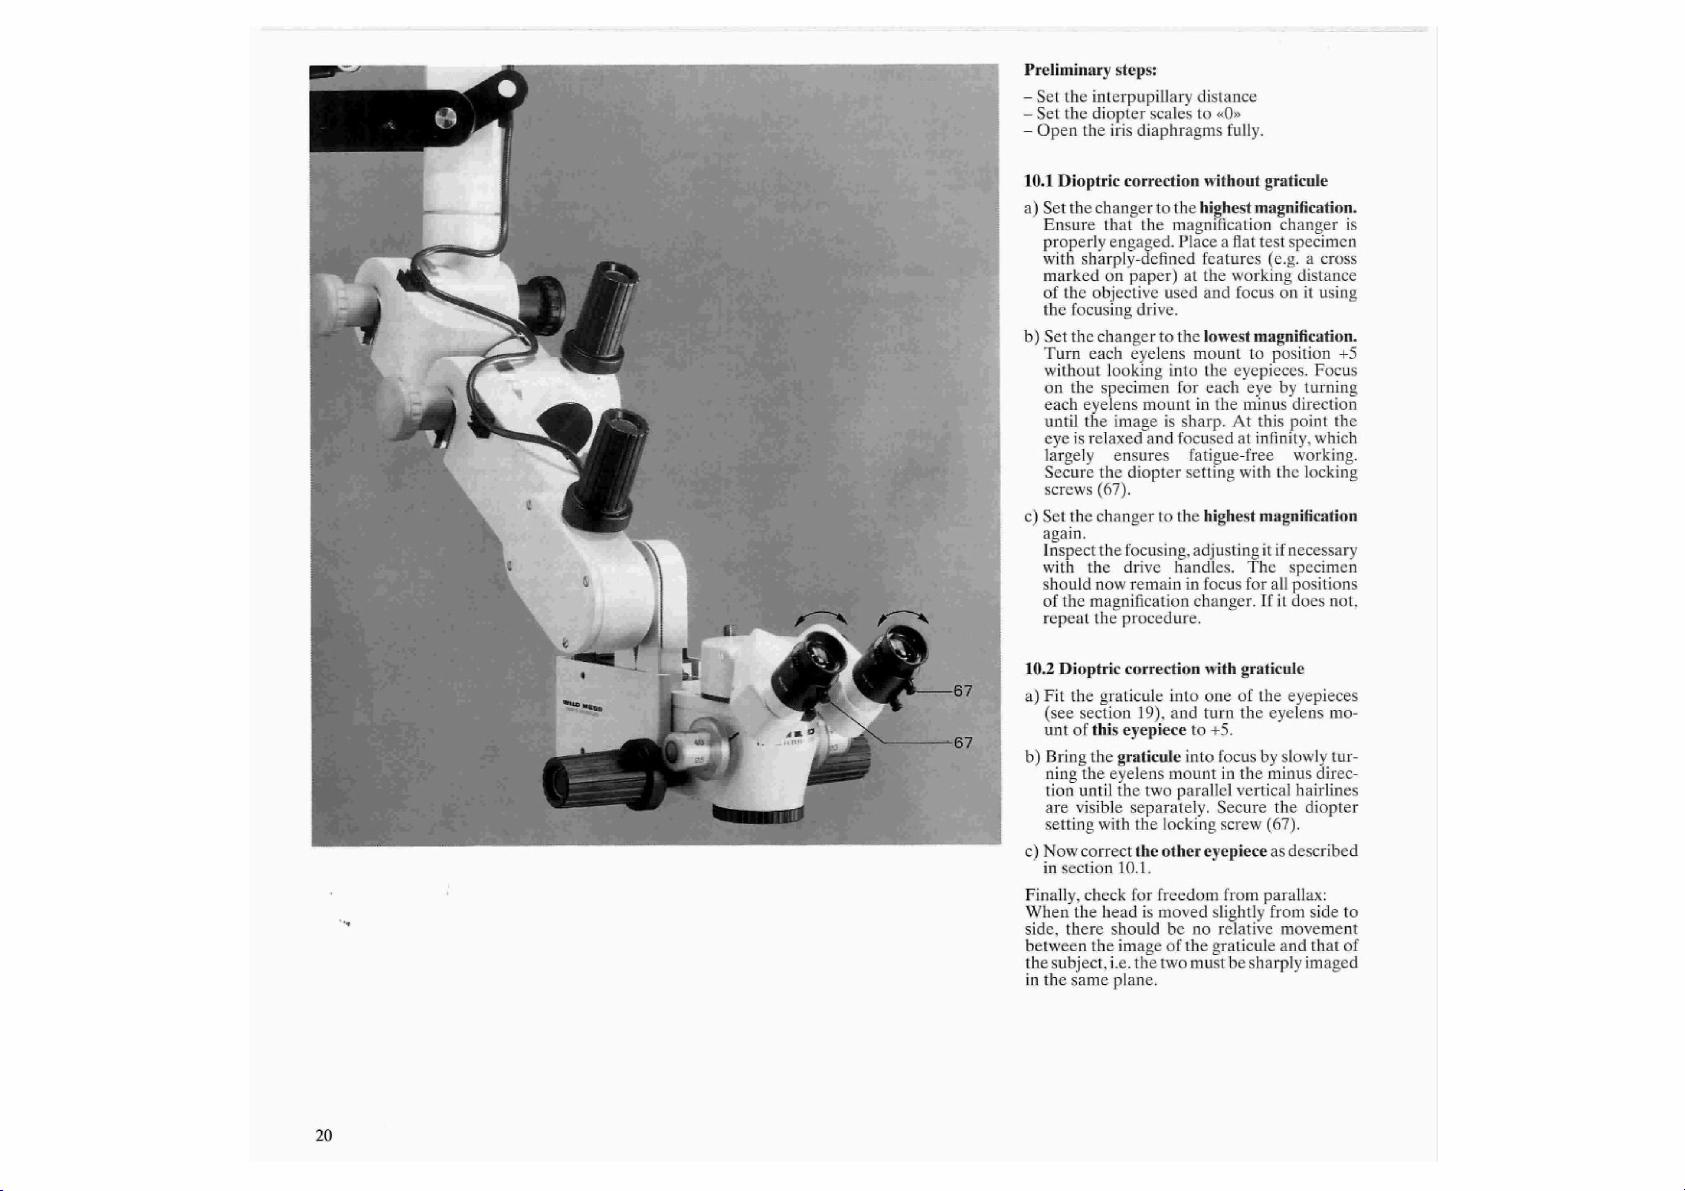
Preliminary
—
Set
the
—
—
10.1
a)
b)
c)
interpupillary
Set
the
diopter
Open
the
Dioptric
Set the
changer
Ensure
properly
with
sharply-defined
marked
of
the
objective
the
focusing
Set
the
changer
Turn
each
without
on
the
specimen
each
eyelens
until
the
eye
is
relaxed
largely
Secure
the
screws
(67).
Set
the
changer
again.
Inspect
the
with
the
should
now
of
the
magnification
repeat
the
that
steps:
scales
iris
diaphragms
correction
to
the
engaged.
on
paper)
drive,
to
eyelens
looking
mount
image
and
ensures
diopter
to
focusing,
drive
remain
procedure.
distance
to
«()»
fully.
without
the
highest
magnification
Place a flat
features
at
the
used and
into
is
working
focus
the
lowest
mount
to
the
eyepieces,
for
each
eye
in
the
sharp.
focused
the
handles.
minus
At
at
fatigue-free
setting
with
highest
adjusting
in
The
focus
for
changer,
graticule
magnification.
changer
test
(e.g. a cross
on
magnification.
position
by
this
infinity,
the
is
specimen
distance
it
using
+5
Focus
turning
direction
point
the
which
working.
locking
magnification
it
if
necessary
specimen
all
positions
If
it
does
not,
20
10.2
Dioptric
a)
Fit
the
(see
section
unt
of
b)
Bring
ning
the
tion
until
are visible
setting
c)
Now
correct
in
section
Finally,
check
When
the
side,
there
between
the
subject,
in
the
same
correction
graticule
19),
this
eyepiece
the
graticule
eyelens
the
two
separately.
with
the
the
10.1.
for
head
is
should
the
image
i.e.
the
plane.
with graticule
into
one
and
turn
to
into
mount
parallel
locking
other
eyepiece
freedom
moved
be
no
of
the
two
must
of
the
the
eyelens mo-
+5.
focus
by
in
the
minus
vertical
Secure
screw
(67).
as
from
parallax:
slightly
from
relative
graticule
be
sharply
eyepieces
slowly
direc-
hairlines
the
diopter
described
side
movement
and
that
imaged
tur-
to
of
Page 21

Préparatifs:
—
Régler
—
—
10.1
a)
b)
c)
10.2
a)
b)
c)
Puis
sentent
ment
jet
placer
dans
l’écartement
Régler
les
Diaphragme
Correction
Bouton
du
plus
fort
Une
tion.
de
tours
placé à la
lisé.
Bouton
plus
Tourner
der
point
œil,
d'œil
A
qui
avec
Bouton
plus
Contrôler
ment
ment
et
sans
soit
cas,
grossissement.
clenche
Mettre
commande
bien
du
faible
dans
de
en
tournant
en
direction
ce
point,
supprime
les
pinces à vis
du
fort
grossissement.
la
mise
de
commande.
l’objet
devoir
le
grossissement
répéter
Correction
Mettre
le
chap.
19).
Tourner
réticule
sur +5.
Mettre
au
observer
sur
—5
jusqu à ce
verticales
paraissent
pince à vis
Régler
l’oculaire
au
chap.
10.1.
contrôler
pas
la
téte
ne
doivent
l’un
par
le
même
dioptries
changeur
marqués
distance
changeur
grossissement.
les
les
l’objet
l'œil
changeur
la
doit
refaire
pupillaire
sur
iris
dioptrique
d'arrét
au
sur
lentilles
oculaires.
toute
netteté
au
la
procédure.
«O»
sur
«OPEN».
de
indique
point à l’aide
un
objet-test
(p.ex.
de
travail
de
d'œil
séparément
lentement
de
-5.
est
accommodé à l'infini,
fatigue.
(67).
de
et
point
au
Le
maintenant
de
mise
choisi.
dioptrique,
réticule
la
point
l’objet,
qui
nettes.
(67).
de
de
pas
dans
lentille
d'œil
sur
les
traits
en
tournant
que
partagent
Fixer
sans
réticule
que
le
réticule
parallaxe:
droit 4 gauche,
donner
rapport à l’autre,
plan.
l'impression
grossissement
la
bonne
du
mouvement
plat
croix
grossissement
sur
Faire
grossissement
parfaire
moyen
réglage
au
avec
un
de
les
le
champ
ce
et
en
le
aux
sur
de
l'objectif
+5
sans
une
pour
chaque
Fixer
ce
éventuelle-
du
est
apparaître
point,
quel
Si
ce
n’est
réticule
oculaire
l’oculaire
du
réticule
la
lentille
deux
parallèles
visuel
réglage
comme
l’objet
tournant
réticule
de
mais
être
papier),
mise
chaque
réglage
mouve-
terminé
avec
ne pré-
sur
le
posi-
con-
uti-
sur
le
regar-
au
lentille
ce
sur
le
net
que
pas
le
(voir
avec
sans
d'œil
ap-
la
décrit
légère-
et
l’ob-
se
dé-
nets
Vorbereitungen:
—
Augenabstand
—
Dioptriekorrektur
-
Irisblenden
10.1
Dioptriekorrektur
a)
Grösste
Der
eingerastet
Flaches
ren
stand
kussiertrieb
b)
Kleinste
Augenlinsen
Okulare
Auge
hen,
In
diesem
Unendlich
hende
Die
с)
Grósste
Schärfe
siertrieb
nun
sein,
Andernfalls
werden.
10.2
Dioptriekorrektur
a)
Strichplatte
Kap.
stellen.
b)
Strichplatte
Drehen
scharfstellen,
Paralellen
Einstellung
c)
Okular
10.1
Anschliessend
Bei
leichtem
Sirichplatte
verschieben,
Ebene
«OPEN».
Vergrösserung
Vergrósserungswechsler
sein.
Testpräparat
(z.B.
Kreuz
des
verwendeten
scharfstellen.
Vergrösserung
zu
schauen.
einzeln
bis
das
Objekt
Punkt
akkomodiert,
Ermüdungsfreiheit
Einstellung
Vergrósserung
kontrollieren,
nachfokussieren.
bei
jeder
ohne
fokussieren
muss
in
19).
Okular
ohne
der
Augenlinse
getrennt
der
ohne
beschrieben
Parallaxfreiheit
Bewegen
und
d.h.
scharf
eingestelli
einstellen
«0»
ohne
Strichplatte
cinstellen.
mit
Papier)
Objektivs
einstellen.
+5
drehen,
scharfen
im
ohne
auf
nach
Augenlinsen
langsam
dass
Strichplatte
Objekt
in
Richtung
scharf
das
Auge
Schrauben
einstellen.
eventuell
zu
der
Vorgang
mit
Strichplatte
Okular
mit
Strichplatte
Objekt
in
die
zwei
erkennbar
des
Kopfes
nicht
müssen
sein.
erscheint.
entspannt
so
dass
gewährleistet
(67)
Das
miissen.
einsetzen
durch
Richtung
senkrechten
(67)
fixieren.
wie
kontrollieren:
gegeneinander
in
der
ist
mit
Vergròsserungsstufe
ein
Schraube
korrigieren.
sie
muss
ganz
Kontu-
Arbeitsab-
mit
Fo-
in
die
fiir
jedes
-5
dre-
auf
weitge-
ist.
fixieren.
mit
Fokus-
Objekt
soll
scharf
wiederholt
(siche
auf
+5
langsames
—5
so
sind.
Die
unter
Kap.
diirfen
sich
gleichen
Preparativos:
—
Ajustar
la
—
Correceción
—
Dialragma
10.1
a)
Ajustar
El
fectamente
ensayo
(por
pel) a la
diente
el
nítido.
b)
Ajustar
Girar
sin
lentes
lentamente
el
En
dado
la
cio.
nillos
c)
Ajustar
Controlar
gir
Ahora
todas
dad
deberä
10.2
a)
Insertar
(véase
retículo
b)
Girar
ción
hasta
aparezcan
por
c)
Corregir
como
A
continuación
objeto
Al
mover
el
objeto
to
al
en
el
distancia
Corrección
el
cambiador
plano
ejemplo
al
objetivo
mando
el
las
lentes
mirar a través
oculares
objeto
aparezca
este
punto
en
el
certeza
de
Fijar
esta
(67).
el
el
enfoque
el
objeto
las
posiciones
de
corregir
repetir
Corrección
el
capítulo
hasta
la
lente
de
—-5
que
medio
el
se
ha
estén
exentos
ligeramente
no
deben
otro,
es
mismo
plano.
interocular
de
las
dioptrias
iris
en
«OPEN».
de
las
dioptrías
aumento
distancia
de
aumento
infinito,
aumento
la
retículo
enfocando
las
del
decir
máximo.
de
aumentos
encajado.
en
evitar
nitidez.
separadas.
ajuste
descrito
Colocar
con
contornos
una
cruz
marcada
de
empleado y enfocarlo
enfoque
el
posición
todo
de
la
ocular
dos
tornillo
controlar
hasta
mínimo.
oculares
de
los
por
separado
la
dirección
nítido.
ojo
está
de
manera
en
gran
por
máximo.
Eventualmente
con
el
mando
deberá
de
aumento
el
enfoque.
el
procedimiento.
las
dioptrías
en
uno
19).
Ajustar
posición
lentamente
el
líneas
Fijar
(67).
del
en
el
que
de
paralaje:
la
cabeza,
desplazarse
que
deben
en
«O»
sin
retículo
debe
estar
un
objeto
bien
definidos
trabajo
hasta
oculares.
aparecer
retículo
verticales
ocular
en un
correspon-
que
aparezca
la
posición
Girar
para
cada
de
-5
hasta
relajado y acomo-
que
se
parte
medio
De
con
de
el
+5.
esta
capítulo
el
el
estar
tiene
el
cansan-
de
los
corre-
de
enfoque.
nítido
sin
necesi-
no
ser
asi
retículo
los
oculares
ocular
con
en
la
direc-
sin
objeto
paralelas
posición
sin
retículo
10.1.
retículo y el
el
retículo
uno
respec-
enfocados
per-
de
pa-
con
+5
las
ojo
que
tor-
en
se
el
y
21
Page 22

11.
Brake
The
setting
drive
depends
fitted
to
drive
arrows
Turn
rection
attained.
12.
For
microscope,
brought
drive
ease
ration
accessories
The
final
tion
—
—
—
the
to
its
touch,
the
brake
until
Focusing
the
LEICA
into
handles
of
movement
in
accordance
diopter
focusing
10).
Set
the
focusing
that
the
the
line,
To
magnification
completely.
Manoeuvre
rating
by
recognizable
working
length
Use
ject.
edge
intersection
fig.
2).
obtain
field
means
distance
of
the
focusing
If
the
properly,
focus
for
of
focusing
of
the
brake
on
the
weight
optics
see
ring
the
carrier.
fig.
2).
(41)
required
(where
in
mid-position
M651
the
subject
focus
by
(fig.
(see
corrections
procedure
an
the
and
of
the
the
diopter
the
all
magnification
means
3).
The
is
adjusted
with
section
drive
of
the
cover
point
overall
view,
step,
ensuring
instrument
lower
swingarm
down
the
approximates
objective
drive
correction
subject
11).
must
is
to
of
it
selected.
will
drive
ring
of
the
of
the
Set
the
the
the
appropriate
ease
of
movement
surgical
of
the
operation
of
the
range
is
before
the
weight
be
set
carried
its
mid
plate
the
arrows
engage
that
across
towards
until
the
microscope.
to
focus
has
remain
steps.
focusing
accessories
focusing
two
black
di-
is
operating
is
focusing
60
mm.
The
the
ope-
of
the
before
(see
position
level
with
(dotted
the
lowest
it
engages
to
the
ope-
the
subject
subject
the
focal
on
the
been
sharply
the
sec-
so
is
The
sub-
set
in
out
is
to
22
Page 23

11.
Frein
de
la
commande
de
mise
au
point
Le
réglage
du
de
la
charge
Mettre
médiane
l'anneau
jusqu'à
point
au
les
microscopes
la
mise
du
bouton
(fig.
3).
du
mouvement
en
fonction
au
un
10).
le
mouvement
de
sa
course
en
tirets
le
grossissement
un
champ
engagée.
l'instrument
et
l’abaisser
jusqu'à
visuel.
choisi.
au
des
quel
que
la
La
netteté
réglée
mouvement
occasionnée
le
mouvement
(ligne
moleté
ce
se
laisse
point
au
point
du
L’amplitude
de
la
point
ne
réglage
minutieux
(flèches
fig.
2).
visuel
de
grossissement
sur
ce
que
Cette
point
sur
de
commande.
dioptries
que
sait
distance
des
de
l’objet
par
le
mouvement
pend
soires.
en
position
Tourner
appropriée
mise
au
reté
souhaitée.
12.
Mise
Pour
M651,
moyen
mande
dureté
ment
La
mise
uapres
fmi
chap.
—
Mettre
lieu
ene
Choisir
avoir
du
changeur
faitement
—
Basculer
toire
bile,
le
champ
approximativement à la
l'objectif
—
Mettre
mouvement
rection
être net,
si,
tant
difiéc.
rapprochées
ment
de.
de
mise
de
et
tiret
(41)
dans
que
le
manipuler
d'opération
sur
l’objet
mouvement
est
se
régle
surcharge
peut
de
commande
en
le
plus
plus
grand.
sur
le
l'objet
avec
celui-ci
apparaisse
distance
distance
l’objet
Lorsque
est
exacte,
le
grossissement
de
travail
parties
peut
au
point
les
acces-
au
point
fig.
2).
la
direction
avec
la
LEICA
se
fait
de
com-
60
mm.
(voir
chap.
effectuée
dioptries
au
pour
La
clenche
être
opéra-
le
bras
dans
focale
moyen
la
l'objet
choi-
pas
constam-
comman-
dé-
du-
mi-
par-
mo-
cor-
doit
mo-
par
mise
mouvement
de
individuelle-
être
des
coïncidence,
faible
doit
champ
correspond
au
n'est
éloignées
être
de
11.
Fokussiertrieb-Bremse
Die
Einstellung
hángig
von
kussiertrieb
lierte
Linie
Randelring
drehen,
wünschten
de
12.
Fokussieren
Bei
den
M651
wird
den
Fokussiertriebknépfen
(Bild
au
La
3).
Gängigkeit
Operation
duell
eingestellt
Die
Scharfstellung kann
Dioptrieeinstellung
werden
-
Fokussiertrieb
blech
auf
nie
Bild
Kleinste
li-
Ubersicht
gerastet
—
Instrument
ken
und
jekt
niederschwenken,
erkennbar
Dieser
Brennweite
—
Objekt
exakter
de
bei
jeder
scheinen,
du
gedndert
Partien
kussieren
eingestellt
ou
des
der
in
Bild
(41)
bis
sich
Leichtigkeit
Operationsmikroskopen
die
Der
des
entsprechend
(siche
der
2).
Vergrosserungsstufe
wahlen.
sein.
iiber
mit
wird.
Abstand
mit
Fokussiertrieb
Fokussiertriebes
Belastung
Mittelstellung
2).
in
der
Objektstelle
Hub
Fokussiertriebes
(siche
Kap.
so
Pfeilmitte
dem
des
gewáhlten
durch
die
betreffende
Fokussiertrieb
betätigen
beträgt
der
Kap.
erst
einwandfrei
10).
drehen,
liegt
Die
Stufe
das
Operationsfeld
Schwenkarm
bis
entspricht
Dioptrickorrektur
Vergrésserungsstufe
sofern
der
wird.
des
Objektes
in
entsprechender
werden.
Arbeitsabstand
Néher
und
kónnen
ist
Zubchór.
bringen
durch
scharf
Belastung
11).
nach
dass
es
im
Objektivs.
schartstellen.
muss
weiter
Richtung
(strich-
Richtung
mit
der
lásst.
LEICA
Drehen
eingestellt
60
mm.
wird
vor
indivi-
korrekter
durchgeführt
das
Abdeck-
(strichlierte
zur
besseren
muss
ganz
schwen-
auf das
Gesichtsfeld
ungefihr
das
Objekt
scharf
nicht
liegende
durch
Nachfo-
scharf
11.
ab-
El
Fo-
carga
mando
en
Girar
ge-
correspondiente
que
seada.
12.
an
En
M651
Die
mando
der
alcanza
individualmente
mando
(véase
Un
efectuado
(véase
Li-
—
ein-
Ob-
-
der
Bei
er-
—
Freno
ajuste
del
ejercida
en
la
fig.
2).
el
anillo
pueda
Enfoque
los
microscopios
el
objeto
de
60
mm.
de
capítulo
enfoque
capítulo
Girar
el
mando
la
chapa
la
cionar
obtener
de
jada.
Girar
encima
por
hasta
tancia
distancia
Enfocar
hasta
las
te,
posiciones
se
partes
pueden
medio
pondiente.
de
flecha
la
una
aumento
el
instrumento
del
medio
que
corresponde
el
que
dioptrías
el
objeto
modifique
más
del
del
mando
mando
de
por
la
ser
enfoque
el
(línea
posición
focal
aparezca
ser
los
posición
moleteado
hasta
manipulado
se
enfoca
enfoque
Antes
de
la
marcha
de
11).
impecable
ajuste
correcto
10).
de
enfoque
cubrimiento
de
trazos
de
visión
de
debe
estar
campo
de
del
brazo
éste
sea
del
objetivo
objeto
con
nítido.
ha
sido
debe
de
cercanas o más
reenfoque
efectuada
aparecer
aumento,
la
distancia
enfocadas
de
enfoque
enfoque
accesorios.
central
que
de
(fig
sólo
aumento
hasta
la
móvil
reconocible.
depende
(línea
(41)
en
el
mando
con
la
operación
girando
3).
La
la
operación
suave o dura
acuerdo
es
posible
de
de
tal
apunte
en
la
fig.
conjunto.
perfectamente
que
operación y bajarlo
hacia
Ajustar
de
trazos
la
dirección
de
suavidad
LEICA
el
botón
elevación
se
ajusta
con
la
si
las
dioptrias
manera
al
centro
2).
Selec-
mínima
La
posición
enca-
se
encuentre
el
objeto
de
enfo-
carga
se
para
Esta
la
el
de-
del
del
ha
que
de
dis-
aproximadamente a la
escogido.
el
mando
de
Si
nítido
siempre y cuando
lejanas
nítidamente
en
la
dirección
enfoque
la
corrección
correctamen-
en
todas
de
trabajo.
del
de
las
no
Las
objeto
por
corres-
bh
다고
Page 24

13.
Illumination
The
illumination
on
the
column
the
ceiling
the
transformer
The
(43)
mm
or
bing
13.1
A
lamp
bulbs
(85)
(86)
Switch
Without
from
wards,
Do
13.2
The
cope
bulbs.
If a bulb
ve
(87)
cond
lamp-change
Before
place
change
mount.
swinging-arm
surgical
which
diameter
UV-barrier)
not
the
is
operating
accepts
filter
is
built
Fitting
the
housing
is
built
into
Housing
Guide
rail
off
the
touching
their
packing
along
the
touch
Quick-change
LEICA
beneath
M651
has a quick-change
should
bar
of
bulb
takes
starting
the
defective
indicator.
is
regulated
of
the
For
stand, a 12 V regulating
used.
two
filters
(neutral,
can
be
in.
bulb
for
centred
the
cover
of
bulb
lamp.
the
and
guide
the
quartz
lamp
surgical
fail
during
the
quick-change
the
lamp
the
indicator
the
next
bulb
by a control
wall
or
floor
the
universal
microscope
filter
slides
daylight,
inserted. A heat-absor-
12V/50W
microscope.
mount
Lift
the
remove
them,
rails
(fig.
envelope.
mount
operating
lamp
the
housing
to
(88)
sticks
surgical
and
push
housing
3}
mount
operation,
lamp
(fig.
the
operation,
bulbs,
slide
place
stand
or of
stand
has a rack
in
which
green,
halogen
cover.
the
latter
pointing
micros-
for
mount
3);
the
first
and
out.
in
the
lamp-
unit
and
32
up-
two
mo-
se-
the
re-
24
Page 25

13.
Eclairage
L'éclairage
sol
est
réglé
trouvant
tifs
moyen
Le
boîtier
peuvent
miére
mètre
intégré.
13.1
Un
aux
placées,
(85)
(86)
Déconnecter
du
de
poule!
Introduire
dans
13.2
Les
possèdent
indicateur.
Si
dant
amenée
rapide
boîtier
dicateur
sur
universel
du
transformateur
microscope
(43)
être
du jour,
de
32
Mise
en
boîtier
de
halogènes
est
Couvercle
Rail
de
poule
boîtier.
les
Retirer
les
rails
ampoule.
Changeur
microscopes
un
une
des
ampoules
l’opération,
dans
d’ampoule
de
lampe
rétractile
L'ampoule
avant
la
rétractile
poussant
prochaine
doit
du
des
statifs
mural,
au
moyen
la
colonne
et à bras
d'opération
pour 2 porte-filtres
introduits
de
protection
mm.
Un
filtre
place
des
lampe,
dans
centrées
Intégré
au
du
boîtier
guidage
l'éclairage.
l'emballage
Ne
pas
toucher
ampoules,
de
guidage
rapide
d’opération
changeur
s'avére
l'ampoule
l'axe
optique à l’aide
(87)
(fig.
3).
apparaît
défectueuse
opération
être
remis
bout
des
de
de
l'alimentation
du
statif,
mobile
12V.
est
des
filtres
UV
anticalorifique y est
ampoules
lequel
de
12
corps
de
microscope.
de
la
monture
Relever
de
le
verre
dirigées
(fig.
2).
d’ampoule
LEICA
rapide
d’ampoule
défectueuse
de
rechange
se
trouvant
En
même
(88).
doit
être
et
en
doigts.
position
plafond
dans
ayant
les
V/50 W sont
celui
des
est
réglé
équipé
lesquels
gris,
vert,
un
ampoules
de
le
couvercle
protection
de
vers
le
M651
du
changeur
sous
temps,
et
de
se
sta-
au
d’un
lu-
dia-
l'am-
l’am-
haut,
avec
pen-
sera
le
l'in-
remplacée
l'indicateur
en
le
13.
Beleuchtung
Bei
den
wird
an
Schwenkarmstativ
mator
Am
Filtereinschub
Grauglas-,
filter
Ein
13.1
Im
Aufnahme
Glühlampen
(85)
(86)
Licht
pen.
fernen.
pen
ne
13.2
Die
verfiigen
mit
Fallt
pen
Schnellwechsler
gehäuse langsam
ben
Gleichzeitig
sichtbar.
Die
Operation
schieber
werden.
Wand-,
die
Beleuchtung
der
Stativsáule,
12V
reguliert.
Operationsmikroskop
mit
Warmeschutzfilter
Einsetzen
Optiktráger
Gehäusedeckel
Führungsschiene
ausschalten.
Schutzverpackung
nach
schieben
Lampenschnellwechsler
Operationsmikroskope
Anzeige.
wihrend
aus,
(Bild
defekte
(43)
Tageslicht-,
(4
32
mm
der
der
12V/50 W integriert.
Glaskolben
oben
gerichtet
(Bild
tiber
einen
der
wird
3).
wird
Glihlampe
ausgetauscht
von
Hand
Decken-
ist
2).
die
(87)
in
der
und
Bodenstativen
mit
einem
beim
an
einem
fiir
zwei
Griin-
eingesetzt
ist
Glühlampe
ein
Lampengeháuse
vorzentrierten 日 alogen-
der
Glühlampenfassung
Gehäusedeckel
der
nicht
berühren!
in
Lampenschnellwechsler
Arbeit
Ersatzlampe
unter
den
Strahlengang
Anzeigenschieber
sollte
und
wieder
Steuergerät
Universal-
Reguliertransfor-
befindet
Filterhalter,
eingebaut.
Glühlampe
die
einer
vor
hineingeschoben
sich
und
UV-Schutz-
werden
kónnen.
hochklap-
Glühlam-
Führungsschie-
LEICA
dem
der
der
Gliihlam-
mit
Lampen-
der
nachsten
Anzeigen-
M651
gescho-
und
ein
in
die
zur
ent-
dem
(88)
13.
Huminación
En
el
caso
suelo,
la
rato
el
móvil,
En
un
se
cristal
y
calorifugo.
13.1
Integrada
carcasa
centradas
E
(86)
Desconectar
Retirar
billa.
recha
iNo
nos!
13.2
Los
están
bombillas
En
rante
bombilla
dor
rayos
la
La
antes
con
su
iluminación
de
mando
caso
del
en
un
el
microscopio
chasis
(43)
pueden
gris,
filtro
ultravioleta.
Colocaciôn
para
de
Tapa
de
Corredera
el
Introducir
en
las
tocar
la
Cambiador
microscopios
provistos
con
caso
de
el
trabajo,
de
rapido
(fig.
3).
indicación
bombilla
de
la
la
indicación
posición
de
los
estativos
en
la
estativo
transformador
colocar
filtro
en
embalaje
correderas
ampolla
fundirse
columna
universal y en
de
para
dos
filtros
para
Está
de
la
el
portaóptica
las
bombillas
12
V/SOW.
la
carcasa
de
guía
la
luz.
Abrir
de
las
bombillas
de
rápido
de
operación
de
um
indicación.
una
se
corre
repuesto
(87)
hasta
Al
mismo
del
cambio
defectuosa
próxima
original.
operación y la
debe
de
es
operación
luz
bombilla
pared,
regulada
del
regulable
portafiltros
de
(2
32
natural,
incorporado
se
encuentra
de
halógeno
del
portabombillas
la
tapa
protección
en
de
guia
bombilla
de
bombillas
(fig.
la
LEICA
cambiador
de
las
bombillas
delicadamente
por
medio
la
trayectoria
tiempo
se
(88).
debe
ser
ser
encajada a mano
techo
con
un
apa-
estativo;
el
se
mm:
filtro
de
de
posición
con
en
de
brazo
de
12
V.
encuentra
en
el
que
filtro
de
verde
un
filtro
una
pre-
la
carcasa.
la
bom-
de-
2).
las
ma-
M651
rápido
de
du-
del
hace
la
cambia-
de
los
visible
reemplazada
corredera
en
y
25
Page 26

13.3
Intensity
The
control
lumn.
(70)
Power
(71)
Regulating
—
Set
the
power
—
—
-
—
13.4
By
transformer
which
—
—
—
—
Agi
[Insert
the
Connect
Turn
on
pilot
lamp
Adjust
regulating
Intensity
turning
is
shown
79)
Regulating
80)
Voltmeter
Set
the
power
supply
Insert
the
Connect
Turn
the
avoid
overloading
12V
is
not
variation
unit
switch
knob
voltage
selector
(see
bulb
or
the
power
the
power
shines.
the
brightness
knob
variation
the
regulating
is
switched
on a meter,
knob
voltage
selector
(see
bulb
or
the
power
regulating
to
be
can
be
with
section
bulbs
(71).
section
bulbs
cable.
knob
the
passed
ae
switch
with
the
control
turned
about
pilot
lamp
to
the
voltage
28).
(section
13.1).
(orange).
(70).
The
continuously
with
the
transformer
knob
clockwise,
on
and
the
is
set
steplessly.
to
the
voltage
32),
(section
bulb,
(see
(79)
clockwise.
the
section
13.1).
click
unit
the
co-
of
the
green
with
the
the
voltage,
of
the
Ta
stop
32).
at
26
Page 27

13.3
Réglage
L'alimentation
colonne
(70)
(71)
—
—
—
—
—
13.4
L'éclairage
de
Un
(79)
(80)
—
—
—
-
du
statif
Interrupteur
tróle
Bouton
de
Régler
la
Mettre
Raccorder
tension
l’ampoule
le
Enelencher
s'allume
Régler
bouton
Régler
Mettre
Raccorder
Tourner
sens
de
Vampoule
et
en
de
Réglage
réglage,
voltmètre
Bouton
Voltmètre
la
"ampoule
le
des
aiguilles
butée
sur
continu
réglage
est
puis
de
tension
le
(cf.
sert
du
bouton
de
l’alimentation
peut
être
basculée
pour
en
faciliter
principal
réglage
câble
l'interrupteur
de
transformateur
obtenu
réglé
indique
avec
du
réseau
place
(voir
(chap.
(orange)
en
réseau
principal
contrôle.
la
luminosité à l’aide
(71).
en
tournant
progressivement.
la
tension.
réglage
du
réseau
en
place
réseau
de
réglage
montre.
32).
(voir
au
une
câble
d'une
12 V empêche
chap.
autour
l'emploi.
lampe
chap.
13.1).
au
(70)
le
(voir
chap.
chap.
résau.
(79)
La
position
surtension
de
la
de
con-
28).
réseau.
qui
du
bouton
32).
13.1).
dans
le
de
13.3
Regulierung
Das
Steuergerät
nung
um
die
Stativsäule
(70)
Hauptschalter
(71)
Regulierknopf
—
Netzspannung
—
Glühlampe
—
Netzkabel
—
Hauptschalter
zur
Kontrolle
—
Helligkeit
regulieren.
13.4
Regulierung
Beim
leuchtung
eingeschaltet
Ein
Voltmeter
(80)
Regulierknopf
(80)
Voltmeter
—
Netzspannung
—
Gliihlampe
—
Netzkabel
—
Regulierknopf
hen.
eine
321
einsetzen
(orange)
mit
Reguliertransformator
durch
und
einsetzen
ans
Eine
Raststellung
Uberlastung
am
Steuergerát
kann
zur
beguemen
geschwenkt
mit
Kontrollampe
einstellen
(70)
auf.
(siche
(Kap.
ans
Netz
einschalten.
Regulierknopf
am
Transformator
Drehen
des
stufenlos
zeigt
einstellen
Netz
(79)
der
reguliert.
die
Spannung
(siehe
(Kap.
anschliessen.
im
Uhrzeigersinn
bei
Gliihlampe
Bedie-
werden.
Kap.
13.1).
Regulierknopfes
13.1).
12 V verhindert
28).
anschliessen.
Er
leuchtet
(71)
stufenlos
wird
die
Be-
an.
Kap.
32).
dre-
(vgl.
Kap.
13.3
Ajuste
El
aparato
no a la
modidad
(70)
(71)
—
Ajustar
(véase
—
Insertar
—
Conectar
Jado) a la
—
Conectar
se
—
Ajustar
botén
13.4
En
conecta y se
nación
Un
(79)
(80)
—
Ajustar
(véase
—
Insertar
-
Conectar
—
Girar
tido de
retención
de
columna
de
Interruptor
trol
Botôn
la
capítulo
la
ilumina a efectos
la
(71)
Ajuste
el
caso
del
girando
voltímetro
Botón
Voltimetro
la
capitulo
la
el
botón
las
12 V impide
(véase
capitulo
en
el
aparato
mando
del
operacién.
principal
de
regulaciôn
tensión
28).
bombilla
el
cable
red.
el
interruptor
luminosidad
en
el
transformador
transformador
regula
el
botón
indica
de
regulación
tensiön
32).
bombilla
el
cable
de
agujas
correspondiente a la
la
32),
de
mando
puede
ser
estativo
de
de
de
progresivamente
la
de
de
regulación
del
sobrecarga
para
con
lampara
alimentación
(véase
capítulo
alimentación
principal
control.
en
continuo
de
de
regulación.
tensión.
alimentaciön
(véase
capítulo
alimentación a la
reloj.
(79)
Una
de
girado
en
mayor
de
con-
13.1).
(anaran-
(70).
Este
con
regulación
la
ilumi-
13.1).
red.
en
el
sen-
posición
tensión
la
bombilla
tor-
co-
el
se
de
de
27
Page 28

14.
Sterile
All
of
need
lizable
(59)
Protective
gas-sterilizable
(51)
Clip-on
steam-sterilizable
(52)
Transparent
changer,
(57)
Diaphragm
steam-sterilizable
The
clip-on
the
metal
the
axial
lizable.
The
changer
It
is
also
can
be
The
drive
pillary
tubes
transparent
Because
protective
sterilizable;
sterilized. A metal
the
objective
then
A
sterilizable
for
the
Sterilizable
with
under
eyepieces
Disposable
covers
the
controls
to
touch
during
covers.
glass
handles
steam-sterilizable
lever
handles
handle
button
(fig. 2).
transparent
knob
is
merely
steam-sterilizable.
read
through
knob
also
cover,
of
its
glass
covers
(fig. 5).
covers
to
we
mount
angle
(55)
on
be
high-quality
for
recommend
into
extension
conditions.
distance
is
snapped
diaphragm
variable
sterile
which
the
for
for
knob
cover
extension,
engage
axes.
To
cover
the
for
the
«T» version
provided
the
objective
ring
and
position
lever.
permit
of
observation
are
also
the
surgeon
operation
objective,
all
remove
They
for
pressed
cover.
adjusting
optical
(58)
the
(57)
the
They
have
drive
knobs,
for
magnification
when
pushed
them,
are
steam-steri-
thé
magnification
into
The
with a sterilizable
is
protective
(fig.
available.
position.
magnification
the
interpu-
binocular
coating,
is
not
that
it
be
threaded
3).
1s
also
available
binocular
to
be
fit
over
may
steri-
over
press
the
steam-
gas-
on
to
glass
tube
tilted
the
is
28
Page 29

14,
Elements
Les
dispositifs
chirurgien
équipés
(59)
Verre
sable
(51)
Poignée
Pautoclave
(52)
Bouton
sissement,
(57)
Rallonge
stérilisable à autoclave
Les
poignées
Vautoclave,
poignée
clenche.
bouton
(fig.
Le
bouton
sera
placé
qu'à
ce
que
bouton
est
de
grossissement
Le
bouton
laire
(55)
ment
muni
Le
verre
stérilisé à froid,
tement
anti-reflet
porte
pas
protection
fixe
sur
simple
pression
tif
du
microscope
Le levier du
d'une
rallonge
Il
existe
tant
de
manipuler
d'observation
d’asepsie
les
oculaires
De
plus,
jeter
après
stérilisables
de
durant
de
gaines
de
protection
au
gaz
de
positionnement,
transparent
stérilisable á autoclave
du
de
seront
jusqu'à
ce
Pour
retirer
2).
transparent,
sur
le
changeur
le
verrou à déclic
transparent
de
réglage
du
tube
d'un
bouton
de
protection
par
la
vapeur
de
l'objectif, à insertion
une
bague
de
diaphragme
stérilisable
aussi
des
variable
totale.
Elles
(fig.
il
est
possible
usage,
commande
l'opération
stérilisables.
levier
positionnement,
placées
que
restent
binoculaire T doit étre
un
de
haute
de
vissée
la
stéréoscopique
gaines
le
tube
5).
manipulés
peuvent
de
l'objectif,
stérilisable
du
changeur
du
diaphragme
le
verrou à déclic
les
poignées,
stérilisé à l’autoclave,
de
grossissement
pour
que
visibles.
de
l'écartement
rotatif
de
l’objet
gaz,
en
qualité
l’autoclave.
(58) à l'objectif,
monture
iris
(57).
stérilisables
binoculaire à angle
dans
doivent
d'obtenir
de
stérilisées
sur
les
presser
s’enclenche.
les
domaines
stérilisable,
doit
raison
du
qui
Le
verre
rapide,
contre
l'objec-
(fig.
3).
peut
être
permet-
des
conditions
être
glissées
des
housses
par
le
être
stérili-
à
gros-
iris,
à
porte-
s'en-
le
jus-
Ce
pupil-
égale-
être
trai-
ne
sup-
de
se
par
muni
sur
à
14.
Sterile
Die
Bedienungselemente,
wahrend
kónnen
schen
(51)
51)
(52)
(57)
Verlängerungshebel
sterilisierbar
Die
werden
ihr
Schnappverschluss
men
(Bild
Der
knopf
geschoben
ist
transparent,
fen
sichtbar
Der
Augenabstandsversteller
okulartuben T ist
sterbaren
Das
Schutzglas
hochwertigen
sierbar
Befestigung
ring
Schuizglas
den
Ring
Eine
den
Insblendenhebel
Die
chen
variablem
dingungen.
schoben
Ausserdem
tůcher
Abdeckungen
der
Operation
mit
sterilisterbaren
werden.
Objektivschutzglas,
Positioniergriffe,
Drehknopf
dampfsterilisierbar
dampisterilisierbaren
tiber
der
2).
transparente,
wird
(wir
(58)
sterilisierbare
sterilisierbaren
das
erháltlich.
fiir
die
Griffhalterung
Positioniergriffe
dampfsterilisierbare
über
den
bis
er
einrastet.
damit
bleiben.
ebenfalls
Drehknopf
fiir
das
Vergiitung
empfehlen
des
Schutzglases
am
Objektiv
wird
unten
gedriickt.
Schwenken
Einblickwinkel
Sie
werden
(Bild
5).
sind
passende
die
vom
manipuliert
Abdeckungen
gassterilisierbar
dampfsterilisierbar
Vergrésserungswechsler,
Irisblende,
einrastet.
Vergrüsserungswechsler
die
Vergrósserungsstu-
zu
versehen.
Objektiv
nicht
Gassterilisation).
festgeschraubt.
(nicht
bis
es
einrastet
Verlängerung
aulsteckbar.
Abdeckungen
des
Binokulartubus
unter
tiber
Chirurgen
werden,
ver-
dampf-
Positioniergriffe
geschoben,
Zum
Knopf
Diese
Abdeckung
(55)
an
mit
einem
ist
dampfsterili-
wird
verkantet)
(57)
sterilen
die
Okulare
Einweg-Abdeck-
Abneh-
driicken
Dreh-
den
Bin-
sterili-
wegen
ein
Halte-
gegen
(Bild
3).
ist
ermógli-
bis
der
Zur
Das
auf
mit
Be-
ge-
14.
Cubiertas
Los
elementos
nipula
durante
tos
de
cubiertas
(59)
Cristal
esterilizable
(51)
Empuňaduras
esterilizables
(52)
Botén
para
esterilizable
(57)
Prolongación
iris,
esterilizable
Las
empuñaduras
zables
con
tes,
sorte
aprieta
El
sobre
hasta
bierta
posiciones
El
botón
(55)
E
El
cristal
esterilizado
miento
soporta
tección
en
aprieta
ción
para
En
locar
Las
tubo
riable
largo
Además
tirar.
vapor
apretandolas
engrane.
el
botón
botón
esterilizable
el
cambiador
que
engrane.
transparente a fin
de
de
del
tubo
e
provisto
de
antirreflexión
el
vapor.
se
atornilla
el
objetivo.
desde
hasta
que
no
ladearlo).
la
palanca
una
prolongación
cubiertas
binocular
de
forma
de
los
puede
esterilizables
de
mando
la
operación
esterilizables.
de
protección
con
gas
de
emplazamiento,
con
vapor
el
cambiador
con
vapor
de
la
palanca
con
de
emplazamiento
se
insertan
hasta
Para
aumento.
ajuste
binocular T debe
protección
con
abajo
encaje
del
esterilizables
oculares
que
quitar
(fig.
2).
transparente
de
aumentos,
Este
de
la
de
botón
del
gas,
debido a que
de
Para
fijar
un
anillo
El
cristal de
contra
(se
debe
diafragma
esterilizable
con
ángulo
aséptica.
(fig.
disponerse
distancia
Estas
que
el
cirujano
pueden
del
objetivo,
de
aumentos,
del
vapor
sobre
la
sujeción
las
empuñaduras
apretándolo
botón
tiene
de
dejar
giratorio
objetivo
alta
el
cristal de
de
retención
protección
el
anillo
prestar
iris
se
permiten
de
observación
se
deslizan a lo
5).
de
fundas
ma-
ser
provis-
diafragma
esterili-
los
sopor-
por
re-
se
se
coloca
una
cu-
visibles
las
interocular
estar
igual-
esteriliza-
debe
ser
el
trata-
calidad
pro-
(58)
de
reten-
atención
puede
(57).
mover
de
usar
no
se
co-
el
va-
y
Page 30

Il.
Components
ve
=
(
им.
=
ES
RAR
SORTE
|
ppi
| | A complete
outfit
a
Stand
b
M651
optics
c
Binocular
d
Two
WEdTETS
e
Objective
f
Positioning
g
Two
sterilizable
h
Control
15.
Optics
The
magnification
er
of
microscope
steps
6x,
The
low
81
mm)
during
very
long
ter
is
used.
The
built-in
quick-change
bulbs, a built-in
interchangeable
The
optics
system
handles,
covers
The
LEICA
of
the
range
of
carrier
tube
wide-field
handles,
transparent
unit
or
carrier
the
LEICA
produces
10x,
16x,
height
ensures a comfortable
the
operation,
focal
length
12
lamp
carrier
with
and
for
the
magnification
M651
binocular
accessories.
consists
eyepieces
regulating
25x
of
V/50 W illuminator
heat-absorbing
filter
two
two
tubes
of:
for
spectacle
steam-sterilizable
knob
covers,
transformer
changer
the
in
M651
mount
also
sterilizable
transparent
optics
the
surgical
the
total
and
40x.
microscope
even
or
holders.
body
with
when
the
for
filter,
has a focusing
changer
carrier
and
objectives,
magnification
objectives
two
optics
body
beam
positioning
accepts
steam-
carri-
operating
(only
position
of
split-
includes
sterilizable
halogen
and
two
drive
knobs.
any
and
a
a
30
Page 31

Il.
Composants
Un
équipement
a
dun
statif
b
d’un
corps
c
d'un tube
d
de
deux
porteur
e
d’un
objectif
f
de
poignées
a
l’autoclave
g
de
deux
stérilisables á l'autoclave
h
d’une
réglable
15.
Corps
Le
changeur
croscope
10x,
16x,
La
faible
mm)
favorise
corps
et
Le
système
compose
prévu
pour
d'un
filtre
porte-filtres
De
plus,
poignées
l’autoclave,
ment
stérilisables
sement
font
L'utilisateur
le
corps
sorte
de
que
des
complet
de
microscope
binoculaire
oculaires
de
lunettes
de
positionnement
boutons
alimentation
de
LEICA
25x
hauteur
des
bras.
d'éclairage
d'un
anticalorifique
interchangeables.
deux
de
et
partie
de
microscope
tubes
accessoires.
de
microscope
de
grossissement
M651 a cing
et
40x,
du
corps
une
position
changeur
deux
ampoules
commandes
positionnement
deux
boutons
pour
du
peut
monter
binoculaires
grands-angulaires
ou
12V/50W
le
corps
se
compose:
M651
réglage
transparents
d’un
transformateur
du
corps
positions:
de
microscope
confortable
incorporé
rapide
aux
incorporé
de
mise
stérilisables
de
réglage
changeur
de
microscope.
sans
problèmes
LEICA
et
d'objectifs,
pour
stérilisables
de
mi-
6x,
(81
du
et
de
point
égale-
grossis-
toute
se
deux
aux
à
sur
d’ampoule,
halogěnes,
au
de
M651
ainsi
Il.
Komponenten
Eine
komplette
a
Stativ
b
Optiktrager
c
Binokulartubus
d
Zwei
Weitwinkel-Brillenträgerokularen
e
Objektiv
f
Positioniergriffen,
g
Zwei
transparenten
sterilisierbar
h
Steuergerat
15.
Optikträger
Der
Vergrósserungswechsler
gers
LEICA
10x,
16x,
Die
geringe
mm
begiinstigt
stánden
eine
bequeme
Das
eingebaute
besteht
aus
zwei
Halogen-Gliihlampen,
ten
Warmeschutzfilter
baren
Filterhaltern.
Ferner
gehóren
siertriebkněple
niergriffen
fe
fúr
den
Am
Opuktriger
Benutzer
jedes
Objektiv
montieren.
Ausriistung
M651
dampfsterilisierbar
Drehknöpfen,
bzw.
Reguliertransformator
M651
25x
und
Vergrósserungswechsler.
problemlos
verfiigt
und
40x.
Bauhóhe
bei
einem
und
der
selbst
bei
Einsatz
Kóper-
Beleuchtungssystem
zum
mit
zwei
seiner
eines
und
Lampenschnellwechsler
und
Optiktráger
sterilisierbaren
sterilisierbare
LEICA
jeden
Wahl
besteht
aus:
dampf-
des
uber
Optiktráger
grossen
Armhaltung.
Optiktrá-
die
Stufen
Arbeitsab-
Strahlenteilers
12V/50W
einem
cingebau-
zwei
auswechsel-
|
zwei
Fokus-
Positio-
Drehknôp-
M651
kann
Binokulartubus,
und
Zubehòr
von
Il.
Un
a
b
с
d
e
f
£
h
6x,
15.
81
El
LEICA
10x,
La
(81
fiir
cuerpo y los
trabajo
rayos.
El
12
do
geno,
portafiltros
der
Además
enfoque
miento
esterilizables
En
puede
tubo
ACCESOTIOS.
Componentes
equipo
completo
Estativo
Portaéptica
Тибо
Dos
Tes
de
Objetivo
Empuñaduras
zables
Dos botones
rilizables
Aparato
ble
Portaóptica
cambiador
16x,
baja
mm)
sistema
V/50W
de
el
binocular,
M651
binocular
oculares
lámparas
un
portaóptica
montar
granangulares
antcojos
de
con
con
de
M651
25x y 40x.
altura
favorece
grandes y empleando
se
posicionamiento
vapor
giratorios
vapor
mando o transformador
de
aumentos
dispone
de
construcción
una
brazos,
incluso
de
iluminación
compone
para
filtro
calorífugo
intercambiables.
el
portaóptica
con
empuñaduras
esterilizables y dos
para
el
cambiador
LEICA
sin
ningtin
el
objetivo
consta
de:
para
portado-
transparentes y este-
del
portaóptica
de
los
posiciones
del
cómoda
de un
dos
tiene
portaóptica
posición
con
distancias
el
divisor
incorporado
cambiador
bombillas
incorporado y dos
botones
M651,
problema
dos
de
de
que
mandos
de
posiciona-
giratorios
aumentos.
el
cualquier
prefiera
esterili-
regula-
del
6x,
del
de
de
de
rápi-
haló-
de
usuario
y
Page 32

103
-Η1
-0s-f[[eoruouos1a
-(0
"CT
-go
-pe
"wSerydeip
-pe
um
pue
WV
(|
oq
"Su)
“(z
Sognj
39)
sqnl
4ejm30ug.
sagn)
elnoourq
JEJNI0UIg
Pour
ISIEIS
MOT
οἱ
"adBIIBAB
JOJ
aourjsip
AALIP
1TOH1LW
918
Areqpidndisjut
UJIM
pue
wserydeip
sui-ajqnop
'parddns
*a9uejsip
"HOB3
ag
Are
jo
os¡e
penuew
UoIsISA
pidnd1a]u1
ues
pagrrduns
quaugsní
4114
3usní
pue
Jo
Aq
01000
paseaisap
341
59140043
10
pasea1ou1
00004
э4
gm
01
UONPBAISS
Cy]
oq],
Jo
sapiaoId
JO
sadAq
ajSue
je
a[qeuea
JJ
yum
uonensguoo
ue
suonisod
samsua
Yi
20)
Âpog
(£
JUSUINASUL
1ejn30mg
‘91])
2a1J-an81e]
uograI9s
2
pun
工
-adsarrl
5198191
-T1
10133.5P
2
UOTIBUIQLUOS
UE9
12/N30U1Q
UOTJEAI9SQO
SULMILA
απ
134113
ΑΡΑ
24}
ÂUE
0449
Ul
‘поптрре
YILM
JO
2[AUE
PUB
ÁJGUIDSSE
OÙ
L
"SOLIOSSIDIE
JUDLUNIIS
JO
ΙΤ
06
JO
at)
01
ISQYS
Ag
UT
sutu
[2911134
рацвл
10]
198
Ferr
Ajssopdajs
3g
34]
UB
мол
ou
aq
|
-afa
‘TOLLO
an
somjdo
ysng
ag]
:9QM)
uo
ποῃσιήσαι
ο0π1
94]
JO
340
IE[NIOUIQ
34
gr
ㅁ
01.10[
WTOOHIG
ㅁ
20414
pautpoui
241
€
32
SUYA
MOT
비
그
-
-163
53000
(다
341
)
Matos
ol
aqnl
Surdwes
IeInoourq
“gede
ay]
sagnı
3
Suisn
四
alInaag
3991d
J3U
一
Jayyds
*
PuE
au}
4
ㅁ
00225
3qn]
Ui
Sy
weag
IEInooUuIq
335
0516
。22061510
ay]
193depe
10
AU}
LUE
^16[[40
US9MJ9Q
30019
ㅁ
01310
Sorldo
히
IOUUBU
4
버
au1
341
터
01
135 01,
134113
aures
341.
-101
113011151
aq
0]
2qm]
ay]
Iejnoomg
DOM
.g¢
01
‘tonisod
am
dn
sajgeua
Ад
A[pe1age]
poi]
a]
(c
È
ul
Su)
pau
si
Page 33

16.
Tubes
binoculaires
Des
tubes
(fig.
1)
et
ge
phragme
différentes
noculaires
demande,
Un
l'angle
Le
riable
fortable,
pement
droits
de
Vécartement
iris
positions
peuvent
sans
tube
intermédiaire
d'observation
tube
binoculaire à angle
(fig.
3)
sans
et
d'opération.
varié
en
continu
binoculaire
teurs
différentes.
soit
l'inclinaison.
Montage:
—
Placer
le
tube
microscope
—
Régler
oculaire,
moyen
Vécartement
puis
de
microscope.
Réglage
pitre
Insérer
le
ou
de
7.
la
tube
binoculaire
le
répartiteur
pièce
microscope
tourner
latéralement
angle
maximal
binoculaires
(fig.
2)
avec
pupillaire
sont
disponibles
de
également
ces
particularités.
de + 15°.
assure
une
fatigue,
la
L'angle
peut
position
quels
disposition
d'observation
de
0° a 180°.
étre
adapté
L'image
binoculaire
d'opération.
fixer
la
le
pince à vis
l’écartement
tournante
et
le
optique
est
incliné, cette
le
de
tube
30°.
inclinés,
surbaissés
bouton
et
double
pour
Ces
étre
de
réaliser
livrés,
travail.
permet
d'observation
du
corps
que
soient
du
microscope
peut
De
plus,
pour deux
est
droite
quelle
sur
le
des
tubes
tube
binoculaire
(45)
du
pupillaire,
intermédiaire
corps
de
microscope
(fig.
5).
Lorsque
pièce
permet
binoculaire
de
régla-
dia-
les
tubes
bi-
sur
modifier
va-
con-
Végui-
être
le
tube
hau-
que
corps
du
porte-
au
corps
de
voir
cha-
entre
de
d'un
16.
Binokulartuben
Fiir
die
verschiedenen
hen
binokulare
Einblickh6he
radtuben
(Bild
Augenabstandversteller
de
ausgeriistet,
ohne
diese
Mit
blickwinkel
variiert
Der
winkel
Besonderheiten
dem
Tubuszwischenstiick
dieser
werden.
Binokulartubus
(Bild
skopstellung
dungsfreie
und
Einblickwinkel
180°
einstellen.
lartubus
für
zwei
eingerichtet
bleibt
bei
jeder
Montage:
—
Aufsetzen
des
tiktriger
—
Beim
Schrâgtubus
schieben.
schraube
(45)
ben.
Einstellen
Das
dieselbe
le
Optikträger
(Bild
der
werden.
des
drehbare
Weise
5).
In
Binokulartubus
Arbeitspositionen
Schrägtuben
(Bild
1)
2)
werden
3)
gewährt
und
bequeme
lässt
Zusdtzlich
werden.
Neigung
Binokulartubus
Augenabstandes
Tubuszwischenstiick
zwischen
bzw.
schrágen
und
zur
Verfiigune.
und
auf
Wunsch
Binokulartuben
mit
variablem
bei
Ausbaustufe
Kérperhaltung.
sich
stufenlos
kann
verschiedene
Die
automatisch
Binokulartubus
Tubusrohre
am
Optiktriger
Binokulartubus
Strahlenteiler
Mikroskoplagen
seitlich
mit
niedriger
binokulare
Sie
sind mit
Doppelirisblen-
aber
geliefert.
kann
der
um + 15°
Einblick-
beliebiger
cine
von
der
Mikro-
ermii-
0°
Binoku-
Einblickhôhen
Bildaufrichtung
erhalten.
auf
den
auscinander-
mit
Klemm-
festschrau-
siehe
Kap.
wird
eingesetzt
kann
bis
30"
verdreht
16.
ste-
Para
disposición
Ge-
baja
noculares
de
auch
mas
den
Ein-
especiales.
Con
lo
de
puede
El
variable
Der
del
bis
plicación
da y descansada
observación
desde
nocular
de
de
Op-
con
Montaje:
=
Colocar
—
Regular
lares
nocular
7.
llo
auf
Ajuste
und
La
misma
taópticas o divisor
microscopio
tubo
hasta
Tubos
binoculares
las
distintas
posiciones
tubos
altura
de
observación
rectos
de
la
distancia
doble,
intermedia
(fig.
sin
ajuste
de
iris
ser
obtenidos
la
pieza
observación
variarse
tubo
en + 15º.
binocular
(fig. 3)
asegura
microscopio y en
(con
accesorios)
puede
0°
hasta
180°.
puede
observación
la
imagen
cualquier
de
de
pieza
manera
binocular
ser
se
inclinación.
el
tubo
la
distancia
del
tubo
al
portaóptica
apriete
(45).
la
distancia
intermedia
entre
se
distintas.
mantiene
binocular
inclinado.
halla
puede
30°.
de
binoculares
2).
(fig.
Estos
trabajo
inclinados
1) y tubos
están
interocular y diafrag-
sin
embargo
estas
de
estos
con
ángulo
con
cualquier
del
cuerpo.
regularse
también
dos
características
para
el
tubo,
tubos
de
cualquier
grado
una
postura
El
continuamente
observación
Adicionalmente
dispuesto
para
El
enderezamiento
automáticamente
en
el
los
tubos
portaóptica.
de
Fijar
por
medio
interocular,
giratoria
el
tubo
de
rayos
en
posición
girarse
véase
se
monta
binocular y el
(fig.
5).
inclinada,
lateralmente
están
a
con
bi-
provistos
pue-
el
ángu-
binoculares
posición
de
am-
cómo-
ángulo
de
el
tubo
dos
bi-
alturas
portaocu-
el
tubo
bi-
del
torni-
cap.
7.
de
la
por-
Cuando
el
el
人
1
Page 34

WILD
MADE
ME5D
IX
SWITZERLAND
17.
Objectives
The
objectives,
200, 225, 250, 275,
pectively,
microscopes.
Screw
the
side
of
direction
helped
by
wise
until
18.
Eyepieces
The
wide-field
fit
into
any
observer
(61)
Sleeve
62)
Graticule
63)
Eye
65)
Spacing
(65)
Flexible
Fitting
the
—
Remove
tubes
eyepleces.
so
that
the
spring
piece
with
—
Screw
the
eyecup
If
preferred,
—
The
diopter
mount
Fitting
the
the
eyepiece:
Unscrew
eyepiece,
over
it,
align
the
white
back
Into
the
eyetube.
Framing
fit
required
the
microscope
(fig.
initially
it
is
heard
eyepieces
binocular
tubes.
for
Geticle),
lens
ring
eyecup
eyepieces:
the
and
fully
Insert
the
screws
shackles
the
the
spacing
and
the
correction
of
the
graticule
the
sleeve
slide
the
the
spot
on
position,
marks:
of
all
1).
dust
screw
eyepiece
See
focal
lengths
300,
350
Leica
objective
Location
turning
to
engage.
for
tube
graticule
(reticle)
in
caps
slacken
the
eyepieces
are
opposite
(fig.
(66).
ring
the
eye
eyecups
is
(see
for
photo-
from
the
mount
pattern
of
the
sleeve,
and
secure
section
and
surgical
on
in
an
anticlockwise
of
the
the
objective
spectacle
and
into
mount
from
screws
into
3).
Secure
or
rings
lens
(see
can
be
set
on
section
and
underside
of
the
graticule
the
graticule
screw
the
20.5.
100, 150,
400
mm
operating
to
the
under-
thread
clock-
wearers
the
second
the
eyepiece
(66)
of
the
tubes
to
the
slits
each
in
between
section
rolled
back.
the
eye
10).
cine/TV
of
the
sleeve
eyepiece
175,
res-
is
the
of
eye-
8).
lens
in
the
(62)
with
in
34
Page 35

17.
Objectifs
Les
objectifs
200, 225,
viennent à tous
Leica.
Placer
cope
jusqu'au
18.
Oculaires
Les
oculaires
de
lunettes
et
aux
(61)
Porte-réticule
(62)
Réticule
(63)
Lentille
(64)
Anneau
(65)
Oeillères
Mise
en
—
Retirer
bes
(66)
jusqu'a
con
opposé á celui
dans
Visser
—
et
la
Les
—
Voir
Mise
en
la
photomicrographie
Dévisser
Mettre
porte-réticule
réticule.
ter
le
tenir
l’oculaire
Voir
réticules
de
250,
l'objectif
et
le
tourner
déclic
grands-angulaires
s'adaptent
tubes
d'observation
en
d'œil
d’écartement
en
place
des
les
capuchons
porte-oculaire.
des
oculaires
la
butée.
que
les
pinces á vis
les
tubes
l'anneau
lentille
chap.
10
place
le
porte-réticule
le
réticule
Placer
d’ceil
peuvent
du
et
Serrer
de
ceilléres
réticule.
distance
275, 300,
les
choisi
audible,
focale
350
microscopes
par
en
légèrement
puis
aux
tubes
simultanée.
monture
caoutchouc
oculaires:
de
protection
Desserrer
pour
porteurs
Placer
les
des
porte-oculaire
pour
réticule
Vy
l'oculaire
dans
cadrage
se
rainures
d'écartement
(voir
chap.
étre
retournées.
le
réglage
dans
et
le
film:
en
monture
pousser.
dans
la
pince à vis
le
tube.
au
100, 150, 175,
ou
400
d'opération
bas
sur
vers
le
visser
pour
binoculaires
les
pinces à vis
de
oculaires
trouvent
en
forme
(fig.
3).
entre
8).
des
dioptries.
Poculaire
sous
l’oculaire.
(62)
Revisser
le
tube.
pour
chap.
20.5.
mm
con-
le
micros-
la
gauche
(fig.
1).
porteurs
des
tu-
lunettes
de
fa-
du
cóté
de
U
I’ceillére
pour
dans
le
le
porte-
Orien-
main-
17.
Objektive
Die
Objektive
275, 300,
zu
allen
Das
gewahlte
den
Uhrzeigersinn
schraubt
hen
im
erleichtert
18.
Okulare
Die
Weitwinkel-Brillentrágerokulare
in
die
Binokulartuben
tertuben,
61)
Hülse
62)
Strichplatte
63)
Augenlinse
(64)
Distanzring
(65)
Gummiaugenmuschel
Einsetzen
-
Schutzkappen
nen.
okularen
so
cinsetzen,
gentiber
ren
liegen
der
Klemmschraube
im
Tubusrohr
—
Einschrauben
Augenmuschel
Die
Augenmuscheln
gestiilpt
—
Dioptriekorrektur
Einsetzen
graphie
Hiilse
Strichplatte
schieben
Hiilse
wieder
bus
einsetzen.
festschrauben.
Formatbegrenzungen
mit
350
Leica
(Bild
Uhrzeigersinn,
der
Schrauben
den
werden.
und
unten
und
100,
oder
400
mm
Operationsmikroskopen.
Objektiv
in
1).
Vorgängiges
das
Einschrauben.
und
zum
Aufsetzen
in
Fassung
Okulare:
von
den
(66)
bis
Anschlag
dass
die
Federlaschen
(Bild
3).
Mit
gefasst.
der
Distanzringe
und
Augenlinse
kónnen
siehe
der
Strichplatte
Kino
in
das
am
Okular
(62)
mit
Fassung
anpressen.
einschrauben.
Strichplatte
siehe
150,
175,
Brennweite
wird
von
das
Mikroskop
bis
es
hórbar
in
die
der
Strichplatte
Tubusrohren
an
den
Brillentráger-
aufdrehen.
Klemmschrauben
in
den
der
Federlasche
wird
das
bei
Kap.
10.
fiir
Okular:
herausschrauben.
tiber
Okular
ausrichten.
Kap.
200,
225,
250,
passen
unten
gegen
einge-
leichtes
Dre-
cinrastet,
passen
Mitbeobach-
entfer-
Okulare
ge-
Tubusroh-
zwischen
(s.
Kap.
Bedarf
die
Hiilse
in
den
Okular
und
exakt
8).
um-
Tu-
Okular
Mikrophoto-
20.5.
17.
Objetivos
Los
objetivos
150,
175,
se
adaptan a todos
ción
Leica.
El
objetivo
sentido
1).
Para
el
objetivo
contrario,
las
roscas.
18.
Oculares
Los
oculares
de
anteojos
binoculares y a
simultánea.
(61)
Receptáculo
(62)
Retículo
(63)
Lente
(64)
Anillo
(65)
Anteojera
Montaje
—
Quitar
portaoculares.
nillos
anteojos.
portaoculares
de
apriete
zaderas
Con
la
fija
el
binocular.
—
Atornillar
anteojera y la
En
caso
rebatirse.
—
Para
tulo
10.
Introducción
microfotografia y cinematografia:
Destornillar
jo
del
ocular.
montura
Volver a atornillar
el
ocular
el
ocular
Véase
limitación
con
200, 225, 250, 275,
deseado
contrario
facilitar
hasta
ocular
de
las
(66)
Introducir
en
distancias
los
microscopios
se
atornilla
al
de
esta
previamente
espaciador
los
de
operación,
oir
el
encaje
granangulares
se
adaptan a todos
los
tubos
para
en
su
montura
de
goma
oculares:
tapas
de
protección
Aflojar
los
oculares
los
de
tal
se
los
manera
encuentren
tubos
las
insertar
abrazadera y el
ocular
con
exactitud
los
anillos
lente
necesario,
la
corrección
el
en
el
en
el
por
ocular
las
de
la
del
retículo
receptáculo
Colocar
receptáculo y apretarlo.
medio
el
tubo,
de
el
receptáculo.
Alinear
del
formatos
focales
300,
350 ó 400
desde
agujas
se
un
poco
de
para
para
el
hasta
el
para
portadores
oculares
que
frente a las
portaoculares
tornillo
de
espaciadores
(véase
anteojeras
dioptrias
en
el
en
el
retículo
el
retículo.
tornillo.
en
cap.
de
100,
mm
de
opera-
abajo
del
puede
en
los
portadores
observación
retículo
de
tope
en
los
en
capítulo
véase
ocular
lado
(62)
en
reloj
(fig.
girar
sentido
filetes
de
los
tubos
los
tubos
los
tor-
de
los
tubos
tornillos
abra-
(fig.
3).
apricte
se
el
tubo
entre
8).
pueden
capi-
para
de
aba-
con
su
Introducir
Fijar
20.5.
la
35
Page 36

III.
Accessories
The
Leica
be
stant,
graphy
cessories,
them,
surgical
equipped
for
for
photomicrography,
and
for
engage
adjust
the
Warning:
Never
change
equipment
operation!
19.
180°
dual
The
180°
surgeons
microscope
The
the
tube
(45).
are
have
—
—
—
The
6)
full
more
two
The
double-iris
with
photography,
(see
dual
to
180°
dual
LEICA
and
is
The
binocular
then
added.
been
with
Operator:
Assistant:
with
Operator:
Assistant:
angle
with
Both
angle
is
found
microscope
microscope
of
observation
microscope
users:
of
observation.
bracket
recommended
cantilever
space
surgeons.
dual
stereo
two
lateral
section
work
simultaneously.
stereo
M651
secured
Low
Straight
Low
Binocular
with
should
diaphra
cine
20).
operating
dual
observation,
television.
the
safety
counterbalance
the
configuration
is
positioned
stereo
attachment
stereo
attachment
at
the
attachment
optics
carrier
with
the
tubes
The
useful:
for
following
horizontal:
inclined
inclined
Binocular
carrier
of
the
outlets
binocular
binocular
steeply
inclined:
binocular
tube with
positioned
tubes
rod
in
circumstances
stand
be
made
attachment
and a beam
which
and
multi-station
microscopes
for
for
cinemicro-
Before
adding
hook;
after
(section
whilst
over
the
enables
surgical
operating
is
mounted
like a binocular
clamping
the
two
surgeons
combinations
tube
tube
T
tube
variable
normally:
with
variable
(fig.
3,
see
is
where
used
and
available
incorporates
can
be
used
viewing
can
an
assi-
ac-
adding
4).
the
field
of
two
on
screw
T
T
section
the
where
for
the
a
splitter
for
36
Page 37

III.
Accessoires
Les
microscopes
être
équipés
travail
avec
se
de
vue
télévisée,
suspendre
contrepoids
19.
pour
Le
permet à deux
tanément
Le
se
de
par
binoculaires
combinaisons
—
-
—
Dans
liser
l'utilisation
ce
Le
double
et
latérales
.
graphie,
(voir
"~
cinématographique
Attention:
Ne
jamais
du
champ
Dispositif
assistant
dispositif
au
dispositif
place
comme
microscope
la
pince à vis
En
position
Opérateur:
baissé
Assistant:
En
position
Opérateur:
baissé
Assistant:
vation
variable
Pour
toutes
De
chaque
d'observation
toutes
toute
la
(fig.
3,
cf.
dispositif
diaphragme
un
répartiteur
pouvant
le
chap.
d’opération
pour
l'observation
assistants,
Avant
le
levier
(chap.
la
de
monter
de
blocage,
4).
monter
les
opératoire!
d'observation
d'observation
chirurgiens
microscope
d'observation
un
tube
LEICA
destinés
suivantes
horizontale
tube
tube
très
tube
tube
les
côté:
les
portée
du
support
chap.
d'observation
ciné
20).
binoculaire
M651
(45).
Fixer
aux
ont
bmoculaire
binoculaire
inclinée
bimoculaire
binoculaire a angle
positions
tube
variable
situations
du
statif,
avec
6).
inis
optique
être
utilisées
et
l'observation
Leica
peuvent
simultanée,
photographie,
et
la
les
accessoires
la
transmission
accessoires,
puis
régler
au-dessus
180°
180°
pour
de
d'opération.
180°
où
ensuite
deux
fait
du
microscope:
droit
du
microscope:
du
binoculaire à angle
où
il
nous
colonne
180°
de
réglage
avec
assistant
travailler
il
chirurgiens.
leurs
incliné
incliné
microscope:
convient
pour
simul-
pour
assistant
sur
le
est
maintenu
les
tubes
preuves:
T,
T
T,
d'obser-
d'uti-
conseillons
réceptri-
possède
incorporé
deux
sorties
la
photo-
simultanée
corps
HI.
Leica
le
beobachtung,
pri-
aufnahmen
stet
einhángen,
le
führen
19.
Die
Chirurgen
mikroskop
Die
Binokulartubus
M651
(45)
tuben
Kombinationen
-
Crwiesen:
Les
—
bei
Operateur:
sur-
sur-
niedrig
Mitarbeiter:
—
bei
Operateur:
nicdrig
Mitarbeiter:
Einblickwinkel
—
bei
beidseitig:
Einblickwinkel.
Fiir
ladung
Chirurgen
wir
siche
Die
un
eingebaute
lenteiler
für
werden
Zubehór
Operationsmikroskope
Mitarbeit,
und
werden. Vor
(Kap.
Achtung:
Umrüsten
Operationsfeld!
Fernsehtibertragung
dem
danach
Gewichtsausgleich
4).
nie
über
180°-Mitarbeitereinrichtung
180°-Mitarbeitereinrichtung
gleichzeitig
zu
180°Mitarbeitereinrichtung
fixiert.
horizontaler
stark
universeller
Situationen,
den
Kap.
Mitarbeiteremrichtung
Photo,
arbeiten.
auf
aufgesetzt
für
und
Danach
beide
Chirurgen
binokularer
binokularer
geneigter
binokularer
Binokulartubus
Binokulartubus
genutzt
Tráger
kónnen
in
und
geschaffen
mit
6).
Doppelirisblende
mit
zwei
Kino
und
(siehe
dem
mit
haben
Mikroskopstellung:
Mikroskopstellung:
Mikroskopstellung:
denen
Aufnahmesáule
seitlichen
Mitbeobachtung
k6nnen
Photographie,
Umrüsten
dem
an
einem
Optiktrager
der
Klemmschraube
werden
die
befestigt.
sich
als
Schrâgtubus
Geradtubus
Schragtubus
mit
mit
die
Kap.
volle
Raum
soll,
verfügt
und
Ausgängen,
20).
mehr
werden
fiir
Mit-
Film-
ausgerii-
Sperrhebel
durch-
erlaubt
zwei
Operations-
wird
wie
LEICA
Binokular-
Folgende
vortcilhaft
T
variablem
variablem
Stativaus-
fiir
beide
empfehlen
(Bild
über
eine
einen
Strah-
genutzt
HI.
Accesorios
Los
microscopios
ser
equipados
la
asistencia
tografía,
misión
cesorios
después
pítulo
4).
Atención:
iNunca
sobre
19.
Dispositivo
El
ein
T,
T,
die
dispositivo
a
dos
cirujanos
microscopio
El
dispositivo
loca
como
taóptica
tornillo
los
tubos
Las
combinaciones
buenos
—
En
posición
Cirujano:
jado
Asistente:
—
En
posición
Cirujano:
jado
Asistente:
servaciôn
—
Para
todas
De
ambos
de
observación
En
3,
todas
cesario
ra
crear
cirujanos,
te
con
portamicroscopio
Este
dispositivo
corporado y divisor
terales
19.
0006 y observacion
20).
para
por
parte
las
tomas
de
televisión.
enganchar
de
cambiarlos
efectuar
el
campo
de 180°
trabajar
de
operación.
de
un
tubo
LEICA
de
apriete
binoculares
resultados:
horizontal
tubo
binocular
Tubo
muy
tubo
binocular
Tubo
variable
las
posiciones
lados:
variable
las
situaciones
utilizar
toda
cl
mayor
aconsejamos
posee
que
pueden
de
operación
la
observación
de
cinematográficas y la
Antes
la
compensar
cambios
de
de
180°
para
simultaneamente
180°
para
binocular
M651,
(45).
Seguidamente
para
siguientes
binocular
inclinada
binocular
tubo
la
portada
espacio
la
diafragma
de
rayos
ser
aprovechadas
simultanea
Leica
un
palanca
la
donde
del
binocular
posible
utilización
(fig.
simultanea,
colaborador,
de
cambiar
de
el
de
operación!
para
el
el
asistente
el
asistente
sobre
se
los
dos
microscopio:
inclinado
recto
T
del
microscopio:
inclinado
con
ángulo
del
microscopio:
en
las
que
del
estativo
para
3,
véase
iris
con
dos
(véase
peso
accesorios
asistente
fija
cirujanos.
han
con
del
doble
salidas
pueden
la
fo-
trans-
los
ac-
bloqueo;
(ca-
permite
en
el
se
co-
el
por-
con
el
se
fijan
dado
T,
reba-
T,
reba-
de
ob-
ángulo
sea
ne-
pa-
los
dos
sopor-
cap.
6).
in-
la-
para
fo-
cap.
Lad
—
Page 38

20.
Beam
The
beam
lets,
is
the
cond
bes.
The
the
the
The
so
the
desired,
inserting
when
rated.
screw
the
outlets
photography
king
The
with
of field
these
20.1
The
out
any
the
Mounting:
Introduce
dovetail
secure
Insert
ring
ter
10).
framing
into
surgeon
eyepiece
same
field
nucleus
observer
beam
observer,
lateral
beam
splitter
that
its
diaphragm
observer,
it
can
an
the
sterile
Place
the
cover
side
of
can
down
double-iris
the
lever
and
tubes
Tube
for
second-observer
two
axes,
angle:
knurled
the
mount
it.
the
eyepiece,
or
rings
setting
If
the
during
the
eyepiece
and
magnifications,
total
of
view.
splitter
splitter,
splitter
outlets.
the
for
second
magnification
which
of
the
tubes,
phototubes
directs
the
remainder
is
fitted
lever
and
is
secured
be
positioned
adapter,
the
so
magnification
binocular
plate
the
beam
be
the
to
fit
sleeve
the
splitter
used
simultaneously,
while a second
instrument.
diaphragm,
(56),
serves
reduce
the
to
it
in
the
second
observer
and
consequently
image
is
(98).
dovetail
(97)
of
secure
(see
section
the
eye
observer
photography,
(see
second
modular
that
(95)
to
light
same
tube
kept
ofthe
the
to
be
observer
and
has
two
50%
of
being
on
the
(56)
points
by a screw
15
mm
it
is
changer
tube
in
from
to
be
observer
which
increase
intensity.
manner.
can
be
positioned
vertical
tube
beam
it,
add
8).
Adjust
used
is
responsible
fit a
section
they
will
will
lateral
system
of
and
cine
the
light
available
optics
carrier
towards
(45).
higher
not
touched
is
outlet
used.
e.g.
is
is
operated
the
rotated
by
turning
(96)
into
splitter
the
spacing
the
(see
section
graticule
18).
If
use
the
have
see
the
ope-
Both
depth
All
diop-
same
same
position.
the
out-
se-
tu-
to
at
If
by
Un-
on
for
loo-
of
ab-
at
the
and
for
the
the
38
Page 39

20.
Répartiteur
Le
répartiteur
vertures
l'installation
tanée,
et
Le
50%
oculaires
ties
Le
microscope
phragme
puis
ser
tique
ce
cher
changement
Dévisser
se
les
être
tanée
Le
augmenter
la
Le
optique
ments.
20.1
Le
ne
que
dressée
Montage:
Introduire
tanée,
trante
répartiteur
Mettre
visser
Régler
chap.
_
fectuer
phier,
(cf.
l'opérateur
ficient
champ
latérales,
des
ciné.
répartiteur
de
la
lumière
et
latérales.
répartiteur
iris
fixé
au
le
tube
que
l’on
intermédiaire
les
accessoires
la
trouve
sur
deux
côtés
utilisés,
et
la
double
lumière à l’aide
montage
est
Tube
pour
tube
pour
dans
deux
angle
d'observation.
par
muni
(96),
l’oculaire
les
anneaux
les
10).
Si
le
contréle
un
réticule
chap.
18).
du
visuel.
optique
optique,
est
la
des
tubes
rallonges
50%
de
(56)
moyen
binoculaire
plaque
photographie
diaphragme
la
des
semblable
un
le
dans
optique
dioptries
et
même
stéréo,
optique
dans
dans
optique
sorte
soit
dirigé
de
peut
rehausser à l’aide
de
15
mm,
de
grossissement.
de
le
côté
utilisé.
du
répartiteur
p.
ex.
pour
profondeur
du
levier
accessoires
l'observation
l'observation
axes
et
permet
anneau
tube
pour
d’une
pièce
la
queue
puis
en
place,
d'écartement
selon
le
deuxiéme
du
cadrage
peut
En
utilisant
le
deuxième
grossissement
pourvu
pièce
d'observation
chacun
chacune
est
que
la
sur
non
recouvrement
pour
moleté
serrer
de
essentielle
photographiques
sur
VIS.50%
des
des
placé
sur
le
levier du
vers
l'observateur,
pince à vis
le
répartiteur
pour
éviter
stérilisés
Dans
certains
optique
l'observation
(fig.
2).
iris
est
utilisé
de
champ
(56).
sur
le
tous
ces
simultanée
simultanée
ainsi
de
L'image
(08).
l’observation
de
liaison
d’aronde
la
pince à vis.
serrer
la
(cf.
l’observateur
observateur
pour
être
mis
dans
les
mêmes
observateur
et
deux
ou-
pour
simul-
dirige
deux
tubes
deux
sor-
le
corps
de
dia-
(45).
Vis-
op-
d’une
piè-
de
tou-
lors
du
(95)
qui
cas,
peuvent
simul-
pour
et
réduire
répartiteur
équipe-
se
tour-
régler
cha-
peut
être
re-
simul-
autocen-
(97)
du
pince à vis,
chap.
8).
(cf.
doit
ef-
photogra-
l’oculaire
oculaires,
béné-
du
même
20.
Strahlenteiler
Der
Strahlenteiler
gángen
ist
stallation
Mitbeobachteransatz,
Ansatz.
Der
je
50%
in
die
Der
ger
zum
xieren.
festschrauben.
teiler
gesetzt
des
rungswechsel
Abdeckplatte
schrauben,
auch
gleichzeitige
phie.
Die
Scharfentiefe
mit
Die
teiler
20.1
Der
drehbar,
stellt
Randelring
Montage:
Mitbeobachtertubus
Einsatz
führung
festschrauben.
Okular
einsetzen
achtende
(vel.
Ausschnittkontrolle
übernehmen,
Okular
Verwendung
teur
serung
das
von
Strahlenteiler
in
die
beiden
Strahlenteiler
aufgesetzt,
Beobachter
Binokulartubus
mit
einem
werden.
unsterilen
der
beide
Ausgänge
Doppelirisblende
Hebel
(56)
Montage
ist
fiir
Mitbeobachtertubus
Mitbeobachtertubus
so
werden
(96)
(97)
einsetzen,
(vgl.
Auge
Kap.
10).
eingesetzt
und
Mitbeobachter
und
das
mit
optische
Mitbeobachtertuben,
VIS.50%
beiden
Tubusrohre
seitlichen
wird
dass
der
zeigt.
Bei
Bedarf
Zwischenstůck
Dadurch
Zubehórs
verhindert.
(95) auf
benutzt
Mitbeobachtung
und
zum
bedient
des
Zubehórs
alle
diese
dass
jeder
kann.
(98)
aufgerichtet
sorefálltig
des
Strahlenteilers
festschrauben.
Kap.
8).
des
Soll
kann
werden
gleicher
gleiche
zwei
seitlichen
Kernstiick
Photoansatz
lenkt
und
fiir
und
das
Ausgänge.
so
auf
den
Irisblendenhebel
Mit
Schraube
auf
dem
Strahlenteiler
kann
der
15
eine
beim
Ausgang
soll.
werden,
und
zur
Steigerung
an
den
in
zwei
mm
Beriihrung
Vergrósse-
Es
Photogra-
des
wird
dem
werden
benutzt
kann
Abblenden
werden.
Ausriistungen
ist
Einblickwinkel
Das
Bild
kann
werden.
mit
selbstzentrierendem
in
die
Schwalben-
einsetzen
Dioptrie
Mitarbeiters
der
beim
eine
Okulare
Distanzringe
fiir
Mitbeobachter
Photographieren
Strichplatte
(vgl.
Kap.
haben
die
gleiche
Gesichtsfeld.
Aus-
die
In-
Stereo-
Kino-
Licht
zu
zu
je
50%
Optikträ-
(56)
(45)
fi-
Strahlen-
hóher
ab-
kónnen
z.B.
fiir
der
Lichts
Strahlen-
gleich.
Achsen
einge-
mit
dem
und
das
a
cinstellen
die
in
das
18).
Bei
Opera-
Vergrös-
20.
Divisor
El
divisor
la
pieza
bos
para
estereoscópico
plementos
cinematográfica.
El
divisor
la
luz a los
das
laterales.
El
divisor
tica
con
cia
el
Atornillar
rayos.
divisor
termedia.
con
accesorios
aumentos.
lateral
lizar
también
observación
El
diafragma
por
medio
mentar
tiguar
El
montaje
rayos
20.1
Tubo
Este
tubo
de
manera
gulo
de
leteado
Montaje:
Introducir
pieza
de
cola
fijarlo.
Introducir
anillos
las
dioptrias a los
cap.
10).
ción
del
introducir
tulo
18).
cirujano y el
mento y el
de
de
rayos
óptica
central
observación
de
de
cámera
de
rayos
tubos
de
rayos
la
palanca
observador.
el
tubo
En
caso
de
de
rayos
De
esta
no
Destornillar
(95)
que
se
ambas
simultánea y para
iris
de
la
la
profundidad
la
luz.
de
es
de
espaciadores
los
idéntico
para
segundo
puede
que
se
observación.
(98)
se
puede
cuidadosamente
unión
autocentrante
de
milano
el
ocular y fijarlo.
Si
el
colaborador
formato
un
reticulo
Sise
emplean
asistente
mismo
rayos
con
dos
salidas
para
la
simultánea,
observación
fotográfica y de
obs.
50%
oculares y el
se
coloca
(56)
del
Se
fija
con
binocular
necesidad
15
mm
mediante
manera
se
esterilizados
la
ha
palanca
para
ser
para
cubierta
de utilizar.
salidas,
doble
puede
(56)
de
campo y para
accesorios
todos
abservador
girado
Por
enderezar
(97)
del
(véase
del
la
en
los
tendrán
en
ajustar
medio
divisor
capitulo
observador
controla
fotografia,
el
ocular
mismos
visual.
puede
ojos
campo
laterales
instalación
dispositivo
simultánea,
dirige
el
50% a las
sobre
el
diafragma
sobre
se
por
estos
portaóp-
el
tornillo
el
divisor
puede
elevar
una
pieza
evita
el
contacto
al
cambiar
de
la
Se
pueden
ejemplo
fotografía.
ser
accionado
con
el
fin
en
el
divisor
equipos.
torno a dos
cualquier
del
anillo
la
imagen.
el
tubo
(96)
en
de
Atornillar
8).
la
se
(véase
oculares,
el
mismo
es
de
tu-
su-
cámera
50%
de
sali-
iris
ha-
(45).
de
el
in-
los
salida
uti-
para
de
au-
amor-
de
ejes,
án-
mo-
con
la
la
guía
rayos
los
Ajustar
(véase
limita-
puede
capi-
el
au-
y
Page 40

20.2
Stereo
attachment
The
stereo
observe
surgeon
participate.
Carefully
self-centring
ter
Add
ned
cular
The
rotatable
be
positioned
matter
on
(98).
20.3
The
image
ted
imaging),
sr
eld.
The
adapters,
binocular
so
that
the
taken.
Introduce
TV
am
Fit
priate
cine/TV
(105)
rotated
90°
to
count
In
cameras
ness
by
means
beam
A
focusing
ced
which
the
sharpness
rectly
attachment
surgical
and,
position
and
secure
the
straight
binocular
tube
and
stereo
attachment
about
what
of
the
Cine / TV
phototube
produced
directly
resulting
image
phototube
are
tubes
the
surgeon
image
even
the
tube carefully
splitter
and
the
C-mount
camera.
tube
has
been
to
any
one
another)
the
final
which
regulation,
of
splitter.
and
in
that
is
nearer
dioptric
(see
of
section
correction,
enables
procedures
because
dovetail
it.
the
of
stereo
mount
binocular
tube
or
the
fit
the
eyepieces.
for
three
axes
in
relation
the
instrument
image
is
corrected
tube
and
the
by
the
into
contrast
objective
the
film
in
larger
and
and
the
parfocally
and
the
second
and
while
the
self-centring
into
the
secure
it
adapter
Mount
this
and
secure
slackened,
of
the
four
and
have
the
brightness
diaphragm
framing
of
to
the
cine/TV
image,
20.5).
secured,
which
orientation
the
eyepiece
the
for
second
an
along
the
spatial
attachment
of
the
tube,
the
low
inclined
second
and
can
to
the
assistant
configuration.
with
cine
tube
to
plane
(single-stage
fields
excellent
cine
tube,
matched
observer
the
assistant
photograph
mount
of
dovetail
(fig.
2).
(101)
to
combination
it.
After
the
camera
basic
positions
taking
of
the
automatic
can
lever
the
binocular
tube.
determines
be
carried
image.
(56)
is
no
graticule
to
observer
assistant
with
the
image,
in
the
beam
split-
45”
incli-
bino-
observer
is
therefore
no
The
the
ring
cause
the
be
projec-
of
view,
depth
and
their
to
the
tubes,
can
see
is
being
the
cine/
of
the
be-
the
appro-
on
the
the
screw
can
be
(at
into
ac-
bright-
be
altéred
on
the
to
be
pla-
tube
It
enables
the
out
cor-
to
to
of
40
Page 41

20.2
Rallonge
observateur
La
rallonge
met à l'assistant
chirurgicales
en,
la
perception
per
activement à Vopération.
Placer
servateur
trante
fixation.
Fixer
le
le
tube
surbaissé
La
rallonge
peut
être
possible
mieux à l'assistant
tion.
L'anneau
l'image.
20.3
Rallonge
Les
rallonges
directement
tion
en
grands
d'image
faite.
Les
rallonges
adaptateurs,
tubes
binoculaires
observateur;
observer
vent
de
l’image
Monter
termédiaire
optique.
(101)
sur
à
vis.
En
peut
être
Tenir
compte
Pour
les
d'un
régulateur
adapter
diaphragme
tique.
|
Un
réticule
correctement
nant
pour
pour
les
stéréo
pour
d'observer
en
même
du
la
rallonge
dans
du
binoculaire a 45°
une
champs
élevé
la
la
la
répartiteur
tube
d'observation
et
le
munir
stéréo
tournée
de
choisir
moleté
ciné / TV
photo
dans
le
étape),
de
et
une
photo
sont
le
chirurgien
ainsi
même
pendant
rallonge
autocentrante,
Visser
un
la
chambre
desserrant
tournée
chambres
cadrages.
de
de
la
automatique
luminosité à l’aide
de
trouvant
dans
un
les
dioptries,
la
netteté
pour
deuxiéme
deuxième
stéréo
queue
pour
dans
la
pour
et
plan-émulsion
prises
profondeur
spécialement
et
en
ciné
adaptateur
90°
rotation
qui
oculaire
de
observateur
les
temps
relief
l'autorise á partici-
pour
d’aronde
optique
et
binoculaire
ou
le
des
oculaires
deuxième
trois
position
chaque
(98)
ciné,
projettent
ce
qui
se
de
vues,
et
ciné,
aux
tubes
et
permanence
la
prise de
(fig.
2),
sur
adéquate,
la
vis
(105),
chaque
de
ne
sont
du
sur
le
permet
ce
l'image.
interventions
que
deuxième
serrer
tube
observateur
axes,
qui
genre
sert à redresser
traduit
un
de
ainsi
pour
l'assistant
avec
le
avec
serrer
fois,
l’image.
pas
de
levier
répartiteur
qui
est
Voir
per-
le
chirurgi-
ob-
autocen-
la
vis
de
droit,
binoculaire
adéquats.
il
est
donc
convient
d'opéra-
l’image
(reproduc-
par de
contraste
champ
par-
que
ajustés
répartiteur
la
luminosité,
aux
deuxième
peu-
le
cadrage
vue.
pièce
filetage
la
pince
chambre
puis
fixée.
équipées
(56)
op-
de
régler
détermi-
chap.
20.5
les
in-
du
la
C
20.2
Stereo-Mitbeobachteransatz
Der
Stereo-Mitbeobachteransatz
Assistenten,
mit
dem
des
stereoskopischen
Mitbeobachteransatz
zentrierende
teilers
Binokularen
Schrágtubus
mit
niedriger
Okularen
Der
Stereo-Mitbeobachteransatz
Achsen
onssituation
den
kann.
ring
(98)
20.3
Kino / TV-Ansatz
Photo-
vom
Objektiv
fige
Abbildung).
Aufnahmefelder,
ezeichnete
hoto-
auf
die
tertuben
und
wihrend
ten
kônnen.
Kinoansatz
Finsatz
mit
C-Gewinde
Kamera
Kamera
entieren,
(105)
fixieren.
Bilddrehung
keine
verfúgen,
denhebel
werden.
Mit
Hilfe
kann
gefiihrt
ausschlaggcbend
siehe
chirurgische
Chirurgen
Schwalbenfthrung
einsetzen
drehbar,
und
und
Binokulartuben
Assistent
am
schrauben.
mit
in
einer
automatische
eine
werden,
Kap.
und
Geradtubus,
45”
oder
Einblickhóhe
ausrüsten.
so
zum
Das
Bild
aufrichten.
Kinoansatz
direkt
hoher
Schärfentiefe,
Kinoansatz
speziell
abgestimmt,
der
Aufnahme
(Bild
Strahlenteiler
(101)
Adapter
festschrauben
der
vier
beachten.
kann
die
(56)
am
einer
Strichplatte
korrekte
die
20.5.
zu
beobachten
Effektes
sorgfaltig
festschrauben.
binokularen
dass
Assistent
lässt
sich
projizieren
in
die
Das
Resultat
Bildkontrast
sowie
und
den
Bildausschnitt
permanent
2)
mit
selbstzentrierendem
an
auf
dem
Raststellungen,
Bei
Helligkeitsregulicrung
Helligkeit
Strahlenteiler
Dioptriekorrektur
fiir
die
ist.
Formatbegrenzungen
ermóglicht
Eingriffe
mitzuarbciten.
in
die
des
binokularen
Schrágtubus
befestigen
er
Filmebene
montieren.
die
und
ist
in
jeder
positioniert
mit
dem
sind
Adapter
die
Mitbeobach-
so
dass
entsprechende
Kinoansatz
mit
Kameras,
mit
dem
in
einem
Scharfe
des
simultan
und
dank
selbst-
Strahlen-
und
mit
in
drei
Operati-
wer-
Rändel-
das
Bild
(einstu-
grosse
und
aus-
sind
Chirurg
auch
beobach-
Adapter
ori-
Schraube
jede
90º,
die
tiber
Blen-
angepasst
Okular
durch-
Bildes
20.2
Dispositivo
de
observacion
El
dispositivo
simultánea
operaciones
el
cirujano
ve,
participar
Colocar
servación
tocentrante
tornillo
Fijar
tubo
ra
lares
El
simultánea
pues
venga
El
la
20.3
Los
imagen
de
resultado
contraste
dad
El
adaptador
con
servación
no y el
mente
la
Montar
la
de
Atornillar
la
Orientar
suplemento
una
cada
sición
no
se
la
el
simultánea
de
el
tubo
binocular
de
observación
adecuados.
dispositivo
posible
al
asistente
anillo
moleteado
imagen.
Suplemento
suplementos
del
la
película
son
de
de
campo.
suplemento
los
tubos
simultánea,
asistente
el
sector
toma.
el
pieza
de
rayos.
cámara
correspondiente.
la
de
las
una
con
de
la
disponen
puede
corrigir
palanca
rayos.
Con
la
ayuda
puede
efectuar
trías,
lo
la
los
que
nitidez
formatos
de
estereoscópico
simultanea
estereoscópico
permite
quirúrgicas
y,
dispositivo
del
fijación.
de
puede
objetivo
están
suplemento
unión
el
cámara
de
cuatro
imagen.
de
(56)
es
la
al
asistente
gracias a la
activamente
observación
45” o el
estereoscópico
elegir
(reproducción
grandes
la
imagen y excelente
para
binoculares y los
pueden
de
al
estereoscópico
en
divisor
la
de
tubo
baja y equiparlo
ser
girado
la
posición
en
cada
(98)
de
cámara
para
cine y foto
directamente
campos
foto y cine
especialmente
de
observar
la
imagen
de
autocentrante
adaptador
cámara,
el
tornillo
con
con
el
atornillarla y fijarla
posiciones
(105).
En
el
regulación
la
luminosidad
del
diafragma
de un
retículo
un
ajuste
de
la
mayor
imagen.
véase
Para
capítulo
de
observación
observar
mismo
percepción
sirve
modo
caso
automática
correcto
tiempo
en
cola
rayos y apretar
binocular
binocular
tipo
para
cámara
adaptador
del
la
operación.
de
milano
con
de
observación
en
tres
que
mejor
de
operación.
para
enderezar
cine / TV
proyectan
en
en
también
rosca C (101)
de
el
una
fase).
de
toma,
profundi-
así
como
coordinados
tubos
para
que
el
permanente-
durante
(fig.
en
el
sobre
encaje
Observar
de
cámaras
de
por
medio
del
divisor
en
el
ocular
de
importancia
la
20.5.
las
delimitación
las
que
relie-
de
ob-
au-
el
recto,
el
de
altu-
los
ocu-
ejes,
es
con-
la
plano
El
fuerte
el
ob-
ciruja-
2)
con
divisor
en
el
en
de
90°
la
po-
que
la
luz
de
de
se
diop-
para
de
4]
Page 42

055
062
xoyal
=
=
suaj-ajdurs
1241
941
Чи
Mm
pourejgo
4041
Aue
4314049
sjdasae
saut
21303041
P'0Z
9168
agnmojoyd
(1
ainsodxs
1214ере
Sy)
eroure9
sy
ay]
ции
工
1248]
-0]
UI
asBaIoap
(SZ
ш
=
$0594
J
20]
ssaujydlıg
JEU]
12|
‘Play
DIEME
ay]
Э41
B
36
saonpord
Jo
ing
aspa
Ξαομεσιμα
“1a1depe
ay]
laldepe
sprem
θεια
anu
Pue
-12
3H1
01
Ialltds
Jo
(001)
Ίπποι
Gunou-
uueaq
SULUAI-J[9S
aql
1)
olUTAIInJareo
1aidepe
oy)
e1aures
SUL
aqmolodUd
20nNponu]
“Y
941
3.M995
UNOJA]
314
Jajdepe
-Ejd
"BIDUIED
(239)
aq
0)
ww
JY]
st
29m0]0yd
O}
amnonels
pce
JUN
=
J
PaUuIquIOS
ay]
Suituelj
ay
10
Ww
0)
Ajquiasse
ay]
pue
0567
JOoUUOD
=
Sursns0]
1
941
stu]
12041
pue
114
y
34101
-JIP
-109
0011298
OMJ
31410010
TeInoourq
92$)
OU]
10]
aqni0J0yd
341.
SIT]
341
'54100431
10
JELUIO]
341
2991d949
[62301
01
AU}
191894
13106010
SMOUS
yey)
SI
ㅁ
Ul
1]
10
YOYA
ㅁ
3731
‘(8I
pas
19114
100
ul
dreys
0211102
3019
osye
6
30
“0280
(Z
st
15001
aseUN
OT
216
UONDas
310
sug
ㅁ
211618
241
1241
295)
INO[o3
ay}
0$
ouejd
YIM
‘А]эуагазов
1YSIJÁRP
ugy
UOTIeI
941
JI
-91
-18
"pa11oja1d
101
INO[0O3
SH
aq
219
MOO
0]
D1PSUDdLUOI
YONW
“(ÇI
19A9MOY
109925
0
UI
SIE
398)
ŠUNMS
1YSI]
этазвлэ4
39
[EIOYI
UP
-urq
(opya1)
amogel
Sure
pue
Sursn304
SZ
вицие.ц
и
АЧЧе18
aql
Jo
рие
олоциэшо
saoatdakAa
34151201
saqn}
pue
au]
&
A
AydeSorstmojougd
HOSUL
L/eub
pue
-ojoyd
10}
J0
suo
O1
ojui
ÁIRSSODDU
ajnoneis
10,4
SI
“VW
[ем
“30810
-BU
GOTy
(701
2Ц1
1019
As
$5142421|
Joalqns
Uuonaas
29)
Ul
oY]
pasn30]
"(9[
das)
JO
401295
ainjaid
BIE
Á[9]8.M938
SY]
93$)
ay]
SO]BSIPUI
э4п}
uo
3q
леза4е
1е[пзо
01
pu
98
sun
-59
310
ㅁ
011031102
20
ㅁ
10010
ㅁㅁㅁ
2
ㅁ
0415020]1
3180.10
"tu
CE
JBULNOJ
‘ade
008
0400
UI
311
062
CE
Jo
5418031
21
ssaudieys
SMOUS
[6201
31
94]
ㅁ
1910
20
0]
ㅁ
46
ㅁ
18
비
¡eyuas
26101
24,
LULU
WU
OSE
(SZ
LHtH
=
=
fF
J
PQMIOJOY
EQNIOION
CC
VELO]
:p
:£
“St
BU
J
πα
WU
ος
¿01
Χιπ
=3
LULU
3qN]
91'/
ÇE
A.L/BUIS
TEULIOJ
YEULOJ
τς
A4
UI
9°
Xx
“WI
09
Y
{OL
OSpra
(1ojmaloid
=
J
AQNI
CUL
Ep
AL
unu
JEUO
/OUTD
91)
y
:9
“814
CF
Page 43

20.4
Rallonge
La
rallonge
pour
les
le
Avec
se
mm,
grossissements
Nous
teur £ =
nosité
Montage:
Introduire
d'une
queue
serrer
Visser
l’un
350
Monter
rallonge
Un
du
au
formats
principales
se
optries
nette
chap.
Lorsque
re
penser
duisant
contre,
couleurs
20.5
photographiques
Pour
phie,
pourvu
mettra
er
se
.
déterminants
Le
réticule
mm
Fig.
Fig.
Fig.
Fig.
appareils
commerce
Vadaptateur f =
est
plus
court
ce
dernier
vous
signalons
250
vers
le
la
pièce
d'aronde
la
pince à vis.
Vadaptateur
des
deux
mm
et
le
la
chambre
photographique
réticule
tube
binoculaire
point
(cf.
de
un
du
un
au
petit
de
réticule
correctement,
dans
10.2).
certains
jour
sont
la
température
un
nous
pour
Réticule
la
photomicrographie
un
oculaire
d'un
de
déterminer
réglage
point
(cf.
format
pour
et
350
mm,
3:
rallonge
format
4:
rallonge
format
5:
rallonge
format
6:
rallonge
format
photographique
photographique
reflex
(fig.
plus
mm
provoque
bord.
rallonge
de liaison
adaptateurs É =
relier à la
sera
placé
chap.
l’image
Vadaptateur.
il
faut
le
plan-émulsion
utilisés,
filtre
recommandons
lumière
de
cadrage
réticule
correct
chap.
pour
24 x 36
les
photographique
24 x 36
photographique
24 x 36
ciné
7,16 x 9,6
ciné
*/3"
que
1).
250
qu'avec
du
films
et
focales
Vadaptateur f =
permettant
importants.
cependant
photographique,
autocentrante,
répartiteur
de
la
chambre.
avec
(fig.
dans
pour
le
18).
Ce
pour
effectuer
pour
couleurs
il
est
de
bleu
(voir
artificielle.
pour
ciné
du
tube
(voir
le
cadrage
des
dioptries
10.2).
la
netteté
mm
d'adaptateur
107
mm:
mm
107
mm:
video 4 6,6 x 8,8
peut
étre
l’on
trouve
mm
le
temps
de
réaliser
que
une
chambre
l'adaptateur
l’un
cadrage
réticule
les
Lorsque
que
possible
couleurs
et
binoculaire
chap.
Ces
est
(16 / proj.)
l'adapta-
perte
de
optique,
(100)
250
mm
2).
des
oculaires
et
indique
deux
distances
l’on
le
réglage
l'image
également
pour
la
de
en
chap.
13).
l'emploi
de
de
les
rallonges
la
cinématogra-
18).
et
d’effectu-
et
de
réglages
l’image.
délimité
250
mm:
350
mm:
mm
utilisée
dans
de
po-
350
des
lumi-
munie
dans
la
puis
sur
ou f =
sur
la
la
mise
les
utili-
des
di-
reste
(cf.
lumié-
com-
intro-
Par
films
sera
Il
per-
la
mi-
sont
sur
le
de
250
20.4
Photoansatz
Der
Photoansatz
gelreflexkameras
Mit
dem
tungszeiten
mm,
werden.
sam,
ligkeitsabfall
Montage:
Photoansatz
sorgfáltig
lenteilers
Kameraadapter
Adapter f =
schrauben
Kamera
montieren
Zur
eines
Strichplatte
die
der
Strichplatie
den,
scharf
Bei
kann
Farbtemperatur
Kap.
wendung
20.5
und
Für
phie wird
einer
Mit
gelegt
Fokussierung
10.2).
einstellung
Schärfe
Auf
24 x 36
und
Fig.
Fig.
Fig.
Fig.
Adapter f =
kůrzer
mit
dem
hôhere
Wir
dass
machen
der
Adapter f =
zum
mit
in
die
einsetzen
250
und
mit
Adaptern
(Bild
Ausschnittwahl
der
Okulare
Bildbegrenzungen
eingesetzt
Adapter.
muss
damit
das
abgebildet
Verwendung
ein
Blaufilter
13).
Wir
empfehlen
von
Kunstlichtfilmen.
Formatstrichplatte
Kinoansatz
Mikrophotographie
ein
Hilfe
und
eine
durchgeführt
Korrekte
Okular
Strichplatte
ihrer
sind
des
Bildes.
der
Strichplatte
mm
fiir
350
mm
aufgedampft.
3;
Photoansatz
Format
4:
Photoansatz
Format
5:
Kinoansatz
Format
6:
Kinoansatz
Format
24 x 36
24 x 36
7,16 x 9,6
3"
kann
fiir
verwendet
selbstzentrierendem
Schwalbenfiihrung
(100)
mit
2).
Die
Bild
kónnen
exakte
Scharfstellung
handelstibliche
werden
250
mm
als
Vergrósserungen
Rand
und
mm
der
und
im
Diopiriekorrektur
korrekt
auch
wird
von
zur
eingesetzt
ausgeriistet
sind
mit
dem
Adapter
aber
darauf
250
mm
hin
verursacht.
festschrauben.
an
einem
oder f =
Kamera
auf
350
verbinden.
dem
Scharfstellung
Binokulartubus
(vgl.
Kap.
fiir
(vgl.
18).
beide
Brennweiten
durchgefiihrt
in
der
Kap.
Tageslicht-Farbfilmen
Kompensierung
werden
hingegen
fiir
Photo-
und
im
Dioptriekorrektur
Kinematogra-
Binokulartubus
(siche
die
Ausschnitte
werden ( vel.
und
ausschlaggebend
ist
das
die
Adapter-Brennweiten
250
350
107
107
Video 4 6,6 x 8,8
Kleinbildformat
mm:
mm:
mm:
mm
(16/
mm:
Spie-
(Bild
1).
die
Belich-
f=
350
erzielt
aufmerk-
einem
Hel-
Einsatz
des
Stah-
der
beiden
mm
fest-
Photoansatz
wird
in
eine
Sie
zeigt
mit
wer-
Filmebene
10.2).
der
(siehe
die
Ver-
mit
Kap.
18).
fest-
und
Kap.
Dioptrie-
fir
die
250
Proj.)
mm
20.4
Suplemento
El
suplemento
ser
empleado
les (fig.
Con
exposición
dor f =
res
hecho
ce
Montaje:
Introducir
camara
la
Atornillar
uno
mm y aplicarlo a la
Montar
suplemento
Para
gen y para
en
se
mitación
cales
dioptrías
correctamente a fin
producida
sión
Si
na
pensar
Nosotros
pleo
20.5
y
Para
introduce
tubo
de
mitacion
correcto
capitulo
trias y del
para
En
imagen
para
los
Fig.
Fig.
Fig.
Fig.
1).
el
adaptador f =
350
aumentos.
de
una
pérdida
con
cola
de
de
los
la
la
selección
uno
de
capítulo
de
ambos
(véase
se
utilizan
se
puede
la
de
películas para
Retículo
cine
la
microfotografia y la
binocular
este
reticulo
de
10.2).
la
nitidez
el
reticulo
para
las
distancias
adaptadores.
3:
Suplemento
formato
4:
Suplemento
formato
5:
Suplemento
formato
6:
Suplemento
formato
de
de
con
las
son
más
mm,
con
Llamamos
que
el
adaptador f =
de
claridad
cuidadosamente
la
pieza
milano
del
el
adaptador
adaptadores f =
cámara
de
cámara
de
el
enfoque
los
oculares
18).
El
de
la
imagen
adaptadores.
con
el
retículo
nítidamente
capítulo
películas
introducir
temperatura
recomendamos,
de
formatos
un
reticulo
(véase
se
de
los
formatos y efectuar
las
dioptrias y del
El
ajuste
enfoque
de
la
esta
delimitado
el
formato
focales
24 x 36
24 x 36
7.16 x 9.6
*/3”
vídeo A 6.6 x 8.8
camara
cámara
cámaras
250
mm
cortos
que
el
que
se
la
en
de
unión
divisor
de
cámara.
con
los
adaptadores
(fig.
la
delimitación
se
introduce
del
tubo
retículo
para
debe
de
que
en
el
10.2).
de
color
un
filtro
de
color
sin
luz
artificial.
para
en
uno
cap.
puede
determinar
correcto
es
de
importancia
imagen.
pequeño
de
de
cámara
de
cámara
de
cine
107
mm
de
cine
107
fotografica
fotográfica
reflex
los
alcanzan
atencion
250
el
el
suplemento
autocentrante
de
cámara
250
2).
binocular
muestra
las
El
la
imagen
plano
azul
(véase
embargo,
suplementos
cinematografia
de
los
18).
enfoque
el
250 y 350
250
250
mm:
(proy.
mm:
puede
habitua-
tiempos
con
el
adapta-
mayo-
sobre
mm
produ-
borde.
rayos y fijarlo.
(100)
mm o f = 350
en
de
la
ima-
un
retículo
(véa-
la
ajuste
efectuado
sea
de
la
luz
para
cap.
el
oculares
la
ayuda
la
el
deli-
de
emul-
diur-
com-
foto
deli-
ajuste
distancias
ser
para
Con
(véase
de
las
diop-
decisiva
tamaño
de
24 x 36
mm
mm:
de
mm
mm:
de
16
mm)
mm
de
el
de
en
en
el
fo-
las
re-
6).
em-
se
del
la
de
43
Page 44

20.6
Dual
attachment
Connect
splitter
TV
—
—
~
—
—
Photo
—
—
— Fit
—
Adjusting
The
mittances
one
supplied
—
—
TV-
dual
fig.
35
(page
camera
Equip
the
Fit
it
into
Tighten
Release
TV
camera
tions.
Tighten
camera
Fit
the
camera
Screw
the
apter.
the
camera
Tighten
filter
of
which
with
Remove
Exchange
and
photo
attachment
2
mm
format:
the
dual
38).
with
TV
the
dual
the
clamping
the
clamping
in
the
clamping
photo
the
clamping
the
brightness
changer
30%,
can
the
the
TV
the
formats
see
attachment
C-mount
camera
with a TV
attachment.
screw.
screw
one
of
the
screw.
adapter
objective
to
the
dual
screw.
contains
50%
and
be
replaced
equipment:
camera.
filter
in
the
with
section
to
and
45°
click
to
the
camera.
to
the
attachment.
for
TV
filters
100%
by
the
TV
outlet.
the
20.5.
the
beam
objective.
engage
the
stop
posi-
camera
ad-
with
trans-
respectively,
8%
filter
12":
74":
60
60
mm
ÓN
A
mm
2":
#3":
85
85
mm
mm
2":
107
mm
24":
107
mm
Page 45

20.6
Double
Fixer
la
tique
Chambre
—
—
—
—
ー
Chambre
-
ー
—
—
Réglage
Le
double
(p.
39).
TY
Munir
la
Placer
la
Serrer
la
Desserrer
chambre
Serrer
la
photo
Munir
la
Visser
Placer
Serrer
chambre
l'objectif
la
la
de
changeur
chambre
chambre
pince à vis.
TV
Dince à vis.
chambre
pince à vis.
la
transmission
filtres
peut
2
format
être
la
TV
chambre
ni):
—
Retirer
-
Remplacer
Formats
Fig.
Petit
rallonge
rallonge
avec
la
pince à vis
dans
sur
filetage
C
d’un
objectif
dans
la
rallonge.
l’une
des 4 positions.
de
l'adaptateur
le
et
photo à l'adaptateur.
dans
la
rallonge.
luminosité
de
filtres
30%,
remplacé
le
filtre
avec
voir
50%
ТУ.
(sortie
double
chap.
TV
est
muni
et
100%.
par
rallonge
20.5.
TV).
répartiteur
TV.
encliqueter
de
chambre.
de
filtres
L'un
le
filtre
8%
op-
la
de
de
ces
(four-
20.6
Dualansatz
Dualansatz
(S.
39).
TV-Kamera
-
mit
—im
—
Klemmschraube
-
Klemmschraube
einem
—
Klemmschraube
Photo-Kamera
—
mit
—
Photo-Objektiv
schrauben.
—
Kamera
-
Klemmschraube
am
Strahlenteiler
mit
C-Gewinde
TV-Objektiv
Dualansatz
der
einsetzen.
45°-Schritte
Kameraadapter
im
Dualansatz
ausrüsten.
festziehen.
lósen
festzichen.
ausrústen.
am
festziehen.
Helligkeitsregulierung
Im
Filterwechsler
onsfilter
kann
getauscht
—
—
30%,
durch
werden:
TV-Kamera
Filter im
TV-Ausgang
TV-Formate
Abb.
2
Kleinbildformate
50%,
den
8%-Filter
abheben.
mit
Dualansatz
befinden
100%.
siehe
befestigen
und
TV-Kamera
einrasten.
Kameraadapter
einsetzen.
fiir
TV
sich
Transmissi-
Einer
dieser
(mitgeliefert)
auswechseln.
Kap.
20.5.
in
fest-
Filter
aus-
20.6
Suplemento
Ajustar
rayos
Camara
—
—
—
—
(pag.
Equipar
montarla
fijar
el
aflojar
el
de
tornillo
el
camara
—
fijar
el
tornillo
Cámara
—
-
fotográfica
Eguipar
mara.
atornillar
tador.
—
montar
-
fijar
el
tornille
Ajuste
de
En
el
cambiador
filtros
de
Uno
de
éstos
(incluido
—
Retirar
—
Sustituir
Formatos
suplemento
Formato
dual
suplemento
dual
39).
TV
con
rosca
la
camara
en
el
suplemento
de
tornillo
de
TV
en
de
la
cámara
el
objetivo fotográfico
la
cámara
de
la
luminosidad
transmisión
puede
en
el
suministro):
la
cámara
el
filtro
de
TV y fotografía
con
el
apriete.
de
apriete
uno
de
apriete.
con
el
en
el
suplemento
apriete.
de
filtros
de
sustituirse
de
TV,
en
la
salida
C
para
30%,
dual
pequeño
véase
cap.
en
el
divisor
objetivo
de
dual.
(a) y engranar
los
pasos
de
adaptador
en
TV
(b)
se
encuentran
50% y 100%.
por
el
de
TV.
con
20.5.
TV.
45”.
de
la
el
adap-
dual.
de
de
la
cá-
8%
Page 46

21.
Leica
photomicrographic
The
HV
or
tube,
tomicrographic
phototube
further
image
The
the
focusing
down
with
used
A
format-indicating
mats,
eyepieces
The
depth
Leica
quirement
and
for
all
ly
and
Detailed
struction
tomicrographic
A
phototube
tography,
mera
two
C-mount,
mount.
The
microscope
HU
is
the
nucleus
magnifies
(two-stage
scales
trinocular
built-in
materials.
are
and
the
binocular
variable
with
types
observer
angle
the
HV
is
to
be
of
the
double-iris
of
field
to
photoautomats
with
formats
rapidly
interchanged.
information
booklets
can
but
be
or
also
easily
of
linkage:
the
can
during
to
phototube,
of
the
system.
thereby
phototubes
introduced
binocular.
be
regard
Magazines
and
systems.
be
objective f =
Leica
The
the
intermediate
magnification),
attained.
framing
tube.
of
observation
and
HU
graticule,
diaphragm
individually
meet
to
film
materials
is
to
for
the
Leica
used
not
to
enable a eine
fitted.
There
the
view
the
the
process.
systems
or
the
trinocular
modular
eyepiece
and higher
are
matched
can
be
carried
The
binocular
valid
into
one
adjusted,
flexibility
saving
cameras
can
found
modular
only
for
is a choice
TV
adapter
50
mm
subject
cannot
for
enables
or
down
phototubes.
every
the
and
be
in
image
so
all
of
of
backs
be
in
the
still
TV
with
pho-
the
that
out
tube
be
for-
the
the
re-
time
easi-
in-
pho-
pho-
ca-
of
with
C-
the
46
LEICA
with
M651
MPS
surgical
48/52
operating
Photoautomat
microscope
Page 47

21.
Systemes
graphiques
Les
tubes
be
trioculaire
tomicrographique
l'image
intermédiaire
dans
le
tube
deux
étapes),
échelles
bes
photographiques
re
sont
étudiés
netteté
dans
l’objet
même
binoculaire à angle
peut
être
HV
et
HU.
Des
réticules
laires,
servent à contrôler
La
profondeur
ellement
incorporé.
Les
Photoautomat
les
exigences quant à la
lité
pour
Des
rallonges
tous
les
tographiques
sans
difficulté
données
ploi
des
ca.
De
méme
graphiques,
un
montage
TV
ou
ciné.
lune
avec
avec
tube
50
mm
avec
l'objet
pendant
gistrement.
photomicro-
Leica
photographiques
sont
photographique
ce
de
reproduction
de
le
tube
pendant
utilisé
sur
de
format,
de
au
moyen
une
méthode
photographiques,
formats
systèmes
et
usuels,
et
détaillées,
que
pour
le
tube
et
un
réglage
Deux
le
raccord
oculaire,
filetage
la
HV,
HU
les
noyaux
Leica.
L'agrandissement
se
fera
du
système
par
ou
un
oculaire
(reproduction
qu
permet
pour
façon à pouvoir
binoculaire
la
d'observation
les
tubes
champ
du
double
Leica
de
qualités
peuvent
très
rapidement.
se
référer aux
photomicrographiques
les
photographique
versions
TV,
oculaire
C.
démonstration
d'obtenir
plus
élevées.
la
version
trioculai-
contrôler
et
prise de vue.
photographiques
placés
le
cadrage.
est
remplissent
qualité
travail
d’émulsions
observer
variable
dans
réglée
individu-
diaphragme
et à la
rationnelle.
prévues
être
échangées
Pour
modes
éguipements
simples
de
la
sont
disponibles:
filetage
L'utilisateur
fixe
C,
et
objectif f =
ou l’enre-
Le
les
garantit
caméra
observe
le
tu-
pho-
de
en
des
Les
tu-
la
tube
ne
ocu-
iris
toutes
flexibi-
pour
pho-
des
d'em-
Lei-
photo-
l’autre
21.
Leica-Mikrophotosysteme
Die
Phototuben
tubus
sind
Leica
Mikrophotosystem.
im
Phototubus
vergróssert
lassen
sich
reichen.
Die
Phototuben
so
abgestimmt,
okulartubus
wahrend
kann.
Der
blickwinkel
HV
und
Für
die
Ausschnittkontrolle
ten
mit
zur
Verfůgung,
werden
Mit
der
Scharfentiefe
Leica
Photoautomaten
spruch
an
sparender
für
alle
Filmmaterialien
schnell
und
Detaillierte
Bedienungsanleitungen
photosystemen.
Wie
bei
tubus
auch
Fernseh-
hen
zwei
TV-Anschlussstück
Okularstutzen,
=
50
mm
das
Objekt
Aufzeichnung
HV,
HU
die
optischen
wird
(zweistufige
hóhere
fiir
dass
kontrolliert
der
Aufnahme
Binokulartubus
kann
HU
verwendet
Begrenzungslinien
die
kónnen.
eingebauten
individuell
Flexibilitát
Arbeitsweise.
einfach
Angaben
Photoausriistungen
fiir
einen
und
Filmkamera.
Varianten
festem
mit
C-Gewinde.
während
bequem
oder
Kernstiicke
ein
Zwischenbild
Abbildung).
Abbildungsmassstábe
trinokularen
die
Scharfstellung
beobachtet
nicht
auf
werden.
in
die
Okulare
Doppelirisblende
regulierbar.
erfiillen
bei
zeit-
Die
und
gewechselt
entnehmen
zu
einfachen
zur
Verfiigung:
mit
C-Gewinde
Okular
Der
der
béobachten.
Durch
und
mit
den
stehen
fiir
Kameraaufsätze
Formate
den
sorgt
Dem
Operateur
Vorführung
der
Trinokular-
ein
Okular
Dadurch
Aufbau
im
das
werden
variablem
Phototuben
Strichplat-
alle
Formate
eingesetzt
jeden
und
material-
kónnen
werden.
Sie
bitte
Leica
Mikro-
der
Aufbau
Benutzer
mit
oder
und
Objektiv
fiir
das
nach-
er-
sind
Bin-
Objekt
Ein-
ist
die
An-
den
Photo-
der
ste-
dem
mit
kann
oder
21.
Sistemas
Los
tubos
cular
ma
ocular
media
etapas).
producción
Los
cular
de
observar
Para
cuentran a disposición
indican
pueden
Con
de
de
Los
requisitos
tando
de
Los
pos
mente
Información
instrucciones
microfotográficos
Come
tubo
montaje
matografía.
usuario
f
con
y
objetivo
puede
rante
fotograficos
son
las
microfotográfico
tubos
controlar
regularse
campo.
Photoautomat
material
suplementos
de
rosca € o
piezas
en
el
tubo
es
aumentada
Gracias a esto
más
fotográficos
están
concebidos
la
el
objeto
el
control
las
delimitaciones
ser
insertados
el
diafragma
individualmente
respecto a la
al
mismo
en
películas y formatos
intercambiables.
detallada
para
en
el
caso
fotográfico
de
las
Se
dos
variantes:
con
f=
50
observar
el
registro o la
microfotograficos
HV,
ópticas
fotográfico,
grandes.
nitidez
aun
del
recorie
iris
de
tiempo
el
trabajo.
de
el
de
de
los
asegura
cámaras
encuentran a disposición
tubo
mm
el
objeto
HU o tubo
centrales
Leica. A través
la
(reproducción
se
para
de
en
durante
retículos
en
doble
Leica
economía
camara
encuentran
empleo
Leica.
equipos
de
con
portaocular,
con
presentación.
imagen
logran
escalas
el
montaje
manera
de
uno
flexibilidad,
también
televisión o de cine-
el
rosca
que
el
tubo
binocular
la
toma.
de
la
imagen
con
los
tamaños,
de
los
incorporado
la
profundidad
cumplen
de
para
todos
son
fácil y rápida-
de
los
fotográficos,
adaptador
€.
El
cómodamente
del
en
se
líneas
oculares.
todos
posibili-
tiempo
Uds.
sistemas
el
sencillo
ocular
operador
Leica
trino-
siste-
de
un
inter-
dos
de
re-
trino-
pue-
y
se
en-
que
que
pue-
los
y
los
ti-
en
las
el
del
de
TV
fijo
du-
Microscope
avec
Photoautomat
d'opération
LEICA M 651
MPS
48/52
Operationsmikroskop
mit
Photoautomat
MPS
LEICA
48/52
M651
Microscopio
con
Photoautomat
de
operación
MPS
LEICA
48/52
M651
AT
Page 48

IV.
Assembly
22.
Wall
ZN
The
bracket
rienced
on the
(1)
Mounting
(2)
Column
0)
Control
(20)
Swingarm
Assembly:
—
Column
Slide
the
secure
it
screws
swingarm
bracket.
—
Control
The
control
the
bracket
cumstances.
Assembly
Screw
the
that
they no
Slide
the
cure
it
with
Slide
the
(fig.
3).
—
Swingarm
Loosen
ger
protrude
A
Tighten
the
—
Lower
Tighten
Loosen
lower
the
ceptable
Tighten
ring
with
If
the
control
bracket,
—
Place
the
—
Lower
—
Lower
enough
the
column
-
Secure
unit.
—
Connect
mount
wall
which
tradesman
wall.
unit
column
with
(6)
must
may
unit
or
above
four
safety
the
control
the
four
safety
the
swingarm
the
screws
the
screws
column
position.
the
screws
the
the
mounting
column
the
swingarm
the
column
for
the
from
the
safety
the
MS-A,
mount
must
bracket
through
the
screws
be
be
unit
may
below
the
bracket
screws
longer
ring
along
screw
unit
screws
into
the
the
braking
hook
(6).
(5)
and
(5)
screw
unit
is
in
control
beneath.
ring
control
fixed
is
carried
be
fitted
at
the
the
(5)(fig.
accessible
mounted
be
fitted
it,
depending
(fig.
(6)
into
project.
the
(4).
along
(6)
until
bore.
knobs
(section
into
the
and
the
the
swingarm
and
secure
(4).
to
be
fitted
sequence
the
bracket.
into the
and
the
unit
beneath
unit
(see
by a mounting
by an
correct
the
column
1.2).
column
safety
column.
to
expe-
height
holes
(b)
2).
The
other
so
that
above
either
above
on
the
3):
column
and
the
column
they
no
and
engage
(fig.
ring,
to
an
the
safety
beneath
is
as
follows:
swingarm
be
slid
on
the
control
section
28).
and
the
the
cir-
so
se-
lon-
4).
and
ac-
the
far
to
48
Page 49

-adsa
-3U
вип
EpeyuoU
$э
Un
рэле@
:3959p
10d
495
V-SW
ap
poaed
35
onb
0498153
pased
afejuoyy
ap
oniejsz
‘Al
ZZ
W-SN
abejuoy
AHEJSPUEM
Al
‘ZZ
V-SW
obejuoy
fem
nes
Al
ZZ
onb
eLıpuoj
e]
mne
ua
[ap
IJUQUIBLIESOD
onb
Ej
arodos
©
“gjosuo
vjosuo3
UJSIJED
[可
W/
-OSUOY
AUIA
JS1
SAIJEJSPUE
AA
SP
19581]
JUDIUINOSQE
POP
[BANU
JHEIS
Np
appos
aT
(T)
-UOUL
UUFUNpE
PUE
AA
UU
19P
UE
пол
2YOH
*3JIIOS
3Зшрэдип
19)y9SUNMIİ
цэраэм
ap
‘al
ied
‘onjnoa
Maney
E|J
‘тише
эху
94}
ojosuoy
µοῃ
Ul
(1)
"aysenads
2UUO[0)
31908
un
(1)
(7)
орчеш
[lagu
эр
00040010239
ojeredy
(호)
(£)
12125191916
ames
(z)
(©)
иопешэциту
aniqow
seIg
(5)
(07)
HO
oztıg
:olejuojy
(07)
で
一
i
UUIBMNUSMUIS
133
anes
BJUO
(07)
JA
—
S9INJI9ANO
$9]
SUEP
2440102
BJ
125818
auuo[0
:3S.PJUOJA]
3.118
J
一
-y
(9)
"B]OSUOI
epand
Á
50[[04101
(q)
as
orguio
비
31010
31)
509
6041303
01800
[a
‘(7
10d
‘31])
‘sajqisazor
[41041
60040102
BJ
12752
pun
uaqaiyas
(q)
uasunuO
391p
yolnp
nes
SAT
(Z
'3U)(C)
SIA
sap
U3ÁOwU
ne
19xY
E]
19
(Q)
opuew
5
이
02610
[0
ㅁ
401
ap
15$
[3
0403
ojeredy
1810000
иэаэр
BLIEL
—
sep
AG
y3ue3nz
2SeJUOJN
(7
PI)
ajosuoy
InZ
vererxy
Jap
Uassnur
Jaqn
(¢)
uaqnesyog
sauueyuaMypas
(9)
uagnesyos
“LIS
qu
np
2p
snssap-ne
uononysuos
‘a]iqou
SaldISSaaaB
SEI
eT
np
op
adejuow
3100403
aa
1HaAIOD
HOHHEHUI3UHITW
aj
106031
mod
(9)
apos
UT
SIA
一
эр
элаор
opely
128
apand
opueu
ejosuos
ap
ojesede
ej
ofeg
[4
o
La1I3HUad3dar)
El
U3
128n]
SODTIIUTOTE
[2p
:(€
opusipuadap
39)
138
BJOSU03
30
464
“eöuodsıp
(9)
By
aiqos
50110
ㅁ
0101
afequoyy
9s
anb
50
Jap
13140
(E
1200
PU)
130
alIITBd
"TaDT9AA
ajosuoy
ㅁ
1BIaSTama1S
JHE
18HSaTad
Jp
14255205
SBD
пиву
ИИ
(CDU)
apos
aj
ans
"apos
28EJuO
a]
I
10gn
9JOSUOY
adejuoj
"INDLI9IXA,|
29
e,
nbsnl
2uuoj03
B
snjd
EJ
1031105531
SUBD
(9)
SIA
au
59]
sapa,
I9SSIA
nb
1193190916
—
snos
no
INS
UONPIUDUNJE
|
10XY
"1HaLLIT
THSUI
1
-000102
ua
ofode
(+)
e]
'008[6531005
10d
ogro
ap
ojjtue
opuewi
[2
[a
uoo
ap
eqtire
0
ㅁ
2013
61504
60
000102
ㅁ
-N2.149$
3MES
31P
UL
HSM
OS
(9)
USQNEILDS
9IC]
o]
mey
uo
red
aayng
ap
neauUR,]
Jassi[s
ane
(€
oprefy
erede
su)
apsap
Á
opeleq
eutunjos
ja
1271524
12259
À
eu
e
U3qarqUos
-ge
“HASRISNEISY
pun
uaqartos
Ames
"Uaghsafad
14301
alp
3InBS
Jaqn
14214
(+)
3Ip
0240
UISSNE
aqnermyos
I3qn
(ΕΡΜΗ)
UOA
]BI38Ianalg
918
SULIZINIS
MU
SIQ
“UIQ
‘(+)
13x
a|
sind
*aumo|os
BIT
ap
Buo]
‘uayues
pun
1ο
au
saIl3.nb
3UUOIOO
ao
Bl
g.nbsnf
Ins
UOIJEJUQUNIE]
(9)
SIA sa]
‘(€
80)
ojigow
191198891
Jassrege
oINaIN
se
一
-unsua
“BULUN[OS
-08
ou
snb
X
Oua1
ET
BlSBu
ap
JOLIayUI
ap
(9)
sauojoqg
SOIIIUHO1
pated
$0]
SO[
e]
1eanbo¡g
BIIULIOTBS3(T
us
AOU
UBS[es31q
0761$
NY
—
SSEP
ISU
‘Uaqneiyossneiay
JIU
aITBS
TSD
PUBMUSUUT
изм
0$
(9)
HE
"12881512124
TGNPIYIG
J9p
yuaMyIS
Jne
ars
一
ap
PUS
3103113141
“(TT
deyo)
Ja
ura
10100
ej
Ins
saIdISIA
9383014
ap
suojnoq
ap
19143]
sa]
9]
1anbo¡g
‘2UUO[09
$14
112105
E]
1ο]οπῇ
V
R
ZaA
“(4
oÁode
3)
BHT
euumjo3
[16001
p
ojjrue
02610
비
[a
43
A
‘(9)
19
(5)
[1400
0Z81Q
[9
1890109)
—
1249414245
‘uayaizjsay
‘(7'T
402
sogruo]
8
이
60000102
[14101
so]
50
61
1eIsnfy
501[2
18168
ㅁ
05
된
(p
PIA)
Uezlesula
‘U9Y2IZISI]
anes
“29$9p
as
anb
eme
E]
490
U9SOT
4260
ULIENUSMUOS
‘dey)
aIp
aydouysmaig
UL
uaympysay
(9)
ULIEYUIMYIS
USQNEIJIS
JU
ones
V
—
a91ng
SeIq
NESUUE
‘(+
By)
31
ap
]
»uuojoa
23346
nesuur
19
(C)
30400102
SIA
|
“AN[NOA
E
IMs
aTIqoUW
SEIQ
A]
199814
—
Jaxy
sa]
B|
aLIassap
ja
Maney
Jassteqe
(¢)
sta
TIOAB
say]
e]
"aa]nd
€
ranbojg
3[1q001
SaIdW
ap
-10)
op
ove
ja
sefy
£
(ç)
soygruzoj
$01
тет
у
«af
jne
$81117101$
зэр
рип
($)
чэапетоб
"(p)
SLA
BJ
DAB
310310815
E]
ofeq
[20
opueta
0462
(+)
B
ap
BAall
om
erede
as
3[eluor
5
ja
uos
ararmb
oÂode
ja
‘ejos
as
IS
WW
SULIZINIS
pun
‘uayuasge
uayatzjsay
"TaIaIXH
DUOH
(¢)
(ヤセ )
adrlBIS
24пе142$
AYDSUNM
“apos
aj
snos
“Q[OSUOS
3938|d
E]
319
SUBP
‘ms
лор
2UU0[09
»urm03
попезиэшще,
в]
I3p9301d
лава
|
IG
—
~EZIIS9p
E]SEY
"BUUM[OJ
[IAQUI
Jos
"BIOSUO3
epond
OZEJQ
'0000401023
E]
U3
opuewi
BJ
[9
JIAOLU
US
UOI
ap
EULUN[O9
OZEIG
ojeIede
[D
E
JEDOJOJ
ja
Jeleg
anb
一
—
E]
U9
ofeqe
apsap
op
‘USAUSSQE
60000102
미
162010:)
:0pOLU
-
1эри2510}
-28
э1о5иом
"137]95UTS
иг
лэр
эЗеао
лайт
12128120916
эр
13/0319
SEP
Iyosuna
PIA
-snf
afiqowi
"3000]09
seIq
E]
9]
INS
DDAL
3]1qOU
IUUOJOD
selq
E]
9]
19SSIEGW
919]
—
—
JOMOS
"TaZ1aSUta
3]NPS
ULIBAUIMUIS
aIOSHO
31P
Ul
ULIEAUIMUIS
“Ip
:38]0JUIYLO
JIMI
UI
DNES
ajnes
Y
—
—
—
"UOTJPJUSUE,]
aassi]à
‘(27
219
"de
ossind
SNOS
39)
uogejuowije
‘seq ua
uonejuawiye
227nq
Ted 30
ap
NEOUUR,
ㅁ
|
ponho
0102
13HQLBT
|
e]
I9XLA
e
nb”
ms
—
-
"dea
ap
oyerede
2883A)
opueu
ja
oleq
ap
oAode
ojetede
ap
ojjrue
¡ap
norte
'opueur
ja
1elty
(
=-
—
ー
“‘Uashsajaq
“NES
'dey
alp
94918)
Jaqn
1BTag1ana1S
$9]1819319N9I9
uajun
‘HUEY
uoA
Uaplam
LHaD
JE19819N9]S
S3p
13]0n
UISSINYISUY
Waqoyrsas
SUUZINS
SEP
SSEP
a]
(87
—
—
0
Page 50

“wr
Ere
=
CB
e
23.
Floor
stand
MS-C,
The
floor
stand
unit
handle
for
column:
foot
the
em
between
if
required
of
the
by
and
then
Rotate
out
sideways
column
dust
plugs.
the
control
control
the
four
unit.
the
cover
wire.
the
(90,
91,
that
(see
section
swingarm
the
four
control
control
the
MS-C
and
pushing
brakes
down
screws
column
two
the
the
the
braking
92,
the
base, a column
15)
Base
(19)
Column
(3)
Control
(9
Metal
17)
Handles
Assembly:
—
Insert
the
Apply
the
of
the
pedals
plugs
and
(fig.
1). A 20
troduced
ble
base
techniques.
Fit
each
the
column
screws,
les
(17).
les
point
cure
the
the
two
ー
Attach
Slide
the
wards,
—
AN
—Loosen
—
М
—
so
HEE
ei
=
E
down
Fit
the
swingarm.
Disconnect
control
Support
cal
earthing
Tighten
arm
Ensure
ged
Lower
the
Tighten
Close
the
Connect
the
axes
hard.
(14).
the
metal
means
add
the
column
using
unit:
unit,
column
power
screws
on
section
safety
1).
into
screws
unit.
unit
rollable
consists
swingarm.
the floor
(16)
by
Remove
Insert
extension
column
for
special
handle
of
the
two
screw-on
so
the
screws
control
(fig.
cable
(8),
account
knobs
2).
hook
the
column
(6).
(see
that
to
2).
and
section
relative
of a rollable
stand
pressing
and
of
on
the
the
column
can
be
the
operating
axes
(18)
two
hollow
hand-
the
hand-
the
base,
(14),
and
knobs
open
the
electri-
the
swing-
(22)
is
(fig.
;
28).
both
dust
m-
rolla-
to
se-
fit
up-
the
enga-
4).
50
Page 51

23.
Statif
Le
statif
roulant.
(15)
(19)
(3)
(18)
(17)
de
d'une
Pied
Colonne
Alimentation
Porte-poignée
Poignées
Montage
—
Colonne
Bloquer
sur
les
pédales.
les
couvrement
(fig.
1).
opératoires
longe
de
lonne.
Pour
garantir
nécessite
fare:
Monier
les
moyen
des
poignées
la
poignée
vis
de
fixation
recouvrement.
—
Alimentaion
Faire
glisser
les
boutons
—
Bras
mobile
Tirer
—
Ouvrir
le
serrant
—
Retirer
prenant
les
avec
garde
Bloquer
mobile
le
levier
chap.
Placer
le
Visser
les 4 vis
Fermer
—
l'alimentation.
Brancher
de
sol
roulant
sol
MS-C
colonne
de
freins du
se
et
positionnement
pied
Retirer
et
les
vis
Pour
spéciales,
20
cm
l'utilisation
(14).
satisfaire à des
on
entre
le
la
stabilité,
d'un
porte-poignées
vis à six
(17).
soit
pans
Tourner
alignée
(14)
et
remettre
Valimentation
de
réglage
le
cable
réseau.
boîtier
de
vis
l’alimentation
(8).
précaution
au
cable
les
freins
91, 92,
blocage
de
chap.
(90,
de
1).
bras
mobile
sur
(6).
l'alimentation
MS-C
compose
d'un
les
peut
pied
l'éclairage à fente
creux,
la
sur
vers
de
pivotement
(22)
la
(cf.
d'un
bras
mobile.
(16)
en
appuyant
plaques
Placer
la
colonne
techniques
placer
supplémen-
la
colonne
et
visser
pour
pied,
serrer
les
plaques
sur
la
haut
couvercle
2).
Contrôler
accroché
chap.
28).
une
et
calonne,
(fig.
en
du
(fig.
roulant
poids
sur
colonne
le
le
le
mise à terre
est
colonne
de
la
fixé
pied
re-
ral-
co-
au
les
que
les
de
2).
des-
en
bras
si
(cf.
4).
23.
Fahrbares
Das
Bodenstativ
baren
Fuss,
arm.
(15)
(19)
(3)
(18)
(17)
Montage
—
Saule
ciner
Fuss
Sáule
Steuergerát
Griffhalterungen
Positiomergriffe
Fussbremsen
ten
blockieren,
(14)
herausnehmen.
Für
spezielle
ne
Sâulenverlângerung
20
cm
zwischen
Säule
montiert
Griffhalterungen
an
der
Säule
schrauben.
zum
Fuss
ausgerichtet
festziehen
—
Steuergerät
Steuergerãt
nach
oben
—
Schwenkarm
AN
Netzkahel
—
Gehâuse
des
Schrauben
—
Deckel
mit
dungskabel
Die
Gelenkbremsen
(90,
91,
lieren, ob
hängt
ist
—
Schwenkarm
Vier
Schrauben
Steuergerát
—
Anschliessen
28).
Bodenstativ
MS-C
besteht
Sáule
und
einem
(16)
durch
festes
Staubdeckel
Sáule
einsetzen
Operationstechniken
mit
dem
einer
fahrbaren
werden.
(18)
so
drehen,
mit
Griffe
montieren.
Säule
sind.
und
Staubdeckel
mit
den
über
Bedienungsknôpfen
die
Säule
schieben
ziehen.
Steuergerâtes
(8)
6ffnen.
Rücksicht
vorsichtig
92)
festziehen
der
(vel.
Kap.
in
die
Sáule
(0)
schliessen,
des
Steuergerites
durch
auf das
abnehmen.
des
(Kap.
Sperrhebel
1).
einsetzen
festziehen.
MS-C
aus
einem
fahr-
Schwenk-
Heruntertre-
und
Schrauben
(Bild
1).
kann
ei-
Lange
und
darüber-
die
Griffe
(Bild
Lósen
Kontrol-
(22)
einge-
(Bild
(siche
von
der
(14)
2).
der
Er-
4).
Kap.
Fuss
Inbusschrauben
(17)
dass
Schrauben
aufsetzen.
montierte
Schwenkarmes
2).
23,
Estativo
El
estativo
rredizo,
(15)
Pie
(19)
Columna
(3)
Aparato
(18)
Soportes
(17)
Empuñaduras
Montaje
—
Columna
Bloquear
fuertemente.
contra
la
columna
—
Para
satisfacer
ciales
se
columna
columna.
—
Montar
(18)
por
hexagonal.
sobre
los
nera
que
das
con
locar
las
—
Aparato
Deslizar
nes
hacia
Brazo
—
MA
Desconectar
Abrir
la
do
los
-
Quitar
cable
de
Bloquear
91,
lar
enganchada
—
Colocar
Ajustar
Cerrar
—
Conexión
28.)
de
suelo,
de
suelo
una
el
polvo y los
MS-C
columna y el
de
mando
para
las
empuñaduras
los
frenos
de
Quitar
(fig.
1).
técnicas
puede
colocar
de
20
cm
entre
los
soportes
medio
de
los
Atornillar
soportes.
las
el
pie.
tapas
de
el
arriba
Girar
empuñaduras
Apretar
contra
mando
aparato
de
sobre
móvil
el
cable
caja
del
tornillos
con
(8).
cuidado
aparato
la
conexión a tierra
los
cap.
la
frenos
2)
del
palanca
92,
que
(véase
el brazo móvil
los
cuatro
el
aparato
del
tornillos
de
aparato
mando.
corredizo
consta
brazo
pie
(16)
las
tapas
tornillos
de
operación
una
proongación
el
pie
de
las
empuñaduras
tornillos
las
empuñaduras
la
columna
queden
los
tornillos
el
polvo,
mando
la
columna
de
alimentación.
de
mando
tapa
para
ya
montado.
de
articulación
brazo
móvil.
de
bloqueo
capítulo
en
la
columna
(6).
de
mando
MS-C
de
un
pie
móvil.
protectoras
(14).
corredizo y la
con
no
1).
co-
pisándolos
Colocar
espe-
de
de
cabeza
(17)
de
ma-
orienta-
(14) y co-
los
boto-
(fig.
2).
aflojan-
dañar
(90,
Contro-
(22)
esté
(fig.
4).
(véase
cap.
el
Page 52

OS
|
HER
+
24.
Ceiling
ZN
The
fitting
tiltable
the
connection
arm
to
Fuses:
230
i
T
6.3
T
0.05
V
T0.5
mount
The
fitting of
ceiling
plate,
swingarm,
and
the
electrical
ling
mount
ca
agency.
of
the
joint
is
described
the
control
A,5x20mm
A. 5 x
20
A,5x20
MS-F
the
the
the
carrier
connections
will
be
microscope
of
the
control
unit
in
(167656)
mm
(167660)
mm
(167650)
mounting
ceiling
with
organized
carrier
in
sections
from
section
bracket
mount,
control
to
the
by
the
and
of
25-27,
the
swing-
28.
or
the
unit
cei-
Lei-
the
and
115 V
T6.3
A,
T
6.3 x 32
0.05
A,
T10
25.
A
It
instrument,
ving a perforated
—
—
—
6.3 x 32
A.
6.3 x 32
Tiltable
tiltable
increases
Slacken
of
the
steel
Hook
the
Engage
the
propriate
the
swingarm
(27)(the
perforated
The
orange
of
the
tiltable
microscope
mm
mm
mm
joint
joint,
can
the
overhang
and
has a safety
plate
the
orange
axle
is
tiltable
pegs
of
position
and
alteration
disc
is
knob
(28),
joint,
carrier.
(167673)
(167676)
(167669)
be
fitted
and
mechanism
and a crane
knob
(27)
seen,
joint
on
to
the
tiltable
in
the
perforated
tighten
of
the
peg
described
which
serves
to
the
mobility
until
the
axle,
joint
the
orange
position
in
section
also
to
swingarm.
of
the
invol-
hook.
the
end
at
an
ap-
disc
knob
on
the
3).
forms
part
secure
the
of
52
Page 53

24.
Statif
de
plafond
L’agence
montage
socle,
tal,
positif
triques
Le
mode
porte-microscope
27,
celui
mobile
et
au
chapitre
Fusibles:
230
V
T
6,3
A,5x
T 0.05 A, 5 x
TOS
A,5x
115
V
T6,3
A,
T
0,05
A,
T
1,0
A,
25.
Joint
Un
joint
mobile
lité
de
l’ensemble.
pose
du
curité:
—
Tourner
butée.
—
Accrocher
—
Engrener
foré
du
puis
bloquer
le
réglage
Le
bouton
du
joint
microscope.
Leica
de
du
tube
du
bras
de
commande
du
de
fixation
du
cable
le
dispositif
28.
20
20
20
6,3 x 32
6,3 x 32
6,3 x 32
pivotant
pivotant
pour
augmenter
disque
perforé
le
bouton
le
dispositif
les
tourillons
bras
mobile,
le
du
disque
orangé
pivotant
la
plaque
de
mobile,
statif
est
décrit
de
commande
mm
(167656)
mm
(167660)
mm
(167650)
mm
mm
mm
peut
La
liaison
bouton
(28)
et
MS-F
régle
les
de
statif,
du
du
support
et
des
de
plafond.
du
joint
pivotant
aux
de
(1676765
(167676
(167669)
orangé
dans
perforé).
qui
commande
être
monté
la
portée
de
et
du
dispositif
|
(27)
de
sécurité.
dans
la
position
(27)(voir
fait
également
sert à fixer
conditions
plafond
ou
bras
horizon-
pour
liaisons
chapitres
relie
le
est
décrit
sur
le
et
la
mobi-
sûreté
se
de
jusqu’à
le
disque
voulue,
chap. 3 pour
partic
le
porte-
et
com-
24.
Deckenstativ
de
VAN
Die
du
dis-
élec-
du
25
à
bras
bras
sé-
la
per-
Konsole,
arms,
Steuergeråt
bindungen
der
Die
Befestigung
kroskoptráger
stigung
Steuergerát
Sicherungen:
230
V
T63
A,5x
T
0,05
A, 3 x
TOS
A,5x
a
05
A,
25.
Schwenkgelenk
Das
Schwenkgelenk
Schwenkarm
und
Beweglichkeit
heitsverbindung
Sicherheitsaufhángung.
—
Knopf,
—
Sicherheitsaufhângung
—
Zapfen
scheibe
Knopf
verstellung
Der
orange
Schwenkgelenk
des
Mikroskopträgers.
Montage
des
des
Schwenkarms,
Leica
Vertretung
ist
des
Steuerkabels
ist
im
20mm
20
20mm
6,3 x 32
6,3 x 32
6,3 x 32
montiert
orange
in
gewünschter
des
Schwenkarmes
(27)
stark
siehe
Knopf
MS-F
der
Stativrohrs,
und
der
zum
Deckenstativ
von
Schwenkgelenk
in
den
Kap.
28
(167656)
mm
(167660)
(167650)
mm
(1
mm
(167676
mm
(167669)
kann
werden,
zu
erhóhen.
besteht
(27),
bis
festziehen
Kap.
(28)
und
dient
Deckenplatte
des
des
Trågers
elektrischen
geregelt.
Kap.
25-27,
vom
Schwenkarm
beschrieben.
61616)
fakultativ
um
Ausladung
aus
Anschlag
einhângen.
Position
3).
gehört
Die
Lochscheibe
aufdrehen.
in
einrasten
(Lochscheiben-
ebenfalls
der
Befestigung
bzw.
Auslege-
Ver-
wird
und
die
Befe-
an
Sicher-
der
Loch-
ZN
mit
von
Mi-
im
den
und
und
zum
24.
Estativo
El
montaje
consola,
horizontal,
con
aparato
nes
eléctricas
regulado
La
fijación
tamicroscopio
los
del
cap.
Fusibles:
230
T
6.3
T0.05
TOS
115
T
6.3
T
0.05
25.
La
a
pedido
aumentar
La
perforado y un
—
Aflojar
торе.
—
Enganchar
—
Encajar
disco
fuertemente
posición
El
ticulación
tamicroscapio.
de
caps.
25-27,
brazo
móvil
28.
V
A,5x
20
A, 5 x
20
A,5x20
V
3
6.3
x
A,
À,
6.3 x 32
6.3 x 32
Articulacion
articulación
en
el
conexión
alcance y la
de
el
botón
el
el
perno
perforado
del
botón
anaranjado
orientable y sirve
de
techo
de
la
del
tubo
del
brazo
de
mando y de
para
por
la
representación
la
articulación
con
portaóptica
la
fijación
en
el
aparato
mm
(167656)
mm
(167660)
mm
(167650)
32
mm
(167673)
mm
(167676)
mm
(167669)
orientable
orientable
el
brazo
seguridad
diapositivo
anaranjado
dispositivo
en
la
del
brazo
el
botón
disco
perforado
MS-F
placa
del
del
el
movilidad
(27)
(28)
techo o de
estativo,
móvil,
estativo
orientable y por-
se
del
cable
de
mando
puede
movil
ser
con
consiste
de
seguridad.
(27)
de
seguridad.
posición
móvil y enclavar
(para
el
véase
pertenece a la
para
del
brazo
del
soporte
las
conexio-
de
techo
Leica.
describe
de
mando
montada
el
fin
del
mismo.
en un
hasta
deseada
cambio
capítulo
fijar
el
la
es
en
en
el
de
disco
el
del
de
3).
ar-
por-
Page 54

26.
Optics
26.1
Fitting
The
LEICA
the
MS-A
F
mount,
carrier.
Mounting
—Loosen
cover
drive
(40)
—
Slide
the
microscope
that
the
erted,
~—
Replace
two
screws
To
attach
26.2
Fitting
—
Position
tion
to
the
peg
—
Fit
and
—
Secure
by
means
25
mm
sitioned.
—
Remove
stop
(49).
—
Slide
the
carrier
the
clamping
—
Secure
screws;
ding
off.
carrier
to
the
M651
mount,
is
to
the
plate
(fig.
completely.
microscope
carrier.
four
and
tighten
and
(46).
the
to
the
the
bracket
the
microscope
(47)(fig.
tighten
the
adapter
of
four
diameter
the
screws
optics
rod
from
the
carrier
it
prevents
microscope
optics
the
MS-C
be
attached
two
screws
2),
and
on
Hold
hollow
screws
them.
secure
the
microscope
bracket
with carrier
4).
the
four
(35)
hollow
hole
must
from
carrier
with
beneath
screw
(54).
rod
end-stop
the
carrier
carrier,
if
used
stand
or
to
the
microscope
(46),
remove
lower
the
the
peg
(47)
the
microscope
(48)
can
cover
plate
carrier,
see
with carrier
the
screws
be
the
carrier
adapter
and
secure
rod
by
means
screws
optics
(fig.
vertically
(49)
carrier
hollow
to
instrument
with
the
MS-
the
focusing
of
the
so
be
ins-
with
the
section
rod
in
rela-
of
(48).
carrier
5).
The
po-
rod
end-
on
to
the
it
with
with
the
from
sli-
Page 55

26.
Corps
de
microscope
26.1
Montage
Le
corps
au
le
porte-microscope
MS-A,
Montage
—
Desserrer
protection
mise
-
Faire
(47)
Maintenir
six
pans
-
Revisser
des
deux
Pour
chap.
26.2
Montage
avec
colonne
—
Emboîter
sur
le
porte-microscope
de
microscope
MS-C
et
MS-F.
les
vis
(46),
(fig.
3).
au
point
glisser
du
porte-microscope.
creux
le
vis
accrocher
27.
Tourner
(40)
le
microscope
le
microscope
(48)
couvercle
(46).
le
sur
le
support
réceptrice
le
support
vers
LEICA
dans
retirer
puissent
de
porte-microscope,
avec
porte-microscope à l’aide
(fig.
4).
—
Mettre
les
les
bloquer.
—
Fixer
l'adaptateur
cope
au
moyen
(fig.
5).
L'ouverture
doit être
—
Retirer
(49).
-
Faire
corps
Vassurer
—
Fixer
(49) à l’aide
l'instrument
en
la
glisser,
de
microscope
avec
de
nouveau
quatre
vis
ーー
vis à six
(35)
des
quatre
position
sur
l'extrémité
par
en
la
pince à vis
l’extrémité
de
de
glisser.
de
verticale.
bas,
la
M651
le
la
le
bas.
sur
pour
être
protection à l’aide
colonne
du
pans
au
corps
vis a six
25
mm
sur
avec
l'adaptateur
(54).
vis
pour
est
cas
des
le
couvercle
commande
le
tourillon
que
les 4 vis
introduites.
tourillon
creux
(48)
de
micros-
pans
de
diamètre
de
la
colonne
la
colonne
de
la
colonne
empêcher
statifs
sur
creux
fixé
de
de
à
voir
le
(47)
et
le
et
26.
Optikträger
26.1
Montage
Der
Optiktrager
Stativen
skopträger
Montage
—
Schrauben
men
Fokussiertrieb
—
Mikroskop
kroskoptragers
Mikroskop
ben
kônnen.
ー
Schutzdeckel
der
aufschrauben.
Einhangen
MS-A,
befestigt.
(Bild
2).
(48)
cingesetzt
an
(46)
über
so
des
27.
26.2
Montage
mit
Aufnahmesáule
—
Trâger
trâger
(Bild
—
Die
vier
festziehen.
—
Adapter
Optikträger
(©
25
—
Schrauben
an
mit
Aufnahmesâule
mit
Hilfe
4).
Inbusschrauben
(35)
befestigen
mm
muss
am
nen.
—
Optiktriger
Saule
sichern.
—
Sáulenabschluss
wieder
Abgleiten
mit
schieben
befestigen;
gesichert.
den
Mikroskopträger
LEICA
MS-C
(40)
schieben.
halten,
mit
Mikroskoptragers
den
mit
senkrecht
Sâulenabschluss
und
und
lósen,
Schutzdeckel
ganz
den
Zaplen
dass
und
zwei
Trager
des
Zapfens
vier
(Bild
Adapter
mit
(49)
mit
so
ist
M651
MS-F
herunterdrehen.
vier
angezogen
Schrauben
am
(48)
Inbusschrauben
5).
ausgerichtet
von
Klemmschraube
Hilfe
das
Instrument
wird
bei
den
am
Mikro-
abneh-
(47)
des
Inbusschrau-
werden
(46)
wie-
siche
Kap.
Mikroskop-
(47)
einpassen
einsetzen
Die
unten
der
und
Offnung
sein.
(49)
entfer-
iiber
(54)
Schrauben
gegen
26.
26.1
El
portadptica
tamicroscopio
MS-F.
Montaje
—
Aflojar
protección
Mi-
que
—
Pasar
(47)
Sostener
puedan
cabeza
—
Volver a atornillar
(46).
Para
cap.
26.2
portamicroscopio
—
Acoplar
tamicroscopio
(fig.
—
Colocar
gonal
am
—
Fijar
de
La
pendicular.
-
Atornillar
die
columna
—
Deslizar
adaptador
tornillo
—
Fijar
ayuda
desliza.
Portaóptica
Montaje
Montaje
cabeza
abertura
en
el
portamicroscopio
LEICA
de
los
los
tornillos
(fig.
(40)
el
del
hexagonal
enganchar
27.
4).
(48) y apretarlos.
el
adaptador
3).
en
la
posición
microscopio
portamicroscopio.
el
microscopio
introducir y apretar
el
en
el
soporte
el
soporte
con
los
cuatro
(35)
hexagonal
de Ø 25
los
tornillos
(49).
desde
abajo
en
la
columna y asegurarlo
el
cierre
los
tornillos;
de
de
(54).
nuevo
M651
se
fija
estativos
(46) y quitar
Fijar
el
más
por
encima
de
(48).
la
tapa
portamicroscopio,
con
con
la
columna
ayuda
|
tornillos
con
en
el
portaóptica
mm
en
el
portaóptica
de
la
así
el
en
MS-A,
la
mando
baja.
del
tal
manera
los
tornillos
con
dos
la
columna
en
del
muñón
de
cabeza
los
cuatro
debe
quedar
el
cierre
columna
instrumento
el
por-
MS-C
y
tapa
de
de
enfo-
muñón
que
se
de
tornillos
véase
el
por-
(47)
hexa-
tornillos
(fig.
5).
per-
de
la
con
el
con
el
(49)
con
no
se
55
Page 56

27.
Microscope
—
Attach
the
scope,
see
joint
(fig.
2
—
Slacken
the
of
—
Hook
the
forated
In
scope
correct
28.
The
trol
ling
A
the
knob
the
steel
the
pegs
at
disc,
combination
carrier
position
Control
illuminator
unit
if
mount
Warning:
Before
disconnect
(73)
Voltage
(74)
Socket
(75)
Socket
—
Connect
the
socket
—
Connect
socket
«LAMP»
4).
—
Press
the
enough
latitude
strument
—
Connect
socket
Insert
supply.
(74).
the
—
—Connect
microscope
section
1),
or
directly
orange
(27)
of
the
axle
tiltable
an
appropriate
and
with
and
unit
is
the
wall
are
used,
opening
the
selector
for
power
for
lamp
the
cable
on
the
the
cable
cable
(fig.
1).
the
power
bulb
(see
the
power
carrier
carrier
26)
either
to
knob
tiltable
is
seen.
joint
on
retighten
one
the
tiltable
for
the
user
to
be
connected
or
floor
the
control
power
and
fuse
cable
cable
from
the
swingarm.
from
the
(75)
on
the
into
the
for
the
movement
cable
section
cable
(with
to
the
swingarm
of
the
swingarm
joint
until
the
axle,
position
the
orange
another,
joint
(see
stands
unit,
cable.
holder
lamp
swingarm
control
clips,
(orange)
13.1).
to
the
micro-
the
tiltable
(fig.
or
the
end
engage
in
the
per-
knob.
the
micro-
ensure
the
section
3).
to
the
con-
or
the
cei-
always
housing
to
to
the
unit
(fig.
ensuring
of
the
in-
to
the
electricity
Changing
If
after
connected
not
shine,
—
Pull
out
—
Open
the
—
Pull
out
You
can
tube.
—
Replace
ses.
—
Open
the
—
Turn
the
re
115 V
240
V)
ver
is
replaced,
fuses
the
control
an
switched
first
inspect
the
power
cover
the
holders
tell a blown
the
holders
cover
drum
(for
100-120
is
visible
(73)
(73)
so
in
unit
on
the
cable
marked
fuse
complete
that
the
V)
the
window
has
been
the
illuminator
fuses.
with
by
its
melted
with
appropriate
or
230 V (for
when
properly
does
an
arrow.
glass
new
figu-
200-
the
co-
fu-
Page 57

ordoosOrQItul
-BIHI1IB
-HIB
[0
OZBTq
ㅁㅁ
BT
3103010123110
[3P
ap
せ
[
Ia
[Ia
(9Z
uoo
oltdoosoJorelIod
omnzideo
01do3so1311BU0d
asesA)
opejuom
Ia
Ie[r
'/Z
丁
一
(I
“ONA
(/
OPELUETIEUE
て
)
HO1O]
0
|
は
(?
ugolod
0
di)
:(]
a|qejuonio
89)
эавизно
[3
1BIHHLLTO1S3C]
Плош
uorejno
07219
иото
—
Japo
SEIYISUY
-5)24
PIE)
(с
yuajasyuomyss
NU9]9FYUSMYIS
alT3THUOUH
РИЯ)
siq
WieyUamYyog
иехиал42$
リリ
jiu
ガル
sasendoysoryiyy
リリ
リロ
リル
リリ
//
WE
(97
ше
“dey
ур
*s)
doys
лэро
ure
‘aduvio
‘jdouy
1199$
we
(/7)
"Tail3TDTTB
jdouy
72
—
эЧоэзолэни
2348
2doosoDIu-2]10d
adoosos9iu-
3104
a]
10x14
‘/Z
—
—
ej
juejoAld
"(<
99)
e
'51)
nbsnl
juezoard
эпдош
jurol
sjiqoux
jurof
np
seg
asueio
serq
a]
aj
1ns
ins
np
(97
uoynog
juaurajoamp
(47)
"dE
uomoq
a]
jo)
duno]
ajuom
no
a
no
(7
-a19u3,|
"911398
Op
jnisodsip
2]
12420199
‘aging
—
-ua
uoraisod
SAJUDISJIP
ΕΙ
[эр
А
“pepundos
e]
ua
opesojiad
op
oanisodsip
"3001
oasip
13
ja
ja
01604
1eyouesug
ua
opreles
[41001
—
Jap
-BIUI3
Ul
UOUISOd
'uaduyyula
191495UNM93
SUNSUEUNESTAUIAUNS
UL
IQISYISYIOT
—
-NOA
uorIsod
e]
glojrad
anbsıp
19χῃ
a]
suep
σ[
19
19u
21
Jauajqo
9]qejuario
SE]
apand
SP
TIE
UOIOBUIHOO
MITIE
"IIBIIILLTO1E
as
oidoasorarure]rod
E]
SBUL
ap
せ
]
souoniIsod
A
B
EDBaSaD
"12408125159;
рип
0
ㅁ
315
mod
sagudoidde
snjd
sa]
suonisodsip
sa]
IJUBLIBA
SBIOBIFD
Jazjnuag
-OINIJA
-Od
цэцэрэщозлэл
‘(¢
‘dey
Pun
Usp
‘[8a)
yuafasyusMysg
IN]
sIp
ajueue,
тэр
ysis
поцешашо\
191813
ayssisseurysamz
uoA
Jasendoys
uauoTis
чолпа
-Hisod
a3d0950.19101-3110d
saluarpHIP
np
sap
39
зи
juejoard
п$эл
‘(£
juro!
тпэтез|ол
‘deyo
np
suo
ya)
|
olrensn
[9
Bred
aJUSIUSALOS
*(¢
opnuides
osega)
“pared
ap
OjEIedE
3p
SOAHBS3
[5
πο
Bj3au03
opuew
so]
ap
25
osea
ap
uoroeuUNUNJI
ojesedy
ja
U3
A
opuem
‘gz
o[3ns
PT
-39UB
-U2pO4
]BI93I3n3alS
‘-PUEAA
"04391
U9P
We
19Q
PIIM
UDAHPISUDJDACI
jesabsanals
Bunmnldonalag
"Tasso
pun
[DS
эта
‘97
‘UOTBJUQUNE,]
op
‘TeInw
sjneis
эр
эдвеоэ.р
uonejuauny
jnisodstp
'8Z
27
IS
NBISaI
afqud
6
a]
2P1099B1
Jay
ueiqap
SD
PUOJEJ
:OUa
smofnoT,
ap
호
12
W
[OS
-ede
E
ap
[9
o[gisnjejrod
duge
9198
01853990
[ο
aiduiais
Á
52401543}
BIN
jopuew
461042025201!
1S
uopejuour
UO
DUI
эр
10123196
ap
이티
y
V
‘иэрлэм
J3UJYOIS
JELSBIAMAJS
SEP
“SUN
SSMJA]
y
ツ
(5/)
Joyeyssunsayoig
|
UOYDIZSNEIIY
pun
I3dgZ1aN
1ayyeMssunuueds
[ACEYZIOAJ
JOM
asyong
(¢/)
(p/)
ΕΙ
e
aIHISTT-3110d
э4цте|
(9JIDANO
эр
12104
219
13
nB9S91
0015031
дор
поцешоците:
30
10212212
“dg
[geo
np
>»
astg
lg
Mp
31989
3]
13p10938
|
50
(¢/)
(+2)
y
—
191)
“OJUSISIXS
0510
цоовшаище
[ο
PII
ua
E]
«ΠΛ
$эиотбиа;
Ap
UOISUD]
ΝΤ’
эр
эаво
51452
эр
è]
e
1079319
[эр
ajnyoug
(+1)
opuewi
[ap
aynyaug
ap
Ja
ojerede
Jeysnhy
(¢/)
—
3SYME
"UDGNEIUOSIAA
We
ssyong
IP
Jap
18125190215
UI
PUM
ue
osneyasuaduie’T
UUPNUSMUIS
UDSSATTYDSUL
«dINWT»
asyong
(C/
)
“JOSSIA
ше
(6/)
LLLIENUIMYIS
шол
wioa
<ANV
Taqe
jaqe’y
TP
可
—
一
BT
-вх0
‘(+
suep
34)
эр
uonejuounje,|
$20128
эпдош
52]
seIg
SUEP
np
13
ap
3IIdOUH
вла
пр
35110
9/83
3|gB3
(GL)
«dv
9]
a[
195SH[3
"198SIA
a1mponuj—
T>
3116.41
astid
sind
-
-LUF]
Ia
[IAQUI
opuew
SE]
OZEIQ
‘Te][iuIo]e
SP
ap
ESEDILI
[9P
ojesede
(SL)
£
ΕΙ
paow
[op
ορ
«АИГУЛ»
51455
ajqeo
1e[pruloje
OZ21q
[ο
Ia
ajnyoua
[9
Jejnypug
IEBJndou
ua
(€
sered
δη)
jo
可
一
US
TRH
993251512
(+1)
SIP
Ul
asqang
UamEjuos
(T
ap
PNA)
(UDGNEIUDSISA
ul
USI9NPO]
(aduelto)
Waysn.p
Ul
[PQEY
[3qEZ13NI
usypseyay
‘(с
РИ)
‘(]
By)
nal
ap
juatuuresg¿ns
juessIe]
U9
101]
aL
—
一
E]
‘Te,
SUEp
‘deys
(98UEIO)
moa
‘aoejd
πσοςθ
ua
ο1αξο
aynodure,]
οἱ
οΠπρο
(pz)
ama
asud
ΠΠ
—
--
"1913935
easel
NE
NESSII
2]QRI
9]
JAPIOIIEY
—
-EIGER
-UBILUB)
(134)
SE]
US
SOÍO[y
soze]
9
sa[quo
so]
nnonponuj
—
"ГЕТ
ualesua
ово
UOIBJUSUNE
anb
э5вэл
e]sey
(FL)
ap
‘8
sopopuejorde
aynyoue
Пашод
[052
[5
qa
e]
reynyouy
ua
1811950]
serapez
(opel
—
—
ΤΕΙ
‘dey
"U9SSAI[YOSUE
oyais
uazjasura
ZION
JasTPIMssuNAay
UE
9durejynje)
[PQRNZIAN
IIS
一
—
-2J931109
aUITIIE,S
au
PpJ099B.1
agEIIEI59.I
189
sojgisny
IPUBUILIOS
:UOISUa]
op
Silos
juawaduey)
3P
ja
3014
JUST
3
31080001221102
‘pal
B]
B
иоовиэище
-9U09
ap
лозЧпллэзи!
BISI
Opueu
эр
A[dU9
[9
1198009
|е
opep
Sojgisny
ap
EY
OJEIEdE
A
эр
apejaauoo
OIQUIE
jo
)
IS
—
-э9итэ
Чит
1281112915
81134213]э&
рип
20255049528
эгр
э1р
151217
3198491916
Uedasrzqe
изо
215
1YDLOX
UsJndd
(6)
[9qexZaMN
UDY
и21эеЧ2$
зачету
'1alUonal
STE
—
—
sUEp
1UBITIO3
"SO]QISNY
"933
[y
sun
31
ap
$3]
PIOGE,P
1310110402
SPA
23
SUR
‘sed
anbsi0]
p
asLHd
saanbiew
BT
xnani93J9p
ap
measoIalqeBo
(cz)
suonexy
anberd
189
$31
o[gisny
af
e]
IaI]a
19IHIY
mano
ur)
订
—
—
一
anb
UNSUIU
IU
UDIOEUILUM]I
E]
apaioua
D8
OU
Á
*UOIX
-124
пэвиплэцен
изыэглеш
TIaJd
Ww
3I
—
eun
43
пор
3910991
зорволеш
‘s9[Qisnj
98
“pal
so]
OISUILIA
2[01)
09
*OPOrp
“SIS
эзуэуэр
эше
иэциэуло
AIS
“Wayarzsne
-noU
OPBLI9AR
Sajqisnyeloid
ap
9183
(£L)
31150]
[9
edez
ajnyouasa(]
Uf]
so]
e]
'Bdo5aH
anbes
e1qy
—
—
一
O1UOISEJC)
-13sUI3
U98unIoUoIS
Jap
미
42264
ㅁ
3
ㅁ
1210
3
ㅁ
11001
ssep
191
032[004142522
428001211011
‘ueIep
Suni
“Woz
-
CA
15433
OZI-001
sap
e]
anb
sanArInod
ΠρΠΟΙ
suoUBXJ
£
21134
sal
ap
211)
aqm
2U2Y
af
—
©
Suorsua]
35
e,nbsnf
mod)
(EL)
moque]
A
anpeld
‘sa[qisny
S[]
3j
30100
el
19u1noT—
IIAnO
xneo4:
00
-
-anu
‘ортрип]
ZaA
ap
BHT
sojsta01d
в15э
опри
эр
ои4
из
[эр
ojusure|y
[2
"anb
BIaurBth
sojgisnzejiod
|E]
ap
(/
10QUIE]
)
so]
"S9[QISN]
Bde1
»nbojo3
B]
[9
BI
213
SOA
一
—
—
19po
3pusyas1ds]ua
-194
(A
un
OZ1-001
(A
0p7-007
addepy
этр
USBunuurds
ssep
vaSunuueds
wauassoyyosas
‘иэЧалр
'usujjo
MJ)
OS
(£/)
ASTI
Inj)
13LHLLIO1]
addepy
—
-gdde
(A
ObZ-0OC
SHotsua1
Inod)
A
DEZ
no
120
A
[MEZ
1315
(ET
一
"»9unaja1
onbej[d
ej
ap
angus]
E]
supp
assiti
-93
LS
SauOISUa1
-OISua]
BIed)
LIed)
“ENURJUIA
A
A
CII
OCZ
Bazargde
O
B
(A
UD
OZI
(A
'ede]
OPT
E
001
E
8j
DOZ
3P
врелл
sou
SP
‘JurIayasio
Page 58

10
suonsanp
JUBUINAJSUI
00151.51
[earuegUoau
ssajun
ЭЦ]
Ш
Teondo
squouoduioo
02419
BY}
apuewsip
JO
921279
A
SIE
08
AUONIA|S
80100
лэлэм
103
"|
‘Ашер
9snp
WOJJ
‘sunodea
JUSWINSUI
eye
am
10
proe
19/1000
1221044
pue
"7
-SHgS
-YS1au
ay)
Ur
sjesmuoyo
Åue
21015
1OT
OT
て
[220]
INOA
Srror1
コ
umT
10
‘JUSLUNSUI
]siemads
13
き
HO]
OU
e
JUSTIN
241
ul
[¡e9
JO
SUL
pooyTnog
*Á[L10]38]
OU]
JT
‘+
1иэ5е
:
SHdO
2515]
"S
-qnI5IIEIUnaUd
AIaA
B
aABH
Anjenb
SaAHQaIqO
o8etu
tw
DaAOtHa1
ou]
DU
uo
SagatdaAa
aouangui
SAG
'ging
STISNCI
AHIICT
peg
139
1o
-21
pauealo
joyooje
aq
UBI
20
01316
53411203100
PUB
s3oatrdaA
本
"(1SIU
SYILLU
ul
peddip
sdnoaAa
sno
(41012
meu]
ч19]2
ay}
1109
pue
3AOLHaT)
в
Чим
0
sjuuidiaduy
ㅁ
6
ㅁ
312
рэлош
6
ㅁ
TaH13
Чим
91JU99
24]
LOI]
DStIBa13
1S2d|
3.1B
SaAHaa[dO
"SPIEMINO
SI3A09
pue
-o1d
aq
‘sasaidaAo
A1]
pjnoys
JO
supa
saqn]
ynoyyM
JNO
Ag
]Snp
saqny
sIaLueo
1SUITBSB
‘sasaidaAq
Ῥοριλοιά
Da1
sodo
コ
31
pasaoid
aq
pynoys
‘asn
UI
1OL
*19A09
UOYM
Jsnp
‘SPUEJS
“PURJŞ
E
Ag
‘9
-A1
139113
"39
A
せ
LU
‘sped
TB1S
[291112312
Aue
2D1AI9S
[10
31n1HSdTS
10
poz
388318
oUjne
1Ou
jou
ÁJUO
ο
O(T
"/
“HUBUSJUEU
pue
sited
-MSUI
-L18]8U
10
Li
SYNEJ
40
988
JE
S18A09
40
Áujenb
dD1UPJENÉ
ayj
aajuejenÉ
S9JUBJBNE
Ing
‘sjuaw
84
18109
Jadosdun
‘I8A8MOU
10
ssajaie9
‘OU
S80P
wot
]j
‘asnjaejnuew
Guyjnsas
Buypuey
abewep
pue
sje
Page 59

V.
Entretien
instruments
.
Ne
démonter
tiques,
mécaniques
n'est
pas
mentionné
.
Protéger
トコ
l'humidité,
.
Ne
à
proximité.
.
Si
ment,
Systèmes
Les
considérablement
dépoussiérage
poire
et
et
et
nettoyées
Retirer
grand
milieu
Protéger
laires,
microscope
les
livraison.
Statifs:
En
tifs
priées.
Ne
Ne
d'un
.
Seul
surer
rations.
l'instrument
des
pas
entreposer
l'instrument
adressez-vous à l'agence
optiques:
oculaires
en
caoutchouc.
les
objectifs
non
pelucheux.
les
parties
avec
les
œillères.
diamètre
vers
l'extérieur.
toujours
les
tubes
différents
cas
avec
pas
monter
sans
de
non-utilisation,
les
housses
graisser
aucune
autre
type
le
personnel
la
maintenance
des
en
aucun
ou
dans
vapeurs
de
substances
ne
fonctionne
et
objectifs
la
qualité
s'effectue
Nettoyez
avec
un
chiffon
Les
empreintes
fortement
un
chiffon
Toutes
doivent
de
la
sans
oculaires
tube
ou
huiler
fiche ou
sur
de
de
les
service
et
d'observation,
cables
couvercles
cas
les
le
mode
poussières,
acides
pas
salis
de
au
mieux
les
doux,
salies
imbibé
les
être
nettoyées
parties
d'emploi.
et
alcalines.
chimiques
parfaite-
Leica.
influencent
l’image.
avec
oculaires
de
d'alcool.
lentilles
électroniques
des
poussière
et
le
faisant
partie
protéger
protection
les
pièces.
prise
électrique
de
l'appareil.
agréé
cffectuer
les
si
propre
doigts
seront
les
ocu-
corps
avec
de
les
appro-
doit
répa-
op-
ce
de
Le
une
de
du
de
la
sta-
as-
V.
Pílege
I.
Auf
oder
men,
Bedienungsanleitung
.
Die
Geräte
Sáuren
.
Keine
te
aufbewahren.
.
Funktionieren
wandfrei,
Rate
Optik:
5
Verschmutzte
einflussen
Staub
entfernt.
weichen,
putzen.
Verschmutzungen
Tuch
Die
groBen
den
am
der
keinen
elektronische
wenn
dies
vor
und
Alkali
Chemikalien
dann
zichen.
die
wird
am
Okulare
sauberen,
Bei
Fingerabdriicken
geben.
Augenmuscheln
Glasflachen
besten
geputzt.
Okulare,
Optiktrager
gen
geschiitzt
Stative:
6
Bei
den
schiitzt
Keine
Keine
.
Mit
nur
werden.
offene
Staub
Nichtgebrauch
Wartungs-
ohne
mit
werden.
passenden
werden.
Teile
fetten
anderen
autorisiertes
Geráte
Fall
optische,
Teile
nicht
Staub,
die
die
Okulare
Bildqualitat
besten
von
Tuben
den
Geritestecker
und
auseinanderneh-
ausdriicklich
beschricben
Nässe,
schiitzen.
in
der
Nâhe
Geráte
nicht
Leica-Vertretung
und
stark.
mit
Objektive
nicht
fusselnden
reinen
einem
Alkohol
und
der
der
Mitte
ohne
Tubus
sollten
mitgelieferten
sollten
Staubschutzhiillen
oder
člen.
Reparaturarbeiten
Servicepersonal
mechanische
in
ist.
Dünsten
Objektive
und
von
der
Gerä-
mehr
ein-
Blasebalg
mit
einem
Tuch
stàrkeren
auf
abschrauben.
Objektive
nach
Okulare
die
wer-
auBen
immer
Deckeln
Stative
montieren.
betraut
und
mit
darf
der
zu
be-
das
hin
ge-
ge-
ル
Cuidado
instrumentos
.
De
ninguna
partes
ópticas,
no
está
instrucciones
.
Proteger
medad,
linas.
.
No
canias
-
En
jo
Optica:
Los
sobre
nera
fuelle.
con
hilachas.
suciedad
con
Destornillar
nera
lentes
hacia
Cubrir
los
taópticas
suministradas.
Estativos:
Cuando
ser
No
No
‘he
Los
raciones
personal
expresamente
los
instrumentos
vapores y sustancias
guardar
caso
del
tubos
protegidos
engrasar
conectar
sustancias
de
los
de
desperfectos,
representante
oculares y objetivos
la
calida
de
quitar
Limpiar
un
paňo
blando,
En
caso
persistente,
un
poco
de
limpiar
de
los
afuera.
siempre
abiertos
sin
ne
se
solamente
de
servicio
las
ni
enchufes
de
trabajos
de
los
manera
instrumentos.
tubos
de
se
deben
mecánicas o electrónicas,
de
uso.
químicas
de
Leica.
de
la
imagen.
el
polvo
los
oculares y los
limpio y que
de
impresiones
humedecer
alcohol
puro.
anteojeras.
las
superficies
objetivos
contra
el
sin
oculares y los
por
medio
utilicen,
con
aceitar
los
sus
fundas
ninguna
ajenos.
mantenimiento y de
pueden
autorizado.
descrito
contra
ácidas o alca-
solicitar
sucios
La
es
soplarlo
La
grandes
es
desde
polvo
los
de
estativos
de
protección.
de
ser
confiados
desmontar
en
polvo,
en
las
el
conse-
repercuten
mejor
con
objetivos
no
suelte
digitales
el
mejor
el
centro
oculares,
las
deben
la
partes.
si
las
hu-
cer-
ma-
un
pafio
ma-
de
las
por-
tapas
repa-
y
a
Garantie
Nous
répondons
La
garantie
brication
résultent
propriée.
couvre
et
de
matériel
d'une
manipulation
de
la
qualité
seulement
et
de
nos
les
non
les
dommages
négligente
instruments.
défauts
de
et
non
fa-
qui
ap-
Garantie
Wir
biirgen
Die
Garantie
kations-
die
Handhabung
und
durch
fiir
die
Qualitat
erstreckt
Materialfehler,
Fahrlässigkeit
entstanden
sich
sind.
unserer
jedoch
nicht auf
und
unsachgemáBe
Instrumente.
nur
auf
Fabri-
Schäden,
Garantia
Respondemos
trumentos.
solamente
rial,
manipulaciones
pero
los
no
Sin
los
defectos
de
la
calidad
embargo,
dafios
incorrectas.
nuestra
de
fabricación o de
causados
de
nuestros
garantia
por
ins-
cubre
mate-
descuido
o
59
Page 60

microscope
ng
Data
i
operat
|
M651
Optical
Vi.
LEICA
surgica
6x)
때
(0
275mm
|f
(0.4x)
Omm
5
(=2
(0.44x)|
225mm
Objetivo
If
/
(0.5x)
Objektiv
/
00mm
=2
Objectif
上
/
(0.6x)
Objective
f=175mm
(0.67x)|
|f=150mm
(1.0x)
f=100mm
travail
distance
de
Working
Distance
Arbeitsabstand
travail
distance
de
Distance
Working
Arbeitsabstand
travail
distance
de
Distance
Arbcitsabstand
Working
travail
distance
de
Working
Distance
Arbeitsabstand
travail
distance
de
Distance
Arbeitsabstand
Working
travail
distance
de
Working
Distance
Arbeitsabstand
travail
distance
de
Distance
Arbeitsabstand
Working
TOHISOd
trabajo
de
mm
Distancia
265
|
trabajo
de
mm
Distancia
240
|
trabajo
de
mm
Distancia
215
|
trabajo
de
mm
190
Distancia
|
trabajo
de
mm
170
Distancia
trabajo|
de
mm
140
Distancia
trabajo}
de
E
Е
—
Distancia
a
зошашие
Zi
pensia
JASSOUIYAINpplajs|yarsary
GunIagOQISIaAIBETOL
[2101
ποσα
IEEEIIIIRIIHUUEIEIUEIEEIB
duniagold1oA]e10,L
[2101
UoneaUruaeui
Jassowiysinppyaysiyaisay
SUNIAJOISIAA[EIO
[9101
UONELHUSEU
Jassoulyanppyaysiyarsan,
9111999189124
[8101
ποιο
13SsSLllInDDI3ISIUOISar
18101
ПОПОВ
JOSSILUYAANPP[ATSTYIsaLy
TUNIAJOLLIA
12101
UONBIYIUSELI
1эззэшцалирр12]
зип
[2101
UOIIESUIUSEUU
эр
Joperqwea
ANAS
LA[SIAMSSUTIASSO.ITLD
ua
SjuaurassIssoLS
uonisod
JIFUPUD
odulr;)
Gi
ansia
duero
1D
PO
[210]
Quauny
1491235155047)
αρ
JPO
@i
yensta
odwe5
3
jansta
duelo
J9JOUIBIP
PAL
18101
QUoLuny
1121985158040)
[TeloT
@
jensia
odury
@
jansia
dury5
JOVOWEIP
pjaly
1810]
0103000
1421955155040)
TB1OL
Gi
pensia
odurg
(A
Jansıa
dueyg
1a1aurBth
DI3IH
[2101
quawuny
1194155515801)
ещ
[2}0,
gi
|ensia
odur”
(©
[ansta
due
MODUL
PO
[210]
Gud
Q1UaUHTW
Jens
Ojuauimy
[ap
OD
MOUKU
mg
|610,
pdumB
durry5
DI3IH
EO,
[MO],
odur
5121525)
ашецо
ΡΙΟΙΗ
[PIO]
UDIDISO
IanTgraA]IB1O
1211255155047)
BmSIA
の
ponsta
』ajauurBiD
[BIO1
1421255155047)
(Gi
Gi
[ansia
αΦΊΙΟΙΗΠΙΡ
[2107
тала.
1191558155047)
UOHPIIUBLJA
コ
두
L
[810].
1.
Y
A,
7.8
mm
96.3*
LK
mm
87.5*
2.4x
mm
78.8*
2.7х
mm
70.0*
3.0x
mm
61.3*
3.4x
un
wi
4.0x
μα
er;
6.0x
τη
wy
36.1
e
9.1x
5.8x
3.6х
32.8
21.0
6.4x
4.0x
10.0x
18.9
47.3
29.5
4x
4
T.1x
11.1x
16.8
42.0
26.3
5.0x
8.0x
12.5x
14.7
36.8
23.0
9.1х
5.7x
14.3x
19.7
12.6
31.5
6.7x
16.7x
10.7x
8.4
13.1
21.0
10.0x
16.0x
25.0x
10
16
25
B
WwW
14.4
64.2
em
3.5x
5.8x
14.5x
ση
的
13:1
wy
35.0
3.8x
6.4х
16.0x
11.8
52.5
43x
le
17.8x
10.5
28.0
46.7
4.8x
8.0x
20.0x
9.2
40.8
24,5
n
ui
9.]х
22.9х
7.9
35.0
21.0
6.4x
10.7x
26.7%
a
14.0
23.3
9.6x
16.0x
40.0x
:
10
40
6.5
10.5
16.3
43.5
26.1
5.5x
91x
14.5x
SET
36.4x
9
8.8
14.0
21.9
10.2x
19.7
11.4x
17.5
12.8x
15
14.6х
13.1
17.1x
8
25.6x
16
39.6
6.0x
16.0x
25.6x
7.9
12.6
35.6
6.7x
17.8x
28.4x
7.0
11.2
31:7
20.0х
32.0х
9.8
6.1
27.7
8.6х
22.9х
36.6х
8.4
5.3
23.8
10.0x
26.7x
42.7x
5.6
35
15.8
15.0x
40.0x
64.0x
6
40
25
9.5
uri
14.8
23.8
16.0x
10.0x
25.0x
40.0x
29
8.6
13.4
21.4
4x
17.8x
11.1x
27.8x
44
4.8
7.6
11.9
19.0
12.5х
20.0х
31.3х
50.0х
6.7
16.6
14.3х
14,3
16.7x
9.5
25.0x
10
42
10.4
22.9x
35.7x
57,1x
3.6
8.9
SY
26.7%
41.7x
66.7х
2.4
3.8
5.9
40.0х
62.5х
100.0х
16
25
40
B
Eyepiece
Oculaire
Okular
Ocular
10x/21
“m
16x/14B
25x/9.5
60
Page 61

29118129
uoi281ad0
soaudo
эр
01d03S0191)4J
sojeg
159W
VJI31
"Л
ua}eg
doysosyiusuonesadg
2425140
159W
VIIIT
‘IA
sanbydo
uoye1ad0
saguuog
p
149W
9200950191
WITT
‘IA
m
Si
SARS
oaHoolgo
3A1199(q0
э^поэ[о
SMMS
anoalqo
tone
Het
nh
=
J
39
10]
μας
Rui
UUU
DG
pz
.
(xc7'0)
oanalgg
umpop=|(xg70)
/
anyalgg
>
/
1199140
umpgE=||(xEC0)
/
aanaalqg
ww
00-1
wu
ции
007
с/
|
=
=]
1
103
10]
ции
uu
gp
gp
Up
Sr.
AO
IE
unu
WS
HET
SE
CZZ
liti
=
=F
=
J
AOE
40j
301
umu
DU
WOOD
O
CC
[BABI
SoUBIsIp
puesqesogiy
эр
SUNIOM
ээиеи
|
|
|
[TBABH
aQUBISIP
pueisqesuoqiy|
эр
ーー
FUDPIOM
эоцеза
|
|
TIeAenl
ээчетяр
purisqesmeqiy|
ap
'
aouelstG
Яо
A,
Я
foNsta
wu
unu
ции
tuu
pepe
2A1N99{Q0
CUYD
e
Np
0001
ae
WNLUIXRL
00
OSE
=
aq
J
107
SII
unu
URI]
96
A
+
Olede
эр
EETB1SIC]
TOTO
06E
|
olegen
ap
envesiq
unu
Op
|
olegen
ap
ebumsiq
LULU
067
persa
5
5
3
BB
Е
ши
005
(ст
001
SLI
677
¢/
a:
|
=)
=
=]
=
=3Jnoalqo,|
mod
unu
pz
|
7
i
558,
=
1
]
J
JMalg0
12290.
jnoalgo,|
112240.
Jusalqo,|
|
[
лпо4
лпо4
nod
nod
ции
unu
ина
ww
gp
9с
CC
CF
a
¢
não”
а
=
3
a
È
|ESFE
FES
ESS.
sS5|
|
aso
É
а
E
B
n
>
|
2328
PESI
EŞE
SOF)
|
525"
a
E
3
©
É
|
-8
SEE
ЕБЕ.
BOISE
|
|
8880
Язе
aS
Lea
2855
ep
ous
=
пли
uu
unu
ur
066
pos
OCZ
с/с
=
=
=
=J
J
у
J
Jnaalqo,y
JNoalqo,|
1420140.[
1020.1
nod
mod
anod
1000
uu
wu
ции
wur
/g
z/
09
7
9
EE
5555
E
5052
5832
EE
[One
EE
EEE
|5852/58832
(325.8
EF
Omega
EEE
E
[583528
은
|
|
5292
으
59
5388
즈
ὅδ
응
3
|
|
.
|£58
[ας
2585
훈
5
명주
Β
ut
(OP
=
3
3maalqo,
|
mod
uu
96
ロロ
ロロ
|
テコ
の
コロ
ロロ
〇
|
と
ヨウ
ロロ
ロロ
コロ
|
と
テコ
ロコ
ミロ
妥
aoardaA
arena
TEMO
IEIn30
S
ゴ
:DI3IS1UOISar)
utu
001
—JAnyalgo
S3131HI3na[3SSnB
unog
uu
XE
yz
y
*U'O
TU
セ
[
|
*SI
=
#STCI
ULU
~
|
XLT
|
«OSOL
ции
=
|
XOT
:
9
ru
OCT
J
Şapel
ANYOgGO
twiag
tag
WW
tr
OE
gp
0#8
ーー
|
xoz
—
|
SEL
-
|
X67
—
|
OFF
-
|
XEE
—
OI
8
16/01
uu
wu
Çöz
OZ
—
=
|
Anyolgo
циэ4
ции
с
9
든든
\C9
For
XUL
EST
XC8
ST
ции
ции
(65
сс
=}
=
=
}
АО
AN491qO
ANYalgg
04199
URQ
циэд
WU
ини
4404
27.
/9
09
OTE
56
ra
*
XO'OL
ヤ
+
て
FSI
LTS
:
Xp
XLS
E
TI
(VOL
SSI
>
XE
XE
:
EI
OF
9
WIL
ww
gg¢
(0$
=
J
Ayalqg
wiagq
πια
ai
ルー』
AH39IHO
ia
Un
eee
/8
96
0'5$
09S
:
*
X0'p
セ
;
9
9'0€
06
=
πει
x9$
=
Vir
9
;
と
XÇB
XE
τε
9
OT
91
È
WIL
001
=
了
OADalqo
OS
ULU
7
=
:
:
。
:
E
5
unu
wtu
uu
Wu
007
Ç/J
OST
CZZ
=
=
—
=
}
J
J
J
OAHolgo
OANalqo
OANalgo
QAH2IqO
103
UOd
voo
000
tu
WU
wma
0001
gp
cp
96
CE
OSE
OFT
tt9
=
|
xc9
XOOT
XE
=
|
Fes
ete
EZI
;
|
|
XEST
ХР
XT'L
2
|
SOL
SBT
Slr
:
|
|
SEIT
*OS
XE
8
:
OT
OF
9
ции
C/Z
=
J
OaHalgo
uoa
unu
/
9
:
=
я
3
E
=
d
S6/XST
unu
unu
ции
(GE
(005
00ф
=
=
=
}
J
J
OAValgo
Oanalgo
OaTalqo
103
Uo
uo
unu
unu
tuu
96
¿8
Z/
56
ČST
È
XO'SC
xO'ST
; :
|
|
€8
CET
x9'82
X6LL
sj
|
|
VII
TL
©
XE
X8
=
00
CE
OF
ST
|
Page 62

VII.
Technical
Only
the
ted
1.
2.
following
to
the
control
Tested
Leica
Accessories
station
Power
Pri
DE
115
V/230V
50 / 60
Fuses
2x16AT(5x20
Safety
Type B 4
Secondary
13.5
У=5
Microscope : LEICA
Care!
The
control
voltage
voltage
Pull
out
control
Use
the
designated
VDE
where
passed
as
safe
supply
Hz
class
Class
Output
А
Fuse
unit
in
the
setting,
the
cable
unit.
instrument
rooms
0107.
Do
there
is
accessories
unit:
accessories.
by
to
use.
+t
mm)
1
M651
V/50
W
6.3
AT
was
set
To
to
page
before
only
in
accordance
use
the
danger
ní
-
12
factory.
refer
not
the
data
may
an
approved
for
lamp
(5 x 20
to
230 V grid
change
56.
you
open
in
medically-
with
instrument
of
explosion.
be
mm)
the
the
connec-
testing
type
grid
62
Page 63

Vil.
Données
Ne
brancher
de
commande:
1.
Accessoires
2.
Accessoires
testée
Connexion
Primaire
115V/230V
50/60
Fusible
2 x 1,6
Classe
Typ B 4
Sortie
13,5
Microscope:
Attention!
Le
bloc
pour
changer
Avant
cher
L'instrument
des
norme
explosives.
que
Leica
par
un
au
Hz
AT
(5 x 20
de
protection
classe
Secondaire
V=5
A
LEICA
lampe
fusible
de
commande a été
une
tension
la
tension,
d'ouvrir
le
câble
réseau.
VDE
ne
0107
locaux à usage
techniques
les
éléments
homologués.
dont
la
~
mm)
1
de
bloc
doit
et
tite
12
réseau
voir
médical
non
compatibilité
de
contrôle
|
|
M651
V/50
6,3
AT
230
page
de
commande,
être
utilisé
répondant à la
pas
centre
réseau
le
suivants
pour
type
W
(5 x 20
ajusté
V.
57.
que dans
dans
au
est
agréé.
de
mm)
en
usine
Pour
débran-
des
zones
VII.
Technische
Am
bloc
at-
Steuergerät
Zubehór
1.
Gepriiftes
2.
Zubehór,
wendungsfáhigkeit
Priifstelle
NetzanschluB
Primär
115
V/230V
50/60
Hz
m
2 x 1,6
AT
Schutzklasse
TypB & Klasse
Ausgang
13,5 V =5
Microscope : LEICA
Achtung
Das
Steuergerát
spannung
der
Netzspannung
Vor
Offnen
Netzkabel
Verwendung
genutzten
Betrieb
gefährdetem
darf
angeschlossen
Zubehór
dessen
nachgewiesen
~
(5 x 20
I
Sekundar
À
12V/50
Sicherung
!
wurde
230 V cingestellt.Umschaltung
des
Steuergerätes
ziehen.
des
Gerätes
Ráumen
des
Gerátes
Bereich.
Daten
ausschliesslich
werden:
der
Firma
sicherheitstechnische
durch
ist.
SR
주
|
mm)
M651
W
6,3
im
Werk
siehe
Seite
nur
nach
VDE
nicht
in
folgendes
Leica.
eine
zugelassene
fiir
Lampentyp
AT
(5 x 20
auf
Netz-
57
in
medizinisch
0107.
explosions-
mm)
VII.
En
el
únicamente
1.
Accesorios
Ver-
Leica
2.
Accesorios
ensayos
dad
nipulados.
Conexión
Primario
115V/230V
50/60
Fusibles
2x
Clase
Tipo B 4
Salida
135
Microscope:
i
Atenciôn
El
fábrica
Para
Antes
desenchufe
No
uso
utilizar
peligro
Datos
aparato
autorizado,
técnica
Hz
1,6
AT
de
protección
Secundario
У=5А
aparato
para
cambiar
de
abrir
emplee
médico
el
de
técnicos
de
mando
los
siguientes
controlados
que,
aprobados
-
ー
mm)
1
6,3
control
tensión
tensión,
el
aparato
cable
de
garantizan
+
0%
15%
M651
viene
red.
en
completa, a la
de
red
(5 x 20
clase
LEICA
bombilla
fusible
!
de
una
la
el
el
instrumento
exclusivamente.
instrumento
explosión.
pueden
accesorios:
por
por
hora
para
12 V /
50
W
AT
(5 x 20
ajustado
de red
de
consulte
de
mando,
sino
en
Absténgase
zonas
con
conectarse
la
compafifa
un
centro
una
seguri-
de
ser
tipo
de
mm)
de
230
V.
pág.
57
recintos
de
ma-
de
de
Page 64

PUB
sad
SOLITA
ou]
SI0NpoAd
AU
punodwog
¡esibins
OTS
payas
po
quaquos
sadossojáijy
AdeJ6ouoiuoloud
Ádoasorajy
Éuiuueas
Buunseayy
HaDIA
18587
IL e yu
dede
Susa
PaJUBA
ii
DA
HOSL — BBIX — рыюрозуия
pala
ja
10
pot
OO
NE
Sot
smnzia
Paqulag © REG!
pebueys
AydeBouj
SANA
weag
MENER
uonoaj3
AU
ös
e
WI
PRUE — уу
(PUEpAT
ag
eur
pue
KLOTRLO
ΙΙ
EY]
WOLSIAA
MS)
Pinsqaaly
ΠΠ
Kania
es
sono
А
—GLL
GOL
SEB-H « P]
ΠΟ
$18]8L10}981,34
siaddllslanoq
OL
SM
SÁBOJ
SSULO
Вшриб
e
JOTA
Ále10y
‘ON
‘HY
2013]
60
ΤΙ
ΠΠ
uoneledaig
SAWOLOISIWE
ajdwes
512350417
IF]
NI
DITA
SWALSASOYIIW
jo
pue
—
Japinosd
AydeiGouqy
woy
umosÉ
SUIS
$ец
89/019-151}
‘UawaInseaw
"Зиашидеш
]SÁSO
SUTPUBISINO
SPlOM
оцциа!о$
“LDISIA
ayı
10}
рие
ag
зрааи
0]
JT
ποιο]
10}
sadoosoJalu
SI
,518ш015п2
UCISSIfij
Jo)
"SAINJINIJSOIIIW
ло
SuRaisÁsoJOIy EDAT
puesg
01
5400005
Suipea]
JO
алфелоци!
ayl
SISÁJELE
“eo187
AY)
abpuquieg
Auediuos
pue
Bunp
“uayotay
IETOIIBULIaIUH
"HHBAUUUI
“2187
“pp”
HUB
HGHIDEBHH
cuomipes
UR
—
41004
Buoj
ΜΙΠΟΊΞ
sazijoquiAs
&
yA
SOIT
saweu
ES]
squaunazsti]
비
pubig
BIT]
avy
DE9
9158
89
Lb
£8
L6p
59
LL
6Ъ1
Sit
87
59+
19+XB4
"SAJLAK9S
A9UTOJSTY
JO
和
it0A1au
L+
хе4
tr
09
0918
141
vZ
bS
Loy
11
Gpl
alt
85
Eb+
19+
L+
si
‘91
Чар
MSN
ouejup/ajepmojiM
IG
aPAY
guualA
YUON
200.38
В
сведет
:epeueg
-msny
UM
991961
98
BBE
LL
68
10
ZZO
(8
#6
1959
[91
SBB
bb
6+
2+
GE+
G4
хе4
хе4
XeJ
X8J
GB
699
LO
095LI9Z9Bb+]91
G8
LO
561
ZE
$8
LbL
968
bb
EE+
96+
G9+
‘aL
Jel
18
херзэ
очещеийн!апы
wiaysueg
ларан
00053
Aueuuag
eu
:puelud
(991801
(I
GLE
00%
619
29
$9
69
Or
[9528
Ef
4S
Lb
EZ
SE
Z0GE+
Z8+
58+
18+
XE
xe4
X24
1684
00%
009
669
[98h/5T06E+
99
65
9799
SP
1
62
SE
82
28+
58+
18+
Та
181
IAL
Jal
okyoj
10085
цепи
‘Buoy
eder
:8840
buoy
Aeg
习
BOL
ZE
lb
OL
LE+XE4
+
ХВ
001
58
1%
02
[5+
+
"la
al
As
1005
m
43
‚зриемачзем
JEDNO
M
OL
829
Gh
St
6h
08
Ge
EG
//
DE
PE+XEJ
69+
Dyt
XEJ
хе}
—
DES
956
808
6b
957
Gb
16
56
EG
(199+
98
PE+
97+
JEL
Jal
1а1
BuUnyualloS
84
미
92189
=
морем
weds
Ур
РЕ
608
1
[7+
хе
|
PETE
BOB
L
Lr+
18L
661.819
‘PUBHBTIMS
ZES
MEME
"SALIJUNOJ
266
806
609
598
8061
21
(JO
07
+
1+X84
9841
XBJ
9tZ
006
элош
9pZ
598
8061
21
02
ит
tb+
1+
вто]
Ja,
‘al
Aasiap
jo
залпа
mapyjajepusjjy
sauday
UOUIN
итозал
:wopGury
ал
payup
ре
WSN
2)
L009?
Juawabevew
|64006418141
N3/
pata
LO0PL
비
4100
ayy
OS|
94110]
spjou
"OS
BUE
5818391404163
LO06
"pr
NU
suejsásajy
OS)
ssauisng
Spuepuels
41815/6
ayy
66
55
19197
65-1179
内
]
SBUIDIOH
4)EUTIOA9G-
67+
хе3
SUI91SAS0J3IMM
"065-1979
48/2191
856£-(
62+
89187
181
A
зиашабеиеш
Aujenb
juawafeuBwu
|езиашиоллна
Aujenh
PUB
BIUBINSSE
oz
Bugejei
WOD'SWAISASOJIIW-B
LE
LE
LZL
Et
LE
Eh
Lt+
LEL
suoydajaj
LL
D1]
Vr+
MAM
XE4
{pueszims)
PY]
SUlgJsAS0J9IMM
B6niqean
INOS
Wu
ssauisng
6656-49
29187]
 Loading...