

Leica DISTO D510 User Manual
Leica DISTOTM X310
The original laser distance meter
Leica DISTOTM D510
The original laser distance meter
Leica DISTOTM D510
The original laser distance meter

ENTable of Contents
Instrument Set-up - - - - - - - - - - - - - - - - - - - - - - - - - - 2
Introduction - - - - - - - - - - - - - - - - - - - - - - - - - - - - - - - - - - - 2
Overview - - - - - - - - - - - - - - - - - - - - - - - - - - - - - - - - - - - - - 2
Basic measuring screen - - - - - - - - - - - - - - - - - - - - - - - - - - - - 3
Selection screen- - - - - - - - - - - - - - - - - - - - - - - - - - - - - - - - - 3
Pointfinder (Viewscreen)- - - - - - - - - - - - - - - - - - - - - - - - - - - 4
Insert batteries - - - - - - - - - - - - - - - - - - - - - - - - - - - - - - - - - 4
Operations - - - - - - - - - - - - - - - - - - - - - - - - - - - - - - - - - - 5
Switching ON/OFF - - - - - - - - - - - - - - - - - - - - - - - - - - - - - - 5
Clear - - - - - - - - - - - - - - - - - - - - - - - - - - - - - - - - - - - - - - - - 5
Message Codes - - - - - - - - - - - - - - - - - - - - - - - - - - - - - - - - - 5
Multifunctional endpiece - - - - - - - - - - - - - - - - - - - - - - - - - - - 5
Permament / Minimum-Maximum measuring- - - - - - - - - - - - - 5
Add / Subtract - - - - - - - - - - - - - - - - - - - - - - - - - - - - - - - - - 6
Pointfinder (Viewscreen)- - - - - - - - - - - - - - - - - - - - - - - - - - - 6
Settings - - - - - - - - - - - - - - - - - - - - - - - - - - - - - - - - - - - - - 7
Overview - - - - - - - - - - - - - - - - - - - - - - - - - - - - - - - - - - - - - 7
Tilt units - - - - - - - - - - - - - - - - - - - - - - - - - - - - - - - - - - - - - - 7
Distance units - - - - - - - - - - - - - - - - - - - - - - - - - - - - - - - - - - 8
Beep ON/OFF - - - - - - - - - - - - - - - - - - - - - - - - - - - - - - - - - 8
Digital level ON/OFF - - - - - - - - - - - - - - - - - - - - - - - - - - - - - 8
De-/Activate keypad lock - - - - - - - - - - - - - - - - - - - - - - - - - - 9
Unlock keypad- - - - - - - - - - - - - - - - - - - - - - - - - - - - - - - - - - 9
Personalized favorites - - - - - - - - - - - - - - - - - - - - - - - - - - - - - 9
Illumination - - - - - - - - - - - - - - - - - - - - - - - - - - - - - - - - - - - - 9
De-/Activate Bluetooth Smart- - - - - - - - - - - - - - - - - - - - - - 10
Calibration of tilt sensor (Tilt Calibration) - - - - - - - - - - - - - - 11
Reset - - - - - - - - - - - - - - - - - - - - - - - - - - - - - - - - - - - - - - - 12
Offset- - - - - - - - - - - - - - - - - - - - - - - - - - - - - - - - - - - - - - - 12
Functions- - - - - - - - - - - - - - - - - - - - - - - - - - - - - - - - - - - 13
Overview - - - - - - - - - - - - - - - - - - - - - - - - - - - - - - - - - - - - 13
Timer- - - - - - - - - - - - - - - - - - - - - - - - - - - - - - - - - - - - - - - 13
Calculator - - - - - - - - - - - - - - - - - - - - - - - - - - - - - - - - - - - - 13
Adjusting measuring reference/tripod - - - - - - - - - - - - - - - - - 14
Memory- - - - - - - - - - - - - - - - - - - - - - - - - - - - - - - - - - - - - - 14
Measuring single distance - - - - - - - - - - - - - - - - - - - - - - - - - - 15
Smart Horizontal Mode - - - - - - - - - - - - - - - - - - - - - - - - - - - 15
Height-profile measurement - - - - - - - - - - - - - - - - - - - - - - - - 16
Area - - - - - - - - - - - - - - - - - - - - - - - - - - - - - - - - - - - - - - - - 17
Volume - - - - - - - - - - - - - - - - - - - - - - - - - - - - - - - - - - - - - - 18
Triangular area - - - - - - - - - - - - - - - - - - - - - - - - - - - - - - - - - 19
Long range mode - - - - - - - - - - - - - - - - - - - - - - - - - - - - - - - 19
Inclination tracking- - - - - - - - - - - - - - - - - - - - - - - - - - - - - - - 20
Sloped objects - - - - - - - - - - - - - - - - - - - - - - - - - - - - - - - - - 20
Height tracking - - - - - - - - - - - - - - - - - - - - - - - - - - - - - - - - - 21
Trapezium - - - - - - - - - - - - - - - - - - - - - - - - - - - - - - - - - - - - 22
Stake out - - - - - - - - - - - - - - - - - - - - - - - - - - - - - - - - - - - - - 23
Pythagoras (2-point) - - - - - - - - - - - - - - - - - - - - - - - - - - - - - 24
Pythagoras (3-point) - - - - - - - - - - - - - - - - - - - - - - - - - - - - - 25
Technical Data - - - - - - - - - - - - - - - - - - - - - - - - - - - - - 26
Message Codes - - - - - - - - - - - - - - - - - - - - - - - - - - - - - 27
Care- - - - - - - - - - - - - - - - - - - - - - - - - - - - - - - - - - - - - - - - - 27
Warranty - - - - - - - - - - - - - - - - - - - - - - - - - - - - - - - - - - - 27
Safety Instructions - - - - - - - - - - - - - - - - - - - - - - - - - 27
Areas of responsibility - - - - - - - - - - - - - - - - - - - - - - - - - - - - 27
Permitted use - - - - - - - - - - - - - - - - - - - - - - - - - - - - - - - - - - 28
Prohibited use - - - - - - - - - - - - - - - - - - - - - - - - - - - - - - - - - 28
Hazards in use - - - - - - - - - - - - - - - - - - - - - - - - - - - - - - - - - 28
Limits of use - - - - - - - - - - - - - - - - - - - - - - - - - - - - - - - - - - - 28
Disposal- - - - - - - - - - - - - - - - - - - - - - - - - - - - - - - - - - - - - - 28
Electromagnetic Compatibility (EMC) - - - - - - - - - - - - - - - - - 29
Use of the product with Bluetooth® - - - - - - - - - - - - - - - - - - 29
Laser classification- - - - - - - - - - - - - - - - - - - - - - - - - - - - - - - 29
Labelling - - - - - - - - - - - - - - - - - - - - - - - - - - - - - - - - - - - - - 29
Leica DISTOTM D510 792312
1

ENInstrument Set-up
Display
On/Measure
Pointfinder
(Viewscreen)
Navigation
Clear / Off
Selection keys
linked to symbols above
Return /
Equal
Function
screen
Add /
Subtract
Introduction
The safety instructions and the user manual should be read
through carefully before the product is used for the first time.
The person responsible for the product must ensure that all
users understand these directions and adhere to them.
The symbols used have the following meanings:
WARNING
Indicates a potentially hazardous situation or an unintended use
which, if not avoided, will result in death or serious injury.
CAUTION
Indicates a potentially hazardous situation or an unintended use
which, if not avoided, may result in minor injury and/or appreciable
material, financial and environmental damage.
Important paragraphs which must be adhered to in practice as
i
they enable the product to be used in a technically correct and
efficient manner.
Overview
Leica DISTOTM D510 792312
2

ENInstrument Set-up
Status bar
Favorites
Main line
Active function
Page indicator
Settings
Function /
Settings
Help
function
Basic measuring screen
Selection screen
Leica DISTOTM D510 792312
3

ENInstrument Set-up
1x
Zoom stage
Favorites
Illumination
adjustment
with navigation
keys left and
right
Active function
Zoom (1x, 2x, 4x)
with navigation
keys up and down
Crosshair
i
To ensure a reliable
use, do not use zinccarbon batteries.
We recommend
using high quality
batteries.
Change batteries
when battery symbol
is flashing.
Pointfinder (Viewscreen)
Insert batteries
Leica DISTOTM D510 792312
4
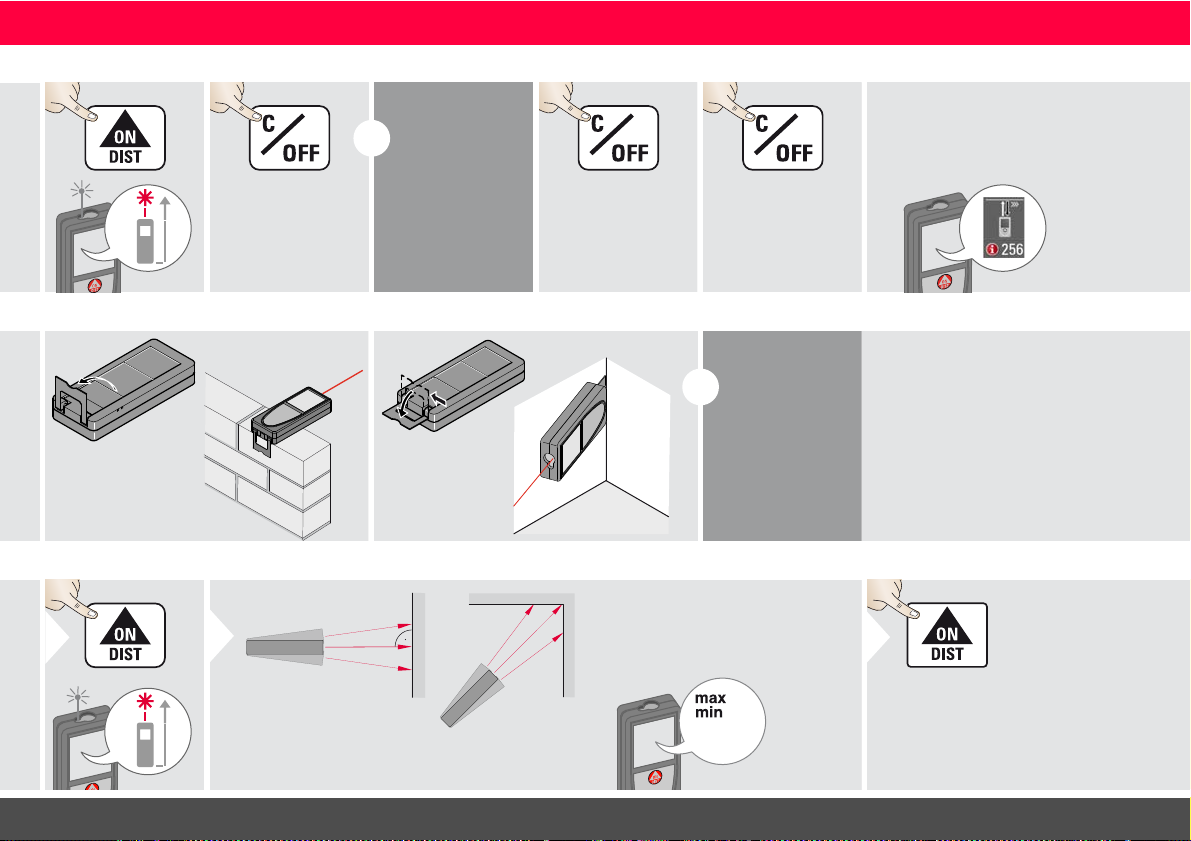
Switching ON/OFF Clear Message Codes
ON
OFF
2 sec
Device is turned
OFF.
i
Press ON button
2 sec to start
continuous laser
mode. If no key is
pressed for 180
sec, the device
switches off automatically.
1x
Undo last action.
2x
Leave actual function, go to default
operation mode.
If the info icon appears with a
number, observe the instructions in
section "Message Codes".
Example:
i
The orientation
of the endpiece
is automatically
detected and
the zero point is
accordingly adjusted.
1
2 sec
8.532 m
Used to measure room diagonals (maximum values) or horizontal distance (minimum values)
The minimum and maximum distance measured is displayed (min,
max.). The last value measured is
displayed in the main line.
min.
max.
2
Stops permanent / minimummaximum measuring.
3
Multifunctional endpiece
Permament / Minimum-Maximum measuring
ENOperations
Leica DISTOTM D510 792312
5
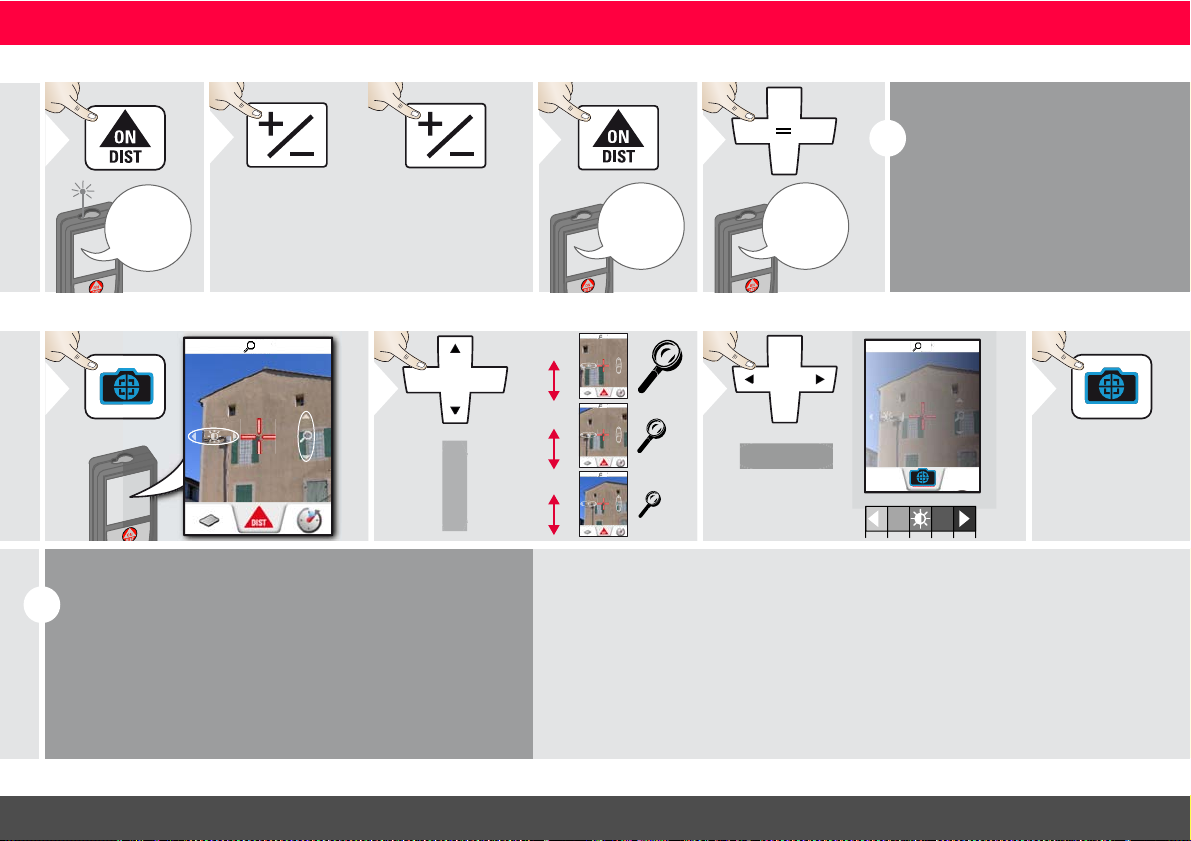
Add / Subtract
7.332 m
1
The next measurement is added
to the previous
one.
2
The next measurement is sub-
tracted from the
previous one.
2x
7.332 m
12.847 m
3
20.179 m
4
i
This process can be repeated as
required. The same process can
be used for adding or subtracting
areas or volumes.
1x
1
1x
2x
4x
2
4x
2x
1x
1x
3
Exit pointfinder
(viewscreen).
4
i
This is a great help for outdoor measuring. The integrated
pointfinder (viewscreen) shows the target on the display.
The device measures in the middle of the cross hair, even if
the laser dot is not visible.
Parallax errors occur when the pointfinder camera is used
on close targets, with the effect that the laser appears displaced in the crosshair. In this case rely on the real laser dot.
Pointfinder (Viewscreen)
ENOperations
Leica DISTOTM D510 792312
6

Overview
1
2
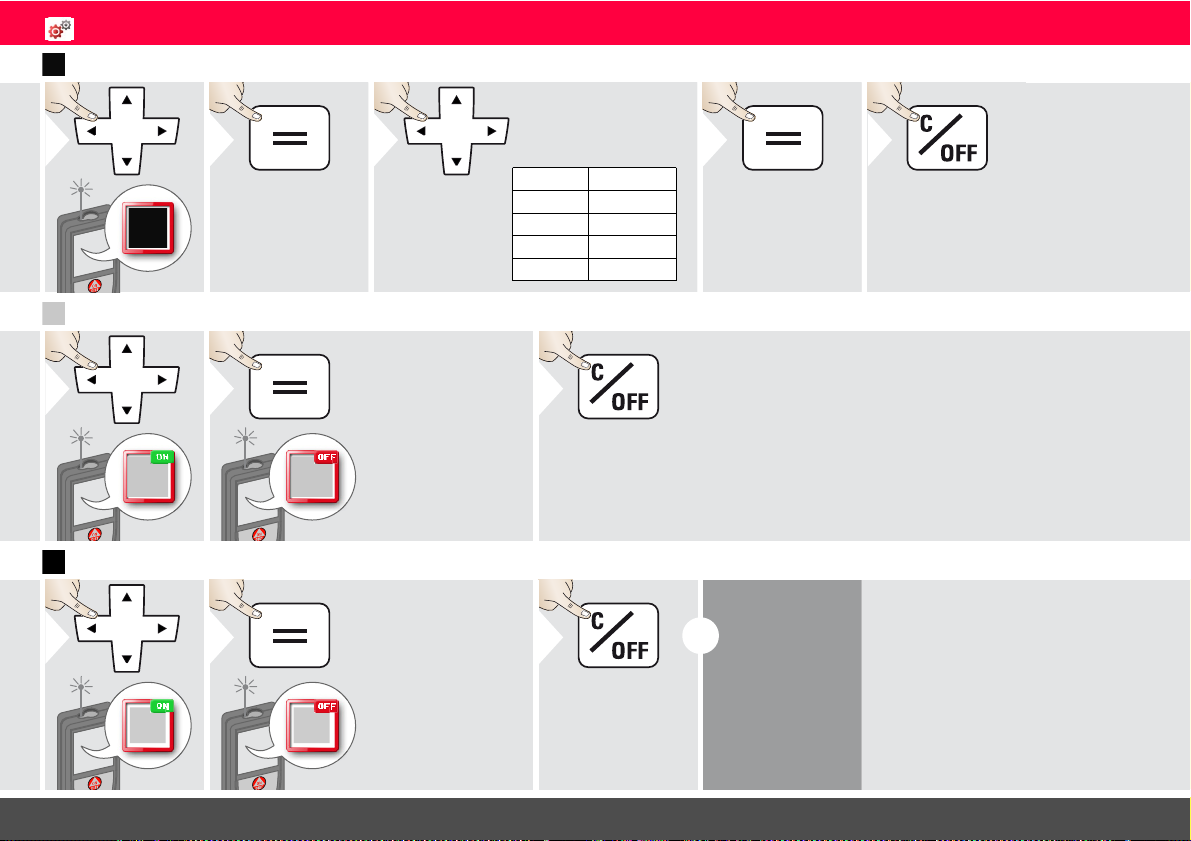
Tilt units
Distance units
Beep
Digital level
Keypad lock
Favorites
Illumination
Bluethooth
®
Tilt calibration
Reset
Offset
1
2
± 90.0°
± 180.0°
360.0°
0.00 %
0.0 mm/m
0.00 in/ft
Switch between the
following units:
3
4
Confirm setting.
Exit settings.
5
Tilt units
Leica DISTOTM D510 792312
ENSettings
7
Distance units
1
2
0.0000 m
0.000 m
0.00 m
0 mm
0.00 ft
0'00" 1/32
0.00 in
0 in 1/32
0.000 yd
Switch between the
following units:
3
4
Confirm setting.
Exit settings.
5
1ON2
To switch ON,
repeat procedure.
OFF
Exit settings.
3
1ON2
To switch ON,
repeat procedure.
OFF
Exit settings.
3
i
The digital level
is displayed in
the status line.
Beep ON/OFF
Digital level ON/OFF
ENSettings
Leica DISTOTM D510 792312
8
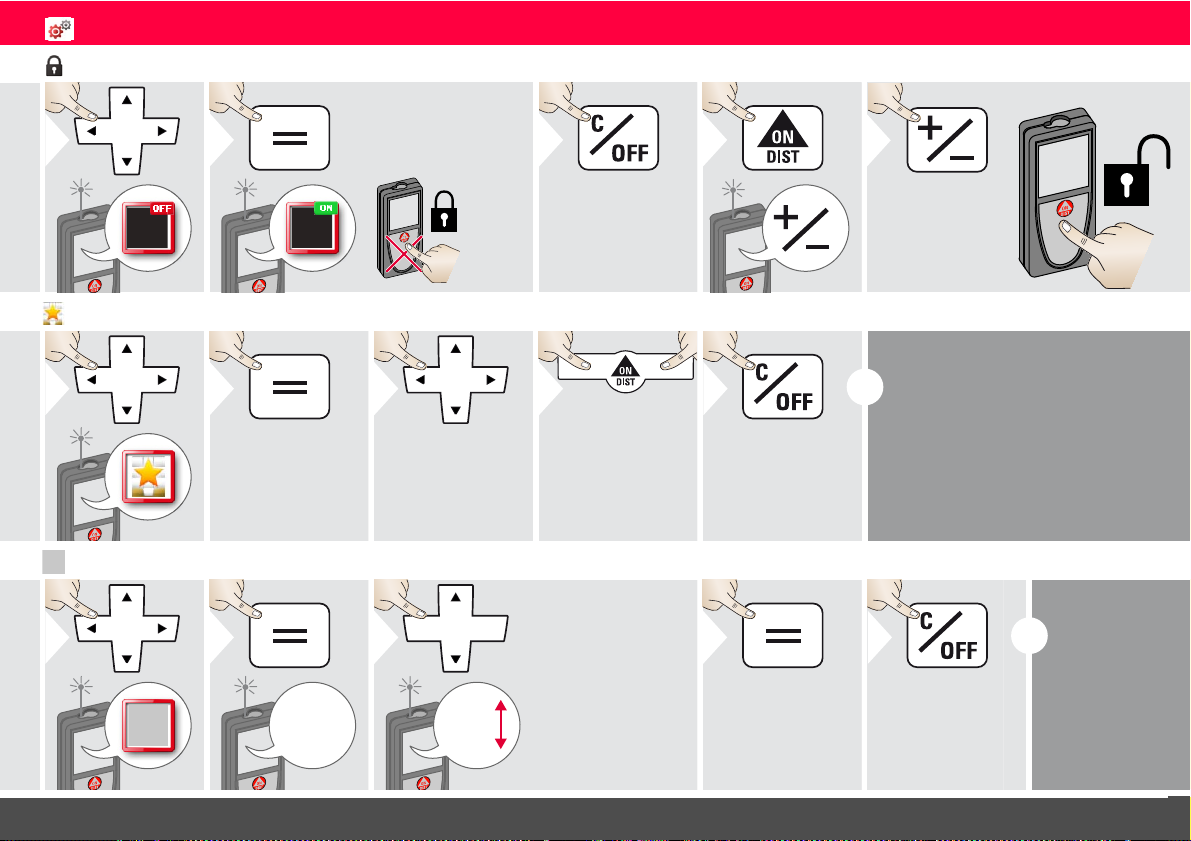
De-/Activate keypad lock Unlock keypad
1
OFF
2
To deactivate,
repeat procedure.
ON
Exit settings.
3
1
within
2 sec
2
123
Select favorite
function.
4
Press selection
key left or right.
Function is set as
favorite above the
corresponding selection key.
Exit settings.
5
i
Select your favorite functions for
quick access.
Short cut:
Press 2 sec on a selection-key in
the measuring mode.
1
1/6
2
1/6
2/6
3/6
4/6
5/6
6/6
3
Select brightness.
4
Confirm setting.
Exit settings.
5
i
To save
power reduce brightness if not
necessary.
Personalized favorites
Illumination
ENSettings
Leica DISTOTM D510 792312
9
 Loading...