

Page 1

LEICA DIGITAL-MODUL-R
Anleitung/Instructions
Page 2
1.2
1.1
1.3
1.4
1.5
1.25
1.11 1.12 1.13
1.14
1.15
1.16
1.17
1.181.191.201.211.22a1.221.23
1.6
1.7
1.9
1.8
1.10
1.24
Page 3
1.26 1.2 7 1.28 1.28a 1.29 1.30
1.31
1.39 1.38 1. 37
1.36
1.35
1.32 1.33
1.34
1.31
1.45
1.46a
1.40 1.421.41
1.43
1.4 4
1.4 6
Page 4
1.50
1.49
1.52
1.53b
1.51
1.48
1.47
1.53a
1.5 3
1.56
1.55
1.5 4
1.5 7a
1.5 7
1.58
1.59
1.60a
1.6 0
1.60b
Page 5

LEICA DIGITAL-MODUL-R
Instructions
Illustrations inside front and rear covers
Page 6

Foreword
We wish you a great deal of enjoyment and success
using your new LEICA DIGITAL-MODUL-R. It allows you
to use the quality and performance of your LEICA
R8/R9 and Leica R lenses for digital photography at
any time.
Switching between the two systems is extremely simple
and there is no change in the handling of your existing
items of equipment.
The user interface for the specific digital settings is
just as logically and ergonomically structured as on the
Leica R itself.
In order to be able to use the full capabilities of your
LEICA DIGITAL-MODUL-R correctly, you should read this
manual first.
60 / Foreword
This manual has been printed on 100% chlorine free bleached
paper. The complex manufacturing process eases the burden
on the water system and thus helps to protect our environment.
Page 7

This is a Class B product based on the standard of
the Voluntary Control Council for Interference from
Information Technology Equipment (VCCI). If this is
used near a radio or television receiver in a domestic
environment, it may cause radio interference.
Install and use the equipment according to the
instruction manual.
FCC Note: (U.S. only)
This equipment has been tested and found to comply
with the limits for a Class B digital device, pursuant to
Part 15 of the FCC Rules. These limits are designed to
provide reasonable protection against harmful interfer
ence in a residential installation. This equipment
generates, uses, and can radiate radio frequency
energy and, if not installed and used in accordance
with the instructions, may cause harmful interference
to radio communications. However, there is no guarantee that interference will not occur in a particular
installation. If this equipment does cause harmful
interference to radio or television reception, which
can be determined by turning the equipment off and
on, the user is encouraged to try to correct the interference by one or more of the following measures:
• Reorient or relocate the receiving antenna.
• Increase the separation between the equipment and
receiver.
• Connect the equipment into an outlet on a circuit
different from that to which the receiver is connected.
• Consult the dealer or an experienced radio/TV
technician for help.
Trade Name: LEICA
Model No.: DIGITAL-MODUL-R
Responsible party/
Support contact: Leica Camera Inc.
-
This device complies with Part 15 of the FCC Rules.
Operation is subject to the following two conditions:
(1) This device may not cause harmful interference,
and (2) this device must accept any interference
received, including interference that may cause undesired operation.
This Class B digital apparatus complies with Canadian
ICES-003
156 Ludlow Avenue
Northvale, New Jersey 07647
Tel.: +12017679608
Fax: +12017678666
e-mail: olesin@aol.com
LEICA DIGITAL-MODUL-R
FCC Caution:
To assure continued compliance, follow the attached
installation instructions and use only shielded interface cables with ferrite core when connecting to computer or peripheral devices.
Any changes or modifications not expressly approved
by the party responsible for compliance could void the
user’s authority to operate this equipment.
Tested To Comply
With FCC Standards
FOR HOME OR OFFICE USE
Safety instructions/ 61
Page 8

Table of Contents
Foreword . . . . . . . . . . . . . . . . . . . . . . . . . . . . . . . . .60
Warning notices . . . . . . . . . . . . . . . . . . . . . . . . . . .64
Legal notices . . . . . . . . . . . . . . . . . . . . . . . . . . . . . .64
Disposal of electric and electronic equipment . .64
Items supplied . . . . . . . . . . . . . . . . . . . . . . . . . . . .65
Designation of parts . . . . . . . . . . . . . . . . . . . . . . . .66
The displays
On the monitor . . . . . . . . . . . . . . . . . . . . . . . . . . . . . 68
On the data panel . . . . . . . . . . . . . . . . . . . . . . . . . . . 69
The menu items . . . . . . . . . . . . . . . . . . . . . . . . . . .70
Quick guide
Presets . . . . . . . . . . . . . . . . . . . . . . . . . . . . . . . . . . . 71
Taking photographs . . . . . . . . . . . . . . . . . . . . . . . . . . 71
Viewing pictures . . . . . . . . . . . . . . . . . . . . . . . . . . . . 71
Enlarging pictures on the monitor screen . . . . . . . . . 71
Deleting pictures . . . . . . . . . . . . . . . . . . . . . . . . . . . . 71
Formatting the memory card . . . . . . . . . . . . . . . . . . 71
Detailed guide
Important information
Preparation . . . . . . . . . . . . . . . . . . . . . . . . . . . . . .72
Changing the focusing screen . . . . . . . . . . . . . . . . . . 72
Cleaning the focusing screen . . . . . . . . . . . . . . . . 73
Removing the battery compartment/
an attached motor . . . . . . . . . . . . . . . . . . . . . . . . . . 74
Removing the camera back . . . . . . . . . . . . . . . . . . . . 74
. . . . . . . . . . . . . . . . . . . . .72
Attaching the digital back . . . . . . . . . . . . . . . . . . . . . 74
Attaching the power unit . . . . . . . . . . . . . . . . . . . . . . 76
Notes on the use of the rewind release button
and the multiple exposure lever . . . . . . . . . . . . . . 76
Inserting/removing the battery into/
from the power unit . . . . . . . . . . . . . . . . . . . . . . . . 77
Setting the grip strap length . . . . . . . . . . . . . . . . . . . 77
Charging the battery . . . . . . . . . . . . . . . . . . . . . . . . . 78
Charge level displays . . . . . . . . . . . . . . . . . . . . . . . . 79
Mains operation . . . . . . . . . . . . . . . . . . . . . . . . . . . . 79
Inserting and removing the memory card . . . . . . . . . 80
The most important settings/controls
Switching on/off . . . . . . . . . . . . . . . . . . . . . . . . . . . . 81
Taking photographs . . . . . . . . . . . . . . . . . . . . . . . . . . 81
Selecting review modes . . . . . . . . . . . . . . . . . . . . . . 81
Review for unlimited time . . . . . . . . . . . . . . . . . . . 81
Automatic review of last picture . . . . . . . . . . . . . . 81
The shutter release buttons . . . . . . . . . . . . . . . . . . . 82
Series exposures . . . . . . . . . . . . . . . . . . . . . . . . . 83
Automatic exposure bracketing . . . . . . . . . . . . . . 83
Monitor and data panel
The monitor . . . . . . . . . . . . . . . . . . . . . . . . . . . . . 84
– Setting the monitor brightness and contrast . . . 84
– Displaying image data . . . . . . . . . . . . . . . . . . . . 84
–
Histogram . . . . . . . . . . . . . . . . . . . . . . . . . . . . 84
The data panel . . . . . . . . . . . . . . . . . . . . . . . . . . . 85
62 / Table of Contents
Page 9

Setting operations . . . . . . . . . . . . . . . . . . . . . . . . .85
Basic settings . . . . . . . . . . . . . . . . . . . . . . . . . . . . . . 85
Menu functions . . . . . . . . . . . . . . . . . . . . . . . . . . . . . 86
Presets . . . . . . . . . . . . . . . . . . . . . . . . . . . . . . . . . 87
– Menu language . . . . . . . . . . . . . . . . . . . . . . . . . 87
– Date and time . . . . . . . . . . . . . . . . . . . . . . . . . . 87
– Automatic switch off . . . . . . . . . . . . . . . . . . . . . 88
– Button acknowledgement or signal tones . . . . . 88
Basic picture settings . . . . . . . . . . . . . . . . . . . . . . . . 89
Resolution . . . . . . . . . . . . . . . . . . . . . . . . . . . . . . 89
Compression/file format . . . . . . . . . . . . . . . . . . . 89
White balance . . . . . . . . . . . . . . . . . . . . . . . . . . . . 90
– For automatic or one of the fixed settings . . . . 90
– For direct setting of values . . . . . . . . . . . . . . . . 91
– For manual setting by measurement . . . . . . . . . 91
ISO sensitivity . . . . . . . . . . . . . . . . . . . . . . . . . . . . 92
Image properties/Sharpness, color saturation,
and contrast . . . . . . . . . . . . . . . . . . . . . . . . . . .92
Moiré/Pattern overlays . . . . . . . . . . . . . . . . . . . . 93
Color space definition . . . . . . . . . . . . . . . . . . . . . 93
Additional functions
User/application specific profiles . . . . . . . . . . . . 94
– Saving settings/Creating a profile . . . . . . . . . . 94
– Selecting a saved profile . . . . . . . . . . . . . . . . . . 94
Resetting all custom settings . . . . . . . . . . . . . . . . 94
Changing the picture numbering . . . . . . . . . . . . . 95
Taking photographs with the self timer . . . . . . . . 95
Notes on flash photography . . . . . . . . . . . . . . . . . 95
Review mode . . . . . . . . . . . . . . . . . . . . . . . . . . . . . .96
Additional options when viewing . . . . . . . . . . . . . . . . 96
Viewing other pictures/
“Scrolling” in the memory . . . . . . . . . . . . . . . . . 96
Enlarging/selecting the trimming/simultaneous
viewing of several reduced pictures . . . . . . . . . . 96
Deleting pictures . . . . . . . . . . . . . . . . . . . . . . . . . 98
– Deleting individual pictures . . . . . . . . . . . . . . . . 99
– Deleting all pictures on the memory card . . . . . 99
Protecting pictures/Clearing delete protection
Reducing the resolution after recording . . . . . . . 101
Formatting the memory card . . . . . . . . . . . . . . . 102
Transferring data to a computer . . . . . . . . . . . . . 103
Remote control operation via the FireWire
connection . . . . . . . . . . . . . . . . . . . . . . . . . . . . . . 105
Installation of supplied software . . . . . . . . . . . .106
. .100
Miscellaneous
Accessories . . . . . . . . . . . . . . . . . . . . . . . . . . . . . . . 106
Spare parts . . . . . . . . . . . . . . . . . . . . . . . . . . . . . . . 106
Precautions and care instructions
General precautions . . . . . . . . . . . . . . . . . . . . . . . . 107
Care instructions
– For the Digital Module-R . . . . . . . . . . . . . . . . . 108
– For the battery . . . . . . . . . . . . . . . . . . . . . . . . . 108
– For the charger . . . . . . . . . . . . . . . . . . . . . . . . 108
– For memory cards . . . . . . . . . . . . . . . . . . . . . . 108
Cleaning the sensor . . . . . . . . . . . . . . . . . . . . . 109
Storing the Digital-Modul-R . . . . . . . . . . . . . . . . 109
Data structure on the memory card . . . . . . . . . . . . 109
Warning messages . . . . . . . . . . . . . . . . . . . . . . . . . 110
Malfunctions and resolving them . . . . . . . . . . . . . . . 111
Index . . . . . . . . . . . . . . . . . . . . . . . . . . . . . . . . . . . . 112
Technical data . . . . . . . . . . . . . . . . . . . . . . . . . . . . 113
Leica Academy . . . . . . . . . . . . . . . . . . . . . . . . . . . . 114
Leica on the Internet . . . . . . . . . . . . . . . . . . . . . . . . 114
Leica info ser
Leica Customer Service . . . . . . . . . . . . . . . . . . . . . . 114
vice . . . . . . . . . . . . . . . . . . . . . . . . . . 114
Table of Contents/ 63
Page 10
Warning messages
Legal notes
Disposal of electric and
• You should use exclusively the recommended accessories to prevent faults, short circuits or electric
shock.
• Do not expose the unit to moisture or rain.
• Do not attempt to remove parts of the housing (coverings); specialist repairs can only be carried out in
authorized service centers.
• Please ensure that you observe copyright laws. The
recording and publication of pre-recorded media
such as tapes, CDs or other published or broadcast
material may contravene copyright laws.
• This also applies to all of the software supplied.
• The SD logo is a registered trademark.
• Other names, company or product names referred to
in this manual are trademarks or registered trademarks of the relevant companies.
electronic equipment
(Applicable in the EU and other European countries with separate collection systems)
This equipment contains electric
and/or electronic parts and must
therefore not be disposed of as normal household waste.
Instead, it should be disposed at
the
respective collection points for
recycling
provided by the communi-
ties. For you, this is free of charge.
If the equipment contains exchangeable (rechargeable)
batteries, these too must be removed before and, if
necessary, in turn be disposed of according to the relevant regulations (see also the respective comments in
this unit’s instructions).
Further information about the subject is available at
ation, your local waste col-
your community adminis
lection company, or in the store where you purchased
this equipment.
tr
64 / Warning messages
Page 11

Items supplied
Before using your LEICA DIGITAL-MODUL-R for the first
time, check that the accessories supplied are complete.
A. Focusing screen inc. tool for changing
B. Slider for removing the camera back
C. Digital back with
a. Protective cover for sensor with
b. Unlocking slider and
c. Unlocking rocker
D. Power unit with
a. Grip strap
E. Battery
F. Charger with
a. 3 interchangeable plugs for different mains
outlet systems
b.
Car charging lead
G. 512MB SD memory card (in antistatic case)
H. FireWire cable
I. FireWire adapter
J.
Adobe® Photoshop® Elements® 3
CD
Items supplied / 65
Page 12

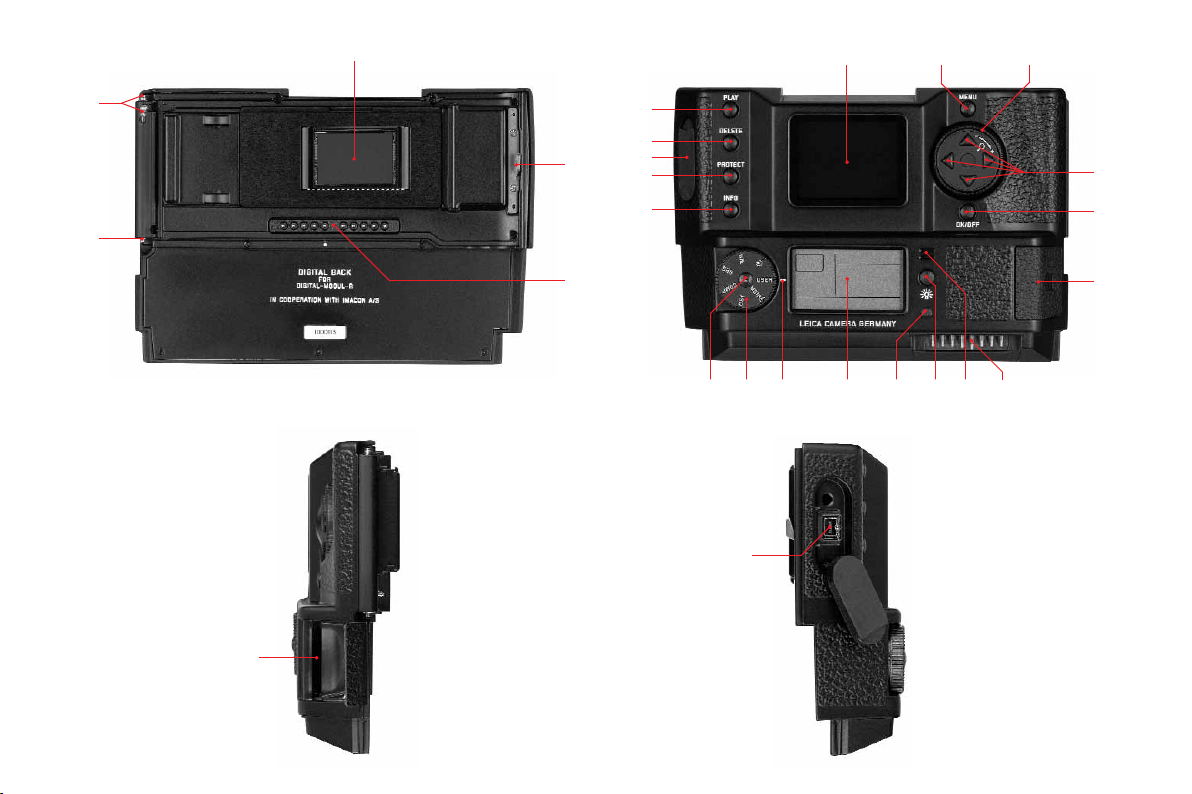
Designation of parts
Digital back
Front view
(with protective cover removed)
1.1 Lower, rigid joint pin for securing in camera
1.2 Upper, moving joint pin for securing in camera
1.3 Sensor
1.4 Locking catch
1.5 Contact strip for connection with camera
housing
Rear view
1.6 Button for displaying image data during
picture review (
1.7 Button for selecting delete protection
function (
PROTECT
1.8 Cover over FireWire socket
1.9 Button for selecting delete function (
1.10 Button for activating (continuous)
review mode (
1.11 Monitor
1.12 Button for activating and deactivating menu
control (
MENU
1.13 Setting ring for navigation in menus/setting the
selected menu items/functions, scrolling in the
memory, and for enlarging/reducing the pictures viewed
INFO
PLAY
)
)
)
DELETE
)
1.14 Direction buttons for navigation in menu/setting
the selected menu items/functions (up and
down),
and scrolling in the memory (left and
right)
1.15 Button to switch off or confirm input (
1.16 Flap over memory card slot
1.17 Contact strip for connection with power unit
1.18 Speaker
1.19 Button for illumination of data field ( )
1.20 LED to confirm that camera is ready or that a
picture has been stored
1.21 Data panel
1.22
Setting dial for the 5 basic picture setting func-
tions, user profiles and auto release function
with
a. Index
1.23
)
View from right
1.24 Memory card slot
View from left
1.25
button for setting the functions selected
SET
using the setting dial 1.22
(with flap open)
(with cover open)
ire) socket for connection to computers
eW
ir
(F
OK/OFF
)
66 / Designation of parts
Page 13

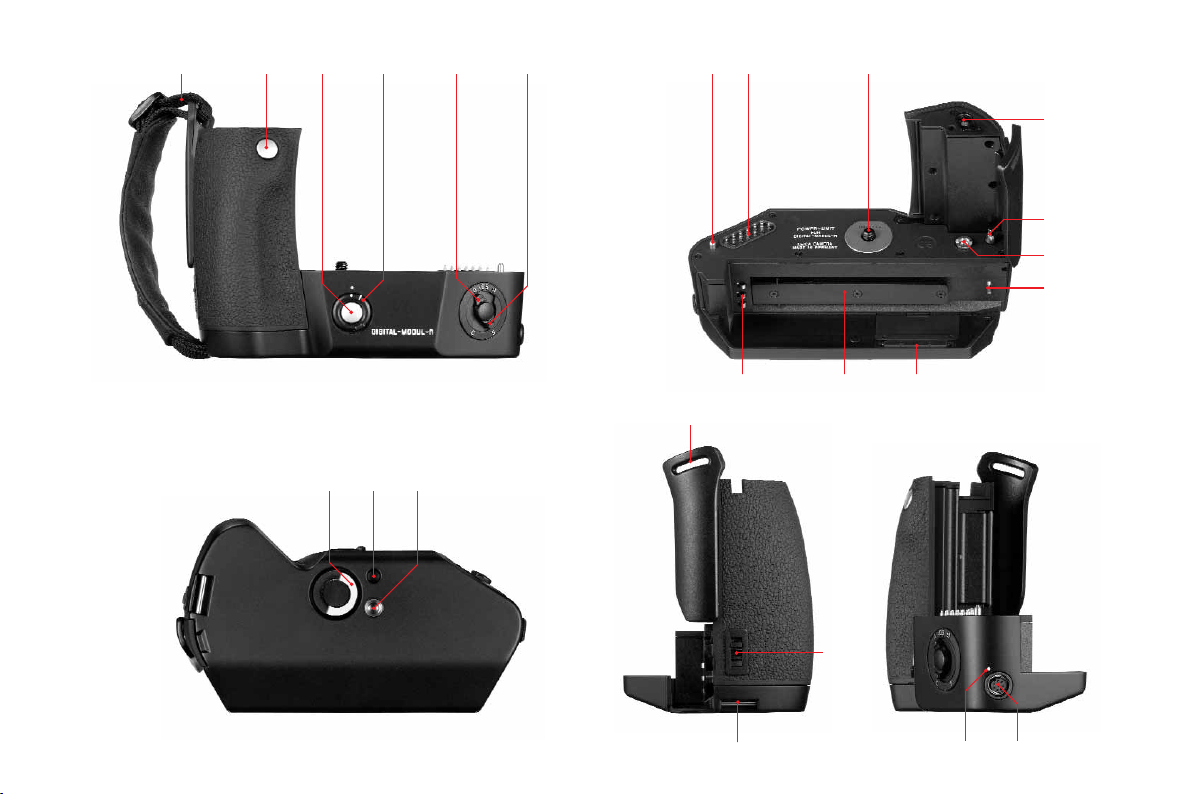
Power unit
Front view
1.26 Grip strap
1.27 Main shutter release button
1.28 Portrait format shutter release button with
a. Locking dial
1.29 Lever for setting automatic exposure bracketing
1.30 Lever to choose between single picture and
series modes
Top view
1.31 Guide pins for attaching to camera body
1.32 Contact strip for control connections to
camera body
1.33 Fastening screw
1.34 Contacts for camera power supply
1.35 Coupling for cocking the shutter
1.36 Unlocking pin for battery pack
1.37 Contact strip for connection with digital back
1.38 Guide for battery
1.39 Contacts for battery
Bottom view
1.40 Toggle for fastening screw
1.41 Guide hole for tripod heads with guide pin
1.42 Tripod connecting thread
View from right
1.43 Upper fastening point for grip strap
1.44 Unlocking slider for battery
1.45 Lower fastening point for grip strap
View from left
1.46 Socket for mains unit and remote control with
a. Index mark
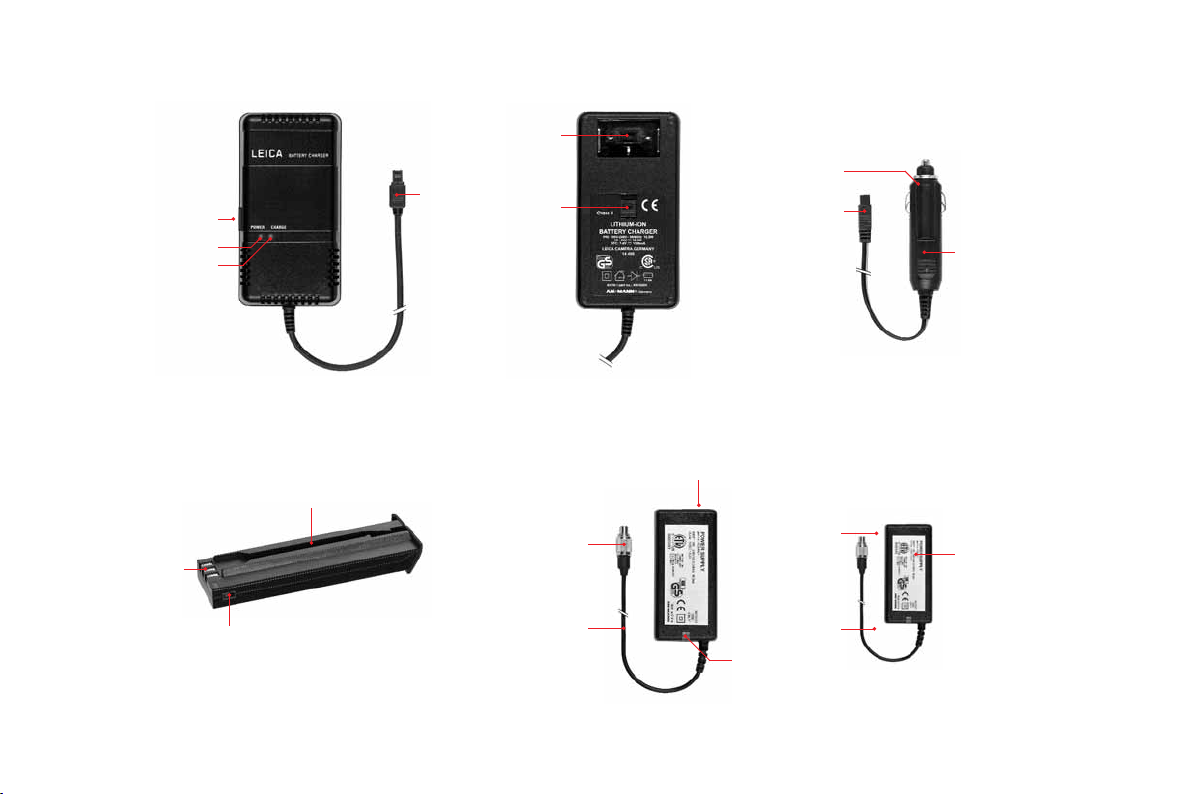
Charger
1.47 Red (
1.48 Green (
CHARGE
) LED to indicate charging
) LED to indicate mains
POWER
connection
1.49 2-pin socket for car charging cable
1.50 Battery connecting cable with 3-pin plug
1.51 Unlocking slider for
1.52 Interchangeable mains plugs (Euro/GB/USA,JP)
1.53 Car charging cable with
a. 2-pin plug for charger and
b. Plug for cigarette lighter
Battery
1.54 Guide
1.55 Socket for charging plug
1.56 Contacts
Mains adapter
1.57 Unit-specific camera connecting cable with
a. 8-pin connector
1.58 Socket for mains cable
LED to indicate mains connection
1.60
1.59 Mains cable (2 supplied, 1x with European plug,
1x with JP/USA plug) with
a. 2-pin device connector
b. Mains plug
Designation of parts / 67
Page 14
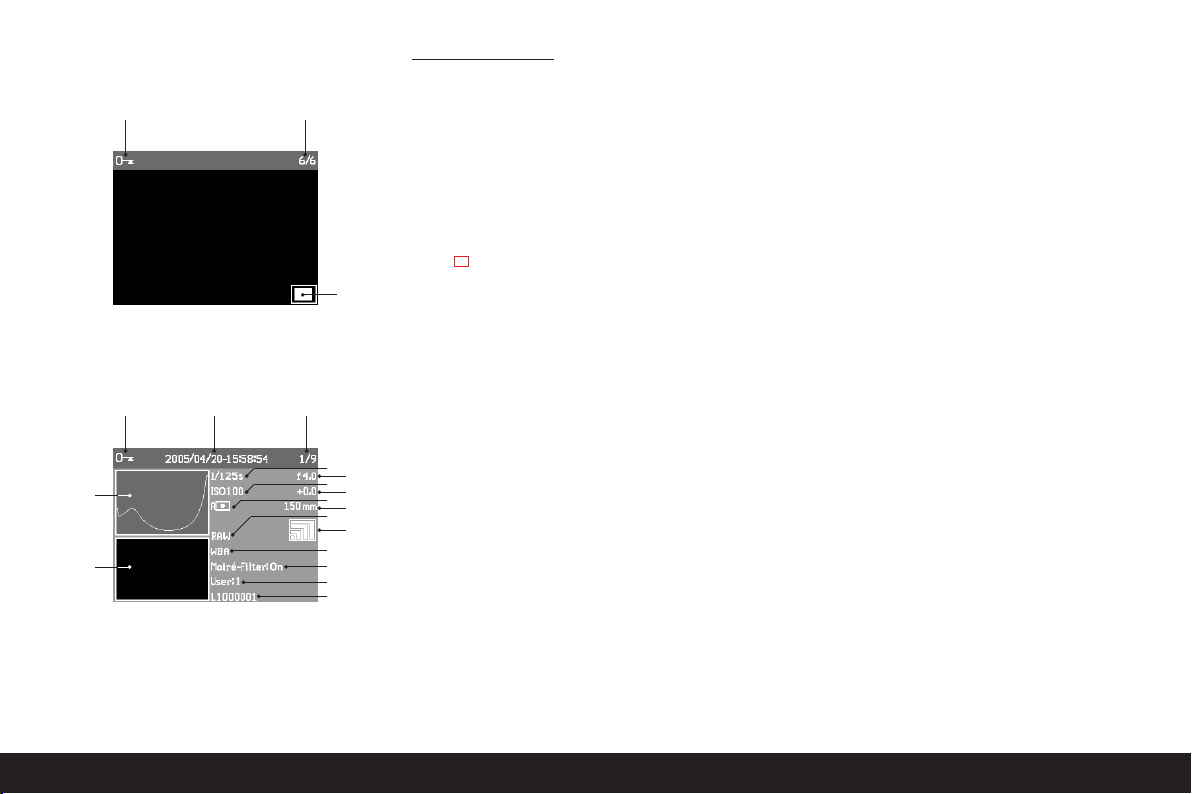
The displays
2.1.1
2.1.7 2.1.8 2.1.9
2.1.6
2.1.5
2.1.2
2.1.3
2.1.10
a
c
e
g
i
j
k
l
2.1 On the monitor
In normal review mode
2.1.1 Delete protection symbol
(only if set)
2.1.2 Picture number/total number of available
pictures
(not with enlarged view)
2.1.3 Enlargement level/position of trimmed area
shown
(schematic, for enlarged view only)
2.1.4 Selected picture
(only with reduced viewing of 4 or 9 pictures)
2.1.10 Picture information
a. Shutter speed
b. Aperture
1
c. Sensitivity
d. Exposure compensation
e. Exposure measuring method
f. Focal length
1, 2
g. Compression/file format
h. Resolution
i. White balance
j. Moiré filter setting
k. User profile
l. Folder number/file name
Review with supplementary information (
INFO
)
2.1.5 Picture
2.1.6 Histogram
a. Luminance (brightness)
b. Red/green/blue
(separate display of individual colors)
2.1.7 Delete protection symbol
b
d
f
h
(only if set)
2.1.8 Date/time
2.1.9 Picture number/total number of available
pictures
1
Most lenses equipped with ROM, including the EXTENDER-R2x
11 269 (see camera and lens instructions) provide the required
information. With lenses and extenders not equipped with ROM,
this information is not displayed.
2
On zoom lenses equipped with ROM, the information displayed is
the respective shortest and longest focal lengths.
68 / The displays
Page 15
2.2.4
2.2.3
2.2.2
2.2.1
2.2.5 2.2.6 2.2.7 2.2.8
2.2.9
2.2.10
2.2.11
2.2
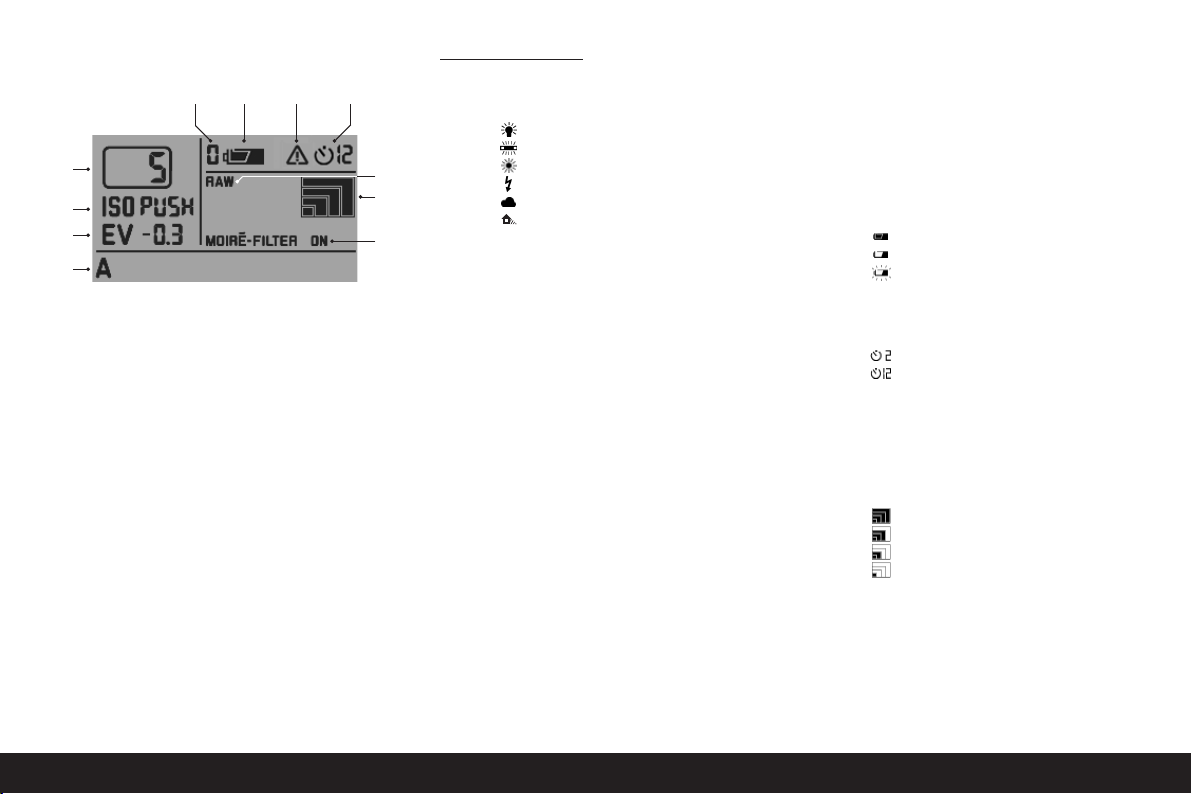
On the data panel
2.2.1 W
hite balance
a.Afor automatic setting
b.
for incandescent lamp light
c.
for fluorescent tubes
d.
for sunlight
e.
for flash light
f.
for light cloud, haze etc.
g.
for cast shadows
h.M(Example) for manual setting by
measurement
i.
(Example) Directly adjustable color
5000K
temperature value
2.2.2
Exposure compensation
(±3EV in 0.5 EV steps, to be set on camera)
2.2.3
Sensitivity
a. ISO 100
1
b. ISO 200
c. ISO 400
d. ISO 800
e. ISO PUSH
only accessible via menu control, 2.2.7 also appears)
2.2.4
Remaining number of pictures
(Higher sensitivity, corresponds to ISO 1600,
2.2.5
Selected user profile
(only if selected, includes functions 2.2.1/.3/.8/.9/.10
and menu settings)
1
a. No display:
correspond to a stored user profile
b. 0
c. 1
d. 2
e. 3
2.2.6
Battery charge level
a.
b.
c.
2.2.7
Indication for
(only in conjunction with 2.2.3e)
2.2.8
Self timer activated/running
a.
b.
2.2.9
Compression/file format
a.
RAW
b.
TIFF
c.
JPEG FINE
d.
2
JPEG BASIC
2.2.10 Resolution
a. (38
Current setting(s) do not
1
Factory setting (cannot be changed)
1ststored user profile
2ndstored user profile
3rdstored user profile
Fully charged
Partially discharged
Flat (flashing)
ISO PUSH
2 seconds delay
12 seconds delay
1
1
76)
72 x 25
b. (2896 x 1920)
c. (1936 x 1280)
d. (1280 x 848)
Moiré filter setting
2.2.11
1
Factory default settings
2
see also p. 89
The displays/ 69
Page 16

The menu items
3.1 User Profile
3.2
Sharpness
3.3
Color Saturation
Contrast
3.4
3.5
ISO Push
3.6
Color Management
3.7
Resize
3.8
Picture Numbering
3.9
Auto Review
3.10
Histogram
User/application specific
profile
Of the picture
Of the picture
Of the picture
Increase in highest adjust-
able ISO Sensitivity
Working color space
Reduce resolution after
recording
A
utomatic review of last
picture
Graphic to indicate bright-
ness distribution
3.11
Monitor Contrast
3.12
Monitor Brightness
3.13
Auto Power Off
3.14
Acoustic Signal
3.15
Language
3.16
Date
3.17
Time
3.18
Format
3.19
Firmware
3.20
Reset
3.21
Interface
Button acknowledgement
tones
Formatting the memory
card
Firmware version
Simultaneously reset all
settings – to the default
factory settings
Setting for FireWire inter-
face
70 / The menu items
Page 17

Quick Guide
Have the following parts ready:
• Camera
• Focusing screen (A) with tool for changing
• Slider for removing camera back (B)
• Digital back (C) with protective cover (Ca)
• Power unit (D)
• Battery (E)
• Charger (F)
• Memory card (G)
Presets
Notes:
• For more details about particular steps/operations
on the camera, please refer to the corresponding
instructions.
• The pictures produced using the method described
below use the default factory settings for the various
functions (see p. 69).
1. Connect the charger (F) to the battery to charge it
up (see p. 78).
2. Replace the focusing screen in the camera with the
one supplied with the Digital-Modul-R (A) (see p. 72).
3. Remove the camera battery compartment.
4. Remove the camera back (see p. 74).
5. Attach the digital back (C) to the camera (see p. 75).
6. Attach the power unit (D) to the digital back
(see p. 76).
7. Insert the charged battery into the power unit
(see p. 77).
8. Insert the memory card (G) (see p. 80).
9. Set the desired modes/functions on the camera.
10. Switch on the Digital-Modul-R (see p. 81).
11. Set the date and time (see p. 87).
Taking photographs
1. Use the focusing screen to focus in the normal way.
When selecting the trimming, pay attention to the
frame for digital format (see p. 72).
2. Release the shutter with one of the 3 shutter
release buttons to take the picture (see p. 82).
Viewing pictures
For an unlimited viewing duration:
1. Press the
ture taken.
2. Press the left or right direction button (1.14) to view
other pictures.
Notes:
• The
Auto Review
able for brief automatic review after taking each picture.
• The
INFO
additional information about a picture at the same
time – with the picture reduced.
button (1.10) to view the last pic-
PLAY
function (3.9, see p. 81) is avail-
function (see p. 84) allows you to display
Enlarging pictures on the monitor screen
(only possible for normal review (using
in
Auto Review
pressed first)
Turn the setting ring (1.13) to the right (clockwise) to
view an enlarged version of the picture displayed (see
p. 96).
Note:
reduced pictures to be viewed simultaneously to gain
an overview (see p. 97).
Deleting pictures
(only possible for normal review (using
in
Auto Review
pressed first)
Press the
tions on the monitor (1.11, see also p. 98).
Note: The pictures can be protected, e.g. against accidentally being deleted (
Formatting the memor
1. Press the
2. In the menu select the
tional steps necessary, see p. 70/86/102) to delete
all data on the memory card.
mode the
Turning to the left (anticlockwise) allows 4 or 9
mode the
button (1.9) and follow the instruc-
DELETE
button (1.12).
MENU
PLAY
PLAY
PROTECT
y card
Format
button must be
button must be
, see p. 100).
option (3.13, addi-
PLAY
PLAY
button),
button),
Quick Guide / 71
Page 18
Detailed guide
Preparation
Important information:
• Some of the procedures described in these instructions include operation of the camera – however, this
is not dealt with in detail here. For more details
about particular steps/operations on the LEICA
R8/R9, please refer to the corresponding instructions.
• Apart from a few exceptions, these procedures apply
equally to use of the LEICA R8 and LEICA R9 camera
models. Details of the exceptions:
a. Switching the Digital-Modul-R on and off
See “Switching on and off”, p. 81
b. Blocking the shutter release buttons
See “The shutter release buttons”, p. 82
c. Flash operation
The shutter release buttons on the LEICA R9 (but
not on the LEICA R8) are blocked if an attached and
ready for use flash unit is set to
• With both camera models, the B function is not available when used together with the LEICA DIGITALMODUL-R.
TTL
(see p. 95).
Changing the focusing screen
The focusing screen in the camera must be replaced
with the one supplied (A). This has a frame corresponding to the slightly smaller format of the sensor.
Important: Parts of the subject that can be seen in the
camera’s viewfinder but lie outside this frame are not
captured by the sensor and therefore do not appear in
the picture.
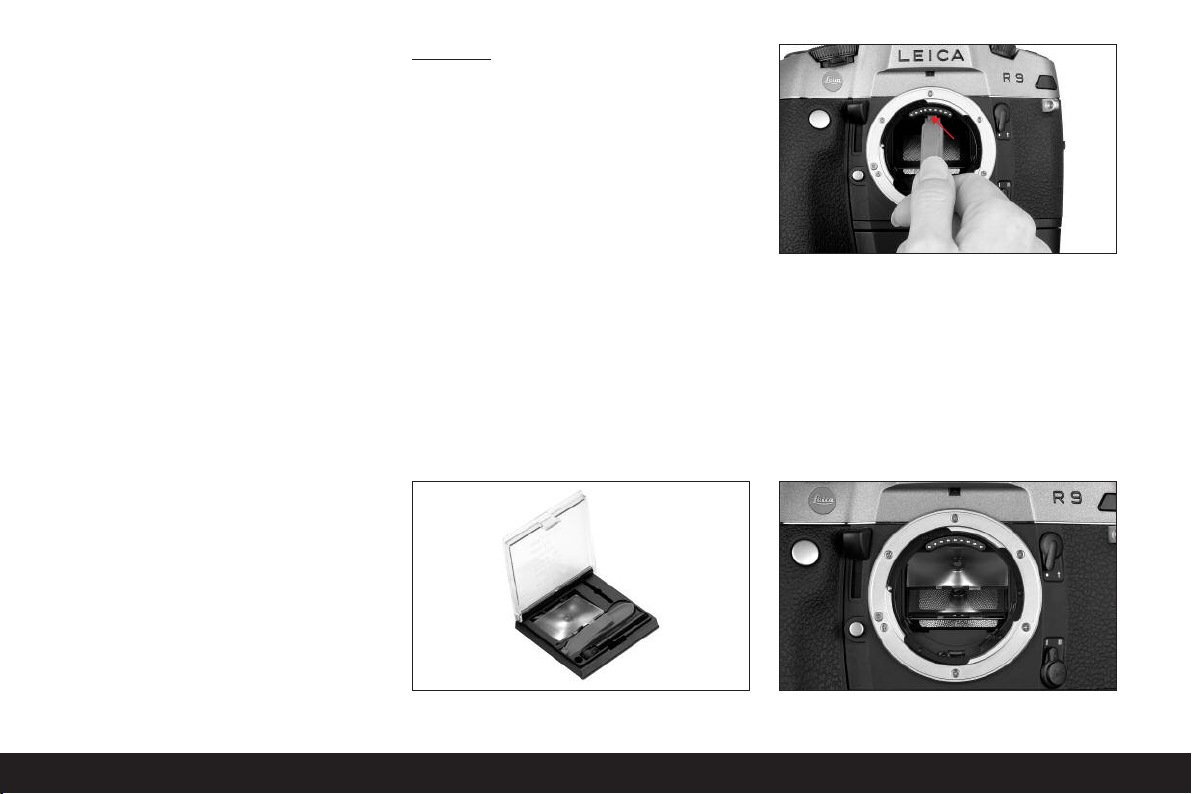
Removing
1. If a lens is attached to the camera, remove it.
Then:
2. Take the tweezers from the container along with the
supplied focusing screen (Figure 1) and place the cam
on the front of the tweezers, as shown in Figure 2,
behind the latch of the frame (behind the contact
strip in the bayonet, arrow).
1
2
Important: To change the focusing screen, only use
the tweezers; do not attempt to use your bare hands
and ensure that you do not touch the focusing
screen or the mirror with the tweezers or your hand
while inserting, to prevent dirt and scratches on the
sensitive surfaces.
3. Pull the latch forward so that the frame and the inlying focusing screen swing downwards (Figure 3).
3
72 / Detailed guide /Preparation
Page 19
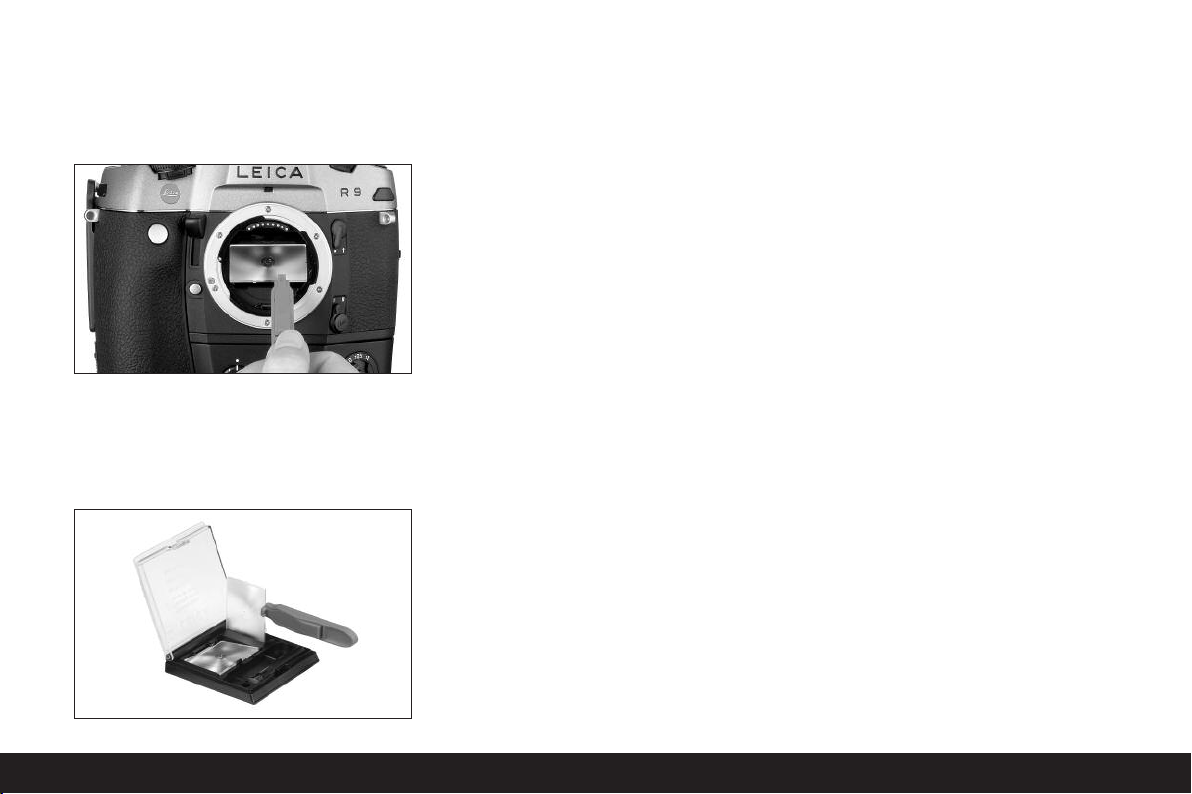
4. Then grip the tab on the focusing screen with the
tweezers (front right).
5. Lift the focusing screen upwards out of the frame
and
6. then remove it downwards (Figure 4).
Note: For secure temporary storage while making
the change, you should place the focusing screen
in the slit provided in the container, as shown in
Figure 5.
Inserting
1. Pick up the focusing screen lying in the container by
its tab using the tweezers,
2. remove it from its compartment by exerting a slight
pressure on the spring groove,
3. move it diagonally upwards into the opening in the
bayonet, and
4. place it in the frame.
5. Now place the cam on the front of the tweezers
behind the frame retaining spring and
6. press the frame upwards until it clicks into place.
Important: Do not use force; if necessary check
that the focusing screen is correctly positioned in
the frame.
4
Use the tweezers to place the replaced focusing screen
under the spring groove in the container and click it
into place in its compartment.
Cleaning the focusing screen
Dust particles can be removed using the brush supplied. It is recommended that you place the brush in
the hole provided in the container and then move the
focusing screen over the hair of the brush using the
tweezers.
More severe dirt and fingerprints can be removed in an
ultrasonic bath by an optician or by the Leica Camera
AG Customer Service (address: see p. 114).
Note: Use a clean fresh ultrasonic bath; hold the focusing
screen with the tweezers and immerse for 3–4 min-
utes,
do not simply place in the bath.
Important: Do not attempt to clean a focusing screen
with lens paper or a cloth - this can cause such severe
damage to the surface that the focusing screen can no
longer be used.
Then rinse the focusing screen with distilled water in
the ultrasonic unit for 3–4 minutes.
Notes:
• If non-dis
• The ultrasonic bath and distilled water should not be
When removing the focusing screen, lightly shake off
the residual water and place in the container to dry.
tilled water is used, marks can be expected.
heated.
5
Detailed guide / Preparation/ 73
Page 20

Removing the battery compartment/
an attached motor
Like the Motor-Winder-R8/R9 / Motor-Drive-R8/R9,
the power unit for the Digital-Modul-R has its own integrated grip section. The battery compartment or any
motor attached must therefore be removed from the
camera.
Removing the camera back
1. Open the camera back.
2. Place slider B on the inside of the camera back, as
shown in Figure 1. For correct guidance, the grooves
in the slider must be aligned with the vertical strip to
the right of the axis (arrow).
3. Press the slider and thus the moving upper joint pin
on the back downwards. The back is thus unlocked
and can be
4. tilted (Figure 2) and removed.
2
Attaching the digital back
1. Insert the lower rigid joint pin (1.1) on the digital
back, which is held slightly diagonal for this purpose, into the camera’s lower cap bearing (Figure 3).
The camera and digital back should be held at an
angle of approximately 90°.
74 / Detailed guide /Preparation
To attach the camera back, follow this procedure in
reverse order.
1
3
2. Press the red slider (Cb) on the protective cover
(Ca) – and with it the moving upper joint pin – downwards (Figure 4),
4
Page 21

3. hold it in place
4. tilt the digital back to the correct position, and
5. allow the upper joint pin (1.2) to engage in the upper
cap bearing by releasing the slider.
6. To unlock the protective cover, press the left-hand
side of the rocker switch (Cc, Figure 5),
5
7. slide the protective cover (Ca) to the right (approx.
5mm, Figure 6) and carefully remove it vertically
from the digital back.
Important:
• Wherever possible, the digital back should be
attached and removed in a dust-free environment.
• Take care to avoid touching the sensor surface or
allowing it to become dirty. For example, fingerprints
can cause irreparable damage to the sensor cover
glass.
• Always attach the cover immediately after removing
the digital back from the camera and only remove it
to attach it to the camera. This is also necessary to
protect the color filter against fading due to the longterm effects of bright light or UV radiation.
• Ensure that the cover is also free of dust.
• However, if the sensor should get dirty, i.e. in need of
cleaning, to avoid damage you should always follow
the instructions in the section “Cleaning the sensor”,
see page 109.
8. Close the camera by pressing on the digital back. It
locks automatically – just like the camera’s back.
To remove the digital back, follow this procedure in
6
reverse order.
Detailed guide / Preparation/ 75
Page 22

Attaching the power unit
1. Place the power unit (D) straight onto the camera
and digital back from below and slide it upwards so
that its rear edge surrounds the digital back.
2. Secure the connection by tightening the fastening
screw (clockwise) using the toggle (1.40).
Notes on the use of the rewind release button
and the multiple exposure lever
•
With the Digital-Modul-R attached, you should never
operate the camera’s rewind release button or its
multiple exposure lever.
•
Always see to it before attaching the Digital-ModulR that the rewind release button is not locked in its
pressed position.
•
After rewinding a film, the rewind release button is
always locked. Before attaching the Digital-Modul-R,
it must be unlocked manually.
1. To do so, open the camera’s back,
2. push the multiple exposure lever back once and
immediately return it to its resting position, and
3. rotate the film sprocket wheel as indicated in the
image.
4. As soon as the sprocket wheel blocks and the
rewind release button has sprung back up, you can
continue attaching the Digital-Modul-R, as described
on pp. 75–76.
Notes
•
Should you accidentally have pressed the rewind
release button while using the Digital-Modul-R, it
might not be possible to release it as a result, and
the camera may try to rewind the film. If so, you can
hear a constant humming of the motor in the power
unit. In such a case, proceed as described in points
1.–4. above.
To do so, it is advisable (to protect the sensor), to
temporarily remove the Digital-Modul-R again and
attach its protective cover.
•
Should you accidentally have moved the multiple
exposure lever while using the Digital-Modul-R on
the LEICA R8, the camera can be released, but no
images will be recorded. In such a case please push
the lever back to its resting position.
76 / Detailed guide /Preparation
Important: Be very careful not to touch the shutter
curtain!
Page 23

Inserting/removing the battery into/
from the power unit
Inserting
1. Hold the battery so that the side with the guide
(1.54) is pointing forward (towards the lens).
2. Guide the battery into the resulting slot and
3. slide it to the far left. The battery is automatically
locked in place once it overcomes the spring force.
Notes:
• The battery should be charged before using the
Digital-Modul-R for the first time (see p. 78).
• The Digital-Modul-R should be switched off before
removing the battery.
Removing
4. Press the unlocking slider 1.44 upwards. The spring
force then causes the battery to spring upwards so
that you can take hold of it
5. and completely remove it.
Setting the grip strap length
The integrated grip strap (1.26) provides extremely
convenient handling and carrying – even over a long
period and in conjunction with long and heavy lenses.
The series of figures shows how you can adjust the grip
strap length.
Detailed guide / Preparation/ 77
Page 24

Charging the battery
The powerful and quick-charging lithium ion battery
(E)
provides the necessary power for both the LEICA
DIGITAL-MODUL-R and the LEICA R8/R9.
Attention:
• Only the battery type specified and described in
this manual, and/or battery types specified and
described by Leica Camera AG, may be used in the
Digital-Modul-R.
• The battery may only be used in the unit for which it
is designed and may only be charged exactly as
described below.
• Using the battery contrary to the instructions and
using non-specified battery types can result in explosion under certain circumstances.
• The charger supplied should be used exclusively for
charging this battery type. Do not attempt to use it
for other purposes.
• Ensure that the mains outlet used is freely accessible.
• The charger may only be used in closed, dry rooms.
• The charger must be protected against moisture, and
may only be cleaned when disconnected from the
mains.
• The charger may not be opened. Repairs may only be
carried out by authorized workshops.
• Never throw batteries into a fire as this can cause
them to explode.
• Defective batteries should be disposed of as specified by their manufacturer.
Notes:
• The battery can only be charged outside the power
unit (D), i.e. exclusively through the charger. It is not
charged when in the power unit, even during mains
operation (see p. 79).
• The battery should be charged before using the
Digital-Modul-R for the first time.
• The battery must have a temperature of 0°–35°C
to be charged (otherwise the charger does not
switch on).
• Lithium ion batteries such as the one used in the
Digital-Modul-R do not develop a “memory effect”.
They can therefore be charged at any time, regardless of their current charge level. If a battery is only
partly discharged when charging starts, it is charged
to full capacity faster.
• The battery gets warm during charging. This is normal and not a malfunction.
• A new battery only reaches its full capacity after it
has been fully charged and discharged 2 or 3 times.
• To ensure a maximum service life of the battery, it
should not be exposed to constant extremes of
temperature (e.g. in a parked car in the summer or
winter). Also, it should not be
a. completely charged unless it is to be used soon
afterwards (can cause a loss of capacity) or
b. stored for several months without being charged
(due to unavoidable slow discharging)
• Even with optimum conditions of use, every battery
has a limited service life! After several hundred
charging cycles, this becomes noticeable as the
operating times get significantly shorter.
Connect the charger (C), i.e. plug its cable (1.50) into
the socket on the battery (1.55) and connect the mains
plug (1.52) to a mains socket.
• Both LEDs (green/
POWER
, 1.48; red/
CHARGE
,
1.47) light up to indicate that charging is in process.
78 / Detailed guide /Preparation
Page 25

After charging is complete – approx. 2 hours1– the red
LED goes out and the charging current is disconnected.
There is therefore no risk of overcharging. Nevertheless,
the charger should then be disconnected from the
mains.
The following LED displays indicate that charging is
defective or is not possible:
LED not lit LED flashing
Green / a. Mains connection –
POWER LED not correct
Red / Battery is not charged a. Battery outside temCHARGE LED a. Battery not connected perature range speci-
b. Connected battery
cannot be charged
correctly fied above (0°–35°)
b. Connected battery b. Battery totally dis-
already fully charged charged, pulsed
precharging will be
carried out first
If a fault cannot be resolved by eliminating the causes
stated in the above table, you should contact your dealer,
the Leica office in your country or Leica Camera AG.
A fully charged battery provides approx. 3 hours of
operating time.
1
If the battery temperature is too low or the battery is old, this time
can be up to 3 hours; if the battery is still partially charged it can
also be (significantly) shorter.
Charge level displays (2.2.6)
The battery’s charge level appears in the data panel
(1.21) (unless the mains unit is connected, see next
section).
=
Sufficient capacity
=
Low capacity
=
Replacement or recharging necessary
Notes:
• Remove the battery if you will not be using the camera/the Digital-Modul-R for a long time. Turn off both
units first.
• The date and time will have to be reset (see p. 87)
within 10 days after the capacity of a battery left in
the Digital-Modul-R is exhausted.
Mains operation
You can operate the camera/Digital-Modul-R unit
from the mains using the mains unit available as an
accessory (order no. 14 452), so that you can continue working regardless of the battery capacity.
Use
The mains adapter allows stationary use of a LEICA
R8/9 with LEICA DIGITAL-MODUL-R attached over any
length of time. For studio photography or very long
exposures, for example, this can make working significantly easier compared to the standard power supply
using the reechargeable battery.
Connection:
1. Plug the 8-pin connector (1.57a) into the corresponding socket (1.46) on the supply unit for the
Digital-Modul-R, ensuring that the guides on the
connector and the socket are aligned (a white dot
on the Digital-Modul-R’s housing indicates the correct position 1.46a). Then secure the connection
by tightening the union nut on the connector.
2. Next connect the appropriate mains cable (1.59)
for the system you are using, i.e. plug the smaller
connector on the mains cable (1.60a) into socket 2
and the mains plug (1.60b) into a mains socket.
• The LED 1.59 lights up to confirm the correct
mains connection.
Notes
• The mains adapter automatically switches to the
prevailing mains voltage.
• The battery is not charged during mains operation.
• The battery does not need to be left in the Digital-
Modul-R for mains operation.
• The Digital-Modul-R can get warm during operation
from the mains – this is normal and is not a malfunction.
• During mains operation, the connection between
the Digital-Modul-R and the mains adapter should
not be interrupted.
Safety instructions
• The mains adapter may only be connected to suit-
able voltage sources, i.e. only those described in
these instructions.
• It may only be used in enclosed, dry rooms.
Detailed guide / Preparation/ 79
Page 26

•
It must be protected against moisture, oil and grease.
• It should not be covered due to the risk of overheating.
• It should never be operated in the vicinity of flammable gases.
• Ensure that the mains outlet used is freely accessible.
• The mains adapter may only be cleaned with the
mains plug removed and only with a dry cloth.
• The unit may not be used if its housing or the mains
plug are damaged.
• It may not be opened. Repairs may only be carried
out by authorized workshops.
Inserting and removing the memory card
The LEICA DIGITAL-MODUL-R stores the image data on
an extremely compact and robust SD (Secure Digital)
card. Alternatively, MultiMedia cards can also be used.
SD memory cards and MultiMedia cards are small, light
and interchangeable external storage media. SD memory cards, particularly those with a high capacity, allow
significantly faster recording and reproduction of the
data. They have a write protection switch, which you
can use to block them against unintentionally storing
and deleting pictures. This switch takes the form of a
slider on the non-beveled side of the card; in the lower
position, marked
, the data is protected.
LOCK
SD memory cards and MultiMedia cards are available
from different suppliers and with different capacities.
The LEICA DIGITAL-MODUL-R includes a 512MB SD
memory card.
Note:
Do not touch the memory card contacts.
1. Switch off the Digital-Modul-R with its
OK/OFF
button (1.15).
2. Open the flap (1.18) over the memory card slot on
the right-hand side of the Digital-Modul-R, by first
pressing/pulling it slightly back as indicated by the
arrow. The spring force then causes the flap to automatically spring up.
3. Insert the memory card (G) into the slot (1.24) with
the contacts to the rear and the beveled corner
pointing upwards. Slide it completely into the slot
against the spring resistance until you hear it click
into place.
4. Close the cover by pressing it and sliding it forward
until it clicks into place.
To remove the memory card, follow this procedure in
reverse order. To release, the card must first be
pressed slightly further in – as indicated on the flap.
Notes:
• Some types of SD memory cards may cause malfunction with the Digital-Modul-R. Therefore, please
contact the Leica Information Service before acquiring additional memory cards (address: see p. 114).
• If the memory card cannot be inserted, check that it
is aligned correctly.
• If you cannot close the flap after removing the memory card, replace and remove the memory card and
then try again.
• When you open the flap (1.16) and remove the memory card, a corresponding warning message appears
in the monitor (1.11) instead of the normal displays:
Attention
No SD-Card
• Do not remove the memory card or the battery, or
disconnect from the mains while the LED (1.20) is lit
to indicate that a picture is being recorded and/or
that data is being saved to the card. Otherwise, the
data on the card can be destroyed and the DigitalModul-R may malfunction.
• As electromagnetic fields, electrostatic charge and
defects to the Digital-Modul-R and the card can lead
to damage to or loss of the data on the memory
card, it is recommended that the data is also transferred to a computer and saved there (see p. 103).
• For the same reason, it is recommended that the
card is always stored in the antistatic cover supplied.
80 / Detailed guide /Preparation
Page 27

The most important settings/controls
Switching on/off
Switching on
The Digital-Modul-R is switched on using one of the
three shutter release buttons (camera shutter release –/
main – [1.27] and portrait format shutter release [1.28]
buttons) or using the camera’s stop-down slider or, on
the LEICA R9, using its master switch. The LED (1.20)
briefly lights up and the displays in the data panel (1.21)
appear (see p. 69; in some cases until the DigitalModul-R is automatically switched off, see next section). At the same time, the Leica logo appears in the
monitor (1.11) – it disappears when the camera is ready
to use (after approx. 3s).
If the acknowledge tones are activated (
nal
, 3.14, see p. 88), they also indicate that the camera
Acoustic Sig-
is ready to take pictures.
Note:
After attaching and switching on the DigitalModul-R, you should check whether the camera’s shutter is cocked and therefore ready to take pictures. If
not, this can be done at any time using the camera’s
quick wind lever or, after switching on the DigitalModul-R, by tapping one of the shutter release buttons
(see also “The shutter release buttons”, p. 82).
Switching off
The Digital-Modul-R is switched off using either its
button (1.15) or, on the LEICA R9, using the
OK/OFF
camer’s master switch. The displays in the monitor
(1.11) and the data panel (1.21) disappear.
The Digital-Modul-R is automatically switched off if an
automatic power off time is specified using menu control (
Auto Power Off
, 3.13, see p. 70/86/88) and it is
not operated during this time.
Taking photographs
After switching on, the Digital-Modul-R is always in
record mode, i.e. the monitor (1.11) remains dark once
it is ready to use.
Operation of the camera, including the settings for all
camera functions, remains unchanged when using the
Digital-Modul-R. The only difference is that you must
take account of the frame for digital format (see p. 72)
on the focusing screen when determining the trimming.
From review mode (see next section), you can switch
back to record mode at any time by tapping one of the
shutter release buttons (see p. 82) or operating the
camera’s stop-down slider.
Selecting review modes
To review the pictures, you can choose between two
modes: To review for an unlimited time –
review briefly after taking the picture –
Review for unlimited time -
By pressing the
PLAY
PLAY
button (1.10), you can switch to
and to
PLAY
Auto Review
.
review mode at any time.
The last picture taken appears in the monitor along
with the corresponding displays (see p. 68). However, if
the memory card inserted does not contain any image
files, when you switch to review mode, the following
message appears:
No valid image to play
.
Automatic review of last picture - Auto Review
In
Auto Review
mode, each picture is shown in the
monitor (1.11) immediately after it has been taken. This
allows you to quickly and easily check whether the picture was successful or needs to be taken again.
The function allows you to choose the duration for
which the picture is shown and to review the picture
information with or without a histogram (see p. 84).
Detailed guide / The most important settings/ controls / 81
Page 28

Setting the function
In the menu (see p. 70/86), select
then select
Time
(duration) and set the desired func-
Auto Review
(3.9),
tion or duration in the submenu that then appears:
(
OFF,1 Second,3 Seconds,5 Seconds
).
To select whether you want a display with or without a
histogram (see p. 84), open up the first submenu again,
select
Histogram
(
Standard,Without
From
Auto Review
i.e. unlimited,
the following ways: Press the
(1.9),
PROTECT
OK/OFF
and then choose the desired setting
).
mode, you can switch to normal,
review mode at any time in one of
PLAY
(1.10),
(1.7),
INFO
PLAY
(1. 6),
MENU
DELETE
(1.12), or
(1.15) button or use the magnifier function
(see p. 96) with the setting ring (1. 13).
Note:
If you are taking photographs using the series
exposure function (see p. 83) or automatic exposure
bracketing (see p. 83), the last picture in the series is
shown first in both review modes. Details of how to
select the other pictures in the series and further
options in review mode are described in the sections
under “Review mode” starting on p. 96.
The shutter release buttons
There are a total of three shutter release buttons on
the camera and the Digital-Modul-R, which you can use
depending on the situation and/or your personal preference. All three – the camera’s and the two on the
Digital-Modul-R (1.29/30) – work in an identical way,
i.e. in three stages:
1. A brief tap activates the camera’s metering system
and starts any preset self timer delay time.
If the Digital-Modul-R was previously switched off,
this switches it on (see p. 81).
Notes:
• After switching on, the camera is ready to use after
approx. 3s.
• It may be necessary to cock the camera’s shutter
after switching on – either manually using the quick
wind lever or by pressing one of the shutter release
buttons again, see also “Switching on”, p. 81).
• The shutter release buttons are locked
a. if the internal buffer memory is (temporarily) full,
e.g. after a series of 10 pictures,
b. if the memory card inserted is full,
c. if no memory card is inserted, or
d. if a self timer delay time is set or is already run-
ning.
2. Pressing the shutter release button to the pressure
point and holding it in this position stores the
metered exposure value for selective or, on the
LEICA R9, center-weighted metering in
A,T
and
P
automatic exposure modes.
3. Completely depressing releases the camera and the
Digital-Modul-R, the picture is taken and the data is
transferred to the memory card.
Notes:
• A motor integrated into the Digital-Modul-R automat-
ically cocks the shutter after each picture. Alternatively, for example to save battery capacity or avoid
noise, you can also do this manually using the camera’s quick wind lever. If the quick wind lever is in the
ready position, i.e. folded out, the motorized drive is
deactivated.
• Menu control can be used to select button acknow-
ledgement tones (
Acoustic Signal
, 3.14, see p. 88).
• The shutter release should be pressed gently and not
jerkily to avoid blurring.
82 / Detailed guide /The most important settings/controls
Page 29

Series exposures
Thanks to the integrated motor for cocking the shutter,
the LEICA DIGITAL-MODUL-R can be used not only for
single pictures – lever 1.30 set to (S[single]) – but also
for series of pictures – lever set to (C[continuous]) –
for example to capture sequences of movement in several stages.
Apart from the operation of the shutter release buttons, series exposures are taken in the same way as
single pictures: If you press briefly, the camera continues to take single pictures. A series of pictures is taken
for the time that you hold down the shutter release button (as long as the memory card has capacity)
Depending on the set resolution (see p. 89) and compression rate/file format (see p. 89), a maximum of
2 pictures per second and up to 9 at a time can be
taken. For detailed information about the total possible
numbers of pictures for the 512MB memory card supplied, refer to the table on p. 89.
Notes:
• The maximum picture frequency of 2 fps can only be
achieved at shutter speeds of 1/
s
500
and faster.
• Regardless of how many pictures have been taken in
a series, the
PLAY
(see p. 81) and
Auto Review
(3.9,
see p. 81) functions always show the last picture
first. You can select the other pictures in the series
by pressing the right and/or left direction button
(1.14).
Automatic exposure bracketing
Many attractive subjects are very rich in contrast, i.e.
they have both very light and very dark areas. The
effect can be quite different, depending on which sections you base your exposure on. In such cases, you
can use automatic exposure bracketing to produce
several alternatives with graduated exposure. You can
then select the most appropriate picture for further
use.
With the Digital-Modul-R, an automatic exposure series
(bracketing) consists of 3 pictures at a time. Two graduations are available and are selected using the lever
1.29: The pictures are exposed differently by1/2EV
(±
)
or 1 EV
(±1)
0.5
at a time. Depending on the mode
set on the Digital-Modul-R, the different exposures are
achieved by changing the aperture (in T), the shutter
speed (in Aand m) or both (in P). The exposures are
made in the following order: correct exposure, underexposure, overexposure.
If the lever is set to 0, the function is not operational.
Notes:
• For automatic exposure bracketing, the three pictures – with the camera’s quick wind lever folded
down (see “The shutter release buttons”, p. 82) – are
automatically taken one after the other, provided the
mode is set to series or single pictures (see previous
section).
• As long as the lever 1.29 is in the appropriate position, pressing one of the shutter release buttons
again or holding it down with the setting on series
exposures/Cproduces further exposure series, i.e.
the lever must be reset if you do not want to produce
any more exposure series. When set to single pic-
, only a single exposure series is taken. If
tures/
S
you want to take another, you must first set the lever
and then reset it to the desired graduation.
to
0
• Depending on the available shutter speed/aperture
combinations, the working range of the automatic
exposure bracketing may be limited.
Detailed guide / The most important settings/ controls / 83
Page 30

Monitor and data panel
The LEICA DIGITAL-MODUL-R has two displays that are
switched on along with the unit itself.
The monitor
The color monitor (1.11) is used to view the pictures on
the memory card.
Note:
In a digital reflex camera, the returning mirror
covers the sensor – except for the brief instant when
the picture is taken. Therefore, unlike on digital
viewfinder cameras, a “live” image cannot be shown.
A monitor image is thus only available in review mode
(see p. 81) and must be switched on using the
PLAY
button (1.10).
To allow unrestricted viewing, only the picture number
(2.1.2) appears in the header or, for protected pictures
(see p. 100), the symbol (2.1.1/.7) as an indication
of this; for an enlarged view or a view that has been
moved from the center, this is indicated by a symbol to
the bottom right ( , 2.1.3) representing the approximate position and size of the trimming shown.
Setting the monitor brightness and contrast
The brightness and contrast of the monitor image can
be set using menu control (see p. 70/86,
Brightness
three levels –
, 3.12 /
Monitor Contrast
High,Standard
or
Monitor
, 3.11;) to one of
Low
– so that you can
adjust it optimally to the current situation, i.e. the available lighting conditions.
Note:
The brightness setting affects the life of the
battery: The brighter the image, the higher the power
consumption and the shorter the battery life.
Displaying image data
You can use the
button (1.6) to display a whole
INFO
range of picture information along with a reduced
image.
You can also use menu control (
Histogram
, 3.10) to
select different additional histogram variations (see
next section).
Histogram
The histogram (2.1.5) represents the distribution of
brightness in the picture. The horizontal axis corresponds to the tone values from black (left) to gray
through to white (right). The vertical axis corresponds
to the amount of pixels for each brightness.
Along with your impression of the picture itself, this
representation provides you with an additional fast and
easy method of evaluating the exposure setting after
taking the picture.
On the LEICA DIGITAL-MODUL-R, you can choose
between four variations of the histogram: Either related
to the overall brightness or separately for the 3 primary
colors red/green/blue and in each case either with or
without indication (red) of the areas that no longer discern details, i.e. are too light (clipping).
Note:
The histogram display always relates to the
trimmed area of the picture currently shown.
AB
A:
Predominantly dark pixels,
only a few light ones:
Underexposure
B:
Majority of pixels are of
average brightness:
Correct exposure
C:
Predominantly light pixels,
only a few light ones:
Overexposure
C
84 / Detailed guide /Monitor and data panel
Page 31

Setting the function
In the menu (see p. 70/86), select the
Histogram
option (3.10) and then set the desired function in the
corresponding submenu: (
out Clipping/Standard histogram with Clipping
Standard histogram with-
/
RGB histogram without Clipping/RGB histogram
with Clipping
).
Note: The histogram is not available for simultaneous
review of several reduced pictures (see p. 96).
The data panel
The data panel (1.21) displays the basic settings (see
also p. 69 and the next section) selected using the setting ring (1.13).
If you wish, the data field can be illuminated by pressing the button (1.19). Pressing the button again
deactivates the illumination. It is deactivated automatically after 12s to help preserve the battery capacity.
Setting operations
The functions and settings on the LEICA DIGITALMODUL-R are divided into two groups:
A. Basic settings for pictures, and
B. Menu functions
A. Basic settings
These basic picture settings are made up of those settings that are needed most frequently to adapt to different subjects, applications etc.:
1.
Compression rate/file format (
COMP
[compression],
see p. 89)
2. Resolution (
3. Sensitivity (
4. Pattern overlays (
[resolution], see p. 89)
RES
, see p. 92)
ISO
Moir
´
,
see p. 93)
e
5. White balance (WB[white balance], see p. 90)
This group also includes:
6. User profiles (
USER
, see p. 94)
7. Self timer ( , see p. 95)
The relevant settings for these functions are displayed
in the data panel (1.21) when the Digital-Modul-R is
switched on.
To facilitate fast and easy operation, these functions
can all be selected using the setting dial (1.22) next to
the data panel.
The actual settings for all of the functions are made in
the same way:
1. Select the desired function by turning the setting
dial (so that the corresponding marking is aligned
with the index mark (1.22a).
2. Press the
button (1.23) in the center of the dial.
SET
• The data panel then only shows the displays for
the selected function.
3. While keeping the
button pressed, use the set-
SET
ting ring (1.13) to set the desired value.
4. Release the
button (1.23) and the value is
SET
stored.
The white balance (
) function requires additional
WB
settings. The corresponding explanations, along with
further details about the other functions, can be found
in the relevant sections.
Detailed guide / Basic settings / 85
Page 32

B. Menu functions
The functions grouped together in the menu (see
“Menu items”, p. 70) affect the basic settings of the
Digital-Modul-R, the preselection of particular image
properties for taking pictures, adaptation of the image
files after taking the picture including deleting all data
and the choice of the preferred histogram representation when displaying picture data.
In principle, all menu functions are set in the same
way, except that you use the buttons to the right of
the monitor, which in this case acts as the display:
1. Open the menu by pressing the
MENU
button
(1.12).
• The first 7 menu items then appear in the monitor
(1.11).
The currently active menu item always has a black
background and a red border. The previous function
variation set is always listed to the right of the line.
2. You can select the desired menu item either by turning the setting ring (1.13) or by pressing the up/
down direction key (1.14).
Note:
The menu items are not arranged in an “endless
loop”, i.e. at the “ends” of the list – the
(3.1) and
Interface
(3.21) menu items – only one set-
User Profile
ting direction is available, down in the first case, up in
the second.
3. To set the relevant function, first press the
OK/OFF
button (1.15).
• The associated multi-line submenu, identified by a
red border, appears to the right of the menu item.
The selected item is again indicated by a black background.
4. You can then select the desired function variation
either by turning the setting ring (1.13) or by pressing the up/down direction key (1.14).
Note:
You can exit the submenus at any time without
applying any settings you have made in them by pressing the
MENU
button.
86 / Detailed guide /Menu functions
Page 33

5. To save your setting, press the
OK/OFF
button
again.
• The function variation set is then shown to the
right of the menu line.
6. Exit the menu by pressing the
Menu items such as
Date
(3.16) and
MENU
Time
button again.
(3.17)
require additional settings. The corresponding explanations, along with further details about the other menu
functions, can be found in the relevant sections.
Presets
Menu language
By factory default, the language used for menu control
is English, i.e. all menu items initially appear with their
English names. German, Spanish, French, Japanese,
Italian and Dutch can all be selected as alternative
menu languages.
These instructions list all menu functions and displays
in the same language as the instructions, however the
figures show the English-language menu in each case.
Setting the function
In the menu (see p. 70/86), select
Language
(3.15)
and then choose the desired language in the corresponding submenu.
• Apart from a few exceptions (button names, short
designations), all linguistic information changes.
Date and time
Date
and
Time
are each set using separate menu
items.
Date
There are 3 variations available for the sequence of the
date.
Setting
1. In the menu (see p. 70/86), select
Date
(3.16) and
open up the submenu. It consists of the 2 items
Setting
and
2. Select
Sequence
Setting
.
.
• A further submenu appears, containing groups of
figures for the year, month and day, in which the
currently active group, i.e. the one that can be set,
is identified by a black background and red border.
3. The figures are set using the up and down direction
buttons (1.14), while the left and right direction buttons are used to switch between the groups of figures.
Note: The figures are not arranged in an “endless
loop”, i.e. the down button must be used for lower
figures and the up button for higher figures.
4. After setting all 3 values, confirm and save by press-
OK/OFF
button.
ing the
• The list of menu items appears again.
Detailed guide / Presets/ 87
Page 34

5. To change the way in which the figures are displayed, select
• The 3 possible sequences
Month/Day/Year
6. The preferred option is set and confirmed as
described in points 3 and 4.
Note: Even if no battery is inserted or the battery is flat
and the mains unit is not connected, the date and time
setting is retained for around 10 days by a built-in
buffer battery. However, the date and time must then
be set attain as described above.
Time
The time can either be shown in 24- or 12-hour format.
Setting
Both the two groups of figures and the display format
are set under the
Setting
for
Date
and
Format
on p. 87.
Sequence
Time
in the submenu.
Day/Month/Year
, and
Year/Month/Day
menu item (3.17) using the
sub-items, essentially as described
,
appear.
Automatic switch off
This function automatically switches off the DigitalModul-R after a specified period of time. You can
choose whether you wish to activate this function and,
if so, how long you want the set time to be. In this way,
you can tailor this function to your own personal working methods and also significantly extend the life of
your battery charge.
Setting the function
In the menu (see p. 70/86), select
(3.13) and then choose the desired function.
Note:
If the Digital-Modul-R is switched off while the
camera is switched on, it can be switched back on at
any time by pressing one of the three shutter release
buttons (camera shutter release button [on LEICA R9
only]/main [1.27] and portrait format shutter release
buttons [1.28]) or by pressing the stop-down slider on
the camera [on LEICA R9 only] (see also “Switching on
and off”, p. 81).
Button acknowledg
With the LEICA DIGITAL-MODUL-R, you can decide
whether you want your settings and particular sequences
of functions to be acknowledged by acoustic signals –
with two volumes available – or whether you want operation of the Digital-Modul-R to be silent.
ement or signal tones
Auto Power Off
A clicking tone is used as an acknowledgement, which
can be activated individually to confirm presses of buttons and to indicate a full memory card. Different double tones are used for the audio histogram: The pitch of
the tone remains the same for correct exposure, drops
for underexposure and rises for overexposure.
Note: By factory default, the signal tones are deactivated.
Setting the functions
1. In the menu (see p. 70/86), select
(3.14) and open up the submenu. It consists of the
4 items
Volume,Audio Histogram
sure control),
tone), and
2. Select
• A further submenu appears containing the 3 alter-
natives
(quiet).
3. Choose the desired function from this submenu.
• After confirmation, the initial monitor screen
appears again.
4. In the other 3 submenus, c
want to activate the tones for the relevant functions.
Key Click
Full SD Card
Volume
Off
(no tones at all),
(key acknowledgement
(full memory card).
,
Acoustic Signal
(acoustic expo-
High
(loud) and
hoose whether or not you
Low
88 / Detailed guide /Presets
Page 35

Basic picture settings
Note:
The details in the table relate to the 512MB
memory card supplied and retention of the same set-
Resolution
The picture data can be recorded at four different pixel
settings, i.e. resolutions. This allows you to adjust it
precisely to the intended use or to the available memory card capacity.
At the highest resolution (which also means the largest
data volume), which you should select for optimum
quality for larger prints, it is of course possible to save
considerably fewer pictures to a card than at the lowest resolution, which is perfectly adequate for sending
tings. If, on the other hand, you change the compression rate and/or resolution, the resulting number of
pictures will be different.
Setting the function
Turn the setting dial (1.22) to
the
button (1.23) pressed, and use the setting ring
SET
RES
(1.13) to select the desired resolution (see also p. 85).
• The display in the data panel changes accordingly
(2.2.9a/b/c/d).
a picture by e-mail or for a website.
Note:
When using raw data storage (
RAW
, see next
section), the resolution switches to .
Possible resolutions and resulting numbers of pictures
Compression rate/
RAW TIFF
JPEG FINE
1
file format (low) (normal)
Resolution
(3872 x 2576) 24 16 48 110
(2896 x 1920) - 29 86 195
(1936 x 1280) - 66 185 400
(1280 x 848) - 145 385 750
1
Average values, can differ significantly depending on the subjects.
(resolution), keep
JPEG BASIC
Compression/file format
Picture data can be recorded at four different compression rates or file formats. This allows you to adjust the
setting precisely to the intended use or to the available
memory card capacity.
Of course, less compressed or uncompressed data,
which contains more picture information and should be
selected for large prints or further processing in photographic programs for example, allows you to save considerably fewer pictures per memory card than with
higher compression, i.e. with reduced picture information.
Notes:
• Regardless of the existing setting, when using raw
data storage –
RAW
– the resolution is automatically
set to (3872 x 2576) (see previous section). The
standardized DNG (Digital Negative) format is used
to store the camera raw data.
• A high compression rate can result in very fine structures in the subject being lost or incorrectly reproduced (artifacts; e.g. “stepped” diagonal edges).
1
Detailed guide / Basic settings/ 89
Page 36

• The remaining number of pictures or recording duration shown in the monitor does not necessarily
change after every picture. This depends on the subject; very fine structures result in higher quantities of
data, homogeneous surfaces in lower quantities. The
details in the table are based on an average file size
for the set resolution. The file sizes are often smaller,
depending on the picture content and the compression rate, which means that the remaining memory
capacity is then greater than previously calculated
and displayed.
• For the possible compression rates and the resulting
numbers of pictures, refer to the table in the previous section.
Setting the function
Turn the setting dial (1.22) to
keep the
button (1.23) pressed, and use the set-
SET
COMP
(compression),
ting ring (1.13) to select the desired compression rate
(see also p. 85).
• The display in the data panel changes accordingly
(2.2.10).
White balance
In digital photography, white balance ensures neutral
reproduction of color in any light. It is based on the
Digital-Modul-R being set in advance to reproduce a
particular color as white.
On the LEICA DIGITAL-MODUL-R, you can choose
between nine different settings:
–AFor automatic control, which provides neutral
results in most situations,
–
Six fixed presets for the most frequent light sources,
–
e.g. for indoor pictures with (prevailing)
incandescent lamp light,
–
e.g. for indoor pictures with (prevailing) light
from fluorescent tubes,
–
e.g. for outdoor pictures in sunshine,
–
e.g. for pictures with (prevailing) electronic
flash illumination,
–
e.g. for outdoor pictures with cloudy skies,
–
e.g. for outdoor pictures with the main subject in shadow,
–M(Example) For manual setting by measurement,
and
–
1
(Example) For a directly set value.
5000K
Note:
When using an electronic flash unit, for correct
color reproduction the white balance must be set to
either automatic (A) or .
Setting the function
For automatic or one of the fixed settings
Turn the setting dial (1.22) to WB(white balance), hold
down the
button (1.23) and use the setting ring
SET
(1.13) to select the desired option (see also p. 85).
• The display in the data panel changes accordingly
(2.2.1a/b/c/d/e/f/g).
90 / Detailed guide /Basic settings
1
All color temperatures are specified in Kelvin.
Page 37

For direct setting of values
You can directly set values between
2600
and
9800
(K1) (from 2600 to 5000K in increments of 100, from
5000 to 8000K in increments of 200 and from 8000 to
9800K in increments of 300). This provides you with a
broad scope, covering almost all light temperatures
that can occur in practice and within which you can
adapt the color reproduction very sensitively to the
ambiant light color and/or your personal preferences.
1. Turn the setting dial (1.22) to WB(white balance),
hold down the
ting ring (1.13) to select the
button (1.23) and use the set-
SET
5000K
option (2.2.1h,
example).
2. release the
• After you release the
SET
button again,
SET
button, the figure
oo
flashes for approx. 3s to indicate that it can be
changed during this time.
3. use the setting ring to select the desired value, and
4. confirm your setting by pressing one of the three
shutter release buttons (camera shutter release button/main [1.27] and portrait format shutter release
buttons [1.28] or pressing the
button again.
SET
• The display of the set value (2.2.1 i) is permanently
lit.
Note: The display of the value stops flashing after
approx. 3s, i.e. the value that is then set is stored. If
you want to change it, you must press the
SET
ton again to do so.
but-
For manual setting by measurement
1. Turn the setting dial (1.22) to WB(white balance),
keep the
button (1.23) pressed and use the set-
SET
ting ring (1.13) to select the Moption (2.2.1h).
2. Release the
SET
button again.
• In the data panel, the Mflashes to indicate readi-
ness to make the setting; at the same time the
message
Point the camera at a white surface
and press the shutter
appears in the monitor.
3. The actual setting is made by subsequently taking a
picture in which you should aim at a white or neutral
gray surface in the center of the picture.
• The Mdisplay appears in the data panel. To indi-
cate that the value has been stored, the
flashing and the message
WB is set
stops
M
appears in
the monitor.
However, if the exposure is not assessed as correct or the surface you aim at is not neutral,
exposure WB not set
or
Bad object WB not set
Bad
appears to indicate this.
In such cases, repeat step 3 with the correct exposure setting or with a more neutral surface.
A value calculated in this way remains stored, i.e. it is
used for all subsequent pictures, until you either carry
out another measurement – in this case you merely
need to press the
button to prepare to make the
SET
setting – or use one of the other white balance settings
(2.2.1a-g, i).
1
All color temperatures are specified in Kelvin.
Detailed guide / Basic settings/ 91
Page 38

ISO sensitivity
In traditional photography, the choice of ISO value
reflects the light sensitivity of the film used. More sensitive films allow faster shutter speeds and/or smaller
apertures and vice versa, at the same brightness.
The ISO setting on the LEICA DIGITAL-MODUL-R also
allows the shutter speed/aperture values to be adjusted manually in five steps to meet specific requirements.
The optimum picture quality is obtained at
ISO 100
,
the lowest of the possible settings. The higher sensitivities
ISO 200,ISO 400,ISO 800
and the addi-
tional increase possible with the final option using the
ISO PUSH
function (see below) result in increasing
“image noise”. This effect can be compared to the
“graining” that occurs with highly sensitive films.
Setting the function
Turn the setting dial (1.22) to
ISO
, keep the
SET
button (1.23) pressed, and use the setting ring (1.13) to
select the desired sensitivity (see also p. 85).
• The display in the data panel changes accordingly
(2.2.3a/b/c/d).
If you require a further increase in sensitivity beyond
ISO 800
(i.e. if a faster shutter speed is more important than the increased image noise), due to very poor
lighting conditions for example, the
ISO PUSH
function provides you with the additional ISO 1600 sensitivity level.
Note:
ISO PUSH
is only available if the setting has
previously been released in the menu.
In the menu (see p. 70/86), select
ISO Push
(3.5)
and then choose the desired function in the corresponding submenu.
Image properties/Sharpness, color
saturation, and contrast
One of the many advantages of electronic photography
over traditional photography is that it is very easy to
change critical properties of a picture, i.e. those that
determine its character. While photographic software after recording and transfer to a computer - provides
great scope for doing this, the LEICA DIGITAL-MODUL-R
luence three of the most important
allows you t
o inf
image properties even before taking the picture:
• Sharp reproduction – at least of the main subject –
using the correct distance setting is a prerequisite
for a successfully picture. In turn, the impression of
sharpness of a picture is to a great extent determined by the sharpness of the edges, i.e. by how
small the transition area between light and dark is at
the edges in the picture. The impression of sharpness can thus be changed by enlarging or reducing
these areas.
• The color saturation determines whether the colors
in the picture tend to appear as “pale” and pastel-like
or “bright” and colorful. While the lighting and weather conditions (hazy/clear) are given as conditions for
the picture, there is definite scope for influencing the
reproduction here.
• The contrast, i.e. the difference between light and
dark sections of the image, determines whether an
image has a more “flat” or “brilliant” effect. As a consequence, the contrast can be influenced by increasing or reducing this difference, i.e. by lighter reproduction of light sections of the image and darker
reproduction of dark sections.
For all three image properties – independently of one
another – as well as the Standard setting, i.e.
unchanged
or stronger
tion,Black+White
reproduction, you can select a weaker
High
option. In the case of
Color Satura-
reproduction can also be selected
Low
as a fourth option.
92 / Detailed guide /Basic settings
Page 39

Note: If the file format
RAW
is selected, these settings
have no effect as in this case the image data is always
saved in its original form (changes must be made later
on the computer).
Setting the three functions
In the menu (see p. 70/86), select the relevant item,
Sharpness
(3.2),
Color Saturation
(3.3) or
Contrast
(3.4), and then choose your preferred option in the corresponding submenus.
Moiré/Pattern overlays
In contrast to traditional photography, where the negative/picture is made up of completely arbitrarily distributed “silver grains” or “color spots”, digital photography is based on capturing the subject using sensors,
which have an absolutely regular arrangement of pixels. If subjects that include regular small structures,
such as a balustrade photographed from a distance,
fabric surfaces, a tea strainer, a pin-striped suit etc. are
photographed digitally, the two structures can become
overlaid, which manifests itself as an interfering pattern on these sections of the picture – so-called Moiré.
On the LEICA DIGITAL-MODUL-R, a filter function can
be used to mitigate this effect.
Setting the function
Turn the setting dial (1.22) to
MOIR
´
,
keep the
E
SET
button (1.23) pressed and use the setting ring (1.13) to
select the desired option (see also p. 85).
• The display in the data panel changes accordingly
(2.2.11).
Notes:
• This filter function should only be used if the corresponding effects have occurred in a picture.
• The Moiré filter function is associated with increased
calculation work. As a consequence, the data processing time is extended, as is the storage time, particularly when used in conjunction with the series
exposure function (see p. 83).
Color space definition
The requirements in terms of color reproduction differ
considerably for the various possible uses of digital picture files. Different color spaces have therefore been
developed, such as the standard RGB (red/green/blue)
that is perfectly adequate for simple printing. For more
demanding image processing using appropriate programs, e.g. for color correction, Adobe ®RGB has
become established as the standard in the relevant
sectors.
The LEICA DIGITAL-MODUL-R allows you to set one of
these two color spaces, either
shown abbreviated as sRGB) or
standard RGB
Adobe RGB
(often
.
Setting the function
In the menu (see p. 70/86), select
Color Management
(3.6) and then choose the desired function in the corresponding submenu.
Notes:
• If you want to have your prints produced by major
photographic laboratories, mini labs or Internet picture services, you should alw
RGB
setting.
• The
Adobe RGB
setting is only recommended for
ays select the
standard
professional image processing in completely colorcalibrated working environments.
Detailed guide / Basic settings/ 93
Page 40

Additional functions
User/application specific profiles
On the LEICA DIGITAL-MODUL-R, any combinations of
all menu and data field settings can be permanently
stored, e.g. so that they can be retrieved quickly and
easily for recurring situations/subjects. A total of
three memory slots are available for these combinations
– 1/2/3
Applying settings/Creating a profile
1. Set the desired menu and data field functions.
2. In the menu, select
User Profile
(3.1) and then
choose the desired memory slot in the corresponding submenu.
Saving settings/Creating a profile
3. Turn the setting dial (1.22) to
USER
, keep the
SET
button (1.23) pressed, and use the setting ring (1.13)
to select the desired memory slot.
• After pressing the
button (1.23),-initially
SET
appears in the data panel instead of one of the
numbers (2.2.5).
During this time, the button can be released again
without you having to select one of the memory
slots.
• After you select one of the memory slots, the dis-
play changes accordingly.
Notes:
• In addition to the three memory slots, there is also
the 0setting, which you can use to restore the factory default settings at any time, regardless of whether
you are currently using one of the memory slots or
any other unsaved function settings. To a great extent,
user 0
therefore corresponds to the
Reset
function
(see next section).
• If you change one of the settings for the profile currently in use, the corresponding display is cleared.
Resetting all custom settings
You can use this function to reset all custom settings
previously made to the default factory settings in one
go, i.e. both the settings made using menu control
and those made using the dial 1.22 in the data field.
Setting the function
In the menu (see p. 70/86), select Reset (3.20) and
then choose the desired function in the corresponding
submenu.
• The default factory settings for the functions listed
are displayed in the monitor (1.11) and the data
panel (1.21).
Important: This reset also affects any individual profiles specified and saving using the User Profile function (3.1).
94 / Detailed guide /Additional functions
Page 41

Changing the picture numbering
The LEICA DIGITAL-MODUL-R assigns pictures sequential picture numbers, in the default factory setting
regardless of whether the memory card is changed
(
Continous
). However, you can use menu control at
any time to specify that the numbering should begin
again each time the memory card is changed, e.g. to
assign the picture numbers to different events, subjects etc.
Setting the function
In the menu (see p. 70/86), select Picture
Numbering
(3.8) and then choose the desired function
in the corresponding submenu.
• Depending on the selected function, the file number-
ing starts again from 1 either after the next change
of memory card –
or from the next picture –
set back by changing SD-card
set back now
.
Notes:
•
The change of numbering relates exclusively to the
file names, e.g.
the
INFO
•
After formatting the memory card, the folder number
L100 0001
, which are only shown in
display (see p. 84).
can also be set back.
Taking photographs with the self timer
You can use the self timer to take a picture with a delay
of either 2 or 12s. This can be particularly useful, for
example in the first case if you want to avoid the picture being out of focus due to camera shake when
releasing the shutter or, in the second case, for group
photographs where you want to appear in the picture
yourself. In such cases, it is recommended that the
camera be placed on a tripod.
Setting and using the function
Turn the setting dial (1.22) to , keep the
ton (1.23) pressed, and use the setting ring (1.13) to
select the desired option (see p. 85).
• A corresponding display (2.2.8) appears in the data
panel.
–
To start the delay time, tap one of the shutter release
buttons (camera shutter release button/1.27/28).
• The flashing LED on the front of the camera indicates
that the delay time is running, and it simultaneously
counts down in the data panel.
Note:
While the self timer delay time is running, it can
be aborted at any time by pressing the
the relevant setting is retained and the function can be
restarted by tapping one of the shutter release buttons
again.
SET
but-
SET
button –
Notes on flash photography
TTL flash mode, i.e. using the
setting on the flash
TTL
unit to control the flash exposure on the camera is not
possible due to the operating principle.
Reason: This TTL flash exposure control is based on
the reflection properties of films. However, the surfaces of digital image sensors generally have different
reflection properties. As a consequence, computer
control (normally A) or manual mode (normally M) on
the relevant flash unit should be used.
By contrast, flash metering and exposure setting using
the camera’s Ffunction can be used with no restrictions. With the LEICA R9 and flash units with the corresponding features, the
function is also avail-
HSS
able.
For further details, please refer to the relevant flash
unit instructions.
When using electronic flash units, for correct color
reproduction the white balance on the Digital-Modul-R
must be set to either automatic (A), electronic flash ,
or manual setting by measurement (M) (see p. 90).
Important:
In self timer mode, the exposure is not set
by depressing a shutter release button to the pressure
point, it is set immediately before the picture is taken.
Detailed guide / Additional functions/ 95
Page 42

Review mode
As described in the “Selecting review modes” and
“Automatic review of last picture” (p. 81) sections, you
can view the pictures you have taken in the monitor on
the LEICA DIGITAL-MODUL-R. This can either be automatic for a short time immediately after taking the picture in
Auto Review
unlimited time, in
mode or at any time, and for an
mode. In both cases, several
PLAY
additional options are available while viewing the
pictures.
Notes:
• The Digital-Modul-R stores pictures in line with the
DCF standards (Design Rule for Camera File System).
• The Digital-Modul-R can only be used to view image
data produced with the unit.
Additional options when viewing
A. Viewing other pictures/“Scrolling” in the memory
You can open other saved pictures using the left and
right direction buttons (1.14). Pressing the left button
takes you to the pictures with lower numbers, right
takes you to those with higher numbers. Holding the
button down (approx. 2s) results in fast scrolling. After
the highest and lowest numbers, the series of pictures
begins again in an endless loop, which means you can
reach all pictures in either direction.
• The picture and file numbers in the monitor change
accordingly.
B.
Enlarging/selecting the trimming/simultaneous
viewing of several reduced pictures
With the LEICA DIGITAL-MODUL-R, it is possible to
open an enlarged trimmed area of an individual picture
in the monitor to study it more closely, with a free
choice of trimming. Conversely, you can also view up to
9 pictures simultaneously in the monitor, e.g. to gain
an overview or to find the picture you are looking for
more quickly.
Notes:
• The more the picture is enlarged, the more the reproduction quality in the monitor deteriorates – due to
the proportionally lower resolution.
• It may not be possible to enlarge pictures taken with
cameras of other types.
• While an enlarged picture is displayed, the direction
buttons are no longer available to open other pictures, but are used to “navigate” within the picture
instead.
96 / Detailed guide /Review mode
Page 43

Turning the setting ring (1.13) to the right (clockwise)
enlarges a central trimmed area. The more you turn the
ring, the greater the enlargement and the smaller the
trimmed area.
• During calculation of the data, the hourglass symbol
appears briefly in the display. The rectangle with-
in the frame (2.1.2) in the lower right-hand corner of
the monitor symbolizes the current enlargement.
In an enlarged view, you can use the four direction
buttons (1.14) to select any position for the trimming.
To do this, press the button (several times) for the
direction in which you want to shift the trimming.
• In addition to the enlargement, the rectangle within
the frame (2.1.2) in the lower right-hand corner of
the monitor symbolizes the position of the trimming
displayed.
By turning the setting ring to the left (anticlockwise,
starting from normal size), you can simultaneously view
4 – or by turning the ring further – 9 pictures in the
monitor.
• Up to 9 reduced images are shown in the monitor
(1.11) including the picture previously being viewed
at normal size, which is marked with a red border.
Detailed guide / Review mode/ 97
Page 44

You can use the four direction buttons (1.14) to navigate freely among the reduced images, and the relevant image is marked accordingly. You can then view
this image at normal size by turning the setting ring
(1.13) to the right.
Note:
When showing 9 pictures, turning the setting
dial further to the right places the red frame around
the entire group of pictures, which then allows you to
“scroll” more quickly, a block at a time.
C. Deleting pictures
While a picture is displayed in the monitor, you have an
opportunity to delete it if you wish to do so. This can be
useful, for example if the pictures have already been
saved to other media, if you no longer require them or
if you need to free up more space on the memory card.
The LEICA DIGITAL-MODUL-R therefore offers you the
option of deleting individual or all pictures as required.
Notes:
• Deleting is possible regardless of whether a picture
is currently displayed at normal size or several
reduced pictures are displayed.
• For protected pictures, the protection must first be
cancelled before they can be deleted (see also next
section).
Procedure
Press the
DELETE
button (1.9).
• The corresponding submenu appears in the monitor
display (1.11).
98 / Detailed guide /Review mode
Important:
Pictures are permanently deleted. They
cannot subsequently be retrieved.
Notes:
• The delete process can be cancelled at any time by
pressing the
DELETE
button again.
• The following controls and their functions are not
available during the entire delete process:
MENU
(1.12),
PROTECT
(1.7), and
INFO
the
(1.6) buttons.
Page 45

Subsequent operation is controlled by the menu, i.e. in
principle in exactly the same way as described in the
“Setting operations”/“Menu functions” sections (on
p. 85/86). After specifying the relevant menu display,
this is done using the direction buttons (1.14) or the
setting ring (1.13) and the
OK/OFF
button (1.15).
The first step is to decide
whether you want to delete individual pictures
Delete
Current picture
or
all pictures simultaneously
Delete
All pictures
Note: If the picture shown is protected (see p. 100),
the function variation cannot be
Current picture
selected in the submenu.
When deleting all pictures, to prevent accidental deleting there is an intermediate step in which you must
reconfirm that you definitely want to delete all pictures
on the memory card.
Displays after deleting
Deleting individual pictures
After deleting, the preceding picture appears.
If there are no more pictures saved on the card, the
following message appears: .
No valid image to play
Deleting all pictures on the memory card
After deleting, the following message appears:
No valid image to play
.
However, if one or more pictures were protected, the
picture or the first of the pictures then appears.
Note: When a picture is deleted, the subsequent pictures in the picture counter (2.2.4) are re-numbered as
follows: For example, if you delete picture no. 3, what
was previously picture no. 4 then becomes no. 3, the
previous no. 5 becomes no. 4 etc. However, this does
not apply to the file numbering on the SD card (in the
display, see p. 84) for the remaining image files
INFO
in the folder (2.2.12), which remains unchanged.
Detailed guide / Review mode/ 99
Page 46

D. Protecting pictures/Clearing delete protection
The pictures stored on the memory card can be protected against accidental deleting. This protection can
then be cleared at any time.
Notes:
• Pictures can be protected and the protection cleared
regardless of whether a picture is currently displayed
at normal size or several reduced pictures are displayed.
• For details of the different procedures/responses
when you attempt to delete protected pictures, refer
to the previous section.
If you decide you want to delete them, clear the protection as described below.
•
The protection is only effective in this Digital-Modul-R.
• Even protected pictures are deleted when formatting
the memory card (see next section for details).
• On SD memory cards, you can prevent accidental
deleting by sliding the write protection switch on the
card (see p. 80) to the position marked
LOCK
.
Procedure
Press the
PROTECT
button (1.7).
• The corresponding submenu appears in the monitor
display (1.11).
Notes:
• The setting process can be cancelled at any time by
pressing the
PROTECT
button again.
• The following controls and their functions are not
available during the entire setting process:
MENU
(1.12),
DELETE
(1.9), and
INFO
the
(1.6) buttons.
Subsequent operations are controlled by the menu, i.e.
in principle in exactly the same way as described in the
“Setting operations”/“Menu functions” sections (on
p. 85/86)
. After specifying the relevant menu display, this
is done in several steps using the direction buttons (1.14)
or the setting ring (1.13) and the
OK/OFF
button (1.15).
The first step is to decide
whether you want to protect individual pictures
Protect
Current picture
or
all pictures simultaneously
Protect
All pictures
or
whether you want to clear the existing protection for
individual pictures
Unprotect
Current picture
or
for all pictures
Note: The f
ollowing functions are not possible and the
Unprotect
All pictures
menu text appears in white instead of black to indicate
this:
a. Protecting a picture that is already protected, or
b. if all pictures are already protected, as well as
c. clearing the protection for a picture that is not pro-
tected, or
d. if no pictures are protected.
,
,
,
.
100 / Detailed guide /Review mode
Page 47

When protecting or clearing the protection for all pictures, to prevent accidental settings you must confirm
your choice again in an intermediate step.
Displays after protection/clearing protection
After leaving menu control, the original monitor display
appears again, with the corresponding symbol for
protected pictures (2.1.1/.7).
Note: The symbol also appears if a picture that is
already protected is opened.
Reducing the resolution after recording
You can reduce the resolution (see also p. 89) of a picture that has already been stored at a later date. This is
particularly recommended if you want to increase the
remaining memory capacity of the card, send the picture as an e-mail attachment or use it for part of a website.
A maximum of 3 reduction levels are available, which
are linked to two fixed compression rates (see also
p. 89):
2896 x 1920 / Large JPEG fine,
Medium JPEG fine
basic
.
and 1280 x 848 /
1920 x 1280 /
Small JPEG
Note: The resolution can only be reduced if at least
one lower level than the original resolution is available.
Setting the function
In the menu (see p. 70/86), select
Resize
(3.7) and
then choose the desired format in the corresponding
submenu.
• An hourglass initially appears in the submenu to indi-
cate that the data is being converted. When using
the
function (see p. 26), the new properties
INFO
(2.1.10 g/h) are specified.
Notes:
• Conversion of the picture data to the specified new
format can take a few seconds.
• Variations with new resolutions replace those with
the original resolution and take on the original picture numbers.
Detailed guide / Review mode/ 101
Page 48

Formatting the memory card
It is not normally necessary to format (initialize) the
memory card. However, if the
message is displayed, it is necessary.
Nevertheless, it is recommended that the memory card
be formatted occasionally, as a certain amount of
residual data (info accompany pictures) can take up
some of the memory capacity.
Important:
on the card, including picture files and all other data,
e.g. music files, is irretrievably lost. You should therefore get into the habit of transferring all your pictures
onto a secure bulk storage medium, e.g. the hard drive
on your computer, as soon as possible.
Notes:
• Do not switch off the Digital-Modul-R while the memory is being formatted.
• If the memory card has been formatted in a different
device, e.g. a computer, you should format it again in
the Digital-Modul-R.
• If the memory card cannot be formatted, you should
ask your dealer or Leica for advice.
• Even protected pictures (see previous section) are
deleted when formatting the memory card.
When formatting, all information present
Memory card error
Procedure
In the menu (see p. 70/86), select
• The corresponding submenu appears in the monitor
(1.11).
To guard against unintentional settings, you then have
to confirm in the corresponding submenu that you definitely want to format the memory card.
Displays during formatting
• During the formatting process, the hourglass symbol
briefly appears in the display, the submenu then
disappears and the
briefly appears in the otherwise empty monitor display, after which the menu items appear again.
No valid image to play
Format
(3.15).
message
102 / Detailed guide /Review mode
Page 49

Transferring data to a computer
The LEICA DIGITAL-MODUL-R is compatible with the
following operating systems:
•
Microsoft® Windows®: Windows® 98, Windows®ME,
Windows® 2000, Windows®XP
• Apple® Macintosh®: Mac® OS X
The Digital-Modul-R is equipped with an IEEE 1394
FireWire interface to transfer data onto a computer.
This allows extremely fast data transfer to computers
with the same kind of interface. The computer used
must have either a FireWire port (IEEE 1394, for direct
connection to Digital-Modul-R) or a card reader for SD
cards.
Important: The FireWire plugs on the supplied cable
(H) are different, matching the differing socket sizes
on the Digital-Modul-R and computers, i.e. they do not
even fit in the “wrong” sockets. Therefore, connecting
is normally “automatically” done correctly, if necessary with the help of the supplied adapter (I).
Nevertheless, be careful not to confuse them and do
not use force, otherwise this could lead to a false
polarity – and damage to the equipment.
Note:
When using a FireWire connection, note the
following: Connecting two or more devices to a computer or connecting using a hub or extension cables
can result in malfunctions.
Connecting and transferring data
with Windows® 98 SE
1. Under the
Disc
off and back on.
2. Connect the Digital-Modul-R to a FireWire socket
on the computer using the FireWire cable supplied
(H and if necessary the adapter supplied, I).
3. When connecting the Digital-Modul-R for the first
time, have the
ready, as it may be necessary to copy a driver onto
the computer’s hard drive.
If the driver for data transfer is already installed on
the hard drive, continue the data transfer as
described under point 5, if not follow point 4.
4. Insert the
drive on your computer and follow the instructions
on the screen. It may be necessary to restart your
computer.
5. After successfully connecting, the memory card
inserted in the Digital-Modul-R appears as a drive
letter on your computer’s desktop. At the same
time, a FireWire symbol appears in the monitor
(1.11) on the Digital-Modul-R.
6. You can now copy the pictures from the memory
card to a folder of your choice using
Explorer and access them.
Interface
function and then switch the Digital-Modul-R
Windows® 98 SE
(3.21) menu item, select the
Windows® 98 SE
installation CD
installation CD in a CD
Windows®
Connecting and transferring data
with Windows® 2000, Windows® XP
1. Under the
Disc
off and back on.
2. Connect the Digital-Modul-R using the FireWire
cable supplied (H, and if necessary the adapter supplied, I) to a FireWire socket on the computer.
3. After successfully connecting, the memory card
inserted in the Digital-Modul-R appears as a drive
letter on your computer’s desktop. At the same
time, a FireWire symbol appears in the monitor
(1.11) on the Digital-Modul-R.
4. You can now copy the pictures from the memory
card to a folder of your choice using
Explorer and access them.
Interface
(3.21) menu item, select the
function and then switch the Digital-Modul-R
Windows®
Detailed guide / Transferring data to a computer / 103
Page 50

Connecting and transferring data with Mac® OS X
1. Under the
Disc
off and back on.
2. Connect the Digital-Modul-R using the FireWire
cable supplied (H, and if necessary the adapter supplied, I) to a FireWire socket on the computer.
Important: The FireWire plugs on the supplied
cable (H) are different, matching the differing socket sizes on the Digital-Modul-R (1.46) and computers, i.e. they do not even fit in the “wrong” sockets.
Therefore, connecting is normally “automatically”
done correctly, if necessary with the help of the
supplied adapter (I).
Nevertheless, be careful not to confuse them and
do not use force, otherwise this could lead to a
false polarity – and damage to the equipment.
3. After successfully connecting, the memory card
inserted in the Digital-Modul-R appears as a drive
letter on your computer’s desktop. At the same
time, a FireWire symbol appears in the monitor
(1.11) on the Digital-Modul-R.
4. To transfer the data open the folder
clicking on the corresponding icon. You will find individual directories designated
etc.
5. From here, you can copy the pictures to a folder of
your choice and access them.
Interface
(3.21) menu item, select the
function and then switch the Digital-Modul-R
DCIM
by double
100LEICA,101LEICA
Important:
• Use only the FireWire cable supplied (H) and, if
necessary, the FireWire adapter supplied (I).
• While data is being transferred from the DigitalModul-R to the computer, the connection may not
under any circumstances be broken by removing the
FireWire cable, as otherwise the computer and/or
the Digital-Modul-R can crash, and the memory card
may even be irreparably damaged.
• While data is being transferred from the DigitalModul-R to the computer, the Digital-Modul-R may
not be switched off or switch itself off due to a lack
of battery power, as this can cause the computer to
crash. If it is not being operated from the mains
when a connection is active, the battery may not
under any circumstances be removed for the same
reason. If the battery capacity runs short during data
transfer, the corresponding symbol flashes (2.2.6c,
see p. 79). In this case, stop the data transfer, switch
off the Digital-Modul-R (see p. 81) and charge the
battery (see p. 78).
We therefore recommend that during data transfer
the Digital-Modul-R is operated from the mains (see
p. 79) using the mains adaptor available as an accessory (order no. 14 452).
Connecting and transferring data
to other computers
The picture files can also be transferred to other computers using a standard card reader for SD memory
cards. Card readers with a USB interface are available
for computers with a USB interface. If your computer is
equipped with a PCMCIA slot (common on portable
models), plug-in cards with a PCMCIA connection are
available as an alternative. These devices and further
information about them is available from a computer
accessory dealer.
104 / Detailed guide /Transferring data to a computer
Page 51

Remote control operation via the FireWire
connection with Mac® and Windows ®
The Digital-Modul-R can be controlled directly from
a computer using the FlexColor software. The most
up to date version of this Imacon software can be
downloaded free of charge after registering your
Digital-Modul-R on the Leica homepage under
www.leica-camera.com/digitalekameras/digitalmodul/
http://www.leica-camera.de/photography/r_system/
downloads/index.e html
digital-modul-r/
1. Install the FlexColor software on your computer.
(Description on the download page).
2. Under the
Camera
Interface
(3.21) menu item, select the
function and then switch the Digital-Modul-R
off and back on.
3. Connect the Digital-Modul-R to a free FireWire
socket on your computer using the FireWire cable
supplied (F) and switch on the
Digital-Modul-R
.
Important: The FireWire plugs on the supplied
cable (H) are different, matching the differing socket sizes on the Digital-Modul-R and computers, i.e.
they do not even fit in the “wrong” sockets. Therefore, connecting is normally “automatically” done
correctly, if necessary with the help of the supplied
adapter (I).
Nevertheless, be careful not to confuse them and
do not use force, otherwise this could lead to a
false polarity – and damage to the equipment.
4. Start FlexColor.
5. A successful connection between the computer
and the Digital-Modul-R is indicated by the appearance of the corresponding symbol in the monitor
(1.11) and the message
CAMERA ONLINE
in the
FlexColor footer.
6. You can take a picture with your LEICA R9/R9 by
clicking on the
CAPTURE
button in the FlexColor
main window.
The picture is immediately transferred onto the computer’s hard drive, i.e. it is saved in the folder selected
in the Thumbnails window in FlexColor. If you do not
choose a different folder, these files are saved in
C:\Scratchpad. The pictures just taken are automatically opened in FlexColor.
Note: If you save directly to the computer using FlexColor, the picture files are only saved on your computer’s hard drive in Imacon “FFF” file format. The camera
is only ready to take the next picture after the previous
picture file has been completely transferred, i.e. series
es are not possible. This applies regardless of
exposur
whether you release the shutter on the camera or on
the computer.
Detailed guide / Remote control/ 105
Page 52

Installation of supplied software
The LEICA DIGITAL-MODUL-R includes a CD-ROM (J).
This contains the
Adobe® Photoshop® Elements® 3
program. You can use this software to professionally
organize, edit, print and archive the pictures you produce with the Digital-Modul-R.
System Requirements
Microsoft®Windows®XP Professional or Home Edition
with Service Pack 1; Windows®2000 with Service Pack
4 or later; Mac OS X v.10.2.8 or v.10.3
Installation
On Macintosh® computers:
1. Insert the CD supplied in a CD or DVD drive on your
computer.
2. Open a window for the drive and start the installa-
tion by double clicking and follow the instructions in
the installation program.
On Windows® computers:
1. Insert the CD in your CD or DVD drive.
2. The installation program then starts automatically.
Follow the instructions. If the installation does not
start automatically, open
Windows® Explorer
and
click on your CD or DVD drive. In the right-hand
Windows® Explorer
window you will find the file
“Setup.exe”. Run this file and follow the instructions
in the installation program.
Note: The serial number is printed on the paper cover
of the CD.
Working with raw data
If you have selected the DNG picture format (
RAW
),
you have the option of influencing individual parameters or image properties yourself. To do this, you need
an image editing program that includes the option of
opening raw data files in the standardized DNG format,
for example the
ware supplied, or
Adobe® Photoshop® Elements® 3
Adobe® Photoshop® CS
with the
soft-
Camera-RAW plugin from version 2.3, or FlexColor
(available for download from the Leica homepage
www.leica-camera.com/digitalekameras/digitalmodul/
downloads/index.e html
During editing, you have the option of adjusting parameters such as white balance, tone values, gradation,
sharpness etc. to achieve an optimum image quality.
You have the option of importing DNG files from a data
carrier using the Digital-Modul-R Content window. In
this case, the file is then automatically saved in the
Imacon “FFF” file format. This format retains the original raw data in the file. All editing is saved in the file
and can either be undone later or retrieved.
Miscellaneous
Accessories Order no.
Digital-Modul-R full matt screen
for LEICA R8/R9 14 393
Digital-Modul-R microprism screen
for LEICA R8/R9 14 394
Digital-Modul-R full matt screen with
grid division
for LEICA R8/R9 14 395
Mains unit complete with connecting
cable and 2 mains cables (D/USA)
Lithium ion battery pack
14 452
14 447
Electric shutter release switch
for LEICA R8/R9 14 254
Electric cable release
for LEICA R8/R9 14 255
Extension for shutter release switch/
cable release
14 275
LEICA REMOTE CONTROL R8/R9 14 202
Spare parts Order no.
Standard/universal
focusing
screen for LEIC
Digital-Modul-R
A R8/R9
14 392
Slider for removing the
rear camera panel
Protective cover for sensor
412-237.001-020
412-030.802-000
Charger, complete (with 3 interchangeable plugs and car charging cable)
14 449
FireWire cable, (2m, 4 to 8 pin) 412-237.003-000
FireWire adapter, 6 to 4 pin 412-237.004-000
106 / Detailed guide /Installation of supplied software / Miscellaneous
Page 53

Precautions and care instructions
General precautions
Do not use the Digital-Modul-R in the immediate vicinity of devices with powerful magnetic, electrostatic or
electromagnetic fields (e.g. induction ovens, microwave
ovens, television sets or computer monitors, video
games consoles, cell phones, radio equipment).
• If you place the Digital-Modul-R on or immediately
adjacent to a television set, the magnetic field could
impair the pictures recorded.
• The same applies for use in the vicinity of cell
phones.
• Strong magnetic fields, e.g. from speakers or large
electric motors, can damage the stored data or the
pictures.
• If the Digital-Modul-R does not work correctly as a
result of the effects of electromagnetic fields, switch
it off, remove the battery or unplug it from the
optionally available mains adapter, re-insert the battery or reconnect to the mains adapter and then
switch it on again.
Do not use the Digital-Modul-R in the immediate vicinity of radio transmitters or high voltage power lines.
• Their electromagnetic fields can also interfere with
picture recordings.
Protect the Digital-Modul-R against contact with insect
sprays and other aggressive chemicals. Petroleum
spirit, thinner and alcohol may not be used for cleaning.
• Certain chemicals and liquids can damage the
Digital-Modul-R’s housing or the surface finish.
• As rubber and plastics sometimes emit aggressive
chemicals, they should not remain in contact with
the Digital-Modul-R for a long time.
Ensure that no sand or dust can penetrate into the
Digital-Modul-R, e.g. on the beach.
• Sand and dust can damage the camera and the
memory card. Take particular care when inserting
and removing the card.
Ensure that no water can penetrate into the DigitalModul-R, e.g. in snow and rain or on the beach.
• Moisture can cause malfunctions and even permanent damage to the camera, the Digital-Modul-R, and
the memory card.
• If salt water spray gets onto the Digital-Modul-R, wet
a soft cloth with tap water, wring it out thoroughly
and wipe the Digital-Modul-R with it. Then wipe
thoroughly with a dry cloth.
Monitor/data panel
• If the Digital-Modul-R is exposed to significant temperature fluctuations, condensation can form on the
data panel/monitor. Wipe it carefully with a soft dry
cloth.
• If the Digital-Modul-R is very cold when switched on,
the data panel/monitor display will initially be slightly darker than normal. As soon as the LCD element
warms up, the normal brightness is restored.
The monitor is manufactured using a high-precision
process. This ensures that, of the total of around
130,000 pixels, more than 99.995% work correctly
and only 0.005% remain dark or are always light.
However, this is not a malfunction and it does not
impair the reproduction of the picture. Cosmic radiation (e.g. on flights) can cause pixel defects.
Condensation
If condensation has formed on or in the Digital-Modul-R,
you should switch it off and leave it to stand at room
temperature for around an hour. Once the camera temperature has adjusted to room temperature, the condensation will disappear by itself.
Precautions and care instructions/ 107
Page 54

Care instructions
For the Digital-Modul-R
• Unplug from the mains adapter before cleaning the
Digital-Modul-R.
• Only clean the Digital-Modul-R with a soft dry cloth.
Stubborn dirt should first of all be covered with a
well-thinned cleaning agent and then wiped off with
a dry cloth.
For the battery
Rechargeable lithium ion batteries generate power
through internal chemical reactions. These reactions
are also influenced by the external temperature and
humidity. Very high or low temperatures reduce the life
of the battery.
• Remove the battery if you will not be using the
Digital-Modul-R for a long time. Otherwise, after
several weeks the battery could become totally discharged, i.e. the voltage is significantly reduced, as
the Digital-Modul-R uses a low idle current (to save
the date) even when it is turned off. A totally discharged battery cannot be recharged.
• Store the batteries only when they are fully discharged. This condition, which is not the same as
being totally discharged, is reached when the display
2.2.6c appears in the data panel (1.21). For very
long storage periods, it should be charged up and
discharged again around once a year.
• Always ensure that the battery contacts are clean
and freely accessible. Protect the contacts from
metal objects such as paper clips or pieces of jewelry, which can cause short circuits. A short-circuited
battery can get very hot and cause severe burns.
• If a battery is dropped, check the housing and the
contacts immediately for any damage. Using a damaged battery can damage the Digital-Modul-R.
• Batteries have only a limited service life.
• Take damaged batteries to a collection point to
ensure correct recycling.
• Never throw batteries into a fire as this can cause
them to explode.
For the charger
• If the charger is used in the vicinity of radio
receivers, it can interfere with the reception; make
sure there is a distance of at least 1m between the
devices.
• When the charger is in use, it can make a noise
(buzzing) – this is quite normal and is not a malfunction.
• When it is not in use, disconnect the charger from
the mains as otherwise it uses a certain (very small)
amount of power even when the camera is turned
off and the battery is not being used.
• Always keep the charger’s contacts clean.
For memory cards
• While a picture is being stored or the memory card
is being read, it may not be removed, and the DigitalModul-R may not be turned off or exposed to vibrations.
• For safety, memory cards should only ever be stored
in the antistatic case supplied.
• Do not store memory cards where they will be
exposed to high temperatures, direct sunlight, electromagnetic fields or static discharge.
• Do not drop or bend a memory card as this can damage it and result in loss of the stored data.
• Always remove the memory card if you will not be
using the Digital-Modul-R for a long time.
• Do not touch the connections on the rear of the
memory card and keep them free of dirt, dust and
moisture.
• It is recommended that the memory card be formatted from time to time as the fragmentation that
occurs when deleting can block some of the memory
capacity.
108 / Precautions and care instructions
Page 55

Cleaning the sensor
If any dust or dirt particles should adhere to the sensor cover glass, depending on the size of the particles
this can be identified by dark spots or marks on the
pictures.
The Digital-Modul-R can be sent in to the Leica
Came
ra AG Customer Service (address: see p. 114)
for cleaning of the sensor at a fee; this cleaning is not
part of the warranty services. If you prefer to carry
out the cleaning yourself, you should always follow the
instructions below.
Important: Leica Camera AG accepts no liability for
damage caused by the user when cleaning the sensor.
As far as possible, the sensor should be inspected and
cleaned in a dust-free environment to prevent further
soiling.
An 8x or 10x magnifying glass is very useful for the
inspection before and after cleaning.
Lightly adhering dust can be blown off the sensor cover
glass using clean and, if necessary ionized gases such
as air or nitrogen. It makes sense to use a (rubber)
bellows with no brush for this purpose. Special, low
pressure cleaning sprays such as “Tetenal Antidust
Professional” can also be used in line with their specified usage.
If the adhering particles cannot be removed using the
method described, Leica recommends cleaning with
an appropriate standard cleaning agent. In case of
doubt, please turn to the Leica Information Service
(address: see p. 114).
Attention:
• Do not attempt to blow dust particles off the sensor
cover glass using your mouth; even tiny droplets of
saliva can cause marks that are difficult to remove.
• Compressed air cleaners with high gas pressure
may not be used as they can also cause damage.
• Take care to avoid touching the sensor surface with
any hard objects during inspection and cleaning.
Storing the Digital-Modul-R
If you will not be using the Digital-Modul-R for a long
period, it is recommended that you
1. switch it off (see p. 81),
2. remove the memory card (see p. 80) and
3. remove the battery (see p. 77) (after a maximum of
10 days, the date and time entered are lost, see p. 87)
• The Digital-Modul-R should preferably be stored in a
closed and padded case, so that nothing can damage it and it is protected from dust.
• Store the Digital-Modul-R in a location that is not
exposed to high temperatures or moisture. When
used in humid conditions, the Digital-Modul-R should
be completely free of all moisture before being
stored away.
• To prevent the formation of fungus, do not store the
Digital-Modul-R in a leather case for long periods of
time.
Data structure on the memory card
When the data stored on a card is transferred to a
computer, the following folder structure is used:
Up to 999 pictures can be stored in each of the folders
100LEICA,101LEICA
etc.
Precautions and care instructions / Data structure/ 109
Page 56

Warning messages
Cardslot open
Close the flap (see p. 80).
No SD-Card
Insert a memory card (see p. 80).
NO VALID IMAGE TO PLAY
No pictures are saved on the inserted card.
In order for review to take place, pictures first of all
need to be taken or another card with saved pictures
inserted (see p. 80).
Full SD-Card
Insert another memory card (see. p. 80) or delete pictures you no longer need (see p. 98/99).
SD-Card Protected
(Against deleting)
Reset the write protection for the memory card (see
p. 80).
MEMORY CARD ERROR
(Depending on the card this message may be issued
with a delay)
It was not possible to access the memory card.
Remove it and re-insert it (see p. 80). The memory
card may be damaged.
Data transfer
The image data is being transferred to the SD-card.
During this time, no other image processing is possible.
Error code XX
In case of such a message please ask your Leica dealer or the Leica agency in your country for further
information.
110 / Warning messages
Page 57

Malfunctions and resolving them
1. The Digital-Modul-R does not respond when
switched on.
1.1
Is the battery inserted correctly or is the charger
connected correctly?
The battery is only charged outside the Digital-
Modul-R.
1.2
Does the battery have sufficient charge?
Use a charged battery.
1.3 Is the electrical contact between camera and
Digital-Modul-R ensured?
Separate camera and Digital-Modul-R and reconnect.
2. The Digital-Modul-R switches off again
immediately after being switched on.
2.1
Does the battery have sufficient charge to operate
the Digital-Modul-R?
Charge the battery or insert a charged battery.
2.2
Is there any condensation?
This occurs if the Digital-Modul-R is moved from
a cold place to a warm one. Wait until the condensation clears.
3.
I cannot save the picture.
3.1
Is a memory card inserted?
3.2
The capacity of the memory card is full.
Delete pictures you no longer require before
taking new ones.
3.3 Is the multiple exposure lever in its home position
(the rewind release button is visible, see also p. 76)?
4. The monitor is too dark or too bright.
4.1
Set the desired brightness.
5. The picture I have just taken is not shown in
the monitor
5.1
Is the
Auto Review
Digital-Modul-R is set to recording mode)?
6. I cannot display the picture.
6.1
Is a memory card inserted?
6.2
The memory card does not contain any data.
7.
Despite being connected to a computer,
I cannot transfer any data.
7.1
Check that the computer and the Digital-Modul-R
are correctly connected to one another.
8.
The time and date information is incorrect.
8.1
The Digital-Modul-R has not been used for a long
time, particularly if the battery has been
removed.
Set the date and time.
9. I cannot release the camera
9.1 Is a memory card inserted?
9.2 The capacity of the memory card is full. Delete
pictures you no longer require before taking new
ones.
10. The Digital-Modul-R does not react after
releasing
10.1 Is a memory card inserted?
10.2 The capacity of the memory card is full. Delete
pictures you no longer require before taking new
ones.
function activated (when the
Warning messages / Malfunctions/ 111
Page 58

Index
Accessories . . . . . . . . . . . . . . . . . . . . . . . . . . . . . . . 106
Battery
Charge level displays . . . . . . . . . . . . . . . . . . . . . . 79
Charging . . . . . . . . . . . . . . . . . . . . . . . . . . . . . . . . 78
Inserting/removing from Digital-Modul-R . . . . . . 77
Care instructions . . . . . . . . . . . . . . . . . . . . . . . . . . 108
Color saturation, see image properties
Compression rate . . . . . . . . . . . . . . . . . . . . . . . . . . . 89
Contrast, see image properties
Data panel . . . . . . . . . . . . . . . . . . . . . . . . . . . . . 69/89
Data structure on the memory card . . . . . . . . . . . . 110
Deleting pictures . . . . . . . . . . . . . . . . . . . . . . . . . . . . 98
All pictures on the memory card . . . . . . . . . . . . .99
Single pictures . . . . . . . . . . . . . . . . . . . . . . . . . . . 99
Designation of parts . . . . . . . . . . . . . . . . . . . . . . . . . 66
Displays . . . . . . . . . . . . . . . . . . . . . . . . . . . . . . . 68/69
Enlarge, see review mode and viewing pictures
Exposure bracketing, automatic . . . . . . . . . . . . . . . . 83
Flash operation . . . . . . . . . . . . . . . . . . . . . . . . . . . . . 95
Formatting the memory card . . . . . . . . . . . . . . . . . 102
Frame frequency . . . . . . . . . . . . . . . . . . . . . . . . . . . . 83
Grip strap . . . . . . . . . . . . . . . . . . . . . . . . . . . . . . . . . 77
Histogram . . . . . . . . . . . . . . . . . . . . . . . . . . . . . . . . . 84
Image properties (contrast, sharpness,
color saturation) . . . . . . . . . . . . . . . . . . . . . . . . . . . 82
Installation of supplied software . . . . . . . . . . . . . . . 106
ISO sensitivity . . . . . . . . . . . . . . . . . . . . . . . . . . . . . . 92
Items supplied . . . . . . . . . . . . . . . . . . . . . . . . . . . . . 65
Mains operation . . . . . . . . . . . . . . . . . . . . . . . . . . . . 79
Malfunctions and resolving them . . . . . . . . . . . . . . . 111
Memory card, inserting and removing . . . . . . . . . . . 80
Menu control . . . . . . . . . . . . . . . . . . . . . . . . . . . . . . . 86
Menu items . . . . . . . . . . . . . . . . . . . . . . . . . . . . . . . . 70
Menu language . . . . . . . . . . . . . . . . . . . . . . . . . . . . . 87
Monitor . . . . . . . . . . . . . . . . . . . . . . . . . . . . . . . . 70/84
Parts, designation . . . . . . . . . . . . . . . . . . . . . . . . . . . 66
Photographing . . . . . . . . . . . . . . . . . . . . . . . . . . . . . . 81
Precautions . . . . . . . . . . . . . . . . . . . . . . . . . . . . . . . 107
Protecting pictures/Clearing delete protection . . . 100
Quick guide . . . . . . . . . . . . . . . . . . . . . . . . . . . . . . . . 71
Record and review modes . . . . . . . . . . . . . . . . . . . . . 81
Resetting all custom menu settings . . . . . . . . . . . . . 94
Resolution
Reducing after recording . . . . . . . . . . . . . . . . . . . . . 101
Setting . . . . . . . . . . . . . . . . . . . . . . . . . . . . . . . . . . . 89
Review mode . . . . . . . . . . . . . . . . . . . . . . . . . . . . . . . 96
Enlarging . . . . . . . . . . . . . . . . . . . . . . . . . . . . . . . . 97
Four/nine single pictures simultaneously . . . . . . 97
Selecting the trimming . . . . . . . . . . . . . . . . . . . . . 97
Single pictures . . . . . . . . . . . . . . . . . . . . . . . . . . . 96
Switch off, automatic . . . . . . . . . . . . . . . . . . . . . . . . 88
Setting the brightness . . . . . . . . . . . . . . . . . . . . . 84
Setting the contrast . . . . . . . . . . . . . . . . . . . . . . . 84
Self timer . . . . . . . . . . . . . . . . . . . . . . . . . . . . . . . . . 95
Series exposures . . . . . . . . . . . . . . . . . . . . . . . . . . . 83
Sharpness, see image properties
Shutter release buttons . . . . . . . . . . . . . . . . . . . . . . 82
Sounds (button acknowledge (response) tones) . . . . 88
Spare parts . . . . . . . . . . . . . . . . . . . . . . . . . . . . . . . 106
Storing the Digital-Modul-R . . . . . . . . . . . . . . . . . . . 109
Switching on/off . . . . . . . . . . . . . . . . . . . . . . . . . . . . 81
Technical data . . . . . . . . . . . . . . . . . . . . . . . . . . . . . 113
Time and date . . . . . . . . . . . . . . . . . . . . . . . . . . . . . . 87
Transferring data to a computer . . . . . . . . . . . . . . . 103
Trimming, Selection of, see review mode . . . . . . . . . 96
Viewing the picture
With the
Auto Review
function
(automatic review) . . . . . . . . . . . . . . . . . . . . . . . 81
With the
function . . . . . . . . . . . . . . . . . . . . 81
PLAY
Volume, setting the button acknowledge
(response) tones
Warning messages . . . . . . . . . . . . . . . . . . . . . . . . . .110
Warning notices . . . . . . . . . . . . . . . . . . . . . . . . . . . . 64
White balance . . . . . . . . . . . . . . . . . . . . . . . . . . . . . . 90
112 / Index
Page 59

Unit description and
technical data
Digital-Modul-R
Type Digital module that can be changed by photographer;
fully compatible with LEICA R8 and R9, all Leica R lenses
and all Leica lenses with “R control cams”, two parts: digital
back and power unit.
Picture format/image sensor
(10 MPixel) CCD chip, active area 26.4 x 17.6mm, extension factor 1,37.
Resolution Adjustable: 3872 x 2576, 2576 x 1712,
1936 x 1280, 1280 x 848 pixels.
Data formats
levels.
File size
Color depth 16 bit
Color space Adobe® RGB, sRGB.
Sensitivity ISO 100 to ISO1600.
White balance
perature entry.
Storage medium SD card up to 2GB, larger SD cards
with firmware update.
Monitor 1.8” color display, 130,338 pixels.
Data panel Black/white display for settings: frame counter,
ISO, exposure compensation, battery level, self timer,
compression, resolution, Moiré on/off, white balance.
DNG (raw data), TIFF, 2 JPEG compression
DNG: 21MB, TIFF: 29 MB.
Automatic, manual, 6 presets, color tem-
3872 x 2576 pixels
Menu Sharpness, color saturation, contrast, picture
numbering, monitor contrast and brightness,
duration, histogram on/off, audio histogram on/off,
power saving options, format card, alarm signals, date,
time, user profile, firmware update, reset.
Menu languages German, English, French, Spanish,
Italian, Japanese, Dutch.
Interface IEEE 1394 FireWire.
Switch on/off With master switch on rear of Digital-
Modul-R, optional automatic switch off of Digital-Modul-R
after approx. 2/5/10 minutes (Standby mode), reactivation
by tapping one of shutter releases or switching DigitalModul-R off and back on.
Shutter cocking Motorized using power unit.
Max. exposure time 16 seconds
Series exposures 2 fps, max. 9 pictures in series.
Automatic exposure bracketing Optional: 3 pictures
1
with
/2or 1 EV graduations.
Compatibility
Softwar
Self timer Delay time either 2 or 12s (indicated by flash-
ing LED on front of camera and corresponding symbol in
data panel).
Operating conditions 0 to +40 °C
Power supply Rechargeable lithium ion battery, 7.4 V,
1800mAh.
Charger Input: 100–240 V AC, 50/60Hz, automatic
switching; Output: 8.4V DC, 1.2A.
Tripod thread
Dimensions (W x H x D) with LEICA R9: 158 x 140 x
89mm
Weight Digital back with power unit and battery: 725g,
complete with LEICA R9: 1.395g
Mac® OS X, Windows®98/ME/2000/XP.
e Adobe® Photoshop® Elements® 3 (Mac/Win)
A1/4DIN 4503 (1/4”).
Auto review
Mains adapter
AC 100–240V, 50/60Hz, automatic switching
Inlet
Outlet
DC 8V, max. 3.2A
Dimensions (WxHx D) 45 x 28 x 95mm (housing only)
Weight
approx. 195g (unit complete with camera con-
necting cable and 1 mains cable)
Items supplied LEICA DIGITAL-MODUL-R , power unit for
shutter cocking and power supply, universal matt focusing
screen with image field frame for digital application, tool
for
removing camera back, Lithium ion battery 7.4V/
1800mAh,
(Euro, UK, USA), charging cable for 12V and 24V vehicle
connection, 512MB SanDisc Ultra II SD card, sensor protective cover, storage case for LEICA DIGITAL-MODUL-R,
FireWire cable with adapter (4-/6-pin), Adobe® Photoshop®
Elements® 3
Subject to changes to design, manufacture and range.
battery charger 100–240V with mains adapters
(Mac/Win).
Technical Data/ 113
Page 60

Leica Academy
As well as outstanding high-performance products
for taking, reproducing and viewing photographs, for
many years we have also been offering the special
services of the Leica Akademie, with practical seminars
and training courses, which are intended to share our
knowledge about the world of photography, projection
and magnification with both beginners and advanced
photographic enthusiasts.
The contents of the courses, which are run by a
trained team of experts in the modern, well-equipped
training suite at our Solms factory and in the nearby
Gut Altenberg, vary from general photography to
areas of special interest and offer a range of suggestions, information and advice for your own work.
More detailed information and the current Leica
Academy brochure are available from:
Leica Camera AG
Leica Akademie
Oskar-Barnack-Str. 11
D-35606 Solms
Phone: +49 (0) 6442-208-421
Fax: +49 (0) 64 42-208-425
e-mail: la@leica-camera.com
Leica on the Internet
Current information about products, news, events and
the Leica company is available on our homepage on
the Internet at:
http://www.leica-camera.com
Leica info service
The Leica Informations-Service can provide you with
an answer to any technical questions relating to the
Leica range either in writing, on the telephone or by
e-mail.
Leica Camera AG
Informations Service
Postfach 1180
D-35599 Solms
Phone: +49 (0) 6442-208-111
Fax: +49 (0) 64 42-208-339
e-mail: info@leica-camera.com
Leica Customer Service
Leica AG’s Customer Service center, or the repair
service of the Leica national offices (see the Warranty
Card for an address list), is available to assist you in
maintaining your Leica equipment or in case of damage. Please contact your nearest authorised Leica
dealer.
Leica Camera AG
Customer Service
Solmser Gewerbepark 8
D-35606 Solms
Phone: +49 (0) 6442-208-189
Fax: +49 (0) 64 42-208-339
e-mail: customer.service@leica-camera.com
114 / Service
Page 61

my point of view
Leica Camera AG / Oskar-Barnack-Str. 11 / D-35606 Solms
www.leica-camera.com / info@leica-camera.com
Telefon +49 (0) 64 42- 208-0 / Telefax +49 (0) 64 42- 208-333
93093 XI/05/ FLW/B.
 Loading...