

Page 1

LEICA CM
Anleitung/Instructions/Instrucciones
Page 2

60
Foreword
We wish you a great deal of pleasure and success using your new
LEICA CM. The excellent optical performance of the fast LEICA
SUMMARIT 40mm f/2.4 lens enables you to achieve outstanding
picture quality even under critical lighting conditions. Its compact
size means the LEICA CM fits into almost any pocket, making
it
your constant companion.
Thanks to its fully automatic programmed exposure control mode
and autoflash feature, the LEICA CM provides uncomplicated
photography. Alternatively, you can take over picture composition yourself at any time using the manual settings.
You can select from numerous special functions to improve the
picture quality even in very difficult exposure conditions.
Please read these instructions so that you can make the most of
your LEICA CM’s capabilities.
These instructions are printed on 100% chlorine free bleached
paper, whose high-quality manufacturing process protects the
water and is environmentally friendly.
Page 3

61
Brief description
The LEICA CM is a stylish, compact and versatile 35mm viewfind
er camera with exceptional features, making it ideally suited for
both uncomplicated and more demanding photography. Its special features are:
• LEICA SUMMARIT 40mm f/2.4 high-performance lens
(6 lenses in 4 groups)
• Titanium housing
• Distance range from approx. 0.7m to infinity
• Choice of automatic (autofocus) or manual distance setting,
each with focus display in viewfinder
• Two-zone center-weighted exposure metering with automatic
backlighting detection (for automatic fill-in flash)
• Metering memory lock for AF and exposure
• Choice of programmed automatic exposure control mode
(automatic setting of shutter speed and aperture) with shift
option, or aperture priority exposure control mode (automatic
setting of shutter speed after manual aperture pre-selection),
each with display of resulting values in viewfinder
• Fastest shutter speed
1
/
1000
s
• Long-time exposures up to 99s with modes B
(automatic control) or
T
(manual control)
• Exposure compensation in
1
/3EV steps up to ±2EV
(can be permanently stored)
• Built-in flash unit with guide number controlled light emission
• Automatic flash activation in inadequate lighting conditions,
including backlight situations
• Selectable pre-flash light for reduction of “red eye effect”
• Manual flash on and off selection
• ISO flash shoe for connection of a more powerful external
flash unit (e.g. LEICA SF 24D)
• Flash status display in viewfinder
• Preferred flash mode can be permanently stored
• Diopter correction for viewfinder eyepiece
• Automatic film speed setting (DX coding)
• Automatic film loading
• Automatic film advance
• Series exposures: approx. 1 frame every 1.5s
• Automatic film rewind
• Integrated data imprinting function
English
Page 4

62
Contents
Foreword . . . . . . . . . . . . . . . . . . . . . . . . . . . . . . . . . . . . . . . . 60
Brief description . . . . . . . . . . . . . . . . . . . . . . . . . . . . . . . . . . . 61
Designation of parts . . . . . . . . . . . . . . . . . . . . . . . . . . . . . . . . 64
Displays in the LCD data panel . . . . . . . . . . . . . . . . . . . . . . . 65
Viewfinder displays . . . . . . . . . . . . . . . . . . . . . . . . . . . . . . . . 66
Safety instructions . . . . . . . . . . . . . . . . . . . . . . . . . . . . . . . . . 67
Fitting the wrist/neck strap . . . . . . . . . . . . . . . . . . . . . . . . . . 68
Preparing the LEICA CM for use . . . . . . . . . . . . . . . . . . . . . . . 68
– Inserting and removing the battery . . . . . . . . . . . . . . . . . . . 68
– Checking the battery . . . . . . . . . . . . . . . . . . . . . . . . . . . . . . 68
– Switching the camera on and off/Automatic power off . . . 69
– Imprinting data . . . . . . . . . . . . . . . . . . . . . . . . . . . . . . . . . . 70
Setting the data . . . . . . . . . . . . . . . . . . . . . . . . . . . . . . . . . . 71
Selecting the data to be imprinted/the date sequence . . . 73
– Loading the film . . . . . . . . . . . . . . . . . . . . . . . . . . . . . . . . . . 74
Compatible 35mm films . . . . . . . . . . . . . . . . . . . . . . . . . . . 77
– Holding the camera correctly . . . . . . . . . . . . . . . . . . . . . . . 77
– The viewfinder/Viewfinder displays . . . . . . . . . . . . . . . . . . 78
Diopter settings . . . . . . . . . . . . . . . . . . . . . . . . . . . . . . . . . . 78
Taking photographs with the LEICA CM . . . . . . . . . . . . . . . . . 79
– Distance setting . . . . . . . . . . . . . . . . . . . . . . . . . . . . . . . . . 79
Automatic distance setting/Autofocus . . . . . . . . . . . . . . . . 80
Manual distance setting . . . . . . . . . . . . . . . . . . . . . . . . . . . 81
– Exposure control . . . . . . . . . . . . . . . . . . . . . . . . . . . . . . . . . 83
Programmed automatic exposure control mode . . . . . . . . . 83
Program shift . . . . . . . . . . . . . . . . . . . . . . . . . . . . . . . . . . 84
Aperture priority exposure control mode . . . . . . . . . . . . . . 85
Storing focus and exposure settings . . . . . . . . . . . . . . . . . . 86
Exposure compensation . . . . . . . . . . . . . . . . . . . . . . . . . . . 87
– Selectable modes . . . . . . . . . . . . . . . . . . . . . . . . . . . . . . . . 89
Photography with and without flash . . . . . . . . . . . . . . . . . . 90
Instructions for using external flash units . . . . . . . . . . . . . 90
Flash range . . . . . . . . . . . . . . . . . . . . . . . . . . . . . . . . . . . . 91
Modes with automatic flash activation . . . . . . . . . . . . . . . 92
(1) Taking photographs with automatic
flash activation . . . . . . . . . . . . . . . . . . . . . . . . . . . . 92
(2) Taking photographs with automatic
flash activation and pre-flash light
t
. . . . . . . . . . . 93
(3) Taking photographs with automatic
flash activation and slower shutter
speeds
S
. . . . . . . . . . . . . . . . . . . . . . . . . . . . . . 94
(4) Taking photographs with automatic
flash activation, pre-flash light and slower
shutter speeds
S
t
. . . . . . . . . . . . . . . . . . . . . . 95
(5) Taking photographs with automatic
flash activation, synchronization with
the end of the exposure, and slower
shutter speeds
nS
. . . . . . . . . . . . . . . . . . . . . 96
Page 5

63
Modes with manual flash activation 97
(6) Taking photographs with manual
flash activation q . . . . . . . . . . . . . . . . . . . . . . . . . . . 97
(7) Taking photographs with manual
flash activation and pre-flash light
q
t
. . . . . . . . . 97
(8) Taking photographs with manual
flash activation and slower shutter
speeds
q
S
. . . . . . . . . . . . . . . . . . . . . . . . . . . . . 98
(9) Taking photographs with manual
flash activation, slower shutter speeds
and pre-flash light
q
S
t
. . . . . . . . . . . . . . . . . . 99
(10) Taking photographs with manual
flash activation, flash synchronization
with the end of the exposure, and slower
shutter speeds
q
nS
. . . . . . . . . . . . . . . . . . . 100
Taking photographs with manually controlled
long-time exposures . . . . . . . . . . . . . . . . . . . . . . . . . . . . 101
(11) Taking photographs with manual
flash activation and the T function
q
T
. . . . . . . . . 102
(12) Taking photographs with manual
flash activation, pre-flash light and
the T function
q
t
T
. . . . . . . . . . . . . . . . . . . . . . . 103
(13) Taking photographs with manual
flash activation, flash synchronization
with the end of exposure, and the
T function
q
n
T
. . . . . . . . . . . . . . . . . . . . . . . . . 104
(14) Taking photographs with manual
flash off and the T function
u
T
. . . . . . . . . . . . . . 105
(15) Taking photographs with manual flash off
u
. . . . . 106
The automatically self-activating B function . . . . . . . . . . 107
Storing flash modes/the set
exposure compensation . . . . . . . . . . . . . . . . . . . . . . . . . 108
– Self timer . . . . . . . . . . . . . . . . . . . . . . . . . . . . . . . . . . . . . . 110
– Automatic rewind of fully exposed film . . . . . . . . . . . . . . . 111
Rewinding a partially exposed film . . . . . . . . . . . . . . . . . 111
Accessories . . . . . . . . . . . . . . . . . . . . . . . . . . . . . . . . . . . . . . 111
Troubleshooting . . . . . . . . . . . . . . . . . . . . . . . . . . . . . . . . . . 112
Care tips for the LEICA CM . . . . . . . . . . . . . . . . . . . . . . . . . . 114
Technical data . . . . . . . . . . . . . . . . . . . . . . . . . . . . . . . . . . . . 115
Leica Academy . . . . . . . . . . . . . . . . . . . . . . . . . . . . . . . . . . . 117
Leica on the Internet . . . . . . . . . . . . . . . . . . . . . . . . . . . . . . . 117
Leica information service . . . . . . . . . . . . . . . . . . . . . . . . . . . 117
Leica Customer Service . . . . . . . . . . . . . . . . . . . . . . . . . . . . 117
English
Page 6

64
Designation of parts
1. Exposure metering cell
2. Autofocus sensors
3. Pre-flash light for reduction of “red eye effect” and for
signaling self timer function
4. Viewfinder window
5. Flash reflector
6. LEICA SUMMARIT 40mm f/2.4 lens with automatically
closing cover
7. Main switch
8. Shutter release button
9. Adjustment dial for autofocus mode/manual distance
setting
10. Adjusting lever for programmed automatic exposure mode/
manual aperture pre-selection (aperture priority mode)
11. Flash shoe with
a. Central and
b. control contacts
12. Socket for electric cable release
13. Back cover release slider
14. Diopter adjustment dial
15. Viewfinder eyepiece
16. Viewing window for film cartridges
17. Camera back cover
18. Main control dial
19. Liquid crystal data panel
20. TIMER button* for setting the self timer functions
(in conjunction with main control dial)
21. EV button* for setting exposure compensation
(in conjunction with main control dial)
22. MODE button* for setting the flash modes
(in conjunction with main control dial)
23. DATE button* for all date, time and imprint settings
(in conjunction with main control dial)
24. Battery compartment cover
25. Tripod thread
26. Manual film rewind button
27. Fastening eyelet for carrying strap
28. Film take up spool with pressure roller
29. Film guide pins
30. DX contacts
31. Film cartridge slot
32. Rewind axle spindle
* The entire area of the buttons can be used to press them, not just the
slightly protruding left edges.
Page 7
65
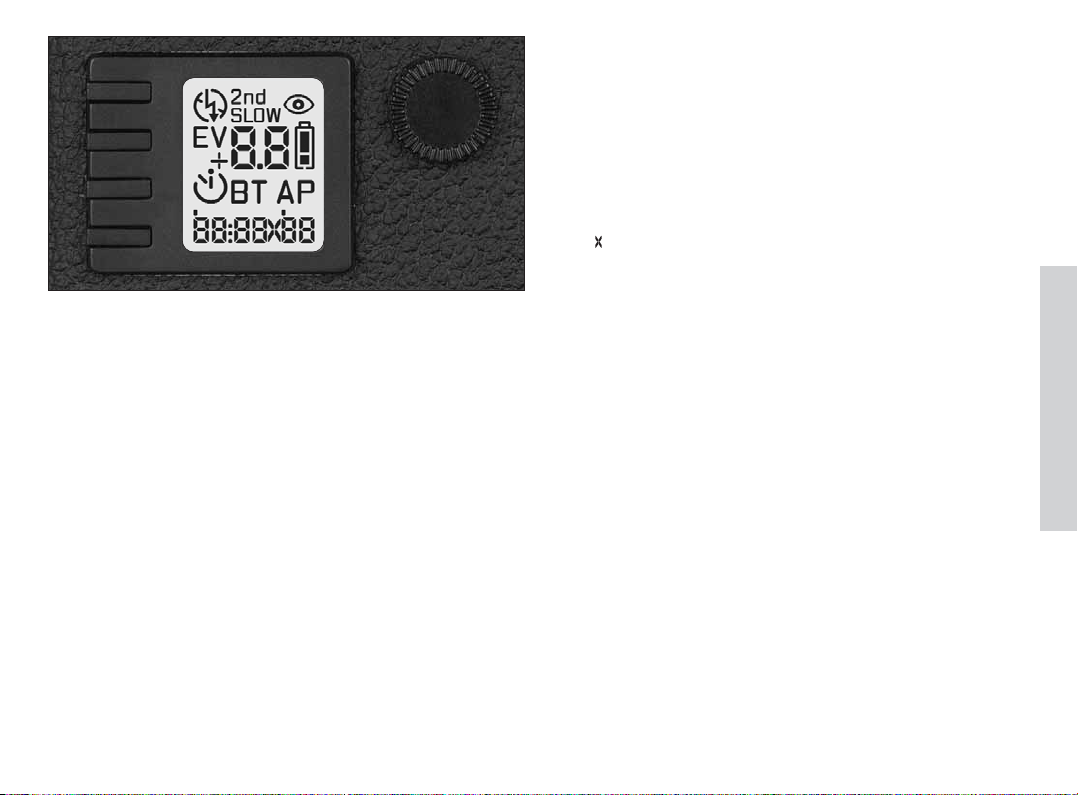
Displays in the LCD data panel (19)
q
Manual flash on
u
Manual flash off
n
Flash synchronisation with the end of the exposure
S
Slower shutter speeds possible
t
Pre-flash light for reduction of “red eye effect”
E
+
-
Exposure compensation set
8.8
Numerical display for:
– Frame counter
– Timer for long time exposures and count-down
for self timer
– Set exposure compensation value
– Confirmation of correct film loading
(lower segments of figures)
Battery status
r/s
Self timer activated/set or counting down
B
Automatic switching to long time exposure
(for longer shutter speeds than 30s in the modes
S, S
t
,
nS
,
q
S
,
q
S
t
,
q
nS
,
and
u
)
T
Manual long time exposure
A
Aperture priority exposure control mode
P
Programmed automatic exposure control mode
.
88:.88.88
Six-digit, seven-segment digital display for
– Date and time or no imprint
– Distance (in m) for manual setting
–
z
Infinity manually set
– (
b/100
; alternately flashing) indicates the film
speed setting for speeds/film cartridges that
cannot be set correctly
– Automatic flash activation (brief switching to
a
-display during setting)
e
English
Page 8
66
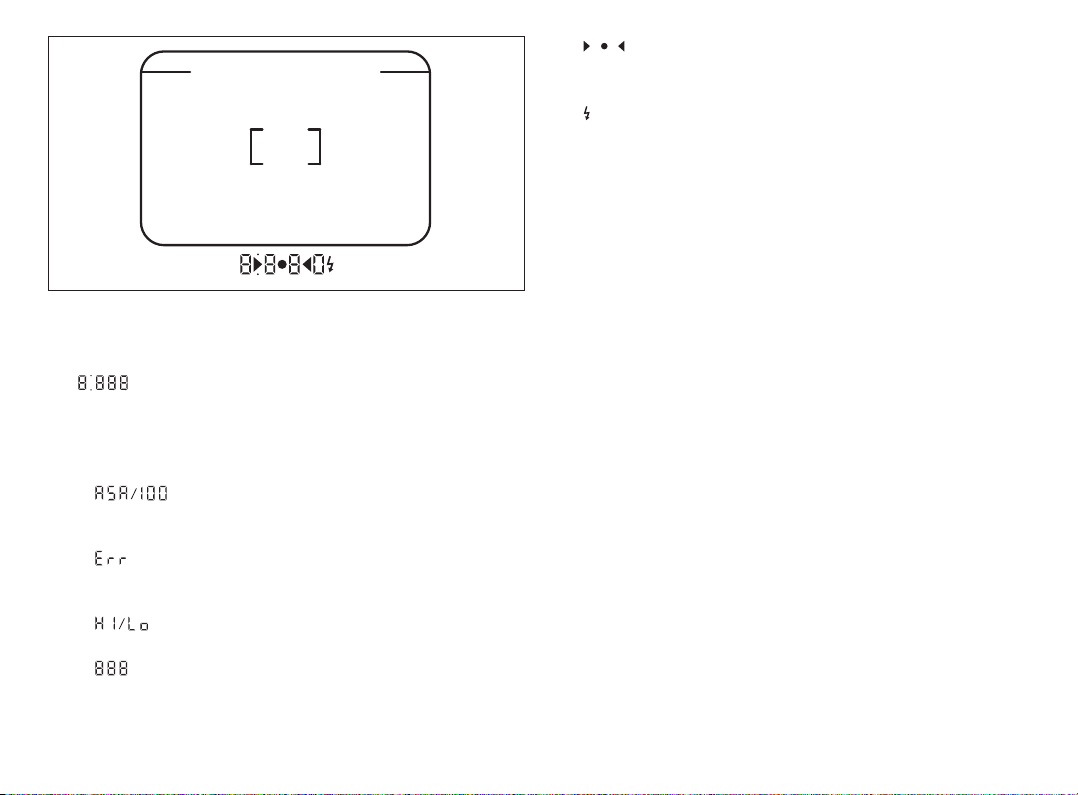
Viewfinder displays
LEDs (Light Emitting Diodes, with automatic brightness control,
adapted to the external brightness)
A. Four-digit, seven-segment digital display with de-
cimal point and point above:
• Specifies the automatically generated or manually set
shutter speeds and/or the automatically generated aperture values
• (flashing alternately) Indication of manual film
speed setting in case of impossible automatic setting due
to missing or illegible DX-code
• Indication of impossible mode setting on an attached external flash unit
• Indication of set exposure compensation
• Warning of over or under exposure, or working
below metering range
• Signal for shutter speeds slower than 1s
B. Two triangular and one circular LED:
• Jointly act as a balance to indicate the automatically or
manually set focus
C. Flash-shaped LED:
• Flash status
Note: After the shutter is released, i.e. after a picture is taken, all
displays are always extinguished except the symbol for the flash
status and, if the film is incorrectly loaded or completely rewound or if no film at all is loaded, the corresponding frame
counter displays (see “Loading the film”, p. 74).
Page 9
67
Safety instructions
• If the camera shows any sign of malfunction, do not try to repair it yourself. Your first step should be to change the battery.
If this is unsuccessful, return the camera to your specialist
dealer or to another photographic specialist.
• Please ensure that you are fully conversant with the operation
and functions of your new camera before using it for special
occasions (holidays, weddings etc.). Please read this instruction manual and take some test pictures to ensure that your
camera functions perfectly before you use it at special events.
•
If your camera (or battery) emits a strange smell, heat, or
smoke,
remove the battery immediately, taking care not to
burn yourself.
• The same applies if there are significant “rattling” sounds.
• If your camera is dropped or subjected to an impact in which
the interior is exposed, do not touch the exposed parts. Some
of these parts have a voltage of 200V!
• Remove the battery immediately if the camera is dropped in
water or if water gets into the interior of the camera.
• Never store your camera where the temperature is extremely
high or extremely low.
• When it is not in use, you should always turn the camera off
(using the ON/OFF switch, 7) in order to retract the lens. Ensure that the lens cover is closed.
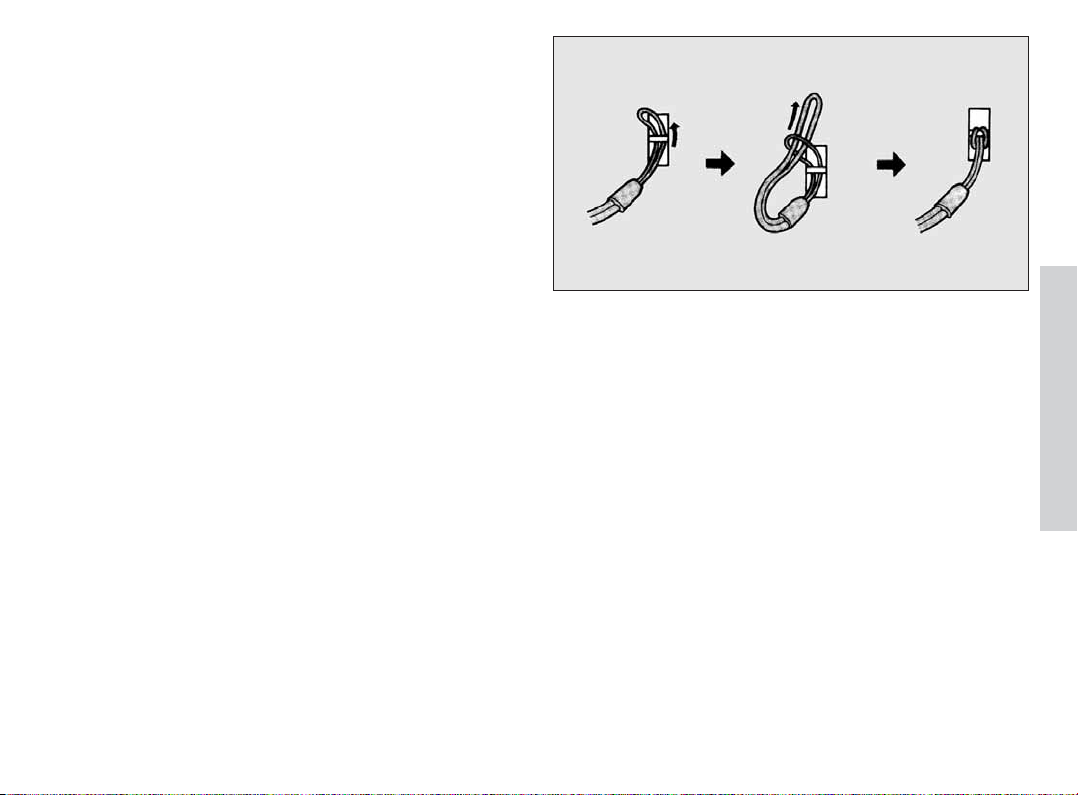
Fitting the wrist/neck strap
1. Push the smaller loop of the wrist/neck strap through the
eyelet (27) on the right of the camera housing.
2. Then thread the end of the wrist/neck strap through the
aforementioned small loop and pull it tight, so that the resulting loop lies securely on the eyelet on the camera housing.
English
Page 10
68
Preparing the LEICA CM for use
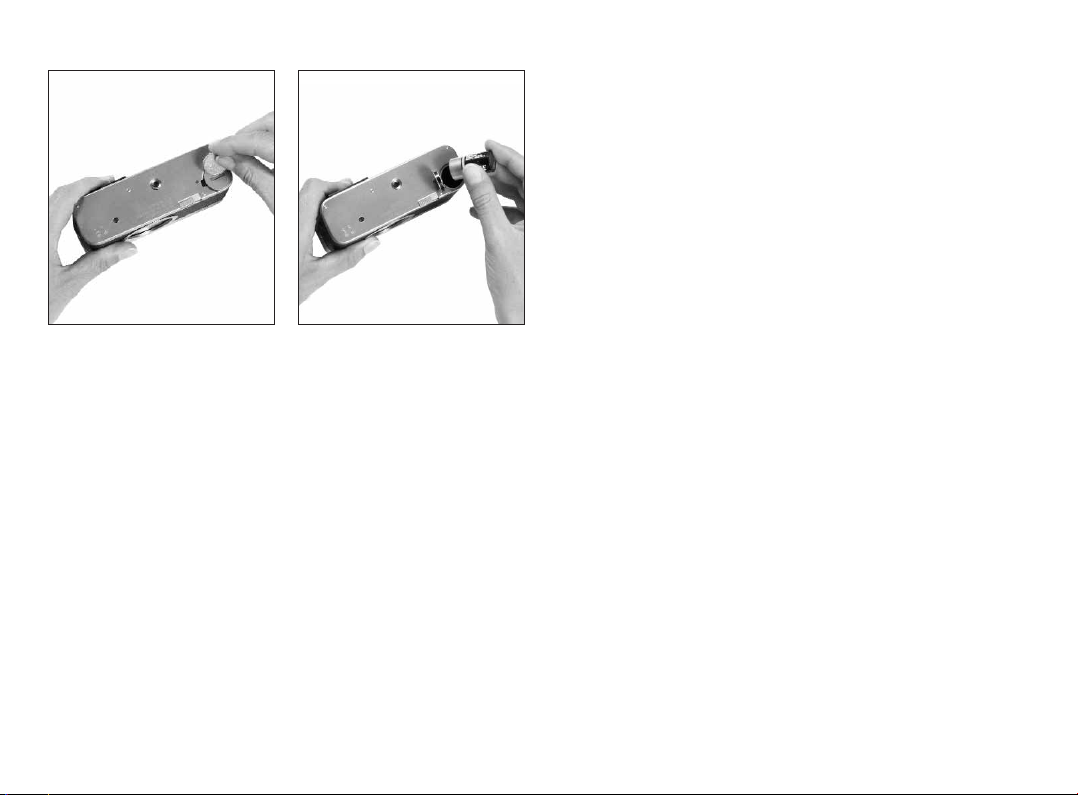
Inserting and removing the battery
The LEICA CM takes a 3 volt lithium battery (e.g. Duracell
DL123A, Kodak KL 123LA, Panasonic CR 123A, Varta CR123A or
other CR123 types). This supplies both the camera and the date
printer with power.
1. Open the bayonet catch on the battery compartment cover
(underside of camera, 24) by turning it anticlockwise using a
coin (as indicated by the markings next to the cover).
2. Insert a lithium battery so that the positive terminal goes in
first (as shown by the markings in the battery compartment).
3. Close the cover again by turning it clockwise.
Note: We recommend that you change the batteries when the
camera is turned off, as the programmed data is retained for
around 30s. With the camera switched on, the data is cleared as
soon as the battery is removed, so the date and time may need
to be re-entered when the battery is changed (see also “Imprinting
data”, p. 70).
Checking the battery
When the camera is switched on (see p. 69) and the battery has
sufficient capacity, the battery symbol ( ) appears completely
filled in on the LCD data panel (19). The lens (6) also moves to its
ready position.
If the symbol appears only half filled ( ), this means that the
battery capacity is down to 30% at the most and the battery
needs to be changed soon.
If the half-filled symbol ( ) is flashing or no display appears at
all, the battery is flat and must be replaced immediately. In this
case, the camera will no longer function. Therefore, we recommend you take a spare battery with you when traveling.
A new battery will last for around 8 36-exposure films with 50%
use of the flash, i.e. around 290 exposures (according to Leica
testing standards).
Notes:
• If the lens does not move to its ready position when you switch
the camera on, the battery is either discharged, incorrectly
installed or there is no battery at all.
• If the symbol ( ) flashes on its own or no display is visible,
either the battery contacts are dirty,
• In this case, please clean them with a clean, dry and lint-free
cloth.
or
the battery may be partially discharged as a result of taking a
series of pictures one after another.
After a short wait to allow the battery to recover, photography
can commence.
• The battery contacts should always be kept clean.
f
f
f
e
Page 11
69
• If there is a film in the camera, you should insert a new battery
immediately after removing the old one.
• Cold conditions impair the battery performance. The film also
becomes stiffer, making it harder to wind. Therefore, at low
temperatures the LEICA CM should be kept as close to the
body as possible and a new battery should be inserted.
Warning:
• Batteries should never be put in a fire, heated, recharged, disassembled or broken apart.
• Used batteries should not be disposed of as normal, household garbage as they contain hazardous materials that are
harmful to the environment. To ensure they are properly recycled, they should be returned to the dealer or disposed of as
special waste (at a collection point).
Switching the camera on and off/Automatic power off
Slide the ON/OFF switch (7) into the marked ON position. After
switching on, the lens cover opens, the lens moves to its ready
position and the displays appear in the data panel (19).
If the camera is switched off by sliding the ON/OFF switch to the
OFF position, all displays disappear, the lens retracts and the
lens cover closes.
If the camera is not released within approximately 3 minutes of
switching on, it switches itself off automatically as described
above, but in this case the lens does not retract.
This standby mode prevents unnecessary battery consumption.
Note: However, despite this standby mode, in order to extend the
life of the battery, you should definitely make it a habit to always
turn the camera off if it will not be used for a long time.
English
7
Page 12

70
If the camera has switched to standby mode, you can re-activate
it at any time in one of the following ways:
• Turn it off and back on using the ON/OFF switch
• Press the TIMER button (20).
• Press the EV button (21).
• Press the MODE button (22).
• Tap or press the shutter release (3)
Note: The camera automatically selects the default flash mode
each time it is switched on (see “Selectable modes“, p. 89), unless you have previously stored a different mode. This also applies to a stored exposure compensation (see also “Storing flash
modes/the set exposure compensation”, p. 108).
Imprinting data
The LEICA CM has an integrated dating facility. This allows either
the day and time (day, hour and minute) or the date (day, month
and year in four different selectable orders), as desired, to be
imprinted in the bottom right hand corner of each picture. The
position and size of the imprint can be seen on the photograph
illustrated.
Page 13

71
Notes:
• The data is imprinted on the film from the front by LEDs (Light
Emitting Diodes).
• The brightness of the imprint is controlled by the camera’s automatic film speed setting (DX coding). Even so, there can be
slight variations in legibility depending on the film used. With
certain low speed films, the imprint is only very faint or cannot
be seen at all. The data appears in red to orange on dark subject areas and orange to yellow on light areas. Therefore, it can
only be seen with difficulty against light, orange colored or
very “busy“ backgrounds.
• The automatic calendar runs from 2003 to 2060.
• The power supply for the picture dating facility comes from the
camera battery. If it is exchanged within 30s with the camera
turned off, the set data is retained. If it is exchanged with the
camera switched on, the date immediately reverts to the factory default setting.
• The digit groups flash for as long as no setting has been made.
Setting the data
In principle, the date, the time and the desired sequence of the
date are entered in exactly the same way as most other settings
on the LEICA CM with only two of the operator controls – the corresponding function button (to the left of the relevant display)
and the main control dial.
English
Page 14

72
Operating step
1. Press and hold down the DATE button (23) (min. 2s).
2. Turn the main control dial (18) to the right (clockwise) to increase the value or to the left (anticlockwise) to reduce it.
Note: The values are arranged in an “endless loop”, i.e.
they can be reached by turning the dial in either direction
(from
4
to 6).
3. Briefly press the DATE button.
4. Set the 4 remaining values – Month/Day/Hour/Minute –
as described in steps 2 and 3.
5. Pressing the DATE button briefly for a fifth time stores your
entries.
Displays in the data panel
The left-hand numerical display flashes (after the button is
released for a further 4s) to indicate that setting is possible
during this time.
Note: Each time the main control dial is moved (18, see point 2)
the flashing/the available setting time is extended by a
further 4s.
The other displays disappear.
Note: The display switches to Year/Month/Day
The value changes accordingly.
The central digit group flashes.
As for points 1 and 2.
The display stops flashing as confirmation.
Note: The year is indicated by an apostrophe.
Page 15

73
Selecting the data to be imprinted/the date sequence
You can also use the DATE button (23) to select whether or which data is to be displayed and imprinted on your pictures.
To take account of different international conventions, the LEICA CM allows four different options for displaying the date:
Year/Month/Day – Day/Month/Year – Year/Day/Month – Month/Day/Year – Time/Day – No imprint
Operating step
1. Briefly press the DATE button (23).
2. Turn the main control dial (18) to set the desired date
format.
Note: The order runs through repeatedly
3. Pressing the DATE button briefly for a second time stores
your entries.
Displays in the data panel
The numerical display for the date flashes
The corresponding display format flashes
Examples:
– Date
31 10 4
– Time
11 :11 31
– No imprint ccc
The display stops flashing as confirmation
English
Page 16

74
Loading the film
Automatic film loading is possible with the camera switched both
on and off.
Warning:
• Before opening the back cover, please ensure that the film has
been completely wound back into the cartridge. Otherwise,
the light will damage the part of the film already exposed and
with it many of the shots already taken. The camera should only be opened when the
0
is flashing in the frame counter. In
the film cartridge viewing window (16), you can see whether a
cartridge is loaded and the counter shows whether or not it is
rewound. (see “Automatic rewind of fully exposed film”, and
“Rewinding a partially exposed film”, p. 111).
• To prevent the incidence of light, films should be loaded and
unloaded in subdued light wherever possible e.g. in one’s own
shadow.
• When loading the film, avoid touching the rear lens element
with your fingers or the edge of the film.
13
17
29
29
Page 17

75
Operating step
1. Using the slider (13) on the left of the camera, release and
open the back cover (17).
Note: Take this opportunity to check whether there is any
dust on the rear lens element. If so, it should be removed
with a soft brush.
2. Place the film cartridge in the film cartridge compartment
(31) as shown. The sprung spindle on the rewind axle (32)
must engage with the corresponding slot in the film cart
ridge.
3. Lay the film flat on the film channel, between the guides
(29) and pull the leader right over the take-up spool (28) –
as shown in the illustration – up to the marking to the left
(arrow). If you have taken the leader too far, carefully push
a little film back into the cartridge. The film must lie flat in
the film channel.
Displays in the data panel
0
in frame counter, otherwise unchanged
Note: When the camera is turned off, the date display and the
set exposure control mode do not appear.
Constant
Constant
English
Page 18

76
Operating step (cont.)
4. Close the back cover. The camera switches itself on (if it
was not switched on before), threads the film automatically
onto the take-up spool and advances it to the first frame.
Displays in the data panel
In frame counter for correct loading:
Initially briefly
1
, during the process two alternately flashing
lines, followed by
1
constantly
In frame counter for incorrect loading:
1
flashing
If the frame counter in the data panel shows
1
, the camera is
ready to use. If, on the other hand
1
is flashing, the film has
not been loaded correctly. In this case, open the back cover
again, remove the film and reload it, as described under 2–4.
Note: For non-DX coded films (see next section), when the
camera is ready to use the frame counter in the data panel
also shows
1
, but if the film is incorrectly loaded, it shows 0.
Page 19

77
Compatible 35mm films
The LEICA CM is a 35mm camera, i.e. it takes 35mm format
films. DX coded 35mm films (film packaging and film cartridge
are marked with “DX”) are automatically set by the camera.
DX coded films outside this speed range and non-DX coded films
are set to ISO 100.
If the camera cannot detect the DX code for the specified reasons, or because the film is damaged, this is indicated by alternate flashing of
b
and
100
for 3s both in the viewfinder (in the
digital display) and in the data panel (19) when the film is loaded
and each time the camera is turned on.
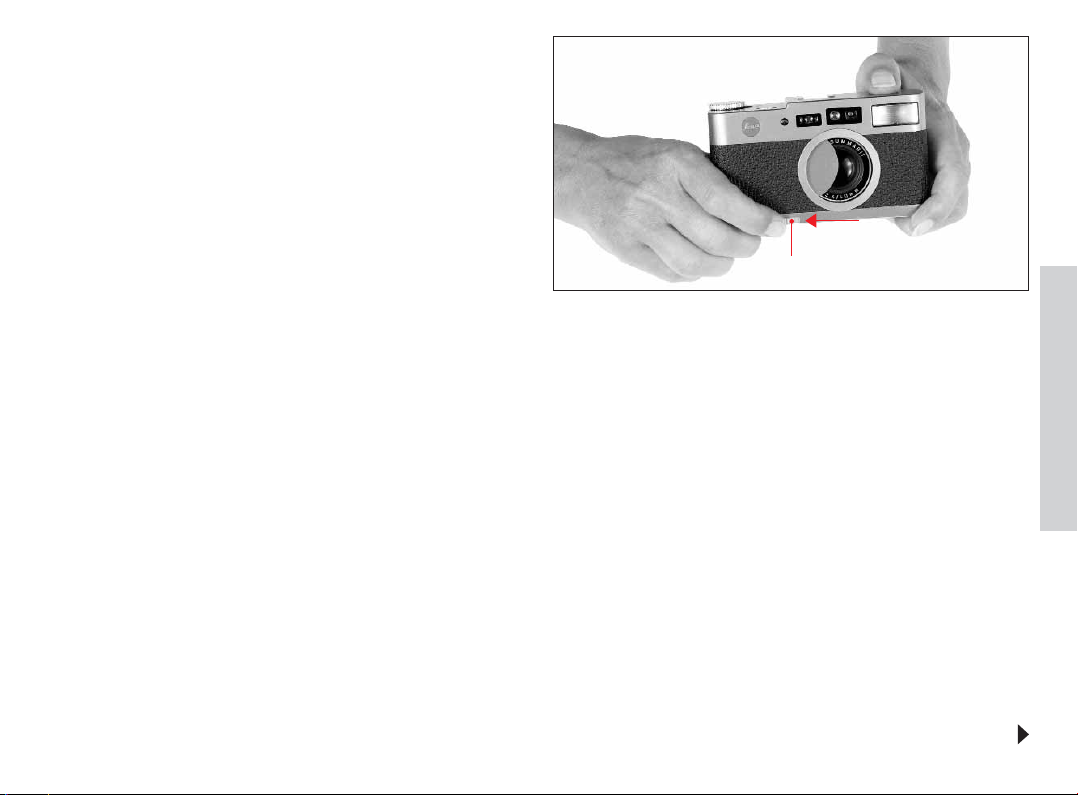
Holding the camera correctly
To avoid blurring, the LEICA CM should be held as shown in the
illustrations. To achieve good results, it is essential to avoid
covering the lens, flash, the autofocus sensors or the exposure
meter sensor with your hand, the carrying strap etc.
If you are taking a portrait format picture, the flash should be at
the top, as illumination “from above“ gives the most natural effect.
For portrait format photos we also recommend pressing the
shutter release with your thumb, which helps keep the camera
particularly steady.
English
Page 20

78
The viewfinder/Viewfinder displays
The viewfinder image in the LEICA CM shows approx. 85% of the
image field. The following markings and displays can be seen in
the viewfinder:
a. Close range marks
For close range shots, what you see in the viewfinder is partly
above of what the lens records. This parallax
fault becomes in-
creasingly noticeable the shorter the distance
to the subject.
The close range markings in the LEICA CM act as the upper
image field limits for ranges of 0.7–1m.
b. Distance metering field frame
Regardless of the modes used for distance metering and exposure control, the parts of the subject that you want to be in
focus and which you want to base the exposure on must be
situated within this frame. (For details of focusing and exposure metering for off-center objects, please refer to the section
“Storing focus and exposure settings“ on page 86)
c. LED displays
Digits and symbols in a line at the lower edge of the viewfinder
image provide information about
1. the set or automatically controlled shutter speed and aperture values
2. the automatic or manual distance setting
3. the status of the built-in flash or an attached system-compatible flash unit
For more details about the LED displays, please refer to the
relevant sections.
Diopter settings
For optimum viewing of the subject, the LEICA CM allows you to
adjust the viewfinder to your own vision within a range of –3 to
+1.0 diopters. To do this, the clicking dial (14) to the left of the
viewfinder eyepiece (15) must be adjusted so that both the viewfinder image and the close range marks and LED displays can be
seen perfectly clearly.
14
a
c
b
a
Page 21

79
Taking photographs with the LEICA CM
The LEICA CM is a fully automatic camera. With automatic setting of the distance and therefore the focus (autofocus), fully
automatic, programmed exposure control and, if required, automatically activated flash, it is ideal for uncomplicated, reliable
and quick photography. When the camera is switched on, these
functions are always active immediately, unless you have previously stored a different mode (see the section “Storing flash
modes/the set exposure compensation” on p. 108).
In addition, the LEICA CM allows you to use aperture priority exposure control mode to determine the desired depth of field by
specifying an aperture and/or to set the distance manually at
any time, to realize specific picture composition ideas.
Several other functions are available to make the most of any
subject or situation.
Distance setting
The LEICA CM has a distance metering system with a range of
0.7m to infinity. When using the autofocus mode, it ensures a
high-precision automatic setting. Particularly with the fast LEICA
SUMMARIT 40mm f/2.4 at full stop, this is crucial for optimum
focusing. For manual focusing, it allows extremely sensitive
work, with displays in the viewfinder and the data panel providing
precise information about the correct setting and the specified
distance.
When positioning your main subject in the picture, note that the
distance metering system in the LEICA CM records exclusively
the center of the image, i.e. the area indicated by the frame in the
center of the viewfinder image.
Notes:
• The passive distance metering system in the LEICA CM relies
on contrasts, i.e. light/dark differences in the subject, and
therefore on a particular minimum brightness. In poor lighting
conditions, an auxiliary light (3) with a range of approx. 5.1m
is therefore turned on automatically (in autofocus mode only).
•
For physical reasons, some subjects are difficult when it
comes to distance metering, e.g.:
– Those with no or only slight contrast (sky, white walls etc.)
– Those with a textureless surface or exclusively horizontal
structures
– Fast moving objects
– Very dark objects and light absorbing surfaces
– Subjects with regular patterns
– Sources of bright light in the picture (spot lights, ceiling
lights etc.)
For these subjects, you should therefore either use the focus
and exposure memory (see “Storing focus and exposure settings, p. 86) or set the distance manually by estimation (see
“Manual distance setting”, p. 81).
• The autofocus system takes into account the aperture set
either automatically or manually and adjusts the distance setting
to the respective different depth of field range (see “Aperture
priority exposure control mode”, p. 85). When using aperture
priority mode, you can therefore selectively optimize the accuracy of the distance setting for critical subjects by selecting as
large an aperture as possible (low value).
English
Page 22

80
Automatic distance setting/Autofocus
For autofocus mode, the adjustment dial (9) is turned completely to the right (i.e. clockwise) until it engages in the AF position.
If the main subject is supposed to be in the center of your picture,
point the frame in the center of the viewfinder at the part of the
subject you want to be in focus, so that it fills the frame as far as
possible. Lightly pressing (to the pressure point) the shutter release button (8) the takes the measurement and the lens is set
accordingly.
The table lists the AF system’s operating mode and viewfinder
displays:
Viewfinder display
Lit
Flashing slowly
(at 2Hz)
Flashing quickly
(at 8Hz)
Distance metering
Possible
Not possible
Metered distance
below 0.7m
Shutter release
Free
Free
Blocked
Setting
To measured distance
a. With flash unit automatically or manually switched on:
to 2.5m
b. With flash unit switched off or not activated: Always to
the distance at which the available depth of field range,
depending on the set aperture, is optimally used, i.e.
starting as close as possible in the foreground and
always stretching to infinity
–
8
9
Page 23

81
Manual distance setting
For manual setting, the adjustment dial (9) is turned to the left
(i.e. anticlockwise) from the AF position to the desired distance.
In the data panel (19), the set distance is then displayed instead
of the date, e.g.
0.7
m
,
23.0
m
or z(for infinity).
Operating step
1. Turn on the focusing system and
the corresponding displays by
tapping the shutter release button
(8, to pressure point).
2. Point the frame in the center of the
viewfinder at the part of the subject
you want to be in focus, so that it
fills it as far as possible.
3. Use the adjustment dial (9) to set
the distance at which the viewfinder
display reports correct focus.
4. Press the shutter release button
down completely to take the picture
Viewfinder displays
1 or 2 elements of the focus display
appear
The elements displayed (possibly)
change
The focus displays in the viewfinder give
information on whether setting for the
part of the subject recorded in the frame
in the center of the viewfinder is correct
(see the following table)
As above
Lens
Takes on the position for the set distance
for as long as the shutter release is held
down.
–
–
Moves into the position for the set
distance for the duration of the exposu
re
English
8
9
Page 24

82
Notes:
• At all times, the display in the viewfinder relates to the part of the subject that is currently being recorded within the metering field
(frame).
• The display disappears 12s after releasing the shutter release, with each movement of the adjustment dial during this time extending the time by a further 4s. The display disappears immediately after taking the picture.
Viewfinder display
Flashing slowly (2Hz)
Flashing quickly (8Hz)
No display
Status/Required action
Distance set too short; turn to right necessary
Distance set slightly too short; turn to right necessary
Correct distance set
Distance set slightly too long; turn to left necessary
Distance set too long; turn to left necessary
Distance metering not possible despite adequate lighting conditions*
The appropriate part of the subject is less than 0.7m away; correct setting impossible
Distance metering not possible due to inadequate lighting conditions*; auxiliary light (3)
not activated
* See “Notes” under “Distance setting”, p. 79
Page 25

83
Exposure control
The LEICA CM offers you a choice of two modes for controlling the exposure, which you can use to adjust the camera perfectly to
your preferred working method or the relevant subject. You can choose between fast, convenient and reliable program mode, i.e. fully automatic, and aperture priority mode, for easy specification of the desired depth of field.
Programmed automatic exposure control mode
Programmed automatic exposure mode is the right mode to choose for uncomplicated photography. It is ideal when you want the camera to be ready to use at all times, particularly for quick
snapshots or for moving objects, i.e. when there is no time to make individual settings. It controls
the exposure by automatically setting an appropriate combination of shutter speed and aperture.
To make the setting, turn the lever 10 clockwise as far as it will go, until it engages in the position
marked P.
In the data panel
P
appears as confirmation of the
set function
In the viewfinder (in the digital display)
When the shutter release button is pressed to the pressure point, the speed and aperture values set by
the camera appear alternately.
The display disappears immediately when the shutter release button is released, otherwise after 4s, i.e.
after both values have been displayed 3x.
If the available brightness exceeds the working range of the exposure control system, this is indicated
by a flashing .
In the modes with slower shutter speeds and those with no flash (see “Selectable modes”, p. 89), the
camera automatically switches to long time exposure (
B
) at low brightness. This is indicated by the alternating display of (for the largest aperture) and (representing exposure times >30s) before the
picture is taken.
Displays
Note: At full stop (2.4) shutter speeds of up to 1/
500
s are available, at f/4 up to 1/
750
s and at all other apertures up to 1/
1000
s.
English
10
Page 26

84
Program shift
The LEICA CM’s variable programmed automatic exposure control mode combines the security and speed of fully automatic expo
sure
control with the freedom to adjust the speed/aperture combination selected by the camera to your own preferences at any time.
For example, to achieve sharp reproduction of an athlete in sports photography, you should set a fast shutter speed (the aperture is
thus opened further fi lower depth of field). If, on the other hand, you would rather have a large depth of field (smaller aperture = higher values) and accept the associated slower speeds that are necessary, then a slower shutter speed can be set (e.g. for landscape
photography). The overall exposure, i.e. the brightness of the image, remains unchanged.
To change the set speed/aperture combination, while continuing to hold down the shutter release button, turn the main control dial (18)
to the left (anticlockwise) for faster shutter speeds and larger apertures,
or
to the right (clockwise) for slower shutter speeds and smaller apertures.
Notes:
• The available speed and aperture values limit the range of the program shift function, i.e. no combinations can be set, which re-
quire larger or smaller apertures than f/2.4 or 22 or faster shutter speeds than
1
/
1000
s for correct exposure.
• The program shift function is not available for close range flash exposures if the exposure cannot be controlled just by reducing
flash output (see also “Photography with and without flash”, p. 90) so that the aperture setting is also automatically adjusted.
In the data panel
Continuing
P
In the viewfinder (in the digital display)
Continues as for programmed automatic exposure control mode, except that in this case the display only
disappears when the shutter release button is released.
Displays
Page 27

85
Aperture priority exposure control mode
Aperture priority mode automatically adjusts the shutter speed
to the manually set aperture. This allows you to ensure that the
desired depth of field selected by setting the aperture value is always retained, i.e. even if the lighting conditions change.
To make the setting, select the desired aperture value by turning
the lever 10. Clicking positions are available for the full stop 2.4
and whole aperture values between 4 and 22.
In the data panel
A
appears as confirmation of the
set function
In the viewfinder (in the digital display)
a. After pressing shutter release button to the pressure point: The shutter speed corresponding to the
set aperture
b.
After setting a different aperture value (only while the shutter release button is not pressed): The newly
set aperture is displayed for 4s and then disappears.
If the shutter release button is then pressed, the display changes, with the resulting shutter speed
displayed instead. This only disappears after the shutter release button is released.
While the shutter speed is displayed, the aperture can be displayed briefly (for 1s) at any time instead
by turning the main control dial (18)
Generally:
In the modes with slower shutter speeds and that without flash (No. 3–5, 8–10, and 15, see “Selectable
modes”, p. 89) the camera automatically switches to long time exposure (
B
) at low brightness. This is indicated by alternate display of the set aperture and (representing the exposure times >30s) before
the picture is taken.
For extremely bright subjects, which exceed the working range of the metering system, appears instead of the shutter speed or aperture display to indicate this. The correct exposure of these subjects is
not guaranteed.
Displays
English
10
Page 28

86
Storing focus and exposure settings
The exposure control and metering system in the LEICA CM is
center weighted, i.e. the entire image field is recorded but the
area marked by the autofocus frame is given a significantly greater weighting. This design means that the parts of the subject positioned in the center are normally in focus and correctly exposed without any additional settings.
If, for composition reasons, the main subject is to be positioned
outside the center of the picture (picture A), the focus and exposure memory-lock function that is always activated when the
shutter release button is pressed to its pressure point in autofocus mode and for aperture priority and programmed automatic
exposure control modes can be used for this purpose.
Aim the camera so that, when you look through the viewfinder,
the main subject or the part of the main subject you want to be
in focus and correctly exposed is in the autofocus frame (picture
B). Then press the shutter release button to the pressure point.
To indicate that the measurements have been made and stored,
the red dot and the corresponding shutter speed and/or aperture values appear in the viewfinder display.
If you keep the shutter release button pressed in this position,
you can change the framing as you wish. The displays remain the
same even if the distance to the subject and/or its brightness
change.
Then press the shutter release button all the way down to take
the photograph (picture C).
If any of the physical conditions described above might prevent
autofocusing: First of all, measure the distance and exposure for
another object at about the same distance and in the same light,
and then store these values.
Important:
• The distance and exposure measurements are erased from
memory as soon as you let go of the shutter release button.
• You can repeat the measurements as often as you like before
taking a picture.
• If you keep the shutter release button pressed, as long as the
flash is not switched on, the camera will continue taking pictures with a frequency of around 0.7 fps. This series exposure
mode makes it possible to record sequences of movement, for
example.
ABC
Page 29

87
Exposure compensation
Exposure meters are calibrated to subjects with average brightness, i.e. which, on average, reflect around 18% of the incident light.
If the metered subject does not meet these requirements, an appropriate exposure compensation is necessary. The LEICA CM allows
compensation in the range ± 2EV in increments of
1
/3EV.
When the shutter release button is pressed to the pressure point, the point above the decimal point appears in the viewfinder to
indicate that the exposure compensation is set (see “The viewfinder/Viewfinder displays”, pp. 66/78).
Operating step
1. Briefly press the EV button (21) next to the corresponding
display in the data panel (19).
2. Set the desired compensation value by turning the main
control dial (18); to the left (anticlockwise) for negative
values and to the right (clockwise) for positive values.
Note: The values do not run through in an “endless loop”,
i.e. to reset you must turn the dial in the opposite direction.
3. Press the EV button again to confirm the setting and return
to normal mode.
Note: 3s after using one of the two controls, flashing ends
automatically and the last value set is stored.
Displays in the data panel
E
flashes (for a further 4 s after releasing the button) to indicate that a value can be set during this time, and the frame
counter immediately to the right switches to indicate the
compensation value. The remaining displays disappear
The compensation value changes by + or –
1
/3EV for every
click-stop position, with the relevant sign (
+/
-
) appearing be-
low
E
at the same time.
The relevant sign (
+/
-
) remains to indicate that an exposure
compensation has been set. The remaining displays appear
again.
Setting
English
Page 30

88
Example of a + compensation
(corresponds to an increase in exposure)
For subjects with very bright dominant surfaces, which reflect a
great deal of light, e.g. snow or a beach, the exposure meter selects a shutter speed that would be too fast and/or an aperture
that would be too small. As a result, the snow would show up in
a mid-gray and any people in the photograph would be too dark:
this is underexposure!
To increase the exposure, a setting of e.g. +2.0EV is made.
Example of a –compensation
(corresponds to an reduction in exposure)
For subjects with very dark surfaces, which do not reflect much
light, the exposure meter selects a shutter speed that would be
too long and/or an aperture that would be too large. For example, a black car in front of a dark background would show up as
a gray car and any people in the photograph would be too light:
this is overexposure!
To reduce the exposure, a setting of e.g. –2.0EV is made.
Page 31

89
Selectable modes
The LEICA CM offers 15 different function variations for flash mode, including the option of making long time exposures at any time.
Various combinations of additional functions are combined into practical modes. These modes are available for both aperture priority and programmed automatic exposure control mode.
The 5 most frequently used modes (No. 1, 2, 6, 7, and 15) are combined into a “1st setting level” for quick and easy access, while the
“2nd setting level” includes all 15 modes.
With one minor difference, the settings are essentially always made in the same way:
Operating step
1. Press the MODE button (22)
a. briefly (<2s) to select within the “1st setting level”
b. for longer (>2 s) to select within the “2nd setting level”
2. Set the desired mode by turning the main control dial (18).
Note: The modes run through in an “endless loop”, i.e. they
can all be reached by turning the dial in either direction.
3. Press the MODE button again to confirm the setting and
return to normal mode.
Displays in the data panel
a. After the button is released the last mode set flashes for
4s to indicate that a different mode can be set during this
time.
b. All flash mode symbols light up shortly (approx. 1s), after-
wards only the last mode set flashes (4s) to indicate that
a different mode can be set during this time.
In both cases: The other displays disappear
Note: The setting time of 4s is extended each time the main
control dial is moved.
The symbol(s) for the set mode appear next to the button.
For the default mode “Automatic flash activation”
a
ap-
pears (in addition to
q
) in the date display on the bottom line
that changes for this purpose during setting.
The relevant symbol(s) remain. The other displays appear
again.
Setting
English
Page 32

90
Note: The descriptions of each of the modes indicate whether
they can only be selected using the “2nd setting level” (applies to
No. 3–5 and 8–14).
Important: Once selected, a mode remains active until you select
another one. If, on the other hand, the camera is switched off or
switches itself off, the default setting is active when it is switched
on again. However, if a mode has been stored it becomes the
default mode and remains active even when the camera is turned
on and off (see “Storing flash modes/the set exposure compensation” on p. 108).
Photography with and without flash
The LEICA CM has a built-in flash (5), which either fires automatically or can be manually switched on or off, depending on the
selected mode.
It is also possible to use a pre-flash light (3), in order to reduce
the “red eye effect”.
The ISO flash shoe (11) also allows the use of more powerful external flash units, preferably models that meet the SCA-3002
standard (with SCA-3502 M4 adapter), which in many cases can
completely prevent “red eye effect” due to the larger distance of
their flash reflectors from the lens axis. We specifically recommend the LEICA SF 24D (order No. 14 444/14448)
Instructions for using external flash units
• As soon as a system-compatible external flash unit is attached, the set flash modes with pre-flash function (No. 2, 4,
7, 9, and 12) are reset to the otherwise identical modes without pre-flash (No. 1, 3, 6, 8, and 11) and displayed accordingly
in the data panel (19).
However, when the flash unit is removed the camera is reset to
the stored mode, i.e. either to
a
(the default factory setting,
see p. 89) or the mode you have permanently stored (see
“Sto
ring flash modes/the set exposure compensation”, p. 108).
• On the LEICA SF 24D, the mode TTL/GNC should be set to allow automatic control by the camera. When set to A, subjects
with above or below average brightness may not be optimally
exposed. When set to M, the flash exposure must be adjusted
to the aperture and distance values set by the camera by setting a corresponding reduced power output level.
• For SCA-3002 standard flash units:
1.
To retain the automatic flash exposure control, an SCA-3502
M4 adapter is required.
2.
It must be possible to set the flash unit to a mode that
allows the camera’s guide number calculation to control the
flash power (Guide Number Control, see the relevant flash
instructions).
• For all other SCA system flash units and earlier adapters than
the SCA-3502 M4:
1. The flash unit must be set to A or M.
2. For M, the reduced power output must be determined by
guide number calculation and set manually on the flash
unit.
• For non-SCA flash units:
1. The only available flash modes are manual flash activation
and deactivation (No. 6 and 15).
2. Only aperture priority can be used on the camera (when
setting to programmed automatic exposure mode,
appears in the viewfinder and the shutter release button is
blocked).
Page 33

91
3. The flash unit must be set to A or M. For M, the reduced
power output must be determined by guide number calculation and set manually on the flash unit. For A, the aperture
settings on the camera and the flash unit must be the same.
• For indirect flash (rotated or tilted flash reflector), the flash
unit must be set to A mode.
• Do not use a cover for the flash (hot) shoe, as this will mechanically shut down the internal flash.
The information below relates to the use of the built-in flash unit.
The camera primarily controls flash exposures by controlling the
light emission based on the automatically or manually set aperture and the automatically or manually set distance.
For manual flash activation (modes No. 6–10) and backlight
situations, i.e. inadequate external brightness, the automatic fillin flash control on the LEICA CM guarantees a balanced relationship between ambient and flash illumination by appropriately
adjusted dosing of flash power output.
Important: When using the flash in any mode, check that the
main subject is within the appropriate flash range.
Flash range
The effective range of the flash depends on the set aperture and
the film speed. For good results, it is crucial that the main subject is within the appropriate flash range. See the table below for
details.
Notes:
• The distances given in the table are based on the use of positive slide film. When using negative films (for prints), where a
slight “underexposure” due to their wide exposure latitude is
not so critical, the range can be extended by a factor of 1.4.
• Deeply staggered subjects cannot be uniformly illuminated by
the flash light from the front to the back. The information relates to the parts of the subject recorded in the metering field
and are therefore only a guideline.
• All values are rounded off.
Film speed Maximum effective
in ISO flash range
25/15° 0.7– 2.9m
50/18° 0.7–
4.1
m
100/21° 0.7– 5.8m
200/24° 0.7– 8.2m
400/27° 0.7–11.6m
800/30° 0.7–16.5m
1600/33° 0.7–23.3m
3200/36° 0.7–33.0 m
5000/38° 0.7– 41.2m
English
Page 34

92
Modes with automatic flash activation
In these modes, the flash is always activated automatically when, because of poor lighting conditions, long exposure times on freehand shots could lead to blurring, for example, in a dimly lit room and outdoors, at twilight or in poor weather.
The flash is also activated automatically when the metering system detects a situation in which the overall brightness is adequate for
exposure without the use of the flash, but is significantly lower in the center of the picture. A graduated fill-in flash used in such cases ensures that the main subject (normally positioned in the center) is automatically reproduced correctly even with backlighting.
(1) Taking photographs with automatic flash activation
After switching on, the LEICA CM always goes into this universal mode (unless another mode has been stored, see the section “Storing
flash modes/the set exposure compensation“ on p. 108).
Note: This default mode, which is normally always activated, is only indicated by the corresponding symbols in the data panel when
setting the function.
Operating step
1. When setting the
function
2. After setting the
function/when
pressing the shutter
release button
(at least to the
pressure point)
In the data panel
q
and
a
flashing
–
In the viewfinder (only with flash activated)
–
a. Flash unit not (yet) charged/ready to use: Flash symbol flashes at 2Hz
(for maximum of approx. 6s with sufficient battery capacity)
b. Flash unit charged/ready to use: Flash symbol lit
c. Flash exposure at least 0.5 EV too low: also lit
d. Flash exposure at least 0.5EV too high: also lit
e. When using an incorrectly set external flash units (see “Instructions for
using external flash units”, p. 90): also appears (shutter release is
blocked)
Setting/Displays
Page 35

93
(2) Taking photographs with automatic flash activation and pre-flash light
t
When taking portrait and group photos the “red eye“ effect caused by light from the flash reflecting off the cornea straight back to
the camera can occur. It is therefore best if the people being photographed do not look straight at the camera. As the effect is worsened when the pupils are wide open in conditions of low lighting, when taking photographs indoors for example, you should switch
on as much room lighting as possible, so that the pupils become smaller.
The pre-flash light is an additional source of constant light, which is activated when the shutter release button is pressed just before
the shutter opens, in order to minimize the pupils of subjects looking at the camera thereby reducing the “red-eye“ effect.
Operating step
3. After the exposure
In the data panel–In the viewfinder
a. Flash exposure correct and flash unit ready to use: Flash symbol lit
b. Flash exposure correct but flash unit not (yet) ready to use: Flash symbol
flashes for 2s at 4Hz (shutter release is blocked)
c. Flash exposure not adequate and flash unit not (yet) ready to use: Flash
symbol only appears again after 2s (shutter release blocked)
Setting/Displays (cont.)
Setting/Displays
Operating step
1. When setting the
function
2. After setting the
function/when
pressing the shutter
release button
(at least to the
pressure point)
3. After the exposure
In the data panel
q
, tand
a
flashing
t
t
In the viewfinder
–
As for default mode (No. 1)
As for default mode (No. 1)
English
Page 36

94
(3) Taking photographs with automatic flash activation and slower shutter speeds
S
(can only be selected using “2nd setting level”, see “Selectable modes”, p. 89)
To minimize the risk of blurring, the exposure time is not extended beyond 1/60s in the modes with flash activation. For pictures where
the flash is used, this means that objects in the background, which the flash cannot reach, are often badly underexposed.
To take appropriate account of the available ambient light, longer exposure times are necessary in these exposure situations. In this
mode, the ambient light controls the shutter speeds, even as far as long time exposure B where necessary (see the section “The automatically self-activating B function”, p. 107).
Note: With low light, i.e. slower shutter speeds than
1
/60s, the camera should be held steady, supported, or a tripod used. Even after
the flash, the camera should only be moved when the film has been advanced.
Setting/Displays
Operating step
1. When setting the
function
2. After setting the
function/when
pressing the shutter
release button
(at least to the
pressure point)
3.
During the exposure
(only for automatic
switching to long
time exposures)
4. After the exposure
In the data panel
q
, Sand
a
flashing
S
; also Bfor automatically controlled
long time exposures
S
, B; at the same
time the counter switches
to display the ex-
pired exposure time
S
In the viewfinder
–
As for default mode (No. 1); for automatic switching to long time exposures, for 2s the following appear alternately: (with P, for the largest
aperture) or the set aperture (with A) and (representing the exposure
times >30s)
The relevant focus status display and
As for default mode (No. 1)
Page 37

95
(4) Taking photographs with automatic flash activation, slower shutter speeds and pre-flash light
S
t
(can only be selected using “2nd setting level”, see “Selectable modes”, p. 89)
This mode allows you to use the functions of modes 2 and 3 in combination.
Note: With low light, i.e. slower shutter speeds than
1
/60s, the camera should be held steady, supported, or a tripod used. Even after
the flash, the camera should only be moved when the film has been advanced.
Setting/Displays
Operating step
1. When setting the
function
2. After setting the
function/when
pressing the shutter
release button
(at least to the
pressure point)
3.
During the exposure
(only for automatic
switching to long
time exposures)
4. After the exposure
In the data panel
q
, S, tand
a
flashing
S
and t; also
B
for automatically
controlled long time
exposures
S
, tand B; at the
same time the counter
switches to display the
expired exposure time
S
and
t
In the viewfinder
–
As for default mode (No. 1); for automatic switching to long time exposures, for 2s the following appear alternately: (with P, for the largest
aperture) or the set aperture (with A) and (representing the exposure times >30s)
The relevant focus status display and
As for default mode (No. 1)
English
Page 38

96
(5) Taking photographs with automatic flash activation, flash synchronization with the end of the exposure,
and slower shutter speeds
nS
(can only be selected using “2nd setting level”, see “Selectable modes”, p. 89)
The LEICA CM allows you to synchronize firing of the flash either with the beginning or the end of the exposure time. This makes it
possible for the very short flash exposure to be either at the beginning or at the end of the – relatively much longer – exposure of the
ambient light. Particularly for moving subjects in dark surroundings, which shine themselves or reflect light – e.g. vehicles – synchronization with the end of the exposure time often results in a more natural effect.
Otherwise, this mode corresponds to
S
.
Note: With low light, i.e. slower shutter speeds than
1
/60s, the camera should be held steady, supported, or a tripod used. Even after
the flash, the camera should only be moved when the film has been advanced.
Setting/Displays
Operating step
1. When setting the
function
2. After setting the
function/when
pressing the shutter
release button
(at least to the
pressure point)
3.
During the exposure
(only for automatic
switching to long
time exposures)
4. After the exposure
In the data panel
q
, n, Sand
a
flashing
n
and S; also
B
for automatically controlled long time exposures
n, S
, B; at the
same time the counter
switches to display the
expired exposure time
n
and
S
In the viewfinder
–
As for default mode (No. 1); for automatic switching to long time exposures, for 2s the following appear alternately: (with P, for the largest
aperture) or the set aperture (with A) and (representing the exposure times >30s)
The relevant focus status display and
As for default mode (No. 1)
Page 39

97
Modes with manual flash activation
As described in the section “Modes with automatic flash activation” on p. 92, the LEICA CM automatically activates the flash in backlight situations. However, if the darker part of the subject is not to be positioned in the center of the picture for composition reasons,
the built-in flash unit will not be used due to the adequate overall brightness. The same applies in the case where you want to moderate high contrast (e.g. in direct sunlight). In such situations, it can be useful to switch on the flash manually.
As long as these modes are activated, the flash unit is activated for every picture, regardless of the prevailing lighting conditions,
otherwise the functions correspond exactly with those modes with automatic flash activation (No. 1–5).
(6) Taking photographs with manual flash activation
q
(7) Taking photographs with manual flash activation and pre-flash light
t
q
Setting/Displays
Operating step
1. When setting the function
2.
After setting the function/when pressing the shutter release button (at least to the pressure point)
3. After the exposure
In the data panel
q
flashing
q
q
In the viewfinder
–
As for default mode (No. 1)
As for default mode (No. 1)
Setting/Displays
Operating step
1. When setting the function
2.
After setting the function/when pressing the shutter release button (at least to the pressure point)
3. After the exposure
In the data panel
q
and tflashing
q
and
t
q
and
t
In the viewfinder
–
As for default mode (No. 1)
As for default mode (No. 1)
English
Page 40

98
(8) Taking photographs with manual flash activation and slower shutter speeds
q
S
(can only be selected using “2nd setting level”, see “Selectable modes”, p. 89)
Note: With low light, i.e. slower shutter speeds than
1
/60s, the camera should be held steady, supported, or a tripod used. Even after
the flash, the camera should only be moved when the film has been advanced.
Setting/Displays
Operating step
1. When setting the
function
2. After setting the
function/when
pressing the shutter
release button
(at least to the
pressure point)
3.
During the exposure
(only for automatic
switching to long
time exposures)
4. After the exposure
In the data panel
q
and Sflashing
q
and S; also
B
for automatically
controlled long time
exposures
q
, Sand B; at the
same time the counter
switches to display the
expired exposure time
q
and
S
In the viewfinder
–
As for default mode (No. 1); for automatic switching to long time exposures, for 2s the following appear alternately: (with P, for the largest
aperture) or the set aperture (with A) and (representing the exposure times >30s)
The relevant focus status display and
As for default mode (No. 1)
Page 41

99
(9) Taking photographs manual flash activation, slower shutter speeds and pre-flash light
q
S
t
(can only be selected using “2nd setting level”, see “Selectable modes”, p. 89)
Note: With low light, i.e. slower shutter speeds than
1
/60s, the camera should be held steady, supported, or a tripod used. Even after
the flash, the camera should only be moved when the film has been advanced.
Setting/Displays
Operating step
1. When setting the
function
2. After setting the
function/when
pressing the shutter
release button
(at least to the
pressure point)
3.
During the exposure
(only for automatic
switching to long
time exposures)
4. After the exposure
In the data panel
q
, Sand
t
flashing
q
, Sand t; also
B
for automatically
controlled long time
exposures
q
, S, tand B;
at the same time the
counter switches to
display the expired
exposure time
q
, S, and
t
In the viewfinder
–
As for default mode (No. 1); for automatic switching to long time exposures, for 2s the following appear alternately: (with P, for the largest
aperture) or the set aperture (with A) and (representing the exposure times >30s)
The relevant focus status display and
As for default mode (No. 1)
English
Page 42

100
(10) Taking photographs with manual flash activation, flash synchronization with the end of the exposure,
and slower shutter speeds
q
nS
(can only be selected using “2nd setting level”, see “Selectable modes”, p. 89)
Note: With low light, i.e. slower shutter speeds than
1
/60s, the camera should be held steady, supported, or a tripod used. Even after
the flash, the camera should only be moved when the film has been advanced.
Setting/Displays
Operating step
1. When setting the
function
2. After setting the
function/when
pressing the shutter
release button
(at least to the
pressure point)
3.
During the exposure
(only for automatic
switching to long
time exposures)
4. After the exposure
In the data panel
q
, n, and
S
flashing
q
, n, and S; also
B for automatically
controlled long time
exposures
q
, n, S, and B;
at the same time the
counter switches to
display the expired
exposure time
q
, n, and
S
In the viewfinder
–
As for default mode (No. 1); for automatic switching to long time exposures, for 2s the following appear alternately: (with P, for the largest
aperture) or the set aperture (with A) and (representing the exposure times >30s)
The relevant focus status display and
As for default mode (No. 1)
Page 43

101
Taking photographs with manually controlled long-time exposures
Certain subjects, e.g. thunderstorms, street scenes at night or fireworks only develop their full appeal in pictures with longer exposures.
For perfectly blur-free long exposures, e.g. when used in conjunction with tripod and electric cable release, the T functions are ideal,
as the shutter release button does not have to be held down:
Start to take the photograph as normal but the shutter will only actually open once you lift your finger from the shutter release button. To end the exposure, press the shutter release button again.
To allow you the greatest possible creative freedom, the LEICA CM allows you to choose between 4 different options, i.e. function
combinations using this T control. The flash functions correspond to those in the modes with normal exposure control.
Notes:
• The shutter release button should be pressed smoothly and not jerkily when using the T function to prevent blurring. Unless it is
deliberately wanted for composition reasons, the camera should only be moved after the film has been advanced.
• With low light, i.e. slower shutter speeds than
1
/60s, the camera should be held steady, supported, or a tripod used. Even after the
flash, the camera should only be moved when the film has been advanced.
• The pocket-sized LEICA Mini Tripod (Order No. 14320) and the LEICA Electric Cable Release (Order No. 18 540) are highly recommended as accessories when taking photographs with long exposure times.
• In these modes, the camera’s electronics do not take any exposure measurements, which means that a number of shots with
various exposure lengths are recommended to allow a selection to be made afterwards.
• The exposure will end automatically after 99s even if the shutter release button has not been pressed again by that time.
English
Page 44

102
(11) Taking photographs with manual flash activation and the T function
q
T
(can only be selected using “2nd setting level”, see “Selectable modes”, p. 89)
Setting/Displays
Operating step
1. When setting the
function
2. After setting the
function/when
pressing the shutter
release button
(at least to the
pressure point)
3.
During the exposure
4. After the exposure
In the data panel
q
and Tflashing
q
and
T
q
and T; at the same
time the counter switches to display the expired exposure time
q
and
T
In the viewfinder
–
As for default mode (No. 1); the automatically or manually set aperture
and appear alternately (representing the exposure times >30s)
The relevant focus status display and
As for default mode (No. 1)
Page 45

103
(12) Taking photographs with manual flash activation, pre-flash light and the T function
q
t
T
(can only be selected using “2nd setting level”, see “Selectable modes”, p. 89)
Setting/Displays
Operating step
1. When setting the
function
2. After setting the
function/when
pressing the shutter
release button
(at least to the
pressure point)
3.
During the exposure
4. After the exposure
In the data panel
q
, t, and Tflashing
q
, t, and
T
q
, t, and T; at the
same time the counter
switches to display the
expired exposure time
q
, t, and
T
In the viewfinder
–
As for default mode (No. 1); the automatically or manually set aperture
and appear alternately (representing the exposure times >30s)
The relevant focus status display and
As for default mode (No. 1)
English
Page 46

104
(13) Taking photographs with manual flash activation, flash synchronization with the end of the exposure,
and the T function
q
n
T
(can only be selected using “2nd setting level”, see “Selectable modes”, p. 89)
Setting/Displays
Operating step
1. When setting the
function
2. After setting the
function/when
pressing the shutter
release button
(at least to the
pressure point)
3.
During the exposure
4. After the exposure
In the data panel
q
, n, and Tflashing
q
, n, and
T
q
, n, and T; at the
same time the counter
switches to display the
expired exposure time
q
, n, and
T
In the viewfinder
–
As for default mode (No. 1); the automatically or manually set aperture
and appear alternately (representing the exposure times >30s)
The relevant focus status display and
As for default mode (No. 1)
Page 47

105
(14) Taking photographs with manual flash off and the T function
u
T
(can only be selected using “2nd setting level”, see “Selectable modes”, p. 89)
Setting/Displays
Operating step
1. When setting the
function
2. After setting the
function/when
pressing the shutter
release button
(at least to the
pressure point)
3.
During the exposure
4. After the exposure
In the data panel
u
and Tflashing
u
and
T
u
and T; at the same
time the counter switches
to display the ex-
pired exposure time
u
and
T
In the viewfinder
–
As for default mode (No. 1); the automatically or manually set aperture
and appear alternately (representing the exposure times >30s)
The relevant focus status display and
As for default mode (No. 1)
English
Page 48

106
(15) Taking photographs with manual flash off
u
Deliberately switching off the flash allows you to take atmospheric photographs in the twilight and inside buildings for example, or
you can take photographs in museums where the use of flash is prohibited. In this mode, the ambient light controls the shutter speeds,
even as far as long time exposure B where necessary (see “The automatically self-activating B function”, p. 107).
Setting/Displays
Operating step
1. When setting the
function
2. After setting the
function/when
pressing the shutter
release button
(at least to the
pressure point)
3.
During the exposure
(only for automatic
switching to long
time exposures)
4. After the exposure
In the data panel
u
flashing
u
; also Bfor automatically controlled long
time exposures
u
and B; at the same
time the counter switches
to display the ex-
pired exposure time
u
In the viewfinder
–
As for default mode (No. 1); the automatically or manually set aperture
and appear alternately (representing the exposure times >30s)
The relevant focus status display and
As for default mode (No. 1)
Page 49

107
The automatically self-activating B function
In the modes S (No.3), S t (No.4), nS (No.5),
q
S
(No.8),
q
S
t
(No.9),
q
nS
(No.10) and u(No.15)
the camera automatically switches to long time exposure below
a particular brightness threshold. When the shutter release button is pressed halfway,
B
is then also displayed in the data panel
(19). At maximum aperture (2.4), the shutter then remains open
for as long as the shutter release button is held down, up to a max
imum of 99s. During the exposure, the frame counter times the
exposure in seconds.
Warning: When the camera switches to this function in the
various modes, the exposure metering active previously is deactivated at the same time. Therefore, a number of shots with
various exposure lengths are recommended to allow a selection
to be made afterwards.
Note: The pocket-sized LEICA Mini Tripod (Order No.14320) and
the LEICA Electric Cable Release (Order No. 18 540) are highly
recommended as accessories when taking photographs with
long exposure times.
English
Page 50

108
Storing flash modes/the set exposure compensation
Under certain circumstances or for particular subjects, it can be appropriate to always use particular functions of the LEICA CM. For
example, this might be the case if a series of portraits are always to be taken with pre-flash light or a series of landscape photographs
for a multivision with a fixed exposure compensation. For this purpose, all flash modes and the set compensation can be permanently
stored, so that they are available again immediately even when the camera is switched off and then on again.
The process for storing the modes and exposure compensation is similar to that for setting the functions themselves:
A stored mode or value is deleted in the same way, i.e. by selecting and storing the default setting (or any other desired mode) or
0.0 E (or any other compensation value).
Note: A stored mode is also deleted when the battery is changed.
Operating step
1. a. If no setting process is activated (the corresponding
displays in the data panel [19] are continuously lit):
Set the desired function (as described in the “Exposure
compensation”, p. 87 and “Selectable modes”, p. 89
sections)
b.
After setting the desired function, but while setting mode
is still active (the corresponding display flashes slowly):
Press the MODE (22) or EV button (21) for at least 3s.
2. After storing
Displays in the data panel
a. The corresponding display (the relevant symbol(s) for the
flash mode or
E
) flash for 4s to indicate that a mode/value can be set. For EV, the counter to the right switches to
indicate the compensation value. The remaining displays
disappear.
b. The corresponding display flashes quickly to indicate that
the function has been permanently stored.
The displays for the relevant functions are lit continuously and
the remaining displays appear again.
Setting
Page 51

109
Self timer
The LEICA CM offers a choice between a 2 and 10s lead time for self timer mode, e.g. when you want to appear in the picture yourself or to prevent any blurring resulting from pressing the shutter release.
Operating step
1. Press the TIMER button (20)
2. Set the desired delay time by turning the main control dial
(18).
Note: The delay times run through in an “endless loop”,
i.e. they can be reached by turning the dial in either
direction.
3. Press the TIMER button again to confirm the setting and
return to normal mode.
Displays in the data panel
The self timer symbol
(s)
flashes (after releasing the button
for a further 4s) to indicate that a delay time can be set during this time; the counter shows
0
.
The other displays disappear.
The flashing self timer symbol switches to the display for the
set function
(r)
; the counter shows 2or10. When set to
0
(no self timer function), the initial display flashes.
The self timer symbol for the set function remains; the counter
shows the selected delay time. The remaining displays appear
again.
Setting the delay time
English
Page 52

110
Notes:
• The self timer is always only activated for a single picture, i.e. it must be set again if you want to use it again afterwards.
• If the flash is not yet charged up when the TIMER button is pressed – the symbol in the viewfinder is flashing – the self timer cannot be activated.
Important: Please note that the exposure measurements are only taken just before the shutter opens!
Starting/Canceling the self timer
Operating step
1. To start, press the shutter release
button (8)
2. You can cancel the process at any
time, either by pressing the shutter
release button again, the TIMER button or by turning off the camera
Displays in the data panel
The self timer symbol for the set function remains
.
While it is counting down,
the remaining
seconds before release
are shown in the counter
The self timer symbol switches back to
the original display (
s
). The counter
switches back to the display for the
current frame number.
Miscellaneous
Before the shutter is released the white
pre-flash light (3) on the front of the
camera lights up as follows:
– 1/9 second(s) flashing
(with 2/10s delay time)
– 1 second constantly lit
– Shutter release
The light goes out
Page 53

111
Automatic rewind of fully exposed film
The film starts to rewind automatically after the last exposure at
the end of the film. The frame counter in the data panel (19)
counts backwards, with the frame numbers and segments running backwards as confirmation of rewinding appearing alternately. The motor stops when the film is rewound. The
0
in the
counter flashes to indicate that the completely rewound film can
now be removed.
Important: If the motor stops without the
0
in the data panel
flashing, the battery needs to be replaced. Do not open the back
of the camera or the partially rewound film will be exposed to the
light, making it unusable, the shots taken will be ruined. After inserting the new battery, press the mid-roll rewind button (26) on
the bottom of the camera to continue rewinding the film.
Rewinding a partially exposed film
The motorized film rewind can be activated manually at any time,
so that a partially exposed film can be developed, for example.
To do this, press the mid-roll rewind button (26) on the bottom of
the camera using a ballpoint pen or similar object.
Accessories: Order No.
Carrying Strap, approx. 50cm long
(supplied with camera – replacement) 18529
Wrist strap (supplied with camera – replacement)
18528
LEICA Electric Cable Release (approx. 30cm long)
18 540
Leather case with belt loop 18560
LEICA Mini Tripod 14320
English
Page 54

112
Troubleshooting
Problem Cause Remedy
Camera will not take a picture Camera is not switched on Switch the camera on (see p. 69)
Battery is flat Replace the battery (see p. 68)
Battery contacts dirty Clean battery contacts
Flash is recharging Wait for a short while until the flash has
charged up (see p. 116)
External flash unit is not Position flash unit correctly
correctly attached
Subject is too close Ensure subject is at least 0.7m away
(see p. 79)
Film not loaded correctly, Open back cover, reload film (see p. 74)
flashing1/
0
Film has been rewound and the Remove film cartridge (see p. 111)
cartridge is still inside the camera
Error in program Remove battery and re-insert.
Camera will not take a photograph Film transport malfunction Rewind film by pressing the film rewind
and the frame counter is flashing button
in the data panel (see pp. 75/76)
Whole picture out of focus Camera moved when taking picture Hold camera steady and press shutter
release button gently
Incorrect manual focusing Check distance to subject and reset
Page 55

113
Problem Cause Remedy
Main subject out of focus Autofocus sensors covered Keep hands, carrying strap etc. clear
Subject too close Distance to subject must be at least 0.7m
Main object outside autofocus frame Use focus memory (see p. 86)
Unfavorable focusing conditions, Focus on substitute objects at the same
e.g. bright light sources in picture distance
Subject photographed through glass, Set distance to infinity manually (see p. 81)
e.g. from a bus or aircraft
Incorrect manual focusing Check distance to subject and reset
Picture is foggy or partially Lens is not clean Clean lens (see “Care tips for the
out of focus (drops of water, fingerprint) LEICA CM”, p. 114)
Whole picture of part of picture Lens or flash unit partially covered Keep hands, carrying strap etc. clear of
underexposed the flash reflector, lens and metering cells;
hold camera steady (see p. 77)
Distance too great for flash For flash photographs, do not exceed the
flash range or use films with a higher speed
(see p. 91)
Overexposed picture The sensor for exposure metering Keep hands, carrying strap etc. clear of
was covered when the camera was held. the lens and metering cells; hold camera
steady (see p. 77)
English
Page 56

114
Care tips for the LEICA CM
Dust on the outside surface of the lens can be removed using a
soft brush or a clean, dry, lint-free cloth, e.g. a clean cotton handkerchief or unfinished lens cleaning cloth. It must be ensured
that the part of the cotton cloth used for wiping the lens is not
touched beforehand. This is the only sure way to prevent sweat
from the hand or traces of grease getting onto the glass surfaces.
Special cleaning cloths, such as those used for eyeglasses, are
not recommended. These cloths are impregnated with chemicals
that can damage optical glass (the glass used to make eyeglasses has a different composition from the types of glass used
in lenses). Alcohol and other chemical solutions must not be
used to clean the housing. If necessary, wipe with a soft, dry
cloth.
The LEICA CM should not be exposed to any severe impacts, extreme heat and/or humidity. Extremely low temperatures impair
the functioning of the camera. In cold conditions, it is therefore
recommended that the LEICA CM is kept in a warm inside
pocket. Sudden temperature fluctuations from cold to hot should
be avoided, as condensation can form inside the camera, which
impairs its functions. Any condensation that does form will disappear by itself after some time in a dry environment. The camera
should not be put in a closed box or bag before it is completely dry.
The camera should not be turned on during this time and we also
recommend that the battery is removed in such cases.
The LEICA CM should not get wet. This can result in expensive repairs or can even ruin the camera completely. When not in use,
the camera – dried off thoroughly beforehand if necessary (particularly after use in environments with high humidity!) – should
be stored in a cool, dry place free of dust and chemicals.
Do not exert excessive pressure on the LCD data panel. The data panel is designed for use at temperature between 0°C and
+40°C (approx. 32° to 104°F). At lower or higher temperatures,
the legibility of the data panel may deteriorate. Higher temperatures can even lead to the data panel temporarily turning black.
Warning: The camera contains high-voltage electronic components. Therefore, the camera housing should not be unscrewed
or broken apart. High voltages can endanger life!
Page 57

115
Technical data
Type Compact autofocus 35mm viewfinder camera with fast, slightly wide angle
normal lens.
Film format 24x36mm
Lens LEICA SUMMARIT 40mm f/2.4 (6 lens elements in 4 groups) with improved
multicoating
Distance setting range Automatic or manual distance setting from 0.7m to infinity, LED display of focus status in each mode.
Smallest object field 566 x 377mm (reproduction ratio 1 :15.7)
Autofocus system Passive phase detection autofocus, AF auxiliary light activates
automatically in poor lighting conditions.
Exposure system Choice of programmed automatic exposure control mode, i.e.
fully automatic exposure control with manual shift option or aperture priority exposure control mode with manual aperture pre-selection, optionally with automatic
flash activation.
Exposure metering Center weighted metering characteristics, two-zone metering (center/edge) with automatic backlighting detection (for automatic fill-in
flash).
Metering memory lock Pressing the shutter release button to the pressure point
stores the distance and exposure measurement.
Exposure meter range (at ISO 100/21°)
At exposure values below EV 8.5 the flash is activated automatically in modes
No. 1–5.
Shutter speed range 1 to 1/
1000
s (in programmed automatic exposure mode at
f/2.4, up to
1
/
500
s
at f/4, up to 1/
750
s
) in modes No. 3-5 and 8–10, 30 s to 1/
1000
s
(for programmed automatic exposure mode at f/2.4, up to
1
/
500
s
at f/4, up to
1
/
750
s
) in modes with automatic and manual flash activation (No. 1, 2, 6, 7). Auto-
matic switching to
B
for longer, manual exposure times of up to 99s controlled ac-
cording to estimates in these modes. Selectively used and manually controlled long
time exposures of up to 99s (T function) for blur-free pictures in modes No. 11–14.
Exposure compensation ±2EV in
1
/3EV increments
Automatic flash and manual flash activation and pre-flash In poor light the
built-in flash unit is automatically activated in modes No. 1–5. Manual activation
and deactivation of flash unit is possible at any time in modes No. 6–14 and 15. Preflash light for reduction of “red eye effect” in modes No. 2, 4, 5, 7, 9, and 10. Flash
with slower shutter speeds also possible in modes No. 3–5 and 8–10.
Modes (in selection order) Automatic flash activation (No. 1, universal mode, always activated when camera turned on unless another mode has been stored), Automatic flash activation with pre-flash light (No. 2), Automatic flash activation with
slower shutter speeds including
B
(No. 3), Automatic flash activation with pre-flash
light and slower shutter speeds including
B
(No. 4), Automatic flash activation with
slower shutter speeds inc.
B
and synchronization with the end of exposure (No. 5),
Manual flash activation (No. 6), Manual flash activation with pre-flash light (No. 7),
Manual flash activation with slower shutter speeds including
B
(No. 8), Manual flash
activation with pre-flash light and slower shutter speeds including
B
(No. 9), Manual
flash activation with slower shutter speeds inc.
B
and synchronization with end of
exposure (No. 10),
T function with manual flash off (No. 14), T function with manual
flash activation (No. 11),
T function with manual flash activation and flash synchro-
nization with end of exposure time (No. 13),
T function with manual flash activation
and pre-flash light (No. 12), and Manual flash off (No. 15)
The modes selected remain stored until another mode is selected, the camera is
switched off, or the battery is changed unless another mode is stored. Every mode
can be permanently stored.
Flash range (at ISO 100/21°) from 0.7–5.8m. Guide number 14.
Flash recovery time Approx. 6s with new battery.
Film speed setting Automatic film speed setting for DX-coded films from ISO
25/15° to 5000/38°. In the case of films without a DX code or films with a DX code
and speed outside this range, setting to ISO 100/21°.
Flash mode Exposure meter range
Flash activated automatically EV8.5 (f/2,4, 1/60s) –
or manually EV19 (f/22,
1
/
1000
s)
(No. 1, 2, 6, 7)
Flash with slower shutter speeds EV2 (f/2.4, 2s) –
or deactivated EV19 (f/22,
1
/
1000
s)
(No. 3–5, 8–10, 15)
English
Page 58

116
Viewfinder Real image viewfinder with markings for distance metering field and
the range of the maximum metering sensitivity for exposure metering. Diopter correction +1 to –3 diopters.
Viewfinder displays Three-part LED chain as status indication for distance metering, four-digit seven-segment digital LED display for automatically or manually
set speed, and aperture values and lighting spot for exposure compensation, LED
flash symbol for flash status display
Viewfinder magnification 0.4x, viewfinder image size corresponds to approx.
85% of film format.
Film loading and transport Film is automatically threaded and advanced to the
first frame by motor when film cartridge is inserted and back cover closed. Motorized film advance after every exposure. Series exposures at 0.7 fps possible (without flash). At the end of the film, the film is automatically rewound by the motor. The
film is rewound completely into the cartridge. It is possible to rewind the film prematurely.
Displays in data panel Liquid crystal display (LCD = Liquid Crystal Display) with
frame counter (
88
, also acts as display for loading, advancing and rewinding film,
second counter for long time exposures, and self timer mode, and to display exposure compensation values when setting), figures or placeholders for optional imprinting of date or time or manually set distance (
.
88:.88.88
), symbols for battery
status ( ), currently set flash (q/u/t/S/n) and exposure modes (B/T/A/P)
,
exposure compensation
(±E)
and self timer
(s/r, inactive or set/activated).
Self timer Delay time either 2 or 10s; indicated by flashing or illumination of the
white light on the front of the camera and countdown in data panel.
Turning camera on/off With ON/OFF switch at bottom of front right hand side
of camera. Lens moves into ready or retracted position, lens cover opens or closes
and the displays in the data panel appear or are extinguished. The camera switches
itself off automatically after around 3 minutes without use.
Operating voltage 3V
Power supply Long-life lithium battery 3 V (CR123A).
Housing External housing made of titanium with leather trim in Leica design. Back
with film cartridge viewing window. Eyelet on the side for carrying- or grip strap.
Tripod thread A
1
/4DIN 4503 (1/4"
).
Dating facility Camera is equipped with an integral dating facility to imprint the
day and time or date on the film or in the bottom right-hand corner of the picture
(as desired). Quartz-controlled clock and automatic calendar until 2060. Control of
the exposure brightness by the camera’s automatic film speed setting.
Dimensions (W x H x D) 116 x 64 x 43mm (lens retracted).
Weight approx. 300 g (without battery)
e
Page 59

117
Leica Academy
As well as outstanding high-performance products for taking,
reproducing and viewing photographs, for many years we have
also been offering the special services of the Leica Akademie,
with practical seminars and training courses, which are intended
to share our knowledge about the world of photography, projection
and magnification with both beginners and advanced photographic
enthusiasts.
The contents of the courses, which are run by a trained team of
experts in the modern, well-equipped training suite at our Solms
factory and in the nearby Gut Altenberg, vary from general photography to areas of special interest and offer a range of suggestions,
information and advice for your own work.
More detailed information and the current Leica Academy brochure are available from:
Leica Camera AG
Leica Akademie
Oskar-Barnack-Str. 11
D-35606 Solms
Phone: +49 (0) 6442-208-421
Fax: +49 (0) 6442-208-425
e-mail: la@leica-camera.com
Leica on the Internet
Current information about products, news, events and the Leica
company is available on our homepage on the Internet at:
http://www.leica-camera.com
Leica info service
The Leica Informations-Service can provide you with an answer
to any technical questions relating to the Leica range either in
writing, on the telephone or by e-mail.
Leica Camera AG
Informations Service
Postfach 1180
D-35599 Solms
Phone: +49 (0) 6442-208-111
Fax: +49 (0) 6442-208-339
e-mail: info@leica-camera.com
Leica Customer Service
Leica AG’s Customer Service center, or the repair service of the
Leica national offices (see the Warranty Card for an address list),
is available to assist you in maintaining your Leica equipment or
in case of damage. Please contact your nearest authorised Leica
dealer.
Leica Camera AG
Customer Service
Solmser Gewerbepark 8
D-35606 Solms
Phone: +49 (0) 6442-208-189
Fax: +49 (0) 6442-208-339
e-mail: customer.service@leica-camera.com
English
 Loading...