

Latitude 760 User Manual
LED Wrist Band
Instruction Manual
Table of Contents
1.0 Introduction
2.0 Specifications
3.0 Description and Settings of the LED Wrist Band
3.1 Mode selection of the LED Wrist Band
3.1.1 Details of each Mode – General Information Display
3.1.1.1 Daily Goal Level
3.1.1.2 Move Time and Active Time
3.1.2 Details of each Mode – Daily display
3.1.3 Step Display
3.1.4 Distance Display
3.1.5 Calories Burnt Display
3.1.6 Workout Mode Display
3.1.7 Workout Record Mode Display
3.1.8 Sleeping Mode
3.1.9 Battery Status and Charging
4.0 Home → Settings: Pairing the LED Wrist Band to an iOS and Android Product
4.1 Setting up your own profile
4.1.1 Setting up your Login ID and Password
4.2 Settings for the LED Wrist Band via your device
4.2.1 Alarm Settings
4.2.2 Daily Goals
4.2.3 Workout Goals
4.2.4 General Settings
Table of Contents
4.2.5 Wrist Band Settings
4.2.5.1 Wear the band on the left or right hand
4.2.5.2 Auto Stride Enable
4.2.5.3 Tilt Wake Enable
4.2.5.4 Enable Auto Sleep
4.2.5.5 Beep on Button Stroke
4.2.5.6 Customize LED Screen
4.2.5.6.1 Custom Settings
4.2.5.6.1.1 Time Mode
4.2.5.6.1.2 Daily Mode
4.2.5.6.1.3 Workout Mode
4.2.5.6.1.4 Other Modes
4.2.5.7 Firmware upgrade
5.0 Home - Reports
6.0 Home - Workout History
7.0 Home - About
8.0 Wristband Main page
8.1 Home
8.2 Steps
8.3 Distance
8.4 Calories Burnt
8.5 Active Time
8.6 Summary
8.7 Sleep Time
8.8 Main page
FCC Statement
FCC Caution:
Any Changes or modifications not expressly approved by the party responsible for compliance could void the
user's authority to operate the equipment.
This device complies with part 15 of the FCC Rules. Operation is subject to the following two conditions: (1) This
device may not cause harmful interference, and (2) this device must accept any interference received, including
interference that may cause undesired operation.
IMPORTANT NOTE:
FCC Radiation Exposure Statement:
This equipment complies with FCC radiation exposure limits set forth for an uncontrolled environment.
Note: This equipment has been tested and found to comply with the limits for a Class B digital device, pursuant
to part 15 of the FCC Rules. These limits are designed to provide reasonable protection against harmful
interference in a residential installation. This equipment generates, uses and can radiate radio frequency energy
and, if not installed and used in accordance with the instructions, may cause harmful interference to radio
communications. However, there is no guarantee that interference will not occur in a particular installation. If this
equipment does cause harmful interference to radio or television reception, which can be determined by turning
the equipment off and on, the user is encouraged to try to correct the interference by one or more of the following
measures:
— Reorient or relocate the receiving antenna.
— Increase the separation between the equipment and receiver.
— Connect the equipment into an outlet on a circuit different from that to which the receiver is connected.
— Consult the dealer or an experienced radio/TV technician for help.
IC Statement
This device complies with Industry Canada licence-exempt RSS standard(s). Operation is subject to the following two
conditions:
(1) this device may not cause interference, and
(2) this device must accept any interference, including interference that may cause undesired operation of the device.
Under Industry Canada regulations, this radio transmitter may only operate using an antenna of a type and maximum
(or lesser) gain approved for the transmitter by Industry Canada. To reduce potential radio interference to other users,
the antenna type and its gain should be so chosen that the equivalent isotropically radiated power (e.i.r.p.) is not more
than that necessary for successful communication.
Le présent appareil est conforme aux CNR d'Industrie Canada applicables aux appareils radio exempts de licence.
L'exploitation est autorisée aux deux conditions suivantes :
(1) l'appareil nedoit pas produire de brouillage, et
(2) l'utilisateur de l'appareil doit accepter tout brouillage radioélectrique subi, même si le brouillage est susceptible
d'en compromettre le fonctionnement.
Conformément à la réglementation d'Industrie Canada, le présent émetteur radio peut fonctionner avec une antenne
d'un type et d'un gain maximal (ou inférieur) approuvé pour l'émetteur par Industrie Canada. Dans le but de réduire
les risques de brouillage radioélectrique à l'intention des autres utilisateurs, il faut choisir le type d'antenne et son gain
de sorte que la puissance isotrope rayonnée équivalente (p.i.r.e.) ne dépasse pas l'intensité nécessaire à
l'établissement d'une communication satisfaisante.
IC SAR Waring :
This equipment complies with IC radiation exposure limits set forth for an uncontrolled environment.
1.0 Introduction
Thank you for your purchase of the LED Wrist Band.
With this band, you can monitor your daily activities easily! Simply put the band on your wrist and this small device will
record the number of steps taken, the distance travelled, the calorie burnt and the sleeping patterns in your daily activity
for your review.
This product has to be used in line with an iOS and Android devices that support Bluetooth 4.0 technology to review your
daily activities.
Your LED Wrist Band is carefully designed and produced. In order to fully utilize the features of the LED Wrist Band, it is
advisable to use it in conformity with the notes mentioned below:
Read this user’s manual carefully before using the LED Wrist Band and keep this manual in a safe place for future
reference.
Avoid exposing the LED Wrist Band to extreme conditions for an unreasonable time.
Avoid rough use or severe impacts on the LED Wrist Band.
Keep the LED Wrist Band away from magnets or appliances which contain magnetic components such as mobile
phones, speakers or motors as these items may ruin the sensors.
Clean the LED Wrist Band occasionally with a soft cloth.
DO NOT expose the LED Wrist Band to strong chemicals such as gasoline and alcohol as they will damage the LED Wrist
Band.
DO NOT dispose of the LED Wrist Band into fire as the battery inside the main unit may explode.
WARNING!
Make sure that you fully understand the functions and limitations of the LED Wrist Band and it is NOT a professional
medical device. Should you have any further questions regarding your daily life condition, please consult your doctor.
2.0 Specifications
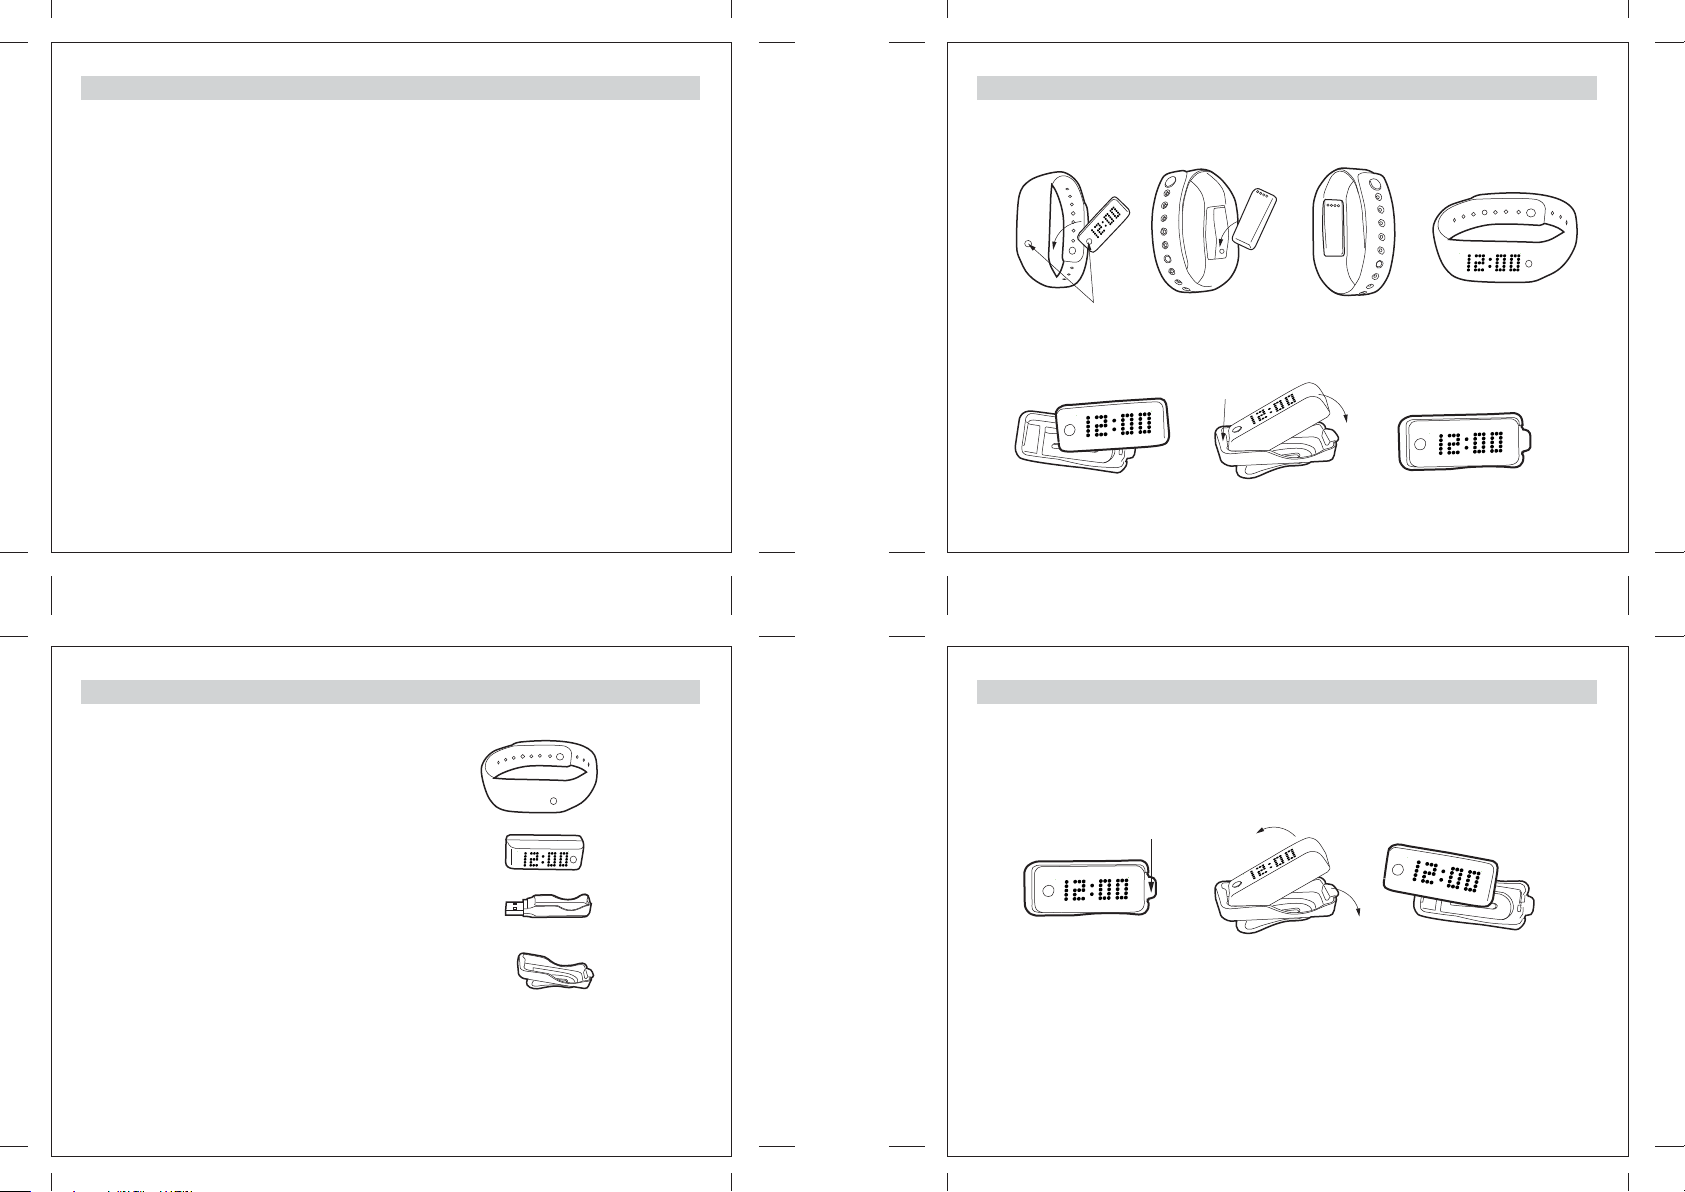
How to place the main unit into the Wrist Band
Place the main unit into the socket of the wrist band with the mode button facing upward and matching
the bulge.
The mode button facing upward and
matching the bulge
How to place the main unit into the socket of the Clip
Place one end of the main unit with the notch matching to
the lever of the socket
lock the main unit at the
notch of the Clip
2.0 Specifications
LED Wrist Band – 1 pc
Main unit with display – 1 pc
USB Socket for battery charging – 1 pc
Clip with Socket for the main unit – 1 pc
You may wear this product either on the wrist or clip it at the pocket opening or waistband as you wish to
track your daily activities. Before using this LED Wrist Band, please charge the main unit first. For charging
the main unit, please refer to the Chapter 3.1.9 Battery Status for more details.
2.0 Specifications
How to remove the main unit from the Clip
Press the lever near the notch to remove the main unit from the Clip.
Press the lever
near the notch
The main Unit can store up to 7-days-per-minute data and 30-days-daily data When the information without
transferring is over 7 days, only the latest 7 days information is kept.

3.0 Description and Settings of the LED Wrist Band
The LED Wrist Band has only one mode button to control all functions.
3.1 Mode Selection
Different modes can be selected as below sketch. When the display is scrolling, you may press the mode
button once to select the next mode.
[M] [M]
General Information
Display
Daily Display
Steps Display
Mode button [M]
Main unit with display
3.0 Description and Settings of the LED Wrist Band - ON / OFF
To switch ON the LED Wrist Band, press and hold the mode button until “Hi! Your Name GLAD TO SEE U
AGAIN” scroll on the screen. After the band is switched ON, you may set your own name in the App after
pairing. For pairing, please check the chapter 4.0 for more details.
To switch OFF the LED Wrist Band, press and hold the mode button of your LED Wrist Band until the word
“MENU” appears and then release it. The Menu screen will scroll on your LED Wrist Band in the sequence as
the Sketch below.
[M]
[M][M]
Record Display
When the display of the LED Wrist Band goes off, press the mode button once to display the last mode
*
information.
Note: DAILY, STEP, DIST and CAL displays can be set to ON or OFF via the App. For more details,
please refer to the Chapter 4.2.5.6.1.2 Daily Mode and Chapter 4.2.5.6.1.4 Other Modes.
Display
[M]
Distance DisplayCalories Burnt
3.1.1 DETAILS OF EACH MODE-General Information Display
Press the mode button once, the LED Wrist Band will display General Information. When the General
Information display doesn’t appear, press the mode button until the General Information display appears.
When the Icon OFF appears, press the mode button to confirm. “SEE U LATER” will scroll on the screen and
the band is switched off.
Current time Daily goal level Accumulative time of the movement
Accumulative time for the Active time
for the whole day
Note: MOVE Time and ACTIVE Time displays can be set to ON or OFF via the App. For more details, please
refer to the Chapter 4.2.5.6.1.1 Time Mode.
of the whole day
 Loading...