

Page 1

Accelerator Pro & Accelerator Pro Plus
Sports & Fitness Watches
Page 2

1.0 INTRODUCTION
1.1 What the Buttons Do
2.0 TIMEKEEPING & SENSOR MENUS
3.0 CURRENT TIME MODE - SET THE WATCH
4.0 ALARM MODE - SETTING ON/OFF
4.1 Alarm Mode - Setting Alarms
5.0 CHRONOGRAPH MODE - HOW TO USE
5.1 Chronograph Mode - Recall Lap Time
6.0 TIMER MODE - SET A TARGET TIME
6.1 Timer Mode - Establish User Presets
6.2 Timer Mode - Use the Countdown Timer
7.0 PACE TIME MODE - HOW TO USE
7.1 Pace Mode - Set a Pace
7.2 Pace Mode - Use Pace with Chronograph
8.0 DUAL TIME MODE
9.0 SENSOR MODE - STOP/START THE SENSOR,
TIMER & LOGBOOK
9.1 Sensor Mode - Reset Screen, Session & Timer
10.0 DISTANCE MODE OVERVIEW
10.1 Distance Mode - Capturing the Data
10.2 Distance Mode - Display
10.3 Distance Mode - Supplementary Function Menu
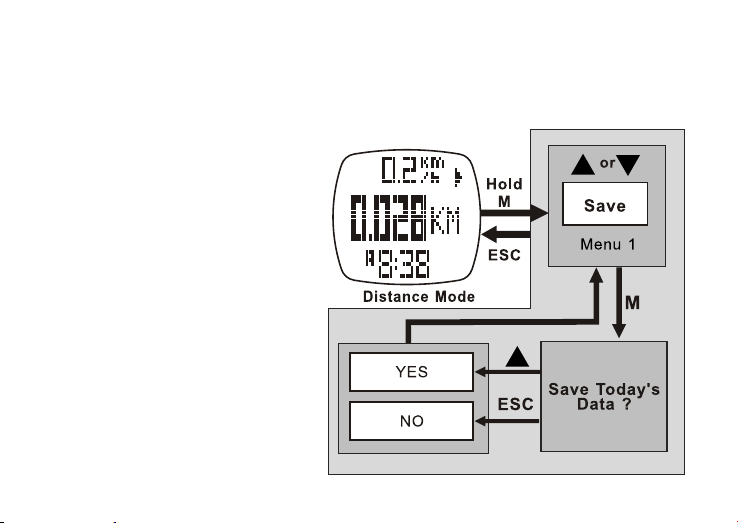
10.3.1 Distance Mode - Menu 1 Save a Session
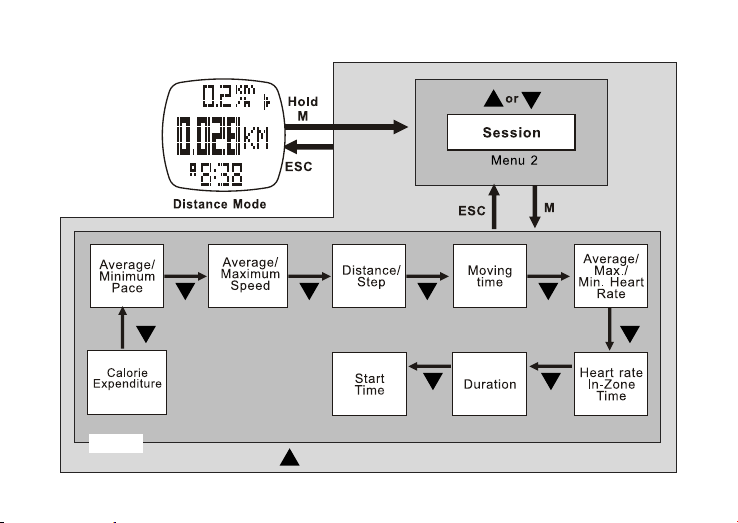
10.3.2 Distance Mode - Menu 2 Session Review
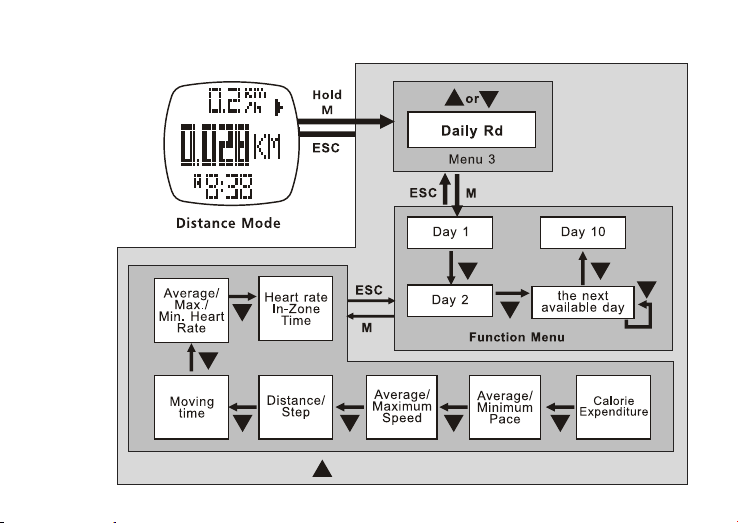
10.3.3 Distance Mode - Menu 3 Daily Record Review
10.3.4 Distance Mode - Menu 4 Sleep Time Setting
10.3.5 Distance Mode - Menu 5 Sense Sensitivity Setting
11.0 HEART RATE MODE FUNCTIONS
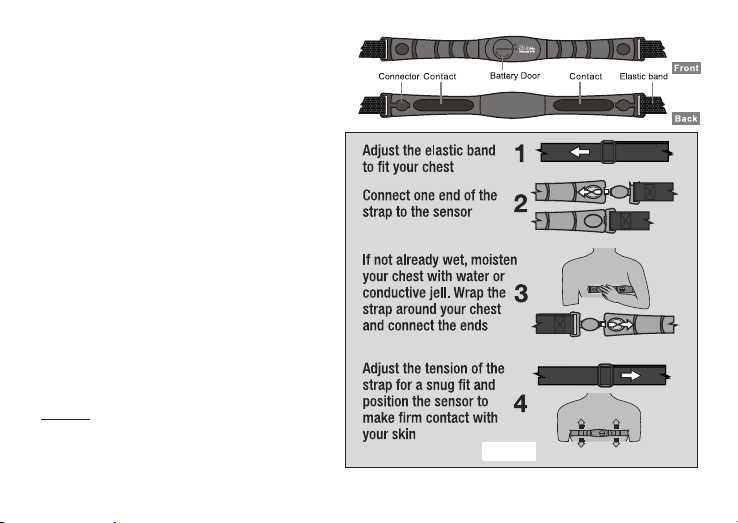
11.1 Heart Rate Mode - Chest Strap
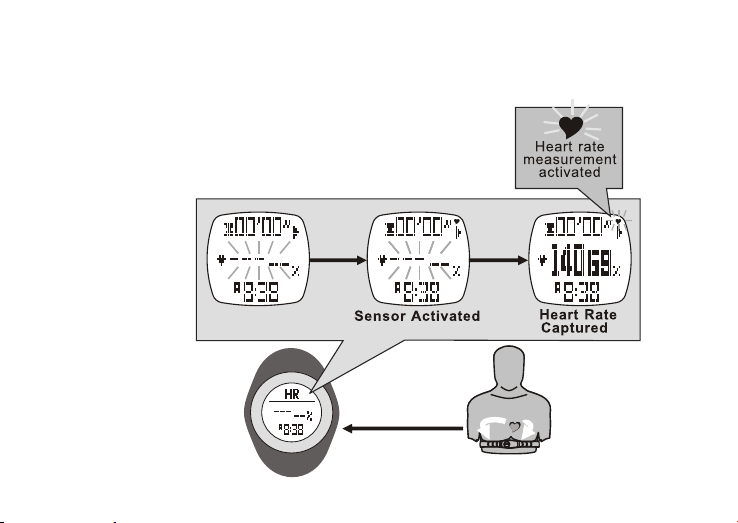
11.2 Heart Rate Mode - Capture the Data
11.3 Heart Rate Mode - Function Display
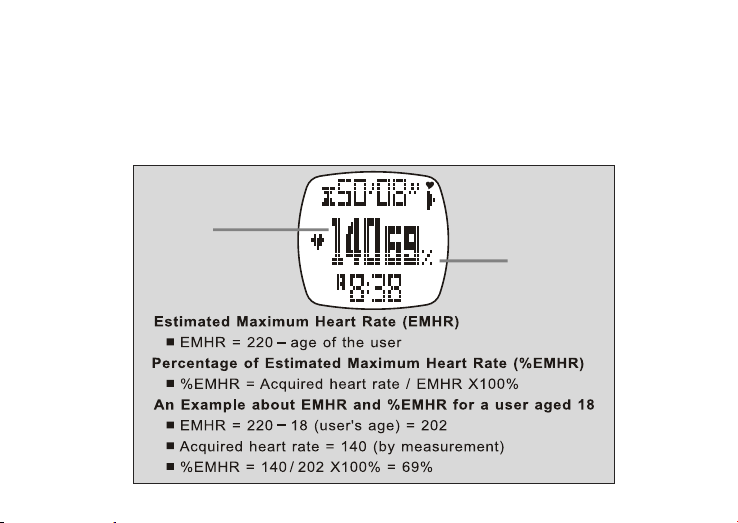
11.4 Heart Rate Mode - EMHR and % EMHR
11.5 Heart Rate Mode - Zone Alert Limits
11.6 Heart Rate Mode - Turn ON/OFF Zone Alert
11.7 Heart Rate Mode - No Signal or Long Response Time
11.8 Heart Rate Mode - Supplementary Function Menu
11.8.1 Heart Rate Mode - Function Menu 1 Save Session
Page 3

11.8.2 Heart Rate Mode - Function Menu 2 Session Review
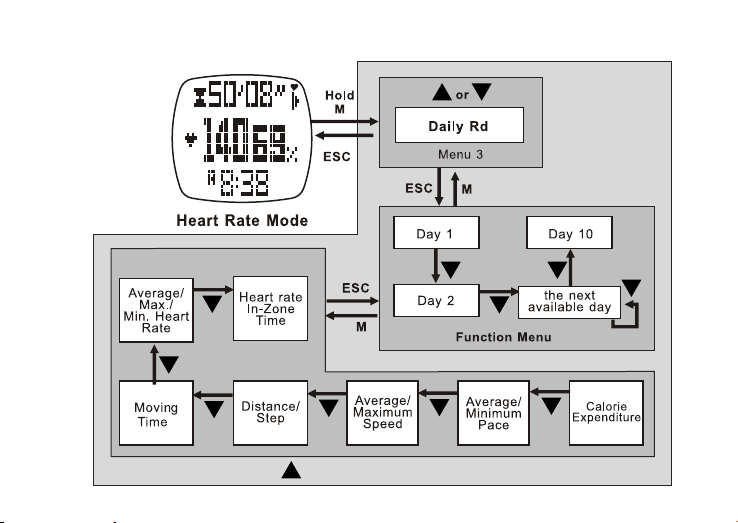
11.8.3 Heart Rate Mode - Function Menu 3 Daily Record
11.8.4 Heart Rate Mode - Menu 4 Zone Setting
12.0 USER MODE FUNCTION MENU
12.1 User Mode - Capture the Data
12.2 User Mode - Change the Display
12.3 User Mode - Supplementary Function Menus
12.3.1 User Mode - Menu 1 Save Session
12.3.2 User Mode - Menu 2 Save Review
12.3.3 User Mode - Menu 3 Daily Record Review
12.3.4 User Mode - Menu 4 Display Setting
13.0 LOGBOOK MODE FUNCTION MENU
13.0.1 Logbook Mode - Menu 1 View
13.0.2 Logbook Mode - Menu 2 Logbook Stop/Start
13.0.3 Logbook Mode - Menu 3 PC Link
13.0.4 Logbook Mode - Menu 4 Log Rate Setting
13.0.5 Logbook Mode - Menu 5 Log Auto Start
13.0.6 Logbook Mode - Menu 6 Erase Session for Logbook
13.0.7 Logbook Mode - Menu 7 View Free Memory
14.0 PC LINK INSTALLATION
14.0.1 PC Link - Pair the Watch & Chest Strap
with the Program
14.0.2 PC Link - Send Data to a PC through
the PC Pod
14.0.3 PC Link - Download, Analyze & Save
Data from the Watch
14.0.4 PC Link - Analyze & Save Real Time
Data from the Chest Strap
15.0 REPLACE THE BATTERIES
16.0 SLEEP MODE
LIMITED WARRANTY
Note: All of the above information in this color,
refers to the Accelerator Pro Plus only.
Page 4

1.0 INTRODUCTION
Thank you for purchasing
this Tech4o Accelerator
Pro Series Watch! We’ve
done everything possible
to insure that your watch is
easy to use, with a logical
screen flow using up/down
buttons, and a one button
escape.
Stride length is important for
accurate measures. Visit
www.tech4o.com to use
the stride length calculator
on our customer support
pages.
1.1 What the Buttons Do
As a convention, we use ▲
to indicate pressing the
ST/STP button and ▼ to
indicate pressing the LAP/
RESET button in all the
illustrations. Also, these icons appear in the watch display whenever they are available. See fig 1.
ESC-
• Selects between Time &
Sensor mode.
• Returns to previous
screen or function.
• Exits Sensor mode.
• When held,
turns on backlight.
MODE - M
• Selects among:
Current Time,
Daily Alarm,
Chrono, Timer, Pacer
& Dual Time modes.
• Selects among: Distance,
Heart Rate, User & Logbook modes.
• Selects among items in Setting Display.
fig. 1
• Activates the Reload
• Resets the laps to zero in Chrono.
ST/STP ▲
• Scrolls upward.
• Increases values in
Setting Mode.
• Stops/Starts functions
in Timer & Chrono
modes.
LAP/RESET ▼
• Scrolls downward.
• Decreases values in
Setting Mode.
function in Timer.
Page 5

▲
▼ ▼
▼
▼▼
▼
see 2.1
Press to move in reverse direction
2.0 TIMEKEEPING MENUS: See fig 2.
fig. 2
Whenever you land on any of the Mode Menus, they will automatically enter their respective Function
Menu after a few seconds or press M to go instantly to the function. Press ESC if you wish to back
out of a Function Menu.
Page 6
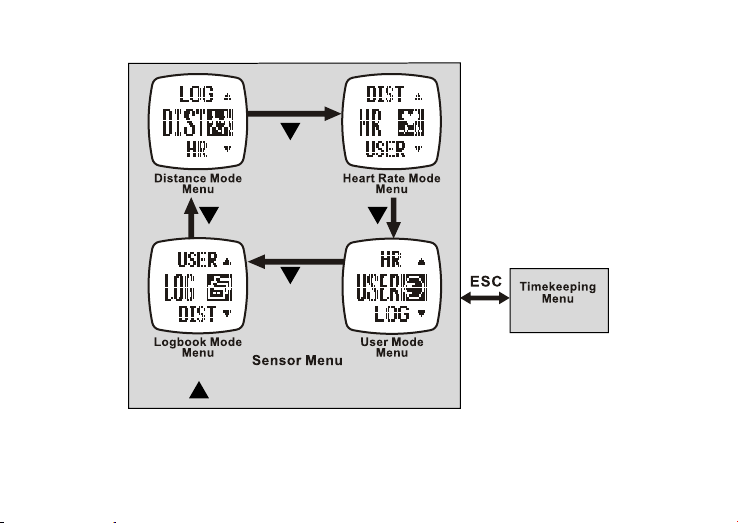
See 2.0
Press to move in the reverse direction
SENSOR MENUS: See fig. 3.
fig. 3
Whenever you land on any of the Mode Menus, they will automatically enter their respective Function Menu
after a few seconds. Press ESC if you wish to back out of a Function Menu.
Page 7

Exit the current display
Return to the previous level
Advance to the next level
Scroll the menu
Change the setting
Scroll the menu
Change the setting
Confirm the selection or setting
3.0 CURRENT TIME MODE - SET THE WATCH See fig. 4
fig. 4
* 1. Press M to confirm these selections.
* 2. When Normal, press ESC to turn on. When Night, press any button to turn on.
* 3. The Heart Rate Chest Strap must be worn for this to work.
* 4. If Chime is on , the watch will beep once every hour on the hour.
Page 8
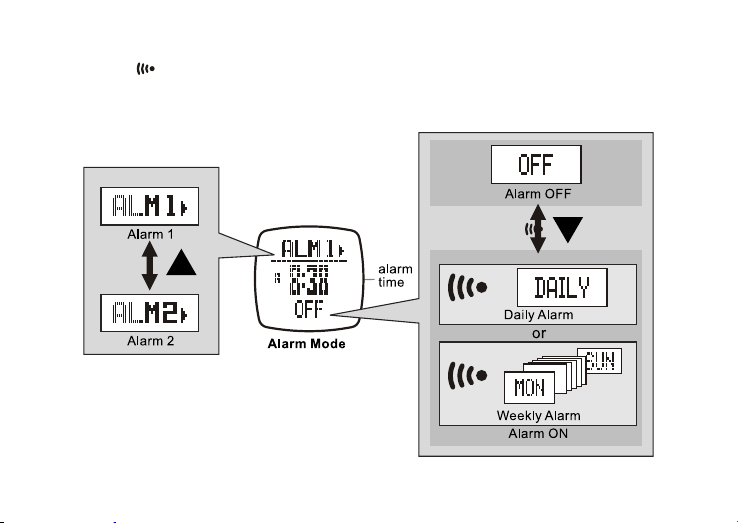
4.0 ALARM MODE - SETTING ON/OFF See fig. 5
If an Alarm is on , the watch will beep at your predetermined time, either daily or weekly.
The Alarm will beep for 30 seconds. Press any button to stop it.
Alarm1 and Alarm2 can be set independently for either daily or weekly.
fig. 5
Page 9

Press to move in the reverse direction
4.1 Alarm Mode - Setting Alarms See fig. 6
fig. 6
* 1. When selected, Daily will beep at the same time every day of the week.
* 2. When selected, Week Day will beep once a week at the same time on the same day of the week.
Page 10

lap number
10 seconds
total elapsed
time
lap time freezes
for 10 seconds
*1
*2
5.0 CHRONOGRAPH MODE - HOW TO USE See fig. 7
fig. 7
* 1. The Chronograph can record up to 50 lap times.
* 2. With the Chronograph stopped, press and hold ▼ for 2 seconds to reset it.
When reset, all recorded lap times will be erased.
Page 11

Press to move in the reverse direction
5.1 Chronograph Mode - Recall Lap Time See fig. 8
fig. 8
See the previous section to erase recorded lap times.
Page 12

6.0 TIMER MODE - SET A TARGET TIME See fig. 9
fig. 9
* 1. The Timer counts down from the Target Time to Zero.
* 2. The Timer includes 5 Quick-Set-Values: 3, 5, 10, 15 and 45 minutes. These are programed into the
software and cannot be changed.
* 3. The Timer also provides for a User determined Preset Value. See the next section to set a value.
Page 13
or
or
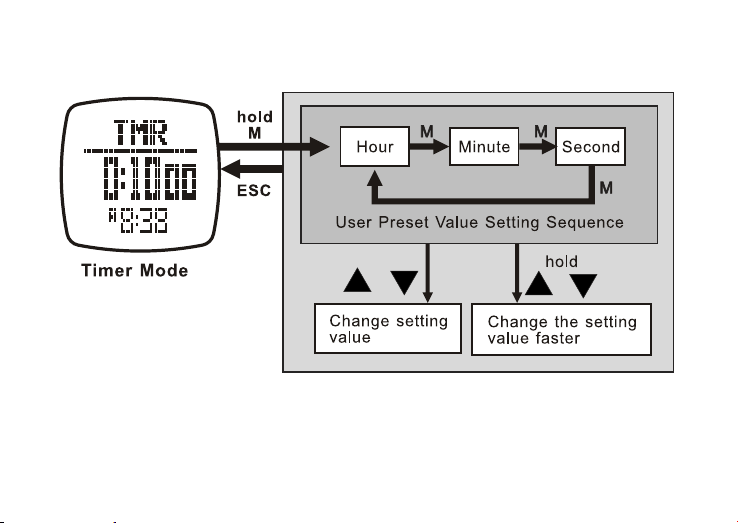
6.1 Timer Mode - Establish User Presets See fig. 10
fig. 10
The setting range is up to 99 hours, 59 minutes and 59 seconds.
Page 14

Target time
automatically reloads
6.2 Timer Mode - Use the Countdown Timer See fig. 11
fig. 11
* 1. The CountDown Timer beeps once every minute for the last 10 minutes.
• Beeps once every 10 seconds for the last minute.
• Beeps once every second for the last 10 seconds.
• Beeps for 30 seconds when it reaches Zero. Press any button to stop the beep.
Page 15
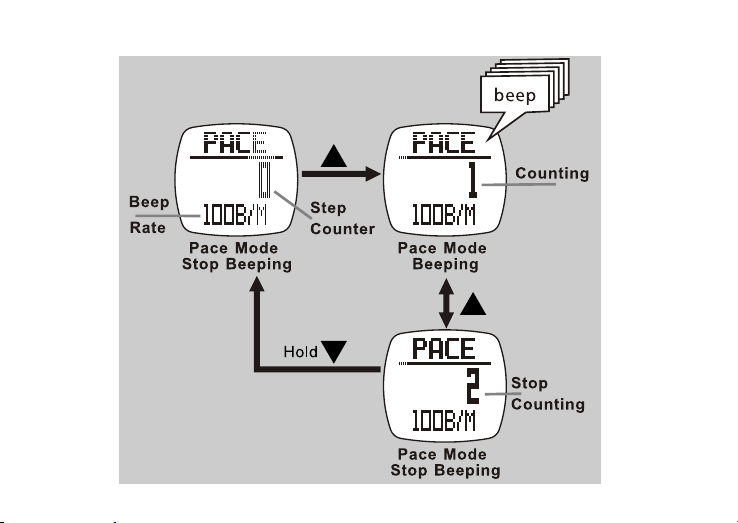
7.0 PACE TIME MODE - HOW TO USE PACER See fig. 12
fig. 12
Page 16

or
or
Hold
Change some
setting values
faster
Change setting
values
7.1 Pace Mode - Set a Pace
The Pace sets a rate in
increments of 5 beeps
per minute. i.e. 30, 35,
See fig. 13
7.2 Pace Mode - Use Pace with Chronograph
See fig. 14
With Pace running, press M 4 times to access the
Chronograph Mode. Press ▲ to Stop/start the
Chronograph counting.
40, 45,… and has a
setting range from 30 to
180 bpm.
fig. 13 fig. 14
Page 17

or
or
hold
8.0 DUAL TIME MODE see fig. 15
The "seconds" in Dual Time and the "seconds" in
Current Time are synchronized, and therefore always the same.
fig. 15
Page 18
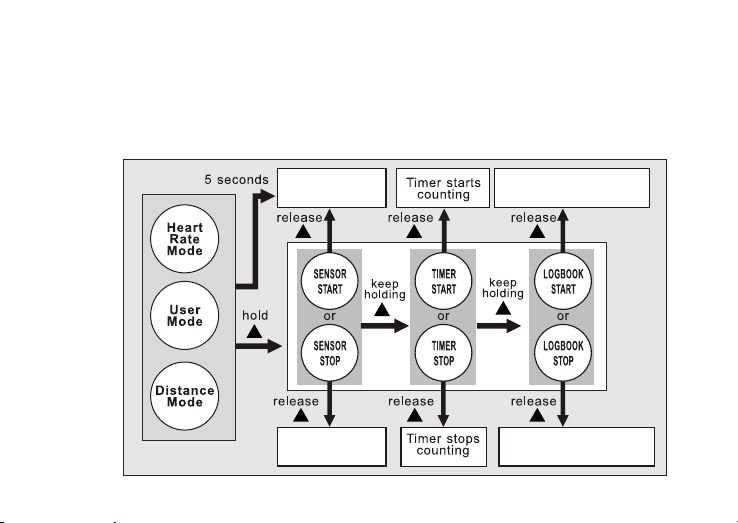
Logbook starts logging
(Sensor activated)
Logbook stops logging
(Sensor deactivated)
Sensor activated
Sensor
deactivated
9.0 SENSOR MODE - STOP/START THE SENSOR, TIMER & LOGBOOK see fig. 16
When you enter Heart Rate, User or Distance modes, Sensor automatically starts after 5 seconds.
When Sensor is active, Logbook will automatically start if it is set to "Auto".
When Logbook is active, LOG will flash.
When in Heart Rate, User and Distance modes, the stand-alone count up timer will gather all the accumulated
exercise time.
fig. 16
Page 19
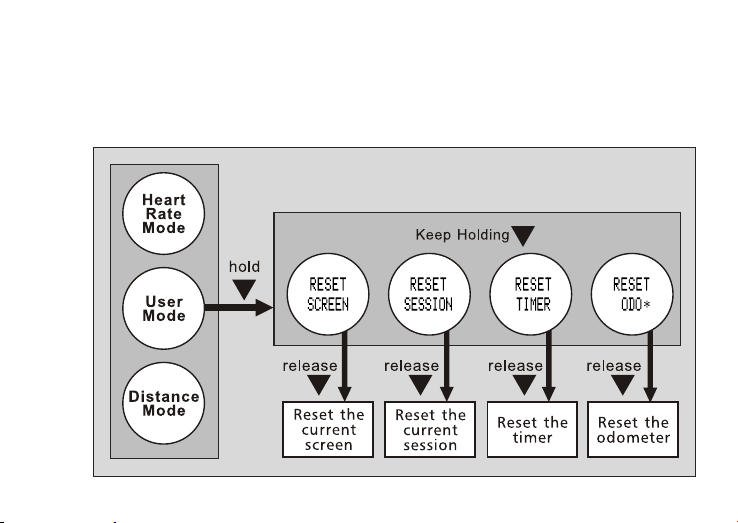
9.1 Sensor Mode - reset Screen, Session & Timer see fig. 17
This diagram only works in User Mode. If you wish to ignore the last exercise, follow the diagram
below to reset the Screen and/or Session. Also, follow it to reset the Timer or Odometer.
fig. 17
Page 20
10.0 DISTANCE MODE OVERVIEW
Current Speed: A real time display of your current speed
Maximum Speed: Your peak speed within the current walk/run
Average Speed: Your average speed within the current walk/run
Current Pace: Amount of time needed to travel one Kilometer/Mile at your current rate
Step: Total number of steps within the current walk/run
Calories Burned: Total number of calories burned within the current walk/run
Distance: Total distance traveled within the current walk/run
Exercise Time: Total amount of time you have been moving
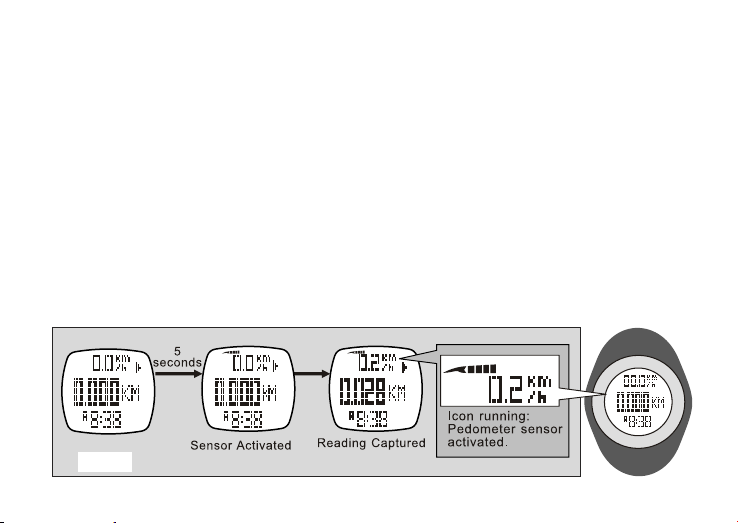
10.1 Distance Mode - Capturing the Data see fig. 18
When you enter Distance Mode, the Sensor automatically activates after 5 seconds. To manually activate the
Sensor; see section 9.0. When the sensor is active, it gathers data into the current Session. The current Session
data is saved into the Daily Record or reviewed in the Distance Function Menu. The watch stores up
10 Daily Records. To reset the current Session; see section 9.1.
fig. 18
Page 21
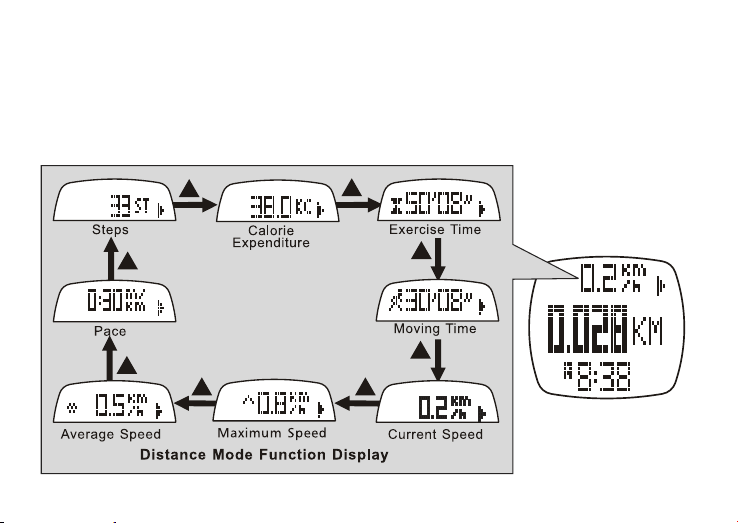
10.2 Distance Mode Display See fig. 19
The Exercise Timer counts independently, even with the Sensor OFF or the screen changed. The same
exercise time can be checked from Heart Rate, Distance or User modes.
Calorie Expenditure is calculated from Heart Rate & Pedometer and continues even if you change screens.
The Sensor must be ON. The same calorie data can be checked from Heart Rate, Distance or User modes.
fig. 19
Page 22
10.3 Distance Mode - Supplementary Function Menus:
Menu 1 - Save save the current session into today's record
Menu 2 - Session review statistical data of current session
Menu 3 - Daily Record review 10 days of daily records
Menu 4 - Sleep set the auto-sleep time for the pedometer
Menu 5 - Sense set sensitivity of the pedometer
10.3.1 Distance Mode - Menu 1 Save a Session see fig. 20
When in the Distance Mode, press and hold
M to access the supplementary features of the
Distance Function Menu.
If you have not saved your last Session, the
watch will auto-save it into today's record at
midnight.
fig. 20
Page 23
Press to move in the reverse direction
Session Review Menu
10.3.2 Distance Mode - Menu 2 - Session Review see fig. 21
fig. 21
Page 24
Press to move in reverse direction
10.3.3 Distance Mode - Menu 3 - Daily Record Review See fig. 22
fig. 22
Page 25
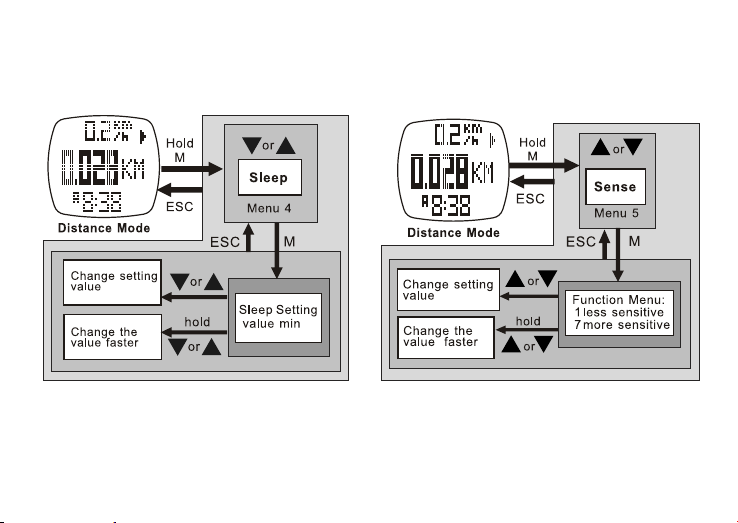
10.3.4 Distance Mode - Menu 4 -
Sleep Time Set See fig. 23
10.3.5 Distance Mode - Menu 5 - Sense
Sensitivity Setting See fig. 24
fig. 23
fig. 24
Page 26
11.0 HEART RATE MODE- FUNCTIONS:
Current Heart Rate - A real time display of
your current heart rate in beats per minute and
as a percentage of your maximum heart rate.
HR Zone Alert - An alert that warns you
whenever your heart rate falls below or rises
above the defined zone.
Calories Burned - A real time display of calories
burned.
HR Statistics - Displays your average ,
maximum and minimum heart rate.
In Zone Timer - Displays the elapsed time your
heart rate was in the zone.
Save/View Sessions & Daily Records - Logs
your heart rate along with the other readings
into a session and saves them into a Daily
Record. Views both the Session and Daily
Record.
11.1 Heart Rate Mode - Chest Strap See fig. 25
DO NOT wear the chest strap over your clothes.
It must be in direct contact with bare skin to
receive a heart rate signal.
fig. 25
Page 27
radio frequency
signal
heart beat
signal
5
seconds
5-8
seconds
11.2 Heart Rate Mode - Capture the Data See fig. 26
When you enter Heart Rate Mode, the Sensor automatically activates after 5 seconds.
To manually activate the Sensor;
see section 9.0.
When active, the sensor collects exercise data into the current Session.
The current Session data can be saved into a Daily Record or reviewed in the
HR Function Menu.
Daily Records can also be reviewed in the HR Function Menu.
The watch stores up 10 Daily Records.
fig. 26
Page 28
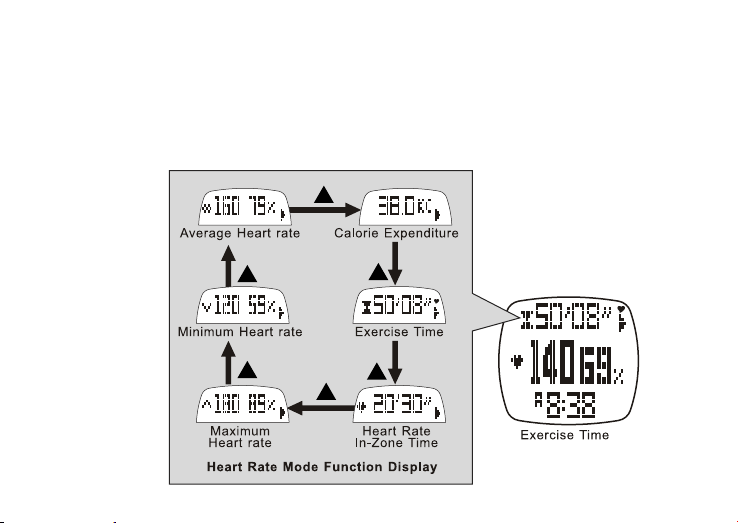
11.3 Heart Rate Mode - Function Display See fig. 27
The Exercise Timer counts independently, even with the Sensor OFF or the screen changed. The same exercise
time can be checked from Heart Rate, Distance or User modes.
Calorie Expenditure is calculated from Heart Rate & Pedometer and continues even if you change screens.
The Sensor must be ON. The same calorie data can be checked from Heart Rate, Distance or User modes.
fig. 27
Page 29
Beats Per Minute
BPM
Percentage of
Estimated Maximum
Heart Rate
% EMHR
11.4 Heart Rate Mode - EMHR and % EMHR See fig. 28
Generally, you will use the Estimated Maximum Heart Rate to set your custom Zone Alert targets.
Example: the upper target can be set to 78% and the lower target limit can be set to 58%.
CAUTION: The Zone Alert depends upon your health status, have your EMHR determined by your
Personal Trainer or Physician before you start an exercise program or use the Zone Alert function.
fig. 28
Page 30
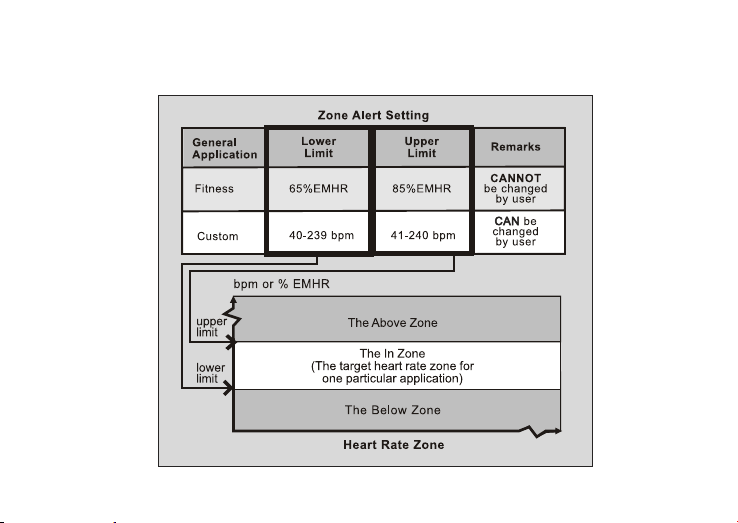
11.5 Heart Rate Mode - Zone Alert Limits See fig. 29
To set custom Upper and Lower Limits,
see section 11.8.4.
fig. 29
Page 31
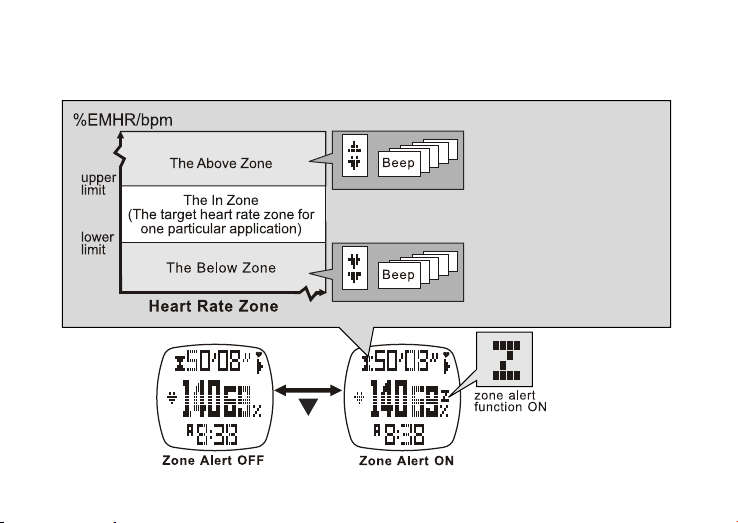
Displays this Icon and
Beeps when the acquired
HR is above upper limit
Displays this Icon and
Beeps when the acquired
HR is below lower limit
11.6 Heart Rate Mode - Turn ON/OFF Zone Alert See fig. 30
fig. 30
Page 32

11.7 Heart Rate Mode - No signal
or Long Response Time
11.8 Heart Rate Mode - Supplementary Function
Menus:
Poor contact between your skin and sensors.
• Dry or Dead Skin. Solution: Scrub chest with a towel
and apply conductive gel or saliva.
• Oily Skin Insulates the Sensor. Solution: Wipe chest
and sensors. An alcohol wipe works best.
• Loose chest strap. Solution: Readjust the strap and
tighten the elastic band to a firm fit.
Muscle Tremors from a Very Tight Chest
Band.
Solution: Loosen the elastic band slightly. Properly
worn, the band will provide a consistent reading even
with arm movement when running or jogging.
Irregular Heartbeat. It is very difcult to consistently
read the heart rate for those with arrhythmia. There is
no solution.
Low Battery. Erratic readings may be caused by a low
power battery in the chest strap. Solution: Replace the
battery.
When in the Heart Rate Mode, press and
hold M to access the supplementary features
in the Heart Rate Function Menu.
If you have not saved your last Session, the
watch will auto-save it into today's record at
midnight.
Menu 1 - Save save the current session into
today's record
Menu 2 - Session review statistical data of
current session
Menu 3 - Daily Record review 10 days of
daily records
Menu 4 - Zone set the upper and lower limits
for the Zone Alert
Page 33
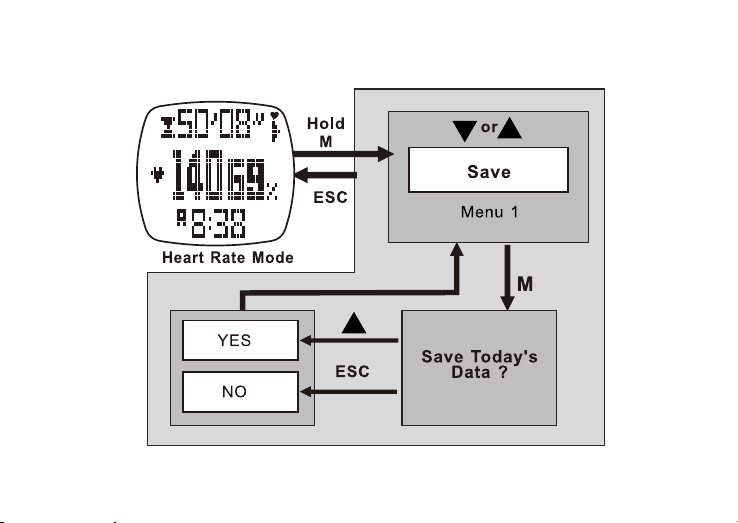
11.8.1 Heart Rate Mode - Function Menu 1 - Save Session See fig. 31
fig. 31
Page 34
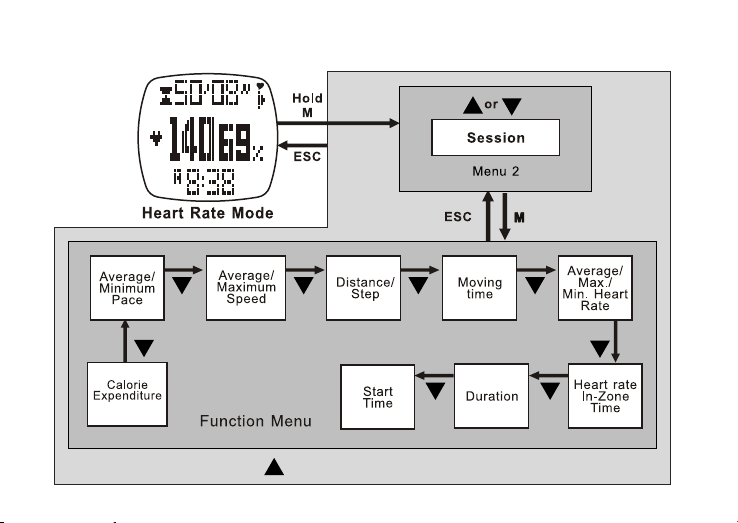
Press to move in the reverse direction
11.8.2 Heart Rate Mode - Function Menu 2 - Session Review See fig. 32
fig. 32
Page 35
Press to move in the reverse direction
11.8.3 Heart Rate Mode - Function Menu 3 - Daily Record Review See fig. 33
fig. 33
Page 36
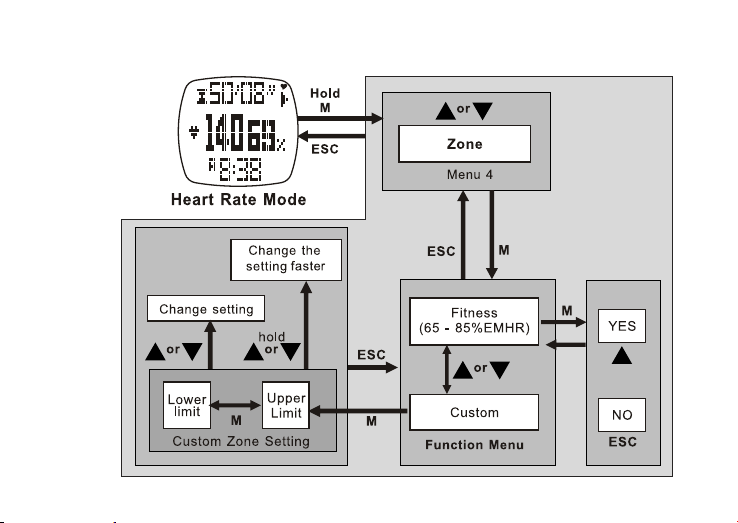
11.8.4 Heart Rate Mode - Menu 4 - Zone Setting See fig. 34
fig. 34
Page 37
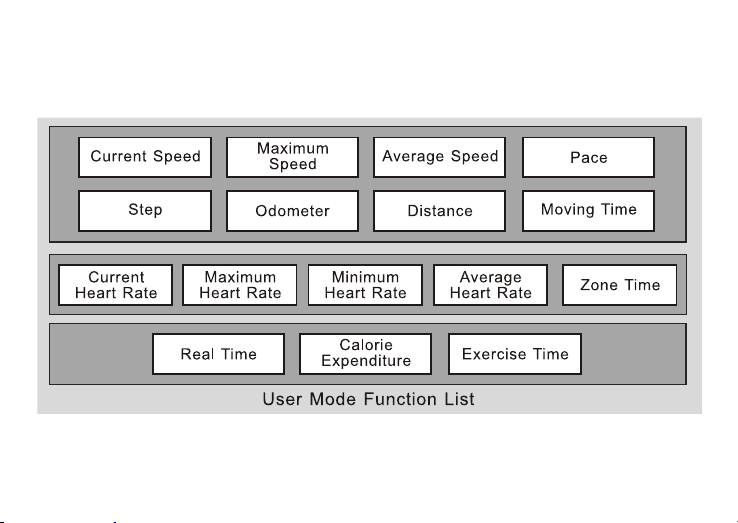
12.0 USER MODE FUNCTION MENU
You can select any one of the functions to show in the top, middle or bottom row of
the display. This mode only works with the chest strap. See the list below.
Page 38
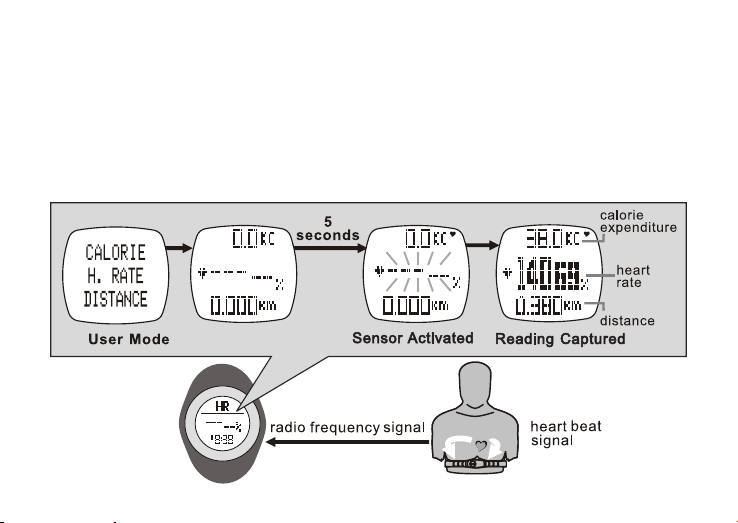
12.1 User Mode - Capture the Data See fig. 35
When you enter User Mode, the Sensor will automatically activate after 5 seconds. Also, you
can manually activate the Sensor; see section 9.0.
When the sensor is active, it will collect exercise data into the current Session.
The data in the current Session can be saved into a Daily Record or reviewed in the
User Function Menu.
Daily Records can also be reviewed in the HR Function Menu. The watch stores up 10 Daily Records.
You can reset the current Session; see section 9.1.
fig. 35
Page 39
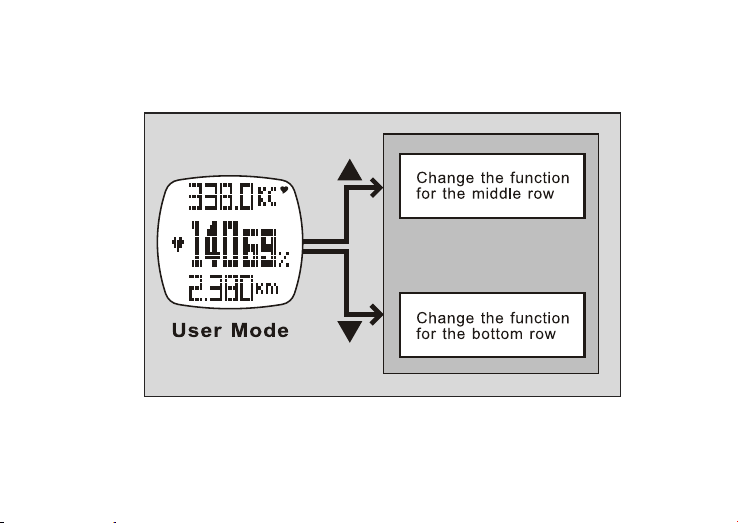
Select from one
of the16 dierent
functions
12.2 User Mode - Change the Display See fig. 35
To change the top row, see section 12.3.4.
fig. 36
Page 40
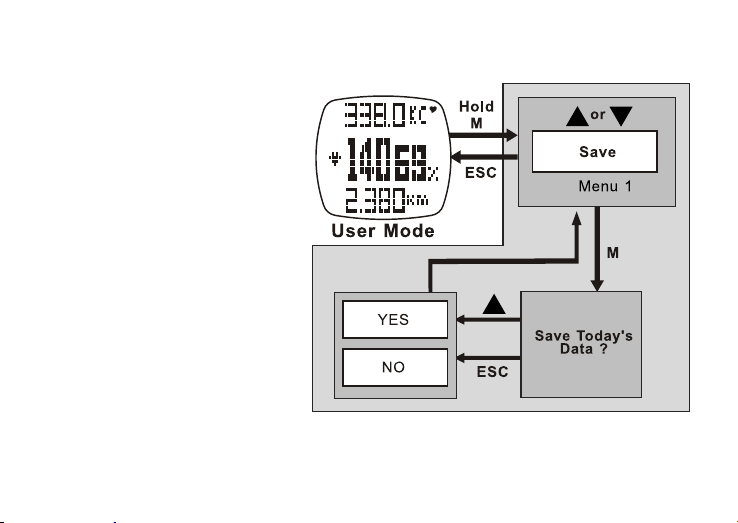
12.3 User Mode - Supplementary
Function Menus:
When in the User Mode, press and hold M
to access these supplementary features in
the User Function Menu.
Menu 1 - Save save the current session into
today's record
Menu 2 - Session review statistical data of
current session
Menu 3 - Daily Record review 10 days of
daily records
Menu 4 - View change the display function.
select any one of 16
fig. 37
12.3.1 User Mode - Menu 1 - Save Session See fig. 37
Page 41
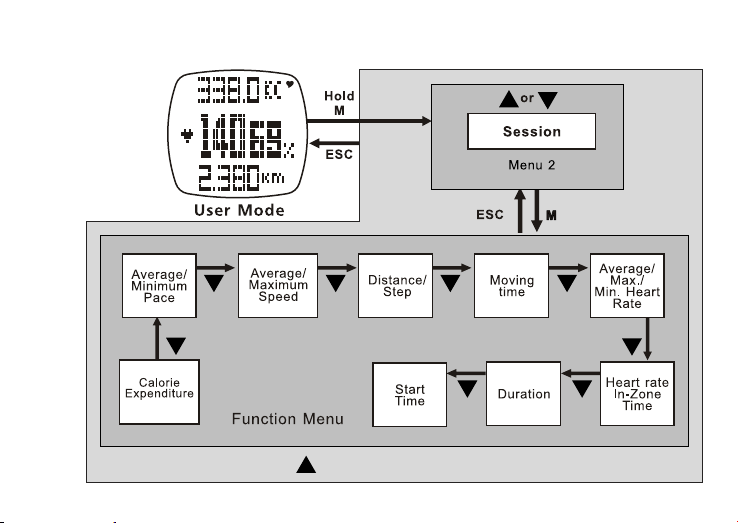
Press to move in the reverse direction
12.3.2 User Mode - Menu 2 - Session Review See fig. 38
fig. 38
Page 42
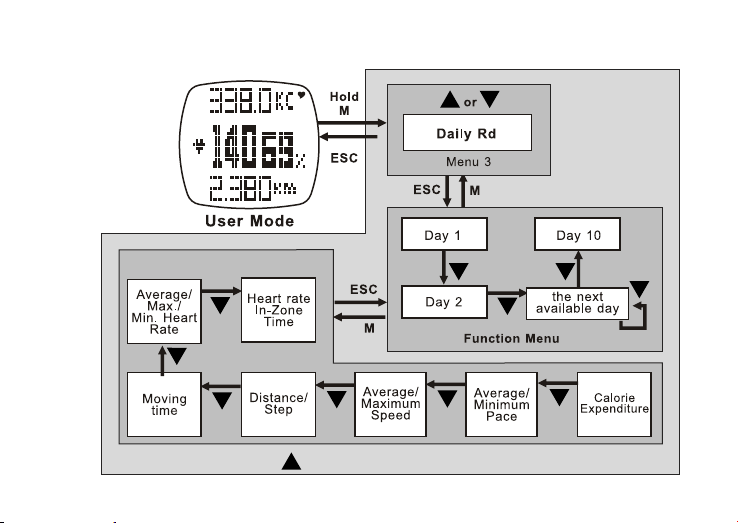
Press to move in the reverse direction
12.3.3 User Mode - Menu 3 - Daily Record Review See fig. 39
fig. 39
Page 43
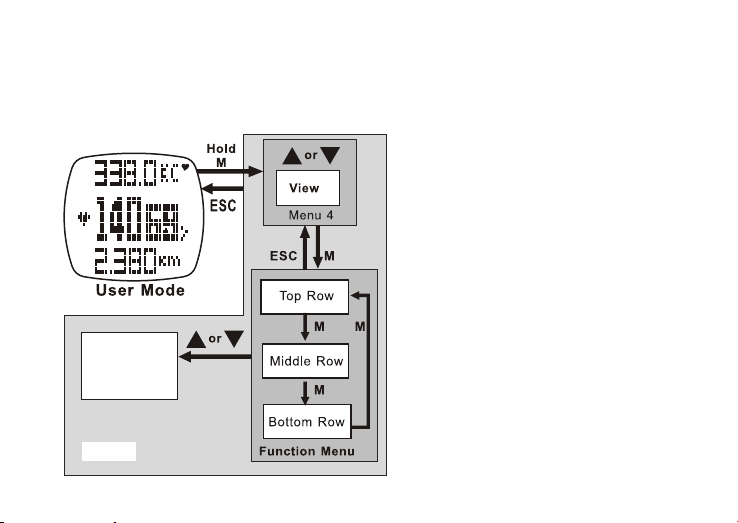
Select any
one of the
16 functions
12.3.4 User Mode - Menu 4 - Display Setting
See fig. 40
fig. 40
13.0 LOGBOOK MODE SUPPLEMENTAL
FUNCTION MENUS:
When in the Logbook Mode, press and hold
M to access these supplementary features in
the Logbook Function Menu.
Menu 1 - View Recalls details of a logged
record
Menu 2 - Stop/Start Starts and stops the
logging function
Menu 3 - PC Link Pairs the watch with the
Wireless Data Manager. Uploads data from
the watch to a PC
Menu 4 - Log Rate Sets the sampling rate for
the logging function
Menu 5 - Auto Sets the Auto-Start log
function
Menu 6 - Erase Clears a logged record
Menu 7 - Mem Displays amount of free
memory
Page 44
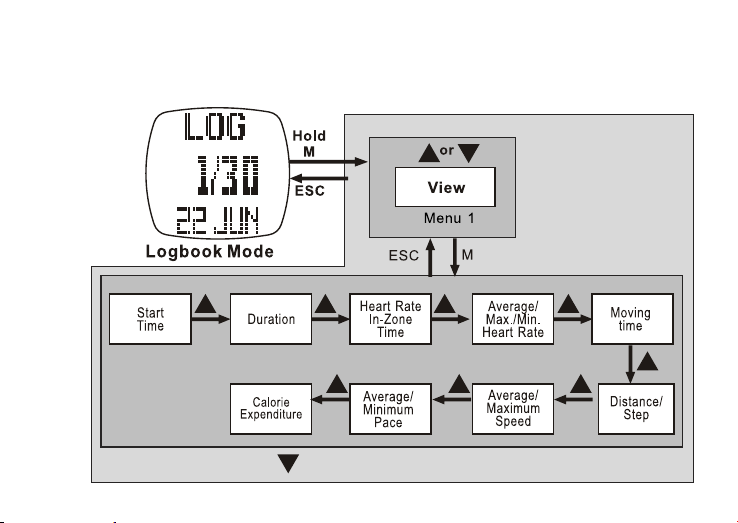
Press to move in the reverse direction
13.0.1 Logbook Mode - Menu 1 - View See fig. 41
If a Log is started, the Session cannot be viewed.
fig. 41
Page 45
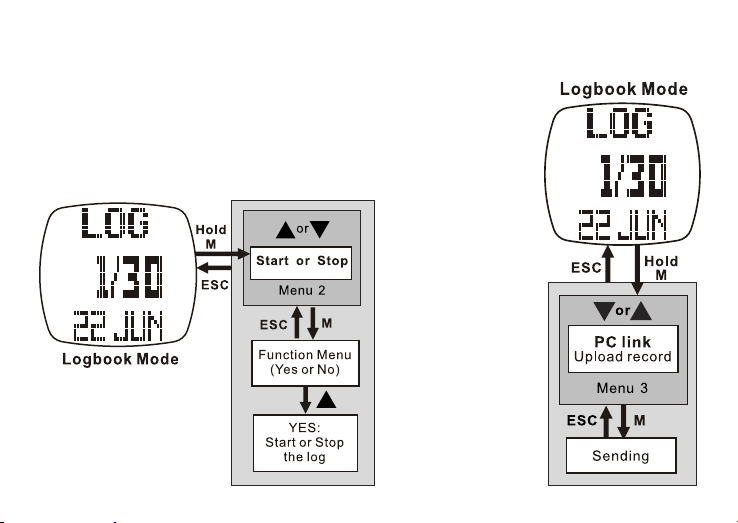
13.0.2 Logbook Mode - Menu 2 -
Logbook Stop/Start See fig. 42
When the Log is started, LOG will flash and the watch
will create a new log session and collect the reading
into a record at a pre-defined rate.
The Log function can also be started/stopped in Heart
Rate, Distance and User modes. Press and hold ▲.
See section 9.0.
fig. 42 fig. 43
13.0.3 Logbook Mode - Menu 3 - PC Link See fig. 43
This only works with the
PC Pod and a PC. See
section 15.0 before you
attempt to up-load data.
Install the software Data
Manager onto a PC.
Activate Data Manager.
Connect the PC Pod to a
USB port on the PC.
Start the upload from the
watch.
Page 46
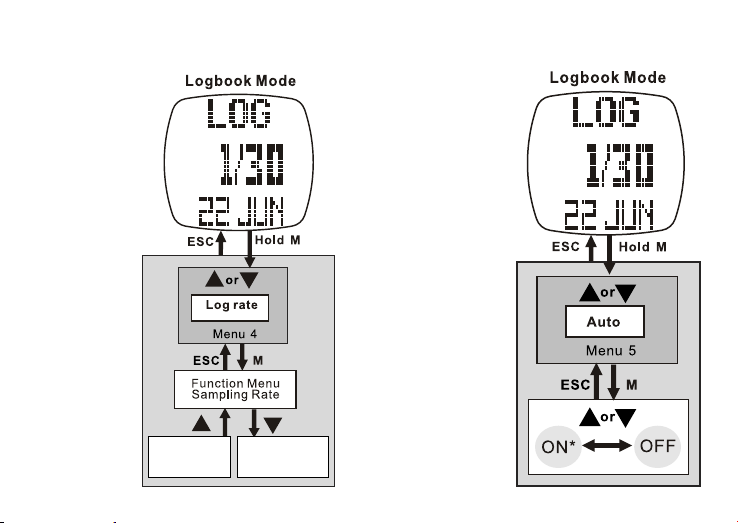
Scroll forward
to change rate
Scroll backward
to change rate
13.0.4 Logbook Mode - Menu 4 -Log
Rate See fig. 44
13.0.5 Logbook Mode - Menu 5 - Log Auto
Start
See fig. 45
Important: When
the Log is started,
the log rate cannot
be changed.
fig. 44 fig. 45
* If ON is selected,
whenever you activate
the Sensor in Heart Rate,
Distance or User modes,
the Log Function will start
automatically.
Page 47
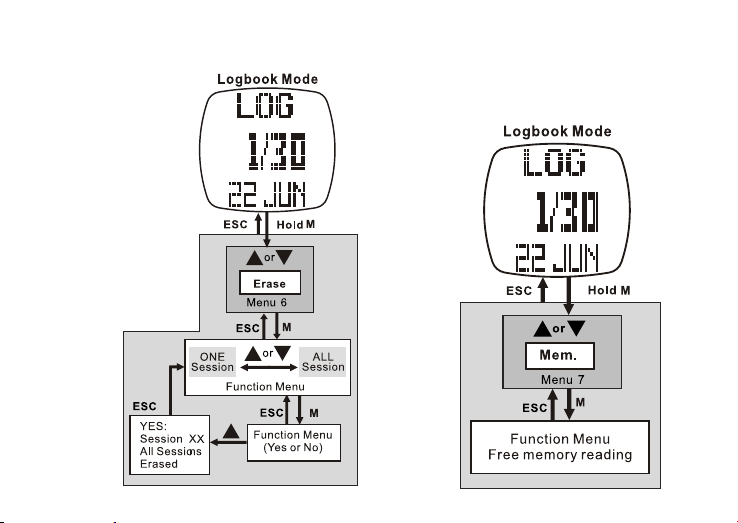
13.0.6 Logbook Mode - Menu 6 - Erase Session
for Logbook See fig. 46
Press ▲ or ▼ to select a
target session [ i.e. 1/30 ,
2/30, 3/30… ] to erase.
fig. 46 fig. 47
13.0.7 Logbook Mode - Menu 7 - View
Free Memory See fig. 47
Page 48
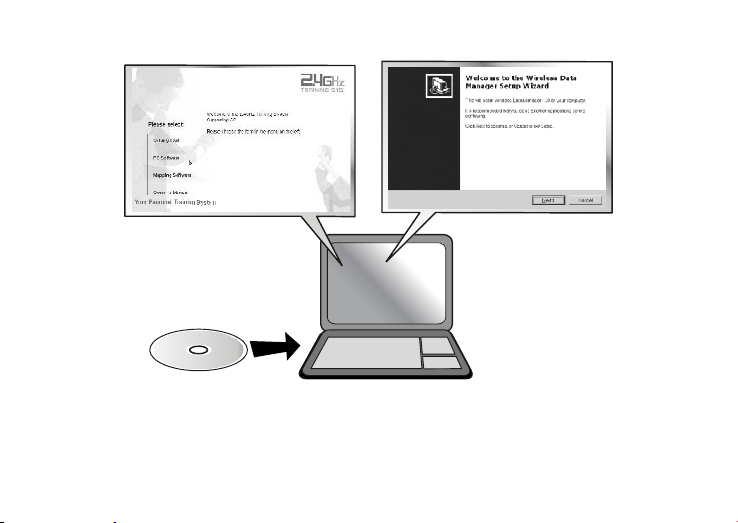
14.0 PC LINK INSTALLATION See fig. 48
fig. 48
1. Insert the included
CD and execute the
installation software. A
menu will display.
2. Click on the "PC Software"
button that's on the side menu.
Then click the "Here" button to
initiate the installation wizard.
3. Follow the on screen
instructions to load the
software into the target
drive.
Page 49
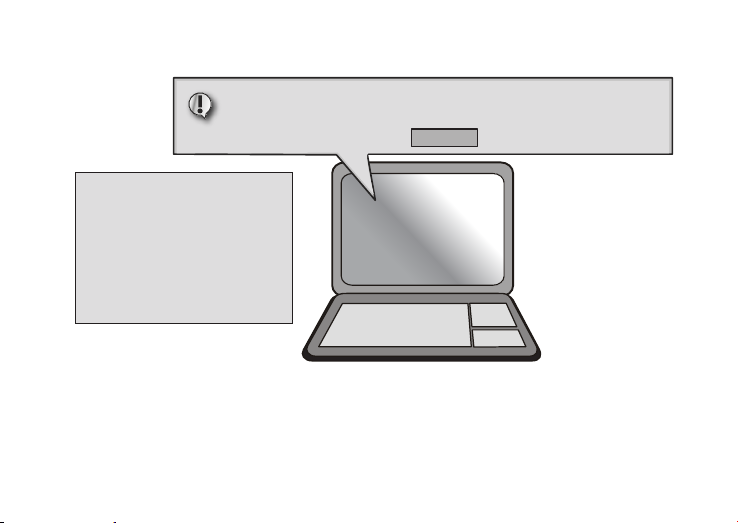
OK !
It’s the first time that you use this software. Please insert the PC Pod into your PC to set up.
14.0.1 PC Link - Pair the Watch & Chest Strap with the Program See fig. 49
Note: For the Pairing to work:
• The watch must be in Logbook
Mode - PC Link. The PC Link
function must be active.
• The chest strap must be worn or
pressed to the chest so that the
Heart Rate signal is sampling.
fig. 49
1.When the download is complete, execute
the Wireless Data Manager program
from the program window menu bar.
2. The wizard will guide you
to pair the watch & chest
strap with the program.
3. When the paring is finished, the
ID of the watch & chest strap will
be saved into the program.
The watch & chest strap can be paired with the program again under the Option menu using the Setting option.
Page 50
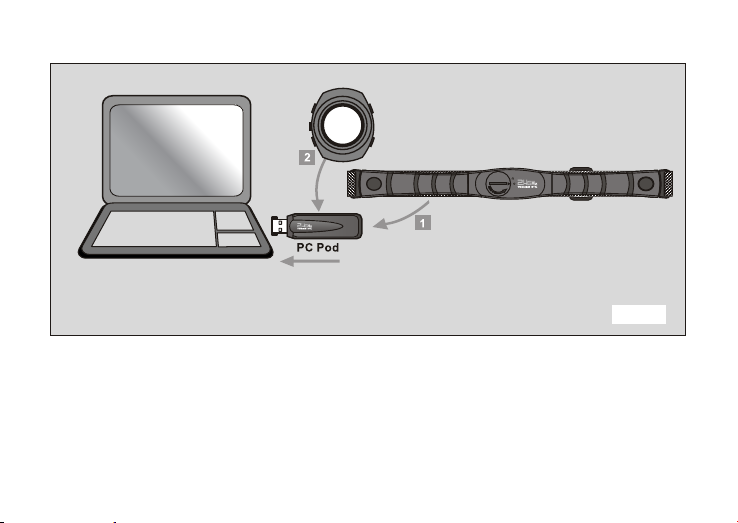
Important: To transfer information, place the Watch or Chest Strap within 20 ft.
of the PC Pod or the Pod may NOT be able to receive the data .
14.0.2 PC Link - Send data to a PC through the PC Pod See fig. 50
fig. 50
1. The Chest Strap sends:
• Real Time Heart Rate
• Average Heart Rate
• Minimum Heart Rate
• Maximum Heart Rate
2. The Watch sends:
• Chrono Logs- Lap and Split Lap Time for Every Lap, Maximum, Average,
Minimum and Total Lap Times
• 48 Hour Logs- Altitude, Temperature and Pressure Readings
• Logbook Logs- Session Info [ Start Time, Log Rate, No. of Session,
Duration …] and Data Summery of Session [ Calorie count…]
• Daily Statistic Logs- Data Summary for [ Speed, Distance, Calorie, HR …]
Page 51
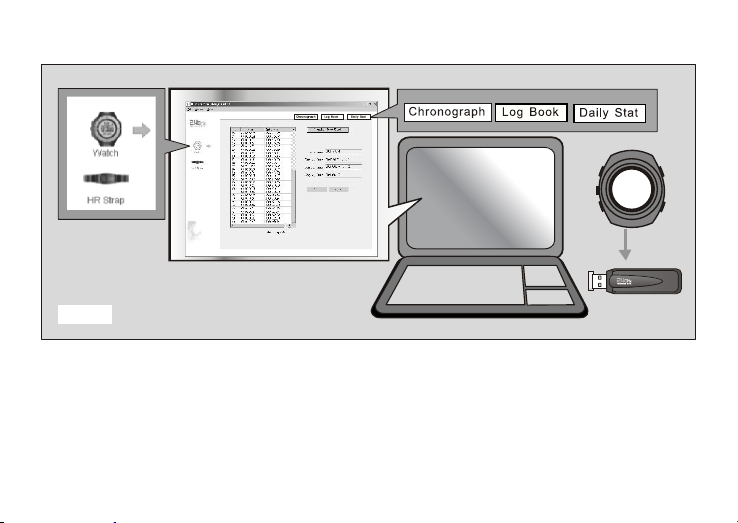
14.0.3 PC Link - Download, Analyze & Save Data From the Watch See fig. 51
fig. 51
The watch must be in Logbook Mode - PC Link Display. The PC Link function must be active.
1.Click on the Watch Icon
in the side menu to access
the watch screen.
2. Select Chronograph,
Logbook or Daily
Stat from the top menu.
3. Click Download
button to transfer
data from the watch.
4. Analyze the Data
on the PC with the
options provided by the
program. Save the data.
Page 52
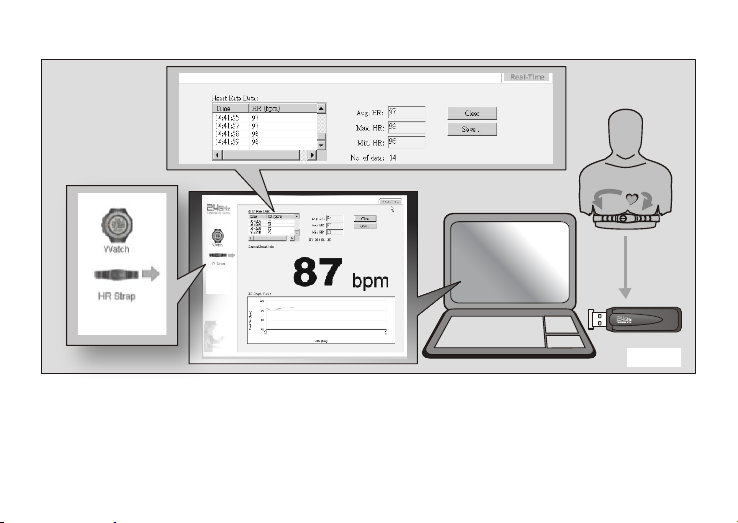
14.0.4 PC Link - Analyze & Save Real Time Data From the Chest Strap See fig. 52
The HR Strap must be worn & active for this to work.
1. Click on the HR Strap Icon
in the side menu to access
the chest strap screen
2. Real Time HR
will Display
3. Analyze the Data on
the PC with the options
provided by the program.
fig. 52
4. Save the data
to your PC
Page 53
15.0 REPLACE THE BATTERIES
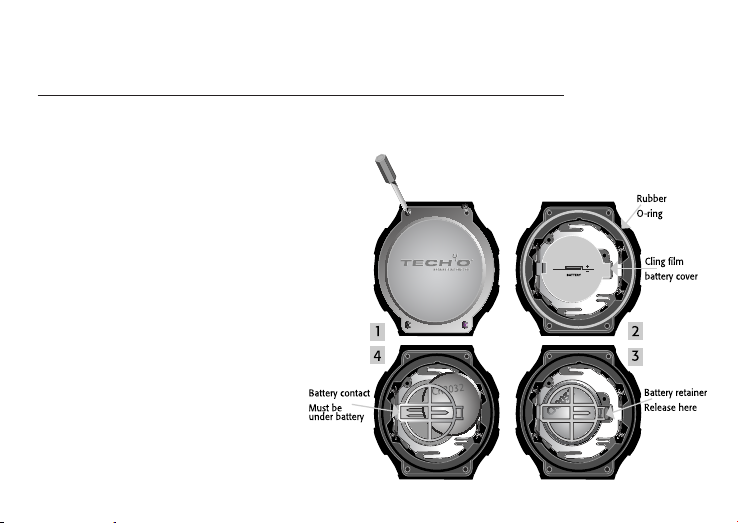
Watch: See fig. 53
All of the watch memory will be erased whenever the battery is changed.
We recommend that you take the watch to a jeweler or service center to replace the battery.
However, if you have the proper tools, you may try the following:
1. With a jewelers Phillips screwdriver remove the 4 screws and case back. Remember to save all watch parts as
you will need to re-install them.
2. Remove the cling film battery cover
3. Fit a stiff pin into the notch of the battery
retainer. Push it out and up to release the
retainer. Take care as this is delicate work. Lift
the spent battery out and recycle.
4. Insert a new CR2032 battery with the +
facing up. Take care to slide the battery up
and over the battery contact. Should you
crush the contact against the side, the watch
will not work and this is not covered by the
warranty.
5. Make sure that the rubber O-ring is still
in place. This O-ring must sit properly to
maintain water resistance. Refit the cling
film over the battery. Lastly, place the case
back to its original position and screw
it down.
fig. 53
Page 54
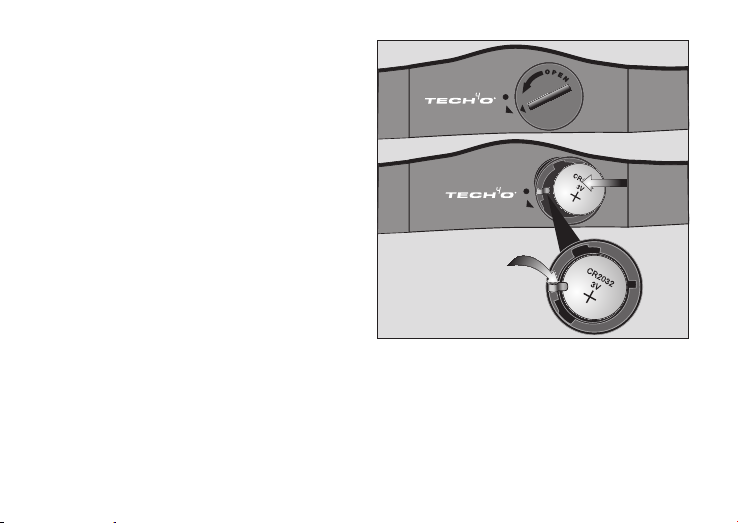
Chest Strap: See fig. 54
1. With a coin in the cover slot, turn the small cover
arrow just past the strap arrow and the cover will
pop up for easy removal.
2. Be sure to slip the battery underneath the metal
contact arm.
3. Refit the battery cover, aligning the arrows, and
turn clockwise to close.
Note: If the chest strap fails to initialize [no signal],
reset it.
A. Remove the battery and turn it upside down.
B. With the positive side of the battery facing
down, lay it under the plus and on the minus
contacts inside the battery well. This will reset
the strap.
C. Re-install the battery with the positive side up.
16.0 SLEEP MODE
When in Current Time Mode, press and hold ▼ for 5 seconds.
This puts the watch in a power saving mode. The display will
shut down but the time-keeping functions will continue to run.
Press any button to return to normal display.
fig. 54
Page 55

LIMITED WARRANTY:
What is covered? Johnson Outdoors Gear LLC warrants
your Tech4o® brand product to be free from
defects in materials or workmanship and to perform
accurately for one (1) year from date of original
purchase provided it has not been damaged by the
causes described in the next paragraph.
What is not covered? Normal wear and tear, damage
due to misuse, alteration, accidents, abuse, improper
maintenance and non-compliance with written
instructions and precautions are not covered by this
warranty. Watches & Electronic instruments are water
resistant, they are not waterproof. Damage resulting
from excessive exposure to water, heat or cold is not
covered under this warranty. The replaceable battery
is not covered under the warranty.
THERE ARE NO OTHER EXPRESS WARRANTIES
BEYOND THE TERMS OF THIS LIMITED
WARRANTY. IN NO EVENT SHALL JOHNSON
OUTDOORS GEAR LLC BE LIABLE FOR
INCIDENTAL OR CONSEQUENTIAL DAMAGES.
Some states do not allow exclusion or limitation of
incidental or consequential damages, so the above
exclusion may not apply to you.
How to obtain warranty service. Should a defect covered
by this warranty appear in your product, call our
Consumer Service Department toll-free at 1.800.572.8822
for return authorization and instructions. (You must pay
the cost of returning the unit to us). If the product is
found to be defective in material or workmanship, we
shall, at our option, either repair or replace it without
charge, and will pay the cost of return shipment to you.
How State law relates to this warranty: This warranty gives
you specific legal rights, and you may have other rights
which vary from state to state.
FCC STATEMENT:
This device complies with part 15 of the FCC Rules.
Operation is subject to the following two conditions:
(1) This device may not cause harmful interference, and
(2) this device must accept any interference received,
including interference that may cause undesired
operation.
Any Changes or modications not expressly approved by the
party responsible for compliance could void the user's
authority to operate the equipment.
Note: This equipment has been tested and found to comply
with the limits for a Class B digital device, pursuant to
part 15 of the FCC Rules. These limits are designed
Page 56

to provide reasonable protection against harmful
interference in a residential installation. This equipment
generates, uses and can radiate radio frequency energy
and, if not installed and used in accordance with the
instructions, may cause harmful interference to radio
communications. However, there is no guarantee that
interference will not occur in a particular installation.
If this equipment does cause harmful interference to
radio or television reception, which can be determined
by turning the equipment off and on, the user is
encouraged to try to correct the interference by one or
more of the following measures:
• Reorient or relocate the receiving antenna.
• Increase the separation between the equipment and
receiver.
• Connect the equipment into an outlet on a circuit
different from that to which the receiver is connected.
• Consult the dealer or an experienced radio/TV
technician for help
Johnson Outdoors Gear LLC © 2010 Revision A
U.S.A.: Johnson Outdoors Gear LLC
625 Conklin Road, PO Box 966
Binghamton, New York 13902
Phone: 607.779.2222 Toll Free: 1.800.572.8822
Canada: Johnson Outdoors Canada Inc.
4180 Harvester Road
Burlington, Ontario Canada L7L 6B6
Phone: 905.634.0023 Toll Free: 1.800.263.6390
Europe: Nigor Net BV
Kabelweg 100
1014 BC Amsterdam
Phone: +31 (0)20-5818550
Web: www.tech4o.eu E-mail: [email protected]
For technical help: www.tech4o.com
 Loading...