

Page 1

GPS Watch: Instruction Manual
A91359 ART11-0438 Project no: Prepared by: Richard & Dorris Copyright: Latitude Limited Date: 5 January 2012
TD00310
130 mm
130 mm
90 mm
Remarks:
Size:130 x 90 mm
Type: Book type
Language: English
Paper: white wood free 100 gms
Color: 1C+1C Black
Pages: 48 pages
Binding: Saddle wire
Finishing: Nil
saddle wire
Cover
folding line
Back Co ve r
Whi te i ns id e ba ck c ov er
Whi te i ns id e fr on t co ve r
Prepa red by:
Check ed by:
Appro ved by:
Date :
Date :
Date :
Page 2

OWNER'S MANUAL
Page 3

A. Introduction A-01
Na v Ma s t er co m b ine s pe r s o nal tra i n ing and
navigation functions into one co mp a c t wrist
com puter. It is among the world ’s smal le st of its
kin d and yet full y water resi st ance. It can withst and
im mer sio n i n 30 me t e r s o f w a t e r. T h e GP S
nav igati on functi on locates and tracks your pos ition
whe rever you go. N av M aster is p ow ered by a
hig hly sens it ive chip th at tracks you r positi on ev en
at we ak s ignal c on ditio n. It can be ad op ted for
var ious kind s of outd oo r activit ies such as Joggi ng,
Run ning, B iking , Hikin g, Skii ng , Sai li ng, Hun ting,
etc .
Thi s package com es with a dig it ally code d Heart
Ra t e Mo n i tor (HRM ) ches t s t r ap an d a US B
ded icate d cabl e. The HRM list ens to your phys ical
con ditio n an d gives y ou w arnin g in stant ly when
yo u do ex er c is e. Thi s pa ck age co m es w i th a
ded icate d USB cabl e. This USB clip cab le is use d
for fast batter y char ging and dat a tran sfer betwee n
you r N av Mas ter and PC in a snap. Da ta transfe r
is done by a PC sof tw are, GPS Master. It as si sts
you with work out ana lysis , ro ut e pl an ning a nd
tra ining summ ary report ing. I t i s a help ful partne r
tha t accompanies you to exp lo re your phy si ca l
lim its an d beyo nd .
Sat ellit e
Sig nal
Sat ellit e
Sig nal
NAV
Master
Sat ellit e
Sig nal
Page 4
A. Introduction: Warnings and Cautions
A-02
WARNI NG !
B e sure t hat you full y understa nd the func tion s and limita tions of thi s product
befo re usi ng it.
T he p erfo rman ce o f th is prod uct, li ke m ost Glo bal Pos itio nin g S ystem
equi pment, de pends on t he sa tell ites oper ated by t he go vernmen t of t he
Unit ed Sta tes. T he sa tellite syste m may be subject to change which could affec t
the accura cy and perfo rmance of th is pr oduc t and all GPS eq uipment.
T his pr oduct is an assi stant devi ce for nav igat ion. It is NOT a sub stitute f or
get ting th e na vigat ing inf ormat ion fro m ch arts, ma ps, obs erva tions and
expe rienced nav igators . DO NO T u se this produc t for nav igation tha t requ ires
prec ise na vigation or is use d f or vita l matt ers.
T his Watch an d Chest St rap is a s uppl ementary de vice fo r me asuring hea rt
rate ; it is N OT a sub stitute for medical devic es. You should perio dically compa re
the heart rate r eadings acquir ed by t his watc h a nd C hest St rap with t he
read ings f rom a doctor.
C onsu lt a d octor or trai ner be fore se tting y our Up per and Lo wer he art rat e
limi ts.
T his prod uct, like most elec tronic or magne tic devices, may inter fere with th e
pace maker. The refore, it is s afe for pat ients w ith pace makers to c heck wit h
thei r doct ors be fore u sing t his pr oduct.
I n cas e of doubt ab out the dire ctio ns a nd posit ions of the way of naviga tion,
cons ult th e park admin istratio n offi ce bef ore st arting the navigati on.
D O NOT exp ose yo ur wa tch to e xtreme con diti ons.
D O NO T u se t his Watc h a nd Ches t S trap for commerc ial or profe ssional
purp oses.
D O NOT charge or conne ct the unit with the USB clip whe n it is w et. Wipe dry
and air dry be fore u sing.
A ltho ugh this unit is w ater resi stance, you c annot we ar it for swim ming. The
GPS and chest strap heart rate f unction do not work under water.
CAUT IO N
Th is produ ct can onl y locate p osition s in
an outd oor e nviron ment or o pen area.
The more open the area is, the more
acc urate and fa ster inf ormati on i t ca n
coll ect t o loc ate the positi on.
Th e fir st pos itio n can be lo cated wit hin 1
minu te at c old sta rt, and 10 se cond s or
at hot s tart.
To us e worko ut and n avigati on func tions
with GPS , tur n on th e GPS rece iver and
get the p osit ion updat ed in adv anc e.
Othe rwise, the GP S re lated f eature s ar e
no t wo rki ng ac cor di ng t o t he cur rent
situ ation as t he recei ver coll ects sat elli te
data con stan tly as long as the GPS of the
watc h is on.
iThe A lti tude is ta ken at the Mean Sea
Leve l in meter /fee t.
iRins e and wash your Chest Stra p with tap
wate r and wipe it dry after each use.
D O N OT tak e hea rt rat e mea suremen t
when divi ng or under wate r.
D O NOT u se h and c ream on t he s kin t hat
is in co ntac t w ith the sen sor; it wi ll
insu late the tra nsmiss ion o f the signa ls
from the skin to t he sensor.
Page 5

A. Introduction: FCC Compliance Statement
Th is devic e comp li es wit h Part 15 of the FCC Rul es. Operation is
sub ject to the fo llowi ng two conditi on s: (1 ) Thi s devic e may not
cau se har mf ul int er ference , and (2) Thi s devi ce must accept any
FCC
Comp lia nce
Stat eme nt
(For U S)
in t e rfe r e n ce re c e i ved , in clud i n g int e r f ere n c e that ma y c aus e
und esirabl e o peratio n.
WARN ING : Cha ng es or mo dif ic ati ons t o t hi s wa tch not
exp ressly a pprov ed by the pa rt y re sp onsible for c ompli an ce
cou ld void the us er ’s right to op erate the e quipmen t.
NO TE : This eq ui pment has b een teste d and found t o comply
wit h the li mits for a class B digital devi ce , pursuant to Part 15
of the FC C Rul e s. Th e se li mit s a re de sig n ed to prov i de
re asona ble protec tion agains t h a r m f u l in t e r f e r e n c e in a
res id ential ins ta llation . Thi s equipment gen er ates, uses an d
rad iates radi o frequency energ y. If it is not insta lled and used in
ac c o r d a n c e with th e in s t r u c t ions, it ma y ca u s e h a r mful
int erferen ce to radio comm unicati ons.
Ho we ver, th ere is no gu arantee that interfe re nce will not o ccur in a
pa r t icu l a r ins t a llat i o n. If th i s eq u i p men t do es ca u s e har m f ul
in t e r f e r ence to ra d i o or te l evisi o n re c e p t ion, wh i c h ca n b e
determin ed by turni ng the eq ui pm en t off and on , the use r is
rec ommende d to reduce the inter fe rence by one or more of the
fol lowing measures:
Re or ient or rel ocate th e r eceivin g a ntenna.
In cr ease the sepa ra tion space betwe en t he wa tch and the
rec eiver.
Co ns ult the dealer or an ex perienc ed radio/TV t echnici an for help.
A-03
Page 6

A. Introduction: Care and Maintenance
• The watch is ca reful ly desig ne d and produ ced . In o rder to
CARE
MAIN TEN ANC E
uti lize the fe ature s, it is advis ab le to use th e wat ch in
con formi ty with the note s b elow:
• Avoid e xp osing t he w atch t o extr eme co nd iti on s for a n
unr eason able time a nd a void r oug h use or se ver e impa ct
on the watch .
• Clean the watc h occa siona lly wi th a soft and mois t clot h.
• Brus h th e cl ip c ontac ts a t the botto m of t he w at ch
reg ularl y. D irt buildin g up on t he sur face of the cont act
poi nts ma y af fec t normal ch argin g and data tran sfer.
• DO NO T expo se th e wat ch to st rong che mi cal s suc h as
gas oline and alco hol as they will damag e the watch.
• Store the watc h in a dry pla ce when it is not in use.
• Remov e the batte ry from the Chest Strap when it will not
be used for a lo ng time.
• Rins e and w as h y ou r C he st Stra p with tap water and
wip e it dry after each use.
• Do n ot b end or s tretc h th e c ont ac t st ri ps o n the C hest
Str ap, es pecia lly wh ile tr ans mi tting .
• U nder a high el ectro stati c di sc harge enviro nment , the
ope ratio n of the PC conn ec tio n may not be ma intai ned. It
is advisab le for the us er to recon nect the watch to th e PC
aga in until norm al opera tion res umes.
A-04
Page 7

B. Introduction
Water resistance is up to 30 meters
Heavy duty mineral glass lens
Compact size: 46 x 61 x 16 mm and Weight
60g only.
Dual-processor design optimizes the batte ry
life. The Battery with a fully single charge
keeps the watch runni ng for a year without
using GPS fu nction.
Workout functions
5 fully custom ized prof iles for fast workout
setup. The profiles can be configured by the
watch or through GP S Ma ster.
3 co nfi gu rab le Vie ws (sc reens ) fo r ea ch
profile
3 programmable fields fo r ea ch view
A single workout log can have a maximum of
44,470 waypoi nts. If the number of w orkout
lo g fi les incr ea s es , the tota l nu mbe r of
waypoints is slightl y reduced. The memory of
this watch can keep 114 workout logs.
Smart Lap
B-01
Heart Rate Monitor
Digitally coded 2. 4GHz wireles s chest str ap
4 target heart rate zones
Above/In/Below Zone timer
Audio above/In/Below zone alert
Naviga tion functions
Total 10 p aths (routes) with a maximum of
99 waypoints for each path
3 Navigatio n Mod es: Waypoint, Forwa rd
and Backward
Heading pointer
Current speed, distance to waypoint and
destination, es timated time of arrival (ETA)
Ma nual and auto matic wayp oint marki ng
(Smart Lap)
Electronic Compass
North Pole pointer
1 degree resolution with 16 cardinals
Page 8

B. Unit Overview: Name of the Parts (Watch)
B-02
[E L]
Lig ht
But ton
LCD
Dis play
[ ]Mod e
[ ]M
But ton
Fro nt
GPS a ntenn a locat ion – alw ays
dir ect ant enna to wards s ky for
bes t GPS rec eptio n
[ tart / to p] S S [S/ S]
But ton
[ ]Vie w
[ ]V
But ton
[La p/Res et]
[L/ R]
But ton
Cli p Guidi ng
Not ch
USB C able
Con tact po ints
Bac k
Page 9

B. Unit Overview: Name of the Parts (Chest Strap)
Bat tery
Hat ch
Fro nt
Bui lt-in
Ant enna
(un derne ath
Con ducti ve Cont act Pad
Bac k
the c ase)
B-03
Con ducti ve Cont act Pad
Page 10

B. Unit Overview:
NAV Ma ster
GLOBAL P OSITI ONING S YSTEM
with Hea rt Rate M onito r
Elas tic Be nd
USB C able
Man ual
OWNER'S MANUAL
B-04
Man ual
In st ruc ti on on how to use th e wa tc h
Ela stic Ben d
iMou nt the Ches t S trap on use rs chest
USB cable
To charg e the battery of t he watch
To conne ct and comm unica te with the PC
Page 11

C. Setting Up: Replace Battery for the Chest Strap
Old
batte ry h at ch
CR2032
New
CR2032
CR2032
C-01
Close positio n ma ke r
Ope n posi ti on m ak er
1 42
Turn th e batt ery h atc h
ant ic lo ck wi se un ti l t he
ar ro w a lign s wit h t he
op en p osi tio n mar ker
(arr ow) . Then turn one
step fur the r slightly unti l
the battery hatch pop s
up.
Pu t a si de t he bat te ry
hatc h. Repl ace the old
b a tt er y w i t h a ne w
CR20 32 batte ry with the
“+” si de fa cin g upw ard .
IM PO RTANT: Be s u re
th at th e ba tt e r y si t s
b en e a t h t h e m e t a l
batt ery h ook .
3
Re -in sta ll t h e b att e ry
hatc h.
IM PO RTANT: Be s u re
that th e O- Rin g i s pl ace d
on its origina l positi on
(bat ter y hat ch) a nd al l
the su rfa ces a re cl ean .
Turn th e batt ery h atc h
cloc kwi se until the arrow
al i gn s wit h th e c l os e
posi tio n mar ker ( dot ).
Page 12

C. Setting Up: Fasten the Chest Strap on one’s chest
C-02
1
Inse rt t he c onne cte r of the el asti c ba nd
into the ho le at the end of the che st str ap.
3
Note:
Cent er the Chest Strap agai nst your ches t
as h igh under you r b reas ts as com fort abl e.
Adju st the Chest Str ap with the elast ic
band c omfo rtably an d allo w for no rmal
brea thi ng.
WARNI NG:
!DO N OT adj ust the Chest Str ap too tight, it may hinder the blo od cir cul atio n a nd bre athi ng.
!Avoi d d oing any aw kwa rd moti on dur ing measure men t, it may create an ina ccu rate heart rat e r eadi ng.
!Wettin g the c ontacts with w ater or saliva can inc rease th e condu ctivity.
!Make sure th at the contacts are
measu rement
Clean the contac ts oc casional ly by moist pape r towe l, an d wipe it dry with d ry pa per
!
to re move gr ease.
!Use the C hest S trap in a place within 3 m eters from t he Wat ch, ot herwise the Watch
CANNO T receiv e the d ata fro m the Ch est Str ap.
2
Twist th e el ast ic b and so th at t he who le
conn ect er is c ompl ete ly lodge d into the
ches t s tra p.
Lodg e the f ree conn ect or into the
4
othe r end of t he Chest Strap as Ste p
1 an d 2 .
.
made firm co ntact wi th the user's skin du ring
Page 13

C. Heart rate Monitor Function: Strap Pairing
Str ap P ai ri ng
Eve ry C he st S tr ap ( HR M) i s as si gn ed a u ni qu e ID w he n it w as m an uf ac tu re d in t he f ac to ry. T he w at ch
has to be p ai re d up w it h it b ef or e us e. T hi s is t o av oi d in te rf er en ce w it h ot he r us er s wh o ar e us in g th e sa me
equipment. Pa ir in g ha s be en d on e in t he f ac to ry. S ho ul d yo u re pl ac e th e HR M wi th a n ew o ne , yo u ha ve t o pa ir
the n ew s tr ap a ga in .
To do the p ai ri ng , Ho ld [ M] t o go t o Me nu - -> H RM -- > Pa ir in g. T he n to uc h an d ho ld t he 2 c on du ct iv e pa ds o n
the C he st S tr ap f or a f ew s ec on ds . If t he p ai ri ng i s su cc es sf ul , th e me ss ag e “D ON E! ” wi ll b e di sp la ye d on t he
watch .
C-03
Home time mode
Hold
[M]
[M]
DONE!
or
FAIL
Menu:
Workout
HRM
Touch t he cont acts
wit h both ha nd
[V]
HRM:
On/Off
Pairing
Paring
Chest
Strap
.....
Str ap Pair ing
Page 14

C. Charge the Battery
The wa tc h ha s a b ui lt -i n r ec ha rg ea bl e li th iu m p ol ym er b at te ry. C ha rg e it fo r at le as t 3 h ou rs when it i s
going to be us ed fo r t he fi rs t t im e. Wh en th e b at te ry is em pt y, t he ch ar gi ng cy cl e w il l b e c om pl et ed in le ss th an 2
hours. Wh en the b at te ry is not em pt y, t he char gi ng time wi ll be sh or te r.T he p er fo rm an ce o f t he b at te ry with a
single charge depe nd s up on its us ag e. If t he GPS is not activated, it c an run fo r ap pr ox im at el y on e ye ar. This
recha rg ea bl e b at te ry is g oo d f or at least 5 00 cha rg in g c yc le s. Bat te ry gaug e f un ct io n i s p ro vi de d. The
approxi ma te remaining time left, whe n work in g with GPS , is ca lc ul at ed by push in g the [V] butt on onc e in th e
TIM E mo de . T hi s ca n on ly se rv e as a rou gh esti ma ti on . T he actu al life ma y va ry with c ha ng e of th e op er at in g
conditi on s. If the batt er y leve l is ne ar ly emp ty, GPS fun ct io n will be disa bl ed aut om at ic al ly. At thi s stag e, the
watch c an s ti ll r un f or a no th er 2 w ee ks w it h no rm al t im e ke ep in g fu nc ti on s.
To charge the batte ry :
1) Align the clip guide and pins with th e no tc h an d co nt ac ts a t th e bo tt om o f th e wa tc h
2) Ma ke s ur e th e cl ip i s se cu re d
3) Pl ug t he o th er e nd o f th e US B ca bl e in to o ne o f th e PC ’s U SB c on ne ct or s
USB C able
Con tacts p oint
C-04
Fro nt
Bac k
Bac k
Page 15

D. Getting Start: Glossary
Way po in t
Way po in ts ar e a set of co or di na te s that id en ti fy po in ts in a p hy si ca l spa ce . For the pu rp os e of te rr es tr ia l
navigatio n, th es e coor di na te s usually inc lu de lon gi tu de and lati tu de , and som et im es alt it ud e. The Way po in t
name is li mi te d t o 10 ch ar ac te rs lo ng . I t can b e n am ed or rena me d i n t he GP S Ma st er. Re na mi ng ca n b e do ne
easily by jus t ki ck in g an d dr ag gi ng o n th e wa yp oi nt n am es .
Path
Path i s a collection of w ay po in ts . I t ca n be tr ea te d in de pe nd en tl y as sc at te re d wa yp oi nt s; or l in ke d in se qu en ti al
order ( ei th er forw ar d or backward). Li nk ed wayp oi nt s fo rm a PATH ( or rout e) . Na v Ma st er has 1 0 Pa th s. Each
path ha s a ma xi mu m o f 99 wa yp oi nt s. Pa th s c an be cr ea te d b y L ap -To- Wa yp oi nt fu nc ti on (S ma rt La p) . Or th ey
can b e c re at ed by GE (Goo gl e E ar th ) o r G Ma ps (Googl e M ap s) th en th ey are t ra ns fe rr ed to th e w at ch thro ug h
the GPS M as te r. Th e Pa th n am e ca n be 3 2 ch ar ac te rs l on g.
Wor ko ut l og
Aft er wo rk ou t or n av ig at io n has st ar te d, Na v Master coll ec ts al l dat a int o the Workout lo g. Th e sam pl in g
interva l is c on tr ol le d by th e val ue s in t he Tra ck Lo g se tt in g. Wo rk ou t lo gs co nt ai n: s ta rt in g time an d da te ,
workout sum ma ry, l ap d et ai ls , sp ee d, d is ta nc e, H R an d tr ac k da ta .
Pace
PACE is comm on ly used by run ne rs to esti ma te the time req ui re d to go to a dest in at io n. It is def in ed as the
elapsed ti me ne ed ed pe r K m / Mi le . I t i s a no th er in te rp re ta ti on of sp ee d b ut in re ve rs e u ni t. T he un it of PAC E i s
speci fi ed i n Me nu- -> Se tt in gs- -> Sy st em- -> Un it s-- >D st /S pd .
E.g . w he n th e un it i s Km an d PAC E is 6 , it m ea ns t ha t you a re r un ni ng a t 6 m in ut es p er K il om et er. I t is eq ui va le nt
to 60/6 = > 10 K m/ H . Wh en t he v al ue o f PAC E is s ma ll er, i t me an s th at y ou a re r un ni ng f as te r.
Compa ss b ea ri ng
Compass b ea ri ng is eq ui va le nt to az im ut h be ar in g. An az im ut h be ar in g u se s al l 360° of a com pa ss to indicate
directi on . Th e co mp as s is la be le d cl oc kw is e wi th 0 ° as N or th , 90 ° as East, 18 0° a s So ut h, a nd 2 70 ° as W es t,
so a bearin g of 4 2° w ou ld b e no rt he as t an d a be ar in g of 2 00 ° wo ul d be s ou th we st , an d so o n.
D-01
Page 16

D. Getting Start: Glossary
Lap -By-D istan ce (LBD )
Cre ate a lap a fter th e prese t lap dis tance h as reac hed
Lap -To-Way point ( L2WP)
Cre ate a way point a t the end o f a selec ted pat h whene ver a lap i s marke d.
AGP S ( Optio nal fun ction )
AGP S st an ds for As si ste d GP S, is a me th od whic h sh or ten s th e ti me for "fix in g" GPS sat el li te s si gn al. Also , it a ids th e
wat ch to per form a fa ster GP S posit ionin g calcu latio n under a w eak sig nal env ironm ent.
The w atch AGP S funct ion is al ways on .
AGP S does ha ve expi ry. The ex pir y can be ch ecked b y Menu > GP S > AGP S.
AGP S data w ill be s ent to wat ch whe n co nnect ing to G PS Mas te r. Th e up da ti ng p ro ce ss w il l ta ke aro un d 30 s econd s once
the w atch is u n-plu gged. D uring t his per iod, GP S funct ion is no t avail able. O nce fin ished , the exp ire dat e will be u pdate d.
Col d Start
Whe n GPS has b een s us pe nde d for a lon g tim e, Sate lli te da ta coll ect ed ea rl ie r a re no t v alid an ym ore . It ta kes abou t 30
sec onds to c ollec t suffi ci en t sat ellit e data to l ocate y our pos ition . Th is is k nown as c old sta rt.
Hot S tart
Whe n GPS h as b ee n te rmina ted fo r on ly a sho rt per io d of ti me b efore re -st artin g, sat el li te d at a is st il l va li d. I t take s on ly a
few s econd s to loca te your p ositi on. Thi s is k no wn as H ot star t.
GPS M aster
GPS Ma ster is a PC appl ica tion sof tware wr it te n to work wi th th e Nav Mas ter watc h. Wor kout log an d pat hs can be
dow nload ed / up loa ded e asily via th e U SB cabl e. GPS M as te r p rovid es a muc h bet ter m ea ns for w or ko ut analy sis, pa th
cre ation a nd mani pulat ion.
%EM HR
%EM HR = perc entag e of Hear t Rate (H R) with r espec t to the Es timat ed Maxi mum Hea rt Rate .
Est imate d maxim um HR is ca lcula ted as 22 0 – your ag e
Targ et H R Zo ne (Ta rg et Z on e)
The r egion o f HR is wha t you wou ld like t o set you r highe st and lo west HR l imits t o be duri ng exer cise.
D-02
Page 17

D. Getting Start: Buttons Functions Summary
But to ns N am es Major F un ct io ns
Lig ht
Pre ss t o tu rn ON t he EL back light for about 3 s eco nds
Hol d to ent er N igh t Mo de ( Pr ess onc e to exi t)
D-03
Mod e
ST. / STP
VIE W
LAP /R ESE T
Press t o se le ct a mo ng t he f un ct io na l di sp la ys
Hold to ent er t he s et ti ng m od e
Hold to fas t ex it t o fu nc ti on m od es w he n yo u ar e se ve ra l le ve ls d ow n th e me nu
Press t o ex it s et ti ng o r go b ac k on e le ve l up t he m en u
Press t o mo ve f or wa rd
Press t o in cr ea se w at ch d at a
Press t o St ar t/ S to p wo rk ou t / Ch ro no gr ap h
Press t o en te r su b- m od es o r wo rk ou t vi ew s
Press t o ma ke s el ec ti on /c on fi rm at io n
Hold to tur n on / of f GP S in t he W or ko ut / Navigation Mode
Pre ss t o mo ve b ac kw ar d
Pre ss t o de cr ea se w at ch d at a
Pre ss t o ta ke l ap s in t he W or ko ut M od e
Hold to save Wa yp oi nt s in t he N av ig at io n Mo de
Hold to clear the w or ko ut d at a
Page 18
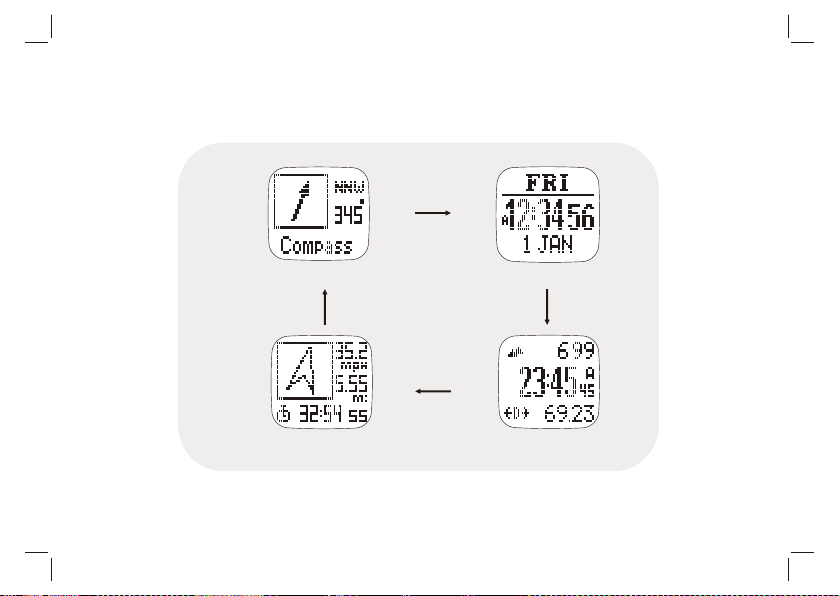
D. Getting Start: Main Function Modes
D-04
[M]
Compass
[M]
Navigation
Time mode
[M]
[M]
Workout mode
Main Function Modes
Page 19

E. Workout Mode
The Worko ut mode recor ds an d dis plays your cu rr ent perfor mance. You can keep records
of and review your per formanc e while you are running or navig ating in th e wildernes s. The
wor kout mode sho ws speed, dis ta nce trav el ed, workou t time from the sta rt, heart rat e and
oth er usef ul data regarding your curr en t worko ut . It ke eps recor ds of spe ed, heart rate and
alt itude for you to view on a PC grap hi cally.
The Workout mode c an work with the Navigat io n mod e simul taneo us ly. Start , stop, lap,
GPS shortcu t operat ions are common to both modes. Per forming th ese acti ons in either of
the se modes ha s t he same effect.
Abo ut the Wo rkout Mo de
The watc h offe rs 5 a ctivity prof iles (defa ul ts are Runnin g, Cycling, Hikin g, Sailing and User).
Nam e editi ng of t hese profiles can only be done in the PC appl ication softwa re . Text editin g
is quite a p ai nful task if it is done by a watch which only h as 4 butt ons. E ach profi le has 3
vie ws (or scre en s). Each vi ew has 3 data fie ld s. Data fie ld s can be selec ted freely fr om a
lis t of fiel ds . T his a llows yo u to view selec ted f ie lds o n your own inte re st. P rofile
con figurat io n can also be done t hrough t he P C soft wa re q uickly. You can store a s many
pro files a s you w an t i n the P C. Its massiv e storage c apacity is virtually no limit t o the
num ber of po ss ible profi le combina ti ons that you can think of.
E-
01
Page 20

E. Workout Mode
Workout mode
02
E-
How to sta rt the Worko ut Mode
Press [M] in the Tim e mode to ente r th e Wo rko ut mode
P re ss [ S/S ] to St ar t/S to p th e Wor kou t. G P S is t urn ed o n
aut oma ti cal ly at start whe n t hey hav e not bee n turned on
man ual ly.
Mar k La ps
P re ss [L/R ] to take Laps . Th e ma xi mu m nu mb er of l ap s fo r a si ng le
workou t se ss io n is 9 9.
Reset Wor ko ut / N avigati on
Wh en wo rk ou t h as be en stop pe d, hold [ L/R] un ti l y ou se e t he RE SE T
popup mess ag e to rese t wor ko ut /n av ig at io n. This cle ar s the current
sessio n o f wor ko ut dat a and pre pa re s you to star t ano th er new
workou t. Wor ko ut dat a are rec or de d and sto re d auto matical ly in the
memory at rese t. If yo u don ’ t want to ke ep it , you ha ve to er as e it
manual ly. H er e i s t he ke y s eq ue nc e: Ho ld [M ] > Me nu > Worko ut >
Delete > D el L as t.
Sum mary of wor ko ut h is to ry c an b e vi ew ed f ro m:
Hold [M] > Men u > Wor kout > Hist or y.
How to chang e th e Workout vi ew
Pr es s [V] t o s el ec t among t he 3 pr es et di sp la ys . Th ese 3 di sp la ys w ill
be show n in s eq ue nc e when the ViewS ca n f un ct io n has been
turned on . Each dis pl ay sta ys for abou t 3 s ec on ds . To se t/reset the
Vie wS ca n: H ol d [M] > Menu > Wor ko ut > V ie wS ca n > On /O ff
Not e: S ee nex t c ha pt er to se lect t he Worko ut prof il es , custom iz e t he
data dis pl ay a nd r ev ie w th e wo rk ou t hi st or y.
Page 21
E. Workout Mode - GPS
Fixing with
GPS
Hold
[V]
GPS Fixed
Workout mode
03
E-
How to turn O N the GPS ma nuall y:
If GPS re ce ive r has be en stop ped for a l ong time , say mo re than 2
hou rs, i t i s r ec ommen ded t o s tart the GPS m an ually, espe ciall y
whe n y ou wan t t o have track logg ing don e at t he beginn in g o f
wor kout. I t is beca use the G PS cold s tart ti me is lon g. Usua ll y it
tak es app rox im ate 30 sec onds. Durin g the cold start perio d, tra ck
inf ormat ion is n ot ava ila bl e. You shou ld hav e the GPS pos iti on
upd ated i n ad va nce. To d o this, you can do eith er of t he
fol lowin gs:
a) Hold [M ] > Me nu > GP S> G PS O N or OFF (t ur n GP S ON ); o r
Simp ly h ol d [V ] fo r 2 secon ds a t Wo rk ou t / Na vi gatio n mo de s to
togg le G PS e it he r ON or OFF .
b) Hold [M ] > Me nu > GP S> T im eo ut
Eith er 5 o r 30 m in ut es can be c ho se n. W he n GPS i s lo st a nd
30 min ut es t im eo ut is sel ec te d, t he w atch wi ll t ry t o re -loca te i ts
posi ti on v ia s at ellit es i n 30 m in ut es.
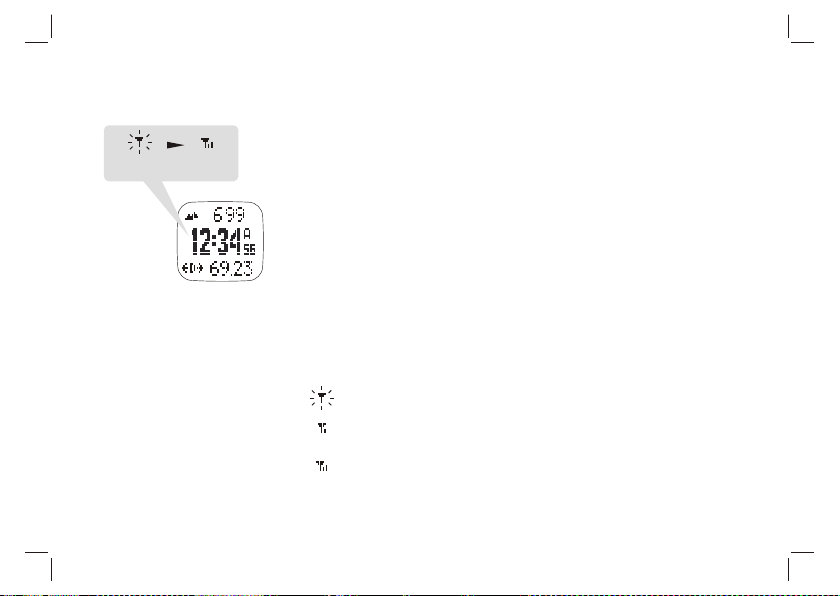
GPS st at us i nd ic ator
- When G PS i s co ll ec ting sa te ll it e in for ma ti on , an “ ANTEN NA ”
icon i s fl as hi ng a t the top l ef t fo r mo st o f the wor ko ut v ie ws.
- If the G PS h as a 2 D lo ca tion lo ca te d, a “ GP S fixed ”
mess ag e wi ll p op -up and i t wi ll l as t fo r a few s ec on ds . An I con
at the t op l ef t is a s sh own her e.
- If mor e th an o ne s at ellit e ar e ca pt ur ed, t he G PS h as a 3 D
loca ti on l oc at ed. An Ico n wi ll b e li ke t his .
- If the G PS l os es c on tact wi th s at el li tes and c an no t fi x its
posi ti on , a po p- u p “GPS Lo st ” me ss ag e will ap pe ar. I t st ay s on
the LC D un ti l a bu tt on is pre ss ed .
Page 22
E. Workout Mode - Workout Profile
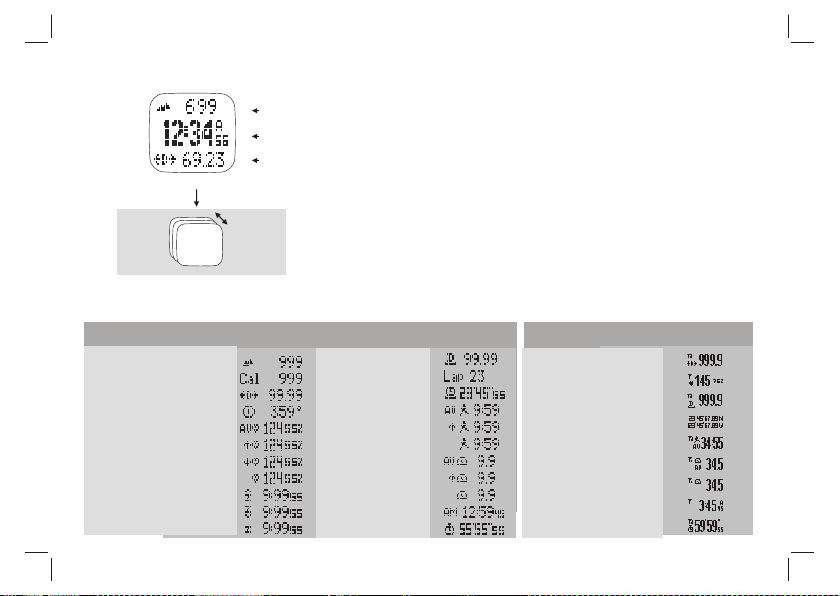
How t o se le ct W or ko ut P ro fi le
h Ho ld [M ] u nd er an y m od e t o e nt er Me nu > Wo rk ou t > Pr of il es >
Selec t; p re ss [ V] t o co nf ir m.
h P re ss [S / S] o r [ L/ R ] to se le ct the de si ra bl e profile a nd then
Pre ss [ V] t o co nf ir m.
How t o cu st om iz e th e Wo rk ou t vi ew d at a
hHold [M ] un de r an y mo de to e nt er Menu > Wo rk ou t > Pr of il es >
Cus to mi ze > Se le ct the desi ra bl e pr of il e > Select Vi ew s 1 to 3;
Line 1 -3 s ho w t he c or re sp on di ng d at a a cc or di ng t o t he t ab le b el ow.
Pess [ S/ S ] or [ L/ R ] to se le ct t he de si ra bl e da ta t o b e sh ow n on
the watch .
How t o re se t to d ef au lt s et ti ng
h Ho ld [M ] u nd er an y m od e t o e nt er Me nu > Wo rk ou t > Pr of il es >
Reset; pr es s [V ] to c on fi rm .
Workout mode
[V]
Line 1
Line 2
Line 3
[V]
E-
04
Lin e 1 an d 3
- Altit ud e
- Calories
- Dista nc e
- Heading
- Ave ra ge H ea rt R at e
- Max Heart R at e
- Min Heart Rat e
- Current Hea rt R at e
- Above tar ge t zo ne t im e
- Below tar ge t zo ne t im e
- Withi n ta rg et z on e ti me
- Lap dista nc e
- Lap numbe r
- Lap Time
- Ave ra ge P ac e
- Maxim um P ac e
- Curre nt P ac e
- Ave ra ge S pe ed
- Maxim um S pe ed
- Curre nt S pe ed
- Tim e of D ay
- Wor ko ut Ti me
Lin e 2
- Dista nc e
- Curre nt hea rt r at e
- Lap dista nc e
- Latit ud e & Lo ng it ud e
- Ave ra ge P ac e
- Ave ra ge S pe ed
- Curre nt Spe ed
- Tim e of D ay
- Wor ko ut Ti me
Page 23

E. Workout Mode - Work out History
How to rev ie w Work ou t Hi st or y fr om t he w at ch
Ho ld [M] under any mode to ente r Me nu > Wo rkout > H istor y; pre ss [V] to con fir m.
The summ ary of th e la test record wi ll be s ho wn.
Vie w Wo rk ou t Su mm ar y:
Work ou t dat a sum ma ry has 3 p age s. At th e Top righ t cor ne r of fi rst pag e is th e rec ord num ber.
Cha nge the re co rd numb er b y pr ess in g [S/S] o r [L /R] but to n. Th e 2n d an d 3rd lines a re d ate and
tim e of th e re cor d. Th e last li ne is the t ota l nu mbe r of l aps f or this w orkou t. Th is pa ge s tay s fo r 5
sec ond s. T hen it is re pla ce d by t he n ext on e. P ages 1 , 2, a nd 3 a re s hown o nce at a t im e fo r 5
sec ond s seq uen ti all y. The 2nd page sho ws wor ko ut tim e, dista nce, and av erage pa ce. The 3rd page
sho ws calo rie consu mpt ion, aver age hea rt rate and averag e speed . Af ter sever al cycl es of displ ays , it
wil l go back to th e Tim e mode au to mat icall y. If you want to ta ke a look at th e de ta ils of in divid ual la ps,
pre ss [V] to go to t he Lap Summ ary dis play. When you fini sh, pre ss [M] to go ba ck to the pre vi ous
men u or hold [M] to go back to t he Time mo de direc tly.
Vie w La p Su mmary :
Lap sum mar y con sis ts of 2 pages. Re cord num ber is at the top le ft whi le cu rre nt lap numb er is at
the top right corner .Chang e the lap nu mber by pr essin g [S/S] or [L/R] butt on. Like the data summ ary,
the se pa ge s ar e s how n a lte rn ati ve ly. Page 1 s how s l ap ti me , lap d istan ce, a nd l ap a ve rag e p ace .
Pag e 2 sho ws the spli t time (elapse tim e from startin g to th is lap) , avera ge heart rate for this lap and
the lap sp ee d.
Press [ V] to switch b et ween Wo rk ou t S um ma ry and La p S um ma ry di sp la ys . W he n you f in is h, pr es s [ M]
to go back t o th e Work ou t me nu o r ho ld [ M] t o go b ac k to the Tim e mo de d ir ec tl y.
How to Del et e th e last or A ll rec ord s
Ho ld [M] un der any mode to ente r Me nu > Wo rkout > D elete las t / De let e all.
Pr ess [V] to c onf ir m
Not e: T he tot al num ber of Rec or ds d epend s on the si ze of t he Memory.
E-05
Page 24

06
E. Workout Mode - Smart Lap
Smart L ap is a co nc ep t of m ar ki ng l aps or w ay po in ts a ut om at ic al ly. You c an m ak e use o f Sm ar t La p to a ch ie ve t he
following fun ct io ns :
Lap -B y- Di st an ce ( LB D) : Ho ld [ M] t o en te r th e Me nu >W or ko ut >S ma rt La p> By Di st
When th is fu nc ti on is tu rn ed ON , you ca n spe ci fy a fix ed di st an ce su ch th at a new la p is mar ke d
automat ic al ly wh en ev er t he la p di st an ce is r ea ch ed w it h t he p re se t t ar ge t. You just f oc us o n y ou r wo rk ou t. It i s no
need f or yo u to pu sh t he la p bu tt on an ym or e. You ar e f re e to ma rk a ny ne w laps ma nu al ly in b et we en th e La p- By Dista nc e pe ri od .
* Whe n th e Al er t fu nc ti on i s sw it ch ed O N, a s in gl e be ep w il l so un d on ce w he n a ne w la p is m ar ke d.
Lap -To -Wa yp oi nt ( L2 WP ) : Ho le [ M] t o en te r th e Me nu >W or ko ut >S ma rt La p> ”L ap -> WP ”
T hi s is a ve ry u se fu l fe at ur e to cr ea te a PATH b y the wa tc h al on e. O ne o f the 10 PAT Hs h as t o be d ed ic at ed
for this purpose. Th is pa th is sp ec if ie d i n t he La p- >W P s et ti ng sc re en . I f t hi s f un ct io n i s t ur ne d O N, th e s el ec te d
path is clea re d at th e be gi nn in g of Wo rk ou t/ Na vi ga ti on . A ft er th at , wh en ev er a new l ap is c re at ed , d is re ga rd in g
whether i t is adde d by La p- By -D is ta nc e or by p us hi ng lap b ut to n ma nu al ly, the c ur re nt loca ti on is a dd ed as th e
latest w ay po in t of th e de di ca te d pa th . Th e n um be r of waypoints al lo we d is th e sa me a s t ha t de fi ne d i n th e re gu la r
paths.
E-
Page 25

07
E. Workout Mode - Application example - Backward tracking
A typ ic al applica ti on fo r th is is b ac kw ar d t ra ck in g. I f y ou a re go in g to ex pl or e th e w il de rn es s wi th ou t p la nn in g an d
want to r et ur n on t he s am e pa th , yo u ma y:
- Se t LBD t o, say 20 0 meters, a nd turn i t ON: H ol d [ M] to enter Me nu >W or ko ut >S ma rt La p> By Di st >[ ON ,
200].
R em em be r t ha t t he ma xi mu m number of wa yp oi nt s f or a p at h i s limited t o 9 9. Se t m in im um LB D d is ta nc e
accordi ngly and y et i t wi ll n ot e xc ee d th e li mi t. W ay po in ts b ey on d th e pa th l im it a re i gn or ed .
- Se t L2 WP p at h to P at h9 , an d tu rn i t ON : Ho ld [M] to e nt er M en u> Wo rk out>SmartLap>" La p- >W P" > [O N,
Path9 ]
- Sta rt W or ko ut /N av ig at io n tr ip : Na vi ga ti on [ S/ S]
- If y ou wa nt t o s to p an d r et ur n, then p re ss [S /S ] to st op a nd ho ld [ L/ R] to r es et an d then yo u a re r ea dy to r et ur n
on the sa me p at h.
- Turn O FF L 2W P: H ol d [M ] to e nt er M en u> Wo rk ou t> Sm ar tL ap >" La p- >W P” >[ OF F]
- Sel ec t Pa th 9 as t he c ur re nt p at h fo r na vi ga ti on . Ho ld [ M] t o en te r Me nu >N av ig at io n> Se lP at h> Pa th 9
- Set n av ig at io n mo de t o ba ck wa rd . Ho ld [ M] t o en te r Me nu >N av ig at io n> Na vM od e> Ba ck wa rd
- On th e Na vi ga ti on -G ot o sc re en , se le ct t he l as t wa yp oi nt o f Pa th 9 as t he c ur re nt w ay po in t
- S ta rt Navi ga ti on , f ol lo w th e Heading P oi nt er. Th e wa tc h wi ll gu id e yo u fr om th e la st waypoint to the s ta rt in g
point pre ci se ly.
E-
Page 26
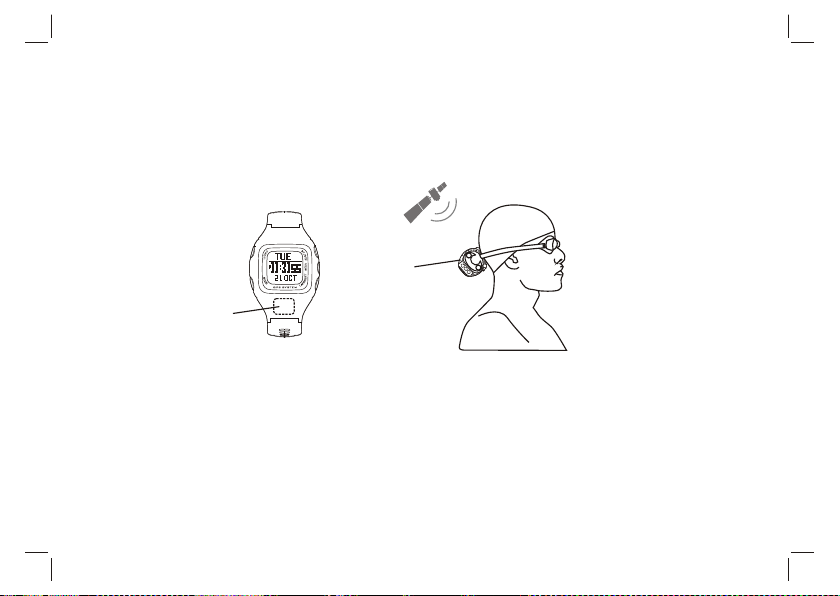
E. Workout Mode - Application example - Triathlon Race
Tip s fo r us in g th e wa tc h at Tr ia th lo n Race:
1) Start ( bef or e st ar t to s wi m) : Se cu re s th e wa tc h fi rmly ar ou nd g og gl es s tr ap s, w it h wa tc h an te nna
direct io n po in ti ng t o th e sk y.
Antenn a
Antenn a
locati on
2) At T1 (swim t o bi ke ): t ak e of f th e wa tc h fr om t he g og gl es a nd w ea r it a ro und wrist , or m ou nt i t on t op
of bike mo un t
3) At T2 (bike t o ru n) : af te r pu tt in g on t he w at ch a ro un d wrist, ex it ( no t st op ) Wo rk ou t Mo de a nd r eenter it b y pr es si ng k ey [ M] : Wo rk ou t Mo de - > Na vi ga ti on - > Co mp as s -> Tim e -> W or ko ut M od e
The reas on f or d oi ng t hi s is t ha t ou r wa tc h ha s Bi ki ng and Runn in g Mo de s. The y ha ve d ifferent m et ho ds
for spee d / di st an ce c al cu la ti on s. R e- en tr y Wo rk ou t Mo de c an reset th e Mo de t o Ru nn in g.
Direct io n
08E-
Page 27
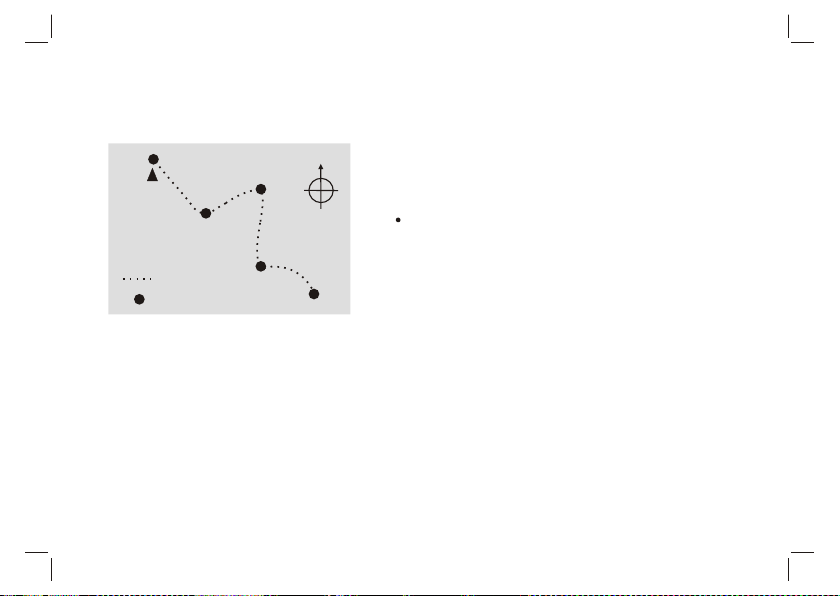
E. Workout Mode - TrackLog interval
5
10M in
10M in
4
Pat h
Trac k Log
Exa mple: Tr ackLo g has bee n set at 10 Min
2
3
10M in
10M in
0
1
09
E-
Nav Ma st er reco rd s you r tr ac k co ntinuou sl y. T he sam pl in g
interv al is spe ci fi ed by th e val ue in the Tra ck Lo g set ti ng .
The Def au lt is 4 s ec on ds . I t c an be se t from 1 s ec on d t o 1 0
minute s.
How to set the Tr ac kL og t im e
Und er any mode , Ho ld [ M]
Menu > Wo rk ou t > Tr ac kl og
Pre ss [S/S] or [L/R] to se t th e ti me
Page 28

F-
F. Navigation Function
The Na vi ga ti on mo de ha s 2 scre en s: Na vi ga ti on an d Got o scr eens. Naviga ti on sc re en gi ve s you al l the
inform at io n y ou ne ed wh en you are naviga ti ng to a waypoin t. Goto scre en al lo ws yo u to pick a w ay point from
the curr en t pa th .
Introduc ti on
Nav Ma st er i s ab le t o ke ep 1 0 p at hs s im ul ta ne ou sl y. Bu t yo u ca n work on a s in gl e pa th a t a t im e. This is k no wn
as th e c ur re nt p at h. To se le ct th e cu rr en t p at h: Menu > N av ig at io n > S el Pa th . Each pa th ha s a m ax im um of
99 wa yp oi nt s. Waypoi nt s, in a p at h, m ay or ma y n ot hav e r el at io ns hi p w ith on e a no th er. Wh en the y h av e n o
relati on sh ip , th is p ath i s ju st a co ll ec ti on o f sca tt er ed w ay po in ts . Wa yp oi nt s can b e li nk ed s equ en ti al ly t o form
a ro ut e. You can navigat e up or do wn a r ou te unti l the fi rs t or l as t w ay po in t ha s been reac he d. Sel ec t yo u
naviga ti on m od e be fo re n av ig at io n
Naviga ti on m od es
There a re 3 navi ga ti on mode s: Waypo in t, Forw ar d, and Ba ck wa rd mode s. You can pick y our de si red mo de
with thi s ke y se qu en ce – M en u > Na vi ga ti on > N av M od e.
Way po in t mo de
The acti ve wayp oi nt is t he dest in at io n. Sele ct this mode if y ou want to g o to the in di vi du al wayp oi nt s in the
curren t pa th . T he n, p ic k the a ct iv e w ay po in t o n t he G ot o scree n. T hi s a ct iv e w ay po in t i s actuall y th e
destin at io n.
Forwar d mo de
The la st w ay po in t i s th e de st ination . Se le ct t his m od e if y ou wa nt t o navig at e fr om t he f irst w ay po in t to th e la st
one in t he c ur rent pa th . Pi ck t he ne ar es t wa yp oint as t he a ct ive w ay po in t on t he Go to s cr ee n b ef or e yo u st ar t.
When th e ac ti ve wayp oi nt is r ea ch ed , it will navigat e to th e ne xt wayp oi nt alon g th e pa th . T hi s re pe at s un ti l
the dest in at io n (l as t wa yp oi nt ) is r ea ch ed .
01
Page 29

F-
F. Navigation Function
Backwa rd m od e
The f ir st waypoi nt is the d es ti na ti on. Se le ct this mo de w he n y ou w an t to na vi ga te alon g t he path in r ev er se
order. Fo r e xa mp le : f ro m t he l ast w ay po in t t o the f ir st on e al ong t he cu rr en t path. P ic k t he neares t wa yp oi nt
on the Goto scr ee n befo re you star t. If the act iv e way po in t is r ea ched, it wi ll nav ig at e you to the pr evious
waypoi nt a lo ng t he p at h. T hi s re pe at s un ti l th e de st in at io n (first wa yp oi nt ) is r ea ch ed .
Set Way po in t ra di us
You ar e r eg ar de d as a rr iv al at the acti ve waypo in t wh en you fall int o the regi on of th e wayp oi nt with in the
radius s et i n t he W P Ra di us se tt in g. I t can b e ad ju sted in M en u > N av ig at io n > W P Ra di us . Th e Defau lt i s 30
meters ( 10 0 ft ). The range i s 10 m~ 20 0m .
02
Page 30
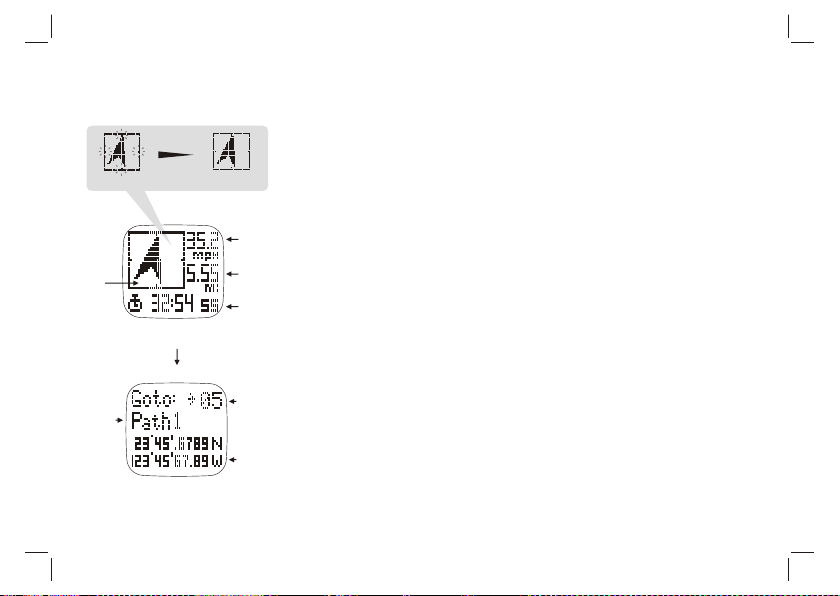
F. Navigation Function - How to navigate
How to set up t he p at h an d na vigat ion mo de a s de scrib ed
bef ore. Turn O N GPS b y Ho ld ing [ V] . Or i f you w ant to h ave
wor kout logged , just pr ess [S/S] to start workout . Then wait for
Fixing with GPS
Direction
Navigation
Path
Name
Wayp oint Data View
Hold
[V]
[V]
GPS Fixed
Current
Speed
Waypoint
Destination
Workout
Data View
Waypoint
No.
Navigation
data
GPS to be f ix ed. At the same time , you can p ick the acti ve
way point by press ing [V ] to sw itc h to t he Goto screen.
Set Active Way po int
On the G oto sc ree n, brow se the w aypoi nts up or do wn o n the
cur rent path with [S/S] an d [L/R] butt ons. The se qu enc e numbe r
of the wa ypo in t is show n at the top righ t. The Pa th name is in
th e 2 n d li n e. Ot her deta i l s of t h e wa y p oi nt a re show n
con secut ively in lines 3 a nd 4 acro ss 3 p age s.
- Pa ge 1 shows the time , d ate, a nd n am e o f a w aypoi nt. Th e
nam e of t he wayp oint is limit ed to 10 char acter s long. Edit ing of
the way point nam e can only be d on e in t he GPS Master. A
D e f au lt na me “Wa y p tX X” is as s ig ne d to a w a yp o in t
aut omati cally by th e w atc h w hen it is ma rked m anual ly or
cre ated by Smart Lap. Wh er e XX is a sequen ce nu mbe r goi ng
fro m 01 to 99 .
- Page 2 show s the dist ance b etwee n th e curr ent posit io n an d
the heading to this waypo int when GPS has been fixe d.
- Pa ge 3 sh ow s th e lati tude and lo ngi tu de of thi s wa yp oint
Pre ss [ V] o nc e ag ain to g o back to Na vigat ion after t he a ctive
way point has been sele cte d.
03F-
Page 31
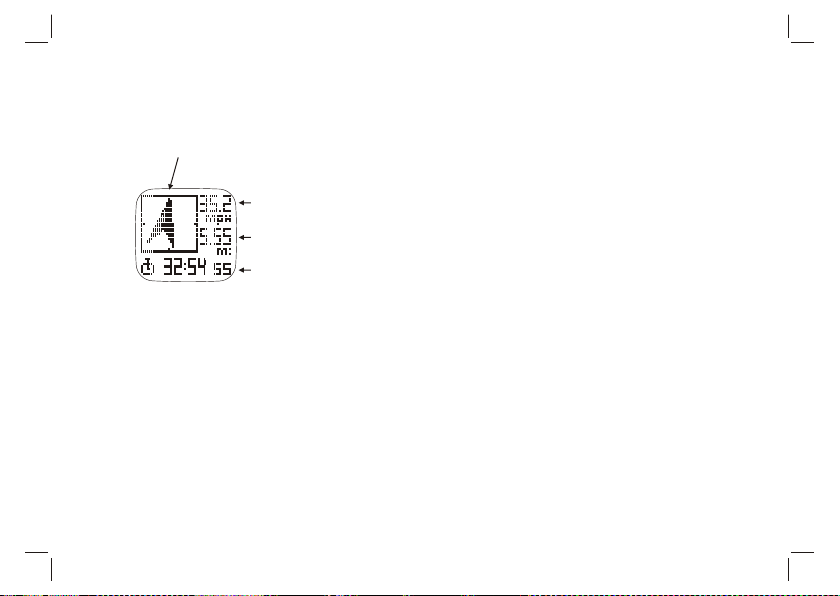
F. Navigation Function
F-
04
Heading pointer
Navigation
Current
Speed
Waypoint
Destination
Workout
Data View
Fol low th e he ad ing poin ter
Onc e GPS has be en fixed , the hea di ng poi nt er sta rts to
wor k. Make sure that the elec tro ni c comp ass ha s b een
cal ibrat ed p ro perly (See compass cali bra ti on d et ail s in t he
Sys tem Set ting ch ap ter ) an d the wat ch i s maint ained a t
hor izont al po sitio n. Til ting away from the horizo nt al po sit io n
wi ll affe ct t he a ccu ra cy o f the h ead in g poi nte r. Whe n
eve rythi ng i s pr op erl y set, the p ointe r al ways poin ts to the
act ive wa ypoin t.
Your cur rent speed and dista nce to the acti ve wa ypoin t are
sho wn a t t he t op r ight o f N aviga ti on s cre en . Time o f D ay,
Workou t Time, Distan ce to Dest in ati on , E stima ted Ti me to
Des tinat ion, and Current HR are scrol ling out once at a t ime
at the bott om line . When there is no HR datum , it will not be
sho wn at all and this part will be ski pped.
Whe n you a re appr oachi ng to the WP re gi on of t he ac ti ve
way point within the pr es et r adi us , 3 be ep t ones will be
hea rd. The beep t ones w ill b e supp resse d w hen the K ey
Tone s et ti ng is t ur ned O FF. I f you are navi gatin g with
Fo rw ar d / B ac kwa rd m od e, i t dire ct s you t o the n ex t
way point aut omati cally. This pro ce ss repe at s until you arriv e
at the final destina tion.
Page 32

F. Navigation Function
Navigation
F-
05
How to cr eate Waypoin ts or a path in the PC
Note: You should have G PS Ma ster i nsta lled in the P C f irst . S ee the GP S
Maste r ins tall atio n and user’s manua l for details.
R un GPS M aste r
A ctiv ate the Path Manage r ( Path-->P ath Manager )
C lick NEW on the Curr ent Path
Loca te the d esir ed pos itio n in the embedded G oogl e Maps ( GMAP ) and
left click the mouse button. A ne w waypoint is just created. It is a ssig ned to
a default nam e. If you want to change this name , double cli ck the waypoi nt
place mar k. A dialog ue bo x will app ear. You can i nput a mea ning ful name
there . The name of waypoints is li mite d to 10 c hara cter s lon g.
A dd as ma ny points as yo u wan t. Waypoints are link ed sequenti ally.
Cl ick Save Pat h as you finish add ing wayp oint s. They will be saved into
the Current Path table.
Clip the watch an d plug in the USB cable. T hen C lick t he “P C->Wat ch”
butto n in GP S Master. Pat h(s) in the Curren t Path tabl e will be transfer red to
the watch in sec onds .
How to Sa ve waypoint while navigat ing
Once GPS has been fixed, hold [L/R ] to save the wa ypo int
The wa ypo int wil l be s ave d to the curren t path
How to St art/ Stop Workout sess ion and Take Laps while naviga ting
P ress [S/S] to S tart Workout . Pus h [S/ S] again to Stop Work out
P ress [L/R] to t ake Lap
Page 33
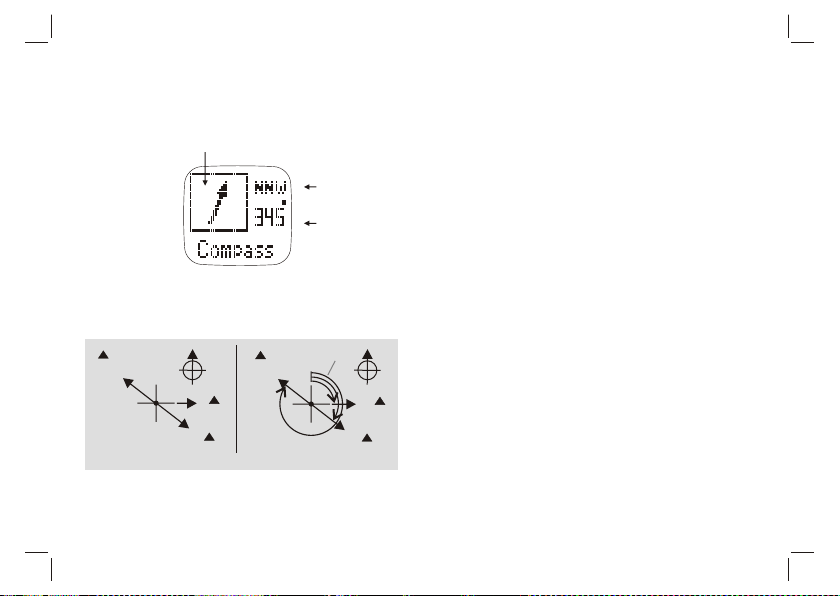
G. Compass Mode Function
G-
01
obje ct D
NW
poin t A
Com pass Di recti ons
Direction
Compass Mode
N
N
E
obje ct B
SE
obje ct C
obje ct D
315°
Bea ring Di recti ons
poin t
A
Cardinal
directions
Azimuth
hori zonta l
angl es
0°
135°
obje ct C
90°
The Directi on of a n Object
The d ir ec ti on of a n o bj ec t from a p oi nt can be
exp res se d in t erm s o f eit her card in al di rec tion or
azi mut h. T hi s w at ch i nclud es b ot h ca rd ina l dire cti on
and azimuth .
The 16 car di nal dire cti ons
Card in al dir ec ti on s a re t he mos t c om mo nl y used
for ms of d ir ect ions. They i ncl ud e Nort h, So ut h, Ea st
and We st. This e lec tr oni c com pa ss ha s Pri mar y (NE,
NW, SE, SW) and Se con dary (NNE, ENE, ESE, SSE ,
SSW, WSW, WNW, NNW) Int erCar din al dir ect ions as
wel l. Card in al dire ct ion is show n at th e top ri ght
cor ner.
0°
The Azimuth
Azi mut h i s defi ned as the h orizo nta l a ngl e b etw ee n
the Nort h a nd the obje ct measure d c loc kwise . ( The
Nor th i s 0 degre e). Azimu th i s s how n in the m id dle
rig ht.
obje ct B
Page 34

G. Compass Function - Setting
How to calib ra te the co mp ass
H old [M] u nd er a ny mode t o e nter t he mai n menu : Menu > Set tings > S ystem >
Com pass > C alibr at e Wh ile ca libra ti ng, turn t he w atch 3 60 d eg ree horiz on tally. You w ill
see th e tra ce of do ts forming th e out line of a rectangu lar box when the watc h is rot at ing.
Cal ibrat io n is do ne when the ou tline is filled compl etely.
Not e: Press any k ey to exi t t he calib ration without any ch anges
Ho w to se t the magne tic de cl inati on of the co mpass
H old [ M] under a ny mode to enter t he m ain menu: Menu > Settin gs > Syste m >
Com pass > De cl inate
P ress [S/S] or [L/R] to change the value
P ress [V] to confirm
Not e: Consu lt the webs it es belo w f or deter mi ning the de clina tion at you r loca ti on.
Htt p://w ww.mag ne tic-d ec linat ion.com /
htt p://w ww.ngd c. noaa. go v/geo magmode ls/Decl inati on .jsp
htt p://g eo mag.n rc an.gc .ca/app s/mdcal -eng. ph p
G-
02
Page 35
01
H. Heart rate Monitor Function
How to Us e He ar t ra te M on it or ( HR M)
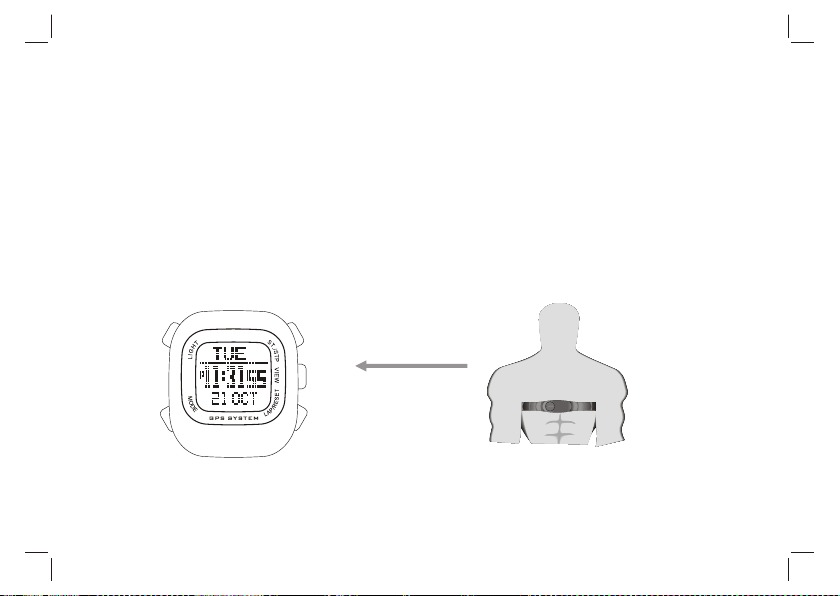
Wor ki ng w it h th e HR M is s im pl e. W ea r th e ch es t st ra p as m en ti on ed e ar li er. Th e st ra p sh ou ld b e tu rn ed O N by
itsel f. At t he w at ch , pr es s [S /S ] in W or ko ut m od e. T he w at ch w il l di sp la y an i co n “H R” w it h th e ch es t st ra p in a
couple of sec on ds . Du ri ng y ou r wo rk ou t, t he H R is s to re d at t he r at e as d ef in ed i n th e Tra ck Lo g. P re ss [ S/ S] a ga in
to st op w he n yo u fi ni sh w or ko ut .
How to st ar t th e He ar t Ra te M on it or
The re a re 2 w ay s to a ct iv at e th e He ar t Ra te M on it or f un ct io n:
1) Under Wo rk ou t mo de , th e He ar t Ra te M on it or w il l st ar t au to ma ti ca ll y wh en W or ko ut s ta rt s.
2) Hold [M] u nd er a ny m od e to e nt er t he S et ti ng m od e: M en u > HR M > On /O ff
Heart Rate Da ta
Heart Rate Da ta
H-
Page 36
H. Heart Rate(HR) Zone
%
EMHR
Fat
Upper
Limit
Lower
Limit
Healt h
65% 75% 80%
50% 55% 65%
Aerobi cs
Burn
Abov e Z one
In Zone
Belo w Z one
Heart Rate Zone
User
User
defi ned
02
H-
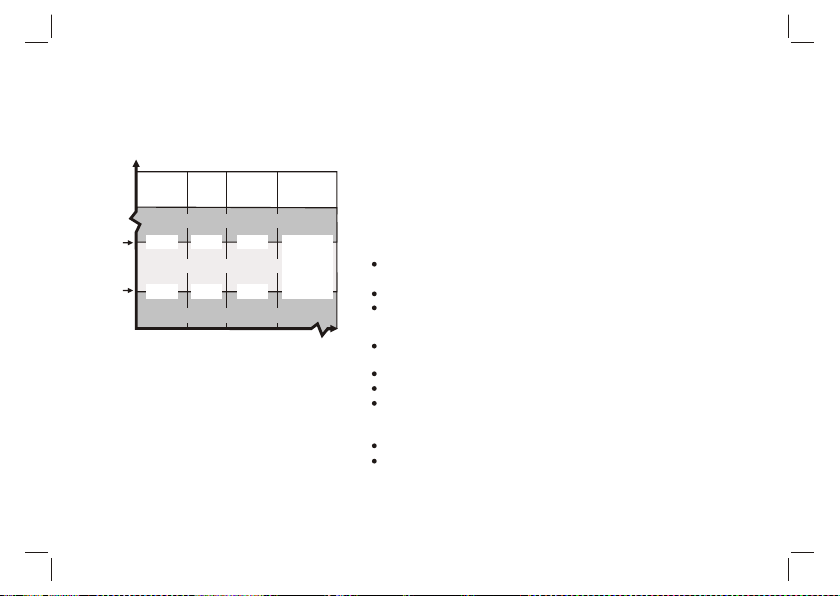
How t o Use Targ et H ea rt R at e Zo ne
Set ting targ et H R zo ne i s very imp ortan t fo r yo ur p erson al tra ining
pla n. If yo u a re n ot wor king i n th e t ar ge t zo ne , al er t b ee ps w il l so un d.
You can a dj us t you r pa ce of e xe rc is e to ma in tain yo ur HR i n th e
tar get z one lim its. Th er e ar e 4 ta rg et zone leve ls : He alth, Fat Burn,
Aer obics and User. Th e li mi ts of th es e zo ne s are sh ow n on t he left
tab le. I f t he y d o n ot fi t y ou r t ra in in g s ch em e, yo u a re free to se t y ou r
own t arget z one lim its in an y of thes e setti ngs.
How t o selec t Heart R ate Zon e
Hol d [M] und er any mo de to ent er Menu > H RM > HR Zon e >
Sel ect
Sel ect amo ng Heal th / Fat bu rn / Aerob ics / Use r
Pre ss [V] to c onfir m > “Done ” will be s hown
How t o set the H R Zone Li mits
Hol d [M] und er any mo de to ent er Menu > H RM > HR Zon e
>Cu stomi ze
Sel ect amo ng Heal th / Fat bu rn / Aerob ics / Use r
Set t he valu e by pres sing [S /S] or [L /R]
Pre ss [V] to c onfir m
How t o reset a ll Hear t Rate Zo nes
Hol d [M] und er any mo de to ent er Sett ing Men u > HRM > HR
Zon e > Reset ALL; pr ess [V ] to c on fi rm .
Page 37
I. PC Connection Function
Per sonal C omput er
the W at ch c onn ected
wit h the PC
I-
01
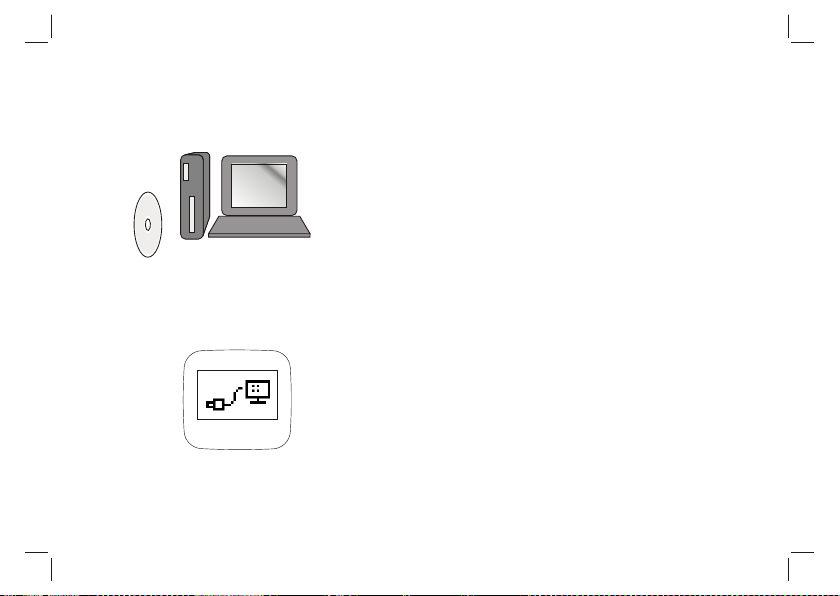
Ins tal l the bun dl ed PC s oftwa re into your PC i n
ord er to c on nec t your wa tch fo r da ta trans fer an d
mak ing use of s ome sp eci al featu re s.
Sys tem requ ireme nts for th e PC are as f oll ow s:
Pe nti um II 300 MHz or higher
64 MB Main memory or higher
20 MB hard disk sp ac e or more
25 6 co lor monit or or hig her
Wi ndo w XP / VIS TA/ 7 op era ti ng syste m
CD -RO M dr iv e
US B po rt
Fol low the instruct ions in t he GPS ma ste r setup
wiz ard to in sta ll the pr ogram . Aft er insta llati on,
res tar t your PC .
Clip the U SB c ab le t o th e wa tc h an d plug th e ca bl e
into the P C’s USB co nn ec to r. On ce c on ne ct ed,
"C on necte d ic on " w il l be s ho wn o n th e watch ’s
screen .
Page 38
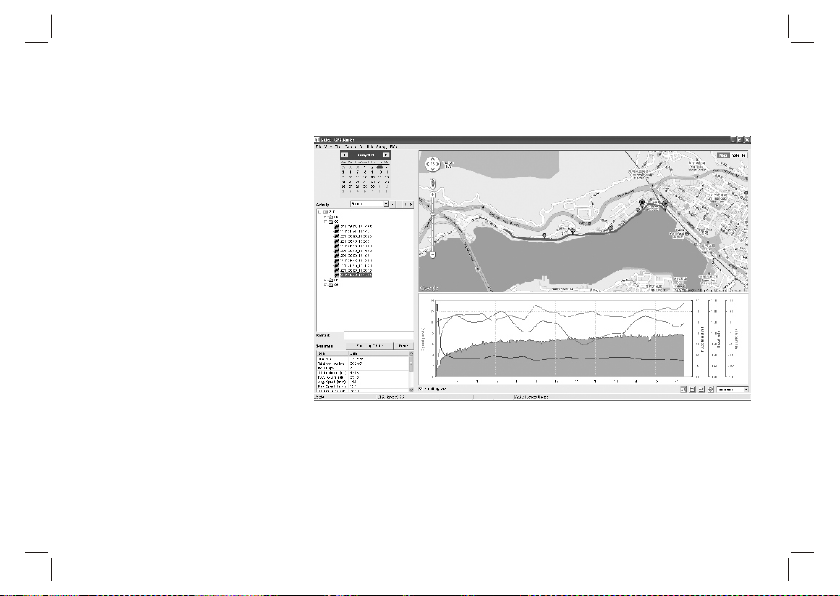
I. PC Connection Function
How to se tup a new user
- Ente r U se r n ame in the
New us er dialo gu e b ox
- Pres s ' Add'
How to sy nchro ni ze data
bet ween the watc h a nd the
PC
-O n P C s creen > Data
tra nsfer > Rec ei ve the
Watc h Data
- Wo rkout da ta wi ll be
sho wn on the screen
02I-
PC Sc reen
Page 39
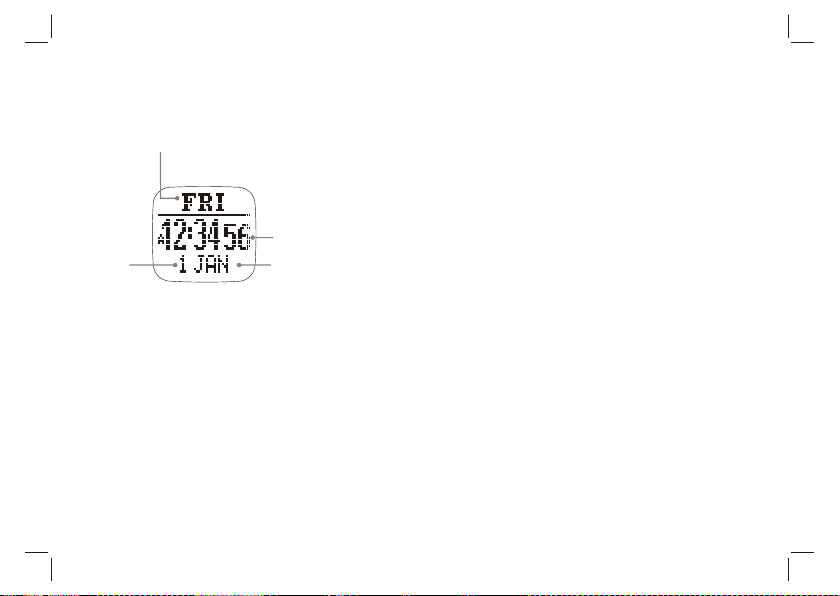
J. Home Time Function
J-
01
Dat e
Day o f week
Home time mode
Cur rent ti me
Mon th
How to set Time Of Day
Nav Ma ster is a bl e to sy nchroni ze its cl oc k with the
sat ellit e' s atom ic clock au tomatic ally. Th is is done
whe never the G PS fixes its p ositi on. Aut o time zo ne is
ano ther cool f eatur e. It tries to set your current time zone
acc ordin g t o the longi tude. In other wo rds, when there is a
sat ellit e a nd the GP S is turn ed on occas ional ly. The time is
syn chron iz ed with the sa telli te ’s clock. You don’ t n eed to
bot her to ad ju st the wa tch. T he time is a lw ays ac curate.
Whe n ther e i s no sa tellite coverage, manual time setting is
als o avai la ble.
Hol d [ M] under any m ode to enter Menu > S ettin gs >
Time Da te
Sel ec t Home Time/ Dual Ti me or For mat
Time of Day S ettin g
GPS Update - Me nu > Set tings > Tim eDate >
Hom eTi me > G PS Upd; selec t on/ off.
Whe n this opti on has be en turned ON, th e Nav Master
wil l s ynchron ize th e t ime wi th the sate llite at omic clock
whe never a G PS is fixed .
Page 40

J. Home Time Function
Time Zo ne
Men u > Setti ng s > Tim eDate > HomeTime > Tim eZone
Set time zone accor ding to y ou r curr en t loca tion. It can be ad ju sted from + 12:00 to -12:00 hours
fro m GMT at 0.5 hour step . Alter na tivel y, it can be set automa tical ly by GPS. When t his op tion
is activate d, GPS sets your time zone accor ding to t he longitu de. It sh ould work m ost of the
tim e, but th er e are excep tions be cause of Dayl ig ht-S aving Time (D ST) or o ther rea so ns.
Whe n t he time zone set by GPS does not refl ec t your loca l time correctly, adjus t the time
man ually.
Man ual ti me se tting
Men u > Setti ng s > Tim eDate > HomeTime > Manua l
Set time and da te in the fo ll owing sequ ence:
Sec ond > Minut e > Hour > Year > Month > Day
Pre ss [S/S] or [L /R] to chan ge the va lue
Dua l Ti me Setting
Men u > Setti ng s > Tim eDate > DualTime
Pre ss [S/S] or [L /R] to chan ge the va lue at 30 min i ncremen t.
For mat
Men u > Setti ng s > Tim eDate > Forma t
Pre ss [S/S] or [L /R] to choo se 12 / 24 Hour Format
J-
02
Page 41
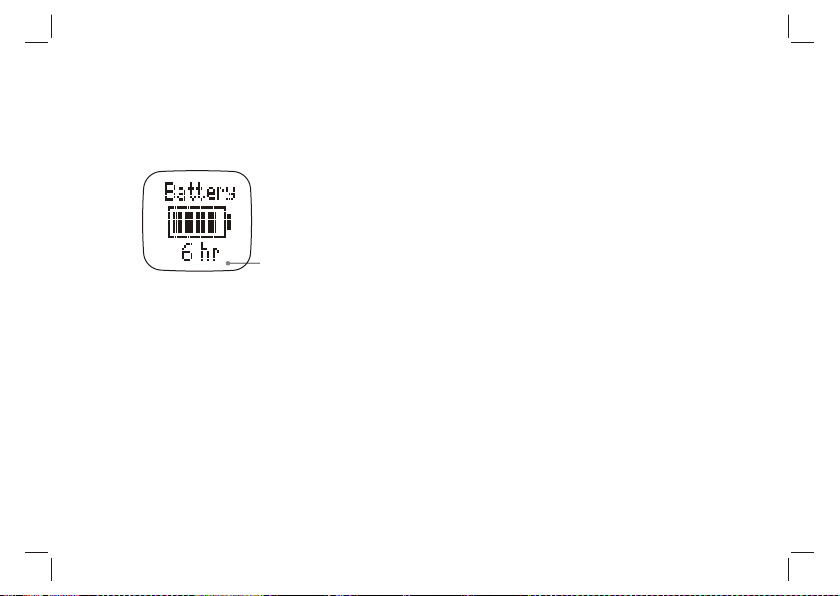
K. Battery life - remaining power
GPS
Rem ainin g
Battery Life Time
hou rs
K-
01
Che ck Batte ry life - rema in ing po wer
Pre ss [V] in the Ho me time mod e > Ba tt ery
Bat tery life r em ainin g hou rs for GP S will be show n
Page 42
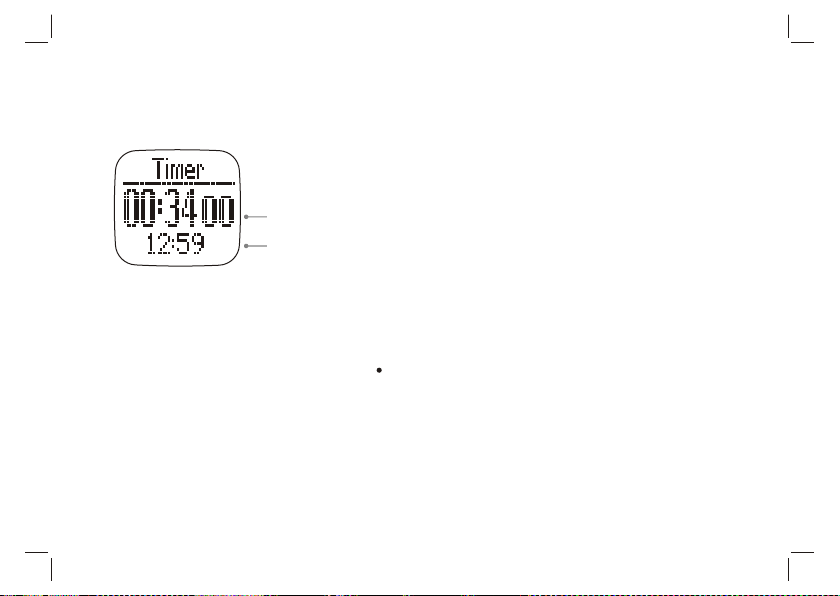
L. Timer Function
Timer mode
Time r time
Cur rent ti me
L-
01
How to use the Tim er
iPre ss [ V] i n the Home ti me mode > B at tery >
Timer
i Pr ess [ S/ S] to s tart or sto p.
iPre ss [L/ R] to reset to th e pres et time.
iBee p s ou nd wil l b e heard in t he las t 10
sec onds.
iLon g bee p wil l be heard once reac hi ng 0: 00: 00;
pre ss any key to sto p the be ep.
How to se t t he Tim er
Hold [M] under any mode to enter Menu > Settin gs
> Timer
Pre ss [S/ S] or [L / R] to chang e t he value:
Pres s [ V] to c hange Ho ur > M inute > S econd
Page 43
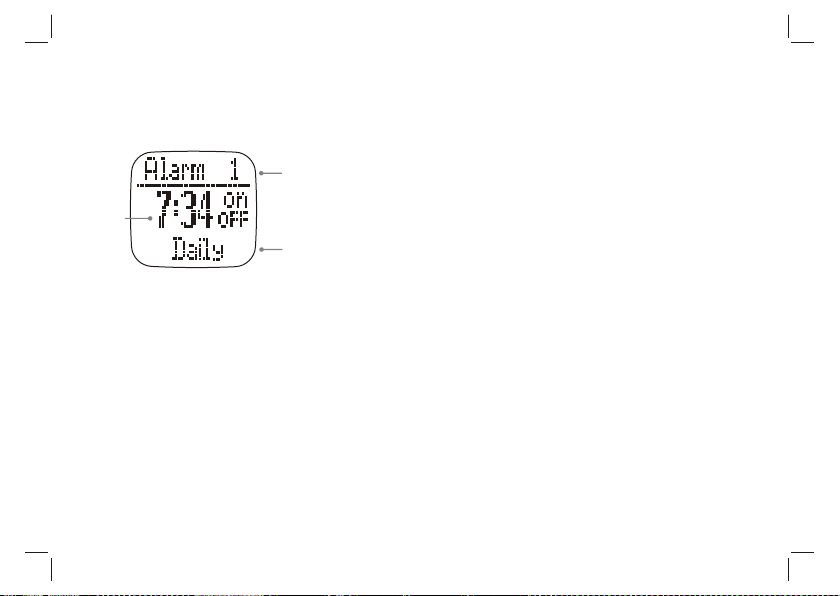
M. Alarm Function
Ala rm
tim e
Alarm mode
Ala rm No.
Ala rm
Day
-
01
M
How to use th e Al arm
Press [V] in the Home time mode > Batte ry > Tim er
> Al arm
P res s [S/S] to selec t 1 - 5Ala rm s
P ress [L/R] to turn the alarm On / Off
How to set th e Al arm
Hold [M] under any mode to enter Menu > Settin gs
> Ala rms
Alar m no. > Hour > mi nu tes > On/ Of f > Daily /S un-
Sat /Mon- Fr i
P ress [S/S] or [L/R] to change the value
Page 44
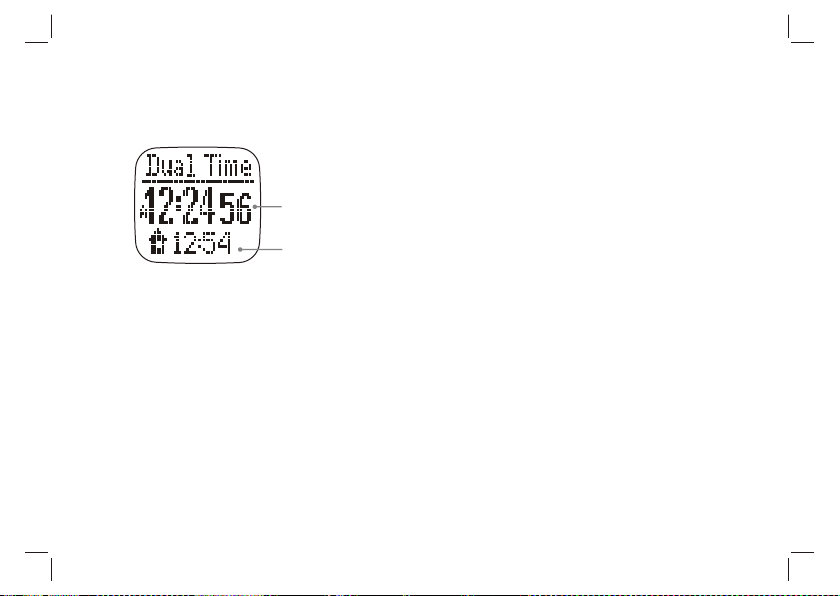
N. Dual Time Mode
Dual Time mode
Dua l
Time
Hom e
Time
-
01N
How to use Dual Ti me
Pre ss [V] in the Home t im e mode > B at tery
> Timer > Al ar m > Dual Tim e
How to se t D ual Time
Hold [M] un der any mode to ent er Menu > Set tings >
Time Date > D ua l Ti me
P ress [V ] t o s el ect Dual Time
Press [ S/ S] or [L/R] t o chan ge the valu e at
30 min in creme nt .
Page 45

O. User settings
01O-
To g et the accur at e work out data , the
use r’s data se tup is impo rtant .
Hol d [M] und er any mode to enter Me nu
> Se tting s > User
Gende r or Bi rthDate or Wei gh t
Gen der
Press [S /S] or [L/R] to sel ec t Male or
fem ale
Press [M] to co nf irm
Dat e of Bi rt h
Press [S/S] or [L/R ] to ch ange the va lue
Press [V] to confirm and set the followi ng
dat a
Year > Mont h > Day
Press [M] to co nf irm
Weight
Pres s [S/ S] or [L /R] to c ha nge the
val ue. Hold th e bu tton to c ha nge the
val ue faste r
Press [ M] to confi rm
No te : To change th e U nit, see the
sub sequent ch ap ter
Page 46

P. System settings
P-
01
For system setti ng
Hold [M] under any mode to enter Menu
> Se tting s > System
S o un d o r C o nt ra st or U n it s o r
Com pass or Lang uage or Syst em
Res et
Sou nd
Selec t Key Tone / Chim e
Tu rn On/ Of f
Press [M] to co nf irm
Con trast
Selec t from leve l 3 Light er to 16 Darke r
Press [M] to co nf irm
Uni ts
Selec t G enera l / Latl ong
Gener al > k g/ M/ Km or lb /ft/ mi
Beari ng > M in's ec " o r D ecima l
Com pass
Re fer to the cha p te r - Comp as s
fun ction mo de se tting s
Lan guage
Selec t lang ua ges
Press [V] to co nf irm
Sys tem Reset
Selec t No/ Yes
Press [V] to co nf irm
NO TE : Thi s w il l res et th e wat ch to the
fac tory defau lt setti ng s.
All da ta will be cle ar ed.
Page 47
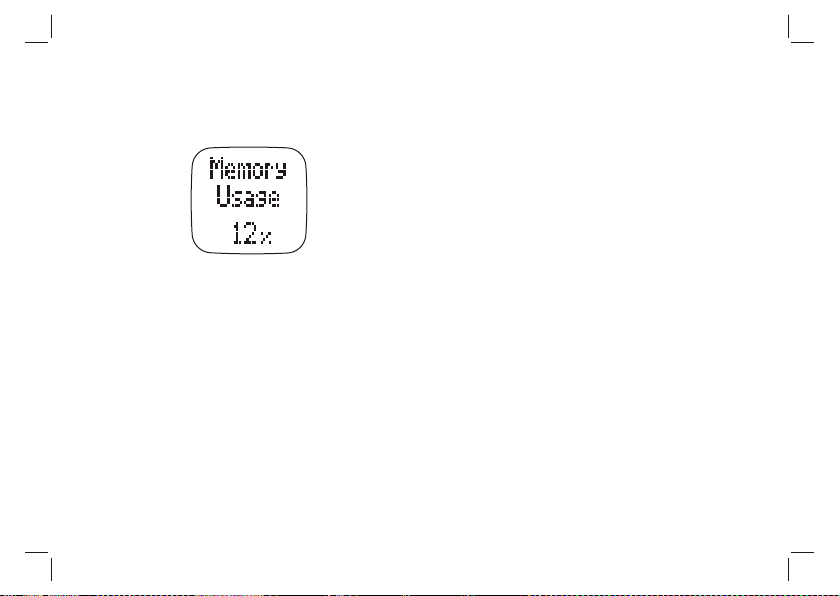
Q. Memory Usage
Memory Usage
01Q-
How to ch eck the Mem or y U sage
Hold [M] und er any mod e to enter Menu
> Me mory
Display
Page 48
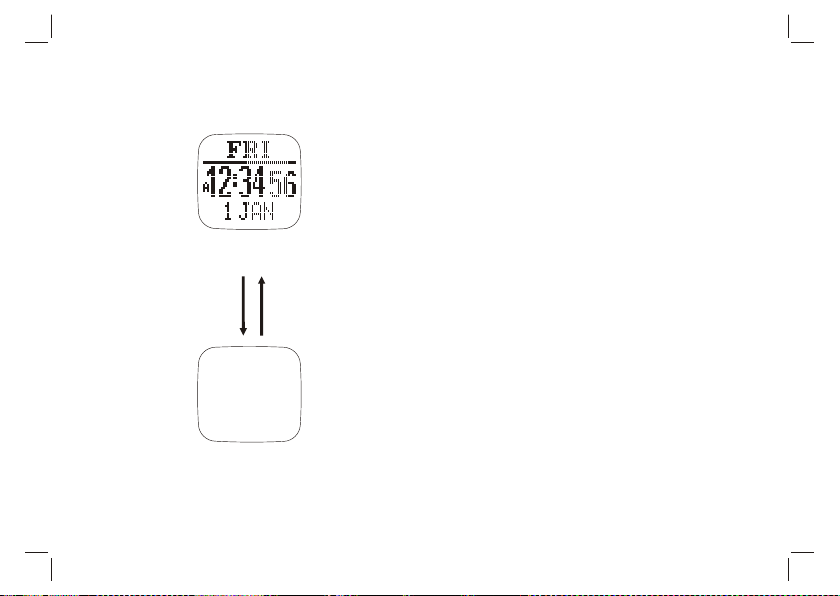
R. Power Saving Mode
Home time mode
Hol d [L/R]
5 sec ond
Power Saving Mode
(LCD display is turned off)
Hol d [L/R]
5 sec ond
Power Savi ng Mode
This Watch has a Power Saving Function which
can turn off t he LCD display so that th e b attery
can last lon ger.
In the Power Saving Mode, the wat ch funct ion
is still working normally. (i.e. The timekeeping
function is still ru nning in the Power S aving
Mode.)
How to activ ate/exi t the Power S aving Mode
To activate the Power Saving Mode, hold the
[L/R] button in the Home Time Mo de for about 5
seconds an d the LCD dis play will b e turned off .
Hold [L/R] b utton in th e Power Saving Mode to
resume the L CD displa y.
R-
01
 Loading...