

Page 1

APN ref. no.: A74740_Enghish
Date: -04-08
Vendor ref.:
no. of color: C
B&W artwork attached:
Presentation
Testing
Production/Shipment
SCALE 1:1
Prepared by:
Veried by:
Approved by:
Page 2

130 mm
140 mm
EVE 9 and EVE 14
OWNER'S MANUAL
Page 3

Language: English
Table of Content
1.0 Welco me 1
2.0 Funct ions of Operating Keys 2
3.0 Funct ions of the chest belt 2
4.0 Wear th e Chest Belt 3
5.0 Funct ions Mode 4
6.0 Activate or Deacti vate the Key tone and Heart rat e zo ne alert 5
7.0 Language, Clock, D at e and Pair in g with chest belt 5
7.1 Set Language 5
7.2 Set Clock and Date 5 - 6
7.3 Pairing t he Watch w ith chest belt 6
8.0 Dual Time 6
8.1 Set Dual Time 6
8.2 View Dual Time 7
9.0 Stopwatch 7
9.1 Use the Stopwatch 7
9.2 Take Lap Time ( ) 8
9.3 Review Lap Time 8
9.4 Reset Stopwatch (a nd Lap Time 9
10.0 Set Your Personal Data f or Your Personal Heart Ra te M ode 9
10.1 Set Gender, Birthday and Height 9
10.2 Set Wei ght and Sport Typ e 10
10.3 Set Target Heart Rate Zo ne S etting Type 10
11.0 View Target Heart Rate Z on e Indications 10
11.1 View Heart Rate Mode 11
12.0 Alarm 12
12.1 Select Alarm 1 or Alar m 2 12
12.2 Set Daily Alarm 12
12.3 Activate or Deacti vate the Alarm 12
13.0 SOS Mode 13
13.1 Set Name for SOS 13
13.2 Set Blood type for SOS 13
13.3 Set Phone number for S OS 14
13.4 View Name, Blood typ e, Phone number for SOS 14
14.0 View Scan Mode (EV E 14 Features Only) 15
15.0 Birthday Reminde r 15
16.0 Low Battery Indica tion 16
17.0 Reset the Watch and Power Saving Mode 16
18.0 Poten tial Causes for NO Hear t Rate Reading or Long Resp onse Time 16
19.0 Chest Belt Batte ry R eplacement 17
20.0 Watch B attery Replacemen t 17
EVE 14 Feature s Only
(EVE 14 Featur es Only)
EVE 14 Feature s Only)
Page
Page 4
1.0 Welcome
Congratulations on your purchase of a heart rate monitor from Pro Touch. It
is designed for ease of use during following sport activities: jogging,
walking, cycling, fitness training and cross training. In order to learn and
apply the various functions of your new heart rate monitor, please read this
user manual carefully.
1.1 General
It’s important that you know your maximum heart rate (MHR), training zone,
upper heart rate limit and lower heart rate limit before you begin. This
information helps you to achieve the maximum health benefits out of your
workout. We recommend consulting a medical practitioner or registered
physician before setting your personal training-schedule and target. Or you
can set your own upper and lower limit using the following as a reference
guide. You may estimate your MHR using the following formula:
220 – age = MHR.
WARNING !
! This product set, like most electronic or
ma g netic de v i ces, ma y i nterfe r e with
pacemakers. We recommend patients with
pacemakers to consult with their doctor
before using this product set.
! Make sure that you fully understand the
functions and limitations of this product set
before using it.
! This product set is a supplementary device
for measuring heart rate; it is NOT a
substitute for any medical devices. You
should periodically compare the heart rate
reading provided by this product set with the
reading from a doctor.
Care and Maintenance
!
Avoid rough usage or severe
impacts to this product set.
!
Store this product set in a dry
place when it is not in use.
C l ea n y our p r od uct s et
!
o c ca s io n al l y w i th a s o ft
moistened cloth.
DO NOT expose this product
!
se t t o c h em i ca l s s u ch a s
gasoline an d alcohol; these
ch emic a ls wi ll da mage this
product set.
1
Page 5
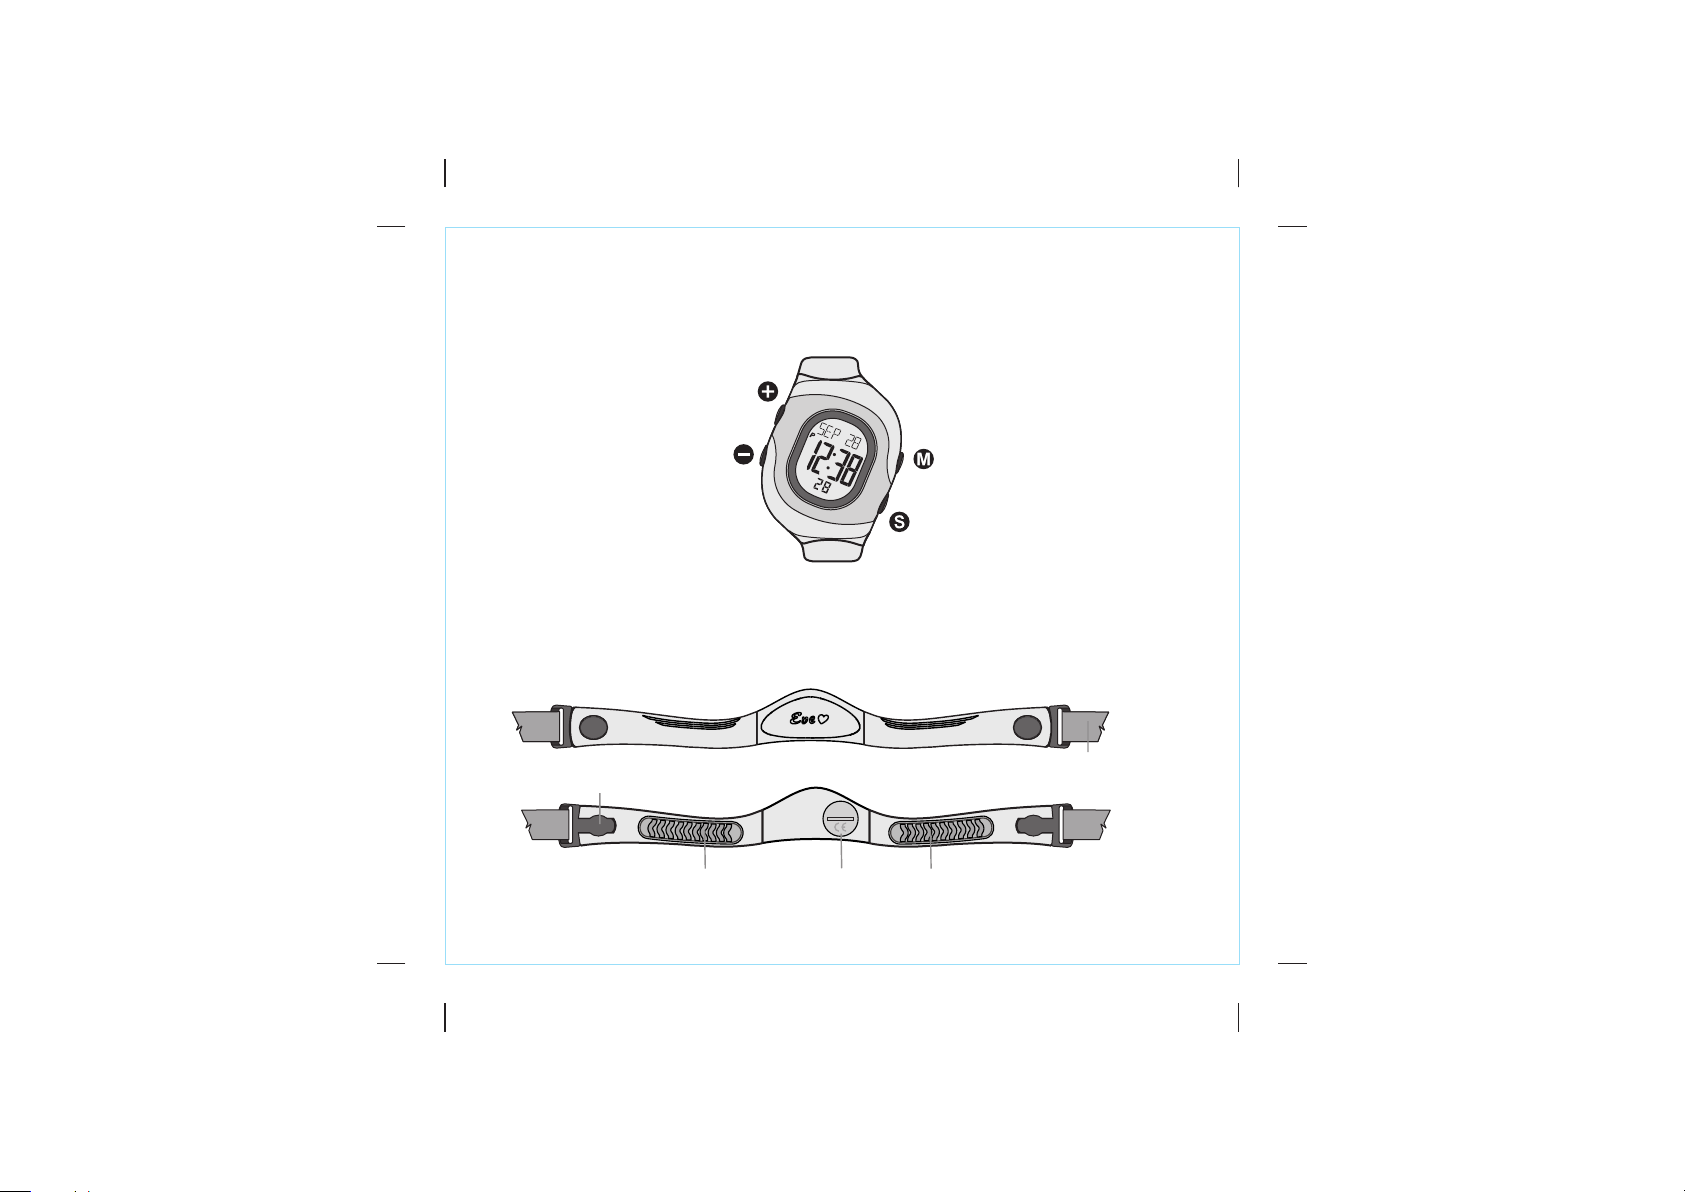
2.0 Functions of the Operating Keys
(+)
!
To increase the value in
setting mode.
!
To shift from DUAL Clock to
Home Time in Time mode.
( - )
!
To decrease the value in
setting mode.
!
To t r i g g e r t h e k e y t o n e
ON/OFF.
!
To trigger the stopwatch
START/STOP.
!
To t r ig g er t he Al ar m
ON/OFF.
!
Press and Hold for 2 sec. to
turn ON the Backlight.
3.0 Functions of the chest belt
(MODE)
!
To change modes among
the different main function
modes.
!
To change modes among
di f fer e nt s et ti ng s ub modes.
(SET / SOS)
!
To e n te r ( h ol d f or 2
seconds) or quit the setting
mode.
!
To take lap time and reset
stopwatch.
!
To enter SOS mode.
Connector
Front
Back
Battery coverContact
Contact
(conta ct with the skin)
Elastic Band
2
Page 6

4.0 Wear the Chest Belt
Co nnec t on e co nnec tor
1 2
with the chest belt. Ensure
tha t th e co n n ect o r i s
completely lodged into the
chest belt.
Extend the elastic band for
allowing a loose fitting the
chest belt on your chest.
Fit the chest belt on your
3
chest with one hand.
Co n ne c t t h e o pp os i te
4
connector to the chest belt
with the another hand.
IMPORTANT: This Chest Belt must be worn directly on your skin. DO NOT wear the chest belt on the top of your
clothes, otherwise the chest belt CANNOT get the heart rate signal.
NOTE: In dry seasons, wet the contacts with water to make the signal transmission normal.
Fas ten the elasti c band
5
until it is fitted on your
chest comfortably.
Move the chest belt until
6
the two contacts are firmly
contacted with the skin of
your chest.
Precautions / Tips
There are two contacts located on the back of the Chest Belt. These two contacts must
+
make firm contact with the user's skin during measurement.
DO NOT take heart rate measurement when diving or under water.
+
Clean the contacts occasionally by applying a few drops of water, and wipe it dry with a
+
paper towel to remove any residual grease.
DO NOT use hand cream; it will insulate the signal between the skin and the contacts.
+
Clean your skin with soap and water for a better signal transmission.
+
For those with extremely dry skin, apply some conductive gel or water to increase
+
conductivity.
Adjust the Chest Belt with the supplied elastic band until it holds on your chest firmly to
+
avoid loosening when exercising.
Avoid doing any awkward motion during measurement, it will create an inaccurate heart
+
rate reading.
3
Page 7
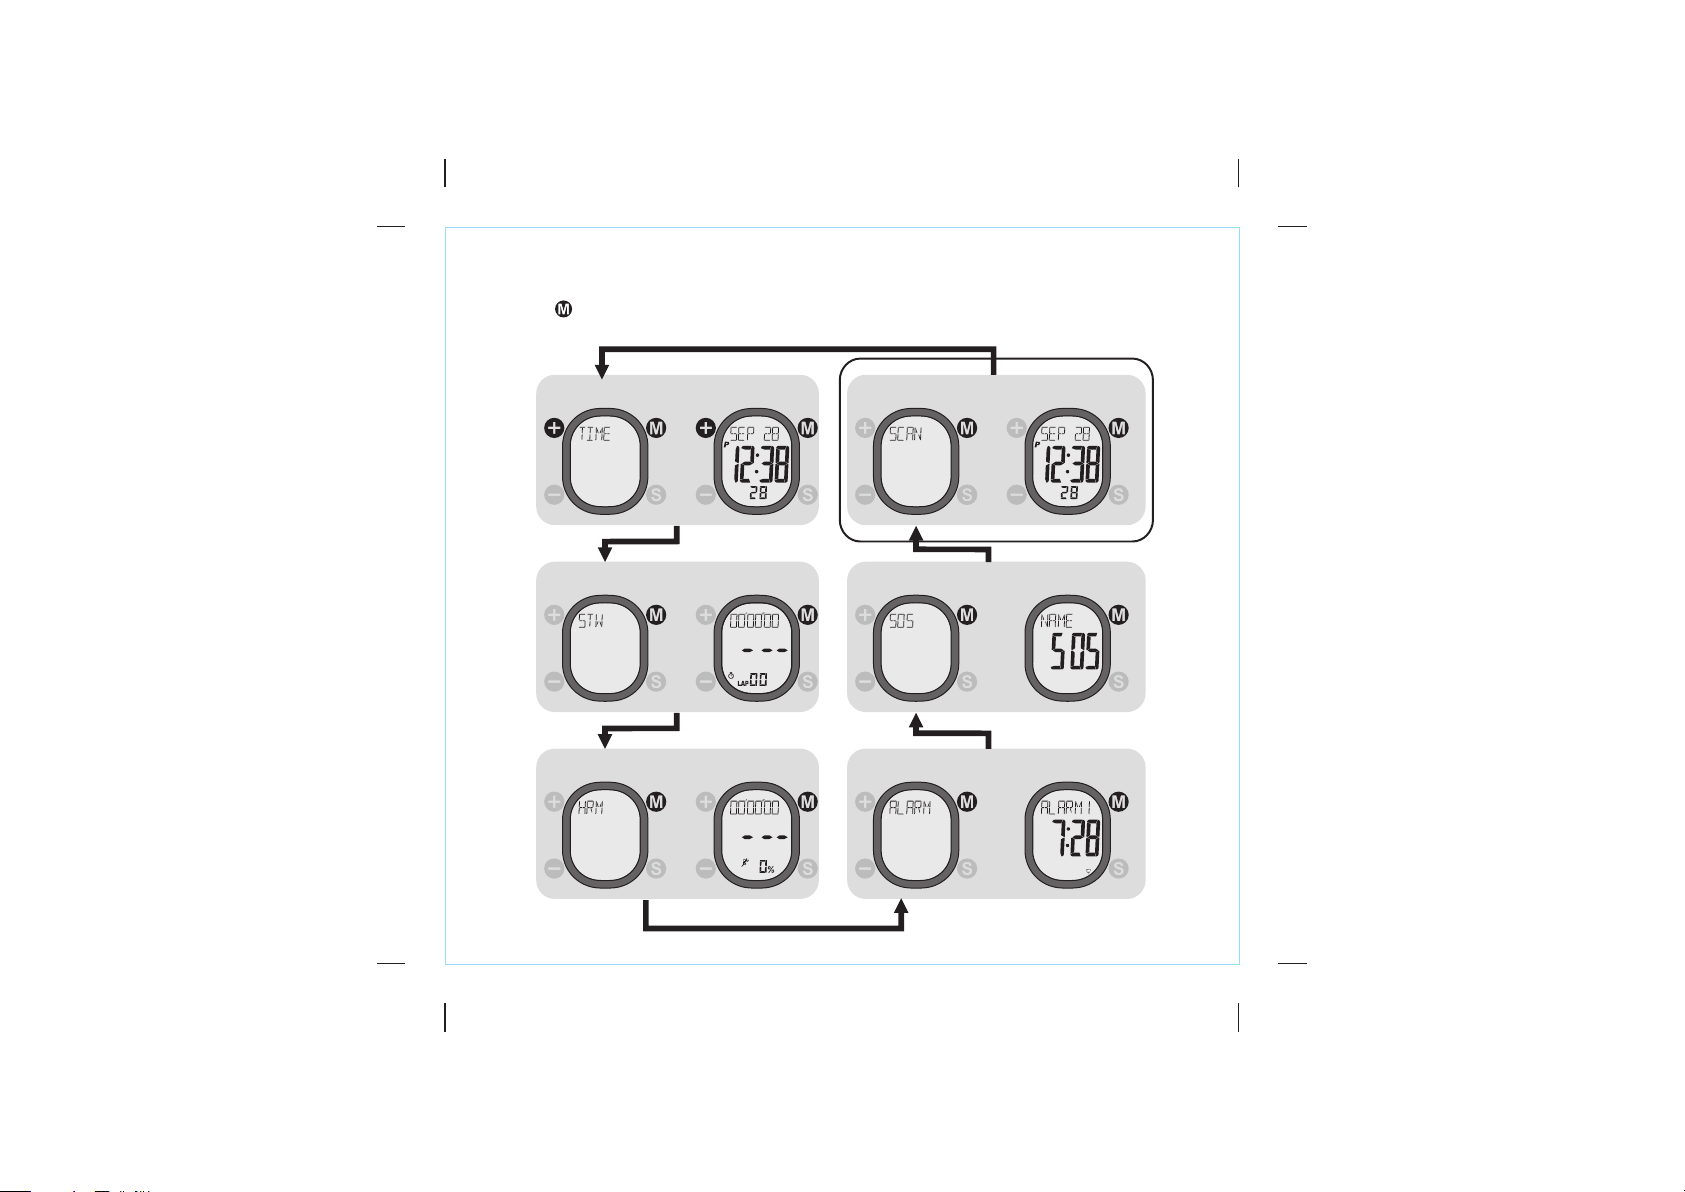
5.0 Functions Mode
!
Press any button to resume the display if is activated - Blank display.
!
Press
to next menu.
Power Saving Mode
Time Mode
Stopwatch Mode SOS Mode
Heart Rate Mode Alarm Mode
Time Mode
(2 seconds later)
Stopwatch Mode
(2 seconds later)
Heart Rate Mode
(2 seconds later)
Scan Mode
Scan Mode
(2 seconds later)
EVE 14 Features Only
SOS Mode
(2 seconds later)
Alarm Mode
(2 seconds later)
4
Page 8
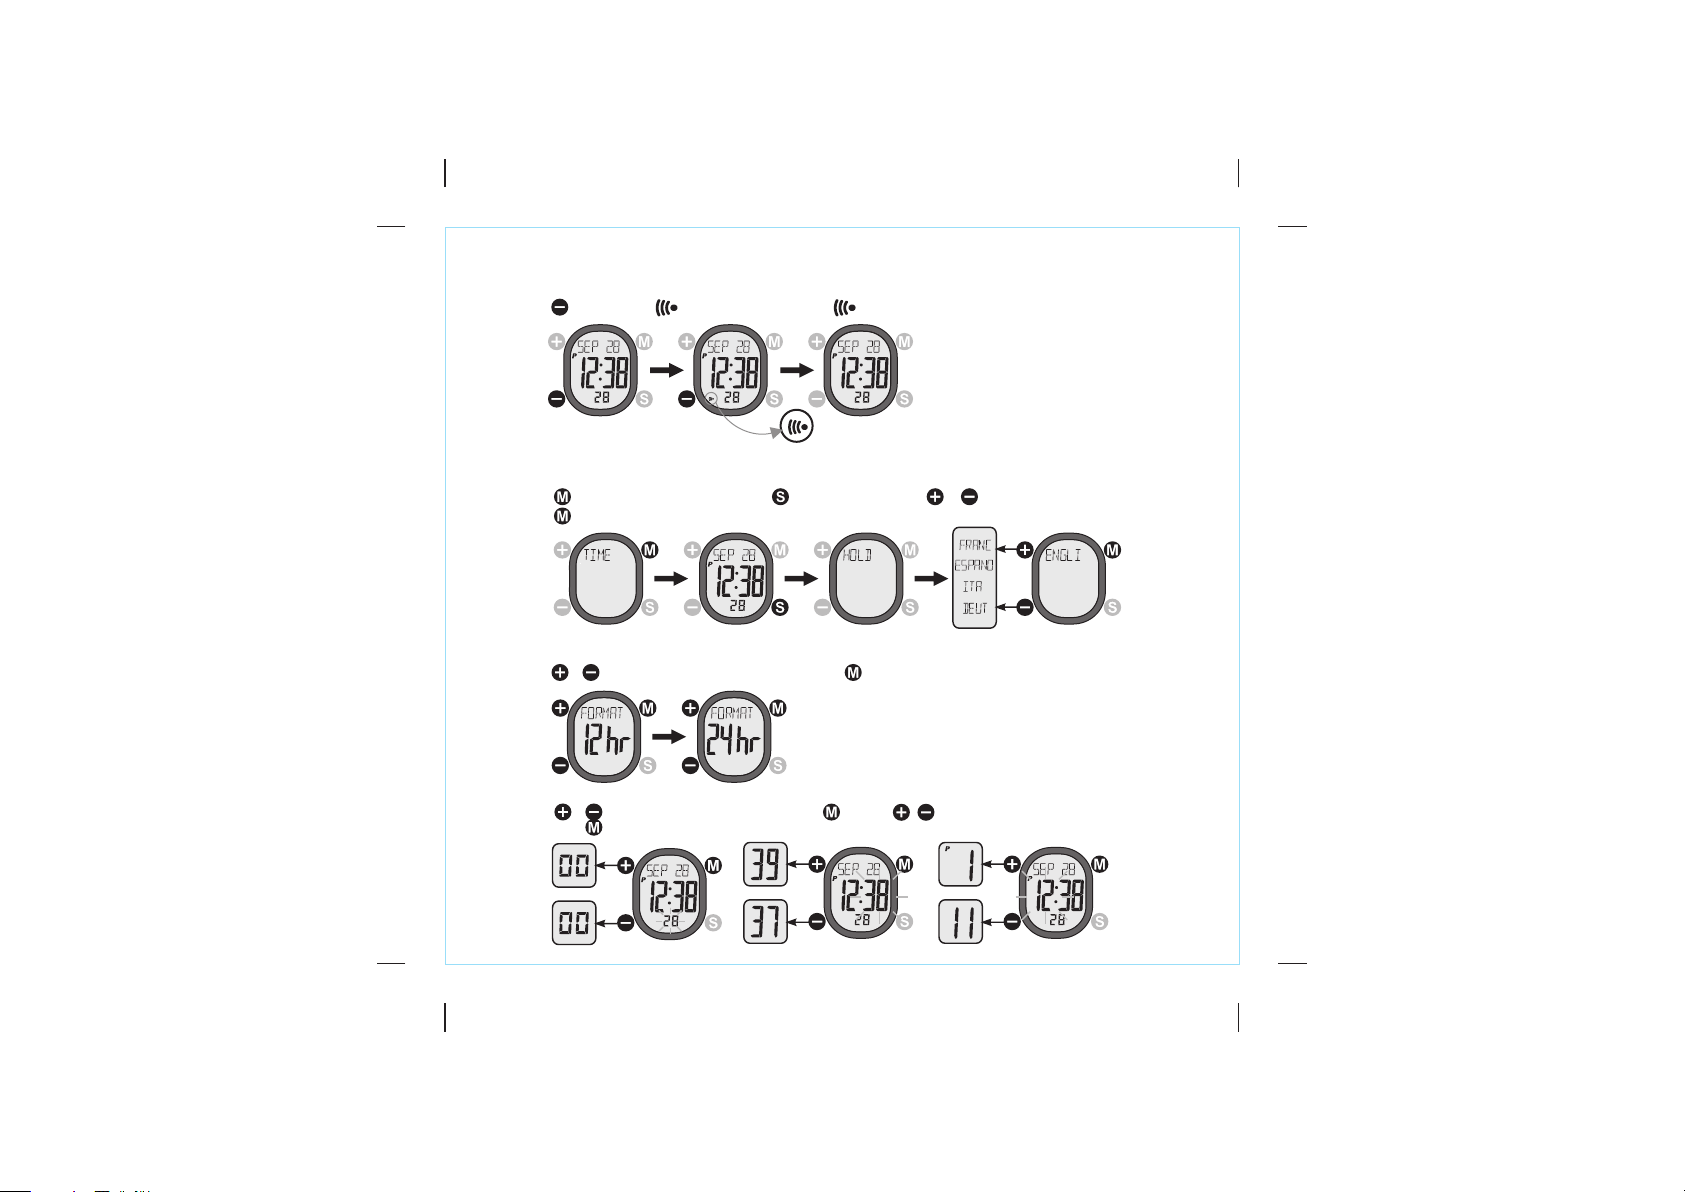
6.0 Activate or Deactivate the Key Tone and Heart Rate Zone Alert
!
Press to activate ( appears) or deactivate the Key tone and Heart rate Zone Alert .( disappears)
7.0 Language, Clock, Date, and Pairing with the chest belt
7.1 Set Language
!
Press until "TIME" appears and hold for 2 seconds. Press / to select a language and confirm
with .
7.2 Set Clock and Date
!
Press / to select "12" or "24" and confirm with .
!
Press / to reset second, and confirm with . Press / to select hour and minute, and confirm
each with .
5
Page 9
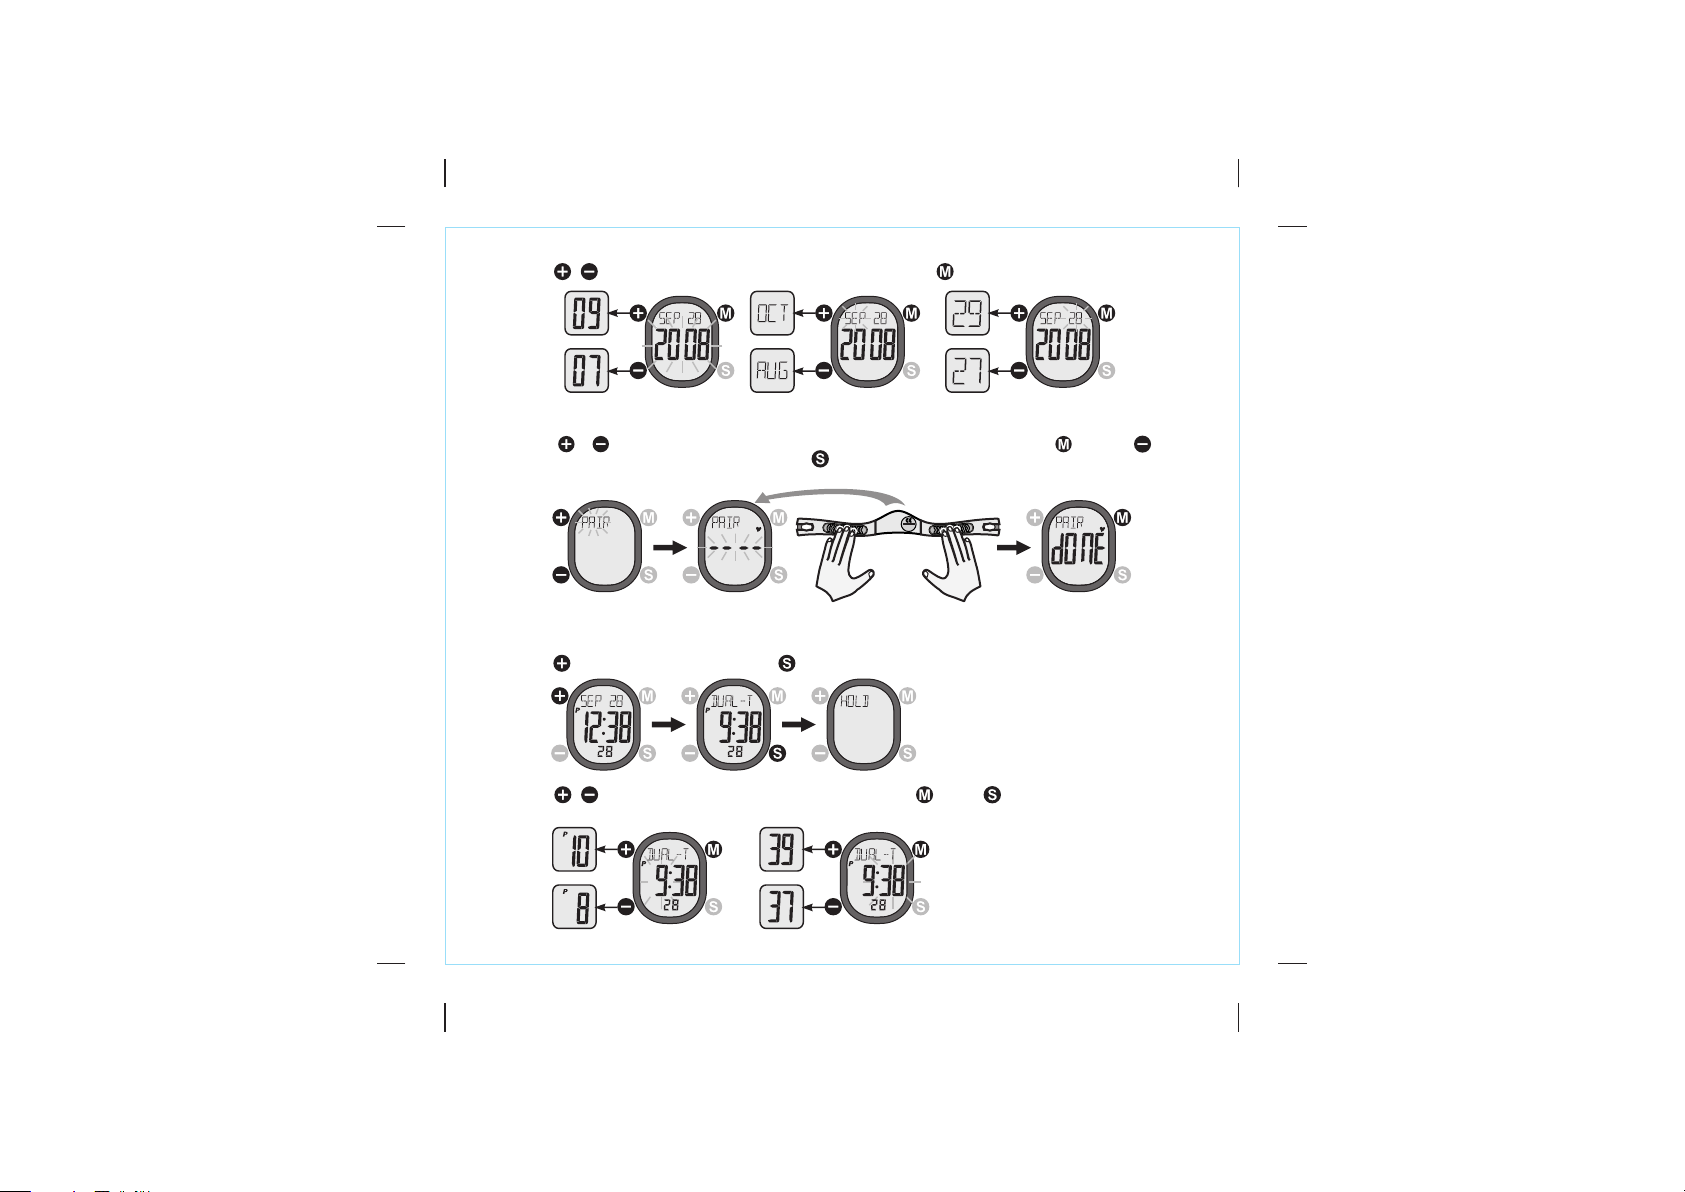
!
Press / to select year, month and day, and confirm each with .
7.3 Pairing the Watch with the Chest Belt
!
Press / to start pairing (pair the chest belt with the watch) and confirm with . ! Press can
terminate the process during the pairing. Press to return to Time Mode.
NOTE: Pairing will need to do once only when it is the first time using the chest belt.
8.0 Dual Time
8.1 Set Dual Time
!
Press until "DUAL-T" appears and hold for 2 seconds.
!
Press / to select hour and minute, and confirm each with . Press to return to Dual Time Mode.
6
Page 10
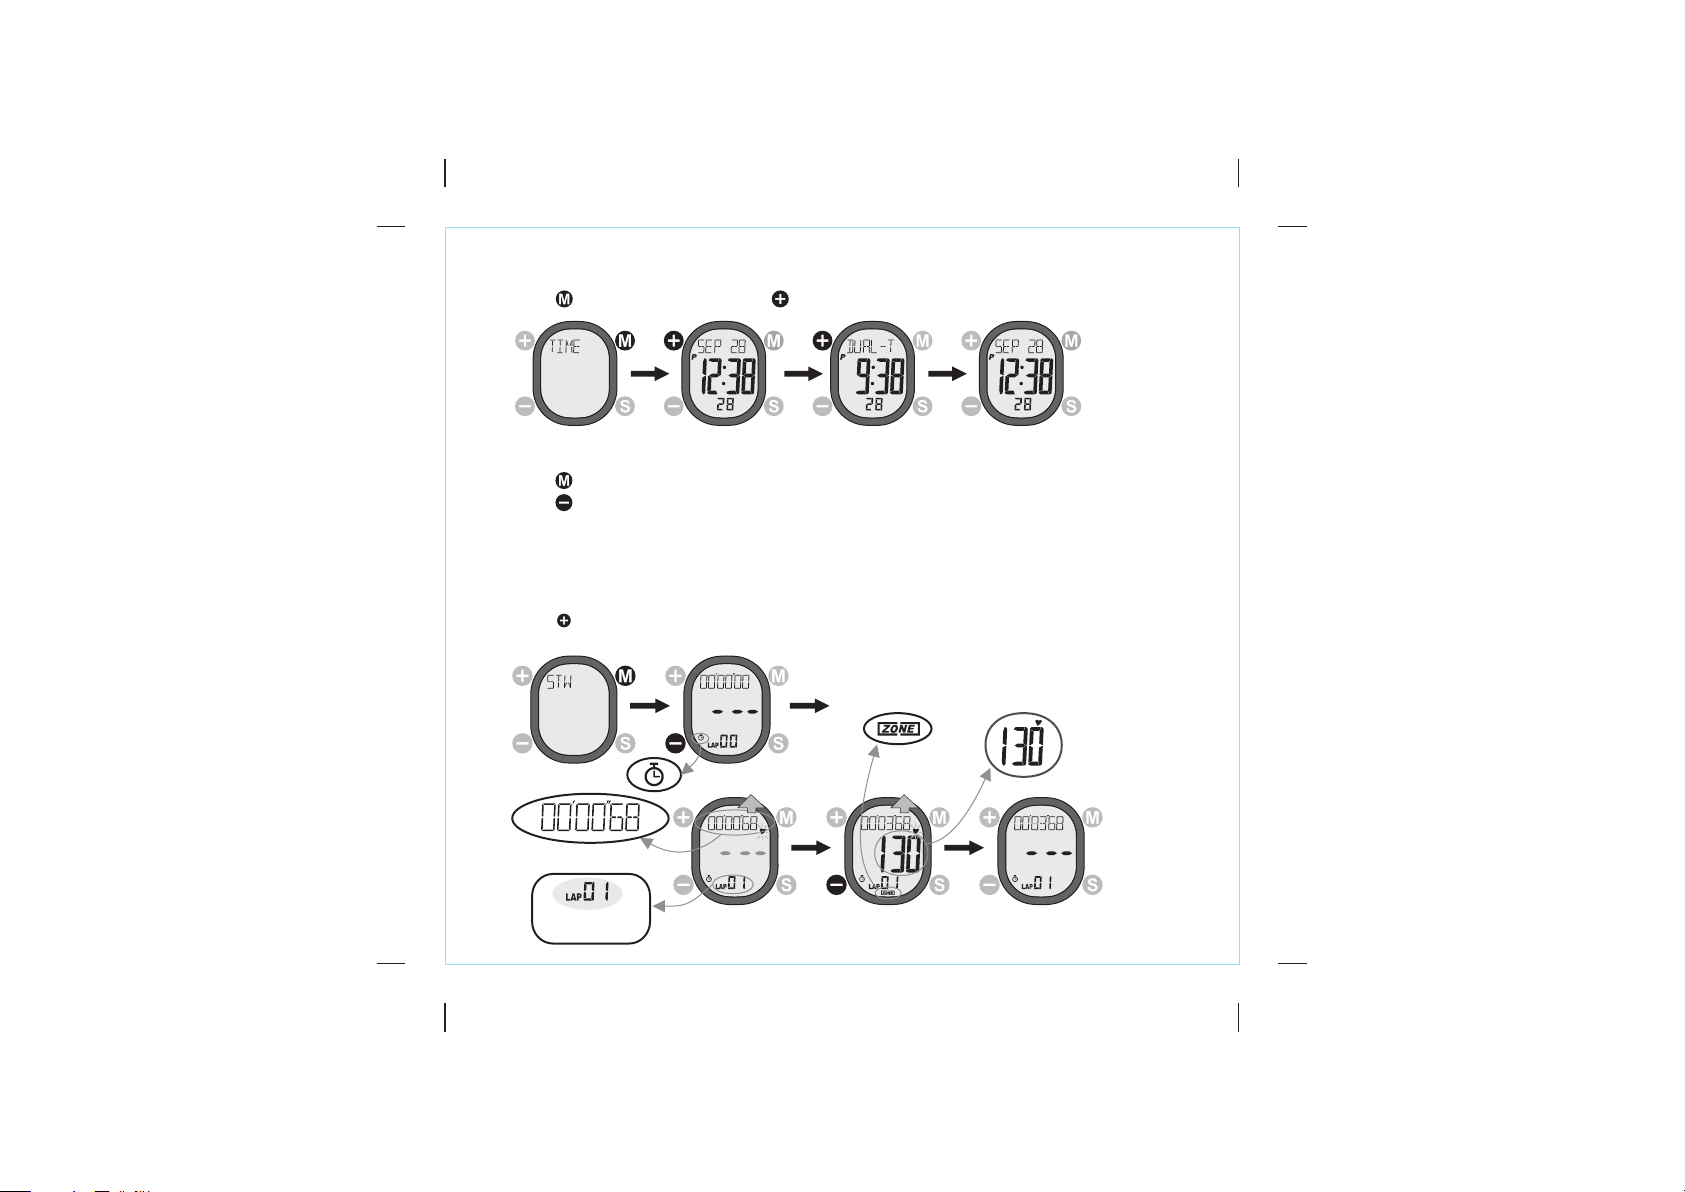
8.2 View Dual Time
!
Press until "TIME" appears and press .
9.0 Stopwatch
9.1 Use the Stopwatch
!
Press until STW appears. The heart rate function will be activated automatically.
!
Press to start or stop the stopwatch.
NOTE:
!
Please wear the chest belt in advance b!efore using the Stopwatch with heart rate function, otherwise it
functions as a normal stopwatch.
!
The Total Lap Time, Maximum (MAX) and Average (AVG) heart rate, Up (U), In (I) and Below(L) Zone Exercise
Time, Calorie (KCAL), and Fat Burn (FATB) are recorded if the chest belt is worn. These records can be
reviewed on Heart Rate Mode.
Press to resume the connection if the watch loses connection with chest belt during running,
!
Check the chapter 11.0 for the implications of Heart Rate Zone Indicator.
current
Heart Rate
Zone Indicator
heart rate
running running
current lap time
EVE 14
Features Only
7
Page 11

9.2 Take Lap time
!
Press to take a lap time when the stopwatch is running.
lap time (lap 1)
running running
lap time (lap 2)
9.3 Review Lap time
!
Press to stop the stopwatch and press to review total lap time, lap time of each lap and the average
lap heart rate of each lap. Press to quit the review.
total
lap time
running
lap time
( )lap 4
lap average
heart rate
EVE 14 Features Only
8
Page 12

9.4 Reset Stopwatch (and Lap time EVE 14 Features Only)
!
EVE 14
Features Only
old to reset the stopwatch (and lap time . Press to stop the stopwatch and h EVE 14 Features Only)
running
10.0 Set Your Personal Data for Your Personal Heart Rate Mode.
!
Press until "HRM" appears and hold for 2 seconds. Any Heart Rate sub-mode can enter the Heart Rate
Setting mode too by holding for 2 seconds.
!
Press / to set gender, birthday, height, weight, sport type, heart rate zone setting type ( )
and your upper and lower heart rate (for manual setting). Confirm each with .
heart rate zone
auto/manual
10.1 Set Gender, Birthday And Height
9
Page 13

10.2 Set Weight and Sport Type.
Choose your sport type
(slow)
(middle)
(fast)
(slow)
(middle)
(fast)
(low)
(middle)
(high)
10.3 Set Target Heart Rate Zone Setting Type
Lower
Limit
(Manual)
11.0 View the Target Heart Rate Zone Indications
Zone Heart Rate
Visual
Indication
Above Zone
Upper Limit
(Auto or Manual)
In-Zone
(the target heart rate zone)
Lower Limit
(Auto or Manual)
NOTE:
!
When the heart rate exceeds the upper or lower limits, the audible signal warning will go ON if key-tone is ON.
Below Zone
Heart Rate Zone Indication
Audible
Indication
Beep!
Beep!
Upper
Limit
(Manual)
10
Page 14
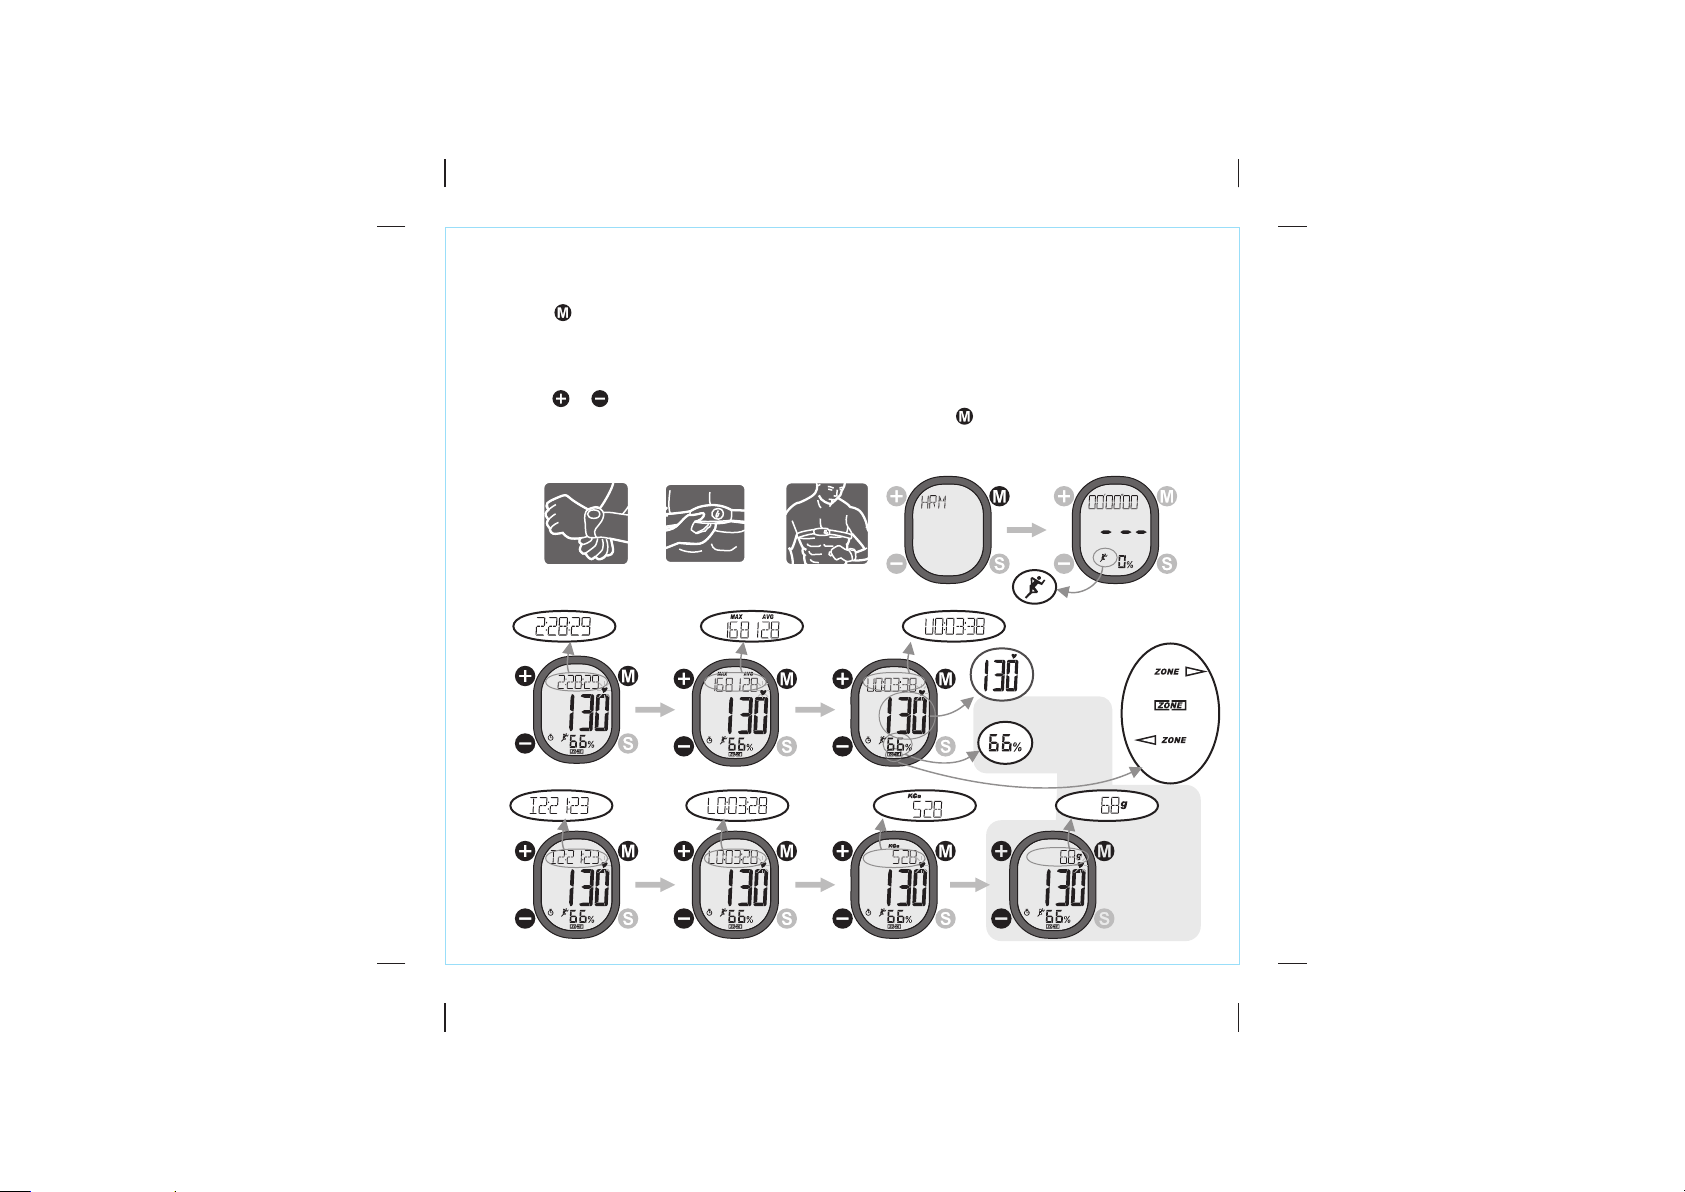
11.1 Use Heart Rate and Review the Training Record
Use the Heart Ra te function
!
Press until "HRM" appears.
!
The heart rate function will be activated automatically when Heart Rate Mode is selected.
NOTE:
!
Please wear the chest belt in advance before using the Heart Rate function.
Review the Training Rec ord
!
Press / to see t
Below(L) Zone Exercise Time, Calorie (KCAL), and Fat Burn (FATB)
NOTE:
!
The Total Lap Time, Maximum (MAX) and Average (AVG) heart rate, Up (U), In (I) and Below(L) Zone Exercise
Time, Calorie (KCAL), and Fat Burn (FATB) are recorded in Stopwatch Mode only .
Put on the
1.
Watch
he Total Lap Time, Maximum (MAX) and Average (AVG) heart rate, Up (U), In (I) and
Put on the
2.
chest belt
total lap
time
(stopwatch)
In-zone
exercise
time
Get your
3.
heart rate
Below-zone
exercise
time
Max. & Avg.
heart rate
Press to move to Alarm Mode.
Up-zone
exercise
time
current
heart rate
the current
heart rate
in term of %
of the
maximum
heart rate
l
Calorie
Expenditure
l
Heart R at e Zone
Ind icato r (Refe r to
Chapt er 11.0)
Abo ve-zone
In- zone
Bel ow-zone
Fat
Burn
EVE 14
Fea tu res
Only
11
Page 15

12.0 Alarm
12.1 Select Alarm 1 or Alarm 2
!
Press to select Alarm 1 or Alarm 2. Press until "ALARM" appears.
12.2 Set Daily Alarm
!
Press until "ALARM" appears and hold for 2 seconds.
!
Press / to select hour and minute, and confirm each with . Press to return to Alarm Mode.
12.3 Activate or Deactivate the Alarm
!
Press to activate ( appears) or deactivate the alarm.( appears)
12
Page 16
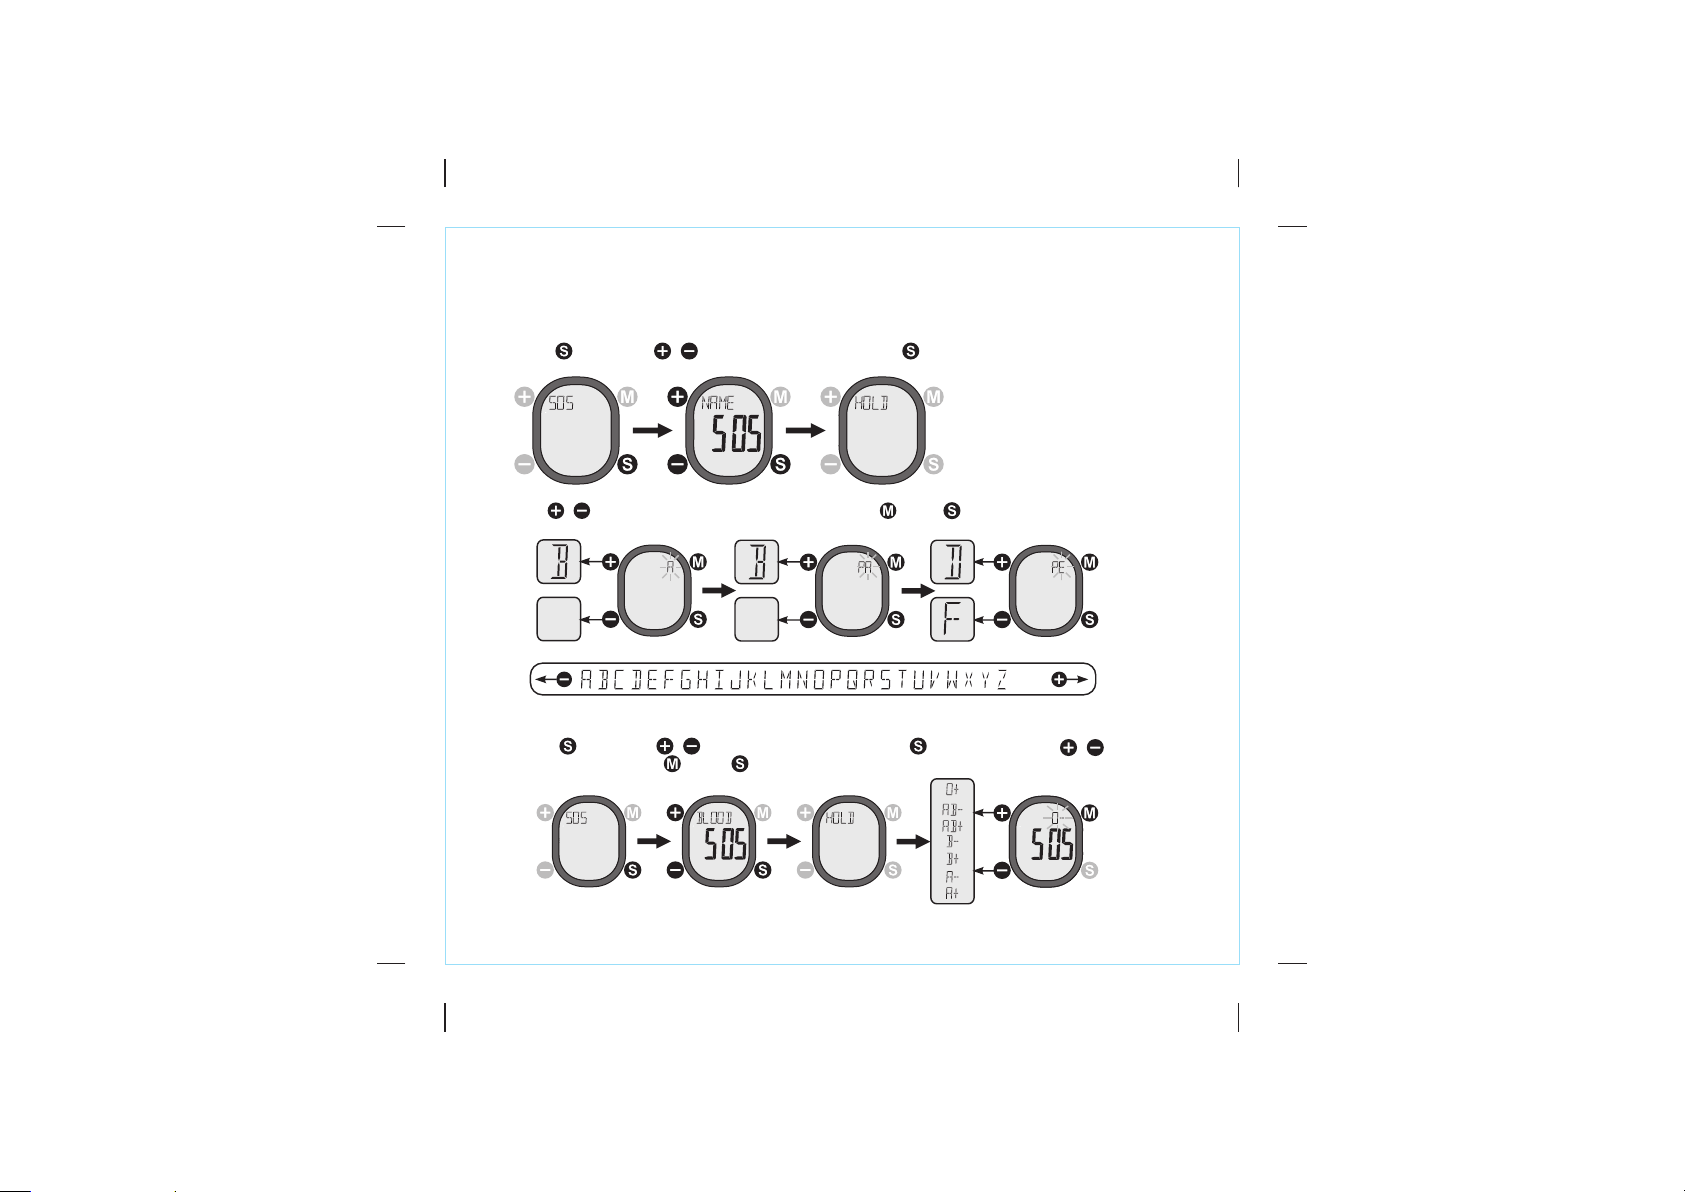
13.0 SOS Mode
!
User's personal infomation for emergency.
13.1 Set Name for SOS.
!
Press once. for 2 seconds.Press / until "NAME" appears and hold
!
Press / to select the alphabet, and confirm each with . Press to return to SOS Mode.
Spa ce Spa ce
(Sp ace)
13.2 Set Blood type for SOS.
!
Press once. for 2 seconds. Press / until "BLOOD" appears and hold Press / to select a blood
type and confirm with . Press to return to SOS Mode.
13
Page 17

13.3 Set Phone number for SOS.
!
Press once. for 2 seconds.Press / until "PHONE" appears and hold
!
Press / to select the digit, and confirm each with . Press to return to SOS Mode.
13.4 View Name, Blood type, Phone number for SOS
!
Press once. Press / to view the Name, Blood type, and phone number. Press to return to SCAN Mode.
Name: PETER
Phone no: 12345678
Blood type: O+
14
Page 18
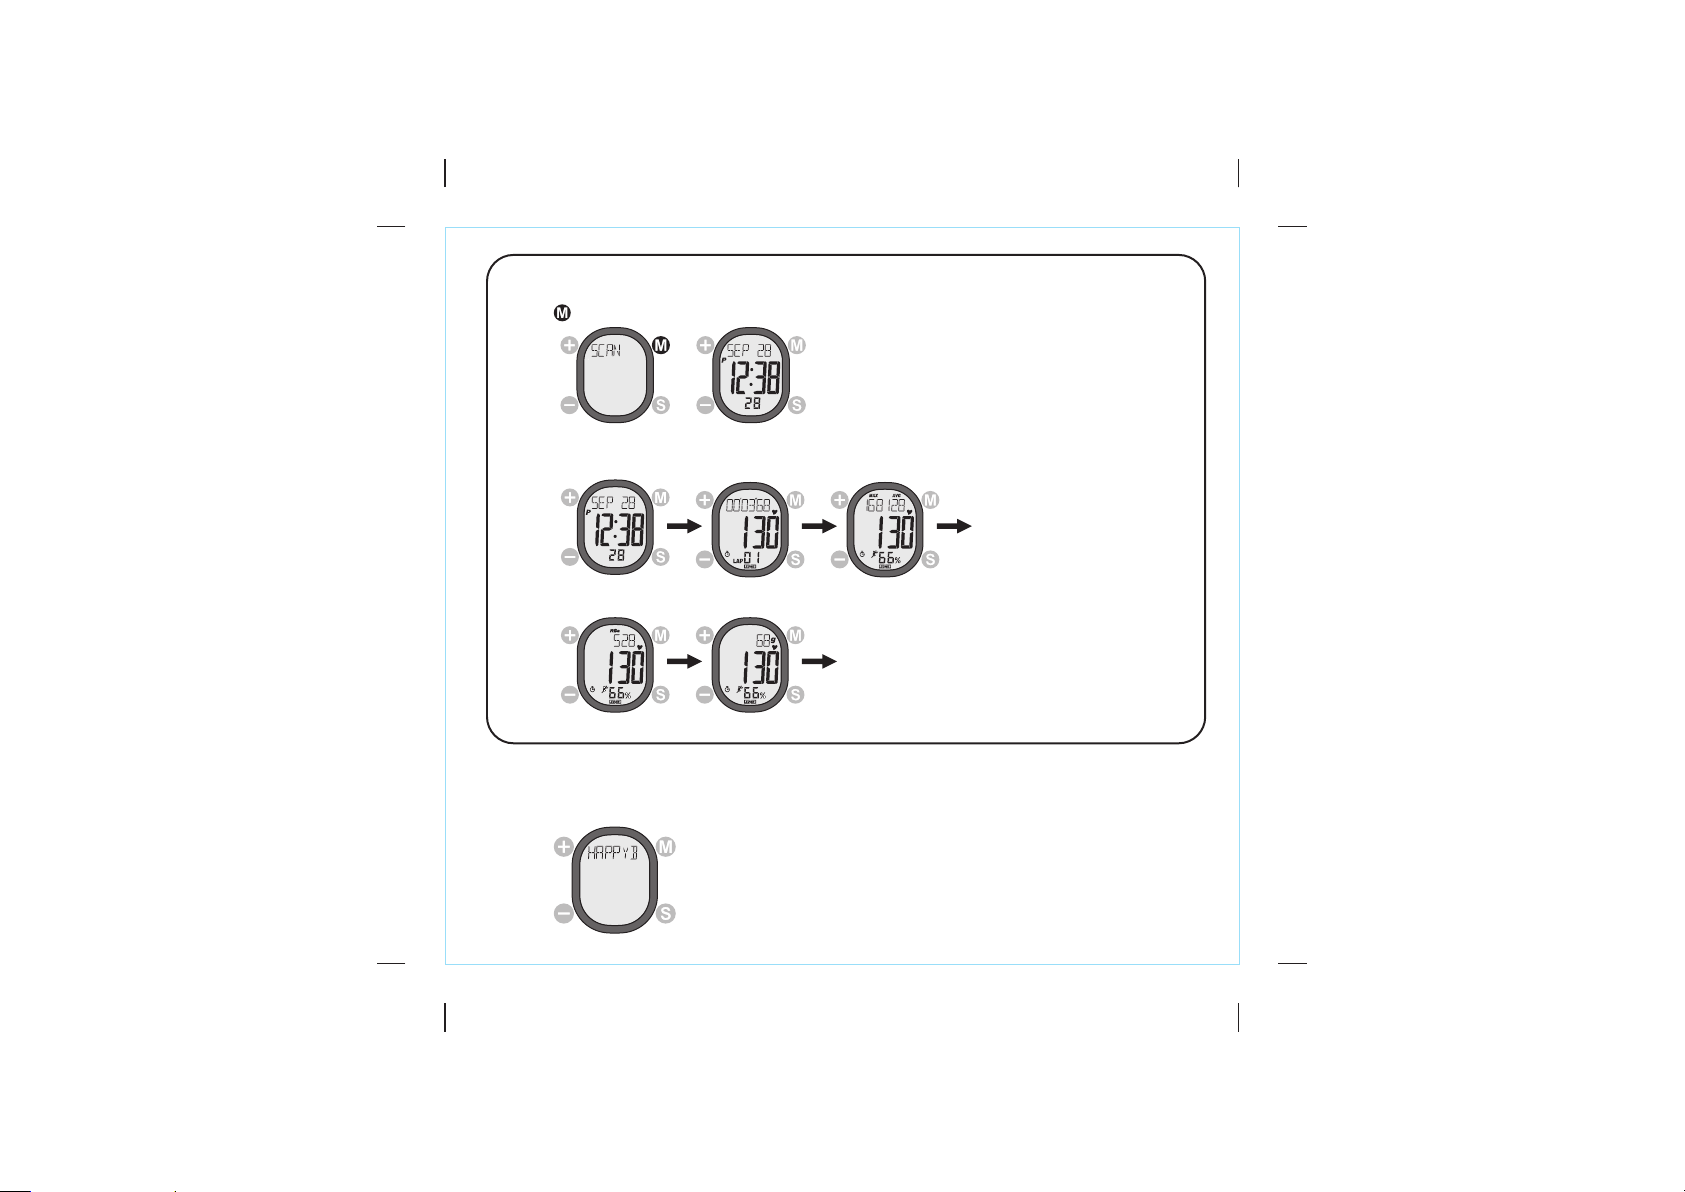
14.0 View Scan mode: Current Time Mode, Stopwatch Mode and Heart Rate Mode cyclically.
The Scan Mode shows all training results after a training.
!
Press until "SCAN" appear.
!
Without pressing any key the watch starts to show the following displays one by one cyclically: TIME, STW,
AVGHR, KCAL and FATB.
Time Display
l
Calorie Burnt Display
Stopwatch Display
Fat Burnt Display
Average Heart Rate
Display
Time Display ...
EVE 14 Features Only
15.0 Birthday Reminder
!
When the date is the same as the birthday set by the user, the watch will beep for 1 minute to remind the
user, after the watch is being woke up from sleep mode.
15
Page 19

16.0 Low Battery Indication
!
When the battery of the watch drops to a low level, the Low Battery Indicator will be ON to remind user.
17.0 Reset the Watch and Power Saving Mode
!
In any Modes, hold all the 4 buttons for more than 5 seconds will reset all the settings of the watch. After
reset, all parameters and pairing of chest belt need to be set again.
!
In Time Mode, press and hold for 5 seconds to go into Power Saving Mode (turning off the LCD).
Timekeeping function is still running under Power Saving Mode. Press any key to resume from this mode.
Power Saving ModeReset Display (Full Segment ON)
(5 seconds later)(5 seconds later)
18.0 Pot ential Causes for NO Heart Rate Reading or Long Response Time
1) Cause: Dry Skin.
Solution: Apply conductive gel or saliva thoroughly to chest area. (Even water will help if conductive gel is
not available).
2) Cause: Chest belt is not placed firmly over the chest.
Solution: Make sure the Chest belt is placed firmly over the chest by tightening elastic band.
3) Cause: Muscle tremors caused by holding the Chest belt too hard on your chest.
Solution:
This will ensure good and consistent readings even while walking or jogging with arms swung naturally.
4) Cause: Dead skin on chest.
Solution: Usually rubbing your chest with a towel will help.
5)Cause: A thin layer of body grease can insulate the ECG signal-basically prevents the back sensor on
the Chest belt from picking up one's ECG.
Solution: Wipe chest and the contacts on the back of Chest belt with a tissue or soft towel.
6) Cause: Hairy chest.
Solution: Apply conductive gel to chest area.
7)Cause: Irregular heartbeats.
Solution: N/A. It is difficult to consistently pick up a reading for those with irregular heart beats.
Inconsistent response times are expected for those with arrhythmia.
8)Cause: Low Battery.
Solution: It might be due to the battery level of the Chest belt is low. Replace the battery of the Chest belt.
The contacts must make firm contact (NOT too hard) with the user's skin during measurement.
16
Page 20
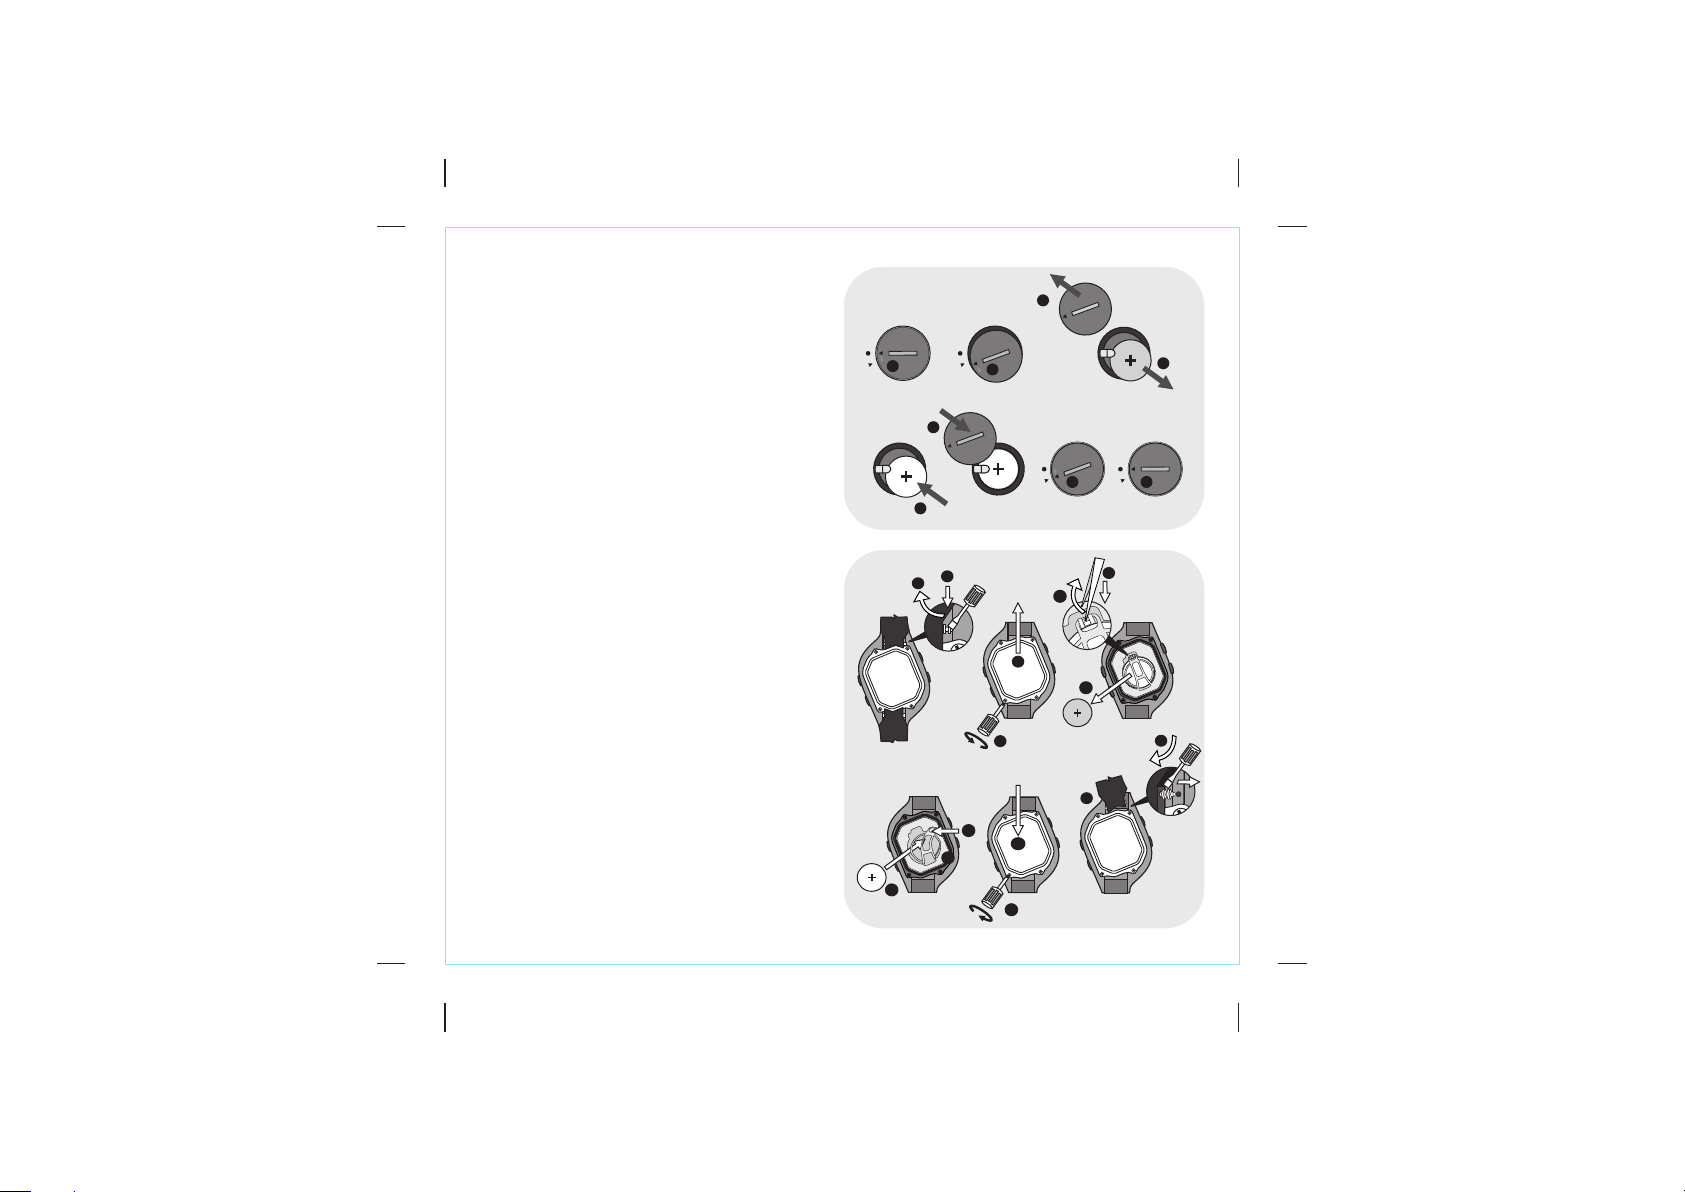
19.0 Chest Belt Battery Replacement
1 .T u r n t h e b a t t er y c o v e r w it h a c o in
counterclockw ise unti l the arrow pointin g to
arrow.
2.Turn the cov er furth er gently to pop it out.
3.Put aside the batte ry cover.
4.Remove the empty battery.
5.Insert a new CR2025 battery w ith the (+) side
of the battery touch with the 'L' shape metal
contact.
6.IMPORTANT: Make su re that the sealing rubber
o-ring is placed correctly in its slot before the
battery cover is closed.
7.Put the battery cover back with the arrow on the
cover pointing to the arrow, and then press the
cover do wn gently until it is on the same level
with the surface.
8.Turn the cover with the coin clockwise until the
arrow pointing to dot .
20.0 Watch Battery Replacement
1. Insert the tip of a flathead screw-driver into the
notch of the spring bar.
2. Push the notch and lift the wrist strap to dislodge
the spring bar. Dislodge the lower strap similarly.
3. Unscrew the case-back with a crosshead screw-
driver.
4. Put aside the case-back.
5. Insert one end of the pinchers into the notch of the
battery contact plate.
6. Push the notch outward GENTLY.
7. Put aside the empty battery.
8. Insert a NEW CR2025 battery with (+) upward.
9. A ‘click’ will sound when the buckle is locked.
10.IMPORTANT: Make sure that the rubber ring is
sitting in the slot properly before screw the caseback, otherwise water will leak into the Watch.
11.Put the case-back back to its original position.
12.Screw the case-back to the case.
13.Insert one end of the spring bar into the lodge on
the watch.
14.Insert the tip of a flathead screw-driver into the
of the spring bar
notch . Push the notch and lower
the wrist strap to the watch until the spring bar
is COMPLETELY lodged. Lodge the lower strap
similarly.
on
3
1
CR202 5
5
2
CR2025
8
2
6
CR202 5
1
3
9
10
12
7
6
4
7
CR2025
4X
13
11
4X
4
CR202 5
8
5
14
3
17
Page 21

FCC Warning:
This device complies with part 15 of the FCC Rules. Operation is subject to the following two conditions:
(1) This device may not cause harmful interference, and
(2) This devi
Cha
nges or modifications not expressly approved by the party responsible for compliance could void the user's
authority to operate the equipment.
ce must accept any interference received, including interference that may cause undesired operation.
 Loading...