

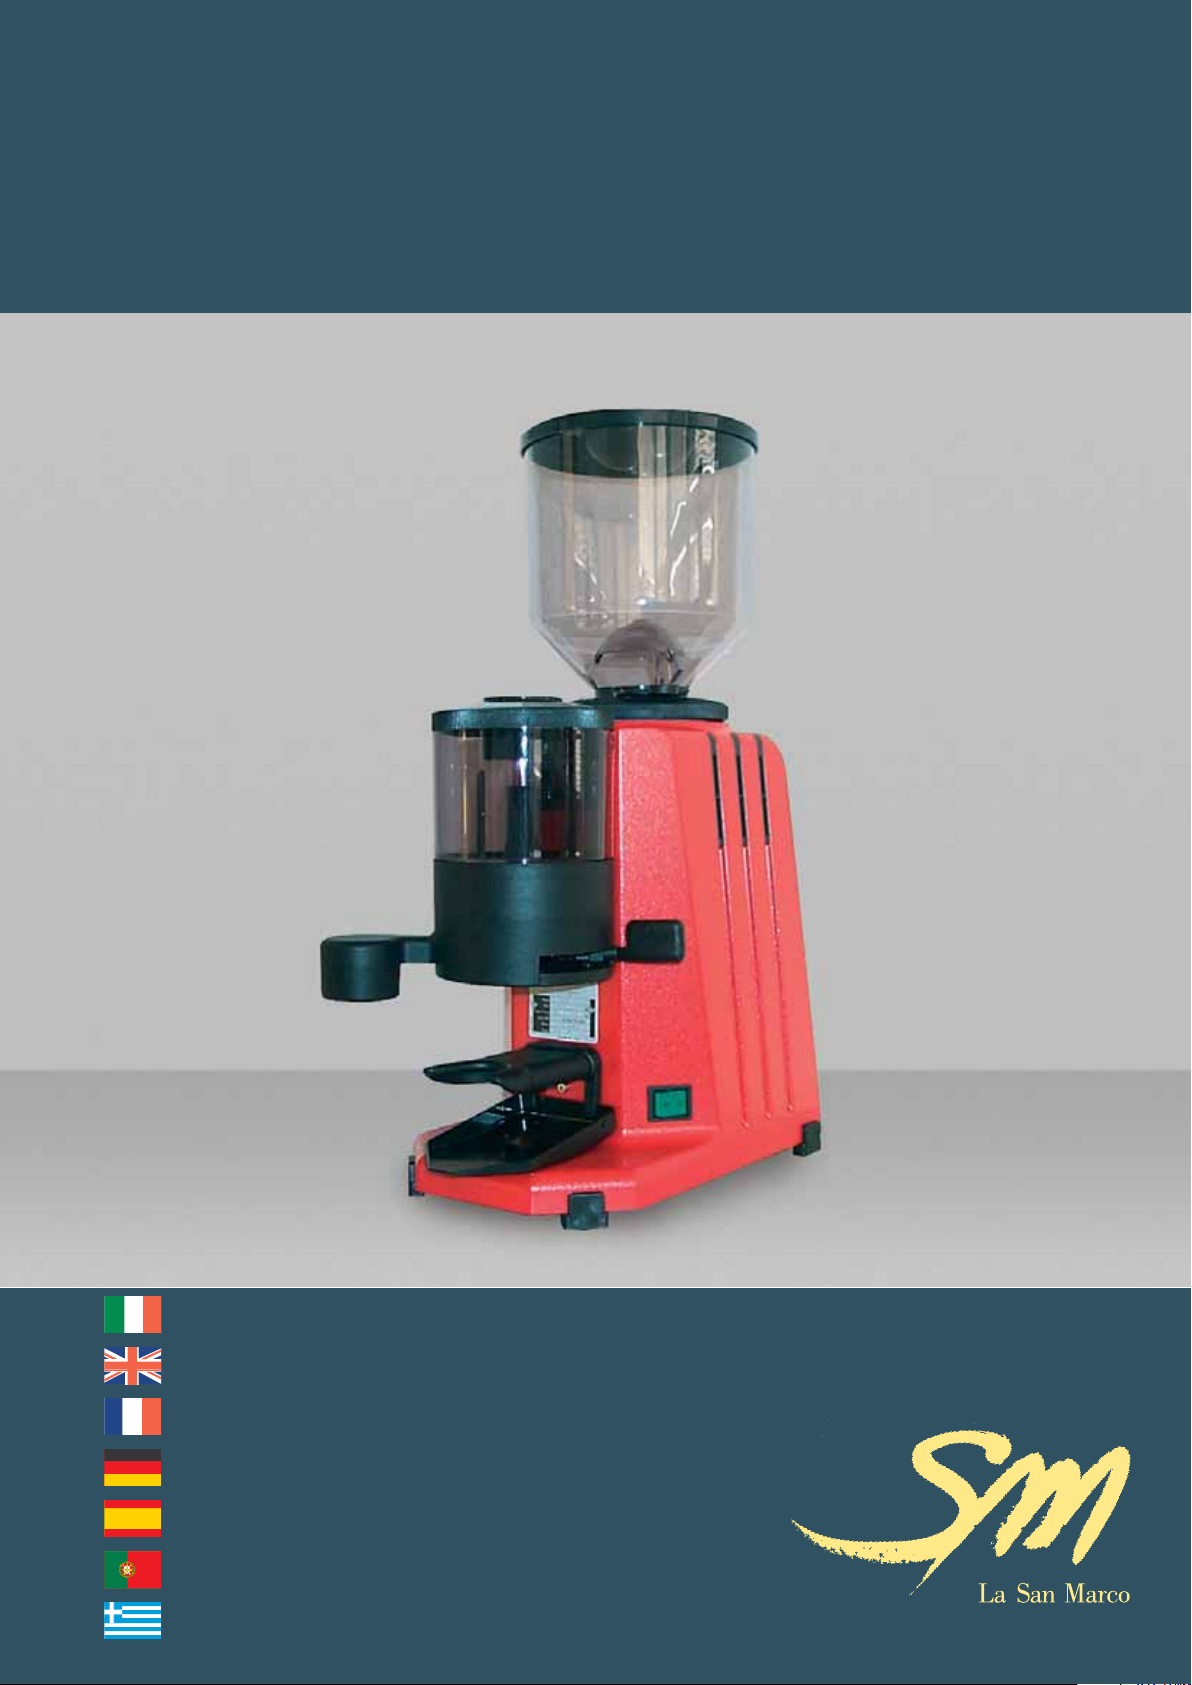
La San Marco SM 90A Installation Manual
MACINADOSATORE 90-95
IT MACINADOSATORE SM 90-95
GB GRINDER-DISPENSER SM 90-95
FR MOULIN DOSEUR SM 90-95
DE DOSIERMÜHLE SM 90-95
ES MOLINILLO-DOSIFICATOR SM 90-95
PT MOINHO-DOSEADOR SM 90-95
GR ¢O™IMETPIKO™ MY§O™ KAºE SM 90-95
MACINADOSATORE SM 90-95
ITALIANO

ITALIANO
Indice Generale
1. Note di carattere generale . . . . . . . . . . . . . . . . . . . . . . . . . . pag. 3
2. Introduzione . . . . . . . . . . . . . . . . . . . . . . . . . . . . . . . . . . . . pag. 4
3. Caratteristiche tecniche . . . . . . . . . . . . . . . . . . . . . . . . . . . . pag. 5
4. Installazione del macinadosatore . . . . . . . . . . . . . . . . . . . . pag. 7
1.1 Il caffè espresso . . . . . . . . . . . . . . . . . . . . . . . . . . . . . . . . . . . . . . . . . . . . . . . . pag. 3
1.2 La conservazione del caffè in grani . . . . . . . . . . . . . . . . . . . . . . . . . . . . . . . . . pag. 3
1.3 Il macinadosatore e la macinatura . . . . . . . . . . . . . . . . . . . . . . . . . . . . . . . . . . pag. 3
1.4 La conservazione del caffè macinato . . . . . . . . . . . . . . . . . . . . . . . . . . . . . . . . pag. 3
1.5 La macchina per caffè espresso . . . . . . . . . . . . . . . . . . . . . . . . . . . . . . . . . . . pag. 3
1.6 Condizioni climatiche - operatore . . . . . . . . . . . . . . . . . . . . . . . . . . . . . . . . . . pag. 3
2.1 Consultazione del manuale . . . . . . . . . . . . . . . . . . . . . . . . . . . . . . . . . . . . . . . pag. 4
2.2 Avvertenze . . . . . . . . . . . . . . . . . . . . . . . . . . . . . . . . . . . . . . . . . . . . . . . . . . . . pag. 4
3.1 Caratteristiche generali dei vari modelli . . . . . . . . . . . . . . . . . . . . . . . . . . . . . . pag. 5
3.2 Caratteristiche tecniche . . . . . . . . . . . . . . . . . . . . . . . . . . . . . . . . . . . . . . . . . . pag. 5
3.3 Disegno complessivo . . . . . . . . . . . . . . . . . . . . . . . . . . . . . . . . . . . . . . . . . . . . pag. 6
4.1 Avvertenze . . . . . . . . . . . . . . . . . . . . . . . . . . . . . . . . . . . . . . . . . . . . . . . . . . . . . pag. 7
4.2 Collegamento elettrico. . . . . . . . . . . . . . . . . . . . . . . . . . . . . . . . . . . . . . . . . . . . pag. 7
4.3 Programmazione del tempo di macinatura (mod. automatici) . . . . . . . . . . . . . pag. 8
4.4 Regolazione della macinatura . . . . . . . . . . . . . . . . . . . . . . . . . . . . . . . . . . . . . . pag. 8
4.5 Sostituzione delle macine . . . . . . . . . . . . . . . . . . . . . . . . . . . . . . . . . . . . . . . . . pag. 8
4.6 Regolazione della dose del caffè macinato. . . . . . . . . . . . . . . . . . . . . . . . . . . . pag. 9
5. Istruzioni per il funzionamento. . . . . . . . . . . . . . . . . . . . . . . pag. 9
5.1 Utilizzo del macinadosatore . . . . . . . . . . . . . . . . . . . . . . . . . . . . . . . . . . . . . . . pag. 9
5.2 Consigli pratici per l'operatore . . . . . . . . . . . . . . . . . . . . . . . . . . . . . . . . . . . . . pag. 9
6. Informazioni agli utenti. . . . . . . . . . . . . . . . . . . . . . . . . . . . . pag. 10
7. Garanzia. . . . . . . . . . . . . . . . . . . . . . . . . . . . . . . . . . . . . . . . pag. 10
8. Dichiarazione di conformità . . . . . . . . . . . . . . . . . . . . . . . . . pag. 10
9. Problemi e soluzioni. . . . . . . . . . . . . . . . . . . . . . . . . . . . . . . pag. 11
Manuale Cod. 7770.030
Revisione 01.08
2

1. Note di carattere generale
• Nella prima parte di questo manuale d'uso è spiegato brevemente il metodo per la produzione del caffè
espresso, le moderne attrezzature utilizzate e la funzione che svolge il macinadosatore all'interno di questo delicato processo.
1.1 Il caffè espresso
L'espresso è un caffè preparato con un metodo d'estrazione particolare, che consente di ottenere una bevanda molto concentrata, sciropposa, dal gusto e dall'aroma intensi. Il metodo di preparazione dell'espresso consiste nell'estrarre le sostanze contenute nel caffè macinato mediante il flusso d'acqua calda sotto pressione
(circa 9 bar) per un tempo variabile dai 25 ai 35 secondi; in questo modo le sostanze solubili (zuccheri e proteine) ed insolubili (grassi e colloidi) contenute nel caffè sono "trascinate" nella tazzina formando la crema
caratteristica del vero espresso. La preparazione dell'espresso è un'operazione molto delicata; esistono diversi fattori che influiscono sulla riuscita di quest'operazione: la conservazione del caffè in grani, il macinadosatore e la macinatura, la conservazione del macinato, la macchina per caffè espresso, la variabilità delle condizioni climatiche, l'attenzione e la competenza dell'operatore addetto alla preparazione del caffè espresso.
1.2 La conservazione del caffè in grani
Le varietà di caffè presenti in natura sono due: la qualità "arabica" e la qualità "robusta". Solitamente il caffè torrefatto utilizzato per produrre l'espresso contiene una miscela delle due varietà, opportunamente mescolate in
percentuali variabili, che tengono conto delle caratteristiche organolettiche dei singoli componenti. La miscela di
caffè torrefatto deve essere conservata chiusa ermeticamente all'interno della sua confezione. Il caffè in grani,
dopo la torrefazione, contiene al suo interno tutte le sostanze e gli aromi caratteristici della varietà o della miscela; tali aromi svaniscono rapidamente quando i grani di caffè vengono a contatto con l'aria, la luce e l'umidità.
ITALIANO
1.3 Il macinadosatore e la macinatura
Il macinadosatore è un apparecchio che provvede alla macinazione del caffè in grani e alla sua dosatura. Per
ottenere un buon espresso occorrono particelle di caffè macinato con diametro variabile da circa 1 mm, fino
a polvere inferiore a 150 μm. Il caffè in polvere offre una maggiore superficie di contatto all'acqua, consentendo una più elevata estrazione delle sostanze solubili ed insolubili; variando la granulometria del macinato
si potrà così modificare la resistenza offerta al passaggio dell'acqua. Se il macinato è composto di granuli
troppo grossi, l'erogazione avviene in maniera troppo veloce, l'acqua non riesce ad estrarre completamente
le qualità del macinato e si ottiene così un espresso di colore chiaro, acquoso, senza il gusto e l'aroma caratteristico del caffè. Quando il macinato è troppo fine, invece, l'espresso è di colore scuro, bruciato e freddo;
il tempo d'erogazione è troppo lungo e l'acqua filtra con difficoltà in quanto la polvere offre una resistenza
eccessiva al suo passaggio. Il caffè espresso risulta sovraestratto.
1.4 La conservazione del caffè macinato
Il caffè macinato è molto più sensibile del caffè in grani: la dispersione delle sostanze aromatiche è molto
veloce se viene conservato in recipienti aperti e in ambienti umidi. La macinazione del caffè in grani deve
essere fatta su piccole quantità e il macinato deve essere utilizzato nel più breve tempo possibile.
1.5 La macchina per caffè espresso
La macchina per caffè espresso è quell'apparecchiatura sostanzialmente costituita da una caldaia e da una
serie di scambiatori, nella quale il riscaldamento dell'acqua è realizzato per mezzo di una resistenza elettrica o di un bruciatore a gas. L'acqua, portata ad elevata temperatura, attraversa il caffè macinato posto nella
coppa porta filtro e ne estrae gli aromi. Quando nel presente manuale si parla di macchina per caffè espresso, ci si riferisce ai modelli ad "erogazione continua" con gruppo idraulico e a quelli a pistone manuale (detti
a leva). I macinadosatori che La San Marco S.p.A. produce sono apparecchi professionali progettati e
costruiti per essere affiancati a questi tipi di macchina per caffè espresso.
1.6 Condizioni climatiche - operatore
Per ottenere un buon espresso, come detto, è indispensabile macinare il caffè secondo una certa granulometria. Il caffè macinato è molto igroscopico; "sente", in altre parole, l'umidità ambientale. La macinatura
deve essere modificata al variare delle condizioni climatiche; un macinato con un tasso d'umidità elevato
aumenta la resistenza al passaggio dell'acqua. Altri fattori importanti per la preparazione del caffè espresso
sono la quantità e la pressatura del macinato all'interno della coppa porta filtro. Questi ultimi fattori (umidità,
quantità e granulometria del macinato, pressatura) devono essere considerati e valutati dall'operatore addetto alla realizzazione dell'espresso. Per questi motivi l'operatore ha un ruolo fondamentale nel percorso della
preparazione del caffè espresso.
3
ITALIANO
2. Introduzione
2.1 Consultazione del manuale
2.2 Avvertenze
• Il presente manuale fornisce tutte le informazioni necessarie all'installazione, all'avviamento, all'utilizzo e alla manutenzione del macinadosatore.
• Il personale addetto al normale uso e alla manutenzione ordinaria e il personale tecnico adibito agli interventi di manutenzione straordinaria e di riparazione devono aver
letto attentamente ed assimilato il contenuto di tale manuale.
• Questo manuale è parte integrante della macchina, deve essere conservato per tutta
la durata della macchina a cui si riferisce e deve essere trasferito a qualsiasi altro utente o successivo proprietario.
• Il manuale o copia di esso deve essere sempre vicino alla macchina per la consultazione da parte dell'operatore; deve essere conservato con cura, in luogo protetto da calore, umidità, polvere e agenti corrosivi.
• Il macinadosatore La San Marco S.p.A. deve essere usato secondo le modalità
descritte dal presente manuale; ogni uso improprio o difforme di tale apparecchio preclude ogni condizione di garanzia o responsabilità del costruttore.
• Il macinadosatore è stato progettato e costruito per provvedere alla macinazione del
caffè in grani e alla sua dosatura. Ogni uso al di fuori di quanto specificato nel presente manuale è da considerarsi improprio e pertanto non autorizzato. Il costruttore
declina ogni responsabilità per danni derivanti dall'uso improprio dell'apparecchio.
• L'utilizzatore deve essere una persona adulta e responsabile, il quale deve attenersi
alle norme di sicurezza vigenti nel paese d'installazione oltre che alle regole dettate
dal comune buon senso. Per un uso corretto e sicuro della macchina, l'operatore deve
osservare le regole di prevenzione degli infortuni ed ogni altro requisito di medicina e
igiene del lavoro.
• L'utilizzo dell'apparecchio e le operazioni di manutenzione ordinaria e pulizia sono
riservate al solo personale addetto, delegato dal cliente sotto la sua responsabilità.
• È severamente vietato far funzionare la macchina con le protezioni fisse e/o mobili
smontate o con i dispositivi di sicurezza esclusi; è severamente vietato rimuovere o
manomettere i dispositivi di sicurezza.
• Mentre il macinadosatore è in funzione, non introdurre all'interno della tramoggia o del
dosatore oggetti, quali utensili o simili (cacciaviti, cucchiai, ecc.).
• Prima di effettuare qualsiasi operazione di manutenzione ordinaria o pulizia, staccare
la spina d'alimentazione elettrica dalla presa di rete, se possibile, altrimenti disinserire l'interruttore onnipolare a monte della macchina.
• Per le operazioni di pulizia evitare l'utilizzo di prodotti quali alcool, benzina o solventi
in genere; utilizzare acqua o solventi neutri.
• Per le operazioni di pulizia della carrozzeria è sufficiente utilizzare un panno umido o
una spugna; non utilizzare mai getti d'acqua. Per la pulizia delle parti interne del dosatore, del gruppo di macinazione e della tramoggia utilizzare una spazzola.
• Gli interventi di manutenzione straordinaria e riparazione devono essere eseguiti dal
personale tecnico specializzato dei centri di assistenza tecnica La San Marco S.p.A.
• Se il cavo di alimentazione è danneggiato, esso deve essere sostituito dal costruttore o dal suo servizio assistenza tecnica o comunque con qualifica similare.
• In caso di guasti o rottura di qualche componente del macinadosatore rivolgersi al
centro di assistenza autorizzato e richiedere l'utilizzo di ricambi originali La San Marco
S.p.A.; l'utilizzo di ricambi non originali fa decadere le certificazioni di conformità che
accompagnano la macchina.
• È severamente vietato procedere alla realizzazione di operazioni delle quali non si è autorizzati e non si sono capite le esatte modalità; contattare la casa costruttrice per ogni necessità di informazioni, ricambi o accessori.
• In caso di messa in disuso e smantellamento della macchina rivolgersi al fornitore
oppure alle aziende municipalizzate che si occupano dello smaltimento dei rifiuti solidi urbani. Non disperdere nell'ambiente.
4

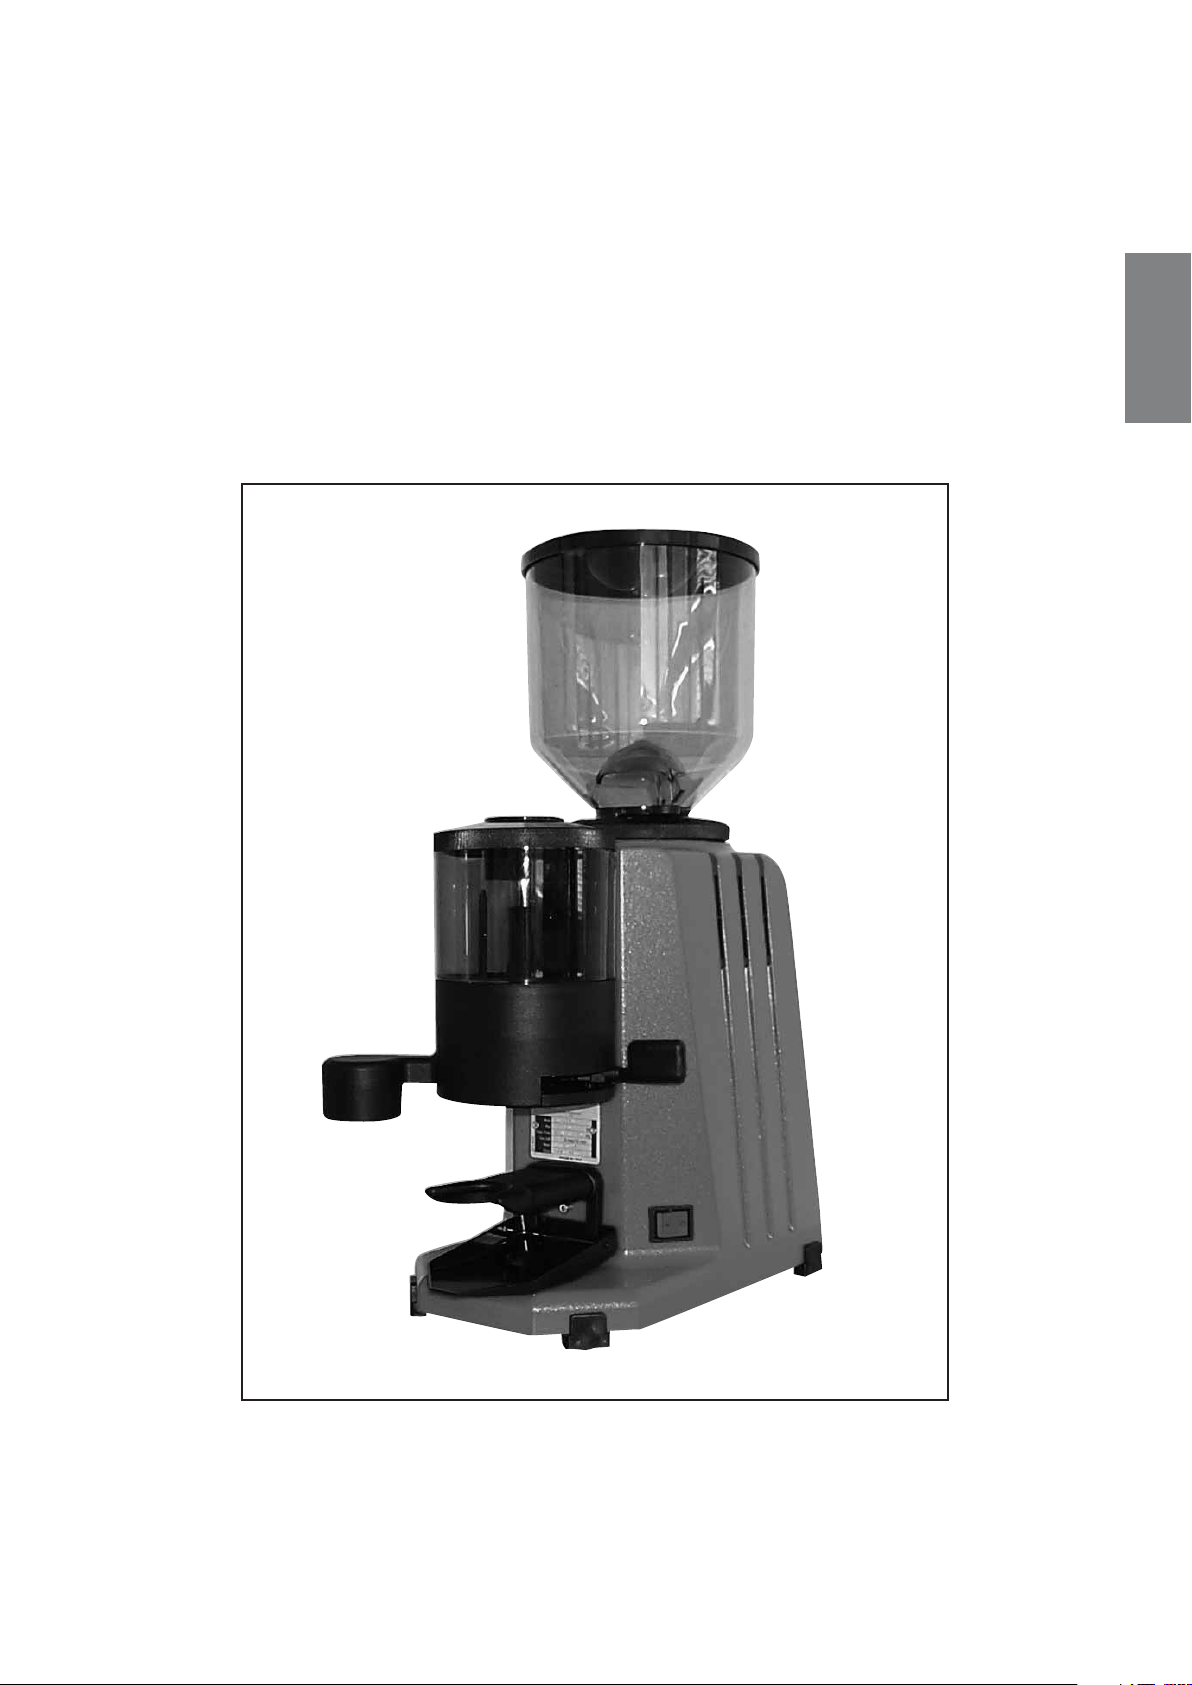
3. Caratteristiche tecniche
3.1 Caratteristiche generali dei vari modelli
I macinadosatori La San Marco sono attrezzature professionali che provvedono alla macinazione del caffè in
grani e alla sua dosatura. La San Marco S.p.A. produce due modelli di macinadosatori e sono: SM 90; SM
95. Sono essenzialmente composti da:
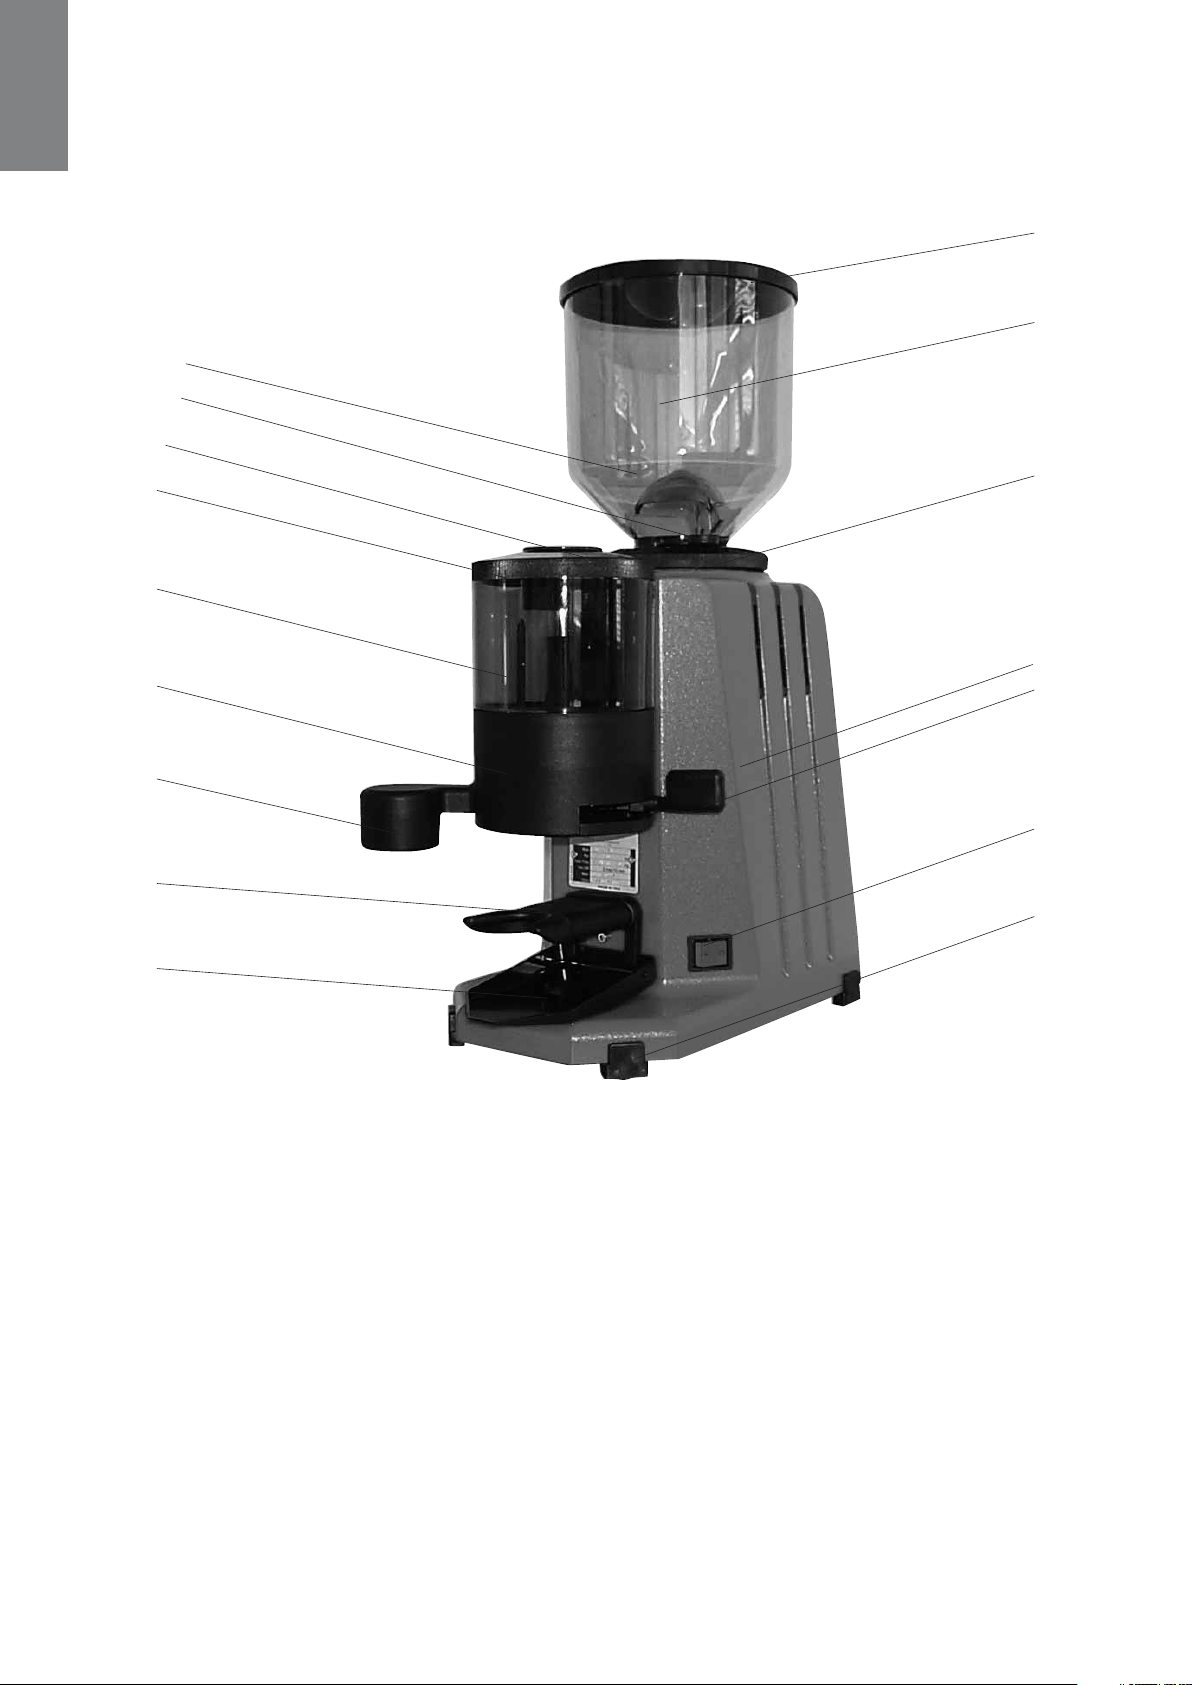
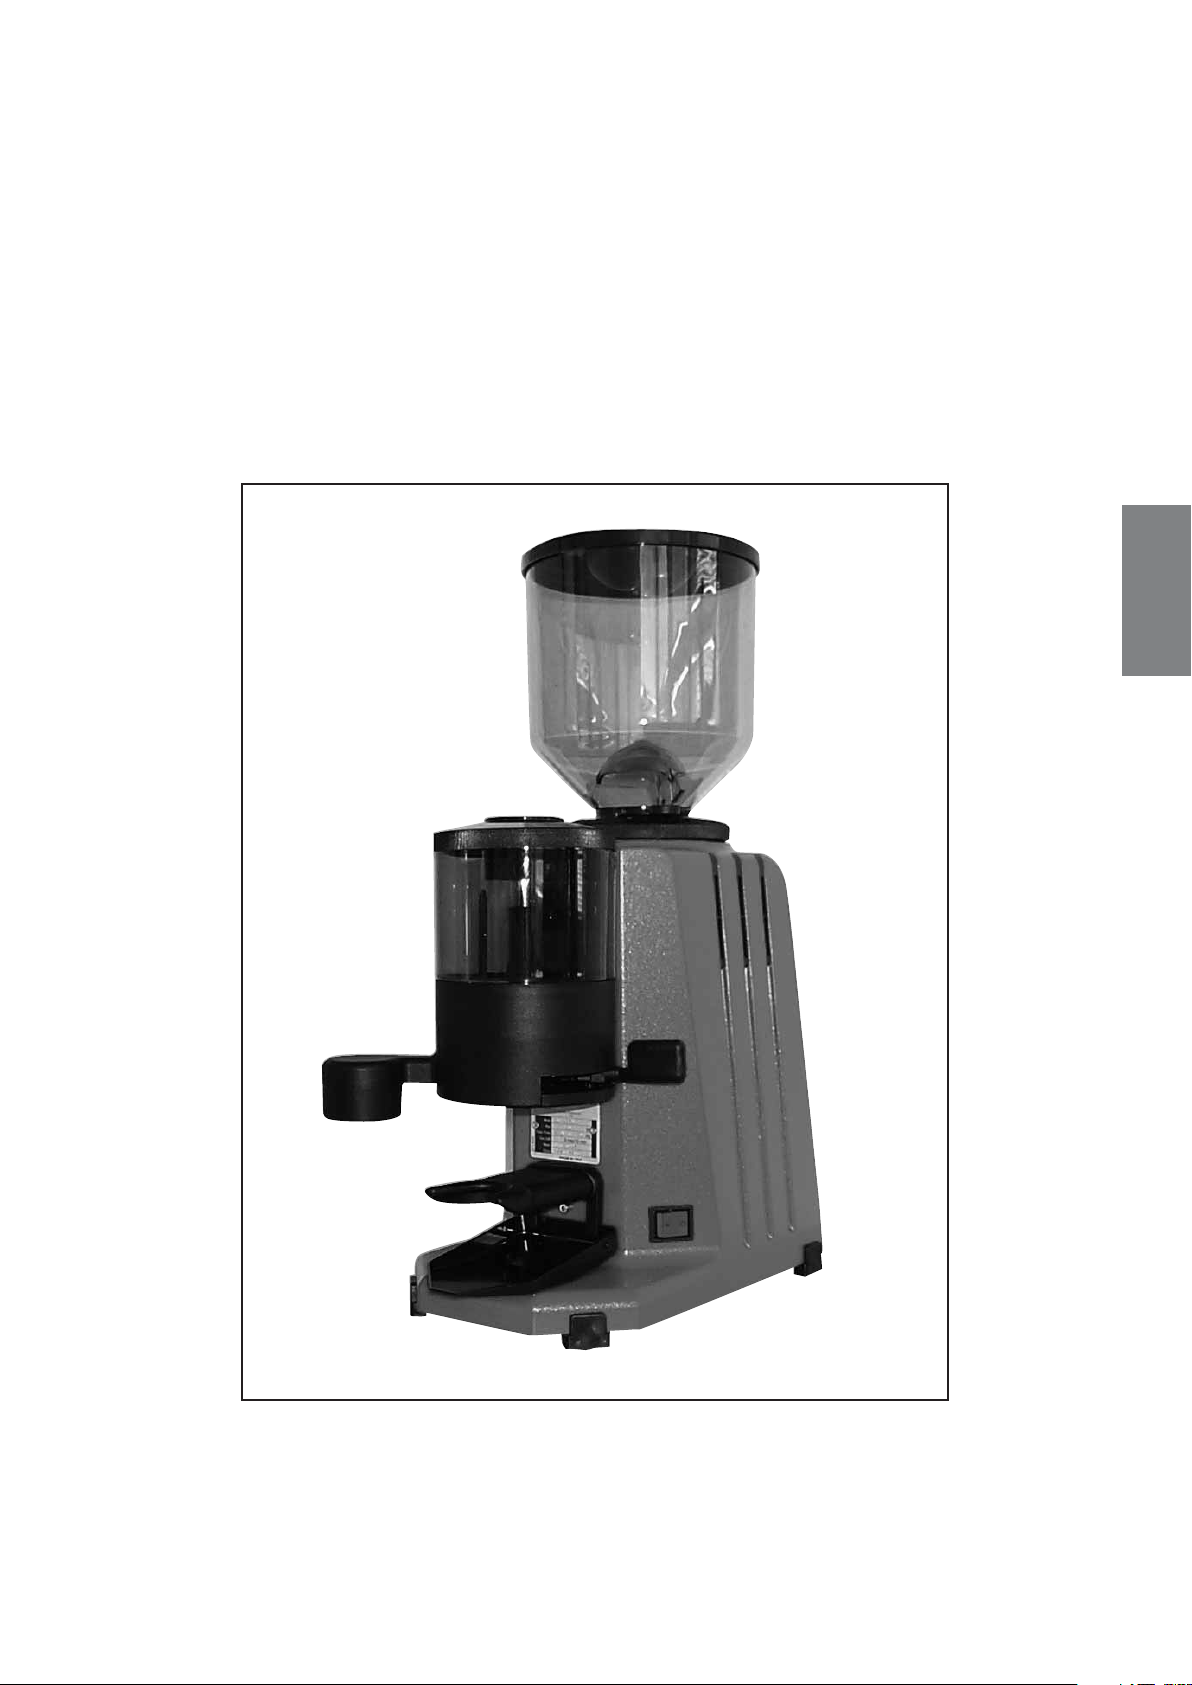
• Una carrozzeria 1 in alluminio verniciato. Le dimensioni, la forma e il volume sono identiche per tutti i modelli.
• Una tramoggia 3, in materiale plastico trasparente, posizionata nella parte superiore del macinadosatore.
La tramoggia è fissata al macinadosatore con una vite speciale; la rimozione della tramoggia è possibile
solamente con l'ausilio di un utensile. All'interno della tramoggia c'è una calotta di protezione 6, che
impedisce l'accesso alle macine con gli arti superiori.
• Un motore elettrico sul quale viene collegato il gruppo di macinazione.
• Un gruppo di macinazione a macine piane aventi il diametro di 64 mm il modello SM 90 e di 84 mm il
modello SM 95.
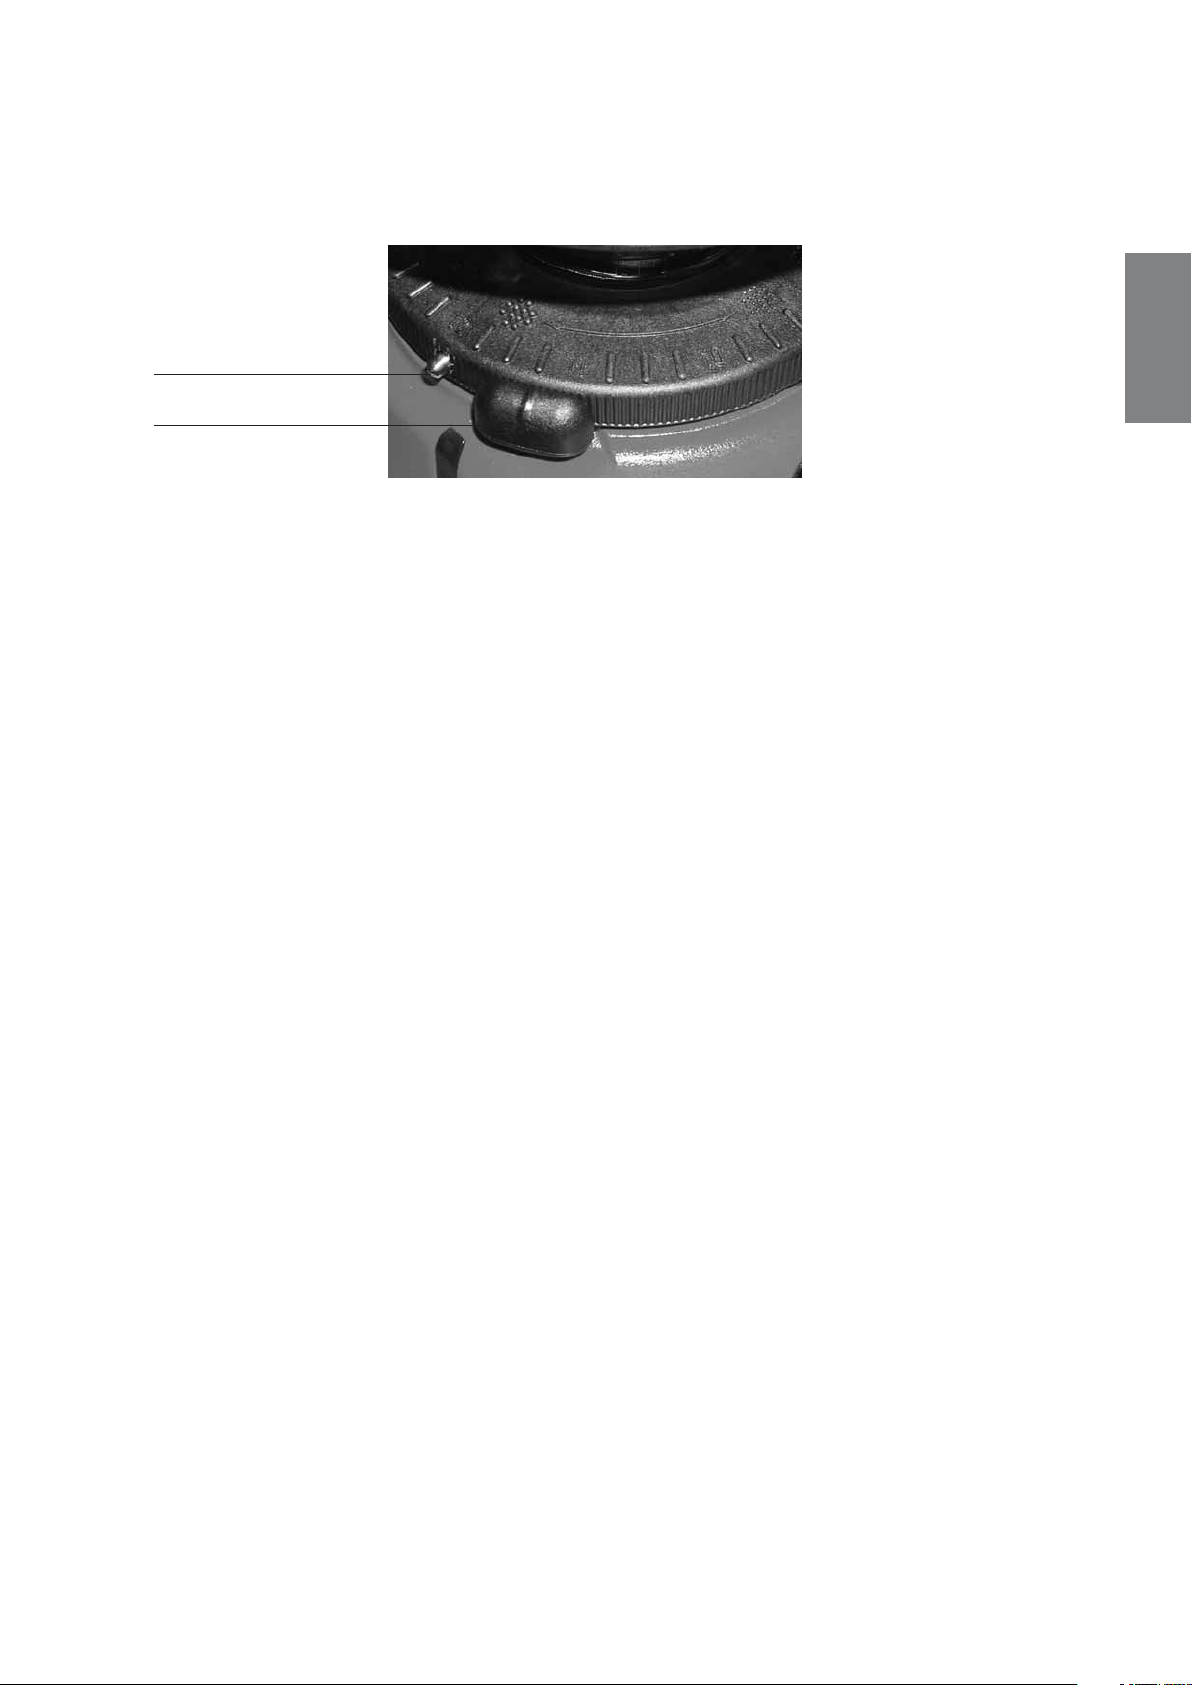
• Una ghiera di regolazione della macinatura 7 con il pulsante di sblocco 8. Sulla parte superiore della ghiera ci sono le indicazioni per la regolazione della macinatura. Per modificare la granulometria del caffè
macinato bisogna ruotare la ghiera in senso orario o antiorario.
• Un dosatore 9 che consente la dosatura e il dosaggio del caffè macinato; ha un campo di regolazione che
varia da 5 a 9 grammi o in configurazione per dosatura maggiorata, da 6 a 10 grammi. La dose del caffè
macinato si può regolare agendo sul pomello di regolazione 11, posto all'interno del dosatore. La distribuzione del macinato si effettua tirando la leva di prelievo 13. Il pressino 12, disponibile nelle versioni cilindrica e conica, consente la pressatura del caffè macinato all'interno della coppa porta filtro.
• Una forcella 14 di sostegno per la coppa porta filtro.
• Nei modelli SM90-95, automatici, una centralina elettronica controlla l'avvio e l'arresto della macinatura.
Programmando la centralina elettronica è possibile regolare il tempo di macinatura e inoltre far riavviare il
macinadosatore dopo il desiderato numero di prelievi di caffè macinato.
• Un interruttore generale 2 on/off con LED verde.
ITALIANO
3.2 Caratteristiche tecniche
MODELLO
SM 90
SM 90A
SM 90T
SM 95
SM 95A
VELOCITÀ
MOTORE
(g/min)
1350
1350
1350
880
880
POTENZA
MOTORE
(W)
220
220
220
245
245
I modelli di macinadosatori La San Marco S.p.A. sono predisposti per le seguenti tensioni:
• 110 V-1 ~ 60 Hz
• 230 V-1~ 50 Hz
• 230 / 400 V-3N~ 50 Hz
• 240 V-1 ~ 50 Hz
POTENZA
ASSORBITA
(W)
350
350
350
460
460
TIPO DI
MACINE
PIANE
PIANE
PIANE
PIANE
PIANE
CAPACITÀ DI
MACINAZIONE
(kg/h)
8,5
8,5
8,5
13
13
DIMENSIONE
MACINE
Ø (mm)
64
64
64
84
84
VELOCITÀ
MACINE
(g/min)
1350
1350
1350
880
880
EMISSIONE
ESONORA
dB(A)
72
72
72
69
69
PESO
(Kg)
13,8
13,8
13,8
13,8
13,8
5
ITALIANO
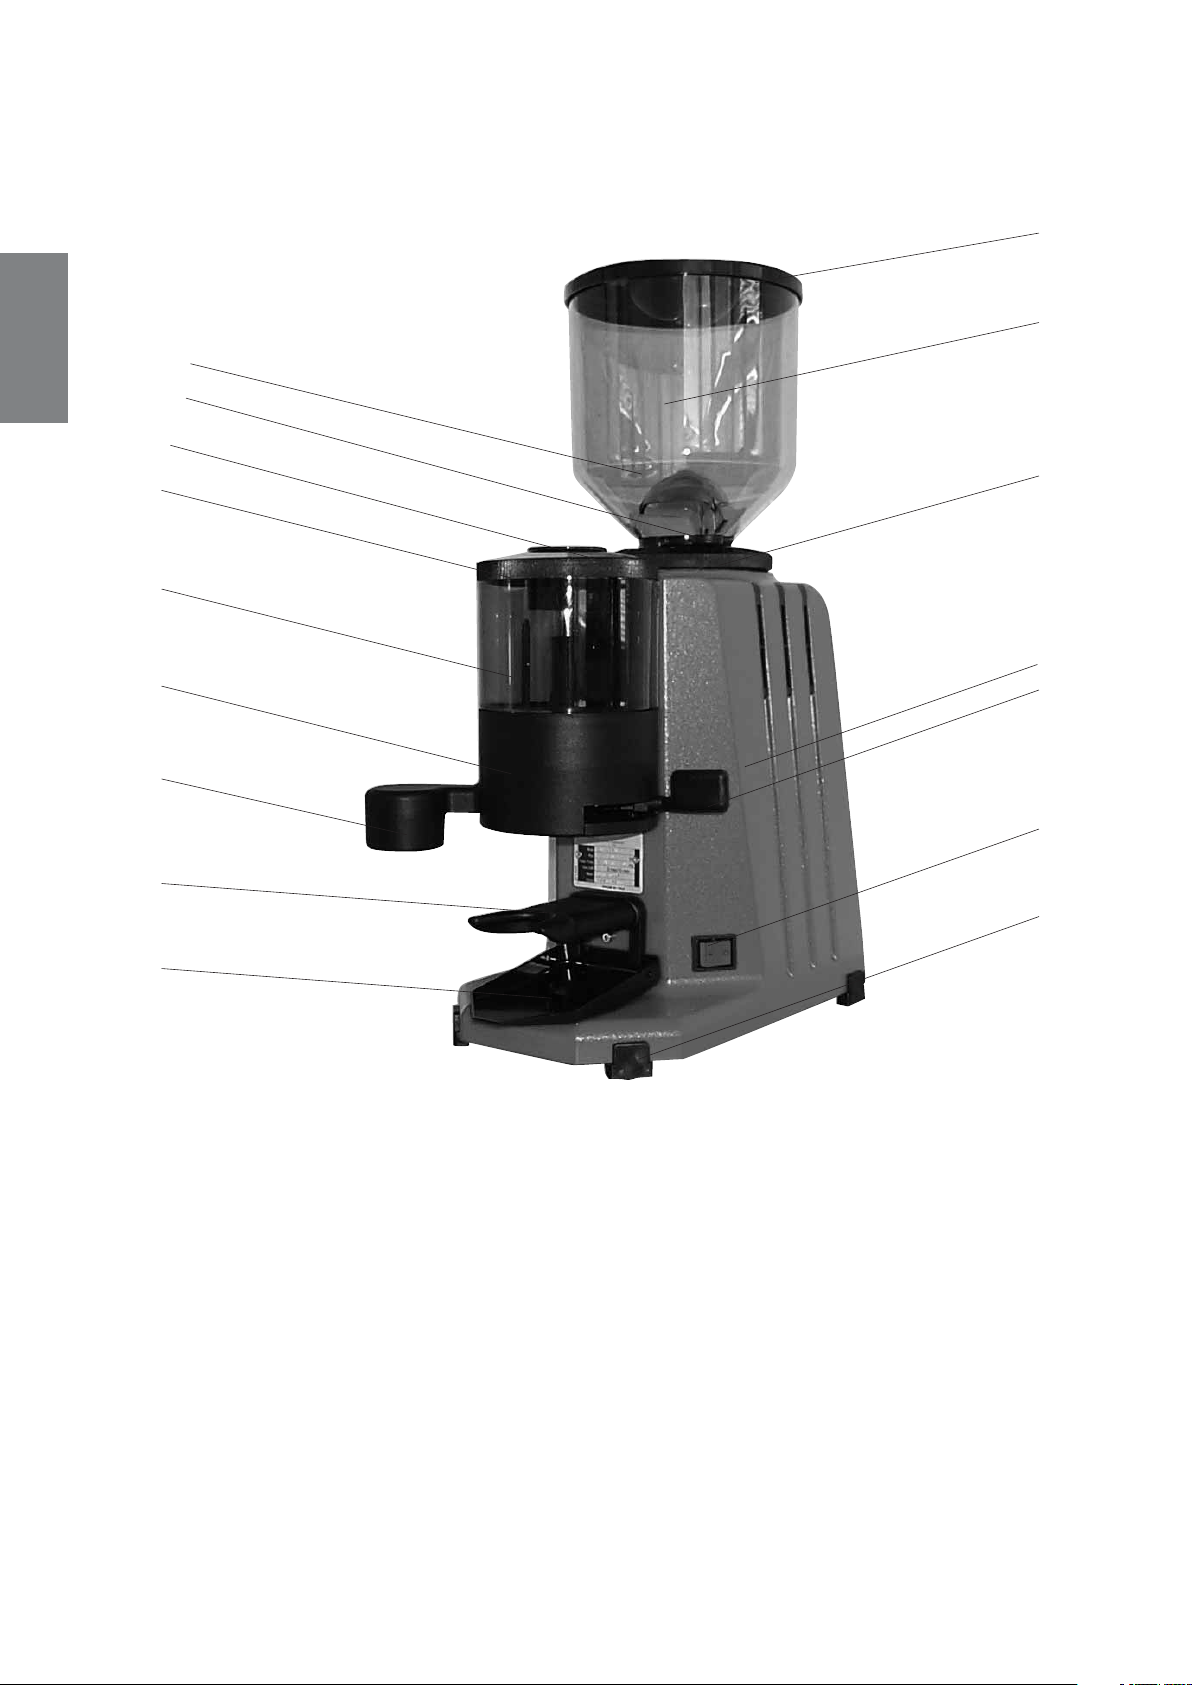
3.3 Disegno complessivo
6
5
8
10
11
9
4
3
7
1
13
12
14
15
LEGENDA
1 CARROZZERIA IN ALLUMINIO
2 INTERRUTTORE GENERALE
3 TRAMOGGIA
4 COPERCHIO TRAMOGGIA
5 SERRANDA PER TRAMOGGIA
6 CALOTTA DI PROTEZIONE MACINE
7 GHIERA DI REGOLAZIONE MACINATURA
8 PULSANTE DI SBLOCCO GHIERA
9 DOSATORE
10 COPERCHIO DOSATORE
11 POMELLO DI REGOLAZIONE DOSE
12 PRESSINO
13 LEVA DI PRELIEVO CAFFÈ MACINATO
14 FORCELLA PER COPPA PORTA FILTRO
15 VASCHETTA RACCOGLI CAFFÈ
16 PIEDINO IN GOMMA
2
16
6
4. Installazione del macinadosatore
4.1 Avvertenze
L'installazione deve essere eseguita dal personale tecnico qualificato e autorizzato La
San Marco S.p.A.
Il macinadosatore è consegnato ai clienti in un apposito imballo di cartone e polistirolo.
L'imballo contiene: il macinadosatore, i suoi accessori, il manuale d'uso e la dichiarazione di conformità. Dopo aver aperto l'imballo, assicurarsi dell'integrità del macinadosatore e dei suoi componenti; in caso di dubbio non utilizzare l'apparecchio e rivolgersi a per-
sonale qualificato e autorizzato dei centri d'assistenza tecnica La San Marco S.p.A..
L'imballo deve essere smaltito presso gli appositi centri di raccolta dei rifiuti, secondo le leggi vigenti nel
paese d'installazione. Non disperdere nell'ambiente. Gli elementi dell'imballo (cartone, polistirolo, punti
metallici, ecc.) possono causare una fonte di pericolo. Non lasciare alla portata dei bambini.
Il macinadosatore deve essere posto su un piano perfettamente orizzontale, sufficientemente robusto per
sostenerlo, stabile e asciutto.
4.2 Collegamento elettrico
Disposizioni per un corretto collegamento elettrico del macinadosatore:
• Prima di allacciare l'apparecchio alle rete elettrica, assicurarsi che i dati di targa del macinadosatore corri-
spondano con quelli dell'impianto di distribuzione elettrica; la targa è situata sotto il piattino raccogli fondi.
• L'allacciamento deve essere eseguito conformemente alle disposizioni del paese d'installazione.
• L'impianto elettrico predisposto dal cliente deve rispettare le norme vigenti; la presa di corrente deve
essere dotata di un efficace impianto di messa a terra. La San Marco S.p.A. declina ogni responsabilità
qualora le prescrizioni di legge non vengano rispettate. Un errata installazione può causare danni a persone o cose per le quali il costruttore non può essere considerato responsabile.
• Nel caso si rendesse necessario l'uso di adattatori, prese multiple e prolunghe, è necessario utilizzare
solamente prodotti conformi alle norme di sicurezza vigenti.
• Per evitare eventuali surriscaldamenti del cavo d'alimentazione si raccomanda di svolgerlo per tutta la
sua lunghezza.
• I macinadosatori monofase sono equipaggiati con un cavo d'alimentazione a tre conduttori munito di
spina per il collegamento elettrico alla presa di rete.
• Per il collegamento elettrico dei modelli trifase è necessario installare un interruttore generale onnipolare
a monte dell'impianto d'alimentazione elettrica, il quale deve essere dimensionato secondo le caratteristiche elettriche (potenza e tensione) riportate sulla targa dell'apparecchio. L'interruttore onnipolare si
deve disinserire dalla rete con una apertura dei contatti di almeno 3 mm.
• I macinadosatori trifase sono equipaggiati con un cavo d'alimentazione a cinque conduttori; il collega-
mento dei modelli trifase deve essere eseguito nel seguente modo: (collegamento a stella per la tensione
400V-3N~ e collegamento a triangolo per i modelli con alimentazione 230V-3~)
Tensione
400V-3N~
230V-3~
Collegamento alla presa
d’alimentazione elettrica
L
3
L
2
L
1
N
GI/VE
L
3
L
2
L
1
N
GI/VE
• Al termine del collegamento elettrico accertarsi che il senso di rotazione del motore sia orario (guardan-
do l'apparecchio dall'alto); se il senso è antiorario, invertire due fasi d'alimentazione.
• Qualora si esegua una trasformazione da 400V-3N~ a 230V-3~ o viceversa, utilizzare le etichette adesive pre-
viste nel corredo, per aggiornare i dati riportati sull'etichetta incollata all'estremità del cavo d'alimentazione.
Collegamento alla centralina elettronica
all’interno dell’apparecchio
2
GI BL BI N E VE MA
21
GI BL BI N E VE MA
46
4365
1
3
5
LEGENDA:
= marrone
L
3
L2= nero
L1= nero
N = neutro (blu)
GI/VE = terra
1 = giallo
2 = blu
3 = bianco
4 = nero
5 = verde
6 = marrone
ITALIANO
7
ITALIANO
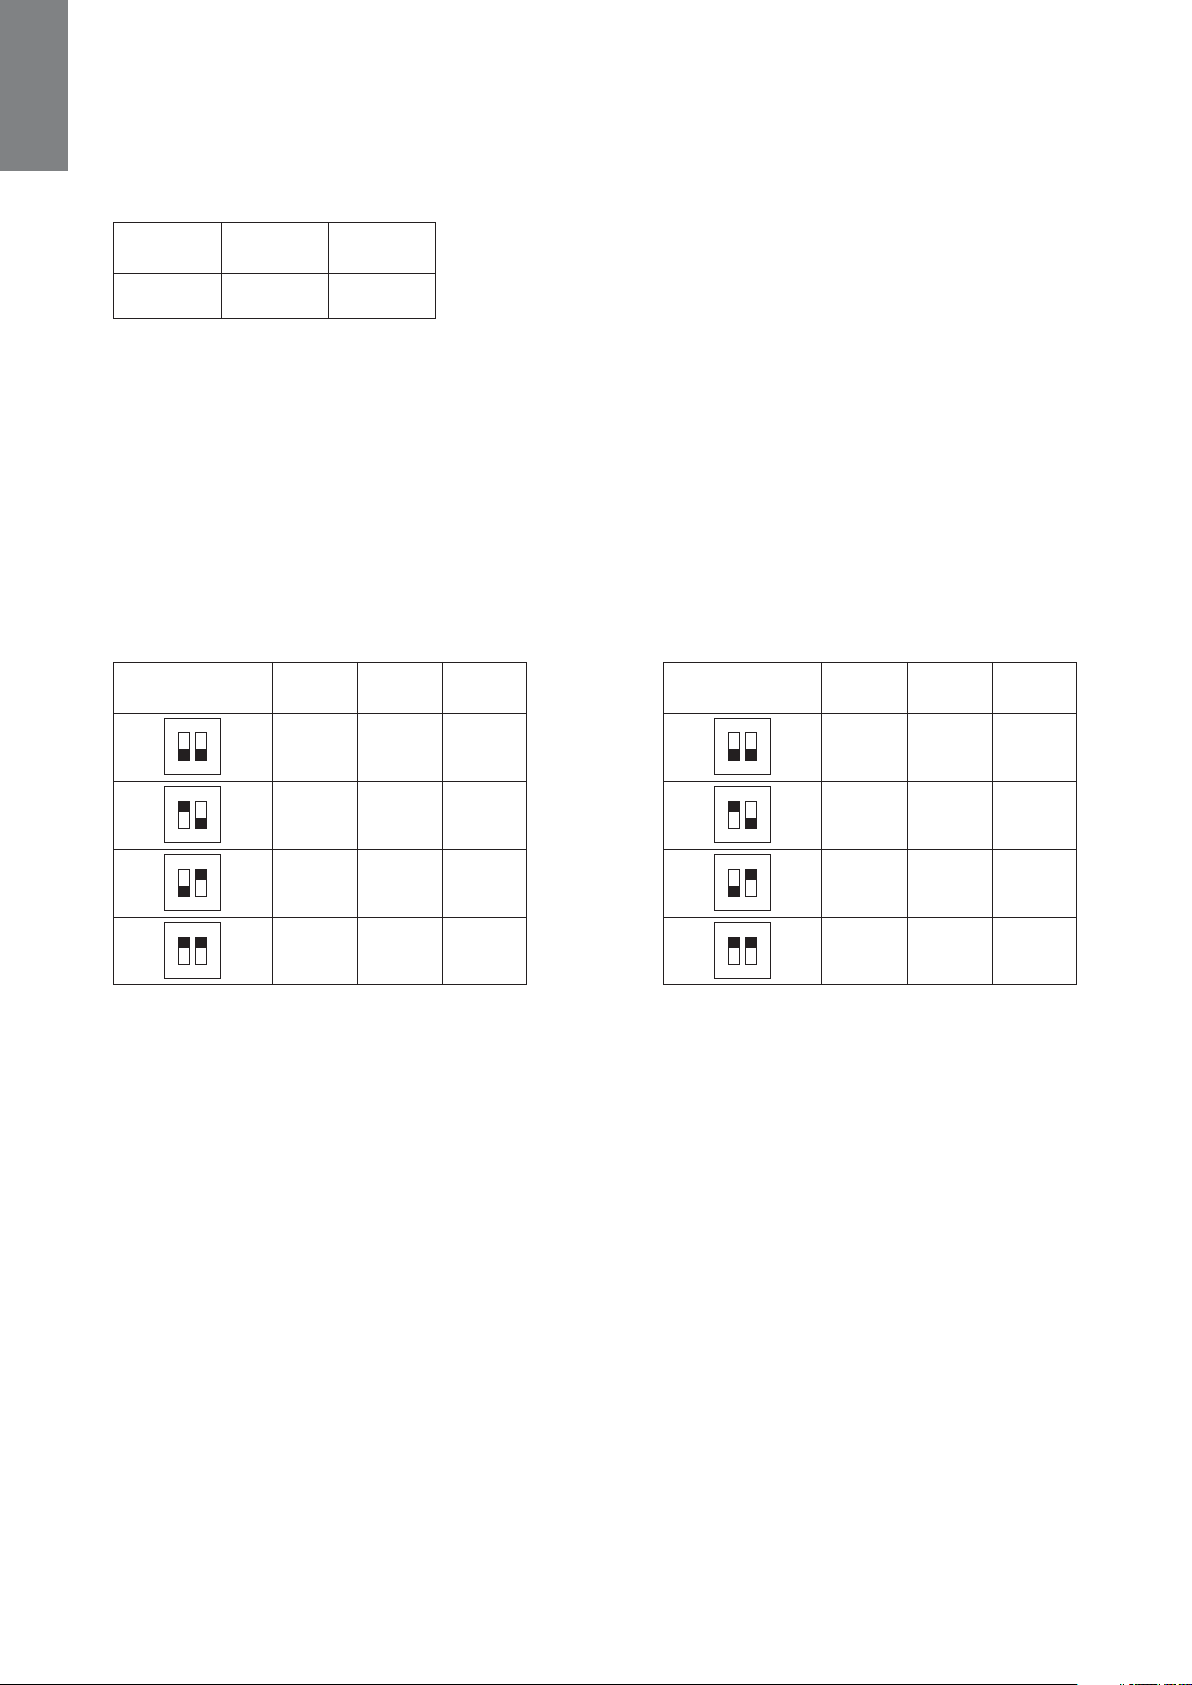
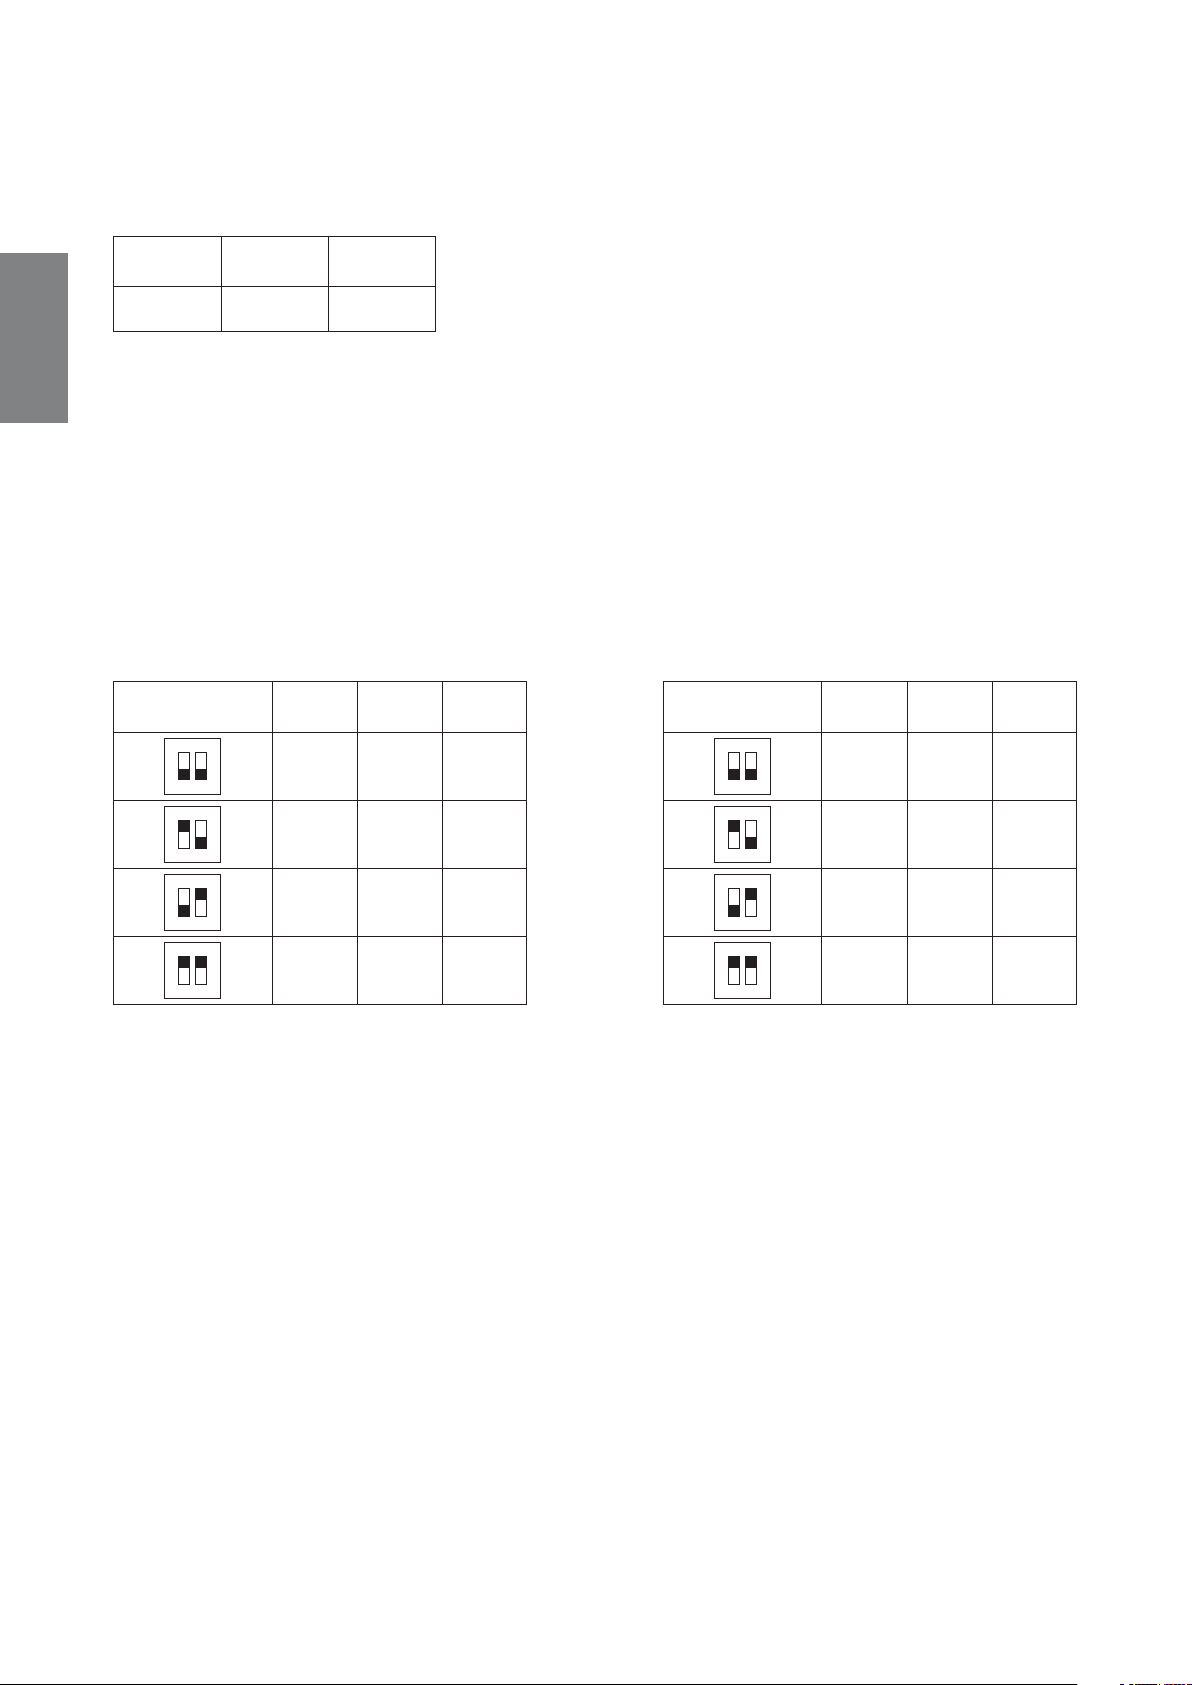
4.3 Programmazione del tempo di macinatura (mod. automatici)
La centralina elettronica regola il tempo di macinatura e inoltre fa riavviare il macinadosatore dopo un certo numero di prelievi di caffè macinato; è programmata dal costruttore secondo dei valori prestabiliti (vedere tabella).
l'intervento del microinterruttore "troppo pieno". L'installatore può modificare le impostazioni della centralina elettronica qualora l'utilizzatore dell'apparecchio richieda dei parametri diversi da quelli impostati dal costruttore.
Disposizioni per una corretta regolazione del tempo di macinatura:
• Disinserire l'alimentazione elettrica.
• Adagiare il macinadosatore su un fianco e togliere il fondo; la centralina elettronica, che regola il tempo
• Stabilire, in accordo con l'utilizzatore dell'apparecchio, il tempo di macinazione e il numero di impulsi per
• Per impostare i parametri stabiliti regolare i dip switches posti all'interno della centralina elettronica (vedere
Il macinadosatore, avviato con l'interruttore 2, rimane attivo e si arresta
MODELLO
TEMPO DI
MACINATURA
PRELIEVI DI
CAFFÈ
MACINATO
allo scadere del tempo di macinatura impostato oppure all'intervento
del microinterruttore "troppo pieno", il quale azzera il timer.
L'apparecchio si riavvia dopo un certo numero di prelievi di caffè maci-
SM 90/95 A 80 s 12
nato, secondo gli impulsi dati dalla leva 13 e si arresta allo scadere del
tempo di macinatura impostato oppure come già detto, a seguito del-
di macinatura, è posta all'interno del macinadosatore.
l'avvio/arresto della macinatura.
tabella riportata in basso). I dip switches 1 e 2 regolano il tempo di macinatura; si può impostare un tempo di
macinatura variabile da 30 a 120 secondi. I dip switches 3 e 4 controllano il riavvio del motore in funzione del
numero di prelievi di caffè macinato; è possibile far riavviare il macinadosatore dopo 6, 12, 18 o 24 prelievi.
CONFIGURAZIONE
DIP SW
ON
OF
ON
OF
ON
OF
ON
OF
DIP SW1
Off
On
Off
On
DIP SW2
Off
Off
On
On
TEMPO
30 s
50 s
80 s
120 s
CONFIGURAZIONE
DIP SW
ON
OF
ON
OF
ON
OF
ON
OF
DIP SW3
Off
On
Off
On
DIP SW4
Off
Off
On
On
PRELIEVI
6
12
18
24
4.4 Regolazione della macinatura
Disposizioni per una corretta regolazione:
• Riempire la tramoggia 3 con il caffè in grani e aprire la serranda 5.
• Avviare il macinadosatore azionando l'interruttore generale 2; macinare una piccola quantità di caffè e
spegnere l'apparecchio.
• Controllare la granulometria del caffè macinato. Fare uno o più caffè espresso e verificare l'erogazione in
tazzina (l'erogazione "ideale" si ottiene con 6÷8 grammi di caffè macinato per tazzina con un tempo di
25÷35 secondi). Si possono verificare tre casi:
a) L'erogazione del caffè in tazzina è lenta: la granulometria del caffè macinato è troppo fine (deve esse-
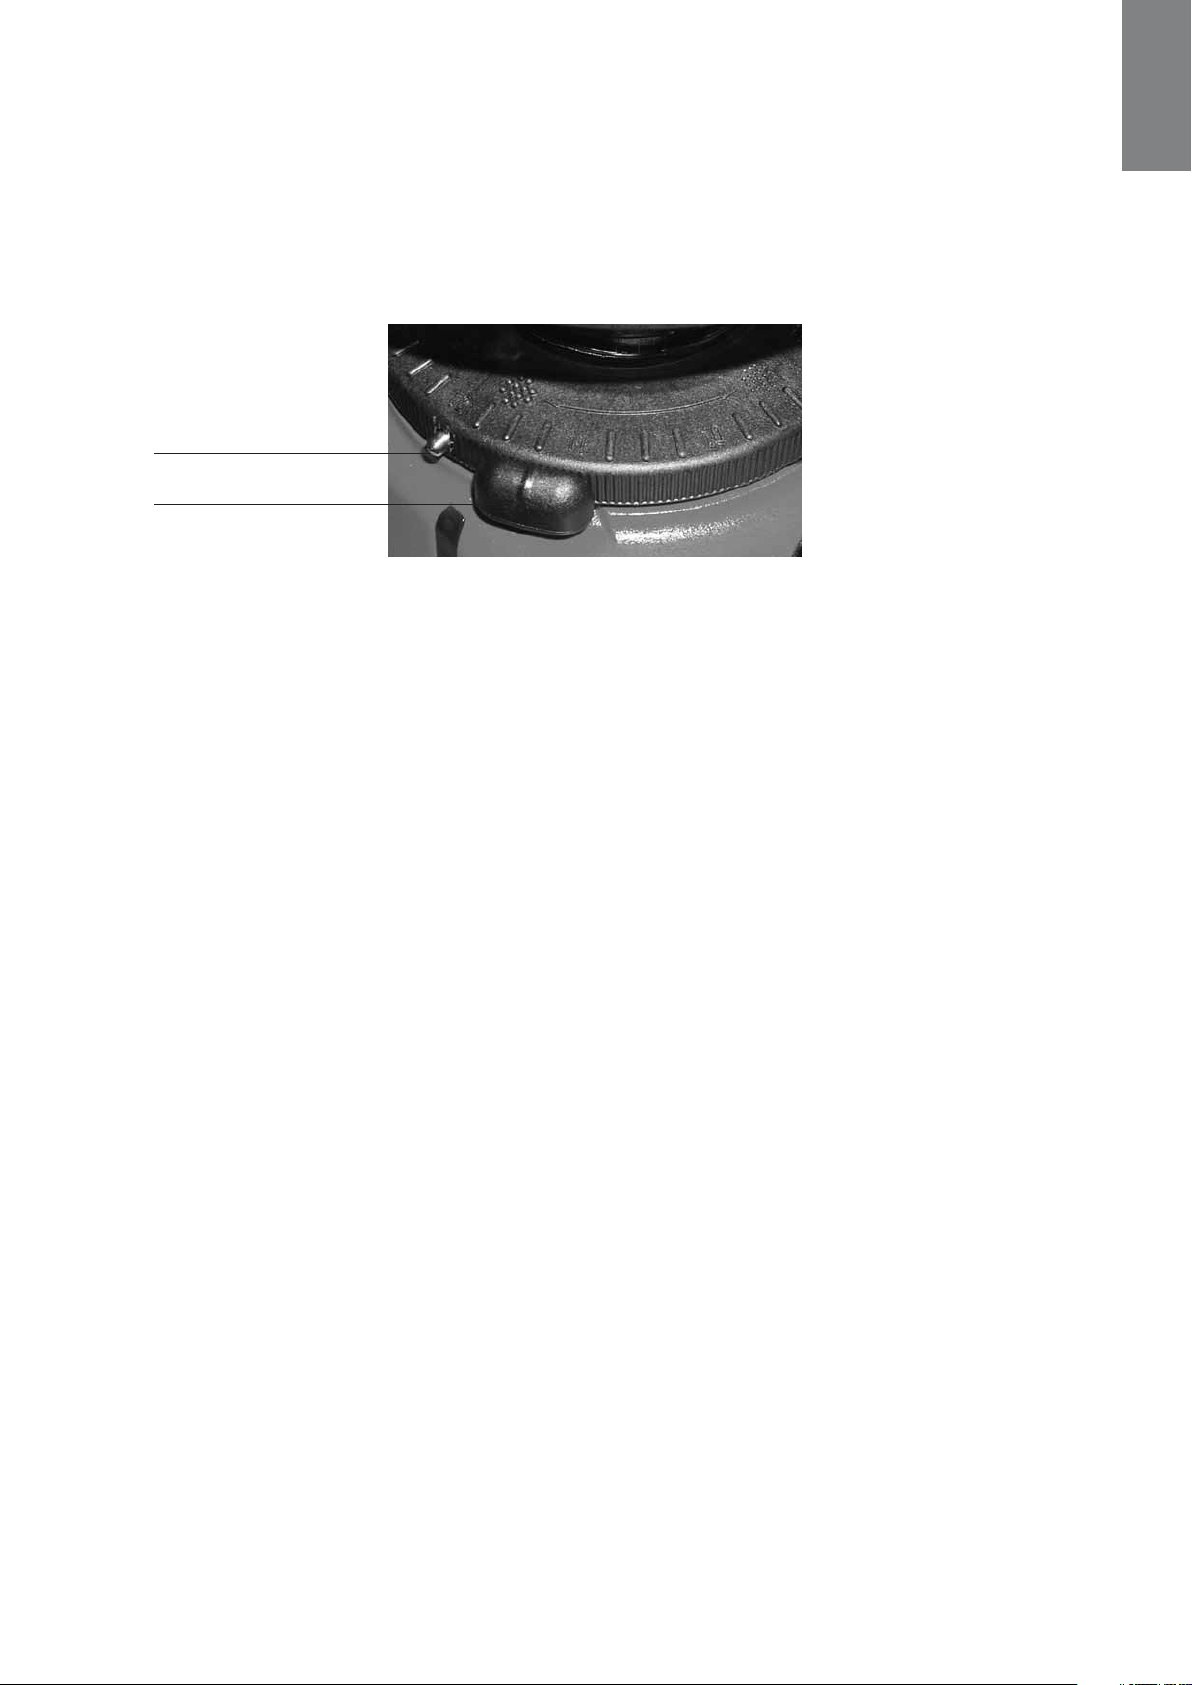
re aumentata). La regolazione della granulosità si effettua premendo il pulsante di sblocco 8 e ruotando la ghiera di regolazione 7 in senso orario .
b) L'erogazione del caffè in tazzina è veloce: la granulosità del caffè macinato è troppo grossa (deve
essere diminuita). La regolazione della granulosità si effettua premendo il pulsante di sblocco 8 e ruotando la ghiera di regolazione 7 in senso antiorario .
c) L'erogazione avviene in maniera corretta.
4.5 Sostituzione delle macine
Il metodo corretto per eseguire l'operazione di sostituzione delle macine è il seguente:
1. svitare completamente la vite di bloccaggio della tramoggia (1) ed estrarre la tramoggia stessa.
2. tenendo premuto il pulsante di sblocco (2) ruotare la ghiera di regolazione in senso orario in modo da svi-
tare il porta macina superiore ed estrarlo dalla propria sede.
8
3. sostituire le macine e centrare la macina inferiore rispetto ai tre raschiatori (la distanza da tali denti è di
0,9 mm, per centrare la macina si consiglia l'uso di uno spessimetro).
4. pulire accuratamente le sedi porta macine e la filettatura del porta macina superiore.
5. avvitare il porta macina superiore fino a portare la macina superiore a sfiorare quella inferiore; tale mano-
vra va eseguita con il macinadosatore in rotazione al fine di intercettare, con esattezza, il punto in cui le
due macine cominciano a venire in contatto.
6. regolare la macinatura come descritto nel paragrafo precedente.
(1)
(2)
4.6 Regolazione della dose del caffè macinato
Disposizioni per una corretta regolazione della dose (grammatura) del caffè macinato:
• La regolazione della dose si effettua agendo sul pomello di regolazione 11 posto all'interno del
dosatore 9.
• Per diminuire la dose, togliere il coperchio del dosatore e ruotare il pomello in senso orario; per aumen-
tare la dose, ruotare il pomello in senso antiorario.
• Si consiglia di prelevare dieci dosi di caffè macinato e di pesarle con una bilancia elettronica; la dose
media deve essere circa 7 grammi (dose consigliata).
ITALIANO
5. Istruzioni per il funzionamento
5.1 Utilizzo del macinadosatore
Disposizioni per un corretto utilizzo dell'apparecchio:
• Riempire la tramoggia 3 con il caffè in grani e aprire la serranda 5.
• Modello Timer: avviare la macinatura ruotando il timer in senso orario; la macinatura si arresta allo sca-
dere del tempo impostato. Riportare manualmente il timer a "zero" se si vuole interrompere anticipatamente la macinatura.
• Modello Automatico: avviare il macinadosatore azionando l’interruttore generale 2; all’interno del pulsan-
te si accende il LED di colore verde segnalando che l’apparecchio è in tensione. La centralina elettronica
arresta la macinatura allo scadere del tempo impostato, oppure all’intervento del microinterruttore “troppo pieno”; la macinatura si può arrestare in qualsiasi momento portando l’interruttore generale 2 in posizione “zero”. Il riavvio del motore in funzione del numero di prelievi di caffè macinato è programmabile e
può avvenire dopo 6, 12, 18 o 24 prelievi.
• Modello Manuale: stesse caratteristiche della versione automatica fatta eccezione della funzione di arresto
macinatura per “troppo pieno” e riavvio del motore in funzione del numero di prelievi di caffè macinato.
• Il prelievo del caffè macinato dal dosatore 9 si effettua con la leva 13.
• Porre la coppa porta filtro sulla forcella 14 e tirare la leva (verso l’operatore) per il prelievo di una dose di
caffè macinato; ogni movimento completo della leva corrisponde al prelievo di una dose.
• Pressare il caffè macinato utilizzando il pressino 12; inserire la coppa porta filtro nel gruppo d’erogazione
della macchina per caffè espresso e avviare l’erogazione.
5.2 Consigli pratici per l’operatore
• Conservare il caffè in grani all'interno di contenitori ermetici in ambiente secco e a temperatura ambiente.
• Non lasciare mai grossi quantitativi di caffè macinato all'interno del dosatore per lunghi periodi (ad esem-
pio: durante la giornata di riposo).
9
ITALIANO
• Verificare periodicamente la granulosità del caffè macinato e la sua dosatura, tenendo presente che le condizio-
• Far verificare periodicamente dal personale tecnico autorizzato lo stato di usura delle macine, tenendo
• Pulire periodicamente il macinadosatore e i suoi componenti, soprattutto la tramoggia e il dosatore.
• In caso di sosta prolungata (ferie, lavoro stagionale, ecc.) svuotare completamente la tramoggia e il dosa-
6. Informazione agli utenti
• L’adeguata raccolta differenziata per l’avvio successivo dell’apparecchiatura dismessa al riciclaggio, al tratta-
• Lo smaltimento abusivo del prodotto da parte del detentore comporta l’applicazione delle sanzioni
ni atmosferiche (umidità ambientale) influiscono notevolmente sulla preparazione del caffè espresso. Aumentare
la granulosità del macinato quando aumenta l'umidità ambientale e diminuirla quando l'umidità cala.
presente che le macine piane possono trattare non più di 300÷600 kg di caffè prima di essere inservibili.
L'eventuale sostituzione deve essere effettuata dal personale dell'assistenza tecnica.
tore e pulire con cura il macinadosatore in tutte le sue parti.
Ai sensi dell’art. 13 del Decreto legislativo 25 luglio 2005, n. 151 ”Attuazione delle
Direttive 2002/95/CE, 2002/96/CE e 2003/108/CE, relative alla riduzione dell’uso di
sostanze pericolose nelle apparecchiature elettriche ed elettroniche, nonché allo smalti-
mento dei rifiuti”
• Il simbolo del cassonetto barrato riportato sull’apparecchiatura o sulla sua confezione indica che il prodotto alla fine della propria vita utile deve essere raccolto separatamente dagli altri rifiuti.
• La raccolta differenziata della presente apparecchiatura giunta a fine vita è organizzata e gestita dal produttore. L’utente che vorrà disfarsi della presente apparecchiatura
dovrà quindi contattare il produttore e seguire il sistema che questo ha adottato per
consentire la raccolta separata dell’apparecchiatura giunta a fine vita.
mento e allo smaltimento ambientalmente compatibile contribuisce ad evitare possibili effetti negativi sull’ambiente e sulla salute e favorisce il reimpiego e/o riciclo dei materiali di cui è composta l’apparecchiatura.
amministrative previste dalla normativa vigente.
7. Garanzia
La garanzia decade se:
• Non si rispettano le istruzioni del presente manuale.
• Le operazioni di manutenzione straordinaria e riparazione sono eseguite da personale non autorizzato.
• Si utilizza l'apparecchio in modo diverso da quello previsto dal manuale d'uso.
• I componenti originali sono stati sostituiti con parti di diversa fabbricazione.
• La garanzia non si applica a danni provocati da incuria, uso ed installazione errati e non conformi a quanto prescritto dal presente manuale, cattivo uso, maltrattamento, fulmini e fenomeni atmosferici, sovratensioni e sovracorrenti, insufficiente o irregolare alimentazione elettrica.
8. Dichiarazione di conformità
La società costruttrice:
La San Marco S.p.A.
34072 Gradisca d’Isonzo (GO) Italia – Via Padre e Figlio Venuti, 10
telefono (+39) 0481 967111 – fax (+39) 0481 960166 – http://www.lasanmarco.com
dichiara sotto la propria responsabilità che la macchina per caffè espresso descritta in questo manuale ed
identificata dai dati di targa posti sull’apparecchio è conforme alle direttive: 98/37/CE, 73/23/CE,
89/336/CEE, 89/109/CEE. Per la verifica della conformità a dette direttive sono state applicate le norme
armonizzate: EN 12100-1, EN 12100-2, EN 60335-1, EN 60335-2-64
Gradisca d’Isonzo, Giugno 2007
Amministratore delegato
Ing. Roberto Marri
10

9. Problemi e soluzioni
Prima di richiedere l'intervento dell'assistenza tecnica eseguire i controlli sotto elencati:
DIFETTO CAUSA SOLUZIONE
ITALIANO
1) Il caffè scende velocemente
dal beccuccio d'erogazione;
la crema del caffè in tazzina è
chiara.
2) Il caffè scende lentamente (a
gocce) dal beccuccio; la crema
del caffè in tazzina è scura.
3) Presenza di fondi di caffè
nella tazzina.
Se non è possibile risolvere il problema nel modo descritto, oppure si è verificato qualche altro difetto, rivolgersi al centro di assistenza tecnica autorizzato La San Marco S.p.A.
a) macinatura troppo grossa.
b) pressatura debole.
c) dose scarsa.
a) macinatura troppo fine.
b) pressatura forte.
c) dose elevata.
a) macinatura troppo fine.
b) macine consumate.
a) diminuire la granulometria.
b) aumentare la pressatura.
c) aumentare la dose.
a) aumentare la granulometria.
b) ridurre la pressatura.
c) diminuire la dose.
a) aumentare la granulometria.
b) sostituire le macine.
La San Marco S.p.A. si riserva di applicare modifiche tecniche alle
attrezzature, qualora lo ritenesse necessario, senza preavviso.
11

ITALIANO
12
GRINDER-DISPENSER SM 90-95
ENGLISH

General Notes
1. General notes . . . . . . . . . . . . . . . . . . . . . . . . . . . . . . . . . . . pag. 15
1.1 The espresso coffee . . . . . . . . . . . . . . . . . . . . . . . . . . . . . . . . . . . . . . . . . . . . . pag. 15
1.2 Storing the coffee beans . . . . . . . . . . . . . . . . . . . . . . . . . . . . . . . . . . . . . . . . . pag. 15
1.3 The grinder-dispenser and the grinding process . . . . . . . . . . . . . . . . . . . . . . . pag. 15
1.4 Storing the ground coffee . . . . . . . . . . . . . . . . . . . . . . . . . . . . . . . . . . . . . . . . . pag. 15
1.5 The espresso coffee machine . . . . . . . . . . . . . . . . . . . . . . . . . . . . . . . . . . . . . pag. 15
1.6 Climatic conditions - Operator . . . . . . . . . . . . . . . . . . . . . . . . . . . . . . . . . . . . . pag. 15
ENGLISH
2. Introduction . . . . . . . . . . . . . . . . . . . . . . . . . . . . . . . . . . . . . pag. 16
3. Technical characteristics . . . . . . . . . . . . . . . . . . . . . . . . . . . pag. 17
4. Installation . . . . . . . . . . . . . . . . . . . . . . . . . . . . . . . . . . . . . . pag. 19
5. Operating instructions . . . . . . . . . . . . . . . . . . . . . . . . . . . . . pag. 21
6. Information for users in the European community . . . . . . . pag. 22
7. Warranty. . . . . . . . . . . . . . . . . . . . . . . . . . . . . . . . . . . . . . . . pag. 22
2.1 Using the manual . . . . . . . . . . . . . . . . . . . . . . . . . . . . . . . . . . . . . . . . . . . . . . . pag. 16
2.2 Warnings . . . . . . . . . . . . . . . . . . . . . . . . . . . . . . . . . . . . . . . . . . . . . . . . . . . . . . pag. 16
3.1 General characteristics of the different models . . . . . . . . . . . . . . . . . . . . . . . . pag. 17
3.2 Technical characteristics . . . . . . . . . . . . . . . . . . . . . . . . . . . . . . . . . . . . . . . . . pag. 17
3.3 Assembly drawing . . . . . . . . . . . . . . . . . . . . . . . . . . . . . . . . . . . . . . . . . . . . . . pag. 18
4.1 Warnings . . . . . . . . . . . . . . . . . . . . . . . . . . . . . . . . . . . . . . . . . . . . . . . . . . . . . . pag. 19
4.2 Electrical connections . . . . . . . . . . . . . . . . . . . . . . . . . . . . . . . . . . . . . . . . . . . pag. 19
4.3 Programming the grinding time (Automatic models). . . . . . . . . . . . . . . . . . . . . pag. 20
4.4 Grinding adjustment . . . . . . . . . . . . . . . . . . . . . . . . . . . . . . . . . . . . . . . . . . . . . pag. 20
4.5 Changing the coffee grinders . . . . . . . . . . . . . . . . . . . . . . . . . . . . . . . . . . . . . . pag. 20
4.6 Adjusting the quantity of ground coffee . . . . . . . . . . . . . . . . . . . . . . . . . . . . . . pag. 21
5.1 Using the grinder-dispenser . . . . . . . . . . . . . . . . . . . . . . . . . . . . . . . . . . . . . . . pag. 21
5.2 Practical suggestions for the operator . . . . . . . . . . . . . . . . . . . . . . . . . . . . . . . pag. 21
8. Declaration of conformity. . . . . . . . . . . . . . . . . . . . . . . . . . . pag. 22
9. Problem solving . . . . . . . . . . . . . . . . . . . . . . . . . . . . . . . . . . pag. 23
MANUALE CODICE 7770.030
Rev. 01.08
14

1. General notes
• The first part of this user's manual briefly explains the method of making espresso coffee, the modern
equipment used and the function of the grinder-dispenser in this delicate process.
1.1 The espresso coffee
Espresso is a coffee prepared with a particular brewing process, which makes it possible to make a very concentrated, syrupy beverage of intense taste and aroma. The method of preparation of espresso consists of
extracting the substances contained in ground coffee by passing through it a flow of hot water under pressure (about 9 bar) for 25 to 35 seconds. In this manner, the soluble substances (sugars and proteins) and the
insoluble materials (fats and colloids) in the coffee are "drawn out" into the cup, forming the characteristic
cream of real espresso. The preparation of espresso is a very delicate process; various factors affect the success of this operation: the preservation of the coffee beans, the grinder-dispenser and the grinding process,
the preservation of the ground coffee, the espresso coffee machine itself, the changeable weather conditions, and the care and attention of the operator in making the espresso coffee.
1.2 Storing the coffee beans
There are two varieties of coffee found in nature: the "arabica" variety and the "robusta" strain. Normally, the
roasted coffee used to make espresso contains a mixture of the two varieties, suitably blended in varying
percentages, taking into account the organoleptic characteristics of the individual components. The blend of
roasted coffee must be kept hermetically sealed inside its package. The roasted coffee beans contain within them all the principles and characteristic aromas of the variety or the blend; these aromas fade rapidly
when the coffee beans come into contact with air, light and humidity.
ENGLISH
1.3 The grinder-dispenser and the grinding process
The grinder-dispenser is a device designed to grind and dispense the coffee. To make a good espresso, the
coffee should be ground to particle sizes ranging from about 1 mm to a powder finer than 150 μm. Powdered
coffee offers a greater contact surface to water, allowing a greater extraction of soluble and insoluble substances. By varying the particle sizes of ground coffee, it is thus possible to modify the resistance offered
against the passage of water. If the ground coffee is made up of excessively coarse particles, the serving
time is too short, the water does not manage to extract all the qualities of the ground coffee, and the resulting espresso is light in colour, thin, bland and lacking the characteristic coffee aroma. When the ground coffee is too fine, the espresso brewed is dark, burnt and cold; the serving time is too long and the water passage is too sluggish since the fine powder offers an excessive resistance to the water flow. The resulting
espresso is too strong.
1.4 Storing the ground coffee
Ground coffee is much more sensitive than coffee beans: the dispersion of aromatic substances takes place
very rapidly if it is kept in open containers and in moist environments. The coffee beans should be ground in
small quantities and the ground coffee should be used in the shortest time possible.
1.5 The espresso coffee machine
The espresso machine is a device that consists essentially of a boiler and a series of heat exchangers, in
which water is heated by an electric heating element or a gas burner. Water heated to a high temperature is
made to flow through the ground coffee placed in the filter cup and extracts its aromas. When this manual
talks about espresso coffee machines, this refers to all "continuous serving" models with hydraulic unit, and
to the manual piston type (known as lever operated). La San Marco S.p.A. grinder-dispensers are professional devices designed and built to be used with this type of espresso coffee machine.
1.6 Climatic conditions - Operator
As already mentioned, to make a good espresso it is essential that the coffee be ground to a proper particle
size. Ground coffee is very hygroscopic; in other words, it "senses" the moisture in the air and grinding should
therefore be modified to suit varying climatic conditions; a ground coffee with a high moisture content increases the resistance to the passage of water. Other important factors in the making of espresso are the quantity
and compactness of the ground coffee inside the filter cup. These factors (moisture, quantity and coarseness
of the ground coffee, compactness) must be considered and weighed by the operator making the espresso.
For these reasons, the operator has a very important role in the espresso coffee-making process.
15
2. Introduction
2.1 Using the manual
ENGLISH
2.2 Warnings
• This manual provides all the necessary information for the installation, start-up, use
and maintenance of the grinder-dispenser.
• The persons in charge of normal use and maintenance and the technical personnel authorized to carry out extraordinary maintenance and repairs are expected to
have read and adopted the contents of this manual.
• This manual is an integral part of the machine. It should be kept for the life of the
machine and transferred to any other user or subsequent owner.
• The manual or a copy of the same should always be kept near the machine where the
operator can readily look it up; it should be kept with care, in a place away from heat,
moisture, dust and corrosive agents.
• The La San Marco S.p.A. grinder-dispenser must be used in the manners
described in this manual; all other improper or inappropriate uses of this device
void the warranty conditions and the liability of the manufacturer.
• The grinder-dispenser is designed and built for metering and grinding the coffee
beans in the desired amounts. All other uses outside those specified in this manual
must be considered inappropriate and therefore not authorized. The manufacturer
declines any liability for damage resulting from the improper use of the device.
• The user must be a responsible adult, who is expected to comply with the safety procedures that apply in the country where the machine is installed, in addition to the
rules of common sense. For a proper and safe use of the machine, the operator must
comply with the rules of accident prevention and with all other requirements of health
and hygiene in the workplace.
• The use of the machine and the routine maintenance and cleaning operations are
reserved exclusively for personnel authorized by the customer and under his own
responsibility.
• The machine must not be operated with the fixed and/or mobile guards removed or
with the safety devices cut off; the safety devices must absolutely not be removed or
tampered with.
• While the grinder-dispenser is in operation, do not introduce any objects (screwdrivers, spoons, etc.) into the hopper or the dispenser.
• Before carrying out any routine maintenance or cleaning of the machine, switch off
the machine and pull out the plug from the power socket, if possible, or disconnect
the omnipolar switch upstream of the machine.
• Avoid using products such as alcohol, petroleum products or solvents in general to
clean the machine; use water or neutral solvents.
• A moist cloth or sponge is sufficient to clean the machine housing; never use jets of
water. Use a brush to clean the internal parts of the dispenser, the grinding unit and
the hopper.
• Any extraordinary maintenance or repairs must be carried out exclusively by specialized personnel at La San Marco S.p.A. service centres.
• If the power cord is damaged, it must be replaced by the manufacturer, the manufacturer’s service centre or a similarly qualified organization.
• In case of malfunctions or breakdown of any grinder-dispenser components, contact
the authorized service centre and request the use of original La San Marco S.p.A.
spare parts. The use of any but original spare parts voids the warranty certificates provided with the machine.
• The user must not carry out any unauthorized operations or any work without understanding the exact procedures; contact the manufacturer for any information, spare
parts or accessories.
• If the machine is to be discarded or disposed of, contact the supplier or the public utilities
in charge of municipal waste disposal. Do not discard the machine in the environment!
16

3. Technical characteristics
3.1 General characteristics of the different models
The La San Marco grinders-dispensers are professional equipment designed for grinding and metering coffee beans. La San Marco S.p.A. manufactures two basic grinder-dispenser models: SM 90; SM 95. They are
essentially made up of:
• A painted aluminium housing 1. The size, shape and volume are identical for all models.
• A hopper 3, made of transparent plastic material, positioned on top of the grinder-dispenser. The hopper
is fixed to the grinder-dispenser by a special screw. The hopper can only be removed with the help of an
appropriate tool. Inside the hopper there is a guard 6 that prevents the accidental contact of the hands
with the grinders.
• An electric motor to which the grinding unit is connected.
• A grinding unit. Model SM 90 and model SM 95 are equipped with a grinding unit with flat grinders of 64
mm and 84 mm diameter, respectively.
• A grind adjustment ring 7 with a release button 8. The top of the ring shows the grinding adjustments possible. The ring is turned clockwise or counterclockwise to change the fineness of the ground coffee.
• A dispenser 9 designed to measure and dispense the ground coffee; it has an adjustment range from 5
to 9 grams or, in the increased dose configuration, from 6 to 10 grams. The amount of ground coffee dispensed can be adjusted by operating on the control knob 11, located inside the dispenser. The ground
coffee is dispensed by pulling on the coffee dispensing lever 13. The presser 12, available on cylindrical
and conical versions, enables the ground coffee to be pressed down inside the filter cup.
• A support fork 14 for the filter cup.
• (SM 90/95 automatic version only). An electronic control unit that controls the coffee grinder start and
stop. The grinding time can be programmed on the electronic control unit and the grinder-dispenser can
be made to restart after a desired number of ground coffee servings.
• An on/off main switch 2 with green LED.
ENGLISH
3.2 Technical characteristics
MODEL
SM 90
SM 90A
SM 90T
SM 95
SM 95A
MOTOR
SPEED
(rpm)
1350
1350
1350
880
880
MOTOR
POWER
(W)
220
220
220
245
245
The La San Marco S.p.A. grinder-dispensers are prearranged for the following voltages:
• 110 V-1 ~ 60 Hz
• 230 V-1~ 50 Hz
• 230 / 400 V-3N~ 50 Hz
• 240 V-1 ~ 50 Hz
POWER
INPUT
(W)
350
350
350
460
460
TYPE OF
GRINDERS
Flat
Flat
Flat
Flat
Flat
GRINDING
CAPACITY
(kg/h)
8,5
8,5
8,5
13
13
GRINDER
SIZE
Ø (mm)
64
64
64
84
84
GRINDERS
SPEED
(rpm)
1350
1350
1350
880
880
NOISE LEVEL
dB(A)
72
72
72
69
69
WEIGHT
(Kg)
13,8
13,8
13,8
13,8
13,8
17
3.3 Assembly drawing
ENGLISH
10
11
4
3
6
5
8
7
1
9
13
12
14
15
LEGEND
1. ALUMINIUM HOUSING
2. MAIN SWITCH
3. HOPPER
4. HOPPER LID
5. HOPPER GATE
6. GRINDER GUARD
7. GRINDING ADJUSTMENT RING
8. ADJUSTMENT RING RELEASE BUTTON
9. DISPENSER
10. DISPENSER LID
11. BATCH ADJUSTMENT KNOB
12. PRESSER
13. GROUND COFFEE DISPENSING LEVER
14. FILTER CUP SUPPORT FORK
15. COFFEE COLLECTING TRAY
16. RUBBER FOOT
2
16
18

4. Installation
4.1 Warnings
The machine must be installed by qualified technical personnel authorized by La San
Marco S.p.A.
The grinder-dispenser is delivered to the customers in a suitable cardboard and styrofoam package. The package contains the grinder-dispenser, its accessories, the user
manual and the compliance declaration. After having opened the package, check the
integrity of the grinder-dispenser and its components; in case of doubt, do not use the
appliance and contact the qualified personnel of the La San Marco S.p.A. service centres.
The package should be disposed of through the proper waste collection centres, in compliance with the laws of the country where it is installed. Do not discard it in the environment. The packing
elements (carton, styrofoam, metal staples, etc.) can be hazardous. Keep away from children!
Place the grinder-dispenser on a perfectly horizontal surface that is sufficiently sturdy to support it, stable and dry.
4.2 Electrical connections
Instructions for a proper electrical connection of the grinder-dispenser:
• Before connecting the appliance to the power supply, make sure that the tag data of the grinder-dispenser
are the same as the network power supply; the rating tag is located under the grounds collecting tray.
• The connection must be made in accordance with the provisions of the country where the machine is in-
stalled.
• The electrical system prearranged by the customer must be in compliance with applicable standards. The
power socket must be provided with a suitable ground conductor. La San Marco S.p.A. declines any liability if the prescriptions of the law are not complied with. An improper installation can cause damage or
personal in-jury, for which the manufacturer cannot be considered liable.
• If it is necessary to use adapters, multiple sockets and extensions, use only products in compliance with
the safety standards in force.
• Unwind the power cable completely to avoid overheating it.
• The single-phase grinder-dispensers are provided with a three-conductor power cable and a plug for con-
nec-tion to the power socket.
• For the electrical connection of the three-phase models, install an omnipolar main switch upstream of the
power supply; the main switch must have the same electrical characteristics (power and voltage) as
shown on the machine rating tag. The main switch must be able to break the power supply with a contact gap of at least 3 mm.
• The three-phase grinder-dispensers are equipped with a five-conductor power cable. The connection of
the three-phase models must be carried out as follows: (star connection for the models with 400V-3N~
power supply and delta connection for the models with 230V-3~ power supply).
Voltage
400V-3N~
230V-3~
Connection to
the power socket
L
3
L
2
L
1
N
GI/VE
L
3
L
2
L
1
N
GI/VE
• At the completion of the electrical connection, check that the motor turns in a clockwise direction (look-
ing at the appliance from above); if it turns counterclockwise, reverse two power phases.
• If the power is transformed from 400V-3N~ to 230V-3N~ or vice versa, use the adhesive labels provided
with the machine to update the data shown on the label glued at the end of the power cable.
Connection to the electronic control unit
inside the machine
2
GI BL BI N E VE MA
21
GI BL BI N E VE MA
46
4365
LEGEND:
1
3
5
= brown
L
3
L2= black
L1= black
N = neutral (blue)
GI/VE = ground
1 = yellow
2 = blue
3 = white
4 = black
5 = green
6 = brown
ENGLISH
19
4.3 Programming the grinding time (Automatic models)
The electronic control unit controls the grinding time and restarts the grinder-dispenser after a certain number of batches of ground coffee are dispensed. The unit is programmed by the manufacturer according to
preset values (see table).
SM 90/95 A 80 s 12
stops at the end of the preset grinding time or, as already mentioned, it is stopped by the action of the over-
ENGLISH
flow limit switch. The installer can modify the settings on the electronic control unit if the user of the appliance requests different parameters from those preset by the manufacturer.
Instructions for a proper adjustment of the grinding time:
• Disconnect the power supply.
• Lean the grinder-dispenser on one side and remove the bottom; the electronic control unit, which con-
• Set, in agreement with the user of the appliance, the grinding time and the number of impulses to
• To set the agreed parameters, adjust the dip switches located inside the electronic control unit (see fig-
MODEL
GRINDING
TIME
BATCHES OF
GROUND
COFFEE
The grinder-dispenser, started with the main switch 2, remains active
and stops at the end of the preset grinding time or is stopped by the
action of the overflow limit switch, which resets the timer. The
grinder-dispenser starts again after a certain number of batches of
ground coffee, based on the impulses given by the lever 13, and
trols the grinding time, is located inside the grinder-dispenser.
start/stop grinding.
ure). Dip switches 1 and 2 control the grinding time; it is possible to set a grinding time from 30 to 120
seconds. Dip switches 3 and 4 control the impulses given by the coffee dispensing lever; it is possible to
restart the grinder-dispenser after 6, 12, 18 or 24 batches dispensed.
DIP SW
CONFIGURATION
ON
OF
ON
OF
ON
OF
ON
OF
DIP SW1
Off
On
Off
On
DIP SW2
Off
Off
On
On
TIME
30 s
50 s
80 s
120 s
DIP SW
CONFIGURATION
ON
OF
ON
OF
ON
OF
ON
OF
DIP SW3
Off
On
Off
On
DIP SW4
Off
Off
On
On
BATCHES
6
12
18
24
4.4 Grinding adjustment
Instructions for a proper adjustment:
• Fill the hopper 3 with the coffee beans and open the gate 5.
• Start the grinder-dispenser by pressing the main switch 2. Grind a small amount of coffee and switch off the unit.
• Check the fineness of the ground coffee. Make one or more cups of espresso coffee and check the cof-
fee served into the cup (the "ideal" quantity for brewing a cup of espresso is 6 to 8 grams of ground coffee, with a time of 25 to 35 seconds). There may be three different cases:
a) The coffee brews too slowly: the coffee is ground too fine (it should be coarser). To make a coarser
grind, press the release button 8 and turn the adjustment ring 7 clockwise.
b) The coffee brews too fast: the coffee is ground too coarse (it should be finer). To make a finer grind,
press the release button 8 and turn the adjustment ring 7 counterclockwise.
c) The coffee brews at the proper speed.
4.5 Changing the coffee grinders
The proper grinder change procedure is as follows:
1. Loosen the hopper locking screw (1) completely and pull out the hopper.
2. While keeping the release button (2) pressed, turn the adjusting ring clockwise to unscrew the upper
grinder support and remove it from its seat.
3. Replace the grinders and align the lower grinder with the three scraping teeth (the distance from these
teeth is 0,9 mm; to centre the machine we suggest using a thickness gauge).
20
4. Clean the grinder seats and the thread of the upper grinder support accurately.
5. Screw the upper grinder support down to where the upper grinder grazes the lower one; this operation
should be carried out with the coffee grinder-dispenser in rotation in order to determine the exact point
at which the two grinders come into contact with each other.
6. Adjust the coffee grinding as described in the previous paragraph.
(1)
(2)
4.6 Adjusting the quantity of ground coffee
Instructions for properly adjusting the quantity (grams) of ground coffee:
• The batch of ground coffee is controlled by means of the adjusting knob 11 located inside the dispenser 9.
• To decrease the amount, remove the lid from the dispenser and turn the knob clockwise; to increase the
amount, turn the knob counterclockwise.
• We suggest dispensing ten batches of ground coffee and weighing them with an electronic balance. The
average batch should be about 7 grams (suggested quantity).
5. Operating instructions
5.1 Using the grinder-dispenser
ENGLISH
Instructions for a proper use of the appliance:
• Fill the hopper 3 with coffee beans and open the gate 5.
• Timer model: start the coffee grinding by turning the manual timer clockwise; grinding stops when the set
time has elapsed. Turn the timer back to "zero" if you wish to stop grinding before the set time.
• Manual model: with the automatic timer: start the grinder-dispenser by pressing the main switch 2; the
green LED lights up in the push button (showing that the unit is connected). The electronic control unit
stops grinding at the end of the set time; grinding can be stopped at any time by turning the main switch
2 to position "zero". Motor restart based on the number of ground coffee servings is programmable and
may take place after 6, 12, 18, or 24 servings.
• Manual model: same characteristics as the automatic version, except for the “overflow” grinding shut-
down function and motor restart based on the number of ground coffee servings.
• The ground coffee is dispensed from the dispenser 9 by operating the lever 13.
• Place the filter cup on the support fork 14 and pull the lever (toward the operator) to dispense a batch of
ground coffee. Every complete movement of the lever corresponds to one batch.
• Press the ground coffee using the press 12; insert the filter cup in the machine serving unit and start the
coffee serving.
5.2 Practical suggestions for the operator
• Keep the coffee beans in sealed containers in a dry environment at room temperature.
• Never leave large quantities of ground coffee inside the dispenser for long periods (for example: during
the off day).
• Check from time to time the fineness of the ground coffee and the quantities dispensed, bearing in mind
that weather conditions (ambient humidity) have a considerable effect on the preparation of espresso coffee. Increase the coarseness of the ground coffee when ambient humidity increases and decrease it when
the humidity decreases.
21

• Have the state of wear of the grinders checked from time to time by authorized technical service person-
• Clean the grinder-dispenser and its components from time to time, particularly the hopper and the dispenser.
• In case of prolonged idle periods (holidays, seasonal shutdowns, etc.), empty the hopper and the dis-
6. Information for users in the European community
ENGLISH
and health, and favours the recycling of materials that the unit is made of.
In accordance with European Directive 2002/96/EC, abusive disposal of the product by the user will result in
application of penalties as set forth by local law.
7. Warranty
nel, bearing in mind that the flat grinding wheels cannot grind more than 300-600 kg of coffee beans
before becoming useless. The replacement of the grinders must be carried out by authorized technical
service personnel.
penser completely and carefully clean every part of the grinder-dispenser.
Pursuant to European Directive 2002/96/EC on electrical waste (WEEE), users in the
European community are advised of the following.
The symbol with the crossed-out dustbin on the appliance or its packaging indicates that
at the end of the product’s life cycle, it must be collected separately from other waste.
Suitable separate collection of the equipment for subsequent recycling, treatment and
disposal contributes to preventing possible negative consequences for the environment
The warranty becomes void if:
• The instructions in this manual are not complied with.
• The extraordinary maintenance and repair operations are carried out by unauthorized personnel.
• The machine is used in manners not provided for in this user manual.
• The original components are replaced with parts from different manufacturers.
• The warranty does not cover damage caused by carelessness, improper use and installation, rough han-
dling, lightning and weather agents, overvoltage and overcurrents, insufficient or irregular electrical
power supply.
8. Declaration of conformity
The manufacturer:
La San Marco S.p.A.
34072 Gradisca d’Isonzo (GO) Italy – Via Padre e Figlio Venuti, 10
phone (+39) 0481 967111 – fax (+39) 0481 960166 – http://www.lasanmarco.com
declares under its own responsibility that the espresso coffee machine described in this manual and identified by the data on the tag located on the machine, is compliant with directives 98/37/EC, 73/23/EC,
89/336/EEC, 89/109/EEC. For verification of compliance with said directives, the following harmonized standards have been applied: EN 12100-1, EN 12100-2, EN 60335-1, EN 60335-2-64
Gradisca d’Isonzo, June 2007
Managing director
Mr Roberto Marri
22

9. Problem solving
Before requesting the technical assistance of the service centre, carry out the following checks:
PROBLEM CAUSE SOLUTION
1) The coffee flows out of the
serving nozzle fast; the cream
of the coffee in the cup is light.
2) The coffee flows out of the
nozzle slowly (drop by drop);
the cream of the coffee in the
cup is dark.
3) Presence of coffee grounds in
the cup.
If it is not possible to solve the problem as suggested, or if problems other than those described above occur,
please contact the La San Marco S.p.A. authorized technical service centre.
a) coffee ground too coarse.
b) weak pressing.
c) insufficient batch.
a) coffee ground too fine.
b) excessive pressing.
c) batch too large.
a) coffee ground too fine.
b) grinders worn out.
a) grind coffee finer.
b) increase the pressing force.
c) increase the batch amount.
a) grind coffee coarser.
b) reduce the pressing force.
c) reduce the batch amount.
a) grind coffee coarser.
b) replace the grinders.
ENGLISH
La San Marco S.p.A. reserves the right to apply technical changes to the equipment
should they become necessary, without advance notice.
23

ENGLISH
24
MOULIN DOSEUR SM 90-95
FRANÇAIS
 Loading...