

Page 1
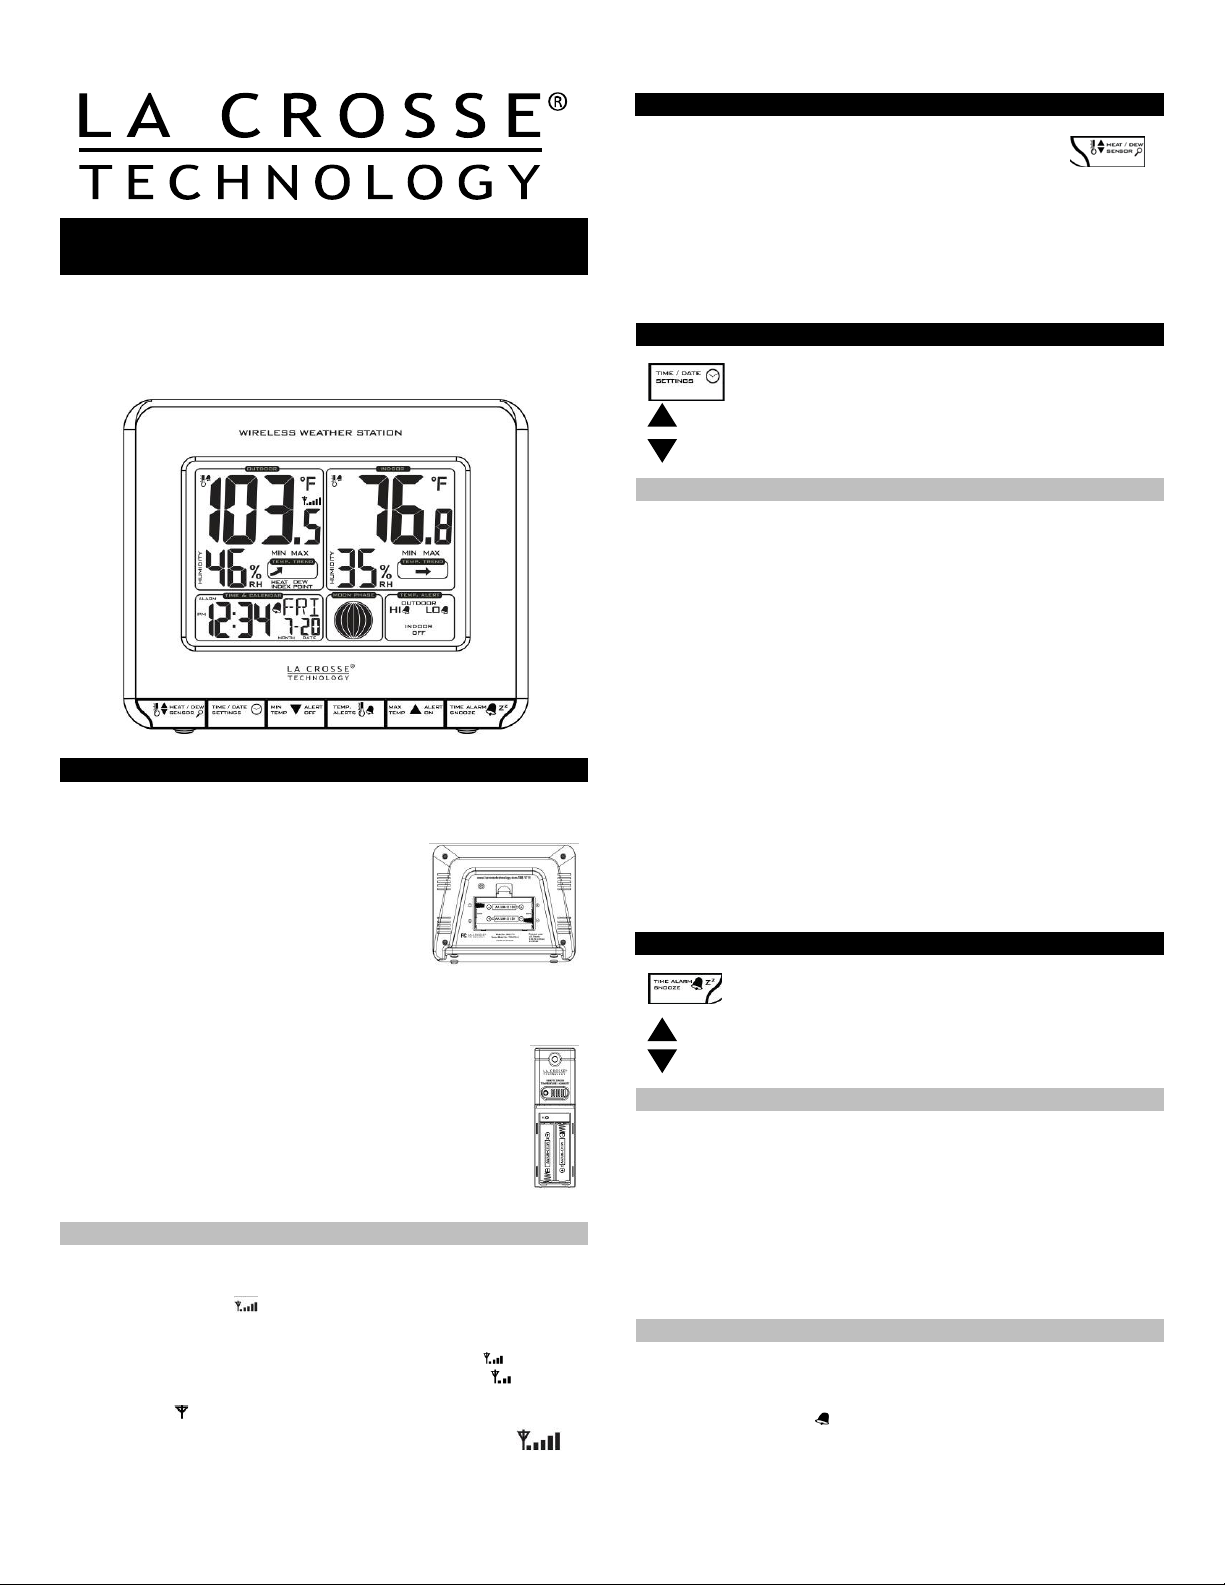
Wireless Weather Station
Model 308-1711 | Quick Setup Guide
The Wireless Weather Station features manu al set t im e, date, tim e alarm ,
Outdoor/I ndoor temperature alerts, and moon phase. Monitor temp erature
and humidi ty, track tem per atu re trends and set cus tomizable temperatur e
alerts--all in one conv enient devic e. Wireless transmission range of over
200 feet (60 meters) in op en air, from tr ansmitter to weather station.
SETUP INSTRUCTIONS STEP BY STEP
STEP 1:
• Remove batter y cover f rom the weather station. Sl ide tab down and pull
out to remove the battery cover.
• Insert 2 NEW A A batt eries (not included) int o
the back of the w eath er station. Obser ve the
correct polarity (see marking inside the batter y
comp artment). The weather station will light up
and show, i ndoor temperature, humi di t y and
time.
• Do Not Mix Old and New Batter ies
• Do Not Mix Alk aline, Standard , Lithium or Rechargeable Batterie s
STEP 2:
• Ensure that the transmitter is within 10 feet of the Weather
Station.
• To r emove batter y cover f rom TX141TH-A transmitter, slide the
battery cover down and lift off the front of the transmitter.
• Insert 2 NEW AA batteries (not included) into the transmitter.
Observe the correct pol arity.
• Within 3 minutes the weather station will show r eadi ngs in the
outdoor temperature area on the LCD.
• Note: Allow the weath er station and th e transmitter to stay
within 10 f eet of each other f or th e first 15 minut es of set up.
TRANSMITTER SIGNAL STRENGTH
After the bat te ries are inse rt ed, the weather st ation will search for the
outdoor temperatur e/h umidity transmitter for 3 minutes.
Th e an t e n n a s ymb ol will flash during rec eption, and tem perature
display wil l be dashes “---“.
Th e an t e n n a s ymb ol will scroll during signal synchronization.
If synchronizati on fails onc e, th e antenna will lose one ba r.
If synchronization f ails twice, the ant enna will lose two bars.
If recepti on continuousl y f ai l s to receive 5 times, the ant enna symbol wi l l
be shown as
The antenna will show full display with successful RF (radio
.
frequency ) reception.
TROUBLESHOOTING
If the outdoor temperature is n ot displayed after three
minutes, hold the SENSOR button on the weat her station
for th ree seconds t o search for outdoor transmitter.
Next, press the TX button on the outdoor transm i tter to send signal.
If it still does not recei ve the outdoor temper atu re, remove batteries from
both the w eather station and the transmitter for 15 m i nutes then repeat
the setup instructions from step 1.
The maximum transmitti ng range in open air is over 200-feet (60
meters). Obstacles suc h as walls, wi ndows, stucco, concrete, and large
metal objects can redu ce the range.
TIME/DATE
The TIME/DATE button w i l l m ove t hrough the program
menu and c onfirm settings.
Use the UP ARROW button to increase a value.
Use the D OW N ARROW button to decreas e a v alue.
SET TIME AND DATE
Hold the TIME/DATE button for three sec onds to enter t im e set mo de.
YEAR: The Year will flash. Use the ARROW buttons to choose the year,
and press the TIME /DATE button to confir m and move t o the month.
MONTH: The Month will flash, u se the ARROW buttons to choose the
month, and press the TIME/ DA T E button to c onfirm and move to the
date.
DATE: The Date will flash. Use the ARROW b uttons to choose the date,
and press th e TIME/DATE button to confirm and mov e to 12/24 hour
ti me format.
12/24-HOUR: Th e time format 12/24 will flash. Use the ARROW buttons
to choose 12-hour or 24-hour t im e for mat and pr ess th e TIME/DATE
button t o confi rm and move to h our.
HOUR: The Hour will flash. Use the ARROW b uttons to choose the
hour, and press the TIME/ DA TE button t o c onfirm and move to minutes.
MINUTES: The Minutes will flash. Use the ARR OW buttons to choo se
the minut es, and press t he TIME/D ATE butt on t o confirm and move to
Fahrenheit/Celsius.
FAHRENHEIT/CELSIUS: °F or °C will flash. U s e the ARROW buttons
butto n to select Fahr enheit or Cel sius. Press and rel eas e th e
TI M E/DATE bu tton to c onfirm and exit the progr am menu .
Note: W hen no buttons are press ed for ten seconds, the weather station
will save th e l ast change and d efault back to normal tim e and
tem per atur e d i s play mode.
TIME ALARM
The TIME ALAR M button moves through th e alarm setting
mode a nd confirms th e f inal setting.
Use the UP ARROW button to i ncrease a value.
Use the D OWN ARROW button to decr eas e a value.
SET TIME ALARM
From normal time and temperature disp lay mode, press and rel ease the
TIME ALAR M button once t o show alarm ti me. Hold the TIME ALARM
button for three seconds to enter alarm set mode.
HOUR: The Hour will flash. Us e the AR ROW buttons to s et the hou r,
and press TIME ALARM button to confirm and switch t o m inutes.
MINUTES: The Minutes will flash. Use th e ARROW bu ttons to set the
minutes, and press TIME ALARM butt on to confirm.
Press the TIME/D ATE butto n t o return to normal mode
Note: W hen no buttons are pres sed for ten second s, the weather station
will save th e last chan ge and defaul t b ack to n ormal mode.
ACTIVATE/DEACTIVATE TIME ALARM
From normal time and temperature disp lay mode, press and release the
TIME ALAR M button once t o show alarm tim e.
Press and r el ease the TIME ALARM button repeatedly to turn ON/OFF
alarm. T he alarm icon
appears wh en alarm is activat ed.
Note: Th e al arm will ri ng f or 2 m i nutes then turn off.
1
Page 2
SNOOZE
• When the al arm sounds, pr ess the TIME ALAR M button to snooze the
alarm for 10 minutes.
• The snooz e opt ion can be repeated three times.
Note: Whil e the alarm sounds, press any button except th e TIME ALARM
button t o turn the alarm off.
TEMPER AT URE TRE ND ARROWS
The indoor and outdoor temperatur e trend
indicat ors will update every 30 minut es or less.
These trends represent temperature changes
over the past three hours.
UP: Temperat ure rising m ore than 2°F /1°C in the past thr ee hours
RIGHT: Temperature ha s not changed more than 2 °F / 1°C in t he past
three hours.
DOWN: Temperature falling more than 2°F /1°C in t he past three h ours
MIN/MAX TEMPERATURES
The weath er station will show the daily m i nimum and maximum
temperatures eac h day starting at midnight (12: 00 AM). The w eat her station
automatically resets the min/m ax t em peratures at midnight (12:00 AM).
• View M IN data: Press and release the MIN TEMP button to view th e
minimum Indoor and Outdoor Temperatures.
• Reset MIN d ata: Hold t he MIN TEMP button for 5
seconds and t he Indoor and all Outdoor Minimum Tem peratures will be
reset to c urrent temperatures .
• View MAX data: Press an d relea se the MAX TE M P bu tton to view the
maximum Indoor and Outdoor T em peratures.
• Reset MAX data: Hold the MAX TEMP button for 5
seconds and the Indoor and all Outd oor Maxim um
Temperatures will be reset to current temperatures.
Note: When no buttons are pressed f or t en seconds, the weather station
will return t o di splay the current temperature.
TEMPERATURE ALERTS
Alert values are set when they flash in t he outdoor and in door temper ature
areas. Temperatur e alerts are turned on or off in the Temperature Alert box.
From normal time and temperatur e di splay mode, press and releas e the
TEMP ALERT button to select:
o Outdoor HI
o Outdoor LOW
o Indoor HI
o Indoor LOW
One or all the tem p erature alerts may be set.
Rang e for indoor temperature alert: +32°F t o +122°F (0 °C to 50°C)
Rang e for outdoor tem per atu r e a l er t : -40°F to 140°F (-4 0°C to 60°C)
SET ALERTS
Hold the TEMP ALERT button for three seconds, until the
we ather stat ion beeps, to enter alert setti ng.
OUTDOOR HI alert wil l flash in the outdoor temperature area. Press the
ARROW bu ttons to set the alert v alu e, and press the TEM P AL ERT
button to confirm. Then pr ess the TEMP ALERT button again swit ch to
OUTDOO R L OW setting.
OUTDOOR LOW alert will flash in the outdoor
tem per atur e a rea. Press the ARROW buttons to set the
alert value, and press the TEMP ALE RT button to
confirm. Then press the TEMP ALERT button again switch t o INDOOR
HI setting.
INDOOR HI alert will flash in the indoor t em perature area. Press the
ARROW bu ttons to set the alert value, and pre ss the TEMP A L ER T
button t o confi rm. Then press the TEMP ALERT button again switch to
INDOOR LOW sett i ng.
INDOOR LOW displ ay will flash in the indoor
tem per atur e a rea. Press the ARROW butto ns to
choose the v al ue, and press the TEMP ALERT button
to con firm and exit.
TEMPERA TUR E ALERT S ON/OFF
From normal time and temperature disp lay mode, press and release th e
TEMP ALERT button to toggle between:
o Outdoor HI
o Outdoor LOW
o Indoor HI
o Indoor LOW
Press the MAX TEMP button to tu rn the selected alert ON. The alert i con
appears w hen alarm is acti v ated.
Press the MIN TEMP button to turn the alert OFF.
Note: When no tem p erat u r e a lert s are s et , the
Temperature Ale rt area will show ALE RTS O FF.
TEMPERATURE ALERT RINGS
When a temp erature alert i s ringing, the corresponding alert symbol
will flash.
The al e r t w i l l ri ng f or five seconds every minute, unt i l t he
tem p er atu r e i s ou t o f alert ra nge.
Press any button to stop alert . The alert symbol will still
show.
Turn Alert OF F : I n normal mode, pr ess and releas e t he TEMP ALERT
button to select the alert to turn off. With HI or LOW aler t selected, pre ss
the MIN button to turn that alert OFF.
HEAT IN DE X & DEW POINT TEMPERATURE
HEAT INDEX
Heat Index combines the effects of heat and humidity. It is the appar ent
temperature of how hot it feels to a human b eing. As humi di t y i nc reases,
the body i s unable to cool effectively. T he tem per atu re w ill feel warmer.
View Heat Index: From normal t im e and tempe rat ure display mod e, press
the HEAT/DEW butt on once and Heat Ind ex wil l show instead of the
outdoor am bient temperature.
Note: Heat i ndex will be the same numb er as the
temperature unti l the ou tdoor temperature is ab ove 80
degrees °F (26.7°C)
DEW POINT TEMPERATURE
Dew Point Temperature is the s aturat ion point of the air, or the temp erature
to which the air has to cool in order to creat e condensation. The higher the
dew points, the higher the moisture conten t of the air at a given
temperature.
View Dew P oint Temperatur e: From normal time and temperature display
mode, press th e HEAT/DEW but ton twice and Dew Point will show instea d
of the outdoor ambient temp erature. Th e wor ds Dew Poi nt
will show near outdoor temperatur es.
Note: Dew Point i s lowe r than t he actual temp erature.
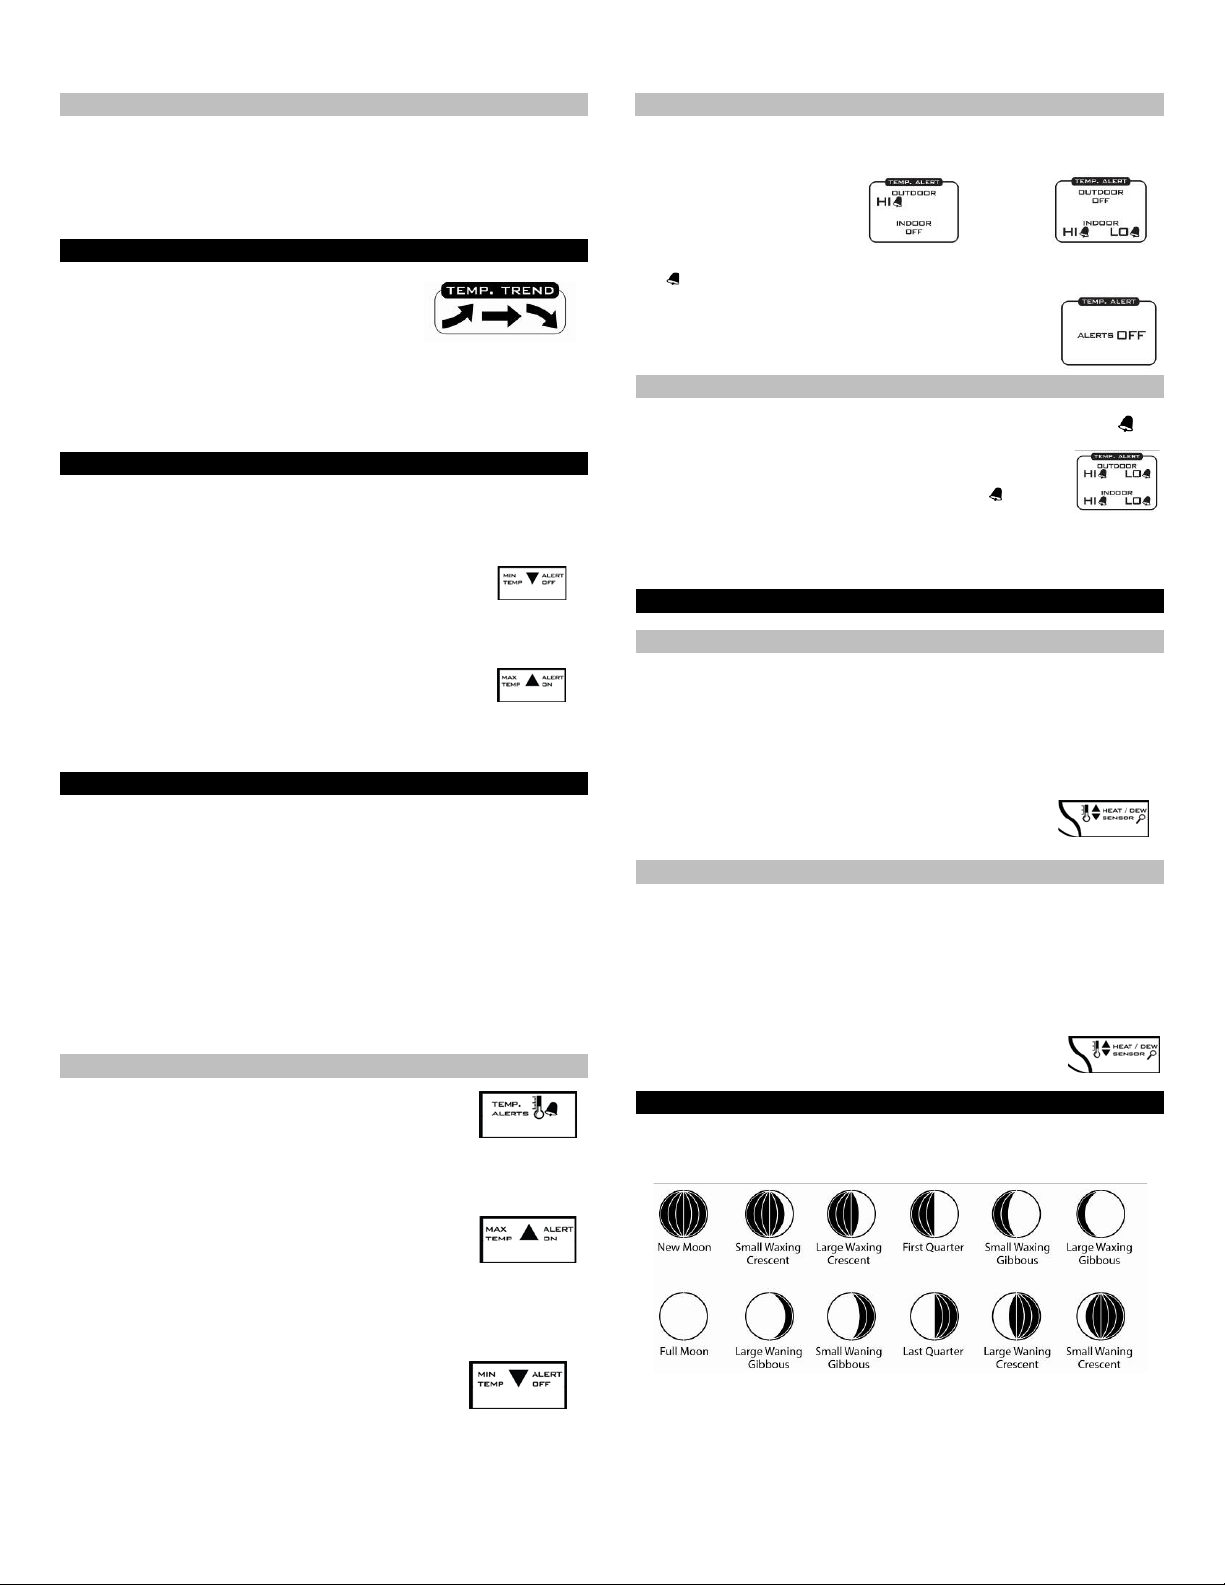
MOON PHASE
The Moon Phase is based on th e date manually set on the weat her station.
The moon is divi ded by 6 sections, showing a total of 12 phas es of the
moon.
2
Page 3

LOW BATTERY
• When this low bat tery icon appears in t he indoor (IN) r eading section,
rep lace the batter ies in the w eather station.
• When this low bat tery icon appears in t he outdoor (O UT) readings
section, r eplace the batteries in the outdoor transm i t ter.
POSIT I ON THE WEAT HER STATION
Ch oos e a location f or the weathe r stat ion th at is withi n rang e (200 feet, 60
meters) of the outdoor transmitter. The weath er station has a buil d i n base
stand to sit on a table or desk.
• Ch oo s e a l ocat ion 6 f e et or mor e from elec t r on i cs su c h as
cordless pho nes, g aming systems, televi sions, microwaves,
routers, b aby monitors, etc., whic h can prevent signal
reception.
• Be aware of el ect ri cal wires and plumbing w ithin a wall.
• Best reception is achieved when the fr ont or the back of the
weather st ation is facing the outdoor transmitt er. This allows
a larger port ion of the antenna to receive a signal.
POSITION THE WIRELESS OUTDOOR TRANSMITTER
Once t he weather station sh ows the out door temperature/humidi ty, place it
and the transmitter in the desired locati ons and wai t ap prox i m ately on e hour
before permanently m ount i ng the transmitter to ensure that there i s proper
reception. The transm i tter should be m ounted vertically, in a shad ed,
protect ed area, at least 6 feet from the ground to avoid d amage and ensure
accurate r eadi ngs. The transmitt er is water resist ant, not waterproof and
should not be placed anywhere it will become submerged in water or
subject to stan ding water or sn ow.
Choose a location for the tr ansmitter that is within range of
the Weather station and under an overhang for accur ac y.
The maximum transmit ting range in open air is over 200-feet
(60 meters).
Option 1:
• Install one mounti ng s cr ew (not included) into a wall
leaving approximately ½ of an inch (12.7mm) extended.
• Pl ace the transmitter ont o the screw, using the hanging
hole o n the backside.
• Gen tly pull the transmitter dow n t o lock the scr ew int o
place.
Option 2:
• Insert the m ount i ng screw (not included) through the fr ont of the
transmitter and into the wall.
• Tighten th e sc rew to snug (do not over tight en).
To achieve a true temperature/humidi ty reading, m ount where dir ect
sunlight c annot reach th e outdoor transmitter. Mount t he outdoor
transmitt er on a North-faci ng wall or in any well shaded area. Under an
eave or deck r ail work well. The maximum t ransmitting range in open air i s
over 200-feet (6 0 meters). Obstacles suc h as walls, windows, st ucco,
concr ete , an d larg e metal objec ts can reduce the range. Place the
transmitter at least 6 feet i n t he air to impr ove signal transmission.
CARE AND MAINT EN AN CE
• Do Not Mix Old an d New Batteries
• Do Not Mix Alk aline, Standard , Lithium o r Rechargeable Batteries
• Do not expose the weather station to extreme t emperatures, vibration or
shock.
• Keep w eather station dr y.
• Clean weather stat ion with a soft d amp cloth. Do not use solve nts or
scouring ag ents.
• The weather station i s n ot a toy. Keep it out of reach of child ren.
• The weather station is not to be us ed f or medical purpose or for p ubl i c
information; it is for home u se only.
• The specificati ons of this weather station may change w ithou t prior notice.
• Improper use or unauthorized opening of housin g will void th e warranty.
• If the w eath er stat ion does not work properly, change the batteries.
SPECIFICATION
Indoor:
Temperature Range: +32°F to +122 °F (0°C to 50°C)
Interval: About ever y 30 s econds
Outdoor:
Temperature Range: -40°F to 140°F (-40°C t o 60 °C)
Distance: Over 20 0 ft . (60 meters)
RF 433MHz ( open air)
Interval: About ever y 50 s econds
Power:
Weather Station: 2-AA, IEC, LR6 batteries (not includ ed)
TX141TH-A Transmitter: 2-AA, IEC, LR6 batteries (n ot included)
Battery Li fe:
TX141TH-A Transmitter
Bat tery Lif e: Battery lif e is over 24 months w hen
using reputable Alkaline battery brands.
Weather Station
Battery L if e: Bat tery life is over 12 months when
using reputable Alkaline battery brands.
Dimensions:
Weather Station: 5.40” L x 1.68” W x 4.40” H
(137.2 mm L x 42.8 mm W x 111.8 mm H)
TX141TH-A Transmitter: 1.57" L x 0.79" W x 5.12" H
(40 x 20 x 130 mm)
WARRANT Y INF OR MATI ON
La Crosse Technology, Lt d provides a 1-year l i mited warranty on this
product against manuf acturing defects in materi al s and workm anship.
This limi t ed warranty begi ns on the original date of pu rchase, is v ali d only
on products p urchased and used in North America and onl y to the origin al
purchaser of this produc t. To receive warranty service, the purchaser must
contact La Crosse Technology, Ltd for problem determinati on and service
procedures. Warranty ser vi ce can only be performed by a La Crosse
Technology, Ltd authori zed service center. The origi nal dated bill of sale
must be presented upon request as proof of purchase t o La Crosse
Technology, Ltd or La Cr os se Technology, Ltd’s authori zed service center.
La Crosse Technology, Lt d will repair or replace this product, at our opt ion
and at no charge as stipul at ed herein, wit h new or recondit ioned parts or
products if found to be defective during the limited w arranty period specified
above. All replaced part s and products b ecome the prop ert y of La Cross e
Technology, Ltd and must be returned to La Crosse Technology, Ltd.
Rep lacement parts an d products assume the remaining original war ranty,
or ninety (90) days, whichever is longer. La Crosse T echnology, Ltd will
pay all expenses for labor and materials for all repairs covered by t his
warranty. If necessary repairs are not covered by this warranty, or i f a
product is examined whi ch is not in need or repair, you will be charged f or
the repairs or examinat ion. The owner must pay any shipping ch arges
incurred in getting the La Crosse Technology, Ltd product to a La Crosse
Technology, Ltd authori zed service center. La Cr oss e T echnology, Ltd will
pay ground return shipping charg es to the owner of the product to a USA
address only.
The La Cros se Technology, Ltd warranty covers all defects in material and
workmanshi p with the foll owi ng specifi ed excepti ons: (1) damage c au s ed by
accident, unreasonable use or neglect (i nc l uding the l ack of reason abl e and
necessary maintenance); (2) damage occurrin g during shipment (claim s
must be presented to th e carrier); (3) damage to, or deterioration of, any
acces sory or decorativ e surface; (4) damage re sulti ng f rom failure to foll ow
instructions c ont ained in the owne r’s manu al; (5) damage resul ting from the
perform ance of repairs or alt eration s by someone oth er than an authoriz e d
La Crosse Technology, Lt d aut horized ser vi ce center; (6) uni ts used for
other than h ome use (7) applications and uses that thi s pr oduct was not
intended or (8) t he products inability to receive a sign al d ue to any sourc e of
interference.
This warranty covers only actual defects within t he product itself, and does
not co ver th e cost of install ati on or remo val from a fix ed installation, normal
set-up or adju st ments, cl aims based on m i sr epresentation by t he seller or
performance v ariation s re sulting from ins tallati on-r el at ed circumst ances.
3
Page 4

LA CROSSE TECHNOLOGY, LTD WILL NOT ASSUME LIABILITY FOR
Printed in China
INCIDEN TAL, CONSEQUENT IAL, PUNI T IVE, OR OT HER SIMIL A R
DAMAGES ASSOCIATED WITH THE OPERATION OR MALFUNCTION
OF THIS P RO DUCT. THIS PRODU CT I S NOT TO BE USED FOR
MEDICAL P URPOSES OR FOR PUBLIC INFO RMATION. THIS
PRODUCT I S NOT A TOY. KEEP O UT O F CHI L DREN’S REACH.
This warranty gives yo u specific l egal rights. You may also h ave other
rights specific to the State. Some States d o not allow the exclu sion o f
consequent ial or incidental damages t herefor e th e above exclusi on of
limit ation m ay not apply to you.
For warranty work, techn i cal sup por t , or i nformation contact:
La C rosse Technology , Ltd
2817 Losey B l vd. S .
La Crosse, WI 54601
Contact Sup port: 1-608-782-1610
Product Regi st ration:
www.lacrossetechnology.com/support/register
The compl et e in st ruction manual is avail abl e at:
www.lacrossetechnology.com/308-1711
Protect ed under U.S. Patents:
5,978,738
6,076,044
6,597,990
FCC STAT EMENT
Thi s eq uipment has b een tested and f ound to comply w i t h the limits for a
Class B digital device, pur suant to part 1 5 of the FCC Rules. T hese limit s
are design ed to provide r easonable protection agai nst harmful interference
in a resident ial installation. This equipment generates, uses and can radiate
radio frequ ency energy and, if not inst alled and used in accordance with the
instructions, may caus e harmful interference to radio communications.
However, there is no guaran te e that interf eren ce will not occur in a
particular installation. If thi s equipment does cause harmful interf erence to
radio or t el evision reception, which c an be determined by turning the
equipm ent off and on, the user is encouraged to try to correct the
interference by one or m ore of the followi ng measures:
—Re orient or relocate the receiving a nt enna.
—Increas e the separation between the equipment and receiver.
—Connect t he equipment i nt o an outlet on a circ uit different from that to
which the receiver is conn ected.
—Consult the dealer or an experienced radio/ T V technician for help.
This device mus t n ot b e co-l ocated or operat i ng i n conjunction with any
other antenna or transmi t ter. Operation i s subject t o the following tw o
conditions:
(1) this device may not cause harmful interference, and
(2) this device must accept any interf erence received, includin g interference
that may c ause undesired operation.
Caution!
The manufacturer is not r esponsible f or any radio or TV interference caused
by unauthorized modifications to this equipm ent. Such modif ications co uld
voi d the user aut hor ity to operate the equipment.
All rights r eserved. This handbook must not be reproduced in any form ,
even in excerpts, or duplicated or processed using el ectronic, mechanical
or chemical procedur es w i thout writt en permission of the publisher.
This handbook may contain mistakes and printing errors. The information
in this handb ook is regularl y c hecked and corrections made in the next
issue. We accept no liability for technical mistak es or printing err ors, or
their consequences.
Al l tr ad emarks an d pat en ts ar e ack n ow led ged .
4
 Loading...