

1
LONG RANGE WIRELESS COLOR WEATHER STATION Owner’s Manual
Thank you for purchasing the new generation color weather station. Designed and engineered
with the state-of-art technology and components, this instrument will provide accurate and
reliable measurement of barometric pressure, weather forecast, in/ out humidity, temperature,
heat index, dew point as well as atomic clock. Read this manual carefully to fully explore the
features and functions of the new product.
ABOUT WWVB (Radio Controlled Time)
The NIST (National Institute of Standards and Technology—Time and Frequency Division)
WWVB radio station is located in Ft. Collins, Colorado, and transmits the exact time and date
signal continuously throughout the United States at 60 kHz. The signal can be received up
to 2,000 miles away through the internal antenna in the Weather Station. However, due to
the nature of the Earth’s Ionosphere, reception is very limited during daylight hours. The
Weather Station will search for a signal every night when reception is best. The WWVB radio
station derives its signal from the NIST Atomic clock in Boulder, Colorado. A team of atomic
physicists is continually measuring every second, of every day, to an accuracy of ten billionths
of a second per day. These physicists have created an international standard, measuring
a second as 9,192,631,770 vibrations of a Cesium-133 atom in a vacuum. For more
information on the atomic clock and WWVB please see the NIST website at
http://www.boulder.nist.gov/timefreq/stations/wwvb.htm
.
W177.indd 1 9/15/07 10:21:32 AM

2
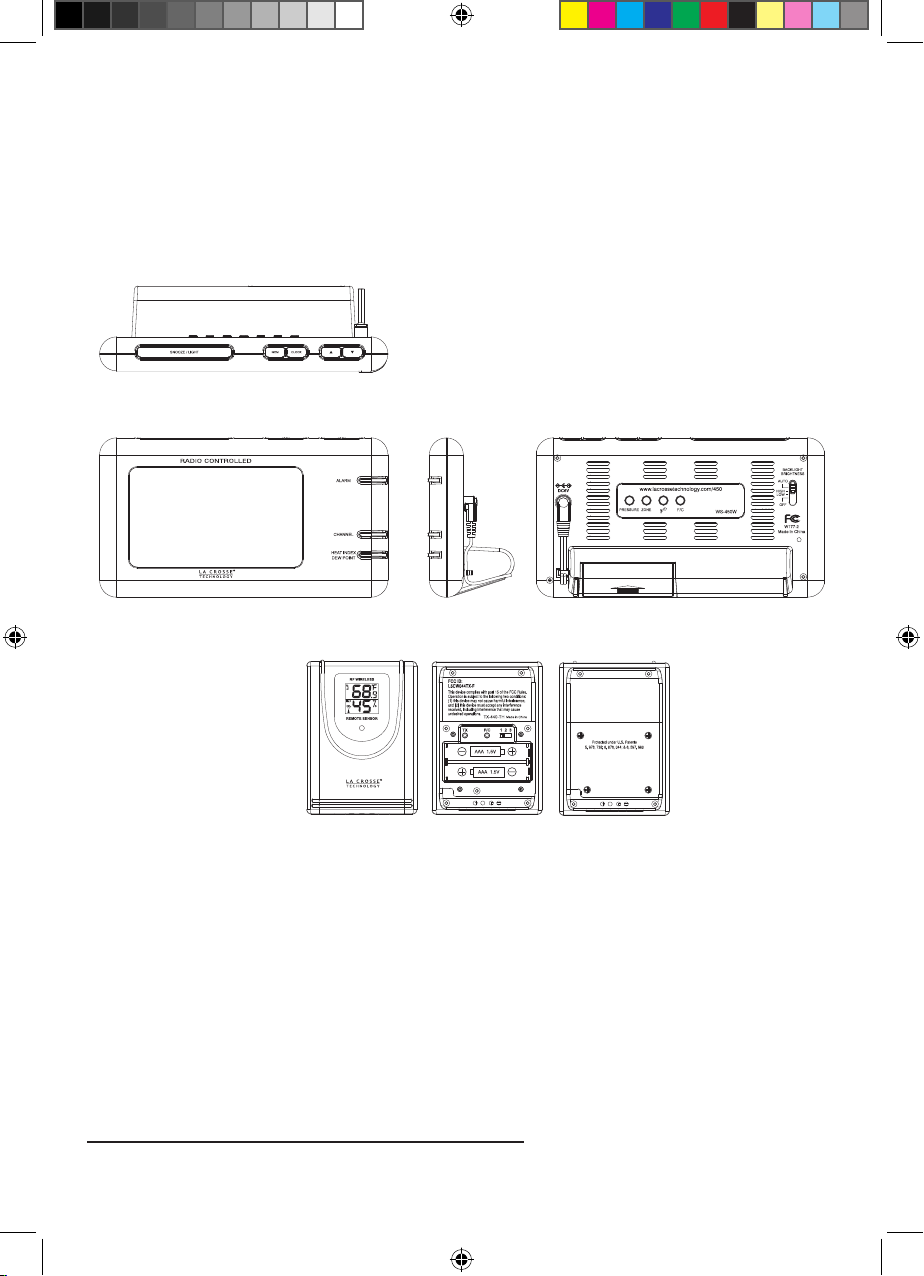
Name and Functions of Buttons:
Press Functions Hold 3 seconds
CLOCK Read time, calendar and day-of-week Set Clock & Calendar
ALARM Read alarm time; enable/disable alarm Alarm time setting
▲ UP 1 step forward in setting Fast advance
▼ Down 1 step backward in setting Fast backward
CHANNEL Select indoor, Channel 1,2,3, auto Search for remote sensor
scroll
MEM Read max/min temperatures & Clear memory record
humidity
HEAT INDEX/ Read Heat Index & Dew Point
DEW POINT
PRESSURE Toggle pressure unit hPa, inHg & mb Altitude setting
SNOOZE/LIGHT Trigger snooze alarm & extend
backlight
ZONE Select the 4 U.S. time zones Enter DST setting mode
F/C Toggle degree F & C unit
Search for atomic time signal
Slide Switch
BACKLIGHT (AUTO/ HIGH / LOW / OFF) Display brightness setting
(*** AUTO mode is recommended to adjust the brightness automatically)
BATTERY & ADAPTER INSTALLATION
Home Receiver Unit:
Main Power Source: Plug in the 6.0V adapter into the adapter socket at the back for basic
operation and continuous backlight.
Backup Power: Lift off the battery cover, install 3 pieces of AAA backup batteries according to
the polarity indicated, close the battery cover.
Remote Sensor:
Loosen the screws on the battery door with a small screwdriver, insert 2 AAA batteries
according to the polarity indicated. Replace the cover and tighten the screws.
W177.indd 2 9/15/07 10:21:36 AM
3
ALTITUDE SETTING
After inserting batteries or adapter, the main unit will enter altitude setting mode directly.
Press “▲” or “▼” to select pressure unit in hPa, mb or inHg. Press “PRESSURE” to confirm.
Then press “▲” or “▼” to enter your current altitude in meter or feet. Press “PRESSURE”
to confirm and exit the setting. This allows the unit to provide a more accurate barometric
pressure & weather forecast reading. (For more information, see “WEATHER FORECAST &
BAROMETRIC PRESSURE” section)
SETTING UP THE WIRELESS THERMO-HYGROMETER:
• For the first installation, always turn on the home unit and then the remote sensor. Set
Channel 1 for the first remote sensor. Set channel 2 and channel 3 for the 2nd and 3rd
sensor.
• Press and hold CHANNEL button on main unit until a beep is sound to search for remote
sensor.
• Press the TX button on the back of remote sensor to transmit RF signal.
• When RF connection is established, the respective temperature & humidity of the selected
channel will appear on the main unit.
ATOMIC CLOCK
The unit will start synchronizing the clock after battery/adapter installation or reset. In normal
mode, press “ “ on the back of the display, to enforce searching of atomic clock signal. The
antenna icon will appear during synchronization, if the icon disappears afterwards, atomic
time signal is not available at the moment. Try other locations later. Place the unit away from
source of interference such as mobile phones, appliances, TV etc. Place the front or back of
the unit toward Colorado for best signal reception.
Antenna icon with full signal strength will appear on screen if the reception of atomic time
is successful. The atomic clock will have a daily synchronization at 02:03 and 03:03 everyday.
Each reception cycle is minimum 2.5 minutes and maximum 10 minutes.
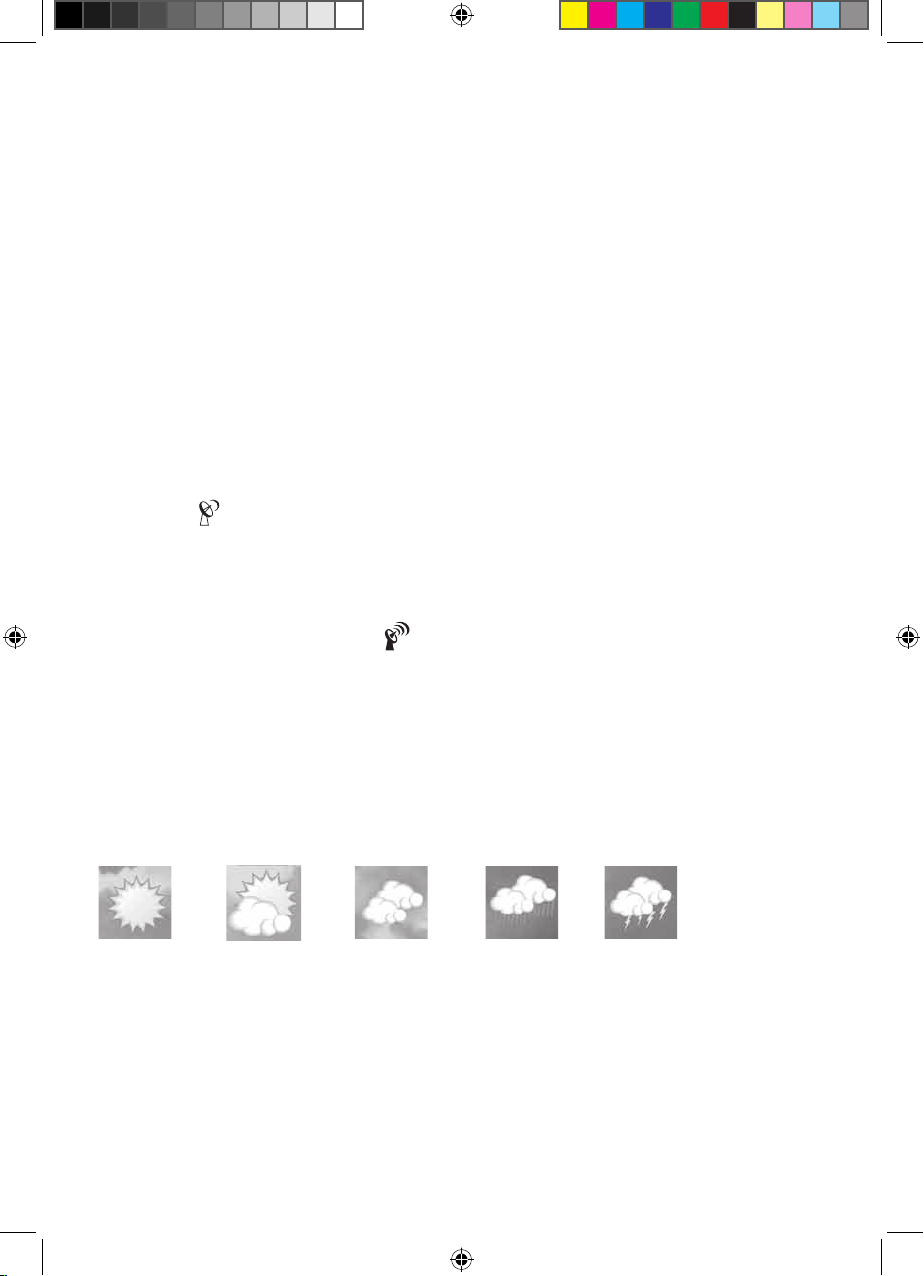
WEATHER FORECAST & BAROMETRIC PRESSURE
The unit predicts weather condition of the next 12 – 24 hours based on the change of
atmospheric pressure. Allow 48-60 hours after set up for the unit to acclimate to your
environment. The coverage area is around 18.5 – 31 miles. The weather forecast is based
on atmospheric pressure change and is about 70-75% correct. As weather conditions cannot
be 100% correctly forecasted, we cannot be responsible for any loss caused by an incorrect
forecast.
SUNNY PARTLY CLOUDY CLOUDY RAINY STORMY
The current weather forecast is the one highlighted by a black-outlined square box.
To obtain an accurate weather forecast & barometric pressure reading, you need to input your
current altitude. After the reset of the unit, it will enter altitude setting mode. Press “▲” or “▼”
to set the pressure unit in hPa, mb or inHg. Press “PRESSURE” to confirm. Then enter your
current altitude in meter or feet. Press “PRESSURE” to confirm and exit the setting. You can
also hold “PRESSURE” button to enter altitude setting mode during normal use.
Press PRESSURE button to select pressure unit between hPa, inHg & mb.
W177.indd 3 9/15/07 10:21:37 AM

4
IN/OUT TEMPERATURE & HUMIDITY
Temperature reading is located on the upper left of the display and humidity is on the right of
the temperature.
Press “F/C“ button to select temperature unit F/C.
Press CHANNEL button to select indoor, Ch1, Ch2, Ch3 and auto-channel scrolling display
modes.
IN/OUT HEAT INDEX
Heat Index combines the effects of heat and humidity. It is the apparent temperature of how
hot the heat-humidity combination makes it feels.
Press “Heat Index/Dew Point” button once to show the respective indoor or outdoor heat
index on the upper left display. “HEAT INDEX” icon will appear.
HEAT INDEX ALERT INDICATOR
During conditions indicating a high heat index, a Heat Index Alert Indicator will appear on
screen.
Caution Exercise more fatiguing than usual
Extreme caution Heat cramps, exhaustion possible
Danger Heat exhaustion likely
Extreme danger Heat stroke imminent
IN/OUT DEW POINT
Dew point is the saturation point of the air, or the temperature to which the air has to be
cooled in order to get condensation.
In normal mode, press HEAT INDEX / DEW POINT button twice to show the respective indoor
or outdoor dew point reading on the upper left display. “DEW POINT” icon will appear.
IN/OUT COMFORT LEVEL
In/Out Comfort indicator combines the effect of temperature & humidity and displays in 3
levels:
COMF: Comfortable level, ideal range for both temperature & humidity
WET: Contain excess moisture
DRY: Contain inadequate moisture
ANIMATED COLOR GRAPHS
The circular color graphs are designed as an intuitive way to gauge the weather at a glance.
The left color graph represents the respective In/Out temperature, heat index or dew point of
the current display mode. The right graph represents the respective In/Out humidity.
The higher the temperature & humidity, the more color portion of the color graph appears.
Lower temperature & humidity show less color portion of the color graph.
MAXIMUM / MINIMUM MEMORY
Press MEM button repeatedly to view the maximum & minimum values of temperature,
humidity, heat index or dew point readings. To clear the memory record, hold MEM button
while the respective values are displaying on screen.
W177.indd 4 9/15/07 10:21:37 AM

5
TEMPERATURE & HUMIDITY TREND INDICATOR
The icons (arrow) will indicate Rising, Steady, Falling if the temperature or humidity change is
more than 2 degrees F (or 1 degree C) within an hour.
CLOCK & CALENDAR
Press “CLOCK” to toggle display between time, calendar and day of the week.
Hold “CLOCK “ button to enter clock setting mode. Using “▲”or “▼“ to adjust and “CLOCK” to
confirm, the following values can be set in sequence:
12/24hr format > Hr > Min > Yr > D/M or M/D format > Month > Date > EXIT
U.S. ZONE TIME & DST
Press “ZONE“ button to select U.S. time zone between Pacific “PA”, Mountain “MO”, Central
“CE” and Eastern “EA”.
Hold “ZONE” to enter DST (Daylight Saving Time) setting mode. Press “▲“or “▼“ to enable or
disable the DST setting. Press “ZONE” to confirm and exit.
ALARM SETTING
Press “ALARM” to show alarm time and “AL.” icon will appear. Press again to enable or
disable the alarm. Bell icon “ ” appears when alarm is enabled.
Hold “ALARM” to enter alarm time setting mode. Press “▲”or “ ▼” to enter the desired Hr/
Min values and press “ALARM“ to confirm setting.
SNOOZE & BACKLIGHT
When alarm is going off, press SNOOZE/ LIGHT to trigger snooze alarm and “Zz” icon
will appear. To stop alarm for one day, press “ALARM” key. Press SNOOZE/LIGHT for an
extended backlight if adapter is not connected.
BACKLIGHT BRIGHTNESS CONTROL
Select display brightness mode with the slide switch on the back casing.
• AUTO:
Display brightness is adjusted automatically according to the surrounding brightness
detected by the light sensor located on the left of the Snooze/Light button. In a bright
environment, display brightness will increase. As the environment turns dark, display
brightness will reduce.
(
Note: Auto mode is recommended for power saving, display lifetime and convenient
purpose)
(Important: Avoid having obstacle above the light sensor window for an accurate light
sensing result. Otherwise, the display will turn dim even in bright environment)
• High: Turn to high brightness mode
• Low: Turn to low brightness mode
• Off Turn off display backlight
LOW BATTERY INDICATION
Low battery indication is available for the home unit itself and all of the 3 remote channels.
Replace the batteries and follow the setup procedure in this instruction manual.
BATTERY DISPOSAL
Replace only with the same or equivalent type recommended by the manufacturer.
Please dispose of old, defective batteries in an environmentally friendly manner in accordance
with the relevant legislation.
W177.indd 5 9/15/07 10:21:37 AM

6
SPECIFICATIONS
Indoor Temperature : +32 °F to +122 °F (0 °C to + 50 °C)
In/Out Humidity : 20% - 99% H
Remote sensor : -4 °F to +140 °F (-20 °C to +60 °C)
Channel : max. 3 remote sensors
Transmission : up to 75M (246 ft.) in open area, RF434 MHz
Resolution : 0.1 degree C for temperature, 1% for humidity
Heat Index :
Indoor : 23°F to 122°F (-5°C to 50°C)
Outdoor : -4F to 140°F (-20C to 60°C)
Elevation : -160 ft. to 3,940 ft. (-50M to 1,200M)
Clock : WWVB Atomic Clock, Quartz back-up
Power : 6.0V adapter & AAA x 3 pcs for main unit
AAA x 2 pcs for remote sensor
Trouble shooting for WS 450
Batteries
are our #1 warranty issue. Please be sure you are using plain alkaline batteries
dated at least 6 years in advance or reading at least 1.48 on a voltmeter. Be sure that your a/c
cord is properly plugged into the base.
Outdoor Temperature/Humidity
Shows dashes or is inaccurate-
• Check placement of sensor and obstructions such as windows, stucco, metal, trees etc.
• Did sensor get wet? Bring in, remove, batteries allow to dry and try restart.
• The sensor will read the temperature in the location where it is placed. Check for sources
of heat or reflected heat. Position your sensor under an eave or window ledge etc. on
North side of home.
• Check the channel button to be sure you are reading the correct sensor.
• Please note the humidity range is 20-99%. Below 20% you may see dashes.
• Check Batteries-and complete a restart.
Adjust to Fahrenheit or Celsius
• On the sensor, remove the battery cover and press the button for F/C
• On the base station press the button for F/C
Restart
• Bring both units inside and have the units at least 5 feet apart with nothing between them.
• Remove all power from both units.
• Press one of the buttons on the display at least 20 times to clear all memory. Verify that
the display is blank before proceeding.
• Let the all units sit with batteries out for 10 minutes.
• Be sure to use a new, Brand Name Alkaline battery dated at least 6 years in advance
(super, ultra, max, heavy duty and rechargeable types should be avoided).
• Plug in a/c cord and/or insert batteries in the display unit, then Insert batteries into the
sensor.
• Press and hold CHANNEL button on display unit until a beep is sound to search for
remote sensor.
• Press the TX button on the back of remote sensor to transmit RF signal.
• When RF connection is established, the respective temperature & humidity of the selected
channel will appear on the main unit.
W177.indd 6 9/15/07 10:21:37 AM

7
Indoor Temperature readings-
Shows dashes or is missing-
• Please note the humidity range is 20-99%. Below 20% you may see dashes.
• Check A/C connection and Batteries-This is almost always a power issue.
Time and Date information-
Time is not accurate of “jumps” time.
• Be sure your Time Zone is correct.
• Remove scratch guard.
• Has it connected with WWVB? Allow up to 5 nights for this to connect due to atmospheric
interferences.
Date changes at noon rather than midnight
• Time Zone is incorrect.
Weather Station Beeps-
• Alarm is on.
• Low power
• Button is depressed.
Forecast Icons Incorrect
• Set your elevation in the Pressure area.
• Allow 48-60 hours after set up to acclimate to your area.
Display Information
Display is blank
• Check A/C cord and Batteries. Is A/C cord plugged into a live outlet and not one that must
be turned on with a switch.
• Be sure batteries have not leaked
Missing segments-
• Check A/C connection and Batteries
• This is almost always a power issue.
• Complete a restart.
Black spot on LCD
• This is likely due to impact and not a warranty issue.
W177.indd 7 9/15/07 10:21:37 AM

8
WARRANTY INFORMATION
La Crosse Technology, Ltd provides a 1-year limited warranty on this product against
manufacturing defects in materials and workmanship.
This limited warranty begins on the original date of purchase, is valid only on products
purchased and used in North America and only to the original purchaser of this product. To
receive warranty service, the purchaser must contact La Crosse Technology, Ltd for problem
determination and service procedures. Warranty service can only be performed by a La
Crosse Technology, Ltd authorized service center. The original dated bill of sale must be
presented upon request as proof of purchase to La Crosse Technology, Ltd or La Crosse
Technology, Ltd’s authorized service center.
La Crosse Technology, Ltd will repair or replace this product, at our option and at no charge
as stipulated herein, with new or reconditioned parts or products if found to be defective
during the limited warranty period specified above. All replaced parts and products become
the property of La Crosse Technology, Ltd and must be returned to La Crosse Technology,
Ltd.
Replacement parts and products assume the remaining original warranty, or ninety (90) days,
whichever is longer. La Crosse Technology, Ltd will pay all expenses for labor and materials
for all repairs covered by this warranty. If necessary repairs are not covered by this warranty,
or if a product is examined which is not in need or repair, you will be charged for the repairs or
examination.
The owner must pay any shipping charges incurred in getting your La Crosse Technology, Ltd
product to a La Crosse Technology, Ltd authorized service center.
Your La Crosse Technology, Ltd warranty covers all defects in material and workmanship
with the following specified exceptions: (1) damage caused by accident, unreasonable use or
neglect (including the lack of reasonable and necessary maintenance); (2) damage occurring
during shipment (claims must be presented to the carrier); (3) damage to, or deterioration of,
any accessory or decorative surface; (4) damage resulting from failure to follow instructions
contained in your owner’s manual; (5) damage resulting from the performance of repairs
or alterations by someone other than an authorized La Crosse Technology, Ltd authorized
service center; (6) units used for other than home use (7) applications and uses that this
product was not intended or (8) the products inability to receive a signal due to any source of
interference.
This warranty covers only actual defects within the product itself, and does not cover the cost
of installation or removal from a fixed installation, normal set-up or adjustments, claims based
on misrepresentation by the seller or performance variations resulting from installation-related
circumstances.
LA CROSSE TECHNOLOGY, LTD WILL NOT ASSUME LIABILITY FOR INCIDENTAL,
CONSEQUENTIAL, PUNITIVE, OR OTHER SIMILAR DAMAGES ASSOCIATED WITH THE
OPERATION OR MALFUNCTION OF THIS PRODUCT. THIS PRODUCT IS NOT TO BE
USED FOR MEDICAL PURPOSES OR FOR PUBLIC INFORMATION. THIS PRODUCT IS
NOT A TOY. KEEP OUT OF CHILDREN’S REACH.
W177.indd 8 9/15/07 10:21:37 AM

9
This warranty gives you specific legal rights. You may also have other rights specific to
your State. Some States do no allow the exclusion of consequential or incidental damages
therefore the above exclusion of limitation may not apply to you.
For warranty work, technical support, or information contact:
La Crosse Technology, Ltd
2809 Losey Blvd S.
La Crosse, WI 54601
Phone: 608.782.1610
Fax: 608.796.1020
e-mail:
support@lacrossetechnology.com
(warranty work)
sales@lacrossetechnology.com
(information on other products)
web:
www.lacrossetechnology.com/450
All rights reserved. This handbook must not be reproduced in any form, even in excerpts, or
duplicated or processed using electronic, mechanical or chemical procedures without written
permission of the publisher.
This handbook may contain mistakes and printing errors. The information in this handbook is
regularly checked and corrections made in the next issue. We accept no liability for technical
mistakes or printing errors, or their consequences.
All trademarks and patents are acknowledged.
NOTE:
THE MANUFACTURER IS NOT RESPONSIBLE FOR ANY RADIO OR TV INTERFERENCE
CAUSED BY UNAUTHORIZED MODIFICATIONS TO THIS EQUIPMENT. SUCH
MODIFICATIONS COULD VOID THE USER AUTHORITY TO OPERATE THE EQUIPMENT
W177.indd 9 9/15/07 10:21:37 AM

10
This equipment has been tested and found to comply with the limits for a Class B digital
device,
pursuant to Part 15 of the FCC Rules. These limits are designed to provide reasonable
protection against harmful interference in a residential installation. This equipment generates,
uses and can radiate radio frequency energy and, if not installed and used in accordance with
the instructions, may cause harmful interference to radio communications. However, there
is no guarantee that interference will not occur in a particular installation. If this equipment
does cause harmful interference to radio or television reception, which can be determined by
turning the equipment off and on, the user is encouraged to try to correct the interference by
one or more of the following measures:
• Reorient or relocate the receiving antenna.
• Increase the separation between the equipment and receiver.
• Connect the equipment into an outlet on a circuit different from that to which the receiver is
connected.
• Consult the dealer or an experienced radio/TV technician for help.
For Outdoor Temperature and Humidity Sensor:
FCC ID: L5CW044TX-F
THIS DEVICE COMPLIES WITH PART 15 OF THE FCC RULES. OPERATION IS
SUBJECT TO THE FOLLOWING TWO CONDITIONS: (1) THIS DEVICE MAY NOT CAUSE
HARMFUL INTERFERENCE, AND (2) THIS DEVICE MUST ACCEPT ANY INTERFERENCE
RECEIVED, INCLUDING INTERFERENCE THAT MAY CAUSE UNDESIRED OPERATION.
FREQ. 433.92 MHz
LA CROSSE TECHNOLOGY
MADE IN CHINA
MODEL: TX-440-TH
Protected under U.S. Patents
5,978,738; 6,076,044; & 6,597,990
W177.indd 10 9/15/07 10:21:37 AM
 Loading...