

Model: 308-146/308-146W
Instruction Manual
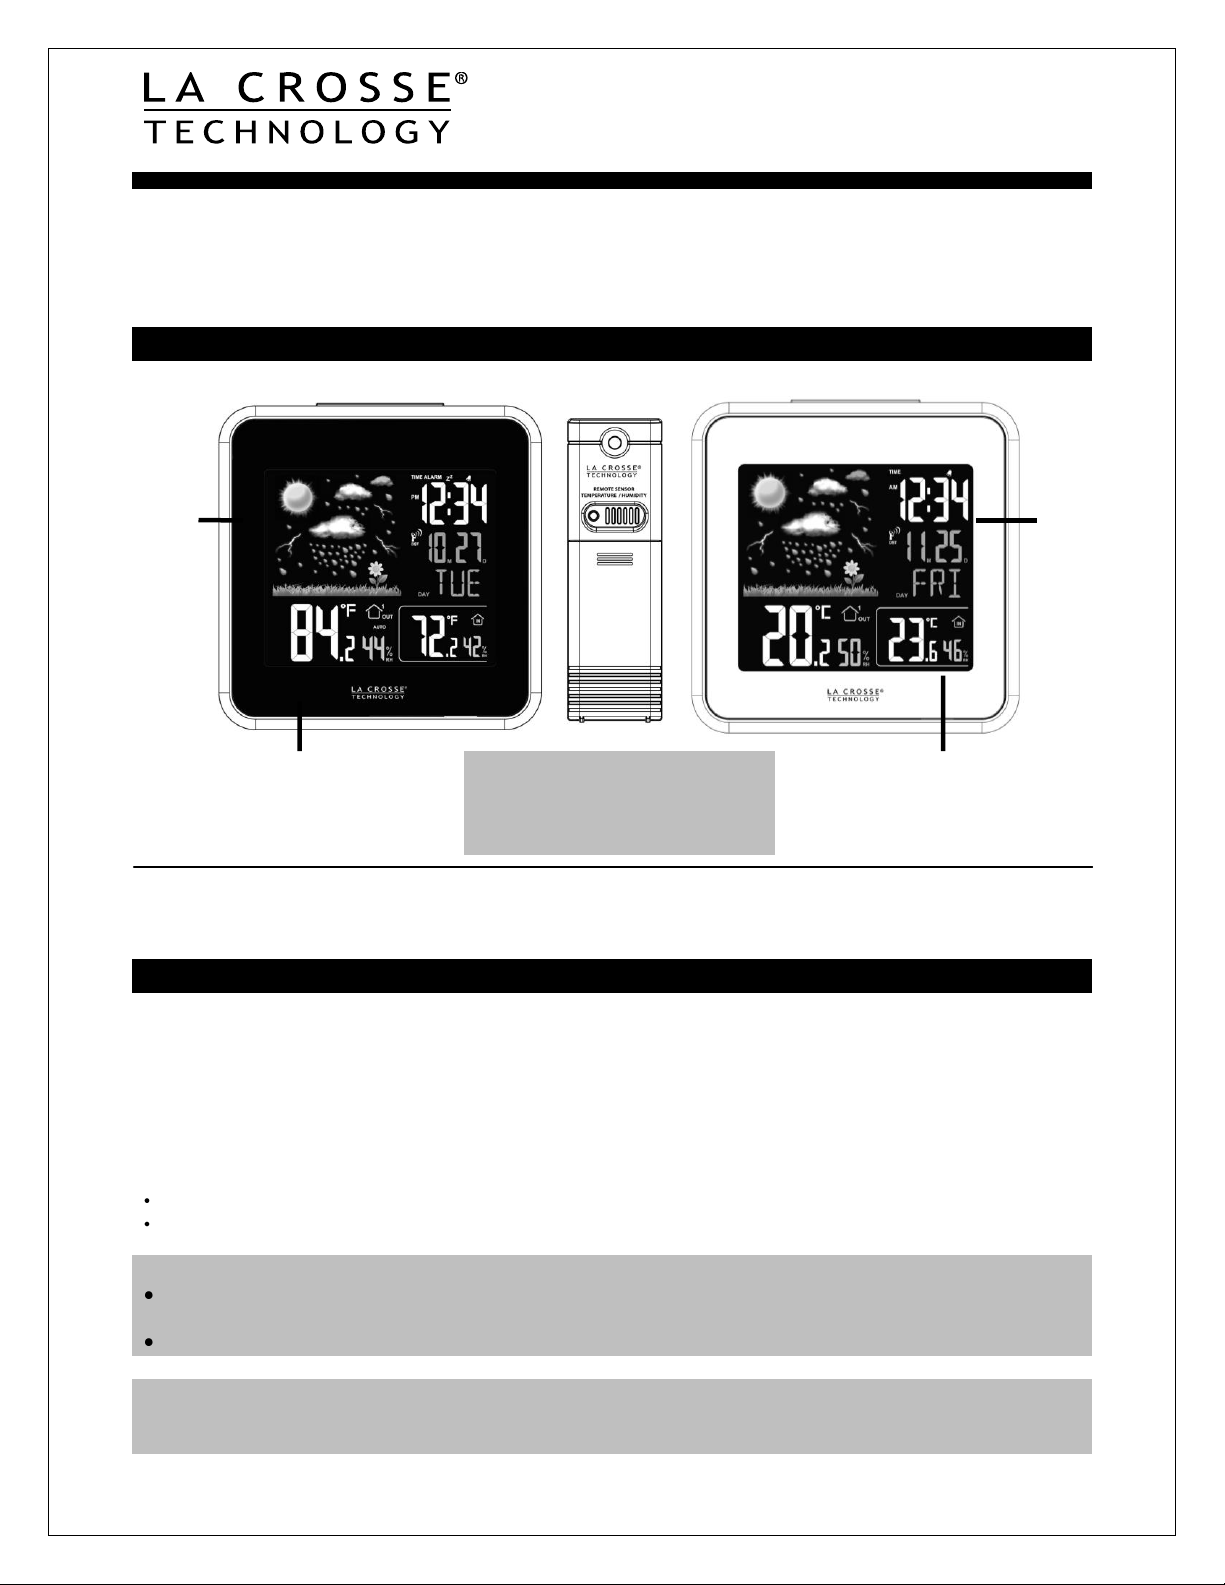
Five
Forecast
Icons
Time,
Alarm,
Month,
Date +
Weekday
Outdoor Temperature ºF/ºC,
Humidity RH %
+ Channel Indicator
Indoor Temperature ºF/ºC
+ Humidity RH%
NOTE: This forecast station is sold
with one TX142TH sensor or one
TX14TH sensor. Either sensor
may be used interchangeably.
The Wireless Color Forecast Station features atomic time, weather forecast, indoor and outdoor
temperature/humidity as well as heat index and dew point, on a stylish, colorful, and easy to read display.
It has a USB charging port to charge your smartphone or other device. Transmission range of over 200
feet (60 meters) in open air, from transmitter to forecast station.
Wireless Color Forecast Station
Get Support: www.lacrossetechnology.com/308-146
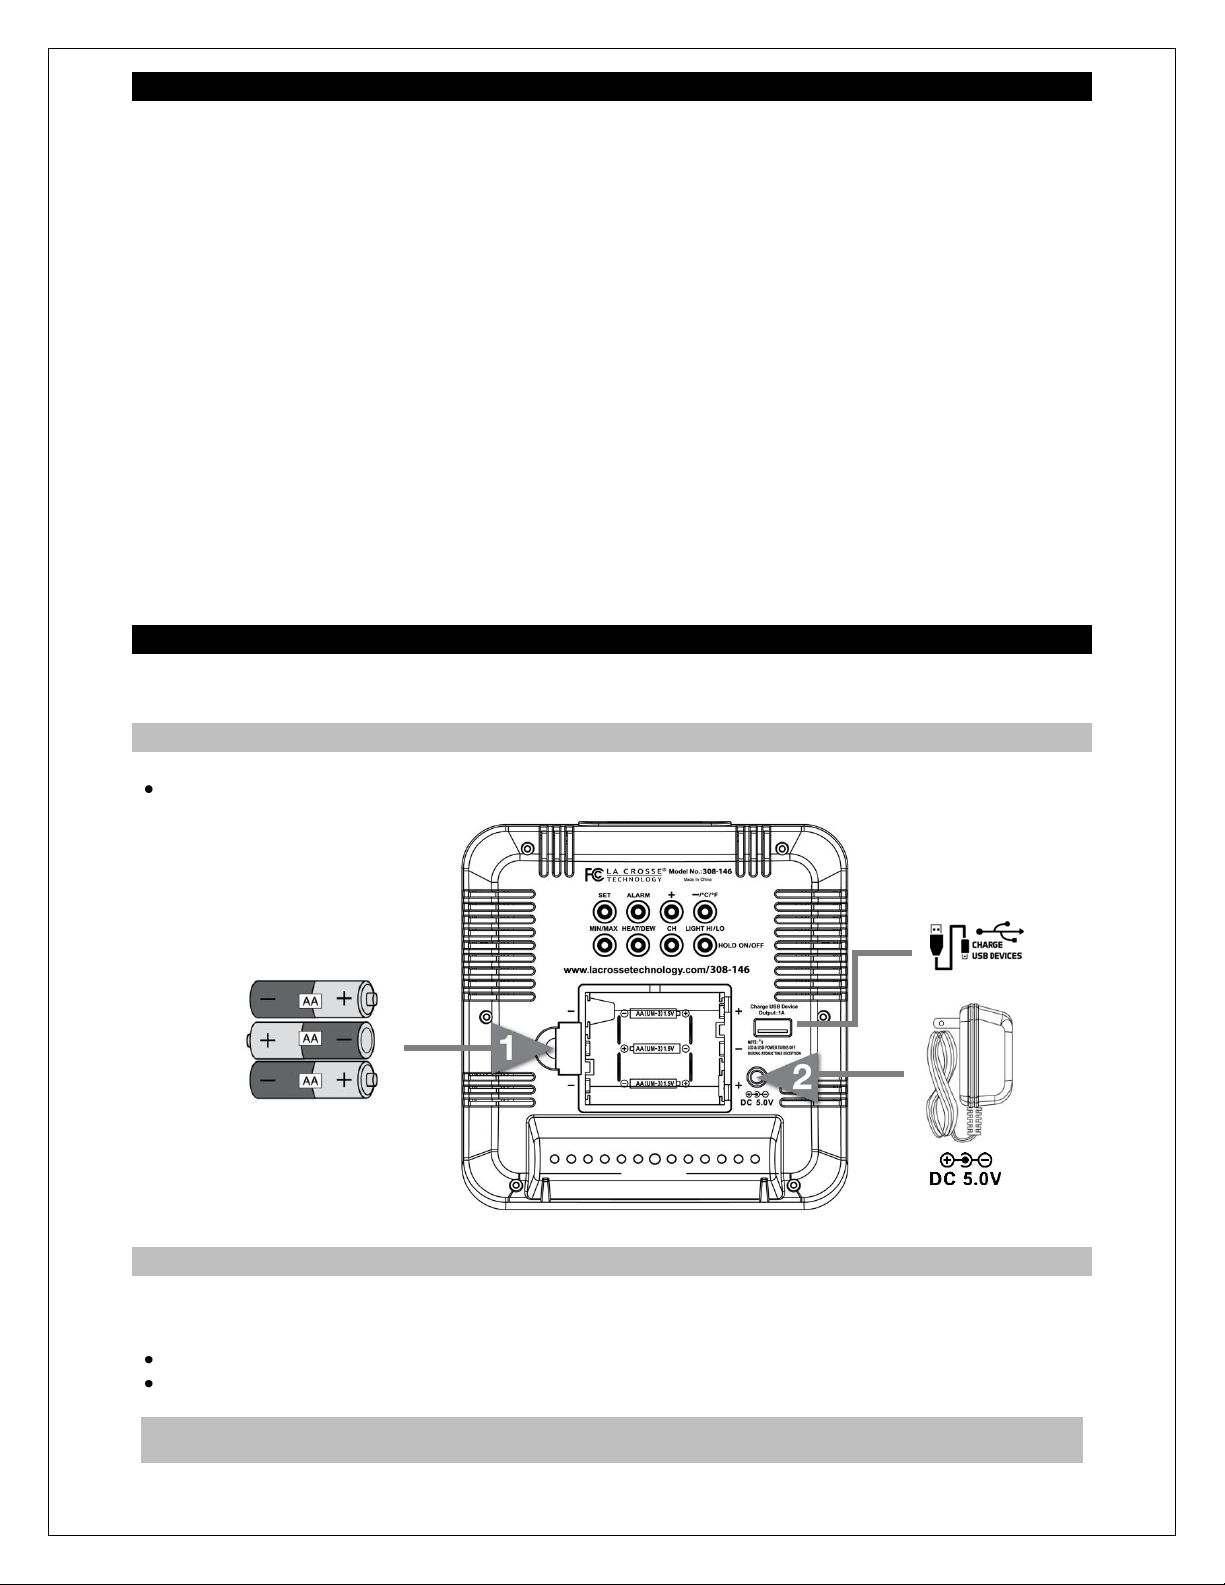
INITIAL SETUP
Step 1: Insert the included 5-volt AC power adapter into forecast station and then into wall outlet.
Step 2: Insert 3 new “AA” batteries (not included) into the forecast station. Observe the correct polarity.
Step 3: Insert 2 new “AA” batteries (not included) into the outdoor transmitter. Observe the correct
polarity. The red LED will flash when transmitting.
Do Not Mix Old and New Batteries
Do Not Mix Alkaline, Standard, Lithium or Rechargeable Batteries
RESTART:
If the outdoor temperature is not displayed after 3 minutes, unplug the AC adapter and remove
batteries from the forecast station & transmitter for 15 minutes.
Return to Step 1 above.
ATOMIC SIGNAL SEARCH:
The LCD backlight and USB charging port will momentarily turn off while the station searches for the
atomic signal. After the initial search, this station will only search for the atomic signal after midnight.
Model: 308-146/308146W www.lacrossetechnology.com/support 1

Table of Contents
Wireless Color Forecast Station 1
Initial Setup 1
Table of Contents 2
Features 3
Power the Forecast Station 3
A/C Power Adapter 3
Batteries 3
Install Batteries in the TX142TH Transmitter 4
Install Batteries in the TX14TH Transmitter 4
LCD Screen 4
Function Buttons 5
Program Menu 5
WWVB ON/OFF 5
Time Zone 6
Daylight Saving Time Indicator 6
12-hour or 24-hour Time Format 6
Set Time 6
Set Calendar 6
Fahrenheit/Celsius 6
Alarm Set 7
Deactivate Alarm 7
Snooze Alarm 7
USB Charge Port 7
Backlight 7
A/C Power Adapter 8
Batteries 8
Weather Forecast Icon 8
Min/Max Temperature Data 8
View Min/Max 8
Reset Min/Max 9
Heat Index 9
Dew Point Temperature 9
Low Battery Icon 9
Use Multiple Outdoor Transmitters 9
Channel Scroll 10
WWVB Radio-controlled Time 10
WWVB Reception Icon 10
Manual Signal Search 10
Care and Maintenance 11
Position the Outdoor Transmitter 11
Outdoor Temperature/Humidity Flashes 12
Position the Forecast Station 12
Specifications 12
Indoor 12
Outdoor 12
Humidity 12
Power Requirements 12
Battery Life 12
Dimensions 12
Warranty Information 13
FCC Statement 13
Model: 308-146/308146W www.lacrossetechnology.com/support 2
Features
• Atomic time and date (auto sets)
• 12/24 hour time with snooze alarm and alarm icon
• Charge devices with USB charging port
• Calendar display: month, day, date
• Heat index and dew point
• Forecast: sunny, partly sunny, cloudy, rainy and stormy
• 12 hour forecast based on changing barometric pressure
• IN / OUT temperature (°F / °C)
• IN / OUT humidity (%RH)
• MIN / MAX records (24-hour readings)
• Time zone selection: Atlantic Time (AST), Eastern Time (EST), Central Time (CST), Mountain Time
(MST), Pacific Time (PST), Alaskan Time (AKT) and Hawaiian Time (HAT)
• Light up the forecast station with a press of a button using battery power OR continuous light using
the AC adapter with ON / OFF option
• LCD light dimmer for nighttime use
• Low battery icon for forecast station and sensor
• Sits on desktop or tabletop
• 3 "AA" Alkaline batteries (not included) OR optional 5.0V AC adapter (included)
Power the Forecast Station
The forecast station can be powered by the 5-volt a/c adapter or batteries.
A/C Power Adapter
Insert enclosed 5-volt a/c power adapter into a wall outlet, then into the forecast station.
Batteries
1. Remove battery cover: Slide tab to the right and pull out to remove battery cover.
2. Install three fresh AA batteries according to the polarity markings.
Do Not Mix Old and New Batteries
Do Not Mix Alkaline, Lithium, Standard, or Rechargeable Batteries
NOTE: If the forecast station does not display indoor temperature after 60 seconds, remove adapter and
batteries, and wait for at least 60 seconds before repeating the setup process.
Model: 308-146/308146W www.lacrossetechnology.com/support 3
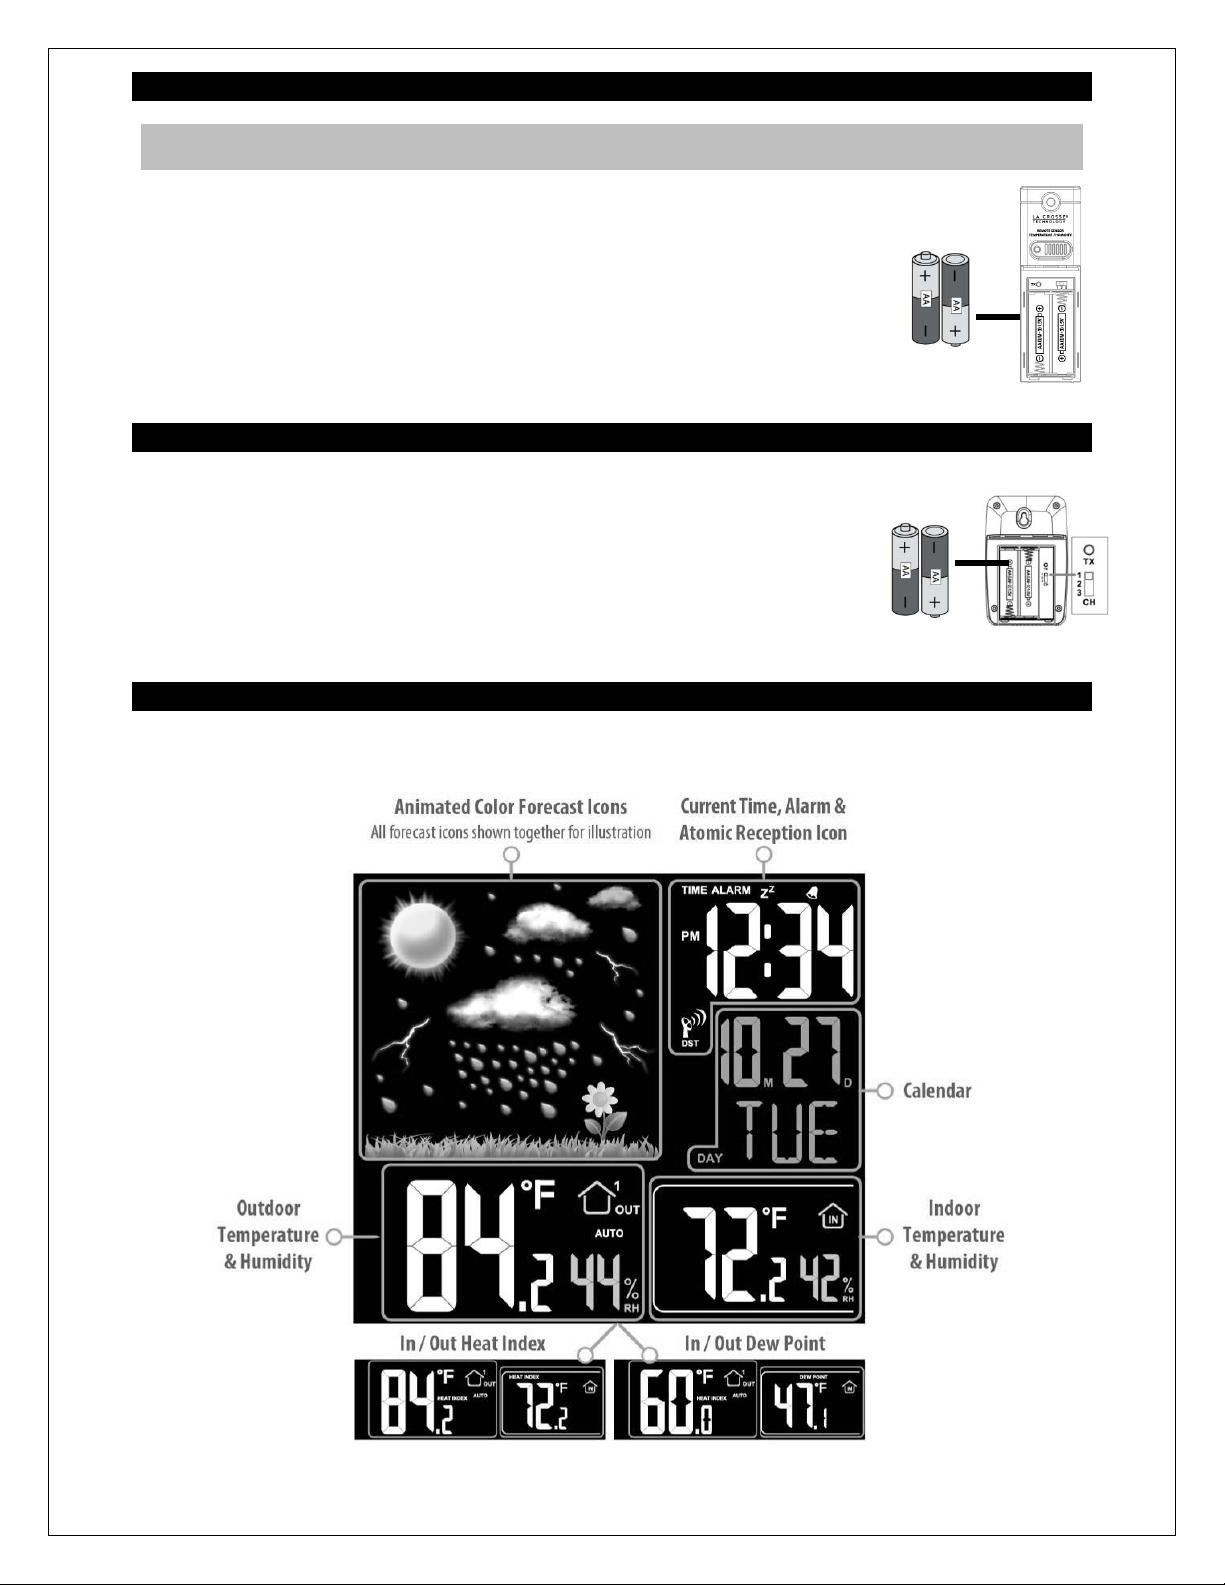
Install Batteries in the TX142TH Transmitter
NOTE: This forecast station will come with one TX142TH transmitter OR one TX14TH transmitter.
Both transmitters work interchangeably.
1. Slide the battery cover down, then lift off the front of the TX142TH transmitter.
Note: Be careful not to break the tabs on the battery cover.
2. Confirm the channel selector switch is on channel 1.
3. Insert two new AA batteries into the transmitter.
Observe the correct polarity (see marking inside battery compartment).
4. Keep transmitter 5-10 ft. from the forecast station during setup.
5. After 15 minutes, if the outdoor temperature shows on the forecast station,
move the outdoor transmitter outside to a shaded location within range of the forecast
station.
Install Batteries in the TX14TH Transmitter
1. Slide the battery cover down, then lift off the back of the TX14TH transmitter.
Note: Be careful not to break the tabs on the battery cover.
2. Confirm the channel selector switch is on channel 1.
3. Insert two new AA batteries into the transmitter.
4. Observe the correct polarity (see marking inside battery compartment).
5. Keep transmitter 5-10 ft. from the forecast station during setup.
6. After 15 minutes, if the outdoor temperature shows on the forecast station,
move the outdoor transmitter outside to a shaded location within range of the forecast station.
LCD Screen
The LCD screen is split into 5 sections displaying the information for time, calendar, weather forecast,
indoor data, and outdoor data.
Model: 308-146/308146W www.lacrossetechnology.com/support 4

Function Buttons
Button
Press and Release Functions
Hold 3-5 seconds
SET
Move through program menu Confirm
setting.
Enter program menu, set time,
date, etc.
ALARM
View Alarm
Activate/Deactivate Alarm
Alarm set
+/RCC
1 step forward (setup)
Search for WWVB signal
Fast advance (setup)
-/°C/°F
Select temperature in °C/° F
1 step backward (setup)
Fast backward (set)
MIN/MAX
1-time MAX values
2-times MIN values
Resets all MIN / MAX values
HEAT/DEW
1-time Heat Index
2-times Dew Point
CH
Switch channels
(when using multiple transmitters)
Search for remote transmitter
LIGHT HI/LO
HOLD ON/OFF
Dim backlight for night time.
Turn continuous backlight
ON or OFF (a/c adapter)
LIGHT/SNOOZE (top)
Activates backlight when using only
batteries.
Trigger snooze alarm
WWVB
Program Menu
The SET button will move through the items in the program menu. The +/RCC or -/°C/°F button will
change these values.
WWVB reception ON or OFF
Time Zone (Seven Time Zones)
Daylight Saving Indicator
12/24 hour time format
Manual time set (Hour, Minutes)
Calendar set (Year, Month, Date)
WWVB Reception ON/OFF
The WWVB time reception defaults to ON. To turn the WWVB reception OFF:
1. Hold the SET button for 5 seconds.
2. WWVB and ON will flash.
3. Press and release the +/RCC or -/°C/°F button to turn this OFF.
4. Confirm with the SET button and move to the Time Zone.
Model: 308-146/308146W www.lacrossetechnology.com/support 5

Time Zone
DST
ON
12H
2010
1M.1D
This forecast station offers seven time zones listed in letter format (default is EST):
1. EST will flash.
2. Press and release the +/RCC or -/°C/°F button to select a different Time Zone.
3. Confirm with the SET button and move to Daylight Saving Indicator.
Daylight Saving Time Indicator
DST will default to the ON position as most of the country observes the DST change. This should be in
the ON position all year long. If you live in an area does not observe the DST change, switch this to the
OFF position.
1. DST and ON will flash.
2. Press and release the +/RCC or -/°C/°F button to turn DST to OFF.
3. Confirm with the SET button and move to 12/24 hour time format.
12-hour or 24-hour Time Format
The Time may be displayed in 12-hour or 24-hour format. Default is 12-hour time.
Note: When in 12-hour format AM or PM will show in front of the hour.
1. 12H will flash.
2. Press and release the +/RCC or -/°C/°F button to select 24-hour time.
3. Confirm with the SET button and move to Set Time.
Set Time
To set the time manually:
1. The hour digit will flash.
2. Press and release the +/RCC or -/°C/°F button to select the hour.
3. Press and release the SET button to set the minutes.
4. The minute’s digit will flash.
5. Press and release the +/RCC or -/°C/°F button to select the minutes.
6. Confirm with the SET button and move to Set Calendar.
Set Calendar
To set the calendar:
1. The year will flash.
2. Press and release the +/RCC or -/°C/°F button to set the year (between year 2010-2039).
3. Press the SET button again to confirm and to enter the month setting.
4. The month will flash.
5. Press and release the +/RCC or -/°C/°F button to set the month.
6. Press the SET button again to confirm and enter the date setting.
7. The date will flash.
8. Press and release the +/RCC or -/°C/°F button to set the date.
9. Confirm all calendar settings with the SET button to confirm and exit the program menu.
Note: The day of the week will set automatically once the year, month and date are set.
Fahrenheit/Celsius
1. Press and release the -/°C/°F button once to switch from Fahrenheit to Celsius.
Model: 308-146/308146W www.lacrossetechnology.com/support 6

Alarm Set
Hold the ALARM button for 5 seconds to enter the alarm time set mode.
1. The alarm hour digit will flash.
2. Press and release the +/RCC or -/°C/°F button to select the hour.
3. Press and release the SET button to set the minutes. The minute digits
will flash.
4. Press and release the +/RCC or -/°C/°F button to select the minutes.
5. Confirm with the SET button and exit.
6. The alarm icon will show above the minutes indicating the alarm is active.
7. The alarm icon will flash when the alarm is sounding.
Deactivate Alarm
1. Press and release the ALARM button once to show Alarm Time.
2. Press and release the ALARM button to deactivate the Alarm. The alarm icon will disappear
indicating the alarm is no longer active.
Snooze
1. When the alarm sounds, press the SNOOZE/LIGHT button to trigger snooze alarm for 10 minutes.
The snooze icon Zz will flash when the snooze feature is active.
2. To stop alarm for one day, press ALARM button, while in snooze mode. The alarm icon will remain
solid.
Note: When the alarm sounds, it continues for 2 minutes and then shuts off completely.
USB Charge Port
Charge a smart phone, camera or other devices when the forecast station is
plugged into a power outlet with the included 5V AC adapter.
Note: This is a power-output charging port. It does not supply power to the
forecast station.
Connect your external device’s USB charging cable (not included) to the
USB charging port.
Charging times will vary.
USB Power Output: 1A maximum current. Charge 1A devices or devices
that are self-regulating.
Note: Some USB cables are for data transfer only and cannot be used for charging. Make sure that the
USB cable you use will charge your device. Most USB cables included with mobile devices will work for
charging.
ATOMIC SIGNAL SEARCH:
The LCD backlight and USB charging port will momentarily turn off while the station searches for the
atomic signal. After the initial search, this station will only search for the atomic signal after midnight.
Backlight
A/C Adapter
The backlight can show continuously when operating the forecast station with the 5-volt a/c adapter. If the
backlight is not on continuously, hold the HOLD ON/OFF button until the station beeps. The backlight
should show.
1. HIGH: The backlight defaults to HIGH (brightness) when the a/c adapter is in use.
2. LO: Press and release the LIGHT HI/LO button to dim the brightness of the backlight.
3. Press and release the LIGHT HI/LO button again to return to full strength (HIGH).
Note: When the Adapter is NOT in use, the High/Low backlight feature is not available.
Model: 308-146/308146W www.lacrossetechnology.com/support 7

1. OFF: Hold the HOLD ON/OFF button for 5 seconds, until the station beeps, to turn the backlight off to
sleep.
2. ON: Hold the HOLD ON/OFF button again until the station beeps, to turn the backlight on.
Note: When the backlight is off, press any button to activate the backlight for 8 seconds, and then it will
turn off again.
Battery Power
Press and release the SNOOZE/LIGHT button and the backlight will show for 8 seconds, when operating
on batteries only.
Weather Forecast Icons
The forecast station unit predicts weather condition for the next 12-hours based on the change of
atmospheric pressure. As weather conditions cannot be 100% correctly forecasted we cannot be
responsible for any loss caused by an incorrect forecast.
INTELLIGENT WEATHER FORECAST
This station learns. Please allow 3 to 4 weeks for barometric calibration. This will ensure an accurate
personal forecast for your location.
As the forecast station builds memory, it will compare the current average pressure to the past forty day
average pressure for increased accuracy. The longer the forecast station operates in one location the
more accurate the forecast icons will be.
The icons forecast the weather in terms of getting better or worse and not necessarily sunny or rainy as
each icon indicates. For example, if the current weather is cloudy and the rainy icon is displayed, it does
not mean that the product is faulty because it is not raining. It simply means that the air pressure has
dropped and the weather is expected to get worse but not necessarily rainy.
Common to weather forecasting, absolute accuracy cannot be guaranteed. The weather forecasting
feature is estimated to have an accuracy level of about 75% due to the varying areas the forecast station
has been designed for use. In areas that experience sudden changes in weather (for example from sunny
to rain), the forecast station will be more accurate compared to use in areas where the weather is
stagnant most of the time (for example mostly sunny).
MIN/MAX Temperature Data
This forecast station features daily minimum and maximum temperatures each day starting at midnight
(12:00 AM). The forecast station automatically resets the min/max temperatures at midnight (12:00 AM).
View Min/Max
MAX: From a normal display press and release the MIN/MAX button once to view maximum
temperature and humidity values for Indoor and Outdoor data. The word MAX will appear next to the
indoor and outdoor temperature.
MIN: From a normal display press and release the MIN/MAX button twice to view minimum temperature
and humidity values for Indoor or Outdoor data. The word MIN will appear next to the indoor and
outdoor temperature.
Model: 308-146/308146W www.lacrossetechnology.com/support 8

Reset Min/Max
Hold the MIN/MAX button for 5 seconds to manually reset each indoor and outdoor minimum and
maximum value. (The forecast station automatically resets the min/max temperatures at midnight: 12:00
AM).
Note: If you are using multiple transmitters connected to the forecast station, all channels will reset at the
same time.
Heat Index
Heat Index combines the effects of heat and humidity. It is the apparent temperature of how hot it feels to
a human being. When relative humidity increases, the air feels warmer than it actually is because your
body is less able to cool effectively by evaporation of perspiration.
View Heat Index: From a normal display press the HEAT/DEW button once and the Heat Index will show
instead of the ambient temperature. The words Heat Index will show near the indoor and outdoor
temperatures.
Note: Heat index will be the same number as the temperature until the temperature is above 80 degrees
°F (26.7°C).
Dew Point Temperature
Dew point is the saturation point of the air, or the temperature to which the air has to be cooled in order to
create condensation. The higher the dew points, the higher the moisture content of the air at a given
temperature. Dew Point Temperature is the absolute measure of the moisture in the air at a given
temperature. Relative humidity is the relative measure of moisture in the air at a certain temperature.
View Dew Point: From a normal display press the HEAT/DEW button twice and the Dew Point
temperature will show instead of the ambient temperature. The words Dew Point will show near the
indoor and outdoor temperatures.
Note: Dew Point is lower than the actual temperature.
Low Battery Icon
When this icon appears in the indoor (IN) data reading section, replace the batteries in the forecast
station.
When this icon appears in the outdoor (OUT) data readings section, replace the batteries in the
outdoor transmitter.
Use Multiple Outdoor Transmitters
The forecast station will accommodate up to three remote outdoor transmitters (TX142TH or TX14TH).
The channel selection button allows you to easily see the temperature in various locations: outdoors,
baby’s room, greenhouse, basement, etc.
Model: 308-146/308146W www.lacrossetechnology.com/support 9

To connect multiple remote transmitters to the forecast station:
1. Remove the battery cover from all the transmitters (Leave battery covers off until all
transmitters are received by the forecast station).
2. Set the first outdoor transmitter to Channel 1 and insert 2-AA batteries.
3. Set the second outdoor transmitter to Channel 2 and insert 2-AA batteries.
4. Set the third outdoor transmitter to Channel 3 and insert 2-AA batteries.
5. Press and hold CH button on the forecast station until a beep sounds. The forecast
station will search for all outdoor transmitters.
6. Press the TX button on each outdoor transmitter to transmit RF signal.
7. When RF connection is established, the respective temperature & humidity for each of
the selected channels numbers will appear on the main unit.
8. Allow the transmitters and the forecast station to stay 5-10 feet apart for 15 minutes to
establish a solid connection.
9. Install the battery covers on each sensor.
10. After 15 minutes place the remote transmitters in appropriate locations (see “position the
outdoor transmitter”).
11. Press and release the CH button to view channel 1, 2 or 3 on the forecast station when multiple
transmitters are used.
Note: You cannot change channels if only one transmitter is connected.
Channel Scroll
1. Press and release the CH button until the word AUTO appears in the outdoor data area. The forecast
station will automatically rotate through the channels for all connected transmitters.
2. Press and release the CH button to lock the forecast station into one channel. Then view channels
individually with a press of the CH button.
WWVB Radio-controlled Time
The NIST radio station, WWVB, is located in Ft. Collins, and transmits the exact time signal continuously
throughout the United States at 60 kHz. The signal can be received up to 2,000 miles away through the
internal antenna in the forecast station. However, due to the nature of the Earth’s Ionosphere, reception is
very limited during daylight hours. The forecast station will search for a signal every night when reception
is best. The WWVB radio station derives its signal from the NIST Atomic Clock in Boulder, Colorado. A
team of atomic physicists continually measures every second of every day to an accuracy of ten billionths
of a second a day. These physicists have created an international standard, measuring a second as
9,192,631,770 vibrations of a Cesium 133 atom in a vacuum. This atomic clock regulates the WWVB
transmitter.
WWVB Reception Icon
The WWVB time reception icon with full signal strength will appear on screen in front of the
date when the reception of time is successful.
The tower icon will show solid when the forecast station has received the WWVB signal.
No tower icon is shown. The forecast station was unable to receive a signal at this time.
Reposition the forecast station for better signal reception or try again at bedtime.
The forecast station will start searching at UTC: 07:00 and if no reception on the first attempt they will
try again at 08:00, 09:00 and 10:00. Each attempt will be at least 2 minutes and the most will be 10
minutes.
If there is no signal or too much interference the receiver will only be on for 2 minutes.
If the signal is good it may catch a signal in ABOUT 2-3 minutes.
If the signal is marginal it will try to catch a signal for up to 10 minutes.
IMPORTANT: When operating on a/c power, the backlight and USB charge port will turn off while the
forecast station searches for the WWVB signal, to avoid interference. Both features will return after
the 2-10 minute search which occurs during the late night or early morning hours.
Note: In case the forecast station is not able to detect the WWVB-signal (disturbances, transmitting
distance, etc.); the time may be manually set.
Model: 308-146/308146W www.lacrossetechnology.com/support 10

Manual Signal Search
In normal mode, hold the RCC button until the reception icon appears to force a search of the WWVB
signal. The WWVB icon will flash during the search. If this icon disappears after the 2-minute search,
the radio time signal is not available at the moment.
Recommended distance to any interfering sources like computer monitors or TV sets is a minimum of
6 feet (2 meters).
Within ferro-concrete rooms (basements, superstructures), the received signal is naturally weakened.
In extreme cases, please place the unit close to a window and/ or point its front or back towards the
Fort Collins, Colorado, transmitter.
During nighttime, the atmospheric disturbances are usually less severe and reception is possible in
most cases. A single daily reception is adequate to keep the accuracy deviation below 1 second.
Note: In case the forecast station is not able to detect the WWVB-signal (disturbances, transmitting
distance, etc.), the time and date can be manually set (see “program menu”).
Care and Maintenance
Do Not Mix Old and New Batteries
Do Not Mix Alkaline, Lithium, Standard, or Rechargeable Batteries
Do not expose the forecast station to extreme temperatures, vibration or shock. Keep dry.
Clean forecast station with a soft damp cloth. Do not use solvents or scouring agents.
The forecast station is not a toy. Keep it out of reach of children.
The forecast station is not to be used for medical purpose or for public information, but is determined
for home use only.
The specifications of this forecast station may change without prior notice.
Improper use or unauthorized opening of housing will void the warranty.
If the forecast station does not work properly, change the batteries and/or check the a/c cord
connection.
Position the Outdoor Transmitter
Once the forecast station shows the outdoor temperature/humidity, place it and the transmitter in the
desired locations and wait approximately 1-hour before permanently mounting the transmitter to ensure
that there is proper reception. The transmitter should be mounted vertically, in a shaded, protected area,
at least 6 feet from the ground to avoid damage and ensure accurate readings. The transmitter is water
resistant, not waterproof and should not be placed anywhere it will become submerged in water or subject
to standing water or snow. transmitting range in open air is over 200 feet (60 meters) from outdoor
transmitter to forecast station.
Option 1:
Install one mounting screw (not included) into a wall leaving approximately
½ of an inch (12.7mm) extended.
Place the transmitter onto the screw, using the hanging hole on the
backside.
Gently pull the transmitter down to lock the screw into place.
Option 2:
Insert the mounting screw (not included) through the front of the
transmitter and into the wall.
Tighten the screw to snug (do not over tighten).
To achieve a true temperature/humidity reading, mount where direct sunlight cannot reach the outdoor
transmitter. Mount the outdoor transmitter on a North-facing wall or in any well shaded area. Under an
eave or deck rail work well. The maximum transmitting range in open air is over 200 feet (60 meters).
Obstacles such as walls, windows, stucco, concrete and large metal objects can reduce the range. Place
the transmitter at least 6 feet in the air to improve signal transmission.
Model: 308-146/308146W www.lacrossetechnology.com/support 11

Indoor:
Temperature Range:
+32°F to +122°F (0°C to 50°C)
Humidity Range:
19%-97% (RH)
Interval:
About every 30 seconds
Outdoor:
Temperature Range:
-40°F to 140°F (-40°C to 60°C)
Alkaline Batteries:
-20°F to 140°F (-28.8°C to 60°C)
Lithium Batteries:
-40°F to 140°F (-40°C to 60°C)
NOTE:
Temperatures below - 20°F (-28.8°C) require Lithium batteries in the
outdoor sensor.
Humidity Range:
19%-97% (RH)
Distance:
Over 200 ft. (60 meters) RF 433MHz (open air)
Interval:
About every 50 seconds
Power:
Forecast Station
Primary Power:
5-volt AC power adapter (included)
Optional/Battery Backup
Optional 3-AAA, IEC, LR3 batteries (not included)
TX142TH/TX14TH Transmitter:
2-AA, IEC, LR6 batteries (not included)
USB
USB Charge Port:
Output 1A
Battery Life:
Forecast Station
Battery Backup:
Battery life is over 24 months when using the AC adapter for
primary power
TX142TH/TX14TH Transmitter:
Battery life is over 12 months when using reputable battery brands
for both Alkaline and Lithium batteries
Dimensions:
Forecast Station:
6.3" L x 2.75" W x 4.25" H (160 x 70 x 108 mm)
TX142TH Transmitter:
2.4” L x 1.3” W x 3.78” H (64 x 36 x 101mm)
Outdoor Temperature/Humidity Flashing
Low battery icon present: Change batteries in the transmitter, and then hold the CH button until the
station beeps to search for the outdoor transmitter again.
End of Transmission Range: Move the transmitter closer to the forecast station. Avoid obstructions
in the signal path. Keep transmitter and forecast station away from electronics.
Position the Forecast Station
1. The forecast station has a wide base to sit on a desk or table.
2. Choose a location 6 feet or more from electronics such as cordless phones, gaming systems,
televisions, microwaves, routers etc.
3. Place within range of the outdoor transmitter.
4. The maximum transmitting range in open air is 200-feet (60 meters). Obstacles such as walls,
windows, stucco, concrete, and large metal objects can reduce the range.
5. For best WWVB reception orientate the forecast station with the front of the back facing Ft. Collins
Colorado.
Specifications
Model: 308-146/308146W www.lacrossetechnology.com/support 12

Warranty Information
La Crosse Technology, Ltd. provides a 1-year limited time warranty (from date of purchase) on this
product relating to manufacturing defects in materials & workmanship.
View full warranty details online at:
www.lacrossetechnology.com/warranty_info.pdf
For warranty work, technical support or other information contact:
La Crosse Technology, Ltd
2817 Losey Blvd. S.
La Crosse, WI 54601
Contact Support:
1-608-782-1610
Product Registration: www.lacrossetechnology.com/support/register
Protected under U.S. Patents: 5,978,738, 6,076,044, 6,597,990
Online Product Support:
www.lacrossetechnology.com/308-146
FCC Statement
This Device complies with Part 15 of the FCC Rules. Operation is subject to the following two conditions:
(1) This device may not cause harmful interference, and (2) the device must accept any interference
received, including interference that may cause undesired operation.
NOTE: THE MANUFACTURER IS NOT RESPONSIBLE FOR ANY RADIO OR TV INTERFERENCE
CAUSED BY UNAUTHORIZED MODIFICATIONS TO THIS EQUIPMENT. SUCH MODIFICATIONS
COULD VOID THE USER AUTHORITY TO OPERATE THE EQUIPMENT
All rights reserved. This handbook must not be reproduced in any form, even in excerpts, or duplicated or
processed using electronic, mechanical or chemical procedures without written permission of the
publisher.
This handbook may contain mistakes and printing errors. The information in this handbook is regularly
checked and corrections made in the next issue. We accept no liability for technical mistakes or printing
errors, or their consequences.
All trademarks and patents are acknowledged.
Model: 308-146/308146W www.lacrossetechnology.com/support 13
 Loading...