

La Crosse Technology 308-159-CBP Instructions
COLOR WEATHER STATION
MODEL: 308159
DC: 071321
For more product information visit: bit.ly/laxtech_support
POWER UP
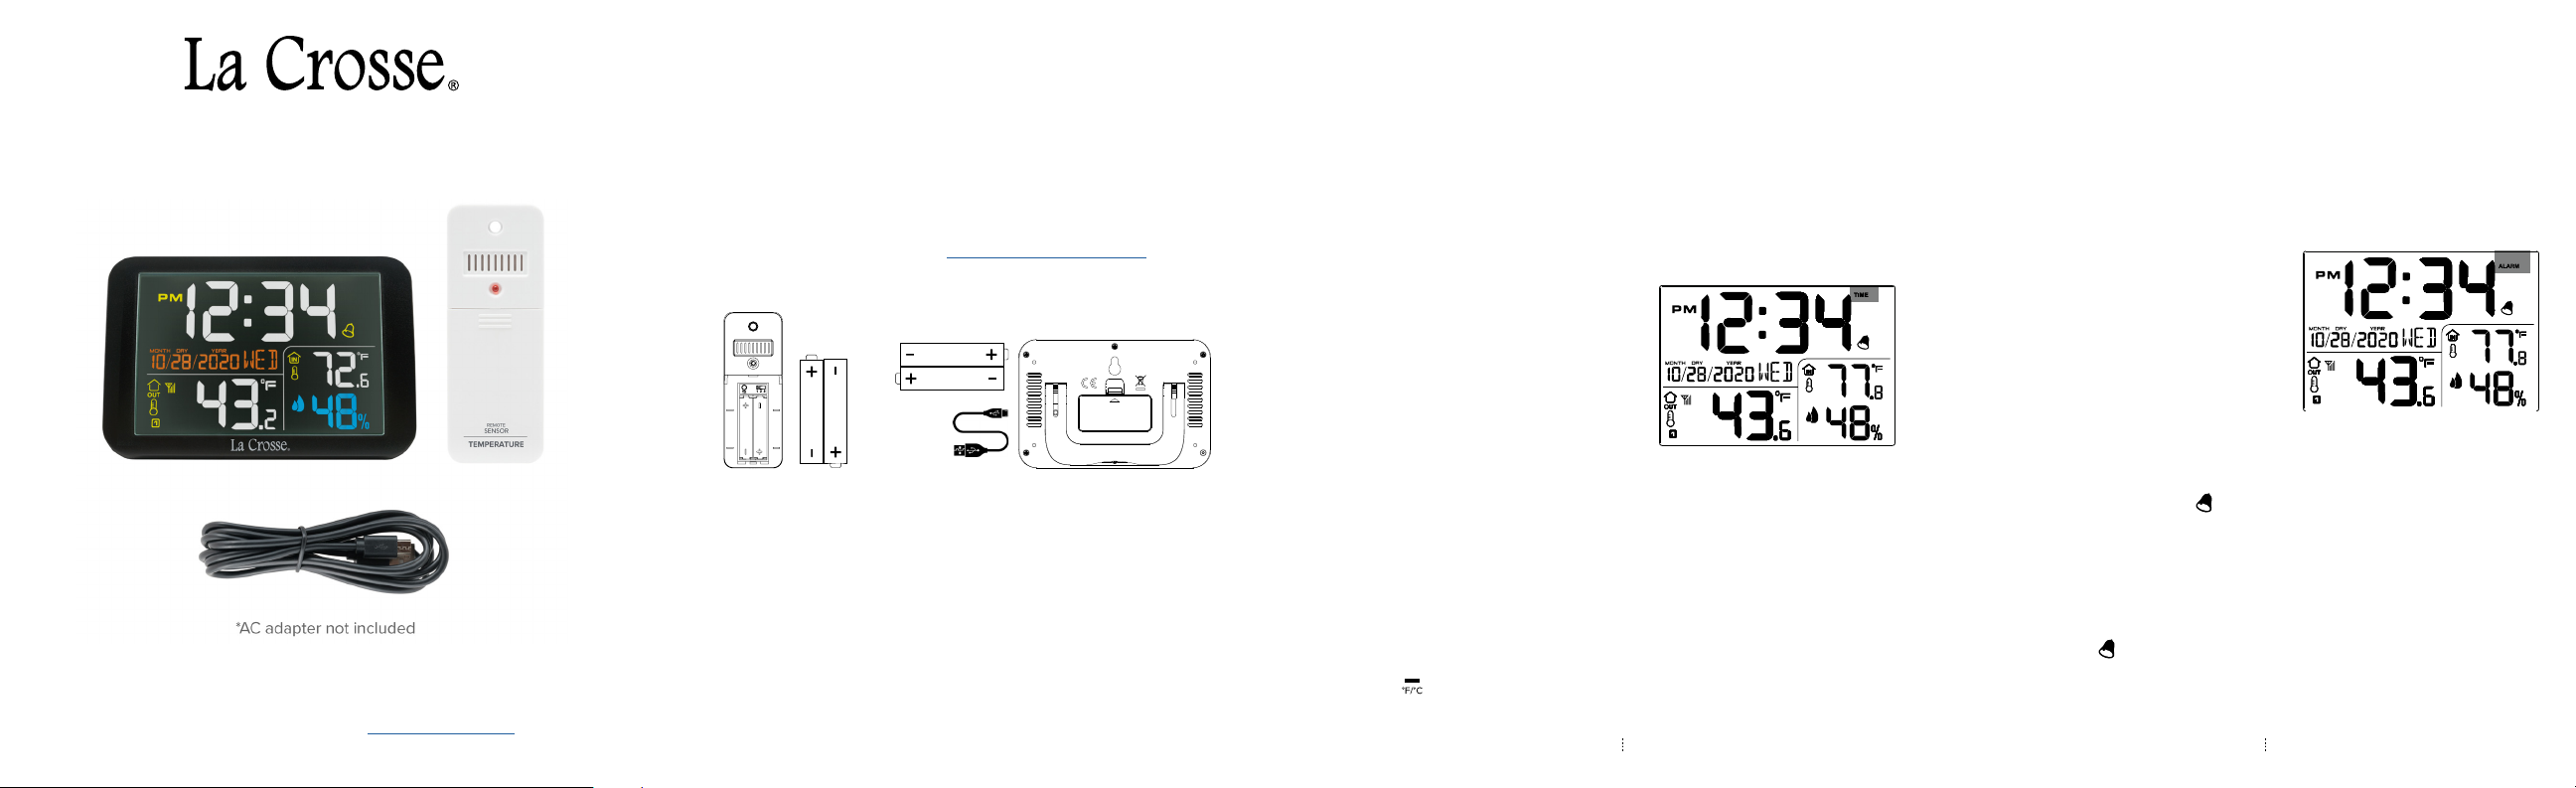
1. Insert 2-AAA batteries into your Outdoor Sensor.
2. Insert the 5.0 volt USB power cord intoan outlet, then into the side of
your Weather Station. Optional: Insert 2-AAA batteries into your station.
3. Adjust time and date settings on the station.
4. Once the Outdoor Sensor is reading to your station, place it outside in a
shaded location.
Watch our sensor mounting video: bit.ly/th_sensor_mounting
Outdoor Sensor
TX151
AAA
AAA
AAA
AAA
Weather Station
308-159
BACKLIGHT
Power Cord:
• Hold the LCD LIGHT button until the station beeps to turn the
continuous Backlight ON or OFF.
• When the Backlight is o, press any button to turn it on for about 8
seconds.
Batteries Only: Press any button to activate the backlight for 8 seconds.
Page | 2
SETTINGS ALARM
1. Press the SET/ALARM button so the word “TIME” shows in the upper
right corner.
2. With the word “TIME” showing in the upper right corner, hold the SET/
ALARM button to enter the main Settings Menu.
3. Once the settings begin flashing, let go of the SET/ALARM button and
use the + or - button to adjust, and SET/ALARM to confirm or exit.
Settings Menu order:
• 12/24 Hour Time
• Hour
• Minute
• Year
• Month
• Date
• Language
(ENG, GER, FRE, SPA, ITA, DUT, DAN)
Language: The language selected in this menu will adjust the Weekday
readout and menu items.
Weekday: Weekday sets automatically when Year, Month and Date are
set.
FAHRENHEIT OR CELCIUS
Press the button to select Fahrenheit or Celsius temperature display.
Page 3
1. Press the SET/ALARM button so the word “ALARM” shows in the upper
right corner.
2. With the word “ALARM” showing in the upper right corner, hold the
SET/ALARM button to enter Alarm Settings.
3. Use the + or - button to adjust, and SET/ALARM to confirm and exit.
Alarm Settings Order:
• Hour
• Minute
Activate/Deactivate Alarm:
Setting the alarm time and activating the alarm are separate actions.
• Press the ALARM ON/OFF button to activate or deactivate the alarm.
• When active the Alarm Icon will show.
Silence Alarm for 24-hours:
• When the alarm sounds, press any button to silence the alarm for
24-hours.
• The Alarm Icon will continue to show.
Page 4

MIN/MAX READINGS BUTTON FUNCTIONS
The MIN/MAX readings are all time values from when the station was first
powered on or last reset.
1. Press the MIN/MAX button to view indoor & outdoor MAX records.
2. Press MIN/MAX again to view MIN records.
Reset Records:
1. Press the MIN/MAX button to view records.
2. Hold the MIN/MAX button to reset all Indoor and Outdoor records to
current readings.
RESET
Power Cord: Hold to turn off Backlight. Hold again for continuous
Backlight.
Press to view Sensor Channels or initiate the Auto-scroll feature.
Settings Menu: Press to increase values.
Hold to search for Outdoor Sensor.
Press to select Time or Alarm Mode, and to confirm settings in menus.
Hold to enter Time or Alarm Settings.
Press to select Fahrenheit or Celsius Temperature display.
Settings Menu: Press to decrease values.
Press to view indoor and outdoor MAX or MIN Records.
Hold to reset MAX and MIN Records.
Press to activate or deactivate Alarm.
Press to Factory Reset Station
LOW BATTERY INDICATOR
• When the Battery Indicator shows next to the outdoor temperature,
replace batteries in the Outdoor Sensor.
SEARCH FOR OUTDOOR SENSOR
• If the sensor loses connection to the station for any reason, the station
will show dashes after 3 minutes.
• To search for your Outdoor Sensor, hold the button until the
Reception Icon animates.
• When the sensor is connected, the Reception Icon will flash once
when new signal is received.
• If your outdoor sensor is unable to reconnect on its own, a reset of your
station may be necessary. Use a paper clip to press the RESET button
on the back of the station.
• When the Battery Indicator shows next to the indoor temperature,
replace batteries in the Weather Station.
CHANNEL INDICATOR
• This station can show data for up to 3 remote sensors. The Channel
Indicator will highlight which sensor data is being displayed.
• The Channel Number on the station should match the Channel
selected on the sensor.
• The Auto-scroll Icon shows when the station cycles through all three
channels. Press the button to start or stop the auto-scroll.
Visit www.lacrossetechnology.com for add-on sensor availability.
SPECIFICATIONS
Station 308-159:
Temperature Range: 14F to 122F (-10C to 50C)
Humidity Range: 20% to 95% RH
Power Requirements: 5V/1A USB Power Cord*
Optional: 2 “AAA” LR3 Batteries (not included)
Battery Life: Over 12 months with reputable batteries
Dimensions: 5.45” x 0.91” x 3.62” (13.85 cm x 2.3 cm x 9.2 cm)
Sensor TX151:
Temperature Range: -40°F to 140F (-40°C to 60°C)
Transmission Range: Over 197 feet (60 meters) in open air RF 433MHz
Update Interval: About every 50 seconds
Power Requirements: 2 “AAA” LR3 Batteries (not included)
Battery Life: Over 12 months with reputable batteries
Dimensions: 4.72” x 0.79” x 1.77” (12.0 cm x 2.0 cm x 4.5 cm)
WE’RE HERE TO HELP!
If you require additional support, get in touch with our friendly customer
support team based out of La Crosse, WI.
Phone: 1-608-782-1610
Online: bit.ly/contact_techsupport
Our knowledgeable customer support team is available:
Monday-Friday, 8am-6pm CST.
JOIN THE CONVERSATION
Ask questions, watch detailed setup videos, and provide feedback on our
social media outlets!
Page 6Page 5 Page 7
WARRANTY INFO
This product is warranted to be free from defects in material and workmanship under normal use and service
for a period of one year from the date of sale to the customer. Warranty will not apply to defects resulting from
abuse, accidents, or misuse. If a defect that is covered by this warranty arises during the warranty period,
promptly return the clock (postage prepaid) with proof of purchase showing the date the weather station was
purchased to the following address and such defects will be repaired, or the products will be replaced at
La Crosse Clock Company option without charge.
La Crosse Clock Company, Warranty Department, 2830 South 26th Street., La Crosse, WI 54601
CARE + MAINTENANCE
•
Do not mix old and new batteries.
•
Do not mix Alkaline, Lithium, standard, or rechargeable batteries.
•
Always purchase the correct size and grade of battery most suitable for intended use.
•
Clean the battery contacts and also those of the device prior to battery installation.
•
Ensure the batteries have with correct polarity (+ / -).
•
Remove batteries from equipment that will not to be used for an extended period.
•
Promptly remove expired batteries.
FCC STATEMENT
This equipment has been tested and found to comply with the limits for a Class B digital device, pursuant
to part 15 of the FCC Rules. These limits are designed to provide reasonable protection against harmful
interference in a residential installation. This equipment generates, uses and can radiate radio frequency
energy and, if not installed and used in accordance with the instructions, may cause harmful interference to
radio communications. However, there is no guarantee that interference will not occur in a particular installation.
If this equipment does cause harmful interference to radio or television reception, which can be determined by
turning the equipment off and on, the user is encouraged to try to correct the interference by one or more of
the following measures:
• Reorient or relocate the receiving antenna.
• Increase the separation between the equipment and receiver.
• Connect the equipment into an outlet on a circuit different from that to which the receiver is connected.
• Consult the dealer or an experienced radio/TV technician for help.
This device complies with Part 15 of the FCC Rules. Operation is subject to the following two conditions:
(1) This device may not cause harmful interference, and
(2) This device must accept any interference received, including interference that may cause undesired
operation.
CAUTION! Any changes or modifications not expressly approved by the party responsible for compliance
could void the user’s authority to operate the equipment.
All rights reserved. This manual may not be reproduced in any form, even in part, or duplicated or processed
using electronic, mechanical or chemical process without the written permission
of the publisher.
This booklet may contain errors or misprints. The information it contains is regularly checked and corrections
are included in subsequent editions. We disclaim any responsibility for any technical error or printing error, or
their consequences. All trademarks and patents are recognized.
WARNING: This product can expose you to chemicals including styrene, which is known to the
State of California to cause cancer. For more information go to: www.P65Warnings.ca.gov
Page 8
 Loading...