


FS-9500DN
Kyocera KM-2530, KM-1510, KM-1530, KM-1650, KM-1810 Extended Driver User Guide
...
Kyocera Extended Driver
User Guide

©2002-2005 KYOCERA MITA Corporation All rights reserved.
Revision 1.3
Legal Notes
Unauthorized reproduction of all or part of this guide is prohibited.
The information in this guide is subject to change for improvement without notice.
We cannot be held liable for any problems arising from the use of this product, regardless of the information herein.
Regarding Trademarks
• PCL is a registered trademark of Hewlett-Packard Company.
• Microsoft Windows is a registered trademark of Microsoft Corporation in the U.S. and/or other countries.
• PostScript is either a registered trademark or trademark of Adobe Systems Incorporated in the U.S. and/or other countries.
• TrueType is a registered trademark of Apple Computer Inc.
• All other brand and product names herein are registered trademarks or trademarks of their respective companies.
Examples of the operations given in this guide are for the Windows XP printing environment. Essentially the same operations
are used for Windows 95/98/Me/2000 environments.
Models supported by the KX printer driver
The explanatory screens shown in this guide may differ from your printing system.
Copier/MFP KM- 1510
KM- 1530
KM- 1810
KM- 1815
KM- 1820 / FS- 11 18MFP
KM- 2030
KM- 2530
KM- 2550
KM- 3035
KM- 3530
KM- 4030
KM- 4035
KM- 4230
KM- 4530
KM- 5035
KM- 5230
KM- 5530
KM- 6030
KM- 6230
KM- 6330
KM- 7530
KM- 8030
FS- 1 1 18MFP
KM- C830
KM- C830D
KM- C850
KM- C850D
KM- C2630
KM- C2630
Printers FS- 600
FS- 680
FS- 800
FS- 820
FS- 920
FS- 1000
FS- 1000+
FS- 1010
FS- 1018MFP
FS- 1020D
FS- 1050
FS- 1200
FS- 1700
FS- 1700+
FS- 1714M
FS- 1750
FS- 1800
FS- 1800+
FS- 1900
FS- 1920
FS- 3700
FS- 3700+
FS- 3718M
FS- 3750
FS- 3800
FS- 3820N
FS- 3830N
FS- 5800C
FS- 5900C
FS- 6020
FS- 6026
FS- 6300
FS- 6350TW
FS- 6700
FS- 6750
FS- 6900
FS- 6950TW
FS- 7000
FS- 7000+
FS- 7028M
FS- 8000C
FS- 9000
FS- 9100DN
FS- 9120DN
FS- 9500DN
FS- 9520DN
FS- C5016N
FS- C5020
FS- C8008N
FS- C8026N
Ci1100
DP- 1400
DP- 1800
DP- 2800
DP- 2800+
DP- 3600

i
Chapter 1 Installation .................................................................................................................. 1
Installing the Printer Driver in Windows ........................................................................................1
Local Connection ............................................................................................................................. 1
USB Connection ...............................................................................................................................7
Network Connection ......................................................................................................................14
LPR Connection ............................................................................................................................. 18
Installing Components ...................................................................................................................25
Installing the Latest Printer Driver ............................................................................................... 27
Chapter 2 Printer Properties .................................................................................................. 29
Accessing Printer Properties ........................................................................................................ 29
Installing Optional Devices ........................................................................................................... 30
Punch Settings .............................................................................................................................31
Booklet Stitcher Punch Settings ................. ... ... ... ... .... ... ... ... .... ... ... ... .... ... ..................................... 32
Assigning Virtual Mailboxes ......................................................................................................... 32
RAM Disk Settings ....................................................................................................................... 33
User Settings ..................................................................................................................................34
Identification .................................................................................................................................34
Unit of Measurement .................................................................................................................... 34
Language Preference Selection ...................................................................................................35
Simplified User Interface ..............................................................................................................35
Page Description Language (PDL) Settings .............................................................................. 36
Administrator Settings ...................................................................................................................38
Job Accounting .... ... ... ... .... ... ... ... .... ... .......................................... ... ... .... ... ... ... ............................... 38
Job Name Display ............................ ... ... .......................................... .... ... ... ... ... .... ........................39
Setting the Administrator Password .............................................................................................39
Compatibility Settings .................................................................................................................... 41
Auto Configuration ......................................................................................................................... 43
Chapter 3 Printing from Applications ................................................................................47
Basic Printing Tasks ...................................................................................................................... 47
Scaling ....................................... ....... ...... ....... ...... ....... ... ...... ....... ...... ....... ...... ....... ........................52
Printing on Paper of Non-Standard Sizes .................................................................................. 55
Duplex Printing ...............................................................................................................................58
Manual Duplex .............................................................................................................................59
Reverse Order Printing ................................................................................................................. 62
Prologue/Epilogue .........................................................................................................................62
Printing Watermarks ...................................................................................................................... 64
Adjusting Image Settings .............................................................................................................. 71
Print Quality ..................................................................................................................................72
Grayscale Adjustment ...................... ... ... .......................................... .... ... ... ... ... ............................ 73
Font Downloading ........................................................................................................................74
Adjusting Color ...............................................................................................................................78
Color Mode ................................................................................................................................... 78
Table of Contents

ii
Chapter 4 Using Optional Equipment ................................................................................89
Staple ............................................................................................................................................... 89
Using the Stapler . ... ... ... .... ... ... ... .......................................... .... ... ..................................................89
Offset ............................................................................................................................................... 91
Punch ............................................................................................................................................... 92
Cover Mode, Page Insert, and Transparency Interleaving ...................................................... 93
Printing with Covers ......................................... ... ... .... ... ... ... .... ... ... ... ............................................ 93
Cover Printing Options .................................................................................................................94
Page Insert ................................................................................................................................... 97
Combinations ............................................................................................................................... 99
Transparency Interleaving .......................................................................................................... 100
Booklet Printing ............................................................................................................................102
Left-Edge and Right-Edge Binding .............................................................................................103
Collating Modes ........................................................................................................................... 104
Sorter Modes .... ... ... ... ... .... .......................................... ... ... .......................................... ... .............104
Sorter Mode Differences ..................................... ... .... ... ... ... .... ... ... ... .... ...................................... 105
Non-Collating .......................................... ....... ...... ....... ...... ....... ...... ....... ...... ...... ....... ...................106
Mailbox Mode ............................................................................................................................. 107
Rotate Collate ............................................................................................................................... 108
Job Settings ..................................................................................................................................108
Quick Copy ... .... ... ... ... ... .... .......................................... ... ... .......................................... ................109
Printing the Remaining Copies of Proof and Hold Jobs ............................................................. 111
Private Print ................................................................................................................................ 111
Printing Private Print Jobs ..........................................................................................................112
Job Storage .................. .......................................... .... ... ... ... .... ... ................................................ 112
Printing Jobs Saved Using Job Storage .....................................................................................113
Virtual Mailbox .............................................................................................................................. 113
Temporary and Permanent Jobs ...............................................................................................119
Printing Additional Copies of Saved Jobs ..................................................................................122
Reading with the Barcode Reader ............................................................................................. 124
Saving Profiles .............................................................................................................................125
Creating Profiles .. ... ... ... .... ... ... ... .... .......................................... ... ... ... .... ... ... ................................ 125
Editing Profiles ...........................................................................................................................127
Setting Information ....................................................................................................................... 131
Appendix A Available Fonts ................................................................................................. 133
Index ................................................................................................................................................ 135

1
Chapter 1 Installation
Installing the Printer Driver in Windows
A printer driver is an application that sends documents to the printer. Install the printer driver
from the supplied Kyocera Software Library CD-ROM. Once installed, a variety of printer
settings can be configured.
When installing the printer driver, specify the connection method to the computer.
There are four connection methods:
• Local Connection
• USB Connection
• Network Connection
• LPR Connection
Local Connection
This section describes how to install the printer driver when the printer and computer are
connected through a parallel cable connection.
To install using a Local Connection:
1 Ensure the power for the computer and printer are turned off.
2 Connect the computer and printer using a parallel cable. Once connected, power on both
devices.
NOTE
In Windows XP or 2000, you must be logged into the system with administrator
privileges to install the printer driver .
NOTE
Once the printer driver is installed, you can add more components. For detailed
information on installing components, see Installing Components on page 25.
2
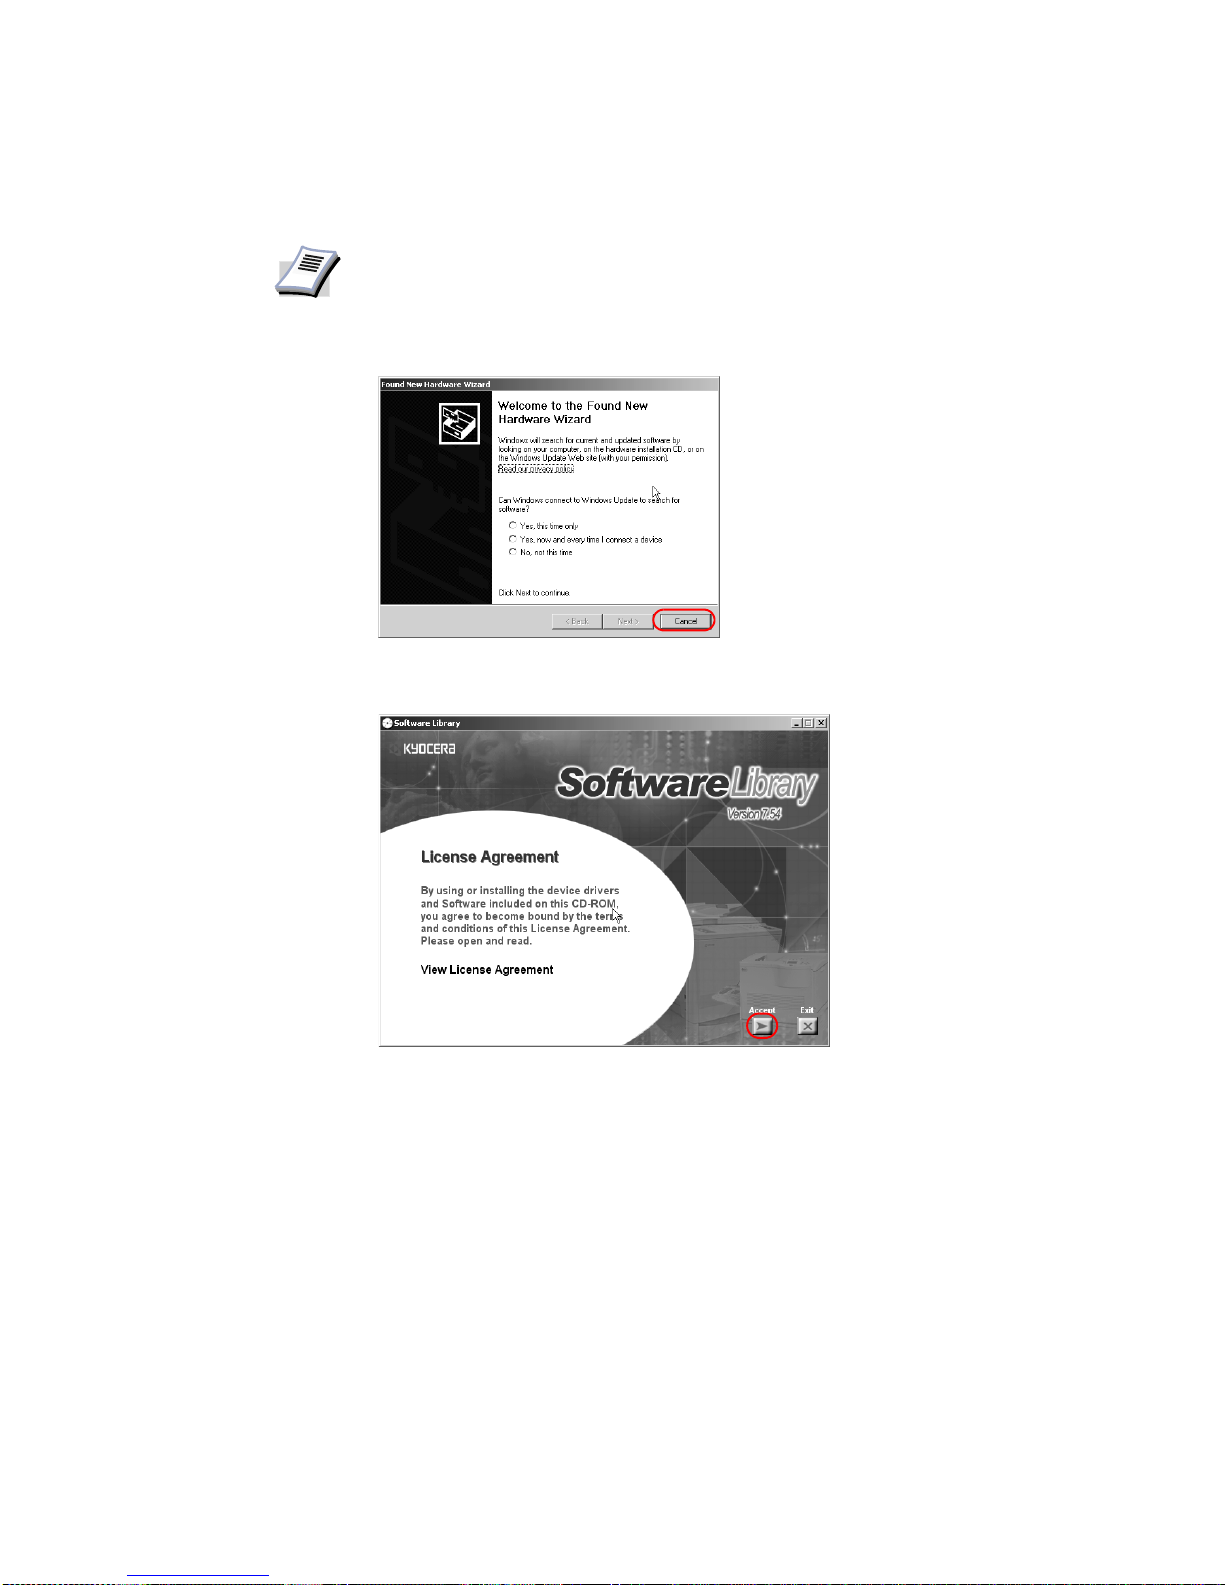
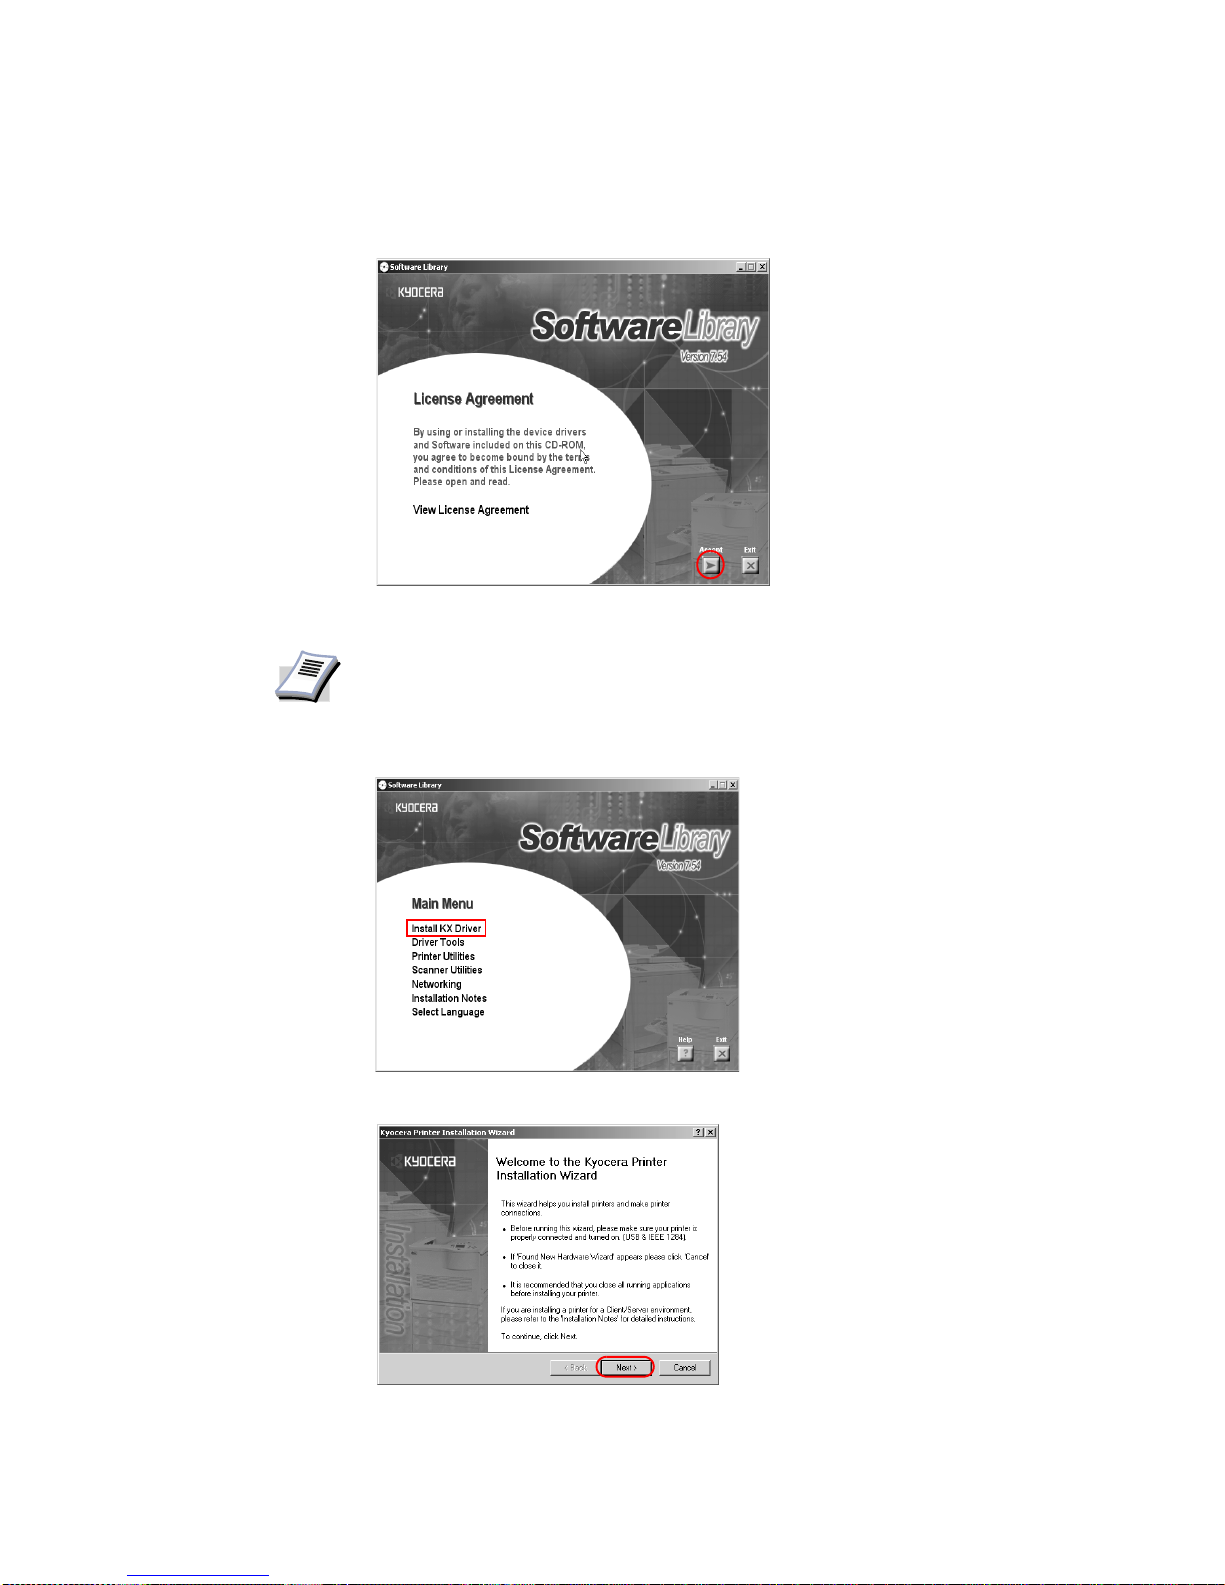
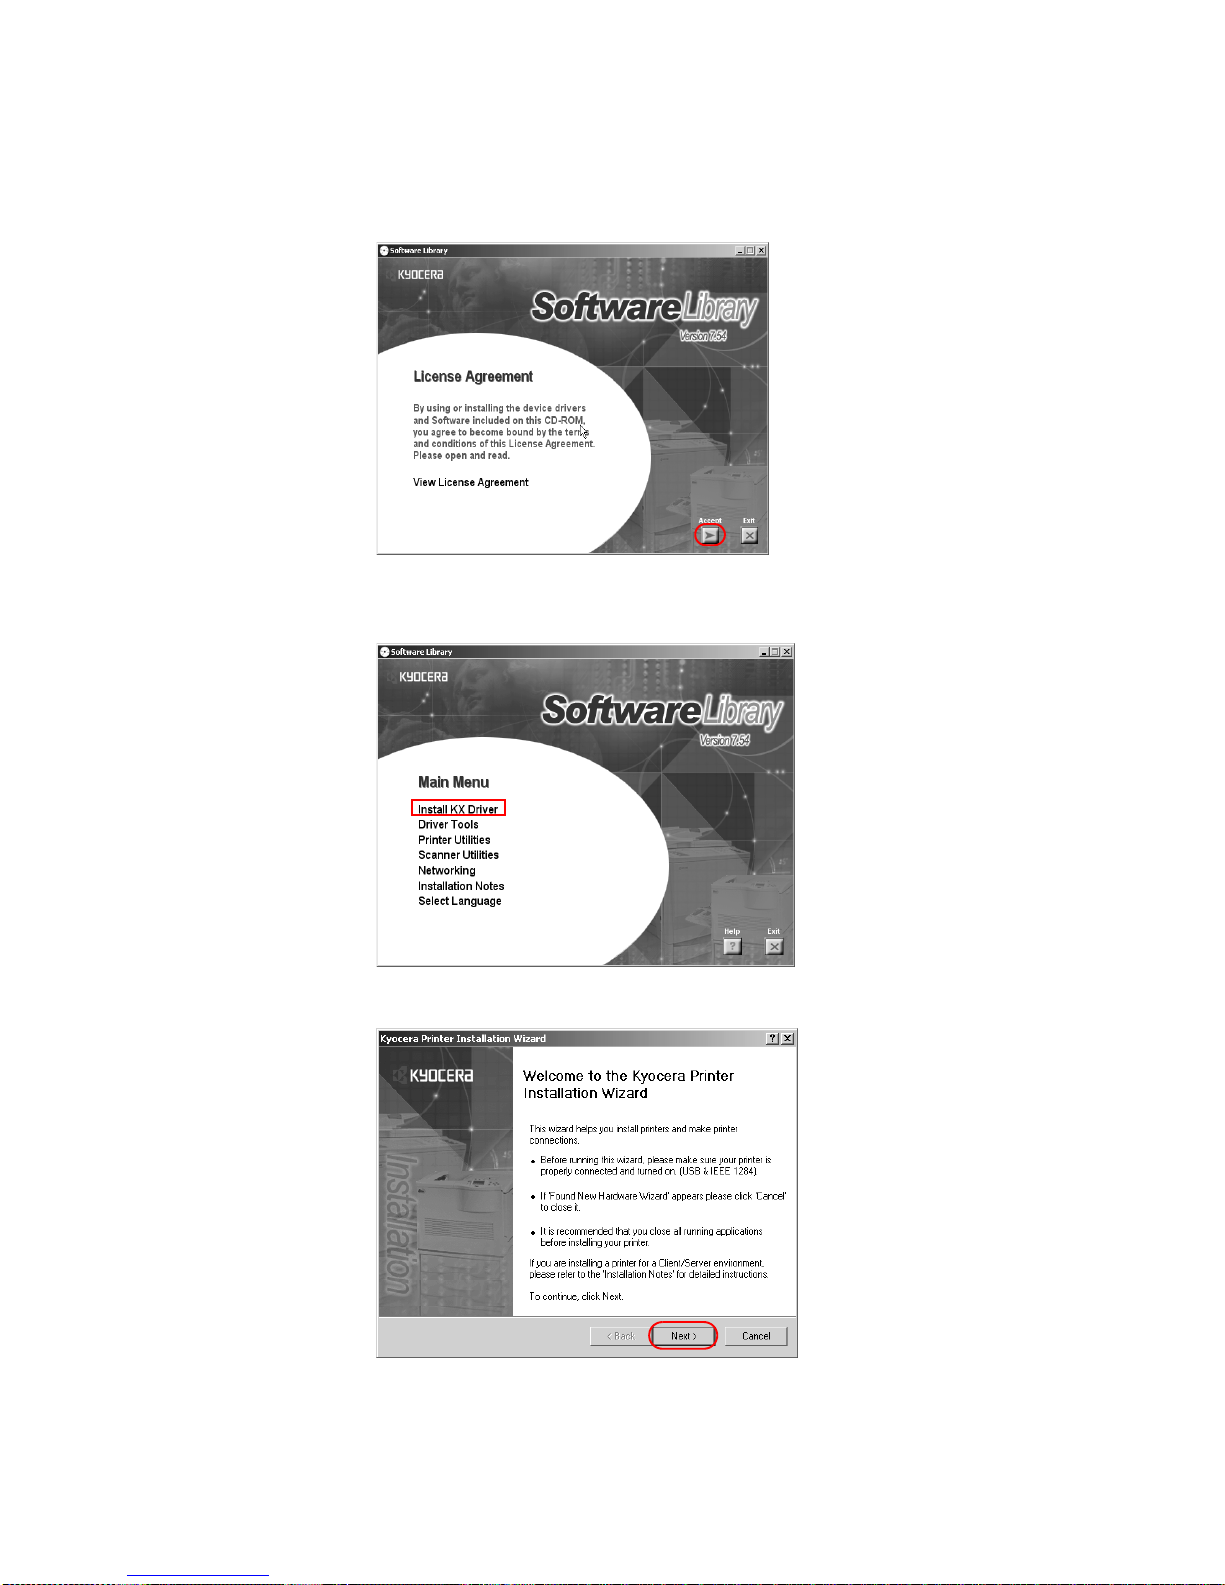
3 Insert the Kyocera Software Library CD-ROM into the CD drive.
Once the installation program launches, the
License Agreement appears.
4Click
View License Agreement to display and read the License Agreement.
5Click
Accept to proceed to the Main Menu dialog box.
If the installation program fails to launch after inserting the CD-ROM into the CD drive,
navigate to Windows Explorer, access the CD-ROM, and double-click the Setup.exe file.
NOTE
• Ensure the printer is ready to print (remove packing materials, insert paper
and any toner or ink cartridges) before connecting the cable.
• For further details on connecting using a parallel cable, refer to the printer's
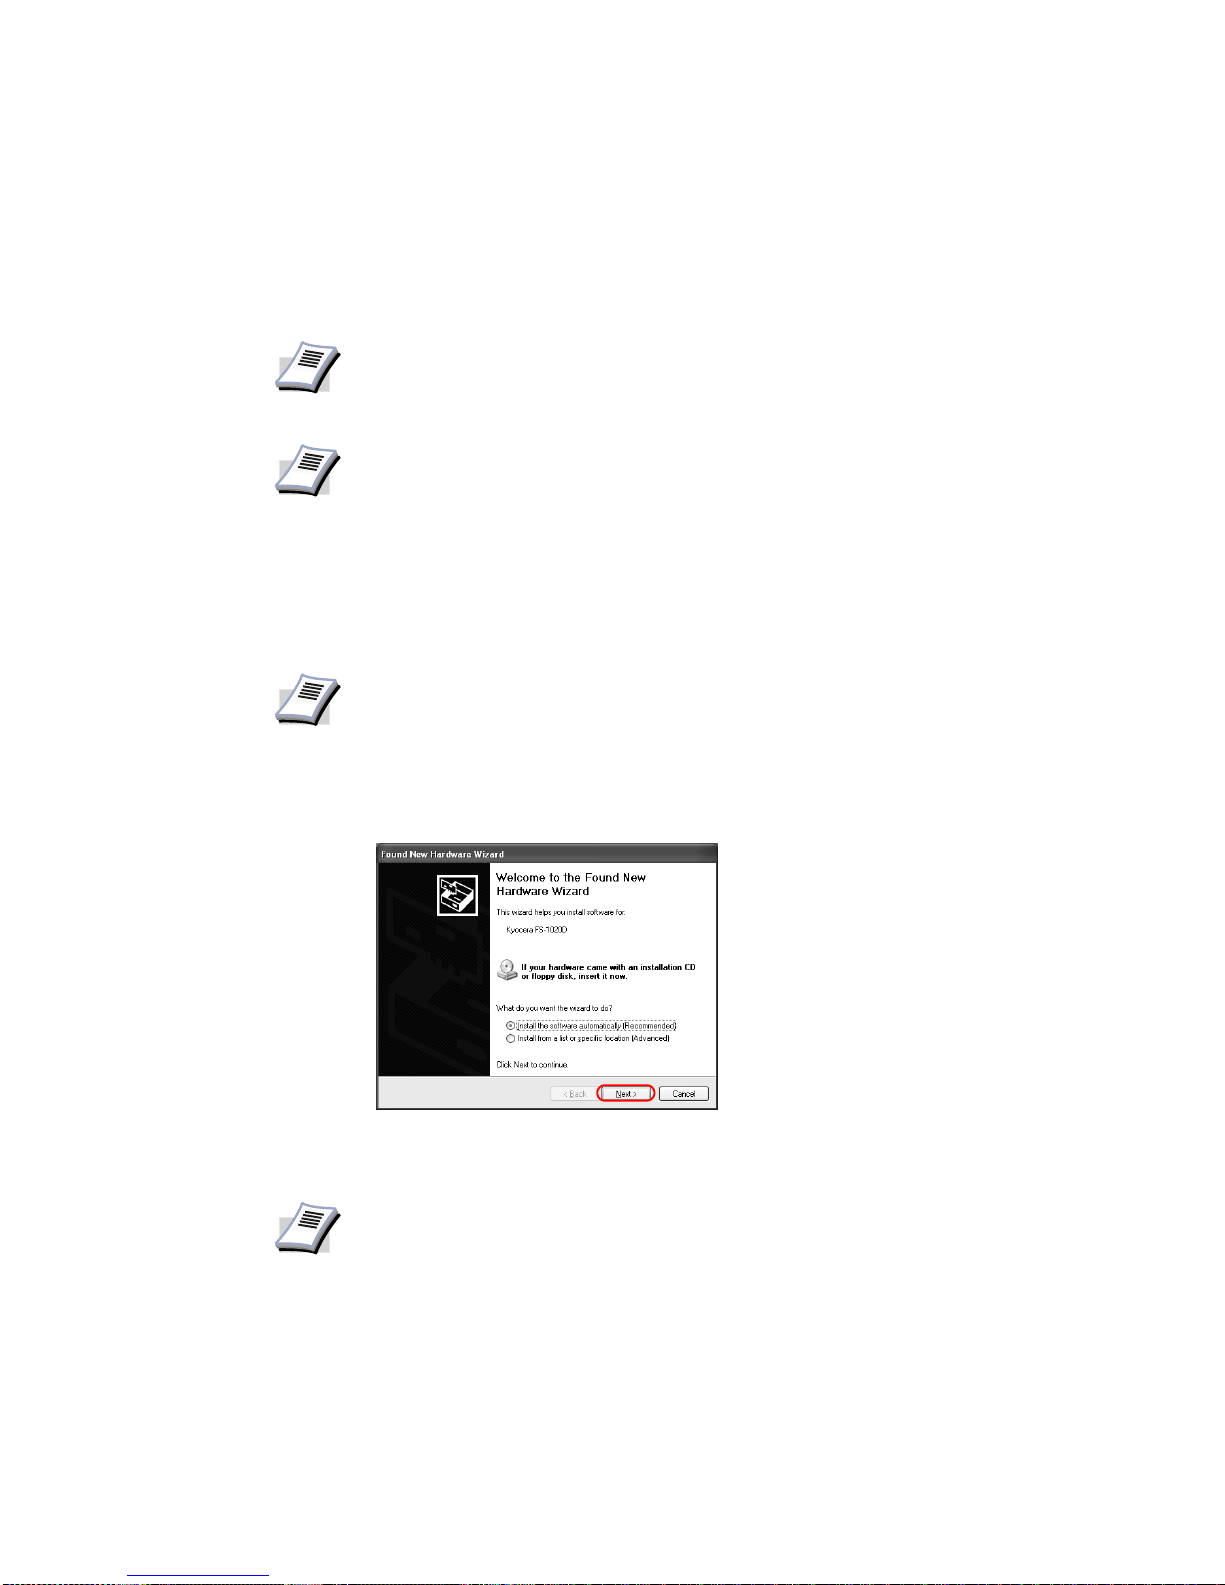
Operation Guide.
• If the
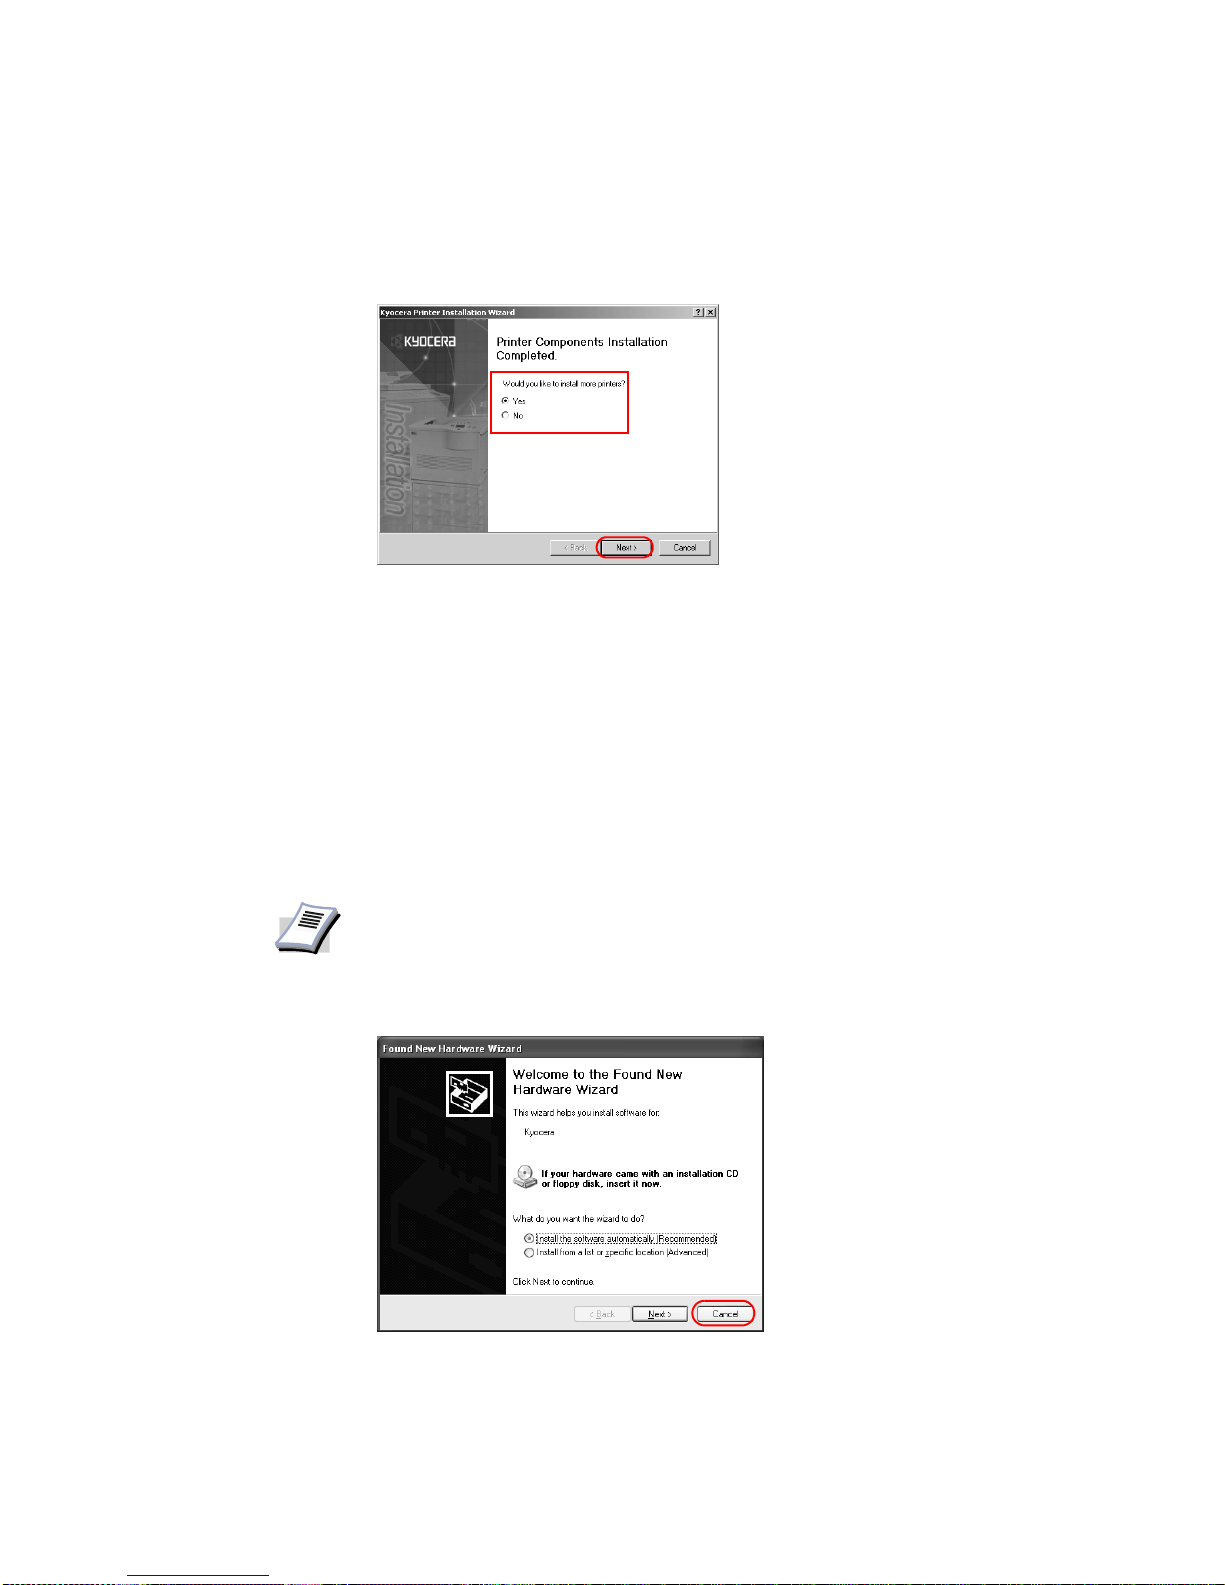
Welcome to the Found New Hardware Wizard dialog box is
displayed, click
Cancel.
Installation
3
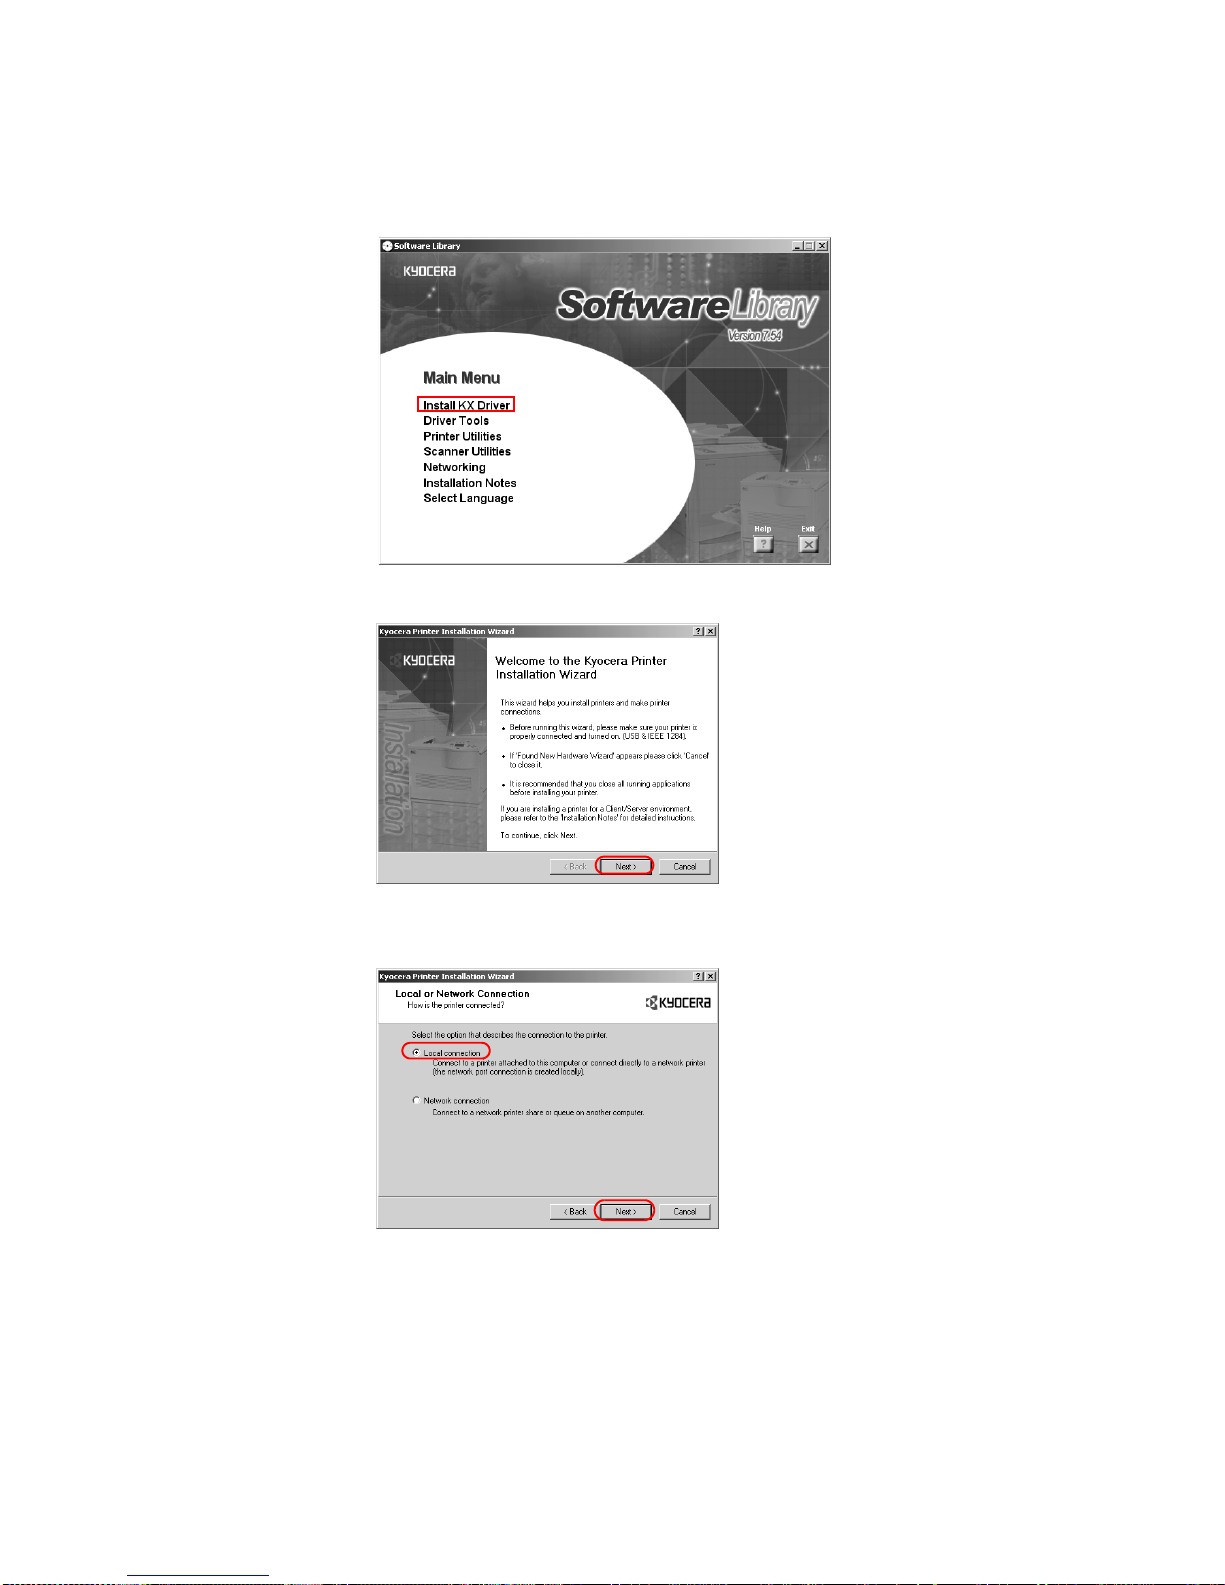
6Click
Install KX Driver.
7 The
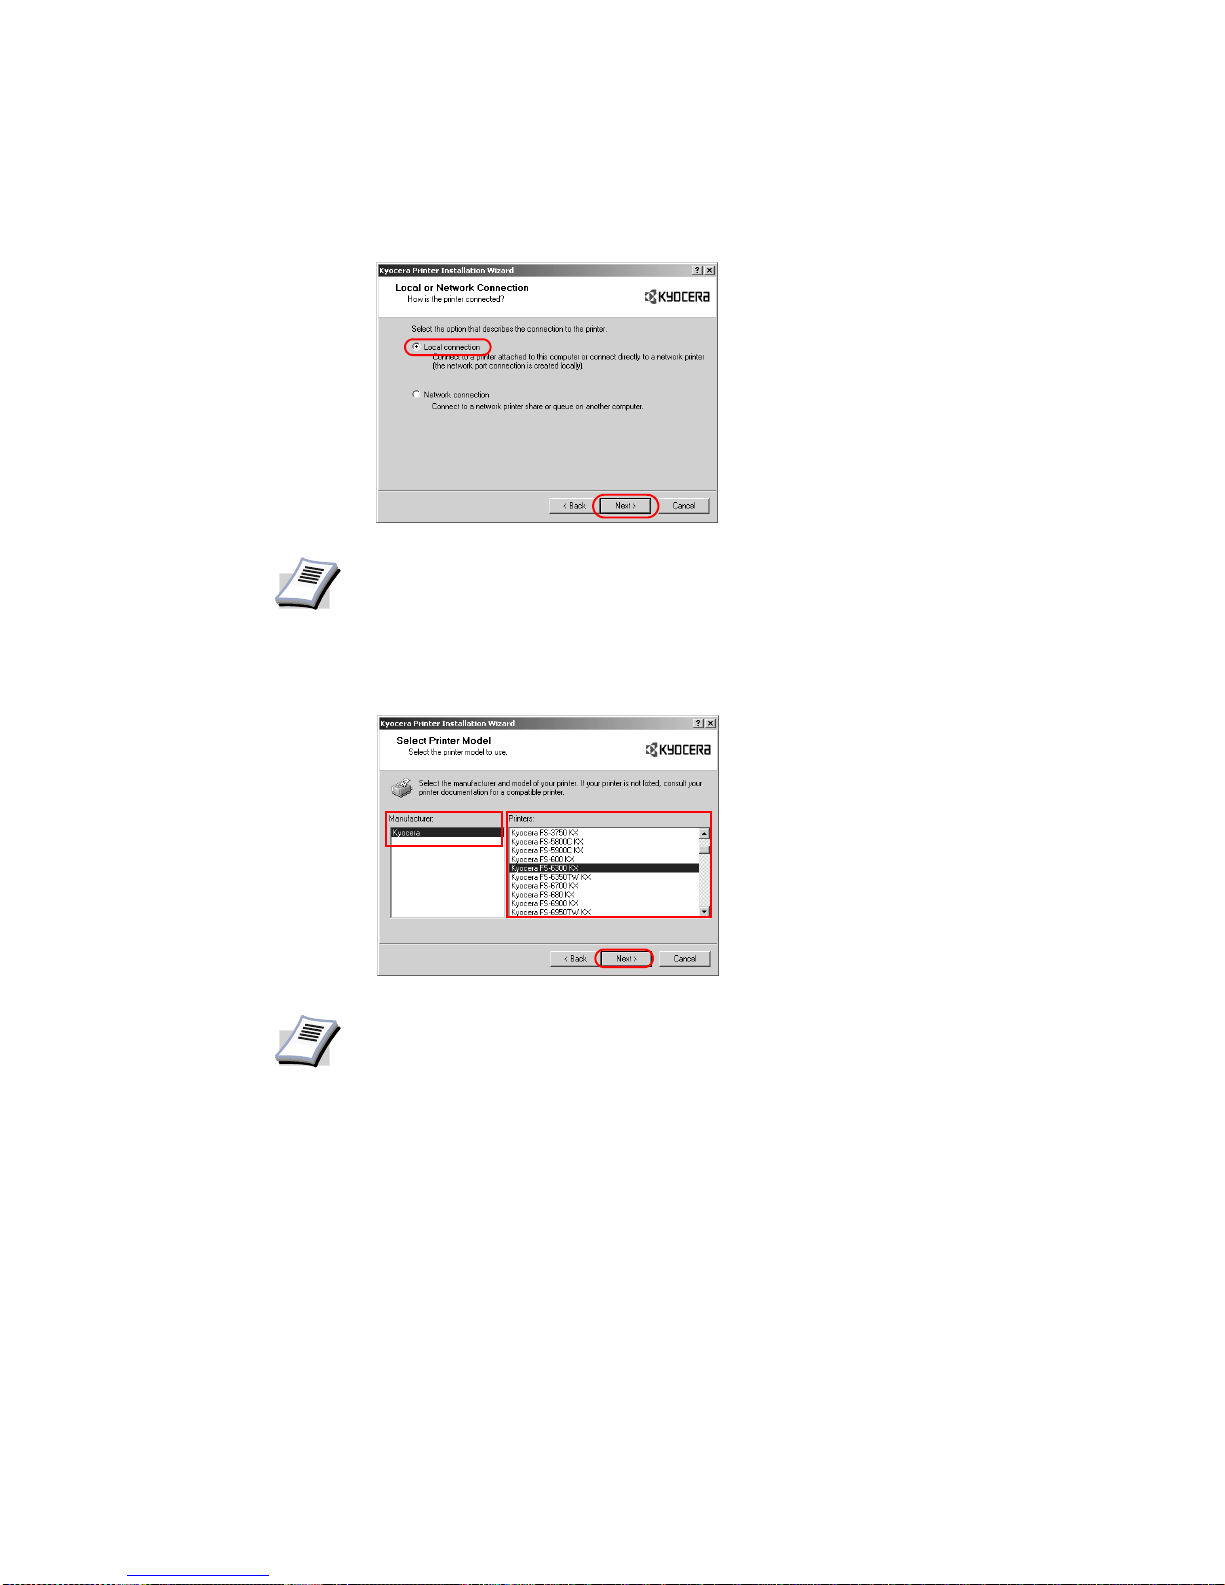
Welcome to the Kyocera Printer Installatio n Wizard dialog box appears. Click Next.
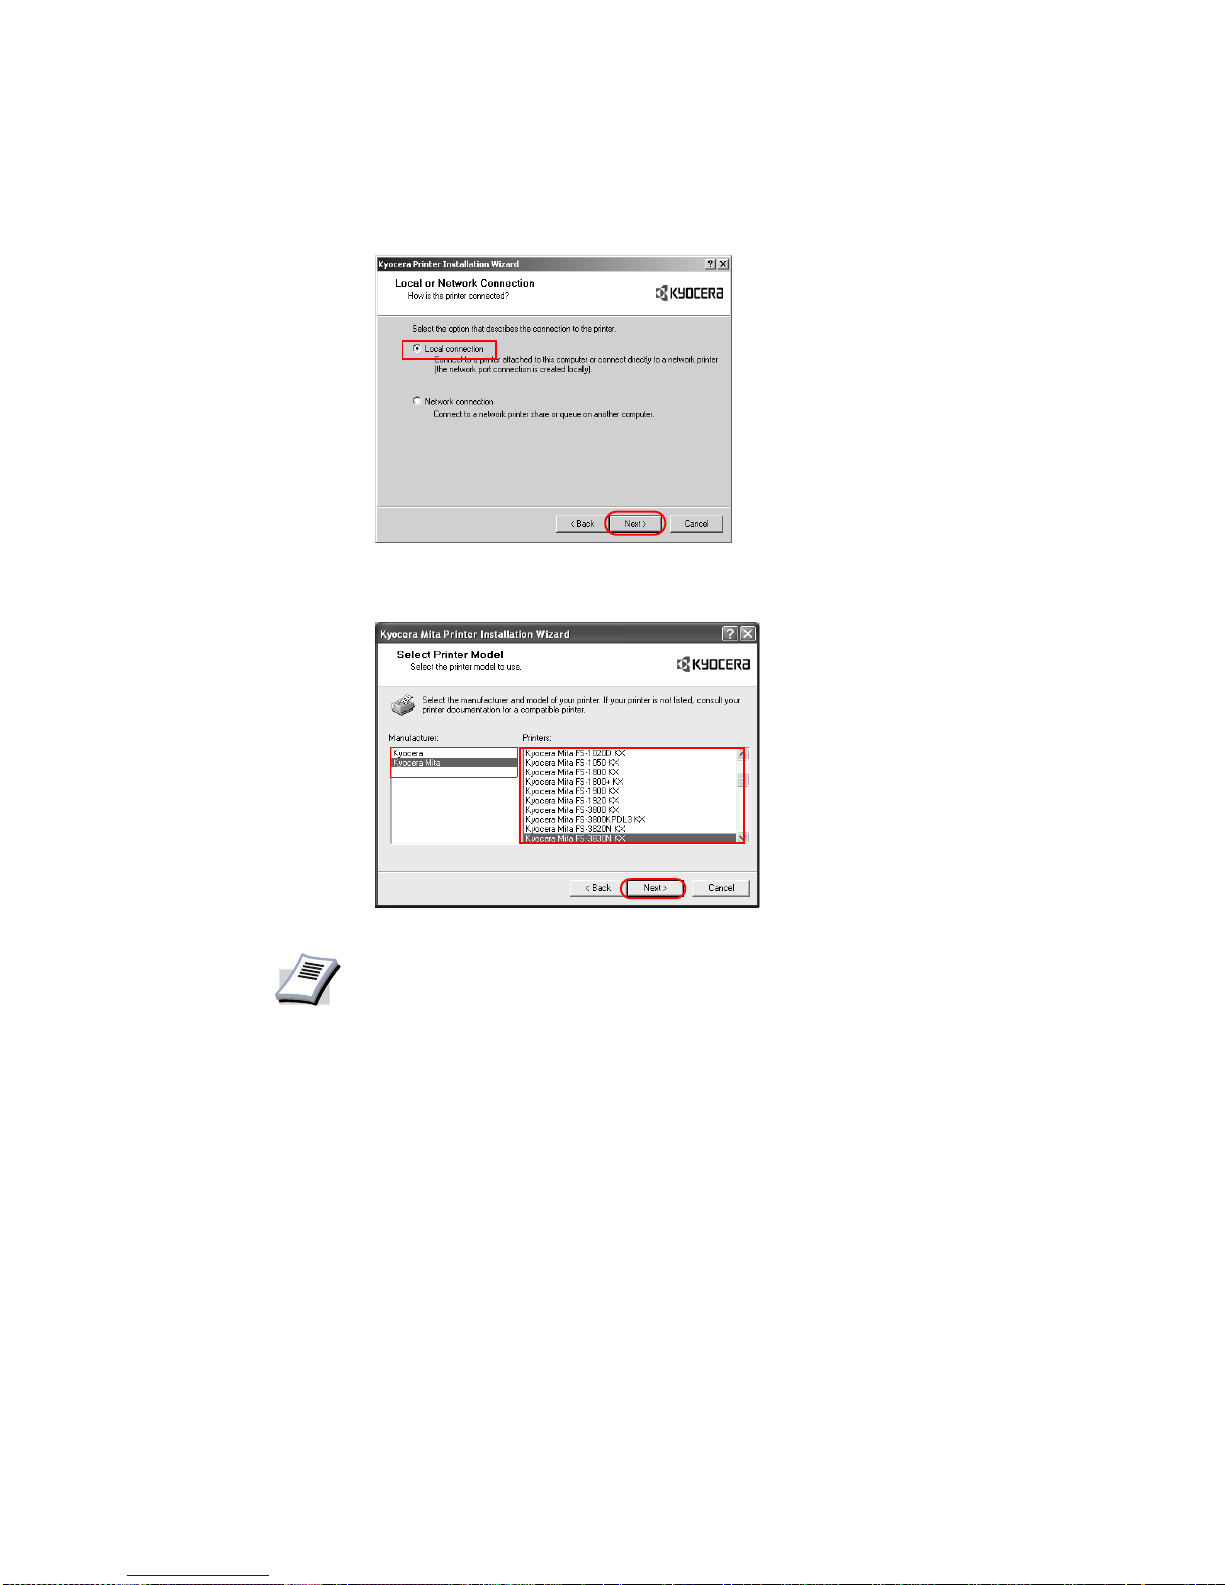
8 The
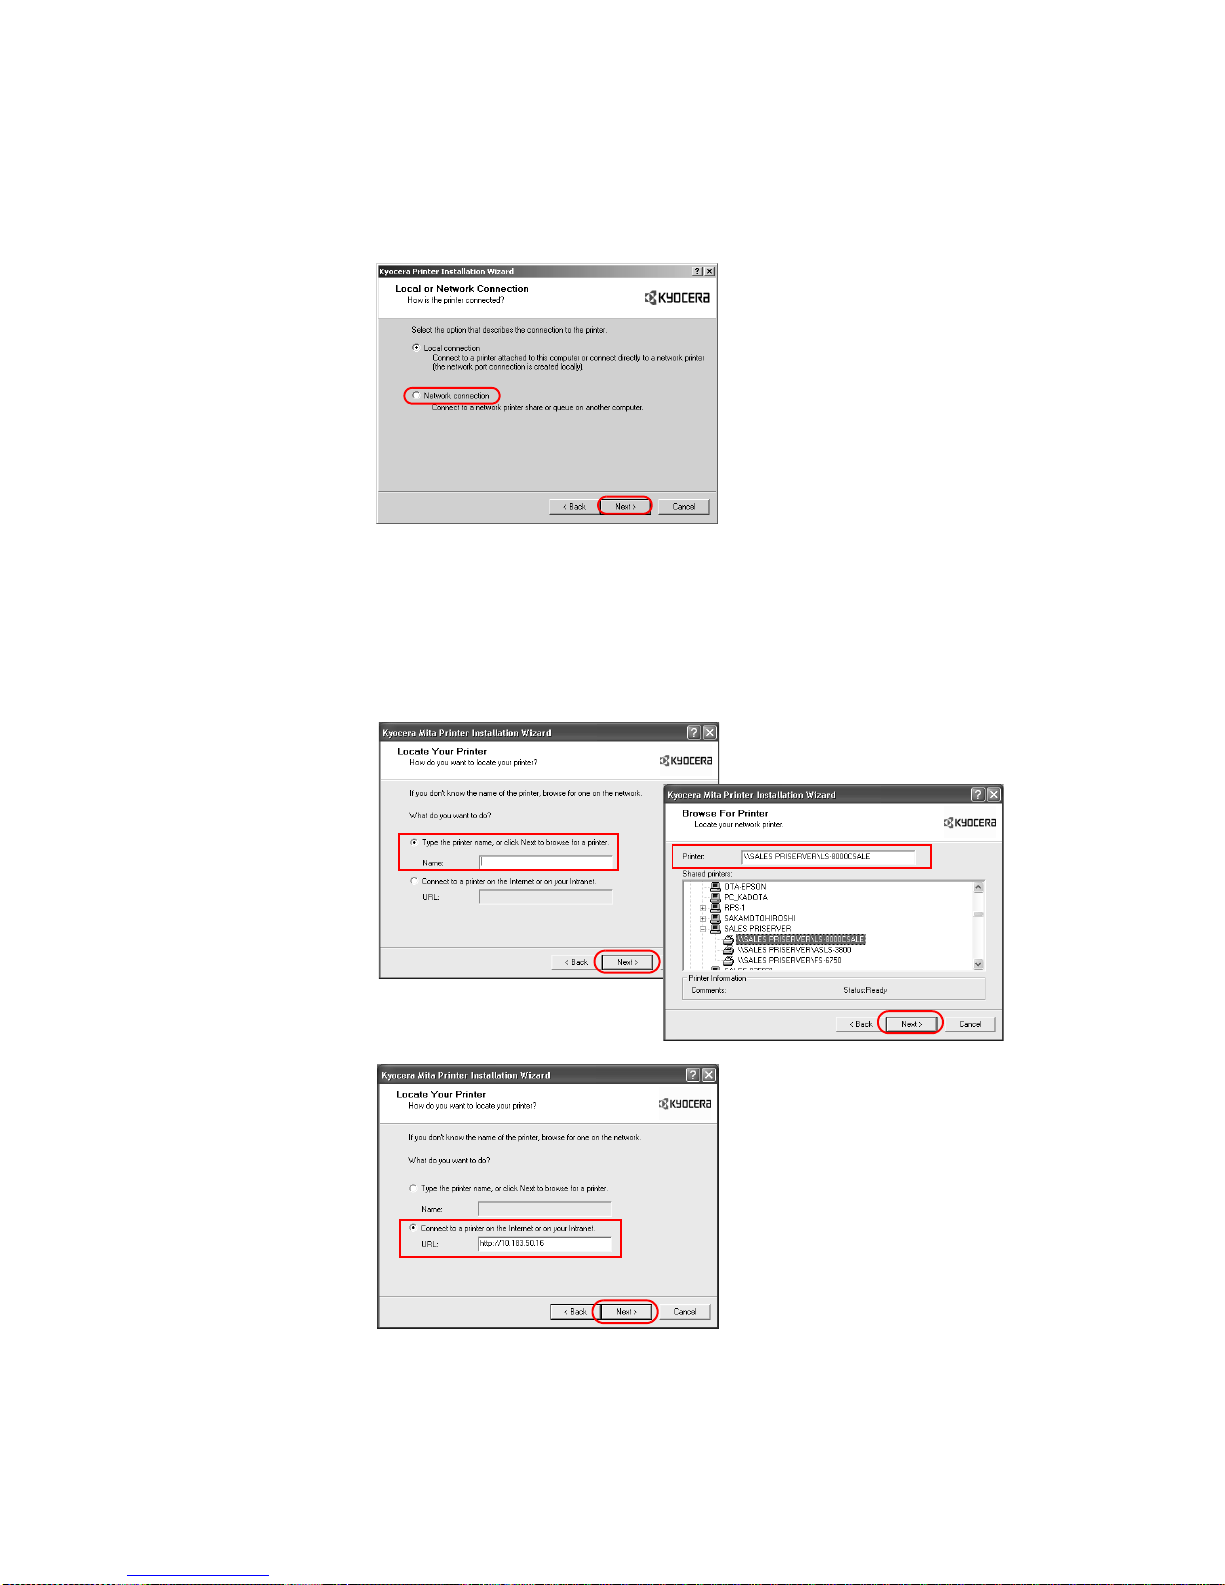
Local or Network Connection dialog box appears. Select Local connection, and
click
Next.
4
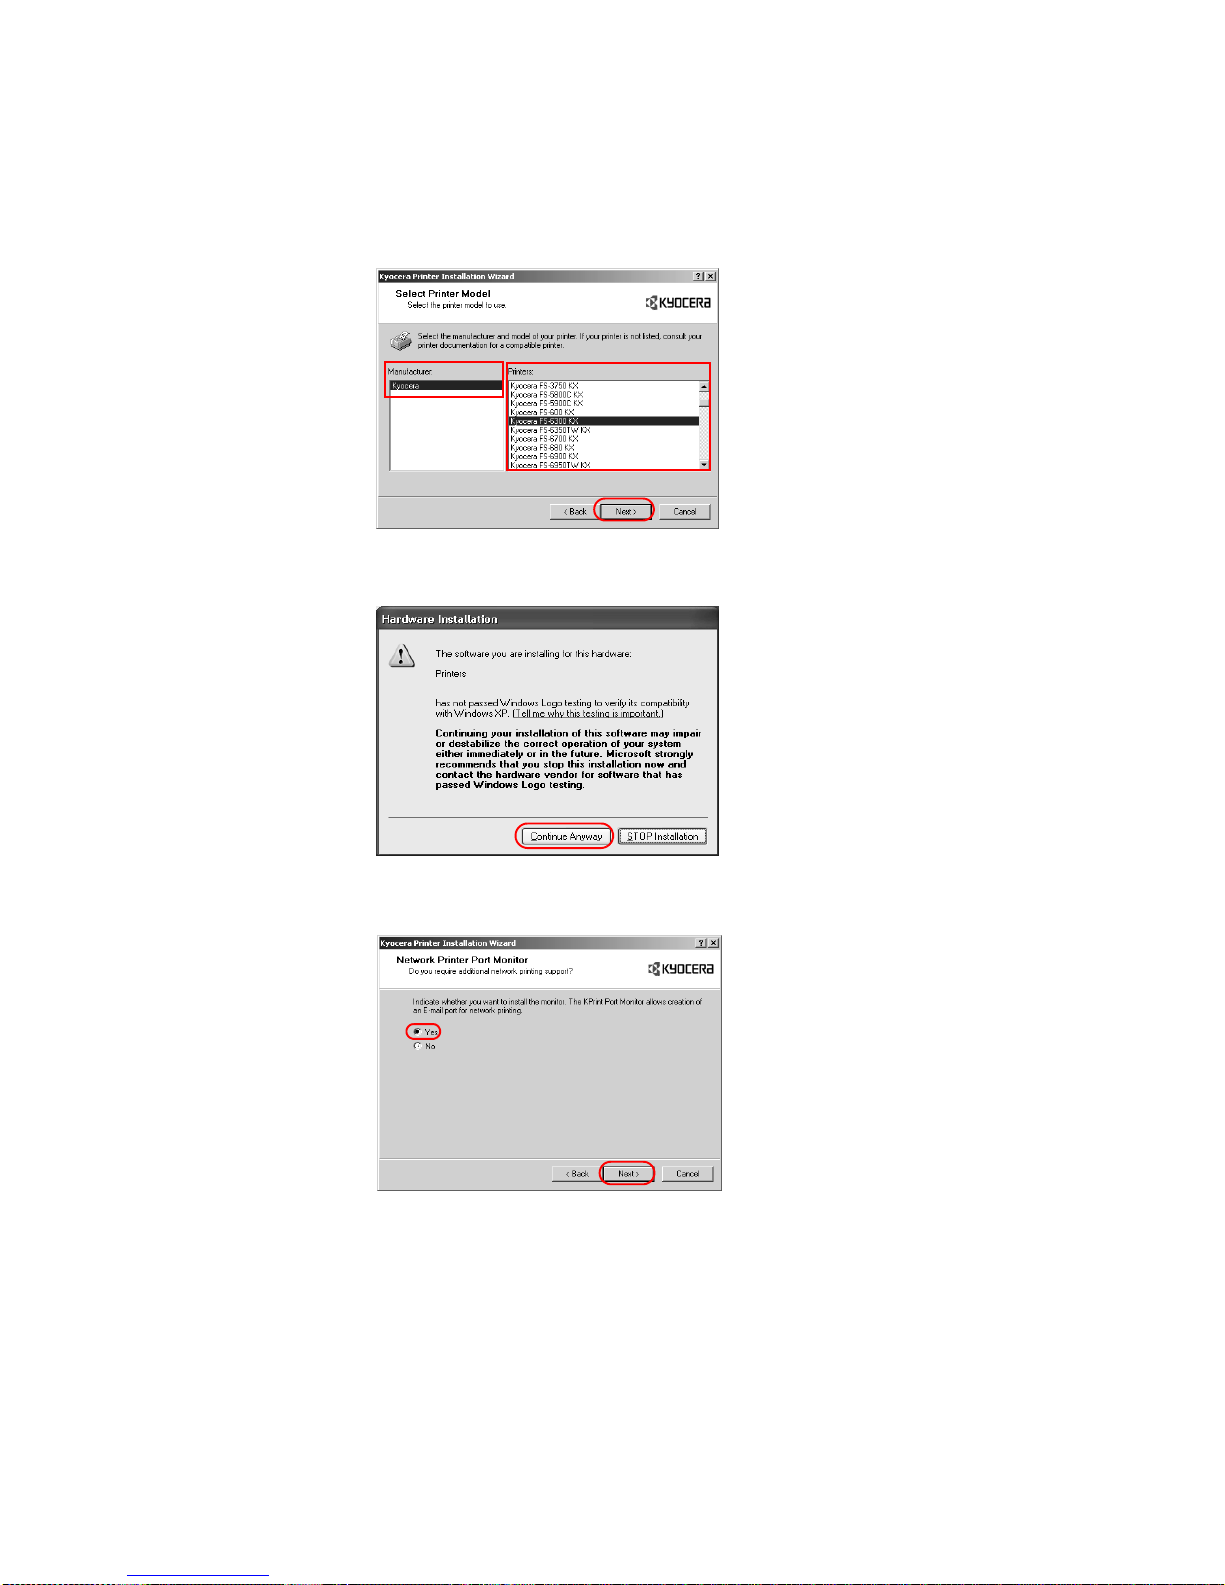
9 The
Select Printer Model dialog box appears. From the list, select the Manufacturer and
corresponding
Printers you wish to connect, and click Next.
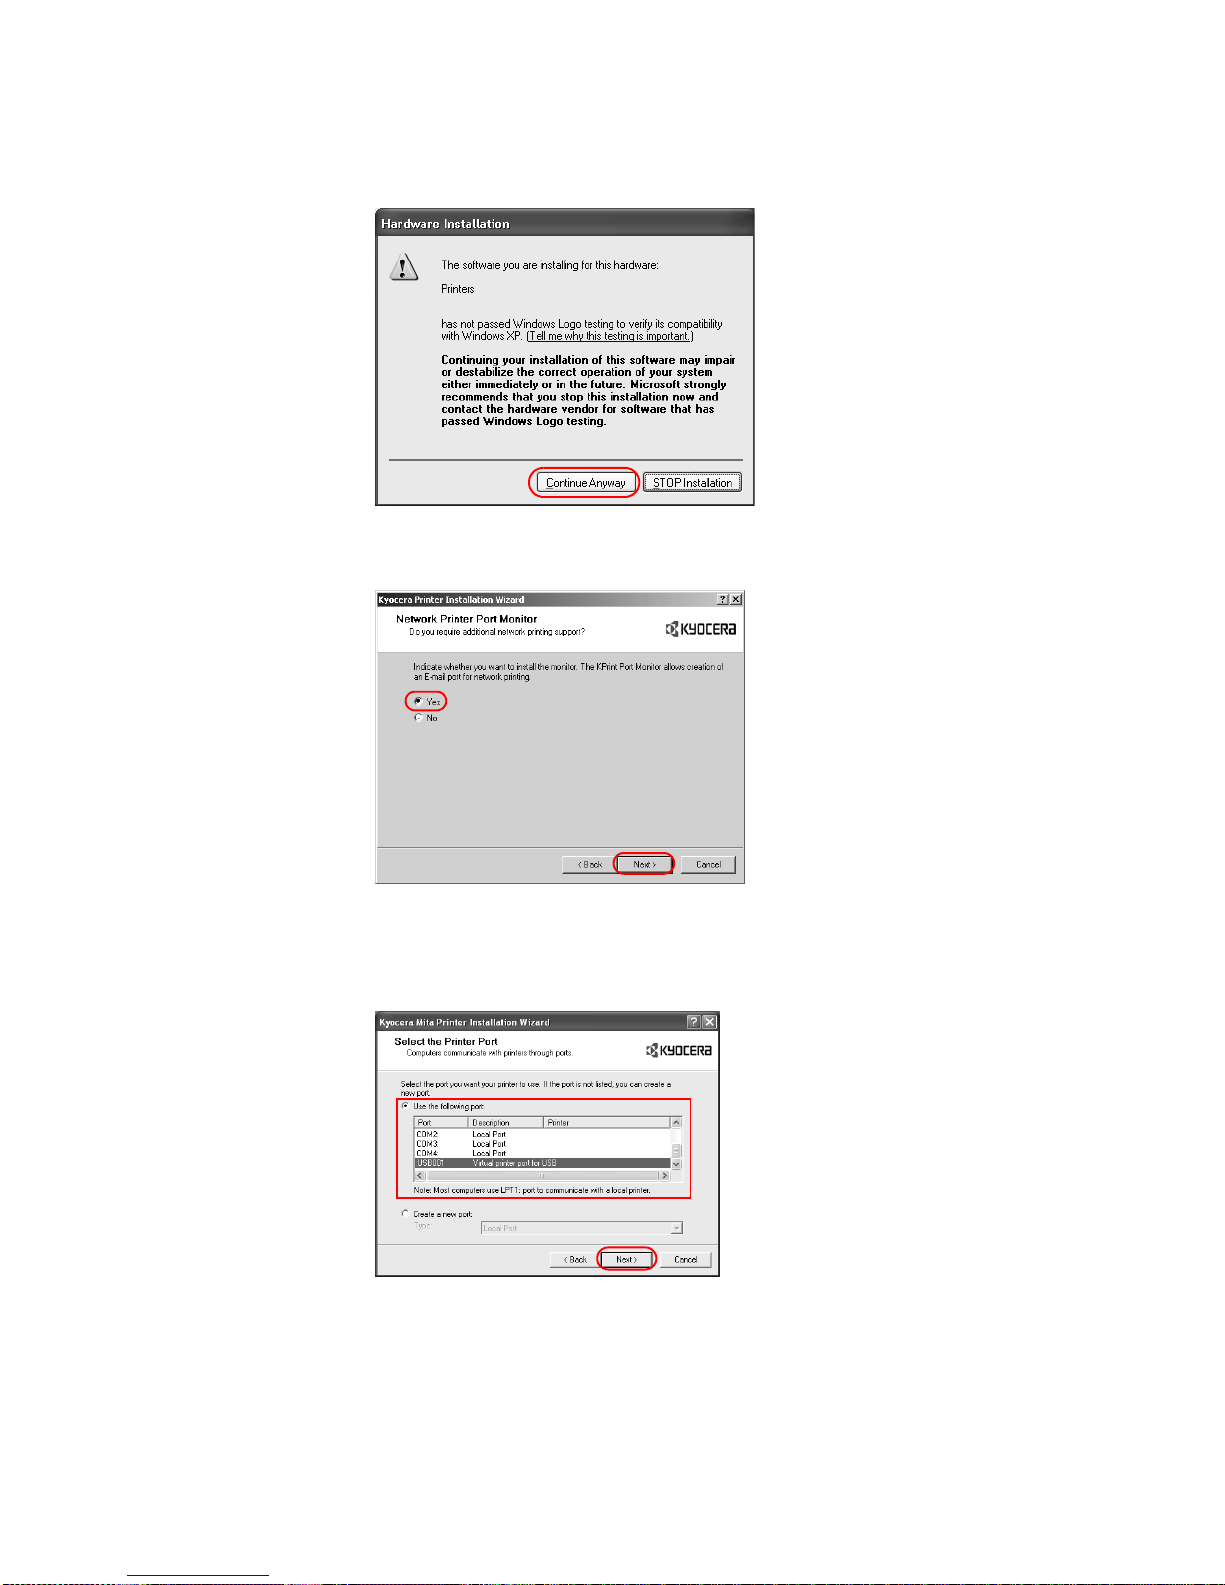
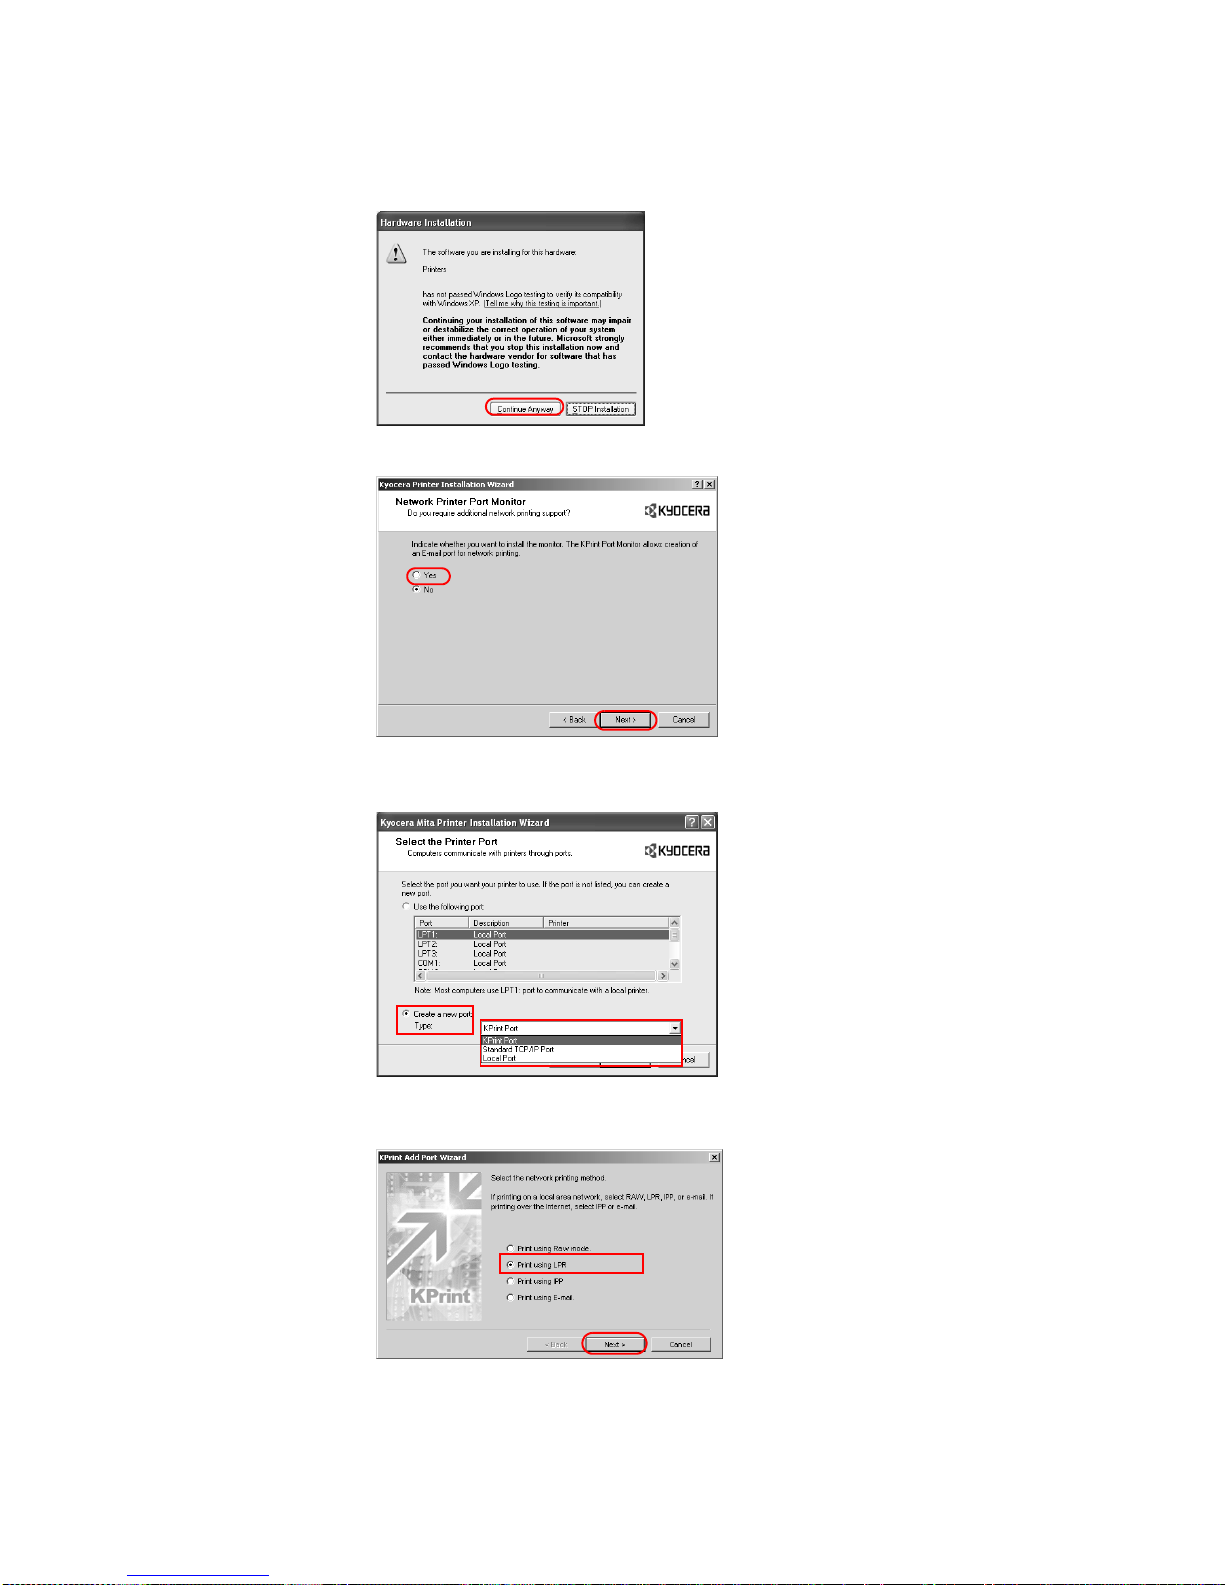
• If the Found New Hardware dialog box appears, click Cancel.
• If the Hardware Installation warning dialog box appears, click Continue Anyway.
• If the Network Printer Port Monitor dialog box appears, select Yes to install an e-mail
printer port for network printing and click
Next.
Installation
5
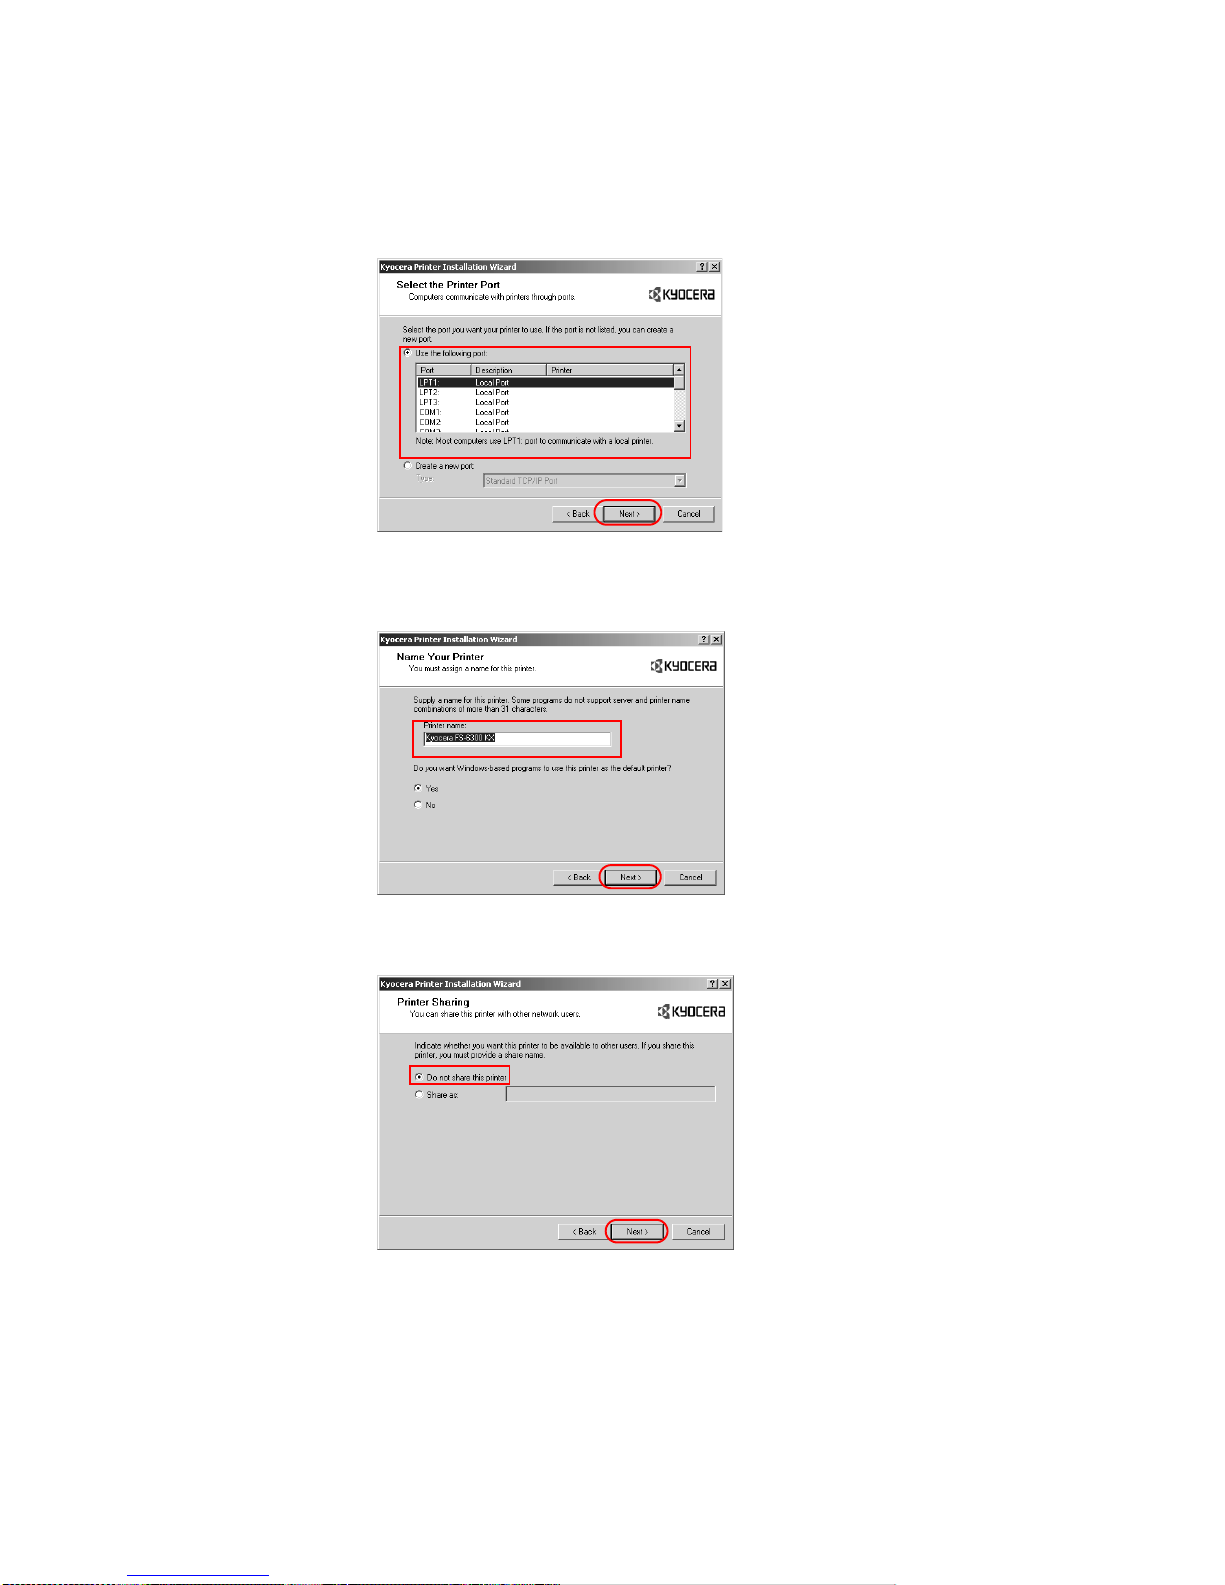
10 The
Select the Printer Port dialog box appears. Select LPT1: from Use the following
port:
, and then click Next.
11 The
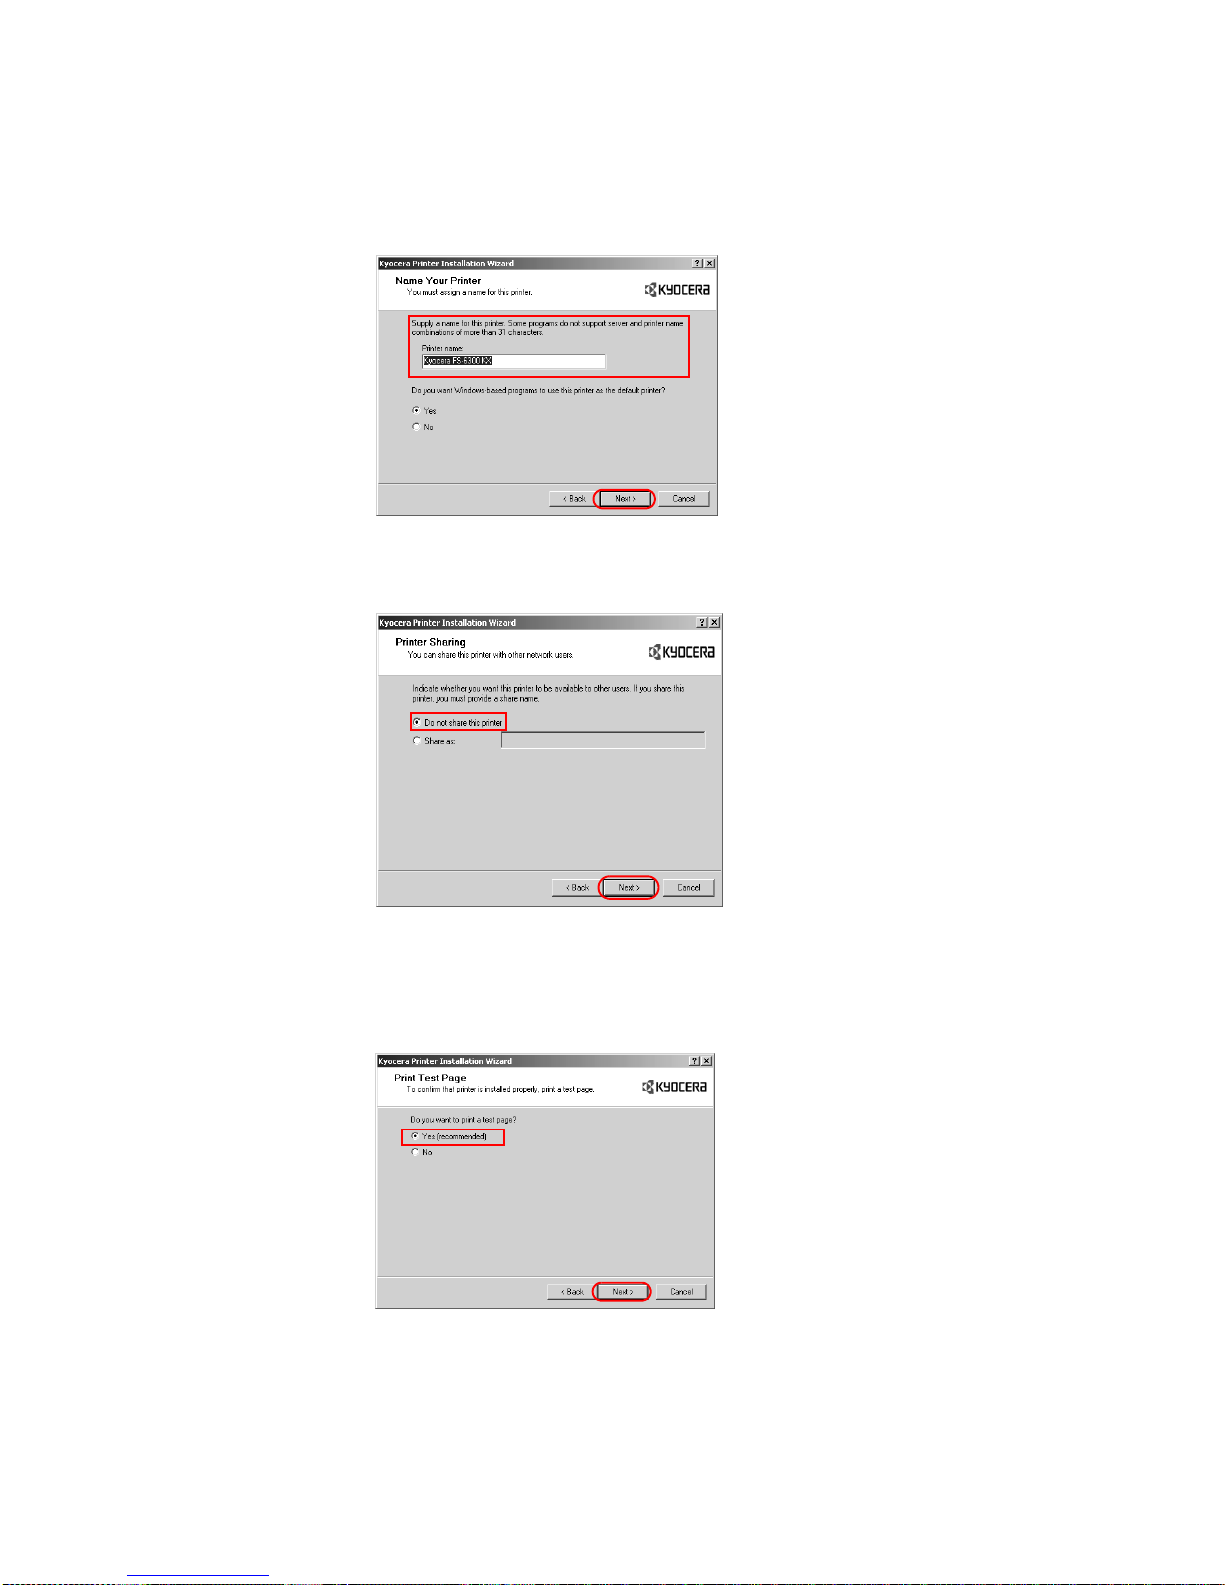
Name Your Printer dialog box appears.
Select
Yes or No to use the printer as the default printer for Windows-based programs.
Click
Next.
12 The
Printer Sharing dialog box appears.
If you do not want to share the printer, select Do not share this printer and click Next.
6
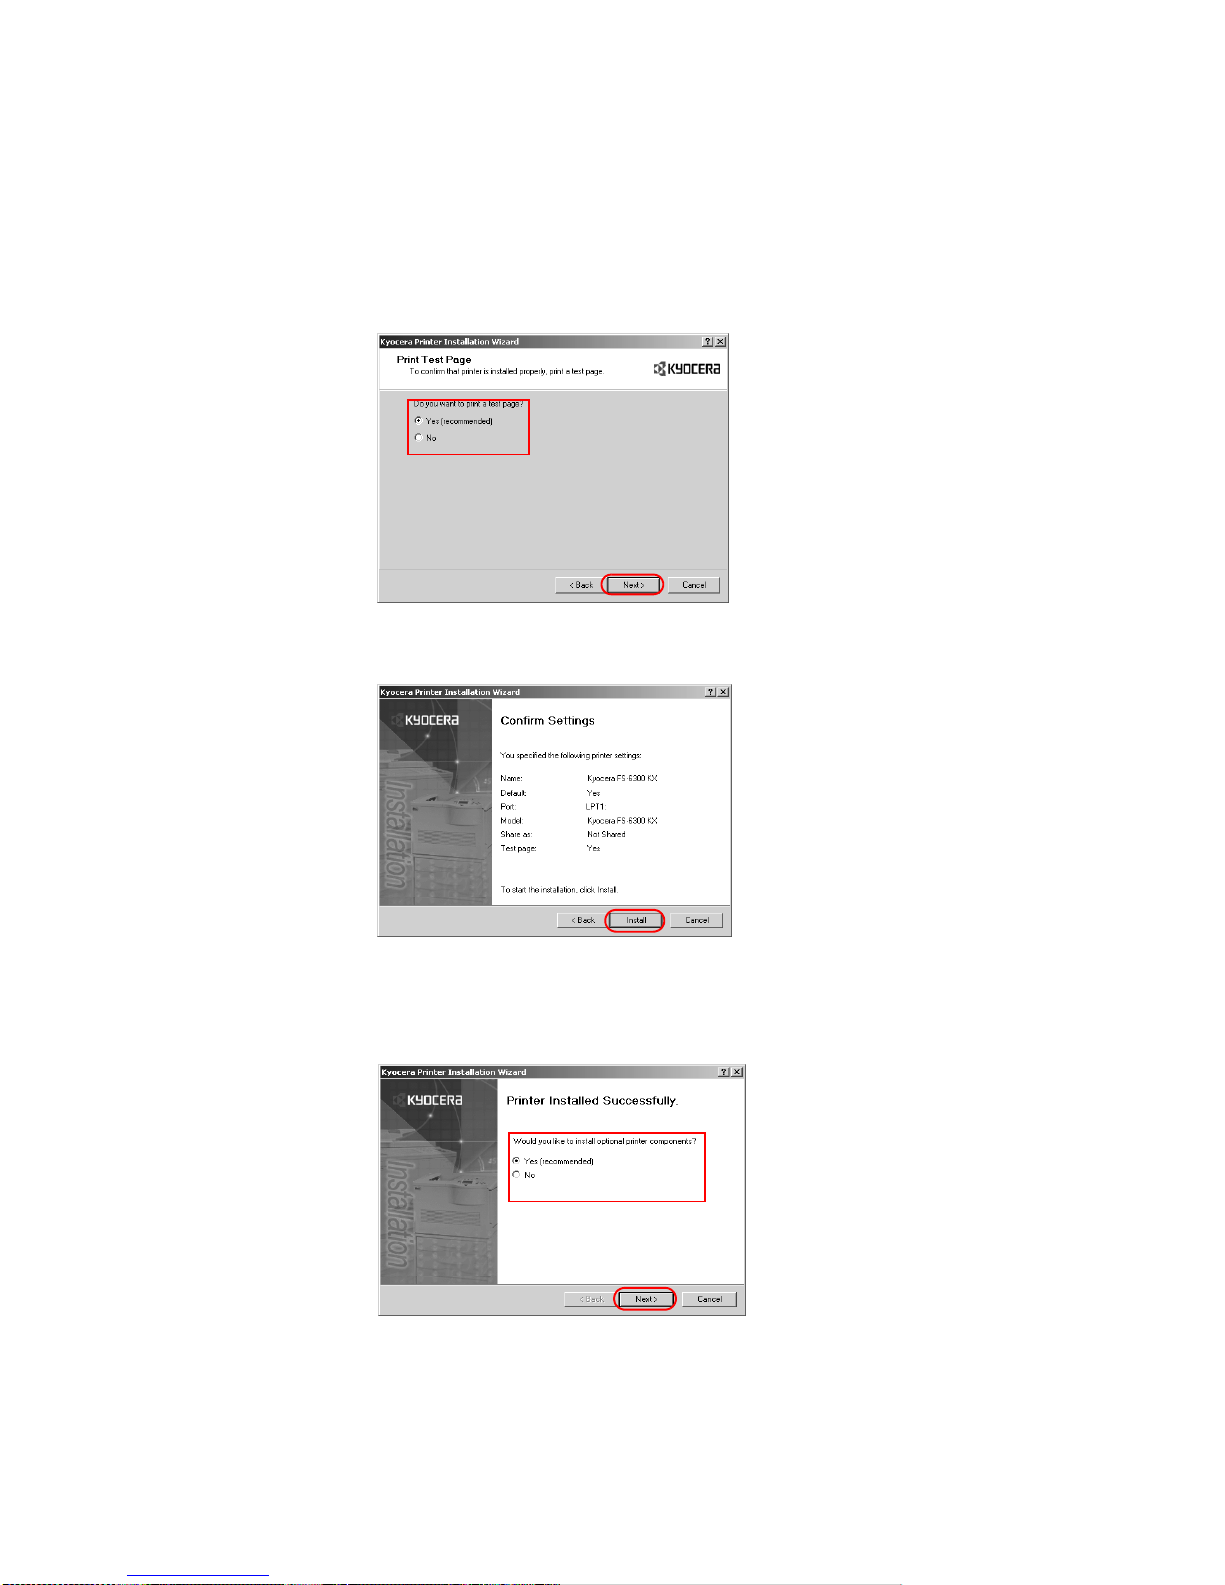
13 The
Print Test Page dialog box appears.
• Select Yes (recommended) to print a test page to confirm the proper operation of your
printer and click
Next. If the test page does not print properly, click Troubleshoot to
determine the problem.
• Select No if you do not wish to print a test page and click Next.
14 The
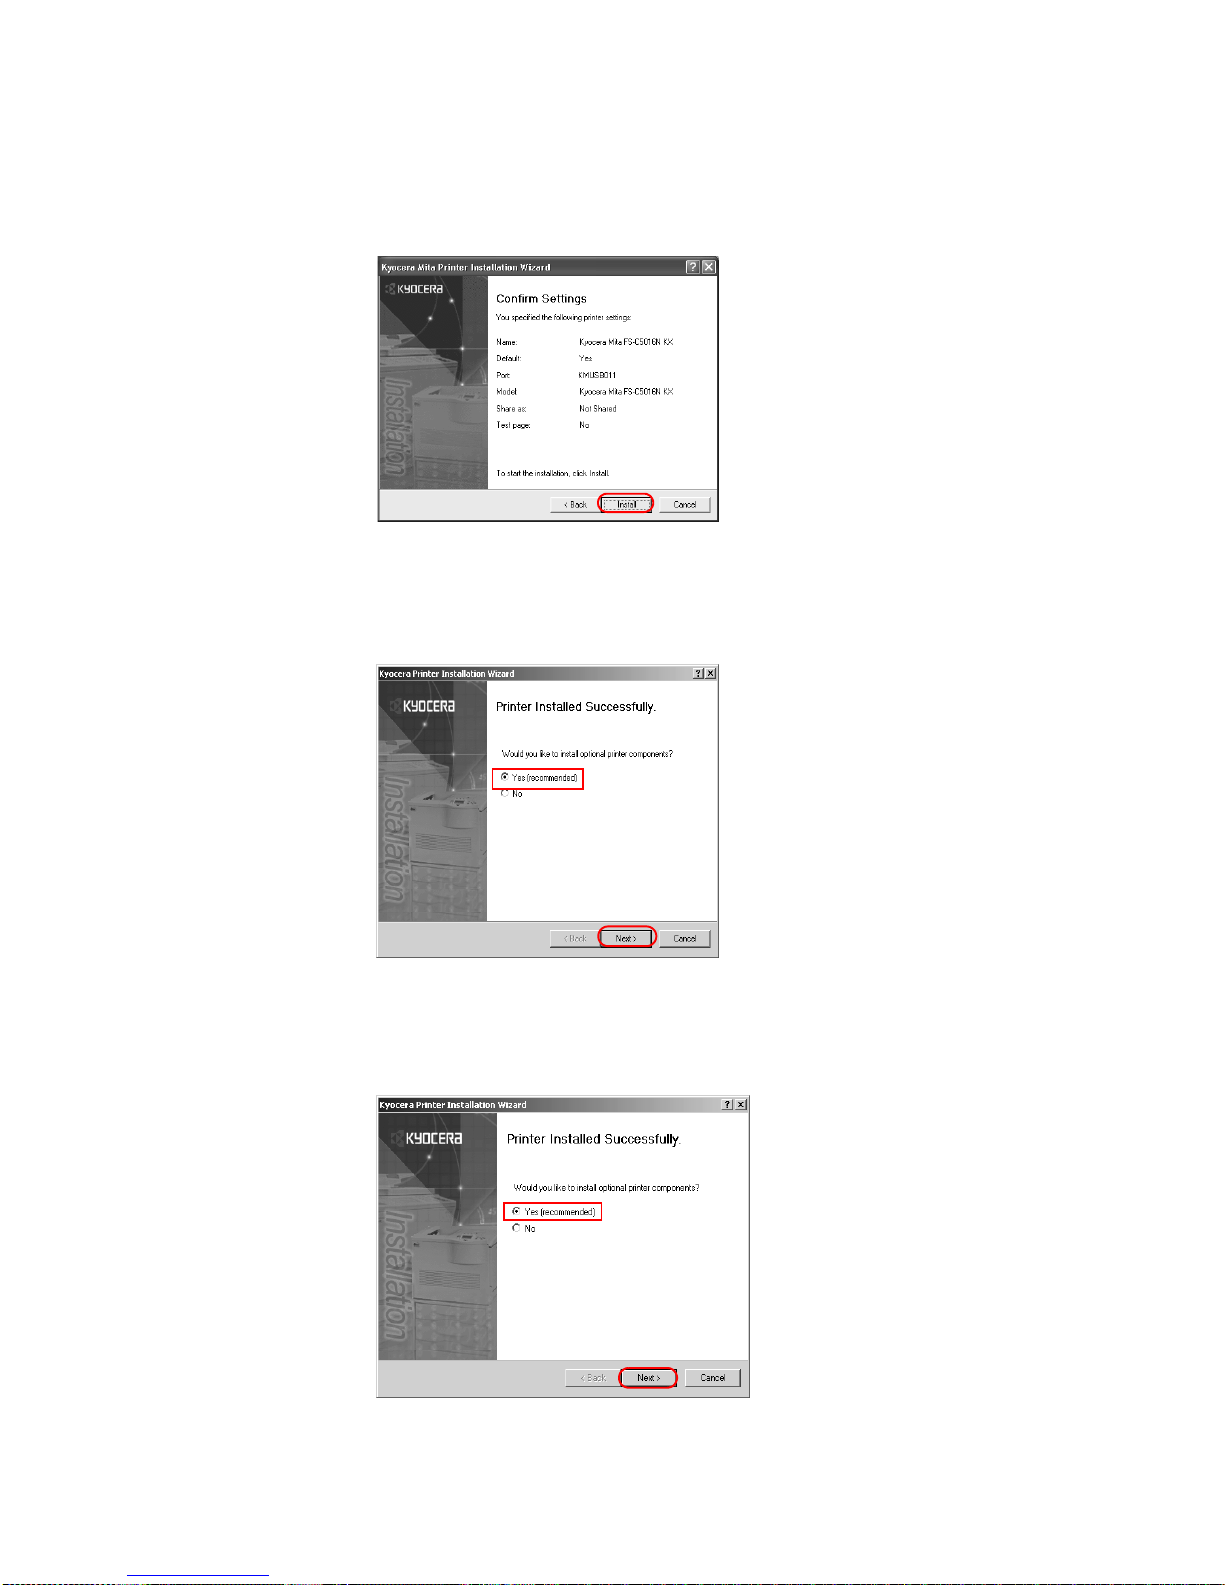
Confirm Settings dialog box appears. Verify the settings and click Install.
The printer driver installation begins.
15 Once the installation is complete, the
Printer Installed Successfully dialog box appears.
• Select Yes (recommended) to install optional components and click Next. Proceed to
Installing Components on page 25.
• Select No if you do not wish to install optional components and click Next.
Installation
7
16 Choose from one of the following options:
• Select Yes and click Next to install additional printer dri vers.
The
New Printer Installation dialog box appears.
• Select No to complete the installation and click Finish.
The installation of the printer is now complete. If prompted, restart your system.
USB Connection
This section describes how to install the printer driver when the printer and computer are
connected using a USB connection.
To install using a USB Connection:
1 Ensure the power for the computer and printer are turned off.
2 Connect the computer and printer using a USB cable. Once connected, power on both
devices.
3 Insert the Kyocera Software Library CD-ROM into the CD drive.
NOTE
• Ensure the printer is ready to print (remove packing materials, insert paper
and any toner or ink cartridges) before connecting the cable.
• For further details on connecting using a USB cable, refer to the printer's
Operation Guide.
• If the Welcome to the Found New Hardware Wizard dialog box appears,
click Cancel.
8
4 Once the installation program launches, the
License Agreement dialog box appears. Click
View License Agreement to display and read the License Agreement.
5Click
Accept to proceed to the Main Menu dialog box.
6Click
Install KX Driver.
7 The
Welcome to the Kyocera Printer Installation Wizard dialog box appears. Click Next.
NOTE
If the installation program fails to launch after inserting the CD-ROM into the CD
drive, navigate to Windows Explor er, access the CD-ROM, and double-click the
Setup.exe file.
Installation
9
8 The
Local or Network Connection dialog box appears. Select Local Connection and
click
Next.
9 The
Select Printer Model dialog box appears. From the list, select the Manufacturer and
corresponding
Printers you wish to connect, and click Next.
NOTE
•If Found New Hardware dialog box appears, click Cancel.
• If the Hardware Installation warning dialog box appears, click Continue
Anyway.
10
• If the Network Printer Port Monitor dialog box appears, select Yes and then click
Next.
10 The
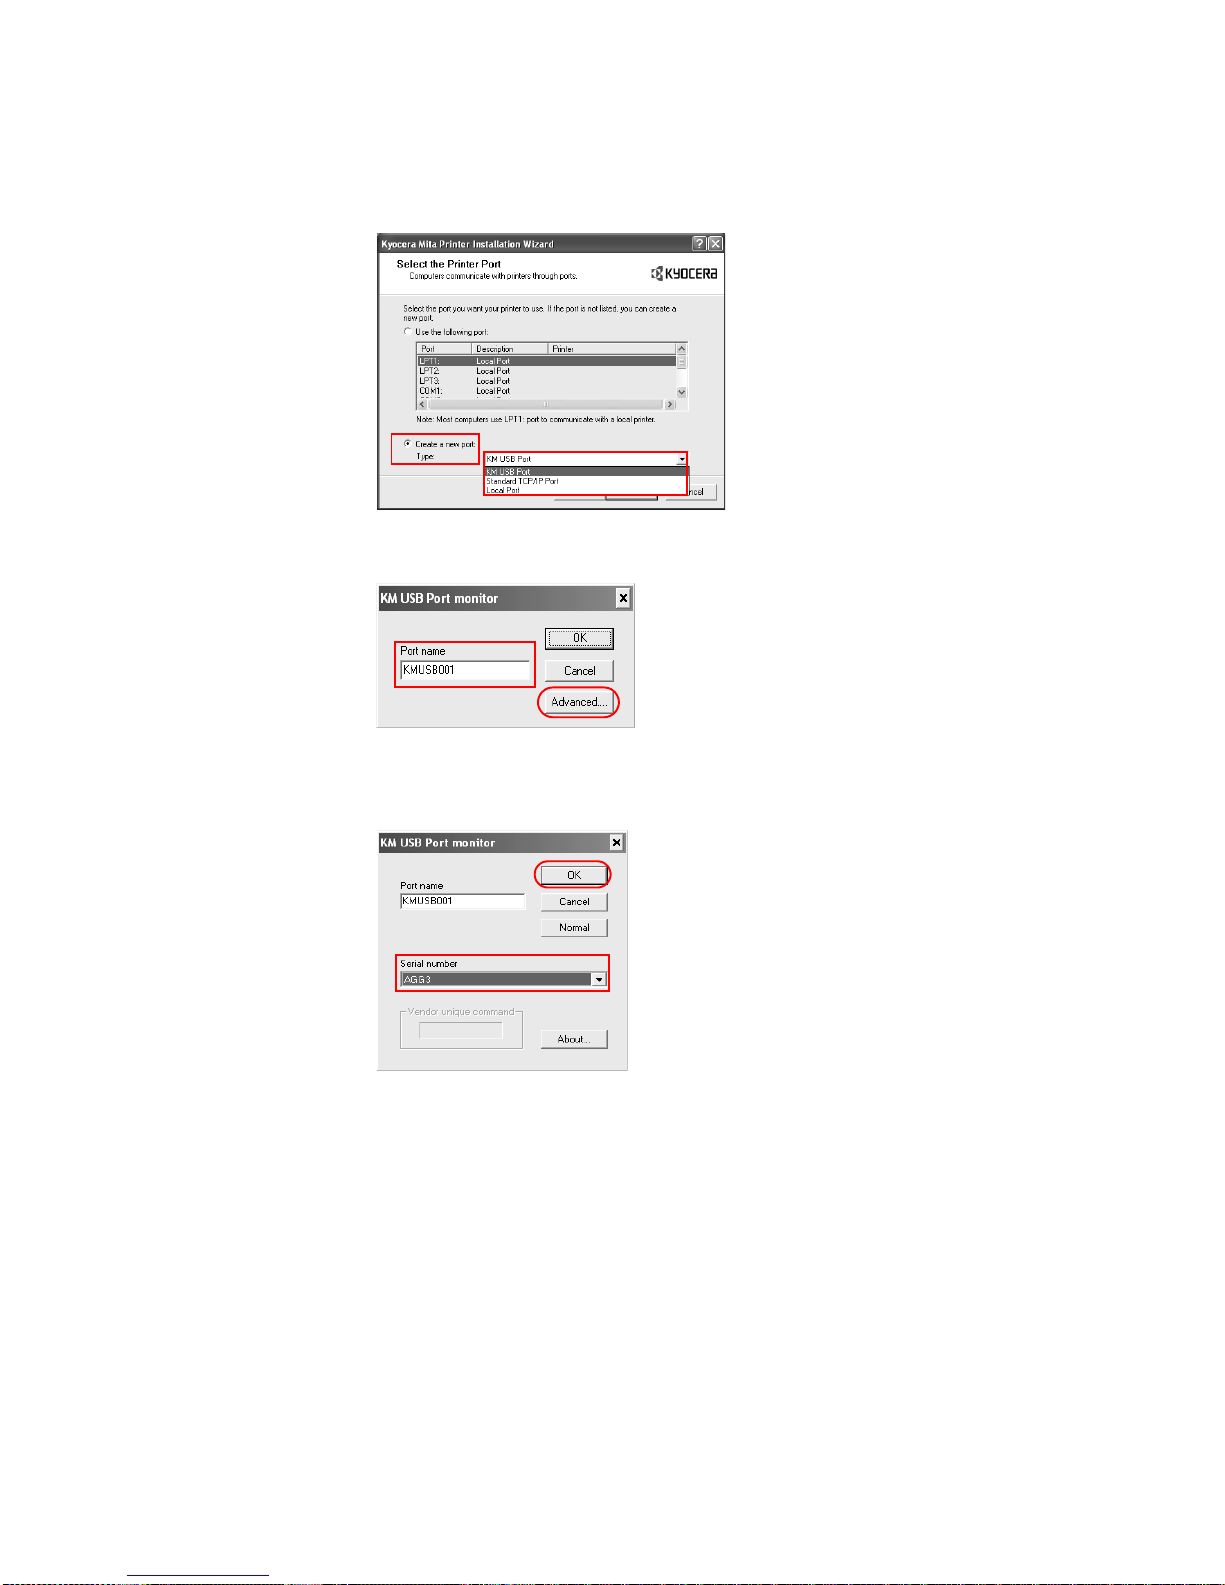
Select the Printer Port dialog box appears. Select USB port
(for example, USB001 or KMUSB001)
from the listed ports, then click Next and proceed
to step 14.
If there are no USB ports listed under
Use the following port, proceed to step 11.
Installation
11
11 Select
KM USB Port: from the Create a new port type list, then click Next.
12 The
KM USB Port monitor dialog box appears. Confirm the Port name and click
Advanced... .
13 The
Serial number list appears. Confirm the serial number and click OK.
If the
Serial number list is blank, cancel the installation procedure. Turn off the printer and
return to step 1.
14 The
Name Your Printer dialog box appears.
12
Select
Yes or No to determine whether to use the printer as the default printer for
Windows-based programs. Click
Next.
15 The
Printer Sharing dialog box appears. Choose from one of the following options.
• Select Do not share this printer to limit the user access to this printer and click Next.
• Select Share as to share this printer and enter a share name. Click Next.
16 The
Print Test Page dialog box appears. Choose from one of the following options.
• Select Yes (recommended) to print a test page to confirm the proper operation of your
printer and click
Next. If the test page does not print properly, click Troubleshoot to
determine the problem.
• Select No if you do not wish to print a test page, and click Next.
Installation
13
17 The
Confirm Settings dialog box appears. V erify the printer settings and click Install. The
printer driver installation begins.
18 Once the installation is complete, the
Printer Installed Successfully dialog box appears.
Choose from one of the following options.
• Select Yes (recommended) to install optional components and click Next. Proceed to
Installing Components on page 25.
• Select No if you do not wish to install optional components and click Next.
19 The
Printer Installed Successfully dialog box appears. Choose from one of the following
options.
• Select Yes and click Next to install additional printer dri vers.
The
New Printer Installation dialog box appears.
• Select No to complete the installation and click Finish.
14
The installation of the printer is now complete. If prompted, restart your system.
Network Connection
This section describes how to install the printer driver when connecting to a network printer.
To insta ll using a Network Connection:
1 Ensure the computer and printer are turned off.
2 Connect to the computer and printer using a network cable. Once connected, turn on both
devices.
• If the Welcome to the Found New Hardware Wizard dialog box displays, click
Cancel.
3 Insert the Kyocera Software Library CD-ROM into the CD drive.
Once the installation program launches, the
License Agreement dialog box displays.
NOTE
For further details on connections using other network protocols, consult the
configuration guide supplied with your network interface card.
NOTE
The KPrint utility must be installed in order to connect to a network printer . For
further details, refer to the supplied Kyocera Software Library CD-ROM.
NOTE
• Ensure the printer is ready to print (remove packing materials, insert paper
and any toner or ink cartridges) before connecting the cable.
• For further details on connecting using a parallel cable, refer to the printer's
Operation Guide.
NOTE
If the installation program fails to launch after inserting the CD-ROM into the CD
drive, navigate to Windows Explor er, access the CD-ROM, and double-click the
Setup.exe file.
Installation
15
4Click
View License Agreement to display and read the License Agreement.
5Click
Accept to proceed to the Main Menu dialog box.
6Click
Install KX Driver.
7 The
Welcome to the Kyocera Printer Installation Wizard dialog box appears. Click Next.
16
8 The
Local or Network Connection dialog box appears. Select Network Connection and
click
Next.
9 The
Locate Your Printer dialog box appears. Select one of the following search methods:
• Type the printer name...: Leave the printer name blank and click Next. All printers
available on network servers appear.
If you have directly typed in the print server name, click
Next.
• Connect to a printer on the Internet or...: Search by URL for printers that operate
with the Internet print protocol.
Find and select the printer URL and click
Next.
Installation
17
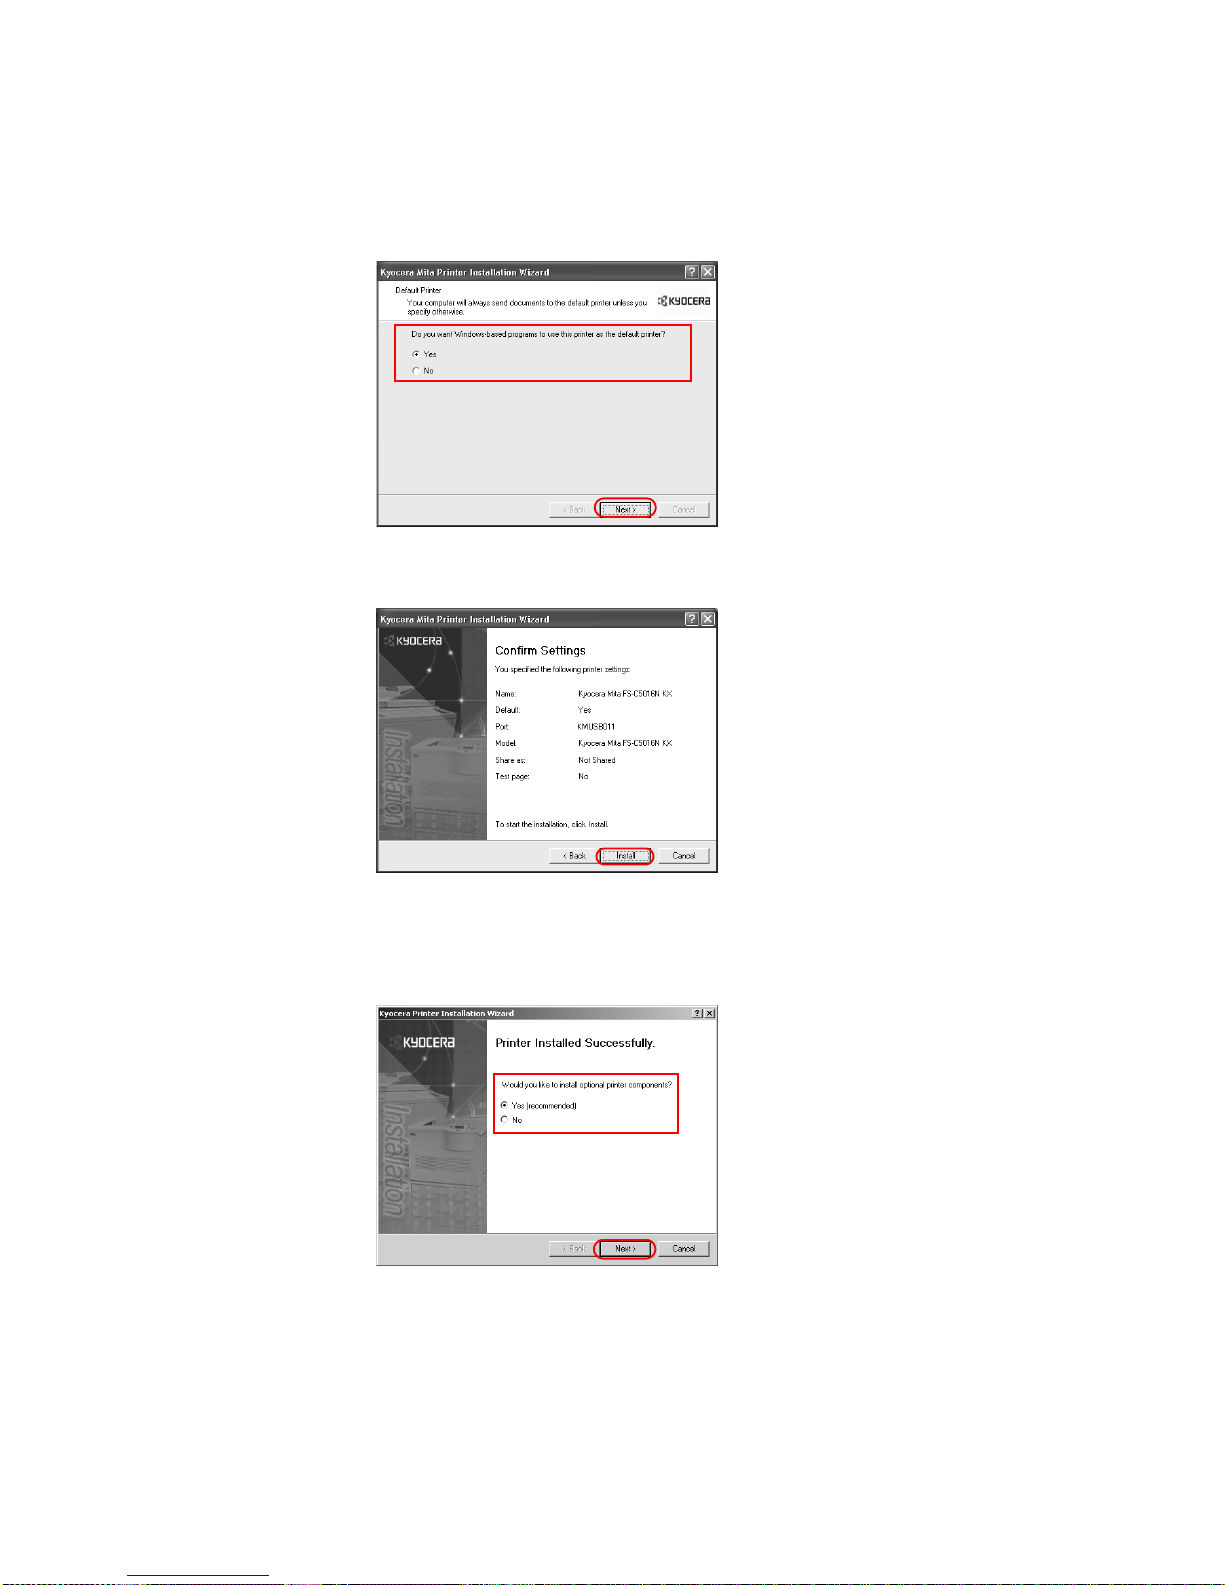
10 The
Default Printer dialog box appears. Select Yes or No to determine whether to apply
the selected printer as the default printer for all Windows-based applications.
11 The
Confirm Settings dialog box appears. Verify the printer settings and click Install. The
printer driver installation begins.
12 Once the installation is complete, the
Printer Installed Successfully dialog box appears.
• Select Yes (recommended) to install optional components and click Next. Proceed to
Installing Components on page 25.
• Select No if you do not wish to install optional components and click Next.
18
13 The
Printer Installed Successfully dialog box displays. Choose from one of the following
options.
• Select Yes to install additional printers and then click Next. The New Printer
Installation
dialog box appears.
• Select No to complete the installation, and click Finish.
The installation of the printer is now complete. If prompted, restart your system.
LPR Connection
When the printer has a built-in network interface, you can print over a network using an LPR
port. This section describes how to install the printer driver when the computer and printer are
connected using a LPR port connection.
To install usin g an LPR Port Connection:
1 Ensure both the computer and printer are turned off.
2 Connect to the computer and printer using a network cable. Once connected, power on both
devices.
3 Insert the Kyocera Software Library CD-ROM into the CD drive.
NOTE
• Ensure the printer is ready to print (remove packing materials, insert paper
and any toner or ink cartridges) before connecting the cable.
• For further details on connecting using a network cable, refer to the printer's
Operation Guide.
• If the Welcome to the Found New Hardware Wizard dialog box appears,
click
Cancel.
Installation
19
4 Once the installation program launches, the
License Agreement dialog box displays. Click
View License Agreement to display and read the License Agreement.
5Click
Accept to proceed to the Main Menu dialog box.
6Click
Install KX Driver.
7 The
Welcome to the Kyocera Printer Installation Wizard dialog box appears. Click Next.
NOTE
If the installation program fails to launch after inserting the CD-ROM into the CD
drive, navigate to Windows Explor er, access the CD-ROM, and double-click the
Setup.exe file.
20
8 The
Local or Network Connection dialog box appears. Select Local Connection and
click
Next.
9 The
Select Printer Model dialog box appears. From the list, select the Manufacturer and
corresponding
Printers you wish to connect, and click Next.
NOTE
For further details on connecting a network printing environment, refer to the IB21E/IB-22 User's Manual on the CD-ROM supplied with your printer .
NOTE
•If Found New Hardware dialog box appears, click Cancel.
• If the Hardware Installation warning dialog box appears, click Continue
Anyway.
Installation
21
• If the Network Printer Port Monitor dialog box appears, select Yes and click Next.
10 The
Select the Printer Port dialog box appears. Select KPrint Port: from the Create a
new port: Type
list, and then click Next.
11 The
KPrint Add Port Wizard dialog box appears. Select Print using LPR (Line Printer
Remote)
and click Next.
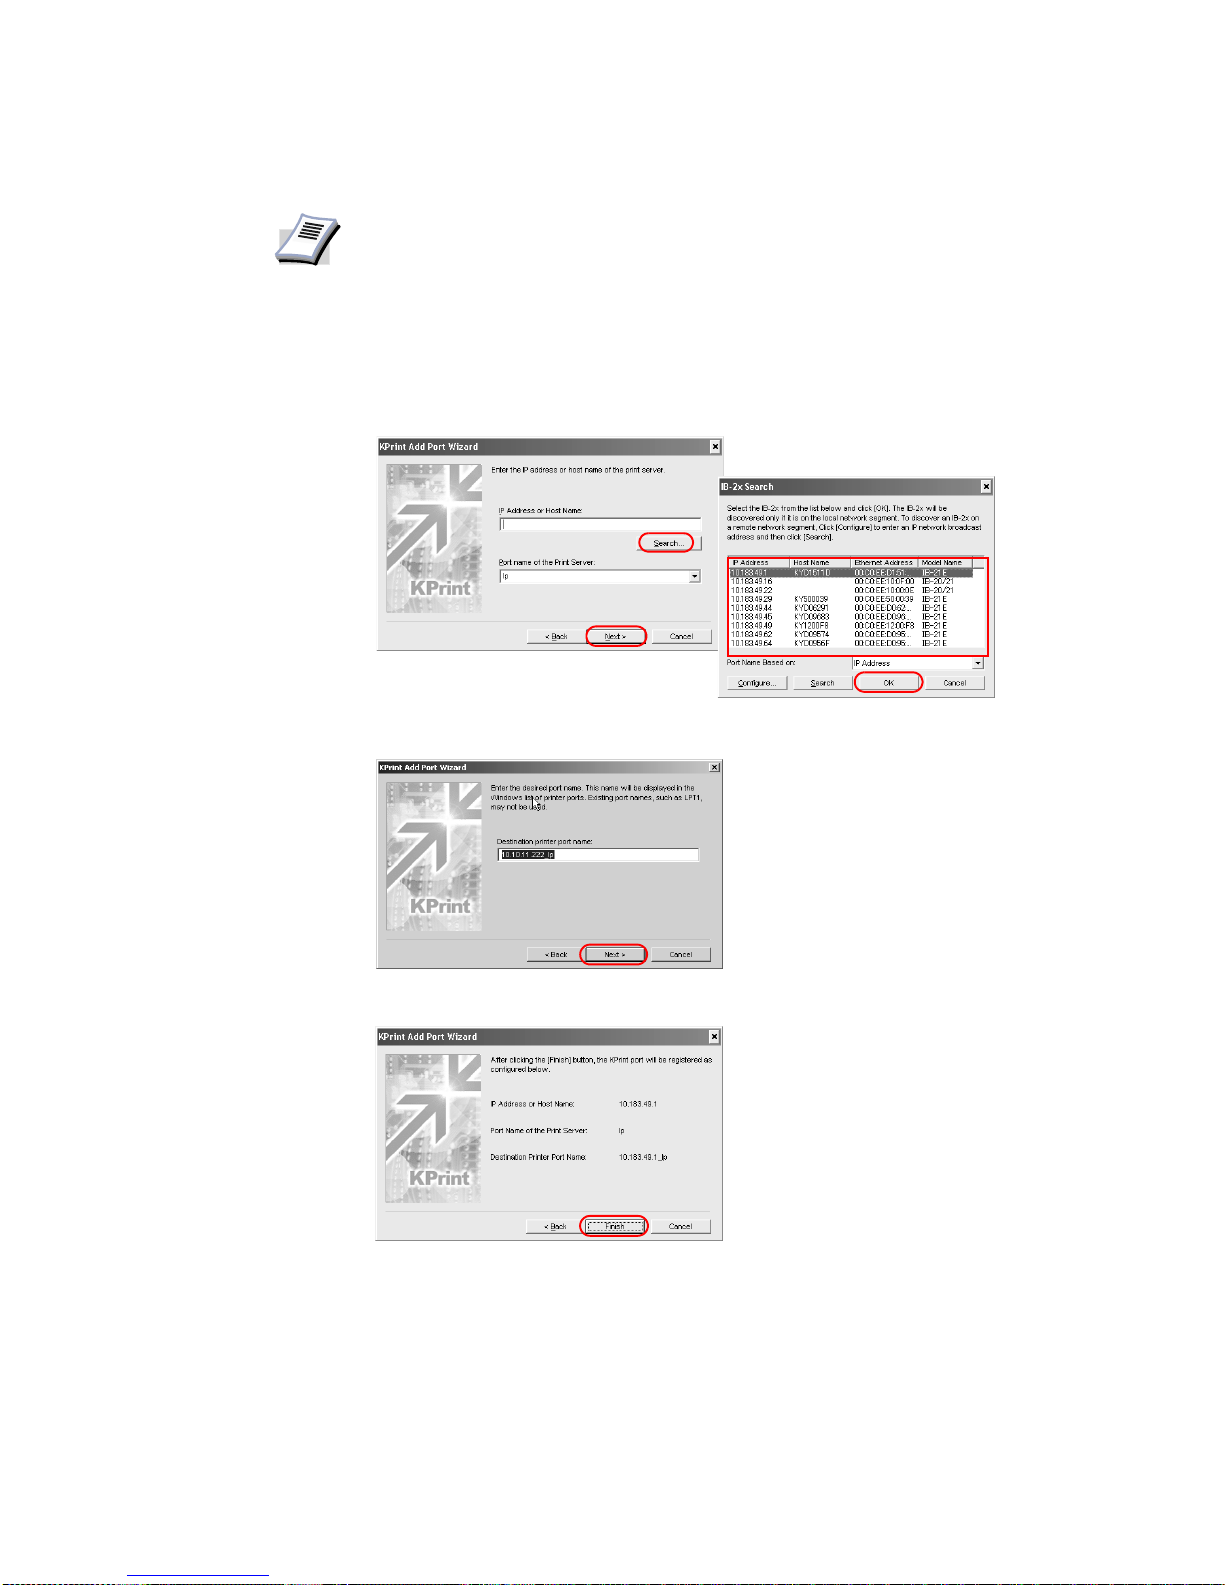
22
12 In the
Enter the IP address or host name of the print server dialog box, enter the IP
Address or Host Name
and click Next.
• Click Search... if the IP Address or Host Name is not known. A list of available
network printers displays. Select the network printer, then click
OK. Click Next to
continue
.
13 Confirm the destination printer port name and click
Next.
14 Confirm the settings, and click
Finish.
15 The
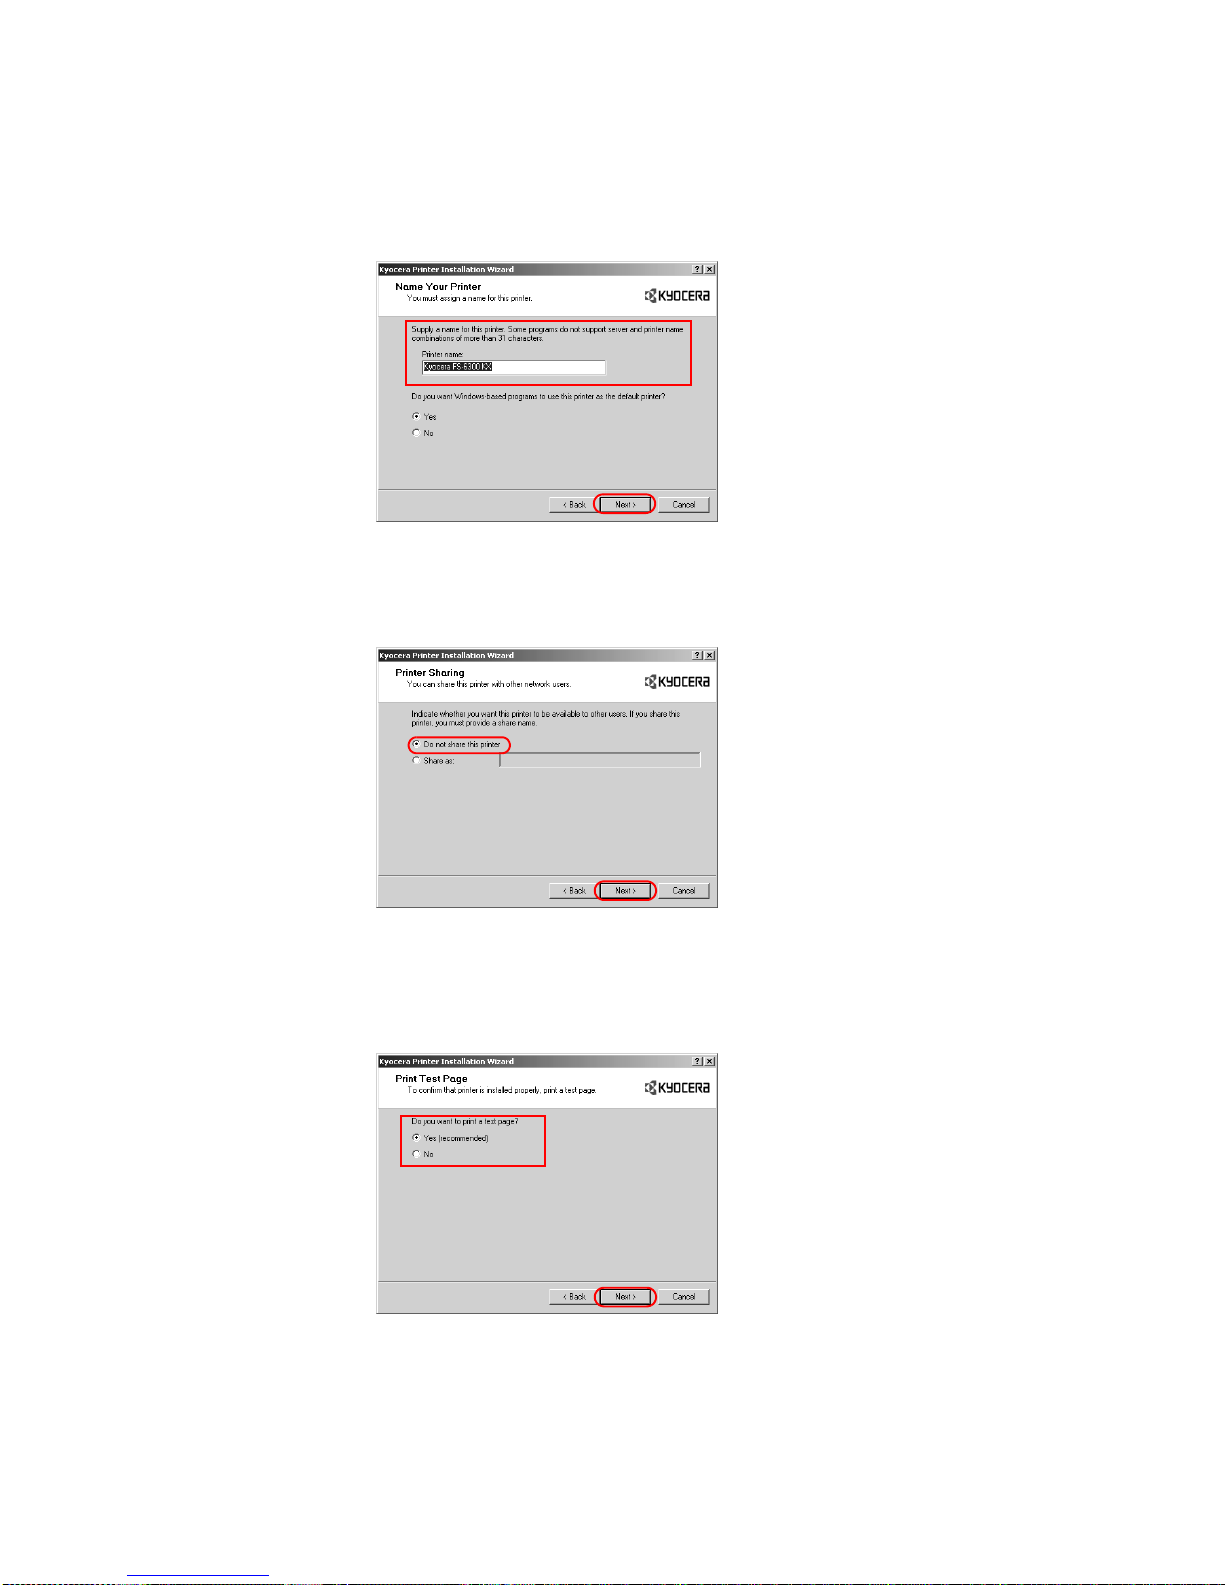
Name Your Printer dialog box appears.
NOTE
If the KPrint utility is installed, the following procedure may differ .
Installation
23
Select
Yes or No to determine whether to use the printer as the default printer for
Windows-based programs. Click
Next.
16 The
Printer Sharing dialog box appears. Choose from one of the following options.
• Select Do not share this printer to prevent other users from accessing this printer and
click
Next.
• Select Share as to share this printer and enter a share name. Click Next.
17 The
Print Test Page dialog box appears. Choose from one of the following options.
• Select Yes (recommended) to print a test page to confirm the proper operation of your
printer and click
Next. If the test page does not print properly, click Troubleshoot to
determine the problem.
• Select No if you do not wish to print a test page, and click Next.
24
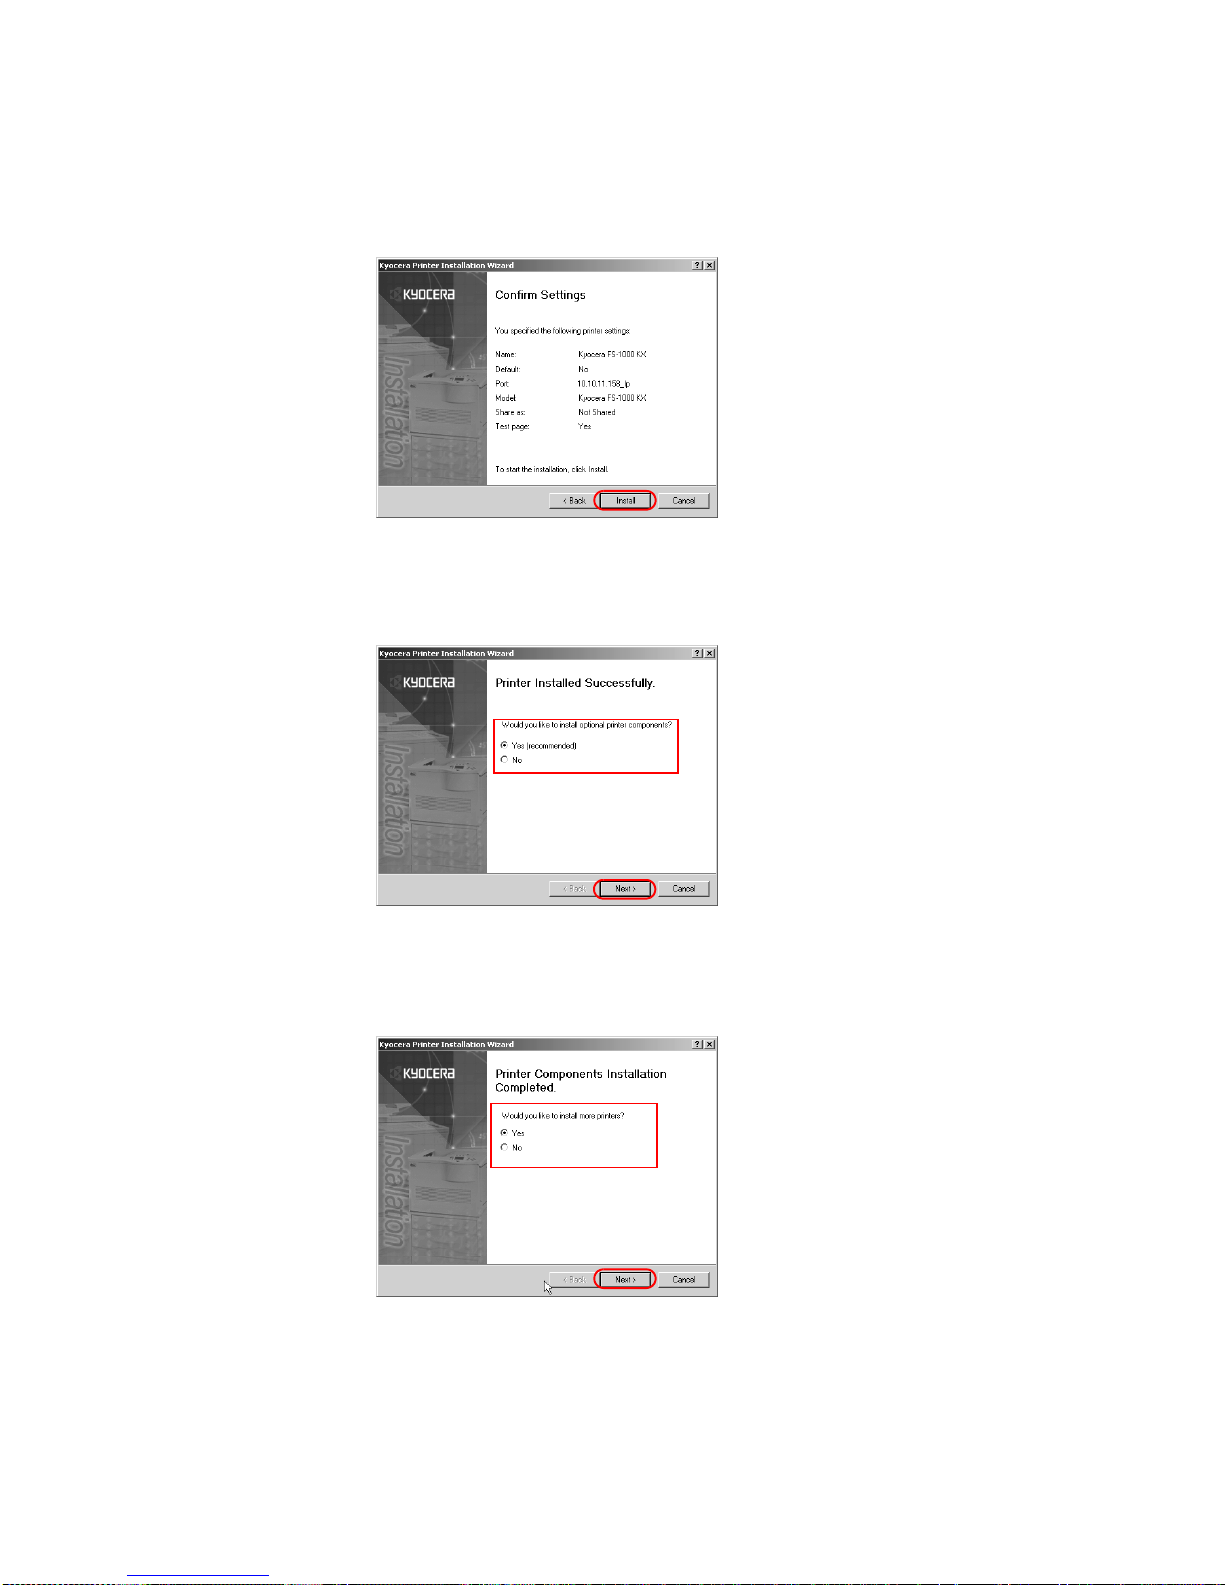
18 The
Confirm Settings dialog box appears. V erify the printer settings and click Install. The
printer driver installation begins.
19 Once the installation is complete, the
Printer Installed Successfully dialog box appears.
• Select Yes (recommended) to install optional components and click Next. Proceed to
Installing Components on page 25.
• Select No if you do not wish to install optional components and click Next
.
20 The Printer Installed Successfully dialog box. Choose from one of the following options.
• Select Yes and click Next to install additional printer dri vers.
The
New Printer Installation dialog box appears.
• Select No to complete the installation and click Finish.
The installation of the printer is now complete. If prompted, restart your system.
Installation
25
Installing Components
You can expand the functions of your printer driver by installing components that compliment
the ways in which you utilize your printer. For more information on profiles, refer to Saving
Profiles on page 125.
To install Printer Components:
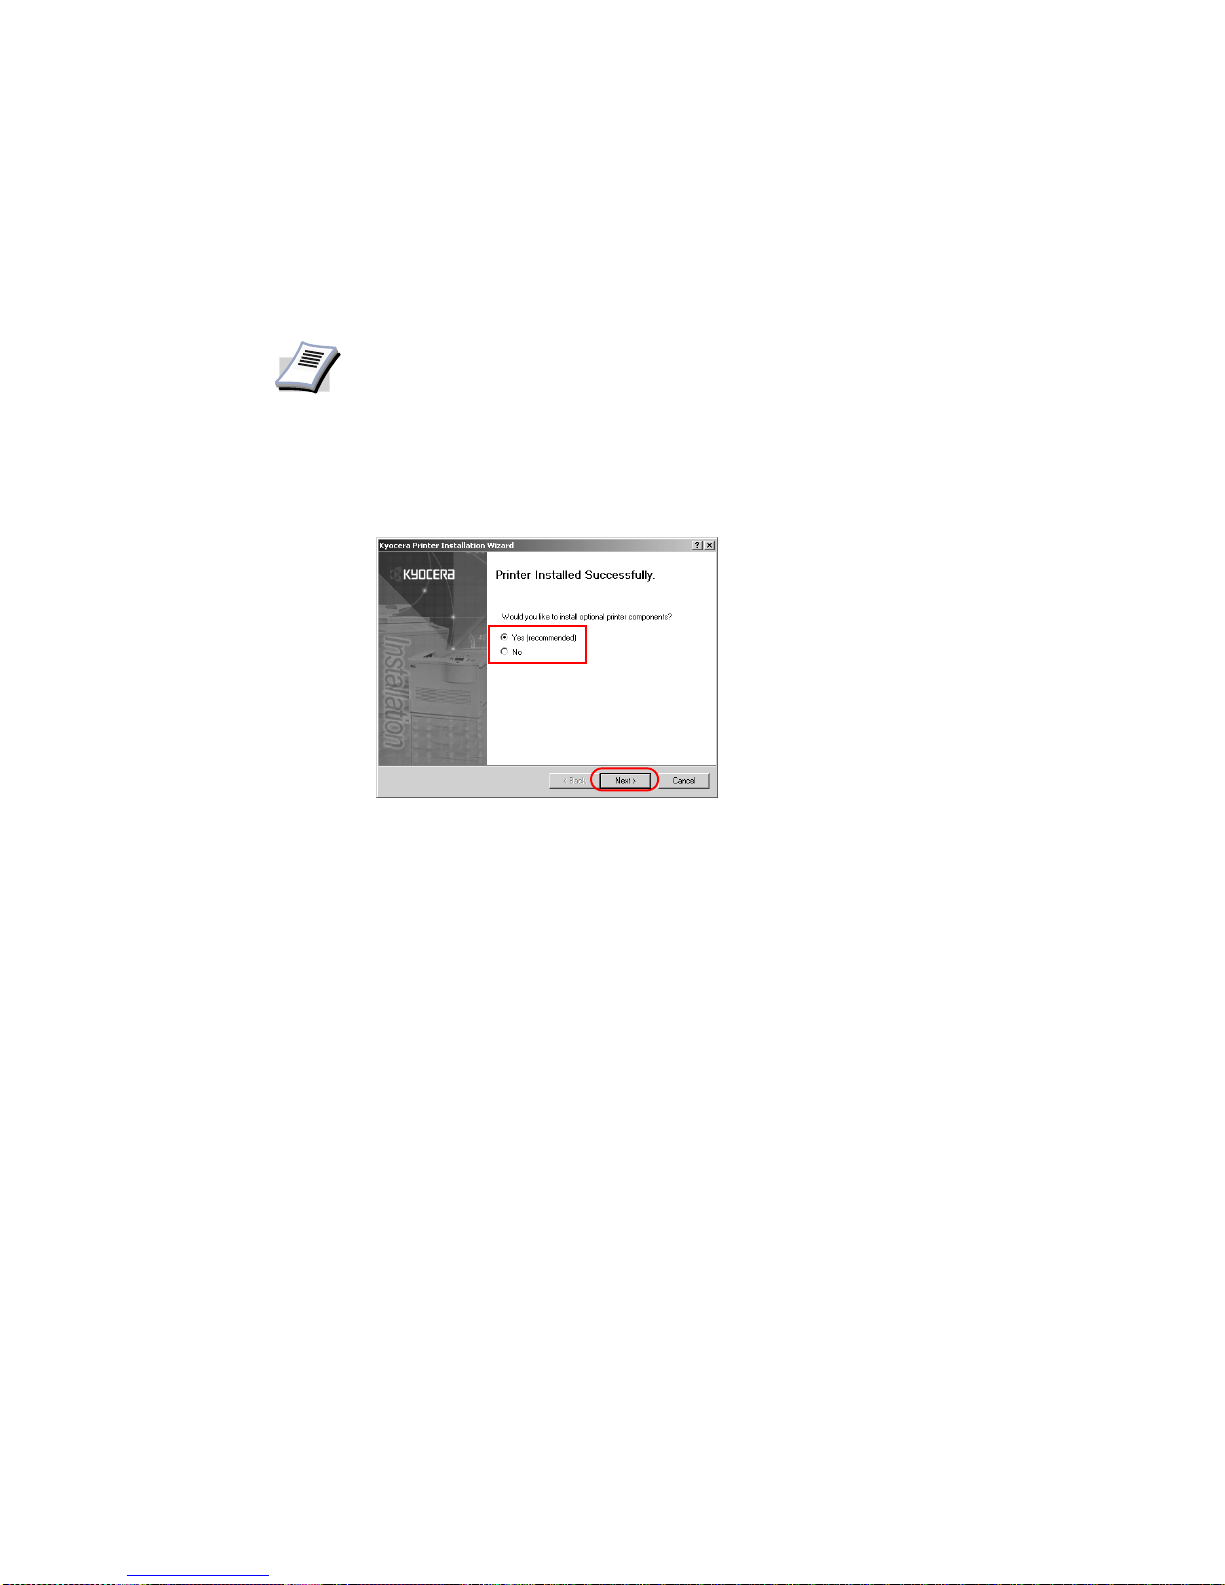
1 Once the installation is complete, the Printer Installed Successfully dialog box appears.
Select
Yes (recommended) and click Next.
NOTE
The displayed components may vary based on the printer model.
26
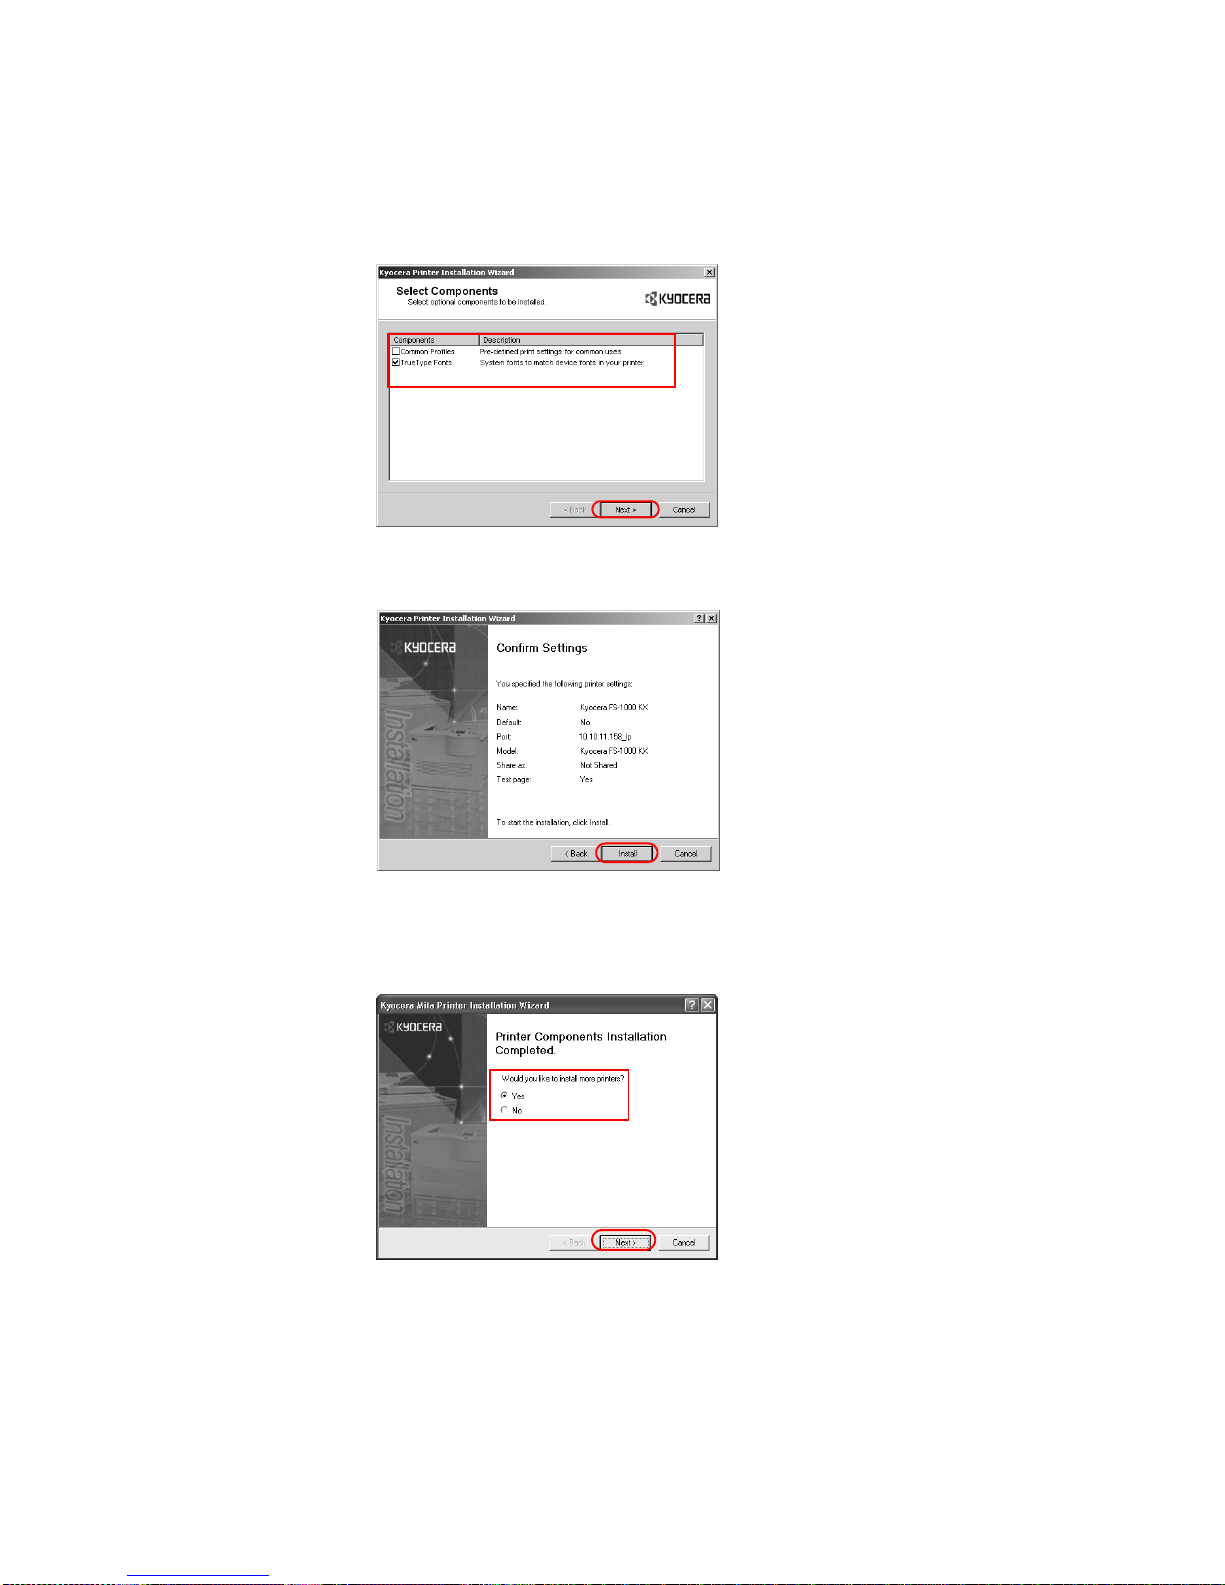
2 The
Select Components dialog box appears. Select the check box of the components you
wish to install, and click
Next. Follow the instructions in the dialog box to proceed.
• The Confirm Settings dialog box appears. Verify the selected component items, and
click
Install.
3 The
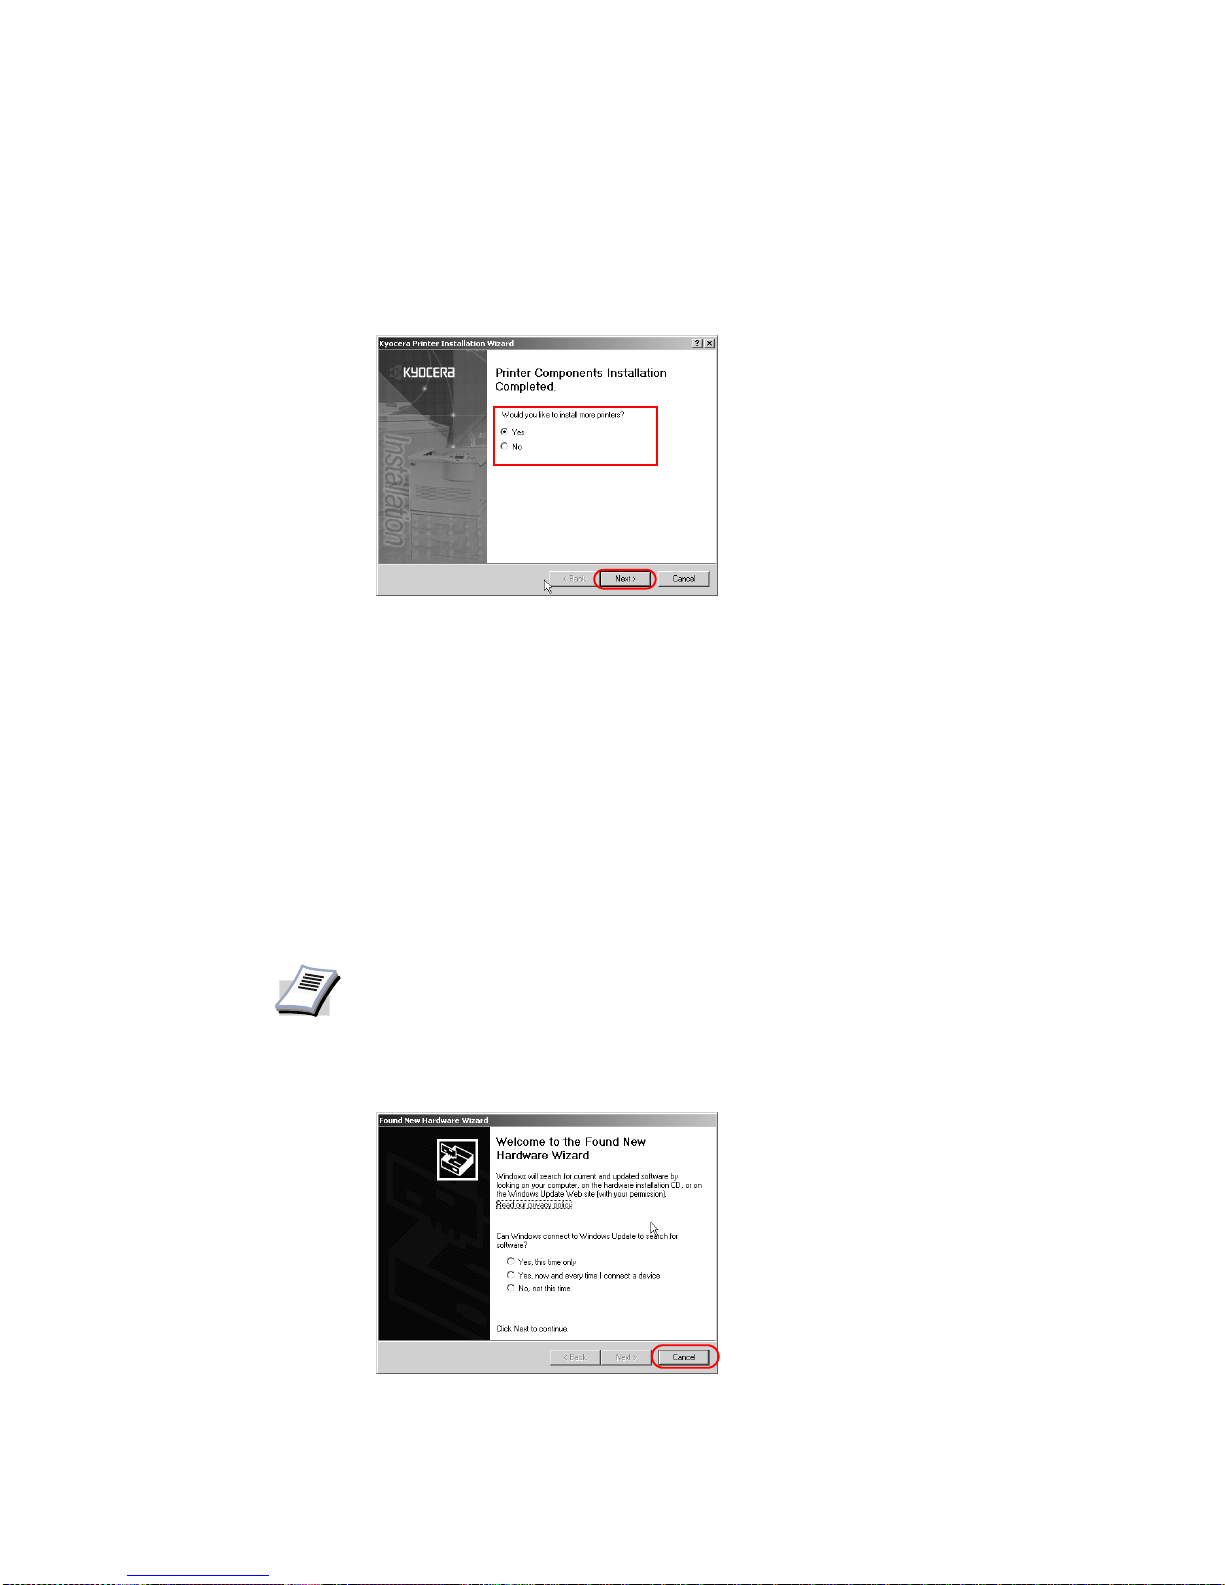
Printer Components Installation Completed dialog box appears. Choose from one of
the following options.
• Select No to complete the installation, and click Finish.
• Select Yes to install additional printer drivers, and then click Next.
Refer to the Local and Network Connec tion dialog box shown in the previous section,
to prepare for the installation of an additional printer driver.
4 Continue the installation as describe above.Click
Exit to complete the installation.
 Loading...