

Page 1

User Guide
[UG template version 13a]
[sprint_TorqueXT_ug_en_100114_d4]
Page 2

Table of Contents
Get Started ................................................................................................................................ 1
Your Phone at a Glance ...................................................................................................... 1
Set Up Your Phone ............................................................................................................. 1
Insert and Charge the Battery ...................................................................................... 2
Your SIM Card ................................................................ ............................................. 3
Activate Your Phone ........................................................................................................... 4
Set Up Voicemail ................................................................................................................ 5
Sprint Account Information and Help ................................................................................... 6
Sprint Account Passwords ........................................................................................... 6
Manage Your Account ................................................................................................. 6
Sprint Support Services ............................................................................................... 7
Phone Basics ............................................................................................................................. 9
Your Phone’s Layout ........................................................................................................... 9
Smart Sonic Receiver ........................................................................................................11
Turn Your Phone On and Off .............................................................................................12
Turn Your Screen On and Off ............................................................................................12
Touchscreen Navigation ....................................................................................................13
Your Home Screen ............................................................................................................17
Home Screen Overview ..............................................................................................17
Customize the Home Screen ......................................................................................19
Dura Grid Widget ...............................................................................................................22
Launcher Screens ..............................................................................................................22
Notifications Panel .............................................................................................................23
Quick Settings Panel ..........................................................................................................23
Status Bar ..........................................................................................................................24
Enter Text ..........................................................................................................................25
Touchscreen Keyboards .............................................................................................25
Swype .........................................................................................................................26
Google Keyboard ........................................................................................................29
Google Voice Typing ..................................................................................................31
TOC i
Page 3

Tips for Editing Text ....................................................................................................32
Phone Calls ..............................................................................................................................33
Make Phone Calls ..............................................................................................................33
Call Using the Phone Dialer ........................................................................................33
Call from Recent Calls ................................................................................................33
Call from Contacts ......................................................................................................34
Call a Number in a Text Message ...............................................................................34
Call Emergency Numbers ...........................................................................................34
Call Numbers with Pauses ..........................................................................................35
Call Using the Plus (+) Code .......................................................................................36
Call Using Internet Calling ................................ ..........................................................36
Receive Phone Calls ..........................................................................................................37
Voicemail ...........................................................................................................................37
Voicemail Setup ..........................................................................................................38
Voicemail Notification .................................................................................................38
Retrieve Your Voicemail Messages ............................................................................38
Visual Voicemail ................................................................................................................39
Set Up Visual Voicemail..............................................................................................39
Review Visual Voicemail .............................................................................................40
Listen to Multiple Voicemail Messages .......................................................................40
Compose a Visual Voicemail Message .......................................................................41
Visual Voicemail Options ................................ ............................................................41
Configure Visual Voicemail Settings ...........................................................................42
Change Your Main Greeting via the Voicemail Menu ..................................................43
Edit the Display Name via the Voicemail Menu ...........................................................43
Phone Call Options ............................................................................................................43
In-call Options .............................................................................................................44
Caller ID .....................................................................................................................45
Call Waiting ................................................................................................................45
3-Way Calling .............................................................................................................45
Call Forwarding ..........................................................................................................46
Recent Calls ................................................................ ......................................................46
Call Settings ......................................................................................................................48
TOC ii
Page 4

Voicemail Settings ......................................................................................................48
North American Dialing ...............................................................................................48
International Dialing ....................................................................................................48
TTY Mode ...................................................................................................................48
Sprint Direct Connect .........................................................................................................49
Before Making Your First Direct Connect Call .............................................................50
Direct Connect Numbers.............................................................................................50
Save a Direct Connect Number ..................................................................................51
Make and Answer Direct Connect Calls ......................................................................51
Availability Notifications ..............................................................................................54
Answer Direct Connect Calls ......................................................................................54
End a Direct Connect Call ...........................................................................................55
Call Alerts ...................................................................................................................55
Make Group Connect Calls .........................................................................................56
Make Group Connect Calls .........................................................................................57
Group Connect Call Information ..................................................................................58
TeamDC .....................................................................................................................59
Opt-In TeamDC ..........................................................................................................61
Scan Lock ...................................................................................................................61
Invites .........................................................................................................................62
Direct Connect Settings ..............................................................................................63
Contacts....................................................................................................................................67
Get Started with People .....................................................................................................67
The Contacts List ........................................................................................................67
Contacts List Options ..................................................................................................68
Display Options ..........................................................................................................69
Add a Contact ....................................................................................................................69
Save a Phone Number .......................................................................................................70
Edit a Contact ....................................................................................................................71
Add or Edit Information for a Contact ..........................................................................71
Assign a Stored Picture to a Contact ..........................................................................71
Assign a New Picture to a Contact ..............................................................................71
Assign a Ringtone to a Contact...................................................................................72
TOC iii
Page 5

Assign a Vibration to a Contact ...................................................................................72
Add a Contact to Favorites .........................................................................................73
Send a Contact’s Call to Voicemail .............................................................................73
Add a Contact Widget to the Home Screen.................................................................73
Delete a Contact .........................................................................................................73
Add a Group Contact .........................................................................................................73
Edit a Group Contact .........................................................................................................74
DC Group Contact .............................................................................................................74
Add a Group Connect Contact ................................ ....................................................75
Edit a Group Connect Contact ....................................................................................75
ICE (In Case of Emergency) ..............................................................................................76
ICE Contacts ..............................................................................................................76
Personal Information ...................................................................................................76
Synchronize Contacts ........................................................................................................77
Share a Contact .................................................................................................................77
Sprint Mobile Sync .............................................................................................................78
Accounts and Messaging ..........................................................................................................79
Gmail / Google ...................................................................................................................79
Create a Google Account ............................................................................................79
Sign In to Your Google Account ..................................................................................80
Access Gmail ..............................................................................................................80
Send a Gmail Message ..............................................................................................81
Read and Reply to Gmail Messages ...........................................................................81
Email .................................................................................................................................82
Add an Email Account ................................................................................................82
Add a Corporate Account ............................................................................................83
Compose and Send Email ..........................................................................................84
View and Reply to Email .............................................................................................85
Manage Your Email Inbox ...........................................................................................85
General Email Settings ...............................................................................................86
Email Account Settings ...............................................................................................86
Text and Multimedia Messaging.........................................................................................88
Send a Text Message .................................................................................................88
TOC iv
Page 6

Send a Multimedia Message (MMS) ...........................................................................89
Save and Resume a Draft Message ...........................................................................91
New Messages Notification .........................................................................................91
Manage Message Conversations ................................................................................91
Text and MMS Options ...............................................................................................94
Social Networking Accounts ...............................................................................................95
Facebook ....................................................................................................................95
Google+ ......................................................................................................................96
YouTube .....................................................................................................................96
Apps and Entertainment ............................................................................................................98
Google Play Store ..............................................................................................................98
Find and Install an App ...............................................................................................98
Create a Google Wallet Account .................................................................................99
Google Play Store Menu Options ................................................................................99
Request a Refund for a Paid App ............................................................................. 100
Open an Installed App .............................................................................................. 100
Uninstall an App ....................................................................................................... 100
Get Help with Google Play ........................................................................................ 101
Navigation ........................................................................................................................ 101
Google Maps ............................................................................................................ 101
Music ............................................................................................................................... 103
Google Play Music App ............................................................................................ 103
Google Play Movies & TV App ......................................................................................... 105
Google Play Books App ................................................................................................... 106
Google Play Newsstand App ........................................................................................... 106
Sprint ID ........................................................................................................................... 106
Install Your ID Pack .................................................................................................. 107
Switch ID Packs ........................................................................................................ 107
Sprint Zone ...................................................................................................................... 107
Web and Data ......................................................................................................................... 109
Wi-Fi ................................................................................................................................ 109
Turn Wi-Fi On and Connect to a Wireless Network ................................................... 109
Check the Wireless Network Status .......................................................................... 110
TOC v
Page 7

Connect to a Different Wi-Fi Network ........................................................................ 110
Connections Optimizer ..................................................................................................... 110
Data Services General Information – 4G LTE and 3G Networks ................................ ..... 111
4G LTE ..................................................................................................................... 111
Data Connection Status and Indicators ..................................................................... 112
Launch a Web Connection ........................................................................................ 112
Virtual Private Networks (VPN) ........................................................................................ 113
Prepare Your Phone for VPN Connection ................................................................. 113
Add a VPN Connection ............................................................................................. 113
Connect to or Disconnect from a VPN ...................................................................... 113
Browser ........................................................................................................................... 114
Launch the Web Browser.......................................................................................... 114
Learn to Navigate the Browser ................................................................................. 114
Lumen Toolbar ......................................................................................................... 115
Browser Menu .......................................................................................................... 117
Select Text on a Web Page ...................................................................................... 118
Go to a Specific Website........................................................................................... 118
Adjust Browser Settings ............................................................................................ 119
Reset the Browser to Default .................................................................................... 120
Set the Browser Home Page .................................................................................... 121
Create Bookmarks .................................................................................................... 121
Create a New Homepage ......................................................................................... 122
Add Bookmarks to Your Home Screen ..................................................................... 122
Portable Wi-Fi Hotspot ..................................................................................................... 122
Camera and Video .................................................................................................................. 125
Take Pictures ................................................................................................................... 125
Open or Close the Camera ....................................................................................... 125
Viewfinder Screen..................................................................................................... 126
Take a Picture .......................................................................................................... 126
Camera Review Screen ............................................................................................ 127
Record Videos ................................................................................................................. 128
Camera and Video Camera Settings ................................................................................ 129
View Pictures and Videos Using Gallery .......................................................................... 132
TOC vi
Page 8

Open Gallery ............................................................................................................ 132
View Pictures and Videos ......................................................................................... 133
Zoom In or Out on a Picture ...................................................................................... 133
Watch Video ............................................................................................................. 133
Work with Pictures ................................................................ ........................................... 134
Picture Options Menu ............................................................................................... 134
Share Pictures and Videos............................................................................................... 136
Send Pictures or Videos by Email ............................................................................. 137
Send a Picture or Video by Multimedia Message ...................................................... 137
Send Pictures or Videos Using Bluetooth ................................................................. 138
Share Pictures and Videos on Facebook .................................................................. 138
Share Pictures and Videos on Google+ .................................................................... 138
Share Pictures on Picasa .......................................................................................... 139
Share Videos on YouTube ........................................................................................ 139
Tools and Calendar ................................................................................................................. 140
Calendar .......................................................................................................................... 140
Add an Event to the Calendar ................................................................................... 140
Add a Task ................................ ................................................................ ............... 141
Invite Guests to Your Calendar Event ....................................................................... 141
Calendar Event Alerts ............................................................................................... 142
View Calendar Events .............................................................................................. 143
Erase Calendar Events ............................................................................................. 144
Show or Hide Calendars ........................................................................................... 144
Choose Google Calendars to Synchronize With Your Phone .................................... 144
Clock ............................................................................................................................... 145
Alarms ...................................................................................................................... 147
World Clock .............................................................................................................. 147
Timer ........................................................................................................................ 148
Stopwatch ................................................................................................................. 148
Calculator ........................................................................................................................ 148
Flashlight ......................................................................................................................... 149
Sound Recorder ............................................................................................................... 149
MagniFont ........................................................................................................................ 150
TOC vii
Page 9

Voice Services ................................................................................................................. 151
Automatic Speech Recognition (ASR) ...................................................................... 151
Voice Search ............................................................................................................ 152
Eco Mode ........................................................................................................................ 152
Bluetooth ......................................................................................................................... 153
Turn Bluetooth On or Off........................................................................................... 153
The Bluetooth Settings Menu .................................................................................... 153
Change the Device Name ......................................................................................... 154
Connect a Bluetooth Headset or Car Kit ................................................................... 154
Reconnect a Headset or Car Kit ............................................................................... 155
Disconnect or Unpair from a Bluetooth Device .......................................................... 155
Send and Receive Information Using Bluetooth ........................................................ 156
Near Field Communication (NFC) Technology ................................ ................................. 157
Transfer Files Between Your Phone and a Computer ...................................................... 158
Update Your Phone ......................................................................................................... 158
Update Your Phone Firmware .................................................................................. 158
Update Your Profile .................................................................................................. 160
Update Your PRL ..................................................................................................... 160
Update Kyocera Software ......................................................................................... 160
UICC Unlock ............................................................................................................. 160
Settings ................................................................................................................................... 161
Wi-Fi Settings .................................................................................................................. 161
Bluetooth Settings ............................................................................................................ 162
MaxiMZR Settings ........................................................................................................... 162
Data Usage Settings ........................................................................................................ 162
More Settings................................................................................................................... 163
Airplane Mode .......................................................................................................... 163
Default SMS App ................................................................................................ ...... 164
NFC Settings ............................................................................................................ 164
Android Beam ........................................................................................................... 164
Tethering & Portable Hotspot Settings ...................................................................... 165
VPN Settings ............................................................................................................ 165
Mobile Networks Settings ......................................................................................... 165
TOC viii
Page 10

Roaming ................................................................................................................... 166
Emergency Alerts ..................................................................................................... 168
Sound Settings ................................................................................................................ 170
Volumes ................................................................................................................... 170
DC Calls Sound ........................................................................................................ 170
Call Alerts Sound ...................................................................................................... 170
Phone Ringtone ........................................................................................................ 171
Vibrate Pattern .......................................................................................................... 171
Vibrate When Ringing ............................................................................................... 171
Persistent Alerts ....................................................................................................... 171
Default Notification Sound ........................................................................................ 171
Dial Pad Touch Tones .............................................................................................. 172
Touch Sounds .......................................................................................................... 172
Screen Lock Sound .................................................................................................. 172
Vibrate on Touch ...................................................................................................... 172
Vibrate on Keypress ................................................................................................. 172
Hearing Aid ............................................................................................................... 172
Display Settings ............................................................................................................... 173
Brightness ................................................................................................................ 173
Wallpaper ................................................................................................................. 173
Auto-Rotate Screen .................................................................................................. 173
Sleep ........................................................................................................................ 174
Daydream ................................................................................................................. 174
Font Size .................................................................................................................. 174
Key Backlight ............................................................................................................ 175
Display Battery Percentage ...................................................................................... 175
Screen Proximity Safety............................................................................................ 175
DC Button ........................................................................................................................ 175
Direct Connect Settings ................................................................................................... 176
Storage Settings .............................................................................................................. 176
Phone Memory ......................................................................................................... 176
Battery Settings ............................................................................................................... 176
PC Connection Settings ................................................................................................ ... 176
TOC ix
Page 11

Apps Settings................................................................................................................... 177
Tap & Pay ........................................................................................................................ 177
Location Settings ............................................................................................................. 177
Lock Screen Settings ....................................................................................................... 178
Screen Lock.............................................................................................................. 178
Disable the Screen Lock ........................................................................................... 180
Improve Face Matching ............................................................................................ 180
Liveness Check ........................................................................................................ 180
Automatically Lock .................................................................................................... 181
Power Button Instantly Locks .................................................................................... 181
Enable Widgets ........................................................................................................ 181
Start Screen Widgets ................................................................................................ 181
Owner Information .................................................................................................... 182
Security Settings ................................ ................................................................ .............. 182
Encrypt & Decrypt Data ............................................................................................ 182
Make Passwords Visible ........................................................................................... 182
Device Administrators ............................................................................................... 183
Unknown Sources..................................................................................................... 183
Verify Apps ............................................................................................................... 183
Credential Storage .................................................................................................... 183
Language & Input Settings ............................................................................................... 184
Language ................................................................................................................. 184
Spell Checker ........................................................................................................... 184
Personal Dictionary ................................................................................................... 185
Default Text Input ..................................................................................................... 185
Google Keyboard Settings ........................................................................................ 185
Swype Keyboard Settings ......................................................................................... 186
Google Voice Typing Settings ................................................................................... 187
Voice Search ............................................................................................................ 188
Text-to-Speech Output ............................................................................................. 188
Pointer Speed ........................................................................................................... 189
Back Up and Reset Phone ............................................................................................... 189
Accounts ................................................................ .......................................................... 190
TOC x
Page 12

Date & Time Settings ....................................................................................................... 191
Accessibility Settings ....................................................................................................... 191
Services .................................................................................................................... 191
Vision........................................................................................................................ 191
Hearing ..................................................................................................................... 192
Mobility ..................................................................................................................... 193
Others ....................................................................................................................... 193
Printing ............................................................................................................................ 194
Activate This Device ................................ ................................................................ ........ 194
About Phone .................................................................................................................... 194
System Update ................................................................................................................ 195
Copyright Information .............................................................................................................. 196
Index ....................................................................................................................................... 197
TOC xi
Page 13
Get Started
The following topics give you all the information you need to set up your phone and service the
first time.
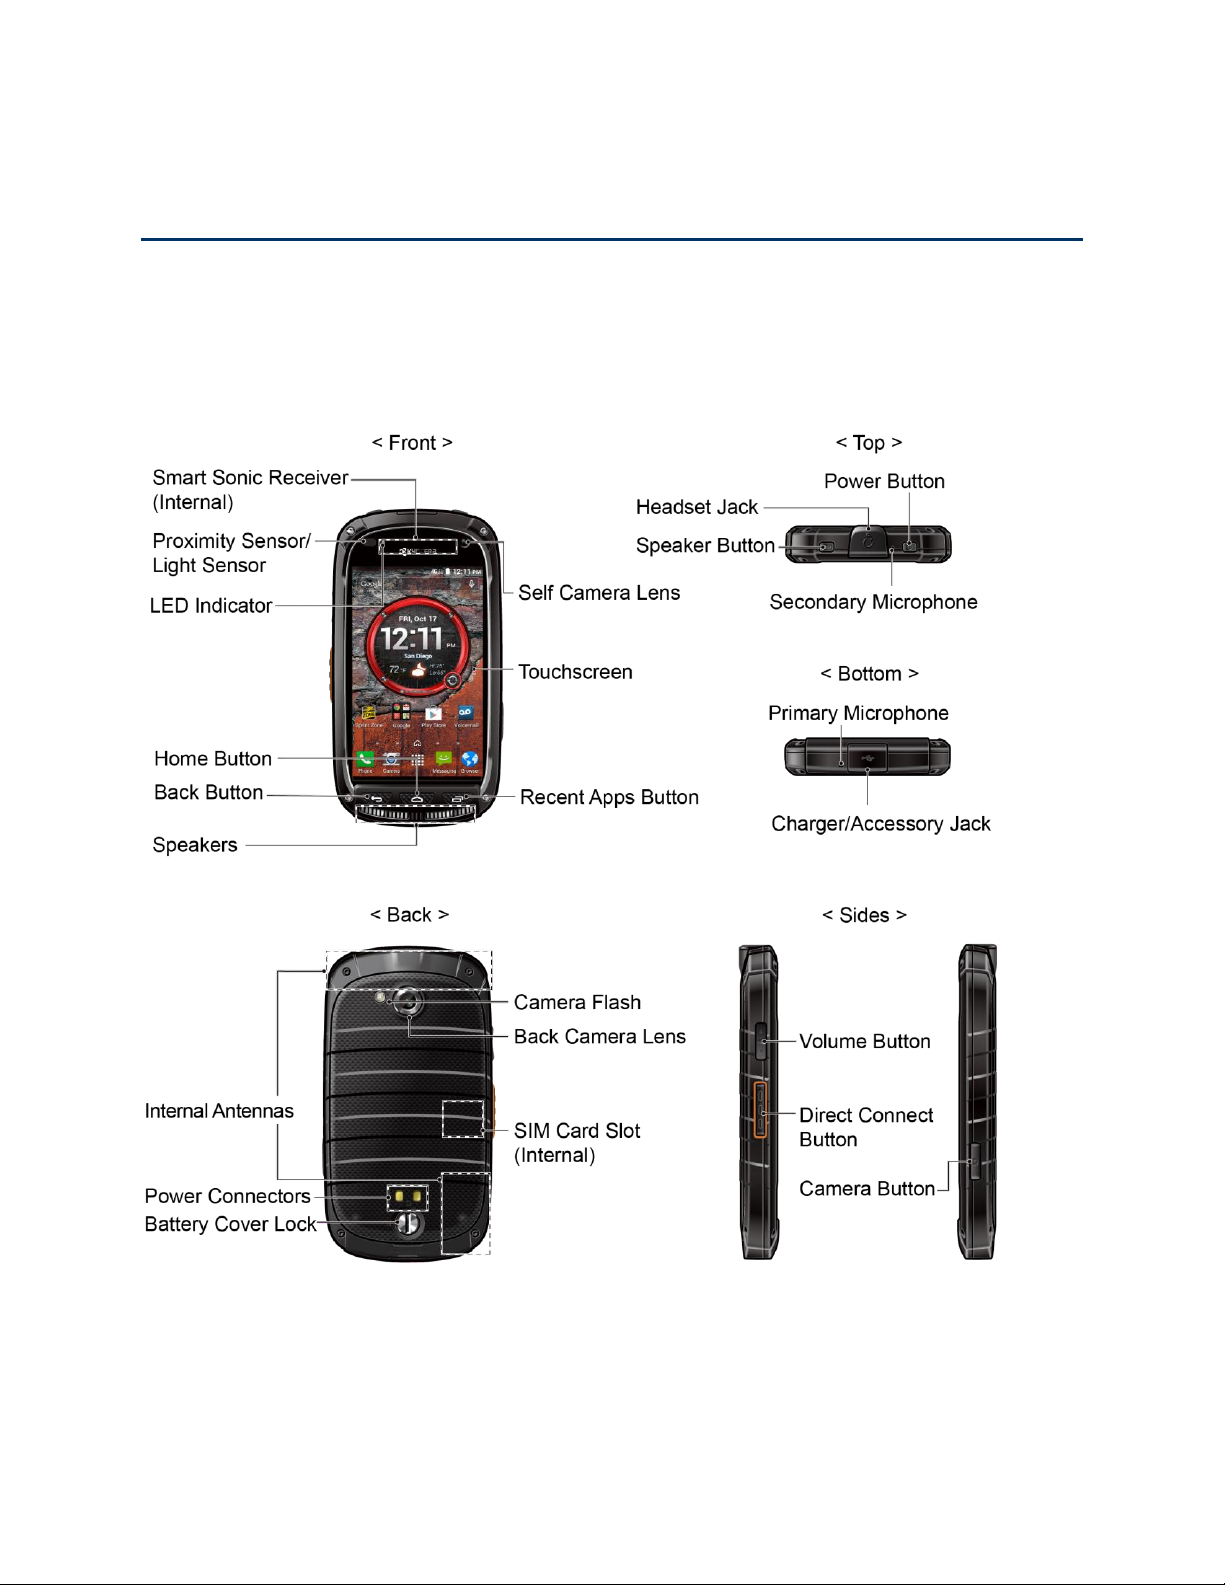
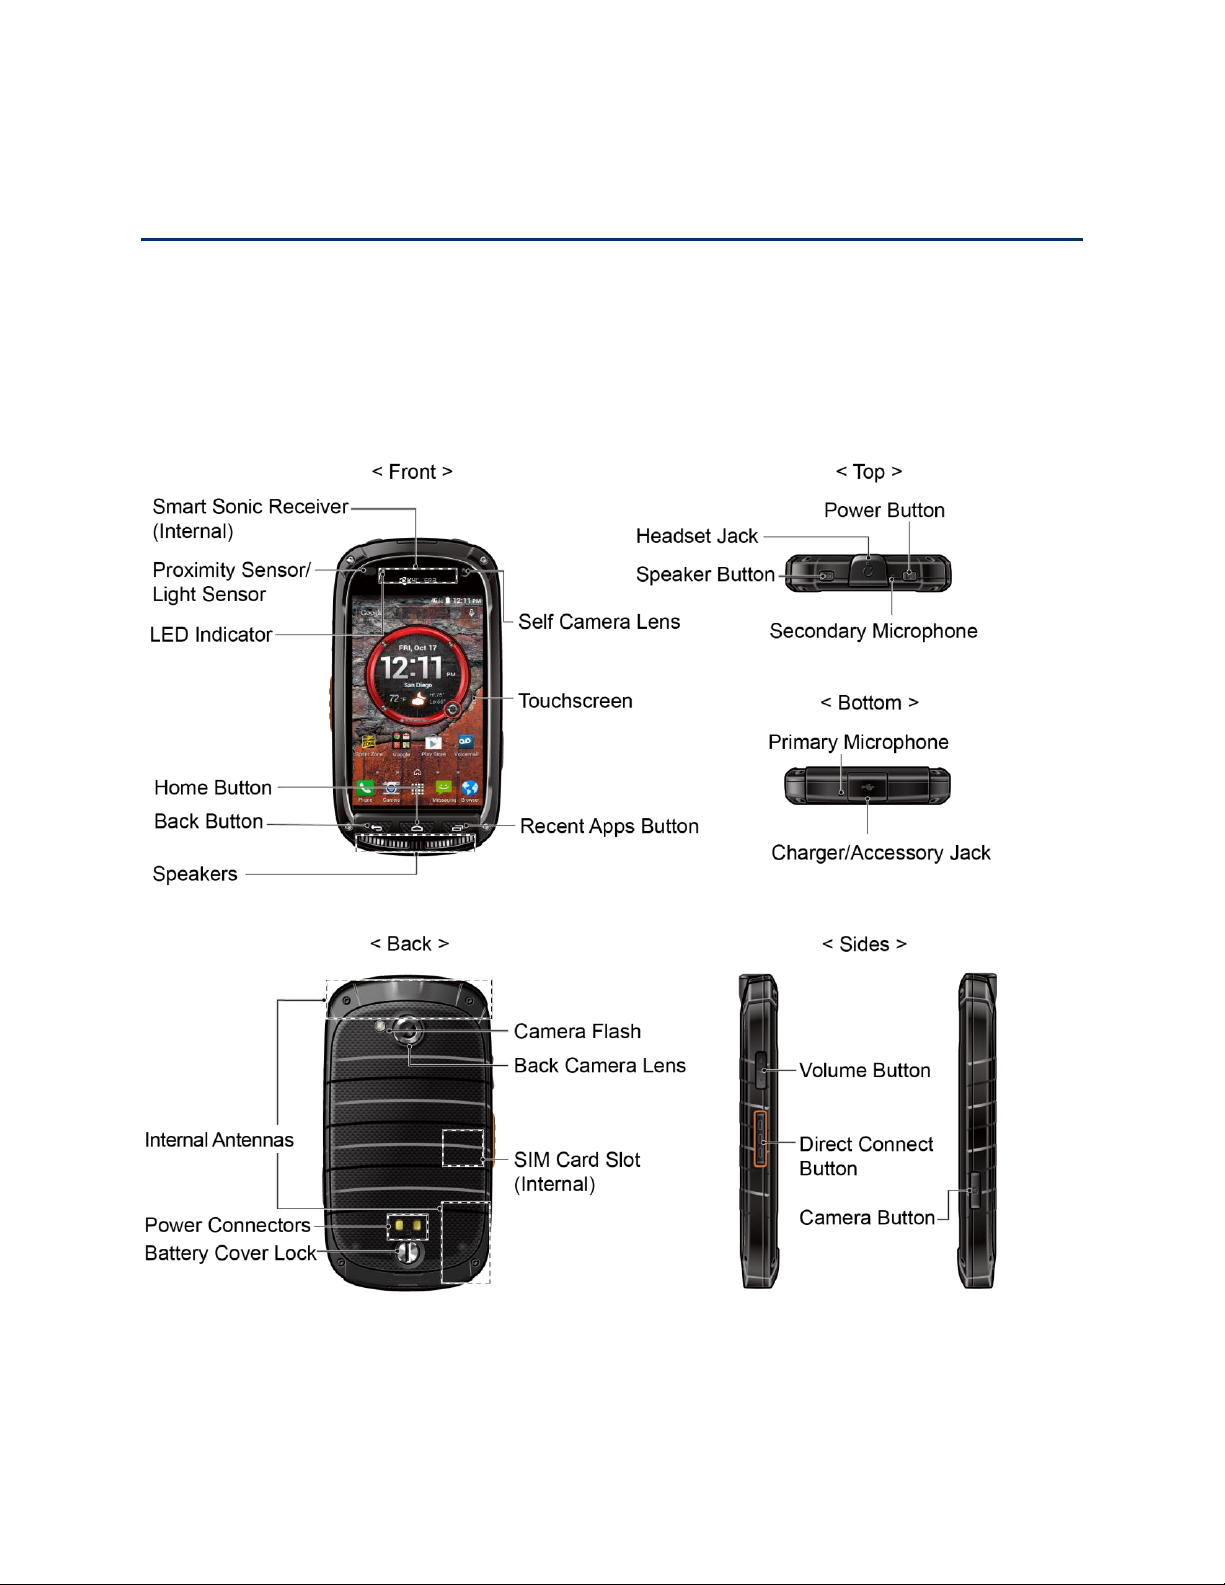
Your Phone at a Glance
The following illustration outlines your phone’s primary external features and buttons.
Set Up Your Phone
You must first install and charge the battery to begin setting up your phone.
Get Started 1
Page 14

Insert and Charge the Battery
Follow the steps below to insert the battery and charge it.
1. Install the battery.
Turn the battery cover lock counter-clockwise to the unlocked position.
Insert your thumbnail or fingernail into the slot and lift the battery cover gently.
Insert the battery, contacts end first, and gently press the battery into place.
Replace the battery cover, making sure all the tabs are secure and there are no
gaps around the cover.
Get Started 2
Page 15
Turn the battery cover lock clockwise to the locked position.
Note: When you insert the battery, your phone may power on automatically.
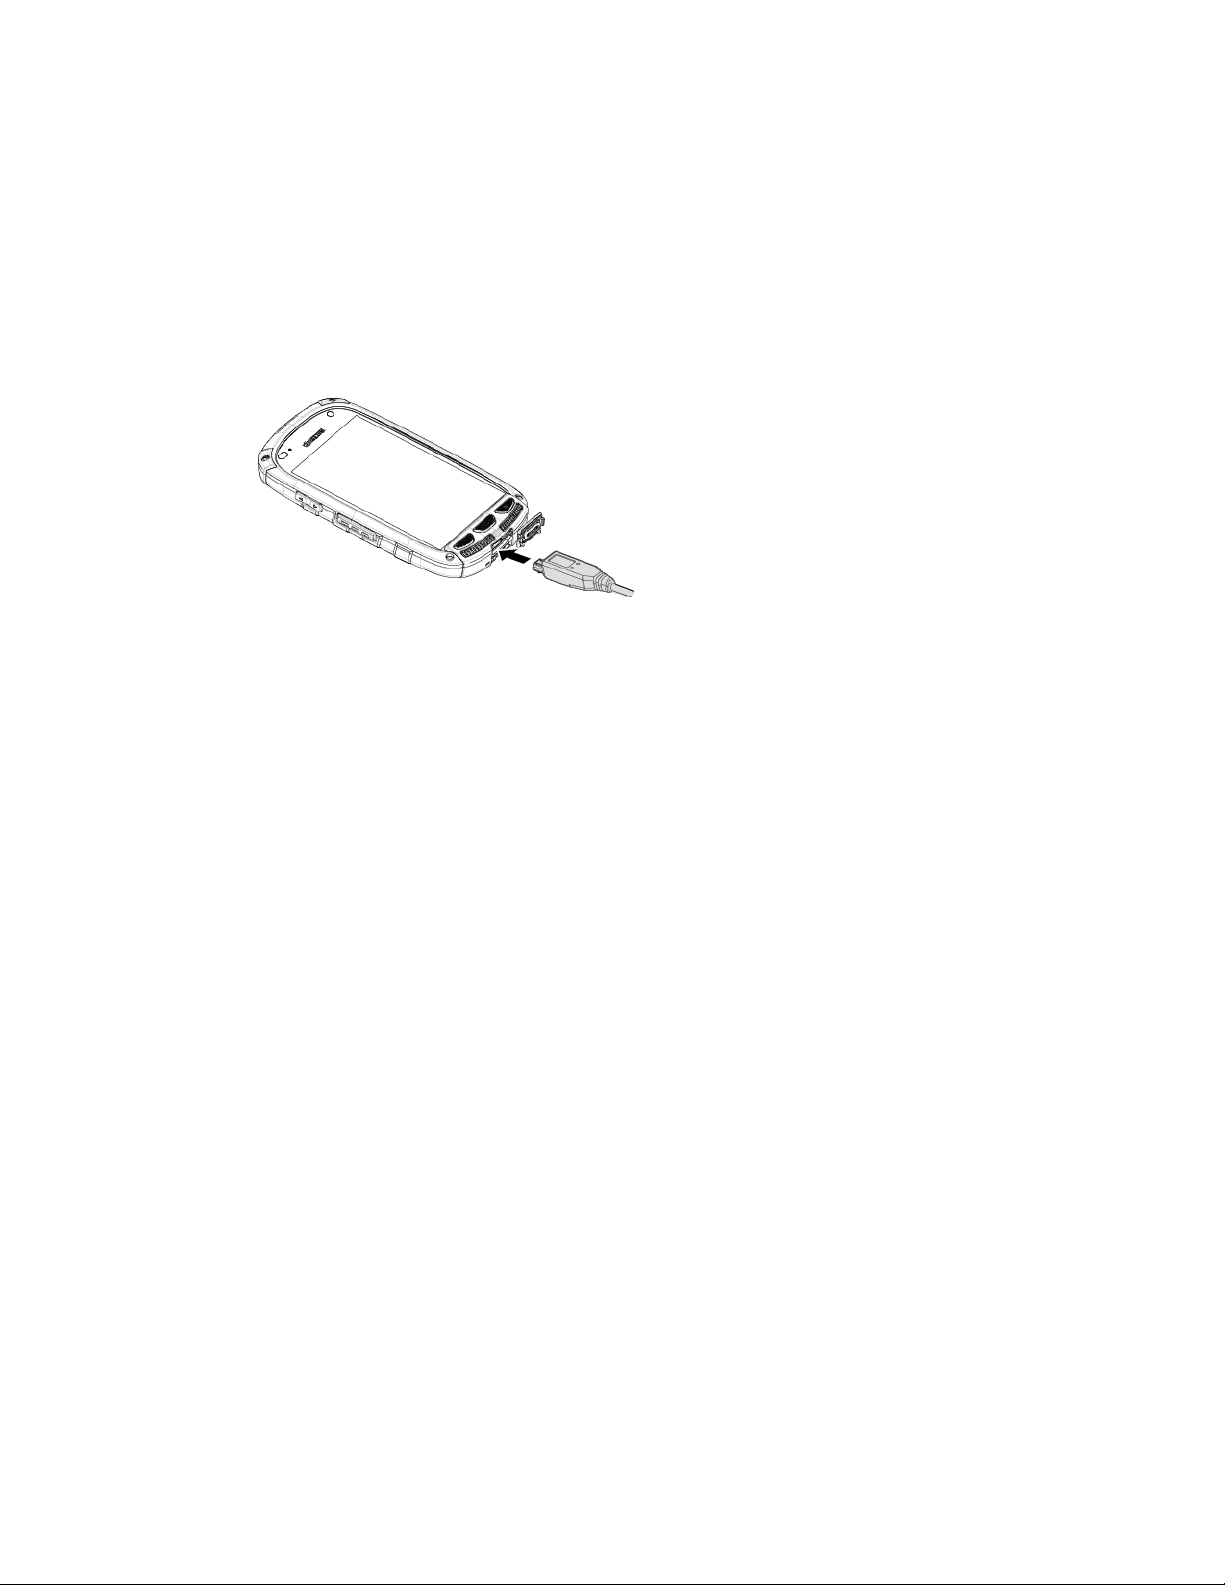
2. Charge your battery.
Open the cover of the charger/accessory jack.
Plug the smaller end of the USB cable into the phone’s charger/accessory jack.
Plug the other end of the USB cable into the charger, and then plug the charger into
an electrical outlet.
Note: Your phone’s battery should have enough charge for the phone to turn on and find a
signal, run the setup application, set up voicemail, and make a call. You should fully charge the
battery as soon as possible.
3. Press and hold the Power Button to turn the phone on.
If your phone is activated, it will turn on, search for service, and begin the setup
process.
If your phone is not yet activated, see Activate Your Phone for more information.
Your SIM Card
Your phone comes with a preinstalled SIM (Subscriber Identity Module) card. If you need to
reinstall your SIM card, follow the instructions below.
Note: The SIM included contains information specific to your phone and should be retained with
the phone.
1. Remove the battery cover. See Insert and Charge the Battery.
2. Lift the battery and remove it.
Get Started 3
Page 16
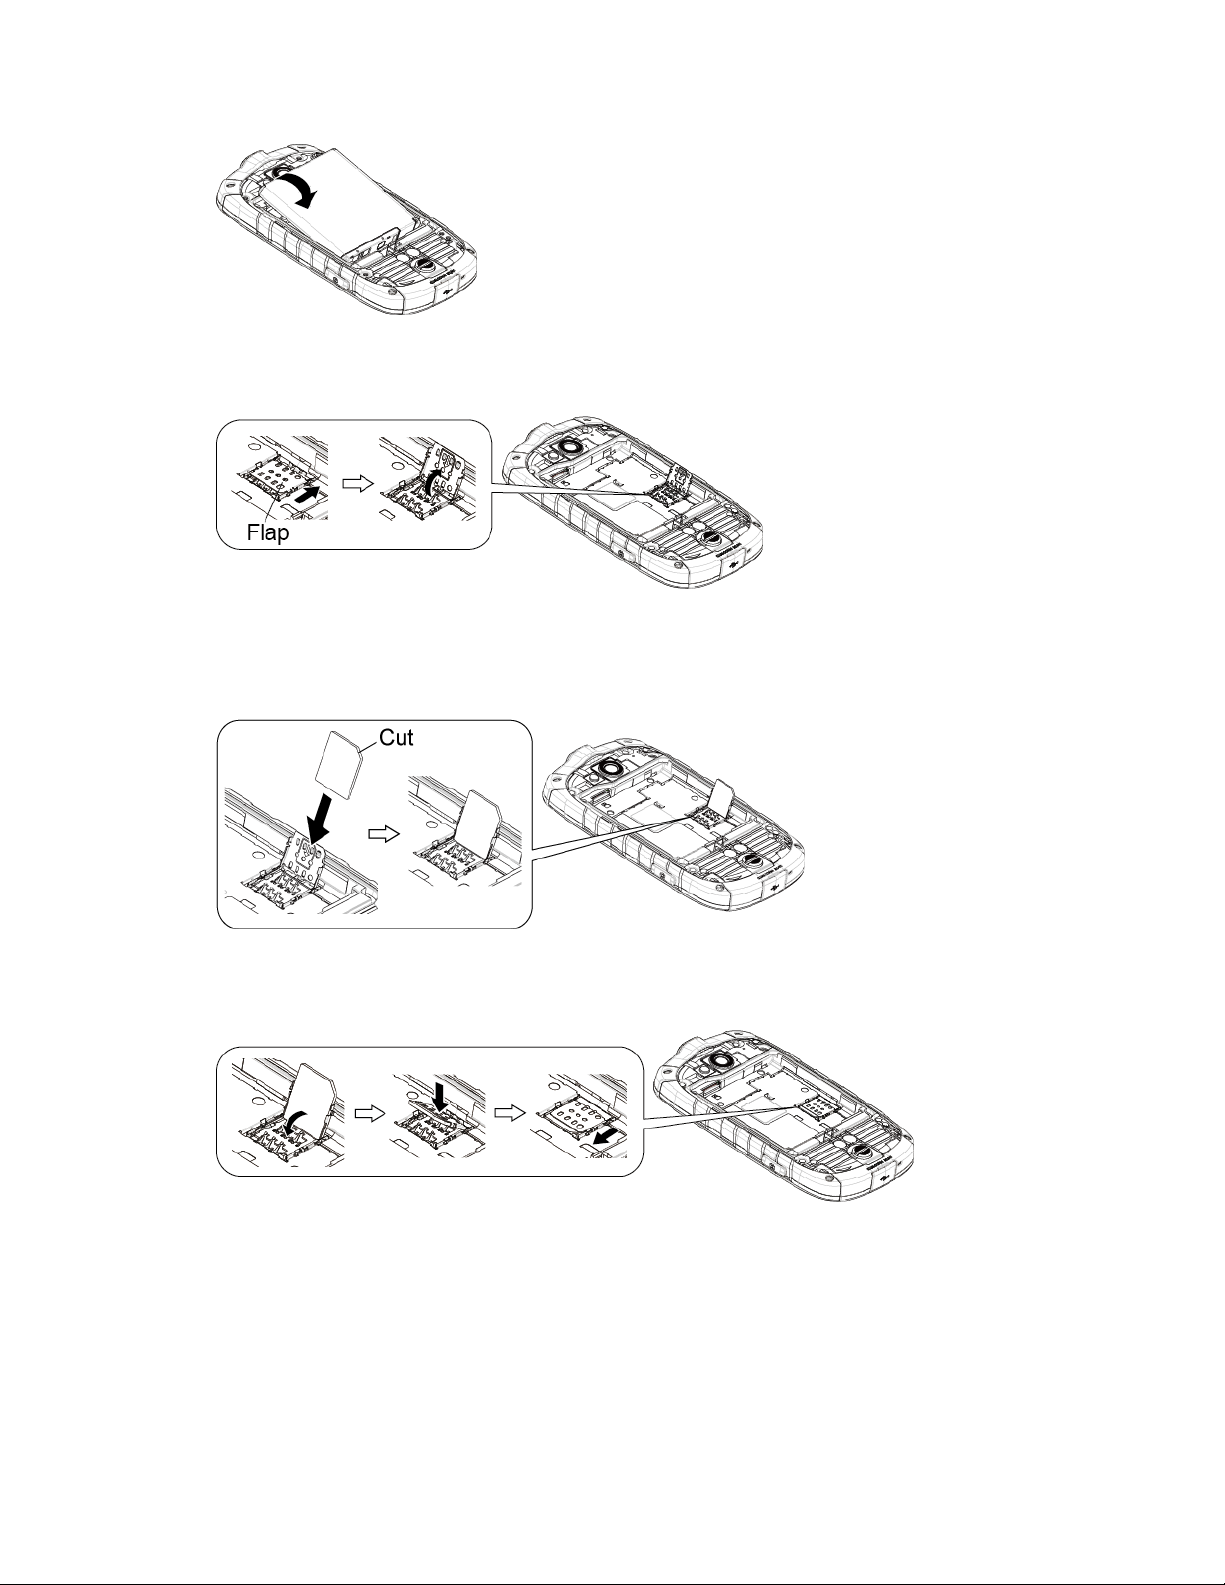
3. Slide the flap of the SIM card holder in the direction of the arrow to unlock it and lift the
flap.
4. Hold the SIM card so that the metal contacts on the SIM card face down and the cut off
corner points to the bottom-left corner of your phone. Insert the SIM card into the flap of
the SIM card holder.
5. Replace the flap of the SIM card holder and slide the flap in the direction of the arrow to
lock it.
6. Replace the battery and the battery cover. See Insert and Charge the Battery.
Activate Your Phone
Follow the instructions below to activate your phone if it has not already been activated.
Depending on your account or how and where you purchased your phone, it may be ready to
use or you may need to activate it on your Sprint account.
Get Started 4
Page 17

● If you purchased your phone at a Sprint Store, it is probably activated and ready to use.
● If you received your phone in the mail and it is for a new Sprint account or a new line of
service, it is designed to activate automatically.
When you turn the phone on for the first time, you should see a Hands Free
Activation screen, which may be followed by a PRL Update screen and a
Firmware Update screen. Follow the onscreen instructions to continue.
● If you received your phone in the mail and you are activating a new phone for an existing
number on your account (you’re swapping phones), you can activate on your computer
online or directly on your phone.
Activate on your computer:
• Go to sprint.com/activate and complete the online instructions to activate your
phone.
Activate on your phone:
• Turn on your new phone. (Make sure the old one is turned off.) Your phone will
automatically attempt Hands-Free Activation.
• If an error occurs, touch Activate to override auto-activation and start the manual
activation wizard.
• Follow the onscreen prompts to complete the activation process.
To confirm activation, make a phone call. If your phone is still not activated visit
sprint.com/support for assistance. If you do not have access to the Internet, call Sprint
Customer Service at 1-888-211-4727 from another phone.
Tip: Do not press the Power Button while the phone is being activated. Pressing the Power
Button cancels the activation process.
Note: If you are having any difficulty with activation, visit sprint.com/support.
Set Up Voicemail
You should set up your voicemail and personal greeting as soon as your phone is activated.
Always use a password to protect against unauthorized access. Your phone automatically
transfers all unanswered calls to your voicemail, even if your phone is in use or turned off.
1. Press Home > > Dialpad tab.
2. Touch and hold to dial your voicemail number.
3. Follow the system prompts to:
Get Started 5
Page 18

Create your password.
Record your name announcement.
Record your greeting.
Important: Voicemail Password – It is strongly recommended that you create a password
when setting up your voicemail to protect against unauthorized access. Without a password,
anyone who has access to your phone is able to access your voicemail messages.
For more information about voicemail, see Voicemail or Visual Voicemail.
Sprint Account Information and Help
Find out about account passwords and information about managing your account and finding
help.
Sprint Account Passwords
You will need to create passwords to protect access to your personal account information, your
voicemail account, and your data services account. As a Sprint customer, you enjoy unlimited
access to all your information.
Account User Name and Password
If you are the account owner, you will create an account user name and password when you
sign on to sprint.com/mysprint. (Click Sign in/Register and then click Sign up now! to get
started.) If you are not the account owner (if someone else receives the bill for your Sprint
service), you can get a sub-account password at sprint.com/mysprint.
Voicemail Password
You’ll create your voicemail password when you set up your voicemail. See Set Up Voicemail
for more information on your voicemail password.
Data Services Password
With your Sprint phone, you may elect to set up an optional data services password to control
access and authorize purchases.
For more information, or to change your passwords, sign on to sprint.com/mysprint.
Manage Your Account
Manage your Sprint account from your computer, your Sprint phone, or any other phone.
Online: sprint.com/mysprint
● Access your account information.
Get Started 6
Page 19
● Check your minutes used (depending on your Sprint service plan).
● View and pay your bill.
● Enroll in Sprint online billing and automatic payment.
● Purchase accessories.
● Shop for the latest Sprint phones.
● View available Sprint service plans and options.
● Learn more about data services and other products like games, ringtones, screen savers,
and more.
From Your Sprint Phone
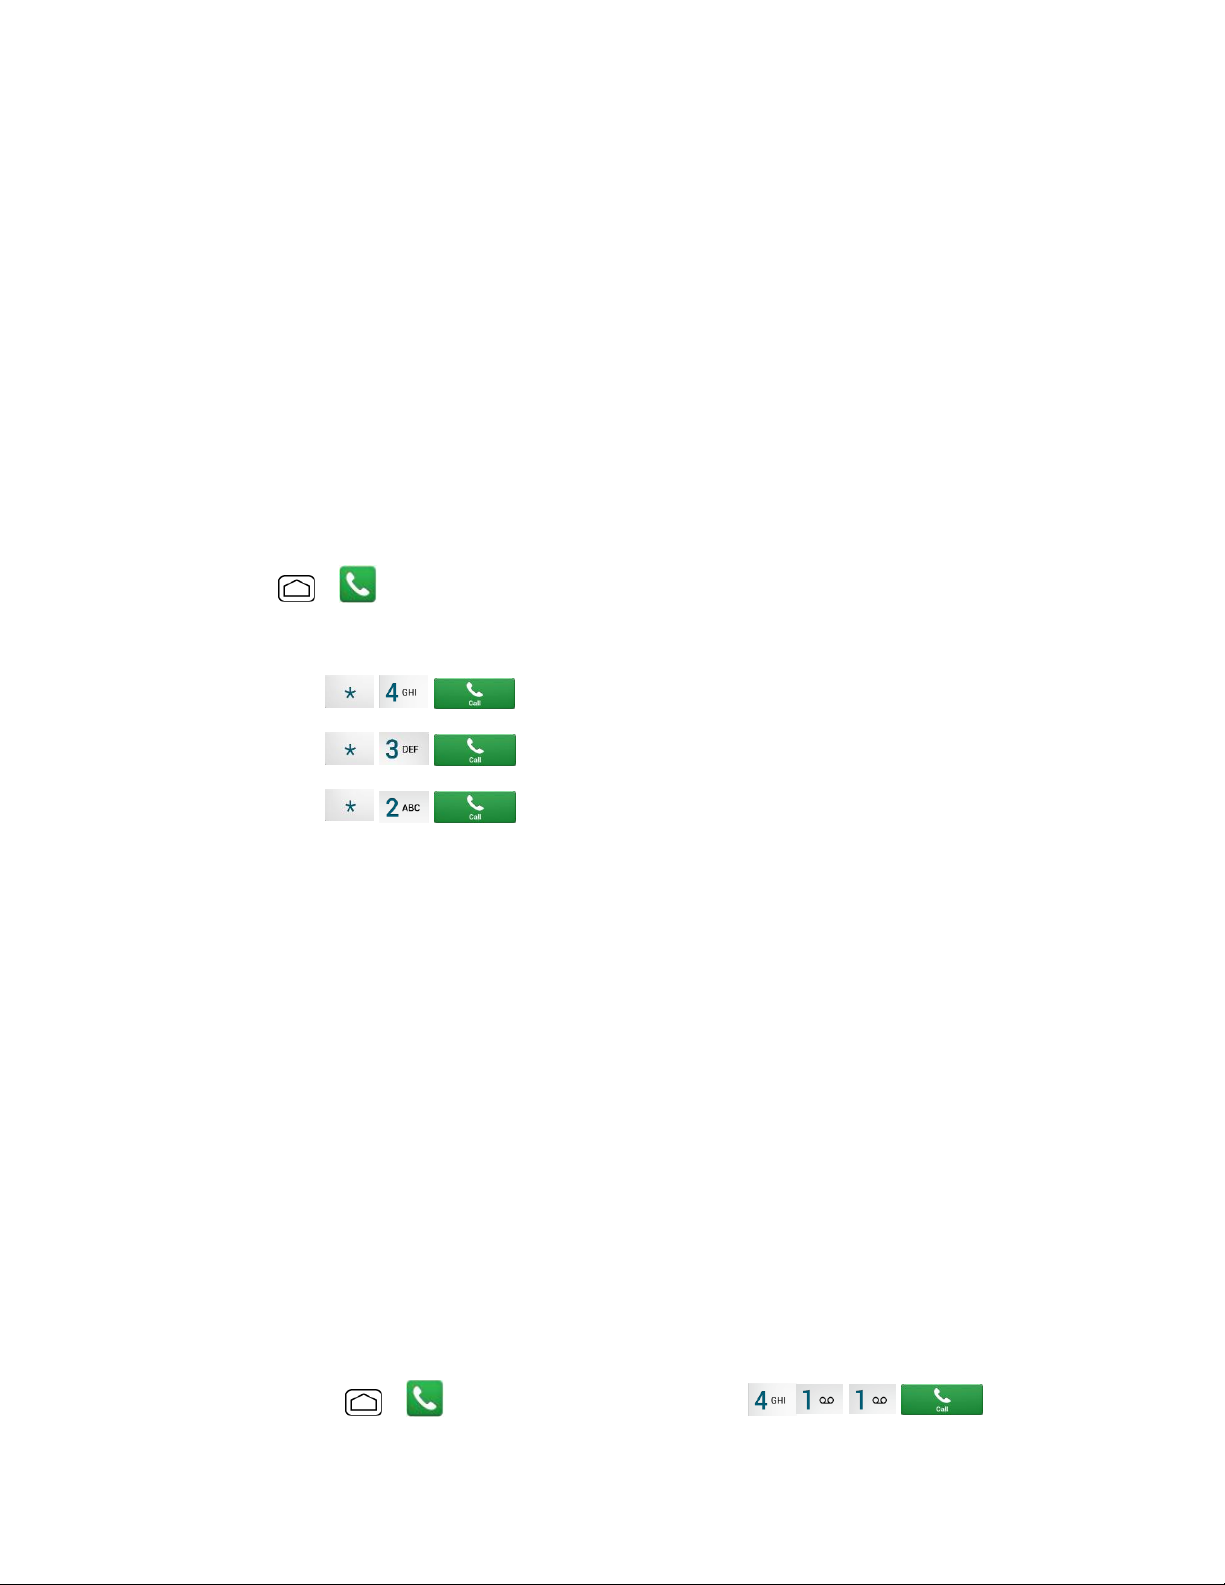
1. Press > > Dialpad tab.
2. Do any of the following:
Touch to check minute usage and account balance.
Touch to make a payment.
Touch to access a summary of your Sprint service plan or get
answers to other questions.
From Any Other Phone
● Sprint Customer Service: 1-888-211-4727.
● Business Customer Service: 1-888-788-4727.
Sprint Support Services
Sprint 411 and Sprint Operator Services let you easily access information and calling assistance
from your Sprint phone.
Sprint 411
Sprint 411 gives you access to a variety of services and information, including residential,
business, and government listings; movie listings or showtimes; driving directions, restaurant
reservations, and major local event information. You can get up to three pieces of information
per call, and the operator can automatically connect your call at no additional charge.
There is a per-call charge to use Sprint 411, and you will be billed for airtime.
■ Press Home > > Dialpad tab, and then touch .
Get Started 7
Page 20

Sprint Operator Services
Sprint Operator Services provides assistance when you place collect calls or when you place
calls billed to a local telephone calling card or third party.
■ Press Home
For more information or to see the latest in products and services, visit us online at
sprint.com/mysprint.
> > Dialpad tab, and then touch .
Get Started 8
Page 21
Phone Basics
Your phone is packed with features that simplify your life and expand your ability to stay
connected to the people and information that are important to you. The following topics will
introduce the basic functions and features of your phone.
Your Phone’s Layout
The illustrations and descriptions below outline your phone’s basic layout.
Phone Basics 9
Page 22

Key Functions
● Smart Sonic Receiver (Internal) lets you hear the caller and automated prompts. See
Smart Sonic Receiver.
● Proximity Sensor and Light Sensor detects how close an object is to the surface of
the screen. This is typically used to detect when your face is pressed against the screen,
such as during a phone call. It also automatically turns off the keyboard backlight and
brightens the display when you are in sunlight or a bright room, and turns on the
keyboard backlight and dims the display in darker places.
While talking on the phone, the sensor detects talk activity and locks the keypad to
prevent accidental key presses.
● LED Indicator displays a phone notification, charging status, or alert.
● Home Button returns you to the Home screen.
● Back Button lets you return to the previous screen, or close a dialog box, options
menu, the Notifications panel, or onscreen keyboard.
● Recent Apps Button allows you to open a list of thumbnail images of apps you
have worked with recently.
● Self Camera Lens takes pictures and records videos while facing the screen, and
allows you to video conference.
● Touchscreen displays all the information needed to operate your phone. Also provides
one-touch access to all of your features and applications.
● Speakers let you hear the different ringtones and sounds. The speakers also let you
hear the caller's voice in speakerphone mode.
● Power Button lets you turn the phone on or off or turn the screen on or off, or switch
your phone to silent mode, vibration mode, or airplane mode.
● Headset Jack allows you to plug in either a stereo headset or an optional headset for
convenient, hands-free conversations.
● Speaker Button lets you place or receive calls in speakerphone mode or turn the
speakerphone on and off during a call.
● Secondary Microphone suppresses background noise improving audio quality for the
other party during voice calls except in speakerphone mode.
● Primary Microphone transmits your voice and ambient sound during voice calls, voice
recordings and videos.
Phone Basics 10
Page 23

● Charger/Accessory Jack allows you to connect the micro-USB cable (included) to
charge the battery or to transfer files to and from a computer.
CAUTION! Inserting an accessory into the incorrect jack may damage the phone.
● Headset Jack allows you to plug in either a stereo headset or an optional headset for
convenient, hands-free conversations.
● Primary Microphone transmits your voice and ambient sound during voice calls, voice
recordings and videos.
● Volume Button allows you to adjust the ringtone or media volume when you are not on
a call, or adjust the voice volume during a call.
● Direct Connect Button (DC Button) allows you to make Direct Connect calls, send Call
Alerts, and view Direct Connect Call logs.
● Camera Button lets you activate the camera and video camera, and take pictures and
videos.
● Internal Antennas facilitate reception and transmission. To maximize performance, do
not obstruct while using the phone.
● Battery Cover Lock turns to lock and unlock the battery cover.
● Power Connectors allow your phone to be connected to an optional multi-bay charger.
● Back Camera Lens lets you take pictures and videos.
● SIM Card Slot (Internal) allows you to insert a SIM card.
Note: Your phone comes with the SIM card preinstalled.
● Back Camera Lens lets you take pictures and videos.
● Camera Flash helps illuminate subjects in low-light environments when taking a picture
or recording a video. It can also work as a flashlight.
Smart Sonic Receiver
Smart Sonic receiver transmits sound through vibrations on your phone’s display screen. Place
your ear around the internal receiver and adjust the position of the phone to find the best
hearing point depending on the surrounding environment.
Phone Basics 11
Page 24
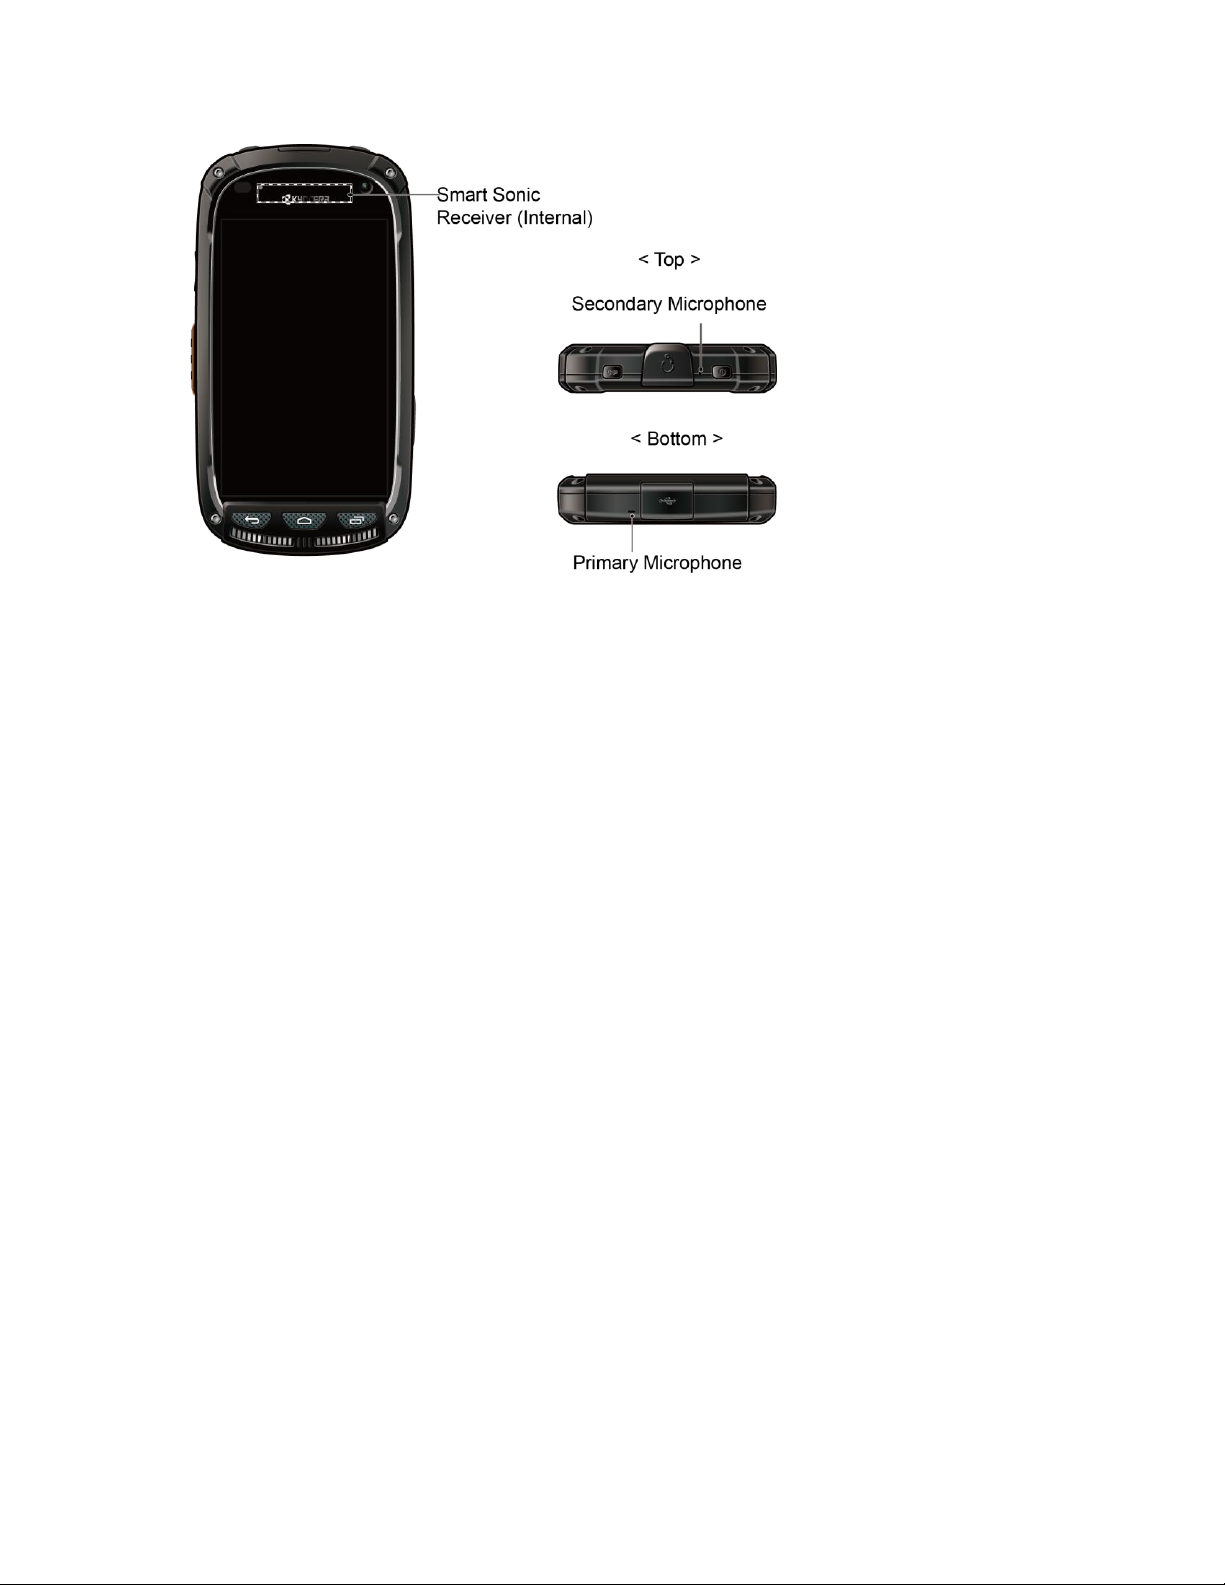
Note: Do not cover the microphones during a call. Do not apply any sheet or sticker to the
display area as it may compromise the hearing quality.
Turn Your Phone On and Off
The instructions below explain how to turn your phone on and off.
Turn Your Phone On
■ Press and hold the Power Button for three seconds.
Turn Your Phone Off
1. Press and hold the Power Button to open the phone options menu.
2. Touch Power off > OK to turn the phone off.
Turn Your Screen On and Off
Your phone allows you to quickly turn the screen off when not in use and to turn it back on when
you need it.
Turn the Screen Off When Not in Use
■ To quickly turn the screen off, press the Power Button. Pressing the Power Button
again or receiving an incoming call will turn on your phone screen and show the lock
screen.
To save battery power, the phone automatically turns off the screen after a certain period of
time when you leave it idle. You will still be able to receive messages and calls while the
phone’s screen is off.
Phone Basics 12
Page 25
Note: For information on how to adjust the time before the screen turns off, see Sleep.
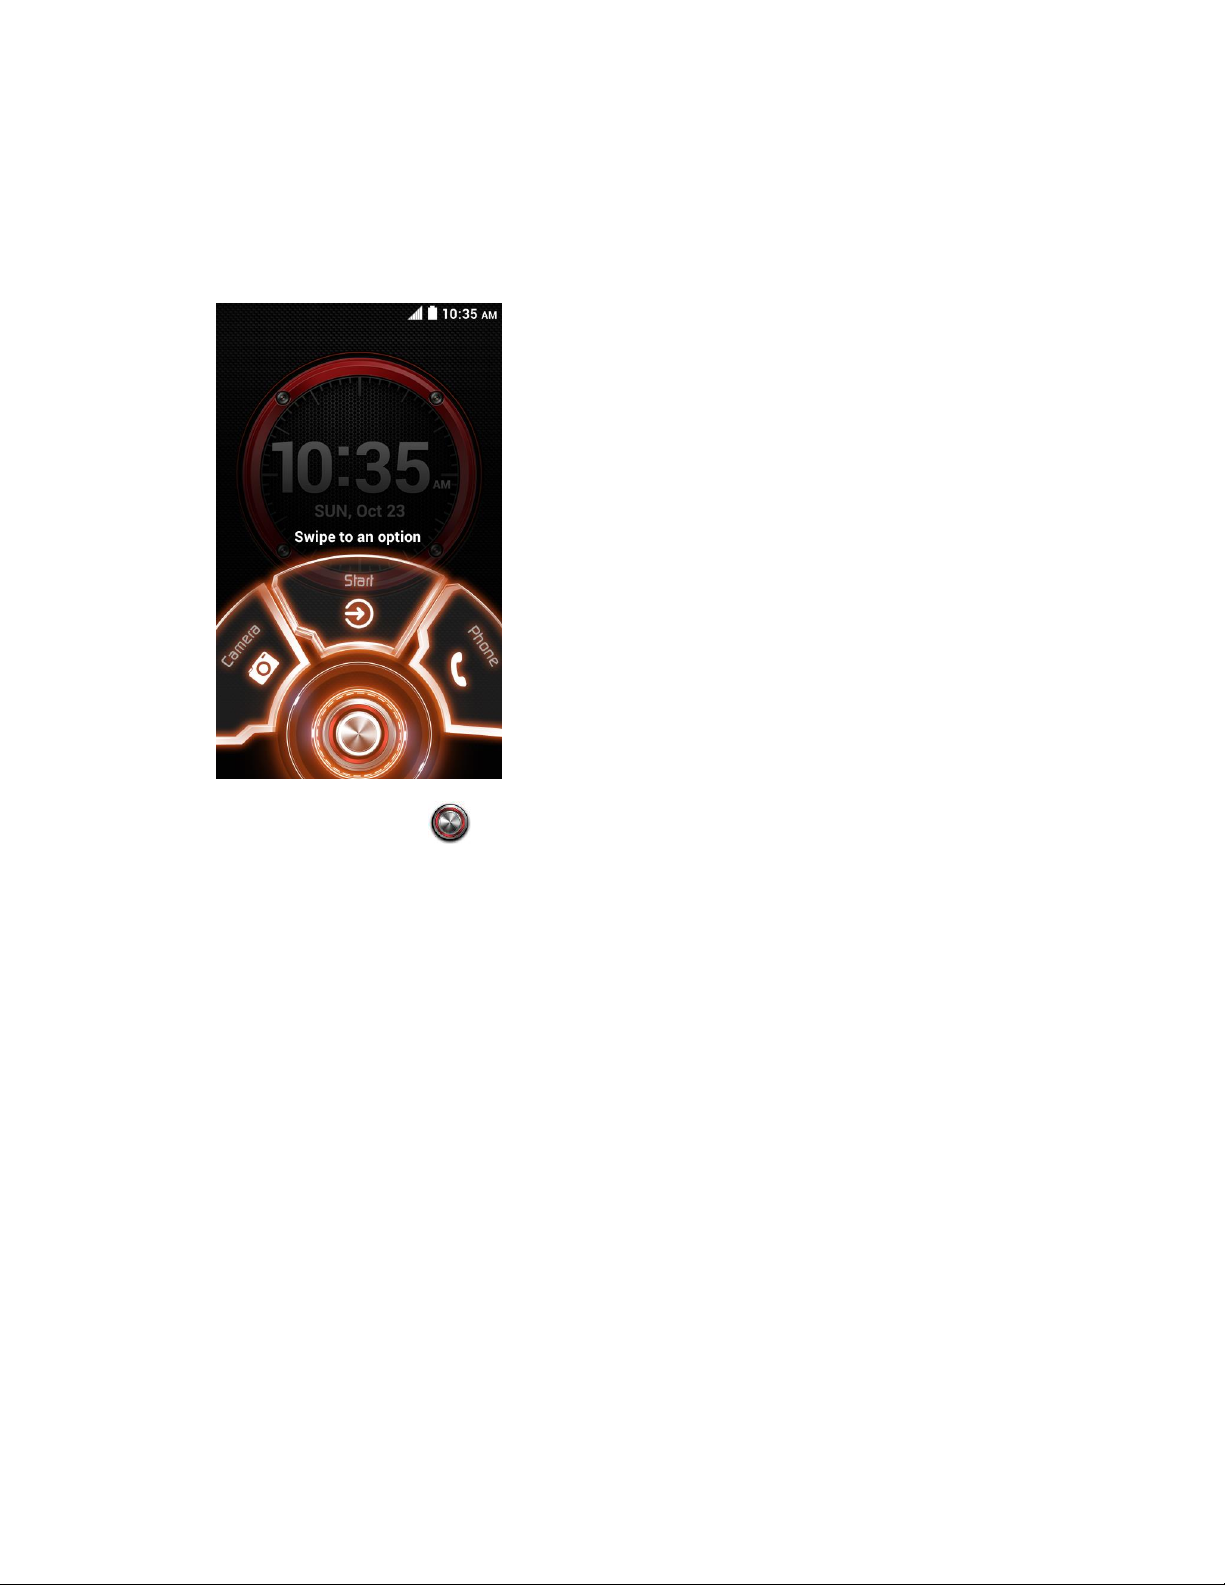
Turn the Screen On
1. To turn the screen on, press the Power Button. The below screen appears by default.
2. On the screen, swipe toward:
Start to access the Home screen or the screen displayed before it was turned off.
Camera to launch the Camera app.
Phone to launch the Phone app.
Note: To set up a screen lock for security, see Lock Screen Settings.
Touchscreen Navigation
Your phone’s touchscreen lets you control actions through a variety of touch gestures.
Warning: Do not touch with a pen or stylus. It may damage the touch screen.
Touch
When you want to type using the onscreen keyboard, select items onscreen such as application
and settings icons, or press onscreen buttons, simply touch them with your finger.
Phone Basics 13
Page 26

Touch and Hold
To open the available options for an item (for example, a contact or link in a Web page), touch
and hold the item.
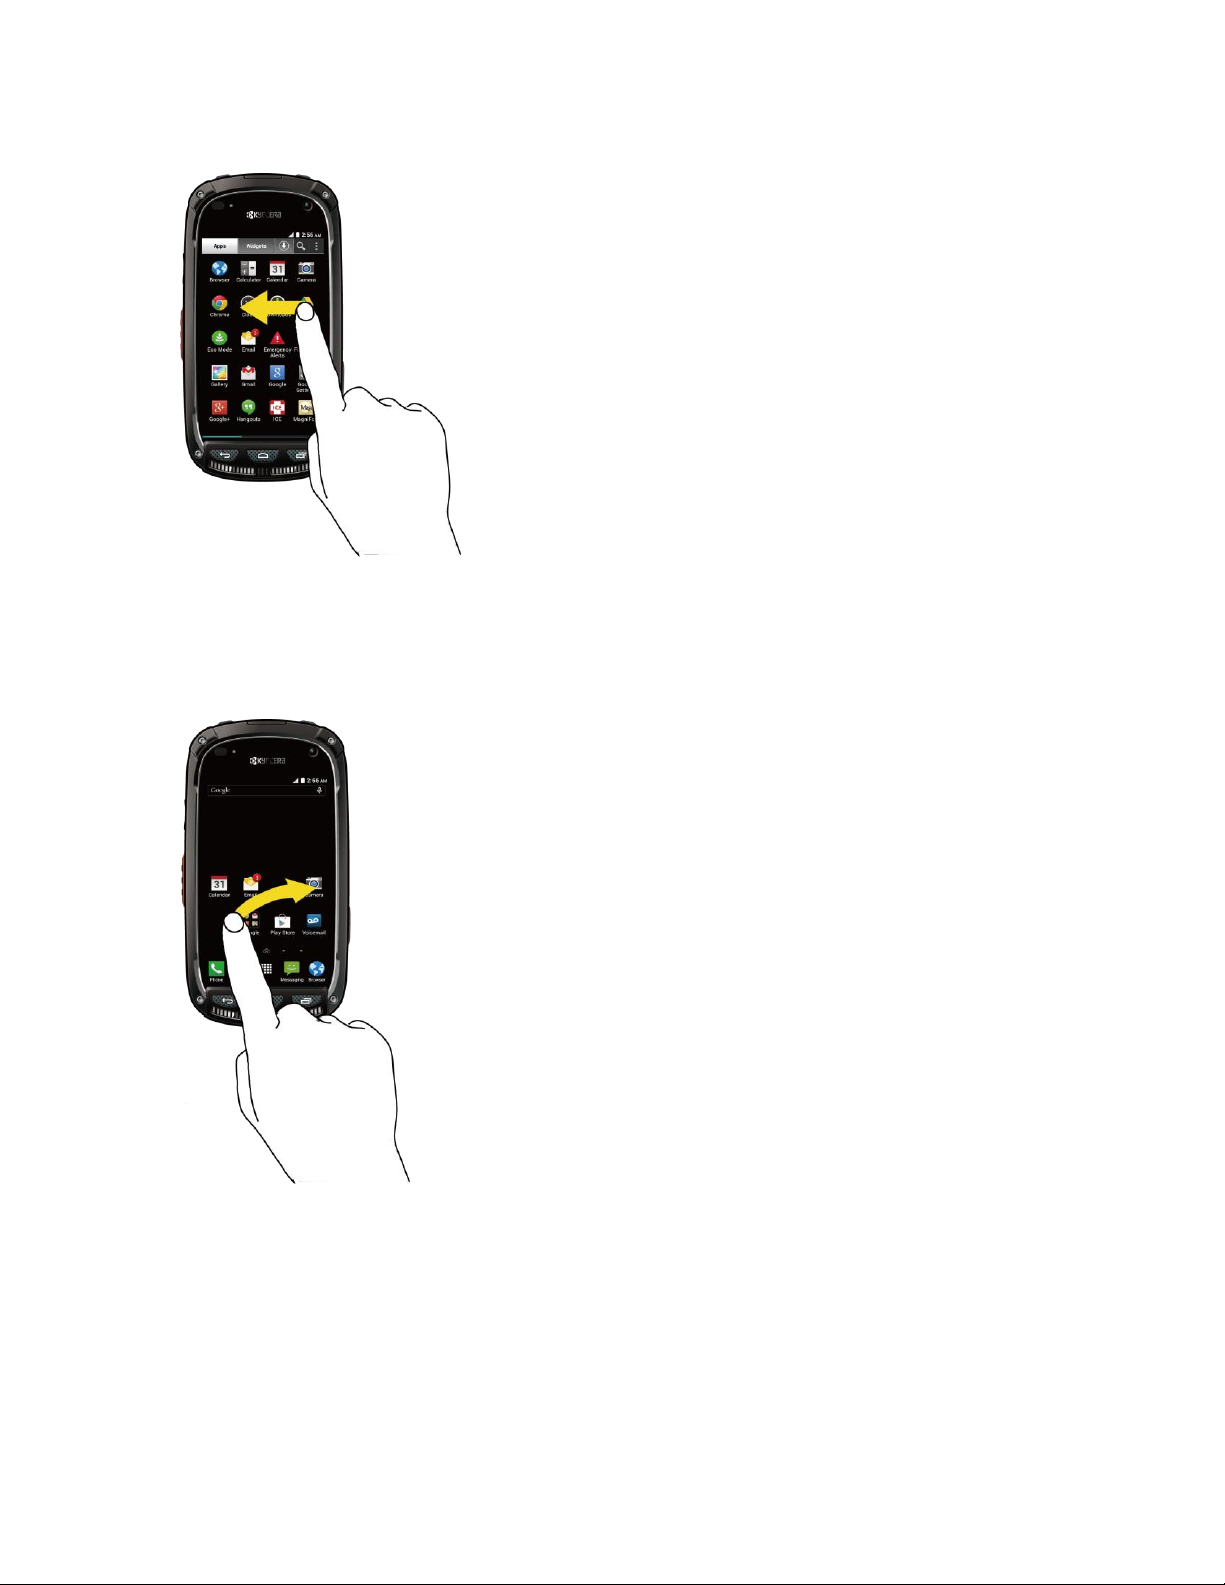
Swipe or Slide
To swipe or slide means to quickly drag your finger vertically or horizontally across the screen.
Phone Basics 14
Page 27
Drag
To drag, press and hold your finger with some pressure before you start to move your finger.
While dragging, do not release your finger until you have reached the target position.
Flick
Flicking the screen is similar to swiping, except that you need to swipe your finger in light, quick
strokes. This finger gesture is always in a vertical direction, such as when flicking the contacts
or message list.
Phone Basics 15
Page 28
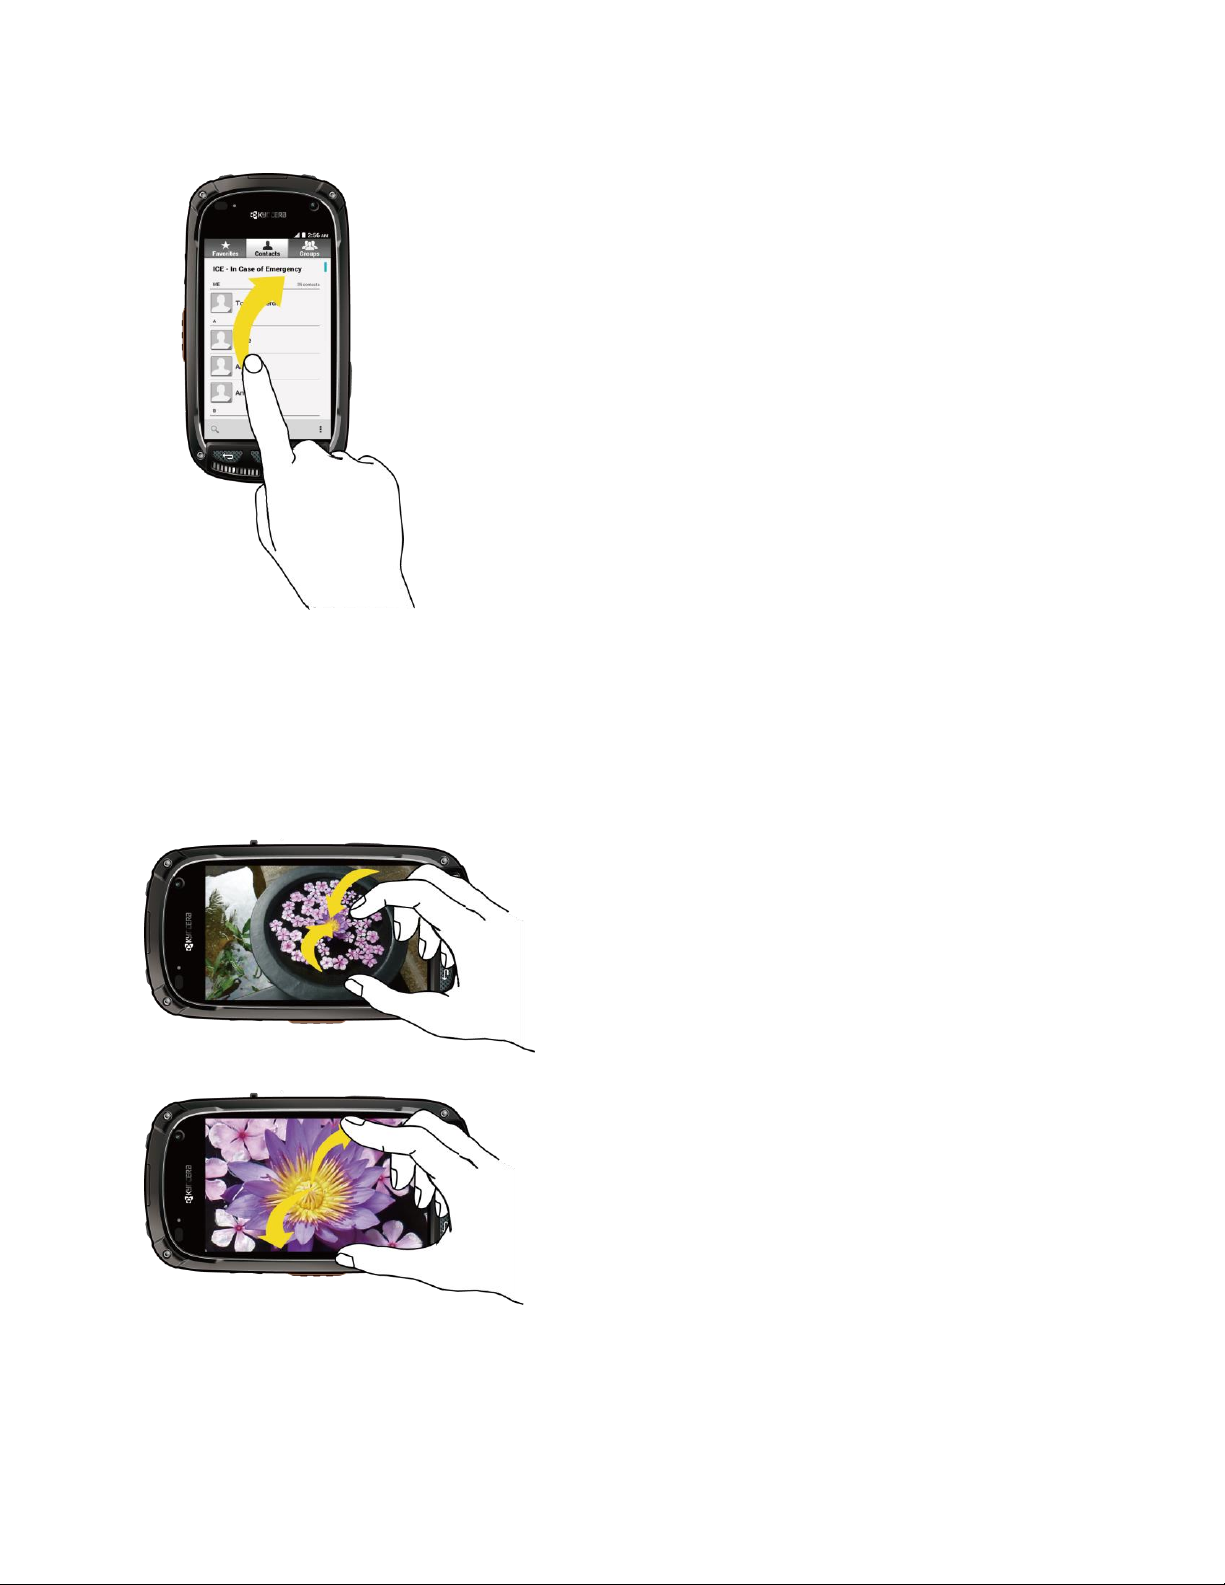
Pinch and Spread
“Pinch” the screen using your thumb and forefinger to zoom out or “spread” the screen to zoom
in when viewing a picture or a Web page. (Move fingers inward to zoom out and outward to
zoom in.)
Phone Basics 16
Page 29
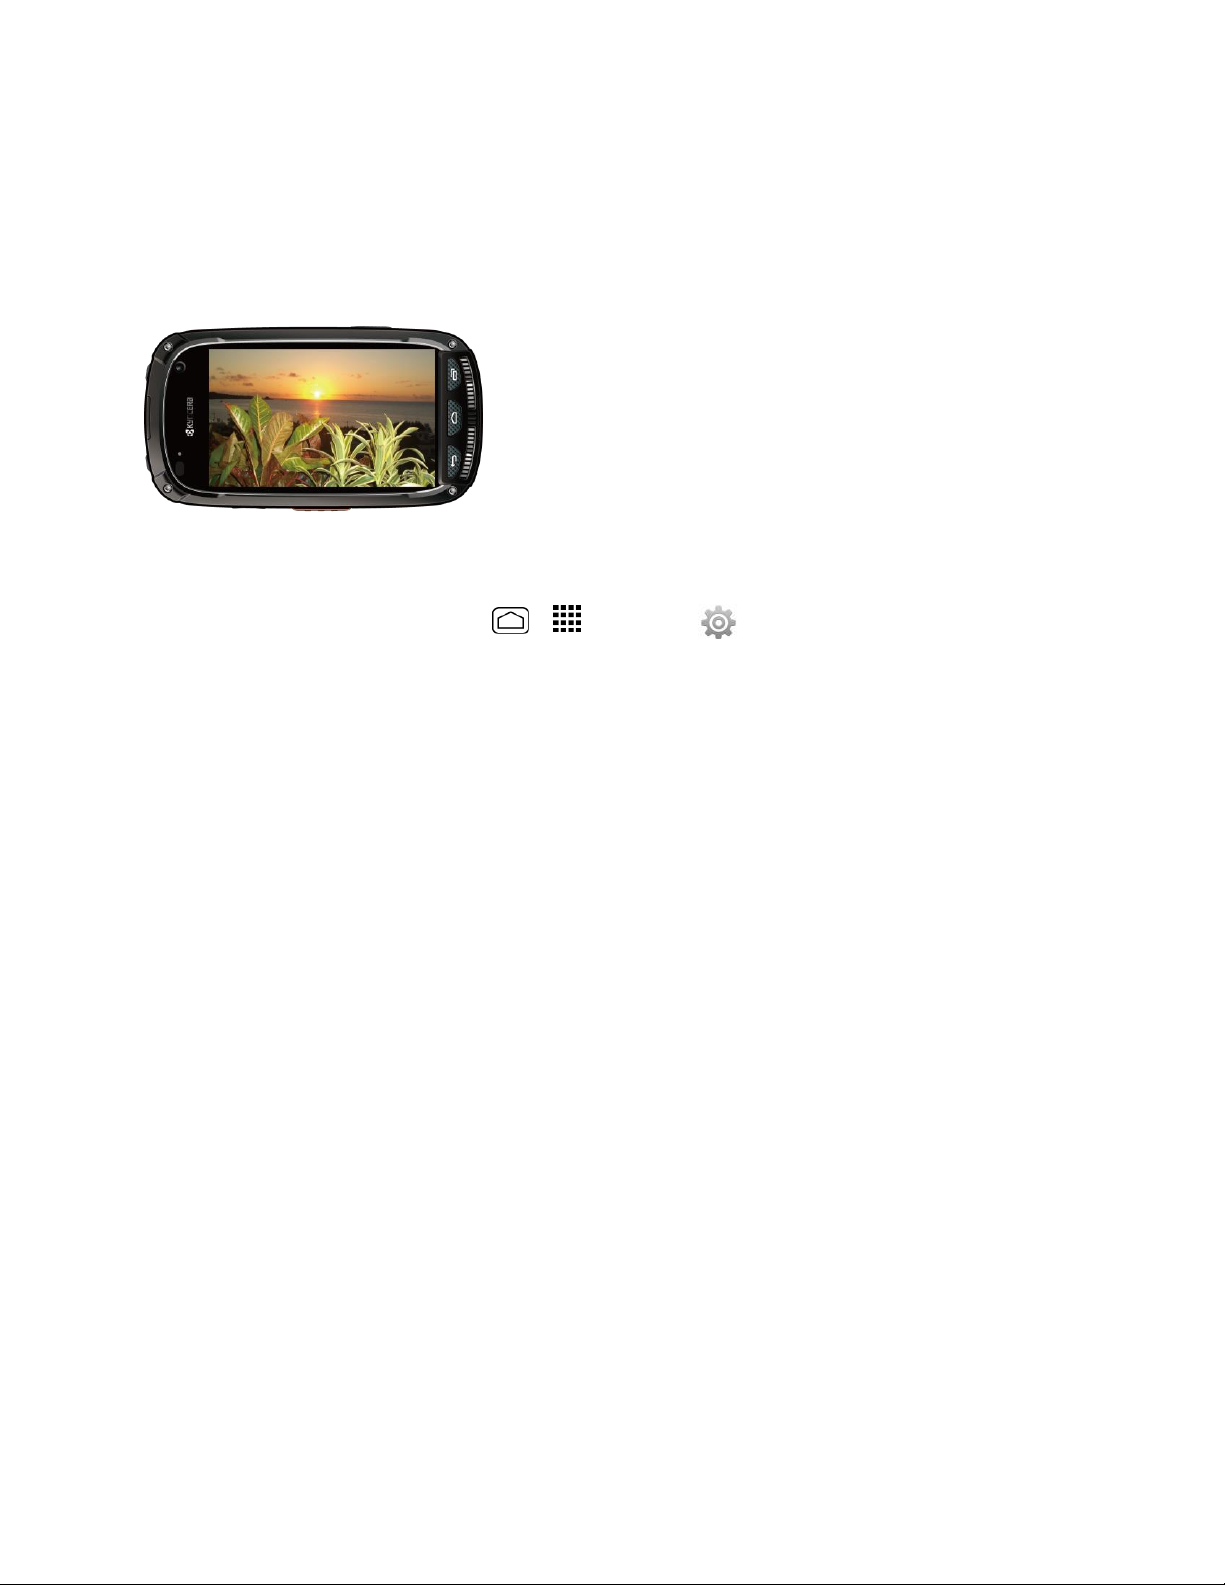
Rotate
For most screens, you can automatically change the screen orientation from portrait to
landscape by turning the phone sideways. When entering text, you can turn the phone sideways
to bring up a bigger keyboard. See Touchscreen Keyboards for more details.
Note: The Auto-rotate screen check box needs to be selected for the screen orientation to
automatically change. Press Home > > Settings > Display > Auto-rotate screen.
Your Home Screen
The home screen is the starting point for your phone’s applications, functions, and menus. You
can customize your home screen by adding application icons, shortcuts, folders, widgets, and
more.
Home Screen Overview
Your home screen extends beyond the initial screen. Swipe the screen left or right to display
additional screens.
Phone Basics 17
Page 30
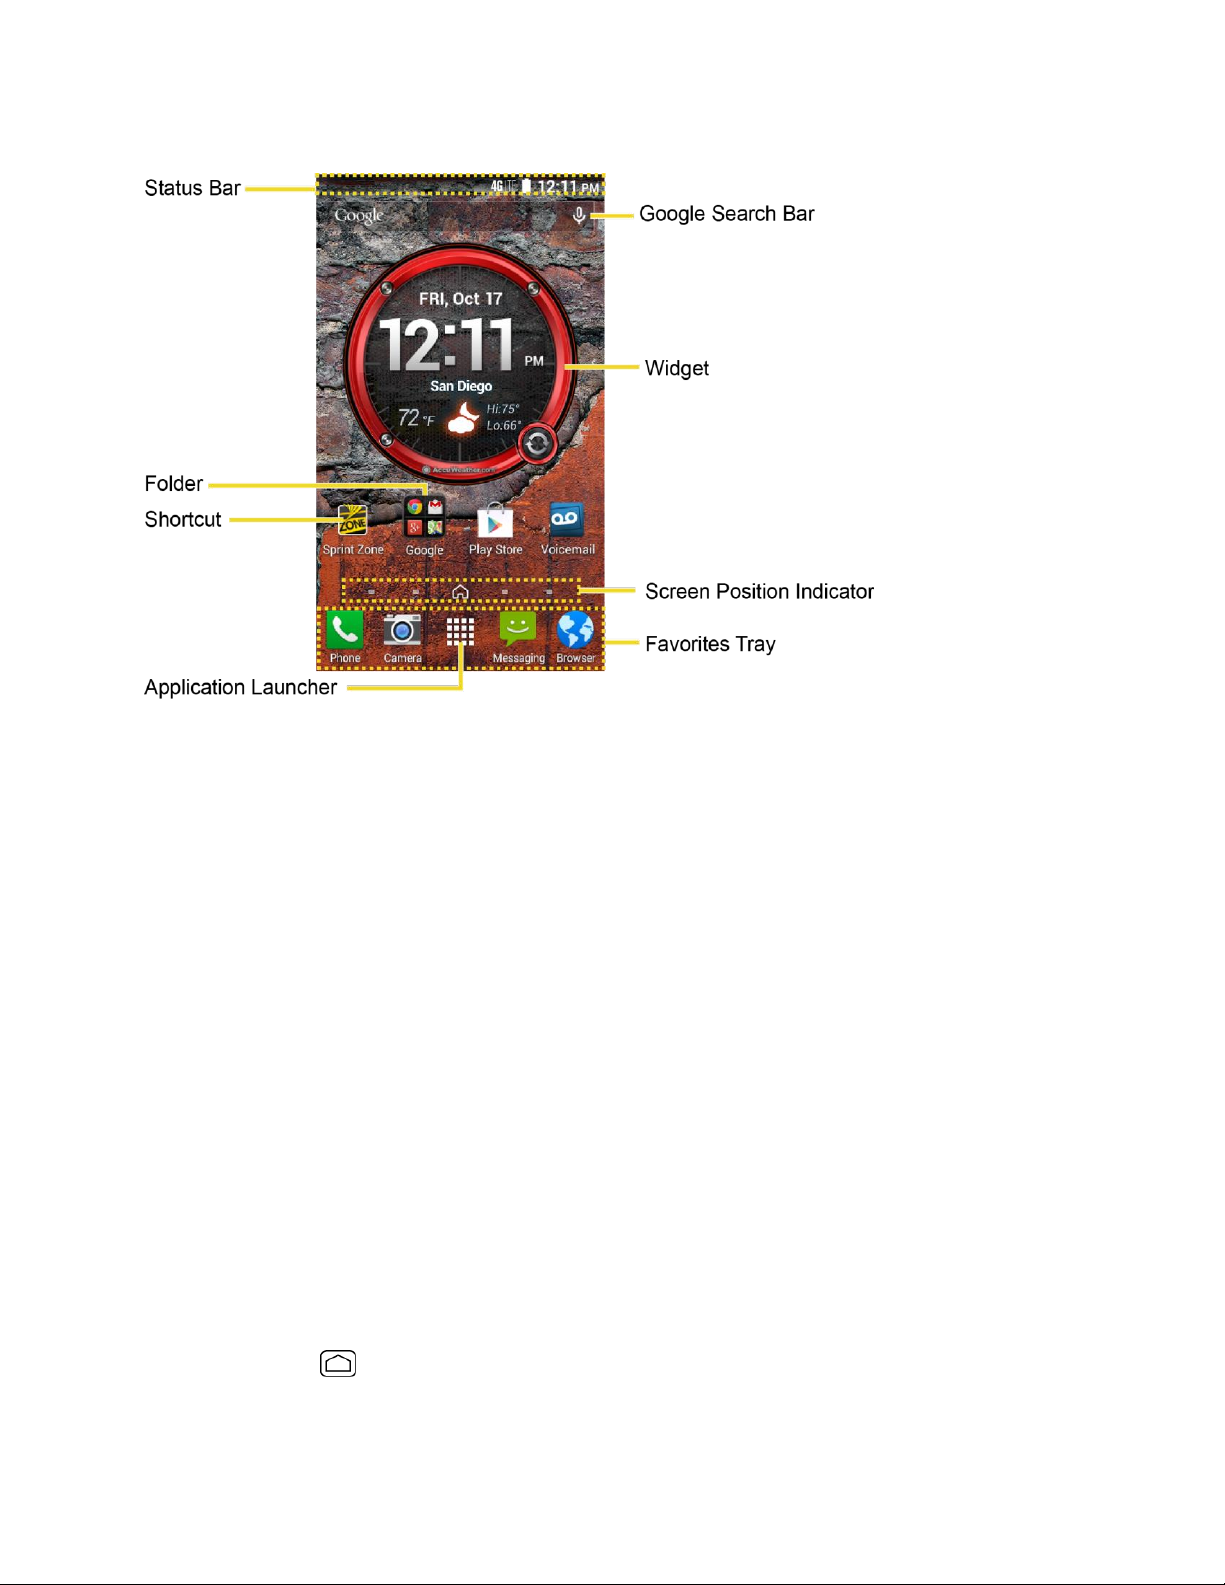
● Status Bar: Displays the time, notification, and phone status icons. Slide down to
display the notifications panel.
● Folder: Allows users to organize screen items. You can store multiple application icons
as a group.
● Shortcut: Allows users to quickly launch applications.
● Application Launcher: Touch to display available applications and widgets on the
phone.
● Favorites Tray: Contains up to five icons and appears on every home screen. You can
customize these icons except the application launcher icon in the middle.
● Screen Position Indicator: Indicates which home screen is displayed. Touch to access
each screen. The home screen icon shows the main home screen.
● Widget: Widget is a small program, designed usually to serve a single purpose, and
allows users to access quickly at-a-glance information or simple interactive functions.
● Google Search Bar: Allows users to enter text or spoken keywords for a quick search
on the phone or on the Internet. Touch to enter text or touch the microphone icon to
speak your keyword.
Tip: Press Home to return to the main home screen from any other screen.
Phone Basics 18
Page 31

Customize the Home Screen
Learn how to add, move, or remove items from the home screen.
Manage Your Home Screens
In addition to the main home screen, your phone has extended home screens to provide more
space for adding icons, widgets, and more. Press Home
to move from the main screen to an extended screen. There are up to six extended screens
available in addition to the main Home screen.
and then drag across the screen
1. Press Home
– or –
Lightly pinch any home screen with your thumb and index finger to display the home
screen thumbnails.
2. The following options are available:
Touch a thumbnail of the home screen you want to open.
If you are not already using the maximum number of screens for your phone, you
can add more screens by touching . You can have up to seven home screens in
total.
Touch and hold a thumbnail and drag it to rearrange the positions of the home
screens. Release the thumbnail where you want to place it.
Touch and hold a thumbnail, drag it to “X Remove” and release it when it turns red
to delete the home screen. The main home screen cannot be deleted.
Touch the home icon at the top of each screen to set the screen as the main home
screen.
from the main Home screen.
3. Touch Done.
Add App Shortcuts or Widgets to the Home Screen
1. Touch on the favorites tray.
2. Slide the
3. Touch and hold the app icon or a widget and drag it to "Add to Home Screen" at the top
of the screen.
4. Move your finger to find the place to add it to. The blue frames which appear on the
screen indicate where you might place the item.
Phone Basics 19
Apps
or
Widgets
screens to find the item you want to add to the home screen.
Page 32

5. Release your finger.
– or –
1. Touch and hold an empty area on a home screen.
2. Slide the Apps or Widgets screens to find the item you want to add to the home screen.
3. Touch and hold the app icon or a widget and drag it to a home screen thumbnail where
you want to add it.
Tip: You can also select a home screen thumbnail where you want the app icon or a widget to
appear, and then simply tap on the app or widget icon.
Move or Remove Items on the Home Screen
■ Touch and hold the item you want to move or remove from the home screen.
To move the item, drag it to a new area and release it.
To remove the item, drag it to “X Remove” at the top of the screen and release it
when it turns red.
Favorites Tray
The favorites tray holds up to five icons and appears on every home screen. You can replace
those icons, except the application launcher icon in the center of the tray.
To add a new icon to the favorites tray:
1. Remove the current icon on the tray.
Drag the icon out of the favorites tray, either onto the main screen or to "X Remove."
2. Touch and hold an app icon and drag it to the favorites tray.
3. Release your finger.
Use Folders
You can use folders to organize the apps on your Home screens.
To create folders:
■ Touch and hold an app icon and drag it over another to create a new folder containing
both apps. A new folder icon appears.
You can now drag more apps to the folder if you wish.
Phone Basics 20
Page 33

To add more apps to the folders:
1. Touch a folder icon and touch in the top-right corner.
2. Swipe left or right to browse through the available Apps page and place checkmarks on
those apps you want to put in the folder.
3. Touch Done to complete the process.
To manage folders:
1. Touch a folder icon you want to manage.
2. The following options are available:
Touch the Unnamed field. The keyboard opens and you can name the folder. To
rename it, touch the name.
Drag the app out of the folder and drop it anywhere on the home screen to remove it.
Touch and hold one of the app icons, then drag it to "X Remove" at the top of the
screen to remove it from the home screen.
Tip: App folders can be deleted just like any other icon on the Home screen. Touch and hold a
folder icon, then drag it to "X Remove" at the top of the screen.
Change Wallpaper
Select and assign your phone’s background wallpaper.
1. Touch and hold the empty area on the Home screen and then touch
– or –
Press
2. Select one of the following options:
Home
Gallery to set a saved picture in Gallery. Select an album, select an image and
zoom in and out on the image to resize it. Touch SET WALLPAPER when you are
finished.
ID wallpapers to set an ID wallpaper. Select an image included in your ID pack and
touch Set wallpaper.
> >
Settings
>
Display
>
Wallpaper
.
Wallpapers
.
Live Wallpapers to set a live wallpaper. Select an image and touch Set wallpaper.
Phone Basics 21
Page 34

Photos to use saved or taken pictures on your phone. Touch to select a picture, and
zoom in and out on the image to resize it. Touch SET WALLPAPER when you are
finished.
Wallpapers to set a preset wallpaper. Slide the small image on the screen sideways
to see available options. Select an image and touch Set wallpaper.
Dura Grid Widget
The Dura Grid widget offers popular settings and apps uniquely designed with high contrast,
large icons for easy access with gloved hands or while on the move. The Dura Grid widget can
also be customized with most frequently used apps and settings and is available in a six or nineposition layout.
Add a Six-position or Nine-position Dura Grid Widget to the Home Screen
1. Touch and hold the empty area on the Home screen.
2. Touch Widgets and slide the Widgets screen to find the six or nine-position Dura Grid
widget.
3. Touch and hold the six or nine-position Dura Grid widget and move your finger to one of
the Home screen thumbnails displayed at the top of the screen.
4. When you find the position you prefer, release your finger.
Change an Icon on the Dura Grid Widget:
1. Touch Edit on Dura Grid. A red “X” icon appears in the right hand corner of each of
the icons.
2. Touch the setting or feature to be changed. The icon disappears.
3. Touch Add and tap on an icon from the Controller or Apps tabs.
4. Touch Done.
Launcher Screens
You can access all your apps and widgets on your phone from the launcher screens. You can
also customize the view of your launcher screens.
Access the Launcher Screens
1. Press Home
2. Following options are available:
> .
Touch Apps to display the apps on your phone.
Phone Basics 22
Page 35

Touch Widgets to display the widgets on your phone.
Touch to display the apps downloaded on your phone.
Touch to search apps on the Launcher tray.
Touch > Reset order to reset the order of apps and widgets to default.
Touch > App sorting to customize the order of apps.
Touch > Manage apps to access the Apps settings screen. See Apps Settings.
Touch > System settings to access the phone's settings menu. See Settings.
Rearrange Your Apps on the Launcher Screens
1. Press Home
2. Touch and hold an app, drag it to a new position and release it. To move it to another
screen, drag the app to Jump to another screen and release it on the screen you want
to place it.
3. Touch Done.
> > > App sorting.
Notifications Panel
You can open the Notifications panel to view the list of notifications you received, Wi-Fi
connection status, and more.
To open the Notifications panel:
■ Slide the status bar down to the bottom of the touchscreen.
Tip: To dismiss all notifications, touch the Dismiss icon at the top right.
Quick Settings Panel
The Quick Settings panel allows you easy access to common phone settings. For more
information on the settings menus, see Settings.
To open the Quick Settings panel:
1. Swipe down with two fingers from the top of any screen.
– or –
Phone Basics 23
Page 36

Icon
Status
Bluetooth® active
Wi-Fi® active
Vibrate
Silent
Network (roaming, full signal)
Network (full signal)
Network (no signal)
4G LTE network (data service)
3G (data service)
GPS active
Airplane mode
Alarm set
Battery (charging)
Battery (full charge)
Battery (discharged)
Drag down from the top of the screen to open the Notifications panel, and then touch the
Quick Settings icon at the top right.
2. Touch a specific setting to open it.
You can touch the toggle icon to switch between notification panel and quick
settings panel.
Status Bar
The status bar at the top of the home screen provides phone and service status information on
the right side and notification alerts on the left. To view notification alerts, touch the status bar
and drag it down.
Status Icons
Phone Basics 24
Page 37

Icon
Status
DC Unavailable
DC Off
DC Speaker On
DC Speaker Off
Icon
Notification
Missed call
New email
New Gmail
New message
New voicemail
Event
Music playing
USB connection
Alarm
Keyboard active
Downloading
Call Alert, Missed Call Alert
DC call, Invite, Availability Notification, GLMS, Missed DC call
Notification Icons
Enter Text
You can type on your phone using one of the available touchscreen keyboards.
Touchscreen Keyboards
Your phone offers you a choice of two touchscreen keyboards for entering text. The keyboard
appears automatically onscreen when you touch a text entry field and can be used in either
Phone Basics 25
Page 38

portrait or landscape mode. You can also use the Google voice typing option to enter text using
your voice (see Google Voice Typing for details).
The methods available include:
● Google Keyboard lets you use a traditional QWERTY setup to enter text. Additional
options expand your ability to enter text faster and more accurately. See Google
Keyboard for details.
● Google voice typing provides a voice-to-text interface.
● Swype lets you enter letters and words in one continuous motion by swiping your finger
across the letters. See Swype for details.
Note: Swype is selected as a default keyboard.
To select a keyboard from Settings:
1. Press
2. Touch
To switch the keyboard when a keyboard is displayed:
1. Drag down from the top of the screen to open the Notifications panel and touch
input method
2. Touch
Home
> >
Google Keyboard or Swype
.
Google Keyboard
Settings
or
>
Swype
Language & input
.
.
>
Default
.
Choose
Swype
The Swype™ keyboard lets you enter words by drawing a path from letter to letter in one
continuous motion.
Phone Basics 26
Page 39

Swype Keyboard Overview
Key appearance may vary depending on the selected application or text field.
Note:
Phone Basics 27
Page 40

Using Swype
1. From a screen where you can enter text, drag down from the top of the screen to open
the Notifications panel, and then touch Choose input method > Swype.
2. Swipe your finger continuously over the letters to form a word. As you swipe over letters,
words matching your pattern appear at the top of the Swype keyboard. To enter a word,
lift your finger, or touch a word at the top of the keyboard.
Touch to select ABC mode. Touch to select Number & Symbol mode.
In ABC mode, touch to alter the capitalization:
(Unshifted) to enter all letters in lowercase.
(One-character-shifted) to capitalize only the first letter of a word.
(Caps lock) to enter all letters in uppercase.
The Number & Symbol keyboards are in two layers. Touch to display the second
keyboard.
Some keys have alternate characters. In either mode, if a key displays an extra
character on the upper right corner, touch and hold the key to enter the character.
Or, touch and hold a key to call up a list of all the characters available on that key.
Touch the character you want to enter from the list.
Touch to switch to Google voice typing, to enter text by speaking.
For more information about using Swype and its additional capabilities, including using voice
entry and personalizing your Swype dictionary, touch and hold from the Swype keyboard
display, and then touch Help > How to Swype. You can also visit swype.com for more
information.
Phone Basics 28
Page 41

Swype Settings
You can customize the Swype settings as you like.
■ Touch and hold on the Swype keyboard.
– or –
Press Home > > Settings > Language & input, and then touch next
to Swype.
– or –
When a keyboard is displayed, drag down from the top of the screen to open the
Notifications panel, and then touch Choose input method > Set up input method >
(next to Swype).
For more information about Swype settings, see Swype Keyboard Settings.
Google Keyboard
The Google Keyboard offers a traditional QWERTY keyboard setup for entering text by touching
keys (like on a computer), along with enhancements and options that allow you to enter text
faster and more accurately, such as continuous key input, personalized usage dictionaries, and
more.
Phone Basics 29
Page 42

Google Keyboard Overview
Note: Key appearance may vary depending on the selected application or text field.
Using Google Keyboard
With Google Keyboard, it's easy to enter text, symbols, and numbers.
1. From a screen where you can enter text, drag down from the top of the screen to open
the Notifications panel, and then touch Choose input method > Google Keyboard.
2. Touch keys to enter text. While entering text, use the following options:
Touch to select ABC mode. Touch to select Number & Symbol mode.
In ABC mode, touch to alter the capitalization:
(Unshifted) to enter all letters in lowercase.
(One-character-shifted) to capitalize only the first letter of a word.
You can select the caps lock by double-touching or touching and holding or
to make all letters in uppercase.
(Caps lock) to enter all letters in uppercase.
Phone Basics 30
Page 43

In Number & Symbol mode, touch to display more symbols.
If you make a mistake, touch to delete incorrect characters. Touch and hold
to delete a whole word or field.
Some keys have alternate characters. In either mode, if a key displays an extra
character at the upper right corner, touch and hold the key to enter the character. Or,
touch and hold a key to call up a list of all the characters available on that key.
Touch the character you want to enter from the list.
Touch to switch to Google voice typing, to enter text by speaking.
Google Keyboard Settings
You can customize the Google Keyboard settings as you like.
■ On the Google Keyboard, touch and hold the key immediately left to the space key and
touch Google Keyboard Settings.
– or –
Press Home > > Settings > Language & input, and then touch next to
Google Keyboard.
– or –
When a keyboard is displayed, drag down from the top of the screen to open the
Notifications panel, and then touch Choose input method > Set up input methods >
(next to Google Keyboard).
For more information about Google Keyboard settings, see Google Keyboard Settings.
Google Voice Typing
Google voice typing uses Google voice recognition to convert speech to text.
Use Google Voice Typing to Enter Text
When using this feature, you can use your voice instead of typing text.
1. From a screen where you can enter text, drag down from the top of the screen to open
the Notifications panel, and then touch Choose input method > Google voice typing.
2. Say the text you wish to enter into the microphone.
If the text is incorrect, touch DELETE.
Phone Basics 31
Page 44

3. Once you have completed entering your text, touch .
Tip: You can quickly assign Google voice typing from the keyboard. Touch the microphone icon
to turn on voice typing.
Google Voice Typing Settings
You can customize the Google voice typing settings as you like.
1. Press Home > > Settings > Language & input, and then check the
Google voice typing check box.
2. Touch next to Google voice typing to configure its settings.
For more information about Google voice typing settings, see Google Voice Typing Settings.
Tips for Editing Text
Your phone gives you many options to make entering text easier, including copying, cutting, and
pasting text, using voice-to-text input, customizing the user dictionary, using predictive text, and
more.
1. In a text entry field, touch and hold the text body.
2. Selection tabs appear and the currently selected words or characters are highlighted.
Drag the tabs to expand or reduce the range of the selected text.
3. Touch an onscreen option from the edit menu bar. Touch to close the edit menu bar.
(Select all): Highlights all the text in the field.
(Cut): Removes the selected text and saves it to the clipboard.
(Copy): Copies the selected text to the clipboard.
PASTE: Inserts the last copied or cut text into the current field.
Phone Basics 32
Page 45

Phone Calls
With our wireless service and your phone’s calling features, you can enjoy clear phone calls
across the country.
Make Phone Calls
There are several convenient ways to place calls from your phone.
Call Using the Phone Dialer
The most “traditional” way to place a call is by using the phone’s dialer screen.
1. Press Home > > Dialpad tab to display the phone dialpad.
2. Touch the number keys on the dialpad to enter the phone number.
3. Touch to call the number.
4. To end the call, touch .
Call from Recent Calls
The Recent calls list lets you quickly place calls to recent incoming, outgoing, or missed
numbers.
Phone Calls 33
Page 46

1. Press Home > to display the phone app.
2. Touch the Recent calls tab to display the recent calls list.
3. Touch the phone icon next to the number or contact to place a call.
For additional options, touch the name or number.
Call from Contacts
You can place phone calls directly from entries in your Contacts list.
1. Press
2. Your favorites and frequent contacts are displayed.
3. Touch the contact you want to place a call.
For additional information on Contacts, see Contacts.
Home
Touch Phone book to display the phone book.
Touch to search for your contact.
> to display the phone app.
Call a Number in a Text Message
While viewing a text message or email message, you can place a call to a number that is in the
body of the message.
1. Press
account.
2. Touch the message with the phone number.
3. The Dialpad screen then opens, with the phone number automatically filled in and ready
Home
> >
Messaging
. If necessary, select a messaging or email
to be dialed. To place the call, touch .
Call Emergency Numbers
You can place calls to 9-1-1 even if the phone’s screen is locked or your account is restricted.
To call the 9-1-1 emergency number:
1. Press
2. Touch .
To call the 9-1-1 emergency number when the pattern screen lock, the facial screen lock, the
PIN screen lock or the password screen lock is on:
Phone Calls 34
Home
> >
Dialpad
tab to display the phone dialpad.
Page 47

1. Touch
2. Touch .
Once an emergency call is placed, your phone will be in Emergency mode where nonemergency calls cannot be made.
To exit Emergency mode:
Emergency call
at the bottom of the lock screen.
■ Press
Back
>
Exit Emergency mode
>
Yes
.
Enhanced 9-1-1 (E911) Information
This phone features an embedded Global Positioning System (GPS) chip necessary for utilizing
E911 emergency location services where available.
When you place an emergency 9-1-1 call, the GPS feature of your phone seeks information to
calculate your approximate location. Depending on several variables, including availability and
access to satellite signals, it may take up to 30 seconds or more to determine and report your
approximate location.
Important: Always report your location to the 9-1-1 operator when placing an emergency call.
Some designated emergency call takers, known as Public Safety Answering Points (PSAPs),
may not be equipped to receive GPS location information from your phone.
Call Numbers with Pauses
You can dial phone numbers with pauses for use with automated systems, such as voicemail or
credit card billing numbers.
There are two types of pauses available on your phone:
●
Add 2-sec pause:
●
Add wait:
1. Press
2. Enter all or part of a number.
3. Touch >
4. Enter additional numbers.
5. Touch to dial the number.
Phone Calls 35
Sends the next set of numbers when you touch
Home
Automatically sends the next set of numbers after two seconds.
in the pop-up window.
Yes
> >
Add 2-sec pause
Dialpad
tab to display the phone dialpad.
or
Add wait
.
Page 48

Call Using the Plus (+) Code
When placing international calls, Plus Code Dialing automatically enters the international access
code for your location (for example, 011 for international calls made from the U.S.).
1. Press
2. Touch and hold until you see a “+” on the display screen.
3. Enter the country code and phone number, and then touch . The phone
automatically prepends the access code for international dialing, followed by the country
code and phone number.
Home
> >
Dialpad
tab to display the phone dialpad.
Call Using Internet Calling
When Wi-Fi network is available, you can make and receive calls through an Internet calling
account.
Important:
Add an Internet Calling Account
1. Press
2. Touch the
3. Enter your account details. When finished, touch
Calling a phone number using Internet calling may incur additional charges.
Home
cancel.
> to display the phone app.
tab, and then touch
Menu
Call settings
>
SIP Accounts
to confirm or touch
SAVE
>
ADD ACCOUNT
DISCARD
.
to
4. To set your phone to receive Internet calls on your added account, press Back and
select the Receive incoming calls check box.
Note:
reduces the life of your phone’s battery.
This requires the phone to maintain a connection with a Wi-Fi data network, which
Make an Internet Call
1. Press Home > > People .
2. Touch a contact and then touch
Internet call
.
Internet Calling Setting
1. Press
2. Touch the
3. Select an option:
Phone Calls 36
Home
> to display the phone app.
tab, and then touch
Menu
Call settings
>
Use Internet calling
.
Page 49

For all calls when data network is available to use Internet calling for all calls
when Wi-Fi network is available
Only for Internet calls
addresses.
Ask for each call
to use Internet calling only for calls to Internet calling
to ask each time you make a call.
Receive Phone Calls
The following information lets you know how to answer incoming calls, mute the ringer on
incoming calls, reject incoming calls, and more.
When you receive a phone call from a contact, the Incoming call screen appears and displays
the caller ID icon, name, and phone number of the calling party. When you receive a phone call
from someone who is not stored in People, only the default caller ID icon and phone number
appear on the Incoming call screen.
Note: If your phone is turned off, all calls automatically go to voicemail.
Answer an Incoming Call
■ On the Incoming call screen, swipe the Answer icon .
Mute the Ringing Sound
■ Press the Volume Button down.
Reject an Incoming Call
■ Swipe the Ignore icon . The call will be sent directly to voicemail.
Reject a Call and Send a Text Message
You can reject an incoming call and automatically send a text message to the caller.
■ Swipe the Ignore & Text icon to ignore the call and send a message to the caller.
You can edit the text messages through the Call settings menu. From the phone app,
touch the Menu tab > Call settings > Quick responses and touch a preset text
message to edit it.
Voicemail
The following topics outline your phone’s voicemail service.
Phone Calls 37
Page 50

Note: Your phone also supports the Visual Voicemail app. For information on setting up and
using Visual Voicemail, see Visual Voicemail.
Voicemail Setup
You should set up your voicemail and personal greeting as soon as your phone is activated.
■ For information on setting up your voicemail, see Set Up Voicemail.
Tip: For information on using the Visual Voicemail app, see Visual Voicemail.
Voicemail Notification
There are a couple of different ways your phone alerts you to a new voicemail message.
● By sounding the assigned notification sound.
● By vibrating the phone when the vibrate setting is on.
● By displaying within the Notifications area of the Status bar when a new unheard
voicemail message(s) is received.
Note: When you are roaming off the network, you may not receive notification of new voicemail
messages. It is recommended that you periodically check your voicemail by dialing 1 + area
code + your wireless phone number. When your voicemail answers, touch and enter your
password. Roaming rates apply when you access voicemail while roaming off the network.
Note: Your phone accepts messages even when it is turned off. However, your phone notifies
you of new messages only when it is turned on and you are in a network service area.
Retrieve Your Voicemail Messages
You can review your messages directly from your wireless phone (using either traditional
voicemail or Visual Voicemail) or from any other touch-tone phone.
Use Traditional Voicemail to Access Your Messages
1. Press Home > > Dialpad tab to display the phone dialpad.
2. Touch and hold . If prompted, enter your voicemail password.
3. Follow the voice prompts to listen to and manage your voicemail messages.
Use Visual Voicemail to Access Your Messages
1. Press Home > > Voicemail .
2. Touch an entry to listen to the message.
Phone Calls 38
Page 51

Note: You are charged for airtime minutes when you access voicemail from your wireless
phone.
Use Another Phone to Access Messages
1. Dial your wireless phone number.
2. When your voicemail answers, press the asterisk key on the phone (*).
3. Enter your password.
Use Visual Voicemail to Delete Your Messages
1. Press Home > > Voicemail .
2. Open a message and touch .
Tip: You can restore messages you have sent to the trash folder. Touch Inbox > Trash, touch
and hold the message you want to restore to the inbox, and then touch the restore icon .
Visual Voicemail
Visual Voicemail gives you a quick and easy way to access your voicemail. Now you can find
exactly the message you are looking for without having to listen to every voicemail message first.
This new feature periodically goes out to your voicemail, and gathers the caller information from
all of the current voicemails. It then populates a list with the caller name and number, along with
the length of time and priority level of the voicemail message.
Set Up Visual Voicemail
Setting up Visual Voicemail follows many of the same procedures as setting up traditional
voicemail. You should set up your voicemail and personal greeting as soon as your phone is
activated. Your phone automatically transfers all unanswered calls to your voicemail, even if
your phone is in use or turned off.
Note: To set up your traditional voicemail box, see Voicemail Setup.
1. Press Home > > Voicemail . You’ll see a Personalize your voicemail
prompt.
2. Touch Personalize now and follow the system prompts to:
Create a password (part of standard voicemail).
Record your name announcement.
Record your greeting.
Phone Calls 39
Page 52

Important: Voicemail Password – It is strongly recommended that you create a password
when setting up your voicemail to protect against unauthorized access. Without a password,
anyone who has access to your phone is able to access your voicemail messages.
3. Touch the Welcome to Voicemail message on the screen to play a brief explanation of
the voicemail services.
Review Visual Voicemail
Visual Voicemail lets you easily access and select which messages you want to review.
1. Press Home > > Voicemail . You will see the voicemail inbox.
2. Touch a message to review it.
Tip: There are several icons at the bottom of the review screen for maintenance, storage,
messaging, and other options. For an explanation of all your options, touch > Help > Visual
Voicemail Menu > Visual Voicemail Menu.
Listen to Multiple Voicemail Messages
When you are done listening to a voicemail message, you can easily access other voicemail
messages without returning to the main voicemail screen.
1. Listen to the current voicemail message.
2. Swipe your finger left or right to display the next or previous message. (It will begin
playing automatically.)
Phone Calls 40
Page 53

You can navigate through voicemail messages as frequently as you'd like. You can even move
to the next or previous message before you're finished listening to the current one.
Compose a Visual Voicemail Message
Record a voice message and share or send it.
1. Press Home > > Voicemail .
2. Touch to access the recording screen and touch to start recording.
3. Touch to stop recording.
4. Touch to review the recorded message.
Touch > Re-record to discard the current message and start a new recording.
5. Touch to select a method to share the recorded message and follow the onscreen
instructions.
You will be asked to set a Display name if it is not set.
– or –
Type the recipient in the To field or touch and select the recipient from your
contacts, and then touch to send the message.
Visual Voicemail Options
Your visual voicemail options appear as icons at the bottom of the voicemail review screen.
1. Press Home > > Voicemail .
2. Touch a message to review it. The following options are available while reviewing a
voicemail message:
Note: Not all options are available for all messages.
Pause
to start playing.
Play
to pause the playback.
or
Phone Calls 41
Speaker
to turn the speakerphone on or off during playback.
Page 54

Delete
the trash folder.
to delete the current voicemail message. The message will be moved to
onscreen instructions.
The bar provides a visual timeline for the current message. Touch
and drag this bar to scrub through the message to different points.
Call
Share
Reply
to call the number the message came from.
to share the message. Select an available method and follow the
to reply to the message via text or voice message.
Configure Visual Voicemail Settings
The Visual Voicemail settings menu lets you access settings for notifications, pictures, greetings,
and more.
1. Press Home > > Voicemail .
2. Touch >
Manage subscription to verify your Voicemail-to-Text account information.
Settings
. Select an option to change its settings.
Auto forward to email to send a copy of new messages to an email address of
your choice.
Personalize voicemail to change your voicemail greeting for incoming calls and
update password. See Change Your Main Greeting via the Voicemail Menu.
Notifications to determine how you are notified of new voicemails.
Delete messages to set the timing to permanently delete the messages in the trash
folder.
Display name to enter a name that is attached to your outgoing voicemails as part
of an identification string. See Edit the Display Name via the Voicemail Menu.
Speakerphone to set the speakerphone setting.
Transcriptions displayed to allow text to be transcribed and displayed on the
phone.
Themes to select a theme for the Visual Voicemail.
View quick tips tutorial to display some quick tips for using Visual Voicemail.
Phone Calls 42
Page 55

Help to go to the help page of Visual Voicemail.
Send feedback to send your feedback on the Visual Voicemail.
Updates to search for an update to your Visual message software.
About Voicemail to view build information about the current Visual Voicemail
application.
You can restore messages you have sent to the trash folder. Touch
Tip:
and hold the message you want to restore to the inbox, and then touch the restore icon .
Voicemail settings can also be accessed by pressing
Note:
tab >
Call settings
>
Voicemail
.
Home
>
Inbox
Phone
>
Trash
>
, touch
Menu
Change Your Main Greeting via the Voicemail Menu
Your main greeting can be changed directly via the Visual Voicemail system. This direct access
saves you from having to navigate within the voicemail menu.
1. Press Home > > Voicemail .
2. Touch > Settings > Personalize voicemail.
3. Touch OK to connect to the voicemail system. Follow the prompts to change your
current greeting.
Edit the Display Name via the Voicemail Menu
From your Visual Voicemail menu, you can quickly change the name or number attached to
your voice messages.
1. Press Home > > Voicemail .
2. Touch > Settings > Display name.
3. Touch the existing identification field and enter a new identifying name or number (used
to identify you to recipients of your voice messages).
4. Touch OK to save your information.
Phone Call Options
Your phone application provides many useful features and options to help you make the most of
your calling experience.
Phone Calls 43
Page 56

In-call Options
While you’re on a call, you will see a number of onscreen options. Touch an option to select it.
● Add call: Touch and hold to initiate a conference call (3-way call).
●
End call:
●
Dialpad/Hide:
numbers such as an extension or access code.
For example: When you call your bank’s 800 number, use your dialpad to enter your
● Speaker: Route the phone’s audio through the speaker (ON) or through the earpiece
(OFF).
Warning: Because of higher volume levels, do not place the phone near your ear during
speakerphone use.
● Mute: Mute the microphone during an active call. Touch the ON/OFF button to mute or
unmute your microphone.
Note: If Mute is activated, the speaker mode is deactivated.
● Bluetooth: Route the phone's audio through a connected Bluetooth headset (ON) or
through the speaker (OFF).
End the current call.
Toggle the appearance of the onscreen dialpad to enter additional
account number and PIN.
Phone Calls 44
Page 57

Caller ID
Caller ID identifies a caller before you answer the phone by displaying the number of the
incoming call. If you do not want your number displayed when you make a call, follow these
steps.
1. Press Home > > Dialpad tab to display the phone dialpad.
2. Touch .
3. Enter a phone number.
4. Touch .
Call Waiting
When you’re on a call, Call Waiting alerts you to incoming calls by sounding two beeps. Your
phone’s screen informs you that another call is coming in and displays the caller’s phone
number (if it is available).
To respond to an incoming call while you’re on a call:
■ Swipe . This puts the first caller on hold and answers the second call.
To switch back to the first caller:
■ Touch
For those calls where you don’t want to be interrupted, you can temporarily disable Call
Note:
Waiting by touching before placing your call. Call Waiting is automatically
reactivated once you end the call.
Switch calls
.
3-Way Calling
With 3-way calling, you can talk to two people at the same time. When using this feature, the
normal airtime rates will be charged for each of the two calls.
1. On the Dialpad screen, enter a number and touch (or place a call from recent
calls or phone book).
2. Once you have established the connection, touch
(or place the call from Recent calls or Contacts). This puts the first caller on hold and
dials the second number.
Add call
, and dial the second number
3. When you’re connected to the second party, touch
now in session.
Phone Calls 45
Merge calls
. Your conference call is
Page 58

4. To end the 3-way call, touch .
If one of the people you called hangs up during your call, you and the remaining caller
Note:
stay connected. If you initiated the call and are the first to hang up, all callers are disconnected.
Call Forwarding
Call Forwarding lets you forward all your incoming calls to another phone number, even when
your phone is turned off. You can continue to make calls from your phone when you have
activated Call Forwarding.
Note: You are charged a higher rate for calls you have forwarded.
To activate Call Forwarding:
1. Press Home > > Dialpad tab to display the phone dialpad.
2. Touch .
3. Enter the area code and phone number to which you want your calls forwarded.
4. Touch . (You will hear a tone to confirm the activation of Call Forwarding.)
To deactivate Call Forwarding:
1. Press Home > > Dialpad tab to display the phone dialpad.
2. Touch .
3. Touch . (You will hear a tone to confirm the deactivation.)
Recent Calls
The Recent calls tab of the Phone application lists all recent incoming, outgoing, and missed
calls.
View Recent Calls
1. Press Home > to display the phone app.
2. Touch the Recent calls tab to display the recent calls list.
You can determine if an entry was an incoming, outgoing, or a missed call from the
icons shown below.
= Incoming Call
Phone Calls 46
Page 59

= Outgoing Call
= Missed Call
Recent Calls Options
■ To make a call from the recent calls, see Call from Recent Calls.
For additional options:
1. Press
2. Touch the
3. Touch an entry to view the contact.
Home
Touch to send a text message.
Touch Add to contacts to add the number to Contacts.
Touch > Delete from recent call to delete the call.
Touch > Edit number before call to edit the number before calling.
> to display the phone app.
Recent calls
tab to display the recent calls list.
Filter Recent Calls
1. Press Home > to display the phone app.
2. Touch the Recent calls tab to display the recent calls list.
3. Touch > Filter by, and then select All calls, Missed calls, Outgoing calls, or
Incoming calls.
Clear Recent Calls
Use the menu option to clear your recent calls.
1. Press Home > to display the phone app.
2. Touch the
3. Touch >
Phone Calls 47
Recent calls
Clear recent calls
tab to display the recent calls list.
> OK.
Page 60

Call Settings
Your phone’s Call Settings menu lets you configure your voicemail options and a number of
other settings for the phone application.
Voicemail Settings
If you need to adjust your voicemail provider or access settings, use the Voicemail settings
menu.
1. Press Home > to display the phone app.
2. Touch the Menu tab, and then touch Call settings > Voicemail.
3. Configure options for voicemail.
North American Dialing
Use this option when placing international calls while in the United States or Canada.
1. Press
2. Touch the
3. Select the
Home
> to display the phone app.
tab, and then touch
Menu
North American dialing
Call settings
check box. See Call Using the Plus (+) Code.
.
International Dialing
Use this option when placing international calls from outside the United States or Canada.
1. Press
2. Touch the
3. Clear the
Home
international dialing code.
> to display the phone app.
tab, and then touch
Menu
North American dialing
Call settings
check box and touch
.
International dialing
to set the
TTY Mode
A TTY (teletypewriter, also known as a TDD or Text Telephone) is a telecommunications device
that allows people who are deaf, hard of hearing, or who have speech or language disabilities,
to communicate by telephone.
Your phone is compatible with select TTY devices. Please check with the manufacturer of your
TTY device to ensure that it supports digital wireless transmission. Your phone and TTY device
will connect using a special cable that plugs into your phone’s headset jack. If this cable was not
provided with your TTY device, contact your TTY device manufacturer to purchase the
connector cable.
To turn TTY Mode on or off:
Phone Calls 48
Page 61

1. Press
Home
> to display the phone app.
2. Touch the
3. Touch
TTY Full, TTY HCO
tab, and then touch
Menu
, or
TTY VCO
Call settings
>
TTY mode
to turn TTY mode on.
.
– or –
Touch
TTY Off
to turn TTY mode off.
Note: When enabled, TTY mode may impair the audio quality of non-TTY devices connected
to the headset jack.
Warning: 9-1-1 Emergency Calling
It is recommended that TTY users make emergency calls by other means, including
Telecommunications Relay Services (TRS), analog cellular, and landline communications.
Wireless TTY calls to 9-1-1 may be corrupted when received by public safety answering points
(PSAPs), rendering some communications unintelligible. The problem encountered appears
related to TTY equipment or software used by PSAPs. This matter has been brought to the
attention of the FCC, and the wireless industry and the PSAP community are currently working
to resolve this.
Sprint Direct Connect
Sprint® Direct Connect®, available exclusively from Sprint, offers instant, two-way “walkie-talkiestyle” communication between you and your family, friends, and co-workers, all at the click of a
button. Perfect for get-in get-out conversations such as checking status, getting information,
getting directions, or coordinating with others—fast. Call Alert sends an alert to other Direct
Connect users to let them know you want to reach them.
About Sprint Direct Connect
Learn the services available with Sprint Direct Connect.
The following Sprint Direct Connect services are available:
●
Direct Connect
●
Group Connect
connect instantly with up to 20 other Direct Connect users at the same time.
●
TeamDC
SM
calling with up to 200 other Direct Connect users (with Sprint phones only). With
TeamDC and Opt-In TeamDC, all members can access the most up-to-date group list on
their phones.
®
- Allows two-way radio communication with other Direct Connect users.
®
- Creates and manages groups in Contacts, “on the fly,” or online to
and
Opt-In TeamDC
- Create a group online that allows nationwide group
Phone Calls 49
Page 62

Before Making Your First Direct Connect Call
To enable Direct Connect on your phone, you must first enable Direct Connect services on your
Sprint account. Sign in to sprint.com/mysprint or call Sprint Customer Service at
for more information.
4727
1-888-211-
Important:
When the Direct Connect feature is active, your phone’s data services are enabled.
Enable Direct Connect Services
1. Sign in to your account at sprint.com/mysprint.
2. On the My Account tab, click the Manage this device dropdown menu and select
Change my services.
3. Under Push-to-Talk, select Unlimited Direct Connect and Group Connect and Sprint
Service.
Direct Connect Numbers
Sprint Direct Connect is compatible with two different types of Direct Connect numbers.
● Separate numbers – Some Direct Connect numbers are a unique number (not a
standard wireless phone number). This type is made up of three sets of digits separated
by asterisks (for example, 444*5555*111). When calling a person or storing a contact
with this type of number, be sure to include the asterisks in the number. If you are saving
the number in your Contacts, choose DC ONLY for the phone type.
● A single number – Some Direct Connect numbers use the same numbers as the
wireless number for the phone (for example, 555-555-1234). If the person you are calling
has a single number for both voice calls and for Direct Connect, use that ten-digit phone
number to make Direct Connect calls. You do not need to add any asterisks (*) to the
number. If you are saving this number in your Contacts, choose other than DC ONLY for
the phone type.
Your Direct Connect Number
Your Direct Connect number is the same as your wireless phone number (for example, 555555-1234). Sprint Direct Connect is compatible with this type of Direct Connect number as well
as Direct Connect-specific numbers separated by asterisks (for example, 444*5555*111).
Tip: One way to easily ensure that your contacts have your correct number is to call them so
that they can save your number from their Call logs. Ask them for their contact information.
Remember you will need all digits of the number to make a successful call. Also, if they have a
separate number for Direct Connect, you will need to enter asterisks (*) between sets of
numbers.
Phone Calls 50
Page 63

Save a Direct Connect Number
You can store Direct Connect numbers in your Contacts just like traditional phone numbers.
1. Use your dialpad to enter a Direct Connect number.
The Direct Connect number may be the ten-digit wireless phone number of the
contact.
– or –
The Direct Connect number may be a unique number made up of three sets of digits
separated by asterisks (for example, 444*5555*111). When saving this type of
number, always include the asterisks (*).
2. Touch
3. To add the number to an existing contact, touch the contact, select a number type for the
new number, and then touch OK.
– or –
To add the number as a new contact, touch
and any additional information, and then touch
Add to contacts
When selecting a number type for the entry:
• Select
phone number. Make sure to include the asterisks (*) between the sections of a
DC ONLY number.
• Select other than
number are the same.
DC ONLY
.
CREATE NEW CONTACT
. See Add a Contact.
Save
if the Direct Connect number is different from the wireless
DC ONLY
if the wireless phone number and the Direct Connect
, enter the name
Display Your Direct Connect Number
Your Direct Connect number and other information about your phone and account will be
displayed.
■ Press
Home
> >
Settings
>
About phone
>
Status
.
Make and Answer Direct Connect Calls
You can make a Direct Connect call by entering a Direct Connect number manually or by
selecting an entry containing a Direct Connect number in your Contacts or History. For
information on saving Direct Connect numbers to Contacts, see Save a Direct Connect Number.
Make a Direct Connect Call by Entering a Number
Place a Direct Connect call by entering a Direct Connect number with your keypad.
Phone Calls 51
Page 64

1. Press
2. Enter a Direct Connect number.
The Direct Connect number may be the ten-digit wireless phone number of the
Home
person you are calling.
– or –
If calling a user with a UFMI number, the Direct Connect number may have three
parts with an asterisk between each part (for example: 444*5555*111). When dialing
or saving this type of number, always include the asterisks (*).
> >
Dialpad
tab.
3. Press and release the
Pressing and releasing the
emits an incoming tone and displays your name or number. If available, he or she
can choose to respond and begin the conversation.
Alternatively, you can hold the button and speak after you first press and hear the
tone. In this case, your voice will broadcast instantly over the recipient’s speaker.
Pinging the recipient’s phone by pressing and releasing may avoid unintentional
interruptions.
4. After the recipient accepts your call:
Wait for “
Press and hold the
Wait for a tone to sound and “Me” to appear onscreen before you begin talking.
5. Release the
6. Touch to end the call.
Push to Talk
DC Button
Direct Connect Button (DC Button
DC Button
” to appear onscreen.
DC Button
to listen.
.
“pings” the recipient. The recipient’s phone
) on the side of your phone.
All Direct Connect calls end automatically if there is no activity on the call for several
Note:
seconds.
Make a Direct Connect Call from Contacts
Place a Direct Connect call to the Direct Connect numbers stored in your Contacts.
1. Press
2. Touch an entry you want to place a Direct Connect call.
3. Touch the number with “
Phone Calls 52
Home
> >
People
DC ONLY
>
Contacts
” or “
Direct Connect
tab.
XXX” under it.
Page 65

– or –
Touch
4. Press and release the
5. Continue the Direct Connect call as described previously.
Direct Connect
Select the
as default for a Direct Connect call to the contact.
Remember this choice
or press the
DC Button
DC Button
check box first if you want to select the number
.
, and select a number.
Make a Direct Connect Call Using a Speed Dial Number
Place a Direct Connect call to assigned speed dial numbers.
1. Press
2. Enter a speed dial number and press and release the
3. Continue the Direct Connect call as described previously.
Home
> >
Dialpad
tab.
DC Button
Make a Direct Connect Call from Recent DC’s
Place a Direct Connect call from your Direct Connect Call logs.
.
1. Press
– or –
Press the
logs. See One Touch DC.
2. Touch next to the entry you want to place a Direct Connect call.
3. Continue the Direct Connect call as described previously.
To redial your most recent Direct Connect call, press the
Tip:
screen.
Home
> >
DC Button
Recent DC's
to display your Direct Connect (including Call Alert and Invite) Call
tab.
DC Button
on the recent DC’s
Make a Direct Connect Call from the DC Book
The DC book contains the numbers and groups you can place a Direct Connect call to.
1. Press
2. Touch an entry to place a Direct Connect call.
Home
> >
DC book
tab.
3. Continue the Direct Connect call as described previously.
Phone Calls 53
Page 66

Availability Notifications
You will receive a message when you place a Direct Connect call to a contact and that contact
is on another call. You can press the
request to be notified when the contact becomes available.
To send a request:
DC Button
to try again, or you may be able to send a
■ Touch
When you receive a requested notification, you can respond in various ways. If you receive a
notification while in a DC call, touch
notification.
To return the call:
1. With the notification displayed, press and hold the
2. Continue with the Direct Connect call as previously detailed.
To place a voice call:
■ Press the
To dismiss a notification:
■ Touch
Notify when available
Speaker Button
Ignore
.
.
Call back
.
to finish the current call and respond to the
DC Button
.
Answer Direct Connect Calls
When you receive a Direct Connect call, you hear an incoming tone or the phone vibrates,
depending on your settings. You will see the Direct Connect number and the caller’s name (if
available) on your screen. You may also hear the caller’s voice through the speakerphone.
Default for Direct Connect calls is speakerphone on. You can turn the speakerphone off and
listen to Direct Connect calls through the earpiece as you would a regular call, or you can listen
through a headset.
Answer Direct Connect Calls
1. Press the
feature.
If you enable the Direct Connect speakerphone ( ), you will hear the caller’s
voice through the speakerphone on the front of the phone.
If you disable the Direct Connect speakerphone ( ), you will only hear the
caller’s voice through the earpiece.
2. Accept the incoming call. If available, the caller’s name and Direct Connect number also
appear on the display.
Phone Calls 54
Speaker Button
to either enable or disable the Direct Connect speakerphone
Page 67

3. When the caller has finished speaking, you will hear a tone and see “
the display.
Push to Talk
” on
4. Press and hold the
appear onscreen. Continue the Direct Connect call as described previously.
Tip: Touch to dismiss an incoming Direct Connect call.
Touch
Tip:
Bluetooth
DC Button
to route the audio through a paired Bluetooth device.
and wait for a tone to sound and a message (“Me”) to
Convert a Direct Connect Call to a Phone Call
1. While on a Direct Connect call, touch
2. Read the message, and then select a number (if more than two numbers are available)
or touch
number.
Tip: Quieting incoming calls and increasing your privacy.
incoming Direct Connect calls may disturb others, or if you wish to increase the privacy of your
calls, please set your speakerphone to “off” and your ringer to “vibrate.” When the
speakerphone is off, Direct Connect calls use the phone’s earpiece and microphone, while still
utilizing the DC Button. You may also use an earbud or other hands-free device for increased
convenience.
Convert call
. Your phone ends the Direct Connect call and dials the selected
Convert call
.
When you are in an area where
End a Direct Connect Call
There are two ways to disconnect a Direct Connect call.
■ Do nothing; the call will automatically end after several seconds if neither party presses
the
DC Button
– or –
Touch .
.
Call Alerts
Call Alerts let you notify others that you want to communicate with them using Direct Connect.
When a user receives a Call Alert, the phone sounds a tone and displays your name or Direct
Connect number.
Send a Call Alert
Send a notification to start a Direct Connect call.
1. Press
Send Call alert
Home
> >
.
Dialpad
tab. Enter a Direct Connect number and touch >
Phone Calls 55
Page 68

– or –
Touch on the Contacts details screen, the Recent DC’s details screen, the DC book
screen, or the Quick contact screen.
When sending a Call Alert, make sure you select the Direct Connect number for the
Note:
person you are trying to reach.
2. Touch
Important:
users with Sprint phones. If you send a Call Alert with text to another Direct Connect subscriber
without this capability, the user will receive the Call Alert but will not receive the text message.
Note: There is no additional charge to send preset text messages with Call Alerts.
3. Press and release the
displays an alert.)
Tip: If you get an error message saying that your contact “is not reachable via Direct Connect”
or “this number is not DC capable,” please check to see that you have entered or highlighted a
valid Direct Connect number.
Add text
Preset text messages with Call Alerts can only be sent to and from Direct Connect
and select a text, if you want to attach a preset text to the alert.
DC Button
. (The receiving phone emits an incoming tone and
Reply to a Call Alert
Call Alerts continue to repeat for a set amount of time or until you return the call or dismiss the
alert. See Call Alerts to adjust the settings. If you receive a Call Alert while in a DC call, touch
Call back
To reply to a Call Alert:
to finish the current call and respond to the Call Alert.
1. With the Call Alert displayed, press and hold the
2. Continue with the Direct Connect call as previously detailed.
To place a voice call:
■ Press the
To dismiss a Call Alert:
■ Touch
Speaker Button
Dismiss
.
.
DC Button
to return the call.
Make Group Connect Calls
A Group Connect call is a Direct Connect call made to up to 20 Direct Connect users with Sprint
phones nationwide at one time.
You can make a Group Connect call in several different ways:
Phone Calls 56
Page 69

● By setting up a group entry in Contact on your phone.
● By using the Sprint Mobile Sync tool at sprint.com/mysprint. See Sprint Mobile Sync.
● By selecting or entering multiple numbers for a one-time call.
For information on creating groups and storing them in Contacts, see Add a Group Connect
Contact.
Important:
in Contacts, you must select an entry’s Direct Connect–capable number. If you select a number
that is not Direct Connect–capable, the name will be added to the list, but Group Connect calls
will not go through to that group member.
When making a Group Connect call or creating a group list for Group Connect calls
Make Group Connect Calls
You can make Group Connect calls by selecting saved groups from your Contacts, selecting
from group calls saved in Call log, or by creating groups for one-time use.
Make a Group Connect Call from Contacts
1. Press
2. Touch next to the group entry you want to place a Group Connect call to.
3. Continue the Group Connect call in the same manner as a one-to-one Direct Connect
call.
Only one person at a time may speak on a Group Connect call.
Note:
4. When you are finished, touch to end the call. (By default, when you end a
Group Connect call that you initiated, all other participants are dropped from the call. To
change this option, see Group Call Options.)
Home
> >
People
>
DC Groups
tab.
Note: If you get an error message saying that your contact “is not reachable via Direct Connect”
or “this number is not DC capable,” please check to see that you have entered or highlighted a
valid Direct Connect number.
Make a Group Connect Call from Recent DC’s
1. Press
2. Touch next to the group entry you want to place a Group Connect call to.
3. Continue the Group Connect call as described previously.
Phone Calls 57
Home
> >
Recent DC's
tab.
Page 70

Make a Group Connect Call from the DC Book
1. Press
2. Touch a group entry to place a Group Connect call.
3. Continue the Group Connect call as described previously.
Home
> >
DC book
tab.
Make a Group Connect Call without Saving the Group
1. Press
– or –
Press
2. Touch >
3. Select entries from the People list.
4. When you have finished selecting entries, press the
5. Continue the Group Connect call as described previously.
Home
Home
> >
> >
DC Multiple
People
Recent DC's
.
>
DC Groups
tab or
DC book
tab.
tab.
DC Button
.
Join or Rejoin a Group Connect Call
If you are not available at the beginning of a Group Connect call, or if you drop off the call
temporarily, you can rejoin the in-progress Group Connect call.
1. Press
2. Touch next to the group entry you want to join or rejoin.
3. Continue the Group Connect call as described previously.
You may also join or rejoin a Group Connect call from your Contacts. Touch next to
Tip:
the group entry.
If the Group Connect call has already ended, pressing the
Note:
Group Connect call.
If you do not want to participate in a Group Connect call, touch .
Note:
Home
> >
Recent DC's
tab.
DC Button
initiates a new
Group Connect Call Information
Your phone’s display may show some useful information during a Group Connect call.
Phone Calls 58
Page 71

During a Group Connect call, the following information may appear on your screen:
● The name of the group.
● The name or Direct Connect number of the person speaking.
● The number of group members who are connected to the call out of the number invited
(for example, 4 out of 6).
TeamDC
TeamDC lets Direct Connect users make group calls to up to 200 other users nationwide. With
TeamDC, any Direct Connect or Sprint user can create a TeamDC group online, which the
system then automatically pushes to all the group members’ phones. Once a user creates and
distributes a TeamDC group, any member of the group can make a TeamDC call to the entire
group. If the user who created the group makes any changes to the group, the system
automatically sends updates to the members’ phones.
Set Up a TeamDC Group
Any Direct Connect subscriber on a Sprint phone can create TeamDC groups online. Only the
TeamDC group creator or an account administrator may modify a group member list once he or
she has created it.
1. Sign on to your account at sprint.com/mysprint.
2. From your account summary page, click
Mobile Sync
3. Add TeamDC members directly (using Direct Connect numbers) or select individual
members or groups from your Contacts list.
4.
(Optional)
(default is
You can assign a priority of
During a TeamDC call, members with a higher Talker Priority can “break in” when
members with a lower priority are speaking.
Note: Talker Priority
level (Low, Medium, or High) for each member of a TeamDC group. When a TeamDC call is
active, members with a higher priority may interrupt a member with a lower priority while that
member is speaking. By default, the system sets all members of a TeamDC group to a “Medium”
priority level.
5. Click
Save
>
My Contacts
Click
Set Talker Priority
Medium
to save the TeamDC group and distribute it to the other group members.
).
: The optional TeamDC “Talker Priority” feature lets you define a priority
>
Add group
Low, Medium
My services and device
>
TeamDC
to select a Talker Priority for each group member
, or
.
to each member.
High
>
Contacts
>
Launch
Phone Calls 59
Page 72

Update TeamDC Groups
Connect to the network to keep your TeamDC groups’ list up-to-date.
1. Press
2. Touch >
Your phone will connect to the network and retrieve a current list of TeamDC groups
Home
for your account.
> >
List TeamDC Group
People
>
DC Groups
.
tab.
Make a TeamDC Call
Place a call to the members in a TeamDC group.
1. Press
– or –
Press
2. Touch or next to the TeamDC group you want to make a TeamDC call.
You can touch an entry from
Tip:
Home
Home
> >
> >
People
Recent DC's
Home
>
DC Groups
tab.
> >
tab.
DC book
tab.
3. Continue the TeamDC call as any other Direct Connect or Group Connect call.
4. When you are finished, press to end the call. (By default, when you end a
TeamDC call that you initiated, all other participants are dropped from the call. To
change this option, see Group Call Options.)
Join or Rejoin a TeamDC Call
If you are not available at the beginning of a call, or if you drop off the call temporarily, you can
rejoin the in-progress TeamDC call.
1. Press
2. Touch next to the TeamDC group you want to make a TeamDC call.
3. Continue the TeamDC call as described previously.
You may also join or rejoin a TeamDC call from your Contacts. Touch next to the
Tip:
TeamDC group.
Home
> >
Recent DC's
tab.
Phone Calls 60
Page 73

If the TeamDC call has already ended, pressing the
Note:
call.
DC Button
Remove Yourself from a TeamDC Group
You may have the option to remove yourself from a TeamDC group.
initiates a new TeamDC
1. Press
2. Touch an entry to display the TeamDC group details screen.
3. Touch >
4. Touch
This action also deletes the TeamDC group you belonged to from your Contacts.
Note:
TeamDC group membership can either be forced or non-forced. With a forced TeamDC
Note:
group, an end user on the same account cannot be removed from the group, whereas a user
not on the same account can.
Home
> >
Remove Me
Remove
People
.
.
>
DC Groups
tab.
TeamDC Call Information
Your phone’s display may show some useful information during a TeamDC call.
During a TeamDC call, the following information may appear on your screen:
● The name of the group.
● The name or Direct Connect number of the person speaking.
● The number of TeamDC members who are connected to the call out of the number
invited (for example, 4 out of 6).
Opt-In TeamDC
Opt-In TeamDC works like a chatroom. You can make and manage Opt-In TeamDC groups in
the same way as you would for TeamDC groups on the Web. You can also send an Invite
during an Opt-In TeamDC call to the group members who have not yet joined the call. (See
Send an Invite During a Call.)
Scan Lock
At any given time, you can specify which TeamDC and Opt-in Team DC groups you wish to be
active on your phone. You can either participate in all TeamDC and Opt-in TeamDC calls for
which you are a member, or select specific groups to be active. The Direct Connect service is
suspended while configuring the scan lock settings.
1. Press
Phone Calls 61
Home
> >
People
>
DC Groups
tab.
Page 74

2. Touch >
the server, or updating the list on your phone, and selecting groups from the list.
– or -
List TeamDC Group
> >
Scan lock
for downloading the group list from
Touch >
3. Select an option:
Receive all TeamDC calls
for all groups.
Select which TeamDC calls to receive
calls and Invites for certain groups only. Select the groups and touch OK.
Scan lock
for selecting groups from the list saved on your phone.
to allow TeamDC calls, Opt-In TeamDC calls, and Invites
to allow TeamDC calls, Opt-In TeamDC
Invites
You can send an Invite to initiate a Group Connect call. When the group members receive an
Invite, their phones sound a tone and display your name (if it is in Contacts).
While on a call, you may also send an invitation message to a specific Contacts entry, or to the
group members who have not joined the call yet.
Send an Invite
You can send an Invite to initiate a call. You can also send an Invite during a call to those who
have not joined the call yet.
Send an Invite to Start a Call
To send an Invite to start an Opt-In TeamDC call:
1. Select a group from Recent DC’s or Contacts and touch next to the Opt-In
TeamDC entry.
2. When the group is not active, a message appears. Read the message and touch
Invite
Send an Invite During a Call
To send an Invite during an Opt-In TeamDC call to the group members who have not joined the
call yet:
■ While on an Opt-In TeamDC call, touch
To send an Invite during a Direct Connect or Group Connect call to a personal or group
Contacts entry:
1. While on a Direct Connect or Group Connect call, touch
Send invites
.
Add to call
.
.
Phone Calls 62
Page 75

2. Select an entry from the displayed list.
3. Touch
Invite
.
Reply to an Invite
Respond to an Invite to return the call, place a voice call, or dismiss it. If you receive an Invite
while in a DC call, touch
To reply to an Invite:
1. With the DC Invite displayed, press and hold the
2. Continue with the Direct Connect call as previously detailed.
To place a voice call:
■ Press the
To dismiss an Invite:
■ Touch
Speaker Button
Dismiss
Call back
.
to finish the current call and respond to the Invite.
DC Button
.
to return the call.
Direct Connect Settings
Some Direct Connect settings menus are available when you subscribe to Sprint Direct Connect
services.
Turn Direct Connect On and Off
By default, your phone’s Direct Connect feature is turned on.
1. Press
2. Touch On or
Your phone displays the DC Off icon ( ) on the status bar when Direct Connect is turned off.
Note: Sprint Direct Connect is not available in LTE/CDMA mode.
Note: Disabling Direct Connect from your phone’s settings menu does not affect your
subscription status to Sprint Direct Connect services.
Home
> >
.
Off
Settings
>
Direct Connect settings
>
Direct Connect
.
Direct Connect Permissions
You can control which numbers can reach your phone using Direct Connect.
To set permissions approach:
Phone Calls 63
Page 76

1. Press
Choose approach
Home
> >
.
Settings
>
Direct Connect settings
>
Permissions
>
2. Touch
calls, except those from numbers I allow.
3. Touch OK.
To edit permissions list:
1. Press
2. Touch
3. Touch
4. Touch
To remove an entry from the list:
Accept all DC calls, except those from numbers I block.
Home
New number
From contacts
From recent DC’s
> >
Edit block contacts list
and select an option:
: Enter a number and name.
: Select entries from the People list.
: Select entries from the recent DC’s list.
Add
Add new
or OK.
Settings
or
.
>
Edit allow contacts list.
Direct Connect settings
or
Reject all DC
>
Permissions
.
1. Press
2. Touch
3. Touch the delete icon next to the listing you want to remove.
Home
> >
Edit block contacts list
Settings
>
or
Edit allow contacts list.
Direct Connect settings
Group Call Options
Set the way to end a group call you initiated.
1. Press
options
2. Select an option:
Home
Allow the call to continue.:
will remain active until the last member disconnects.
End the call for everyone.:
when you hang up.
> >
.
Settings
Keeps the call active even after you hang up. The call
Terminates the call session for all connected members
>
Direct Connect settings
>
Permissions
>
Group call
.
Phone Calls 64
Page 77

Active MIC in DC Speaker Mode
Your phone is equipped with two microphones and you can choose which one to use for DC
speaker calls.
1. Press
Speaker mode
2. Select
Home
Top
or
> >
.
Bottom
.
Settings
>
Direct Connect settings
>
Active MIC in DC
DC Headset Mode
You can use the headset button as the
1. Press
2. Select the
Home
> >
DC headset mode
Settings
check box to enable the function.
DC Button
>
.
Direct Connect settings.
One Touch DC
You can select the function of the DC button when you press it in standby mode. By default, it
displays your Direct Connect (including Call Alert and Invite) Call logs. You can also select to
enable or disable the assigned function of the DC button when the phone’s display is off in idle
state.
To assign a function to the DC button:
1. Press
2. Touch
Home
Action
> >
and select an option.
Settings
>
Direct Connect settings
>
One touch DC
.
Phone Calls 65
Page 78

Launch Recent DC's list
to display your Direct Connect recent history.
Launch contacts list
DC selected contact
Contacts, Recent DC’s
DC most recent number
your Direct Connect Call logs.
Off
3. Touch
Enable
Disable
to disable one touch DC.
Action when screen off
to enable the one touch DC function even when the screen is off.
to disable the one touch DC function when the screen is off.
to display your Contacts list.
to place a Direct Connect call to a selected number. Select
, or
New number
to place a Direct Connect call to the latest number listed in
and select an option.
and enter or select the number to specify.
Beep During a DC Call
While on a DC call, you can control the beep sound for missed DC calls, Invites, Call Alerts and
Availability Notifications.
1. Press
Home
> >
Settings
>
Direct Connect settings
.
2. Select the
the check box to mute it.
Beep during DC call
check box to hear the sound during DC calls, or clear
Phone Calls 66
Page 79

Contacts
The People application lets you store and manage contacts from a variety of sources, including
contacts you enter and save directly in your phone, as well as contacts synchronized with your
Google Account, your PC, compatible email programs (including Exchange Server), and your
Facebook friends.
Get Started with People
Before using the People app, it’s best to learn a few basics.
The Contacts List
Learn how to view and navigate through your phone’s Contacts list.
■ Press Home > > People > Contacts tab. You will see the Contacts list.
● Favorites: Touch to display your favorite contacts.
● Contacts: Touch to display the individual contacts.
● Groups: Touch to display the group contacts.
● DC Groups: Touch to display the DC Group of contacts
Contacts 67
Page 80

● ICE: Touch to Touch to display your ICE (in case of emergency) contacts and your
information.
● Add contact: Touch to add a contact. See Add a Contact.
● Add group: Touch to add a group contact. See Add a Group Contact.
●
Connect calls. See Add a Group Connect Contact.
● Search: Touch to search a contact.
● Menu: Touch to display the main contacts list options.
Scroll through the list to view all your contacts. To see a specific entry, scroll to it and touch it.
Tip: If you have a lot of contacts stored, you’ll see a slider on the right when you’re flicking up or
down the list. To go directly to a letter, touch and hold the slider and drag it to a letter.
Add Group Connect contact:
Touch to add a Group Connect contact for Direct
Contacts List Options
You can access optional features in the Contacts list.
■ Press Home > > People > Contacts tab > to display the main contacts
list options.
List TeamDC Group:
be active on your phone. See Scan Lock.
Displays a list of TeamDC groups. You can select a group to
DC Multiple:
Call without Saving the Group.
Contacts to display:
Options.
Speed dial setup:
Delete:
Import/export:
visible contacts.
Accounts:
Settings:
displayed. See Display Options.
Contacts 68
Selects contacts and places a DC call. See Make a Group Connect
Selects contacts to be displayed on People. See Display
Allows you to assign a speed dial number to a selected contact.
Erases the currently selected contact or contacts.
Imports/exports contacts from/to the internal storage or shares your
Opens the sync options for accounts.
Opens the Display options page. You can select how your contacts are
Page 81

Display Options
Select which contacts to display on People.
1. Press Home > > People > Contacts tab.
2. Touch > Contacts to display.
3. Select one of the following options:
All contacts to display all the contacts you save.
Phone to display all the contacts saved in your phone.
An account (for example, Google) to display only its contacts.
Customize whether to display all the contacts saved in your phone, or to select
contact types for each account. Touch Phone or an account name, make your
selection, and then touch OK.
You can also select how your contacts are displayed.
1. Press Home > > People > Contacts tab.
2. Touch > Settings.
3. Set the following options:
Sort list by to choose how your contacts are sorted.
View contact names to choose how your contacts name is displayed.
Add a Contact
You can add contacts from the People application. Enter details such as name, phone numbers,
email addresses, mailing addresses, and more.
1. Press Home > > People > Contacts tab.
2. Touch to add a contact.
3. If you have multiple account types associated with your phone, select a contact type.
Select Phone if you want your contacts on your phone only; they will not be synced
with your Google Account.
Contacts 69
Page 82

Select Google if you want to save contacts to your Google Account; these will be
synced automatically with your Google Account online.
4. Use the keyboard to enter as much information as you want.
: Touch the picture icon to assign a picture to the contact. See Assign a Stored
Picture to a Contact or Assign a New Picture to a Contact.
Name
Add organization
PHONE
EMAIL
ADDRESS
Add another field:
IM, Notes, Nickname, Website, Internet call
Note: To select a type (label) for a phone number, email address, or postal address (such as
MOBILE, HOME, WORK, etc.), touch the type to the left of the field and select the appropriate
type.
Note: To add more phone numbers, email addresses, etc., touch Add new under the current
numbers or addresses.
5. When you have finished adding information, touch Save.
Touch to include additional information such as
, etc.
Phonetic name
Save a Phone Number
You can save a phone number to Contacts directly from the phone dialpad.
1. Press Home > > Dialpad tab to display the phone dialpad.
2. Enter a phone number and touch Add to contacts.
3. To add the number to an existing contact, touch the contact, select a number type for the
new number, and then touch OK.
,
– or –
To add the number as a new contact, touch CREATE NEW CONTACT, enter the name
and any additional information, and then touch Save. See Add a Contact.
Contacts 70
Page 83

Edit a Contact
Once you’ve added a contact, you can add or edit any of the information in the entry, assign a
caller ID picture, customize with a unique ringtone, and more.
Add or Edit Information for a Contact
Use the Edit contact menu to add or edit information for an existing contact.
1. Press Home > > People > Contacts tab.
2. Touch a contact to display it, and then touch > Edit.
3. Touch any field you want to change or add. See Add a Contact.
4. Add or edit the information, and then touch Save.
Note: To select a type (label) for a phone number, email address, or postal address (such as
MOBILE, HOME, WORK, etc.), touch the type to the right of the field while on the edit contact
menu.
Note: To add more phone numbers, email addresses, etc., touch Add new under the current
numbers or addresses.
Assign a Stored Picture to a Contact
The Edit contact menu lets you assign a picture stored in your phone’s memory to a contact.
1. Press Home > > People > Contacts tab.
2. Touch a contact to display it, and then touch > Edit.
3. Touch the contact icon to the right of the name.
4. Touch Choose photo from Gallery and select a location.
5. Touch a picture to select it and select an app to use.
You may be prompted to size the picture for use with contacts. Drag the square to
frame the portion of the picture to use. Touch and hold the edge of the square and
drag it to resize the square and touch Save or SAVE.
6. Touch Save to save the contact.
Assign a New Picture to a Contact
Follow the instructions to take a new picture and assign it directly to an existing contact.
Contacts 71
Page 84

1. Press
Home
> >
People
>
Contacts
tab.
2. Touch a contact to display it, and then touch
3. Touch the contact icon to the right of the name.
4. Touch
5. Touch to take a picture. If you’re satisfied with the picture, touch OK to continue.
6. Touch
Take photo
You may be prompted to size the picture for use with contacts. Drag the square to
frame the portion of the picture to use. Touch and hold the edge of the square and
drag it to resize the square and touch
to save the contact.
Save
.
Save
>
or
.
Edit
SAVE
.
Assign a Ringtone to a Contact
Know who’s calling without looking at your phone by assigning a specific ringer to a contact.
1. Press
2. Touch a contact to display it, and then touch
Home
> >
People
>
Contacts
tab.
>
Set ringtone
.
3. Touch an available ringtone.
When you touch a ringtone, you will hear a sample.
4. Touch OK to assign the ringtone.
Assign a Vibration to a Contact
You can assign a specific vibrate pattern to a contact.
1. Press
2. Touch a contact to display it, and touch
3. Touch an available vibration.
When you touch a vibration, you will feel a vibration.
4. Touch OK to assign the vibration.
Home
> >
People
>
Contacts
>
tab.
Set vibrate
.
Contacts 72
Page 85

Add a Contact to Favorites
The Favorites tab of the People application is a listing that can help you access your frequent or
preferred contacts entries.
1. Press
2. Touch a contact.
3. Touch . The icon changes to when the contact is added to Favorites.
Home
> >
People
>
Contacts
tab.
Send a Contact’s Call to Voicemail
You can transfer your contact’s voice call to voicemail anytime you receive it.
1. Press
2. Touch a contact to display it, and then touch .
3. Select the
Home
> >
All calls to voicemail
People
>
Contacts
check box.
tab.
Add a Contact Widget to the Home Screen
You can place your favorite contacts on the home screen.
1. Press
Home
> >
People
>
Contacts
tab.
2. Touch a contact to display it, and then touch > Place on Home screen. The contact
widget is added to your home screen.
Tip: To remove a contact widget from the home screen, touch and hold a contact widget and
drag it over “X Remove” at the top of the screen and release it when it turns red.
Delete a Contact
You can delete a contact from the contacts details page.
1. Press
2. Touch a contact to display it, and then touch > Delete.
3. Touch OK.
Home
> >
People
>
Contacts
tab.
Add a Group Contact
Create a group contact with your personal contact entries in People.
Contacts 73
Page 86

In order to create a group contact, you may first sync your phone with a Google or
Note:
Corporate account. See Synchronize Contacts for instructions on how to sync your phone to an
account.
1. Press
2. Touch to add a group contact.
3. Select the account in which you want to create a group contact.
4. Enter the group’s name.
5. Touch Add new and check the entries that you want to add to the group contact.
6. Touch Done, and touch Save after confirming the group contact information.
Home
> >
People
>
Groups
tab.
Edit a Group Contact
Manage the group contacts you create.
Add or Remove the Group Contact, or Rename the Group
1. Press
2. Touch a group contact and touch
Home
> >
People
>
Groups
>
Edit
tab.
.
3. The following options are available:
Touch the group’s name to rename it.
Touch Add new to add an entry to the group contact. Check the entries that you
want to add, touch Done, and confirm the group contact information.
Touch next to the entry you want to remove from the group.
4. Touch
Save
.
Delete a Group Contact
1. Press
2. Touch a group contact and touch
Home
> >
People
>
Groups
>
Delete
tab.
> OK.
DC Group Contact
Your phone stores Group Connect entries, TeamDC entries, and Opt-In TeamDC entries in DC
group contact. You can store up to 25 Group Connect entries. Each Group Connect entry can
Contacts 74
Page 87

contain up to 20 members for making Direct Connect group calls. The TeamDC and Opt-In
TeamDC entries are created and managed online. See TeamDC.
Add a Group Connect Contact
Create a Group Connect contact with your personal contact entries in People.
1. Press
2. Touch to add a DC group contact.
3. Touch
4. Enter the group’s name.
5. Touch
Home
> >
Add new
.
Save
People
and select the entries from the available list and touch OK.
>
DC Groups
tab.
Edit a Group Connect Contact
Manage the Group Connect contacts you create.
Add or Remove the Group Connect Contact, or Rename the Group
1. Press
2. Touch an entry and touch >
3. The following options are available:
Home
> >
People
Edit
>
DC Groups
.
tab.
Touch the group’s name to rename it.
Touch
Touch next to the entry you want to remove from the group.
4. Touch
Add new
Save
.
to add an entry to the group.
Delete a Group Connect Contact
1. Press
2. Touch an entry and touch >
Contacts 75
Home
> >
People
Delete
>
DC Groups
> OK.
tab.
Page 88

ICE (In Case of Emergency)
Registering ICE information might help rescue workers, such as paramedics and police officers,
as well as hospital personnel, identify your primary contact or special medical need you might
have in case of emergency.
ICE Contacts
You can register up to five emergency contacts.
To add an ICE contact:
1. Press Home > > ICE .
– or –
Press Home > > People > Contacts tab, and then touch ICE- In Case of
Emergency.
2. Touch . You can register up to five emergency contacts.
Note: You will be prompted to enable the Location settings if they are disabled. Read the
onscreen information and follow the instructions.
3. Touch the entry to register.
To remove an ICE contact:
1. Press
2. Touch and touch the contact to remove.
3. Touch OK.
Home
> >
ICE
.
Personal Information
You can register your own information, medical information, etc.
1. Press Home > > ICE .
– or –
Press Home > > People >Contacts tab, and then touch ICE- In Case of
Emergency.
Contacts 76
Page 89

2. Touch My emergency information > .
3. Enter or edit the necessary information and touch Save.
Synchronize Contacts
Syncing data from your managed accounts lets you add and manage new or existing contacts
from your online or remote accounts to your phone. Prior to syncing, you must have an active
Google or Corporate account with associated contacts, and be signed into your account with the
phone.
With syncing, any contacts (with phone numbers, email addresses, pictures, etc.) are updated
and synced with your phone.
For more information about syncing existing managed accounts, see Manage Existing Accounts.
1. Press
2. Touch
3. Touch the account you want to sync your contacts with.
4. Select the
The process of updating your contacts tab can take several minutes. If after 10-20
Note:
minutes, your list has not been updated, repeat steps 3 and 4.
Your People then reflects any updated contact information.
■ This update process works both ways. For example, any changes on the phone are
updated to your Gmail contacts list after sync.
Home
> >
Corporate, Google
Contacts
check box.
Settings
, etc. under ACCOUNTS.
.
Share a Contact
You can quickly share contacts using Bluetooth, email, Gmail, or text messaging.
1. Press Home > > People > Contacts tab.
2. Touch a contact to display it, and then touch > Share.
3. In the Share contact via menu, select a method:
Bluetooth to send the information via Bluetooth. See Bluetooth for information on
pairing and sending via Bluetooth.
Drive to send the information to Drive. Confirm, or edit, the document title and
account and folder to save, and then touch OK.
Contacts 77
Page 90

Email to send the information as an email attachment. See Compose and Send
Email for details on sending email.
Gmail to send the information as a Gmail attachment. See Send a Gmail Message
for details.
Messaging to send the information in a multimedia message. For more information
on text messaging, see Text and Multimedia Messaging.
Sprint Mobile Sync
You can add and edit all your contacts and groups, including TeamDC and Opt-In TeamDC
groups, online using the Sprint Mobile Sync service.
With Sprint Mobile Sync you can:
●
Add and edit contacts and groups.
manage contacts and groups, and set up and manage TeamDC and Opt-In TeamDC
groups.
●
Synchronize and back up your contacts.
phone in a secure location, and automatically synchronize new information from the
computer to the phone and from the phone to the computer.
●
Transfer contacts to a new phone.
Sync sends your existing contact information to the phone upon activation.
●
Erase contact information from a lost phone.
Mobile Sync can remotely remove all the contact information. You can then send the
information to your replacement phone.
●
Import and export contacts with online address books.
information from or to Outlook, or other compatible databases.
Access Sprint Mobile Sync Online
1. Sign on to your
2. Click
My services and device
My Sprint
page at sprint.com/mysprint.
Use your computer to easily add, edit, and
Save all the contacts information from your
When you activate a new phone, Sprint Mobile
If your phone is lost or stolen, Sprint
Import or export contact
>
Contacts
>
Launch Mobile Sync
.
Follow the onscreen instructions to add, edit, and manage all your contact information.
Contacts 78
Page 91

Accounts and Messaging
With wireless service and your phone’s messaging capabilities, you have the opportunity to
share information through many different channels and accounts, including Gmail (Google),
personal and corporate email, text and multimedia messaging, and social networking accounts.
Gmail / Google
You will need a Google Account to access several phone features such as Gmail, Google Maps,
YouTubeTM, and the Google Play applications. Before you are able to access Google
applications, you must enter your account information. These applications sync between your
phone and your online Google Account.
Create a Google Account
If you do not already have a Google Account, you can create one online or using your phone.
Note: Although you need a Gmail account to use certain features of your phone, such as
Google Play, you do not need to use Gmail as the default account for your phone.
Create a Google Account Online
1. From a computer, launch a Web browser and navigate to google.com.
2. On the main page, click Sign-in > Create an account now.
3. Follow the onscreen prompts to create your free account.
Create a Google Account Using Your Phone
1. Press Home > > Settings > Add account.
2. Touch Google and then touch New.
3. Enter your First name and Last name, and then touch .
4. Enter a desired Username, and then touch .
5. When prompted, enter and reenter a password, and then touch .
6. Touch Set up recovery options to configure your Google password recovery.
Note: When setting up a new Google Account, either on your phone or online, you will be
prompted to add a secondary email address. Enter a second Gmail address or any other email
address from which you currently send and receive email. This address is used to authenticate
your account should you ever encounter problems or forget your password. It is strongly
Accounts and Messaging 79
Page 92

encouraged for Android users so you can regain access to Google services and purchases on
your phone.
7. Select the BACKUP & RESTORE and COMMUNICATION options, if prompted, and
touch .
8. Touch I accept if you agree to the Google Terms of Service and Privacy Policy, Chrome
Terms of Service and Privacy Notice, and Google Play Terms of Service.
9. Type the displayed texts for authentication and touch .
10. To join Google+, touch Get started and follow the onscreen instructions.
11. Enter your credit card information to enable purchases at Google Play Store. Your
account is displayed under ACCOUNTS in the Settings menu.
Sign In to Your Google Account
If you have a Google Account but have not yet signed in with your phone, follow these
instructions to sign in to your Google Account.
1. Press Home > > Settings > Add account.
2. Touch Google, and then touch Existing.
3. Enter your Gmail username and password, and then touch .
4. Read and accept the Google Terms of Service, and then touch OK.
5. Follow the onscreen prompts to sign in to your current Google Account.
6. After your phone connects with the Google servers, select the items you would like to
sync with your phone, and then touch . Your account is displayed in Google under
ACCOUNTS in the Settings menu.
Access Gmail
Access your personal Gmail account directly on your phone.
1. Press Home > > Gmail .
2. Do any of the following:
View more email messages: If the inbox is full, swipe your finger up the screen to
view more messages and conversations.
Read a new email message: Touch the unread message or the conversation with an
unread message (just-arrived items display in bold).
Accounts and Messaging 80
Page 93

Select messages and conversations: Touch the box before the email or
conversation.
View the inbox of your other Gmail account:
• Touch the account name at the top of the inbox, and then touch the account you
want to view.
Refresh the inbox: Swipe down to refresh the inbox.
Send a Gmail Message
Use your phone to send Gmail messages.
1. Press Home > > Gmail .
2. In any folder, touch .
3. Enter the message recipient’s email address in the To field. If you are sending the email
message to several recipients, separate the email addresses with a comma. As you
enter email addresses, any matching addresses from your contacts list are displayed.
Touch a match to enter that address directly.
4. If you want to send a carbon copy (Cc) or a blind carbon copy (Bcc) of the email to other
recipients, touch > Add Cc/Bcc.
5. Enter the email subject, and then compose your email.
Note: If you want to attach a picture, touch > Attach file. Locate and touch the picture you
want to attach.
6. After composing your message, touch .
Note:
draft messages, touch at the top of the Gmail screen, and then touch
Note:
Sent
While composing the message, touch >
To view your sent messages, touch at the top of the Gmail screen, and then touch
.
Save draft
to save it as a draft. To view your
Drafts
.
Read and Reply to Gmail Messages
Your phone allows you to access, read, and reply to all your Gmail messages.
1. Press Home > > Gmail .
2. Touch a message to display it.
Accounts and Messaging 81
Page 94

Tip: You can also access new messages through the Notifications bar. When a new Gmail
message arrives, you’ll see the icon in the Notifications bar. Slide the bar down to display
notifications. Touch a message to display it.
3. To reply to or forward a message:
Touch to reply to the message.
Touch >
Touch >
Touch > Print to save the print job as a PDF file to your Google Drive.
4. After composing your message, touch .
Reply all
Forward
to reply to all recipients.
to forward the message.
Email
Use the Email application to send and receive email from your webmail or other accounts, using
POP3 or IMAP, or access your Exchange ActiveSync account for your corporate email needs.
Add an Email Account
You can add several types of personal email accounts, such as POP3 and IMAP accounts, on
your phone.
Add an Email Account from the Settings Menu
1. Press Home > > Settings > Add account > Email.
2. Enter the Email address and Password for the email account and then touch Next.
Touching Next prompts your phone to attempt a "regular" email setup and test the
incoming and outgoing servers.
If you have custom settings you need to configure, touch Manual setup and enter
your settings. These may include mail type, user name, password, server, security
type, etc.
3. Select your sync settings and then touch Next.
4. Enter an account name and a display name and touch
Important:
asked to enter more details. You should get all pertinent information for the email account, such
as incoming and outgoing server settings, before you proceed.
Accounts and Messaging 82
If the account type you want to set up is not in the phone database, you will be
to complete setup.
Next
Page 95

Add an Email Account from the Email App
You can also set up email accounts directly from the Email app.
1. Press Home > > Email .
2. Do one of the following:
If you have already added an email account, in your email inbox, touch >
Settings, and then touch ADD ACCOUNT.
3. Enter the Email address and Password for the email account and then touch Next.
Touching Next prompts your phone to attempt a "regular" email setup and test the
incoming and outgoing servers.
If you have custom settings you need to configure, touch Manual setup and enter
your settings. These may include mail type, user name, password, server, security
type, etc.
4. Select your sync settings and then touch Next.
5. Enter an account name and a display name and touch Next to complete setup.
Important: If the account type you want to set up is not in the phone database, you will be
asked to enter more details. You should get all pertinent information for the email account, such
as incoming and outgoing server settings, before you proceed.
Add a Corporate Account
If you synchronize your phone with your corporate account, you can read, manage, and send
email in the same easy way as with a POP3/IMAP account. However, you can also access
some powerful Exchange features.
Important: Before setting up a Microsoft Exchange ActiveSync Account, contact your
company’s Exchange Server administrator for required account settings information.
1. Press
2. Enter the
Home
company's network administrator for further details:
Email address:
Password:
> >
Email address
typically your network access password (case-sensitive).
Settings
and
your corporate email address.
>
Password
Add account
information and then touch
>
Corporate
.
. Consult your
Next
3. Enter the Username, Password, Server, Domain, Port information:
Username:
Accounts and Messaging 83
enter your network login username.
Page 96

Password:
typically your network access password (case-sensitive).
Server:
mail.XXX.com. Obtain this information from your company’s network administrator.
Domain:
Port:
4. If your network requires SSL encryption, select the SSL/TLS from the dropdown list and
activate this additional level of security.
5. Touch
6. If the onscreen activation disclaimer is displayed, touch OK.
7. Configure your
between your phone and server), and activate any other email settings, and then touch
.
Next
Note:
completion issues.
Signal interruptions or incorrect user name or password information can cause
8. Identify your new account with a unique name and touch
your exchange server remote email address. Typically it is in the form
enter your network domain.
enter the appropriate port number.
.
Next
Incoming checking frequency, Days to sync
(days to synchronize
.
Next
Note:
on your phone.
You can have multiple corporate email (Microsoft Exchange ActiveSync) accounts active
Compose and Send Email
Compose and send email using any account you have set up on your phone. Increase your
productivity by attaching files such as pictures or videos to your email messages.
1. Press Home > > Email .
2. In any folder, touch .
Tip: Touch the account name at the top of the screen to switch to a different email account.
3. Fill in one or more recipients. You can:
Enter email addresses directly in the To field. If you’re sending the email to several
recipients, separate the email addresses with a comma. As you enter email
addresses, any matching addresses from your contacts list are displayed. Touch a
match to enter the address directly.
Tip: If you want to send a CC or a BCC of the email to other recipients, touch > Add
Cc/Bcc.
Accounts and Messaging 84
Page 97

4. Enter the subject, and then compose your message.
5. To add an attachment, touch > Attach file. You can choose from Pictures, Take
picture, Videos, Record video, Audio, or Others.
Touch to delete a selected attachment from your current email.
6. Touch to send the message immediately, or touch > Save draft to save it as a
draft.
Note: To open a draft email, touch Inbox (top of the Email screen) and then touch Drafts.
View and Reply to Email
Reading and replying to email on your phone is as simple as on your computer.
1. Press Home > > Email .
2. On the email account inbox, touch the message you want to view.
Tip: Touch the account name at the top of the screen to switch to a different email account.
3. To reply to or forward a message:
Touch to reply to the sender of the message.
Touch
Touch to forward the message.
4. After composing your message, touch .
to reply to all recipients of the message.
Manage Your Email Inbox
Your email inbox provides management options for viewing and deleting your email messages.
View Your Email Inbox
1. Press Home > > Email .
2. Touch the email account at the top of the screen to select a different inbox.
Refresh an Email Account
Whatever your automatic synchronization settings are, you can also synchronize your sent and
received email messages manually at any time.
Accounts and Messaging 85
Page 98

■ While viewing the account you want to synchronize, touch > Refresh.
Delete an Email Message
1. On the email account inbox, touch and hold the message you want to delete.
2. Touch .
Delete Multiple Email Messages
1. On the email account inbox, touch the box next to the messages you want to delete.
2. Touch .
General Email Settings
You can edit the general settings of your email.
1. Press Home > > Email .
2. Touch > Settings > General settings. The following options are available:
Confirm before deleting: Check to display a confirmation before deleting a
message.
Confirm before sending: Check to display a confirmation before sending a
message.
Auto-advance: Choose which screen to show after you delete a message.
Sender image: Check to display an image of the sender in conversation list.
Swipe to delete: Check to delete a message in conversation list by swiping it.
View type of the mail list: Select a type of the email list from Subject oriented
type or Sender oriented type.
Message format: Select a format to use for messages.
Default image size: Select the size of the image files to attach to your message.
Exchange errors log: Check to save the Exchange ActiveSync error logs.
Email Account Settings
You can edit settings for your individual email accounts, such as email address and password,
name display and signature, frequency of retrieval, and more.
Note: Available settings depend on the type of email account.
Accounts and Messaging 86
Page 99

1. Press Home > > Email .
2. Touch > Settings.
3. Select the email account you want to edit.
4. Set the following options. Some options are available to corporate accounts only:
Account name:
Your name:
Signature:
Quick responses:
Inbox view:
Edit your account name.
Edit the name displayed on your emails.
Create an email signature for your outgoing emails.
Edit the text you frequently insert when composing emails.
Select how the inbox is displayed from Normal view and Conversation
view.
Clear email address history:
Clear all email addresses of composed emails in the
prediction list.
Sync frequency:
Enable Peak-Time:
Set the frequency to synchronize your account.
Set the two sets of time intervals to check your new emails –
one for peak time and the other for off peak-time.
• Frequency during Peak-Time: Select the time interval used by your phone to
check your new emails during peak time.
• Frequency during Off Peak-Time: Select the time interval used by your phone
to check your new emails during off peak time.
• Peak-Time schedule: Set a period of time to be the peak time according to the
days of the week.
Days to sync: Set a period of time to synchronize your account.
Sync email: Check to synchronize your email.
Sync contacts: Check to synchronize your contacts.
Sync calendar: Check to synchronize your calendar.
Sync task: Check to synchronize your task.
Sync SMS: Check to synchronize your SMS.
Accounts and Messaging 87
Page 100

Security options: Enable security options such as encrypting your outgoing
messages including attachments and attaching a digital signature to your outgoing
messages.
Download attachments: Check if you want to automatically download attachments
via Wi-Fi.
Download over Wi-Fi only: Check if you want to download content over Wi-Fi only.
Email notifications: Check to display the email notification icon on the status bar
when a new mail is received.
Choose ringtone: Select a ringtone for new email messages.
Vibrate: Select a vibrate pattern for new email messages.
Incoming settings: Adjust the incoming email parameters, such as username,
password, and other incoming connection parameters (ex: IMAP server).
Out of office settings: Set your current status and your message to reply
automatically while you are out of the office.
Mail size limit: Set the limit to partially download emails. If you want to download
the rest of the message, touch View entire email which appears below the partially
downloaded message.
Outgoing settings: Adjust the outgoing email parameters, such as username,
password, and other outgoing connection parameters (ex: SMTP server).
Text and Multimedia Messaging
With Text Messaging (SMS), you can send and receive instant text messages between your
wireless phone and another messaging-ready phone.
Multimedia messages, or MMS, can contain text and pictures, recorded voice, audio or video
files, picture slideshows, contact cards (vCard), or appointments (vCalendar).
See your service plan for applicable charges for messaging.
Send a Text Message
Quickly compose and send text messages on your phone.
1. Press Home > > Messaging .
2. On the Messaging screen, touch . The Compose screen opens.
3. Fill in one or more recipients. You can:
Accounts and Messaging 88
 Loading...