

Page 1
Duplexer
Duplexeinheit
Unité de duplexage
Unità duplex
Duplexor
User's Manual
Bedienungsanleitung
Manuel d'utilisation
Istruzioni per l'uso
Manual del usuario
For the Kyocera Laser Printers
Für Kyocera Laserdrucker
Pour imprimantes laser Kyocera
Per la stampanti laser Kyocera
Para las impresoras láser Kyocera
Page 2

Declaration of Conformity
Manufacturer’s name: Kyocera Corporation, Printer Division
Manufacturer’s address: 2-14-9 Tamagawadai, Setagaya Ward, Tokyo 158-8610, Japan
declares that the product
Product name: Duplexer
Model number: DU-21 (as tested with Printer FS-1750 and enhancement
Conforms to the following product specifications.
The manufacturer and its merchandising companies retain the following technical documentation in
anticipation of the inspection that may be conducted by the authorities concerned.
optional units HS-21, PF-21, and ST-20 etc.)
EN 55 022:1998 Class B
EN 50 082-1:1997
IEC 801-2:1991
IEC 801-3:1984
IEC 801-4:1988
EN 60 950:1992+A1+A2+A3+A4
User’s instruction that conforms to the applicable specifications
Technical drawings
Descriptions of the procedures that guarantee the conformity
Other technical information
KYOCERA ELECTRONICS EUROPE GmbH
KYOCERA ELECTRONICS EUROPE GmbH
Mollsfeld 12
40670 Meerbusch, Germany
Phone: +49 21 59 918 0
Fax: +49 21 59 918 100
Declaration of Conformity
Manufacturer’s name: Kyocera Corporation, Printer Division
Manufacturer’s address: 2-14-9 Tamagawadai, Setagaya Ward, Tokyo 158-8610, Japan
declares that the product
Product name: Duplexer
Model number: DU-21 (as tested with Printer FS-1750 and enhancement optional units
Description of device: This Page Printer Model FS-1750 is the 14ppm; up to A4 size plain paper,
Conforms to the following product specifications.
HS-21, PF-21, and ST-20 etc.)
laser, dry toner etc. The printer can be equipped with several enhancement
optional units such as the Paper Feeder PF-21, Duplexer DU-21 etc.
i
Page 3

AS/NZS 3548:1995
(CISPR 22:1993 Class B)
IEC60 950:1991+A1+A2+A3+A4
(EN 60 950:1992+A1+A2+A3+A4)
The manufacturer and its merchandising companies retain the following technical documentation in
anticipation of the inspection that may be conducted by the authorities concerned.
User’s instruction that conforms to the applicable specifications
Technical drawings
Descriptions of the procedures that guarantee the conformity
Other technical information
The manufacturer has been employed with ISO9001 scheme. The manufacturer has been attested by JQA and BS.
KYOCERA ELECTRONICS AUSTRALIA PTY., LTD
Unit 6, 112, Taravera Road North Ryde,
NSW 2113, Australia
Phone: +61 2-9888-9999
Fax: +61 2-9888-9588
Declaration of Conformity
Model Number: DU-21 (as tested with Printer FS-1750 and enhancement optional units
Trade Name: Kyocera
Responsible Party: Kyocera Electronics Inc.
Address: 11465 John's Creek Parkway
Telephone number: 770-623-2150
Fax number: 770-623-2151
Contact person for technical matter: Paul Bosak
Manufacturer’s name: Kyocera Corporation, Printer Division
Manufacturer’s address: 2-14-9 Tamagawadai, Setagaya Ward,
This device complies with Part 15 of the FCC Rules, Operation is subject to the following two
conditions: (1) This device may not cause harmful interference, and (2) this device must accept
any interference received, including interference that may cause undesired operation.
The manufacturer and its merchandising companies retain the following technical documentation in
anticipation of the inspection that may be conducted by the authorities concerned.
User’s instruction that conforms to the applicable specifications
Technical drawings
Descriptions of the procedures that guarantee the conformity
Other technical information
HS-21, PF-21, and ST-20 etc.)
Suite #250 Duluth, GA 30097, U.S.A.
Phone: 770-623-2163
Tokyo 158-8610, Japan
KYOCERA ELECTRONICS Inc.
ii
Page 4
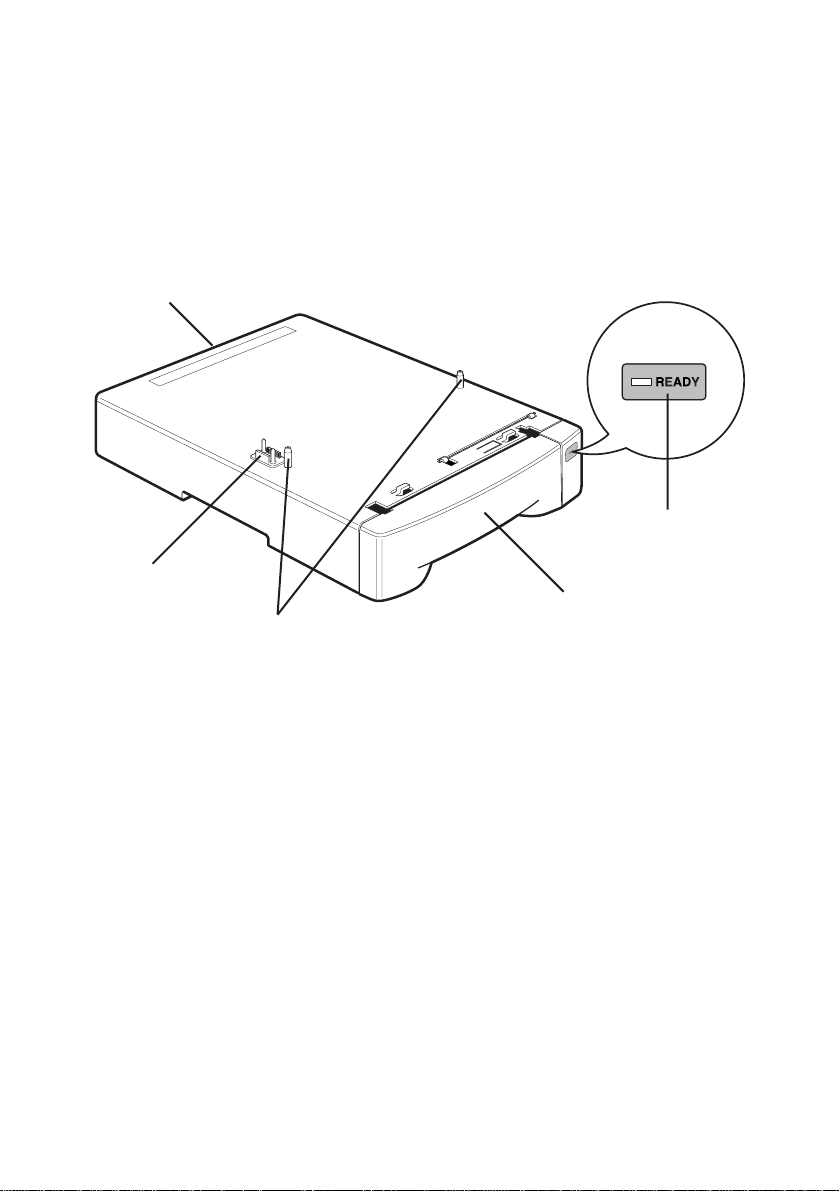
Fig. 1 Names of parts
Abb. 1 Namen der Teile
Fig. 1 Nomenclature
Fig. 1 Nome delle parti
Figura 1 Nombres de las partes
E
C
A
D
B
A - Connector A - Anschluß A - Connecteur A - Connettore A - Conector
B - Positioning pins B - Positionierungsstifte B - Broches de positionnement
B - Pe rni di posizionamento B - Clavijas de colocación
C - READY indicator C - Anzeige READY C - Indicateur READY C - Indicatore READY
C - Indicador de puesta a punto (READY)
D - Duplexer drawer D - Duplexlade D - Caser de l’unité de duplexage D - Cassetto unità duplex
D - Cajón del duplexor
E - Rear cover E - Hintere Abdeckung E - Couvercle arrière E - Coperchio posteriore E - Tapa
trasera
iii
Page 5
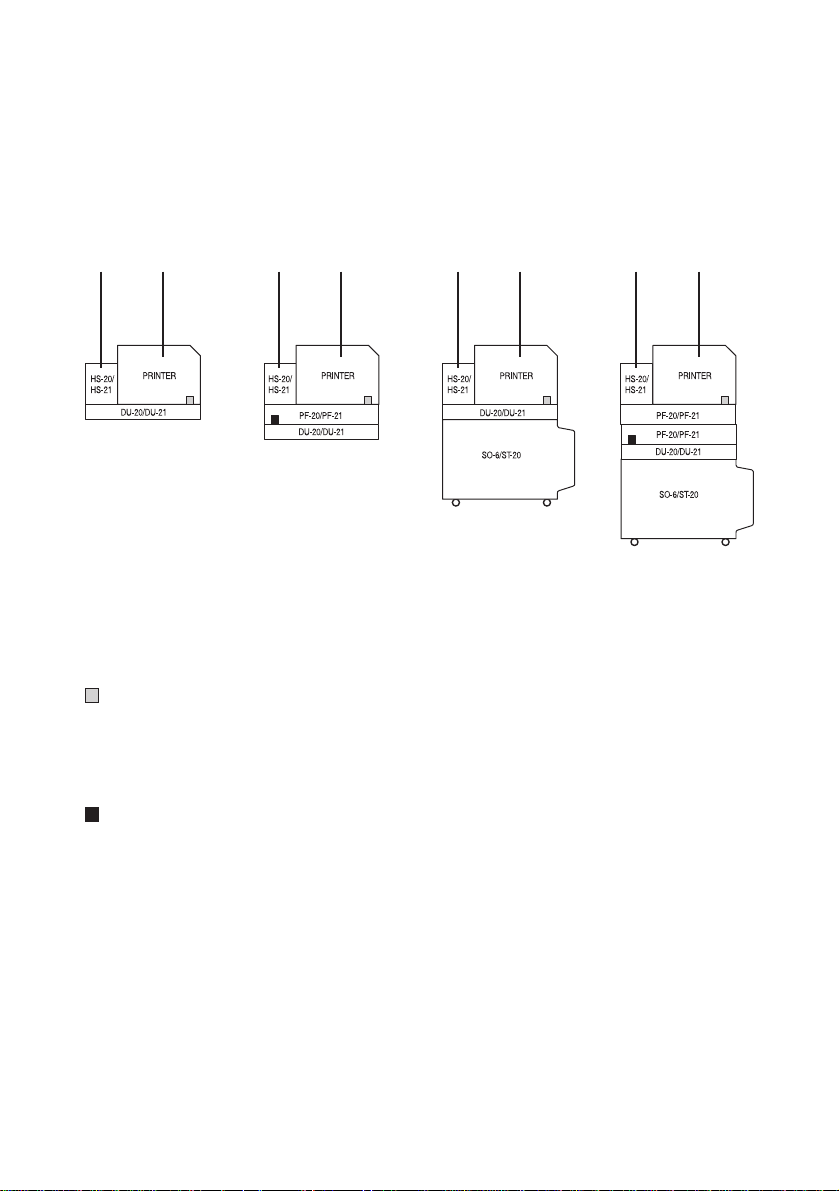
Fig. 2 Typical configurations using the duplexer
Abb. 2 Typische Konfigurationen mit der Duplexeinheit
Fig.2 Configurations typiques en utilisant l’unité de duplexage
Fig. 2 Configurazione tipica con unità duplex
Figura 2 Configuraciones típicas utilizando el duplexor
FG FG FG FG
(d)(a) (b) (c)
F - HS-20/HS-21 F - HS-20/HS-21 F - HS-20/HS-21 F - HS-20/HS-21 F - HS-20/HS-21
G - Printer G - Drucke r G - Imprimante G - Stampante G - Impresora
Optional PA-20 paper path adaptor
Optionaler Papierwegadapter PA-20
Adaptateur d’acheminement de papier optionnel PA-20
Adattatore del percorso della carta opzionale PA-20
Adaptador opcional de recorrido de papel PA-20
Optional PA-1 paper path adaptor
Optionaler Papierwegadapter PA-1
Adaptateur d’acheminement de papier optionnel PA-1
Adattatore del percorso della carta opzionale PA-1
Adaptador opcional de recorrido de papel PA-1
iv
Page 6
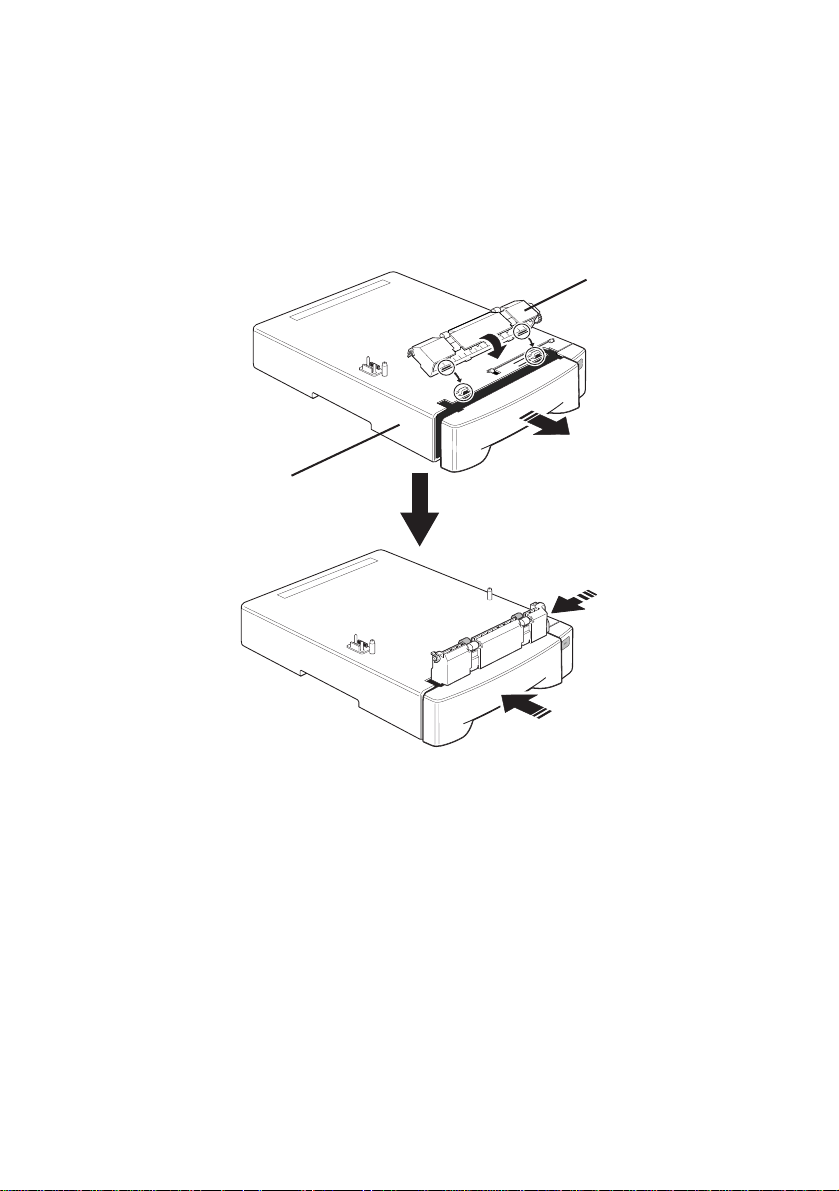
Fig. 3 Installing the PA-20 on the front of the duplexer
Abb. 3 Installieren des PA-20 an Vorderseite der Duplexeinheit
Fig. 3 Installation du PA-20 à l’avant de l’unité de duplexage
Fig. 3 Installazione del PA-20 sul lato anteriore dell’unità duplex
Figura 3 Instalación del PA-20 en la parte delantera del duplexor
PA-20
H
H - Duplexer H - Duplexer H - Duplexeinheit H - Unité de duplexage H - Unità duplex
H - Duplexor
To remove the PA-20, simpl y reverse the above procedur e.
Zum Entfernen des PA-20 den obigen Vo rgang einfach umkehren.
Pour retirer le PA-20, inverser tout simplement cette pr océdure.
Per rimuove re il PA-20, invertire semplicemente la procedura sopraindicata.
Para extraer el PA-20, invierta simplemente el procedimiento dado más arriba.
v
Page 7

Fig. 4 Lowering the printer
Abb. 4 Absenken des Drukers
Fig. 4 Pour baisser l’imprimante
Fig. 4 Posizionamento della stampante
Figura 4 Bajada de la impresora
Fig. 5 Installing the PA-1 on the rear of the duplexer
Abb. 5 Installieren des PA-1 an Rückseite der Duplexeinheit
Fig. 5 Installation du PA-1 à l’arrière de l’unité de duplexage
Fig. 5 Installazione del PA-1 sul lato posteriore dell’unità duplex
Figura 5 Instalación del PA-1 en la parte trasera del duplexor
PA-1
vi
Page 8
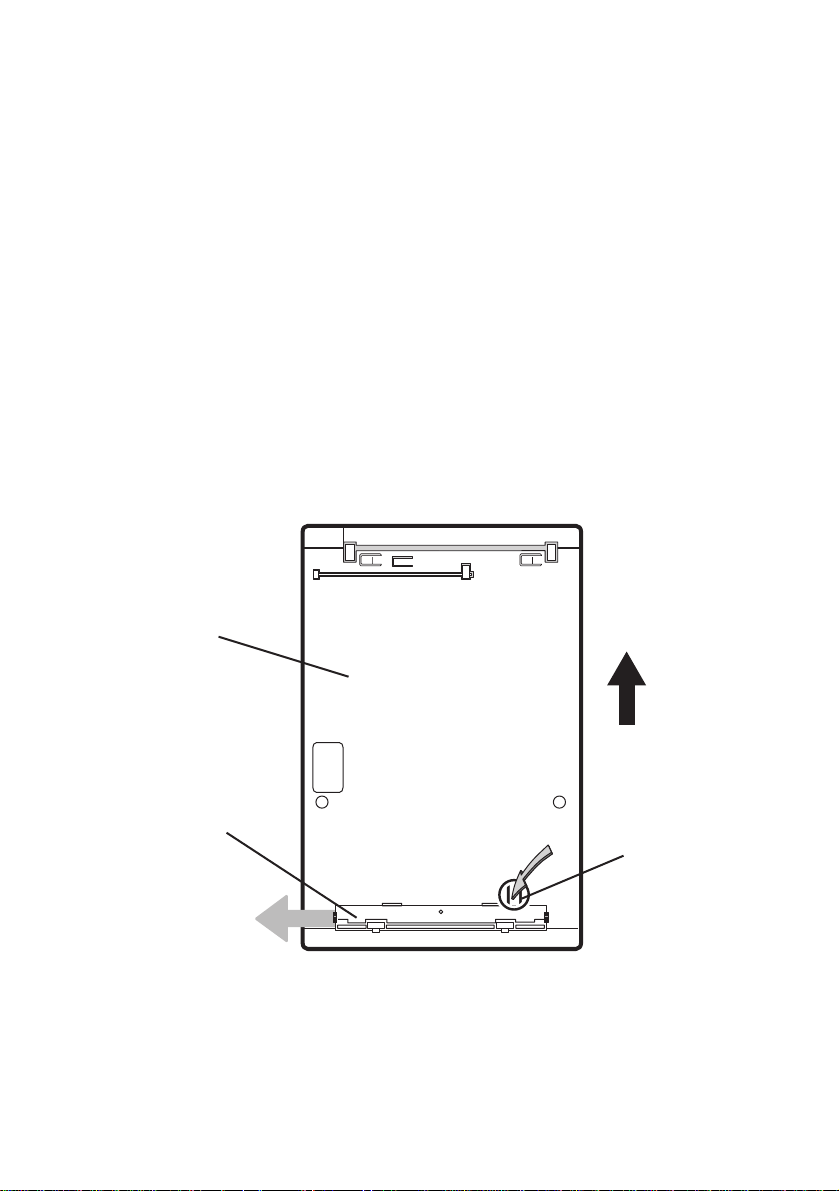
Fig. 6 Removing the PA-1
To remove the PA-1, press at the point indicated in the figure below while sliding
the PA-1 to the right.
Abb. 6 Entfernen des PA-1
Zum Entfernen des PA-1 auf den in der nachfolgenden Abbildung bezeichneten
Punkt drücken und debei den PA-1 nach rechts sch i eben.
Fig. 6 Pour retirer le PA-1
Pour retirer le PA-1, appuyer à l’endroit indiqué dans l’illustration ci-dessous tout
en glissant le PA-1 vers la droite.
Fig. 6 Rimozione del PA-1
Per rimuovere il PA-1, premete nel punto indicato nella figura in basso mentre
fate scorrere il PA-1 stesso verso destra.
Figura 6 Desmontaje del PA- 1
Para desmontar el PA-1, presione en el punto indicado en la figura de abajo y
deslice el PA-1 hacia la derecha.
DU-21
I
PA-1
J
I - Front of duplexer I - Vorderseite der Duplexeinheit I - Avant de l’unité de duplexage I - Parte
anteriore dell’unità duplex I - Parte delantera del duplexor
J - Push J - Drücken J - Appuyer J - Premere J - Pulse
vii
Page 9
Fig. 7 Installing the paper feeder on the duplexer
Abb. 7 Installieren der Papierzuführung auf die Duplexeinheit
Fig. 7 Installation du chargeur de papier sur l’unité de duplexage
Fig. 7 Installazione l’alimentatore sull’unità duplex
Figura 7 Instalación del alimentador de papel en el duplexor
K
L
K - Paper feeder K - Papierzuführung K - Chargeur de papier K - Alimentatore carta
K - Alimentador de papel
L - Duplexer L - Duplexeinheit L - Unité de duplexage L - Unità duplex L - Duplexor
viii
Page 10

Fig. 8 Paper path with duplex printing
Abb. 8 Papierweg bei doppelseitigem Drucken
Fig. 8 Ac heminement du papier avec impression en duplex
Fig. 8 Percorso carta con stampa fronte-retro
Figura 8 Recorrido del papel con impresión dúplex
M
M - Paper handler/stacker M - Papier-Handler/Stapler M - Gestionnaire/empileuse
M - Unità trasporto/ordinamento carta M - Manipulador/apilador del papel
N - Pr inter N - Drucker N - Imprimante N - Stampante N- Impresora
O - Duplexer O - Duplexeinheit O - Unité de duplexage O - Unità duplex O - Duplexor
N
O
ix
Page 11
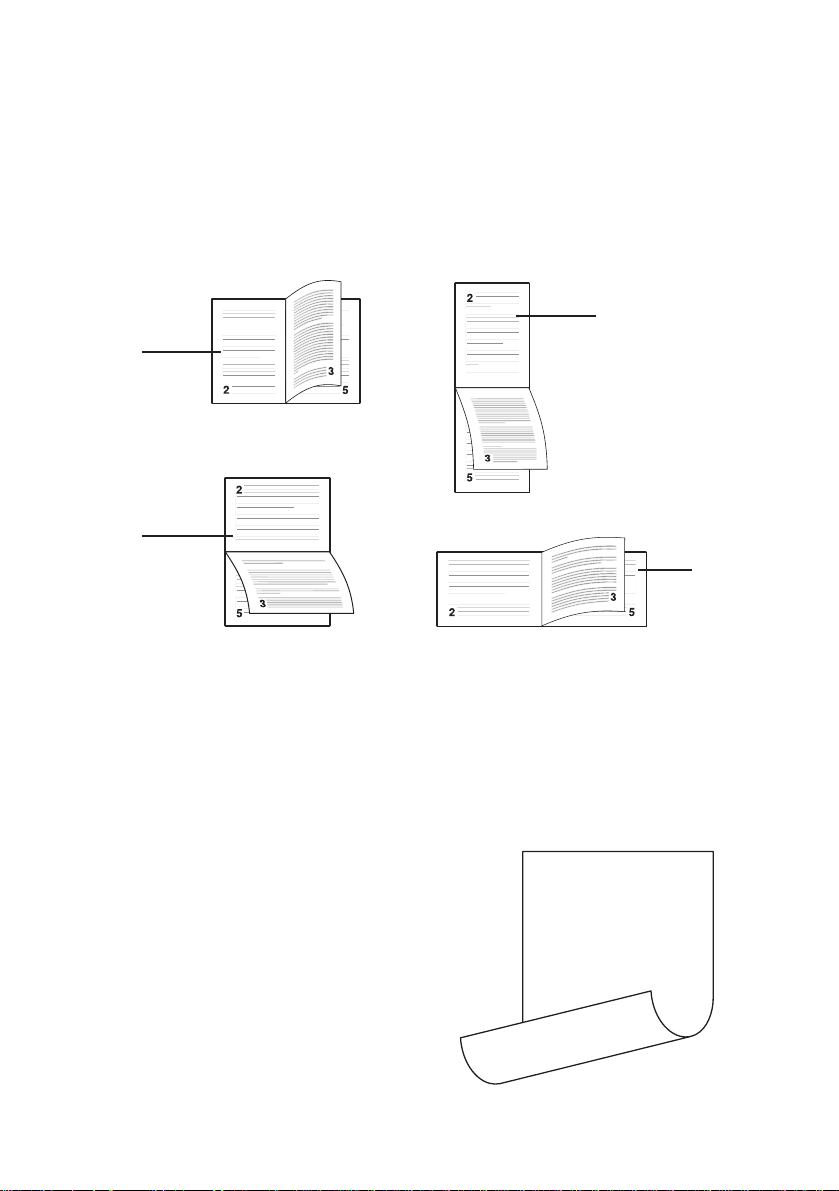
Fig. 9 Types of binding setups
Abb. 9 Mögliche Einstellungen zum Binden
Fig. 9 Types de réglages de liaison
Fig. 9 Tipi di impostazione raccolta
Figura 9 Tipos de encuadernación
(1)
(2)
Q
P
(3)
R
(4)
P - Portrait, long-edg P - Hochformat, längsseitig P - Portrait, bord long P - Ritratto, bordo lungo
P - Retrato , borde largo
Q - Portrait, short-edge Q - Hochformat, kurzseitig Q - Portrait, bord court Q - Ritratto, bordo corto
Q - Retrato, borde corto
R - Landscape, long-edge R - Querform at, längsseitig R - Pa ysage, bord long
R - Paesaggio, b ordo lungo R - Paisaje , borde l argo
S - Landscape, short-edge S - Querformat , kurzseitig S - Paysage, bord court
S - Paesaggio, bo rdo corto S - Paisaje, borde corto
S
Fig. 10 Sample of output with the
duplexer
This text prints right side-up on the front side of the page
Abb. 10 Druckbeispiel bei Verwendung
der Duplexeinheit
Fig. 10 Ex emple de sortie par une unité
de duplexage
Fig. 10 Esempio di uscita con l’unità
duplex
Figura 10 Muestra de salida con
This tex t prin ts ups ide- down o n the re vers e side o f the pa ge
duplexor
x
Page 12
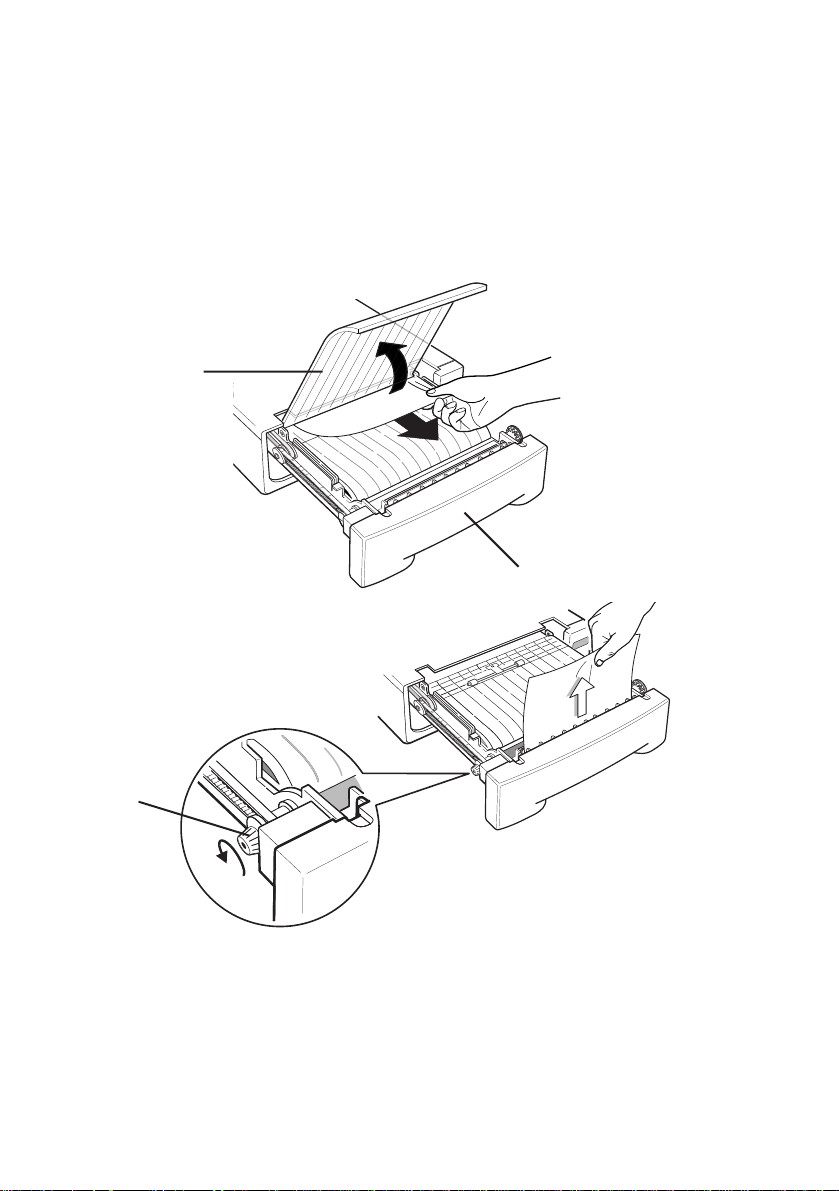
Fig. 11 Clearing jams
Abb. 11 Beseitigen von Papierstaus
Fig. 11 Dégagement du bourrage
Fig. 11 Eliminazione inceppamenti carta
Figura 11 Eliminación de atascos del papel
(a)
U
(b)
T
V
T - Duplexer drawer T - Duplexlade T - Casier de l’unité de duplexage T - Cassetto unità duplex
T - Cajón del duplexor
U - Clear plastic cover U - Knopf U - Bouton U - Manopola U - Pomo
V -Turn knob to clear jam. V - Knopf zum Beseitigen von Papierstaus drehen V - Tourner le
bouton pour dégager le bourrage V - Ruotare la manopola per eliminar e l’inceppamento
V - Gire el control para eliminar los atascos del papel
xi
Page 13

Table of Contents
English
Information to users:.......................................................................................... 3
Introduction .......................................................................................................4
Packing list......................................................................................................... 4
Names of parts ................................................................................................... 5
Installation ......................................................................................................... 6
Duplexer modes ................................................................................................. 9
PRESCRIBE commands.................................................................................. 12
Troubleshooting............................................................................................... 14
Adjusting the print position ............................................................................. 15
Paper selection ................................................................................................. 17
Specifications................................................................................................... 23
Deutsch
Einleitung......................................................................................................... 26
Verpackungsinhalt ........................................................................................... 26
Namen der Teile............................................................................................... 27
Installierung ..................................................................................................... 28
Betriebsarten der Duplexeinheit ...................................................................... 31
PRESCRIBE Befehle....................................................................................... 34
Fehlerbehebung ............................................................................................... 36
Einstellen der Druckposition ........................................................................... 37
Wahl des Papiers .............................................................................................. 39
Technische Daten............................................................................................. 45
Bescheinigung des Herstellers/Importeurs ...................................................... 46
Français
Introduction ..................................................................................................... 48
Liste de l’emballage......................................................................................... 48
Nomenclature................................................................................................... 49
Installation ....................................................................................................... 50
Modes d’unité de duplexage............................................................................ 53
Commandes PRESCRIBE ............................................................................... 56
Guide de dépannage ........................................................................................ 58
Réglage de la position d’impression................................................................ 59
Sélection de papier........................................................................................... 61
Spécifications................................................................................................... 67
xii
Page 14

Italiano
Introduzione..................................................................................................... 70
Elenco contenuti confezione............................................................................ 70
Nome delle parti .............................................................................................. 71
Installazione ..................................................................................................... 72
Modi dell’unità duplex .................................................................................... 75
Comandi PRESCRIBE .................................................................................... 78
Diagnostica ...................................................................................................... 80
Regolazione della posizione di stampa............................................................ 81
Selezione della carta ........................................................................................ 83
Dati tecnici....................................................................................................... 89
Español
Introducción..................................................................................................... 92
Lista de embalaje ............................................................................................. 92
Nombres de las partes ...................................................................................... 93
Instalación........................................................................................................ 94
Modos de duplexor .......................................................................................... 97
Comandos PRESCRIBE ................................................................................ 100
Localización y solución de averías ................................................................ 102
Ajuste de la posición de impresión................................................................ 103
Selección de papel ......................................................................................... 105
Especificaciones ............................................................................................ 111
xiii
Page 15

This page intentionally left blank
Page 16

We shall have no liability or responsibility to customers or any other person or
entity with respect to any liability, loss or damage caused or alleged to be caused
directly or indirectl y by equipment sold or furnished by us, including but not
limited to, any interruption of service, loss of business or anticipatory profits, or
consequential damages resulting from the use or operation of the equipment or
software.
Caution
NO LIABILITY IS ASSUMED FOR ANY DAMAGE CAUSED BY IMPROPER
INSTALLATION.
Notice
The information in this manual is subject to change without notification.
Additional pages may be inserted in future editions. The user is asked to excuse
any technical inaccuracies or typographical erro rs in the present edition.
No responsibility is assumed if accidents occur while the user is following the
instructions in this manual.
The contents of this manual are protected by copyright. No part of this manual
may be reproduced or copied by an y means without the permission of the
copyright holder.
English
Regarding Tradenames:
PRESCRIBE is a registered trademark of Kyocera Corporation.
HP LaserJet is a product of Hewlett-Packard Company.
PCL is a registered trademark of Hewlett-Packard Company.
PostScript is a registered trademark of Adobe Systems Incorporated.
© Copyright 1999 by Kyocera Corporation
All rights reserved, Revision 1.0., June 1999
1
Page 17

Warning
FCC Regulations state that any unauthorized changes or modifications
to this equipment not expressly approved by the manufacturer could
void the user’s authority to operate the equipment.
Note: The equipment has been tested and found to comply with the
limits for a Class B digital device, pursuant to Part 15 of the FCC
Rules. These limits are designed to provide reasonable protection
against harmful interference when the equipment is operated in a
commercial environment.
The equipment generates, users, and can radiate radio frequency
energy and, if not installed and used in accordance with the instruction
manual, may cause harmful interf erence to radio communications.
Operation of the equipment in a residential area is likely to cause
harmful interference in which case the user will be required to correct
the interference at his own e xpense.
Radio interference requirement in European countries
The optional duplexer DU-21 is intended for use with the printer models
FS-1200/FS-1700/FS-1700+/FS-1750/FS-3700/FS-3700+/FS-3750, which
are type tested and categorized as Class B computing devices in
accordance with the EN55022 rules.
Devices in the Class B category may cause interference to radio or
television reception, particularly in a residential installation.
2
Page 18

Information to users:
This equipment has been tested and found to comply with the limits for a Class B
digital device, pursuant to Part 15 of FCC Rules. These limits are designed to
provide reasonable protection against harmful interference in a residential
installation. This equipment generates, uses, and can radiate radio frequency
energy and, if not installed and used in accordance with the instructions, may
cause harmful interference to radio communications. However, there is no
guarantee that interference will not occur in a particular installation. If this
equipment does cause harmful interference to radio or television reception, which
can be determined by turning the equipment off and on, the user is encouraged to
try to correct the interference by one or more of the following measures:
❐ Reorient or relocate the receiving antenna.
❐ Increase the separation between the equipment and receiver.
❐ Connect the equipment into an outlet on a circuit different from that to
which the receiver is connected.
❐ Consult the dealer or an experienced radio/TV technician for help.
Changes or modifications not expressly approved by the manufacturer for
compliance could void the user’s authority to operate the equipment.
English
3
Page 19

Introduction
The DU-21 is an auxiliary unit designed for use with the Kyocera laser printers.
Using the duplexer, you can automatically print on both sides of the paper.
This instruction manual explains how to install and use the duplexer.
Topics covered in this manual are:
❐ Installing the duplexer
❐ Modes of duplexer operation
❐ Mode selection from the printer’s control panel
❐ Mode selection by PRESCRIBE command
❐ Mode selection by PCL (Hewlett-Packard Page Control Language)
command
Packing list
Make sure that the duplexer package contains the following items in the indicated
quantities.
DU-21 duplexer, 1
Cable holders, 2
Instruction manual (this booklet), 1
4
Page 20

Names of parts
Before installing the duplexer, please read the following list of names. These
names are used in describing procedures for installing and using the duplexer.
See Figure 1 on page iii.
Connector: When you install the duplexer, this connector plugs into a connector
located inside the bottom of the printer (or of the optional paper feeder, if used
together with the duplexer).
Positioning pins: These pins fit into two holes in the bottom of the printer (or
of the optional paper feeder, if used together with the duplexer).
READY indicator: Lights when the duplexer is ready. Flashes when a jam
occurs in the duplexer.
Duplexer drawer: Open to install the paper path adaptor, or to clear paper jams.
Rear cover: Opens to allow clearing paper jams.
English
5
Page 21

Installation
The duplexer fits onto the bottom of the printer or of the optional paper feeder (if
the optional paper feeder is installed together with the duplexer).
CAUTION Before installing (or removing) the duplexer, be sure to turn
off the printer’s power.
Figure 2 on page iv shows allowable printer configurations including the duplexer.
Depending on other optional units installed together with the duplexer, different
paper path adaptors are required. Note that any configuration containing the
duplexer also requires the optional paper handler/stacker. For details on how to
install the optional paper handler, see the instructions provided with the optional
paper handler/stacker.
Installing the duplexer with no other option units
If the duplexer is the only option unit you will be using with the printer, it mounts
directly under neath the printer as shown in Figure 2(a). The printer sits directly on
top of the duplexer.
1. Install the optional PA-20 paper path adaptor on the duplexer as shown
in Figure 3.
• Pull the duplexer drawer slightly open.
• Align the tabs with the slots.
• After fitting the tabs to the slots, slide the paper path adaptor to the
left to lock.
• Close the duplexer drawer.
2. Next, align the positioning pins on top of the duplexer and the lock pin
on the paper path adaptor with the holes in the base of the printer, then
slowly and carefully lower the printer onto the duplexe r. Hold the printer
level while lowering it onto the duplexer, and make sure that the
connector on the duplexer fits squarely into the corresponding connector
in the base of the printer. (Fig. 4)
3. Install the optional paper handler/stacker. For details, see the instructions
provided with the paper handler/stacker.
6
Page 22

Installing the duplexer together with other option units
The duplexer mounts underneath the paper feeder as shown in Figure 2(b). In this
configuration, the printer sits on top of the paper feeder.
1. If you will be using the duplexer together with a paper feeder, you must
install the PA-1 paper path adaptor on the rear of duplexer. Install the
PA-1 as shown in Figure 5.
• Align the tabs with the slots.
• After fitting the tabs to the slots, slide the paper path adaptor in the
direction indicated by the arrow to lock it. See Figure 6 for how to
remove the PA-20.
2. Next, install the paper feeder on top of the duplexer as shown in Figure
7. Align the positioning pins on top of the duple xer and the lock pin on
the paper path adaptor with the holes in the base of paper feeder, then
carefully lower the paper feeder onto the duplexer. Hold the paper feeder
level while lowering it onto the duplexer, and make sure that the
connector on the duplexer fits squarely into the corresponding connector
in the base of the paper feeder.
Note You can stack two paper feeders on top of one another. For
details, see the paper feeder instruction manual.
3. Install the optional PA-20 paper path adaptor on the paper feeder as
shown in Figure 3.
• Align the tabs with the slots.
• After fitting the tabs to the slots, slide the paper path adaptor to the
left to lock.
English
4. Lower the printer onto the paper feeder. Observe the same precautions as
when lowering the paper feeder onto the duplexer. (Fig.4)
5. Install the optional paper handler/stacker. For details, see the instructions
provided with the paper handler/stacker.
7
Page 23
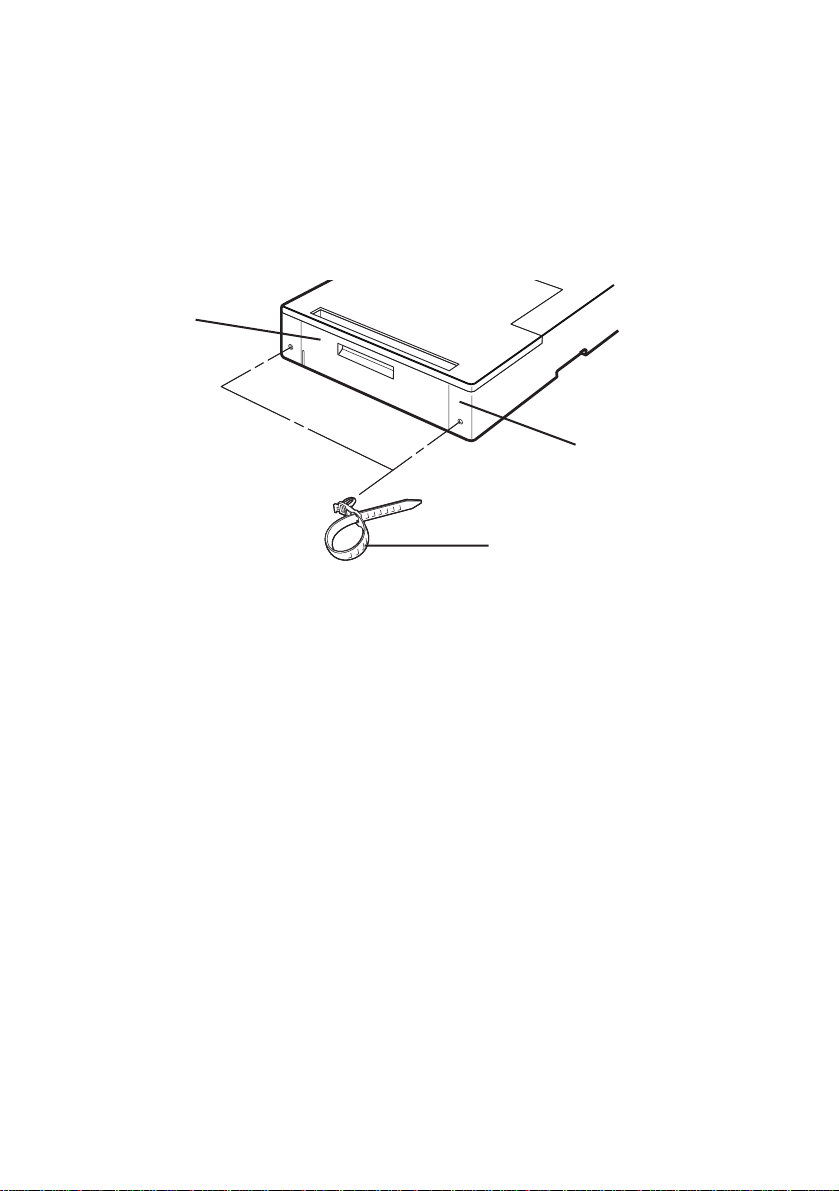
Using the cable holder
The cable holder provided together with the optional duplexer provides a
convenient means of bundling the printer’s power and interface cab les. To use the
cable holder, press it into one of the holes to the left or r ight of the rear cover as
shown.
Rear cover
Rear of duplexer
Cable holder (2)
Printer memory for duplex printing
With duplex printing, the printer basically needs twice as much memory as is
required for simplex printing. Further, depending on the printer and the selected
printing environment, it may be necessary to expand printer memory in order to
perform duplex printing. For memory requirements, see the printer's User's
Manual.
8
Page 24

Duplexer modes
The duplexer allows you to print on both sides of the paper. Fir st the printer prints
on one side of the paper in the usual manner. Then it sends the paper to the
duplexer, which turns it over to allow printing on the other side. Figure 8 shows
the path through which paper travels when printing in the duplex mode.
Binding setups
The term binding refers to the manner in which printed pages of paper are joined
together when pages are joined together (by gluing, stitching, etc.) in book form.
The two possible types of binding are long-edge binding, in which pages are
joined together along their long edge; and short-edge binding, in which they are
joined together along their short edge. In selecting a binding type, you must also
consider the orientation of the printed page. You can use long-edge or short-edge
binding with either landscape or portrait printing.
Depending on the binding type and print orientation, the duplexer provides four
types of binding setups. These are: (1) portrait, long-edge, (2) portrait, short edge,
(3) landscape, long-edge, and (4) landscape, short-edge. Figure 9 shows these
binding setups.
With portrait, long-edge binding and landscape, short-edge binding [setups (1)
and (4) in Figure 9], text on both sides of the paper is oriented in the same
direction.
English
With portrait, short-edge binding and landscape, long-edge binding [setups (2)
and (3) in Figure 9], text on the rear side of the paper is printed upside down with
respect to that on the front side.
Mode Selection
You can enable the duplexer by selecting the Duplex mode option using the
MODE key on the printer’s control panel, or b y means of PRESCRIBE or PCL
mode selection commands.
9
Page 25

Mode selection by MODE key
To select duplex printing and binding setup from the printer's control panel,
proceed as follows. (For printer control panel key operation, also see the printer's
User's Manual.)
1. Make sure that the printer is ready and on-line.
2. Press the MODE key on the printer’s control panel.
3. Follow the key operation procedure for each printer until the message
display indicates Duplex mode. The current duplex mode is indicated
by one of the following messages:
None
Short edge bind
Long edge bind
The default duplex mode is None.
4. To change the duplex mode, press the ENTER key. The message display
shows a blinking question mark (?).
5. Press the + or - key until the display shows the desired binding type. If
you want to abandon the duplex mode selection procedure, press the
CANCEL key now. The duplex mode remains unchanged.
6. Press the ENTER key to set the new duplex mode.
7. Press the EXIT key and the message display returns to Ready.
Complete the binding setup by selecting the appropriate print orientation, portrait
or landscape. See the printer’s instruction manual for the procedure.
Note While using the duplexer, you can also select face-up or face-
down delivery of printed pages. Select a delivery type that
suits your needs. For information on this procedure, see the
printer's User's Manual.
10
Page 26

Manual feeding
Duplex printing is not available if paper is fed manually from the printer’s manual
feed tray or using the optional envelope feeder. If the paper is fed manually while
the duplexer is activated, the printer automatically deactivates the duplex mode
and delivers all output pages to the face-up tray.
Mode selection by command
As an alternative to the control panel selection procedure described on page 9,
you can select duplex printing and the binding mode setup using certain
PRESCRIBE and PCL commands. These commands also provide certain
functions that a re not available from the control panel.
The PRESCRIBE duplex control commands and their functions are:
❐ DUPX (select/deselect DUPleX mode)
❐ DXPG (select DupleX PaGe side)
The PCL commands provide the same functions as the PRESCRIBE commands
listed above. However, unlike the PRESCRIBE commands (which can be used in
any printer emulation mode), the PCL commands are only effective while using
the printer in the HP LaserJet emulation (PCL) mode.
The PCL duplex control commands and their functions are as follows.
English
❐ <Esc>&l#S (select/deselect duplex mode)
❐ <Esc>&a#G (select duplex pa ge side)
PRESCRIBE commands are described in detail below.
11
Page 27

PRESCRIBE commands
DUPX (select/deselect DUPleX mode)
Format DUPX mode;
Parameters mode: a number from 0 to 2
The DUPX command instructs the printer to select or deselect duplex printing and
selects the duplex mode. The parameters are as follows.
0=Select simplex mode
1=Select duplex mode, long-edge binding
2=Select duplex mode, short-edge binding
The default duplex mode can be selected by the FRPO N4 command. The
parameter values are the same as the DUPX command above. For example, to
power up the printer with the long-edge duplex binding mode, enter the
command:
ECHO !R! FRPO N4, 1; EXIT; > LPT1
For LPT1, substitute the port to which the computer is connected.
DXPG (select DupleX PaGe side)
Format DXPG side;
Parameters side: a number from 0 to 2
The DXPG command ends printing on the current page in the same manner as a
form feed. However, unlike the form feed, it also selects the paper side, front or
back, on which printing of the ensuing page is printed. The parameters are as
follows.
12
Page 28

0=Select next side (same as with a form feed)
1=Select front side (printing of the ensuing page begins on the
front side of the next sheet, regardless of whether the curr e n t
page was printed on the front or back side of the current sheet)
2=Select back side (printing of the ensuing page begins on the
back side of the current sheet if the current page was printed on
the front side, or on the back side of the next sheet if the
current page was printed on the back side)
Example
The following example selects the duplex mode with short-edge binding, selects
to portrait page orientation, and prints text on both sides of the page. The result is
as shown in Figure 10.
!R! CMNT Initiates a PRESCRIBE command sequence;
RES; CMNT Causes a page break and resets parameters;
DUPX 2; CMNT Selects duplex mode, short-edge binding;
SPO P; CMNT Selects portrait orientation;
STAK 1; CMNT Select face-down delivery; EXIT;
This text prints rightside-up on the front side
of the page.
!R! DXPG 0; CMNT Ends current page (front side of the
paper); EXIT;
This text prints upside-down on the reverse side
of the page.
!R! RES; EXIT;
English
13
Page 29

Troubleshooting
This section explains how to handle paper jams in the duplexer and respond to
error messages.
Paper jam
In the event of a paper jam, the Paper jam message appears on the printer’s
message display.
Note When clearing jams, check other option units (the paper
handler/stacker, paper feeder, sorter, and bulk paper stacker)
for jammed paper before pulling out the DU-21’s duplexer
drawer. To check for other option units for jams, open their
rear covers.
If paper jams inside the duplexer, the READY indicator flashes on the duplexer’s
indicator panel. To clear the jam, first check other option units for paper by
opening their rear covers. Remove any paper you find. Then pull the duplexer
drawer part-way open. If paper is visible under the clear plastic cover, open the
cover and remove the paper as shown in Figure 11(a).
If the paper is stuck inside the duplexer, turn the knob on the left side of the
duplexer drawer counterclockwise [see Figure 11(b)] to move the paper out of the
duplexer.
If the paper jams at the rear of the duplex unit, open the rear cover and
remove it.
Whenever you clear a jam, be sure to check inside other option units, as well as
inside the duplexer drawer and the duplexer’s rear cover.
After clearing the jam, reclose the drawer, open and close the printer’s top cove r
or the paper feed unit. Then the printer automatically warm up, goes on-line, and
continue printing. Depending on the part at which the jam occurred, the printer
may or may not print the jammed page.
Error message
If the printer’s message display shows Duplex unit front cover Open
or Duplex unit rear cover Open, check the front/rear covers and ensure
that they are securely closed.
14
Page 30
Adjusting the print position
When using duplex printing, the image on the reverse side of the paper may be
slightly out of alignment with that on the front side. If this occurs, the image
position can be adjusted either to the left or right by about 2 mm. When using the
duplex unit, the reverse side of the paper (the second page) is printed first,
followed by the front side (the first page). Adjustment of the print position affects
only the image printed on the front side of the paper; i.e., print positioning on
odd-numbered pages.
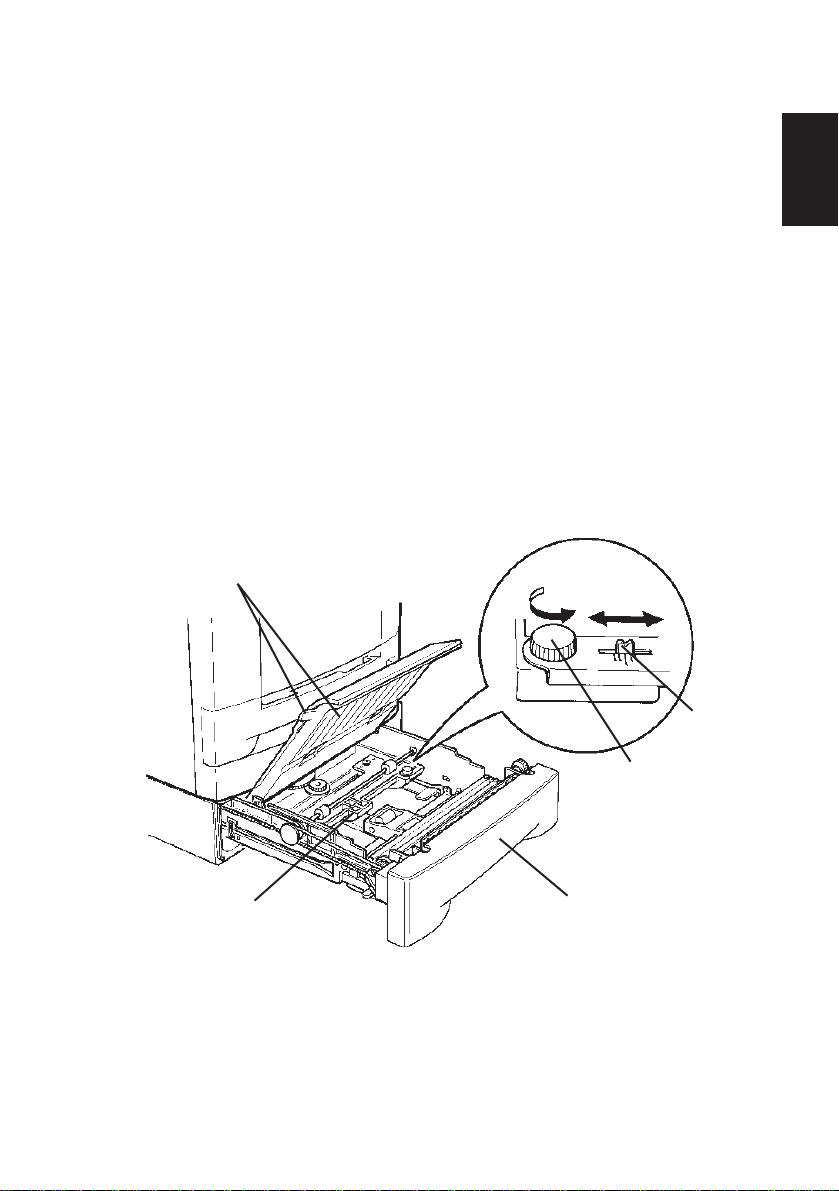
Adjustment procedure
1. Prepare a double-sided print sample using the duplex printing mode.
2. Pull the duplex drawer out as far as it will go.
3. Open the two covers inside the drawer, then loosen the thumbscrew
located on the right inside of the drawer. This frees the adjuster, allowing
you to move it to the right or left. The adjuster is set to the center
position upon shipment from the factory.
Covers
English
Scale
Thumb screw
Adjuster
Duplex drawer
The scale located to the right of the thumbscrew is calibrated in
millimeters. Moving the adjuster to the right of the center position moves
the print position a corresponding amount to the left. Conversely, moving
the adjuster to the left moves the print position a corresponding amount
to the right.
15
Page 31
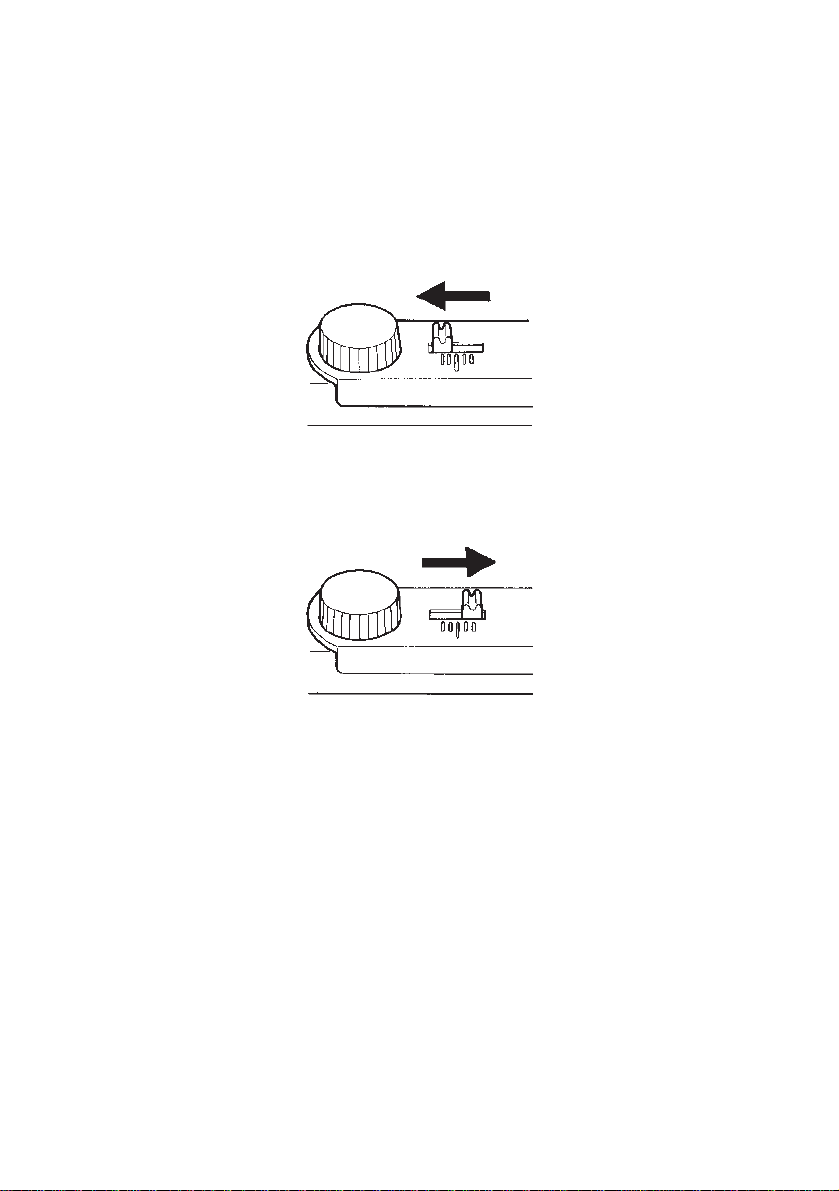
4. Hold the print sample up to a light with the front side facing towards
you.
If the image on the front side of the paper is to the right of that on the
rear side, move the adjuster to the left by that amount while referring to
the adjuster scale.
If the image on the front side of the paper is to the left of that on the rear
side, move the adjuster to the right by that amount while r eferring to the
adjuster scale.
5. When done, re-tighten the thumbscrew, close the two cove rs , and close
the duplexer drawer.
16
Page 32

Paper selection
General guidelines
The duplexer may not be used to print on paper not satisfying the requirements
below. Also, special types of print media such as overhead projection (OHP) film,
envelopes, adhesive-backed labels, and paper containing watermarks must not be
used with duplex printing. These types can result in jams, misfeeds, and paper
waste, and in extreme cases can damage the duplexer.
Note The manufacturer assumes no liability for pr oblems that
occur when paper not satisfying these requirements is used
with the duplexer.
Selection of the right paper is important. The wrong paper can result in jams,
misfeeds, curl, poor print quality, and paper waste, and in extreme cases can
damage the duplexer and the printer. The guidelines given below will increase the
productivity of your office by ensuring efficient, t rouble-free printing and
reducing wear and tear on the duplexer and the printer.
Paper availability
Most types of paper are compatible with a variety of machines. Paper intended for
xerographic copiers can also be used with the duplexer and the printer.
There are three general grades of paper: economy, standard, and premium. The
most significant difference between grades is the ease with which they pass
through the printer. This is affected by the smoothness, size, and moisture content
of the paper, and the way in which the paper is cut. The higher the grade of paper
you use, the less risk there will be of paper jam and other problems, and the
higher the level of quality your printed output will reflect.
English
Differences between paper from different suppliers can also affect the duplexer’s
performance. A high-quality printer cannot produce high-quality results when the
wrong paper is used. Low-priced paper is not economical in the long run if it
causes printing problems.
Paper in each grade is available in a range of basis weights (defined later). The
traditional standard weights are 19, 20, and 24 pounds (70 g/m2 to 90 g/m2).
17
Page 33

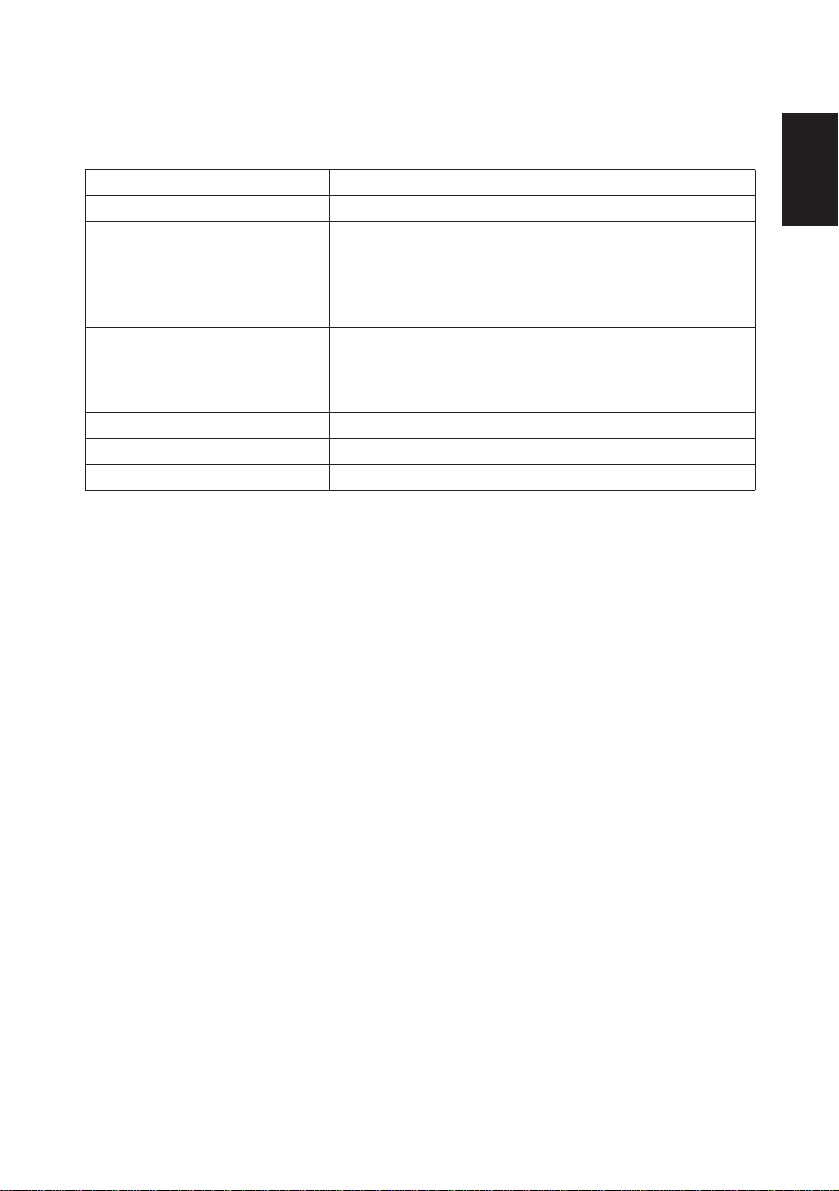
Paper Specifications
The following table summarizes the basic paper specifications. Details are given
on the following table.
Table 1 Specification for White Bond Paper
Item Specification
Weight 70 to 90 g/m2 (19 to 24 lbs/ream)
Thickness 0.086 to 0.110 mm (3.4 to 4.3 mils)
Dimensional accuracy ±0.7 mm (±0.0276 inches)
Squareness of corners 90° ± 0.2°
Moisture content 4% to 6%
Direction of grain Long grain
Pulp content 80% or more
Selecting the right paper
Printer printing is a process involving LED light, electrostatic discharge, toner,
and heat. In addition, as the paper passes through the printer it undergoes
considerable sliding, bending, and twisting motions. A high-quality printing pap er
matching the requirements withstands all these stresses, enabling the duplexer and
the printer to turn out clean, crisp printed copy consistently.
Remember that all paper is not the same. Some of the factors to consider when
selecting paper for duplex printing are as follows:
Condition of the paper
Avoid using paper that is bent at the edges, curled, dirty, torn, or contaminated
with lint, cl ay, or paper shreds.
Use of paper in these conditions can lead to illegible printing, misfeeding, and
paper jams, and can shorten the life of the duplexer and the printer. In particular,
avoid using paper with a surface coating or other surface treatment. The paper
should have as smooth and even a surface as possible.
18
Page 34

Composition
Do not use paper that has been coated or surface-treated and contains plastic or
carbon. The heat of fusing can cause such paper to give off harmful fumes.
Bond paper should contain at least 80% pulp. Not more than 20% of the total
paper content should consist of cotton or other fibers.
Paper size
Printer’s cassettes are available for the paper sizes listed in Table 2. The
dimensional tolerances are ±0.7 mm (±0.0276 inches) for the length and width.
The angle at the corners must be 90° ±0.2°.
Table 2 Paper Sizes for Printer’s Cassette Paper Feed
Printer’s cassette Siz e
Legal 8.5 × 14 in
Letter 8.5 × 11 in
ISO A4 210 × 297 mm
JIS B5 182 × 257 mm
ISO A5 148 × 210 mm
Smoothness
The paper should have a smooth, uncoated surface. Paper with a rough or sandy
surface can cause voids in the printed output. Paper that is too smooth, however,
can cause multiple feeding and fogging problems. (Fogging is a gray background
effect.)
English
Basis weight
Basis weight is the weight of a standard quantity of paper. In the traditional
system the standard quantity is a ream consisting of 500 sheets measuring 17 × 22
inches each. In the metric system the standard quantity is 1 square meter.
Paper that is too light or too heavy can cause misfeeding, jams, and premature
wear of the duplexer and the printer. Uneven paper weight can cause multiple
feeds, print defects, poor toner fusing, blurring, and other print quality problems.
The proper weight is 70 to 90 g/m2 (19 to 24 lbs/ream).
Important Although the printer can print on lighter paper with the
basis weight of as low as 60 g/m2 in simplex printing, duplex
printing is not possible with the paper weight of less than 70
g/m2.
19
Page 35

Thickness (Caliper)
Thick paper is referred to as high-caliper paper and thin paper as low-caliper
paper. The pa per used with the printer in duplex mode should be neither
extremely thick nor extremely thin. If you are having problems with paper jams,
multiple feeds, and faint printing, the paper may be too thin. If you are having
problems with paper jams, and blurred printing the paper may be too thick. The
proper thickness is 0.086 to 0.110 mm (3.4 to 4.3 mils).
Moisture content
Moisture content is defined as the percent ratio of moisture to the dry mass of the
paper. Moisture can affect the paper’s appearance, feedability, curl, electrostatic
properties, and toner fusing characteristics.
The moisture content of the paper varies with the relative humidity in the room.
When the relative humidity is high and the paper absorbs moisture, the paper
edges expand, becoming wavy in appearance. When the relative humidity is low
and paper loses moisture, the edges shrink and tighten, and print contrast may
suffer.
Wavy or tight edges can cause misfeeding and alignment anomalies. The moisture
content of the paper should be 4% to 6%.
To ensure the proper moisture content it is important to store the paper in a
controlled environment. Some tips on moisture control are:
❐ Store paper in a cool, dry location.
❐ Keep the paper in its wrapping as long as possible. Rewrap paper that is
not in use.
❐ Store paper in its original carton. Place a pallet etc. under the carton to
separate it from the floor.
❐ After removing paper from storage, let it stand in the same room as the
printer for 48 hours before use.
❐ Avoid leaving paper where it is exposed to heat, sunlight, or damp.
20
Page 36

Paper grain
When paper is manufactured, it is cut into sheets with the grain running parallel to
the length (long grain) or parallel to the width (short grain). Short grain paper can
cause feeding problems in the duplexer and the printer. All paper used in the
duplexer and the printer should be long grain.
Other paper properties
Porosity: Refers to the density of the paper structure; that is, to how openly or
compactly the fibers are bonded.
Stiffness: Limp paper can buckle inside the duplexer and the printer, while
paper that is too stiff may bind. Either way the result is a paper jam.
Curl: Most paper has a natural tendency to curl in one direction. The paper
should be loaded so that the natural curl is downward, to counteract the upward
curl imparted by the printer. Printed sheets will then come out flat. Most paper
also has a top and bottom surface. Loading instructions are usually given on the
paper package.
Electrostatic properties: During the printing process the paper is
electrostatically charged to attract the toner. The paper must be able to release this
charge so that printed sheets do not cling together in the output tray.
Whiteness: The contrast of the printed page depends on the whiteness of the
paper. Whiter paper provides a sharper, brighter appearance.
English
Quality control: Uneven sheet size, corne rs that are not square, ragged edges,
welded (uncut) sheets, and crushed edges and corners can cause the duplexer and
the printer to malfunction in various ways. A quality paper supplier should take
considerable care to ensure that these problems do not occur.
Packaging: Paper should be packed in a sturdy carton to protect it from damage
during transport. Quality paper obtained from a reputable supplier is usually
properly packaged.
21
Page 37

Special paper
The following types of special paper can be used:
❐ Colored paper
❐ Preprinted paper
Use paper that is sold specifically for use with copiers (heat-fusing type).
Since the composition and quality of special paper vary considerably, special
paper is more li kely than white bond paper to g ive trouble during printing. No
liability will be assumed if moisture etc. given off in printing on special paper
causes harm to the machine or operator.
Note Before purchasing any type of special paper, test a sample on
the duplxer and the printer and check that printing quality is
satisfactory.
Specifications for each type of special paper are given below.
Colored paper
Colored paper should satisfy the same conditions as white bond paper, listed in
Table 1. In addition, the pigments used in the paper must be able to withstand the
heat of fusing during the printing process (up to 200°C or 392°F).
Preprinted paper
Preprinted paper should have a bond paper base. The preprinted ink must be a ble
to withstand the heat of fusing during the printing process, and must not be
affected by silicone oil.
Do not use paper with any kind of surface treatment, such as the type of paper
commonly used for calendars.
22
Page 38
Specifications
Item Specification
Applicable printers K yocera page printers
Paper size Letter (8.5 × 11 inches)
ISO A4 (21 × 29.7 cm)
Legal (8.5 × 14 inches)
JIS B5 (18.2 × 25.7 cm)
ISO A5 (14.8 × 21 cm)
Environmental requirements Temperature: 10°C to 32.5°C
Humidity: 20% to 80% RH
Ideal conditions are 20°C/65% RH
Altitude under 2000 m
Dimensions 110 mm (4.3") H × 345 mm (13.6") W × 513 mm (20.2") D
Weight 6.4 kg (14.1 lbs)
Power supply Supplied from printer
English
23
Page 39

This page intentionally left blank
Page 40

Wir haften nicht für direkte oder indirekte Verluste oder Schäden, die einem
Kunden oder irgendeiner anderen Person oder Rechtsperson durch von uns
verkaufte oder ausgerüstete Geräte direkt oder indirekt entstehen oder geltend
gemacht werden, und lehnen jedwede Haftung für eine eventuelle Unterbrechung
einer Dienstleistung, für Geschäftsverluste oder für den Verlust erwarteter Profite
sowie von Folgeschäden, die aus der Benutzung des Gerätes oder der Software
entstehen könnten, ab.
Achtung
FÜR SCHÄDEN, DIE AUF UNRICHTIGE INSTALLATION ZURÜCKZUFÜHREN
SIND, WIRD KEINE HAFTUNG ÜBERNOMMEN.
Hinweis
Der Inhalt dieser Anleitung kann ohne Vorankündigung geändert werden. In
zukünftigen Ausgaben können zusätzliche Seiten eingefügt werden. Wir bitten
den Benutzer, eventuelle technische Ungenauigkeiten oder drucktechnische
Fehler in dieser Ausgabe zu entschuldigen.
Für Unfälle, die sich während dem Befolgen der Anweisungen in dieser Anleitung
ereignen, wird keine Haftung übernommen.
Der Inhalt dieser Anleitung ist urheberrechtlich geschützt. Kein Teil dieser
Anleitung darf in welcher Form auch immer ohne schriftliche Genehmigung des
Urheberrechtinhabers reproduziert oder kopiert werden.
Warenzeichen:
PRESCRIBE ist ein eingetragenes Warenzeichen der Kyocera Corporation.
HP LaserJet ist ein Produkt der Hewlett-Packard Company.
PCL ist ein eingetragenes Warenzeichen der Hewlett-Packard Company.
PostScript ist ein eingetragenes Warenzei chen von Adobe Systems Incorporated.
Deutsch
© Copyright 1999 by Kyocera Corporation
Alle Rechte vorbehalten. Auflage 1.0, Juni 1999
Funkentstörungsvors chriften in europäischen Staaten
Die optionale Duplexeinheit DU-21 wird mit den Druc kermodellen FS-1200/
FS-1700/FS-1700+/FS-1750/FS-3700/FS-3700+/FS-3750 benutzt, die
anläßlich einer Typenprüfung in Übereinstimmung mit den Bestimmungen
nach EN55022 als Rechnergeräte der Klasse B eingestuft wurden.
Geräte der Klasse B können den Radio- oder Fernsehempfang
beeinträchtigen, besonders bei Aufstellung in W ohnbereichen.
25
Page 41

Einleitung
Die DU-21 ist ein Zusatzgerät, das mit Laserdruckern von Kyocera benutzt wird.
Die Duplexeinheit ermöglicht es, Papier automatisch beidseitig zu bedrucken.
In dieser Benutzeranleitung wird die Installierung und Benutzung der
Duplexeinheit erklärt.
Folgende Themen werden behandelt:
❐ Installierung der Duplexeinheit
❐ Betriebsarten der Duplexeinheit
❐ Wählen der Betriebsart über das Bedienfeld des Druckers
❐ Wählen der Betriebsart über PRESCRIBE Befehle
❐ Wählen der Betriebsart über PCL Befehle (Hewlett-Packard Page
Control Language)
Verpackungsinhalt
Überprüfen Sie, ob sich in der Verpackung der Duplexeinheit die folgenden
Gegenstände in der angegebenen Menge befinden.
Duplexeinheit DU-21, 1
Kabelhalter, 2
Benutzeranleitung (diese Broschüre), 1
26
Page 42

Namen der Teile
Bitte lesen Sie vor dem Installieren der Duplexeinheit die folgende Liste der
Namen der Teile durch, da diese Namen bei den Erklärungen zum Installieren un d
Benutzen der Duplexeinheit verwendet we rden.
Siehe Abbildung 1 auf Seite iii.
Anschluß: Beim Installieren der Duplexeinheit wird dieser Anschluß in einen
Anschluß in der Bodenplatte des Druckers (oder der optionalen Papierzuführung,
falls diese zusammen mit der Duplexeinheit benutzt wird) gesteckt.
Positionierungsstifte: Beim Installieren des Sortierers werden diese Stifte in
zwei Löcher in der Bodenplatte des Druckers (oder der optionalen
Papierzuführung, falls diese mit der Duplexeinheit benutzt wird) eingeführt.
Anzeige READY: Leuchtet, wenn die Duplexeinheit betriebsbereit ist. Bei einem
Papierstau in der Duplexeinheit blinkt diese Anzeige.
Duplexlade: Wird zum Installieren des Papierwegadapters oder zum Beseitigen
eines Papierstaus geöffnet.
Hintere Abdeckung: Wird zum Beseitigen von Papierstaus geöffnet.
Deutsch
27
Page 43

Installierung
Die Duplexeinheit wird am Boden des Druckers bzw. der optionalen
Papierzuführung (falls die optionale Papierzuführung zusammen mit der
Duplexeinheit installiert wird) angebracht.
ACHTUNG Vor dem Installieren (oder Entfernen) der Duplexeinheit den
Drucker unbedingt ausschalten.
Abbildung 2 auf Seite iv zeigt, welche Konfigurationen des Druckers und der
Duplexeinheit zulässig sind. Abhängig davon, wel che anderen optionalen Geräte
zusammen mit der Duplexeinheit installiert sind, ist der Einsatz verschiedener
Papierwegadapter notwendig. Beachten Sie, daß der Gebrauch der Duplexeinheit
immer auch den optionale Papier-Handler/Stapler voraussetzt. Wie der optionale
Papier-Handler installier t wird, entnehmen Sie dessen Anleitung.
Installieren der Duplexeinheit ohne andere Zusatzeinrichtungen
Ist die Duplexeinheit das einzige Zusatzgerät, das Sie mit dem Drucker benutzen,
wird sie wie in Abbildung 2(a) gezeigt direkt unter dem Drucker installiert. Der
Drucker steht direkt auf der Duplexeinheit.
1. Installieren Sie den optionalen Papierwegadapter PA-20 an der
Duplexeinheit wie in Abbildung 3 ge zei g t .
• Die Duplexlade etwas aufziehen.
• Die Nasen an den Öffnungen ausrichten.
• Nachdem die Nasen in die Öffnungen eingeführt sind, den
Papierwegadapter nach links schieben, um ihn zu arretieren.
• Die Duplexlade schließen.
2. Als nächstes die Positionierungsstifte an der Oberseite der Duplexeinheit
und den Ve rriegelungsstift am Papierwegadapter an den Löchern in der
Bodenplatte des Druckers ausrichten. Anschließend den Drucker
langsam und vorsichtig auf die Duplexeinheit absenken. Halten Sie den
Drucker beim Absenken auf die Duplexeinheit waagerecht. Achten Sie
darauf, daß der Ansc hluß an der Duplexeinheit richtig (rechtwinkelig) in
den entsprechenden Anschluß in der Bodenplatte des Druckers
eingeführt wird. (Abb. 4)
28
Page 44

3. Installieren Sie den optionalen Papier-Handler/Stapler. Wie Sie dazu
vorgehen müssen, entnehmen Sie der Anleitung des optionalen PapierHandler/Staplers.
Installieren der Duplexeinheit zusammen mit anderen
Zusatzeinrichtungen
Die Duplexeinheit wird wie in Abbildung 2(b) gezeigt unter der Papierzuführung
angebracht. Bei dieser Konfiguration befindet sich der Drucker auf der
Papierzuführung.
1. Wenn Sie die Duplexeinheit zusammen mit einer Papierzuführung
benutzen, müssen Sie an der Rückseite der Duplexeinheit den
Papierwegadapter PA-1 installieren. Installieren Sie den PA-1 wie in
Abbildung 5 gezeigt.
• Die Nasen an den Öffnungen ausrichten.
• Nachdem die Nasen in die Öffnungen eingeführt sind, den
Papierwegadapter in Richtung des Pfeils schieben, um ihn zu
arretieren. Abbildung 6 zeigt, wie der PA-20 entfernt wird.
2. Als nächstes die Papierzuführung auf der Duplexeinheit anbringen, wie
in Abbildung 7 gezeigt. Die Positionierungsstifte an der Oberseite der
Duplexeinheit und den Ve rr iegelungsstift am Papierwegadapter an den
Löchern in der Bodenplatte der Papierzuführung ausrichten.
Anschließend die Papierzuführung langsam und vors i chtig auf die
Duplexeinheit absenken. Halten Sie die Papierzuführung beim Absenken
auf die Duplexeinheit waagerecht. Achten Sie darauf, daß der Anschluß
an der Duplexeinheit richtig (rechtwinkelig) in den entsprechenden
Anschluß in der Bodenplatte der Papierzuführung eingeführt wird.
Deutsch
Hinweis Sie können zwei Papierzuführungen aufeinander stellen.
Mehr dazu finden Sie in der Bedienungsanleitung der
Papierzuführung.
3. Installieren Sie den optionalen Papierwegadapter PA-20 an der
Papierzuführung, wie in Abbildung 3 gezei gt.
• Die Nasen an den Öffnungen ausrichten.
• Nachdem die Nasen in die Öffnungen eingeführt sind, den
Papierwegadapter nach links schieben, um ihn zu arretieren.
29
Page 45

4. Senken Sie den Drucker auf die Papierzuführung ab. Beachten Sie die
selben Vors i chtsmaßnahmen wie beim Absenken der Papierzuführung
auf die Duplexeinheit. (Abb. 4)
5. Installieren Sie den optionalen Papier-Handler/Stapler. Wie Sie dazu
vorgehen müssen, entnehmen Sie der Anleitung des optionalen PapierHandler/Staplers.
Benutzen der Kabelhalter
Die mit der optionalen Duplexeinheit mitgelieferten Kabelhalter dienen zum
Bündeln der Netz-und Schnittstellenkabel des Druckers. Die Kabelhalter werden,
wie die Abbildung zeigt, in eines der Löcher links und rechts an der hinteren
Abdeckung gedrückt.
Rückwand
Rückseite der Duplexeinheit
Kabelhalter (2)
Druckerspeicher für doppelseitiges Drucken (Duplexdruck)
Beim doppelseitigen D rucken benötigt der Drucker im Grunde doppelt so viel
Speicher wie beim einseitigen Drucken. Je nac h Druckermodell und der
gewählten Druckumgebung ist eventuell eine Erweiterung des Druckerspeichers
notwendig, damit ein Duplexdruck möglich ist. Die Speichervoraussetzungen
werden in der Bedienungsanleitung des Druckers behandelt.
30
Page 46

Betriebsarten der Duplexeinheit
Die Duplexeinheit ermöglicht doppelseitiges Bedrucken von Blättern. Zuerst
bedruckt der Drucker wie gewöhnlich eine Seite das Papiers. Dann wird das
Papier zur Duplexeinheit gelenkt, wo es umgedreht wird, damit auch die andere
Seite bedruckt werden kann. Abbildung 8 zeigt, welchen Weg das Papier beim
doppelseitigen Drucken nimmt.
Binden einstellen
Der Ausdruck binden bezieht sich auf die Art, in der die einzelnen Blätter in
Buchform miteinander verbunden (z.B. durch Kleben, Heften us w.) werden. Die
beiden möglichen Arten sind das längsseitige Binden (long-edge binding),
wobei die Blätter an den langen Kanten verbunden werden, sowie das kurzseitige
Binden (short-edge binding), wobei die Blätter an den kurzen Kanten
verbunden werden. Beim Wählen der Art des Bindens müssen Sie auch die
Orientierung der bedruckten Seite berücksichtigen. Sowohl beim Drucken im
Hochformat, wie auc h beim Drucken im Querformat, ist ein längsseitiges und
kurzseitiges Binden möglich.
Abhängig von der Art des Bindens und der Orientierung , kann das Binden auf
vier verschiedene Arten geschehen. Diese vier möglichen Einstellungen sind: (1)
Hochformat, längsseitig, (2) Hochformat, kurzseitig, (3) Querformat, längsseitig
und (4) Querformat, kurzseitig. Abbildung 9 zeigt diese Einstellungen.
Bei Hochformat und längsseitigem Binden bzw. Querformat und kurzseitigem
Binden [Einstellung (1) und (4) in Abbildung 9], ist der Text auf beiden Seiten des
Blattes gleich ausgerichtet.
Bei Hochformat und kurzseitigem Binden bzw. Querformat und längsseitigem
Binden ([Einstellung (2) und (3) in Abbildung 9], wird der Text auf der Rückseite
des Blattes, ve rglichen mit dem Text auf der Vorderseite, verkehrt gedruckt.
Wählen der Betriebsart
Die Duplexeinheit wird aktiviert, indem mit der Taste MODE im Bedienfeld des
Druckers die Option Duplex gewählt wird. Auch PRESCRIBE oder PCL
Befehle können dafür benutzt werden.
Deutsch
31
Page 47

Wählen der Betriebsart über die Taste MODE
Gehen Sie wie folgt vor, um über das Bedienfeld des Druckers den Duplexdruck
und die Art des Bindens zu wählen. (Der Gebrauch des Bedienfelds des Druckers
wird in der Bedienungsanleitung des Druckers erklärt.)
1. Stellen Sie sicher, daß der Drucker online und betriebsbereit (ready) ist.
2. Drücken Sie im Bedienfeld des Druckers die Taste MODE.
3. Drücken Sie die entsprechenden Tasten des Druckers, bis das Display
Duplex zeigt. Eine der folgenden Meldungen zeigt den aktuellen
Duplexmodus an:
Aus
Binden oben
Binden links
Der standardmäßige Duplexmodus ist Aus.
4. Zum Ändern des Duplexmodus die Taste ENTER drücken. Das Display
zeigt ein blinkendes F ragezeichen (?).
5. Drücken Sie die Taste + oder -, bis im Display die gewünschte Art des
Bindens angezeigt wird. Wollen Sie den Auswählvorgang abbrechen,
drücken Sie nun die Taste CANCEL. Der Duplexmodus bleibt in diesem
Fall unverändert.
6. Drücken Sie die Taste ENTER, um den neuen Duplexmodus zu
aktivieren.
7. Drücken Sie die Taste EXIT, woraufhin das Display wieder Bereit
anzeigt.
Vervollständigen Sie die Wahl der Art des Bindens, indem Sie die
Druckausrichtung, Hochformat oder Querformat, wählen. Anleitungen dazu
finden Sie in der Benutzeranleitung des Druckers.
Hinweis Wenn Sie die Duplexeinheit benutzen, können Sie auch
wählen, ob die Blätter mit der bedruckten Seite nach oben
oder nach unten ausgegeben werden. Wählen Sie die
gewünschte Ausgabeart. Mehr dazu finden Sie in der
Bedienungsanleitung des Druckers.
32
Page 48

Manuelle Zuführung
Papier, das dem Drucker über die manuelle Zuführung oder die optionale
Umschlagzuführung zugeführt wird, kann nicht beidseitig bedruckt werden. Wird
Papier manuell zugeführt, während die Duplexeinheit aktiviert ist, beendet der
Drucker automatisch den Duplexmodus und gibt alle bedruckten Seiten über die
Face-Up Ablage des Druckers aus.
Wahl der Betriebsart über Befehle
Alternativ zum auf Seite 31 beschriebenen Wählen über das Bedienfeld, kann der
Duplexmodus und die Art des Bindens mit bestimmten PRESCRIBE und PCL
Befehlen gesteuert werden. Darüber hinaus stehen mit diesen Befehlen
Funktionen zur Verfügung, die über das Bedienfeld nicht angesprochen werden
können.
Die PRESCRIBE Befehle zum Steuern der Duplexeinheit und deren Funktionen
sind:
❐ DUPX (Duplexmodus aktivieren/deaktivieren)
❐ DXPG (Duplex-Blattseite wählen)
Die PCL-Befehle bieten die selben Funktionen wie die oben aufgelisteten
PRESCRIBE Befehle. Anders jedoch als die PRESCRIBE Befehle (die in jedem
Emulierungsmodus des Drucke rs benutzt werden können), können die PCL
Befehle nur benutzt werden, wenn sich der Drucker im Emulier ungsmodus HP
LaserJet (PCL) befindet.
Die PCL Befehle zum Steuern der Duplexeinheit und deren Funktionen sind:
❐ <ESC>&1#S (Duplexmodus aktivieren/deaktivieren)
❐ <ESC>&a#G (Duplex-Blattseite wählen)
Nachfolgend eine ausführliche Erklärung der PRESCRIBE Befehle.
Deutsch
33
Page 49

PRESCRIBE Befehle
DUPX (Duplexmodus aktivieren/deaktivieren)
Format DUPX Modus;
Parameter Modus: Ziffer von 0 bis 2
Der Befehl DUPX weist den Drucker an, den Duplexmodus zu aktivieren bzw. zu
deaktivieren. Die Parameter für diesen Befehl sind:
0=Simplexmodus wählen (einseitiges Bedrucken)
1=Duplexmodus und längsseitiges Binden wählen
2=Duplexmodus und kurzseitiges Binden wählen
Mit dem Befehl FRPO N4 kann einer der Duplexmodi zum Standardmodus
gemacht werden. Die Parameterwerte haben die selbe Bedeutung wie oben für
den DUPX Befehl. Damit beim Einschalten des Druckers zum Beispiel
automatisch der Duplexmodus mit längsseitigem Binden aktiviert wird , muß
folgender Befehl ausgegeben werden:
ECHO !R! FRPO N4, 1; EXIT; > LPT1
Geben Sie für LPT1 den Port an, an den der Drucker angeschlossen ist.
DXPG (Duplex-Blattseite wählen)
Format DXPG Seite;
Parameter Seite: Ziffer von 0 bis 2
Der DXPG Befehl schließt das Bedrucken einer Seite genauso ab, wie ein
Formularvorschub. Anders aber als ein Formularvorschub, wählt dieser Befe h l
auch die Blattseite, vorne oder hinten, auf der die nachfolgende Seite gedruckt
wird. Die Parameter sind:
34
Page 50

0=Nächste Seite wählen (entspricht einem Formularvorschub)
1=Vorderseite wählen (der Ausdruck der näc hsten Seite beginnt
auf der Vorderseite des nächsten Blattes, und zwar ungeachtet ,
ob die aktuelle Seite auf der Vord e rseite oder Rückseite des
Blattes ausgedruckt wurde).
2=Rückseite wählen (der Ausdruck der nächsten Seite beginnt
auf der Rückseite des aktuellen Blattes, wenn die aktuelle Seite
auf der Vorderseite gedruckt wurde, oder auf der Rückseite des
nächsten Blattes, wenn die aktuelle Seite auf der Rückseite des
Blattes ausgedruckt wurde).
Beispiel
Das folgende Beispiel wählt Duplexdruck und kurzseitiges Binden, a k tiviert als
Seitenorientierung das Hochformat und bedruckt beide Seiten des Blattes.
Abbildung 10 zeigt das Ergebnis.
!R! CMNT Leitet eine PRESCRIBE Befehlsfolge ein;
RES; CMNT Verursacht einen Seitenumbruch und setzt die
Parameter zurück;
DUPX 2; CMNT Aktiviert den Duplexmodus und kurzseitiges
Binden;
SPO P; CMNT Wählt Hochformat;
STAK 1; CMNT Wählt Papierausgabe mit Druckseite nach
unten; EXIT;
Dieser Text wird aufrecht auf der Vorderseite des
Blattes gedruckt
!R! DXPG 0; CMNT Beendet die aktuelle Seite
(Vorderseite des Blattes); EXIT;
Dieser Text wird verkehrt auf der Rückseite des Blattes
gedruckt.
!R! RES; EXIT;
Deutsch
35
Page 51

Fehlerbehebung
Dieser Abschnitt erklärt die Beseitigung von Papierstaus in der Duplexeinheit und
zeigt, wie man sich bei Fehlermeldungen verhalten sollte.
Papier stau
Bei einem Papierstau zeigt das Display des Druckers Papierstau, bitte
entfernen an.
Hinweis Bevor Sie zum Beseitigen eines Papierstaus die Duplexlade
der DU-21 herausziehen, überprüfen Sie andere optionale
Geräte (Papier-Handler/Stapler, Papierzuführung, Sortierer
und Massenablage) auf gestautes Papier. Öffnen Sie dazu die
hintere Abdeckung des jeweiligen Gerätes.
Wenn sich Papier innerhalb der Duplexeinheit staut, blinkt die Anzeige READY
im Anzeigefeld der Duplexeinheit. Zum Beseitigen des Staus zuerst die anderen
Zusatzgeräte auf Papierstaus prüfen, indem Sie deren hintere Abdeckung öffnen.
Entfernen Sie alles Papier, das Sie finden. Anschließend die Duplexlade halb
offen ziehen. Sehen Sie unter der klaren Plastikabdeckung Papier, die Abdeckung
öffnen und das Papier wie in Abbildung 11(a) ge zeigt entfernen.
Steckt das Papier innerhalb der Duplexeinheit, drehen Sie den Knopf an der
linken Seite der Duplexlade gegen den Uhrzeigersinn [siehe Abbildung 11(b)],
um das Papier aus der Duplexeinheit herauszutransportieren.
Steckt das Papier an der Hinterseite der Duplexeinheit, die hintere Abdeckung
öffnen und das Papier entfernen.
Wenn Sie einen Papierstau beseitigen, kontrollieren Sie auch die Innenseite der
Duplexlade und die hintere Abdeckung und prüfen Sie auch immer andere
Zusat zeinrichtungen auf Papierstaus.
Nach Beseitigung des Papierstaus die Lade schließen und öffnen und schließen
Sie die obere Abdeckung des Dr ucke rs oder der Papierzuführung. Der Drucke r
wärmt sich anschließend automatisch auf und geht danach online, um den
Ausdruck fortzusetzen. Ob der Drucker die gestaute Seite abermals druckt hängt
davon ab, wo der Papierstau aufgetreten ist.
36
Page 52

Fehlermeldung
Zeigt das Display des Druckers Duplexeinhait vorn offen oder
Duplexeinhait hinten offen, überprüfen Sie, ob die vordere/hintere
Abdeckung richtig geschlossen sind.
Einstellen der Druckposition
Beim zweiseitigen Bedrucken (Duplexdruck) kann es passieren, daß das
Druckbild auf der Rückseite eines Blattes im Vergleich zum Druckbild auf der
Vorderseite etwas versetzt ist. In diesem Fall kann das Druckbild um etwa 2 mm
nach links oder rechts verschoben werden. Beim Benut zen der Duplexeinheit wird
zuerst die Rückseite eines Blattes (die zweite Seite sozusagen) und danach die
Vorderseite (die erste Seite) bedruckt. Nur die Position des Druckbildes auf der
Vorde rseite kann ve rstellt we rden, d.h. die Druckposition auf ungeraden Seiten.
Einstellen
1. Drucken Sie im Duplexmodus eine beidseitig bedruckte Seite aus.
2. Ziehen Sie die Duplexlade so weit wie möglich heraus.
3. Öffnen Sie die beiden Abdeckungen innerhalb der Lade und lockern Sie
anschließend den Drehknopf auf der rechten Seite der Lade. Das gibt
den Regler frei, der nun nach rechts oder links vers choben werden kann.
Der Regler ist vom Hersteller auf die mittlere Position voreingestellt.
Deutsch
Abdeckungen
Regler
Skala
Drehknopf
Duplexiade
37
Page 53

Die Skala rechts vom Drehknopf zeigt Millimeter an. Verschieben des
Reglers nach rechts verlagert die Druckposition um den entsprechenden
Abstand nach links. Umgekehrt wird durch Ve rs ch i eben des Reglers nach
links die Druckposition um den entsprechenden Abstand nach rechts
verschoben.
4. Halten Sie die Probeseite mit der Vorderseite in Ihre Richtung weisend
gegen ein Licht.
Ist das Druckbild auf der Vorderseite des Blattes rechts vom Druckbild
auf der Rückseite, verschieben Sie den Regler unter Berücksichtigung
der Skala um den entsprechenden Wert nach links.
Ist das Druckbild auf der Vorderseite des Blattes links vom Druckbild auf
der Rückseite, vers chieben Sie den Regler unter Berücksichtigung der
Skala um den entsprechenden We rt nach rechts.
5. Nach dem Einstellen den Drehknopf wieder festziehen, die beiden
Abdeckungen schließen und die Duplexlade schließen.
38
Page 54

Wahl des Papiers
Allgemeine Richtlinien
Die Duplexeinheit darf nicht mit Papier benutzt werden, das den nachfolgenden
Anforderungen nicht entspri cht. Fe rner dürfen Druckmedien, wie Folien für
Overhead-Projektoren, Umschläge, Selbstklebe-Etiketten sowie Wasserzeichen
enthaltendes Papier nicht für den Duplexbetrieb benutzt werden. Derartige
Druckmedien können zu Staus, Fehleinzügen, Papierabfall und im Extremfall zur
Beschädigung der Duplexeinheit führen.
Hinweis Der Hersteller übernimmt keine Haftung für Probleme die
auftreten, wenn die Duplexeinheit mit Papier verwendet
wird, das diesen Anforderungen nic ht entspr icht.
Der Wahl des richtigen Papiers kommt große Bedeutung zu. Ein falscher
Papiertyp kann zu Staus, Fehleinzügen, Krümmung, schlechter Druckqualität,
Papierabfall und im Extremfall zur Beschädigung der Duplexeinheit oder des
Druckers führen. Die nachfolgenden Richtlinien zeigen, wie man wirtschaftlich
und problemfrei druckt und die Abnutzung von Duplexeinheit und Drucker
niedrig hält, was zur Hebung der Produktivität Ihres Büros beiträgt.
Erhältlichkeit von Papier
Die meisten Papiertypen sind für verschiedene Geräte geeignet. Auch Papier, das
für nach dem xerografischen Prinzip arbeitende Kopierer gedacht ist, kann mit der
Duplexeinheit und dem Drucker benutzt werden.
Deutsch
Es gibt drei grundlegende Güteklassen für Papier: billige Qualität, normale
Qualität und hochwertige Qualität. Der bedeutsamste Unterschied zwischen
Güteklassen liegt darin, wie leicht das Papier durch den Drucker transportiert
wird. Entscheidend dafür sind Glätte, Größe und Feuchtigkeitsgehalt des Papiers,
sowie wie es geschnitten ist. Je höher die Güteklasse des verwendeten Papiers ist,
desto geringer ist die Gefahr eines Papierstaus und anderer Probleme. Außerdem
zeigt sich eine höhere Güteklasse auch in der Qualität des Ausdrucks.
Auch die Unterschiede in der Qualität von Papier verschiedener Hersteller hat
Einfluß auf die Leistung der Duplexeinheit. Ein guter Drucker kann keine guten
Druckgebnisse liefern, wenn das falsche Pa pier ben utzt wird. Billiges Papier ist
längerfristig gesehen nicht wirtschaftlich, wenn es Probleme verursacht.
39
Page 55

Papier der einzelnen Güteklassen ist in vers chiedenen Papiergewichten (wird
später erklärt) erhältlich. Die üblichen Standardgewichte betr agen 70 g/m2 bis 90
g/m2.
Papierspezifikationen
Die folgende Tabelle faßt die grundlegenden Papiereigenschaften zusammen.
Nach der Tabelle finden Sie dann detaillierte Erklärungen.
Tabelle 1 Spezifikationen für weißes Feinpostpapier (Bankpostpapier)
Posten Spezifikationen
Gewicht 70 bis 90 g/m
Stärke 0,086 bis 0,110 mm
Abmessungstoleranz 0,7 mm
Rechteckigkeit der Kanten 90° ± 0,2°
Feuchtigkeitsgehalt 4% bis 6%
Faserlaufrichtung Längsfaser
Zellstoffgehalt 80% oder mehr
2
Wahl des richtigen Papiers
Beim Bedrucken von Papier durch den Drucker spielen unter anderem LED-Licht,
elektrostatische Entladungen, Toner und Hitze eine Rolle. Außerdem durchläuft
das Papier den Drucker, wobei es erheblich gezogen, gekrümmt und gedreht wird.
Papier guter Qualität, das den Anforderungen entspricht, hält dieser Belastung
stand und ermöglicht es so der Duplexeinheit und dem Drucker, konstant saubere
und deutliche Ausdrucke zu produzieren.
Bedenken Sie aber, daß Papier nicht gleich Papier ist. Einige der Faktoren, die Sie
beim Kauf von Papier für die Duplexeinheit berücksichtigen sollten, sind:
Zustand des Papiers
Vermeiden Sie Papier, dessen Kanten verbogen sind oder das gekrümmt,
schmutzig, eingerissen oder durch Fusseln, Staub oder Papierschnitzel
verunreinigt ist.
Papier in solchem Zustand kann zu unleserlichen Ausdrucken, Fehleinzügen und
Papierstaus führen und die Lebensdauer der Duplexeinheit und des Druckers
verkürzen. Vermeiden Sie insbesondere oberflächenbeschichtetes Papier oder
Papier, dessen Oberfläche anderweitig behandelt wurde. Die Oberfläche des
Papiers sollte so glatt und eben wie möglich sein.
40
Page 56

Zusammensetzung
Verwenden Sie kein Papier, das beschichtet oder dessen Oberfläche sonstwie
behandelt wurde und das Plastik oder Karbon enthält. Die beim Fixieren
entstehende Hitze könnte dazu führen, daß solches Papier schädliche Gase abgibt.
Der Zellstoffgehalt von Feinpostpapier sollte mindestens 80% betragen. Das
Papier darf insgesamt nicht mehr als 20% Baumwollfasern oder andere Fasern
enthalten.
Papierformat
Für die in Tabelle 2 aufgelisteten Papierformate sind Papierkassetten erhältlich.
Die Abmessungstoleranz beträgt ±0,7 mm für die Länge und Breite . Der Winkel
der Ecken muß 90° ±0,2° betragen.
Tabelle 2 Papierformate für Einzug aus Druckerkassetten
Druckerkassette Format
Legal 8,5 × 14 Zoll
Letter 8,5 × 11 Zoll
ISO A4 210 × 297 mm
JIS B5 182 × 257 mm
ISO A5 148 × 210 mm
Glätte
Das Papier sollte eine glatte, nicht beschichtete Oberfläche besitzen. Papier mit
einer rauhen oder sandigen Oberfläche kann zu einem lückenhaften Ausdruck
führen. Zu glattes Papier allerdings kann zu Mehrfacheinzügen und zu Schleiern
führen. (Unter Schleier versteht sich ein grauer Hintergrund.)
Papiergewicht
Mit Papiergewicht wird das Gewicht einer bestimmten Standardmenge gemeint.
Traditionell ist diese Standardmenge ein Ries (480 Bogen). Im englischen
Sprachraum versteht man darunter 500 Blätter mit einer Abmessung von 17 ´ 22
Zoll. Im metrischen System beträgt die Standardmenge 1 Quadratmeter. Zu
leichtes oder zu sch weres Papier kann zu Fehleinzügen, Papierstaus oder
vorzeitiger Abnutzung der Duplexeinheit oder des Druckers führen. Unebenes
Papier kann zu Mehrfacheinzügen, Druckfehlern, schlechter Fixierung des Toners,
Vers chmieren und andere n D ruckproblemen führen. Das richtige Papiergewicht
beträgt 70 bis 90 g/m2.
Deutsch
41
Page 57

Wichtig Bei Simplexbetrieb (d.h. nur eine Papier seite wird bedruckt)
kann der Drucker zwar Papier bedrucken, das bis 60 g/m
2
leicht sein kann, Duplexbetrieb mit Papier mit weniger als 70
g/m2 ist aber nicht möglich.
Dicke (Stärke)
Dickes Papier wird als starkes Papier und dünnes Papier als schwaches Papier
bezeichnet. Das mit Drucker und Duplexeinheit benutzte Papier sollte weder
extrem dick noch extrem dünn sein. Wenn Sie Probleme mit Papierstaus,
Mehrfacheinzügen und einem zu schwachem Druckbild haben, l iegt das vielleicht
an zu dünnem Papier. Wenn Sie Probleme mit Papierstaus und einem
verschmierten Druckbild haben, ist das Papier vielleicht zu dick. Die richtige
Papierdicke beträgt 0,086 bis 0,110 mm.
Feuchtigkeitsgehalt
Der Feuchtigkeitsgehalt wird als prozentuales Verhältnis zwischen Trockenmasse
und Feuchtigkeit angegeben. Der Feuchtigkeitsgehalt beeinflußt das
Erscheinungsbild des Papiers, sowie dessen Einzugsfähigkeit, Krümmung,
elektrostatische Eigenschaften und Tonerfixierung.
Der Feuchtigkeitsgehalt des Papier richtet sich der relativen Luftfeuchtigkeit im
Raum. Ist die relative Luftfeuchtigkeit hoch und das Papier nimmt die
Feuchtigkeit auf, dehnen sich die Papierkanten aus und erscheinen wellig. Ist die
relative Luftfeuchtigkeit niedrig und das Papier gibt Feuchtigkeit ab, ziehen sich
die Papierkanten zusammen und werden straffer, worunter der Druckkontrast
leiden kann.
Wellige oder straff e Kanten können zu Fehleinzügen und unregelmäßiger
Ausrichtung führen. Der Feuchtigkeitsgehalt des Papiers sollte 4% bis 6%
betragen.
Damit das Papier den richtigen Feuchtigkeitsgehalt aufweist ist es wichtig, den
Feuchtigkeitsgehalt des Lagerraumes zu regulieren. Hier einige Hinweise zum
Regeln der Feuchtigkeit:
❐ Papier an einem kühlen, trockenen Ort aufbewahren.
❐ Das Papier so lange wie möglich in dessen Verpackung belassen. Nicht
benutztes Papier wieder einpacken.
❐ Papier in dessen Originalkarton aufbewahren. Eine Palette oder ähnliches
unter den Karton stellen, um ihn vom Fußboden zu trennen.
42
Page 58

❐ Nachdem das Papier aus dem Lagerraum gebracht wurde, sollte es 48
Stunden vor der Benutzung in dem Raum gelagert werden, in dem der
Drucker steht.
❐ Das Papier nicht an heißen, sonnenbestrahlten oder feuchten Stellen
aufbewahren.
Faserlaufrichtung
Bei der Herstellung wird Papier in Bögen geschnitten, wobei die
Faserlaufrichtung entweder parallel zur Länge (Längsfaser) oder zur Breite
(Breitfaser) verläuft. Breitfaseriges Papier kann zu Problemen beim Papiereinzug
führen. Alles mit der Duplexeinheit und dem Drucker benutzte Papier sollte daher
längsfaserig sein.
Andere Papier eigenschaften
Porosität: Bezieht sich auf die Dichte der Papierstruktur, d.h. wie weit oder dicht
die Fasern gebunden sind.
Steifheit: Schlaffes Papier kann im Drucker oder der Duplexeinheit einknicken,
während sich zu steifes Papier verklemmen kann. Beides führt zu einem
Papierstau.
Krümmung: Meistens besitzt Papier eine natürliche Tendenz, sich in eine
Richtung zu krümmen. Das Papier sollte so eingelegt werden, daß die natürliche
Krümmung nach unten weist, um so der durch den Druckvorgang bewirkten
Aufwärtskrümmung entgegen zu wirken. Die bedruckten Blätter werden so flach
ausgeworfen. Meistens besitzt Papier eine verschieden strukturierte Vorder- und
Rückseite. Oft finden Sie auf der Papierverpackung Hinweise zum Einlegen des
Papiers.
Deutsch
Elektrostatische Eigenschaften: Beim Bedrucken wird das Papier
elektrostatisch aufgeladen, um Toner anzuziehen. Das Papier muß diese Ladung
freigeben können, damit die Blätter im Ausgabebehälter nicht zusammenhaften.
Weißheit: Der Kontrast des Druckbildes hängt von der Weißheit des Papiers ab.
Weißeres Papier bietet ein schärferes und klareres Erscheinungsbild.
Qualitätskontrolle: Ungleiche Blattabmessungen, nicht rechteckige Ecken,
ausgefranste Kanten, verschweißte (nicht beschnittene) Blätter und verknitterte
Kanten und Ecken können zu verschiedenen Störungen der Duplexeinheit und des
Druckers führen. Ein guter Papierlieferant sollte sehr darauf achten, daß es nicht
zu solchen Problemen kommt.
43
Page 59

Verpackung: Das Papier sollte in einem festen Karton verpackt sein, um
Transportschäden vorzubeugen. Gutes von einem verläßlichen Lieferanten
kommendes Papier ist gewöhnlich ordentlich verpackt.
Spezialpapier
Die folgenden Spezialpapierarten können benutzt werden:
❐ Farbpapier
❐ Vorbedruckte Formulare
Benutzen Sie Papier, das ausdrücklich für auf dem Prinzip der Hitzefixierung
arbeitende Kopierer angeboten wird.
Da die Zusammensetzung und die Qualität von Spezialpapier sehr unterschiedlich
ist, kommt es beim Bedrucken von Spezialpapier häufiger zu Problemen als mit
weißem Feinpostpapier. Es wird keine Haftung für den Fall übernommen, daß
beim Bedrucken von Spezialpapier Feuchtigkeit usw. freigesetzt wird und das
Gerät oder die Bedienperson schädigt.
Hinweis Bevor Sie Spezialpapier kaufen, drucken Sie eine Probeseite
über den Drucker und die Duplexeinheit aus, um
festzustellen, ob die Druckqualität befriedigt.
Nachfolgend die Spezifikationen für die beiden Spezialpapierarten.
Farbpapier
Farbpapier muß den selben Anforderungen entsprechen, die in Tabelle 1 an
weißes Feinpostpapier gestellt werden. Außerdem müssen die im Papier
enthaltenen Pigmentstoffe der beim Fixieren entstehenden Hitze (bis zu 200°C)
widerstehen können.
V orbedruckte Formulare
Vorbedruckte Formulare sollten aus Feinpostpapier bestehen. Die auf dem
Formular aufgebrachte Tinte muß der beim Fixieren entstehenden Hitze
widerstehen können und gegen Silikonöl beständig sein.
Benutzen Sie kein Papier, dessen Oberfl äche behandelt wurde, wie dies z.B. bei
Kalendern häufig der Fall ist.
44
Page 60

Technische Daten
Posten Technische Daten
Geeignete Drucker Kyocera Seitendrucker
Papierformat Letter (8,5 × 11 Zoll)
ISO A4 (21,0 × 29,7 cm)
Legal (8,5 × 14 Zoll)
JIS B5 (18,2 × 25,7 cm)
ISO A5 (14,8 × 21 cm)
Umgebungsbedingungen Temperatur: 10°C bis 32,5°C
Feuchtigkeit: 20% bis 80% relative Luftfeuchtigkeit
Idealbedingungen sind 20°C/65% relative Luftfeuchtigkeit,
unter 2000 m Meereshöhe
Abmessungen 11,0 cm (H) × 34,5 cm (B) × 51,3 cm (T)
Gewicht 6,4 kg
Stromversorgung Erfolgt über Drucker
Deutsch
45
Page 61

Bescheinigung des Herstellers/Importeurs
Hiemit wird bescheigt, daß der/die/das
(Gerät, Typ, Bezeic hnung)
DU-21
in Übereinstimmung mit den Bestimmungen der BMPT-AmtsblVfg 243/1991
funkentstört ist. Der vorschriftsmäßige Betrieb mancher Geräte (z.b. Meßsender)
kann allerdings gewissen Einschränkungen unterliegen. Beachten Sie deshalb die
Hinweise in der Bedienungsanleitung.
Dem Bundesamt für die Zulassungen in der Telekommunikation wurde das
Inverkehrbringen dieses Gerätes angezeigt und die Berechtigung zur Überprüfung
der Serie auf Einhaltung der Bestimmungen eingeräumt.
Name und Anschrift des Herstellers/Importeurs
Kyocera Electronics Europe GmbH
Mollsfeld 12, 40670 Meerbusch
46
Page 62

Nous nous dégageons de toute responsabilité envers les clients ou tout autre
personne physique ou morale concernant la responsabilité, la perte ou la panne
causée ou supposée être causée directement ou indirectement par l’équipement
vendu ou fourni par nous, y compris et non limité à l’interruption de service, la
fermeture de l’entrepri se, les bénéfices anticipés ou tout autre dommage
conséquent suite à l’utilisation ou le fonctionnement de l’appareil ou du logiciel.
Précaution
NOUS N’ASSUMONS AUCUNE RESPONSABILITE POUR TOUT DOMMA GE
CAUSE PAR UNE MAUVAISE INSTALLA TION.
Notice
Les informations contenues dans ce mode d’emploi sont sujettes à des
modifications sans préavis. Des pages supplémentaires peuvent être insérées dans
les éditions ultérieures. Nous demandons à l’utilisateur de nous excuser pour
d’éventuelles inexactitudes techniques ou erreurs typographiques dans la
présente édition.
Nous n’assumons aucune responsabilité en cas d’éventuels accidents ou erreu rs
lorsque l’utilisateur suit les instructions de ce mode d’emploi.
Le contenu de ce mode d’emploi est protégé par les droits d’auteur. Toute
reproduction ou copie d’une partie ou de la totalité de ce mode d’emploi sans la
permission écrite du détenteur des droits d’auteur est interdite.
Concernant les noms de marques:
PRESCRIBE est une marque déposée de Kyocera Corporation.
HP LaserJet est un produit de Hewlett-Packard Company.
PCL est une marque déposée de Hewlett-Packard Company.
PostScript est une marque déposée de Adobe Systems Incorporate d.
Français
© Copyright 1999 par Kyocera Corporation
Tous droits réservés, Révision 1.0., Juin 1999
Conditions des interférences radio dans les pays européens
L'unité de duplexage optionnelle DU-21 est destinée à l'utilisation avec les
imprimantes modèles FS-1200/FS-1700/FS-1700+/FS-1750/FS-3700/
FS-3700+/FS-3750, dont le type est testé et catalogué comme appareil de
la classe B conformément au règlement EN55022.
Les appareils de la classe B peuvent causer des interférences avec la
réception radio ou télévision, particulièrement dans une zone résidentielle.
47
Page 63

Introduction
Le DU-21 est un appareil auxiliaire conçu pour être utilisé avec les imprimantes
laser de Kyocera. Grâce à l'unité de duplexage, vous pouvez imprimer
automatiquement sur les deux faces du papier.
Ce mode d’emploi explique la procédure d’installation et l’utilisation de l’unité
de duplexage.
Les points expliqués dans ce mode d’emploi sont:
❐ Installation de l’unité de duplexage
❐ Modes de l’opération de l’unité de duplexage
❐ Sélection de mode à partir du panneau de contrôle de l’imprimante
❐ Sélection de mode par la commande PRESCRIBE
❐ Sélection de mode par la commande PCL (langage de contrôle de page
de Hewlett-Packard)
Liste de l’emballage
S’assurer que le paquet de l’unité de duplexage contient tous les articles suivants
ainsi que le bon nombre.
Unité de duplexage DU-21, 1
Supports de câbles, 2
Mode d’emploi (ce manuel), 1
48
Page 64

Nomenclature
Avant d’installer l’unité de duplexage, prière de lire la liste de noms suivante.
Ces noms sont utilisés dans les procédures de description d’installation et
d’utilisation de l’unité de duplexage.
Voir figure 1 en page iii.
Connecteur: Lors de l’installation de l’unité de duplexage, ce connecteur se
branche dans un connecteur situé dans le bas de l’imprimante (ou du chargeur de
papier optionnel, s’il est utilisé avec l’unité de duplexage).
Broches de positionnement: Ces broches rentrent dans deux fentes situées
dans le bas de l’imprimante (ou du chargeur de papier optionnel, s’il est utilisé
avec l’unité de duplexage).
Indicateur prêt READY: S’allume lorsque l’unité de duplexage est prête.
Clignote lorsqu’il y a bourrage de papier dans l’unité de duplexage.
Caser de l’unité de duplexage: S’ouvre pour installer l’adaptateur
d’acheminement de papier ou pour dégager le papier coincé.
Couvercle arrière: S’ouvre pour permettre de dégager le papier coincé.
Français
49
Page 65

Installation
L’unité de duplexage se place dans le bas de l’imprimante ou du chargeur de
papier optionnel (si le chargeur de papier optionnel est installé avec l’unité de
duplexage).
Remarque Avant d’installer (ou de retirer) l’unité de duplexage, mettre
l’imprimante hors tension.
La figure 2 en page iv montre les configurations d'imprimante permises
comprenant l'unité de duplexag e. Différents adaptateurs d'acheminement de
papier sont nécessaires en fonction des autres unités optionnelles installées avec
l'unité de duplexage. Notez que toute configuration comprenant l'unité de
duplexage nécessite également la gestionnaire/empileuse optionnelle. Pour les
détails sur l'installation de la gestionnaire/empileuse de papier optionnelle,
reportez-vous aux instructions fournies avec.
Installation de l’unité de duplexage sans aucune autre unité
optionnelle
Si l’unité de duplexage est le seul appareil optionnel à utiliser avec l’imprimante,
elle doit être montée directement sous l’imprimante tel qu’illustré dans la figure
2(a). L’imprimante se met au dessus de l’unité de duplexage.
1. Installer l’adaptateur d’acheminement de papier PA-20 au dessus de
l’unité de duplexage tel qu’illustré dans la figure 3.
• Tirer en ouvrant légèrement le casier de l’unité de duplexage.
• Aligner les languettes avec les fentes.
• Après avoir rentré les languettes dans les fentes, glisser l’adaptateur
d’acheminement de papier vers la gauche pour verrouiller.
• Fermer l’unité de duplexage.
2. Aligner, ensuite, les broches de positionnement au dessus de l’unité de
duplexage et la broche de verrouillage sur l’adaptateur d’acheminement
de papier avec les fentes en bas de l’imprimante, puis baisser doucement
et minutieusement l’imprimante sur l’unité de duplexage. Maintenir le
niveau de l’imprimante en la baissant sur l’unité de duplexage et
s’assurer que le connecteur de l’unité de duplexage rentre carrément
dans le connecteur correspondant sur le socle de l’imprimante. (Fig. 4)
50
Page 66

3. Installer la gestionnaire/empileuse de papier optionnelle. Pour les
détails, se reporter aux instructions fournies avec la gestionnaire/
empileuse de papier.
Installation de l’unité de duplexage avec d’autres unités optionnelles
L'unité de duplexage s'installe sous le chargeur de papier tel qu'indiqué dans la
figure 2(b). Dans cette configuration, l'imprimante est placée au dessus du
chargeur de papier.
1. Si l'unité de duplexage est utilisée avec le chargeur de papier, il faut
installer l'adaptateur d'acheminement de papier PA-1 à l'arrière de l'unité
de duplexage. Installer le PA-1 tel qu'indiqué dans la figure 5.
• Aligner les languettes avec les fentes.
• Après avoir placé les languettes dans les fentes, glisser l’adaptateur
d’acheminement de papier dans la direction de la Flèche pour
verrouiller. Voir la figure 6 pour retir er le PA-20.
2. Installer, ensuite, le chargeur de papier au dessus de l’unité de
duplexage tel qu’illustré dans la figure 7. Aligner les broches de
positionnement au dessus de l’unité de duplexage et la broche de
verrouillage sur l’adaptateur d’acheminement de papier avec les fentes
sur le socle du chargeur de papier, puis baisser doucement le chargeur
de papier sur l’unité de duplexage. Maintenir le niveau du chargeur de
papier en le baissant sur l’unité de duplexage et s’assurer que le
connecteur de l’unité de duplexage rentre bien dans le connecteur
correspondant sur le socle du chargeur de papier.
Français
Remarque. Il est possible d'empiler deux chargeurs de papier l'un au
dessus de l'autre. Pour les détails, voir le manuel
d'instructions du chargeur de papier.
3. Installer l’adaptateur d’acheminement de papier PA-20 sur le chargeur de
papier tel qu’indiqué dans la figure 3.
• Aligner les languettes avec les fentes.
• Après avoir rentré les languettes dans les fentes, glisser l’adaptateur
d’acheminement de papier vers la gauche pour verrouiller.
4. Baisser l’imprimante sur le chargeur de papier. Observer les mêmes
précautions en baissant le chargeur de papier sur l’unité de duplexage.
(Fig. 4)
51
Page 67

5. Installer la gestionnaire/empileuse de papier. Pour les détails, voir les
instructions fournies avec la gestionnaire/empileuse.
Utilisation du support de câbles
Le support de câbles fourni avec l’unité de duplexage optionnelle est un moyen
pratique pour ranger les câbles d’alimentation d’imprimante ou d’interface. Pour
utiliser le support de câbles, le pousser à gauche ou à droite dans l’une des fentes
du couvercle arrière tel qu’illustré.
Couvercle arrière
Arrière de l’unité de duplexage
Support de câble (2)
Mémoire d’imprimante pour l’impression en duplex
Avec l’impression en duplex, l’imprimante requiert deux fois plus de mémoire
que pour l’impression simple. De même, en fonction de l'imprimante et de
l'environnement d'impression sélectionné, il peut être nécessaire d'élargir la
mémoire de l'imprimante pour pouvoir effectuer l'impression en duplex. Pour les
conditions concernant la mémoire, se reporter au manuel d'utilisation de
l'imprimante.
52
Page 68

Modes d’unité de duplexage
L’unité de duplexage permt d’imprimer un papier recto verso. L’imprimante
imprime en premier sur une face du papier de la manière habituelle, puis envoie
le papier à l’unité de duplexage, qui le retourne pour permettre d’imprimer l’autre
face. La figure 8 montre l’acheminement suivi par le papier lors de l’impression
en mode duplex.
Réglages de liaison
Le terme liaison se rapporte à la manière dont les pages imprimées sont liées
ensembles lorsqu’elles sont attachées (par la colle, le brochage, etc.) sous forme
de livre. Les deux types de liaison possibles sont l’un à bord long, dans lequel
les pages sont liées le long de leur bord long et l’autre à bord court avec les
pages liées par leur bord court. Dans la sélection de type de liaison, il faut aussi
considérer l’orientation de la page imprimée. Il est possible d’utiliser la liaison à
bord long et ou bord court avec impression portrait ou paysage.
En fonction du type de liaison et de l’orientation d’impression, l’unité de
duplexage fournit quatre types de réglages de liaison; (1) portrait, bord-long, (2)
portrait, bord court, (3) paysage, bord long et (4) paysage, bord court. La figure
9 montre les réglages de liaison.
Avec le portrait, liaison bord long et paysage, liaison bord cour t [Réglages (1) et
(4) dans la figure 9], le texte sur les deux faces du papier est orienté dans la
même direction.
Français
Avec le portrait, liaison bord court et paysage, liaison bord long [Réglages (2) et
(3) dans la figure 9], le texte au verso du papier est imprimé à l’envers du côté
recto.
Sélection de mode
Il est possible d’activer l’unité de duplexage en sélectionnant l’option Mode
duplex en utilisant la touche MODE du panneau de commande de
l’imprimante ou bien par l’intermédiaire des commandes de sélection de mode
PRESCRIBE ou PCL.
53
Page 69

Sélection de mode par la touche MODE
Pour sélectionner l'impression en duplex et le réglage de liaison à partir du
panneau de commande de l'imprimante, procéder comme suit. (Pour le
fonctionnement du panneau de commande, voir également le manuel d'utilisation
de l'imprimante.)
1. S’assurer que l’imprimante est prête et en ligne.
2. Appuyer sur la touche MODE sur le panneau de commande de
l’imprimante.
3. Suivre la procédure de fonctionnement pour chaque imprimante jusqu'à
ce que l'affichage de message indique le Mode duplex. Le mode
duplex actuel est indiqué par l’un des messages suivants:
Inactif
Bord relié court
Bord relié long
Le mode duplex par défaut est Inactif.
4. Pour changer le mode duoplex, appuy er sur la touche ENTER.
L’a ffichage de message indique un point d’interrogation (?).
5. Appuyer sur la touche + ou - jusqu’à ce que l’affichage indique le type
de liaison souhaitée. Pour abandonner la procédure de sélection du mode
duplex, appuyer maintenant sur la touche CANCEL. Le mode duplex
reste inchangé.
6. Appuyer sur l a t ouche ENTER pour régler le nouveau mode duplex.
7. Appuyer sur la touche EXIT et l’affichage de message revient sur Prêt.
Terminer le réglage de liaison en sélectionnant l’orientation d’impression
appropriée, portrait ou paysage. Voir le mode d’emploi de l’imprimante pour la
procédure.
54
Page 70

Remarque Lors de l'utilisation de l'unité de duplexage, il est possible de
sélectionner la sortie face vers le haut ou face vers le bas des
pages imprimées. Sélectionner un type de sortie répondant à
vos besoins. Pour les informations sur cette procédure, voir le
manuel d'utilisation de l'imprimante.
Alimentation manuelle
L’impression en duplex n’est pas disponible si le papier est alimenté
manuellement à partir du plateau de chage manuelle de l’imprimante ou en
utilisant le chargeur d’enveloppe optionnel. Si le papier est alimenté
manuellement alors que l’unité de duplexage est activée, l’imprimante désactive
automatiquement le mode duplex et délivre toutes les pages sorties au plateau de
sortie face vers le haut.
Sélection de mode par commande
En tant qu’alternative à la procédure de sélection du panneau de commande
décrite en page 53, il est possible de sélectionner l’impression en duplex et le
réglage de mode de liaison en utilisant certaines commandes PRESCRIBE et
PCL. Ces commandes fournissent également certaines fonctions qui ne sont pas
disponibles par le panneau de commande.
Les commandes de contrôle duplex PRESCRIBE et leurs fonctions sont les
suivantes:
❐ DUPX (sélectionne/annule le mode duplex)
❐ DXPG (Sélectionne le face de page duplex)
Les commandes PCL fournissent les mêmes fonctions que les commandes
PRESCRIBE listées ci-dessus. Toutefois, contrairement aux commandes
PRESCRIBE (qui peuvent être utilisées dans n’importe quel mode d’émulation
d’imprimante), les commandes PCL ne sont effectives que lors de l’utilisation de
l’imprimante en mode d’émulation HP LaserJet (PCL).
Les commandes de contrôle duplex PCL et leurs fonctions sont les suivantes:
❐ <Esc>&l#S (sélectionne/annule le mode duplex)
❐ <Esc>&a#G (Sélectionne le face de page duplex)
Français
Les commandes PRESCRIBE sont décrites en détail ci-dessous.
55
Page 71

Commandes PRESCRIBE
DUPX (sélectionne/annule le mode DUPleX)
Format DUPX mode;
Paramètres mode: un chiffre de 0 à 2.
La commande DUPX informe l’imprimante de sélectionner ou annuler
l’impression en duplex et sélectionne le mode duplex. Les paramètres sont les
suivants:
0= Sélectionne le mode simple
1= Sélectionne le mode duplex, liaison bord long
2= Sélectionne le mode duplex, liaison bord court
Le mode duplex par défaut peut être sélectionné par la commande FRPO N4.
Les valeurs de paramètre sont les mêmes que celles de la commande DUPX cidessus. Par exemple, pour mettre l’imprimante sous tension avec le mode liason
en duplex à bord long, entrer la commande:
ECHO !R! FRPO N4, 1; EXIT; >> LPT1
Pour LPT1, substituer le port auquel l’ordinateur est raccordé.
DXPG (sélectionne la face de PaGe DupleX)
Format DXPG face;
Paramètres face: un chi ffre de 0 à 2.
La commande DPXG termine l’impression sur la page actuelle de la même
manière que l’alimentation de feuille. Toutefois, contrairement à l’alimentation
de feuille, elle sélectionne également la face du papier, recto ou verso, pour
l’impression de page suivante. Les paramètres sont les suivants:
56
Page 72

0= Sélectionne la page suivante (pareil que l’alimentation de
feuille)
1= Sélectionne la face recto (L’impression de page suivante
commence au recto de la feuille suivante, sans tenir compte de
la face d’impression de la feuille actuelle).
2= Sélectionne la face verso (L’impression de la page suivante
commence au verso de la feuille actuelle si elle est imprimée
au recto ou bien au verso de la feuille suivante si la page
actuelle est imprimée au verso).
Exemple
L’exemple suivant sélectionne le mode duplex avec liaison à bord court,
l’orientation de la page portrait et imprime le texte recto verso. Le résultat est
illustré dans la figure 10.
!R! CMNT Initialise une séquence de commande PRESCRIBE;
RES; CMNT provoque un changement de page et
réinitialise les paramètres;
DUPX 2; CMNT sélectionne le mode duplex, liaison à bord
court
SPO P; CMNT sélectionne l’orientation portrait
STAK 1; CMNT sélectionne la sortie face vers le bas; EXIT;
Ce texte imprime à droite de la face recto de la page.
!R! DXPG 0; CMNT termine la page actuelle (face recto
du papier); EXIT;
Ce texte imprime à l’envers au verso de la page.
!R! RES; EXIT;
Français
57
Page 73

Guide de dépannage
Cette section explique comment dégager le bourrage de papier dans l’unité de
duplexage et répond aux messages d’erreur.
Bourrage papier
Dans le cas de bourrage de papier, le message de Bourrage papier apparaît
sur l’affichage de message de l’imprimante.
Remarque En dégageant le papier coincé, vérifier les autres unités
optionnelles (la gestionnaire/empileuse de papier, le chargeur
de papier, la trieuse et l'empileuse à grande capacité) pour
tout bourrage de papier avant de tirer le casier de l'unité de
duplexage DU-21. Pour vérifier tout bourrage de papier dans
les autres unités optionnelles, ouvrir leurs couvercles
arrières.
Si le papier est coincé dans l’unité de duplexage, l’indicateur prêt (READY)
clignote sur le panneau d’indicateurs de l’unité de duplexage. Pour dégager le pa,
vérifier tout d’abord les autres unités optionnelles en ouvr ant leurs couvercles
arrières et retirer tout papier coincé. Tirer, ensuite, le casier de l’unité de
duplexage pour l’ouvrir en partie. Si le papier est visible sous le couvercle en
plastique transparent, ouvrir le couvercle et retirer le papier tel qu’indiqué dans la
figure 11(a).
Si le papier est complètement coincé à l’intérieur de l’unité de duplexage, tourner
le bouton à gauche du casier de l’unité de duplexage dans le sens contraire des
aiguilles d’une montre [voir figure 11(b)] pour sortir le papier.
Si le papier se coince à l’arrière de l’unité de duplexage, ouvrir le couvercle
arrière pour le retirer.
Chaque fois que le bourrage de papier est dégagé, vérifier, l’intérieur des autres
unités optionnelles ainsi le casier de l’unité de duplexage et son couvercle arrière.
Après avoir dégagé le bourrage de pa pier, refermer le casier puis ouvrir et
refermer le couvercle supérieur de l’imprimante ou le chargeur de papier.
L’imprimante chauffe automatiquement, se met en ligne et continue l’impression.
La page coincée peut ne pas être de nouveau imprimée en fonction de l’endroit où
le bourrage s’est produit.
58
Page 74
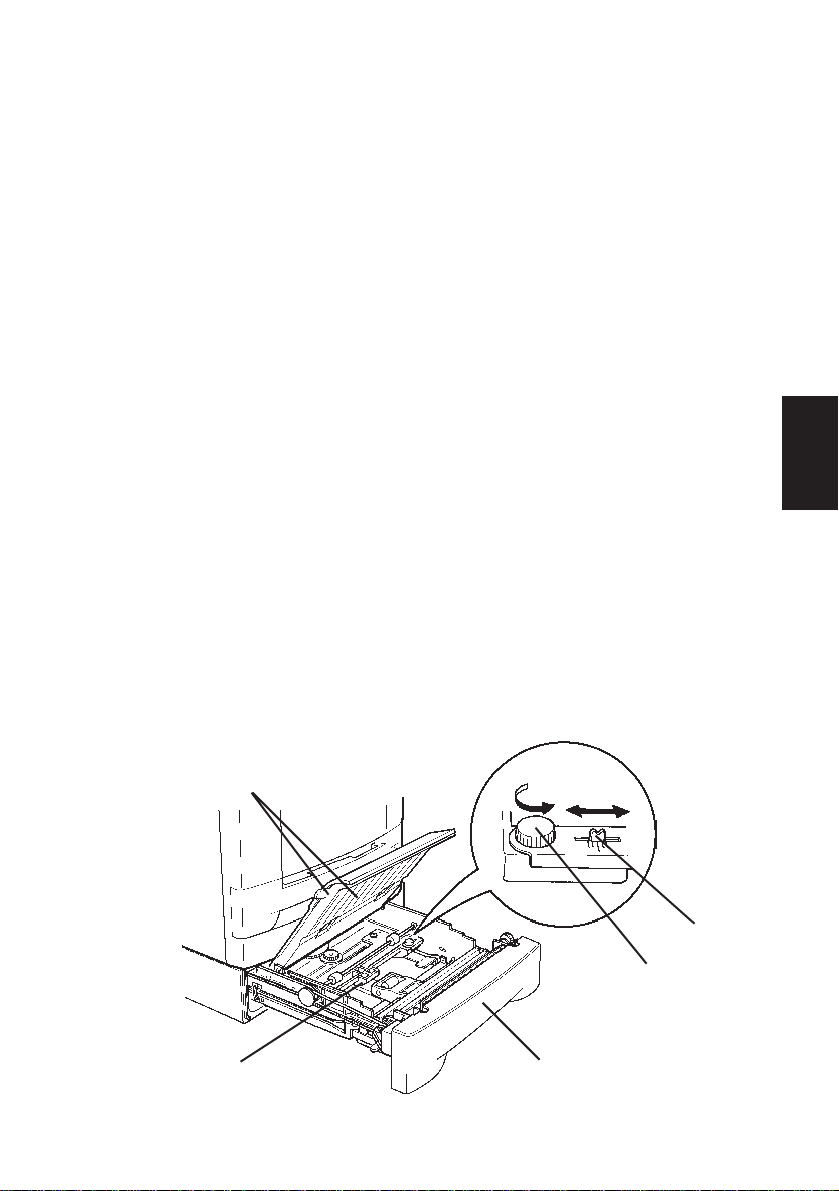
Message d’erreur
Si l’affichage de message de l’imprimante indique Panneau av. duplex
ouvert ou Panneau ar. duplex ouvert, vérifier les couvercles avant/
arrière et s’assurer qu’ils sont fermement fermés.
Réglage de la position d’impression
Lors de l’impression en duplex, l’image au verso du papier peut ne pas être tout
à fait alignée avec celle au recto. Dans ce cas, la position de l’image peut être
réglée de 2 mm vers la gauche ou la droite. Lors de l’utilisation de l’unité de
duplexage, le verso du papier (la deuxième page) est imprimée en premier, puis le
recto (la première page). Le réglage de la position d’impression n’affecte que
l’image imprimée au recto du papier, par exemple, imprimer en positionnant par
nombre pairs de pages.
Procédure de réglage
1. Préparer un échantillon d’impression recto-verso en utilisant le mode
d’impression en duplex.
2. Tirer aussi loin que possible le casier de l’unité de duplexage.
3. Ouvrir les deux couvercles à l’intérieur du casier, puis dévisser la vis à
oreilles située à gauche dans le casier. Ceci libère l’ajusteur, permettant
ainsi de le déplacer à gauche ou à droite. L’ajusteur est placé sur la
position centrale au départ d’usine.
Couvercles
Ajusteur
Caser de l’unité de
duplexage
Français
Echelle
Vis à oreilles
59
Page 75

L’échelle située à droite de la vis à oreilles est graduée en millimimètres.
En déplaçant l’ajusteur à droite de la position centrale, la position
d’impression est déplacée de la même valeur vers la gauche et vice-
versa.
4. Tenir l’échantillon d’impression devant une lumière avec la face recto
devant soi.
Si l’image de la face recto est à droite de celle de la face verso,
déplacer l’ajusteur vers la gauche en se rapportant à l’échelle de
l’ajusteur.
Si l’image de la face recto du papier est à gauche de celle de la face
verso, déplacer l’ajusteur à droite de la même valeur en se rapportant à
l’échelle de l’ajusteur.
5. Une fois terminé, reserrer la vis à oreilles, refermer les deux couvercles
et fermer le casier de l’unité de duplexage.
60
Page 76

Sélection de papier
Directives générales
L’unité de duplexage ne doit pas être utilisée pour imprimer sur du papier n’ayant
pas les conditions requises. De même, des types spéciaux de papier, tel que le film
OHP, les enveloppes, les étiquettes adhésives ainsi que le papier en filigrane ne
doivent pas être utilisés pour l’impression en duplex. Ces types de papier risquent
de provoquer un bourrage, une mauvaise alimentation et une perte de papier et
peut, le cas échéant, endommager l’unité de duplexage.
Remarque Le fabricant n’assume aucune responsabilité quant aux
problèmes survenant suite à l’utilisation de papier ne
correspondant pas aux conditions requises a vec l’unité de
duplexage.
La sélection du papier adéquat est très importante. Le papier inadéquat risque de
se plier, de provoquer des bourrages, une mauvaise alimentation, une mauvaise
qualité d’impression, de la perte de papier et le cas échéant, endommager l’unité
de duplexage et l’imprimante. Les directives données ci-dessous peuvent
augmenter la productivité en assurant une impression performante et sans
problèmes et diminue l’usure par l’utilisation de l’unité de duplexage et de
l’imprimante.
Français
V alidité du pa pier
La plupart des types de papier sont compatibles avec divers machines. Le papier
destiné aux copieurs xérographiques peut aussi être utilisé avec l’unité de
duplexage et l’imprimante.
Il exite trois qualités de papier: économique, standard et premium. La différence
significative entre ces trois qualités est la facilité de passage dans l’imprimante.
ceci est affecté par l’épaisseur, le format , la condensation d’humidité du papier
et la manière dont le papier a été coupé. Plus la qualité de papier est meilleure,
moins les problèmes de bourrage et autre peuvent survenir et meilleure est la
qualité d’impression.
L’utilisation de papier de différents fabricants peut aussi affecter les performances
de l’unité de duplexage. Une imprimante de grande qualité ne peut produire de
résultats élevés si le papier utilisé est inadéquat. Un papier peut onéreux n’est pas
forcément économique à la longue s’il cause des problèmes d’impression.
61
Page 77
Le papier de différentes qualités est disponible dans une gamme de poids de base
(définis ultérieurement). Les poids standar ds sont de 70 g/m2 à 90 g/m2 (19, 20 et
24 livres).
Spécifications de papier
Le tableau suivant résume les spécifications de base de papier. Les détails sont
donnés dans le tableau suivant.
Tableau 1 Spécifications pour le papier adhésif blanc (White Bond)
Article Spécifications
Poids 70 à 90 g/m2 (19 à 24 li./rame)
Epaisseur 0,086 à 0,110 mm (3,4 à 4,3 mils)
Exactitude de dimensions ±0,7 mm (±0,0276 pouces)
Carré des coins 90° ±0,2°
Condensation d’humidité 4% à 6%
Direction du grain Grain long
Quantité de pâte 80% ou plus
Sélection du papier adéquat
L’impression d’imprimante est un procédé comprenant une lumière DEL, une
décharge électrostatique, du toner et de la chaleur. De plus, au cours de son
passage dans l’imprimante, le papier subit des mouvements de glissement, de
pliage et de torsion. Un papier de bonne qualité correspondant aux conditions
requises peut supporter ces mouvements, permettant à l’unité de duplexage et à
l’imprimante de donner constamment des bonnes copies.
Se rappeler que tous les papiers ne sont pas les mêmes. Certains facteurs
suivants doivent être pris en considération lors de la sélection du papier pour
l’impression en duplex:
Condition du papier
Eviter d’utiliser du papier corné, plié, sale, tordu ou contaminé par des peluches
ou de la glaise ou bien des morceaux de papier.
L’utilisation de papier dans ces conditions peut provoquer une mauvaise
impression, alimentation, des bourrages de papier et risque d’écourter la durée
de vie de l’unité de duplexage et de l’imprimante. Eviter d’utiliser, en
particulier, du papier à surface enduite ou traitée. La surface du papier doit être
aussi lisse et uniforme que possible.
62
Page 78
Composition
Ne pas utiliser de papier enduit ou à surface traitée et contenant du plastique ou
du carbone. La chaleur des fusibles risque de faire dégager des fumées nuisibles
du papier.
Le papier adhésif doit contenir au moins 80% de pâte. Le papier ne doit pas
contenir plus de 20% de coton ou d’autres fibres.
Format de papier
Les bacs à papier sont disponibles pour les formats de papier listés dans le
tableau 2. Les tolérances de dimensions sont de ± 0,7 mm (±0,0276 pouces)
pour la longueur et la largeur. L’angle des coins doit être de 90°±0,2°.
Tableau 2 Formats de papier pour la charge de papier dans le bac de l’imprimante
Bac d’imprimante Format
Lé gal 8,5 × 14 po.
Lettre 8,5 × 11 po.
ISO A4 210 × 197 mm
JIS B5 182 × 257 mm
ISO A5 148 × 210 mm
Aspect lisse
Le papier doit avoir une surface lisse non-enduite. Le papier avec une surface
rugueuse ou sableuse risque de se bloquer dans l’imprimante. Toutefois, un
papier trop lisse peut être chargé en plusieurs exemplaires et provoquer des
problèmes d’effet brouillard (L’effet brouillard est un effet d’arrièr e-plan gris).
Poids de base
Le poids de base est le poids d’une quantité standard de papier. Dans le système
traditionnel, une quantité standard est une rame consistuée de 500 feuilles
mesurant 17 × 22 pouces chacune. Dans le système métrique la quantité standard
est un mètre carré. Un papier trop léger ou trop lourd peut provoquer une
mauvaise alimentation, un bourrage de papier et l’usure prématurée de l’unité de
duplexage et de l’imprimante. Un poids inégal de papier risque de provoquer
une alimentation multiple, des défauts d’impression, des problèmes de toner, de
flou et d’autres qualités d’impression. Le poids adéquat est de 70 à 90 g/m2 (19 à
24 li./rame).
Français
63
Page 79

Important Bien que l’imprimante soit capable d’imprimer avec un
poids de base de 60 g/m2 en impression simple, l’impression
en duplex n’est pas possible ave du papier dont le poids est
inférieur à 70 g/m2.
Epaisseur (Compas)
Un papier épais correspond à du papier à grand compas et un papier fin à du
papier à compas faible. Le papier utilisé avec l’imprimante en mode duplex ne
doit être ni extrêmenent épais ni extrêmement fin. Dans le cas de problèmes de
bourrage, d’alimentation, d’impression pâle, le papier doit être très fin. S’il y a
des problèmes de bourrage et d’impression floue, le papier doit être trop épais.
L’épaisseur du papier doit être de 0,086 à 0,110 mm (3,4 à 4,3 mils).
Condensation d’humidité
La condensation en humidité est définie comme un taux de pourcentage
d’humidité par rapport à la masse sèche de pap. L’humidité peut affecter
l’apparence du papier, l’alimentation, le pliage, les propriétés électrostatiques
ainsi que les caractéristiques de chauffage de toner.
La condensation en humidité du papier varie avec l’humidité relative de la pièce.
Lorsque l’humidité relative est élevée et que le papier absorbe l’humidité, les
bords du papier s’élargissent, présentant des vagues. Lorsque l’humidité est
faible et que le papier perd de l’humidité, les bords rétrécissent et le contraste
d’impression peut en souffrir.
Des bords en vagues ou rétrécis peut provoquer une mauvaise alimentation et
des anomalies d’alignement. La condensation d’humidité du papier doit être de
4% à 6%.
Pour assurer une condensation d’humidité adéquate, il est important de ranger le
papier dans un environnement contrôlé. En voici quelques conseils:
❐ Ranger le papier dans un endroit frais et sec.
❐ Garder le papier dans son emballage aussi longtemps que possible et le
réemballer après l’utilisation.
❐ Ranger le papier dans son carton d’origine et le séparer du sol.
❐ Après avoir retiré le papier de son emballage, le laisser dans la même
pièce que l’imprimante pendant 48 heures avanr de l’utiliser.
❐ Eviter de laisser le papier exposé à la chaleur, les rayons du soleil ou à
l’humidité.
64
Page 80

Grain du papier
Lorsque le papier est fabriqué, il est coupé en feuilles avec le grain allant
parallèlement à la longueur (grain long) ou parallèlement à la largeur (grain
court). Le papier à grain court p rovoque des problèmes d’alimentation dans
l’unité de duplexage et l’imprimante.Tous les papiers utilisés avec l’unité de
duplexage et l’imprimante doivent être à grain long.
Autres propriétés de papier
Porosité: Se rapporte à la densité dans la structure du papier qui correspond à
comment sont liés les fibres, ouvertes ou compactes.
Consistance: Le papier souple peut gondoler dans l’unité de duplexage et
l’imprimante, alors que le papier trop souple peut se lier. Ceci peut provoquer un
bourrage de papier.
Pliage: La plupart des papiers ont tendance à se plier naturellement dans un sens.
Le papier doit être chargé avec le sens de pliage vers le bas pour éviter qu’il soit
plier vers le haut dans l’imprimante. Les feuilles imprimées sortiront ainsi plates.
La plupart des papier possèdent également un recto et un verso. Les instructions
d’alimentation sont généralement données sur l’emballage du papier.
Propriétés électrostatiques: Pendant le procédé d’impression, le papier est
électrostatiquement chargé pour tirer le toner. Le papier doit être capable de
relâcher cette charge de manière que les feuilles imprimées ne s’entrechoquent
pas à la sortie.
Blancheur: Le contraste de la page imprimée dépend de la blancheur du
papier. Un papier bien blanc procure une apprence claire et nette.
Contrôle de qualité: Des formats de papier inégaux, des coins non-carrés, des
bords cornés, des feuilles non-coupées et des coins et bords froissés peuve n t
provoquer un mauvais fonctionnement de l’unité de duplexage et de
l’imprimante. Un fournisseur de papier de qualité doit assurer qu’aucun de ces
problèmes ne puisse survenir.
Emballage: Le papier doit être rangé dans un carton fort pour le protéger
pendant le transport. Un papier de bonne qualité est généralement bien emballé
par le fabricant.
Français
65
Page 81

Papier Spécial
Les types suivants de papier spécial peuvent être utilisés:
❐ Papier colorés
❐ Papier préimprimés
Utiliser du papier vendu spécialement pour être utilisé avec les copieurs (type
thermique).
Etant donné que la qualité et la composition de papier spécial varient
considérablement, le papier spécial est proche du papier adhésif blanc pour les
problèmes d’impression. Aucune responsabilité n’est assumée si l’humidité ou
autre causée par l’impression sur du papier spécial endommage la machine ou
blesse l’utilisateur .
Remarque Avant d’acheter aucun type de papier spécial, vérifier un
échantillon sur l’unité de duplexage et l’imprimante et
vérifier que la qualité d’impression est satisfaisante.
Les spécifications de chaque type de papier est donnée ci-dessous.
Papier coloré
Le papier coloré doit répondre aux mêmes conditions que le papier adhésif blanc
listées dans le tableau 1. De plus, les pigments utilisés dans le papier doivent
supporter la chaleur pendant le procédé d’impression (jusqu’à 200°C ou 392°F).
Papier préimprimé
Le papier préimprimé doit avoir une base de papier adhésif. L’encre
préimprimée doit supporter la chaleur thermique pendant le procédé
d’impression et ne doit pas être affecté par l’huile silicone.
Ne pas utiliser de papier à surface traitée, tel que le papier généralement utilisé
pour les calendriers.
66
Page 82
Spécifications
Article Spécifications
Imprimantes applicables Imprimantes à page Kyocera
For mat papier Lettre (8,5 × 11 pouces)
ISO A4 (21 × 29,7 cm)
Légal (8,5 × 14 pouces)
JIS B5 (18,2 × 25,7 cm)
ISO A5 (14,8 × 21 cm)
Environnement r equis Température: 10°C à 32,5°C
Humidité: 20% à 80% RH
Conditions optimales: 20°C, 65% RH, Altitude inférieure à
2000 m
Dimensions 11,0 cm (4,3") × 34,5 cm (13,6") × 51,3 cm (20,2")(h×l×p)
Poids 6,4 kg (14,1 li.)
Alimentation Fournie par l’imprimante
Français
67
Page 83

Cette page est délibérément laissée blanche
Page 84

Non ci assumiamo alcuna colpa o responsabilità verso i clienti o qualsiasi altra
persona o entità per quanto riguarda perdite o danni causati o presumibilmente
causati direttamente o indirettamente da apparecchiature da noi vendute o fornite,
perdite di affari o profitti o danni consequenziali risultanti dall’uso e dal
funzionamento dell’apparecchiatura o del software,
Attenzione
NESSUNA RESPONSABILITA’ VIENE ASSUNTA PER QU ALSIASI DANNO
CAUSATO DA UN’INSTALLAZIONE INAPPROPRIATA.
Nota
Le informazioni di questo manuale sono soggette a cambiamenti senza preavviso.
Pagine addizionali possono essere inserite in future edizioni. Ci scusiamo con
l’utente per qualsiasi inaccuratezza tecnica o errore tipografico presenti in questa
edizione.
Non ci assumiamo alcuna responsabilità per incidenti che si verificassero mentre
l’utente segue le istruzioni di questo manuale.
I contenuti di questo manuale sono protetti da copyright. Nessuna parte di questo
manuale può essere riprodotta o copiata in alcun modo senza il permesso del
proprietario dei diritti.
Nomi registrati:
PRESCRIBE è un marchio registrato della Kyocera Corporation.
HP LaserJet è un prodotto della Hewlett-Packard Company.
PCL è un marchio registrato della Hewlett-Packard Company.
PostScript è un marchio registrato della Adobe Systems Incorporated.
Italiano
© Copyright 1999 della Kyocera Corporation
Tutti i diritti riservati, revisione 1.0, giugno 1999
Norme sulle interferenze radio in Europa
L'unità duplex opzionale DU-21 deve venire usata con le stampanti di
modello FS-1200/FS-1700/FS-1700+/FS-1750/FS-3700/FS-3700+/FS-3750,
che sono state provate e definite dispositivi di calcolo della classe B in
accordo con le regolamentazioni EN55022.
I dispositivi della classe B possono causare interferenze con la ricezione
televis iva o radio, in particolare se installate in residenze private.
69
Page 85

Introduzione
La DU-21 è un'unità ausiliaria studiata per l'uso con le stampanti a laser Kyocera.
Grazie all'unità duplex, potrete stampare automaticamente ambedue i lati dei
fogli.
Questo manuale di istruzioni spiega come installare ed utilizzare l’unità duplex.
Gli argomenti trattati in questo manuale sono:
❐ Installazione dell’unità duplex
❐ Modi di funzionamento dell’unità duplex
❐ Selezione del modo dal pannello di comando della stampante
❐ Selezione del modo per mezzo di comandi PRESCRIBE
❐ Selezione del modo per mezzo di comandi PCL (linguaggio di comando
della Hewlett-P ac kard)
Elenco contenuti confezione
Accertarsi che la confesione dell’unità duplex contenga le parti indicate di
seguito nelle quantità previste.
Unità duplex DU-21, 1
Supporti cavi, 2
Manuale di istruzioni (questo manuale), 1
70
Page 86

Nome delle part i
Prima di installare l’unità duplex, leggere il seguente elenco di nomi. Questi nomi
vengono utilizzati nella descrizione delle procedure per l’installazione e l’uso
dell’unità duplex stessa.
Vedere la figura 1 a pag. iii.
Connettore: Quando si installa l’unità duplex, questo connettore si collega ad
un connettore all’interno del fondo della stampante (o dell’alimentatore opzionale
della carta se esso viene utilizzato assieme all’unità duplex).
Perni di posizionamento: Questi perni si inseriscono nei due fori sul fondo
della stampante (o dell’alimentatore opzionale della carta se esso viene utilizzato
assieme all’unità duplex).
Indicatore READY: Si illumina quando l’unità duplex è pronta per l’uso. Esso
lampeggia quando la carta si inceppa all’interno dell’unità duplex.
Cassetto unità duplex: Aprire questo cassetto per installare l’adattatore del
percorso della carta o per eliminare inceppamenti della carta.
Coperchio posteriore: Aprire questo coperchio per eliminare inceppamenti
della carta.
Italiano
71
Page 87

Installazione
L’unità duplex viene applicata al fondo della stampante (o dell’alimentatore
opzionale della carta se esso viene installato assieme all’unità duplex).
ATTENZIONE Prima di installare (o rimuovere) l’unità duplex, accertarsi di
disattivare l’alimentazione della stampante.
La figura 2 a pag. iv mostra le configurazione della stampante possibili che
includono l'unità duplex. A seconda delle unità opzionali installate con l'unità
duplex, sono richiesti differenti adattatori del percorso della carta. Notare che
qualsiasi configurazione che includa l'unità duplex richiede anche l'unità di
trasporto/ordinamento della carta. Per dettagli sull'installazione dell'unità opzionale
di trasporto/ordinamento della carta, consultare le istruzioni ad essa allegate.
Installazione dell’unità duplex senza altre unità opzionali
Se l’unità duplex è l’unica unità opzionale che si desidera utilizzare con la
stampante, essa viene montata direttamente sotto alla stampante come indicato
nella figura 2 (a). La stampante viene appoggiata direttamente sopra all’unità
duplex.
1. Installare l’adattatore opzionale del percorso della carta PA-20 sull’unità
duplex come indicato in figura 3.
• Aprire leggermente il cassetto dell’unità duplex.
• Allineare le linguette con le fessure.
• Dopo aver inserito le linguette nelle fessure, far scorrere l’adattatore
del percorso della carta verso sinistra per bloccarlo.
• Chiudere il cassetto dell’unità duplex.
2. Allineare quindi i perni di posizionamento sulla parte superiore
dell’unità duplex ed i fori sulla base della stampante ed abbassare
lentamente e con attenzione la stampante sull’unità duplex. Tenere la
stampante a livello mentre la si abbassa sull’unità duplex ed accertarsi
che il connettore dell’unità duplex si inserisca senza intoppi nel
connettore corrispondente nella base della stampante. (Fig. 4)
3. IInstallare l'unità di trasporto/ordinamento della carta. Per dettagli,
consultare le istruzioni fornite insieme all'unità di trasporto/ordinamento
della carta stessa.
72
Page 88

Installazione dell’unità duplex assieme ad altre unità opzionali
L'unità duplex viene installata sotto l'alimentatore carta nel modo mostrato in
figura 2 (b). In questa configurazione, la stampante sta stopra l'alimenta tor carta.
1. Se si utilizza l'unità duplex insieme ad un alimentatore della carta, è
necessario installare l'adattatore del percorso della carta PA-1 sul retro
dell'unità duplex stessa. Installare il PA-1 come indicato in figura 5.
• Allineare le linguette con le fessure.
• Dopo aver inserito le linguette nelle fessure, far scorrere l’adattatore
del percorso della carta nella direzione indicata dalla freccia per
bloccarlo. Vedere la figura 6 per la procedura di rimozione del PA-20.
2. Installare quindi l’alimentatore della carta sopra all’unità duplex come
indicato in figura 7. Allineare i perni di posizionamento sopra all’unità
duplex ed il perno di bloccaggio dell’adattatore del percorso della carta
con i fori sulla base dell’alimentatore e quindi abbassare con attenzione
l’alimentatore sull’unità duplex. stampante sull’unità duplex. Tenere
l’alimentatore della carta a livello mentre lo si abbassa sull’unità duplex
ed accertarsi che il connettore dell’unità duplex si inserisca senza intoppi
nel connettore corrispondente nella base dell’alimentatore.
Nota Si possono sovrapporre due alimentatori carta. Per dettagli,
consultare il manuale di istruzioni dell'alimentatore carta.
Italiano
3. Installare l’adattatore opzionale del percorso della carta PA-20
sull’alimentatore della carta come indicato in figura 3.
• Allineare le linguette con le fessure.
• Dopo aver inserito le linguette nelle fessure, far scorrere l’adattatore
del percorso della carta verso sinistra per bloccarlo.
4. Abbassare la stampante sull’alimentatore della carta. Osservare le stesse
precauzioni menzionate per qundo si l’alimentatore sull’unità duplex.
(Fig. 4)
5. Installare l’unità di trasporto/ordinamento della carta opzionale. Per
dettagli vedere le istruzioni fornite assieme all’unità di trasporto/
ordinamento della carta stessa.
73
Page 89

Uso dei supporti dei cavi
I supporti dei cavi forniti in dotazione all’unità duplex servono per raccoglier e
assieme i cavi di alimentazione e di interfaccia. Per utilizzarli, inserirli in uno dei
fori a destra o a sinistra del coperchio posteriore come indicato.
Coperchio posteriore
Retro dell’unità duplex
Fascetta cavo (2)
Memoria della stampante per stampa duplex
Per la stampa duplex, la stampante necessita del doppio della memoria necessaria
per la stampa semplice. Inoltre, a seconda della stampante e dell’ambiente di
stampa, per eseguire la stampa duplex può rendersi necessario aumentare la
memoria della stampante. Per quanto riguarda la memoria richiesta, consultare il
manuale di istruzioni della stampante.
74
Page 90

Modi dell’unità duplex
L’unità duplex permette di stampare su entrambi i lati del foglio. Prima la
stampante stampa su un lato del foglio nel modo solito. Quindi, essa invia il
folgio all’unità duplex che lo volta per permettere la stampa sul lato opposto. La
figura 8 mostra il percorso seguito dal foglio durante la stampa duplex.
Impostazione raccolta
Il termine raccolta si riferisce alla maniara in cui le pagine stampate vengono
raccolte assieme (con colla, punti, ecc.) sotto forma di libro. I due tipi di raccolta
possibili sono la raccolta sul bordo lungo, nel quale le pagine vengono unite
lungo il bordo più lungo, e la raccolta sul bordo corto, nel quale le pagine
vengono unite lungo il bordo più corto. Nella selezione del tipo di raccolta è
anche necessario considerare l’orientamento della pagina. E’ possibile utilizzare la
raccolta a bordo lungo o a bordo corto sia nella stampa tipo paesaggio che ritratto.
A seconda del tipo di raccolta e dell’orientamento della stampa, l’unità duplex
fornisce quattro tipi di impostazione. Essi sono: (1) ritratto, bordo lungo, (2)
ritratto, bordo corto, (3) paesaggio, bordo lungo e (4) paesaggio bordo corto. La
figura 9 sette mostra queste impostazioni di raccolta.
Con la stampa ritratto a bordo lungo e paesaggio a bordo corto [impostazioni (1) e
(4) della figura 9], il testo su entrambi i lati del foglio è orientato nella stessa
direzione.
Con la stampa ritratto a bordo corto e paesaggio a bordo lungo [impostazioni (2) e
(3) della figura 9], il testo sul lato posteriore del foglio è rovesciato rispetto a
quello sul lato anteriore.
Selezione del modo
E’ possibile attivare l’unità duplex selezionando il Modo fronte/retr
utilizzando il tasto MODE sul pannello di comando della stampante o per mezzo
dei comandi di selezione del modo PRESCRIBE o PCL.
75
Italiano
Page 91

Selezione del modo col tasto MODE
Per impostare la stampa duplex e l'impostazione di raccolta dal pannello comandi
della stampante, procedere nel modo seguente. (Per quanto riguarda l'uso dei tasti
del pannello comandi della stampante, consultare il manuale di istruzioni della
stampante stessa.)
1. Accertarsi che la stampante sia pronta ed on-line.
2. Premere il tasto MODE del pannello di comando della stampante.
3. Seguire la procedura di uso dei tasti per ciascuna stampante sino a che il
display non indica il Mode fronte/retr. Il modo duplex corrente
viene indicato da uno dei messaggi seguenti:
Nessuno
Lato corto
Lato lungo
Il modo duplex di base e Nessuno.
4. Per cambiare il modo duplex, premere il tasto ENTER. Il display
visualizza un punto di domanda (?) lamp eggiante.
5. Premere ripetutamente il tasto + o - fino a che il display non visualizza il
tipo di raccolta desiderato. Se si desidera abbandonare la procedura di
selezione del modo duplex, premere il tasto CANCEL a questo punto. Il
modo duplex non cambia.
6. Premere il tasto ENTER per impostare il nuovo modo duplex.
7. Premere il tasto EXIT ed il display ritorna alla visualizzazione
Stampante pronta.
Completare l’impostazione del tipo di raccolta selezionando l’orientamento della
stampa, paesaggio o ritratto, appropriato. Vedere il man uale di istruzioni della
stampante per la procedura del caso.
Nota Quando si usa l'unità duplex, è possibile scegliere anche
l'emissione a faccia in giù o in su dei fogli. Scegliere il modo
di emissione desiderato. Per informazioni in proposito,
consultare il manuale di istruzioni della stampante.
76
Page 92

Alimentazione manuale
La stampa duplex non è possibile se la carta viene alimentata manualmente dal
piano di alimentazione manuale della stampante o per mezzo dell’alimentatore di
buste opzionale. Se la carta viene alimentata manualmente mentre l’unità duplex è
attivata, la stampante disattiva automaticamente il modo duplex ed invia le pagine
prodotte al piano di raccolta a faccia in su.
Selezione del modo con un comando
Come alternatica alla procedura di selezione dal apnnello di comando della
stampante descritto a pagina 75, è possibile selezionare la stampa duplex e
l’impostazione del modo di raccolta utilizzando certi comandi PRESCRIBE o
PCL. Questi comandi forniscono anche l’accesso a certe funzioni che non sono
disponibili dal pannello di comando.
I comandi di controllo duplex PRESCRIBE e le loro funzioni sono:
❐ DUPX (selezione/deselezione modo duplex)
❐ DXPG (selezione lato pagina duplex)
I comandi PCL forniscono le stesse funzioni dei comandi PRESCRIBE
sopraindicati. Comunque, contrariamente ai comandi PRESCRIBE (che possono
essere utilizzati in qualsiasi modo di emulazione), i comandi PCL sono efficaci
solo utilizzando la stampante nel modo di emulazione HP LaserJet (PCL).
I comandi di controllo duplex PCL e le loro funzioni sono:
❐ <Esc>&1#S (selezione/deselezione modo duplex)
❐ <Esc>&a#G (selezione lato pagina duplex)
I comandi PRESCRIBE vengono descritti dettagliatamente di seguito.
Italiano
77
Page 93

Comandi PRESCRIBE
DUPX (selezione/deselezione modo duplex)
Formato DUPX modo;
Parametri Modo: un numero da 0 a 2
Il comando DUPX fornisce istruzioni alla stampante per la selezione o
deselezione della stampa duplex e seleziona il modo duplex. I parametri sono
come indicato di seguito.
0 = Selezione modo simplex
1 = Selezione modo duplex, raccolta bordo lungo
2 = Selezione modo duplex, raccolta bordo corto
Il modo duplex di base può essere selezionato per mezzo del comando FRPO N4.
I valori dei parametri sono uguali al comando DUPX sopraindicato. Per esempio,
per accendere la stampante nel modo di raccolta duplex a bordo lungo, introdurre
il comando:
ECHO !R! FRPO N4, 1; EXIT; > LPT1
Ad LPT1 sostituire la porta a cui il computer è collegato.
DXPG (selezione lato pagina duplex)
Formato DXPG lato;
Parametri Lato: un numero da 0 a 2
Il comando DXPG termina la stampa sul foglio corrente allo stesso modo di un
comando di alimentazione del foglio. Comunque, diversamente da quest’ultimo,
esso seleziona anche il lato del foglio, anteriore o posteriore, su cui viene
stampata la pagina seguente. I parametri sono come indicato di seguito.
78
Page 94

0 = Selezione lato successivo (uguale ad un comando di
alimentazione foglio)
1 = Selezione lato anteriore (la stampa della pagina successiva
inizia sul lato anteriore del foglio successivo
indipendentemente dal fatto che la pagina corrente sia stata
stampata sul lato anteriore o posteriore del foglio).
2 = Selezione lato posteriore (la stampa della pagina
successiva inizia sul lato posteriore del foglio corrente se la
pagina corrente è stata stampata sul lato anteriore del foglio
oppure sul lato posteriore del foglio successivo se la pagina
corrente è stata stampata sul lato posteriore del foglio
corrente).
Esempio
L’esempio seguente seleziona il modo duplex con raccolta sul lato corto,
l’orientamento ritratto e la stampa su entrambi i lati del foglio. Il risultato viene
mostrato in figura 10.
!R! CMNT Inizia una sequenza di comando PRESCRIBE;
RES; CMNT Causa una divisione di pagina ed inizializza
i parametri;
DUPX 2; CMNT Seleziona il modo duplex con raccolta a
lato corto;
SPO P; CMNT Seleziona l’orientamento ritratto;
STAK 1; CMNT Seleziona l’emissione a faccia in giù; EXIT;
Questo testo viene stampato col lato destro in alto sul
lato anteriore del foglio.
!R! DXPG 0; CMNT Termina la pagina corrente (lato
anteriore del foglio); EXIT;
Questo testo viene stampato rovesciato sul lato
posteriore del foglio.
!R! R RES; EXIT;
Italiano
79
Page 95

Diagnostica
Questa sezione spiega come eliminare gli inceppamenti della carta nell’unità
duplex e come rispondere ai messaggi di errore.
Inceppamenti carta
Nel caso di un inceppamento della carta, il messaggio Inceppamento carta
appare sul display della stampante.
Nota Quando si eliminano inceppamenti, controllare se vi sono
inceppamenti nelle altre unità opzionali (unità di tr asporto/
ordinamento carta, alimentatore carta, fascicolatrice ed
impilatore in grandi quantità della carta) prima di estrarre il
cassetto dell'unità duplex DU-21. Per controllare se vi sono
inceppamenti nelle altre unità opzionali, aprirne i coperchi
posteriori.
Se si verifica un inceppamento della carta all’interno dell’unità duplex,
l’indicatore READY lampeggia sul pannello indicatore dell’unità duplex stessa.
Per eliminare l’inceppamento, controllare per prima cosa se vi sono inceppamenti
nelle altre unità opzionali aprendo i loro coperchi posteriori. Rimuovere tutta la
carta trovata. Estrarre quindi parzialmente il cassetto dell’unità duplex. Se la carta
fosse visibile sottoal coperchio di plastica trasparente, aprire il coperchio e
rimuovere la carta come indicato in figura 11(a).
Se la carta fosse bloccata all’interno dell’unità duplex, ruotare la manopola sul
lato sinistro del cassetto dell’unità in senso antiorario [vedi fig. 11(b)] per estrarre
la carta dall’unità duplex.
Se la carta si inceppa sul retro dell’unità duplex, aprire il coperchio posteriore e
rimuovere la carta stessa.
Quando si elimina un inceppamento della carta, accertarsi di controllare l’interno
delle altre unità opzionali oltre all’interno del cassetto e del coperchio posteriore
dell’unità duplex.
Dopo aver eliminato l’inceppamento, aprire e chiudere il coperchio superiore
dell’unità di alimentazione della carta. La stampante si riscalda automaticamente,
si porta in linea e continua la stampa. A seconda del punto in cui il foglio causa
dell’inceppamento si trova, la stampante può stampare o meno la pagina cui esso
corrisponde.
80
Page 96

Messaggi di err o re
Se il display della stampante visualizza i messaggi Coperchio anter.
fronte/retro ap. o Coperchio post. fronte/retro ap.,
controllare i coperchi anteriore e posteriore per accertarsi che essi siano ben
chiusi.
Regolazione della posizione di stampa
Quando si utilizza la stampa con l’unità duplex, l’immagine sul lato posteriore del
foglio potrebbe essere leggermente fuori allineamento rispetto a quella sul lato
anteriore. Se ciò dovesse accadere, la posizione dell’immagine stampata può
essere regolata verso sinistra o destra di circa 2 mm. Quando si utilizza l’unità
duplex, il lato posteriore del foglio, seconda pagina, viene stampato per primo
seguito quindi dal lato anteriore (prima pagina). La regolazione della posizione di
stampa influenza solo il lato anteriore del foglio e cioè la posizione della stampa
sulle pagine dispari.
Procedura di regolazione
1. Preparare un campione di stampa fronte-retro utilizzando l’unità duplex.
2. Estrarre completamente il cassetto dell’unità duplex.
3. Aprire i due coperchi all’interno del cassetto e quindi allentare la vite sul
lato destro all’interno del cassetto stesso. Ciò libera il registro
premettendo di spostarlo verso destra o verso sinistra. Il registro viene
fissato nella posizione centrale al momento della spedizione.
Coperchi
Scala
Vite
Registro
Cassetto unità duplex
Italiano
81
Page 97
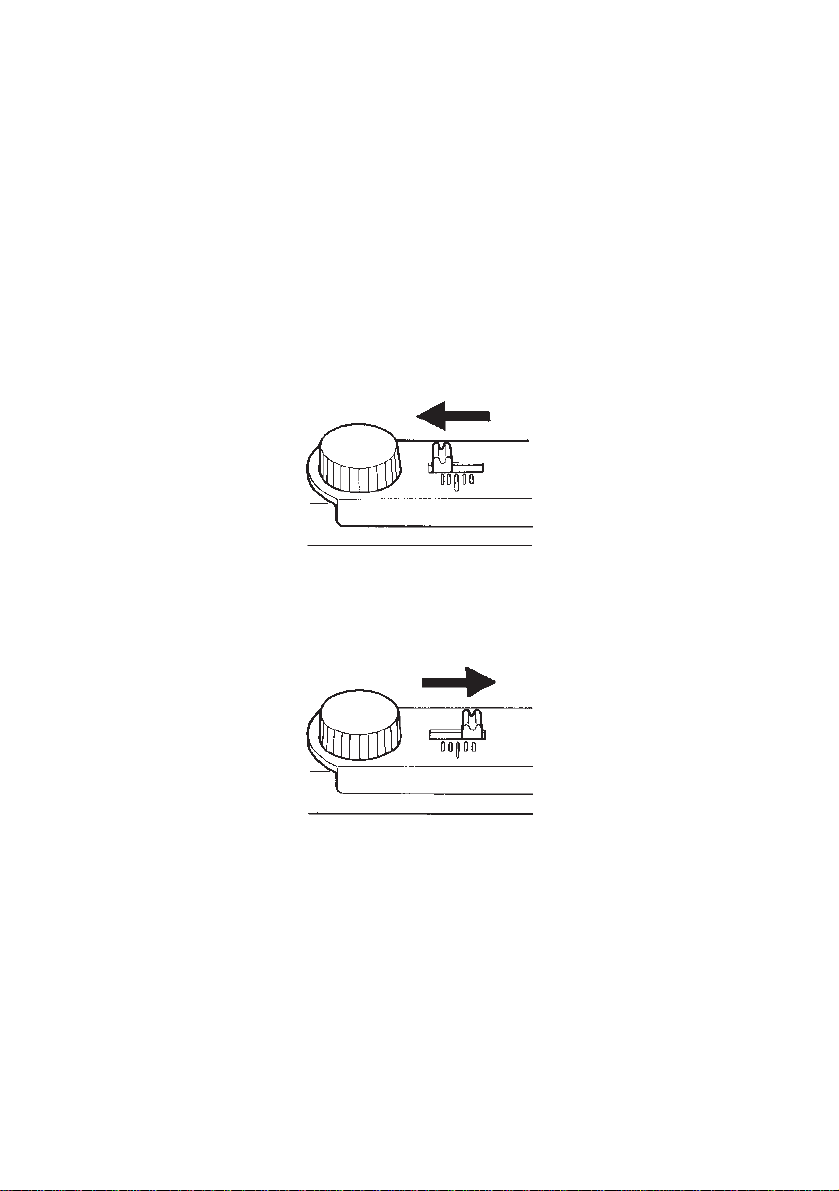
La scala alla destra della vite è calibrata in millimetri. Lo spostamento
del registro alla destra della posizione centrale sposta la posizione di
stampa verso sinistra in misura corrispondente. Allo stesso modo, lo
spostamento del registro alla sinistra della posizione centrale sposta la
posizione di stampa verso destra.
4. Tenere il campione di stampa controluce con il lato anteriore verso di sé.
Se l’immagine del lato anteriore del foglio fosse a destra di quella sul
lato posteriore, spostare il registro verso sinistra in misura
corrispondente facendo riferimento alla scala del registro.
Se l’immagine del lato anteriore del foglio fosse a sinistra di quella sul
lato posteriore, spostare il registro verso destra in misura corrispondente
facendo riferimento alla scala del registro.
5. Al termine della regolazione, ristringere la vite, chiudere i due coperchi e
quindi chiudere il cassetto dell’unità duplex.
82
Page 98

Selezione della carta
Direttive generali
L’unità duplex non può essere utilizzata per la stampa su carta che non soddisfa
le condizioni indicate in basso. Inoltre, materiali di stampa di tipo speciale come
film per diapositive, buste, etichette autoadesive e carta con filigrana non devono
essere utilizzati per la stampa con l’unità duplex. Questi materiali possono causare
inceppamenti, alimentazione scorretta, spreco di carta e, in casi estremi, danni
all’unità duplex.
Nota Il fabbricante non si assume alcuna responsabilità per
problemi derivanti dall’uso di carta che non soddisfa tali
condizioni.
La selezione della carta adatta è importante. L’uso di carta inadatta può causare
inceppamenti, alimentazione scorretta, arricciamento dei fogli, qualità di stampa
scadente, spreco di carta e, in casi estremi, danni all’unità duplex ed alla
stampante. Le direttive fornite di seguito aumenteranno la produttività dell’ufficio
assicurando una stampa efficiente e senza prob lemi riducendo l’usura dell’unità
duplex e della stampante.
Disponibilità carta
La maggior parte dei tipi di carta sono compatibili con una varietà di macchine.
Carta per macchine copiatirci può essere utilizzata anche con l’unità duplex e la
stampante.
Italiano
Vi sono tre gradi generali di carta: sconomica, standard e premium. La differenza
più significativa tr a i vari gradi consiste nella facilità con cui la carta passa
attraverso la stampante. Questa facilità viene influenzata dalla uniformità, dal
formato, dalla quantità di umidità e dal modo in cui la carta viene tagliata. Più alto
è il grado della carta utilizzata, minore è il rischio di inceppamenti o altri
problemi e ciò si riflette sulla qualità della stampa.
Anche carta diversa di fornitori diversi può influenzare le prestazioni dell’unità
duplex. Una stampante di qualità non è in grado di fornire una stampa di qualità
se viene utilizzata la carta scorretta. La carta economica non è poi così economica
nel tempo se essa causa problemi di stampa.
83
Page 99

La carta di ciascun grado è disponibile in una gamma di pesi di base (definiti in
seguito). I pesi standard tradizionali sono da 70 g/m2 a 90 g/m2.
Caratteristiche carta
La tabella seguente mostra le caratteristiche di base della carta. I vari dettagli
vengono forniti nella tabella successiva.
T abella 1 Caratteristiche carta da stampa bianca
Voce Caratteristiche
Peso Da 70 a 90 g/m
Spessore Da 0,086 a 0,110 mm
Precisione formato 0,7 mm
Quadratura angoli 90° ±0,2°
Contenuto umidità Da 4% a 6%
Direzione grana Grana lunga
Contenuto polpa 80% o più
2
Selezione della carta corretta
La stampa è un processo che involve luce LED, scariche elettrostatiche, toner e
calore. Inoltre, quando la carta passa attraverso la stampante, essa viene sottoposta
a movimenti che comportano scorrimenti, piegature e attorciagliamenti. Una
carta per stampa di buona qualità è in grado di sopportare tutti questi stre s s
permettendo all’unità duplex ed alla stampante di produrre consistentemente
copie nitide e chiare.
Ricordare che i vari tipi di carta NON sono tutti uguali. Alcuni dei fattori da
considerare quando si sceglie la carta per la stampa con l’unità duplex sono
indicati di seguito:
Condizioni della carta
Evitare di utilizzare carta pie gata sui bordi, arricciata , strappata o contaminata con
filacce, creta o trucioli.
L’uso di tali tipi di carta può causare la stampa di caratteri illeggibili,
alimentazioni scorrette, inceppamenti e può accorciare la durata dell’unità duplex
e della stampante. In particolare, evitare l’uso di carta patinata o con superficie
trattata. La carta deve avere una superficie per quanto possibile liscia ed uniforme.
84
Page 100

Composizione
Non utilizzare carta patinata o con superficie trattata contenente plastica o
carbonio. Il calore del processo di fusione può causare l’emissione di fumi
dannosi da parte di tali tipi di carta.
La carta da stampa deve contenere almeno 80% di polpa. Non più del 20% del
contenuto della carta deve essere cotone o altre fibre.
Formato cart a
Cassetti della carta sono disponibili per i formati indicati nella tabella 2. La
tolleranza per il formato è di ±0,7 mm per lunghezza e larghezza. Gli angoli
devono essere 90° ±0,2°.
T abella 2 Formati carta per cassetto stampante
Cassetto stampante Formato
Legal 8,5 × 14 pollici
Letter 8,5 × 11 pollici
ISO A4 210 × 297 mm
JIS B5 182 × 257 mm
ISO A5 148 × 210 mm
Ruvidità
La carta deve possodere una superficie liscia e non patinata. La carta con una
supericie non uniforme o ruvida può causare interruzioni della stampa. Carta
eccessivamente liscia, comunque, può causare problemi di alimentazioni multiple
ed annebbiamenti. (L’annebbiamento è un effetto di sfondo grigio).
Italiano
Peso base
Il peso base è il peso di una quantità standard di carta. Nel sistema tradizionale,
la quantità standard è una risma consistente di 500 fogli da 17 × 22 pollici. Nel
sistema metrico decimale, la quantità standard è pari ad 1 metro quadrato.
Carta troppo leggera o troppo pesante può causare alimentazioni scorrette,
inceppamenti ed usura precoce dell’unità duplex e della stampante. Un peso della
carta non uniforme può causare alimentazioni multiple, difetti di stampa, fusione
scadente del toner, sfocatura ed altri problemi di stampa. Il peso appropriato per la
carta è da 70 a 90 g/m2.
85
 Loading...