

Page 1
www.krups.com
8080012562
a
b
d
e
i
h
OPEN
Eject
g
k
j
f
f2
f1
f3
f
f4
e
c
fig. 3
English . . . . . . . . . . . . . . . . . . . . . . . . . p. 1
Français . . . . . . . . . . . . . . . . . . . . . . . . p. 14
Español . . . . . . . . . . . . . . . . . . . . . . . . p. 27
Réalisation : Espace Graphique
WWW.KRUPS.COM
XP56 SERIE
EN
FR
ES
KR_ESPRESSO_XP56_NAFTA_8080012562_8080012562 10/04/13 15:17 PageC1
Page 2
1
1
2
2
fig. 4
fig. 6
fig. 1 fig. 2
fig. 3
fig. 5
fig. 10
fig. 11
fig. 8
fig. 12
fig. 9
fig. 7
1
2
fig. 13
fig.21
fig. 14
fig. 15
fig. 19
fig. 20
fig. 16.3
fig. 18.1
fig. 18.2
fig. 16.2
fig. 17
1
CANADA
GROU PE SEB
CANADA
345 Passmore Avenue
Toronto, ON
M1V 3N8
MEXICO
Groupe SEB MEXICO
S.A. de C.V.
Goldsmith 38 Desp.
401 Col. Polanco
Delegacion Miguel
Hildalgo
11 560 Mexico D.F.
MEXICO
U.S.A.
GROU PE SEB USA
2121 Eden Road
Millville, NJ 08332
1-800-418-3325 01800 1128325 800-526-5377
FECHA DE COMPRA :
KR_ESPRESSO_XP56_NAFTA_8080012562_8080012562 10/04/13 15:17 PageC4
Page 3
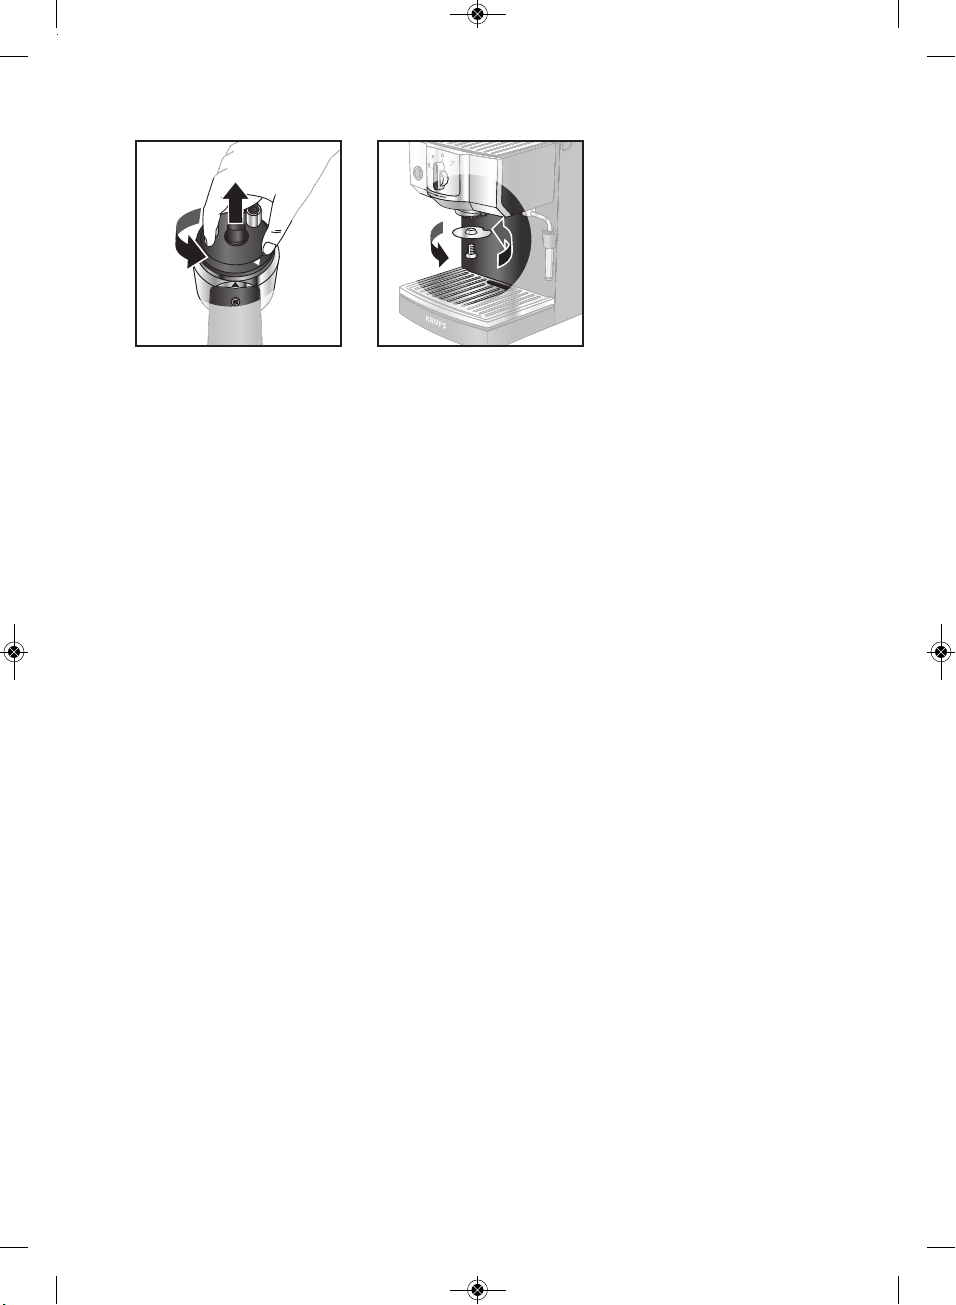
fig. 22
1
2
f
ig. 23
KR_ESPRESSO_XP56_NAFTA_8080012562_808001256210/04/1315:16PageC7
Page 4
English
1
IMPORTANT SAFEGUARDS
When using electrical appliances, basic safety precautions should always be followed to
reduce the risk of fire, electric shock, and/or injury to persons including the following :
1. Read all instructions prior to first use.
2. Do not touch hot surfaces. Use handles or knobs.
3. To protect against fire, electric shock and injury to persons, do not immerse cord,
plugs or machine in water or other liquid.
4. Not intented for use by children.
5. Close supervision is necessary when any machine is used near children. Keep
machine out of reach of children.
6. This appliance is not designed to be used by people (including children) with a
physical, sensory or mental impairment, or people without knowledge or experience,
unless they are supervised or given prior instructions concerning the use of the
appliance by someone responsible for their safety.
7. Children must be supervised to ensure that they do not play with the appliance.
8. Burns can occur from touching hot plate, hot water or steam. Exercise caution.
9. Exercise caution when using the steam nozzle as steam can cause scalding.
10. Unplug machine from outlet when not in use and when cleaning. Allow to cool before
putting on or taking off parts, before cleaning the machine, and before storing.
11. All machines are subject to stringent quality control. Practical tests using machines
taken at random are conducted and this may explain any slight marks or coffee
residue prior to use.
12. Do not operate any machine with a damaged cord or plug or after the machine
malfunctions, or has been damaged in any manner. Return machine to the nearest
Krups Service Center for examination, repair or adjustment or your respective
countries Consumer Service Department.
13. To reduce the risk of injury do not drape cord over the counter top or table top where
it can be pulled on by children or tripped over accidentally.
14. Do not let cord hang over edge of table or counter, or touch hot surfaces.
15. The use of accessory attachments not recommended by Krups may result in fire,
electric shock or injury to persons.
16. Do not use outdoors.
17. Do not place on or near a hot gas or electric burner, or in a heated oven.
18. To disconnect the machine, turn the control to “off” then remove plug from wall outlet.
Do not yank cord, instead grasp plug and pull to disconnect.
19. Do not use the machine for other than intended use.
20. Do not pour liquids other than water and descaling solutions specified in this manual
into the water tank.
21. Protect the machine against humidity and freezing.
22. This machine is for household use only.
23. This appliance is not suitable for making drinks for babies under the age of 2 years.
SAVE THESE INSTRUCTIONS
KR_ESPRESSO_XP56_NAFTA_8080012562_808001256210/04/1315:16Page1
Page 5
English
2
CAUTION
This machine is intended for household use only. Any servicing other than cleaning and
user maintenance should be performed by the nearest authorized Krups Service Center.
Visit our website at www.krupsusa.com in the USA or www.krups.ca in Canada or
contact your respective country's Consumer Service department for the service center
nearest to you.
To reduce the risk of fire or electric shock, do not attempt to disassemble the machine.
Repair should be done by an authorized Krups Service Center only.
SHORT CORD INSTRUCTIONS
A. A short power cord or a detachable power cord is provided to reduce the risks
of becoming entangled in or tripping over a longer cord accidentally.
B. Longer detachable power cords or extension cords are available and may be
used if care is exercised in their use.
C. If a long detachable power cord or an extension cord is used:
1) the marked electrical rating of the detachable power cord or extension cord
should be at least as great as the electrical rating of the appliance.
2) If the appliance is of the grounded type, the extension cord should be a
grounding type 3-wire cord.
3) the longer cord should be arranged so that it will not drape over the counter
where it can be pulled on by children or tripped over accidentally.
The appliance may have a polarized plug (one blade is wider than the other).
To reduce the risk of electric shock, this plug is intended to fit into a polarized outlet only
one way. If the plug does not fit fully into the outlet, reverse the plug. If it still does not
fit, contact a qualified electrician. Do not attempt to modify the plug in anyway.
In the interest of improving products, Krups reserves the right to change specifications
without prior notice.
KR_ESPRESSO_XP56_NAFTA_8080012562_808001256210/04/1315:16Page2
Page 6
English
3
n Pump: 15 bars
n Filter holder with grounds ejection system. Compatible with espresso ground coffee and all types of
pods, ESE or soft.
n Steam function
n Automatic shutoff.
n Removable water compartment (capacity: 1.1L or 37oz.).
n Power: 1450 W
n Voltage: 120V – 60Hz
n Anti overheating safety mechanisms
n Dimensions: 11-3/4” x 9” x 11” (h x l x d)
IMPORTANT!
Voltage for use: this appliance is designed only for use with a 120 V alternating
current.
Type of use: Your appliance is EXCLUSIVELY designed FOR USE IN THE HOME.
n For an espresso with intense flavour, we recommend using freshly ground special espresso coffee which
is ideal for the delicacy of this type of coffee, along with cups with a capacity not exceeding 1.7oz.
n Keep the espresso ground coffee in the refrigerator, in an air-tight container as it retains its flavour
longer.
n Do not fill your filter holder to the brim, but use the measuring spoon (1 tablespoon per cup).
n If you do not use the appliance for more than 5 days, rinse and drain the water tank.
n Before removing the water tank to fill or empty it, always turn the appliance off.
n Always place the unit on a flat, stable, heat-resistant work surface.
n To obtain an espresso at exactly the right temperature, we recommend that you preheat your cups.
2. TECHNICAL CHARACTERISTICS
3. TIPS
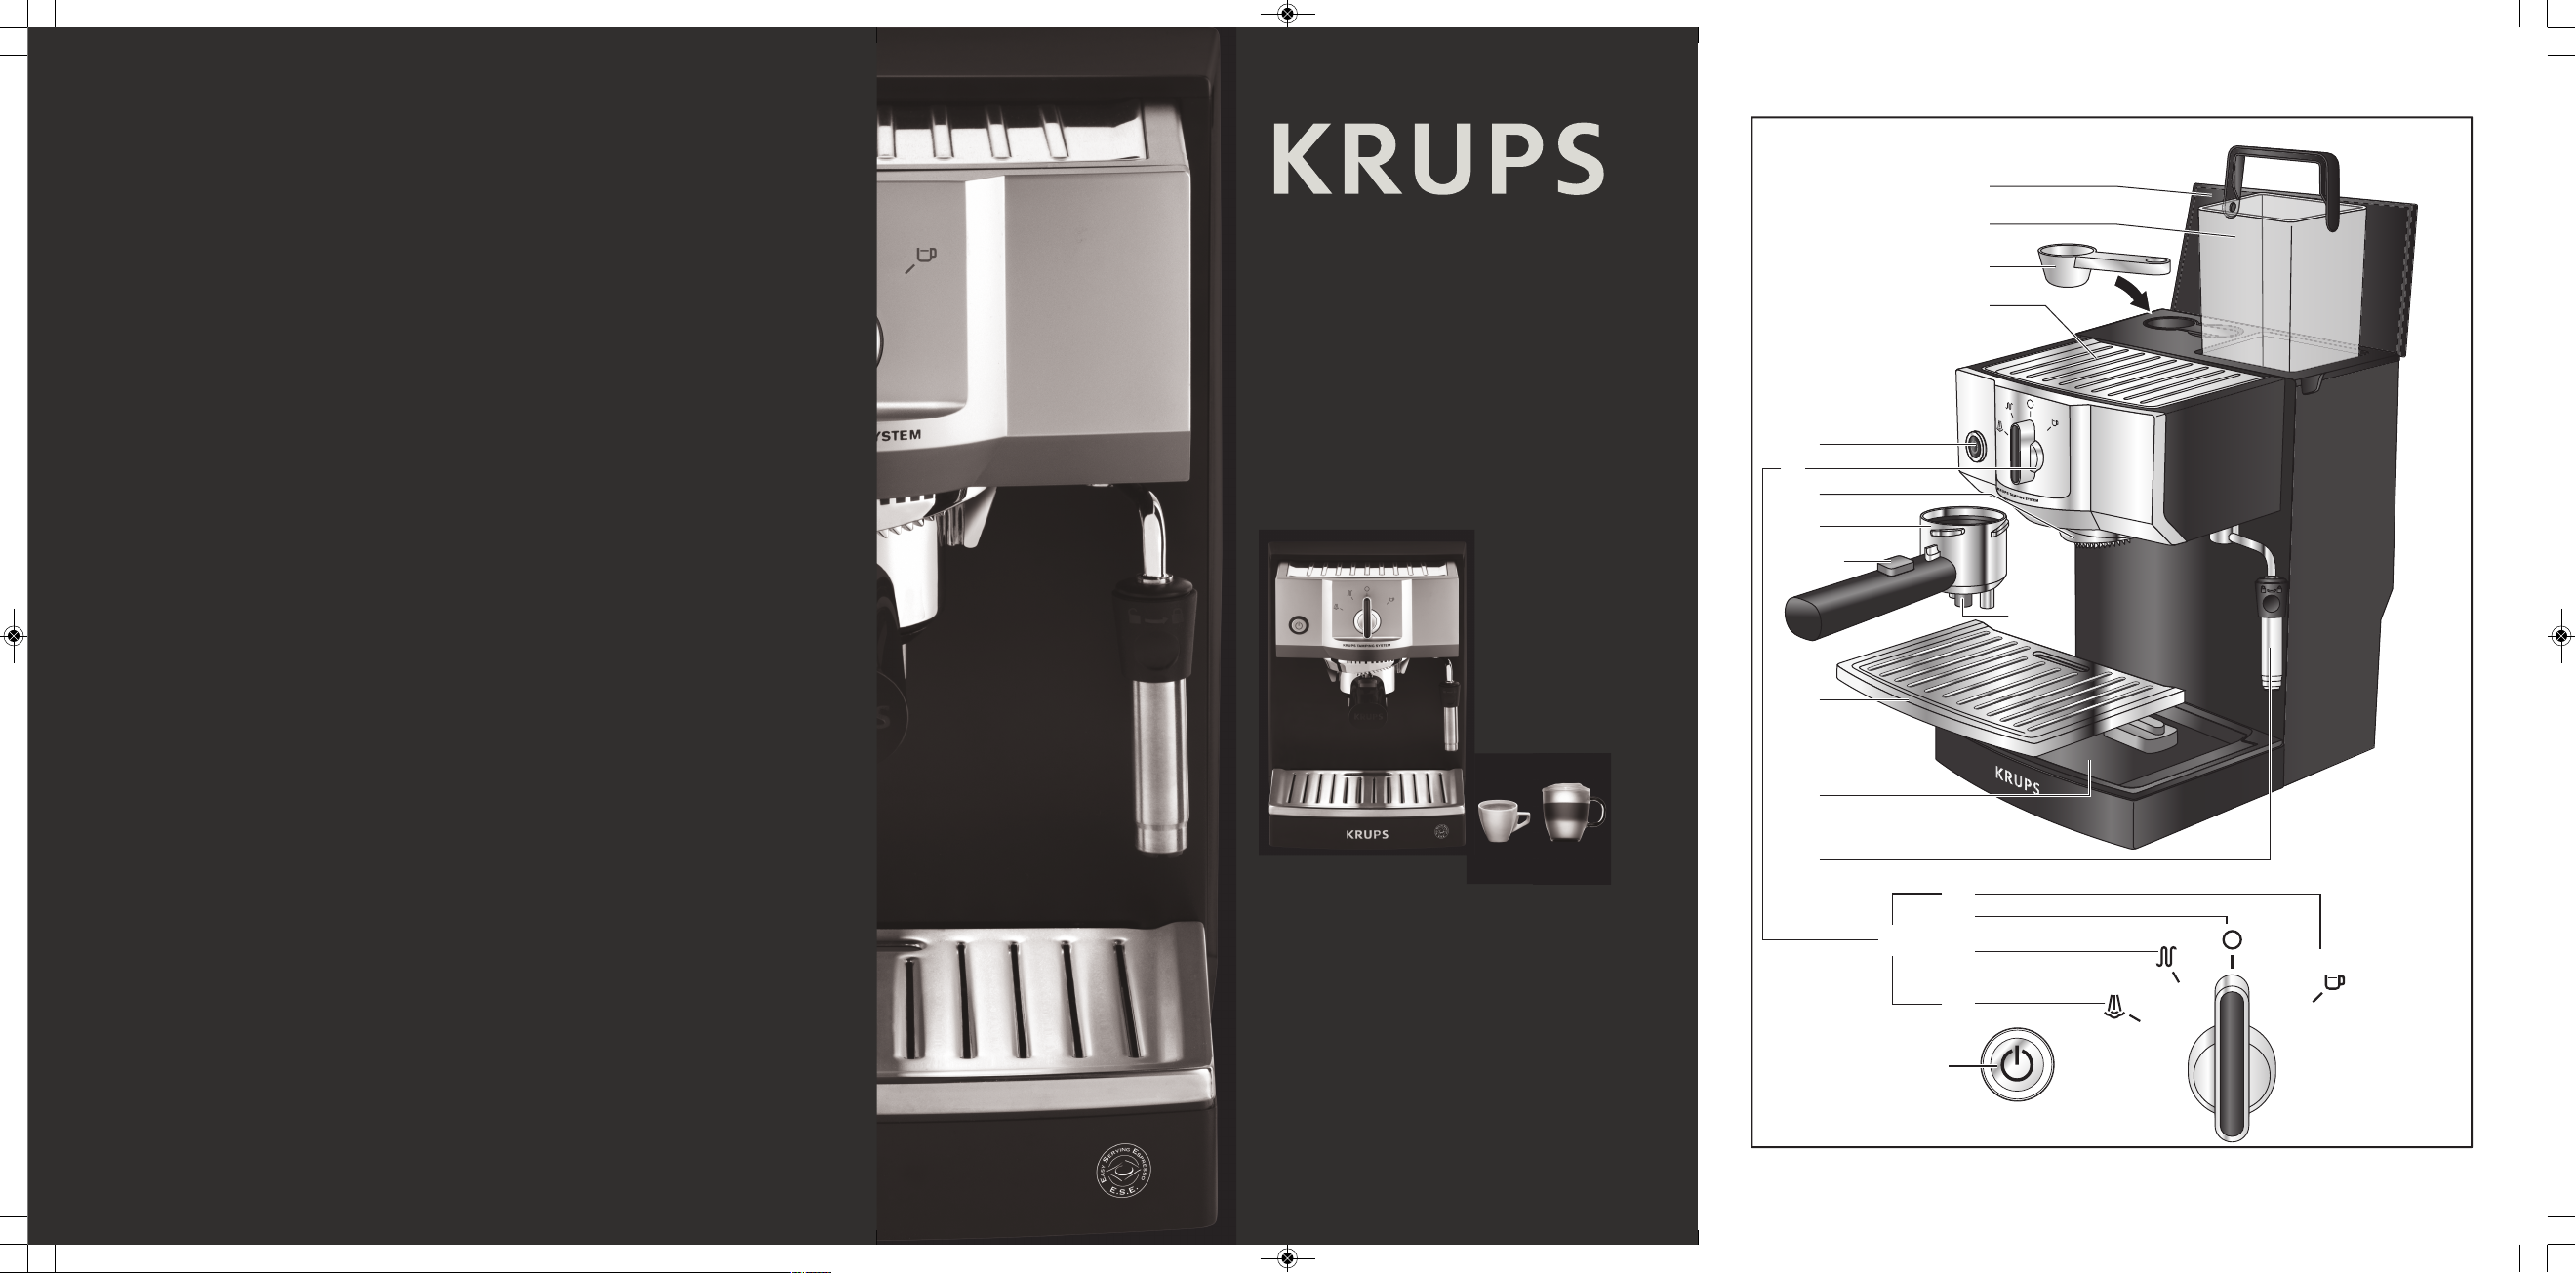
a Water compartment lid
b Detachable water tank
c Measuring spoon
d Cup warming plate
e On / Off button with LED
f Function switch
f1. Coffee position
f2. Off position
f3. Steam preheating position
f4. Steam position
g Percolation head
h Filter holder with grounds or pod ejection
system and gradual coffee tamping system:
KTS "Krups Tamping System": Compatible with
ground coffee (1 or 2 cups) and ESE or soft
pods
i Drip tray grid
j Drip tray with level indicator
k Steam nozzle
1. DESCRIPTION
Your machine is equipped with a filter holder which boasts three exclusive systems:
-
One for the gradual tamping of the espresso ground coffee as the filter holder is being positioned
(KTS "Krups Tamping System").
- Another is for ejecting the used grounds.
- The last is for using E.S.E. (Easy Serving Espresso) or soft pods.
It is also removable, and so can be frequently cleaned to be maintained in perfect working order. For your
safety, your filter holder is equipped with a locking system to keep it in place when the pressure rises.
KR_ESPRESSO_XP56_NAFTA_8080012562_808001256210/04/1315:16Page3
Page 7
English
4
n To prolong the life of your appliance, we recommend you use a Claris Aqua Filter System F088 cartridge
(accessory not included) and that you descale the appliance at regular intervals.
Before using your espresso machine, clean all the accessories in soapy water and dry them.
If you are not using the Claris cartridge, please refer to the paragraph here below “RINSING OF YOUR
APPLIANCE”.
A. INSTALLING THE CLARIS CARTRIDGE (to be done every time the cartridge is replaced)
If you are using a Claris filter cartridge, please follow the procedure to fill it with water:
n Screw the Claris filter into the bottom of the water tank.
n Fill the water tank with water and put it back in place (fig.2 and 3).
n Turn the appliance on by pressing the " " button (fig.4).
n Turn the switch to the " " position. Once the light stops flashing, turn back the switch to the " "
position.
n Repeat this operation 2 more times.
n To make sure the Claris cartridge is full of water, place a container under the brewing head, turn the
switch to the " " position and make sure some water is running through. If not, repeat the above
procedure.
n In this manner you can be sure that water is circulating well through the filter cartridge.
IMPORTANT:
This installation procedure must be carried out every time the cartridge is replaced.
The Claris cartridge needs to be replaced every 2 to 3 months if it is used daily.
B. RINSING YOUR APPLIANCE (to be done on first use and after each cleaning / descaling
operation)
- RINSING OUT THE ESPRESSO CIRCUIT
Before making an espresso for the first time, the machine should be cleaned.
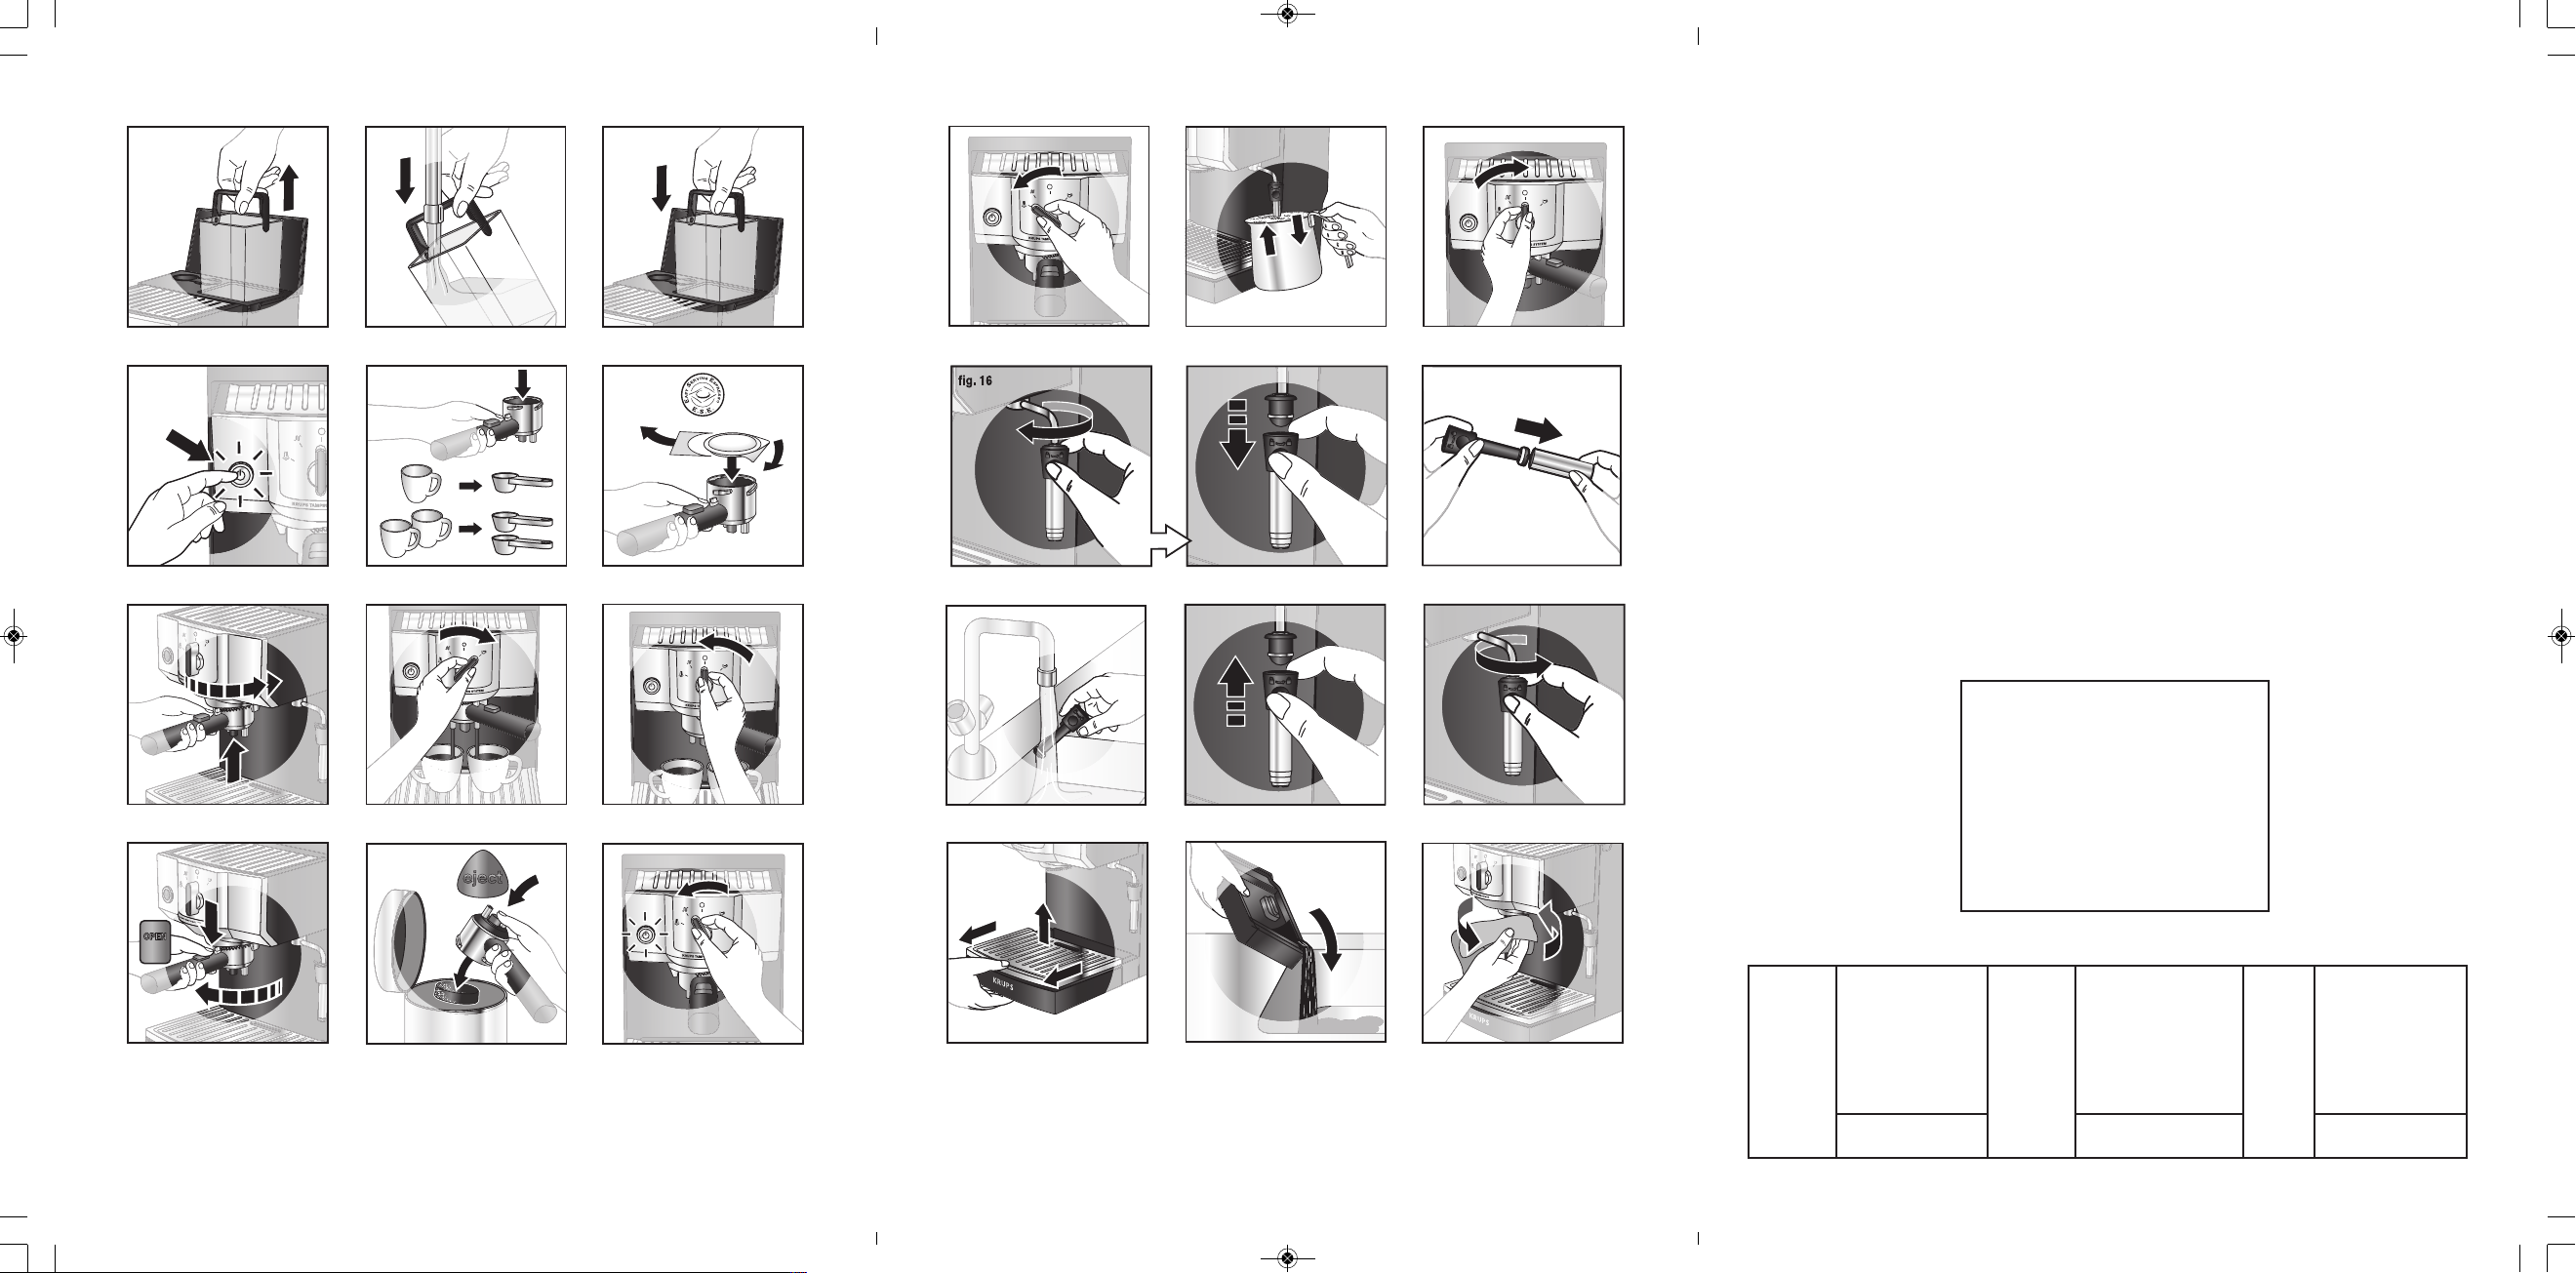
n Open the lid and remove the water tank using the handle (fig.1).
n Fill it with water (fig. 2).
n Put the water tank back in place by positioning it firmly, to ensure the water inlet is in place, and close
the lid (fig.3).
n Turn the appliance on by pressing the " " button (fig.4).
n Insert the filter holder (without ground coffee) in the appliance (fig.7).
n Place a container of sufficient volume under the filter holder.
n Once the appliance has reached the right temperature, the light stops flashing. Turn the switch to the
" " position (fig.8) and let all the water in the tank run through.
n If necessary, stop the operation by turning the switch to the " " position (fig.9) to empty the container
and then resume the operation.
n Empty the container and unlock the filter holder: press the "OPEN" button on the filter holder and turn
it to the left (fig.10).
IMPORTANT!
Before using for the first time, after a prolonged period of inactivity or after descaling,
the appliance must be cleaned as described in paragraph 5: "BEFORE FIRST USE".
4. BEFORE FIRST USE
KR_ESPRESSO_XP56_NAFTA_8080012562_808001256210/04/1315:16Page4
Page 8
English
5
- RINSING OUT THE STEAM CIRCUIT.
Before using the steam function for the first time, the steam circuit should be cleaned.
n Fill the water tank
n Turn the appliance on by pressing the button.
n Place a recipient underneath the steam nozzle.
n Turn the switch to the position, the button starts to blink.
n When the button has stopped flashing, turn the switch to the position and let the water run until
steam is formed.
n Keep the steam production going for at least 30 seconds.
In order to release all the aromas of the coffee and ensure your complete satisfaction, this machine preinfuses each coffee. The pump works for 3 seconds, stops the following 3 seconds and then the cycle
continues until the end of the preparation.
PREHEATING THE ACCESSORIES
For the best results, we recommend that you preheat the accessories (filter holder and cups) without
espresso ground coffee. To do so:
n Fill the water tank and turn the machine on. (fig.1, 2, 3 and 4).
n Put the filter holder in place, place the cups underneath the filter holder.
As soon as the appliance reaches the required temperature, the light stops flashing.
n Turn the switch to the " " position (fig.8).
n When the cups are filled with hot water, turn the switch to the " " position. (fig.9).
n Remove the cups.
n Unlock the filter holder: press "OPEN" while turning the filter holder to the left and remove it from the
machine. (fig.10).
Note: When the appliance is hot, the espresso cups can be preheated on the cup warming plate.
WITH GROUND COFFEE
The type of coffee you choose will determine the strength and taste of your espresso. Always
use espresso ground coffee. Do not use instant coffee.
n Fill the water tank and turn the machine on (fig. 1, 2, 3 and 4). During the preheating of the appliance,
the light flashes.
n Using the measuring spoon, place the espresso ground coffee in the filter holder: one spoon (full to the
brim) per cup (fig.5).
n Remove any excess espresso ground coffee from the edge of the filter.
Important: Do not tamp the coffee down in the filter holder. The coffee is automatically tamped
using the KTS “Krups Tamping System”.
n Insert the filter holder in the device by turning it to the right as far as it will go, up to the stop (fig.7).
n Put one or two cups under the filter holder (fig.8).
As soon as the appliance reaches the required temperature, the light stops flashing.
n Turn the switch to the “ ” position (fig.8).
n When you have the desired amount of coffee, turn the switch to the " " position (fig.9).
n Unlock the filter holder: press “OPEN” while turning the filter holder to the left and remove it from the
machine (fig. 10).
n Remove the used espresso coffee grounds using the ejection system by pressing the "EJECT" button
located between the two coffee outlet nozzles (fig.11). Wash the filter holder under running water,
pressing "EJECT" to eliminate the remnants of grounds.
The filter holder now can be filled again to prepare other espressos.
5. MAKING AN ESPRESSO
KR_ESPRESSO_XP56_NAFTA_8080012562_808001256210/04/1315:16Page5
Page 9
English
6
WITH AN “E.S.E." ESPRESSO POD
“ESE” for “Easy Serving Espresso" is a packaged pod (44 mm diameter) of 7g or 1 scoop of
selected coffee, ground and compacted between two paper filters, specially designed to make
Italian style ristrettos (tight espressos).
This system allows immediate, simple, clean and comfortable use of your machine.
n Fill the water tank and turn the machine on (fig. 1, 2, 3 and 4). During the pre-heating phase, the
indicator light will flash.
n Tear the excess paper off the pod, put the E.S.E. pod in the filter holder, with the red writing facing down
(fig.6).
Be sure to place all the paper inside the filter holder, otherwise there might be leaks.
n If the pod is not positioned correctly, the result in the cup will not be satisfactory.
n Never use two pods together.
n Then, follow steps of figures 7 to 11.
WITH A SOFT POD
Your machine is also compatible with soft pods (usually 2.3 inches in diameter). Given that this
kind of pod is not specifically designed for espresso machines, you will get a less full-bodied
espresso than with an E.S.E. pod.
n Fill the water tank and turn the machine on (fig. 1, 2, 3 and 4). During the pre-heating phase, the
indicator lamp will flash.
n Place a soft pod in the filter holder. Never use two pods together. If the pod is not positioned correctly,
the result in the cup will not be satisfactory.
n Then, follow steps of figures 7 to 11.
Steam is used to froth milk (for example to make a cappuccino or a cafe latte) thanks to the cappuccino
accessory.
To produce steam, the pump works by emitting an intermittent noise.
After using the steam function, the appliance cools automatically by pumping cold water through
the heating system. During the pumping cycles, the excess steam in the heating system is released with the
hot water into the drip tray. The steam and noise that accompany this phase are important for
cooling the appliance.
Warning: during and after using the appliance, the metal parts of the steam nozzle can become very hot.
USING THE STEAM NOZZLE TO FROTH MILK
n Fill the water tank and turn the machine on (fig. 1, 2, 3 and 4).
n Turn the switch to the “ ” position. The indicator lamp flashes (fig.12).
n Move the steam nozzle towards the outside of the appliance.
n Pour 2 to 3.4oz. of fresh skimmed, semi skimmed or whole milk in a small container of about 17oz. and
which can pass under the steam nozzle. The milk and its container should be quite cold.
n We recommend that you use cold milk.
n As soon as the indicator lamp stops flashing, plunge the steam nozzle into the milk.
n Turn the switch to the “ ” position (fig. 13).
n For a good result, hold the nozzle towards the bottom of the container for about 25 seconds while the
milk heats (without however touching the bottom of the container). Then, bring the container down
gradually so that the nozzle moves up towards the surface (without ever coming out of the milk) (fig.14).
n Once the froth has formed, turn the switch to the “ ” position (fig.15). The appliance will now
automatically cool down by starting 3 intermittent pumping cycles. Once this is automatic operation is
complete, you can make another espresso.
6. STEAM FUNCTION
KR_ESPRESSO_XP56_NAFTA_8080012562_808001256210/04/1315:16Page6
Page 10
English
7
IMPORTANT:
To prevent the steam nozzle holes from being clogged, the milk foam must not reach
the black plastic upper part.
It is important to clean the steam nozzle after each use to prevent the milk from drying on the inside of the
nozzle. To do so:
n Place the steam nozzle in a container with water and repeat the milk frothing operation for 30 seconds.
CAUTION!
The steam nozzle is still hot!
USING THE KRUPS XS-6000 AUTO-CAPPUCCINO SET TO FROTH MILK (SOLD SEPARATELY)
The auto-cappuccino accessory makes it easier to make a cappuccino or a caffe latte. It is made up of a
special dual-position nozzle, a stainless steel milk container and a pipe.
This accessory may be sold separately.
n Assemble all the different pieces. Choose the caffè latte or cappuccino position on the special nozzle.
n Fill up the milk container and place a cup or a glass underneath the special auto-cappuccino nozzle.
n Turn the switch to the “steam preheating” position. • Once the light has stopped blinking, turn the switch
to the “steam” position.
n Once the froth has been formed, turn the switch to the “stop” position. The appliance will now
automatically cool itself by launching 3 intermittent pumping cycles. Once this is automatic operation is
complete, you can make a coffee.
To prevent the milk from drying on the auto-cappuccino accessory, we strongly recommend.
n pouring clean water in the container and re-assembling the various components.
n starting a steam cycle.
n clean all of the components with a damp cloth.
n Do not wash your espresso machine accessories in the dishwasher.
CLEANING THE APPLIANCE
n Unplug the machine before cleaning and let the appliance cool down.
n Clean the outside of the appliance from time to time with a damp cloth. After use, the water tank must
be emptied.
n Rinse inside the tank regularly.
n When a thin white layer starts to form in the tank, carry out a descaling operation (see paragraph 9
"DESCALING").
CLEANING THE DRIP TRAY
The drip tray must be emptied after each time the appliance is used. Lift up slightly and remove it from the
appliance.
If multiple espressos are prepared one after the other, it should be emptied from time to time (every 7 to 8
espressos approximately) (fig.19 and 20). The presence of water is normal and is not the sign of a leak.
If necessary, clean the drip tray and its grid with water and a little gentle washing-up liquid, rinse and dry.
When reassembling the components, make sure everything is in the right place.
CLEANING THE BREW HEAD, FILTER HOLDER AND HANDLE
n They must be cleaned after each use. Simply wipe a damp cloth over the percolation head (fig. 21) and
clean the filter holder under running water and use a small amount gentle washing-up liquid.
n Do not use alcohol or solvent-based cleaning products.
7. CLEANING AND MAINTENANCE
KR_ESPRESSO_XP56_NAFTA_8080012562_808001256210/04/1315:16Page7
Page 11
English
8
n For best results, you can activate the "EJECT" button several times during rinsing. We recommend that
you shake the filter holder thoroughly in order to remove all the water.
n Rinse and dry.
n When not using your espresso coffee maker, do not leave the filter holder on it, in order to prevent wear
to the seal.
For more thorough cleaning, the filter holder can be dismantled:
n You can remove the black plastic part where the coffee outlets and the "EJECT" button are to be found:
turn it to the left and pull sharply (fig. 22).
n Clean the various components under running water and a little gentle washing-up liquid.
n Rinse and dry.
n Replace the black plastic part in the metal holder, turn it to the right until the two arrows on each
component line up.
If the brew head is heavily clogged, unscrew the grid using a screw-driver, clean it put it back, pressing
down firmly (fig.23).
OF THE STEAM NOZZLE
n This accessory consists of 2 parts: one part which is the plastic support and the other which is the metal
protection cylinder.
n Before cleaning, unlock the nozzle from the articulated arm by turning it to the left (fig.16, 16.2).
n Then slide the metal cylinder along the plastic support (fig.16.3).
n Clean these two parts with tap water and some mild washing-up liquid (fig.17).
n Rinse and dry.
n Once the parts have been properly cleaned, put the metal cylinder back on the support.
n Make sure that you don’t damage the silicone seal which makes the nozzle watertight (fig.16.3).
n Insert the nozzle on the articulated arm then lock to the right (fig.18.1, 18.2).
The guarantee does not cover appliances which become faulty because the descaling operations have not
been carried out regularly.
Descale your espresso maker regularly using white vinegar or a packet of citric or sulphamic acid which you
can buy in most hardware stores.
We recommend that you use the Krups descaling accessory, reference F054, available in Krups
authorized service centers. In addition to two descaling bags, this accessory includes a water hardness
tape tester to assess the required frequency with which your appliance should be descaled, in normal use.
The amount of scale depends on the hardness of the water but also on the level of use. The frequency of
descaling given by the F054 accessory is therefore purely indicative. However, you can refer to the
following table:
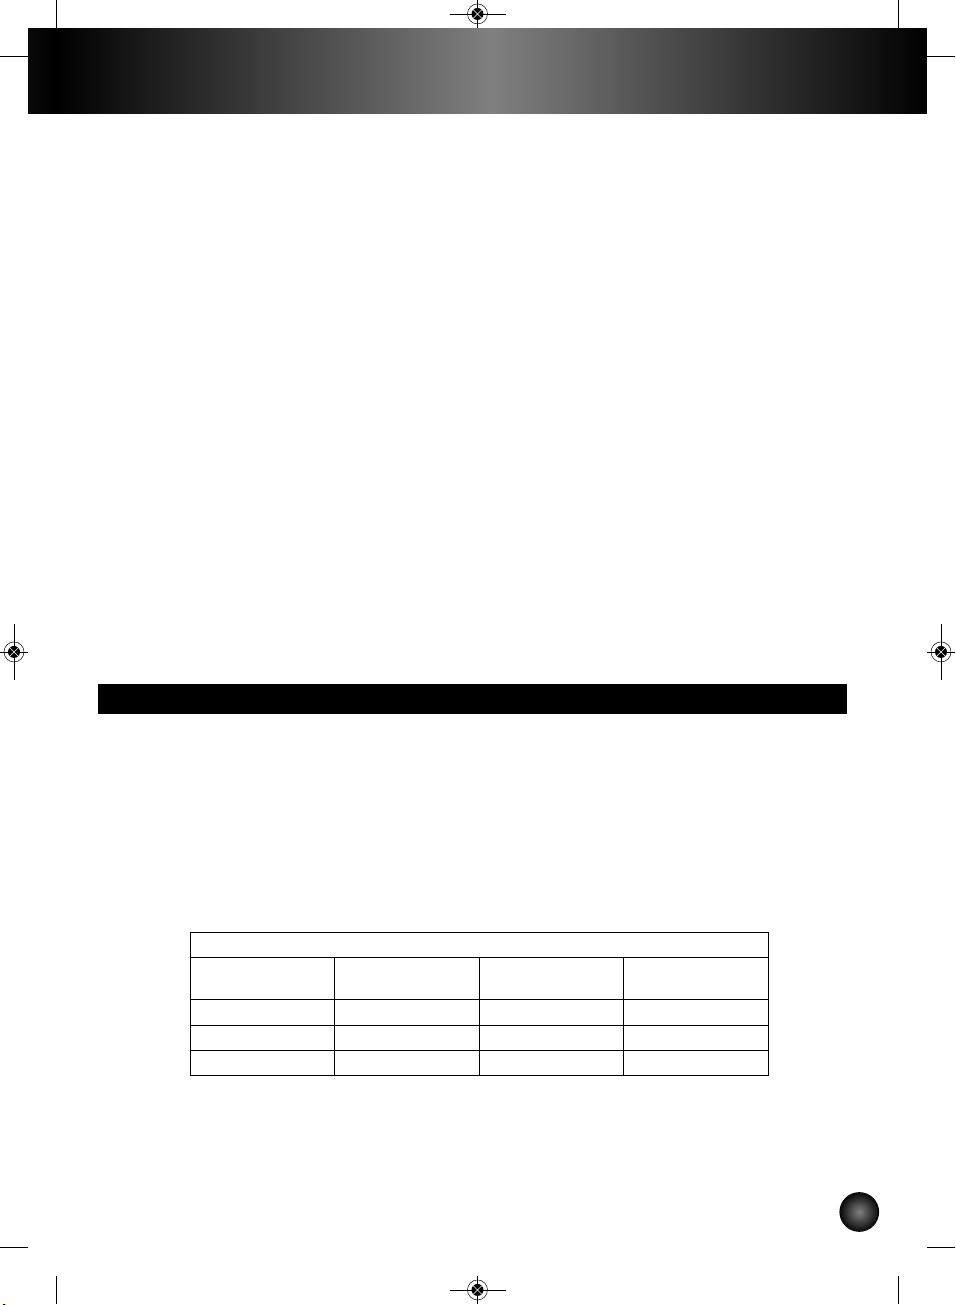
If in doubt, it is recommended to descale every month.
DESCALING THE STEAM AND COFFEE CIRCUITS
n Empty the tank and put it back in place.
n If your product is equipped with our Claris - Aqua Filter System cartridge F088, please remove this
cartridge before the descaling operation.
8. DESCALING
DESCALING FREQUENCY
Average # of
espressos / week
Soft water
(<19°th)
Hard water
(19-30°th)
Very hard water
(>30°th)
Less than 7 Once a year Every 8 months Every 6 months
From 7 to 20 Every 4 months Every 3 months Every 2 months
Over 20 Every 3 months Every 2 months Every month
KR_ESPRESSO_XP56_NAFTA_8080012562_808001256210/04/1315:16Page8
Page 12
English
9
n Fill the tank with a mixture composed of three parts water for one part white vinegar or a mixture of 17oz.
of water and a packet of citric or sulphamic acid available in the shops.
n Insert the filter holder (without espresso ground coffee) into the appliance and lock it by turning it to the
right as far as it will go.
n Place a container under the steam nozzle.
n Press the “ ” button.
n Immediately turn the switch to the “ ” position (without stopping at the " " position).
n Let the mixture run through the nozzle until steam appears.
n Turn the switch back to the " " position
n Place a container of sufficient volume under the filter holder.
n Once the light stops blinking, turn the switch to the “ ” position and half of the mixture run through.
n Turn the machine off using the " " button and leave the switch on the “ ” position.
n After 15 minutes, turn the machine back on.
n Let the rest of the water run through.
n Turn the switch to the “ ” position.
RINSING
IMPORTANT!
After descaling, perform 2-3 rinsing operations with clear water (without espresso
ground coffee), as described in paragraph 5 "using for the first time".
Remember to rinse the steam nozzle by following the instructions below:
n Place a container under the steam nozzle.
n Press the “ ” button.
n Immediately turn the switch to the “ ” position (without stopping at the “ ” position).
n Let the water run through the nozzle until steam appears.
n Turn the switch back to the “ ” position.
The appliance is descaled and ready to be used again.
n This product has been designed for domestic use only. Any commercial use, inappropriate use or failure
to comply with the instructions, the manufacturer accepts no responsibility and the guarantee will not
apply.
n No repairs will be carried out due to a lack of descaling will be covered by the guarantee.
n If you have any problem or query please contact our Customer Relations Team for expert help and
advice.
Helpline: 800-526-5377 - USA
GROUPE SEB USA
2121 Eden Road
Millville, NJ 08332
9. GUARANTEE
KR_ESPRESSO_XP56_NAFTA_8080012562_808001256210/04/1315:16Page9
Page 13
English
10
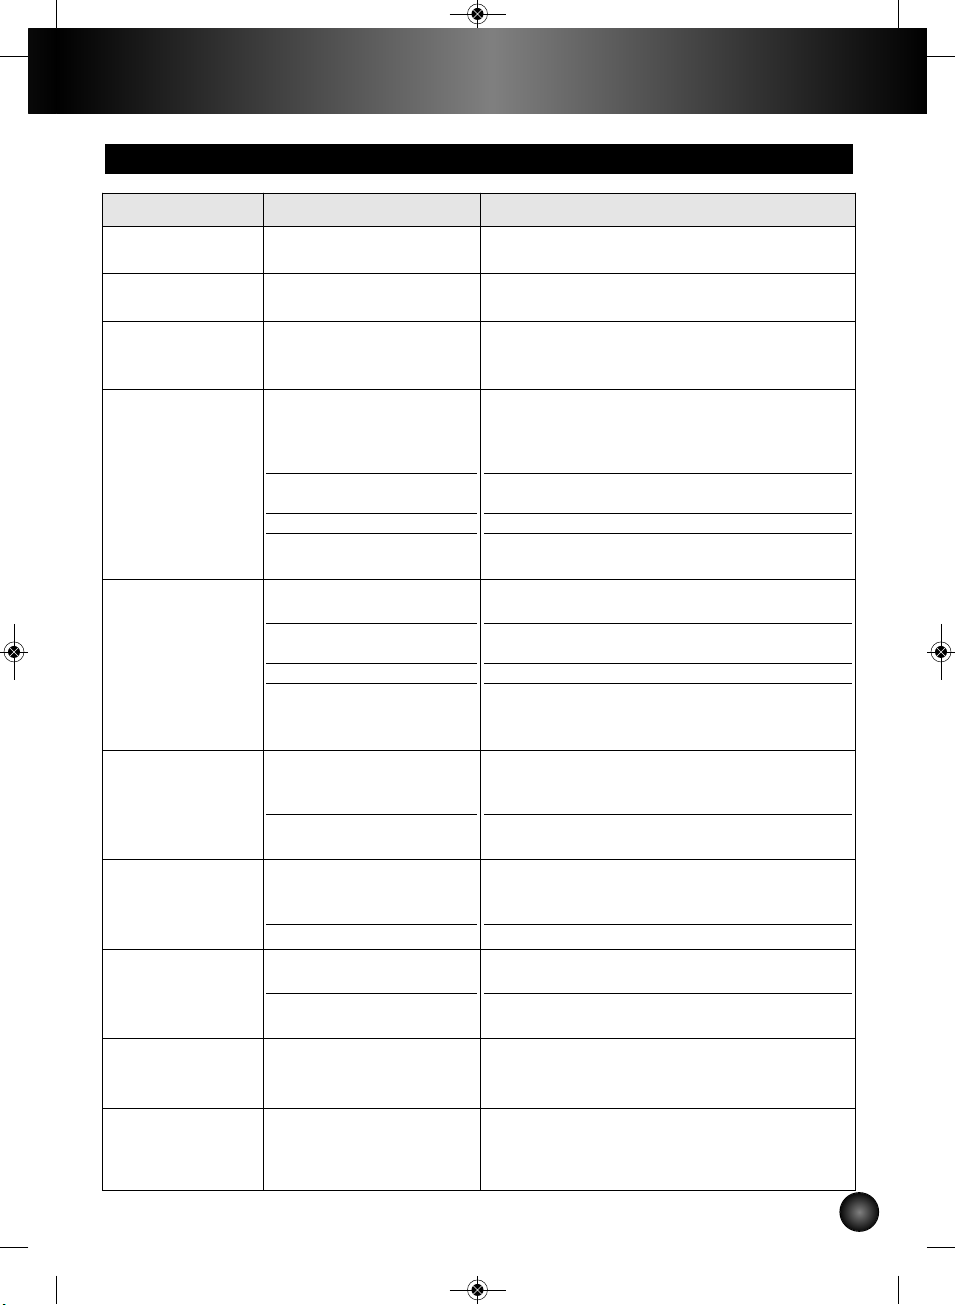
10. TROUBLESHOOTING
The water tank leaks
when it is carried.
The valve at the bottom of
the tank is dirty or defective.
The valve is blocked by
scale.
Wash the water tank and operate the valve at the
bottom of the tank with your finger.
Descale the appliance (paragraph 9).
Water leaks under
the appliance.
Internal leak.
Check the position of the tank. If the fault persists,
do not use the appliance, contact an approved
service center.
Water leaks under
the drip tray
Water can be present and/or
flow when you remove the
drip tray.This is not a sign of
a leak.
Problems Possible causes Solutions
The espresso is not
hot enough.
The cups and the filter
holder are cold.
Preheat the accessories: cups and filter holder (see
paragraph 6).
The filter holder is
blocked
You forgot to unlock the
filter.
Press “OPEN” while turning the filter holder to the
left.
The grounds are not
dry after water has
run through.
You have not tightened the
filter holder properly.
Tighten the filter holder by turning it to the right as
far as it will go, up to the stop.
The coffee flows too
slowly.
The flow rate depends on
the fineness of the coffee
used and can vary when
preparing the espresso
The ground coffee is too
fine, too oily or floury.
The filter holder is dirty.
The water drip-through grid
is clogged.
choose a more coarsely ground coffee.
Clean your filter holder (see paragraph 8).
When the appliance has cooled, clean the
percolation head with a damp cloth. (fig.21).
The water does not
run through.
No water in the tank.
Tank poorly fitted.
The filter is clogged. The
ground coffee is too fine.
Your device is scaled up.
The Claris cartridge has
been replaced but not
primed.
Fill the tank.
Press firmly on the tank.
Clean the filter holder (see paragraph 8) and try a
less fine grind.
See paragraph 9.
See paragraph 5.
Water leaks from the
filter holder after an
espresso has been
made.
The switch has not been
positioned on the "stop"
position.
Formation of scale because
of especially hard water.
Turn off your appliance by positioning the switch
on the "stop" position. (fig.9).
Descale the appliance according to the manual
(see paragraph 9).
Coffee grounds in
the cup.
The filter holder is clogged.
The grind is too fine.
Clean the filter holder with hot water. Press
“EJECT” to eliminate the remnants of the grounds.
Shake to drain the water.
choose a more coarsely ground coffee.
KR_ESPRESSO_XP56_NAFTA_8080012562_808001256210/04/1315:16Page10
Page 14
English
11
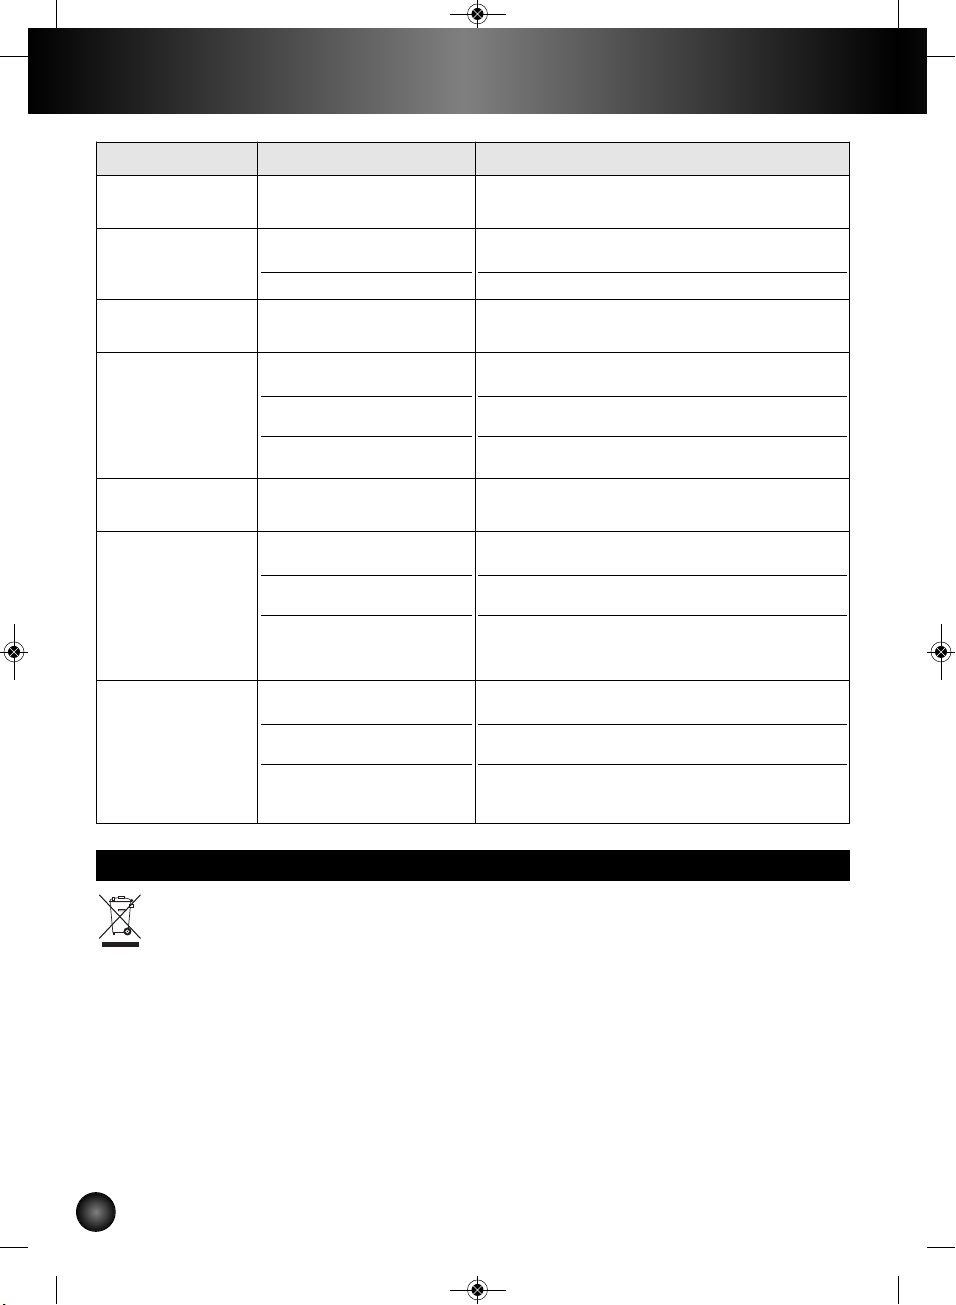
11. END-OF-LIFE ELECTRONIC PRODUCT
Environmental protection first!
Your appliance contains a lot of recoverable or recyclable material.
When disposing of it, take it to a local civic waste collection point.
The machine leaks
on the sides of the
filter holder.
The filter holder has not
been properly positioned.
The edge of the filter holder
is clogged by ground coffee.
Pod poorly positioned in the
filter.
Put the filter holder in place and lock it (by turning
it to the right as far as it will go, up to the stop).
Remove excess coffee.
Place all the paper inside the filter holder.
Your espresso tastes
bad.
After descaling, the rinsing
was not performed properly.
Rinse the device according to the manual (see
paragraph 9).
The appliance does
not work
The pump was unprimed
due to lack of water.
The detachable water tank is
not properly clicked in place.
The Claris cartridge has
been replaced but not
primed.
Fill the water tank and reprime the pump (see
paragraph 5). Avoid completely emptying the tank.
Click the tank into place by pressing firmly.
See paragraph 5.
The steam nozzle
does not froth the
milk.
The steam nozzle is clogged
or scaled up.
The milk is not cold or not
fresh enough.
The shape of the container
is not appropriate.
Descale the steam nozzle (see paragraph 9) or
unclog it with a needle.
Use fresh, cold milk. Try using a different brand of
milk.
Use a small pitcher.
Problems Possible causes Solutions
C
rackles are heard
in the filter holder.
N
ormal phenomenon:
the filter holder security lock.
The pump is
unusually noisy.
No water in the tank.
Tank not locked in place.
Stop the appliance, fill the water tank and turn the
machine back on.
Press down firmly on the tank.
The cups are not
filled equally.
The filter holder is clogged. See paragraph 8.
KR_ESPRESSO_XP56_NAFTA_8080012562_808001256210/04/1315:16Page11
Page 15

English
12
: www.krups.com
With a strong commitment to the environment, most of Krups products are
repairable during and after the warranty period. Before returning any defective
products to the point of purchase, please call Krups consumer service directly
at the phone number below for repair options.
Your help to sustain the environment is appreciated!
The Warranty
This product is guaranteed by Krups for a period of 2 years against any manufacturing defect
in materials or workmanship, starting from the initial date of purchase.
The manufacturer's warranty by Krups is an extra benefit which does not affect consumer's Statutory Rights.
The Krups warranty covers all costs related to restoring the proven defective product so that it
conforms to its original specifications, through the repair or replacement of any defective part
and the necessary labor. At Krups’s choice, a replacement product may be provided instead of
repairing a defective product. Krups’s sole obligation and your exclusive resolution under this
warranty are limited to such repair or replacement.
Conditions & Exclusions
The Krups warranty only applies within USA, Canada & Mexico, and is valid only on presentation of a proof of purchase. The product can be taken directly in person to an authorized
service centre or must be adequately packaged and returned, by recorded delivery (or equivalent method of postage), to a Krups authorized service centre. Full address details for each country’s authorized service centre are listed on the Krups website (www.krups.com
) or by calling the
appropriate telephone number listed below to request the appropriate postal address.
Krups shall not be obliged to repair or replace any product which is not accompanied by a valid
proof of purchase.
This warranty will not cover any damage which could occur as a result of misuse, negligence,
failure to follow Krups instructions, use on current or voltage other than as stamped on the product, or a modification or unauthorized repair of the product. It also does not cover normal tear
and wear, maintenance or replacement of consumable parts, and the following:
-using the wrong type of water
-scaling (any de-scaling must be carried out according to the instructions for use);
-ingress of water, dust or insects into the product;
-mechanical damages, overloading
-damages or bad results due to wrong voltage or frequency
-accidents including fire, flood, lightning, etc
-professional or commercial use
-damage to any glass or porcelain ware in the product
This warranty does not apply to any product that has been tampered with, or to damages incurred through improper use and care, faulty packaging by the owner or mishandling by any carrier.
KRUPS MANUFACTURER'S WARRANTY
KR_ESPRESSO_XP56_NAFTA_8080012562_808001256210/04/1315:16Page12
Page 16

English
13
The Krups manufacturer's warranty applies only for products purchased and used in USA, Canada
& Mexico. Where a product purchased in one country and then used in another one:
a) The Krups guarantee duration is the one in the country of usage of the product, even if the
product was purchased in another listed country with different guarantee duration.
b) The Krups guarantee does not apply in case of non conformity of the purchased product
with the local standards, such as voltage, frequency, power plugs, or other local technical
specifications
c) The repair process for products purchased outside the country of use may require a lon-
ger time if the product is not locally sold by Krups
d) In cases where the product is not repairable in the new country, the Krups guarantee is li-
mited to a replacement by a similar product or an alternative product at similar cost, where
possible.
Consumer Statutory Rights
This Krups manufacturer's warranty does not affect the statutory rights a consumer may have or
those rights that cannot be excluded or limited, nor rights against the retailer from which the consumer purchased the product. This warranty gives a consumer specific legal rights, and the consumer may also have other legal rights which vary from State to State or Country to Country or
Province to Province. The consumer may assert any such rights at his sole discretion.
Additional information
Accessories, Consumables and end-user replaceable parts can be purchased, if locally available,
as described in Krups internet site.
: www.krups.com
CANADA
GROUPE SEB
CANADA
345 Passmore Avenue
Toronto, ON
M1V 3N8
MEXICO
Groupe SEB MEXICO
S.A. de C.V.
Goldsmith 38 Desp.
401 Col. Polanco
Delegacion Miguel
Hildalgo
11 560 Mexico D.F.
MEXICO
U.S.A.
GROUPE SEB USA
2121 Eden Road
Millville, NJ 08332
1-800-418-3325 01800 1128325 800-526-5377
KR_ESPRESSO_XP56_NAFTA_8080012562_808001256210/04/1315:16Page13
Page 17

Français
14
MISES EN GARDE IMPORTANTES
Lorsque vous utilisez un appareil électrique, afin de réduire les risques d’incendie, de
choc électrique et de blessure, des consignes de sécurité élémentaires doivent toujours
être observées et en particulier les suivantes :
1. Lire le mode d’emploi en entier avant la première utilisation.
2. Ne pas toucher les surfaces chaudes. Utiliser les poignées ou les boutons.
3. Pour se protéger des incendies, des chocs électriques et des blessures, ne pas
immerger le cordon d’alimentation, les prises de courant ou la machine dans l’eau ni
dans tout autre liquide.
4. Cet appareil n’est pas conçu pour être utilisé par des enfants.
5. Une surveillance étroite est nécessaire lorsque l’appareil électrique est utilisé à
proximité des enfants. Garder hors de la portée des enfants.
6. Cet appareil n’est pas prévu pour être utilisé par des personnes (y compris les
enfants) dont les capacités physiques, sensorielles ou mentales sont réduites, ou
des personnes dénuées d’expérience ou de connaissance, sauf si elles ont pu
bénéficier, par l’intermédiaire d’une personne responsable de leur sécurité, d’une
surveillance ou d’instructions préalables concernant l’utilisation de l’appareil.
7. Il convient de surveiller les enfants pour s’assurer qu’ils ne jouent pas avec l’appareil.
8. Tout contact avec les surfaces chaudes, l’eau chaude ou la vapeur peut causer des
brûlures. Faire preuve de prudence.
9. Faire preuve de prudence lorsque la buse à vapeur est utilisée car la vapeur peut
causer des brûlures.
10. Débrancher l’appareil de la prise murale s’il n’est pas utilisé pendant quelques jours
et avant de le nettoyer. Laisser l’appareil refroidir avant d’installer ou d’enlever les
accessoires et avant de le nettoyer ou de le ranger.
11. Tous les appareils sont soumis à des contrôles rigoureux de la qualité. Des tests
pratiques sont effectués sur des appareils sélectionnés au hasard, ce qui peut
expliquer des petites marques ou des résidus de café dans l’appareil avant sa
première utilisation.
12. Ne pas utiliser un appareil électrique avec un cordon d’alimentation ou une prise
endommagé, quand l’appareil fonctionne mal, ou s’il a été endommagé de quelque
manière que ce soit. Retourner tout appareil défectueux au Centre de service Krups
le plus près afin qu’il soit examiné, ajusté ou réparé.
13. Pour diminuer les risques de blessures, ne pas laisser le cordon pendre de la table
ou du comptoir, où il pourrait être tiré par un enfant ou faire trébucher quelqu’un.
14. Le cordon ne doit pas pendre de la table ou du comptoir, ni entrer en contact avec
des surfaces chaudes.
15. L’utilisation d’accessoires non recommandés par Krups peut causer des incendies,
des chocs électriques ou des blessures.
16. Ne pas utiliser à l’extérieur.
17. Ne pas placer sur ou près d’un brûleur à gaz, d’une plaque électrique ou dans un
four chaud.
KR_ESPRESSO_XP56_NAFTA_8080012562_808001256210/04/1315:16Page14
Page 18

Français
15
18. Pour débrancher l’appareil, tourner le bouton de commande à « off » puis
débrancher de la prise murale. Ne pas tirer sur le cordon mais plutôt sur la fiche.
19. Utiliser cet appareil uniquement pour l’usage auquel il est destiné.
20. Ne pas verser des liquides autres que de l’eau et la solution de détartrage précisée
dans ce manuel dans le réservoir d’eau.
21. Protéger l’appareil de l’humidité et du gel.
22. Pour usage domestique seulement.
23. L’appareil n’est pas destiné à la préparation de boissons pour les nourrissons.
CONSERVER CES INSTRUCTIONS
ATTENTION
Cet appareil est conçu pour une utilisation domestique seulement. Tout entretien autre
que le nettoyage et l’entretien normal de l’appareil par son propriétaire doit être effectué
par le personnel agréé de Krups uniquement. Visiter notre site Web www.krups.ca au
Canada ou communiquer avec le service à la clientèle pour le centre de service le plus
près de chez vous. Afin de réduire les risques d’incendie et de choc électrique, ne pas
démonter la base de l’appareil. Toute réparation doit être effectuée par le personnel
agréé de Krups uniquement.
INSTRUCTIONS POUR LE CORDON COURT
A. Un cordon d’alimentation court ou amovible est fourni avec l’appareil pour éviter
qu’il ne s’emmêle ou qu’on trébuche dessus.
B. Des rallonges et des cordons plus longs peuvent être utilisés, mais l'utilisateur
doit prendre les précautions nécessaires.
C. Si vous utilisez une rallonge ou un cordon d’alimentation plus long :
1) Le calibre spécifié sur le cordon ou la rallonge doit être égal ou supérieur à
celui indiqué sur l’appareil.
2) Si l’appareil est mis à la terre, le cordon ou la rallonge doit être du type mis à
la terre (à 3 fils).
3) Le cordon d’alimentation doit être placé de façon à ce qu’il ne pende pas du
plan de travail ou du haut de la table car un enfant pourrait tirer dessus ou
trébucher accidentellement.
L’appareil peut être équipé d’une prise polarisée (une lame est plus large que l’autre).
Pour réduire les risques de chocs électriques, cette fiche ne peut se brancher que dans
un sens. Si la fiche ne rentre pas correctement dans la prise murale, retournez-la. Si elle
ne rentre toujours pas, contactez un électricien. N’essayez en aucune façon de modifier
la prise.
Dans le but d’améliorer ses produits, Krups se réserve le droit de modifier les
spécifications sans avis préalable.
KR_ESPRESSO_XP56_NAFTA_8080012562_808001256210/04/1315:16Page15
Page 19

Français
16
a Couvercle du réservoir
b Réservoir d’eau amovible
c Cuillère à mesurer
d Plateau chauffe-tasses
e Bouton marche / arrêt avec témoin lumineux
f Sélecteur de fonctions
f1. Position café
f2. Position arrêt
f3. Position préchauffage vapeur
f4. Position vapeur
g Tête de percolation
h Porte-filtre avec système d’éjection du marc ou
de la dosette et tassage progressif du café :
système KTS « Krups Tamping System ».
Accepte le café moulu (1 ou 2 tasses) et
dosettes E.S.E. ou souples.
i Grille du plateau d’égouttage
j Plateau d’égouttage muni de son indicateur de
niveau
k Buse à vapeur
1. DESCRIPTION
Nous vous remercions de votre confiance et de votre fidélité aux produits Krups. Votre machine est
équipée d’un porte-filtre qui dispose de trois systèmes exclusifs :
- L’un pour le tassage progressif de la mouture lors du positionnement du porte-filtre (système KTS
« Krups Tamping System »).
- L’autre pour l’éjection du marc.
- Le dernier pour l’utilisation de dosettes E.S.E. (Easy Serving Espresso) ou souples.
Il est en outre démontable, ce qui permet de le maintenir, par des nettoyages fréquents, en parfait état
de fonctionnement. Par sécurité, votre porte-filtre est équipé d’un système de verrouillage pour qu’il reste
en place lors de la montée en pression.
n Pompe : 15 bars
n Porte-filtre avec système d’éjection du marc. Accepte le café moulu et tous types de dosettes, E.S.E.
ou souples.
n Fonction vapeur
n Mise en veille automatique.
n Réservoir amovible (capacité : 1,1 litre)
n Puissance : 1450 W
n Tension : 220-240 V – 50 Hz
n Dispositifs de sécurité contre les surchauffes
n Dimensions : H. 300 mm, L. 230 mm, P. 280 mm
IMPORTANT!
Tension d’utilisation : cet appareil est prévu pour fonctionner uniquement en courant
alternatif de 220-240 V.
Type d’utilisation : cet appareil est prévu pour une UTILISATION DOMESTIQUE
SEULEMENT.
n Pour obtenir un espresso à l’arôme corsé, nous vous recommandons d’utiliser du café spécial
espresso fraîchement moulu qui convient à la délicatesse de la préparation de ce type de boisson, ainsi
que des tasses d’une capacité ne dépassant pas 50 ml.
n Conservez la mouture au réfrigérateur, elle garde ainsi plus longtemps son arôme.
2. CARACTÉRISTIQUES TECHNIQUES
3. CONSEILS
KR_ESPRESSO_XP56_NAFTA_8080012562_808001256210/04/1315:16Page16
Page 20

Français
17
n Ne remplissez pas votre porte-filtre à ras, mais utilisez la cuillère à mesurer (1 cuillère par tasse).
n Si vous n’utilisez pas l’appareil pendant plus de 5 jours, videz et rincez le réservoir d’eau.
n Avant d’enlever le réservoir pour le remplir ou pour le vider, veillez à toujours éteindre l’appareil.
n Veillez à toujours poser l’appareil sur une surface plane et stable.
n Pour obtenir une meilleure température de café en tasse, nous vous conseillons de préchauffer vos
tasses.
n Pour prolonger la durée de vie de votre appareil, nous vous conseillons d’utiliser une cartouche filtrante
Claris Aqua Filter F088 (accessoire non fourni) et de procéder à des détartrages réguliers.
IMPORTANT !
Avant la première utilisation, après des arrêts prolongés ou après le détartrage,
l’appareil doit être nettoyé comme décrit au paragraphe 5 : « MISE EN SERVICE ».
Avant d’utiliser votre machine à espresso, nettoyez tous les accessoires à l’eau savonneuse puis séchezles.
Si vous n'utilisez pas la cartouche Claris, reportez-vous directement au paragraphe « RINÇAGE DE
VOTRE APPAREIL ».
A. INSTALLATION DE LA CARTOUCHE CLARIS (À effectuer à chaque changement de
cartouche):
Si vous utilisez une cartouche Claris, veuillez suivre la procédure suivante pour la remplir d’eau :
n Vissez la cartouche Claris au fond du réservoir.
n Remplissez-le d’eau (fig.2).
n Replacez le réservoir en le positionnant fermement pour assurer l’arrivée d’eau et refermez le couvercle
(fig.3).
n Mettez l’appareil en marche en appuyant sur le bouton « marche / arrêt » (fig.4).
n Tournez le sélecteur en position « préchauffage vapeur ». Lorsque le voyant devient fixe, ramenez le
sélecteur en position « arrêt ». Répétez cette opération 2 fois de plus.
n Pour s’assurer que la cartouche est bien remplie, mettez un récipient sous la tête de percolation,
tournez le sélecteur en position « café » et vérifiez que de l’eau s’écoule. Si ce n’est pas le cas, répétez
la procédure décrite ci-dessus.
n Ces opérations permettent de s’assurer que l’eau circule bien au travers de la cartouche de filtration.
IMPORTANT :
Cette procédure d’installation doit être effectuée à chaque changement de cartouche.
La cartouche Claris nécessite d’être remplacée tous les 2 à 3 mois en cas d’utilisation
quotidienne.
B. RINÇAGE DE VOTRE APPAREIL (À effectuer lors de la première utilisation et après chaque
nettoyage / détartrage.)
- RINÇAGE DU CIRCUIT CAFÉ
Procédez ensuite à un rinçage de votre appareil. Pour cela :
n Ouvrez le couvercle et enlevez le réservoir à l’aide de la poignée (fig.1).
n Remplissez-le d’eau (fig.2).
n Replacez le réservoir en le positionnant fermement pour assurer l’arrivée d’eau et refermez le couvercle
(fig.3).
n Mettez l’appareil en marche en appuyant sur le bouton « marche / arrêt » (fig.4).
n Insérez le porte-filtre (sans mouture) dans l’appareil (fig.7).
4. MISE EN SERVICE
KR_ESPRESSO_XP56_NAFTA_8080012562_808001256210/04/1315:16Page17
Page 21

Français
18
n Mettez un récipient d’un volume suffisant sous le porte-filtre.
n Dès que l’appareil atteint la bonne température, le témoin lumineux devient fixe, tournez alors le
sélecteur sur la position « café » et laissez couler toute l’eau contenue dans le réservoir (fig.8).
n Si nécessaire, interrompez l’opération en tournant le sélecteur sur la position « arrêt » pour vider le
récipient puis reprenez l’opération (fig.9).
n Videz le récipient et déverrouillez le porte filtre : appuyez sur le bouton « OPEN » du porte filtre et
tournez vers la gauche (fig.10).
- RINÇAGE DU CIRCUIT VAPEUR
Avant la première utilisation de la fonction vapeur, il faut procéder au nettoyage du circuit vapeur.
n Remplissez le réservoir d’eau.
n Mettez l’appareil en marche en appuyant sur le bouton .
n Placez un récipient sous la buse à vapeur.
n Mettez le bouton sélecteur en position le bouton se met à clignoter.
n Lorsque le bouton est fixe, tournez le sélecteur en position et laissez couler l’eau jusqu’à
obtention de vapeur.
n Maintenez la production de vapeur pendant au moins 30 secondes.
Afin de dégager tous les arômes du café et vous donner entière satisfaction, cette machine réalise une
pré-infusion avant chaque café. La pompe fonctionne 3 secondes, s’interrompt les 3 secondes suivantes
puis continue le cycle jusqu’à la fin de la préparation.
PRÉCHAUFFAGE DES ACCESSOIRES
Pour un meilleur résultat, nous vous conseillons d’effectuer au préalable un préchauffage des
accessoires (porte-filtre et tasses) sans mouture. Pour cela :
n Remplissez le réservoir d’eau et mettez l’appareil en marche (fig.1, 2, 3 et 4).
n Mettez le porte-filtre en place, placez les tasses dessous.
Dès que l’appareil atteint la bonne température, le témoin lumineux cesse de clignoter.
n Tournez alors le sélecteur en position « café » (fig.8).
n Quand les tasses sont remplies d’eau chaude, remettez le sélecteur en position « arrêt » (fig.9).
n Enlevez les tasses.
n Déverrouillez le porte-filtre : appuyez sur le bouton « OPEN » en tournant le porte-filtre vers la gauche
et retirez-le de l’appareil (fig.10).
Remarque : Lorsque l’appareil est chaud, les tasses à espresso peuvent être préchauffées sur le plateau
chauffe-tasses.
AVEC CAFÉ MOULU
Le type de mouture que vous choisissez déterminera la force et le goût de votre espresso.
n Remplissez le réservoir d’eau et mettez l’appareil en marche (fig.1, 2, 3 et 4). Durant le préchauffage
de l’appareil, le témoin lumineux clignote.
n À l’aide de la cuillère à mesurer, mettez la mouture dans le porte-filtre : une cuillère à mesurer (pleine
à ras bord) par tasse (fig.5).
n Enlevez l’excédent de mouture sur le bord du porte-filtre.
Important : Ne tassez pas la mouture dans le porte-filtre. Le café est tassé automatiquement
avec le système KTS « Krups Tamping System ».
n Insérez le porte-filtre dans l’appareil en le tournant au maximum vers la droite, jusqu’au bout (fig.7).
n Mettez une ou deux tasses sous le porte-filtre.
5. PRÉPARATION D’UN ESPRESSO
KR_ESPRESSO_XP56_NAFTA_8080012562_808001256210/04/1315:16Page18
Page 22

Français
19
Dès que l’appareil atteint la bonne température, le témoin lumineux devient fixe.
n Tournez alors le sélecteur en position « café » (fig.8).
n Lorsque vous avez obtenu la quantité de café souhaitée, remettez le sélecteur en position « arrêt »
(fig.9).
n Déverrouillez le porte-filtre : appuyez sur le bouton « OPEN » en tournant le porte-filtre vers la gauche
et retirez-le de l’appareil (fig.10).
n Jetez le marc grâce au système d’éjection en pressant sur le bouton « EJECT » situé entre les deux
buses de sortie de café (fig.11). Lavez le porte-filtre à l’eau courante, en actionnant la touche « EJECT
» pour éliminer les restes de mouture.
Le porte-filtre peut de nouveau être rempli pour préparer d’autres espressos.
AVEC UNE DOSETTE ESPRESSO «E.S.E.»
Une dosette « E.S.E. » pour « Easy Serving Espresso» (préparation simplifiée de l’espresso) est
une dosette emballée (44 mm de diamètre) de 7g de café sélectionné, moulu et compacté
entre deux papiers filtres, spécialement conçue pour la réalisation d’espresso « ristretto »
(serré) à l’italienne.
Ce système permet une utilisation immédiate, simple, propre et agréable de votre machine.
n Remplissez le réservoir d’eau et mettez l’appareil en marche (fig.1, 2, 3 et 4). Durant le préchauffage
de l’appareil, le témoin lumineux clignote.
n Déchirez le papier qui dépasse de la dosette, placez la dosette E.S.E. dans le porte-filtre, avec
l’inscription rouge vers le bas (fig.6).
Veillez à bien placer tout le papier à l’intérieur du porte-filtre, sinon il pourrait y avoir des fuites.
n Si la dosette est mal placée, le résultat en tasse ne sera pas satisfaisant.
n N’utilisez jamais deux dosettes ensemble.
n Suivez les étapes des figures 7 à 11 de la préparation d’un espresso.
AVEC UNE DOSETTE SOUPLE
Votre machine est également compatible avec les dosettes souples (généralement 60 mm de
diamètre). Ce type de dosettes n’étant pas spécifiquement conçu pour les machines espresso,
vous obtiendrez un espresso moins corsé qu’avec une dosette E.S.E.
n Remplissez le réservoir d’eau et mettez l’appareil en marche (fig.1, 2, 3 et 4). Durant le préchauffage
de l’appareil, le témoin lumineux clignote.
n Déposez une dosette souple dans le porte-filtre. Ne jamais mettre deux dosettes ensemble. Si la
dosette est mal placée, le résultat en tasse ne sera pas satisfaisant.
n Suivez les étapes des figures 7 à 11 de la préparation d’un espresso.
La vapeur sert à faire mousser le lait (pour préparer par exemple un cappuccino ou un café latte) grâce
à l’accessoire à cappuccino.
Pour produire la vapeur, la pompe fonctionne en émettant un bruit intermittent.
Après l’utilisation de la fonction vapeur, l’appareil refroidit automatiquement en pompant de
l’eau froide qui va refroidir le système de chauffe. Durant les cycles de pompage, le surplus de vapeur
contenu dans le système de chauffe se libère avec l’eau chaude dans le plateau récolte-gouttes.
Le dégagement de vapeur et le bruit qui l’accompagne sont nécessaires au refroidissement
de l’appareil.
Attention : durant et après l’utilisation de l’appareil, les parties métalliques de la buse à vapeur peuvent
être brûlantes.
6. FONCTION VAPEUR
KR_ESPRESSO_XP56_NAFTA_8080012562_808001256210/04/1315:16Page19
Page 23

Français
20
UTILISATION DE LA BUSE À VAPEUR POUR FAIRE MOUSSER DU LAIT
n Remplissez le réservoir d’eau et mettez l’appareil en marche (fig.1, 2, 3 et 4).
n Tournez le sélecteur en position « préchauffage vapeur ». Le témoin lumineux clignote (fig.12).
n Déplacez la buse à vapeur vers l’extérieur de l’appareil.
n Versez 60 à 100ml de lait demi-écrémé dans un récipient étroit d’environ 1/2 litre et pouvant passer
sous la buse à vapeur. Le lait et son récipient doivent être bien froids.
n Nous vous conseillons d'utiliser du lait pasteurisé ou du lait UHT et d'éviter le lait cru.
n Dès que le témoin lumineux devient fixe, plongez la buse à vapeur dans le lait.
n Tournez le sélecteur sur la position « vapeur » (fig.13).
n Pour un bon résultat, maintenez la buse au fond du récipient environ 25 secondes le temps que le lait
chauffe (sans toutefois toucher le fond du récipient). Ensuite, descendez progressivement le récipient
pour que la buse remonte vers la surface (sans jamais le sortir du lait) (fig.14).
n Une fois la mousse obtenue, tournez le sélecteur en position « arrêt » (fig.15). À ce moment-là,
l’appareil refroidit automatiquement en lançant 3 cycles de pompage par intermittence. Une fois cette
opération automatique terminée, vous pouvez vous faire un café.
Important : Pour éviter de boucher la buse à vapeur, la mousse de lait ne doit jamais atteindre la partie
supérieure en plastique noire.
Il est important de nettoyer la buse à vapeur après chaque utilisation pour éviter que le lait ne sèche à
l’intérieur. Pour cela :
n Placez la buse à vapeur dans un récipient rempli d'eau et répétez l’opération de moussage de lait
pendant 30 secondes.
ATTENTION !
La buse à vapeur est encore chaude !
UTILISATION DE L'ACCESSOIRE AUTO-CAPPUCCINO KRUPS XS 6000 POUR FAIRE
MOUSSER DU LAIT (VENDU SÉPAREMENT)
L’accessoire auto-cappuccino facilite la préparation de cappuccino et de café latte. Il est composé d’une
buse spéciale à deux positions, d’un récipient à lait en acier inoxydable et d’un tuyau.
Cet accessoire peut être vendu séparément.
n Assemblez les différentes pièces. Choisissez la position cappuccino ou café latte sur la buse spéciale.
n Remplissez le récipient de lait et placez une tasse ou un verre sous la buse spéciale auto-cappuccino.
n Tournez le sélecteur en position « préchauffage vapeur ». Une fois que le témoin lumineux est fixe,
placez-le en position « vapeur ».
n Une fois la mousse obtenue, tournez le sélecteur en position « arrêt ». À ce moment-là, l’appareil
refroidit automatiquement en lançant 3 cycles de pompage par intermittence. Une fois cette opération
automatique terminée, vous pouvez vous faire un café.
Afin d’éviter que le lait ne sèche sur l’accessoire auto-cappuccino, nous vous recommandons fortement de :
n verser de l’eau propre dans le récipient et de réinstaller les différents composants
n démarrer un cycle de vapeur
n nettoyer tous les composants à l’aide d’un linge humide.
n Ne lavez pas les accessoires de votre machine espresso au lave-vaisselle.
DE L'APPAREIL
n Débranchez la prise de courant avant chaque nettoyage et faites refroidir l’appareil.
n Nettoyez de temps à autre l’extérieur de l’appareil avec une éponge humide. Après usage, le réservoir
d’eau doit être vidé.
7. NETTOYAGE ET ENTRETIEN
KR_ESPRESSO_XP56_NAFTA_8080012562_808001256210/04/1315:16Page20
Page 24

Français
21
n Rincez régulièrement l’intérieur du réservoir.
n
Lorsqu’une fine couche blanche opacifie votre réservoir, effectuez une opération de détartrage (cf
paragraphe 9 « DÉTARTRAGE »).
DU PLATEAU D’ÉGOUTTAGE
Après chaque utilisation de l’appareil, il doit être vidé. Soulevez-le légèrement et retirez-le de l’appareil.
Si plusieurs espressos sont préparés les uns après les autres, il convient de le vider de temps en temps (tous
les 7 à 8 espressos environ) (fig.19 et 20). La présence d’eau est normale et n’est pas signe d’une fuite.
Si nécessaire, nettoyez le plateau d’égouttage et sa grille avec de l’eau et un peu de savon à vaisselle
non agressif, rincez et séchez. Au remontage, assurez-vous de la bonne place des différents éléments.
DE LA TÊTE DE PERCOLATION ET DU PORTE-FILTRE
n Ils doivent être nettoyés après chaque utilisation. Il suffit de passer un linge humide sur la tête de
percolation (fig.21) et de nettoyer le porte-filtre avec de l’eau claire et un peu de savon à vaisselle non
agressif.
n N'utilisez pas de produits nettoyants à base d'alcool ou de solvant.
n Pour un meilleur résultat, vous pouvez actionner plusieurs fois le bouton « EJECT » pendant le rinçage.
Nous vous conseillons de secouer fortement votre porte-filtre afin d’en évacuer toute l’eau.
n Rincez et séchez.
n Lorsque vous n’utilisez pas votre machine à espresso, ne laissez pas le porte-filtre sur l’appareil pour éviter
l’usure du joint.
Pour un nettoyage en profondeur, le porte-filtre peut être entièrement démonté :
n Vous pouvez retirer la partie en plastique noir où se trouvent les sorties café et le bouton « EJECT » :
tournez-la vers la gauche puis tirez fortement (fig.22).
n Nettoyez les différents éléments avec de l’eau claire et un peu de savon à vaisselle non agressif.
n Rincez et séchez.
n Remettez la partie en plastique noir dans la pièce en métal, tournez-la vers la droite jusqu'à l'alignement
des deux flèches sur les deux pièces.
n En cas de fort encrassement de la tête de percolation, dévissez sa grille à l’aide d’un tournevis cruciforme,
nettoyez-la et remontez-la en serrant fermement (fig.23).
DE LA BUSE À VAPEUR
n Cet accessoire est composé de 2 parties : un support de plastique et un cylindre métallique de protection.
n Pour commencer le nettoyage, déverrouiller la buse du bras articulé en la tournant vers la gauche. (fig.16,
16.2)
n Faites ensuite coulisser le cylindre métallique le long du support de plastique (fig.16.3).
n Nettoyez ces deux parties avec de l’eau claire et un peu de savon à vaisselle non agressif (fig.17).
n Rincez et séchez.
n Une fois les parties bien nettoyées, remettez en place le cylindre métallique sur le support.
n Veillez à ne pas endommager le joint de silicone qui assure l’étanchéité de la buse (fig.16.3).
n Insérez la buse sur le bras articulé puis verrouillez vers la droite (fig.18.1, 18.2).
La garantie ne couvre pas les appareils en panne dont le détartrage n’a pas été effectué périodiquement.
Détartrez régulièrement votre machine à espresso avec du vinaigre blanc ou un sachet d’acide citrique ou
sulfamique du commerce.
Nous vous conseillons d’utiliser l’accessoire de détartrage Krups, référence F054, disponible dans
les centres de service agréés Krups. Cet accessoire comprend, en plus de deux doses de détartrage, un
ruban testeur de dureté de l’eau pour évaluer la fréquence de détartrage de votre appareil en utilisation
normale. L’entartrage dépend de la dureté de l’eau mais aussi du cycle d’utilisation. La fréquence de
8. DÉTARTRAGE
KR_ESPRESSO_XP56_NAFTA_8080012562_808001256210/04/1315:16Page21
Page 25

Français
22
détartrage indiquée par l’accessoire F054 est donc donnée à titre indicatif. Vous pouvez cependant vous
r
éférer au tableau suivant:
En cas de doute, un détartrage tous les mois est conseillé.
DÉTARTRAGE DU CIRCUIT VAPEUR ET CAFÉ
n Videz le réservoir et remettez-le en place.
n Si votre produit est équipé de notre cartouche Claris - Aqua Filter F088, retirez cette cartouche avant
l’opération de détartrage.
n Remplissez le réservoir avec un mélange composé de trois volumes d’eau pour un volume de vinaigre
blanc ou d’un mélange composé de ½ litre d’eau et d’un sachet d’acide citrique ou sulfamique du
commerce.
n Insérez le porte-filtre (sans mouture) dans l’appareil et verrouillez-le en tournant vers la droite jusqu'au
bout.
n Placez un récipient sous la buse à vapeur.
n Appuyez sur le bouton « marche / arrêt » (fig.4).
n Et aussitôt placez le sélecteur en position « vapeur » (sans s’arrêter à la position « préchauffage vapeur
») (fig.13).
n Laissez s’écouler le mélange par la buse jusqu’à l’apparition de la vapeur.
n Ramenez le sélecteur en position « arrêt » (fig.9).
n Placez un récipient d’un volume suffisant sous le porte-filtre.
n Lorsque le témoin lumineux devient fixe, tournez le sélecteur en position « café » et laissez s’écouler la
moitié du mélange (fig.8).
n Arrêtez l’appareil avec le bouton « marche / arrêt » en laissant le sélecteur en position « café ».
n Après 15 minutes remettez l’appareil en marche.
n Laissez s’écouler le reste du réservoir.
n Tournez le sélecteur en position « arrêt ».
RINÇAGE
IMPORTANT !
Après le détartrage, effectuez 2-3 opérations de rinçage avec de l’eau claire (sans mouture),
comme décrit au paragraphe 5 « Mise en service ».
N’oubliez pas de rincer la buse à vapeur en suivant les instructions suivantes :
n Placez un récipient sous la buse à vapeur.
n Appuyez sur le bouton « marche / arrêt » (fig.4).
n Et tournez aussitôt le sélecteur en position « vapeur » (sans s’arrêter en position « préchauffage vapeur »)
(fig.13).
n Laissez s’écouler l’eau par la buse jusqu’à l’apparition de la vapeur.
n Ramenez le sélecteur en position « arrêt ».
L’appareil est détartré et à nouveau prêt à fonctionner.
FRÉQUENCE DE DÉTARTRAGE
Nb moyen de
cafés par semaine
Eau douce
(<19°th)
Eau calcaire
(19-30°th)
Eau très calcaire
(>30°th)
Moins de 7 1 fois par an Tous les 8 mois Tous les 6 mois
De 7 à 20 Tous les 4 mois Tous les 3 mois Tous les 2 mois
Plus de 20 Tous les 3 mois Tous les 2 mois Tous les mois
KR_ESPRESSO_XP56_NAFTA_8080012562_808001256210/04/1315:16Page22
Page 26

Français
23
n Votre appareil est garanti mais toute erreur de branchement, manipulation ou utilisation autres que
celles décrites dans la notice annule la garantie.
n Cet appareil a été conçu exclusivement pour un usage domestique, tout autre type d’utilisation annule
la garantie.
n Aucune réparation pour cause d’entartrage ne sera couverte par la garantie.
n Pour tout problème d’après-vente ou de pièces détachées, consultez votre revendeur ou un centre de
service agréé.
10. PROBLÈMES, CAUSES PROBABLES ET ACTIONS CORRECTIVES
9. GARANTIES
Problèmes Causes probables Solutions
L’espresso n’est
pas assez chaud.
Les tasses et le porte-filtre
sont froids.
Préchauffez les accessoires : tasses et porte-filtre (cf
paragraphe 6).
Le porte-filtre est
bloqué.
Vous avez oublié de
déverrouiller le porte-filtre.
Appuyez sur le bouton « OPEN » tout en tournant le
porte-filtre vers la gauche.
Le marc n’est pas
sec après le
passage de l’eau.
Vous n’avez pas serré le
porte-filtre correctement.
Serrez plus le porte-filtre en le tournant au maximum
vers la droite, jusqu’en butée.
L’espresso coule
trop lentement.
La vitesse d’écoulement
dépend de la finesse du café
utilisé et peut varier pendant
la préparation de l’espresso.
La mouture est trop fine, trop
grasse ou farineuse.
Le porte-filtre est sale.
La grille de passage de l’eau
est encrassée.
Choisissez une mouture légèrement plus grosse.
Nettoyez votre porte-filtre (cf paragraphe 8).
Quand l’appareil est refroidi, nettoyez la tête de
percolation avec une éponge humide. (fig.21).
L’eau ne passe pas.
Il n’y a pas d’eau dans le
réservoir.
Le réservoir est mal monté.
Le filtre est bouché, la
mouture est trop fine.
Votre appareil est entartré.
La cartouche Claris a été
changée mais pas amorcée.
Remplissez le réservoir.
Appuyez fermement sur le réservoir.
Nettoyez le porte-filtre (cf paragraphe 8) et essayez une
mouture moins fine.
Cf paragraphe 9.
Veuillez vous reporter au paragraphe 5.
De l’eau s’écoule
du porte-filtre après
la préparation d’un
espresso.
Le sélecteur n’a pas été placé
en position «arrêt».
Il y a formation de tartre
prématurée en raison d’une
eau particulièrement calcaire.
Éteignez votre appareil en plaçant le sélecteur en
position « arrêt ». (fig.9)
Détartrez votre appareil conformément aux indications
du mode d’emploi (cf paragraphe 9).
Il y a du marc dans
la tasse.
Le porte-filtre est encrassé.
La mouture est trop fine.
Nettoyez le porte-filtre à l’eau chaude. Actionnez la
touche « EJECT » pour éliminer les restes éventuels de
mouture. Secouez-le pour évacuer l’eau.
Utilisez une mouture légèrement plus grosse.
Le réservoir d’eau
fuit quand on le
transporte.
Le clapet du fond du réservoir
est sale ou défectueux.
Le clapet est bloqué par du
calcaire.
Lavez le réservoir d’eau et faites fonctionner avec le
doigt le clapet qui est au fond du réservoir.
Détartrez l’appareil (paragraphe 9).
KR_ESPRESSO_XP56_NAFTA_8080012562_808001256210/04/1315:16Page23
Page 27

Français
24
Votre espresso a
mauvais goût.
Après le détartrage, le
rinçage n’a pas été effectué
correctement.
Rincez l’appareil conformément au mode d’emploi (cf
paragraphe 9).
L’appareil ne
fonctionne pas.
La pompe s’est désamorcée
pour cause de manque d’eau.
Le réservoir d’eau amovible
est mal enclenché.
La cartouche Claris a été
changée mais pas amorcée.
Remplissez le réservoir d’eau et réamorcez la pompe (cf
paragraphe 5). Evitez de vider complètement le réservoir.
Enclenchez le réservoir d’eau en appuyant fortement.
Veuillez vous reporter au paragraphe 5.
La buse à vapeur
ne fait pas mousser
le lait.
La buse à vapeur est
bouchée ou entartrée.
Le lait est trop chaud.
La forme du récipient n’est
pas appropriée.
Vous utilisez du lait écrémé.
Détartrez la buse à vapeur (cf paragraphe 9) ou
débouchez-la à l’aide d’une aiguille.
Utilisez du lait froid.
Utilisez un petit pichet.
Utilisez de préférence du lait entier ou demi-écrémé.
P
roblèmes
C
auses probables
S
olutions
Il y a un
écoulement d’eau
sous l’appareil.
Il y a une fuite interne.
Vérifiez la bonne position du réservoir. Si le défaut
persiste, n’utilisez pas l’appareil, adressez-vous à un
centre de service agréé.
Il y a un
écoulement d’eau
sous le plateau
d’égouttage.
Une présence et ou un
écoulement d’eau peut
apparaître lors du retrait du
tiroir récoltes gouttes. Ceci
n'est pas un signe de fuite.
Des craquements
sont entendus dans
le porte-filtre.
C’est un phénomène normal :
blocage de sécurité du porte-
filtre.
La pompe est
anormalement
bruyante.
Il n’y a pas d’eau dans le
réservoir.
Le réservoir est mal monté.
Arrêtez l’appareil, remplissez le réservoir d’eau et
redémarrez.
Appuyez fermement sur le réservoir.
Les tasses sont
remplies de
manière inégale.
Le porte-filtre est encrassé. Nettoyez le porte-filtre (cf paragraphe 8).
L’espresso fuit sur
les côtés du portefiltre.
Le porte-filtre n’est pas placé
correctement.
Le bord du porte-filtre est
encrassé par la mouture.
La dosette est mal
positionnée dans le portefiltre.
Mettez le porte-filtre en place et verrouillez-le (tournez au
maximum vers la droite jusqu’au bout). (fig.7).
Enlevez l’excédent de mouture.
Placez bien tout le papier à l’intérieur du porte-filtre.
11. PRODUIT ÉLECTRIQUE OU ÉLECTRONIQUE EN FIN DE VIE
Participons à la protection de l’environnement !
Votre appareil contient de nombreux matériaux valorisables ou recyclables.
Confiez celui-ci dans un point de collecte ou à défaut dans un centre de service agréé pour que son
traitement soit effectué.
KR_ESPRESSO_XP56_NAFTA_8080012562_808001256210/04/1315:16Page24
Page 28

Français
25
: www.krups.com
Dans le cadre de notre ferme engagement envers l’environnement, la plupart des
produits Krups sont réparables durant la période de garantie et par la suite. Avant de
retourner des produits défectueux à l’endroit où vous l’avez acheté,
veuillez communiquer directement avec le service à la clientèle de Krups au numéro
de téléphone mentionné ci-dessous, pour connaître les options de réparation.
Votre aide pour soutenir l’environnement est appréciée!
La garantie
Ce produit est garanti par Krups pendant 2 ans contre tout défaut de fabrication ou de maind’œuvre et ce, à partir de la date initiale de l'achat.
Cette garantie du fabricant Krups vient en complément des droits des consommateurs.
La garantie du fabricant couvre tous les coûts de remise en état d'un produit reconnu
défectueux pour qu’il se conforme à ses spécifications d'origine, par la réparation ou le
remplacement de pièces défectueuses et la main-d’œuvre nécessaire. Au choix de Krups, un
produit de remplacement peut être proposé à la place de la réparation du produit défectueux.
Les obligations de Krups dans le cadre de cette garantie se limitent exclusivement à cette
réparation ou ce remplacement.
Conditions et exclusions
La garantie de Krups ne s'applique qu’aux États-Unis, au Canada et au Mexique et n'est valable
que sur présentation d'une preuve d'achat. Le produit peut être déposé directement en
personne, à un centre de service autorisé ou peut être adéquatement emballé et retourné par
courrier recommandé (ou d’autres méthodes d’expédition similaires), à un centre de service
autorisé. La liste complète des centres de service autorisés de chaque pays, ainsi que leurs
coordonnées complètes, est disponible sur le site de Krups (www.krups.com
) ou en appelant
au numéro de téléphone approprié, tel que précisé sur la liste ci-dessous, pour obtenir l’adresse
postale appropriée.
Krups ne sera pas obligée de réparer ou d'échanger un produit qui ne serait pas accompagné
d'une preuve d'achat valide.
Cette garantie ne couvre pas les dommages encourus à la suite d'une mauvaise utilisation,
d'une négligence, du non-respect des instructions d'utilisation et d’entretien, de l'utilisation
avec une alimentation électrique non conforme à celle spécifiée sur la plaque signalétique ou
d'une modification ou d'une réparation non autorisée du produit. Elle n'inclut également pas
l'usure normale du produit, ni l’entretien ou le remplacement de pièces de pièces d’usure, ni les
cas suivants :
-utilisation d'une eau ou d’un consommable non adaptés
- entartrage (tout détartrage doit être réalisé conformément aux instructions précisées
dans le mode d'emploi)
- infiltration d'eau, de poussière, d'insectes, dans le produit
- dommages mécaniques ou surcharge
- dommages ou mauvais résultats dus à un mauvais voltage ou une mauvaise fréquence
- tous accidents liés à un feu, une inondation, la foudre, etc.
- usage professionnel ou commercial
- verre ou céramique endommagé
GARANTIE KRUPS*
KR_ESPRESSO_XP56_NAFTA_8080012562_808001256210/04/1315:16Page25
Page 29

Français
26
Cette garantie ne s'applique pas aux produits trafiqués ou aux dommages encourus à la suite
d’une mauvaise utilisation ou d’un mauvais entretien, aux problèmes au niveau de l'emballage effectué par son propriétaire ou d’une manutention inadéquate de la part du transporteur.
La garantie du fabricant Krups ne s’applique qu’aux produits achetés et utilisés aux États-Unis,
au Canada et au Mexique. En cas d'utilisation dans un autre pays que celui de l'achat :
a) La durée de la garantie de Krups est celle du pays d'utilisation du produit, y compris
dans le cas où le produit aurait été acquis dans l’un des pays listés, avec une durée de
garantie différente.
b) La garantie de Krups ne s'applique pas en cas de non-conformité du produit aux
normes locales, tels que le voltage, la fréquence électrique, le type de prise électrique
ou toute autre spécification locale.
c) Le processus de réparation du produit acheté à l’extérieur du pays d’utilisation, pourrait
exiger une période de réparation supérieure aux conditions locales, si le produit n'est
pas vendu par Krups dans le pays d'emploi
d) Au cas où le produit ne serait pas réparable dans le pays d'emploi, la garantie de
Krups est limitée au remplacement par un produit équivalent ou un produit alternatif de
même valeur si c'est possible
.
Droits légaux des consommateurs
Cette garantie de Krups n'affecte ni les droits légaux dont bénéficie tout consommateur, qui ne
sauraient être exclus ou limités, ni les droits légaux envers le commerçant où le consommateur a
acheté le produit. Cette garantie donne au consommateur des droits spécifiques et le consommateur peut par ailleurs bénéficier des droits particuliers en fonction du pays, de l'État ou de la
province. Le consommateur peut faire usage de ces droits à sa discrétion exclusive.
Informations supplémentaires
Les accessoires, pièces d’usure et autres pièces remplaçables directement par l'utilisateur,
peuvent être achetées, si elles sont disponibles localement, tel que décrit sur le site internet de
Krups / www.krups.com.
: www.krups.com
CANADA
GROUPE SEB
CANADA
345 Passmore Avenue
Toronto, ON
M1V 3N8
MEXICO
Groupe SEB MEXICO
S.A. de C.V.
Goldsmith 38 Desp.
401 Col. Polanco
Delegacion Miguel
Hildalgo
11 560 Mexico D.F.
MEXICO
E-U
GROUPE SEB USA
2121 Eden Road
Millville, NJ 08332
1-800-418-3325 01800 1128325 800-526-5377
KR_ESPRESSO_XP56_NAFTA_8080012562_808001256210/04/1315:16Page26
Page 30

Español
27
INSTRUCCIONES DE SEGURIDAD
Cuando utilice aparatos eléctricos debe seguir ciertas instrucciones de seguridad para
reducir el riesgo de choque eléctrico, fuego o daño a la persona que lo utiliza:
1. Lea atentamente el modo de empleo antes de la primera utilización del aparato y
consérvelo: una utilización no conforme liberaría a Krups de toda responsabilidad.
2. Verifique que la tensión de alimentación indicada en la placa del fabricante del
aparato corresponde efectivamente a la de su instalación eléctrica.
3. No ponga el aparato sobre una superficie caliente como una placa eléctrica y
tampoco lo utilice cerca de una llama sin protección.
4. Retire inmediatamente la cafetera de la toma de corriente si observa cualquier
anomalía durante el funcionamiento.
5. No tire del cable de alimentación para desconectar el aparato.
6. No deje el cable de alimentación colgar del borde de una mesa ni de una superficie
de trabajo.
7. Este aparato no está previsto para que lo utilicen personas (incluso niños) cuya
capacidad física, sensorial o mental esté disminuida, o personas sin experiencia o
conocimientos, excepto si pueden recibir a través de otra persona responsable de
su seguridad, una vigilancia adecuada o instrucciones previas relativas a la
utilización del aparato.
8. Conviene vigilar a los niños para asegurarse de que no jueguen con el aparato.
9. No deje su mano o el cable de alimentación sobre las partes metálicas del aparato.
10. Nunca sumerja el aparato , el cable ni la toma eléctrica en agua ni en cualquier otro
líquido.
11. Mantenga el aparato fuera del alcance de los niños y no deje colgar el cable.
12. No utilice el aparato si el cable de alimentación o el enchufe la clavija están
dañados, no utilizar el aparato para evitar todo peligro, hacer reemplazar
obligatoriamente el cable de alimentación por un centro autorizado Krups.
13. Remítase siempre a las instrucciones para descalcificar el aparato.
14. Proteja el aparato de la humedad y del frío.
15. No utilice el aparato si no funciona correctamente o si ha sufrido un daño. En tal
caso, se aconseja hacer examinar el aparato por un centro de servicio autorizado
Krups.
16. A excepción de la limpieza y la descalcificación según los procedimientos del modo
de empleo del aparato, toda intervención en el aparato debe efectuarse por un
centro de servicio autorizado Krups.
17. Para su seguridad, utilice para su aparato sólo accesorios y refacciones aprobados
por Krups.
18. Todo error de conexión anula la garantía.
19. Desconecte el aparato tan pronto deja de utilizarlo durante un periodo largo o
cuando lo limpia.
KR_ESPRESSO_XP56_NAFTA_8080012562_808001256210/04/1315:16Page27
Page 31

Español
28
20. Todos los aparatos se someten a un severo control de calidad. Se realizan pruebas
de uso con aparatos tomados al azar, lo que explica eventuales restos de uso.
21. No se aconseja utilizar tomas múltiples y/o extensiones.
22. No ponga agua en el depósito para café en granos y/o bajo la rejilla de
mantenimiento.
23. Preste atención a la orientación de la boquilla de vapor para evitar cualquier riesgo
de quemadura.
24. La garantía pierde su validez en caso de falta de descalcificación, de limpieza o de
mantenimiento constante o por la presencia de cuerpos extraños en el molino.
25. El aparato no está pensado para preparar bebidas para bebés.
GUARDE ESTE INSTRUCTIVO
¡ATENCIÓN!
Este aparato es solamente para uso doméstico. Cualquier servicio salvo limpieza y
mantenimiento debe realizarse por un centro de servicio autorizado Krups. Visite nuestra
página de internet en: www.krupsusa.com en EUA, www.krups.ca en Canadá ó
www.krups.com.mx en México.
También puede contactar a su centro de servicio más cercano.
Para reducir el riesgo de incendio o choque eléctrico, no desarme el aparato.
Las reparaciones deberán realizarse por un centro de Servicio Autorizado Krups.
INSTRUCCIONES ESPECIALES PARA EL CABLE DE
ALIMENTACIÓN
A. Con el aparato se suministra un cable de alimentación corto para reducir el
riesgo de que alguien tropiece o se enrede accidentalmente en los pies.
B. Están disponibles cables de alimentación más largos o extensiones eléctricas y
pueden utilizarse teniendo precaución.
C. Si se utiliza una extensión:
1) las características eléctricas del cable o de la extensión deben ser al menos
iguales a las del aparato.
2) si el aparato es del tipo puesta a tierra, la extensión debe ser de tipo puesta
a tierra y comprender 3 enchufes y
3) el cable de alimentación o la extensión deben estar puestos de forma que no
cuelguen de borde del plano de trabajo de la mesa para que los niños no
puedan jalarlo o tropezar accidentalmente.
Krups se reserva el derecho de cambiar las especificaciones del producto en función
de mejorarlo.
KR_ESPRESSO_XP56_NAFTA_8080012562_808001256210/04/1315:16Page28
Page 32

a Tapa del depósito
b Depósito de agua extraíble
c Cuchara dosificadora
d Bandeja calienta-tazas
e Botón On / Off con indicador luminoso
f Selector de funciones
f1. Posición de café
f2. Posición de apagado
f3. Posición de precalentado vapor
f4. Posición de vapor
g Cabezal de percolación
h Portafiltros con sistema de expulsión del poso o
del dosificador y compactado progresivo del
café: sistema KTS «Krups Tamping System».
Compatible con café molido (1 o 2 tazas) y
dosificadores E.S.E. o flexibles.
i Rejilla de la bandeja recoge-gotas
j Bandeja recoge-gotas provista de indicador de
nivel
k Boquilla de vapor
1. DESCRIPCIÓN
Le agradecemos su confianza y fidelidad en los productos Krups. Su aparato está provisto de un
p
ortafiltros que contiene tres sistemas exclusivos:
- Un sistema para el compactado progresivo de la molienda durante la colocación del portafiltros
(sistema KTS «Krups Tamping System»).
- Un sistema para la expulsión del poso.
- Y, por último, un sistema para la utilización de dosificadores E.S.E. (Easy Serving Expreso) o
flexibles.
Además, es desmontable, lo que permite mantenerlo en perfecto estado de funcionamiento mediante
frecuentes limpiezas. Por seguridad, su portafiltros está provisto de un sistema de bloqueo que le permite
mantenerse en su posición durante un aumento de presión.
n Antes de poner en funcionamiento su electrodoméstico, leer
atentamente estas instrucciones de uso.
n Este aparato está previsto solamente para una UTILIZACIÓN
DOMÊSTICA.
n Comprobar que la tensión indicada en la placa de características del
aparato corresponde con la de la instalación eléctrica.
n No colocar el expreso sobre una superficie caliente (placa eléctrica, por
ejemplo) o cerca de una flama.
n No retirar el portafiltros que contiene la molienda mientras está pasando
el agua, tener en cuenta que el aparato está bajo presión.
n No utilizar el aparato sin haber colocado antes la rejilla y la bandeja
recoge-gotas.
n Hay que desenchufar el aparato en el caso de que haya problemas
durante la elaboración del café o antes de limpiar el aparato.
n No desenchufar el aparato tirando del cable, ni dejar el cable sobre filos
cortantes o en la esquina de un mueble.
n Evitar el contacto del cable o de las manos con las partes calientes del
aparato (bandeja calienta-tazas, portafiltros, boquilla de vapor).
2. INSTRUCCIONES DE SEGURIDAD
Español
29
KR_ESPRESSO_XP56_NAFTA_8080012562_808001256210/04/1315:16Page29
Page 33

Español
30
n No sumergir nunca el aparato en agua.
n Mantener el aparato fuera del alcance de los niños, no dejar el cable
colgando.
n Seguir las instrucciones relativas a la descalcificación.
n No poner el aparato en funcionamiento si esta dañado o si el cable está
en mal estado.
n Si el cable o cualquier otro elemento específico, estuvieran defectuosos,
estos deberán ser sustituidos por el servicio técnico Krups únicamente,
para evitar cualquier riesgo. En ningún caso, deberá abrir usted el
aparato.
n Comprobar que el portafiltros está bien cerrado antes de elaborar el
café.
n Este aparato no es apto para ser utilizado por personas (incluidos niños)
con alguna discapacidad física, sensorial o mental, o con falta de
experiencia y conocimientos, a no ser que estén vigiladas o hayan
recibido instrucciones sobre cómo utilizar el electrodoméstico por una
persona responsable de su seguridad.
n Hay que vigilar a los niños para impedir que jueguen con el aparato.
n Los accesorios y partes desmontables del aparato no se pueden meter
en el lavavajillas.
n Este aparato está diseñado únicamente para un uso doméstico.
n La garantía no cubre el uso del aparato:
- en zonas de cocina reservadas para el personal en tiendas, oficinas y
demás entornos profesionales,
- en granjas,
- por parte de clientes de hoteles, moteles y demás entornos de carácter
residencial,
- en entornos de tipo habitaciones rurales.
n El aparato no está pensado para preparar bebidas para bebés.
n Este aparato puede ser utilizado por niños mayores de 8 años y por
personas que tengan capacidades físicas, sensoriales o mentales
reducidas o bien que estén desprovistas de experiencia o de
conocimientos, siempre que sean vigilados atentamente o bien se les
haya instruido en el uso seguro del aparato así como de los riesgos que
implica. La utilización del aparato debe haber sido comprendida
perfectamente.
n Los niños no deben jugar con el aparato.
n La limpieza y el mantenimiento efectuados por el usuario no deben ser
realizados por niños sin vigilancia.
KR_ESPRESSO_XP56_NAFTA_8080012562_808001256210/04/1315:16Page30
Page 34

Español
31
n Guarde el aparato y su cable fuera del alcance de niños menores de 8
años de edad.
n Los niños no deben utilizar el aparato como si fuera un juguete.
n Bomba: bar (1.5 MPa)
n Portafiltros con sistema de expulsión del poso. Compatible con café molido y todos los tipos de
dosificadores, E.S.E. o flexibles.
n Función de vapor.
n auto apagado.
n Depósito extraíble (capacidad: 1,1 litros).
n Potencia: 1450 W
n Tensión: 120 V 60 Hz
n Dispositivos de seguridad contra sobrecalentamiento.
n Dimensiones: A. 300 mm, L. 230 mm, P. 280 mm
¡IMPORTANTE!
Tensión de uso: este aparato está diseñado para funcionar únicamente con una
corriente alterna de 120 V.
Tipo de utilización: Este aparato está destinado SOLAMENTE a USO DOMÉSTICO.
n Para obtener un expreso con un aroma intenso, recomendamos utilizar café especial expreso recién
molido, que está indicado para la delicadeza de preparación de este tipo de café, así como tazas con
una capacidad que no sobrepase los 50 ml.
n Conservar el café molido en el refrigerador, así se mantendrá por más tiempo su aroma.
n No llenar el portafiltros al tope, utilizar la cuchara dosificadora (1 cuchara por taza).
n Si no se va a utilizar el aparato durante más de 5 días, vaciar y enjuagar el depósito de agua.
n Antes de retirar el depósito para llenarlo o vaciarlo, apagar siempre el aparato.
n Colocar siempre el aparato sobre una superficie plana y estable.
n Para obtener una mejor temperatura del café en la taza, recomendamos calentar previamente las tazas.
n Para prolongar la vida del aparato, recomendamos utilizar un cartucho de filtro Claris Aqua Filter
System F088 (accesorio no incluido) y desincrustar el aparato con regularidad.
Antes de utilizar la máquina de café expreso, limpiar todos los accesorios con agua y jabón y secarlos a
continuación.
Si no está utilizando el cartucho de Claris, por favor, consulte el apartado "ACLARADO DE SU
APARATO".
3. CARACTERÍSTICAS TÉCNICAS
4. CONSEJOS
¡IMPORTANTE!
Antes de utilizar el aparato por primera vez, después de períodos prolongados sin
usar o de operaciones de desincrustación, el aparato debe limpiarse de la forma
indicada en el párrafo 5: «PUESTA EN MARCHA ».
5. PUESTA EN MARCHA
KR_ESPRESSO_XP56_NAFTA_8080012562_808001256210/04/1315:16Page31
Page 35

Español
32
A. INSTALACIÓN DEL CARTUCHO CLARIS (Se realizará cada vez que cambie el cartucho)
Si está utilizando un cartucho filtro Claris, por favor, siga este procedimiento para llenarlo con agua:
n Enrosque el filtro Claris a la parte inferior del depósito de agua.
n Llene el depósito de agua con agua y vuelva a colocarlo en su sitio (fig.2 y 3).
n Ponga en marcha el aparato presionando el botón «On / Off» (fig.4).
n Ponga el interruptor en la posición de «precalentado de vapor». Cuando la luz haya dejado de
parpadear, vuelva a colocar el interruptor en posición «parada».
n Repita esta operación 2 veces más.
n Asegúrese de que el cartucho Claris está lleno de agua, coloque el container bajo el cabezal
dispensador, ponga el interruptor en posición “café” y asegúrese de que pase agua. Si viera que el
agua no pasa, repita el procedimiento anterior.
n Estas operaciones permiten asegurarse que el agua circule correctamente a través del cartucho de
filtro.
IMPORTANTE:
Este procedimiento de instalación debe efectuarse cada vez que se cambie de
cartucho.
El cartucho Claris necesita ser reemplazado cada 2 o 3 meses si se usa
diariamente.
B. ACLARADO DE SU APARATO (Se realiza durante el primer uso y después de cada limpieza
/ descalcificación).
- ENJUAGADO DEL CIRCUITO ESPRESSO
Después, aclarar el aparato. Para esto:
n Abrir la tapa y retirar el depósito ayudándose del asa (fig.1).
n Llenarlo de agua (fig.2).
n Sustituir el depósito sujetándolo firmemente para asegurar la entrada de agua y luego cerrar la tapa
(fig.3).
n Poner el aparato en marcha pulsando el botón «On / Off» (fig.4).
n Introducir el portafiltros (sin molienda) en el aparato (fig.7).
n Colocar un recipiente de capacidad suficiente debajo del portafiltros.
n En cuanto el aparato alcance la temperatura adecuada, el indicador luminoso quedará fijo, entonces
girar el selector hacia la posición de «café» (fig.8) y dejar salir toda el agua contenida en el depósito.
n Si fuera necesario, interrumpir la operación girando el selector hacia la posición de «parada» (fig.9)
para vaciar el recipiente y a continuación repetir la operación.
n Vaciar el recipiente y desbloquear el portafiltros: Pulsar el botón «OPEN» del portafiltros y girar hacia
la izquierda (fig.10).
-
LAVADO DEL CIRCUITO DE VAPOR.
Antes de utilizar por primera vez la función de vapor, hay que lavar el circuito de vapor.
n
Llene el depósito de agua
n Ponga el aparato en marcha pulsando el botón .
n
Coloque un recipiente bajo la boquilla de vapor.
n Sitúe el botón selector en posición , entonces el botón de comenzará a parpadear.
n Cuando el botón de deje de parpadear, gire el selector hasta la posición y deje que salga el
agua hasta obtener vapor.
n Mantenga la producción de vapor durante al menos 30 segundos.
KR_ESPRESSO_XP56_NAFTA_8080012562_808001256210/04/1315:16Page32
Page 36

Español
33
Para obtener todo el aroma del café y que sea de su entera satisfacción, este aparato realiza una infusión
previa antes de cada café. La bomba funciona durante 3 segundos y se interrumpe durante los 3 segundos
siguientes y a continuación continúa el ciclo hasta el final de la preparación.
PRECALENTADO DE LOS ACCESORIOS
Para un mejor resultado, recomendamos realizar previamente un precalentado de los accesorios
(portafiltros y tazas) sin molienda. Para esto:
n Llenar el depósito de agua y encender el aparato (fig.1, 2, 3 y 4).
n Colocar el portafiltros y las tazas debajo.
En cuanto el aparato alcance la temperatura adecuada, el indicador luminoso dejará de parpadear.
n Girar el selector hacia la posición de «café» (fig.8).
n Cuando las tazas estén llenas de agua caliente, poner el selector en la posición de «parada» (fig.9).
n Retirar las tazas.
n Desbloquear el portafiltros: Pulsar el botón «OPEN» girando el portafiltros hacia la izquierda y retirarlo
del aparato (fig.10).
Observación: Cuando el aparato está caliente, las tazas de expreso pueden precalentarse sobre la
bandeja calienta-tazas.
CON CAFÉ MOLIDO
El tipo de molienda que se elija determinará la fuerza y el sabor del expreso.
n Llenar el depósito con agua y encender el aparato (fig.1, 2, 3 y 4). Durante el precalentado del
aparato, el indicador luminoso parpadeará.
n Con la cuchara dosificadora, echar el café molido en el portafiltros: una cuchara dosificadora (llena
hasta el borde) por taza (fig.5).
n Retirar el excedente de la molienda del borde del portafiltros.
Importante: No compactar la molienda en el portafiltros. El café se compacta
automáticamente con el sistema KTS «Krups Tamping System».
n Introducir el portafiltros en el aparato girándolo al máximo hacia la derecha, hasta el tope (fig.7).
n Poner una o dos tazas debajo del portafiltros.
En cuanto el aparato alcance la temperatura adecuada, el indicador luminoso se quedará fijo.
n Girar entonces el selector hacia la posición «café» (fig.8).
n Cuando se haya obtenido la cantidad de café deseada, volver a poner el selector en la posición
«parada» (fig.9).
n Desbloquear el portafiltros: Pulsar el botón «OPEN» girando el portafiltros hacia la izquierda y retirarlo
del aparato (fig.10).
n Retirar el poso mediante el sistema de expulsión pulsando el botón «EJECT» situado entre las dos
boquillas de salida del café (fig.11). Lavar el portafiltros con agua corriente, accionando el botón
«EJECT» para eliminar los restos de molienda.
El portafiltros puede llenarse de nuevo para preparar otros expresos.
CON UN DOSIFICADOR EXPRESO «E.S.E.»
«E.S.E.» por «Easy Serving Expreso» (preparación simplificada del expreso) es un dosificador
envasado (44 mm de diámetro) de 7 g de café seleccionado, molido y compactado entre dos
papeles filtro, especialmente diseñados para la realización de expresos «ristretto» (cerrado)
a la italiana.
Este sistema permite una utilización inmediata, sencilla, limpia y cómoda de su aparato.
n Llenar el depósito de agua y encender el aparato (fig.1, 2, 3 y 4). Durante el precalentamiento del
aparato, el indicador luminoso parpadeará.
6. PREPARACIÓN DE UN ESPRESSO
KR_ESPRESSO_XP56_NAFTA_8080012562_808001256210/04/1315:16Page33
Page 37

Español
34
n Recortar el papel que rebase el dosificador, colocar el dosificador E.S.E. en el portafiltros, con la
inscripción roja hacia abajo (fig.6).
Colocar adecuadamente todo el papel dentro del portafiltros, en caso contrario podrían
producirse fugas.
n Si el dosificador estuviera mal colocado, el resultado en taza no sería satisfactorio.
n No utilizar nunca dos dosificadores a la vez.
n Después, siga los pasos de las imágenes 7 a 11.
CON UN DOSIFICADOR FLEXIBLE
Su aparato es compatible también con los dosificadores flexibles (generalmente de 60 mm
de diámetro). Este tipo de dosificadores no se han diseñado específicamente para las
máquinas de café expreso, por lo que obtendrá un expreso menos fuerte que con un
dosificador E.S.E.
n Llenar el depósito de agua y encender el aparato (fig.1, 2, 3 y 4). Durante el precalentamiento del
aparato, el indicador luminoso parpadeará.
n Colocar un dosificador flexible en el portafiltros. No colocar nunca dos dosificadores a la vez. Si el
dosificador estuviera mal colocado, el resultado en taza no sería satisfactorio.
n Después, siga los pasos de las imágenes 7 a 11.
El vapor sirve para hacer espuma con la leche (para preparar, por ejemplo, un capuchino o un café latte)
gracias al accesorio para cappuccinos.
Para producir vapor, la bomba funciona emitiendo un ruido intermitente.
Tras la utilización de la función de vapor, el aparato se enfriará automáticamente al bombear
el agua fría que enfriará el sistema de calentamiento. Durante los ciclos de bombeo, el exceso de
vapor contenido en el sistema de calentamiento se liberará con el agua caliente a través de la bandeja
recoge-gotas. La emisión de vapor y el ruido que le acompaña son necesarios para que el
aparato se enfríe.
Atención: Durante y después de la utilización del aparato, las partes metálicas de la boquilla de vapor
están calientes y podrían causar quemaduras.
UTILIZACIÓN DE LA BOQUILLA DE VAPOR PARA HACER ESPUMA CON LA LECHE
n Llenar el depósito de agua y encender el aparato (fig.1, 2, 3 y 4).
n Girar el selector hacia la posición «precalentado vapor». El indicador luminoso parpadeará (fig.12).
n Desplazar la boquilla de vapor fuera del aparato.
n Echar de 60 a 100 ml de leche semidesnatada en un recipiente estrecho de aproximadamente 1/2 litro
y que pueda pasar por debajo de la boquilla de vapor. La leche y su recipiente deben estar bien fríos.
n Recomendamos utilizar leche pasteurizada o leche UHT y evitar la leche cruda.
n En cuanto el indicador luminoso quede fijo, introducir la boquilla de vapor en la leche.
n Girar el selector hacia la posición «vapor» (fig.13).
n Para conseguir un buen resultado, mantener la boquilla en el fondo del recipiente durante
aproximadamente 25 segundos, el tiempo suficiente para que la leche se caliente (no obstante, sin
tocar el fondo del recipiente). Después, bajar progresivamente el recipiente para que la boquilla suba
hacia la superficie (sin sacarla nunca de la leche) (fig.14).
n Una vez obtenida la espuma, girar el selector hacia la posición «parada» (fig.15). En este momento, el
aparato se enfriará automáticamente iniciando 3 ciclos de bombeo intermitente. Cuando esta
operación automática haya terminado, se podrá preparar un café.
7. FUNCIÓN DE VAPOR
KR_ESPRESSO_XP56_NAFTA_8080012562_808001256210/04/1315:16Page34
Page 38

Español
35
Importante: Para evitar que la boquilla de vapor se taponen, la espuma de leche
debe llegar la parte superior de plástico negro.
Es importante limpiar la boquilla vapor después de cada utilización para evitar que la leche se seque dentro. Para esto:
n Colocar la boquilla vapor en un recipiente con agua y repita la operación de espumado de la leche
durante 30 segundos.
¡ATENCIÓN!
¡La boquilla de vapor está aún caliente!
UTILI ZACIÓN DEL JUEGO AUTO-CAPPUCCINO KRUPS XS 6000 PARA HACER ESPUMA CON
LA LECHE (SE VENDE POR SEPARADO)
El accesorio Auto-Cappuccino facilita la preparación de cappuccinos y del café latte. Se compone de una
boquilla especial, un recipiente para leche de acero inoxidable y un tubo.
Este accesorio puede venderse por separado.
n Montar las diferentes piezas. Elegir la posición capuchino o café latte en la boquilla especial.
n Llenar el recipiente para leche y colocar una taza o un vaso debajo de la boquilla especial auto-
cappuccino.
n Girar el selector hacia la posición «precalentado vapor». Una vez que el indicador luminoso quede fijo,
situarlo en la posición «vapor».
n Una vez obtenida la espuma, girar el selector hacia la posición «parada». En este momento, el aparato
se enfriará automáticamente iniciando 3 ciclos de bombeo intermitente. Cuando esta operación haya
terminado, se podrá preparar un café.
Para evitar que la leche no se seque en el accesorio auto-cappuccino, recomendamos encarecidamente:
n Verter agua limpia en el recipiente y reinstalar los diferentes componentes.
n Iniciar un ciclo de vapor.
n Limpiar todos los componentes con un paño húmedo.
n No lavar los accesorios de la máquina de café expreso en el lavavajillas.
DEL APARATO
n Desenchufarlo y dejarlo enfriar antes de limpiarlo.
n Limpiar de vez en cuando el exterior del aparato con una esponja húmeda. Tras utilizarlo, hay que vaciar
el depósito de agua.
n Aclarar regularmente el interior del depósito.
n Cuando una capa fina blanca vuelva opaco el depósito, hay que realizar una operación de
desincrustación (ver párrafo 9 «DESINCRUSTACIÓN»).
DEL LA BANDEJA RECOGE-GOTAS
Cada vez que se termine de utilizar el aparato, hay que vaciarlo. Tirar de la bandeja suavemente y sacarla
del aparato.
Si se han preparado varios expresos sucesivos, conviene vaciarla de vez en cuando (cada 7 u 8 expresos
aproximadamente) (fig.19 y 20). La presencia de agua es normal y no significa que exista una fuga.
Si fuera necesario, limpiar la bandeja recoge-gotas y la rejilla con agua y un poco de detergente no
agresivo, aclarar y secar. Cuando se vuelva a instalar, asegurarse de colocar los diferentes elementos
correctamente.
8. LIMPIEZA Y MANTENIMIENTO
KR_ESPRESSO_XP56_NAFTA_8080012562_808001256210/04/1315:16Page35
Page 39

Español
36
DEL CABEZAL DE PERCOLACIÓN Y DEL PORTAFILTROS
n Deben limpiarse cada vez que se utilicen. Bastará con pasar un paño húmedo por el cabezal de
percolación (fig.21) y limpiar el portafiltros con agua clara y un poco de detergente no agresivo.
n No utilizar productos limpiadores a base de alcohol o disolventes.
n Para obtener mejores resultados, se puede accionar varias veces el botón «EJECT» durante el
aclarado. Recomendamos sacudir con fuerza el portafiltros para sacar toda el agua.
n Aclarar y secar.
n Cuando ya no se utilice la máquina de café, no dejar el portafiltros dentro para evitar el desgaste de la
junta.
Para una limpieza profunda, el portafiltros puede desmontarse por completo:
n Se puede retirar la parte de plástico negro donde se encuentran las salidas del café y el botón
«EJECT»: Girarla hacia la izquierda y a continuación tirar con fuerza (fig.22).
n Limpiar los diferentes elementos con agua clara y un poco de detergente no agresivo.
n Aclarar y secar.
n Colocar la parte de plástico negro en la pieza de metal, girarla hacia la derecha hasta que estén
alineadas las dos flechas sobre las dos piezas.
n Si el cabezal está obstruido, desenroscar la rejilla utilizando un tornillo, límpielo y repárelo presionando
firmemente hacia abajo (fig.23).
DE LA BOQUILLA DE VAPOR
n Este accesorio está compuesto por 2 piezas: una pieza de soporte de plástico y el cilindro metálico
de protección.
n Para iniciar la limpieza, desbloquee la boquilla del brazo articulado girándola hacia la izquierda. (figs.16
y 16.2)
n Deslice el cilindro metálico a lo largo del soporte de plástico (fig.16.3).
n Limpie ambas piezas con agua clara y un poco de líquido lavavajillas suave (fig.17).
n Enjuáguelas y séquelas.
n Cuando haya limpiado bien las piezas, vuelva a colocar el cilindro metálico sobre el soporte.
n Tenga cuidado de no dañar la junta de silicona que garantiza la estanqueidad de la boquilla(fig.16.3).
n Introduzca la boquilla sobre el brazo articulado y luego apriétela hacia la derecha (figs.18.1 y 18.2).
La garantía no cubre los aparatos averiados a los que no se les han realizado las operaciones periódicas
de desincrustación.
Desincrustar regularmente el expreso con vinagre blanco o un sobrecito de ácido cítrico o sulfámico.
Aconsejamos el uso del accesorio para desincrustar Krups, referencia F054, disponible en los
servicios técnicos autorizados. Este accesorio incluye, además de dos dosis para desincrustar, una cinta
para probar la dureza del agua y evaluar la frecuencia de desincrustación de su aparato para una
utilización normal. El grado de incrustación depende de la dureza del agua y también del ciclo de
utilización. La frecuencia de desincrustación indicada por el accesorio F054 se proporciona a título
indicativo. No obstante, puede utilizar la siguiente tabla:
En caso de duda, es recomendable realizar una desincrustación todos los meses.
9. DESINCRUSTACIÓN
FRECUENCIA DE DESINCRUSTACIÓN
Nº medio de cafés
a la semana
Agua blanda
(<19°th)
Agua calcárea
(19-30°th)
Agua muy
calcárea
(>30°th)
Menos de 7 1 vez al año Cada 8 meses Cada 6 meses
De 7 a 20 Cada 4 meses Cada 3 meses Cada 2 meses
Más de 20 Cada 3 meses Cada 2 meses Todos los meses
KR_ESPRESSO_XP56_NAFTA_8080012562_808001256210/04/1315:16Page36
Page 40

Español
37
DESINCRUSTACIÓN DEL CIRCUITO DE VAPOR Y CAFÉ
n Vaciar el depósito y colocarlo de nuevo en su sitio.
n Si su producto esta equipado con el cartucho Claris - Aqua Filter System F088 por favor quite el
cartucho antes de iniciar el programa de descalcificación.
n Llenar el depósito con una mezcla compuesta de tres volúmenes de agua por un volumen de vinagre
blanco o una mezcla compuesta de ½ litro de agua y un sobrecito de ácido cítrico o sulfámico.
n Introducir el portafiltros (sin molienda) en el aparato y bloquearlo girándolo hacia la derecha hasta el
tope.
n Colocar un recipiente debajo de la boquilla de vapor.
n Pulsar el botón «on / off».
n A continuación, colocar el selector en la posición «vapor» (sin pararse en la posición «precalentado
vapor»).
n Dejar salir la mezcla por la boquilla hasta que aparezca el vapor.
n Colocar el selector en la posición «parada»
n Colocar un recipiente con capacidad suficiente debajo del portafiltros.
n Cuando el indicador luminoso quede fijo, girar el selector hacia la posición «café» y dejar salir la mitad
de la mezcla.
n Apagar el aparato con el botón «on / off» dejando el selector en la posición «café».
n Después de 15 minutos, encender el aparato de nuevo.
n Dejar salir el resto del depósito.
n Girar el selector hacia la posición «parada».
ACLARADO
¡IMPORTANTE!
Después de la desincrustación, realizar 2-3 operaciones de aclarado con agua clara
(sin molienda), tal y como se describe en el párrafo 5 «Primera puesta en
funcionamiento».
No olvidarse de aclarar la boquilla de vapor siguiendo las siguientes instrucciones:
n Colocar un recipiente debajo de la boquilla de vapor.
n Pulsar el botón «on / off».
n Y girar el selector hacia la posición «vapor» (sin pararse en la posición «precalentado vapor»).
n Dejar salir el agua por la boquilla hasta que aparezca el vapor.
n Llevar el selector hacia la posición «parada».
El aparato está desincrustado, listo para funcionar de nuevo.
n El aparato está garantizado, pero cualquier error de conexión, manipulación o utilización diferente a las
descritas en el folleto anularían la garantía.
n Este aparato se ha diseñado exclusivamente para uso doméstico, cualquier otro uso anularía la
garantía.
n La garantía no cubrirá ninguna reparación causada por la cal.
n Para cualquier problema de postventa o piezas sueltas, consulte a su distribuidor o a un servicio
técnico autorizado.
10. GARANTÍA
KR_ESPRESSO_XP56_NAFTA_8080012562_808001256210/04/1315:16Page37
Page 41

Español
38
11. PROBLEMAS, CAUSAS PROBABLES Y ACCIONES CORRECTIVAS
Problemas Causas posibles Soluciones
El expreso no está
bastante caliente.
Las tazas y el portafiltros
están fríos.
Calentar previamente los accesorios: tazas y
portafiltros (ver párrafo 6).
El portafiltros está
bloqueado.
Olvidó bloquear el portafiltros.
Pulsar el botón «OPEN» girando el portafiltros hacia la
izquierda.
El poso no se seca
después de que pasa
el agua.
No ha cerrado el portafiltros
correctamente.
Cerrar más el portafiltros girándolo al máximo hacia
la derecha, hasta el tope.
El expreso es
demasiado lento.
La velocidad con la que se
cuela depende de la finura del
café utilizado y puede variar
durante la preparación del
expresso.
La molienda es demasiado
fina, demasiado gruesa o
harinosa.
El portafiltros está sucio.
La rejilla por donde pasa el
agua está atascada.
Elegir una molienda ligeramente más gruesa.
Limpiar el portafiltros (ver párrafo 8).
Cuando enfríe el aparato, limpiar el cabezal de
percolación con una esponja húmeda. (fig.21)
El agua no pasa.
No hay agua en el depósito.
Depósito mal montado.
El filtro está atascado, la
molienda es demasiado fina.
El aparato tiene cal.
Se ha cambiado el cartucho
Claris, pero no se ha
preparado.
Llenar el depósito.
Presionar el depósito con fuerza.
Limpiar el portafiltros (ver párrafo 8) y probar con una
molienda más fina.
Ver párrafo 9.
Consulte el párrafo 5
Sale agua del
portafiltros después
de preparar un
expreso.
El selector no se ha colocada
en la posición de «parada».
Formación de cal prematura
debido a un agua
especialmente calcárea.
Apagar el aparato girando el selector hacia la
posición de «parada». (fig.9).
Desincrustar el aparato según las instrucciones de
uso (ver párrafo 9).
Presencia de poso en
la taza.
El portafiltros está atascado.
La molienda es demasiado
fina.
Lavar el portafiltros con agua caliente. Pulsar el
botón «EJECT» para eliminar los posibles restos de
molienda. Agitarlo para evacuar toda el agua.
Utilizar una molienda ligeramente más gruesa.
El depósito de agua
pierde cuando se le
transporta.
La válvula del fondo del
depósito está sucia o
defectuosa.
La válvula está bloqueada por
cal.
Lavar el depósito con agua y ponerlo a funcionar con
el dedo en la válvula situada en el fondo del
depósito.
Desincrustar el aparato (párrafo 9).
KR_ESPRESSO_XP56_NAFTA_8080012562_808001256210/04/1315:16Page38
Page 42

Español
39
12. PRODUCTO ELÉCTRICO O ELECTRÓNICO AL FINAL DE SU VIDA ÚTIL
¡Participemos en la protección del medio ambiente!
El aparato contiene numerosos materiales revalorizables o reciclables.
Llévelo a un punto de recolección especifico para que realicen su tratamiento.
El expreso pierde por
los lados del
portafiltros.
El portafiltros no está
colocado correctamente.
El borde del portafiltros está
atascado por la molienda.
Dosificador mal colocado en
el portafiltros.
Colocar el portafiltros y bloquearlo (girando al
máximo hacia la derecha hasta llegar al tope).
Retirar el exceso de molienda.
Colocar todo el papel correctamente dentro del
portafiltros.
El expreso tiene mal
sabor.
Después de desincrustarlo, no
se ha realizado correctamente
el aclarado.
Aclarar el aparato según las instrucciones de uso
(ver párrafo 9).
El aparato no
funciona.
La bomba está desactivada
debido a la falta de agua.
El depósito de agua extraíble
está mal encajado.
Se ha cambiado el cartucho
Claris, pero no se ha preparado
Llenar el depósito de agua y volver a activar la
bomba (ver párrafo 5). Evitar vaciar el depósito por
completo.
Encajar el depósito de agua presionando con fuerza.
Consulte el párrafo 5
La boquilla vapor no
hace espuma con la
leche.
La boquilla de vapor está
taponada o con cal.
La leche está demasiado
caliente.
La forma del recipiente no es
la apropiada.
Utiliza leche desnatada.
Desincrustar la boquilla de vapor (ver párrafo 9) o
desatascarla con una aguja.
Utilizar leche fría.
Utilizar una jarra pequeña.
Utilizar preferentemente leche entera o semidesnatada.
P
roblemas
C
ausas posibles
S
oluciones
El aparato pierde
agua.
Fuga interna.
Comprobar que el depósito está bien colocado. Si el
problema persiste, no utilizar el aparato, acudir a un
servicio técnico autorizado.
Hay agua debajo de
la bandeja de goteo.
Al retirar la bandeja de goteo
puede aparecer agua.Esto no
es un signo de fuga.
Se oyen chasquidos
en el portafiltros.
Fenómeno normal:
Bloqueo de seguridad del
portafiltros.
La bomba hace un
ruido anormal.
Ausencia de agua en el
depósito.
Depósito mal montado.
Apagar el aparato, llenar el depósito de agua y
encenderlo de nuevo.
Presionar el depósito con fuerza.
Las tazas se llenan
de manera desigual.
El portafiltros está atascado. Ver párrafo 8.
KR_ESPRESSO_XP56_NAFTA_8080012562_808001256210/04/1315:16Page39
Page 43

Español
40
: www.krups.com
Comprometidos fuertemente con el medio ambiente,
la mayoría de los productos Krups son reparables durante y posteriormente
al periodo de garantía, Antes de regresar cualquier producto al sitio de venta,
por favor llame directamente a servicios al consumidor de Krups,
para conocer las opciones de reparación, al número indicado abajo.
Apreciamos su ayuda para preservar el medio ambiente!
Garantía
Krups garantiza este producto por 2 años contra cualquier defecto de fabricación tanto en
materiales como en mano de obra, a partir de la fecha de compra.
La garantía del fabricante Krups, es un beneficio extra que no afecta los derechos legales del
consumidor
La garantía Krups cubrirá todos los gastos relacionados con la reparación de los productos
defectuosos hasta que cumplan con sus especificaciones originales, mediante la reparación o
reemplazo de cualquier pieza defectuosa y la mano de obra necesaria para ello. A criterio de
Krups, en lugar de la reparación, podría hacer cambio de producto. Incluyendo los gastos de
transportación en México razonablemente erogados para el cumplimiento de esta garantía,
exclusivamente para aquellos sitios donde no se cuente con un centro de servicio autorizado.
La única obligación de Krups y su exclusiva determinación bajo esta garantía se limita a la
reparación o reemplazo del producto.
Condiciones y exclusiones
La garantía Krups, aplica solamente en Estados Unidos de Norteamérica, Canadá y México, y
serà válida solamente con la presentación del comprobante de compra. El producto puede ser
llevado directamente a un centro de servicio autorizado, o debidamente empacado y devuelto,
mediante servicio de mensajería autorizada (o servicio de paquetería equivalente), al centro de
servicio autorizado de Krups. Detalles y dirección completa de los centros de servicio
autorizados de cada país, se encuentran listados en la dirección electrónica de Krups
(www.krups.com
) o bien llamando al nùmero telefónico de cada país indicado abajo, para
solicitar la dirección correspondiente.
Krups no está obligado a reparar o reemplazar ningún producto el cual no sea acompañado de
su comprobante de compra.
Esta garantía no cubre ningún daño que pudiera ocurrir como resultado de mal uso,
negligencia, o no haber seguido las intrucciones de uso establecidas por Krups, uso de
corriente o voltaje diferente al indicado en el producto, o una modificación o reparación no
autorizada del mismo. Tampoco cubre el desgaste o deterioro normal del producto, ni el
reemplazo de componentes consumibles, ni lo siguiente:
- uso de tipo incorrecto de agua
- sarro (la eliminación de sarro (residuos calcáreos) deberá ser llevada a cabo de acuerdo
a las instrucciones de uso)
- ingreso de agua, polvo o insectos al interior del producto
- daños mecánicos, sobrecargas
- accidentes incluyendo fuego, inundaciones, rayos, etc
- uso comercial o profesional
- daños en componentes de vidrio o cerámicos en el producto
KRUPS GARANTÍA DEL FABRICANTE
KR_ESPRESSO_XP56_NAFTA_8080012562_808001256210/04/1315:16Page40
Page 44

Español
41
Esta garantía no aplica a ningún producto si ha sido intervenido, o presenta daños derivados de
uso o cuidado incorrecto, mal empacado por el propietario o mal manejo por parte del servicio de
paquetería.
La garantía Krups, aplica solo a los productos comprados en Estados Unidos de Norteamérica,
Canadá y México, cuando un producto es comprado en un país y usado en otro diferente:
a) La duración de la garantía Krups es la correspondiente al país donde se utilice el producto,
aún cuando la duración de la garantía donde haya sido comprado el producto dentro de
los paìses listados, sea diferente.
b) La garantía Krups no aplica en caso de no conformidad del producto comprado con los
estándares locales, tales como voltaje, frecuencia, contactos eléctricos, u otras
especificaciones técnicas.
c) El proceso de reparación de un producto comprado fuera del pais de uso, puede necesitar
de un tiempo mayor si el producto no es vendido localmente
d) En caso de que el producto no sea reparable en el nuevo país, la garantía Krups se limita
al reemplazo por un producto similar, o un producto alternativo de costo similar, dentro de
lo posible.
Derechos establecidos por la ley al Consumidor
Esta garantía Krups, no afecta los derechos establecidos por la ley que el consumidor pudiera
tener o aquellos derechos que no pueden ser excluidos o limitados, tampoco los derechos contra
el distribuidor al que el consumidor le haya comprado el producto. Esta garantía proporciona al
consumidor derechos legales específicos, y el consumidor podrá tener tambièn otros derechos
legales los cuales varian de Estado a Estado o de País a País o de Provincia a Provincia. El
consumidor podrá hacer valer esos derechos a su discreción.
Informaciòn adicional
Accesorios, consumibles y piezas reemplazables pueden ser compradas si localmente se
encuentran disponibles, como se describe en el sitio de internet de Krups
: www.krups.com
CANADA
GROUPE SEB
CANADA
345 Passmore Avenue
Toronto, ON
M1V 3N8
MEXICO
Groupe SEB MEXICO
S.A. de C.V.
Goldsmith 38 Desp.
401 Col. Polanco
Delegacion Miguel
Hildalgo
11 560 Mexico D.F.
MEXICO
U.S.A.
GROUPE SEB USA
2121 Eden Road
Millville, NJ 08332
1-800-418-3325 01800 1128325 800-526-5377
KR_ESPRESSO_XP56_NAFTA_8080012562_808001256210/04/1315:16Page41
Page 45

KR_ESPRESSO_XP56_NAFTA_8080012562_808001256210/04/1315:16Page42
Page 46

KR_ESPRESSO_XP56_NAFTA_8080012562_808001256210/04/1315:16Page43
 Loading...