

Page 1
ESPRESSO AUTOMATIC
SERIE EA84XX
DEENFRNLES
PTITELDANOSVFI
www.krups.com
Page 2
A
B
H
C
D
E
F
G
1
I
2
J
K
1 2
L
N
M
Q
O
P
Page 3
01234
1
1 2
sec.
1
5 6 7 8
2 3 4
o
h
9 10 11 12
13 14 15 16
1 2
h
17 18 19 20
1 2
h
21
22 24
h
h
23
Page 4

Dear customer,
Congratulations on purchasing your Espresso Automatic Series EA84XX. This machine
allows you to prepare a wide variety of drinks, including espressos, coffees or ristrettos,
totally automatically. You can also prepare milk drinks such as cappuccinos. It is designed
to allow you to enjoy restaurant quality coffee at home, whatever the time of day or day of
the week. You will appreciate both the quality of the coffee produced as well as the ease of
use. You can choose the volume, strength and temperature of your drinks.
The Compact Thermoblock System with integrated percolation chamber, 15 bar pump and
coffee granules that are freshly ground just before extraction, allows you to make ristrettos,
espressos and coffees that are hot right from the first cup with maximum flavour and
covered in a chamois coloured cream.
The hot water function also allows you to prepare teas and other drinks at an instant.
Espressos are traditionally served in small porcelain cups that widen at the top, releasing
all of the coffee’s aromas. To obtain an espresso with the perfect temperature and with a
small cream, we recommend heating the cups beforehand.
It will probably take several attempts before you find the coffee beans you prefer. By
changing the mixture and/or roasting process, you will soon achieve the ideal result.
Espressos are more aromatic than a classic filter coffee. Despite its more distinct taste,
which is very evident in the mouth and more persistent, an espresso contains less caffeine
than a filter coffee (approximately 60 to 80 mg per cup compared to 80 to 100 mg per cup);
this is due to shorter percolation time.
The quality of the water used is also a determining factor in terms of the quality of the drink
achieved. Ideally, use water straight from the tap (so that it has not had time to stagnate on
contact with the air); the water should also be free from any chloride odours and it should
be cold.
The ergonomic and comfortable colour touch screen will help you navigate through the
programmes. It will guide you through the stages, from preparing your drink to maintenance
operations.
We hope you enjoy using your Krups machine.
EN
The Krups team
29
Page 5

Here are some recommendations for making the most of your machine and producing
quality coffees:
• The quality of the water has a huge impact on the quality of the aromas. Limescale and
chlorine can alter the taste of your coffee. We recommend that you use the Claris Aqua
Filter System cartridge, or slightly mineralised water to preserve all the aromas of your
coffee.
• To prepare ristretto, espresso and coffee recipes, we recommend that you use pre-heated
(by running under hot water) tulip shaped porcelain cups, which are the correct size for
the size of drink you want. For your cappuccino, latte and hot milk recipes, we recommend
that you use thick glass cups for a delicious result.
• Roasted coffee beans can lose their flavour if they are not protected. We recommend that
you use the quantity of beans required for the next four to five days. The quality of coffee
beans varies and whether you like them or not is a matter of personal taste; however, we
recommend that you use arabica rather than robusta coffee beans. It will probably take
several attempts to find the coffee beans that you prefer.
Finally, we recommend that you do not use oily or caramelised beans, which can damage
the machine.
• The quality and fineness of the ground beans will affect the aromas and quality of the
cream. The finer the ground beans the creamier the cream. The grounding should be
adjusted to the drink desired: fine for ristretto and espresso and coarser for coffee.
• You can use pasteurised or UHT milk, skimmed, semi-skimmed or whole milk, straight
from the fridge (7°C). The use of special milks (microfiltered, unpasteurised, fermented,
enriched, etc.) can produce less satisfactory results, in particular in terms of the quality
of the froth and these are therefore not recommended.
This appliance is covered by a two year manufacturer's guarantee. Please refer to the
guarantee document for details on the guarantee terms and conditions in your country.
This product has been designed for domestic use only. Any commercial use, inappropriate
use or failure to comply with the instructions, the manufacturer accepts no responsibility
and the guarantee will not apply.
The guarantee does not cover any damage and deterioration from misuse or repairs
performed by non-qualified individuals. The guarantee is negated if all the maintenance
operations or instructions are not respected or if the cleaning or descaling products used
do not comply with KRUPS specifications. The guarantee does not apply if the Claris Aqua
Filter System cartridge has not been used according to the KRUPS instructions. Normal
wear and tear of the parts (grinding wheel, valves, seals) are exempt from the guarantee as
is damage caused by external objects in the coffee grinder (for example: wood, stones,
plastic, parts, etc.).
Caution: only use this machine with Krups accessories to preserve the manufactu-
!
rer's guarantee.
30
Page 6

TABLE OF CONTENTS
IMPORTANT INFORMATION ON THE PRODUCT AND INSTRUCTIONS 32
Guide to symbols used in the instructions ..................................................................... 32
Safety instructions ......................................................................................................... 32
Use according to the instructions .................................................................................. 34
Products supplied with your machine ............................................................................ 34
Factory control ............................................................................................................... 34
DESCRIPTION 35
OVERVIEW 36
Presentation of the different symbols ............................................................................. 36
BEFORE FIRST USE 36
INSTALLATION 36
Initial settings .................................................................................................................. 36
Installing the filter ............................................................................................................ 38
Preparing the appliance .................................................................................................. 38
PREPARING DRINKS 39
Information on recipes .................................................................................................... 39
Preparing the grinder ...................................................................................................... 39
Preparing drinks using coffee beans............................................................................... 40
Preparing other drinks: milk-based recipes .................................................................... 41
Hot water......................................................................................................................... 42
EN
OTHER FUNCTIONS: Prog button 43
Settings ........................................................................................................................... 43
Maintenance.................................................................................................................... 44
Info ............................................................................................................................... 44
GENERAL MAINTENANCE 45
Emptying the coffee grounds collector, coffee drawer and the drip tray........................ 45
Circuit rinsing .................................................................................................................. 45
Automatic clean programmes ........................................................................................ 45
PROBLEMS AND CORRECTIVE MEASURES 47
TECHNICAL DATA 50
TRANSPORT 51
DISPOSAL 51
RECIPES 52
31
Page 7

IMPORTANT INFORMATION ON THE PRODUCT
AND INSTRUCTIONS
This manual contains all the important information for setting up, using and maintaining your
automatic coffee/espresso machine.
The manual also includes important safety instructions.
Always read the instructions carefully before using your appliance for the first time and keep
them for future use: any use which does not conform to these instructions will absolve Krups
from any liability.
Guide to symbols used in the instructions
Symbols and associated words used in these instructions.
Danger: warning against risks of serious or fatal injuries. The flash symbol warns against
electrical dangers.
Caution: warning against any malfunctions, damage to or destruction of the appliance.
!
!
Important: general or important comment on the functioning of the appliance.
Safety instructions
!
Important: these instructions are provided to protect you, third parties and the appliance.
Strict compliance is therefore necessary.
Conditions of use
Do not immerse the appliance in water. Do not immerse the power cord or plug in water or any
other liquid. Any contact between the appliance’s conductive parts and humidity or water can
cause fatal injuries due to the presence of electricity! This appliance can only be used in dry
locations
If the room temperature should change from cold to hot, please wait a few hours before starting
the appliance to ensure that it is not damaged due to condensation.
Avoid placing the appliance in direct sunlight, or exposing it to heat, cold, ice or humidity.
Take care not to place the appliance on a hot surface such as a warming plate or near a naked
flame, to avoid any risk of fire or other damage.
Keep the appliance out of the reach of children.
This appliance is not intended to be used by persons (including children) with reduced physical,
sensory or mental capacities or lack of experience and knowledge, unless they are supervised
or have been given instructions beforehand concerning use of the appliance by a person
responsible for their safety.
Children should not be allowed to play with the appliance.
If one of the products supplied with the machine is swallowed, inform your doctor and/or poison
centre immediately.
32
Page 8

Electrical power supply
Danger: Non-compliance with these instructions could cause fatal injuries due to elec-
tric shock!
Please check that the supply voltage indicated on the name plate of the appliance
corresponds to your electrical installation. The appliance should always be plugged into a
socket outlet with an earth connection.
Check that the socket outlet can be easily accessed so that the plug can be disconnected
easily in the event of a malfunction or during a storm for example.
For the safety of your appliance, remove the plug in the event of a storm. Do not pull the
power lead to remove the plug.
Remove the plug immediately if you notice any problem during operation or if there is a
problem during percolation.
Disconnect the appliance if you are not going to use it over a long period and when cleaning.
Do not use the appliance if the power cord or the appliance itself is damaged. If the power
cord or plug is damaged, the power cord must be replaced by an approved KRUPS centre.
Do not leave the power cord overhanging a table or work surface. Do not leave your hand
or power cord on hot parts of the appliance.
The use of multiple plugs or extension leads is not recommended. Any error in connection
will invalidate the guarantee.
Appliance
With the exception of cleaning and descaling according to the appliance’s instructions, any
intervention on the appliance must be performed by an approved KRUPS centre.
For your own safety, only use approved KRUPS accessories and spare parts since these
are suitable for your appliance.
Disconnect the appliance when you leave the room or house for a long period of time.
Never open the appliance. Caution, risk of death due to electrical current! Any unauthorised
opening of the appliance will negate the guarantee. Do not use your appliance if it is not
working properly or if it has been damaged. In this event, it is recommended that you get
the appliance examined by an approved KRUPS centre (refer to the list in the KRUPS
service booklet).
For safety and accreditation reasons, any transformation or modification of the appliance,
performed individually, is forbidden, as only tested appliances are accredited and the
manufacturer will refuse all liability in the event of damage.
For safety reasons, during the production of steam for making cappuccinos, hot milk or hot
water, take care not to place your hand on the steam spout outlet.
The steam spout can be very hot, take care not to handle it during or just after use.
EN
33
Page 9

Use and maintenance
In the event of a malfunction or poor working condition, check the appliance and try to resolve
the problem (see p. 47: Problems and corrective measures) or get the appliance repaired if the
malfunction persists.
Always refer to the instructions for descaling/cleaning the appliance. Disconnect from the mains
before starting any maintenance operation.
Intended use
This Espresso Automatic Series EA84XX coffee/espresso machine should only be used to
make espressos, coffee, hot water or to froth milk.
This appliance is intended for domestic use only. It is not intended to be used in the following
applications and the guarantee will not apply for:
- staff kitchen areas in stores, offices and other working environments
- Farm houses,
- by clients in hotel, motels and other residential type environments.
- Bed and breakfast type environments.
The Espresso Automatic Series EA84XX coffee/espresso machine is not intended for
commercial or professional use. Use for any purpose other than those described in the present
manual does not comply with the instructions and can result in injuries and property damage
as well as the deterioration or destruction of the appliance.
Products supplied with your machine
Check the products supplied with your machine. If a part is missing, contact the hotline directly
(see p. 36: Initial settings).
Parts provided:
- Espresso Automatic Series EA84XX
- 1 Auto-cappuccino accessory (depending on the model)
- 2 cleaning tablets
- 1 descaler sachet
- Claris – Aqua Filter System cartridge with screw accessory
- 1 stick to determine water hardness
- Instructions
- List of Krups After Sales Service Centres
- Guarantee documents
- 1 power cord
- 1 steam spout cleaning kit
Factory control
Your appliance was checked and tested before leaving the manufacturing factory. Despite the
care taken when cleaning, it is possible that you may find coffee residue in the coffee grinder
and/or drops of coffee on the drip tray. Thank you for your understanding. We also recommend
that you rinse the appliance once or several times before using for the first time or when it has
not been used for several days.
34
Page 10

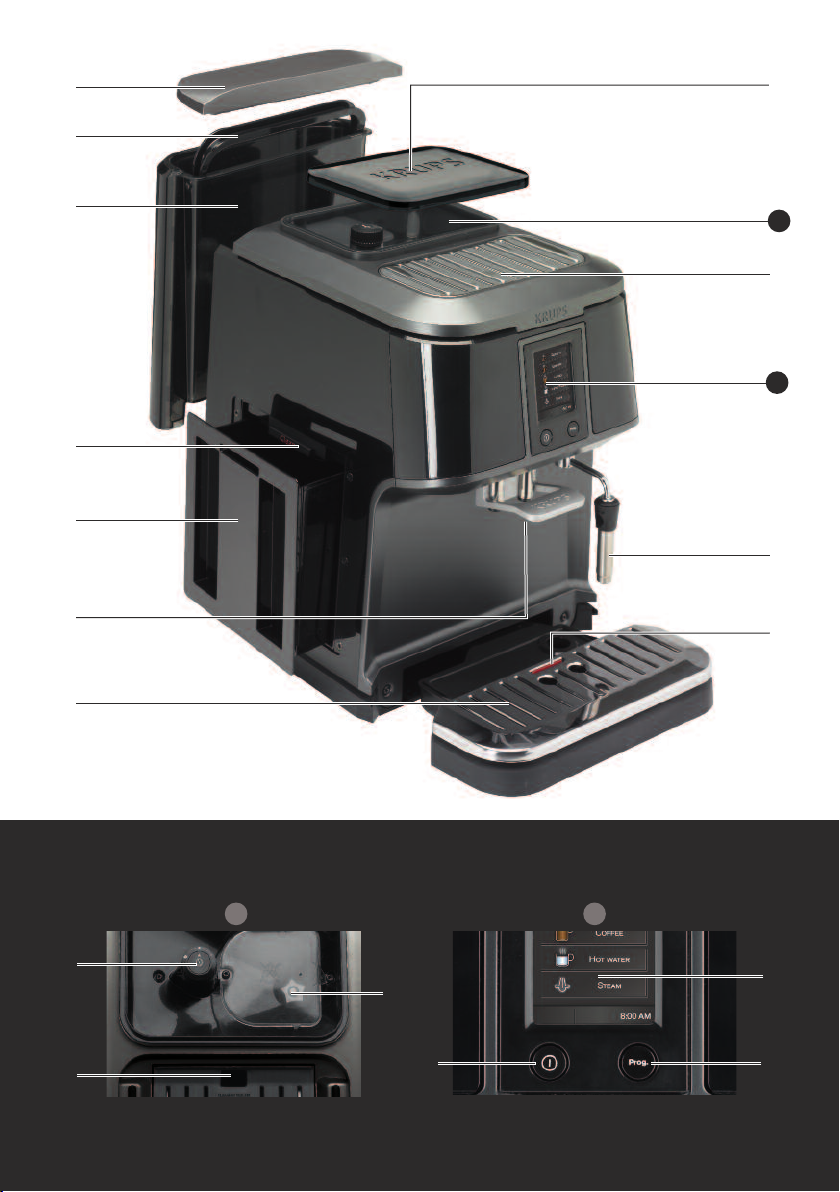
DESCRIPTION
EN
A
Water tank lid
B
Water tank handle
C
Water tank
D
Coffee drawer
E
Coffee grounds collector
F
Handle for height adjustable coffee
outlets
G
Removable grille and drip tray
H
Lid for the coffee bean tank
I
Cup rest grille
J
Steam spout
Further information on:
The drip tray: allows you to collect water or coffee that may leak from the appliance
during/after preparations. It must always be left in the same place. Coffee drawer: allows
you to collect excess ground coffee.
!
Important: read these instructions carefully and keep for future use. Please follow the
safety instructions.
Manufacturer
SAS GSM
Rue Saint-Léonard
F-53104 Mayenne
France
K
Steam spout
Coffee beans tank
1
L
Coffee grinding setting button
M
Spout for cleaning tablet
N
Metal grinding wheel
Touch screen
2
O
Touch screen
P
Programme button
Q
“Stop/start” button
ACCESSORIES (sold separately)
F 088
Claris - Aqua Filter
System cartridge
(1 cartridge supplied)
XS 3000
Block of
10 cleaning tablets
(2 tablets supplied)
This product may differ from the photos
F 054
Descaling
powder (1 sachet
supplied)
35
Page 11

OVERVIEW
Presentation of the different symbols
Allows you to validate the stage.
Allows you to go back to the previous stage.
Allows you to go back to the main menu.
Warns of an alert message.
Allows you to interrupt the preparation or
action in progress.
BEFORE FIRST USE INSTALLING
THE APPLIANCE
Danger: The appliance should be plugged into a 230V - 240V AC socket outlet with an
earth connection. Otherwise, you could be exposed to fatal injuries due to electric
shock!
Follow the safety instructions (See “safety instructions”).
Initial settings
When using the machine for the first time you are asked to perform certain settings. Follow the
instructions that appear on the display. The aim of the following paragraphs is to give you some
visual aids.
Turn on the appliance by pressing the On/Off (Q) button. Let the appliance guide you.
These are the first settings requested:
Language
Select a display language by pressing on the arrows until the required
language appears.
Press OK to validate.
Country
Select your county of residence by pressing the arrows until the country
appears.
Press OK to validate.
If your country is not in the list, press +.
36
Page 12

The appliance will also ask you to set the following parameters:
Hotline number for your country of residence
If you do not know the hotline number for the country you entered in the list, you can search
for it on the Internet site indicated on the screen.
Unit of measurement
You can select whether you would like to use oz or ml as your volume unit.
Date and time
To set the time, click on the required time format (24H or AM/PM).
Auto on
It is possible to set the time at which you would like the machine to turn on automatically
every day. Select the time at which you would like the machine to start automatically using
the previously selected time format.
Auto off
You can choose the length of time after which the appliance will switch off automatically:
from 15 minutes to two hours, in slots of 15 minutes.
Water hardness
You must set your machine based on the water hardness, between 0 and 4.
Information on water hardness:
Before using the appliance for the first time, determine the hardness of your water to that
you can adjust the appliance to this hardness. You should also do this when you are using
your machine in a location where the water hardness is different or you notice a change in
the water hardness. To determine the water hardness, use the strip supplied with the
machine or contact your water company.
The table below contains information on the different classes:
EN
Degree of
hardness
° dH
° e
° f
Appliance
setting
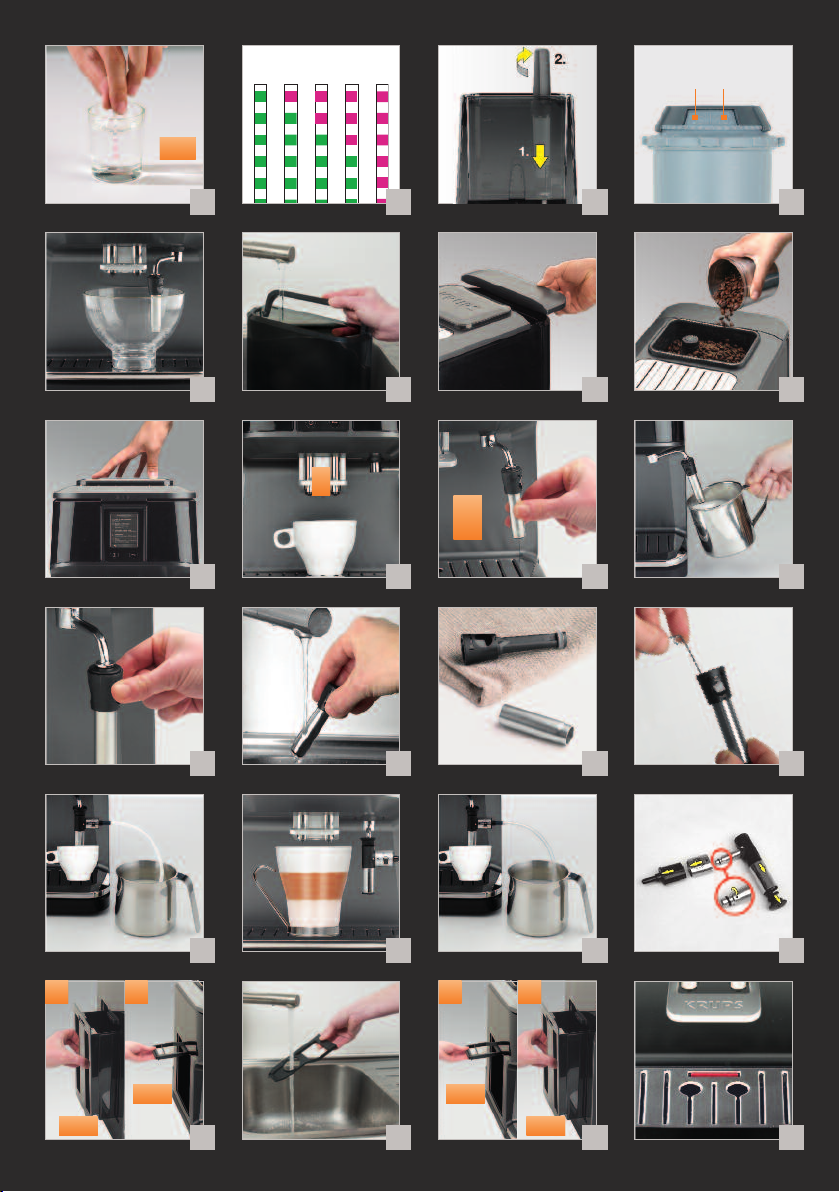
Fill a glass with water and immerse the strip. Fig. 1
Read the water hardness after one minute. Fig. 2
Indicate the number of red zones when setting your appliance.
Class 0
Very soft
< 3° > 4° > 7° > 14° > 21°
< 3,75° > 5° > 8,75° > 17,5° > 26,25°
< 5,4° > 7,2° > 12,6° > 25,2° > 37,8°
01 2 34
Class 1
Soft
Class 2
Moderately
hard
Class 3
Hard
Class 4
Very hard
37
Page 13

Installing the filter
When turning on for the first time, the appliance will ask you if you want to install the filter. If
you want to, press “YES” and follow the instructions on the screen.
Installing the cartridge in the appliance: screw the filter cartridge into the bottom of the water
tank using the accessory supplied with the cartridge. Fig. 3.
Set the month in which the cartridge was installed (position 1 in the image, figure to the left of
the opening) by turning the grey ring on the upper end of the filter. The month in which the
cartridge needs replacing is indicated in position 2 of the image. Fig. 4.
Place a 0.6 l container under the steam spout. Fig. 5.
The machine’s ignition should function regardless of whether a filter is installed or not. The
water circuits must be refilled. To do this, follow the instructions on the screen. The machine
will start by preheating the circuits, it will then perform a test and an automatic rinse.
The screen then displays the main drinks menu.
Caution: a stream of water could run from the steam spout during initial preheating. Take
!
!
Important: if the initial start-up cycle is interrupted before it has been completed, you will be
care not to burn yourself.
asked to register certain settings again or to confirm some of these.
Preparing the appliance
Remove and fill the water tank. Fig. 6.
Close by placing the lid on the tank. Fig. 7.
Open the lid on the coffee beans tank and pour in the beans (250 g maximum). Fig. 8.
Close the lid on the coffee beans tank. Fig. 9.
Caution: never put ground coffee into the coffee tank.
!
Caution: the use of oily, caramelised or aromatic coffee beans is not recommended in this
!
Caution: make sure that any foreign objects such as small stones in the coffee beans do not
!
machine. Since some of these beans are very big, they can damage the machine.
enter the tank. Any damage caused by foreign objects entering the coffee tank is
excluded from the guarantee. Do not put water in the coffee beans tank.
Do not forget to position the drip tray to ensure that no water leaks onto your work
top and to prevent burns. Check that your water tank is clean.
38
Page 14

PREPARING DRINKS
Information on recipes
Depending on the recipe selected, your Espresso Automatic EA84XX will automatically
adjust the quantity of ground coffee.
Table of drinks and settings that may be changed by the user.
EN
COFFEE
RECIPES
RISTRETTO
ESPRESSO
COFFEE
No. of cups
possible
1 20 to 35 ml (in 5 ml slots)
1
2 x 1
1
2 x 1
Possible settings
Volume (ml)
30 to 70 ml (in 10 ml slots)
2 x 30 to 70 ml (in 10 ml slots)
In two cycles
80 to 180 ml (in 10 ml slots)
2 x 80 to 180 ml (in 10 ml slots)
In two cycles
Possible settings
Strength
Automatic
Preparing the grinder
You can adjust the strength of your coffee by adjusting the size of the ground coffee beans.
In general, the finer the coffee grounds the stronger and creamier the coffee, however this
depends on the type of coffee used.
Adjust the size of the ground beans by turning the ‘Coffee grinding setting’ button (L) on
the bean tank. You are advised to do this during the grinding process and gradually. After
three preparations, you will notice a very distinctive difference in taste.
The grinding setting is useful when you change coffee type or if you would like a stronger
or weaker coffee. It is not recommended that you perform this setting systematically.
39
Page 15

Preparing drinks using coffee beans
Caution: your appliance is designed for use with coffee beans only. When preparing your
!
Press the “Espresso” button.
If the machine detects a lack of water when you request a recipe, it will
ask you to fill the tank.
Place the cup(s) under the coffee spouts.
You can adjust the height of the coffee outlet depending on the size of
your cup(s). Fig. 10.
Possible settings
The machine lets you prepare one or two cups.
Selecting the strength: the more beans selected the coarser the
preparation. You can change the strength using the – and + buttons
located to the left and right of the symbols. Press the “OK” button on the
touch screen to launch the preparation.
first coffee, after a long period of absence or after cleaning or descaling, a bit of
steam and hot water may exit the coffee or steam outlets (self-priming). If the coffee
outlet is too high for the size of your cups, there is a risk of splashes or burns. This
chapter explains how the machine operates using the example of the Espresso
function.
Preparing an espresso
The machine grinds the beans, compacts the coffee grounds and
performs percolation.
It is possible to adjust the volume of coffee in preparation using the - and
+ buttons.
You can stop the preparation at any time by pressing “STOP”. Caution,
pressing stop causes a machine resetting phase that can last up to 30
seconds. This is normal.
When a cycle is interrupted, the machine does not stop immediately, the
machine will finish its cycle but the preparation will be cancelled.
40
Page 16

Preparing other drinks: milk-based recipes
These recipes are made using the steam spout; before each preparation check that it is
tight by turning the bottom to the right.
The steam froths the milk. As steam production requires high temperatures, the appliance
has an additional preheating phase.
When the screen displays the drink selection menu, press the “steam” button.
The screen indicates that the appliance is preheating and a message appears asking you
to place a container under the steam spout. You can start the steam production by pressing
the “OK” button.
MILK FROTH
!
Important: we recommend that you use pasteurised or UHT milk, recently opened.
Unpasteurised milk does not produce the best results. After using the steam
functions, the spout can remain hot; we recommend that you wait a few
moments before handling.
Check that the steam spout is properly positioned. Fig. 11.
Pour milk into your milk container. Only fill half way. Immerse the steam spout into the milk.
Fig. 12.
Press the steam button and follow the on-screen instructions.
To achieve a good result:
Stage 1: While holding the milk container, immerse the steam spout into the milk (about 2
cm) and wait for it to start frothing.
Stage 2: Raise the container slightly (about 1 cm). Never immerse the metal tube
completely.
Stage 3: Lower the container gradually as the foam increases.
EN
Caution: do not immerse the metal tube completely.
!
!
Important: press any button to stop the steam function. The maximum duration for steam
production per cycle is limited to 2 minutes. Caution, the cycle does not stop
immediately.
When the spout is hot, handle using the plastic part only. Fig. 13.
Caution: avoid all contact with the metal parts on the spout during use, you risk burning
!
To remove any trace of milk from the steam spout, place a container under the spout and
press "hot water" for a few seconds.
The steam spout can be disassembled for thorough cleaning. Fig. 14.
Wash with water and a bit of non-abrasive washing up liquid using a brush. Rinse and dry.
Fig. 15.
Before putting back into its place, make sure that the air holes are not blocked with milk
residue. Unblock with the needle provided if necessary. Fig. 16.
yourself. Handle the spout using the plastic accessory provided in your Welcome
pack.
41
Page 17

AUTO CAPPUCCINO (available depending on the model)
The auto-cappuccino accessory helps the preparation of a cappuccino or latte.
!
Important: we recommend that you use pasteurised or UHT milk, recently opened.
Unpasteurised milk does not produce the best results.
Preparing the appliance:
Connect the milk suction pipe to the auto-cappuccino accessory, on the unbevelled side.
Fit the accessory on the steam outlet.
Enter the bevelled end of the suction pipe into a container filled with milk. Fig. 17.
Place a cup under the auto-cappuccino accessory.
!
Important: The inlet must not be twisted.
Recipe stage 1:
Select the cappuccino ( ) or latte ( ) setting on the auto-cappuccino
spout.
Press “steam” to launch the pre-heating.
Possible settings
You can change the steam time using the – and + buttons located to the
left and right of the symbols.
Press the “OK” button on the touch screen to launch the preparation.
!
Important: press any button to stop the steam function. The maximum duration for steam
production per cycle is limited to 2 minutes. Caution, the cycle does not stop
immediately.
Recipe stage 2:
Place a cup under the coffee outlet and start a coffee/espresso cycle. Fig. 18. (See chapter:
Preparing drinks using coffee beans).
Rinsing the accessory:
To ensure that the accessory functions correctly, rinse with water after each use. Your appliance
will not ask you to do this. Perform a steam cycle with a container filled with water to clean inside
the spout. Fig. 19.
To do this, you can also use the KRUPS XS4000 liquid cleaner which is available as an accessory.
Maintenance and cleaning:
Disassemble the accessory and clean the parts using a small brush and, if necessary, a little
washing up liquid. Fig. 20.
If necessary, unblock the small opening (highlighted in the illustration) using the cleaning pin
(supplied with your machine).
Hot water
Check that the steam spout is securely locked on its support.
When the screen displays the drink selection menu, press “HOT WATER". A message invites
you to place a container under the steam spout and choose the volume.
You can start producing hot water by pressing “OK”.
42
Page 18

!
Important: press any button to stop the steam function. If the spout is obstructed, unblock
using the needle supplied.
OTHER FUNCTIONS: Prog button
You can access the menu for the appliance’s other functions by pressing the Prog button.
Settings
The “Settings” menu allows you to make the necessary changes for your own optimum
user comfort and preferences. Below are the main settings available.
Date
Clock
Language
Country
Unit of
measurement
Screen brightness
Coffee temperature
The setting of the date is necessary in particular if using an antilimescale cartridge.
You can select a 12 or 24 hour display.
You can choose your preferred language from the suggestions.
You can select your country of residence.
You can choose between ml and oz.
You can adjust the screen contrast to your preference.
You can adjust the temperature of your recipes based on three
levels.
EN
Water hardness
Auto-on
Auto-off
You should adjust the water hardness between 0 and 4. See
chapter “Measuring water hardness”.
You can set the automatic pre-heating to a certain time.
You can choose the length of time after which the appliance will
switch off automatically:
From 15 mins to 2 hours, in slots of 15 mins.
43
Page 19

Maintenance
All these options allow you to start the selected programmes. You then have to follow the onscreen instructions.
Rinsing
Cleaning
Descaling
Filter
To exit the maintenance menu, press .
Allows you to access the rinse programme.
Allows you to access the clean programme.
Allows you to access the descale programme.
This function is not active until the number of recipes made has been
reached.
Allows you to access the filter programme.
Info
The “Info” menu allows you to access a certain amount of information on your use and certain
stages in the life of your machine. It also provides information on the machine's maintenance.
Below is the main information available.
Date of first use
Drinks prepared
Coffee cleaning
circuit
Displays the date of first use.
Displays the total number of coffees, hot water and steam cycles
performed by the machine.
Indicates that this should be performed after x amount of cycles.
Descaling
Filter
44
Indicates that this should be performed after x amount of cycles.
Indicates that this should be changed after x days or x litres.
Page 20

GENERAL MAINTENANCE
Emptying the coffee grounds collector, coffee drawer and the
drip tray
The drip tray collects the used water and the coffee grounds collector collects the used
coffee grounds.
The coffee drawer allows you to remove any coffee grounds below the percolation chamber.
If the message “Empty the two trays” is displayed, empty and clean
the drip tray.
1. Remove, empty and clean the coffee grounds collector. Fig. 21.
2. Remove the coffee drawer. Fig. 21.
Clean under water and dry well before refitting. Fig. 22.
First position the coffee drawer then the coffee grounds collector Fig.
23.
The drip tray is equipped with a float indicating when it requires emptying. Fig. 24.
Circuit rinsing
You can perform a rinse at any time by pressing Prog then maintenance. Depending on the
types of recipes prepared, the machine can perform an automatic rinse when switching off.
Caution: during this rinse operation, hot water exits the coffee spout. Make sure the drip
!
tray is always in place even when the machine is not in use. Take care not to
burn yourself. The cycle only lasts a few seconds and will stop automatically.
Automatic clean programmes
Automatic clean programme for the coffee circuit
The machine will tell you when a clean programme is required. This clean must take place
every 360 preparations approximately.
To perform the clean programme, you will need a container with a capacity of at least 0.6 l;
this should be placed under the coffee outlets and a KRUPS cleaning tablet (XS3000).
Follow the instructions on-screen. It is also possible to launch cleaning via the maintenance
menu.
!
Important: you do not have to perform the clean programme immediately when the
appliance requests this; however, you should do this as soon as possible. If
cleaning is delayed, an alert message will remain on the screen until the
operation is performed. You should only use KRUPS cleaning tablets (XS
3000), as the guarantee does not cover material damage caused by the use
of other brand tablets. The cleaning tablets are available from your KRUPS
After-Sales Service.
Caution: the cleaning cycle must be completed to comply with the guarantee condi-
!
The automatic clean programme includes two phases: a clean and a rinse cycle; the
programme takes about 13 minutes.
tions.
EN
45
Page 21

!
Important: if you disconnect your machine during cleaning or in the event of a power cut,
the cleaning programme will resume the stage in progress during the incident. It
will not be possible to delay this operation. It is mandatory due to water circuit
rinse reasons. In this case, a new cleaning tablet may be required. Make sure the
entire clean programme is completed to remove any traces of descaling product
that may be hazardous to your health.
Do not place your hands under the coffee outlets during the cycle.
Automatic descale programme for the steam circuit
Caution: if your appliance is fitted with our Claris - Aqua Filter System F088 cartridge,
!
The machine will tell you when the descale programme is required. The frequency at which this
programme needs to be run depends on the quality of the water used and whether the Claris
Aqua Filter System filter is used or not (the more limescale in the water, the more descaling is
required).
!
Important: you do not have to perform the descale programme immediately when the
You should only use KRUPS F054 descaling tablets, as the guarantee does not cover material
damage caused by the use of other products. The descaling products are available from your
KRUPS After-Sales Service.
Follow the instructions on-screen. It is also possible to launch descaling via the maintenance
menu.
Caution: the descaling cycle must be completed to comply with the guarantee condi-
!
To complete the descale programme you will need a container with a capacity of at least 0.6 l,
which should be placed under the steam spout, as well as a sachet of KRUPS (40g) F 054
descaler.
The automatic descale programme includes three phases: one descaling cycle and two rinse
cycles. The programme lasts approximately 20 min.
caution: water can splash during the descale or coffee circuit cleaning programmes. If
!
!
Important : if there is a power cut or you disconnect your machine, the cycle will relaunch
please remove this before descaling.
appliance requests this; however, you should do this as soon as possible. If
descaling is delayed, an alert message will remain on the screen until the
operation is performed.
tions.
necessary, place a paper napkin on the drip tray.
the stage in progress when the incident occurred; this operation cannot be
delayed. Make sure the entire cycle is completed to remove any traces of
descaling product that may be hazardous to your health. Take care to protect
your work surface during the descaling cycles, in particular if it is marble, stone
or wood.
46
Page 22

PROBLEMS AND CORRECTIVE MEASURES
If your machine is not working correctly, first of all try to resolve the problem using this
malfunction list. If the problem persists, contact our hotline (See chapter on Initial settings).
MALFUNCTION CORRECTIVE MEASURES
The machine indicates a
fault, the software is frozen or your machine is
malfunctioning.
The appliance does not
come on after pressing
the Start/Stop button.
The espresso or coffee is
not hot enough.
Switch off and disconnect the machine, remove the filter
cartridge and wait 20 seconds before restarting.
Check the fuses on your electrical installation.
Check that the two power connectors are correctly inserted in the appliance and the mains socket outlet.
Check that the mains socket outlet in your installation is
not faulty.
Have your appliance checked by a qualified technician.
Increase the temperature of the coffee in the Settings
menu.
Heat the cup by rinsing with hot water before starting the
preparation.
EN
The coffee is too clear or
not coarse enough.
The coffee comes out
too slowly.
Do not use oily, caramelised or aromatised coffees.
Check that the bean tank contains coffee and that it descends correctly.
Reduce the volume of the preparation, increase the
strength of the preparation.
Turn the grinding setting button to the left for finer coffee
grounds.
Prepare your coffee in two cycles using the two cup function.
Turn the grinding setting button to the right for coarser
coffee grounds (this can depend on the type of coffee
used).
Perform one or several rinse cycles. Launch a clean programme (cf p. 45).
Change the Claris Aqua Filter cartridge (follow the installation procedure).
47
Page 23

MALFUNCTION CORRECTIVE MEASURESS
Turn the grinding setting button to the left for finer coffee
grounds (this can depend on the type of coffee used).
The coffee is not very
creamy.
Perform one or several rinse cycles. Launch the clean programme (cf p. 45).
Change the Claris Aqua Filter System cartridge (follow the
installation procedure).
Your coffee may be stale. Try using new, fresher coffee.
No coffee is coming out
of the machine.
You have used ground
coffee instead of beans.
The grinder is making a
strange noise.
The grinding setting button is difficult to turn.
Water or steam are
abnormally coming out
of the steam spout.
No steam is coming out
of the steam spout.
An incident has been detected during the preparation.
The appliance is restarted automatically and is ready for a
new cycle.
Launch a cleaning programme (P45).
Vacuum up the coffee contained in the bean tank.
Foreign bodies are present in the grinder.
See if you can remove the foreign body using a vacuum then
with an object. Disconnect the machine before any intervention.
Only change the grinding setting when in operation.
Foreign bodies are present in the grinder.
See if you can remove the foreign body using a vacuum then
with an object. Disconnect the machine before any intervention.
In the case of repeated operations, some drops can come out
of the steam spout.
Some parts of your appliance can sometimes be hot, take care
not to burn yourself; let the machine cool down before handling.
Check that the steam spout is securely tightened on the hose,
and that it is not blocked. If this is the case, clean using the
needle supplied for this purpose.
Empty the tank and temporarily remove the Claris cartridge. Fill
the tank with calcium rich mineral water
(>100 mg/l) and perform successive steam cycles (5 to 10)
into a container until you obtain a constant flow of steam.
Re-insert the Claris cartridge into the tank.
48
Page 24

MALFUNCTION CORRECTIVE MEASURES
Insufficient quantity of
milk froth.
The milk froth is not fine
enough.
The Auto cappuccino accessory does not pump
in the milk (accessory
sold separately).
Cf. previous paragraph.
We recommend that you use fresh, pasteurised or UHT
milk, recently opened; it is also recommended that you
use a cold container.
We recommend that you use fresh, pasteurised or UHT
milk, recently opened; it is also recommended that you
use a cold container. Check that the level of milk in the
glass is sufficient.
Check that the steam spout is securely tightened onto the
hose.
Clean the steam spout (cf. chapter Preparing other drinks:
milk-based recipes).
Some parts of your machine can remain hot, take care not
to burn yourself; let the machine cool down before handling.
Check that the flexible inlet is not blocked, obstructed or
twisted and that it is securely fitted into the accessory to
avoid any air intake.
Make sure that the accessory is in the correct position, either for cappuccino or latte; the two arrows must be facing one another.
Clean the accessory with a steam cycle and a container
filled with water. You can use the KRUPS XS4000 liquid
cleaner available as an accessory.
EN
After filling the water
tank, the warning
message remains on
the screen.
The clean or descale
programme will not start.
After washing the coffee
drawer, the warning message remains on the
screen.
Check that the tank is correctly positioned in the appliance.
Check and unblock the float if necessary. The float at the
bottom of the tank should move freely.
Disconnect the appliance for 20 seconds and then restart.
Reinstall the coffee drawer correctly.
Wait in general 8 seconds before reinstalling the coffee
drawer.
49
Page 25

MALFUNCTION CORRECTIVE MEASURES
After emptying the coffee
grounds collector, the
warning message
remains on the screen.
There is a power cut
during the cycle.
There is water under the
appliance.
If one of the problems in the table persists, call KRUPS customer service. See contact list
enclosed.
!
Important: Programme malfunctions are often resolved by disconnecting the appliance for
approximately one minute and reconnecting.
Danger: Only a qualified technician is authorised to perform repairs on the power cord and
the electrical network. If this instruction is not followed, you are at risk of death
due to electric shock! Never use an appliance that is visibly damaged!
Reinstall the coffee grounds collector correctly.
Wait in general 8 seconds before reinstalling the empty collector.
The appliance restarts automatically when reconnected.
Check that the drip tray is properly positioned, even when the
appliance is not in use.
Check that the drip tray is properly positioned, empty if necessary.
The drip tray should not be removed during a cycle.
TECHNICAL DATA
Appliance:
Electrical power
supply:
Energy
consumption:
Water tank:
50
Automatic Espresso
Series EA84xx
220-240V~ / 50 Hz
During operation:
1450 W
1,7 l
Coffee grounds
tank:
Pump pressure:
First use and
storage:
Dimensions
(H x l x P) :
Weight EA84xx:
Under reserve of technical modifications.
250 g
15 bars
indoors, in a dry
place (free from
frost).
376 x 274 x 404 mm
9.5 kg
Page 26

TRANSPORT
Keep the original packaging for transporting the appliance.
Before transporting or transferring the appliance, empty the coffee grounds collector,
the coffee beans tank, the water tank and the drip trays to avoid water spillage.
Caution: if the appliance should fall out of the packaging during transport, it is advisable
!
to take it to an After Sales Service Centre to have it checked and thus avoid any
risk of fire or electrical hazard.
DISPOSAL
The symbol on the appliance or packaging indicates that this product can never be treated
as household waste. It must therefore be sent to a waste collection centre for the recycling
of electrical and electronic equipment. By taking your appliance to a proper collection centre
and disposing of your appliances correctly at the end of their life, you are helping preserve
our natural resources and are preventing harmful consequences for the environment and
public health. For more information on the waste collection points contact an approved
service centre or your dealer.
!
Important: your appliance contains valuable materials which can be recovered or
recycled.
Let’s all help protect the environment !
Your appliance contains many recyclable materials that can be recovered or
recycled.
Leave it at a local civic waste collection point.
EN
HELPLINE
If you have any product problems or queries, please contact our Customer Relations Team
first for expert help and advice:
0845 330 6460 - UK
(01) 677 4003 - ROI
or consult our website - www.krups.co.uk
51
Page 27

Here are some recipes you can make using your KRUPS Automatic :
• Cappuccino
For a cappuccino, the ideal proportions are as follows: 1/3 hot milk, 1/3 coffee, 1/3 milk froth.
• Caffe Latte
To make coffee with milk, also often called Latte Macchiato, the proportions are as follows: 3/5 hot milk, 1/5
coffee, 1/5 milk froth
• For these milk-based preparations, it is best to use cold skimmed milk straight from the refrigerator (ideally
between 6 and 8° C).
• To finish off, you can sprinkle with cocoa.
• Café Crème
• Prepare a conventional espresso in a large cup.
• Add a little cream to get a café crème.
• Café corretto*
• Prepare a cup of espresso as usual.
• Then add 1/4 or 1/2 of a liqueur glass of Cognac to taste.
You can also use anisette, brandy, Sambuca, Kirsch or Cointreau.
There are many other ways to give some punch to your espresso.
Just use your imagination.
• Coffee liqueur*
• Mix 3 cups of espresso, 250 g of brown sugar candy and 1/2 litre of Cognac or Kirsch in an empty 0.75 litre
bottle.
• Leave the mixture to marinate for at least 2 weeks.
You will obtain a delicious liqueur. A real treat for coffee lovers.
• Italian style iced coffee
4 scoops of vanilla ice-cream, 2 cups of espresso with sugar to taste, 1/8 l milk, fresh cream, grated chocolate.
• Mix the cold espresso with the milk.
• Serve the scoops of ice-cream into the glasses, pour the coffee onto them and decorate with fresh cream
and grated chocolate.
• Coffee à la frisonne*
• Add a small glass of rum to a cup of sweetened espresso.
• Decorate with a good layer of fresh cream and serve.
• Flambéed espresso*
2 cups of espresso, 2 small glasses of Cognac, 2 teaspoons of brown sugar, fresh cream.
• Pour the Cognac into heat-resistant glasses, heat and light.
• Add the sugar, mix, pour in the coffee and decorate with fresh cream.
• Espresso parfait*
2 cups of espresso, 6 egg yolks, 200g sugar, 1/8 litre of sweetened fresh cream, 1 small glass of orange liqueur.
• Beat the egg yolks with the sugar until it forms a thick, frothy mass.
• Add the cold espresso and the orange liqueur.
• Then mix in the whipped fresh cream.
• Pour the mix into saucer champagne glasses or ordinary.
• Put the champagne glasses in the freezer.
52
(*: Remember, over-indulgence in alcohol is bad for the health.)
Page 28

DE
HOTLINE : DE;: 0800 98 000 00 - AT;: 00800 98 000 000 - CH;: 0800 37 77 37
EN HOTLINE: UK: 0845 330 6460 - ROI: (01) 677 4003
FR
HOTLINE : BE;: 32 70 23 31 59 - FR;: 09 74 50 10 61 - CH;: 0800 37 77 37
NL
HOTLINE : NL;: 0318 58 24 24
ES
HOTLINE : ES;: 902 31 23 00
PT
Clube Consumidor : PT;: 808 284 735
IT
SERVIZIO CONSUMATORI: IT: 199 207701 - CH: 0800 37 77 37
EL
ΕΛΛΑΔΑ : GR: 2106371251
DA
KUNDESERVICE i DK;: 44 66 31 55
NO
HOTLINE : NO;: 815 09 567
SV
KUNDSERVICE : SV;: 08 594 213 30
FI
ASIAKASPALVELU : FI : 09 6229 420
XXXXXX
XXXXXX - version1 - 03.2012- Réalisation : Espace graphique
www.krups.com
 Loading...