

Konica Minolta PaperPort 9 User Manual

C OPYRIGHTS
Copyright © 1999–2003 by ScanSoft®, Inc. All rights reserved. No part of this publication
may be transmitted, transcribed, reproduced, stored in any retrieval system or translated into
any language or computer language in any form or by any means, mechanical, electronic,
magnetic, optical, chemical, manual, or otherwise, without prior written consent from
ScanSoft, Inc., 9 Centennial Drive, Peabody, Massachusetts 01960. Printed in the United
States of America and the Netherlands.
The software described in this book is furnished under license and may be used or copied only
in accordance with the terms of such license.
I
MPORTANT NOTI CE
ScanSoft, Inc. provides this publication “as is” without warranty of any kind, either express or
implied, including but not limited to the implied warranties of merchantability or fitness for a
particular purpose. Some states or jurisdictions do not allow disclaimer of express or implied
warranties in certain transactions; therefore, this statement may not apply to you. ScanSoft
reserves the right to revise this publication and to make changes from time to time in the
content hereof without obligation of ScanSoft to notify any person of such revision or
changes.
RADEMARK REFERENCES
T
ScanSoft, Pa perPort, PaperPort Deluxe, ScanDirect, FormTyper, OmniPage, OmniForm, and
SimpleSearch are registered trademarks or trademarks of ScanSoft, Inc. in the United States
and/or other countries.
All other names and trademarks referenced herein are trademarks of ScanSoft or their
respective owners. Designations used by third-party manufacturers and sellers to distinguish
their products may be claimed as trademarks by those third-parties.
ScanSoft, Inc.
9 Centennial Drive
Peabody, Massachusetts 01960
PaperPort 9 Getting Started Guide
Part Number 50-F31A-10024
March, 2003

C ONTENTS
Welcome to PaperPort 7
Installing PaperPort 7
Registration 7
Learning PaperPort 8
Using online Help 8
Using release notes 8
Technical Support 8
What’s new in PaperPort 9? 9
Create, edit, and manage PDF files 9
Save time with batch processing 9
Use improved scanning features 10
Annotate all image items 10
Find files and documents with ease 10
Use a variety of new productivity enhancements 10
Getting to Know PaperPort 11
The PaperPort desktop 11
PaperPort items 12
The Folders pane 12
PaperPort thumbnails 13
The Page View window 15
PaperPort Getting Started Guide iii

Acquiring Items 16
Scan to the PaperPort desktop 16
Print to PaperPort 17
Capture web pages 17
Add PaperPort folders 18
Import files 18
Download pictures from your camera 18
Touching Up Images 19
Image editing tools 19
Edit multiple images 20
Annotating Pages 21
Annotation tools 21
iv Contents
Filing Items 22
Work with PaperPort folders 23
Color-code folders 23
Work with items 23
Add search criteria to items 24
Finding Items 25
Find items by their properties 25
Find words in an item 25
Add items to the SimpleSearch index 26
Use the Search pane 26
Use PDF Searchable Image 27

Sharing Files 27
Sending Items to Other Programs 28
Adjust Send To options 29
Customize the Send To bar 30
Send items as E-mail attachments 30
Converting Items 31
Convert items to image formats 31
Convert images to text 32
Filling Out Scanned Forms 33
Creating PDF Documents 34
Using ScanDirect 35
PaperPort Getting Started Guide v

vi Contents

Welcome to PaperPort
Welcome to the PaperPort Getting Started Guide. PaperPort provides the easiest
way to turn paper into organized digital documents that everybody in an office
can quickly find and use. PaperPort works with scanners, multifunction printers,
and networked digital copiers to turn paper documents into digital documents. It
then helps you to manage them along with all other electronic documents in one
convenient and easy-to-use filing system.
PaperPort’s large, clear thumbnails allow you to visually organize, retrieve and use
your scanned documents, including Word files, spreadsheets, PDF files and even
digital photos. PaperPort’s editing tools ensure that scanned documents will look
great while the annotation tools let you add notes and highlights to any scanned
image.
Installing PaperPort
You can install PaperPort from a CD or from the Web.
The PaperPort installation program provides easy step-by-step instructions.
F
ollow the instructions on each screen to install the software.
Registration
Registration enables you to take full advantage of ScanSoft product support and
to receive notifications of product updates.
When you finish installing PaperPort, you are prompted to register online. If you
want to update your registration information, you can always go to the ScanSoft,
Inc. web site at
http://www.scansoft.com.
PaperPort Getting Started Guide 7

Learning PaperPort
This guide introduces you to PaperPort and shows you how PaperPort can help
you manage your information. Additional sources of information to help you
learn how to use PaperPort include online Help, Release Notes, and the ScanSoft
web site.
Using online Help
The PaperPort online Help includes comprehensive information on features,
settings, and procedures. Help is available from the PaperPort Help menu.
Additional technical support, including technical notes, frequently asked
questions, software updates, and more is available on the PaperPort Help menu.
Using release notes
PaperPort Release Notes provide important information about this release of
PaperPort. This document is included on the installation CD, on the PaperPort
Help menu, and as a sample document on the PaperPort desktop.
Technical Support
ScanSoft offers both complimentary and fee-based technical support options
designed to meet your individual needs. Our services offer person-to-person
telephone and e-mail technical support. We also offer self-service, 24-hour access
to our Knowledge Base.
Visit http://www.scansoft.com for information about your support policy, local
support contacts, and product updates. Before contacting ScanSoft, be sure to
read the user documentation and review the Release Notes.
8 Welcome to PaperPort

What’s new in PaperPort 9?
PaperPort 9 includes a number of valuable new features to help you manage your
documents.
Create, edit, and manage PDF files
You can now scan, create, and manage PDF files, using the worldwide standard
for electronic document exchange. You can perform operations directly on PDF
files and no longer need to convert them to the MAX format beforehand.
For example, you can:
• Scan directly to PDF Image format, and, if OmniPage Pro 11 or higher is
installed, to the PDF Searchable Image format.
• Stack, unstack, reorder, and rotate PDF files.
• Improve and annotate PDF files with PaperPort’s Image Editing and
Annotation tools.
• Index and search for the content and properties of PDF files.
• Send PDF files to programs on the Send To bar.
Using the free Acrobat Reader from Adobe, anybody can view and print your
documents from almost any computer worldwide. PDF files ensure that your
files will be accessible on any operating system.
Save time with batch processing
Batch processing features enable you to quickly perform operations on multiple
items at the same time.
For example, you can straighten an entire stack of pages, assign common
keywords to several items, or resize a number of items.
Commands enabled for batch processing include Save As, Auto Enhance, Resize,
Invert Color, Auto Straighten, Remove Stray Dots, Improve Lines, and Rotate.
PaperPort Getting Started Guide 9

Use improved scanning features
PaperPort now provides single page, multipage, and dual-sided scanning, PDF
output, and sortable names for scanned items.
Annotate all image items
PaperPort now supports annotations on all image types, and you can edit
annotations on both PDF and PaperPort Image (.max) files as well.
Find files and documents with ease
You can now use PaperPort’s enhanced Search features to find items by specific
item properties. You can also index TIFF files, PDF image files, and read-only
files and directories.
Use a variety of new productivity enhancements
PaperPort helps you manage your time more efficiently by letting you:
• Launch a program by clicking its program icon on the Send To bar.
• Open My PaperPort Documents folder each time you start the program,
rather than opening the last folder opened.
• Auto-arrange items on the PaperPort desktop.
There are many more features and enhancements in this release. For a detailed
list, see the Release Notes document, which is easily accessible from the
PaperPort Help menu.
10 Welcome to PaperPort
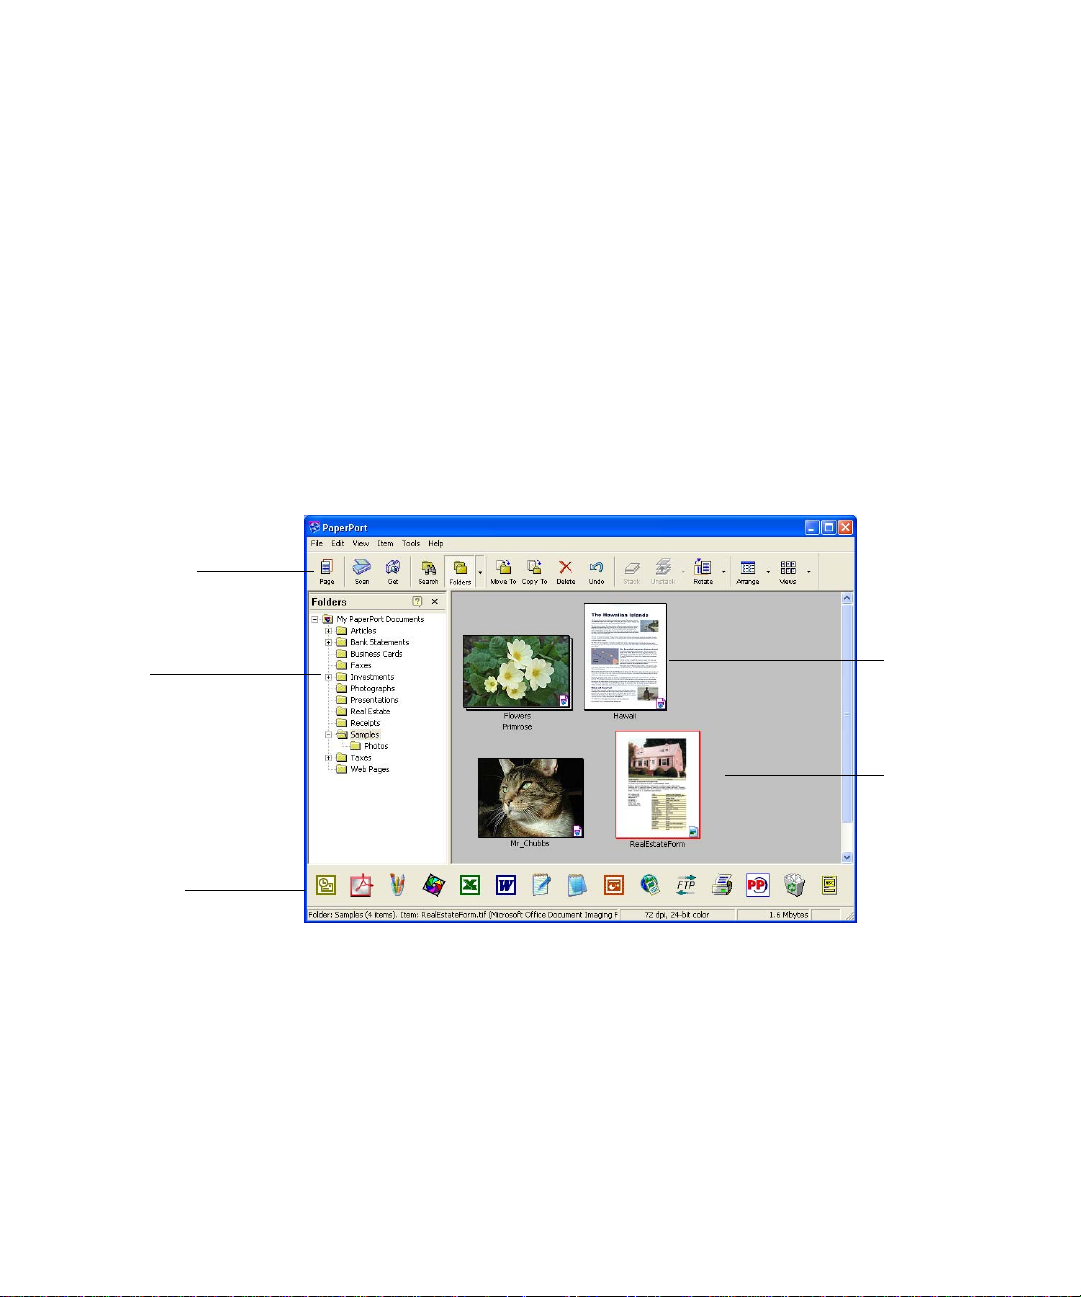
Main toolbar
S
Getting to Know PaperPort
This section introduces you to the different parts of PaperPort. Refer to the
PaperPort Help for detailed information about all these topics.
The PaperPort desktop
The PaperPort desktop appears with the Folders pane when you first start the
program. It displays your documents, as well as the tools you can use to manage
them. PaperPort offers all the tools necessary to organize, find, and use
documents and images.
Folders
end To Bar
PaperPort Getting Started Guide 11
Document
thumbnails
Desktop
 Loading...