

Page 1
USER'S MANUAL
Page 2

Foreword
Welcome
This PostScript® User’s Manual describes how to use the PostScript® Printer Software for Minolta PageWorks 20. Before reading this PostScript® User’s Manual, we recommend that you read
the User’s Manual for PageWorks 20. It explains how to set up and
operate the printer.
No part of this document may be reproduced, transmitted, transcribed, stored in a retrieval system, or translated into other languages without the express written prior consent from Minolta
Co., Ltd.
The contents of this manual are subject to change without notice.
Trademark Acknowledgments
PageWorks is a trademark of Minolta in the U.S. and Canada.
Minolta is a registered trademark of Minolta Co., Ltd.
Apple, Macintosh, and TrueType are registered trademarks of
Apple Computer Inc.
MS-DOS, Microsoft and Windows are registered trademarks of
Microsoft Corporation in the United States and/or other countries.
Adobe, PostScript and the PostScript logo are trademarks of
Adobe Systems Incorporated.
PCL is a registered trademark of Hewlett-Packard Company.
All other products or name brands are trademarks or registered
trademarks of their respective holders.
i
Page 3

Foreword
Customer Support
Customer support for all Minolta PageWorks printer product is
available 24 hours a day, seven days, a week by calling 1-800-459-
3250 (from within North America). Minolta also maintains a web
site which provides printer driver downloads, Frequently Asked
Questions and handles all e-mail requests for technical assistance
at www.minoltaprinters.com.
Please be prepared to provide the following information when contacting Minolta Customer Support:
• Model name
• Serial number
• A detailed description of the problem
• Any message displayed on the LCD panel
For questions or problems with instruction, please be prepared to
provide the following additional information:
• Brand name and model number of the computer
• Type of processor
• Type of operating system
• Amount of installed RAM
ii
Page 4

CONTENTS
Windows 95
Printer Software Overview .................................... 1
Displaying the PageWorks 20 P o stScript Printer
Software Window................................................ 2
Exiting the PageWorks 20 PostScript Printer
Software Window................................................ 3
Choosing Menu Settings..................................... 3
Common Button Operations ............................... 4
Software Settings................................................... 5
Paper..................................................................5
Device Options.................................................. 10
Contents
PostScript..........................................................13
iii
Page 5

Contents
Windows 3.1
Printer Software Overview .................................... 1
Displaying the PageWorks 20 P o stScript Printer
Software Window................................................ 2
Exiting the PageWorks 20 PostScript Printer
Software Window................................................ 3
Choosing Menu Settings..................................... 3
Common Button Operations ............................... 3
Software Settings................................................... 5
Paper..................................................................5
Features.............................................................. 8
Macintosh
Introduction ............................................................ 1
Page Setup.............................................................. 2
Print Menu Settings ............................................... 4
iv
Page 6

Windows
Windows 95
95
Page 7

Windows 95
Page 8

Windows 95
Windows 95
Printer Software Overview
The Minolta PageW orks 20 PostScript Printer Software lets you set up
your PageWorks 20 printer to provide the type of printed output you
want. Note also that such factors as the original data (data format), the
type of paper you are using, and the settings of your application
software can also affect printing results.
Windows 95
Windows 95-1
Page 9
Windows 95
Windows 95
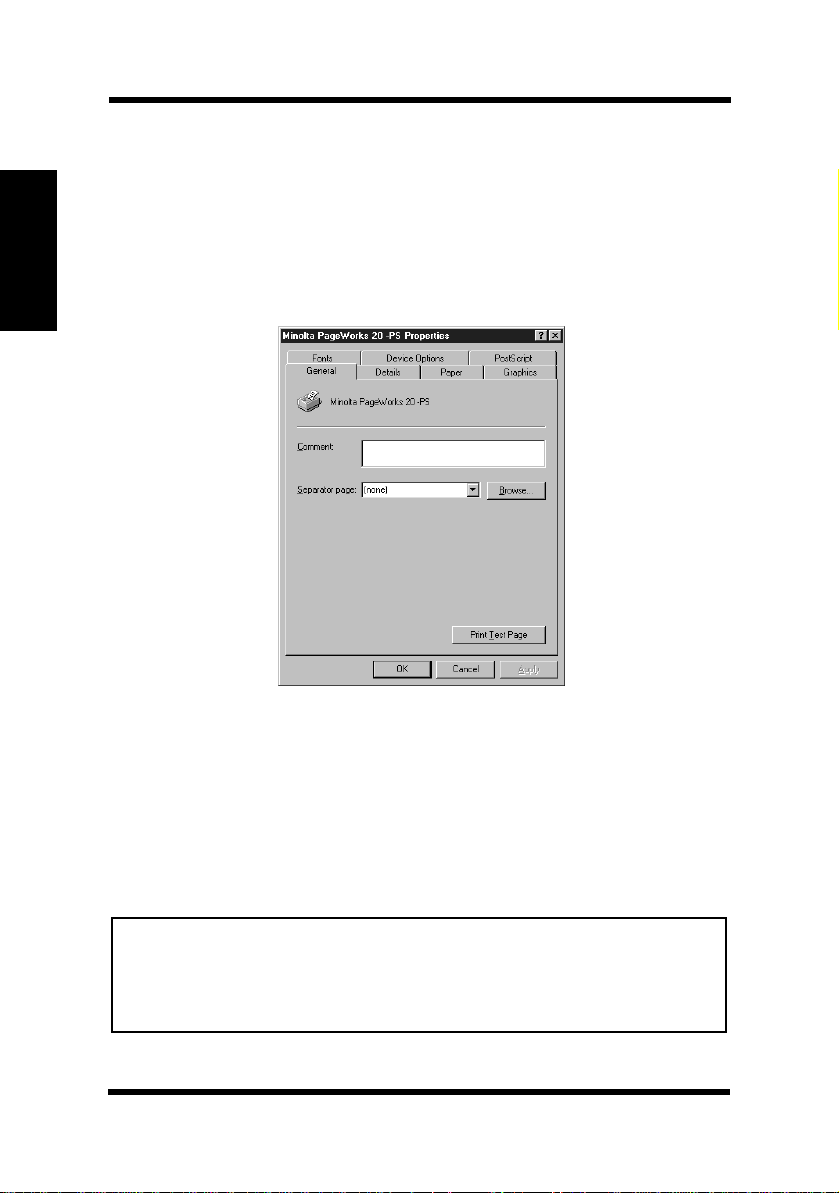
Displaying the PageWorks 20 PostScript Printer Software Window
1. Click the Start button, Settings, and then Printers to display the
Printers dialog box.
2. Click Minolta PageWorks 20 -PS to highlight i t, and then select
Properties from the File menu.
Tabs
You can move between the P ageWorks 20 Printer Software screens by
clicking on the tabs along the top of the window. These tabs let you
check the status of your printer and make various changes in its
settings. The following sections of this manual describe in detail
about how to do this.
Note
• If you install and use both PS and PCL printer software, it may
take time when switching between them. In this case, set the
Spool Settings in the Details dialog box to “Disable bi-direc
tional support for this printer”.
-
Windows 95-2
Page 10

Windows 95
Exiting the PageWorks 20 PostScript Printer Software
Window
After you are finished using the PageWorks 20 PostScript Printer
Software, you can exit it either by clicking the
by clicking the window close button in the upper-right corner of the
window.
OK or Cancel button, or
Choosing Menu Settings
The following Windows standard procedures can be used when
making settings in the printer software’s menu pages.
• Clicking an option button or name
• Clicking a check box
• Dragging the scroll box on a scroll bar
• Clicking a drop-down list box and then clicking on an item to
select it
• Holding down the [Alt] key and typing the underlined character
that represents a setting
Windows 95
See the documentation that comes with Windows 95 for details on
these and other operations.
Windows 95-3
Page 11

Windows 95
Windows 95
Common Button Operations
The following buttons appear at the bottom of each menu.
OK
Click this button to close the printer software window and send or
save all the setting changes you made to the printer.
Cancel
Click this button to close the printer software window without saving
or sending any of the changes you have made.
Apply
Click this button to send or save all the setting changes you made to
the printer, without closing the printer software windo w.
Restore Defaults
Click this button to restore settings to their original values.
Windows 95-4
Page 12
Windows 95
Software Settings
This section describes specific settings for PageWorks 20 you can
make with this printer software.
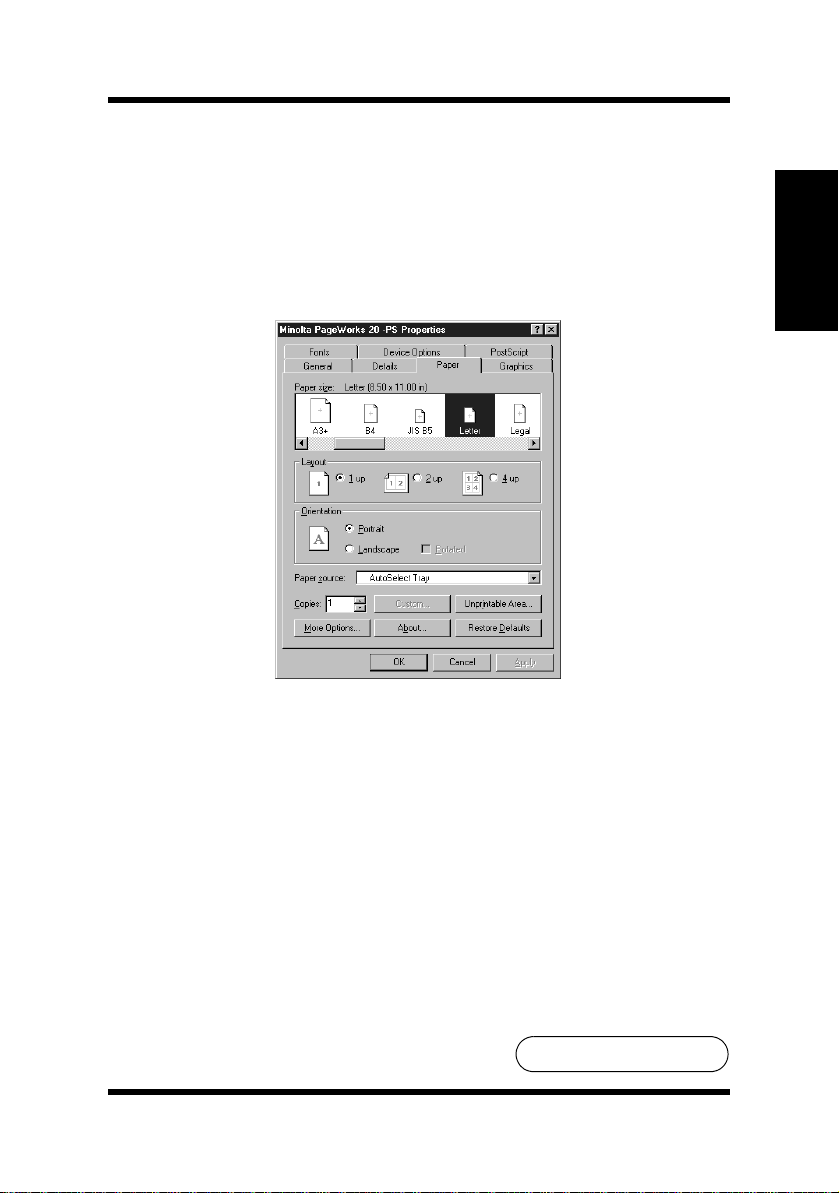
Paper
Paper size:
The Paper size setting allows you to choose from various paper and
envelope sizes of document data that are supported by your printer.
The left to right moving scroll bar at the bottom of the paper size
window allows you to view the possible paper and envelope
selections.
Windows 95
To Be Continued
Windows 95-5
▼
Page 13

Windows 95
Windows 95
Paper
• A4
• A3
• A3+
• B4
• JIS B5
• Letter
• Legal
• Ledger
• Executive
• Custom page 1
• Custom page 2
• Custom page 3
Envelope
• ISO B5
• COM10
• C5
• DL
• Monarch
Windows 95-6
Page 14

Windows 95
Custom page
The Custom button activates by selecting Custom page. Click this
button to open a dialog box that can be used to specify the paper size
for the Custom page. The paper size can be specified in either inches
or millimeters in the following ranges:
• 3.63 to 13.00” x 5.50 to 19.01”
• 92.1 to 330.2mm x 139.7 to 483.0mm
Notes
• Available paper/envelope sizes with the prohibition mark
require additional setting changes. Such setting changes might
be possible through the current Paper dialog box, such as the
paper source setting.
• When printing on both sides of paper, an envelope size (ISO B5,
COM10, C5, DL and Monarch) cannot be selected.
• When printing PS data with the custom paper setting, printing
will be changed to the Manual Feed mode.
Windows 95
To Be Continued
Windows 95-7
▼
Page 15

Windows 95
Paper source:
This setting identifies the location inside of the printer of the paper to
be used. Paper sources might include
Tray3 and Manual Feed. Paper sources that are not available to your
printer are identified by the prohibition mark.
AutoSelect Tray, Tray1, Tray2,
Windows 95
By setting the paper source to AutoSelect Tray, the printer will
automatically select the paper source according to the paper size to be
printed in the priority order of Tray 2, Tray 3 and Tray 1.
When Manual Feed is set, “MANUAL FEED” will be displayed in
the control panel for only the first page in copies. The printer will not
start printing until the On Line key is pressed. After pressing the On
Line key, the printer keeps printing until the number of copies
completes printing.
Windows 95-8
Page 16

Windows 95
More Options...
The More Options button opens a dialog box that allows you to select
whether it performs duplex printing, or media type including Plain Paper ,
Transparency, Thin and Envelope.
Printing on both sides (duplex printing):
When printing on both sides of paper, be sure to set the Duplex Unit
to “Installed” under Installable options of the Device Options dialog
box.
None
Do not perform duplex printing.
Flip on long edge
Performs duplex printing for folding along the long edge.
Flip on short edge
Performs duplex printing for folding along the short edge.
Windows 95
Paper type:
This setting selects Plain Paper, Transparency, Thin or Envelope as
the media type for Manual Feed according to
the paper to be used.
Selecting the proper media type gets the best possible result.
Windows 95-9
Page 17

Windows 95
Windows 95
Device Options
Available printer memory [in KB]:
Indicates the amount of memory used in PostScript. Usually, printer
software automatically sets a recommended size for this memory
depending on the amount of memory stored in the printer which is
entered at VM Option of the Installed Options.
Printer features:
The settings in this dialog box allow you to fine-tune the general
features of the printer to a particular document to be printed. To
modify a feature, select one of the following Printer Feature
categories:
of the corresponding options from the
Print Quality and Toner Density. Then, select from one
“Change Setting for” window.
Windows 95-10
Page 18

Windows 95
Print Quality
This setting specifies the graphics processing method.
Standard
The graphics will not be processed.
Toner save
This setting allows you to use less toner when printing.
Toner Density
Selects the density of the toner applied to the page. This setting can be
fine-adjusted in 7 different steps. The default is Medium.
Installable options:
Lists possible setting changes to the printer options. Some options
that appear in this dialog box may not necessarily be installed in your
printer and will be listed as “Not Installed”. Use the
Settings”
Duplex Unit
window to modify one of the installed options.
Registers whether or not the optional Duplex Unit has been installed.
“Change
Windows 95
Tray3
Registers whether or not the optional Third Tray Unit has been
installed.
VM Option
Use this setting to tell the printer software how much memory is
installed in the printer. The printer software will manage resources in
accordance with the amount of memory available.
To Be Continued
Windows 95-11
▼
Page 19

Windows 95
Windows 95
Note
• The printer comes with 4MB of installed memory from the factory.
• When installing a PS-DIMM, you may need to install additional
expansion memory according to your particular needs. See the
table below.
Recommended Total Memory Size
A4/Letter A3/Ledger
PCL One side 12MB 12MB 12MB
Both sides 12MB 12MB 12MB
PS One side 12MB 16MB 20MB
Both sides 16MB 28MB 36MB
(310 x 483mm)
A3+
Windows 95-12
Page 20

Windows 95
PostScript
Advanced...
Click the Advanced... button to open the “Advanced PostScript
Options”
performance, howev e r the def ault settings should be sufficient for all
general purposes of the printer.
window. These settings are provided to optimize printer
Windows 95
To Be Continued
To Be Continued
Windows 95-13
▼
▼
Page 21

Windows 95
Windows 95
Send CTRL+D before/after job
Use these settings to enable the printer to activate a reset either before
or after a document has been printed.
Note
• When the printer you are using is in a network environment, do
not click these check boxes.
Windows 95-14
Page 22

Windows
Windows 3.1
3.1
Windows 3.1
Page 23

Windows 3.1
Page 24

Windows 3.1
Windows 3.1
Printer Software Overview
The Minolta PageW orks 20 PostScript Printer Software lets you set up
your PageWorks 20 printer to provide the type of printed output you
want. Note also that such factors as the original data (data format), the
type of paper you are using, and the settings of your application
software can also affect printing results.
Windows 3.1
Windows 3.1-1
Page 25

Windows 3.1
Windows 3.1
Displaying the PageWorks 20 PostScript Printer Software Window
1. Turn on your computer and start up Windows 3.1.
2. From the Program Manager, double-click Main to display the
Main group, and then double-click
Control Panel dialog box.
3. Double-click Printers to display the printers dialog box.
4. Select Minolta PageWorks 20 -PS from the Installed printers
and then click
Setup....
Control Panel to display the
Tabs
You can move between the P ageWorks 20 PostScript Printer Software
screens by clicking on the tabs along the top of the window. These
tabs let you check the status of your printer and make various changes
in its settings. The following sections of this manual describe in detail
about how to do this.
Windows 3.1-2
Page 26

Windows 3.1
Exiting the PageWorks 20 PostScript Printer Software Window
After you are finished using the PageWorks 20 PostScript Printer
Software, you can exit it either by clicking the
or by clicking the window close button in the upper-left corner of the
window.
OK or Cancel button,
Choosing Menu Settings
The following Windows standard procedures can be used when
making settings in the printer software’s menu pages.
• Clicking an option button or name
• Clicking a check box
• Dragging the scroll box on a scroll bar
• Clicking a drop-down list box and then clicking on an item to
select it
• Holding down the [Alt] key and typing the underlined character
that represents a setting
See the documentation that comes with Windows 3.1 for details on
these and other operations.
Windows 3.1
Common Button Operations
The following buttons appear at the bottom of all the driver menus.
OK
Click this button to close the printer software window and send or
save all the setting changes you made to the printer.
Cancel
Click this button to close the printer software window without sending
or saving any of the changes you have made.
To Be Continued
Windows 3.1-3
▼
Page 27

Windows 3.1
Windows 3.1
Help
Click this button to view information regarding the immediate
window and its function(s).
About
Click this button for various copy right information.
Windows 3.1-4
Page 28
Windows 3.1
Software Settings
This section describes specific settings for PageWorks 20 you can
make with this printer software.
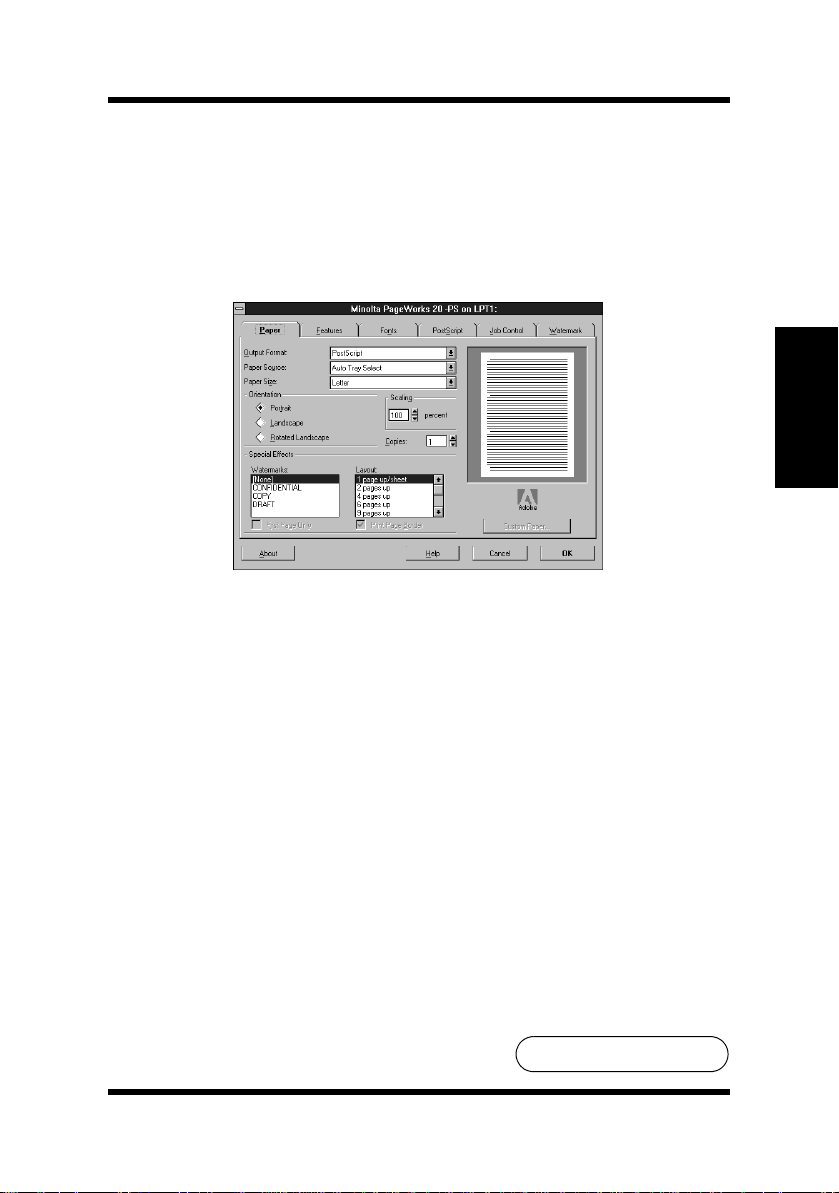
Paper
Paper Source:
This window displays the currently selected source of paper for the
printer. Click on the arrow to the right of the window to display the
paper tray options or to change the currently selected paper source.
Make sure that the selected tray contains the correct size of paper.
Windows 3.1
By setting the paper source to Auto Tray Select, the printer will
automatically select the paper source according to the paper size to be
printed in the priority order of Tray 2, Tray 3 and Tray 1.
When Manual Feeder is set, “MANUAL FEED” will be displayed in
the control panel for only the first page in copies. The printer will not
start printing until the On Line key is pressed. After pressing the On
Line key, the printer keeps printing until the number of copies
completes printing.
To Be Continued
Windows 3.1-5
▼
Page 29

Windows 3.1
Paper Size:
This window shows the currently selected paper size of document
data being used for printing. The pull-down menu of possible paper
sizes is displayed by clicking once on the arrow to the right of the
window. Make sure that the selected tray contains the correct size of
paper.
Windows 3.1
Paper
• A4
• A3
• A3+
• B4
• JIS B5
• Letter
• Legal
• Ledger
• Executive
• Custom paper 1
• Custom paper 2
• Custom paper 3
Envelope
• ISO B5
• COM10
• C5
• DL
• Monarch
Windows 3.1-6
Page 30

Windows 3.1
Custom Paper
The Custom Paper button is activated by selecting Custom paper.
Click this button to open a dialog box that can be used to specify the
paper size for the Custom paper. The paper size can be specified in
either inches or millimeters in the following ranges:
• 3.63 to 13.00” x 5.50 to 19.01”
• 92.1 to 330.2mm x 139.7 to 483.0mm
Notes
• A3+ and available envelope sizes can be selected only when
Tray 1 or Manual Feeder is set as the paper source.
• When printing PS data with the custom paper setting, printing
will be changed to the Manual Feed mode.
Windows 3.1
Windows 3.1-7
Page 31

Windows 3.1
Features
Windows 3.1
This tab is only available if your printer supports various features or
accessories such as optional Duplex Unit.
• Duplex
• Duplex Unit
• Memory Configuration
• Tray3
• Media Type
• Print Quality
• Toner Density
Duplex:
When printing on both sides of the paper, be sure to set the Duplex
Unit to “Installed” under Installable options of the Device Options.
None
Do not perform duplex printing.
Bind long edge
Performs duplex printing for folding along the long edge.
Bind short edge
Performs duplex printing for folding along the short edge.
Windows 3.1-8
Page 32

Windows 3.1
Duplex Unit:
Registers whether or not the optional Duplex Unit has been installed.
Memory Configuration:
Use this setting to tell the printer software how much memory is
installed in the printer. The printer software will manage resources in
accordance with the amount of memory available.
Note
• The printer comes with 4MB of installed memory from the factory.
• When installing a PS-DIMM, you may need to install additional
expansion memory according to your particular needs. See the
table below.
Recommended Total Memory Size
Windows 3.1
A4/Letter A3/Ledger
PCL One side 12MB 12MB 12MB
Both sides 12MB 12MB 12MB
PS One side 12MB 16MB 20MB
Both sides 16MB 28MB 36MB
A3+
(310 x 483mm)
Tray3:
Registers whether or not the optional Third Tray Unit has been
installed.
To Be Continued
Windows 3.1-9
▼
Page 33

Windows 3.1
Print Quality:
This setting specifies the graphics processing method.
Standard
The graphics will not be processed.
Toner save
This setting allows you to use less toner when printing.
Toner Density:
Selects the density of the toner applied to the page. This setting can be
fine-adjusted in 7 different steps. The default is Medium.
Windows 3.1
Media Type:
Use this drop-down list to specify Plain Paper, Transparency, Thin or
Envelope as the output media for Manual Feed. The printer will auto-
matically make adjustments to optimize printing according to your
choice.
Windows 3.1-10
Page 34

Macintosh
Macintosh
Macintosh
Page 35

Macintosh
Page 36

Macintosh
Macintosh
Introduction
The Minolta PageWorks 20 PostScript Printer Software allows you
take full advantage of your printer’s features and capabilities using
your computer running the Mac OS.
This section explains the software’s features.
Macintosh
Mac-1
Page 37

Macintosh
Macintosh
Page Setup
This section describes specific settings for PageWorks 20 you can
make with this printer software.
Paper:
The Paper setting allows you to choose from various paper sizes of
document data that are supported by the printer. The paper sizes are:
A4, A3, A3+, B4, JIS B5, Letter, Legal, Ledger, Executive, DL, C5,
Monarch, ISO B5, COM10 and Custom.
Notes
• When printing on both sides of paper, an envelope size (ISO B5,
COM10, C5, DL and Monarch) cannot be selected.
• When printing PS data with the custom paper setting, printing
will be changed to the Manual Feed mode.
Help
Use this button to view information regarding the immediate window
and its function(s).
Mac-2
Page 38

Macintosh
Options
Help
Use this button to view information regarding the immediate window
and its function(s).
Macintosh
Mac-3
Page 39

Macintosh
Macintosh
Print Menu Settings
This section describes specific settings for PageWorks 20 you can
make with this printer software.
Paper Source:
Select “All” to print all documents using paper from the same tray.
Select “First from” to print only the first page of a document from a
specified tray.
To continue printing the following pages of the document from a tray
other than the “First from:” tray, specify the desired tray from the
“Remaining from:” options.
By setting the paper source to Auto Select, the printer will
automatically select the paper source according to the paper size to be
printed in the priority order of Tray 2, Tray 3 and Tray 1.
When Manual Feeder is set, “MANUAL FEED” will be displayed in
the control panel for only the first page in copies. The printer will not
start printing until the On Line key is pressed. After pressing the On
Line key, the printer keeps printing until the number of copies
completes printing.
Help
Use this button to view information regarding the immediate window
and its function(s).
Mac-4
Page 40

Macintosh
Options
Duplex:
When printing on both sides of the paper, be sure to set the Duplex Unit
to “Installed” in the Installable Options.
Printer’s default
Depends on the user’s printer setting.
None
Do not perform duplex printing.
Bind Long-Edge
Performs duplex printing for folding along the long edge.
Bind Short-Edge
Performs duplex printing for folding along the short edge.
Macintosh
Print Quality:
This setting specifies the graphics processing method.
Printer’s default
Depends on the user’s printer setting.
Standard
The graphics will not be processed.
Toner save
This setting allows you to use less toner when printing.
To Be Continued
▼
Mac-5
Page 41

Macintosh
Macintosh
Toner Density:
Selects the density of the toner applied to the page. This setting can be
fine-adjusted in 7 dif f ere nt step s. The default is Medium.
Media Type:
Use this drop-down list to specify Plain Paper, Transparency, Thin or
Envelope as the output media for Manual Feed. The printer will
automatically make adjustments to optimize printing according to your
choice.
Help
Use this button to vie w informatio n regarding the immediate windo w an d
its function(s).
Mac-6
Page 42

 Loading...