

Page 1

PageScope
Net Care Device Manager Ver. 3.0
User’s Guide
Net Care Device Manager
Page 2

Contents
1 Summary
1.1 Introduction ........................................................................................1-1
1.1.1 About Device Manager ...................................................................1-1
Basic and extended functions........................................................ 1-1
Configuration of Enterprise Suite ................................................... 1-2
1.1.2 Add-on (extension) applications .....................................................1-2
1.2 Function descriptions........................................................................1-3
1.2.1 Device List ......................................................................................1-3
1.2.2 User List ......................................................................................... 1-3
1.2.3 Counter Reader ..............................................................................1-3
1.2.4 Server Settings ...............................................................................1-4
1.2.5 Admin Console ...............................................................................1-4
1.3 System requirements.........................................................................1-5
1.3.1 Client computer ..............................................................................1-5
1.4 General setup operation....................................................................1-6
Device Manager settings................................................................ 1-6
1.4.1 Administrator settings ....................................................................1-6
1.4.2 When the date is changed on the computer ..................................1-6
2 Basic operations
2.1 Logging on to Enterprise Suite .........................................................2-1
2.1.1 Accessing the Login page ..............................................................2-2
Accessing the Login page .............................................................. 2-2
Address of Login page ................................................................... 2-2
2.1.2 Logging on as a system administrator ...........................................2-3
Logon procedure ............................................................................ 2-3
2.1.3 Logging on as a general user .........................................................2-5
Logon procedure ............................................................................ 2-5
2.2 Basic operations ................................................................................2-7
2.2.1 Top Menu page ..............................................................................2-7
2.2.2 Pages for the functions ..................................................................2-9
Device Manager i
Page 3

3 Device List
3.1 Device List ..........................................................................................3-1
3.1.1 Available operations in the Device List page ..................................3-1
Displaying the device list................................................................ 3-2
Status icon...................................................................................... 3-3
3.1.2 Displaying the device list ................................................................3-4
Group view ..................................................................................... 3-4
Subnet view.................................................................................... 3-5
3.1.3 Managing device information .........................................................3-6
Managing system information ........................................................ 3-8
Managing network information..................................................... 3-10
Managing user authentication settings ........................................ 3-11
Restarting the device.................................................................... 3-12
Releasing a device problem ......................................................... 3-12
3.1.4 Specifying display settings for the device list ..............................3-13
Adding display items .................................................................... 3-14
Deleting display items .................................................................. 3-15
Specifying the display order......................................................... 3-15
3.1.5 Filtering (narrowing) ......................................................................3-16
3.1.6 Exporting data ..............................................................................3-17
Editing the exported file................................................................ 3-18
Editing a text or CSV file............................................................... 3-18
3.2 Counter List ......................................................................................3-20
3.2.1 Available operations in the Counter List page ..............................3-20
3.2.2 Displaying the counter list ............................................................3-21
Group view ................................................................................... 3-21
Subnet view.................................................................................. 3-22
3.2.3 Specifying settings for displaying the counter list ........................ 3-23
Adding display items .................................................................... 3-24
Deleting display items .................................................................. 3-25
Specifying the display order......................................................... 3-25
3.2.4 Filtering (narrowing) ......................................................................3-25
3.2.5 Exporting counter data .................................................................3-26
3.3 Counter Template List.....................................................................3-27
3.4 Sending a counter notification........................................................3-28
3.4.1 Functions available in Counter Notification page .........................3-28
Device Manager ii
Page 4

3.4.2 Counter notification setting ..........................................................3-29
Registering counter notification.................................................... 3-29
Editing E-mail for counter notification .......................................... 3-31
Editing a template......................................................................... 3-32
Editing counter notification........................................................... 3-32
Deleting counter notification......................................................... 3-33
3.5 Multi-Setting.....................................................................................3-34
3.5.1 Using Multi-Setting .......................................................................3-34
3.5.2 Available operations in the Multi-Setting page .............................3-35
3.5.3 Specifying items for the template .................................................3-36
3.5.4 Importing device data to the template .........................................3-37
Checking the result of the operation to obtain the device data ... 3-38
3.5.5 Copying the template information to the devices ........................3-39
Checking the result of the operation to specify the device
data............................................................................................... 3-42
3.5.6 Checking the multi-setting result ..................................................3-43
3.5.7 Editing items for the template ......................................................3-45
Editing the registered template .................................................... 3-45
Editing the template by copying................................................... 3-46
3.5.8 Checking the information for the registered template .................. 3-47
3.5.9 Schedule Settings ........................................................................3-47
3.5.10 Importing the Multi-Setting Template ...........................................3-49
Creating a file to be imported....................................................... 3-50
Checking the import result ........................................................... 3-53
3.5.11 Exporting a multi-setting template ............................................... 3-54
3.6 Sending a device status notification ..............................................3-56
3.6.1 Available operations in the Device Status Notification page ........ 3-57
3.6.2 Specifying the device status notification ......................................3-58
Registering the device status notification .................................... 3-58
Editing E-mail for device status notification ................................. 3-60
Editing a template......................................................................... 3-61
Editing the device status notification ........................................... 3-63
Deleting a device status notification............................................. 3-64
3.7 Multi-Setting of Administrator Password ......................................3-65
3.7.1 Multi-setting of administrator password ......................................3-65
3.7.2 The result of administrator password multi-setting ......................3-66
3.7.3 Configuration Reminder ...............................................................3-67
Device Manager iii
Page 5

3.8 Firmware Update Setting ................................................................3-68
3.8.1 Available operations in firmware update setting ..........................3-68
Update status icons ..................................................................... 3-69
3.8.2 Proxy settings ...............................................................................3-70
3.8.3 Update setting ..............................................................................3-71
3.8.4 Checking the update history ........................................................3-72
3.9 Setting for Sending IC Card Info.....................................................3-73
3.9.1 Available operations in the Setting for Sending IC Card Info
page ..............................................................................................3-73
3.9.2 Checking the Result of Sending IC Card Info ...............................3-75
3.10 Device Auto Discovery.....................................................................3-76
3.10.1 Available operations in the Device Auto Discovery page ............. 3-76
3.10.2 Specifying a network search range ..............................................3-80
Adding an SNMP broadcast discovery ........................................ 3-80
Adding an SNMP unicast discovery............................................. 3-81
Adding an SNMP multicast discovery.......................................... 3-83
3.10.3 Specifying a SNMP setting ........................................................... 3-84
Adding SNMPv1 settings ............................................................. 3-84
Adding SNMPv3 settings ............................................................. 3-85
3.10.4 Deleting settings ...........................................................................3-85
3.10.5 Automatically searching for the devices .......................................3-86
Searching for the devices immediately ........................................ 3-86
Checking the search status or results .......................................... 3-87
Automatically performing periodic searches................................ 3-88
3.10.6 Importing a search range .............................................................3-88
Creating a file to be imported....................................................... 3-89
Checking the import result ........................................................... 3-91
3.10.7 Exporting search condition data ..................................................3-93
3.10.8 Setting for Automatically Putting Device in Device Group ...........3-94
Adding a new setting for Automatically Putting Device
in Device Group............................................................................ 3-95
Editing a setting for Automatically Putting Device in Device
Group............................................................................................ 3-98
3.11 Manual Device Registration............................................................3-99
3.11.1 Available operations in the Manual Device Registration page ..... 3-99
3.11.2 Device Single Registration ..........................................................3-102
Device Manager iv
Page 6

3.11.3 Device Batch Registration ..........................................................3-103
Downloading an import file format ............................................. 3-104
Creating a file to be imported..................................................... 3-104
Checking the import result ......................................................... 3-112
3.11.4 Virtual Device Registration ......................................................... 3-114
Downloading an import file format ............................................. 3-116
Creating a file to be imported..................................................... 3-117
Checking the import result ......................................................... 3-119
3.12 Device Management ......................................................................3-120
3.12.1 Available operations in the Device Management screen ............3-120
Manage icon............................................................................... 3-122
3.12.2 Device Management ...................................................................3-123
Including the registered device in the targets of
management............................................................................... 3-123
Excluding registered devices from the targets of
management............................................................................... 3-123
Deleting devices from the device management list.................... 3-123
3.13 Device Information Settings..........................................................3-124
3.13.1 Available operations in the Device Information Settings page ...3-124
Confirming communication result .............................................. 3-126
3.13.2 Editing device information ..........................................................3-127
3.13.3 Editing information of multiple devices ......................................3-134
3.14 Device Group Settings...................................................................3-136
3.14.1 Available operations in the Device Group page .........................3-136
3.14.2 Device Group Settings ...............................................................3-137
Registering a device group......................................................... 3-137
Editing a device group................................................................ 3-138
Deleting a device group.............................................................. 3-139
3.14.3 Importing device group data ......................................................3-140
Creating a file to be imported..................................................... 3-141
Checking the import result ......................................................... 3-143
3.14.4 Exporting device group data ......................................................3-144
3.15 Administrator Settings...................................................................3-145
3.15.1 Available operations in the Administrator Settings page ............3-145
3.15.2 Specifying the administrator .......................................................3-146
Adding an administrator ............................................................. 3-146
Deleting an administrator ........................................................... 3-147
Device Manager v
Page 7

3.16 Device Group Manager Settings...................................................3-148
3.16.1 Available operations in the Device Group Manager Settings
3.16.2 Specifying an administrator in the device group ........................ 3-149
3.17 Filter Setting ...................................................................................3-152
3.17.1 Functions available in Filter Setting page ...................................3-152
3.17.2 Specifying the filter .....................................................................3-153
3.18 Subnet Setting................................................................................3-156
3.18.1 Functions available in Subnet Setting page ...............................3-156
3.18.2 Specifying subnet settings .........................................................3-157
3.18.3 Importing subnet data ................................................................3-158
3.18.4 Exporting subnet data ................................................................3-162
3.19 Detail Settings ................................................................................3-164
page ............................................................................................3-148
Adding a device group manager ................................................ 3-149
Deleting a device group manager .............................................. 3-151
Registering a filter....................................................................... 3-153
Editing a filter.............................................................................. 3-154
Deleting a filter............................................................................ 3-155
Registering a subnet................................................................... 3-157
Editing a subnet.......................................................................... 3-157
Deleting a subnet........................................................................ 3-158
Creating a file to be imported..................................................... 3-159
Checking the import result ......................................................... 3-161
4 User List
4.1 User List..............................................................................................4-1
4.1.1 Available operations in the User List page .....................................4-1
4.1.2 Viewing the user list ........................................................................4-2
4.1.3 Specifying display settings for the user list ....................................4-3
4.1.4 Registering a new user ...................................................................4-3
4.1.5 Editing user information .................................................................. 4-4
4.1.6 Editing information of multiple users ..............................................4-5
4.1.7 Deleting a user ................................................................................ 4-6
4.1.8 Importing data ................................................................................4-6
4.1.9 Importing from a file .......................................................................4-7
4.1.10 Creating a file to be imported .........................................................4-8
4.1.11 Checking the import result ...........................................................4-11
Device Manager vi
Page 8

4.1.12 Importing from a device ...............................................................4-13
Displaying the list of devices to be imported ............................... 4-13
Selecting the user to be imported ................................................ 4-15
4.1.13 Checking the import result ...........................................................4-16
4.1.14 Exporting data ..............................................................................4-17
4.2 Account Track List...........................................................................4-19
4.2.1 Available operations in the Account Track List page ...................4-19
4.2.2 Displaying the account track list ..................................................4-20
4.2.3 Registering a new account track ..................................................4-21
4.2.4 Editing an account track ...............................................................4-22
4.2.5 Deleting an account track .............................................................4-22
4.2.6 Importing data ..............................................................................4-22
4.2.7 Importing from a file .....................................................................4-23
4.2.8 Creating a file to be imported .......................................................4-24
4.2.9 Checking the import result ...........................................................4-27
4.2.10 Importing from a device ...............................................................4-29
Displaying the list of devices to be imported ............................... 4-29
Selecting the account track to be imported................................. 4-31
4.2.11 Checking the import result ...........................................................4-32
4.2.12 Exporting data ..............................................................................4-33
4.3 User Group Settings ........................................................................4-36
4.3.1 Registering and editing groups ....................................................4-36
Specifying display settings for the group list ............................... 4-37
4.3.2 Deleting a group ...........................................................................4-38
4.4 Account Group Settings ..................................................................4-39
4.4.1 Registering and editing groups ....................................................4-39
Specifying display settings for the group list ............................... 4-40
4.4.2 Deleting a group ...........................................................................4-41
4.5 Administrator Settings.....................................................................4-42
4.5.1 Specifying the administrator .........................................................4-42
4.5.2 Adding an administrator ............................................................... 4-42
4.5.3 Deleting an administrator .............................................................4-44
4.6 Changing a password......................................................................4-45
4.7 Detail Settings ..................................................................................4-46
Device Manager vii
Page 9

5 Counter Reader
5.1 Counter Information...........................................................................5-2
5.1.1 Selecting the device ....................................................................... 5-2
5.1.2 Selecting a time period ...................................................................5-3
5.1.3 Displaying the result .......................................................................5-4
Exporting ........................................................................................ 5-5
5.2 Initial settings .....................................................................................5-7
5.2.1 Device Management .......................................................................5-7
5.2.2 Counter Collection Settings .........................................................5-10
5.3 Option................................................................................................5-13
5.3.1 Administrator Settings ..................................................................5-13
Adding an administrator ............................................................... 5-14
Deleting an administrator ............................................................. 5-15
5.3.2 Counter Collection Results ........................................................... 5-16
6 Server Settings
6.1 Administrator Settings.......................................................................6-1
6.2 E-mail Server Settings.......................................................................6-2
6.3 Display Settings..................................................................................6-4
6.4 Application Information.....................................................................6-5
6.5 License Management ........................................................................6-6
6.5.1 License Types .................................................................................6-7
Trial Licenses.................................................................................. 6-7
Regular Licenses ............................................................................ 6-7
6.5.2 Available operations in License Management page ....................... 6-8
License Management page (Online)............................................... 6-8
License Management page (Offline)............................................. 6-10
6.5.3 Registering trial licenses (Online) ..................................................6-11
Trial License Registration page (Online) ....................................... 6-12
6.5.4 Registering trial licenses (Offline) .................................................6-13
Trial license registration flow ........................................................ 6-13
Exporting the license authentication file with Enterprise Suite .... 6-13
Performing license authentication in the Web page for license
authentication............................................................................... 6-14
Importing the license authentication result file to Enterprise
Suite.............................................................................................. 6-14
Trial License Registration (Offline) page....................................... 6-15
License Confirmation (File Import) page....................................... 6-16
Device Manager viii
Page 10

License Registration (File Import) page........................................ 6-17
6.5.5 Registering regular licenses (Online) ............................................6-18
License Confirmation page........................................................... 6-19
License Registration page............................................................ 6-20
6.5.6 Registering regular licenses (Offline) ............................................6-21
License registration flow............................................................... 6-21
Exporting the license authentication file with Enterprise Suite .... 6-21
Performing license authentication in the Web page for license
authentication............................................................................... 6-22
Importing the license authentication result file to Enterprise
Suite.............................................................................................. 6-23
License Confirmation (offline) page.............................................. 6-24
6.5.7 Upgrading the application version ...............................................6-25
6.5.8 Deleting licenses (Online) .............................................................6-25
6.5.9 Deleting licenses (Offline) .............................................................6-26
License deletion flow.................................................................... 6-26
Deleting Enterprise Suite licenses ................................................ 6-26
Updating license information in the Web page for license
authentication............................................................................... 6-27
6.6 Support Device Information............................................................6-28
6.7 Version information..........................................................................6-29
7 Using Admin Console
7.1 Starting and logging on to Admin Console......................................7-1
Starting and logging on to Admin Console .................................... 7-1
7.2 Starting and stopping the server......................................................7-3
Stopping Enterprise Suite............................................................... 7-3
Starting Enterprise Suite................................................................. 7-4
7.3 Database Settings..............................................................................7-5
7.4 Proxy Settings ....................................................................................7-7
7.5 Server Address...................................................................................7-8
7.5.1 Available operations in the Server Address page ........................... 7-9
7.5.2 Network environment and setting items .......................................7-11
When the server computer automatically acquires
the IP address .............................................................................. 7-11
When the IP address of the server computer is fixed .................. 7-11
7.6 Backup ..............................................................................................7-13
7.7 Restore..............................................................................................7-17
7.8 Changing a password......................................................................7-20
Device Manager ix
Page 11

7.9 Job log settings................................................................................7-21
8 Setting for each purpose
8.1 Automatically creating (registering) a list of devices to
be managed ........................................................................................8-1
Automatically registering a device.................................................. 8-1
8.2 Registering (adding) devices not connected to the network.........8-2
Registering devices not connected to the network........................ 8-2
8.3 Immediately notifying a status change (error) in a managed
device ..................................................................................................8-3
Setting a device status notification ................................................ 8-3
8.4 Collectively changing the settings of managed devices................8-4
Multi-setting.................................................................................... 8-4
8.5 Receiving the usage status (counter information) of a managed
device as an electronic file................................................................8-5
Counter notification setting ............................................................ 8-5
8.6 Registering a user..............................................................................8-6
Registering a user........................................................................... 8-6
8.7 Checking counter information of a managed device .....................8-7
Displaying counter information....................................................... 8-7
8.8 Registering licenses for each application .......................................8-8
When connecting your computer to Internet:................................. 8-8
When not connecting your computer to Internet: .......................... 8-8
8.9 Saving a registered database ...........................................................8-9
Backing up a database................................................................... 8-9
Restoring a database ..................................................................... 8-9
8.10 Using Enterprise Suite Terminal.....................................................8-10
Registering a device ..................................................................... 8-10
Associating Enterprise Suite Terminal with a device.................... 8-10
9 Troubleshooting
9.1 Problems related to logging..............................................................9-1
9.2 Problems related to page display.....................................................9-2
9.3 Problems related to Device List........................................................9-3
9.4 Problems related to User List ...........................................................9-5
9.5 Problems related to Counter Reader ...............................................9-6
Device Manager x
Page 12
About this product
Device Manager is a utility software designed to centrally manage the
configuration and status check of MFPs on the network as well as user
information. With Device Manager, usage status of multiple MFPs and
printers can be checked in real time via a Web browser. It also allows for
multi-setting of various items, and automatic notification of MFP status
information and counter data.
Installing add-on (extension) applications to Device Manager will allow you
to use various functions in conjunction with the device.
Abbreviation of product names
This manual describes product names with the following abbreviations.
Product name Abbrev.
KONICA MINOLTA PageScope Enterprise
Suite
KONICA MINOLTA PageScope Web Connection
KONICA MINOLTA PageScope Net Care Device Manager
KONICA MINOLTA PageScope Authentication
Manager
KONICA MINOLTA PageScope Account Manager
KONICA MINOLTA PageScope My Panel
Manager
KONICA MINOLTA Gateway for Biometric Authentication Manager
KONICA MINOLTA PageScope Enterprise
Suite Terminal Professional
KONICA MINOLTA PageScope Enterprise
Suite Terminal UltraLight
Enterprise Suite
Web Connection
Device Manager
Authentication Manager
Account Manager
My Panel Manager
Gateway for Biometric Authentication Manager
Enterprise Suite Terminal
Device Manager xi
Page 13

Trademarks and registered trademarks
Trademark acknowledgements
KONICA MINOLTA and KONICA MINOLTA logo are registered trademarks or
trademarks of KONICA MINOLTA HOLDINGS, INC.
PageScope and bizhub are registered trademarks or trademarks of KONICA
MINOLTA BUSINESS TECHNOLOGIES, INC.
Microsoft, Excel, SQL Server, and Windows are either registered trademarks
or trademarks of Microsoft Corporation in the United States and/or other
countries.
Mozilla and Firefox are trademarks of the Mozilla Foundation.
Apple and Mac OS are trademarks of Apple Inc., registered in the U.S. and
other countries. Safari is a trademark of Apple Inc.
All other company and product names are either trademarks or registered
trademarks of their respective companies.
RSA BSAFE
RSA and BSAFE are either registered trademarks or trademarks of EMC
Corporation in the United States and/or other countries.
®
License information
This product includes RSA BSAFE Cryptographic
software from EMC Corporation.
Dialog boxes
The dialog boxes shown in this manual are those that appear in Windows XP.
!
Detail
The dialog boxes that appear in this document may differ from those that
appear on your computer, depending on the installed devices and
specified settings.
Device Manager xii
Page 14

Note
Unauthorized reproduction, translation or duplication of this document,
whether in its entirety or in part, is strictly prohibited.
The contents of this document are subject to change without notice.
Copyright © 2007 KONICA MINOLTA BUSINESS TECHNOLOGIES, INC. All
rights reserved.
Device Manager xiii
Page 15

Summary
1Summary
1.1 Introduction
1.1.1 About Device Manager
Device Manager is an application server that enables medium to large-size
organizations to centrally manage user and device information.
It works in conjunction with MFPs and printers that are connected to the
network to offer a variety of solutions, including reduced device
management costs, efficient use of the device, and enhanced security.
Operation status of multiple devices such as MFPs and printers can be
checked in real time via a Web browser, allowing for multi-setting of various
items, and the automatic notification of MFP status information and counter
data.
Basic and extended functions
Device Manager provides the following basic functions.
- Device List
Manages device information.
- User List
Manages user information.
- Counter Reader
Checks the device usage status.
- Server Settings
Configures various settings of Enterprise Suite.
- Admin Console
Allows you to configure database connection settings for Enterprise
Suite, back up and restore the database, and change the system
administrator password.
Add-on (extension) applications make various extended functions available.
The basic functions provided by Device Manager and add-on (function
expansion) applications are collectively called Enterprise Suite.
1
2
Reminder
For details on the functions, refer to "Function descriptions" on page 1-3.
Device Manager 1-1
Page 16

Summary
Configuration of Enterprise Suite
Enterprise Suite consists of the following elements.
- Database
Centrally manages device and user information.
It uses Microsoft SQL Server.
- Web applications
A Web browser is used to access Enterprise Suite. Web applications
interact with a database to transmit information necessary for a Web
browser.
Web applications use IIS (Internet Information Services).
1.1.2 Add-on (extension) applications
Add-on (extension) applications make more advanced functions available in
addition to the basic functionality of Device Manager.
2
Note
The add-on applications do not function by themselves.
1
To use add-on applications, the following prerequisites must be satisfied.
- Device Manager is active.
- Add-on applications have been installed.
- Module licenses and the required number of device licenses have been
obtained and registered. (For paid add-ons)
- Add-on applications have been enabled in the devices. (For paid add-
ons)
Device Manager 1-2
Page 17

Summary
1.2 Function descriptions
1.2.1 Device List
This function enables central setting and management of multiple devices on
the network.
- With this function, the operation status of registered devices can be
checked in real time.
- Other manufacturers' network printers can also be managed if they are
equipped with an MIB compliant with RFC1213 (MIB-II), RFC1514 (Host
Resource MIB) and RFC1759 (Printer MIB).
- The status of registered devices can be displayed in a list for any group
or subnet.
- Devices to be managed can be searched automatically, or registered
manually.
- Counter data can be checked for each registered device.
- This function obtains the setting value from a single device to fabricate a
template, and uses the template to apply the same setting conditions to
multiple devices collectively.
- From the registered users, users with Administrator privileges can be
specified.
1.2.2 User List
Register information associated with the users and account tracks.
Information can be obtained from a file or a connected device over a
network.
- From the registered users, users with Administrator privileges can be
specified.
For details, refer to "User List" on page 4-1.
Installing Authentication Manager enables you to add an administrative
function for user authentication.
For details, refer to the "Authentication Manager User's Guide".
1
1.2.3 Counter Reader
Counter information about the number of copies and printouts produced by
a registered device can be viewed.
- From the registered users, users with Administrator privileges can be
specified.
For details, refer to "Counter Reader" on page 5-1.
Installing Account Manager enables you to add a counter collection/analysis
function.
For details, refer to the "Account Manager User's Guide".
Device Manager 1-3
Page 18

Summary
1.2.4 Server Settings
Specify the basic settings for Enterprise Suite.
- Specify the necessary system administrator settings.
- Settings for e-mail functions can be specified.
- Manage the licenses for add-on applications.
For details, refer to "Server Settings" on page 6-1.
1.2.5 Admin Console
Perform operations such as starting and stopping Enterprise Suite.
Database backup or restore is also performed.
For details, refer to "Using Admin Console" on page 7-1.
1
Device Manager 1-4
Page 19

Summary
1.3 System requirements
1.3.1 Client computer
In order to access Enterprise Suite, the following environment is required.
Web browser
- Microsoft Internet Explorer 6.0 or later
- Mozilla Firefox 3.5 or later
- Apple Safari 2.0 or later (Mac OS only)
Usage notes for a Web browser
- The [Back] and [Refresh] buttons of the Web browser cannot be used.
- You may experience difficulties using the browser if the Intranet security
level is set to "Medium" or higher.
If an export file cannot be downloaded, make sure that the security level
is set to "Medium-low" or lower.
- Use UTF-8 as the character encoding for the Web browser. You may
experience difficulties using the browser if any other character encoding
is used.
- If "Image display" or style sheet is set to OFF in the Web browser, you
may experience difficulties using the browser.
- Some functions may not be available if a pop-up blocker function is used.
- Do not log on with multiple Web browsers from the same computer. You
may experience difficulties using the browser if you have logged on
multiple times.
- Do not click buttons and the like in quick succession. Doing so may affect
your use of the Web browser.
- Use the standard text size for the Web browser. If the text size is changed
from the standard size, you may not be able to select the items using your
mouse.
1
Device Manager 1-5
Page 20

Summary
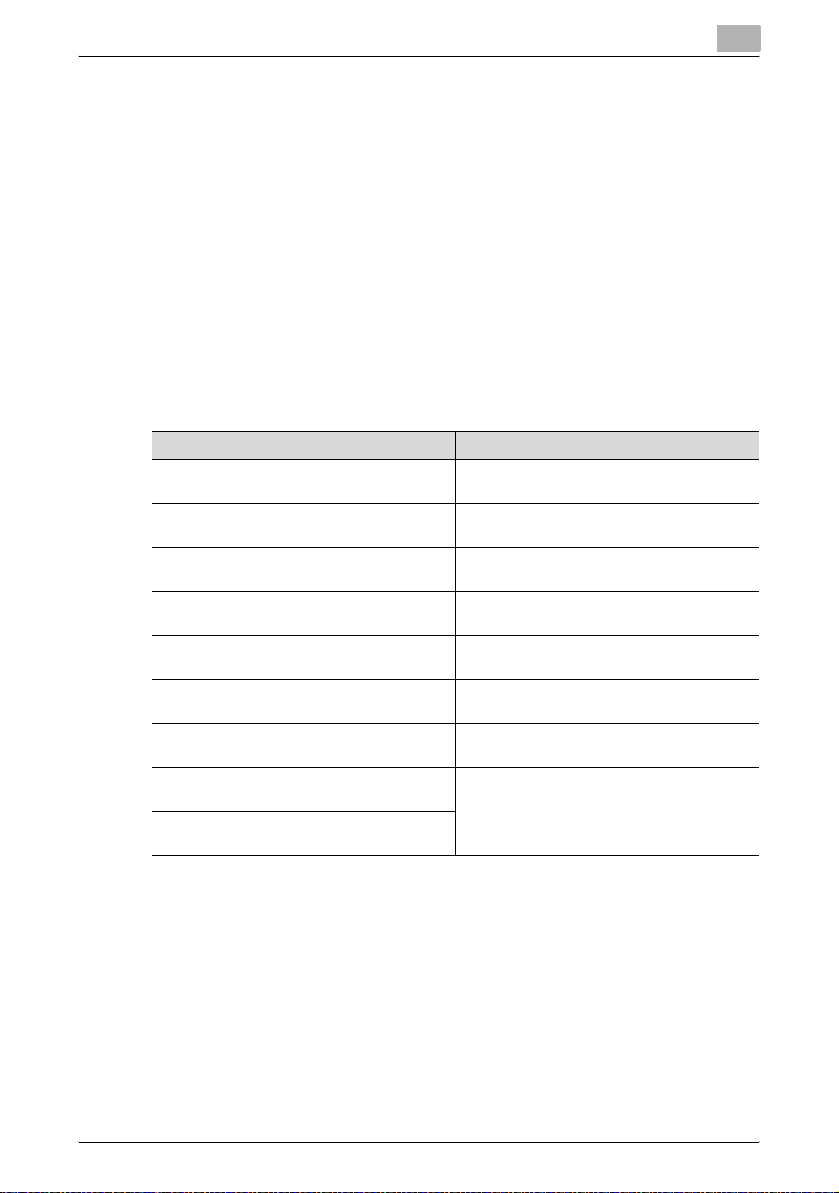
1.4 General setup operation
In order to use Device Manager, configure settings in the following order.
Device Manager settings
Log on to Device Manager as a system administrator, and then specify
settings for the following. These items are required for the E-mail notification
function and administrator settings.
Function Description
Device List Device Auto Discovery: Specify search conditions to automatically
User List User Registration: Register users. (p. 4-3)
Counter Reader Device Management: Select the device of which you want to view
Server Settings E-mail Server Settings: Select whether or not to use e-mail func-
detect devices to be registered from the network. (p. 3-76)
Manual Device Registration: Manually register devices that cannot
be found automatically. (p. 3-99)
Device Management: Specify devices to be managed from the
registered devices. (p. 3-120)
Device Information Settings: Define the communication settings
for each device. (p. 3-124)
Account Track Registration: Register account tracks. (p. 4-21)
the counter information. (p. 5-7)
Counter Collection Settings: Specify the settings for totaling and
saving counters collected from each device. (p. 5-10)
tions, such as notifications. (p. 6-2)
1
1.4.1 Administrator settings
Log on to Device Manager as a system administrator and register users.
Once user registration is completed, a general administrator for overall
Device Manager as well as administrators for each device group can be
specified.
For details on registering users, refer to "User List" on page 4-1.
1.4.2 When the date is changed on the computer
If the date is changed from Control Panel, restart the server with Admin
Console. For the procedure to restart, refer to "Starting and stopping the
server" on page 7-3.
Device Manager 1-6
Page 21

Basic operations
2 Basic operations
This chapter provides details on logging on to Device Manager as well as
basic operations.
2.1 Logging on to Enterprise Suite
This chapter provides details on logging on to Enterprise Suite.
2
Note
If the number of simultaneous TCP-level connections is limited to the
server where Enterprise Suite is running, multiple users may not be able
to log on. For example, with Windows XP Professional, ten users can
connect at the TCP level at the same time.
2
Reminder
The functions available after logging on differ for the system
administrator and the general user. For details, refer to "Logging on as a
general user" on page 2-5.
2
Device Manager 2-1
Page 22

Basic operations
2.1.1 Accessing the Login page
Access the Login page of Enterprise Suite.
Accessing the Login page
1 Start up the Web browser.
2 Type in the address of the Login page to access it.
– The address of the Login page varies depending on your network
environment or Enterprise Suite server installation method. For
details, refer to "Address of Login page" on page 2-2.
The Login page appears.
Address of Login page
Access environment Address of Login page
When accessing from a computer in which Enterprise Suite is running
When accessing from a computer that is not
the one where Enterprise Suite is running
2
http://localhost/PSES/
http://[server_name]/PSES/
2
Reminder
Replace server_name with the IP address or the name of the host on
which Enterprise Suite is running.
2
Reminder
If the setting has been changed in the IIS Setting page of the Device
Manager setup wizard during installation, replace "PSES" with the alias
name of the IIS virtual directory, which is used by Enterprise Suite.
To use an IPv6 address for a server name, enclose the address in a pair
of brackets, [ ].
If the server address is "FFFF:FFFF::FFFF", access the following
address:
"http://[FFFF:FFFF::FFFF]/PSES/" Some browsers may not allow you to
access this server address.
If SSL encryption is enabled for Enterprise Suite, type in https instead of
http.
Device Manager 2-2
Page 23
Basic operations
2.1.2 Logging on as a system administrator
Log on to Enterprise Suite as a system administrator.
Logon procedure
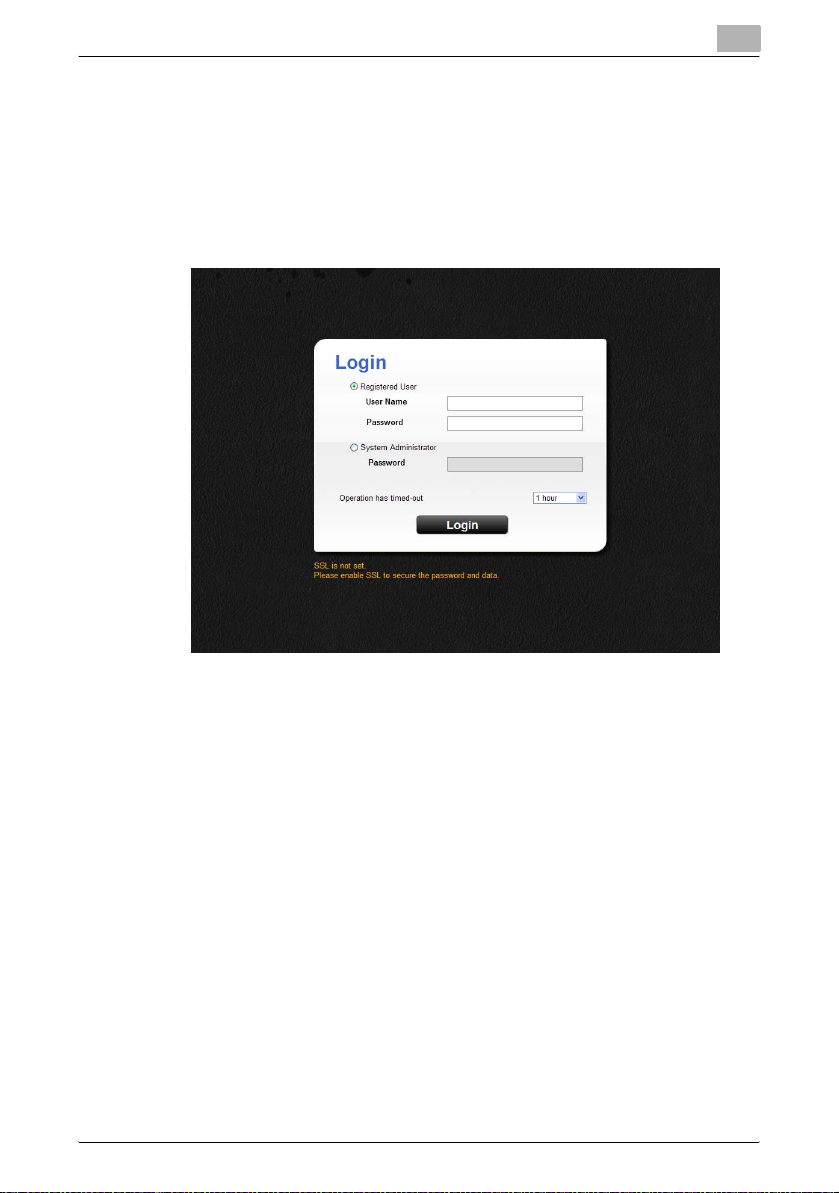
1 Access the Login page.
The Login page appears.
2
2 Select [System Administrator].
– [Operation has timed-out]: Specify the timeout setting if necessary.
Timeout occurs automatically if no operations are carried out during
the specified period.
– When the "Idle Time-out Time" value of the computer in which
Enterprise Suite is running is shorter than the time specified in
[Operation has timed-out], timeout occurs automatically if no
operations are carried out even after the time specified in "Idle
Time-out Time" has lapsed. To review and setup the "Idle Time-out
Time", see the Help of each OS.
3 In the [Password] box, type the password for the system administrator
of Enterprise Suite.
– The default system administrator password for Enterprise Suite is
Admin.
– The system administrator password for Enterprise Suite can be
changed from Admin Console. For details, refer to "Changing a
password" on page 7-20.
Device Manager 2-3
Page 24
Basic operations
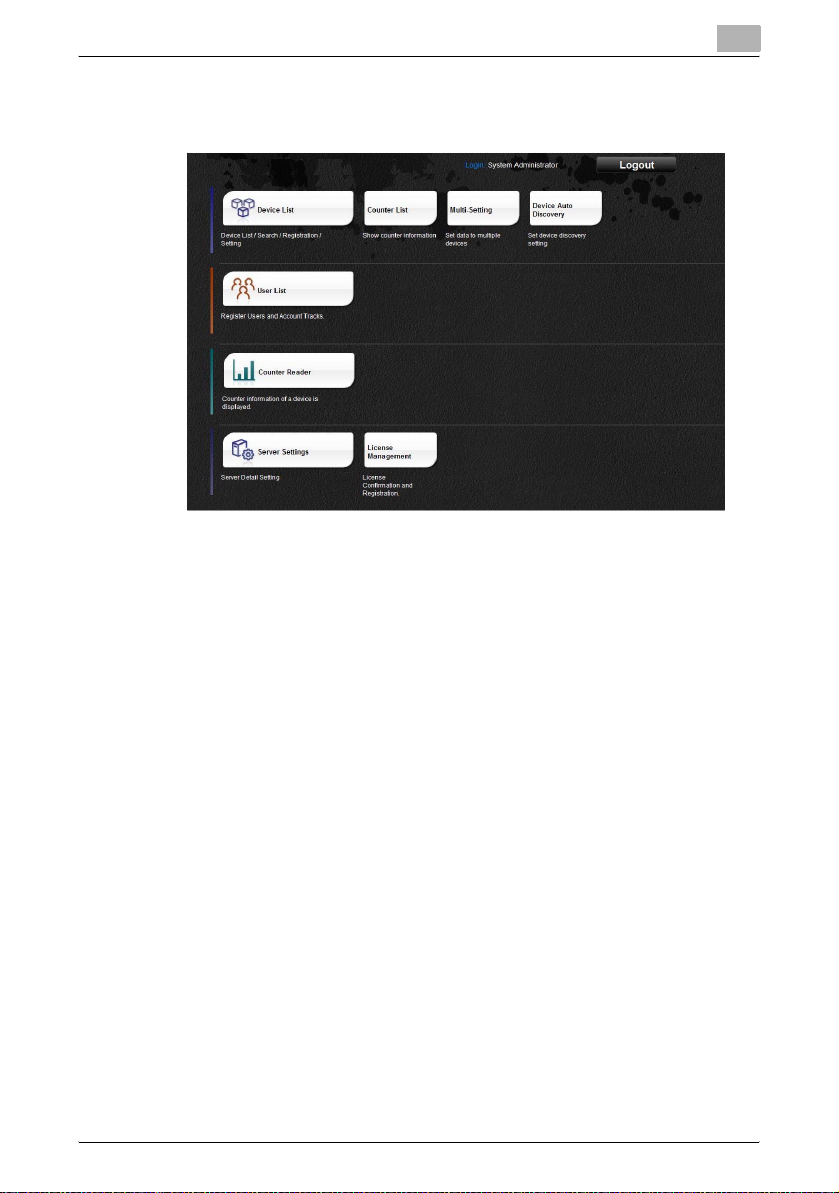
4 Click the [Login] button.
2
The Top Menu page appears.
Device Manager 2-4
Page 25
Basic operations
2.1.3 Logging on as a general user
Log on to Enterprise Suite as a general user.
The user information must first be registered with Enterprise Suite. For
details on registering users, refer to "User List" on page 4-1.
Also to make the Device Manager functions available for general users,
administrator privileges must be specified for a particular user by the system
administrator.
For details on specifying administrator privileges to general users, refer to
"Administrator Settings" on page 3-145 and "Device Group Manager
Settings" on page 3-148.
2
Reminder
When logged on as a general user, only the function for changing the
User List password is available.
Logon procedure
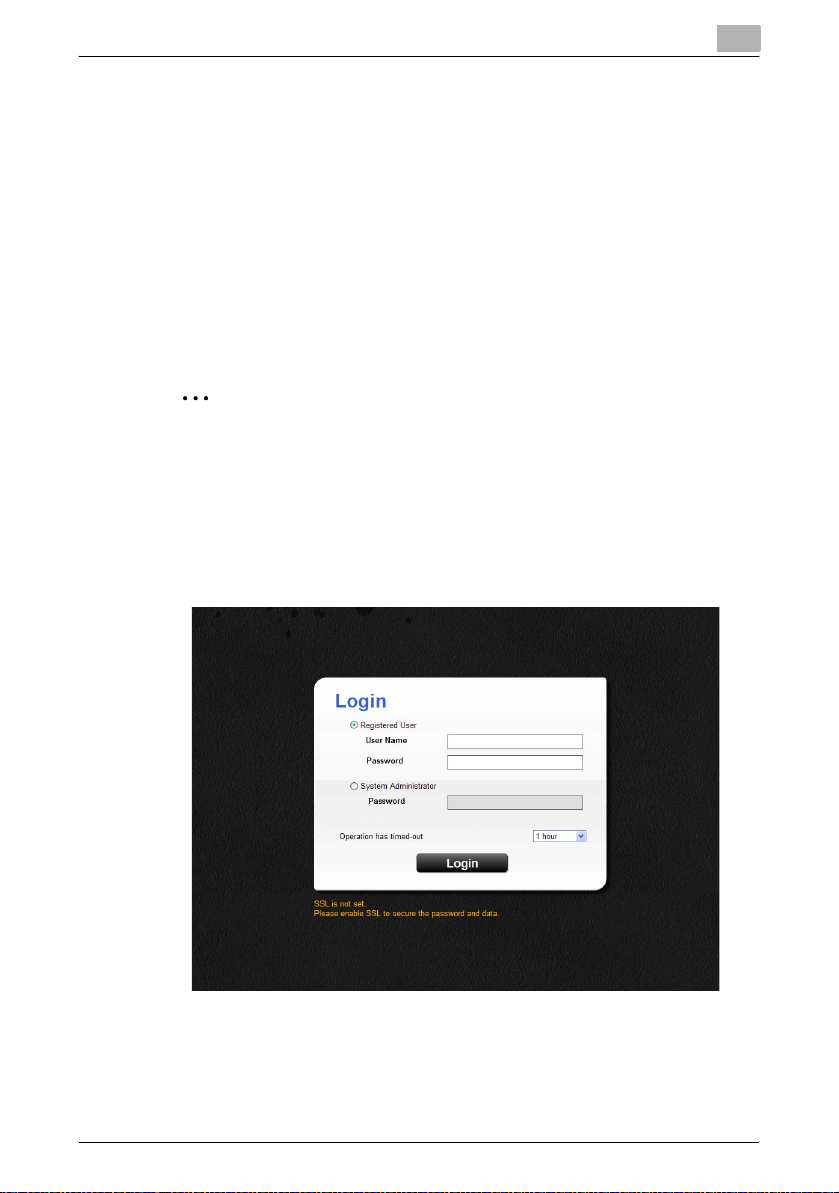
1 Access the Login page.
The Login page appears.
2
Device Manager 2-5
Page 26
Basic operations
2 Select [Registered User].
3 Enter the information for a registered user.
4 Click the [Login] button.
2
– [Operation has timed-out]: Specify the timeout setting if necessary.
Timeout occurs automatically if no operations are carried out during
the specified period.
– When the "Idle Time-out Time" value of the computer in which
Enterprise Suite is running is shorter than the time specified in
[Operation has timed-out], timeout occurs automatically if no
operations are carried out even after the time specified in "Idle
Time-out Time" has lapsed. To review and setup the "Idle Time-out
Time", see the Help of each OS.
– [User Name]: Type in the user name.
– [Password]: Type in the password.
The Top Menu page appears.
Device Manager 2-6
Page 27

Basic operations
2.2 Basic operations
The basic operation of Device Manager is described below.
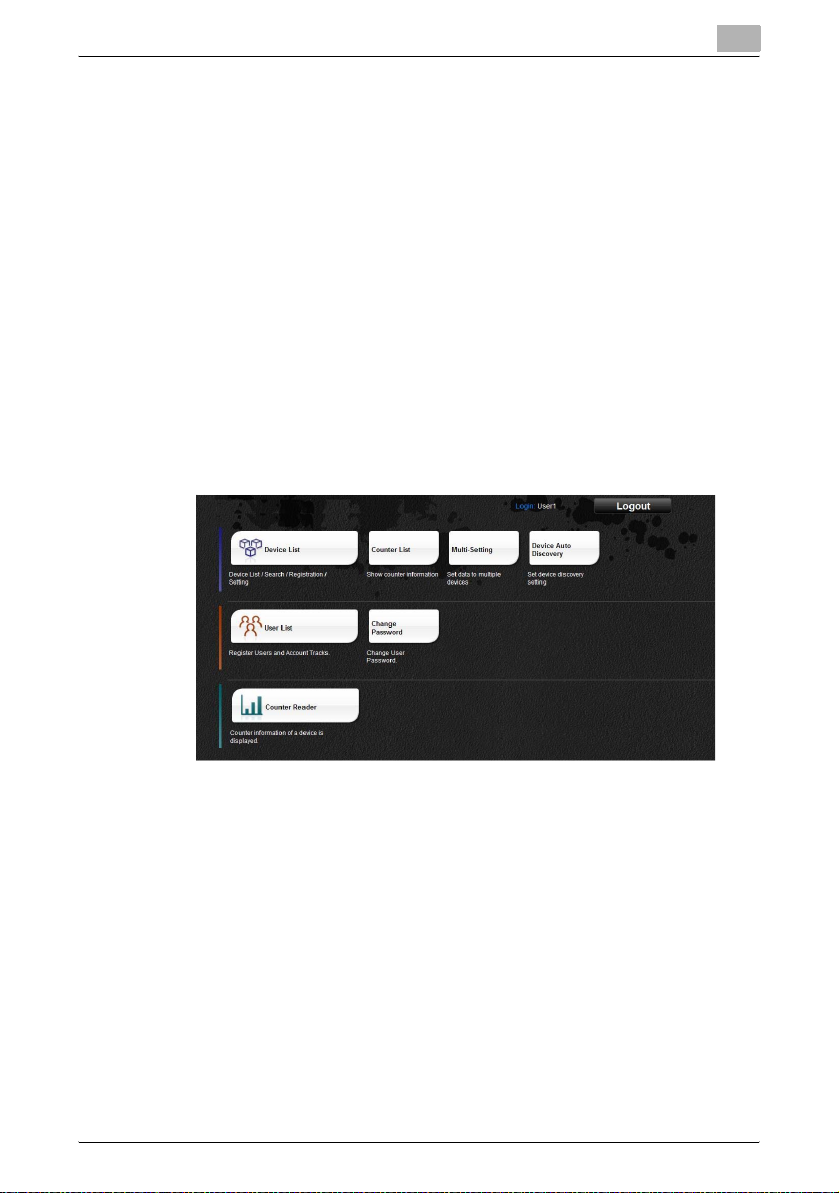
2.2.1 Top Menu page
1
2
3
4
2
No. Function Description
1 Device List Devices can be registered and managed. For details, refer
to "3 Device List".
2
Reminder
This function can be used by the "system administrator", the "administrator" dedicated to
Device List, or the "device group manager".
For details on "administrator" dedicated to Device List, refer to "Administrator Settings" on
page 3-145. For "device group manager", refer
to "Device Group Manager Settings" on
page 3-148.
Device Manager 2-7
Page 28

Basic operations
No. Function Description
2 User List Users can be registered and managed. For details, refer to
3 Counter Reader Counters can be totaled. For details, refer to "5 Counter
4 Server Settings The server settings for Enterprise Suite can be specified.
2
"4 User List".
2
Reminder
This function can be used by the "system administrator" or the "User List administrator".
When logged on as a general user, only the
function for changing the password is available.
For details on the user list administrator, refer to
"Administrator Settings" on page 4-42.
Reader".
2
Reminder
This function is available to the system administrator and the Counter Reader administrator.
For details on the Counter Reader administrator, refer to "Administrator Settings" on
page 5-13.
For details, refer to "6 Server Settings".
2
Reminder
This function can only be used by the system
administrator.
Device Manager 2-8
Page 29
Basic operations
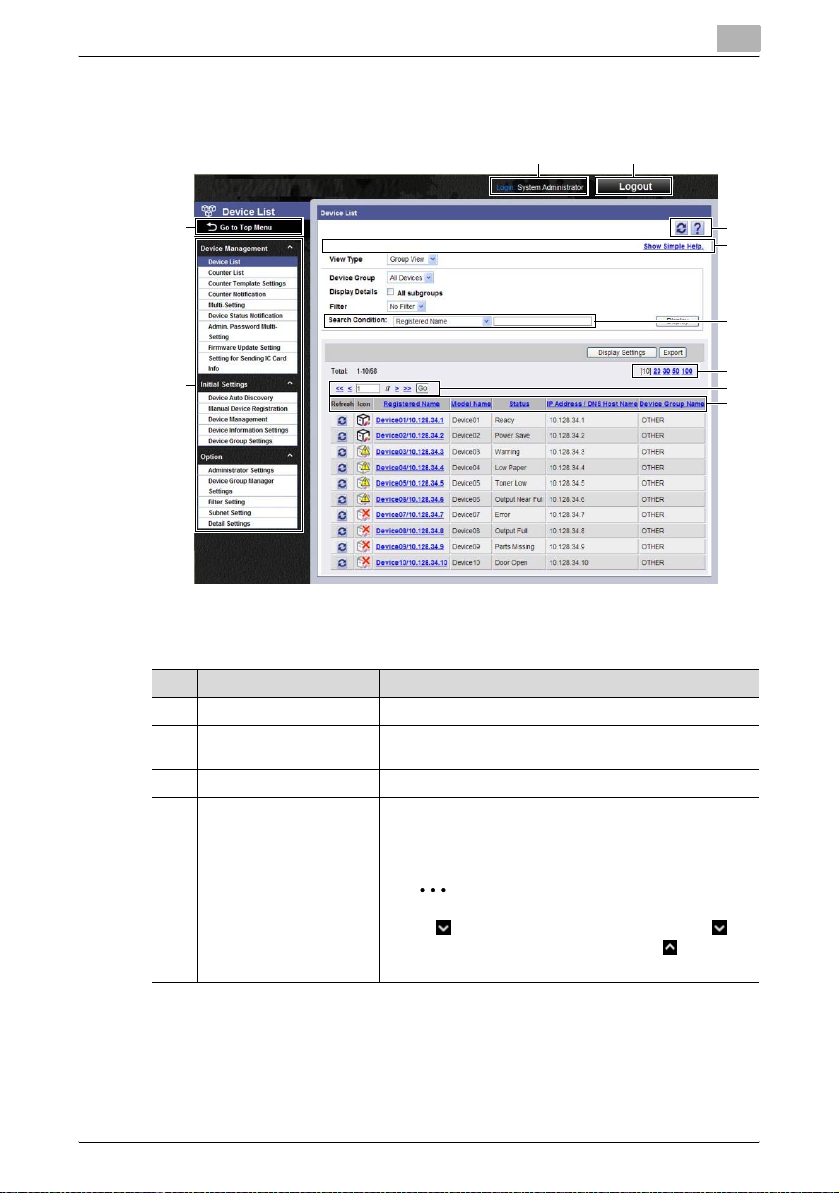
2.2.2 Pages for the functions
2
12
3
4
No. Function Description
1 Login user name Displays the name of the user who is logged in.
2 [Logout] button Click this button to log off of Enterprise Suite and display
3 [Go to Top Menu] button Click this button to display the Top Menu page.
4 Menu The menu items are displayed.
the Login page.
Click a menu item to display details on the right side of the
page.
2
Reminder
If appears beside the menu title, click to
display the collapsed menu. Click to close
the menu.
5
6
7
9
10
11
Device Manager 2-9
Page 30

Basic operations
No. Function Description
5 Click this button to display the page for the item one level
higher in the menu.
2
Note
The [Back] button of the Web browser cannot
be used.
Click this button to update the information in the current
page.
2
Note
The [Refresh] button of the Web browser cannot be used.
Click this button to display the Help information for the current page.
2
6 Simple Help The basic help information is displayed for the current
7 Search Condition When a list is displayed in the page, the listed items can be
8 [Select All/Uncheck All]
button
9 Maximum number of dis-
played lines
10 Page selection These buttons appear when the list displayed in the page
11 Sort List When a list is displayed on the page, click an item name in
page. Help information is displayed or hidden each time
"Simple Help" is clicked.
narrowed.
Select a column to search from the drop-down list, and
then type in the text to be searched for in the text box.
When a list is displayed in the page, all items can be selected or cleared.
When a list is displayed in the page, select the number of
data items displayed in the list.
For example, if 10 is clicked, ten data items are displayed
in the current page.
extends over multiple pages.
• Click the [<] button to display the previous page.
• Click the [>] button to display the next page.
• Click the [<<] button to display the first page.
• Click the [>>] button to display the last page.
• Type the desired page number in the text box, and then
click the [Go] button to display the specified page.
the list to sort the entire list using the item as a sort key.
Device Manager 2-10
Page 31

Device List
3 Device List
3.1 Device List
The device list periodically communicates with the registered device to
display the device status and the settings in real time. Using the device list,
the user can check the remaining amount of paper, error information,
administrator, and protocol of the device.
In addition, the user can jump to the device management page or the server
incorporated in the device (Web Connection) to change the settings for the
device.
3.1.1 Available operations in the Device List page
The list of information of the registered devices can be viewed.
% On the Top Menu page, click the [Device List] button.
3
Function Details
View Type Changes from one view of the device list to another.
Device Group Select a device group to be displayed in the device list.
Display Details Appears only when Group View is selected.
Filter Select view-narrowing condition (filter) for the device list.
Select "Group View" or "Subnet View".
The device group must be first registered.
Select this check box to display a list of all devices, including subordinate groups if master and subordinate relationships are specified in a device group.
The filter must be first registered.
Device Manager 3-1
Page 32

Device List
3
Function Details
Search Condition Specify the condition for narrowing devices to be displayed
[Display Settings] button Click this button, and then select the items to be displayed
[Export] button Click this button to export the information for the currently
(Device List) Checks the information for the devices, calls the device
in the list.
in the device list.
displayed devices in the device list and save it.
management page where settings for the devices can be
registered or calls Web Connection (the server incorporated in the device).
2
Note
In some browsers, the server incorporated in
the device may not be displayed.
Displaying the device list
In the device list, various kinds of information relating to the registered device
can be viewed. Also, displayed data can be sorted for each item, and the
screen where the settings for the device can be changed can be called by
clicking the registered name or icon for the device.
Function Details
(Item titles) Click the item title to sort numerical characters or character
Refresh Click the icon to communicate with the device and refresh
Icon Displays the device status.
Registered Name Displays the registered name for the device.
Model Name Displays the model name for the device.
Status Displays the device status.
Serial Number Displays the serial number for the device.
IP Address / DNS Host Name Displays the IP address or DNS host name for the device.
Device Group Name Displays the name of the group that the device belongs to.
Nickname* Displays the nickname for the device.
Location* Displays the installation location for the device.
codes in ascending order.
The item with an icon displayed cannot be sorted.
the information for the device.
For details on the status icon, refer to "Status icon" on
page 3-3.
Click the registered name of the device to display the device management page. On the device management page,
settings for operation and communication can be specified
for each device. For details, refer to "Managing device information" on page 3-6.
Device Manager 3-2
Page 33

Device List
2
Function Details
Contact Person* Displays the contact person for the device.
MAC Address Displays the MAC address of the device.
Print Speed Displays the print speed for the device.
Color Displays whether the device type is color or monochrome.
Duplex Displays whether the device supports duplex printing.
Terminal Displays whether or not the device is using Enterprise Suite
Firmware Version Displays the firmware version of the device.
Device Server Click the icon to display the server incorporated in the de-
Terminal.
• [in use]: The device is using Enterprise Suite Terminal.
• Will Not Display: The device is not using Enterprise Suite
Terminal.
vice (Web Connection) in a separate window. With the Web
Connection, settings for operation and communication can
be specified for each device.
2
Note
In some browsers, the server incorporated in
the device may not be displayed.
3
Reminder
The display items for the device list can be selected. For details, refer to
"Specifying display settings for the device list" on page 3-13.
* indicates item names that can be changed when "Display Settings" is
selected on the Server Settings page. For details, refer to "Display
Settings" on page 6-4.
Status icon
In the device list, the status icon that indicates the status of the registered
device can be viewed.
The shape of the status icon differs depending on the type of the registered
device.
Device type Normal Off Line Error Warning Unknown
Monochrome printer
Color printer
Device Manager 3-3
Page 34

Device List
Device type Normal Off Line Error Warning Unknown
Monochrome MFP
Color MFP
Device from a competitor
Virtual device
3.1.2 Displaying the device list
The device status and the settings can be checked by displaying the device
list. There are two types of devices lists: the group view to display devices in
each device group specified arbitrary and the subnet view to display devices
for each subnet.
2
Reminder
To display the list of device information, the device must be first
registered.
For details, refer to "Device Auto Discovery" on page 3-76 and "Manual
Device Registration" on page 3-99.
3
Group view
1 From the [View Type] drop-down list, select "Group View".
2 From the [Device Group] drop-down list, select the device group to be
displayed.
– To display all devices, select "All Devices".
– If master and subordinate relationships are specified in the group,
select the "All subgroups" check box to display all devices,
including those in subordinate groups.
– Specifying the search condition can narrow down devices to be
displayed in the list. Select a column to search from the drop-down
list, and then type in the text to be searched for in the text box.
Device Manager 3-4
Page 35

Device List
2
3
3 Click the [Display] button.
A list of devices registered in the selected group appears.
Reminder
The device group must be first specified. For details, refer to "Device
Group Settings" on page 3-136.
Subnet view
1 From the [View Type] drop-down list, select "Subnet View".
2 From the [Subnet] drop-down list, select the subnet to be displayed.
– To display all devices, select "All Devices".
– Specifying the search condition can narrow down devices to be
displayed in the list. Select a column to search from the drop-down
list, and then type in the text to be searched for in the text box.
Device Manager 3-5
Page 36

Device List
3 Click the [Display] button.
A list of devices registered in the selected subnet appears.
3.1.3 Managing device information
Detailed device information can be viewed by calling the device
management page from the device list. On the device management page,
system information for each device and network information can be viewed
and specified.
3
2
Reminder
If display of the device management page fails, check the SNMP settings
on the Device Information Settings page.
In addition, if timeout occurs frequently, specify settings for "Timeout"
and "Retry" on the Detail Settings page. For details, refer to "Detail
Settings" on page 3-164.
2
Note
If "SNMP Write Settings" and "OpenAPI Setting" are not correctly
specified on the Device Information Settings page, the "Set to Devices"
button is disabled.
Device Manager 3-6
Page 37

Device List
3
% On the Device List page, click the registered name of the device of
which information is to be viewed.
1
2
3
No. Function Description
1 Category tab Click this tab to change from one view of the menu tab to
2 Menu tab Click this tab to change from one view of the information
3 (Information view area) Displays the information of the device selected on the cat-
4 (Installed server) Click this icon to display the server incorporated in the de-
another.
view area to another.
egory or menu tab.
vice (Web Connection) in a separate window.
4
2
Note
In some browsers, the server incorporated in
the device may not be displayed.
Device Manager 3-7
Page 38

Device List
3
Managing system information
The device status and settings for the printer can be viewed and specified.
1 Click the System tab.
2 Click the menu tab to be managed, and then check the settings.
– To change the settings, change the settings, and then click the
[Apply] button.
– To go back to the Device List page, click .
Function Details
Status Displays illustrations that indicate the status of the current
Summary Specify and manage detail information for the device such
Print Displays settings for print speed, resolution, and double-
Input Tray Displays the input tray status and setting information.
Output Tray Displays the output tray status and setting information.
Consumables Displays the information for consumables such as paper
Support Specify the contact address when a trouble occurs.
OpenAPI Check the status of OpenAPI connection and, change the
External Server Settings Check or configure the settings of an external server the
device, error code of a fatal error, or option installation information.
as the nickname, installation location, and administrator for
the device.
sided print.
and toner.
OpenAPI connection setting of the device as required.
device uses for authentication.
Device Manager 3-8
Page 39

Device List
2
Function Details
Date/Time Select whether to set the date of the device manually or us-
Electricity Used Displays the device usage status such as the Total Amount
Terminal Configure settings to use Enterprise Suite Terminal.
Use Terminal Select this check box to use Enterprise Suite Terminal.
Serial number Enter the serial number of the Enterprise Suite Terminal to
IP Address Enter the IP address of the Enterprise Suite Terminal to be
Version of Firmware Displays the firmware version of the Enterprise Suite Termi-
Accounting Driver Specify the accounting driver to be used for the device.
ing a time server.
of Electricity Used or the Total Amount of CO2 Emitted on
a monthly basis.
be used.
used.
nal to be used.
Note
In order to perform user authentication, the serial number entered for the
terminal must be the same as the serial number of the Enterprise Suite
Terminal to be used.
3
2
Reminder
The items in the displayed tab vary depending on device models.
Device Manager 3-9
Page 40

Device List
3
Managing network information
Network information can be viewed and specified.
1 Click the Network tab.
2 Click the menu tab to be managed, and then check the settings.
– To change the settings, change the settings, and then click the
[Apply] button.
– To go back to the Device List page, click .
Function Details
TCP/IP Specify information relating to TCP/IP.
Netware Specify information relating to Netware.
AppleTalk Specify information relating to AppleTalk.
SNMP Specify information relating to SNMP.
SMB Specify information relating to SMB.
LPD Specify information relating to LPD.
FTP Specify information relating to FTP.
HTTP Specify information relating to HTTP.
2
Note
If "HTTP" or "OFF" is selected, it disables a
communication with the device. In addition, an
error message appears to prompt you to check
for a communication with the device.
POP Specify information relating to POP.
SMTP Specify information relating to SMTP.
Device Manager 3-10
Page 41

Device List
2
2
Function Details
IPP Specify settings for printing using the IPP.
SLP Specify information relating to SLP.
Web Service Specify information relating to the Web service.
Others Displays the MAC address, serial number, and firmware
Note
In some device models, the changed contents are not applied to the page
by changing setting items in "TCP/IP(IPv6)" and clicking the [Apply]
button. To display the changed contents, click on the upper right of
the page.
Reminder
The items in the displayed tab vary depending on device models.
Managing user authentication settings
User authentication settings for each device can be checked or configured.
version.
3
1 Click the [Authentication Settings] tab.
2 Check the settings.
– To change the settings, change the settings, and then click the
[Apply] button.
– To go back to the Device List page, click .
2
Reminder
The [Authentication Settings] tab does not appear depending on device
models.
Device Manager 3-11
Page 42

Device List
3
Restarting the device
The network interface card and device can be restarted remotely from the
Device Management page.
1 Click the [Reset] tab.
2 Click the [Execute] button.
– If you click the [Execute] button for "Reset NIC", the device's
network interface card will be restarted.
– If you click the [Execute] button for "Reboot device", the device will
be restarted.
Releasing a device problem
If a problem occurs on the device, it can be released by remote control from
the device management page.
1 Click the [Troubleshooting] tab.
2 Click the [Execute] button.
2
Note
Some types of problems cannot be released by remote control. If you
have failed to release a problem, contact our service representative.
Device Manager 3-12
Page 43

Device List
2
Reminder
The [Troubleshooting] tab does not appear depending on device models.
3.1.4 Specifying display settings for the device list
The items to be displayed or hidden in the device list and display order can
be selected.
% On the Device List page, click the [Display Settings] button to open the
Display Settings page.
3
Function Details
Will Display Displays the list of devices to be displayed in the device list.
Will Not Display Displays the list of devices not to be displayed in the device
[Add] button Click this button to move the item selected in the [Will Not
[Delete] button Click this button to move the item selected in the [Will Dis-
[Up] button Click this button to move up the item selected in the [Will
[Down] button Click this button to move down the item selected in the [Will
list.
Display] area to the bottom of the [Will Display] area to add
it to the device list.
play] area to the bottom of the [Will Not Display] area to delete it from the device list.
Display] area one line. The display order of the device list is
also placed one higher.
Display] area one line. The display order of the device list is
also placed one lower.
Device Manager 3-13
Page 44

Device List
2
3
Adding display items
Display items in the device list can be added.
Settings can be specified for the following parameters.
- Refresh
- Icon
- Registered name
- Model Name
- Status
- Serial Number
- IP Address / DNS Host Name
- Device Group Name
- Nickname*
- Location*
- Contact Person*
- MAC Address
- Print Speed
- Color
- Duplex
- Device Server
- Terminal
- Firmware Version
Note
The registered name must be displayed.
2
Reminder
* indicates item names that can be changed when "Display Settings" is
selected on the Server Settings page. For details, refer to "Display
Settings" on page 6-4.
1 Select the item to be displayed in the device list from the [Will Not
Display] area, and then click the [Add] button.
2 Click the [Apply] button.
The selected item is added to the display items in the device list.
Device Manager 3-14
Page 45

Device List
3
Deleting display items
Items that have been displayed in the device list can be hidden.
1 Select the item not to be displayed from the [Will Display] area, and
then click the [Delete] button.
2 Click the [Apply] button.
The selected item is not displayed in the device list.
Specifying the display order
The order of items to be displayed in the device list can be specified. The
order of display items in the device list corresponds to the display order in
the [Will Display] area.
1 Select the item of which display order is to be changed from the [Will
Display] area, and then click the [Up] or [Down] button to specify the
display order.
– Every clicking moves the display order one up or one down.
2 Click the [Apply] button.
The order of display items in the device list is changed.
Device Manager 3-15
Page 46

Device List
3.1.5 Filtering (narrowing)
Data registered in the device list can be displayed by narrowing data based
on the conditions registered in advance.
1 From the [Filter] drop-down list, select the filter for narrowing.
2 Click the [Display] button.
3
Device Manager 3-16
Page 47

Device List
3.1.6 Exporting data
The registered information can be stored temporarily by writing device
information displayed in the Device List page to a file. The exportable file
formats are as follows.
- Excel 97-2003 Workbook format (.xls)
- Excel Workbook format (Office Excel 2007 or later)(.xlsx)
- XML spreadsheet format (XML format that can be read by Excel) (.xml)
- Text format (tab delimited) (.txt)
- CSV format (comma delimited) (.csv)
2
Reminder
When the filtering function is used, data with filtering results applied is
exported.
1 On the Device List page, click the [Export] button.
The Export Device List page appears.
3
2 Select the type of file you want to export from the [File format] drop-
down list.
– When specifying a read password for a file to be exported, select
the "Set password and export." check box, and enter a password.
– A password of 1-15 characters can be set for files in the Excel 97-
2003 Workbook format (.xls).
– A password of 1-255 characters can be set for files in the Excel
Workbook format (Office Excel 2007 or later) (.xlsx).
– To clear the entered information, click the [Clear] button.
3 Click the [Start Export] button.
The File Download dialog box appears.
4 In the File Download dialog box, click the [Save] button.
5 Specify the location where the file is to be saved, and then click the
[Save] button.
Device Manager 3-17
Page 48

Device List
2
2
3
6 In the Download complete dialog box, click the [Close] button.
The exported data is saved in the specified location.
Reminder
The exported data can be viewed and edited in a spreadsheet application
or text editor.
For details on editing the export file in a spreadsheet application, refer to
"Editing the exported file" on page 3-18.
Editing the exported file
The exported file can be edited and saved in a spreadsheet application.
Reminder
To edit and save an XML file in a spreadsheet application, specify the file
type to "XML Spreadsheet", and then save it.
For the procedure to edit a tab-delimited text file (.txt) or a commadelimited CSV file (.csv) in a spreadsheet application, see "Editing a text
or CSV file".
Editing a text or CSV file
The following procedure describes how to edit an exported tab-delimited
text or comma-delimited CSV file in Microsoft Excel.
1 Open the spreadsheet application.
2 Open the exported file.
– To open a CSV file using Microsoft Excel 2003, select "Import
External Data" - "Import Data" from the Data menu. In the Select
Data Source dialog box, select "All Files" as the file type.
– To open a CSV file using Microsoft Excel 2007, click "From Text"
on the Data tab.
The Text Import Wizard appears.
3 Specify the format of data to be delimited, and then the [Next] button.
– As the data format of the original data, select data separated with
delimiters such as a comma and tab.
– As the line where scanning starts, select "1"
– Select "UTF-8" as the character code.
Device Manager 3-18
Page 49

Device List
3
4 Specify a field delimiter, and then the [Next] button.
– To edit a text file, select the "Tab" check box in the "Delimiters"
section.
– To edit a CSV file, select the "Comma" check box in the
"Delimiters" section.
– Clear the check box for specifying whether the continuous
delimiters are to be handled as one character or not.
– As quotation marks for a character string, select """.
5 Specify the format of the delimited data for the column, and then the
[Finish] button.
– Click the line displayed in the data preview, and then change the
data format for the column to "Text".
– Change the data format for all columns to "Text".
The exported file opens.
6 Edit the file.
7 Save the file.
– To save the file as a text file, specify the file type to "Text (Tab
delimited)", and then save it.
– To save the file as a CSV file, specify the file type to "CSV (comma
delimited)", and then save it.
8 Change the file character code to UTF-8.
– Select "Accessories" - "Notepad" to open the file saved in step 8,
and then save it as a new file. Select "UTF-8" as the character code.
Device Manager 3-19
Page 50

Device List
3.2 Counter List
On the Counter List page, the number of output copies by color or function
for each of the registered devices can be viewed.
In addition, settings can be specified so that the information for the counter
list can be saved in a file or sent by e-mail periodically.
2
Reminder
Obtainable counters differ depending on the model.
3.2.1 Available operations in the Counter List page
The list of information of the output copies for the registered devices can be
viewed.
% On the Top Menu page, click the [Counter List] button.
3
Function Details
[Display Settings] button Click this button to select the items to be displayed in the
[Export] button Click this button to export the counter information dis-
Device Manager 3-20
counter list.
played in the counter list and save it.
Page 51

Device List
Function Details
Go to the Template Assingnment
dialog.
Click this button to display the counter template assignment page.
For details, contact our service representative.
3.2.2 Displaying the counter list
There are two types of methods to display the counter list: the group view to
display devices in each device group specified arbitrary and the subnet view
to display devices for each subnet.
Group view
1 From the [View Type] drop-down list, select "Group View".
2 From the [Device Group] drop-down list, select the device group to be
displayed.
– To display all devices, select "All Devices".
– If master and subordinate relationships are specified in the group,
select the "All subgroups" check box to display all devices,
including those in subordinate groups.
3 Click the [Display] button.
A list of devices registered in the selected group appears.
3
Device Manager 3-21
Page 52

Device List
2
3
Note
The device group must be first specified. For details, refer to "Device
Group Settings" on page 3-136.
Subnet view
1 From the [View Type] drop-down list, select "Subnet View".
2 From the [Subnet] drop-down list, select the subnet to be displayed.
– To display all devices, select "All Devices".
3 Click the [Display] button.
A list of devices registered in the selected subnet appears.
2
Note
The subnet must be first specified. For details, refer to "Subnet Setting"
on page 3-156.
Device Manager 3-22
Page 53

Device List
3.2.3 Specifying settings for displaying the counter list
The items to be displayed or hidden in the counter list and display order can
be selected.
% On the Counter List page, click the [Display Settings] button to open
the Display Settings page.
3
Function Details
Will Display Displays the list of devices to be displayed in the counter
Will Not Display Displays the list of devices not to be displayed in the coun-
[Add] button Click this button to move the item selected in the [Will Not
[Delete] button Click this button to move the item selected in the [Will Dis-
[Up] button Click this button to move up the item selected in the [Will
[Down] button Click this button to move down the item selected in the [Will
list.
ter list.
Display] area to the bottom of the [Will Display] area to add
it to the counter list.
play] area to the bottom of the [Will Not Display] area to delete it from the counter list.
Display] area one line. The display order of the counter list
is also placed one higher.
Display] area one line. The display order of the counter list
is also placed one lower.
Device Manager 3-23
Page 54

Device List
3
Adding display items
Display items in the counter list can be added. Settings can be specified for
the following parameters.
- Refresh
- Registered Name
- Model Name
- IP Address / DNS Host Name
- Total
- Color Total
- Black Total
- Copy Total
- Copy Full Color
- Copy 2 Color
- Copy Mono Color
- Copy Black
- Print Total
- Print Full Color
- Print 2 Color
- Print Mono Color
- Print Black
- Scan/Fax Total
- Scan/Fax Full Color
- Scan/Fax Black
- Date
- Serial Number
- MAC Address
- Device Group Name
- Nickname
- Location
- Contact Person
2
Note
The registered name must be displayed.
1 Select the item to be displayed in the counter list from the [Will Not
Display] area, and then click the [Add] button.
2 Click the [Apply] button.
The selected item is added to the display items in the counter list.
Device Manager 3-24
Page 55

Device List
3
Deleting display items
Items that have been displayed in the counter list can be hidden.
1 Select the item not to be displayed from the [Will Display] area, and
then click the [Delete] button.
2 Click the [Apply] button.
The selected item is not displayed in the counter list.
Specifying the display order
The order of items to be displayed in the counter list can be specified. The
order of display items in the counter list corresponds to the display order in
the [Will Display] area.
1 Select the item of which display order is to be changed from the [Will
Display] area, and then click the [Up] or [Down] button to specify the
display order.
– Every clicking moves the display order one up or one down.
2 Click the [Apply] button.
The order of display items in the counter list is changed.
3.2.4 Filtering (narrowing)
The devices to be displayed in the counter list can be narrowed according to
the condition registered in advance.
1 From the [Filter] drop-down list, select the filter for narrowing.
2 Click the [Display] button.
2
Reminder
Selectable conditions as the filter are the same as those on the Device
List page.
Conditions for the filter must be registered on the "Filter Setting" page.
For details, refer to "Filter Setting" on page 3-152.
Device Manager 3-25
Page 56

Device List
3.2.5 Exporting counter data
Counter information displayed in the Counter List page can be written as a
file. Registered information can be temporarily saved.
1 On the Counter List page, click the [Export] button.
The Export Counter List page appears.
2 Select the type of file you want to export from the [File format] drop-
down list.
– When specifying a read password for a file to be exported, select
the "Set password and export." check box, and enter a password.
– A password of 1-15 characters can be set for files in the Excel 97-
2003 Workbook format (.xls).
– A password of 1-255 characters can be set for files in the Excel
Workbook format (Office Excel 2007 or later) (.xlsx).
– To clear the entered information, click the [Clear] button.
3
3 Click the [Start Export] button.
The File Download dialog box appears.
4 In the File Download dialog box, click the [Save] button.
5 Specify the location where the file is to be saved, and then click the
[Save] button.
6 In the Download complete dialog box, click the [Close] button.
The exported data is saved in the specified location.
2
Reminder
The exported data can be viewed and edited in a spreadsheet application
or text editor.
For details on editing the export file in a spreadsheet application, refer to
"Editing the exported file" on page 3-18.
Device Manager 3-26
Page 57

Device List
3.3 Counter Template List
Using a counter template allows you to display the detailed counter of other
companies' products in the counter list.
Device Manager uses MIB (Management Information Base) information of
SNMP (Simple Network Management Protocol) to total counter data. For the
total counter, MIB information is common to all companies; however, for the
detailed counter such as a color counter, MIB information varies depending
on manufacturers.
To total the detailed counter of another company's product, the customer
needs to obtain OID information of Private-MIB from the manufacturer and
configure a counter template.
For details on how to operate this function, contact our service
representative.
3
Device Manager 3-27
Page 58

Device List
3.4 Sending a counter notification
The information for the counter list can be specified so that it is saved or sent
by e-mail periodically. Multiple notification settings can be specified.
2
Reminder
Counter Information is collected by communicating with a device(s) at the
Counter Polling Interval on the Detail Settings page.
3.4.1 Functions available in Counter Notification page
The registered counter notification names are displayed as a list.
1 On the Top Menu page, click the [Device List] button.
2 Click [Counter Notification] in the menu.
3
Function Details
[Add] button Click this button to add an information notification setting
[Edit] button Click this button to edit the registered information notifica-
[Delete] button Click this button to delete the registered information notifi-
(Counter notification list) Displays the list of the registered counter notifications.
Device Manager 3-28
for the counter list.
tion setting.
cation setting.
Page 59

Device List
3.4.2 Counter notification setting
Specify and register a new counter notification condition.
Registering counter notification
Specify and register a new counter notification condition.
1 On the Counter Notification page, click the [Add] button.
2 Specify the necessary settings, and then click the [Apply] button.
– To clear the entered information, click the [Clear] button.
3
<Setting Name>
Function Details
Setting Name Type in the notification setting name.
File Name Type in the name of the file to be saved.
File format Select the type of file to be saved.
The following file formats are available.
• Excel 97-2003 Workbook format (.xls)
• Excel Workbook format (Office Excel 2007 or later)(.xlsx)
• XML spreadsheet format (XML format that can be read
by Excel) (.xml)
• Text format (tab delimited) (.txt)
• CSV format (comma delimited) (.csv)
The character code for the text (tab-delimited) or CSV
(comma-delimited) file type is UTF-8.
Device Manager 3-29
Page 60

Device List
Function Details
Password Protection Select this option to specify a read password for a file to be
Language Select a language to display a counter notification.
Device Group Select a device group to issue a counter notification.
exported.
Select the [Password Protection] check box, and specify a
password in [Password]. For confirmation, type in the password again.
2
Reminder
This function can be specified when the user
logs on with system administrator's privileges
or administrator privileges only for Device List.
This cannot be specified when the user logs on
with device group manager's privileges.
<Notification Type>
Function Details
Save to File Saves counter information in the specified directory at pe-
Save Directory Type in a directory where the counter information file is
E-mail Send Sends counter information to the specified E-mail address
E-mail Address Type in an e-mail address to which the counter information
Edit E-Mail Contents Allows you to edit the subj ec t and t ext of an E-mai l to noti fy
riodic intervals.
saved.
as an attached file.
If the "Use E-mail Function" check box is cleared in the Email Server Settings page of Server Settings, "E -mail Send"
is not available.
file is to be sent.
Delimiters used for separating multiple e-mail addresses
when sending the file to them are a comma (,) and semicolon (;).
counter information.
3
<Processing Interval>
Function Details
Every Month/Every Week/Every
Day
Select "Every Month", "Every Week" or "Every Day" as the
period for performing the periodic process. After selecting
the interval, select the details for the period for performing
the periodic process.
Device Manager 3-30
Page 61

Device List
3
Editing E-mail for counter notification
Allows you to edit the subject and text of an E-mail to notify counter
information.
1 Click the [Edit E-Mail Contents] button in the Add Counter Notification
page.
2 Specify the necessary settings, and then click the [Apply] button.
Function Details
Use Standard Template Select this option to use a fixed phrase.
Edit Template Select this option to edit a subject or text of an E-mail.
Subject Enter a subject in the text box, and edit an e-mail.
2
Reminder
This function is not available when "Use Standard Template" is selected.
Text Enter a text in the text box, and edit an e-mail.
2
Reminder
This function is not available when "Use Standard Template" is selected.
Preview Click the [Display] button to display and check the contents
[Apply] button Click this button to apply the setting changes specified on
[Clear] button Click this button to cancel the setting changes specified on
Device Manager 3-31
of the specified E-mail.
this page.
this page.
Page 62

Device List
Editing a template
When "Edit Template" is selected, a fixed phrase to be used in a standard
template is displayed in the text box. The fixed phrase that was displayed
can be edited freely within the specified number of characters.
In this case, using the pre-determined fixed strings enables you to display
information obtained from an Enterprise Suite database in a fixed phrase.
<Fixed strings available for counter notification>
Fixed string Contents displayed in actual E-mail
%CounterSettingName The registered data is displayed in "Setting item" of the Add
Editing counter notification
Registered counter notification setting conditions can be checked and
edited.
and Set Counter Notification page.
1 On the Counter Notification page, click the [Edit] button.
2 Specify an item to be changed, and click the [Apply] button.
3
Device Manager 3-32
Page 63

Device List
2
3
Reminder
For details on the settings, refer to "Registering counter notification" on
page 3-29.
Deleting counter notification
Registered counter notification can be deleted.
1 On the Counter Notification page, select the counter notification to be
deleted, and then click the [Delete] button.
2 Check the message that appears, and then click the [OK] button to
delete the template.
The counter notification is deleted.
Device Manager 3-33
Page 64

Device List
3.5 Multi-Setting
Using the settings for a registered device, a template for set data can be
created. Using the created template, device data can be specified for
multiple devices collectively.
2
Reminder
The created template can also be used as a backup of the set data.
3.5.1 Using Multi-Setting
Follow the steps below to specify settings for multiple devices collectively.
For details on the operation, refer to respective pages.
1 Create an empty template to be used for specifying settings for
multiple devices collectively.
– On the Multi-Setting page, click the [Add] button.
– For details, refer to "Specifying items for the template" on
page 3-36.
2 Import the settings from a device to the empty template.
– On the Multi-Setting page, select the template, and then click the
[Get from Device] button.
– For details, refer to "Importing device data to the template" on
page 3-37.
3
3 Copy the settings imported to the template to a different device.
– On the Multi-Setting page, select the template, and then click the
[Set to Devices] button.
– For details, refer to "Copying the template information to the
devices" on page 3-39.
Device Manager 3-34
Page 65

Device List
3.5.2 Available operations in the Multi-Setting page
The list of registered templates can be viewed.
% On the Top Menu page, click the [Multi-Setting] button.
Function Details
[Add] button Click this button to register a new template.
[Edit] button Click this button to change the settings for a registered
[Copy] button Click this button to copy a registered template.
[Delete] button Click this button to delete a registered template.
[Information] button Click this button to display the settings for a registered
[Get from Device] button Click this button to extract the settings for a registered de-
[Set to Devices] button Click this button to set the template data containing the
[Apply it to Device Group] button Click this button to automatically set the registered tem-
[Clear "Schedule an application
(by Device)"] button
[Result Display] button Click this button to display the result of the multi-setting
[Import] button Click this button to import and register the multi-setting
[Export] button Click this button to export the registered multi-setting tem-
(Template list) Displays the list of registered templates.
template.
template.
vice to register them in the template.
settings to the devices.
plate information to a device group at one time.
Click this button to clear the schedule setting that is specified with a registered template.
that was specified with a registered template.
template that was saved in a file in advance.
plate information as a file.
3
Device Manager 3-35
Page 66

Device List
3.5.3 Specifying items for the template
A form of a new template can be created by selecting items to be specified
for multi-setting.
2
Reminder
Setting items for the added new template are blank. Settings for the
template can be imported from a registered device using the [Get from
Device] button. For details, refer to "Importing device data to the
template" on page 3-37.
1 On the Multi-Setting page, click the [Add] button.
2 Specify the necessary settings, and then click the [Apply] button.
– To clear the entered information, click the [Clear] button.
3
Function Details
Template Name Type in the template name.
[Select All/Uncheck All] button Click this button to select or clear all displayed settings.
(Setting item tree) From the displayed setting items, select setting items to be
Device Manager 3-36
specified for the multi-setting process.
Page 67

Device List
3.5.4 Importing device data to the template
The setting data for the registered device is imported to the created template
to complete the template.
1 On the Multi-Setting page, select the template, and then click the [Get
from Device] button.
The Get Device Data page appears.
2 From the [Device Group] drop-down list, select the device group to be
displayed.
– To display all devices, select "All Devices".
– Specifying the search condition can narrow down devices to be
displayed in the list. Select a column to search from the drop-down
list, and then type in the text to be searched for in the text box.
3 Click the [Display] button.
A list of devices registered in the selected group appears.
3
4 Select the device for which settings to be used for the template are
registered, and then click the [Get from Device] button.
The result of the operation to obtain the device data appears.
2
Reminder
For details on the result page, refer to "Checking the result of the
operation to obtain the device data" on page 3-38.
Device Manager 3-37
Page 68

Device List
2
2
3
Note
If "SNMP Write Settings" and "OpenAPI" are not correctly specified in the
Device Information Settings page, the [Get from Device] button is
disabled.
Note
The Public/Personal User Box password of the device cannot be
imported from the device into the template. To collectively set the
Public/Personal User Box password in the device, use the function to
import and export the multi-setting template. Edit the multi-setting file
that has been exported to the file, add the password, then import the
edited multi-setting template. For details, refer to "Importing the MultiSetting Template" on page 3-49 and "Exporting a multi-setting template"
on page 3-54.
Checking the result of the operation to obtain the device data
The result of the operation to obtain the device data can be checked. Check
the details, and then click the [OK] button.
Function Details
Registered Name Displays the registered name for the device data acquisi-
(Result tree) Displays the result of the operation to obtain the device da-
tion source device.
ta.
If data has been obtained correctly, that data is displayed.
2
Note
For setting items that are not supported by the
device, "Not Supported" is displayed.
Device Manager 3-38
Page 69

Device List
3.5.5 Copying the template information to the devices
The registered template information is specified for multiple devices
collectively.
2
Note
Any template information that is not from the device cannot be registered
to the devices.
2
Reminder
To execute multi-setting processing at periodic intervals, you need to
configure schedule settings. For details, refer to "Schedule Settings" on
page 3-47.
1 On the Multi-Setting page, select the template, and then click the [Set
to Devices] button.
The Set Device Data page appears.
2 In [Setting Method], select a timing to configure the multi-setting.
– To immediately configure the multi-setting, select [Apply now.].
– To configure the multi-setting at the specified time, select
[Schedule an application (by Device) Setting]. Select a time to
configure the multi-setting from the [Time] drop-down list.
– Click the [Clear "Schedule an application (by Device)"] button on
the Multi-Setting page to clear the schedule specified in [Schedule
an application (by Device) Setting].
3
3 In [Send Results], select whether to receive a multi-setting result
notification E-mail.
– When not receiving a result notification E-mail, select [Do Not
Notify] in [Notification Setting].
– When receiving a result notification E-mail, select when to receive
a notification. In [Notification Setting], select [Always send the
results] or [Send results only when failed.].
– In [E-mail Address], enter the E-mail address to receive a result
notification E-mail.
– Select the language to display the result notification E-mail from the
[Language] drop-down list.
Device Manager 3-39
Page 70

Device List
3
4 From the [Device Group] drop-down list, select the device group to be
displayed.
– To display all devices, select "All Devices".
– To display only the devices that failed in multi-setting, select the
[Display only the devices where Multi Setting failed.] check box.
– Specifying the search condition can narrow down devices to be
displayed in the list. Select a column to search from the drop-down
list, and then type in the text to be searched for in the text box.
5 Click the [Display] button.
A list of devices registered in the selected group appears.
Device Manager 3-40
Page 71

Device List
2
2
3
6 Select the check box beside the devices to which the template data is
to be applied, and then click the [Apply] button.
– To select all devices, click the [Select All] button.
– If the template contains setting items that require the devices to be
restarted, a confirmation dialog box asking the user whether to
restart the devices appears.
– To clear the entered information, click the [Clear] button.
If you select [Apply now.] in [Setting Method], the device data setting
result appears.
If you select [Schedule an application (by Device) Setting] in [Setting
Method], the Multi-Setting page appears.
Note
If "SNMP Write Settings" and "OpenAPI Setting"are not correctly
specified on the Device Information Settings page, the "Set to Devices"
button is disabled.
If there are too many devices, it may take time to configure device data
settings.
Reminder
Depending on models, you cannot copy some setting values between
models.
2
Reminder
For details on the result page, refer to "Checking the result of the
operation to specify the device data" on page 3-42.
Device Manager 3-41
Page 72

Device List
3
Checking the result of the operation to specify the device data
The result of the operation to specify the device data can be checked. Check
the details, and then click the [OK] button.
Function Details
Registered Name Displays the registered name for the device to which the
(Result tree) Displays the result of the operation to specify the device
device data has been specified.
data collectively.
If data has been specified correctly, that data is displayed.
If data has not been specified, "Timeout" is displayed.
2
Note
For setting items that are not supported by the
device, "Not Supported" is displayed.
Device Manager 3-42
Page 73

Device List
3.5.6 Checking the multi-setting result
Display the result of the multi-setting that was specified with a registered
template. You can check whether the multi-setting has succeeded normally.
1 Select a template on the Multi-Setting page, and then click the [Result
Display] button.
The Result page appears.
2 Select a device group to be displayed from the [Device Group] drop-
down list.
– To display all devices, select "All Devices".
– To display only the devices that failed in multi-setting, select the
[Display only the devices where Multi Setting failed.] check box.
– Specifying search conditions can narrow down devices to be
displayed in the list. Select a column to be searched from the dropdown list, and then type a character string to be searched in the text
box.
3 In the [Search Range] drop-down list, select a timing to configure the
multi-setting for devices to be searched.
– "All Devices": Displays all devices.
– "Devices where "Schedule an application (by Device Group)" was
executed.", "Devices where "Schedule an application (by Device)"
was executed.": Displays only the devices for which the multisetting was specified with a specified schedule.
– "Devices where "Apply now (by Device Group)" was executed",
"Devices where "Apply now (by Device)" was executed": Displays
only the devices for which the multi-setting was specified with no
schedule specified.
3
Device Manager 3-43
Page 74

Device List
4 Click the [Display] button.
A list of devices registered in the selected group appears.
Function Details
Result Displays the multi-setting status with an icon.
Shows the device for which no multi-setting has been
specified.
Shows the device for which the multi-setting has been
specified normally.
Shows the device for which the multi-setting has failed.
3
Basic Setting Displays the method in which the multi-setting was last
Date&Time last executed Displays the date and time when the multi-setting was last
Registered Name Displays the registered name of the device for which the
Model Name Displays the model name of the device for which the multi-
IP Address / DNS Host Name Displays the IP address or DNS host name of the device for
specified.
specified.
multi-setting has been specified.
setting has been specified.
which the multi-setting has been specified.
Device Manager 3-44
Page 75

Device List
3.5.7 Editing items for the template
The template can be edited by calling the registered template, and then
overwriting the setting items, or copying the registered template to modify
the setting items.
Editing the registered template
The registered template can be called to change the setting items.
1 On the Multi-Setting page, select the template to be edited, and then
click the [Edit] button.
The Edit Template page appears.
2 Specify the necessary settings, and then click the [Apply] button.
– To clear the entered information, click the [Clear] button.
3
2
Reminder
After editing the template, refresh the settings for the template by
obtaining the device data.
Device Manager 3-45
Page 76

Device List
3
Editing the template by copying
The settings can be edited by copying the registered template. Using the
already registered template, an additional template with different settings
can be created.
1 On the Multi-Setting page, select the template, and then click the
[Copy] button.
The Edit Template page appears.
2 Specify the necessary settings, and then click the [Apply] button.
– To clear the entered information, click the [Clear] button.
2
Reminder
After copying and editing the template, refresh the settings for the
template by obtaining the device data.
Device Manager 3-46
Page 77

Device List
3.5.8 Checking the information for the registered template
The settings of the registered template can be checked.
2
Note
Any template information that is not from the device cannot be checked.
1 In the template list on the Multi-Setting page, select the template of
which settings are to be checked, and then click the [Information]
button.
2 Check the details, and then click the [OK] button.
3
Function Details
Template Name Displays the template name.
(Setting item tree) Displays the settings.
3.5.9 Schedule Settings
Automatically set the registered template information to a device group at
one time.
A multi-setting schedule that enables not only the immediate multi-setting
but also the periodical multi-setting for template information can be
specified.
Enabling the multi-setting schedule can automatically apply the same
settings as for other devices in a device group to a new device, which is
added to a device group.
Device Manager 3-47
Page 78

Device List
3
% Select a template on the Multi-Setting page, and then click the [Apply
it to Device Group] button.
The Schedule Settings page appears.
Function Details
Template Name Displays the template name.
Setting Method Select a timing to configure the multi-setting.
Apply now. Immediately specifies the multi-setting.
Schedule Settings Periodically specifies the multi-setting based on the speci-
Send Results Select whether to receive a multi-setting result notification
Notification Setting When not receiving a result notification E-mail, select [Do
E-mail Address Enter the E-mail address to receive a result notification E-
Language Select a language to display a result notification E-mail.
Included Devices Specify a device that is targeted for multi-setting.
fied schedule.
• Do not set.: Does not specify the multi-setting.
• Every Month / Every Week / Every Day: Periodically
specifies the multi-setting. Specify a processing time in
each item.
E-mail.
Not Notify] in [Notification Setting].
When receiving a result notification E-mail, select when to
receive a notification. In [Notification Setting], select [Always send the results] or [Send results only when failed.].
mail.
• Device Group: Select a device group targeted for multisetting from the drop-down list.
• Conditions: Select a device that is targeted for multi-setting. If you select [Only the devices which are newly added to the group.], the multi-setting is applied only to a
device newly assigned to a device group.
Device Manager 3-48
Page 79

Device List
3.5.10 Importing the Multi-Setting Template
Import and register the multi-setting template that was saved in a file in
advance. Specify the following settings when importing the template.
2
Reminder
If there is a multi-setting that is currently executed, you cannot import the
multi-setting template.
- Excel 97 to Excel 2003 book formats (.xls)
- Excel book format (Office Excel 2007 or later) (.xlsx)
- XML spreadsheet format (XML format available for Excel) (.xml)
- Text (tab-delimited) format (.txt)
- CSV (comma-delimited) format (.csv)
1 On the Multi-Setting page, click the [Import] button.
2 Specify the settings necessary for importing, and then click the [Start
Import] button.
– To clear the entered information, click the [Clear] button.
3
The result of the import operation appears.
Function Details
Import File Path Type in the path to the file to be imported. The file path can
Operation for Already Existing
Templates
Import the file which is secured by
password.
also be specified by clicking the [Browse] button.
Select whether to overwrite template information when
there is a template that has already been registered with the
same name as for the imported multi-setting template.
Selecting "Overwrite" overwrites only setting items registered in the imported multi-setting file.
Click this option to import a file with a password specified.
Select the [Import the file which is secured by password.]
check box, and then type in the password specified for the
file in [Password].
Device Manager 3-49
Page 80

Device List
2
2
3
Reminder
For details on the Result page, refer to "Checking the import result" on
page 3-53.
Creating a file to be imported
A file to be imported can be created using a spreadsheet application.
Reminder
You can create an import file by clicking the [Export] button to export a
file, then entering the data.
For details on editing the exported file in a spreadsheet application, refer
to "Editing the exported file" on page 3-18.
1 Open data in the spreadsheet application.
2 Create data, and then save it as a new file.
– To save data, set the file type to the importable one with Enterprise
Suite.
– When data is saved in the text (tab-delimited) format (.txt) or CSV
(comma-delimited) format (.csv), change the character code of a file
to UTF-8. To select a character code, click "Accessories" "Notepad" to open the saved file, and save it as a new file.
Device Manager 3-50
Page 81

Device List
2
Reminder
The importable file formats are as follows.
- Excel 97 to Excel 2003 book formats (.xls)
- Excel book format (Office Excel 2007 or later) (.xlsx)
- XML spreadsheet format (XML format available for Excel) (.xml)
- Text (tab-delimited) format (.txt)
- CSV (comma-delimited) format (.csv)
1
10
11
2
4
5
7
8
3
6
9
3
10
11
15
No. Required Function Details
1 o ##TableName Indicates that this table contains data of the multi-set-
2 o ##Information Indicates a data legend. Type in a legend in the first col-
3 o (Contents of ##In-
4 o ##DispName Enter item titles to be displayed in a page. Type in
5 o ##DataName Enter item titles to perform the database-based man-
6 o Template Name Type in the name of the multi-setting template.
7 o ##TableName Indicates that this table contains settings of the multi-
8 o ##Information Indicates a data legend. Type a legend in the first col-
formation)
12
16 17 18 19 20 21
ting template.
Type in "##TableName" and "DeviceTemplate" to the
right of the first column of the first row.
umn of the second row.
Define a legend in detail.
Downward from the second column of the second row,
type in as described below.
"Template Name : [Required] Max: 32 chars"
"##DispName" and "Template Name" from the first column of the fourth row to the right.
agement. Type in "##DataName" and "TemplateName"
from the first column of the fifth row to the right.
Do not type anything in the first column.
setting template. Type in "##TableName" and "DeviceTemplateDetail" from the first column to the right.
umn.
13 14
Device Manager 3-51
Page 82

Device List
No. Required Function Details
9 o (Contents of ##In-
10 o ##DispName Enter item titles to be displayed in a page. Type in the
11 o ##DataName Enter item titles to perform the database-based man-
12 Category 1 Type the setting category name (hierarchical level 1) in
13 Category 2 Type the setting category name (hierarchical level 2) in
14 Category 3 Type the setting category name (hierarchical level 3) in
15 Category 4 Type the setting category name (hierarchical level 4) in
16 Category 5 Type the setting category name (hierarchical level 5) in
17 Item Name Type the setting item name in the seventh column.
18 o Item ID Type a unique identifier of the setting item in the eighth
19 Item Index Type the index corresponding to the setting value in the
formation)
Define a legend in detail.
Type in the following items downward from the second
column.
"Category XX : Specify items."
"Item name : Specify items."
"Item ID : Specify items."
"Item Index : Specify items."
"Set/Do not Set : 1=Import 0=Do not import"
"SetValue : The value to apply to the device."
following items from the first column to the right.
"##DispName"
"Category 1"
"Category 2"
"Category 3"
"Category 4"
"Category 5"
"Item Name"
"Item ID"
"Item Index"
"Set/Do not Set"
"SetValue"
agement. Type in the following items from the first column to the right.
"##DataName"
"Category1"
"Category2"
"Category3"
"Category4"
"Category5"
"ItemName"
"ItemID"
"ItemIndex"
"Enable"
"Value"
the second column.
Do not type in anything in the first column.
the third column.
the fourth column.
the fifth column.
the sixth column.
column.
ninth column.
The index starts with "0".
3
Device Manager 3-52
Page 83

Device List
2
No. Required Function Details
20 o Set/Do not Set Specify whether to set a value to a setting item in the
21 SetValue Type the value of the setting item in the eleventh col-
tenth column.
When setting, type in "1".
When not setting, type in "0".
umn.
Note
The basic contents of data are shown in the row that contains
"##TableName", "##Information", "##DispName", and "##DataName".
Do not change the data in these rows. Starting with the row after the one
describing "##DataName", type in detailed data for the device.
Be sure to enter data for the items marked as "Required".
Checking the import result
The results of the import operation can be viewed. Check the details, and
then click the [OK] button.
3
Function Details
Result Displays whether the registration operation was success-
Template Name Displays the name of the multi-setting template.
fully completed from importing.
• "Registration Completed": The new registration was
successfully completed.
• "Update": When "Overwrite" is selected in "Operation
for Already Existing Templates", this item is displayed if
the value of the same setting item that has already been
registered is updated normally.
• "Cancel": When "Do not Overwrite" is selected in "Operation for Already Existing Templates", this item is displayed if the setting item is not changed because the
same setting item has already been registered.
• "Error": Appears when the entered data is inappropriate
and cannot be registered. Check again the contents of
the file to be imported.
Device Manager 3-53
Page 84

Device List
3.5.11 Exporting a multi-setting template
Export the registered multi-setting template information as a file. If
necessary, you can temporarily store the registered contents or import
template settings changed to fit the file type and register a new multi-setting
template based on the imported settings.
1 On the Multi-Setting page, click the [Export] button.
The Export Multi-Setting template page appears.
2 From the [Template] drop-down list, select a multi-setting template to
be exported.
3 Click [Template Content Selection].
The Export Content Selection page appears.
3
Device Manager 3-54
Page 85

Device List
3
4 Select items to be exported, and then click the [Apply] button.
– To clear the entered information, click the [Clear] button.
– Clicking [Select All] or [Uncheck All] select or clear all the displayed
setting items.
The Export Content Selection page is closed.
5 Select the type of file you want to export from the [File format] drop-
down list.
– When specifying a read password for a file to be exported, select
the "Set password and export." check box, and enter a password.
– A password of 1-15 characters can be set for files in the Excel 97-
2003 Workbook format (.xls).
– A password of 1-255 characters can be set for files in the Excel
Workbook format (Office Excel 2007 or later) (.xlsx).
– To clear the entered information, click the [Clear] button.
6 Click the [Start Export] button.
The File Download dialog box appears.
7 In the File Download dialog box, click the [Save] button.
8 Specify the location where the file is to be saved, and then click the
[Save] button.
9 In the Download complete dialog box, click the [Close] button.
The exported data is saved in the specified location.
2
Reminder
The exported data can be viewed and edited in a spreadsheet application
or text editor.
For details on editing the export file in a spreadsheet application, refer to
"Editing the exported file" on page 3-18.
Device Manager 3-55
Page 86

Device List
3.6 Sending a device status notification
Change in the device status such as error occurrence, error recovery, or the
remaining amount of consumables can be notified by e-mail. Multiple status
notification settings can be specified.
2
Reminder
Target devices of status notification vary depending on the Administrator
privileges of the login user.
If the device group manager has registered the status notification
settings, only the device groups with the Administrator privileges are
targeted for status notification.
Communications to a device is performed at the Status Polling Interval
on the Detail Settings page. When a status change occurs, E-mail
notification will be sent immediately.
3
Device Manager 3-56
Page 87

Device List
3
3.6.1 Available operations in the Device Status Notification page
The list of registered status notification settings can be viewed.
2
Note
If no E-mail server setting is configured in Server Settings, "Device Status
Notification" is not available. For details, refer to "E-mail Server Settings"
on page 6-2.
1 On the Top Menu page, click the [Device List] button.
2 Click [Device Status Notification] in the menu.
Function Details
[Add] button Click this button to register a new device status notification
[Edit] button Click this button to change a registered device status noti-
[Delete] button Click this button to delete a registered device status notifi-
(Device status notification list) Displays the list of the registered device status notifica-
setting.
fication setting.
cation setting.
tions.
Device Manager 3-57
Page 88

Device List
3.6.2 Specifying the device status notification
Conditions for E-mail notification and destination e-mail address can be
registered and edited.
Registering the device status notification
A new device status notification setting can be registered.
1 On the Device Status Notification page, click the [Add] button.
2 Specify the necessary settings, and then click the [Apply] button.
– To cancel the selected settings, click the [Clear] button.
3
Device Manager 3-58
Page 89

Device List
Function Details
E-mail Address Type in the e-mail address of the person to be notified. De-
E-mail Language Select the language that the status notification destination
Device Group Select a device group to issue a device status notification.
limiters used for separating multiple e-mail addresses when
sending the file to them are a comma (,) and semicolon (;).
e-mail address appears in.
2
Reminder
This function can be specified when the user
logs on with system administrator's privileges
or administrator privileges only for Device List.
This cannot be specified when the user logs on
with device group manager's privileges.
Devices included in one notification e-mail
Edit E-Mail Contents Allows you to edit the subj ec t and t ext of an E-mai l to noti fy
[Select All/Uncheck All] button Click this button to select or clear all displayed settings.
Status to Notify Sends an e-mail when the device status is changed to the
Recovery to Notify Sends an e-mail when the device status is recovered from
When collectively sending status information of the target
device, select "One e-mail for all devices". When sending a
status notification by device, select "One e-mail per device".
device status information.
selected status.
the selected status.
3
Device Manager 3-59
Page 90

Device List
Editing E-mail for device status notification
Allows you to edit the subject and text of an E-mail to notify device status
information.
1 Click the [Edit E-Mail Contents] button in the Add Device Status
Notification page.
2 Specify the necessary settings, and then click the [Apply] button.
Function Details
Use Standard Template Select this option to use a fixed phrase.
Edit Template Select this option to edit a subject or text of an E-mail.
Subject Enter a subject in the text box, and edit an e-mail.
2
Reminder
This function is not available when "Use Standard Template" is selected.
Text Enter a text in the text box, and edit an e-mail.
2
Reminder
This function is not available when "Use Standard Template" is selected.
Preview Click the [Display] button to display and check the contents
[Apply] button Click this button to apply the setting changes specified on
[Clear] button Click this button to cancel the setting changes specified on
of the specified E-mail.
this page.
this page.
3
Device Manager 3-60
Page 91

Device List
Editing a template
When "Edit Template" is selected, a fixed phrase to be used in a standard
template is displayed in the text box. The fixed phrase that was displayed
can be edited freely within the specified number of characters.
In this case, using the pre-determined fixed strings enables you to display
information obtained from an Enterprise Suite database in a fixed phrase.
<Fixed strings available for device status notification>
Fixed string Contents displayed in actual E-mail
%RegisterdName Displays the data registered in "Registered Name" of the
%ModelName Displays the data registered in "Model Name" of the device
%SerialNumber Displays the data registered in "Serial Number" of the de-
%IPAddress/DNSHostName Displays the data registered in "Registered Name" of the
%MACAddress Displays the data registered in "MAC Address" of the de-
%DeviceGroupName Displays the data registered in "Device Group Name" of the
%SystemName Displays the data registered in "Nickname" of the device
%SystemLocation Displays the data registered in "Location" of the device list.
%SystemContact Displays the data registered in "Contact Person" of the de-
%ErrorStatus Displays an error type when an error has occurred in the
%RecoveryStatus Displays the type of an error from which the device was re-
%CaptionSystemName Displays the data registered in "System Name" of the Dis-
%CaptionSystemLocation Displays the data registered in "System Location" of the
%CaptionSystemContact Displays the data registered in "System Contact" of the
%RepetitionStart* Available when repeatedly using the contents of a template
%RepetitionEnd* Available when repeatedly using the contents of a template
device list.
list.
vice list.
device list.
vice list.
device list.
list.
vice list.
device.
covered.
play Settings page for Server Settings.
Display Settings page for Server Settings.
Display Settings page for Server Settings.
by the number of devices that are targeted for status notification.
Enter this string in the beginning part of the contents to be
repeated.
by the number of devices that are targeted for status notification.
Enter this string in the ending part of the contents to be repeated.
3
Device Manager 3-61
Page 92

Device List
2
3
Reminder
The fixed strings above are available only in the text of an E-mail when
"One e-mail for all devices" is selected in Notification Setting of the
Device Status Notification page. They are not available for subject.
The fixed strings marked by an asterisk (*) are not available when "One email per device" is selected in Notification Setting of the Device Status
Notification page.
Device Manager 3-62
Page 93

Device List
3
Editing the device status notification
Conditions for the registered device status notification can be viewed and
edited.
1 On the Device Status Notification page, click the [Edit] button.
2 Specify the necessary settings, and then click the [Apply] button.
– To cancel all the selected settings, click the [Clear] button.
2
Reminder
For details on the settings, refer to "Registering the device status
notification" on page 3-58.
Device Manager 3-63
Page 94

Device List
2
2
3
Reminder
A device group manager can edit only the status notifications targeted for
the device groups for which the device group manager has the
Administrator privileges.
Deleting a device status notification
Click this button to delete a registered device status.
1 On the Device Status Notification page, select the device status to be
deleted, and then click the [Delete] button.
2 Check the message that appears, and then click the [OK] button to
delete the template.
The selected device status notification is deleted.
Reminder
A device group manager can delete only the status notifications targeted
for the device groups for which the device group manager has the
Administrator privileges.
Device Manager 3-64
Page 95

Device List
3.7 Multi-Setting of Administrator Password
The administrator password can be set collectively for multiple devices.
During the multi-setting process of the administrator password, you can
check whether the same password has been used.
3.7.1 Multi-setting of administrator password
The administrator password can be specified collectively for multiple
devices.
1 On the Top Menu page, click the [Device List] button.
2 Click [Admin. Password Multi-Setting] in the menu.
– Only the devices that are registered to the selected device group
and for which the administrator password can be specified
collectively will be displayed in the list.
– To specify the administrator password collectively, special
firmware must be installed on the devices. For details, contact our
service representative.
3
Device Manager 3-65
Page 96

Device List
<Admin.Password>
Function Details
Password Type in the password.
Retype Password Type in the password again.
Minimum number of passwords
changes before using an old password.
Select the number of passwords to be checked among the
passwords collectively set for multiple devices in the past.
<Select device to apply the settings to>
Function Details
Device Group Narrow the devices to be displayed.
All subgroups Select whether to only display devices that directly belong
Search Condition When a list is displayed in the page, the listed items can be
Display Apply the change in "Device Group" and "All subgroups".
to the selected group, or to display all devices including
those in subgroups.
narrowed.
3.7.2 The result of administrator password multi-setting
The result of the administrator password multi-setting can be displayed.
3
Function Details
Administrator Password MultiSetting Result
Result Displays the result after the administrator password has
Registered Name Displays the registered name of the device.
Model Name Displays the model name of the device.
Description Displays the result after the administrator password has
Displays the result of the administrator password multi-setting.
been applied to the device.
been applied to the device.
Device Manager 3-66
Page 97

Device List
3.7.3 Configuration Reminder
Configure settings to send an E-mail (reminder) that prompts you to change
the administrator password at periodic intervals.
Sending a reminder prevents users from forgetting to update the
administrator password, thus enhancing security.
% Click the [Configuration Reminder] button in the Admin. Password
Multi-Setting page.
<Processing Interval>
Function Details
Every Year, Every Month, Every
Week
Select the interval to send reminders from the following:
Every Year, Every Month, or Every W eek. After selecting the
interval, select the details for the period in order to perform
the periodic process.
3
<Notification Destination>
Function Details
E-mail Address Specify an E-mail address to send a reminder to.
Language Select a language to be used in the main body of an E-mail.
When simultaneously sending an E-mail to multiple addresses, insert a comma (,) or semicolon (;) between them
as a delimiter.
Device Manager 3-67
Page 98

Device List
3.8 Firmware Update Setting
The device firmware can be downloaded from the network and updated.
You can specify a schedule that enables not only immediate firmware update
processing but also automatic firmware update processing which
automatically updates firmware at the specified time.
2
Note
To update firmware, settings must be specified by your service
representative. For details, contact your service representative.
3.8.1 Available operations in firmware update setting
Display a list of devices, and then configure settings to update firmware.
1 Click [Firmware Update Setting] in the menu.
2 Select a device group to be displayed from the [Device Group] drop-
down list.
– To display all devices, select "All Devices".
– If master and subordinate relationships are specified in the group,
select the "All subgroups" check box to display all devices,
including those in subordinate groups.
– Specifying search conditions can narrow down devices to be
displayed in the list. Select a column to be searched from the dropdown list, and then type a character string to be searched in the text
box.
3
3 Click the [Display] button.
A list of devices registered in the selected group appears.
Function Details
Proxy Settings Specify proxy settings for the device.
Device Manager 3-68
Page 99

Device List
3
Function Details
Update Setting Specify the time to update the device firmware.
Clear "Specify Time". Clears the setting to update firmware at the specified time.
Update History Displays the history with device firmware updated.
Select All /Uncheck All Selects or clears all the displayed setting items.
(Device List) Displays a list of devices for which firmware update
Update status icons
The firmware update status is displayed with icons on the Firmware Update
Setting page.
Icon Status Description
(None) Not yet No settings required to update firmware are specified.
Not yet Firmware is not updated, or a setting required to update
processing is available.
The following items are displayed.
•Status
• File Name
• Date and time of last update
•Registered name
•Model Name
• IP Address / DNS Host Name
• Firmware Version
firmware at the specified time is not specified.
Waiting The device is waiting until firmware is updated at the spec-
Running Firmware update processing is currently running.
Updated (Version# changed)
Updated (Version# not
changed)
Updated (Timeout)
Refresh Failed Failed to update firmware.
ified time.
Firmware is updated, and a new version of firmware is applied.
Firmware was updated, but its version was not changed.
The specified time lapsed after firmware was updated, but
the firmware status cannot be viewed.
Device Manager 3-69
Page 100

Device List
3.8.2 Proxy settings
Specify proxy settings for the device if proxy server settings are required
when the device downloads firmware.
2
Reminder
The proxy settings are available for multiple devices.
1 On the Firmware Update Setting page, select the check boxes of target
devices, and then click the [Proxy Settings] button.
The Proxy Settings page appears.
2 Specify proxy settings for the selected device.
– If you specify multiple devices, select the check boxes of target
setting items.
3
Function Details
HTTP Proxy Setting Specify HTTP proxy settings.
Device Manager 3-70
 Loading...