

Page 1

PageScope
NDPS Gateway 2.5
User Manual
Page 2

Foreword
Welcome
PageScope NDPS Gateway is software that controls printers and print jobs
and checks their status in an NDPS (Novell Distributed Print Services)
environment, the newest printing system by Novell, Inc.
PageScope NDPS Gateway provides the following:
• Printer agent configuration
• Printer control snap-in functionality
• NDPS gateway server capabilities
Trademark Acknowledgements
KONICA MINOLTA and the KONICA MINOLTA logo are trademarks of
KONICA MINOLTA HOLDINGS, INC.
PageScope is a trademark of KONICA MINOLTA BUSINESS
TECHNOLOGIES, INC.
Ethernet is a registered trademark of Xerox Corporation.
Microsoft, Windows, and Windows NT are registered trademarks of
Microsoft Corporation.
Netscape Communications, the Netscape Communications logo, Netscape
Navigator, Netscape Communicator, and Netscape are trademarks of
Netscape Communications Corporation.
Novell, NetWare, NDS, Novell Directory Services, NDPS, and Novell
Distributed Print Services are registered trademarks of Novell, Inc.
Novell Client, Printer Agent, Public Access Printer, and Controlled Access
Printer are trademarks of Novell, Inc.
PCL is a registered trademark of Hewlett-Packard Company Limited.
All other product names are trademarks or registered trademarks of their
respective holders.
Copyright© 2002 by Peerless Systems Corp, 2381 Rosecrans Avenue, El
Segundo, CA 90245
Copyright© 2002 KONICA MINOLTA BUSINESS TECHNOLOGIES,
INC.
i
Page 3

Foreword
Screen images shown in this manual may differ slightly from actual
ones. Specifications are subject to change without prior notice.
ii
Page 4

Contents
CONTENTS
1 Overview ............................................................ 1
1.1 Features .................................................................... 1
1.2 Supported Platforms ............................................... 1
1.3 Supported Language ............................................... 2
2 Installation ......................................................... 3
2.1 Installing NDPS ........................................................ 3
2.2 Installing PageScope NDPS Gateway .................... 4
3 Printer Agent Configuration ............................. 6
3.1 Starting Up the Configuration Utility ..................... 6
3.1.1 For a Public Access Printer ...........................................7
3.1.2 For a Controlled Access Printer ...................................9
3.2 Configuring a Printer Agent .................................. 11
3.3 Manually Adding a Printer ..................................... 13
3.4 Printer Detection Settings ..................................... 14
iii
Page 5

Contents
4 NDPS User Interface ....................................... 17
4.1 NDPS Printer Manager .......................................... 17
4.2 Installing a Printer Device for a Printer Agent .... 19
4.3 NDPS Job Manager ................................................ 21
4.4 Microsoft Printer Manager .................................... 21
4.5 NDPS Printer Gateway Operation ......................... 22
5 NDPS Printer Snap-In Operation .................... 23
5.1 Printer Details Button ............................................ 24
5.1.1 Identification .................................................................24
5.1.2 Feature ..........................................................................25
5.1.3 Status ............................................................................25
5.1.4 Set Defaults ..................................................................26
5.1.5 About .............................................................................26
5.2 I/O Info Button ........................................................ 27
5.2.1 Input Summary .............................................................27
5.2.2 Output Summary ..........................................................28
5.3 Job Info Button ...................................................... 29
5.4 Enable/Disable Input Button ................................. 30
5.5 Pause/Resume Output Button .............................. 30
5.6 Polling Setting Button ........................................... 30
5.7 Troubleshooting Button ........................................ 31
5.8 Control Panel Displays .......................................... 32
5.9 Linking to Web Utilities ......................................... 32
iv
Page 6

Contents
6 PageScope NDPS Gateway Server
Capabilities ...................................................... 33
6.1 Printer List .............................................................. 33
6.2 Specifying Printer Settings ................................... 34
7 Troubleshooting ............................................... 35
7.1 Troubleshooting the NDPS Printer Configuration
Module .................................................................... 35
7.1.1 Why does the “Authentication failed”
message appear? .........................................................35
7.1.2 Why is a particular printer not found
in the “Discovered Printers” list? ...............................35
7.2 Troubleshooting the NDPS Printer Gateway
Module .................................................................... 36
7.2.1 Why is an NDPS printer agent
in the “Not Bound” state? ...........................................36
7.2.2 Why is an NDPS printer agent
in the “Needs Attention” state? ..................................37
7.2.3 Why is an NDPS printer agent stuck
in the “Printing” state? ................................................37
7.3 Troubleshooting the NDPS Printer Control
Snap-In Module ...................................................... 38
7.3.1 Why is the Novell Printer Control snap-in
opened for a KONICA MINOLTA printer? ....................38
7.3.2 Why can a screen not be opened? .............................38
7.3.3 Why is there no or bad data in the screen? ...............38
7.4 Troubleshooting the NDPS Module ...................... 39
7.4.1 Why does an event not generate the pop-up
or log message on the client machine? .....................39
v
Page 7

Contents
vi
Page 8

1 Overview
1.1 Features
• NDPS (Novell Distributed Print Services) printing to supported
KONICA MINOLTA printer models is provided.
• Supported KONICA MINOLTA printers on an IP network can be
detected, and a list for user selection is provided.
• Events can be detected, and messages to users can be generated.
• PageScope NDPS Gateway accesses printers using SNMP (Simple
Network Management Protocol) and displays front panel messages
and the status of the printers.
1Overview
• Supported Printers:
Most KONICA MINOLTA digital MFPs
*1
and KONICA MINOLTA
laser beam printers are supported. (Some models are not supported.)
*1 MFPs: Multifunction Peripherals
1.2 Supported Platforms
Environment of
server where
PageScope NDPS
Gateway will run
NDPS
Snap-in environment
The newest Service Pack must be installed, and use
of IP must be possible.
• NetWare 5
• NetWare 5.1
• NetWare 6
• NDPS 2.0 or later
• Windows 95 (Service Pack 1 or later)
• Windows 98
• Windows 98 Second Edition
• Windows NT 4.0 (Service Pack 6a or later)
• Windows 2000 (Service Pack 2 or later)
• Windows XP
1
Page 9

1Overview
• For Windows 95/98, NetWare Client v3.32 or later
Novell client
Client Web browser
Protocol • TCP/IP (LPD)
• For Windows NT/2000/XP, NetWare Client v4.83
or later
• Internet Explorer 4.0 or later
• Netscape 4.0 or later
1.3 Supported Language
• English
Printer agent
configuration/
Control snap-in
NDPS gateway
server
• German
• Spanish
• Italian
• French
• Japanese
• English
2
Page 10

2 Installation
2Installation
This section describes how to install PageScope NDPS Gateway, which is
composed of different parts. The gateway component provides NDPS
service to NDPS clients for non-NDPS printers. The control snap-in utility
manages the KONICA MINOLTA printer agents. Additionally, the
configuration utility allows you to configure the NDPS printer agents.
2.1 Installing NDPS
The PageScope NDPS Gateway is added to the Novell NDPS. Therefore, the
first step is to install NDPS.
1. When installing NetWare 5.x or 6.x, make sure that NDPS is also
installed. If the server is installed without NDPS, you can add the service after server installation by loading “NWCONFIG.NLM”, then
selecting “Product Options”, and adding NDPS to the server.
2. The administration utility is “NWADMN32.EXE”, located at
“SYS:\PUBLIC\WIN32”.
3. Run “NWADMN32”, and then select an NDPS broker. Create NDPS
brokers when necessary.
4. Add printer drivers, banners and fonts to NDPS via the NDPS Resource
Service Manager.
5. The NDPS Printer Manager for Windows 95, 98, NT and 2000 client is
“NWPMW32.EXE”, located at “SYS:\PUBLIC\WIN32”.
3
Page 11
2 Installation
2.2 Installing PageScope NDPS Gateway
PageScope NDPS Gateway will be installed onto a NetWare server from
Windows.
Note
• Before installation, be sure that you are connected to the
NetWare server onto which PageScope NDPS Gateway will be
installed, or that you are logged on with administrator privileges.
• Before upgrading PageScope NDPS Gateway to a newer
version, perform the following two operations.
⋅
Quit PageScope NDPS Gateway.
⋅
Then, quit NWADMIN32.exe from all client computers logged
into the NetWare Server where PageScope NDPS Gateway is
running.
1. On Windows, start up the installation program (mltndps.exe).
2. Click the [Next] button.
The License Agreement dialog appears.
3. Click the [Yes] button.
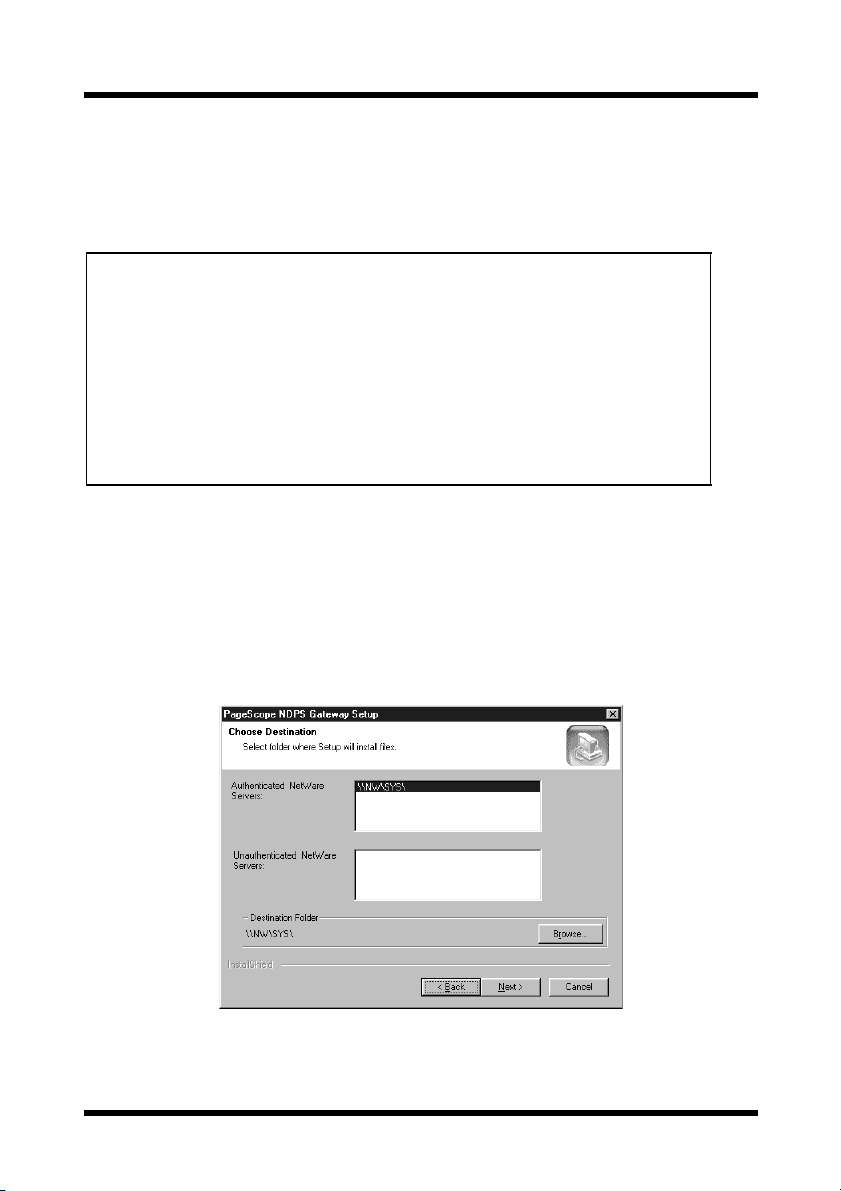
The Choose Destination dialog appears, allowing you to specify
where the application will be installed.
4
Page 12

2 Installation
• Authenticated NetWare Servers:
A list of NetWare servers that are logged in is displayed.
• Unauthenticated NetWare Servers:
A list of NetWare servers that are connected but not logged in is
displayed.
4. From either the “Authenticated NetWare Servers” or the “Unau-
thenticated NetWare Servers” list, select the server where
PageScope NDPS Gateway will be installed.
5. To change the installation location to a folder other than that shown in
“Destination Folder”, click the [Browse] button.
If the server is not logged in, the Login dialog appears, allowing you to
log in.
Specify the folder, and then click the [OK] button.
6. Click the Next button.
Installation begins, and the files are copied to the specified NetWare
server.
Files that are copied
The following files are copied when PageScope NDPS Gateway is installed.
These files are removed when PageScope NDPS Gateway is uninstalled.
Module Name Path
Minocfg.pd2
MinoCtrl.pc2
Minolta.ini
MinoSnmp.dll
MiCfgRes.dll
MiCtlRes.dll
Milgateway.hlp
Milgateway.cnt
Minogw.nlm SYS:\SYSTEM
Minogw.msg
Minogw.hlp
SYS:\PUBLIC\WIN32
SYS:\PUBLIC\WIN32
SYS:\PUBLIC\WIN32
SYS:\PUBLIC\WIN32
SYS:\PUBLIC\WIN32\NLS\(appropriate language folder)
SYS:\PUBLIC\WIN32\NLS\(appropriate language folder)
SYS:\PUBLIC\WIN32\NLS\(appropriate language folder)
SYS:\PUBLIC\WIN32\NLS\(appropriate language folder)
SYS:\SYSTEM\NLS\4
SYS:\SYSTEM\NLS\4
5
Page 13

3 Printer Agent Configuration
3 Printer Agent Configuration
Each NetWare printer is represented by an NDPS (Novell Distributed Print
Services) printer agent. The NDPS client submits a print job to the NDPS
printer agent. The NDPS PSM (Print Service Manager) passes the job to the
gateway, which submits the job to the NetWare printer for printing.
In an NDPS environment, users can configure a printer as a public access
printer or as a controlled access printer. The relationship between the NDPS
printer agent and the NetWare printer can be established via the
configuration utility. The configuration utility is a Windows-based
application. The operation of this configuration utility is described in this
section.
3.1 Starting Up the Configuration Utility
The procedures for creating a public access printer agent and a controlled
access printer agent are very similar. The only difference is in how the
configuration utility is started up. This difference and the operation of the
configuration utility is explained below.
Public access printer
A public access printer is available to all users as soon as a printer agent for
that printer appears on the network. Public access printers are not
represented by NDS (Novell Directory Services) objects, and they simply
exist on the network for all clients to locate and use. In order to use a public
access printer, clients must connect to the network, but they do not need
authentication in the NDS tree before using a public access printer.
However, users do not have privileges for setting configuration options that
are also available for controlled access printers.
6
Page 14
3 Printer Agent Configuration
Controlled access printer
A controlled access printer enables you to assign NDS privileges for
controlling which users can see, use, and manage this printer. To configure a
controlled access printer, you can simply create an NDPS printer object to
represent the printer. The newly created NDPS printer object will appear in
the NWADMIN utility’s NDS browser. As with other NDS objects, a
controlled access printer offers a full range of security options. Users can
also configure default properties, which are unavailable to public access.
Before creating a printer agent, be sure that:
•“NDPS.NLM” is loaded. If it is not, type “load ndpsm” at the server
console prompt, and then select the NDPS manager that you want to
start up.
•“NWADMN32.EXE”, located at “SYS:\PUBLIC\WIN32\”, has
been ran.
3.1.1 For a Public Access Printer
1. Double-click the corresponding NDPS manager object within the NDS
tree.
7
Page 15
3 Printer Agent Configuration
2. Select “Printer Agent List” from the column at the right, and then click
the [New] button to create the printer agent.
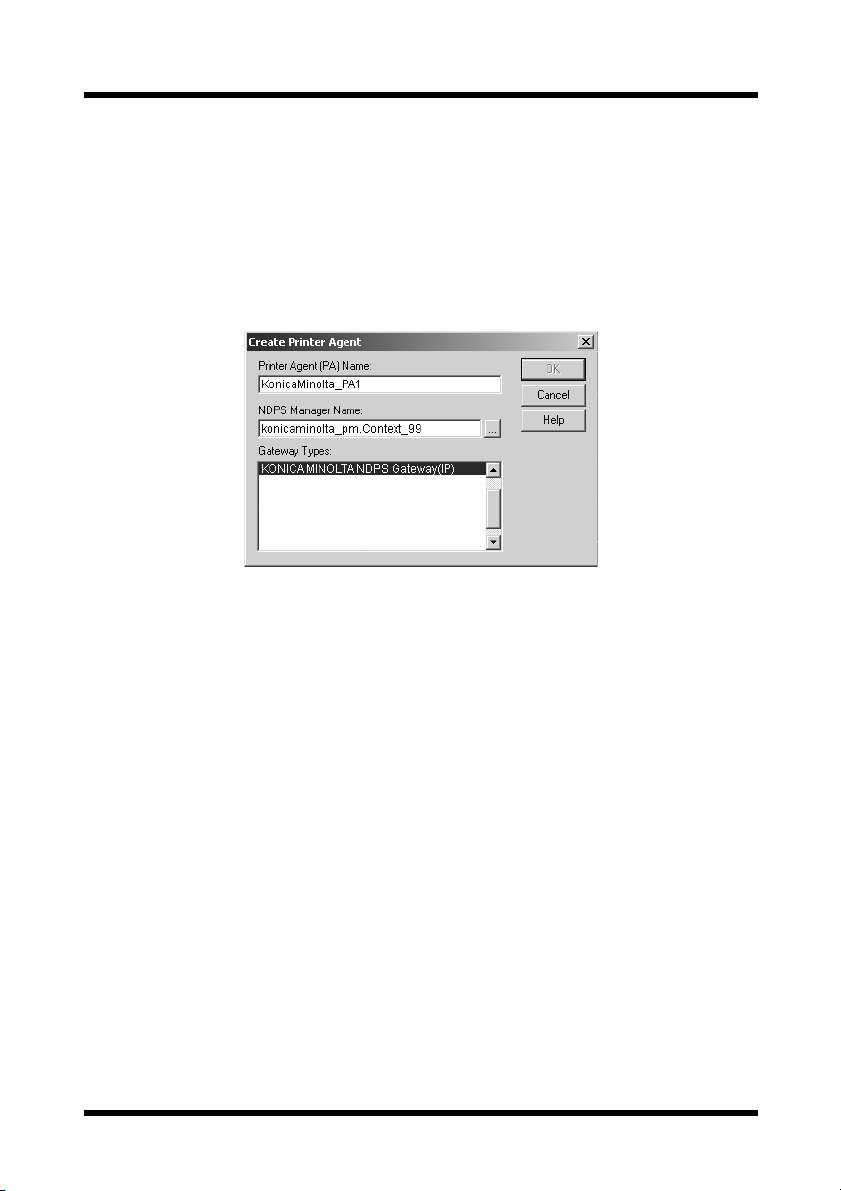
The Create Printer Agent dialog appears. (This dialog is the same as
that displayed when creating a controlled access printer, as described
below.)
3. Enter the printer agent name (e.g., KonicaMinolta_PA1) in the “Printer
Agent (PA) Name” box.
4. From the list, according to the syntax
“NDPS_Manager_Name.Context_Name”, select the NDPS manager
started up from the server console.
5. Select “KONICA MINOLTA NDPS Gateway (IP)” in the “Gateway
Types” box, and then click the [OK] button.
To configure the printer agent, continue with the instructions in section
3.2.
8
Page 16

3 Printer Agent Configuration
3.1.2 For a Controlled Access Printer
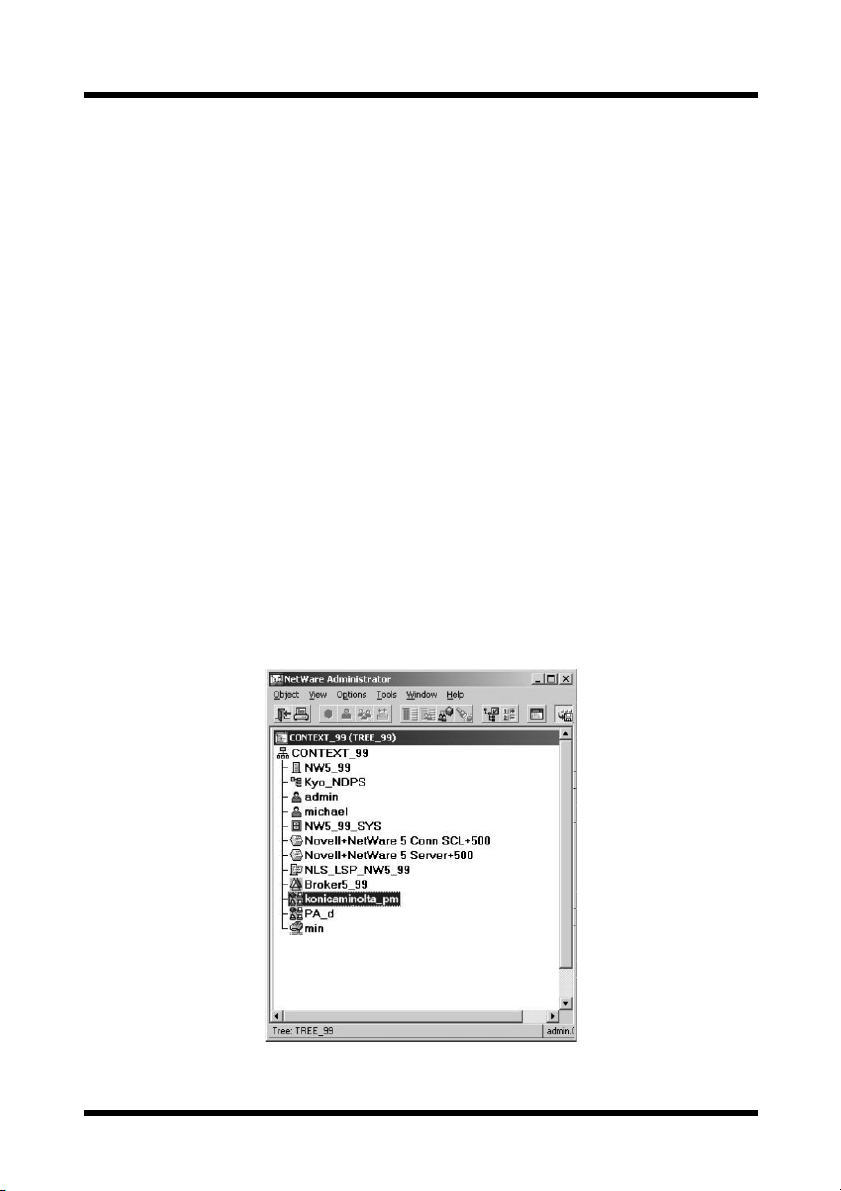
1. From the NetWare Administrator dialog, select the context under which
the printer agent is created in this NDS container (e.g.,
“CONTEXT_99”).
2. From the “Object” menu, select “Create”.
The New Object dialog appears.
3. Select “NDPS Printer”, and then click the [OK] button.
The Create NDPS Printer dialog appears.
9
Page 17

3 Printer Agent Configuration
4. Enter the printer agent name (e.g., KonicaMinolta_PA1) into the
“NDPS Printer Name” box.
5. Select “Create a New Printer Agent” under “Printer Agent
Source”, and then click the [Create] button.
The Create Printer Agent dialog appears.
6. Enter the printer agent name (e.g., KonicaMinolta_PA1) into the
“Printer Agent (PA) Name” box.
7. From the list, according to the syntax
“NDPS_Manager_Name.Context_Name”, select the NDPS manager
started up from the server console.
8. Select “KONICA MINOLTA NDPS Gateway (IP)” in the “Gateway
Types” box, and then click the [OK] button to proceed.
To configure the printer agent, continue with the instructions in section
3.2.
10
Page 18

3 Printer Agent Configuration
3.2 Configuring a Printer Agent
When creating either a public access printer or a controlled access printer,
the same Create Printer Agent dialog appears. After completing the dialog,
the KONICA MINOLTA PageScope NDPS Gateway dialog appears.
A list of printer names and their corresponding IP address is displayed in the
KONICA MINOLTA PageScope NDPS Gateway dialog.
Note
• To detect printers located in other subnets, click the [Advanced]
button. Refer to section 3.4 for details.
• To add a single printer located in another subnet, click the [Add
Device] button, and then following the instructions explained in
section 3.3.
11
Page 19

3 Printer Agent Configuration
1. From the list, select the printer assigned to the printer agent, and then
click the [Finish] button.
The LPR Settings dialog appears, allowing you to select the name of
the lpd queue for the selected printer.
2. From the list, select the name of the lpd queue to be used, and then click
the [OK] button.
In the dialog that appears, asking for confirmation, click the [OK]
button.
A dialog appears, allowing you to select the printer driver for the
selected printer.
3. Select the corresponding printer driver.
The PageScope NDPS Gateway will then be completed.
12
Page 20

3 Printer Agent Configuration
3.3 Manually Adding a Printer
Click the [Add Device] button to add other printers that cannot be or have
not been automatically detected by the configuration utility. This is useful
when you have defined a small network coverage for printer detection (e.g.,
hop count = 0), but you want to configure a distant printer.
1. Click the [Add Device] button in the KONICA MINOLTA PageScope
NDPS Gateway dialog.
The Add Device dialog appears.
2. Enter the IP address, and then click the [OK] button.
A supported KONICA MINOLTA printer is added.
Whether the printer for that IP address exists or not is checked. If that printer
exists on the network and if it can be confirmed that the printer is a
supported KONICA MINOLTA printer, that printer is added to the list of
detected printers in the KONICA MINOLTA PageScope NDPS Gateway
dialog.
13
Page 21

3 Printer Agent Configuration
3.4 Printer Detection Settings
After clicking the [Advanced] button, various settings can be made to
specify the location in which printers are detected.
On the “Default Setting” tab of the Advanced dialog, you can change the
following two settings:
• SNMP Community Setting:
You can select a different read community (usually specified as
“public”), which is used for communicating with
KONICA MINOLTA printing devices.
• IP Discovery Setting:
You can define the maximum hop count (number of routers passed
through) when detecting printers automatically. The default value is
0, and users are allowed to enter a hop count between 0 and 10.
However, for cases when printers are to be located with a hop count
above 10 and for better performance during detection, users can add
an additional subnet in which printers are detected, as described
below.
14
Page 22

3 Printer Agent Configuration
Specifying a searched subnet
In the following cases, the location in which printers are searched for should
be specified.
• If the printer is in a location that requires many routers (more than 10
hops) to be transversed
• When you wish to use a printer that is far from the local subnet
• When a larger maximum number of hops results in the list containing
many printers
• If too many broadcast packets will be sent into the network, resulting
in increased network traffic
1. Click the [Advanced] button in the KONICA MINOLTA PageScope
NDPS Gateway dialog.
The Advanced dialog appears.
2. Click the “IP Discovery” tab of the Advanced dialog.
A list of subnet addresses is displayed.
The Subnet list allows users to specify a particular subnet to be
included in the search in addition to controlling the detection with a
maximum hop count.
15
Page 23

3 Printer Agent Configuration
3. Click the [Add] button.
The Add Subnet dialog appears.
4. In the “IP Address” box, enter the address of the subnet to be added.
In the “Subnet Mask” box, enter the subnet mask, and then click the
[OK] button.
Later, if any printers are found in that specified subnet, they will be
added to the list of detected printers in the KONICA MINOLTA
PageScope NDPS Gateway dialog.
16
Page 24

4 NDPS User Interface
4 NDPS User Interface
This section walks through all the screens that an NDPS user encounters.
4.1 NDPS Printer Manager
The NDPS Printer Manager is the major utility that NDPS clients can use to
configure and monitor their NDPS printing environment.
1. For a Windows 95, 98 or NT client, run “NWPMW32.EXE”, located at
“SYS:\PUBLIC\WIN32”, to start up the NDPS Printer Manager. The
utility can be started in other Windows environments in the same way.
The following screen appears.
This main screen shows the KONICA MINOLTA NDPS printers that are
currently selected by the users.
17
Page 25

4 NDPS User Interface
The status of the printers is indicated in real time. All NDPS status defined
by Novell will be supported. Some of the supported event types can be
found in the following dialog.
This dialog shows the two types of events: the print job events and the
printer events. The print job events are not directly controlled by NDPS
Gateway. NDPS Gateway interacts with the NDPS printer agent, which
could result in various print jobs events. The printer events are directly
controlled by NDPS Gateway. NDPS event objects are added to NDPS
MOD (Managed Object Database) when NDPS Gateway detects warnings
and errors in the printer.
18
Page 26

4 NDPS User Interface
4.2 Installing a Printer Device for a Printer Agent
In this dialog, you can select, deselect and configure NDPS printers from
client computers. The “Available Printers” box lists all the NDPS printers
that have been registered in NDPS. The NDPS printer registration can be
performed either based on a program or manually. The printer agent lists for
the NDPS manager can be modified via NWADMIN (dialog on page 7) or
through a C-Worthy interface on the server. Start up “NDPSM.NLM”, and
then specify the necessary items.
19
Page 27

4 NDPS User Interface
NDPS users could select a printer from either the “Installed Printers” box
or the “Available Printers” box, then click [Printer Information] to display
the details of the printer configuration and its real time status. Notice that the
user machine is not required to have the printer driver installed in order to
see them.
NDPS printers support multiple configurations. To choose which
configuration profile is to be used, select a printer in the “Installed
Printers” box of the Novell Printers dialog, and then click the
[Configuration] button.
20
Page 28

4 NDPS User Interface
4.3 NDPS Job Manager
The job list of a printer can be displayed by double-clicking the printer in
the printer list of the Novell Printer Manager main screen.
The job status basically shows the current state of the printer agent.
The details of the print job can be displayed by double-clicking the print job.
All NDPS job and document attributes defined in NDPS MOD are provided.
New job and document attributes will not be added. The attribute set for
NDPS jobs and documents are not listed in this document. Refer to the
NDPS document for details.
NDPS provides more sophisticated job management, for example, print jobs
can be reordered. All print job operations available through NDPS Printer
Manager are supported by NDPS Gateway.
4.4 Microsoft Printer Manager
When an NDPS printer is selected, Novell Printer Manager will add its
printer icon to the “Printers” window of the Microsoft Control Panel. In
addition, many printer vendors have proprietary printer managers added to
the “Printers” window of the Microsoft Control Panel. Those applications
will still work because the NDPS Gateway does not modify the printer
software in the target printers. They may provide supplemental information
to Novell NDPS Printer Manager because the proprietary information may
not be defined in “NDPS MOD”.
21
Page 29

4 NDPS User Interface
4.5 NDPS Printer Gateway Operation
The operation of the NDPS network requires the coordination of many
components. For detailed explanations of NDPS operation, read the Novell
NDPS architecture documents and relevant user manuals.
This document focuses on the operation of the KONICA MINOLTA
PageScope NDPS Gateway and its snap-in program.
22
Page 30

5 NDPS Printer Snap-In Operation
5 NDPS Printer Snap-In Operation
The snap-in program is started up differently for controlled access printers
and public access printers.
For public access printers, select “Tools” from the main menu bar, and then
click “View NDPS Public Printers”. A box containing a list of all public
access printers is displayed. Double-clicking the desired printer will start up
the snap-in program, shown below.
For controlled access printers, double-click the desired NDPS printer object
in the tree. The snap-in will automatically be started up. If you don’t know
where the printer object is, then you could use the locate object function in
NWADMIN to find it for you.
23
Page 31

5 NDPS Printer Snap-In Operation
5.1 Printer Details Button
Clicking this button displays a menu listing five available commands:
Identification, Feature, Status, Set Defaults and About.
5.1.1 Identification
Click this command to display the Novell-defined Identification dialog. It
shows the NDPS manager that manages the printer agent, the printer
manufacturer, model name, printer control DLL name, etc.
24
Page 32

5 NDPS Printer Snap-In Operation
5.1.2 Feature
Click this command to display the Novell-defined Features dialog, which
shows information for supported document formats, duplexing, maximum
resolution, printing mechanisms, maximum printing speed and the memory
size of the printer.
5.1.3 Status
When the printer encounters problems, the Printer Status dialog reports the
related details, such as the event time, event name, location where the event
occurred, etc., so that the user can quickly locate problems and resolve
them.
25
Page 33

5 NDPS Printer Snap-In Operation
5.1.4 Set Defaults
Click this command to display the Novell-defined Printer Defaults dialog,
which allows the user to configure the default behavior of the printers, such
as, the copy count and banner page settings.
5.1.5 About
Click this command to display the current version of the PageScope NDPS
Gateway.
26
Page 34

5 NDPS Printer Snap-In Operation
5.2 I/O Info Button
Clicking this button displays a menu, allowing you to see information for
the selected paper supply trays and paper output trays for the printer.
5.2.1 Input Summary
This summary gives the printer tray names, maximum capacity, paper level,
paper size and orientation.
Input Configuration
Select one of the input trays listed, and then click the [Detail] button to view
the tray details.
You can also double-click one of the input trays listed to view its details.
27
Page 35

5 NDPS Printer Snap-In Operation
5.2.2 Output Summary
This summary gives output tray information, including the tray name, tray
type, unit dimensions and maximum capacity.
Output Configuration
Select one of the output trays listed, and then click the [Detail] button to
view the tray details.
You can also double-click one of the output trays listed to view its details.
28
Page 36

5 NDPS Printer Snap-In Operation
5.3 Job Info Button
Clicking this button displays a menu listing two available commands: Job
List and Spooling.
Click the “Job List” command to manage the print jobs (move, copy or
delete them).
Click the “Spooling” command to configure the spooling settings of the
printer agent.
29
Page 37

5 NDPS Printer Snap-In Operation
5.4 Enable/Disable Input Button
Clicking this button pauses or resumes spooling (input). When spooling is
paused, new print jobs sent from client’s machines are temporarily not
accepted.
5.5 Pause/Resume Output Button
Clicking this button pauses or resumes printing (output). When printing is
paused, printing of jobs is temporarily stopped.
5.6 Polling Setting Button
Clicking this button allows the time interval between each status polling to
be configured. The speed of the front panel message update is directly
affected. The smaller the polling value, the heavier the network traffic. This
interval can be set within a range of 1 to 1000 second(s).
30
Page 38

5 NDPS Printer Snap-In Operation
5.7 Troubleshooting Button
The current printer events are displayed in the order of their severity.
In the snap-in dialog, an error icon appears at the point in the printer where
the error occurred. The icon that appears differs depending on the severity of
the error.
31
Page 39

5 NDPS Printer Snap-In Operation
5.8 Control Panel Displays
The snap-in dialog displays messages showing the printer status, such as
when it is printing and warming up, or other alert messages. If there is more
than one event to be reported, only the most critical and the most recent one
will be shown.
5.9 Linking to Web Utilities
By clicking the Web Utilities logo, the default Web browser is started up,
and Web Utilities for the currently displayed printer appears.
32
Page 40

6 PageScope NDPS Gateway Server Capabilities
6 PageScope NDPS Gateway Server
Capabilities
With PageScope NDPS Gateway on a NetWare server, PageScope NDPS
Gateway can be set and the printer can be observed and controlled.
When “Minogw.nlm” is started up on the NetWare server, the following
screen appears.
6.1 Printer List
If “Printer List” is selected from the PageScope NDPS Gateway screen, a
list of printer agents that are controlled by PageScope NDPS Gateway
appears.
33
Page 41

6 PageScope NDPS Gateway Server Capabilities
6.2 Specifying Printer Settings
Select a printer agent from the List of Printers screen, and then press the
[Enter] key to display a screen containing the available printer settings.
• Polling Sleep Time:
Specify the length of time (in seconds) for the PageScope NDPS
Gateway server to acquire the printer information. The default
setting is 30 seconds.
• Polling Retries:
Specify the number of times to retry after a timeout has occurred
while accessing the printer. The default setting is 1 time.
• Polling Timeout:
Specify the length of time (in seconds) for waiting until a timeout is
determined while accessing the printer. The default setting is 1
second.
34
Page 42

7 Troubleshooting
7 Troubleshooting
The programs should work properly if the procedures described above are
followed. Nevertheless, something unexpected could cause them to fail to
operate normally. This chapter explains how to diagnose any problems.
7.1 Troubleshooting the NDPS Printer Configura-
tion Module
7.1.1 Why does the “Authentication failed” message
appear?
This occurs only with the QMS (Queue Management Services) port handler.
The configuration utility requires an authorized connection with sufficient
privileges in order for it to add objects and link them together.
The Windows-based configuration does not login for you. Instead, it will
request that you login before configuring printer agents. If your login does
not have sufficient privileges, the “Authentication failed” message may
appear.
7.1.2 Why is a particular printer not found in the
“Discovered Printers” list?
This may be caused due to any of the following reasons.
• Loosened network cables — Check all cable connections and verify
the connections with the “ping” command.
• Incorrect IP address is configured on the printer — Make sure the IP
address is reachable from the client’s machine. If the printer is located
in another subnet, remember to specify the default gateway (i.e.,
router address) on both the client’s machine and the printer.
• Incorrect read community name — Provide a valid community name
for detection. Normally, “public” is a valid name.
35
Page 43

7 Troubleshooting
• Printer is not in “Ready” mode — After the printer is turned on, it
needs some time for initialization. Use the “ping” command to verify
the current state of the printer.
7.2 Troubleshooting the NDPS Printer Gateway Module
7.2.1 Why is an NDPS printer agent in the “Not Bound”
state?
The NDPS printer agent cannot be initialized for some reason. Press the
[ENTER] key to bring up the screen, and then select “Shutdown Printer”.
Next, press [ENTER] again, and then select “Startup Printer”. Go to the
server console screen and check the message. A message explaining why the
printer agent cannot be initialized should usually be displayed. The gateway
screen may also contain additional information.
The printer agent can be reconfigured by selecting it, then pressing
[ENTER] in the configuration field. You don’t need to worry if the resource
is duplicated or not; the configuration program will reuse the existing
resource.
36
Page 44

7 Troubleshooting
7.2.2 Why is an NDPS printer agent in the “Needs
Attention” state?
The printer has uncorrected problems at that time. Press [ENTER] to look at
its details screen. Press [ENTER] in the status field to list all that printer’s
problems that are uncorrected. The state will be reset to idle after all of the
problems are cleared.
If the printer agent remains in the “Needs Attention” state for a long period
of time, you should go to investigate the error. For example, if the printer
agent displays “Printer Not Connected”, you should check the power
connection or the network connection for the printer. If you cannot find the
cause of the problem, as a last resort, you could perform the following
procedure:
• Select the printer agent that you want to investigate.
• Press [ENTER] to view the details information.
• In the “Status and Control” section, press [ENTER].
• Select “Shutdown Printer”, and then press [ENTER].
• The printer agent will change to the “Shutdown” state.
• Return to the “Status and Control” menu, and select “Restart
Printer”.
• Press [ENTER] to proceed, and the printer agent will go back to the
“Idle” state.
7.2.3 Why is an NDPS printer agent stuck in the “Printing” state?
This state indicates that the job has been opened by the gateway but has
never been closed. This rarely happens to QMS because jobs are written to
the local hard disk. This may happen to parallel port printers. Make sure that
the printer is in good operating condition and is not blocking the job flow.
37
Page 45

7 Troubleshooting
7.3 Troubleshooting the NDPS Printer Control
Snap-In Module
7.3.1 Why is the Novell Printer Control snap-in opened for a KONICA MINOLTA printer?
It is likely that the “MinoCtrl.PC2” file is not copied to the right directory.
Since it was not found, the Novell printer control snap-in was opened by
default. Copy “MinoCtrl.PC2” to the “SYS:\PUBLIC\WIN32” directory.
7.3.2 Why can a screen not be opened?
This usually occurs when a message box containing a number appears.
7.3.3 Why is there no or bad data in the screen?
An error may have occurred in the printer. Therefore, the gateway cannot get
up-to-date information from the printer. Open the printer status screen to
check the details.
Another possibility is that the gateway cannot communicate with the printer.
Look at the detection screen to see if any time-out messages are displayed.
38
Page 46

7 Troubleshooting
7.4 Troubleshooting the NDPS Module
7.4.1 Why does an event not generate the pop-up or log message on the client machine?
First, be sure to check the events. Select the printer agent in the NDPS
Printer Manager, select “Configuration” and select “Notification”. There
are different icons for different notification mechanisms. You will see at
least two, the log and pop-up. Make sure that the events are properly set for
each notification method.
There are two kinds of events: print job events and printer events. For public
access printers, printer events will not be transmitted outside a print job
session. For instance, if the printer runs out of paper in the middle of
printing, the event will be reported. If the client is not printing a document
and an out-of-paper event has occurred, a warning for this event will not be
transmitted to the client.
For controlled access printers, make sure that the NDPS broker object has
the right to write to the client. Otherwise, the message cannot be transmitted
to the client due to the NDS access control.
39
Page 47

2002
www.konicaminolta.net
Copyright
2003.114343-PS038-04
 Loading...