

Page 1
PageScope
Direct Print Ver. 1.1
User’s Guide
Page 2

Contents
Contents
1 Introduction
1.1 System Requirements.................................................................. 1-1
1.2 Main Features ............................................................................... 1-2
1.3 Copyright Information.................................................................. 1-4
2 Installing PageScope Direct Print
2.1 Installing........................................................................................ 2-1
2.2 Uninstalling................................................................................... 2-7
3 Starting PageScope Direct Print
3.1 Using the “Start” Menu................................................................ 3-1
3.2 Using the Application Icon on the Desktop ............................... 3-1
3.3 Main Window ................................................................................ 3-2
4 Specifying Printer Settings
4.1 Adding a Printer ........................................................................... 4-1
4.1.1 “Network” tab ............................................................................. 4-3
4.1.2 “User Authentication/Account Track” tab ................................... 4-4
4.1.3 “Configure” tab........................................................................... 4-6
4.1.4 Specifying printer search parameters ........................................ 4-7
4.2 Changing Printer Settings........................................................... 4-8
4.3 Deleting a Printer.......................................................................... 4-8
5 Programming Job Settings
5.1 Adding a Job Setting ................................................................... 5-1
5.2 Changing a Job Setting ............................................................... 5-3
5.3 Deleting a Job Setting.................................................................. 5-4
6Printing
6.1 Using the Appropriate Icon on the Desktop .............................. 6-1
6.2 Using the Shortcut Menu (Displayed by Right-Clicking).......... 6-3
6.3 Specifying a File From the Main Window................................... 6-5
PageScope Direct Print i
Page 3

Contents
6.4 Using Hot Folders ........................................................................ 6-6
6.4.1 Setting up hot folders................................................................. 6-6
6.4.2 Specifying detailed hot folder settings ....................................... 6-9
6.4.3 Hot folders monitoring icon ...................................................... 6-10
6.4.4 Printing using a hot folder ........................................................ 6-11
7 Security Functions
7.1 Common to Administrators and General Users........................ 7-1
7.2 Administrators.............................................................................. 7-1
7.3 General Users............................................................................... 7-2
8 Additional Settings
8.1 Edit Job Setting for each printing............................................... 8-1
8.2 Edit Authentication/Account Track for each printing ............... 8-3
9 Checking the Printing Status and Print Log
9.1 Checking the Printing Status ...................................................... 9-1
9.2 Viewing the Print Log................................................................... 9-3
9.2.1 Specifying the log setting........................................................... 9-4
9.2.2 Retrieving data........................................................................... 9-5
10 Warning/Error Messages
10.1 Messages Concerning PDF Versions....................................... 10-1
PageScope Direct Print ii
Page 4
Introduction
1 Introduction
PageScope Direct Print is an application for sending files such as PDF
and TIFF files directly to a printer.
A file can be printed by dragging it to the appropriate icon on the desktop
or by using the Windows shortcut menu (displayed by right-clicking), or
the file can be printed automatically by using hot folders.
In addition, job settings, which consist of specified print settings, can be
programmed.
1.1 System Requirements
1
Compatible
operating systems
Compatible printers Refer to the PageScope Direct Print Help or the Readme file for the
Compatible files PDF, TIFF, PS, PCL, ASCII (Text), XPS
Windows XP Home Edition (SP3 or later)
Windows XP Professional (SP3 or later)
Windows XP Professional x64 Edition (SP2 or later)
Windows Vista Home Basic (SP2 or later)*
Windows Vista Home Premium (SP2 or later)*
Windows Vista Business (SP2 or later)*
Windows Vista Enterprise (SP2 or later)*
Windows Vista Ultimate (SP2 or later)*
Windows 7 Home Basic (SP1 or later)
Windows 7 Home Premium (SP1 or later)*
Windows 7 Professional (SP1 or later)*
Windows 7 Enterprise (SP1 or later)*
Windows 7 Ultimate (SP1 or later)*
* 32-bit (x86) and 64-bit (x64) editions are supported.
model names of compatible printers.
* A connection to an Ethernet network is required.
*Differs depending on the printer being used for printing.
Refer to the Readme file for the latest information about service packs and
so on.
Note
With PageScope Direct Print, the only files that can be printed are
those of formats compatible with the printer.
When PageScope Direct Print sends a file to the printer, file formats
that can be printed are automatically detected.
For details on compatible file formats and versions, refer to the support
information for the printer being used.
PageScope Direct Print 1-1
Page 5

Introduction
1.2 Main Features
Printing by dragging a file to the appropriate icon on the desktop
A file can easily be printed by dragging it to the appropriate icon on the
desktop.
In addition, a desktop shortcut can be created for each job setting,
allowing you to print using the print settings that best meet your needs.
Printing using the Windows shortcut menu (displayed by rightclicking)
A file can easily be printed by right-clicking it, then selecting “PageScope
Direct Print” in the shortcut menu that appeared.
Automatic printing using a hot folder
A file can automatically be printed by copying it to a hot folder (folder
monitored for printing) that has been set up in advance.
In addition, by specifying that a hot folder be shared and allowing it to be
used on the local network, other users logged onto the network can print
using the hot folder.
Registering multiple printers/job settings
By setting up multiple printers and job settings, it is no longer necessary
to change the settings each time you wish to print.
Various settings such as the paper tray, paper type, stapling and hole
punching settings, and the number of copies can be customized for each
job setting.
1
Editing print settings
Job settings, such as the number of copies to be printed and the paper
tray, can be edited during printing.
Specifying the authentication setting
The authentication settings can be specified when a printer is registered.
In addition, a dialog box for authentication appears before printing begins
so that the user name or account name and their passwords can be
entered.
PageScope Direct Print 1-2
Page 6

Introduction
Security functions
The settings can be saved by each user logged onto Windows.
Users with administrator privileges can use the settings of all users.
However, a general user has limitations applied when using the settings
of other users.
1
PageScope Direct Print 1-3
Page 7

Introduction
1.3 Copyright Information
Trademark Acknowledgements
KONICA MINOLTA and the KONICA MINOLTA logo are trademarks or
registered trademarks of KONICA MINOLTA HOLDINGS, INC.
PageScope is a trademark or a registered trademark of KONICA
MINOLTA BUSINESS TECHNOLOGIES, INC.
Ethernet is a registered trademark of Xerox Corporation.
Microsoft® and Windows® are registered trademarks of Microsoft
Corporation in the United States and other countries.
RSA® is a registered trademark or trademark of RSA Security Inc. RSA
BSAFE® is a registered trademark or trademark of RSA Security Inc. in
the United States and/or other countries.
License information
This product includes RSA BSAFE Cryptographic
software from RSA Security Inc.
1
All other company and product names are trademarks or registered
trademarks of their respective companies.
Screen Images
The dialog boxes shown in this manual are those that appear in Windows
XP.
Notice
Unauthorized reproduction, translation or duplication of this document,
whether in its entirety or in part, is strictly prohibited.
The content of this document is subject to change without notice.
Copyright © 2004 KONICA MINOLTA BUSINESS TECHNOLOGIES,
INC. All rights reserved.
PageScope Direct Print 1-4
Page 8
Installing PageScope Direct Print
2 Installing PageScope Direct Print
2.1 Installing
Install PageScope Direct Print onto your computer.
Note
When installing onto Windows XP or Windows Vista, be sure to log in
with administrator privileges.
Quit all applications (including virus detection programs) that are
running.
In addition, if a previous version of PageScope Direct Print is installed
on the computer, start installation with no uninstallation made.
Check that the printer to be used is connected to a network, and then
make sure that the printer is turned on.
Operating procedure
2
1 Place the CD-ROM into your computer’s CD-ROM drive.
2 Start up the installation program. (Setup.exe)
Choose Setup Language dialog box appears.
PageScope Direct Print 2-1
Page 9

Installing PageScope Direct Print
3 Select the language and click [OK].
The following dialog box appears.
4 Click the [Next] button.
The License Agreement dialog box appears.
2
5 Read the end user license agreement, and then select “I accept the
terms in the license agreement”.
6 Click the [Next] button.
A dialog box appears, allowing you to select the folder where the file
PageScope Direct Print 2-2
Page 10
Installing PageScope Direct Print
or folder is to be copied to.
7 To install the application into a folder other than the one indicated, click
the [Change] button, and then specify the folder where you wish to
install the application.
8 Click the [Install] button.
The installation begins.
Once the installation is completed, the following dialog box appears.
2
PageScope Direct Print 2-3
Page 11
Installing PageScope Direct Print
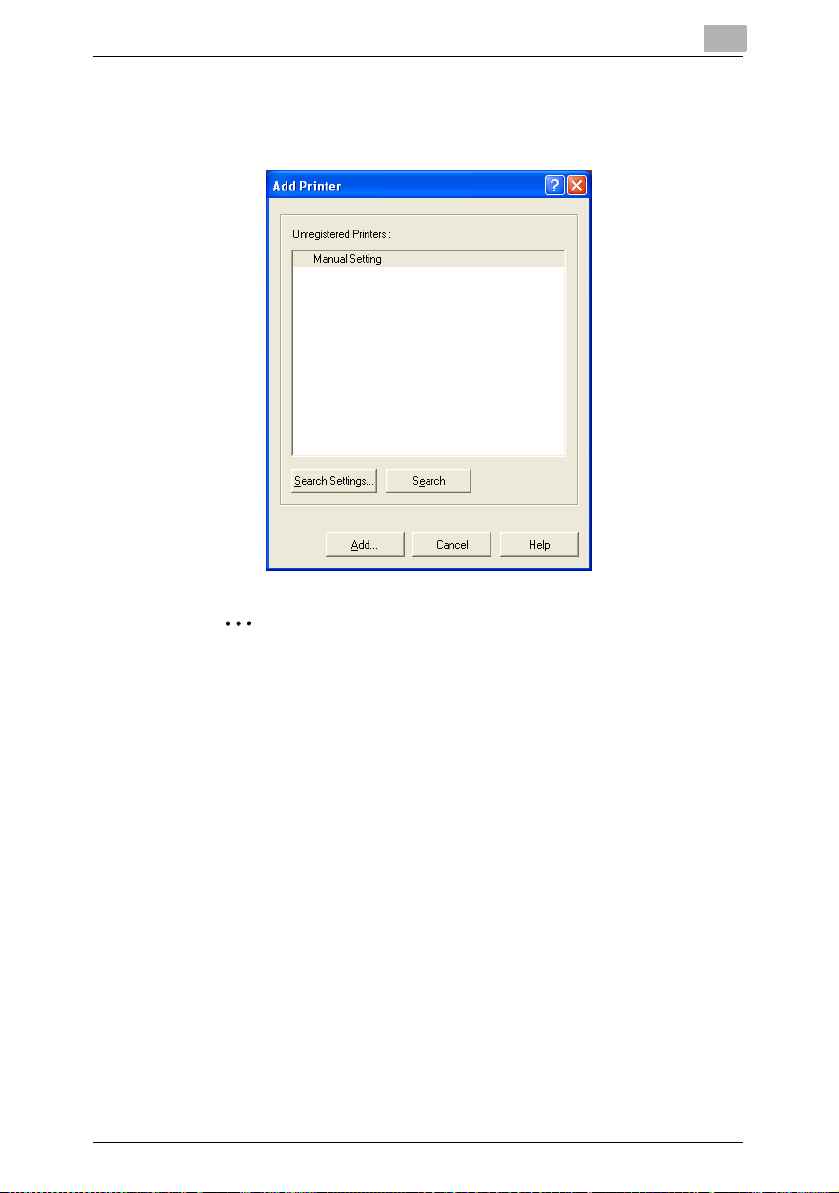
9 Click the [Initialize] button.
The compatible printers on the network are detected and appear in the
Add Printer dialog box.
2
Note
If no compatible printers can be found on the network, only
“Manual Setting” appears in the list. In addition, if the enhanced
security function has been set from the printer, the printer cannot
be detected and only “Manual Setting” appears.
In this case, click the [Cancel] button to quit initializing. This
completes the installation, even though the [Cancel] button was
clicked. After starting up PageScope Direct Print, specify the range
to search for printers or manually register printers. For details, refer
to “Adding a Printer” on page 4-1.
10 Select the printer that you wish to use.
H If multiple printers are listed, select the printer to be used as the
default printer.
PageScope Direct Print 2-4
Page 12
Installing PageScope Direct Print
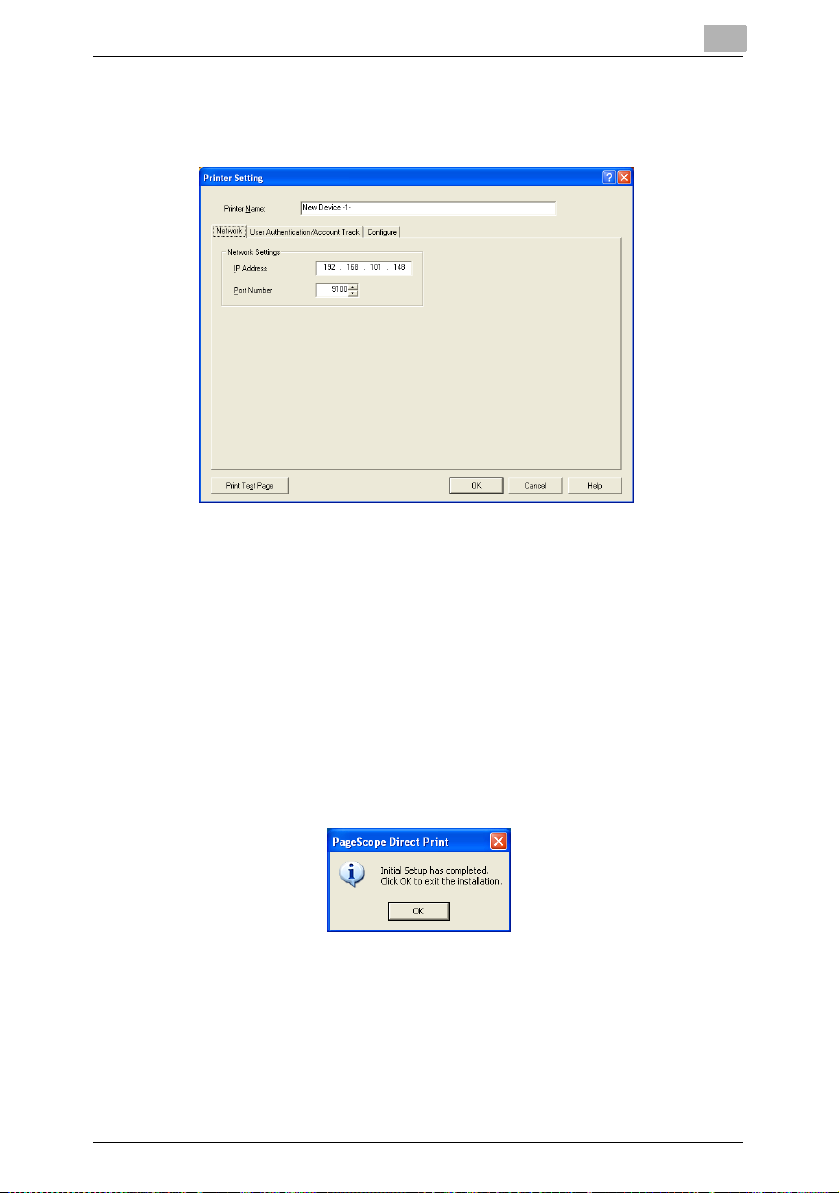
11 Click the [Add] button.
The Printer Setting dialog box appears.
12 Specify the appropriate printer settings.
H On the “Configure” tab, specify the option configuration for the
printer.
H For details on the various settings, refer to “Adding a Printer” on
page 4-1.
H The printer settings can also be changed after it is registered. For
details, refer to “Changing Printer Settings” on page 4-8.
2
13 Click the [OK] button.
A message appears, indicating that the initial setup is completed.
PageScope Direct Print 2-5
Page 13

Installing PageScope Direct Print
14 Click the [OK] button.
This completes the installation of PageScope Direct Print and its initial
setup.
Note
After the message indicating the completion of the initial setup
appeared, a message may appear, recommending that the computer
be restarted. If this message appears, follow the on-screen
instructions to restart Windows.
Memo
Separate MSI-based installers have been prepared for this software.
When an MSI-based installer is used, the software can be
automatically distributed, and can be installed automatically in the
Active Directory environment.
For details, contact your service representative.
2
PageScope Direct Print 2-6
Page 14
Installing PageScope Direct Print
2.2 Uninstalling
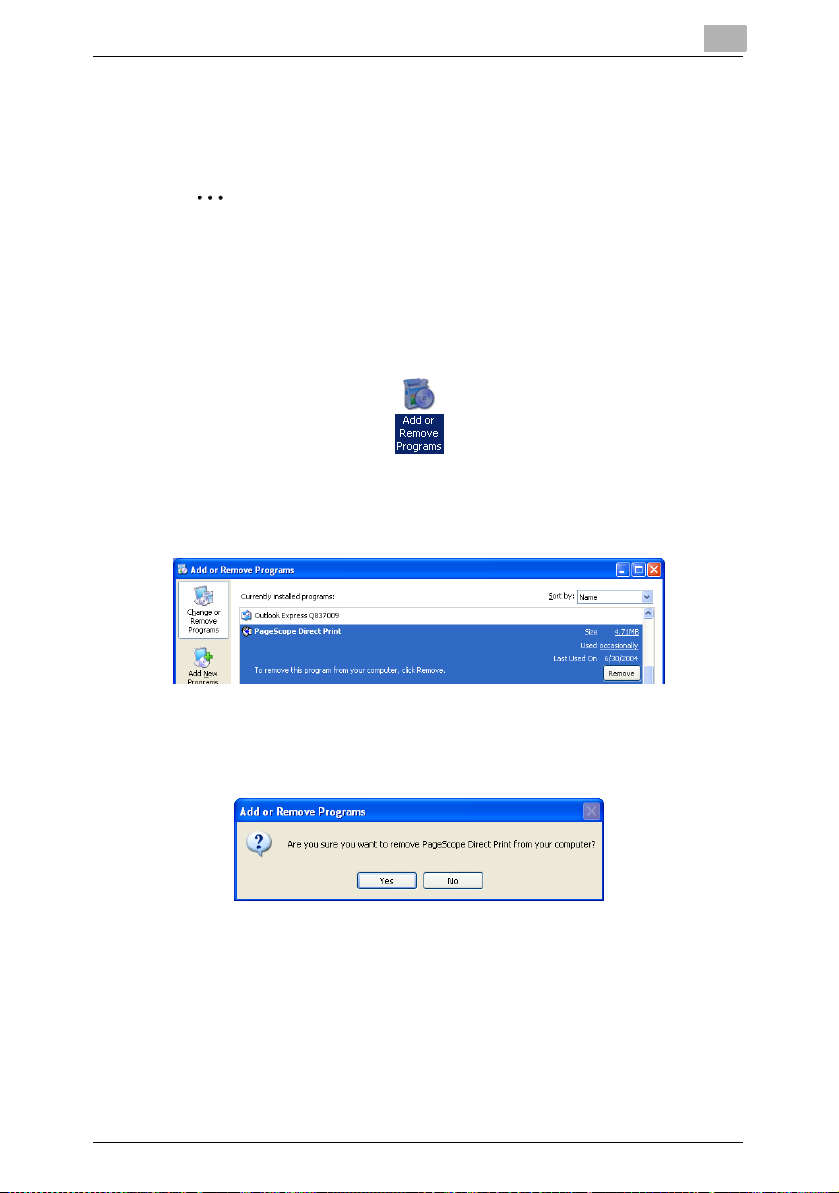
Uninstall PageScope Direct Print by using “Add or Remove Programs”.
Note
Before uninstalling, quit the PageScope Direct Print application.
Operating procedure
1 With Windows XP/Vista, click “Control Panel” in the “Start” menu, and
then double-click “Add or Remove Programs”.
2 From the “Currently installed programs” list, select “PageScope Direct
Print”.
2
3 Click the [Remove] button.
The following confirmation message appears.
4 Click the [Yes] button.
PageScope Direct Print is uninstalled.
PageScope Direct Print 2-7
Page 15

Starting PageScope Direct Print
3 Starting PageScope Direct Print
PageScope Direct Print can be started using either the “Start” menu or the
application icon on the desktop.
3.1 Using the “Start” Menu
Operating procedure
§ In the Windows XP/Vista, select “Start” menu, point to “All Programs”,
“KONICA MINOLTA”, then “PageScope Direct Print”, and then click
“PageScope Direct Print”.
The main window for PageScope Direct Print appears.
3.2 Using the Application Icon on the Desktop
Operating procedure
§ Double-click the “PageScope Direct Print” icon on the desktop.
3
The main window for PageScope Direct Print appears.
PageScope Direct Print 3-1
Page 16
Starting PageScope Direct Print
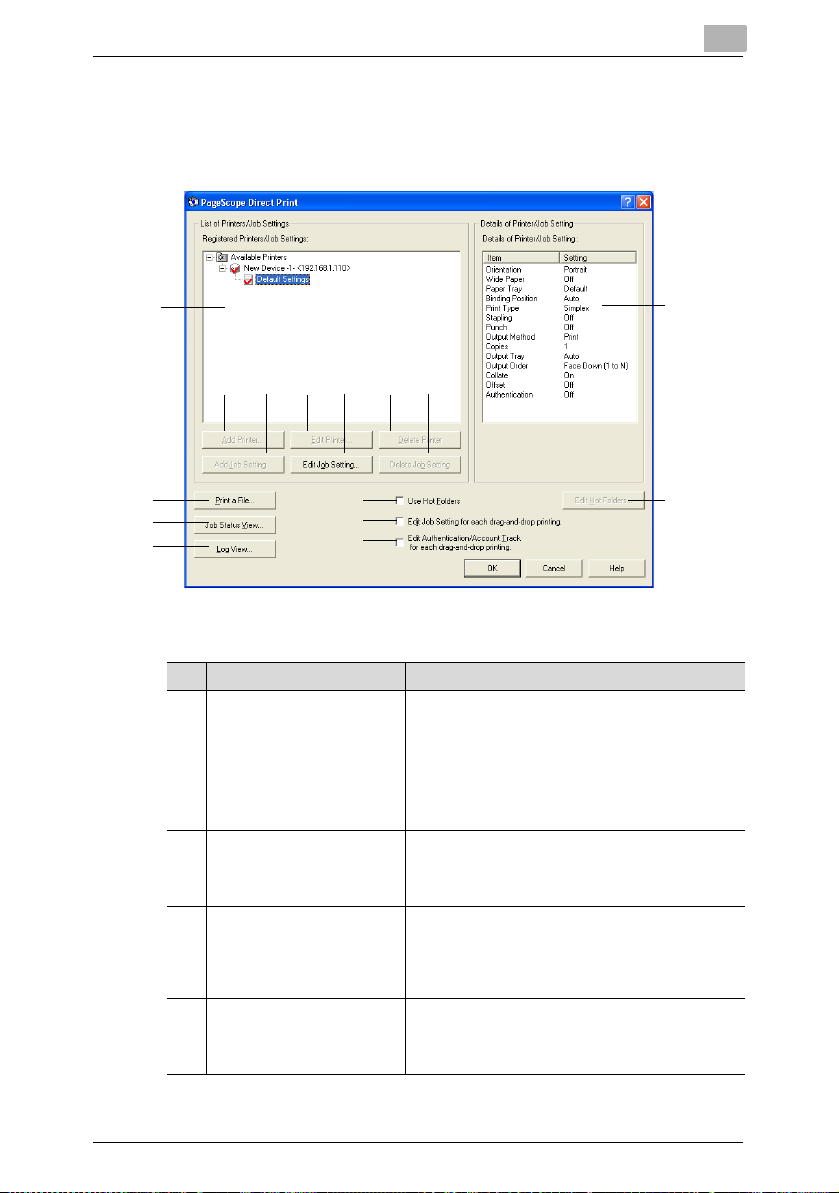
3.3 Main Window
3
1
2 5 3 6 4 7
9
10
11
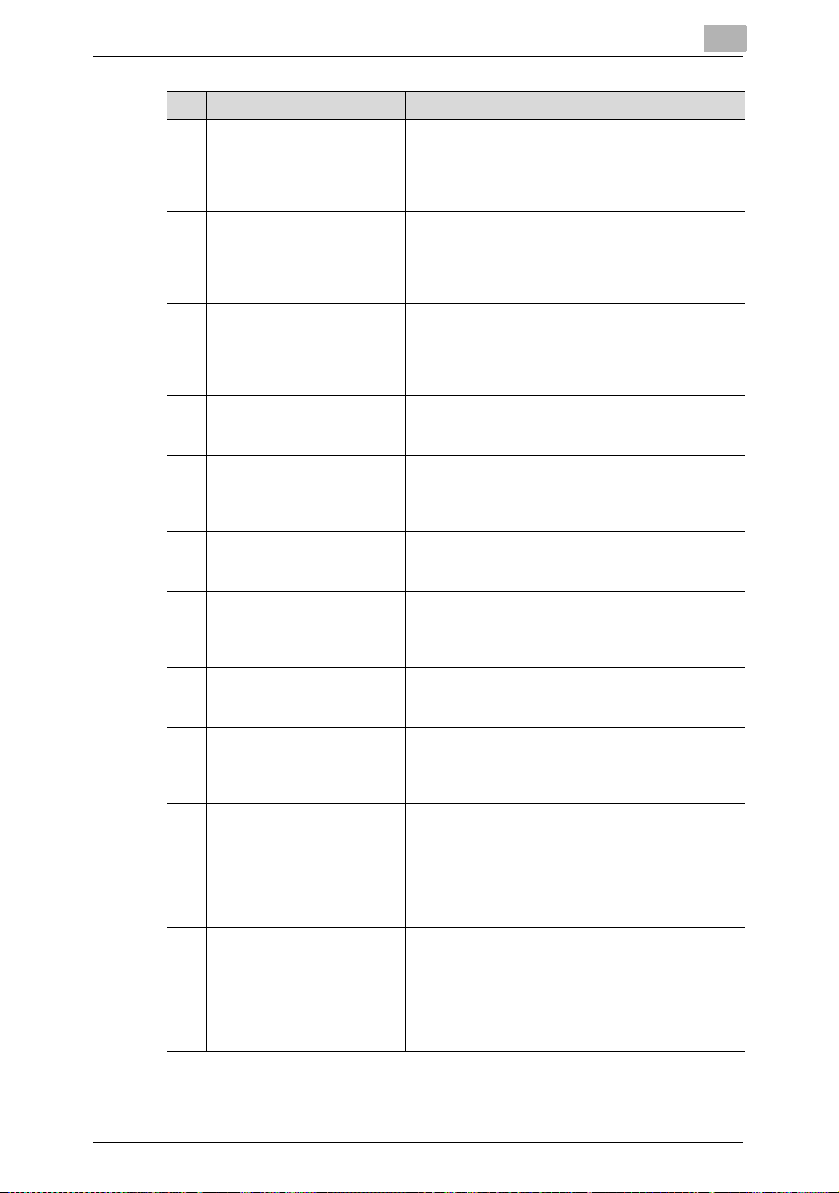
No. Element Name Description
1 “Registered Printers/Job
Settings” list
2 [Add Printer] button Select “Available Printers” in the “Registered
3 [Edit Printer] button Select a printer in the “Registered Printers/Job
4 [Delete Printer] button Select a printer in the “Registered Printers/Job
12
14
15
Displays the list of registered printers and job settings
in a tree structure.
Click “+” to display the names of job settings
programmed for the printer; click “-” to close the tree
structure.
Right-click the printer or job setting to display a menu
containing commands for changing or deleting the
settings.
Printers/Job Settings” list, and then click this button to
add a printer.
For details, refer to “Adding a Printer” on page 4-1.
Settings” list, and then click this button to change the
settings for a registered printer.
For details, refer to “Changing Printer Settings” on
page 4-8.
Settings” list, and then click this button to delete a
registered printer.
For details, refer to “Deleting a Printer” on page 4-8.
8
13
PageScope Direct Print 3-2
Page 17
Starting PageScope Direct Print
No. Element Name Description
5 [Add Job Setting] button Select a printer in the “Registered Printers/Job
6 [Edit Job Setting] button Select a job setting in the “Registered Printers/Job
7 [Delete Job Setting] button Select a job setting in the “Registered Printers/Job
8 “Details of Printers/Job
Setting” box
9 [Print a File] button Click this button to specify the file to be printed from
10 [Job Status View] button Click this button to view the printing status.
11 [Log View] button Click this button to view the log of files that have been
12 “Use Hot Folders” check box If this check box is selected, hot folders (folders
13 [Edit Hot Folders] button Click this button to specify the settings for the hot
14 “Edit Job Setting for each
drag-and-drop printing.”
check box
15 “Edit Authentication/Account
Track for each drag-and-drop
printing.” check box
Settings” list, and then click this button to add a job
setting for a registered printer.
For details, refer to “Adding a Job Setting” on
page 5-1.
Settings” list, and then click this button to change the
print settings for a programmed job setting.
For details, refer to “Changing a Job Setting” on
page 5-3.
Settings” list, and then click this button to delete a
programmed job setting.
For details, refer to “Deleting a Job Setting” on
page 5-4.
This box displays the print settings for the job setting
that is selected in the “Registered Printers/Job
Settings” list.
the main window.
For details, refer to “Specifying a File From the Main
Window” on page 6-5.
For details, refer to “Checking the Printing Status” on
page 9-1.
printed.
For details, refer to “Viewing the Print Log” on
page 9-3.
monitored for printing) can be used.
For details, refer to “Using Hot Folders” on page 6-6.
folders.
For details, refer to “Setting up hot folders” on
page 6-6.
If this check box is selected, a dialog box for changing
the print settings of the job setting appears each time
printing is performed by dragging a file to the
appropriate icon on the desktop or by using the
shortcut menu (displayed by right-clicking).
For details, refer to “Edit Job Setting for each printing”
on page 8-1.
If this check box is selected, a dialog box for
authentication appears each time printing is
performed by dragging a file to the appropriate icon
on the desktop or by using the shortcut menu
(displayed by right-clicking).
For details, refer to “Edit Authentication/Account
Track for each printing” on page 8-3.
3
PageScope Direct Print 3-3
Page 18

Specifying Printer Settings
4 Specifying Printer Settings
4.1 Adding a Printer
A printer can be added to the “Registered Printers/Job Settings” list in the
main window. With PageScope Direct Print, multiple printers can be
registered.
In addition, printers can be added manually if they could not be detected
when PageScope Direct Print was installed.
Note
Check that the printer to be used is connected to a network, and then
make sure that the printer is turned on.
Operating procedure
1 Start up PageScope Direct Print.
The main window appears.
4
Note
If no printer could be detected when PageScope Direct Print is
installed, the dialog box shown in step 3 appears. Either perform
the operation described in “Specifying printer search parameters”
on page 4-7, or skip to step 4.
2 Select “Available Printers” in the “Registered Printers/Job Settings”
list.
PageScope Direct Print 4-1
Page 19

Specifying Printer Settings
3 Click the [Add Printer] button.
The compatible printers on the network are detected and appear in the
Add Printer dialog box.
H The Add Printer dialog box can also be displayed by right-clicking,
then selecting “Add Printer” in the menu that appeared.
Note
Printers cannot be detected if their security functions have been
set. In this case, since only “Manual Setting” appears, specify
manual settings in steps 4 and 5.
4
Memo
Printers that have already been registered do not appear in the list.
If no printer is listed, specify the search settings, and then search
again. For details, refer to “Specifying printer search parameters”
on page 4-7.
PageScope Direct Print 4-2
Page 20

Specifying Printer Settings
4 Select the printer to be used, and then click the [Add] button.
If the listed printers cannot be used or to specify manual settings,
select “Manual Setting”, and then click the [Add] button.
The Printer Setting dialog box appears.
5 Specify the printer name and the various settings on the “Network”,
“User Authentication/Account Track”, and “Configure” tabs, and then
click the [OK] button.
H In the “Printer Name” box, type in the name of the printer.
H To print a test page, click the [Print Test Page] button.
4
4.1.1 “Network” tab
IP Address
For a printer that was detected, the IP address of the printer appears.
For a manual setting, type in the IP address of the printer.
Check with the network administrator for the IP address of the printer.
Port Number
Type in the port number for the printer.
PageScope Direct Print 4-3
Page 21

Specifying Printer Settings
4.1.2 “User Authentication/Account Track” tab
Note
These settings are available only if the user authentication or account
track settings have be set from the printer.
4
“Use User Authentication” check box
Select this check to use user authentication, and then select either “Public
User” or “Recipient User”.
Public User
Select this setting to specify no user name for sending print data to the
printer. A user name and password do not need to be specified.
Recipient User
Select this setting to specify a user name for sending print data to the
printer. A user name and password must be specified.
User Name
When “Recipient User” is selected, type in the user name. If the name of
the user currently logged into the computer is to be specified, the user
name can be selected from the drop-down list.
PageScope Direct Print 4-4
Page 22

Specifying Printer Settings
Password
When “Recipient User” is selected, type in the password for the specified
user name.
“Use Account Track” check box
Select this check box to use account track, and then type the account
name and password in the “Account Name” and “Password” boxes.
Account Name
Type in the account name used for sending print data to the printer.
Password
Type in the password for the entered account name.
[Server Setting] button
The Authentication server is set that is registered with the printer.
[Relay Server Settings] button
The intermediate server authentication is set that is registered with the
printer.
4
PageScope Direct Print 4-5
Page 23

Specifying Printer Settings
4.1.3 “Configure” tab
Configure
Specify the appropriate settings according to the device option
configuration of the printer being used.
4
[Acquire Device Information] button
Click this button to gather device option information from the printer and
the specify the appropriate settings.
[PageScope Web Connection] button
Click this button to display the PageScope Web Connection page for the
printer in order to specify the printer settings.
Encryption Key
When a document is printed, confidential information such as the
password of [User Authentication] is encrypted to be sent to the printer.
If you want to change an encryption word that is used in this encryption
process from a given encryption word, enter an encryption word.
PageScope Direct Print 4-6
Page 24

Specifying Printer Settings
4.1.4 Specifying printer search parameters
The range for searching for a printer on a network can be specified.
Operating procedure
1 In the Add Printer dialog box (refer to “Adding a Printer” on page 4-1),
click the [Search Settings] button.
The Printer Search Settings dialog box appears.
4
2 In the “Start IP Address” and “End IP Address” boxes, type in the
corresponding IP addresses to specify the range on the network to
search for the printer.
3 Click the [OK] button.
The Add Printer dialog box is displayed again.
4 Click the [Search] button to search the specified range.
Compatible printers are searched for, and the search results appear in
the “Unregistered Printers” list.
PageScope Direct Print 4-7
Page 25

Specifying Printer Settings
4.2 Changing Printer Settings
The settings for a registered printer can be changed.
Operating procedure
1 From the “Registered Printers/Job Settings” list in the main window,
select the printer whose settings you wish to change.
2 Click the [Edit Printer] button.
The Printer Setting dialog box appears.
H The Edit Printer dialog box can also be displayed by right-clicking
the printer, then selecting “Edit Printer” in the menu that appeared.
3 Change the printer settings, and then click the [OK] button.
H For details on the various settings, refer to “Adding a Printer” on
page 4-1.
4.3 Deleting a Printer
Registered printers can be deleted.
Operating procedure
4
1 From the “Registered Printers/Job Settings” list in the main window,
select the printer that you wish to delete.
2 Click the [Delete Printer] button.
H The confirmation message dialog can also be displayed by right-
clicking the printer, then selecting “Delete Printer” in the menu that
appeared.
H When deleting a printer registered with a hot folder, the following
confirmation message appears. Click the [OK] button.
PageScope Direct Print 4-8
Page 26

Specifying Printer Settings
3 In the confirmation message dialog box, click the [OK] button.
The printer is deleted from the “Registered Printers/Job Settings” list.
4
PageScope Direct Print 4-9
Page 27

Programming Job Settings
5 Programming Job Settings
Job settings, which consist of specified print settings, can be programmed
for each printer.
Note
The print settings available for job settings differ depending on the
printer being used.
5.1 Adding a Job Setting
Operating procedure
1 From the “Registered Printers/Job Settings” list in the main window,
select the printer that you wish to create a job setting for.
2 Click the [Add Job Setting] button.
The Print Settings dialog box appears.
5
PageScope Direct Print 5-1
Page 28

Programming Job Settings
H The Print Settings dialog box can also be displayed by right-
clicking the printer, then selecting “Add Job Setting” in the menu
that appeared.
3 In the “Job Setting Name” box at the top of the dialog box, type in the
name of the job setting.
4 Specify the appropriate print settings for the job setting.
For details on the various settings, click the [Help] button in the lowerright corner of the dialog box, and then refer to the help information.
H To create a desktop shortcut for the current job setting, select the
“Create a shortcut icon on desktop.” check box at the bottom of the
dialog box.
H To specify this job setting as the default settings, select the
“Specify as a default setting.” check box at the bottom of the dialog
box.
Default settings are indicated with a red check mark ( ).
5 After the desired settings are specified, click the [OK] button.
5
PageScope Direct Print 5-2
Page 29

Programming Job Settings
5.2 Changing a Job Setting
The settings for a programmed job setting can be changed.
Note
General users cannot change the job settings of other users.
Operating procedure
1 From the “Registered Printers/Job Settings” list in the main window,
select the job setting whose print settings you wish to change.
2 Click the [Edit Job Setting] button.
The Print Settings dialog box appears.
H The Print Settings dialog box can also be displayed by right-
clicking the job setting, then selecting “Edit Job Setting” in the
menu that appeared, or by double-clicking the job setting.
3 Change the print settings for the job setting, and then click the [OK]
button.
H For details on the various settings, click the [Help] button in the
lower-right corner of the dialog box, and then refer to the help
information.
5
PageScope Direct Print 5-3
Page 30

Programming Job Settings
5.3 Deleting a Job Setting
Programmed job settings can be deleted.
Note
General users cannot delete the job settings of other users.
Operating procedure
1 From the “Registered Printers/Job Settings” list in the main window,
select the job setting that you wish to delete.
2 Click the [Delete Job Setting] button.
H The job setting can also be deleted by right-clicking the job setting,
then selecting “Delete Job Setting”.
A confirmation message dialog box appears.
5
3 Click the [OK] button.
The job setting is deleted from the “Registered Printers/Job Settings”
list.
PageScope Direct Print 5-4
Page 31

Printing
6Printing
6.1 Using the Appropriate Icon on the Desktop
A file can be printed by dragging it to a printer icon (or a shortcut icon for
a job setting) on the desktop.
Operating procedure
1 With PageScope Direct Print closed, select the file that you wish to
print.
2 Drag the file to the printer icon (or the shortcut icon for a job setting)
on the desktop.
6
If the file is dragged to a printer icon on the desktop, the file is printed
with the default print settings (indicated by ( )) for PageScope
Direct Print.
If the file is dragged to a shortcut icon for a job setting, the file is printed
with the print settings of the selected job setting.
PageScope Direct Print 6-1
Page 32

Printing
6
Memo
For details on creating a desktop shortcut for a job setting, refer to step
4 of “Adding a Job Setting” on page 5-1.
If the “Edit Job Setting for each drag-and-drop printing.” check box or
“Edit Authentication/Account Track for each drag-and-drop printing.”
check box is selected, a dialog box appears so that the settings can
be specified when printing is performed. For details, refer to
“8 Additional Settings”.
PageScope Direct Print 6-2
Page 33

Printing
6.2 Using the Shortcut Menu (Displayed by RightClicking)
In Windows, a file can be printed by right-clicking it, then selecting
“PageScope Direct Print” in the shortcut menu that appeared.
Operating procedure
1 With PageScope Direct Print closed, select the file that you wish to
print.
2 Right-click the file, and then select “PageScope Direct Print” in the
shortcut menu that appeared.
6
Memo
If the “Edit Job Setting for each drag-and-drop printing.” check box
or “Edit Authentication/Account Track for each drag-and-drop
printing.” check box is selected, a dialog box appears so that the
settings can be specified when printing is performed. For details,
refer to “8 Additional Settings”.
PageScope Direct Print 6-3
Page 34

Printing
6
3 Select the printer that you wish to use to print the file.
4 Specifies the job setting.
The file is printed with the selected job setting.
PageScope Direct Print 6-4
Page 35

Printing
6.3 Specifying a File From the Main Window
A file can be printed by selecting a job setting in the main window (p. 3-2),
then selecting the file to be printed.
Operating procedure
1 From the “Registered Printers/Job Settings” list in the main window,
select the job setting that you wish to use.
2 In the main window, click the [Print a File] button.
The Print a File dialog box appears.
6
H The Print a File dialog box can also be displayed by right-clicking
the job setting, then selecting “Print a File” in the menu that
appeared.
3 From the “Files of type” drop-down list, select the type of file to be
printed (PDF, TIFF, PS, PCL or TEXT file).
4 Select the file to be printed.
H Multiple files can be selected while the [Shift] or [Ctrl] keys are held
down.
5 Click the [Print] button.
The selected file is printed.
PageScope Direct Print 6-5
Page 36

Printing
6.4 Using Hot Folders
A file can automatically be printed by copying it to a hot folder (folder
monitored for printing) that has been set up in advance.
If the folder is set to be shared, printing is possible from other computers
on the network.
Note
Shared folders on a computer running Windows XP cannot be
accessed by computers running Mac OS 8 or 9.
6.4.1 Setting up hot folders
In order to print using hot folders, the hot folders must first be set up.
Operating procedure
1 In the main window, select the “Use Hot Folders” check box.
2 Click the [Edit Hot Folders] button beside the check box.
The Hot Folder Settings dialog box appears.
6
If a hot folder has already been set up, it is listed in the “List of Hot
Folders” list. The registered printers and their job settings appear in
the “Registered Printers/Job Settings” list.
PageScope Direct Print 6-6
Page 37

Printing
6
3 To set up a new hot folder, click the [Add] button.
The Browse For Folder dialog box appears.
4 Select the folder to be used as a hot folder.
H Click “+” to open a folder, or click “-” to close the folder.
H To create a new folder, select the folder that will contain the new
folder, and then click the [Make New Folder] button. When the new
folder is created, type in the name of the folder.
5 Click the [OK] button.
The selected folder is added to the “List of Hot Folders” list in the Hot
Folder Settings dialog box.
PageScope Direct Print 6-7
Page 38

Printing
6
6 Select a hot folder in the “List of Hot Folders” list, and then select the
printer and job setting from the “Registered Printers/Job Settings” list
to be used with the selected hot folder.
H Be sure that only one job setting for a printer is assigned to a single
hot folder. To use different job settings, create multiple hot folders
and use the hot folder corresponding to the desired job setting.
7 Click the [OK] button.
This completes the setup of the hot folders.
Using multiple hot folders
Repeat steps 3 through 6 to create multiple hot folders, and then assign
the desired printer and job setting to each hot folder.
Cancelling a hot folder setup
In the Hot Folder Settings dialog box that appears in step 2, select the
folder whose hot folder setup is to be cancelled, and then click the [Delete]
button. The hot folder setup for the selected folder is cancelled.
Note
When the hot folder setup of a folder is cancelled, the folder itself is not
deleted.
PageScope Direct Print 6-8
Page 39

Printing
6.4.2 Specifying detailed hot folder settings
Detailed settings for the hot folder can be specified.
Operating procedure
1 In the Hot Folder Settings dialog box (refer to “Setting up hot folders”
on page 6-6), click the [Detail Settings] button.
6
The Detail Settings of Hot Folders dialog box appears.
PageScope Direct Print 6-9
Page 40

Printing
2 Specify the desired settings under “Files Sent from Hot Folders” and
“Intervals of Watching Hot Folders” and for the “Show icon on
Windows system tray.” check box.
H Files Sent from Hot Folders
Select whether to delete files sent to the printer from a hot folder or
to move the files to a subfolder.
H Intervals of Watching Hot Folders
Specify the interval at which the hot folders are monitored.
H “Show icon on Windows system tray.” check box
If this check box is selected, the icon ( ) appears in the system
tray.
3 Click the [OK] button.
The Hot Folder Settings dialog box appears again.
6.4.3 Hot folders monitoring icon
If the “Show icon on Windows system tray.” check box in the Detail
Settings of Hot Folders dialog box is selected, the icon ( ) appears in
the system tray.
Right-click this icon to display a menu that contains the following
commands.
G Launch PageScope Direct Print
Select this command to display the main window.
G Stop Watching Hot Folders
Select this command to stop monitoring the hot folders.
G Show Icon at Watching Hot Folders
If there is no check mark beside this command, the icon does not
appear in the system tray.
G about
Select this command to display the version information for PageScope
Direct Print.
6
PageScope Direct Print 6-10
Page 41

Printing
6.4.4 Printing using a hot folder
Operating procedure
1 Select the file that you wish to print.
2 Copy the file into a hot folder that has previously been set up.
6
When the file is copied into the hot folder, the print job is automatically sent
to the printer and the data is printed. Before printing, no messages or
dialog boxes appear.
If “Move to Sub-Folder” was selected in the Detail Settings of Hot Folders
dialog box, a subfolder named “Sent Data” is created in the hot folder
when a print job is sent to the printer. Files that have been sent to the
printer are moved to this subfolder.
Note
If “Move to Recycle Bin” was selected in the Detail Settings of Hot
Folders dialog box, printed files are automatically deleted from the hot
folder.
PageScope Direct Print 6-11
Page 42

Security Functions
7 Security Functions
The settings and print logs can be protected for each user logged onto
Windows.
Users with administrator privileges can view or edit the settings of all
users. However, limitations are applied to general users specifying or
editing the settings of other users.
Users belonging to the Administrators group and having administrator
privileges are called “administrators”, and all other users are called
“general users”.
7.1 Common to Administrators and General Users
Both users with administrator privileges and general user can perform the
following operations.
G View, use and change device settings (settings on the “User
Authentication/Account Track” tab) for other users
G Delete print logs for all users
7.2 Administrators
7
Users with administrator privileges can perform the following operations.
G View, use and change device settings (settings on the “Network” and
“Option” tabs) for all users
G View, use and change job settings for all users
G View, use and change hot folder settings for all users
G View and perform (delete) jobs of all users
G View print logs for all users
PageScope Direct Print 7-1
Page 43

Security Functions
7.3 General Users
General users can perform the following operations.
G View and use administrator device settings (settings on the “Network”
and “Option” tabs)
G View and use administrator job settings
G View and use administrator hot folder settings
G View, use and change their own device settings (settings on the
“Network” and “Option” tabs)
G View, use and change their own job settings
G View, use and change their own hot folder settings
G View jobs of other users*
G View and perform (delete) their own jobs
G View print logs for other users*
G View and save their own print log
General users cannot perform the following operations.
G Change device settings (settings on the “Network” and “Option” tabs)
for other users
G Change job settings for other users
G Change hot folder settings for other users
G Perform (delete) jobs of other users
G Save print logs for other users
*General users can view the print status and print logs of other users;
however, they cannot view the names of files in the jobs.
7
PageScope Direct Print 7-2
Page 44

Additional Settings
8 Additional Settings
8.1 Edit Job Setting for each printing
The application can be set so that a dialog box for changing the print
settings of the job setting appears each time printing is performed by
dragging a file to the appropriate icon on the desktop or by using the
shortcut menu (displayed by right-clicking).
This is useful for checking or changing the job setting before printing.
Operating procedure
1 In the main window, select the “Edit Job Setting for each drag-and-
drop printing.” check box.
2 Click the [OK] button to quit the application.
3 Print by either dragging a file to the appropriate icon on the desktop or
using the shortcut menu (displayed by right-clicking).
H For details on these printing methods, refer to “Using the
Appropriate Icon on the Desktop” on page 6-1 and “Using the
Shortcut Menu (Displayed by Right-Clicking)” on page 6-3.
The Print Settings dialog box appears.
8
2
3
1 4
PageScope Direct Print 8-1
Page 45

Additional Settings
4 Select the desired job setting or change the print settings, and then
click the [Print] button.
No. Element Name Description
1 Printer/Job Setting List Displays the list of registered printers and job settings
2 Job Setting Name Displays the name of the selected job setting.
3 Print settings Displays the print settings for the selected job setting.
4 [Save] button Click this button to save the current job setting with
The file is printed with the selected job setting.
Memo
If the “Edit Authentication/Account Track for each drag-and-drop
printing.” check box in the main window was selected, the User
Authentication/Account Track dialog box appears.
in a tree structure.
When the dialog box is displayed, the default printer/
job setting is selected.
From this list, a different printer or job setting can be
selected.
The settings on the various tab can be changed.
the new print settings.
8
PageScope Direct Print 8-2
Page 46

Additional Settings
8.2 Edit Authentication/Account Track for each printing
The application can be set so that a dialog box for entering the user name
or account name and their passwords appears each time printing is
performed by dragging a file to the appropriate icon on the desktop or by
using the shortcut menu (displayed by right-clicking).
Note
This setting is available only if the user authentication or account track
settings have be set from the printer.
Operating procedure
1 In the main window, select the “Edit Authentication/Account Track for
each drag-and-drop printing.” check box.
2 Click the [OK] button to quit the application.
3 Print by either dragging a file to the appropriate icon on the desktop or
using the shortcut menu (displayed by right-clicking).
H For details on these printing methods, refer to “Using the
Appropriate Icon on the Desktop” on page 6-1 and “Using the
Shortcut Menu (Displayed by Right-Clicking)” on page 6-3.
The User Authentication/Account Track dialog box appears.
8
PageScope Direct Print 8-3
Page 47

Additional Settings
Memo
If the “Edit Job Setting for each drag-and-drop printing.” check box
was selected, this dialog box appears after the Print Settings
dialog box is displayed.
4 To use user authentication, select the “Use User Authentication”
check box, and then select either “Public User” or “Recipient User”.
If “Recipient User” is selected, type in the user name and the
password.
5 To use account track, select the “Use Account Track” check box, and
then type the account name and password in the “Account Name” and
“Password” boxes.
6 After the desired settings are specified, click the [OK] button.
The specified user authentication or account track information is set to
the printer and the file is printed.
8
PageScope Direct Print 8-4
Page 48

Checking the Printing Status and Print Log
9
9 Checking the Printing Status and Print
Log
Note
The printing status and the print log for the application can be checked.
These may differ from the printing status and the print log for the
printer.
General users cannot save the print logs of other users.
9.1 Checking the Printing Status
Operating procedure
§ In the main window, click the [Job Status View] button.
The Printing Status dialog box appears.
Element Description
Printer Displays the name of the printer where the print job was sent.
User Displays the name of the user who sent the print job.
Status Displays the printing status (PRINTING, WAIT, PAUSED, or
PageScope Direct Print 9-1
Error).
When a file of a version incompatible with the printer is printed,
“Error” is displayed.
Page 49

Checking the Printing Status and Print Log
Element Description
File Name Displays the name of the file being printed. General users
Hot Folder Displays the path to the hot folder (only when a hot folder is
[Resume] button To resume printing a file after printing was stopped (file with the
[Delete] button To delete a file queued for printing, select the file, and then click
cannot view the names of files printed by other users.
used).
“PAUSED” status), select the print job, and then click this
button.
this button.
9
PageScope Direct Print 9-2
Page 50

Checking the Printing Status and Print Log
9.2 Viewing the Print Log
Operating procedure
§ In the main window, click the [Log View] button.
The List of Log dialog box appears.
Element Description
Date/Time Displays the date and time that the file was printed.
User Displays the name of the user who sent the print job.
File Name Displays the name of the printed file. General users cannot
Printer Displays the name of the printer where the file was sent.
Hot Folder Displays the path to the hot folder (only when a hot folder is
Result Displays the result of printing the file (OK, DELETED, or
[Log Settings] button The maximum amount of log data that is saved can be set.
[Save Sent File as] button A print job previously sent to the printer can be retrieved and
view the names of files printed by other users.
used).
WARNING).
When a file of a version that may not be printed correctly is
printed, “Warning” is displayed.
For details, refer to “Specifying the log setting” on page 9-4.
saved as a file.
For details, refer to “Retrieving data” on page 9-5.
9
Memo
The number of files displayed in the log differs depending on the size
specified in the Log Settings dialog box. For details on specifying the
log setting, refer to “Specifying the log setting” on page 9-4.
PageScope Direct Print 9-3
Page 51

Checking the Printing Status and Print Log
9.2.1 Specifying the log setting
The maximum amount of log data that is saved can be set.
Operating procedure
1 In the main window, click the [Log View] button.
The List of Log dialog box appears.
2 Click the [Log Settings] button.
The Log Settings dialog box appears.
3 Specify the log capacity.
H A setting between 0 and 1,000 MB can be specified, however, a
capacity larger than the size of the computer's hard disk cannot be
specified.
9
4 Click the [OK] button.
Note
The default setting for “Log Capacity” is 0 MB. When “Log Capacity” is
set 0 MB, only the last log is saved. To save previous logs, specify an
appropriate setting for “Log Capacity”.
PageScope Direct Print 9-4
Page 52

Checking the Printing Status and Print Log
9.2.2 Retrieving data
A print job previously sent to the printer can be retrieved and saved as a
file.
Operating procedure
1 In the main window, click the [Log View] button.
The List of Log dialog box appears.
2 Select the file whose data you wish to retrieve, and then click the [Save
Sent File as] button.
The Save Sent File dialog box appears.
9
3 Select the folder where the data is to be saved and specify a file name,
and then click the [Save] button.
PageScope Direct Print 9-5
Page 53

Warning/Error Messages
10 Warning/Error Messages
The error messages that appear when printing with PageScope Direct
Print are described below.
10.1 Messages Concerning PDF Versions
This message appears if the printer supports PDF ver. 1.5 files and you
try to print a PDF ver. 1.6 file.
Memo
This message does not appear when printing is performed using a hot
folder, however, “WARNING” will appear under “Result” in the List of
Log dialog box.
10
For details on compatible PDF versions, refer to the support
information for the printer being used.
PageScope Direct Print 10-1
Page 54

Warning/Error Messages
This message appears if you try to print a PDF file of a version that is not
compatible with the selected printer.
Memo
This message does not appear when printing is performed using a hot
folder, however, “Error” will appear under “Status” in the Printing
Status dialog box.
For details on compatible PDF versions, refer to the support
information for the printer being used.
10
PageScope Direct Print 10-2
Page 55

4343-PS093-13
2004
http://konicaminolta.com
Copyright
2011.7
 Loading...