

Konica Minolta PAGEPRO 9100, CROWN PRINT MONITOR, MAGICOLOR 3100, MAGICOLOR 3300DN, MAGICOLOR 3300EN User Manual
...Page 1

Crown®
Print Monitor+
Administrator’s
Guide
1800722-001A
Page 2

Trademarks
KONICA MINOLTA and the KONICA MINOLTA logo are trademarks or registered
trademarks of KONICA MINOLTA HOLDINGS, INC. PagePro is a trademark or
registered trademark of KONICA MINOLTA BUSINESS TECHNOLOGIES, INC.
magicolor is a trademark or registered trademark of KONICA MINOLTA PRINTING
SOLUTIONS U.S.A., INC. All other trademarks are the property of their respective
owners.
Proprietary Statement
The digitally encoded software included with your printer is Copyright © 2003
KONICA MINOLTA BUSINESS TECHNOLOGIES, INC. All Rights Reserved. This
software may not be reproduced, modified, displayed, transferred, or copied in any
form or in any manner or on any media, in whole or in part, without the express
written permission of KONICA MINOLTA BUSINESS TECHNOLOGIES, INC.
Copyright Notice
Copyright © 2003 KONICA MINOLTA BUSINESS TECHNOLOGIES, INC., Marunouchi
Center Building, 1-6-1 Marunouchi, Chiyoda-ku, Tokyo, 100-0005, Japan. All Rights
Reserved. This document may not be copied, in whole or part, nor transferred to any
other media or language, without written permission of KONICA MINOLTA BUSINESS
TECHNOLOGIES, INC.
Manual Notice
KONICA MINOLTA BUSINESS TECHNOLOGIES, INC. reserves the right to make
changes to this manual and to the equipment described herein without notice.
Considerable effort has been made to ensure that this manual is free of inaccuracies
and omissions. However, KONICA MINOLTA BUSINESS TECHNOLOGIES, INC.
makes no warranty of any kind including, but not limited to, any implied warranties of
merchantability and fitness for a particular purpose with regard to this manual.
KONICA MINOLTA BUSINESS TECHNOLOGIES, INC. assumes no responsibility for,
or liability for, errors contained in this manual or for incidental, special, or
consequential damages arising out of the furnishing of this manual, or the use of this
manual in operating the equipment, or in connection with the performance of the
equipment when so operated.
Page 3

Contents
1 Introduction ...................................................................................................... 5
Introduction 6
System Requirements 7
About the Documentation 8
About This Manual 9
Conventions 9
About Crown Print Monitor+ 10
Status Component 10
Send Component 10
Configuration Component 10
2 Installation ...................................................................................................... 11
Preparing to Use Crown Print Monitor+ 12
Automatic Installation 12
Manual Installation 12
Step 1. Installing Crown Print Monitor+ Manually 12
Installation Notes 13
Downloading from the Internet 13
Installation 13
Page 4

Step 2. Adding a Printer Port 14
Windows XP/2000/NT4 14
Windows Me/98 15
Step 3. Configuring a Port — Automatic and Manual Installation 16
Port Configuration Options 17
Port Configuration Steps 18
Using Crown Print Monitor+ 19
Windows XP/2000/NT4 19
Windows Me/98 20
Uninstalling Crown Print Monitor+ 22
3 Troubleshooting ............................................................................................. 23
Spooler Status Information 24
Windows Me/98 24
Windows XP/2000/NT4 25
Monitor Status Information 26
Windows Me/98 26
Windows XP/2000/NT4 27
Printer Status Information 28
Contentsiv
Page 5

Introduction
Page 6
Introduction
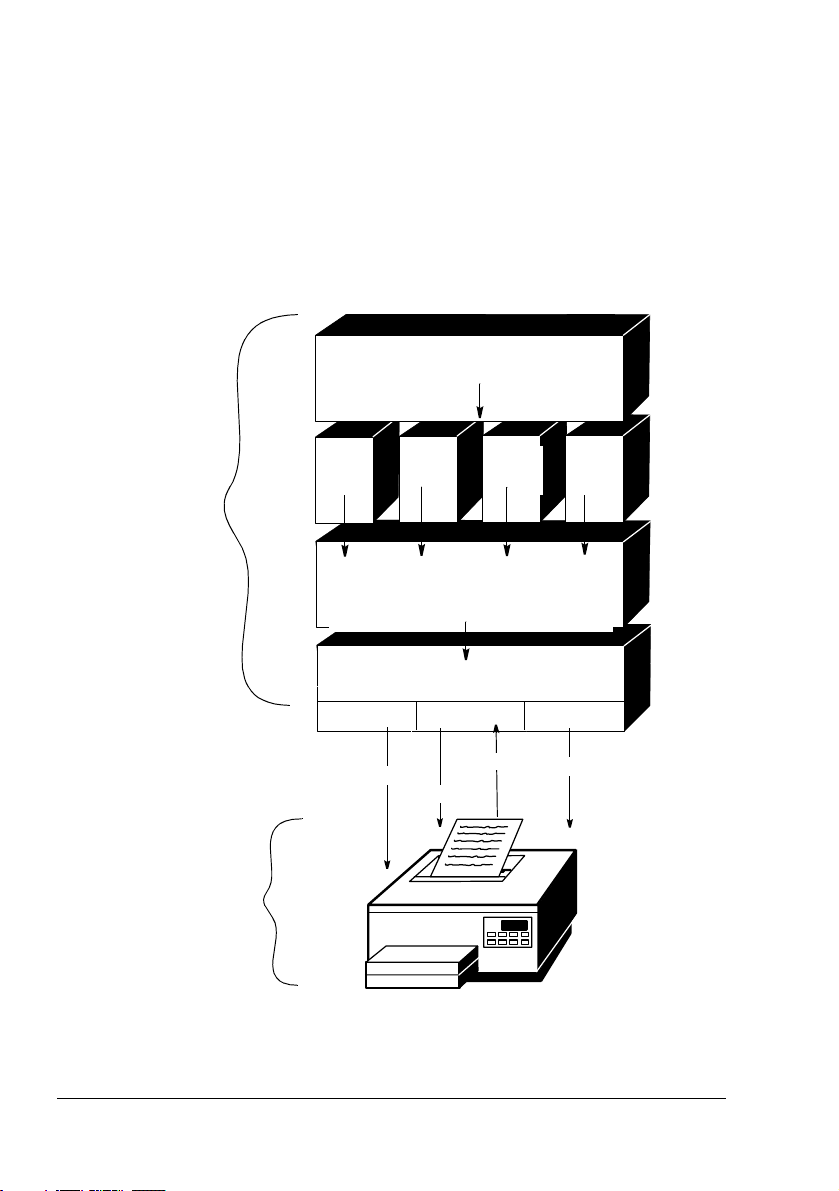
Crown Print Monitor+ works with the Microsoft Print Spooler in Windows
environments to port jobs to the printer as well as to retrieve information from
the printer. In Crown Print Monitor+, Print Spooler “monitors” or “despoolers”
are configured to service print jobs in a particular queue. Designed
specifically for your printer, Crown Print Monitor+ uses TCP/IP protocol to
transport print jobs and access printer status information.
As shown in the illustration, Crown Print Monitor+ does more than just transport your print job to the printer. It also displays status information on that print
job.
Application
Printer
Print
Print
Queue
Print
Queue
Print
Queue
Windows XP/2000/NT4/Me/98
Print Spooler
Crown Print Monitor+
*LPRMON
Data
WINMON
Data
*LOCALMON
Status
Print
Queue
Data
Introduction6
Page 7

System Requirements
To use Crown Print Monitor+, you need
A printer with Crown or Crown Port+ printer technology and an Ethernet
interface configured for TCP/IP protocol
Crown Print Monitor+ works with the KONICA MINOLTA printer
it was shipped with. If you have other KONICA MINOLTA
printers, check their documentation or our web site at
www.konicaminolta.net/printer/
technology. If so, they can also use Crown Print Monitor+.
A workstation running Microsoft Windows XP/2000/NT4/Me/98
Crown Print Monitor+ files
to see whether they use Crown
Files are available on the Software Utilities CD-ROM that came
with your printer or you can download the files from the Internet.
The AutoInstaller (on the Software Utilities CD-ROM that came with your
printer) automatically installs the necessary components of Crown Print
Monitor+ and places the required files in the appropriate locations.
You can also load the files manually, either using the files on the CD-ROM
that came with your printer or by downloading the files from the Internet.
If you already have Crown Print Monitor installed, Crown Print
Monitor+ can function at the same time so you don’t have to
reconfigure older printers. Or you can delete the ports to which the
older printers are attached, recreate them using Crown Print
Monitor+ and let Crown Print Monitor+ manage your Crown
printers.
System Requirements
7
Page 8
About the Documentation
If your printer has a network interface, Crown Print Monitor+ documentation
came with your printer on CD-ROM.
Crown Print
Monitor+
Administrator’s
Guide
Crown Print
Monitor+ Help
Other
Documentation
You’re now looking at this manual. It
contains detailed information on installing, using, and troubleshooting Crown
Print Monitor+. A more detailed explanation of this manual is provided in the
“About This Manual” section, later in
this chapter.
The help file explains what the monitor
is, describes its use, and provides
context-sensitive help for topics.
For additional information, you can refer
to other documentation that came with
your printer or network interface, or with
your Windows and other Microsoft
systems.
About the Documentation8
Page 9

About This Manual
This manual is written for Windows XP/2000/NT4/Me/98 administrators, and
it is divided into the following sections:
Presents an overview of Crown Print Monitor+,
Introduction
1
Installation
2
provides system requirements, and describes
Crown Print Monitor+ files.
Provides the installation and uninstallation
instructions and describes how to access and
use Crown Print Monitor+.
Troubleshooting
3
Provides information on Crown Print Monitor+
status messages.
Conventions
The following typographic conventions are used throughout this manual:
Mixed-Case
Courier
Mixed-Case
Italic Courier
UPPERCASE File and utility names.
lowercase italic Variable information in the text.
↵
Text you type, and messages and
information displayed on the screen.
Variable text you type; replace the
italicized word(s) with information specific
to your computer, printer, or network.
Press the Enter key
Notes contain tips, extra information, or important information
that deserves emphasis or reiteration.
About This Manual
9
Page 10

About Crown Print Monitor+
Crown Print Monitor+ transports print jobs to a print device using the TCP/IP
protocol and displays status information to the host via Print Manager. Its
three main components are status, send, and configuration. They’re
explained in the following sections.
Status Component
This component obtains information from the printer, such as print job “go/
nogo” and error or warning conditions. Status information displays in Print
Manager through the print queue status dialog box. Status information comes
from the Windows XP/2000/NT4/Me/98 Print Spooler, Crown Print Monitor+,
or the printer, depending on where the job is in the printing process. See
chapter 3, “Troubleshooting,” and chapter 2, the “Using Crown Print Monitor+”
section, for more information on status messages.
Send Component
Crown Print Monitor+ communicates over TCP/IP ports 35 or 9100.
Older versions of Crown Print Monitor communicate only over port 35.
This component transports print jobs to a specific print device. When a job is
sent to a print device by the Network Print Monitor, it uses Windows XP/2000/
NT4/Me/98 operating system resources to transport the job. If a connection is
broken while a job is being transported, the monitor may discard the
remaining data and gives control back to Crown Print Monitor+ Print Spooler.
Any other pending jobs remain in the queue until the print device problem is
corrected.
Configuration Component
This component configures the port name, Internet address, time delays,
types of events to record in the application log, and problem sound alert. It
consists of the Add Port and Configure Port dialog boxes.
About Crown Print Monitor+10
Page 11

Installation
Page 12

Preparing to Use Crown Print Monitor+
Before you can use Crown Print Monitor+, you need to:
Install Crown Print Monitor+
Add a printer port
Configure the port
Automatic Installation
If you use the AutoInstaller (setup.exe) on the Software Utilities CD-ROM that
came with your printer, follow this procedure to automatically install Crown
Print Monitor+ and add a printer port.
1 Insert the Software Utilities CD-ROM in your PC’s CD-ROM drive.
If the AutoInstaller does not start automatically, double-click
setup.exe in the CD-ROM’s root directory.
2 In the Main Menu select Additional Software.
3 When prompted, in the Product list select Printer Management Utilities
and in the Setup Type drop-down box select Custom.
4 When prompted, select Crown Print Monitor+.
5 Follow the instructions to install Crown Print Monitor+ and add a printer port.
6 Skip to “Step 3. Configuring a Port — Automatic and Manual Installation”
on page 16 to configure the port you just added.
Manual Installation
You can also load Crown Print Monitor+ manually, using files from the Software Utilities CD-ROM or downloaded from the Internet.
Step 1. Installing Crown Print Monitor+ Manually
If you used the Software Utilities CD-ROM AutoInstaller (as described
in “Automatic Installation” above), this step is performed automatically
for you. Skip to “Step 3. Configuring a Port — Automatic and Manual
Installation” on page 16.
Use Crown Print Monitor+ files on the Software Utilities CD-ROM or go to our
web site at printer.konicaminolta.net/support
port & Drivers; select your printer; choose Drivers, PPDs, and Utilities;
choose your operating system; and scroll through the options to find Crown
Print Monitor+.
Preparing to Use Crown Print Monitor+12
. On the web site, choose Sup-
Page 13

Installation Notes
Windows XP/2000/NT4
You must be logged on as a member of the Administrator group to
install Crown Print Monitor+. Also, the TCP/IP network protocol must
be installed.
Windows Me/98
The TCP/IP network protocol must be installed to install Crown Print
Monitor+.
Downloading from the Internet
1 Create a new folder on your desktop and name the folder Monitor.
2 From the web site, download the cpmplus.exe file into the folder created
in step 1.
3 Open the monitor folder and double click the cpmplus.exe file
This extracts the files into the monitor folder.
4 Locate and double-click the setup.exe file within the folder.
5 Continue with step 5 in the “Installation” section below.
Installation
If you need to download Crown Print Monitor+ from the Internet see
the steps above; otherwise, continue with the steps below.
If you are updating from an old version of Crown Print Monitor+, you
will be asked whether you want to uninstall the current version.
Choose Yes or OK to restart your workstation when prompted, and
use the same procedure (described here) that you would use for a
new installation.
1 Insert the Software Utilities CD-ROM into the appropriate drive on your
PC.
It runs automatically.
2 Close the AutoInstaller.
3 In Windows Explorer, browse to x:\utilities\crown print monitor, where x is
your CD-ROM drive.
4 Double-click on the setup.exe file.
5 Select the Setup Language, then choose OK.
Step 1. Installing Crown Print Monitor+ Manually
13
Page 14

6 Click Next on the Welcome screen to continue.
Crown Print Monitor+ setup begins.
7 If you are prompted to add a new port, type the IP Address of your printer
into both the Port Name and IP Address boxes. Then choose OK.
8 Choose Finish and restart your computer when prompted.
Step 2. Adding a Printer Port
If you used the Software Utilities CD-ROM AutoInstaller (as described
in “Automatic Installation” on page 12), this step is performed
automatically for you. Skip to “Step 3. Configuring a Port — Automatic
and Manual Installation” on page 16.
Before you can use Crown Print Monitor+ to transport print jobs to a printer
and display status information on them, you must add the port associated
with the print device to your system configuration.
Windows XP/2000/NT4
1 Following instructions that came with your Windows system, complete the
Create Printer dialog box information.
2 Right-click on your printer.
3 Select Properties.
4 Select the Ports tab and then click on Add Port.
5 In the Print to: list box select Other.
6 Choose Crown Port+.
7 Choose New Port.
8 Follow the instructions below for either the Manual Option or the
Auto-Discovery Option.
Manual Option
In this option, you identify the port name and IP address manually. You also
configure the port during this process.
1 Select the Manual radio button.
2 Type the port name and IP address in the appropriate text boxes.
3 Select the advanced button.
The Configure Crown Port dialog box appears.
4 Configure the Timers, Port Settings, Audible Alert, and Output Bin
Notification. Refer to “Port Configuration Options” on page 17.
Step 2. Adding a Printer Port14
Page 15

5 Select OK.
The Configure Crown Port dialog box closes.
Auto Discovery Option
In this option, the port name and IP address are set automatically. You can
configure the port after completing these steps.
1 Select the Auto Discovery radio button.
2 Select the Search for Printers button.
The Add Crown Port dialog box disappears and you are back in the
printer driver’s Add Port dialog box.
3 Close the Add Port dialog box.
This returns you to the printer driver, where the auto-discovered printers
are displayed.
4 Select the appropriate port name from the drop-down list box.
5 Close the Printer Properties dialog box.
6 Skip to “Step 3. Configuring a Port — Automatic and Manual Installation”
on page 16.
Windows Me/98
1 From the Start menu, choose Settings.
2 From the Settings menu, choose Printers.
3 In the Printers window, right-click on the new printer to display the pop-up
menu.
4 Choose Properties to display the Properties dialog box.
5 Choose the Details tab and then choose Add Port.
6 Select Other.
7 Select Crown Port+ from the list
and then choose OK.
The Add Crown Port window
appears.
If you want to identify the port’s
logical name and IP address
manually, select the Manual radio
button and follow steps for the
Manual Option.
If you want to discover the port’s
logical name and IP address
automatically, select the AutoDiscovery radio button and follow the steps
for AutoDiscovery.
Step 2. Adding a Printer Port
15
Page 16

Manual Option
1 After selecting the Manual button, type the port name and IP address in
the appropriate text boxes.
2 Select the Advanced button.
The Configure Crown Port dialog box appears.
3 Configure the Timers, the Port Setting, the Audible Alert and the Output
Bin Notification. For information about the options, see “Port
Configuration Options” on page 17.
4 Choose OK.
The Configure Crown Port dialog box disappears.
5 Choose OK.
The Properties dialog box displays again and the port name appears in
the Print to the Following Port drop-down list box on the Details tab.
Auto Discovery Option
1 After selecting the Auto Discovery option from the Add Crown Port+
menu, choose Search for Printers.
The Properties dialog box displays, and all of the available port names
appear in the Print to the Following Port drop-down list box on the Details
tab.
If the list does not include all ports, close the Properties box and
reopen it.
2 Select the appropriate port name from the drop-down list.
3 Configure the port. See “Step 3. Configuring a Port — Automatic and
Manual Installation” on page 16.
Step 3. Configuring a Port — Automatic and Manual Installation
Whether you installed Crown Print Monitor+ automatically or manually and
whether you used the manual or autodiscovery option for adding a port, once
you add a port you can configure its settings.
During the configuration procedure, you make choices about the way Crown
Print Monitor+ informs you if there is a printing problem.
Step 3. Configuring a Port — Automatic and Manual16
Page 17

Port Configuration Options
Timers
There are three timers to set. For each time, you scroll through a list box and
select a value between 1 and 600 (seconds).
1 Status Update Interval — Determines how often Crown Print Monitor+
updates Print Manager about the printer’s status.
2 Status Request Timeout — Determines how long Crown Print Monitor+
waits before notifying Print Manager that the printer is not responding.
3 Send Request Timeout — Determines how long Crown Print Monitor+
waits for a print job to be sent before returning control to the Windows
Spooler.
Port Settings
To configure the Port Settings
For printers using Crown Port+ printer technology, select Port 9100.
For example, Crown Port+ printers that use Port 9100 include the
magicolor 2350, magicolor 3300, and magicolor 7300.
For printers using Crown technology, select Port 35.
For example, Crown printers that use Port 35 include the 2060, 3260,
4032, magicolor 2, magicolor 330, magicolor 2200 and 2210,
magicolor 6100 and 6110, magicolor 3100, magicolor 3300, and
PagePro 9100.
Audible Alert
If you check the Audible Alert box, you enable the system speaker to beep
when Crown Printer Monitor+ encounters an error writing to the port.
The Audible Alert is not an option for printers using Port 9100.
Output Bin Notification
When this option box is checked, print jobs are displayed in the Windows
print job queue dialog box until they are delivered to the printer’s output bin.
In addition, when this box is checked, print jobs submitted while another job is
printing are not spooled to the printer. Instead, they remain in the Windows
print job queue until the previous job is delivered to the output tray.
Output Bin Notification is not an option for printers using Port 9100.
Step 3. Configuring a Port — Automatic and Manual
17
Page 18

Port Configuration Steps
Windows XP/2000/NT4
Follow these steps to configure the port.
1 From the Print Manager, choose Printer Properties.
2 From the Print to: list box, select the print device using the port that needs
to be configured.
3 On the Ports tab, select Configure Port.
4 Configure the Timers, the Port Setting, the Audible Alert, and the Output
Bin Notifications. Options are described in “Port Configuration Options” on
page 17.
5 Choose OK.
6 Close the dialog box.
Windows Me/98
Follow these steps to configure the port.
1 From the Start menu, choose Settings.
2 Choose Printers.
3 In the Printers window, right-click on an existing printer to display the
printer’s menu.
4 Choose the Properties tab to display the Properties dialog box.
5 Click the Details button.
6 In the Print to the Following Port drop-down list, select the port you want
to configure.
7 Choose the Port Settings button to display the Configure Crown Port window.
Step 3. Configuring a Port — Automatic and Manual18
Page 19

8 Configure the Timers, the Audible Alert, and the Output Bin Notification.
Options are described in “Port Configuration Options” on page 17.
9 Choose OK.
10 Close the Print Servers Properties dialog box.
Using Crown Print Monitor+
If you have installed Crown Print Monitor+, added a port for the printer, and
configured the port settings, if necessary, you are ready to use Crown Print
Monitor+.
Windows XP/2000/NT4
To obtain status information on a print job, from the Start menu choose Settings and then Printers, then double-click on the printer you have selected.
Whenever a print job is sent to that port, its status is reported in the sample
status window shown below.
Print Job Status Information
This provides a sample of what should appear in the status window once you
have set up Crown Print Monitor+.
The following is an explanation of the status window prompts:
Menu or Item Explanation
Printer Provides a drop-down menu that allows you to select Con-
nect, Set as Default Printer, Printing Preferences, Pause
Printing, Cancel All Documents, Sharing, Use Printer Offline,
(Printer) Properties, and Close.
Document Allows you to Pause, Resume, Restart, Cancel, or view the
(Document) Properties of one or more print jobs.
View Allows you to view or hide the Status Bar and Refresh print
job information.
Help Provides access to Help Topics, the printing Troubleshooter,
and information About Windows.
Using Crown Print Monitor+
19
Page 20

Menu or Item Explanation
Document
Name
Status Displays the current state of the print job in process. A print
Owner Displays the document owner.
Pages Displays the number of pages in the document.
Submitted Displays the time the print job is submitted to the Print
Size Displays the document size.
Port Displays the port name or IP address for the current port.
See chapter 3, “Troubleshooting,” for more information on the status messages that display.
Displays the title(s) of the document(s). (This may also be
the filename.)
job either proceeds in a normal error-free state or it is in an
error state. Error states can be nonvolatile like PAPER OUT
or
PAPER JAM or volatile like the inability to connect to a
target printer (this state is displayed as
Responding
Spooler.
).
Printer Not
Windows Me/98
Print Job Status Information
To obtain status information on a print job, from the Start menu choose Settings and then Printers, then double-click on the printer you have selected.
Whenever a print job is sent to that port, its status is reported in the sample
status window shown below.
Using Crown Print Monitor+20
Page 21

The following is an explanation of the status window menus and field names:
Menu or Item Explanation
Printer Provides a drop-down menu that allows you to select Pause
Printing, Set as Default, Purge Print Documents, and
(Printer) Properties.
Document Gives you the option to Pause or Cancel one or more print
jobs.
View Allows you to view or hide the Status Bar.
Help Provides access to Help Topics and information About
Windows
Document
Name
Status Displays the current state of the print job in process, as well
Owner Lists the print job owner.
Progress Shows the progress of the print job by displaying the size of
Started at Displays the time and date the file was sent to print.
Displays the title(s) of the document(s). (This may also be
the filename.)
as those waiting to be printed. A print job either proceeds in a
normal error-free state, or it is in an error state. Error states
can be nonvolatile like
volatile like the inability to connect to a target printer (this
state is displayed as
the file still to print.
PAPER OUT or PAPER JAM or
Printer Not Responding).
See chapter 3, “Troubleshooting,” for more information on the status messages that display.
Using Crown Print Monitor+
21
Page 22

Uninstalling Crown Print Monitor+
Use this procedure when uninstalling Crown Print Monitor+.
1 From the Start menu, choose Settings.
2 From the Settings menu, choose Printers.
3 Right-click on your printer and choose Properties.
4 In the Properties window, choose the Details tab, scroll down in the Print
to the following port: listing and select a port not associated with Crown
Print Monitor+.
You need to select a different port because you can’t delete an
active port.
5 If yo have more than one printer using Crown Print Monitor+, repeat steps
3–4 for each additional printer.
6 From the Settings menu, choose Control Panel.
7 In the Control Panel dialog box, choose Add/Remove Programs.
8 Choose Apply and then choose OK.
9 Choose Add/Remove.
10 When a dialog box displays, asking you if you want to uninstall Crown
Print Monitor+, choose OK.
If a dialog box appears saying that a locked file (crnxmon.dll) was
detected, choose the Reboot button.
11 When the uninstall is complete, choose Yes to restart your computer.
12 Click Finish.
All files that are associated with Crown Print Monitor+ installation
are removed.
Uninstalling Crown Print Monitor+22
Page 23

Troubleshooting
Page 24

Spooler Status Information
Windows Me/98
One of the following messages displays via Print Manager in the printer
status window when the Windows Me/98 Print Spooler is the originator of the
status information:
When this message
displays in the Print
Manager printer status
window . . .
Spooling The print job is being
Printing The spooler is ready to
Deleting The spooler has finished
Error The spooler is reporting
It indicates . . . Take this action . . .
spooled from an
application either on a
local or remote
workstation.
activate the designated
monitor and despool the
submitted print job.
submitting the print job
to the designated print
monitor and is deleting
the spool file.
an error received from
the monitor.
If the print job is
spooled on a local
workstation, then a
dialog box prompting
you to either delete or
retry the job displays.
If the print job is
spooled on a remote
workstation, then the
job is retried until it is
either deleted or the
printer becomes
unavailable.
None
None
None
For print jobs spooled
on a local workstation, click the appropriate dialog box
button.
For print jobs spooled
on a remote workstation, either wait until
the error clears or
delete the job.
Spooler Status Information24
Page 25

Windows XP/2000/NT4
When this message
displays in the Print
Manager printer
status window . . .
Spooling The print job is being spooled
It indicates . . . Take this action . . .
from an application either on
a local or remote workstation.
Remote Downlevel
Document displays in the
Document Name column of
the status window when the
client workstation, spooling
jobs to an NT4 server, does
not transmit complete job
information. See your
Microsoft Windows NT4
documentation for more
information on this message.
Printing The spooler is ready to acti-
vate the designated monitor
and despool the submitted
print job.
Deleting The spooler has finished sub-
mitting the print job to the designated print monitor and is
deleting the spool file.
Error The spooler is reporting an
error received from the monitor.
If the print job is spooled on
a local workstation, then a
dialog box prompting you to
either delete or retry the job
displays.
If the print job is spooled on
a remote workstation, then
the job is retried until it is
either deleted or the printer
becomes unavailable.
None
None
None
For print jobs
spooled on a local
workstation, click
the appropriate
dialog box button.
For print jobs
spooled on a
remote workstation, either wait
until the error
clears or delete
the job.
Spooler Status Information
25
Page 26

Monitor Status Information
One of the following messages displays via Print Manager in the printer
status window when Crown Print Monitor+ is the originator of the status
information.
Windows Me/98
When this message
displays in the Print
Manager printer status
window . . .
Printer not responding Crown Print Monitor+
Printer Busy This message displays
It indicates . . . Take this action . . .
can’t communicate with
the printer.
while the job is transferred to the printer.
Printer Off or
Connection Broken
If the print job is
spooled by a local
workstation, then
either turn on the
printer or reconnect it
to the network.
If the job is spooled
by a remote workstation, then turn on the
printer or reconnect it
to the network.
None
Monitor Status Information26
Page 27

Windows XP/2000/NT4
When this message
displays in the Print
Manager printer status
window . . .
Printer not responding Crown Print Monitor+
Printer Busy This message displays
It indicates . . . Take this action . . .
can’t communicate with
the printer.
while the job is transferred to the printer. The
flag next to this message indicates spooling
status:
Green Flag
Printer spooling is
enabled.
Printer Off or
Connection Broken
If the print job is
spooled by a local
workstation, then
either turn on the
printer or reconnect it
to the network.
If the job is spooled
by a remote workstation, then turn on the
printer or reconnect it
to the network.
None
Red Flag
Monitor Status Information
Printer spooling is
disabled.
27
Page 28

Printer Status Information
This printer-dependent status information displays via Print Manager in the
printer status window when Crown Print Monitor+ is displaying a message
from the print device. Most of these messages are uppercase, and they may
vary from one print device to the next. See your printer documentation for a
complete list and description of these messages.
When this
message displays
in the Print
Manager printer
status window . . .
Print device control
panel status
messages, such as
the following:
IDLE
TONER OUT
ADJUST UPPER
BIN
PAPER JAM
It indicates . . . Take this action . . .
The print device has
encountered a problem
(the status message is also
displayed on the control
panel of the print device).
See your printer
documentation for a
complete list of these
messages.
If the print job is spooled
on a local workstation, a
dialog box prompting
you to either delete or
retry the job displays.
If the print job is spooled
on a remote workstation,
the job is retried until it is
either deleted or the
printer becomes
unavailable (for
example, is busy printing
another job or goes
off-line).
Fix the printer problem and
then do the following:
For print jobs spooled on
a local workstation, click
the appropriate dialog
box button.
For print jobs spooled on
a remote workstation,
either wait until the error
clears or delete the job
Remember that if the
send request timeout
expires, then the
print job will be
terminated and
cleared from the
system.
Printer Status Information28
 Loading...