

Page 1

+ Documentation ++ Documentation ++ Documentation ++ Documentation ++ Documentation ++
User Manual
PagePro 4100E
Page 2

Contents
1 Introduction
1.1 Welcome to Minolta/QMS ............................................................1-1
1.2 Roadmap of this manual ..............................................................1-2
Where to find what in this User’s Manual........................................1-2
Brief explanatio n of special type styles and method of
presentation ....................................................................................1-3
1.3 Working safely with your laser print er..... ............ ........... ............1-4
Notes on your safety and operating safety...................................... 1-4
Laser safety.....................................................................................1-6
Intern a l la se r rad i at io n.. ............ .......................................................1-6
CDRH regulations...........................................................................1-7
Laser safety label................................ ............ ............ ....................1-8
Laser caution label..........................................................................1-9
Ozone emission...................................................................... ......1-10
2 Unpacking, installing and setting up the printer
2.1 Unpacking the laser printer..........................................................2-1
2.2 Overview of the printer.................................................................2-3
External features.............................................................................2-3
Inside th e pri n te r ....... ... ...................................................................2-4
Optional accessories.......................................................................2-5
Printer control panel........................................................................2-6
2.3 Installing your laser printer..........................................................2-7
Place of installation .........................................................................2-7
Stora g e of co n s umables and acc e ss o ries ............ .. ... .....................2-7
Ambient conditions..........................................................................2-8
Space required................................................................................2-9
2.4 S e tting up your la se r pr in te r...... .. ..............................................2 -1 1
Fitting the paper output tray and paper feed tray 1 ......................2-11
Connecting the power cable .......... ........................ .. ........... ..........2-12
Switching the printer on and off.....................................................2-13
Printi ng a configuration p ag e .. .. ............ .......................................2-14
Connecting the printer to a computer (parallel por t) .......... ...........2-15
Connecting the print er to a computer (USB port) ............ .. ...........2-16
PagePro 4100E TOC-1
Page 3

3 Installi ng the pri nt er dr iver
3.1 Sy s te m re q u ir ements ..... ... .. ......................................................... 3 -1
3.2 No t es o n ins ta l ling the prin t er dr iv e r....... ... ................................ 3-1
General information on the printer driver ........................................ 3-2
Information on installation using Plug-and-Play ............................. 3-2
Information on installation using the Add Prin ter Wizard......... .. .....3-2
Information on installing a network printer......................................3-3
3.3 Installing the USB device driver.................................................. 3-4
3.4 CD - R OM in s ta ll a tion for Win9 5, Win98 or WinN T 4 . 0.. ............... 3-8
3.5 Installation for Windows3.1x................ ....................................3-10
3.6 Uninstalling the Windows printer driver ............... .. .............. ... 3-12
Deinstallation for Windows 95/98 and Windows NT 4.0...............3-12
Deinstallati on for Windows 3.1x ..................................... .. ............3-13
3.7 Installation for MS-DOS ............................................................. 3-14
4 Working with the Windows printer drivers
4.1 Displaying printer driver settings ............................................... 4-1
Displaying setti ngs in Windows 95/98 ............ .. ............ .................4-1
Displaying settings in Windows NT 4.0 ................... ......................4-3
Displaying the settings in Windows 3.1x ....................................... 4-4
4.2 Pa p e r in de x ca rd...... .. ............................................................. ...... 4-5
Selecting a paper format ................................................................ 4-6
Creating a custom paper for ma t ........ .................................. ..........4-7
Adjusting the print -out to fit the paper .......... ............ ............ ..........4-8
Specifying the number of copies .................................................... 4-8
Specifying the orientation of the print paper.............. .. ............ .......4-8
Switching on/off t he pri nter’s sorting function.................................4-9
Specifying the paper source......................................................... 4-10
Recalling the original setings [DEFAULT] ....................................4-10
4.3 Page layout index card .............................................................. 4-11
Printing multiple document pages per print page (N-up)..............4-12
Printi ng w a te rma rks..... ... ..............................................................4 -1 3
Custo m w a te rm a r ks ..................................................................... 4-14
Scaling the printed document....................................................... 4-15
Duplex function............................................................................. 4-15
TOC-2 PagePro 4100E
Page 4

4.4 Q u a l ity in d e x ca rd.......................................................................4 -1 6
Optimizing data exchange with the printer (All raster)..................4-17
Switching Toner Save function on and off.....................................4-17
Specifying the graphics mode................. .................................. ....4-18
Optimizing the print quality of text and graphi cs (Fi ne-ART).........4-18
Specifying TrueType mode...........................................................4-19
Deter min ing the resolu tion . .. ........................................................4 -1 9
Specifying the emulation mode.....................................................4-19
Optimizing the presentation of graphics in the print-out
(Detail of quality...)........................................................................4-20
4.5 Font index card...........................................................................4-21
Adding fonts..................................................................................4-22
Deleting fonts................................................................................4-22
Setting the ID ................................................................................4-22
4.6 Device option index card............................................................4-23
Activating the optional duplex unit.... ........................ .....................4-24
Activating opti onal paper feed tray 2 or 3... .. ............ .....................4-24
5 Working with the Windows printer tools
5.1 C a lling up the St a tu s Di splay....... ... .............................................5-2
Calling up the Status Display in Windows 95/98, Windows NT 4.0 5-2
Calling up the Status Display in Windows 3.1x ..............................5-3
Altering the size of the Sta tus Display window ...... .. ........... ............5-4
5.2 C a lling up the Co n t ro l P a n el...... .. ... .............................................5 -5
5.3 P a p e r in d e x card ... .. ......................................................................5-6
Defining the response in the case of a lack of suitable paper ........5-7
Specifying a paper format for paper feed tray 1 .............................5-7
5.4 P r in ter setting in d e x car d... ... .......................................................5 -8
Switching on/off the Power Save mode ............ .. .. .........................5-9
Switching on/off th e paper format error detection .................. .. ......5-9
Detecting paper misfeeds – Jam Reco v e ry .. .................................5 -9
Switching preheat on/off ........ ........... ............ .. .. ............ ..................5-9
Specifying the print language........... ............ ............ .....................5-10
5.5 T e s t p ri nt in d ex card.... ......................................... ......................5-1 1
The various test prints...................................................................5-11
5.6 Counter index card......................................... ............................5-12
Checking the status of a counter...... ............ .................................5-13
Resetting a counter 5-13
5.7 Configuration index card............................................................5-14
PagePro 4100E TOC-3
Page 5

6 Working with the DOS printer tools
6.1 Using the Status Display ............................................................. 6-1
Calling up the Status Display ......................................................... 6-1
Switching on/off popup messages (Setup menu).................. .........6-2
Changing the hotkey command for the Status Display
(Setup menu) ................ ............ ............ .. ............ ...........................6-2
Defining popup messages (Setup menu) ......................................6-2
6.2 Us i ng th e DOS Co n trol Panel ...................................................... 6-3
Calling up the Control Panel .......................................................... 6-3
6.3 Pa p e r p ane l ....... ...................... ...................................................... 6-4
Selecting a paper format ................................................................ 6-5
Specifying the paper source...........................................................6-6
Specifying the number of lines printed per page ............................6-6
Specifying the number of copies .................................................... 6-6
Specifying the orientation of the printing paper..............................6-7
Defining the response to format errors .......................................... 6-7
Specifying a paper format for paper feed tray 1 ............................6-8
6.4 Font panel..................................................................................... 6-9
6.5 Output Quality panel ..................................................................6-10
Switching on/off t he Toner Save function.......... .. ........... ............ ..6-11
Fine- A R T fea tu re..... ............ ......................................................... 6 -1 1
Print language..............................................................................6-11
6.6 Counter panel ............. ........... .......................... ........................... 6-12
Checking the status of a counter............. ............ ...................... ...6-13
Rese tt in g a coun t e r .... ................................................................. 6-1 3
6.7 Configuration panel.................................................................... 6-14
6.8 Printer Setting panel .................................................................. 6-15
Switching on/off the Power Save mode ....................................... 6-16
Switching on/off t he paper format error detection ......... ...............6-16
Pre-H e a t fe a tu re ....... .. ... ..............................................................6-16
Switching on/off t he automatic continuation function .............. .. ...6-16
Detecting paper misfeeds – Jam Re co v e ry ..... ............................ 6 -1 7
Specifying the input/output timeout ......... .. ............ ............ ..........6-17
7 Working with the printer
7.1 Please note the follo wing points: .................. .. ........... ................ 7-1
What should I watch out for when loa ding paper?..........................7-1
What should I watch out for when loading envelopes? .................. 7-1
Which sizes of paper can I use?... .. ...................... ............ ..............7-2
What types of paper can I use?......................................................7-3
Printable area.................................................................................7-3
TOC-4 PagePro 4100E
Page 6

7.2 U s ing the contr o l b ut to n ..............................................................7-4
Printing out the configuration page ................................................7-5
Continuing a print job after an error message ................................7-5
7.3 Loading paper ...............................................................................7-6
Loading paper into pap er fe ed tray 1 ........................... ............ ......7-6
Loading paper into the manual feed unit ........... ............ .. ............ .. .7-7
Loading paper into pap er fe ed tray 2/3 ................ ............ ............ .7-8
7.4 Monitoring print jobs with the Status Display..........................7-10
8 Installing optional accessories
8.1 Installing paper feed tray 2/3........................................................8-1
8.2 Installin g the d uplex unit ..............................................................8 -3
8.3 Installing a SIMM memory module............................ ..................8-5
8.4 Installing a PostScript ROM-SIMM memory module............. .. .. .8-9
8.5 Installing a network card............................................................8-13
9 Caring for and maintaining your
printer
9.1 C leaning the pr in t e r ..... .................................................................9-2
Clean in g th e case .. ......................................... ...............................9-2
Cleaning the paper feed roller ........................................................9-2
9.2 Replacing the imaging cartridge .................................................9-5
10 Troubleshooting
10.1 Clear in g pap e r mi sf e e ds ....... .....................................................1 0 -2
Clearing paper misfeeds at the imaging cartri dge ..................... .. .10-2
Clearing a paper misfeed at the fusing unit .... ............ ............ .. ....10-4
Clearing a paper misfeed at the output tray .................. ............ .. .10-6
Clearing a paper misfeed at paper feed tray 1 ............. ................10-7
Clearing a paper misfeed at the manual feed unit ..... ............ .. ....10-8
Clearing a paper misfeed at paper feed tray 2 (optional) .............10-9
Clearing paper misfeeds at the duplex unit (top) .......................10-10
Clearing paper misfeeds at the duplex unit (bottom ) .................10-11
10.2 Problems with print quality......................................................10-12
10.3 General printing problems.......................................................10-15
PagePro 4100E TOC-5
Page 7

10.4 Printer messages...................................................................... 10-16
Lamp functions........................................................................... 10-16
Status messages........................................................................10-17
User messages...........................................................................10-18
Servi ce me ss a g es ..... .. ... ............................................................ 10-20
11 Appendix
11.1 Perfor ma n ce fe a tures... .. ............................................................ 11-1
Hardware...................................................................................... 11-1
Software .......................................................................................11-1
Operating system ......................................................................... 11-1
11.2 Technical specification .............................................................. 11-2
PagePro 4100E printer................. .. .. ............................................11-2
500-sheet paper fee d tray (option)....................................... ........11-3
Duplex unit (option) ...................................................................... 11-4
Network card (option) ...................................................................11-4
SDRAM-SIMM memory module (option)......................................11-4
Interfaces and cab les................ .. ...................... ............ ...............11-5
USB inte r fa ce a nd cab le...... ............................... ..........................11-5
11.3 Minolta/QMS’s concern for environmental protection ...........11-6
What does the energy star mean?........ .. ...................... ............ ...11-6
11.4 Index ............................................................................................ 11-7
TOC-6 PagePro 4100E
Page 8

Introduction
1 Introduction
1.1 Welcome to Minolta/QMS
Thank you for purchasing a Minolta/QMS PagePro 4100E laser pri nter.
To achieve the best possi ble results and to use your laser printer
effectively, this User’s Manual provides you with information on the
follow ing topics:
G installing the printer driver,
G working with the printer drivers and tools,
G working with the printer,
G caring for and maintaining your printer,
G troubleshooting.
Read this User’s Manual careful ly before o perating your prin ter for the first
time, and always keep the manual within easy reach.
We reserve the right to make changes to the contents of this manual.
Trademarks
PCL is a registered tradema rk of the Hewl ett -Packard Company.
Centronics is a registered trademark of Centr onics, Inc.
MS-DOS, Microsoft, Windows and Windows NT are registered
trademarks of Micr osoft Corporation.
IBM is a registered trademark of the Internati onal Business Machines
Corporation.
Apple, Macintosh and TrueType are registered trademarks of Apple
Computer, Inc.
PagePro is a registered trademark of Minolta.
Adobe and PostScript are tr adem arks of Adobe Systems, Inc.
Fine-ART and Fine Micro Toning are trademarks of Minolta Co. Ltd.
QMS and the QMS logo are registered trademarks of QMS, Inc.
All other names of products and brand-names are tradem arks or
registered trademarks of their respective proprietors.
1
PagePro 4100E 1-1
Page 9

1
1.2 Roadmap of this manual
Where to find what in this User’s Manual
You don’t know exactly where to find the information you need? The
following table is designed to help you.
Alternatively, to find information on a specific problem quickl y and
precisely, please refer to the index at the end of the User ’s Manual.
No. Title of chapter Content of chapter
Contents A complete list of all the chapters and sub-chapters in
1 Introduction Introductory remarks and information on how to use
2 Unpacking, installing and
setting up the printer
3 Installing the printer driver A step-by-step explanation of the routine for installing
4 Working with the Windows
printer drivers
5 Working with the Windows
printer tools
6 Working with the DOS printer
tools
7 Working with the printer Getting to know how your printer works. For example,
8 Installing optional
accessories
9 Caring for and maintaining
your printer
10 Troubleshooting Help with analysing and rectifying faults.
11 Appendix A collection of helpful additional information, e.g.:
this User’s Manual.
this manual as well as notes on the safe use of the
printer.
|nformation on how to set up the printer as well as an
introduction to the various features.
the printer driver.
Details of how to control the printer via the printer
driver. This helps you learn how to use the printer’s
functions effectively.
Details of how you can use the supplementary
Windows programs most effectively.
Details of how you can use the supplementary DOS
programs most effectively.
information on:
• loading paper
• monitoring print jobs
• cancelling print jobs
Details of how to install optional accessories
correctly, e.g.:
• 500-sheet paper feed tray
• network card
Details of how to look after your printer and how you
can easily replace cerain parts yourself.
• technical specification
• index of keywords
Introduction
1-2 PagePro 4100E
Page 10
Introduction
Brief explanation of special type styles and method of presentation
Special type styles and methods of presentation are used in this User’s
Manual to highlight var ious circumstances. The following examples will
help you to recognize and deal with the most important of these.
CAUTION
This is a warning!
A warning alerts you to danger to life and limb or to damage that could
result to the machine by tr eating it improperly .
➜ The arrow refers yo u to saf ety measures that must be taken to pr event
[MENU] Key on the control panel / button on the printer driver with
➜ Single action to be performed (there are no other steps)
1
the hazard.
the description “Menu“
Step 1 of a series of actions
1
Step 2 of a series of actions, etc.
2
Help is available here .
?
➜ The approach that is suggested
here is sure to get you to your
desired result.
Here you can see what has to be done.
✎
This is a hel p fu l tip
Text passages th at are iden tified in this manner provide you with trick s
and handy tips to make it even easier to work with the printer.
PagePro 4100E 1-3
Page 11

1
1.3 Working safely with your laser printer
Notes on your safety and operating saf ety
Working improperly wit h the printer can result in heal th hazards, electric
shocks and even fires. Before you unpack the laser printer, you should
make yourself fami li ar with this information on your safety and operating
safety.
CAUTION
Observe the following information:
➜ Make sure that the power cable is correctly plugged into the socket
and that the socket is at al l ti m es visible and readily accessible.
➜ Do not pull the cabl e of t he po wer plug as thi s may da mage t he cable.
The result could be an electric shock or a fire.
➜ Remove the power plug from the socket if the machi ne will not be use d
for an extended period of t ime.
➜ Do not remove the power cab le from the socket wit h wet hands as this
may result in an electric shock.
➜ Do not mov e the unit unl ess the power ca ble has been rem oved from
the socket. Ot herwise you may d amage the cabl e. The r esult co uld be
a short-circuit or a fi re.
➜ Do not place any hea vy objects on t he power cable. Do not pull or kink
the cable as this can result in damage to the cable. The result could
be an electric shock or a fi re.
➜ Make sure that the machine is not standing on a cable connected to
another machine as this can resu lt i n d amage t o that cabl e. The resu lt
could be a fire or improper functioning of the unit in question.
➜ Make sure that the power supply to the unit has the correct voltage.
Otherwise the result could be a fire or an electric shock.
➜ Switch off the unit immediately and unplug th e power cable if the
power supply cable is damaged. Failure to do so could result in a f ire
or an electric shock. Contact your customer support service centre.
➜ Use only ext ens ion cab les t hat are des igned f or at le ast t he maxim um
power rating of the machine. Extension cables with lower ratings can
result in overheating and can even cause a fire.
Introduction
1-4 PagePro 4100E
Page 12

Introduction
➜ Perform only t he procedures that are described in this manual. Usi ng
➜ Do not place any heavy objects on the machine.
➜ Do not open any covers on the machine while printing is in progress.
➜ Do not switch off the unit while printing is in progress.
➜ Do not place any magnetic object near the machine.
➜ Do not use any flammable sp rays, liqui ds or gases in the vicinity of the
➜ Do not remove any safet y devices and do not alter the const ruct ion of
➜ Do not insert any paper cl ips, staple s or other smal l meta l objec ts into
➜ Do not place coffee cups, drin ks bottles or other conta iners with liquids
➜ If the machine becomes unusually hot, or if you notic e smoke or an
1
the machine improperly can result in a fire or an electric shock.
machine.
the machine. The unit is equipped with high-voltage components.
Using the machine improperly can result in a fire or an electric shock.
openings on the machine. The result could be an electric shock or a
fire. If metal pieces are fed i nto th e machi ne, swi tch it of f imm ediate ly,
disconnect the power cable and contact your customer support
service centre .
in them on the machine. If li quid enters the machine the result could
be an electric sho ck or a f ire. If l iquid does g et into the ma chine, swit ch
it off immediately , di sconnect the power cable and cont act your
customer support ser vice centre.
unusual odour coming fr om the machine, swi tch it off immedia tely and
remove the power cable from the socket. Contact your customer
support technical specialist.
PagePro 4100E 1-5
Page 13

1
Introduction
Laser safety
This printer is equipped with a laser unit. If the print er is used in
accordance wit h the instruct ions in the User ’s Manual, t he laser presents
no danger.
The radiation emitt ed is complet ely absorbed and attenuated by the case.
The laser radi ation c annot esc ape at any t im e during the pri ntin g process .
This laser printer is categorized as a Class 1 print er. This classifica tion
means that the printer does not produce any hazardous laser radiation.
This printer is certi fied as a Class I Laser product under the US
Department of Health and Human Service s (DHHS) Radiation
Performance Standard according to the Radiation Control for Health and
Safety Act of 1968. This means t hat the printer does not produce
hazardous laser ra diation.
Internal laser radiation
Average radiation output:
1.03 mW at the laser aperture of the laser unit.
Wavelength: 770-810 nm
This device works with a laser diode of class 3b with invisib le l aser
radiation. The las er diode and the polygon mirror fo r sampling are
integrated into t he laser unit.
The laser unit is NOT AN ITEM TO BE MAINTAINED ON SITE. You
should therefore not open it under any circumstance.
CAUTION
Dangerous laser radiation!
Using the printer in a manne r other than as indicated in this manual may
result in exposure to dangerous radiation.
➜ Use the printe r only according to the instr uctions contained in the
User’s Manual.
1-6 PagePro 4100E
Page 14

Introduction
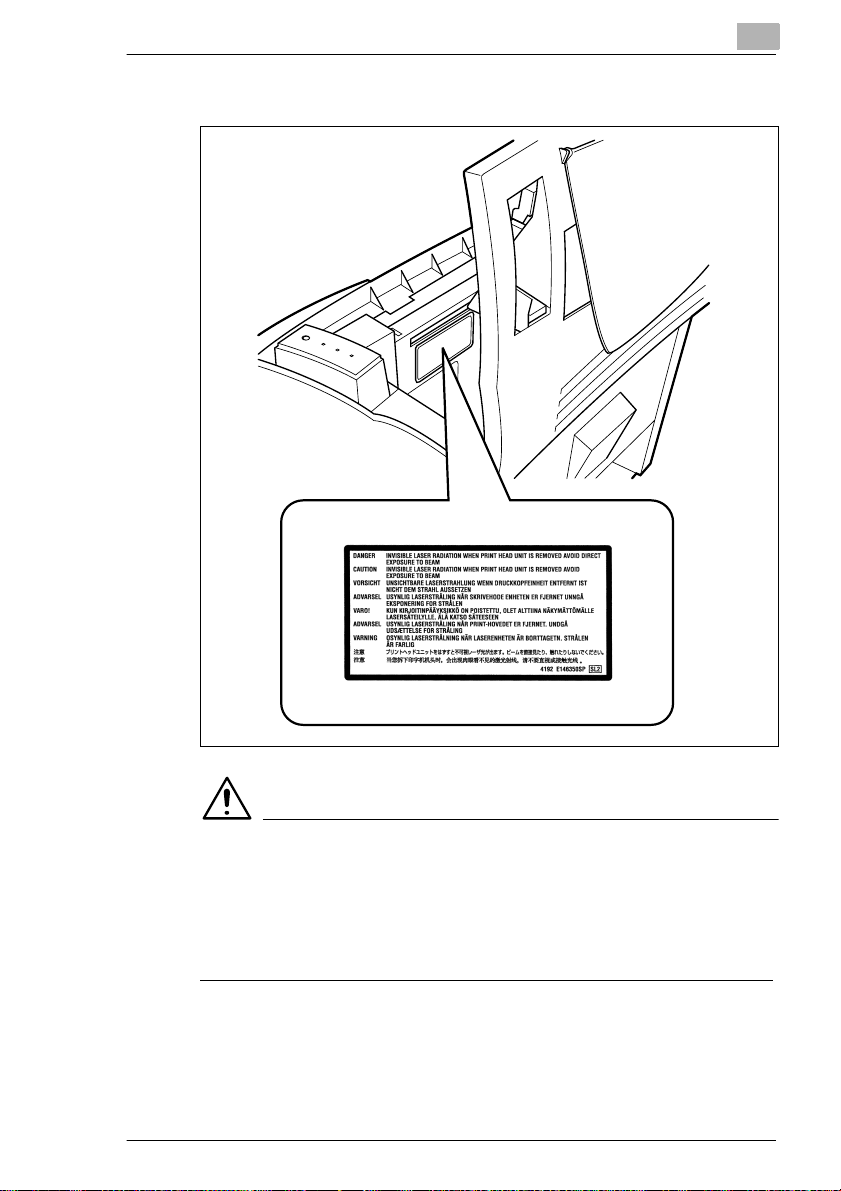
CDRH regulations
On 2 August 1976 the Center for Devices and Radiological Health
(CDRH), part of the US Food and Drug Administration, introduced
specifications for all products that operate with laser beams. Products
which are to be sold or used i n the USA must compl y with th ese stat utory
requirements without exception. The safety label shown here confirms
compliance with the CDRH re gulations . This l abel must be attac hed to al l
products sold or used in th e USA.
1
PagePro 4100E 1-7
Page 15

1
Introduction
Laser safety label
DANGER
Use the printer only as described in this manual!
Using the controls, adjusting the printer or performing procedures other
than as specifie d in th is manual may result in exposu re to hazardous
radiation.
➜ Use the printe r only according to the instr uctions contained in the
User’s Manual.
1-8 PagePro 4100E
Page 16
Introduction
Laser caution label
1
CAUTION
Dangerous laser radiatio n!
This is a semiconduct or l aser. The maximum power of the laser diode is
5 mW and the wavelength is 770–810 nm.
➜ Use the printer only according to the instruct ions contained in the
User's Manual.
PagePro 4100E 1-9
Page 17

1
Introduction
Ozone emission
Small quantities of ozone escape during the printi ng process. These
quantities do not repr esent a health hazard. In spite of this, you should
take care that the area in which t he mac hine is located has adequate
ventilation, especially if you are printing large quantities of materials or if
the machine is being use d continuously over a long peri od of time.
1-10 PagePro 4100E
Page 18
Unpacking, in stalling and setting up t he pri nter
2 Unpacking, installing and setting up
the printer
2.1 Unpacking the laser printer
CAUTION
Danger to children from packaging materials made of plastic
➜ After unpacking, keep the pa ckaging mater ials out of r each of chi ldren.
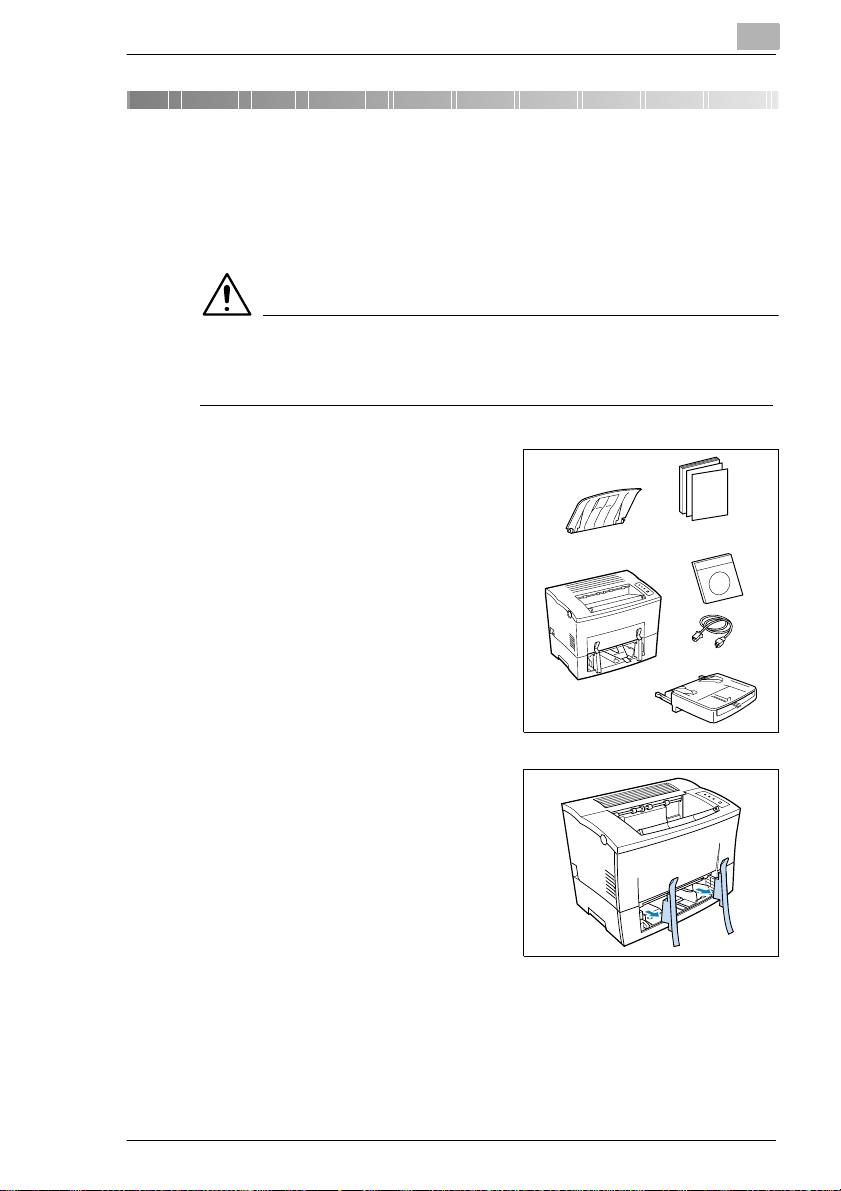
Remove the printer parts and
1
accessories fr om the box.
❍ Paper output tray
❍ Printer
❍ Inst a llation Guide
❍ CD-ROM
❍ Power cable
❍ Paper feed tray.
2
Remove the pa ckagi ng m aterial
2
from the printer.
Remove the transport retainers
3
from the printer.
PagePro 4100E 2-1
Page 19
2
Unpacking, installing and setting up the printer
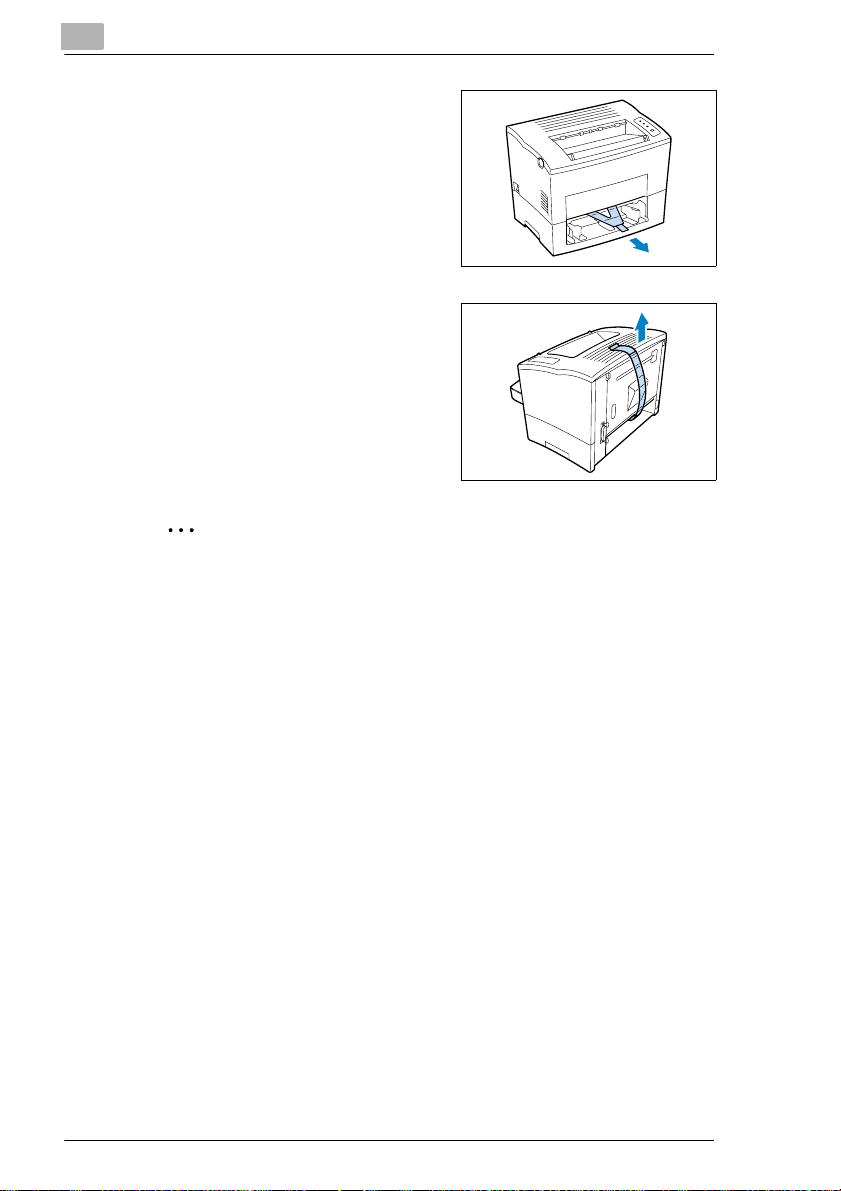
Pull the plastic strips out of the
4
printer.
Remove the plastic st ri ps from the
5
rear of the printer.
✎
Why save packaging materi als?
If you need to move the printer , you can use the packaging again. In
this way you can be certain that your printer is correctly packed.
2-2 PagePro 4100E
Page 20
Unpacking, in stalling and setting up t he pri nter
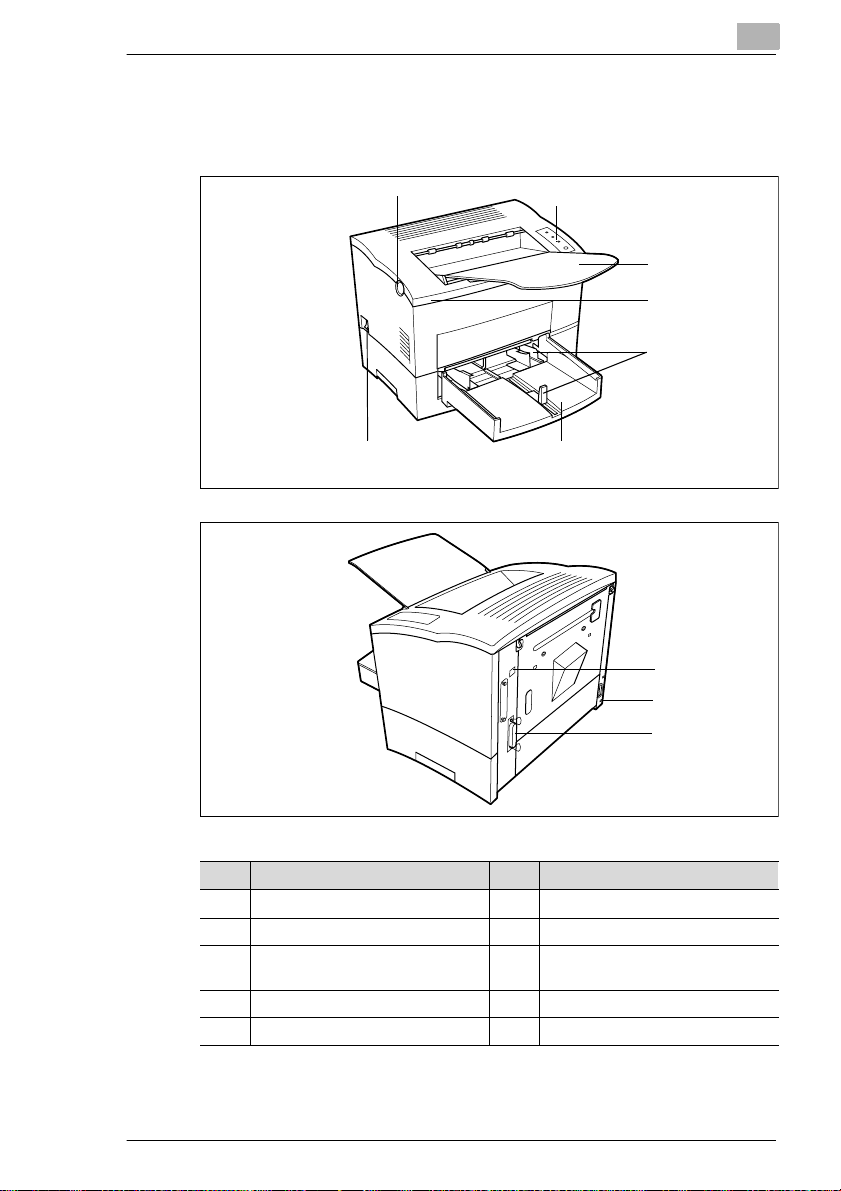
2.2 Overview of the printe r
External features
2
1
2
3
4
5
67
8
9
10
No. Description No. Description
1 Release button for top cover 6 Paper feed tray 1 (multipurpose tray)
2 Contr ol panel 7 Power Switch (ON/O FF)
3 Paper output tray
(face down)
4 Top cover 9 Socket for power cable
5 Paper guides 10 Parallel port
8 USB port
PagePro 4100E 2-3
Page 21
2
Unpacking, installing and setting up the printer
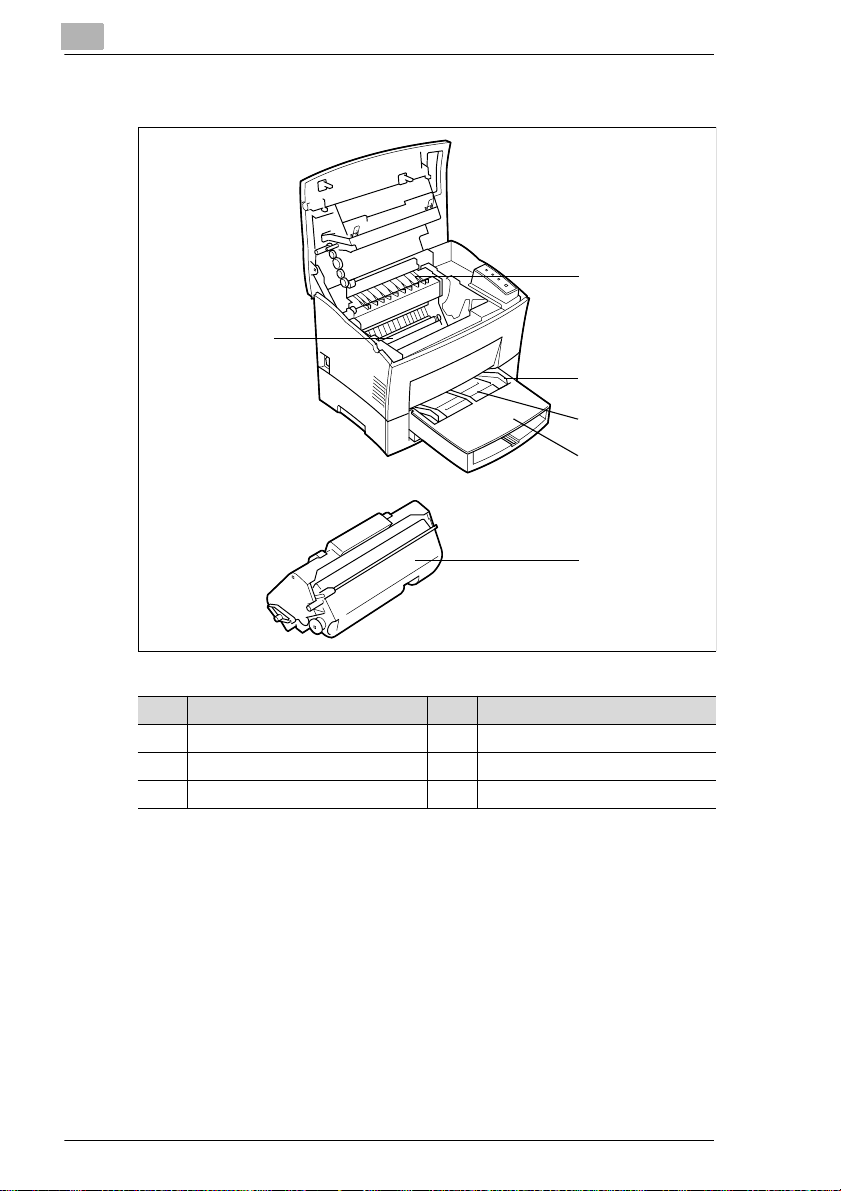
Inside the printer
1
5
2
3
4
6
No. Description No. Description
1 Fusing unit 4 Cover to paper feed tray 2
2 Paper guide 5 Image transfer roller
3 Manual paper feed unit 6 Imaging cartridge
2-4 PagePro 4100E
Page 22
Unpacking, in stalling and setting up t he pri nter
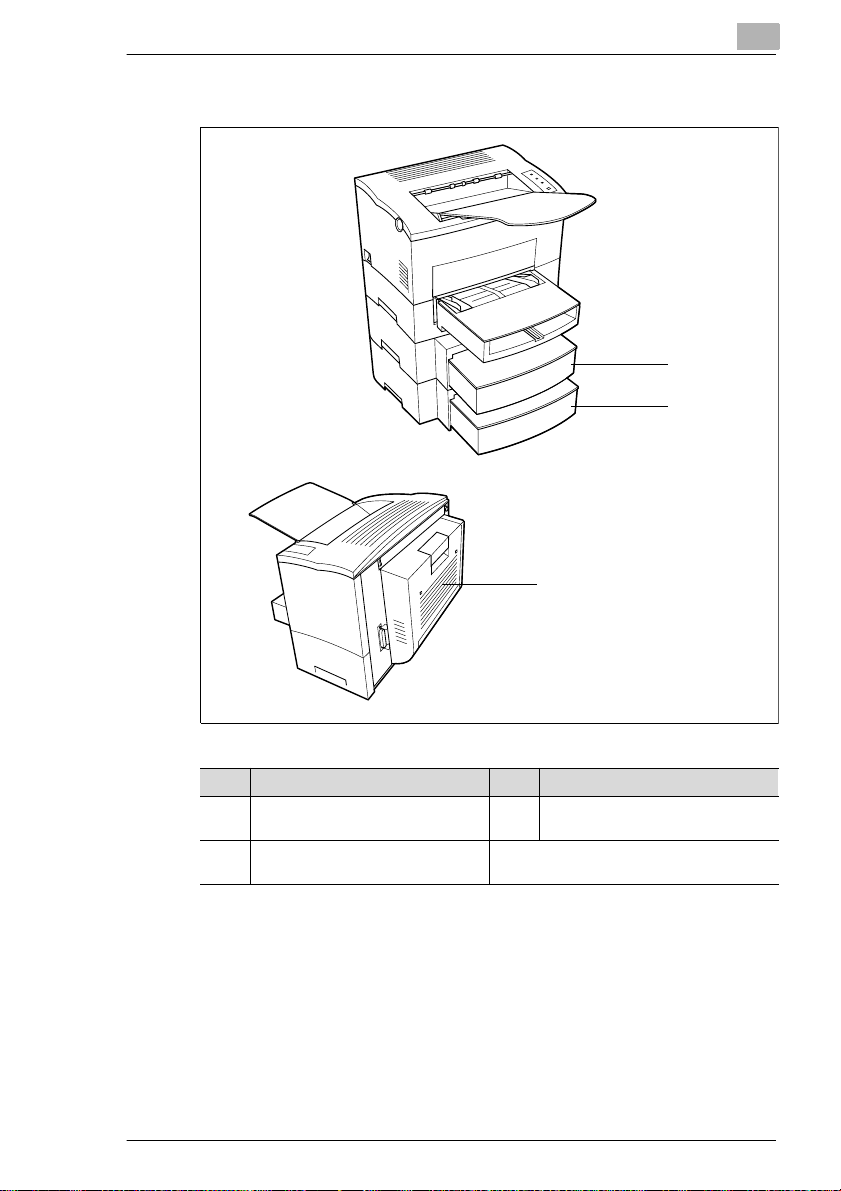
Optional accessories
2
1
2
3
No. Description No. Description
1 Paper feed tray 2
(500-sheet cassette)
2 Paper feed tray 3
(500-sheet cassette)
3 Duplex unit
PagePro 4100E 2-5
Page 23

2
Unpacking, installing and setting up the printer
Printer control panel
1
2
3
4
The control panel has three lamps and one button.
No. Description No . Description
1 Stand-by lamp (green) 3 Fault (red)
2 Paper empty (orange) 4 Control button
2-6 PagePro 4100E
Page 24

Unpacking, in stalling and setting up t he pri nter
2.3 Installing your laser printer
Place of installation
The printer should be set up in a place which is:
G dry and free from dust,
G on a stable surface,
G well ventila ted,
G away of highly flammable items, e.g. curtai ns,
G away of objects which mi ght obstruct the printer’s ventilation slits,
G near to an easily accessible power socket.
The printer must be positioned in a way that it cannot be adversely
affected by the following:
G splashing l iquids,
G organic gases, e.g. ammonia,
G direct sunlight,
G severe temperature fluctuati ons,
G exhaust-ai r from heating, ventil ation or air-conditioning systems.
Storage of consumables and accessories
Printing consumables and accessories should be kept:
G sealed in their original packagings,
G protected against direct sunlight or heat,
G protected against fluorescent light,
G in a cool, dry and dust- free place,
G out of reach of children.
2
CAUTION
Toner poses a health hazard!
Toner is harmful if swallowed.
➜ If you swallow toner, con sult a doctor immediately.
➜ If you get ton er on your han ds, wash them i mmediately with cold water
and soap.
PagePro 4100E 2-7
Page 25

2
Unpacking, installing and setting up the printer
Ambient conditions
The optimum ambient conditions for your printer are as follows:
G Temperature range 50°F to 95°F / 10°C to 35°C
(maximum variati on of 18°F / 10°C per hour);
G Relative hum idity of 15% to 85%
(maximum variati on of 20% per hour).
2-8 PagePro 4100E
Page 26
Unpacking, in stalling and setting up t he pri nter
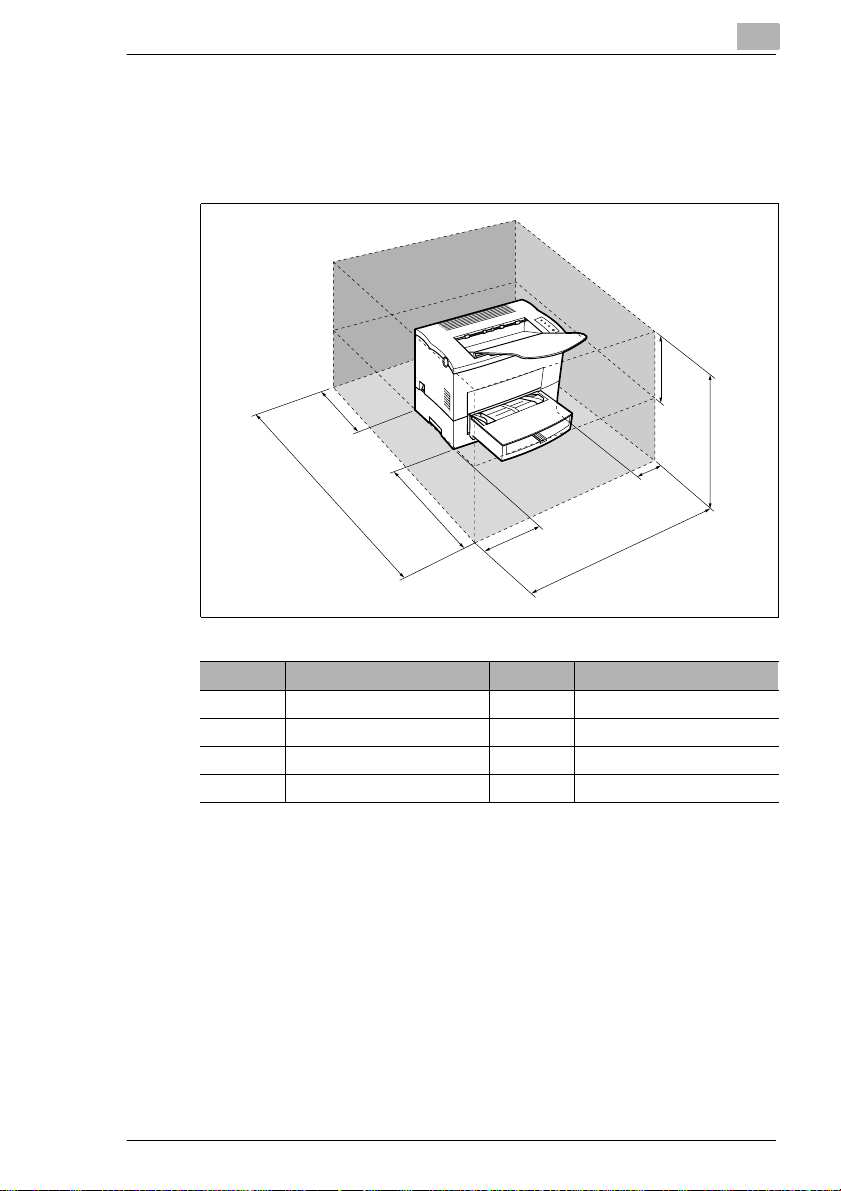
Space required
Make certain t hat th ere is enou gh space a vai labl e around the print er (s ee
figure). This will faci litate operation, rel oading paper and toner, and
maintenance of the pr int er.
D
2
H
C
A
Bez. Maße Bez. Maße
A 40-1/2 in. / 1030 mm E 23-1/2 in. / 600 mm
B 33 in. / 840 mm F 11-3/4 in. / 300 mm
C 24-3/4 in. / 630 mm G 4 in. / 100 mm
D 6 in. / 150 mm H 11-3/4 in. / 300 mm
E
F
G
B
PagePro 4100E 2-9
Page 27

2
Unpacking, installing and setting up the printer
H
D
A
Bez. Maße Bez. Maße
A 40-1/2 in. / 1030 mm E 23-1/2 in. / 600 mm
B 33 in. / 840 mm F 11-3/4 in. / 300 mm
C 29-1/2 in. / 750 mm G 4 in. / 100 mm
D 6 in. / 150 mm H 11-3/4 in. / 300 mm
E
F
B
C
G
2-10 PagePro 4100E
Page 28
Unpacking, in stalling and setting up t he pri nter
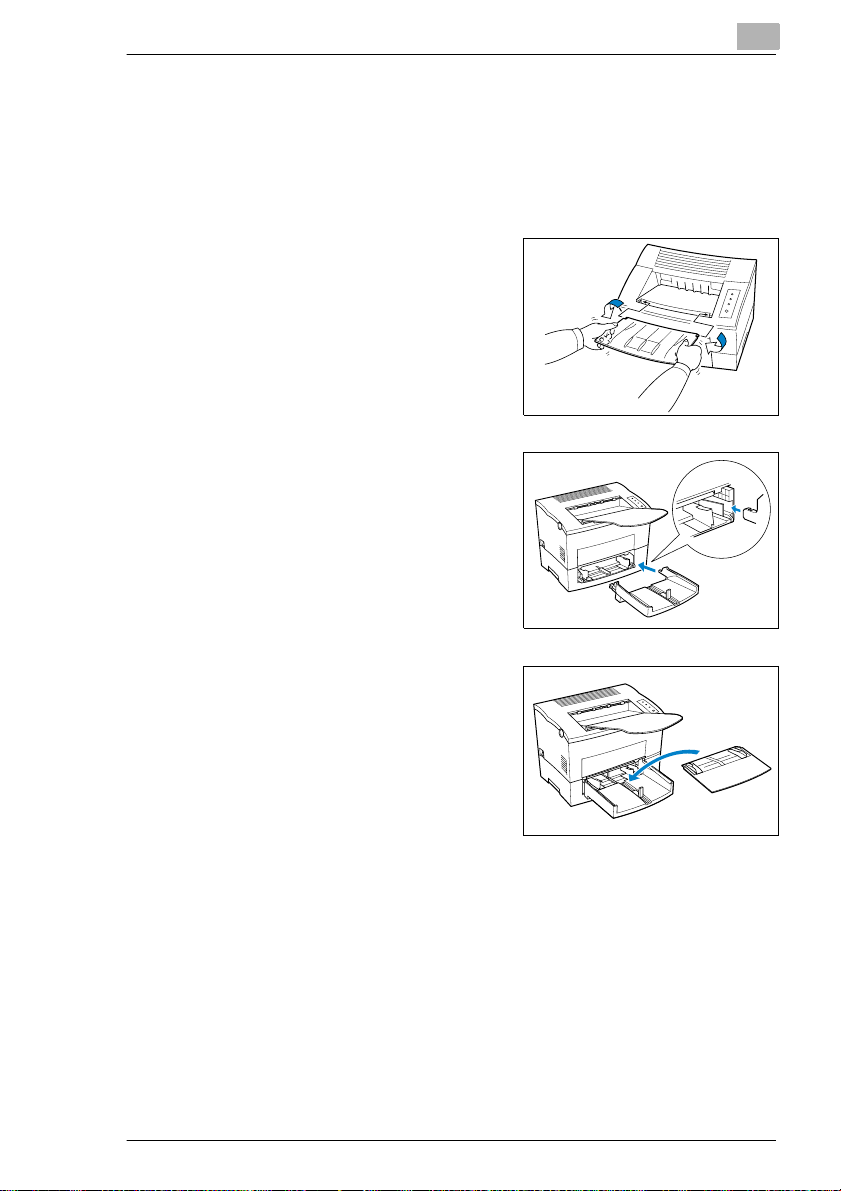
2.4 Setting up your laser printer
Fitting the paper output tray and paper feed tray 1
Set the guides of the paper feed tray to match t he size of paper you wish
to use.
Attach the paper output tray to the
1
printer as shown here.
Slide the lower part of the paper
2
feed tr a y in to the printer.
2
Fit the cover of paper feed
3
tray 1.
PagePro 4100E 2-11
Page 29
2
Unpacking, installing and setting up the printer
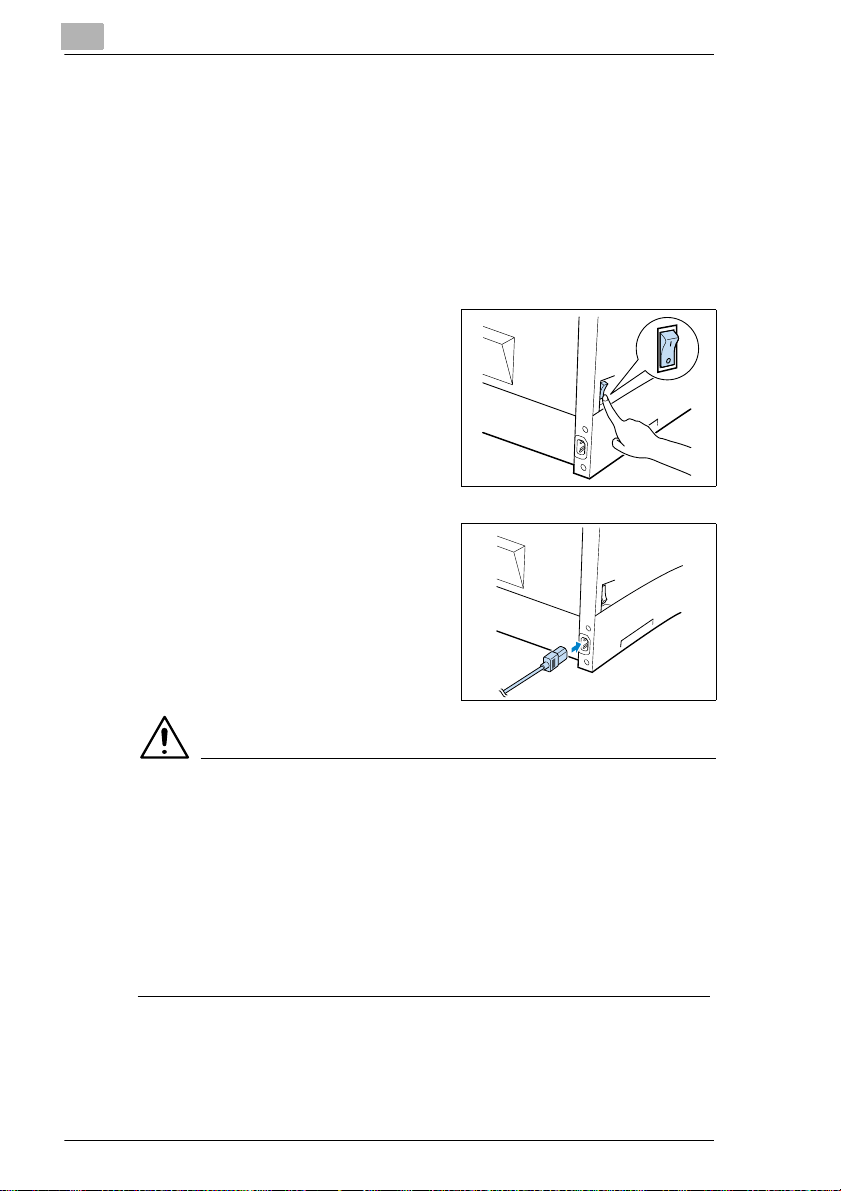
Connecting the power cable
Only use the power cable suppli ed with the printer!
The laser printer req uires a power supply with minimal voltage and
frequency fluc tuation. If necessary, ask an electrician f or advice.
✔ Power supply: 120-127 V at 50-60 Hz / 220-240 V at 50-60 Hz
✔ Voltage fluctuation: 120 V -10%, 127 V +6% / 220-240 V ± 10%
✔ Frequency fluctuation: Within 3 Hz
Make sure that the printer’s power
1
switch is in the "0" (OFF) position.
Insert the plug on the end of the
2
power cable (supplied) into the
power socket of the print er.
Insert the other end of the power
3
cable into a power socket.
CAUTION
Using the wrong power cable may lead to a short-circuit situation!
The use of a power cable of inadequate cross-secti on can lead to a
overheating of the cable.
➜ Only use an extensi on cable which has a hi gher rat ing than the c urrent
consumption of the printer.
➜ Only use cables wi th a ground connection.
➜ Always observe the relevant local regu lations regarding the
connection of electrical equipment to the mai ns network.
2-12 PagePro 4100E
Page 30
Unpacking, in stalling and setting up t he pri nter
Switching the printer on and off
CAUTION
Improper handling may result in damge to the printer!
➜ Never switch off the printer while a print job is in progress, the printer
is receiving data fr om the computer (flashing “Stand-by“ lamp on the
control panel) or the printer is being reset.
➜ Switch the power switc h to "I" (ON)
in order to activate the printer.
The printer is ready for use after
approx. 23 seconds.
➜ Switch the power switch to
"0" (OFF) in order to deactivate the
printer.
✎
Saving energy makes sense!
After the printer has not received a print com mand for a certain amount
of time, it automatically switches to POWER SAVE mode. This time
interval can be set usi ng the control panel (see the Onli ne m anual).
If the printer receiv es a new pri nt j ob whil e it is in Power Save mode,
or if the side cover is opened, or if the [ON LINE] key is pressed, the
printer automatically starts its warm-up phase.
2
PagePro 4100E 2-13
Page 31

2
Unpacking, installing and setting up the printer
Printing a configuration page
Print a configurat ion page in order to make sure that the pr inter is
functioning properly.
Switch on the printer.
1
The printer is ready for use
after approx. 23 seconds.
Make sure that:
2
❍ the “Fault“ and “Paper“ lamps
are off, and
❍ the “Stand-by“ lamp is on
constantly.
Press the control button briefly.
3
The configuration page will now be
printed.
Control button
✎
Be prepared for technical queries.
Please have a current con fi guration page available when calling for
technical assistance. Make a note of the Serial No. of your printer on
the configuration page, see page 1-8 (laser safety label).
2-14 PagePro 4100E
Page 32

Unpacking, in stalling and setting up t he pri nter
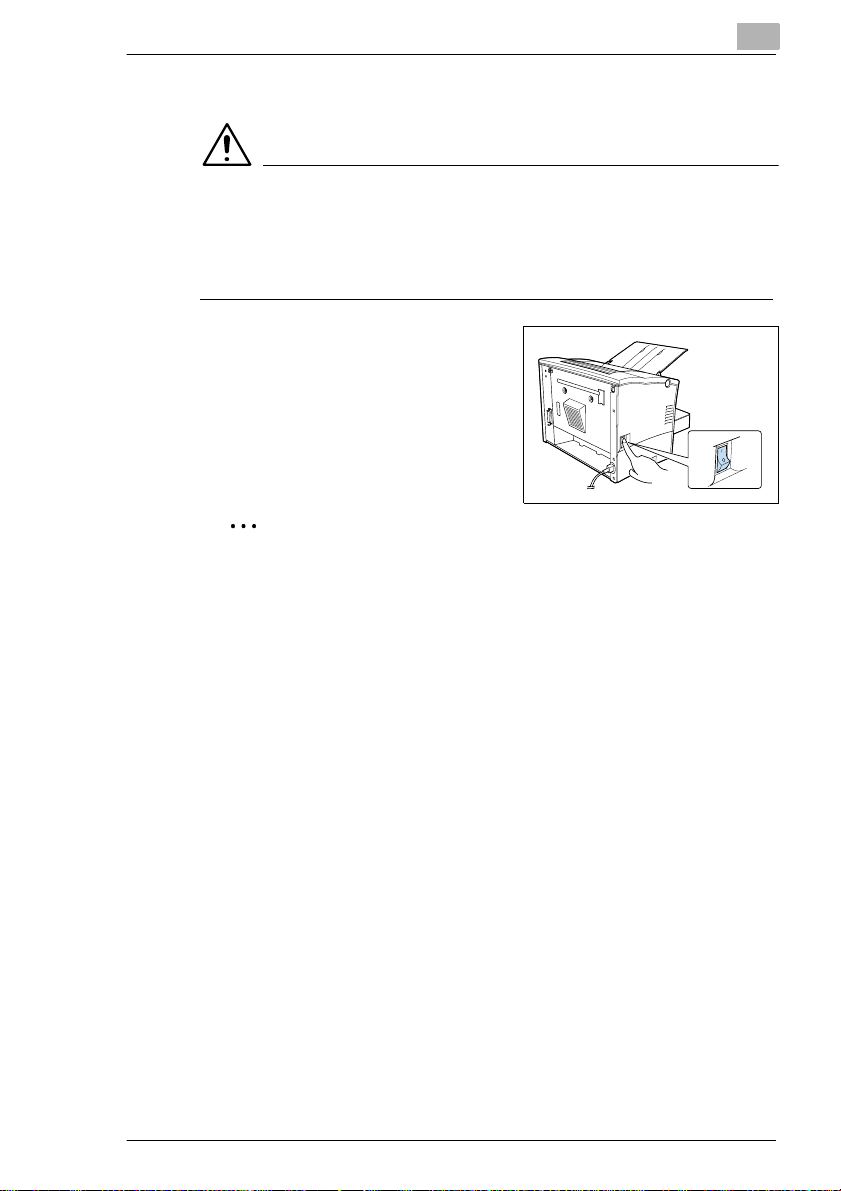
Connecting the printer to a comput er (parallel port)
Switch off the printer and t he com puter.
1
Connect one end of the interf ace cable to the parallel por t of your
2
computer.
Connect the other end of the interface cable to the parallel port of the
3
printer.
Secure the connectors by means of the clips on the sockets.
4
2
For the technical speci fication of the cable, see page 11-5.
CAUTION
Using the wrong type of cable may result in damage to the
equipment!
Using the wrong type of cable may damage the socket on the printer.
➜ Only use an IEEE 1 284 type B sh ielded inte rface cable f or connect ing
the printer to your computer.
➜ Minolta/QMS does not warrant the use of any particular cabl e. The
user assumes all responsibility as to the quality and performance of
the cable.
PagePro 4100E 2-15
Page 33

2
Unpacking, installing and setting up the printer
Connecting the printer to a comput er (USB por t)
Switch on the computer and start Windows 98.
1
Switch on the printer.
2
Connect one end of the interf ace cable to the USB port of the printer.
3
Connect the other end of the interface cable to the USB port of the
4
computer.
2-16 PagePro 4100E
Page 34

Installing the printer driver
3 Installing the printer driver
3.1 System requi rements
The following system requirements will ensur e that your printer runs
without problems:
G An IBM-compatible PC wit h a 486DX 16M Hz processor or higher
(Pentium processor recommended).
G Microsoft Windows 3.1x, Windows95, Windows98, WindowsNT4.0,
MS-DOS 6.2 or higher (except MS- DO S 7.0) .
G At least 8 MB of RAM.
G At least 5 MB of spare memory ca pacity.
G A CD-ROM drive.
G I/O interface: an IEEE 128 4 type B parallel cable.
3.2 Notes on installing the printer driver
The installat ion pr ogr am is de si gned so t hat even p eopl e not accu stomed
to working with computer s can easily accomplish it. You wil l be l ed step
by step through the installation process. All you need to do is follow the
instructions on the screen.
Before you begin the i nst allati on, you sh oul d observe t he fol lowing points:
G What operating system is running on your computer?
G What is the letter of your CD-ROM drive (D, E, etc.)?
G Which optional accessories are fitted to your printer?
G Is your printer a local printer or a network printer?
❍ Local printer:
when the printer is connected directly to your computer via a parallel
interface cable.
❍ Network printer:
when the printer is integrated in a computer network.
3
✎
More questions?
If you are still not certain about making a setting, you can display
additional information on screen by using the HELP button.
PagePro 4100E 3-1
Page 35

3
Installing the printer driver
General information on the printer driver
The printer driver is on a CD-ROM supplied with the printer. If your
computer is not fitted with a CD-ROM drive, then you can download the
printer driver from the Internet.
You will find the latest version of the printer driver under the
address http://www.qms.com.
Information on installation using Plug-and-Play
We recommend the printer driver being installed usin g the CD-ROM´s
installer. I f you install the printer driver using hardware wizards or device
driver update wizards (plug-and play inst all ation), you should note these
points:
G The “Drivers\Pp4100\Win95 or Win311\GB\Pcl\drv“ directory on the
CD-ROM must be specified.
G The Status Display, Control Panel and Driver Help will not be inst alled.
G The auxil iary program for dei nstallation wil l not be installed . To use this
auxiliary program, st art the fil e “zuninst.exe“ on the CD that is s upplied
with your printer.
Information on installation using the Add Printer Wizard
Do not use the Add Printer Wizard from th e Pri nters folder. Install ati on
through the Add Printer Wizard will prevent the printer fr om performing
properly.
We recommend the printer driver being installed usin g the CD-ROM´s
installer.
3-2 PagePro 4100E
Page 36

Installing the printer driver
Information on installing a network printer
✎
Local printer or network printer?
The printer can b e equipped with an opt ional network card if requi red.
Please contact your hardware supplier.
You can install the printer as a local printer or as a network printer. You
should note the follo w ing points when installing i t as a network printer:
G If you woul d like to access the printer from a server running Windows
95, first install the printer driver from the server using the installation
program. Do not use the hardware wizard for printer installation.
G If your printe r will not be printing any documents in a network
environment, set the dat a spool format of the client to RAW.
3
PagePro 4100E 3-3
Page 37

3
3.3 Installing the USB device driver
When connecting the PagePr o 4100E printer to your compute r with a USB
cable, inst all the USB devi ce driver accor ding to th e followi ng inst r uctio ns
before installing the printer driver.
This printer can only be connected with a USB cable if the computer is
running Windows 98.
Switch on your computer and star t Windows 98.
1
Switch on the printer.
2
Check that Windows 98 has finished loading and that the printer is
3
ready.
Insert th e Printer Driver CD-ROM supplied wi th y o ur printer into y o u r
4
computer’s CD-ROM drive.
When the opening screen appears, close it.
5
Connect the printer to the computer with the USB cable
6
(see page 2-16) to display the Add New Hardwa re Wizard dialogue.
Installing the printer driver
Click [NEXT] to display the next dialogue.
7
3-4 PagePro 4100E
Page 38

Installing the printer driver
Check the “Search for the best driver for your device“ box, and then
8
click [NEXT] .
When the next dialogue appears, check the Specify a location box,
9
and then click [BROWSE...].
3
Browse the CD-ROM and navigat e to
10
“Drivers\Pw4100\Win98\ D\Pcl \Drv\usb“. Then click [OK].
PagePro 4100E 3-5
Page 39

3
Installing the printer driver
When the following dialo gue appears, click [NEXT].
11
When the following dialo gue appears, click [FINISH] to complete the
12
installation.
3-6 PagePro 4100E
Page 40

Installing the printer driver
After installation is complete, check that “Minol ta/QMS PagePro 4100“
13
appears below Uni versal serial bus controll er on the Device Manager
tab of the System Properties dialogue. To display the System
Properties dialo gue, right-click the [MY COMPUTER] icon on the
desktop, and then click [PROPERTIES] in the shortcut menu t hat
appears.
3
Eject the CD-ROM from your computer’s CD-ROM drive.
14
This completes the installation of the USB device dri ver for the
PagePro 4100E printer.
✎
And now install the printer
When install ing the PCL printer driver you must select “USB/0“ when
prompted for the print er port (Select Port).
PagePro 4100E 3-7
Page 41

3
Installing the printer driver
3.4 CD-ROM installation for Win95, Win98 or WinNT 4.0
Make certain that the pri nter is connected to your pri nter locally or
1
through a network.
Switch on the printer.
2
Switch on the computer and start Windows 95, Windows 98 or
3
Windows NT 4.0.
When the Update Device Driver Wizard dialog appears under
?
Win 95 or 98:
➜ Click [CANCEL] to close the dialog.
Place the PagePro 4100E printer driver CD in the CD-ROM drive of
4
your computer.
The installation program starts automatically.
The installation program does not start automatically?
?
➜ Start Windows Explorer and open the directory of the CD.
➜ Double-click on “Pagepro.exe“ to st art the installation program.
In the next dialog window, choose a language for the installation
5
procedure.
3-8 PagePro 4100E
Page 42

Installing the printer driver
Follow the instruct ions on the screen to complet e the i nstallation.
6
After the printer driver has been successfully i nstalled, the “Mi nolta QMS
Printer Utilities“ Program Group appears.
You can now call up the “Min olt a QMS P rin ter U tili ties “ Program G roup via
the Windows Start menu.
1
3
PagePro 4100E 3-9
Page 43

3
3.5 Installation for Windows 3.1x
Install the printer driver for Windows 3. 1x as describ ed below and not via
the Printers dialogue box.
Make sure tha t the pri nte r is c onnected to your compu ter l ocall y or via
1
a net w ork.
Switch on the printer.
2
Switch on the computer and start Windows 3.1x.
3
Place the printer driver CD in the CD-ROM drive of your computer.
4
Double-click t he icon [ CONTROL PANEL] wich is locat ed in t he “Main
5
group“ within the “Program Manager“. Double-click [PRINTERS] to
display the “Printer“ dialog.
Click on "Add>>" to display the list of printers. Select "Install unlisted
6
or updated printer" and click on "Install".
The following box appears.
Installing the printer driver
Browse to the CD-ROM drive and navigate to
7
“Drivers\Pp4100\Win311\GB\Pcl\drv“. Confirm with [OK].
Select Minolta/ QMS PagePro 410 0 [UNI] from t he list and co nfirm wit h
8
[OK].
3-10 PagePro 4100E
Page 44

Installing the printer driver
Click on [Set as default printer].
9
After the printer driver has been successfully installed, the icon for
“Minolta/QMS PagePro 410 0 [UNI]“ appears in t he "Print ers" Program
Group.
An error message appears announcing that the UNIDRV.DLL fi le
?
is required but cannot be found.
➜ Install a UniTool Dri ver from the list of printer s and try again.
3
PagePro 4100E 3-11
Page 45

3
Installing the printer driver
3.6 Uninstalling the Windows printer driver
Deinstallation for Windows 95/98 and Windows NT 4.0
Call up the “Minolta QMS Printer Utilities“ Program Group.
1
Click on “Uninstall“.
2
The deinstallation program starts automatically.
Follow the subsequent instructions.
3
The deinstallation of the printer driv er is successful ly completed once
the Windows operating system has been restarted.
3-12 PagePro 4100E
Page 46

Installing the printer driver
Deinstallation for Windows 3.1x
Call up the “Minolta/QMS PagePro 4100 [UNI]“ Program Group.
1
Click on "Remove".
2
You are prompted to confirm/cancel your select ion.
Click on [YES] in order to del ete the printer driver.
3
3
Click on [Close].
4
The program group is deinstalled.
PagePro 4100E 3-13
Page 47

3
3.7 Installation for MS-DOS
MS-DOS versions 6.2 or higher (except MS-DOS 7.0) are supported.
Make sure tha t the pri nte r is c onnected to your compu ter l ocall y or via
1
a net w ork.
Switch on the printer.
2
Switch on the computer and start MS-DOS.
3
Place the PagePro 4100E printer driver CD in the CD-ROM drive of
4
your computer.
Change to the CD-ROM drive.
5
Enter, for example: d:\
(d = corresponding letter of your CD-ROM driv e)
Change to the directory whi ch contains the install ation program.
6
Enter: cd Drivers\Pp4100\Dos
Star t the inst allati on progra m .
7
Enter: install
Select the option required and press ENTER.
8
Installing the printer driver
✎
AUTOEXEC.BAT file modified!
One command line was added to the AUTOEXEC.BAT file. The
purpose of this command i s to ensure that the Status Display is
automatically l oaded upon switc hing on the comput er or execut ing the
AUTOEXEC.BAT file.
3-14 PagePro 4100E
Page 48

Working with the Windows printer drivers
4 Working with t he Windows printer
drivers
4.1 Displaying printer driver settings
Displaying settings in Windows 95/98
In the START menu, select “Settings – Printer“.
1
The “Printer“ dialogue box appears.
Click on the “Minolta/QMS PagePro 4100“ icon.
2
Under “File“, select the item “Properties“.
3
The following box appears.
4
Click on the "-> 32-bit SuperDri ver Setup" tab.
4
The printer driver dialogue box appears.
PagePro 4100E 4-1
Page 49

4
Working with the Windows printer drivers
✎
The operating system also uses index cards!
The “About“ index card is automa ti cally determined by the operating
system and is therefore not described in this manual.
4-2 PagePro 4100E
Page 50

Working with the Windows printer drivers
Displaying settings in Windows NT 4.0
In the START menu, select “Settings – Printer“.
1
The “Printer“ dialogue box appears.
Click on the “Minolta/QMS PagePro 4100“ icon.
2
Under “File“, select the item “Document Defaults“.
3
The following box appears.
4
PagePro 4100E 4-3
Page 51

4
Working with the Windows printer drivers
Displaying the settings in Windows 3. 1x
The options on the individual index cards correspond to those of
Windows 95/98.
In the Windows main group, double-click on the “Control panel“ icon.
1
The “Control panel“ program group appears.
In the Control panel window, cl ick on the “Printers“ icon.
2
The “Printer“ dialogue box appears.
In the “Printer“ dialogue box , select Mi nolta/QMS PagePro 4100 [UNI]
3
from the list of “Install ed printers“.
Click on [SETUP...].
4
The Driver Setup dialogu e box appears.
4-4 PagePro 4100E
Page 52

Working with the Windows printer drivers
4.2 Paper index card
This index card allow s you to:
G select the pap er format,
G set up custom paper formats,
G fit documents to a paper format upon print-out ,
G specify the numb er of copies,
G specify the ori entation of the paper,
G switch on/off the printer’s sorting function
G specify paper feed from different tra ys,
G recall the original settings (Default).
4
PagePro 4100E 4-5
Page 53

4
Working with the Windows printer drivers
Selecting a paper format
Use “Paper size“ to specif y the format of the printed page. The various
paper sizes support ed by your printer are shown in the dr opdown list.
The following formats have a fixed definition in the dropdown list:
Paper Size Envelopes Size
Letter 8.5 x 11 in. Env. Monarch 3.875 × 7.5in.
Legal 8.5 × 14 in. Env. COM10 4.125 × 9.5 in.
Executive 7.5 × 10.5 in. Env. DL 110 × 220 mm
A4 210 × 297 mm Env. C5 162 x 250 mm
A5 148 × 210 mm Env. B5 176 × 250 mm
JIS B5 182 x 257 mm J-Post (Postcard) 4 × 5.75 in.
You can can design your own custom formats and add them to this lis t,
see page 4-7.
✎
Not all paper formats availa ble?
If you have selected the optional paper feed tray 2 or 3 under “Paper
source“, then not al l the paper format s given i n the table are availab le.
4-6 PagePro 4100E
Page 54

Working with the Windows printer drivers
Creating a custom paper format
You can create your own person all y designed paper size.
Click on [EDIT CUSTOM...].
1
The “Custom papers“ dialogue box appears.
To create a new paper size, cli ck on [ADD].
2
The boxes underneath are t hen activated.
4
Enter a name for the new paper format.
3
Specify the unit of measurement (inches, millimetres).
4
Specify the dimensions (width x height).
5
❍ min. dimensions: 3 1/2 × 8 1/2 in. / 88 × 216 mm
❍ max. dimensions: 6 × 14 in. / 152 × 356 mm
Confirm your entries with [OK].
6
The dialogue box close s. The newly created format is now displayed
at the end of the “Paper size“ drop down li st and can be s elect ed when
required.
✎
You wish to delete a custom format?
In the “Custom papers“ dialogue box, mark t he pap er size you wi sh t o
delete. Then click on [DEL ETE]. Confi rm with [OK].
PagePro 4100E 4-7
Page 55

4
Working with the Windows printer drivers
Adjusting the print-out to f it the paper
Use the “Fit to paper “ functio n to fi t your doc ument to a certai n paper size
when it is printed. Your document will be automatically enlarged or
reduced so that it will fit on the paper size you have selected.
The “Fit to paper“ functio n cannot be used at the same time as th e “N-Up“
or "All raster" functions.
Activate the checkbox “Fit to paper“.
1
This activates the dr opdown list underneath.
From the dropdown list that is now availab le, select th e paper size on
2
which you would like to print.
Confirm your entries with [OK].
3
Specifying the number of copies
In the “Copies“ box, specify the number of cop ies that you wish to prin t out.
You may enter any value between 1 and 999.
Specifying the orientation of the print paper
Under “Orientation“ you can specify whether your document should be
printed in portrait (vertical) or la ndscape (horizontal ) f o rmat.
Portrait
Landscape
A
4-8 PagePro 4100E
A
Page 56

Working with the Windows printer drivers
Switching on/off the printer’s sorting function
Switch on the “Collate“ function in order to sort your prin t-outs
automatically.
4
Collate OFF
1
1
1
3
2
1
2
2
3
2
2
Collate ON
1
3
3
3
3
2
1
✎
Deactivate the sort feature in other applications!
Deactivate the sort f eature in other software applications if there is a
conflict between the setting in the printer driver and the setting in the
other applicati on.
PagePro 4100E 4-9
Page 57

4
Working with the Windows printer drivers
Specifying the paper source
Under “Paper source“ you can specify which tray will feed the printer.
Paper source Description
Auto Printing paper is fed from all available trays
Tray 1 Printing paper is fed from tray 1
Tray 2/3* Printing paper is fed from tray 2/3
Manual feed Printing paper is fed into the printer through the manual
* optional paper source units
feed unit.
To feed paper manually, place a sheet in the input and
press the control button.
✎
Not all paper formats availa ble?
If you have selected the optional paper feed tray 2 or 3 under “Paper
source“, then not al l the paper format s given i n the table are availab le.
Recalling the original seti ngs [DEFAULT]
Click on [DEFAULT] in orde r to re set all op tions o n th is ind ex card t o thei r
original factor y settings.
4-10 PagePro 4100E
Page 58

Working with the Windows printer drivers
4.3 Page layout index card
This index card allow s you to:
G print several pages of a document on the same print page,
G provide print -outs with a watermark,
G design custom wat erm arks,
G scale (enla rge/ reduce) documents upon pri n t-out,
G activate the dupl ex function (printi ng on both sides).
4
PagePro 4100E 4-11
Page 59

4
Working with the Windows printer drivers
Printing multiple document pages per print page (N-up)
Use the “N-Up“ function to print multi ple reduced document pages on a
single print page.
The “N-up“ function cann ot be used at the same time as the features
“Scaling“, “Fit to paper“ and “All raster“.
N-Up settings Description
Auto One document page will be printed on each print page
2 pages per sheet Two document pages will be printed on each print page
4 pages per sheet Four document pages will be printed on each print page
9 pages per sheet Nine document pages will be printed on each print page
16 pages per sheet 16 document pages will be printed on each print page
➜ Activate the “Border line“ checkbox to separate individual document
pages from each other by means of lines.
➜ Click on [DETAIL OF N-UP...] to define the layout of d ocum ent pages
on the print page.
The “N-Up“ dialogue box appears.
4-12 PagePro 4100E
Page 60

Working with the Windows printer drivers
Printin g watermarks
Use the “Watermark“ function to print background texts on your print
pages that will inform the reader at a glance about the natur e of your
document.
➜ Select a predefined watermark from the dropdown list.
➜ Activate the checkb ox “First page only“ so that the watermark wi ll only
be printed on the first page of a multi-page document.
✎
Watermarks as copy protecti on!
Provide your print- outs with a watermark in order to prevent the printed
pages from being copied .
4
PagePro 4100E 4-13
Page 61

4
Working with the Windows printer drivers
Custom watermarks
Design your own personal water m ark.
Click on [EDIT WATERMARK...] in order to open the “Watermark“
1
dialogue box.
Click on [ADD] to create a new watermark,
2
or
click on a predefined watermark to modify it.
The fields under “Watermar k edit“ are activated.
Design your watermark by changing the settings.
3
In the preview box you can see how the water m ark will appear when
it is printed and where it is positioned on the page.
Confirm your entries with [OK].
4
The dialogue box close s.
✎
Deleting watermarks? No problem!
If you would li ke to delet e a watermar k, mark it in the lis t of waterm arks
and click on [DELETE].
4-14 PagePro 4100E
Page 62

Working with the Windows printer drivers
Scaling the printed document
The print-out of a do cument may be enlar ged or r educe d by mea ns of t he
“Scaling“ function.
The “Scaling“ function cannot be used at the same time as the “N-up“ or
“All raste r“ functions.
➜ In the “Scaling“ box, enter the value – in per cen t (%) – by which the
document is to be enlarged or reduced (max. reduction: 50%; max.
enlargement: 200%).
Duplex function
The Duplex function al lows you to automati call y print on both sid es of the
paper.
A dropdown list offers you the following options:
G Short edge binding,
G Long edge binding ,
G Booklet left open: for printing a document which is folded once in the
middle and bound on the right-hand side,
G Booklet right op en: for pr in ting a docume nt whic h is fold ed onc e in t he
middle and bound on the left-hand side.
4
✎
The booklet function is not available?
The Scaling, Fit to paper and N-up fu nctions cannot be used at the
same tim e a s th e Bookle t function.
PagePro 4100E 4-15
Page 63

4
4.4 Quality index card
This index card allow s you to:
G optimize the exchange of text and graphics data with the printer
(All raster),
G switch on/off Toner Save mode,
G determine the graphics mode,
G optimize the print quality of text and graphics (Fine-ART),
G determine the True-Type mode,
G specify the resolution for the pr int-out,
G determine the emulation mode,
G optimize the printing of graphics [DETAIL OF QUALITY...].
Working with the Windows printer drivers
✎
Not all menus available simult aneously?
If, for example, the emu lation m ode has been set to “Enhanced“, then
the “All raster“ function is not available. If the “All raster“ function is set
to OFF, the “Graphics mode“ menu is available, etc.
4-16 PagePro 4100E
Page 64

Working with the Windows printer drivers
Optimizing data exchange with the printer (All raster)
Use the “All raster“ functi on to determine th e format in which gra phics and
font data is loaded into the printer.
The “All raster“ function cannot be used at the same time as the “N-up“,
“Scaling“, “Fit to paper“ and “Font“ functions.
➜ Select “ON“ to send both grap hics and fon t data to t he printe r as raster
graphics. This makes it possi ble for the printed docum ent to agre e as
closely as possib le wi th the appearance on the screen . Printing may
be slower with this functi on activated.
Printer-resident fonts cannot be used
➜ Select “OFF“ to send your do cument to t he print er in th e conventi onal
transmission form.
Printer-resident fonts may be used.
The graphics mode can be specif ied manually.
Switching Toner Save function on and off
You can reduce your printing costs with the “Toner Save“ feature.
Text and graphics are pri nted in grey in Toner Save mode. The purpose
of this is to use as little toner as possible. You can save on printi ng costs
by printing rough drafts and other preliminary materials in Toner Save
mode.
➜ Select “ON“ to pri nt your documents using a minimal amount of toner.
➜ Select “OFF“ to print your documents with the normal amount of to ner.
4
PagePro 4100E 4-17
Page 65

4
Working with the Windows printer drivers
Specifying the graphics mode
The “Graphics mode“ function defines th e format in which graphics data
is exchanged with the pri nter.
This function is onl y available when “All raster“ is set to “OFF“.
➜ Select “AUTO“ to enable the most appropriate graphics mode to be
selected automatically.
➜ Select “VECTOR“ to treat the graphics in your document as vector
graphics. Load ing gra phics a s vec tors s peeds up the pr in ting process .
➜ Select “RASTER“ to treat the graphics in your document as bitmaps.
Loading graphics in this mode takes longer than the vector mode but
does rectify print ing problems.
Optimizing the print qualit y of tex t and graphics (Fine-ART)
Use the “Fine-Art“ fu nction to smooth the edges of text and gr aphics and
hence optimize the print quality.
➜ Select “OFF“ to achieve an optimum print qualit y for photos (raster
graphics).
➜ Select “ON“ to achieve an optimum print quality for text and graphics
(vector graphics) in your document.
4-18 PagePro 4100E
Page 66

Working with the Windows printer drivers
Specifying TrueType mode
The “TrueType mode“ function allows you to specify the format in which
TrueType fonts are to be exchanged with the printer.
This function is only available when “Graphics mode“ has been set to
“RASTER“.
➜ Select “DOWNLOAD AS BITMAP“ to load TrueType fonts into the
printer as bitmap fonts. Printer-resident fonts are available in this
mode.
➜ Select “TRUETYPE AS GRAPHICS“ to load TrueType font s into the
printer as raster data. Printer-resident fonts are not available in this
mode.
Determining the res o lution
The quality of the prin t- out is defined by means of the “Graphics quality“
function.
➜ Select “300dpi“ for normal print-outs, e.g. for text and graphics with
thick line elements (with Fine-ART).
➜ Select “600dpi“ for print- outs which r equire a h igh print qu ality, e.g. for
text and graphics with fin e li ne elements (with Fine-ART).
➜ Select “1200dpi“ for print-outs which r equire a very hi gh print quality,
e.g. high-resolution graphics.
4
Specifying the emulation mode
This function is only available when “All raster“ is set to “OFF“.
➜ Select “ENHANCED“ for PCL6 compatibil ity.
➜ Select “STANDARD“ for PCL5e compati bility.
PagePro 4100E 4-19
Page 67

4
Working with the Windows printer drivers
Optimizing the presentation of graphics in the print-out (Detail of quality...)
The Graphics dialogue window is called up via the [DETAIL OF
QUALITY...] button. This window contains further options for optimizing
the appearance of graphics in the print-out.
Two options are avilabl e:
G Dither pattern
influences the pr esentat ion of g rey t ones and shad ing in p ictur es. Th e
coarser the dither pattern, the coarser the grey gradations.
G Adjustment
Slider controls enable you to alter the contrast and the brightness of
graphics.
✎
You wish to send graphics by fax?
When you print out graphic s that you int end t o fax or copy aft erwa rds,
select the “Photocopy“ dither pat tern. The graphics are then printed
out in a form suitable for faxing or copying.
4-20 PagePro 4100E
Page 68

Working with the Windows printer drivers
4.5 Font index card
This index card allow s you to:
G add fonts to the prin ter’s on-board memory,
G delete fonts from the printer’s on-board memory,
G set the ID.
4
PagePro 4100E 4-21
Page 69

4
Working with the Windows printer drivers
Adding fonts
You can add fonts to the pr inter’s on- board memory v ia the Paper ?? inde x
card.
➜ Click on [ADD FONTS...] and then specify the directory in which the
downloaded fonts are to be saved.
If there are already f onts in this directory , th en these are shown in the
right-hand list .
If the list shows fonts to be down loa ded in t he ri ght-han d lis t box, then t he
button changes from [ADD FONTS...] to [CLOSE DRIVE].
➜ Click on [CLOSE DRIVE] to close the contents of the right-hand list
box and show the [ADD FONTS...] button again.
Deleting fonts
The fonts shown in the left-hand list can be deleted.
➜ Mark the font to be delet ed and then click on [DELETE].
Settin g th e ID
You may specify numbers as ID codes for fonts.
➜ Click on [ID SETTING...] in or der to determine the ID codes for the
fonts you have already marked in the left-hand list.
When downloading the f ont, the pri nter dr iver a lloca tes the I D code to t he
respective fon t.
4-22 PagePro 4100E
Page 70

Working with the Windows printer drivers
4.6 Device option index card
This index card allow s you to:
G activate the optional duplex unit,
G activate optional paper feed tray 2 or 3.
4
PagePro 4100E 4-23
Page 71

4
Working with the Windows printer drivers
Activating the optiona l dupl ex unit
If you have installed the duplex unit, then you can mar k thi s in the list of
available options.
➜ Activate the duplex unit with the [ADD] button.
➜ Deactivate the duplex unit with the [REMOVE] button.
Activating optional paper feed tray 2 or 3
If you have inst alled paper feed tray 2 or 3, then you can mark t his in the
list of availabl e options.
➜ Activate paper f eed tray 2 or 3 with the [ADD] button.
➜ Deactivate paper feed tray 2 or 3 with the [REMOVE] button.
4-24 PagePro 4100E
Page 72

Working with the Windows printer tools
5 Working with t he Windows printer
tools
The Windows printer tools include:
G the Status Display and
G the Co ntrol Pa nel.
✎
Automatic start of Status Display!
If upon installi ng the printer driver you activated the option to
automatically start the printer driver , t hen the Status Display is
automatically called up upon starting the computer.
5
PagePro 4100E 5-1
Page 73

5
Working with the Windows printer tools
5.1 Calling up the Status Display
Calling up the Status Display in Windows 95/98, Windows NT 4.0
Open the “Minolta QMS PageWorks/Pro 4100“ Program Group.
1
Click on “Mino lt a QMS Status Display 4100“.
2
The Status Display appears.
5-2 PagePro 4100E
Page 74

Working with the Windows printer tools
Calling up the Status Display in Windows 3.1x
The options on the individual index cards correspond to those of
Windows 95/98.
Open the “Minolta/QMS PagePro 4100 [UNI]“ program group within
1
the Program Manager.
Doubleclick the [MINOLTA/QMS PAGEPRO 4100 STATUS
2
DISPLAY] icon.
The "Status Display" appears.
5
PagePro 4100E 5-3
Page 75

5
Working with the Windows printer tools
Altering the size of the Status Display window
➜ In the Status Display menu bar, select the "View" menu and then the
option “Reduce“ in order to decrease the size of the window.
➜ In the Status Display menu bar, select the "View" menu and then the
option “Expand“ in order to i ncrease the size of the window.
5-4 PagePro 4100E
Page 76

Working with the Windows printer tools
5.2 Calling up the Control Panel
Use the Control Panel in ord er to check and/or alter the bas ic settings of
the printer.
Open the “Minolta QMS PagePro 4100“ Program Group.
1
Click on “Minolta QMS Control Panel 4100“.
2
The Status Display appears.
Click on [PRINTER SETTINGS] or select “Settings – Printer Settings“
3
The Control Panel appears.
5
PagePro 4100E 5-5
Page 77

5
5.3 Paper index card
Working with the Windows printer tools
This index card allow s you to:
G define the response in the case of a lack of suitable paper (paper
format error),
G define the paper format for paper feed tray 1.
5-6 PagePro 4100E
Page 78

Working with the Windows printer tools
Defining the response in the case of a lack of suitable paper
You can determine how the pr inter responds in the case of a paper for mat
error.
➜ Select “Proceed“ to continue printi ng on the paper format al ready fed
into the machine.
➜ Select “Clear“ to automatically cancel the print job when a paper
format error is detected.
➜ Select “None“ to switch the pri nter to stand-by mode.
✎
Switch on "Auto continue"!
On the “Printer setting“ index car d , the “Detec t si ze error“ function
allows you to determine whether a print job should be continued after
a defined time despite a paper format error.
Specifying a paper format for pape r feed tray 1
You can specif y whether p aper feed t ray 1 is to b e used as a universal tray
or as a tray set to a certain format.
➜ Select “Multi purpose tray“ to be able to load all paper formats
supported by paper fee d tray 1.
➜ Select “Fixed si ze“ to specify a certain paper for m at f or paper feed
tray 1.
5
Paper Size Envelopes Size
Letter 8.5 x 11 in. Env. Monarch 3.875 × 7.5in.
Legal 8.5 × 14 in. Env. COM10 4.125 × 9.5 in.
Executive 7.5 × 10.5 in. Env. DL 110 × 220 mm
A4 210 × 297 mm Env. C5 162 x 250 mm
A5 148 × 210 mm Env. B5 176 × 250 mm
JIS B5 182 x 257 mm J-Post (Postcard) 4 × 5.75 in.
✎
Settings
The settings for paper f eed tray 1 on the “Paper“ index card may be
overridden by the settings of other print applications.
PagePro 4100E 5-7
Page 79

5
Working with the Windows printer tools
5.4 Printer setting index card
This index card allow s you to:
G switch on/off the Power Save mode,
G switc h on/off the detection of paper format errors,
G switch on/off the detection of paper misfeeds – Jam Recovery ,
G switch on/off the Pre-Heat function,
G specify the print language for communication between printer and
computer.
5-8 PagePro 4100E
Page 80

Working with the Windows printer tools
Switching on/off the Power Save mode
In order to save energy, th e printer automaticall y switches to the Power
Save mode after a certai n peri od of i nacti vity. W hen the pr inte r rec eives a
new command or the control but ton is pressed while in this mode, the
printer automatically switches to the warm-up phase.
➜ Select “ON“ and enter a time period after which the printer should
switch to the Power Save mode
➜ Select “OFF“ to deactivate the Power Save mode
Switching on/off the paper format error detection
You can specify whether the printer should respond when t he paper fed
into the machine is dif ferent to that set in the print er dr iver.
➜ Select “ON“ to detect paper format errors.
➜ Select “OFF“ to ignore pape r form at errors.
Detecting paper misfeeds – Jam Reco very
This function protects the data in the event of a paper misf eed.
➜ Select “On“ to instruct the printer to save data if a document jams in
the printer prior to being printed.
➜ Select “Off“ to suppress th e saving ofdata if a document jams in t he
printer prior to being printed.
5
Switching preheat on/off
You can specify whether the fusing unit is to be heated up after receiving
a print job.
➜ Select “On“ to heat the fusing unit as soon as a print job is sent from
the c omputer.
➜ Select “Off“ to suppre ss preheati ng of the fusing uni t as soon as a print
job is sent from the computer.
PagePro 4100E 5-9
Page 81

5
Working with the Windows printer tools
Specifying the print language
The print lang uage defi nes the way in whic h the com puter communi cates
with the printer.
➜ Select PCL or PostScri pt (optional) by clic king in the dropdown list.
➜ Select “Automatic“ to enable t he most appr opriate p rint langua ge to b e
selected automatically.
5-10 PagePro 4100E
Page 82

Working with the Windows printer tools
5.5 Test print index card
5
This index card allow s you to:
G print out a demonstration page,
G print out a confi guration page,
G print out a list of PCL- resident fonts,
G print out a list of PostScript-resid ent fonts.
The various test prints
Test print Description
Demonstration page Prints out a demonstration page with an overview of all printer
Configuration page Prints out a configuration page with the current printer settings.
List of PCL-resident fonts Prints out a list of all printer fonts available, with designations
List of PostScript-resident
fonts
functions.
and samples.
Prints out a list of all PostScript fonts available, with
designations and samples, provided an optional PostScript
ROM-SIMM has been installed.
PagePro 4100E 5-11
Page 83

5
5.6 Counter index card
Working with the Windows printer tools
This index card allow s you to:
G check the status of a counter,
G reset a counter.
5-12 PagePro 4100E
Page 84

Working with the Windows printer tools
Checking the status of a counter
Counter Description
Total This indicates the total number of pages printed by the printer.
This counter can only be reset by a customer service engineer.
Tray 2 This indicates how many pages have been fed from paper feed
Tray 3 This indicates how many pages have been fed from paper feed
tray 2.
tray 3.
Resetting a counter
This resets the counter status to zero “0“.
The“total counter “ status can only be reset by a customer service
engineer.
➜ Click on the [RESET] button adjacent the counter you wish to reset.
The associated counter is reset to zero “0“.
5
PagePro 4100E 5-13
Page 85

5
5.7 Configuration index card
Working with the Windows printer tools
This index card summarizes the most importa nt printer settings f or qui ck
reference.
No settings can be altered via this index card.
5-14 PagePro 4100E
Page 86

Working with the DOS printer tool s
6 Working with the DOS prin ter t ools
6.1 Using the Status Display
Calling up the Status Display
Call up the Status Display in or der to check the printer and the pr ogress
of print jobs.
Change to the directory into which the pri nter driver files were copied
1
upon installation.
Enter, for example: cd c:\pp4100
Enter the following command in order to load the Status Display:
2
status
The Status Display is loaded into the RAM and can then be called up.
Press the keys [CTRL]+[ALT]+[R] to call up the Status Display.
3
6
✎
Deleting the Status Display from the RAM!
Enter the command status /d in order to delete the Status Display
from the RAM.
PagePro 4100E 6-1
Page 87

6
Working with the DOS printer tool s
Switching on/off popup messages (Set up m enu)
Faults are quickly signalled by means of popup messages. If the printer
malfunctions , a dia logue box containing an appropriate message
automatically appears on the screen.
➜ Activate the checkbox “Enable popup“ so that popup mess ages
appear automatica ll y on the screen.
Changing the hotkey command for the Status Dis play (Setup menu)
You can change the key combination for calling up the Statu s Display.
➜ Press the desir ed keys in succession in order t o de fi ne a new key
combination for calling up the Status Display.
Defining popup messages (Setu p menu)
You can specify whi ch printer faults ca use a popup mes sage to appear on
the screen.
➜ Mark one of t he erro r mes sages and p res s ENTER in or der t o chan ge
the status of the error message.
Active = show popup message
Inactive = suppress popup messag e
6-2 PagePro 4100E
Page 88

Working with the DOS printer tool s
6.2 Using the DOS Control Panel
Calling up the Control Panel
Call up the Control Panel in order to specify the basic setti ngs of the
printer.
Change to the directory into which the pri nter driver files were copied
1
upon installation.
Enter, for example: cd c:\pp4100
Enter the following command in order to call up the Control Panel:
2
dospanel
The Control Panel appears.
6
✎
You wish to close the Control Panel? No Problem!
Press the keys [ALT] + [X] or select “File – Exit“ from the menu bar in
order to close the Contro l Panel .
PagePro 4100E 6-3
Page 89

6
6.3 Paper panel
This panel allows you to:
G specify the paper format,
G specify paper feed from differ ent trays,
G specif y the sequence of the paper feed from different trays,
G specif y the number of lines printed per page,
G specify the number of copies,
G define the orientation of the paper,
G define the response in the case of format errors,
G define the paper format for paper feed tray 1.
Working with the DOS printer tool s
6-4 PagePro 4100E
Page 90

Working with the DOS printer tool s
Selecting a paper format
Use “Paper size“ to spec if y the format of the printed page. The various
paper sizes support ed by your printer are shown in the dr opdown list.
The following formats have a fixed definition in the dropdown list:
Paper Size Envelopes Size
Letter 8.5 x 11 in. Env. Monarch 3.875 × 7.5in.
Legal 8.5 × 14 in. Env. COM10 4.125 × 9.5 in.
Executive 7.5 × 10.5 in. Env. DL 110 × 220 mm
A4 210 × 297 mm Env. C5 162 x 250 mm
A5 148 × 210 mm Env. B5 176 × 250 mm
JIS B5 182 x 257 mm J-Post (Postcard) 4 × 5.75 in.
✎
Not all paper formats availa ble?
If you have selected the optional paper feed tray 2 or 3 under “Paper
source“, then not al l the paper format s given in the table are availab le.
6
PagePro 4100E 6-5
Page 91

6
Working with the DOS printer tool s
Specifying the paper source
Under “Paper source“ you can specify which tray will feed the printer and
which type of paper is to be fed in.
Paper source Description
Automatic Printing paper is fed from all available trays
Tray 1 Printing paper is fed from tray 1
Tray 2/3* Printing paper is fed from tray 2/3
Manual Printing paper is fed into the printer through the manual
* optional paper source units
feed unit.
To feed paper manually, place a sheet in the input and
press the control button.
✎
Not all paper formats availa ble?
If you have selected the optional paper feed tray 2 or 3 under “Paper
source“, then not al l the paper format s given i n the table are availab le.
Specifying the number of lines print ed per page
Enter the number of lines to be printed per page in the “Line/Page“ box.
Specifying the number of copies
In the “Copies“ box, specify the number of cop ies that you wish to prin t out.
You may enter any value between 1 and 999.
6-6 PagePro 4100E
Page 92

Working with the DOS printer tool s
Specifying the orientation of the printing paper
Under “Orientation“ you can specify whether your docum ent should be
printed in portrait (vertical) or la ndscape (horizontal) format.
Portrait
6
Landscape
A
Defining th e response to format errors
The “Paper Time Out“ function allows you to define how the printer
responds to paper format errors.
➜ Select “Proceed“ to continue printi ng on the paper format al ready fed
into the machine.
➜ Select “Clear“ to automatically cancel the print job when a paper
format error is detected.
➜ Select “None“ to switch the pri nter to stand-by mode.
A
PagePro 4100E 6-7
Page 93

6
Working with the DOS printer tool s
Specifying a paper format for paper feed tray 1
You can specif y whether p aper feed tray 1 is to b e used as a universal tray
or as a tray set to a certain format.
➜ Select “Mult i ple si ze“ to be abl e to l oad all paper format s s upporte d by
paper feed tray 1.
➜ Select “Fixed size“ to specify a certai n paper format for paper feed
tray 1.
Paper Size Envelopes Size
Letter 8.5 x 11 in. Env. Monarch 3.875 × 7.5in.
Legal 8.5 × 14 in. Env. COM10 4.125 × 9.5 in.
Executive 7.5 × 10.5 in. Env. DL 110 × 220 mm
A4 210 × 297 mm Env. C5 162 x 250 mm
A5 148 × 210 mm Env. B5 176 × 250 mm
JIS B5 182 x 257 mm J-Post (Postcard) 4 × 5.75 in.
✎
Settings
The settings for paper f eed tray 1 in the “Setup“ panel may be
overridden by the settings in other printing applications!
6-8 PagePro 4100E
Page 94

Working with the DOS printer tool s
6.4 Font panel
This panel allows you to:
G determine th e font (Typeface) which is to be used for the pri nt-out,
G determine th e character set (Symbol Set) which is t o be used for the
print-out,
G determine th e font size (Pitch/Point) which i s to be used for the print-
out.
6
PagePro 4100E 6-9
Page 95

6
6.5 Output Quality panel
This panel allows you to:
G switch on/off the Toner Save mode,
G define the resolution for the pri nt-out,
G define the print quality opti mization for text and graphics (Fine-Art),
G specify the toner density.
Working with the DOS printer tool s
6-10 PagePro 4100E
Page 96

Working with the DOS printer tool s
Switching on/off the Toner Save function
You can reduce your printing costs with the “Toner Save“ feature.
Text and graphics are pri nted in grey in Toner Save mode. The purpose
of this is to use as little toner as possible. You can save on printi ng costs
by printing rough drafts and other preliminary materials in Toner Save
mode.
➜ Select “ON“ to pri nt your documents using a minimal amount of toner.
➜ Select “OFF“ to print your documents with the normal amount of to ner.
Fine-ART feature
Use the Fine-ART f unction to smooth t he edges of text and graphics and
hence optimize the print quality.
➜ Select “OFF“ to achieve an optimum print quality for photos (raster
graphics).
➜ Select “ON“ to opti m ize the print quality of text and vector graphics in
your document.
Print language
The print lang uage defi nes the way in whic h the com puter communi cates
with the printer.
➜ Select “PCL“ or “PostScript“ (optional) by click ing in the dropdown list.
➜ Select “Automatic“ to enable the mos t appropriat e print language t o be
selected automati cally.
6
PagePro 4100E 6-11
Page 97

6
6.6 Counter panel
This panel allows you to:
G check the status of a counter,
G reset a counter.
Working with the DOS printer tool s
6-12 PagePro 4100E
Page 98

Working with the DOS printer tool s
Checking the status of a counter
Counter Description
Total Counter This indicates the total number of pages printed by the printer.
Tray2 Counter This indicates how many pages have been fed from paper feed
Tray3 Counter This indicates how many pages have been fed from paper feed
Resetting a counter
This resets the counter status to zero "0".
The “total counter“ status can only be reset by a customer service
engineer.
➜ Click on the [RESET] button adjacent the counter you wish to reset.
The associated counter is reset to zero "0".
6
This counter can only be reset by a customer service engineer.
tray 2.
tray 3.
PagePro 4100E 6-13
Page 99

6
6.7 Configuration panel
This panel summarizes the most important printer settings for qui ck
reference:
G Printer Name
The designation of the pri nter.
G Total Memory
Indicates the total memory available.
G Additional Accessories
Indicates presence and status of optional accessories.
No settings can be altered via this panel.
Working with the DOS printer tool s
6-14 PagePro 4100E
Page 100

Working with the DOS printer tool s
6.8 Printer S etting panel
This panel allows you to:
G switch on/off the Power Save mode,
G switch on/off the detection of paper format errors,
G activate the Pre- Heat function,
G switch on/off the automatic continuat ion in the case of an error
message,
G switch on/off the data protection func ti on in the case of a paper
misfeed – Jam Recov ery,
G define the input/output timeout.
6
PagePro 4100E 6-15
 Loading...