

Page 1

Table of Contents
1 Introduction
1.1 Welcome to Minolta/QMS..............................................................................................1-1
1.2 Working safely with your laser printer.........................................................................1-2
Notes on your safety and operating safety.. ...... ................................. ...... ........................1-2
Laser safety......................................................................................................................1-3
Internal laser radiation......................................................................................................1-3
CDRH regulations............................................................................................................1-4
Laser safety label.............................................................................................................1-4
Laser caution label...........................................................................................................1-5
1.3 User instructions............................................................................................................1-6
FCC Part 15 - Radio Frequency Devices Warning
(for users in the USA).......................................................................................................1-6
Interference-causing Equipment Standard (ICES-003 ISSUE 3) Warning
(for users in Canada).......................................................................................................1-7
Ozone emission............................................................................ ..... ...... ...... ..... .............1-7
2 Unpacking and setting up
2.1 Unpacking the laser printer...........................................................................................2-1
2.2 Overview of printer ........................................................................................................2-3
External printer parts.......................................................................... ...... ...... ..... ...... .......2-3
Internal printer parts.........................................................................................................2-4
Optional printer parts........................................................................................................2-5
Printer control panel.........................................................................................................2-6
2.3 Setting up the laser printer (1)......................................................................................2-7
Place of installation..........................................................................................................2-7
Storage of consumables and accessories .......................................................................2-7
Ambient conditions...................................... ...... ..... .................................. ...... ..... ...... ..... ..2-7
Space required.................................................................................................................2-8
2.4 Please note the following points:...............................................................................2-10
What should I watch out for when loading paper?.........................................................2-10
What should I watch out for when loading envelopes?..................................................2-10
Which sizes of paper can I use?....................................................................................2-11
What types of paper can I use?.....................................................................................2-12
2.5 Setting up the laser printer (2)....................................................................................2-13
Fitting the paper output tray and paper feed tray 1 .......................................................2-13
Connecting the power cable ..........................................................................................2-14
Switching the printer on and off......................................................................................2-15
Printing a configuration page ........................................................................................2-16
Connecting the printer to a computer (parall el port) ...................................... ................2-17
Connecting the printer to a computer (USB port) ..........................................................2-18
3 Installing the printer driver
3.1 System requirements.....................................................................................................3-1
-1
Page 2

3.2 Notes on installing the printer driver...........................................................................3-1
General information on the printer driver.........................................................................3-2
Information on installation using Plug-and-Play ..............................................................3-2
Information on installation using the Add Printer Wizard.................................................3-2
Information on installing a network printer.......................................................................3-2
3.3 Installing the USB device driver...................................................................................3-3
3.4 CD-ROM installation for Win95, Win98 or WinNT4.0..................................................3-7
3.5 Installation for Windows 3.1x ......................................................................................3-9
3.6 Uninstalling the Windows printer driver ...................................................................3-10
Deinstallation for Windows 95/98 and Windows NT 4.0................................................3-10
Deinstallation for Windows 3.1x ....................................................................................3-11
3.7 Installation for MS-DOS ..............................................................................................3-12
4 Starting the online manual
4.1 Notes on the online manual..........................................................................................4-1
4.2 Start the online manual as follows:.............................................................................4-2
5 Appendix
5.1 Performance feature s................ ...... ..... ...... ..... ...... .................................. ..... ...... ...... .....5-1
Hardware................................................ ...... ..... ...... ...... ................................. ...... ...... ... ..5-1
Software .................................................................. ...... ................................. ...... ...... .. ...5-1
Operating system.................................................... ...... ..... ...... .................................. .....5-1
5.2 Technical specification.................................................................................................5-2
PagePro 4100E printer ....................................................................................................5-2
500-sheet paper feed tray (option)..................................................................................5-3
Duplex unit (option).........................................................................................................5-3
Network card (option)......................................................................................................5-4
SDRAM-SIMM memory module (option).........................................................................5-4
Interfaces and cables.................................................... ..... ...... .................................. .....5-4
USB interface and cable..................................................................................................5-4
5.3 Minolta/QMS's concern for environmental protection ..............................................5-5
What does the energy star mean? ..................................................................................5-5
5.4 Customer information...................................................................................................5-6
Warranty..........................................................................................................................5-6
What does this warranty cover?......................................................................................5-6
What does this warranty NOT cover?..............................................................................5-6
Consumables and your warranty.....................................................................................5-6
Electrostatic discharge and your warranty.......................................................................5-6
What is the period of coverage?......................................................................................5-7
What will Minolta-QMS do to correct problems? .............................................................5-7
How do you obtain warranty service?..............................................................................5-7
How does local law relate to this warranty?....................................................................5-8
5.5 Certified Minolta-QMS Service Partners......................................................................5-8
5.6 Minolta-QMS support....................................................................................................5-9
-2
Page 3

Minolta-QMS USA, Canada and Latin America...............................................................5-9
Minolta-QMS Europe, Middle East, Africa and Australia..................................................5-9
5.7 Program Licence Agreement......................................................................................5-10
Notice to the User..........................................................................................................5-10
Licence Agreement........................................................................................................5-10
Term...............................................................................................................................5-10
Limited Warranty............................................................................................................5-10
Severability.....................................................................................................................5-11
GOVERNMENT END USERS.......................................................................................5-11
5.8 Index..............................................................................................................................5-12
-3
Page 4

-4
Page 5

Introduction
1 Introduction
1.1 Welcome to Minolta/QMS
Thank you for purchasing a Minolta/QMS laser printer.
This Installatio n Guide is a shor tened versi on of t he U ser´s M anual and will pr ovi de yo u all the
important informa tio n yo u need to put yo ur prin ter in operation. You w il l f ind information on t he
following topics:
l Working safely with your laser printer
l Unpacking and setting up
l Installing the printer driver
l Starting the online manual
l Technical data.
Read this introduction carefully before using your printer for the first time, and always keep it
within reach.
You will find the full v ersion of the User's Ma nual f or your Minol ta/QMS laser pri nter in the form
of an online manual in digital format on the CD-ROM that is supplied with your printer.
The full manual contains extensive information on the following topics, among others:
l Working with the printer driver
l Working with the printer's control panel
l Installing optional accessories
l Caring for and maintaining your pr inter
l Identifying and resolving problems.
1
We reserve the right to make changes to the contents of this manual.
1-1
Page 6

1
Trademarks
PCL is a trademark of the Hewlett-Packard Company.
Centronics is a registered trademark of Centronics, Inc.
MS-DOS, Microsoft, Windows and Windows NT are registered trademarks of Microsoft
Corporation.
IBM is a registered trademark of the Internationa l Business Machines Corporation.
Apple, Macintosh and TrueType are registered trademarks of Apple Computer, Inc.
PagePro is a trademark of Minolta.
Adobe and PostScript are trademarks of Adobe Systems, Inc.
Fine-ART and Fine Micro Toning are trademarks of Minolta Co., Ltd.
QMS and the QMS logo are registered trademarks of QMS, Inc.
All other names of produc ts and brand -names are trad emarks or re gistered tra demarks of the ir
respective proprietors.
1.2 Working safely with your laser printer
Notes on your safety and operating safety
Working improperly w ith the p rinter ca n resul t in h ealth h azards , elect ric sho cks and m ay eve n
cause fires. Before you unpack the laser printer, you should make yourself familiar with this
information regarding your safety and operating safety.
Introduction
1-2
CAUTION
Observe the following information:
Ü Make sure that the pow er cable is correc tly plugg ed into the socket and that the socket i s at
all times visible and readily accessible.
Ü Do not pull the cable of the power plug as this may damage the cable. The result could be
an electric shock or a fire.
Ü Remove the power plug from the socket if the machine will not be used for an extended
period of time.
Ü Do not remove the power cable from the socket with wet hands as this may result in an
electric shock.
Ü Do not move the unit unles s the power cab le has been remo ved from the socket . Otherwise
you may damage the cable. The result could be a short-circuit or a fire.
Ü Do not place any heavy objects on the p ower ca ble. Do n ot pull o r kink t he ca ble as t his can
result in damage to the cable. The result could be an electric shock or a fire.
Ü Make sure that the mac hine is not standi ng on a cable c onnected to anothe r machine as this
can result in damage to that cable. The result c oul d be a fire or i mp r ope r func ti oni ng of the
unit in question.
Ü Make sure that the power supply to the unit has the correct voltage. Otherwise the result
could be a fire or an electric shock.
Ü Switch off the unit immediately and unplug the power cable if the power supply cable is
Page 7

Introduction
Ü Use only extension cables that are designed for at least the maximum power rating of the
Ü Perform only the procedures that are described in this manual. Using the machine
Ü Do not place any heavy objects on the machine.
Ü Do not open any covers on the machine while printing is in progress.
Ü Do not switch off the un it while printing is in progress.
Ü Do not place any magnetic object near the machine.
Ü Do not use any flammable sprays, liquids or gases in the vicinity of the machine.
Ü Do not remove any safety devi ces and do not alter the construct ion of the ma chine. The u nit
Ü Do not insert any paper clips, staples or other small metal objects into openings on the
Ü Do not place coffee cups, drinks bottles or other containers with liquids in them on the
Ü If the machine becomes unusually hot, or if you notice smoke or an unusual odour coming
1
damaged. Failure to do so c ould res ult in a fire or an electri c shock. Contact y our custom er
support technical specialist.
machine. Extension cables with low er ratings can resu lt in ov erheating and can e ven cau se
a fire.
improperl y can result in a fire or an electric shock.
is equipped with high- voltage compone nts. Using the ma chine improperly ca n result in a fire
or an electric shock.
machine. The result could be an electric shock or a fire. If metal pieces are fed into the
machine, switch it o ff i mm ed iate ly , d isc on nec t the power cable an d c ontact your custo mer
support technical specialist.
machine. If liquid enters the machine the result could be an electric shock or a fire. If liquid
does get into the m achine, switch it off immediately, disconnect the po wer cable and con tact
your customer support technical specialist.
from the machine, switch it off immediately and remove the power cable from the socket.
Contact your customer support technical specialist.
Laser safety
This printer is equi pped with a lase r unit. If the pri nter is used in ac cordance with th e instructions
in the User's Manual, the laser presents no danger.
The radiation emitted is completely absorbed and attenuated by the case. The laser radiation
cannot escape at any time during the printing process.
This laser printer is categorized as a Class 1 printer. This classification means that the printer
does not produce any hazardous laser radiation.
This printer is certified as a Class I Laser product under the US Department of Health and
Human Services (DHHS) Radiatio n Perfo r ma nce Stand ard ac co rdi ng to th e Ra di atio n Cont rol
for Health and Safety Act of 1968. This means that the pr inter does not produce haza rdous laser
radiation.
Internal laser radiation
Average radiation output:
1.03 mW at the laser aperture of the print head unit.
Wavelength: 770-810 nm
1-3
Page 8
1
Introduction
This device works with a laser diode of class 3b with invisible laser radiation. The laser diode
and the polygon mirror for sampling are integrated into the laser unit.
The laser unit is NOT AN I TEM TO BE MAI NTAINED ON SITE. Yo u sho uld there fore no t open
it under any circumstance.
CAUTION
Dangerous laser radiation!
Using the printer in a manner other than as indicated in this manual may result in exposure to
dangerous radiation.
Ü Use the printer only according to the instructions contained in the User's Manual.
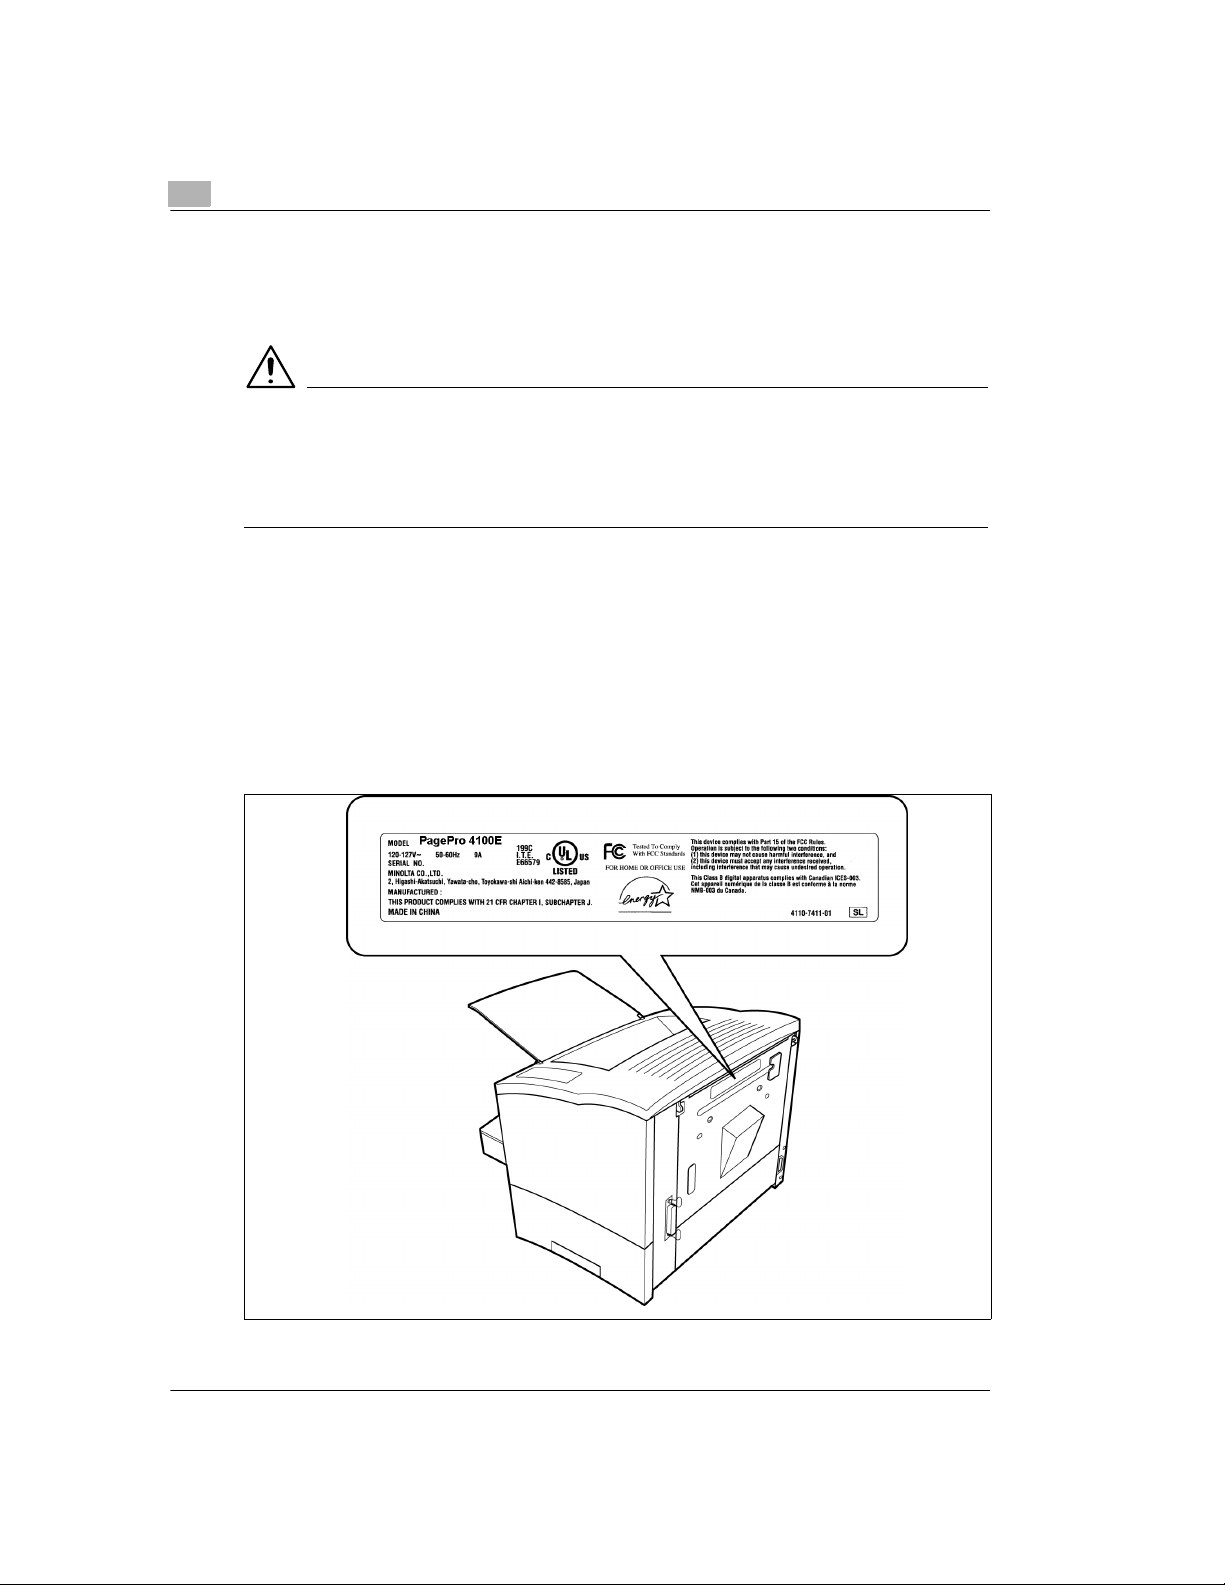
CDRH regulations
On 2 August 1976 the Center for Devices and Radiological Health (CDRH), part of the US Food
and Drug Administration, introduced specifications for all products that operate with laser
beams. Products which are to be sold or used in the USA must comply with these statutory
requirements without exception. The safety label shown on the following page confirms
compliance with the CDRH regu lations. This label must be attached t o all products sold or use d
in the USA.
Laser safety label
1-4
Page 9
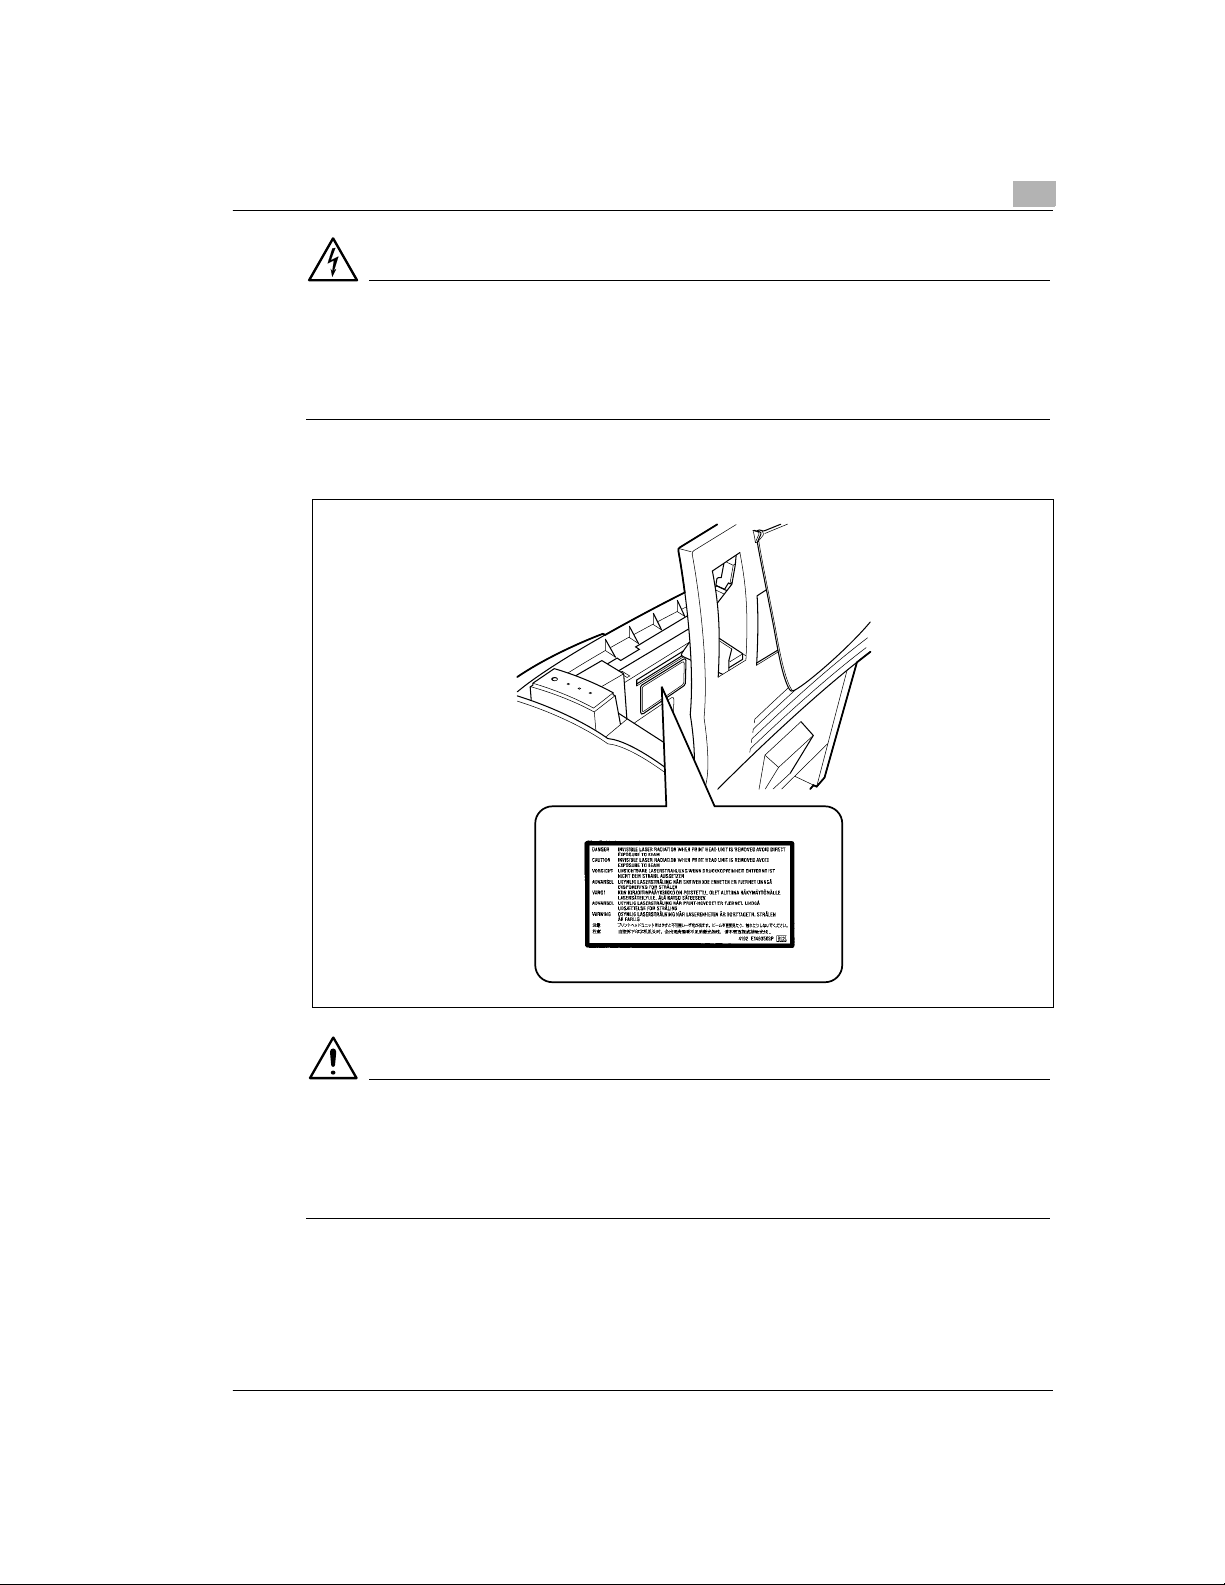
Introduction
DANGER
Use the printer only as described in this manual!
Using the controls, ad justing the p rinter or perform ing procedures o ther than as s pecified in t his
manual may result in exposure to hazardous radiation.
Ü Use the printer only according to the instructions contained in the User's Manual.
Laser caution label
1
CAUTION
Dangerous laser radiation!
This is a semiconductor laser. The maximum power of the laser diode is 5 mW and the
wavelength is 770–810 nm.
Ü Use the printer only according to the instructions contained in the User's Manual.
1-5
Page 10

1
1.3 User instructions
FCC Part 15 - Radio Frequency Devices Warning
(for users in the USA)
FCC: Declaration of Conformity
Product type Laser Beam Printer
Product name PagePro 4100E
Options Paper feed tray 2 (4166)
This device complies with Part 15 of the FCC Rules.
Operation is subject to the following conditions:
1. this device may not cause harmful interference, and
2. this device must accept any interference received, including interference
that may cause undesired operation.
*1 The Token Ring Network Interface Card (4179-261) complies
with the limits for a Class A digital device.
Paper feed tray 3 (4166)
Duplex unit (4168)
Expansio n memory (Maximum 96MB)
Adobe PostScript ROM-SIMM (4179-295)
Network interface card
10BaseT/100BaseT X (41 79 -25 5)
10BaseT/10Base2 (4179-241)
Token Ring (4179-261 )*1
Introduction
This equipment has been tested and fou nd to comply with t he limits for a Clas s B digital devic e,
pursuant to Part 15 of the FCC Rules. These limits are designed to provide reasonable
protection against harmful interference in a residential installation. This equipment generates,
uses and can radiate radio frequency energy and, if not installed and used in accordance with
the instructions, may cause harm ful interference to radio communicat ions. However, th ere is no
guarantee that interference will not occur in a particular installation.
If this equipmen t does c ause harmf ul interf erence to radio or te levision re cepti on, which can be
determined by turning the equipment off and on, the user is encouraged to try to correct the
interference by one or more of the following measures:
l Redirect or relocate the receiving antenna.
l Increase the separation between the equipment and the receiver.
l Connect the equipment to a socket on a circuit different from the one to which the receiver
is connected.
l Consult the dealer or an experienced radio/TV technician for help.
This device mus t be used with a s hi eld ed interface cable and shielded ne twork c able. The use
of non-shielded cables is likely to result in interference with radio communications and is
prohibited under FCC rules.
The design and production of this unit conform to FCC regulations, and any changes or
modifications must be registered with the FCC and are subject to FCC control. Any changes
made by the purchaser or user without first contacting the manufacturer will be subject to
penalty under FCC regulations.
1-6
Page 11

Introduction
This equipment h as been t ested an d found to com ply with th e limi ts for a Class A digital device,
pursuant to part 15 of the FCC Rules. These limits are designed to provide reasonable
protection against harmful interference when the equipment is operated in a commercial
environment. This equipment generates, uses and can radiate radio frequency energy and, if
not installed and used in accordance with the instruction manual, may cause harmful
interference to r adi o com munica tio ns. Ope rati on of this equi pment in a resi dentia l area is likel y
to cause harmful interferenc e in which case the user will be require d to correct the interfe rence
at his own expense.
The design and production of this unit conform to FCC regulations, and any changes or
modifications must be registered with the FCC and are subject to FCC control.
Any changes made by the purchaser or user without first contacting the manufacturer will be
subject to penalty under FCC regulations.
Interference-causing Equipment Standard (ICES-003 ISSUE 3) Warning (for users in
Canada)
This Class B digital apparatus complies with Canadian standard ICES-003.
Cet appareil numérique de la classe B est conforme à la norme NMB-003 du Canada.
This Class A digital apparatus (4179-261) complies with Canadian standard ICES-003.
Cet appareil numérique de la classe A (4179-261) est conforme à la norme NMB-003 du
Canada.
1
FCC: Declaration of Conformity
Product type Network interface card
Product name 4179-261
Ozone emission
Small quantities o f ozone escape d uring the printing process. These q uantities do not re present
a health hazard. In spite of this, you should ta ke care that the area in which the machine is
located has adeq uate v entila tion, e speci ally if you are pri nting l arge qu antitie s of materia ls or i f
the machine is being used continuously over a long period of time.
1-7
Page 12
2
2 Unpacking and setting up
2.1 Unpacking the laser printer
CAUTION
Danger to children from packaging materials made of plastic
Ü After unpacking, keep the packaging materials out of reach of children.
Remove the printer parts and accessories from the box.
1
m Paper output tray
m Printer
m Installation Guide
m CD-ROM
m Power cable
m Paper feed tray
Remove the packaging material from the printer.
2
Unpacking and setting up
2-1
Remove the transport retainers from the printer.
3
Page 13
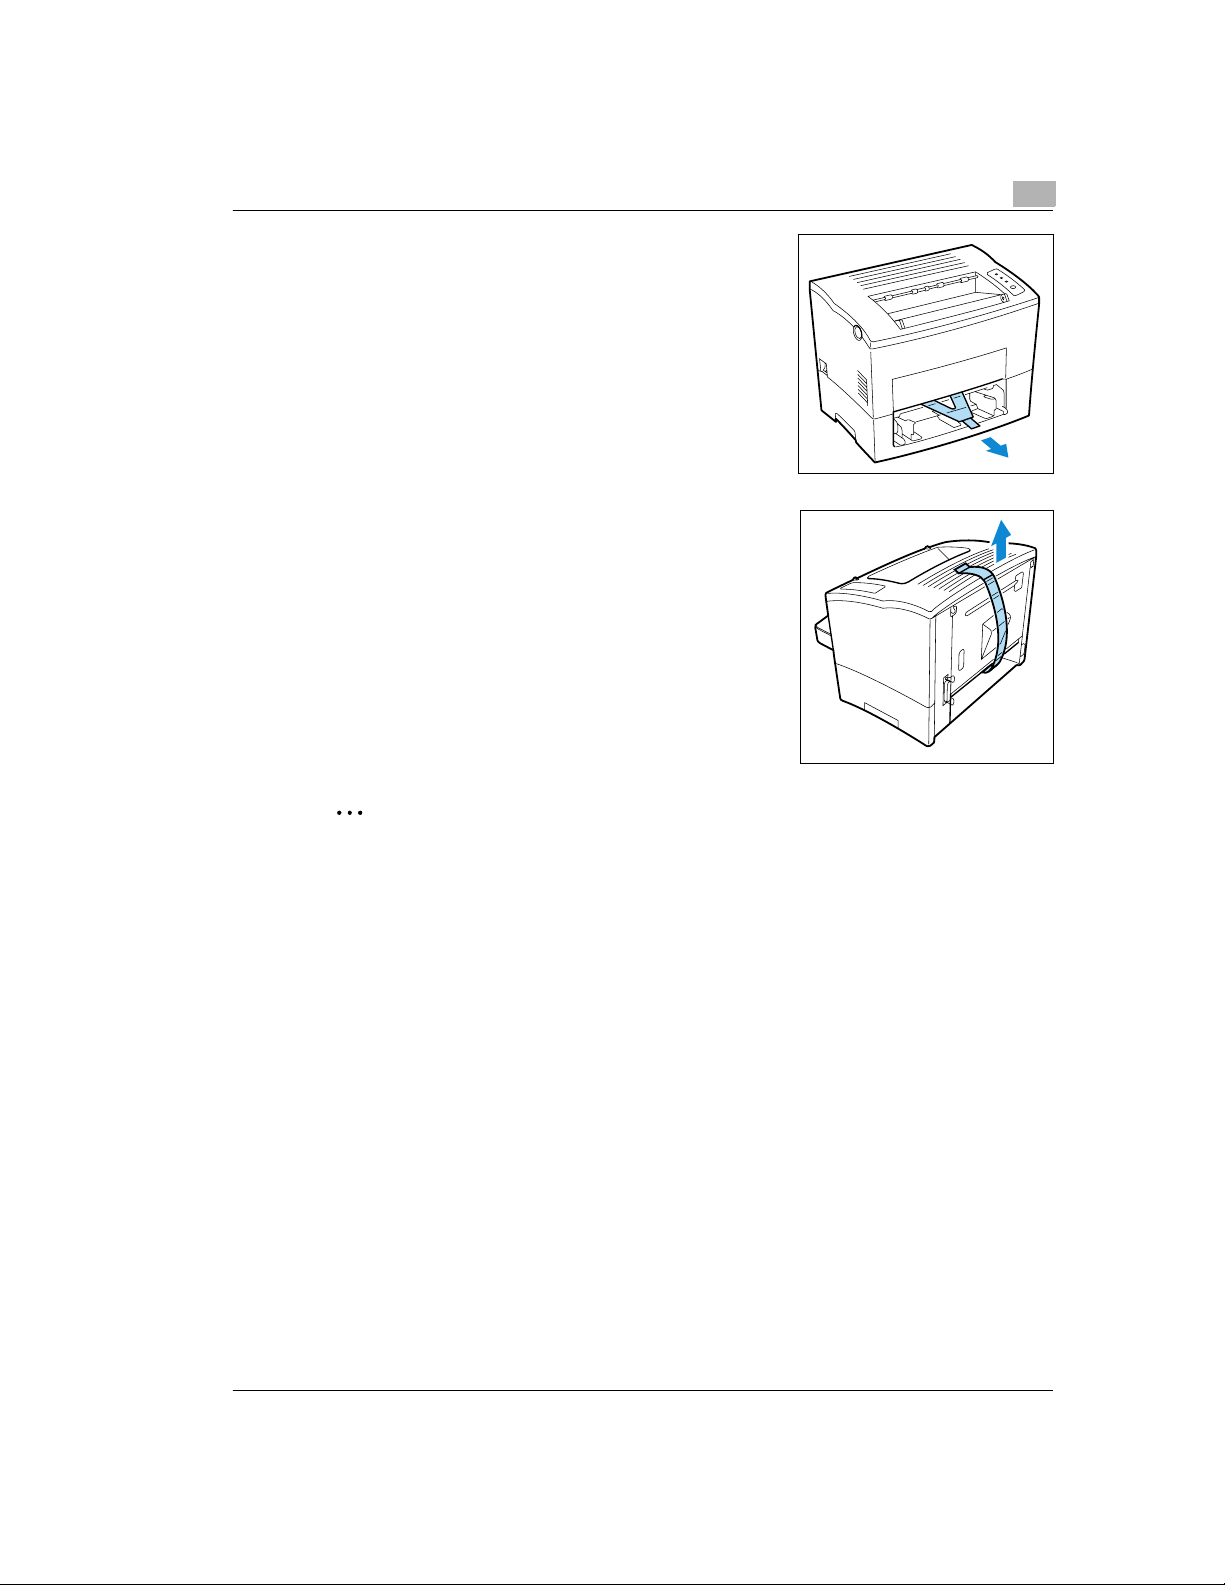
Unpacking and setting up
Pull the plastic strips out of the printer.
4
Remove the plastic strips from the rear of the printer.
5
2
.
Why save the packaging materials?
If you need to move the printer, you can use the packaging again. In this way you can be
certain that your printer is corr ectly packed.
2-2
Page 14
2
2.2 Overview of printer
External printer parts
Unpacking and setting up
1
2
3
4
5
67
10
8
9
2-3
No. Description No. Description
1 Release button for top cover 6 Paper feed tray 1
2 Control panel 7 Power Switch (ON/OFF)
3 Paper output tray
(face down)
4 Top Cover 9 Parallel port
5 Paper guides 10 USB port
(multipurpose tray)
8 Socket for power cable
Page 15

Unpacking and setting up
Internal printer parts
2
1
5
2
3
4
6
No. Description No. Description
1 Fusing unit 4 Cover to paper feed tray 2
2 Paper guide 5 Image transfer roller
3 Manual paper feed unit 6 Imaging cartridge
2-4
Page 16
2
Unpacking and setting up
Optional printer parts
1
2
2-5
3
No. Description No. Description
1 Paper feed tray 2
(500-sheet cassette)
2 Paper feed tray 3
(500-sheet cassette)
3 Duplex unit
Page 17
Unpacking and setting up
Printer control panel
The control panel has three lamps and one button.
2
1
2
3
4
No. Description No. Description
1 Stand-by lamp (green) 3 Fault (red)
2 Paper empty (orange) 4 Control button
Please refer to the Online Manual for further information on the control panel.
2-6
Page 18

2
2.3 Setting up the laser printer (1)
Place of installation
The printer should be set up in a place which is:
l dry and free from dust,
l on a stable surface,
l well ventilated,
l away of highly flammable items, e.g. curtains,
l away of objects which might obstruct the printer’s ventilation slits,
l near to an easily accessible power socket.
The printer must be positioned in a way that it cannot be adversely affected by the following:
l splashing liquids,
l organic gases, e.g. ammonia,
l direct sunlight,
l severe temperature fluctuations,
l exhaust-air from heating, ventilation or air-conditioning systems.
Storage of consumables and accessories
Printing consumables and accessories should be kept:
l sealed in their original packagings,
l protected against direct sunlight or heat,
l protected against fluorescent light,
l in a cool, dry and dust-free place,
l out of the reach of chil dren.
Unpacking and setting up
2-7
CAUTION
Toner poses a health hazard!
Toner is harmful if swallowed.
Ü If you swallow toner, consult a doctor immediately.
Ü If you get toner on your hands, wash them immediately with cold water and soap.
Ambient conditions
The optimum ambient conditions for your printer are:
l Temperatures from 50°F to 95°F / 10°C to 35°C
(maximum variation of 18°F / 10°C per hour);
l Relative humidity of 15% to 85%
(maximum variation of 20% per hour).
Page 19
Unpacking and setting up
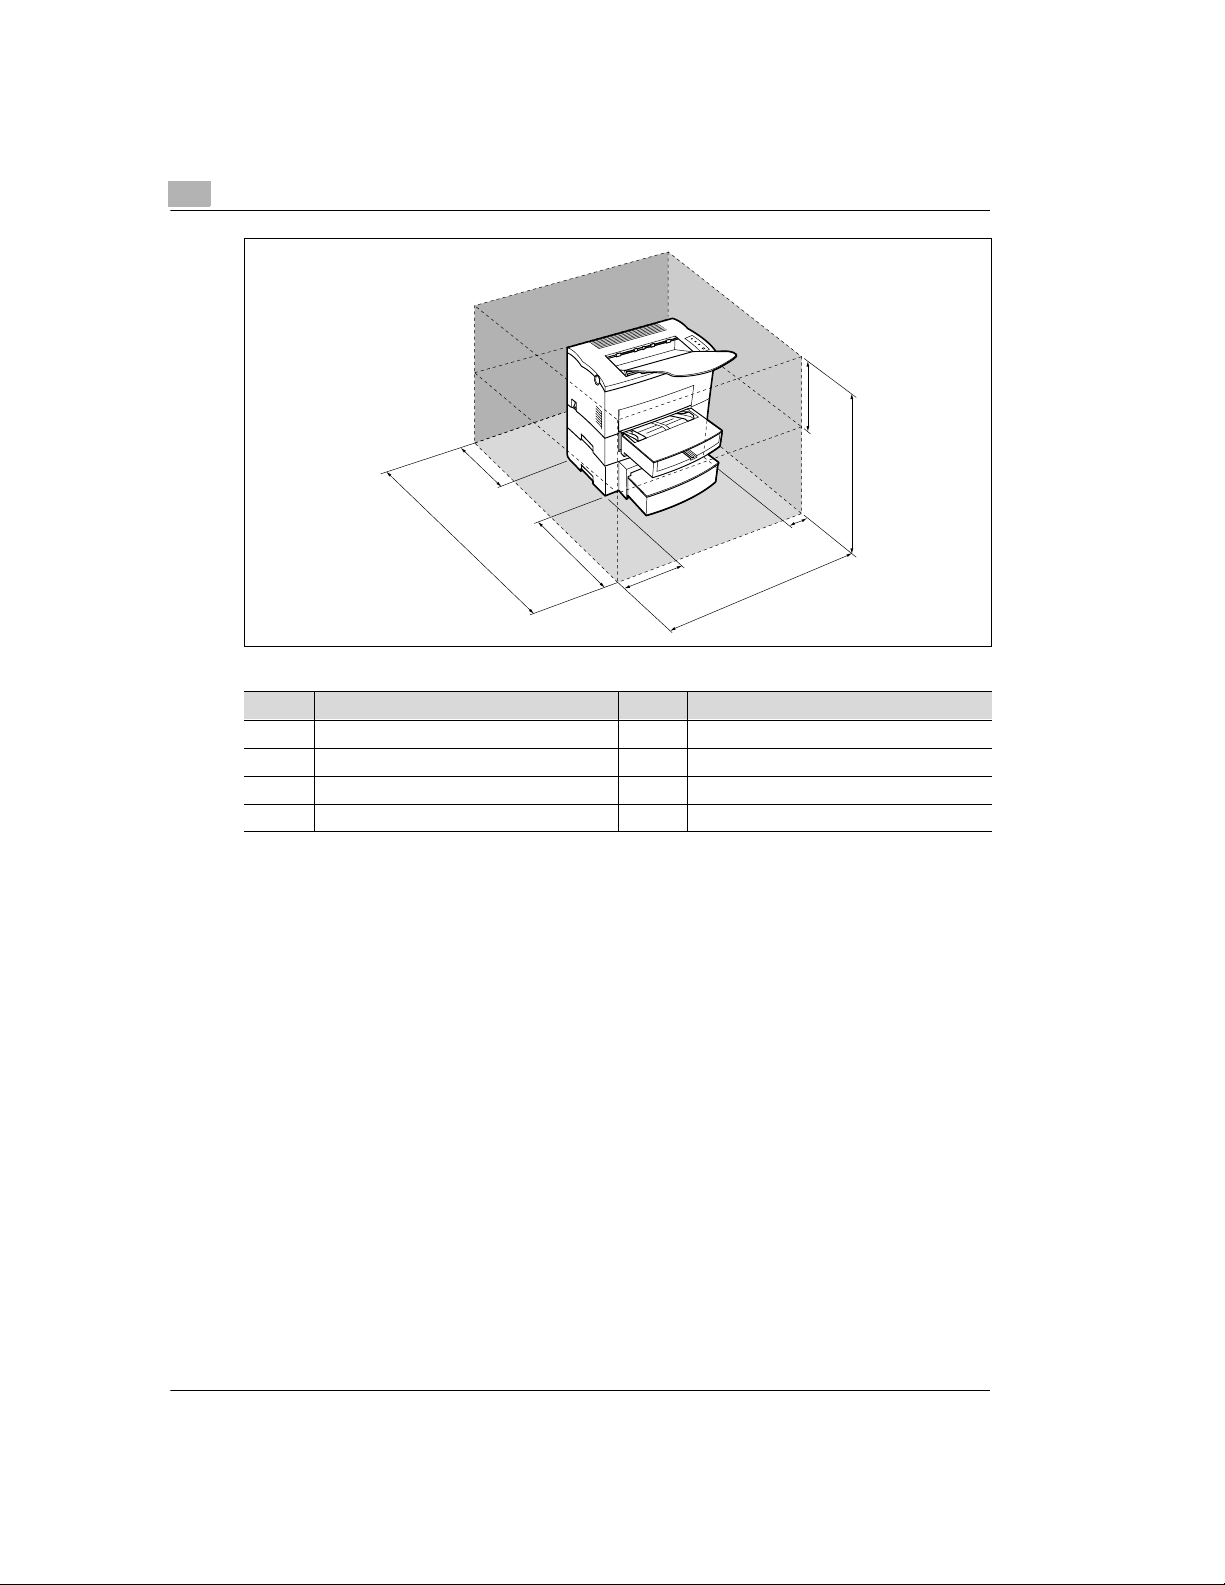
Space requ ired
Make certain that there is en ough s pace avai lable a round th e printer (see ill ustrati on). Thi s will
facilitate operation, reloading paper and toner, and maintenance of the printer.
2
H
D
C
G
A
E
F
B
No. Dimension No. Dimension
A 4 0-1/2 in. / 1030 mm E 23-1/2 in. / 600 mm
B 33 in. / 840 mm F 11-3/4 in. / 300 mm
C 24-3/4 in. / 630 mm G 4 in. / 100 mm
D 6 in. / 150 mm H 11-3/4 in. / 300 mm
2-8
Page 20
2
Unpacking and setting up
H
D
A
No. Dimension No. Dimension
A 40-1/2 in. / 1030 mm E 23- 1/2 in. / 600 mm
B 33 in. / 840 mm F 11-3/4 in. / 300 mm
C 29-1/2 in. / 750 mm G 4 in. / 100 mm
D 6 in. / 150 mm H 11-3/4 in. / 300 mm
E
F
B
C
G
2-9
Page 21

Unpacking and setting up
2.4 Please note the following points:
What should I watch out for when loading paper?
To avoid paper misfeeds in the laser printer, please observe the following points:
l Do not use any paper with the following features:
m Paper that has already been used in a thermal or ink-jet printer.
m Folded or wavy paper.
m Paper with a surface that is too smooth, too rough or irregular.
m Specially coated paper such as carbon paper or paper with an adhesive surface.
m Paper that is not cut at right angles.
m Paper that is held together by glue, adhesive or clips.
m Paper with labels that detach easily.
m Warped or curled-up postcards.
.
Note:
When paper is loaded, the orientation is based on the format marks in the paper source
units.
What should I watch out for when loading envelopes?
To avoid envelope misfeeds in the laser printer, please observe the following points:
l Do not use self-adhesive envelopes or those with a tear-off strip, closures or a window.
l Place the e nvelopes in the tray horizontally.
l Place the envelopes in the tray with th e flap down so that the upper su rface of the enve lopes
is lying against the side of the tray with the feed roller.
l Load envelopes of format B5 with the flap facing down and pointing to the rear of the tray.
l Make certain that the flaps are neatly folded back.
2
.
Test the envelopes before buying large quantities!
Some types of envelo pes cre as e ea sil y when they are run through a pr int er. Te st a type of
envelope before purchasing large quantities.
2-10
Page 22

2
Unpacking and setting up
Which sizes of paper can I use?
This printer is designed for use with the sizes of paper listed below.
Paper source
Paper size
Standard sizes
A4
210 × 297 mm
A5
148 × 210 mm
JIS B5
182 × 257 mm
Letter
8-1/2 in. × 11 in.
Legal
8-1/2 in. x 14 in.
Executive
7-1/2 in x 10-1/2 in.
Envelopes, postcard and custom sizes
Envelope DL
110×220mm
Envelope C5
162×250mm
Envelope B5
176×250mm
Envelope COM10
4-1/8 in. x 9-1/2 in.
Envelope Monarch
3-7/8 in x 7-1/2 in.
J-Post (Postcard)
4 in. x 5-3/4 in.
Custom Size
3-3/8 in. to 8-1/2 in × 3-1/2 in to 14 in.
85 to 216 mm × 90 to 356 mm
* 1. Each of the 5 cassettes of Tray 2/Tray 3 support one of the 5 types of paper that are compatible with this printer.
2. Letter is standard cassette size for the second/third paper feed tray.
Tray 1 Tray 2/3*
Yes Yes Yes
Yes No Yes
Yes Yes Yes
Yes Yes*
Yes Yes Yes
Yes Yes Yes
Yes No Yes
Yes No Yes
Yes No Yes
Yes No Yes
Yes No Yes
Yes No Yes
Yes No Yes
(option)
2
1
Manual paper
feed unit
Yes
2-11
Page 23

Unpacking and setting up
What types of paper can I use?
This printer is only designed for use with the types of paper listed below.
Paper media
standard media:
Plain paper
weight: 16 to 24 lbs. / 60 to 90g/m
Recycled paper
weight: 16 to 24 lbs. / 60 to 90g/m
special media:
Transparent film Yes No Yes
Labels Yes No Yes
Letterhead Yes No Yes
Envelopes Yes No Yes
Postcards Yes No Yes
Card or thick paper
24 to 43-1/4 lbs. / 90 to 163g/m
.
2
Paper source
Tray 1 Tray 2/3
Yes Yes Yes
2
Yes Yes Yes
2
2
Yes No Yes
(option)
Manual paper
feed unit
Note
Special media is not supported for duplex printing.
2-12
Page 24

2
2.5 Setting up the laser printer (2)
Fitting the paper output tray and paper feed tray 1
Set the guides of the paper feed tray to match the size of paper you wish to use.
Attach the paper outp ut tray to the printer as shown here.
1
Slide the lower part of the paper feed tray into th e pr inter.
2
Unpacking and setting up
2-13
Fit the cover of paper feed tray 1.
3
Page 25

Unpacking and setting up
Connecting the power cable
Only use the power cable supplied with the printer.
The laser printer requires a power supply with minimal voltage and frequency fluctuation.
If necessary, ask an electrician for advice.
4 Power supply: 120-127 V at 50-60 Hz / 220-240 V at 50-60 Hz
4 Voltage fluctuation: 120V -10%, 127 V +6% / 220-240 V ±10%
4 Frequency fluctuation: Within 3 Hz
Make certain that the printer's power switch is in the
1
"0" (OFF) position.
Insert the plug on the end of the power cable (supplied)
2
into the power socket of the printer.
2
Insert the other end of the power cable into a power
3
socket.
CAUTION
Using the wrong power cable may lead to a short circuit situation!
Using power cables of inadequate cross-section can lead to overheating of the cable.
Ü Only use an exte ns ion c abl e w h ic h h as a higher rating tha n t he current consumption of the
printer.
Ü Only use cables with a ground connection.
Ü Always observe the relevant local regulations regarding the connection of electrical
equipment to the mains network.
2-14
Page 26

2
Unpacking and setting up
Switching the printer on and off
CAUTION
Improper handling may result in damage to the printer!
Ü Never switch off the printer w hile a prin t job is in progre ss, the printe r is recei ving data from
the computer (flashing “Stand-by“ lamp on the control panel) or the printer is being reset.
Ü Switch the power switch to "I" (ON) in order to activate the
printer.
The printer is ready for use after approx. 23 seconds.
Ü Switch the power switch to "0" (OFF) in order to
deactivate the printer.
.
Saving energy makes sense!
After the printer has not received a print command for a certain amount of time, it
automatically switches to POWER SAVE mode. This time interval can be set using the
control panel (see the Online manual).
If the printer receives a new print job while it is in Power Save mode, or if the side cover is
opened, or if the [ON LINE] key is pressed, the printer automatically starts its warm-up
phase.
2-15
Page 27

Unpacking and setting up
Printing a configuration page
Print a configuration page in order to make sure that the printer is functioning properly.
Switch on the printer.
1
The printer is ready for operation after approx.
23 seconds.
Make sure that :
2
m the “Fault“ and “Paper“ lamps are off, and
m the “Stand-by“ lamp is on constantly.
Press the control button briefly.
3
The configuration page will now be printed.
2
Control button
.
Be well prepared for technical queries.
Please have a current configuration page available when calling for technical assistance.
Make a note of the Serial No. of your printer on the configuation page, see page 1-4 (laser
safety label).
2-16
Page 28

2
Connecting the printer to a computer (parallel port)
Switch off the printer and the computer.
1
Connect one end o f the inte rface cable to the parall el port
2
of your computer.
Connect the other en d of the interface cabl e to the parallel
3
port of the printer.
Secure the connectors by means of the clips on the
4
sockets.
For the technical specification of the cable, see the Online Manual.
Unpacking and setting up
2-17
CAUTION
Using the wrong type of cable may result in damage to the equipment!
Using the wrong type of cable may damage the socket on the printer.
Ü Only use an IEEE 1284 type B shielded interface cable for connecting the printer to your
computer.
Ü Minolta/QMS does not warrant the us e of any particular cab le. The user assumes all
responsibility as to the quality and performance of the cable.
Page 29

Unpacking and setting up
Connecting the printer to a computer (USB port)
Switch on the computer and start Windows 98.
1
Switch on the printer.
2
Connect one end of the interface cable to the USB port of
3
the printer.
Connect the other end of the interface cable to the USB
4
port of the computer.
2
2-18
Page 30

2
Unpacking and setting up
2-19
Page 31

Installing the printer driver
3 Installing the printer driver
3.1 System requirements
The following system requirements will ensure that your printer runs without problems:
l An IBM-compatible PC with a 486DX-16MHz processor or higher (Pentium processor
recommended).
l Microsoft Windows 3.1x, Windows95, Windows98, WindowsNT4.0, MS-DOS 5.0 or higher
(except MS-DOS 7.0).
l At least 8 MB of RAM.
l At least 5 MB of available memory.
l A CD-ROM drive.
l I/O interface: an IEEE 1284 type B parallel cable.
3.2 Notes on installing the printer driver
The installation program is designed so that even people not accustomed to working with
computers can easil y accomplish it. Yo u will be led step by ste p through the installa tion process.
All you need to do is follow the installation program.
Before you begin the installation, you should observe the following points:
l What operating system is running on your computer?
l What is the letter of your CD-ROM drive (D, E, etc.)?
l Which optional accessories are fitted to your printer?
l Is your printer a local printer or a network printer?
m Local printer:
when the printer is connected directly to your computer via a parallel interface cable.
m Network printer (option):
when the printer is integrated into a computer network.
3
.
More questions?
If you are still not certain about making a setting, you can display additional information on
screen by using the HELP button.
3-1
Page 32

3
Installing the printer driver
General information on the printer driver
The printer driv er is sup pli ed on a C D- RO M a lon g w ith th e pri nter . I f y ou r c om pu ter ha s no C DROM drive, you can download the printer driver from the Internet.
You will find the latest version of the printer driver under the address http://www.qms.com.
Information on installation using Plug-and-Play
We recommend the prin ter driver being i nstalled usi ng the CD-ROM´s i nstaller. If y ou install the
printer driver using hardware wizards or device driver update wizards (plug-and play
installation), you should note these points:
l The “Drivers\Pp4100\Win95
specified.
l The Status Display, Control Panel and Driver Help will not be installed.
l The auxiliary program for deinstal lation will not be installed. To use this auxiliary program,
start the file “zuninst.exe“ on the CD that is supplied with your printer.
Information on installation using the Add Printer Wizard
Do not use the Add Prin t er Wi zar d from the Printers fo lder. Installation thro ug h t he Add Printer
Wizard will prevent the printer from performing properly.
We recommend the printer driver being installed using the CD-ROM´s installer.
or
Win311\GB\Pcl\drv“ directory on the CD-ROM must be
Information on installing a network printer
.
Local printer or network printer?
The printer can be equipped with an optional network card if required. Please contact your
hardware supplier.
You can install the printer as a loc al printer or as a network printer. You should make note of
the following points when installing as a network printer:
l If you would like to access the print er from a server using Windows 95, firs t install the printer
driver from the server using the installation program. D o not use the hardware wizard for
printer installation.
l If your printer will not be printing any documents in a network environment, set the data
spool format of the client to RAW.
3-2
Page 33

Installing the printer driver
3.3 Installing the USB device driver
When connecting the PagePro 4100E printer to your computer with a USB cable, install the
USB device driver according to the following instructions before installing the printer driver.
This printer can only be connected with a USB cable if the computer is running Windows 98.
Switch on your computer and start Windows 98.
1
Switch on the printer.
2
Check that Windows 98 has finished loading and that the printer is ready.
3
Insert the Printer Driver CD -R OM su ppl ied with your printer into your co mp uter’s CD-ROM
4
drive.
When the opening screen appears, close it.
5
Connect the printe r t o t he computer with the U SB cab le (s ee pa ge 2-19) to display th e Add
6
New Hardware Wizard dialogue.
3
Click [NEXT] to display the next dialogue.
7
3-3
Page 34

3
Installing the printer driver
Check the “Search for the best driver for your device“ box and then click [NEXT].
8
When the next dialogue appears, check the “Specify a location“ box, and then click
9
[BROWSE...].
3-4
Browse the CD-ROM a nd navigate to “Drivers \Pp4100\Win98\ GB\Pcl\Drv\us b“. Then clic k
10
[OK].
Page 35

Installing the printer driver
When the following dialogue appears, click [NEXT].
11
When the following dialogue appears, click [FINISH] to complete the installation.
12
3
3-5
Page 36

3
Installing the printer driver
After installation is complete, check that “Minolta/QMS PagePro 4100“ appears below
13
Universal serial bus controller on the Device Manager tab of the System Properties
dialogue. To display the System Prope rties di alogue , right-c lick the [M Y COMPUTER ] icon
on the desktop, and then click [PROPERTIES] in the shortcut menu that appears.
Eject the CD-ROM from your computer’s CD-ROM drive.
14
That completes the installation of the USB device driver for the PagePro 4100E printer.
.
And now install the printer
When installing the PCL printer driver you must select “USB/0“ when prompted for the
printer port (Select Port).
3-6
Page 37

Installing the printer driver
3.4 CD-ROM installation for Win95, Win98 or WinNT4.0
Make certain that the printer is connected to your printer locally or through a network.
1
Switch on the printer.
2
Switch on the computer and start Windows 95, Windows 98 or WindowsNT 4.0.
3
When the Update Device Driver Wizard dialog appears under Win 95 or 98:
?
Ü Click
Place the PagePro 4100E printer driver CD in the CD-ROM drive of your computer.
4
The installation program starts automatically.
Cancel
to close the dialog.
3
The installation program does not start automatically?
?
Ü Start Windows Explorer and open the directory of the CD.
Ü Double-click on “Pagepro.exe“ to start the installation program.
In the next dialog window, choose a language for the installation procedure.
5
Follow the instructions on the screen to complete the installation.
6
3-7
Page 38

3
Installing the printer driver
After the printer driver has been successfully installed, the “Minolta QMS Printer Extras“
Program Group appears.
You can now call up the “Minolta QMS Printer Extras“ Program Group via the Windows Start
menu.
3-8
Page 39

Installing the printer driver
3.5 Installation for Windows 3.1x
Install the printer driver for Windo ws 3.1x as desc ribed be low and not vi a the Printers dia logue
window.
Make sure that the printer is connected to your comput er locally or via a network.
1
Switch on the printer.
2
Switch on the computer and start Windows 3.1x.
3
Place the pr inter driver C D in the CD-ROM drive of your computer.
4
Double-click the icon [CONTROL PANEL] wich is located in the “Main group“ within the
5
“Program Manager“. Double-click [PRINTERS] to display the “Printer“ dialog.
Click on "Add>>" to display the list of printers. Select "Install unlisted or updated printer" and
6
click on "Install".
The following box appears.
3
Browse to the CD-ROM drive and navigate to “Drivers\Pp4100\Win311\GB\Pcl\drv“.
7
Confirm with OK.
Select Minolta/QMS PagePro 4100 U from the list and confirm with OK.
8
3-9
Page 40

3
Click on "Set as default printer".
9
After the printer driver has been successfully installed, the icon for “Minolta/QMS PagePro
4100 U“ appears in the "Printers" Program Group.
An error message appears ann ouncing that the UNIDRV. DLL file is requ ired but cannot
?
be found.
Ü Install a UniTool Driver from the list of printers and try again.
3.6 Uninstalling the Windows printer driver
Installing the printer driver
Deinstallation for Windows 95/98 and Windows NT 4.0
Call up the “Minolta QMS Printer Extras“ Program Group.
1
Click on “Uninstall“.
2
The deinstallation program starts automatically.
Follow the subsequent instructions.
3
The deinstallation of the printer driver is successfully completed once the Windows
operating system has been restarted.
3-10
Page 41

Installing the printer driver
Deinstallation for Windows 3.1x
Call up the “Minolta/QMS PagePro 4100U“ Program Group.
1
Click on "Remove".
2
You are prom pted to confi rm/cancel your selection.
Click on [YES] in order to delete the printer driver.
3
3
Click on "Clo se".
4
The program group is deinstalled.
3-11
Page 42

3
3.7 Installation for MS-DOS
MS-DOS versions 6.2 or higher (except MS-DOS 7.0) are supported.
Make sure that the printer is connected to your computer locally or via a network.
1
Switch on t he printer.
2
Switch on the computer and start MS-DOS.
3
Place the PagePro 4100E printer driver CD in the CD-ROM drive of your computer.
4
Change to the CD-ROM drive.
5
Enter, for example:
(d = corresponding letter of your CD-ROM drive)
Change to the directory which contains the installation program.
6
Enter:
cd Drivers\Pp4100\Dos
Start the installation program.
7
Enter:
install
Select the option required and press ENTER.
8
d:\
.
Installing the printer driver
AUTOEXEC.BAT file modified!
One command line was added to the AUTOEXEC.BAT file. The purpose of this command
is to ensure that th e Status M onitor is auto maticall y loaded upon sw itching o n the comput er
or executing the AUTOEXEC.BAT file.
3-12
Page 43

Starting the online manual
4 Starting the online manual
4.1 Notes on the online manual
The PagePro 4100E is sup pl ied w ith an online manual. This o nli ne m an ual c onta ins e xte ns ive
information on the fo llowing topics, among others:
l Working with the printer driver.
l Working with the printer’s control panel.
l Installing optional accessories.
l Caring for and maintaining your pr inter
l Identifying and rectifying problems.
You need the Adobe Acrobat Reader software in order to be able to read the online manual.
.
Install Adobe Acrobat Reader
The PagePro 4100E printer driv er CD c ontain s an onlin e manu al in PDF f ormat. Ho weve r,
if you do not already have Adobe Acrobat Reader installed on your computer, simply start
the online manual. At a certain point you will then be asked if you wish to install Adobe
Acrobat Reader.
4
The online manual is not automatically installed on the hard drive of your computer when
installing the printer driver.
Therefore, to start the online man ual you ha ve to load the PagePro 4100E printer dri ver CD into
the CD-ROM drive of your computer and start the online manual from there.
You can also copy the online manual to the hard drive of your computer. The PDF file of the
online manual can be fo und in the “Manual“ program grou p of the PagePro 4100E prin ter driver
CD.
4-1
Page 44

4
4.2 Start the online manual as follows:
The online manual is not automatically installed on the hard drive of your computer when
installing the printer driv er. Therefo re, to star t the online ma nual you have to loa d the PagePro
4100E printer driver CD into the CD-ROM drive of your computer and start the online manual
from there.
Switch on the comp uter an d start Win dows 3.1x, Windo ws 95, Windows98 or Windows NT
1
4.0.
Place the PagePro 4100E printer driver CD in the CD-ROM drive of your computer.
2
The installation window opens automatically.
The installation window does not appear automatically?
?
Ü Start Windows Explorer and navigate to the contents of the CD.
Ü Double-click on “Pagepro.exe“.
The installation progra m "Welcome" windo w briefly appears on the sc reen. It is replaced
after a few seconds by the following installation window.
Starting the online manual
4-2
Choose a language and then click on [OK].
3
Page 45

Starting the online manual
In the following installation window click on [LOOK AT MA NUAL].
4
4
If Adobe Acrobat Re ader h as alrea dy b een i nstall ed on your comput er, the n the softw are i s
launched automatically for you to either view on-screen or print out a hard copy.
Adobe Acrobat Reader is not already installed on your computer?
?
You need Adobe Acrobat Reader in order to be able to read the online manual.
Ü Install Adobe Acrobat Reader from the CD-ROM.
4-3
Page 46

4
Starting the online manual
4-4
Page 47

Appendix
5 Appendix
5.1 Performance features
Hardware
In terms of hardware, the PagePro 4100E offers you:
l PCL 6 emulation,
l 1200 x 600 dpi print quality with Fine-ART,
l 66 MHz RISC processor,
l 8 MB RAM as standard,
l up to 18 ppm (A4/Letter),
l Parallel port
l USB port,
l upgrade with Adobe PostScript 3 SIMM module,
l upgrade with network card.
Software
In terms of software, the PagePro 4100E offers you:
l browser-based PageScope printer management tool for simple network operation.
5
Operating system
The PagePro 4100E can be used with the following operating systems:
l Windows 95,
l Windows 98,
l Windows 3.1x,
l Windows NT 4.0,
l MS-DOS 6.2 and higher (except MS-DOS 7.0),
l Macintosh (with an optional PostScript ROM-SIMM and an optional network card).
5-1
Page 48

5
5.2 Technical specification
PagePro 4100E printer
Technical specification
Type Desktop laser printer
Print system Electrostatic dry powder imaging system
Exposure system Laser diode + polygon mirror scanning
Resolution 1200dpi × 600dpi, 600dpi × 600dpi (with Fine-ART)
Emulation PCL 6
Printing speed
(single-sided)
Printing speed
(double-sided)
Time to 1st page
(single-sided)
Time to 1st page
(double-sided)
Warm-up tim e max. 23 s
Paper formats A4, A5, JIS B5, Letter, Legal, Executive, Commercial 10,
Paper/Media • Plain paper (16 to 24 lbs. / 60 to 90g/m
Paper sources • Paper feed tray 1 (muiltipurpose tray)
Input capacities • Paper feed tray 1 (muiltipurpose tray): 150 sheets
Output capacity • Output tray (printed side down):100 sheets
Operating temperature 50°F to 95°F / 10 to 35°C (fluctuations 18°F / 10°C per hour)
Humidity 15 to 85% (fluctuations max. 20% per hour)
Toner cartridge life 9000 pages A4 or Letter with a back-to-white ratio of max. 5%. (The starter
Voltage supply 120-127V / 220-240 V at 50-60 Hz
Current consumption • Operation: max. 820 W
Amperage max. 7.0 A (120 V) / 3.5 A (230 V)
18 ppm (A4 or Letter)
5 ppm (A4 or Letter)
18 s (A4 or Letter)
29 s (A4 or Letter)
Monarch, DL, C5 and B5 envelopes, custom formats
(width: 3-1/2 in. to 8-1/2 in. / 88,9 to 216 mm,
length: 6 in. to 14 in. / 152,4 to 356 mm)
• Recycled paper (16 to 24 lbs. / 60 to 90g/m
• OHP film
• Envelopes
• Card and thick paper (24 to 43-1/4 lbs. / 90 to 163 g/m
• Letterhead
• Labels
• Postcards
• Manual feed unit
• Paper feed tray 2 (option)
• Paper feed tray 3 (option)
• Paper feed tray 2: 500 sheets
• Paper feed tray 3: 500 sheets
imaging cartridge supplied with the printer is capable of producing approx. 5000
pages A4 or Letter.)
• Stand-by: max. 60 W
• Power Save mode: max. 30 W
Appendix
2
)
2
)
2
)
5-2
Page 49

Appendix
Technical specific ation
Dimensions
(without paper feed tray 2)
Weight Printer: Approximately 28-3/4 lbs. / 13 kg
Interfaces • Centronics parallel port IEEE 1284B/ECP
Processor Power PC 401/66 MHz
RAM 8 MB (can be expanded to 104 MB)
Options • Paper feed tray 2 (500 sheets)
Height:13 in. / 330mm
Width: 17-5/32 in. / 436 mm
Depth: 20 in. / 510 mm
Imaging cartridge: Approximately 3-1/4 lbs. / 1.5 kg
•USB
• Paper feed tray 3 (500 sheets)
• Duplex unit
• Network card
• Memory expansion (SIMM)
• PostScript ROM-SIMM
500-sheet paper feed tray (option)
Technical specific ation
Paper cassette Standard cassette: Letter
Paper • Plain paper (16 to 24 lbs. / 60 to 90g/m
Paper feeding system One-way system (multi-feed tray)
Capacity max. 500 sheets (plain or recycled paper)
Dimensions Height:4-3/4 in. / 121 mm
Weight approximately 10 lbs. / 4.5 kg
Options: A4, JIS B5, Legal, Executive
• Recycled paper (16 to 24 lbs. / 60 to 90g/m
Width: 17-1/4 in. / 440 mm
Depth: 13-3/4 in. / 350 mm
not including the legal cassette (Tray)
5
2
)
2
)
Duplex unit (option)
Technical specific ation
Paper feeding system One-way system
Paper • Plain paper (16 to 24 lbs. / 60 to 90g/m
Operating temperature 50°F to 95°F / 10°C to 35°C
Humidity 15 to 85%
Dimensions Height:10-3/4 in. / 275 mm
Weight Approximately 5 lbs. / 2.3 kg
• Recycled paper (16 to 24 lbs. / 60 to 90g/m
Width: 12-3/4 in. / 320 mm
Depth: 6 in. / 152 mm
2
)
2
)
5-3
Page 50

5
Network card (option)
Technical specification
Type Ethernet
Version • 10BaseT/100BaseTX
• 10BaseT/10Base2
• Token Ring
SDRAM-SIMM memory module (option)
Technical specification
Capacity 8, 16 and 32 MB
Type of function Burst Mode
Access speed 60 ns or less
No. of pins 72
Type of module SIMM (Single In-line Memory Module)
Interfaces and cables
Technical specification
Connections Printer: parallel 36-pin connection
Type of cable Shielded
Parallel cable IEEE 1284, type B
Length of cable max. 10 feet / 3 meters
Computer: EIA 25-pin connection
Signal and ground pairs must be twisted
Appendix
5-4
USB interface and cable
Technical specification
Connections Printer: Series B connection
Type of cable Shielded
Parallel cable IEEE 1284, type B
Pin allocation 1: V
Length of cable max. 17 feet / 5 meters
Computer: Series A connection
Signal and ground pairs must be twisted
BUS
2: D+
3: D–
4: GND
Shell: Shield
Page 51

Appendix
5.3 Minolta/QMS's concern for environmental protection
What does the energy star mean?
5
Laser printers with the Energy Star
they have not been used for a certain amount of time. This function can reduce your electrical
costs by up to 60%.
This laser printer fulfils the energy efficiency criteria for the Energy Star® of the EPA (USA
Environmental Protection Agency).
®
feature switch into a state with low power consumption if
5-5
Page 52

5
5.4 Customer information
Warranty
Who is covered by this warranty ?
The limited warranty is extended by Minolta-QMS only to the original end-user of the
accompanying Mi nolta-QMS prod uct. The l imited warranty is not as signable by the end-us er to
any other party and is valid only within the borders of the country where the product was
originally purchased.
You will find your Warranty Reply Card at the end of this documentation.
What does this warranty cover?
The warranty covers defects in materials and workmanship in the Minolta-QMS product under
normal use and service.
What does this warranty NOT cover?
Your are solely responsible for any failure of the product which results from accident, abuse,
misapplication o r alterati on of the Minol ta-QM S prod uct , and Mino lta-Q MS assu mes no liab ility
as to consequence of suc h events under the terms of the warranty. The warranty does no t cover
damage to the Minol ta-Q M S pro duc t d ue to i mp roper site preparation, i mpr ope r or inadequate
maintenance, normal w ear and tea r, usage of no n-supp orted med ia, use of cu stom er suppli ed
software or interfaces, unauthorized modification or service, operation outside of environmental
specifications, duty cycle abuse or use of incorrect consumables. While Minolta-QMS has made
every effort to provide clear and accurate technical information about the application of the
Minolta-QMS produc t, Minolta-QM S assumes n o liability for any events ar ising out of the use or
inability t o use this technical information.
Incidental and con sequential damages ca used by malfunction , default or otherwise wi th respect
to the breach of the w arranty are not the res ponsibility of M inolta-QMS and are h ereby exclude d
both for property a nd to t he extent not unco ns cio na ble for personal in jury da mage, even in the
event of the failure of an exclusive remedy. Some jurisdictions do not allow the ex clusion or
limitation of i nci de ntal o r c ons eq uen tia l d am age s, so the above ex cl us ion or li mitation may not
apply to you.
Appendix
5-6
Consumables and your warranty
The use of non-Minolta- QMS consumables and/ or accessories alone does not affect either your
warranty or any maintenance contract you may have purchased. However, if Minolta-QMS
product failure or damage is found to be directly attributable to the use of non-Minolta-QMS
consumables and/ or acces sories, M inolt a-QMS w ill no t repai r the Min olta-Q MS prod uct free o f
charge. In this case, standar d time and materi al charg es will be appl ied to servi ce your Min oltaQMS product for that pa rticular failur e or damage. Min olta-QMS recomm ends that yo u use only
Minolta-QMS consumables and accessories to support your Minolta-QMS product.
Electrostatic discharge and your warranty
It is very importan t to pro tect the M inolt a-QMS prod uct i nternal ci rcuit boards from elec trosta tic
damage during service, maintenance or building in options, that requires opening the MinoltaQMS product. You must always use an anti-static wrist strap. Attach on end of it to your wrist
and the other end to an y conve nient electri cal ground. N ever atta ch the wris t strap to a ny piece
Page 53

Appendix
5
of equipment with an electrical current present. Plastic, rubber, wood, painted metal surfaces
and telephones are not acceptable grounds.
What is the period of coverage?
Refer to the warranty card for spec ific detai ls. There sha ll be no warranty after expiration of the
period of coverage. Any and all implied warranties of merchantability and fitness for particular
use shall have no greater duration tha n the period of cov erage stated herein a nd shall terminate
automatically upon th e exp iratio n of such period. Some j urisdi ctions do not all ow limit ati ons on
how long an implied warranty lasts, so the above limitation may not apply to you.
What will Minolta-QMS do to correct problems?
In the event of a malfunct ion attributable directl y to Minolta-QMS product def ects, Minolta-QMS,
through its distributors or authorized service provide rs, will, at its option, repair or replace the
Minolta-QMS product, to wh atever extent Minolta-QMS de ems necessary to restore the product
to proper operating condition without charge to you. If it is impracticable for any reason in the
opinion of Minolta-QMS to repair or replace the Minolta-QMS product, Minolta-QMS may, at its
option, refund or pay an mount equal to t he lesse r of (1) the purchase price paid fo r the Min oltaQMS product, or (2 ) the then effec tiv e Mi no lta-QMS estimated reta il price for the Min olta -Q MS
product. Minolta-QMS may replace the Minolta-QMS product with a new or remanufactured
functionally equiv alent M inol ta-QMS produc t of equ al va lue , at the option of Min olta-Q MS. The
Minolta-QMS product will be returned to you by method and carrier chosen by Minolta-QMS. If
you desire some other specific form of conveyance or shipment, you must bear the cost of
return shipment. The remedy described above is the exclusive remedy extended to you by
Minolta-QMS for any default, malfunction or failure of the Minolta-QMS product to conform with
this warranty, or otherwis e for breach of this wa rranty or any other warra nty, whether expresse d
or implied.
How do you obtain warranty service?
Warranty service is provided by certified Minolta-QMS distributors and authorized service
providers. To obta in warranty service , c onta ct your Minolta-QMS ve ndo r or if you are in on e of
the countries mentioned on the next pages, you may call the appropriate number.
The Minolta-QMS p roduct can be return ed for repair or re pla ceme nt on ly after approval fro m a
certified Minolta-QMS distributor or service organization. If return shipment is needed, return
the Minolta-QMS produc t together with (a) the return me rchandise authoriza tion (RMA) number
displayed on the carton, merchandise, and packing slip, (b) proof of date of purchase and (c)
your mailing address and telephone number.
Do not return any merchandise to the manufacturer without calling your local Minolta-QMS
support centre for a return merchandise authorization (RMA) number.
Please note that if you return the Minolta-QMS product without proof of purchase or after
expiration of the period of coverage, the certified Minolta-QMS distributor or service
organization will, at its option, repair or replace the Minolta-QMS product and charge you for
parts and labour, unless Minolta-QMS has discontinued the manufacture, distribution or
maintenance of such products because of technical obsolescence.
5-7
Page 54

5
How does local law relate to this warranty?
This warranty gives you specific legal rights and you may also have other rights which vary from
jurisdiction to jur i sdictio n.
5.5 Certified Minolta-QMS Service Partners
Country Telephone Fax
Australia 03 - 988 719 77 03 - 980 030 52
Austria (+) 800 - 767 787 76 (+31) - 30 - 214 251 7
Belgium (+) 800 - 767 787 76 (+31) - 30 - 214 251 7
Canada 1 (800) - 858 1597
Denmark 043 - 553 000 043 - 713 032
Finland 09 - 692 609 9 09 - 674 886
France (+) 800 - 767 787 76 (+31) - 30 - 214 251 7
Germany (+) 800 - 767 787 76 (+31) - 30 - 214 251 7
Hong Kong 852 - 291 987 00 852 - 283 836 03
Israel 03 - 557 999 9 03 - 557 995 5
Italy 0522 - 307 955 0522 - 382 224
Japan 81 - 3 3435 4600 81 - 3 3435 4601
Korea 82 - 274 981 00 82 - 274 917 17
Latin America 1 (800) - 858 1597
Luxembourg 052 - 352 377 052 - 352 376
Netherlands (+) 800 - 767 787 76 (+31) - 30 - 214 251 7
New Zealand 09 - 444 198 8 09 - 444 981 5
Norway 38 - 066 060 38 - 066 061
Portugal (+) 800 - 767 787 76 (+) 800 - 767 787 76
PR China 86 - 203 878 099 3 86 - 203 878 010 7
Saudi Arabia 014 - 771 307 014 - 774 913
Singapore 65 - 747 226 6 65- 746 904 2
Spain (+) 800 - 767 787 76 (+31) - 30 - 214 251 7
Sweden 08 - 793 880 0 08 - 793 784 0
Switzerland 01 - 749 232 3 01 - 749 239 9
United Arab Emirates 971 - 459 903 2 971 - 455 742
United Kingdom (+) 800 - 767 787 76 (+31) - 30 - 214 251 7
USA 1 (800) - 858 1597
-
see note -
-
see note -
-
see note -
Appendix
5-8
Other countries (+) 800 - 767 787 76 (+31) - 30 - 214 251 7
For USA, Canada and Latin America you may also use the internet address:
www.qms.com/service or e-mail to service@minolta-qms.com
(+) = International number
Page 55

Appendix
5.6 Minolta-QMS support
Minolta-QMS support offers:
l Minolta-QMS service representatives in all major cities.
l Professional factory-trained engineers.
l Local stock of key spare parts and consumables.
l Help desk support. Support engineers are factory-trained to provide answers to questions
about equipment operation, systems integration, software compatibility, system upgrades
and other operating or technical issues.
Minolta-QMS USA, Canada and Latin America
Telephone Internet E-mail
1 (877) - 778 2687 www.qms.com/support support@minolta-qms.com
Minolta-QMS Europe, Middle East, Africa and Australia.
Telephone Internet E-mail
(+) 800 - 767 787 76 helpdesk@minolta-qms.nl
5
Information about the latest Minolta-QMS drivers and firmware is also possible via Internet.
Please visit our corporate Minolta-QMS website: www.qms.com. This website also gives
access to new prod uct announce ments and oth er general info rmation abou t Minolta-QMS. You
may also visit our website: www.q-shop.com for ordering consumables.
Note: (+) = International number
5-9
Page 56

5
5.7 Program Licence Agreeme n t
Notice to the User
Please carefully read the Licence Agreement before using or copying the software package in
this documenta tion s et. Th e righ t to u se thi s so ftware p rodu ct is con dition al on your agreem ent
on the following terms . Copying an d using this softw are indicate s that you have accepted these
terms and conditions. If you do not agree to the terms of the Licence, you may return this
software package alon g with the other comp onents of this product to the place of pur chase and
you will be reimbursed or credited according to the policy of the reseller or Minolta-QMS
representative from who you obtained thi s product. You assu me respo nsibility for the selection
of this product to achieve your intended results. Furthermore, you are responsible for
installation, use and results obtained from the product.
Licence Agreement
In consideration of payment of the licence fee, which is a part of the purchase price, MinoltaQMS grants to you a n on-exclu sive right to use th e software subject to t he fol lowing co nditions:
Minolta-QMS grants to you a non-exclusive right to use the software, without the right to
distribute, rent, sub-licence or lease the software or documentation. You may not alter, modify
or adapt the software or documentation, including but not limited to translating, de-compiling,
disassembling, crea tive d erivat ive wor ks or reverse e nginee ring. T he sof tware product m ay be
duplicated or copied as specified in the manual for your own personal use and all removable
copies must bear the copyrigh t notice contained on the origin al software. However, the softw are
may not be duplicated for the purposes of resell or distribution. Purchase of this licence does
not transfer any right, tit le or interest in the software to yo u except as specifi cally set for th in this
licence. The software programs are protected under copyright laws. This software product, or
portions thereof, may have been developed by an independent third party which holds
copyrights and othe r proprietary rights to the software product. You ma y be held res ponsible by
this supplier for any infringement of such rights by you.
Appendix
5-10
Term
This licence is effective unti l terminated. Yo u may termina te the licence at any time. This licence
and your right to us e the software a utomatically t erminate if you f ail to comply wi th any provision
of this licence agreement. In the ev ent of any termi nation, you wil l either return all cop ies of the
product to Minolta-QMS or with Minolta-QMS' prior consent, provide Minolta- QMS with a
certificate of destruction of all copies.
Limited Warranty
Minolta-QMS warrants for a period of NINETY (90) DAYS from the date of payment that the
media on which the software recorded are free from defects in material or workmanship under
normal conditions of use or service. The software is licensed on an 'as is' basis and MinoltaQMS does not warran t that the operation of the s oftware w ill be unin terrupted o r error f ree. You
assume responsibility for the selection of this product to achieve your intended results.
Furthermore, you are responsible for installations, use and results obtained from the product.
In the event that a defect in the media should appear during the warranty period, your remedy
shall be to return the media to Minolta-QMS for replacement. Should Minolta-QMS be unable
to replace the med ia within a reasonable amount of time, you r alternate remedy shall be ref und
of the licence fee upon return of the product and all copies. These are your sole remedies for
any breach of warranty. Except as specifically provided above, M
WARRANTY OR REPRESENTATION, EITHER EXPRESS OR IMPLIED, PERFORMANCE
INOLTA-QMS MAKES NO
Page 57

Appendix
5
MERCHANTABILITY OR FITNESS FOR A PARTICULAR PURPOSE. IN NO EVENT WILL
MINOLTA-QMS BE LIABLE FOR DIRECT, INDIRECT, SPECIAL, INCIDENTAL OR
CONSEQUENTIAL DAMAGES ARISING OUT OF THE USE OF, OR INABILITY TO USE THE
PROGRAM OR DOCUMENTATION, EVEN IF ADVISED OF THE POSSIBILITY OF SUCH
DAMAGES. IN NO CASE SHALL MINOLTA-QMS’ LIABILITY EXCEED THE AMOUNT OF
LICENSE FEE.
THE WARRANTY AND REMEDIES SET FORTH ABOVE ARE EXCLUSIVE AND IN LIEU OF
ALL OTHRS, ORAL OR WRITTEN, EXPRESS OR IMPLIED. SOME STATES DO NOT ALLOW
THE EXCLUSION OF LIMITATION OF IMPLIED WARRANTIES OR LIMITATION OF
LIABILITY FOR INCIDENTAL OR CONSEQUENTIAL DAMAGES, THEREFORE, THE ABOVE
LIMITATION OR EXCLUSION MAY NOT APPLY TO YOU.
Severability
In the event that any part or parts o f this Agreement s hall be hel d ille gal or null a nd voi d by any
court or administrative body of competent jurisdiction, such determination shall not effect the
remaining parts of this Agreement, and they shall remain in full force and effect as if such part
or parts determined illegal or void had not been included.
GOVERNMENT END USERS
If you are acquiring the Software on behalf of any unit or agency of the United States
Government, the fol lowi ng provisions apply. T he Softwa r e is a " co mmerc ia l i t em," as that term
is defined at 48 C.F.R.2.101(OCT 1995), consisting of "commercial computer software" and
"commercial computer software documentation," as such terms are used in 48 C.F.R.12.212
(SEPT 1995). Consistent with48 C.F.R.12.212 and 48 C.F.R.227.7202-1 through 227.7202-4
(JUNE 1995), all U.S. Government End Users acquire the Software with only those rights set
forth herein.
5-11
Page 58

5
5.8 Index
A
Adobe Acrobat Reader, installing ........................................................................................4-1
Ambient conditions
C
Cable specifications .............................................................................................................5-4
CDRH regulations ................................................................................................................1-4
Certified QMS Service Partners
Configuration page, printing out .........................................................................................2-16
Connecting the printer
Consumables, storing
Customer information ...........................................................................................................5-6
Warranty
E
External printer parts ............................................................................................................2-3
Appendix
...............................................................................................................2-7
...........................................................................................5-8
........................................................................................................2-18
..........................................................................................................2-7
.........................................................................................................................5-6
I
Installation using Add Print er W iza rd ................................. ..... ...... ...... ..... ...... ..... ...... ...... .....3-2
installat ion using Plug-and Play
Interface connections ...........................................................................................................5-4
...........................................................................................3-2
L
Laser caution label ...............................................................................................................1-5
Laser printer
connecting to computer
setting up
settings
unpacking
Laser safety label
Limited warranty
Loading paper ....................................................................................................................2-10
........................................................................................................................2-7
.........................................................................................................................2-13
.......................................................................................................................2-1
.................................................................................................................1-4
.................................................................................................................5-10
................................................................................................2-17
N
Network card ........................................................................................................................5-4
5-12
Page 59

Appendix
O
Online manual
Installing Adobe Acrobat Reader
Notes on the online manual
Overview of printer
Optional printer parts
Printer control panel
...............................................................................................................2-3
......................................................................................................2-5
........................................................................................................2-6
....................................................................................4-1
............................. ..... ...... ...... ..... ...... ..... ...... ...... ..... ...... ..... ..4-1
P
PagePro 4100E printer, technical specification ....................................................................5-2
Paper output tray
Paper sizes, feasible ................................................................................................2-11, 2-12
Paper specifications
Parallel printer port ............................... ..... ...... ...... ................................. ...... ...... ..... ...... .....2-17
Performance features
Place of installation
Power cable, connecting ....................................................................................................2-14
Printer accessories, storing
Printer driver
CD-ROM installation for Win95/98/NT4.0
Installation
MS-DOS installation
Notes on installation
Uninstalling the printer driver
USB device driver
Windows 3.1x installtaion
Printing envelopes
Printing out the test page ....................................................................................................2-16
Program Licence Agreement
.................................. ..... ...... ...... ................................. ...... ...... ..... ...... .....2-13
............................. ..... ...... ...... ................................. ...... ...... ..... .2-11, 2-12
................................ ...... ...... ................................. ...... ...... ..................5-1
...............................................................................................................2-7
..................................................................................................2-7
.......................................................................3-7
.......................................................................................................................3-1
......................................................................................................3-12
............................. ...... ...... ..... ............ ..... ...... ..... ...... ...... ..... ...... ..... ..3-1
........................................................................................3-10
...........................................................................................................3-3
................................................................................................3-9
..............................................................................................................2-10
..............................................................................................5-10
5
Q
QMS Service Partners ..........................................................................................................5-8
QMS Support
........................................................................................................................5-9
S
Service Partners ............................. ...... ..... .................................. ...... ..... ..............................5-8
Setting up output tray .........................................................................................................2-13
Setting up the laser printer
Connecting printer to computer
Paper output tray
Printing out the configuration page
Space required
..........................................................................................................2-13
.....................................................................................................................2-8
.....................................................................................2-18
...............................................................................2-16
5-13
Page 60

5
Appendix
Starting the online manual
Storage of consumables and printer accessories ................................................................2-7
Switching the printer on/off
System requ irements
...................................................................................................4-2
................................................................................................2-15
...........................................................................................................3-1
T
Technical specification
500-sheet paper feed tray
Interface connections and cables
Network card
PagePro 4100E printer
SIMM memory module
..................................................................................................................5-4
..............................................................................................5-3
...................................................................................5-4
...................................................................................................5-2
................................ ..... ............ ..... ...... ...... ..... ...... ..... ............ .....5-4
U
Uninstalling the printer driver .............................................................................................3-10
Unpacking the laser printer
USB device driver .................................. ..... ...... ..... ...... ...... ..... ...... ...... .................................3-3
User instructions
..................................................................................................................1-6
..................................................................................................2-1
W
Warranty ..............................................................................................................................5-6
5-14
Page 61

1 Introduction
1.1 Welcome to Minolta/QMS..............................................................................................1-1
1.2 Working safely with your laser printer.........................................................................1-2
Notes on your safety and operating safety.. ...... ................................. ...... ........................1-2
Laser safety......................................................................................................................1-3
Internal laser radiation......................................................................................................1-3
CDRH regulations............................................................................................................1-4
Laser safety label.............................................................................................................1-4
Laser caution label...........................................................................................................1-5
1.3 User instructions............................................................................................................1-6
FCC Part 15 - Radio Frequency Devices Warning
(for users in the USA).......................................................................................................1-6
Interference-causing Equipment Standard (ICES-003 ISSUE 3) Warning
(for users in Canada).......................................................................................................1-7
Ozone emission............................................................................ ..... ...... ...... ..... .............1-7
2 Unpacking and setting up
2.1 Unpacking the laser printer...........................................................................................2-1
2.2 Overview of printer ........................................................................................................2-3
External printer parts.......................................................................... ...... ...... ..... ...... .......2-3
Internal printer parts.........................................................................................................2-4
Optional printer parts........................................................................................................2-5
Printer control panel.........................................................................................................2-6
2.3 Setting up the laser printer (1)......................................................................................2-7
Place of installation..........................................................................................................2-7
Storage of consumables and accessories .......................................................................2-7
Ambient conditions...................................... ...... ..... .................................. ...... ..... ...... ..... ..2-7
Space required.................................................................................................................2-8
2.4 Please note the following points:...............................................................................2-10
What should I watch out for when loading paper?.........................................................2-10
What should I watch out for when loading envelopes?..................................................2-10
Which sizes of paper can I use?....................................................................................2-11
What types of paper can I use?.....................................................................................2-12
2.5 Setting up the laser printer (2)....................................................................................2-13
Fitting the paper output tray and paper feed tray 1 .......................................................2-13
Connecting the power cable ..........................................................................................2-14
Switching the printer on and off......................................................................................2-15
Printing a configuration page ........................................................................................2-16
Connecting the printer to a computer (parall el port) ...................................... ................2-17
Connecting the printer to a computer (USB port) ..........................................................2-18
3 Installing the printer driver
3.1 System requirements.....................................................................................................3-1
3.2 Notes on installing the printer driver...........................................................................3-1
General information on the printer driver.........................................................................3-2
-15
Page 62

Information on installation using Plug-and-Play ..............................................................3-2
Information on installation using the Add Printer Wizard.................................................3-2
Information on installing a network printer.......................................................................3-2
3.3 Installing the USB device driver...................................................................................3-3
3.4 CD-ROM installation for Win95, Win98 or WinNT4.0..................................................3-7
3.5 Installation for Windows 3.1x ......................................................................................3-9
3.6 Uninstalling the Windows printer driver ...................................................................3-10
Deinstallation for Windows 95/98 and Windows NT 4.0................................................3-10
Deinstallation for Windows 3.1x ....................................................................................3-11
3.7 Installation for MS-DOS ..............................................................................................3-12
4 Starting the online manual
4.1 Notes on the online manual..........................................................................................4-1
4.2 Start the online manual as follows:.............................................................................4-2
5 Appendix
5.1 Performance feature s................ ...... ..... ...... ..... ...... .................................. ..... ...... ...... .....5-1
Hardware...................................................... ..... .................................. ...... ..... ...... ...... .....5-1
Software .................................................................. ...... ................................. ...... ...... .. ...5-1
Operating system.................................................... ...... ..... ...... .................................. .....5-1
5.2 Technical specification.................................................................................................5-2
PagePro 4100E printer ....................................................................................................5-2
500-sheet paper feed tray (option)..................................................................................5-3
Duplex unit (option).........................................................................................................5-3
Network card (option)......................................................................................................5-4
SDRAM-SIMM memory module (option).........................................................................5-4
Interfaces and cables.................................................... ..... ...... .................................. .....5-4
USB interface and cable..................................................................................................5-4
5.3 Minolta/QMS's concern for environmental protection ..............................................5-5
What does the energy star mean? ..................................................................................5-5
5.4 Customer information...................................................................................................5-6
Warranty..........................................................................................................................5-6
What does this warranty cover?......................................................................................5-6
What does this warranty NOT cover?..............................................................................5-6
Consumables and your warranty.....................................................................................5-6
Electrostatic discharge and your warranty.......................................................................5-6
What is the period of coverage?......................................................................................5-7
What will Minolta-QMS do to correct problems? .............................................................5-7
How do you obtain warranty service?..............................................................................5-7
How does local law relate to this warranty?....................................................................5-8
5.5 Certified Minolta-QMS Service Partners......................................................................5-8
5.6 Minolta-QMS support....................................................................................................5-9
Minolta-QMS USA, Canada and Latin America...............................................................5-9
Minolta-QMS Europe, Middle East, Africa and Australia.................................................5-9
-16
Page 63

5.7 Program Licence Agreement......................................................................................5-10
Notice to the User..........................................................................................................5-10
Licence Agreement........................................................................................................5-10
Term...............................................................................................................................5-10
Limited Warranty............................................................................................................5-10
Severability.....................................................................................................................5-11
GOVERNMENT END USERS.......................................................................................5-11
5.8 Index..............................................................................................................................5-12
-17
Page 64

-18
Page 65

A
Adobe Acrobat Reader, installing .........................................................................................4-1
Ambient conditions
............................... ..... ...... ...... ..... ...... ...... ..... ...... ..... ...... ...... ..... ...... ..... ..2-7
C
Cable specifications ..............................................................................................................5-4
CDRH regulations
Certified QMS Service Partners
Configuration page, printing out .........................................................................................2-16
Connecting the printer
Consumables, storing ...........................................................................................................2-7
Customer information
Warranty
.................................................................................................................1-4
................................. ...... ...... ..... .................................. ..... ..5-8
............................... ...... ...... ..... ...... ...... ..... ...... ..... ............................2-18
...........................................................................................................5-6
.........................................................................................................................5-6
E
External printer parts ................................. ...... ...... ..... .................................. ...... ..... ...... ..... ..2-3
I
Installation using Add Printer Wizard ....................................................................................3-2
installation using Plug-and Play
Interface connections ...........................................................................................................5-4
............................................................................................3-2
L
Laser caution label ...............................................................................................................1-5
Laser printer
connecting to computer
setting up
settings
unpacking
Laser safety label
Limited warranty .................................................................................................................5-10
Loading paper
............................. ..... ...... ..... ...... ...... ..... ...... ...... ................................. ...... ..... ..2-7
................................. ..... ...... ..... ...... ...... ..... ...... ...... ................................. ...... .....2-13
............................. ..... ...... ..... ...... ...... ..... ...... ...... ................................. ...... ..... ..2-1
.................................................................................................................1-4
.....................................................................................................................2-10
.................................................................................................2-17
N
Network card ........................................................................................................................5-4
-19
Page 66

O
Online manual
Installing Adobe Acrobat Reader
Notes on the online manual
Overview of printer
Optional printer parts
Printer control panel
...............................................................................................................2-3
......................................................................................................2-5
.......................................................................................................2-6
....................................................................................4-1
............................................................................................4-1
P
PagePro 4100E printer, technical specification ...................................................................5-2
Paper output tray
Paper sizes, feasible .................................................................................................2-11, 2-12
Paper specifications
Parallel printer port .............................................................................................................2-17
Performance features
Place of installation
Power cable, connecting ............................. ...... ..... ...... ...... ..... ...... ...... ..... ..........................2-14
Printer accessories, storing
Printer driver
CD-ROM installation for Win95/98/NT4.0
Installation
MS-DOS installation
Notes on installation
Uninstalling the printer driver
USB device driver
Windows 3.1x installtai on
Printing envelopes
Printing out the test page ...................................................................................................2-16
Program Licence Agreement
...............................................................................................................2-13
..................................................................................................2-11, 2-12
..........................................................................................................5-1
..............................................................................................................2-7
..................................................................................................2-7
......................................................................3-7
......................................................................................................................3-1
.....................................................................................................3-12
.......................................................................................................3-1
........................................................................................3-10
...........................................................................................................3-3
................................. ...... ...... ..... ...... ...... ..... ...... ..... ...... ...... .....3-9
................................. ..... ...... ..... ...... ...... ..... ...... ...... ...............................2-10
.............................................................................................5-10
-20
Q
QMS Service Partners .........................................................................................................5-8
QMS Support
.......................................................................................................................5-9
S
Service Partners ..................................................................................................................5-8
Setting up output tray .........................................................................................................2-13
Setting up the laser pri nter
Connecting printer to computer
Paper output tray
Printing out the configuration page
Space required
.............................. ..... ...... .................................. ..... ...... ....................2-13
.....................................................................................................................2-8
....................................................................................2-18
...............................................................................2-16
Page 67

Starting the online manual
Storage of consumables and printer accessories .................................................................2-7
Switching the printer on/off
System requirements
....................................................................................................4-2
.................................................................................................2-15
................................. ...... ...... ..... ...... ...... ..... ...... ..... ..............................3-1
T
Technical specification
500-sheet paper feed tray
Interface connections and cables
Network card
PagePro 4100E printer
SIMM memory module
............................. ...... ........... ...... ..... ...... ........... ...... ..... ...... ........... ...... ..... ..5-4
...............................................................................................5-3
...................................................................................5-4
...................................................................................................5-2
....................................................................................................5-4
U
Uninstalling the printer driver ..............................................................................................3-10
Unpacking the laser printer
USB device driver .................................................................................................................3-3
User instructions
...................................................................................................................1-6
.............................. ...... ..... ...... ...... ..... ...... ..... ...... ........................2-1
W
Warranty ...............................................................................................................................5-6
-21
 Loading...