

Page 1
®
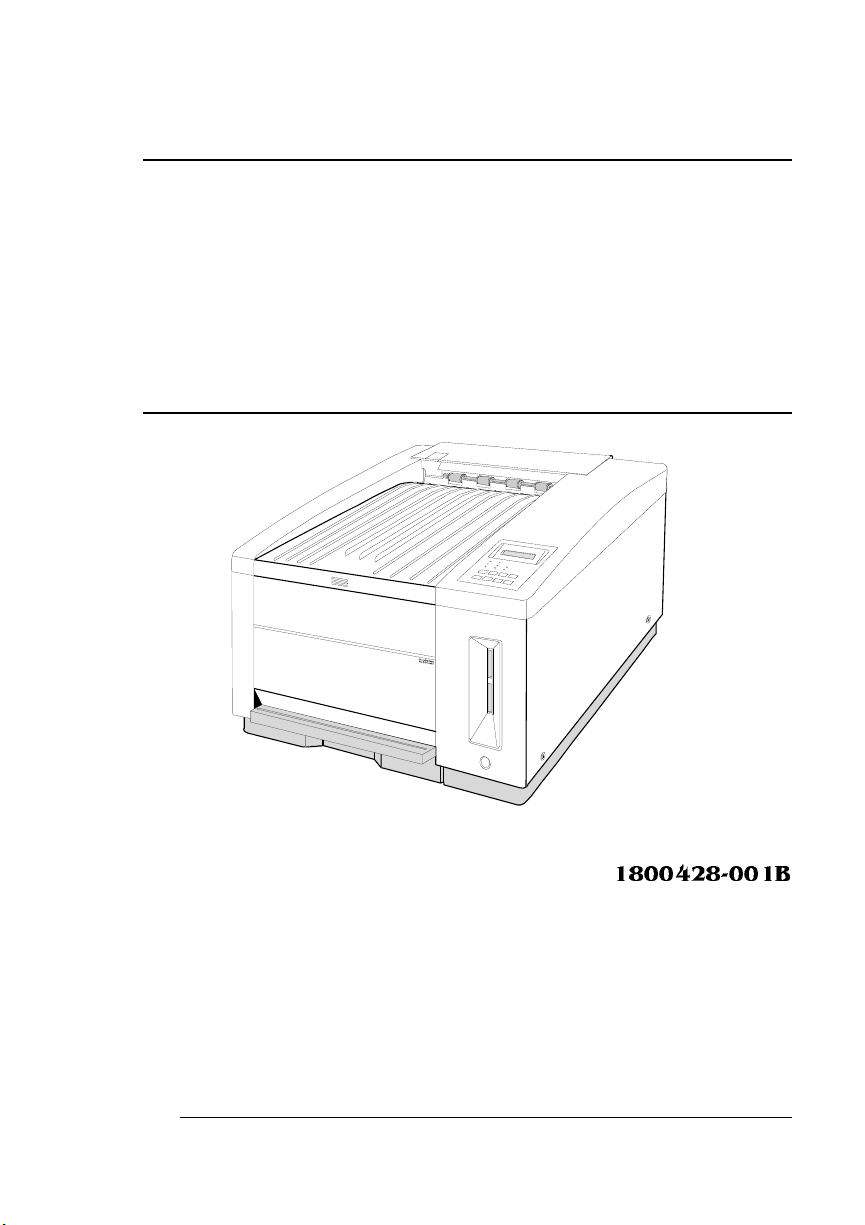
QMS
®
magicolor CX
Reference Guide
1800428-001B
Page 2
Trademarks
The following are trademarks or registered trademarks of their respective owners. Other
product names mentio ned in this manua l may also be trademar ks or register ed
trademarks of their resp ective owners. Regis tered trademark s are regis tered in the
United States Patent and Trademark Office; some trademarks may also be regis tered in
other countries. QM S, magicolor, and the QMS logo ar e regis tere d tradem ar ks of Q MS,
Inc., and Crown, the Crown seal, and PS Executive Series are trademarks of QMS, Inc.
PostScript is a trademark of Ad obe Systems In corpor ated for a page descr iption
language and may be registered in cer tain jur isdictions. Throug hout this manual,
“PostScript Level 2” is used to refer to a set of capabilities define d by Adobe Systems
for its PostScript Level 2 page descrip tion language. Th ese capabilities, am ong others,
are implemented in th is pr odu ct through a Q MS -developed emulation that is com patible
with Adobe's PostScript Level 2 language. Adobe/Adob e Systems Inco rporated. 3Co m,
3+Open/3Com Cor poration. Ald us, Aldus PageMaker, Aldus FreeHand/Aldus
Corporation. Apple, AppleTalk, EtherTalk, LaserWriter, LocalTalk, Macintosh, TrueType/
Apple Computer, Inc. VINES/Banyan. CompuSer ve /H & R Block. DEC, DECnet, VMS/
Digital Equipment Cor poration. Phone NET/Farallon Computing, Inc. Hewlett-Packard,
HP, PCL, HP-GL, LaserJet/H ewlett-Packard Co. IBM PC, Token-Ring/International
Business Machines Cor poration. Intel/Intel Cor poration. Microsoft, M S-DOS/Microsoft
Corporation. Novell and NetWare/Novell, Inc. Quar kXPress/Quar k, Inc. TOPS/Sun
Microsystems, Inc. UNIX/U NIX Systems Laboratorie s.
Proprietary Statement
The digitally encoded software included with your Q MS printe r is Copyrighted © 1996
by QMS, Inc. All Rights Reserved. This software may not be reproduce d, modified,
displayed, transferred, or copied in any form or in any manner or on any media, in whole
or in part, without the express written per mission o f QMS, Inc.
Copyright Notice
This manual is Copyrighte d © 1996 by QMS, Inc., One Magnum Pass, Mobile, AL
36618. All Rights Reser ved. This manual m ay not be copied in whole or in par t, nor
transferred to any other media or language, without the expr ess written permiss ion of
QMS, Inc.
Page 3

Typographic Conventions
The following typographic conventions are used in this manual:
Mixed-Case
Courier
Mixed-Case
Italic
Courier
UPPERCASE
COURIER
lowercas e
bold
lowercase italic
UPPERCASE File and utility na mes
↵ Press the Enter key (PC) or Return key (Macintosh)
^ Press and hold down the Ctrl key (PC)
» Note:
Notes contain tip s, extra information, or impo rtant infor m ati on
Text you type, and messages and information
displayed on the screen
Variable text you type; replace the italicized word(s)
with information specific to your printer or computer
Information displayed in the printer message
window
PostScript operators and DOS commands
Variable information in text
that deserves emphasis or reiteration.
▲ Caution:
Cautions present information that you need to know to a void
equipment damage, process failure, or extreme annoyance.
M
WARNING!
Warnings indicate the possibility of personal injury if a
specific procedure is not performed exactly as des cribed in the
manual.
ACHTUNG!
Bitte halten Sie sich exakt an die im Handbuch
beschriebene Vorgehensweise, da sonst Verletzungsgefahr
bestehen könnte.
Page 4

Products Covered by this Manual
This manual describes the following versions of the
printer : a version with 8 MB RAM, a version with 20 MB RAM, a version with 32 MB RAM, and a version with 40 MB RAM . The 32 MB
and 40 MB versions come standard with an internal hard disk, a SCSI
interface, and an Ethernet or Token-Ring network interface.
v
magicolor
CX
Page 5

Contents
1 Printer Configuration
Configuration Methods ................................................................1-2
The Configuration Menu ..............................................................1-4
About the Contr ol Panel .............................................................. 1-5
The Message Window 1-6
The Control Panel Indicators 1-7
The Control Pa nel Keys 1-8
About the Configurati on Menu ................ ..... ....... ....... ......... .....1-10
Accessing the Configuration Menu 1-11
Selecting Configuration Menu Options 1-11
Changing Character Information 1-13
Saving Configuration Changes 1-15
Canceling Configuration Changes 1-16
Restoring the Factory Default Configuration 1-16
Clearing Warning Messages 1-16
Operator Control Menu ..............................................................1-17
Page 6

Administration Menu ................................................................. 1-20
Communications 1-20
This menu contains several options that allow you to configure
the printer's communication parameters to match the host
and application parameters 1-20
Emulations 1-34
Special Pages 1-49
Printer Start-Up Options 1-52
Memory 1-53
Printer Engine Features 1-60
Miscellaneous 1-63
Disk Operations 1-65
2 Printer Options
Available Options and Accessories ........................................... 2-2
The Sheet Feeder ......................................................................... 2-4
The Envelope Cassette ............................................................... 2-8
Installing the Envelope Cassette 2-8
Font Cards .................................................................................. 2-12
Using Font Cards 2-12
Security Cards . ........ ......... ............ ......... .......... ........... ........ ....... 2-14
Using a Security Card 2-14
Installation Menu 2-18
Using Passwords 2-19
Removing and Replacin g the Con trol ler Board ... ......... ....... ... 2-20
Removing the Controller Board 2-20
Replacing the Controller Board 2-21
Single In-Line Memory Modules (SIMMs) ................................ 2-23
The Intellifont SIMM ................................................................... 2-26
Increasing the Disk Cache Size 2-28
Verifyin g the Installation 2-28
Accessing the Fonts 2-29
Interface Daughterboards .................................... ..................... 2-30
Connecting a Macintosh to a LocalTalk Interface .................. 2-33
QMS magicolor CX Referenceii
Page 7
Installing an Internal IDE Hard Disk .........................................2-34
Attaching External Hard Disks ..................................................2-37
Formatting a Hard Disk ... ....... ..... ....... ....... ..... ......... ....... ....... .....2-39
Installing Fonts ...........................................................................2-41
Removing Fonts 2-42
Installing an Emulation ..............................................................2-44
Updating System So ftware . ........ ....... ............ ......... ............ .......2-45
Choosing the Appropriate System Software Fil e s for
Downloading 2-45
Installing the System Software 2-46
Downloading System Software to a Functional Printer—
SYSTEMDL.PS 2-48
Downloading System Software to a Functional Printer—
SYSTEM.DL 2-51
Downloading System Software to a Non-Functional Printer 2-56
3 Technical Specifications
Print Engine Speci ficati on s ... ..... ...... ..... ... ..... ....... ....... ...... ... ..... ..3-2
Controller Specifications .............................................................3-3
Environmental Requirem ents ....................... .. ..... ...... ... ..... ..... .. ..3-4
Print Media and Consumables ....................................................3-4
Options, Accesso ries , and Replacem en t Parts .. .............. ..... ....3-5
Pinout and Cabl e Speci ficati on s .......... ..... ..... ..... ....... ...... ..... .....3-5
Communi cation M odes .. ....... ...... ....... ....... ..... ......... ......... ....... ...3-11
Simultaneous Interface Operations (SIO) 3-11
The Emulation Sensing Processo r (ESP) 3-11
Parallel Interface Modes 3-12
End Job Mode 3-13
Document Optio n Com man ds .......... ....... ..... ....... ....... ....... .......3-20
Updated DOC Command s .......... .............. ................... ............ ..3 -22
Updated PCL 5 DOC Commands 3-22
Notices ........................................................................................ 3-35
Contents iii
Page 8
FCC Statement 3-35
Canadian Users Notice 3-35
Laser Safety 3-36
Warranty Considerations 3-36
A QMS Customer Support
Sources of Supp ort ................. ..... ..... ....... ...... ..... ... ..... ....... ....... ..... . 2
Your QMS Vendor 2
Your Application Vendor 2
Q-FAX 2
The QMS Corporate Bulletin Board System 3
CompuServe 3
Internet 3
The QMS Customer Response Center (CRC) 4
QMS World-wide Offices .................................................................5
Glossary
Index
QMS magicolor CX Referenceiv
Page 9

1
Printer Configuration
In This Chapter . . .
n
“Configuration Methods” on page 2
n
“The Configuration Menu” on page 4
n
“About the Control Panel” on page 5
n
“About the Config uratio n Menu” on pa ge 10
n
“Operator Control Menu” on page 17
n
“Administrati on Menu” on page 20
Page 10
Configuration
Methods
Configuration Methods
You can configure the printer in the following ways:
n
Through an application or a driver
n
Through the printer control panel
n
Through PS Executive Series Utilities
n
Through printer commands
n
Through a remote console (for network users)
Using an Application or Driver
The best way to control the printer is through your application and a
printer driver. See chapter 1, “Connecting the Printer,” in the user’s
guide, and your application documentatio n for information on choos ing, installing, and using a prin ter dri ver. You should also read the
Printing section of your applica tio n documen tation.
Using the Control P ane l
The printer’s control panel has two functions: (1) it allows you to
change the printer’s default settings through the configuration menu
and (2) it displays the current status of the printer. The configuration
menu is set at the factory for most typical printing environments, so
most users don’t have to use the control panel often. Typically, you or
the system administrator might make a few one-time changes,
depending on your printing environment. If you do make changes in
the control panel, it’s important to realize that any commands given by
your application or printer dri ver will override the control panel settings.
This chapter describes the options available through the control panel
and how to use it. Chapter 4, “Troubleshooting,” of the user’s guide
lists the status messages displayed in the control panel.
Using PS Executive Series Utilities
You can also use the PS Executive Series Utilities (shipped with your
printer) to control the printer from your host. See the README file on
QMS magicolor CX Refe re nce Guide1-2
Page 11
Configuration
Methods
the utilities disk for informat ion on inst alli ng the ut ilit ies, and see the
utilities on-line help for details on using the software.
Using Printer Commands
Printer commands ( such as PostScript operators, QMS Document
Option Commands [DOCs], and HP PCL and HP-GL commands)
allow advanced users to enable fe atu res on a per-job basis.
Refer to your language documentation for specifics on HP PCL and
HP-GL commands.
QMS Document Opt ion Com ma nds are added to the beginning of a
print file and, when interpreted by the printer, turn on specific file processing or document handling features. For example, you can use
DOC to specify an emulation, select a specific inputbin or media size,
or choose page orientation. For more information , order the QMS
Crown Document Option Commands manual from your QMS vendor.
See chapter 3, “Te chnical S pecif icati on s,” of this manual for a list of
DOCs this printer supports.
Using Remote Console
If a network interface is installed in the printer, the network administrator can configure the printer through remote console. To avoid confusion in a shared printing environment, only the system administrator
should make configuration changes.
» Note:
If remote console has the print er off line, pressin g the Online/
Offline key will not take effect until the console puts the printer back
on line.
Printer Configuration
1-3
Page 12

The Confi gu ration
g
g
g
g
y
g
g
g
guag
Menu
The Configuration Menu
Online/
Offline
Menu
Previous Next
*
Operator Control
Select Select
Copies
Collation
Orientation
Inputbin
Chain Inputs
Color Separation
Color Model
Manual Feed Size
Media
Disk Operations
(appears only if a hard
disk is installed)
Install Option
Remove Option
Format Disk
Collation
Spool Overflow
Communications
Timeouts
LocalTalk
Serial
Parallel
Network
Special Pages
Color Balance P age
Service Pa
Calibration Pa
Header Pa
Trailer Pa
Header Inputbin
Trailer Inputbin
Status Page Type
Print Status
Registration Page
Memor
K Mem For Spool
K Mem For PSHeap
K Mem PSFonts
K Mem Emulation
K Mem Emul. Temp
K Mem Display
K Mem Disk Cache
K Mem FrameBuff
MB Printer Mem.
Enable Disk Swap
Administration
e
e
e
e
Emulations
ESP Default
Postscript
PCL5
HP-GL
LinePrinter
Startup Options
Do Start Page
Do Sys Start
Do Error Handler
Engine
Image Alignment
Default Paper
Input 1 Name
Input 2 Name
Outputbin Name
Clear Warnin
Def. Resolution
Pa
e Recovery
Ener
y Saver
Man Feed Timeout
Miscellaneous
Restore Defaults
Reboot System
New Flash Image
Keypad Lan
e
QMS magicolor CX Refe re nce Guide1-4
Page 13
About the
Control Panel
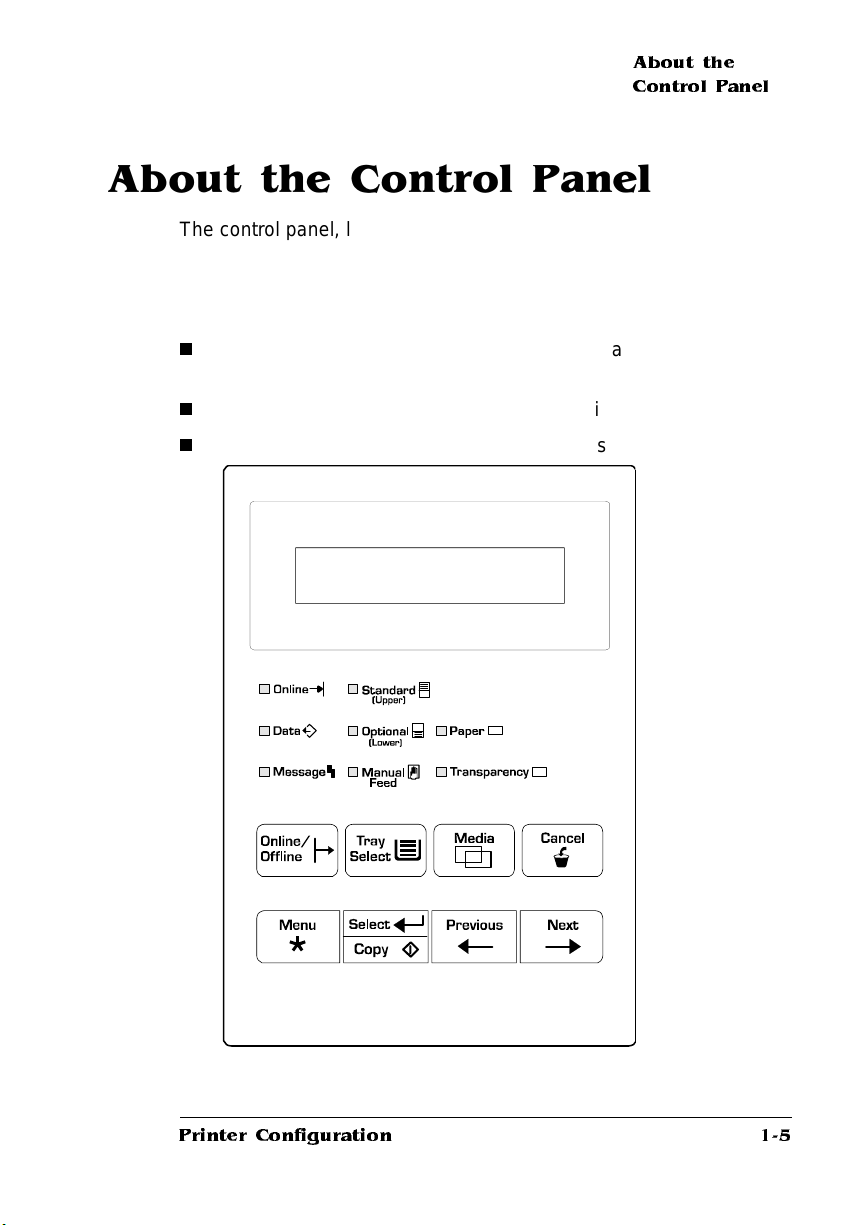
About the Control Panel
The control panel, located on the front of the printer, allows you to
direct the printer’s operation. In addition, it displays the current status
of the printer, including any condition that needs your attention.
The control panel consists of the following parts:
n
A 2-line, 32-character message window displays status and configuration information.
n
Eight LED indicators provide print er statu s informa tion.
n
Eight keys allow you to navigate the printer’s configuration.
IDLE
Printer Configuration
1-5
Page 14
About the
Control Panel
The Message Window
The control panel message window provides status and configuration
information. Status messages are listed in chapter 4, “Troubleshoot ing,” of the user’s guide. Status messages display in order of priority if
the printer is on line; they don't displ ay if the printer is off line.
When you're in the Configuration menu, the top line of the message
window displays the name of the current menu, and the bottom line
displays the name of an option within that menu.
Setting the Message Window Language
Status messages and configuration menus can be displayed in the
message window in English, French, German, or Spanish. If you
need to change the message window language, use the Keypad Language option in the Administration/Miscel laneou s menu.
Keypad Language
Menu
Administration
Miscellaneous
Keypad Language
Notes
The printer must be restarted for changes to the Keypad Language menu
to take effect. You can either let the printer restar t automatically after you
save the change and exit from the configuration menu, or you can wait for
the change to take effect the next time you manually turn on the printer.
Choices
English (default), French, German, Spanish
QMS magicolor CX Refe re nce Guide1-6
Page 15
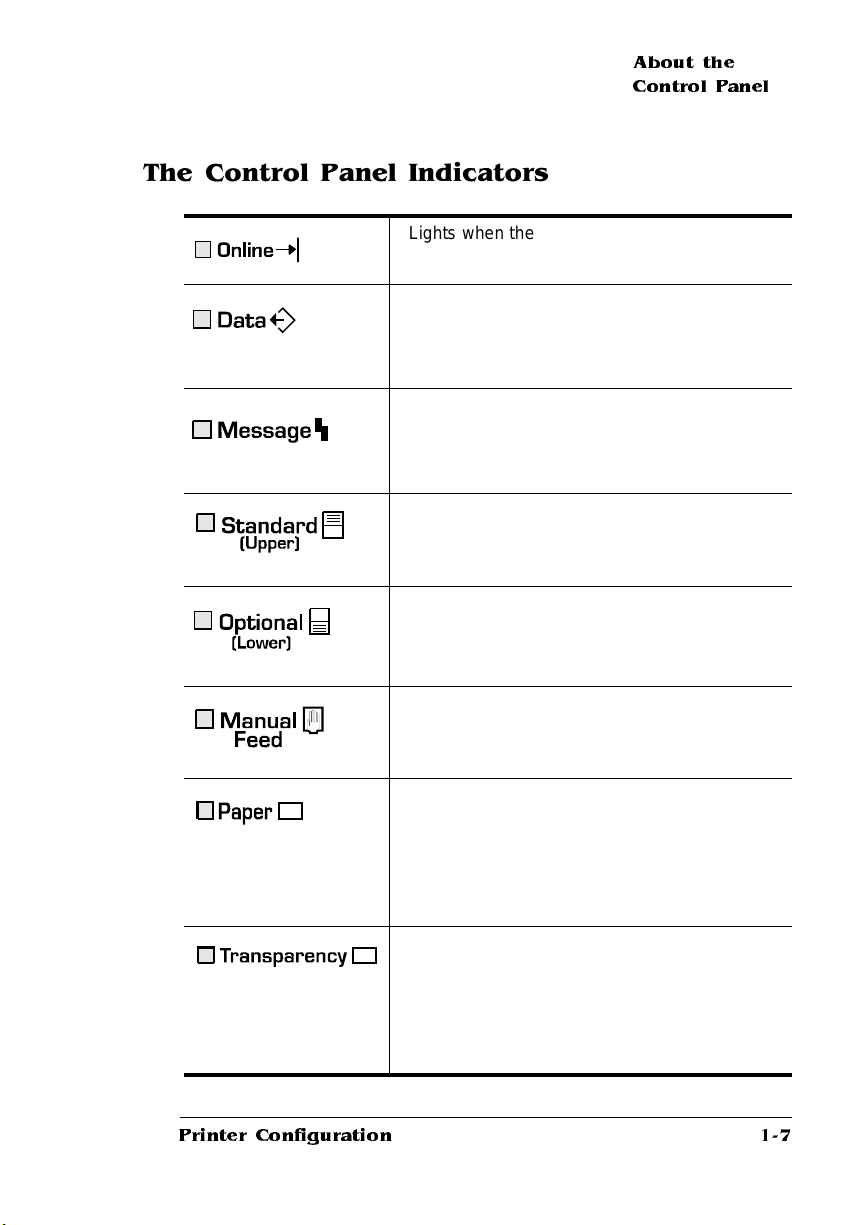
The Control Panel Indicators
Lights when the printer is on line and r eady to
accept and process new print jobs.
Lights when the printer is receiving data from
one or more of the simultaneous interfaces.
This indicator is usually accompanied by a
status message in the message window.
Lights when the printer requires operator
intervention. This indicator is usually
accompanied by a status message in the
message window.
Lights when the standard paper cassette is
selected.
Lights when the optional, lower paper cassette
is selected.
About the
Control Panel
Printer Configuration
Lights when manual feed is selected using the
Tray Select key.
Lights when the media in the active cassette
has been defined to be paper. When this LED
and the Transparency LED are both off, it
means that the Thick Stock media option (in
the Operator C ontrol/ M e dia menu) has been
selected.
Lights when the media in the active cassette
has been defined to be transparency. When
this LED and the Paper LED are both off, it
means that the Thick Stock media option (in
the Operator C ontrol/ M e dia menu) has been
selected.
1-7
Page 16
About the
Control Panel
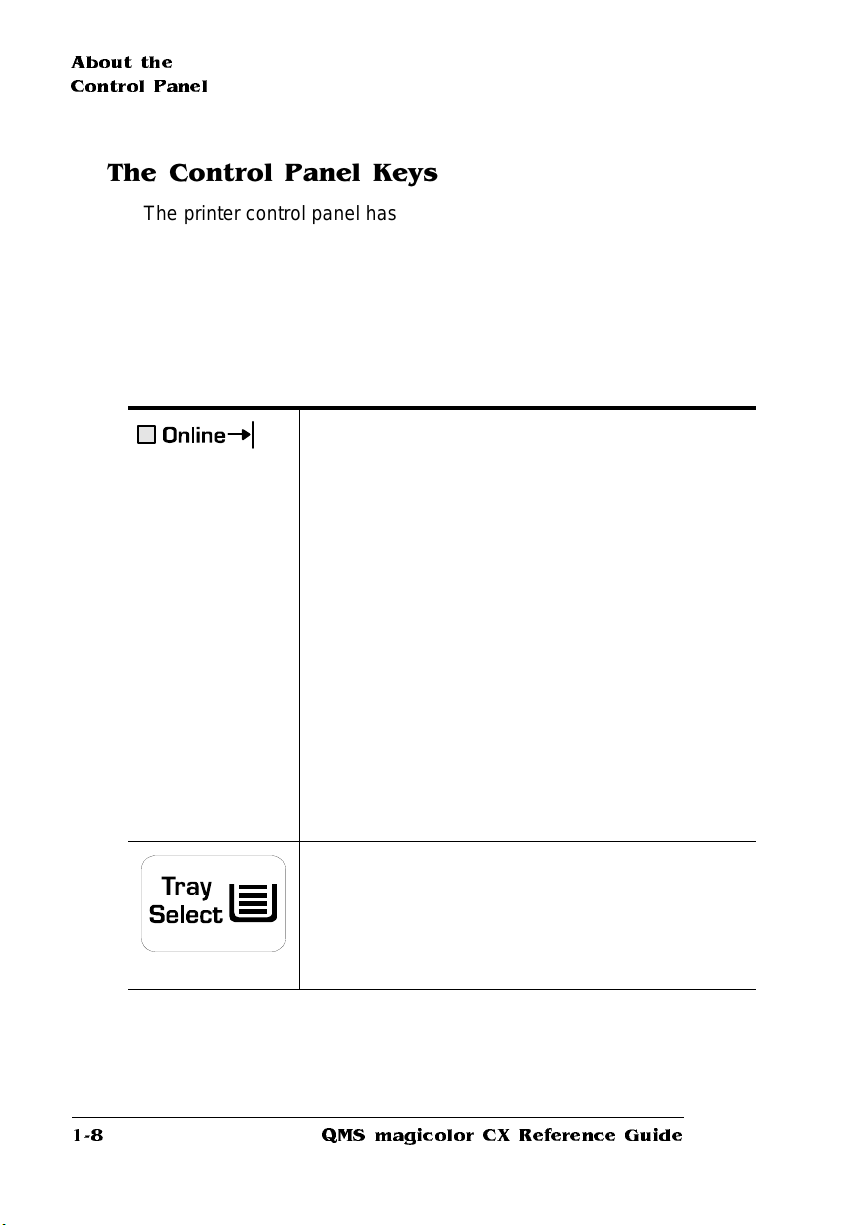
The Control Panel Keys
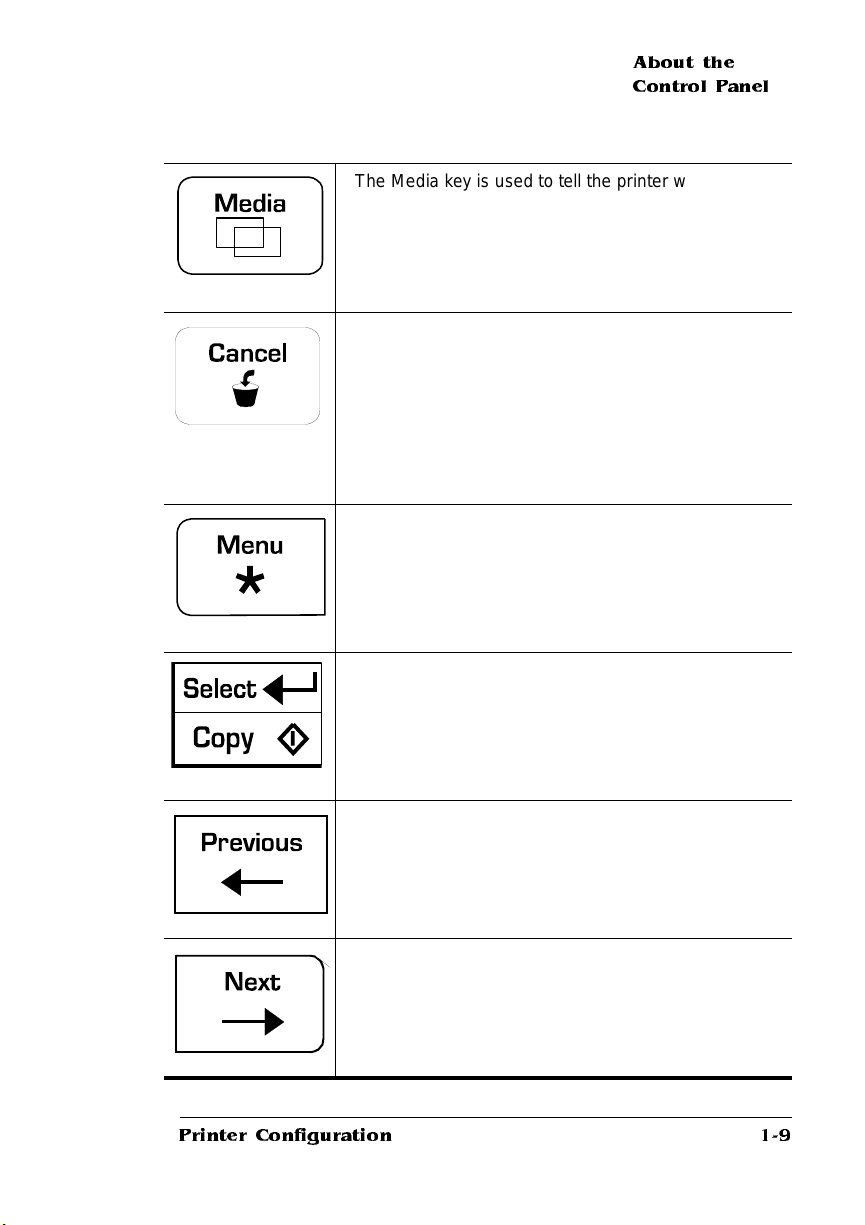
The printer control panel has eight function keys. The top row of keys
(Online/Offline, Tray Select, Media, Cancel) is for frequently used
operations. The bottom row of keys is used to navigate menus, select
options, and enter values.
» Note:
When you're in configuration mode (that is, if you have entered
the menu by pressing the Menu key), the printer ignores the Tray
Select, Media, and Cancel keys.
Press the Online/Offline key once to take the printer
off line (the indicator goes out). You must take the
printer off line before using all other keys except the
Cancel key.
When the printer goes off line, the communication
ports are closed, so no new data is accepted. The
printer continues printing until it has finished all jobs
in process. Although jobs continue to compile and
print using the data alr eady received, a job may be
interrupted, causing it to wait for more incoming data
before printing resumes.
When the printer is off line, press the Online/Offline
key once to place it back on line and ready to accept
new print jobs (the indicator goes back on). If a
remote console has the printer off line, pressing the
Online/Offline key will not take effect until the console
puts the printer back on line.
The Tray Select key allows you to select the cassette
from which to draw print media: the standard (upper)
cassette, the optional (lower) cassette, or the manual
feed tray.
QMS magicolor CX Refe re nce Guide1-8
Page 17
About the
Control Panel
The Media key i s used to tell the printer whether
paper or transparencies are in the currently selected
cassette. The factory default for both upper and lower
cassettes is paper.
Press the Cancel key to cancel the “oldest” print job
currently printing, interpreting, or spooling; or t o send
an end-of-job indicator to print jobs waiting for
incoming data. The printer then resumes printing
other print jobs in the queue. If you press the Cancel
key by mistake, or if you decide not to cancel a print
job after pressing this key, press the Menu key to
“cancel” the Cancel key’s function.
Press the Menu key to acce ss the configuration menu
after the printer goes off line. When you’re changing
printer configuration, press this key to cancel a
change (before pressing the Select k ey), to return to a
previous menu, or to return to a previous c haracter
when entering character information.
Press the Select/Copy ke y to access a menu or to
choose a displayed menu option. If you have the
CrownCopy copier option installed, use this key to
access the Copy menu. The CrownCopy
documentation contains information on using the
copier option.
Press the Previous key to return to the previous
selection or option for the current menu. When
changing character information, use this key to return
to the previous choice for the current input character.
Press the Next key to advance through the list of
selections or options for the current menu. When
changing character information, use this key to
advance to the next choice for the current input
character.
Printer Configuration
1-9
Page 18
About the
Configuration
Menu
About the Configuration Menu
The printer’s configuration menu allows you change the default printer
configuration settings. Any changes made to the configuration will
reside as new default settings and affect all subsequent print jobs.
The options in the configuration menu are organized under these
main menus:
n
Operator Control Menu
Use this menu to select document processing options such as
copy count, choosing input and output paper bins, chaining input
bins, and duplexing (if a duplexing unit is installed). Docum ent
processing selections are usually specified within individual jobs
since each job has its own requirements. However, if there’s no
way of specifying these selections within an applicatio n, use the
control panel to change selections, send the job, and then change
the defaults back.
» Note:
job through the control panel is not recomm ended in a shared
environment. When many systems are using the same printer,
there’s no way of making sure that no other jobs are sent to the
printer while the defaults are changed. The Operator Control
menu may be password protected with an optional security card if
the system administrator does not want users changing defaults.
n
Administration Menu
Use this menu to maintain printer-host communica tion information, and for selecting and configuring printe r emulations, config uring special pages, printing engine calib ration, and confi guring
hard disks, if present.
Defining document processi ng selectio ns for a par ticul ar
QMS magicolor CX Refe re nce Guide1-10
Page 19
About the
Configuration
Menu
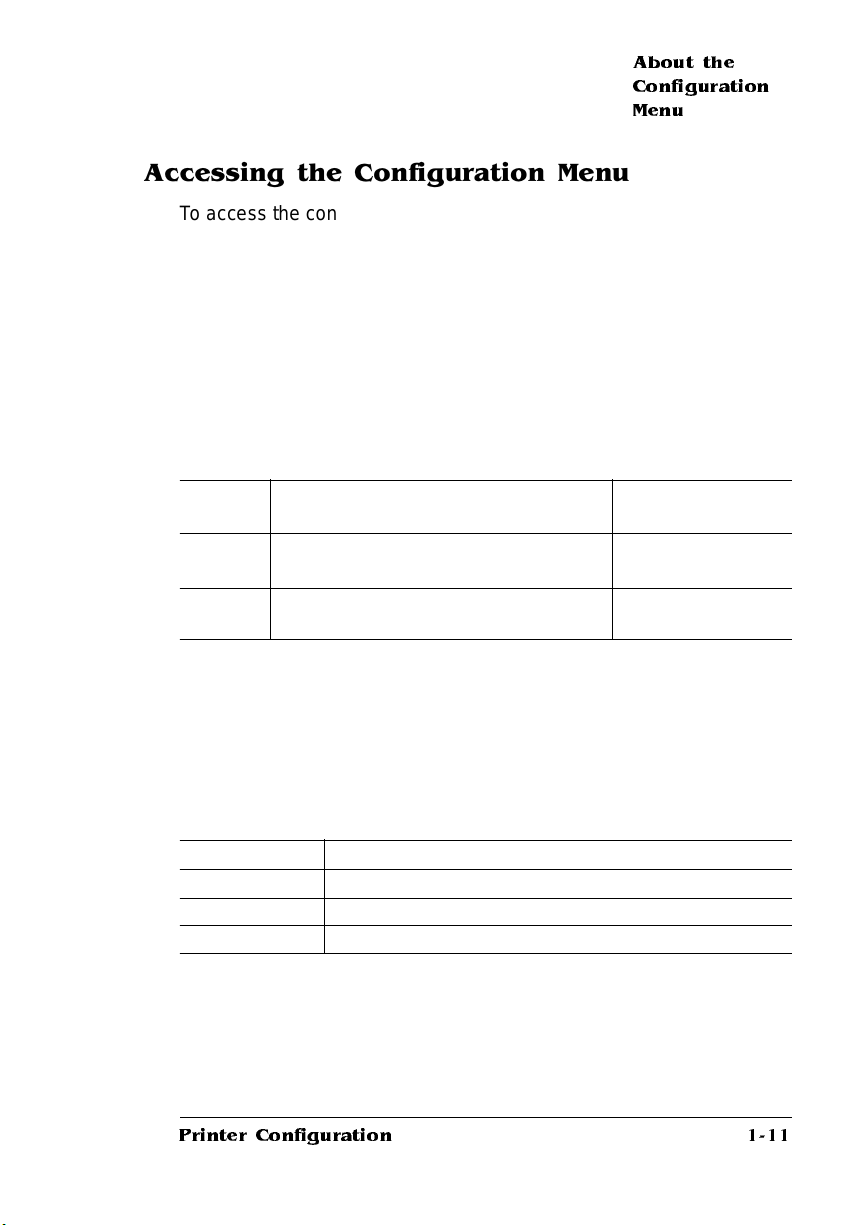
Accessing the Configuration Menu
To access the configuration menu, make sure the printer is idle (IDLE
displays in the message window), then press the Online/Offline key to
take the printer off line (the Online/Offline indicator is not lighted), and
finally press the Menu key.
For example, the following table shows how to use control panel keys
to access the printer configuration menu. Press the control panel keys
in the order shown. The printer responds by displaying a status message or configuration menu in the message window.
» Note:
You may need to press the Next key more t han one time to
advance through the list of options.
Press
this key
Online/
Offline
Menu
The printer must be off line and idle before you can access the configuration menu.
to... The message
window reads...
Tur n off the Online/Offlin e indicator and
ready the printer for configuration.
Access the configuration menu. CONFIGURATION
IDLE
OPERATOR CONTROL
Selecting Configuration Menu Options
Once you access the configuration menu, you use the contro l panel
keys to move through the menu. Use the following keys:
Press this key to...
Next Advance to the next option or submenu within a menu.
Previous Return to the previous option or submenu within a menu.
Select Select an option or enter a submenu.
Printer Configuration
1-11
Page 20
About the
Configuration
Menu
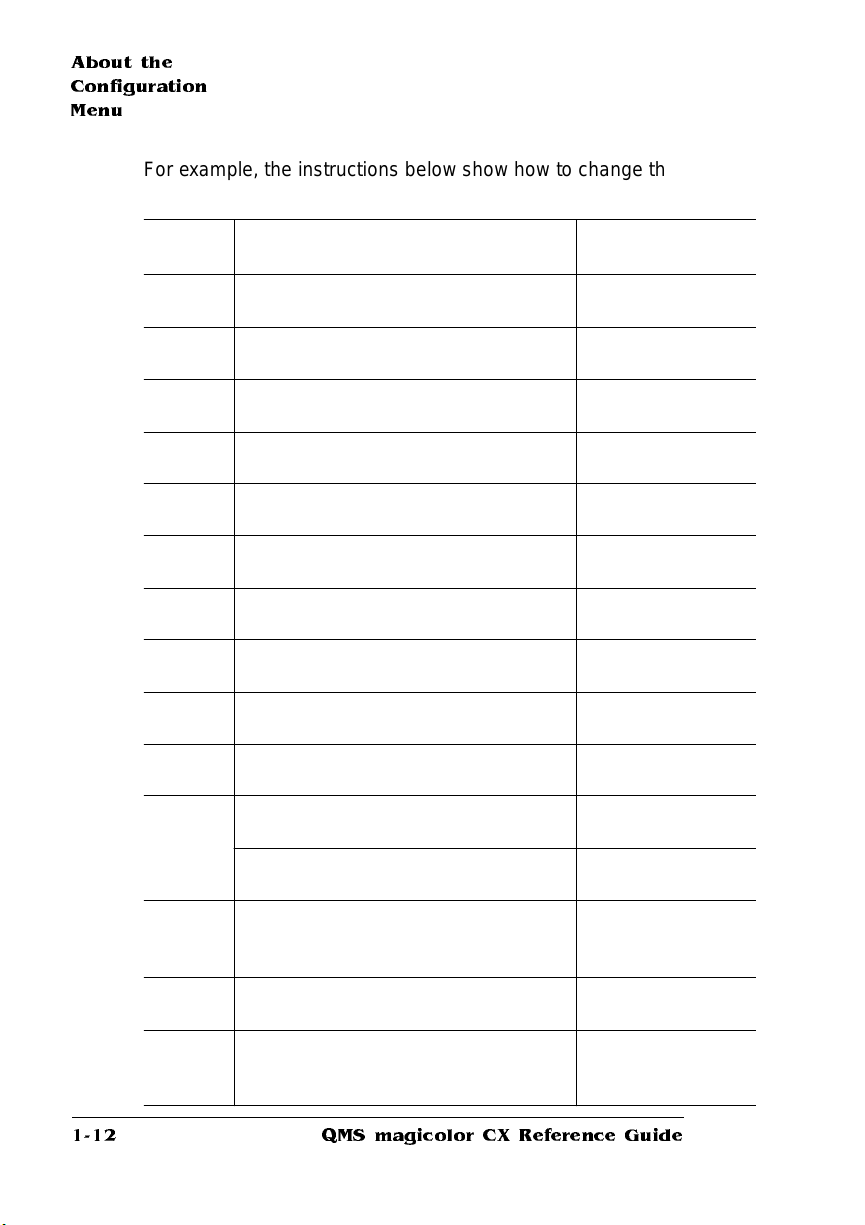
For example, the instructions below show how to change the default
printer emulat ion from ESP to PostScript :
Press
this key
Online/
Offline
Menu
Next
Select
Select
Next
Select
Next
Select
Previous
Select
Online/
Offline
or Menu
Next
Select
to... The message
window reads...
Tur n off the Online/Offlin e indicator and
ready the printer for configuration.
Access the configuration menu. CONFIGURATION
Advance to the Operator Control/
Administration menu.
Access the Administration menu ADMINISTRATION
Access the Communications menu. COMMUNICATIONS
Advance to the Communications/Parallel
menu.
Access the Parallel menu. PARALLEL
Advance to the Parallel/Emulation menu. PARALLEL
Access the Emulation menu. EMULATION
Advance to the Emulation/PostScript
menu.
Select PostScript as the default emulation. POSTSCRIPT
After 3 seconds you are returned to the
Parallel/Emulation menu.
Exit from the menu (Online/Offline) or
return to the previous menu (Menu). You
are prompted to save your change(s).
Advance to the Save Changes?/Yes
option.
Select Yes. The print er finishes pr inting
any print jobs in process, saves your
change, and returns to idle.
IDLE
OPERATOR CONTROL
CONFIGURATION
ADMINISTRATION
COMMUNICATIONS
TIMEOUTS
COMMUNICATIONS
PARALLEL
MODE
EMULATION
ESP
EMULATION
POSTSCRIPT
IS SE LECTED
PARALLEL
EMULATION
SAVE CHANGES?
NO
SAVE CHANGES?
YES
IDLE
QMS magicolor CX Refe re nce Guide1-12
Page 21
About the
Configuration
Menu
Changing Character Information
Sometimes, rather than selecting an opt ion, you need to enter character information, like a number or a word.
Entering character information through the control panel is similar to
setting the time and date on a digital watch. Use the following keys to
change the current input character:
Press this key to...
Next
Previous
Select
Menu
When you exit the character selection process, the printer verifies
character information and confir ms it in the message window. If character information is valid, you’re returned to the previous menu; if it’s
invalid, you’r e retur ned to the input field. Press the Menu key to cancel any changes to the character information.
Advance to the next choice for the current input character.
Return to the previous choice for the current input
character.
Advance the cursor to the next character (or if the cursor’s
on the
character farthest to the right, this key exits the
character selection process).
Return the cursor to the previous character.
If the current character information is longer than the value that you
need to enter, replace each extra character with a space. The printer
interprets a space at the end of character information as a blank.
For example, to change the HP-GL emulation scaling percent , press
the control panel keys in the order shown in the following table.
(Underlining indicates the current input character in the message window.)
Press
this key
Online/
Offline
Menu
Printer Configuration
to... The message
window reads...
Tur n off the Online/Offlin e indicator and
readies the printer for configuration.
Access the configuration menu. CONFIGURATION
IDLE
OPERATOR CONTROL
1-13
Page 22
About the
Configuration
Menu
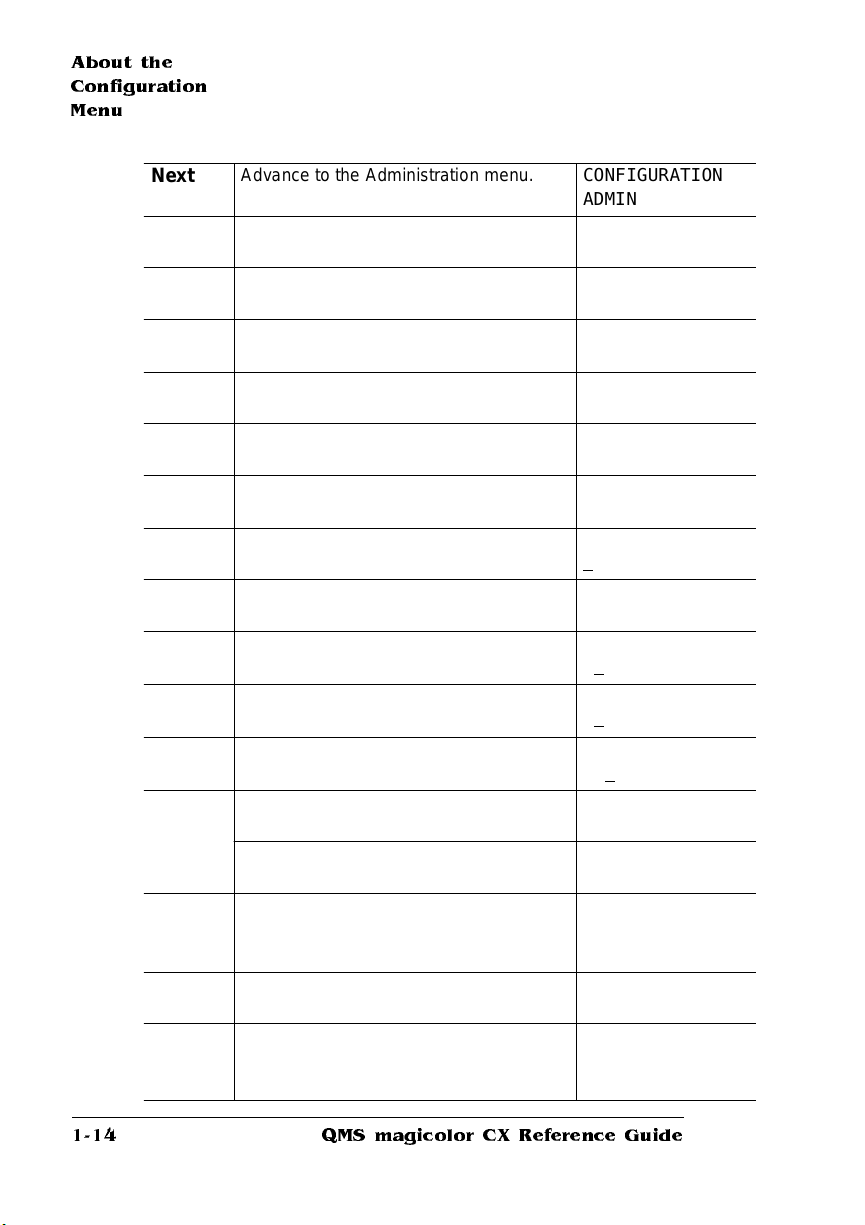
Next
Select
Next
Select
Next
Select
Next
Select
Previous
Select
Next
(5 times)
Select
Select
Online/
Offline
or Menu
Next
Select
Advance to the Administration menu. CONFIGURATION
ADMINISTRATION
Access the Administration menu ADMINISTRATION
COMMUNICATIONS
Advance to the Communications/
Emulation menu.
Access the Emulations menu. EMULATIONS
Advance to the Emulations/HP-GL menu. EMUL ATIONS
Access the HP-GL menu. HP-G L
Advance to the HP-GL/Scaling Percent
menu.
Access the Scaling Percent menu. SCALING PERCENT
Lower the current character to 0. SCALING PERCENT
Select 0 and move the current character
to the next 0.
Advance the current character to 5. SCAL ING PERCENT
Select 5 and move the current character
to the last 0.
Select 50 as the default scaling percent. 50
After 3 seconds you are returned to the
HP-GL/Scaling Percent menu.
Exit from the menu (Online/Offline) or
return to the previous menu (Menu). You
are prompted to save your change(s).
Advance to the Save Changes?/Yes
option.
Select Yes. The print er finishes pr inting
any print jobs in process, saves your
change, and returns to idle.
COMMUNICATIONS
EMUL ATIONS
ESP DEFAULT EMUL
HP-G L
PLOT TER
HP-G L
SCALING PERCENT
1
00
0
00
SCALING PERCENT
00
0
05
0
SCALING PERCENT
050
IS SE LECTED
HP-GL
SCALING PERCENT
SAVE CHANGES?
NO
SAVE CHANGES?
YES
IDLE
QMS magicolor CX Refe re nce Guide1-14
Page 23
About the
Configuration
Menu
Saving Configuration Changes
Before the printer can accept print jobs with configuration changes,
the changes must be saved.
For example, to save configuration changes after exiting a menu,
press the control pa nel keys in the order shown in the following table.
The printer responds by displaying a status message in the message
window.
Press this
key
Online/
Offline or
Menu
Next
Select
Online/
Offline
» Note:
The printer may need to be restarted before certain changes to
to... The message
window read s. ..
Exit from the menu (Online/Offline) or
return to the previous menu (Menu). You
are prompted to save your change(s).
Advance to the Save Changes?/Yes
option.
Select Yes. The printer finishes printi ng
any print jobs in process, saves your
change, a nd returns to idle.
Turn on the Online/Offline indicator and
ready the printer to accept and print jobs.
SAVE CHANGES?
NO
SAVE CHANGES?
YES
IDLE
IDLE
the Administration menu take effect. Some changes restart the printer
automatically while others display the message REBOOT NOW? in the
control panel message window. If this message appears, select YES
to restart the printe r and have the change(s) take effect immediately,
or select NO to wait until you manually restar t the print er for changes
to take effect.
Printer Configuration
1-15
Page 24
About the
Configuration
Menu
Canceling Configuration Changes
If you change a configuration option and then decide to cancel that
change, you can do so when exiting the configuration menu.
For example, to cancel your configuration changes, press the control
panel keys in the order shown in t he following table. The printer
responds by displaying a status message in the message window.
Press
this key
Online/
Offline
or Menu
Select
Online/
Offline
to... The message
window reads...
Exit from the menu (Online/Offline) or
return to the previous menu (Men u) and be
prompted to save your change.
Select No. The printer finishes printing any
print jobs in process, does not save your
changes, and returns to idle.
Turn on the Onlin e/Offline indicator and
ready the printer to accept print jobs.
SAVE CHANGES?
NO
IDLE
IDLE
Restoring the Factory Default Configuration
If you need to cancel all of the configuration changes you have made,
you can reset all of the configuration settings to their factory defaults.
See “Restore Defaults” on page 63 for more information.
» Note:
Remember that any changes made to the configuration menu
are lost when the factory defaults are restored. If your printer has a
hard disk and you have enabled disk swapping (recommended to take
advantage of a hard disk), you should re-enable it after restoring
factory defaults.
Clearing Warning Messages
Use the Clear Warning option to clear a status message that doesn't
automatically clear afte r the related correcti ve action is taken. See
“Clear Warning” on page 60 for more information .
QMS magicolor CX Refe re nce Guide1-16
Page 25
Operator Control Menu
The Operator Control menu consists of the following submenus:
Copies Collation
Orientation Inputbin
Chain Inputbins Col or Model
Color Separation Manual Feed Size
Media
Operator
Control Menu
» Note:
The printer must be turned off and on again before changes to
this menu take effect (except changes to the Copies menu). The
Media key on the printer's control panel provides a faster means of
changing this setting, but doe s not con tai n a thick stock option.
Copies
While it is usually preferable to select in your application the number of
copies you want to print, you can change the default number of copies for
all print jobs through the printer control panel.
Menu
Operator Control
Copies
Notes: Sets the default number of copies for all subsequen t p rint jobs until
the printer is turned off and on again. This setting has no effect on jobs
generated by applications such a s FrameMaker that specify a copy
number outside of the printer driver.
Choices
001 (default)-999
Collation
Use this option to arrange multiple copies of a document in
sequential order.
Menu
Operator Control
Collation
Notes: For additional information on collation, see chapter 2, “Printing,” in
the user’s
guide.
Choices
On (default), Off
Printer Configuration
1-17
Page 26
Operator Control
Menu
Orientation
Specifies whether text and graphics are placed on the page in a
portrait or landscape orientation.
Menu
Operator Control
Orientation
Inputbin
Allows you to select the default cassette (inputbin) from which
media is drawn into the printer.
Menu
Operator Control
Inputbin
Notes: The lower inputbin refers to the optional lower cassette. The
current default inputbin is indicated by the appropriate LED on the print
control panel.
Chain Inp u tbins
Allows you to “chain” input bins (cassettes) so that when the first
input bin empties, the print er will aut oma tically draw media from
the second input bin with the same size and type of media.
Menu
Operator Control
Chain Inputbins
Notes: Use the Operator Control/Inputbin menu to set the default input
bin. Make sure the two bins use the same size and type of media.
Choices
Landscape, Portrait (default)
Choices
Upper (default), Lower
Choices
On (default)—Switch to the next input bin with the
same size and type of media when the default
input bin is empty.
Off—Don’t switch inputbins; use only the default
input bin.
Color Separation
Use this option to turn color separation on or off.
Menu
Operator Control
Color Separation
Choices
On, off (default)
QMS magicolor CX Refe re nce Guide1-18
Page 27
Operator
Control Menu
Color Model
Use this option to select between full-color or monochrome printing.
Menu
Operator Control
Color Model
Choices
Monochrome, Full Color (default)
Manua l Fe ed Size
Use this option to select the size of the print medium to be fed
manually.
Menu
Operator Control
Manual Feed Size
Notes: The Envelope setting should be used if y our env elope siz e doesn’t
match any of the other listed enve lopes sizes.
Choices
Letter (default), Legal, A4, Executive, Com10,
and DL
Media
Use this option to tell the printer what type of media is in each tray so the
printer can optimize output for that media type.
Menu
Operator Control
Media
Notes: First select a media tray (upper for the standard cassette slot,
lower for the optional sheet feeder, or manual for the manual-feed tray).
Then select paper, transparency, or thick stock for that tray. When the
Thick Stock media option has been selected, both the Paper LED and the
Transparency LED on the printer control panel are off.
Choices
Paper (default), transparency, t hick stock
Select Paper for printing paper, envelopes, or labels. Select transparency
for printing on overhead transparency film. Select thick stock (for the
manual-feed tray only) for printing on stock that is between 24 and 43 lb
(90 g/m
2
and 163 g/m2). The factory default is paper.
Printer Configuration
1-19
Page 28
Admi nistr ati on
Menu
Administration Menu
The Administration m enu consists of the following submenus:
Communications Emulations
Special Pages Startup Options
Memory Engine
Miscellaneous
Communications
This menu contains several options that allow you to configure the
printer's communicat ion parameters to m atch the host and appli cati on
parameters
Timeouts
The Timeouts opt ions limit the amount of time the print er waits on
transmission from the host for various types of data.
PostScript Emulatio n Tim eou t
The PostScript emulation tim eout is the maximum number of
seconds the PostScript emulation waits for incoming data.
Menu
Administrati on
Communications
Timeouts
PS W ait Time out
Choices
00000-99999
00030 (30 sec.) (default)
Emulation Timeout
The emulation timeout is the maximum number of seconds
emulations ot her than PostScri pt (such as HP-GL, HP PCL5, and
Lineprinter) wait for incoming data.
Menu
Administration
Communications
Timeouts
Emul Tim e ou t
Notes: A value of 000 is the same as infinity (no timeout).
Choices
00000-99999
00005 (5 sec.) (default)
QMS magicolor CX Refe re nce Guide1-20
Page 29
Admi nistr ati on
Menu
Print Job Timeout
The print job timeout is the maximum numb er of secon ds the
printer processes a print job before it ends the job.
Menu
Administrati on
Communications
Timeouts
Job Timeout
Notes: A value of 000 is the same as infinity (no timeout).
Choices
00000-99999
00000 (infinity, no timeout) (default)
ESP Timeout
The ESP timeout is the maximum number of seconds the printer
waits to match an emulation before print ing the job in the default
emulation.
Menu
Administrati on
Communications
Timeouts
ESP Timeout
Notes: A value of 000 is the same as infinity (no timeout).
Choices
00000-99999
00003 (3 sec.) (default)
Serial Interface
Use the Administration/Communications/Serial menu to set the serial
interface communication values used for printer-host communication.
Mode
Enables or disables the serial port
Menu
Administrati on
Communications
Serial
Mode
Notes: The printer must be restarted for changes to the Mode menu to
take effect. You can either let the printer restart automatically after you
save the change and exit the Configuration menu, or you can wai t for the
change to take effect the next time you manually turn on the printer.
Printer Configuration
Choices
Interactive (default)—Establish two-way
communication between the host and the printer.
Noninteractive—Establish one-way
communication from the host to the printer.
Disabled—Turn off serial communication with the
host. The printer stops accepting print jobs over
the serial interface.
1-21
Page 30
Admi nistr ati on
Menu
Emulation
Sets the serial interface emulation.
Administration
Communications
Emulation
Min K Sp ool
Sets the minimum numbe r of kilobytes of system m emo r y
allocated to th e ser ial int erface.
Administrati on
Communications
Min K Spool
Notes: This value must be less than K Mem For Spool.
A 00000 value does not turn off the spooling buffer for the serial interface.
If the value is set to 00000, the printer calculates the Min K Spool
automatically at initialization.
Menu
Serial
Menu
Serial
Choices
ESP (default), Hexdump, PostScript, PCL5,
HPGL, Lineprinter
Other optional emulations also appear, if
installed.
Choices
00000-99999
00015 (default)
The printer must be restarted for changes to the Min K Spool menu to take
effect. You can either let the printer restart automatically after you save the
change and exit the Configuration menu, or you can wait for the change to
take effect the next time you manually turn on the printer.
Spoo ling Timeout
Sets the number of seconds the interface waits for data from the
host before terminati ng a spooled pri nt job.
Menu
Administrati on
Communications
Serial
Spo ol Timeout
Choices
00000-99999
00030 (default)
QMS magicolor CX Refe re nce Guide1-22
Page 31

Admi nistr ati on
Menu
End Job Mode
Enables (and identifies an end-of-job sequence) or disables data
stream sensing for the end-of-document (E OD) co mmand.
Menu
Administrati on
Communications
Serial
End Job Mode
Choices
None (default)—The printer recognizes only the
PostScript ^D command.
QMS EOD—The printer recognizes only the
QMS %%EndOfDocument command.
HP EOD—The printer recognizes only the HP
<ESC>%12345X command.
Baud Rate
Sets the rate data is transmitted (bits per second) over the serial
interface.
Menu
Administrati on
Communications
Serial
Baud Rate
Notes: Baud rates of 19200 and 38400 require that both RTS and CTS
hardware flow control (Administration/Communications/Serial/Hdwe Flow
Ctl menu) be selected. These baud rates do not support XON/XOFF
software flow control.
Choices
300, 600, 1200, 2400, 4800, 9600 (default),
19200, 38400
Parity
Sets the check bit used to identify data transmission errors.
Menu
Administrati on
Communications
Serial
Parity
Notes: The print er’s parity setting must match that of the host or
application. Use the Administration/Communications/Serial/Ignore Parity
menu to specify how the printer handles parity errors.
Choices
None (default), Odd, Even
Printer Configuration
1-23
Page 32

Admi nistr ati on
Menu
Ignore Parity
Specifies how the printer should handle pa rity errors.
Administrati on
Communications
Ignore Parity
Notes: Use the Administration/Communications/Serial/Parity menu to set
parity.
Receive Software Flow Control
Sets the software com muni catio n prot ocol used by the print er to
control communication from the host comp uter.
Administrati on
Communications
Rcv Sw Flow Ctl
Menu
Serial
Menu
Serial
Choices
Off (default)—Ignore parity errors. The printer
prints its best interpretation of the character(s)
affected by the error.
On—Don’t ignore parity errors. The printer
replaces the character(s) affected by the error
with a question mark.
Choices
ETX/ACK, Robust XON/XOFF, None, XON/XOFF
(default)
Transmit Softwar e Flow Control
Sets the software communi ca tio n protocol used by the host
computer to control commun icati on with the printer.
Menu
Administrati on
Communications
Serial
Xmit Sw Flow Ctl
Choices
ETX/ACK, None (default), XON/XOFF
Data Bits
Sets the number of data bits transmit t ed per character.
Menu
Administrati on
Communications
Serial
Data Bits
Choices
7 Bits, 8 Bits (default)
QMS magicolor CX Refe re nce Guide1-24
Page 33

Admi nistr ati on
Menu
Stop Bits
Sets the number of stop bits transmitted per character.
Menu
Administrati on
Communications
Serial
Stop Bits
Choices
1 Bit (default), 2 Bits
Hardware Fl ow Control
Controls the flow of data between the print er and the host.
Menu
Administrati on
Communications
Serial
Hdwe Flow Ctl
Notes: If the host uses hardware flow control, set this option to match the
type used by the host.
However, to download printer system software to flash ROM via the serial
port, RTS and CTS must be set to On, and t he cable pinouts must be
connected as shown in chapter 3, “Technical Specifications.”
Choices
DSR POL: Normal (default), reverse
DSR: Off (default), on
DTR POL: Normal (default), reverse
DTR: Off, on (default)
RTS: Off (default), on
CTS: Off (default), on
Printer Configuration
1-25
Page 34

Admi nistr ati on
Menu
PS Protocol
Sets the binary communications protocol (BCP) for communicating
over a serial interface to a PostScript printer. See chapter 3,
“Technical Specif icat ions,” of this manual for more information on
PS Protocol.
Administration
Communications
PS Protocol
Menu
Serial
Choices
Binary—En ables quoted binary communications
protocol (BCP). Print jobs can change this setting
through PostScript opera tors. Data in the printable
ASCII range also prints. Use the special quoting
mechanism (see chapter 3, “Technical
Specifications”) for the special characters and ^D
(EOF).
Binary Fixed—Enables binary communications
protocol (BCP). Print jobs cannot change this
setting through PostScript operators. Data in the
printable ASCII range also prints. Use the special
quoting mechanism (see chapter 3, “Technical
Specifications”) for the special characters and ^D
(EOF).
Normal—Enables standard, ASCII (7-bit) hex
protocol. Data is sent and received in ASCII
format. This mode is recommended if you do not
print binary data. It was designed for dat a in the
printable ASCII range. Print jobs can change this
setting through PostScript operators.
Normal Fixed—Enables standard, ASCII (7-bit)
hex protocol. Print jobs cannot change this setting
through PostScript operators.
QMS magicolor CX Refe re nce Guide1-26
Page 35

Admi nistr ati on
Menu
Parallel Interface
Mode
The parallel interface supports Centronics parallel communication as well
as IEEE 1284 bidirectional parallel communication.
Menu
Administration
Communications
Parallel
Mode
Notes: The printer must be restarted for changes to the menu to take
effect. You can either let the printer restart automatically after you save the
change and exit from the Configuration menu, or you can wait for the
change to take effect the next time you manually turn on the printer. See
chapter 3, “Technical Specifications,” for a discussion of the different
modes
Choices
Interactive—Establish two-way communication
between the host and the printer.
Noninteractive (default)—Establish one-way
communication from the host to the printer.
Disabled—Turn off parallel communication with
the host. The printer stops accepting print jobs
over the parallel interface.
Emulati on
Sets the parallel interface emulation.
Menu
Administration
Communications
Parallel
Emulation
Choices
ESP (default), Hexdump, PostScript, PCL 5C,
HPGL, Lineprinter
Other optional emulations also appear, if
installed.
Printer Configuration
1-27
Page 36

Admi nistr ati on
Menu
Min K Sp ool
Sets the minimum numbe r of kilobytes of system m emo r y
allocated to the pa rallel int erface.
Administrati on
Communications
Min K Spool
Notes: This value must be less than K Mem For Spool.
A 00000 value does not turn off the spooling buffer for the parallel
interface. If the value is set to 00000, the printer calculates the Min K
Spool automatically at initialization.
The printer must be restarted for changes to the Min K Spool menu to take
effect. You can either let the printer restart automatically after you save the
change and exit the configuration menu, or you can wait for the change to
take effect the next time you manually turn on the printer.
Spool Tim eo ut
Sets the number of seconds the interface waits for data from the
host before terminati ng a spooled pri nt job.
Administrati on
Communications
Spo ol Timeout
Menu
Parallel
Menu
Parallel
Choices
00000-99999
00015 (default)
Choices
00000-99999
00030 (default)
Data Bits
Sets the number of data bits transmit t ed per character.
Menu
Administrati on
Communications
Parallel
Data Bits
Choices
7 Bits, 8 Bits (default)
QMS magicolor CX Refe re nce Guide1-28
Page 37

Admi nistr ati on
Menu
End Job Mode
Enables (and identifies an end-of-job sequence) or disables data
stream sensing for the end-of-document (E OD) co mmand.
Menu
Administrati on
Communications
Parallel
End Job Mode
Choices
None (default)—The printer recognizes only the
PostScript ^D command.
QMS EOD—The printer recognizes only the
QMS %%EndOfDocument command.
HP EOD—The printer recognizes only the HP
<ESC>%12345X command.
Printer Configuration
1-29
Page 38

Admi nistr ati on
Menu
PS Protocol
Sets the binary communications protocol (BCP) for communicating
over a parallel interface to a PostScript printer. See chapter 3,
“Technical Specif icat ions,” of this manual for more information on
PS Protocol.
Administration
Communications
PS Protocol
Menu
Parallel
Choices
Binary—En ables quoted binary communications
protocol (BCP). Print jobs can change this setting
through PostScript opera tors. Data in the printable
ASCII range also prints. Use the special quoting
mechanism (see chapter 3, “Technical
Specifications”) for the special characters and ^D
(EOF).
Binary Fixed—Enables binary communications
protocol (BCP). Print jobs cannot change this
setting through PostScript operators. Data in the
printable ASCII range also prints. Use the special
quoting mechanism (see chapter 3, “Technical
Specifications”) for the special characters and ^D
(EOF).
Normal—Enables standard, ASCII (7-bit) hex
protocol. Data is sent and received in ASCII
format. This mode is recommended if you do not
print binary data. It was designed for dat a in the
printable ASCII range. Print jobs can change this
setting through PostScript operators.
Normal Fixed—Enables standard, ASCII (7-bit)
hex protocol. Print jobs cannot change this setting
through PostScript operators.
QMS magicolor CX Refe re nce Guide1-30
Page 39

LocalTalk Interface
Admi nistr ati on
Menu
» Note:
The LocalTalk me nu appears only if the optiona l LocalTalk
interface board is installed in the printer.
Use the Administ rati on/ Communi cations/LocalTalk menu to set the
LocalTalk interface values used for printer-host communication.
Mode
Enables or disables the communication interface.
Menu
Administration
Communications
LocalTalk
Mode
Notes: The printer must be restarted for changes to the Mode menu to
take effect. You can either let the printer restart automatically after you
save the change and exit the Configuration menu, or you can wai t for the
change to take effect the next time you manually turn on the printer.
Choices
Enabled (default)—Establish one-way LocalTalk
communication (from the host to the printer).
Disabled— Turn off the LocalTalk interface (the
printer stops accepting LocalTalk interface
print jobs).
Minimum Numb er of Kil obytes for Spool ing
Sets the minimum number of ki lobytes of system memory
allocated to the LocalTalk interface.
Menu
Administration
Communications
LocalTalk
Min K Spool
Notes: This value must be less than the K Mem for Spool value.
A 00000 value does not turn off the spooling buffer for the parallel
interface. If the value is set to 00000, the printer calculates the Min K
Spool automatically at initialization.
Choices
00000-99999
(00015 default)
The printer must be restarted for changes to the Min K Spoo l men u to tak e
effect. You can either let the printer restart automatically after you save the
change and exit from the Configuration menu, or you can wait for the
change to take effect the next time you manually turn on the printer.
Printer Configuration
1-31
Page 40

Admi nistr ati on
Menu
Connection
Allows you to enable or disable print spooling.
Administration
Communications
Connection
Notes: The printer must be restarted for chang es to the Connection menu
to take effect. You can either let the printer restar t automatically after you
save the change and exit the Configuration menu, or you can wai t for the
change to take effect the next time you manually turn on the printer.
Menu
LocalTalk
Choices
Conventional (default)—Allow one LocalTalk
connection and accept only one print job at a
time. If two user s send print jobs to the printer,
the workstation belonging to the first user is
unavailable until the first job has been printed,
and the workstation belonging to the second user
is unavailable until both jobs have been printed.
Spool—Allow multiple LocalTalk connections and
accept (spools) more than one print job at a time.
Workstations are available while jobs are printing.
Both—Allow both single and multiple LocalTalk
connections.
QMS magicolor CX Refe re nce Guide1-32
Page 41

Admi nistr ati on
Menu
PS Protocol
Sets the binary communic ations prot ocol (BCP) for communi cating
over a LocalTalk interface to a PostScript printer. See chapter 3,
“Technical Specifi cations,” of this manual for more inform at ion on
PS Protocol.
Menu
Administration
Communications
LocalTalk
PS Protocol
Choices
Binary—En ables quoted binary communications
protocol (BCP). Print jobs can change this setting
through PostScript opera tors. Data in the printable
ASCII range also prints. Use the special quoting
mechanism (see chapter 3, “Technical
Specifications”) for the special characters and ^D
(EOF).
Binary Fixed—Enables binary communications
protocol (BCP). Print jobs cannot change this
setting through PostScript operators. Data in the
printable ASCII range also prints. Use the special
quoting mechanism (see chapter 3, “Technical
Specifications”) for the special characters and ^D
(EOF).
Normal—Enables standard, ASCII (7-bit) hex
protocol. Data is sent and received in ASCII
format. This mode is recommended if you do not
print binary data. It was designed for dat a in the
printable ASCII range. Print jobs can change this
setting through PostScript operators.
Normal Fixed—Enables standard, ASCII (7-bit)
hex protocol. Print jobs cannot change this setting
through PostScript operators.
Network Interface
This option allows you to configure a network interface, if installed.
See the QMS CrownNet documentation that came with the printer for
information on the options available in this menu.
Printer Configuration
1-33
Page 42

Admi nistr ati on
Menu
Emulations
Optional emulations appear only if installed.
» Note:
To choose an emulation or ESP for a particular interface, use
the appropriate interface menu in the Administration/Communications
menu.
ESP Default Emulatio n
The emulation sensi ng proce ssor (ESP) feature of the printer
analyzes incoming print jobs and identifies which emulation the
printer will us e. The ESP Default Emul sets the ESP default
emulation used when ES P is unable to identify the language of a
print job. This allows the system admi nistrat or to select alt e r nat e
default emulation s.
Menu
Administrati on
Emul ation s
ESP Default Emul
Notes: You must turn the printer off and back on again for the change to
take effect. For more information on ESP, see chapter 3, “Technical
Specifications.”
Choices
HPGL, Lineprinter, PostScript, PCL 5C (default)
QMS magicolor CX Refe re nce Guide1-34
Page 43

Admi nistr ati on
Menu
PostScript
Halftone Typ e
This menu allows you to choose a printer default screening option.
Menu
Administrati on
Emulations
PostScript
Halftone T ype
Notes: Some application software may be set up to ignore the printer's
color settings. For information on preventing this, see “Connecting to a
PC” or “Connecting to a Macintosh” in chapter 1, “Connecting the Printer.”
Color Rendering
For color matching with PostScr ipt Level 2 applications, this option allows
you to choose from color rendering dictionari es.
Menu
Administration
Emulations
PostScript
Color Rende r ing
Notes: Some application software may be set up to ignore the printer's
color settings. For information on preventing this, see “Connecting to a
PC” or “Connecting to a Macintosh” in chapter 1, “Connecting the Printer.”
Choices
Enhanced (default)
ColorSmooth
See “About Printer Default Screening and CRD
Options” in chapter 2, “Printing,” of the user’s
guide for information on these options.
Choices
Business (default)
Color imetric
Photographic
See “About Printer Default Screening and CRD
Options” in chapter 2, “Printing,” of the user’s
guide for information on these options.
HP-GL
Plotter
Identifies the HP -GL plot ter ty pe.
Menu
Administrati on
Emul ation s
HPGL
Plotter
Printer Configuration
Choices
7550A (default), 7475A, 7470A, Colorpro
1-35
Page 44

Admi nistr ati on
Menu
Scaling Percent
Identifies the percentage t o reduce or enlarge an image.
Administrati on
Emulations
Scaling Percent
Notes: To scale plots, select the paper size ori ginally used for the plot in
the Paper Type menu, and then enter the reduction or enlargement
needed to fit the plot on the new page in the Scaling Percent menu. If
necessary, enter new x,y coordinates in the Origin menu to reposi tion the
plot on the page.
Origin (X Direction)
Sets the image offset from the plotter’s origin in 0.01" increment s.
Administrati on
Emulations
X Direction
Menu
HPGL
Menu
HPGL
Origin
Choices
001-150 (1-150%)
100 (100%) (default)
Choices
0000 (default) - 8500 (0"-8.5")
Origin (Y Direction)
Sets the image offset from the plotter’s origin in 0.01" increment s.
Menu
Administrati on
Emulations
HPGL
Origin
Y Direction
Choices
00000 (default) - 11000 (0"-11.0")
Reverse Image
Determ ines whet her an image is pr inted in reverse.
Menu
Administrati on
Emulations
HPGL
Reverse Image
Choices
On—Print a white image on a black background.
Off (default)—Print a black image on a white
background.
QMS magicolor CX Refe re nce Guide1-36
Page 45

Admi nistr ati on
Menu
Enhanced M od e
Increases the resolution of a downloaded character.
Menu
Administrati on
Emulations
HPGL
Enhanced Mode
Notes: The HP-GL user-defined character (UC) command downloads and
draws characters with an encoding scheme that uses pen control
movements and coordinate sequences. The characters are drawn on a
grid that is superimposed on the character plot cell.
Choices
On—Uses an increased resolution for the grid
Off (default)—Uses standard resolution for the
grid
Expan d Mode
Defines a larger imageable area for the selected media type. Th is
increased imageable area affects the default pla cemen t of the
scaling points P1 and P2.
Menu
Administrati on
Emulations
HPGL
Expand Mode
Notes: Setting this option to On partially determines the range of plotter
units for a selected media type. When the plotter senses the media type , it
automatically sets the hard clip limits to 0.591"/15 mm on three sides and
to 1.537"/39 mm on the fourth side. How e v er, if Expand Mode is set to On,
then the limits are set to 0.197"/5 mm on three sides a nd 1.143"/29 mm on
the fourth side.
The HP-GL emulation senses the media size when the Paper Type is set
to Scale to Paper or when it is set to a particular media size through the
control panel or through a QMS Document Option Command.
Choices
On—Expands the imageable area.
Off (default)—Doesn’t expand the imageable
area.
Paper Typ e
Identifies the original image’s paper size.
Menu
Administration
Emulations
HPGL
Paper Type
Choices
Scale to Paper (default), A (letter/8.5"x11.0"), A4
(210x297 mm), B (11.0"x17.0"), A3 (297x420
mm)
Printer Configuration
1-37
Page 46

Admi nistr ati on
Menu
Pen 1 - Pen 8 (Pen x/Width)
Sets the width for the eight plotter pens. A width option is available
for each pen.
Administration
Emulations
Pen
Notes: A setting of “0” defaults the pen width to the pixel setting of “1.”
Pen 1 - Pen 8 (Pen x/Color)
Sets color for the eight plotter pens. A color option is ava ilable for
each pen.
Administration
Emulations
Pen
Menu
HPGL
x
/Width
Menu
HPGL
x
/Color
Choices
00-60 (0.1-6.0 mm)
Defaults:
Pen 1—7 (0.7 mm)
Pen 2—3 (0.3 mm)
Pen 3—3 (0.3 mm)
Pen 4—3 (0.3 mm)
Pen 5—3 (0.3 mm)
Pen 6—3 (0.3 mm)
Pen 7—3 (0.3 mm)
Pen 8—3 (0.3 mm)
Choices
Black, Violet, Brown, Gray - 25%, Gray - 50%,
Gray - 75%, Red, Orange, Yellow, Green, Blue,
Cyan, Magenta
Defaults:
Pen 1—Black (100% black)
Pen 2—Black (100% black)
Pen 3—Red (70% black)
Pen 4—Green (41% black)
Pen 5—Blue ( 8 9% black)
Pen 6—Violet (59% black)
Pen 7—Orange (25.8% bl a ck)
Pen 8—Brown (50% black)
Notes: Cyan=30% black, magenta=59% black, and yellow=11% bl ack.
QMS magicolor CX Refe re nce Guide1-38
Page 47

Admi nistr ati on
Menu
HP PCL 5C
Defaul t Font
Sets the default font for this emulation.
Menu
Administrati on
Emul ation s
HP PCL 5C
Default Font
Notes: * represents a scalable font (default point size [12 points] is used
to scale the font and produce the char acters in the selected size).
If you use Select by Index to select a font by its f ont index, the printer uses
the Administration/Emulations/PCL5/Default Font Idx value to choose the
default font.
Choices
Courier12 (default), Courier12Bold,
Courier1 2Itali c, Courier10, Couri er1 0Bold,
Couri er1 0Italic, Lineprinter, Times*, Times*Italic,
Times*Bold, Times*BldItali c, Univ*, Univ*Itali c,
Univ*Bold, Univ*BldItali c, UnivCond*,
UnivCond*Italic, UnivCond*Bold,
UnivCond*BldItlc, Select by Index
Printer Configuration
1-39
Page 48

Admi nistr ati on
Menu
Symbo l Set
Sets the character set used by the HP PCL5 emulation.
Administrati on
Emulations
HP PCL 5C
Symbol Set
Notes: Not all symbol sets are avail a ble with certain re sident fonts. The
Desktop, PS Math, Math 8, Microsoft-Pub, Pi-Font, PS-Text, Ventura-Intl,
Ventura-Math, Ventura-US, and Windows symbol sets cannot be used
with the resident bitmap fonts Courier 10, Courier 10 Italic, Courier 10
Bold, Courier 12, Courier 12 Italic, Courier 12 Bold, and LinePrinter.
The five dingbat symbol sets (PS-ZapfDingbats, Ventura-D ingbats, ZapfDingbats100, Zapf-Dingbats200, and Zapf-Dingb ats300) can be us ed with
all fonts.
If a mismatch between a symbol set and font occurs, the standard PCL
font selection mechanism is used to locate a font that matches the
selected symbol set. With the standard set of fonts distributed for your
printer, this matches the Times* font, but other user-installed fonts could
change this result.
Menu
Choices
Roman-8 (default), PC-850, PC8-US, PC8-DN,
ECMA-94, Legal, HPGerman, HPSpanish, ISO2, ISO-4, ISO-6, ISO-10, ISO-11, ISO-14, ISO15, ISO-16, ISO-17, ISO-21, ISO-25, ISO-57,
ISO-60, ISO-61, ISO-69, ISO-84, ISO-85,
Desktop, PS Math, Math 8, Microsoft-Pub, PiFont, PS-Text, Ventura-Intl, Vent ura-Math,
Ventura-US, Windows, PS- Za pf-Dingbats,
Ventura-Dingbats, Zapf-Dingbats100, ZapfDingbats200, Zapf-Dingbats300
Lines Per Inch
Sets the number of lines printed per inch.
Menu
Administrati on
Emulations
HP PCL 5C
Lines/Inch x 100
Choices
0100-4800
06 (default)
QMS magicolor CX Refe re nce Guide1-40
Page 49

Admi nistr ati on
Menu
Line Termi na ti on
Adds an indicator which control s the way the printer interprets CR
(carriage return) and LF (line feed) characters.
Menu
Administrati on
Emulations
HP PCL 5C
Line Termination
Choices
CR=CR, LF=LF ( default)
CR=CR+LF, LF=LF
CR=CR, LF=CR+LF
CR or LF=CR+LF
Point Size x100
Specifies the point size for scalable fonts in 0.25 point increments.
Menu
Administrati on
Emulations
HP PCL 5C
Point Size x100
Notes: If the font is not scalable or if a bitmap font is specif ied , th is sett in g
is ignored.
Choices
00025-99975 (0.25-999.75 points)
01200 (12 points) (default)
Printer Configuration
1-41
Page 50

Admi nistr ati on
Menu
Retain Temporary
Allows you to choose whether to retain temporary HP PCL5 fonts
and macros at the end of each print job.
Administrati on
Emulations
HP PCL 5C
Retain Temporary
Menu
Choices
Off (default)—Reset PCL to its d ef ault state a t the
end of each PCL print job, execute an implicit
<ESC>E at the start and end of the job, an d
delete any temporary fonts, macros, and
patterns.
On—Reset PCL to its default state at the end of
each PCL print job. T emporary fon ts , macros , and
patterns from previous PCL print jobs are
retained in memory after the print job has
completed. You can recall these downloaded
fonts, macros, and patterns from within your PCL
file without having to download them again.
On Compatibility—R etain th e entire state of PCL
as well as the temporary macros, fonts, and
patterns from previous PCL jobs unless you do
one of the following:
n
Change any PCL control panel option
n
Send any PCL-specific DOC—except
the emulation DOC
n
Send any other DOC, such as number
of copies, duple x, orientation, or inputbin
n
Send a PCL job from a different communications port—for example, if the PCL
print environment is set for PCL jobs to
print from the parallel port, and a PCL
job is sent from the serial port. If any
one of these occurs, the PCL state is
reset to the new defaul t, and the previous state is lost.
Scalable Fo nts
Specifies whether to enable or disable the printing of HP PCL5
scalable fonts by an application.
QMS magicolor CX Refe re nce Guide1-42
Page 51

Admi nistr ati on
Menu
Menu
Administration
Emulations
HP PCL 5C
Scalable Fonts
Notes: This feature may be useful when printing PCL4 documents which
may inadvertently select unwanted scalable fonts.
Choices
Enable (default)—Allow selection of scalable
fonts. When you print PCL4 documents, PCL5
may substitute scalable fonts that could cause
your PCL 4 documents to print incorrectly.
Disable—Print using bitm ap fonts only.
Default Font In dex
Sets the default font index when Select by Index is chosen in the
Administration/Emulations/HP PCL 5C/Default Font menu. If a font
by the same index number exists, it is selected as the default font.
This font must be a cartridge or downloaded soft font.
Menu
Administrati on
Emulations
HP PCL 5C
Default Font Idx
Choices
00000-32767
Default: Depends on cartridge or downloaded
font(s)
Printer Configuration
1-43
Page 52

Admi nistr ati on
Menu
Monochrome HP-GL/2
Administration
Emulations
HP PCL 5C
Monochrome HP-GL/2
Pen Color Default s:
Pen 0 = White
Pen 1 = Black
Pen 2 = Red
Pen 3 = Green
Pen 4 = Yellow
Pen 5 = Blue
Pen 6 = Magenta
Pen 7 = Cyan
Notes: When set to off, this option maps pen colors as follows:
Pen 0=White, Pen 1=Black, Pen 2=Red, Pen 3=Green, Pen 4=Yellow, Pen
5=Blue, Pen 6=Magenta, Pen 7=Cyan.
When set to on, this option tells the printer to map each pen to its
assigned color, then convert the color to a grayscale using the National
Te levision System Committee (NTSC) color standard for luminosity
coefficients (Additive System):
Y = 0.30R + 0.59G + 0.11B
Example of how to use the color standard formula:
WhiteY = [1*0.30) + (1*0.59) + (1*0.11)]—100% gray
BlackY = [0*0.30) + (0*0.59) + (0*0.11)]—0% gray
RedY = [1*0.30) + (0*0.59) + (0*0.11)]— 30% gray
GreenY = [0*0.30) + (1*0.59) + (0*0.11)]—59% gray
YellowY = [1*0.30) + (1*0.59) + (0*0.11)]—89% gray
BlueY = [0*0.30) + (0*0.59) + (1*0.11)]—11% gray
MagentaY = [1*0.30) + (0*0.59) + (1*0.11)]—41% gray
CyanY = [0*0.30) + (1*0.59) + (1*0.11)]—70% gray
Menu
Choices
Off (default)— HP-GL 2 documents are printed in
color.
On— HP-GL 2 documents are printed in shades
of gray.
QMS magicolor CX Refe re nce Guide1-44
Page 53

Admi nistr ati on
Menu
Download Locati on
Controls the default storage location of PCL objects (fonts,
macros, and patterns).
Menu
Administration
Emulations
HP PCL 5C
Downld Location
Notes: Document Option Commands specifying resources override this
option on a per-job basis (unless the location is specified as RAM, in
which case DOC does not override).
Before you download any objects, ensure that the printer has enough
memory, or they may not be available for use. If it doesn’t, you can install
additional SIMMs to increase printer memory, or, if a h ard disk is a v a ilable,
you can enable disk swappi ng (Administration/Memory/Enable Disk Swap
menu).
Choices
Disk (default)—All downloaded PCL objects are
stored in the default disk resource, if present .
These objects remain on the disk even if the
printer power is turned off. (If this option is set to
Disk and no hard disk is installed, RAM is used
as the default storage location.)
Memory—All downloaded PCL objects are stored
in temporary storage in RAM. If the printer has
both a hard disk and a large amount of memory,
setting this option to Memory enhances printer
performance.
Printer Configuration
1-45
Page 54

Admi nistr ati on
Menu
Lineprinter
Point Size (in 100ths of an i nch )
Sets point size (in .01 point incremen ts) of the font for the current
print job.
Administrati on
Emulations
Lineprinter
Point Sz 100ths
Character Map
Specifies the type of character map to be used.
Administrati on
Emulations
Lineprinter
Character Map
Line Numb ering
Specifies if a five-digit number is to be prefixed to the beginning of
each line.
Administration
Emulations
Lineprinter
Line Numbering
Menu
Menu
Menu
Choices
00400-25600 (4-256 points)
00880 (8.8 points) (default)
Choices
ASCII (default), EBCDIC
Choices
On—Number all lines.
Off (default)—Don’t number lines.
Tab Stop s
Specifies the number of spaces between tab stops.
Menu
Administrati on
Emulations
Lineprinter
Tab Stops
Choices
0-256
8 (default)
QMS magicolor CX Refe re nce Guide1-46
Page 55

Admi nistr ati on
Menu
Line Feed is Carriage Return-L ine Feed
Specifies whether each line feed (LF) in the print job is translated
to a carriage return/line feed (CRLF) combina tion.
Menu
Administrati on
Emulations
Lineprinter
LF is CRLF
Choices
On (default)—Translate all line feeds to carriage
return/line feed combinations.
Off—Use lines feeds only as line feeds.
Carriage Return is Carriage Return -Li ne Feed
Specifies whether each carriage retur n (CR) in the print job is
translated to a carriage return/l ine feed (CRLF) combination.
Menu
Administrati on
Emulations
Lineprinter
CR is CRLF
Choices
On—Translate all carriage returns to line feeds.
Off (default)—Use carriage returns only as
carriage returns.
Form Feed is Carriag e Return -Fo rm Feed
Specifies whether each form feed (FF) in the print job is translated
to a carriage return/for m feed (CRFF) combination.
Menu
Administrati on
Emulations
Lineprinter
FF is CRFF
Choices
On (default)—Translate all form feeds to carriage
return/form feed combinations.
Off—Use form feeds only as form feeds.
Orientation
Specifies whether text and graphics are placed on the page in a
portrait or landscape orientation.
Menu
Administrati on
Emulations
Lineprinter
Orientation
Choices
Landscape, Portrait (default)
Printer Configuration
1-47
Page 56

Admi nistr ati on
Menu
Autowrap
Specifies whether long lin es are to be wrapped to the next line
instead of being truncated.
Administration
Emulations
Lineprinter
Lines Per Page
Specifies the number of lines printed on a page before an
automat ic page eject.
Administration
Emulations
Lineprinter
Lines per Page
Notes: Interline spacing is set to the selected point size. Logical pages
consisting of more lines than speci fied are split into multiple pages.
Margins
Defines the lef t, right , top, and bottom margin s.
Administrati on
Emul ation s
Lineprinter
Menu
Autowrap
Menu
Menu
Margins
Choices
On (default)—Wrap long lines.
Off—Truncate long lines.
Choices
1-128
87 (default)
Choices
Bottom (default)-17000 (0"-17.00")
Left (default)-17000 (0"-17.00")
Right (default)-17000 (0"-17.00")
Top (default)-17000 (0"-17.00")
Font
Sets the printer fonts for the current print job.
Menu
Administrati on
Emulations
Lineprinter
Font
Notes: Any PostScript fonts av ailable on the printer can be used. To see a
list of available PostScript fonts, print an advanced status page through
the printer configuration menu (Administration/Special Pages/Status Page
Type) or through the PS Executive Series Utilities.
Choices
All printer-resident PostScr ipt fonts.
Default: Courier
QMS magicolor CX Refe re nce Guide1-48
Page 57

Admi nistr ati on
Menu
Optional Emulations
If you have an optio nal emula tion installed, such as LN03 Plus, see
the document at ion t hat cam e with it for a description of the options
under the Administration/ Emulat ion s menu.
Special Pages
Status Pages
Printing a status page is a two-step procedure: Identify the type of
status page you want to print, and then print it.
Status Page Type
Two types of status pages are available:
Menu
Administration
Special Pages
Status Page Type
Choices
Standard (default)—Lists printer identification
information, current memory configuration,
timeouts, communication settings, input buffer
sizes, and availa ble fonts. It also h as tickmarks
for measuring the printer’s alignment.
Advanced—Contains the same information as
the standard status page as well as configuration
menu settings, fo nts, and downloaded
emulations.
Status Page
Print s a status page.
Menu
Administrati on
Special Pages
Print Status
Notes: The type of status page printed is determined by the selection
made in the Status Page Type menu.
Choices
Yes, No (default)
Printer Configuration
1-49
Page 58

Admi nistr ati on
Menu
Registration Page
Prints a registration page. This page allows you to check color
registration (placement of each of the process colors on the page).
Administration
Special Pages
Registratio n Page
Notes: Color marks going around the outside of the page demonstrate
horizontal and vertical color registration. Circles in the center of the page
demonstrate cyan, magenta, and yellow color mixtur e s and red, green,
and blue color mixtures. See the Administration/Engine/Image Alignment
menu for calibration instructions.
Color Balance Adj us tm ent Page
Prints a page with instructi ons to help you balance the color on
your printer.
Administration
Special Pages
Color Balan ce
Adjustme nts
Notes: Three color swatches indicate what direction and angle to adjust
the Cyan, Magenta , and Yel low p rint density controls located under the top
cover of the printer.
Menu
Menu
Choices
Yes—Prints registration page.
No (default)—Registration page will not be
printed.
Choices
Yes—Prints color balance page.
No (default)—Color balance page will not be
printed.
Header Page
Menu
Administration
Special Pages
Header Page
Choices
On—Pr int a header page before each job.
Off (default)—Don’t print a header page before
each job.
QMS magicolor CX Refe re nce Guide1-50
Page 59

Admi nistr ati on
Menu
Header Inputbin
You can select the input bin (tray or cassette) from which the
printer pulls me dia when pr inti ng the header pag e.
Menu
Administrati on
Special Pages
Head er Inputbin
Notes: If you used the Administration/Engine/Inputbin
change the names of the input bins, these names replace Upper and
Lower in the message window.
Choices
Upper (default)—Pull header page media from
the upper input bin.
Lower—Pull header page media from the
(optional) lower input bin.
x
Name options to
Trailer Page
Menu
Administration
Special Pages
Trailer Pages
Notes: See the
(available for purchase from your QMS vendor) for more information.
Choices
Off (default)—Don’t print a trailer/error page for
each print job.
On—Pr int a trailer/error page for each print job.
On Error—If any print job errors exist, print a
trailer page that lists the errors as well as other
trailer page information.
Errors Only—If any print job errors exist, print a
trailer page that lists the errors but omits other
trailer page information.
QMS Crown Document Option Commands
manual
Printer Configuration
1-51
Page 60

Admi nistr ati on
Menu
Trail er Page Inputbi n
You can select the input bin (tray or cassette) from which the printer pulls
media wh en pr inting the trailer page.
Menu
Administrati on
Special Pages
T railer Inputbin
Notes: If you used the Administration/Engine/Inputbin
change the names of the inputbins, these names replace Upper and
Lower in the message window.
Choices
Upper (default)—Pull trailer page media from the
Lower—Pull trailer page media from the lower
input bin.
Printer Start-Up Options
Error Ha ndl er
Error Handler is a diagnostic tool that identi fies PostScript errors
encountered during a print job.
Menu
Administration
Startup Options
Do Error Handler
Notes: The printer must be rebooted for this option to take effect. Refer to
the
PostScript Language Reference Manual
Incorporated, Reading, PA: Addison-Wesley, 1990, ISBN 0-201-18127-4)
for more information on PostScript errors.
Choices
Yes—Load the Error Handler.
No (default)—Don’t load the Error Handler.
upper input bin.
x
Name options to
(Adobe Systems
Start-Up Page
By default, the printer prints a start -up page when you turn it on.
You can turn the star t-up page off to conserve paper and toner.
Menu
Administrati on
Startup Options
Do Start Page
Notes: If you used the Administration/Engine/Inputbin
change the names of the input bins, these names replace Multipurp ose,
Lower, and Optional in the message window.
Choices
Yes (default)—Print a start-up page each time the
printer is turned on.
No—Don’t print a star t-up page each time the
printer is turned on.
x
Name options to
QMS magicolor CX Refe re nce Guide1-52
Page 61

Admi nistr ati on
Menu
SYS\START
If Do Sys Start is enabled, when the printer is turne d on, the
controller checks the hard disk, if present, for a PostScript file
named SYS \START and executes this file.
Menu
Administrati on
Startup Options
Do Sys Start
Notes: This file does not print. Information on creating a SYS\START file
is available via Q-FAX (see appendix A, “QMS Customer Support,” in the
user’s guide, for information on using Q-FAX).
Choices
Yes (default)—Check the hard disk, if present, for
and execute the SYS\START file when the printer
is turned on.
No—Don’t check the hard disk for a SYS\START
file.
Memory
This submenu allows you to allocate the printer’s memory (RA M and,
if a hard disk is present and disk swapping is turned on, hard disk
space) among the various memory clients. This flexibility allows experienced users to optimize the printer's performance according to a
given set of conditions.
▲
Caution: Misallocat ed mem or y may hinder the performance level of
the printer. If you try to set a memory client below a minimum required
value or above a maximum allowable value, the message
INCORRECT VALUE appears in the message window.
To find out how memor y is currently allocat ed, print a statu s page
(this option is in the Administration/ S pecial Pages menu) or check
each client individually in the configurati on menu. When you alloca te
memory to a specific client through the control panel, it is allocated in
kilobytes (KB). The sizes listed on the status page are in bytes, so
you must divide the numbers on the status page by 1024 to get the
equivalent number of kilobytes entered through the control panel.
The printer automatically reallocates added or freed memory to either
the Display List or the Frame B uf fer client, whichever asks for it first.
Printer Configuration
1-53
Page 62

Admi nistr ati on
Menu
This is the best place for it for most users, but it can be reallocated to
other memory clients.
The value for each memory client must be evenly divisible by 4 KB: if
a value is entered that is not evenly divisible by 4 K B, it is automati cally converted to the next lower value that is divisible by 4 KB. For
example, if you enter 102 KB, the actual value is lowered to 100 KB
(assuming there is enough memory available to allocate to this client).
The amount shown on the status page will then be 102,400 (100 x
1024).
Spooling Buffer Memory
Listed as Host Input on the status page, this is the amount of memory
used to store incoming data from all the interfaces until the physical print
engine can print the job. When enough memory is allocated to this client,
the host becomes free more quickl y, and the number of jobs that the
printer can accept simultaneously is increased. So increasing this client
can be beneficial in reducing network traffic, but t hrou ghput speed is not
necessarily increased. If available, a hard drive can supplement this client
with additional memory needed for spooling. The size range and default
varies depending upon the amount of memory available on your system.
Administrati on
K Mem for Spool
Menu
Memory
Choices
Variable.
QMS magicolor CX Refe re nce Guide1-54
Page 63

Admi nistr ati on
Menu
PostScript Heap Memory
This is the amount of memory (KB) dedicated to the PostScript emulation
interpreter. This memory holds downloaded PostScript emulation fonts,
operators, and forms. The size range and default varies depending upon
the amount of memory available on your system. This memory client is
also known as virtual memory.
Inefficiently coded PostScript jobs can consume an infinite amount of
virtu al memory or leave objects in the PostScript heap after the print jobs
are completed, l eading to virtual memory errors. If not enough memory is
allocated to th e PostScript heap, the job cannot print.
Increasing the memory allocated to this client allows more complex jobs to
print and increases the nu mber of fonts that can be downloaded to virtual
memory. If you receive a virtual memory error when attempting to print a
job or download a font, this client should be increased in small increments
until the error message goes away.
Menu
Administrati on
Memory
K Mem for PSHEAP
Choices
Variable
PostScript Fonts Memory
This is the amount of memory (KB) dedicated to caching pre viou sly sc aled
bitmap representations of fonts for the PostScript emulation interpreter.
This reduces the number of times a PostScript font must be converted
from outline form to bitmap form, thus reducing processing time. The size
range and default v aries depen ding upon the amount of memory available
on your system. I t is listed as Font Cache on the status page.
As the font cache memory fills, the printer erases bitmapped characters to
make room for n ew charac ters . By increasing the memory allocated to this
client, the printer can store more characters and spend less time erasing
and replacing characters in the cache.
Normally, you do not need to change this memory client unless you use a
large number of fonts at different point sizes. There is no specific formula
to use in figuring the amount of memory required by the font cache, but
after a certain point, large font caches cause printing to take longer than
smaller font caches because of the search time through the cache. You
should experiment to see what font c ache size works best for you.
Menu
Administrati on
Memory
K Mem for PS F onts
Choices
Variable
Printer Configuration
1-55
Page 64

Admi nistr ati on
Menu
Emulation Memory
This is the amount of memory (KB) dedicated to non-PostScript
emulations for temporary storage and for load ing optional emulations . The
size range and default varies depending upon the amount of memory
available on your system.
Increasing this client's memory allows more complicated non-PostScript
jobs to print and allows larger, optional emulations or multiple emulations
to be loaded and ready to process jobs, without having to be reloaded
every time a job in that emulation is sent.
If an emulation is loaded to process a print job and there is not enough
memory in the emulation client, another emulation already loaded might
be unloaded automatically to obtain the ne cessary memory . I f y ou notice a
delay in printing between jobs that have different non-resident emulations,
it's possible that emulations are being reloaded each time they are run.
Adding to the emulation client might eliminate this unloading and
reloading and, consequently, increase throughput.
Also, increase the emulation client if you are printing complex nonPostScript jobs that might require more memory to process correctly.
Administration
K Mem Emul
Note: If you are using the optional CCITT emulation, this value should be
increased by 200 KB.
Menu
Memory
Choices
Variable
Temporary Emulation Memory
This is the amount of memory (KB) to be used by non-PostScript
emulations for storing downloaded fonts. The size range and default
varies depending upon the amount of memory available on your system.
This memory allows context swit ching, which is the ability to retain
downloaded fonts even after the printer c h anges from one emulation to
another. Context switching prevents repetitive downloading and traffic
congestion on networks.
Normally, this memory client does not need to be changed unless you
plan to download many different non-PostScript fonts.
Menu
Administration
Memory
K Mem Emul Temp
Choices
Variable
QMS magicolor CX Refe re nce Guide1-56
Page 65

Admi nistr ati on
Menu
Display L ist Me m ory
This is the amount of memory (KB) dedicated to the display lists. The
display list client holds the intermediate representation of pages to be
printed in compressed blocks of data. The size range and default varies
depending upon the amount of memory available on your system.
Display List shares its memory with the PostScr ipt h eap. Many pages of
compressed blocks belonging to multiple print jobs can be stored
simultaneously in the display list. If enough memory is allocated to this
memory client, a page can always be ready to print as soon as another
page has been imaged by the print engine, so increasing the amount of
memory in this client might improve printing throughput. If not enough
memory is allocated to this client, memory is taken from the excess
memory client (PostScript heap) to complete the print j ob.
Menu
Administrati on
Memory
K Mem Display
Choices
Variable
Frame Buffer Memory
This is the amount of system memory (KB) dedicated to the frame buffers.
This client holds rasterized pages that are ready to be transferred to the
print engine. The amount of frame buffer storage affects the maximum
size of any single page. The resolution, page size, and number of colors
that can be printed depends on how much RAM is in th e printer. See
“Changing Print Resolution” in chapter 2, “Printing,” of the user’s guide for
information on minimum RAM requirements.
Menu
Administrati on
Memory
K Mem Fra me buff
Cho i ces
Variable
Printer Configuration
1-57
Page 66

Admi nistr ati on
Menu
Disk Cache Memory
This is the amount of memory (KB) dedicated to the disk cache, the area
in which frequently used data is stored so it does not have to be
continually read from and written to disk, if present (either an internal or
an external drive). The size range and default var i es depending on the
amount of memory available on your system.
If not enough memory is available for this client, some or all hard disks
may not be accessible and/or an insufficient number of disk cache blocks
may be available.
Administration
K Mem Disk Cache
Printer Memory
This memory client cannot be changed: it is the amount of memory in the
printer that i s available to be split among the other memory clients.
Administration
MB Printer Mem
Menu
Memory
Menu
Memory
Choices
Variable
QMS magicolor CX Refe re nce Guide1-58
Page 67

Admi nistr ati on
Menu
Enabl e Disk Sw ap
If the printer has a hard dis k, then Enab le Disk Swap s hould be ena bled to
take full advant age of it. Disk swappin g gives your printer virtual memory
capability for all memory clients thr ough the creation of a “swap file” on a
hard disk. The def ault size of the swap file depen ds on th e amount o f RAM
installed. The more RAM is installed, the larger the default swap file size
will be. The printer uses this file as an extensi on of its memory. As the
physical RAM fills, the printer can swap the contents to the hard disk file to
allow more space. This file swapping between disk and RAM occurs at
various times throughout the printing process and is completely
transparent.
If disk swapping i s enabled and a hard disk is not available or not turned
on, the printer automatically resets to the factory defaults. It would then be
necessary to re-enable disk swapping, if you want this functionality.
The printer must be restarted for changes to the Enable Disk Swap setting
to take effect. Changing this setting causes the REBOOT NOW? prompt to
appear. You can either choose to restart the printer now and this change
takes effect immediately or you can manually restart the printer and have
this change take effect later.
If you Enable Disk Swap and restart the printer, then the disk cache size
automatically increases to 256 KB. See “Disk Cache Memory” on page 58
for more information.
Menu
Administration
Memory
Enable Disk Swap
Choices
No (default)—Don’t enable disk swapping.
Yes—Enable disk swapping.
Printer Configuration
1-59
Page 68

Admi nistr ati on
Menu
Printer Engine Features
Clear Warning
Use this option to clear a status message that doesn't automatically clear
after the related corrective action is taken.
Menu
Administrati on
Engine
Clear Warning
Notes: You should select the appropriate Clear Warning option each time
you replace a developer cartridge, whether or not a warning message is
actually displayed. See “Replacing a Developer Car tr idge” in chapter 3 in
the user’s guide for information. Also, if you clear REPLACE FUSER or
100K CHECKUP, the counter that tracks that particular service resets to 0
and the message does not reappear until after another complete cycle . If
you continue to use the printer without the proper maintenance or part
replacement, print quality can deteriorate, and the wear on the printer can
shorten the printer's life.
Choices
Options in this menu include all status messages
that don't automatically clear. Select the message
that you want to clear after correcting the
specified status. See chapter 4,
“Tro ubleshooting,” in the user’s guide, for details.
Energy Sa v er
The Energy Saver option specifies whether the pr inter cha nges to
a low-power state (the engine remains on, but the fuser turns off)
after the printe r is inactive for a user-defined length of time. This
low-power state is compliant with US Environmental Protectio n
Agency (EPA) Energy Star regulations. When a print job is
received, the printer returns from the Energy Saver state to an
active state within 90 seconds.
Menu
Operator Control
Energy Saver
Notes: The 1-hour setting is compliant with Energy Star regulations.
Some optional daughterboards may cause the product to become nonEnergy Star compliant.
Choices
15 minutes, 30 minutes, 1 hour (default), 2 hours,
3 hours—(Idle time before activation of low-power
state).
Off—Stay at normal power levels all of the time.
QMS magicolor CX Refe re nce Guide1-60
Page 69

Admi nistr ati on
Menu
Image Alignment
This option allows you to adjust the horizontal and vertical placement
of printed images. To check image alignment , print a standard status
page (Administration/Special Pages/Print Status). When the printer is
placing images properly, the alignment angle bar in the lower-left corner of the status page is 0.5"/12.7 mm from the left and bottom edges
of the page. If the angle bar is off, use the Administ ration/ Engin e/
Image Alignmen t option to align the image horizon tal ly and verti ca lly
in pixel increments (1/300" or 0.08 mm). Engine constraints may limit
the accuracy of pixel alignment.
Horizontal Offset
Menu
Administrati on
Engine
Image Alignment
Horiz Offset
Notes: Values above 100 move the image to the right. Values below 100
move the image to the left.
Choices
000-300 (0.00"/0 mm-1.00"/25.4 mm)
100 (0.33"/.84 mm) (default)
Vertical Offset
Menu
Administration
Engine
Image Alignment
Vertical Offset
Notes: Values above 100 move the image down. Val ues below 100 move
the image up.
Choices
000-300 (0.00"/0 mm-1.00"/25.4 mm)
100 (0.33"/.84 mm) (default)
Default Paper
Default Paper is used when the default media is requested but the
default input bin is missing from the engine so there’s no way to
sense the media size automaticall y.
Menu
Administrati on
Engine
Default Paper
Choices
Letter (default), A4
Printer Configuration
1-61
Page 70

Inputbin x Name
These options are used to name input bins 1 and 2 (upper and
(optional) lower cassette).
Menu
Administrati on
Engine
Inputbin x Name
Choices
Up to 16 alphanumeric characters
Inputbin 1 “upper” / Inputbin 2 “lower” (default)
Outputbin x Name
Use this option to assign a name to the output bin.
Menu
Administrati on
Engine
Inputbin x Name
Choices
Up to 16 alphanumeric characters
Outputbin “upper” (default)
Default Resolution
Menu
Administrati on
Engine
Deaf. Resolution
Choices
300 dpi—300 x 300 dpi resolution
600 dpi—600 x 600 dpi resolution (default)
1200 dpi—1200 x 600 dpi resolution
Default depends on how much memory is in the
printer. See “Changing Print Resolution” in
chapter 2, “Printing,” of the user’s guide for
information on minimum RAM requirements for
different resolutions, page sizes, and numbers of
colors.
Page Recovery
When a media jam or other similar error occurs, the printer can
reprint the job star t ing f rom th e page on wh ich the jam oc curred .
Menu
Administrati on
Engine
Page Recovery
Choices
On—Reprints a print job from the page on which
the jam or error occurred.
Off (default)—Don’t reprint a print job when a jam
or error occurs.
Page 71

Admi nistr ati on
Menu
Manual Feed Ti m eou t
This option allows you to set the amount of time the prin ter wai ts
for paper to be inserted into the manual feed slot before it cancels
the job.
Menu
Administrati on
Engine
Man. Feed Timeout
Notes: A value of 000 sets the timeout to infinity
Choices
000 - 300 seconds
060 seconds (default)
Miscellaneous
Restore Defaults
If you need to cancel all of the configuration changes you have
made, you can reset all of the configuration settings to their factory
defaults
Menu
Administration
Miscellane ous
Restore Defaults
Notes: This process takes several minutes to complete. Remember that
any changes made to t he configuration menu are lost when the factory
defaults are restored, so if you think any changes have been made, it’s a
good idea to print an advanced status page (Administration\Special
Pages\Print Status menu) to have a record of these changes. If the printer
has a hard disk and you have enabled disk swapping (recommended to
take advantage of a hard disk), you should re-enable it after restoring
factory defaults (Administration\Memory\Enable Disk Swap menu).
Choices
Yes, No (default)
Reboot System
You can use this selection to restar t the print er withou t turni ng off
the power switch. You would use this when you’ve made changes
to the configuration and need t o restar t the pr int er before the new
settings will be acknowledged.
Menu
Administrati on
Miscellaneous
Reboot System
Choices
Yes, No (default)
Printer Configuration
1-63
Page 72

Admi nistr ati on
Menu
New Flash Image
The system software in your printer is stored on flash memory.
This allows you to update the system software without opening the
printer and insta lling new PROMs.
Administrati on
Miscellaneous
New Flash Image
Notes: The procedures for downloading a new flash image are in chapter
2, “Printer Options.”
Keypad Language
Status messages and configuration menus can be displayed in the
message window in English, French, German, or Spanish.
Administrati on
Miscellaneous
Keypad Language
Notes: The printer must be restarted for changes to the Keypad
Language menu to take effect. You can either let the printer restart
automatically after you save the change and exit from the Configuration
menu, or you can wait for the change to take effect the next time you
manually turn on the printer.
Menu
Menu
Choices
Yes, No (default)
Choices
English (default), French, German, Spanish
QMS magicolor CX Refe re nce Guide1-64
Page 73

Disk Operations
Admi nistr ati on
Menu
» Note:
▲
This menu appears only if the printer has a hard disk.
Caution: If you connect to this printer an external hard disk you
previously used with an earlier QMS Crown printer, this QMS
magicolor CX software release will aut om atically reorganize the fi les
on the hard disk when the printer is turned ba ck on again. Once this
reorganization is done, the files on the hard disk can no longer be
accessed if the hard disk is reattached to an earlier QMS Crown
printer.
This reorganization proce ss ta kes time. If, when you first turn the
printer on after attaching a previously used hard disk, it does not
come on line immediately, be patient. Interrupting the reorganization
process could cause all files on the hard disk to be lost.
Inst all Option
Use the Administration/Disk Operati ons/Install Option menu to add
optional fonts to the hard disk from a font card. This selection copies data
from the card to the hard disk. See chapter 2, “Printer Options,” for
instructions.
Remove Op tio n
Use the Administration/Disk Operations/Remove Option menu to remove
a previously installed optional font. See chapter 2, “Printer Options,” for
instructions.
v
Printer Configuration
1-65
Page 74

Page 75

2
Printer Options
In This Chapter . . .
n
“Avai lable Options and Accessories” on page 2
n
“The Sheet Feeder” on page 4
n
“The Envelope Cassette” on page 8
n
“Font Cards” on page 12
n
“Security Cards” on page 14
n
“Removing and Replacing the Controller Board” o n page 20
n
“Single In-Line Memory Mo dules (SIMMs)” on page 23
n
“The Intellifont SIMM” on page 26
n
“Interface Daughterboards” on page 30
n
“Connecting a Macintosh to a LocalTalk Interface” on page 33
n
“Installing an Internal IDE Hard Disk” on page 34
n
“Attaching External Hard Disks” on page 37
n
“Installing Fonts” on page 41
n
“Installing an Emu lat ion” on page 44
n
“Updating System Software” on page 45
Page 76

Available Options
and Accessories
Available Options and Accessories
The following options, accessories, and spare par ts are available for
your printer. Contact your QM S vendor for information on obtaining
them.
Documentation QMS Crown Document Option Commands
QMS Crown Network Notes
CrownCopy Color c opier that attaches directly to a printer SCSI port.
See the documentation that accom p anied this option for
installation and use instructions.
Envelope
cassette
Sheet Feeder 250-sheet feeder that comes with a media cassette that is
RAM 4MB, 60 ns, no parity, 72-pin, 1MB x 32 bits
Emulations CALS Host-based filter
30-envelope cassette; can be used in the standard
media-cassette slot or the optional sheet feeder.
interchangeable with the standard cassette.
8MB, 60 ns, no parity, 72-pin, 2MB x 32 bits
16MB, 60 ns, no parity, 72-pin, 4MB x 32 bits
32MB, 60 ns, no parity, 72-pin, 8MB x 32 bits
Does support 2K or 4K refresh-type DRAMs
Additional information is in Q-FAX document 6502, “QMS-
tested SIMMs and Hard Disks.” This document contains a
description of each approved SIMM, its manufacturers
and part numbers, and the QMS products on which it can
be used. See appendix A, “QMS Customer Support,” in
the user’s guide to find out how to access Q-FAX
documents.
CCITT Loadable disk for mat or host-b ased filter
LN03+ Loadable disk format
TIFF Loadable disk format or host-based filter
QMS magicolor CX Refe re nce Guide2-2
Page 77

Fonts HP ProCollection card
Courier, Prestige Elite, Letter Gothic, Tms-Rmn, Helv, and
LinePrinter
Intellifont SIMM
Clarendon, Courier, Garamond (Stempel), Times Roman,
Albertus, Antique Olive, Letter Gothic, Line Printer,
Omega, Univers, ITC Zapf Dingbats, Coronet, and
Marigold
Kanji Font SIMM
Ryumin Light-KL, Gothic BBB-Medium (licensed to QMS
by Morisawa and Company, Ltd.), Mincho Medium,
Mincho Heavy, Gothic Bold, and Gothic Heavy (licensed
to QMS by TypeBank)
LocalTalk Interface Board
System Administrator Secur ity Card
Hard Disks—
Internal IDE,
External SCSI
Token-Ring
Interface
EtherNet
Interface
Internal IDE hard disk (requires a SCSI daughterboard for
installation).
SCSI daughterboard which supports and internal hard
disk and up to 3 external SCSI hard disks
Specifications are included in Q-FAX document 6502,
“QMS-tested SIMMs and Hard Disks.” This document
contains a description of each approved hard disk, its
manufacturers and part numbers, and the QMS products
on which it can be used. See appendix A, “QMS
Customer Support,” in the user’s guide to find out how to
access Q-FAX documents.
LAN Manager/LAN Server
TCP/IP
NetWare
LAN Manager/LAN Server
TCP/IP
NetWare
EtherTalk
Availabl e Options
and Accessorie s
Printer Options
2-3
Page 78

The Sheet Feeder
The Sheet Feeder
Unpack the sheet feeder and make sure you received the following:
n
Sheet feeder unit
n
Two small metal brackets
n
Four large plastic corner brackets
» Note:
M
WARNING!
without consumables. Be sure to have help when lifting and moving it.
If consumables are installed, be sure to keep the printer level when
moving it to prevent accidental spills.
ACHTUNG!
Verbrauchsmaterial ca. 48 kg. Bitte versuchen Sie niemals, den
Drucker alleine anzuheben oder zu transportieren. Achten Sie bitte
darauf, daß der Drucker mit eingebauten Tonerkartuschen nur
waagerecht transportiert wi rd.
1 Turn the printer off, remove the power cord, and disconnect
There may be several other pieces with the sheet feeder,
but they are not required for this procedure.
Your printer weighs approximately 106 lbs (48 kg)
Das Gewicht dieses Druckers beträgt ohne
all interface cables from the printer.
QMS magicolor CX Refe re nce Guide2-4
Page 79

The Sheet Feeder
2 With the help of ano ther pe rson, pick up the prin ter by the
four corners and align it above the sheet feeder.
Keeping the printer level, lower it onto the sheet feeder . The bottom side edges of the printer rest inside the sides of the sheet
feeder.
Printer Options
2-5
Page 80

The Sheet Feeder
3 Install the two small metal brackets using the following pro-
cedure:
a Align one of the metal brackets with the outside of the metal
post on the front right side of the sheet feeder. Make sure the
holes on the post and bracket are centered and that the
flange on the bottom of the bracket goes into the slot on the
post.
b Attach the bracket to the post using one of the two small
metal screws that came with the sheet feeder.
c A lign and attach t he second metal bracket to the rear left
sheet feeder post in the same way as you did the first bracket.
Metal Bracket
Rear Left
Metal Bracket
Rear Left
QMS magicolor CX Refe re nce Guide2-6
Metal Bracket
Front Right
Page 81

The Sheet Feeder
4 Snap the plastic brackets onto the appropriate corners of the
sheet feeder.
The inside corner of each bracket is labeled to indicat e which corner of the sheet feeder it fits in. These brackets also have small
rims on the bottom that fit inside the edges of the sheet feeder.
Rear
Left
Front
Left
(Top View)
Rear
Right
Front
Right
The sheet feeder is now installed. See chapter 2, “Printing,” in the
user’s guide for information on handling media and fillin g cassettes.
» Note:
If you move the printer with the sheet feeder attached, lift the
unit by the four bottom corners, not by the sheet feeder's cassette
slot.
Printer Options
2-7
Page 82

The Envelope
Cassette
The Envelope Cassette
You can purcha se an envelope cassette from your QMS vendor. The
envelope cassette holds up to 30 24-lb (90 g/m2) DL and Com 10
envelopes. They should be the top-flap type with pre-folded sealing
flaps. The leading edge (the edge that feeds into the printer) must be
thin and well creased. End-flap envelopes, envelopes with transparent windows, and envelopes with three or more layers on the left and
right edges are not recommended. The envelope cassette fits in the
slot for the standard or the optional media tray, but we recommend it
be used in the standard slot.
Installing the Envelope Cassette
1 Remove the paper cassette from the printer.
QMS magicolor CX Refe re nce Guide2-8
Page 83

The Envelope
Cassette
2 On the envelope cassette, open the stacker arm and set the
side and rear envelope stackers to the correct envelope size.
Stacker Arm
Set th e
side stackers
Set the
rear stacker
Printer Options
2-9
Page 84

The Envelope
Cassette
3 Set the envelope-size key to the correct envelope size .
4 Lift the stacker arm and load 30 or fewer envelopes printing -
side up, so that the flap side will be on the left wh en the
envelope is pulled into the printer.
5 Lower the stacker arm.
QMS magicolor CX Refe re nce Guide2-10
Flap Side
Page 85

The Envelope
Cassette
6 Slide the envelope cassette into the printer.
7 Make sure you select the correct envelope size through your
software driver when pr inting .
Printer Options
2-11
Page 86

Font Cards
Font Cards
You can purchase cards contai ning fonts not resident on the pr inte r.
The printer can support two cards at once. Fonts cards may go in
either of the two slots located on the front of the printer, below the
control panel. Contact your QMS vendor for availability.
▲ Caution
remove a card. Press the Online/Offline key to turn the LED off. If you
forget to take the printer off line, turn the printer power off and back on
to regain access to the printer's resident fonts and the data stored in
the printer's memory.
However, before installing or removing the ProColle ction font card,
you must turn off your printer rather than just take it off line. Then turn
the printer ba ck on after you finish.
: Usually, the printe r must be off line before you insert or
Using Font Cards
Use the following procedure to install a font card:
1 If you are installing a ProCollectio n card, turn off the printer.
Otherwise, press the Online/Offline key to take the printer off
line (the LED should be off).
▲ Caution
left, toward the center of the printer. Do not force them in backwards;
this could damage the card and pr inter.
: Font cards fit in only one direction, with the front label facing
QMS magicolor CX Refe re nce Guide2-12
Page 87

Font Cards
2 Insert the card into either slot with the front label side facing
left toward the inside of the printer.
3 Depending on the type of card you are installing, either turn
the printer on again or put it back on line.
To remove a card, use the following procedure:
1 If you are removing a P roCo llectio n card, turn off the printer.
Otherwise, press the Online/Offline key to take the printer off
line (the LED should be off).
2 Pull the card out gently.
3 Depending on the type of card you are removing, either turn
the printer on again or put it back on line.
» Note:
If you are using an application, make sure the printer driver
installed suppor ts the fonts on the card, if you want to use those
fonts. If not, contact your application manufacturer for support .
Printer Options
2-13
Page 88

Security Cards
Security Cards
An optional security card allows the Operator Control and Administration menus to be password prot ected, so that only users who know
the password can change printer configurations. When a security
card is installed, a new menu, Installation, appears in the printer's
Configuration menu. The Install ation menu is use d to password-protect the printer.
▲ Caution
security card. If you forget to take the printer off line before you insert
or remove a security card, turn the printer off and back on again to
regain access to the data stored in the printer's memo ry.
: The printer must be off line before you inser t or remove a
Using a Security Card
1 Take the printer off line.
▲ Caution
facing left, toward the center of the printer. Do not force the card in
backwards; this could damage the card and printer.
: A security card fits in only one direction, with the front label
QMS magicolor CX Refe re nce Guide2-14
Page 89

Security Cards
2 Insert the security card in to eith er slot with the card's front
label facing left, toward the insi de of the pri nter.
3 Press the Menu key to enter the Confi gurati on menu . Press
the Next key until the following message displays in the control panel message window:
CONFIGURATION
INSTALLATION
4 Press the Select key to enter the Installati on menu, then use
the Next key to view the menu option s:
OPERATOR PASSWRD
USE OPERATOR PWD
ADMIN PASSWORD
USE ADMIN PWD
5 To password-protect the Operator Control menu, press
Select to display the mes s age
INSTALLATION
OPERATOR PASSWRD
Printer Options
2-15
Page 90

Security Cards
Then, specify the password. (See “Changing Character Information” in chapter 1, “Printer Configuration,” for detailed instructions
for entering alphanumeric values.)
6 When you have entered the complete password, press the
Select key. This saves the password and returns you to the
Installation menu.
7 To turn on the Password option, press the Next key to dis-
play the message
8 Press the Select key to enter this subme nu. Then press the
Next key to display the message
9 Press the Select key. This activates the password option and
returns you to the Installation menu.
10 To password-protect the Administration menu, press the
Next key to display
INSTALLATION
USE OPERATOR PWD
USE OPERATOR PWD
YES
INSTALLATION
ADMIN PASSWORD
11 Press Selec t, then specify the password. (See “Changing
Character Information” in chapter 1, “Printer Configuration,”
for detailed instru ctio ns for enteri ng al ph anum er ic value s.)
12 When you have entered the complete password, press the
Select key. This saves the password and returns you to the
Installation menu.
13 To turn on the Password option, press the Next key to dis-
play the message
INSTALLATION
USE ADMIN PWD
QMS magicolor CX Refe re nce Guide2-16
Page 91

Security Cards
14 Press S elect to ente r this submenu . Press the Next key to
display
USE ADMIN PWD
YES
15 Press S elec t. This returns you to the Ins tallatio n menu.
16 Once the passwords are entered and activated, press the
Menu key to return to the Main menu. The following message
is displayed:
SAVE CHANGES?
*NO
17 Press the N ext key to display
SAVE CHANGES?
YES
18 Press S elec t. Remove the securi ty ca rd from the card slot,
and put the printer back on line.
Once a menu is password-protected, you cannot enter it or make
changes in it until you enter a valid password. You know a menu is
password protected if
ENTER PASSWORD
appears on the message window when you try to enter the Configuration menu. If you enter an invalid password, the message window
flashes
INVALID PASSWORD
for three seconds, and then returns to the parent menu. If you forget
the password, the system administrator can recover it by repeating
the “Using a Security Card” procedure.
If you enter the correct password, you are allowed to enter the menu.
The password for the two menus may be the same or different.
Printer Options
2-17
Page 92

Security Cards
Installation Menu
The Installation menu appea rs only if a security card is installed. The
system administrato r uses the Instal lation me nu to set pas swords for
the Operator Control and Adm in istrati on menus.
Operator Passwo rd
Allows you to enter a password used to enter the Ope rator me nu
when enabled.
Menu
Installation
Operator Passwrd
Notes: Enable the password in the Installation/Use Operator Pwd menu.
Use Operator Password
Determines if a password is required to enter the Operator menu .
Menu
Inst allat ion
Use Operator Pwd
Notes: Enter the password in the Installat ion/Operator Passwrd menu.
Choices
Up to 16 alphanumeric characters
Choices
On—Require a password to enter the Operator
Control m e nu.
Off (default)—Don’t require a password to enter
the Operator Control menu.
Admin Pa ss w ord
This represents the pas sword used to enter the Administrati on
menu when enabled.
Menu
Inst allat ion
Admin Pwd
Notes: Enable the password in the Installation/Use Admin Pwd menu.
Choices
Up to 16 alphanumeric characters
QMS magicolor CX Refe re nce Guide2-18
Page 93

Security Cards
Use Admin Password
Determines if a password is required to enter the Administratio n
menu.
Menu
Inst allation
Use Admin Pwd
Notes: Enter the password in the Installat ion/Admin Password menu.
Choices
On—Require a password to enter the
Administration menu.
Off (default)—Don’t require a password to enter
the Administration menu.
Using Passwords
When a password is required to enter the Operator Control or Administration menu, the message window will display
ENTER PASSWORD
if you press the Select key to enter the menu. Enter the password or
press the Menu key to return to the menu.
If you specify the correct password, access to the selected menu is
granted. However, i f you enter an invalid password, the message window flashes
INVALID PASSWORD
for three seconds and then returns you to the Configuration menu.
Printer Options
2-19
Page 94

Removing an d
Replacing the
Controller Board
Removing and Replacing the Controller Board
▲ Caution
electrostatic damage while perfo r min g this task.
If an anti-static wrist strap is provided in your printer option kit,
attach one end of it to your wrist and the other end to any convenient
electrical ground (for example, the bare metal chassis of equipment,
as on the back of a computer, that is plugged in but turned o ff).
Never attach the wrist strap to any piece of equip ment wi th an
electrical current pr esent. Turn off all power switches first. Plastic,
rubber, wood, painted metal surfaces, and telephones are not
acceptable grounding points. The printer isn't an acceptable
grounding point either because it must be unplugged before you
perform this task.
If you don't have an anti-static wrist strap, discharge your body's
static electric charge by touching a grounded surface before you
handle any printer boards or components and before removing the
controller board cover. Redischarge your body each time after
walking around and before touching the controller board again.
Handle the controller board carefully , and try to handle it by the edges
only.
: It's very important to protect the controller boa rd from
Removing the Controller Board
▲ Caution:
administrator. Do not attempt this procedure if you have no
experience working with circuit boards.
1 Turn the printer off, remove the power cord, and disconnect
2 Loosen the two mounti ng screws th at hold the con troller
The following procedure is written for the system
all interface cables from the printer.
board to the printer.
QMS magicolor CX Refe re nce Guide2-20
Page 95

Removing and
Replacing the
Controller Board
3 Pull the controller boa rd straigh t out and lay it on a flat sur-
face.
Replacing the Controller Board
▲ Caution:
Do not attempt this procedure if you have no experience working with
circuit boards.
1 Reinsert the con t roller bo ard maki ng sure it’s properly
Printer Options
The following instructions are written for advanced users.
seated in its connectors.
2-21
Page 96

Removing an d
Replacing the
Controller Board
2 Tighten the two mounting screws.
3 Reconnect all interface cables an d the powe r cord, and then
turn on the printer.
QMS magicolor CX Refe re nce Guide2-22
Page 97

Single In-Line Memory Modules (SIMMs)
Single In-Line
Memory Modules
(SIMMs)
» Note:
If you’re installing an Intellifont SIMM, see “The Intell ifont
SIMM” on page 26 for instructions. Intellifont SIMM and RAM SIMM
connectors are not interchangeable.
1 Follow the instructions in “Removing the Controller Board”
on page 20, being careful to discharge electrostatic buildup
before you begin.
2 Turn the controller board so that the side where the SIMMs
are located is closest to you.
J1
J2
RAM
SIMM(s)
Printer Options
2-23
Page 98

Single In-Line
Memory Modules
(SIMMs)
3 Remove the currently install ed SIMM( s).
Pull the latch on each side of the SIMM connector outward using
your thumbs. Tilt the SIMM forward and lift it out of the connector.
QMS magicolor CX Refe re nce Guide2-24
Page 99

Single In-Line
Memory Modules
(SIMMs)
4 Insert the new SIMM into the con nec tor closes t to the edge
of the board (J2).
» Note:
J1, the connector closest to the center of the board.
Position the SIMM at a 60° angle to the controller board, with the
notch on the right side and the bottom edge in the connector.
Then pull the SIMM towards you to a 90° angle until you feel it fit
into place behind the clips on either side of the connector. (You
may need to use your fingers to open these clips.) When seated,
the SIMM stands upright , fir mly in place.
If you’r e only going to install one SIMM, it must be placed in
J1
J2
▲ Caution
: If you cannot easily fit the SIMM into place, do not force
it. Reposition it, making sure that the botto m of the SIMM is
seated completely in the connector.
5 Repeat step 4 to install the other SIMM in the remaining con-
nector (J1).
6 Follow the instructions in “Replacing the Controller Board”
on page 21, being careful to follow the directions for eliminating electrostatic buildup.
Printer Options
2-25
Page 100

The Intellifont
SIMM
The Intellifont SIMM
» Note:
M
▲ Caution:
If you’re installing a RAM SIMM, see “Single In-Line Memor y
Modules (SIMMs)” on page 23 for instructions. Intellifont SIMM and
RAM SIMM connectors are not interchangeable.
An optional Intellif ont SIMM increases the number of fonts available
to the HP PCL 5 emulation on your printer from 20 to the 37 PCL 5
fonts available on a Hewlett-Packard LaserJet 4Si.
WARNING!
taking the cover off the printer.
ACHTUNG!
Netzstecker heraus bevor Sie die Druckerabdeckung öffnen.
electrostatic damage while perfo r min g this task.
If an anti-static wrist strap is provided in your printer option kit, attach
one end of it to your wrist and the other end to any convenient
electrical ground (for example, the bare metal chassis of equipment,
as on the back of a computer, that is plugged in but turned off). Never
attach the wrist strap to any piece of equipment with an electr ical
current present. Turn off all power switches first. Plastic, rubber,
wood, painted metal surfaces, and telephones are not acceptable
grounding points. The pr int er isn 't an accep table grou nding poi nt
either because it must be unplugged before you perform this task.
Turn off the printer and unplug the power cord before
Bitte schalten Sie den Drucker aus und ziehen Sie den
It's very impor ta nt to protect the printer tray assembly from
If you don't have an anti-static wrist strap, discharge your body's static
electric charge by touching a grounded surface before you handle any
printer boards or components and before removing the tray assembly
cover. Redischarge your body each time after walking around and
before touching the printer tray assembly again.
1 Follow the instructions in “Removing the Controller Board”
on page 20, being careful to discharge electrostatic buildup
before you begin.
QMS magicolor CX Refe re nce Guide2-26
 Loading...