

Page 1
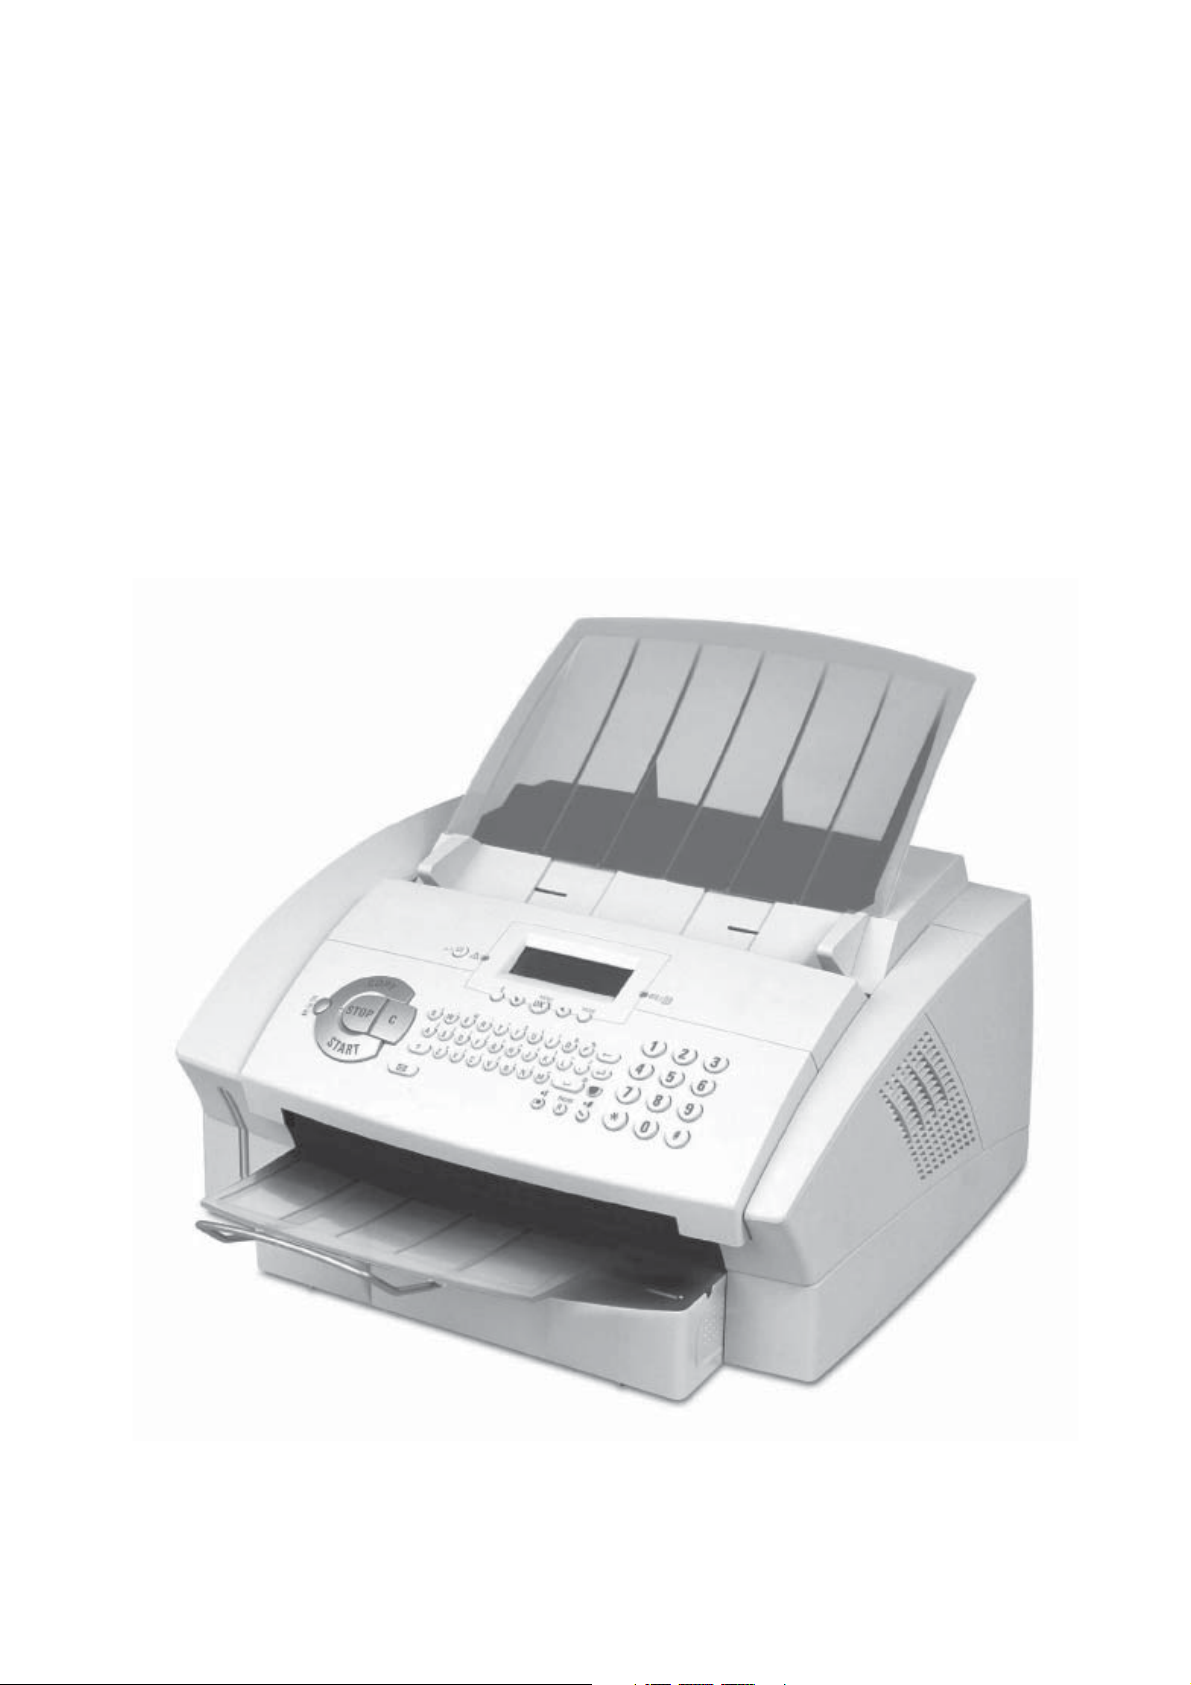
User Manual
Page 2

2
Dear Customer,
we hope that you will have lots of fun using your new
laser fax machine. With your new fax machine you can
send and receive faxes, send and receive SMS messages,
as well as make copies. e machine prints on ordinary
copier and typewriter and photocopier paper. With the
time stamp you can verify the exact arrival time of a fax
transmission at its destination location. is function remains operative even after a loss of electrical power.
For printing purposes, your fax machine utilises the most
up-to-date laser technology. e starter cartridge that is
delivered with your fax machine is suffi cient for up to
1,000 pages.
• Automatic document feeder for 20 documents
• Resolution: Fast · Quality · Photo
• Zoom: 25 to 400 percent
• Up to 99 copies from one document
Printer
• Black and white laser printer
• Resolution 600 dpi
• Ten pages per minute
Lists and Reports
You can connect the machine to your computer (PC with
Microsoft Windows® 98 SE · 2000 · ME · XP), and can
use the machine as a laser printer. You can also use it to
scan documents for use on your computer. (Depending
on the model)
Please read the user manual carefully, and always follow
the safety instructions that are given there. Try out the
many and various possibilities of your laser fax machine.
You cannot damage the machine while making use of the
functions that we have described in this user manual.
Fa x
• Laser printer on ordinary paper
• Modem: Super G3 33k6 modem
• Fax memory: 120 pages
• Fax switch: Manual · EXT/Answering machine · Fax
• Polling of fax transmissions
• Automatic document feeder for 20 documents
• Broadcast function
• Time stamp
• Private branch exchange (PABX) possible
• Caller ID / CLIP
• Telephone book with up to 200 entries
• Ten groups with up to 199 entries
Paper
• Paper tray for up to 250 sheets
• Ordinary typewriter and photocopier paper (60 to
90 g/m2)
Copier
• Functions list
• Journal (30 SMS or fax transmissions)
• Entries and groups in the telephone book
• Overview of the machine settings
• List of the pending transmissions
• Transmission report
SMS
• 160/640 characters *
• Memory for 30 messages
• Automatic printing
• Notifi cation *
•
Sending and receiving with sub-address (Terminal ID)
•
SMS to e-mail or fax *
(* depending on country and network
Scanner
• Resolution: 256 grey tones
• Speed: Six seconds for one A4 page
• Automatic document feeder for 20 documents
Computer-Connection
(Depending on the model)
• For PC
• Microsoft Windows® 98 SE · 2000 · ME · XP
• USB connection (1.1 as well as 2.0 full speed)
• Installation CD with automatic installation
• TWAIN scanner driver
• Paper Port
• Printing from the computer (ten pages per minute)
• Add and edit telephone book entries
*
)
• 64 grey tones
• Speed: 10 pages per minute
Page 3

Table of Contents
Table of Contents
Table of Contents
Safety Instructions . . . . . . . . . . . 4
3
Printing Multiple Copies . . . . . . . . . . . . . . 22
Time Stamp . . . . . . . . . . . . . . . . . . . . . 22
Broadcast Transmissions . . . . . . . . . . . . . . . 22
Time-Deferred Sending . . . . . . . . . . . . . . . 23
Fax Polling . . . . . . . . . . . . . . . . . . . . . 23
Journal . . . . . . . . . . . . . . . . . . . . . . . 24
Jobs . . . . . . . . . . . . . . . . . . . . . . . . . 24
Overview . . . . . . . . . . . . . . . . . . 6
Description of the Machine . . . . . . . . . . . . . . 6
Operation Panel with LCD Display . . . . . . . . . . 7
Package Contents . . . . . . . . . . . . . . . . . . . 8
1. Installation . . . . . . . . . . . . . . . 8
Unpacking and Connecting . . . . . . . . . . . . . . 8
Toner Cartridge . . . . . . . . . . . . . . . . . . . . 9
Paper . . . . . . . . . . . . . . . . . . . . . . . . 11
Special Telephone Connections . . . . . . . . . . . 12
Additional Devices . . . . . . . . . . . . . . . . . 13
Easylink . . . . . . . . . . . . . . . . . . . . . . . 13
2. Settings . . . . . . . . . . . . . . . . . 14
Setting the Country . . . . . . . . . . . . . . . . . 14
Setting the Language . . . . . . . . . . . . . . . . 14
Setting the Date and Time . . . . . . . . . . . . . 14
Entering Your Telephone Number and Name . . . . 14
Page Header. . . . . . . . . . . . . . . . . . . . . 14
Ring Tone . . . . . . . . . . . . . . . . . . . . . . 15
Resolution. . . . . . . . . . . . . . . . . . . . . . 15
Protected Fax Reception. . . . . . . . . . . . . . . 15
Locking the Machine . . . . . . . . . . . . . . . . 15
Energy Saving Mode . . . . . . . . . . . . . . . . 16
Setting the Fax Reception Mode. . . . . . . . . . . 16
3. Telephone Book . . . . . . . . . . 18
Saving New Entries . . . . . . . . . . . . . . . . . 18
Using the Telephone Book . . . . . . . . . . . . . 18
Editing Entries . . . . . . . . . . . . . . . . . . . 18
Deleting Entries . . . . . . . . . . . . . . . . . . . 18
Quick Search . . . . . . . . . . . . . . . . . . . . 18
Groups . . . . . . . . . . . . . . . . . . . . . . . 18
Chain Dialling . . . . . . . . . . . . . . . . . . . 19
Printing the Telephone Book . . . . . . . . . . . . 19
Calling Line Identifi cation . . . . . . . . . . . . . 19
4. Fax . . . . . . . . . . . . . . . . . . . . . 20
5. Copier . . . . . . . . . . . . . . . . . . 25
Making Copies Automatically . . . . . . . . . . . . 25
Adjusting Copies . . . . . . . . . . . . . . . . . . 25
6. SMS* . . . . . . . . . . . . . . . . . . . 26
Sending SMS Messages . . . . . . . . . . . . . . . 26
Receiving SMS Messages . . . . . . . . . . . . . . 26
Reading SMS Messages . . . . . . . . . . . . . . . 26
Printing SMS Messages . . . . . . . . . . . . . . . 27
Deleting SMS Messages . . . . . . . . . . . . . . . 27
Sending SMS Messages to E-Mail or Fax . . . . . . 27
Advanced Sending Options . . . . . . . . . . . . . 27
SMS Settings . . . . . . . . . . . . . . . . . . . . 28
Text2Fax . . . . . . . . . . . . . . . . . . . . . . 29
7. PC Connection** . . . . . . . . . 30
Requirements . . . . . . . . . . . . . . . . . . . . 30
Installing the Software. . . . . . . . . . . . . . . . 30
Uninstalling the Software . . . . . . . . . . . . . . 31
Using the C S . . . . . . . . . . . .
Editing the Telephone Book . . . . . . . . . . . . . 32
Settings . . . . . . . . . . . . . . . . . . . . . . . 33
Displaying the Toner Level . . . . . . . . . . . . . 33
Printing from Computer . . . . . . . . . . . . . . 33
Scanning . . . . . . . . . . . . . . . . . . . . . . 34
8. Troubleshooting . . . . . . . . . . 35
Paper or Document Jams . . . . . . . . . . . . . . 35
Cleaning. . . . . . . . . . . . . . . . . . . . . . . 35
Appendix . . . . . . . . . . . . . . . . . 36
Glossary . . . . . . . . . . . . . . . . . . . . . . . 36
Abbreviations . . . . . . . . . . . . . . . . . . . . 37
Functions List . . . . . . . . . . . . . . . . . . . . 39
Technical Data . . . . . . . . . . . . . . . . . . . 40
Index . . . . . . . . . . . . . . . . . . . . . . . . 41
Inserting Documents . . . . . . . . . . . . . . . . 20
Sending a Fax . . . . . . . . . . . . . . . . . . . . 20
Manually Sending a Fax . . . . . . . . . . . . . . . 21
Speed . . . . . . . . . . . . . . . . . . . . . . . . 21
Transmission Report. . . . . . . . . . . . . . . . . 21
Fax Reception . . . . . . . . . . . . . . . . . . . . 21
Sorted Print-Outs . . . . . . . . . . . . . . . . . . 22
Table of Contents
* Depending on country and telephone network
* * Depending on the model
Page 4
4 Chapter Safety Instructions
Safety Instructions
In order to avoid possible dangers, damage or malfunctions, please heed the following safety instructions for the
setup and operation of your fax machine.
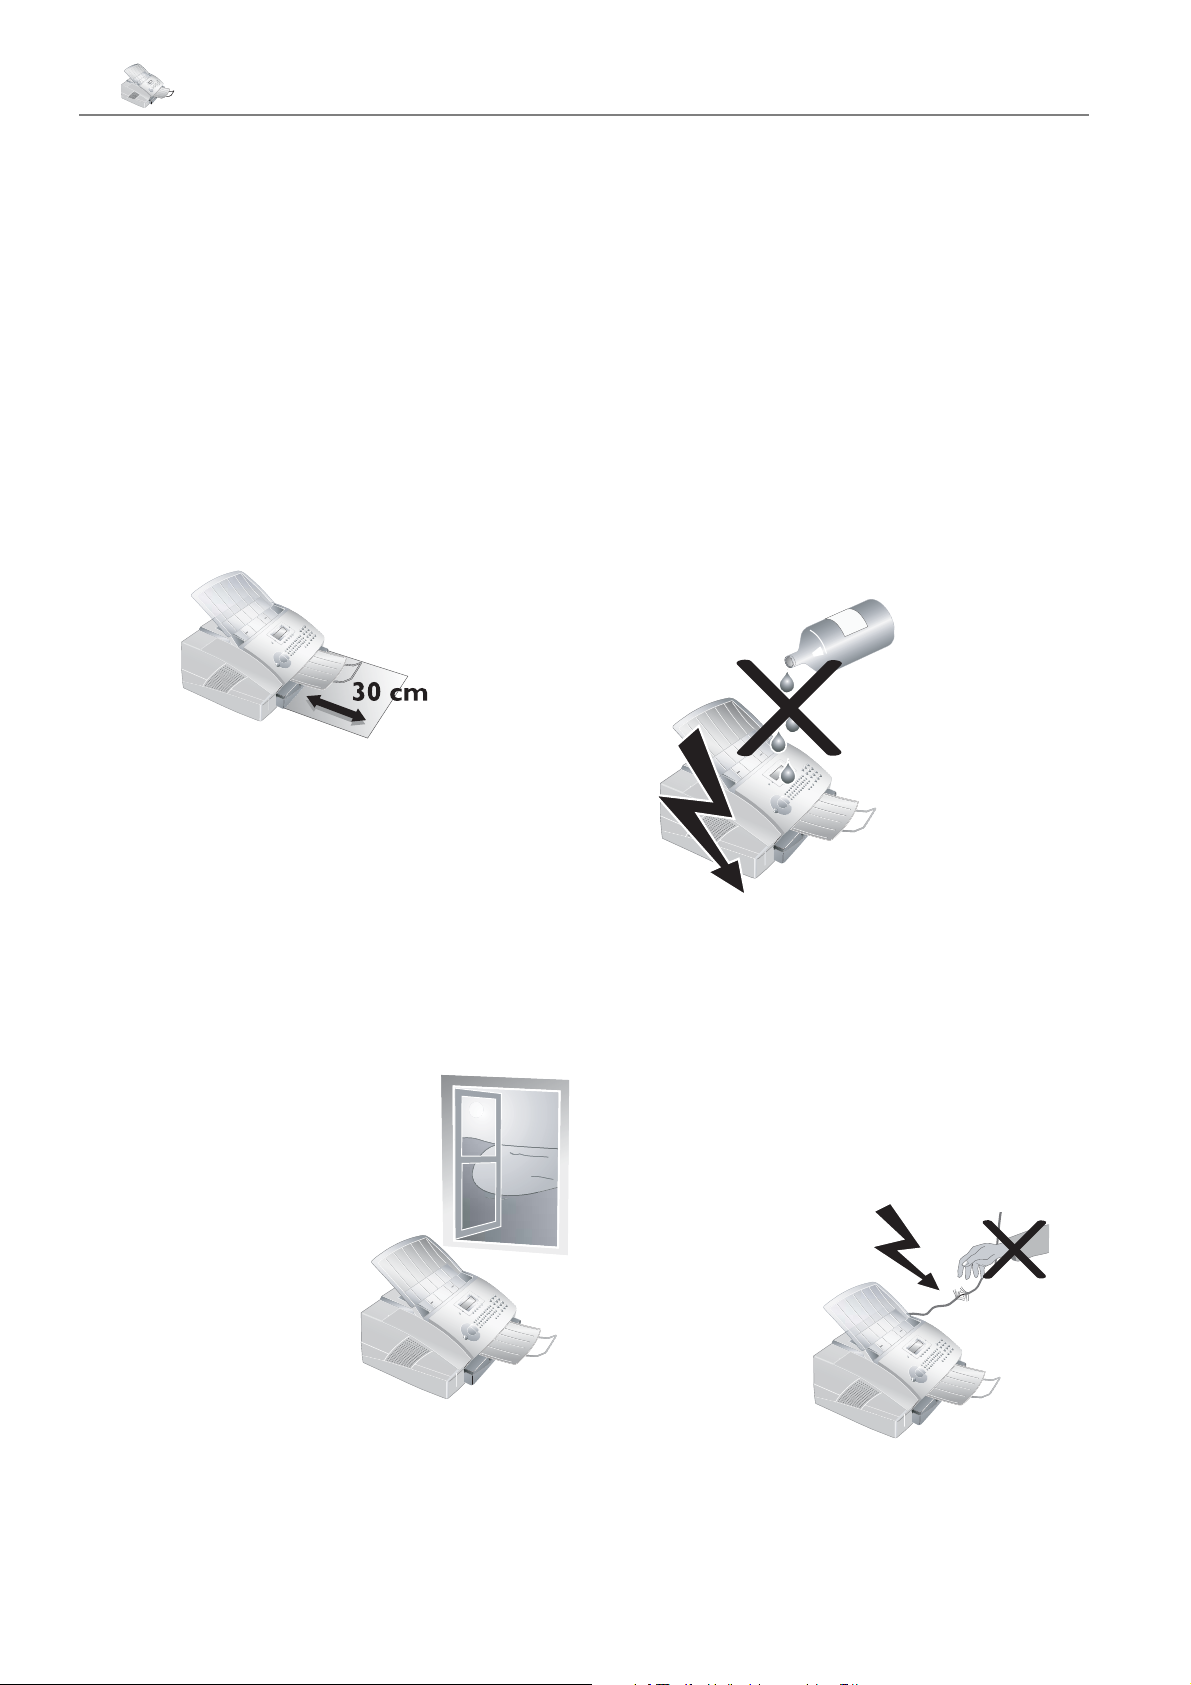
Make sure that the fax machine is stable and secure,
on a smooth, level surface (do not place the machine
¿
on carpets or similar surfaces). If the fax machine should
fall, it can be damaged or can cause injury to people, especially small children. e distance between the fax machine and other appliances or objects, must be at least 15
centimetres. Position all cables in such a way that no one
will stumble over them, thus avoiding possible injuries
to persons and/or damage to the cables or to the fax ma-
chine itself. Allow a
space of at least 30
centimetres in front
of the fax machine,
since documents
and print-outs are
dispensed on the
front side of the
machine.
Always avoid direct sunlight as well as immediate proximity to heaters, air-conditioning units, radios, and television sets. If you use an additional cordless telephone,
you should maintain a distance of at least 15 centimetres
between the laser fax machine and the base station of the
cordless device. Otherwise, acoustic disturbances may occur in the cordless telephone device.
Do not allow children to handle the fax machine without
supervision. e packing materials should be kept out of
the hands of children.
e area in
which you oper-
¿
ate the fax machine
must be adequately
ventilated, especially
if the machine is
used frequently. Set
up your laser fax machine in such a way
that the fl ow of the
exhaust air stream
points away from the
work station.
e fax machine
may not be covered. Do not put your fax machine
¿
in closed cabinets or boxes. Do not place the machine on
soft surfaces such as carpets or cushions and do not cover
the ventilation slits. Otherwise, the fax machine can overheat and catch on fi re. In the event that your fax machine
becomes too hot, or if you see smoke coming from the
device, you must immediately pull the mains cable out of
the power socket. Have your fax machine examined by
trained professionals at a technical service location.
Do not connect the telephone cord or mains cable
in areas where there is moisture of any kind. Never
¿
touch the mains cable, the mains connection or the telephone socket with wet hands.
Do not allow liquids or foreign parts to enter into the
fax machine! Otherwise, people using the device are at
risk to electric shocks. In addition, the fax machine itself
could suff er serious damage. Should liquids
parts never theless enter into the machine,
mediately pull out
the mains cable
and have your fax
machine examined
by the trained
personnel at a
technical service
site. Never leave
your fax machine
outside when it is
raining. During a
thunderstorm, you
should disconnect
your fax machine
from the electrical
power source and from the telephone network. If that
is not possible, then do not use your fax machine. Otherwise, there is a risk of lightning strikes to the user or
damage to the fax machine. Before cleaning the surface of
the fax machine, disconnect the device from the electrical
power source and from the tele phone network. Do not
use any liquid or gaseous cleaning agents on your fax machine (sprays, abrasives, etc.) and do not employ cleaning
agents that contain alcohol.
If the casing
or the mains
¿
cable become damaged in any way,
please pull the
mains cable out of
the power socket.
Never touch telephone cords or
mains cables that
are not insulated
or whose insulation
has been damaged
without fi rst disconnecting the telephone and mains
cable from the network. Only trained personnel from a
technical service location may open the housing of your
fax machine.
or foreign
you must im-
Page 5

Safety Instructions
Chapter Safety Instructions
e fax function will not operate during power
failure.
¿
Never open the toner cartridge. If toner dust escapes, you should avoid allowing it to contact your
¿
skin and eyes. Store both new and used cartridges in a
place where they will not come into the hands of children. In case of a paper jam, do not forcefully remove the
paper, but rather carefully pull it out of the fax machine
and throw it away carefully: It is possible that the toner
may not be completely set on the print-out, and toner
dust could be released into the air. Do not inhale the
released toner dust. Remove the toner dust from clothing
or objects with cold water; hot water would only cause
the toner to set.
If the LCD should break, a mildly caustic liquid can
escape. Absolutely avoid all contact with your skin and
eyes.
Your fax machine has been tested in conformity
with standards EN 60950-1 and IEC 60950-1 and
¿
should only be operated with telephone systems and
power equipment that meet these standards. is fax machine was built exclusively for use in the indicated sales
region. It conforms to the regulations of the telephone
company of the country. Do not perform any other
adjustments and do not carry out any other procedures
apart from those described in this user manual.
5
Laser-Safety
Ã
Your fax machine operates with laser beams. Only a
qualifi ed service technician should open the fax machine
and carry out service operations; otherwise there is a risk
of eye injuries resulting from both visible and invisible
laser radiation.
Class 1 laser product
Safety Instructions
Page 6
6 Chapter Overview
Overview
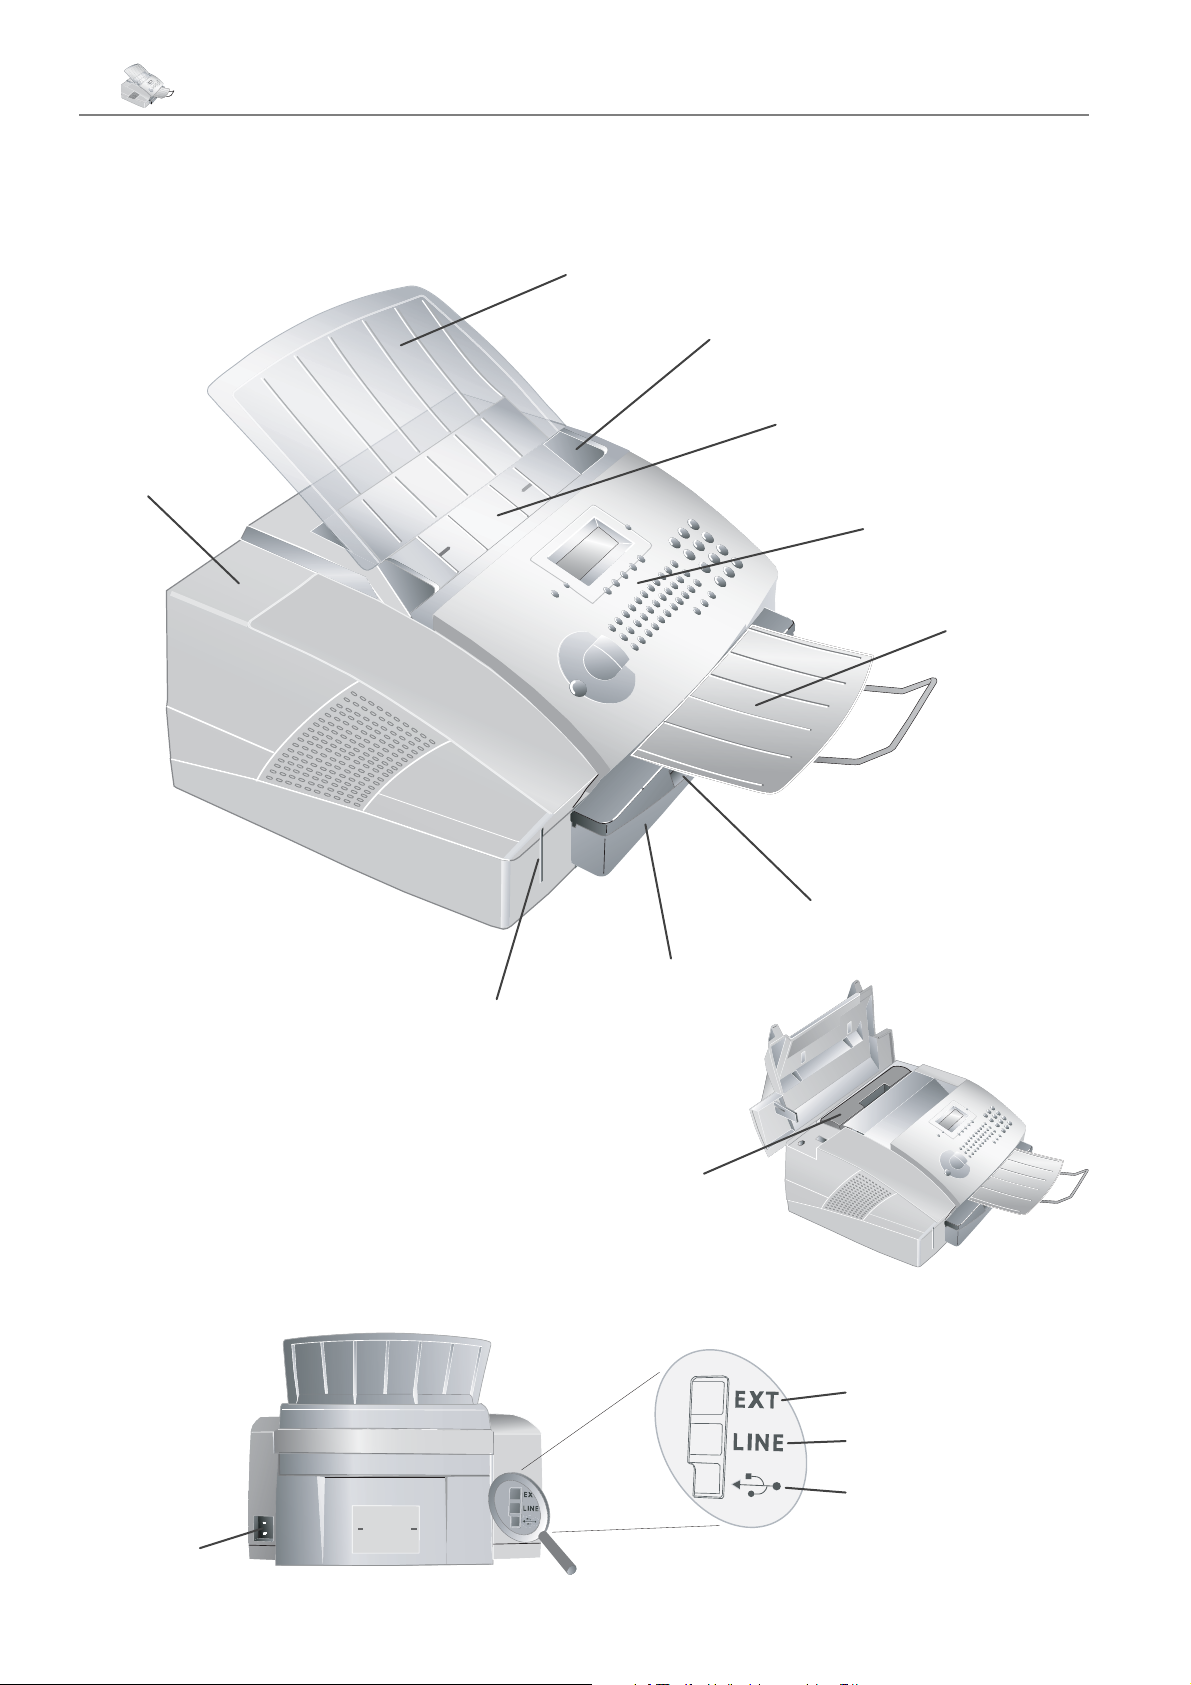
Description of the Machine
Document support
Document guide
Document feed slot
Cover
Operation panel with
LCD display
Document
outlet
Opening for
Plug’n’Print card
Connections on the Rear Side
Print-out and fax outlet
(extendable)
Paper tray
Toner cartridge
External device
Telephone cable
Mains Cable
USB port
(Depending on the
model)
Page 7
Chapter Overview
Chapter Overview
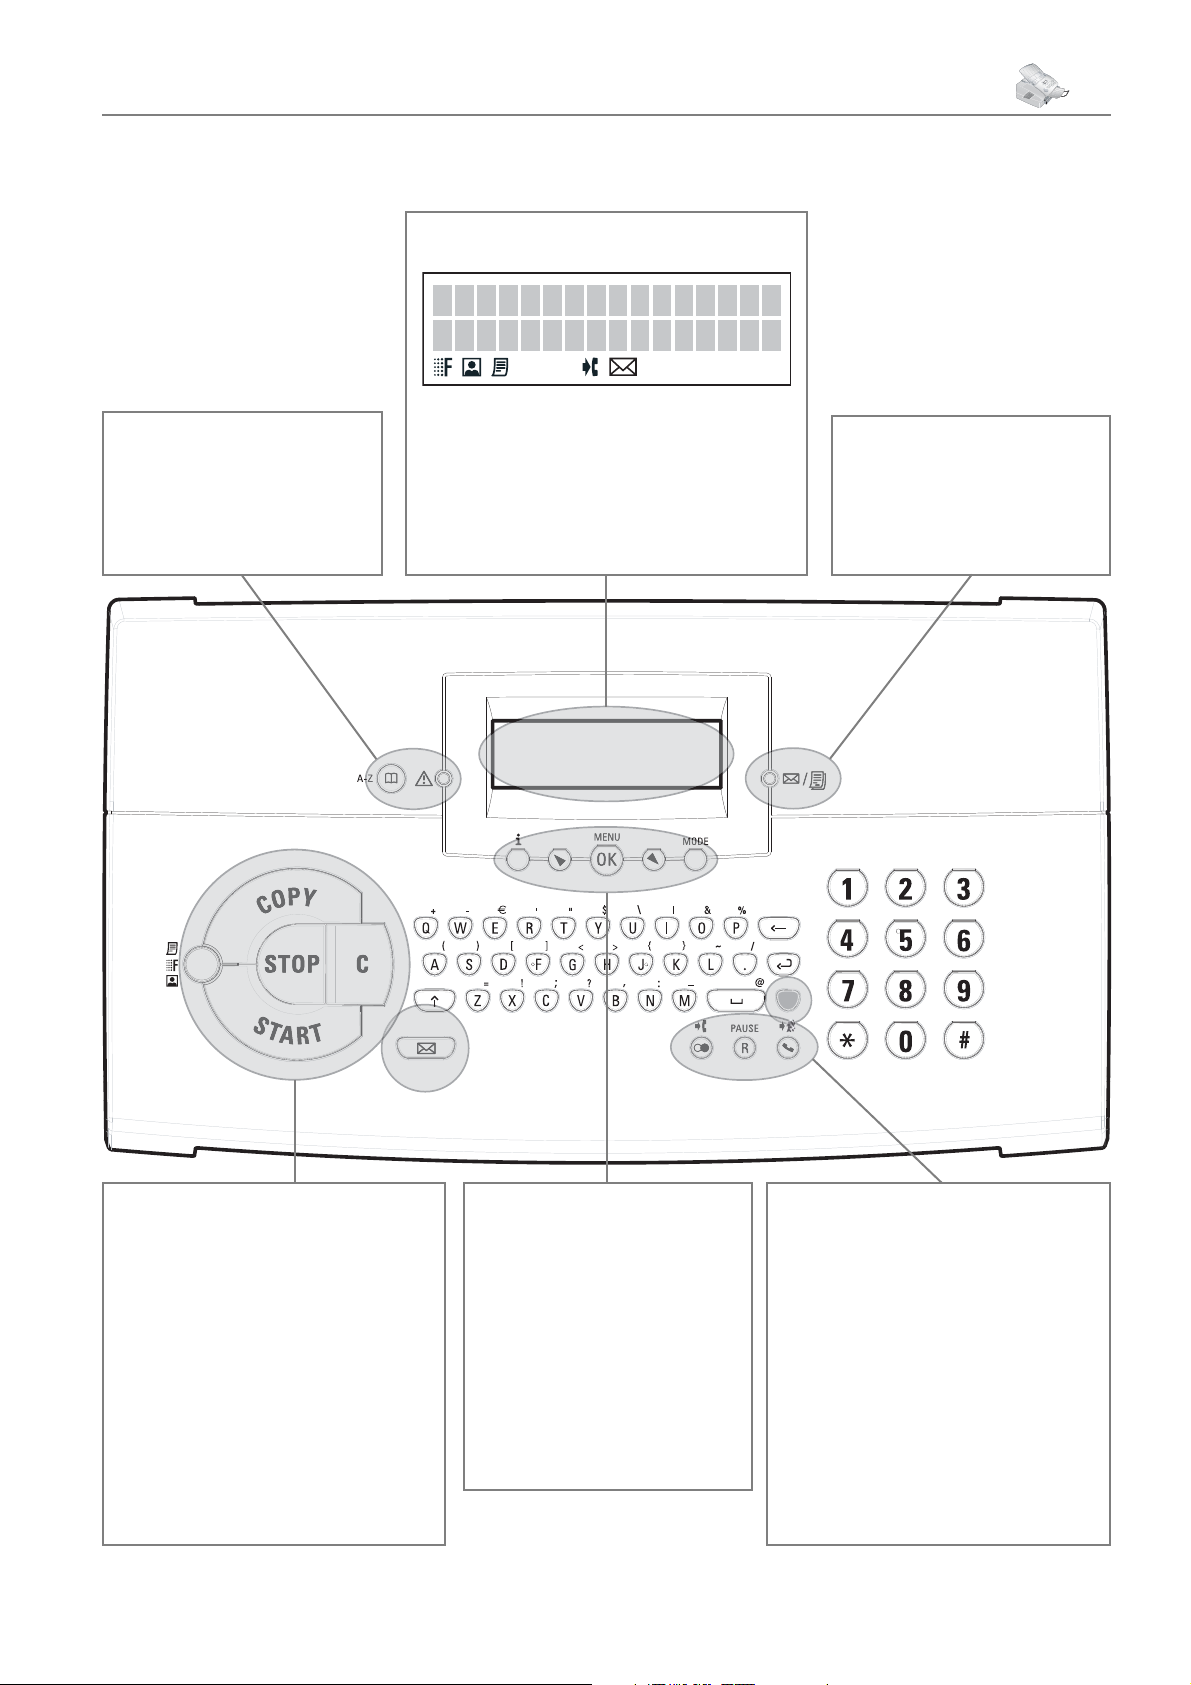
Operation Panel with LCD Display
Symbols on the LCD Display
— SFINE resolution confi gured
}
book functions
Red lamp v—If the lamp
fl ashes, please read what is indicated on the display
— Access telephone
f
— PH OTO resolution confi gured
F
— FINE resolution confi gured
h
— Incoming calls during absence
I
— Incoming SMS messages
W
7
7
Green Lamp
es whenever an SMS message
has arrived or when a document is waiting to be retrieved
from the fax memory
»
—It fl ash-
COPY—Press twice: Make copies
automatically. Press once: Modify copies
STOP—Interrupt an ongoing operation without saving / Eject document
START—Start a fax transmission or
fax reception
h/f/F
FINE—h, SFINE—f, PH OTO—
F
C—Delete / One menu step back
W
sages
—Set resolution (NORMAL,
)
— Read, edit or send SMS mes-
— Select options / Move
¾
the cursor on the display
—Print list of functions, jobs,
¨
settings / Start quick install /
Print out fax journal or telephone book
MENU/OK—
Confi rm inpu
MODE—Fax reception mode
Access functions /
t
Manual, Fax, EXT/ANSW.,
—List of the last ten numbers
º
dialled
Blue key and
callers
R/PAUSE
Blue key and R/PAUSE—Insert dial-
ling pause
¼
Blue key and
tional entry to a fax broadcast
Press the blue key and the corresponding letter key to enter the symbols
shown above it
—List of last ten
º
—Access special functions
—Listening during dialing
—Attach addi-
¼
Page 8
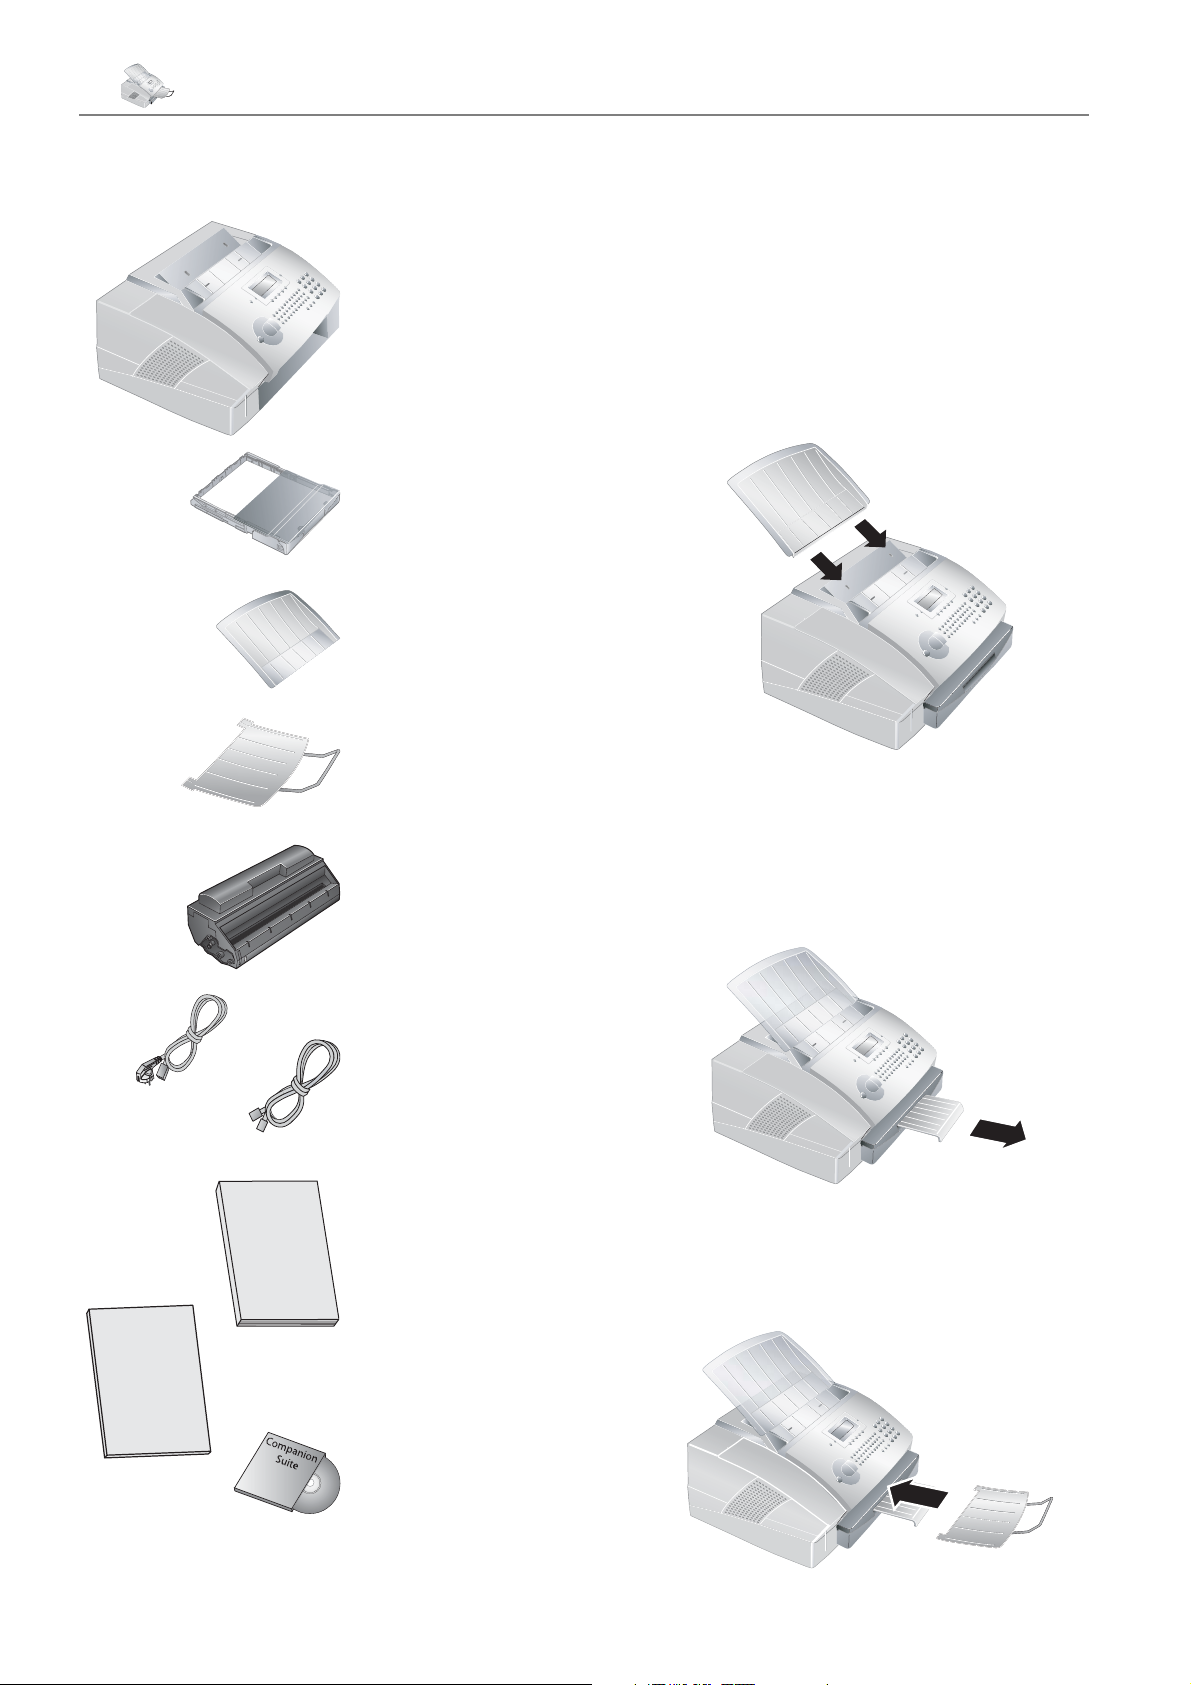
8 Chapter 1. Installation
Package Contents
1. Installation
Fax machine
Unpacking and Connecting
Attaching the Document Support
Insert the document support into the two openings in
the cover. e document support should snap securely
into place.
Paper tray
Document support
Document outlet tray
Starter cartridge
Mains cable
Telephone cable
(specific to each country)
User manual
Installation guide
Extending the Print-out and fax outlet
tray
Pull the print-out and fax outlet tray out of the paper
tray cover.
Attaching the Document outlet tray
Insert the document outlet tray into the two openings
under the operation panel.
Installation CD
(Depending on the model)
Page 9
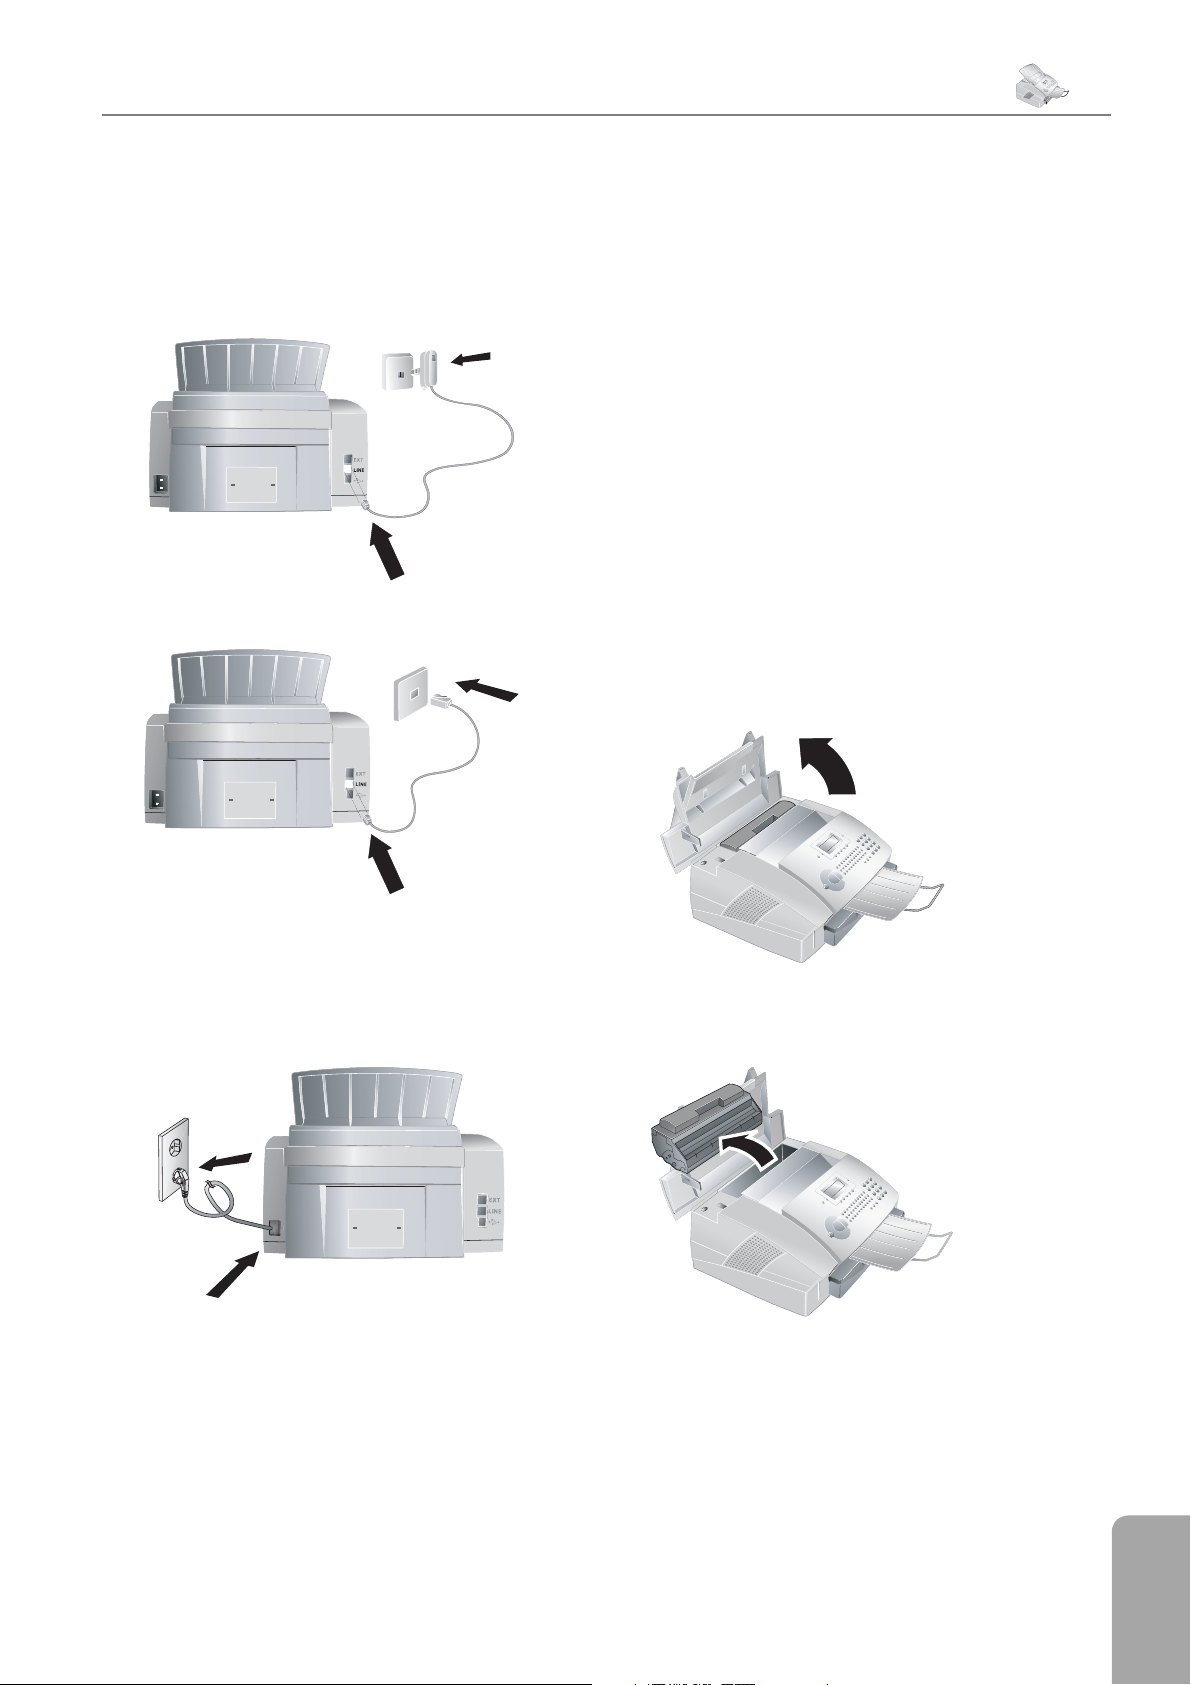
1. Installation
Chapter 1. Installation
9
Connecting the Telephone Cable
Connect the telephone cable to the fax machine by plugging it into the socket located on the rear side of the
machine and designated by the word LINE. Insert the
telephone plug into your PTT line socket.
In GB
For all other countries
Toner Cartridge
New Toner Cartridge
Before you can receive documents, make copies, or print,
a toner cartridge must be inserted into the fax machine.
For this reason, a starter cartridge is supplied with the
machine (this cartridge has a capacity of approximately
1,000 pages). e toner level memory for this starter
cartridge was set at the factory. e starter cartridge
need not be updated with a Plug’n’Print card. For each
additional toner cartridge that you insert into your fax
machine, you must update the toner level memory with
the Plug’n’Print card provided.
In order to guarantee a good print quality,
¡
1 Open the cover by taking hold of both document
use only original toner cartridges. Other
toner cartridges can cause damage to the fax machine. Use of other toner cartridges also voids the
guarantee.
guides and tipping the cover backward.
Connecting the Mains Cable
Insert the mains cable into the connection located on the
rear side of the fax machine. Connect the mains cable to
the electrical socket.
Once the fax machine is connected to the power supply,
the quick install process will immediately commence.
You will be asked to select your country and to enter your
number and name as well as the date and time (see chapter on Settings). If you would like to perform a quick install again, simply press ¨, and select it with ¾ help
page: 2 installation. Confi rm with OK.
2 Remove the old toner cartridge, by gripping it at the
recess in the middle and pulling it upward.
Carefully remove the toner cartridge from
¡
the device so that no toner dust spills out.
Take care where you place the toner cartridge,
escaping toner dust may soil the surface.
1. Installation
Page 10
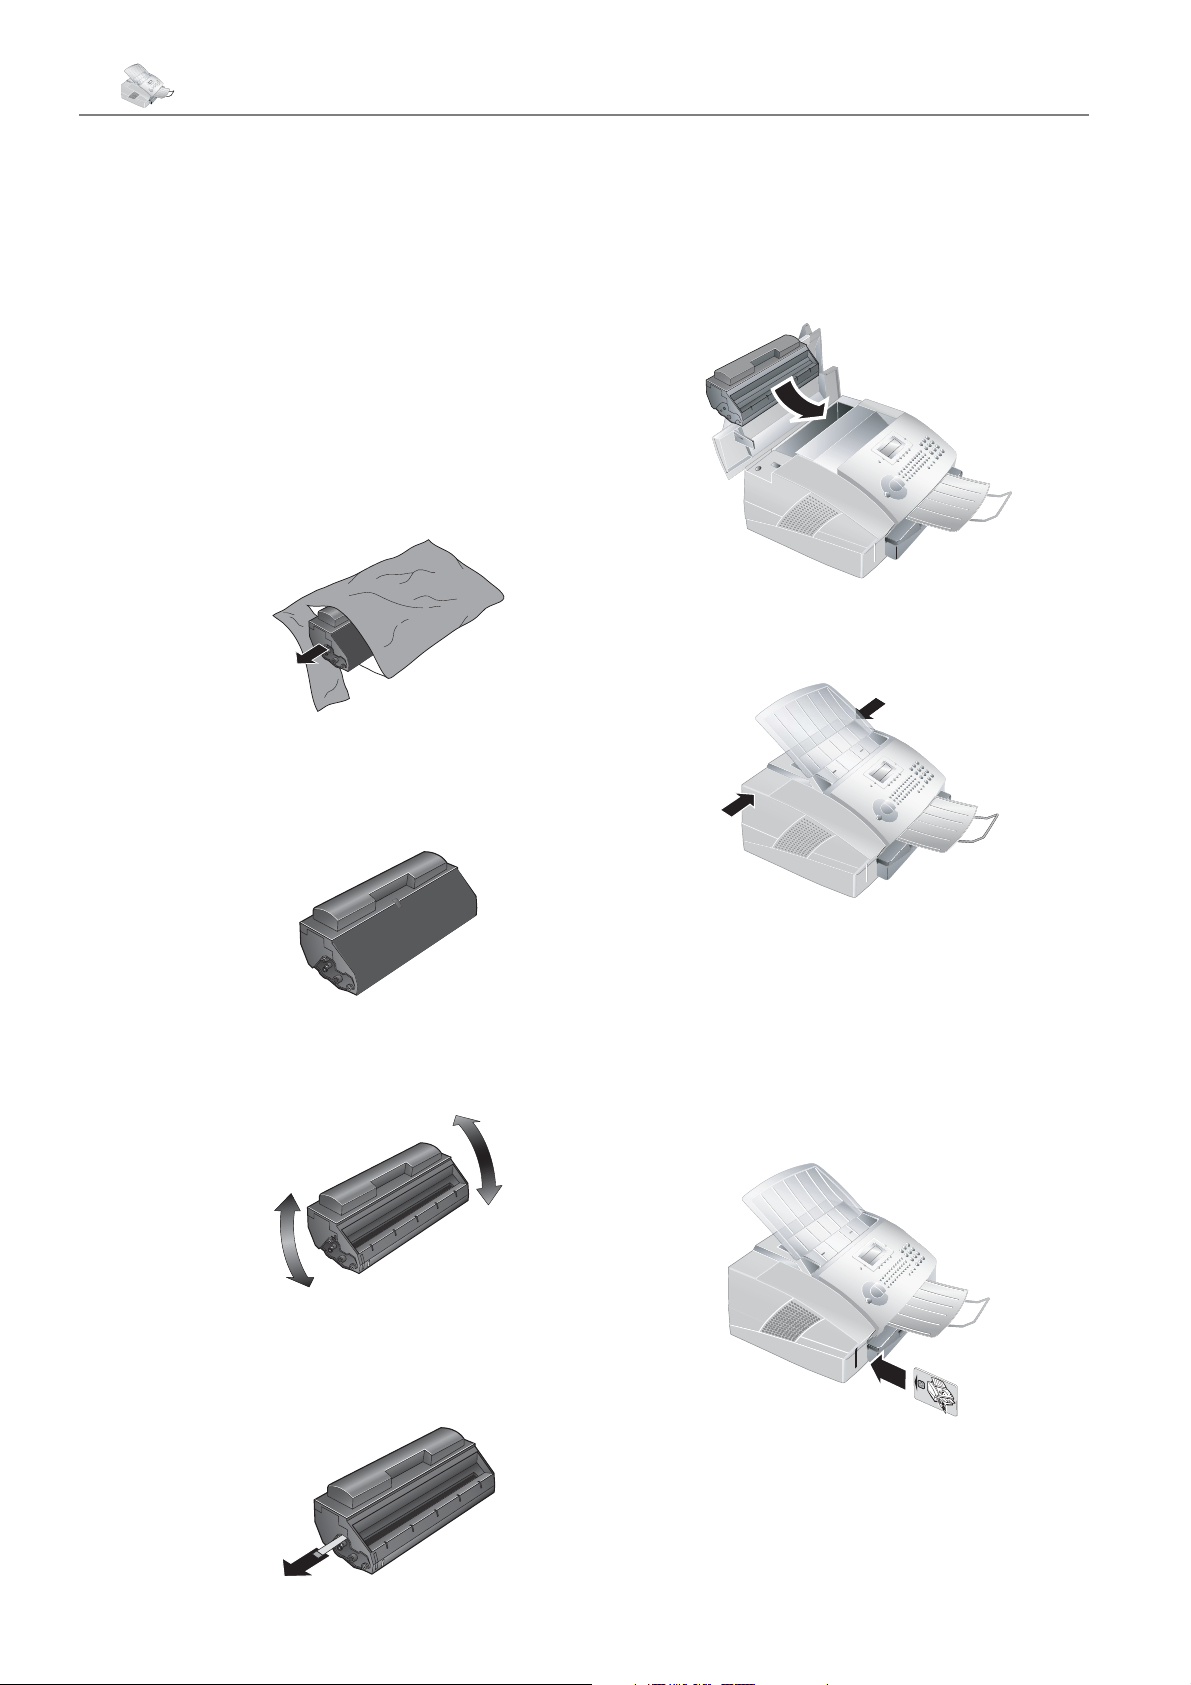
10 Chapter 1. Installation
Store opened or used toner cartridges in their original
packing or in a plastic bag in order to prevent toner
dust from escaping. Dispose of old toner cartridges
by turning them in at specialised shops or at a waste
collection site. Never dispose of toner cartridges by
throwing them into fi re. Toner cartridges should never
be allowed into the hands of children.
Never open a toner cartridge. If toner dust is released
into the air, you should avoid allowing it to contact
your skin and eyes. Do not inhale the released toner
dust. Remove the toner dust from clothing or objects with cold water; hot water would only cause the
toner to set.
3 Take the new toner cartridge from the package.
Æ
7 Place the toner cartridge into your laser fax machine.
8 Close the cover. Make sure that the cover snaps se-
Once you have removed the protection strip,
do not shake the toner cartridge any more.
Otherwise, it is possible that toner dust will be
released into the air.
e cartridge should snap securely into position.
curely into position on both sides.
4 Remove the black protective foil and other packag-
ing material, but do not yet remove the protective
strip from the cartridge.
5 Shake the new toner cartridge back and forth several
times in order to distribute the toner evenly, thereby
improving the print quality.
6 Only after shaking the cartridge, completely pull
off the protection strip located on the left side of the
cartridge.
9 new cartridge? appears on the display. Con-
fi rm with OK.
10 Wait until insert card appears on the display.
Push the Plug’n’Print card of the new toner cartridge
into the opening on the left side next to the paper
tray, with the contacts facing to the left. (Only the
starter cartridge can be used without inserting a
Plug’n’Print card.)
Should the error message unreadable
¡
card
appear on the display, you may have
inserted the Plug’n’Print card incorrectly. e contacts must face to the left as you insert the card
into the machine.
Page 11
1. Installation
Chapter 1. Installation
11
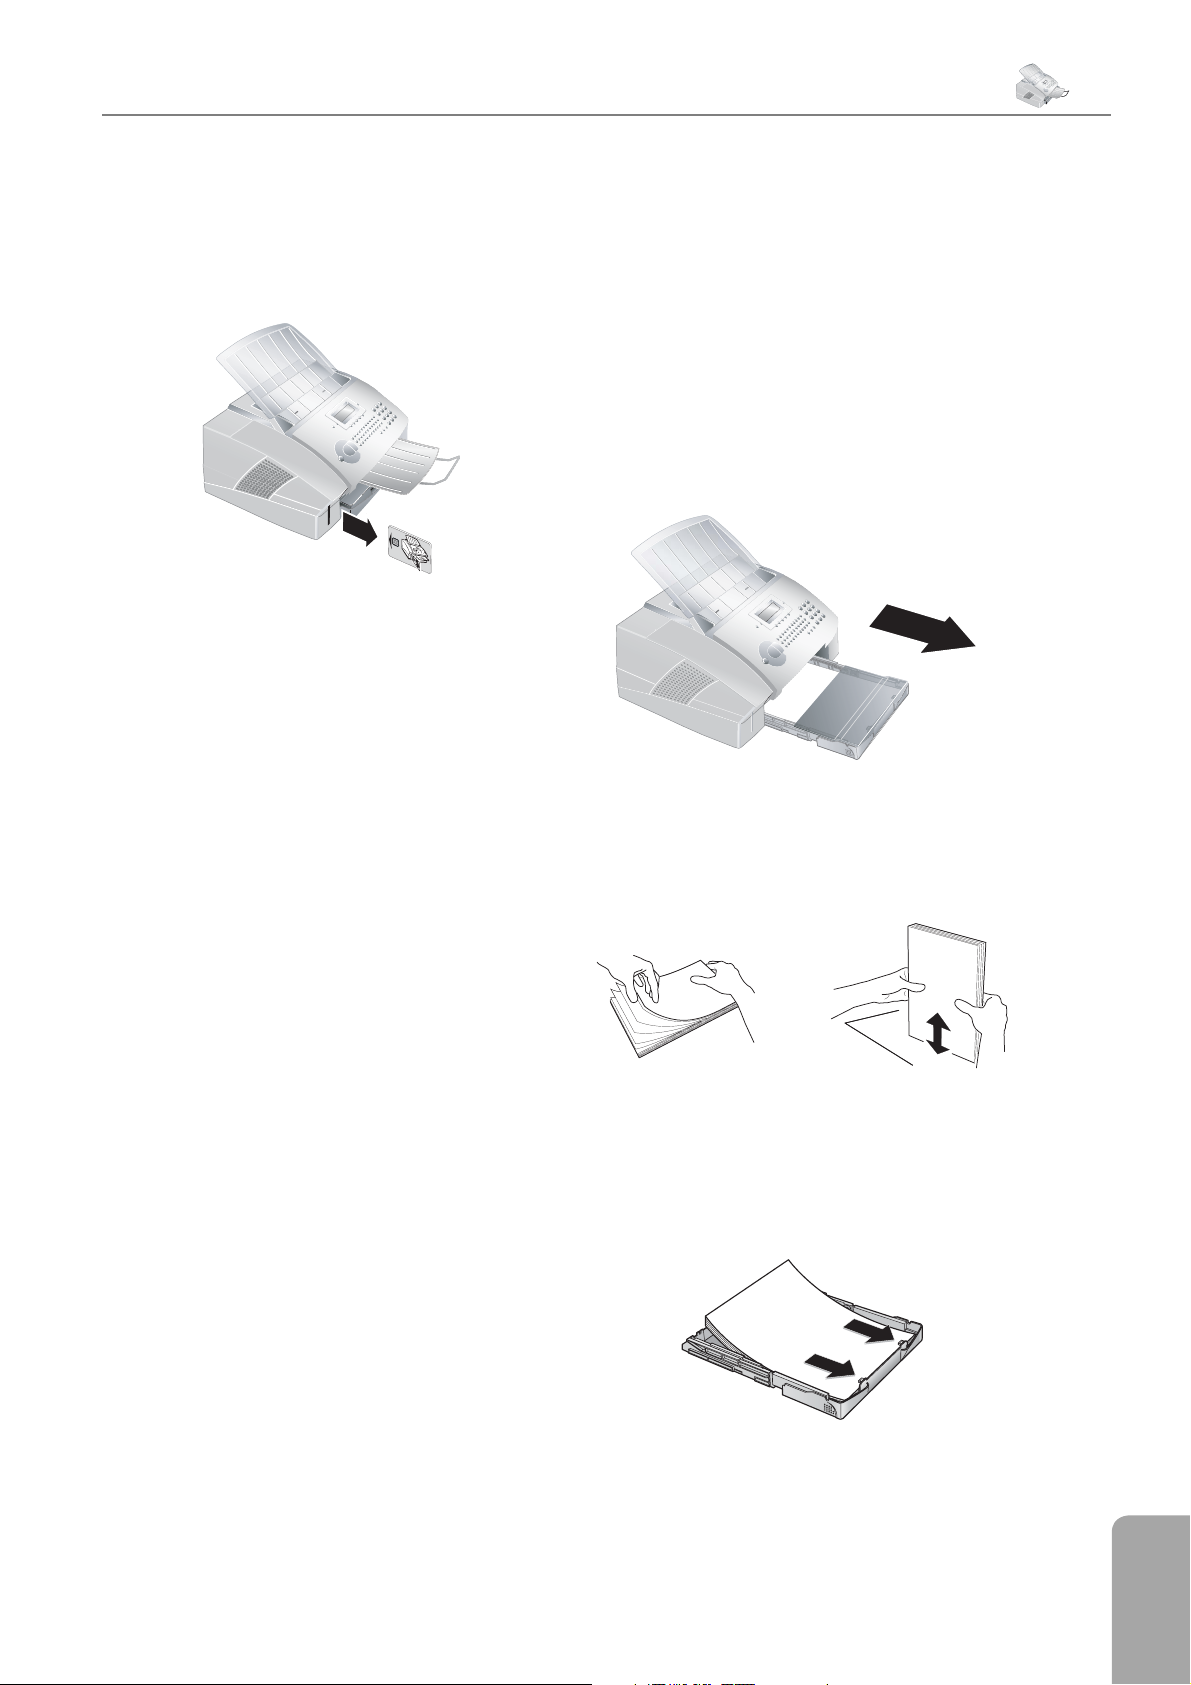
11 It may take a moment to update the cartridge. When
the process is completed, the following appears on
the display:
action completed / remove card
12 Pull the Plug’n’Print card out of the fax machine.
You can interrupt the recharging process at any time by
simply pressing STOP. However, the toner level memo-
ry must be updated for each new toner cartridge. If you
have pressed the STOP key by mistake, you can restart
the recharging process as follows:
3 Pressing C will return you to the previous menu step;
pressing STOP will return you to the root menu.
Paper
Before your fax machine will be ready to make copies or
receive faxes, you must load paper into the machine. Use
the following paper size: A4, 210 × 297 millimetres. Your
fax machine works with normal copier paper and with
typewriter paper (60 to 90 g/m2).
Loading Paper
1 Pull out the paper tray.
1 Press MENU/OK,
2 Select new black with ¾, and confi rm with
OK. Select yes with ¾. After a short time, the fax
machine will ask you to insert the Plug’n’Print card.
If the toner level of your cartridge is low, then every time
you open and close the cover, the following question will
appear on the display: black=new? If you have not
installed a new cartridge, press STOP. If you have installed a new cartridge, press OK and follow the description set forth above.
62
and OK
Displaying the Toner Level
Whenever you insert a new toner cartridge,
Æ
you must update the toner level memory of
your fax machine with the Plug’n’Print card that is
included with the new cartridge. Your fax machine
registers the extent of toner usage for every printout and calculates the toner level of the cartridge
based on this. e indicated toner level is only
meaningful if you update each new toner cartridge
with the Plug’n’Print card provided.
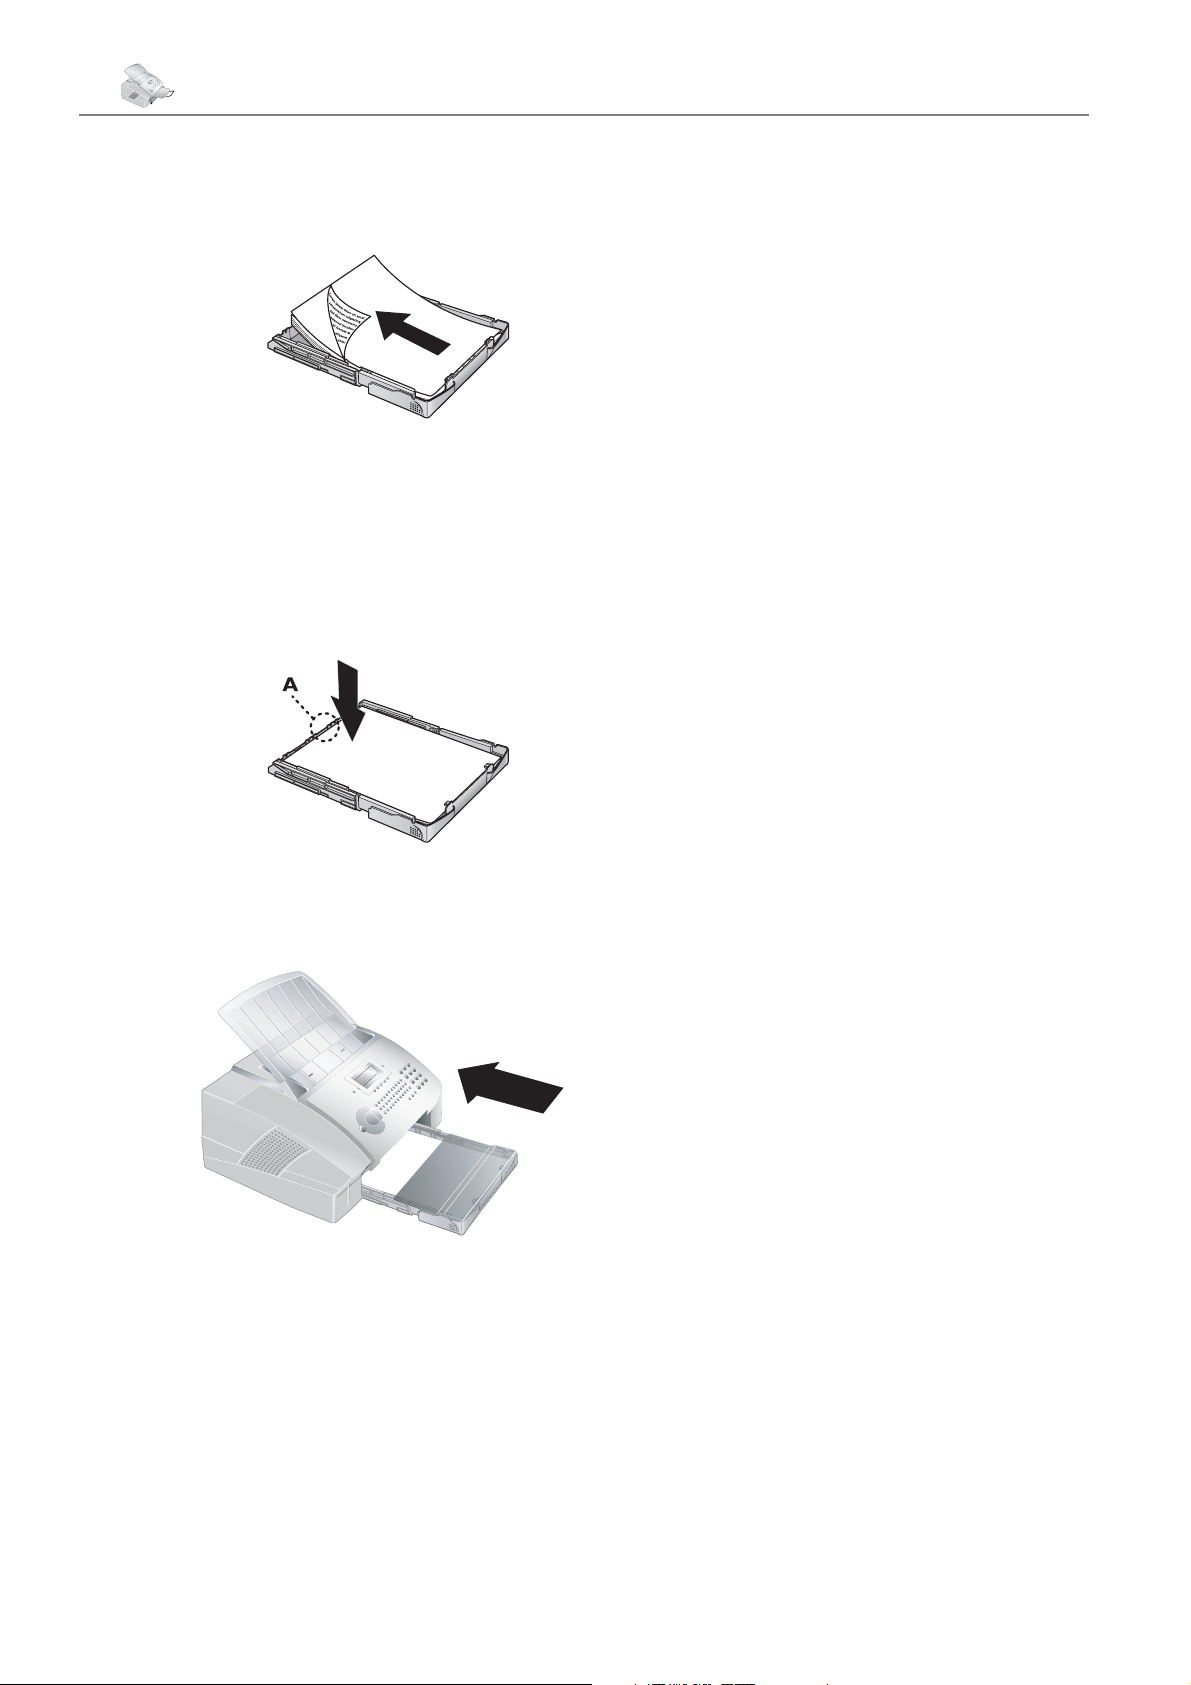
2 Separate the paper sheets by fanning them out,
then align them by tapping edge of the stack lightly
against a fl at surface. is will prevent several sheets
of paper from being drawn in all at once.
3 Remove the cover from the paper tray. Put in only as
much paper as will fi t under the raised limit markers on the upper edge of the paper tray (see also the
drawings on the cover of the paper tray). You can
load up to 250 sheets into the paper tray.
1 Press MENU/OK,
2 Select cart capacity with ¾ and confi rm
with OK. e toner level of the toner cartridge is
indicated by a percentile value between 100 percent
(full) and 0 percent (empty).
62
and OK.
1. Installation
Page 12
12 Chapter 1. Installation
4 If you would like to print on an input sheet (for
example, forms or stationery), place the input sheet
face down in the paper tray, with the top of the page
toward the rear.
Special Telephone
Connections
ISDN Systems
Your fax machine is an analogue fax machine (Group 3).
It is not an ISDN fax machine (Group 4), and therefore
it cannot be operated directly on an ISDN connection.
In order to do this, you need either an analogue adapter
or a connection for analogue terminals. For additional information, please consult the user manual of your ISDN
Forms that have been printed out by a laser
¡
5 Press the paper down until the lever (A) snaps into
printer are not suitable for further printing.
is can lead to a paper jam. If a paper jam should
occur, follow the suggestions set forth in the chapter entitled Troubleshooting / Paper Jam.
place at the rear of the paper tray.
system or ask your telephone service provider.
Private Branch Exchange / PABX
Private branch exchanges (PABX) are customary in all
larger businesses. Before sending a fax, you must press an
outside line access code in order to get a connection to the
public telephone network from a private branch exchange.
6 Place the cover back on the paper tray. Push the
paper tray into the fax machine all the way to the
stopping point.
Do not pull out the paper tray while the fax
Æ
machine is in the process of printing. is can
lead to a paper jam. If a paper jam should occur,
follow the suggestions set forth in the chapter entitled Troubleshooting / Paper Jam.
1 Press MENU/OK,
work
type with ¾. Confi rm with OK.
2 Select pstn or pabx with ¾.
3 Confi rm with OK. Pressing C will return you to the
previous menu step; pressing STOP will return you
to the root menu.
If you are operating the fax machine within a PABX, use
function 15 to set the machine to the appropriate length
for internal numbers and to set the code that must be
dialled in order to access a public telephone line.
1 Press MENU/OK,
with ¾. Confi rm with OK.
2 Input the appropriate length for internal numbers.
e default is 10. Delete the digits with the \ key.
Assume the longest internal number, then add one
digit to that. For example, if your direct dial numbers consist of four digits, then you should input 5.
3 Confi rm with OK.
4 Input the outside line access code that is required in
order to reach the public telephone network. In most
cases, this will be
ask your telephone system provider.)
5 Confi rm with OK. Pressing C will return you to the
previous menu step; pressing STOP will return you
to the root menu.
0
and OK. Select net-
15
and OK. Select Prefix
15
. (If necessary, you may want to
Once these settings are in place, you will no
¡
longer need to prefi x the outside line access
code every time you enter an external number. e
fax machine will automatically add the outside
line access code in front of numbers that are longer
than the confi gured direct dial numbers.
Page 13
1. Installation
Chapter 1. Installation
Additional Devices
13
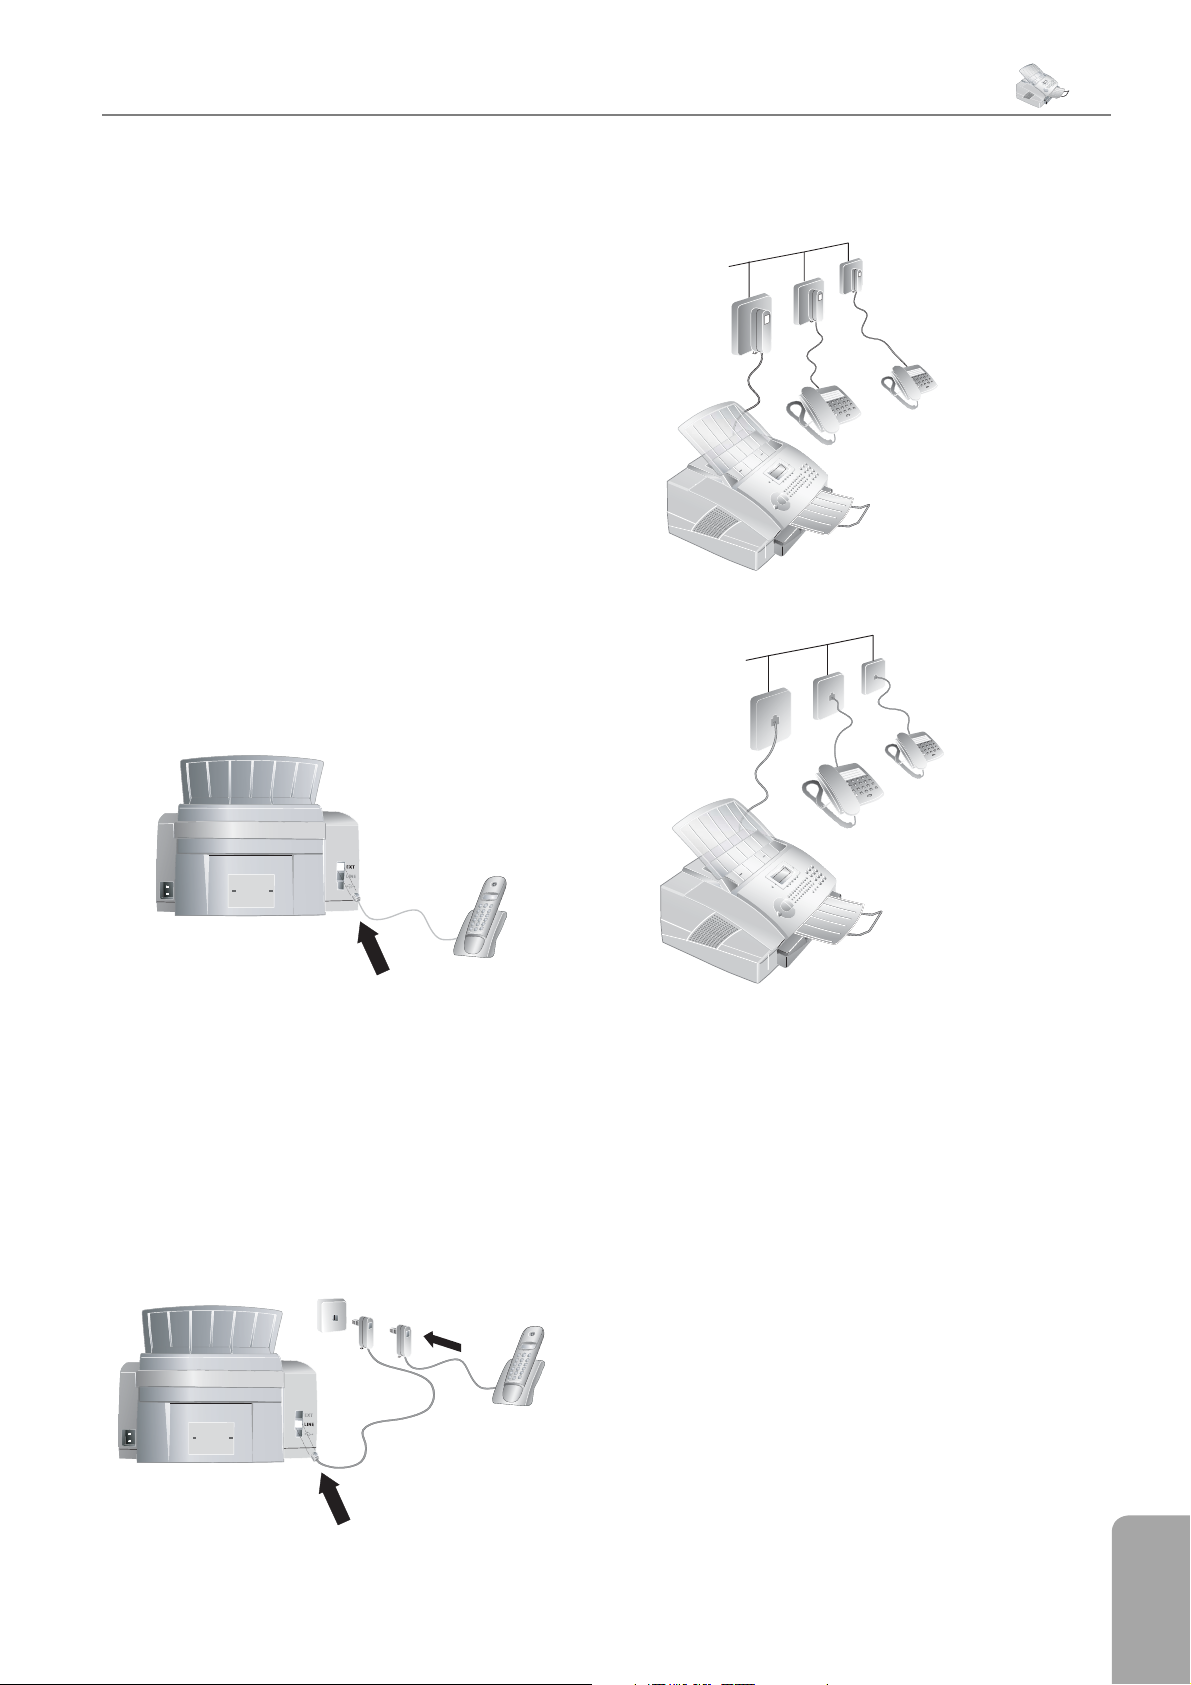
You can connect additional devices to separate sockets on
the same line even if they are in diff erent rooms
You can connect other devices to your PTT line apart
from your fax machine, for example, cordless telephones,
answering machines or modems. If you would like to utilise special peripheral equipment with your fax machine,
you should contact your dealer. For GB: As long as the
Ringer Equivalent Number (REN value) on the line
doesn’t exceed 4. e REN value of this device is 1.
If you are using cordless telephone with SMS function
on the same connection, then the specifi c device at which
you will receive and SMS message will depend on the
specifi c manufacturer. Only one of the devices will receive the SMS message. Try to turn off the SMS reception
on your cordless telephone.
Connection to the Fax Machine
You can connect additional devices directly to your fax
machine. In particular, you may connect external answering machines in the following manner: Plug the telephone cable of the peripheral device into the EXT socket
(RJ-11 connection) of your fax machine.
In GB
For all other countries
If you connect your peripheral device via the EXT socket, the fax switch of the machine will function optimally
and will be able to control the peripheral devices (see the
chapter Settings / Fax Reception Mode).
Connection to the Telephone Line
You can connect additional devices to the same telephone
socket. Make sure the fax machine is the fi rst device connected to the line.
In GB
Easylink
e Easylink function provides assistance in the use of
external devices that are connected to the same telephone
line. To this end, additional telephones must be set to
the tone dialling mode (DTMF tones). Refer to your
telephone’s user manual to determine how you may set
your device to the tone dialling mode.
Starting Fax Reception
If you get a fax call and pick up the handset at an additional telephone—rather than the fax machine itself—
then press
, in order to start the fax reception.
*5
1. Installation
Page 14

14 Chapter 2. Settings
3 Confi rm with OK. Pressing C will return you to the
2. Settings
When needed, your fax machine can print out lists
containing the most important functions and settings
of the machine. Press the key ¨ on the fax machine.
Select with ¾ whether you would like to print out the
help page: 1 functions list or the help
page:
print out the function menu by pressing MENU/OK,
41
out by pressing MENU/OK,
5 setup. Confi rm with OK. You can also
and OK. e list of settings can also be printed
and OK.
44
previous menu step; pressing STOP will return you
to the root menu.
Entering Your Telephone
Number and Name
Your number and name, entered using function 14, will
appear in the page header of every fax you send and as the
sender identifi cation of your SMS messages. In each case,
up to 20 diff erent characters are available to you.
Open the menu functions with MENU/OK.
¡
Return to the previous menu step by press-
ing C. Move the cursor on the display with ¾.
Delete single numbers and letters with C or \. To
interrupt an operation in progress and return to
the root menu without saving, press STOP.
Setting the Country
Use function 11 to select the specifi c country in which
you will be operating your fax machine. It is essential to
select the country because otherwise your fax machine
will not have the correct settings for the local telephone
network.
1 Press MENU/OK,
2 Select the country by pressing ¾.
3 Confi rm with OK. Pressing C will return you to the
previous menu step; pressing STOP will return you
to the root menu.
11
and OK.
Setting the Language
1 Press MENU/OK,
guage on the display.
and OK to set the lan-
12
1 Press MENU/OK,
2 Enter your fax number with the number keys, for
example,
a plus sign, simultaneously press the blue key and Q.
You may add a space by pressing the ½ key. Confi rm your entry by pressing OK.
3 Enter your name using the letter keyboard. To enter
capital letters, press + and the desired key simultaneously. You may add a space by pressing the ½ key.
e symbols are displayed directly above the letter
keys. To enter symbols, press the blue key and the
corresponding letter key simultaneously. It is not
possible to insert a symbol as the fi rst character of
your name.
4 Confi rm with OK. Pressing C will return you to the
previous menu step; pressing STOP will return you
to the root menu.
00 44 123 45
14
and OK.
… To enter
Page Header
Your name and number appear in the page header of each
fax transmission. If you do not wish to send out your
information, you can turn this function off .
1 Press MENU/OK,
16
and OK.
2 Select the desired language by pressing ¾.
3 Confi rm with OK. Pressing C will return you to the
previous menu step; pressing STOP will return you
to the root menu.
Setting the Date and Time
1 To set the date and time on the display, press
MENU/OK,
2 Enter the date and time in the following manner:
08 08 05 14 00
2005, 2:00 pm.
13
and OK.
for August 8th,
2 Select tx header with ¾ and confi rm with
OK.
3 With ¾, select whether or not the page header
should appear on every fax transmission.
4 Confi rm with OK. Pressing C will return you to the
previous menu step; pressing STOP will return you
to the root menu.
Page 15

2. Settings
Chapter 2. Settings
15
Ring Tone
Volume
With the function 18, you can set the volume of the
ring tone. ree diff erent levels of volume are available
to you. To turn off the ring tone entirely, select off.
Your fax machine will automatically receive incoming
faxes without ringing. If your fax machine is set to the
manual reception mode, you can neither hear nor receive
incoming fax calls (see chapter entitled Setting the Fax
Reception Mode).
1 Press MENU/OK,
2 Select the desired volume level with ¾ . You have
three levels of volume available to you (low, me-
dium
, high) or off.
3 Confi rm with OK. Pressing C will return you to the
previous menu step; pressing STOP will return you
to the root menu.
18
and OK.
Entering the PIN Code
1 Press MENU/OK,
2 Select answer code with
OK. Enter a four-digit PIN code.
3 Confi rm with OK. Pressing C will return you to the
previous menu step; pressing STOP will return you
to the root menu.
27
and OK.
¾
and confi rm with
Activation/Deactivation
1 Press MENU/OK,
2 Select activation with ¾ and confi rm with
OK.
3 Enter the four-digit PIN code and confi rm by press-
ing OK. Select with or without with ¾.
4 Confi rm with OK. Pressing C will return you to the
previous menu step; pressing STOP will return you
to the root menu.
27
and OK.
Resolution
With the h/f/F key, you can set the resolution for
fax reception or for fax transmission. e symbol of the
selected resolution appears in the display:
NORMAL—for documents without special features
/FINE—for documents with small print or drawings
h
/SFINE— for documents with many details
f
/PHOTO—for photographs
F
With function 16, you can select the default
¡
resolution setting. Press MENU/OK,
and OK. Select resolution with ¾, then
press OK. Select the desired resolution and confi rm with OK. Pressing C will return you to the
previous menu step; pressing STOP will return
you to the root menu.
16
Protected Fax Reception
Printing Out Fax Transmissions
1 Press MENU/OK,
2 Select print with ¾ and confi rm with OK.
Enter the four-digit PIN code.
3 Confi rm with OK. e stored fax transmissions are
printed out and deleted from the fax memory. Pressing C will return you to the previous menu step;
pressing STOP will return you to the root menu.
27
and OK.
Locking the Machine
With the locking function, you can prevent unauthorised persons from using your fax machine. You can lock
either the entire keyboard or the number pad of your fax
machine.
Entering the Code
You must fi rst enter a code for activating or deactivating
the lock.
You can secure your fax reception with a code. In that
case, incoming faxes are not printed out, but rather are
stored in the fax memory. Only after entering a PIN code
can you print out these fax transmissions. With function
27, you can input a PIN code, activate the secured fax
reception mode or print out stored fax transmissions.
1 Press MENU/OK,
2 Select locking code with ¾ and confi rm
with OK.
3 Enter a four-digit code and confi rm by pressing
OK.
2. Settings
61
and OK.
Page 16

16 Chapter 2. Settings
4 Enter the code again for confi rmation purposes, then
press OK. Pressing C will return you to the previous
menu step; pressing STOP will return you to the
root menu.
Setting the Fax Reception
Mode
If you have already saved a code, the device will ask you
to provide the old code fi rst before you can enter a new
code.
Locking the Keyboard
1 Press MENU/OK,
2 Select lock keybd. with ¾ and confi rm with
OK.
3 Enter the four-digit locking code and confi rm by
pressing OK. Select with with ¾.
4 Confi rm with OK. Pressing C will return you to the
previous menu step; pressing STOP will return you
to the root menu.
All of the keys on the fax machine are now locked. Only
after entering of the correct code will it be possible to access functions or enter numbers. e lock will turn itself
on again after each use of the fax machine. You can cancel
the keyboard lock by repeating this process and selecting
without under step 3.
61
and OK.
Locking the Number Pad
1 Press MENU/OK,
2 Select lock number with ¾ and confi rm it by
pressing OK.
3 Enter the four-digit locking code and confi rm by
pressing OK. Select only direct. with ¾.
61
and OK.
e built-in fax switch makes it possible to send and
receive faxes, and run additional devices on a single telephone PTT line. ree diff erent operating modes are
available to you: FAX, EXT/ANSW. (answering machine) or manual. Press the MODE key to select the
desired operating mode. e selected fax reception mode
appears on the display.
Setting the Number of Rings
e fax switch of your machine distinguishes between fax
transmissions and telephone calls. Furthermore, the fax
switch can also control additional devices that you have
connected to your fax machine through the EXT socket.
You can set the number of ring signals for the fax reception mode with function 17.
1 Press MENU/OK,
2 Use ¾ to select from the list of possible ring set-
tings. You can set between 0 and 5 rings.
3 Confi rm with OK. Pressing C will return you to the
previous menu step; pressing STOP will return you
to the root menu.
17
and OK.
Manual Mode
In MANUAL mode, you must manually start the fax
reception when you receive a fax call. In order to receive
the fax, you must press START. Automatic reception
is not possible with this setting. e Manual mode is
useful if you would like to receive faxes on a connected
computer.
4 Confi rm with OK. Pressing C will return you to the
previous menu step; pressing STOP will return you
to the root menu.
e number keys on the fax machine are now locked. You
can cancel the lock on the number pad by repeating this
process and selecting Free under step 3.
Energy Saving Mode
Your fax machine switches into the energy saving mode
by default. It is not necessary for you to set the device to
this mode. Whenever you receive a fax or if you would
like to print or make a copy, your fax machine will automatically switch back from its energy saving mode to its
operating mode.
Fax Mode
In the Fax mode, the machine will ring for as many
times as you have set with function 17. en the fax
reception switches on.
If you lift up the handset on an additional telephone that
is connected to the EXT socket, and you hear that you
are receiving a fax call (whistling tone or silence), you can
start the fax reception process by pressing
pressing START on the fax machine.
*5
, or by
EXT/Answering machine Mode
You should set the device to this mode if you have additional devices connected to the EXT socket of your
fax machine, especially an external answering machine. If
an additionally connected answering machine receives a
call, your fax machine will check to determine whether or
not the incoming call is a fax transmission. If the device
Page 17

2. Settings
Chapter 2. Settings
recognises a fax signal, it will automatically receive the fax
transmission. If you do not have an answering machine
connected or if a connected answering machine does not
accept the call, the fax machine will take over the call
after a predetermined number of rings and automatically
receive any possible fax transmission being sent.
If you lift up the handset on an additional telephone that
is connected to the EXT socket, and you hear that you
are receiving a fax call (whistling tone or silence), you can
start the fax reception process by pressing
pressing START on the fax machine.
To use this function, additional telephones
¡
must be set to the tone dialling mode
(DTMF tones). (See the chapter entitled Instal-
lation / Easylink).
*5
, or by
17
2. Settings
Page 18

18 Chapter 3. Telephone Book
3 Enter the initial letters or select the entry you would
3. Telephone Book
With the
functions. You can store new entries, search for entries as
well as set and edit groups. Your fax machine’s memory
will hold approximately 200 entries; the exact number
depends on the length of the names and numbers. e
entries can be up to 20 characters in length.
}
key, you can access the telephone book
like to change with
4 Change the stored name, the number and the trans-
mission speed. Move the cursor with
individual letters or numbers with C, or with \.
5 Confi rm the changes by pressing OK.
. Confi rm with OK.
¾
¾
. Delete
Deleting Entries
Saving New Entries
1 Press
2 Select add name with ¾ and confi rm by press-
3 Enter a name using the letter keyboard. To enter
4 Enter the number using the number pad. Confi rm
5 Select the speed for fax transmissions to this recipi-
}
ing OK.
capital letters, press + and the desired key simultaneously. You may add a space by pressing the ½ key.
e symbols are displayed directly above the letter
keys. To enter symbols, press the blue key and the
corresponding letter key simultaneously. It is not
possible to insert a symbol in the fi rst space for a
name. Confi rm with OK.
with OK.
ent. Normally you can select the highest speed. When
poor connection quality is known beforehand—with
an overseas fax recipient, for example—you should
select a slower speed in order to save time and telephone costs for the automatic adjustment.
.
Using the Telephone Book
1 Press
2 Select search with ¾ and confi rm by pressing
}
OK.
.
1 Press
2 Select cancel with ¾ and confi rm by pressing
3 Enter the initial letters or select the entry you would
4 Confi rm the deletion by pressing OK.
}
OK.
like to delete with ¾, then press OK.
.
Quick Search
You can access the stored directory entries by using the
letter keyboard. If your fax machine is in the root menu,
enter the initial letters or the name of the desired entry.
Your fax machine will show you the telephone book
entries for the corresponding letters. Select the desired
number by pressing ¾. Press START.
Groups
You can combine several telephone book entries into a
single group. If you select this group as the recipient of
a fax or an SMS message, the transmission is sent to all
the members of the group (see the chapter entitled Fax /
Broadcasting). Your fax machine can store ten diff erent
groups.
Creating Groups
1 Press
}
.
3 Enter the initial letters or select an entry from the list
by using ¾.
4 Press START.
Editing Entries
1 Press
2 Select modify with ¾ and confi rm by pressing
}
OK.
.
2 Select add list with ¾ and confi rm your se-
lection by pressing OK.
3 Enter a name for the group. Confi rm your entry by
pressing OK.
4 Press
5 Enter a group number from 1 to 9 and confi rm
}
book. Enter the initial letters or make your selection
with ¾. Confi rm by pressing OK. Press
and add additional recipients to the group. Terminate the entry process by pressing OK.
your entry by pressing OK. e group is now saved.
and add entries from the telephone
}
Page 19

3. Telephone Book
Chapter 3. Telephone Book
19
Editing a Group
1 Press
2 Select
3 Select the group that you would like to edit by press-
4 If necessary, enter a new name for the group. Con-
5 You can delete or add entries. Move the cursor with
6 If necessary, enter a new number for the group. Con-
}
OK.
ing
¾
fi rm with OK.
; use C to delete individual recipients. To add
¾
a recipient from the telephone book, press
Confi rm with OK.
fi rm with OK.
.
modify with
. Confi rm with OK.
¾
and confi rm by pressing
}
Deleting a Group
1 Press
2 Select cancel with ¾ and confi rm by pressing
3 Select the group that you would like to delete, then
4 Confi rm the deletion by pressing OK.
}
OK.
press OK.
.
Chain Dialling
You can also obtain a print-out of the tele-
¡
phone book by pressing ¨, then selecting
help page: 4 directory with
Confi rm with OK. e list is printed.
Calling Line Identification
(Depending on the country and telephone
network)
Your fax machine will show a caller’s telephone number.
To make use of this function, Calling Line Identifi cation
Presentation (CLIP) must be enabled for your telephone
line. Contact your telephone company to inquire about
.
whether or not this additional function is available for
your line. e number will not be shown if the caller
suppresses his number.
If you receive a telephone call during your absence, the
symbol I will appear. e caller’s number will appear
in the display. Your fax machine will store the telephone
numbers of the last ten calls.
1 Press the blue key and
callers will appear on the display.
2 Select an entry by pressing ¾. New entries are
marked with a star “*”.
If the number of the rings has been set to
¡
zero with function 17, then the telephone
numbers of callers who have directed their calls to
additionally connected telephones are not shown.
. e list of the last ten
º
¾
.
Before the dialling process begins, you can freely combine
and edit telephone book entries, manually entered digits,
numbers from the redial list or numbers from the caller
list. For example, if you have saved the telephone number
prefi x of an inexpensive telephone service provider (callby-call) as a telephone book entry, select this entry and
manually enter the subsequent telephone number or select another number from the telephone book, the redial
list or the caller list.
Printing the Telephone Book
Your fax machine can print out a list of the stored
telephone book entries and groups. Press
select print with ¾. Confi rm with OK. e list is
printed.
}
and
3. Telephone Book
Page 20
20 Chapter 4. Fax
4. Fax
As much as possible, use fax documents printed with
darker coloured text (black or dark-blue). Yellow, orange
and green are not suitable.
Do not place any documents in your laser fax
Æ
… are wet, that have been edited with correction fl uid,
… that are written on with a soft pencil, with paint,
… that you have taken from newspapers or magazines
… that are held together with offi ce or notebook staples
… that are pasted with note papers.
machine that …
that are soiled or that have a coated surface. Do not
place foils or endless papers into your fax machine as
documents.
chalk or charcoal.
(printer’s ink smudges!).
or with tape or glue. Place into your fax machine
only single sheets without paper clips or adhesive
binding of any sort.
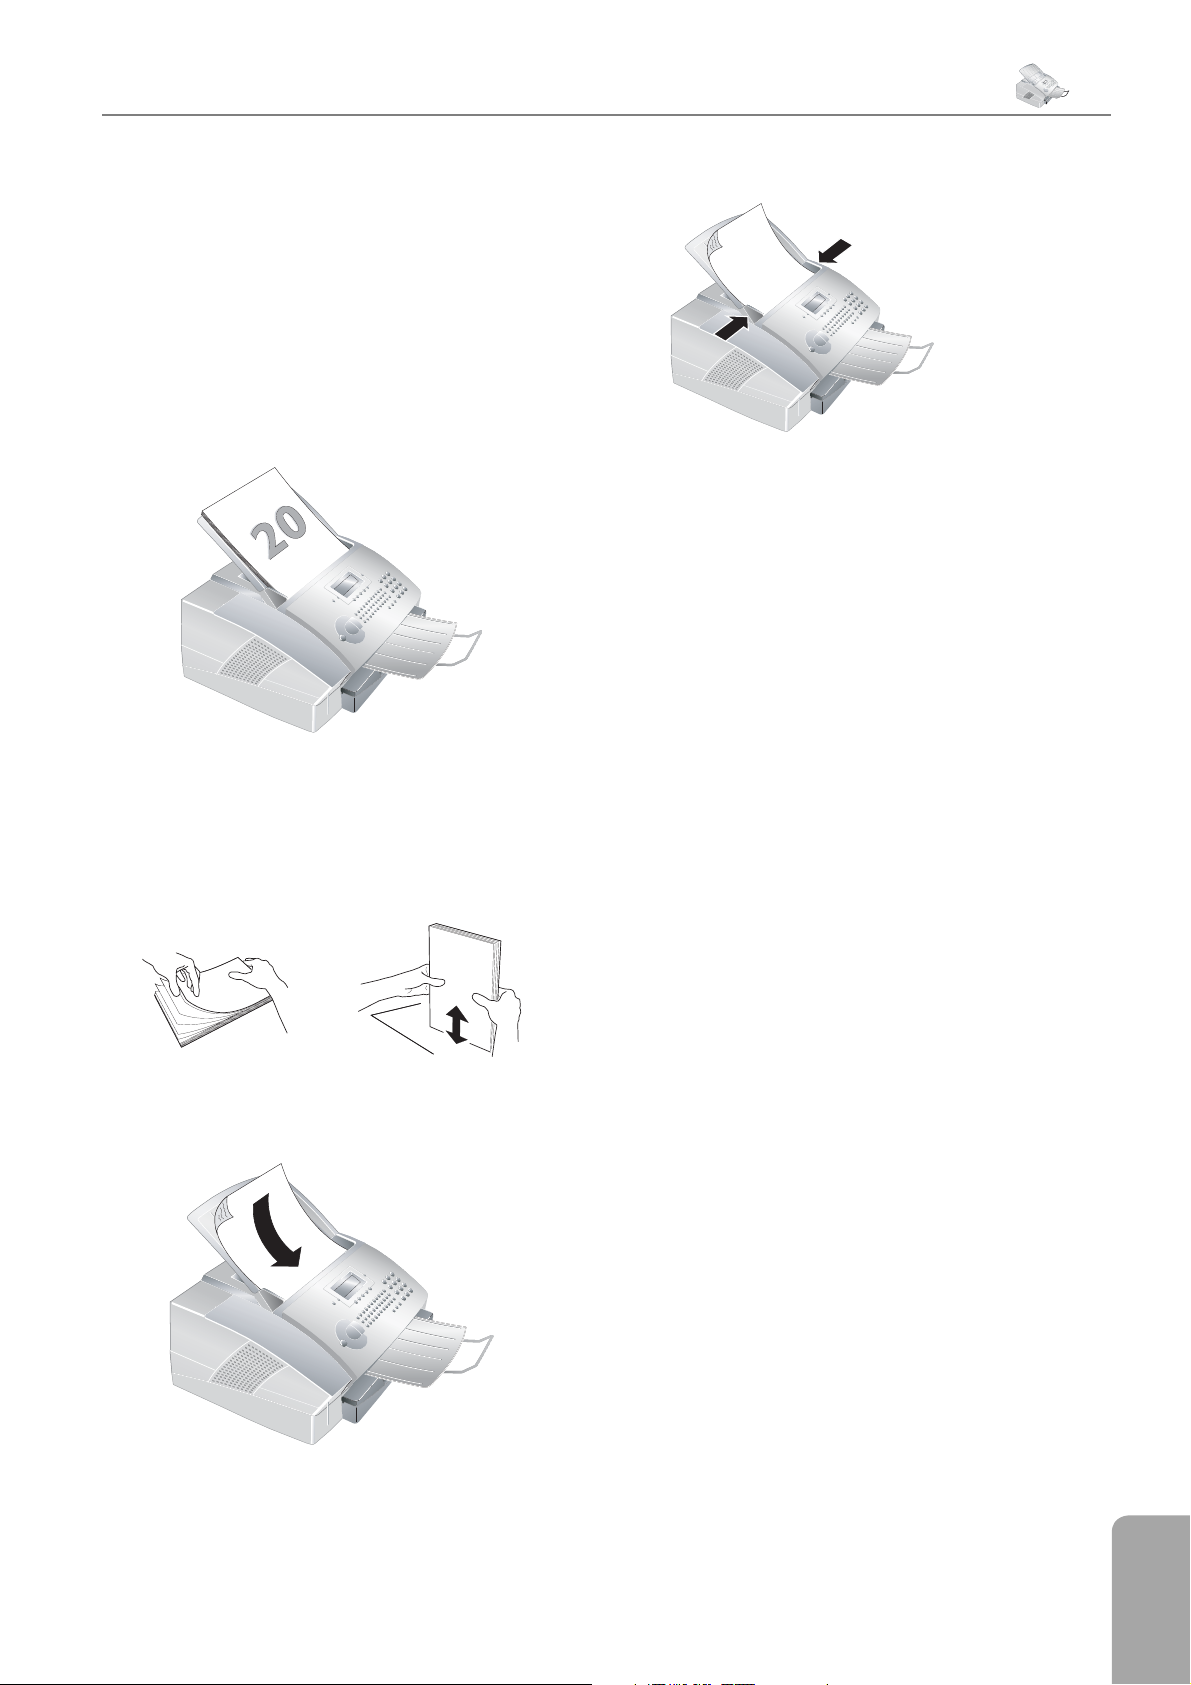
Inserting Documents
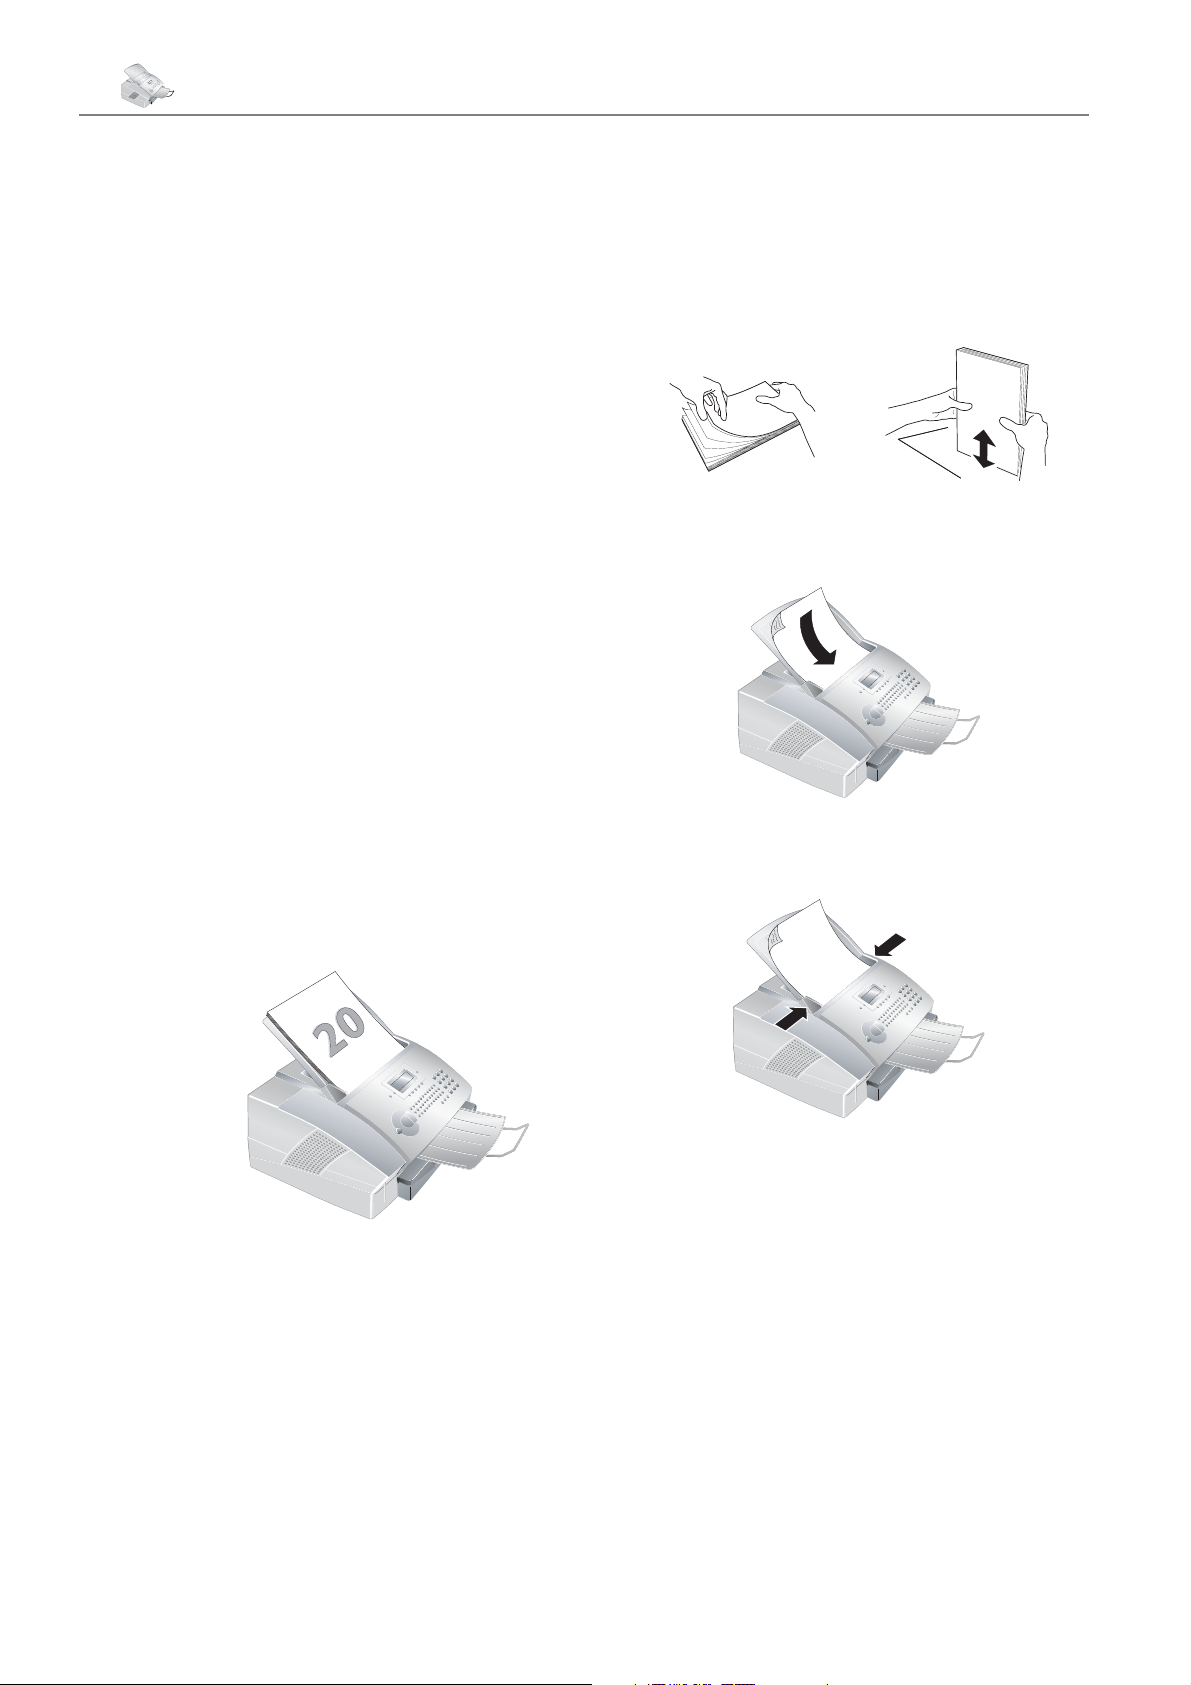
Separate the documents by fanning them
¡
1 Insert the document face down into the document
out, then align them by tapping the edge
of the stack gently against a fl at surface. is will
prevent several sheets of paper from being drawn
in all at once.
feed slot. e lower most document is sent fi rst.
… that are too thick or too thin (card stock or tissue
paper).
… that are creased, crumpled or torn
Use documents of sizes A4 (210 × 297 millimetres)
with 60 to 90 g/m2. Do not use any documents that are
smaller than A4. You can put in up to 20 documents
at a time.
2 Push the document guide inwards, so that it lies level
on the documents.
Press STOP to eject the document without sending it.
Sending a Fax
1 Dial the desired fax number. You can enter a number
with the number pad, or you can select an entry
from the telephone book, the redial list or the caller
list:
Manual entry: Enter the number using the number
pad.
Telephone book: Press
and confi rm with OK. Select the desired number by
pressing ¾.
}
, select search
Page 21

4. Fax
Chapter 4. Fax
Redial list or caller list: To select a number from
the redial list, press
number from the caller list, press the blue key and
and ¾.
º
2 To start the fax transfer, press START.
If the connection to the fax recipient cannot be made—
for example because the line is busy—your fax machine
will try to make that connection again after short time.
After two additional attempts, the fax machine will
discontinue the automatic redial process. If you would
like to terminate the redial process prior to this, press
STOP.
e contrast setting is automatically ad-
¡
justed to the document. If you would like
to specify the contrast yourself, use function 24,
time-deferred sending.
and ¾. To select a
º
Manually Sending a Fax
Transmission Report
Your fax machine will print you a transmission report—
depending on its settings—after it has sent out a fax. is
report indicates whether or not the fax has reached the
intended recipient. Four diff erent settings are available
for the transmission report.
1 Press MENU/OK,
following options:
with—After every error-free fax transfer, a trans-
mission report is printed out. A transmission report
is also printed in cases in which a fax transfer is not
successfully completed because the recipient’s line
is busy.
without—No transmission report will be print-
ed. However, the fax machine will nonetheless save
all fax transfers in its memory. You can print out the
transmission report by using the fax journal.
and OK. Select one of the
25
21
If the fax memory is full, no additional fax documents
can be read in. However, you can still send faxes manually:
1 Insert the document as described under Inserting
Documents.
2 Lift the handset or press the loudspeaker key
.
¼
3 Enter the desired number or select an entry from the
telephone book, the redial list or the caller list.
4 Press START. Hang up the handset. e document
will be scanned and sent.
Speed
e device adjusts the transmission speed to the quality
of the telephone line. You can normally use the highest
speed. If you would like to select a lower speed, for instance to send a fax overseas, set this using function 21
before sending the fax. is saves time and money that
would result from the automatic adjustment.
1 Press MENU/OK,
2 Select the desired speed with ¾.
21
and OK.
always— e transmission report will be printed
out after each successful fax transfer as well as after
interrupted transfers.
on error— e transmission will only be printed
out if the fax transfer was not successfully completed
or if it was terminated prematurely.
2 Confi rm with OK. Pressing C will return you to the
previous menu step; pressing STOP will return you
to the root menu.
ese settings also apply to SMS transmis-
¡
sion reports.
Fax Reception
If you have not changed the factory settings, received
faxes will be printed out automatically. If there is no paper in the paper tray or if you have not inserted a toner
cartridge, the fax machine will save all incoming faxes in
its memory. e fax memory can store up to 120 pages.
e green lamp
whenever there is a fax present in the fax memory. After
you have loaded paper into the fax machine or inserted a
new toner cartridge, press START to print out the stored
faxes.
on the operation panel will fl ash
»
3 Confi rm with OK. Pressing C will return you to the
previous menu step; pressing STOP will return you
to the root menu.
4. Fax
Page 22

22 Chapter 4. Fax
Sorted Print-Outs
If your fax machine receives fax transmissions with multiple pages, it will sort the pages as it prints them out. e
pages that were received last will be dispensed fi rst. You
have the option of turning this function off :
1 Press MENU/OK,
2 Select sorted print with ¾, then press OK.
Select without with ¾. Select with to turn
on the function.
3 Confi rm with OK. Pressing C will return you to the
previous menu step; pressing STOP will return you
to the root menu.
28
and OK.
Printing Multiple Copies
You can apply settings to your fax machine whereby
multiple copies of fax transmissions are printed out upon
reception.
1 Press MENU/OK,
2 Select nbr of copies with ¾ and confi rm
by pressing OK. Enter a value between 1 and 99.
3 Confi rm with OK. Pressing C will return you to the
previous menu step; pressing STOP will return you
to the root menu.
28
and OK.
Broadcast Transmissions
You have two options for sending a fax transmission to
several recipients: You can either enter the numbers of
the individual recipients one-by-one or you can select
a group from your telephone book. In the latter case,
your fax machine will send the fax to all members of this
group: You cannot edit the individual entries.
Broadcast Transmissions to Individual
Recipients
1 Insert the document face down into the document
feed slot. e lower most document is sent fi rst.
2 Enter a number using the number pad, or simply se-
lect an entry from the telephone book. Press
select search and confi rm with OK. Make your
selection from the list of entries with
also select numbers from the redial list or from the
caller list. Press
then select the desired number with ¾.
3 Press the blue key and
keyboard, add additional numbers manually—either
from the telephone book, the redial list or the caller
list. You can enter up to ten numbers. Between the
individual recipients, press the blue key and
4 To begin the fax transfer, press START. You can in-
terrupt the process at any time, by pressing STOP.
or the blue key and
º
¼
. Using the number
¾
}
. You can
º
¼
.
,
,
Time Stamp
e machine prints the date and the exact arrival time
on every incoming fax received. is allows you to
document the exact time at which you have received a
fax transmission. A memory buff er in the fax machine
ensures that the correct date and time of reception will be
maintained even after a power loss.
If the time stamp function is activated, incoming faxes
will be stored in the fax memory. As soon as the last page
has arrived, the arrival time is stored and the fax machine
prints out all the pages. e stored date and the time will
appear on the page header.
1 If you would like to turn this function off , press
MENU/OK,
2 Select without with ¾. Select with to turn
the function on.
3 Confi rm with OK. Pressing C will return you to the
previous menu step; pressing STOP will return you
to the root menu.
26
and OK.
Broadcast Transmissions to a Group
1 Insert the document face down into the document
feed slot. e lower most document is sent fi rst.
2 Select a group from the telephone book. Press
}
Select a group by pressing ¾.
You can enter additional groups or individual num-
bers. Press the blue key and
tional group or choose entries from the telephone
book, the redial list or the caller list; alternatively,
you may enter additional numbers manually using
the number pad.
3 Confi rm with OK.
4 To begin the fax transfer, press START. You can in-
terrupt the process at any time, by pressing STOP.
If your fax machine is not able to reach one of the recipients, the document will still be sent to the other recipients
on the list. After the fax machine has dialled the numbers
of all recipients, it will try again to call the recipients who
were not reached on the fi rst attempt.
, select search and confi rm with OK.
. Select an addi-
¼
Page 23

4. Fax
Chapter 4. Fax
23
Time-Deferred Sending
With this function, you can send fax transmissions at a
later time—within a 24-hour period. For example, you
can use this feature to take advantage of better telephone
rates or to send a fax to a recipient who can be reached
only at certain times.
1 Insert the document face down into the document
feed slot. e lower most document is sent fi rst.
2 Press MENU/OK,
3 Enter the desired number or select an entry from the
telephone book, the redial list or the caller list.
You can enter additional recipients and send
¡
4 Confi rm with OK.
5 Enter the time at which the document should be
6 Select the desired contrast with ¾. Confi rm with
To cancel a scheduled fax transmission, simply delete the
document from the jobs list. Press MENU/OK,
and OK. Select the fax transmission you would like to
delete by pressing ¾. Confi rm twice with OK (see
also the chapter entitled Jobs). Pressing C will return you
to the previous menu step; pressing STOP will return
you to the root menu.
the fax transmission as a broadcast by pressing the blue key and
sent, for example
fi rm with OK.
OK. After a short warm up phase, the fax machine
will read the document into the fax memory and will
send out the fax at the specifi ed time.
and OK.
24
.
¼
14 00
for 2:00 pm. Con-
53
Fax Polling
With the fax polling function, you can retrieve documents that lie ready in a dialled fax machine. It also is
possible to prepare documents in your fax machine that
can be polled by other machines.
Time-Deferred Polling
1 Press MENU/OK,
2 Enter the number from which you would like to poll
a fax or select an entry from the telephone book, the
redial list or the caller list. Press OK.
3 Enter the time at which the document should be
polled, for example
OK.
4 e fax machine is ready to poll the document. e
number will now appear on the display as well as the
time at which the machine will poll the fax transmission. You can continue to send other fax transmissions during this time.
and OK.
22
14 00
for 2:00 pm. Press
Polling Send
You can prepare documents in your fax machine that can
be polled by other machines.
1 Insert the document face down into the document
feed slot. e lower most document is sent fi rst.
2 Press MENU/OK,
3 Select either simple or multiple with ¾.
With the setting simple, the document can be
polled only once. If you select multiple, the
document can be freely polled any number of times.
Confi rm with OK.
4 Select the desired contrast with ¾. Press OK. Af-
ter a short warm up phase, the fax machine will store
the document in the fax memory.
To terminate the polling readiness, simply delete the
document from the jobs list. Press MENU/OK,
and OK. Select the fax transmission you would like to
delete by pressing ¾. Confi rm twice with OK (see
also the chapter entitled Jobs). Pressing C will return you
to the previous menu step; pressing STOP will return
you to the root menu.
23
and OK.
Fax Polling with a Sub-address
53
Immediate Polling
1 Press MENU/OK,
2 Enter the number from which you would like to poll
a fax or select an entry from the telephone book, the
redial list or the caller list. Press START.
22
and OK.
If you would like to poll a fax from a direct dial number
or from a sub-address—for example, if you wish to make
use of a certain service provided by a fax database supplier with several diff erent fax polling off ers—you can
append the direct dial number or the sub-address to the
fax number with a dialling pause. is way, you can also
poll faxes from a machine that is protected by a code.
4. Fax
Page 24
24 Chapter 4. Fax
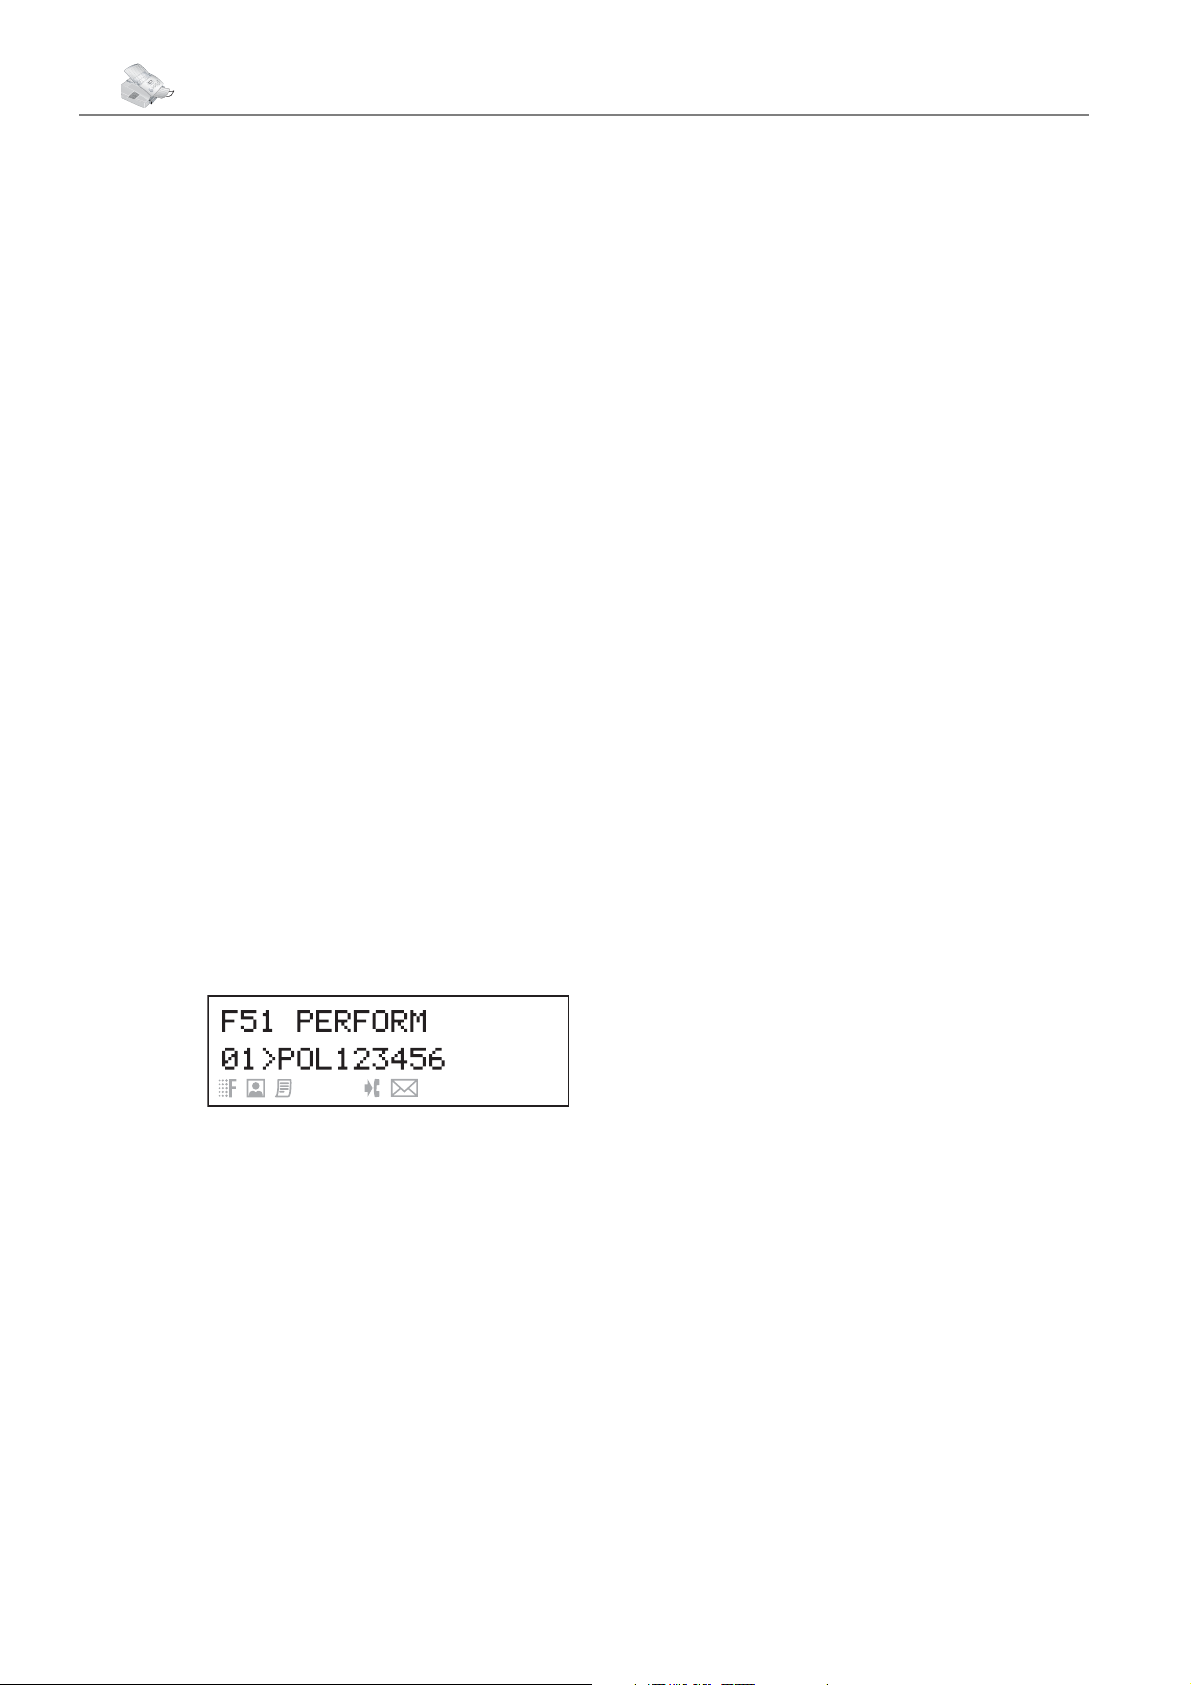
Enter the fax number. Add a dialling pause to the number
by pressing the blue key along with R/PAUSE. Now en-
ter the direct dial number, the sub-address or the code,
for example
pause will appear on the display: 12345 P 12. e sub-
address is not dialled until after the fax connection with
the main number has already been established.
12345
R/PAUSE
12
. A P for
Journal
e fax journal contains a list of the last 30 faxes and
SMS messages that you have either received or sent. A
print-out of the fax journal is automatically dispensed
after the completion of 30 transfers. You can print out
the fax journal at any time.
You have two options to choose from: Press ¨. Select
help page: 3 logs and confi rm with OK. e
print-out of the fax journal is now dispensed. You can
also print out the fax journal by pressing MENU/OK,
and OK.
42
Jobs
Immediate Job Execution
Press MENU/OK,
you would like to execute immediately by pressing
then press OK. e transmission or polling will commence immediately. You may terminate the process by
pressing STOP.
and OK. Select the job that
51
¾
Changing a Job
Press MENU/OK,
you would like to change by pressing
OK. Enter the desired changes and confi rm by pressing
OK. To interrupt an operation in progress and return to
the root menu without saving, press STOP.
and OK. Select the job that
52
¾
, then press
Deleting a Job
Press MENU/OK,
you would like to delete by pressing ¾, then press
OK. Confi rm the deletion by pressing OK. To interrupt
an operation in progress and return to the root menu,
press STOP.
and OK. Select the job that
53
Printing a Job
,
All fax and SMS transmissions that have just been sent,
that have been prepared for polling or that are to be sent
at a later time are present on in the jobs list. By pressing
MENU/OK, 5 and OK, you access the “Jobs” func-
tion. You can immediately execute jobs as well as change
or delete them; in addition, you can either print out individual jobs, or obtain a printed list of all pending jobs.
Jobs appear in the display one-at-a-time:
After the job number and job status indicator, you will
fi nd the fax number to which a fax is to be sent or from
which it is to be polled. Documents on the jobs list can
fall into the following categories with regard to their
status:
tx—Time-deferred sending
doc—Polling send
Press MENU/OK,
you would like to print out by pressing ¾, then press
OK. e print-out of the job is now dispensed.
and OK. Select the job that
54
Print-Out of the Jobs List
Press MENU/OK,
print out a list of all pending jobs.
You can also obtain a print-out of the jobs list by pressing ¨ and selecting help page: 6 commands.
Confi rm with OK. A print-out of the jobs list will now
be dispensed.
and OK. e fax machine will
55
pol—Time-deferred fax polling
tr.—Job in progress
SMS—SMS transmission
Page 25
5. Copier
Chapter 5. Copier
5. Copier
You can copy documents with your fax machine. You
have two diff erent options available for copying. It is possible either to make copies automatically or to adjust the
copies through your own settings.
25
Push the document guide inwards, so that it lies level on
the documents.
Use documents of size A4 (210 × 297 millimetres) with
60 to 90 g/m
smaller than A4. You can put in up to 20 documents
at a time.
¡
of the stack lightly against a fl at surface. is will
prevent several sheets of paper from being drawn
in all at once.
2
. Do not use any documents that are
Separate the documents by fanning them
out, then align them by tapping the edge
Press STOP to eject the documents without copying
them.
Making Copies
Automatically
Press the COPY key twice. e copying process now
commences.
Adjusting Copies
1 Press the COPY key. You have the following options
available:
2 Enter the number of copies you would like to make
of the document. You can make up to 99 copies of a
document. Confi rm with OK.
Insert the documents face down into the document feed
slot. e lower most document will be copied fi rst.
3 Select the resolution. You have a higher resolution
available to you for copying than you have for fax
transmissions. Select the desired resolution with
:
¾
resol.: fast—For documents without draw-
ings or fi ne details
resol.: quality—For documents with small
print or drawings
resol.: Photo—For the highest resolution
Confi rm with OK.
4 You can make copies of the document that are en-
larged or that are compressed in size. Size compression is possible down to 25 percent of the size of the
original, and enlargements of up to 400 percent can
be made. Enter the desired value using the number
pad and confi rm your entry by pressing OK.
5 Select the desired contrast with ¾. Confi rm with
OK. e copying process now commences.
5. Copier
Page 26

26 Chapter 6. SMS
6. SMS
(Short Message Service)
(Depending on country and telephone network)
You can send and receive SMS (Short Message Service)
messages with your Laserfax machine. Your fax machine
is pre-set to use this function; however, use of these services is dependent on the particular country and telephone
network. Ask your telephone system operator whether
SMS operation is possible and whether you must be registered to make use of it. In the event that problems arise,
or changes to your device are required, please contact
your telephone provider.
Return to the previous menu step by press-
¡
Sending SMS Messages
ing C. Move the cursor on the display with
.
Delete individual numbers and letters with C
¾
or \.
To interrupt an operation in progress and re-
turn to the root menu without saving, press STOP.
Redial list: Press
number from the redial list by pressing
.
e fax machine will now send the SMS message.
W
Caller list: To select a number from the caller list,
press the blue key and
machine will now send the SMS message.
5 After sending the SMS message, your fax machine
will print out a transmission report in accordance
with its settings (see the chapter entitled Fax /
Transmission Report).
You can also access the function send SMS
¡
by pressing MENU/OK,
, then select the desired
º
. Press W. e fax
º
31
. Press
¾
and OK.
Sending to Multiple Recipients
1 Press W, select send SMS with ¾ and con-
fi rm with OK.
2 Enter the text as described above, then press W.
3 Enter the number of the fi rst recipient using the
number pad, or select an entry from the telephone
book or the redial list.
1 Press W, select send SMS with ¾ and con-
fi rm with OK.
2 Enter the text that you would like to send. You can
enter a maximum of 160 characters or 640 characters
(depending on country and telephone network).
To enter capital letters, press + and the
¡
3 Press W when you have fi nished entering your
4 You can enter a number with the number pad or
Manual entry: Enter the recipient’s telephone
desired key simultaneously. You may add
a space by pressing the ½ key. e symbols are
displayed directly above the letter keys. To enter
symbols, press the blue key and the corresponding
letter key simultaneously. Press J to begin a new
paragraph. Pressing COPY to obtain a print-out
of your SMS message before sending it.
message.
you can select an entry from the telephone book, the
redial list or the caller list:
number, then press W. e fax machine will now
send the SMS message.
4 Press the blue key and
number. You can add up to ten recipients.
5 Press W to send the SMS message.
, and enter another
¼
Receiving SMS Messages
When you have received an SMS, the green light
will shine on your fax machine, and the W symbol will
appear on the display. e fax machine will automatically
print out incoming SMS messages. If you have turned
the automatic printing function off , the SMS messages
will be stored.
»
Reading SMS Messages
1 Press W, select read SMS with ¾ and con-
fi rm with OK.
2 e number of the last message as well as the date
and time of its reception will be displayed. Unread
messages are marked with a star “*”. Select the desired SMS message by pressing ¾ and confi rm
your selection with OK.
Telephone book: Press
desired entry from your telephone book by pressing
. Press W. e fax machine will now send the
¾
SMS message.
}
, then select the
3 Move the cursor within the SMS message with ¾.
Pressing C will return you to the previous menu step;
pressing STOP will return you to the root menu.
You can also access the function read SMS
¡
by pressing MENU/OK,
32
and OK.
Page 27

6. SMS
Chapter 6. SMS
27
Printing SMS Messages
If you have turned the automatic printing function off ,
use this function to print your SMS messages.
1 Press W, select print SMS with ¾ and con-
fi rm with OK.
2 Use ¾ to select the SMS messages that you would
like to print:
selected—Confi rm by pressing OK. Select the
SMS message that you would like to print out by
pressing ¾. Confi rm with OK.
new—Confi rm by pressing OK. All new messages
will now be printed.
all—Confi rm by pressing OK. All SMS messages
stored in the fax memory will now be printed.
You can also access the function print
OK.
SMS
by pressing MENU/OK,
34
and
¡
Sending SMS Messages to
E-Mail or Fax
(Depending on country and telephone network)
You can send SMS messages to an e-mail address or as fax
transmissions to another fax machine.
SMS Messages to E-Mail
1 Press W, select send SMS and confi rm with
OK. Enter the text that you would like to send, as
described under Sending SMS Messages.
2 Press OK. Select E-mail with ¾ and confi rm
by pressing OK.
3 Enter the e-mail address. To enter the @ sign, press
the blue key and ½.
To add more e-mail addresses, press the blue
¡
4 Press W to send the SMS message.
key and
¼
.
Deleting SMS Messages
Your fax machine can store up to 30 SMS messages. If
the memory is full, no additional SMS messages can be
received. To free up space in the memory, you should
delete some SMS messages.
1 Press MENU/OK,
2 Use ¾ to select the SMS messages that you would
like to delete:
selected—Press OK and use
SMS message that you would like to delete. Confi rm
with OK.
already read—Confi rm by pressing OK. All
SMS messages that have been read will be deleted.
All—Confi rm by pressing OK. All SMS messages
will be deleted.
33
and OK.
to select the
¾
SMS Messages to Fax
1 Press W, select send SMS and confi rm with
OK. Enter the text that you would like to send, as
described under Sending SMS Messages.
2 Press OK. Select Fax with ¾ and confi rm
by pressing OK. Enter the number to which you
would like to send the SMS message. You can enter
a number with the number pad or you can select an
entry from the telephone book, the redial list or the
caller list (see Sending SMS Messages).
To add more numbers, press the blue key
¡
3 Press W to send the SMS message.
and
¼
.
Advanced Sending Options
(Depending on country and telephone network)
Sending SMS with a Sub-address
With a sub-address, you send an SMS message to a certain fax machine that is connected to a telephone line
along with several other devices. In GB: Append the subaddress to the dialled number. For all other countries:
You may have to add a star between the number and the
sub-address (depending on country and telephone network). If the sub-address of the machine is 1, for example, you should dial
123 45 67(*)1
.
6. SMS
Page 28

28 Chapter 6. SMS
Sending SMS Messages to a User Account
Some SMS reception devices can manage several user accounts. You can send an SMS message to a specifi c user
of a device in the following manner:
1 Press W, select SEND SMS and confi rm with
OK. Enter the text that you would like to send, as
described under Sending SMS Messages.
2 Press W and enter the number.
3 Press OK and enter the name of the recipient’s user
account.
4 Press W to send the SMS message.
SMS Settings
(Depending on country and telephone network)
If you have set the country in which you will be operating your fax machine with function 11, the machine will
automatically select the correct SMS settings (see the
chapter entitled Settings / Setting the Country). If you
would like to use diff erent settings, you can change these
with functions 35 and 36.
Numbers of the SMS Center
Turning Off the Automatic Printing
Received SMS messages are printed out automatically.
You have the option of turning this function off .
1 Press MENU/OK,
2 Select auto print and confi rm with OK. Indi-
cate whether you would like to turn the automatic
printing option on or off by selecting with ¾.
3 Confi rm with OK. Pressing C will return you to the
previous menu step; pressing STOP will return you
to the root menu.
35
and OK.
Notification Tone
You will hear a notifi cation tone whenever an SMS message has arrived. You have the option of turning this
function off .
1 Press MENU/OK,
2 Select beep sms and confi rm with OK. Indicate
whether you would like to turn the notifi cation tone
on or off by selecting with ¾.
3 Confi rm with OK. Pressing C will return you to the
previous menu step; pressing STOP will return you
to the root menu.
35
and OK.
e numbers that you need in order to send and receive
SMS messages are stored under SMS centers. If you
should require other numbers, you can change these with
function 36. In case of doubt, you should ask your telephone provider for the correct information.
1 Press MENU/OK,
center
2 Select send n° and confi rm with OK. Enter the
number through which your fax machine should
send SMS messages. Confi rm with OK.
3 Select receive n° and confi rm with OK. Enter
the number through which your fax machine should
receive SMS messages. Confi rm with OK. Pressing
C will return you to the previous menu step; pressing
STOP will return you to the root menu.
You can also receive SMS messages through a second
service provider. Select SMS center 2 and confi rm
with OK. Change the number for reception, as described
under step 3. Pressing C will return you to the previous
menu step; pressing STOP will return you to the root
menu.
1 with ¾. Confi rm with OK.
and OK. Select SMS
36
Name of the Sender
You can set whether or not your name should be sent
with each SMS message—identifying you as the sender.
You can store your name with function 14 (see the chapter entitled Settings / Entering Your Telephone Number
and Name).
1 Press MENU/OK,
2 Select sender name and confi rm with OK. Use
to select whether or not to send your name
¾
with each SMS message.
3 Confi rm with OK. Pressing C will return you to the
previous menu step; pressing STOP will return you
to the root menu.
35
and OK.
Notification
If the notifi cation function is activated, you will receive
an SMS notifi cation as soon as your SMS message has
been delivered to the recipient.
1 Press MENU/OK,
35
and OK.
2 Select notification and confi rm with OK.
Indicate whether you would like to turn the notifi cation function on or off by selecting with ¾.
Page 29

6. SMS
Chapter 6. SMS
3 Confi rm with OK. Pressing C will return you to the
previous menu step; pressing STOP will return you
to the root menu.
Sending of SMS notifi cations may involve
¡
the payment of a fee. Inquire with your
telephone company as to whether or not costs are
incurred through the use of this function.
Sub-address (Terminal ID)
If you have several devices with an SMS function connected to one telephone line, you can assign sub-addresses to these devices. SMS messages can then be sent
to a specifi c device.
Text2Fax
(Depending on country and telephone network)
From your laser fax machine, you can send a text as a fax
transmission to another fax machine.
Move the cursor on the display with ¾.
¡
1 Press W.
Delete individual numbers and letters with
C or \. To interrupt an operation in progress
and return to the root menu without saving, press
STOP.
29
1 Press MENU/OK,
2 Select Term. addr. with ¾ and confi rm by
pressing OK. Enter a number from 0 to 9 as the
sub-address. e sender can send an SMS message
directly to this device by appending the sub-address
to the telephone number.
3 Confi rm with OK. Pressing C will return you to the
previous menu step; pressing STOP will return you
to the root menu.
35
and OK.
Validity Period
With the validity period, you can specify how long your
SMS message will be stored on the telephone company’s
server in the event that the recipient cannot be reached.
If the server cannot deliver the SMS message prior to
the expiration of the validity period, the message will be
deleted.
1 Press MENU/OK,
2 Select valid.period and confi rm with OK. Se-
lect the desired validity period by pressing ¾. e
following settings are possible: 6 hours, 1 day,
1 Week and Maximum. Ask your telephone com-
pany how long the message will be stored with the
setting Maximum.
3 Confi rm with OK. Pressing C will return you to the
previous menu step; pressing STOP will return you
to the root menu.
35
and OK.
2 You can enter a number with the number pad or
you can select an entry from the telephone book, the
redial list or the caller list:
Manual entry: Enter the recipient’s fax number,
then press W.
Telephone book: Press
desired entry from your telephone book by pressing
. Press W.
¾
Redial list: Press
number
W
Caller list: To select a number from the caller list,
press the blue key and
3 Enter the text that you would like to send. You
can enter a maximum of 70 lines of 80 characters
each—a total of 5,600 characters.
¡
a space by pressing the ½ key. Press J to begin a
new paragraph. e symbols are displayed directly
above the letter keys. To enter symbols, press the
blue key and the corresponding letter key simultaneously. Press COPY to obtain a print-out of your
text before sending it.
4 Press W when you have fi nished entering your
message. e fax machine will now send the
Text2Fax message.
from the redial list by pressing ¾. Press
.
To enter capital letters, press + and the
desired key simultaneously. You may enter
}
, then select the desired
º
º
, then select the
. Press W.
5 After sending the Text2Fax message, your fax ma-
chine will print out a transmission report in accordance with its settings (see the chapter entitled Fax /
Transmission Report).
6. SMS
Page 30
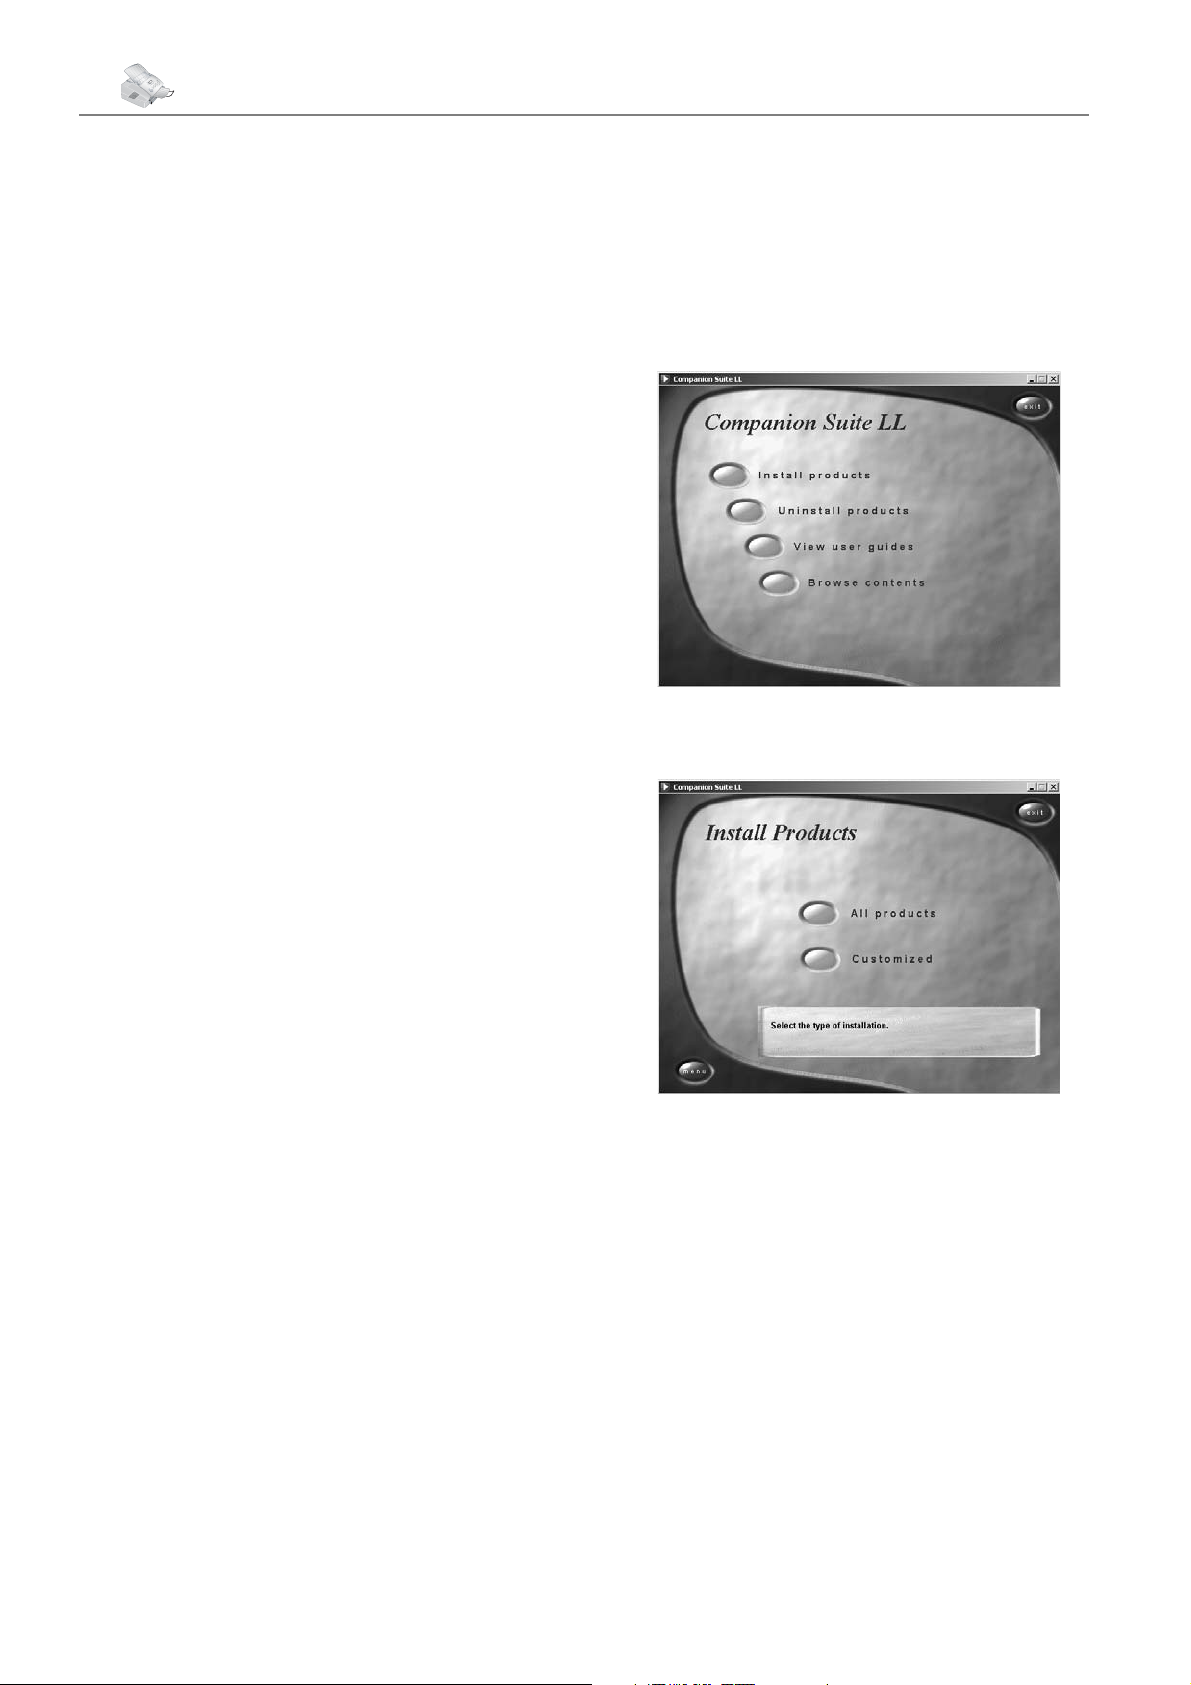
30 Chapter 7. PC Connection
dows® Explorer and start the program S. with a
7. PC Connection
(Depending on the model)
Requirements
Your computer must meet the following minimum requirements:
Processor:
500 MHz for Windows 98 SE®
800 MHz for Windows 2000 · ME®
1 GHz for Windows XP®
RAM:
128 MB for Windows 98 SE · 2000 · ME®
192 MB for Windows XP®
Operating System:
Windows 98 SE · 2000 · ME · XP®
double-click.)
e C S window appears on the screen.
You can install or uninstall C S or load
the user manual for P P. Click on B
C to view the fi les on the installation CD. is
opens a Windows® Explorer window that shows the CD
contents.
Free Hard Drive Space:
260 MB of free hard drive space for installation of
C S and P P.
USB Interface
You can connect your laser fax machine only to a PC (Microsoft Windows® operating system). e fax machine is
not compatible with Linux or Apple Macintosh®.
First install the software. e device may
Æ
not be connected to the PC before this. After
the software installation, the PC must be restarted,
only then should you connect your PC and the
laser fax machine with a USB cable.
Installing the Software
On the installation CD included with your fax machine,
you will fi nd the C Se and P P.
With the C Se, you can access the address book of the fax machine from your computer and
add or edit entries. You can also alter your fax machine
settings as well as checking the toner level of the toner
cartridge. With P P, you can scan and manage
documents.
e laser fax machine is registered as the default printer on
your computer. You can access it as you would any other
printer and use it to create black-and-white print-outs.
Click on I P, and select A P
from the selection menu that follows.
By selecting A P, you will install
¡
Your computer will now prepare for the installation process. en a window will appear on the screen in which
you may start the installation process. Click on N.
the C S and P P, as
well as the drivers for the printer and scanner. If
you would like to install only certain components,
click on C, then select the components
that you would like to install.
Close all open programs and applications before beginning the installation process. Place the installation CD
in the CD-ROM drive of your computer. e program
will start automatically. (If the program does not start
automatically, select the CD-ROM drive in the Win-
Page 31
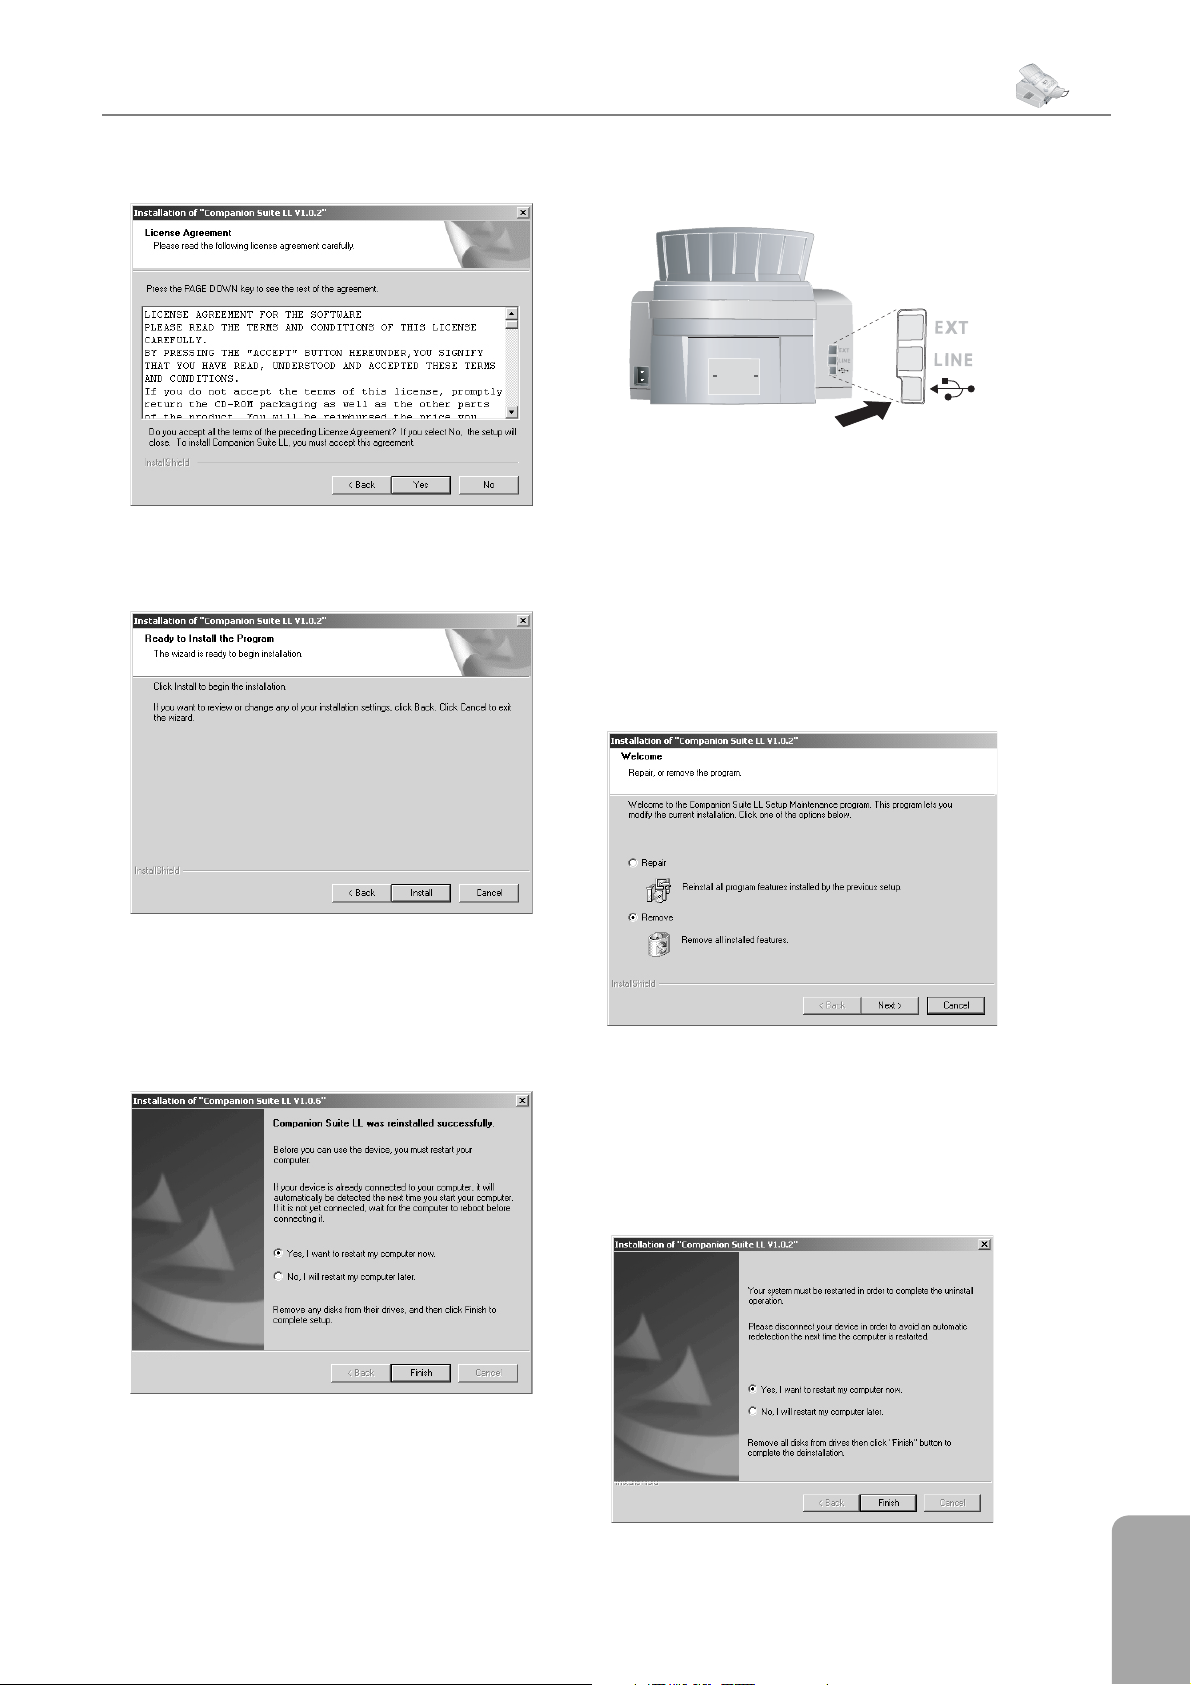
7. PC Connection
Chapter 7. PC Connection
31
Next you will be asked to accept the licensing conditions.
Click on Y.
e program can now commence with the installation.
Click on I.
Only after the restart, connect the laser fax machine
to your PC with a typical USB cable. e USB port of
your device can be found on the rear side.
Uninstalling the Software
Close all open programs and applications before beginning the uninstall process. Load the uninstall program by
clicking on S > P > C S >
C S > U in the Start menu. Your
computer will now prepare for the uninstall process.
You can either repair the program or remove it. Select
R and click on N.
At the conclusion of the installation process you must
restart your computer. Make your selection as to whether
the computer should restart automatically or whether
you would like to restart the computer yourself at a later
time. Click on F.
You will be asked to confi rm the uninstall. After you have
clicked on OK, the C S will be removed
from your computer. At the conclusion of the uninstall
process you must restart your computer. Make your selection as to whether the computer should restart automatically or whether you would like to restart the computer
yourself at a later time. Click on F.
7. PC Connection
Page 32
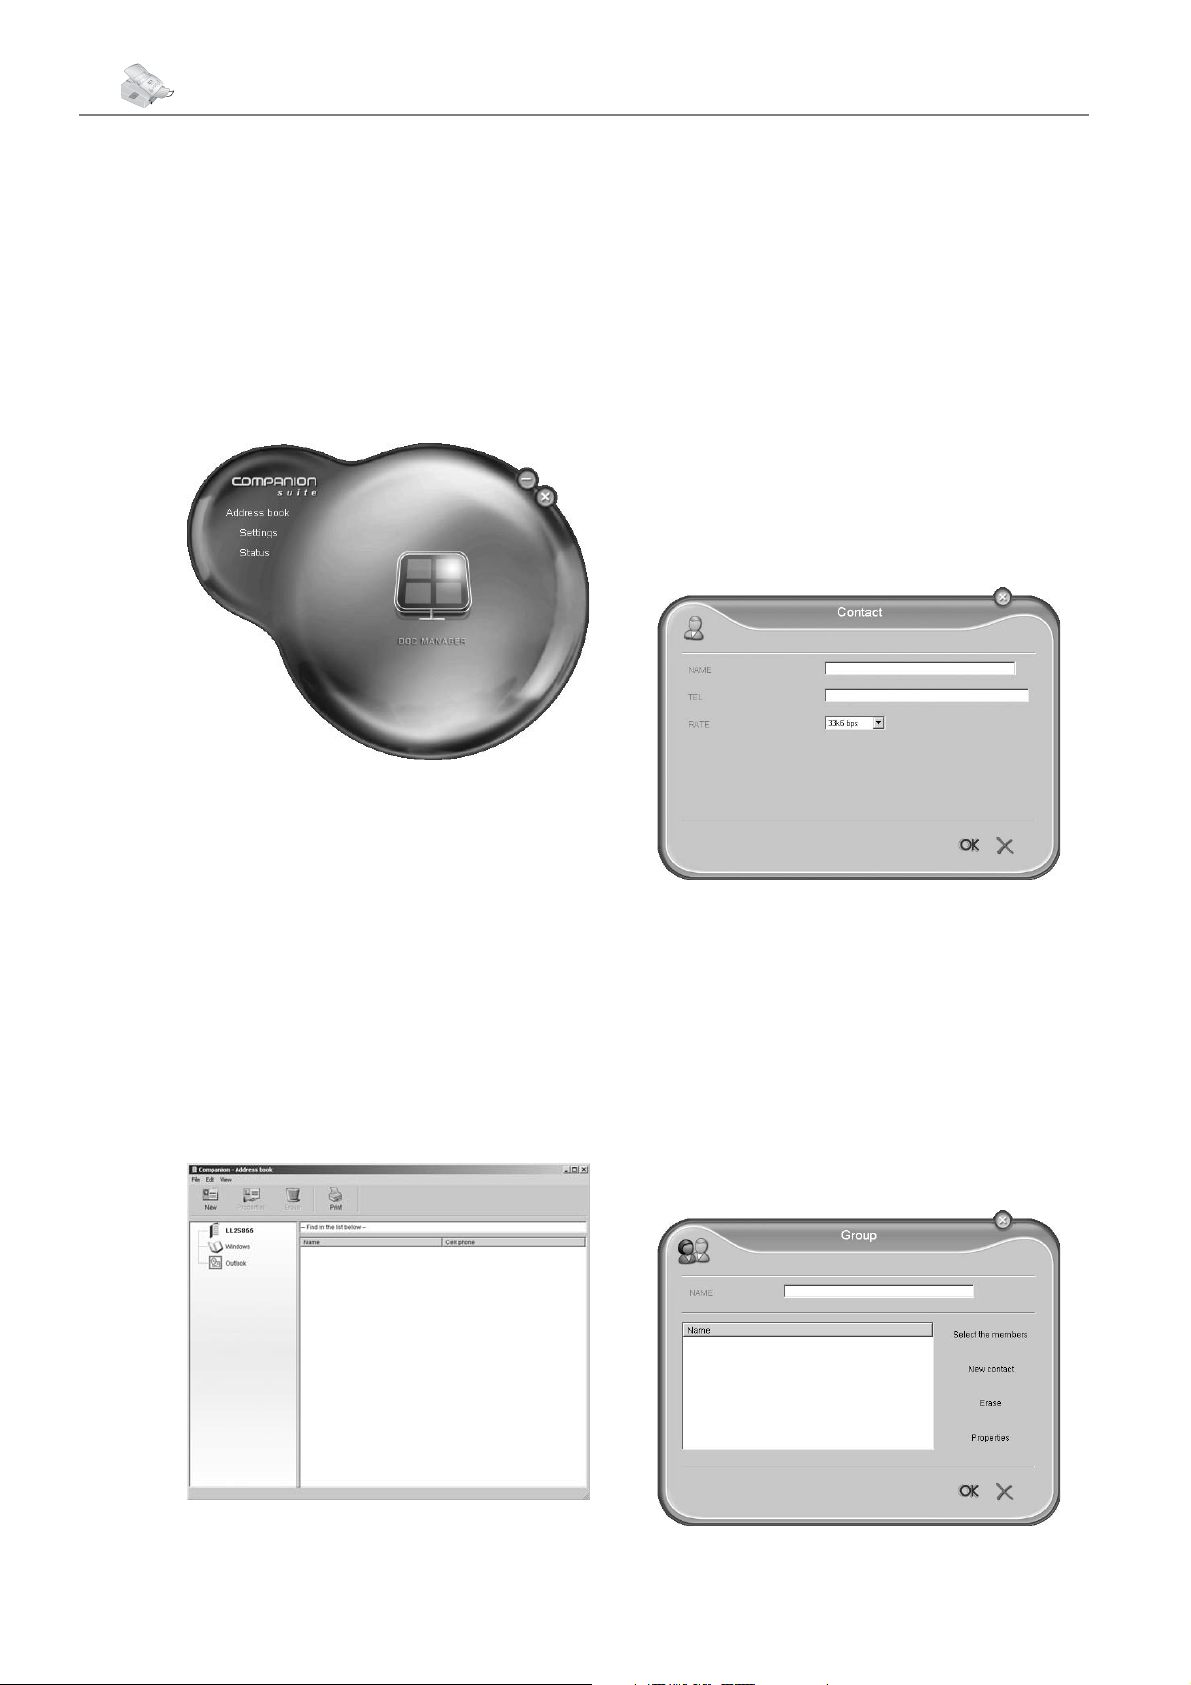
32 Chapter 7. PC Connection
After rebooting has occurred, removal of the C
S from your computer will be complete.
Using the COMPANION SUITE
You can start the Companion Suite either by clicking
on the Companion Director icon on your desktop or
by selecting S > P > C S >
C S > C D from the
Start menu. You can change the look of the start menu
by clicking with the right mouse button.
To edit the telephone book entries, select the laser fax
machine. You can add new entries or groups to your
telephone book and edit or delete these entries as well as
printing out a list of all entries.
You can exchange existing entries between
¡
the address books of Windows®, Microsoft
Outlook® and your laser fax machine. In the right
menu window, select the entry you would like to
copy to a diff erent address book. Hold down the
mouse button to drag this entry to the address
book in the left window to which you would like
to copy the entry.
Add entry
To add an entry, select N. You can choose whether to
add a single entry or a group.
Click on A B to edit the telephone book
of your fax machine. Click on S to change the
basic settings of your fax machine. Under S, you
can select the settings for the display of the toner level. If
you would like to scan documents, click on the large icon
D M in the middle of the start menu.
Editing the Telephone Book
With C S, you can edit the entries in your
fax machine entries and in the Windows® address book
as well as in Microsoft Outlook®. Click on the A
B button.
Enter the name and number and select the transfer speed
for fax transmissions to this recipient (see also the chapter
entitled Telephone / Telephone Book). Confi rm with
OK.
Edit Entry
Select the entry that you would like to edit and click on
P. Change the name or the number and confi rm with OK.
Add group
Page 33
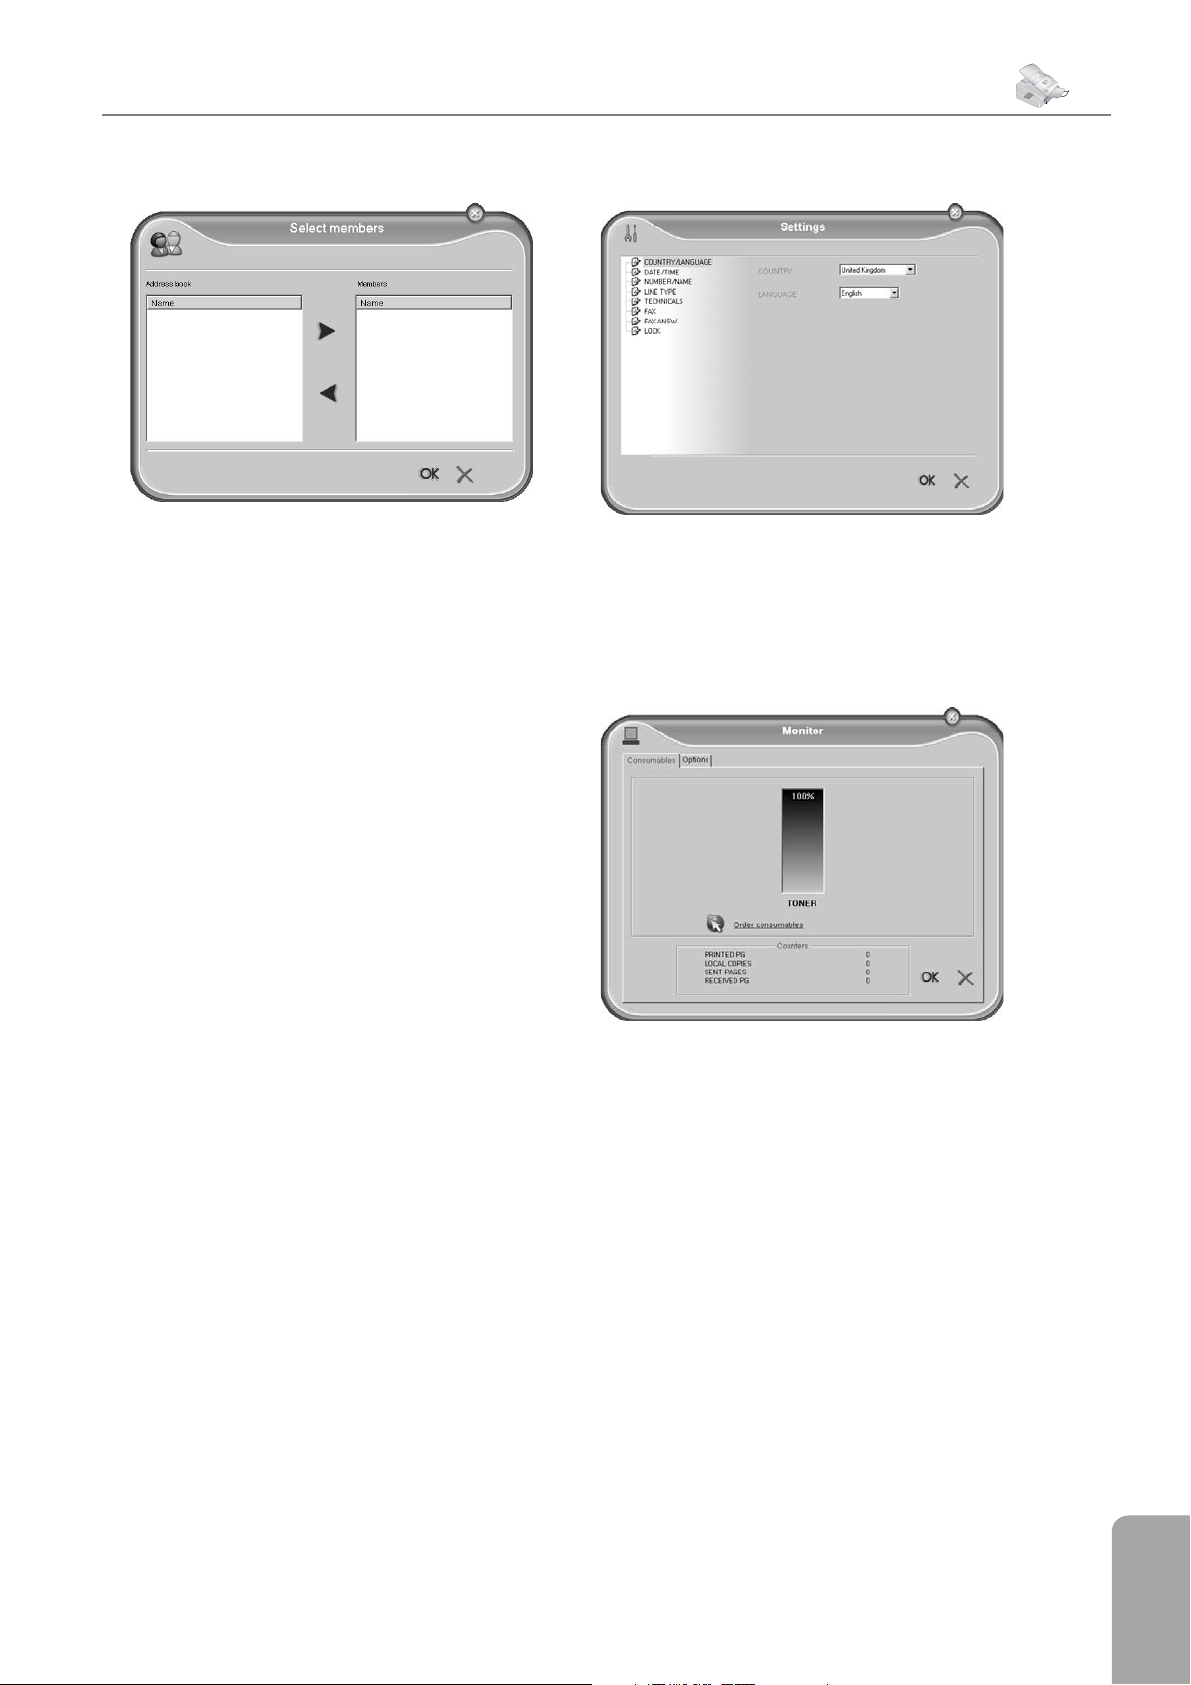
7. PC Connection
Chapter 7. PC Connection
33
Enter the name of the group. Click on S M
to add new entries to the group.
Add new members to the group using the arrow buttons.
Confi rm with OK.
Edit group
Select the group that you would like to edit. Choose
S M to add new entries to the group or remove entries from the group. Click on D to delete
the entire group. Confi rm with OK.
fax machine. You can also confi gure the security codes for
the fax memory and keyboard lock.
Displaying the Toner Level
Click on the S button. e toner level of the toner
cartridge is indicated by a percentile value between 100
percent (full) and 0 percent (empty).
Archiving the Telephone Book
With the address book of the C S you can
save the telephone book entries of your fax machine to
your PC or load saved entries (fi le format *.csv).
Click on F > E to save the telephone book entries. You can select the directory in which you would like
to save the fi le.
Click on F > I to add entries to the address
book. Select the fi le you would like to import; the entries
are added to the existing entries.
e data in the fi le must be separated by
¡
semicolons.
Settings
Click on the S button to modify the basic settings of your fax machine. Among other setting, you
can enter your name and number, set the date and time,
select the connection type and set the parameters for the
Printing from Computer
When you install the C S on your computer, the laser fax is also installed as a printer under
Windows®. In the print menu under S > S >
P, you will fi nd your fax machine listed as L
P S.
You can access your laser fax from any program and use
it to make black-and-white print-outs just as you would
use any other printer. Simply select the L P
S as your printer.
e L P S is installed as
¡
7. PC Connection
the default printer for all programs on your
computer.
Page 34
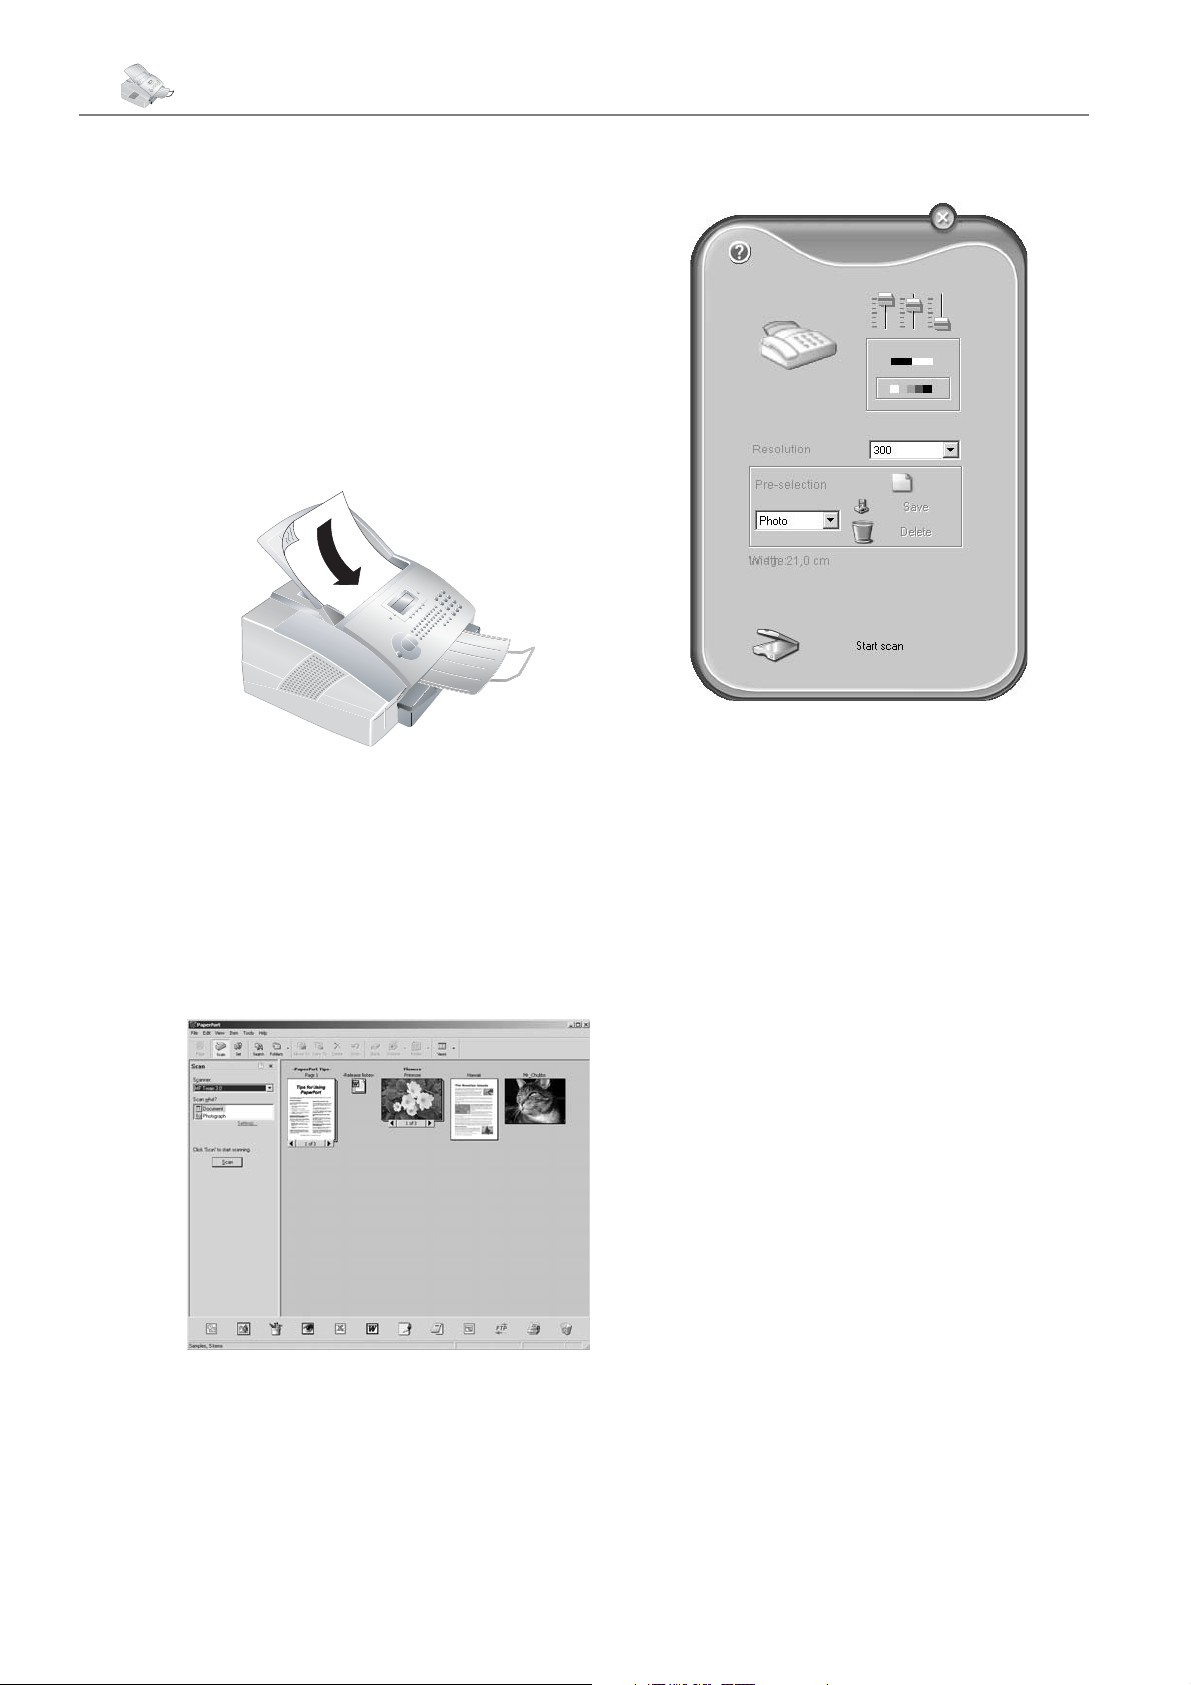
34 Chapter 7. PC Connection
Click in the Print menu on P to edit the printer settings. You can set whether to print in letter or landscape format and how many pages should be printed on a
single sheet. Change the print order to print the last page
of your document fi rst. A long document is then output
sorted; the fi rst page lies on top.
Scanning
Insert the document face down into the document feed
slot. e lower most document is read into the memory
scanned. You can load up to 20 documents into the
paper tray.
Driver as your scanner. e Twain Driver selection
window then appears, as described below.
e installation CD that is delivered with your fax machine contains the program P P. If you select A
P during the installation process, P P
will be installed on your computer along with the C S. Start the program by clicking in the start
menu on the icon D M.
Click on the scan button or select F > S from the
menu bar.
If you select the controller on the upper right, a dialogue
appears in which you can select the alignment and fi lter
settings for the scan.
Using the controls beneath this, you can choose whether
to scan in the black-and-white mode (also called “barcode mode”) or in the grey tone mode.
Enter the desired resolution for the scanner under R.
Click on the lower button S S to commence with
the scanning process. After scanning, the document will
appear in the main window of P Pt. You can now
save it, edit it in a graphics program or process it with the
OCR (Optical Character Recognition) software.
Under the menu item P-, you
¡
can create diff erent profi les. In a profi le,
you may save settings that you would like to use
fairly often, for example, for scanning of a frequently-used document-type. First confi gure all
the settings. en click on N and enter a name
for the profi le. Click on S. To scan documents
with the saved settings, select this profi le from the
selection menu.
Select the Twain Scanner Driver as your scanner. Select whether you would like to scan a document or a
photograph. Click on S. e Twain Scanner Driver
window now opens.
You can also start the scanning process from
¡
any other graphics program if it is supported
by the Twain Driver. Select the Twain Scanner
Page 35
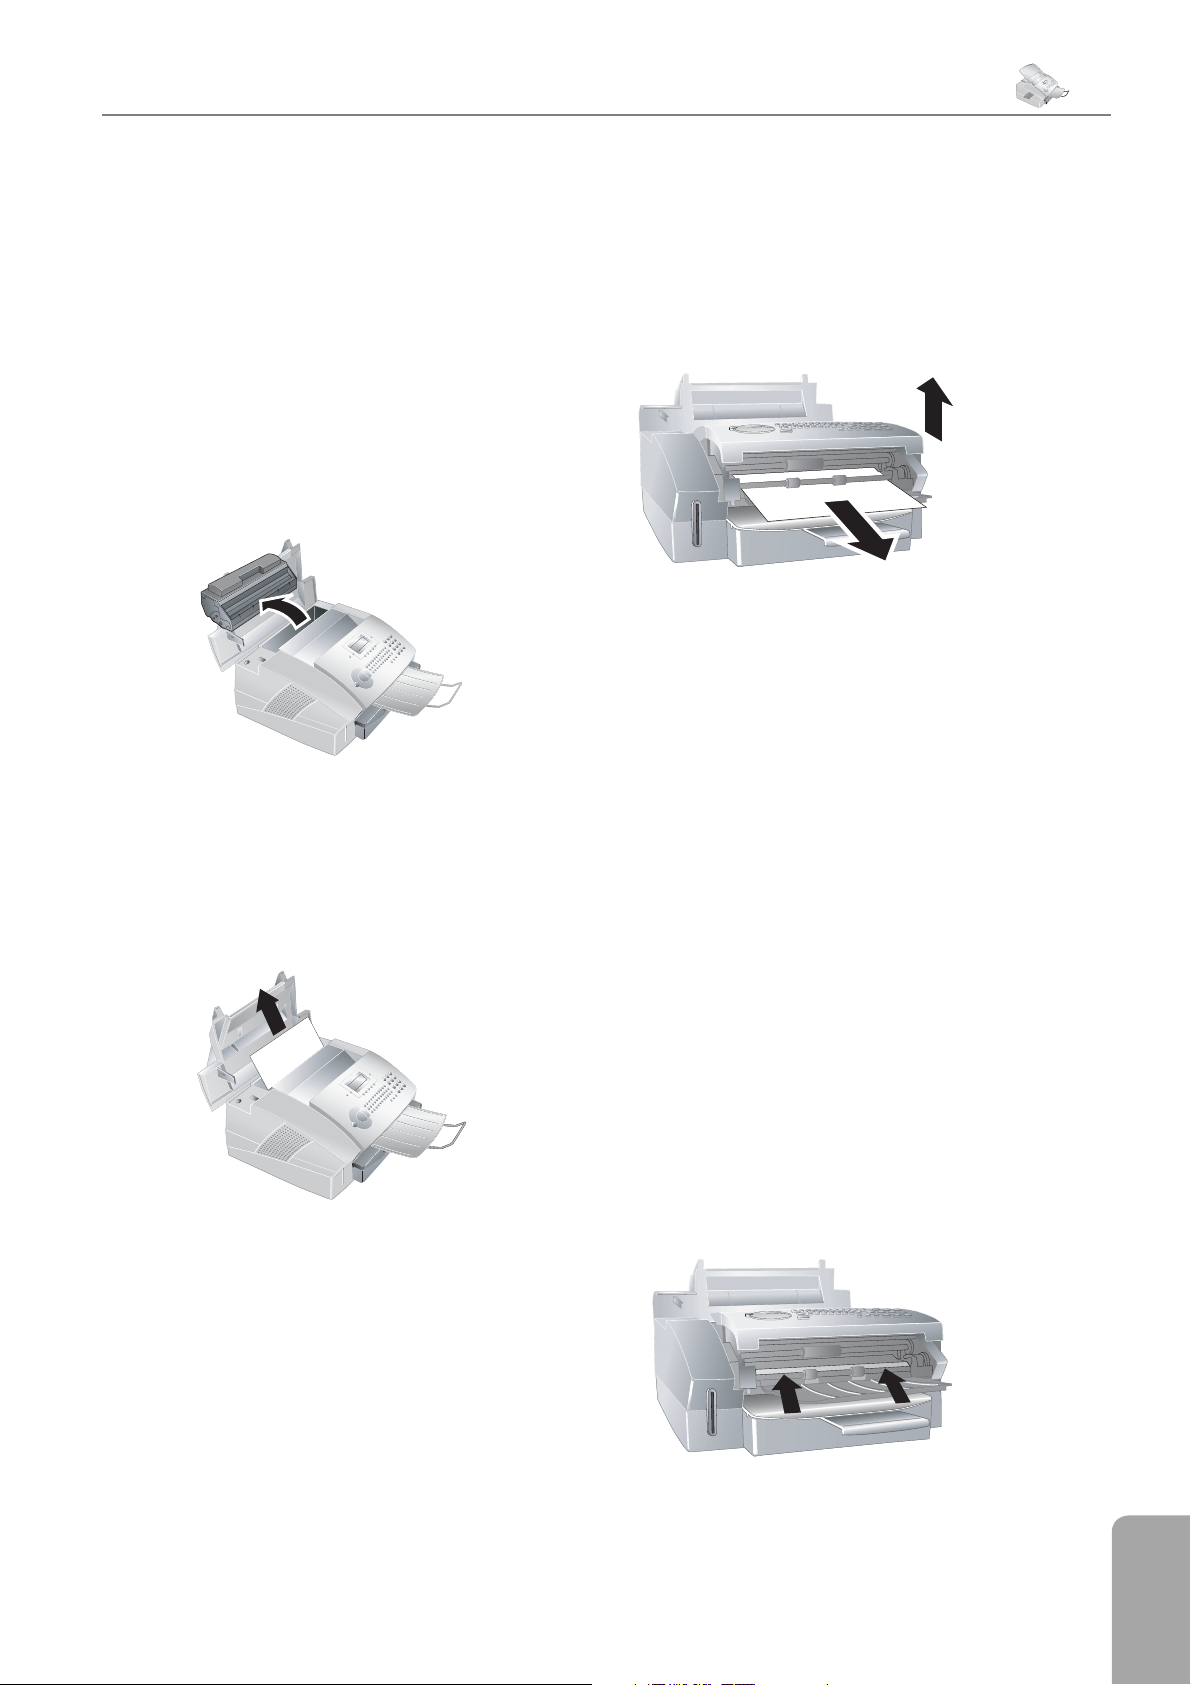
8. Troubleshooting
Chapter 8. Troubleshooting
8. Troubleshooting
Paper or Document Jams
Your fax machine is equipped with sensors that quickly
recognise a paper or document jam. If trouble of this sort
arises, the feeding of the printer paper or document is
stopped immediately.
Open the cover by taking hold of both document guides
and tipping the cover backward. It is possible that you
will have to remove the toner cartridge in order to reach
the paper.
Carefully remove the toner cartridge from the
Æ
Carefully pull out the paper.
device so that no toner dust spills out. Take
care where you place the toner cartridge, escaping
toner dust may soil the surface.
Installation / New Toner Cartridge. If you have
inadvertently pressed STOP, you can start the re-
charging process by pressing MENU/OK,
and OK and then selecting new black with
. Confi rm with OK.
¾
If a document jam should occur in the front area: Work
the panel upwards until it snaps into position. Carefully
pull the paper or document forwards until it is released.
In case of a paper jam, do not forcefully re-
Æ
move the paper, but rather pull it gently out of
the fax machine and throw it away carefully: It is
possible that the toner may not be completely set
on the print-out, and toner dust could be released
into the air. Do not inhale the released toner dust.
Remove the toner dust from clothing or objects
with cold water; hot water would only cause the
toner to set.
62
Cleaning
Use a soft, dry and lint-free cloth for cleaning. Special
fax-cleaning cloths are available through our ordering
service. Under absolutely no circumstances should you
use any liquid or gaseous cleaning agents on your fax
machine (for example: sprays, abrasives, polishes or the
like), and do not employ cleaning agents that contain
alcohol. Do not allow any moisture to reach the interior
of the fax machine.
35
Reinsert the toner cartridge and close the cover. Make
sure that the cover snaps back into position on both sides.
If the toner level of the cartridge is low,
¡
then every time you open and close the
cover, the following question will appears on the
display: black=new ? If you have not installed
a new cartridge, press STOP. Whenever you have
installed a new toner cartridge, please perform
the installation process with the Plug’n’Print card
provided, as described in the chapter entitled
8. Troubleshooting
1 Work the panel upwards until it snaps into posi-
tion.
2 Wipe the scanner glass with a soft, dry and lint-free
cloth behind the rollers for the paper guide.
3 Close the panel.
Page 36

36 Chapter Appendix
Appendix
Glossary
Additional Devices: You can connect ad-
ditional devices to your fax machine, such
as answering machines, telephones, charge
meters and computer modems; these can
be connected either in series or in parallel.
Parallel connection means that the devices
are connected to another telephone socket
of the same line. If you connect the devices
to the external socket of your fax machine,
they are connected in series. e fax switch
of your device can control and regulate
only devices connected in series.
Broadcasting: With this function, you can
send a fax or an SMS message to multiple
recipients.
Call-by-Call: Selection of the telephone
service provider for each telephone call. It
is possible to place telephone calls through
diff erent private service providers. By placing prefi xes in front of the actual telephone
number, one can choose a diff erent service
provider for each telephone call without
entering into a fi rm contract relationship
(see Chain Dialling).
Caller Identification ( Calling Line
Identification Presentation, CLIP):
ere are two types of caller identifi cation.
If someone calls you, your fax machine
will show the caller’s telephone number
on the display. If you call someone, the
machine will send the number so that
your telephone number will be shown to
the person whom you are calling. Your
telephone company must off er both services and must enable them for your PTT
line. e transmission of your telephone
number can be turned on and off temporarily or it can be turned off permanently
(Calling Line Identifi cation Restriction,
CLIR).
Caller List: e numbers of the last ten call-
ers are stored in the caller list. is function requires that the caller identifi cation
function be enabled for your PTT line and
that the caller not suppress the transmission of his or her telephone number (see
Caller Identifi cation).
Calling Line Identification Presenta-
tion (CLIP):
see Caller Identifi cation
Chain Dialling: Before the dialling process
begins, you can freely combine and edit
telephone book entries, manually entered
digits, numbers from the redial list or
numbers from the caller list. For example,
if you have saved the telephone number
prefi x of an inexpensive telephone serviceprovider (see Call-by-Call) as a telephone
book entry, select this entry and manually
enter the desired telephone number or select another number from the telephone
book, the redial list or the caller list.
Dialling Pause: see Fax Polling
Direct-Dial Number (also Exten-
Number used to directly dial a
sion):
specifi c extension of a private branch exchange (see Private Branch Exchange).
Dual Tone Multi-Frequency (DTMF):
see Tone Dialling
Encoding: e data of your fax transmis-
sion are encoded and compressed for the
transmission. e minimum standard is
MH (Modifi ed Huff mann). Better encoding methods are MR (Modifi ed Read) or
MMR (Modifi ed Modifi ed Read).
Energy Saving Mode: e laser fax
machine is normally in the energy save
mode. Whenever you receive a fax or if
you would like to print or make a copy,
your fax machine will automatically switch
back into operating mode (see Warm-Up
Phase).
Error Correction Mode (ECM): e
ECM method reduces transmission errors that result, for example, from bad
telephone lines, thereby reducing the duration of transmissions. Both of the connected fax machines must support ECM.
Fax Groups: Fax machines are classifi ed in
terms of internationally standardised fax
groups based on their transfer type and
speed. Connections between two devices
of diff erent groups is possible; the lowest
common transfer rate is selected. e determination of the speed takes place during the handshake (see Handshake). Fax
groups 1 to 3 are analogue fax machines.
Nowadays, groups 1 and 2 are hardly to be
found any longer; fax machines of group
3—which have a transfer speed that ranges
from 9,600 to 33,600 bps—are currently
most standard. Group 4 fax machines are
digital devices that function exclusively on
ISDN systems. ey have a maximum
transfer speed of 64,000 bps.
Fax Polling: With active fax polling, one
can retrieve a document from another
fax machine. For fax polling from a larger
company off ering several polling services,
you can also enter sub-addresses / directdial numbers. In order to do this, you
must insert a dialling pause between the
fax number and the sub-address.
Fax Signal, also CNG Tone (Calling
Signal): e tone that a fax machine
sends out to announce a fax transmission. When the CNG tone occurs, the fax
switch of the device recognises an incoming fax call and starts the fax reception.
Fax Switch: e fax switch checks incoming
telephone calls and controls the ringing behaviour of the fax machine. According to
the selected mode, fax transmissions will be
received either automatically or manually.
Flash Key (R/PAUSE Key): With the
fl ash key, you can make use of additional
telephone services if these special functions are enabled for your telephone line.
e
R/PAUSE key has replaced the
hook-fl ash function.
Handshake: e handshake is the initial
and fi nal phase of a fax transmission.
After establishing of the connection,
fax machines check the group affi liation
and features such as size compression or
grey tones. After the fax transmission has
been completed and before the connection is terminated, the receiving device
confi rms receipt of the transmission (see
Fax Groups).
Hard modem: e hard modem is a fi xed,
built-in modem. In contrast to the soft
modem, its features and functions are
fi xed and thus cannot be changed (see Soft
Modem, see Modem).
Hook-Flash Function: see Flash Key
Journal: e journal contains informa-
tion pertaining to the last 30 telephone
calls as well as to sent and received faxes
and SMS messages. e journal can be
printed out manually or the machine can
be set to dispense automatic print-outs at
Page 37

Appendix
Chapter Appendix
Appendix
specifi c times (for example after 30 transmissions).
Memory: If there is no paper or toner in
your fax machine, the machine will store
incoming fax transmissions in its memory.
SMS messages are stored in the SMS
memory.
Modem: A modem converts digital compu-
ter signals into acoustic signals and vice
versa. Analogue telephone lines transfer
only acoustic signals, not digital signals
(see Hard Modem, see Soft Modem).
Outside Line Access Code: e outside
line access code is the number or letter that
must be dialled before the actual telephone
number on a telephone of a private branch
exchange in order to establish a connection to the public telephone network (see
Private Branch Exchange).
Parallel Connection: see Additional
Devices
Plug’n’Print Card: Smart card used to set
the toner level memory to full after installing a new toner cartridge.
Polling: see Fax Polling
Private Branch Exchange: Private
branch exchanges are common in larger
companies. Even private ISDN systems
can be branch exchanges. To establish a
connection to the public telephone network from a private branch exchange, one
must dial a number or press a key before
the actual telephone number; in most cases
this is zero (see Outside Line Access Code).
Pulse Dialling: see Tone Dialling
Resolution: Number of dots per inch (dpi).
For sending and receiving faxes, the resolution options available are Normal, Fine,
SFine and Photo. For copying, the available resolutions are Fast, Quality and Photo. e higher the resolution, the longer it
takes to complete the transmission.
37
37
Abbreviations
AM: Answering Machine
bps: Bits per second (transfer rate)
CCITT: Comite Consultatif International Telephonique et Telegraphique (forerun-
ners of the ITU)
CE: Conformité Européenne
CEPT: Conference Européenne des Administrations des Postes et des Télécommuni-
cations (interconnection of the post administrations)
CLIP: Caller Line Identifi cation Presentation (see Caller Identifi cation)
CLIR: Calling Line Identifi cation Restriction (see Caller Identifi cation)
CNG: Calling Signal (see Fax Signal)
DECT: Digital Enhanced Cordless Telecommunication (cordless handset)
dpi: Dots per inch (see Resolution)
DTMF: Dual Tone Multiple Frequency (see Tone Dialling)
ECM: Error Correction Mode (see Error Correction Mode)
GAP: Generic Access Profi le (radio protocol for cordless handsets)
IGM: Incoming Message (incoming message on the answering machine)
ISDN: Integrated Services Digital Network
ITU: International Telecommunications Union (organisation of the UN)
LCD: Liquid Crystal Display
LED: Light Emitting Diode
MH: Modifi ed Huff mann (encoding method for faxes, see Encoding)
MHC: Modifi ed Huff mann Code (encoding method for faxes, see Encoding)
MMR: Modifi ed Modifi ed Read (encoding method for faxes, see Encoding)
MR: Modifi ed Read (encoding method for faxes, see Encoding)
MRC: Modifi ed Read Code (encoding method for faxes, see Encoding)
OCR: Optical Character Recognition (text recognition)
OGM: Outgoing Message (outgoing message of the answering machine)
PA BX : Private Automatic Branch Exchange
POTS: Plain Old Telephone Service (analogue telephone service with low transfer
rate)
PSTN: Public Switched Telephone Network
PTT: Postal, Telegraph and Telephone (organisation)
RAM: Random Access Memory
RJ-11: Registered Jack 11 (auch Western Plug, standardised telephone plug)
SMS: Short Message Service
TAM: Telephone Answering Machine (answering machine)
TWAIN: Tool Without An Interesting Name (standard for scanner drivers)
USB: Universal Serial Bus (computer connection)
Scanning: e reading of a document into
the fax memory or into the computer in
order to send it, copy it or edit it.
Appendix
Appendix
Page 38

38 Chapter Appendix
Sender Identification: e telephone
number and name of the sender as well
as the date and time of the fax transmission appear in the upper margin of each
received fax.
Serial Connection: see Additional De-
vices
Soft Modem: e machine does not con-
tain a fi xed, built-in modem. A program
executes the modem function on demand
and accesses the machine memory (RAM).
e features and functions of the soft modem can be modifi ed by altering the software (see Hard Modem, see Modem).
Stand-alone: Single work station that is
not connected to other workstations over
a network.
Sub-address: see Fax Polling
Time Stamp: e exact date and time of
receipt appear in the page header of each
received fax. A memory buff er guarantees
that exact data are issued even after a power loss. In this way, you can verify exactly
when a fax has reached you.
V.22 bis – maximum 2,400 bps
V.27 ter – maximum 4,800 bps
V.29 – maximum 9,600 bps
V.32 bis – maximum 14,400 bps
V.34 – maximum 33,600 bps
Warm-Up Phase: Normally, the machine
is in the energy saving mode (see Energy
Saving Mode). In the warm-up phase, the
fax machine heats up the printing unit until it has reached the necessary operating
temperature, after which the copy or fax
can be printed out.
Tone Dialling (also Dual Tone Multi-
Frequency):
dialling has replaced pulse dialling, in
which each number was sent as a corresponding number of pulses. With tone
dialling, a specifi c tone is assigned to each
key (referred to as DTMF tones).
In many countries, tone
Toner Level Memory: Update the toner
level memory of your fax machine with
the Plug’n’Print card that is included
with each new toner cartridge. Your fax
machine registers the extent of toner used
for every print-out and calculates the toner
level of the toner cartridge on that basis.
e indicated toner level is only meaningful if you update each new toner cartridge
with the Plug’n’Print card that is provided
with the cartridge.
Transfer Speed: CCITT/ITU has pub-
lished international standards for the
transmission of data over telephone lines.
All short names begin with V, so these are
also referred to as V standards. e most
important transmission speeds for fax
transmissions are:
V.17 – 7,200 to 14,400 bps
V.21 – maximum 300 bps
V.22 – maximum 1,200 bps
Page 39

Appendix
Chapter Appendix
Appendix
Functions List
1 Installation
11 country . . . . . . . . . . . . . . . . . . . .14
List of the available countries
12 language . . . . . . . . . . . . . . . . . . .14
List of the available languages
13
Entering the date and time
14
Entering telephone number and name
15 line type . . . . . . . . . . . . . . . . . . .12
Setting the PSTN / PABX operation
16 technicals . . . . . . . . . . . . . . . 14, 15
Various settings
17 ring count . . . . . . . . . . . . . . . . . .16
Setting the number of rings
18 ringer volume . . . . . . . . . . . . . . .15
Setting the ring volume
date/time . . . . . . . . . . . . . . . . . .14
Number/Name. . . . . . . . . . . . . . . . .14
39
39
35 parameters . . . . . . . . . . . . . . . 28, 29
Settings for sending and receiving SMS
36 sms centers . . . . . . . . . . . . . . . . .28
Entering the numbers of the SMS center
4 Print
41 functions list . . . . . . . . . . . . . .14
List of the available functions
42 logs . . . . . . . . . . . . . . . . . . . . . .24
Overview of the last 30 transmissions
43 directory . . . . . . . . . . . . . . . . . .19
List of the telephone book entries and groups
44 setup . . . . . . . . . . . . . . . . . . . . .14
List of the fax machine settings
45 commands . . . . . . . . . . . . . . . . . . .24
List of pending jobs
2 Fax
21 tx speed . . . . . . . . . . . . . . . . . . .21
Setting the transfer rate
22 polling rx . . . . . . . . . . . . . . . . . .23
Polling a fax from another machine
23 polling tx . . . . . . . . . . . . . . . . . .23
Preparing a transmission for polling send
24 send later . . . . . . . . . . . . . . . . . .23
Fax transmission at a later point in time
25 send report . . . . . . . . . . . . . . . . .21
Settings for Transmission Reports
26 time stamp . . . . . . . . . . . . . . . . . .22
Activating/deactivating the time stamp
27 Fax answ. . . . . . . . . . . . . . . . . . . .15
Setting protected fax reception
28 reception . . . . . . . . . . . . . . . . . .22
Settings for fax reception
3 SMS Service
31 Send sMS . . . . . . . . . . . . . . . . . . .26
Entering and sending SMS messages
32 read sms . . . . . . . . . . . . . . . . . . .26
Reading SMS messages
33 delete sms . . . . . . . . . . . . . . . . . .27
Deleting SMS messages
34 print sms . . . . . . . . . . . . . . . . . . .27
Printing selected SMS messages
5 Commands
51 perform . . . . . . . . . . . . . . . . . . . .24
Immediate execution of a selected job
52 modify. . . . . . . . . . . . . . . . . . . . .24
Changing a selected job
53 cancel. . . . . . . . . . . . . . . . . . . 23, 24
Deleting a selected job
54 print . . . . . . . . . . . . . . . . . . . . .24
Printing out a selected job
55 print list . . . . . . . . . . . . . . . . . .24
Printing out the list of all pending jobs
6 Others
61 Lock . . . . . . . . . . . . . . . . . . . . . .15
Setting keyboard lock
62 print.cartr. . . . . . . . . . . . . . . 11, 35
Installing a new toner cartridge
Appendix
Appendix
Page 40
40 Chapter Appendix
Technical Data
Measurements (W × H × D) . . . . . .370 × 200 × 330 mm
Weight . . . . . . . . . . . . . . . . approx. 7.25 kg
Mains Connection . . . . . . . 220 – 240 Volt / 50 – 60 Hz
Power Consumption . . . . . . . . . . . standby < 8.5 W
. . . . . . . . . . . . . . . .transfer < 17 W
. . . . . . . . . . reception < 20 W standard
Recommended Ambient . . . . . . temperature 17 – 28 ºC
. . . . . . . . . . relative humidity 20 – 80 %
. . . . . . . . . . . . . . . .non-condensing
Emissions . . . . . . corresponds to EN 55022 Class B
. . . . . . . . . . . . . . . . EN 61000-3-2
. . . . . . . . . . . . . . . . EN 61000-3-3
Immunity . . . . . . . . . . corresponds to EN 55024
Paper
Automatic Document Feeder . . . . . . . 20 documents
Paper Sizes . . . . . . . . . . . . . . A4 · 210 × 297 mm
Paper Thickness. . . . . . . . . . . . . . . 0.08 – 0.12 mm
Paper Weight . . . . . . . . . . . . . . . . . . 60 – 90 g/m
Paper Tray . . . . . . . . . . . . . . . .max. 250 sheets
Multiple Copies. . . . . . . . . . . . . . . up to 99 pages
PC Connection (Depending on the model)
Connection Type . . . . . . . USB 1.1 (USB 2.0 Full Speed)
Supported Operating Systems
. . . . . . Windows® 98 SE / 2000 / ME / XP
Scanner Driver . . . . . . . . . . . . . . . . . . .TWAIN
Scanner
Type . . . . . . . Black-and-white, 256 grey tones
Resolution . . . . . . . . . . . . . . . . . 300 × 300 dpi
Scan Area . . . . . . . . . . . . . . max. 218 × 600 mm
Scan Width . . . . . . . . . . . . . . . . . . . . 208 mm
Speed . . . . . . . . . . . . . . 6 seconds/A4-page
SMS (Short Message Service)
Gateway . . . . . . . . . . . . . . . . . . . . . .V.23
Memory . . . . . . . . . . . . . . . . . 30 messages
2
Message Length. . . . . . . . . . . . . 160/640 characters
(depending on country and telephone network)
Printer
Type . . . . . . . . . . . . . Class 1 Laser Printer
Warm-Up Time . . . . . . . . . . . . . approx. 15 seconds
Resolution . . . . . . . . . . . . . . . . . 600 × 600 dpi
Printing Speed . . . . . . . . . . . . . . 10 pages/minute
Print Width . . . . . . . . . . . . . . . . . . . . 200 mm
Fax
Connection Type . . . . . . . . . Public Switched (PSTN)
. . . . . . . Private Branch Exchange (PABX)
Device Type . . . . . . . . . . . . . . . . . . . Group 3
Compatibility . . . . . . . . . . . . . . . . . . ITU-T T.30
Encoding . . . . . . . . . . . . . . . . MH, MR, MMR
Fax Memory . . . . . . . . . . . . . . . . . . . 120 pages
Telephone Book Entries . . . . . . . . . . . . approx. 200
Transfer Speed . . . . . . . . . . . . . . . . . . . . 33.6k
Horizontal Resolution . . . . . . . . . . . . . 8 dots/mm
Vertical Resolution . . . . . . . . . standard 3.85 lines/mm
. . . . . . . . . . . . . . . fine 7.7 lines/mm
Slerexe Letter
The technical specifications are subject to
change without notice.
Copier
Type . . . . . . . . Black-and-white, 64 grey tones
Resolution . . . . . . . . . . . . . . . fast 200 × 300 dpi
. . . . . . . . . . . . . quality 400 × 300 dpi
. . . . . . . . . . . . . .photo 400 × 300 dpi
Copying Speed . . . . . . . . . . . . . . 10 pages/minute
Page 41

Appendix
Chapter Appendix
Appendix
Chapter Appendix
41
41
Index
A
A4
paper . . . . . . . . . . . . 11
Abbreviations. . . . . . . . . . 37
Activate/deactivate
automatic SMS print . . . . 28
lock . . . . . . . . . . . . . 16
name of SMS sender . . . . 28
page header . . . . . . . . . 14
protected fax reception. . . 15
ringer tone . . . . . . . . . 15
SMS notification. . . . . . . 28
SMS notification tone . . . . 28
sorted print-out. . . . . . . 22
time stamp . . . . . . . . . 22
Additional devices . . . . . 13, 36
Easylink . . . . . . . . . . . 13
fax reception mode . . . . . 16
starting fax reception . . . . 13
Address book
PC connection . . . . . . . 32
Attaching
document outlet . . . . . . 8
document support . . . . . 8
Automatic
fax reception mode . . . . . 16
B
Blue key . . . . . . . . . . . . 7
Broadcast . . . . . . . . . . . . 36
fax transmissions . . . . . . 22
groups. . . . . . . . . . 18, 22
individual recipients . . . . . 22
key . . . . . . . . . . . . . 7
C
C
key . . . . . . . . . . . . . 7
Call-by-Call . . . . . . . . . . . 36
Callers
key . . . . . . . . . . . . . 7
Caller list . . . . . . . . . . . . 36
Calling line identification . . 19, 36
Center
SMS . . . . . . . . . . . . . 28
Chain dialling . . . . . . . . 19, 36
Cleaning . . . . . . . . . . . . 35
CLIP . . . . . . . . . . . . 19, 36
symbol on LCD display . . . 7
CNG tone . . . . . . . . . . . 36
Code
fax polling . . . . . . . . . . 23
lock . . . . . . . . . . . . . 15
modify at PC . . . . . . . . 33
private branch exchange . . 12
protected fax reception. . . 15
Combine numbers . . . . . . . 19
Commands
see Jobs
Companion Suite
installation . . . . . . . . . 30
uninstallation . . . . . . . . 31
use . . . . . . . . . . . . . 32
Connect
additional devices . . . . . . 13
EXT socket . . . . . . . . . 13
mains cable . . . . . . . . . 9
telephone cable . . . . . . . 9
Connections on the rear side . 6
Contrast
copy. . . . . . . . . . . . . 25
fax transmission. . . . . . . 21
Copy . . . . . . . . . . . . . . 25
adjust copies . . . . . . . . 25
automatic . . . . . . . . . . 25
contrast . . . . . . . . . . . 25
enlarge . . . . . . . . . . . 25
key . . . . . . . . . . . . . 7
reduce . . . . . . . . . . . 25
resolution . . . . . . . . . . 25
zoom . . . . . . . . . . . . 25
Country
setting. . . . . . . . . . . . 14
set at PC . . . . . . . . . . 33
Cursor
movement on display . . . . 14
D
Date
set . . . . . . . . . . . . . 14
set at PC . . . . . . . . . . 33
Delete
group . . . . . . . . . . . . 19
jobs . . . . . . . . . . . . . 24
SMS message . . . . . . . . 27
telephone book entry. . . . 18
Description
of the machine . . . . . . . 6
Dialled numbers
key . . . . . . . . . . . . . 7
Dialling pause . . . . . . . . . . 36
fax polling . . . . . . . . . . 23
key . . . . . . . . . . . . . 7
Directory
see Telephone book
Display
toner level . . . . . . . . . 11
Documents
fax transmission. . . . . . . 20
Document jam . . . . . . . . . 35
Document outlet
attaching . . . . . . . . . . 8
Document support
attaching . . . . . . . . . . 8
Drivers
installation . . . . . . . . . 30
uninstallation . . . . . . . . 31
E
E-mail
SMS . . . . . . . . . . . . . 27
Easylink . . . . . . . . . . . . . 13
Emissions . . . . . . . . . . . . 40
Encoding . . . . . . . . . . . . 36
Energy saving mode. . . . . 16, 36
Enlarge
copy. . . . . . . . . . . . . 25
Enter
group . . . . . . . . . . . . 18
group at PC . . . . . . . . . 32
number and name. . . . . . 14
symbols . . . . . . . . . . . 7
telephone book entry at PC 32
Error correction mode . . . . . 36
Execute
jobs immediately . . . . . . 24
EXT
fax reception mode . . . . . 16
socket. . . . . . . . . . 13, 17
Extension . . . . . . . . . . . . 36
External answering machines 13, 17
External devices . . . . . . . . 13
F
Fax . . . . . . . . . . . . . . . 20
broadcast . . . . . . . . . . 22
fax memory . . . . . . . . . 21
fax reception . . . . . . . . 21
fax reception mode . . . . . 16
groups. . . . . . . . . . . . 18
insert documents . . . . . . 20
jobs . . . . . . . . . . . . . 24
journal . . . . . . . . . . . 24
multiple copies . . . . . . . 22
polling. . . . . . . . . . . . 23
polling send . . . . . . . . . 23
polling with sub-address . . 23
protected fax reception. . . 15
redial . . . . . . . . . . . . 21
resolution for reception . . 15
send. . . . . . . . . . . . . 20
set contrast . . . . . . . . . 21
sorted print-out. . . . . . . 22
time-deferred sending. . . . 23
time stamp . . . . . . . . . 22
transmission report . . . . . 21
transmission speed . . . . . 21
Fax groups . . . . . . . . . . . 36
Fax memory . . . . . . 21, 37, 40
green lamp . . . . . . . . . 21
protected fax reception. . . 15
Fax reception . . . . . . . . . . 21
Fax reception mode . . . . . . 16
additional devices . . . . 13, 16
key . . . . . . . . . . . . . 7
number of rings . . . . . . . 16
Fax switch . . . . . . . . . . . 36
see Fax reception mode
additional devices . . . . . . 13
key . . . . . . . . . . . . . 7
FINE
key . . . . . . . . . . . . . 7
symbol on LCD display . . . 7
Flash key . . . . . . . . . . . . 36
Free hard drive space
PC connection . . . . . . . 30
Functions
overview . . . . . . . . . . 2
Functions list . . . . . . . . . . 39
print. . . . . . . . . . . . . 14
G
Green lamp . . . . . . . . . 7, 21
Groups . . . . . . . . . . . . . 18
add group at PC. . . . . . . 32
delete . . . . . . . . . . . . 19
enter group . . . . . . . . . 18
fax broadcast . . . . . . . . 22
modify . . . . . . . . . . . 19
modify group at PC . . . . . 33
H
Handshake . . . . . . . . . . . 36
I
Immediate polling. . . . . . . . 23
Immunity . . . . . . . . . . . . 40
Insert
copy documents . . . . . . 25
documents . . . . . . . . . 20
input sheets . . . . . . . . . 12
paper . . . . . . . . . . . . 11
Plug’n’Print card. . . . . . . 10
toner cartridge . . . . . . . 9
Installation . . . . . . . . . . . 8
additional devices . . . . . . 13
Companion Suite . . . . . . 30
document outlet . . . . . . 8
document support . . . . . 8
drivers . . . . . . . . . . . 30
mains cable . . . . . . . . . 9
package contents . . . . . . 8
paper . . . . . . . . . . . . 11
Paper Port . . . . . . . . . 30
quick install process. . . . . 9
software . . . . . . . . . . 30
telephone cable . . . . . . . 9
telephone connections . . . 12
toner cartridge . . . . . . . 9
unpacking . . . . . . . . . . 8
Internal numbers . . . . . . . . 12
ISDN systems. . . . . . . . . . 12
J
Jobs . . . . . . . . . . . . . . . 24
delete . . . . . . . . . . . . 24
immediate execute . . . . . 24
modify . . . . . . . . . . . 24
print. . . . . . . . . . . . . 24
print list . . . . . . . . . . . 24
Journal . . . . . . . . . . . 24, 36
K
Keyboard
lock . . . . . . . . . . . . . 16
quick search. . . . . . . . . 18
L
Language
setting. . . . . . . . . . . . 14
set at PC . . . . . . . . . . 33
Laser-safety instructions . . . . 5
LCD display. . . . . . . . . . . 7
symbols . . . . . . . . . . . 7
LINE
socket. . . . . . . . . . . . 9
Lock . . . . . . . . . . . . . . 15
code . . . . . . . . . . . . 15
keyboard . . . . . . . . . . 16
modify at PC . . . . . . . . 33
number pad . . . . . . . . . 16
Loudspeaker
key . . . . . . . . . . . . . 7
M
Machine
overview . . . . . . . . . . 6
Mains cable
connecting . . . . . . . . . 9
Manual
fax reception . . . . . . . . 16
fax reception mode . . . . . 16
Measurements . . . . . . . . . 40
Menu
key . . . . . . . . . . . . . 7
Missed phone calls . . . . . . . 19
Mode
fax reception . . . . . . . . 16
key . . . . . . . . . . . . . 7
Modem . . . . . . . . . . . 13, 37
hard modem . . . . . . . . 36
soft modem . . . . . . . . . 38
Modify
group . . . . . . . . . . . . 19
group at PC . . . . . . . . . 33
jobs . . . . . . . . . . . . . 24
telephone book entries . . . 18
Appendix
Appendix
Page 42

42 Chapter Appendix
telephone book entries at PC. .
32
N
Name
enter . . . . . . . . . . . . 14
enter at PC . . . . . . . . . 33
SMS sender . . . . . . . . . 28
Notification
SMS . . . . . . . . . . . . . 28
Notification tone
SMS . . . . . . . . . . . . . 28
Number
enter . . . . . . . . . . . . 14
enter at PC . . . . . . . . . 33
Number of rings
set . . . . . . . . . . . . . 16
Number pad
lock . . . . . . . . . . . . . 16
O
OK
key . . . . . . . . . . . . . 7
Operation panel . . . . . . . . 7
Ordering service . . . . . . . . 44
Overview
machine . . . . . . . . . . . 6
operation panel . . . . . . . 7
P
PAB X
see Private branch exchange
Package contents . . . . . . . . 8
Page header. . . . . . . . . . . 14
enter . . . . . . . . . . . . 14
SMS . . . . . . . . . . . . . 28
Paper . . . . . . . . . . . . . . 11
Paper jam . . . . . . . . . . . . 35
Paper Port
installation . . . . . . . . . 30
uninstallation . . . . . . . . 31
use . . . . . . . . . . . . . 34
Paper tray
insert paper . . . . . . . . . 11
Paper weight . . . . . . . . . . 40
PC Connection . . . . . . . . . 30
address book . . . . . . . . 32
default printer. . . . . . . . 33
display toner level. . . . . . 33
free hard drive space . . . . 30
printer . . . . . . . . . . . 33
requirements . . . . . . . . 30
scan . . . . . . . . . . . . . 34
settings of machine . . . . . 33
USB connection. . . . . . . 30
PHOTO
key . . . . . . . . . . . . . 7
symbol on LCD display . . . 7
Plug’n’Print card . . . . . . 9, 37
Polling . . . . . . . . . . . 23, 36
code . . . . . . . . . . . . 23
immediate. . . . . . . . . . 23
send. . . . . . . . . . . . . 23
time-deferred . . . . . . . . 23
with sub address . . . . . . 23
Polling send . . . . . . . . . . . 23
Power consumption . . . . . . 40
Prefix . . . . . . . . . . . . . . 12
Print
automatic SMS . . . . . . . 28
from PC. . . . . . . . . . . 33
functions list . . . . . . . . 14
jobs . . . . . . . . . . . . . 24
jobs list . . . . . . . . . . . 24
journal . . . . . . . . . . . 24
list of settings . . . . . . . . 14
multiple copies of fax reception
22
protected fax reception. . . 15
SMS message . . . . . . 26, 27
telephone book . . . . . . . 19
transmission report . . . . . 21
Printing multiple copies
fax reception . . . . . . . . 22
Private branch exchange . . 12, 37
Prefix . . . . . . . . . . . . 12
Profiles
scan . . . . . . . . . . . . . 34
Protected fax reception . . . . 15
activate/deactivate . . . . . 15
code . . . . . . . . . . . . 15
modify at PC . . . . . . . . 33
print. . . . . . . . . . . . . 15
PSTN . . . . . . . . . . . . . . 12
Pulse dialling . . . . . . . . . . 37
Q
Quick install process . . . . . . 9
Quick search
telephone book entries . . . 18
R
R/PAUSE
key . . . . . . . . . . . . . 36
Read
SMS message . . . . . . . . 26
Receive
SMS message . . . . . . . . 26
Redial
fax transfer . . . . . . . . . 21
Reduce
copy. . . . . . . . . . . . . 25
Red lamp . . . . . . . . . . . . 7
Requirements
PC connection . . . . . . . 30
Resolution . . . . . . . . . 15, 37
copy. . . . . . . . . . . 25, 40
default setting . . . . . . . . 15
key . . . . . . . . . . . . . 7
scan . . . . . . . . . . . . . 34
symbol on LCD display . . . 7
Ringer tone
volume . . . . . . . . . . . 15
S
Safety instructions . . . . . . . 4
Save
entry telephone book. . . . 18
Scan. . . . . . . . . . . . . 34, 37
resolution . . . . . . . . . . 34
Select
key . . . . . . . . . . . . . 7
Send
fax. . . . . . . . . . . . . . 20
fax broadcast . . . . . . . . 22
fax polling . . . . . . . . . . 23
SMS message . . . . . . . . 26
SMS to e-mail . . . . . . . . 27
SMS to fax . . . . . . . . . 27
Text2Fax . . . . . . . . . . 29
time-deferred . . . . . . . . 23
Sender identification . . . . . . 38
Set
country . . . . . . . . . . . 14
date and time . . . . . . . . 14
keyboard lock. . . . . . . . 16
language. . . . . . . . . . . 14
number of rings . . . . . . . 16
number pad lock . . . . . . 16
resolution . . . . . . . . . . 15
ring tone . . . . . . . . . . 15
SMS notification tone . . . . 28
SMS validity period . . . . . 29
transmission speed . . . . . 21
volume of ringer tone. . . . 15
Settings . . . . . . . . . . . . . 14
lock . . . . . . . . . . . . . 15
modify at PC . . . . . . . . 33
number and name. . . . . . 14
page header . . . . . . . . . 14
print list of settings . . . . . 14
resolution . . . . . . . . . . 15
ring tone . . . . . . . . . . 15
set country . . . . . . . . . 14
set date and time . . . . . . 14
set language . . . . . . . . . 14
SMS . . . . . . . . . . . 26, 27
transmission report . . . . . 21
SFINE
key . . . . . . . . . . . . . 7
symbol on LCD display . . . 7
SMS . . . . . . . . . . . . . . . 26
automatic print . . . . . . . 28
country settings. . . . . . . 26
delete message . . . . . . . 27
external cordless telephone 13
green lamp . . . . . . . 7, 26
journal . . . . . . . . . . . 24
key . . . . . . . . . . . . . 7
name of sender . . . . . . . 28
notification . . . . . . . . . 28
notification tone . . . . . . 28
numbers of central office . . 28
print message . . . . . . . . 27
read message . . . . . . . . 26
receive message. . . . . . . 26
send message . . . . . . . . 26
send to multiple recipients . 26
sub-address . . . . . . . . . 29
symbol on LCD display . . . 7
to e-mail . . . . . . . . . . 27
to fax . . . . . . . . . . . . 27
to user account . . . . . . . 28
transmission report . . . . . 21
validity period. . . . . . . . 29
with sub-address . . . . . . 27
Software
installation . . . . . . . . . 30
uninstallation . . . . . . . . 31
Sorted print-out
set . . . . . . . . . . . . . 22
Special functions
key . . . . . . . . . . . . . 7
Speed . . . . . . . . . . . . . . 38
fax transmission. . . . . . . 21
Stand-alone . . . . . . . . . . . 38
Start
key . . . . . . . . . . . . . 7
Starter cartridge . . . . . . . . 9
Stop
key . . . . . . . . . . . . . 7
Sub-address. . . . . . . . . 29, 38
for polling . . . . . . . . . . 23
SMS . . . . . . . . . . . . . 27
Symbols
enter . . . . . . . . . . . . 7
on the LCD display . . . . . 7
T
Technical data. . . . . . . . . . 40
Telephone book . . . . . . . . 18
add entry at PC . . . . . . . 32
delete entries . . . . . . . . 18
delete group . . . . . . . . 19
enter group . . . . . . . . . 18
groups. . . . . . . . . . . . 18
key . . . . . . . . . . . . . 7
modify entries. . . . . . . . 18
modify entries at PC . . . . 32
modify group . . . . . . . . 19
print. . . . . . . . . . . . . 19
quick search. . . . . . . . . 18
save new entry . . . . . . . 18
use entries . . . . . . . . . 18
Telephone cable
connecting . . . . . . . . . 9
Telephone connections . . . . . 12
ISDN systems . . . . . . . . 12
private branch exchange . . 12
Terminal ID
see Sub-address
Text2Fax . . . . . . . . . . . . 29
send. . . . . . . . . . . . . 29
Time
setting. . . . . . . . . . . . 14
Time-deferred
polling. . . . . . . . . . . . 23
sending . . . . . . . . . . . 23
Time stamp . . . . . . . . . 22, 38
Toner cartridge
display level . . . . . . . . . 11
insert . . . . . . . . . . . . 9
installation . . . . . . . . . 9
protection strip . . . . . . . 10
remove old cartridge . . . . 9
starter cartridge . . . . . . 9
toner level memory. . . . . 9
Toner level memory . . . 9, 11, 38
display. . . . . . . . . . . . 11
display at PC . . . . . . . . 33
update with Plug’n’Print card 10
Tone dialling . . . . . . . . . . 38
Easylink . . . . . . . . . . . 13
Transmission report . . . . . . 21
Troubleshooting . . . . . . . . 35
cleaning . . . . . . . . . . . 35
paper or document jam . . . 35
Twain
scanner driver. . . . . . . . 34
U
Uninstallation
Companion Suite . . . . . . 31
drivers . . . . . . . . . . . 31
Paper Port . . . . . . . . . 31
software . . . . . . . . . . 31
Unpacking . . . . . . . . . . . 8
Update
toner level memory. . . . . 10
USB port . . . . . . . . . . 6, 31
PC connection . . . . . . . 30
Use
Companion Suite . . . . . . 32
Paper Port . . . . . . . . . 34
telephone book . . . . . . . 18
User account
send SMS . . . . . . . . . . 28
V
Validity period
SMS . . . . . . . . . . . . . 29
Volume
ringer tone . . . . . . . . . 15
W
Warm-up phase. . . . . . . . . 38
Weight . . . . . . . . . . . . . 40
Z
Zoom
copy. . . . . . . . . . . . . 25
Page 43

Appendix
Chapter Appendix
Appendix
Chapter Appendix
43
43
Appendix
Appendix
Page 44

e CE mark confi rms that the machine corresponds ot the
relevant guidelines of the European Union.
is product is intended for use on an analogue public telecommunications network (PSTN) and for use in the country
specifi ed on the type label. Use in other countries can result in
faulty functioning.
For more information, please contact the technical service centre for your country. Should problems arise during use of your
machine, please contact your retailer fi rst.
is user manual was printed on recycled paper bleached
without chlorine. is satisfi es the highest standards for low
environmental impact. e cardboard packaging used and the
packaging inserts of paper and cardboard can be disposed of as
waste paper. e plastic foil may be submitted for recycling or
disposed of with waste not intended for recycling, depending
on the requirements in your country.
e fax machine contains many materials that can be recycled.
When you wish to dispose of the machine, please obtain information on the applicable regulations in your country for the
recycling of electronic equipment.
This user manual is a document that does not represent a contract. Errors, printing errors and changes are excepted.
User Manual · GB/INT · 252117751-A
 Loading...