

Page 1

®
magicolor 2400 and
magicolor 2500 Series
Warranty Exchange
Guide
1760665-001C
Page 2

Trademarks
KONICA MINOLTA and the KONICA MINOLTA logo are trademarks or registered
trademarks of KONICA MINOLTA HOLDINGS, INC.
magicolor is a trademark or registered trademark of KONICA MINOLTA PRINTING
SOLUTIONS U.S.A., INC. All other trademarks are the property of their respective
owners.
Copyright Notice
Copyright © 2005 KONICA MINOLTA PRINTING SOLUTIONS U.S.A., INC., One
Magnum Pass, Mobile, AL 36618, USA. All Rights Reserved. This document may
not be copied, in whole or part, nor transferred to any other media or language,
without written permission of KONICA MINOLTA BUSINESS TECHNOLOGIES,
INC.
Manual Notice
KONICA MINOLTA BUSINESS TECHNOLOGIES, INC. reserves the right to make
changes to this manual and to the equipment described herein without notice.
Considerable effort has been made to ensure that this manual is free of inaccuracies
and omissions. However, KONICA MINOLTA BUSINESS TECHNOLOGIES, INC.
makes no warranty of any kind including, but not limited to, any implied warranties of
merchantability and fitness for a particular purpose with regard to this manual.
KONICA MINOLTA BUSINESS TECHNOLOGIES, INC. assumes no responsibility
for, or liability for, errors contained in this manual or for incidental, special, or
consequential damages arising out of the furnishing of this manual, or the use of this
manual in operating the equipment, or in connection with the performance of the
equipment when so operated.
2
Page 3
Introduction
Thank you for contacting a technical support representative to obtain information
about returning your magicolor 2500W, magicolor 2530DL or magicolor 25 50 for
warranty exchange. Follow these instructions very carefully.
If you need additional assistance, refer to the General Information Guide
(included with the original printer) or
sources of service and support.
printer.konicaminolta.com for worldwide
Failure to follow these instructions could result in voiding your
warranty.
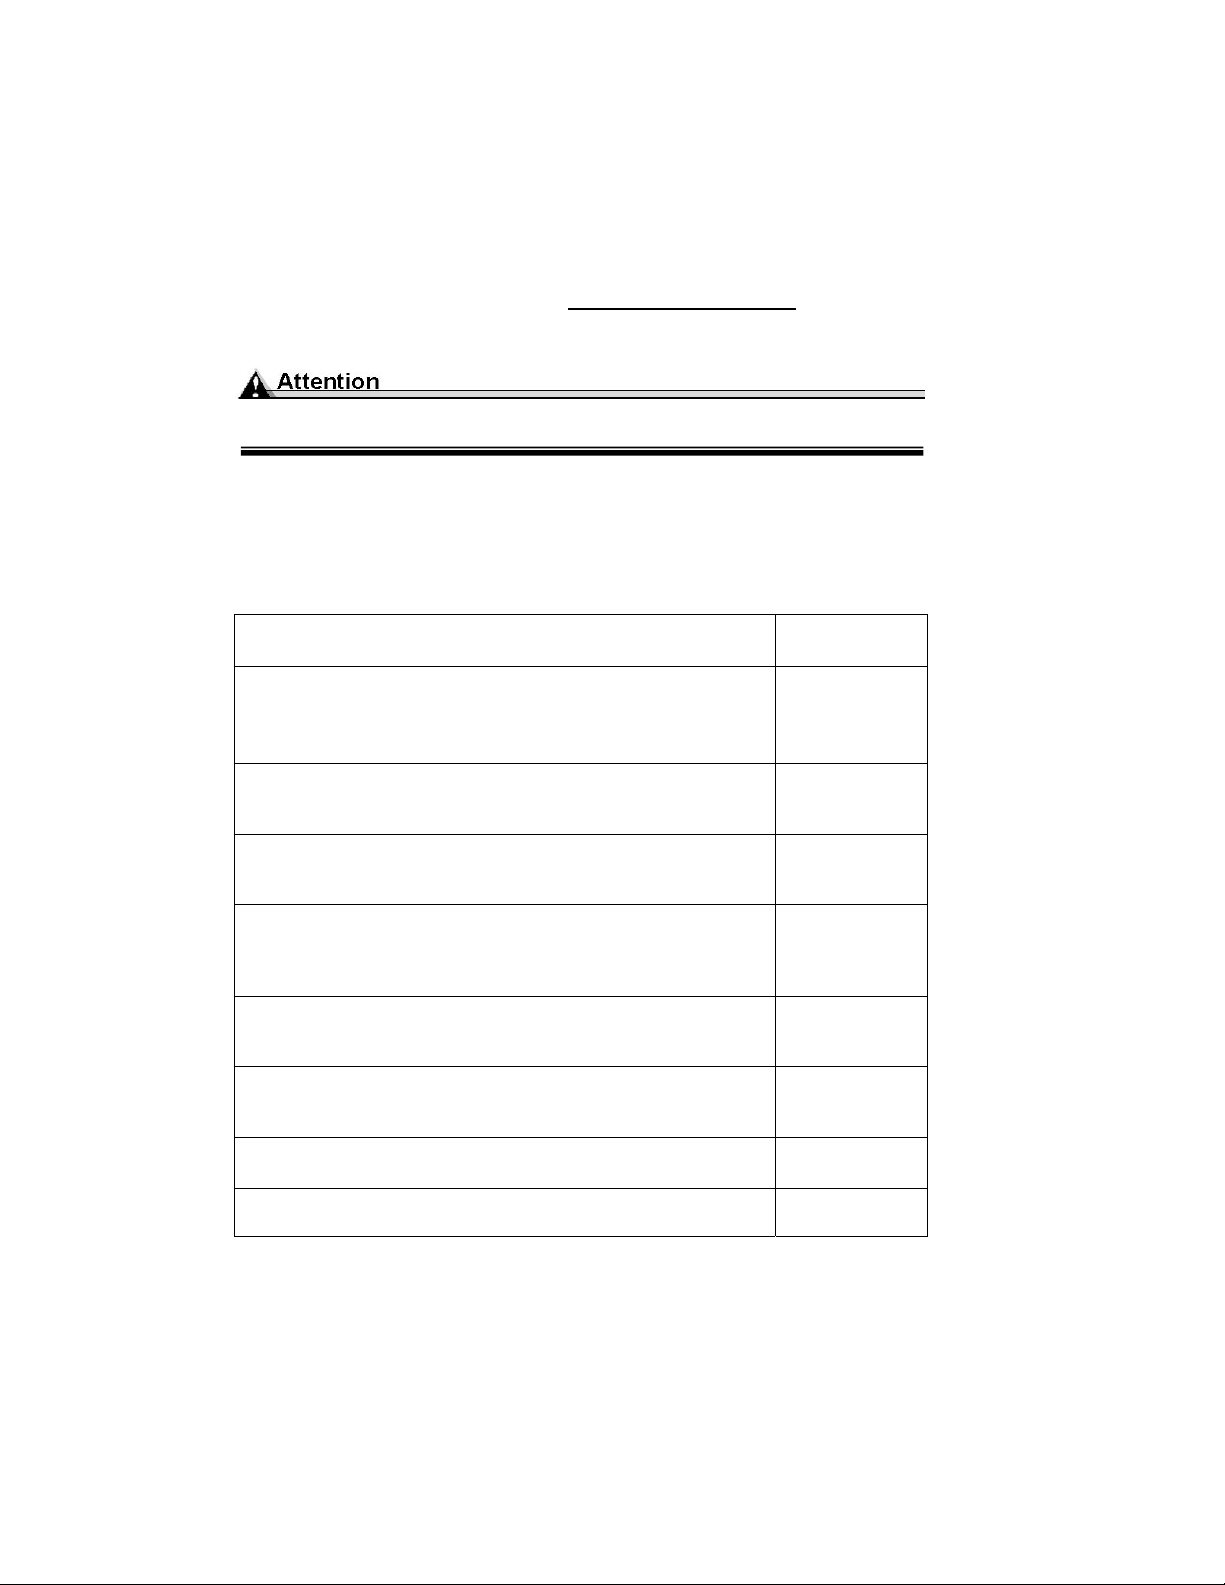
Exchange Procedure
Each of these steps is explained in detail in this guide.
Unpack the exchange printer.
1
2 Prepare the original printer—turn it off, unplug the
power cord, and remove the interface cables and dust
cover.
3 Remove the toner cartridges from the original printer.
4 Install the toner cartridges into the exchange printer.
5 Move the OPC drum cartridge from the original printer to
the exchange printer.
See page 4
See page 5
See page 5
See page 7
See page 8
6 Move the transfer belt unit from the original printer to the
exchange printer.
7 Prepare the original printer for repacking.
8 Repackaging the original printer.
9 Returning the original printer
See page 9
See page 12
See page 12
See page 13
3
Page 4
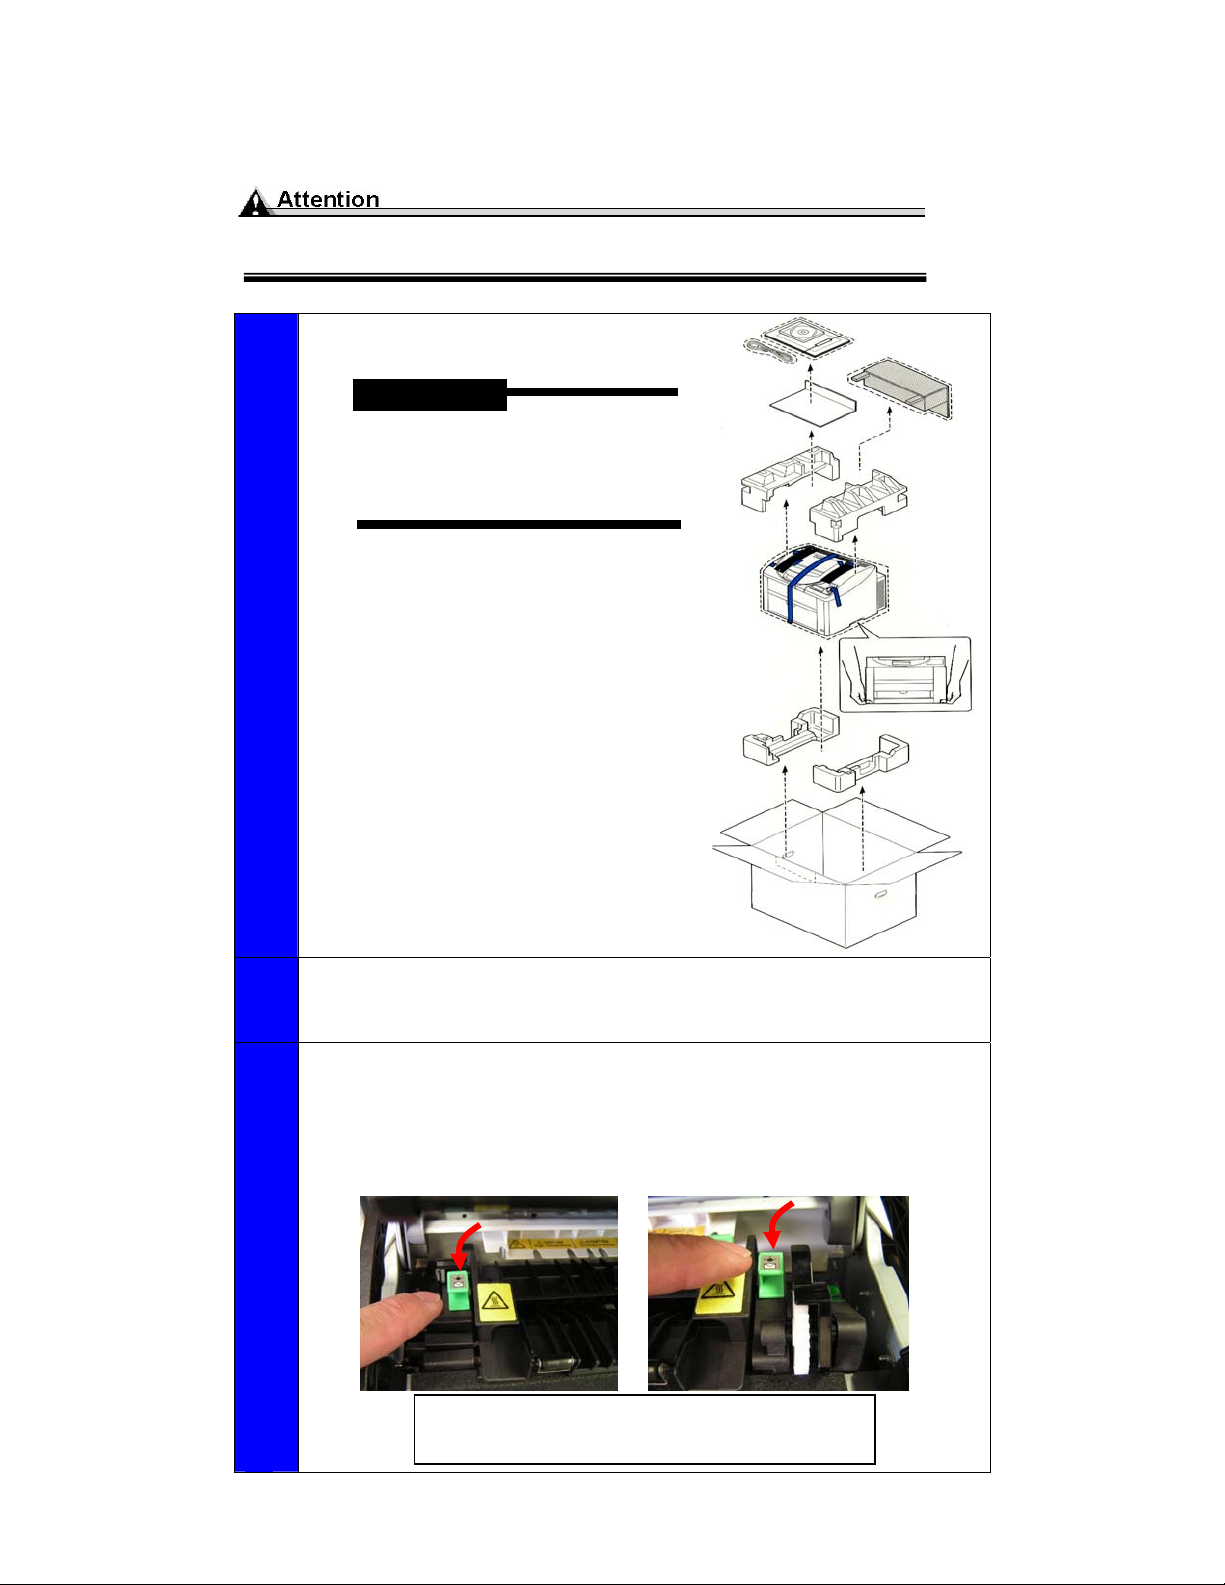
Unpack the Exchange Printer
Use caution when unpacking the exchange printer, so the packaging
(including the tape) can be used to repack the printer to be returned.
1 Unpack the exchange printer
WARNING!
The printer weighs approxi matelty 40 lbs/18 kg without
consumables. Be sure to have
help when lifting and moving it.
Exchange
2 Remove the tape from the outside of the exchange printer, and open the
input and exit trays.
3 Remove the fuser separators from the exchange printer.
The fuser separators are attached to the instruction card with string. Pull
the string to remove the separators. Open the top cover to ensure that the
fuser separator levers are in the closed position.
See the instructions on the fuser separator tag for complete details.
Exchange
Note: The fuser separator lever color may be
Gray or Green depending on the printer model.
4
Page 5
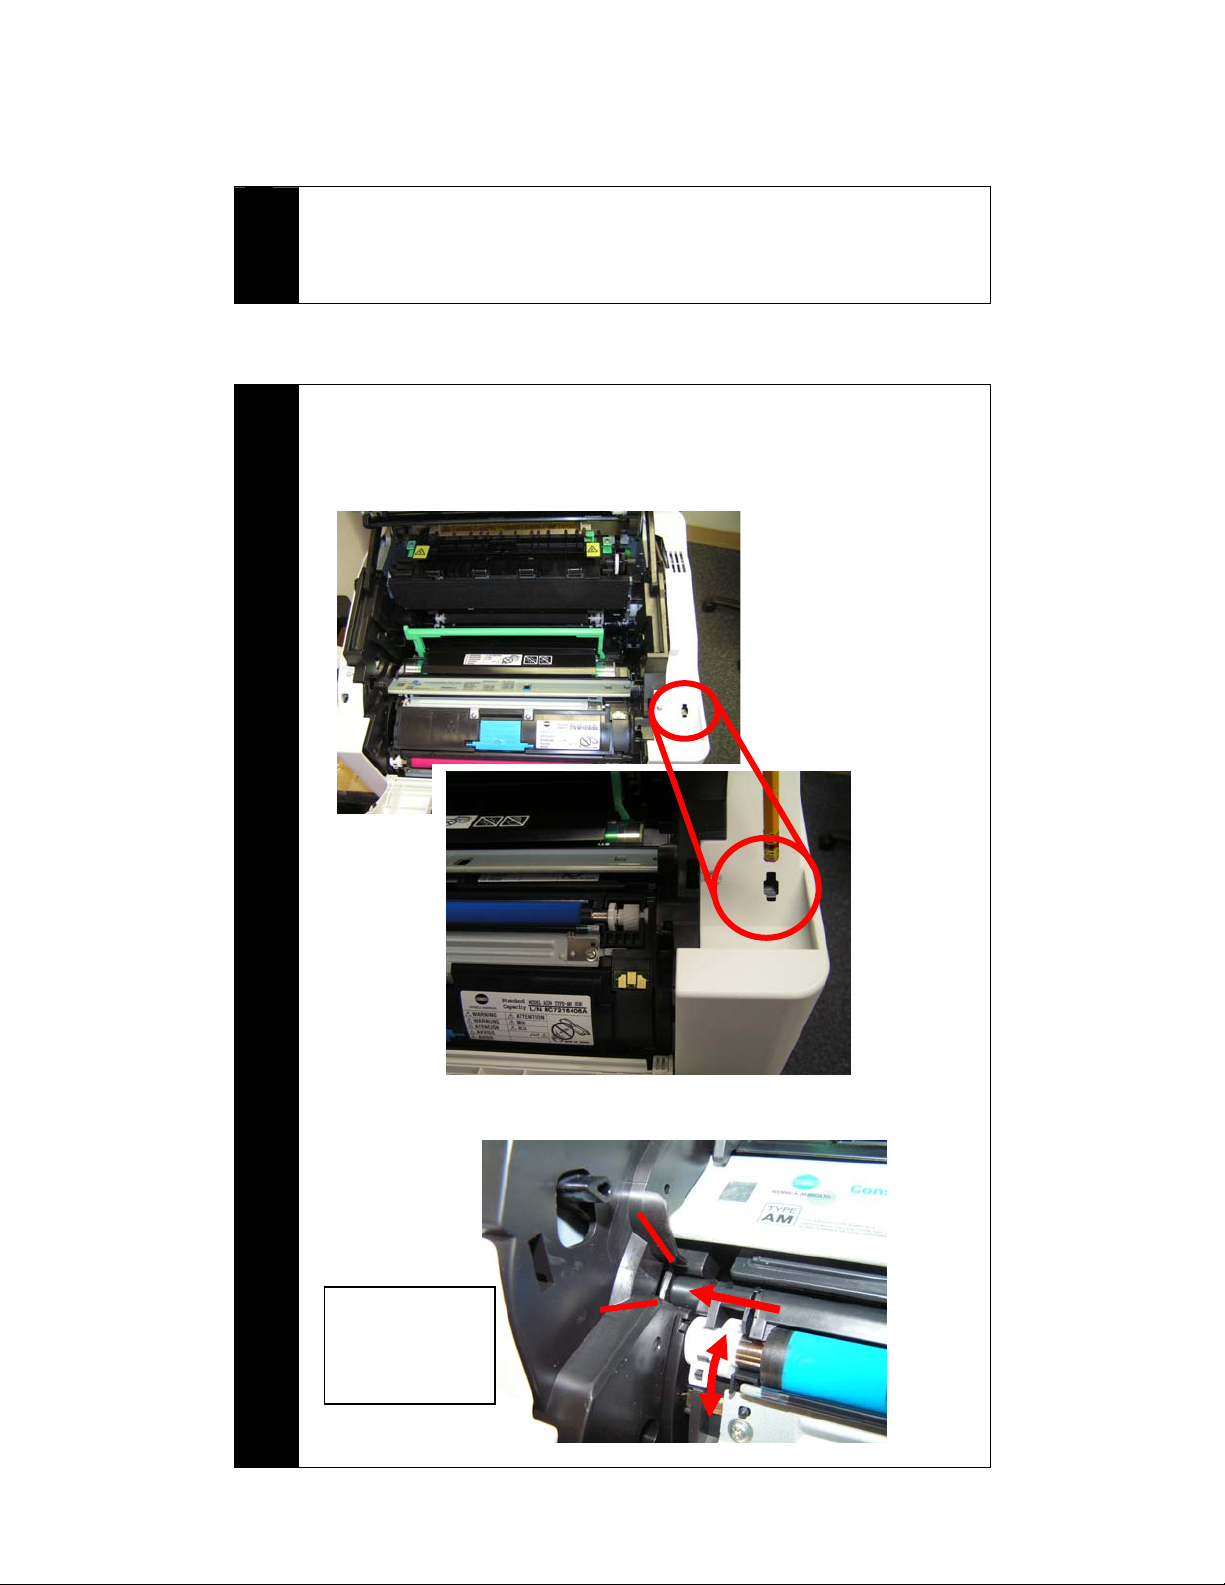
Prepare the Original Printer
4 Turn off the original printer, unplug the power cord and remove the
interface cable(s). Remove the media and dust cover from the original
printer.
Original
Remove the Toner Cartridges
5 Follow these steps to manually remove the toner cartridges.
- Open the top cover
- Press the toner carousel release. Use a pencil to push down on the
release button
Original
- Manually move the toner cartridge to the removal position.
Note: Align the
toner cartridge
pin with the slot
in the printer.
5
Page 6
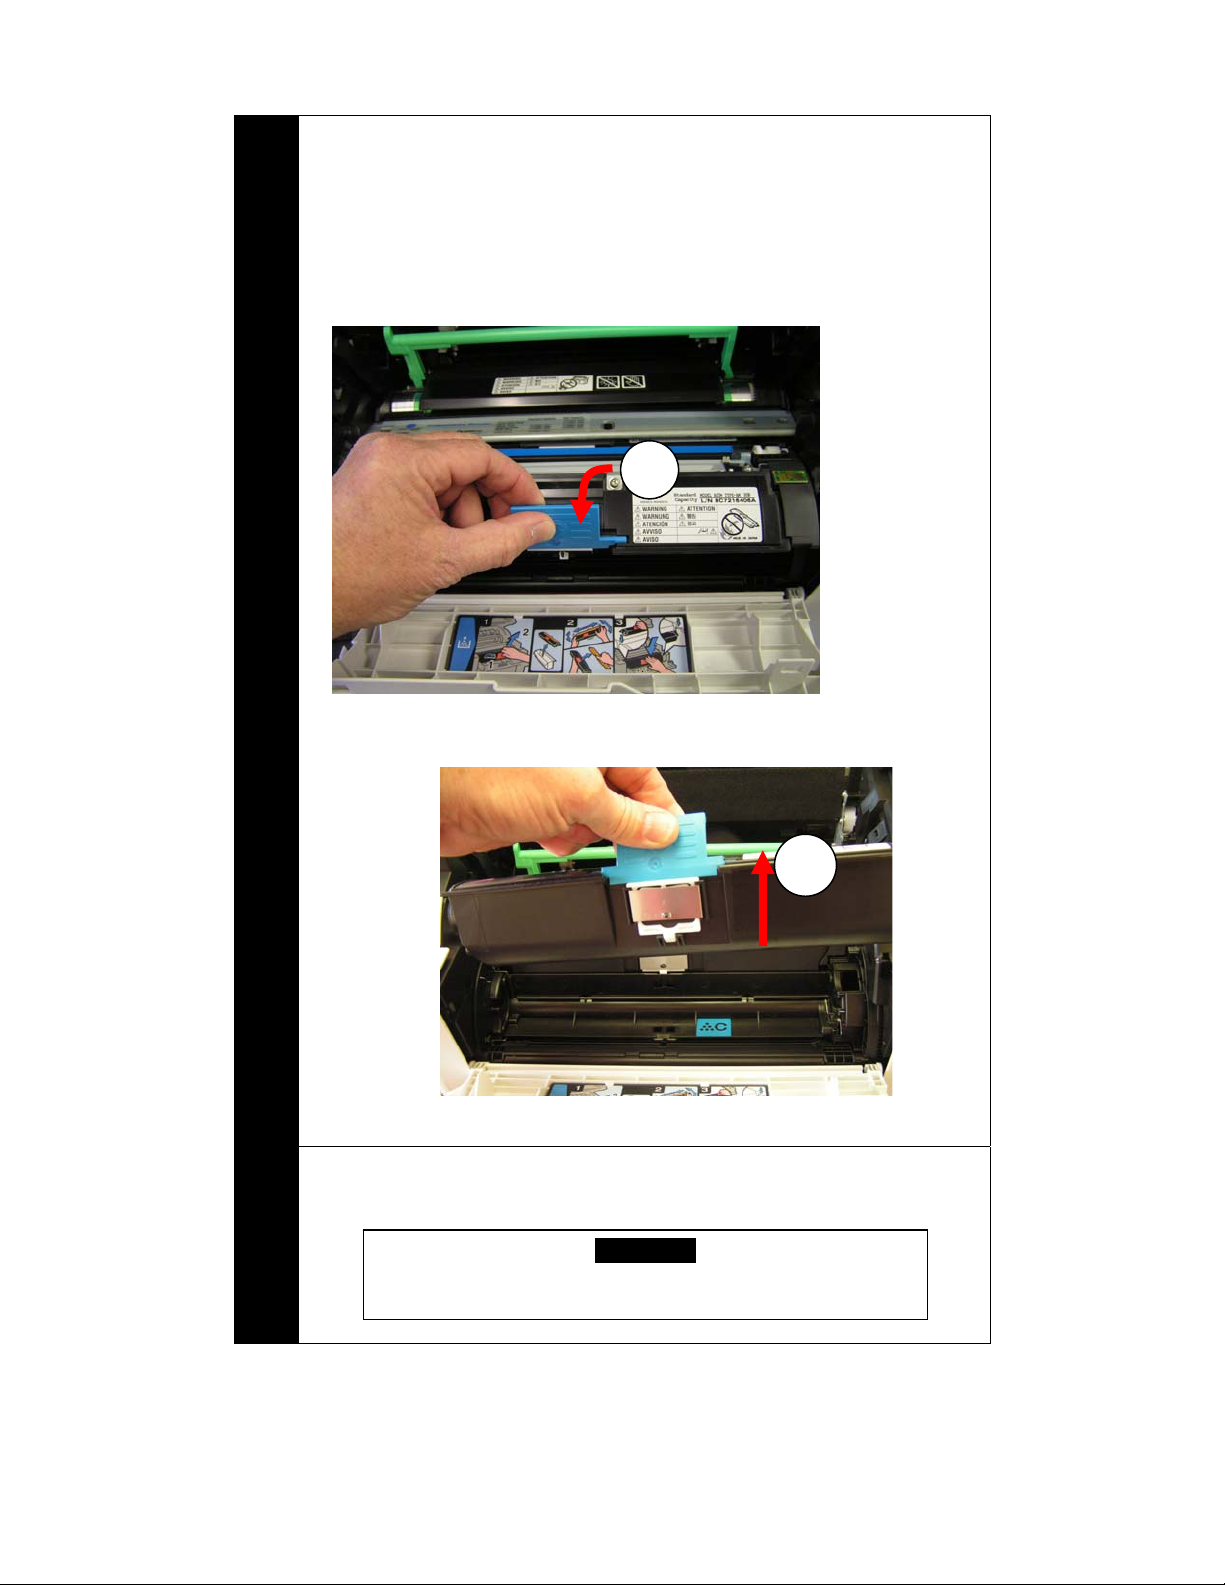
6 To remove the toner cartridges, rotate the carousel to the removal
position.
Note: Be careful not to touch the developer roller (the roller with the color
toner on it). This could cause print quality problems when you install the
toner cartridges in your exchange printer.
A. Lift the toner cartridge handle to release the toner cartridge.
A
Original
Original
B. Lift the toner cartridge up and out.
B
7 Repeat steps 1 and 2 three more time to remove all four toner cartridges
from the original printer.
The carousel may become off balance as the toner cartridges
are removed. Be careful not to let it hit your fingers as it turns.
Caution..
6
Page 7
Install the Toner Cartridges
A
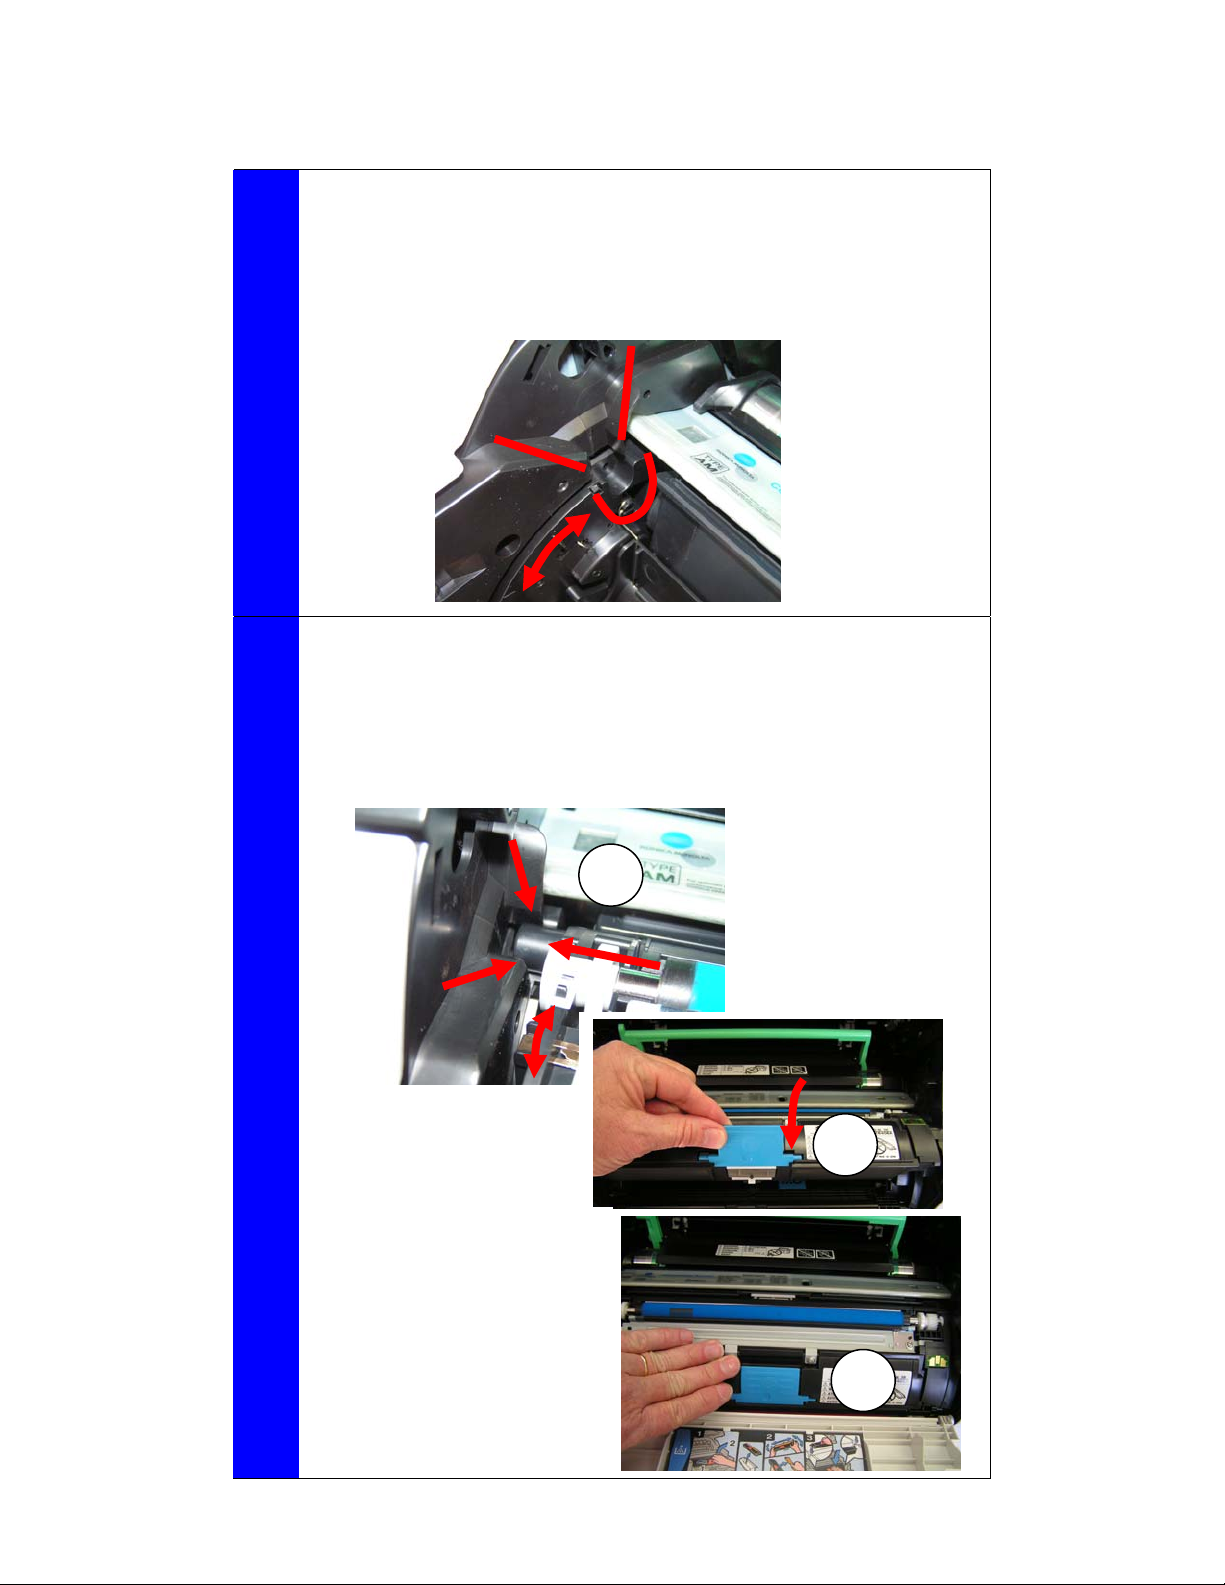
8 Before you can install the toner cartridges into your excha nge pr inter, you
must check the position of the carousel to make sure that the toner
cartridge slot is aligned with the opening inside the printer.
If the slot in not aligned, use a pencil (as described in the removal
procedure) to press the carousel release button and manually rotate the
carousel until the slot is aligned as shown in the picture below.
Exchange
9 Install each toner cartridge into the appropriate slot. The toner color is
shown on the color label inside the carousel and the color ha ndle on the
toner cartridge.
A. Align the toner cartridge pins on either end with the slots (shown above)
in the printer. Push down on the cartridge to fit in pins on the ends of
the cartridge into the slots in printer.
Exchange
B. Rotate the cartridge
down in the front.
B
C. Push down on the
front of the cartridge
until it locks into
position. (Click)
C
C
7
Page 8
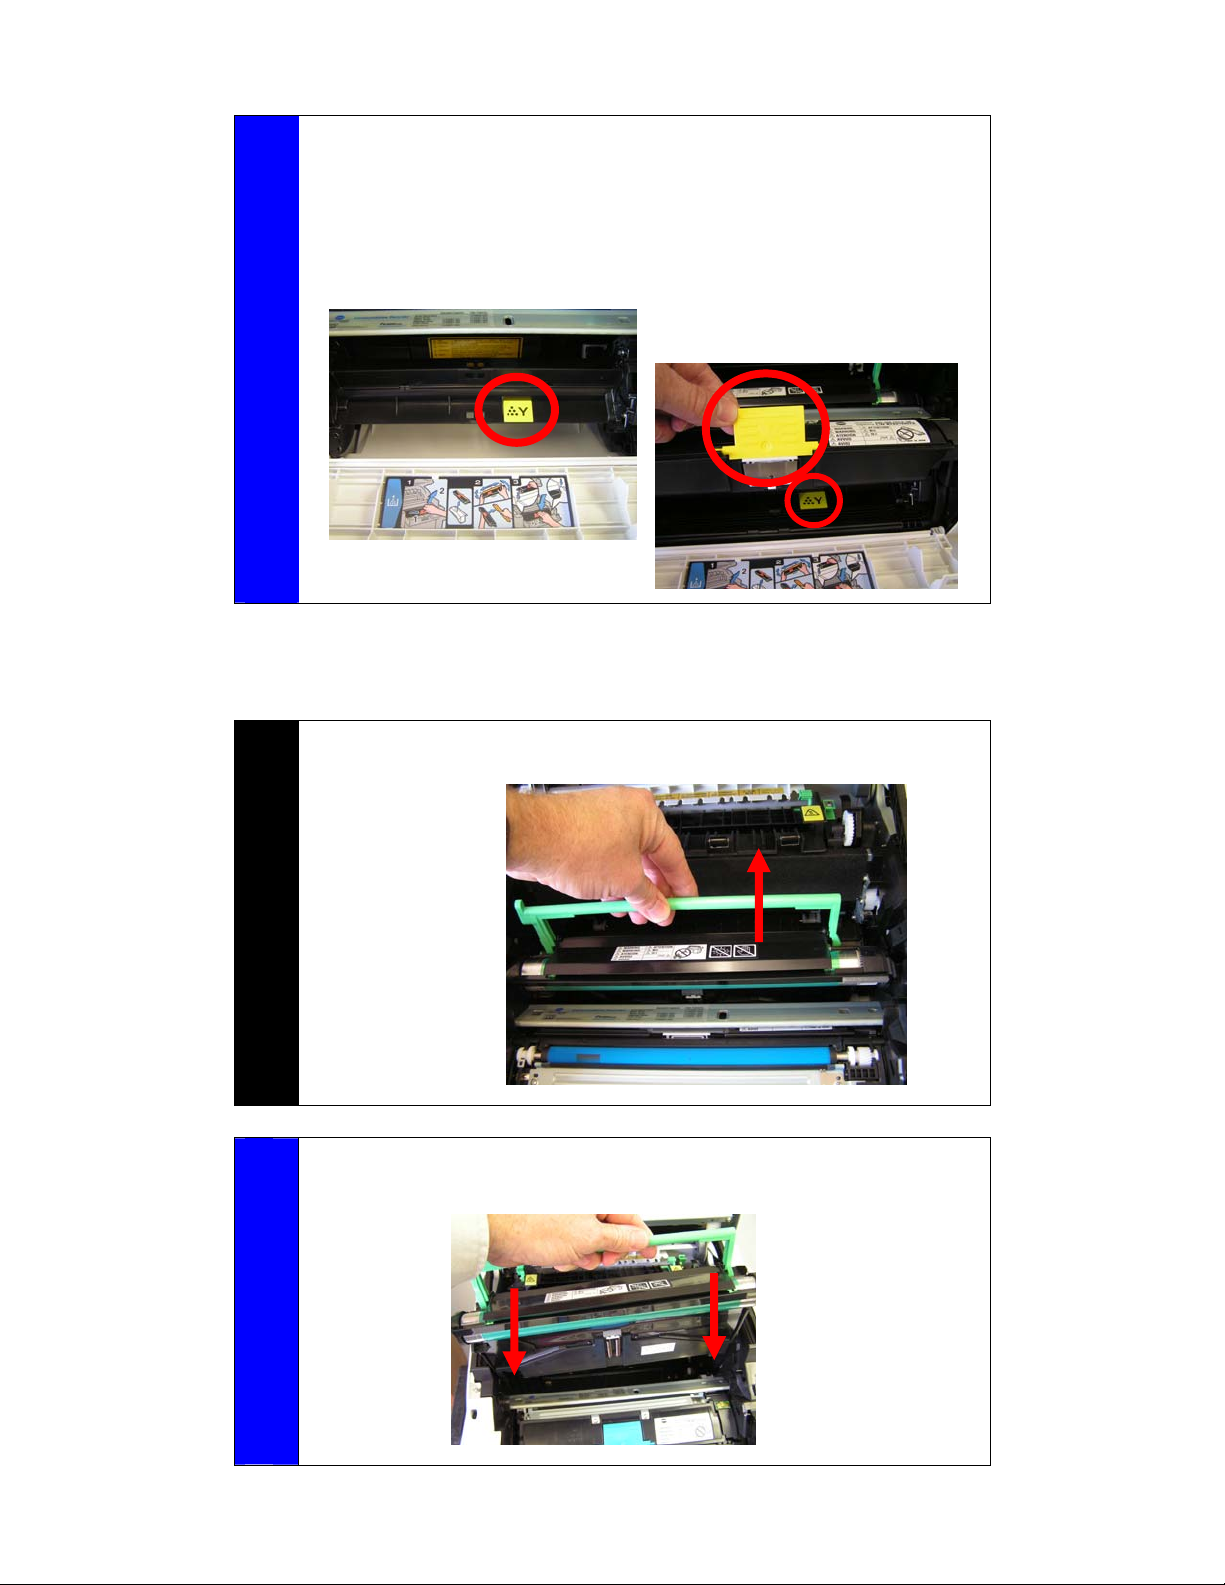
10 Repeat steps 1 and 2 three more times to install the original printer’s
remaining toner cartridges into the exchange printer: Black (K), Yellow (Y)
and then Magenta (M).
Note: The color of toner cartridge is marked inside the carousel and on the
handle of the toner cartridges. Be sure to put the correct cartridge in each
slot.
Exchange
Move the OPC Drum Cartridge
Original
11 Open the top cover of the original pri nter, and carefully pull out the OPC
drum cartridge.
12 Open the top cove r of the Exchange printer, and then carefully inse rt the
OPC drum cartridge.
Exchange
8
Page 9
Move the Transfer Belt Unit
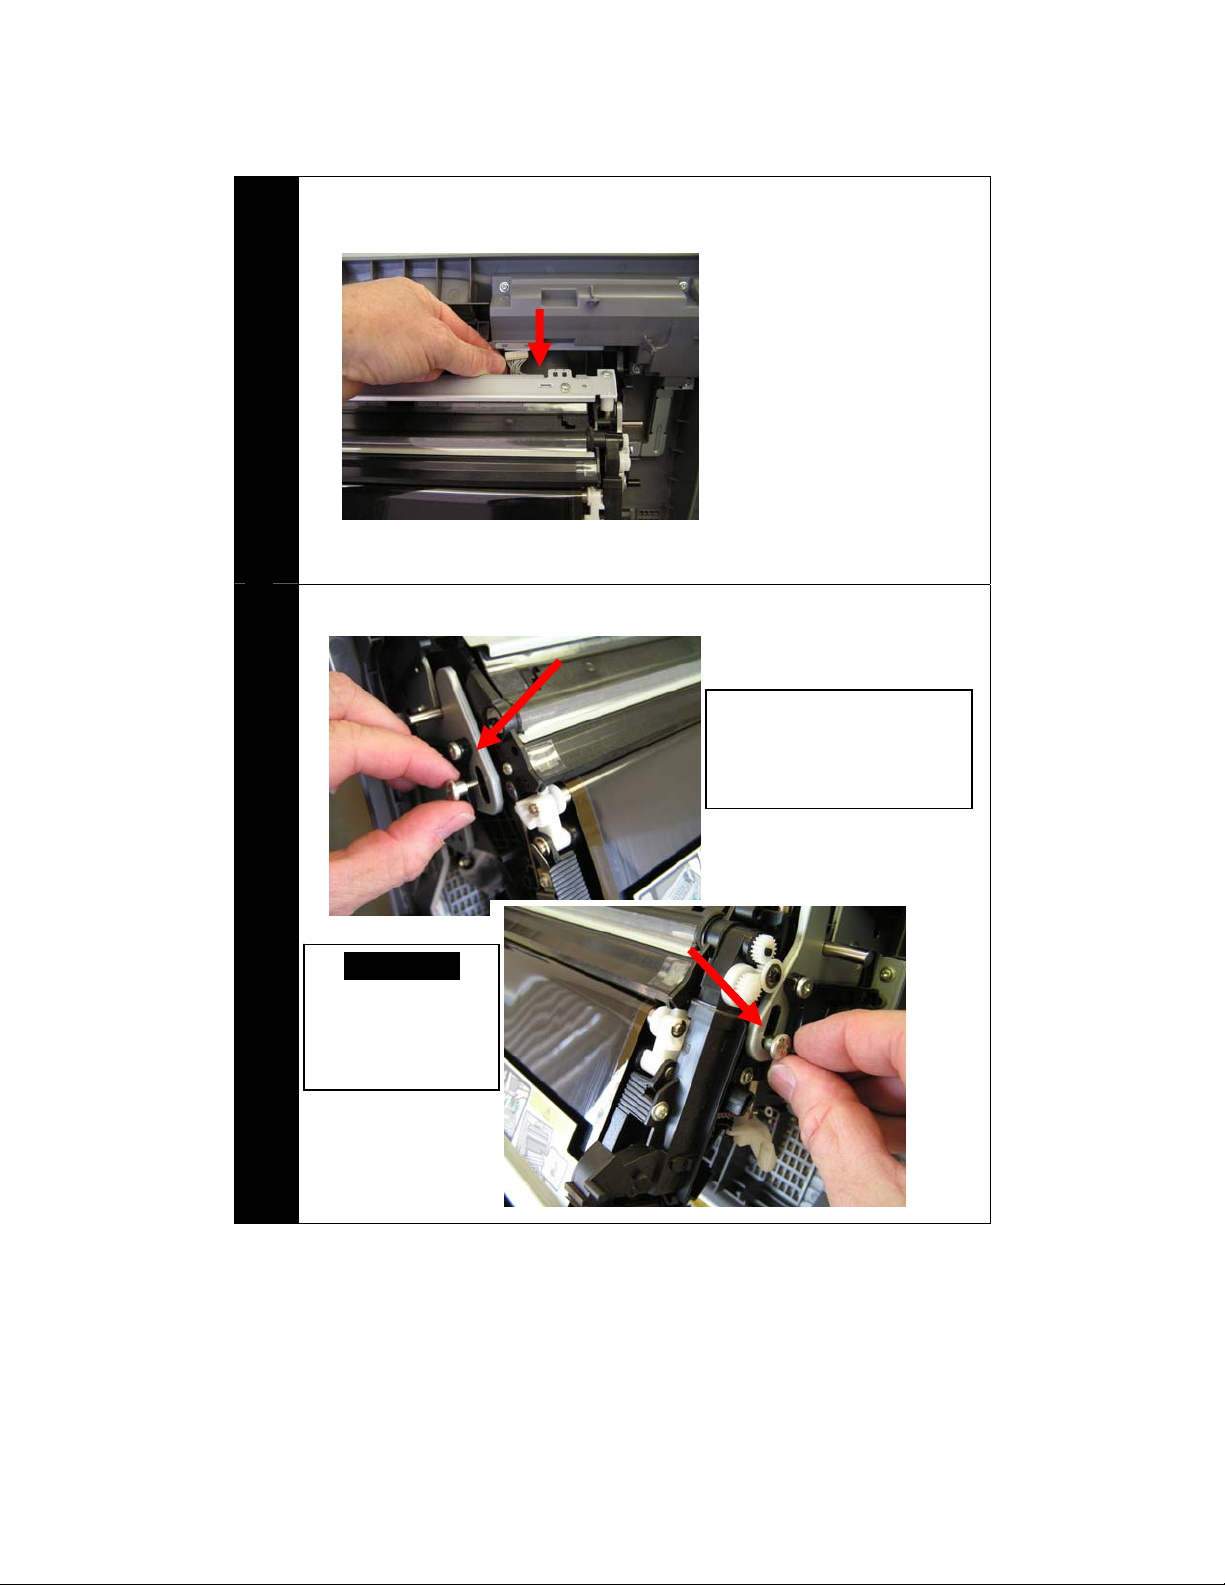
13 With the top cover of the original printer still open, disconnect the
transfer belt unit connector.
Original
14 Remove the two thumb screws, one on each side of the transfer belt unit.
Original
Caution..
Be careful not to
drop the thumb
screw into the
printer.
Note: You may need to
use a screw driver or a
coin to loosen the thumb
screws.
9
Page 10
Original
Exchange
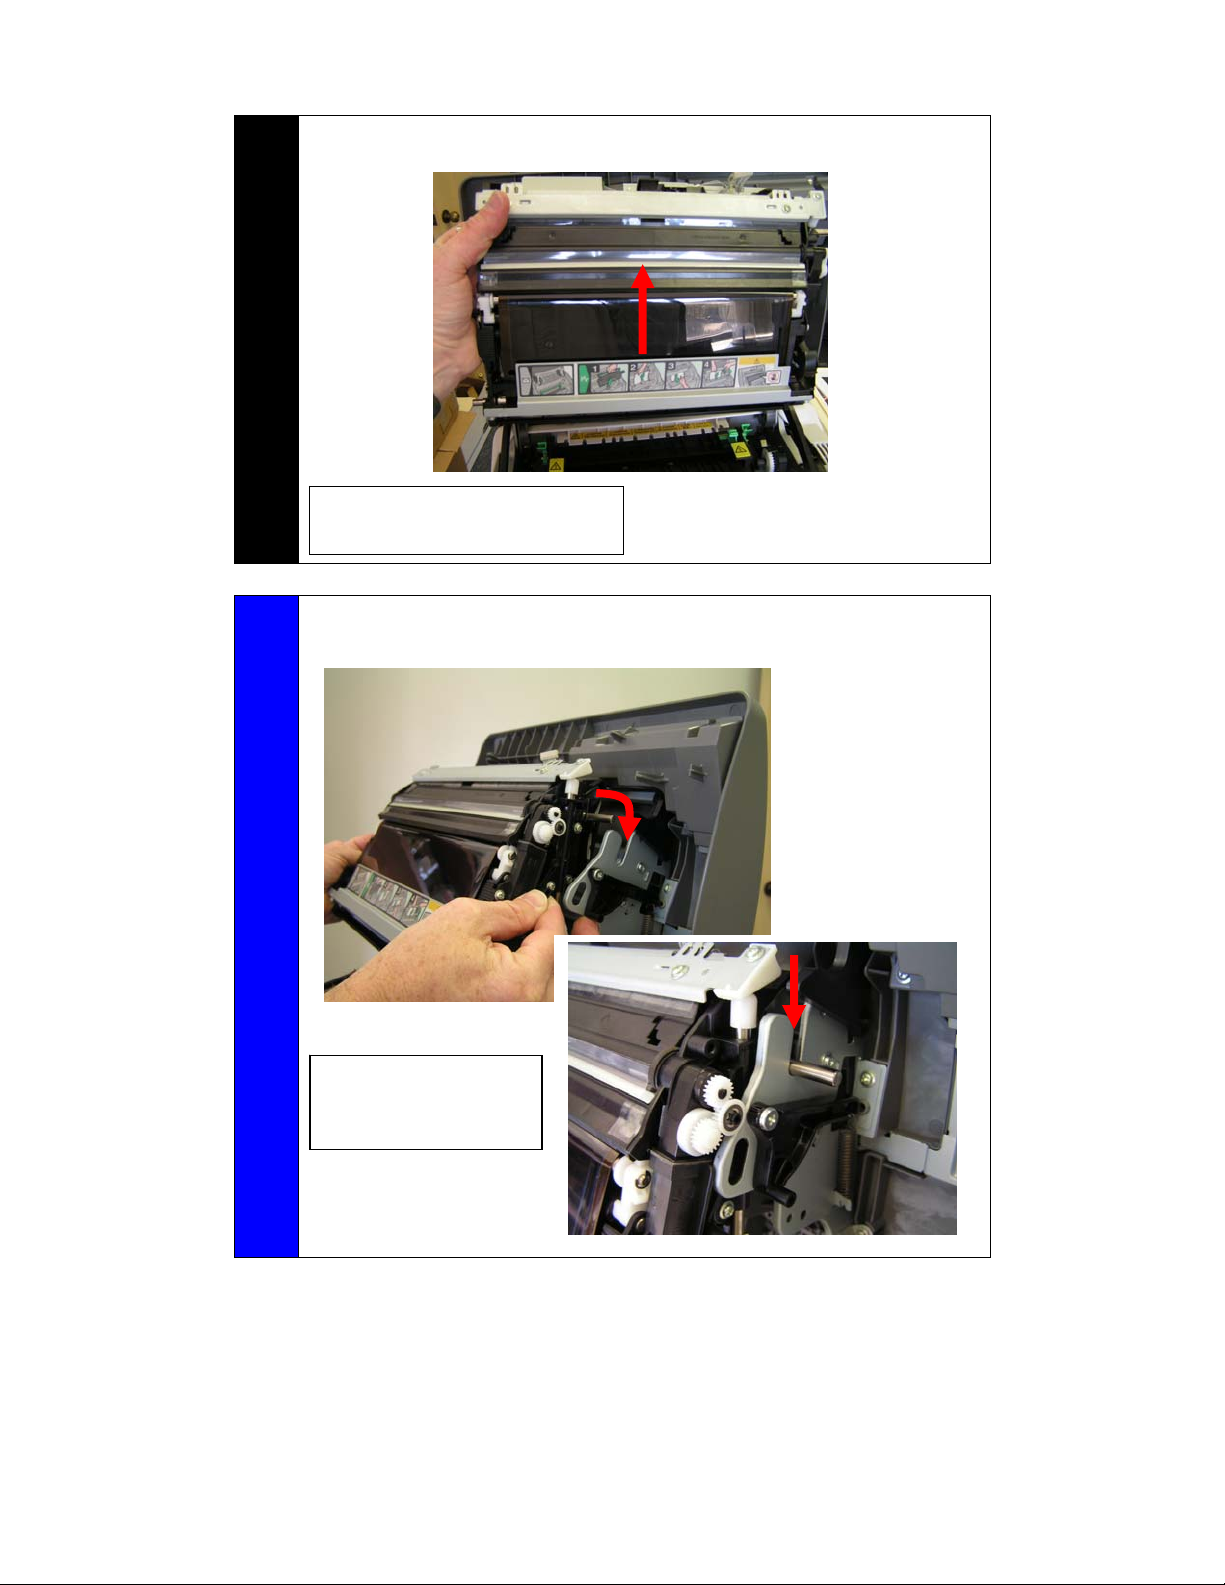
15 Slide out the transfer belt unit from the original printer,
Note: Be careful not to touch or
scratch the transfer belt surface
16 With the top cover of the exchange printer still open, slide the transfer
belt unit into place.
Note: Be careful not to
touch or scratch the
transfer belt surface
10
Page 11
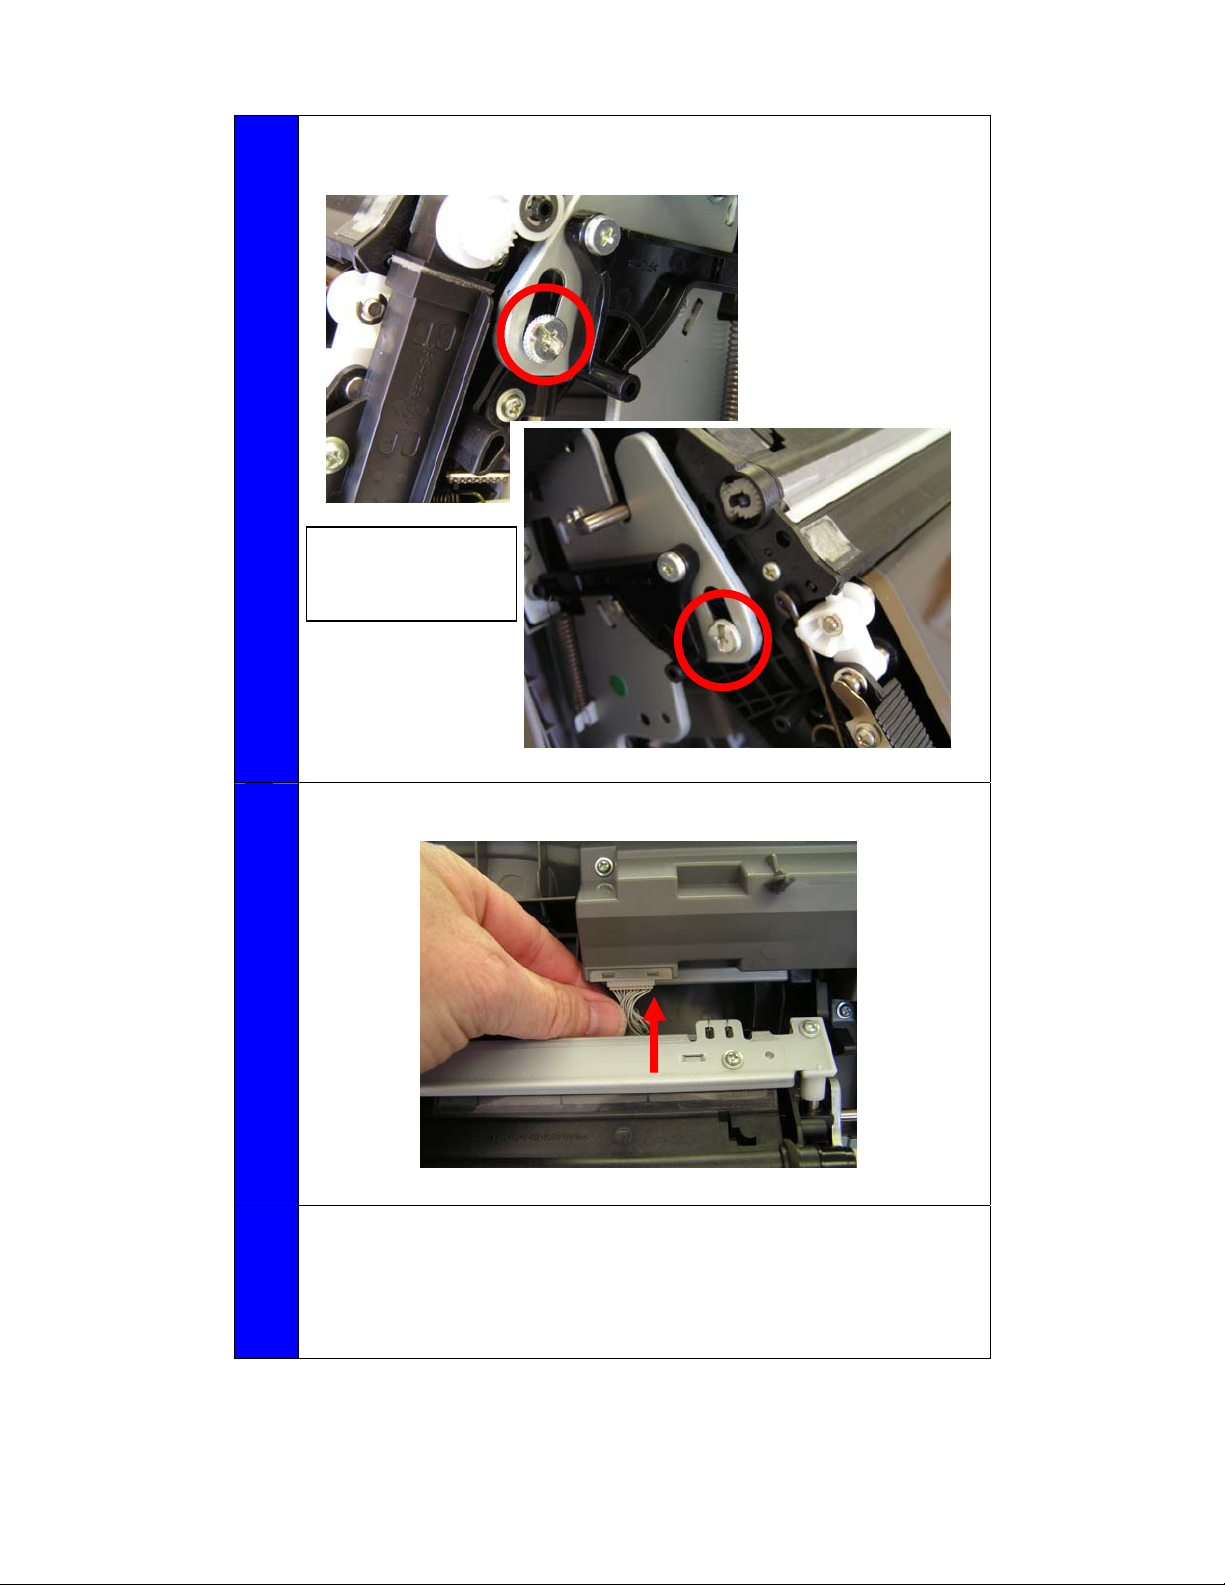
17 Install the two thumb screws, one on each side of the transfer belt unit.
Take care not to over tighten these screws.
Exchange
Note: Be careful not
to over tighten the
thumb screws.
18 Connect the transfer belt unit connector.
Exchange
19 Close the top cover of the exchange printer. Connect the interface
cables, power cord and insert paper into the input tray.
20 Power the exchange printer “On”
Exchange
11
Page 12
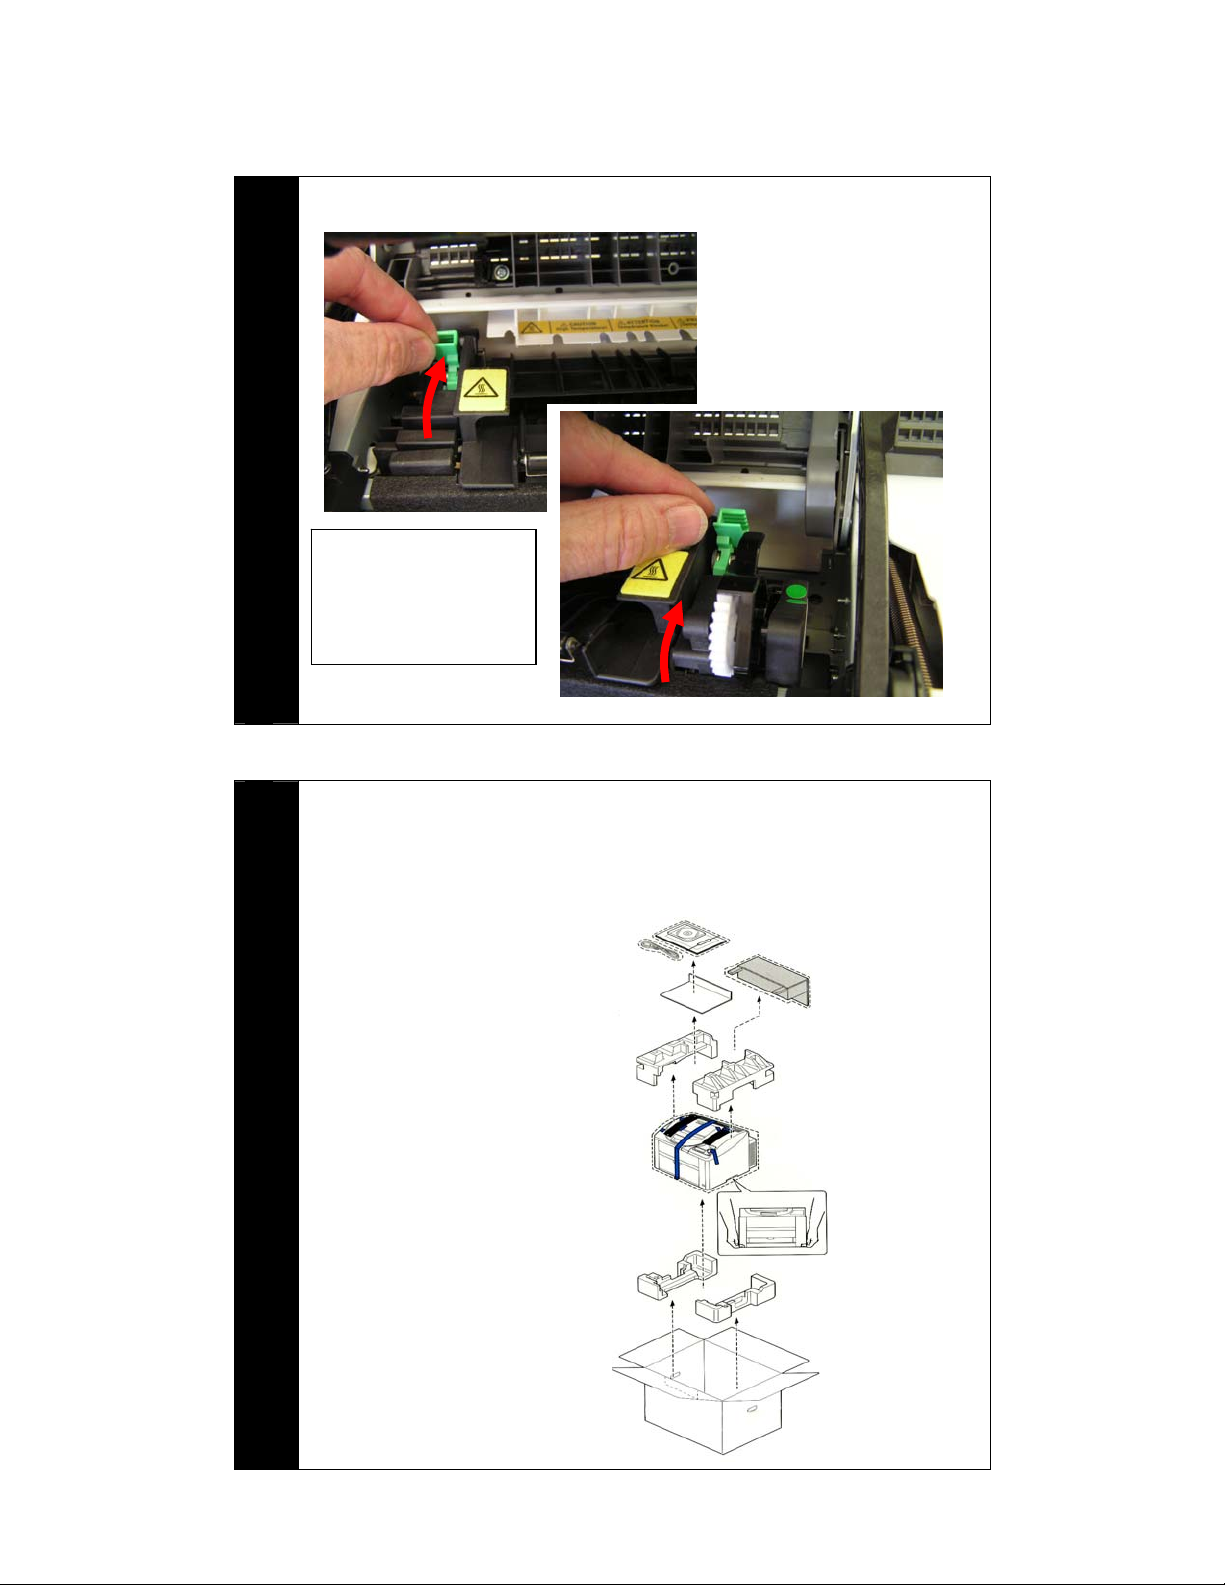
Prepare the Original Printer for Repackaging
21 Open the fuser separator tabs on the original printer.
Original
Note: It is important to
release the pressure
on the fuser roller
before shipping the
printer.
Repackaging the original printer
22 Close the top cover of the original printer.
23 Replace the packing tape on the outside of the original printer.
24 Repack the original
printer in the carton in
which the exchange
printer was shipped.
25 Securely tape the top
flaps of the shipping
carton Closed
Original
12
Page 13
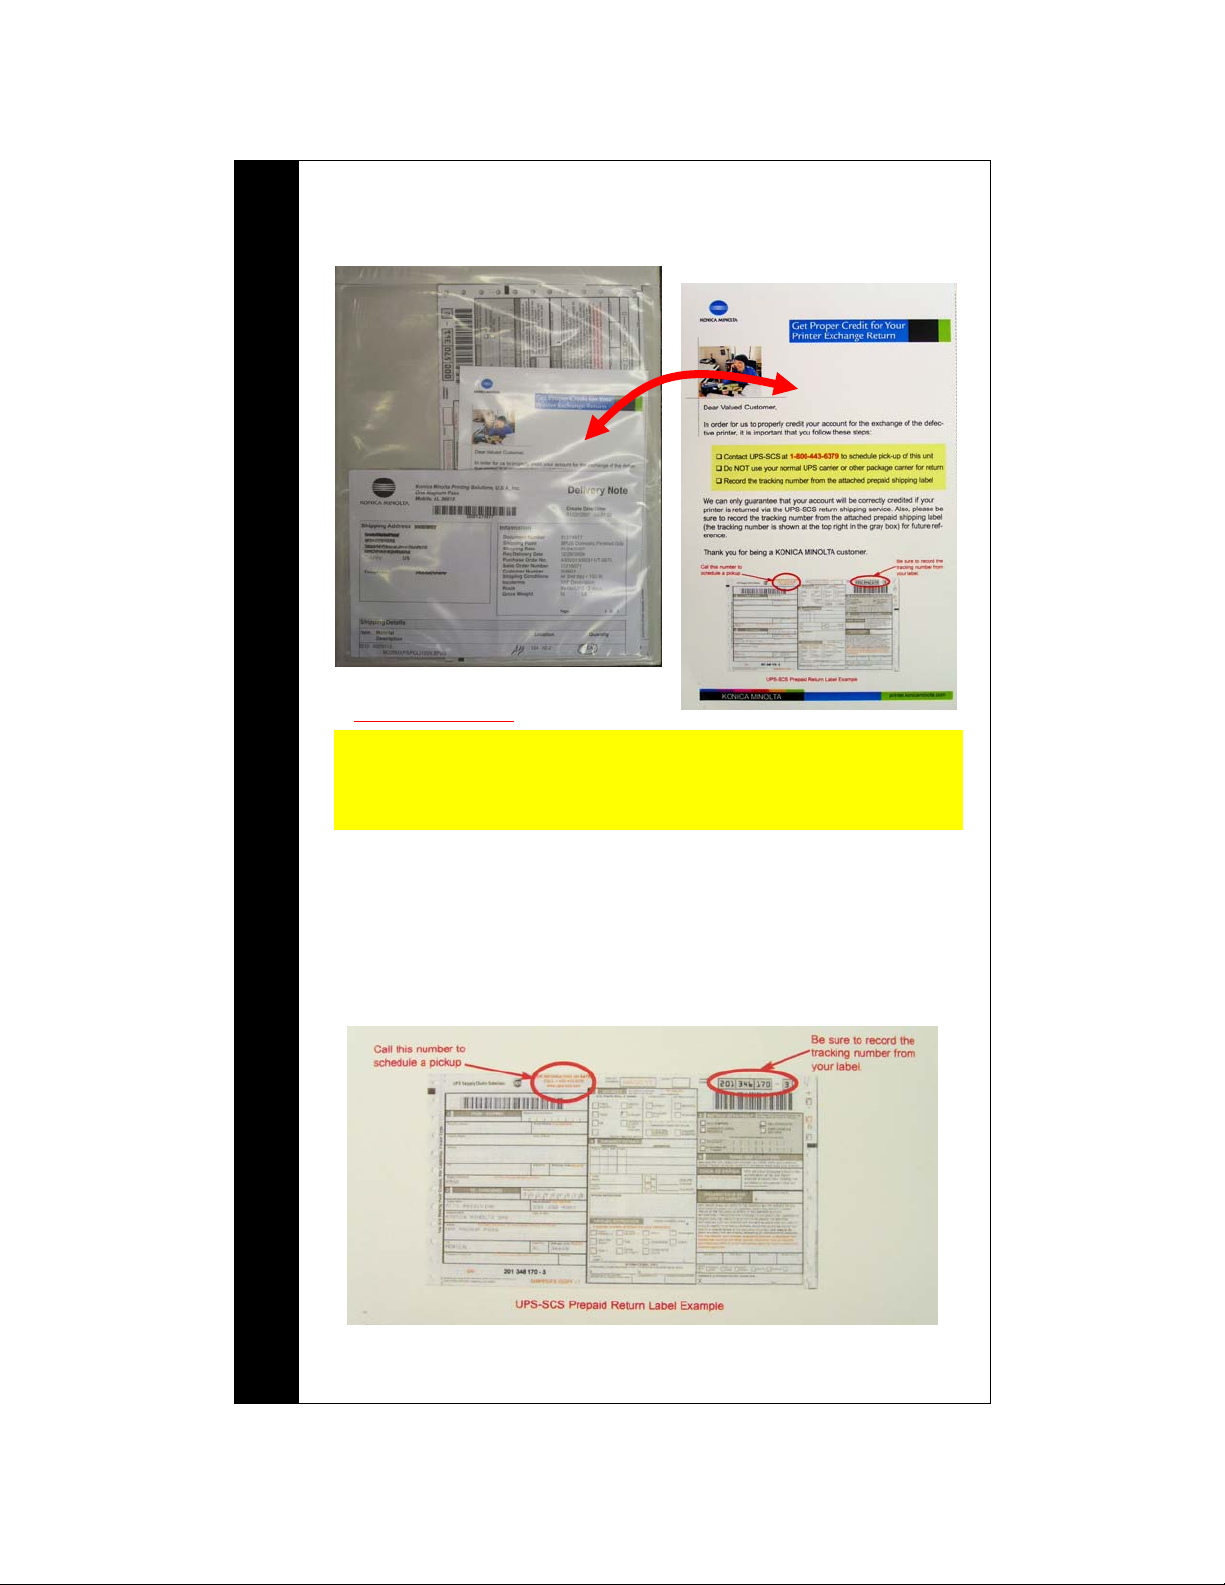
Returning the original printer
26 Locate the Exchange Guide included with the packing slip on the outside
of the exchange printer box. Follow the instructions on this sheet for the
proper return procedure.
Packing Slip Envelope
Important Notes:
Contact UPS-SCS at 1-800-443-6379 to schedule pick-up of the unit
Do NOT use your normal UPS carrier or other package carrier for return
Original
Record the tracking number from the attached prepaid shipping label
27 Clearly write the RMA (Return Merchandise Authorization) number
(located on the Delivery Note sheet included in the packing slip) on the
outside of the carton before calling for pick-up.
Place the prepaid return shipping label (provided in the packing slip) on
28
the outside of the box.
Contact UPS-SCS at 1-800-443-6379 to schedule pick-up of this unit.
29
Thank you for being a KONICA MINOLTA customer
13
 Loading...