


USER’S GUIDE
KN-304
Please read this guide before
using the board and keep readily
available for reference.

Thank you very much for your purchase of the KN-304. This Guide deals with making prints,
correct handling of the machine, and precautions for safety. Please read before printing.
In order to maintain a satisfactory printing performance, please keep this Guide readily
available for reference.

■Preface
The KN-304 Network Board is a network interface board for the K onica IP-011 Printer Controller.
When the KN-304 Network Board is installed in the Konica IP-011 Printer Controller , the Konica
7020 series can be used as a network printer.
The printer itself and the printer controller are provided with instruction manuals individually
(Konica 7020 series instruction manual and Konica IP-011 Printer Controller user’s guide).
● FCC Regulations
This equipment has been tested and found to comply with limits for a Class B digital device,
pursuant to part 15 of FCC rules. These limits are designed to provide reasonable protection
against harmful interference in a residential installation. This equipment generates , uses and
can radiate radio frequency energy and, if not installed and used in accordance with the
instructions, may cause harmful interference to radio communications. However, there is no
guarantee that interference will not occur in a particular installation. If this equipment does
cause harmful interference to radio or television reception, which can be determined by turning
the equipment off and on, the user is encouraged to try to correct the interference by one or
more of the following measures:
• Reorient or relocate the receiving antenna.
• Increase the separation between the equipment and the receiver.
• Connect the equipment to an outlet on a circuit different from the circuit to which the
receiver is connected.
• Consult the dealer or an experienced radio/TV technician for help.
Canadian Department of Communications Regulations
Cet appareil numérique de la classe B est conforme à la norme NMB-003 du Canada.
This Class B digital apparatus complies with Canadian ICES-003.
● Registered trademarks
Microsoft, MS and MS-DOS are registered trademarks of U.S. Microsoft Corporation.
Windows is a registered trademark of U.S. Microsoft Corporation.
Novell and NetWare are registered trademarks of U.S. Novel, Inc.
Adobe and Acrobat are registered trademarks of U.S. Adobe Systems Incorporated.
AppleTalk is a registered trademark of U.S. Apple Computer Inc.
The other company names and trademarks used in this document are the trade names and
trademarks of the associated companies.
KN-304 Network Board i

● About this manual
This manual describes the procedures of installing, operating and setting up the software
used to print using the KN-304 Network Board through the Konica 7020 series mounted with
the IP-011 Printer Controller from a Windows 95/98/NT/2000 (2000 is still to be supported) or
Novell NetW are system that composes a network. Be sure to read the contents of Readme.txt
provided for each program contained in the CD-ROM. For more detail on operation of the
associated applications, refer to the individual instruction manuals.
Konica Co., Ltd. is not responsible for the results of use of the Konica 7020 series + IP-011
Printer Controller + KN-304 Network Board system and this manual.
Use and reproduction of this manual, partly or wholly, without permission is not permitted.
Information included in this manual is subject to change without prior notice.
ii KN-304 Network Board

CONTENTS
■ Preface ............................................................................................... i
● Voluntary Regulations against Electromagnetic Interference......................................... i
● Registered trademarks ................................................................................................... i
● About this manual ......................................................................................................... ii
Chapter 1 KN-304 Network Board overview .........1-1
■ Features of the KN-304 Network Board ......................................... 1-2
■ Installation of the KN-304 Network Board ...................................... 1-2
■ Package contents........................................................................... 1-2
■ How to use the CD-ROM provided................................................. 1-3
■ Network setting procedures............................................................ 1-3
● For peer-to-peer printing from Windows 95/98...........................................................1-3
● For lpr/lpd printing from Windows NT .........................................................................1-3
● Use of NetWare..........................................................................................................1-4
Chapter 2 Setting up from the LCD Panel.............2-1
■ Basic operations from the LCD panel............................................. 2-2
● Network setup procedure .......................................................................................... 2-2
■ TCP/IP setup .................................................................................. 2-4
● Set IP mode ...............................................................................................................2-5
● IP settings ..................................................................................................................2-5
● LPD Banner Enable................................................................................................... 2-6
■ Setup for NetWare.......................................................................... 2-7
● Server Name ..............................................................................................................2-7
● Server Password ....................................................................................................... 2-7
● Queue Scan Rate.......................................................................................................2-7
● Fr ame Type................................................................................................................ 2-7
KN-304 Network Board Contents-1

● Disable Bindery ..........................................................................................................2-8
● NDS Context ..............................................................................................................2-8
● NDS Tree ....................................................................................................................2-8
■ Defining the password .................................................................... 2-8
● Defining/changing the password ................................................................................2-8
● Disabling the password ..............................................................................................2-8
■ Confirming the current network setup information.......................... 2-9
● Displaying the network setup information...................................................................2-9
● Printing the network setup information.......................................................................2-9
Chapter 3 Peer-to-Peer Printing (Windows 95/98) 3-1
■ Basic TCP/IP setup ........................................................................ 3-2
■ Use of IP Peer-to-Peer ................................................................... 3-3
● Installing IP Peer-to-Peer .......................................................................................... 3-3
● Setting IP Peer-to-Peer ..............................................................................................3-3
■ Printer driver setup ......................................................................... 3-5
Chapter 4 Printing by lpd/lpr (Windows NT) .........4-1
■ Basic TCP/IP setup ........................................................................ 4-2
■ lpd/lpr setup.................................................................................... 4-3
● Installing Microsoft TCP/IP Print Service ...................................................................4-3
● Adding a printer port and installing the printer driver ................................................ 4-3
■ Printer Driver Setup from Client ..................................................... 4-4
Chapter 5 NetWare Setup .......................................5-1
■ Setup for NetWare 2.x/3.x ......................................................................... 5-2
■ Setup for NetWare 4.x ............................................................................... 5-3
● Setup information .......................................................................................................5-3
● NDS setup..................................................................................................................5-4
● Setup for Bindery Emulation ......................................................................................5-5
Contents-2 KN-304 Network Board

Chapter 6 Setup Utility MAP...................................6-1
■ MAP (Management Access Program) overview............................. 6-2
● Requirements for installation......................................................................................6-2
● Installing MAP ........................................................................................................... 6-2
■ MAP setup...................................................................................... 6-3
■ Web utility....................................................................................... 6-4
● Choice of printer........................................................................................................ 6-4
● TCP/IP setup ..............................................................................................................6-5
● NetWare setup ...........................................................................................................6-7
■ Setup/indications - other............................................................... 6-10
● Restarting the network card .....................................................................................6-10
● Restoring the default values.....................................................................................6-10
● Confirming the settings ............................................................................................6-10
● Network address ......................................................................................................6-11
● Changing the password............................................................................................6-11
● Test printer................................................................................................................6-11
● Configure Status Page .............................................................................................6-11
● Printer status ............................................................................................................6-11
● Unit Info ....................................................................................................................6-12
Chapter 7 Troubleshooting .....................................7-1
■ LED Status Indicator ...................................................................... 7-2
■ Status Page.................................................................................... 7-3
■ Resetting the KN-304 Factory Default............................................ 7-5
■ How to Diagnose Problems............................................................ 7-6
● Troubleshooting Network Hardware Connections ......................................................7-7
● Troubleshooting NetW are Protocol.............................................................................7-7
● NetWare Checklist......................................................................................................7-7
● File Server Checklist ..................................................................................................7-8
● W orkstation Checklist.................................................................................................7-8
● Print Server Card Configuration Checklist ................................................................ 7-8
● Printer Server/File Server/Printer Checklist ...............................................................7-9
● Workstation to Print Server Card Connection Checklist............................................ 7-9
● KN-304 Loses Its File Server Connection ................................................................. 7-9
● Unable to Print from a Different Context ..................................................................7-10
KN-304 Network Board Contents-3

Appendices............................................ Appendices-1
■ KN-304 Network Board specifications........................... Appendices-2
■ 10/100BaseT UTP cable specifications......................... Appendices-3
■ Information for the TCP/IP network administrator ......... Appendices-4
● Use of DHCP.............................................................................................Appendices-4
● Naming by WINS .......................................................................................Appendices-4
● FTP printing...............................................................................................Appendices-4
Index.................................................................. Index-1
Contents-4 KN-304 Network Board

Chapter 1 KN-304 Network Board overview
■ Features of the KN-304 Network Board ....................... 1-2
■ Installation of the KN-304 Network Board .................... 1-2
■ Package contents......................................................... 1-2
■ How to use the CD-ROM provided............................... 1-3
■ Network setting procedures.......................................... 1-3
● For peer-to-peer printing from Windows 95/98 ....... 1-3
● For lpr/lpd printing from Windows NT...................... 1-3
● Use of NetWare....................................................... 1-4
KN-304 Network Board 1-1

Chapter 1 KN-304 Network Board overview
■ Features of the KN-304 Network Board
The KN-304 Network Board enables the 7020 series fitted with the IP-011 Printer Controller to connect to
the Ethernet.
The KN-304 offers the following features:
• Automatic Selection of 100Base-T (Fast Ethernet) or 10Base-T
• Supports peer-to-peer printing by TCP/IP from Microsoft Windows 95 or 98 (by using a dedicated utility)
• Supports Ipr/Ipd on TCP/IP for Microsoft Windows NT 4.0 or later (to be referred to as Windows NT).
• Supports both the bindery mode of Novell NetWare and Novell Directory Service (NDS)
• Built-in HTTP ser ver enables printer and network board management by linking with the management
Access Program (MAP) provided and a standard web browser
• Automatic IP address acquisition by DHCP
• Use of flash memory allows upgrading of firmware through network
■ Installation of the KN-304 Network Board
The KN-304 Network Board should be fitted to the IP-011 Printer Controller. Request installation of the KN304 to your Konica service representative.
■ Package contents
The package of the KN-304 Network Board contains the following.
• KN-304 Network Board
• KN-304 Quick Configuration Guide
• KN-304 Installation Procedure
• Connection cable
• CD-ROM
1-2 KN-304 Network Board

Chapter 1 KN-304 Network Board overview
■ How to use the CD-ROM provided
The CD-ROM contains some utility programs used f or the KN-304 Network Board and the instruction manual
(same as this) in the form of PDF (P ortable Document Format). The CD-ROM is compatible with Windows
95/98/NT. The software of English language version contained in the CD-ROM includes the following.
MAP (Management Access Program)
This allows to detect the network printers connected by IP/IPX and enables access to Web
utilities incorporated in the KN-304 Network Board to set up the network and printers with the
aid of the Web browser.
IP-P2P
This enables peer-to-peer printing by TCP/IP from Windows 95/98.
■ Network setting procedures
Before you use the KN-304 Network Board, it is needed to set up the system and perform some preparatory
tasks. The procedures depend on the system environment.
● For peer-to-peer printing from Windows 95/98
A printer can be connected in the form of so-called “peer-to-peer” to produce printout without using a print
server in a LAN (Local Area Network) consisting only of Windows 95/98. The setup procedure is as f ollows.
See Chapter 2, Setting up from the LCD Panel, for more detail of Step 1, and Chapter 3, Peer-to-Peer
Printing (Windows 95/98), for Steps 2-4.
Set up the KN-304 Network Board for TCP/IP from the Konica 7020 series machine’s LCD
panel.
Set up your computer (Windows 95/98) for TCP/IP.
Install “IP-P2P” from the CD-ROM provided.
Install the printer driver.
● For lpr/lpd printing from Windows NT
To produce printout by lpr/lpd from Windows NT, the setup procedure is as follows. See Chapter 2, Setting
up from the LCD Panel, for more detail of Step 1, and Chapter 4, Printing by lpd/lpr, for Steps 2-4.
Set up the KN-304 Network Board for TCP/IP from the K onica 7020 series machine’ s LCD panel
Set up your computer (Windows NT) for TCP/IP.
Install “Microsoft TCP/IP Print” if not installed yet.
Install the printer driver.
KN-304 Network Board 1-3
.

Chapter 1 KN-304 Network Board overview
● Use of NetWare
To produce printout in a network of Novell NetWare , the setup procedures depend on the NetWare version
and resource management. See Chapter 2, Setting up from the LCD Panel, for more detail of Step 1, and
Chapter 4, NetWare Setup, for Step 2.
With NetWare 2.x or 3.x
Define the server name, etc. of the KN-304 Network Board from the Konica 7020 series
machine’s LCD panel.
Set up the print server functions by PCONSOLE.
By NDS with NetWare 4.x
Define the server name, etc. of the KN-304 Network Board from the Konica 7020 series
machine’s LCD panel.
Set up the print server functions by NWADMIN.
By bindery emulation with NetWare 4.x
Define the server name, etc. of the KN-304 Network Board from the Konica 7020 series
machine’s LCD panel.
Set up the print server functions by PCONSOLE.
1-4 KN-304 Network Board

Chapter 2 Setting up from the LCD Panel
■ Basic operations from the LCD panel ........................... 2-2
● Network setup procedure ........................................ 2-2
■ TCP/IP setup................................................................. 2-4
● Set IP mode............................................................. 2-5
● IP settings................................................................ 2-5
● LPD Banner Enable................................................. 2-6
■ Setup for NetWare ........................................................ 2-7
● Server Name ........................................................... 2-7
● Server Password ..................................................... 2-7
● Queue Scan Rate .................................................... 2-7
● Fr ame Type .............................................................. 2-7
● Disable Bindery ....................................................... 2-8
● NDS Context............................................................ 2-8
● NDS Tree ................................................................. 2-8
■ Defining the password .................................................. 2-8
● Defining/changing the password.............................. 2-8
● Disabling the password............................................ 2-8
■ Confirming the current network setup information ........ 2-9
● Displaying the network setup information ................ 2-9
● Printing the network setup information .................... 2-9
KN-304 Network Board 2-1
Chapter 2 Setting up from the LCD Panel
■ Basic operations from the LCD panel
After the KN-304 Network Board is installed physically, you can set it up from the LCD panel of the Konica
7020 series for networking. On the liquid crystal display (LCD) screen that is a touch panel, you select a
menu item by touching the associated number k ey . To enter a numeric data or character string, use numeric
keys or character keys displayed. The character keys are laid out on two windows and you go from one to
the other by using the << or >> key.
See the instruction manual of the Konica IP-011 Printer Controller for information except network setup.
● Network setup procedure
You can set up the KN-304 Network Board from the LCD panel by the following procedure for networking.
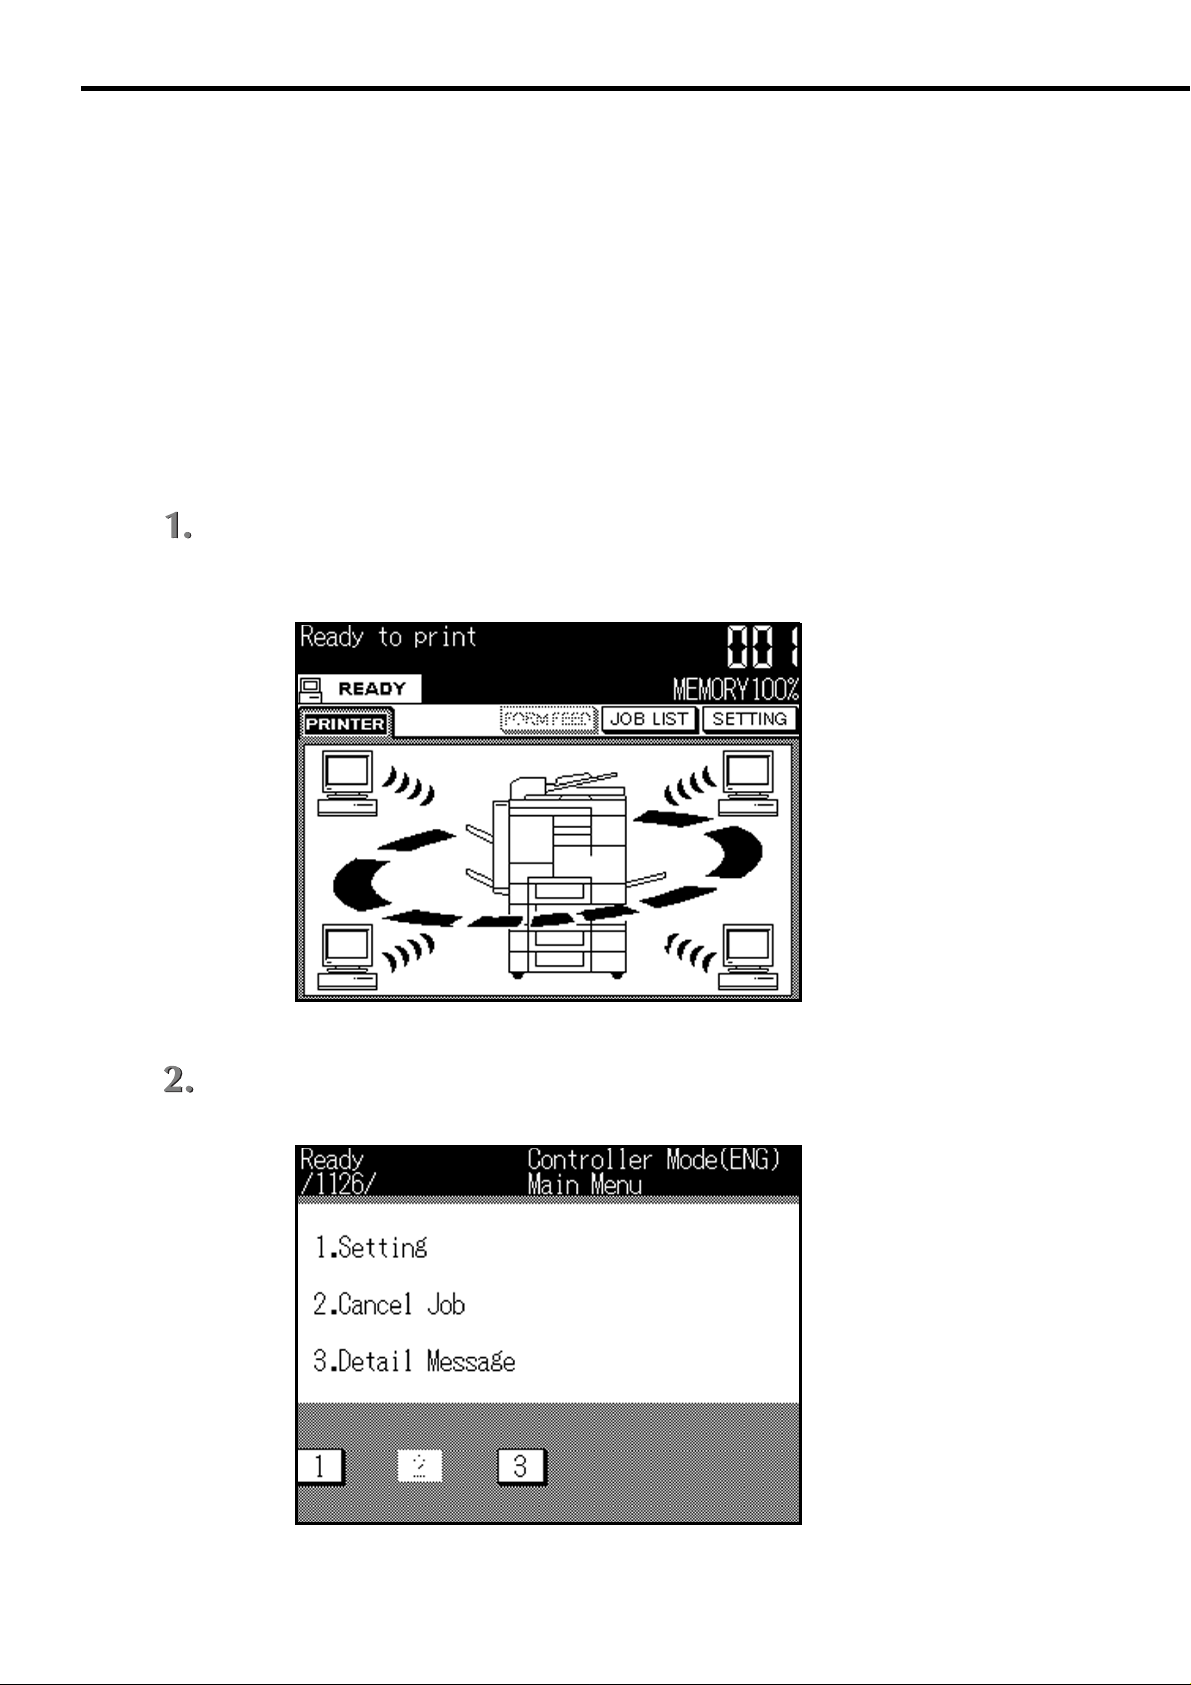
Press the [Scanner/Printer] button next to the LCD panel: the [Printer Mode Basic] window
appears.
Press the [SETTING] key on the LCD panel: the [Main Menu] window appears.
2-2 KN-304 Network Board
Chapter 2 Setting up from the LCD Panel
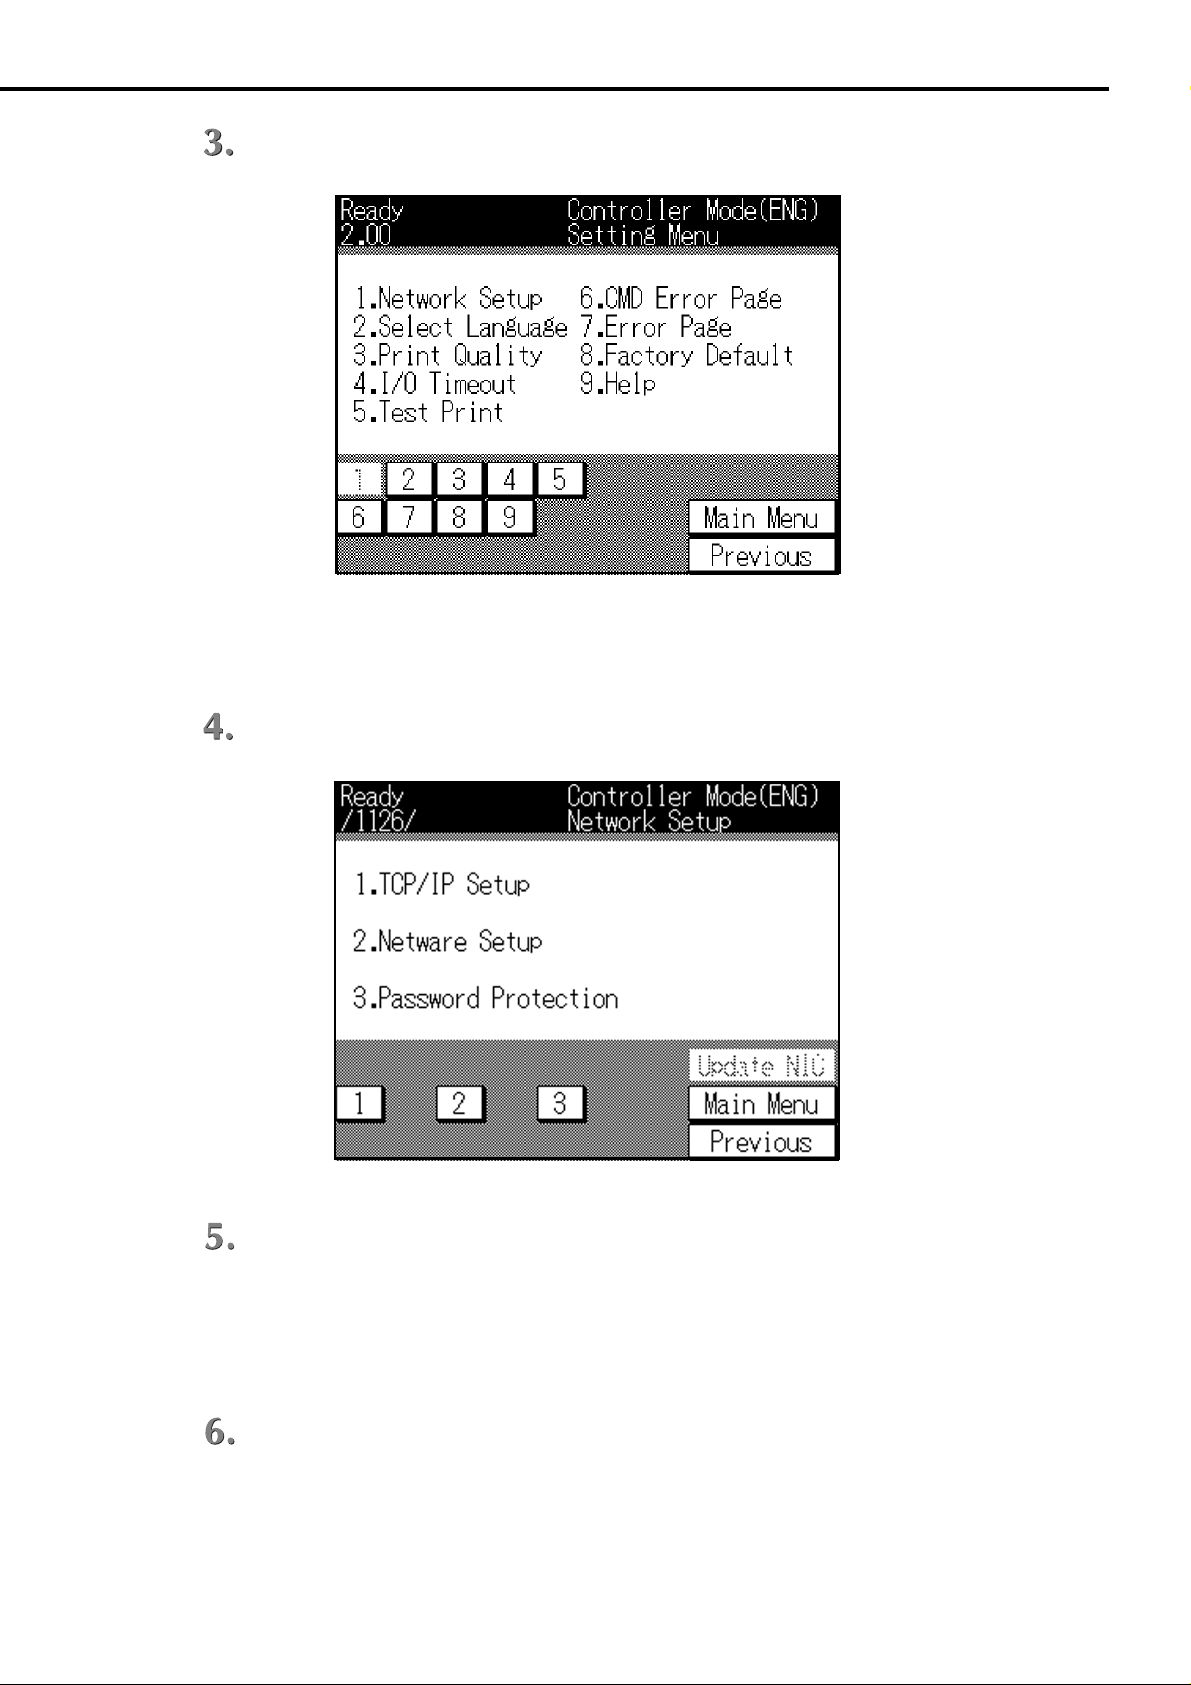
Press the numeric key “1” to select [1. Setting].
The setup mode starts and the [Setting] menu appears.
Press the numeric key “1” to select [1. Network Setup].
Press the numeric key identifying the desired menu item displayed on the window and go on
with the setup procedure.
Press [Previous] to go back to the previous menu window.
Press [Main Menu] to return to the Printer Mode Basic window.
Press [Update NIC] on completion of setup.
If a password is already defined, a prompt will urge y ou to enter the right passw ord. Enter the
right password. As a message appears to confir m if you really want to update NIC, select
[Yes].
KN-304 Network Board 2-3
Chapter 2 Setting up from the LCD Panel
You can change the password b y selecting [3. P ass word Protection]. You can also disable the
password so that no password be used. No password is defined b y default.
On completion of setup, turn off the main power of the Konica 7020 series and wait f or about
6 seconds. Then turn on power again, and the settings you have entered are effective.
(It may take 2-3 minutes after power-on until the KN-304 is ready to work.)
■ TCP/IP setup
TCP/IP must be set up to print peer-to-peer by Windows 95/98 or to print by lpd/lpr of Windows NT.
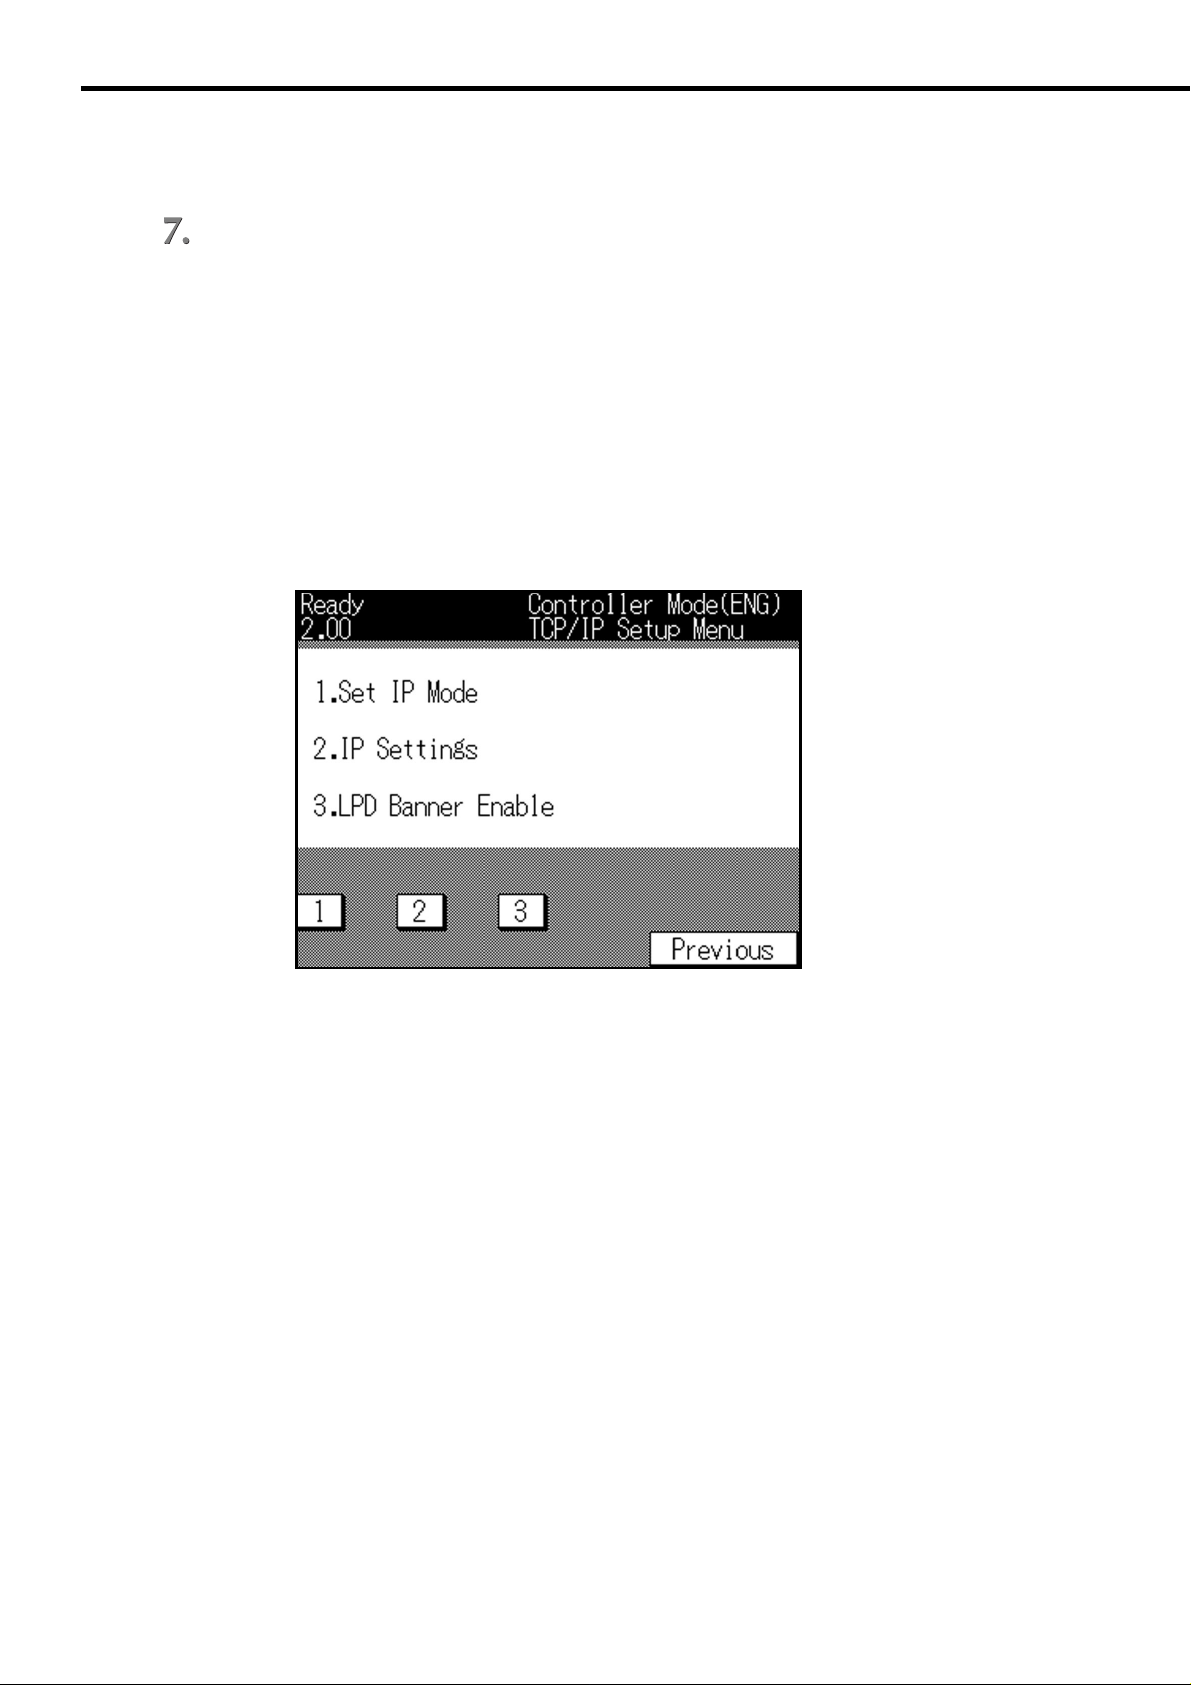
You select [1. TCP/IP Setup] from the [Network Setup] menu, and the [TCP/IP Setup] menu appears as
shown below. Press the number key associated with the desired menu item. Press [Previous] to go back
to the previous menu.
1. Set IP mode
You select the mode of assigning the IP address, dynamic by DHCP (Dynamic Host Configu-
ration Protocol) or static (manual).
2. IP Settings
You set up when the static mode of assigning the IP address is selected. You cannot select
this option if “Enable DHCP” is selected.
3. LPD Banner Enable
To print by lpd/lpr, you designate whether to use LPD banner or not. The LPD banner is a
piece of information on printout made by lpd/lpr , printed on a banner page. LPD banner is not
used by default.
2-4 KN-304 Network Board
Chapter 2 Setting up from the LCD Panel
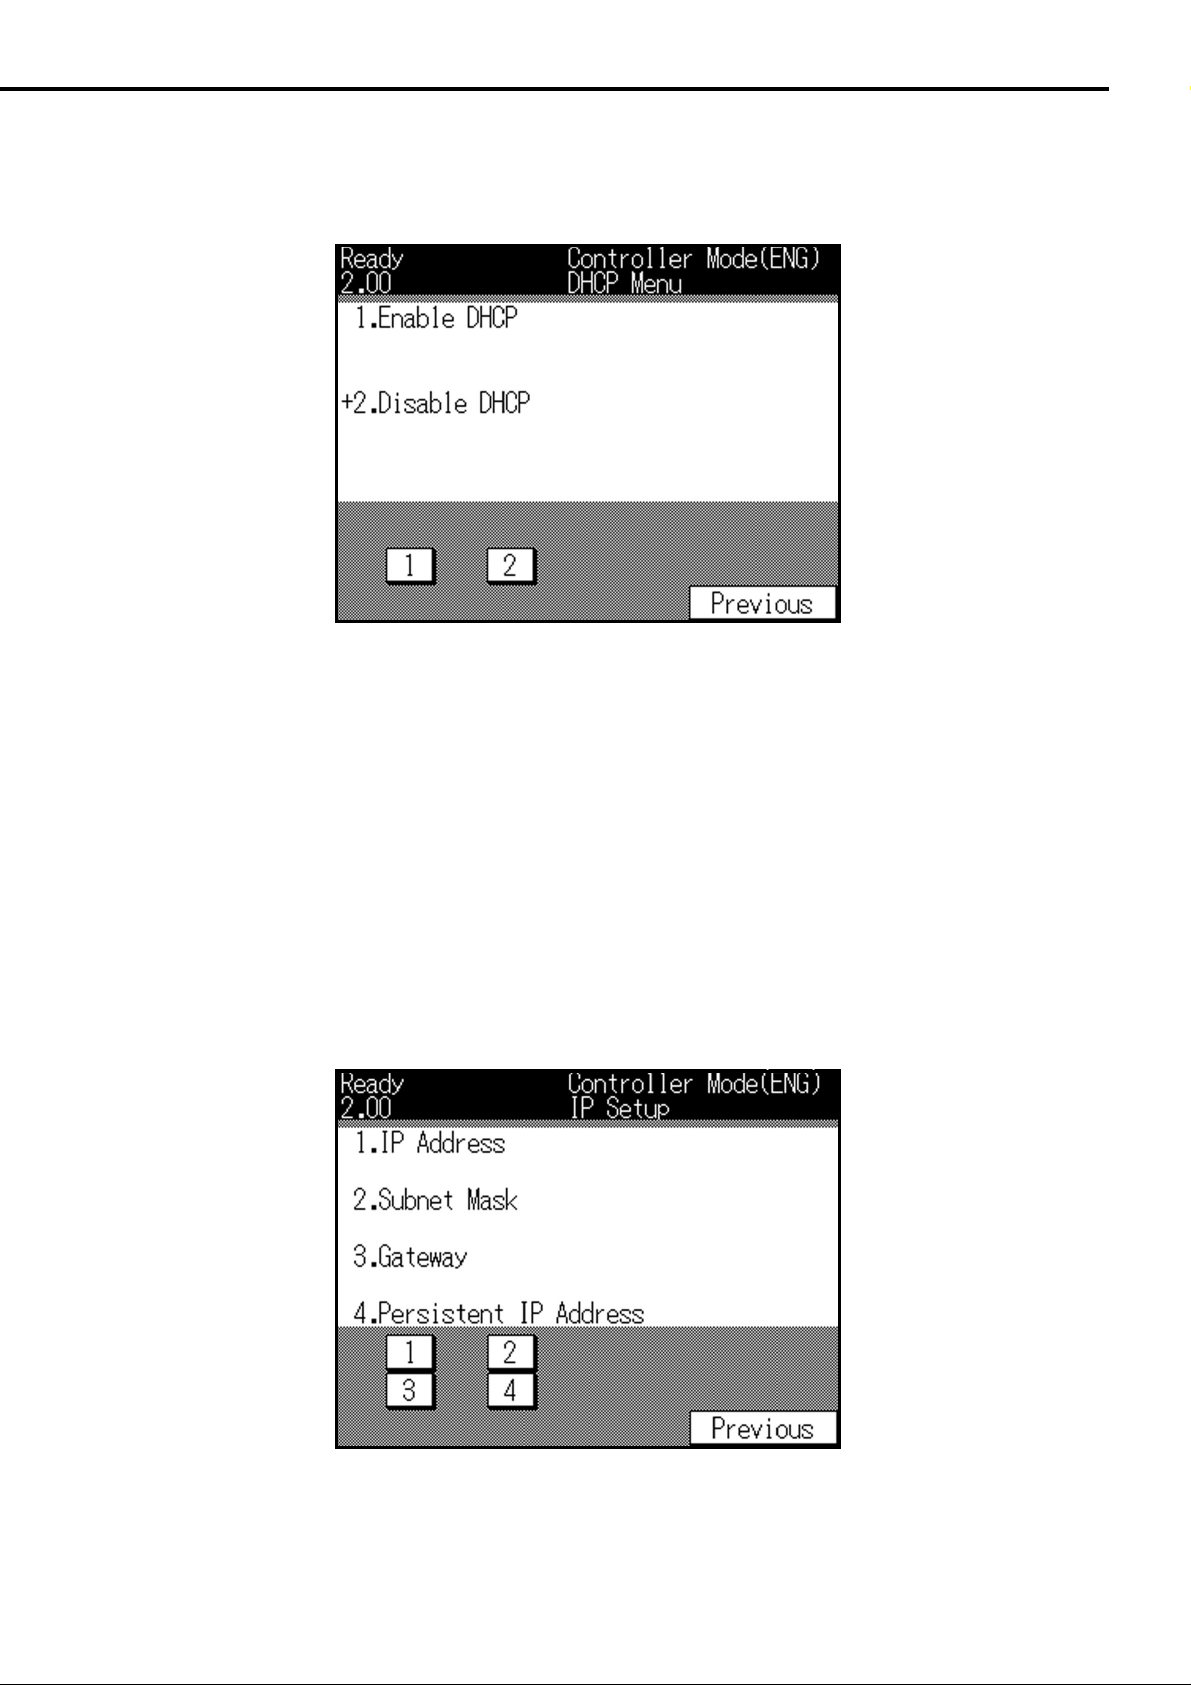
● Set IP mode
Select [1. Set IP mode] from the TCP/IP Setup menu: the [DHCP Menu] window appears.
Select [1. Enable DHCP] to use DHCP and [2. Disab le DHCP] otherwise. Press [Pre vious] to go back to the
previous menu.
● IP Settings
If you have selected [2.Disable DHCP] in the DHCP Menu, it is needed to define an IP address, subnet
mask and gateway and to enable the IP address defined.
As you select [2. IP Settings] in the TCP/IP Setup menu, the screen will appear as follows. You have to
define all of the four items. Press the number key associated with the corresponding menu item and enter
a value. Press [Previous] to go back to the previous menu.
KN-304 Network Board 2-5

Chapter 2 Setting up from the LCD Panel
1. IP Address
Designate the IP address assigned to the KN-304 Network Board. The IP address is a set of
four numbers (0-255 each) delimited with a dot (.), lik e “192.168.0.10”. The mark “+” indicates
a digit which can be entered or changed. If a value you have entered is out of range, a
message will say “Illegal input, try this part again!” The def ault is “0.0.0.0”. Press [Pre vious] to
go back to the previous menu.
2. Subnet Mask
Designate the subnet mask. The subnet mask is a set of four numbers (0-255 each) delimited
with a dot (.), like “255.255.255.0”. The mark “+” indicates a digit which can be entered or
changed. If a value y ou ha ve entered is out of range , a message will sa y “Illegal input, try this
part again!” The default is “0.0.0.0”. Press [Previous] to go back to the previous menu.
3. Gateway
Designate the IP address of the gatewa y; a set of four numbers (0-255 each) delimited with a
dot (.), like “192.168.0.1”. The mark “+” indicates a digit which can be entered or changed. If
a value you ha v e entered is out of range, a message will sa y “Illegal input, try this part again!”
The default is “0.0.0.0”.
4. Persistent IP Address
Select [1. Yes] to enable the IP address defined and [2. No] to disable. Press [Previous] to go
back to the previous menu. The default choice is [1. Yes].
● LPD Banner Enable
Select “3. LPD Banner Enable” from the TCP/IP Setup menu, and the following window appears.
Select [1. Yes] to print LPD banner and [2. No] otherwise. Press [Pre vious] to go back to the pre vious menu.
The default choice is [2. No].
2-6 KN-304 Network Board

Chapter 2 Setting up from the LCD Panel
■ Setup for NetWare
To set up for printing by NetWare, you select “2. NetWare Setup” from the Network Setup menu.
Select “2. NetW are Setup” from the Network Setup men u, and the NetWare Setup men u appears as shown
below. Press the number key associated with the desired menu item. Press [Previous] to go back to the
previous menu.
● Server Name
Define the name of the NetWare print server given to the KN-304 Netw ork Board. The default is “K ON_nnnnnn
(nnnnnn indicates its serial number)”.
● Server Password
Define the password of the NetWare print server. The default is void.
● Queue Scan Rate
Enter a value, 1-255 (seconds), to designate the intervals in which the KN-304 Network Board looks for a
new print queue. The default value is 1 (second).
● Frame Type
Select one out of the following as the frame type used in the LAN. The default is [1. Auto].
1. Auto
2. Ethernet 802.3
3. Ethernet II
4. Ethernet SNAP
5. Ethernet 802.2
KN-304 Network Board 2-7
Chapter 2 Setting up from the LCD Panel
● Disable Bindery
You can enable/disable the Bindery Service of NetWare 4.x and up . Select Yes to enable and No otherwise.
The default is No.
● NDS Context
Designate the NDS context name (e.g. ou=standard.ou=organization_1).
● NDS Tree
Designate the NDS tree name.
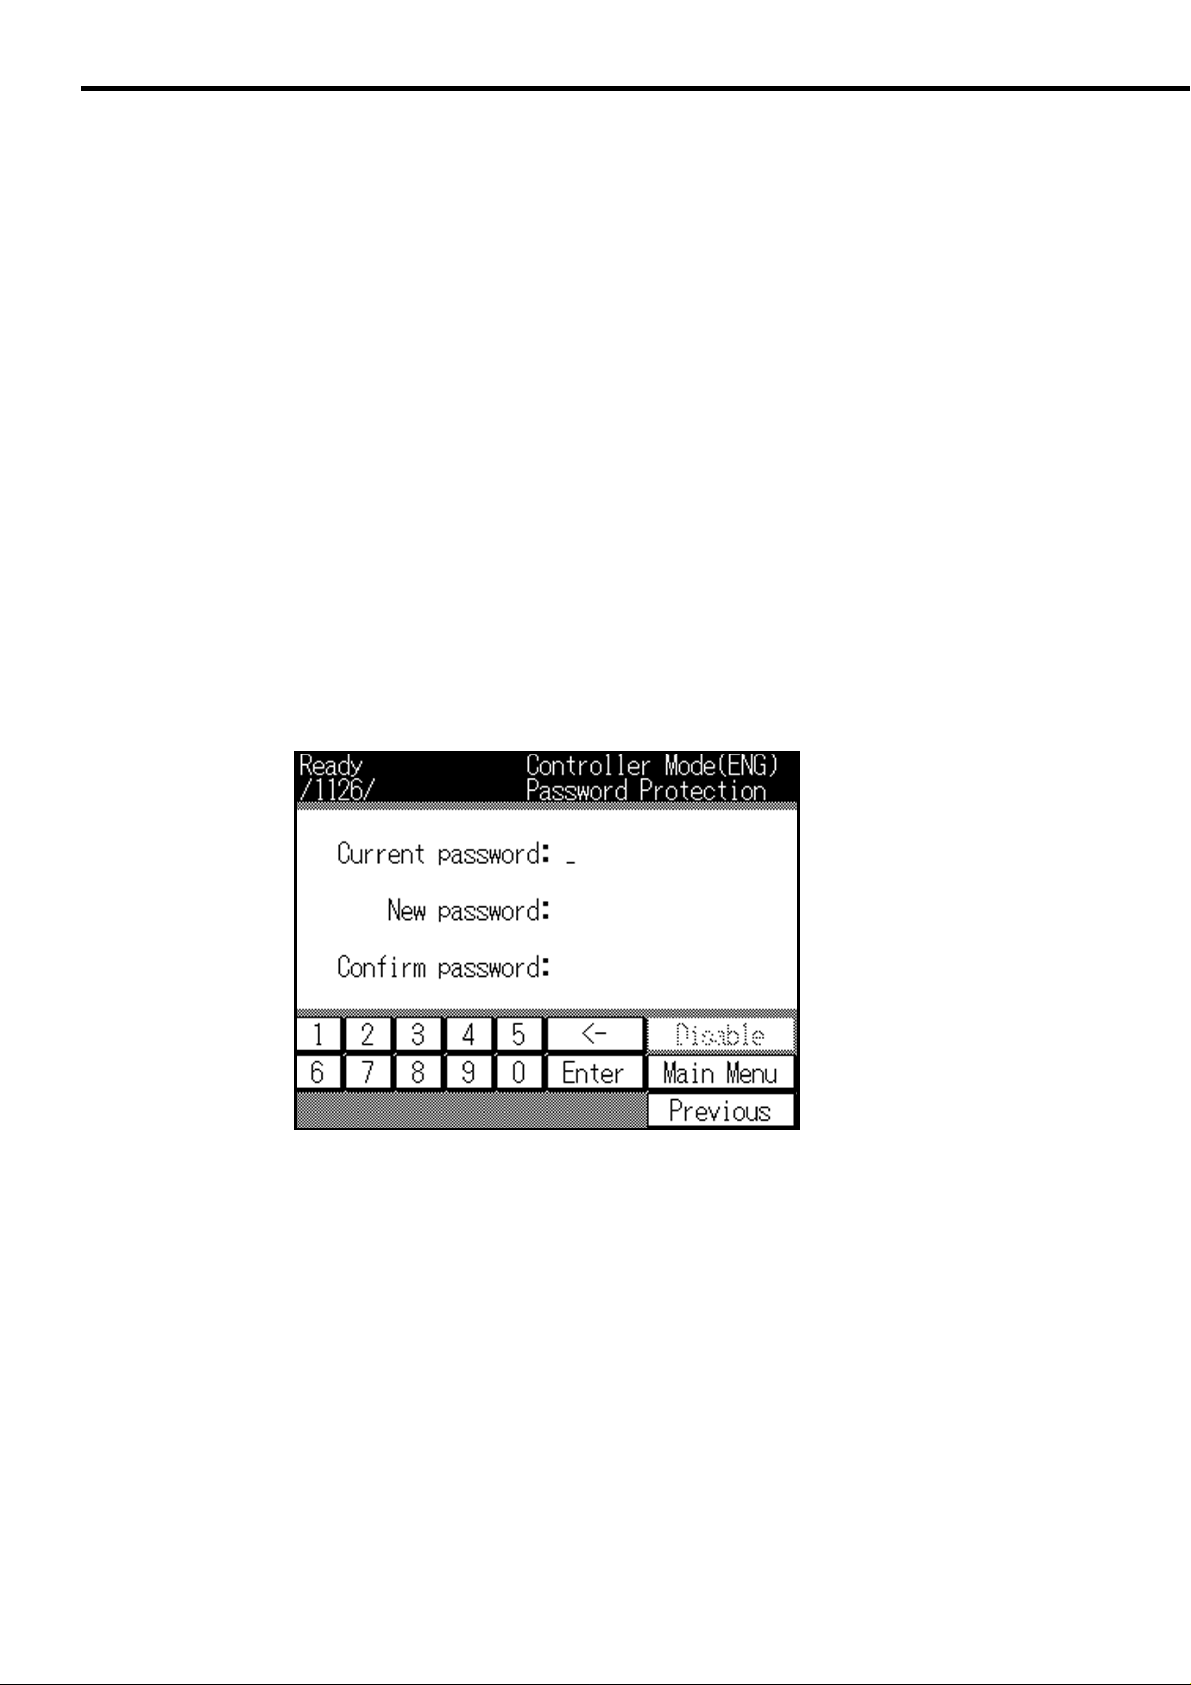
■ Defining the password
Select [3. Password Protection] from the [Network Setup] menu to define the password. If the password is
already defined, you have to type the right password in the window where you are urged to do that, after
pressing [Update NIC]. If you fail to respond with the right password (a number of 1-6 digits), you cannot
change network settings.
● Defining/changing the password
To define the password for the first time, type the password following [New password:] (you cannot enter
information following [Current password:]) and press the [Enter] button. Then type the same password
following “Confirm password:” and press the [Enter] button.
T o change the current pass word defined earlier, type the current pass word follo wing [Current password:]and
press the [Enter] button. Then type the new password following [New password:] and press the [Enter]
button. Finally type again the new password following [Confirm password:] and press the [Enter] button.
● Disabling the password
To disable use of the password, press the [Disable] button in the [Password Protection] window.
2-8 KN-304 Network Board

Chapter 2 Setting up from the LCD Panel
■ Confirming the current network setup information
You can look at the current network setup information displayed on the LCD screen and even printed out.
● Displaying the network setup information
To look at the network setup information on the LCD screen, select [3. Detail Message] from the [Main
menu] and press the [NIC] button.
● Printing the network setup information
To have the network setup information printed out as status page, select [5. Test Print] - [2. NIC Configuration] from the [Setting] menu. See Printout of status page in Chapter 7, T roub leshooting, f or an example of
the printout of network setup information.
KN-304 Network Board 2-9

Chapter 3 Peer-to-Peer Printing (Windows 95/
98)
■ Basic TCP/IP setup....................................................... 3-2
■ Use of IP Peer-to-Peer.................................................. 3-3
● Installing IP Peer-to-Peer......................................... 3-3
● Setting IP Peer-to-Peer............................................ 3-3
■ Printer driver setup ....................................................... 3-5
IKN-304 Network Board 3-1

Chapter 3 Peer-to-Peer Printing (Windows 95/98)
In a LAN, which has no print server but consists only of Windows 95/98 computers, those computers and
printers can be connected in the form called “peer-to-peer”.
As peer-to-peer printing uses the network protocol TCP/IP, the KN-304 Network Board must be set up for
TCP/IP in advance. For each of the Windows 95/98 computers that perform peer-to-peer printing, it is
needed to set up TCP/IP, install and set up [IP-P2P] included in the CD-ROM provided, and set up the
printer driver.
■ Basic TCP/IP setup
Select [Network] from the [Control Panel] of a Windows 95/98 computer that uses the Konica 7020 series
printer via the KN-304 Network Board. Then the [Network] dialog box appears . Click the [Configuration] tab
and make sure that [TCP/IP] exists in the list of Current Network Components. If it is not found, add TCP/
IP. See Windows 95/98 Help or something else for how to add TCP/IP.
When [TCP/IP]exists in the [Current Network Components] list, make sure of the v alues of IP address , etc.
Select [TCP/IP] and click the [Properties] button. The [TCP/IP Properties] dialog box appears. Clic k the [IP
Address] tab and confirm or define the TCP/IP address and subnet mask assigned to the computer . Set up
on another panel as necessary. Click the [OK] button to return to the Network dialog box.
Next, click the [Identification] tab in the [Network] dialog box and confirm the name given to the computer.
Click the [OK] button to finish the setup procedure.
Take care to determine the values of parameters.
Consult the network administrator to determine the values of parameters like the IP address. If
the IP address is inadequate, failures may occur in various locations in the network.
3-2 KN-304 Network Board

Chapter 3 Peer-to-Peer Printing (Windows 95/98)
■ Use of IP Peer-to-Peer
The program IP P eer-to-Peer contained in the CD-R OM provided is required to print out from a Windo ws 95/
98 computer by TCP/IP.
● Installing IP Peer-to-Peer
Click Setup.e x e in the [IP-P2P] folder of the CD-ROM. The installer will start up. Install the prog ram according to the instructions displayed on the screen.
● Setting IP Peer-to-Peer
On completion of installation, select [Start] - [Programs] - [Ip-p2p] - [IP-P2P] to start up IP Peer-to-Peer.
Setting IP Peer-to-Peer
Once IP Peer-to-Peer star ts, the IP Peer-to-Peer Setup dialog box appears. In this screen,
you define the Max Hops for, IP Port and Printer Names.
[Max Hops for]
IP Peer-to-Peer broadcasts to search the printer on the network.
The dafault of Max Hops for (0-15) is 2. When the value is set to 0, search will be exercised
only in the segment to which the computer that has activated IP Peer-to-Peer belongs. When
the value is 2, the network will be searched everywhere accessible via up to two routers. Note
that the greater the value of Maximum Hop Count, the more traffics generated.
KN-304 Network Board 3-3

Chapter 3 Peer-to-Peer Printing (Windows 95/98)
[IP Port]
The KN-304 Network Board has a definite port number assigned. The default is 10000 and
you can change the value as necessary. It is required that the port number assigned to the
KN-304 must be used for IP Peer-to-Peer.
[Printer Names]
You designate the printer name indicated when you select the printer port during printer driver
setup. You may use the serial number of the KN-304, IP address or unit name as the printer
name.
Adding a printer
Click the [Printers] button in the [IP P eer-to-Peer Setup], and the Printers dialog box appears.
Enter required information and click the [Add] button. Now the new printer is added to the list
of [Av ailable Printers]. To delete one out of the printer list, select it and click the Delete b utton.
[IP Address]
Enter the IP address assigned to the printer.
[Name]
Enter the printer name indicated when you select the printer port during printer driver setup.
[Port]
The port number indicated is the base port number plus one. Do not change this value unless
necessary .
[Description]
Enter a character string of description, which will be displayed after the port number when you
select the printer port during printer driver setup.
3-4 KN-304 Network Board
Chapter 3 Peer-to-Peer Printing (Windows 95/98)
■ Printer driver setup
On completion of printer driver setup, you install the printer driver (Konica IP-011 Nozomi). The pr inter
driver is comtained in the CD-ROM provided with the Konica IP-011.
The setup program allows to install not only the printer driver but the Konica IP-011 Nozomi Printer Tools
and Readme.txt. Use the Printer Tools from a computer connected in parallel with the printer. The Printer
Tools cannot be used when connection is made by TCP/IP.
For more detail of the printer driver, refer to the instruction manual of the Konica IP-011 Printer Controller.
The procedure of printer driver installation is as follows.
Set the CD-ROM containing the printer driver in the CD-ROM drive.
Double-click [Setup.exe] in the [95nozomi] folder to start the installer.
When the startup screen of the installer has appeared, click the Next button.
The [Software License Agreement] screen appears. Click [Yes] if you agree.
Designate the form of printer connection. Here you select [Local] and click the [Next b utton].
Designate the printer port. Here you select the printer name defined for IP Peer-to-Peer and
click the Next button.
Designate the printer name and click the [Next] button.
The folder where the printer driver is to be installed is indicated. You may change the f older as
necessary. Click the Next button.
Designate the components to be installed. The [Konica IP-011 Nozomi driver] must be in-
cluded. Click the [Next] button.
If the [Konica IP-011 Nozomi Printer Tools] is included in the components to be installed, a
prompt will ask you saying [Do you Start Status Monitor automatically?] Click Yes to select
automatic startup and No otherwise.
Confirm the list of the components to be installed. Click the [Next] button.
Installation starts actually with the required files copied.
On completion of installation, a prompt asks you whether to restart Windows immediately or
not. You may select No as restarting is not necessary. Click the [Finish] button finally.
To enable the Konica IP-011 Nozomi Printer Tool, you have to restart the system.
KN-304 Network Board 3-5

Chapter 4 Printing by lpd/lpr (Windows NT)
■ Basic TCP/IP setup ...................................................... 4-2
■ lpd/lpr setup.................................................................. 4-3
● Installing Microsoft TCP/IP Print Service................. 4-3
● Adding a printer port and installing the printer driver4-3
■ Printer Driver Setup from Client ................................... 4-4
KN-304 Network Board 4-1

Chapter 4 Printing by lpd/lpr (Windows NT)
The KN-304 Network Board is provided with the standard print server protocol (lpd) for TCP/IP. So , y ou can
use TCP/IP print service (lpr) from a computer of Windo ws NT 4.0 and up (hereafter noted as Windo ws NT).
The network protocol used for printing by lpd/lpr is TCP/IP and therefore the KN-304 Network Board must
be set up for TCP/IP in advance.
For each of the Windows NT computers that perform printing by lpd/lpr, it is needed to set up TCP/IP,
Microsoft TCP/IP printing and printer driver.
■ Basic TCP/IP setup
Select [Network] from the [Control Panel] of a Windows NT computer that uses a printer via the KN-304
Network Board. Then the [Network] dialog box appears. Click the [Configuration] tab and make sure that
[TCP/IP Protocol] exists in the list of Network Protocols. If it is not found, add TCP/IP. See Windows NT
Help or something else for how to add TCP/IP.
When “TCP/IP” exists in the [Network Protocols] list, make sure of the values of IP address, etc. Select
[TCP/IP] and click the Properties button. The [Microsoft TCP/IP Properties] dialog box appears. Click the
[IP Address] tab and confirm or define the TCP/IP address and subnet mask assigned to the computer . Set
up on another panel as necessary. Click the [OK] button to return to the [Network] dialog box.
Next, click the [Identification] tab in the [Network] dialog box and confirm the name given to the computer.
Click the [OK] button to finish the setup procedure.
Take care to determine the values of parameters.
Consult the network administrator to determine the values of parameters like the IP address. If
the IP address is inadequate, failures may occur in various locations in the network.
4-2 KN-304 Network Board

Chapter 4 Printing by lpd/lpr (Windows NT)
■ lpd/lpr setup
●
Installing Microsoft TCP/IP Print Service
Select [Network] from the [Control Panel] of a Windows NT computer, and the [Network] dialog box appears. Click the [Services] tab and make sure that [Microsoft TCP/IP Printing] exists in the list of Network
Services. If it is not found, add TCP/IP. See Windows NT Help or something else for how to add TCP/IP
Printing service.
● Adding a printer port and installing the printer driver
On completion of installing Microsoft TCP/IP Print Ser vice, you add a printer por t and install the printer
driver [Konica IP-011 Nozomi] by using the [Add Printer] f eature of Windows NT. The CD-ROM containing
the printer driver must be prepared.
For more detail of the printer driver, refer to the instruction manual of the Konica IP-011 Printer Controller.
See the following section, Printer Driver Setup from Client, for setup to use as a client the KONICA 7020
series that is set up as a printer shared by Windows computers on the network.
The procedure of adding a printer port and installing the printer driver is as follows.
Click the [Start] button and select [Printers] from [Settings].
Double-click [Add Printer] to activate [Add Printer wizard].
Select [My Computer] and click [Next].
Click the [Add Port] button.
Select [LPR Port] from [Av ailable Printer P orts] in the [Printer Ports] dialog box. Clic k the [New
Port] button.
Type the IP address assigned to the KN-304 Network Board for [Name or Address of Server
providing lpd] in the [Add LPR-Compatible Printer] dialog box.
Type [PORT1] for [Server Printer Name or Printer Cue Name], and click the OK button.
Close the [Printer Ports] dialog box.
Click [Next] of the [Add Printer wizard], and y ou come to the step of installing the printer driver.
You select the printer manufacturer and model on the window displayed.
Set the CD-ROM containing the printer driver in the CD-ROM drive and clic k the [Have Disk...]
button. The [Install from Disk] dialog box appears.
KN-304 Network Board 4-3

Chapter 4 Printing by lpd/lpr (Windows NT)
Designate the CD-ROM drive as [Copy manufacturer’s files from] and click the [Browse...]
button.
Open the [Ntnozomi] folder in the [Locate] dialog box and click the [Open] button.
Select [oemsetup] and click the [Open] button.
Click the [OK] button in the [Install from Disk] dialog box.
Click the [Next] button of the [Add Printer wizard].
Enter [Printer Name] as necessary and click the [Next] button.
Designate whether or not to share the printer with other network computers. If shared, enter
an adequate shared printer name.
A prompt asks you saying [Print Test Page?] Select [Yes] to print a test page and [No] other-
wise, and then click the [Finish] button. Now the printer driver is copied and the printer added.
A test page will be printed out if so designated.
■ Printer Driver Setup from Client
When the printer connected for Microsoft TCP/IP Print Service is set up as a shared printer, a Windows
computer set up as a Microsoft network client can be connected to the printer.
To use a shared printer, each client should install the printer driver (Konica IP-011 Nozomi) and, for this
purpose, use [setup.exe] held in the [95 nozomi] or [Ntnozomi] folder. The setup program allows to install
not only the printer driver but the Konica IP-011 Nozomi Printer Tools and Readme.txt. Use the Printer
Tools from a computer connected in parallel with the printer. The Printer Tools cannot be used when
connection is made by TCP/IP.
For more detail of the printer driver, refer to the instruction manual of the Konica IP-011 Printer Controller.
Set the CD-ROM containing the printer driver in the CD-ROM drive.
Double-click [Setup .exe] in the [95nozomi] folder if the client’ s OS is Windows 95/98, or in the
[Ntnozomi] folder if the OS is Windows NT, to start the installer.
When the startup screen of the installer has appeared, click the [Next] button.
The [Software License Agreement] screen appears. Click [Yes] if you agree.
4-4 KN-304 Network Board

Chapter 4 Printing by lpd/lpr (Windows NT)
Select [Network] as the form of printer connection and click the [Next] button.
Designate the Network Board in the form of “\\computer name\ shared printer name”. Alterna-
tively, click the the Reference... button and look for the printer from the Printer Reference
window. Click the Next button.
Designate the printer name and click the [Next] button.
The folder where the printer driver is to be installed is indicated. You may change the f older as
necessary. Click the [Next] button.
Designate the components to be installed. The [Konica IP-011 Nozomi driver] must be in-
cluded. Click the [Next] button.
If the [Konica IP-011 Nozomi Printer Tools] is included in the components to be installed, a
prompt will ask you saying “Star t up Status Monitor automatically?” Click [Yes] to select
automatic startup and No otherwise.
Confirm the list of the components to be installed. Click the [Next] button.
Installation starts actually with the required files copied.
On completion of installation, a prompt asks you whether to restart Windows immediately or
not. You may select No as restarting is not necessary. Click the [Finish] button finally.
To enable the Konica IP-011 Nozomi Printer Tool, you have to restart the system.
KN-304 Network Board 4-5

Chapter 5 NetWare Setup
■ Setup for NetWare 2.x/3.x ............................................ 5-2
■ Setup for NetWare 4.x .................................................. 5-3
● Setup information .................................................... 5-3
● NDS setup............................................................... 5-4
● Setup for Bindery Emulation ................................... 5-5
KN-304 Network Board 5-1

Chapter 5 NetWare Setup
To print with the Konica 7020 series fitted with the KN-304 Network Board by using Novell NetWare, the
setup procedures depend on the NetWare version and the method of resource management.
■ Setup for NetWare 2.x/3.x
Before setting up NetWare, you have to define the print server name, etc., from the 7020 series machine’s
LCD panel or MAP (Web utility). See Chapter 6, Setup Utility MAP, for setting up NetW are by MAP. See the
manual of Novell NetWare for setting up with PCONSOLE.
The setup procedure of NetWare 2.x/3.x is as f ollows . To perform this procedure, you must be autorized as
supervisor.
Start up PCONSOLE and select the file server to use.
Generate and assign a print queue.
Define KN-304 as the print server.
Define the notification list/password as necessary.
Set up the primary file server as necessary.
On completion of setup, turn off printer’s main po wer and turn it on again. The printer will print out a network
setup list indicating the file servers fitted with KN-304 and the queues that the file servers will service.
MEMO
MEMO
The primary file sever must be defined if the network is of a large scale and connects many sites
having more than one file server. PCONSOLE should be used to set up the primary file sever.
5-2 KN-304 Network Board

Chapter 5 NetWare Setup
■Setup for NetWare 4.x
Novell NetWare 4.x can operate in two modes, NetWare Director y Ser vice (NDS) and Binder y Emulation
Service (Bindery Emulation). Bindery Emulation Service and NDS will be executed simultaneously. It is
also possible to set up the print server so that it operates only in Bindery Emulation Service mode or in NDS
mode.
The print server set up for NDS mode will also service the file server of an old version operating in Bindery
mode.
If NDS is not set up properly for the print server card and Bindery Service mode is not operating,
the print server card cannot find the file server and Novell NetW are protocol will be indicated as
inactive in the network setup list.
● Setup information
NDS
NetWare Directory Service (NDS) offers a different, more advanced approach to network
management than previous NetWare versions. Generally, it stores and tracks all network
objects. As a rule, all 4.x servers must have NDS loaded in order to function. In this way,
every NetWare 4.x server is a Directory server, because it services named Directory objects
such as printers, print server and print queues. With the appropriate privileges, you can
create a print server object, which, once configured in its context (or location) on the network,
eliminates the cumbersome setup of print servers on every network server. NDS provides
true enterprise networking based on a shared network database rather than a individually
defined physical sites. The result is greatly improved print server setup and management.
Bindery emulation
The Directory Information Base (DIB) is used to store information about servers and services,
users, printers, gateways, etc. It is a distributed database, allowing access to data anywhere
on the network wherev er it is stored. Pre-4.x NetWare versions provide the same data f ound
in the DIB but thte data is stored in the NetWare Binery. The DIB was designed with more
flexible access, more specific security, and, since it is distributed, it was designed to be partitioned.
The Directory uses an object-oriented structure, rather than the flat-file structure of the Bindery , and offers network-oriented access, rather than server-oriented access f ound in the Bindery .
KN-304 Network Board 5-3

Chapter 5 NetWare Setup
The Directory is backward-compatible with the NetWare Bindery through Bindery emulation
mode. Section 4.3 descr ibes Print Ser ver Operation with a 4.x NetWare system in bindery
emulation mode. When Bindery emulation is enabled, Directory Services will accept Bindery
requests and respond just as if a Bindery existed on the NetWare server being accessed. Be
aware that information obtained from the Bindery query may not be stored in the server since
the Directory is a partitioned and distributed database. Even though the NetWare 4.x server
is not operating from a Bindery, the applications making Binder y requests will not know the
difference.
● NDS setup
Web utility
This is used for conte xt setup of the KN-304 print server . See “Chapter 6, Setup Utility MAP”,
for more detail.
Novell NWADMIN
Novell NWADMIN (NetWare Administration) is used to generate a directory tree and print
queue objects in the print server, printer and tree.
The KN-304 is provided with a plug-and-play f eature to support NetWare administration utility
(NWADMIN) that enables the NDS administrator to perform centralized management of print
servers.
Refer to the Novell NetWare manual for details of Setup with NWADMIN.
PCONSOLE
NetWare allows of the use of PCONSOLE as an alternative of NWADMIN. PCONSOLE is
used to set up static information of print servers, like which of the queues to service, to whom
information is to be given in case of trouble.
Refer to the Novell NetWare manual for details of setup with PCONSOLE of NDS.
5-4 KN-304 Network Board
● Setup for Bindery Emulation
Make sure of the Bindery Context.
Before connecting the KN-304 print server to the Nov ell NetW are 4.x server of bindery mode,
make sure that the NetWare server contains the bindery context.
If the bindery context does not exist, the network administrator should modify the
AUTOEXEC.NCF file to add an adequate SET command and restart the NetWare server or
enter a SET command from the console prompt to make changes.
Note that any command entered following the console prompt is effective immediately but the
definition of the autoexec file becomes effective only after turning off power and on again.
Perform the following procedure to check if the contains the bindery context.
Chapter 5 NetWare Setup
Log-in to the file server by the name of ADMIN.
Respond to the MS-DOS prompt with TYPE Z:\SYSTEM\AUTOEXEC.NCF.
When the file contents are displayed, see if a line exists that is something as follows.
SET BINDERY CONTEXT=0=<Name>
=0= denotes the file server context. Use the actual file server context.
<Name> identifies the server context and can be found when PCONSOLE is activated as it is
indicated at top left in the Available Items menu window.
If no name is defined, the KN-304 does not work. A name m ust be defined first of all. For this
purpose, terminate PCONSOLE and add the following line in the AUTOEXEC file by using a
text editor.
SET BINDERY CONTEXT=0=KONICA_CORP
After adding the line, turn off power and restart the server. Now the modification is effective.
Alternatively, the network administrator can enter a SET command from the console prompt
to make immediate modifications. At this time, all modifications are lost once the server is
turned off and restarted.
Note that any command following the console prompt is effective immediately but the definition
of the autoexec file becomes effective only after the system is restarted after turning off power.
KN-304 Network Board 5-5

Chapter 5 NetWare Setup
Setup with PCONSOLE in bindery mode
If it is sure that the bindery context exists in the file server, you set up the KN-304 with
PCONSOLE.
Refer to the Novell NetWare manual for details of setup with PCONSOLE.
In Bindery mode, only upper-case letters are valid for the printer server password.
5-6 KN-304 Network Board

Chapter 6 Setup Utility MAP
■ MAP (Management Access Program) overview........... 6-2
● Requirements for installation................................... 6-2
● Installing MAP ......................................................... 6-2
■ MAP setup.................................................................... 6-3
■ Web utility..................................................................... 6-4
● Choice of printer...................................................... 6-4
● TCP/IP setup........................................................... 6-5
● NetWare setup ........................................................ 6-7
■ Setup/indications - other............................................. 6-10
● Restarting the network card .................................. 6-10
● Restoring the default values.................................. 6-10
● Confirming the settings ......................................... 6-10
● Network address ................................................... 6-11
● Changing the password......................................... 6-11
● Test printer............................................................. 6-11
● Configure Status Page .......................................... 6-11
● Printer status ......................................................... 6-11
● Unit Info................................................................. 6-12
KN-304 Network Board 6-1

Chapter 6 Setup Utility MAP
■MAP (Management Access Program) overview
It is possible to change printer settings through access to the HTTP server, incorporating a Web utility,
mounted on the KN-304 Network Board. The CD-R OM provided contains a utility named MAP. MAP allo ws
to detect KN-304 Network Boards on the network and list them up by using a Web bro wser. You can select
one out of the list of the KN-304s to change its settings and operate the Web utility from the Web browser.
● Requirements for installation
MAP is a utility operating on Windows 95/98/NT/2000. It detects KN-304s existing in the network and
establishes connection with the HTTP server mounted on a KN-304. One of the following Web browsers is
needed for interface as MAP does not have a means of interface.
• Netscape Navigator (version 4.x and up)
• Internet Explorer (version 4.x and up)
Therefore TCP/IP must be set up for both the KN-304 and Windows computer. The IPX protocol m ust also
be set up to search KN-304s that use IPX.
● Installing MAP
Install MAP by the following procedure.
Set the CD-ROM provided in the CD-ROM drive and double-click [Setup.exe] in the [Map]
folder.
The setup program starts. Confirm the information displayed and click the [Next] button.
Confirm the folder in which MAP is to be installed. The default is C:\Prog ram Files\MAP. Clic k
the [Next] button, and installation will proceed with the associated files copied.
6-2 KN-304 Network Board

Chapter 6 Setup Utility MAP
■MAP setup
The MAP setup program installs two programs, MAP Setup and MAP. MAP Setup is the program used to
set up the environment for MAP to detect KN-304. Execute MAP Setup first.
To start MAP Setup, select [Start] - [Programs] - [Map] - [MAP Setup]. Once MAP Setup starts, the following
window appears.
In MAP setup, the protocol used by the KN-304 detected on startup of MAP, and the IP maximum hop
count, should be designated. To detect the KN-304 that uses IPX, check the “Search IPX printer” box. To
detect the KN-304 that uses IP, check the “Search IP printer” box.
To use IP as the network protocol, the Max Hops for IP Search should be designated. The default of Max
Hops for IP Search (0-15) is 2. When the value is set at 0, search will be exercised only in the segment to
which the computer that has activated MAP belongs. When the value is 2, the network will be searched
everywhere accessible via up to two routers. Note that the greater the value of maximum hop count, the
more traffics generated.
.
KN-304 Network Board 6-3

Chapter 6 Setup Utility MAP
■ Web utility
Select [Start] - [Program] - [Map] - [MAP] to star t up MAP. On starting, MAP looks for KN-304s on the
network according to the contents of MAP setup. When KN-304s are found, the available KN-304s are
listed in the window of the Web browser selected as the standard browser.
● Choice of printer
You select the printer to be set up out of the list of printers by using the W eb utility. [Network Administration
menu] appears.
System
Reset
Factory Defaults
Unit Status
Network Address
Change Password
If you want to change the language currently used, perform the following procedure.
[Procedure of selecting language]
1)Add “/local” to the URL of the Web browser on the main screen, and press Enter.
Example: http://10.12.10.19/local
The window to select a language appears.
Protocols
Setup NetWare
Setup TCP/IP
Setup IPP
Others
Test Printer
Configure Status Page
Printer Status
2)Click the language you want.
The language you have selected is used on the screen.
3) Click Home.
6-4 KN-304 Network Board

● TCP/IP setup
Select [SetupTCP/IP] from [Protocols] of the [Network Administration menu]
Set the parameters as necessary.
Enable TCP/IP
Check this box to allo w the KN-304 to automatically get the IP address from the DHCP server .
When this box is checked, define the IP address as “0.0.0.0” and remove the check mark in
the “Set IP address” box.
IP address
Enter the print server’s IP address if it is not shown. Consult the system administrator for the
value of IP address.
Chapter 6 Setup Utility MAP
Subnet mask
Enter the sub net mask if it is not shown.
Default Gateway
Enter as necessary. You may leave it void unless necessary.
Base Port Number
Enter the base port number assigned to the print server. The def ault is 10000. The base port
number is used in IP peer-to-peer setup.
Enable DHCP
Check this box to allo w the KN-304 to automatically get the IP address from the DHCP server .
When this box is checked, define the IP address as "0.0.0.0" or clear the "IP Address in
NVRAM" box.
IP Address in NVRAM
Check this box to allow the KN-304 to keep the IP address in NVRAM for access after then.
KN-304 Network Board 6-5

Chapter 6 Setup Utility MAP
NetBIOS Name
Define the NetBIOS name. The default is KON-(serial number).
Primary NetBIOS Name Server
The IP address of the primary NetBIOS name server can be entered/displayed.
Secondary NetBIOS Name Server
The IP address of the secondary NetBIOS name server can be entered/displayed.
Primary Server Registration
If the primary server is defined, a message appears.
Secondary Server Registration
If the secondary ser ver is defined, a message appears.
Enable LPD banner
Check this box to allo w the printer to print the LPD banner page in ev ery print job (only in lpd/
lpr printing).
If the password is not yet entered, you have to enter the password to enter or change settings.
Initially the password is defined as “sysadm”.
On completion of entry, click [Accept Settings]. Now the values entered are effective. To
restore the original values, click [Clear Input].
To enable the KN-304's new parameter values for the IP-011 pr inter controller, turn on and off
power of the 7020 series.
6-6 KN-304 Network Board

● NetWare setup
Select [Setup NetWare] from [Protocols] of the [Network Administration menu]
Set the parameters as necessary.
Enable Network
Check this box to enable Novell NetWare (IPX/SPX) as the print server protocol. Click and
cross out the check mark unless the primary protocol of the print ser ver is Novell NetWare.
This box is not checked by default.
Print Server Name
Every Novell print server has its own name assigned. The default name of the KN-304 print
server is “KON_(serial number)”. The serial number is shown on the label placed on the KN304 Network Board.
Chapter 6 Setup Utility MAP
If you want to change the current print server name whether it is default or not, enter the new
name of up to 63 (1-byte) characters in this field. The same name must be registered for
PCONSOLE: otherwise the new name is invalid.
Print Server Password
The network administrator assigns a password to the Nov ell print server . If the password has
been assigned through NetWare PCONSOLE or NWADMIN, the password must be set in the
print server. Only upper-case letters are valid for the print server password if used in bindery
mode.
KN-304 Network Board 6-7

Chapter 6 Setup Utility MAP
The password entered in this field must be the same as that assigned through NetWare
PCONSOLE or NWADMIN. The password typed is saved in the print server setup memory.
See the Novell manual for assigning passwords to print servers by PCONSOLE.
When entering a print server password, you type the password in the filed of [Print Server
Password] and type the same password again in the field of [Retype Password]. The password is common to all file serves assigned to the print server.
If you click the Save button when the values entered in the fields of [Print Server Password]
and [Retype Password] are not the same, the information entered is not effective.
Retype Password
Type the password again for confirmation.
Preferred File Server
Enter the print server’s primary file server name in this field. The primary file server is that to
which you want the print server to be connected first. When file servers are searched, a
server you don’t want may be found. This feature allows connecting to the desired server.
Preferred NDS Context
The user of Novell NetWare 4.x Director y Service should enter a preference NDS context.
The preference NDS context, with or without type, must be a complete context name. The
context path must not be preceded with a period (.). It is not necessary to enter the container
name (print server name) as it is in the name field. An example of context with type is as
follows.
Complete context
o=standard.ou=organization_1
Or,
standard.organization_1
Consult the system administrator if you have any question.
6-8 KN-304 Network Board

Preferred NDS Tree
For Novell NetWare 4.x Directory Service, enter the preference tree in this field. If you don’t
know the tree, type “WHOAMI” on the MS-DOS command line and press the Enter key.
Print Queue Scan Rate
This option allows adjusting the polling intervals in which the KN-304 print server polls the
network to find a new print queue. The permissible range is 1-255 seconds.
Ethernet Frame Type
This option allows selecting the frame type suitable for the network. If you select “AutoSense”, the frame type will be selected automatically. Click the r adio button of the fr ame type
of the network or of “Auto-Sense”.
Chapter 6 Setup Utility MAP
Disable Bindery
Click this check box to enable/disable the Bindery Service of NetWare 4.x and up. Check off
the box to disab le bindery . When disabled, the print server does not support the print servers
connected to the bindery file server.
If the password is not yet entered, you have to enter the password to enter or change settings.
Initially the password is defined as “sysadm”.
On completion of entry, click [Accept Settings]. Now the values entered are effective. To
restore the original values, click [Clear Input].
To enable the KN-304's new parameter values for the IP-011 pr inter controller, turn on and off
power of the 7020 series.
KN-304 Network Board 6-9

Chapter 6 Setup Utility MAP
■ Setup/indications - other
●
Restarting the network card
Select [Reset] from [System] of the Network Administration menu.
Enter the password (default is "sysadm") and click [Reset Unit].
Restarting will be completed in about 2 minutes.
On completion of restarting, the newly defined parameter values are effective.
To enable the KN-304's new parameter values for the IP-011 pr inter controller, turn on and off
power of the 7020 series after restarting.
●Restoring the default values
Select [Factory Defaults] from [System] of the Network Administration menu.
Enter the password (default is "sysadm") and click [Factory Defaults].
The KN-304's parameters will be reset to the default values.
Note that the values you have set are lost after the parameters are reset to the default values.
This feature allows restoring the default settings, facilitating to redefine the parameters. This
may be convenient when you move the printer or correct inadequate settings.
• The default settings and the values you have set are ineffective until you restart (reset) the
network.
• To enable the KN-304's new parameter values f or the IP-011 printer controller, turn on and off
power of the 7020 series after restarting.
● Confirming the settings
Select [Unit Status] from [System] of the [Network Administration menu].
The protocols and the status of enabled/disabled will be indicated.
To change settings, select Protocol Setup from Protocols.
6-10 KN-304 Network Board

● Network address
Select [Network Address] from [System] of the [Network Administration menu].
The serial number and MAC address will be indicated.
● Changing the password
Select [Change Password] from [System] of the [Network Administration menu].
You can change the password. The default (defined at shipment time) is "sysadm".
● Test printer
Printer test will be sent to the printer.
Enter the password (default is “sysadm”) and click [Start Test].
Chapter 6 Setup Utility MAP
● Configure Status Page
You select whether or not network environment information should be printed out at printer
power-on time or restarting of the KN-304.
• If you check [Status Page on Star tup] , it will be printed when the KN-304’s startup is completed at power-on time.
• “Execute Immediately” button: Click this button to print out the environment information
immediately.
After selecting, enter the password and click the Set button. Now the new settings are effective. To cancel the new settings and restore the previous ones, click the Clear button.
● Printer status
The current printer status will be indicated.
(Example) Ready
Off line
Warming Up
Self Test
Resetting
Toner Low
Printing
No Error
Idle
Waiting
Energy Saving
KN-304 Network Board 6-11

Chapter 6 Setup Utility MAP
● Unit Info
The ROM version, etc., will be indicated.
6-12 KN-304 Network Board

Chapter 7 Troubleshooting
■ LED Status Indicator .................................................... 7-2
■ Status Page.................................................................. 7-3
■ Resetting the KN-304 Factory Default.......................... 7-5
■ How to Diagnose Problems.......................................... 7-6
● Troubleshooting Network Hardware Connections ... 7-7
● Troubleshooting NetWare Protocol.......................... 7-7
● NetWare Checklist................................................... 7-7
● File Server Checklist................................................ 7-8
● Workstation Checklist .............................................. 7-8
● Print Server Card Configuration Checklist............... 7-8
● Printer Server/File Server/Printer Checklist............. 7-9
● Workstation to Print Server Card
Connection Checklist................................................... 7-9
● KN-304 Loses Its File Server Connection ............... 7-9
● Unable to Print from a Different Context................ 7-10
KN-304 Network Board 7-1

Chapter 7 Troubleshooting
■ LED Status Indicator
The KN-304 has two LED status indicators: amber and green. The amber LED generally indicates job
activity; it flashes when a print job is being communicated to the Print Server Card; it is off when no activity
is occurring.
The green LED indicates the operating condition of the KN-304 when it is powered on during normal operation. The following table provides the conditions that this LED may indicate.
LED Patterns
Green LED is ON
solid.
Green LED - blinks 3
times and stays on.
Green LED blinks
rapidly.
Green LED blinks
rapidly 4 Times then
pauses.
Amber LED blinks
short foR 10 seconds.
Amber LED goes off
and the Green LED
blinks continuously.
Green LED blinks
slowly.
And the printer is...
First powered on.
Awaiting print jobs.
Finished with self-tests.
Performing self-tests.
Performing self-tests.
Performing flash
memory self-tests
Awaiting print jobs
sometime after poweron completes.
THEN THE KN-304...
Is performing self-tests.
Is functioning properly.
Prints out status report
Detects bad RAM chip.
Failed the Ethernet hardware
self-test. Check the network.
Did not pass the check-sum test.
Unit automatically goes into
download mode and awaits flash
update.
Some printer interface error.
Operating
Condition
Normal
Normal
Normal
Error
Error
Error
Error
Green LED blinks
rapidly.
Awaiting print jobs.
Has lost its NetWare connection
to file server.
Error
7-2 KN-304 Network Board

Chapter 7 Troubleshooting
■ Status Page
The Status page is sent as a print job to the printer when the KN-304 is powered on. For example, the
report on the next page shows the configuration of the KN-304 immediately before the report is printed.
Konica 7020 series printer also allows you to use a command from the LCD panel that will produce a status
report.
it is strongly recommended that you revie w this report immediately after installation and any time the setup
has been changed. If the report does not include a protocol that was configured, check that the procedure
was done properly.
KN-304 Network Board 7-3

Chapter 7 Troubleshooting
An example of network setup list
--------------------------------------------------------------------------------------------------------------------------------------------
Unit Serial No: 995289 Version: 09.00
Network Address: 00:40:af:78:d9:b8
Network Topology: Ethernet Connector: RJ45
Network Speed: 100 Megabits
Novell Network Information enabled
Print Server Name: KON_260121
Password Defined: no
Preferred File Server not defined
Directory Services Context not defined
Frame Type: 802.2 On 802.3
Peer-to-Peer Information enabled
Frame Type: 802.2 On 802.3
Network ID: 0
TCP/IP Network Information enabled
Frame Type: Ethernet II Protocol Address: 192.102.51.100
Subnet Mask: 255.255.255.0 Default Gateway: 0.0.0.0
IPP Network Information enabled
Internet Printing Protocol http://192.102.51.100:631/Print
AppleTalk Network Information enabled
Frame Type: 802.2 SNAP On 802.3
Preferred AppleTalk Zone: * Default Zone
--------------------------------------------------------------------------------------------------------------------------------------------
Novell Connection Information
Printer Name: Printer 0
File Server: PS280
Queue: 3500_NIC Priority: 1 Attached: Yes
No Notify Defined
File Server: 55SX
Queue: 3500_NIC Priority: 1 Attached: Yes
Notify (Job Owner) First: 60 Repeat: 60
Peer-to-Peer Connection Information
Printer Name: KON_260121
AppleTalk Connection Information
AppleTalk Printer Name: KON_260121
TCP/IP Connection Information
Port Number : 10001
--------------------------------------------------------------------------------------------------------------------------------------------
The KN-304 does not support Apple Talk
7-4 KN-304 Network Board

Chapter 7 Troubleshooting
■Resetting the KN-304 Factory Default
You can cause the KN-304 to restore all parameters to factory default values, so the Print Server Card
appears just as it came from the factory. You may choose to do this when the Print Server Card is moved
to a new location where the environment (NetWare file servers, IP subnets, and so on) is different.
This process is called “Reset to Factory”. It can be done with MAP or a Web Browser . However, if network
access is not possible, the following method may be used.
Note: Resetting to factory default means that the print server loses all data such as names and IP ad-
dresses. It does not lose its serial number or MAC address.
KN-304 Network Board 7-5

Chapter 7 Troubleshooting
■How to Diagnose Problems
Use the following list to determine the cause of printing problems:
1. Verify that the printer is functioning properly.
• Is the printer printing? Make sure the printer is operating properly by causing it to generate a test page .
See your printer’s owner’s manual for instr uctions on generating a test page.
• Is the printer on-line (green LED should light)*? Verify that the printer is on-line or else nothing will print.
*Status at about 2 minutes after power-on.
• Does the LCD panel of Konica 7020 series display an error message? Review Konica 7020 series
manual.
• Did you get a KN-304 status page? On power-up, the KN-304 sends a status page which may contain
information that can be useful for troubleshooting. Keep the status page available until a problem is
resolved.
2. Check the KN-304’s LED status indicator to ensure that there is no error condition. See LED Status
Indicator, for more information.
3. Check the status report to see what protocols are enabled and active. See the appropriate chapter to
confirm that you have installed and configured your network protocol correctly for the KN-304. See
Status Page for an example of the status page.
4. Determine if other users can print. If they can’t and they are all on the same NOS, go to the troubleshooting section for that NOS.
5. When you have determined the nature of the problem, use the checklists in the next section.
7-6 KN-304 Network Board

Chapter 7 Troubleshooting
●Troubleshooting Network Hardware Connections
• For 100BaseT or 10BaseT, check that the network connector is plugged into the RJ connector on the
KN-304.
• Try another cable to make sure you do not have a bad cable.
●Troubleshooting NetWare Protocol
It is recommended you use MAP to get the NetW are setup and parameter v alues . If you have not resolved
the problem after running MAP, go through the checklists in this section.
●NetWare Checklist
• Is the print server name entered correctly? The factor-default name is KON_serial number. The
serial number is located on the card.
• Did you assign print queues to the printer? It is recommended you assign each print queue to only
one Print Server Card-connected printer. If print queues are assigned to other network printers, the
print jobs may be going to an other network printer.
• Did you assign the printer to the type Remote Other /Unknown?
• If the PCONSOLE settings are correct, the connection between the printer and network may have
been broken. Tur n the printer off and, using PCONSOLE, wait for the status message Not Connected. Turn the printer on and the status should change to Waiting for Job.
KN-304 Network Board 7-7

Chapter 7 Troubleshooting
●File Server Checklist
• Is there enough disk space on the file server and is it running?
• Is the correct file server associated with the printer? Use PCONSOLE to check this.
• Did you have the proper rights to configure the printer? (supervisor or administrator)
• Are the File Server and the KN-304 communicating? Run NetWare ’s COMCHECK utility from any
network workstation to check this.
• Are there enough user positions on the File Server? The Print Server function logs on as a user.
●Workstation Checklist
• Is the network loaded onto the workstation? See the NetWare documentation.
• Is the application set up to print to the printer? For instance, are you using the correct driver?
• Is the workstation connected to the correct print queue? Print a file and verify that the file goes to the
queue.
• Are the print queues assigned to the KN-304-connected printer also assigned to another network
printer? If they are, the print jobs may be going to that printer.
• From PCONSOLE, enter a sample print job directly into an assigned queue. Does the job become
Active? Is job printed?
• Is A UT O ENDCAP enab led? Auto Endcap lets y ou send data to a network printer . Use PRINTCON to
check. If not, enable it.
●Print Server Card Configuration Checklist
If all your hardware connections are correct, check the following:
• Use MAP to check the status of the print server. The Unit Status screen shows the status for the
selected network interface card. This report includes a status of file servers and queues assigned to a
printer along with a description of any problems.
• The printer may not be assigned to the correct print queues. Use PCONSOLE to direct print jobs to the
correct queues, then check to see if the print job is in the queue.
• If devices were added or changed, use PCONSOLE to make sure you configured the new devices
correctly.
• Make sure the KN-304’s name has been entered correctly . If you changed the name in MAP, you must
7-8 KN-304 Network Board

Chapter 7 Troubleshooting
also change the name in PCONSOLE before you can print.
• Use PCONSOLE to check the Printer Status. Make sure it is not stopped or paused.
• You cannot use PCONSOLE V ersion 1.0 to configure the network interface card. Connect No vell f or an
upgrade.
●Printer Server/File Server/Printer Checklist
Check the following to see if:
• The KN-304 Print Server can log into the file server, and can service jobs from a File Server.
• The KN-304 Print Server name is listed on that File Server.
• The passw ord assigned to the Print Server Card through PCONSOLE matches the password assigned
through MAP. Use MAP to update the password stored in the network Print Server’s memory.
• The print job is in the print queue and waiting to be printed. Use PCONSOLE to check if the print jobs
are being sent to the printer.
●Workstation to Print Server Card Connection Checklist
To make sure the workstation is communicating with the Print Server Card, check the following:
• Print a file from the workstation and make sure the print job gets to the print queue using PCONSOLE.
If the print job does get to the queue, the problem is not with the workstation/print server connection.
• Use CAPTURE to send data to the printer from a workstation software application. See y our NetWare
print server manual for information.
• Make sure another printer is not taking the print jobs from the queues BEFORE the Print Server Card
can service the job. To do this, disable the other printer until you can verify the Print Server Cardconnected printer setup.
●KN-304 Loses Its File Server Connection
If the KN-304 loses its connection to the file server, it can tak e appro ximately 5 to 10 minutes to reconnect.
If the connection is not made after a reasonable amount of time, check the error conditions to troubleshoot
the problem.
KN-304 Network Board 7-9

Chapter 7 Troubleshooting
●Unable to Print from a Different Context
The KN-304 does not support printing from a context different from the context you are installed upon. If
you want to do this, you must create an alias queue. See your NetWare Manual for more information.
7-10 KN-304 Network Board

Appendices
■ KN-304 Network Board specifications..........Appendices-2
■ 10/100BaseT UTP cable specifications........Appendices-3
■ Information for the TCP/IP network
administrator.....................................................Appendices-4
● Use of DHCP...........................................Appendices-4
● Naming by WINS.....................................Appendices-4
● FTP printing.............................................Appendices-5
KN-304 Network Board Appendices-1

Appendices
■ KN-304 Network Board specifications
KN-304 specifications
Size: 123.7 mm x 95 mm
Weight: 240g
Operating conditions: 0-50 C, 5-80%r.h.
Status indicators: Green LED, yellow (amber) LED (one each)
Settings: Saved in non-volatile memory
Connector: Ethernet: 8-wire RJ45 10/100BaseT
Appendices-2 KN-304 Network Board

Appendices
■ 10/100BaseT UTP cable specifications
Use the Ethernet standards shown below to connect the 10/100BaseT UTPcable to the RJ45 connector on
the print server card. The cable should beof category type 3 or more (it depends on the length).
Pin No. Color Ethernet
8 Blue/white
7 Blue
6 Orange/white Receive5 Green/white
4 Green
3 Orange Receive+
2 Brown/white Transmit1 Brown Transmit+
KN-304 Network Board Appendices-3

Appendices
■ Information for the TCP/IP network administrator
● Use of DHCP
Dynamic Host Configuration Protocol (DHCP) is a service that provides IPaddress assignment and maintenance procedures. The KN-304 can get IPinformation from the service.
There are two user-definable variables related with the DHCP functions.You can set up those variables
from [Setup TCP/IP] of [Network Administration]provided by the Web utility.
• Enable DHCP
• IP address in NOVRAM
a. If you select [Not enable DHCP], the KN-304 does not call for the DHCPservice. If no IP address is
defined for the KN-304 or “Enab le IP addressdefined” is OFF, the KN-304 attempts to get an IP address
by BOOTP requestor some other means.
b. If DHCP can be used and no IP address is defined for the KN-304 or[IP address in NOVRAM] is OFF,
the KN-304 calls for the DHCP when resetor power has turned on.
c. If DHCP can be used but an IP address is defined for the KN-304 and[IP address in NOVRAM] is ON,
the KN-304 gets IP information from NVRAMand does not use DHCP service.
Both of the options [Enable DHCP] and [IP address in NOVRAM] are ON by default (employed at shipment
time). In this case, if the IP identificationinformation stored in NVRAM is not available, the KN-304 generates a DHCPrequest.
When DHCP can be used and the default values are set for the KN-304, itis needed to set up
(reserve) so that the KN-304’s IP address be usedcontinually on the DHCP server, because
otherwise the same address might begiven to other hosts.
● Naming by WINS
Use of WINS for the KN-304
Windows Internet Name Service (WINS) allows registering the current IP address and NetBIOS name to
the KN-304. A client who wishes to communicate with the printer can use the WINS server to match the IP
address and NetBIOS name. F or most users, it is easier to remember the printer’ s NetBIOS name than the
IP address.
To use WINS for the KN-304, it is needed to enter the IP address of the WINS server b y “TCP/IP Setup” of
the Web utility.
Setting for the WINS server
You set up the DHCP server to provide the KN-304 with WINS server inf ormation automatically. Otherwise
you can enter the required information in “TCP/IP Setup” of the KN-304. See the instruction manual of the
DHCP server for details of automatic setup for the DHCP server.
Perform the following steps in order that the WINS server should work for the KN-304.
Appendices-4 KN-304 Network Board

Appendices
Assign an IP address to the KN-304. You may use DHCP.
Initiate access to the desired KN-304 by using the Web utility.
Select “TCP/IP Setup” from the main menu.
The NetBIOS name for the KN-304 is shown on the screen. The NetBIOS name is the KN304’s serial number (for example, KON_993011).
You can enter a new name to change the current NetBIOS name. It should be a string of up to
15 1-byte characters.
If the DHCP server is set up so that the address of the primary WINS server be supplied to the
KN-304, the address is shown in the TCP/IP Setup menu. If it is not shown, enter the IP
address of the primary WINS server. You can also enter the IP address of the secondary
WINS server if you like. If the DHCP server is set up so that the address of the secondary
WINS server be supplied to the KN-304, the address is automatically filled.
Restart the printer (KN-304).
The printer’s status page should now show that the KN-304’s name has been successfully
registered in the WINS server.
● FTP printing
FTP printing by Netscape
Connect to the KN-304’s port through which print jobs are sent. For e xample , perf orm the following steps to print through the KN-304 by Netscape.
Type [ftp://port1@<KN-304’s IP address].
Select [File] from the menu bar.
Select [Upload File].
More than one file cannot be selected for FTP printing.
KN-304 Network Board Appendices-5

Appendices
By Netscape and Drag & Drop
You can print out the contents of a file by Netscape and Drag & Drop.For example, perform the
following steps to print out a file through theKN-304 by Netscape.
The selected file will be sent to the printer.
Type [ftp://port1@<KN-304’s IP address]. A message says [Current directory is ].
Drag the file existing on the system to the Web browser’s window.
A prompt asks you “Do you want to upload the dragged file to the FTP server?” Click “OK”.
The file you just dragged will be sent to the printer.
More than one file cannot be selected for FTP printing. Only one can log in the port.
Use of FTP client
Perform the following to print from FTP Client.
Type [ftp<KN-304’s IP address].
Enter “port1” as the log-in name.
Select binary mode.
Type [put<filename>]. The selected file will be sent to the printer.
Appendices-6 KN-304 Network Board

INDEX
Index
Symbol
95nozomi ........................................................... 3-5
B
Base port number .............................................. 6-5
Basic TCP/IP setup .................................... 3-2, 4-2
Bindery Context ................................................. 5-5
Bindery emulation .............................................. 5-3
Bindery Emulation, Setup for ............................. 5-5
bindery, disable .......................................... 2-8, 6-9
C
CD-ROM provided.............................................. 1-3
D
Default gateway.................................................. 6-5
Description ......................................................... 3-4
DHCP .................................. 2-5, 6-6, Appendices-4
IP Peer-to-Peer .................................................. 3-3
IP Peer-to-Peer Setup ........................................ 3-3
IP Settings.......................................................... 2-5
L
LPD Banner Enable ................................... 2-6, 6-6
lpd/lpr ................................................................. 4-3
M
MAP (Management Access Program) ............... 6-2
MAP setup ......................................................... 6-3
Max Hops for...................................................... 3-3
Microsoft TCP/IP Print Service .......................... 4-3
N
NDS ................................................................... 5-3
NDS Context ...............................................2-8, 6-8
NDS setup.......................................................... 5-4
NDS Tree..................................................... 2-8, 6-8
E
Ethernet Frame T ype.......................................... 6-9
F
File Server Name ............................................... 6-8
G
Gateway ............................................................. 2-6
I
IP address .................................................. 2-6, 3-4
IP address defined, enable the .......................... 2-6
IP Port ................................................................ 3-4
IP mode.............................................................. 2-5
NetWare 2.x/3.x ................................................. 5-2
NetWare 4.x ....................................................... 5-3
NetWare, Setup.......................................... 2-7, 6-7
Network Administration menu ............................ 6-4
Network Setup ................................................... 2-3
network setup information, Confirming .............. 2-9
Nozomi ............................................................... 4-3
Ntnozomi ............................................................ 4-4
NWADMIN.......................................................... 5-4
P
password..............................................2-8, 5-2, 6-6
PCONSOLE ....................................... 5-2, 5-4, 5-6
Port .................................................................... 3-4
Print Server Name ............................................. 6-7
Print Server Password ....................................... 6-7
Printer driver .............................................. 3-5, 4-3
KN-304 Network Board Index-1

Index
Printer Menu window ......................................... 2-2
Printer Mode Basic window................................ 2-2
Printer Name ...................................................... 3-4
Printer por t ......................................................... 4-3
printer, adding .................................................... 3-4
Q
Queue Scan Rate ....................................... 2-7, 6-9
S
Server Name ...................................................... 2-7
Server Password ................................................ 2-7
Status indicator (LED) ........................................ 7-2
Subnet Mask .............................................. 2-6, 6-5
T
TCP/IP setup.............................................. 2-4, 6-5
TCP/IP, enable ................................................... 6-5
W
Web browser ...................................................... 6-2
Web utility............................................ 5-4, 6-2, 6-4
Index-2 KN-304 Network Board

KONICA CORPORATION
2000. 3
2
 Loading...