

Konica Minolta BIZHUB-PRO-1050, BIZHUB-PRO-1050E User Manual
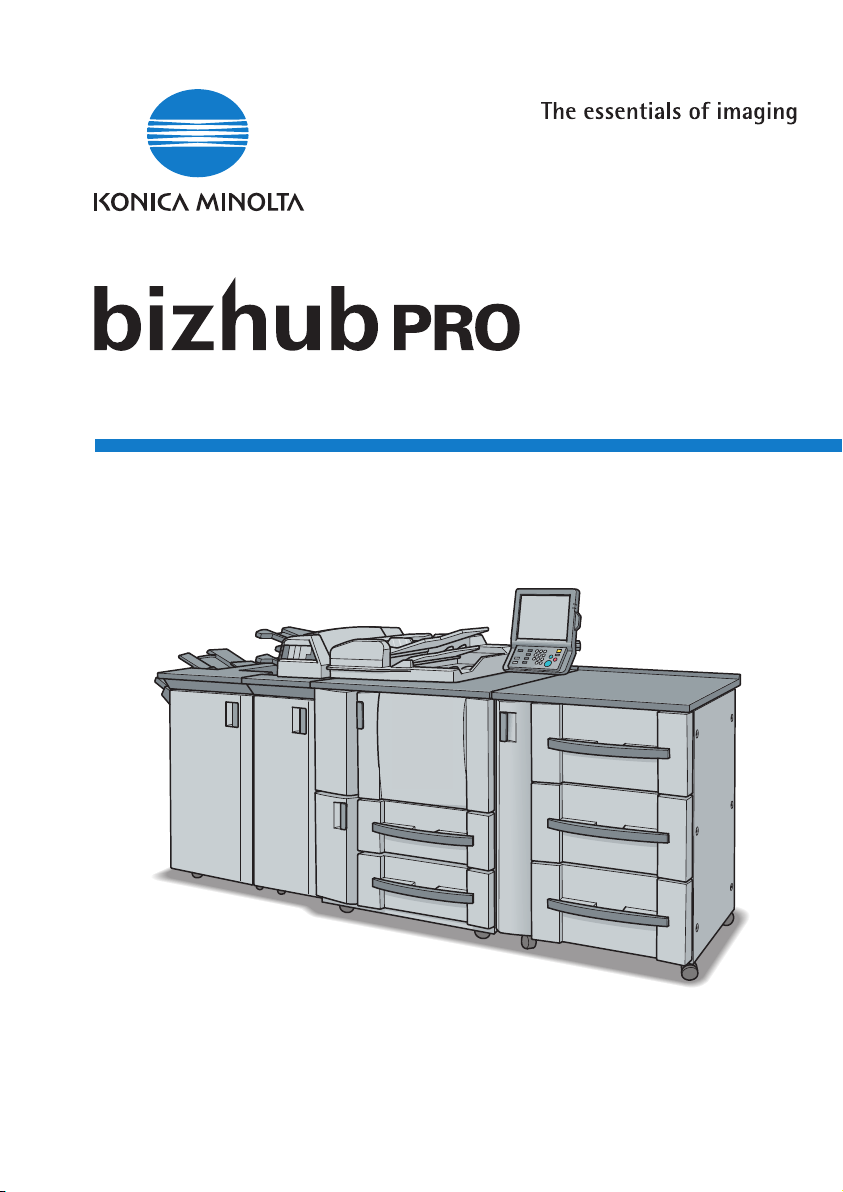
1050/1050e
Operator Manual
• Copier
• POD Administrator
• Security


Table of Contents
1 Safety Information
1.1 Safety Information ............................................................................ 1-3
1.1.1 Warning and Precaution Symbols .................................................. 1-3
1.1.2 Meaning of Symbols ...................................................................... 1-3
1.2 Regulation Notices ......................................................................... 1-10
1.2.1 Laser Safety ................................................................................. 1-10
1.2.2 Ozone Release ............................................................................. 1-12
1.2.3 Electromagnetic Interference ....................................................... 1-12
1.2.4 For European Users ..................................................................... 1-12
1.2.5 For German Users ........................................................................ 1-12
1.3 Caution Labels and Indicators ...................................................... 1-13
1.4 Installation Space ........................................................................... 1-15
2 Preparation for Use
2.1 Machine Configuration ..................................................................... 2-3
2.1.1 External Machine Items .................................................................. 2-3
2.1.2 Internal Machine Items ................................................................... 2-5
2.1.3 Control Panel Layout ..................................................................... 2-6
2.1.4 Folding Unit FD-501 ....................................................................... 2-8
2.1.5 Large Capacity Stacker LS-501/LS-502 ...................................... 2-11
2.1.6 Saddle Stitcher SD-501 ............................................................... 2-13
2.1.7 Perfect Binder PB-501 ................................................................. 2-16
2.1.8 Finisher FS-503 ............................................................................ 2-19
2.1.9 Standard/Optional Equipment ..................................................... 2-20
2.2 Turning On/Off the Power Switch ................................................. 2-23
2.2.1 To Turn On the Power .................................................................. 2-23
2.2.2 To Turn Off the Power .................................................................. 2-25
bizhub PRO 1050/1050e x-1

2.3 To Use Machine When Power Save LED Lights ...........................2-26
2.3.1 Auto Low Power ...........................................................................2-27
2.3.2 Auto Shut-Off ................................................................................2-27
2.3.3 Using Power Save Manually .........................................................2-28
2.3.4 When Weekly Timer Is Activated ..................................................2-30
2.4 Making User Authentication ...........................................................2-33
3 Paper and Original Information
3.1 Paper Information ..............................................................................3-3
3.1.1 Paper Weight ..................................................................................3-3
3.1.2 Tray/ Exit Tray Capacity ..................................................................3-5
3.1.3 Paper Size .......................................................................................3-8
3.1.4 To Store Copy Paper ......................................................................3-9
3.2 Original Information ........................................................................3-10
3.2.1 Using Original Glass .....................................................................3-10
3.2.2 ADF Originals ................................................................................3-12
4 Supplies & Handling
4.1 Loading Paper ....................................................................................4-3
4.1.1 Loading Paper in Main Body Trays and Paper Feeder Unit Trays ..4-4
4.1.2 Loading Cover Paper in Cover Feeding Tray of
Perfect Binder PB-501 ....................................................................4-8
4.1.3 Loading Tabbed Sheets in Tray ....................................................4-11
4.2 Adding Toner ...................................................................................4-14
4.3 Inserting a New Staple Cartridge into Finisher FS-503 ................4-17
4.4 Inserting a New Staple Cartridge into Saddle Stitcher SD-501 ..4-20
4.5 Adding Paste Pellets to Perfect Binder PB-501 ............................4-22
4.6 Empty Trash Basket of Folding Unit FD-501 .................................4-25
4.7 Empty Dust Box of Saddle Stitcher SD-501 ..................................4-27
4.8 Empty Dust Box of Perfect Binder PB-501 ....................................4-29
4.9 Removing Finished Sets from Large Capacity Stacker
LS-501/502 .......................................................................................4-31
x-2 bizhub PRO 1050/1050e

5 Before Making Copies
5.1 Copy Screen ...................................................................................... 5-3
5.1.1 Machine Status Screen .................................................................. 5-5
5.2 Features of the bizhub PRO 1050/1050e ........................................ 5-7
5.3 How to Make a Basic Copy ............................................................ 5-12
5.4 Positioning Originals ...................................................................... 5-16
5.4.1 Positioning Originals in ADF ......................................................... 5-16
5.4.2 Positioning Original on Original Glass .......................................... 5-19
5.5 Setting Print Quantity ..................................................................... 5-20
5.5.1 To Set Print Quantity .................................................................... 5-20
5.5.2 To Change Print Quantity ............................................................. 5-21
5.6 Setting Job During Warm-up ......................................................... 5-22
5.7 To Stop Scanning/Printing ............................................................. 5-25
6 Basic Job Settings
6.1 Copy Conditions Incompatible with Basic Settings ...................... 6-3
6.2 Function Key ..................................................................................... 6-8
6.3 Original Setting ............................................................................... 6-10
6.3.1 Specifying Original Direction ........................................................ 6-10
6.3.2 Selecting Binding Direction of Originals ...................................... 6-12
6.3.3 Copying Mixed Size Originals (Mixed Original) ............................ 6-14
6.3.4 Copying Z-Folded Originals (Z-Folded) ....................................... 6-16
6.3.5 Feeding Single Original from ADF (Single Feed) .......................... 6-18
6.3.6 Copying Non-Standard Size Originals
(Custom Size / Tab Paper) ........................................................... 6-21
6.4 Memory Scan Mode ....................................................................... 6-24
6.5 Special Image .................................................................................. 6-26
6.5.1 Selecting Exposure Level and Adjusting Background Whiteness 6-26
6.5.2 Making Copy Quality Closer to Originals (Text/Photo Enhance) . 6-30
6.6 Zoom ................................................................................................ 6-32
6.6.1 To Copy in 1.000 Magnification Mode ......................................... 6-32
6.6.2 To Change Magnification Ratio .................................................... 6-33
6.7 Copy Mode ...................................................................................... 6-37
6.7.1 Making Double-Sided Copies Using ADF .................................... 6-37
bizhub PRO 1050/1050e x-3

6.8 Making Double-Sided Copies Using Original Glass .....................6-40
6.8.1 Making Single-Sided Copies from Double-Sided Originals ..........6-44
6.9 Paper Tray Setting ...........................................................................6-46
6.9.1 To Select Paper Size Automatically (APS) ....................................6-47
6.9.2 To Specify Desired Paper Size (AMS) ...........................................6-49
6.9.3 Rotation ........................................................................................6-51
6.9.4 Using Paper Not Specified for Any Tray (Paper Presetting) .........6-53
6.10 Reserve Job Setting ........................................................................6-64
7 Job Management
7.1 Overview of Job List Screen .............................................................7-3
7.2 Job Operation on Job List Screen ...................................................7-4
7.2.1 To Check/Control Reserved Jobs ..................................................7-4
7.2.2 To Display Output History ...............................................................7-6
7.2.3 To Display Send History .................................................................7-7
7.2.4 To Check Incomplete Jobs .............................................................7-8
7.2.5 To Check/Operate Suspended Jobs ..............................................7-9
7.2.6 To Check/Control Spool Jobs ......................................................7-11
8 Applications
8.1 Copy Conditions Incompatible with Applications ..........................8-3
8.2 To Use Application Function ............................................................8-8
8.3 Inserting Sheets and Covers (Sheet Insertion) .............................8-10
8.4 Locating Title Pages on the Right Side (Chapter) ........................8-17
8.5 Lay Out Several Pages onto One Sheet (Combination) ...............8-20
8.6 Making a Multiple Page Signature Booklet (Booklet) ..................8-23
8.7 Copying onto Transparent Films (OHP Interleave) .......................8-26
8.8 Inserting Images into Printed Sets (Image Insert) ........................8-29
8.9 Dividing an Image into Right and Left Pages (Book Copy) .........8-33
8.10 Programming Different Settings for an Output Job
(Program Job) ..................................................................................8-39
8.11 Erasing Outside of the Original (No Image Area Erase) ...............8-42
8.12 Reversing Colour in Black and White Image
(Neg. Pos. Reverse) .........................................................................8-45
8.13 Repeating Selected Image Area (Repeat: Vert./Horiz. Mode) .....8-47
x-4 bizhub PRO 1050/1050e

8.14 Repeat Automatically or Select Repeat Times
(Repeat: Auto Detect/ Repeat Mode) ............................................ 8-50
8.15 Eliminating Black Copy Marks Along Borders
(Frame/Fold Erase) ......................................................................... 8-54
8.16 Copying Image in the Centre of Copy Paper
(Image Centering) ........................................................................... 8-58
8.17 Printing Images Fully to the Edges (All-Image Area) ................... 8-60
8.18 Adjusting Position of Copy Image (Image Shift) .......................... 8-61
8.19 Reducing Images to Create Binding Margin (Reduce&Shift) ..... 8-66
8.20 Printing Stamp, Page, Date/Time onto Copies (Stamp) .............. 8-69
8.21 Printing Watermark onto Copies (Stamp) .................................... 8-78
8.22 Print Words, Date/Time, Annotation Number onto Copies
(Annotation) ..................................................................................... 8-81
8.23 Overlay an Image onto Each Page Copied in the Job (Overlay) . 8-86
8.24 Store Image in HDD / Overlay Stored Image
(Overlay Memory) ............................................................................ 8-89
9 Setting Output Methods
9.1 Copy Conditions Incompatible with Output Modes ...................... 9-3
9.2 Selecting an Output Tray ................................................................. 9-8
9.3 Setting Binding Direction for Duplex Copies ............................... 9-13
9.4 Using Finisher FS-503 .................................................................... 9-15
9.4.1 Non-sort / Collated / Uncollated Output to the
Primary (Main) Tray ...................................................................... 9-17
9.4.2 Stapling Output to the Primary (Main) Tray .................................. 9-19
9.4.3 Collated / Uncollated Output to the Secondary (Sub) Tray ......... 9-22
9.5 Using Large Capacity Stacker LS-501/LS-502 ............................ 9-25
9.6 Using Folding Unit FD-501 ............................................................. 9-28
9.6.1 Punching File Holes in Copies ..................................................... 9-29
9.6.2 Folding Copies ............................................................................. 9-32
9.7 Using Saddle Stitcher SD-501 ....................................................... 9-34
9.7.1 Making Folded Booklet ................................................................ 9-34
9.7.2 Folding Copied Set ...................................................................... 9-38
9.8 Using Post Inserter on Folding Unit FD-501 ................................. 9-42
9.9 Using Folder/Finisher Functions Manually ................................... 9-46
9.10 Using Perfect Binder PB-501 ......................................................... 9-50
bizhub PRO 1050/1050e x-5

9.11 Using Two Copiers in Tandem .......................................................9-67
9.11.1 To Stop Scanning/Printing ............................................................9-73
9.11.2 Troubleshooting ............................................................................9-74
10 Advanced Information
10.1 Checking Feature Selections by Proof Copying ...........................10-3
10.2 Checking Feature Selections Before Copying (Check Mode) .....10-5
10.3 Interrupt Copying ............................................................................10-9
10.4 Storing and Recalling Job Conditions (Mode Memory) .............10-11
10.4.1 Storing Job Conditions ...............................................................10-11
10.4.2 Recalling Stored Job Settings ....................................................10-15
10.5 Recalling Previous Job Settings ..................................................10-17
10.6 Displaying Screen for Operation Guide (Help Mode) .................10-19
10.6.1 To Display Help Screen ..............................................................10-20
10.7 Adjusting Response Time of Touch Keys (Accessibility) ...........10-22
11 Machine Status Screen Setting
11.1 Machine Status Screen Setting Outlines .......................................11-3
12 Paper Setting
12.1 Paper Setting Outlines ....................................................................12-3
12.1.1 Setting Items in Paper Setting ......................................................12-3
12.1.2 Recommended Setting of Paper Type/Weight ...........................12-10
12.2 Register Paper Type/Weight ........................................................12-11
12.3 Delete Paper Type/Weight ............................................................12-17
12.4 Set Paper Size, Conditions, Air Assist Function for a Tray .......12-19
12.5 Change Paper Type/Weight Specified for a Tray .......................12-29
13 Adjustment
13.1 Machine Adjustment Outlines ........................................................13-3
13.2 01 Magnification Adjustment ..........................................................13-4
13.3 02 Timing Adjustment ...................................................................13-13
13.4 03 Centering Adjustment ..............................................................13-22
13.5 Finisher Adjustment Outlines .......................................................13-24
13.6 01 Stapler Position Adjustment ....................................................13-25
x-6 bizhub PRO 1050/1050e

13.7 02 Multi Folder (Punch) Adjustment ............................................ 13-31
13.8 03 Multi Folder (Fold) Adjustment ............................................... 13-36
13.9 04 Stacker Adjustment ................................................................. 13-53
13.10 05 Saddle Stitcher Adjustment .................................................... 13-57
13.11 06 Perfect Binder Adjustment ..................................................... 13-76
13.12 07 Trimmer Count Adjustment .................................................. 13-105
14 Controller Setting
14.1 Function Overview .......................................................................... 14-3
14.2 01 Report Type ................................................................................ 14-8
14.3 02 Printer Setting .......................................................................... 14-10
14.4 03 Select Printer Setting .............................................................. 14-17
14.5 04 Spool ......................................................................................... 14-19
14.6 05 Interface Setting ...................................................................... 14-20
15 Utility Screen Settings
15.1 Utility Screen Setting Outlines ...................................................... 15-3
16 User Setting
16.1 01 System Setting ........................................................................... 16-3
16.1.1 01 Language Setting .................................................................... 16-3
16.1.2 02 Buzzer Setting ......................................................................... 16-4
16.1.3 03 1SHOT Indication Time ........................................................... 16-8
16.1.4 04 Default Screen Setting ............................................................ 16-9
16.1.5 05 Auto Reset Setting ................................................................ 16-10
16.1.6 06 Key Response Time .............................................................. 16-11
16.1.7 07 Change User Password ........................................................ 16-12
16.1.8 08 Function Key Setting ............................................................. 16-14
16.2 02 Function Setting ....................................................................... 16-17
16.2.1 01 Feed Tray Setting .................................................................. 16-17
16.2.2 02 ATS Permit ............................................................................ 16-19
16.2.3 03 Auto Paper Type ................................................................... 16-21
16.2.4 02 Each Function Setting ........................................................... 16-23
16.2.5 03 Density Setting ...................................................................... 16-25
16.2.6 03 Photo Mode Density Setting ................................................. 16-29
bizhub PRO 1050/1050e x-7

16.2.7 04 Image Density Selection ........................................................16-31
16.2.8 04 Preset Zoom ..........................................................................16-33
16.2.9 05 Tandem Setting ......................................................................16-34
16.2.10 06 User Paper Selection .............................................................16-38
16.3 03 Copy Setting .............................................................................16-39
16.3.1 01 Reset Setting .........................................................................16-39
16.3.2 02 Each Function Setting ............................................................16-46
16.4 04 Scanner Setting ........................................................................16-49
16.4.1 01 Default Address Setting .........................................................16-49
16.4.2 02 Each Function Setting ............................................................16-51
16.5 05 Touch Screen Adjustment .......................................................16-53
17 Machine Manager Setting
17.1 Machine Manager Setting Outlines ...............................................17-3
17.2 01 System Setting ............................................................................17-6
17.2.1 01 Power Save Setting .................................................................17-6
17.2.2 02 Time and Date Setting .............................................................17-8
17.2.3 03 Weekly Timer Setting .............................................................17-10
17.2.4 04 Management List Print ...........................................................17-22
17.2.5 05 Operation Prohibit Set ...........................................................17-26
17.2.6 06 Expert Adjustment .................................................................17-29
17.2.7 07 Size Setting ............................................................................17-35
17.2.8 08 Annotation Setting .................................................................17-36
17.2.9 09 Perfect Binding Setting ..........................................................17-43
17.3 02 Manager/Machine Register .....................................................17-49
17.3.1 01 Machine Manager Register ....................................................17-49
17.4 03 Use Auth./Volume Track ..........................................................17-51
17.4.1 01 Authentication Method ..........................................................17-51
17.4.2 02 Volume Track .........................................................................17-56
17.4.3 03 User Authentication Set .........................................................17-61
17.4.4 04 Non register/Output Set .........................................................17-67
17.5 04 Network Setting ........................................................................17-68
17.5.1 01 Machine NIC Setting ..............................................................17-68
17.5.2 02 Controller NIC Setting ............................................................17-70
x-8 bizhub PRO 1050/1050e

17.6 05 Copy/Printer Setting .............................................................. 17-128
17.6.1 01 JOB Offset Operating .......................................................... 17-128
17.6.2 02 Continuation Print(Print) ...................................................... 17-129
17.6.3 03 Page No. Position (Booklet) ................................................ 17-130
17.6.4 04 Fixing Prerotation Set ......................................................... 17-131
17.6.5 05 Image Auto Rotation ........................................................... 17-133
17.6.6 06 Interruption Suspend .......................................................... 17-134
17.6.7 07 Copy Reserve Operation ..................................................... 17-135
17.6.8 08 Scan Stop (pull out tray) ...................................................... 17-137
17.6.9 09 Continuation Print (Copy) .................................................... 17-138
17.6.10 10 Original Glass SDF .............................................................. 17-139
17.6.11 11 SDF Auto Setting ................................................................ 17-140
17.7 06 System Connection ............................................................... 17-141
17.7.1 01 User Call .............................................................................. 17-141
17.8 07 Security Setting ...................................................................... 17-142
17.8.1 01 Machine Manager Password .............................................. 17-142
17.8.2 02 HDD Management Setting .................................................. 17-144
17.8.3 03 Security Strengthen mode .................................................. 17-152
17.9 08 Scanner Address Register .................................................... 17-154
17.9.1 01 Send Address Edit/Delete ................................................... 17-154
18 Browser Control Setting
18.1 Web Utilities .................................................................................... 18-3
18.2 Setting Account Track Data .......................................................... 18-5
18.2.1 Adding Account Track ................................................................. 18-6
18.2.2 Editing Account Track Data ......................................................... 18-9
18.3 Setting Scan Transmission Function .......................................... 18-18
18.4 Transmitting Machine Setting File .............................................. 18-24
18.5 Box Edit ......................................................................................... 18-32
18.6 PageScope Web Connection ....................................................... 18-37
18.7 Access ........................................................................................... 18-39
18.8 Screen Configuration ................................................................... 18-40
18.8.1 Logging in Using Administrator Mode ....................................... 18-42
18.9 Administrator Mode ...................................................................... 18-44
bizhub PRO 1050/1050e x-9

18.10 Administrator Mode – System Tab ..............................................18-44
18.10.1 Administrator Password .............................................................18-44
18.10.2 Device Information ......................................................................18-45
18.10.3 ROM Version ...............................................................................18-46
18.10.4 Online Assistance .......................................................................18-46
18.10.5 Import/Export ..............................................................................18-48
18.10.6 Maintenance ...............................................................................18-49
18.10.7 E-Mail Alert .................................................................................18-51
18.11 Administrator Mode – Print Tab ...................................................18-52
18.11.1 Interface ......................................................................................18-52
18.11.2 Port Settings ...............................................................................18-53
18.11.3 Default Settings ..........................................................................18-54
18.11.4 Administrator Mode – Scan Tab .................................................18-58
18.11.5 Subject Registration ...................................................................18-58
18.11.6 Body Registration .......................................................................18-61
18.12 Administrator Mode – Network Tab .............................................18-64
18.12.1 TCP/IP .........................................................................................18-64
18.12.2 NetWare ......................................................................................18-66
18.12.3 IPP ..............................................................................................18-68
18.12.4 FTP ..............................................................................................18-69
18.12.5 SNMP ..........................................................................................18-71
18.12.6 SMB ............................................................................................18-72
18.12.7 Apple Talk ...................................................................................18-74
18.12.8 E-Mail ..........................................................................................18-75
18.12.9 SSL/TLS ......................................................................................18-77
18.12.10 Authentication .............................................................................18-92
19 Security
19.1 Security Functions ...........................................................................19-4
19.1.1 Environments in which Security Strengthen
mode is recommended .................................................................19-5
19.1.2 Creating a secure environment .....................................................19-5
x-10 bizhub PRO 1050/1050e

19.2 Security Strengthen Mode ............................................................. 19-6
19.2.1 Description of Security Strengthen mode .................................... 19-6
19.2.2 Data protected by Security Strengthen mode ............................. 19-7
19.2.3 Data that is not protected in Security Strengthen mode ............. 19-7
19.3 Protect and Delete Data After Use ................................................ 19-8
19.4 User Authentication in Security Strengthen Mode ...................... 19-9
19.4.1 To register a new user ................................................................ 19-10
19.4.2 To change user data .................................................................. 19-15
19.4.3 To delete a user ......................................................................... 19-20
19.4.4 To change password by user ..................................................... 19-23
19.5 HDD Store Function in Security Strengthen Mode .................... 19-26
19.5.1 Store the data in a box while copying ........................................ 19-26
19.5.2 Store scanned data in a box ...................................................... 19-31
19.5.3 Recall/Delete data in a box ........................................................ 19-36
19.5.4 Output data in the Secure Box .................................................. 19-41
19.6 Machine Manager Security Functions ........................................ 19-46
19.6.1 Turn Security Strengthen mode ON/OFF ................................... 19-46
19.6.2 HDD lock password ................................................................... 19-50
19.6.3 Print audit log ............................................................................. 19-55
19.6.4 Analyze audit log ........................................................................ 19-58
20 Troubleshooting
20.1 If “Please Call Service” Message Is Displayed ............................ 20-3
20.2 Clearing Mishandled Paper ........................................................... 20-5
20.3 If MACHINE Tab Blinks in Orange ................................................. 20-8
20.3.1 Paper Misfeed .............................................................................. 20-8
20.3.2 Tray Empty ................................................................................... 20-9
20.3.3 Inconformity in Paper Presetting ................................................ 20-11
20.4 If “Memory Full” Message Is Displayed
(Memory Overflow) ....................................................................... 20-13
20.5 If Power OFF/ON Screen Is Displayed ........................................ 20-14
20.6 Troubleshooting Tips ................................................................... 20-15
bizhub PRO 1050/1050e x-11

21 Maintenance
21.1 Cleaning Image Scanning Section .................................................21-3
21.1.1 Cleaning the ADF Scanning Glass ................................................21-3
21.1.2 Cleaning the Original Glass ..........................................................21-3
21.1.3 Cleaning the ADF Guide Cover .....................................................21-4
21.2 Precautions for Paste Pellets and the Perfect Binder .................21-5
21.3 Checking Copy Count .....................................................................21-6
21.4 Preventive Maintenance .................................................................21-9
22 Machine Specifications
22.1 Main Body Specifications ...............................................................22-3
22.1.1 Main Body .....................................................................................22-3
22.1.2 ADF (DF-603) ...............................................................................22-5
22.2 Option Specifications ......................................................................22-6
22.2.1 Paper Feeder Unit PF-701 ............................................................22-6
22.2.2 Large Capacity Stacker LS-501/LS-502 .......................................22-6
22.2.3 In-Bin Stapler Finisher FS-503 ......................................................22-7
22.2.4 Folding Unit FD-501 ......................................................................22-8
22.2.5 Saddle Stitcher SD-501 ................................................................22-9
22.2.6 Perfect Binder PB-501 ................................................................22-10
23 Appendix
23.1 How to Input Characters ................................................................23-3
23.1.1 About keys on the character input screen ....................................23-3
23.1.2 About character input ...................................................................23-4
23.2 Setting Data for Import/Export .......................................................23-5
23.3 Configuration Setting ....................................................................23-10
23.4 Font List ..........................................................................................23-15
23.5 PCL Font List .................................................................................23-26
23.6 Glossary ..........................................................................................23-29
23.7 Index ...............................................................................................23-32
x-12 bizhub PRO 1050/1050e

ENERGY STAR® Program
The ENERGY STAR Program has been established to encourage the widespread and voluntary use of energy-efficient technologies that reduce energy
consumption and prevent pollution. As an ENERGY STAR Partner, we have
determined that this product meets the ENERGY STAR guidelines for energy
efficiency, based on the following features.
Auto Low Power
-
This function conserves energy by lowering the set temperature of the fixing unit. In the standard setting, Auto Low Power operates automatically
when 15 minutes have elapsed after completion of the last copy, with the
copier remaining in the ready to copy state during that time.
The time period for the Auto Low Power function can be set for 5 minutes,
10 minutes, 15 minutes, 30 minutes, 60 minutes, 90 minutes, 120 minutes, or 240 minutes.
Automatic Shut-Off
-
This function achieves further energy conservation by partially turning the
power supply OFF, thereby reducing energy consumption to 75 W or
less. In the standard setting, Automatic Shut-Off follows Auto Low Power, operating automatically when 90 minutes have elapsed after completion of the last copy, with the copier remaining in the ready to copy state
during that time.
The time period for the Automatic Shut-Off function can be set for 30
minutes, 60 minutes, 90 minutes, 120 minutes or 240 minutes.
Automatic Duplex Copying
-
To reduce paper consumption, use this function to make double-sided
(duplex) copies, automatically.
Combination
-
To reduce paper consumption, this function can also be used to lay out
and copy a fixed number (2, 4, or 8) of pages onto one sheet of copy paper.
We recommend that you utilize Auto Low Power function, the Automatic
Shut-Off function, Automatic Duplex Copying function, and Combination
function.
bizhub PRO 1050/1050e x-13

Acknowledgements
- KONICA MINOLTA, KONICA MINOLTA Logo and The essentials of imag-
ing are registered trademarks or trademarks of KONICA MINOLTA
HOLDINGS, INC.
- PageScope and bizhub PRO are registered trademarks of KONICA MI-
NOLTA BUSINESS TECHNOLOGIES, Inc.
Copyright © 2006 KONICA MINOLTA BUSINESS TECHNOLOGIES, Inc.
Copyright © 2006 GoAhead Software, Inc. All rights reserved.
Exemption
- No part of this manual may be used or duplicated without permission.
- Manufacturer and Sales Company will have no liability for any influences
caused by using the printing system and this Operator Manual.
- The information written in this Operator Manual is subject to change with-
out prior notice.
2
Note
To operate safely, be sure to read the Safety Information before using the
machine. For details, refer to “Safety Information” on page 1-3.
x-14 bizhub PRO 1050/1050e

1
Safety Information

Safety Information
1 Safety Information
1.1 Safety Information
This section contains detailed instructions on the operation and maintenance
of this machine. To achieve optimum utility of this device, all operators
should carefully read and follow the instructions in this manual.
Please read the following section before connecting the machine to the supply. It contains important information related to user safety and preventing
equipment problems.
- Please keep this manual in a handy place near the machine.
- Make sure you observe all of the precautions appear in each section of
this manual.
2
Note
Some parts of the contents of this section may not correspond with the
purchased product.
1.1.1 Warning and Precaution Symbols
The following indicators are used on the warning labels or in this manual to
categorize the level of safety warnings.
1
WARNING
CAUTION
Ignoring this warning could cause serious injury or even death.
Ignoring this caution could cause injury or damage to property.
1.1.2 Meaning of Symbols
A triangle indicates a danger against which you should take precaution.
This symbol warns against cause burns.
A diagonal line indicates a prohibited course of action.
This symbol warns against dismantling the device.
A solid circle indicates an imperative course of action.
This symbol indicates you must unplug the device.
bizhub PRO 1050/1050e 1-3
1
Disassemble and modification
WARNING
• Do not attempt to remove the covers and panels which have been
fixed to the product. Some products have a high-voltage part or a
laser beam source inside that could cause an electrical shock or
blindness.
• Do not modify this product, as a fire, electrical shock, or breakdown
could result. If the product employs a laser, the laser beam source
could cause blindness.
Power cord
WARNING
• Do not scratch, abrade, place a
heavy object on, heat, twist, bend,
pull on, or damage the power cord.
Use of a damaged power cord (exposed core wire, broken wire, etc.)
could result in a fire or breakdown.
Should any of these conditions be
found, immediately turn OFF the
power switch, unplug the power
cord from the power outlet, and
then call your authorized service
representative.
Safety Information
Power source
WARNING
• Use only the specified power source voltage. Failure to do that
could result in a fire or electrical shock.
• Connect power plug directly into wall outlet having the same configuration as the plug. Use of an adapter leads to the product connecting to inadequate power supply (voltage, current capacity,
grounding), and may result in fire or shock. If proper wall outlet is
not available, the customer shall ask qualified electrician for the installation.
• Do not use a multiple outlet adapter nor an extension cord in principle. Use of an adapter or an extension cord could cause a fire or
electrical shock.
Contact your authorized service representative if an extension cord
is required.
• Consult your authorized service representative before connecting
other equipment on the same wall outlet. Overload could result in a
fire.
1-4 bizhub PRO 1050/1050e
Safety Information
Power source
Power plug
CAUTION
• The outlet must be near the equipment and easily accessible. Otherwise you can not pull out the power plug when an emergency occurs.
WARNING
• Do not unplug and plug in the power cord with a wet hand, as an
electrical shock could result.
• Plug the power cord all the way into the power outlet. Failure to do
this could result in a fire or electrical shock.
CAUTION
• Do not tug the power cord when unplugging. Pulling on the power
cord could damage the cord, resulting in a fire or electrical shock.
• Remove the power plug from the outlet more than one time a year
and clean the area between the plug terminals. Dust that accumulates between the plug terminals may cause a fire.
1
Grounding
WARNING
• Connect the power cord to an electrical outlet that is equipped with
a grounding terminal.
bizhub PRO 1050/1050e 1-5
1
Installation
Safety Information
WARNING
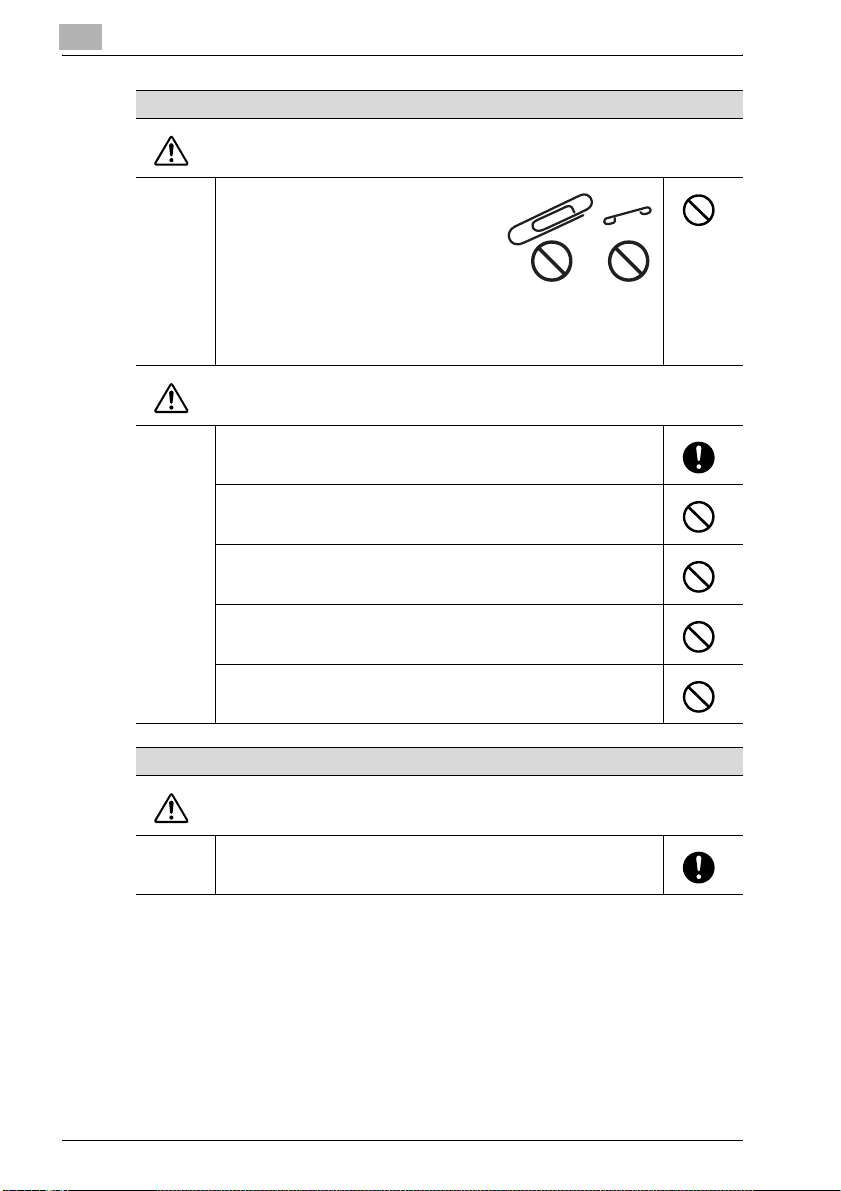
• Do not place a flower vase or other container that contains water, or metal
clips or other small metallic objects on
this product. Spilled water or metallic
objects dropped inside the product
could result in a fire, electrical shock, or
breakdown.
Should a piece of metal, water, or any
other similar foreign matter get inside the product, immediately turn
OFF the power switch, unplug the power cord from the power outlet, and then call your authorized service representative.
CAUTION
• After installing this product, mount it on a secure base. If the unit
moves or falls, it may cause personal injury.
• Do not place the product in a dusty place, or a site exposed to soot
or steam, near a kitchen table, bath, or a humidifier. A fire, electrical
shock, or breakdown could result.
• Do not place this product on an unstable or tilted bench, or in a location subject to a lot of vibration and shock. It could drop or fall,
causing personal injury or mechanical breakdown.
• Do not let any object plug the ventilation holes of this product. Heat
could accumulate inside the product, resulting in a fire or malfunction.
• Do not use flammable sprays, liquids, or gases near this product, as
a fire could result.
Ventilation
CAUTION
• Always use this product in a well ventilated location. Operating the
product in a poorly ventilated room for an extended period of time
could injure your health. Ventilate the room at regular intervals.
1-6 bizhub PRO 1050/1050e

Safety Information
Actions in response to troubles
Consumables
WARNING
• Do not keep using this product, if this product becomes inordinately
hot or emits smoke, or unusual odor or noise. Immediately turn OFF
the power switch, unplug the power cord from the power outlet, and
then call your authorized service representative. If you keep on using it as is, a fire or electrical shock could result.
• Do not keep using this product, if this product has been dropped or
its cover damaged. Immediately turn OFF the power switch, unplug
the power cord from the power outlet, and then call your authorized
service representative. If you keep on using it as is, a fire or electrical shock could result.
CAUTION
• The inside of this product has areas subject to high temperature,
which may cause burns.
When checking the inside of the unit for malfunctions such as a paper misfeed, do not touch the locations (around the fusing unit, etc.)
which are indicated by a “Caution HOT” caution label.
WARNING
1
• Do not throw the toner cartridge or toner into an open flame. The
hot toner may scatter and cause burns or other damage.
CAUTION
• Do not leave a toner bottle or drum in a place within easy reach of
children. Licking or ingesting any of these things could injure your
health.
• Do not store toner units and PC drum units near a floppy disk or
watch that are susceptible to magnetism. They could cause these
products to malfunction.
When moving the machine
CAUTION
• Whenever moving this product, be sure to disconnect the power
cord and other cables. Failure to do this could damage the cord or
cable, resulting in a fire, electrical shock, or breakdown.
• When moving this product, always hold it by the locations specified
in the User manual or other documents. If the unit falls it may cause
severe personal injury. The product may also be damaged or malfunction.
bizhub PRO 1050/1050e 1-7

1
Before successive holidays
CAUTION
• Unplug the product when you will not use the product for long periods of time.
Paste pellet
CAUTION
• Do not put paste pellets close to fire. Paste pellets are flammable
and easy to catch on fire.
• Do not swallow paste pellets. Should you swallow any, drink large
amount of water or milk to vomit, and immediately consult a doctor.
• Keep out of reach of children in order to avoid unexpected accidents.
Safety Information
1-8 bizhub PRO 1050/1050e

Safety Information
Perfect Binder
CAUTION
• Do not use the Perfect Binder without ventilation for an extended
period of time. Ensure to ventilate the room on a regular basis. It is
recommended that the Perfect Binder should be installed in a place
with a local exhaust system. Using the Perfect Binder in a room
without appropriate ventilation could pose health hazard.
• Handle melted hot paste carefully. If it gets in the eye, do not rub
nor tray to open the eye, but cool it with cold water immediately and
consult a doctor.
• Do not touch melted hot paste as it may cause burn injury. If it sticks
on your skin, cool that part of the skin with cold water immediately
and consult a doctor.
• Do not touch the paste tank unit immediately after you turned off
the machine to avoid burn injury. Wait until the unit is no longer hot
when you handle it directly with your hands.
• Do not put the paste hopper and the paste tank unit close to fire.
Paste is flammable and easy to catch on fire.
• Do not get close to the vapor emitted from melted hot paste. If you
have irritation in or around your eyes, nose or throat, move to an
area where you can get fresh air.
• Do not block up the vent for the fan on the back of the Perfect Binder. This will prevent the discharge of heat, and may cause fire or
breakdown.
• Do not change the temperature setting for the paste tank unit. This
may cause fire or breakdown.
1
bizhub PRO 1050/1050e 1-9

1
1.2 Regulation Notices
1.2.1 Laser Safety
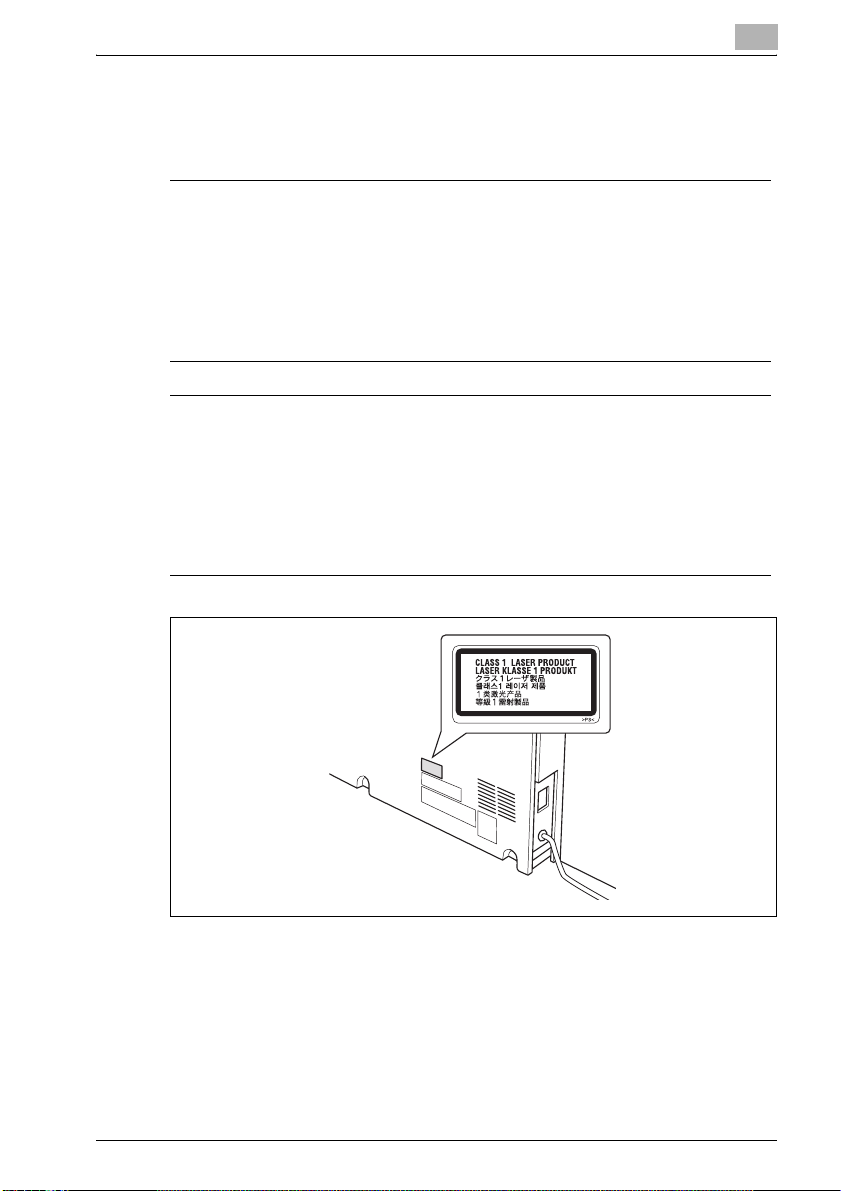
This product employs a Class 3B laser diode having maximum power of
15 mW and wavelength of 770 - 800 nm.
This product is certified as a Class 1 laser product. Since the laser beam is
concealed by protective housings, the product does not emit hazardous laser radiation as long as the product is operated according to the instructions
in this manual.
For Denmark Users
7 ADVARSEL
% Usynlig laserstråling ved åbning, når sikkerhedsafbrydere er ude af
funktion. Undgå udsættelse for sråling.
Klasse 1 laser produkt der opfylder IEC 60825-1 sikkerheds kravene.
% Dansk: Dette er en halvlederlaser. Laserdiodens højeste styrke er
15 mW og bølgelængden er 770 - 800 nm.
For Norway Users
Safety Information
7 ADVARSEL
% Dersom apparatet brukes på annen måte enn spesifisert I denne bruk-
sanvisning, kan brukeren utsettes for usynlig laserstråling som overskrider grensen for laser klass 1.
% Dette en halvleder laser. Maksimal effekt till laserdiode er 15 mW og
bøkgelengde er 770 - 800 nm.
1-10 bizhub PRO 1050/1050e
Safety Information
For Finland, Sweden Users
LUOKAN 1 LASERLAITE
KLASS 1 LASER APPARAT
6 VAROITUS!
% Laitteen käyttäminen muulla kuin tässä käyttöohjeessa mainitulla tav-
alla saattaa altistaa käyttäjän turvallisuusluokan 1 ylittävälle näkymättömälle lasersäteilylle.
% Tämä on puolijohdelaser. Laserdiodin suurin teho on 15 mW ja aallon-
pituus on 770 - 800 nm.
7 VARNING!
% Om apparaten används på annat sätt än I denna bruksanvisning spe-
cificerats, kan användaren utsättas för osynlig laserstrålning, som
överskrider gränsen för laserklass 1.
% Det här är en halvledarlaser. Den maximala effekten för laserdioden är
15 mW och våglängden är 770 - 800 nm.
1
Rear side
of main body
bizhub PRO 1050/1050e 1-11

1
1.2.2 Ozone Release
During print operation, a small quantity of ozone is released. This amount is
not large enough to harm anyone adversely. However, be sure the room
where the machine is being used has adequate ventilation, especially if you
are printing a high volume of materials, or if the machine is being used continuously over a long period.
1.2.3 Electromagnetic Interference
This product must be used with a shielded network cable and shielded USB
interface cable.
The use of non-shield cables is likely to result in interference with radio communications and is prohibited under CISPR 22 and local rules.
1.2.4 For European Users
This product complies with the following EU directives:
89/336/EEC, 73/23/EEC and 93/68/EEC
This declaration is valid for the areas of the European Union (EU) or EFTA only.
This device must be used with a shielded network cable and shielded USB
interface cable. The use of non-shielded cables is likely to result in interference with radio communications and is prohibited under 89/336/EEC rules.
Safety Information
1.2.5 For German Users
Maschinenlärminformations -Verordnung - 3. GSGV, 18.01.1991:
Der arbeitsplatzbezogene Immisionswert betraegt 70 dB(A) oder weniger
nach ISO 7779.
1-12 bizhub PRO 1050/1050e
Safety Information
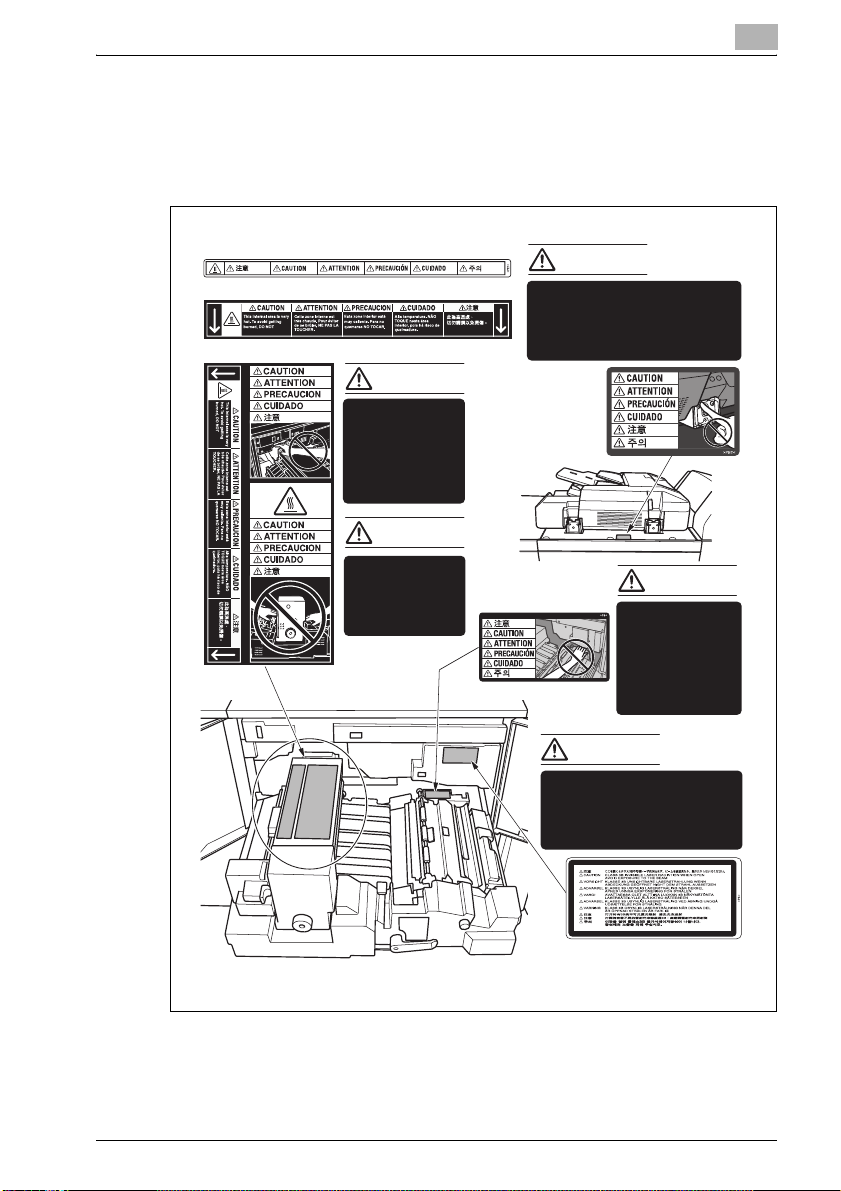
1.3 Caution Labels and Indicators
The caution labels and indicators are attached to the machine areas, as
shown below, where you are advised to pay special attention to avoid any
dangerous situations or serious injury.
1
(Entrance of the reversal output unit)
(Right side of the fixing unit)
(Top surface of the fixing unit)
CAUTION
DO NOT put your
hand between the
main body and
developing fixing
unit; otherwise
you may be
injured.
CAUTION
The fixing unit is
very hot.
To avoid getting
burned DO NOT
TOUCH.
CAUTION
DO NOT INSERT your finger
into the two ADF hinge
portions; otherwise you may
be injured.
CAUTION
DO NOT put your
hand between
the main body
and developing
fixing unit;
otherwise you
may be injured.
CAUTION
This product employs a Class
IIIb Laser Diode that emits an
invisible laser beam. The cover
should not be opened under
any circumstances.
bizhub PRO 1050/1050e 1-13
1
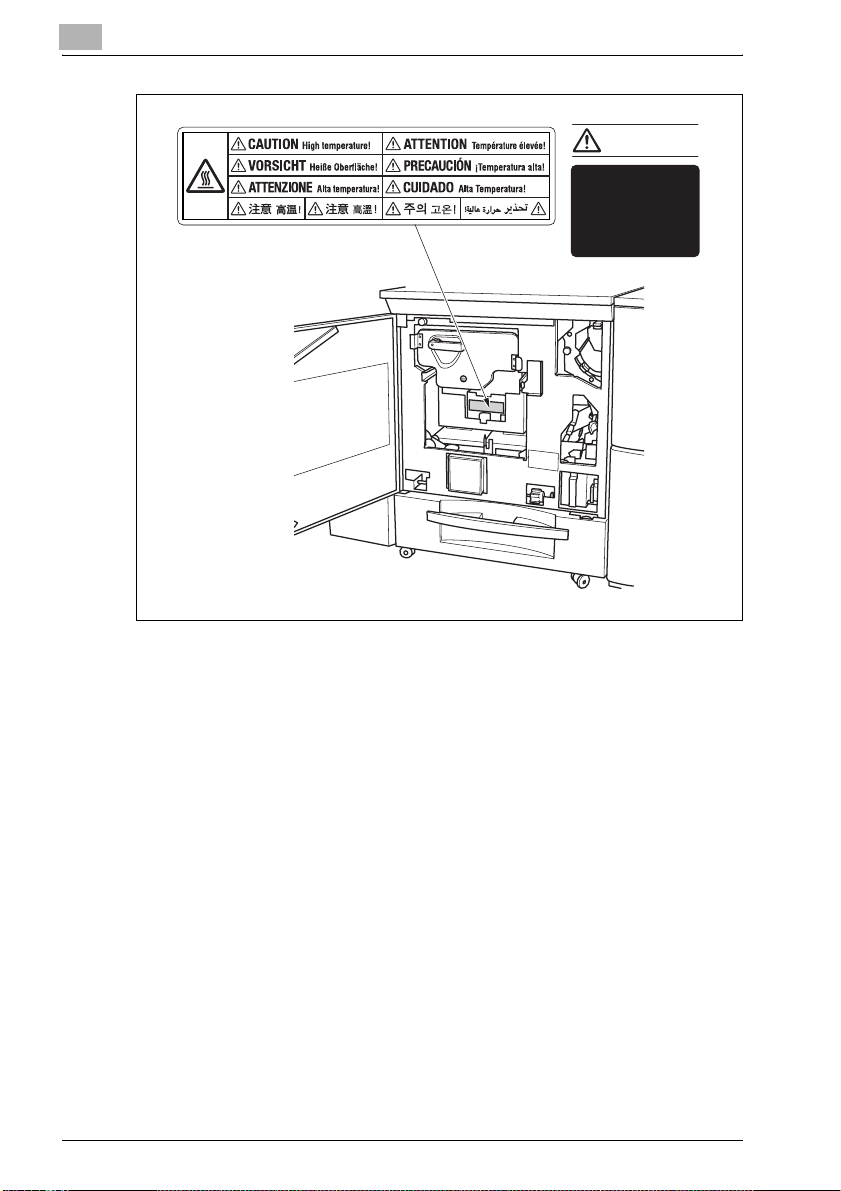
Safety Information
CAUTION
The paste tank
unit is very hot.
To avoid getting
burned DO NOT
TOUCH.
1-14 bizhub PRO 1050/1050e
 Loading...