

Konica Minolta BIZHUB PRO 1050 User Manual

User’s Guide
The essentials of imaging
Printer (PostScript3 Plug-in Driver)

Preface
Welcome to the Konica Minolta bizhub PRO 1050 printer driver!
The printer driver allows you to print PostScript jobs on the bizhub PRO 1050
from Windows and Macintosh applications.
The printer driver comprises a PPD which drives the standard Windows and
Macintosh PostScript drivers plus a plug-in whi ch adds advanced printing
functions to the standard drivers within an easy user interface. Windows prinrer
installation is made easy by the Printer Installer.
The bizhub PRO 1050 printer driver is described in this manual.
Additional information is available as Adobe PS printer driver help – this can be
called from the printer driver.
The printer driver reference guide is stored in machine readable form (PDF
format) on the bizhub PRO 1050 CD-ROM. You may print it for use with your
bizhub PRO 1050 system.
The following conventions are used in this manual:
• Dialogs and functions to be selected by the user are referenced in
this style.
• Some user interface elements are denoted by a path. For example,
Start menu » Settings » Printers and Faxes refers to the dialog
opened by selecting the Windows Start menu, then Settings, then
Printers and Faxes.
• Text input by the user is shown in the typeface Courier.
Copyright © 2004-2005 SOFHA GmbH, Germany.
Copyright © 2004-2005 KONICA MINOLTA Business Technologies, Inc.
Version 2.0, 13 Dec. 2005
KONICA MINOLTA bizhub PRO 1050 is a regist ere d tr ad emark of KONICA
MINOLTA Business Corporation.
SOFHA is a registered trademark of SOFHA GmbH, Germ any .
Microsoft and Windows are registered trademarks of Microsoft Corporation in
the U.S.A. and other countries.
AppleTalk, Macintosh and MacOS are trademarks of Apple Computer, Inc.,
registered in the U.S.A. and other countries.
All other company and product names are (registered) trademarks of the
respective owners.
While every effort has been made to ensure the accuracy of information
contained in this document, KONICA MINOLTA Business Corporation or
SOFHA GmbH shall not be held responsible for any inaccuracies it may contain.
All specifications are subject to change without notice.

Contents
Preface.......................................................................................................................................ii
Windows Installation 5
CD Contents ..............................................................................................................................5
Installing the Printer Installer ....................................................................................................6
Installing a Printer......................................................................................................................7
Windows Printing 14
Page Setup ...............................................................................................................................14
Print .........................................................................................................................................21
Print Properties........................................................................................................................22
Printing from Special Applications..........................................................................................24
Printer Driver Plug-in..............................................................................................................27
Printer Installer............................................................................................................7
Add Printer..................................................................................................................9
Installable Options.....................................................................................................12
Wide Page and Paper Size.........................................................................................16
Custom Page Size......................................................................................................17
Mixed Page Sizes ......................................................................................................20
General......................................................................................................................28
Layout........................................................................................................................30
Paper..........................................................................................................................34
Cover.........................................................................................................................39
Trays..........................................................................................................................41
Tab Sheets .................................................................................................................45
Screening...................................................................................................................46
Forms.........................................................................................................................47
Image Shifting...........................................................................................................49
Post Processing..........................................................................................................51
Workflow ..................................................................................................................52
MacOS X Installation 55
Installing the Printer Driver Software......................................................................................55
Installing a Printer....................................................................................................................57
Installable Options.....................................................................................................58
MacOS X Printing 60
Page Setup ...............................................................................................................................60
Custom Page Size......................................................................................................61
Print .........................................................................................................................................62
Printing from Special Applications..........................................................................................64
Printer Driver Plug-in..............................................................................................................65
Printing in the Classic Environment..........................................................................66
MacOS 9 Installation 67
Installing the Printer Driver Software......................................................................................67
Installing a Printer....................................................................................................................68
Konica Minolta bizhub PRO 1050 Printer Driver Contents • iii

Installable Options.....................................................................................................69
MacOS 9 Printing 70
Page Setup ...............................................................................................................................70
Custom Page Size......................................................................................................71
Mixed Page Sizes ......................................................................................................71
Print .........................................................................................................................................72
Printing from Special Applications..........................................................................................73
Printer Driver Plug-in..............................................................................................................74
Differences from the Windows plug-in.....................................................................75
User Authentication...................................................................................................76
Appendix 82
Paper Sizes...............................................................................................................................82
End User License Agreement..................................................................................................84
Glossary 86
iv • Contents Konica Minolta bizhub PRO 1050 Printer Driver

Windows Installation
CD Contents
The bizhub PRO 1050 client software is delivered on a hybrid Windows and
Macintosh CD-ROM.
The bizhub PRO 1050 Windows client software comprises the Printer Installer
and the printer driver packages.
The contents and folder structure of the CD-ROM is shown in th e graphics
below.
Windows printer drivers for Windows 98/ME, Windows NT4, Windows 2000,
Windows XP, and Windows Server 2003 are contained in the corresp onding
folders for each language. The printer driver software consists of a PPD which
defines printer properties and a plug-in which provides advanced printing
functions under a graphical user interface. If you want to install only Windows
printers, you can choose the printer files directly from the CD-ROM. In this way
you will not need to reboot your PC.
The bizhub PRO 1050 printer driver refere nce guide is stored as a PDF file in the
UserGuide folder. You may print it for use with the bizhub PRO 1050. For
printing a PDF file you need Adobe Reader (Acrobat Reader) which is available
from http://www.adobe.com.
Konica Minolta bizhub PRO 1050 Printer Driver Windows Installation • 5

Installing the Printer Installer
The software on the CD-ROM is localized in several languages.
The Installer is automatically launched when you insert the CD-ROM. You can
also double click setup.exe in the root folder of the CD-ROM.
Select the language for the software to be installed. Then follow the instructions
given by the Installer.
This will install the Printer Installer which supports easy installation of a
Windows printer.
To uninstall the software, launch the Installer from the CD-ROM, or launch
Control panel » Software » Konica Minolta bizhub PRO 1050 Plug-in
Driver Package, then select Remove. The software should also be uninstalled
before installing a new version of the software.
6 • Windows Installation Konica Minolta bizhub PRO 1050 Printer Driver

Installing a Printer
Printer Installer
The POD Server Printer Installer is an easy-to-use application to install
Windows printers.
Launch Printer Installer from the Start menu and click Next.
Enter the printer name or IP address of your bizhub PRO 1050 and click Next.
This will install the bizhub PRO 1050 as a Windows printer.
For Windows XP and Windows 2000, the printer will be created using an lpr
port, e.g.
will be created using a NetBIOS port, e.g.
To establish another connection (NetBIOS or port 910 0), select Other
Connection, and click Next.
Note: If your network uses DNS, the administrator should make sure that the
network name assigned to the bizhub PRO 1050 matches the network name
stored in the DNS.
myprinter:print. For Windows NT4 and Windows 98, the printer
\\myprinter\print.
Konica Minolta bizhub PRO 1050 Printer Driver Windows Installation • 7

Printer Installer shows you a list of printer models to be installed. If no model is
shown, click Have Disk to select an .inf file in the printer driver folder on the
CD-ROM for your operating system.
Select a printer model and click Next.
Note: During printer installation, Windows 2000 and Windows XP may show a
warning about a missing digital signature. You should continue the installation
anyway.
After the printer installation, the printer can be selected from the print dialog of
your applications.
8 • Windows Installation Konica Minolta bizhub PRO 1050 Printer Driver
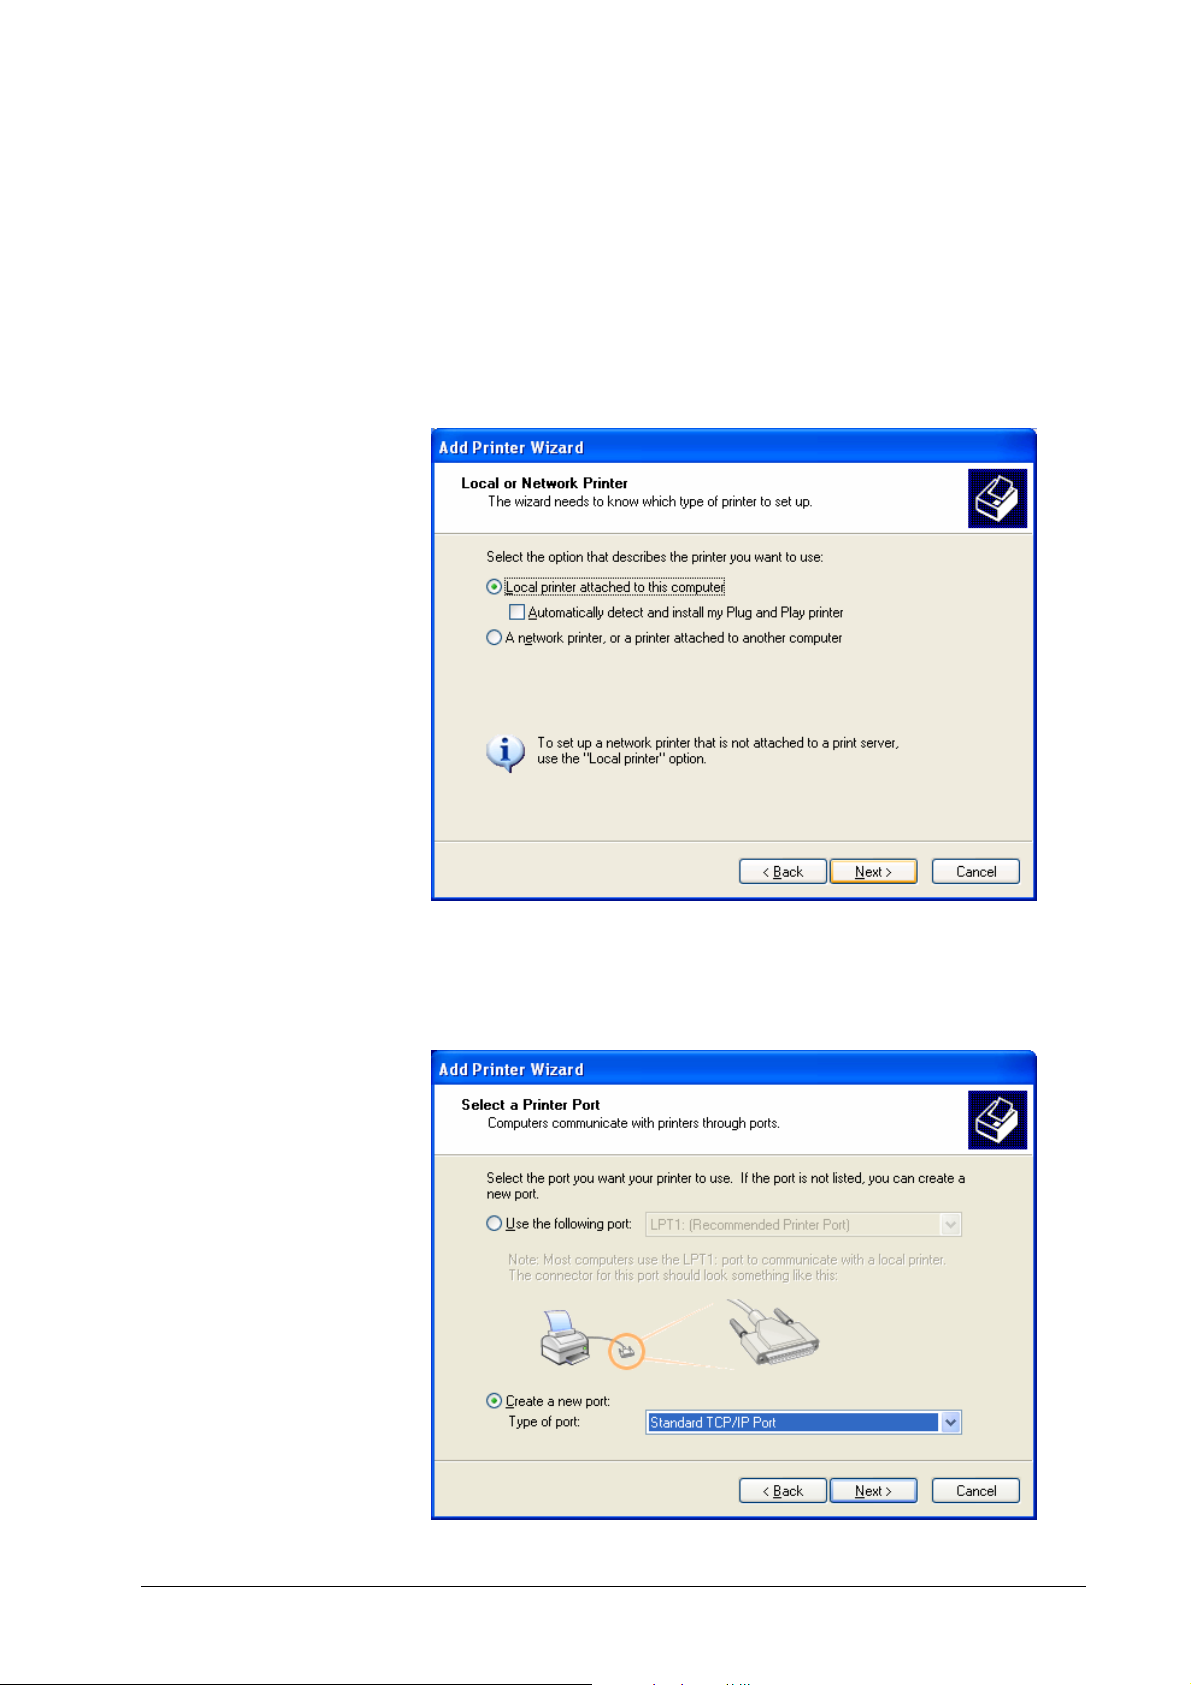
Add Printer
Alternatively to the Printer Installer, you can install a printer using the Add
Printer function.
Select Start menu » Settings » Printers and Faxes » Add Printer and click Next.
Note: Depending on your settings for the start menu, Printers and Faxes will
either unfold to the list of printers or open the “Printers and Faxes” Explorer
window. In the latter case, double click Add Printer to launch it.
Make sure Automatically detect Plug and Play Printer is not checked.
Select Local Printer and click Next.
Konica Minolta bizhub PRO 1050 Printer Driver Windows Installation • 9

To create an lpr port, select Create a new port, then select LPR port, then click
Next.
Enter the network name or IP address of your bizhub PRO 10 5 0 and print as
queue name, then click OK.
Click Next.
10 • Windows Installation Konica Minolta bizhub PRO 1050 Printer Driver

Select Have Disk, then select the .inf file in the printer driver folder on the CD-
ROM. Then click Next.
The resulting dialog shows the bizhub PRO 1050 driver. Click OK.
Confirm the following dialogs to conclude the printer installation.
Note: During printer installation, Windows 2000 and Windows XP may show a
warning about a missing digital signature. You should continue the installation
anyway.
After the printer installation, the printer can be selected from the print dialog of
your applications.
Konica Minolta bizhub PRO 1050 Printer Driver Windows Installation • 11

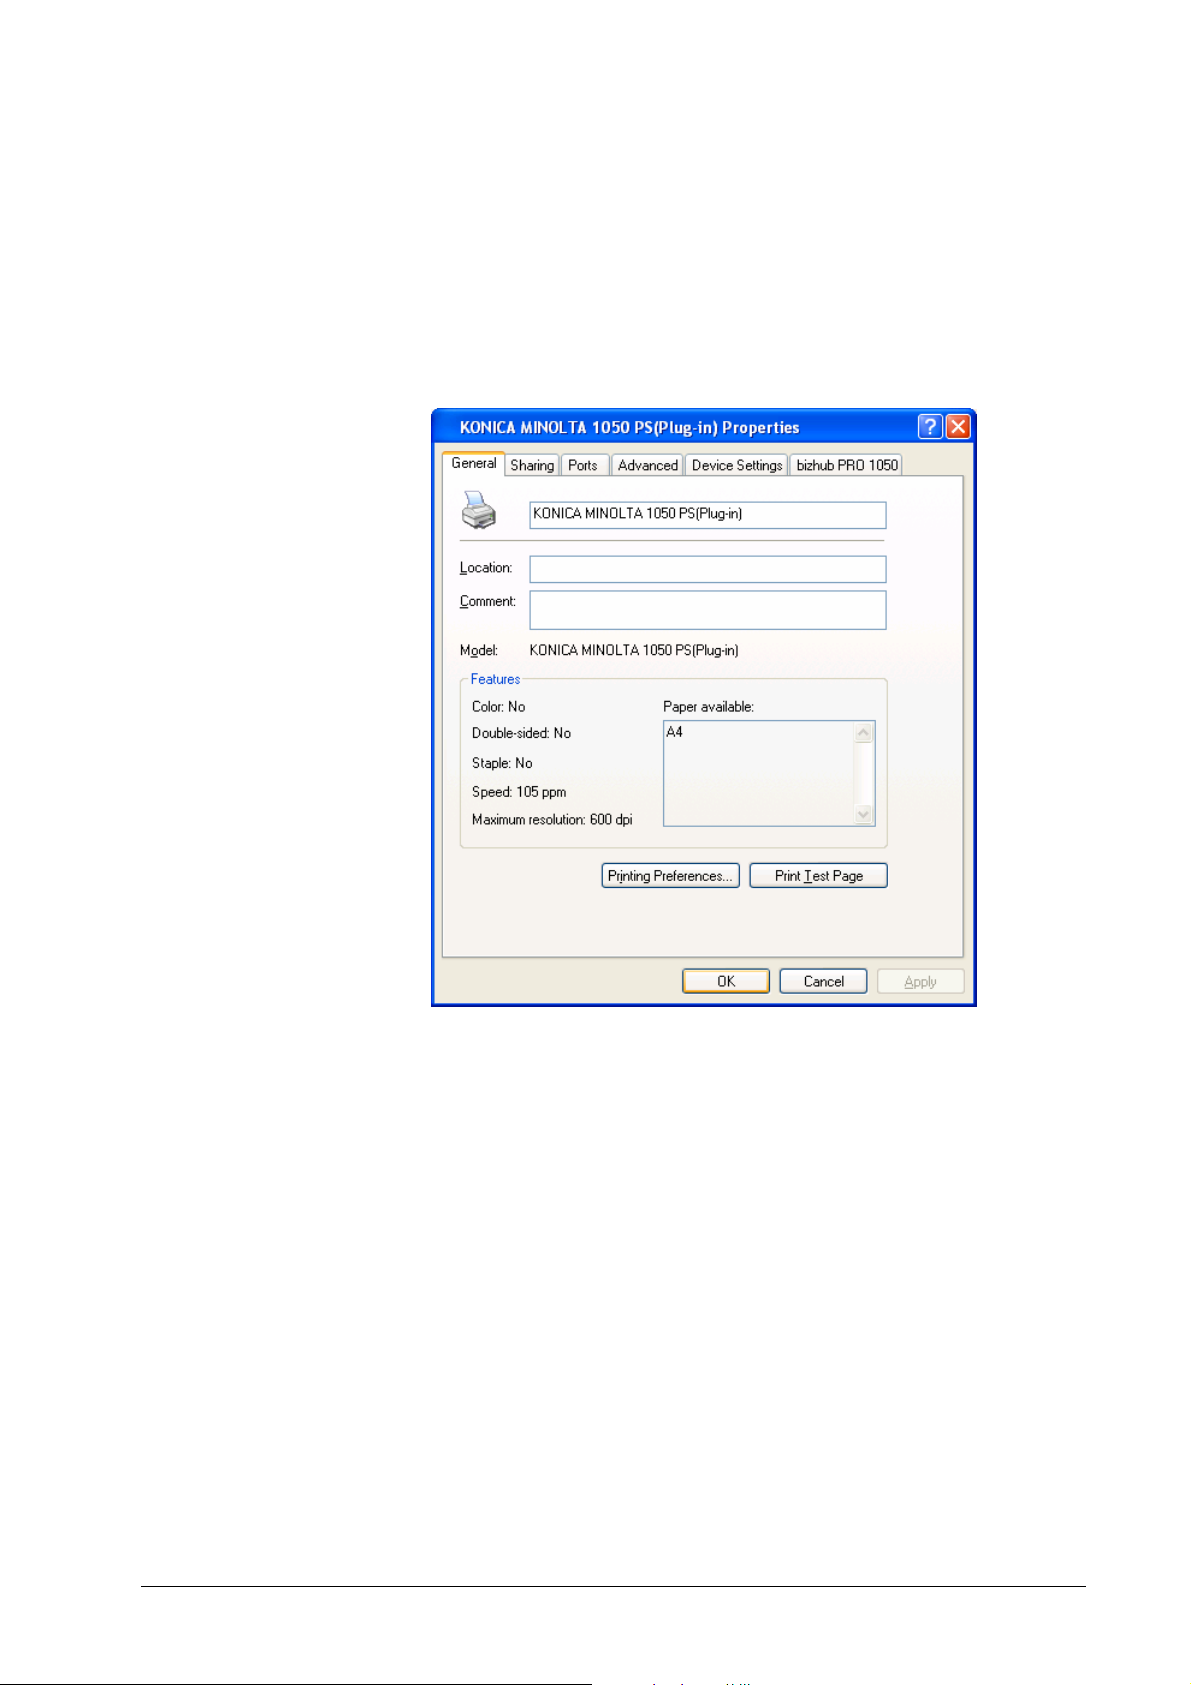
Installable Options
The installable options determine which optional accessories are available on
your bizhub PRO 1050 (e.g. large capacity trays or stapler). The installable
options tailor the user interface of the printer driver on your PC and prevent the
accidental selection of features which are not supported by the bizhub PRO
1050. To make the accessories available in the printer driver you must enable the
corresponding installable options.
To configure the installable options,
open Start menu » Settings » Printers and Faxes » KONICA MIN OL T A
1050 PS (Plug-in),
then select Properties.
This opens the properties dialog of your bizhub PRO 1050 Windows printer.
Select bizhub PRO 1050. This shows the plug-in’s installable options panel.
12 • Windows Installation Konica Minolta bizhub PRO 1050 Printer Driver
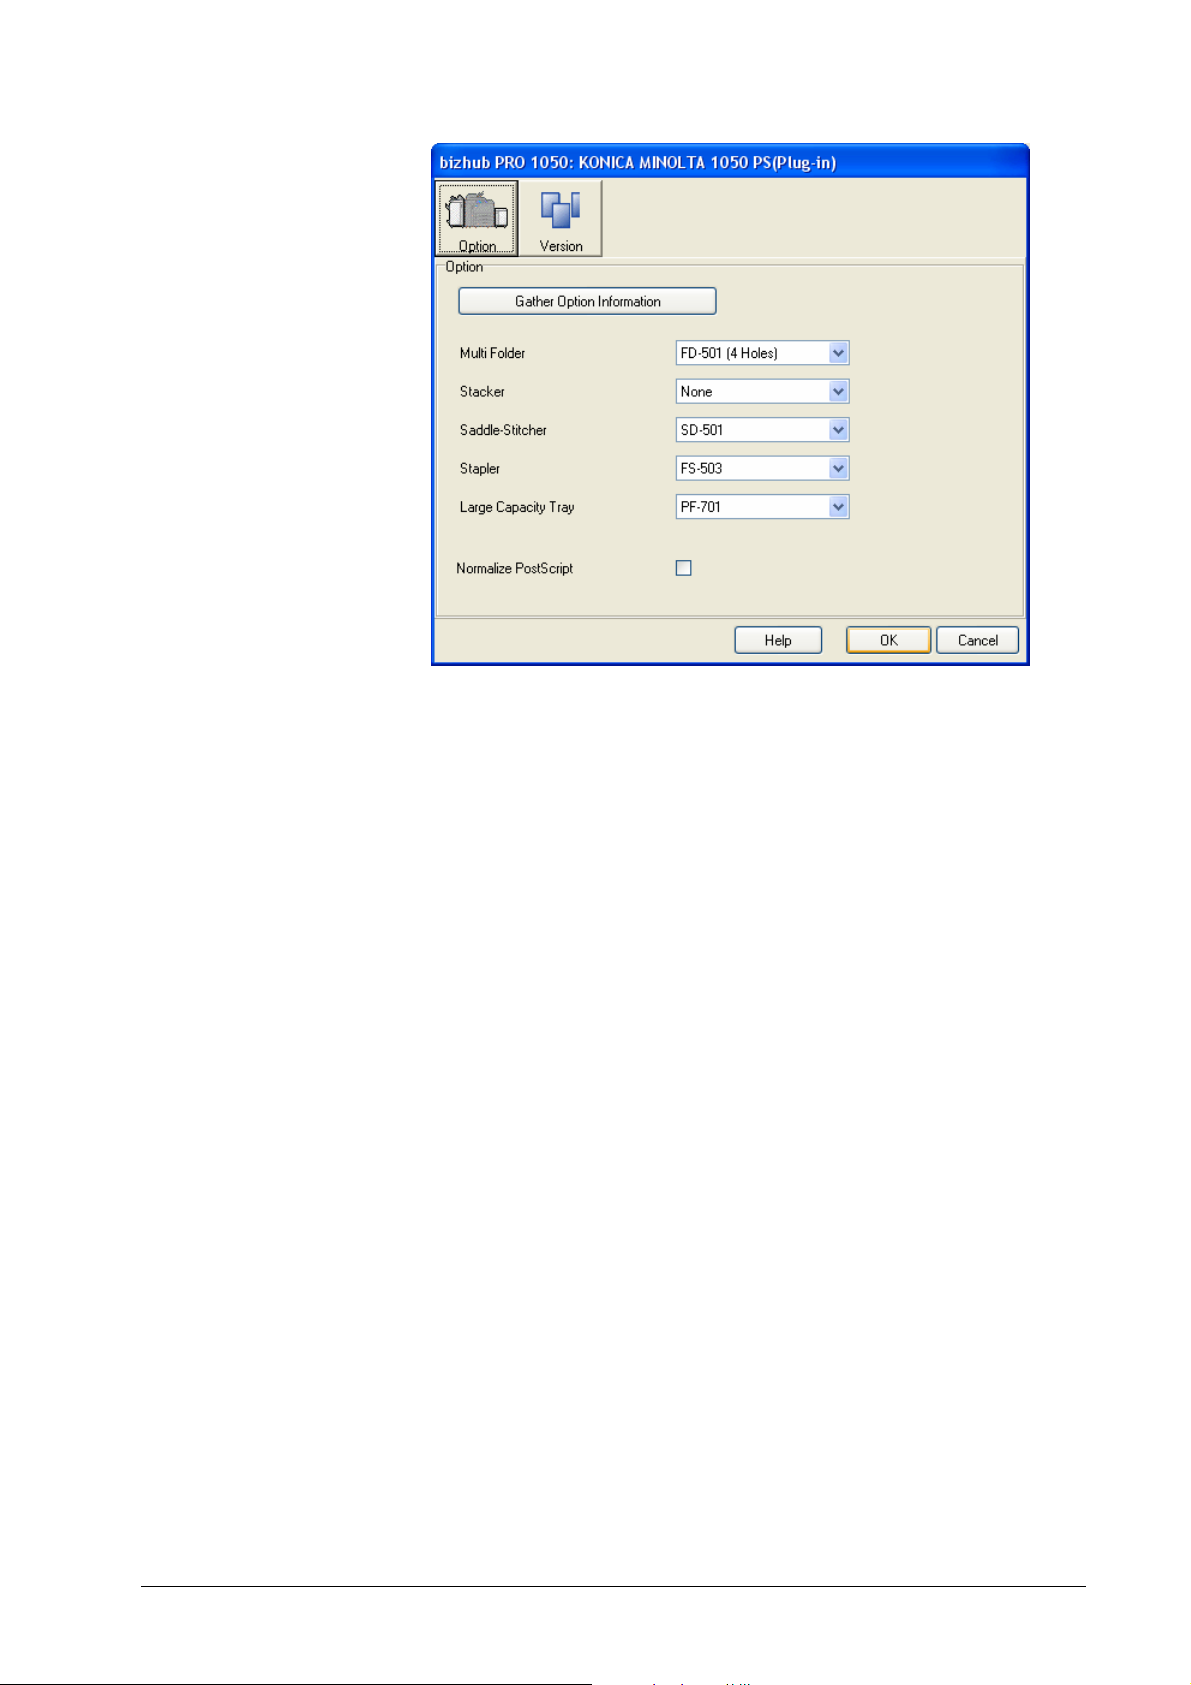
Click Gather Option Information to let the printer driver plug-in auto-detect
the installable options.
You may also change an option value manually. This can be used, e.g. to create
jobs as PostScript files for a bizhub PRO 1050 which is not currently connected
to your PC and may have different options installed.
Click OK twice to confirm your changes.
After you have enabled the available installable options, the features
corresponding to those options will be available in the printer driver.
Normalize PostScript may be enabled if you need to use certain plug-in
features, e.g. tray selection per page, with applications like Adobe PageMaker
which have their own PostScript driver based only on a PPD.
Note: Normalize PostScript should be used with caution as it may change the
output of objects like outline fonts or embedded EPS files. If you want to use the
driver with Normalize PostScript enabled for PageMaker, and with Normalize
PostScript disabled for other applications, you may install the driver twice and
enable Normalize PostScript only in one of the printers.
Note: If the bizhub PRO 1050 is used as a shared printer on a network server
(and not directly), the printer driver plug-in will not be able to configure
installable options automatically. In this case, set the installable options
manually.
Note: Do not use Device Settings » Form to Tray Assignment in the printer
properties dialog to perform tray selection. Using different settings than the
default may cause unexpected results.
Konica Minolta bizhub PRO 1050 Printer Driver Windows Installation • 13
Windows Printing
Page Setup
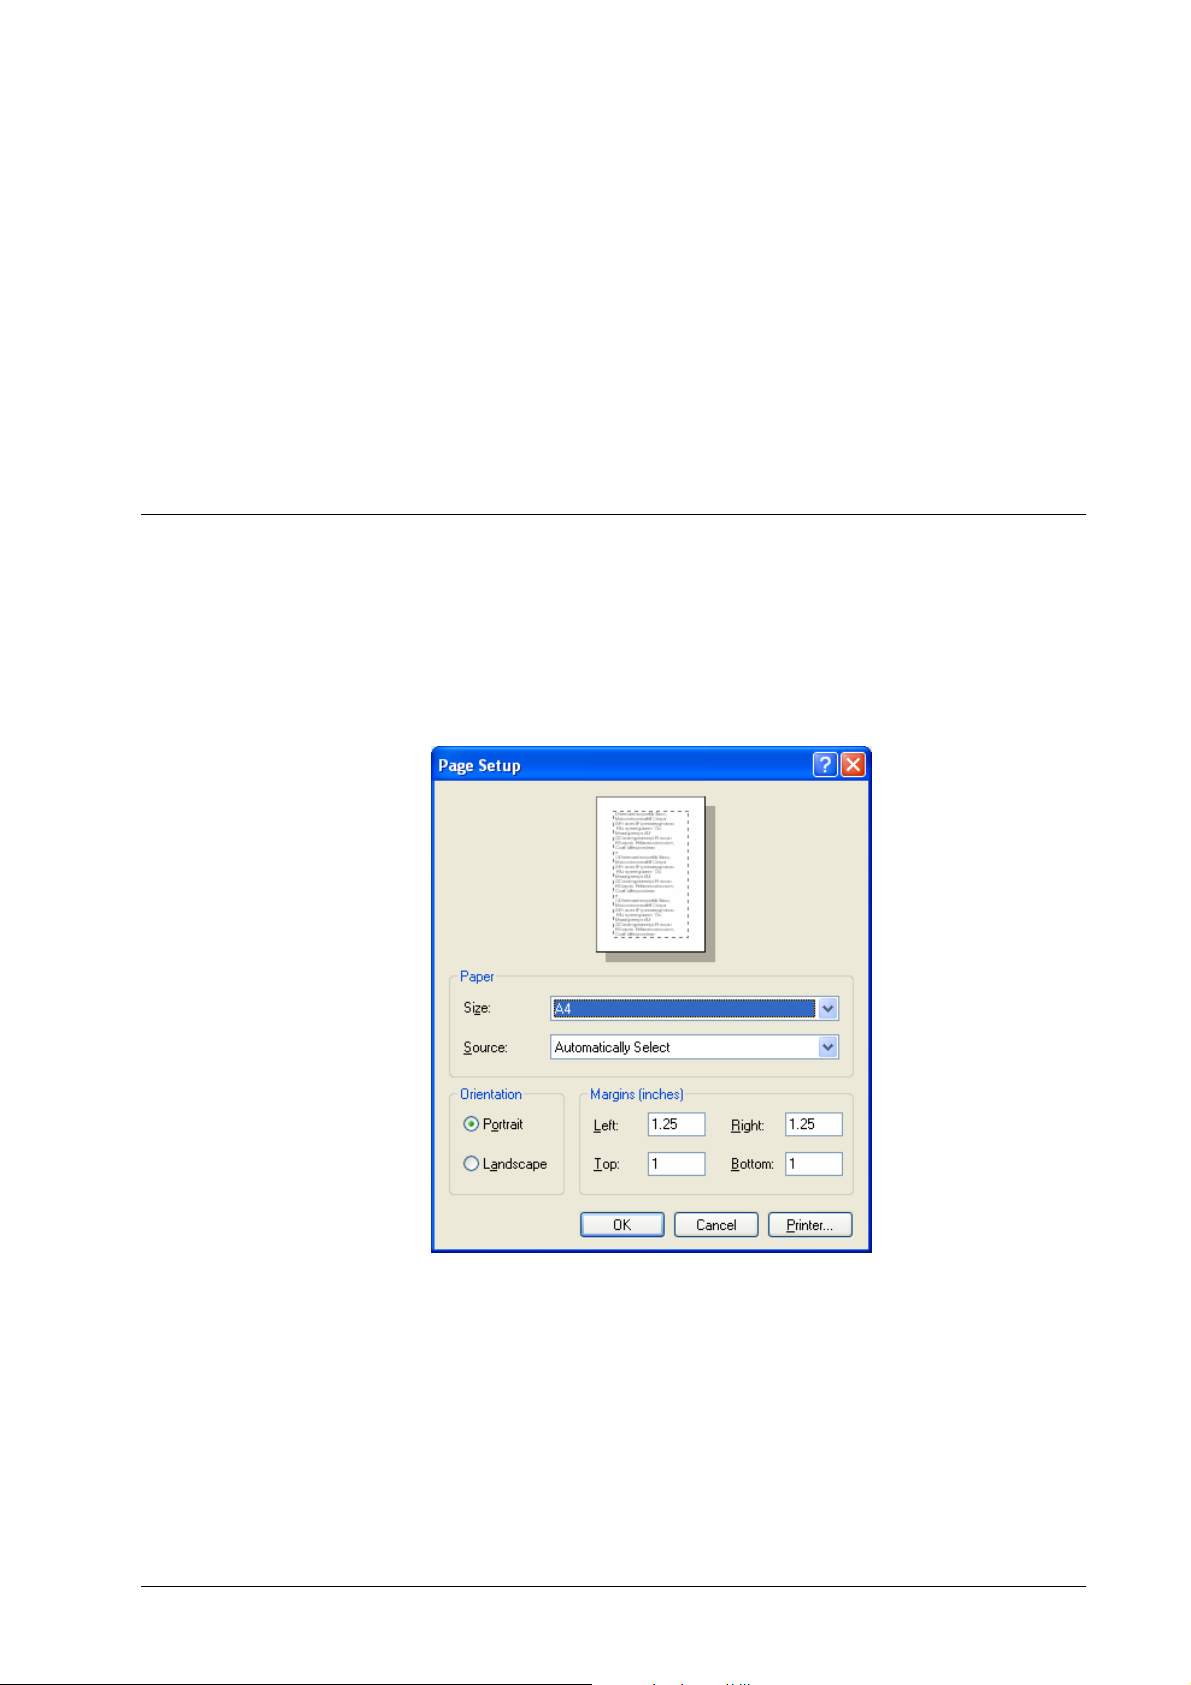
Before you can print a document, you must determine its size and orientation.
Usually, the size and orientation of a new document are predefined as A4 or
Letter and portrait, so you may not need to care.
To determine the document page size, select File » Page Setup (or a similar
command, depending on your application).
In the resulting dialog, select the size, orientation (portrait or landscape), and
margins to be used for your document.
The paper sizes of the bizhub PRO 1050 are described in appendix “Paper
Sizes”.
How to print full bleed using wide document page sizes and wide paper sizes is
described in section “Paper”.
If you do not find all bizhub PRO 1050 paper sizes under Size, click Printer and
then select KONICA MINOLTA 1050 PS as current printer to make the paper
14 • Windows Printing Konica Minolta bizhub PRO 1050 Printer Driver

sizes of the bizhub PRO 1050 available. – In MS Word, open File » Print, select
KONICA MINOLTA 1050 PS (Plug-in), and close the Print dialog to select your
bizhub PRO 1050 as the current printer.
Note that the document page size may be different from the paper size on which
you print. E.g. if you print using booklet layou t, the paper size will be twice the
document page size. The output paper size can be selected in the Print dialog.
See section “Paper” for details.
Selecting non-zero margins will warn you if you place printing elements outside
the margins and try to print.
Konica Minolta bizhub PRO 1050 Printer Driver Windows Printing • 15

Wide Page and Paper Size
For a number of page sizes, there is a corresponding wide page and paper size,
e.g. A4 Wide and Letter Wide.
Wide page and paper sizes allow you to print in full bleed mode.
Normal page sizes, e.g. A4 and Letter, are defined with a margin (8 PostScript
points, 2.8 mm, 1/9 of an inch) on each edge. The imageable area of the page is
smaller than the page size (A4 or Letter) by this amount. This prevents full bleed
printing for normal page sizes.
Wide document page sizes, e.g. A4 Wide and Letter Wide, are defi ne d wi th a
margin (7 PostScript points, 2.5 mm, 1/10 of an inch) which is added on each
edge of the page. The wide page size is bigger than the base page size (A4 or
Letter) by this amount. The imageable area is equal to the base page size. This
allows you to compose documents which fill the base page size to the edge. By
default, a job with wide page size will be printed on wide paper.
Wide paper sizes must be configured at the copier. A wide paper size should be
bigger than the corresponding base size. It need not have the same size as the
corresponding wide document page size (base size + 7 points on each edge).
Printing on wide paper is performed in full bleed mode, i.e. the base size is
printed without leaving a margin. By default, documents printed on wide paper
will be aligned left on the paper.
For printing in full bleed mode, see section “Paper”.
For a list of wide page and paper sizes, see appendix “Paper Sizes”.
Note: If you want to use full bleed printin g, y ou s h ould decide so before
designing your document. When you change the page size of a document from a
normal size to a wide size, elements which have been positioned relative to the
paper edge may have to be repositioned.
16 • Windows Printing Konica Minolta bizhub PRO 1050 Printer Driver
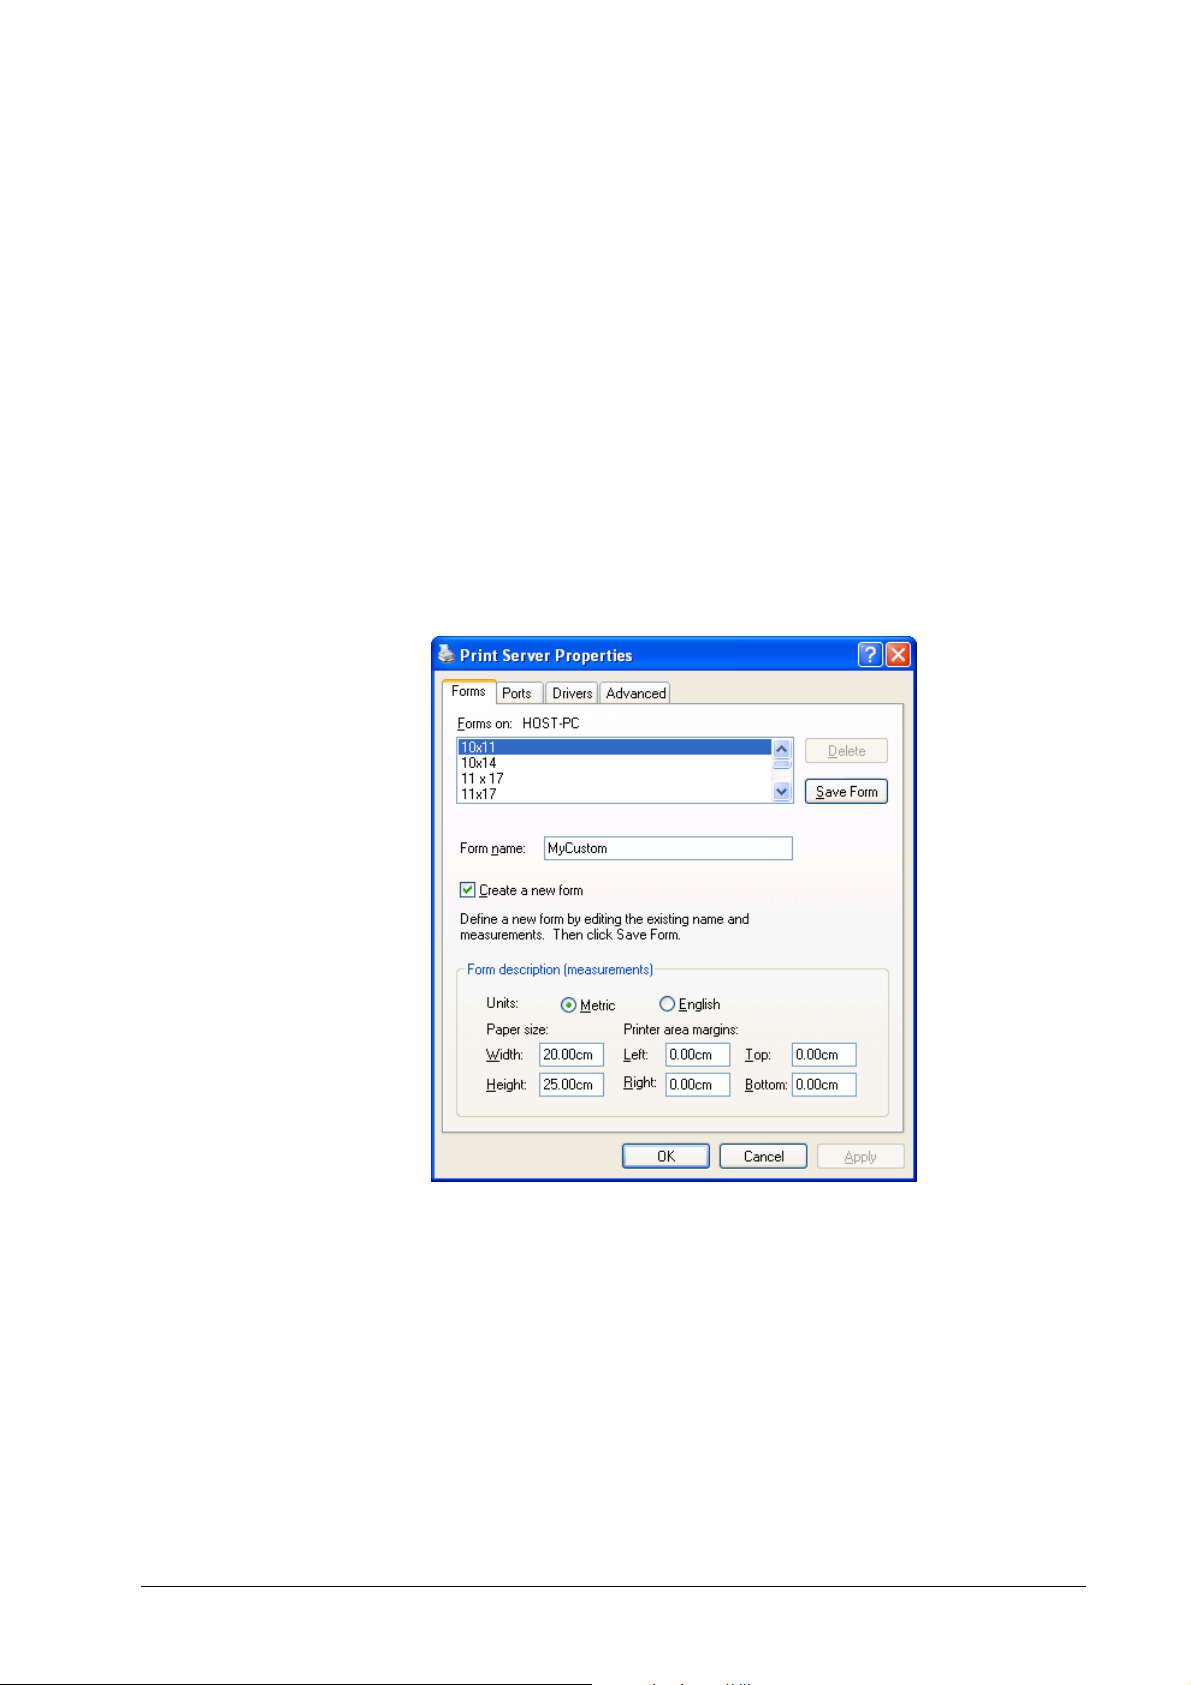
Custom Page Size
Custom page sizes can be determined in two ways:
• By defining forms within the Printers and Faxes dialog
• By entering the PostScript custom size of your printer
Forms
Windows XP, 2000 and NT4 allow to define multiple named forms which can be
used like standard paper sizes.
To define a form, open Start menu » Settings » Printers and Faxes.
Make sure no printer is selected. Select File » Server Properties.
This shows the Properties of Print Server dialog.
In the Forms panel, check Create a new form.
Enter the name and the size of the form and click Save Form.
Define more forms or click Close to finish the creation of forms.
The created forms will be available like standard page sizes for each printer
(provided they fit the limits for custom page size on the respective printer).
The created forms will also be available like standard output paper sizes for the
bizhub PRO 1050. See section “Paper”.
In your application, select File » Page Setup, then select a form and enter the
orientation.
Note: Forms are supported by Windows XP, 2000, and NT4. For Windows 98 or
ME, use PostScript custom size as described below.
Konica Minolta bizhub PRO 1050 Printer Driver Windows Printing • 17
PostScript custom size
The AdobePS driver allows to define a custom page size (Windows 98/ME: 3
custom page sizes) for each printer.
To determine the PostScript custom size of your bizhub PRO 1050 printer,
open Start menu » Settings » Printers and Faxes » KONICA MIN OL T A
1050 PS (Plug-in),
then select Properties.
This will open the printer properties dialog.
Select Printing Preferences.
In the Printing Preferences dialog, click Advanced.
In the Advanced Options dialog, select Paper size » PostScript custom size.
18 • Windows Printing Konica Minolta bizhub PRO 1050 Printer Driver
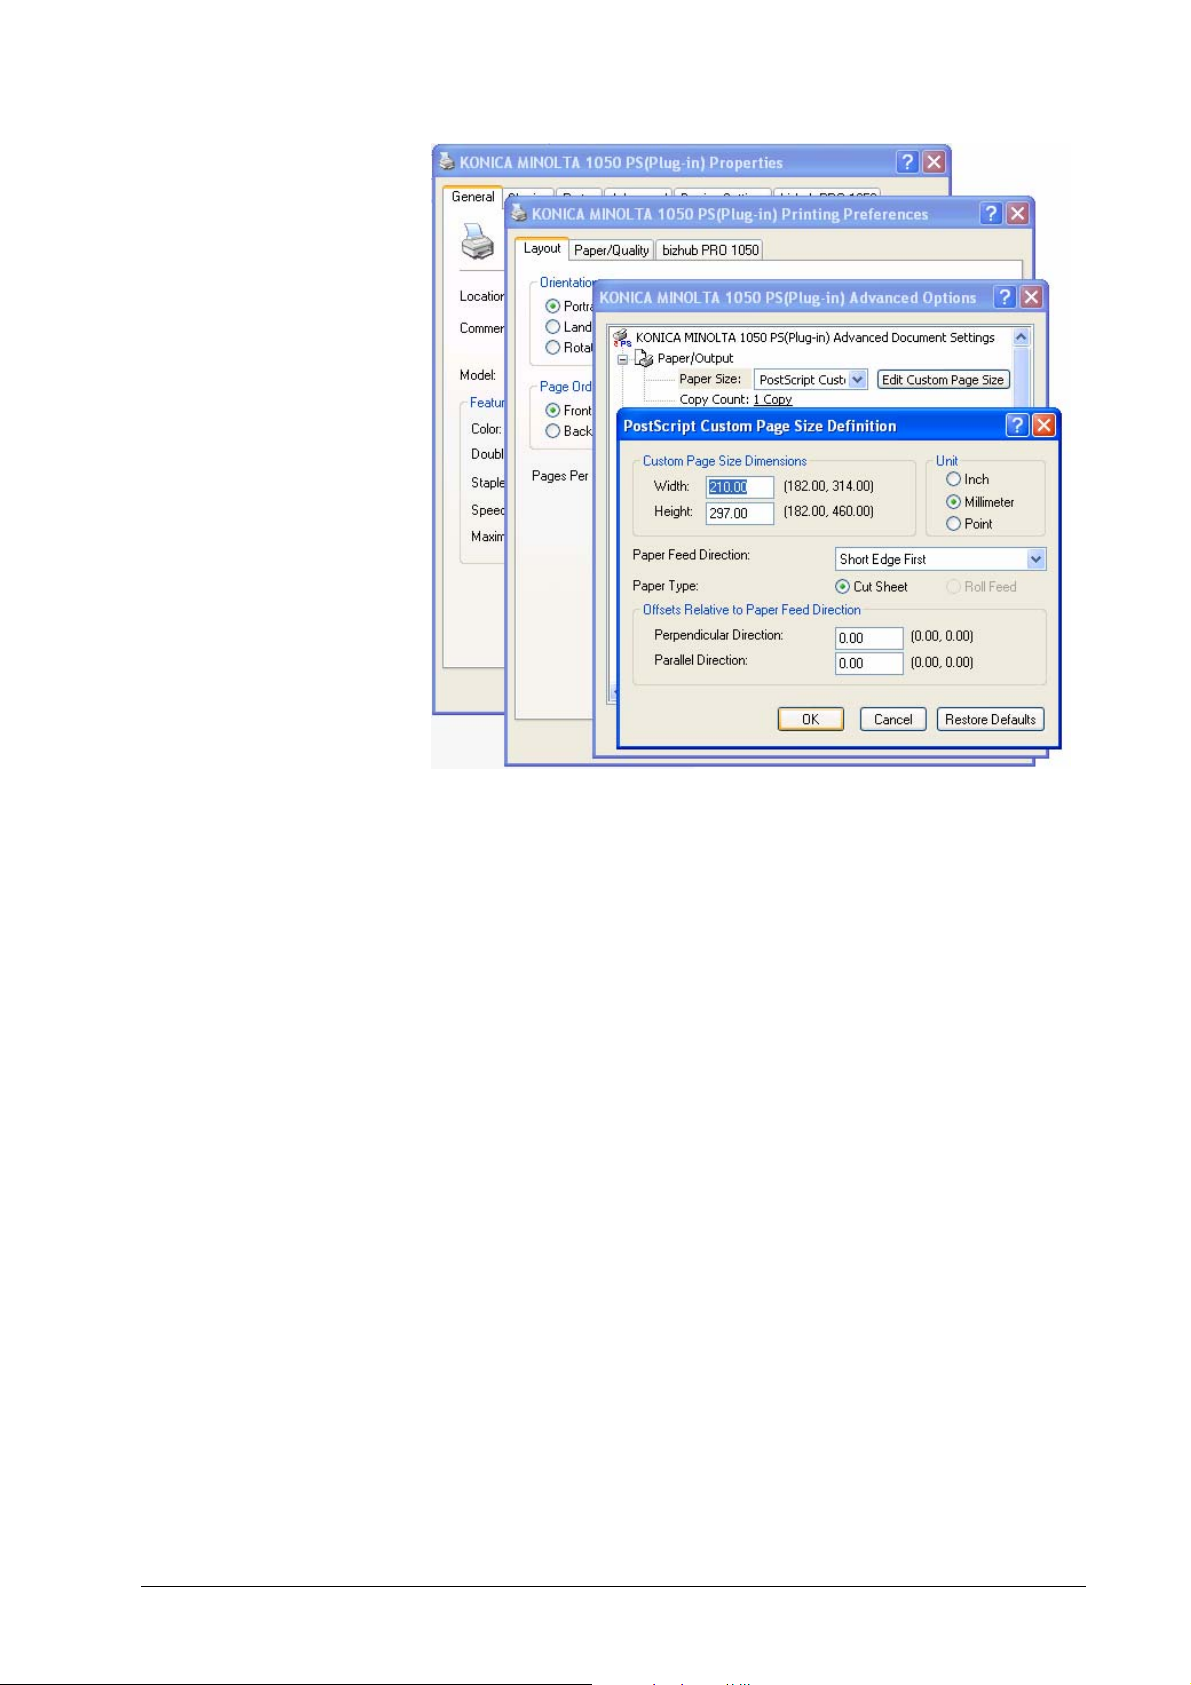
In the PostScript Custom Size dialog, enter the width and height to be used.
Click OK to confirm the changes.
In your application, select File » Page Setup, then select Paper size = PostScript
custom size and enter the orientation.
Note: MS Word has known problems to work with this kind of custom paper
size, therefore it is better to use forms as described above with MS Word.
Note: You can set the PostScript custom size also from your application by
selecting Print » Properties » Advanced and then selecting Paper size »
PostScript custom size. However, this way the definition will be valid only
within this application and only as long as the application is opened.
Konica Minolta bizhub PRO 1050 Printer Driver Windows Printing • 19
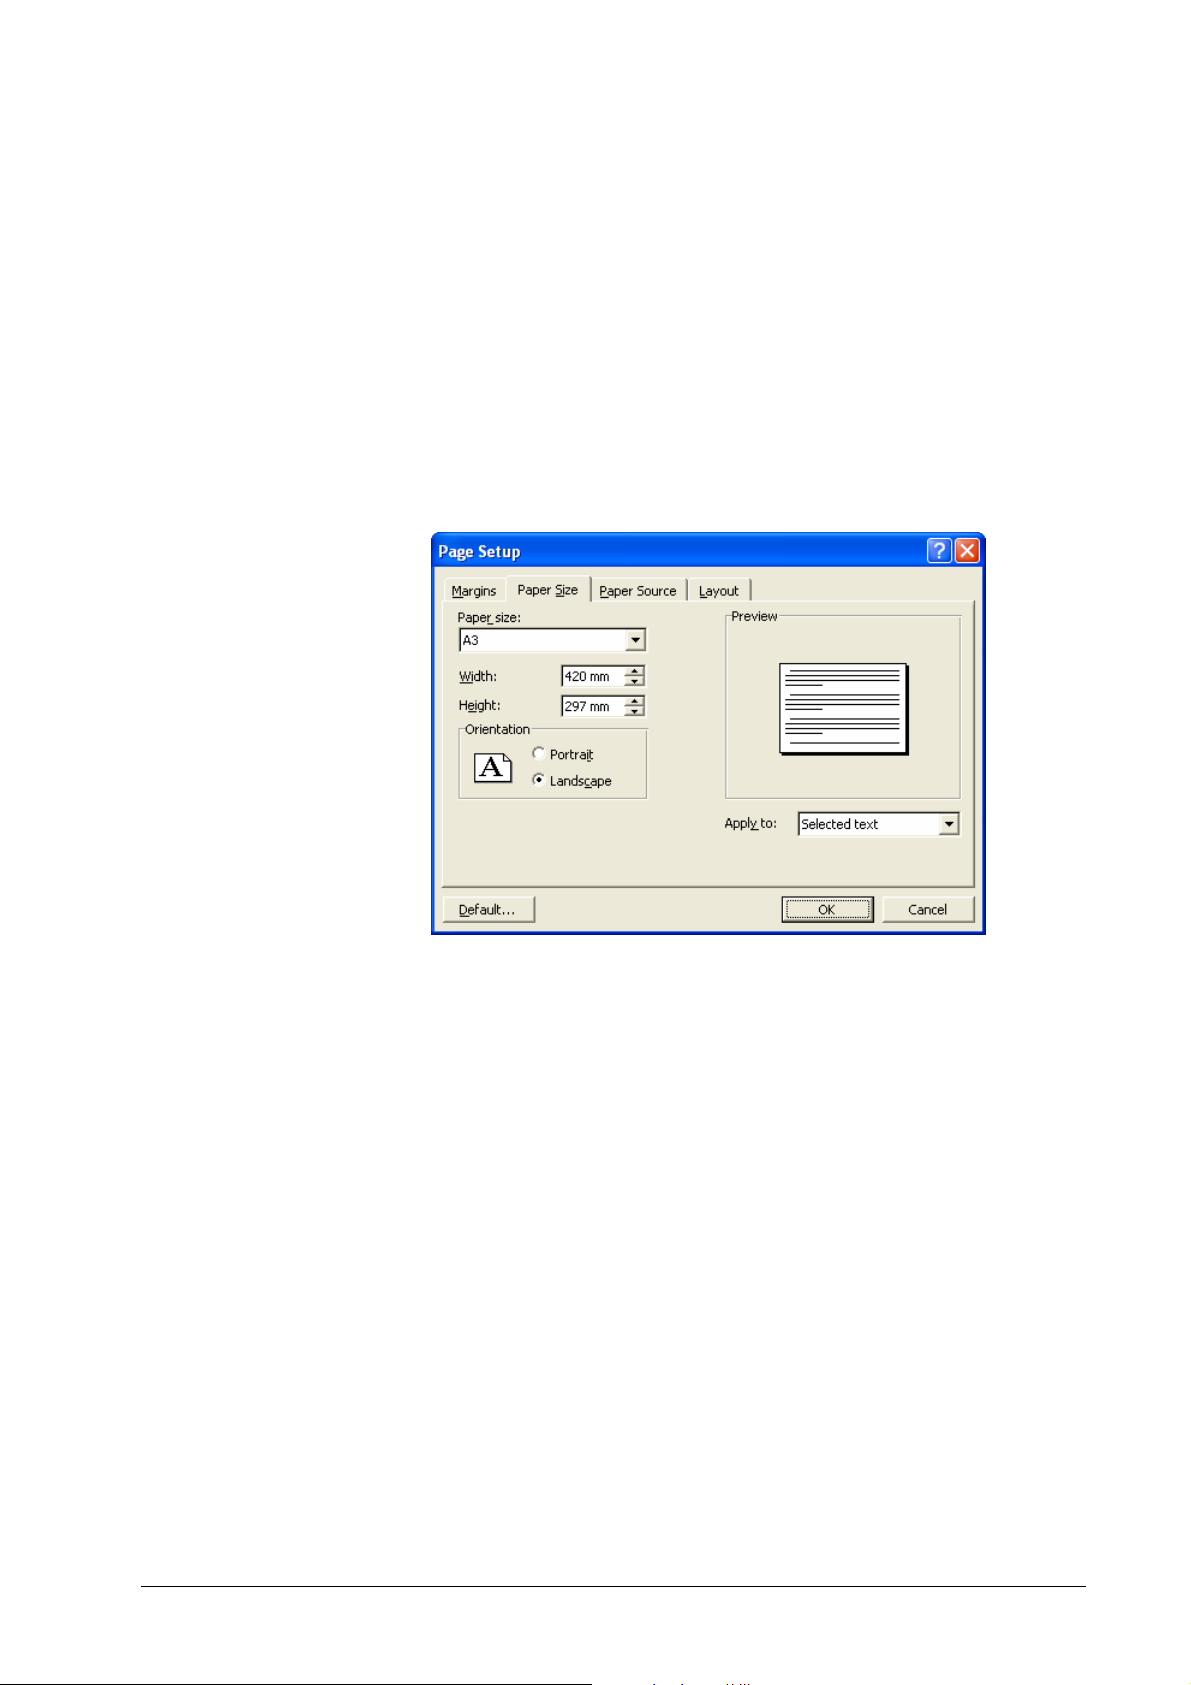
Mixed Page Sizes
Some applications allow you to create documents with mixed page sizes. This
can be used, e.g., to create a report consisting of A4 or Letter portrait pages with
text and some A3 or Tabloid landscape pages with large tables.
To create a document with mixed page sizes, e.g. in MS Word,
create several pages,
select the text on the pages which shall have a different size,
select File » Page Setup,
select the Paper Format panel,
select a page size,
select Apply to Selected text,
and click OK.
This creates a section in the MS Word document with the selected page size.
20 • Windows Printing Konica Minolta bizhub PRO 1050 Printer Driver
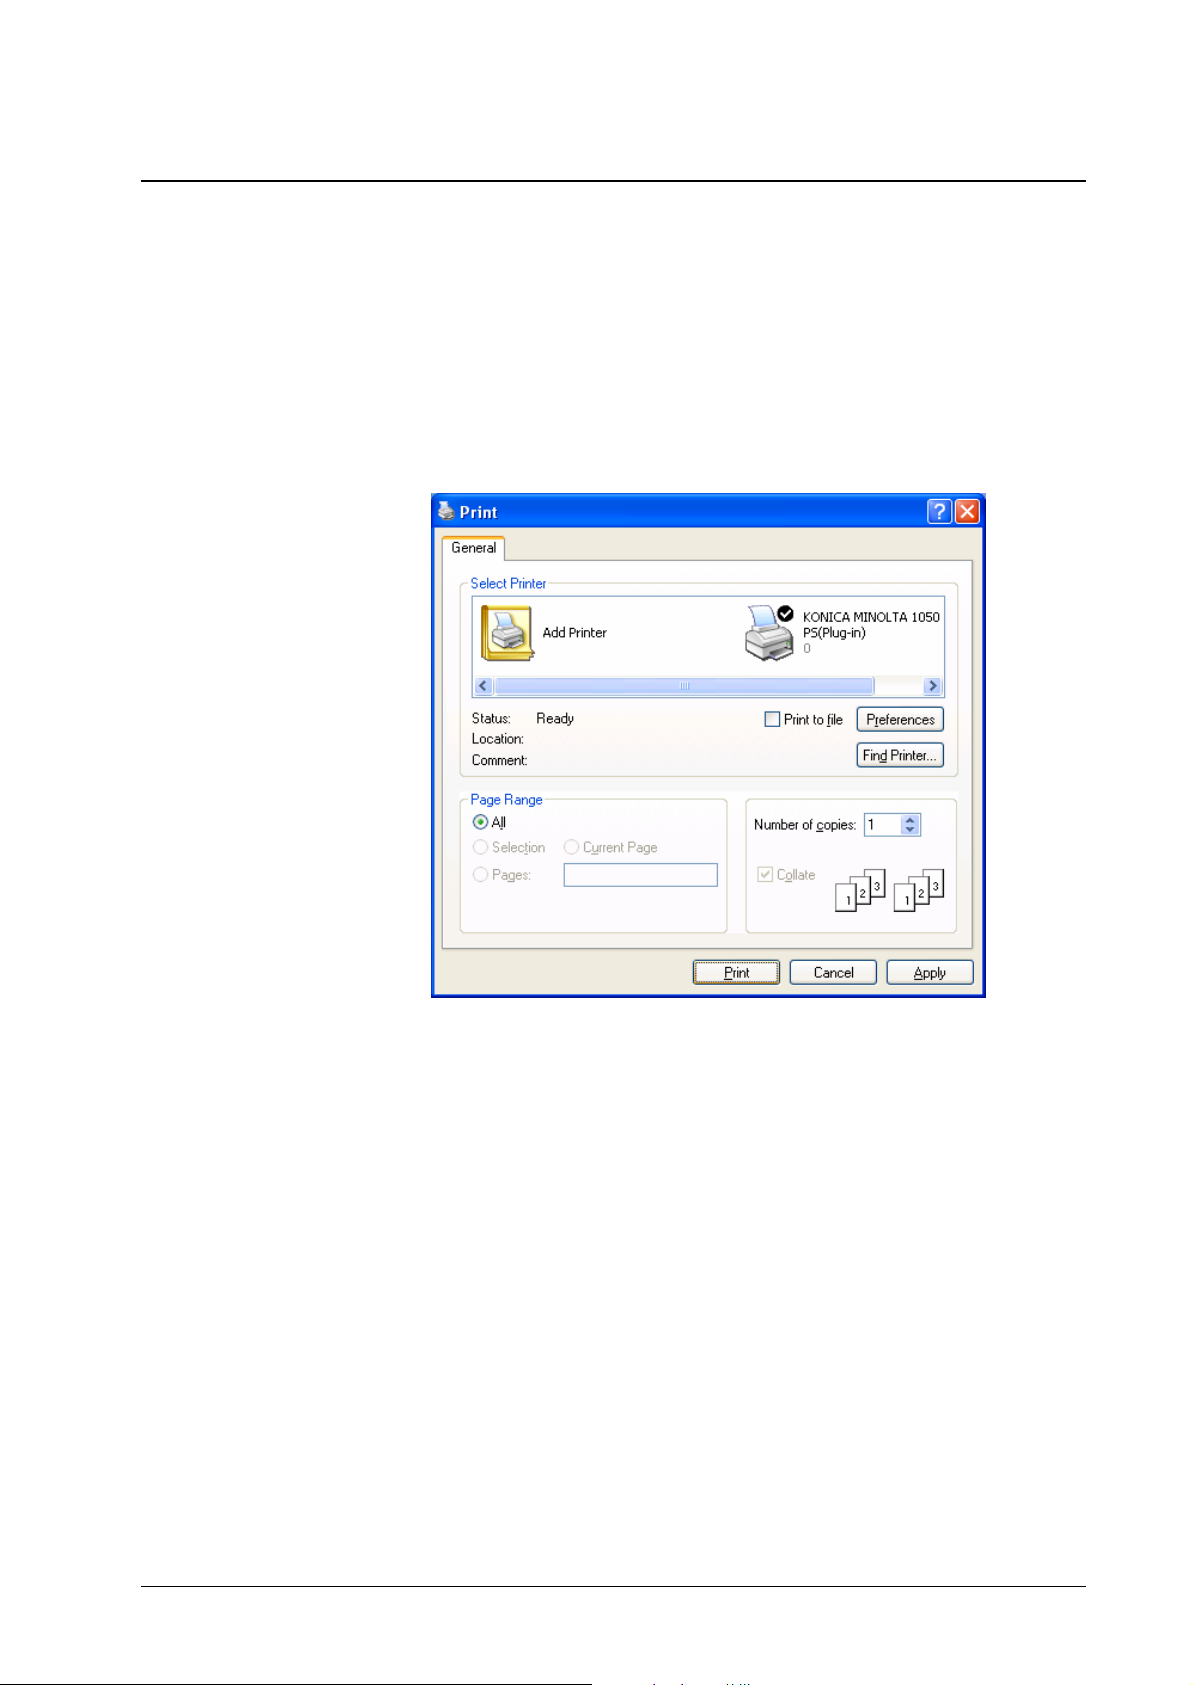
After a document has been created in an application, it can be printed on a
bizhub PRO 1050.
Printing the document is initiated in the Print dialog, which calls the printer
driver to generate a PostScript data stream, the job. The data stream represents
the elements on the document pages. It is amended by detailed instructions for
processing, the job ticket. The job ticket contains information like page size and
orientation, number of copies, tray selection, imposition and finishing modes.
To print a document, select the Print dialog, usually by File » Print.
The Print dialog may look differently in different applications. Usually you can
select at least the following options:
• The Windows printer which corresponds to the bizhub PRO 1050
• The range of pages to be printed
• The number of copies to be printed
Depending on the application, other options may be present. E.g. MS Word
offers you the Collate option. Do not use this option to get sorted sets of
documents, but use the Group check box in the Layout panel of the printer
driver plug-in.
To save your PostScript job to a file, check the Print to file box. This allows you
to save your job and let it be printed on a bizhub PRO 1050 to which you are not
connected now.
To confirm printing, click the OK (or Print) button.
Konica Minolta bizhub PRO 1050 Printer Driver Windows Printing • 21
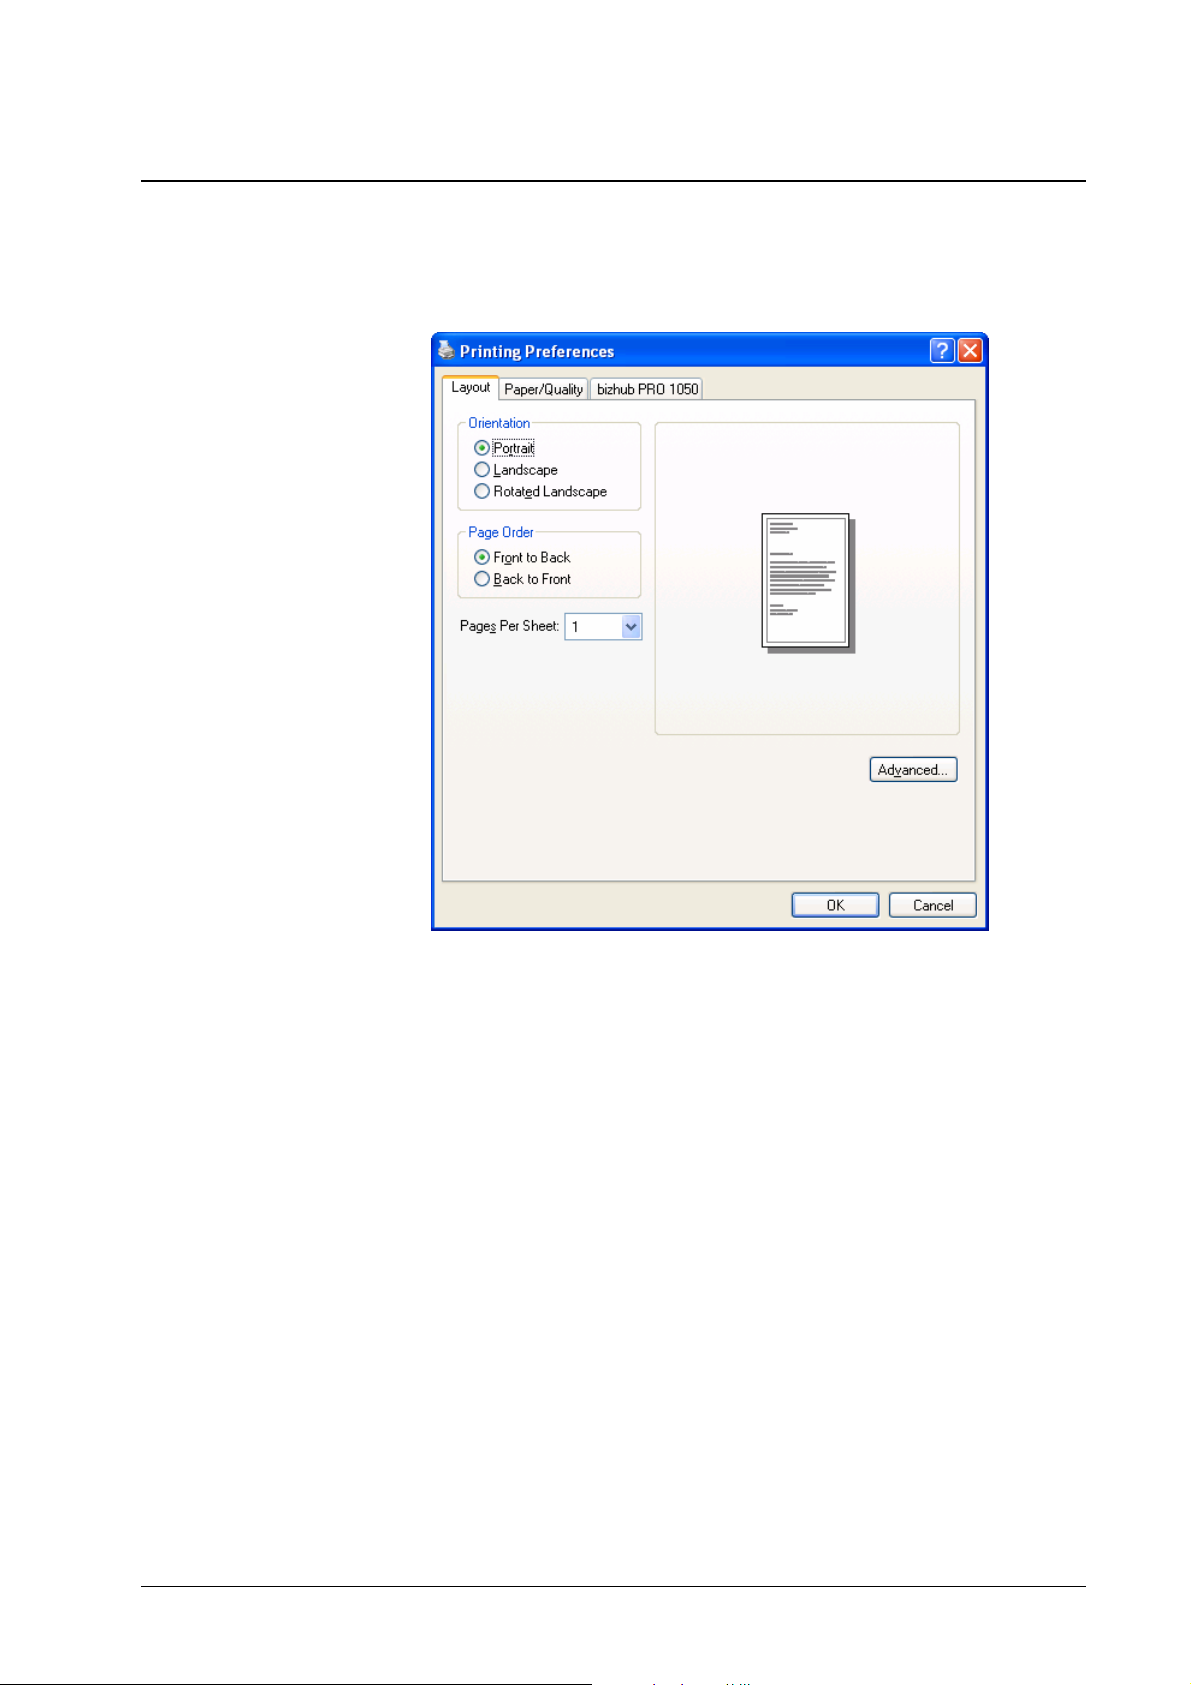
Print Properties
To select more print options within the Print dialog, click the Properties (or
Preferences) button.
The Properties dialog (Layout and Paper/Quality tab sheets and Advanced
dialog) allows you to select the following options:
• Paper size – the paper size selected here corresponds to the
document page size selected in the page setup dialog.
• Orientation – the orientation selected here corresponds to the
document orientation selected in the page setup dialog.
The orientation “landscape rotated” means that the pages are
rotated by 180°. This may be relevant if finishing options are
applied, or if the document contains mixed paper sizes.
• Pages per sheet – allows to print n-up (up to 16 pages per sheet)
using the core printer driver.
Further imposition options are available in the printer driver pl ug-in.
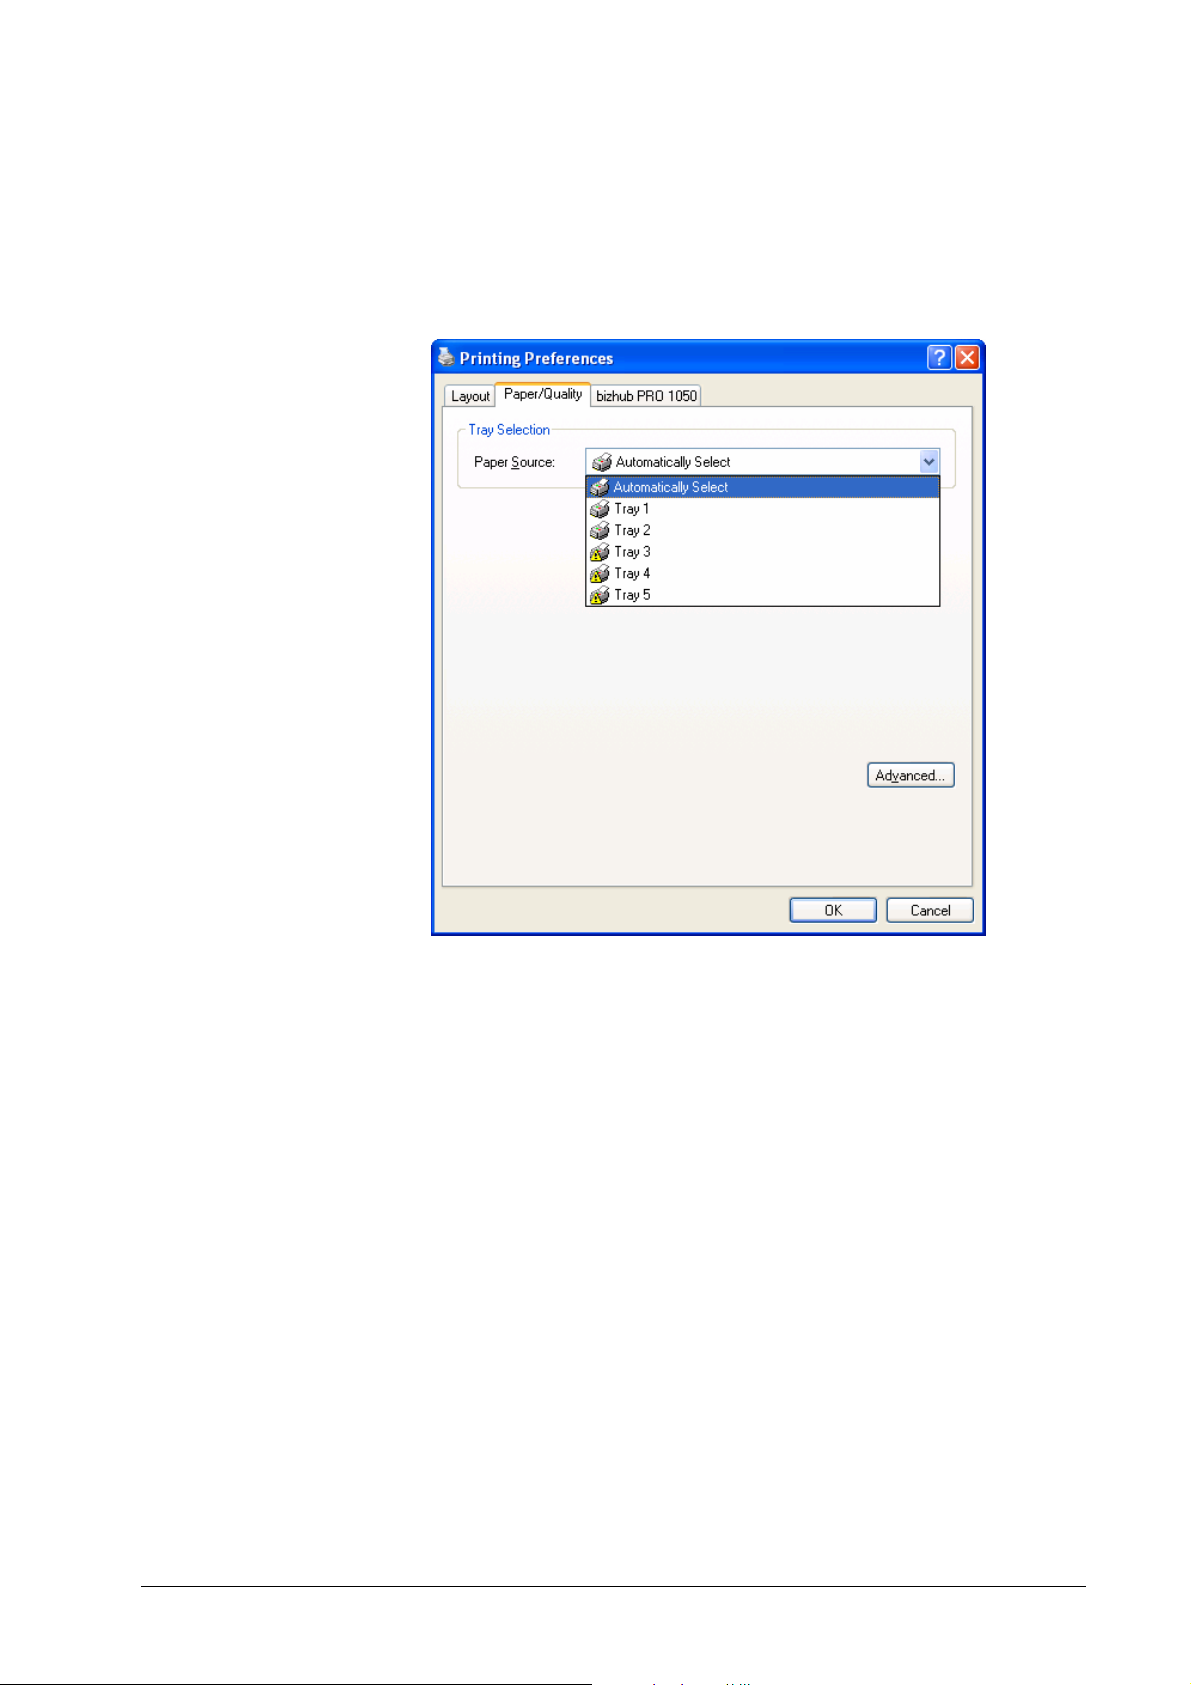
• Paper source – selects the tray to be used for printing.
Autoselect means the selection is performed in the engine, based on
output paper size, orientation, and finishing requirements.
See sections “Paper” and “Trays” for details on paper and tray
selection.
• Page order – selects front to back or back to front printing.
Reordering is applied to document pages, i.e., pages are reversed
before imposition (booklet etc.) is performed. See also “Face up” in
section “Layout”.
22 • Windows Printing Konica Minolta bizhub PRO 1050 Printer Driver
The bizhub PRO 1050 tab sheet is described in section “Printer Driver Plug-in”
Note: If some choices for paper source are marked with a yellow triangle, their
selection will cause a conflict due to a missing installable option for the large
capacity tray. The choices tray 3, tray 4, and tray 5 can only be selected if the
installable option for the large capacity tray is activated as described in section
“Installable Options”.
To resolve conflicts with installable options, make sure the installable option is
activated as described in section “Installable Options”.
Konica Minolta bizhub PRO 1050 Printer Driver Windows Printing • 23
Printing from Special Applications
Printing from Adobe PageMaker
In order to ensure that imposition (Layout not equal Off in the Layout panel)
works correctly, you must instruct PageMaker to generate page independent code.
In PageMaker’s Print dialog, select Options. This opens the Options panel.
Check Page Independence.
This will let PageMaker create page independent code suitable for imposition.
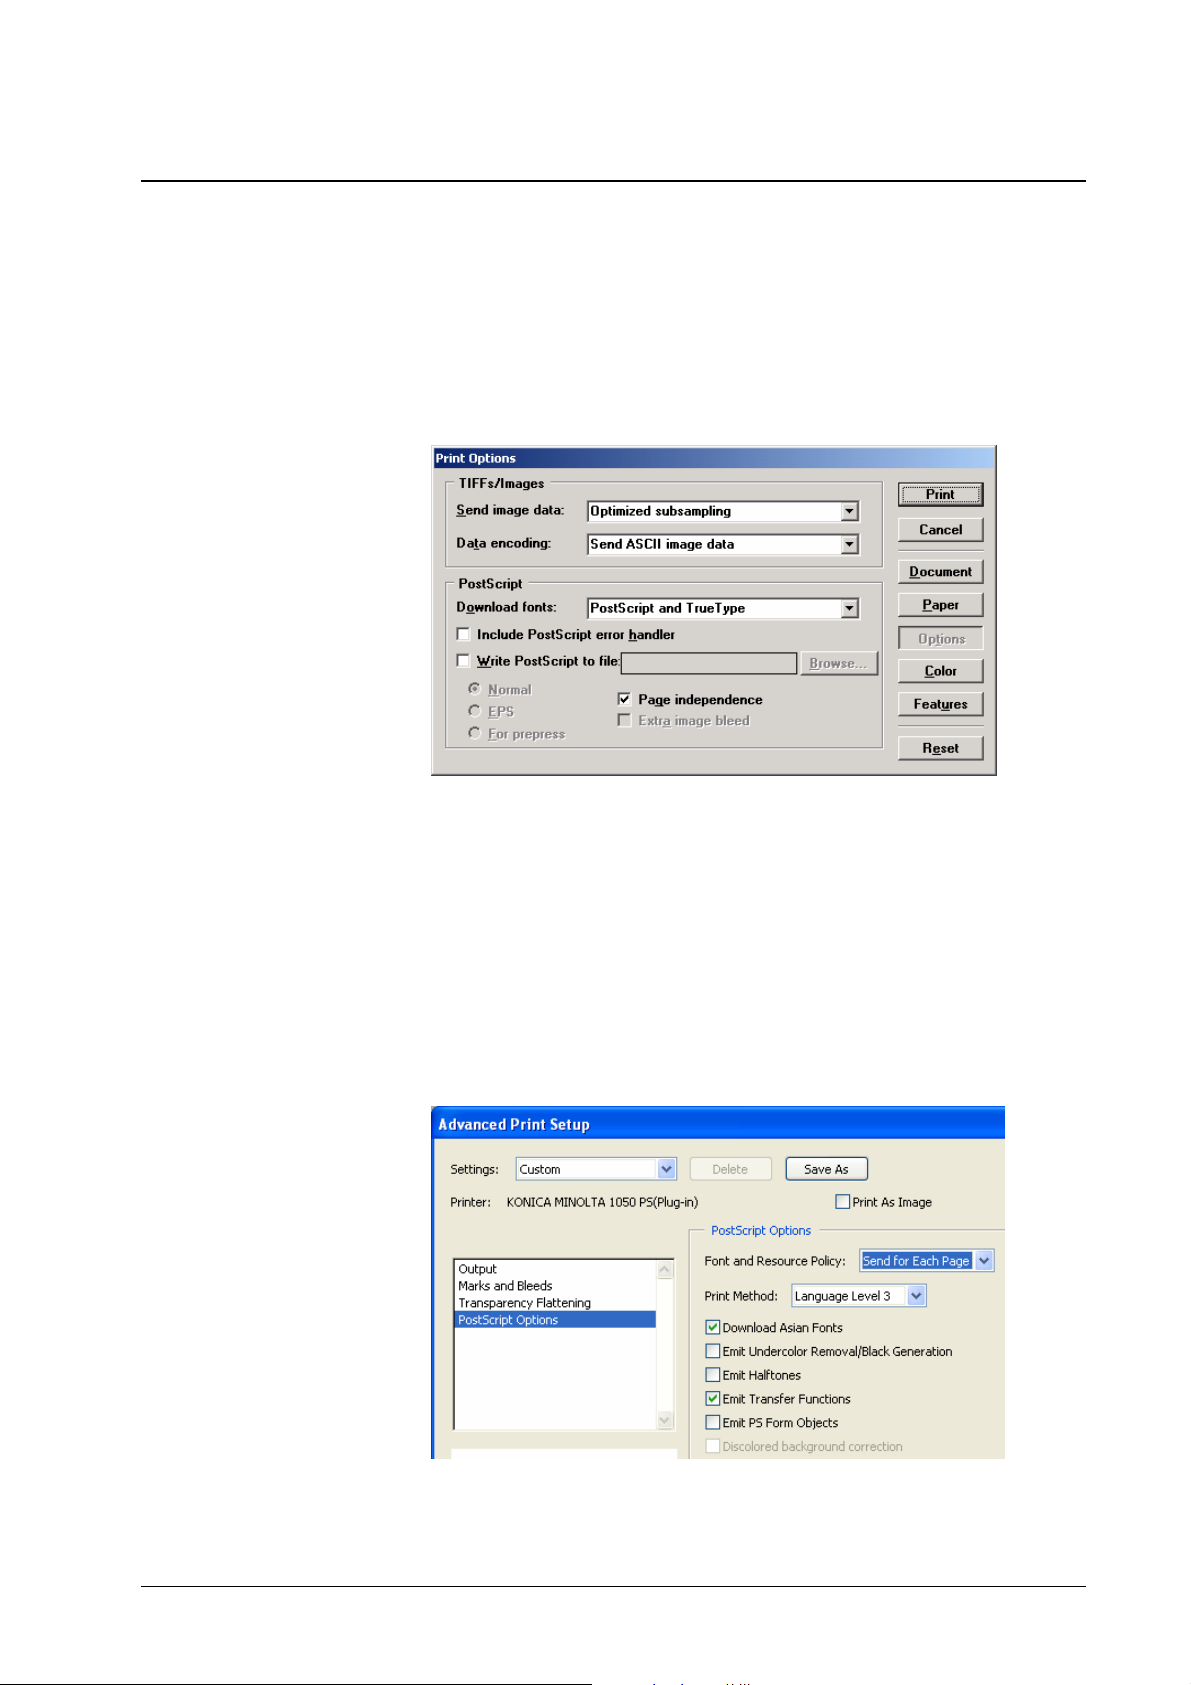
Printing from Adobe Acrobat
In order to ensure that imposition (Layout not equal Off in the Layout panel)
works correctly, you must instruct Acrobat to generate page independent code.
In Acrobat’s Print dialog, select Advanced.
This opens the Advanced Print Setup dialog.
Select PostScript Options.
Set Font and Resource Policy to Send for Each Page.
This will let Acrobat create page independent code suitable for imposition.
24 • Windows Printing Konica Minolta bizhub PRO 1050 Printer Driver

Printing from Quark XPress
In order to ensure that imposition and other driver functions work correctly, you
must instruct XPress to use the bizhub PRO 1050 PPD and the correct page size.
In the XPress Print dialog, select the Setup panel.
In the Setup panel, select the bizhub PRO 1050 PPD as Printer Description.
The paper size will be shown as custom.
Select the document size to be output by XPress (if necessary including
registration marks) as Paper Size.
This will let XPress output consistent settings suitable for imposition and other
driver functions.
Konica Minolta bizhub PRO 1050 Printer Driver Windows Printing • 25

Setting features without the plug-in
The Advanced dialog shows a number of Printer Features, e.g. finishing
options. For most applications, these features are disabled because the printer
driver plug-in is running. In this case, use the printer driver plug-in (see next
section) to set the desired printing options .
Some applications do not support the printer driver plug-in because they provide
their own printer driver. Without the plu g-in, the Printer Features will be
enabled. In this case, open the Advanced dialog and select the desired printing
options from Printer Features. To select a print feature, click on the field right
of the feature name and select the desired value from the pop-up menu.
Note: Some features of the plug-in, like gutter or user authentication can be set
only in the plug-in, but not in the Advanced dialog due to restrictions of the
PPD format. (The PPD format does not support features with arbitrary string or
numeric values.)
26 • Windows Printing Konica Minolta bizhub PRO 1050 Printer Driver

Printer Driver Plug-in
The printer driver plug-in provides a graphical user interface to select printing
and finishing options.
To open the printer driver plug-in, select File » Print, then select Properties, then
select the bizhub PRO 1050 tab sheet. This will show the plug-in.
The printer driver plug-in allows you to determine the following options:
• Layout – this comprises imposition (e.g. booklet) and finishing
options.
• Paper – determine the paper type to be used for printing.
• Cover – select front and back cover sheets.
• Trays – select trays for individual job pages.
• Tab Sheets – configures printing on Tab Sheets.
• Screening – this comprises raster frequency and angle.
• Forms – configures the use of forms.
• Image Shift – this allows to shift bitmaps on the paper.
• Post Processing – this comprises additional operations, e.g. time
stamp
• Workflow – this comprises auto print settings, user authentication
and department authentication.
Konica Minolta bizhub PRO 1050 Printer Driver Windows Printing • 27
 Loading...