

Kodak 8650R THERMAL PRINTER, DIGITAL SCIENCE 8650 COLOR PRINTER, DIGITAL SCIENCE 8650 PS COLOR PRINTER, DIGITAL SCIENCE 8650 Operator's Manual
Page 1
KOD AK DIGITAL SCIENCE
8650/8650 PS Color Printer
™
Operator’s Guide
Part No. 1H9657
Page 2
Radio Frequency Interference
This equipment generates, uses, and can radiate radio frequency energy. If it is not installed and used
in accordance with the User’s Guide, this energy may cause interference to radio and television
reception.
This equipment has been type tested and found to comply with the following:
This device meets FCC Class B emission limits for verification pursuant to Part 15 of the Federal
Communications Commission Rule of the United States.
“The class B limits for radio noise emissions from digital apparatus as set out in the interference–
causing equipment standard entitled “Digital Apparatus”, ICES-003 of the Department of
Communications.”
“Cet appareil numérique respecte les limites de bruits radioléctriques applicables aux appareils
numériques de Classe B prescrites dans la norme sur le matriél brouilleur : “Appareils Numériques”,
NMB-003 édicté par le minstre des Communications.”
•
47CFR Part 15 SubPart B (North American - USA) - Class B or “meets Class B limits for verification”
ICES-003 (North American - Canada) - Class B
•
•
VCCI-2 (Japan) - Class B
This equipment is in the 2nd class category (information equipment to be used in a residential area or
an adjacent area thereto) and conforms to the standards set by the Voluntary Control Council For
Interference by Data Processing Equipment and Electronic Office Machines aimed at pre v enting radio
interference in such residential areas. When used near a radio or TV receiver, it may become the
cause of radio interference. Read the instructions for correct handling.
Requirements of the EMC directive 89/336/EEC were met through compliance with the following:
EN50081-1 (European - EU) consists of:EN55022 (class B)
•
•
EN50082-1 (European - EU) consists of:IEC 801 - 2/91 (ESD)
IEC 801 - 3/84
(rf immunity)
IEC 801 - 4/88 (EFT)
Page 3

“Changes or modifications not expressly approved by the party responsible for compliance could void
the user’s authority to operate the equipment.”
Regulatory Information
The foregoing limits are designed to provide reasonable protection against harmful interference when
operated in a residential installation. However, there is no guarantee that interference will not occur in
a particular location. If this equipment does cause interference to radio or television reception
(determined by turning the equipment off and on), you are encouraged to try to correct the
interference by one or more of the following measures:
Reorient or relocate the receiving antenna
•
•
Relocate the printer with respect to the receiver
•
Move the printer away from the receiver
•
Plug the printer into a different outlet so that the receiver and printer are on different branch
circuits
If problems persist, consult an experienced radio/television technician for additional suggestions. You
may also find the following booklet, prepared by the Federal Communications Commission, helpful:
“How to Identify and Resolve Radio-TV Interference Problems.” This booklet can be purchased by
contacting the Superintendent of Documents, U.S. Government Printing Office, Washington, DC
20402.
Important
This equipment was tested using shielded interface cables. The use of these cables is required to
reduce the possibility of causing interference to radio and television reception.
Das Gerät ist gemäß Amtsblattberfügung 243/91 funkenstört und wurde der Deutschen Bundespost
gemeldet. Kodak AG, Stuttgart.
DIESES GERÄT WURDE SOWOHL EINZELN ALS IN EINER ANLAGE, DIE EINEN NORMALEN
ANWENDUNGSFALL NACHBILDET, AUF DIE EINHALTUNG DER
FUNKENTSTÖRBESTIMMUNGEN GEPRÜFT. ES IST JEDOCH MÖGLICH, DASS DIE
FUNKENSTÖRBESTIMMUNGEN UNTER UNGÜNSTIGEN UMSTÄNEN BEI ANDEREN
GERÄTEKOMBINATIONEN NICHT EINGEHALTEN WERDEN. DER BETREIBER IST FÜR DIE
EINHALTUNG DER FUNKENTSTÖRUNGS BESTIMMUNGEN SEINER GESAMTEN ANLAGE
VERANTWORTLICH, IN DER DIESES GERÄT BETRIEBEN WIRD.
This equipment has been tested and found to comply with the following:
UL 1950
CSA 950
TUV EN60950
Page 4

Safety Regulations
The following symbol has been placed on areas of the printer where electrical shock is possible. Take
extra precautions in these areas
.
Page 5

Table of contents
About this guide ......................................................................................... i
Using this guide ........................................................................................................ i
About the other guides included with the printer ..................................................... ii
Getting help or additional information .....................................................................iii
Introduction ............................................................................................. 1-1
About printer memory ...........................................................................................1-1
Media and image size ..........................................................................................1-2
Interfaces .............................................................................................................1-3
Printer drivers and export modules ......................................................................1-4
Fonts ....................................................................................................................1-5
Resident fonts .........................................................................................1-5
Setting up the printer ............................................................................. 2-1
Finding a location for the printer ...........................................................................2-2
Unpacking the printer ...........................................................................................2-3
Cleaning the print head ........................................................................................2-5
Loading the ribbon ...............................................................................................2-8
Handling the ribbon .................................................................................2-8
Storing the ribbon ....................................................................................2-8
Loading ribbon in the printer ...................................................................2-9
Unpacking and adjusting the paper tray .............................................................2-12
Working with media ...............................................................................2-12
Storing media ........................................................................................2-12
Paper and humidity ...............................................................................2-12
Loading media ....................................................................................................2-14
Putting the dust cover on ......................................................................2-17
Connecting the cables ........................................................................................2-18
Page 6

Connecting a parallel cable .................................................................. 2-19
Connecting a LocalTalk cable ............................................................... 2-19
Connecting a SCSI cable ...................................................................... 2-20
Connecting the power cord ................................................................................2-22
Checking and changing printer settings ............................................................. 2-23
Changing the operating mode .............................................................. 2-23
Changing the media settings ................................................................2-24
About printer initialization ................................................................................... 2-26
If the printer does not initialize itself ...................................................... 2-26
Making a test print ............................................................................................. 2-27
What’s next ........................................................................................................2-27
Operating the printer .............................................................................3-1
Looking at the display panel ................................................................................ 3-2
Working with the printer settings .......................................................................... 3-4
Working in Setup mode .......................................................................... 3-6
About specifying port information ........................................................... 3-6
Working with media ............................................................................................. 3-8
Printing from computer applications .................................................................. 3-15
Scheduling jobs ................................................................................................. 3-16
Handling and storing prints and transparencies ................................................ 3-17
Cleaning the printer ........................................................................................... 3-18
Keeping the printer in good working order .........................................................3-19
Working with the printer .....................................................................................3-19
Troubleshooting the printer ...................................................................4-1
Error messages and how to resolve them ...........................................................4-2
When mismatches occur ..................................................................................... 4-8
Ribbon type mismatch ............................................................................4-8
Receiver type mismatch ......................................................................... 4-8
Receiver size mismatch ..........................................................................4-8
If the printer is not operating correctly ................................................................. 4-9
Page 7

Clearing the paper path ......................................................................................4-11
Cleaning the pick rollers .....................................................................................4-14
Cleaning the sensors .........................................................................................4-16
Repacking the printer .........................................................................................4-17
Getting additional help .......................................................................................4-19
Appendix A Printer specifications/site requirements .........................A-1
Printer specifications .............................................................................. A-1
Space requirements ............................................................................... A-1
Operating environment ........................................................................... A-2
Power requirements ............................................................................... A-2
Appendix B Accessories and supplies ................................................B-1
Accessories ............................................................................................ B-1
Supplies ................................................................................................. B-1
Ribbons .................................................................................................. B-2
Paper ...................................................................................................... B-3
Transparency material ........................................................................... B-4
Appendix C Customizing the printer ....................................................C-1
Adding an external hard drive ............................................................................. C-2
Installing the hard drive .......................................................................... C-2
Initializing the hard drive ........................................................................ C-3
Downloading additional fonts to the hard drive ......................................C-5
Adding memory to the printer ..............................................................................C-8
Preparing to install a SIMM .................................................................... C-8
Installing the SIMM card ....................................................................... C-12
Finishing up ..........................................................................................C-13
Index
Page 8

About this guide
The guide provides the information you need to set up, operate,
maintain, and troubleshoot the
PS Color Printer.
KODAK DIGITAL SCIENCE™
8650/8650
This guide is intended for owners and operators of the
SCIENCE
Using this guide
This guide is organized as follows:
Chapter 1
Chapter 2
Chapter 3
Chapter 4
KODAK DIGITAL
8650/8650 PS Printer.
Introduction —describes the printer and the different
memory configurations of the printer. Talks about
resident and non-resident fonts.
Setting up the printer —explains how to unpack and set
up the printer and how to get it ready to use. Also tells
how to handle, store and load ribbon and media, and
how to clean the printer (includes how to clean the
thermal print head).
Operating the printer —tells how to use the display
panel, how to work with the printer settings, and how to
handle and store finished prints and transparencies.
Troubleshooting the printer —describes and tells how
to handle error and print mismatch messages. Provides
solutions to common operational problems and explains
how to clear the paper path. Lists where to go for
additional help.
October 1997 i
Page 9

About this guide
Appendix A Printer and site specifications —lists printer
specifications and the site specifications
Appendix B Accessories and supplies —lists accessories and
supplies for the printer, and tells how to order them.
Appendix C Customizing the printer —tells how to enhance the
operation of the printer by connecting an external hard
drive and by adding additional memory.
About the other guides included with the printer
The other guides included with the printer are—
•
KODAK DIGITAL SCIENCE 8650 PS Color Printer Driver User’s
Guide
—provides information about setting up and using the ADOBE®
PostScript™ Driver with PCs running Microsoft WINDOWS 3.1, PCs
running WINDOWS 95, and Macintosh computers . Also pro vides color
management information and application-related information.
•
KODAK DIGITAL SCIENCE 8650 Color Printer Export Module for
ADOBE PHOTOSHOP User’s Guide
installing and using the export modules for the 8650 Printer with PCs
running Microsoft WINDOWS 3.1, PCs running WINDOWS 95, and
Macintosh computers.
—provides information about
ii October 1997
Page 10

Getting help or additional information
Your Kodak dealer is the best source for information about setting up,
operating, and obtaining accessories and supplies for your printer.
Please contact your dealer with any questions you have.
Dealer Name ________________________________________
Dealer Telephone Number _____________________________
In addition, for technical support see Kodak’s web site at
www.kodak.com or call 1-800-23KODAK (1-800-235-6325) between
9:00 a.m. and 8:00 p.m. Eastern Standard Time on regular business
days. Contact this number for
•
help setting up or operating the printer
•
where to obtain supplies
•
where to obtain service
•
information about software/printer interaction
•
warranty information
•
information about other Kodak products
The F AX bac k n umber f or product liter ature is 1-800-508-1531. You may
call this number 7 days a week, 24 hours a day.
October 1997 iii
Page 11

Thank you for purchasing the
Color Printer.
The
KODAK Digital Science
The 8650 PS Printer is a PostScript language printer that also operates
in raster mode. You can purchase an upgrade kit for the 8650 Printer
that allows it to operate in both raster and PostScript modes.
The 8650/8650 PS Color Printer is a thermal dye diffusion device with
superior printing speed. It contains a 33 MHz MIPS RISC processor,
has a resolution of 300 dots per inch (DPI), and prints a three or fourcolor page in about 75 seconds. Printed images are high-contrast and
long lasting. KODAK EKTATHERM XTRALIFE Ribbon (available with
3-color ribbon) can be used to protect images from fingerprints.
About printer memory
You can purchase the 8650/8650 PS Printer with 32 MB or 48 MB of
memory. You can add memory to the printer to a maximum of 64 MB.
1
KODAK Digital Science
8650 Printer operates only in raster mode.
Introduction
8650/8650 PS
If your printer has 32 MB of memory
three-color or black ribbons. You cannot, however, print CMYK images
with 4-color ribbon. In addition, your ability to process one job while
printing another is limited.
If your printer has 48 MB of memory
ribbons. With 48 MB of memory, you can process one job at the same
time you are printing another while you are using 12-inch ribbon.
If your printer has 64 MB of memory
all sizes at the same time.
October 1997 1-1
, you can print all image sizes for
, you can print all image sizes for all
, you can process and print jobs of
Page 12
Introduction
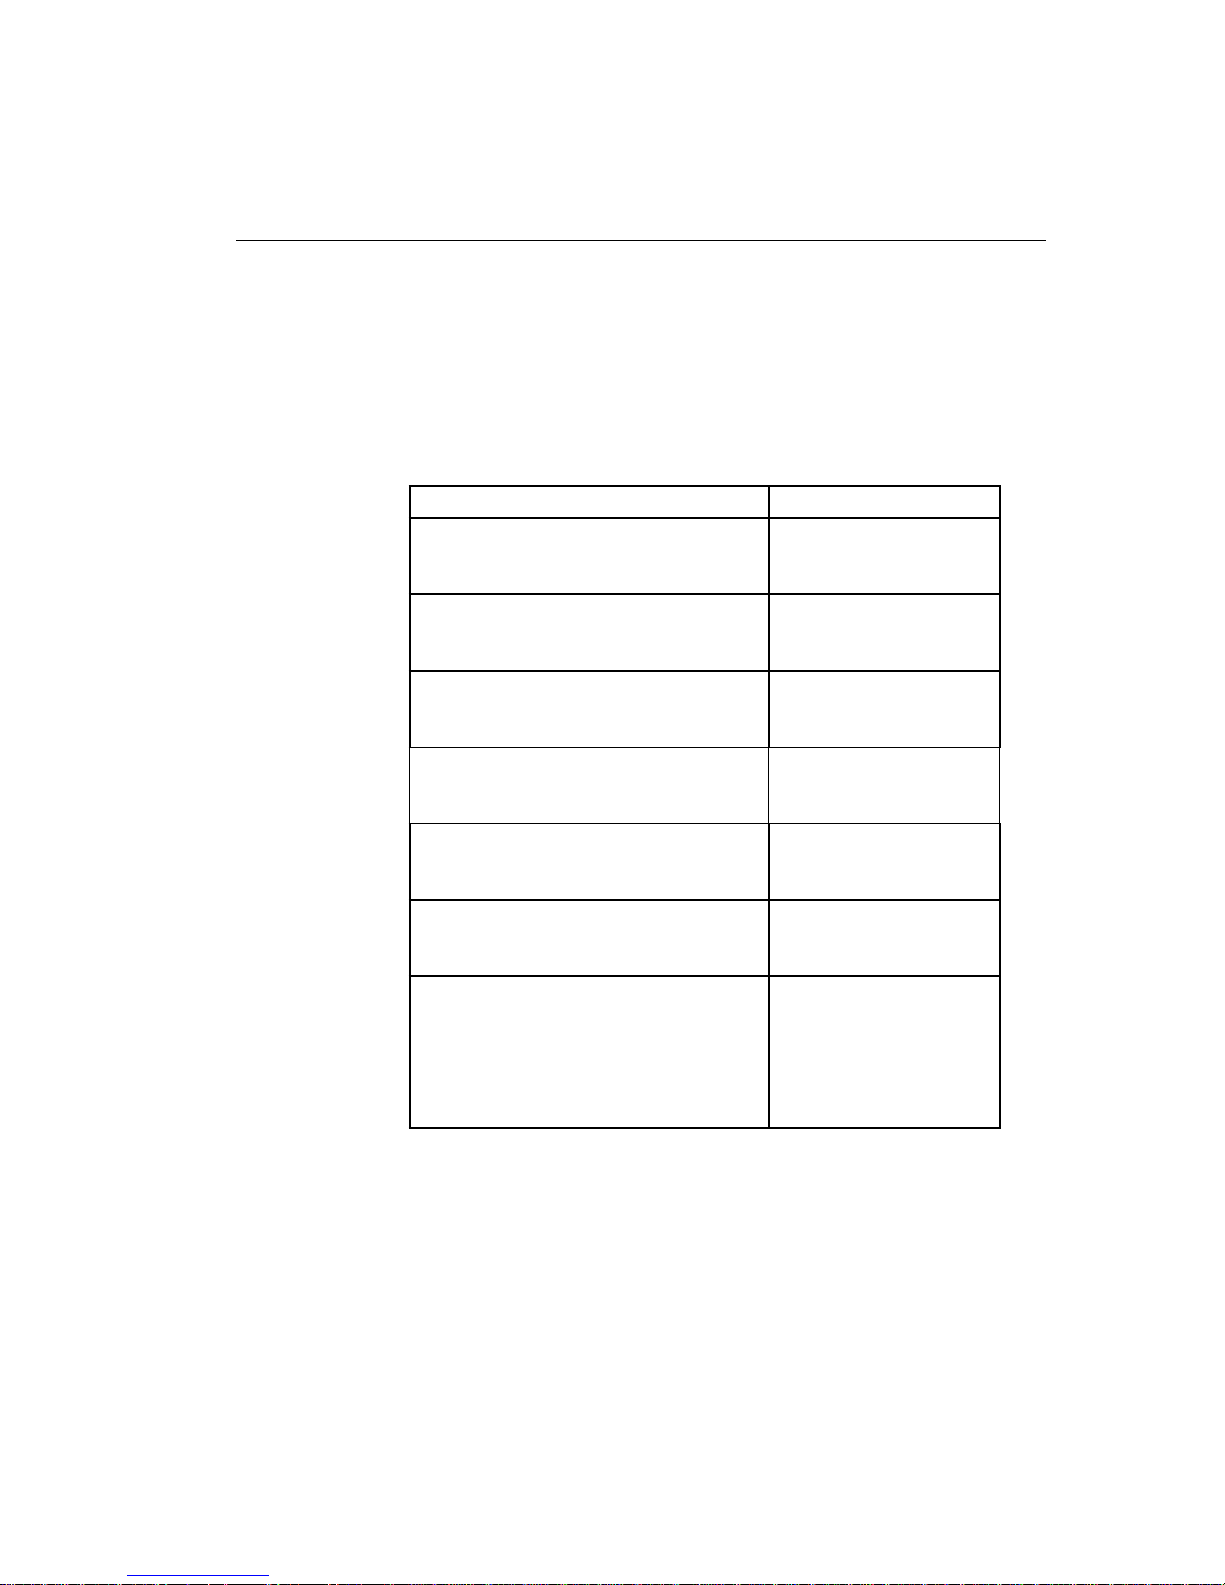
Media and image size
The printer can print on the following sizes and types of KODAK
EKTATHERM XLS Print Paper and on the following sizes of KODAK
EKTATHERM XLS Transparency Material.
See Chapter 3 for illustrations of the maximum image size for each.
Paper/Transparency size
8.5 x 11 (216 x 279 mm) - A
paper (photographic grade) and transparency material
8.27 x 11.69 ( 210 x 297 mm) - A4
paper (photographic grade) and
transparency material
8.5 x 12 (216 x 307 mm) - A (long)
paper (photographic grade) and
transparency material
8.27 x 12 (210 x 307 mm) - A4 (long)
paper (photographic grade) and
transparency material
8.5 x 14 (216 x 358 mm) - A (xlong)
paper (photographic grade) and
transparency material
8.27 x 14 (210 x 358 mm) - A4 (xlong)
paper (photographic grade) and
transparency material
9.5 x 14 (243 x 358 mm) - paper only
—Photographic grade
—Commercial grade
—Publication grade
Maximum image size
8 x 8.93
(204 x 228 mm)
8.0 x 9.6
(204 x 246 mm)
8 x 10
(204 x 256 mm)
8 x 10
(204 x 256 mm)
8 x 12
(204 x 307 mm)
8 x 12 (204 x 307 mm)
Raster mode:
8.5 x 12
(217 x 307 mm)
PostScript mode:
8.5 x 12
(217 x 307 mm)
1-2 October 1997
Page 13
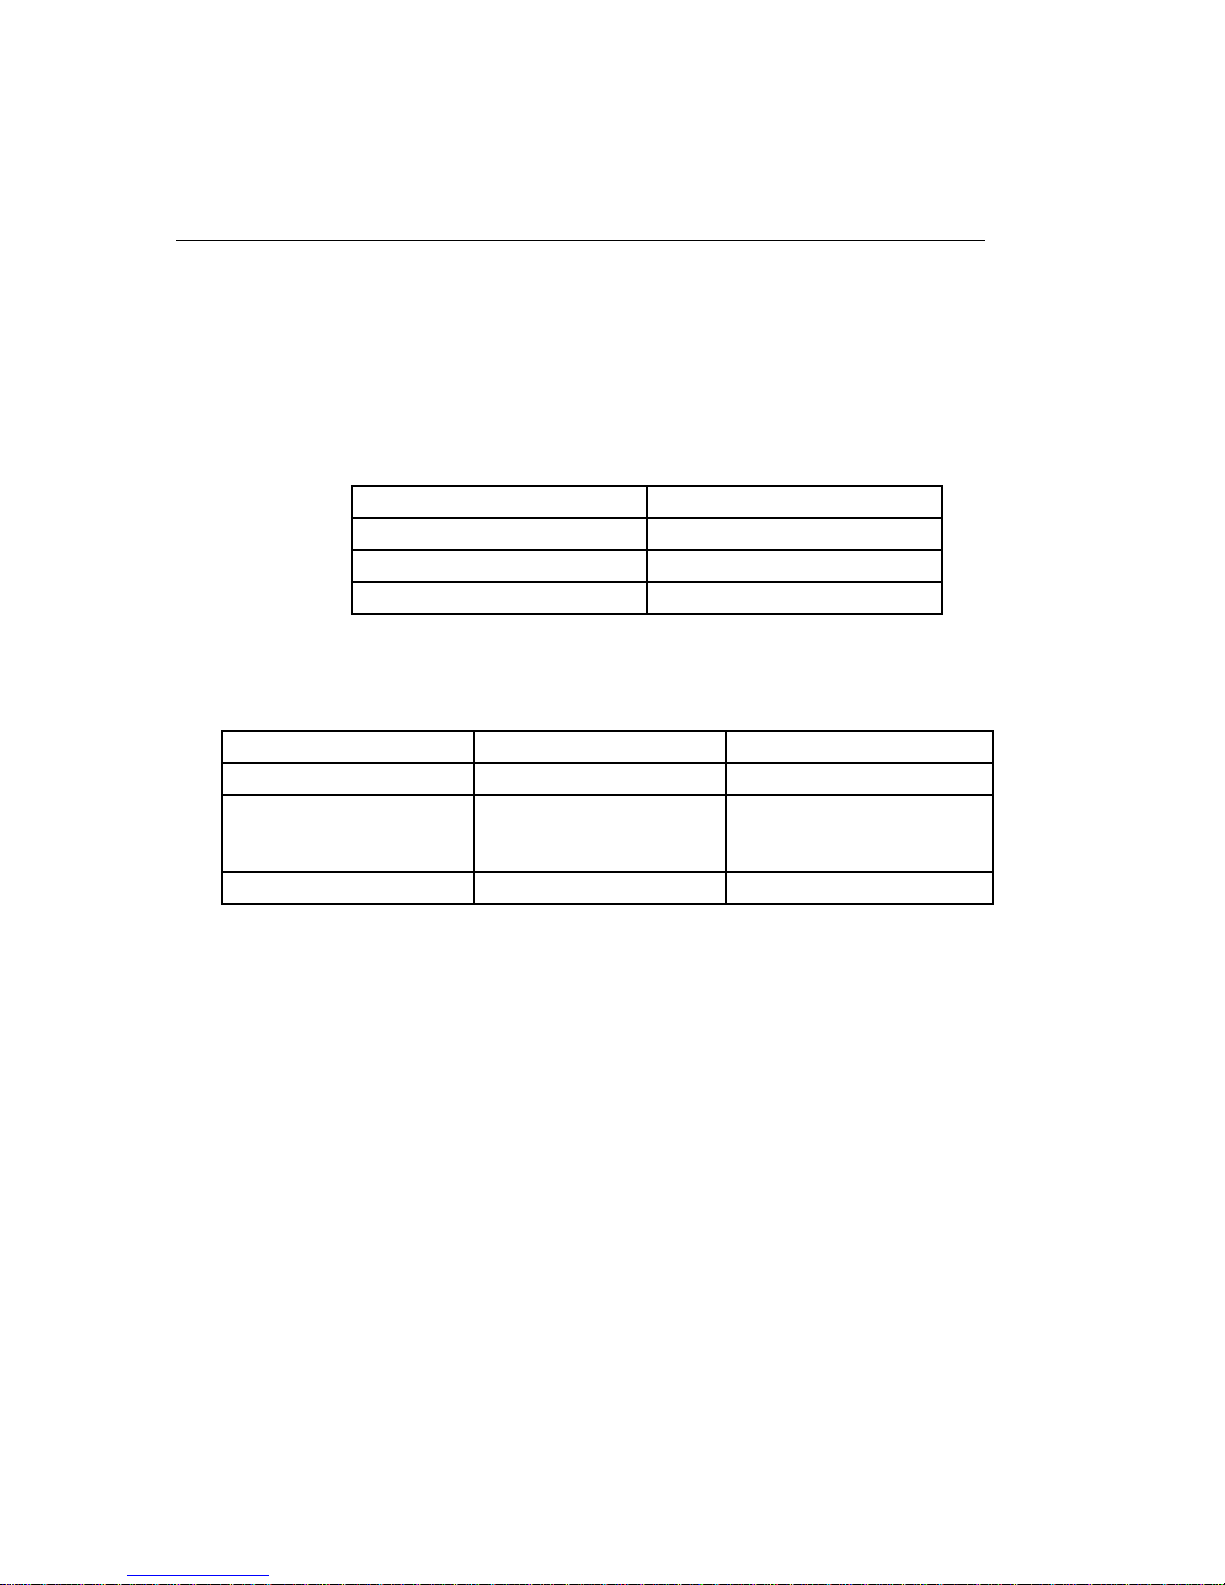
Interfaces
Introduction
Standard communication ports are provided. In addition, the optional
KODAK Network Interface Card lets you tie your printer into networks
using Ethernet cabling.
The following interfaces are provided with the printer.
Interface Type
Centronics Parallel
LocalTalk PostScript only
SCSI Raster only
The following 16 MB Ethernet interfaces are provided by the Network
Interface Card.
Interface Type
EtherTalk
Novell NetWare The following versions of
Novell NetWare for Clients:
NetX, VLM, and MSIPX.
TCP/IP lpr Raster and PostScript
Version Printer Mode
Phase 1 and Phase 2 Raster and PostScript
Printer Mode
Raster and PostScript
Raster and PostScript
October1997 1-3
Page 14

Introduction
Printer drivers and export modules
The printer drivers and export modules developed f or the 8650/8650 PS
Printer are based on high-quality Kodak photographic printing methods.
The color–rendering processes that evolved are highly sophisticated.
Using the drivers and export modules will allow you to access advanced
printing options based on Kodak color science.
The following printer drivers are provided for printers operating in
PostScript mode. For information about installing and using the drivers,
refer to the Printer Driver
•
KODAK DIGITAL SCIENCE
WINDOWS 3.1
•
KODAK DIGITAL SCIENCE
WINDOWS 95
•
KODAK DIGITAL SCIENCE
WINDOWS 95
•
KODAK DIGITAL SCIENCE
MACINTOSH Computers
User’s Guide.
8650 PS PostScript Driver for
8650 PS RGB PostScript Driver for
8650 PS CMYK PostScript Driver for
8650 PS Color Printer Driver for
The following export modules are provided for printers operating in
raster mode. For information about installing and using the export
modules, refer to the Export Module
•
KODAK DIGITAL SCIENCE
ADOBE PHOTOSHOP and WINDOWS 3.1
•
KODAK DIGITAL SCIENCE
ADOBE PHOTOSHOP and WINDOWS 95
•
KODAK DIGITAL SCIENCE
ADOBE PHOTOSHOP and MACINTOSH Computers
Additional printer drivers are available through third party developers.
For third party products, refer to the
Solutions Catalog
Search on solutions catalog.
1-4 October 1997
on the Kodak Web site at http://www.kodak.com.
8650 Export Module for
8650 Export Module for
8650 Export Module for
User’s Guide
KODAK Third Party Digital Imaging
.
Page 15

Fonts
Thirty-five screen fonts are resident on PostScript v ersions of the printer .
You can also connect an external hard drive to the printer for font
storage. See Appendix C for more information.
Resident fonts
The following fonts are resident on PostScript versions of the printer.
•
Courier, Courier Oblique, Bold, Bold Oblique
•
Helvetica, Helvetica Oblique, Bold, Bold Oblique
•
Times Roman, Times Italic, Bold, Bold Italic
•
Helvetica Narrow, Narrow Oblique, Narrow Bold, Narrow Bold Oblique
•
ITC Avant Garde Gothic Book, Book Oblique, Demi, Demi Oblique
•
ITC Bookman Light, Light Italic, Demi, Demi Italic
• ITC Zapf Chancery Medium Italic
• ITC Zapf Dingbats
• New Century Schoolbook Roman, Italic, Bold, Bold Italic
• Palatino Roman, Italic, Bold, Bold Italic
• Symbol
Introduction
October1997 1-5
Page 16

2
This chapter explains how to set up the
8650/8650 PS Color Printer. These steps are:
•
Finding an appropriate location for the printer
•
Unpacking the printer
•
Removing the shipping tape and shipping pins
•
Cleaning the print head
•
Loading ribbon
•
Unpacking and adjusting the paper tray
•
Connecting the interface cables
•
Connecting the power cord and turning the printer on
•
Checking and changing the printer settings
The printer drivers and export module that enable you to take full
advantage of the printer’s capabilities are on the CD-ROM shipped with
the printer. After you set up the printer and before you use it, you should
install the printer drivers and the export module.
This chapter does
export module. For this information, refer to the user’s guide for the
export module or the printer driver.
Setting up the printer
KODAK DIGITAL SCIENCE
not
explain how to install the printer drivers or the
October 1997 2-1
Page 17
Setting up the printer
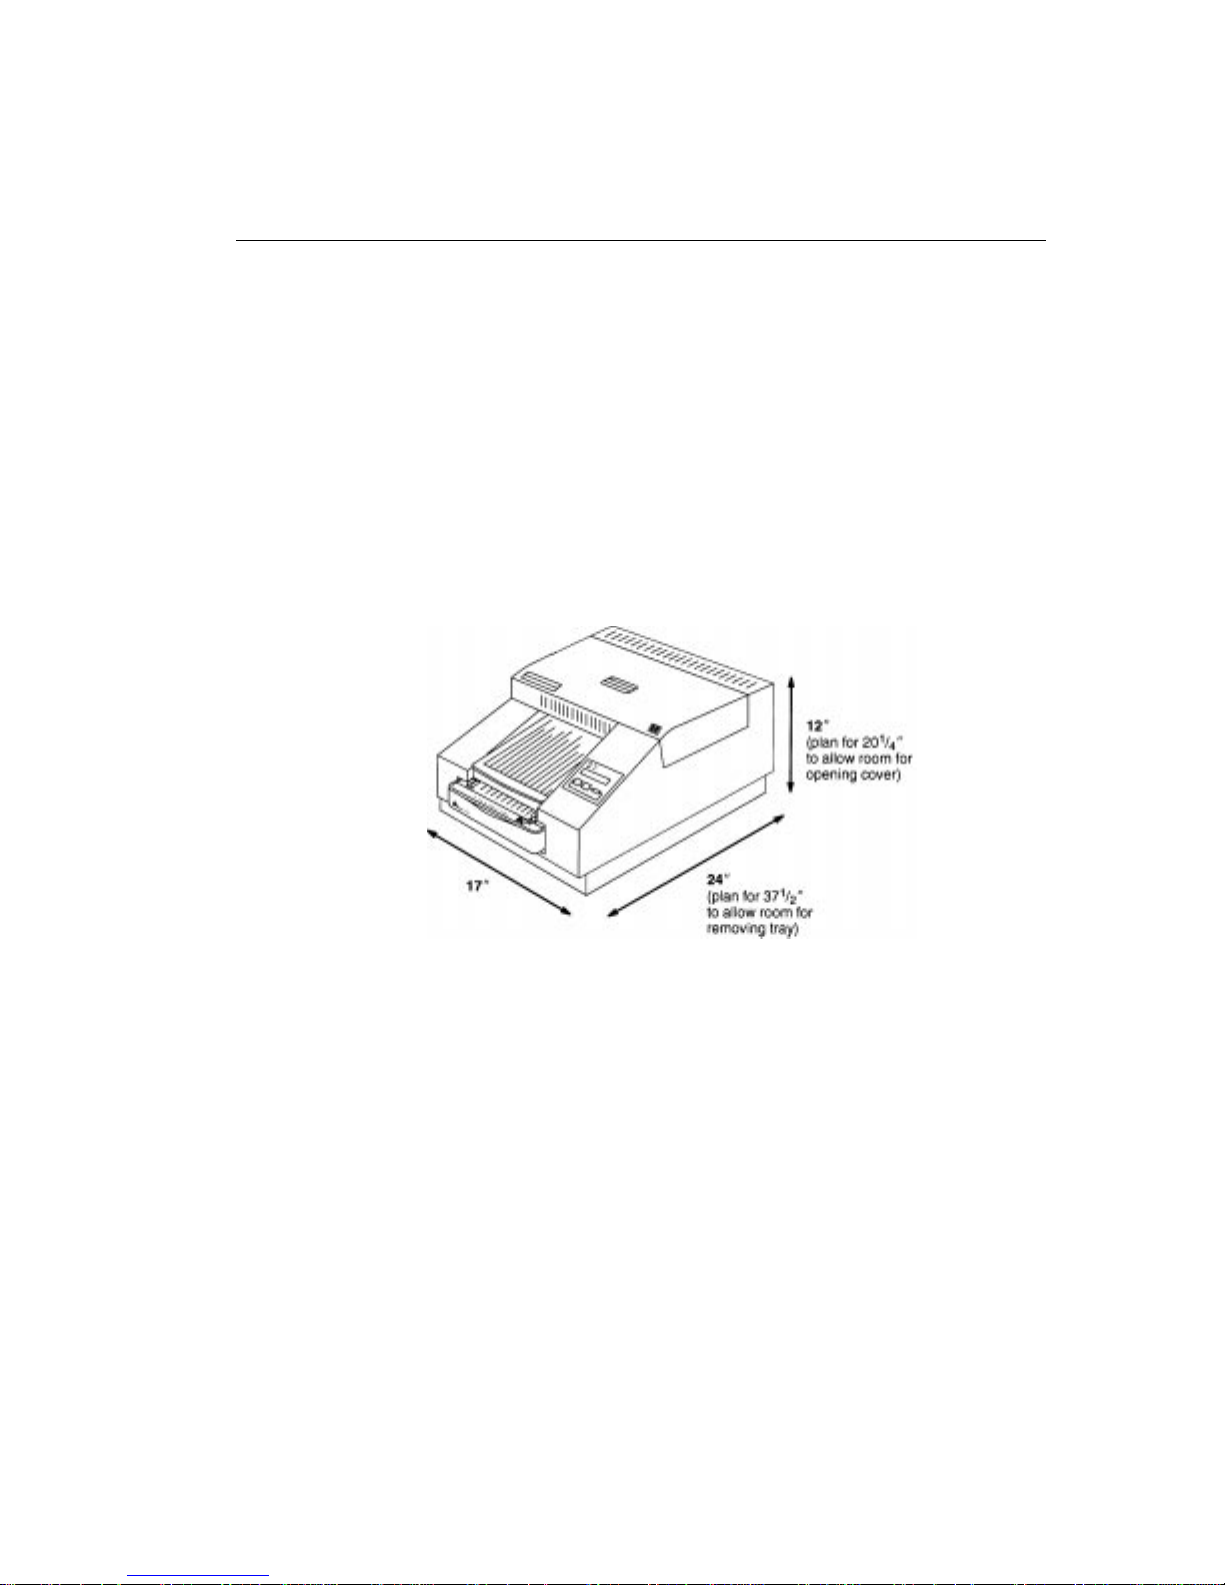
Finding a location for the printer
As you look for an appropriate location for the printer, keep the following
guidelines in mind. Refer to Appendix A for site requirements.
Allow two inches (about 5 cm) on all sides of the printer for easy
•
access.
Place the printer so that air flow is not blocked.
•
Airborne dirt particles can cause image quality problems. Avoid
•
placing the printer in areas where ventilation ducts, open doors, or
frequent passers–by might expose the printer and media to high lev els
of debris.
The space requirements for the printer are shown below.
2-2 October 1997
Page 18

Unpacking the printer
The following items are included with the printer. If any are missing,
contact your place of purchase.
Paper tray
•
Power cords (3)
•
Plastic dust cover
•
Universal language kit with:
•
—4 thermal head cleaning pads
—SCSI terminator
—Picker roller cleaning kit (includes 10 water pads)
—Protective overnight cover (blue)
—Set of user’s guides— Operator’s Guide, Printer Driver Guide, and
Export Module Guide—printed in English.
—CD ROM containing user’ s guides in Spanish, French, German, and
English in ADOBE Acrobat (PDF) format. Contains ADOBE Acrobat
software for accessing, viewing, and printing the guides. The CD
ROM also contains the printer drivers and export module. The user
interface for the printer drivers is in English only. The user interface
for the export module is in English, Spanish, French, and German. In
addition, the CD ROM has color management profiles and software
from EFI and PANTONE and two International Color Consortium
(ICC) profiles—one for 3-color ribbon and one for 4-color ribbon.
Setting up the printer
To unpack the printer:
1. Remove the printer from the shipping carton.
CAUTION: The printer is heavy. We recommend that two
people lift and carry it.
2. Remove the printer from the plastic bag.
October 1997 2-3
Page 19
Setting up the printer
3. Remove the shipping tape from the printer cover.
4. Carefully pull out the shipping pins.
shipping tape
shipping pins
CAUTION: Remove the shipping pins before you use the
printer.
IMPORTANT: Save the packaging and the shipping pins in case you
need to ship the printer.
2-4 October 1997
Page 20
Cleaning the print head
To avoid lines or streaks in y our prints, clean the print head bef ore using
it for the first time and whenever you replace the ribbon. If your site is
particularly dusty, you may need to clean the head more often.
Cleaning pads come with each ribbon spool.
CAUTION: Always use the cleaning pad provided with the ribbon
spool.
Never rub or wipe anything across the thermal head
except when cleaning it.
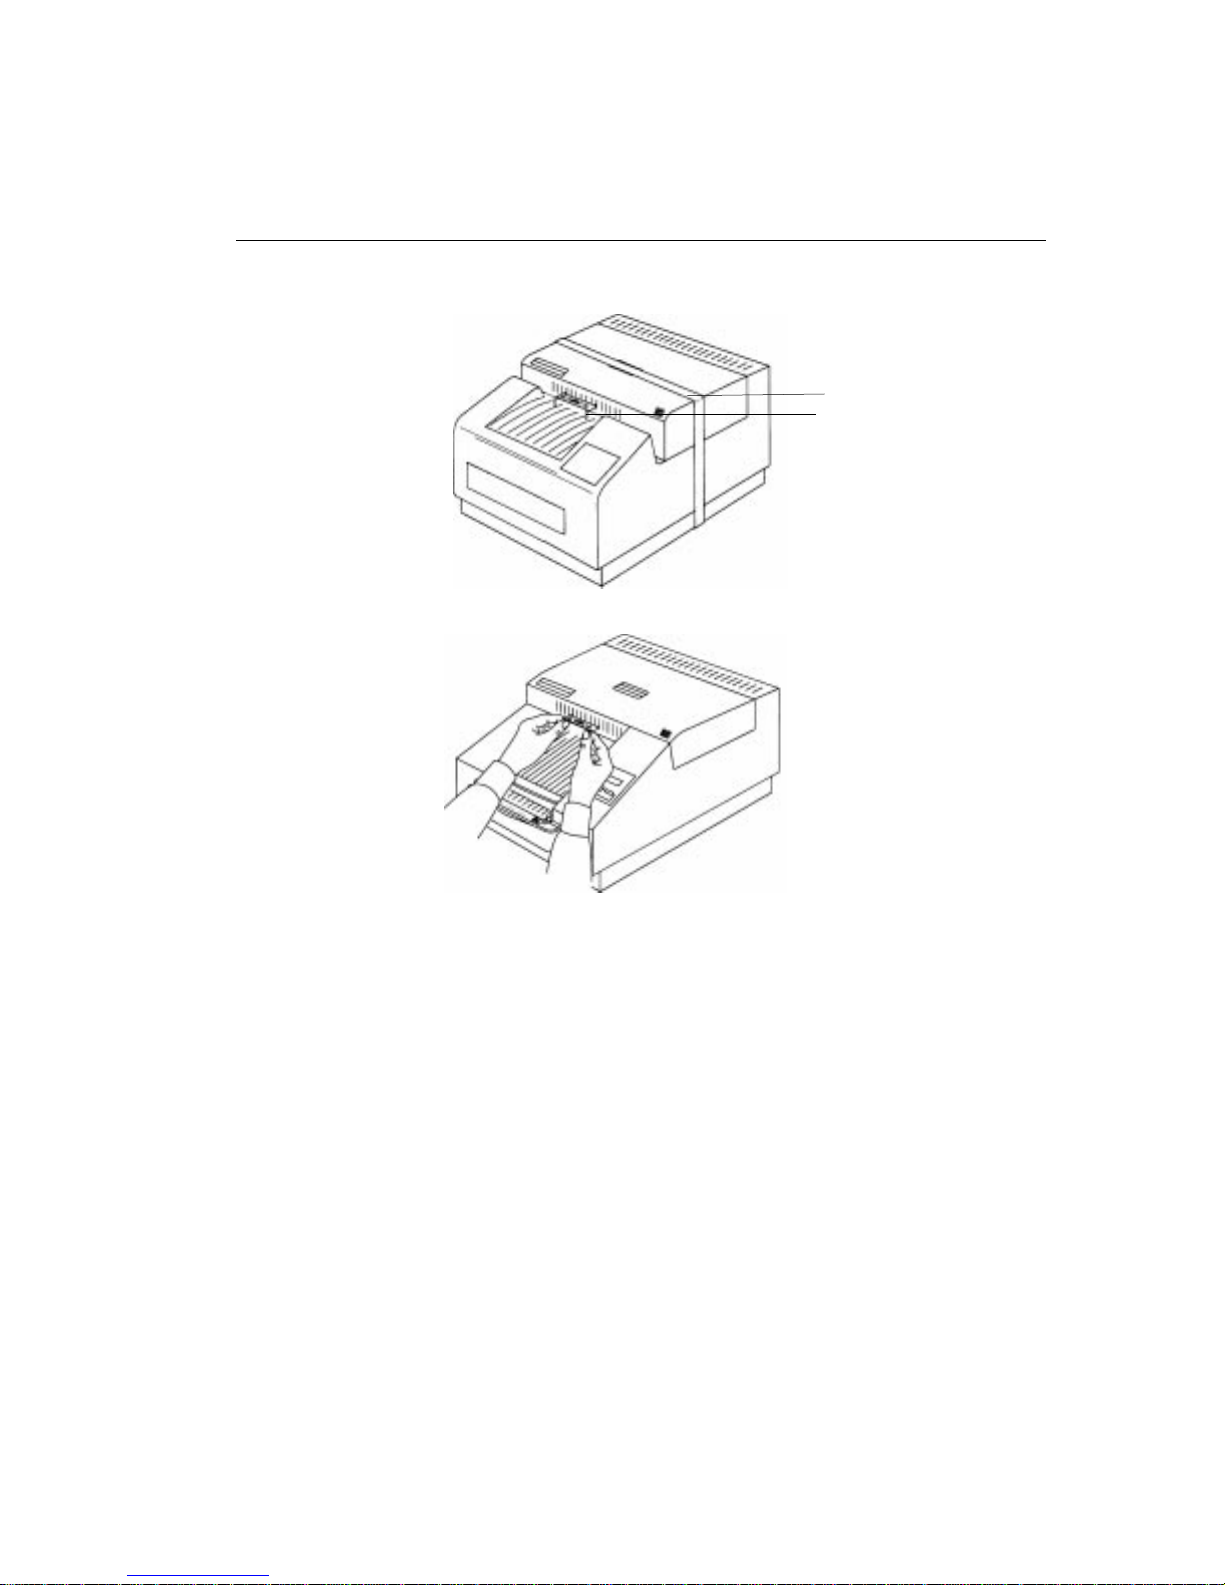
To clean the print head:
1. Make sure the printer is turned off and open the cover.
Setting up the printer
October 1997 2-5
Page 21
Setting up the printer
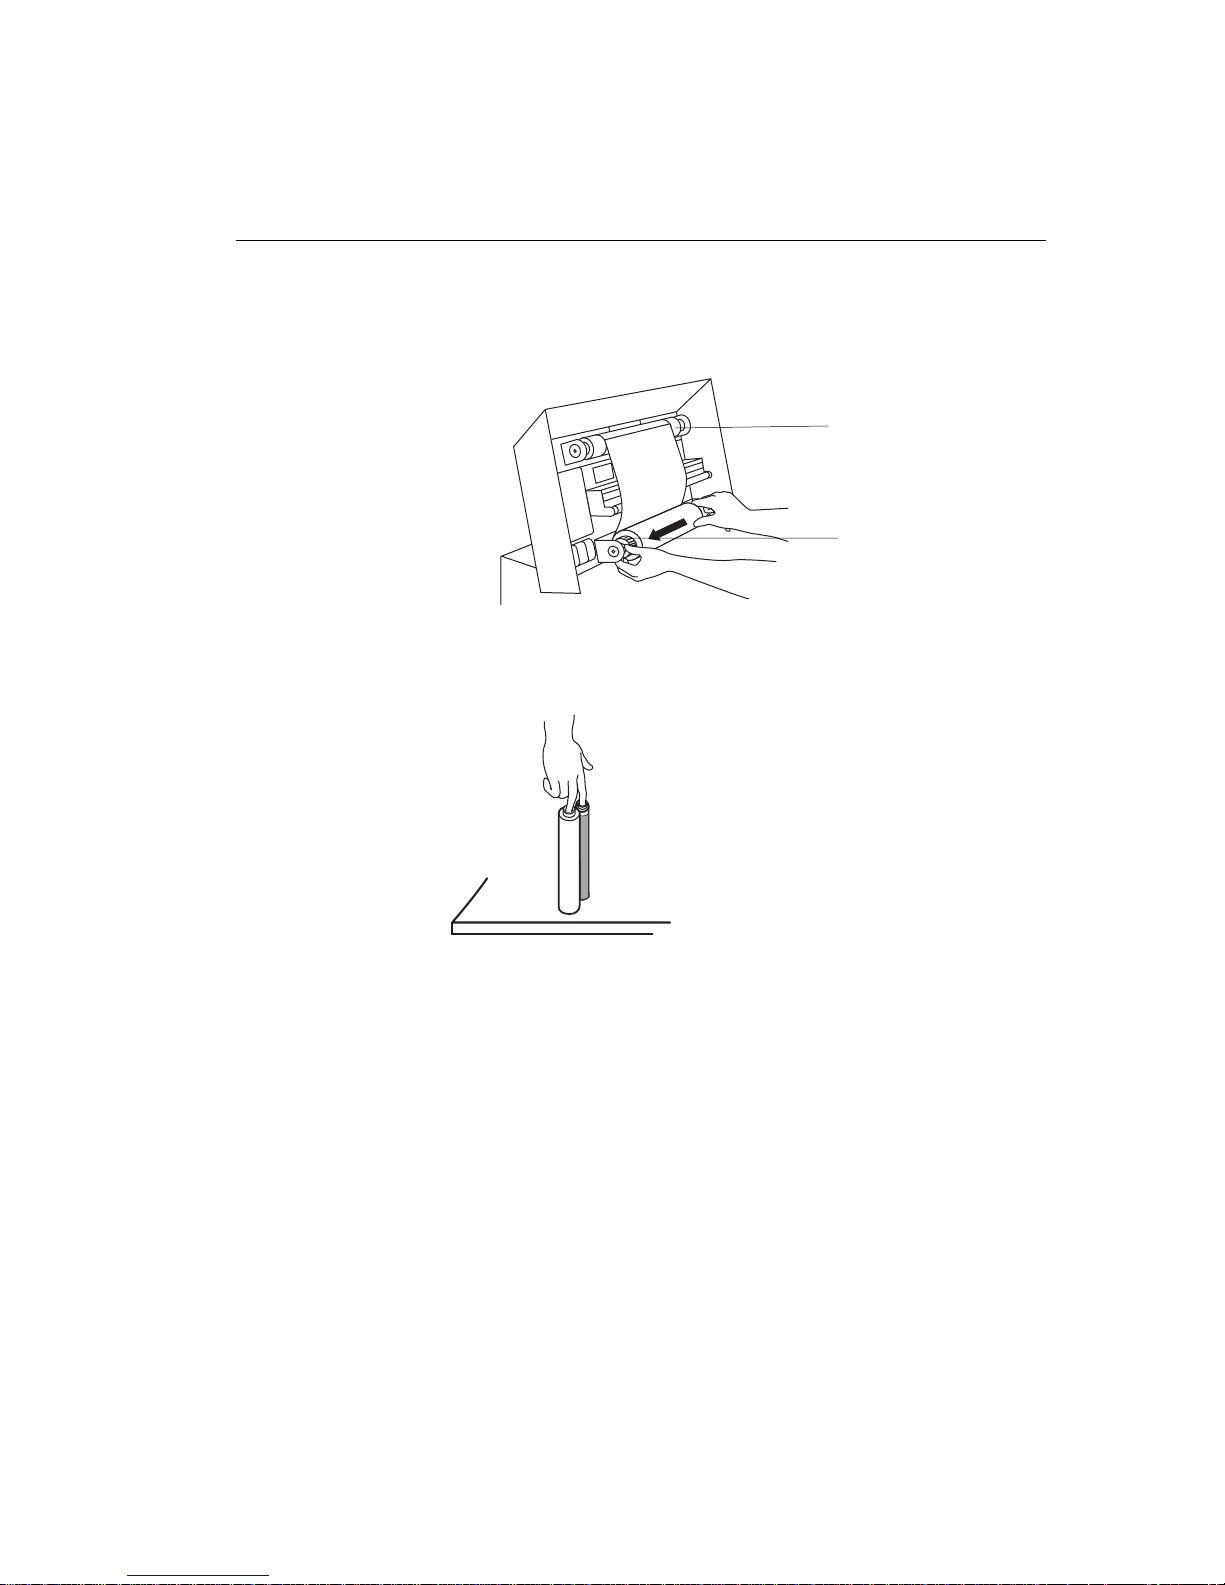
2. Remove the supply spool and wrap it tightly upward. Then remove
the take-up spool. DO NOT touch the ribbon.
Takeup spool
Supply spool
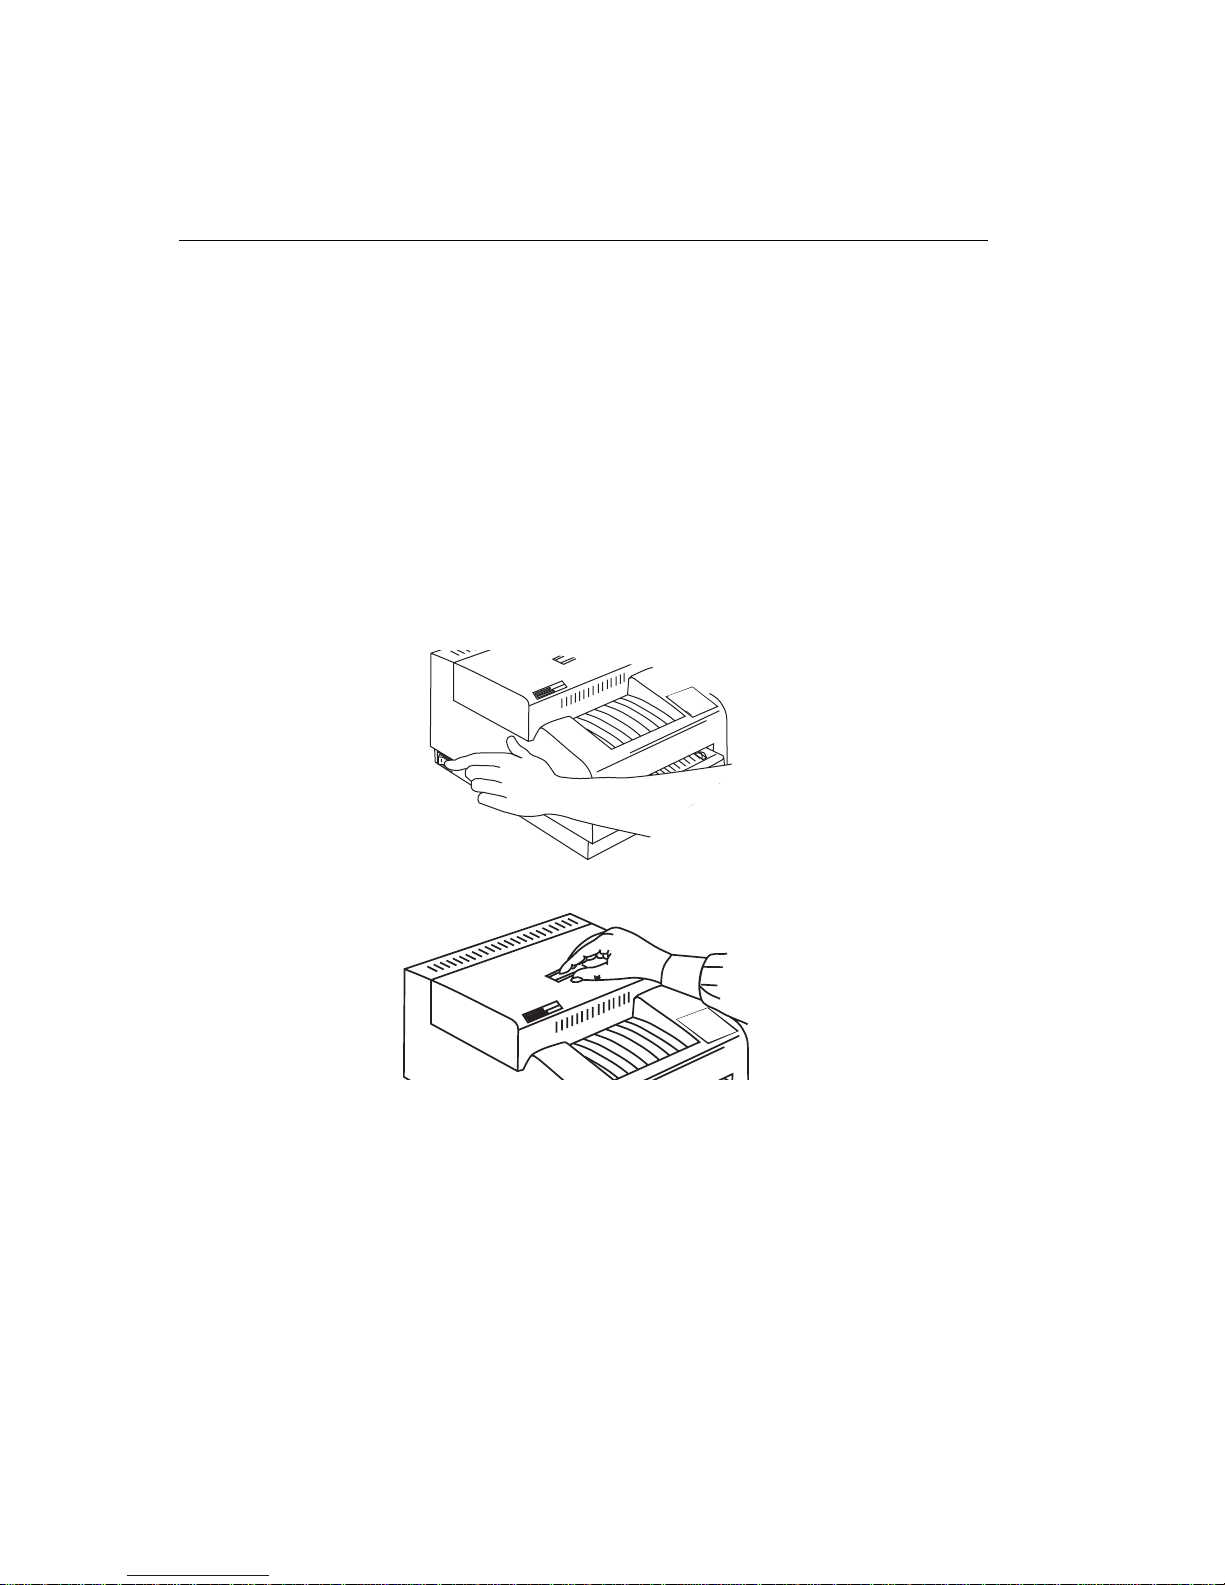
3. Remove both spools and stand them upright on a freshly cleaned
surface.
2-6 October 1997
Page 22
Setting up the printer
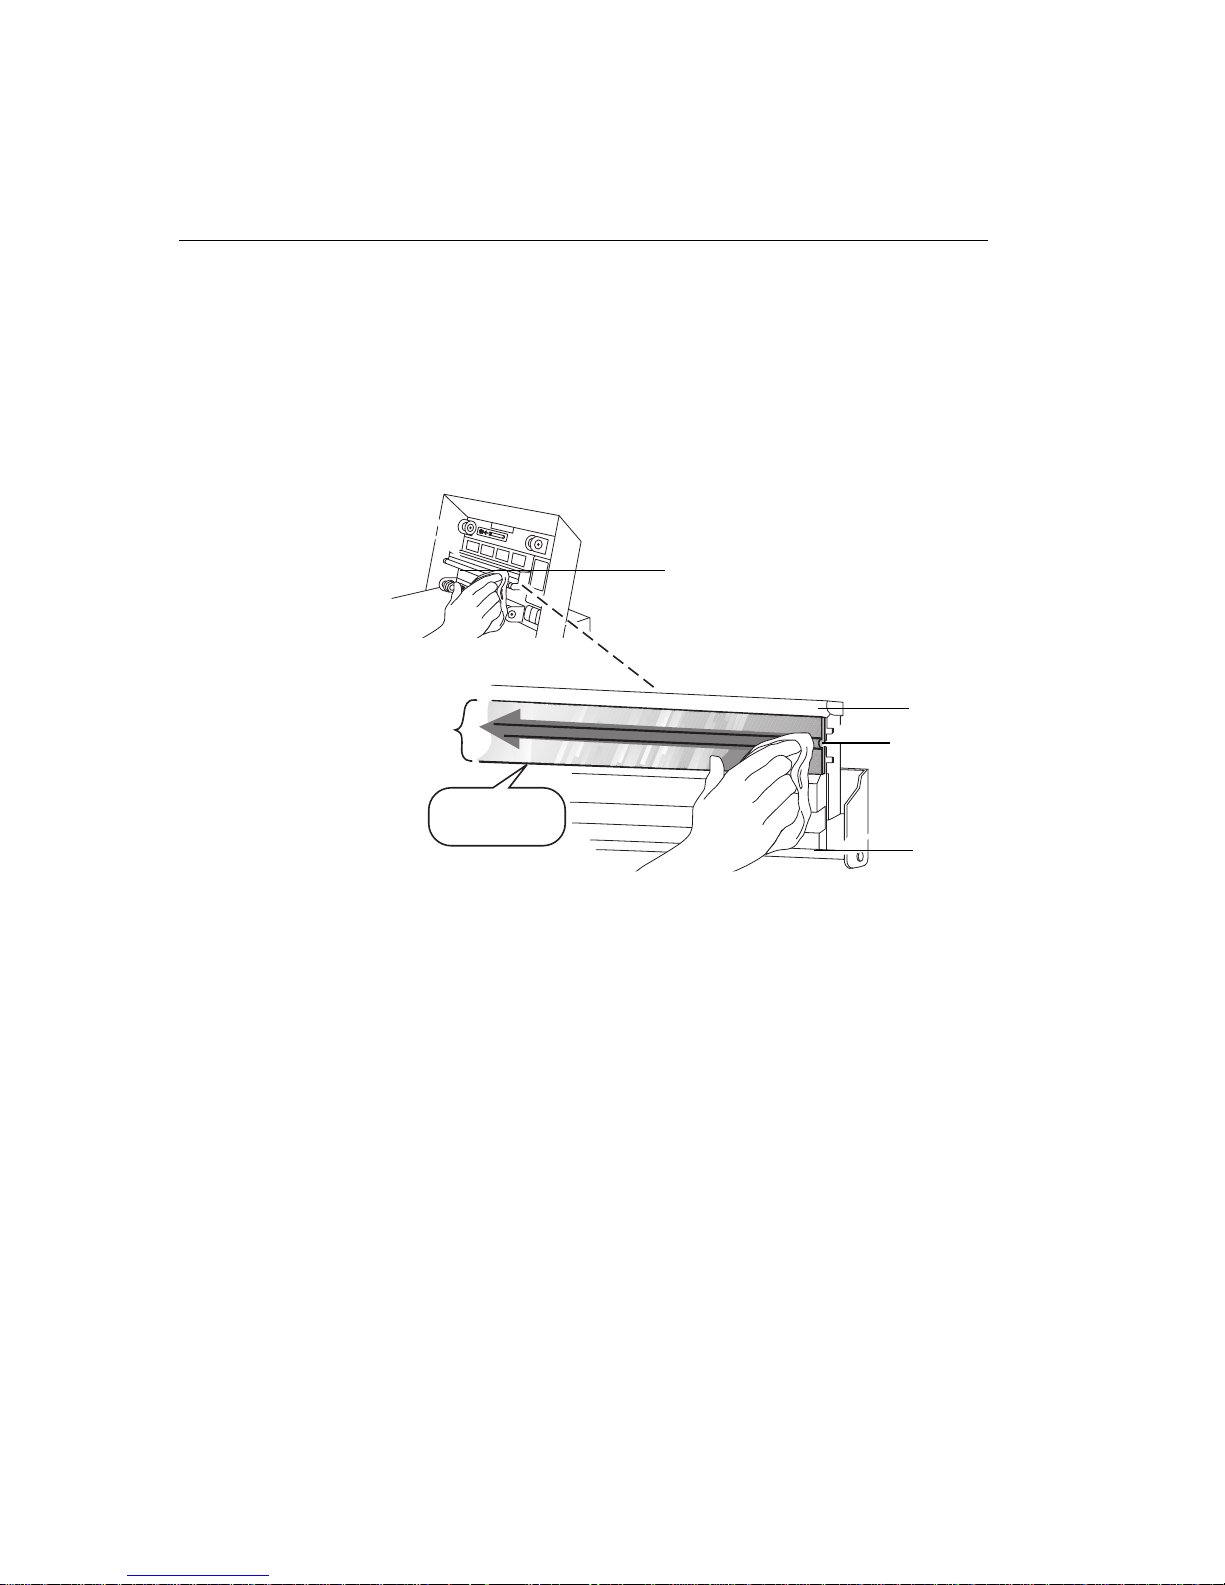
4. To clean the print head, first use the water pad and then use the
alcohol pad. With each pad, wipe along the heater line four times as
follows:
—Wipe the full length of the glass area (always in one direction).
—Use a clean part of the pad for each wipe.
—Apply firm, even pressure.
—Wipe the metal roller bar and rod as shown.
Metal roller bar
4x
AVOID METAL
EDGE!
5. Allow the glass area to dry for about two minutes.
6. Do one of the following:
If reloading the ribbon
on the left. If the ribbon gets dirty or is damaged, wind the take-up
spool ahead to the next clean magenta section.
If loading a new ribbon
package.
7. Close the printer cover, and turn the printer
, load the supply spool first (with the bar code
, refer to the instructions on the ribbon
On
.
Metal bar
Header line
Rod
October 1997 2-7
Page 23

Setting up the printer
Loading the ribbon
The ribbon provides dyes for printing images.
Three-color ribbon contains three dye patches: yellow, magenta, and
cyan. Each three-color ribbon, e xcept the three-color, oversize , e xtr a-lif e
ribbon, contains enough dye to make 100 prints. The three-color,
oversize, extra-life ribbon contains enough dye to make 85 prints.
Four-color ribbon contains four dy e patches: yellow , magenta, cy an, and
black. Each four-color ribbon contains enough dye to make 85 prints.
Black ribbon contains only black dye patches. Each black ribbon
contains enough dye to make 150 prints.
KODAK EKTATHERM XLS Three-Color Ribbon / XTRALIFE Media and
KODAK EKTATHERM XLS Black Ribbon / XTRALIFE Media contain
additional patches that protect images from fingerprints.
Handling the ribbon
Handle ribbon as follows.
•
Hold the ribbon spools by the ends to avoid fingerprints. Fingerprints
on the ribbon web severely reduce image quality.
•
Wear lint free gloves when working with ribbon.
•
Do not expose the ribbon to direct sunlight, extreme heat, dust, or
liquids.
•
Leave the printer cover closed except when you need to access the
inside of the printer.
Storing the ribbon
For highest image quality, store ribbon as follows. See the instructions
on the package for more storage information.
•
Store unopened ribbon at temperatures below 77 ° F (25 ° C).
Avoid exposure to temperatures higher than 100 ° F (38 ° C).
•
Wrap partially used ribbons in their original wrappers to protect them
from dust and dirt when they are not in the printer. Dust and dirt specs
on the ribbon show up as much larger spots on prints.
2-8 October 1997
Page 24
Loading ribbon in the printer
The ribbon fits easily in the printer. There is only one way to correctly
place the spools.
Follow these steps to load a ribbon:
IMPORTANT: Hold the ribbon spools by the ends to avoid fingerprints.
Also, wear lint-free gloves when handling ribbon spools.
1. Remove the old ribbon spools and dispose of them.
NOTE: Images remain on the ribbon after printing. If y ou are working
with confidential documents, you may, to maintain security,
need to consider alternate ways of disposing of the ribbon.
2. Clean the print head. See page 2-5 for instructions.
3. Remove the new ribbon spools from the box.
The supply spool is longer than the take–up spool. For new ribbons,
the supply spool will be loaded with ribbon and the take-up spool will
be empty.
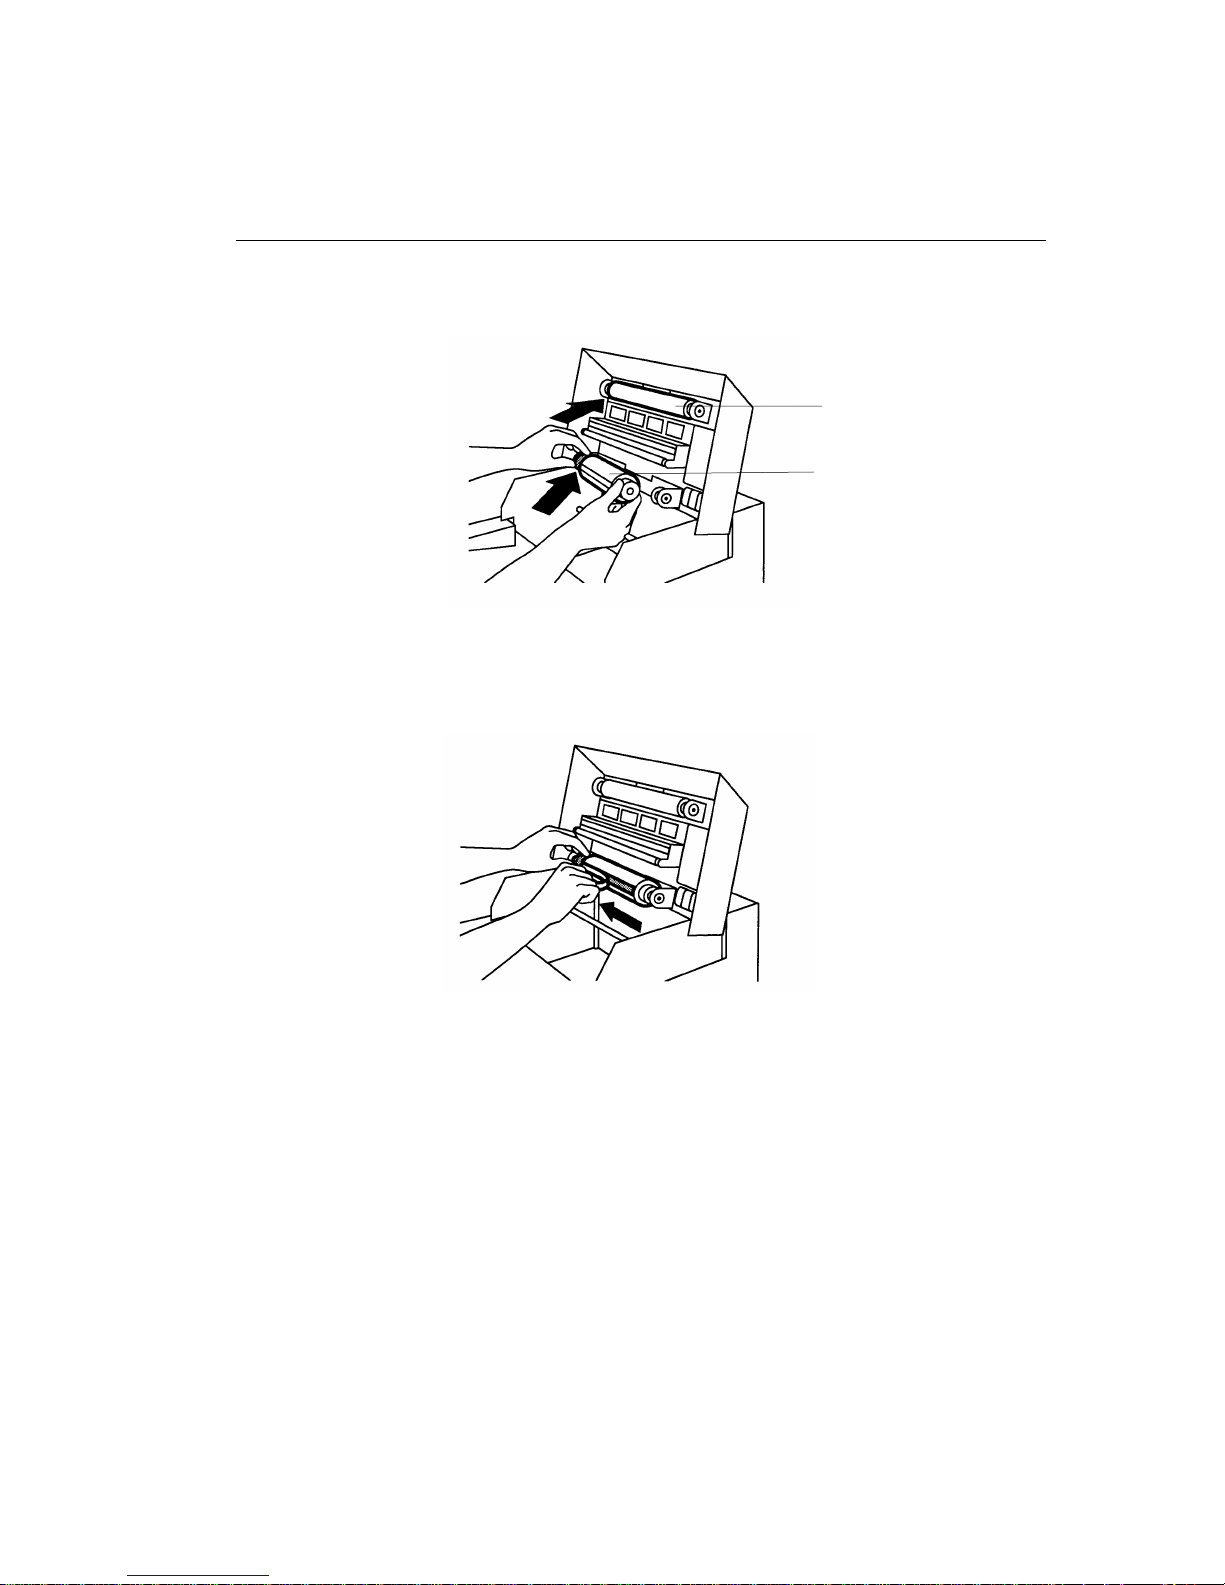
4. Push the left side of the take–up spool into the left side of the top
spool holder (the holders are spring–loaded).
5. Match the notches in the take–up spool with the notches on the right
spool holder.
6. Insert the right side of the take–up spool into the holder on the right.
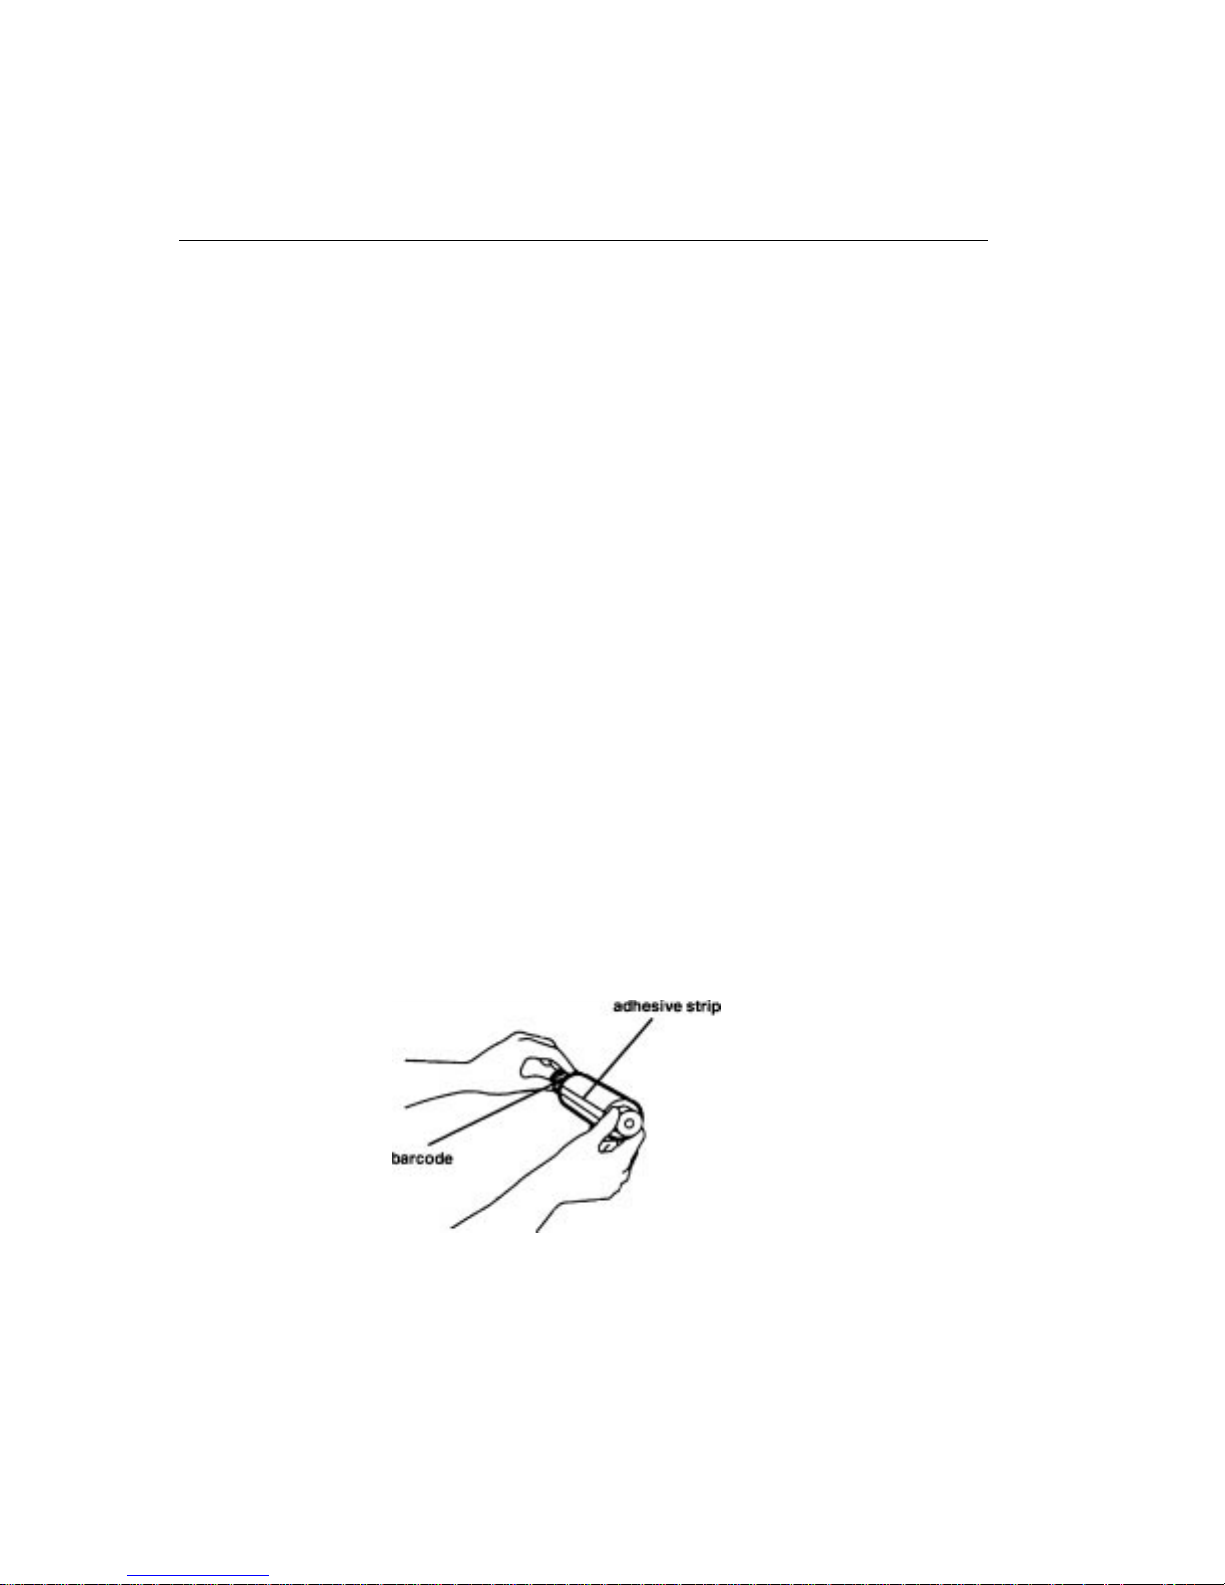
7. Hold the supply spool so that the adhesive strip on the ribbon is
facing you and the barcode is on the left. Make sure, especially
when you are reloading a partially used spool, that the spool
notches are on the right.
Setting up the printer
October 1997 2-9
Page 25
Setting up the printer
8. Push the left side of the supply spool into the left side of the bottom
9. Match the notches in the supply spool with the notches on the right
10. Insert the right side of the supply spool into the holder on the right.
11. Remove the tape from the adhesive strip
spool holder (the holders are spring loaded).
spool holder.
Take-up spool
Supply spool
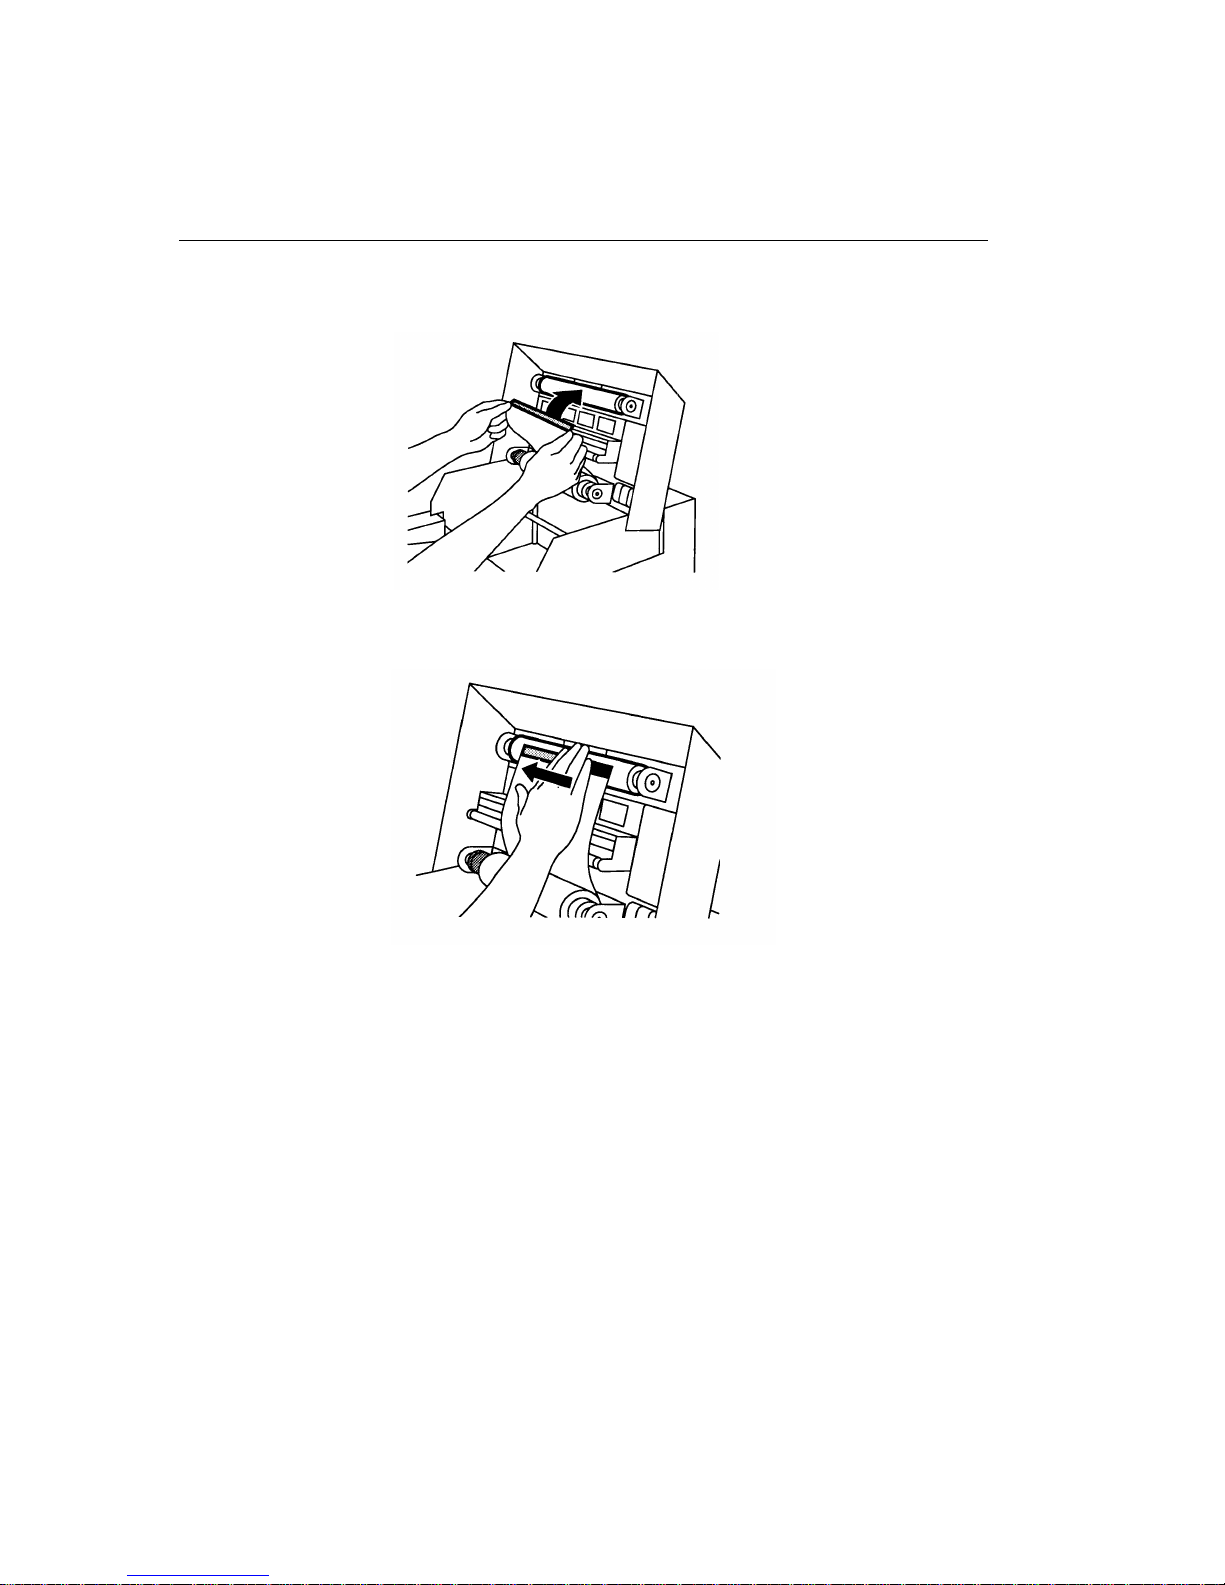
12. Hold any excess ribbon behind the adhesive strip.
2-10 October 1997
Page 26
Setting up the printer
13. Pull the ribbon up carefully and stick the adhesive onto the takeup
spool.
NOTE: Keep the ribbon as straight as possible.
14. Smooth the ribbon over the adhesive strip.
15. Wind the take-up spool away from you several times. The first full
set of dye patches is not used for printing.
16. Close the printer cover.
October 1997 2-11
Page 27

Setting up the printer
Unpacking and adjusting the paper tray
Working with media
When working with paper and transparencies, follow these guidelines:
Hold paper by the edges to avoid fingerprints, which reduce
•
print quality.
Handle the package of paper with the cardboard stiffener sheets
•
in place.
Keep the bottom stiffener board in place when handling stacks of
•
paper to avoid fingerprints on the printing surface.
Do not use wet or damaged stock.
•
Keep the lid on the paper tra y and the paper tra y inserted in the printer
•
to protect media from exposure to light, dust or dirt.
Storing media
For highest image quality, follow these storage instructions:
•
Store opened paper and transparencies at temperatures below 77 ° F
(25 ° C). Avoid exposure to temperatures higher than 100 ° F (38 ° C).
•
Avoid storing loose stacks of media out of its wrapper.
Paper and humidity
Paper is adversely affected by extremes in relative humidity. High
relative humidity tends to cause paper to curl toward the image side of
the paper. Low relative humidity tends to cause paper to curl away from
the image side of the paper. Low relative humidity also tends to increase
static attraction of dust and dirt.
To avoid humidity-related prob lems
you use and store paper is between 40% and 60% relative humidity.
Relative humidity lower than 20% or higher than 76% should be a voided
even for short periods of time. Print paper can tolerate a relative
humidity between 20% and 40%, and between 60% and 76%, for up to a
few hours without causing the paper to curl.
,
make sure the environment in which
2-12 October 1997
Page 28

Setting up the printer
Handling humidity–related paper problems
If paper is exposed to humidity levels outside the recommended range,
take extra care to help protect it as follows.
•
Load small amounts of paper rather than a whole package. Paper
stored in the wrapper lasts longer.
•
Wrap partial stacks of paper in its original plastic wrap, squeeze out
the air, and tape the wrap shut. This will protect the paper from
humidity , as w ell as from dust and dirt. Specs of dust and dirt on paper
show up as much larger spots on prints.
•
Avoid leaving paper in the printer overnight or on weekends.
If the problems persist, consider installing a humidifier or dehumidifier to
bring the humidity at your site to within the acceptable range.
October 1997 2-13
Page 29
Setting up the printer
Loading media
Thermal media—paper and transparencies—comes in various sizes.
See Chapter 3 in this guide for complete information about types and
sizes of media
The paper tray adjusts to the size of the paper you want to load. Do not
force media that is too long or wide into the tray.
IMPORTANT: Use only trays designed for the DIGITAL SCIENCE
Contact your dealer for trays in a size other than the one supplied with
the printer. See "Appendix B Accessories and supplies" for catalog
numbers.
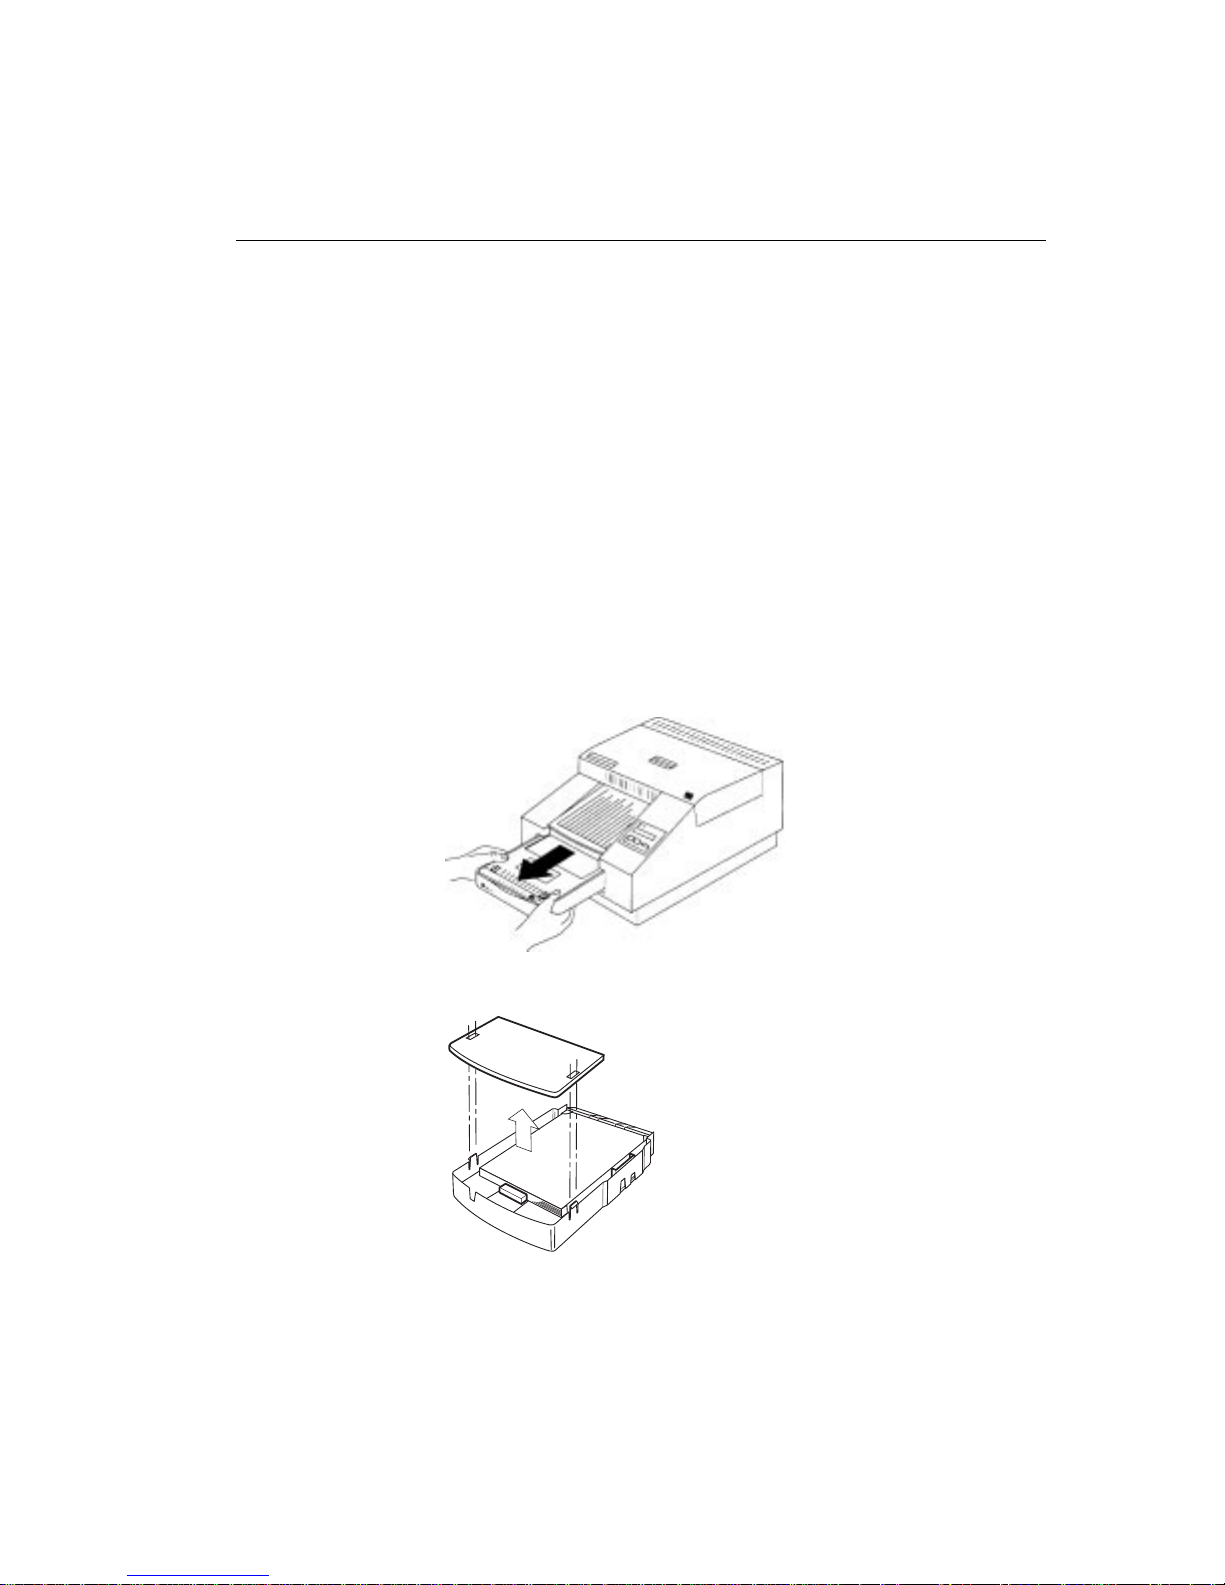
1. Remove the paper tray.
8650/8650 PS Color Printer. Using other tra ys ma y cause
paper jams, especially when you are printing images that
do not take up the maximum image area of the receiver.
2. Press and hold the tabs that come through the top of the lid, then
remove the lid.
2-14 October 1997
Page 30
Setting up the printer
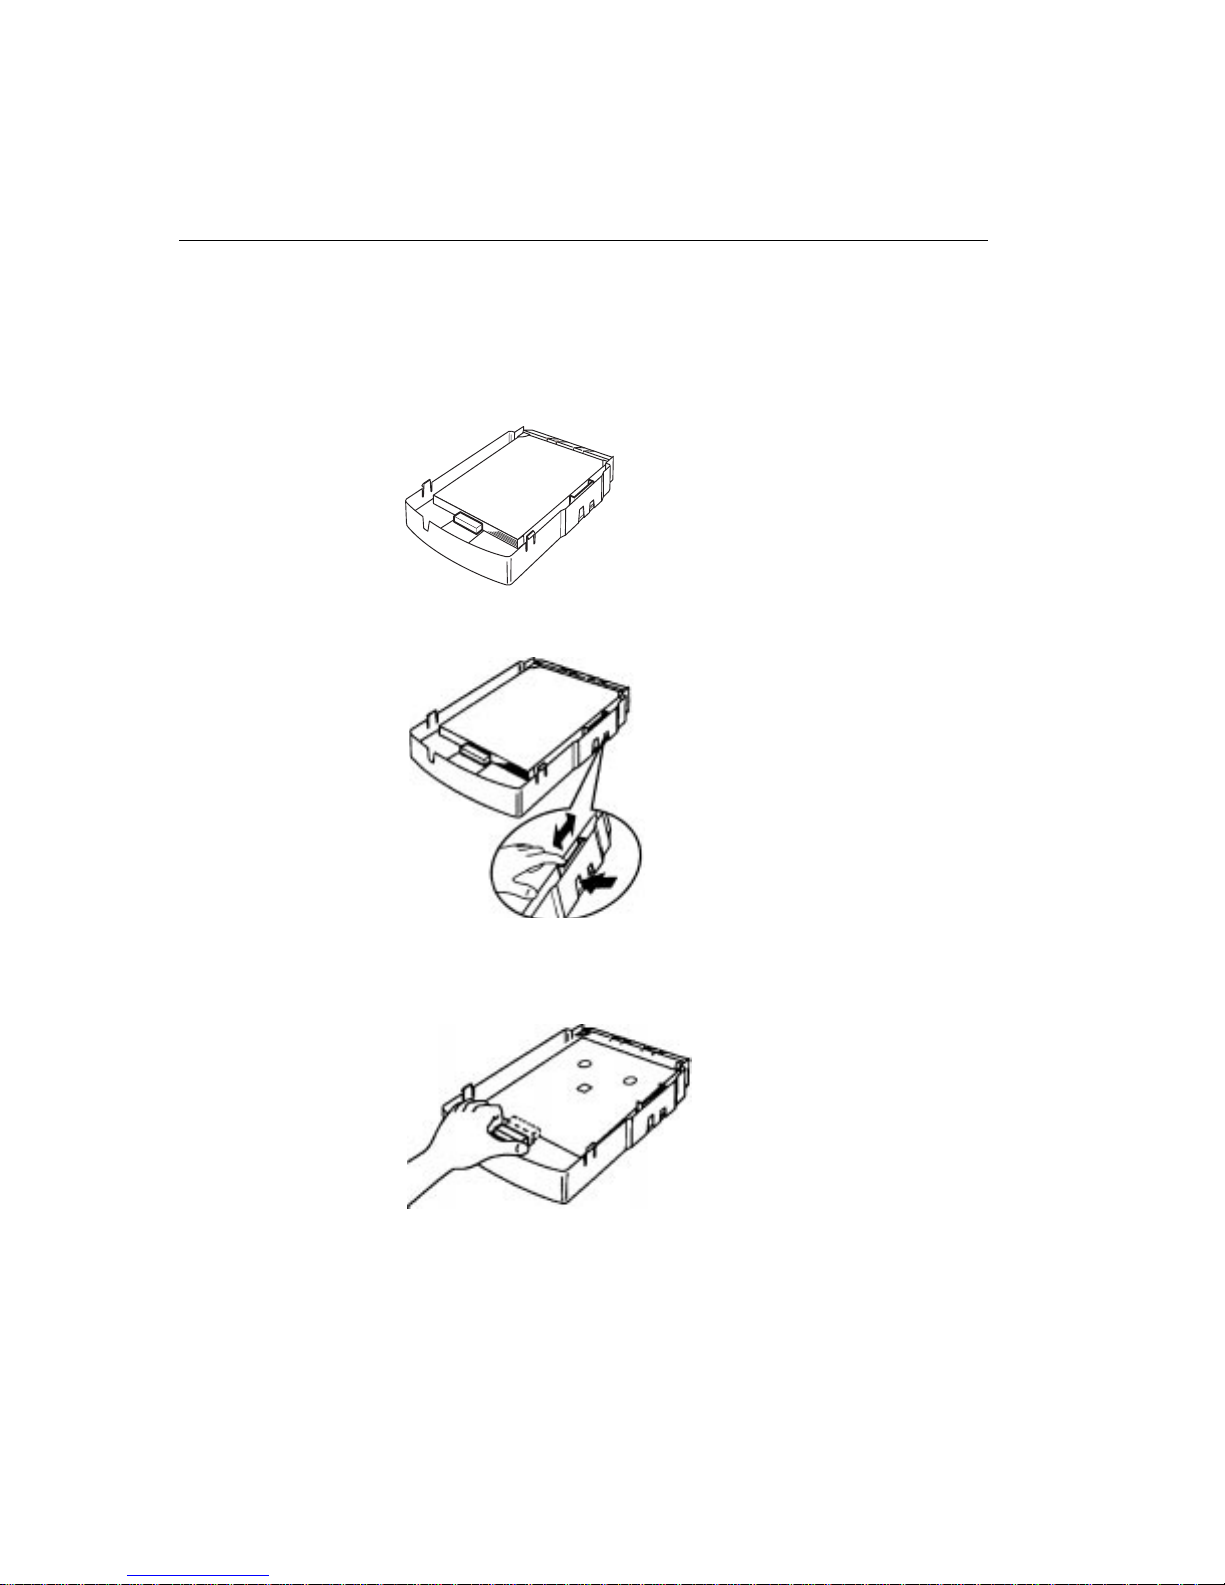
3. Make sure the paper size settings on the tray match, and that they
are correct for the media you are going to load. If necessary, adjust
the settings as follows:
—Look through the opening on the side of the tray at the sensor
label. This label shows the current paper size setting.
—Move the media-length slider on the inside of the tray until the
desired size appears in the opening.
—Make sure the tabs in the media-length stop (the piece that fits
against the installed media) are inserted in the correct slots on the
bottom of the tray. For example, if you set the sensor slider at
8.5 x 12, insert the tabs in the 8.5 x 12 slots.
4. Remove the media from the package. Leave the blue stiffener sheet
on the bottom of the stack in place.
IMPORTANT: Handle paper by the edges to avoid fingerprints on
the top sheet.
October 1997 2-15
Page 31

Setting up the printer
5.
If loading paper
If loading transparencies
, place the paper, logo side up, in the tray.
, place the stack into the tray with the
orientation notch on the lower right-hand side and the blue stiffener
sheet on the bottom.
Make sure the front corners of the stack are under the triangular
metal tabs.
6. Put the lid back on.
7. Make sure the latches on the sides of the tray lock into place in the
lid. Then slide the tray into the printer until it locks into place.
8. Verify that the correct media size appears in the display panel.
2-16 October 1997
Page 32

Putting the dust cover on
To help prevent dirt-related problems, keep the plastic dust cover in
place when you are using the printer.
Attach the dust cover to the printer in the first slot from the left and the
second slot from the right.
Setting up the printer
October 1997 2-17
Page 33

Setting up the printer
Connecting the cables
You must provide the necessary interface cables.Three power cords
(North America/Japan, Europe Continental, and Australia) are included.
If you will be using the printer outside these areas, you may need to
purchase a power cord.
Standard communication ports are provided. Which ones are active
depends on whether you have the 8650 Color Printer or the 8650 PS
Color Printer. Ethernet ports will be in place if the optional Network
Interface Card is installed.
parallel port (PostScript or Raster
printing)
LocalTalk port (PostScript printing
only)
Ethernet port (if optional
Network Interface Card is
installed) (PostScript or Raster
printing)
SCSI II ports (Raster printing only)
power cord inlet
The Centronics (Female) parallel port can be used for printing when
the printer is in PostScript or raster mode.
The Mini Din 9-pin (Female) LocalTalk port can be used for printing
when the printer is in PostScript mode.
The Submini 50-pin (Female) SCSI II ports can be used for printing
when the printer is in raster mode, and for SCSI disk drive connections
when the printer is in PostScript mode. A 50–pin submini SCSI II
terminator is included with the printer.
Ethernet 10BaseT (RJ45) and 10Base2 (BNC) ports are active in both
PostScript and raster mode if the optional Network Interface Card is
installed.
If the optional Network Interface Card is installed, Ethernet cabling is
used. Refer to the Installation and Setup Guide for the
KODAK Network
Interface Card.
2-18 October 1997
Page 34

Connecting a parallel cable
To attach a parallel (Centronics) cable:
1. Make sure the computer is turned On and the printer is turned
2. Connect the Centronics end (no pins) of the cable to the printer’s
parallel port.
3. Connect the 25-pin end of the cable to the computer’s parallel port.
4. Connect the power cord. See "Connecting the power cord" on
page 2-22.
5. Turn the printer
to |).
On
Setting up the printer
Off
.
Parallel port
(PostScript or
Raster Printing)
(press the power switch on the side of the printer
Connecting a LocalTalk cable
You need two LocalT alk connectors and a LocalTalk cable. Do as f ollo ws
to connect the computer and printer using LocalTalk cable:
1. Make sure the computer is turned On and the printer is turned
2. Attach one LocalTalk connector to the computer’s LocalTalk port.
Attach the other connector to the printer's LocalTalk port.
NOTE: If you are already on a LocalTalk network, you may not need
October 1997 2-19
Off
.
Page 35

Setting up the printer
3. Connect the LocalTalk cable to the two connectors.
4. Connect the power cord. See "Connecting the power cord" on
5. Turn the printer
two connectors.
LocalTalk port
(PostScript printing only)
page 2-22.
On
(press the power switch on the side of the printer
to |).
IMPORTANT: The printer can initialize itself only if the computer is
On.
Connecting a SCSI cable
The SCSI connection is active only when the printer is operating in
raster mode. The default SCSI ID for the printer is 5.
To connect a SCSI cable:
1. Make sure that both the printer and the computer are turned
2. The default SCSI ID is 5. To change the SCSI ID see "About
specifying port information" on page 3-6.
2-20 October 1997
Off
.
Page 36

Setting up the printer
3. Connect and secure the SCSI cable to one of the printer’s SCSI
ports.
SCSI ports
(Raster printing only)
4. Connect and secure the SCSI terminator to the open SCSI port (or
to the last device when daisy-chaining multiple devices.)
NOTE: If you are connecting the printer to a Macintosh IIfx
computer, a special Macintosh IIfx terminator is required.
Obtain this terminator from an Apple retailer.
5. Connect the power cord. See "Connecting the power cord" on
page 2-22.
On
6. Turn the printer
(press the power switch on the side of the printer
to |). When READY appears on the printer display panel, turn the
computer On.
October 1997 2-21
Page 37

Setting up the printer
Connecting the power cord
The printer automatically accepts input voltages from 90 to 250V and
frequencies from 47 to 60 Hz.
To attach the power cord:
1. Make sure that the power switch is set to
2. Plug one end of the power cord into the inlet on the back of the
printer. Plug the other end into an AC outlet.
Off
.
Power cord inlet
2-22 October 1997
Page 38

Checking and changing printer settings
Before you make a test print—the last step in setting up the printer—
check that the printer settings are correct for the media you just loaded
and for the mode in which you are going to operate the printer.
This section describes only how to check and set the mode and media
options. For complete information about printer settings, see Chapter 3
in this guide.
You use the buttons on the printer’s display panel (shown below) to look
at and change the printer settings.
Power
Error
Setting up the printer
Print
Cancel
Setup/Selectscroll
Changing the operating mode
If you have the PostScript version of the printer, the printer has two
operating modes: PostScript and raster. The PostScript mode is the
factory default.
To change the mode to raster:
1. Press Setup/Select when READY appears in the display panel.
2. Press Print to scroll down (or Cancel to scroll up) through the
settings until SETUP:MODE appears.
3. Press Setup/Select to access the MODE options.
October 1997 2-23
Page 39

Setting up the printer
4. Press Cancel until MODE:RASTER appears.
5. Press Setup/Select to choose raster mode.
6. Press Cancel until MODE:EXIT appears.
7. Press Setup/Select to exit MODE.
8. Press Cancel until SETUP:EXIT appears.
9. Press Setup/Select to exit Setup mode.
After you change the mode, the printer reinitializes itself. When the
printer is operational, it will be running in raster mode. READY: RASTER
will appear in the display panel.
Changing the media settings
Changing the media type
The printer has three media type settings: Paper, Transparency, and
Draft. (The f aster draft setting lets y ou proof y our transparencies .) P aper
is the factory default.
The default mode, PostScript, will have an asterisk (*) next to it. The
asterisk indicates which option is selected.
If you loaded transparencies in the paper tray, we recommend you
change the media type to transparency. To do so:
1. Press Setup/Select when READY appears in the LCD message
area.
2. Press Print to scroll down (or Cancel to scroll up) through the
settings until SETUP:DEFAULTS appears.
3. Press Setup/Select to access the DEFAULTS options.
4. Press Setup/Select to access the DEFAULTS: MEDIA options.
5. Press Cancel until MEDIA:TYPE appears.
6. Press Setup/Select to access the MEDIA TYPE options.
The default media type, PAPER, will have an asterisk (*) next to it.
The asterisk indicates which option is selected.
7. Press Cancel until the desired media type—TRANSPARENCY or
DRAFT—appears.
8. Press Setup/Select to choose the desired media type.
9. Press Cancel until TYPE:EXIT appears.
10. Press Setup/Select to exit MEDIA TYPE.
11. Press Cancel until DEFAULTS:EXIT appears.
2-24 October 1997
Page 40

Setting up the printer
12. Press Setup/Select to exit Setup mode.
The just-selected option is effective as soon as you exit Setup mode.
Changing the paper color
You can print onto three paper colors: Photographic, Commercial, and
Publication. Photog raphic , which represents standard white stock, is the
factory default.
If you load Commercial or Publication paper in the paper tray, you need
to change the MEDIA: COLOR option. To do so:
1. Press Setup/Select when READY appears in the LCD message
area.
2. Press Print to scroll down (or Cancel to scroll up) through the
settings until SETUP:DEFAULTS appears.
3. Press Setup/Select to access the DEFAULTS options.
4. Press Cancel until MEDIA:COLOR appears.
5. Press Setup/Select to access the MEDIA COLOR options.
6. Press Cancel until the desired media type—COM. or PUB.—
appears.
The default media type, STANDARD , will ha v e an asterisk (*) ne xt to
it. The asterisk indicates which option is selected.
7. Press Setup/Select to choose the desired media type.
8. Press Cancel until COLOR:EXIT appears.
9. Press Setup/Select to exit MEDIA COLOR.
10. Press Cancel until DEFAULTS:EXIT appears.
11. Press Setup/Select to exit DEFAULTS mode.
12. Press Cancel until SETUP:EXIT appears.
13. Press Setup/Select to exit Setup mode.
The just-selected option is effective as soon as you exit Setup mode.
October 1997 2-25
Page 41

Setting up the printer
About printer initialization
When you turn the printer on, it takes up to a minute for the printer to
initialize itself (start up and perform a self check). During this time, the
power light on the display panel illuminates, and the messages below
alternate on the display panel:
When the printer is ready , the f ollo wing message appears on the displa y
panel.
If the printer does not initialize itself
If the printer fails to initialize itself, the message INIT ERROR appears
on the panel. Turn the printer
INITIALIZING*
INITIALIZING**
PLEASE WAIT
READY-POSTSCRIPT
or
READY-RASTER
Off
and then back On.
If the INIT ERROR message appears again, turn off both the printer and
the computer. Disconnect all cables from the printer except the power
cable. Turn on the printer. If the INIT ERROR message appears again,
call for service.
If the INIT ERROR message is cleared, then the problem could be in the
cable connections. Making a test print
2-26 October 1997
Page 42

Setting up the printer
Finally, make a test print. Doing so helps you verify proper printer setup
and operation, and confirms print quality . There are two test images: one
is generated in raster mode, the other in PostScript mode.
To make a test print:
1. Make sure that READY appears on the display panel.
2. Press Print on the display panel.
It takes less than two minutes to make a test print. While the image is
being processed and printed, the messages PROCESSING: TEST
PRINT and PRINTING appear on the display panel.
CAUTION: During printing, the media partially exits the printer
multiple times. Do not pull the print. Wait for the print
to exit completely before touching it.
The printer expects the loaded media to match the media type specified
using the DEF A ULTS:MEDIA option on the display panel. If , f or example ,
the printer expects paper, and transparency material is loaded, a
mismatch message will appear. If you choose to make the test print
using incorrect media, the print will not have proper color reproduction
for that media type.
What’s next
To get the most from your 8650 Color Printer, you need to install the
printer drivers and export modules you plan to use. Refer to the Driver
Guide and to the Export Module Guide.
October 1997 2-27
Page 43

3
This chapter provides the information you need to operate the
KODAK DIGITAL SCIENCE
• Looking at the display panel
• Working with the printer settings
• Printing from computer applications
• Scheduling jobs
• Handling and storing prints and transparencies
• Cleaning the printer
• Keeping the printer in good working order
• Working with the printer
Operating the printer
8650/8650 PS Color Printer. It includes:
October 1997 3-1
Page 44

Operating the printer
Looking at the display panel
The printer display panel is shown below.
Power
Error
Print
Cancel
indicator
lights
message
display
area
Setup/Selectscroll
Two indicator lights show the status of the printer. They are:
• Power light—illuminated when the printer is turned
On
.
• Error light—illuminated when an error occurs. A message describing
the error appears in the display panel. The light remains on until you
respond to all messages.
When the error light glows steadily, you can correct the problem
yourself. When the error light flashes, a system error message appears
in the display panel. Turn the printer off and then back on. If the
message persists, service is required.
Messages appear on the Liquid Crystal Display (LCD) panel one line at
a time. Messages longer than 16 characters are divided into
16-character alternating sections.
3-2 October 1997
Page 45

Operating the printer
Types of messages are—
• Printer status messages—show the mode (raster or PostScript) in
which the printer is operating, the size of the media in the paper tray,
and the type of ribbon that is loaded. This information is displayed
when the printer is idle.
• Job–related messages —show status of the job closest to completion
• Media–related messages—show type of media and ribbon that are
loaded
• Error messages— appear when the paper tray is empty, when the
cover is open, or when errors occur
Use the Print and Cancel buttons to set printing options, cancel jobs,
override mismatches, and generate test prints.
Use the Cancel button as follows:
• To terminate the job that is closest to completion. For example, you
may hav e a job printing and a job processing. If you press Cancel, the
job being printed is ended immediately . No additional pages in that job
are printed, and the page currently being printed is ejected. If you
press Cancel again, the next job will be canceled, if one exists.
• In combination with Setup, to scroll up through the Setup menu.
Use the Print button as follows:
• To generate a test print when the printer is idle.
• To begin printing after a mismatch occurs. In combination with Setup,
to scroll down through the Setup menu.
Use the Setup/Select button to enter the Setup mode to change the
way the printer is set up. See “Working with the printer settings” on
page 3-4 for complete information.
October 1997 3-3
Page 46

Operating the printer
Working with the printer settings
You view and change the printer settings using the printer's Setup mode.
Table 3-1 lists the printer settings and options, and describes each
option. It also shows the factory default for each setting.
Table 3-1. Printer settings
setting
options description factory
default
Mode (setting available ONLY
if the printer can operate in
both
modes)
Port
(Parallel)
Port
(Ethertalk)
Port
(IPX)
Port
(TCP/IP)
PostScript and Raster Specifies which mode the printer is operat-
ing in.
WARNING: When an external hard drive
is connected to a computer, you MUST
disconnect the SCSI cable before
switching from raster to PostScript
mode. Otherwise, the hard drive may be
damaged.
Mode - Normal and
Binary
Version 2 and Version 1 Determines whether Version 1 or Version 2
802.2, 802.3, SNAP,
ETHERNET 2,
AUTOSELECT
fill in IP Address in following format:
nnn.nnn.nnn.nnn
Determines whether the parallel port will accept data in normal PostScript or Adobe binary mode. In normal mode, only printable
characters are accepted; characters in high
ASCII range (128-255) are not accepted.
Binary mode support high ASCII range; full
eight-bit data may be sent.
of AppleTalk will be supported.
Specifies the framing type the printer should
expect.
Sets up the Internet address of the printer
within a TCP/IP network.
Postscript
Normal
Version 2
AUTOSELECT
no default
3-4 October 1997
Page 47

Table 3-1. Printer settings
Operating the printer
Port
(SCSI PostScript
mode only)
Port
(SCSI raster
mode only)
Defaults
(Media
type)
Defaults
(Factory)
Initiator ID: 0 - 7
Enable: Yes and No
Target ID 0 - 7 Specifies the printer's SCSI address when
Paper, Transparency,
Draft
Reset Lets you restore the printer settings to their
Initiator ID: Specifies the printer's SCSI address when the printer is operating in PostScript mode.
Enable: When an external hard drive is connected, allows the printer to act as the SCSI
bus initiator.
CAUTION: Leave the setting at NO unless an external drive is connected. Otherwise, the computer's hard drive could
be damaged.
the printer is operating in raster mode.
• Select Paper if paper is loaded in the tray.
• Select Transparency to print high-density
transparencies.
• Select Draft for faster printing and
proofing of transparencies.
factory default values.
IMPORTANT: If the Network Interface Card
is installed, resetting to the factory defaults
may cause network printing problems.
6
No
5
Paper
Defaults
(Media color)
Language English, Francais,
October 1997 3-5
Photographic, Commercial, Publication
Deutsch, Espanol,
Italiano
Media color choices allow you to print
proofs that approximate the color and hue
of the final press stock.
• Select Photographic to print onto standard white stock.
• Select Commercial to simulate collateral
applications.
• Select Publication to simulate magazine
applications.
The display panel messages can appear in
English, French, German, Spanish, or
Italian.
Photographic
English
Page 48

Operating the printer
Working in Setup mode
To enter Setup mode: Press Setup/Select while the printer is idle.
T o scr oll through the settings: Press Print to scroll up, Cancel to scroll
down. You scroll through the settings continuously.
To select an option: When you find the setting whose options you wish
to view, press Setup/Select. An asterisk (*) next to an option means it is
selected.
To exit Setup mode: Select SETUP:EXIT. Most changes you make are
effective as soon as y ou exit Setup mode. The exceptions are when you
return the settings to the factory defaults, and when you change the
printer's operating mode. In these cases, the printer restarts itself when
you exit Setup mode. Changes are effective immediately afterward.
To restore the printer settings to their factory settings: Press Setup/
Select when SETUP:DEFAULTS appears. Select FACTORY:RESET to
restore all the printer settings to their factory settings.
IMPORTANT: If the Network Interface Card is installed, restoring the
settings to their factory values may cause network
printing problems.
About specifying port information
The options you select must match your host computer settings.
There are different submenus associated with the POR TS men u. Which
ones are available depends on whether the printer is running in Raster
or PostScript mode, and on whether the Network Interface Card is
installed.
3-6 October 1997
Page 49

Operating the printer
The following submenus are a v ailab le only if the Network Interf ace Card
is installed:
• PORTS:ETHERTALK—lets you specify whether version 1 or 2 of
AppleTalk will be used
• PORTS:IPX—lets you specify the framing type to expect when using
Novell Netware
• PORTS:TCP/IP—lets you enter the Internet address of the printer
network interface card within a TCP/IP network
For complete information, refer to the Installation & Setup Guide for the
KODAK Network Interface Card for the KODAK XLS 8400 Printer, the
KOD AK XLS 8600/8600 PS Printer, and the KOD AK DIGITAL SCIENCE
8650/8650 PS Printer
Specifying the printer’s SCSI ID (raster mode)
This option—SCSI:TARGET— appears only on printers running in
raster mode. The SCSI ID default value is 5.
Select an ID that is not in use on the SCSI bus for any other purpose.
For example , do not use the SCSI ID f or your hard drive (0 f or Macintosh
computers, 7 for computers running Microsoft Windows). Similarly, do
not use the ID for an external hard drive used for font storage or the ID
of a scanner connected to the computer.
.
Specifying the SCSI connection (PostScript mode)
This option— SCSI:INITIATOR —appears only on printers running in
PostScript mode. The SCSI ID default value is 6.
Select an ID that is not in use on the SCSI bus for any other purpose.
For example, you cannot use the SCSI ID for your hard drive (0 for
Macintosh computers, 7 for computers running Microsoft Windows).
Similarly, you cannot use the ID for an external hard drive used for font
storage or the ID of a scanner connected to the computer.
INITIATOR:ENABLE lets you determine whether the printer should act
as the SCSI bus initiator. The default is NO.
WARNING:
Choose ENABLE:YES only if an external hard drive is
connected to the printer. Otherwise, disk damage to
the host system could occur.
October 1997 3-7
Page 50

Operating the printer
Working with media
This section describes the media—paper and transparency material—
used with the printer. It also lists handling and storage guidelines.
Thermal paper looks and feels like photographic paper, but it is not light
sensitive. The back is imprinted with the Kodak logo. Paper is shipped in
100-sheet packages.
CAUTION: Use only media designed for use in the 8650/8650 PS
KODAK EKTATHERM XLS Print Paper, available in several sizes, is
available in three grades:
• Photographic Grade——used for photographic applications
• Commercial Grade—used for collateral applications
• Publication Grade—used to simulate magazine applications
Table 3-2 lists each paper type and size, lists which ribbons y ou can use
with each type, and shows the maximum image size for each paper
type.
Color Printer. Using other materials may cause printer
problems.
3-8 October 1997
Page 51

Table 3-2 Kodak thermal paper types, sizes, and image size
Operating the printer
Type of Pape
KODAK EKTATHERM
XLS Print Paper /
Photographic Grade
CAT No 8614364
KODAK EKTATHERM
XLS Print Paper /
Photographic Grade
CAT No 8816514
r
Paper Size Type of Ribbon Maximum Image Size
8.5 x 11 KODAK EKTATHERM
XLS Three-color ribbon /
CMY
CAT No 163 0474
KODAK EKTATHERM
210 x 297mm
(8.27 x 11.69)
XLS Black ribbon / Xtralife
media
CAT No 857 0152
KODAK EKTATHERM
XLS Three-color ribbon /
XTRALIFE media / CMY
CAT No 807 6135
KODAK EKTATHERM
XLS Three-color ribbon /
CMY
CAT No 163 0474
KODAK EKTATHERM
XLS Black ribbon / Xtralife
media
CAT No 857 0152
KODAK EKTATHERM
XLS Three-color ribbon /
XTRALIFE media / CMY
CAT No 807 6135
8.0 x 8.93
204 x 228 mm
8.0 x 9.6
204 x 246 mm
KODAK EKTATHERM
XLS Print Paper /
Photographic Grade
CAT No 8684623
October 1997 3-9
8.5 x 12 KODAK EKTATHERM
XLS Three-color ribbon /
CMY
CAT No 163 0474
KODAK EKTATHERM
XLS Black ribbon / Xtralife
media
CAT No 857 0152
KODAK EKTATHERM
XLS Three-color ribbon /
XTRALIFE media / CMY
CAT No 807 6135
8.0 x 10
204 x 256 mm
Page 52

Operating the printer
KODAK EKTATHERM
XLS Print Paper / Photographic Grade
CAT No 875 1596
KODAK EKTATHERM
XLS Print Paper / Photographic Grade
CAT No 856 5699
210 x 307 mm
(8.27 x 12)
8.5 x 14 KODAK EKTATHERM
KODAK EKTATHERM
XLS Three-color ribbon /
CMY
CAT No 163 0474
KODAK EKTATHERM
XLS Black ribbon / Xtralife
media
CAT No 857 0152
KODAK EKTATHERM
XLS Three-color ribbon /
XTRALIFE media / CMY
CAT No 807 6135
XLS Oversize Threecolor ribbon / CMY
CAT No 821 4082
KODAK EKTATHERM
XLS Oversize Threecolor ribbon / XTRALIFE
media / CMY
CAT No 801 3716
KODAK EKTATHERM
XLS Black ribbon /
XTRALIFE Media
CAT No 857 0152
8.0 x 10
204 x 256 mm
8.0 x 12
204 x 307 mm
KODAK EKTATHERM
XLS Print Paper/ Photographic Grade
CAT No 807 5640
3-10 October 1997
210 x 358 mm
(8.27 x 14)
KODAK EKTATHERM
XLS Oversize Threecolor ribbon / CMY
CAT No 821 4082
KODAK EKTATHERM
XLS Oversize Threecolor ribbon / XTRALIFE
media / CMY
CAT No 801 3716
KODAK EKTATHERM
XLS Black ribbon /
XTRALIFE Media
CAT No 857 0152
8.0 x 12
204 x 307 mm
Page 53

Operating the printer
8.5 x 12
217 x 307 mm
KODAK EKTATHERM
XLS Print Paper /
Photographic Grade
CAT No 867 7759
Commercial Grade
CAT No1581198
Publication Grade
CAT No 8811663
9.5 x 14 KODAK EKTATHERM
XLS Oversize Threecolor ribbon / CMY
CAT No 821 4082
KODAK EKTATHERM
XLS Oversize Threecolor ribbon / XTRALIFE
media / CMY
CAT No 801 3716
KODAK EKTATHERM
XLS Black ribbon /
XTRALIFE Media
CAT No 857 0152
KODAK EKTATHERM
XLS Four-color Ribbon /
CMYK
CAT No 801 3716
October 1997 3-11
Page 54

Operating the printer
Table 3-3 shows the sizes and maximum image size for KODAK
EKTATHERM XLS Transparency Material. The table also shows which
ribbons can be used with each size of transparency material.
Table 3-3 Transparency material size and maximum image size
Transparency
Material
KODAK EKTATHERM
XLS T r ansparency
Material
CAT No 852 6618
KODAK EKTATHERM
XLS T r ansparency
Material
CAT No 850 3005
Size Type of Ribbon Maximum Image Size
8.5 x 11 KODAK EKTATHERM
XLS Three-color ribbon /
CMY
CAT No 8873945
KODAK EKTATHERM
210 x 297mm
(8.27 x 11.69)
XLS Black ribbon / Xtralife
media
CAT No 8570152
KODAK EKTATHERM
XLS Three-color ribbon /
XTRALIFE media / CMY*
CAT No 8733925
KODAK EKTATHERM
XLS Three-color ribbon /
CMY
CAT No 8873945
KODAK EKTATHERM
XLS Black ribbon / Xtralife
media
CAT No 8570152
KODAK EKTATHERM
XLS Three-color ribbon /
XTRALIFE media / CMY*
CAT No 8733925
8.0 x 8.93
204 x 228 mm
8.0 x 9.6
204 x 246 mm
3-12 October 1997
Page 55

Operating the printer
KODAK EKTATHERM
XLS T r ansparency
Material
CAT No 853 4059
KODAK EKTATHERM
XLS T r ansparency
Material
CAT No 871 7001
8.5 x 12 KODAK EKTATHERM
XLS Three-color ribbon /
CMY
CAT No 163 0474
KODAK EKTATHERM
XLS Black ribbon / Xtralife
media
CAT No 857 0152
KODAK EKTATHERM
XLS Three-color ribbon /
XTRALIFE media / CMY*
CAT No 807 6135
210 x 307 mm
(8.27 x 12)
KODAK EKTATHERM
XLS Three-color ribbon /
CMY
CAT No 163 0474
KODAK EKTATHERM
XLS Black ribbon / Xtralife
media
CAT No 857 0152
KODAK EKTATHERM
XLS Three-color ribbon /
XTRALIFE media / CMY*
CAT No 807 6135
8.0 x 10
204 x 256 mm
8.0 x 10
204 x 256 mm
KODAK EKTATHERM
XLS T r ansparency
Material
CAT No 852 9679
8.5 x 14 KODAK EKTATHERM
XLS Oversize Threecolor ribbon / CMY
CAT No 821 4082
KODAK EKTATHERM
XLS Oversize Threecolor ribbon / XTRALIFE
media / CMY
CAT No 801 3716
KODAK EKTATHERM
8.0 x 12
204 x 307 mm
XLS Black ribbon /
XTRALIFE Media*
CAT No 857 0152
October 1997 3-13
Page 56

Operating the printer
KODAK EKTATHERM
XLS T r ansparency
Material
CAT No 861 0651
210 x 358 mm
(8.27 x 14)
KODAK EKTATHERM
XLS Oversize Threecolor ribbon / CMY
CAT No 821 4082
KODAK EKTATHERM
XLS Oversize Threecolor ribbon / XTRALIFE
media / CMY*
CAT No 801 3716
KODAK EKTATHERM
XLS Black ribbon /
XTRALIFE Media*
CAT No 857 0152
8.0 x 12
204 x 307 mm
* Only laminates to paper. When printing transparency material with XL TRALIFE ribbon, the lam-
inate patch is bypassed.
NOTE: See Chapter 2 for information on working with media and ribbon.
3-14 October 1997
Page 57

Printing from computer applications
You print through your applications using the Printer Drivers or the
Export Modules that came with the printer.
• For application-specific printing information, refer to the User’s Guide
for the application or the Application Notes on the CD that came with
your printer.
• For information about printing with the 8650 PS Printer in PostScript
mode, refer to the Printer Driver User’s Guide.
• For information about printing with the 8650 Printer and the 8650 PS
Printer in raster mode, refer to the Export Modules User’s Guide.
The time it takes to print an image depends on the application and on
the type of image being printed. Some images take m uch longer to print
than others. A file made up of lines generally takes less time to print
than a file that is defined in bits, such as a scanned image.
As printing takes place, the paper moves through the imaging path
multiple times. During this process, the paper partially exits the printer.
Do not pull on the print. Wait until the print exits completely before
touching it.
NOTE: When the printer is running in raster mode, the last image you
send remains in memory until you turn the printer
Operating the printer
Off
.
October 1997 3-15
Page 58

Operating the printer
Scheduling jobs
The number of jobs that can be queued to the printer at once depends
on the memory available in the printer. If large files are sent, fewer jobs
can be processed. Installing additional memory in the printer increases
the number of jobs that can be processed at a time.
If the printer is networked, the network configuration affects job
scheduling. When on a network, the printer polls the ports in a round
robin manner. When it receives a job, it stops polling until the job is
complete. Then the printer looks to the next port in the list.
The position of the ports in the list affects the order in which jobs are
processed. When a job is sent is not the sole determinant of when it will
be processed and printed.
3-16 October 1997
Page 59

Operating the printer
Handling and storing prints and transparencies
The image stability of thermal prints depends on factors such as
temperature, relative humidity, and exposure to light or to biological or
chemical contaminates. Using XtraLife ribbon increases print shelf life.
Your thermal images will last a long time if you handle and store them as
described below.
• Handle prints as little as possible. When handling prints, make sure
your hands are clean and free of food, oil, and grease. Wear clean
gloves when possible, and hold prints by the edges.
• Store thermal prints and transparencies in a cool, dry environment
free of chemical contamination.
• The lower the storage temperature, the better. Avoid temperatures
higher than 72°F (25°C) for extended periods.
• A relative humidity between 30% and 50% is ideal.
• Avoid exposure to high-intensity light sources, particularly fluorescent
light and sunlight, which are rich in ultraviolet radiation.
• Avoid e xposure to vin yl items (those made of polyvin yl chloride [PVC])
or any plastic which contains plasticizer. These items usually have a
distinct “plastic” odor. If you use transparency sleeves, make sure that
they are not PVC-based.
October 1997 3-17
Page 60

Operating the printer
Cleaning the printer
To help ensure good printer performance and high-quality output, make
sure the printer’s operating environment is clean and dust-free.
Clean the printer regularly as described below.
Before you begin: Turn the printer
Off
and unplug it.
• Clean the thermal head when you load a new ribbon or if you notice
image quality problems.
• Wipe the printer cabinet, the paper tray area, and the output tray with
distilled or deionized water and a damp, lint–free cloth. This eliminates
dust buildup and prevents dirt from getting into the printer.
CAUTION: Never use abrasives or harsh chemicals to clean
any part of the printer.
Do not use the alcohol cleaning pads packaged
with new ribbon to clean the printer cabinet.
• Clean the area around and under the printer to keep dust out of the
cooling fan.
• Vacuum the printer and the surrounding area to keep them dust free.
3-18 October 1997
Page 61

Keeping the printer in good working order
To keep the printer in good working order:
• Keep the printer clean. Keep the surrounding area vacuumed and
litter-free.
• Protect the printer from tobacco smoke, dust, sand, and liquid spills.
• Do not place objects on top of the printer.
• Do not keep anything under the printer . Doing so may bloc k the fan on
the bottom of the printer.
Working with the printer
Follow these guidelines when working with the printer:
• Keep the plastic dust cover in place when operating the printer.
• Keep the blue protective cover in place when not using the printer.
• Remove prints from the output tray ONLY AFTER the printer ejects
them.
• Do NOT put a print back into the output tray . Doing so can cause jams
and loss of completed prints.
• Avoid loading more than 100 sheets of paper in the paper tray.
Operating the printer
October 1997 3-19
Page 62

4
Troubleshooting the printer
This chapter describes the problems you may occasionally ha ve with the
KODAK DIGITAL SCIENCE
how to solve these problems. This chapter contains the following
sections:
•
Error messages and how to resolve them
•
What to do when mismatches occur
•
What to do if the printer is not operating as it should
•
Clearing the paper path
•
Cleaning the pick rollers
•
Cleaning the sensors
•
Packing the printer
•
Getting additional help
8650/8650 PS Color Printer. It also tells
October 1997 4-1
Page 63

Troubleshooting the printer
Error messages and how to resolve them
Error messages indicate that a problem has occurred. More than one
problem can occur at a time. However, only one error message can
appear at a time. Messages related to high-priority problems are
displayed before lower priority ones.
You must resolve problems in the order in which they appear. For
example, a CLOSE COVER message may appear. After you close the
cover, a paper mismatch message may appear. After you correct the
mismatch, if there are no other errors, READY will be displayed.
Table 4-1 lists and describes the common error messages, and tells
what to do if these messages appear.
Table 4-1 Common error messages
Error message Possible cause Possible solution
CHANGE
RIBBON
CHECK TRAY • The tray is empty.
CLEAR PAPER
PATH
• The supply spool is
empty
• The ribbon’s barcode
cannot be read.
• The wrong type of
ribbon is loaded (for
example, CMYK ribbon
is loaded on a printer
with 32 MB of memory).
• The tray is inserted
improperly.
• There is a paper jam
in the tray area.
A paper jam occurred. Clear the paper path. See "Clearing
• Change the ribbon.
• Make sure the barcode is legible.
If the message persists, service is
required.
• Load the correct type of ribbon.
• Load paper or transparencies.
• Remove the tray. Reinsert the tray,
making sure it is seated correctly.
• Clear the jam.
the paper path" on page 4-11
4-2 October 1997
Page 64

Troubleshooting the printer
CLEAR RIBBON
JAM
CLOSE COVER The printer cover is
INIT ERROR The printer failed to
The ribbon is
jammed.This may be
caused by a paper jam.
open.
initialize.
Press Cancel to eject the paper. If the
message persists, do as follows:
1. Clear the paper jam.
2. If necessary, clear the ribbon jam.
3. Close the cover.
4. Remove the paper tray.
5. Clear paper from the tray area.
6. Reinsert the tray.
7. Turn the printer Off and then back
On.
If the message still persists, service is
required.
Close the cover.
Parallel connection ONLY :
1. Turn Off the printer.
2. Make sure the computer is running.
3. Turn the printer back On.
Other connections :
1. Turn both the printer and host computer Off.
2. Disconnect the interface cable from
the printer.
3. Turn the printer On.
4.
If the printer does initialize
to step 5.
If the printer does not initialize
printer Off and then back
message persists, service is required.
5. Turn the printer Off.
6. Reconnect the interface cable.
7. Turn the printer On.
8.
If the printer does initialize
host computer On.
If the printer does not initialize
is required.
, proceed
, turn the
On
. If the
, turn the
, service
INSERT TRAY The paper tray is not in
October 1997 4-3
place.
Make sure the tray is inserted and
seated correctly.
Page 65

Troubleshooting the printer
LOAD PAPER
LOAD TRANSP ARENCY
LOAD RIBBON The ribbon type that is
• The tray is empty.
• The wrong size media
is loaded.
• Paper is loaded and
transparency was
requested or vice versa.
• Media is not being
picked up from the tray.
• Media is stuck in the
printer.
loaded does not match
the requested ribbon
type.
• Load the type of media requested.
• Load the correct size media.
• Load the type of media requested.
• Clean the picker rollers. See "Cleaning the pick rollers" on page 4-14.
• Clear the paper path. See "Clearing
the paper path" on page 4-11
Load the type of ribbon requested.
4-4 October 1997
Page 66

Table 4-2 Machine Generated Error Codes
Troubleshooting the printer
Condition/Error
Description Possible solution
Code
500 No RECEIVER at LEAD
EDGE SENSOR when
expected
501 RECEIVER stuck at
LEAD EDGE SENSOR
502 RECEIVER size change
without removing TRAY
503 Invalid TRAY size input
508 XLS 8657 ONLY:
RECEIVER Stuck at
URGE SENSOR
510 BAR CODE LABEL not
correct/BAR CODE
SENSOR or FRU mal-
function
511 BAR CODE LABEL not
correct or has damage/
BAR CODE SENSOR
or FRU malfunction
• Verify that the correct media and ribbons are loaded.
• Clean sensors. See "Cleaning the
sensors" on page 4-16.
• If problem persists call for service.
600, 601, 602, 603 CONTROLLER PROM
or BOARD failure
608, 609, 60A,
60C
610 LCD or CONTROLLER
618, 60B EPROM, THERMAL
October 1997 4-5
THERMAL HEAD/
CABLE, CONTROLLER
PRINTED CIRCUIT
BOARD
PRINTED CIRCUIT
BOARD
HEAD
• Power cycle printer
• If error code doesn’t clear, call for
service.
Page 67

Troubleshooting the printer
700 Inboard THERMAL
HEAD POSITION SENSORE #2 open
701 Inboard THERMAL
HEAD POSITION SENSOR #2 blocked
702 Outboard THERMAL
HEAD POSITION SENSOR #1 open
703 Outboard THERMAL
HEAD POSITION SENSOR #1 blocked
708 DONOR PATCH SENS-
ING EMITTERS not
sensing DONOR
709 DONOR SENSORS
not stable
710, 711, 712 DSP Linetime
response times out
718 CONTROLLER
PRINTED CIRCUIT
BOARD
• Open the top cover of the printer.
• Power cycle the printer
• Close the top cover
• If error doesn’t clear, call for service
• Turn off the printer.
• Disconnect all cables except power.
• Turn on printer.
• If error doesn’t clear, call for service
• If error code disappears, the computer, cabling or software could be
causing the problem.
719 THERMAL HEAD/
CABLE, CONTROLLER
PRINTED CIRCUIT
BOARD
720, 721 CONTROLLER
PRINTED CIRCUIT
BOARD/CABLE
[722][INIT
ERROR]
730 THERMAL HEAD Cool-
733 THERMAL HEAD Heat-
738, 739 CONTROLLER, RAM
4-6 October 1997
PLATFORM
ing malfunction
ing malfunction
Page 68

Troubleshooting the printer
740, 741, 742 PROGRAM PROMS or
CONTROLLER
PRINTED CIRCUIT
BOARD
748, 749, 74A,
74B, 74C,74D
750-756 Unexpected write from
757 DSP Set Verify Failure
760-773, 76E,
76F, 76A, 76B,
76C, 76D
800-857 General CONTROL-
900-930, 090B,
091B, 093B, 094B
SERVICE REQ
XXX
PHM Failure
DSP
CONTROLLER
PRINTED CIRCUIT
BOARD
LER PRINTED CIR-
CUIT BOARD
DSP BLOCK, CHECK-
SUM
An error occurred. The
message includes a
4-digit error code.
• Turn off the printer.
• Disconnect all cables except power.
• Turn on printer.
• If error doesn’t clear, call for service
• If error code disappears, the computer, cabling or software could be
causing the problem.
Turn the printer
If the message persists, service is
required.
Off
and then back
On
.
Table 4-3 Common error messages
Error Description Possible solution
POWER INDICATOR LED not illuminated
No Printed Image
on TRANSPARENCY/RECEIVER
October 1997 4-7
LCD POWER INDICA-
TOR not illuminated, or
printer does not oper-
ate.
The printer completes
the print cycle, but there
is not image on the
RECEIVER
• Verify the printer is plugged in, turned
on and that the power cord and wall
outlet are good.
• Call for service.
•Press the print button on the printer to
make a Test Print
• If the Test Print is blank, call for service.
• If Test Print is not blank, reload software and check cabling.
Page 69

Troubleshooting the printer
When mismatches occur
Mismatches result from differences in requested ribbon type, media
type, or media size.
Ribbon type mismatch
If the print job specifies a ribbon type that is not loaded, a mismatch
occurs. Ribbon mismatches result from:
Lamination differences (for example, XtraLife ribbon is requested but
•
is not loaded). For this situation, you can press Print to print the job
with the currently loaded ribbon.
Image size differences (for example, a large image size is requested
•
but oversize ribbon is not loaded). For this situation, you must change
the ribbon or press Cancel to cancel the job.
Ribbon color differences (f or e xample, b lac k-only printing is requested
•
but a color ribbon is loaded). For these situations, you must change
the ribbon or press Cancel to cancel the job.
Receiver type mismatch
If the print job specifies a media type that is not loaded (for example,
paper is requested but transparency material is loaded), a mismatch
occurs. You have three choices:
•
Load the correct media type
•
Press Print to override the error without changing media
IMPORTANT: Printing without loading the correct media type may
result in poor color reproduction.
•
Press Cancel to cancel the job
Receiver size mismatch
If the print job specifies a media size that is not loaded, a mismatch
occurs. Size mismatches are of two types:
•
The image size will fit on the loaded media. You can load the correct
size or print on the currently loaded media
The image size is larger than the loaded media. Change the media or
•
cancel the job.
4-8 October 1997
Page 70

•
•
•
•
•
•
•
If the printer is not operating correctly
You may be able to identify or correct problems yourself. If possible,
make a test print. UseTable 4-4 to find and try to correct the problem. If
you cannot solve the problem, service is required. See "Getting
additional help" on page 4-19.
Table 4-4 . Solving common printer problems
Problem
Printer does not turn on.
Printing takes much
longer than usual.
Nothing happens when a
job is sent.
Narrow white lines run
lengthwise on prints.
(See image 2 at the end
of this guide.)
White or colored speckles or spots appear on
prints. (See image 3 at
the end of this guide.)
Possible cause Possible solutions
• The printer power is
not on.
• Cables and cords are
not connected
securely.
• The image file size
may be larger than
usual and may therefore take longer to
process.
• It is too warm.
Dust or dirt has
contaminated the print
head.
Make sure the power switch is in the “I”
position.
Make sure cables and cords are
connected properly.
Wait a few minutes.
Turn the printer off for ten minutes to let it
cool.
Consider moving the printer to a location
where the temperature is lower.
Wait to see if the job is still processing.
Try printing a file that you have printed
previously.
Verify all export module or printer driver
settings.
Check communications settings for
compatibility between printer and host.
Follow instructions for INIT error on page
4-3 .
• Disconnect the cable from the printer and
try a test print. If this does not work,
service is required.
Make sure the media in the tray is clean
and streak-free.
Make sure the ribbon is clean.
Clean the print head.
If the problem persists, service is required.
•
•
•
•
•
•
Troubleshooting the printer
October 1997 4-9
Page 71

Troubleshooting the printer
•
•
•
•
•
•
•
•
•
Multicolored spots
appear on prints.
Smudges, smears, and
fingerprints have caused
irregularly shaped and
colored areas to appear
on the print. (See image
1 at the end of this
guide.)
Printer initializes, but
does not enter the
READY state.
Edges of transparency
material curl on dense
prints.
Paper does not feed.
Printer does not respond
when you press buttons.
Fingerprints or other
oils have contaminated
the paper or ribbon.
You may have
pressed invalid
buttons.
Clean the printer and the surrounding
area.
Move the printer away from ventilation
ducts or open doors.
Handle media and ribbon carefully and as
described in Chapter 2 of this guide.
Use only KODAK EKTATHERM XLS
XTRALIFE color ribbon.
Disconnect and reconnect the interface
cable.
Restart the printer.
If the problem persists, service is required.
Put prints in transparency sleeves.
Try using the Printer Driver or Export
Module’s
the way that ink is applied to the page.
Look at the paper. Remove sheets with
irregularities.
Reduce the size of the stack of media in
the paper tray.
Make sure that the blue stiffener sheet is
at the bottom of the paper tray.
1. Make sure the cover is closed.
2. Reinsert the paper tray.
3. Restart the printer.
4. Make sure the printer is in READY mode.
Mirror
option, which will change
4-10 October 1997
Page 72

Clearing the paper path
Paper may occasionally jam in the printer. Jams are typically identified
by a CLEAR PAPER PATH or CHECK TRAY message.
To clear the paper path—
1. Open the printer cover.
Troubleshooting the printer
NOTE: An automatic locking feature prevents you from opening the
cover during printing. If you can’t open the cover, turn the
printer
service is required.
Off
and then
On
again. If y ou still can’t open the cover ,
October 1997 4-11
Page 73

Troubleshooting the printer
2. If media is in the paper path, gently pull it up and out of the printer.
Then close the printer cover.
3. If media is jammed in the paper tray area, remove the paper tray.
Then look through the tray insertion slot into the tray area.
4-12 October 1997
Page 74

Troubleshooting the printer
4. Gently remove any jammed media from the paper tray area.
NOTE: If you cannot remove the media, service is required.
5. Slide the tray back into the printer.
October 1997 4-13
Page 75

Troubleshooting the printer
Cleaning the pick rollers
If the paper is not being picked from the tray properly, the pick rollers
may be dirty. You use two water pads and a pad holder to clean the
rollers.
To clean the pick rollers:
1. Remove a water pad from the packet and fold it in half.
2. Insert the pad into the pad holder slot. About 1 inch of the pad
should stick out the top, as shown.
NOTE: The posts are on the bottom of the pad holder.
4-14 October 1997
Page 76

Troubleshooting the printer
3. Wrap the longer end of the pad around the pad holder and insert it
into the pen slot.
4. Pull the other edge of the pad to tighten it.
5. Repeat steps 1 to 4 for the other end of the pad holder.
6. Remove the paper tray from the printer. Remove the cover from the
tray.
7. Remove the media and blue stiffener sheet from the tray.
8. Set the media on a freshly cleaned surface.
9. Insert the prepared pad holder into the paper tray.
The posts on the bottom of the pad holder fit into the holes near the
front of the paper tray.
10. Load the paper tray back into the printer.
11. Make a test print.
12. Wait for the printer to cycle and for the error light on the display
panel to illuminate.
13. Remove the tray from the printer, then reinsert it.
14. Wait for the printer to cycle and for the error light to illuminate again.
October 1997 4-15
Page 77

Troubleshooting the printer
15. Remove the tray.
16. Remove the prepared pad holder from the tray.
17. Load the media into the tray and put the lid back on.
18. Insert the tray in the printer.
IMPORTANT:Wait about five minutes for the rollers to dry before using
Cleaning the sensors
Important: Before cleaning, turn off the printer.
Follow these steps to clean the five ribbon sensors in the printer.
1. Locate the two sensors on top of and in the center of the print head.
They will be visible behind the ribbon.
2. Remove the ribbon.
3. Wipe the sensors with an alcohol pad.
4. Replace the ribbon.
5. To locate the next two sensors, look above where a finished print
comes out and you will see a steel plate with some fringe. At the
center of the plate about one inch back, down the slope is an oval
cut out with the two receiver sensors.
6. Wipe the sensors with an alcohol pad.
7. To locate the fifth sensor, look at the lower, supply, ribbon spool. On
the left hand side is a bar-code label. Immediately above the barcode label is a black box with some wires coming out of it. The
sensor is located on the bottom of that box (the side of the box that
faces the bar-code label.)
8. Using an alcohol pad, clean the sensor area.
the printer.
4-16 October 1997
Page 78

Repacking the printer
Pack the printer as follows if you need to ship it.
1. Remove media from the paper tra y. Pac k the paper tra y in its original
box.
2. Open the printer cover. Then remove the ribbon spools. Discard
them or store them in their original box.
3. Insert the shipping pins as follows:
CAUTION: Insert the pins as described.
—
Insert the left pin through the seventh slot from the left.
—
Insert the right pin through the sixth slot from the right.
Troubleshooting the printer
4. Push the pins until the ends protrude about 1 1/2 inches from the
slot.
5. Close the printer cover.
October 1997 4-17
Page 79

6. Put appliance filament tape over the cover of the printer.
The tape must cover the latch and run down both sides of the printer
all the way to the bottom.
shipping tape
7. Put the printer in its original plastic bag to keep it clean during
shipping.
8. Pack the printer in its original box.
Page 80

Getting additional help
Your Kodak dealer is the best source for information about your printer
and about purchasing supplies and accessories.
In addition, technical support is also available on Kodak’s web site at
www.k odak.com Call 1-800-23KODAK (1-800-235-6325) from 9:00 a.m.
to 8:00 p.m. Eastern Standard Time on regular business days.
Help numbers for the Asia/Pacific and European regions are listed
below.
Troubleshooting the printer
Country
Australia
Hong Kong 85 2 5649387
Indonesia 62 21 430 4527
Korea 82 02 708 5471 4
Malaysia 60 3 757 2722
Philippines 63 2 816 67 18
Singapore 65 4736611
Thailand 66 2 271 3040 x396
Taiwan 88 6 2 893 8234
Country
Belgium
Denmark 45 43/717111
Finland 358 90/87071
France 33 1/4989-0083
Germany 49 0711/406-5561
Italy 39 02/66028454
Netherlands 31 03405/99704
Norway 47 02/818181
Spain 34 91/6267100
Sweden 46 08/58023663
UK 44 044261122 Ext. 44239
Country code Helpline number
61 3 353 2173
Country code Helpline number
32 02/2632400
October 1997 4-19
Page 81

Printer specifications
Printer dimensions
Width: 16.6 inches (43.2 cm)
Depth (with tray inserted): 21 inches (52.7 cm)
Height: 12 inches (30.5 cm)
Printer weight
57 lbs (24.9 kg)
Space requirements
Appendix A
Printer specifications/
site requirements
Minimum space required with tray inserted:
Width: 17 inches (43.2 cm)
Depth: 24 inches (61 cm)
Height: 12 inches (30.5 cm)
Minimum space required for removing tray and opening cover:
Width: 17 inches (43.2 cm)
Depth: 35.5 inches (90.2 cm)
Height: 20.25 inches (52.4 cm)
October 1997 A-1
Page 82

Appendix A Printer specifications/ site requirements
Operating environment
Ambient operating temperature: 59° to 86°F (15° to 30°C)
Relative humidity: 20 to 76%
Power requirements
Voltage/frequency
US/Canada 90 to 250v/47 to 60Hz
Europe 220/50Hz
UK 240/50Hz
Power consumption
250 watts maximum
A-2 October 1997
Page 83

Accessories
Appendix B
Accessories and supplies
This appendix lists the accessories and supplies available for the
KODAK DIGITAL SCIENCE 8650/8650 PS Color Printer. It also tells
how to order them.
Printer accessories are listed below. Purchase these items through your
printer dealer or distributor.
Supplies
Accessory
PostScript UPGRADE KIT for
Color Printer
KODAK Network Interface Card
for KODAK XLS 8400 PS Printer, KODAK XLS 8600 PS
Printer, and KODAK DIGITAL SCIENCE 8650 PS Color
Printer
KODAK A, 8.5, Adjustable Tray 101 8969
KODAK A4, 8.27, Adjustable Tray 851 1420
KODAK 9.5 x 14 Adjustable Tray 882 0060
To order the following supplies, contact Kodak Parts Services at
1-800-431-7278.
Alcohol cleaning pads (box of 50) 1C8079
Water cleaning pads (box of 50) 1C8081
Pick roller cleaning kit 5B5910
Shipping pins (all thermal printers) 989021
DIGITAL SCIENCE
Accessory
8650
Catalog
Number
883 3667
856 3678
Part
Number
October 1997 B-1
Page 84

Appendix B Accessories and supplies
Ribbons
Ribbons available for the printer are listed below. Purchase ribbons
through your printer dealer or distributor.
Maximum
Ribbon Type
KODAK EKTATHERM XLS Three-Color Ribbon 8 x 10 163 0474
KODAK EKTATHERM XLS Oversize Three-Color Ribbon 8.5 x 12 821 4082
KODAK EKTATHERM XLS Three-Color Ribbon / XTRALIFE
Media / CMY
KODAK EKTATHERM XLS Black Ribbon / XTRALIFE Media 8.5 x 12 857 0152
KODAK EKTATHERM XLS Oversize Three-Color Ribbon /
XTRALIFE Media / CMY
KODAK EKTATHERM XLS Four-Color Ribbon / CMYK 8.5 x 12 879 2939
Image Size
8 x 10 807 6135
8.5 x 12 801 3716
Catalog
Number
B-2 October 1997
Page 85

Paper
Paper available for the printer is listed below. Purchase paper through
your printer dealer or distributor. Paper is shipped in 100-sheet
packages.
Paper Type
KODAK EKTATHERM XLS Print Paper
/Photographic Grade
KODAK EKTATHERM XLS Print Paper
/Photographic Grade
KODAK EKTATHERM XLS Print Paper
/Photographic Grade
KODAK EKTATHERM XLS Print Paper
/Photographic Grade
KODAK EKTATHERM XLS Print Paper
/Photographic Grade
KODAK EKTATHERM XLS Print Paper
/Photographic Grade
KODAK EKTATHERM XLS Print Paper
/Photographic Grade
KODAK EKTATHERM XLS Print Paper
/Commercial Grade
KODAK EKTATHERM XLS Print Paper
/Publication Grade
Appendix B Accessories and supplies
Catalog
Size
8.5 x 11
(216 x 281 mm)
8.5 x 12
(216 x 307 mm)
8.5 x 14
(216 x 358 mm)
210 x 297mm
8.27 x 11.69
210 x 307mm
(8.27 x 12)
210 x 358 mm
(8.27 x 14)
9.5 x 14
(243 X 358 mm)
9.5 x 14
(243 X 358 mm)
9.5 x 14
(243 X 358 mm)
Number
861 4364
868 4623
856 5699
881 6514
875 1596
807 5640
867 7759
158 1198
881 1663
See Chapter 3 for illustrations of the maximum image size for each
paper size.
October 1997 B-3
Page 86

Appendix B Accessories and supplies
Transparency material
Transparency sizes available for the printer are listed below. Purchase
transparency material through your printer dealer or distributor.
Transparency material is shipped in 100-sheet packages.
Transparency Type Size
KODAK EKTATHERM XLS Transparency Material /
for use with the KODAK A Adjustable Tray
KODAK EKTATHERM XLS Transparency Material /
for use with the KODAK A Adjustable Tray
KODAK EKTATHERM XLS Transparency Material /
for use with the KODAK A Adjustable Tray
KODAK EKTATHERM XLS Transparency Material
(A4) / for use with the KODAK A4 Adjustable Tray
KODAK EKTATHERM XLS Transparency Material /
for use with the KODAK A4 Adjustable Tray
KODAK EKTATHERM XLS Transparency Material /
for use with the KODAK A4 Adjustable Tray
See Chapter 3 for illustrations of the maximum image size for each
transparency size.
8.5 x 11
(216 x 281 mm)
8.5 x 12
(216 x 307 mm)
8.5 x 14
(216 x 358 mm)
210 x 297 mm
(8.27 x 11.69)
210 x 307 mm
(8.27 x 12)
210 x 358 mm
(8.27 x 14)
Catalog
Number
852 6618
853 4059
852 9679
850 3005
871 7001
861 0651
B-4 October 1997
Page 87

Appendix C
Customizing the printer
This appendix describes two ways you can customize your
KODAK DIGITAL SCIENCE
performance. They are by:
•
connecting an external hard drive to the printer.
•
adding additional memory to the printer.
Connecting an external hard drive enables you to store ADOBE Type
Manager (ATM) fonts (not included) making them permanently
accessible to the printer.
8650/8650 PS Color Printer to enhance its
You can purchase ADOBE fonts for your 8650 printer from your local
distributor. To learn more about available ADOBE products, visit their
Web site at http://www.adobe.com.
Adding additional memory has several benefits. Adding more memory
may allow you to:
•
increase the speed at which images are processed.
•
download more fonts with PostScript jobs.
•
simultaneously process and print more and/or larger jobs.
October 1997 C-1
Page 88

Appendix C Customizing the printer
Adding an external hard drive
This procedure applies only to 8650 PS Color Printers operating in
PostScript mode.
If you want additional ATM fonts to be permanently accessible to the
printer, you need to add an external hard drive. Once you connect and
format an external hard drive, you can use the softw are utilities av ailable
for your system to download the ATM fonts and store them on the hard
drive.
IMPORTANT:The size of the hard drive is limited to 2000 MB or less.
Installing the hard drive
First, connect the cable as follows:
1. Turn the printer
2. Disconnect all devices that are connected to the printer with a SCSI
cable.
3. Set the SCSI ID for the external hard drive to any ID that is different
from the printer’s initiator ID. Refer to the manual shipped with the
hard drive for instructions.
4. Connect one end of the SCSI cable to one of the printer’s
SCSI ports. Connect the other end of the cable to the hard drive.
Off
.
SCSI ports
C-2 October 1997
Page 89

5. If the printer’s other SCSI port is not in use, connect a 50–pin SCSI
terminator to that port.
6.
If the hard drive does not have an internal terminator
terminator to the open SCSI port.
Refer to the manual shipped with the hard drive for instructions.
7. Turn the hard drive and then turn the printer on.
Initializing the hard drive
Next, you must initialize the hard drive.
These directions tell how to initialize a drive with the printer connected to
a Macintosh computer.
WARNING: Initializing the drive reformats it, and all data on the
Appendix C Customizing the printer
, connect a
drive will be lost. Complete this procedure only as
part of the installation process.
1. To set up the printer to communicate with an external hard drive, you
must first enable the initiator.
- Press
- Select:
- Set to YES*.
- Use the Select/Setup key to exit the menu.
2. Open the Chooser. Using the Laserwriter 7.x driver, select the
8650 PS Printer to which the hard drive is connected.
3. If you did not install the utilities program when you loaded the
drivers, insert the CD shipped with the printer into the CD-ROM
drive.
The icon for the CD appears.
4. Double-click on the icon for the CD.
5. Double-click on the English folder.
6. Double-click on the Utilities folder.
Select/Setup
“Ports”
“SCSI Initiator:Enable”
on the display panel to enter the Setup menu.
October 1997 C-3
Page 90

Appendix C Customizing the printer
The For Printing or PS Mode window appears.
7. Double click the
LaserWriter Font Utility
icon.
The LaserWriter Font Utility window appears.
8. Click on
OK
.
A message appears stating that the LaserWriter Font Utility is
checking the characteristics of the current printer. The LaserWriter
Font Utility then becomes the active application.
9. From the File menu, select
Initialize Printer’s Disk.
C-4 October 1997
Page 91

Appendix C Customizing the printer
The following window appears
10. Click on
A message appears stating that all information on the disks will be
erased.
11. Click on
A message appears stating that initialization was successful.
Initialize
OK
.
to initialize the hard drive.
Downloading additional fonts to the hard drive
The steps below describe how to download additional ATM fonts from a
Macintosh computer. To download fonts from a Windows system, follow
the instructions provided by your font vendor.
1. Open the Chooser and select the 8650 PS Printer to which the drive
is attached.
2. Double-click the Downloader progr am icon from where it is stored on
the ATM diskette or Macintosh hard disk.
NOTE: If you have version 3.8 of ATM, you may need to install it by
running the Custom Install procedure and selecting the
Downloader so that you can access it from your hard drive.
You can’t run version 3.8 from diskette.
October 1997 C-5
Page 92

Appendix C Customizing the printer
3. Select
Download Font
from the File menu.
The window below appears.
4. If the current disk is not the one with the fonts you wish to download,
click
Eject;
and insert the appropriate disk.
5. Open the
Outline Fonts
folder containing the fonts you want to
download.
6. Select the font you wish to download from the list on the left side of
7. Repeat step 6 for each font you wish to download.
C-6 October 1997
the window. Then click
Add.
(To add all the fonts, select
The font name appears in the
Disk 4
Outline Fonts Selected
Add All.
list.
)
Page 93

Appendix C Customizing the printer
8. Choose “Disk” from the
9. Click
Download.
Device
list box.
Disk 4
A dialog box listing the font being downloaded and the name of the
printer appears. This box remains on screen until all the fonts are
downloaded. Then a message appears stating that downloading
was successful.
October 1997 C-7
Page 94

Appendix C Customizing the printer
Adding memory to the printer
You can purchase and install SIMMs to increase memory to a total of 64
MB.
NOTE: The
The benefits of having additional memory are as follows:
•
You may increase the speed at which images are processed.
•
You can download more fonts with PostScript jobs.
•
Additional memory allows simultaneous processing and printing of
more and/or larger jobs (that is, it increases the possible number of
prints per hour). For example, operating in raster mode with 64 MB of
memory lets you print one 9 1/2 x 14 job and process a second job of
the same size. With less memory, only smaller jobs can be processed
and printed.
KODAK DIGITAL SCIENCE
Color Printer comes with 48 MB of factory-installed memory.
8650 PS / 48 MB / CMYK
The SIMMs should be 16 MB (in 4MB X 32 bit configuration), 72–pin,
symmetrical, 70 nanosecond SIMMs. The following cards fit these
specifications:
•
Mitsubishi—Part No. MH4M32BNXJ-7
•
Toshiba—Part No. THM324000s-70
•
Motorola—Part No. MCM32400s70
Preparing to install a SIMM
To prepare to install a SIMM.
1. Turn
Off
and unplug the printer.
C-8 October 1997
Page 95

Appendix C Customizing the printer
2. Attach the wrist portion of a static strap to your wrist. Attach the
other end of the strap to the metal plate on the back of the printer.
CAUTION: Use a grounding strap to prevent static discharge
from damaging the printer.
3. Using a Phillips-head screwdriver, remove the five screws on the
plate at the lower portion of the back of the printer.
NOTE: There are ten screws on the back of the printer. Remove
ONLY the five on the lower portion.
October 1997 C-9
Page 96

Appendix C Customizing the printer
4. Grasp the two black handles on the metal plate and slowly pull the
drawer out about three inches.
5. Unlatch the ribbon cable in the front center of the drawer b y pushing
the plastic clips outward.
C-10 October 1997
Page 97

Appendix C Customizing the printer
6. Gently remove the ribbon cable from the socket.
7. Lift the ribbon cable slightly, and slowly pull the drawer out an
additional three inches.
October 1997 C-11
Page 98

Appendix C Customizing the printer
Installing the SIMM card
To install and seat the SIMM.
1. Locate the SIMM receptacles on the left side of the drawer.
Open SIMM slots
2. Hold the SIMM at a 45 ° angle and position it in the first empty
receptacle next to the other installed cards.
3. Gently tilt the SIMM back so that it is upright and snaps into place in
the clips on each side of the receptacle.
C-12 October 1997
Page 99

Finishing up
To finish up the installation:
1. Grasp the black handles on the back of the printer and slide the
2. Reconnect the ribbon cable by pressing it firmly into the connector.
drawer in about three inches.
Appendix C Customizing the printer
3. Make sure that the plastic clips on each side of the ribbon cable
are latched.
4. Close the drawer the rest of the way.
5. Replace the five screws that you removed.
On
6. Plug in the printer and turn it
7. Verify that the Power light is lit on the display panel.
.
October 1997 C-13
Page 100

A
about other guides ii
about printer initialization 2-26
about printer memory 1-1
about the export modules 1-4
about the printer 1-1
about the printer drivers 1-4
about this guide i
accessories
available B-1
ordering B-1
adding an external hard drive C-2 to C-7
adding memory to the printer C-8 to C-13
finishing up C-13
installing a SIMM card C-12
preparing to install a SIMM C-8 to C-13
additional information
getting iii
alcohol cleaning pads
ordering B-1
applications
printing from 3-15
Index
B
barcode 2-9
C
cables
connecting 2-18 to 2-21
cancel button 3-3
Centronics connection
parallel port 2-18
printer modes for 1-3
changing
media settings 2-24
media type 2-24
operating mode 2-23
paper color 2-25
printer settings 2-23 to 2-25
October 1997 I-1
 Loading...