

Page 1
KODAK DC5000 Zoom Digital Camera
User’s Guide
Visit Kodak on the World Wide Web at www.kodak.com
Page 2

Eastman Kodak Company
343 State Street
Rochester, N.Y. 14650
©Eastman Kodak Company, 2000.
Kodak, and Photolife, are trademarks of Eastman Kodak Company .
P/N 6B5271
Page 3

About the Camera’s Weatherproof & Rugged Design
This camera is designed to be weatherproof and rugged. Special seals keep out
moisture for a sure, carefree performance in any weather. While you cannot use
the camera underwater, ideally it can safely be used:
q in the rain
q at pool-side or the beach
q at a construction site or areas with excessive dirt or dust.
Important Camera Information
This camera is designed to be weatherproof, not waterproo f. It is not desi gned to
be submerged in water, or have water poured over it. Please read the following
cautions before using it. Failure to follow the proper precautions may r esult in the
warranty being voided.
q The camera doors and buttons have rubber seals that prevent water,
moisture, and dust from entering the camera. If the battery, memory card
door, and lens cover are not fastened or closed correctly, damage to the
camera can result. Also, while these doors are open, make sure that no
water or dust gets inside the camera or onto the weatherproof seals.
q To ensure a proper seal, use a clean lint-free cloth to wipe off any dust,
sand, or hair that may accumulate on the rub ber seals of the doors and lens
glass cover. Dust or sand on the seals may cause water leakage and may
damage the seals.
q Do not press down on or remove any of the rubber seals .
q When you find a damaged or deteriorated rubber seal, call the technical
support telephone number for your geographic area. Do not attempt to
change or fix the seal.
q If the camera is not used for a period of time, it is normal to expect that
the button or switch may not move smoothly. Push the buttons and
switches several times to smooth out the motion.
q Do not leave the camera exposed to rain or snow for extended periods
of time.
q Use a clean lint-free cloth to wipe off any water or d irt after use, or befo re
opening any of the doors or covers on the camera.
q Weatherproofing may be affected when the camera is exposed to sudden
changes in temperature. Allow the camera time to adjust to the
surrounding temperature before using it. This keeps moisture leaks or
condensation from occurring.
Page 4

q Always insert and remove the batteries and memory cards with dry, clean
hands.
q If water gets into the camera, remove the batteries and lens glass co ver
and allow the camera to dry completely. Do not apply power to the
camera until it is completely dry.
q Before using the camera, make sure the lens cover is secured and that all
sensors and lenses are clean and dry.
q Although the camera can be used at the beach, use extreme caution not to
get sand on the camera seals.
Page 5

Table of Contents
1 Getting Started . . . . . . . . . . . . . . . . . . . . . . . . . . . . . . . . . . . . . 1
Preparing to Take Pictures . . . . . . . . . . . . . . . . . . . . . . . . . . . . . . . . . . . . . .2
Loading Batteries . . . . . . . . . . . . . . . . . . . . . . . . . . . . . . . . . . . . . . . . . . .2
Turning the Camera On and Off . . . . . . . . . . . . . . . . . . . . . . . . . . . . . . .2
Checking Batteries . . . . . . . . . . . . . . . . . . . . . . . . . . . . . . . . . . . . . . . . . .3
Using an AC Adapter . . . . . . . . . . . . . . . . . . . . . . . . . . . . . . . . . . . . . . . .4
Inserting a Camera Memory Card . . . . . . . . . . . . . . . . . . . . . . . . . . . . . .5
Removing a Camera Memory Card . . . . . . . . . . . . . . . . . . . . . . . . . . . . .5
Setting the Clock on Your Camera . . . . . . . . . . . . . . . . . . . . . . . . . . . . .6
Adjusting the LCD Brightness . . . . . . . . . . . . . . . . . . . . . . . . . . . . . . . .7
Attaching the Neck Strap . . . . . . . . . . . . . . . . . . . . . . . . . . . . . . . . . . . . . . .7
2 Taking Pictures . . . . . . . . . . . . . . . . . . . . . . . . . . . . . . . . . . . . . . .9
Previewing a Picture Before it is Taken . . . . . . . . . . . . . . . . . . . . . . . . . . .10
Pressing the Shutter Button . . . . . . . . . . . . . . . . . . . . . . . . . . . . . . . . . . . .11
Zooming in on Your Subject . . . . . . . . . . . . . . . . . . . . . . . . . . . . . . . . . . . . 12
Zooming in Even Closer . . . . . . . . . . . . . . . . . . . . . . . . . . . . . . . . . . . . . . . . 12
Viewing the Picture Just Taken . . . . . . . . . . . . . . . . . . . . . . . . . . . . . . . . . . 13
Setting a Quickview for Each Picture . . . . . . . . . . . . . . . . . . . . . . . . . . . . . 13
Setting the Flash . . . . . . . . . . . . . . . . . . . . . . . . . . . . . . . . . . . . . . . . . . . . . 15
Photographing Distant Subjects . . . . . . . . . . . . . . . . . . . . . . . . . . . . . . . .16
Photographing Close-Ups . . . . . . . . . . . . . . . . . . . . . . . . . . . . . . . . . . . . . . 17
Putting Yourself in the Picture . . . . . . . . . . . . . . . . . . . . . . . . . . . . . . . . . .1 8
Adding the Date to Your Pictures . . . . . . . . . . . . . . . . . . . . . . . . . . . . . . . 19
Deleting the Picture Just Taken . . . . . . . . . . . . . . . . . . . . . . . . . . . . . . . . 20
i
Page 6

3 Customizing Your Pictures . . . . . . . . . . . . . . . . . . . . . . . . . . . . 21
Adjusting the Camera Exposure . . . . . . . . . . . . . . . . . . . . . . . . . . . . . . . . 22
Adding a Border to Your Picture . . . . . . . . . . . . . . . . . . . . . . . . . . . . . . . . 23
Capturing in Black-and-White, Sepia Tone, or Document . . . . . . . . . . . 24
Adjusting the Picture Quality . . . . . . . . . . . . . . . . . . . . . . . . . . . . . . . . . . 25
Adjusting the Picture Resolution . . . . . . . . . . . . . . . . . . . . . . . . . . . . . . . 26
Selecting a White Balance for Indoor Pictures . . . . . . . . . . . . . . . . . . . . 27
Choosing a Metering System . . . . . . . . . . . . . . . . . . . . . . . . . . . . . . . . . . 28
Selecting the ISO Setting . . . . . . . . . . . . . . . . . . . . . . . . . . . . . . . . . . . . . 29
Sharpening and Softening a Picture . . . . . . . . . . . . . . . . . . . . . . . . . . . . . 30
Locking in an Exposure Setting . . . . . . . . . . . . . . . . . . . . . . . . . . . . . . . . . .31
4 Reviewing Your Pictures . . . . . . . . . . . . . . . . . . . . . . . . . . . . . . .33
Viewing Your Pictures . . . . . . . . . . . . . . . . . . . . . . . . . . . . . . . . . . . . . . . . . 34
Magnifying Your Pictures . . . . . . . . . . . . . . . . . . . . . . . . . . . . . . . . . . . . . . 35
Selecting Pictures for Printing . . . . . . . . . . . . . . . . . . . . . . . . . . . . . . . . . 36
Cancelling Pictures for Printing . . . . . . . . . . . . . . . . . . . . . . . . . . . . . . . . . 37
Protecting Your Pictures . . . . . . . . . . . . . . . . . . . . . . . . . . . . . . . . . . . . . . 38
Deleting One or All of Your Pictures . . . . . . . . . . . . . . . . . . . . . . . . . . . . . 39
Running a Slide Show on Your Television . . . . . . . . . . . . . . . . . . . . . . . . . 40
Viewing Information About a Picture . . . . . . . . . . . . . . . . . . . . . . . . . . . . .41
5 Personalizing Your Camera . . . . . . . . . . . . . . . . . . . . . . . . . . . .43
Setting a Response Beep . . . . . . . . . . . . . . . . . . . . . . . . . . . . . . . . . . . . . . 44
Saving Camera Power . . . . . . . . . . . . . . . . . . . . . . . . . . . . . . . . . . . . . . . . . 45
Viewing Camera Information . . . . . . . . . . . . . . . . . . . . . . . . . . . . . . . . . . . 46
Selecting a Language for the Camera . . . . . . . . . . . . . . . . . . . . . . . . . . . 47
Formatting Your Camera Memory Card . . . . . . . . . . . . . . . . . . . . . . . . . . 48
Adjusting the Video Out Signal . . . . . . . . . . . . . . . . . . . . . . . . . . . . . . . . . 49
Adjusting the Camera Default Settings . . . . . . . . . . . . . . . . . . . . . . . . . 50
Setting a Border Default . . . . . . . . . . . . . . . . . . . . . . . . . . . . . . . . . . . 50
Setting a Flash Default . . . . . . . . . . . . . . . . . . . . . . . . . . . . . . . . . . . . .51
Setting a White Balance Default . . . . . . . . . . . . . . . . . . . . . . . . . . . . . 52
ii
Page 7

Setting an Exposure Compensation Default . . . . . . . . . . . . . . . . . . 53
Setting an Effect Default . . . . . . . . . . . . . . . . . . . . . . . . . . . . . . . . . . .54
Setting an Auto ISO Default . . . . . . . . . . . . . . . . . . . . . . . . . . . . . . . .55
6 Installing Your Software . . . . . . . . . . . . . . . . . . . . . . . . . . . . . .57
Windows-Based System Requirements . . . . . . . . . . . . . . . . . . . . . . . . . . .57
Macintosh System Requirements . . . . . . . . . . . . . . . . . . . . . . . . . . . . . . .57
KODAK Software for Windows-Based Computers . . . . . . . . . . . . . . . . . 58
Software Overview . . . . . . . . . . . . . . . . . . . . . . . . . . . . . . . . . . . . . . . . 58
KODAK Software for Macintosh Computers . . . . . . . . . . . . . . . . . . . . . 59
Software Overview . . . . . . . . . . . . . . . . . . . . . . . . . . . . . . . . . . . . . . . . 59
Installing the Software . . . . . . . . . . . . . . . . . . . . . . . . . . . . . . . . . . . . . . . 60
7 Connecting Your Camera . . . . . . . . . . . . . . . . . . . . . . . . . . . . . . 61
Using a Serial Cable Connection . . . . . . . . . . . . . . . . . . . . . . . . . . . . . . . . 62
Connecting to a Windows-Based Computer . . . . . . . . . . . . . . . . . . . 62
Connecting to a Macintosh Computer . . . . . . . . . . . . . . . . . . . . . . . . 63
Using a USB Cable Connection . . . . . . . . . . . . . . . . . . . . . . . . . . . . . . . . . 64
Starting KODAK Software for Windows-Based Computers . . . . . . . . . 65
Opening Mounter Software . . . . . . . . . . . . . . . . . . . . . . . . . . . . . . . . . 65
Opening Digital Access Software (TWAIN Acquire) . . . . . . . . . . . . . 65
Opening Camera Controls Software . . . . . . . . . . . . . . . . . . . . . . . . . . 65
Opening Border Transfer Software . . . . . . . . . . . . . . . . . . . . . . . . . . 65
Starting KODAK Software for Macintosh Computers . . . . . . . . . . . . . 66
Opening Picture Transfer Application . . . . . . . . . . . . . . . . . . . . . . . . 66
Opening Digital Access Software (Plug-In Acquire) . . . . . . . . . . . . 66
Opening Border Transfer Software . . . . . . . . . . . . . . . . . . . . . . . . . . 66
Navigating to Your Pictures . . . . . . . . . . . . . . . . . . . . . . . . . . . . . . . . . . . .67
8 Tips and Troubleshooting . . . . . . . . . . . . . . . . . . . . . . . . . . . . .69
Connecting with Your Camera . . . . . . . . . . . . . . . . . . . . . . . . . . . . . . . . . . 69
Communicating with the Computer . . . . . . . . . . . . . . . . . . . . . . . . . . . . . 69
Adjusting Your Monitor for Better Viewing . . . . . . . . . . . . . . . . . . . . . . . 69
iii
Page 8

Getting Better Results from Your Printer . . . . . . . . . . . . . . . . . . . . . . . 70
Troubleshooting . . . . . . . . . . . . . . . . . . . . . . . . . . . . . . . . . . . . . . . . . . . . . . .71
9 Where to Get Help . . . . . . . . . . . . . . . . . . . . . . . . . . . . . . . . . . .79
Software Help . . . . . . . . . . . . . . . . . . . . . . . . . . . . . . . . . . . . . . . . . . . . . . . 79
Online Services . . . . . . . . . . . . . . . . . . . . . . . . . . . . . . . . . . . . . . . . . . . . . . . 79
Faxed Information . . . . . . . . . . . . . . . . . . . . . . . . . . . . . . . . . . . . . . . . . . . . 79
Customer Support . . . . . . . . . . . . . . . . . . . . . . . . . . . . . . . . . . . . . . . . . . .80
10 Warranty and Regulatory Information . . . . . . . . . . . . . . . . . 83
Warranty Time Period . . . . . . . . . . . . . . . . . . . . . . . . . . . . . . . . . . . . . . . . . 83
Warranty Repair Coverage . . . . . . . . . . . . . . . . . . . . . . . . . . . . . . . . . . . . .83
Limitations . . . . . . . . . . . . . . . . . . . . . . . . . . . . . . . . . . . . . . . . . . . . . . . . . . 84
Application Support . . . . . . . . . . . . . . . . . . . . . . . . . . . . . . . . . . . . . . . . . . 85
How to Obtain Service . . . . . . . . . . . . . . . . . . . . . . . . . . . . . . . . . . . . . . . . 85
Regulatory Information . . . . . . . . . . . . . . . . . . . . . . . . . . . . . . . . . . . . . . . 86
FCC Compliance and Advisory . . . . . . . . . . . . . . . . . . . . . . . . . . . . . . .86
Canadian DOC Statement . . . . . . . . . . . . . . . . . . . . . . . . . . . . . . . . . .8 6
11 Appendix . . . . . . . . . . . . . . . . . . . . . . . . . . . . . . . . . . . . . . . . . . .87
Original Camera Default Settings . . . . . . . . . . . . . . . . . . . . . . . . . . . . . . . 87
Camera Specifications . . . . . . . . . . . . . . . . . . . . . . . . . . . . . . . . . . . . . . .88
General Maintenance and Safety . . . . . . . . . . . . . . . . . . . . . . . . . . . . . . . 89
Using Your Batteries . . . . . . . . . . . . . . . . . . . . . . . . . . . . . . . . . . . . . . . . . .91
iv
Page 9

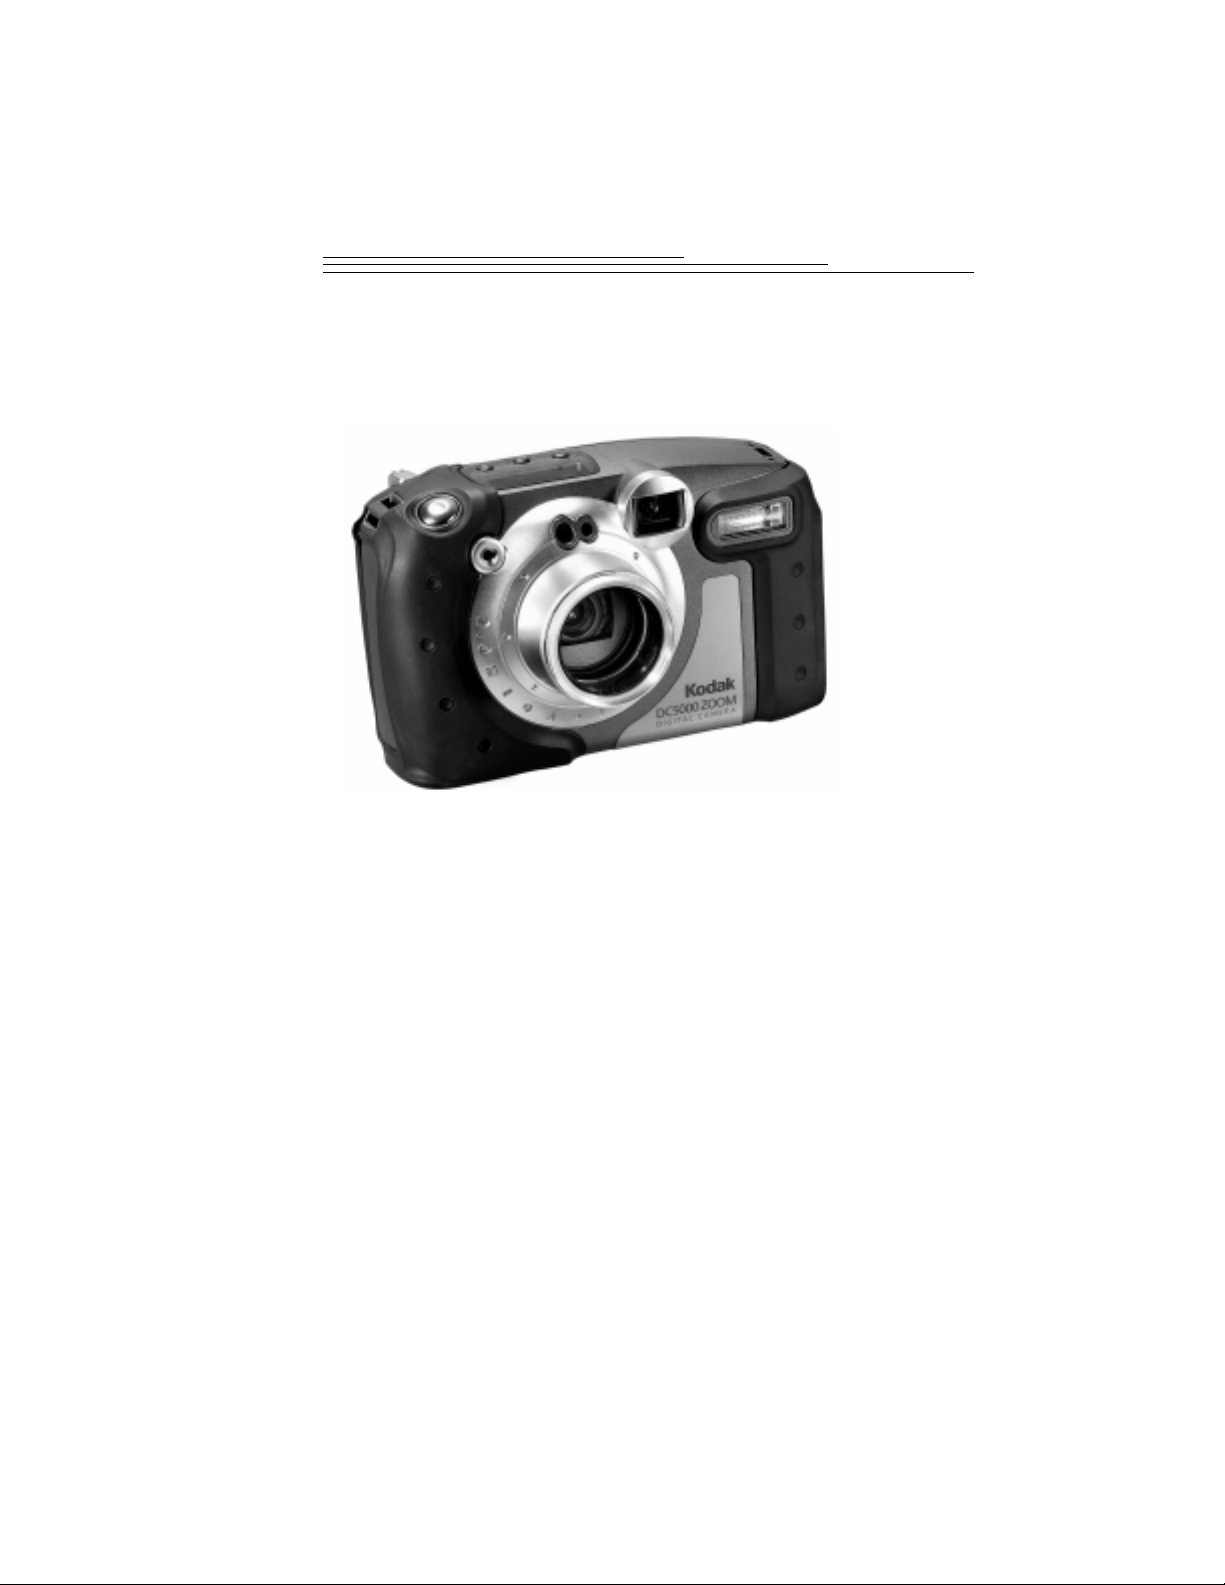
1 Getting
Started
Congratulations on your purchase of the new water resistant, dust proof, 2.0
megapixel KODAK DC5000 Zoom Digital Camera—the camera that takes
pictures digitally, without the use of film. With your new camera, picture taking
and print making have never been easier or faster. The possibilties are endless.
Here is just a few examples of what you can do with your camera:
Utilize the rugged weatherproof design to take pictures in environments
q
not recommended for other cameras.
Take digital pictures in unbelievable detail, color, and sharpness.
q
Transfer your pictures to a computer f or instant editing, enhancem ent, and
q
placement into your document.
E-mail your pictures in minutes to friends, family, and business associates
q
anywhere in the world.
Print high-quality pictures at home using KODAK Inkjet Photo Paper, or
q
take your KODAK Picture Card to a KODAK Picture Maker System and
create photo-quality enlargements with a touch of a button.
Display your pictures to a large audience on a television or video monitor.
q
Customize your pictures with a company logo or graphic using the
q
KODAK DC5000 Border Transfer Application.
1
1
Page 10
Preparing to Take Pictures
Before you start taking pictures with your camera, you first need to install the
batteries or connect a Kodak-specified AC adapter for power, and insert a
KODAK Picture Card (camera memory card) into the camera.
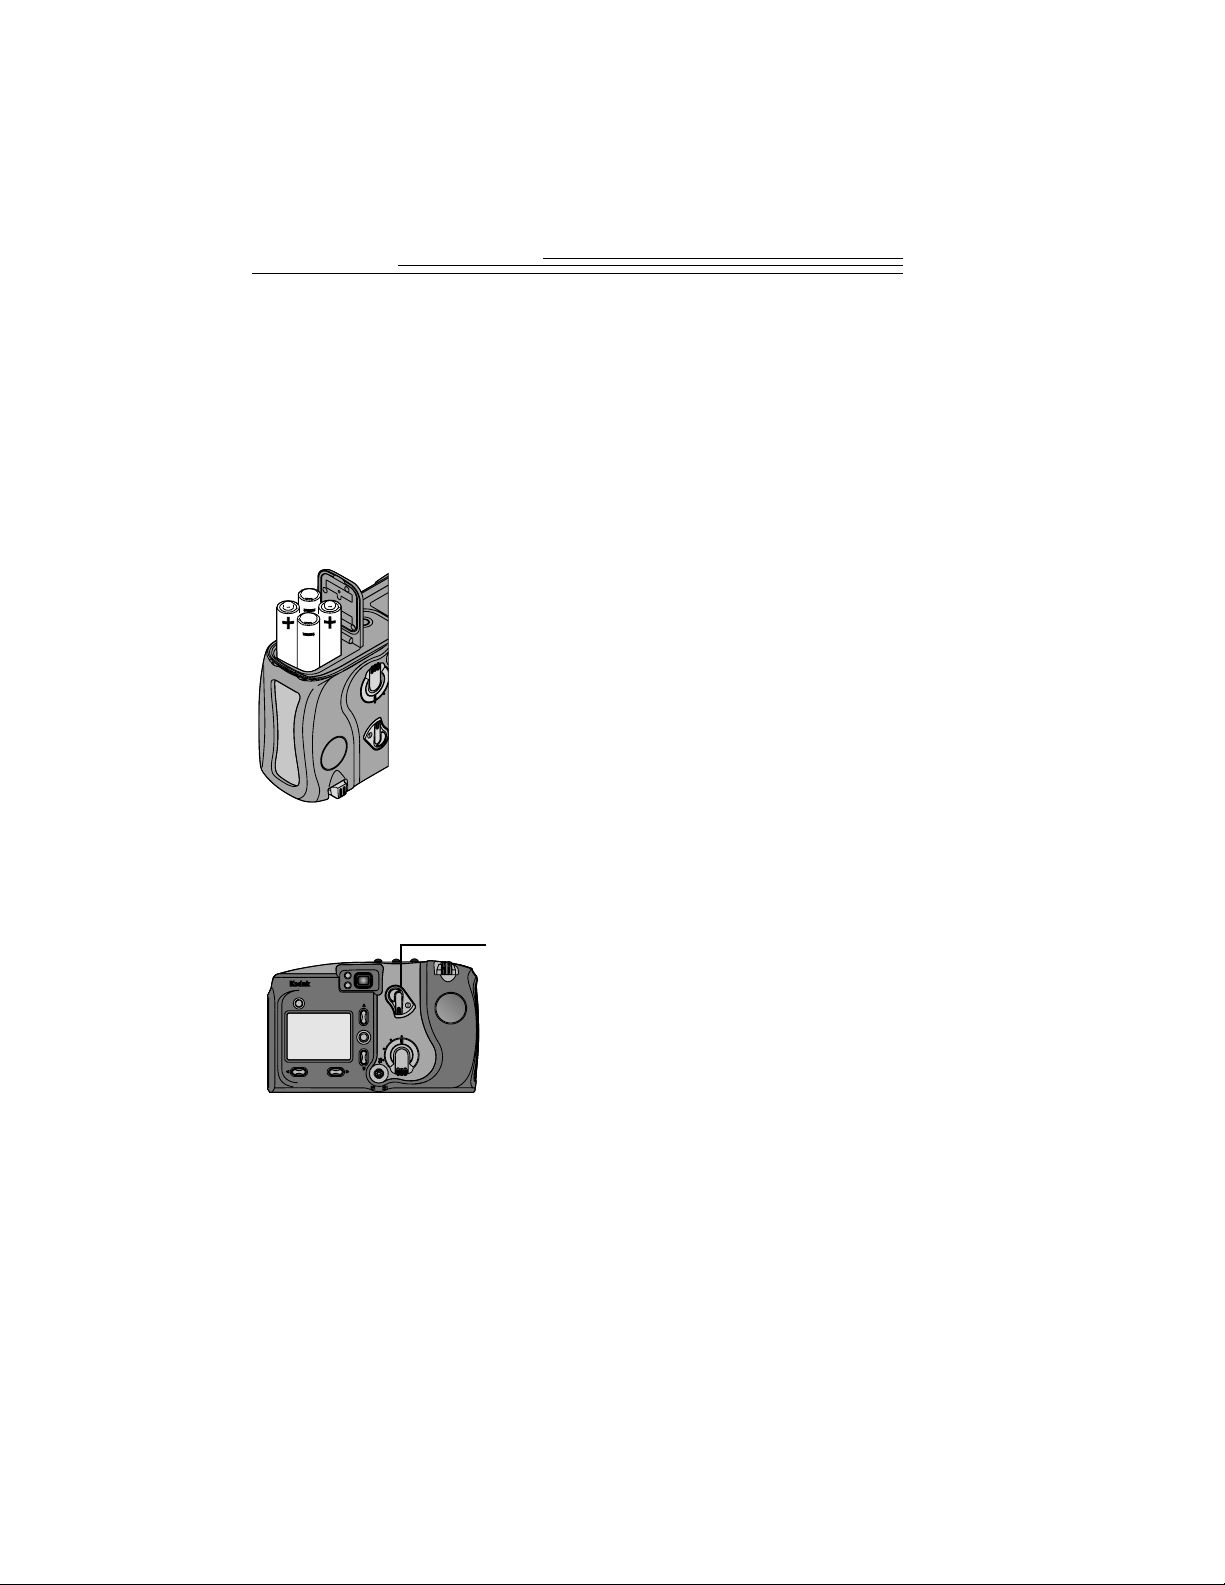
Loading Batteries
Your camera uses four AA batteries. For your convenience, alkaline batteries are
provided so you can start using your camera immediately.
For information on guidelines for battery usage, see page 91.
1 Lift the ring on the battery door.
2 Turn the ring t o unlock th e door, then pull up to
open.
3 Insert the batteries as indicated on the battery
cover, then close and lock the battery door.
Make sure that the gaskets are clean and
that no dirt is present when you close
the door.
Turning the Camera On and Off
Turn the camera on and off using the POWER switch, located on the back of the
camera.
T o turn on the camera, slide the POWER
q
switch to the right.
The Status Display on top of the camera
turns on.
To turn off the camera, slide the POWER
q
switch again to the right.
The camera turns off when it is finished
processing, deleting, or transferring the
picture just taken.
2
Page 11
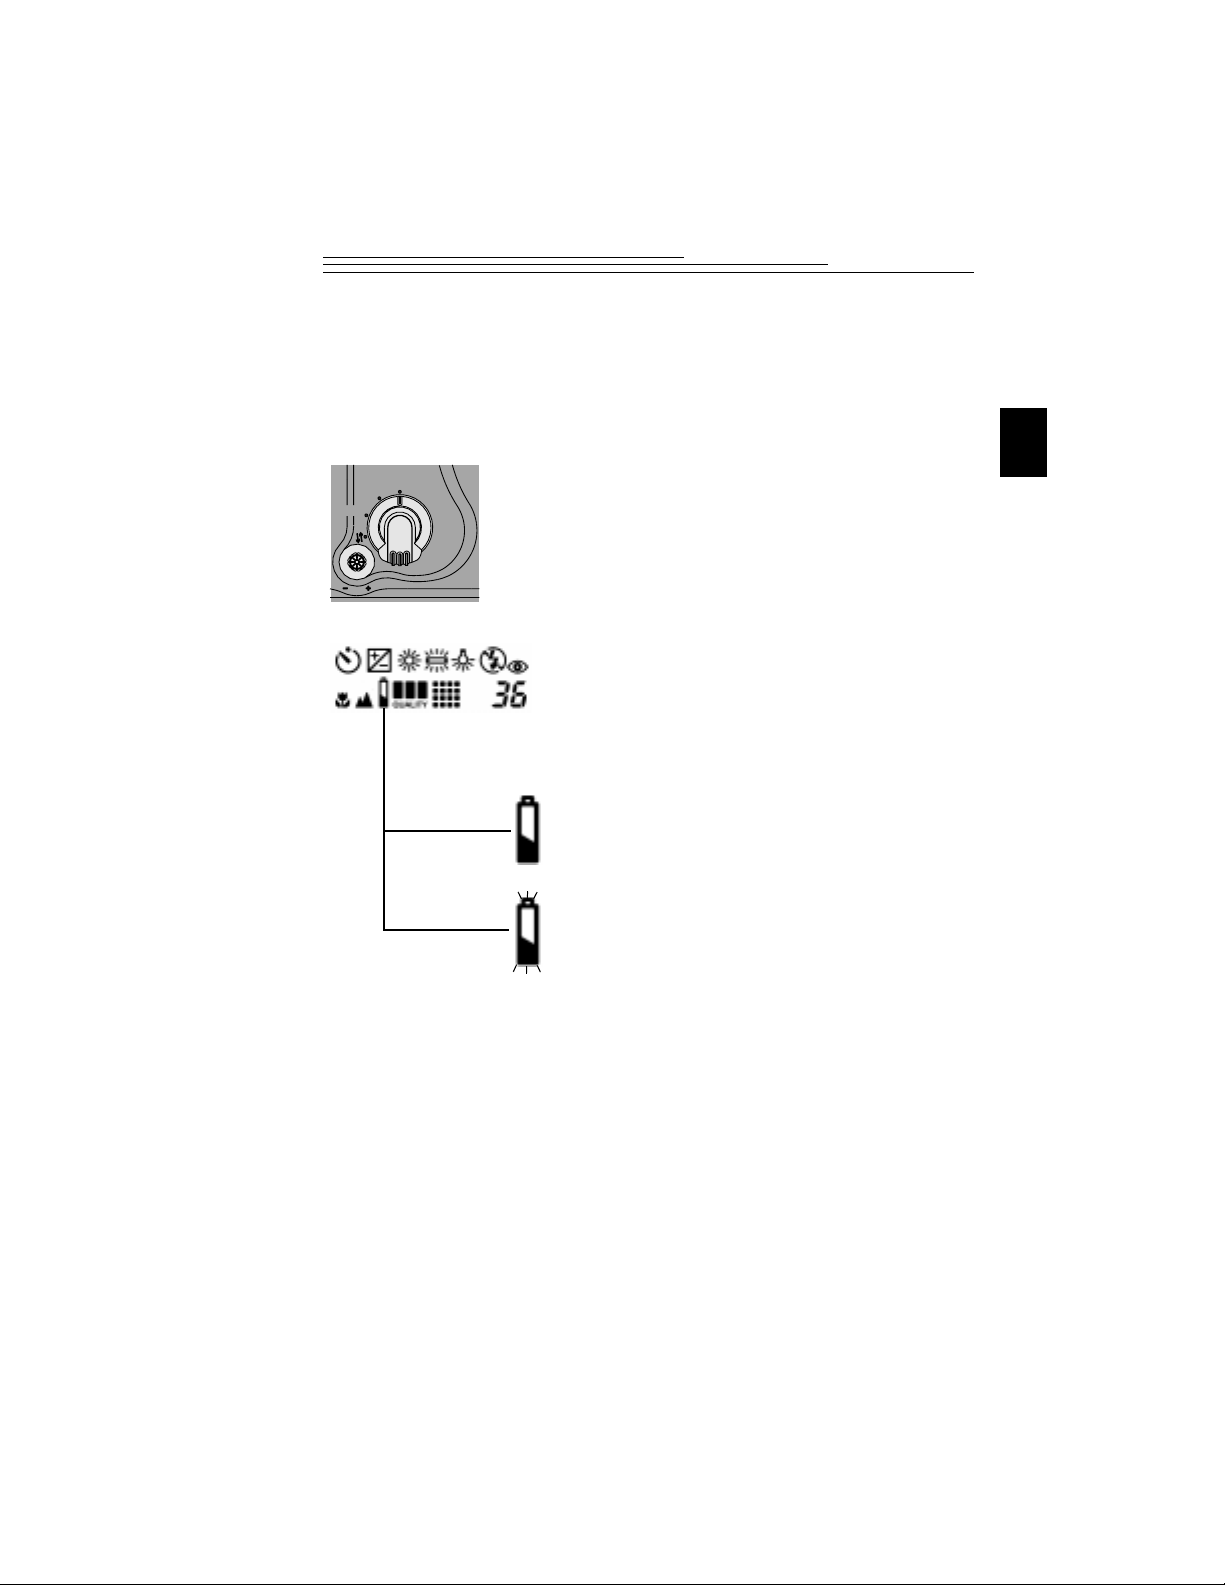
Checking Batteries
Capture
Setup
Review
So that you are never caught with dead batteries, your camera indicates the power
level of the batteries, in the form of a battery status symbol, on the Status Display
when you turn on the camera.
For information on guidelines for battery usage, see page 91.
1 Set the Mode dial to Capture, Review, or
Camera Settings.
The battery status symbol is not visible if you
set the camera to Connect.
2 Slide the POWER switch to the right to turn on
the camera.
3 Check the battery status symbol that appears in
the Status Display.
Full (No Icon)—indicates that batteries are
q
charged and ready to use.
Low—indicates batteries are not fully
q
charged and will soon need to be replaced or
recharged.
1
Exhausted (blinking)—indicates batteries
q
are too weak to power the camera and need
to be replaced.
3
Page 12

Page 13
Inserting a Camera Memory Card
JECT
DC INOUT
IDEO
CARD
Menu
EJECT
OUT
VIDEO
Your camera comes with a KODAK Picture Card (camera memory card), which
is used to store pictures you take with the camera. The cam era memory card , also
referred to as a CompactFlash card, is removable and reusable for easy storage
and transfer of your pictures. You can purchase additional KODAK Picture
Cards from dealers of KODAK products, or from our Web site at http://
www.kodak.com/go/accessories.
1 Lift and turn the ring to unlock and op en the
door on the side of the camera.
2 Hold the camera memory card so the
connection end is pointed at the camera, and
the card label with the MB size is facing
toward the back of the camera.
The camera memory card can only be
inserted one way into the camera. Forcing
the card in the wrong way may damage your
camera.
3 Push the camera memory card all of the way
into the card slot, flip the EJECT button up,
then close the door.
Make sure that the gaskets are clean and that
no dirt is present when you close the door.
1
Removing a Camera Memory Card
1 Open the door on the side of the camera.
2 Flip the EJECT button down, and push in to
eject the camera memory card.
You may need to tilt the camera in order for
the card to slide out.
3 Close the door.
WARNING: Do not insert or eject a camera memory card when the
camera memory card light, located above the card door, is blinking.
This may damage your pictures or camera. Use only certified camera
memory cards that carry the CompactFlash logo.
5
Page 14

Setting the Clock on Your Camera
Menu
Capture
Setup
Review
/
Your camera has a built-in clock that maintains the date and time in a
24-hour format. The camera clock needs to be set if you plan to use the Date
Stamp feature, which imprints the date on your picture. For
information on using the Date Stamp feature, see page 19.
If you remove the batteries from the camera for an extended period of time, or the
batteries become exhausted, you may need to reset the clock.
1 Set the Mode dial to Camera Setup.
2 Slide the POWER switch to the right to turn
on the camera.
The main Camera Setup screen appears.
3 Press a button until the icon
is highlighted.
4 Press the DO-IT button.
The Date/Time screen appears.
5 Press a buttons to adjust the
date and time fields.
/
/
6 Press the DO-IT button.
The camera accepts the setting and returns to
the main Camera Setup screen.
6
Page 15
Adjusting the LCD Brightness
Menu
Capture
Setup
Review
OPEN
Menu
You can adjust the brightness of the color LCD to suit your
particular needs.
1 Set the Mode dial to Camera Setup.
You can set the Mode dial to any setting you
want as long as there is an image in the LCD
screen to adjust the
brightness level.
2 Slide the POWER switch to the right to turn
on the camera.
The main Camera Setup screen appears.
3 Use the dial on the bottom of the camera to
adjust the brightness of the LCD screen to the
brightness level you want.
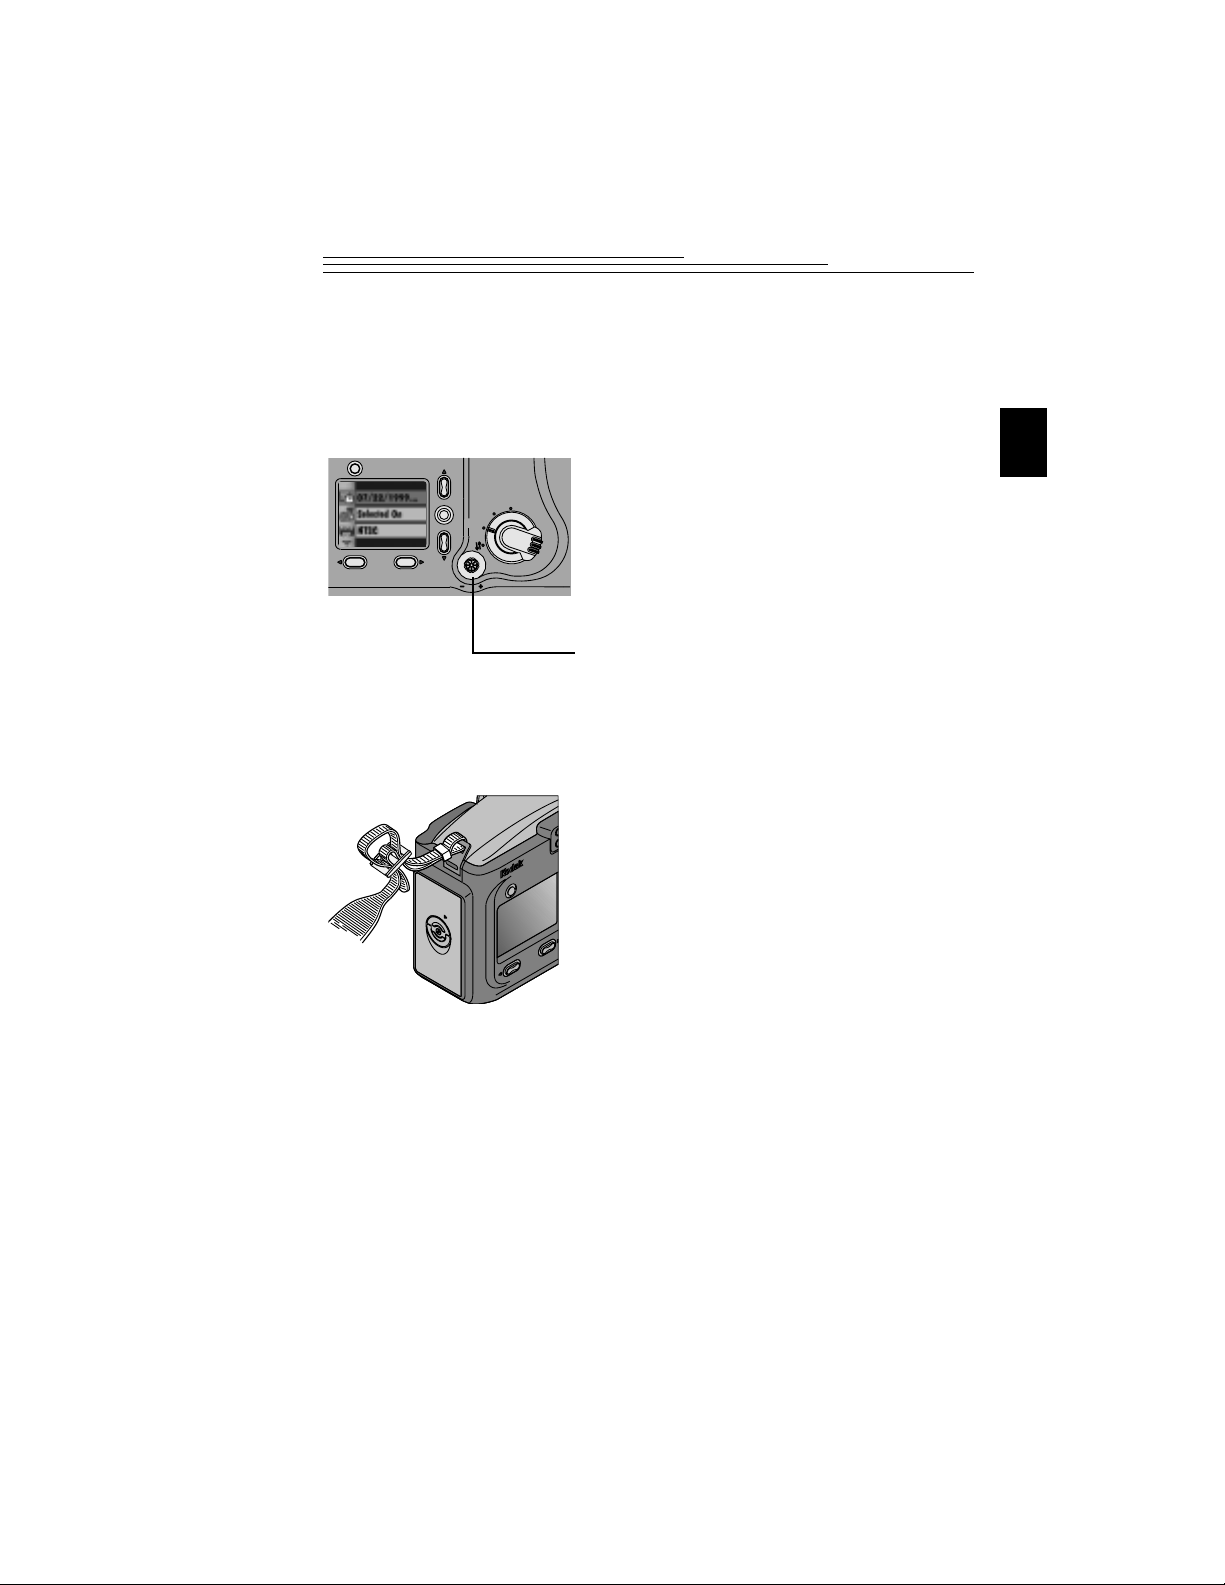
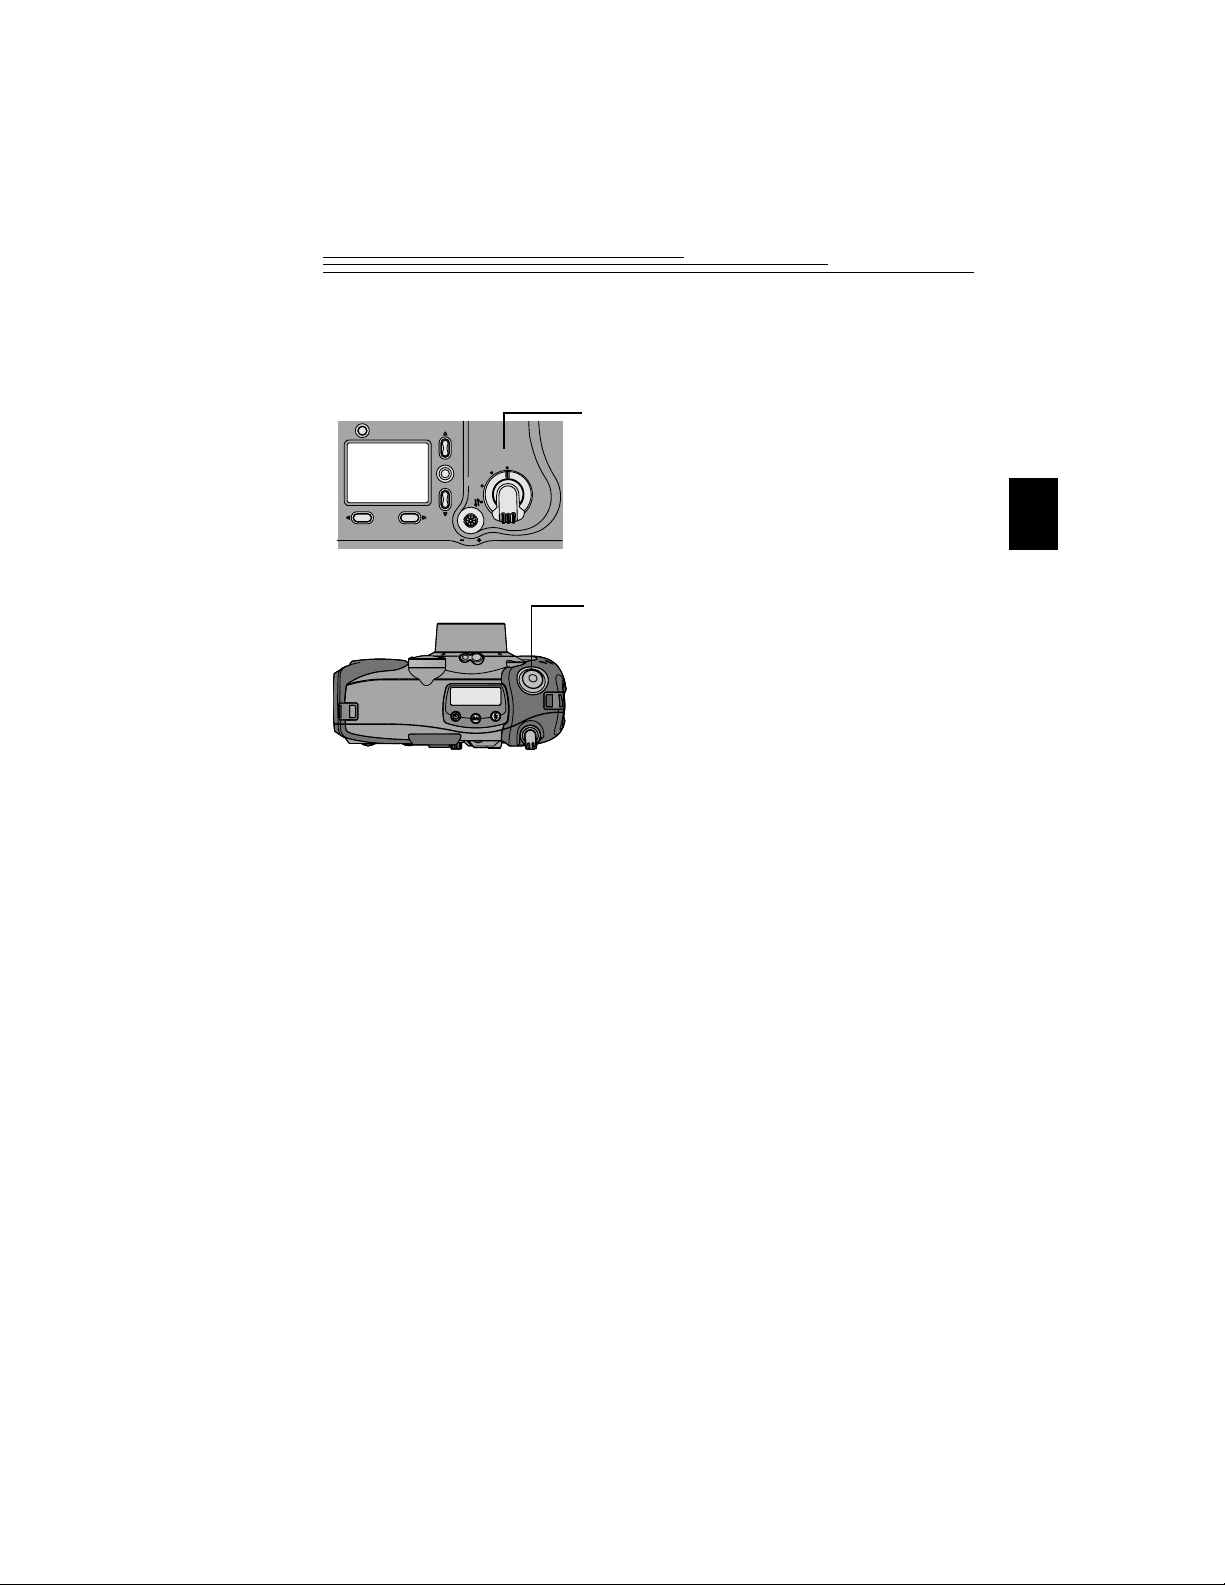
Attaching the Neck Strap
Refer to this illustration and hold the strap firm
while doubling it through th e plast ic holders.
1
7
Page 16

Page 17

2 Taking
Pictures
Your camera makes taking pictures fun. Just set the camera to Capture and you
are on your way to creating great pictures. Everything you need is right at your
fingertips. With the camera you can:
Preview the picture before it is taken.
q
Zoom in closer on your subject.
q
Automatically lock the focus on the subject when you press the
q
SHUTTER button.
View the picture you just took.
q
Vary the flash settings to give you control over the type of flash needed
q
for specific conditions.
Adjust the camera to take landscapes (Infinity Focus) and
q
close-ups, as well as set the Date Stamp feature and Self-Timer, all
available with the touch of a button.
Delete unwanted pictures right away.
q
2
9
Page 18
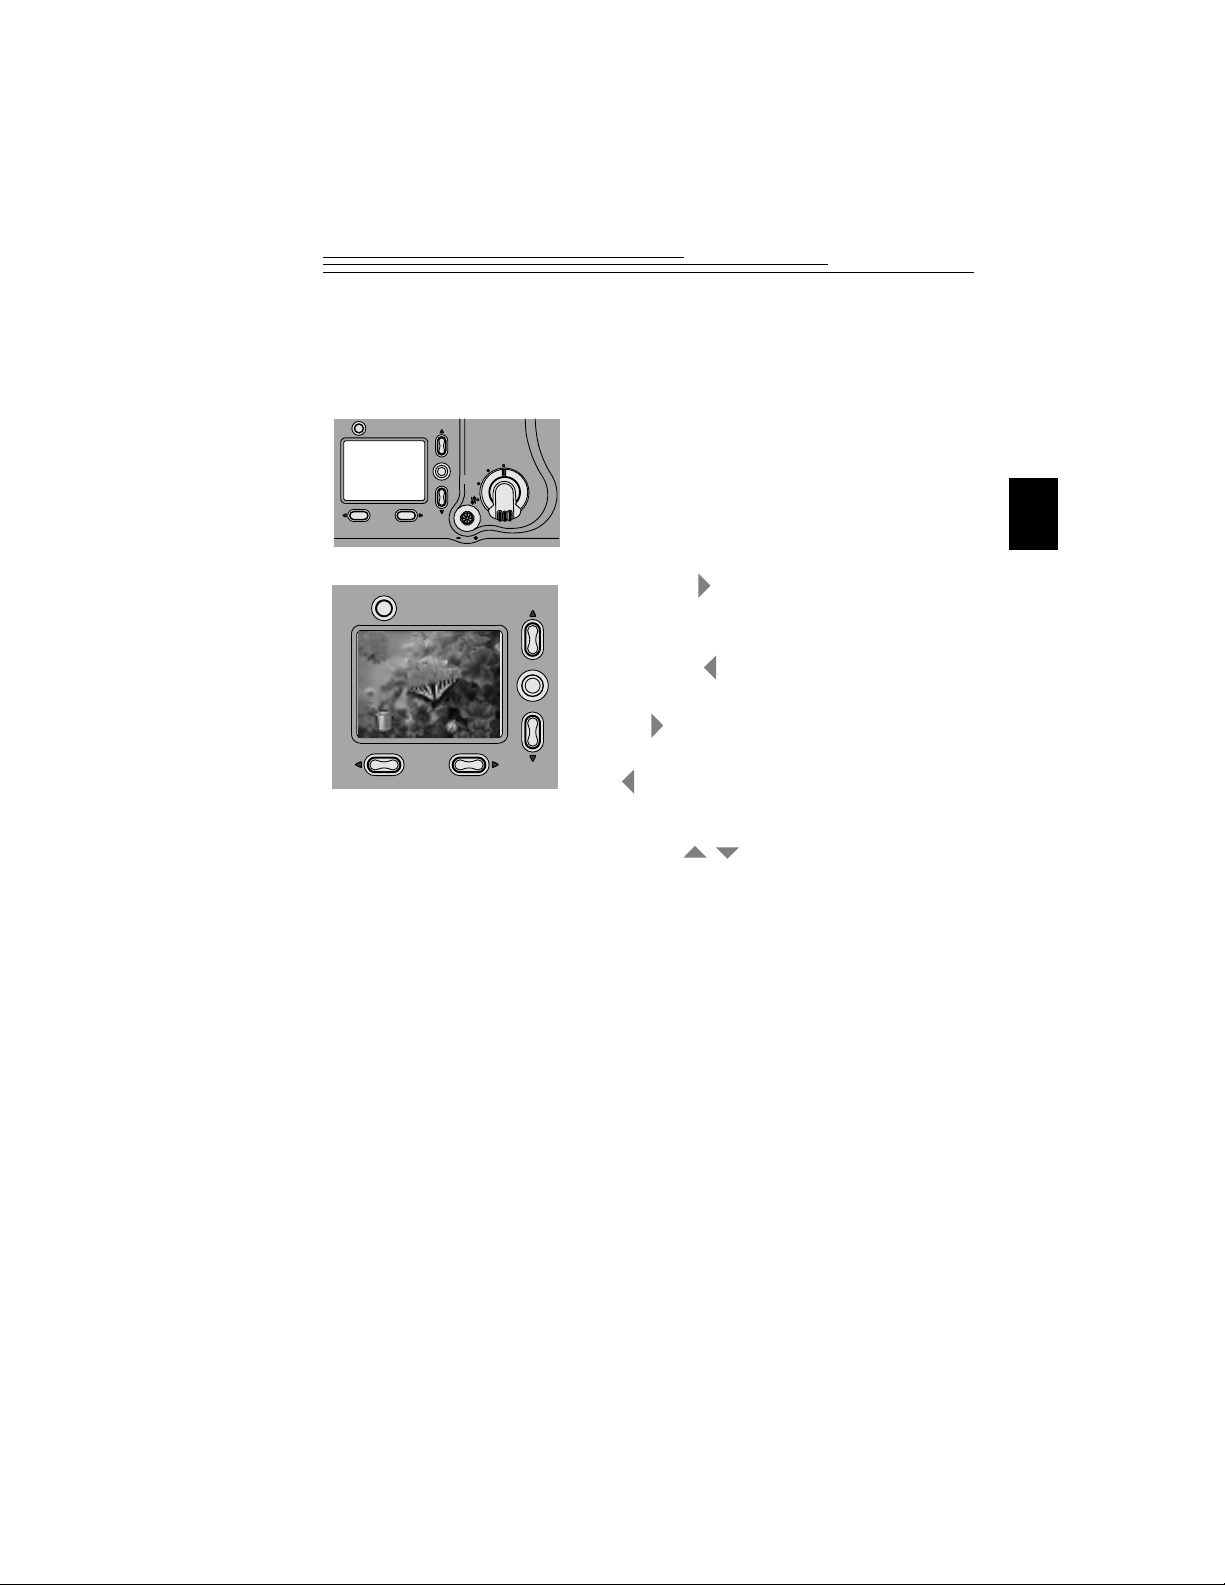
Previewing a Picture Before it is Taken
Menu
Capture
Setup
Review
If you want to see what a picture looks like before you take it, preview the image
on the LCD on the back of your camera. The live image that appears is very
helpful for framing your subject, especially when using the Close-Up, Digital
Zoom, and Border features. If you want to take pictures in black and white or
sepia tone, or highlight text, Preview can help you make that decision. With
Preview, batteries are quickly drained, so use a KODAK-specified AC adapter
whenever possible.
1 Set the Mode dial to Capture.
2 Slide the POWER switch to the right to turn
on the camera.
3 Press the DO-IT button.
The LCD displays a live image with the icons
of activated camera features.
The image in the LCD appears in color
unless you have turned on an effect, such as
black and white or sepia tone, in which case
the effect is applied to the displayed image.
See page 24 for details.
Exposure Compensation—icon appears
q
in the LCD and Status Display if you
adjusted the camera exposure. See page
22 for details.
Exposure Lock—icon appears in the
q
LCD if you locked the exposure. See
page 31 for details.
Borders—selected border appears over
q
the picture on the LCD. See page 23 for
details.
Date Stamp—icon appears in the LCD if
q
you turned on the date stamp. See pag e 19
for details.
4 T o turn off Preview, press the
DO-IT button.
10
Page 19
Pressing the Shutter Button
Menu
Capture
Setup
Review
Taking pictures is a snap with your camera. The SHUTTER button on your
camera locks in the auto focus and takes the picture.
1 Set the Mode dial to Capture.
2 Slide the POWER switch to the right to
turn on the camera.
3 Center the subject using th e guide mar ks in
the viewfinder, or turn on Preview (page
10) and use the LCD to frame your subject.
4 Press the SHUTTER button half-way down
to lock in the camera auto focus.
The camera beeps twice and the green
ready light comes on when the camera is
set to take a picture.
If the green ready light next to the
viewfinder blinks, then the auto focus is not
focused on the subject. Release the
SHUTTER button and recompose your
picture. Press the SHUTTER button halfway down again to relock the auto focus on
the subject.
If the red flash indicator light next to the
viewfinder blinks, then the flash is not fully
charged. Wait for the flash to charge before
taking the picture.
5 Press the SHUTTER button completely
down to take the picture.
The camera beeps again to confirm that a
picture was taken and the camera memory
card light blinks as the picture is stored on
the card.
2
11
Page 20
Zooming in on Your Subject
With a touch of a button you can zoom from Wide Angle, which gives you more
of the surrounding area in pictures, to TelePhoto, which brings the subject in
closer.
1 Set the Mode dial to Capture.
2 Slide the POWER switch to the right to
turn on the camera.
3 Press the ZOOM control.
When you look through the viewfinder,
the subject appears closer or farther away
as you press the ZOOM button.
Zooming in Even Closer
If you need to get closer to your subject, use the Di gital Zoom feature. With
digital zoom, the center of your picture is magnified so your pictures appear even
closer.
1 Press the DO-IT button to turn on
Preview if it is not already activated.
12
The LCD turns on with a live image.
2 Frame your subject using the LCD.
3 Press the ZO OM button until it is at the
farthest position.
4 Release and press the ZOOM button in
the same direction again to activate
digital zoom.
The camera beeps as the LCD displays
the digital zoom icon.
Page 21
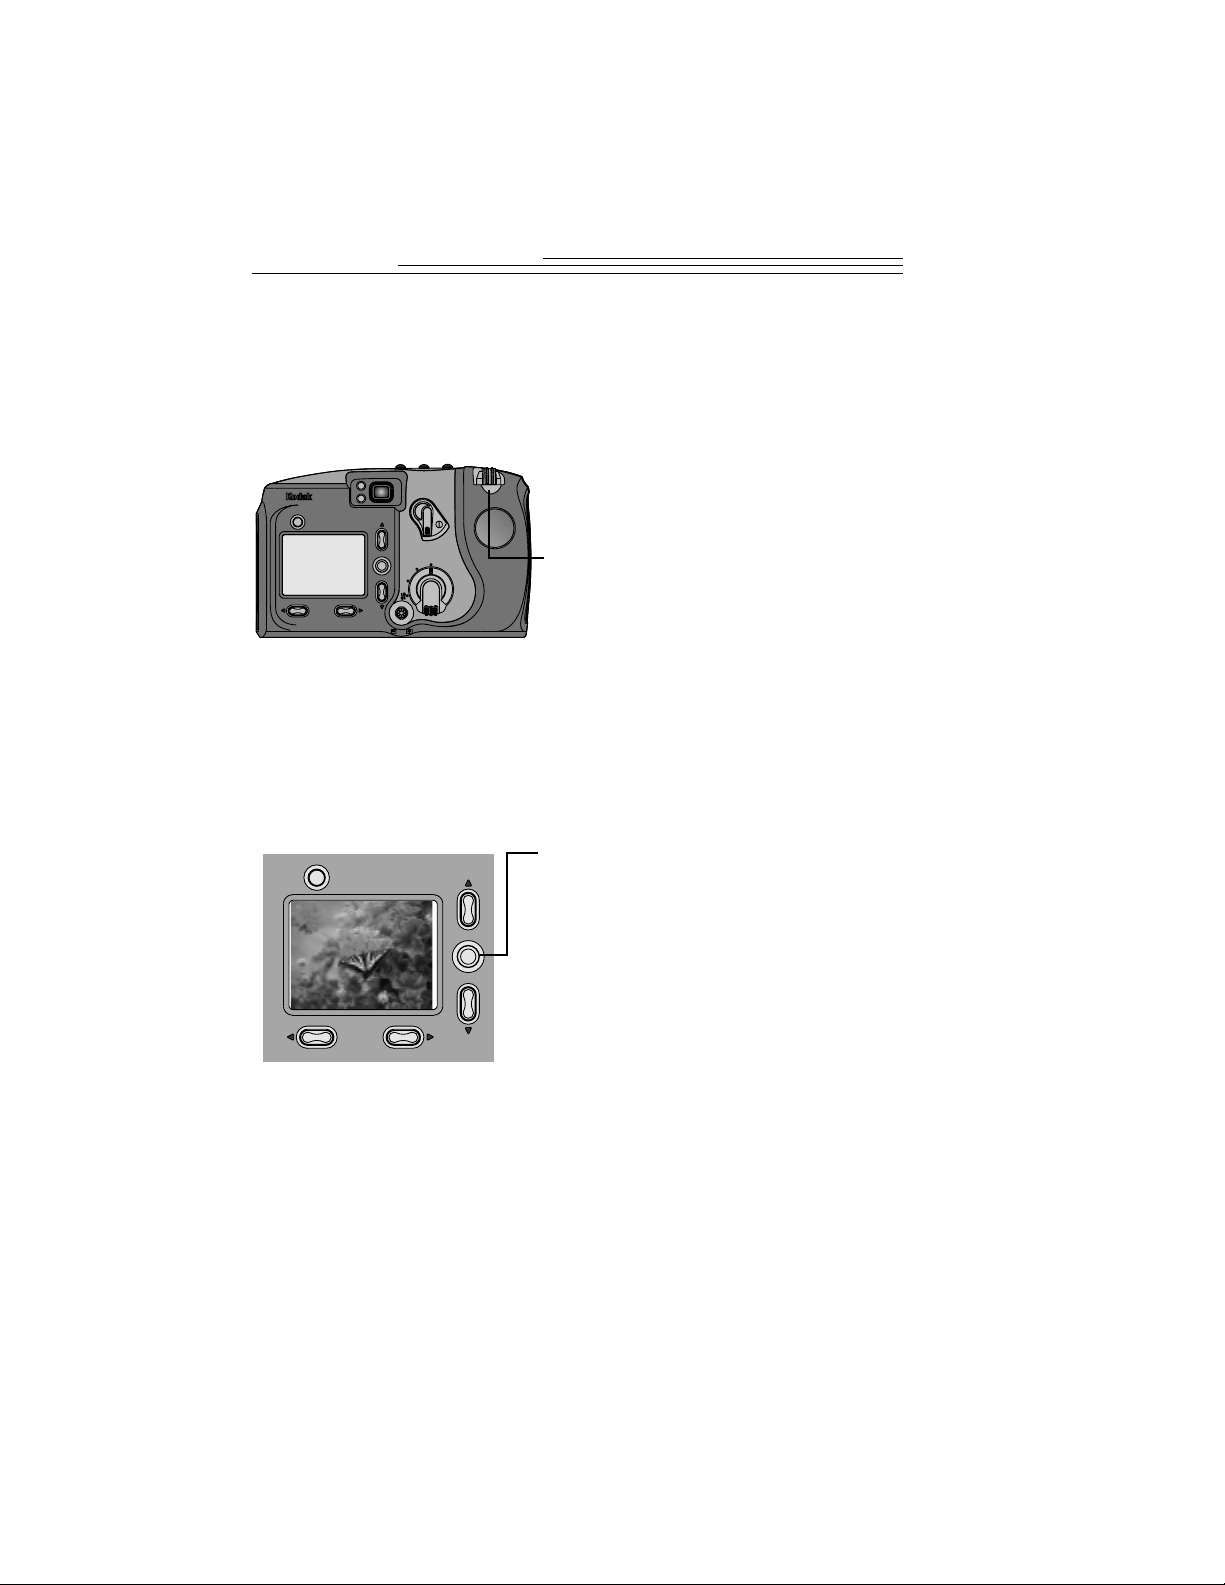
Viewing the Picture Just Taken
Menu
Capture
Setup
Review
You can view a picture seconds after it is taken with a touch of a button. It is a
handy way to check if your subject was positioned correctly.
1 Set the Mode dial to Capture.
2 Slide the POWER switch to the right to turn
on the camera.
3 Press the SHUTTER button to take a picture.
4 Press the button.
The picture just taken appears in the LCD
for several seconds with the delete icon
above the button.
If you want to view the picture again, press
the button.
5 To delete the picture on the LCD, press the
button.
The LCD displays the Delete Picture screen.
6 Press a button until YES
is highlighted.
/
7 Press the DO-IT button.
The picture is permanently deleted from the
camera memory card.
2
13
Page 22
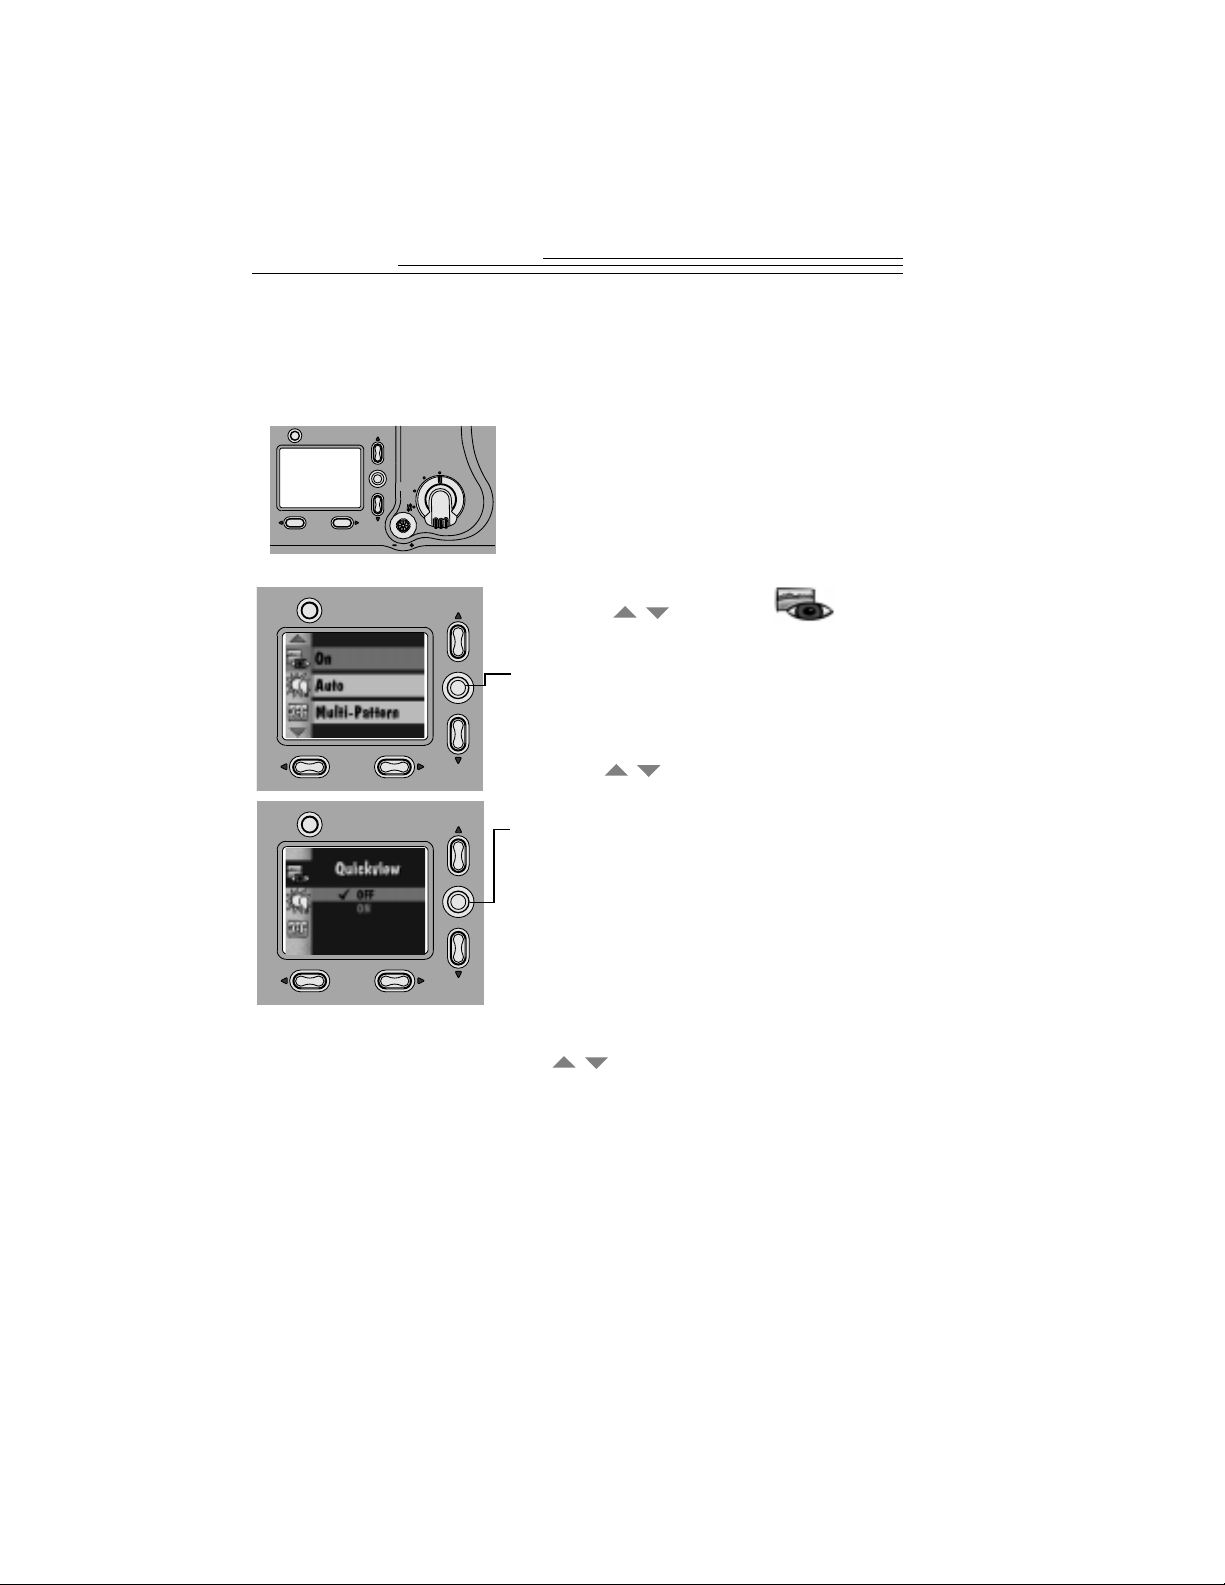
Setting a Quickview for Each Picture
Menu
Capture
Setup
Review
/ / /
You can set the camera so a quick view of the picture just taken appears in the
LCD automatically using the Quic kview feature.
1 Set the Mode dial to Capture.
2 Slide the POWER switch to the right to turn
on the camera.
3 Press the MENU button.
The main Menu screen appears.
4 Press a button until is
highlighted.
5 Press the DO-IT button.
The LCD displays the Quickview screen. The
current setting is checked (ä).
6 Press a button until ON
is highlighted.
7 Press the DO-IT button.
The main Menu screen reappears.
The image appears for several seconds on
the LCD in color unless you have turned on
an effect, such as black and white or s epia
tone, in which case the effect is applied to
the displayed image. See page 24 for details.
8 To turn off Quickview, press a
button on the Quickview screen
until OFF is highlighted, then press the DOIT button.
14
Page 23
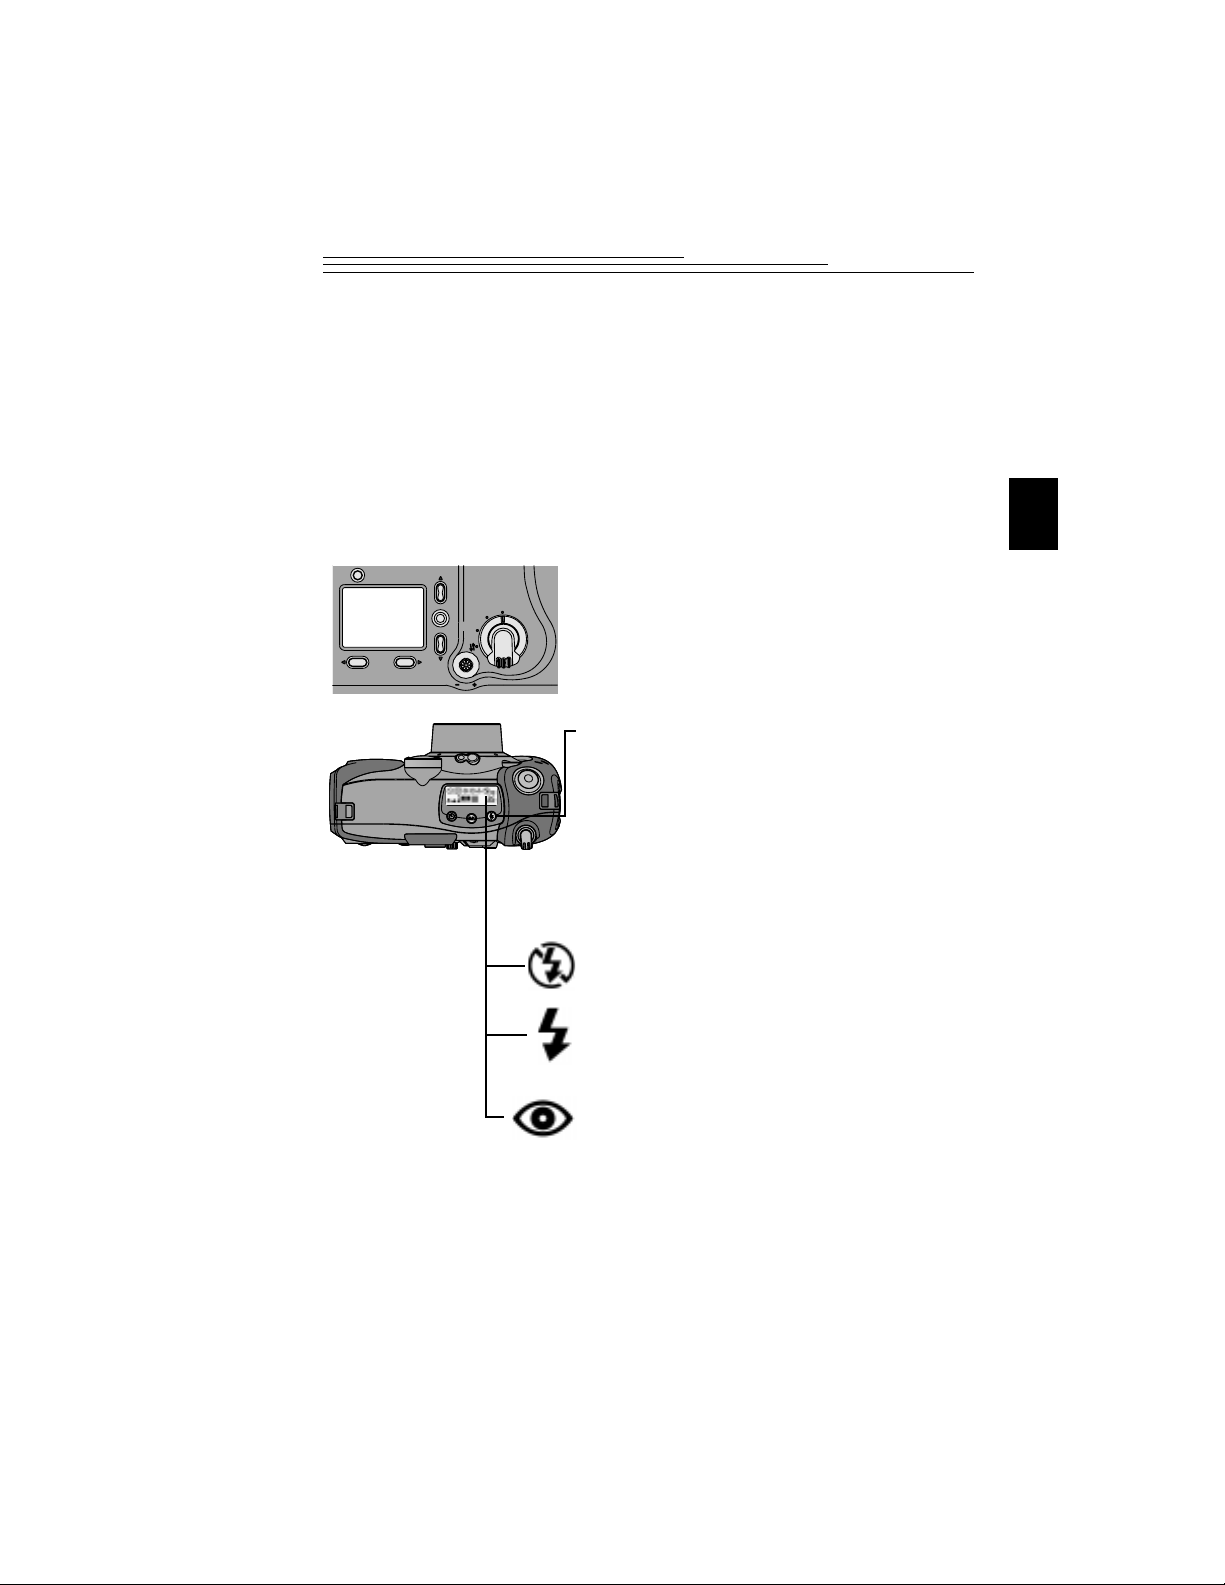
Setting the Flash
Menu
Capture
Setup
Review
When taking pictures at night, indoors, or outdoors in heavy shadows, your
pictures need flash. For everyday picture-taking, use the Auto setting. However,
there are times when changing the flash option can impr ove your pictures. For
instance, if you are taking pictures of people indoors or at night, you can help
reduce the likelihood of red eye by using the Red-Eye setting. When your subject
is outdoors under heavy shadows, you can eliminate those shadows by using the
Fill flash. In situations where the use of flash is prohibited, as in museums, you
can turn off the flash.
1 Set the Mode dial to Capture.
2 Slide the POWER switch to the right to turn
on the camera.
3 Press the FLASH button to scroll though the
flash options.
The Flash setting icon changes in the
Status Display.
Auto (No Icon)—fires the flash
q
automatically when needed. The camera
determines when there is not enough
light.
Off—turns off the flash.
q
2
Fill—fires the flash every time you take a
q
picture.
Red-Eye—fires the flash once before the
q
picture is taken, then fires again when the
picture is taken.
4 To return to the Auto setting, press the
FLASH button, or turn off the camera.
15
Page 24
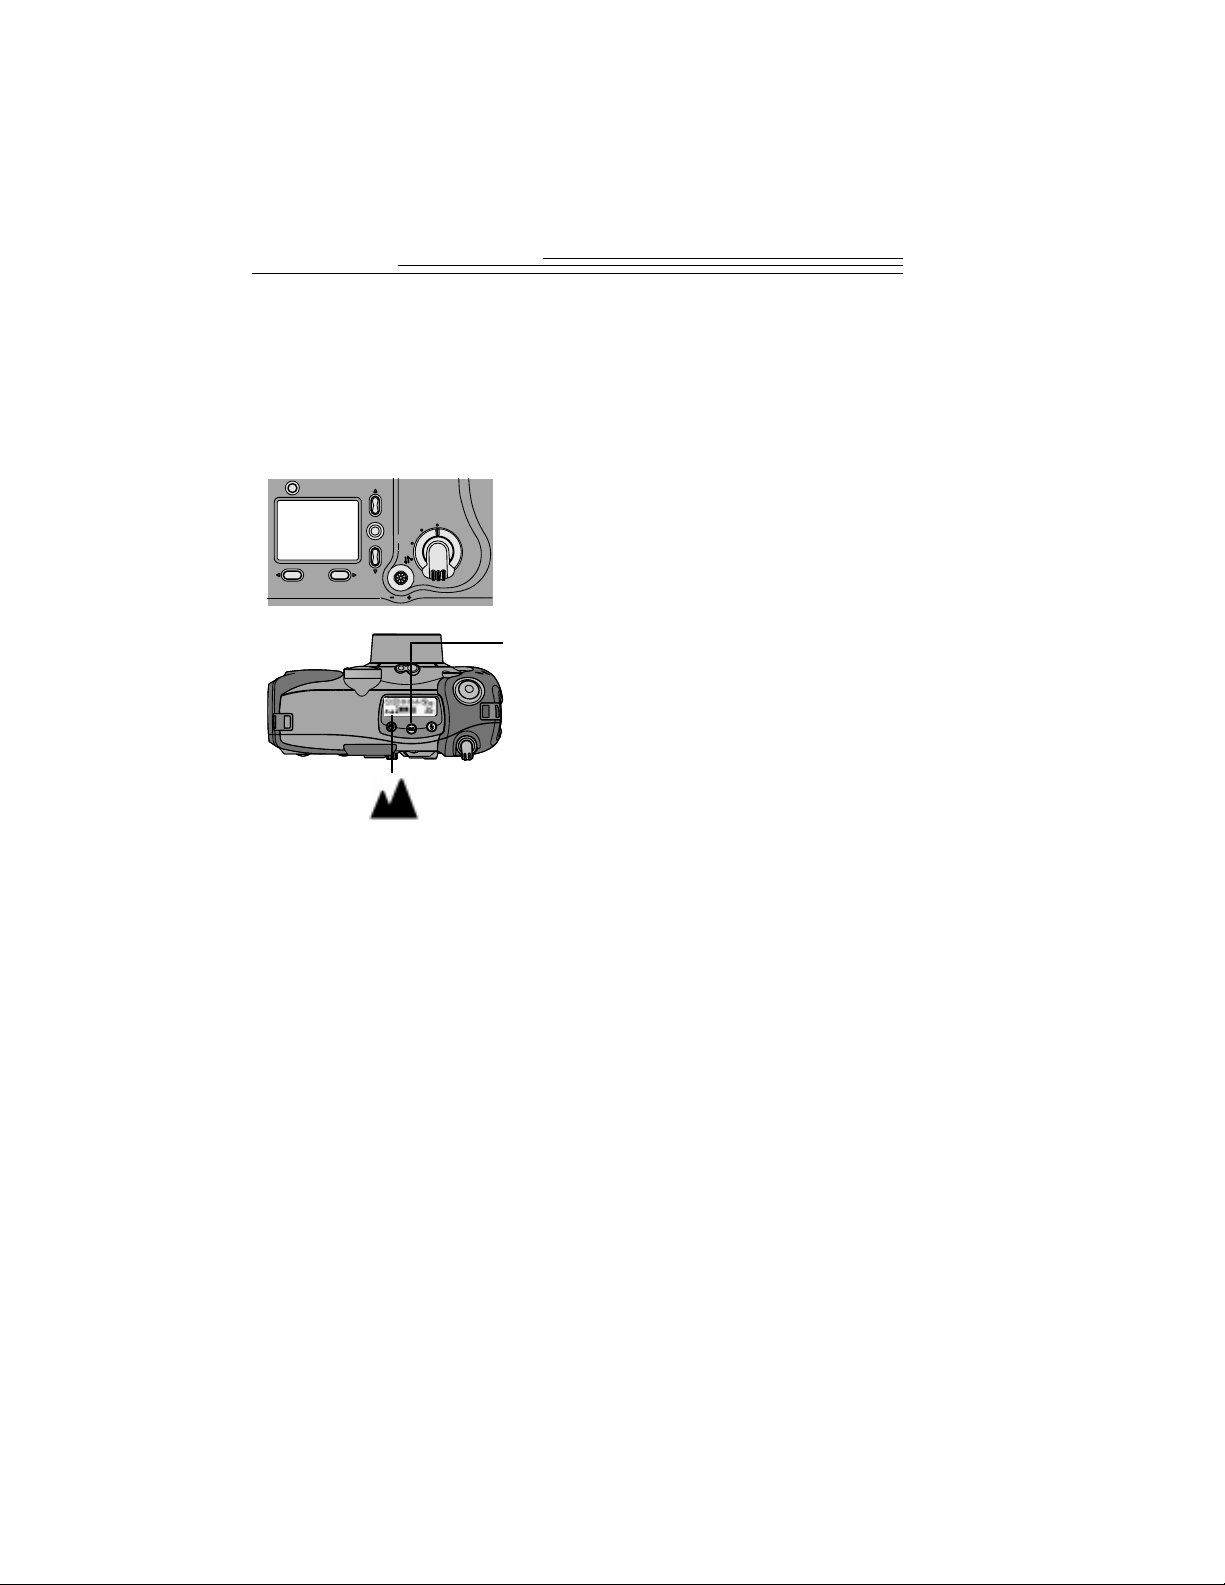
Photographing Distant Subjects
Menu
Capture
Setup
Review
If you want to create postcard-like pictures of scenic views, such as a sunset or
mountain range, use the Infinity Focus feature. When Infinity F ocus is selected,
the camera automatically turns off the flash and auto focus so you get sharp, c lear
pictures.
1 Set the Mode dial to Capture.
2 Slide the POWER switch to the right to turn
on the camera.
3 Press the INFINITY FOCUS/CLOSE-UP
button once.
The Infinity Focus icon appear s in the
Status Display.
If you press the button twice, the close-up
feature is activated.
4 Frame your subject in the viewfinder and
press the SHUTTER button to take
the picture.
5 T o turn off Infinity Focus, press the
INFINITY FOCUS/CLOSE-UP button two
times, or turn off the camera.
16
Page 25
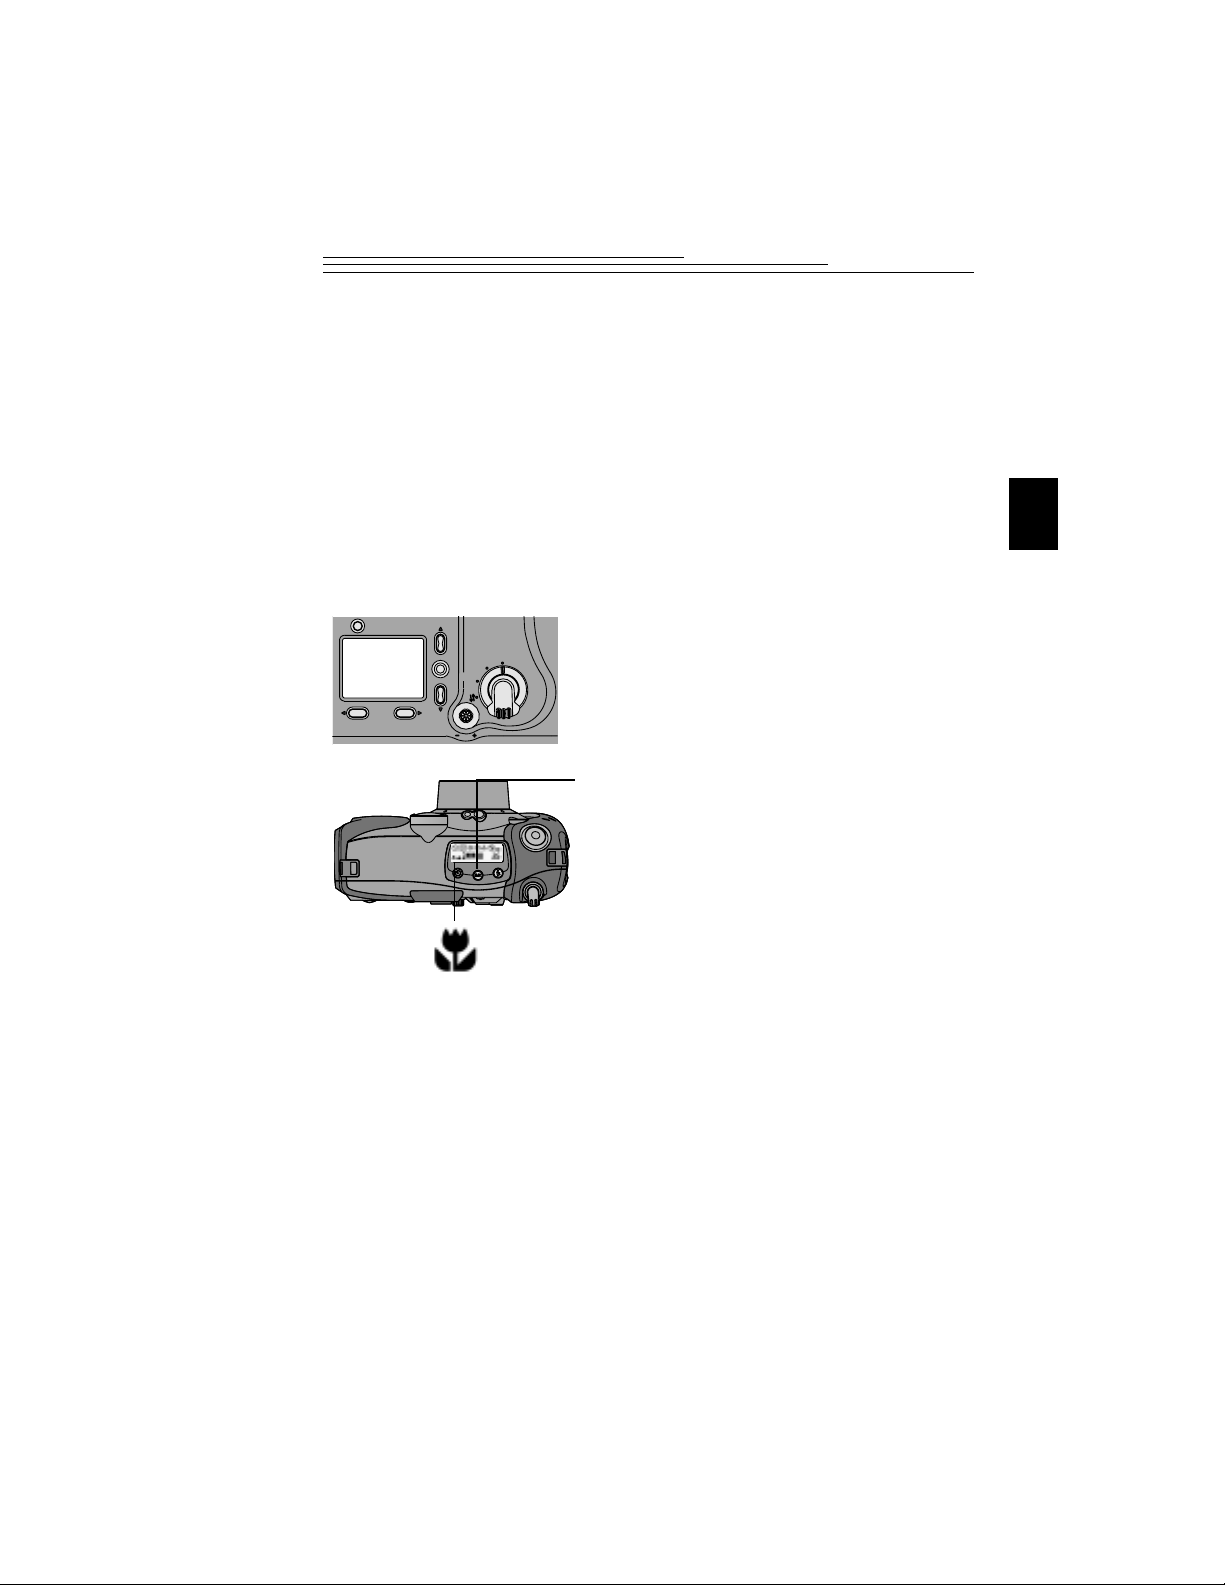
Photographing Close-Ups
Menu
Capture
Setup
Review
If you want to take pictures of objects up close, such as flowers or artwork, use
the Close-Up feature. When selected, the camera automatically sets the focus
distance to 0.8 to 1.6 ft (0.25 to 0.5 m) and sets the flash to ensure detail and
clarity . Since the viewfinder on the camera may not accur ately frame your picture
in Close-Up, the Preview option is automatically activated. For information on
Preview, see page 10.
When you use the Close-Up feature, the zoom capabilities on the camera
are disabled.
1 Set the Mode dial to Capture.
2 Slide the POWER switch to the right to turn
on the camera.
3 Press the I NF IN I TY FOCUS/CLOSE-UP
button twice.
The Close-Up icon appears in th e Sta tu s
Display and the LCD Preview feature shows
a live image.
2
4 Frame your subject using the LCD and press
the SHUTTER button.
5 To turn off Close-Up, press the INFINITY
FOCUS/CLOSE-UP button once, or turn off
the camera.
17
Page 26
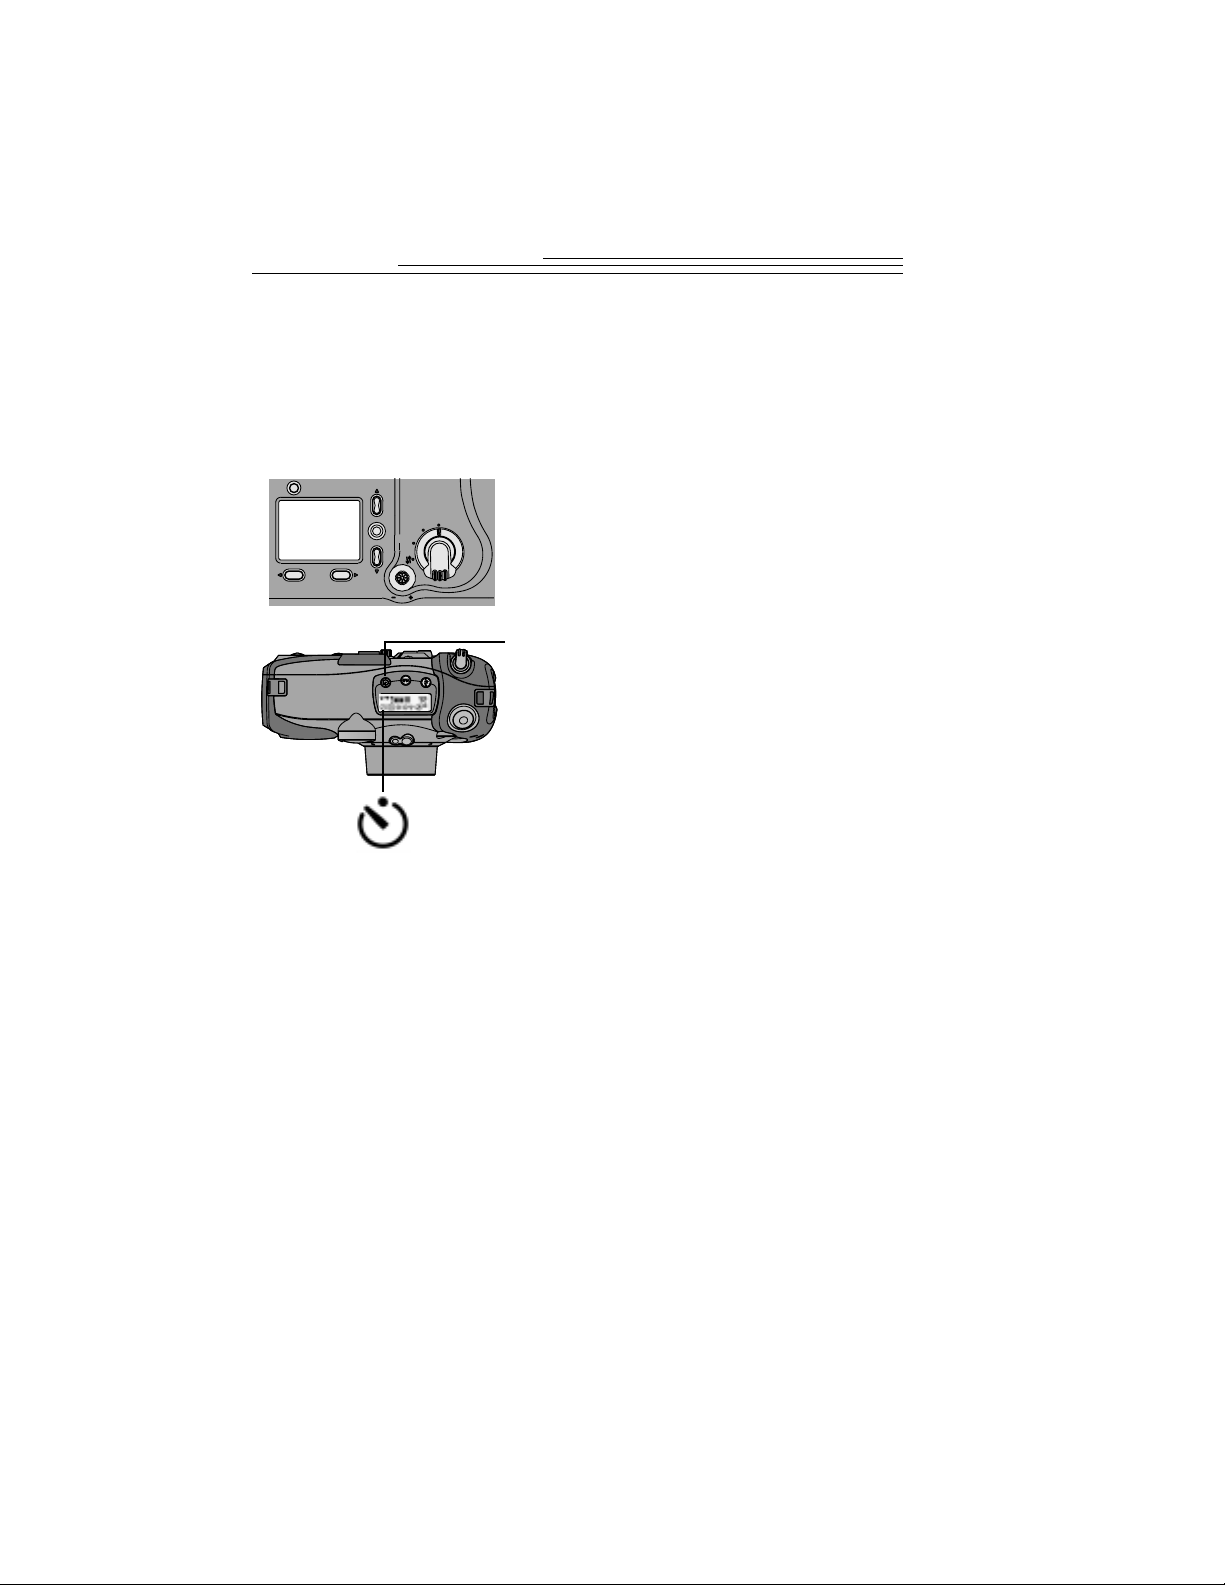
Putting Yourself in the Picture
Menu
Capture
Setup
Review
There might be times when you want everyone, including yourself, to be in the
picture. For these occasions, use the Self-Timer feature to create a 10-second
delay between the time you press the SHUTTER button and the time the picture
is taken.
1 Set the Mode dial to Capture.
2 Slide the POWER switch to the right to turn
on the camera.
3 Press the SELF-TIMER button.
The Self-timer icon appears in the
Status Display.
If you want to cancel self-timer before the
picture is taken, press the SELF-TIMER
button again or turn off the camera.
4 Place the camera on a flat, steady surface or
tripod.
5 Frame your subject in the viewfinder and
press the SHUTTER button.
The red Self-Timer light, located on the front
of the camera, turns on and stays lit fo r 8
seconds, then flashes for 2 additional
seconds just before the picture is taken.
The Self-Timer turns off when the picture is
taken.
18
Page 27

Adding the Date to Your Pictures
Menu
Capture
Setup
Review
You may want to keep track of when a picture was taken, perhaps to record a
child’s first picture or for an insurance claim. Whatever the reason, your camera
has the ability to record the date and time directly on your picture using the Date
Stamp feature. In order for the feature to imprint the correct date and time, you
need to set the camera clock. See page 6 for details . Once a picture is taken with
the date stamp, the date stamp cannot be removed.
1 Set the Mode dial to Capture.
2 Slide the POWER switch to the right to turn
on the camera.
3 Press the MENU button.
The LCD displays the main Menu screen.
2
4 Press a button until the icon is
highlighted.
/
5 Press the DO-IT button.
The LCD displays the Date Stamp screen.
The current setting is checked (ä).
6 Press a button until the Date Stamp
option you want is highlighted.
/
7 Press the DO-IT button.
The main Menu screen reappears.
The next time you take a picture the date or
date and time is recorded in the lower righthand corner of the picture. The Date Stamp
icon appears on the LCD screen if Quickview
(page 14) or Preview
(page 10) is turned on.
8 To turn off Date Stamp, press
a button until OFF is highligh ted,
/
then press the DO-IT button.
19
Page 28
Deleting the Picture Just Taken
Menu
Capture
Setup
Review
If you decide that you do not like a picture, you can delete it quickly from the
camera memory card immediately after it is taken if Quickview is turned on.
Once you delete the picture, it is permanently rem oved fr om the camera memory
card.
1 Set the Mode dial to Capture.
2 Slide the POWER switch to the right to turn
on the camera.
3 Turn on Quickview (page 14).
4 Frame your subject in the viewfinder and
press the SHUTTER button.
The picture appears on the LCD with the
icon displayed above the button.
5 Press the button.
The LCD displays the Delete Picture screen.
20
6 Press a button until YES
/
is highlighted.
7 Press the DO-IT button.
The picture is permanently de leted from the
camera me m ory card.
Page 29

3 Customizing
Your Pictures
Chapters 1 and 2 explained the basics for taking great digital pictures. In this
chapter, you will learn about some of the custom features available on your
camera. Because your camera is so versatile, you have the ability to set the
camera for almost any picture taking situation you may encounter. With the
camera, you can:
Adjust the exposure for pictures that are too light or too dark.
q
Frame your pictures with interesting borders supplied on the camera
q
memory card and software CD.
Capture pictures in color, black and white, sepia tone, or highlight text in
q
documents.
Adjust the ISO sensitivity for low light photography without flash.
q
Select specific picture quality and resolution settings to meet your
q
demanding picture-taking needs.
Set white balancing options, so you get great color reproduction in your
q
pictures.
Adjust the metering system to control how light affects
q
your pictures.
Sharpen and soften pictures so editing in software can be
q
done easier.
Lock the exposure for a consistent look in all your pictures.
q
3
21
Page 30
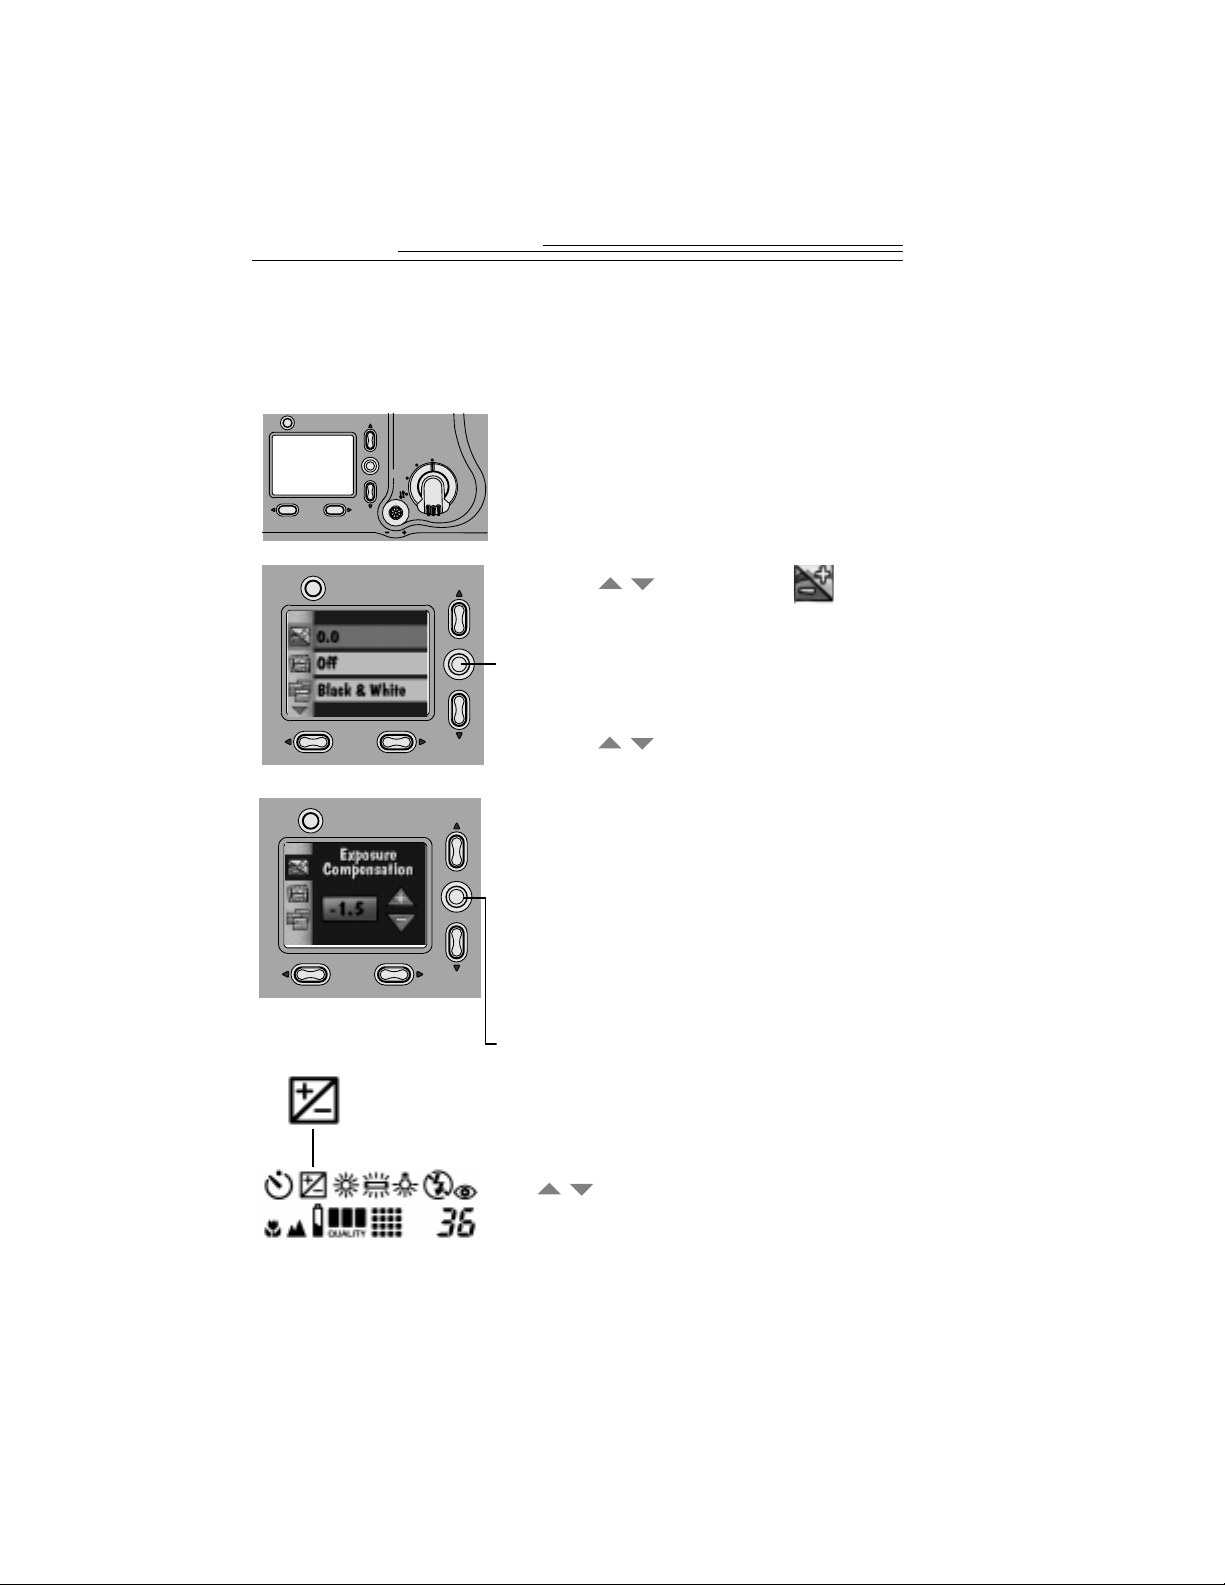
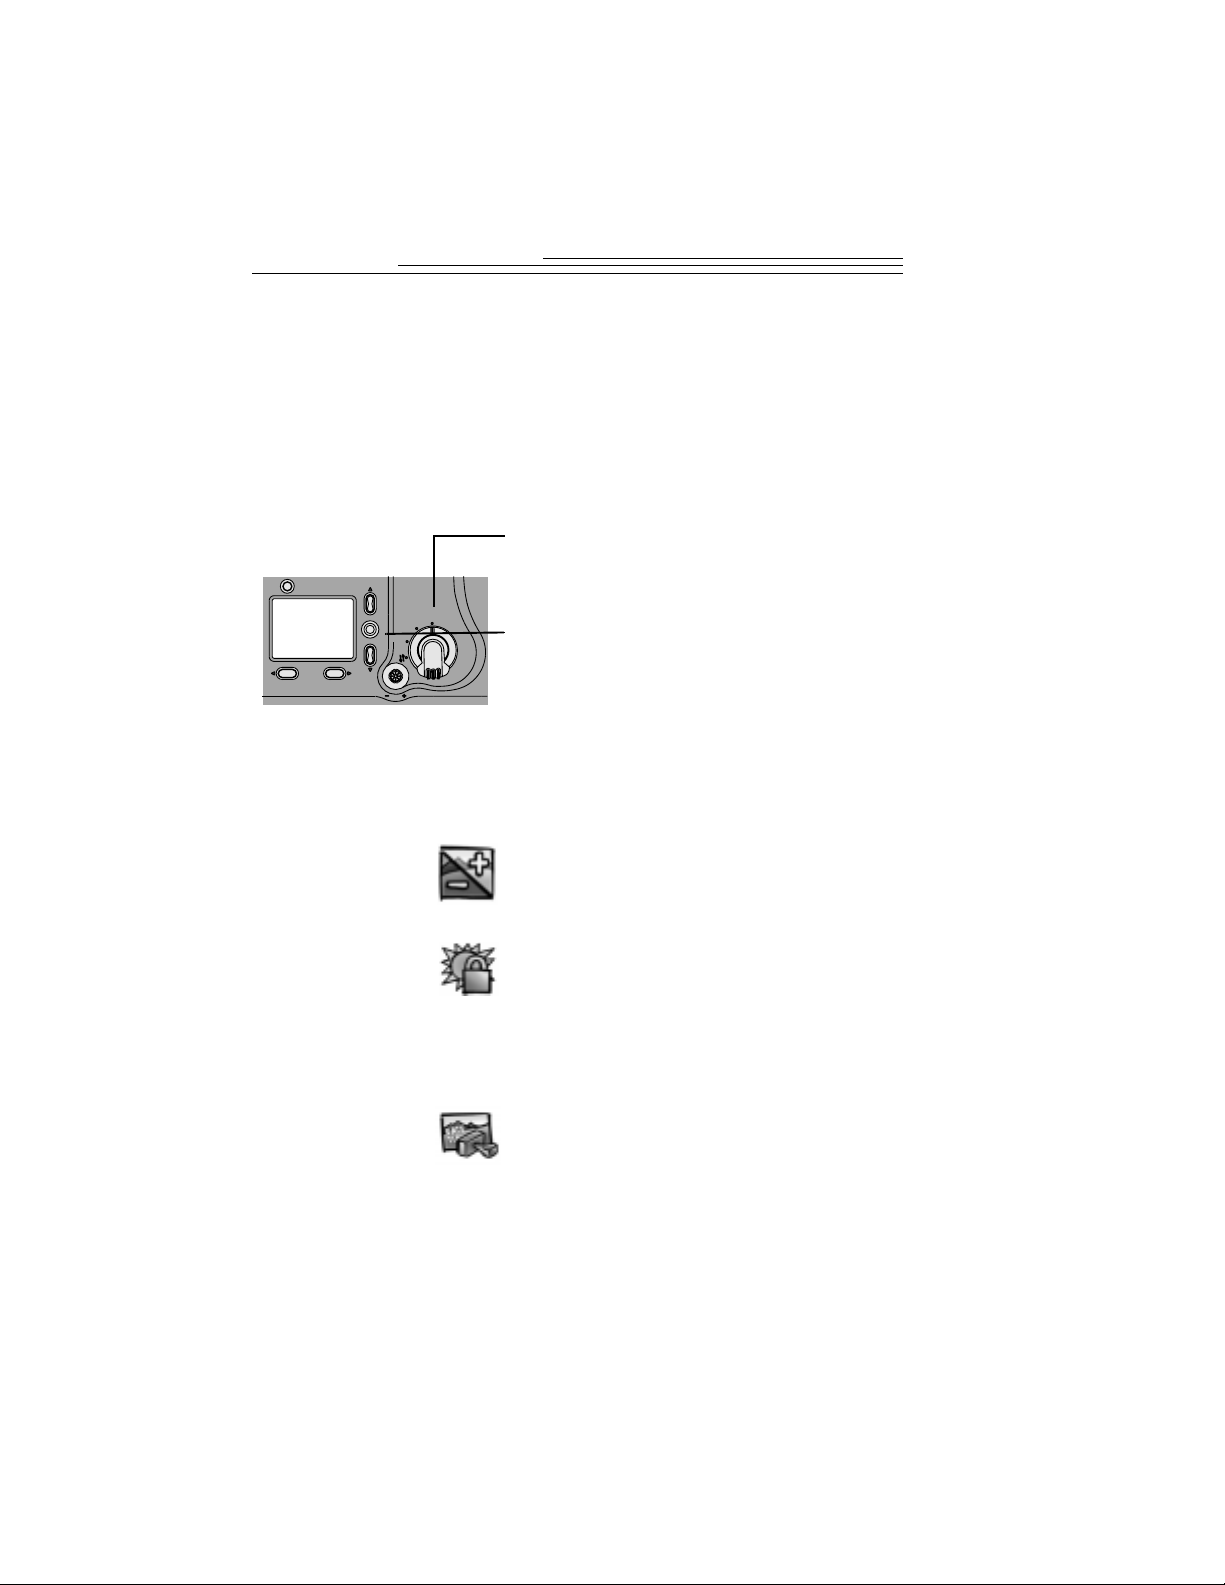
Adjusting the Camera Exposure
Menu
Capture
Setup
Review
/ /
If your pictures seem too dark or too l ight, adj ust the amou nt of lig ht allowed in to
the camera so that your pictures are properly exposed. These adjustments in
lighting are called Exposure Compensation.
1 Set the Mode dial to Capture.
2 Slide the POWER switch to the right to turn on
the camera.
3 Press the Menu button.
The LCD displays the main Menu screen.
4 Press a button until the icon is
highlighted.
5 Press the DO-IT button.
The LCD displays the Exposure
Compensation screen.
/
6 Press a button to change the exposure
number.
q
q
Y ou can adju st the exposure numbers in +2.0 to
-2.0 in 0.5 increments. An increase of 1.0
doubles the amount of light allowed in to the
camera. A decrease of 1.0 reduces the amount
of light by half.
If your pictures are too dark, increase (+)
the exposure number.
If your pictures are too light, decrease
(-) the exposure number.
7 Press the DO-IT button.
The main Menu screen reappears and the
Exposure Compensation icon appears in the
Status Display.
8 To cancel Exposure Compensation, press a
button until 0.0 is highlighted, then
press the DO-IT button, or turn off
the camera, and the setting defaults to 0.0.
It is possible to select an exposure setting as the
default. See page 53 for detai l s.
22
Page 31

Adding a Border to Your Picture
Menu
Capture
Setup
Review
/
You can add a border or logo (or both) to your picture. When you use the Bo rder
feature, the camera Preview turns on automatically to help you frame the picture
and see if the border selected works well with your subject. If you like the border,
go ahead and take the picture. If you do not like the border, select a different one.
Although borders are not included on the camera memory card, you can create
and add your own borders or logos. For more information, refer to the KODAK
DC5000 Border Trans fer Application online help or the ReadMe file. Once the
picture is taken, the border cannot be removed.
FPO
1 Set the Mode dial to Capture.
2 Slide the POWER switch to the right to turn
on the camera.
3 Press the Menu button.
The LCD displays the main Menu screen.
4 Press a button until the icon is
highlighted.
/
5 Press the DO-IT button.
You can select from a list of different borders
to customize your pictures.
6 Press a button until the Border option
you want is highlighted.
/
7 Press the DO-IT button.
The main Menu screen reappears.
8 To cancel Border, press a button until
No Border is highlighted, then press the DOIT button.
3
It is possible to select a specific border as the
default. Se e page 50 for details.
23
Page 32

Capturing in Black-and-White, Sepia Tone, or Document
Menu
Capture
Setup
Review
/ /
With the Effect setting, you can take black-and-white pictures, use sepia tone to
give your picture an antique look, or take pictures of documents so text stands
out. When using the Effects feature, the camera Preview automatically turns on
so that you can see if the effect selected works well with your subject. I f yo u lik e
the effect, go ahead and take the picture. If you do not like the effect, select a
different one before taking the picture. Once the picture is taken with the
effect, the effect cannot be removed.
1 Set the Mode dial to Capture.
2 Slide the POWER switch to the right to turn on
the camera.
3 Press the Menu button.
The LCD displays the main Menu screen.
4 Press a button until the icon is
highlighted.
/
5 Press the DO-IT button.
6 Press a button until the Effect option
you want is highlighted.
q
q
q
q
Black & White—takes a black-and-white
picture.
Sepia Tone—takes a picture with a
reddish-brown cast.
Document—takes a picture with added
contrast so text stands out.
No Effect—takes a color picture.
7 Press the DO-IT button.
The main Menu screen reappears.
8 To cancel Effect, press a button until
No Effect is highlighted, then press the DO-IT
button, or turn off the camera.
It is possible to select a special effect as the
default. See page 54 for details.
24
Page 33

Adjusting the Picture Quality
Menu
Capture
Setup
Review
If you intend to make large prints, you can capture more detail in the picture
using the Best setting. However, with this setting more storage room is used on
the camera memory card. For everyday pictures, use the Better setting, which
gives you great pictures and more storage space on the camera memory card. If
you need to store a large number of pictures on the camera memory card or are
going to e-mail or use the pictures online, use the Good setting.
1 Set the Mode dial to Capture.
2 Slide the POWER switch to the right to turn
on the camera.
3 Press the Menu button.
The LCD displays the main Menu screen.
4 Press a button until the icon is
highlighted.
5 Press the DO-IT button.
The LCD displays the Quality screen. The
current setting is checked (ä).
/
3
6 Press a button until the Quality
option you want is highlighted.
q
q
q
/
Best—use for printing 8x10 pictures.
Better—use for everyday pictures.
Good—use for online or for e-mailing
pictures.
7 Press the DO-IT button.
The main Menu screen reappears as the
Quality icon for the setting you selected
appears in the St atus Display.
You can switch freely between these three
settings when taking pictures.
25
Page 34

Adjusting the Picture Resolution
Menu
Capture
Setup
Review
If you want to send pictures through e-mail or use them online, use the Standard
resolution setting. With this setting, only the information needed for viewing on a
computer or printing small prints is captu red. For p ictu res that are going to be
printed, use the High resolution setting. With this setting, more information is
captured, but fewer pictures fit on the camera memory card.
1 Set the Mode dial to Capture.
2 Slide the POWER switch to the right to turn
on the camera.
3 Press the Menu button.
The LCD displays the main Menu screen.
4 Press a button until the icon is
/
highlighted.
5 Press the DO-IT button.
The LCD displays the Resolution screen. The
current setting is checked (ä).
6 Press a button until the Resolution
/
option you wan t
is highlighted.
High—use this setting when you are
q
going to print your pictures. Picture size
is 1760 x 1168 pixels.
Standard—use this setting when you are
q
going to e-mail or use the pictures online.
Picture size is 896 x 592 pixels.
7 Press the DO-IT button.
The main Menu screen reappears as the
Resolution icon appears in the
Status Display.
You can switch freely between these two
settings when taking pictures.
26
Page 35

Selecting a White Balance for Indoor Pictures
Menu
Capture
Setup
Review
/
/
If you use your camera indoors where flash i s pr ohibi te d , you r pi ctures may ta ke
on a green tint if captured under fl uorescent t ube light ing, o r a reddi sh-orange tint
if captured under tungsten household lighti ng. You can correct this problem using
the White Balance feature on the camera. Use the Auto setting for everyday
pictures. Use the Daylight, Fluorescent, or Tungsten settin g for taking pictures
under these lighting conditions without flash.
1 Set the Mode dial to Capture.
2 Slide the POWER switch to the right to turn
on the camera.
3 Press the Menu button.
The LCD displays the main Menu screen.
3
4 Press a button until the icon is
highlighted.
5 Press the DO-IT button.
The LCD displays the White Balance screen.
The current setting is checked (ä).
6 Press a button until the White
Balance option you want is highlighted.
q
q
q
q
Auto (No Icon)—automatically adjusts
the white balance.
Daylight—balances for natural daylight
lighting.
Fluorescent—corrects for the green cast
of fluorescent lighting.
Tungsten—corrects for the orange cast of
tungsten light bulbs.
7 Press the DO-IT button.
The main Menu screen reappears as the
White Balance icon you selected appears in
the Status Display.
Your camera automatically resets to Auto
when the camera is turned off. To change the
defaults, see page 51.
27
Page 36

Choosing a Metering System
Menu
Capture
Setup
Review
You can control the way light affects your pictures using the metering systems
available on your camera. If you want a nice even exposure throughout the
picture, use the Multi-Pattern setting. This setting is great for everyday pictures.
If you want to emphasize the center of your picture, such as a person’s face,
while at the same time de-emphasizing the background, use the Center-Weighted
setting.
1 Set the Mode dial to Capture.
2 Slide the POWER switch to the right to turn
on the camera.
3 Press the Menu button.
The LCD displays the main Menu screen.
4 Press a button until the icon is
/
highlighted.
5 Press the DO-IT button.
The LCD displays the Auto Exposure screen.
The current setting is checked (ä).
6 Press a button until the Auto
/
Exposure option you want is highlighted.
Multi-Pattern—evaluates the lighting
q
conditions of the entire picture.
Center-Weighted—evaluates the
q
lighting conditions of the subject centered
in the viewfinder and sets the overall
exposure setting for the picture based on
the center of
the subject.
7 Press the DO-IT button.
The main Menu screen reappears.
You can switch freely between the two
settings when taking pictures.
28
Page 37

Selecting the ISO Setting
Menu
Capture
Setup
Review
/
If you take pictures in low light without flash, such as in a museum, you can
select the Auto ISO sensitivity on the camera to help prevent blurred pictures
caused by camera movement. With this feature the shutter speed is automatically
increased to make the camera more responsive, while maintaining proper
exposure for the picture.
1 Set the Mode dial to Capture.
2 Slide the POWER switch to the right to
turn on the camera.
3 Press the Menu button.
The LCD displays the main Menu screen.
3
4 Press a button u ntil the
icon is highlighted.
The LCD displays the Auto ISO screen.
The current setting is (ä).
/
5 Press the DO-IT button.
6 Press a button until the option
you want is highlighted.
q
q
/
OFF—camera selects the optimal
shutter speed for pictures. Ideal for
everyday picture-taking.
ON—camera increases the shutter
speed when flash is turned off. Ideal
for indoor pictures in less than
optimal lighting.
7 Press the DO-IT button.
8 To cancel Auto ISO, press
a button until OFF is highlighted,
then press the DO-IT bu tton, or turn off
the camera.
It is possible to change the ISO default
setting, see page 55.
29
Page 38

Sharpening and Softening a Picture
Menu
Capture
Setup
Review
If you plan to edit your pictures using image editing software, the Sharpness
feature can make some editing processes easier. By selecting the Sharp setting,
the edges around the picture are enhanced, making it easier to cut or crop the
image. If you want to blend the image into a background, use the Soft setting to
de-emphasize the edges. For everyday picture-taking, keep the Sharpness feature
set to Standard. The Sharp or Soft settings may increase or decrease the clarity in
pictures.
1 Set the Mode dial to Capture.
2 Slide the POWER switch to the right to turn
on the camera.
3 Press the Menu button.
The LCD displays the main Menu screen.
4 Press a button until the icon is
/
highlighted.
5 Press the DO-IT button.
The LCD displays the Sharpness screen. The
current setting is checked (ä).
6 Press a button until the Sharpness
/
option you want is highlighted.
Sharp—highlights the edges in your
q
picture, so the edges stand out.
Standard—makes no change to the ed ges
q
in your picture.
Soft—blurs the edges in your picture, so
q
the edges blend in.
7 Press the DO-IT button.
The main Menu screen reappears.
Y ou can switch freely among the three settings
when taking pictures.
30
Page 39

Locking in an Exposure Setting
Menu
Capture
Setup
Review
/
If you take a series of pictures that require a consistent look or a constant
exposure setting, use the Exposure Lock feature. This feature is great for taking a
series of pictures, like a mountain range, and creating a mural with the prints.
1 Set the Mode dial to Capture.
2 Slide the POWER switch to the right to
turn on the camera.
3 Press the Menu button.
The LCD displays the main Menu screen.
3
4 Press a button u ntil the
icon is highlighted.
/
5 Press the DO-IT button.
The LCD displays the Exposure Lock
screen. The current setting is (ä).
6 Press a button u ntil ON
is highlighted.
/
7 Press the DO-IT button.
The “Please take a picture to lock
capture settings” screen appears.
8 Center the area you want to lock the
exposure on in the viewfinder.
9 Press the SHUTTER button to lock in the
exposure setting.
10 To cancel Exposure Lock, press
a button until OFF is highlighted,
then press the DO-IT bu tton, or turn off
the camera.
31
Page 40

Page 41

4 Reviewing Yo ur
Pictur es
Now that you have taken pictures with your camera, it is time to take a look at
them by setting the camera to Camera Review. With this mode, you can:
View yo ur p ictu res and see how any cu sto m featur es, if any, were applied
q
to the shot.
Magnify the picture to check the detail.
q
Select specific pictures and quantities to be printed.
q
Protect pictures from being deleted from your camera
q
memory card.
Delete unwanted pictures to free up space on the camera
q
memory card.
Display and run a slide show on the camera or on a television.
q
View specific information about the picture.
q
4
33
Page 42

Viewing Your Pictures
Menu
Capture
Setup
Review
To view each picture in full LCD size, or you can view up to three smaller
thumbnail-size pictures at a one time using the Filmstrip feature.
1 Set the Mode dial to Review.
2 Slide the POWER switch to the right to turn
on the camera.
The LCD displays the last picture taken with
the frame number, and the Print Order and
Protect icons, if activated.
3 Use the buttons to scroll through an d
/
view the pictures on the LCD.
4 Press the Menu bu tton to di splay the fi lmstrip
and the main Review screen.
The Review Menu icons, filmstrip, and
memory bar appear over the current pict ure.
The filmstrip displays up to three pictures at
a time, in the order taken and stored on the
camera memory card.
5 Use the buttons to scroll through th e
/
filmstrip.
The picture on the filmstrip appears in the
LCD as the memory bar and picture locator
needle moves.
The memory bar indicates the amount of
space on the camera memory card. The dark
section represents the portion of the card that
is filled, while the needle locator shows the
position of the picture on the card.
6 To exit, press the Menu button.
34
Page 43

Magnifying Your Pictures
Menu
Capture
Setup
Review
T o zoom in on a specific part of a pictur e displayed o n the LCD, use the Magnify
feature. This feature lets you view a section of the current picture at two ti mes the
normal LCD size.
1 Set the Mode dial to Review.
2 Slide the POWER switch to the right to turn
on the camera.
The last picture taken appears on the
LCD screen.
3 Press the Menu button.
The main Review Menu screen appears.
4 Press a button until the picture you
want to magnify is highlighted on
the filmstrip.
The picture appears in the LCD viewing
area.
5 Press a button until the icon
is highlighted.
/
/
6 Press the DO-IT button.
The LCD displays a magnified view of the
selected picture.
7 Use the and buttons to scroll
to different parts of the picture.
/
/
8 To exit Magnify, press the DO-IT button.
4
35
Page 44

Selecting Pictures for Printing
Menu
Capture
Setup
Review
/
/
You can scroll through and select certain pictures on the camera memory card to
print, as well as create an index of all of the pictures using the Print Order
feature. This feature is useful because it saves you time when printing pictures
from a KODAK Picture Maker, or Personnel Picture Maker Sys tems.
1 Set the Mode dial to Review.
2 Slide the POWER switch to the right to turn
on the camera.
The last picture taken appears on the
LCD screen.
3 Press the Menu button.
The main Review Menu screen appears.
4 Press a button until the icon
is highlighted.
5 Press the DO-IT button.
The Print Order screen appears.
6 Press a button until the pi cture you
want is highlighted on the filmstrip.
7 Press a button until the Print Order
option you want is highlighted.
q
q
q
q INDEX PRINT or EDIT INDEX
/
CURRENT PICTURE or EDIT
PICTURE—marks the picture currently
selected on the filmstrip.
EXIT—returns you to the main Review
screen.
ALL PICTURES or EDIT ALL—
marks all of the pictures on the camera
memory card.
PRINT— thumbnails of all the pictures
on the camera memory card will print.
36
Page 45

8 Press the DO-IT button.
/
/
The Copies screen appears, unless you
selected the Index Print option, which returns
you to the main Review screen.
9 Press a button until the desired
number of p rints you want appears.
10 P ress the DO-IT button.
The print order is accepted and the Print
Order icon appears in the LCD of each
picture marked for printing. The main Print
Order screen reappears.
11 To exit Print Order, highlight EXIT, then
press the DO-IT button.
Cancelling Pictures for Printing
If you have second thoughts about the pictures you have selected to print, you
can go back and cancel individual pictures or the entire order.
1 Press a button until the Print Order
option you want is highlighted.
q
q
q
q
CANCEL CURRENT—cancels the
print order for the selected picture.
EXIT—returns you to the main Review
Menu screen.
CANCEL PRINT ORDER—cancels all
the print orders for the pictures.
CANCEL INDEX PRINT—cancels the
print order for the index print.
4
2 Press the DO-IT button.
The print order is cancelled and the Print
Order icon is removed. The main Print Or der
screen reappears.
3 To exit Print Order, highlight EXIT, then
press the DO-IT button.
37
Page 46

Protecting Your Pictures
Menu
Capture
Setup
Review
Safeguard your pictures from being deleted accidentally from the camera
memory card by using the Protect feature. This feature is very useful if the
camera and camera memory card are used by more than
one person.
1 Set the Mode dial to Review.
2 Slide the POWER switch to the right to turn
on the camera.
The last picture taken appears on the
LCD screen.
3 Press the Menu button.
The main Review Menu screen appears.
4 Press a button until the icon is
/
highlighted.
The Protect screen appears.
5 Press a button until the picture you
/
want to protect is selected.
6 Press the DO-IT button.
The picture appears on the LC D with the
Protect icon.
7 T o cancel a protected picture, select the
picture to be unprotected and press the DOIT button.
38
Page 47

Deleting One or All of Your Pictures
Menu
Capture
Setup
Review
/
/
If you decide that you do not like the pictures stored on th e camera memor y card,
or you just want to free up space, use the Delete feature to remove one or all of
the pictures on the card. If yo u have marked pictures as protected, they cannot be
deleted until you turn off the Protect feature. See page 38 for details.
1 Set the Mode dial to Review.
2 Slide the POWER switch to the right to turn
on the camera.
The last picture taken appears on the
LCD screen.
3 Press the Menu button.
The main Review Menu screen appears.
4
4 Press a button until the icon is
highlighted.
5 Press the DO-IT button.
The Delete screen appears.
6 Press a button until the picture you want
to delete is selected.
7 Press a button until the Delete option
you want is highlighted.
q
q
q
/
PICTURE—deletes the selected picture
from the camera memory card.
EXIT—returns you to the main Review
screen without deleting the picture(s).
ALL PICTURE S—deletes all of the
pictures on the camera memory card.
8 Press the DO-IT button.
The pictures are deleted from the camera
memory card.
9 To exit Delete, highlight EXIT, then press the
DO-IT button.
39
Page 48

Running a Slide Show on Your Television
Menu
Capture
Setup
Review
View your pictures on the camera LCD, or connect your camera to a television
and display your pictures to a large audience using the Slide Show feature. The
pictures appear on the television for a period of 1 to 99 seconds, a time you set
from the camera. The slide show ends after all the pictures have been shown; or,
if you are using a Kodak-specified AC adapter, the slide show continues until you
stop it.
1 Set the Mode dial to Review.
2 Slide the POWER switch to the right to turn on
the camera.
The last picture taken appear s on the
LCD screen.
3 Press the Menu button.
The main Review Menu screen appears.
4 Press a button until the icon is
highlighted.
/
5 Press the DO-IT button.
The Slide Show Interval screen appears.
6 Use the buttons to select the number
of seconds you want the pictures to appear on
the television.
If you want to view a slide show on the camera
LCD, press the DO-IT to start and stop the
slide show.
/
7 Insert the video cable into the video-out port
on the side of your camera, and connect the
other end of the video cable to the video-in
port on the te levision.
8 Turn on the television.
You may need to adju st the Video Out setting
to NTSC or PAL television signals. See page
49 for details.
9 Press the DO-IT button to start and stop the
slide show.
40
Page 49

Viewing Information About a Picture
Menu
Capture
Setup
Review
/
Look up specific information about a picture using the Picture Information
feature. The information that appears is for viewing and cannot be edited.
1 Set the Mode dial to Review.
2 Slide the POWER switch to the right to turn
on the camera.
The last picture taken appears on the
LCD screen.
3 Press the Menu button.
The main Review Menu screen appears.
4 Press a button until the icon is
highlighted.
4
5 Press the DO-IT button.
The Picture Info screen appears with that
picture’s information displayed.
Quality
q
Resolution
q
.
File Name
q
Directory Name
q
Capture Date/Time
q
Flash
q
Aperture
q
Shutter Speed
q
White Balance
q
Metering
q
Exposure Compensation
q
6 Press a button to view information on
other pictures.
/
7 To exit Picture Information, press the DO-IT
button.
41
Page 50

Page 51

5 Personalizing
Your Camera
Tailor your camera to fit whatever picture-taking needs you have. When you set
the camera to Camera Setup, you have the ability to personalize your camera so it
performs the way you want, each time you use it. With the camera, you can:
q Set a camera response beep, so you get feedback from the camera when
you initiate an action.
q Select a power-save setting to help conserve batteries.
q Access camera information to view a complete history of your
cameras use.
q Adjust a language setting, so you can select the language with which you
are most comfortable working.
q Format other camera memory cards so they work in your camera.
q Select specific default settings, so your camera is always set for th e w ay
you need to use it.
5
43
Page 52

Setting a Response Beep
Menu
Capture
Setup
Review
/
Your camera provides auditory feedback in the form of a beep anytime the
SHUTTER button is pressed, or when the camera cannot perform a selected
function. If you do not want auditory feedback, turn off the beep. This can be
especially useful when taking a spontaneous picture of someone or of wildlife.
1 Set the Mode dial to Camera Setup.
2 Slide the POWER switch to the right to turn
on the camera.
The main Camera Setup screen appears.
3 Press a button until the icon
is highlighted.
4 Press the DO-IT button.
The Beep screen appears. The current setting
is checked (ä).
5 Press a button until the Beep option
you want is highlighted.
/
q OFF—provides no auditory feedback.
q SELECTED ON—provides auditory
feedback when you press the SHUTTER
button, as well as
any warnings.
q ALL ON—provides auditory feedback
anytime a button is pressed.
6 Press the DO-IT button to accept the changes
and return to the main Camera Setup screen.
44
Page 53

Saving Camera Power
Menu
Capture
Setup
Review
/
The Power Save feature helps extend battery life by shortening the ti me that the
camera power stays on when not in use. For your convenience, the Power Save
setting is automatically activated. If situations arise where you need the camera
power to stay on for a longer period of inactivity, such as connecting the camera
to a computer, turn off the Power Save feature to have more time to work before
the camera automatically shuts off.
1 Set the Mode dial to Camera Setup.
2 Slide the POWER switch to the right to turn
on the camera.
The main Camera Setup screen appears.
3 Press a button until the icon is
highlighted.
4 Press the DO-IT button.
The Power Save screen appears. The current
setting is checked (ä).
5 Press a button until the Power Save
option you want is highlighted.
/
6 Press the DO-IT button to accept the changes
and return to the main Camera Setup screen.
5
45
Page 54

Viewing Camera Information
Menu
Capture
Setup
Review
/
Have you ever wondered how m any pict ures you h ave tak en with your camer a or
how many times the flash fired? The Camera Information feature keeps a record
for you.
1 Set the Mode dial to Camera Setup.
2 Slide the POWER switch to the right to turn
on the camera.
The main Camera Setup screen appears.
3 Press a button until the icon
is highlighted.
4 Press the DO-IT button.
The About screen appears.
The information that appears is
view-only and cannot be changed.
q Firmware Version—displays the latest
firmware version loaded into the camera.
q # Images Captured—displays the total
number of pictures taken with the camera.
q # Flash Fired—displays the total number
of times the flash fired in
the camera.
5 Press the DO-IT button to return to the main
Camera Setup screen.
46
Page 55

Selecting a Language for the Camera
Menu
Capture
Setup
Review
Select from many different languages for the camera. Once you select a
language, the text changes to reflect the language selected.
1 Set the Mode dial to Camera Setup.
2 Slide the POWER switch to the right to turn
on the camera.
The main Camera Setup screen appears.
3 Press a button until the icon
is highlighted.
/
4 Press the DO-IT button.
The Language screen appears. The current
setting is checked (ä).
5 Press a butto n un til t he language you
want is highlighted.
The main Camera Setup screen reappears.
6 Press the DO-IT button to accept the changes
and return to the main Camera Setup screen.
/
5
47
Page 56

Formatting Your Camera Memory Card
Menu
Capture
Setup
Review
If you own camera memory cards (CompactFlash cards) that have been used in
other digital cameras, they may not be p roperly formatted for u se in your ca mera,
or the data on the card may become corrupted. W h en these issues arise, your
camera indicates that the camera memory card needs to be formatted.
When you format a camera memory card, all of the information on the card is
erased. This includes pictures, borders and all other files. You can create and add
borders to the camera memory card. For more information, refer to the KODAK
DC5000 Border Transfer Application online help or the ReadMe file.
1 Set the Mode dial to Camera Setup.
2 Slide the POWER switch to the right to turn
on the camera.
The main Camera Setup screen appears.
3 Press a button until the icon is
/
highlighted.
4 Press the DO-IT button.
The Format Memory Card screen appears.
5 Press a button until CONTINUE
/
FORMAT is highlighted.
6 Press the DO-IT button to format the camera
memory card and return to the main Camera
Setup screen.
48
Page 57

Adjusting the Video Out Signal
Menu
Capture
Setup
Review
Set your camera so that it is compatible with NTSC or PAL video signals. The
Video Out feature needs to b e set correctly if you p lan on run ning a slide show of
the pictures from the camera on a tel evisi on or video monito r. For information on
setting up a slide show, see page 40.
1 Set the Mode dial to Camera Setup.
2 Slide the POWER switch to the right to turn
on the camera.
The main Camera Setup screen appears.
3 Press a button until the icon
is highlighted.
4 Press the DO-IT button.
The Video Out screen appears. The current
setting is checked (ä).
5 Press a button until the video out
option you want is highlighted.
/
5
/
q NTSC—used in most countries except
Europe. The United States
uses NTSC.
q PAL—used in European countries.
6 Press the DO-IT button to accept the change
and return to the main Camera Setup screen.
49
Page 58

Adjusting the Camera Default Settings
Menu
Capture
Setup
Review
/
/
Customize your camera so specific settings are activated automatically each time
you turn on the camera. Select settings for Flash, White Balance, Exposure
Compensation, Borders, and Effects to suit your particular picture-taking needs.
For default settings, see page 87.
Setting a Border Default
Adjust the camera so your favorite frame or graphic is added to each picture you
take. This is handy for incorporating your company logo into the pictures. For
more information about the Borders feature, see page 23.
Once the picture is taken, borders cannot be removed.
1 Set the Mode dial to Camera Setup.
2 Slide the POWER switch to the right to turn
on the camera.
The main Camera Setup screen appears.
50
3 Press a button until the icon
is highlighted.
4 Press the DO-IT button.
The Borders Default screen appears. The
current setting is checked (ä).
5 Press a button until the Border
option you want is highlighted.
No Borders is the main default setting.
6 Press the DO-IT button to accept the changes
and return to the main Camera Setup screen.
Page 59

Setting a Flash Default
Menu
Capture
Setup
Review
/
/
Adjust your camera so that it is set to a specific flash setting every time you turn
on the camera. For more information about the Flash setting, see page 15.
1 Set the Mode dial to Camera Setup.
2 Slide the POWER switch to the right to turn
on the camera.
The main Camera Setup screen appears.
3 Press a button until the icon is
highlighted.
4 Press the DO-IT button.
The Flash Default screen appears. The
current setting is checked (ä).
5 Press a button until the Flash option
you want is highlighted.
q AUTO (Main Default)—flash fires
when needed. Ideal for everyday picturetaking situations.
q FILL—flash fires every time you take a
picture. Ideal for pictures outside under
heavy shade.
q RED EYE—flash fires once so the eyes
become accustomed to the flash, then
fires again when the picture is taken.
Ideal for pictures of people.
q OFF—flash does not fire. Ideal for taking
pictures where flash is prohibited.
6 Press the DO-IT button to accept the changes
and return to the main Camera Setup screen.
5
Setting a White Balance Default
If you are always using your camera indoors where flash is prohibited, you can
set the camera so it is balanced for the type of light source that you take pictures
51
Page 60

under. For more information about the White Balance feature, see page 27.
Menu
Capture
Setup
Review
/ /
1 Set the Mode dial to Camera Setup.
2 Slide the POWER switch to the right to turn
on the camera.
The main Camera Setup screen appears.
3 Press a button until the icon
is highlighted.
4 Press the DO-IT button.
The White Balance Default screen appears.
The current setting is checked (ä).
5 Press a button until the White
Balance option yo u want is highlighted.
q AUTO (Main Default)—adjusts
automatically when flash is used. Ideal
for everyday pictures.
q DAYLIGHT—balances for daylight.
Ideal for indoor pictures under natural
lighting.
q TUNGSTEN—balances for the red-
orange color of household lighting.
q FLUORESCENT—balances for the
green color of fluorescent lighting.
6 Press the DO-IT button to accept the changes
and return to the main Camera Setup screen.
52
Page 61

Setting an Exposure Compensation Default
Menu
Capture
Setup
Review
/
/
Adjust the Exposure Compensation setting so that it is used every time you turn
on the camera. For more information about The Exposure Compensation feature,
see page 22.
1 Set the Mode dial to Camera Setup.
2 Slide the POWER switch to the right to turn
on the camera.
The main Camera Setup screen appears.
3 Press a button until the icon is
highlighted.
4 Press the DO-IT button.
The Exposure Compensation Default
screen appears.
5 Press a button until the exposure
compensation number you want
is highlighted.
If your pictures are too dark, increase (+) the
exposure number.
If your pictures are too light, decrease (-) the
exposure number.
The main default setting for Exposure
Compensation is 0.0.
6 Press the DO-IT button to accept the changes
and return to the main Camera Setup screen.
5
53
Page 62

Setting an Effect Default
Menu
Capture
Setup
Review
/
/
If you work for a newspaper or in an office environment where you need to
record lecture slides, you can adjust your camera so it takes pictures in black and
white, sepia tone, or to highlight text every time you turn on the camera. For
more information about the Effects feature, see page 24.
1 Set the Mode dial to Camera Setup.
2 Slide the POWER switch to the right to turn
on the camera.
The main Camera Setup screen appears.
3 Press a button until the icon
is highlighted.
4 Press the DO-IT button.
The Effects Default screen appears. The
current setting is checked (ä).
5 Press a button until the Effects
option you want is highlighted.
q No Effect (Main Default)—captures
pictures in full color.
q Black & White—captures pictures in
black-and-white. Ideal for taki ng pictures
for newspapers.
q Sepia—captures pictures in a red-brown
tone. Ideal for giving pictures an antique
look.
q Document—increases picture contrast so
text stands out.
6 Press the DO-IT button to accept the changes
and return to the main Camera Setup screen.
54
Page 63

Setting an Auto ISO Default
Menu
Capture
Setup
Review
/ /
If you always use your camera indoors without f lash, you can set the camera so it
uses a faster shutter speed to help avoid blurry pictures from camera movement.
For more information about the Auto ISO feature, see page 29.
1 Set the Mode dial to Camera Setup.
2 Slide the POWER switch to the right to turn
on the camera.
The main Camera Setup screen appears.
3 Press a button until the icon
is highlighted.
4 Press the DO-IT button.
The Auto ISO Default screen appears. The
current setting is checked (ä).
5 Press a button until the Auto ISO
option you want is highlighted.
q OFF (Main Default)—camera maintains
optimal shutter speed ranges. Ideal for
everyday pictures.
q ON—camera increases shutter speed
when flash is off . Ideal for indoor pict ures
in less than optimal lighting.
6 Press the DO-IT button to accept the changes
and return to the main Camera Setup screen.
5
55
Page 64

Page 65

6 Installing Your
Software
The KODAK DC5000 Camera Software (Installer) included with your camera
contains software for Windows-based personal computers and Macintosh
computers. These applications provide a variety of features that let you access
and use the pictures stored on the camera memory card. Detailed information on
using the software can be found in the online help supplied with each software
application.
Windows-Based System Requirements
Windows 95, Windows 98, Windows NT 4.0, or Windows 2000,
q
operating system.
Pentium 90-MHz microprocessor (minimum) with CD-ROM drive.
q
Color display monitor with a minimum resolution of 640 x 480 (1024 x
q
768 preferred) and 8-bit color
(16-bit or 24-bit recommended).
16 MB or more of available RAM.
q
120 MB of hard disk space available.
q
Available serial port, USB port (Windows 98 and Windows 2000), or
q
CompactFlash card reader.
6
Macintosh System Requirements
PowerPC-based Macintosh computer, with CD-ROM drive.
q
Operating system 7.6.1 or later for serial connection. Operating system
q
8.5.1 or later for USB connections.
Color display monitor with a minimum resolution of 640 x 480 (1024 x
q
768 preferred) and thousands of colors recommended.
q 32 MB or more of available RAM.
q 120 MB of hard disk space available.
q Available serial port, USB port, or CompactFlash card reader.
57
Page 66

KODAK Software for Windows-Based Computers
There are four KODAK software applications supplied with the camera for use
on a Windows-based computer. They are:
KODAK DC5000 Camera Mounter Software (Mounter)—provides an
q
easy way to view pictures from the camera memory card and copy them to
your computer.
KODAK DC5000 Digital Access Software (TWAIN Acquire)—
q
provides a quick way to view and acquire pictures from the camera
memory card to a TWAIN-compliant host software program, such as
ADOBE Photoshop or ADOBE PhotoDeluxe.
KODAK DC5000 Camera Controls Software (Camera Controls)—
q
lets you change camera, capture, and comm unications settings from a
computer as well as take pictures and review them.
KODAK DC5000 Border Transfer Application (Border)—lets you
q
convert existing Windows BMP files into the border file format (BDR)
and copy the borders to the camera memory card and to the hard disk.
Software Overview
A brief overview of the software is listed below. Detailed information on the
software is available in the online help for each application.
Feature Mounter
View thumbnail images
Transfer pictures
Display picture information
Open pictures on the hard drive
using other applications
Access Camera Controls
Take a picture
Delete pictur es
Format camera memory card
Add borders to camera memory
card
Copy borders to hard disk
58
TWAIN
Acquire
Camera
Controls
Border
✔✔
✔✔
✔✔
✔
✔✔✔
✔
✔✔
✔✔
✔
✔
Page 67

KODAK Software for Macintosh Computers
There are three KODAK software applications supplied with the camera for use
on a Macintosh computer. They are:
KODAK DC50 00 Picture Transfer Application ( Picture Transfer)—
q
provides an easy way to view pictures from the camera memory card and
copy them to your computer.
KODAK DC5000 Digital Access So ftware (Plug-In A cquire)—
q
provides a quick way to view and copy pictur es from the camera memory
card to any application that supports the ADOBE Photoshop plug-in
module, such as ADOBE Photoshop or ADOBE PhotoDeluxe.
KODAK DC5000 Border Transfer Application (Border)—lets you
q
convert existing BMP and PICT files into the border file format (BDR)
and copy the borders to the camera memory card and to the hard disk.
Software Overview
A brief overview of the software is listed below. Detailed information on the
software is available in the online help for each application.
Feature
View thumbnail images
Transfer pictures
Display picture information
Change camera settings
Take a picture
Change camera Capture settings
Delete pictures
Add borders to camera memory card
Copy borders to hard disk
Picture
Transfer
Plug-In
Acquire
✔✔
✔✔
✔✔
✔
✔
✔
✔✔
Border
✔
✔
6
59
Page 68

Installing the Software
While the Installer is automatically loading your software, take a few minute s to
fill out and send in the camera product registration card. This allows you to
receive information regarding software updates and registers some of the
products included with the camera.
1 Close all other software programs before starting the Installer.
2 Place the Installer CD into the CD-ROM drive.
3 Load the software.
On a Windows-based computer—if Auto Play is enabled, the first install
window automatically appears. If the first install window does not
automatically appear, choose Run from the Start menu. In the Run dialog bo x,
type the drive letter that contains the CD and type \setup.exe. For example:
d:\setup.exe
On a Macintosh computer— the first install window automatically appears.
4 Follow the on-screen instructions to ins tall the software.
5 If prompted, restart the computer when the software installation
is complete.
Detailed information on all the KODAK software is included in the online help
for each application.
60
Page 69

7 Connecting
Your Camera
In order for you to transfer pictures taken with your camera, you first need to
connect the camera to your computer or use a card reader. The camera can
communicate with your computer using one of the following:
RS-232 serial cable connection for Windows-based computers.
q
Serial cable or adapter plug for Macintosh computers.
q
Universal Serial Bus (USB) cable connection for both Windows 98 and
q
2000-based personal computers and Macintosh computers.
Card reader. This does not require connecting your camera to your
q
computer, but is another way to get your pictures from the camera. If you
do not have a card reader, you can purchase one as an accessory. For
details about available accessories, ask a dealer of KODAK products, or
visit our Website at: http://www.kodak.com/go/accessories.
Once the camera is connected to a computer and any required software is
installed, you are ready to transfer pictures from the camera to your computer.
Refer to the online help for information on each software application supplied
with the camera.
7
61
Page 70

Using a Serial Cable Connection
Menu
Capture
Setup
Review
The traditional means of connecting the camera to your computer is by serial
cable. When connecting the camera, it is a good idea to use a KODAK-specified
AC adapter (see page 4) to conserve battery power.
Connecting to a Windows-Based Computer
An RS-232 serial cable is provided so you can connect your camera to a
Windows-based computer.
1 Set the Mode dial to Connect.
2 Plug the appropriate end of the serial cable
into an available 9-pin serial port on
the computer.
Serial ports are usually labeled COM1 and
COM2, or A and B. If your computer has a
25-pin port, you need to use a 9-pin adapter
(available at your local computer store) and
attach it to the port before attaching the serial
cable to the computer.
If the ports are not labeled, see your com puter
User’s Guide for a diagram that illustrates all
of the external ports.
3 Open the serial/USB port door on the side of
the camera.
4 Plug the other end of the serial cable into the
camera serial port.
5 Slide the POWER switch to the right to turn
on the camera.
If you get a message on yo ur compu ter stat ing
that you are not connected, refer to the
Serial.PDF document installed with the
software, or the online help for
troubleshooting information.
62
Page 71

Connecting to a Macintosh Computer
Menu
Capture
Setup
Review
Either a serial cable for a Macintosh computer or adapter plug for use with the
RS-232 serial cable is provided so that you can connect your camera through a
serial port on a Macintosh computer.
1 Set the Mode dial to Connect.
2 Connect the serial port adapter plug into the 9 -
pin end of the serial cable.
3 Plug the adapter end of the serial cable into an
available serial port on the back of the
computer.
If your camera came with a serial cable for a
Macintosh computer instead of the serial
adapter plug, connect the end of the serial
cable labelled MAC into the available serial
port on the back of the computer.
Serial ports on Macintosh computers are
usually referred to as mo dem or
printer ports.
If the ports are not labeled, see you r co mpu ter
User’s Guide for a diagram that illustrates all
of the external ports.
7
4 Open the serial/USB port door on the side of
the camera.
5 Plug the other end of the serial cable into the
camera serial port.
6 Slide the POWER switch to the right to turn
on the camera.
If you get a message on your compu ter stating
that you are not connected, refer to the
Connect.PDF document installed with the
software, or the online help for
troubleshooting information.
63
Page 72

Using a USB Cable Connection
Menu
Capture
Setup
Review
If you have a personal computer with a Universal Serial Bus (USB) port, and are
running Windows 98, Windows 2000, or a Macintosh 8.5.1 or higher computer,
you may be able to connect the camera using a USB connection. The USB
interface provides an easy and faster alternative to a serial cable connection.
KODAK only recommends and supports using the camera with the systems listed
in the System Requirements on page 57.
When connecting the camera, it is a good idea to use a KODAK-specified AC
adapter (see page 4) to conserve battery power.
1 Set the Mode dial to Connect.
2 Plug the appropriate end of the USB cable into
the port on the computer with the USB
symbol.
If the port is not labeled, see your computer
User’s Guide for a diagram that illustrates all
of the external ports.
3 Open the serial/USB port door on the side of
the camera.
4 Plug the other end of the USB cable into the
camera serial/USB port.
5 Slide the POWER switch to the right to turn on
the camera.
If you get a message on your computer stating
that you are not connected, refer to the
USB.PDF document installed with the
software, or the online help for troubleshooting
information.
64
Page 73

Starting KODAK Software for Windows-Based
Computers
With the camera con nected to y our computer, you are now ready to open and use
the software that you installed in Chapter 6. For detailed information on using the
software, refer to the online help for
each application.
Opening Mounter Software
1 Double-click the My Computer icon.
The My Computer window appears.
2 Double-click the Camera icon.
The Camera Memory Card window appears listing individual files.
Opening Digital Access Software (TWAIN Acquire)
1 Open a TWAIN-compliant application, such as ADOBE Photoshop or
ADOBE PhotoDeluxe.
2 Choose File –> TWAIN Source.
3 Select KODAK DC5000 Zoom Acquire.
4 Choose File –> TWAIN Acquire.
The main Digital Access window appears.
Opening Camera Controls Software
Double-click the Camera Control icon on the desktop to open the main Camera
Controls window.
Opening Border Transfer Software
From the Windows Task bar click Start –> Programs –>
DC5000 –> Border Transfer Application.
The main Border Transfer window appears.
7
65
Page 74

Starting KODAK Software for Macintosh Computers
With the camera conn ected to yo ur compu t er, you are now ready to open and use
the software that you installed in Chapter 6. For detailed information on using the
software, refer to the online help for
each application.
Opening Picture Transfer Application
1 In the KODAK DC5000 Folder, double-click the Picture Transfer
Application folder.
The Picture Transfer icon appears.
2 Double-click the Picture Transfer icon.
The main Picture Transfer window appears.
Opening Digital Access Software (Plug-In Acquire)
1 Open a Plug-In-compliant application, such as ADOBE Photoshop or
ADOBE PhotoDeluxe.
2 Choose File –> Acquire –> KODAK DC5000 Acquire.
The main Digital Access window appears.
Opening Border Transfer Software
1 In the DC5000 Folder, double-click the Border Transfer Application folder.
2 Double-click the Border Transfer icon.
The main Bord er Transfer window appears.
66
Page 75

Navigating to Your Pictures
Pictures are stored on the camera memory card according to a standard agreed
upon by many camera manufacturers. This standard allows you to use the camera
memory card in different cameras.
Most KODAK applications supplied on the Installer CD guides you to your
pictures on the camera memory card; however, if you use the Mounter software
or a card reader to retrieve your pictu res or you can not lo cate yo ur pictures using
the software provided, the following description of the camera file structur e may
be helpful.
Root level folder is named \DCIM. Each time you turn on the camera or
q
insert a camera memory card, any empty folders within the \DCIM folder
are removed.
Typically, all pictures taken with the camera are stored in the
q
\DCIM\100K5000 folder.
Pictures are numbered in the order in which they are taken. The first
q
picture is name d DCP_0001.JPG, which is stored in the
\DCIM\100K5000 folder.
When you transfer pictures to the computer, or delete pictures from the
q
camera memory card, the camera uses consecutive numbers for
subsequent pictures. For example, if the last picture taken was
DCP_0007.JPG, the next picture is DCP_0008.JPG.
When you insert the camera memory card into another DC5000 camera,
q
the next picture is derived by incrementing either the highest existing
picture number, or the highest picture number previously taken by
that camera.
7
Once you take picture DCP_9999.JPG in the \DCIM\100K5000 folder,
subsequent pictures will appear in a new folder (\DCIM\101K5000) on the
camera memory card, beginning with picture DCP_0001.JP G.
If you use the camera memory card in a camera other than the DC5000 camera,
and that camera manufacturer adheres to this file structure standard, the \DCIM
folder will contain a folder named by that camera. Any pictures taken with that
camera are stored in the folder using the naming conventions established by the
manufacturer. For more information, refer to the documentation that
accompanied that camera.
67
Page 76

Page 77

8 Tips and
Troubleshooting
There may be times when questions arise from using your camera. This chapter
can point you in the right direction for finding the answers quickly, so you can
continue using your camera.
Connecting with Your Camera
If you are getting messages on your computer that state you are not connected,
refer to the PDF documents installed with the software, or the online h elp for
troubleshooting information. If you are connecting to a:
Windows-based Serial connection—refer to Serial.PDF
q
Windows-based USB connection—refer to USB.PDF
q
Macintosh computer—refer to Connect.PDF
q
Communicating with the Computer
If the camera cannot communicate with your computer you may need to adjust
the port and/or sp eed settings. If you are using a
Windows-based computer, the port and speed setting can be adjusted using the
KODAK DC5000 Camera Controls Software, or the KODAK DC5000 Digital
Access Software (TWAIN Acquire). If you are using a Macintosh computer, the
port and speed settings can be adjusted using the KODAK DC5000 Digital
Access Software (Plug-In Acquire), or the KODAK DC5000 Picture Transfer
Application. Information on using these app lications can be found in the online
help for each software application.
8
Adjusting Your Monitor for Better Viewing
Your monitor display settings may need to be adjusted to view pictures from the
camera. Refer to your computer’s User’s Guide for info rmat ion on ho w to adjust
your monitor’s display settings.
69
Page 78

Getting Better Results from Your Printer
You may notice that the colors on your computer screen do not always match
those in your documents or prints. This is because monitors and printers use
different color systems.
You may be able to achieve more predictable results in your printed
documents by:
Improving the qualit y of your paper. Copier paper may not o ffer the same
q
results as coated paper or paper made especially for inkjet printers.
Adjusting your printer software settings.
q
Using fresh ink cartridges. Do not use ink cartridges beyond their
q
life expectancy.
Remember these few tips when it comes time to print your document:
Color printing takes more time. More complex pictures increase the
q
printing and drying time.
Color printing is more memory intensive than black and white. If your
q
computer gives you an insufficient memory message, you may need to
close some applications, change some settings , or add additional memory.
Color prints may not photocopy as clearly as black and white. If you plan
q
to photocopy documents, you should consider printing the document in
grayscale. This setting is usually changed from the Print dialog box.
Resizing the picture to a smaller size or printing the picture on glossy
q
paper may increase the quality of the print.
To improve the quality of your prints, you may want to print your pictures
on KODAK Inkjet Snapshot Paper (S napshot Paper). Snapshot Paper is
made to work with most inkjet printers to give you clearer, crisper, and
more detailed images on your prints.
70
Page 79

Troubleshooting
If you are experiencing difficulties with your camera, check the following table
for possible solutions.
Additional technical information is available in the ReadMe file located in the
KODAK DC5000 folder.
Computer Monitor
Problem Cause Solution
The image on your monitor is
jagged or inappropriately
colored.
Camera Memory Card
Problem Cause Solution
The camera does not recognize
your camera memory card.
Monitor is not set
correctly.
The camera memory
card may no t be
CompactFlash
certified.
The camera memory
card may be corrupt or
formatted for use in
other digital cameras.
Camera memory card
is not inserted in
camera or is inserted
incorrectly.
Adjust your monitor
display settings. Refer
to your computer
User’s Guide for
details.
Purchase a certified
CompactFlash camera
memory card. See
page 5.
Reformat the camera
memory card. See
page 48.
Insert a camera
memory card. See
page 5.
8
71
Page 80

Camera Communications
Problem Cause Solution
Computer cannot
communicate with the camera.
Camera power is off. Turn on the camera.
See page 2.
The Mode dial is not
set to Connect.
Some Advanced
Power Management
utilities on laptops can
turn off ports to save
battery life.
Conflict with another
serial device, such as a
modem or PDA
Camera is not
connected to serial or
USB cable, or cable is
not connected to the
computer serial or
USB port.
Port settings in
software may be set to
the incorrect COM
port.
Set the Mode dial to
Connect.
See the Power
Management section
of your laptop User’s
Guide to disable this
feature.
Refer to the serial
communication or
corresponding section
of your computer
modem, PDA, and/or
operating system
User’s Guide.
Connect serial or USB
cable to camera and
computer port. Refer
to the online help, or
see Chapter 7,
“Connecting
Y our Camera” on page
61.
Change the COM port
settings to AutoSearch or to a specific
COM port. See the
online help.
72
Page 81

Camera
Problem Cause Solution
Ready light does not turn on
and the camera does not work.
Red ready light comes on and
camera does not take a picture.
Red ready light is blinking. Flash is not charged. Wait for the flash to
Green ready light is blinking
and camera takes a picture.
Green ready light is blinking
and camera does not take a
picture
Batteries are low or
dead.
Camera is not turned
on.
Batteries are low. Batteries need to be
Camera memory card
is full.
Auto Focus is not
locked.
Picture is being
processed and saved to
camera memory card.
Batteries need to be
replaced (see page 2),
or recharged (see page
3). Also, you could
use an AC adapter.
Turn on the camera.
See page 2.
replaced (see page 2),
or recharged (see page
3). Also, you could
use an AC adapter.
Transfer pictures to
your computer, delete
pictures on the card
(see page 39), or insert
a card with available
memory
(see page 5) .
charge.
Release the
SHUTTER button and
recompose you
picture. See page 11.
Wait for the pictur e to
complete processing.
8
73
Page 82

Camera
Problem Cause Solution
SHUTTER button does not
work.
Camera does not turn on. Batteries are not
Camera is not turned
on.
Mode dial is not set to
Capture.
Ready light is
blinking. Camera is
processing picture.
The Status Display
reads Full. The
camera memory card
is full.
properly installed.
Batteries are low or
dead.
Turn on the camera.
See page 2.
Set the Mode dial to
Capture.
Wait until Ready light
stops blinking before
attempting to take
another picture.
Transfer pictures to
your computer, delete
pictures on the card
(see page 39), or in sert
a card with available
memory
(see page 5).
Remove and reinstall
the batteries. See page
2.
Batteries need to be
replaced (see page 2),
or recharged (see page
3). Also, you could
use an AC adapter.
74
Page 83

Camera
Problem Cause Solution
Part of the picture is missing. Something was
blocking the lens
when the picture was
taken.
Y our eye or the picture
was not centered
correctly in the
viewfinder.
Camera Close-Up is
activated without
using Preview.
Picture is too dark. Flash is not on or did
not function.
The subject is too far
away for the flash to
have an effect.
The subject is in front
of a bright light.
The Exposure
Compensation is set
incorrectly.
The camera Metering
setting is set to the
Center-Weighted.
Keep hands, fingers,
or other objects away
from the lens when
taking pictures.
Leave space around
subject when
centering picture in
viewfinder.
Activate Preview
when using the CloseUp feature. See page
17.
Turn on the flash. See
page 15. Check the
flash default setting.
See page 51.
Move so there is no
more than 9.8 ft
(3.0 m) between the
camera and the
subject.
Change your position
so the light is not
behind the subject.
Increase the Exposure
Compensation. See
page 22. Check the
Exposure
Compensation default
setting. See page 53.
Change the Metering
setting to MultiPattern. See page 28.
8
75
Page 84

Camera
Problem Cause Solution
Picture is too light. The flash is not
needed.
The subject is too
close when the flash
was used.
The light sensor is
covered.
The Exposure
Compensation is set
incorrectly.
Stored pictures are damaged. The camera memory
card was removed
when the Ready light
was blinking.
Picture is black and white,
sepia toned, or has too much
contrast.
The Effects setting is
set incorrectly.
Change to Auto flash.
See page 15. Check
the flash default
setting. See page 51.
Move so there is at
least 1.6 ft (0.5 m)
between the camera
and the subject.
Hold the camera so
your hands or other
objects do not cover
the light sensor.
Decrease the Exposure
Compensation. See
page 22. Check the
Exposure
Compensation de fault
setting. See page 53.
Make sure the Ready
light is not blinking
before removing the
card.
Change the Effects
setting to No Effects.
See page 24. Check
the Effects default
setting. See page 54.
76
Page 85

Camera
Problem Cause Solution
Pictures remaining number
does not decrease after taking
a picture.
Picture is not clear. The lens is dirty. Clean the lens. See
Picture is tinted green, blue, or
red-orange.
The image Resolution
and Quality settings
does not take up
sufficient space to
decrease the picture
remaining number.
Subject too close
when taking picture.
Subject or the camera
moved while the
picture was taken.
The subject is too far
away for the flash to
be effective.
The Sharpness setting
may be set incorrectly.
The White Balance
setting is set
incorrectly.
The camera is
operating normally.
Continue taking
pictures.
page 89.
Stand at least .82 ft
(.25m) in wide angle,
1.6 ft (.5m) in
telephoto.
Hold camera steady
until the picture is
taken.
Move so the subject is
less than 13 ft
(4.0 m) away.
Change the Sharpness
setting to Standard.
See page 30.
Change the White
Balance setting to
Auto. See page 27.
Check the White
Balance default
setting. See page 51.
8
77
Page 86

LCD Messages
Message Cause Solution
Memory Card is Full. Memory card is full
and cannot hold
additional pictures.
No Card. There is no memory
card inserted in the
camera.
Memory Card is Corrupted/
Unreadable.
Camera needs service. The camera is
Memory card is
corrupted.
malfunctioning.
Transfer pictures to
your computer, delete
pictures on the card
(see page 39), or insert
a card with available
memory
(see page 5).
Insert a memory card
into the camera. See
page 5.
Insert a new (see page
5) or reformat the
memory card (see
page 48).
Have the camera
serviced.
78
Page 87

9 Where to
Get Help
If you need help with your camera, it is available from a number of resources:
Chapter 8 “Tips and
q
Troubleshooting”
Software’s manufacturer
q
Product information by fax
q
Place of purchase
q
World Wide Web
q
Technical support
q
Software Help
Help with any KODAK software packaged with your camera can be obtained
from the online help, or by contacting the manufacturer.
Online Services
Contact Kodak via:
World Wide We b http://www.kodak.com
q
(click on Service and Support)
America Online (keyword) KODAK
q
CompuServe GO KODAK
q
Faxed Information
Kodak offers automated support by fax:
9
q U.S. and Cana da 1-800-295-5531
q Europe 44-0-131-458-6962
q U.K. 44-0-131-458-6962
79
Page 88

Customer Support
If you have questions concerning the operation of KODAK software or the
camera, you should first check the KODAK Service and Support web site at:
www.kodak.com. Then, if you need to speak directly to a customer support
representative, have the camera serial number ready, and be at your computer
when you call.
U.S. and Canada—call toll free, 1-888-375-6325, between the hours of
q
9:00 a.m. and 8:00 p.m. (Eastern Standard Time) Monday
through Friday.
Europe—call the Kodak Digital Imaging Support Centre toll free number
q
associated with your location, or the U.K . toll lin e,
44-131-4586714, between the hours of 09.00 and 17.00 (GMT/CET)
Monday through Friday.
Outside the U.S., Canada, and Europe—call the number on the
q
following pages that is associated with your location.
Country Help number Fax
Argentina 54-1-808-300 54-327-58158
Australia 1-300-130-674 03-9353-2092
Austria 0179-567-357 44-131-4586962
Belgium 02-713-14-45 44-131-4586962
Brazil 0-800-15-0000
Caribbean 78-7-757-5500 305-507-5103
Chile 56-2-697-2000 54-327-58158
China–Shanghai 800-8205155 86-21-63500888-1579
China–Beijing 010-65616561 86-10-6347-5641
Colombia 571-412-55-50 571-412-55-40
Denmark 3-848-71-30 44-131-4586962
Dominican Republic 809-563-1252 809-563-1264
Egypt 44-0-131-458-6714 20-2-393-1199
Eire 44-131-4586714 44-131-4586962
Finland 0800-1-17056 44-131-4586962
France 01-55-1740-77 44-131-4586962
Germany 069-5007-0035 44-131-4586962
Greece 0080044125605 44-131-458-962
Hong Kong 852-2564-9777 852-2562-4258
80
Page 89

Country Help number Fax
Hungary 44-0-131-458 6714 36-1-269-71-13
India 91-22-617-5823 91-22-617-6004
Ireland 01-407-3054 44-131-4586962
Italy 02-696-334-52 44-131-4586962
Japan 81-3-5488-2390 81-3-5488-4512
Kenya 254-2-530-164 254-2-530-171
Korea 82-2-708-5400 82-2-708-5500
Latin America 1-305-267-4700 1-305-267-4780
Lebanon 44-0-131-458 6714 961-1-881726
Malaysia 60-3-757-2722 60-3-755-5919
Mexico 52-5-449-4300
Middle East 44-0-131-458-6714 44-131-4586962
Netherlands 020-3469372 44-131-4586962
New Zealand 0800-500-135 64-9-302-8637
Norway 23-16-21-33 44-131-4586962
Pakistan 971-4-444910 971-4-447033
Panama 52-3-678-6200 507-263-5804
Peru 51-1-224-8610 51-1-224-8605
Philippines 63-2-810-0331 63-2-816-6718
Portugal 44-0-131-458-6714 44-131-4586962
Puerto Rico 787-757-5500 787-257-6060
Russia 44-0-131-4586714 44-131-4586962
Singapore 65-470-9875 65-479-8397
South Africa 27-11-608-2512 27-11-608-3398
Spain 91-749-76-53 44-131-4586962
Sweden 08-587-704-21 44-131-4586962
Switzerland 49-711-406-5112 44-131-4586962
Taiwan 886-2-893-8210 8862-2895-1069
Thailand 66-2-271-3040 66-2-279-5073
Turkey 90-216-362-8686 90-216-362-9200
United Arab Emirates 971-4-444910 971-4-447033
U.K. 0870-2430270 44-131-4586962
Uruguay 59-2-92-0473 598-2-92-1796
Venezuela 58-2-903-1111 582-903-1290
9
81
Page 90

Page 91

10 Warr anty and
Regulatory
Informa tion
Warranty Time Period
Kodak warrants the KODAK DC5000 Zoom Digital Camera to be free from
malfunctions and defects in both materials and workmanship for one year from
the date of purchase.
Warranty Repair Coverage
This warranty will be honored within the geographical location that the product
was purchased.
If the equipment does not function properly during the warranty period due to
defects in either materials or workmanship, Kodak will, at its option, either repair
or replace the equipment without charge, subject to the conditions and limitations
stated herein. Such repair service will include all labor, as well as any necessary
adjustments and/or replacement parts.
If replacement parts are used in making repairs, these parts may be
remanufactured or may contain remanufactured materials. If it is necessary to
replace the entire system, it may be replaced with a remanufactured system.
Kodak will also provide telephone assistance during the warranty period.
10
83
Page 92

Limitations
WARRANTY SERVICE WILL NOT BE PROVIDED WITHOUT DATED
PROOF OF PURCHASE. PLEASE RETURN THE WARRANTY
REGISTRATION CARD WITHIN 30 DAYS OF PURCHASE.
THIS WARRANTY BECOMES NULL AND VOID IF YOU FAIL TO PACK
YOUR DC5000 CAMERA IN A MANNER CONSISTENT WITH THE
ORIGINAL PRODUCT PACKAGING AND DAMAGE OCCURS DURING
PRODUCT SHIPMENT.
THIS WARRANTY DOES NOT COVER: CIRCUMSTANCES B EYOND
KODAK’S CONTROL; SERVICE OR PARTS TO CORRECT PROBLEMS
RESULTING FROM THE USE OF ATTACHMENTS, ACCESSORIES OR
ALTERATIONS NOT MARKETED BY KODAK; SERVICE REQUIRED AS
THE RESULT OF UNAUTHORIZED MODIFICATIONS OR SERVICE;
MISUSE, ABUSE; FAILURE TO FOLLOW KODAK’S OPERATING,
MAINTENANCE OR REPACKAGING INSTRUCTIONS; OR FAILURE TO
USE ITEMS SUPPLIED BY KODAK (SUCH AS ADAPTERS AND
CABLES).
KODAK MAKES NO OTHER WARRANTIES, EXPRESS, IMPLIED, OR OF
MERCHANTABILITY OR FITNESS FOR A PARTICULAR PURPOSE FOR
THIS EQUIPMENT OR SOFTWARE.
REPAIR OR REPLACEMENT WITHOUT CHARGE ARE KODAK’S ONLY
OBLIGATION UNDER THIS WARRANTY. KODAK WILL NOT BE
RESPONSIBLE FOR ANY SPECIAL, CONSEQUENTIAL OR INCIDENTAL
DAMAGES RESULTING FROM THE PURCHASE, USE, OR IMPROPER
FUNCTIONING OF THIS EQUIPMENT REGARDLESS OF THE CAUSE.
SUCH DAMAGES FOR WHICH KODAK WILL NOT BE RESPONSIBLE
INCLUDE, BUT ARE NOT LIMITED TO, LOSS OF REVENUE OR PROFIT,
DOWNTIME COSTS, LOSS OF USE OF THE EQUIPMENT, COST OF ANY
SUBSTITUTE EQUIPMENT, FACILITIES OR SERVICES, OR CLAIMS OF
YOUR CUSTOMERS FOR SUCH DAMAGES.
DEPENDING ON YOUR GEOGRAPHICAL LOCATION, SOME
LIMITATIONS AND EXCLUSIONS MAY NOT APPLY.
84
Page 93

Application Support
For application specific support, contact your reseller, systems integrator,
software manufacturer, or dealer.
How to Obtain Se rvice
Visit us on the Internet at http://www.kodak.co m.
Please refer to the Chapter 9 “Where to Get Help” on page 79 for the support
number designated to your location.
When returning a camera for repair, pack the camera in its original packaging
materials. A problem report should also be enclosed with the equipment. If the
original packaging has been discarded or is not available, packaging will be at the
owner's expense.
Unless a specific Kodak warranty is communicated to the purchaser in writing by
a Kodak company, no other warranty or liability exists beyond the information
contained above, even though defect, damage or loss may be caused by
negligence or other act.
To obtain warranty repair service contact your local Kodak representative. For
assistance, refer to Chapter 9 “Where to Get Help” on page 79 for information.
85
10
Page 94

Regulatory Information
FCC Compliance and Advisory
This device complies with Part 15 of the FCC Rules. Operation is subject to the
following two conditions: 1) this device may not cause harmful interference, and
2) this device must accept any interference received, including interference that
may cause undesired operation.
This equipment has been tested and found to comply with the limits for a Class B
digital device, pursuant to Part 15 of the FCC Rules. These limits are designed to
provide reasonable protection against harmful interference in a residential
installation.
This equipment generates, uses, and can radiate radio frequency energy and, if
not installed or used in accordance with the instructions, may cause harmful
interference to radio communications. However, there is no guarantee that
interference will not occur in a particular installation.
If this equipment does cause harmful interference to rad io or television reception,
which can be determined by turning the equipment off and on, the user is
encouraged to try to correct the interference by one or more of the following
measures: 1) reorient or relocate the receiving antenna; 2) increase the separation
between the equipment and the receiver; 3) connect the equipment to an outlet on
a circuit different from that to which the receiver is connected; 4) consult the
dealer or an experienced radio/TV technician for additional su ggestions.
Any changes or modifications not expressly approved by the party responsible
for compliance could void the user’s authority to operate the equipment. Where
shielded interface cables have been provided with the product or specified
additional components or accessories elsewhere defined to be used with the
installation of the product, they must be used in order to ensure compliance with
FCC regulati o n .
Canadian DOC Statement
DOC Class B Compliance—This digital apparatus does not exceed the Class B
limits for radio noise emissions fro m digital apparatus set out in the radio
interference regulations of the Canadian Department of Communications.
Obervation des normes-Class B—Le présent appareil numérique n’émet pas de
bruits radioélectriques dépassant les l imites applicables aux appareils n umériques
de la Classe B prescrites dans les règlements sur le brouillage redioélectrique
édictés par le Ministère des Communications du Canada.
86
Page 95

11 Appendix
This appendix serves as a resource for specific techn ical infor mation and care fo r
your camera, and contains the following information:
Original default settings.
q
Camera Specifications.
q
Care and maintenance.
q
Battery usage guidelines.
q
Original Camera Default Settings
Your camera is set to these settings when you take the camera out of the box for
the first time.
Feature Setting
Digital Zoom Off
Flash Auto
Infinity Focus/Close-Up Of f
Self-Timer Off
Preview Off
Quickview On
Exposure Compensation 0.0
Quality Best
Resolution High
Date Stamp Off
Auto ISO (DC280) Off
White Balance Auto
Metering Multi-Pattern
Exposure Lock Off
Borders Off
Effects Off
11
87
Page 96

Camera Specifications
DC5000 Camera
Sensor Resolution CCD 1901 x 1212 = 2.1 millions of pixels
(total number of pixels)
Picture
Resolution
High 1760 x 1168=2,0 55,680
Standard 896 x 592=530,432
Color 24-bit, millions of colors
Picture File Format Exif version 2.1 (JPEG base)
Picture Storage ATA compatible CompactFlash card
Viewfinder Real image
ASA/ISO Sensitivity 70
Flash Range Wide 1.6 ft to 9.8 ft (0.5 to 3.0 m)
TelePhoto 1.6 ft to 7.9 f t (0.5 to 2.4 m)
Lens Type KODAK EKTANAR Lens
Maximum
Aperture
Zoom 2X Optical zoom
Focal Length 30 to 60 mm (equivalent to 35mm
Focus Distance Wide/TelePhoto: 1.6 ft (0.5 m) to infinity
Power Batteries AA-size 1.5-volt alkaline
DC Input KODAK-specified AC adapter, accessory
Tripod Socket .25 in. (.006 m) threaded
Vid eo Out NTSC or P A L
Dimensions Width 5.5 in. (140 mm)
Length 3.5 in. (89 mm)
Height 3.25 in. (83 mm)
Weight 1 lb. (459 g) without batteries
Operating Temperature 32 to 104° F (0 to 40° C)
Weatherproof Rating IEC529 Class 4
2.0 millions of pixels
Wide: F/3
TelePhoto: F/3.8
3X Digital zoom
camera)
6.5 to 13 mm (actual)
Close-Up: 0.82 ft (0.25 m) to
1.6 ft (0.5 m)
88
Page 97

General Maintenance and Safety
T o keep from damag in g your camera, do not open the memory card do or,
q
battery door, or skylight filter while in harsh environments such as rain,
sea air, or windstorms. The seals in these areas prevent exposure to
moisture and dirt which can damage your camera.
Always follow basic safety precautions, refer to the “Important Safety
q
Instructions” booklet packed with your camera.
Clean the outside of the camera by wiping with a clean, dry cloth. Never
q
use harsh or abrasive cleaners or organic solvents on the camera or any of
its parts.
Do not allow any chemicals, such as suntan lotion to come into contact
q
with the painted surface of the camera.
Never disassemble or touch the inside of the camera. This could result in
q
electrical shock.
If you notice smoke or a strange smell coming from the camera,
q
immediately turn off the camera, wait a few minutes until the camera
cools, and then remove the batteries. Contact your Technical Support
Center.
If you need to remove the lens filter cover, first clean the outside of the
q
camera to prevent getting any dirt, moisture, or dust on the interi or lens.
Once the cover is removed, do not touch the interior lens. If necessary,
clean the interior lens with the appropriate cleaning accessory, such as a
KODAK lens pen accessory.
lens filter cover
interior lens
When replacing the lens filter cover, be sure that the gaskets are clean and
that the cover is tightly secured.
89
11
Page 98

Clean the lens filter cover and back LCD screen:
q
Do not use cleaning solutions unless they are designed specifically for
camera lenses. Do not wipe the camera lens or LCD screen with
chemically treated eyeglass lens tissue as it may scratch
the lens.
1 Blow gently on the lens or LCD screen to remove dust and dirt.
2 Moisten the lens or LCD screen by breathin g lightly on it.
3 Wipe the lens or LCD screen gently with a soft, lint-free cloth or an
untreated lens-cleaning tissue.
Service agreements are available in some countries. Please contact a dealer of
KODAK products for more information.
90
Page 99

Using Your Batteries
Kodak recommends KODAK Photolife AA Alkaline Batteries, or
q
KODAK Photolife AA Ni-MH Rechargeable Batteries for use in
the camera.
Remove the batteries when the camera is stored for extended periods of
q
time.
Always follow your battery manufacturer’s directions fully. Do not
q
attempt to disassemble, short circuit, or subject the battery to high
temperature or fire.
Your camera has been designed to operate correctly using a variety of
q
AA-size batteries currently available. These include 1.5-volt alkaline and
rechargeable 1.2-volt Nickel Metal Hydride (Ni-MH).
Replace all batteries of a set at the same time. New batteries should not be
q
mixed with used ones. Do not mix rechargeable and nonrechargeable
batteries. Do not mix alkaline or Ni-MH types of batteries. Do not mix
different grades or brands of batteries. Failure to observe this precaution
may result in some batteries in a set being driven beyond their normal
exhaust point and increase their possibility of leakage.
NOT ALL BATTERIES ARE CREATED EQUAL! Battery life depends
q
significantly on age, usage conditions, type, brand, and camera. Digital
camera requirements are very demanding on batteries. Not all batteries
perform well under these challenging conditions. In Kodak lab tests, NiMH rechargeable batteries delivered outstanding results in a variety of
conditions. Ni-MH batteries are designed for high-demand devices, such
as digital cameras, and do not exhibit the “memory” effects seen with
other rechargeable technologies.
If you elect to use alkaline batteries in your camera, you will obtain better
q
performance from “photo-flash grade” alkaline batteries, such as
KODAK PHOTOLIFE alkaline batteries. These types of batteries last
more than twice as long in digital cameras as ordinary alkaline batteries.
Alkaline batteries are not rechargeable, do not attempt to recharg e them in
the battery charger.
When using your camera on battery power, we recommend you limit
q
continuous LCD Preview or Review to less than 10-minutes per session.
If you are using the camera for longer period s, it is recommended that y ou
do so with the camera powered by the
AC adapter.
q When you replace the batteries, make sure that the new batteries are not
wet. If they are, wipe them with a dry cloth before using them.
11
91
Page 100

Battery performance is reduced at temperatures below 32°F (0°C). Carry
q
spare batteries when using your camera in cold weather, and keep them
warm until you are ready to take pictures. Do not discard cold batteries
that do not work, once warmed, they may be usable.
When disposing of batteries, follow the manufacturer’s instructions and
q
any local and national regulations. Kodak suggests customers take
advantage of any community battery recycling progr ams that may exist in
your area. Contact your local waste remover or recycler for details.
Caution Hot Surface
When removing batteries, allo w to cool before touching, since the
q
batteries may be hot.
92
 Loading...