

Page 1

Kodak Digital Science
(TM)
DC50 zoom camera
User’s Guide
Page 2

Contents
Introduction 1. . . . . . . . . . . . . . . . . . . . . . . . . . . . . . . . . . . . . . . . . . . . . . . . . . .
Features 1. . . . . . . . . . . . . . . . . . . . . . . . . . . . . . . . . . . . . . . . . . . . . . . . . .
Checking Package Contents 2. . . . . . . . . . . . . . . . . . . . . . . . . . . . . . . . .
Using the Camera 3. . . . . . . . . . . . . . . . . . . . . . . . . . . . . . . . . . . . . . . . . . . . .
Installing the Batteries 4. . . . . . . . . . . . . . . . . . . . . . . . . . . . . . . . . . . . . .
Turning the Camera On and Off 8. . . . . . . . . . . . . . . . . . . . . . . . . . . . . .
Camera On 8. . . . . . . . . . . . . . . . . . . . . . . . . . . . . . . . . . . . . . . . . . . . . .
Camera Off 9. . . . . . . . . . . . . . . . . . . . . . . . . . . . . . . . . . . . . . . . . . . . . .
Flashing Indicator Lights and Icons 9. . . . . . . . . . . . . . . . . . . . . . . . . . .
Taking Pictures 10. . . . . . . . . . . . . . . . . . . . . . . . . . . . . . . . . . . . . . . . . . . .
Turning On and Positioning the Camera 10. . . . . . . . . . . . . . . . . . . . . .
Framing Your Subject in the Viewfinder 12. . . . . . . . . . . . . . . . . . . . . .
Camera Features 14. . . . . . . . . . . . . . . . . . . . . . . . . . . . . . . . . . . . . . . . . . . . . .
January 1996
Capturing the Image 13. . . . . . . . . . . . . . . . . . . . . . . . . . . . . . . . . . . . . .
Camera Front 16. . . . . . . . . . . . . . . . . . . . . . . . . . . . . . . . . . . . . . . . . . . . .
Sliding Cover/Power Switch 17. . . . . . . . . . . . . . . . . . . . . . . . . . . . . . . .
Front Indicator Light 18. . . . . . . . . . . . . . . . . . . . . . . . . . . . . . . . . . . . . . .
Auto Focus Sensors 18. . . . . . . . . . . . . . . . . . . . . . . . . . . . . . . . . . . . . . .
Camera Top 19. . . . . . . . . . . . . . . . . . . . . . . . . . . . . . . . . . . . . . . . . . . . . . .
Shutter Button 20. . . . . . . . . . . . . . . . . . . . . . . . . . . . . . . . . . . . . . . . . . . .
Zoom Buttons 21. . . . . . . . . . . . . . . . . . . . . . . . . . . . . . . . . . . . . . . . . . . .
i
Page 3

Camera Back 22. . . . . . . . . . . . . . . . . . . . . . . . . . . . . . . . . . . . . . . . . . . . . .
Viewfinder 23. . . . . . . . . . . . . . . . . . . . . . . . . . . . . . . . . . . . . . . . . . . . . . .
Viewfinder Frame 24. . . . . . . . . . . . . . . . . . . . . . . . . . . . . . . . . . . . . . . . .
EJECT Button 24. . . . . . . . . . . . . . . . . . . . . . . . . . . . . . . . . . . . . . . . . . . .
MODE Button 25. . . . . . . . . . . . . . . . . . . . . . . . . . . . . . . . . . . . . . . . . . . .
SELECT Button 26. . . . . . . . . . . . . . . . . . . . . . . . . . . . . . . . . . . . . . . . . .
ERASE Button 26. . . . . . . . . . . . . . . . . . . . . . . . . . . . . . . . . . . . . . . . . . .
DC50 zoom camera LCD Icons 27. . . . . . . . . . . . . . . . . . . . . . . . . . . . . .
Auto Focus 28. . . . . . . . . . . . . . . . . . . . . . . . . . . . . . . . . . . . . . . . . . . .
Exposure Compensation 30. . . . . . . . . . . . . . . . . . . . . . . . . . . . . . . . .
Flash 31. . . . . . . . . . . . . . . . . . . . . . . . . . . . . . . . . . . . . . . . . . . . . . . . . .
Image Quality 33. . . . . . . . . . . . . . . . . . . . . . . . . . . . . . . . . . . . . . . . . .
Timer 34. . . . . . . . . . . . . . . . . . . . . . . . . . . . . . . . . . . . . . . . . . . . . . . . . .
Battery 36. . . . . . . . . . . . . . . . . . . . . . . . . . . . . . . . . . . . . . . . . . . . . . . .
Image Counters 37. . . . . . . . . . . . . . . . . . . . . . . . . . . . . . . . . . . . . . . . . .
Erase Images 39. . . . . . . . . . . . . . . . . . . . . . . . . . . . . . . . . . . . . . . . . .
Memory Card 40. . . . . . . . . . . . . . . . . . . . . . . . . . . . . . . . . . . . . . . . . .
Copy Images 41. . . . . . . . . . . . . . . . . . . . . . . . . . . . . . . . . . . . . . . . . . .
Using Removable Memory Cards 45. . . . . . . . . . . . . . . . . . . . . . . . . . . . . . .
Inserting a Memory Card 46. . . . . . . . . . . . . . . . . . . . . . . . . . . . . . . . . . . .
Removing a Memory Card 48. . . . . . . . . . . . . . . . . . . . . . . . . . . . . . . . . . .
Copying Pictures from the Camera to a Memory Card 49. . . . . . . . . . .
Erasing a Memory Card 50. . . . . . . . . . . . . . . . . . . . . . . . . . . . . . . . . . . . .
File Name 52. . . . . . . . . . . . . . . . . . . . . . . . . . . . . . . . . . . . . . . . . . . . . . . . .
ii
January 1996
Page 4

Batteries 53. . . . . . . . . . . . . . . . . . . . . . . . . . . . . . . . . . . . . . . . . . . . . . . . . . . . . .
Battery Life 53. . . . . . . . . . . . . . . . . . . . . . . . . . . . . . . . . . . . . . . . . . . . . . . .
Storing the Camera 54. . . . . . . . . . . . . . . . . . . . . . . . . . . . . . . . . . . . . . . .
Battery Charge Level 54. . . . . . . . . . . . . . . . . . . . . . . . . . . . . . . . . . . . . . .
Improving Battery Performance 55. . . . . . . . . . . . . . . . . . . . . . . . . . . . . .
Battery Safety Information 55. . . . . . . . . . . . . . . . . . . . . . . . . . . . . . . . . . .
About NiCad Batteries 56. . . . . . . . . . . . . . . . . . . . . . . . . . . . . . . . . . . . . .
Using a Power Adapter 57. . . . . . . . . . . . . . . . . . . . . . . . . . . . . . . . . . . . . . . . .
Connecting a Power Adapter to the Camera 58. . . . . . . . . . . . . . . . . . .
Connecting to a Computer 59. . . . . . . . . . . . . . . . . . . . . . . . . . . . . . . . . . . . .
MACINTOSH Systems 60. . . . . . . . . . . . . . . . . . . . . . . . . . . . . . . . . . . . . .
Systems Running WINDOWS Software 62. . . . . . . . . . . . . . . . . . . . . . .
Maintenance 64. . . . . . . . . . . . . . . . . . . . . . . . . . . . . . . . . . . . . . . . . . . . . . . . . .
T roubleshooting 66. . . . . . . . . . . . . . . . . . . . . . . . . . . . . . . . . . . . . . . . . . . . . . .
Camera Specifications 74. . . . . . . . . . . . . . . . . . . . . . . . . . . . . . . . . . . . . . . . .
Regulatory Information 76. . . . . . . . . . . . . . . . . . . . . . . . . . . . . . . . . . . . . . . .
Index 78. . . . . . . . . . . . . . . . . . . . . . . . . . . . . . . . . . . . . . . . . . . . . . . . . . . . . . . . .
January 1996
General Guidelines 64. . . . . . . . . . . . . . . . . . . . . . . . . . . . . . . . . . . . . . . . .
Cleaning the Camera Lens 64. . . . . . . . . . . . . . . . . . . . . . . . . . . . . . . . . .
Cleaning the Light Sensor and Focus Sensors 65. . . . . . . . . . . . . . . . .
Storing the Camera 65. . . . . . . . . . . . . . . . . . . . . . . . . . . . . . . . . . . . . . . .
iii
Page 5
Introduction
The
Kodak Digital Science
camera) allows you to take pictures and transfer them to your
computer where you can save them, manipulate them using image
editing software, or print them on your printer.
Features
(TM) DC50 zoom camera (DC50 zoom
January 1996
The easy-to-use DC50 zoom camera offers the following features:
– automatic focus
– zoom lens
– flash settings
– timer settings
– exposure settings
– removable memory card
– “power save” mode
– power supply choice: batteries or AC power adapter
– battery use indicator
– standard tripod mount
1
Page 6

Checking Package Contents
The following items are included with your new DC50 zoom camera:
– DC50 zoom camera
– four (4) lithium batteries
– serial cable for use with Macintosh systems
– serial cable for use with Windows systems
– 9-pin adapter for a 25-pin serial port
– camera software application kit
– Quick Reference Guide
Kodak Digital Science
–
on which you will find the following items:
* ADOBE Acrobat (TM) Reader software
(one for Macintosh systems and one for Windows systems)
* an ADOBE Acrobat(TM) “pdf” format file of this User’s Guide
(one for Macintosh systems and one for Windows systems)
* warranty registration card
* various other information which may help you use your
DC50 zoom camera
(TM) Digital Camera Reference CD
2
January 1996
Page 7

Using the Camera
This section provides instructions for using your new DC50 zoom
camera to take pictures. However, you should also become familiar
with the DC50 zoom camera buttons and features which are described
in the
The DC50 zoom camera focuses on subjects from distances of
2.3 feet (70 cm) to infinity. Pictures taken with subjects closer than
2.3 feet (70 cm) may appear blurry. The close-up mode allows
you to take pictures of subjects from distances of 1.6 feet (50 cm).
For more information about focus modes, refer to the
Features
The DC50 zoom camera can store 7 to 22 pictures in its internal
memory, depending on the features you select. The Images Remaining
Counter in the Liquid Crystal Display (LCD) on the back of the camera
shows you the number of pictures that you can take before the camera
is full. As you take pictures, the number in the Images Remaining
Counter decreases. When the camera memory is full, “FUL” appears
in the Images Remaining Counter. You cannot take any more pictures
until the camera memory is erased.
Camera Features
section.
section.
Camera
January 1996
NOTE: For detailed information about the DC50 zoom camera’s
features, refer to the
Pictures can also be stored on optional removable memory
cards. For information about using memory cards in the
DC50 zoom camera, refer to the
Cards
section.
Camera Features
Using Removable Memory
section.
3
Page 8
Installing the Batteries
Four lithium batteries are included with your DC50 zoom camera.
You can also use rechargeable NiCad (nickel-cadmium) or AA
alkaline batteries. Refer to the
about batteries.
Batteries
section for more information
WARNING:
Mixing battery types in the camera may cause
a fire or explosion. Only use batteries that are
all the same type.
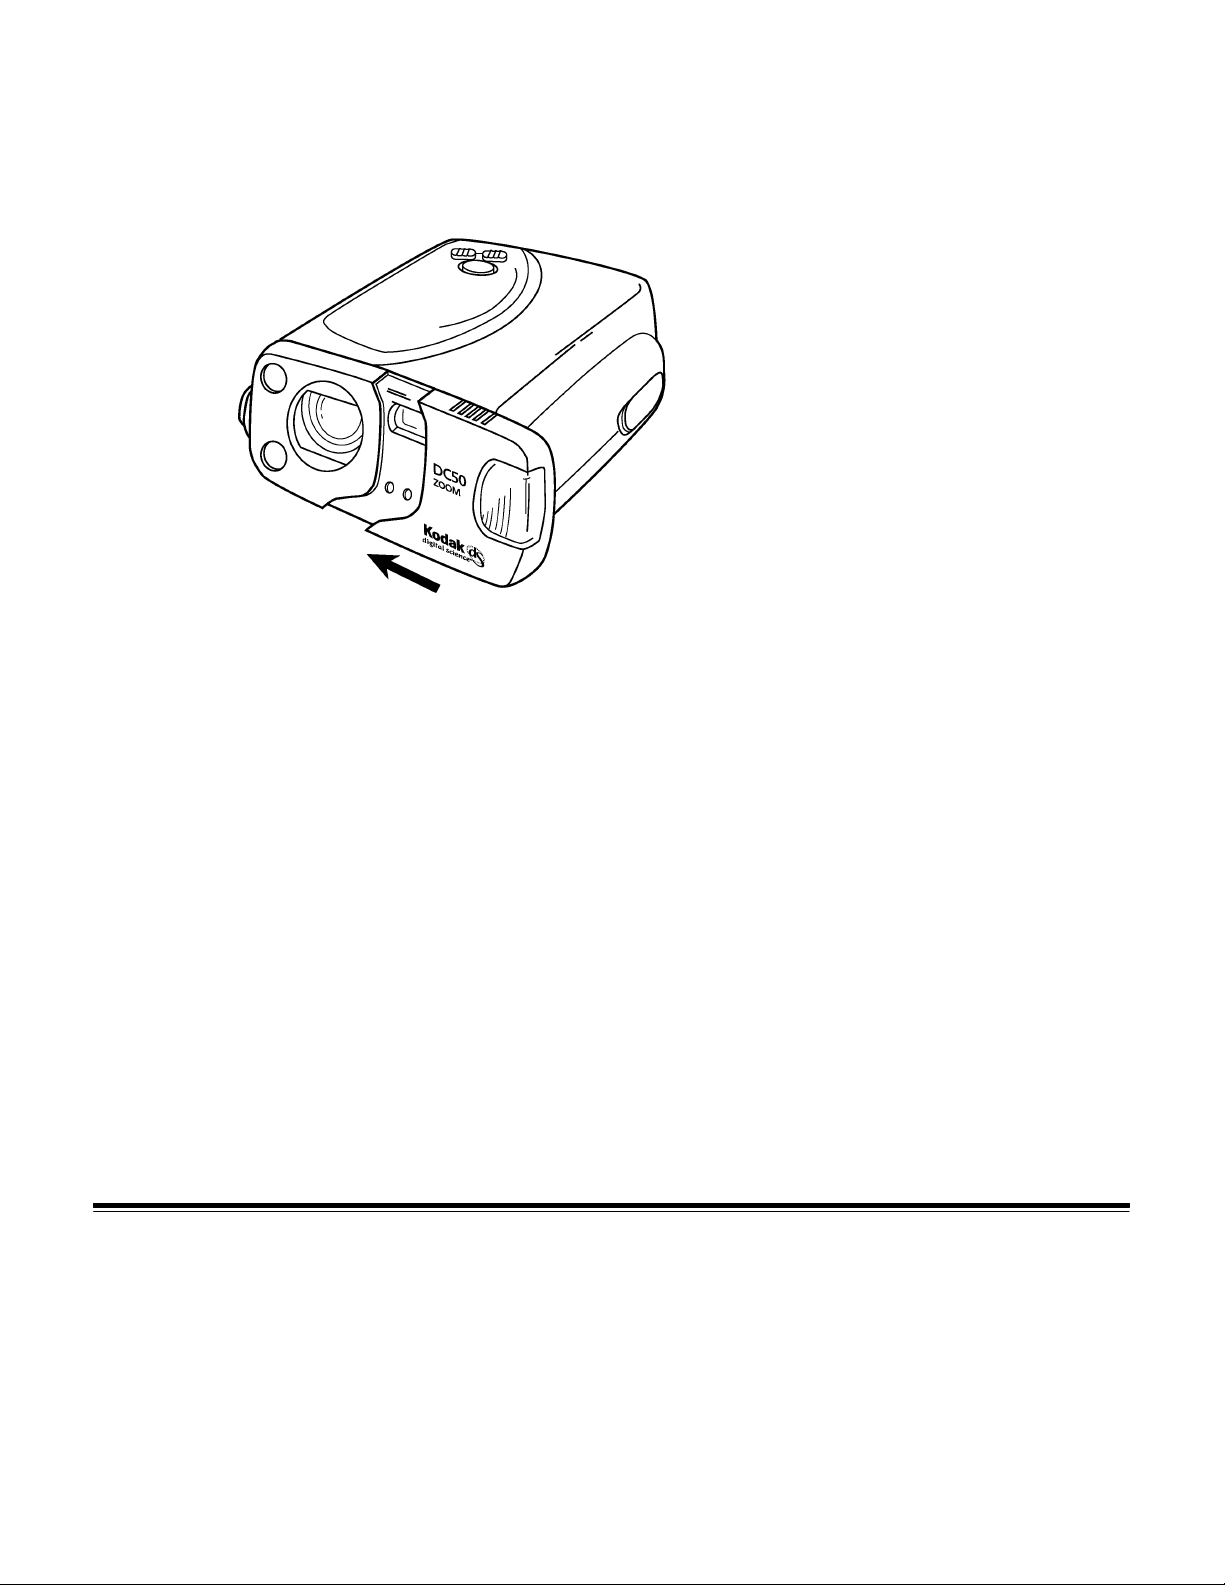
1.Push firmly on the external battery compartment cover and slide the
cover down in the direction of the arrow on the battery cover.
top of camera
external battery compartment cover
The cover slides along its track.
external battery compartment cover
top of camera
4
January 1996
Page 9

2.Remove the external battery compartment cover from the camera
and set it aside.
The internal battery compartment door is exposed.
internal battery compartment door
top of camera
3.Turn the camera over so the top of the camera is on your left and the
front of the camera faces up.
4.Locate the small tab that is just beneath the word OPEN on the
internal battery compartment door.
top of camera
January 1996
tab
internal battery compartment door
5.Pull gently on the tab in the direction of the arrow on the door.
top of camera
tab
internal battery compartment door
5
Page 10

The door slides along its track and is released from its latch.
6.Lift up the door.
The battery compartment is exposed.
top of camera
battery compartment door
battery compartment
NOTE: The proper battery positions are indicated on the internal battery
compartment door, as well as inside the battery compartment.
7.Place four batteries in the proper position in the battery compartment.
WARNING:
Mixing battery types in the camera may cause a fire or
explosion. Only use batteries that are all the same type.
top of camera
battery compartment door
batteries
IMPORTANT:
Make sure that you insert the batteries in the orientation
shown in the above illustration.
6
January 1996
Page 11
8.Close the internal battery compartment door.
9.Push firmly on the door and slide the door until it locks into place.
top of camera
tab
internal battery compartment door
10.Position the external battery compartment cover in its track.
1 1. Slide the external battery compartment cover up until it locks into place.
January 1996
top of camera
external battery compartment cover
7
Page 12
Turning the Camera On and Off
The camera is either on, off, or in the battery-saving power save mode.
For more information about the on, off, and power save modes, refer to
Camera Features
the
Camera On
Pull the sliding cover gently away from the camera to turn on
the camera.
section.
The camera turns on automatically. Icons appear in the LCD.
8
January 1996
Page 13
Camera Off
Push the sliding cover gently toward the camera until it stops to turn
off the camera.
The camera turns off and the feature icons disappear from the LCD.
Flashing Indicator Lights and Icons
January 1996
Power Save
The DC50 zoom camera automatically turns off the camera after
60 seconds without use, even if you are using an AC adapter. Press
any button on the camera to return the camera to its active state.
You can specify a number between 60 and 255 seconds at a host
computer to change the number of seconds before the camera goes
into the power save mode.
The lights and icons on the DC50 zoom camera flash at varying speeds
for different purposes.
9
Page 14

Taking Pictures
Following are steps for taking a picture with your DC50 zoom camera
using the camera’s default values. For detailed information about the
DC50 zoom camera’s features and settings, refer to the
Features
section.
Camera
IMPORTANT:
When you take pictures, make sure that your
fingers or hands do not cover the flash unit,
camera lens, viewfinder window, Auto Exposure
photometric unit, or Auto Focus sensors on
the camera.
Turning On and Positioning the Camera
1.Pull the sliding cover gently away from the camera.
10
The camera is on. Icons appear on the LCD.
2.Hold the camera with both hands with the handstrap on the right
side and the top of the camera facing up.
January 1996
Page 15

3.Slide your right hand fingers under the handstrap on the right side of
the camera and allow the camera to rest on your right thumb.
Your index finger should rest on the shutter button.
NOTE: If you want to frame the picture like a portrait, turn the camera
so it is vertically oriented (with the flash at the top).
January 1996
Most image editing software packages allow you to rotate
pictures within the application, if necessary.
You also can mount the camera on a tripod using the mounting
socket on the bottom of the camera.
11
Page 16

Framing Your Subject in the Viewfinder
1.Look through the viewfinder on the back of the camera.
2.Position the Auto Focus (AF) target marks in the viewfinder frame on
your subject.
NOTE: The Auto Focus (AF) target marks are the solid and dotted
circles in the viewfinder frame. The solid circle is the target
mark for distances to infinity and the dotted circle is the target
mark for the closest distance (to 70 cm). Use the smaller frame
to the right (the one with the little flower
the close-up focus mode.
The picture includes an area slightly larger than the image you
see framed in the viewfinder frame.
in it) when you select
12
January 1996
Page 17

Capturing the Image
Hold the camera as steady as possible when you press the shutter
button. Moving the camera while pressing the shutter button will cause
your pictures to be blurry.
1.Press the shutter button halfway down.
NOTE: The shutter button is the purple button on the top of the camera.
The camera measures the ambient lighting and sets the exposure
and white balance, and automatically focuses the lens. The green
light on the right of the viewfinder illuminates.
NOTE: The green light on the viewfinder flashes if your subject is too
close or too far away. You can specify a close-up focus or
move closer or further away from your subject.
2.Press the shutter button all the way down.
After you press the shutter button, be sure to hold the camera steady
until the green light on the viewfinder flashes. There is a brief delay
between the time the shutter button is pressed and the time the
picture is actually taken and processed by the camera.
January 1996
The Images Remaining Counter flashes, then the number of
remaining pictures is displayed. The number in the Images Taken
Counter increases by one. You cannot take another picture until the
green light on the viewfinder stops flashing.
13
Page 18

Camera Features
This four-part section describes the DC50 zoom camera features.
Camera Front—describes the front of the DC50 zoom camera.
– sliding cover/power switch
camera on
camera off
power save mode
– front indicator light
– exposure sensor
– focus sensors
– flash unit
14
Camera Top—describes the buttons on top of the DC50 zoom camera.
– shutter button
– zoom buttons
Telephoto (T)
Wide Angle (W)
January 1996
Page 19

Camera Back—describes the viewfinder and the buttons on the back of
the DC50 zoom camera.
– viewfinder
– selection buttons
MODE
SELECT
ERASE
– EJECT button
DC50 zoom camera LCD Icons—describes the icons in the Liquid
Crystal Display (LCD) on the back of the DC50 zoom camera.
– LCD icons and settings:
Auto Focus
Exposure Compensation
January 1996
Flash
Image Quality
Timer
Battery
Images Remaining Counter
Images Taken Counter
Erase Images
Memory Card
Copy Images
15
Page 20
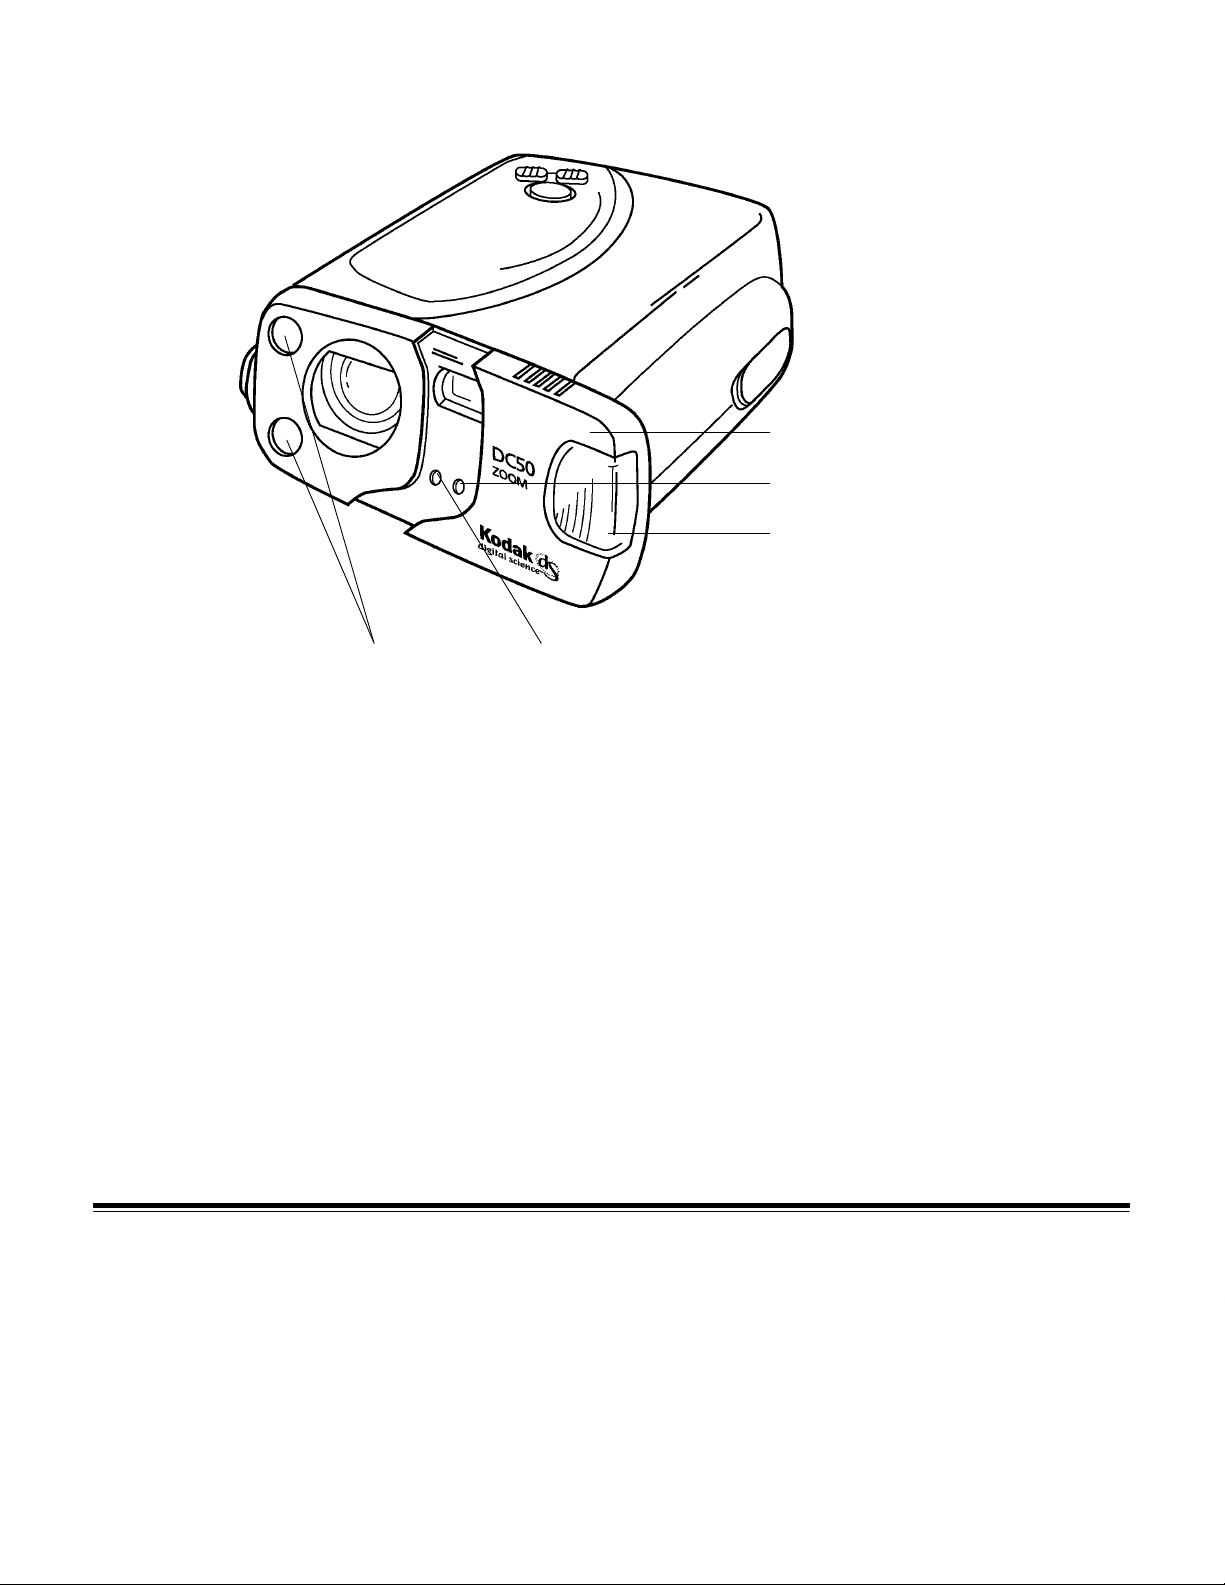
Camera Front
focus sensors light sensor
sliding cover/power switch
front indicator light (red light)
flash unit
16
NOTE: A standard tripod mount (not shown) is located on the bottom of
the camera.
January 1996
Page 21

Sliding Cover/Power Switch
The sliding cover acts a power switch for the camera.
Camera On
When the sliding cover is opened, the camera turns on. Icons appear in
the LCD and all buttons are enabled. The camera is ready for use.
If auto flash or fill flash is specified, the flash charge is initiated. The
camera can receive host commands in this state.
When the camera is on, the following settings are always selected:
Auto Focus—auto focus with multi-spot
Exposure Compensation—no offset
Flash—auto flash
Image Quality—image quality selection previously selected
Timer—off
January 1996
NOTE: These features and their settings are discussed in the
zoom camera LCD Icons
Camera Off
When the sliding cover is closed or power is not supplied from an AC
adapter or the batteries, the camera is off. No icons appear in the LCD,
the flash is not kept charged, no buttons are enabled, and the camera
cannot communicate with the host computer.
If you close the sliding cover while the camera is actively storing an
image in the camera’s internal memory or on a memory card, or it is
copying or erasing images, the camera will turn off after it completes
the task.
section.
DC50
17
Page 22

Power Save Mode
The DC50 zoom camera power save mode is a battery-saving feature
that automatically turns off the camera after 60 seconds without use,
even if you are using an AC adapter. No icons appear in the LCD and
the flash is not kept charged.
NOTE: You can specify a number between 60 and 255 seconds at a
host computer to change the number of seconds before the
camera goes into the power save mode.
Press any button on the camera to return the camera to its active state
(“wake” it) after it goes into power save mode. Only the timer is affected
by the power save mode. Pressing a button when the camera is in
power save mode only turns the camera back on. No action happens.
However, the camera turns off if you close the sliding cover when the
camera is in power save mode.
NOTE: When the camera is in power save mode and it receives a
host command or break signal from the host, the camera
turns back on.
18
Front Indicator Light
The red light on the front of the camera indicates that a picture is being
taken or the timer is working (counting down). The red light illuminates
for a second when an image is being captured. If a timed shutter
release is set up, the red light illuminates for eight seconds and then
flashes for the last two seconds before the picture is taken.
Auto Focus Sensors
Two sensors on the front of the camera measure distances and adjust
the camera’s focus.
January 1996
Page 23
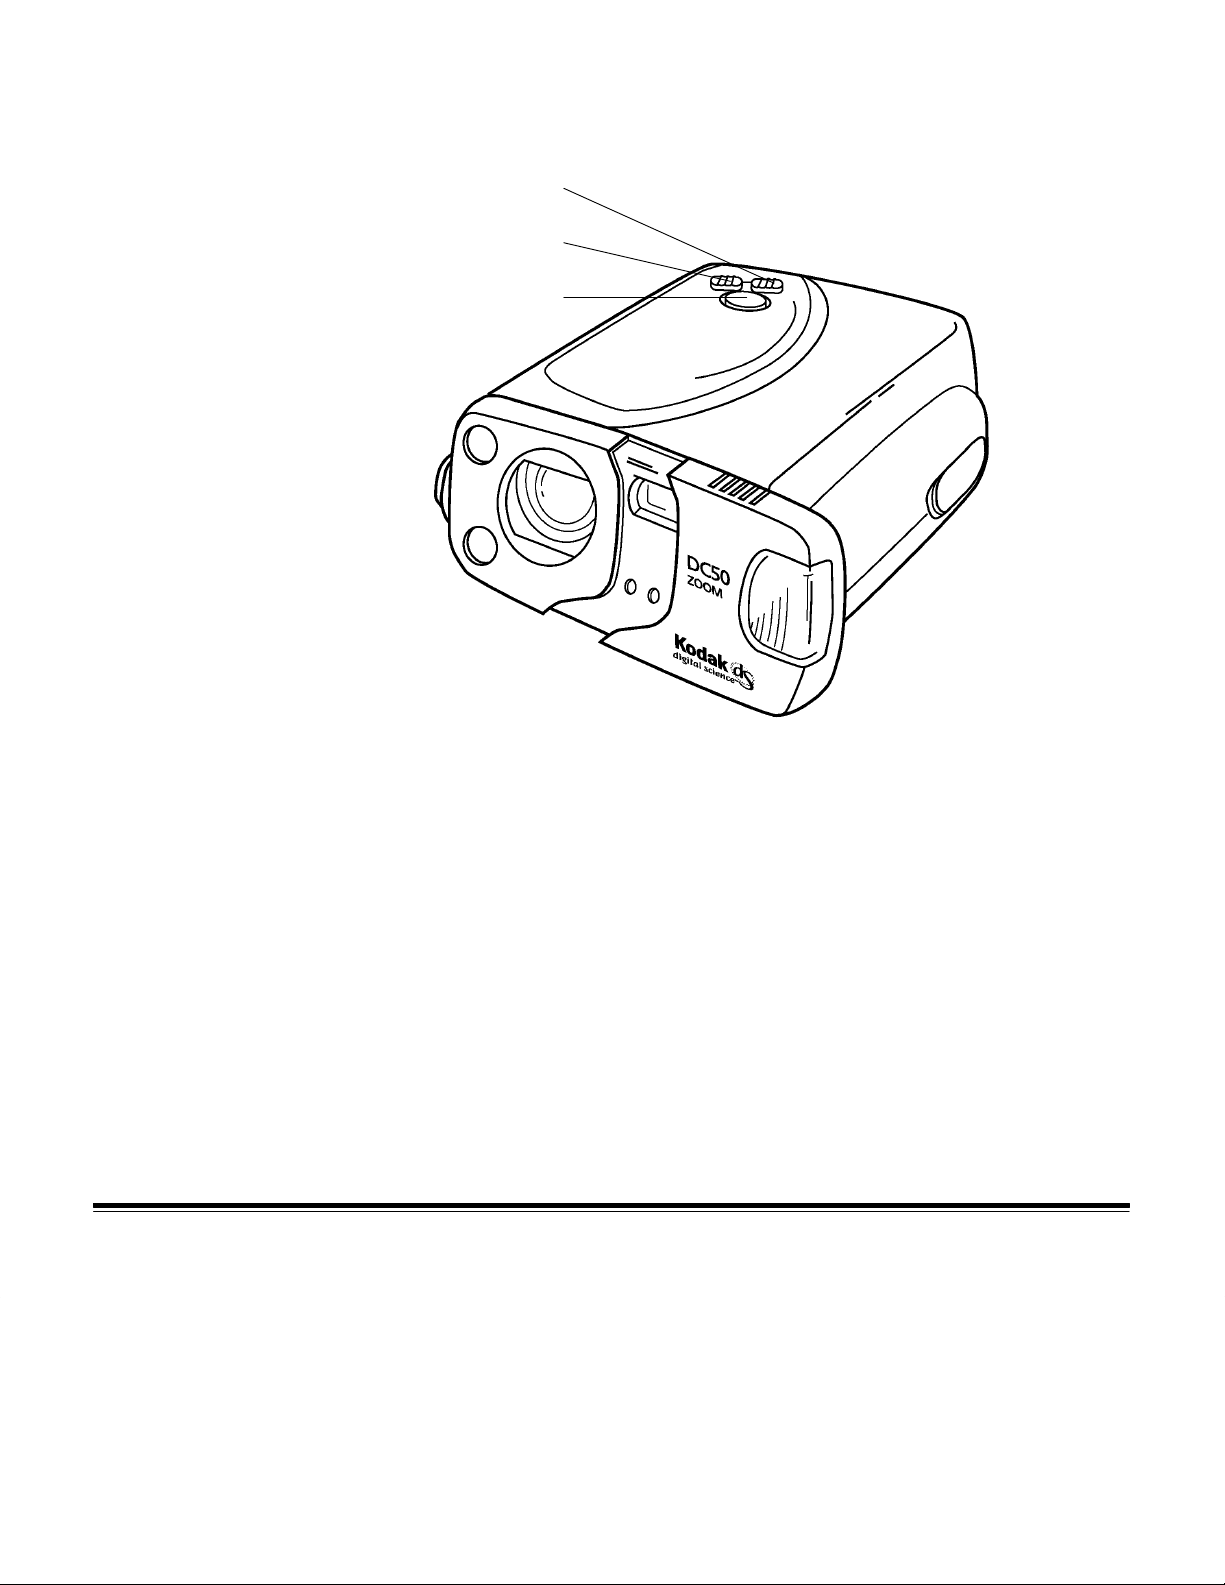
Camera Top
Telephoto zoom button (T)
Wide Angle zoom button (W)
shutter button (purple button)
January 1996
19
Page 24

Shutter Button
The shutter button is the purple button on top of the camera. You take
a picture by pressing the shutter button that is on top of the DC50 zoom
camera. When you lightly press the shutter button halfway down, the
exposure and focus are measured automatically (AE/AF).
When you press the shutter button all the way down, the image is
captured after the exposure and focus are measured. The numbers in
the Images Remaining and Images Taken Counters change, and the
captured image is stored on the memory card or in the camera’s
internal memory if there is no memory card in the camera.
No action occurs when you press the shutter button in the following cases:
– The camera does not have enough space to save captured images.
– The flash is required, but it is not charged.
– The camera is saving a captured image.
– The camera is copying images.
20
– The camera is erasing images.
– The camera is off.
– The camera is using the timer and is counting down to exposure.
– The zoom button is being pressed.
– The camera is in power save mode.
– The battery is empty.
If there is not enough space to store the captured image in the camera’s
internal memory or on a memory card, “FUL” appears in the Images
Remaining Counter.
January 1996
Page 25

Zoom Buttons
The DC50 zoom camera allows you to zoom in on your subject. There
are two zoom buttons: Telephoto and Wide Angle.
Telephoto (T) Button
When you press the Telephoto (T) button, the zoom lens moves from its
current position up to the maximum zoom range in the telephoto
position. When you release the Telephoto button, the zoom lens
stops moving at that point. The maximum field of view is equivalent
to using a 111 mm zoom lens on a 35 mm camera.
If you press the Wide Angle button or the shutter button while the zoom
lens is moving to a telephoto position, the button press is ignored. No
action occurs when you press the Telephoto button in the following cases:
– The camera is storing, copying, or erasing images.
– You have specified close-up focus.
– You pressed the Wide Angle button while the zoom lens was
moving to a telephoto position.
January 1996
Wide Angle Button (W)
When you press the Wide Angle (W) button, the zoom lens moves from
its current position up to the maximum zoom range in the wide angle
position. When you release the Wide Angle button, the zoom lens stops
moving at that point. The maximum field of view is equivalent to using a
37 mm zoom lens on a 35 mm camera.
If you press the T elephoto button or the shutter button while the zoom lens
is moving to a wide angle position, the button press is ignored. No action
occurs when you press the Wide Angle button in the following cases:
– The camera is storing, copying, or erasing images.
– You have specified close-up focus.
– You pressed the Telephoto button while the zoom lens was moving
to a wide angle position.
21
Page 26
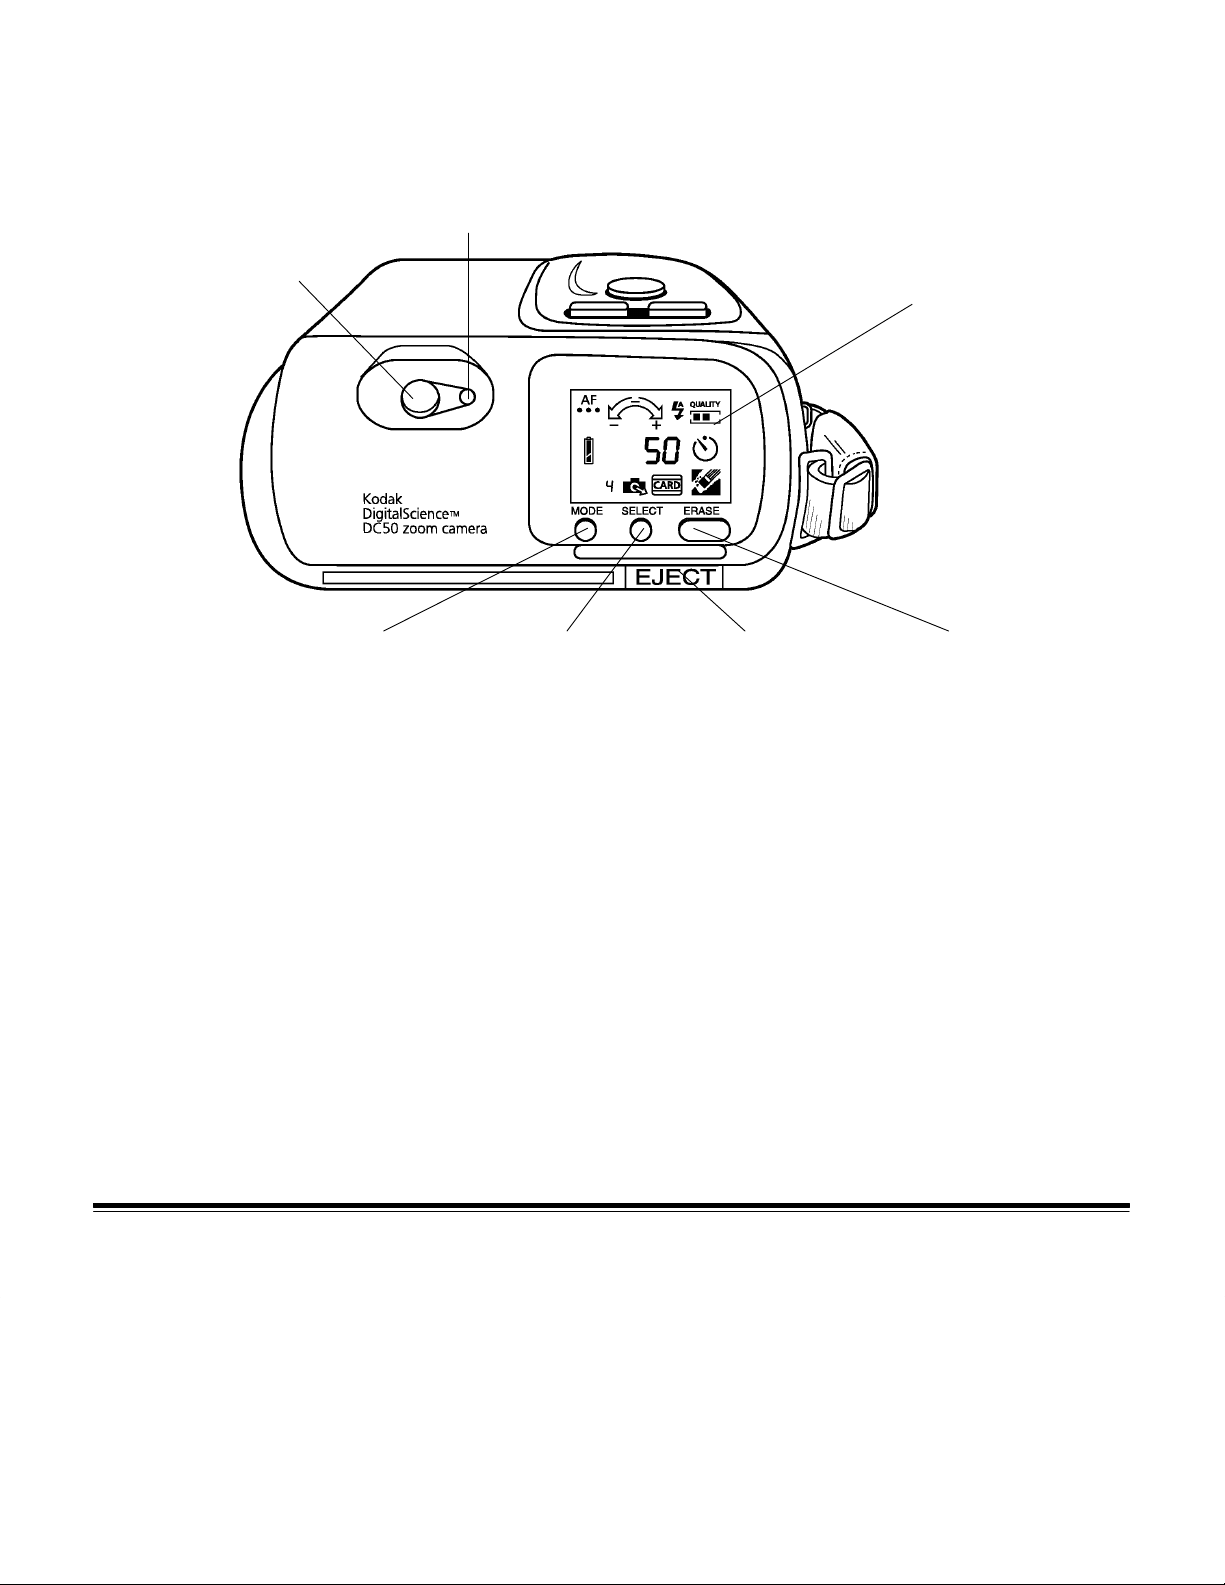
Camera Back
viewfinder light
viewfinder
Liquid Crystal Display (LCD)
22
MODE button SELECT button ERASE button
EJECT button
January 1996
Page 27

Viewfinder
The viewfinder on the back of the camera contains a green light which
indicates the camera status.
When you lightly press the shutter button halfway down, the green light
on the viewfinder illuminates. You can then press the shutter button all
the way down to take a picture. While the captured image processes,
the green light flashes. You cannot use the camera during this time.
When the image processing is complete, the green light turns off.
NOTE: The green light flashes if your subject is too close or too far
away. You can specify a close-up focus or move closer or
further away from your subject.
The green light does not illuminate even when the shutter button is
pressed in the following cases:
– There is no memory space for storing captured images.
– The flash is not charged.
January 1996
– The camera is copying images to the memory card.
– The camera is erasing images.
– The battery is empty.
23
Page 28

Viewfinder Frame
When you look through the viewfinder, you see the viewfinder frame.
The viewfinder frame indicates frames and target marks for several
focus modes.
border for distances to infinity
border for distances
to 2.3 feet or 70 cm
auto focus target mark
for distance to infinity
auto focus target mark
for closest distance
close-up frame
Consider the relationship of frames and focusing before you take a
picture. The Auto Focus (AF) target marks are the solid and dotted
circles in the viewfinder frame. The solid circle is the target mark for
distance to infinity and the dotted circle is the target mark for the closest
distance (up to 2.3 feet or 70 cm). If you are using the close-up focus
mode, frame your subject within the small frame with the flower on the
right side.
The two lines on the left side of the viewfinder frame are borders for the
closest subject distance (up to 2.3 feet or 70 cm). The left edge of the
viewfinder frame is a border for distances to infinity.
24
EJECT Button
The EJECT button allows you to eject a memory card from the camera.
The memory card can be ejected at any time, even when the camera is
performing a process such as copying images. If the EJECT button is
pressed when the camera is accessing the memory card, the camera
will be reset.
January 1996
Page 29

MODE Button
The MODE button allows you to move through the icons in the LCD.
Each time you press the MODE button, a feature icon flashes to
indicate that it is currently selected and active.
NOTE: The icons in the LCD are described in the
LCD Icons
The camera is at the “home” position before you press the MODE
button. Press the MODE button to step through the icons in the LCD.
When the selected icon flashes, you can specify a feature for that icon
by pressing the SELECT button.
returns to the “home” position.
Mode selection is done and the camera returns to the “home” position in
the following cases:
– The shutter button is pressed.
– A zoom button (telephoto or wide angle) is pressed.
– The ERASE button is pressed (except when the Erase Images
icon is selected).
– No action is taken within eight seconds after the MODE button
is pressed.
section.
After you make selections, the camera
DC50 zoom camera
January 1996
25
Page 30

SELECT Button
The SELECT button allows you to move through the selections that are
available for each feature. Each time the SELECT button is pressed, a
feature setting flashes to indicate that it is currently selected and active.
A selected feature returns to the “home” position after a selection is
made in the following cases:
– The MODE button is pressed.
– The shutter button is pressed.
– A zoom button (telephoto or wide angle) is pressed.
– The ERASE button is pressed.
– No action is taken within four seconds after the SELECT button
is pressed.
ERASE Button
26
The ERASE button allows you to erase all of the pictures that are
stored in the camera’s internal memory or on an optional memory
card. The ERASE button can be used only when the Erase Images
icon is selected.
NOTE: Refer to “Erasing Pictures” in the
Icons
from the camera or the memory card.
Erasing a memory card is also described in the
Removable Memory Cards
section for step-by-step instructions for erasing pictures
section.
DC50 zoom camera LCD
Using
January 1996
Page 31

DC50 zoom camera LCD Icons
The DC50 zoom camera features appear as icons in the Liquid Crystal
Display (LCD) and are manipulated using the buttons on the back
of the camera.
January 1996
All features except Image Quality revert to their default settings when
the camera is turned off and on again. Settings remain in place when
the camera is “wakened” from an inactive state.
27
Page 32

Auto Focus
The Auto Focus icon allows you to select from three focus settings:
multi-spot auto focus, single-spot auto focus, and close-up focus.
When you use the MODE button to select the Auto Focus icon, the
current setting appears.
The green light on the viewfinder flashes in the following cases:
– The distance is too close at the normal mode.
– The distance is too close or too far at the close-up mode.
The selected focus setting is canceled when you turn the camera off.
When you turn the camera back on, automatic focus with multi-spot is
the default setting.
Multi-spot Auto Focus
When auto focus with multi-spot is selected, the distances of subjects
are measured with two sensors. These sensors measure the distance
in three horizontal points. The focus is adjusted to the closest distance.
Multi-spot auto focus is the default focus setting.
Single-spot Auto Focus
When auto focus with single-spot is selected, the focus is adjusted to
the distance measured by the center sensor.
28
January 1996
Page 33

Close-up Focus
When the close-up setting is selected, the focus is adjusted to
approximately 1.6 feet (50 cm) from the front of the camera to the
subject. The zoom lens moves to the close-up position. Any zoom
button presses are ignored.
When you take a close-up picture, center your subject in the small
viewfinder frame (the one with the flower on the right side).
Making a Focus Selection
1.Press the MODE button until the Auto Focus icon flashes.
NOTE: The picture includes an area slightly larger than the image you
see framed in the viewfinder frame.
January 1996
2.Press the SELECT button to advance through the focus selections
until you see the one you want.
29
Page 34

Exposure Compensation
The Exposure Compensation icon allows you to change the exposure
to adjust the camera for too dim or too bright lighting. For example, if
the primary source of light is behind your subject, you may want to
change the exposure to the highest setting.
The exposure value is automatically measured by the camera (auto
exposure). You can select an exposure value up to plus or minus two
steps from the automatically measured value. One step equals 0.5 EV
increments. A picture taken with “auto exposure +2” is brighter than a
picture taken with “auto exposure.”
–1.0 EV –0.5 EV auto exposure +0.5 EV +1.0 EV
When you select the Exposure Compensation icon with the MODE
button, the current setting flashes. Press the SELECT button to move
through and specify an exposure value.
30
Any selected exposure value is canceled when you turn the camera off.
When you turn the camera back on, auto exposure with no offset is the
default setting.
Making an Exposure Value Selection
1.Press the MODE button until the Exposure Compensation icon flashes.
2.Press the SELECT button to move the selector indicator in the
Exposure Compensation icon to the exposure value that you want.
January 1996
Page 35

Flash
The Flash icon allows you to select from three flash settings: automatic
flash, flash off, and flash on (fill flash). When you use the MODE button
to select the Flash icon, the current setting appears.
The effective range for the flash in telephoto mode is between 2.3 and
9 feet (70 and 270 cm). The effective range for the flash in wide angle
mode is between 2.3 and 13.7 feet (70 and 415 cm).
In order for the flash to have an impact on the picture, make sure you
are 2.3 to 9 feet (70 to 270 cm) away from the subject. If you want to
take pictures of subjects that are closer than 2.3 feet (70 cm), you can
use the close-up mode to take pictures of subjects that are as close as
1.6 feet (50 cm).
The selected flash setting is canceled when you turn the camera off.
When you turn the camera back on, automatic flash is the default setting.
January 1996
Automatic Flash
In automatic flash, the camera determines if the flash should be used
based on the existing light. To use automatic flash, you do not have to
make any changes to the flash feature. Automatic flash is the default
flash setting.
31
Page 36

Flash Off
The flash is not used even if the existing light is dim.
To turn off the flash:
1.Press the MODE button until the Flash icon flashes.
2.Press the SELECT button until the Flash Off icon appears in the LCD.
Flash On (Fill Flash)
The flash is used for all pictures, even if the existing light is bright. For
example, if the primary source of light is behind your subject, you may
want to change the flash setting to Flash On.
32
To turn on the flash:
1.Press the MODE button until the Flash icon flashes.
2.Press the SELECT button until the Flash On icon appears in the LCD.
January 1996
Page 37

Image Quality
The Image Quality icon allows you to select from three image quality
settings that are used to capture images.
Best Better Good
Use the SELECT button to specify an image quality setting. The
selected image quality setting remains in effect even if you turn the
camera off. The selected feature is maintained until another image
quality setting is selected.
Selecting an Image Quality
1.Press the MODE button until the Image Quality icon flashes.
2.Press the SELECT button until the image quality setting you want to
use appears and flashes in the LCD.
January 1996
The number of pictures that are available in the Images Remaining
Counter changes depending on the image quality you select. The
number of images is an approximate number and will vary depending
on the types of pictures you take.
NOTE: You can store pictures with different image quality settings in the
camera’s internal memory or on a memory card.
33
Page 38

Timer
The Timer icon allows you to specify the period of time that the camera
waits to take a picture after you press the shutter button. This allows
you to set the timer and then move in front of the camera so you can be
in the picture.
When you use the MODE button to select the Timer icon, the icon
flashes. Press the SELECT button to specify “timer on” or “timer off.”
The Timer icon flashes quickly (1/4 second on, 1/4 second off) for
“timer on” and slowly (1/2 second on, 1/2 second off) for “timer off.”
When “timer on” is specified, the Timer icon flashes quickly until the
shutter button is pressed, then it flashes slowly. The Timer icon does
not flash unless it is selected.
When the timer is being selected and you use the MODE button to
advance to the Timer icon, the icon flashes slowly so you can
make a selection.
34
When the camera is counting down, you can press the MODE button to
cancel the countdown, but the timer is still available. Any other button
presses during the countdown is ignored.
The selected timer setting is canceled in the following cases:
– After an image has been taken.
– When the camera is turned off.
– When the camera enters the power save mode.
January 1996
Page 39

No Wait
To take pictures immediately, do not make any changes to the timer
feature. The camera takes the picture as soon as the shutter button is
pressed. “No wait” is the default timer setting.
Ten Seconds
With this timer setting, the camera waits ten seconds after the shutter
button is pressed before it takes the picture. When the shutter button is
pressed with “timer on,” the timer icon flashes slowly for 10 seconds.
The red light on the front of the camera illuminates for eight seconds,
flashes slowly for two seconds, and then the camera takes the picture.
Setting the Timer
1.Press the MODE button until the Timer icon flashes.
2.Press the SELECT button until the Timer icon flashes quickly.
January 1996
3.Press the shutter button twice.
The timer is set. The green light to the right of the viewfinder lights
up. The picture will be taken automatically approximately 10 seconds
after the shutter button is pressed the second time.
The timer is off after the picture has been taken.
35
Page 40

Battery
The Battery icon indicates the battery level as Full, Low, or Empty. The
Battery icon does not appear in the LCD if the camera is connected to
an AC adapter which is plugged into an electrical outlet.
– When the icon appears full, the batteries are fully charged.
– When the icon appears partially filled, the battery charge is
getting low.
– When the icon appears empty, you must replace the batteries.
NOTE: Pictures remain stored in the computer’s internal memory even
if the camera batteries are empty.
36
January 1996
Page 41

Image Counters
Images Remaining Counter
The larger number that appears near the center of the LCD is the
Images Remaining Counter. This number is the approximate number
of pictures that you can still take at the current image quality in the
camera’s internal memory or on the memory card. This number
can be up to three digits, but the leading zeros do not appear. When
you take a picture, this number decreases by one. If no space is
left in the memory, “FUL” appears in the LCD instead of “0.”
When a memory card is in the camera, the Images Remaining Counter
indicates the remaining number of pictures that the card can hold. If
you use a memory card that can hold over 1,000 images, “999+”
appears in the Images Remaining Counter. This means that no more
than 1,000 pictures can be taken, even if the memory card can hold
more than 1,001 pictures. When the LCD shows “999+” and you take
a picture, the “+” disappears and “999” is displayed. If the memory
card is ejected, the Images Remaining Counter shows the number of
pictures available in the camera’s internal memory.
January 1996
NOTE: The camera firmware rearranges the image storage memory
space after each picture is taken. If the Images Remaining
Counter does not decrease after you have taken a picture,
it is probably because the camera has found space for one
more image.
37
Page 42

When Erase Images is selected, the Images Remaining Counter
changes after all of the images are erased, and the maximum number
of pictures that are available at the current image quality for the
camera’s internal memory or a memory card appears in the LCD.
When Copy Images is selected, the Images Remaining Counter
indicates how many additional images the memory card can hold.
This number decreases as images are copied to the card from the
camera’s internal memory.
Images Taken Counter
The smaller number that appears near the lower left corner of the LCD
is the Images Taken Counter. This number is the number of the last
picture that was taken for storage in the camera’s internal memory
or on the memory card. This number can be up to three digits, but the
leading zeros do not appear. The Images Taken Counter begins at “0.”
When you take a picture, this number increases by one. If the number
exceeds 1,000, “999+” appears in the Images Taken Counter.
When Erase Images is selected, “0” appears in the Images Taken
Counter after all of the pictures are erased.
When Copy Images is selected, the Images Taken Counter indicates
the number of pictures in the camera’s internal memory. The Images
Taken Counter always shows the last image number for the card at any
time. This number never decreases (except for the last picture), even if
the pictures in the card are deleted or renamed.
38
January 1996
Page 43

Erase Images
The Erase Images icon appears only when pictures are in the camera’s
internal memory or on the memory card in the camera. After you have
transferred the camera pictures to your computer, you should erase the
pictures in the camera to make room for new pictures.
When you erase pictures, all pictures are deleted from the camera
memory. You cannot specify pictures to delete.
IMPORTANT:
When a memory card is in the camera, the Erase
Images operation erases all of the images on the
memory card. Images in the camera’s internal
memory will not be affected.
Erasing Pictures
1.Press the MODE button until the Erase Images icon flashes.
2.Press the ERASE button and hold it down for two seconds.
The Erase Images icon flashes, indicating that the pictures are being
erased from the camera’s internal memory or from the memory card,
if one is in the camera.
January 1996
3.Release the ERASE button.
When all pictures are deleted, the Erase Images icon disappears,
the Images Remaining Counter indicates the maximum number of
pictures available at the current image quality for the memory
(camera internal memory or memory card), and the Images Taken
Counter returns to “0.”
39
Page 44

Memory Card
When an optional memory card is inserted in the camera, the
Memory Card icon appears in the LCD. The Images Remaining
Counter shows the number of pictures that you can still take at
the current image quality on the memory card. The Images Taken
Counter shows the number of the last picture that was taken for
storage on the memory card.
The Memory Card icon flashes when pictures are being copied
from the camera’s internal memory onto the memory card. The
Memory Card icon does not appear unless a card is in the camera.
40
For more information about memory cards, refer to the
Removable Memory Cards
section.
Using
January 1996
Page 45

Copy Images
The Copy Images icon allows you to copy pictures from the camera’s
internal memory to a memory card that is inserted in the camera.
NOTE: When no memory card is in the camera, the Copy Images icon
does not appear in the LCD.
When images in the camera’s internal memory are copied, the file
names for these images are changed to meet the file name convention
for the PCMCIA–ATA memory card.
For example: three best images named DCI001L.KDC, DCI002L.KDC,
and DCI003L.KDC are in the camera’s internal memory. The highest
image number in the memory card is “7.” When the files are copied to
the memory card, they will be renamed DC0008L.KDC, DC0009L.KDC,
and DC0010L.KDC.
NOTE: Image numbers begin at 001 or 0001 and go up to 1000.
January 1996
41
Page 46

Copying Images to a Memory Card
1.Insert a memory card in the camera.
The Memory Card and Copy Images icons appear on the LCD.
2.Press the MODE button until the Copy Images icon flashes.
NOTE: The Images Remaining and Images Taken Counters also flash.
The Images Taken Counter indicates the number of images
taken in the internal memory.
3.Press the SELECT button.
The Copy Images and Memory Card icons and the Images
Remaining and Images Taken Counters flash. The number in the
Images Remaining Counter varies (it counts down), but the number
in the Images Taken Counter remains the same.
42
All of the images in the camera’s internal memory are copied onto
the memory card. The dates of the copied files change to the date
when the copy takes place.
When the copy operation is finished, the Copy Images icon
disappears from the LCD and the Memory Card icon and the
Images Remaining and Images Taken Counters stop flashing.
The Images Taken Counter indicates the number of images taken
on the memory card.
January 1996
Page 47

Continuing the Copy Operation
During a copy operation, if the memory card becomes full, “FUL”
appears and flashes in the Images Remaining Counter. You can
continue copying after you insert another memory card or cancel the
rest of the copy operation. If you specify any other operation, an error
code may appear in the LCD.
1.Eject and remove the memory card from the camera.
2.Insert a new memory card in the camera.
3.Press the SELECT button.
The copy operation continues. When all of the pictures in the
camera’s internal memory have been copied, the Copy Images
icon disappears from the LCD, the Memory Card icon and the
Images Taken and Images Remaining Counters stops flashing.
The Images Taken Counter indicates the number of images taken
on the memory card.
January 1996
NOTE: You cannot stop the copy operation during the time it is
copying images to a memory card. You can only stop
a copy operation after it has paused to allow you to
insert another memory card.
The copy operation will be canceled in the following cases:
– An incompatible memory card is inserted into the camera.
– The camera goes into the power save mode before you can press
the SELECT button.
All button presses during a copy operation are ignored. The copy
operation may become corrupted if not enough power is available.
43
Page 48

Canceling the Copy Operation
If the memory card to which you are copying images is full and you do
not have another card or you do not want to copy the rest of the images
to another card, you can stop the copy operation.
NOTE: You can only stop a copy operation after it has paused to
allow you to insert another memory card. You cannot stop
the copy operation during the time it is copying images to a
memory card.
Press the MODE button to stop the copy operation. The icons stop
flashing and the Copy Images icon disappears from the LCD. “FUL”
appears in the Images Remaining Counter and the number of uncopied
images is displayed in the Images Taken Counter.
The status is reset when the memory card is ejected from the camera,
the camera is turned off, or the camera goes into the power save mode.
44
January 1996
Page 49

Using Removable Memory Cards
You can save pictures you take with your DC50 zoom camera on
optional removable “Flash” or PCMCIA–ATA memory cards. Using
a memory card in the DC50 zoom camera allows you to take and
save many more pictures. You can insert a PCMCIA–ATA memory
card in a PCMCIA–ATA card reader slot (if there is one) on your
computer and download the pictures on the card.
Memory cards are about the size of a credit card and hold 2 MB to
40 MB of data. SanDisk (TM) PCMCIA–ATA memory cards have been
tested for use in the DC50 zoom camera.
You can purchase a 4 MB SanDisk (TM) memory card (Kodak catalog
number 802 7138) from the retailer who sold you the camera. If your
retailer does not stock the memory cards, call the technical support
telephone number that is listed in the
NOTE: If you try to use a memory card that is not compatible with the
DC50 zoom camera, “Er 1” appears in the LCD.
Troubleshooting
section.
January 1996
The following chart shows the approximate number of pictures you can
save on different size memory cards that you can use with the DC50
zoom camera.
SIze of Memory Card
4 MB 10 MB 20 MB 40 MB
Image Quality Maximum Number of Pictures on Card
Good 69 180 360 720
Better 40 104 208 416
Best 26 70 140 280
45
Page 50

Inserting a Memory Card
When a memory card is in place in the camera, the Memory Card icon
appears in the LCD and the pictures that you take are recorded directly
on the card. No pictures are saved to the camera’s internal memory.
You can insert a memory card in the DC50 zoom camera while the
camera is on (called hot insertion). However, when possible, you
should turn off the camera before you insert a memory card.
IMPORTANT:
Inserting a memory card in the camera at the same
time the camera is processing a picture may cause
damage to the picture.
1.Push the sliding cover gently toward the camera until it stops.
The camera is off.
2.Hold the memory card face up and with the connecting end pointed at
the camera.
3.Insert the card into its slot in the camera.
46
January 1996
Page 51

4.Push the card all of the way in the memory card slot.
The card is connected to the camera. The EJECT button protrudes
slightly from the back of the camera.
NOTE: If you try to use a memory card that is not compatible with the
DC50 zoom camera, “Er 1” appears in the LCD.
5.Pull the sliding cover gently away from the camera.
The camera is on. The Memory Card icon appears in the LCD.
January 1996
47
Page 52

Removing a Memory Card
Remove the memory card from the camera when the card is full or you
want to change memory cards. You also must remove the memory card
when you want to save your pictures on the camera’s internal memory.
You can remove a memory card from the DC50 zoom camera while the
camera is on. However, when possible, you should turn off the camera
before you remove a memory card.
IMPORTANT:
Removing a memory card in the camera at the same
time the camera is processing a picture may cause
damage to the picture.
1.Press the EJECT button.
NOTE: The EJECT button is at the right of the memory card slot.
The camera will be reset if an image is being accessed when
the EJECT button is pressed.
The memory card is partially ejected from the camera. The Memory
Card and Copy Images icons disappear from the LCD. Any pictures
you take will be saved in the camera’s internal memory.
2.Grasp the visible end of the memory card and pull it out of the slot.
NOTE: You may need to tilt the camera down slightly to help the
memory card slide out of its slot. Make sure that the card
does not fall out of the camera or it may be damaged.
48
January 1996
Page 53

Copying Pictures from the Camera to a Memory Card
You can copy pictures that are stored in the camera’s internal memory
onto a memory card.
The Copy Images icon appears in the LCD only when a memory
card is inserted in the camera and pictures are saved in the camera’s
internal memory.
1.Insert the memory card to be copied in the camera.
2.Pull the sliding cover gently away from the camera.
The camera is on.
The Memory Card icon appears in the LCD. The Copy Images icon
appears if any pictures are stored in the camera’s internal memory.
January 1996
3.Press the MODE button until the Copy Images and Images
Remaining Counter icons flash.
4.Press the SELECT button.
All pictures in the camera’s internal memory are copied to the
memory card. The pictures that were copied remain in the camera’s
internal memory.
49
Page 54

Erasing a Memory Card
Once you have transferred stored pictures to your computer, you should
erase the pictures from the memory card to make room for new
pictures. When you erase pictures, all pictures are deleted from the
memory card. You cannot specify individual pictures to delete.
NOTE: Erase pictures from the memory card only when the card is in
the DC50 zoom camera. If you delete pictures from a memory
card when it is in a PCMCIA–ATA card reader, the camera will
not be able to track the numbers of any pictures remaining on
the memory card.
1.Insert the memory card to be copied in the camera.
2.Pull the sliding cover gently away from the camera.
The camera is on.
The Memory Card icon appears in the LCD. The Erase Images icon
appears if any pictures are saved in the camera’s internal memory or
on the memory card.
50
IMPORTANT:
Make sure that the Memory Card icon appears in the
LCD. If you press the ERASE button with no memory
card in the camera, any pictures stored in the camera’s
internal memory will be erased.
3.Press the MODE button until the Erase Images icon flashes.
January 1996
Page 55

4.Press the ERASE button and hold it down for two seconds.
The Erase Images and Memory Card icons flash, indicating that the
pictures are being erased from the memory card.
5.Release the ERASE button.
When the pictures have been deleted, the Erase Images icon
disappears, the Images Remaining Counter indicates the maximum
number of pictures available in the memory card at the current image
quality for the memory, and the Images Taken Counter returns to “0.”
January 1996
51
Page 56

File Name
All images in the internal memory or the PCMCIA–ATA memory card
are stored as files as shown below.
Source
Internal memory DCI
PCMCIA–ATA memory card DC
–
nnn
or
nnnn
going up to 1000.
– s is the image quality where
S = good image quality
M = better image quality
L = best image quality
Image files for the PCMCIA–ATA memory card will be written in
the DC50IMG directory. This directory is written automatically by the
DC50 zoom camera when the memory card is inserted in the camera.
is the image number starting with 001 or 0001 and
File Name
nnn
s.KDC
nnnn
s.KDC
52
January 1996
Page 57

Batteries
The DC50 zoom camera comes with four AA lithium batteries. You can
also use rechargeable NiCad (nickel-cadmium) or AA alkaline batteries.
NiCad or lithium batteries perform better than alkaline batteries.
Battery Life
Using the flash and transferring pictures to the computer both require
more of the battery charge. If you take pictures using the flash 50%
of the time and download the pictures to a computer, you can use
NiCad batteries for approximately 100 images and lithium batteries
for approximately 260 images (based on Kodak’s standard battery test).
IMPORTANT:
You can save your batteries by purchasing a power adapter to use
when taking pictures inside and when transferring files. Refer to the
Using a Power Adapter
adapters that can be used with the DC50 zoom camera.
WARNING:
Rapid repetition of image captures using the flash will
affect battery life.
section for information about the power
Mixing battery types in the camera may cause
a fire or explosion. Use only batteries that are
all the same type.
Lithium batteries contain toxic substances. These
batteries should be disposed of properly. Follow the
battery manufacturer’s disposal instructions or the
guidelines recommended for your area.
January 1996
53
Page 58

Storing the Camera
Remove the batteries from the DC50 zoom camera if it will not be used
for an extended period of time. This prevents possible damage to the
camera from battery leaks or corrosion.
Battery Charge Level
The level of charge remaining in the batteries is shown by the Battery
icon in the LCD. This icon gives you an estimate of how much charge
is left in the batteries.
NOTE: The Battery icon does not appear when a power adapter is
in use.
– When the icon appears full, the batteries are fully charged.
– When the icon appears partially filled, the battery charge is
getting low.
– When the icon appears empty, you must replace the batteries.
54
NOTE: Pictures remain stored in the computer’s internal memory even
if the camera batteries are empty.
January 1996
Page 59

Improving Battery Performance
Follow these guidelines to extend battery life.
– Replace all four batteries at the same time. Mixing new or fully
charged batteries with those that have been in use for some time
weakens the new ones.
– Clean the contacts in the battery compartment periodically by
rubbing them gently with a clean pencil eraser or a cloth.
– Keep batteries away from heat. For example, do not leave
batteries in a car in hot weather.
– Store batteries at room temperature and keep them dry.
– Recharge NiCad batteries if they have not been used after
six months.
Battery Safety Information
Follow these guidelines when handling batteries.
January 1996
– Always handle batteries carefully.
– Do not drop, puncture, disassemble, mutilate, or incinerate batteries.
– If you touch both terminals of a battery with a metal object, the
battery will short circuit and possibly cause an explosion or a fire.
Do not carry loose batteries where the contacts may touch metal
objects such as coins or keys.
– Do not heat batteries to try to rejuvenate their charge.
55
Page 60

About NiCad Batteries
NiCad batteries can be used and recharged over and over again.
When you purchase a charger for NiCad batteries, look for one
that discharges the batteries completely before it recharges them.
“Conditioning” batteries this way helps them hold their charge longer.
If your battery charger does not “condition” batteries, eventually the
batteries may not hold their charge as long as they previously had.
If this happens, try letting the batteries run out of charge completely
before you recharge them. This should improve the lasting power
unless the batteries are wearing out.
Follow the safety and battery charging instructions that come with your
battery charger.
WARNING:
Damaged batteries may leak and burn skin and
eyes. If you come in contact with a damaged
NiCad battery, rinse the affected skin with water
for at least five minutes. Do not wash with soap.
Never charge batteries that are not NiCad batteries
in the charger.
56
January 1996
Page 61

Using a Power Adapter
You can plug your camera into an electrical outlet using a specific type
of surge-protected power adapter. Using a power adapter saves your
batteries when you take a large number of flash pictures and when you
transfer the pictures to your computer.
An AC adapter connector is built into the camera. This connector is
located on the side of the camera and is covered with a rubber cap.
NOTE: An RS232C/RS422 serial communication connector is also
built into the camera. This connector is located next to the
AC adapter connector.
When an adapter is attached to the camera and batteries are
also installed, the camera draws power from the power source
with the higher voltage. If the voltage in the batteries is higher
than the voltage provided by the power adapter, the camera
draws power from the batteries until the voltage drops below
that provided by the power adapter.
January 1996
You can purchase a custom universal adapter for your DC50 zoom
camera. If your retailer does not stock the adapter, call the technical
support telephone number that is listed in the
WARNING:
Using power adapters other than those recommended
for use with the DC50 zoom camera voids the camera’s
warranty, and may result in fire, electrical shock, or
damage to the camera.
Troubleshooting
section.
57
Page 62

Connecting a Power Adapter to the Camera
1.Push the sliding cover closed.
The camera is off.
2.Lift the rubber tab located on the left side of the camera.
The camera’s serial and AC power adapter ports are exposed.
3.Plug the cable end of the AC power adapter into the AC adapter port.
4.Plug the box end of the AC power adapter into an electrical outlet.
5.Pull the sliding cover away from the camera.
58
The camera is on.
January 1996
Page 63

Connecting to a Computer
When you are finished taking pictures with your DC50 zoom camera,
you can transfer the pictures to your computer. You can then use the
pictures or save them on your hard drive. Use the RS232C/RS422
serial cables that are included with the DC50 zoom camera to connect
the camera to a Macintosh computer or an IBM-PC or compatible
computer running Windows software.
The RS232C/RS422 serial communication connector is built into the
camera. This connector is located on the side of the camera and is
covered with a rubber cap.
NOTE: An AC adapter connector is also built into the camera. This
connector is located next to the RS232C/RS422 serial
communication connector.
If you want to connect a serial communication cable to the camera,
pull the rubber cover away from the connectors and plug the cable
in its connector. When a serial communication cable is plugged into
the camera, a three-digit animation appears in the LCD.
January 1996
59
Page 64

MACINTOSH Systems
You can connect the DC50 zoom camera to a serial port on your
Macintosh computer.
IMPORTANT:
Use only the cable that is provided with the
DC50 zoom camera.
1.Push the sliding cover closed.
The camera is off.
2.Plug one end of the Macintosh cable into the modem port or printer
port on the back of your Macintosh computer.
NOTE: If both ports are in use, disconnect the cable from one of
the ports and connect the camera cable. Make sure that the
cable is correctly oriented. Refer to your computer manuals
for information about the ports on your computer.
60
3.Lift the rubber tab located on the left side of the camera.
January 1996
Page 65

The camera’s serial and AC power adapter ports are exposed.
4.Plug the other end of the Macintosh cable into the camera’s
serial port.
You are now ready to transfer the DC50 zoom camera pictures to your
computer using the software provided with the camera.
NOTE: Before you run the software provided with the camera, turn
off AppleTalk and specify an external modem if your system
has an internal modem.
January 1996
61
Page 66

Systems Running WINDOWS Software
Your IBM-PC or compatible computer has either a 9-pin or a 25-pin
serial port. The cable supplied with the DC50 zoom camera uses
a 9-pin connector. If you are using a 25-pin serial port, you must
use the adapter provided with the camera.
IMPORTANT:
Use only the cable that is provided with the
DC50 zoom camera.
1.Push the sliding cover closed.
The camera is off.
2.Attach the 9-pin adapter to the 25-pin port if your computer has a
25-pin port.
3.Plug the cable’s 9-pin connector into the serial port or the adapter
on the back of your computer.
62
4.Tighten the connector’s thumbscrews.
5.Lift the rubber tab located on the left side of the camera.
January 1996
Page 67

The camera’s serial and AC power adapter ports are exposed.
6.Plug the other end of the cable into the camera’s serial port.
You are now ready to transfer the DC50 zoom camera pictures to your
computer using the software provided with the camera.
January 1996
63
Page 68

Maintenance
General Guidelines
– Keep the DC50 zoom camera away from moisture and
high temperatures.
– If the outside of the camera needs to be cleaned, wipe it
with a clean, dry cloth. Never use harsh or abrasive cleaners
or organic solvents on the camera or any of its parts.
– Keep the sliding cover closed whenever the camera is not in use.
Cleaning the Camera Lens
The steps below describe how to clean the camera lens.
IMPORTANT:
1.Blow gently on the lens to remove loose dust and dirt.
2.Moisten the lens by breathing lightly on it.
3.Wipe the lens gently with a soft, lint-free cloth or an untreated
lens-cleaning tissue.
Do not use cleaning solutions unless they are
designed specifically for camera lenses. Do not
use chemically treated eyeglass lens tissues to
wipe the camera lens because they may scratch
the lens.
64
January 1996
Page 69

Cleaning the Light Sensor and Focus Sensors
The light sensor is located below the viewfinder window on the front of
the camera. The auto focus sensors are also on the front of the camera.
viewfinder window
light sensor
Storing the Camera
January 1996
focus sensors
Clean the light sensors and focus sensors by rubbing them gently with a
soft, dry cloth. Do not use any organic solvents to clean the sensors.
Remove the batteries if the camera will not be used for an extended
period of time. This will prevent camera damage from battery leaks
or corrosion.
65
Page 70

Troubleshooting
This section should help you resolve any problems which you may
encounter when using your DC50 zoom camera. If you still have
trouble with your camera after reading this information, refer to the
“Getting Help” section.
Problems and Solutions
LCD Display Does Not Appear
Cause Solution
The camera is not on. Pull the sliding cover away from the
camera to turn it on.
The camera is in power
save mode.
The batteries are low,
empty, or not installed.
The batteries are not
installed correctly.
The power adapter was
disconnected from the
camera while the camera
was still on.
Press any button to activate (“wake”)
the camera.
Replace the batteries or use a
power adapter .
Reinstall the batteries.
For information about installing
batteries, refer to the
Camera
Plug the power adapter back into the
camera, turn the camera on and then
off again, and then disconnect the
power adapter from it.
section.
Using the
66
January 1996
Page 71

Nothing Happens when the Shutter Button Is Pressed
Cause Solution
The flash is recharging. Wait until the green light next to the
viewfinder is off.
The camera does not have
room for another picture.
The camera is saving a
captured image to memory.
The camera is copying an
image to the memory card.
The camera is erasing
images.
Use a memory card to capture
additional pictures.
Erase the pictures stored in the
camera’s internal memory.
For information about erasing
pictures, refer to the
Camera
NOTE: You may want to save the
pictures on your computer before
you delete them from the camera.
Wait for the save process to finish.
Wait for the copy process to finish.
Wait for the erase process to finish.
section.
Using the
January 1996
The camera is not on. Pull the sliding cover away from the
camera to turn it on.
The timer is counting down. Wait for the timer to finish counting
down.
The Zoom button was
pressed.
Wait for the lens to adjust.
67
Page 72

Picture Is Not Clear
Cause Solution
The lens is dirty. Clean the lens as described in the
Maintenance
section.
The subject or the camera
moved before the picture
was taken.
The subject is too close. Move so the subject is at least
The subject is too far away
for the flash to be effective.
The flash should have been
used but it did not go off.
The exposure is not
appropriate for the lighting.
Hold the camera steady until after
you hear the shutter click.
2.3 feet (70 cm) away.
Move so the subject is less than
9 feet (270 cm) away.
Turn on the flash.
Adjust the exposure as described in
Camera Features
the
section.
Part of a Picture Is Missing
Cause Solution
68
Something was in front of
the lens when the picture
was taken.
Make sure that your hands, fingers,
or other objects are not in front of the
lens or the flash.
January 1996
Page 73

Flash Does Not Work
Cause Solution
The flash is off. Turn the flash on as described in the
Camera Features
The batteries are low. Replace the batteries or use an AC
power adapter .
For information about installing the
batteries, refer to the
Camera
section.
section.
Using the
The flash tube has
burned out.
Take the camera to your dealer for
service.
Picture Is Too Dark
Cause Solution
The flash is not on. Turn on the flash as described in the
The subject is too far
away for the flash to
have an effect.
The exposure is not
appropriate for the lighting.
The subject is in front of
a bright light.
Camera Features
Move so there is no more than
9 feet (2.7 m) between the camera
and the subject.
Adjust the exposure as described in
Camera Features
the
Change your position so the light is
not behind the subject.
section.
section.
January 1996
69
Page 74

Picture Is Too Light
Cause Solution
The flash is not needed. Change to automatic flash by
following the instructions in the
Camera Features
section.
The subject is too close
when the flash was used.
The exposure setting
needs to be adjusted.
The light sensors are dirty. Clean the light sensors as described
The light sensors are
covered.
Move so there is at least 2.3 feet
(70 cm) between the camera and
the subject.
Adjust the exposure as described in
Camera Features
the
in the
Hold the camera so your hands
or other objects do not cover the
light sensors.
Refer to the
for the location of the sensors.
Maintenance
Camera Features
section.
section.
section
70
January 1996
Page 75

Error Codes in LCD
Code Solution
Er 1 The memory card is not compatible with the
DC50 zoom camera. Use a compatible card.
10 Take the camera to your dealer for service.
11 Take the camera to your dealer for service.
12 Take the camera to your dealer for service.
13 Take the camera to your dealer for service.
14 Take the camera to your dealer for service.
15 Take the camera to your dealer for service.
16 Take the camera to your dealer for service.
17 Take the camera to your dealer for service.
January 1996
20 Reseat the memory card.
or
Replace the memory card with a known good card.
or
Take the camera to your dealer for service.
21 Confirm that the memory card is one that is
compatible with the camera.
or
Reseat the memory card.
or
Replace the memory card with a known good card.
or
Take the camera to your dealer for service.
71
Page 76

22 Reseat the memory card.
or
Replace the memory card with a known good card.
or
Take the camera to your dealer for service.
23 Confirm that the memory card is one that is compatible
with the camera.
or
Take the camera to your dealer for service.
24 Confirm that the memory card is one that is compatible
with the camera.
or
Replace the memory card with a known good card.
or
Take the camera to your dealer for service.
72
25 Confirm that the memory card is one that is compatible
with the camera.
or
Replace the memory card with a known good card.
or
Take the camera to your dealer for service.
January 1996
Page 77

Getting Help
If you have questions about the DC50 zoom camera, the retailer from
whom you purchased the camera may be able to answer them.
Eastman Kodak Company provides technical information to retailers.
In the U.S., you can also call 1–800–235–6325 for technical support on
regular business days between 9:00 a.m. and 8:00 p.m. Eastern Time if:
– you have questions about your warranty.
– you want to know where to get accessories.
– you want to know where to get service.
– you want information about other Kodak products.
– you have trouble operating the camera.
January 1996
73
Page 78

Camera Specifications
Technical
Type: CCD still frame camera
Image size: 756 x 504 high resolution
Bit depth: 24-bit color
Speed: With flash—pictures can be taken every 8 seconds
Without flash—pictures can be taken every 5 seconds
Flash: Color temperature—5,200 K
Guide number—10.4 (ISO 84)
Zoom Lens
7 to 21 mm
Size
74
Depth: 6.0 in. (152 mm)
Width: 4.7 in. (119 mm)
Height: 2.5 in. (64 mm)
Weight
1.16 lb (525 g) without batteries
Operating Environment
Temperature: 0_ to 40_ C (32_ to 104_ F)
Humidity: 20 to 95 percent, noncondensing
January 1996
Page 79

Power Sources
Batteries: 4 AA batteries—lithium, NiCad (nickel-cadmium),
or alkaline
Power adapter: 4.7 V DC/2.3 A to 8.0 V DC/2.3 A (surge protected)
Power Consumption
Standby: <600 mW
Image capture: <4.5 W
Image processing/flash charging: <16.5 W
Removable Memory
PCMCIA–A T A removable memory card T ype I and II with DOS file format.
Serial Cable
RS232C/RS422 cable with Mini-DIN 8-pin connector. Asynchronous
serial rates up to 57K bits per second on Macintosh systems and
115K bits per second on Windows systems.
January 1996
The rate may increase to 230K bits per second on some Windows
systems with a special serial interface board.
NOTE: These are optimum rates. Different system configurations
perform at different speeds. Your system may not perform
at the optimum speed.
75
Page 80

Regulatory Information
FCC Compliance and Advisory Statement
This device complies with Part 15 of the FCC Rules. Operation is
subject to the following two conditions: 1) this device may not cause
harmful interference, and 2) this device must accept any interference
received, including interference that may cause undesired operation.
This equipment has been tested and found to comply with the limits for
a Class B digital device, pursuant to Part 15 of the FCC Rules. These
limits are designed to provide reasonable protection against harmful
interference in a residential installation.
This equipment generates, uses, and can radiate radio frequency
energy and, if not installed or used in accordance with the instructions,
may cause harmful interference to radio communications. However,
there is no guarantee that interference will not occur in a particular
installation.
76
If this equipment does cause harmful interference to radio or television
reception, which can be determined by turning the equipment off and
on, the user is encouraged to try to correct the interference by one or
more of the following measures: 1) reorient or relocate the receiving
antenna; 2) increase the separation between the equipment and the
receiver; 3) connect the equipment to an outlet on a circuit different
from that to which the receiver is connected; 4) consult the dealer or an
experienced radio/TV technician for additional suggestions.
Any changes or modifications not expressly approved by the party
responsible for compliance could void the user’s authority to operate the
equipment. Where shielded interface cables have been provided with
the product or specified additional components or accessories
elsewhere defined to be used with the installation of the product, they
must be used in order to ensure compliance with FCC regulations.
January 1996
Page 81

Canadian DOC Statement
DOC Class B Compliance—This Class B digital apparatus meets
all requirements of the Canadian Interference-Causing Equipment
Regulations.
Observation des normes-Class B—Cet appareil numérique de la
classe B respecte toutes les exigences du Réglement sur le matériel
brouilleur du Canada.
January 1996
77
Page 82

Index
A
AC adapter, 53, 54
connecting to camera, 58
connector, 57, 59
using, 57–58
Acrobat (TM) Reader software, 2
Adapter, 9-pin, 2
ADOBE Acrobat (TM) Reader software, 2
Alkaline batteries, 4
Auto Focus
icon, 15, 28
multi-spot, 17
target mark, 12
Auto focus sensors, 18
Automatic flash mode, 17, 31
Automatic shutoff, camera, 9, 18
specifying time for, 9, 18
78
January 1996
Page 83

B
Batteries, 2, 20, 36, 53–56
alkaline, 4
charge level, 54
charging, 56
conditioning, 56
extending life of, 55
improving performance of, 55
installing in camera, 4–7
life, 53
and number of images, 53
lithium, 4
disposal of, 53
mixing types, 4, 6, 53
NiCad, 4, 56
charging, 56
pictures in memory when batteries are empty, 36, 54
removing when storing camera, 54, 65
safety information, 55
saving, 53, 57
types, 4
Battery icon, 15, 36, 54
January 1996
79
Page 84

C
Camera
automatic shutoff, 9, 18
specifying time for, 9, 18
erasing pictures from, 26
features, 14–44
holding, 10
indicator lights, 9, 18
flashing, 9, 18
installing batteries in, 4–7
maintenance, 64–65
positioning, 10
power save mode, 9, 18
specifying time for, 9, 18
service, 71
“sleep” mode, 9, 18
specifying time for, 9, 18
software application kit, 2
specifications, 74–75
turning off, 8–9, 17
turning on, 8, 10, 17
using, 3–13
“waking,” 9, 18
Camera features, 14–44
back of camera, 15, 22–26
icons in LCD, 15, 27–44
front of camera, 14, 16–18
sliding cover, 17
top of camera, 14, 19–21
80
January 1996
Page 85

Canadian DOC statement, 77
Capturing images, 10–13
framing subject in viewfinder, 12
positioning camera, 10–11
Charging batteries, 56
Cleaning
DC50 zoom camera focus sensors, 65
DC50 zoom camera lens, 64
DC50 zoom camera light sensor, 65
Close-up focus mode, 3, 29
Closing external battery compartment cover, 7–8
Computer, connecting DC50 camera to, 59–63
Macintosh systems, 60–61
Windows systems, 62–63
Conditioning batteries, 56
Copy Images icon, 15, 41–44
Copy operation, stopping, 43, 44
Copying images to memory card, 42–43, 49
January 1996
81
Page 86

D
DC50 zoom camera, 2
connecting to computer, 59–63
Macintosh systems, 60–61
Windows systems, 62–63
features, 1
maintenance, 64–65
cleaning focus sensors, 65
cleaning lens, 64
cleaning light sensor, 65
package contents, 2
service, 71
storing, 54, 65
Default value
exposure compensation, 30
flash, 31
focus, 28
for icons in LCD, 27
timer, 35
Deleting pictures
from camera’s internal memory, 26, 39
from memory card, 26, 39, 50–51, 90–91
82
January 1996
Page 87

E
EJECT button, 15, 24
Ejecting memory card from camera, 24
ERASE button, 15, 25, 26
Erase Images icon, 15, 26, 39
Erasing images
from camera’s internal memory, 26, 39
from memory card, 26, 39, 50–51, 90–91
Erasing pictures
from camera’s internal memory, 26, 39
from memory card, 26, 39, 50–51, 90–91
Error codes, 71–72
Exposure
changing, 30
selecting value, 30
sensor, 14
value, selecting, multi-spot auto, 30
Exposure Compensation, 17
icon, 15, 30
External battery compartment cover
removing, 4–5
replacing, 7–8
January 1996
83
Page 88

F
FCC compliance and advisory statement, 76
Features, 1
camera, 14–44
back, 15, 22–26
front, 14, 16–18
icons in LCD, 15, 27–44
power switch, 17
top, 14, 19–21
selecting with MODE button, 25
specifying with SELECT button, 25, 26
File name, memory card, 52
Fill flash flash mode, 32
Flash, 14, 17, 20
automatic, 31
does not work, 69
icon, 15, 31–32
fill flash, 32
flash off, 32
flash on, 32
mode, selecting
auto flash, 31
fill flash, 32
off, 32
on, 32
off, flash mode, 32
on, flash mode, 32
84
January 1996
Page 89

Focus, 3, 28–29
close-up, 29
mode, selecting, 29
close-up, 29
multi-spot auto, 28
single-spot auto, 28
multi-spot auto, 28
sensors, 14, 18
DC50 zoom camera, cleaning, 65
single-spot auto, 28
Framing subject in viewfinder, 12
Front indicator light, 14
FUL, in Images Remaining Counter, 20
H
Holding camera, 10–11
Home position in LCD, 25, 26
returning to, 25, 26
January 1996
85
Page 90

I
Icons, 10, 17
flashing, 9
in LCD, 8, 9, 25, 27–44
default values, 27
Image
counters, 37–38
quality, 17
selecting, 33
resolution, 33
selecting, 33
Image Quality
Best, 33
Better, 33
Good, 33
icon, 15, 33
selecting, 33
Images
capturing, 10–13
framing subject in viewfinder, 12
positioning camera, 10–11
transferring to computer, 59–63
Macintosh systems, 60–61
Windows systems, 62–63
Images Remaining Counter, 13
does not decrease, 37
icon, 15, 37–38
Images Taken Counter, 13
icon, 15, 38
86
January 1996
Page 91

Indicator lights
flashing, 9, 18
front of camera, 14, 18
Information, additional, 73
Inserting memory card, 46–47
Installing batteries in camera, 4–7
Internal battery compartment door
closing, 7–8
opening, 5–6
Introduction, 1–2
January 1996
87
Page 92

L
LCD, 8, 9, 10, 17
display does not appear, 66
icons, 15, 27–44
LCD icons, 15, 27–44
Auto Focus, 15, 28
Battery, 15, 36
Copy Images icon, 15, 41–44
default values, 27
Erase Images, 15, 39
Exposure Compensation, 15, 30
Flash, 15, 31–32
Image Quality, 15, 33
selecting, 33
Images Remaining Counter, 15, 37–38
Images Taken Counter, 15, 38
Memory Card, 15, 40
Timer, 15, 34–35
Lens, DC50 zoom camera, cleaning, 64
Light sensor, DC50 zoom camera, cleaning, 65
Lithium batteries, 4, 53
88
January 1996
Page 93

M
Macintosh systems serial cable, 2
Maintenance, for DC50 zoom camera, 64–65
cleaning focus sensors, 65
cleaning lens, 64
cleaning light sensor, 65
Memory
image storage, 37
cards, 37.
see also
PCMCIA–ATA cards
canceling copy when full, 44
continuing copy when full, 43
copying images to, 42–43, 49
ejecting from camera, 24
erasing pictures from, 26, 50–51
image capacity, 45
incompatible, 43, 45, 47, 71
inserting in camera, 46–47
removing from camera, 48
size, 45
using, 45–52
Memory Card icon, 15, 40
Mixing battery types, 53
MODE button, 15, 25
Multi-spot auto focus mode, 28
January 1996
89
Page 94

N
NiCad batteries, 4
Number of pictures available, 37
O
Opening
external battery compartment cover, 4–5
internal battery compartment door, 5–6
90
January 1996
Page 95

P
Package contents, 2
PCMCIA–ATA cards, 37.
see also
Memory cards
canceling copy when full, 44
continuing copy when full, 43
copying images to, 42–43, 49
ejecting from camera, 24
erasing pictures from, 26, 50–51
image capacity, 45
incompatible, 43, 45, 47, 71
inserting in camera, 46–47
Memory Card icon, 15, 40
removing from camera, 48
size, 45
using, 45–52
Performance, battery, 55
Picture
counters, 37–38
not clear, 68
part missing, 68
quality
best, 33
better, 33
good, 33
resolution, 33
selecting, 33
stored in camera’s internal memory, 3
taken, 3
January 1996
91
Page 96

taking, 10–13
framing subject in viewfinder, 12
positioning camera, 10–11
too dark, 69
too light, 70
transferring to computer, 59–63
Macintosh systems, 60–61
Windows systems, 62–63
Positioning camera, 10–11
Power
adapter, 53, 54
connecting to camera, 58
using, 57–58
consumption, 75
sources, 75
switch, 14, 17
Power save mode, 9, 14, 18, 43, 44
specifying time for, 9, 18
Problems with DC50 zoom camera, 66–73
92
January 1996
Page 97

Q
Quick Reference Guide, 2
R
Registration card, 2
Regulatory information, 76–77
Removable memory cards, 45–52, 75
image capacity, 45
inserting in camera, 46–47
removing card from camera, 24, 48
size, 45
Removing memory card from camera, 24, 48
Resolution, 33
selecting, 33
January 1996
93
Page 98

S
Safety information for batteries, 55
Saving images to memory card, 42–43, 49
SELECT button, 15, 25, 26
Selecting icon with MODE button, 25
Selection buttons, 15
ERASE, 15, 26
MODE, 15, 25
SELECT, 15, 26
Sensors
exposure, 14
focus, 14
Serial
communication cable, 2, 59, 75
communications connector, 57, 59
rates, 75
Service, camera, 71
Setting timer, 35
Shutoff, camera, 9, 18
specifying time for, 9, 18
Shutter button, 13, 14, 20
nothing happens when pressed, 20, 23, 67
Single-spot auto focus mode, 28
“Sleep” mode, camera, 9, 18
specifying time for, 9, 18
Sliding cover, 8, 9, 10, 14, 17
Software
ADOBE Acrobat (TM) Reader, 2
camera application, 2
Specifications, camera, 74–75
Storing DC50 zoom camera, 54, 65
94
January 1996
Page 99

T
T button, 14, 21
no action when pressed, 21
Taking pictures, 10–13
framing subject in viewfinder, 12
positioning camera, 10–11
Technical support, 73
Telephoto zoom button, 14, 21
no action when pressed, 21
Time, specifying power save, 9, 18
Timer, 17
icon, 15, 34–35
setting, 35
Transferring pictures to computer, 59–63
Macintosh systems, 60–61
Windows systems, 62–63
Tripod mount, 11, 16
Troubleshooting, 66–73
no action when shutter button is pressed, 20, 23
no action when T button is pressed, 21
no action when Telephoto button is pressed, 21
no action when W button is pressed, 21
no action when Wide Angle button is pressed, 21
Turning off camera, 17
Turning on camera, 17
January 1996
95
Page 100

U
User’s Guide, 2
Using
DC50 zoom camera, 3–13
removable memory, 45–52
inserting card in camera, 46–47
removing card from camera, 48
V
Viewfinder, 12, 15, 23
frame, 24
W
W button, 14, 21
no action when pressed, 21
“Waking” camera, 9, 18
Warranty card, 2
Wide Angle zoom button, 14, 21
no action when pressed, 21
Windows Systems serial cable, 2
96
January 1996
 Loading...