

Page 1
KODAK
DC25 Digital Camera
UserÕs Guide
for camera and software
Page 2

Adobe Photoshop is a trademark of Adobe Systems Incorporated or its subsidiaries and may
be registered in certain jurisdictions.
PictureWorks is a trademark of PictureWorks Technology, Inc.
KaiÕs Power Goo is a trademark of MetaTools, Inc.
Page 3

Table of
Contents
Page
Table of Contents . . . . . . . . . . . . . . . . . . . . . . . . . . . . . . . . i
Getting Started . . . . . . . . . . . . . . . . . . . . . . . . . . . . . . . . 1-1
Package Contents . . . . . . . . . . . . . . . . . . . . . . . . . . . . . . . . . . . . . . . . . . .1-1
Software Included on CD ROM . . . . . . . . . . . . . . . . . . . . . . . . . . . . . . . .1-2
System Requirements . . . . . . . . . . . . . . . . . . . . . . . . . . . . . . . . . . . . . . . .1-2
Your DC25 Camera . . . . . . . . . . . . . . . . . . . . . . . . . . . . . . . . . . . . . . . . .1-3
Using Your DC25 . . . . . . . . . . . . . . . . . . . . . . . . . . . . . . . 2-1
Batteries . . . . . . . . . . . . . . . . . . . . . . . . . . . . . . . . . . . . . . . . . . . . . . . . . .2-1
Table of Contents
Resolution Mode . . . . . . . . . . . . . . . . . . . . . . . . . . . . . . . . . . . . . . . . . . .2-2
Taking Pictures . . . . . . . . . . . . . . . . . . . . . . . . . . . . . . . . . . . . . . . . . . . . .2-3
Using the LCD Display . . . . . . . . . . . . . . . . . . . . . . . . . . . . . . . . . . . . . .2-4
Memory Full . . . . . . . . . . . . . . . . . . . . . . . . . . . . . . . . . . . . . . . . . . . . . . .2-9
Flash . . . . . . . . . . . . . . . . . . . . . . . . . . . . . . . . . . . . . . . . . . . . . . . . . . . .2-10
Automatic Power Off . . . . . . . . . . . . . . . . . . . . . . . . . . . . . . . . . . . . . . .2-10
Self-Timer . . . . . . . . . . . . . . . . . . . . . . . . . . . . . . . . . . . . . . . . . . . . . . . .2-11
Optional Accessories . . . . . . . . . . . . . . . . . . . . . . . . . . . . . . . . . . . . . . .2-12
General Maintenance and Safety . . . . . . . . . . . . . . . . . . . . . . . . . . . . . .2-14
DC25 Specifications . . . . . . . . . . . . . . . . . . . . . . . . . . . . . . . . . . . . . . . .2-15
i
Page 4

Using DC25 with Your Computer . . . . . . . . . . . . . . . . . .3-1
Connecting the DC25 to Your Computer . . . . . . . . . . . . . . . . . . . . . . . . .3-1
Checking Serial Port Availability . . . . . . . . . . . . . . . . . . . . . . . . . . . . . . .3-2
Printing . . . . . . . . . . . . . . . . . . . . . . . . . . . . . . . . . . . . . . . . . . . . . . . . . . .3-3
Picture Easy Software . . . . . . . . . . . . . . . . . . . . . . . . . . .4-1
Installation . . . . . . . . . . . . . . . . . . . . . . . . . . . . . . . . . . . . . . . . . . . . . . . .4-1
Overview . . . . . . . . . . . . . . . . . . . . . . . . . . . . . . . . . . . . . . . . . . . . . . . . .4-2
Transferring Pictures from DC25 . . . . . . . . . . . . . . . . . . . . . . . . . . . . . . .4-3
Saved Pictures . . . . . . . . . . . . . . . . . . . . . . . . . . . . . . . . . . . . . . . . . . . . .4-4
PhotoEnhancer Special Fun Edition Software . . . . . . .5-1
Installation . . . . . . . . . . . . . . . . . . . . . . . . . . . . . . . . . . . . . . . . . . . . . . . .5-1
Starting PhotoEnhancer . . . . . . . . . . . . . . . . . . . . . . . . . . . . . . . . . . . . . .5-2
Camera Communications Settings . . . . . . . . . . . . . . . . . . . . . . . . . . . . . .5-2
Transferring Pictures from DC25 . . . . . . . . . . . . . . . . . . . . . . . . . . . . . . .5-3
Editing Tools . . . . . . . . . . . . . . . . . . . . . . . . . . . . . . . . . . . . . . . . . . . . . .5-5
Enhancing Your Pictures . . . . . . . . . . . . . . . . . . . . . . . . . . . . . . . . . . . . .5-6
Creating Special Effects and Cards . . . . . . . . . . . . . . . . . . . . . . . . . . . . .5-9
Saving Your Pictures . . . . . . . . . . . . . . . . . . . . . . . . . . . . . . . . . . . . . . .5-14
Printing Your Pictures. . . . . . . . . . . . . . . . . . . . . . . . . . . . . . . . . . . . . . .5-14
ii
Page 5

Picture Postcard Software . . . . . . . . . . . . . . . . . . . . . . . 6-1
Installation . . . . . . . . . . . . . . . . . . . . . . . . . . . . . . . . . . . . . . . . . . . . . . . .6-1
Download Picture Postcard Software . . . . . . . . . . . . . . . . . . . . . . . . . . . .6-2
Starting Picture Postcard . . . . . . . . . . . . . . . . . . . . . . . . . . . . . . . . . . . . .6-2
Setting Options or Preferences . . . . . . . . . . . . . . . . . . . . . . . . . . . . . . . . .6-3
Using the Toolbar . . . . . . . . . . . . . . . . . . . . . . . . . . . . . . . . . . . . . . . . . . .6-4
Creating a Postcard . . . . . . . . . . . . . . . . . . . . . . . . . . . . . . . . . . . . . . . . . .6-5
Sending Postcards . . . . . . . . . . . . . . . . . . . . . . . . . . . . . . . . . . . . . . . . . . .6-7
Receiving and Viewing a Postcard . . . . . . . . . . . . . . . . . . . . . . . . . . . . . .6-8
TWAIN Acquire Software . . . . . . . . . . . . . . . . . . . . . . . . 7-1
Installation . . . . . . . . . . . . . . . . . . . . . . . . . . . . . . . . . . . . . . . . . . . . . . . .7-1
Starting Access Software . . . . . . . . . . . . . . . . . . . . . . . . . . . . . . . . . . . . .7-2
Overview . . . . . . . . . . . . . . . . . . . . . . . . . . . . . . . . . . . . . . . . . . . . . . . . .7-2
Transferring Pictures from DC25 . . . . . . . . . . . . . . . . . . . . . . . . . . . . . . .7-5
Rotating Your Picture . . . . . . . . . . . . . . . . . . . . . . . . . . . . . . . . . . . . . . . .7-7
Table of Contents
Enhancing Your Picture . . . . . . . . . . . . . . . . . . . . . . . . . . . . . . . . . . . . . .7-7
Transferring Your Picture . . . . . . . . . . . . . . . . . . . . . . . . . . . . . . . . . . . . .7-8
Troubleshooting . . . . . . . . . . . . . . . . . . . . . . . . . . . . . . . 8-1
Where to Get Help . . . . . . . . . . . . . . . . . . . . . . . . . . . . . . 9-1
Software Help . . . . . . . . . . . . . . . . . . . . . . . . . . . . . . . . . . . . . . . . . . . . . .9-1
Online Services . . . . . . . . . . . . . . . . . . . . . . . . . . . . . . . . . . . . . . . . . . . . .9-2
Faxed Information . . . . . . . . . . . . . . . . . . . . . . . . . . . . . . . . . . . . . . . . . .9-2
Customer Support . . . . . . . . . . . . . . . . . . . . . . . . . . . . . . . . . . . . . . . . . . .9-2
Warranty & Regulatory Information
Index
iii
Page 6

Page 7

Getting Started
Congratulations on purchasing your new KOD AK DC25 Digital Camera (DC25).
The DC25 is the digital camera that offers you the convenience of a point-andshoot camera, a built-in flash, 2 megabytes of picture storage on an optional
Picture Card, and a color Liquid Crystal Display (LCD) which allows you to
immediately view your pictures.
The pictures used through out this manual were taken with the DC25 and edited
using PhotoEnhancer Special Fun Edition software from PictureWorks.
Package Contents
✔
DC25 camera
✔
Quickstart Guide(s)
registration cards
✔
✔
one PC serial cable
✔
DC25 software
1
Getting Started
two 3V lithium batteries
✔
1-1
Page 8

Software Included on CD ROM
✔
Kodak Picture Easy Software—a quick and easy way to transfer pictures
from your DC25 to your computer.
✔
PictureWorks’ PhotoEnhancer Special Fun Edition—transfer pictures
from the DC25 to your computer and let the fun begin! Quickly view,
enhance, and use your pictures in templates to create cards, invitations,
calendars, and more.
KODAK Digital Science Picture Postcard Software—lets you send an
✔
e-mail picture postcard using pictures taken with your DC25.
✔
TW AIN Acquire module—allows you to download pictures to TWAINcompliant software applications.
☞
Additional bonus software may be included on your CD.
System Requirements
Personal computer with a minimum 486, 33MHz microprocessor
✔
✔
MICROSOFT WINDO WS 95
✔
6 MB or more of extended memory available
30 MB available hard disk space
✔
✔
available serial port and CD-ROM drive
✔
color display (800 x 600 24-bit recommended)
1-2
Page 9
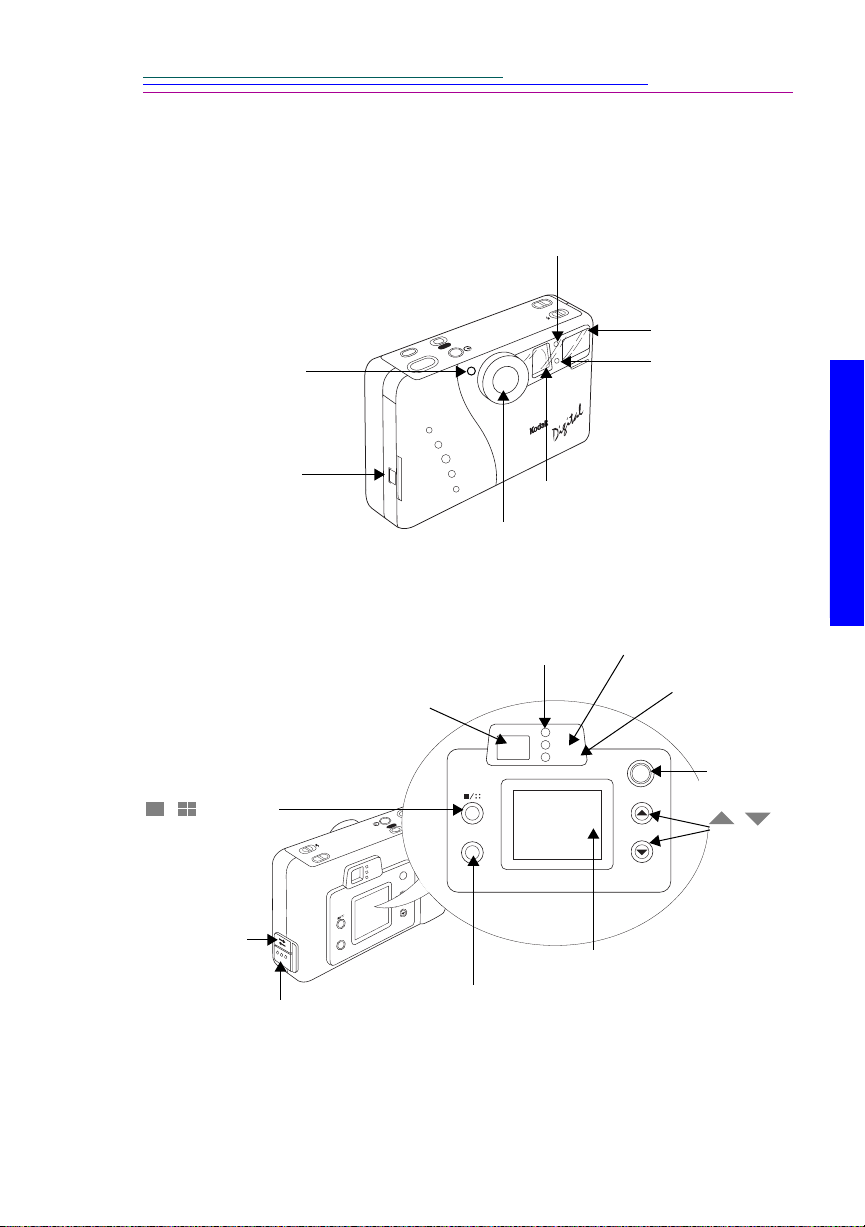
Your DC25 Camera
Camera Front
Flash Sensor
Light Sensor
ERASE
POWER
STANDARD
KODAK
HIGH
DC25 DIGITAL CAMERA
OFF AUTO FILL
Flash
Self-Timer Light
Picture Card Door
Camera Back
/SCROLL
/
Button
Serial Cable
Connection
AC Adapter
Connection
FILL
TO
U
FF A
O
R
A
D
N
TA
S
Viewfinder
HIGH
D
KODAK DC25 DIGITAL CAMERA
SCROLL
STATUS
ENTER
DC25
CAMERA
Card
Viewfinder Lens
Camera Lens
Power Light
Busy Light
Memory Light
Power
Busy
Memory
DISPLAY
R
E
W
O
P
ERASE
Power
Busy
Memory
DISPLAY
PREVIEW
SCROLL
STATUS
ENTER
PREVIEW
DISPLAY
Button
Buttons
/
LCD Display
ST ATUS/ENTER
Button
Getting Started
1
1-3
Page 10
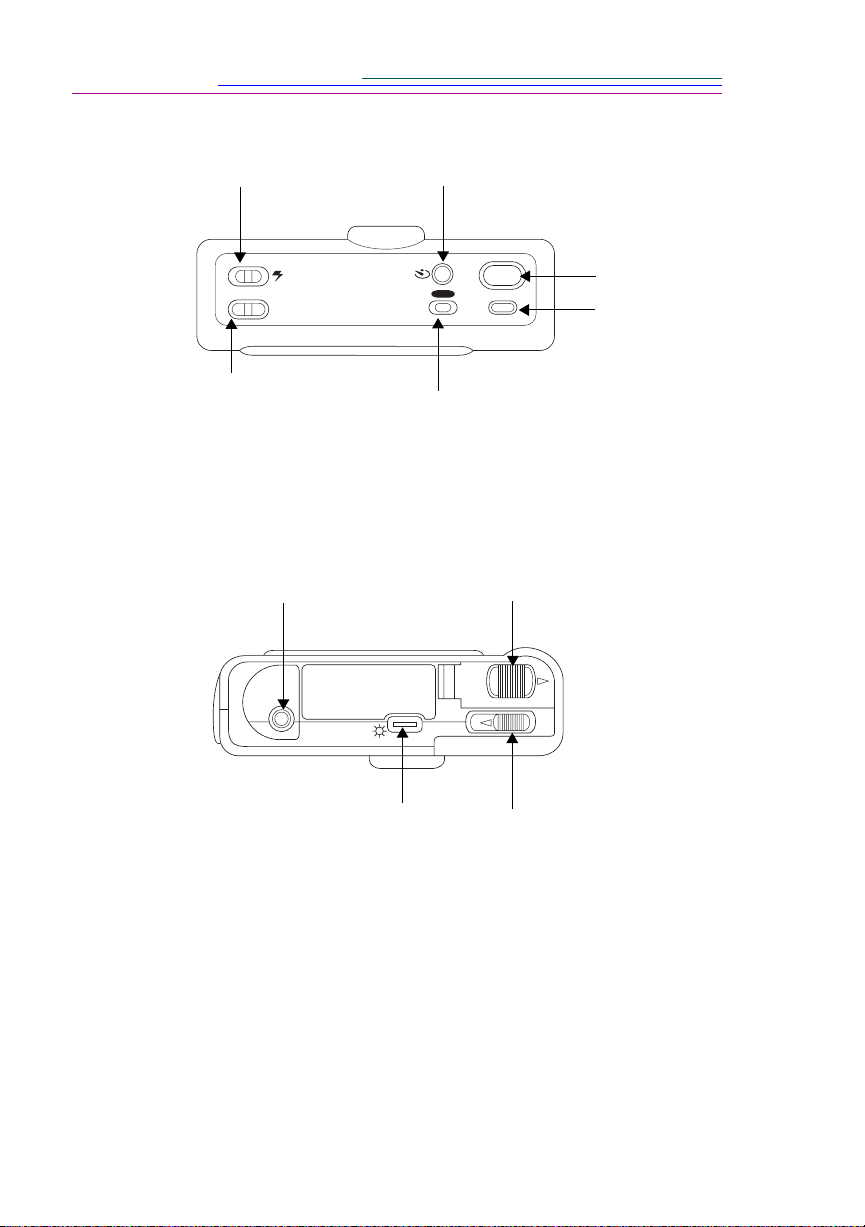
Camera Top
Flash Switch
OFF AUTO FILL
STANDARD HIGH
Resolution Switch
Camera Bottom
Tripod Mount
Self Timer Button
KODAK DC25 DIGITAL CAMERA
Erase Button
ERASE
Eject
POWER
Battery Door
Shutter Button
Camera
Power Button
(On/Off)
1-4
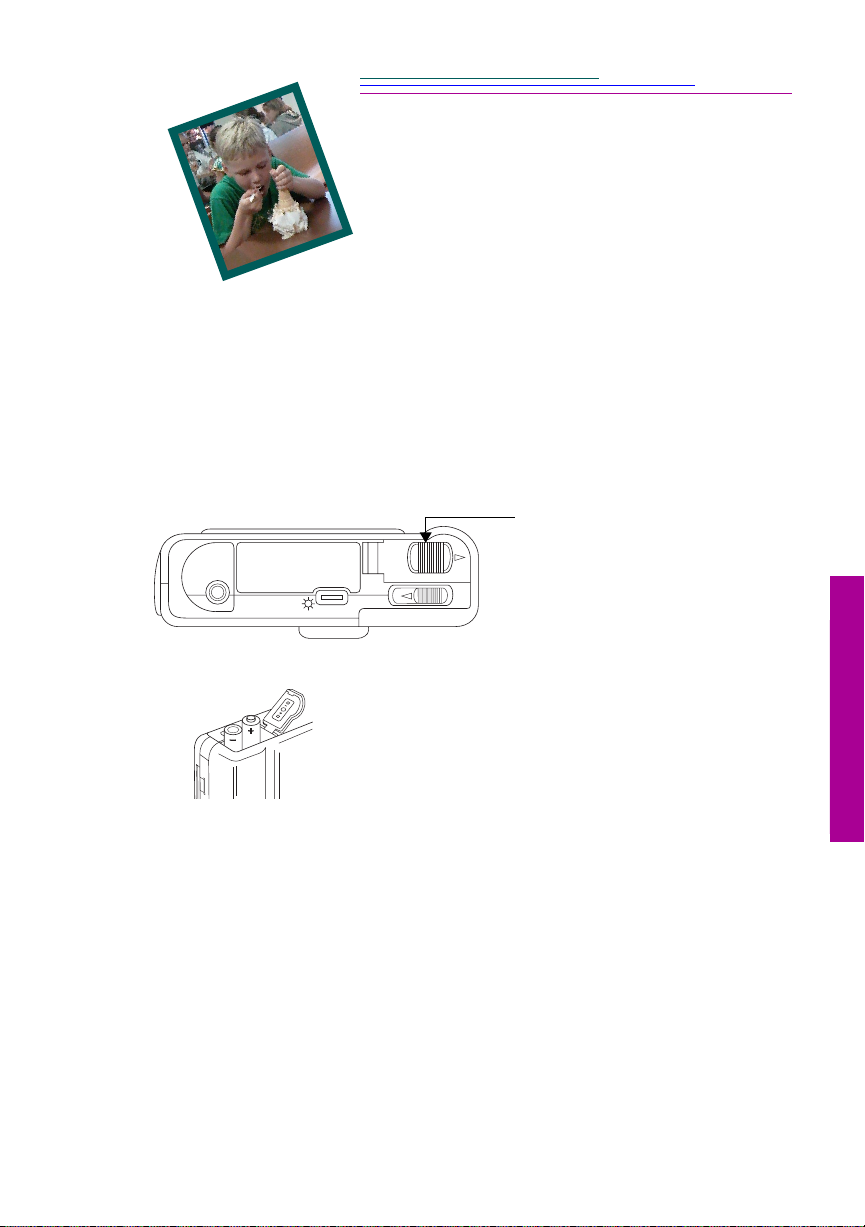
LCD Brightness Wheel
Picture Card
Eject Switch
Page 11
Using Your
DC25
Batteries
Installing Your Batteries
Your DC25 is powered by two 3-volt lithium batteries.
1
Place your thumb on the
battery door.
Eject
Bottom view of camera.
Card
A DC25 AC adapter is available. See page 2-13 for details, and call Kodak
Customer support (see Chapter 9 - Get Help) for dealer information.
☞
Remove the batteries if the DC25 will not be used for an extended period of
time. This prevents camera damage from battery leaks or corrosion.
2
Slide battery door away from
the camera.
3
Insert the batteries as
indicated on inside of battery
door.
2
Using Camera
2-1
Page 12
Battery Indicators
Power
Busy
Memory
The green Power light, on the back of the DC25, blinks to
indicate that the battery is weak and in need of replacement.
You may also check the battery level from the STATUS display on the LCD.
See the
LCD
section of this chapter entitled
Checking Camera Status
for
instructions on accessing the STATUS display.
The DC25 may unexpectedly power off if the batteries have reached a low point
and the batteries will need to be replaced. If the batteries should go dead while
pictures are stored in the camera’s memory or Picture Card, the pictures remain
stored in the camera.
Resolution Mode
You may set your DC25 to capture pictures in a High or Standard resolution.
Your pictures include more detail with high resolution, but they will use more
memory in the DC25 than standard resolution pictures.
OFF AUTO FILL
STANDARD HIGH
KODAK DC25 DIGITAL CAMERA
Resolution switch
ERASE
High—
approximately 14 pictures at
493 X 373 pixels.
POWER
Standard—
approximately 29 pictures at
320 X 240 pixels.
you can take
you can take
You can switch freely between the two settings when taking pictures. The
number of pictures the DC25 is able to store will vary accordingly.
2-2
Page 13
Taking Pictures
OFF AUTO FILL
STANDARD HIGH
KODAK DC25 DIGITAL CAMERA
ERASE
POWER
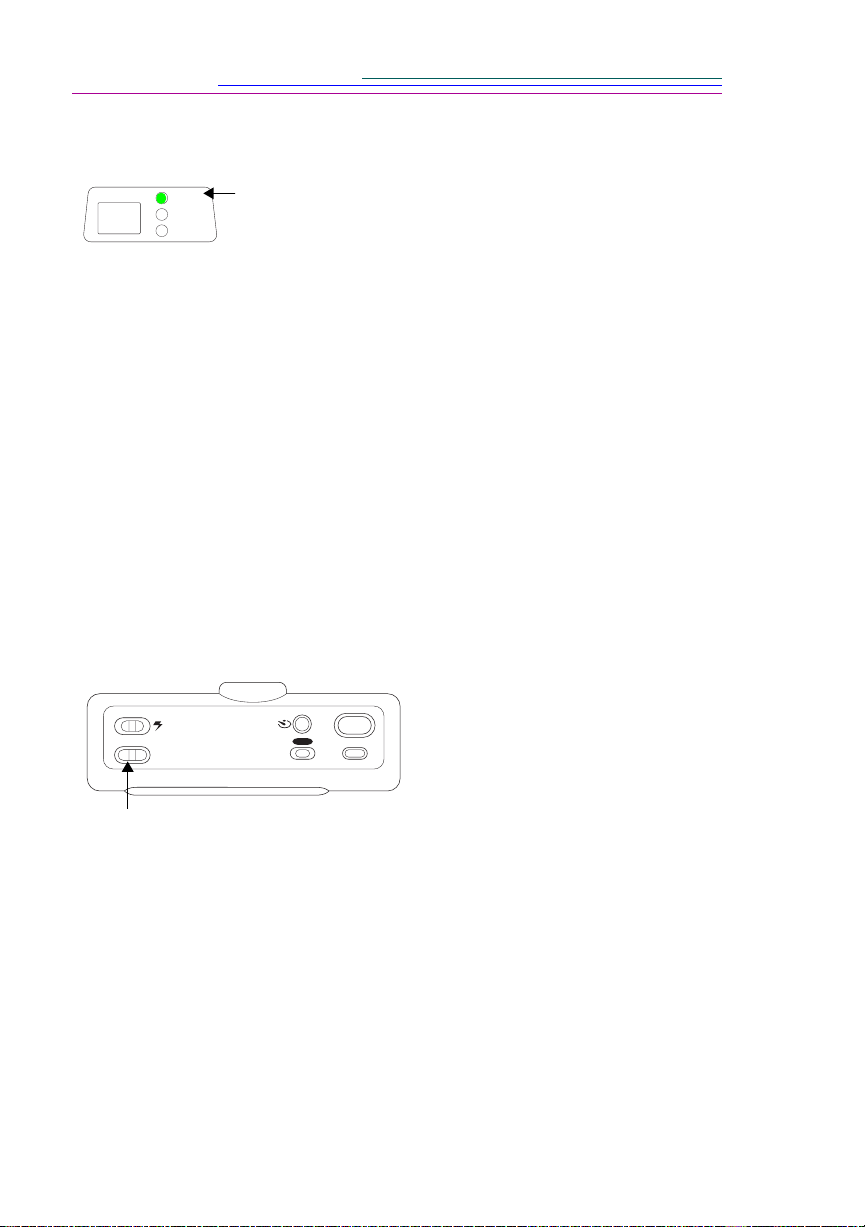
1
Press the POWER button to turn the
DC25 on.
Power
Busy
Memory
Subject range 2 to 3 ft.
(0.5 to 1 m)
Subject range 3 ft. (1 m) to infinity
OFF AUTO FILL
ERASE
STANDARD HIGH
KODAK DC25 DIGITAL CAMERA
POWER
The green Power light turns on
indicating the DC25 is ready to take
pictures.
☞
If the camera is set to standard
resolution, the lights will go
through a series of blinks before
the Power light stays on.
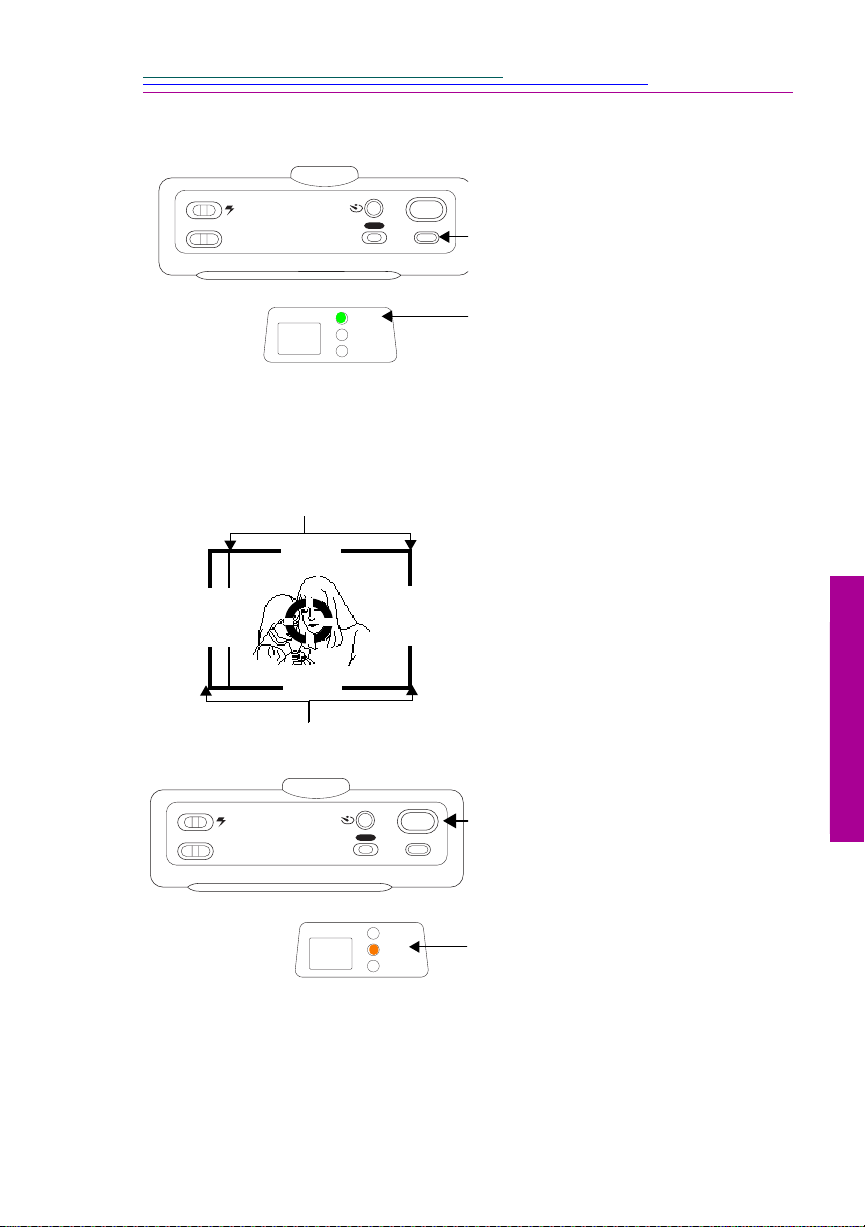
Position the subject in the
2
viewfinder.
Center your subject in the
viewfinder:
✔
Use the viewfinder’s inside line
when your subject is 2 to 3 ft.
(0.5 to 1 m) away.
✔
Use the entire viewfinder area
when your subject is more than
3 ft. (1 m) away.
Firmly press the Shutter button.
3
2
Using Camera
Power
Busy
Memory
The orange Busy light stays on for
approximately 5 seconds as the
DC25 processes the picture. You do
not need to hold the camera still
while the Busy light is lit but you
will not be able to take another
picture until the Busy light turns off .
☞
The red Memory light remains off until the DC25’s memory is full.
2-3
Page 14
Using the LCD Display
Your DC25 comes equipped with a color Liquid Crystal Display (LCD) that
allows you to view pictures just seconds after capturing them!
☞
The LCD does not have to be on to take a picture.
Using the LCD option shortens battery life.
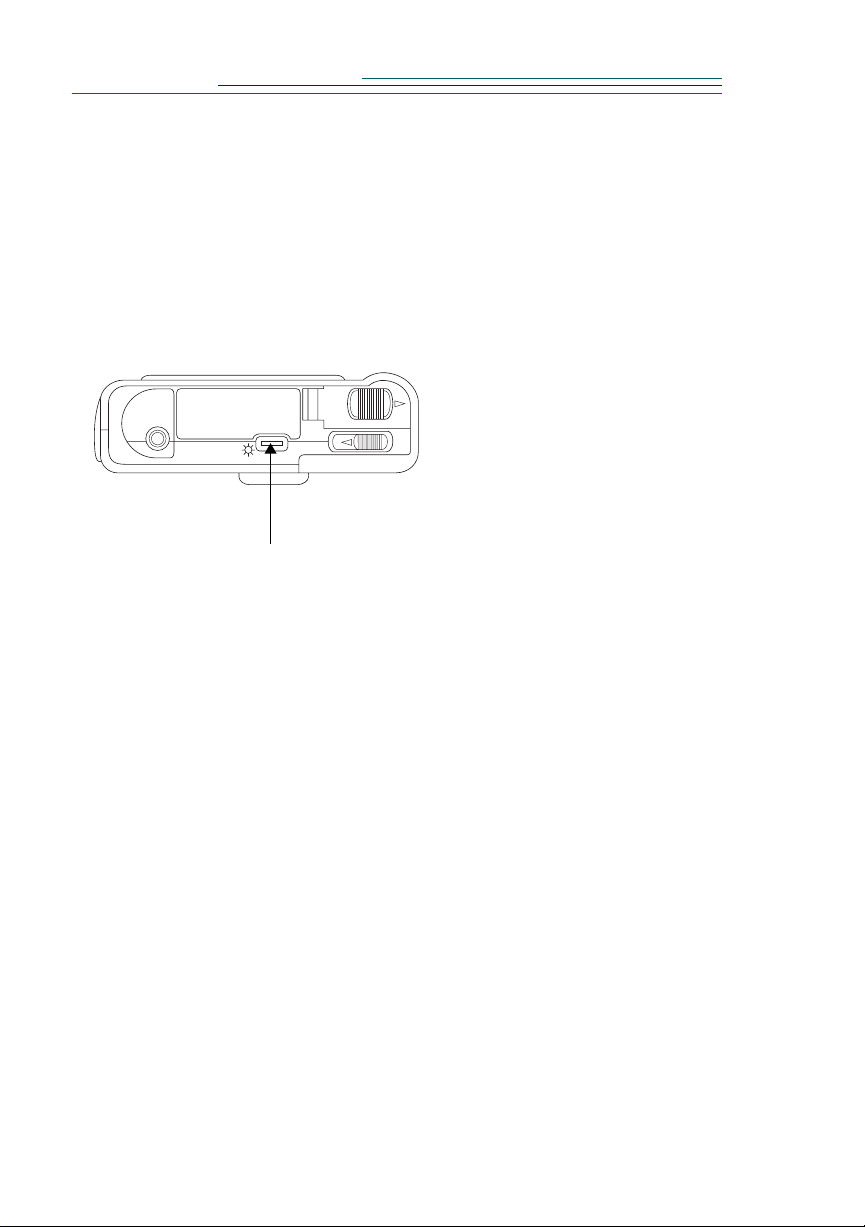
Adjusting LCD Brightness
You may adjust the brightness of
the LCD by turning the
Eject
LCD brightness wheel
Automatic LCD Turn Off
To save battery power, the LCD display automatically turns off after 60 seconds.
To turn the LCD on again, press the DISPLAY button.
brightness wheel located at the
bottom of the DC25.
2-4
Page 15
Viewing Your Pictures on the LCD
/
The DISPLAY button turns on the LCD and allows you to view each picture
moments after it was taken!
OFF AUTO FILL
ERASE
STANDARD HIGH
SCROLL
STATUS
ENTER
KODAK DC25 DIGITAL CAMERA
Power
Busy
Memory
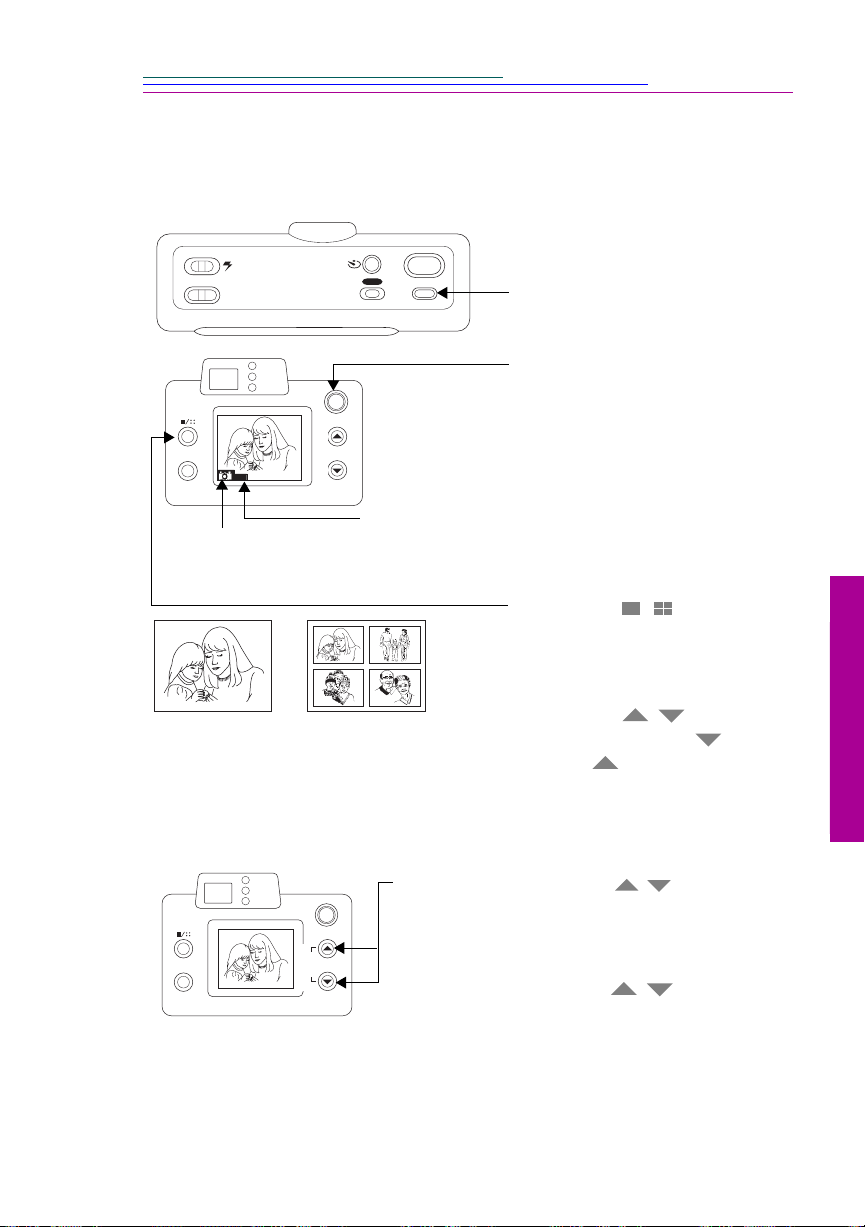
1
Icon where picture
is stored.
DISPLAY
PREVIEW
POWER
Picture number
1
Press the POWER button.
2
Press the DISPLAY button.
The LCD momentarily
displays a BUSY screen then
displays the last picture taken.
The picture number and icon
disappear after 2 seconds.
A message appears if no
pictures are in the DC25 or
optional Picture Card.
3
Press the / SCROLL
/
button to view one picture or
four different pictures at one
time.
4
Press the buttons to
/
view the previous ( ) or
next ( ) pictures.
To Exit:
☞
Press the DISPLAY button again to turn off the LCD.
You may also use the LCD as a viewfinder to preview your subject before
taking a picture.
Power
Busy
Memory
SCROLL
STATUS
ENTER
Using the preview option shortens battery life.
Press and hold down both buttons at the
/
same time for approximately 3 seconds.
DISPLAY
PREVIEW
The LCD displays the subject that is viewed from
the viewfinder.
To Exit:
Press one of the buttons.
2-5
2
Using Camera
Page 16

Checking Camera Status
The STATUS display allows you to check the battery level, available memory in
the DC25 and optional Picture Card (if loaded), and allows you to access the
MOVE TO CARD display.
SCROLL
STATUS
ENTER
MOVE TO CARD
EXIT
SCROLL
STATUS
ENTER
Icon where
picture
is stored.
Power
Busy
Memory
DISPLAY
PREVIEW
1 Press the POWER button.
2 Press the DISPLAY button.
3 Press the STATUS/ENTER button.
Power
Busy
Memory
DISPLAY
PICTURES LEFT
14 (HIGH)
28 (STD)
PREVIEW
MOVE TO CARD
EXIT
PICTURES LEFT
14 (HIGH)
28 (STD)
Indicates remaining number
of pictures that can be
taken in a high or
standard (STD) resolution
☞ If a Picture Card is inserted, STATUS
The STATUS display appears on the LCD.
displays information pertaining to the
Picture Card. T o check the camera’ s status,
the Picture Card must be removed.
Battery
level
—Batteries are fully charged.
—
The batteries will need
to be replaced soon.
Pictures stored in the
camera’s memory or card
are not lost if the batteries
should go dead.
See the Battery section in this chapter entitled Battery Indicators for more
information on batteries
To Exit: Press the /SCROLL button until the EXIT option is highlighted
/
and then press the STATUS/ENTER button.
2-6
Page 17

Moving Pictures from the DC25 to the Picture Card
Selecting the MOVE TO CARD option on the STATUS display allows you to
move a single or all pictures from the DC25 to the optional Picture Card and
erases the picture from the camera’s memory.
☞ A Picture Card must be inserted to use the MOVE TO CARD option.
SCROLL
STATUS
ENTER
Power
Busy
Memory
DISPLAY
PREVIEW
1 Press the POWER button.
2 Press the DISPLAY button.
3 Press the STATUS/ENTER button.
The STATUS display appears with Exit
highlighted.
SCROLL
STATUS
ENTER
Power
Busy
Memory
MOVE TO CARD
EXIT
PICTURES LEFT
12 (HIGH)
23 (STD)
DISPLAY
PREVIEW
4 Press the /SCROLL button until
MOVE TO CARD is highlighted.
5 Press the STATUS/ENTER button.
A display appears with MOVE PICTURE
/
highlighted. The last picture in the camera’s
memory is displayed in the right-hand corner.
The picture number is indicated under the
camera icon.
6 Press the buttons until the correct
/
picture appears on the display.
SCROLL
STATUS
ENTER
Power
Busy
Memory
MOVE PICTURE
MOVE ALL
EXIT
12
DISPLAY
PREVIEW
☞ To move all the pictures from the camera’s
memory to the Picture Card press the
/SCROLL button until MOVE ALL
/
is highlighted.
7 Press the STATUS/ENTER button.
The BUSY display appears and the orange Busy
light stays on while the picture is moved.
☞ An error message CANNOT MOVE ALL appears if the move could not be
completed because the optional Picture Card was full.
To Exit: Press the /SCROLL button until the EXIT option is highlighted
and then press the STATUS/ENTER button.
/
2
Using Camera
2-7
Page 18

Erasing Pictures from the DC25 or Picture Card
/
The ERASE display allows you to erase individual or all the pictures from the
DC25’s memory or the optional Picture Card.
☞ The LCD must be turned on to erase pictures.
1 Press the POWER button.
OFF AUTO FILL
STANDARD HIGH
KODAK DC25 DIGITAL CAMERA
ERASE
2 Press the DISPLAY button.
POWER
3 Press the ERASE button.
SCROLL
STATUS
ENTER
BUSY
SCROLL
STATUS
ENTER
Power
Busy
Memory
ERASE PICTURE
ERASE CAMERA
ERASE CARD
EXIT
23
Power
Busy
Memory
DISPLAY
PREVIEW
DISPLAY
PREVIEW
The ERASE display appears with ERASE
PICTURE highlighted.
4 If erasing one picture, press the
/
buttons until the correct picture appears
on the display.
☞ If erasing the entire camera or Picture
Card, press the /SCROLL button
until ERASE CAMERA or ERASE
CARD is highlighted.
5 Press the STATUS/ENTER button.
☞ If erasing the entire camera or Picture
Card, a display appears asking you to
verify that all the pictures should be
erased. Press the /SCROLL
button until the appropriate response is
highlighted, then press the STATUS/
ENTER button.
The Busy display appears and the orange
Busy light stays on while the picture is
erased.
/
To Exit: Press the /SCROLL button until the EXIT option is highlighted
/
and then press the STATUS/ENTER button.
2-8
Page 19

Memory Full
When the DC25 and/or optional Picture Card are full you must erase the existing
pictures to capture additional pictures. To save pictures, transfer them to your
computer before erasing them.
You may also check the available memory left in the DC25 or Picture Card from
the STATUS display on the LCD. See the LCD section in this chapter entitled
Checking Camera Status for instructions on accessing the STATUS display.
Memory Light
Power
Busy
Memory
The red Memory light comes on when the DC25’s and/or
optional Picture Card’s memory is full. You cannot take
additional pictures.
☞ If the optional Picture Card is full, the red Memory light comes on and you
will not be able to take any more pictures. Remove the Picture Card and, if
the camera memory is not full, you can take additional pictures.
Memory Full Display
The LCD displays a message similar to the one on
the left if it is turned on when the DC25 and/or
MEMORY FULL
optional Picture Card becomes full.
2
Using Camera
2-9
Page 20

Flash
Your DC25 comes equipped with a built-in sensor flash with three settings. The
flash has an effective range of approximately 2 to13 feet (0.5 to 4 meters).
Flash switch
not fire.
Auto—flash fires automatically
Off—flash is turned off and will
OFF AUTO FILL
STANDARD HIGH
KODAK DC25 DIGITAL CAMERA
ERASE
POWER
whenever the DC25 determines
that there is not enough light to
take a picture.
Fill—flash fires every time you
press the Shutter button. Use this
setting when the lighting is poor
or when your subject is lit from
behind.
The DC25 is designed to take pictures indoors under normal lighting conditions
without a flash. Some pictures may need to be lightened using PhotoEnhancer
software. We suggest taking a few test pictures indoors without a flash to test the
possible results. Using the flash may bring out more detail and diminish shadows.
Automatic Power Off
If you do not use your DC25 for approximately 90 seconds, it automatically turns
off. To turn the DC25 on again, press the POWER button.
2-10
Page 21

Self-Timer
Pressing the Self-timer button creates a 10-second delay between the time you
press the Self-timer button and when the picture is taken. This allows you to
include yourself in the picture.
1 Press the POWER button.
2 Place the DC25 on a flat,
steady surface.
3 Press the Self-timer button.
OFF AUTO FILL
ERASE
STANDARD HIGH
KODAK DC25 DIGITAL CAMERA
POWER
The Self-timer light, located
on the front of the camera,
and the Busy Light, located
on the back of the camera,
POWER
STANDARD
KODAK
HIGH
DC25 DIGITAL CAMERA
ERASE
OFF AUTO FILL
turn on and stay lit for 7
DC25
CAMERA
seconds. They then flash for 3
seconds just before the
picture is taken
Card
4 The picture is taken.
To cancel the Self-timer sequence, press the Self-timer button before the picture
is taken.
2
Using Camera
2-11
Page 22

Optional Accessories
The following DC25 accessories are available from your Kodak dealer.
Picture Card
You can take and store more pictures on the DC25 by purchasing a removable
KODAK Picture Card. The card meets all CompactFlash association
requirements and is ATA compatible. The 2 mega byte memory card can
approximately hold an additional 13 high or 24 standard resolution pictures.
Inserting a Picture Card
WARNING: Do not insert the Picture Card into the DC25 when the Busy light
is lit. This may damage your pictures.
1 Turn off the DC25.
ERASE
POWER
DISPLAY
PREVIEW
Card
2 Open the Picture Card door.
3 Hold the Picture Card face
up, with the connecting end
pointed at the DC25.
4 Push the card all of the way
into the Picture Card slot.
5 Close the Picture Card door.
2-12
Page 23

Removing a Picture Card
1 Wait until the Busy light
is off.
2 Turn off the DC25.
3 Open the Picture Card door.
Eject
4 Slide the Eject button.
Camera bottom
ERASE
POWER
slides out of the slot.
5 T ake hold of the Picture Card
and carefully remove it from
the Picture Card slot.
The Picture Card partially
DISPLAY
PREVIEW
Card
6 Close the Picture Card door.
AC Adapter
An AC adapter allows you to connect your DC25 to a standard electrical outlet.
This is especially useful when you are transferring pictures into your computer.
The adaptor powers the camera, but does not charge the batteries.
WARNING: Only use the AC adapter designed for the DC25. Use of any
other adapter can cause fire, electric shock, or injury.
DC25
CAMERA
➝
➝
Insert the AC adapter into the AC power adapter
connection on the side of your DC25.
2
Using Camera
2-13
Page 24

General Maintenance and Safety
✔ To keep from damaging your DC25, avoid exposing it to moisture and
extreme temperatures.
✔ Clean the outside of the DC25 by wiping it with a clean, dry cloth. Never
use harsh or abrasive cleaners or organic solv ents on the camera or an y of
its parts.
✔ Never disassemble or touch the inside of the DC25. This could result in
electrical shock.
✔ If you notice smoke or a strange smell coming from the DC25,
immediately turn the camera off, wait a few minutes until the DC25 cools,
and remove the batteries.
Cleaning the Lens
1 Blow gently on the lens to remove dust and dirt.
2 Moisten the lens by breathing lightly on it.
3 Wipe the lens gently with a soft, lint-free cloth or an untreated lens-cleaning
tissue.
☞ Do not use cleaning solutions unless they are designed specifically for
camera lenses. Do not wipe the camera lens with chemically treated
eyeglass lens tissue as it may scratch the lens.
Cleaning the Light Sensor
The light sensor is located between the viewfinder and the flash on the camera
front.
Clean the light sensor by gently rubbing it with a soft, dry cloth. Do not use any
organic solvents to clean the sensor.
2-14
Page 25

DC25 SpeciÞcations
Image Resolutions—
High 493 X 373 pixel
Standard 320 X 240 pixels
Storage—2 MB internal Aperture—f/4 to f/11
Color—24-bit, millions of colors Tripod Socket—1/4 in.
Sensitivity—ASA/ISO rating
equivalent to 800/1600
Flash—effective range of 13 ft.
(0.5 to 4 m)
Color Temperature of Flash—4500
to 5500 K
Power— two 3V lithium batteries
(K123LA, CR123, or DL123)
Lens—focus free optical quality glass
Focus Distance—2 ft. (0.5 m) to
infinity
Shutter Speed—1/30 to 1/4,000
Viewfinder—Reverse Galilean
Albada
Weight—9.5 oz. (0.27 Kg)
with batteries
Dimensions—1.6 X 5.1 X 2.8 in.
(40 X 130 X 71 mm)
2
Using Camera
2-15
Page 26

Page 27

Using DC25
with Your
Computer
Connecting the DC25 to Your Computer
☞ The camera and the PC should be turned off before connecting the serial
cable.
1 Plug one end of the serial cable into the printer
or a COM port on the back of your computer.
☞ If your computer has a 25-pin port, you need to
purchase a 9-pin adapter and attach it to the
port before attaching the serial cable to the
computer.
DC25 DIGITAL
KODAK
STANDARD HIGH
OFF AUTO FILL
DC25
CAMERA
You are now ready to transfer the pictures from the camera to your computer
using any one of the software packages.
Refer to the appropriate chapters of this user’s guide or the software’s quick
reference guides for more information on the software packages.
2 Lift the rubber tab on the camera.
3 Plug the other end of the serial cable into the
camera’s serial port.
4 Turn on the camera.
3-1
3
Computer Setup
Page 28

Checking Serial Port Availability
If your computer cannot communicate with the DC25, you may need to adjust the
serial port configuration on the computer.
First verify that there are no serial port conflicts with other items on your
computer. To verify select Start-Settings-Control Panel-System from the file
menu. Select Device Manager Tab, and then the appropriate COM and LPT ports
and the communications port (COM1). Check the status and make the
appropriate changes. This is not recommended if the device appears to function
properly.
If your computer still does not recognize that the DC25 is attached and turned on,
you may need to adjust the serial port and speed settings.
1 Open PhotoEnhancer Software.
2 From the Camera pulldown menu select Set Camera Communications.
3 Select DC25 from the Camera Type field.
4 From the Camera Port field select COM 1 or the port you have connected the
camera to.
5 Adjust Camera Port Speed up or down by one setting.
6 Click OK.
7 Open the PhotoEnhancer Express menu and select Photo Center.
8 Select Preview pictures from DC20/DC25.
9 If the software does not recognize the DC25, continue to adjust the serial port
speed on COM1, and the other COM ports until the DC25 is recognized.
Once your computer can communicate with your camera, gradually incr ease
speed to optimize transfer picture time.
3-2
Page 29

Printing
You may notice that the colors on your computer screen do not always match
those in your documents or prints. This is because monitors and printers use
different color systems.
Tips
You may be able to achieve more predictable results in your printed
documents by:
✔ improving the quality of your paper. Copier paper may not offer the same
results as coated paper or paper made especially for ink jet printers.
✔ adjusting your printer software settings.
✔ using fresh ink cartridges. Do not use ink cartridges beyond their life
expectancy.
☞ If you need extreme precision in matching printed output to your computer
screen, you may want to consider purchasing a calibration system. The aim
of a calibration system is to match, as close as possible, the printed image to
the image on your computer screen.
Remember these few tips when it comes time to print your document.
✔ color printing takes more time.
✔ the more complex your document is also increases the print and drying
time.
✔ color printing is more memory intensive than black and white. If your
computer gives you an insufficient memory message, you may need to
close some applications, change some settings, or add additional memory.
✔ color prints may not photocopy as clearly as black and white. If you plan
to photocopy documents, you may consider printing the document in
gray scale. This setting is usually changed from the print menu.
✔ resizing the picture to a smaller size or printing the picture on glossy
paper may increase the quality of the print.
3-3
3
Computer Setup
Page 30

Printing Your Pictures
It improve the quality of your prints, you may want to print your pictures on
Kodak Inkjet Snapshot Paper. Snapshot Paper is made to work with most inkjet
printers to give you clearer, crisper, and more detailed images on your prints.
☞ The 4 X 6 in. Snapshot Paper is only available for inkjet printers.
Do not use with laser printers.
Before You Print using the Snaphot Paper
If necessary:
✔ rotate the picture so that it is a portrait layout.
✔ resize the picture so the image is smaller than the Snapshot paper.
For example: when the image is in a portrait layout, try setting the image
to 4.5 inches tall and 3.4 inches wide.
✔ adjust your printer, if you have one of the recommended printers, as
directed in the Kodak Inkjet Snapshot Paper Getting Started sheet. This
will maximize the quality of your prints!
3-4
Page 31

Picture Easy
Software
KOD AK Picture Easy Software (Picture Easy) is a quick and easy way to transfer
pictures from your DC25 to your computer.
Picture Easy’s icons allow you to:
✔ view thumbnail or full-size color pictures
✔ rotate
✔ print
✔ transfer and save pictures
✔ delete saved pictures
Installation
If you installed the software from the DC25 CD (see the Installation section in
Chapter 5 - PhotoEnhancer Special Fun Edition), Picture Easy software may
already be installed. If it is not already installed, complete the installation
instructions in Chapter 5 and select the Picture Easy software option.
4
Picture Easy
Starting Picture Easy
From the Start menu select Programs, KODAK Picture Easy Software, and then
KODAK Picture Easy Software.
4-1
Page 32

Overview
Picture Easy Window
Camera Pictures Preview Area Saved Pictures
Icons
Camera—displays
pictures from the DC25 or
optional Picture Card.
Icons
Printer—prints the
displayed picture.
4-2
Rotate—turns picture a
quarter-turn to the right.
Question mark—displays
the Picture Easy help
screen.
Empty drawer—saves the
displayed picture to your
computer and then displays
it in the right picture strip.
Trash—deletes the
displayed picture from
your computer and the
right picture strip.
Door—closes Picture
Easy.
Full drawer—indicates
that pictures were saved as
numbered .JPG files to the
\PICTURES subdirectory.
Page 33

Transferring Pictures from DC25
4
1 Connect the DC25 camera to
your computer.
See the Connecting the
DC25 to Your Computer
section in Chapter 3 - Using
DC25 with Your Computer.
2 From the Picture Easy
window select the Camera
icon.
☞ The DC25 must be turned
on to transfer pictures.
Pictures fr om the camera and
optional Picture Card
appear in the left picture
strip. Click on the red arr ows
to scroll up or down the strip.
3 Click on a picture in the strip
to display it in the preview
area.
The picture number, total
number of pictures, and
arrow indicating the strip
that the displayed picture is
from, appears at the top of
the strip.
If necessary, use the rotate
icon to repeatedly turn your
picture.
Picture Easy
4-3
Page 34

4 Click on the empty drawer
icon to save the previewed
picture to your computer.
Your picture appears in the
right picture strip and is
saved to your computer.
Only one copy of the picture
can be saved to the right
strip per session.
Multiple copies of the same
picture cannot be saved to
the right strip.
5 T o previe w a picture from the
right picture strip, click on
the picture.
6 You can also select the:
✔ Trash icon to delete the
picture.
✔ Printer icon to print the
picture.
7 Click Exit to close Picture
Easy.
Saved Pictures
The pictures you selected are saved as numbered .JPG files in the \PICTURES
subdirectory. The subdirectory or folder is found in the same location on your
computer as Picture Easy software.
4-4
Page 35

PhotoEnhancer
Special Fun
Edition Software
With PhotoEnhancer Special Fun Edition software from PICTUREWORKS you
can transfer pictures from your DC25 into your computer and incorporate them
into a variety of fun and creative projects! Use the Enhancement ShortCuts to
correct lighting conditions, focus, or color balance in your pictures. Select
Creative Corner to open your own card shop, using your own pictures and one of
the many style templates to create greeting cards, invitations, calendars,
postcards, and more!
Installation
1 Close all open applications.
2 Place DC25 CD into your CD-ROM drive.
5
PhotoEnhancer
3 From the Start menu choose Run.
4 Type d:\setup and press the <enter> key.
☞ If your CD-ROM uses a drive other than the d drive, substitute that drive
designation in the setup command.
5 Follow the online instructions to complete the installation.
5-1
Page 36

Starting PhotoEnhancer
From the Start menu select Programs, open the KODAK DC25 group and select
PictureWorks PhotoEnhancer Software.
☞ You may need to open the PhotoEnhancer Express menu by selecting
PhotoEnhancer Express from the File pulldown menu.
Camera Communications Settings
If your computer does not recognize that the DC25 is attached and turned on, you
may need to adjust the Camera Communications settings.
☞ PhotoEnhancer software must be opened to adjust camera communications.
1 From the Camera pulldown menu
select Set Camera Communications.
The Preferences window appears.
2 Select camera type, port, and port
speed.
See the Checking Serial Port
Availability section in Chapter 3 -
Using DC25 with Your
Computer.
5-2
3 Click OK.
Page 37

Transferring Pictures from DC25
1 Connect the DC25 camera to
your computer.
See the Connecting the
DC25 to Your Computer
section in Chapter 3 - Using
DC25 with Your Computer.
2 Click Photo Center on the
PhotoEnhancer Express
menu.
The Photo Center menu
appears.
Photo Center options
3 Click Preview pictures from
DC20/DC25 icon.
✔ Get Picture from Disk
5
PhotoEnhancer
You can also select:
to transfer pictures from
your disk drive.
✔ Move pictures from
DC20/DC25 to quickly
save pictures directly to
your computer without
previewing them.
✔ Preview Pictures from
Folder to view pictures
from a folder on your
computer. For example,
you can preview pictures
located in the
\PICTURES subdirectory
of Picture Easy Software.
5-3
Page 38

✔ Go to Kodak Snapshot
1 to transfer pictures
from a scanner to your
computer. The scanner
option is only available
with the Kodak Snapshot
Photo Scanner 1.
☞ The DC25 must be turned
on to access your pictures
The Camera Images window
opens.
4 Select your Image Source
and Range.
5 Click Vie w Slides.
A message box appears
showing the transfer status.
☞ The DC25 may click while
the pictures are transferred.
A Slide Table of your
pictures opens once the
transfer is complete.
6 Select a picture by double-
clicking on it.
5-4
To select multiple pictures
hold down the shift key and
click on individual pictures.
The selected picture(s)
appear in a window.
Page 39

Editing Tools
PhotoEnhancer editing Tool Bar and Brush Box (shown below) automatically
appear when the software is opened. The Zoom option is selected by default.
Once you have opened your picture in an editing window, use the selection tools
and enhancement brushes to edit your pictures.
Hand—scrolls through a
picture.
Rectangle—makes a
rectangular selection.
Lasso—makes freehand
selection.
Sharpen—focuses area of
picture using a brush.
Lighten—lightens area of
picture using a brush.
Red Eye—corrects area of
picture for red eye using a
brush.
☞ When using the
Sharpen, Smooth,
Lighten, and Darken
tools, select a brush size
from the Brush box.
To use the tool palette:
Tool Bar
Brush Box
Zoom—magnifies.To resize
select the File menu’s Image,
View option (or on PCs press
the right mouse button).
Polygon—makes irregular
straight-sided selection.
Magic Wand—selects areas
by similar color.
Smooth—softens area of
picture using a brush.
Darken—darkens area of
picture using a brush.
Ellipse—makes a circular or
elliptical selection.
5
PhotoEnhancer
1 Click on a tool to select it.
2 Place the cursor on the part of the picture that you want to select or brush.
3 Click and drag the mouse to complete your selection or brush stroke.
4 Release the mouse button.
5 Use the Edit pulldown menu to cut, copy, paste, or cancel, or the Image
pulldown menu to flip or rotate, a selected area of your picture.
5-5
Page 40

Enhancing Your Pictures
PhotoEnhancer allows you to enhance your pictures two ways. Use SmartPix to
make corrections for specific lighting conditions in which you took your pictures.
Use By Example to correct focus, exposure, brightness/contrast, and color
balance.
Correcting for Lighting Conditions
1 Open a picture using Photo
Center options.
2 Click Enhancement Short
Cuts on the PhotoEnhancer
Express menu.
The Enhancement Short Cuts
menu appears.
3 Click SmartPix.
5-6
The SmartPix menu appears.
4 Select the lighting condition
in which your picture was
taken.
Your picture adjusts to
compensate for a specific
lighting condition. You can
also adjust for faded colors,
light or dark shadows, or
remove dot patterns.
5 Experiment with the different
SmartPix options to find the
best one for improving your
picture.
Page 41

Enhancing by Example
1 Open a picture using Photo
Center options.
2 Click Enhancement Short
Cuts on the PhotoEnhancer
Express menu.
The Enhancement Short Cuts
menu appears.
3 Click By Example.
The Filter By Example
window opens with a reduced
version of the original
picture in the upper right
corner. The blue square
controls the part of the
picture that appears in the
nine sample boxes. Drag the
blue square in the reduced
version to view the different
areas of the picture.
The middle sample box
corresponds to current
picture setting.
5
PhotoEnhancer
5-7
Page 42

4 Click on the appropriate
Picture Enhancement option:
✔ Focus to sharpen.
✔ Exposure to adjust
lightness or darkness.
✔ Brightness/Contrast to
adjust the tones.
✔ Color to adjust the color
balance.
✔ Variations to adjust the
amount of enhancement.
5 View the pictures in the
sample box and click on the
one you like best.
6 Click Apply.
The enhancement selected
from the sample is applied to
the entire picture.
The sample boxes show the
applied enhancement in
various degrees.
5-8
7 Experiment with the different
enhancement options to find
the best one for improving
your picture.
Use Undo to delete the last
change applied to the picture
and Revert to return the
picture to its original state.
8 Click Done to exit By
Example and keep changes.
Page 43

Creating Special Effects and Cards
Creating Cards, Calendars, and Postcards
1 Open a picture using the
Photo Center options.
If necessary, turn the picture
by selecting Flip Image or
Rotate from the Image
pulldown menu.
2 Click Creative Corner on the
PhotoEnhancer Express
menu.
The Creative Corner menu
appears.
3 Click Cards, Calendars, etc.
The Choose Style dialog box
appears.
5
PhotoEnhancer
4 Click Cards.
You can also create:
✔ Calendars & Flyers
✔ Postcards
5 Select a style template from
the drop-down menu.
The corresponding template
appears in the preview area
on the right.
6 Click Choose to begin
working in a template.
5-9
Page 44

The selected style appears in
the Cards, Calendars, etc.
window.
7 Click the appropriate page
icon to indicate what page
you are working on.
✔ Front
✔ Inside left
✔ Inside right
✔ Back
☞ Page icons are disabled
when working with onepage templates.
8 Click Add Photo.
The Add Photo window
appears listing the name of
the opened picture.
9 Click OK.
☞ Click Browse to select a
picture from a file on your
computer.
5-10
The Cards, Calendars, etc.
window reappears with
selected picture.
10To reduce picture size, place
the cursor on a black framing
box, hold the mouse button
down and drag the framing
square until the desired
picture size is reached.
Page 45

11 To reposition the picture,
click on it and drag it into
place.
12Click on the text icon to add
text.
The Add Text dialog box
appears.
13 Enter your text in the blank
text box.
You can also select the:
✔ Alignment option to
select text placement.
✔ Set Font button to open
the Font window and
select font, size, and
color.
14Click OK.
5
PhotoEnhancer
5-11
Page 46

The Cards, Calendars, etc.
window reappears with your
text inserted at the top.
15Click on your text and drag it
into place.
You can also resize the text
box by placing the cursor on
a black framing box, hold the
mouse button down and drag
the framing square until the
desired shape/size is
reached.
☞ If you want to change your
text after pasting it, doubleclick on the text to open the
Add Text dialog box.
16Click on the appropriate page
icon to complete the rest of
your card.
5-12
17Click on the Print button to
print your masterpiece or the
Save As button to save the
card to a file on your
computer.
18Click Done to exit Cards,
Calendars, etc.
Page 47

Eye-Catching Special Effects - FunPix
1 Open a picture using the
2 Click Creative Corner on the
3 Click FunPix.
4 Click the special effects icon
Photo Center options.
PhotoEnhancer Express
menu.
The Creative Corner menu
appears.
The FunPix menu appears.
you want to apply to your
picture.
Apply several effects to one
picture!
5
PhotoEnhancer
☞ Select the Undo button to
delete the last change
applied to the picture.
Select Redo to reapply the
change.
✔ Cartoon for a colorful
outline of your picture.
5-13
 Loading...