

Page 1

Technical Bulletin
Internal: 731-01750A-EN
Release date: 21 April 2009
Page 1 of 8
Lens Calibration Guide for Leaf AFi-II 10 and
Aptus-II 10 Camera Backs
Leaf AFi-II 10 and Leaf Aptus-II 10 camera backs are accurate and finely tune d instruments with high
resolution and very large lens coverage. Each camera back contains the widest digital sensor available for
medium and large format cameras. The sensor reveals every nuance of whatever lens is placed on the
camera, and itself has properties that may vary across the full sensor width.
To obtain the best quality that is available from the camera back, pe rform lens calib ration for eac h lens that
you use. This is achieved by creating a lens calibration file wh ich you apply to your ima ges. Lens
calibration files are reference files that characteri ze certain properties of the lens and enable the software
to improve the quality of the image. For ex ample, th e lens cali bration fi le will re duce any non-u niformity of
color or vignetting to an absolute minimum.
With each camera back, Leaf provides a unique lens calibrat ion file for each commonly use d lens, and a
generic lens calibration file for manual lenses of medium focal length. These files, as well as any you may
create yourself, are stored by default in the Leaf Tables/Lens Calibrations folder.
Even though the provided files will give adequate images, for best results, it is highly recommended that
you take the time to calibrate all your manual lenses to the specific, finely tuned imaging module you have
acquired.
This guide takes you through the proces s of cali brating y our len ses, and de scribes h ow you can use the
calibration files with Leaf Capture 11 software to achieve images of optimal quality.
Page 2
Technical Bulletin
Page 2 of 8
Creating a Lens Calibration File
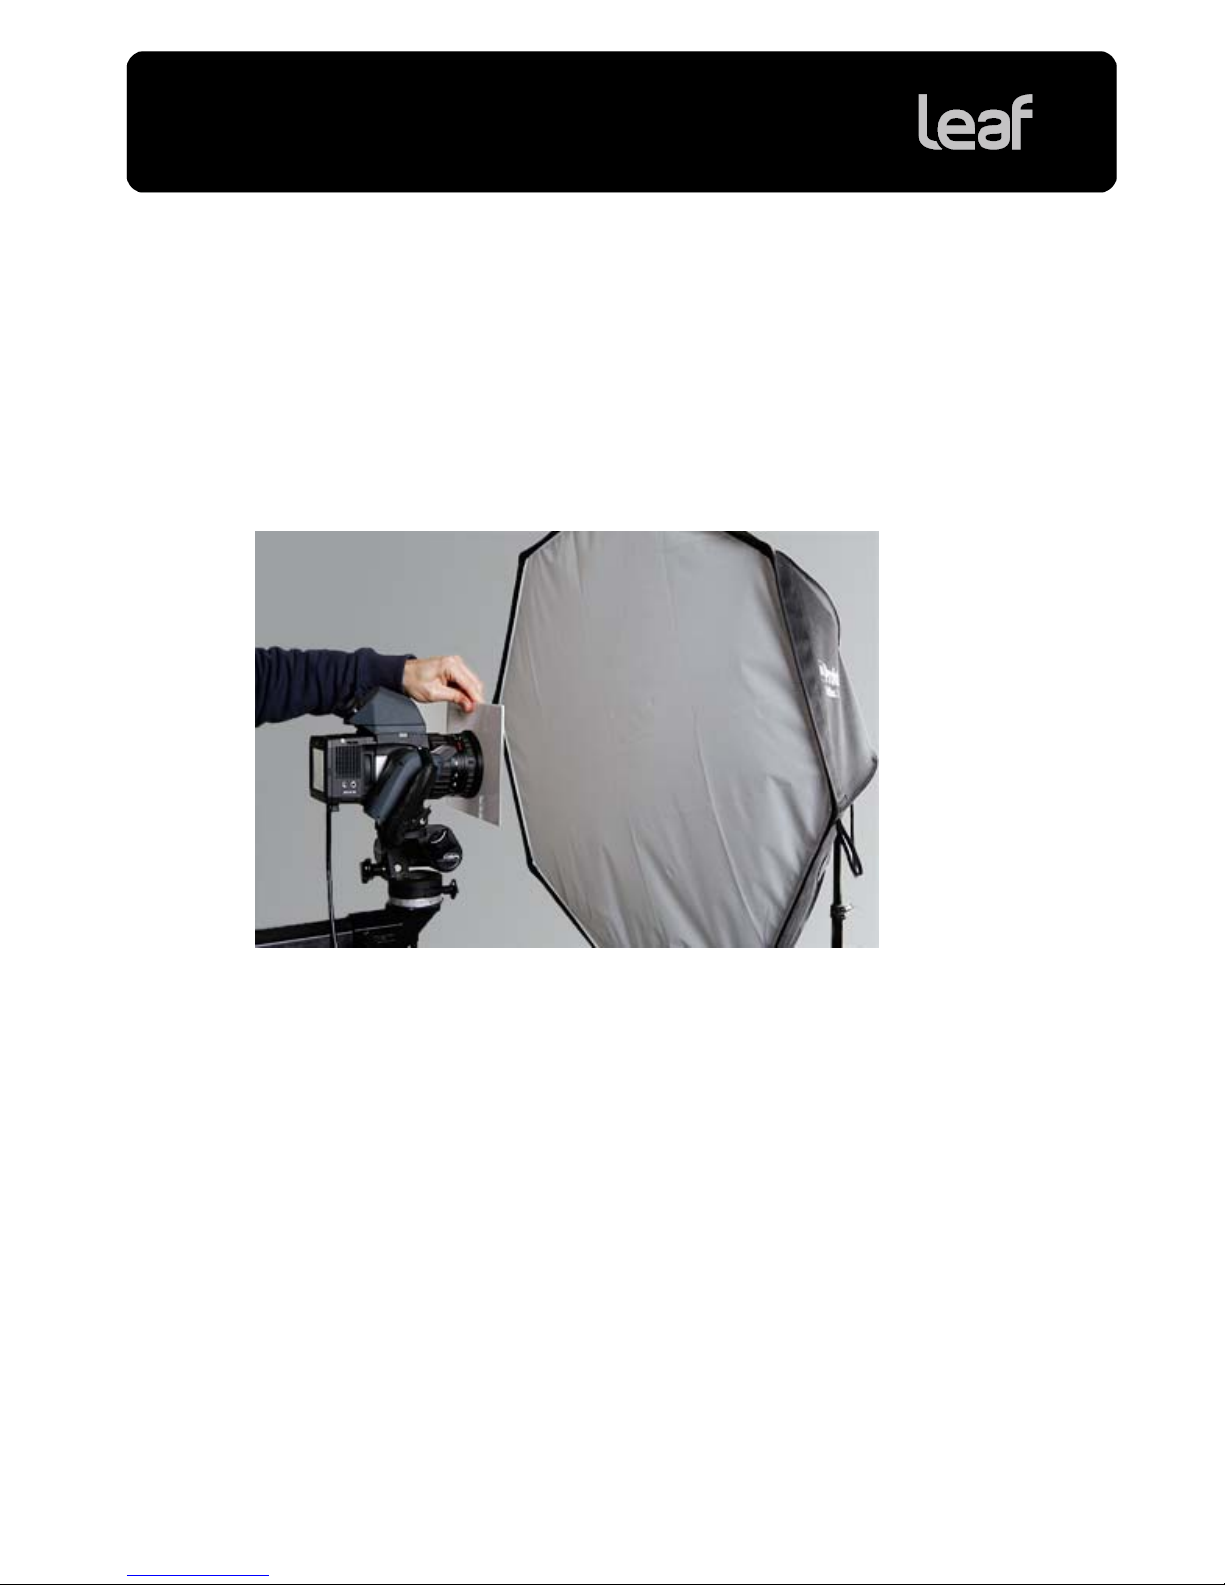
Setting up to Take the Calibration Sho t
What you will need: a Leaf diffuser or any white diffusing sheet that will fully cover the lenses to be used.
1. Connect the camera back to the Leaf Capture software.
2. Place the camera in front of a u niform li ght source.
Tip: A studio flash with a soft box is recommended.
With this setup, you can now create the lens calibration file using L eaf Capture’s cali bration wiza rd.
Page 3
Technical Bulletin
Page 3 of 8
Creating the Lens Calibration File
1. In the Camera menu, select Lens Calibration > Create Wizard.
2. Follow the steps in the lens calibration wizard.
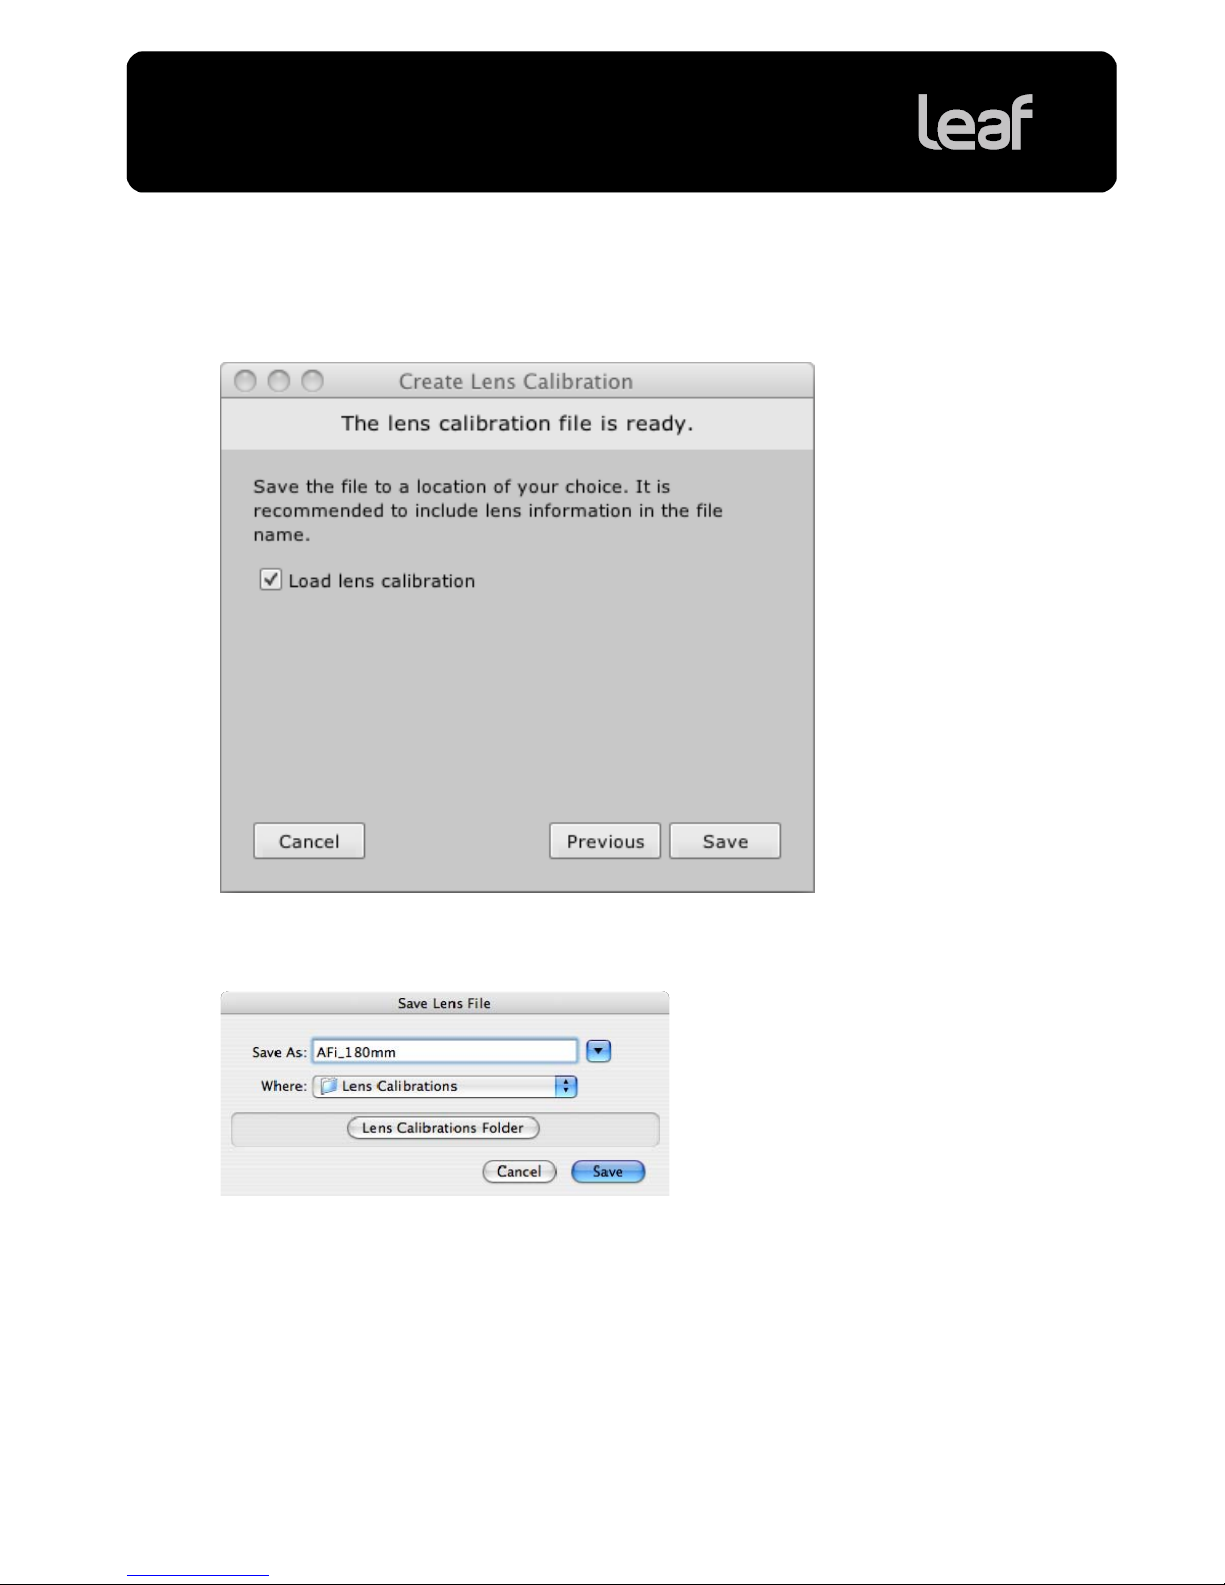
3. At the end of the wizard, select the Load lens calibration check box to load the lens calibration file to
your camera back after it is created. This enable s you to take shots wit h the lens calibrati on file.
4. Click Save.
5. In the Save Lens File dialog box, name and save the l ens ca libration f ile.
It is recommended to give a logical name to the file, for instance ‘AFi 110mm’. It is highly
recommended that you save all of your lens calibrations in the default location.
Tip: If you are not in the default location, click Lens Calibration Folder to access the default folder
directly.
The Load Lens Calibration dialog box appears. The lens calibration file you created is selected.
Page 4

Technical Bulletin
Page 4 of 8
6. Click OK.
Note: Lens calibrations saved in the default location (Leaf Tables/Lens Calibrations) appear in the
Camera Configuration dialog box. See When you are Shooting Tethered, on page 4.
If you
selected Load lens calibration, the lens calibration f ile is load ed to yo ur camera back and
remains active for as long as you are tethered.
Note: If you entered a falloff correction, it is ap plied f or this lo ad only.
When you are Shooting Tethered
For optimal results when shooting tethered, you must spe cify the lens you are usin g and the lens
calibration file when you connect t he came ra back t o the Le af Capture software.
1. Start the Leaf Capture software.
2. Click Open Camera Configuration to open the Camera Configuration dialog b ox.
3. In the Camera Configuration dialog box, from the Lens list, sel ect the a ppropriat e lens cali bration fi le
and click OK.
Use the reference table below to d etermin e the corre ct lens calib ration fil e for the le ns you are using.
For most lenses, the “Generic Lens” lens calibration file is sufficient.
4. Connect the camera back to the Leaf Capture software.
The lens calibration file is loaded and the maximum possible fall off correction is applied. You can now
shoot using the lens calibration f ile.
Page 5

Technical Bulletin
Page 5 of 8
When you are Shooting Portable
When shooting portable, the “Generic Lens” lens calibration file is used when you take your shots.
If the lens you are using requires a more specific lens calibration, use post-processing to correct lens
calibration. Use the EXIF info to remind yo u of the len s used.
Recording the Focal Length
In portable mode, the focal length of electronic/digital lenses is automatically recorded in the image EXIF
data.
Some lens types, such as manual lenses, cannot be detected by the camera back. If a lens is detectable,
the focal length is displayed in t he EXIF inf ormation o n the Info panel (t o access, t ap the info button in
Shoot view). Check that the lens you are u sing is det ectable by the came ra ba ck by exami ning the E XIF
info of an existing image captured with this lens. If the lens is undetectable, manually enter the focal length
as a numeric value to be recorded to the EXIF data
1. On the camera back, in t he Camera view camera settings menu, select Lens.
2. Using the keypad, enter the focal len gth of the lens you are using.
3. Tap OK.
The value you entered is recorded in the E XIF data.
Note: Whenever a manual lens is attached, all images have this
value written to the EXIF field.
Whenever a electronic/digital lens is attached, this value is ignored, and the automatically detected
focal length is used.
Page 6

Technical Bulletin
Page 6 of 8
Applying Lens Calibration to an Image in Leaf Capture
1. In Leaf Capture, select the images you would like to process.
2. In the Process panel, select Leaf Mos in the Format list.
3. Click Settings.
The Leaf Mos Settings dialog box opens.
4. To save the mos file with lossless compression, select Save Compressed.
5. Select Lens Calibration Adjustment.
6. Select Select Calibration File and click the browse icon.
7. Select the lens calibratio n file for t he lens t ype us ed to creat e the im age(s). Use the reference t able
below to determine the correct l ens cali bration fil e for t he len s you are usi ng.
Tip: Click Lens Calibration Folder to access the defaul t lens ca libration f iles fold er dire ctly.
Tip: If you are not sure which lens was used to capture the imag e, first check the len s Focal Length
value in the EXIF data in the Image Inf o dialog box.
8. In the Falloff Correction box, type the desired correction percentage to adjust the fall off.
9. Click OK.
Your lens calibration settings are saved.
10. Process your images to apply the lens calibration file.
Page 7

Technical Bulletin
Page 7 of 8
Reference Tables
You do not need to apply a lens calibration file to shots take n with a lens for whic h the generic le ns
calibration file works. For shots captu red in portable mode with a le ns for which a spe cialized lens
calibration file exists, apply the a ppropriate l ens calib ration f ile, as list ed bel ow.
Reference table for Leaf AFi camera systems:
Lens Used Name of Lens Calibration File
S. Angulon 40mm f/3.5 Generic Lens
S. Angulon 40mm f/3.5 ext tube 34-67mm AFi TX 180mm LFXXXX.mos
Super Angulon 50mm f/2.8 Generic Lens
S. Angulon 50mm f/2.8 ext tube 26-67mm AFi TX 180mm LFXXXX.mos
S. Angulon 80mm f/2.8 Generic Lens
S. Angulon 80mm f/2.8 ext tube 22-67mm AFi TX 180mm LFXXXX.mos
Apo-Symmar 90mm f/4 Generic Lens
Apo-Symmar 90mm f/4 ext tube 34-67mm AFi TX 180mm LFXXXX.mos
Zeiss Planar 110mm f/2 Generic Lens
Zeiss Planar 110mm f/2 ext tube 17-67mm AFi TX 180mm LFXXXX.mos
Makro Apogon 120mm f/4 Generic Lens
Makro Apogon 120mm f/4 ext tube 9-67mm AFi TX 180mm LFXXXX.mos
Variogon 60–140mm f/4.6 AFi Z 60-140mm LFXXXX.mos
Tele Xenar 180mm f/2.8 AFi TX 180mm LFXXXX.mos
Page 8

Technical Bulletin
Copyright © 2009 Kodak. All Rights Reserved. Data subje ct to change without not ice. Leaf, t he Leaf logo , and Ap tus are tra demarks or
registered trademarks of Kodak. The Leaf products mentioned in this do cument are trade marks or ser vice marks of Kodak a nd may be
registered in certain jurisdictions. Other company and brand, pr oduct a nd ser vice names are for ide ntificatio n purpose s only and may
be trademarks or registered trademarks of their respective holders.
Page 8 of 8
Reference table for Mamiya 645 AFD cameras:
Lens Used Name of Lens Calibration File
Sekor D ASPH 28mm f/4.5 Generic Lens
AF 35mm f/3.5 M645 35 mm LFXXXX.mos
AF 45mm f/2.8 Generic Lens
AF 55mm f/2.8 Generic Lens
AF 80mm f/2.8 Generic Lens
AF 120mm f/2.8 M645 120 mm LFXXXX.mos
AF 150mm f/3.5 M645 150mm - 210mm LFXXXX.mos
Sekor D 150mm f/2.8 M645 150mm - 210mm LFXXXX.mos
AF 210mm f/2.8 M645 150mm - 210mm LFXXXX.mos
AF 55-110mm f/3.5 M645 Z 55-110mm LFXXXX.mos
Reference table for Hasselblad V series cameras:
Lens Used Name of Lens Calibration File
Distagon 4/40 Generic Lens
Distagon 4/40 ext tube 10mm Generic Lens
Distagon 4/40 ext tube 21 - 31mm HB5 120mm LFXXXX.mos
Distagon 4/50 Generic Lens
Distagon 4/50 ext tube 10mm Generic Lens
Distagon 4/50 ext tube 21 - 31mm HB5 120mm LFXXXX.mos
Planar 2.8/80 Generic Lens
Planar 2.8/80 ext tube 10 - 31mm HB5 120mm LFXXXX.mos
Makro-Planar 4/120 HB5 120mm LFXXXX.mos
Makro-Planar 4/120 ext tube 10 - 31mm HB5 120mm LFXXXX.mos
 Loading...