


 Loading...
Model
KUDS24SE
KUDC24SE
U s e & C a r e G u i d e
and
ARCHITECT*
Undercounter
Dishwashers
A Note to You ................... |
2 |
Understanding |
|
Dishwasher Safety .......... |
3 |
Parts and Features .......... |
4 |
Start Up Guide ................. |
6 |
Loading Your |
|
Dishwasher ...................... |
8 |
Washing Special |
|
Items ............................... |
14 |
Using the Dispensers ... |
15 |
Operating Your |
|
Dishwasher .................... |
19 |
Caring for Your |
|
Dishwasher .................... |
24 |
Solving Common |
|
Dishwashing |
|
Problems ........................ |
27 |
Troubleshooting ............ |
30 |
Requesting Assistance |
|
or Service ....................... |
32 |
Index ............................... |
34 |
Warranty ......................... |
35 |
In the U.S.A. for assistance or service, call the Consumer  Assistance Center:
 1•800•422•1230
www.kitchenaid.com
|
In Canada for assistance |
9743110 |
or service, see page 2. |

A N o t e t o Y o u
Thank you for buying a KITCHENAID* appliance!
KitchenAid designs the best tools for the most important room in your house. To ensure that you enjoy many years of trouble-free operation, we developed this Use and Care Guide. It contains valuable information concerning how to operate and maintain your new appliance properly and safely. Please read it carefully.
Also, please complete and mail the enclosed Product Registration Card.
In the U.S.A.
For assistance or service |
1-800-422-1230 |
call the Consumer Assistance Center toll free ................................................. |
Throughout Canada for assistance
Call the Consumer Assistance Centre toll free |
.................................................1-800-461-5681 |
|
8:30 a.m. – 6 p.m. (EST) |
Throughout Canada for service |
...................................................... see page 33 |
If you need assistance or service, first see the “Troubleshooting” section of this book. After checking “Troubleshooting,” additional help can be found by checking the “Requesting Assistance or Service” section, or by calling one of the telephone numbers above.
When calling, you will need to know your appliance’s complete model number and serial number. You can find this information on the model and serial number label/plate (see diagram in the “Parts and Features” section.)
Keep this book and the sales slip together in a safe place for future reference. You must provide proof of purchase or installation date for in-warranty service.
Model Number ______________________ |
Builder/Dealer Name ________________ |
Serial Number ______________________ |
Address ___________________________ |
Date Installed ______________________ |
Phone _____________________________ |
2

U n d e r s t a n d i n g D i s h w a s h e r S a f e t y
Your safety and the safety of others is very important.
We have provided many important safety messages in this manual and on your appliance. Always read and obey all safety messages.
This is the safety alert symbol.
This symbol alerts you to hazards that can kill or hurt you and others.
All safety messages will be preceded by the safety alert symbol and the word “DANGER” or “WARNING.” These words mean:
wDANGER
wWARNING
You will be killed or seriously injured if you don’t follow instructions.
You can be killed or seriously injured if you don’t follow instructions.
All safety messages will identify the hazard, tell you how to reduce the chance of injury, and tell you what can happen if the instructions are not followed.
IMPORTANT SAFETY INSTRUCTIONS
WARNING –When using the dishwasher, follow basic precautions, including the following:
•Read all instructions before using the dishwasher.
•Use the dishwasher only for its intended function.
•Use only detergents or rinse agents recommended for use in a dishwasher and keep them out of the reach of children.
•When loading items to be washed:
1)Locate sharp items so that they are not likely to damage the door seal; and
2)Load sharp knives with the handles up to reduce the risk of cut-type injuries.
•Do not wash plastic items unless they are marked “dishwasher safe” or the equivalent. For plastic items not so marked, check the manufacturer’s recommendations.
•Do not touch the heating element during or immediately after use.
•Do not operate the dishwasher unless all enclosure panels are properly in place.
•Do not tamper with controls.
•Do not abuse, sit on, or stand on the door or dish racks of the dishwasher.
•To reduce the risk of injury, do not allow children to play in or on the dishwasher.
•Under certain conditions, hydrogen gas may be produced in a hot water system that has not been used for two weeks or more. HYDROGEN GAS IS EXPLOSIVE. If the hot water system has not been used for such a period, before using the dishwasher turn on all hot water faucets and let the water flow from each for several minutes. This will release any accumulated hydrogen gas. As the gas is flammable, do not smoke or use an open flame during this time.
•Remove the door to the washing compartment when removing an old dishwasher from service or discarding it.
– SAVE THESE INSTRUCTIONS –
3

Parts and Features
Below is an illustration of your appliance with the parts and features called out. To help you find information on specific parts or features quickly, page references are included.
Water inlet |
opening |
Model and |
serial |
number label |
(p. 2) |
Sure-Hold |
cup shelf |
(p. 12) |
Lower rack |
(pp. 11-12) |
Heating |
element |
Detergent |
dispenser |
(p. 15) |
Vent |
(p. 22)
Sure-Hold cup shelf
(p. 9)
Upper spray arm
(p. 7)
Upper rack
(pp. 8-10)
FLEXI-BASKET* silverware basket
(p. 13)
4-way HYDRO SWEEP* spray arm
(p. 24)
Overflow protection float
(p. 24)
Rinse agent dispenser
(p. 18)
Other features:
Fold-down tines, upper rack (p. 9)
Stemware holders (p. 10)
Sure-Hold clips (p. 10)
Fold-down tines, lower rack (p. 12)
4
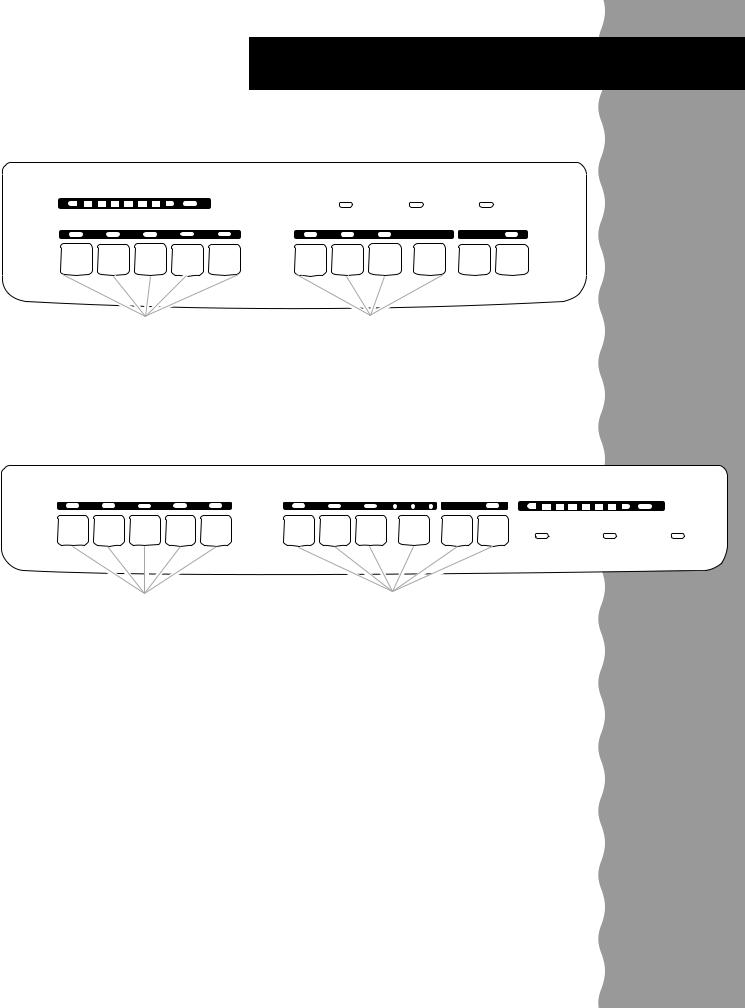
Parts and Features
Control panels
KUDS24SE
CYCLE MONITOR
WASH RINSE DRY CLEAN WATER HEATING CHILD LOCK RINSE AID EMPTY
|
WASH SELECTIONS |
|
|
OPTIONS |
|
6 |
||||
|
|
|
|
|
|
|
2 |
4 |
||
SOAK & |
|
SHORT |
LIGHT |
RINSE |
HIGH |
ENERGY |
SANI |
DELAY |
|
|
NORMAL |
TEMP. |
SAVER |
START CANCEL |
|||||||
SCRUB |
WASH |
CHINA |
ONLY |
RINSE |
HOURS |
|||||
|
WASH |
DRY |
|
|||||||
Cycle pads |
Option pads |
(p. 19) |
(p. 20) |
KUDC24SE
|
WASH SELECTIONS |
|
|
OPTIONS 2 |
4 6 |
|
CYCLE MONITOR |
|
||||
SOAK & |
|
SHORT |
LIGHT |
RINSE |
HIGH |
ENERGY |
SANI |
DELAY |
|
WASH |
RINSE DRY |
CLEAN |
NORMAL |
TEMP. |
SAVER |
START |
CANCEL |
|
|
||||||
SCRUB |
WASH |
CHINA |
ONLY |
RINSE |
HOURS |
|
|
|||||
|
WASH |
DRY |
|
WATER HEATING |
CHILD LOCK |
RINSE AID EMPTY |
||||||
|
|
|
|
|
|
|
|
|||||
Cycle pads |
Option pads |
(p. 19) |
(p. 20) |
5
S t a r t U p G u i d e
Before using your dishwasher
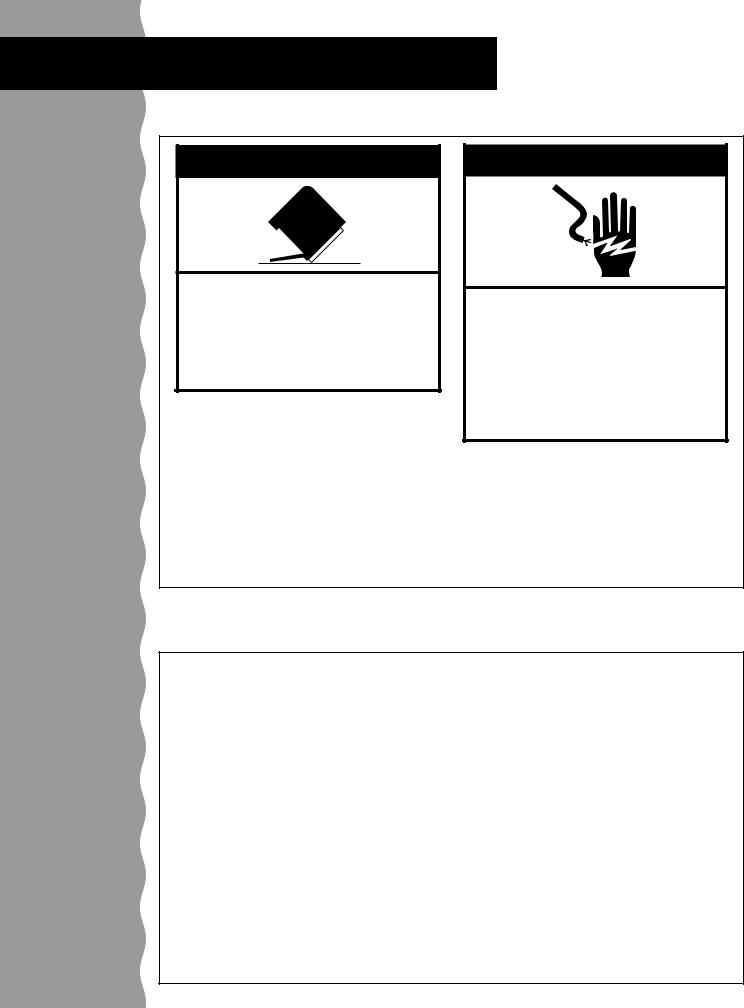
wWARNING
Tip Over Hazard
Do not use dishwasher until completely installed.
Do not push down on open door.
Doing so can result in serious injury or cuts.
•Install where dishwasher is protected from the elements. Protect against freezing to avoid possible rupture of fill valve. Such ruptures are not covered by the warranty. See “Storing your dishwasher” in the “Caring for Your Dishwasher” section for winter storage information.
•Install and level dishwasher on a floor that will hold the weight, and in an area suitable for its size and use.
wWARNING
Electrical Shock Hazard
Electrically ground dishwasher.
Connect ground wire to green ground connector in terminal box.
Do not use an extension cord.
Failure to follow these instructions can result in death, fire, or electrical shock.
•Remove all shipping plugs from hoses and connectors (such as the cap on the drain outlet) before installing. See Installation Instructions for complete information.
GROUNDING INSTRUCTIONS
• For a grounded, cord connected |
Check with a qualified electrician or |
|
dishwasher: |
service representative if you are in |
|
The dishwasher must be grounded. In |
doubt whether the dishwasher is |
|
properly grounded. Do not modify the |
||
the event of a malfunction or breakdown, |
||
plug provided with the dishwasher; if it |
||
grounding will reduce the risk of electric |
||
will not fit the outlet, have a proper |
||
shock by providing a path of least |
||
outlet installed by a qualified electrician. |
||
resistance for electric current. The |
||
• For a permanently connected |
||
dishwasher is equipped with a cord |
||
having an equipment-grounding conduc- |
dishwasher: |
|
tor and a grounding plug. The plug must |
The dishwasher must be connected to a |
|
be plugged into an appropriate outlet that |
grounded metal, permanent wiring |
|
is installed and grounded in accordance |
system, or an equipment-grounding |
|
with all local codes and ordinances. |
conductor must be run with the circuit |
|
WARNING – Improper connection of |
conductors and connected to the |
|
the equipment-grounding conductor can |
equipment-grounding terminal or lead |
result in a risk of electric shock. |
on the dishwasher. |
|
|
– SAVE THESE INSTRUCTIONS – |
|
6
S t a r t U p G u i d e
Using your new KITCHENAID* dishwasher is simple. Follow the steps below to get started. For more information on specific steps and additional safety information, see the page(s) next to the step you would like to know more about.
NOTE: Before using your dishwasher, remove all hang tags, temporary labels, and packaging materials. Please also read the entire Use and Care Guide as it contains important operating and safety information.
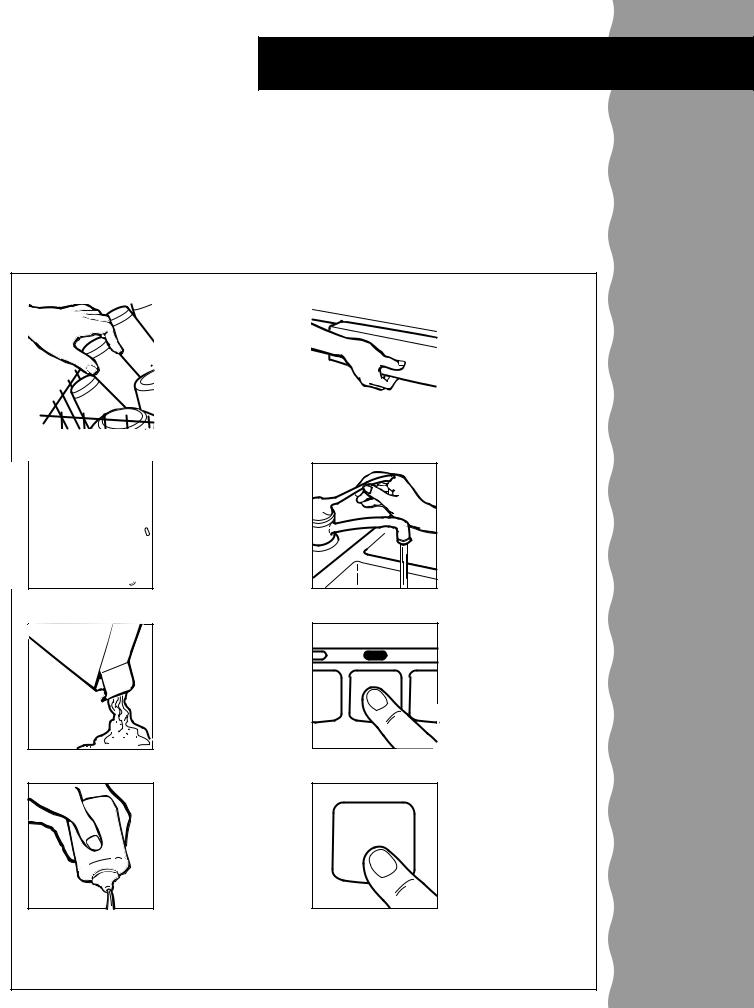
How to use your dishwasher
1. Load the dishwasher. See pages 8-13. |
5. Push door firmly when closing. |
|||||
|
|
|
|
|
|
|
|
|
|
|
|
|
|
|
|
|
|
|
|
|
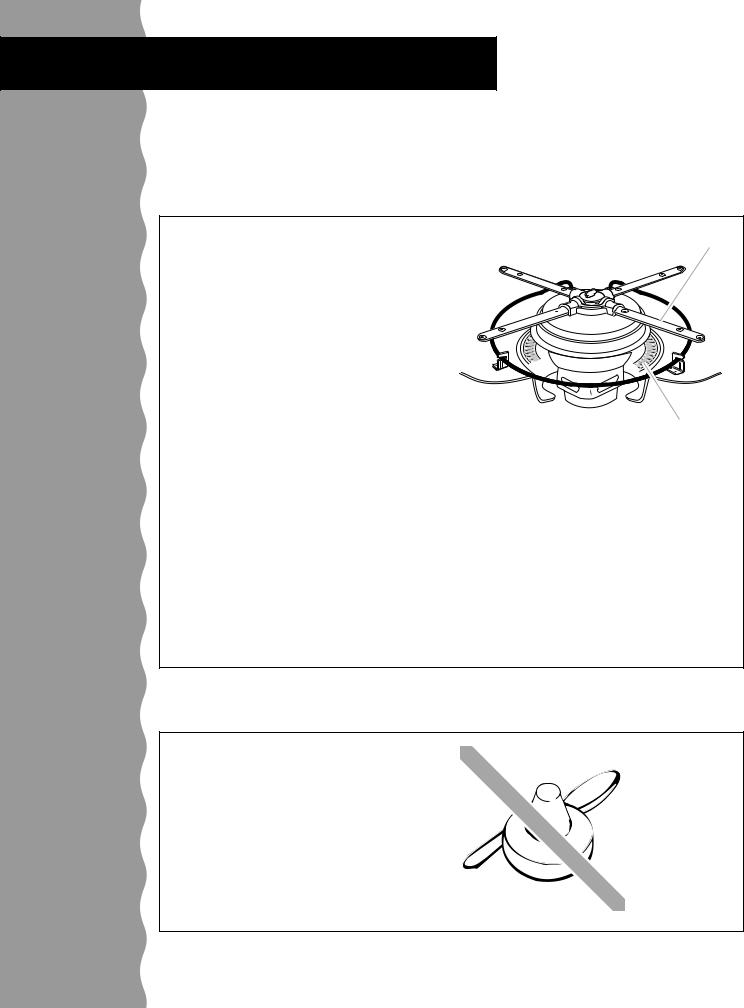
2. Spin the upper spray arm. It should turn 


 freely. Check the
lower spray arm
also to make sure it turns freely.
3. Add detergent. See pages 15-17.
6. Run hot water at sink nearest dishwasher |
until water is hot. Turn |
off water. See page 23. |
7. Press the desired Wash Selection pad. See the “Cycle selection chart” on
 page 19. Then press the desired Option pad(s). See page 20 for “Option selections.”
4. Add rinse agent if needed. See page 18. |
8. Press the Start pad. The cycle will begin |
|
|
|
(if Delay Hours has |
|
|
not been selected). |
|
|
NOTE: The dishwasher |
|
START |
remembers the last |
|
cycle and option(s) that |
|
|
|
were completed. You |
|
|
only have to press the |
|
|
Start pad if you want to |
|
|
use the same cycle and |
option(s). However, if the last cycle you completed was Rinse Only, the dishwasher will run the Normal cycle if you press the Start pad.
Fast and easy start up
7
L o a d i n g Y o u r D i s h w a s h e r
This section tells you how to properly load your dishwasher for the best washing and rinsing results.
Save time and energy
Upper rack loading tips
Preparing to load the dishwasher
• Scrape leftover food, bones, toothpicks, |
• Make sure pot lids and handles, pizza |
and other hard items from dishes. It is not |
pans, cookie sheets, etc., do not interfere |
necessary to rinse dishes before putting |
with the spray arm rotation. |
them into the dishwasher. |
• Run a Rinse Only cycle to keep dishes |
• Load dishes so soiled surfaces face the |
moist if you do not plan to wash them soon. |
spray (down or inward). It is important for |
Foods like eggs, rice, pasta, spinach, and |
the water spray to reach all soiled surfaces. |
cooked cereals can be hard to remove if |
• Take care when loading heavy pots or pans |
they are left to dry. |
into the dishwasher. They can dent the |
|
stainless steel interior of the door if they are |
|
dropped or bumped. |
|
|
|
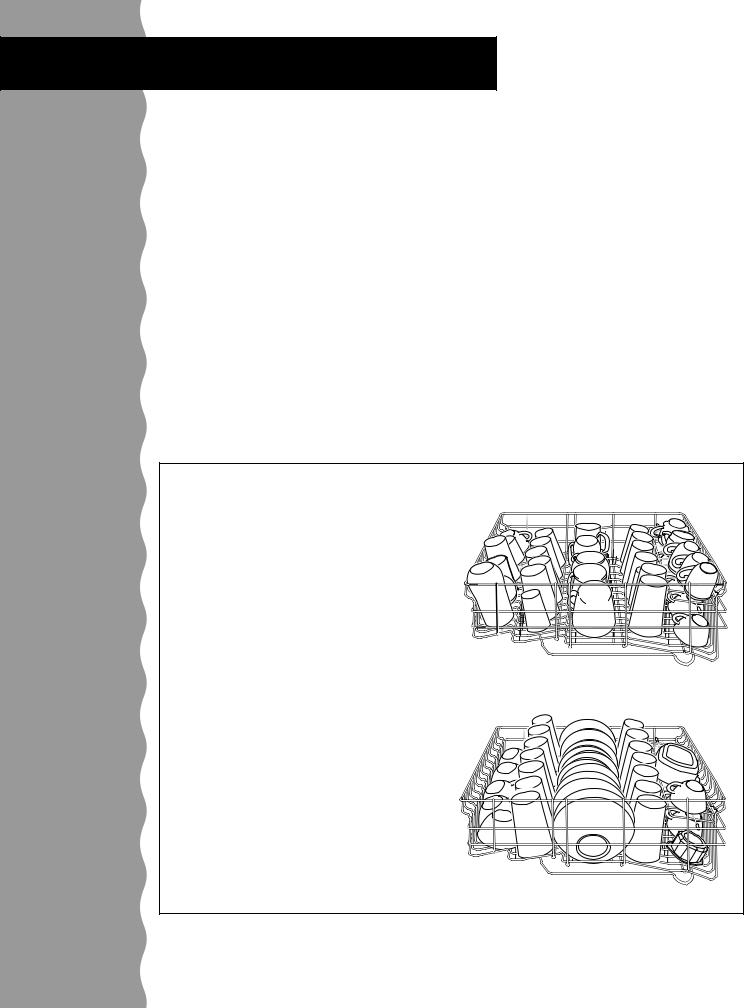
Loading the upper rack
The upper rack is designed for cups, glasses, and other small items.
• Load cups and glasses in the upper rack only, in the rows between the prongs. Placing them over the prongs can cause them to chip or break.
• China, crystal, and other delicate items |
|
|
must not touch each other during dish- |
|
|
washer operation. Damage can occur. |
|
|
• Place items so open ends face down for |
|
|
best cleaning and draining. |
|
|
• Load plastic items securely in the upper |
Cup and glass load |
|
rack only. Wash only plastic items marked |
||
|
||
“dishwasher safe.” |
|
|
• Secure lightweight items so they don’t |
|
|
overturn during washing. Wedge light- |
|
|
weight items against one another or |
|
|
overlap them with heavier dishes. (See |
|
|
“Sure-Hold clips” later in this section.) |
|
|
• Load bowls in the center section for |
|
|
best stability. |
|
|
• Racks with teal-colored tips can be |
|
|
adjusted for different loads. |
|
|
|
Mixed load |
8
L o a d i n g Y o u r D i s h w a s h e r
Loading the upper rack (cont.)
Sure-Hold cup shelf |
Cup shelf |
Fold down the extra shelf on the top rack to |
Upper rack |
hold additional cups and glasses, or small |
loading tips |
items like long utensils and spatulas. |
|
FLEXI-SPLIT* fold down tines |
|
The row of split tines on the right side of the |
Adjustable |
rack is adjustable to accommodate a variety |
racks |
of dishes. These adjustable tines have teal- |
|
colored tips. |
|
• To adjust the front half, move the adjustor |
|
at the front of the rack towards the right to |
|
wedge plastic or other lightweight items |
|
against the side of the rack. Move the |
|
adjuster left to make room for larger |
|
dishes. |
|
• To adjust the back half, push the tines |
|
down gently toward the center of the rack. |
|
FLEXI-FOLD DOWN* tines
The row of tines on the left side of the rack is also adjustable. Push the tines down gently toward the center of the rack to make room for larger dishes.
9
continued on next page

L o a d i n g Y o u r D i s h w a s h e r
Loading the upper rack (cont.)
Upper rack loading tips
Stemware holders |
Stemware holder |
|
Use the stemware holders (attached to the cup shelf) to keep water goblets, wine glasses, etc., in place and prevent damage during washing.
Sure-Hold clips
Sure-Hold clip
The Sure-Hold clips hold lightweight plastic items like cups, lids, or bowls in place during washing. Move a clip anywhere in the rack by pulling it up and off the tine and repositioning it on another tine.
10
L o a d i n g Y o u r D i s h w a s h e r
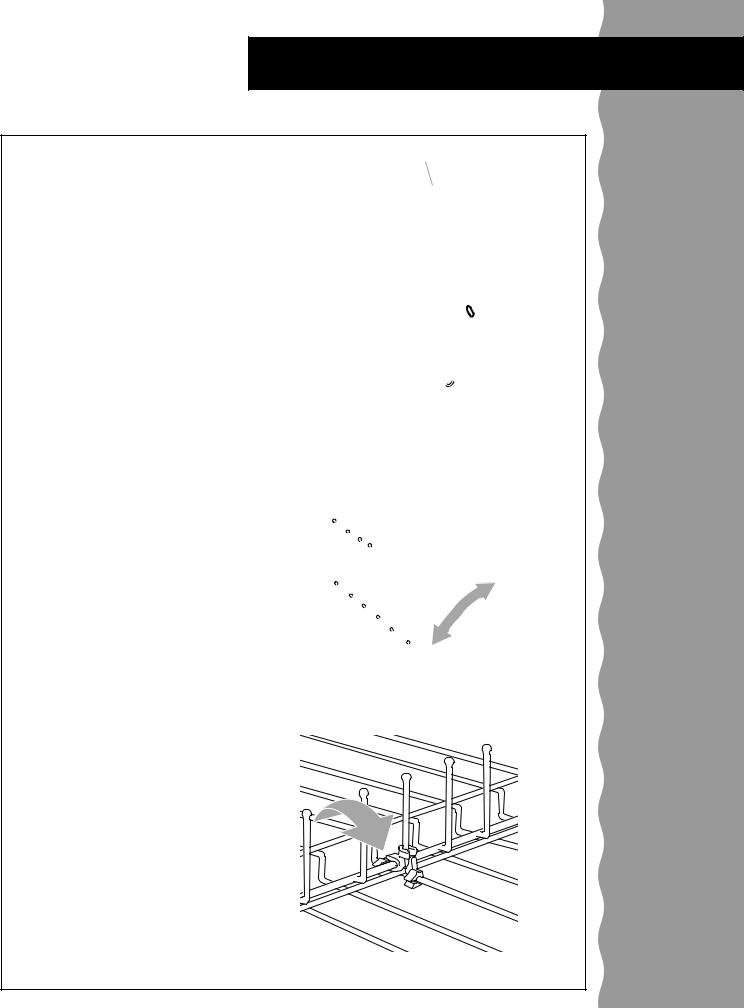
Loading the lower rack
The lower rack is designed for plates, pans, casseroles, and utensils.
•Load items with cooked-on or dried-on food in the lower rack with soiled surfaces facing in toward the spray.
•For maximum capacity and stability of an all-plate load, stagger or overlap small plates with large ones.
•Load plates side to side along with pots, pans, and large cookware, as shown.
•Do not put small items in the lower rack if they are not secured in place.
•Racks with teal-colored tips can be adjusted for different loads.
•Load soup, cereal, and serving bowls in the rack in a variety of ways depending upon their size and shape. Load bowls securely between the rows of prongs. Do not nest bowls because the spray won’t reach their surfaces.
•Do not load items between the bottom rack and the side of the dishwasher tub. This can block the water inlet opening.
•The FLEXI-BASKET* silverware basket can be separated and placed into the lower rack in several locations. Hold basket firmly and pull apart. Now use both sections or just one to load silverware.
Mixed load
Utensil load
Lower rack loading tips
continued on next page
11

|
L o a d i n g Y o u r D i s h w a s h e r |
|
|
|
Loading the lower rack (cont.) |
||
|
|
|
|
Small items |
|
Sure-Hold cup shelf |
|
|
Fold down the extra shelf on the left side of |
||
|
|
the lower rack to hold small items such as |
|
|
|
cups or utensils. |
|
|
FLEXI-FOLD DOWN* tines |
Large items |
Fold down one or both of the back rows of |
|
tines to hold large bowls, pots, pans, |
|
roasters, etc. Push down gently towards the |
|
back of the rack to fold down the tines. |
12
L o a d i n g Y o u r D i s h w a s h e r
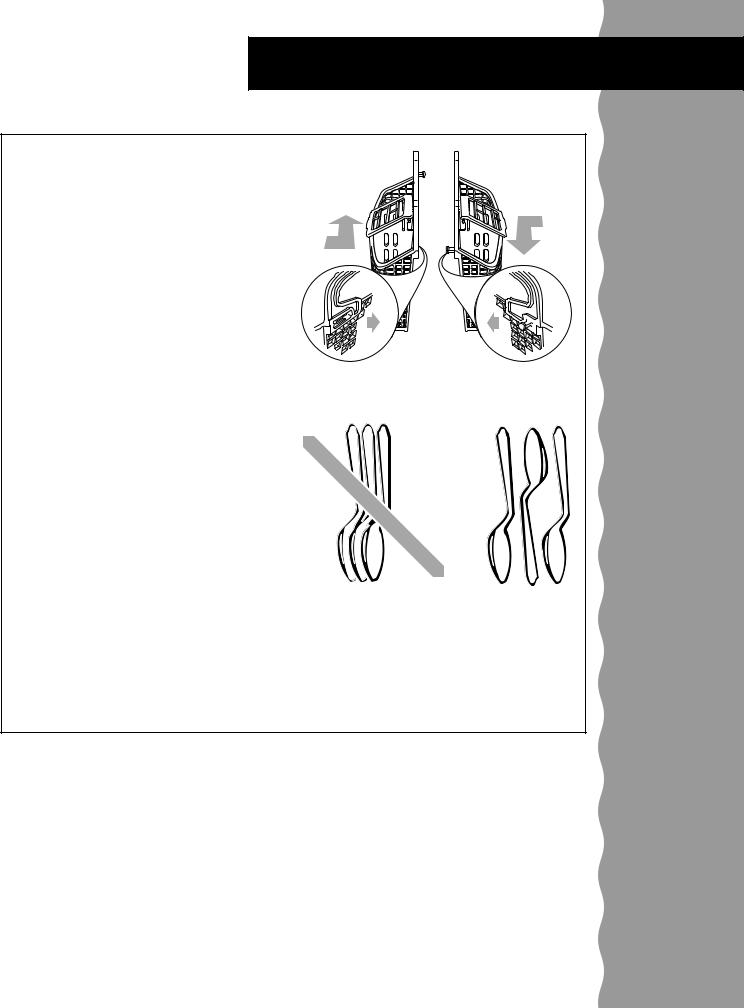
LoadingtheFLEXI-BASKET* silverwarebasket
• The FLEXI-BASKET silverware basket can |
Removable |
be separated and placed into the lower |
silverware |
rack in several locations. Hold basket firmly |
basket |
and pull apart. Now use both sections or |
|
just one to load silverware. |
|
• Load the silverware basket while it is in |
|
the lower rack or take the basket out for |
|
loading on a counter or table. |
|
• Mix items in each section of the basket – |
|
some pointing up and some down. |
|
IMPORTANT: Always load sharp items |
|
(knives, skewers, forks, etc.) pointing down. |
|
• Place small items like baby bottle caps, jar |
|
lids, corn cob holders, etc., in the middle |
|
section with the hinged cover. Close the |
|
cover over the section to hold small items |
|
in place. |
|
• Load forks and spoons so they don’t |
|
nest together. Water spray cannot reach |
|
nested items. |
|
• The silverware basket can also be removed |
|
for easy unloading. Unload or remove the |
|
basket before unloading the upper rack |
|
to avoid spilling water droplets on the |
|
silverware. |
|
NOTES:
•Don’t load silver or silver-plated silverware with stainless steel. These metals can be damaged by contact with one another during washing.
•Some foods (such as salt, vinegar, milk products, fruit juices, etc.) can pit or corrode silverware if left on for long periods of time. Use the Rinse Only cycle when silverware is not washed immediately after use.
13

W a s h i n g S p e c i a l I t e m s
If you have any doubts about washing a particular item, check with the manufacturer to see if it is dishwasher safe.
Check with manufacturer
|
MATERIAL |
DISHWASHER SAFE? |
EXCEPTIONS/SPECIAL INFORMATION |
||
|
|
|
|
|
|
|
Aluminum |
Yes |
High water temperature and detergents may |
||
|
|
|
affect finish of anodized aluminum. All aluminum |
||
|
|
|
will darken when washed in the dishwasher. This |
||
|
|
|
does not affect pan performance. |
||
|
|
|
|
|
|
|
Disposable |
No |
Do not wash throwaway aluminum pans in the |
||
|
Aluminum |
|
dishwasher. These might shift during washing and |
||
|
|
|
transfer black marks to dishes and other items. |
||
|
|
|
|
|
|
|
Bottles and |
No |
Wash bottles and cans by hand. Labels attached |
||
|
Cans |
|
with glue can loosen in your dishwasher, clog |
||
|
|
|
spray arms or the pump, and will reduce washing |
||
|
|
|
performance. |
||
|
|
|
|
|
|
|
Cast Iron |
No |
Seasoning will be removed and iron will rust. |
||
|
|
|
|
|
|
|
China/ |
Yes |
Always check manufacturer’s recommendations |
||
|
Stoneware |
|
before washing. Antique, hand-painted, or over- |
||
|
|
|
the-glaze patterns may fade. Gold leaf can |
||
|
|
|
discolor or fade. |
||
|
|
|
|
|
|
|
Crystal |
Yes |
Always check manufacturer’s recommendations |
||
|
|
|
before washing. Some types of leaded crystal can |
||
|
|
|
etch with repeated washings. |
||
|
|
|
|
|
|
|
Gold |
No |
Gold-colored flatware will discolor. |
||
|
|
|
|
|
|
|
Glass |
Yes |
Milk glass will yellow with repeated washings. |
||
|
|
|
|
|
|
|
Hollow- |
No |
Handles of some knives are attached to the blade |
||
|
Handle |
|
with adhesives which may loosen if washed in the |
||
|
Knives |
|
dishwasher. |
||
|
|
|
|
|
|
|
Pewter, Brass, |
No |
High water temperatures and detergent can |
||
|
and Bronze |
|
discolor or pit finish. |
||
|
|
|
|
|
|
|
Plastics |
Yes |
Always check manufacturer’s recommendations |
||
|
|
|
before washing. Plastics vary in their capacity to |
||
|
|
|
withstand high water temperatures and detergents. |
||
|
|
|
Load plastics in top rack only. |
||
|
|
|
|
|
|
|
Disposable |
No |
Cannot withstand high water temperatures and |
||
|
Plastics |
|
detergents. |
||
|
|
|
|
|
|
|
Stainless |
Yes |
Run a Rinse Only cycle if not washing immediately. |
||
|
Steel |
|
Prolonged contact with food containing salt, vinegar, |
||
|
|
|
milk products, or fruit juice could damage finish. |
||
|
|
|
|
|
|
|
Sterling Silver |
Yes |
Run a Rinse Only cycle if not washing immedi- |
||
|
or Silver Plate |
|
ately. Prolonged contact with food containing salt, |
||
|
|
|
acid, or sulfide (eggs, mayonnaise, and seafood) |
||
|
|
|
can damage finish. |
||
|
|
|
|
|
|
|
Tin |
No |
Can rust. |
||
|
|
|
|
|
|
|
Wooden Ware |
No |
Wash by hand. Always check manufacturer’s |
||
|
|
|
recommendations before washing. Untreated |
||
|
|
|
wood can warp, crack, or lose its finish. |
||
|
|
|
|
|
|
14
U s i n g t h e D i s p e n s e r s
For best washing results, it is important to use the correct amount of detergent and a rinse agent. Read this section for information on using both properly.
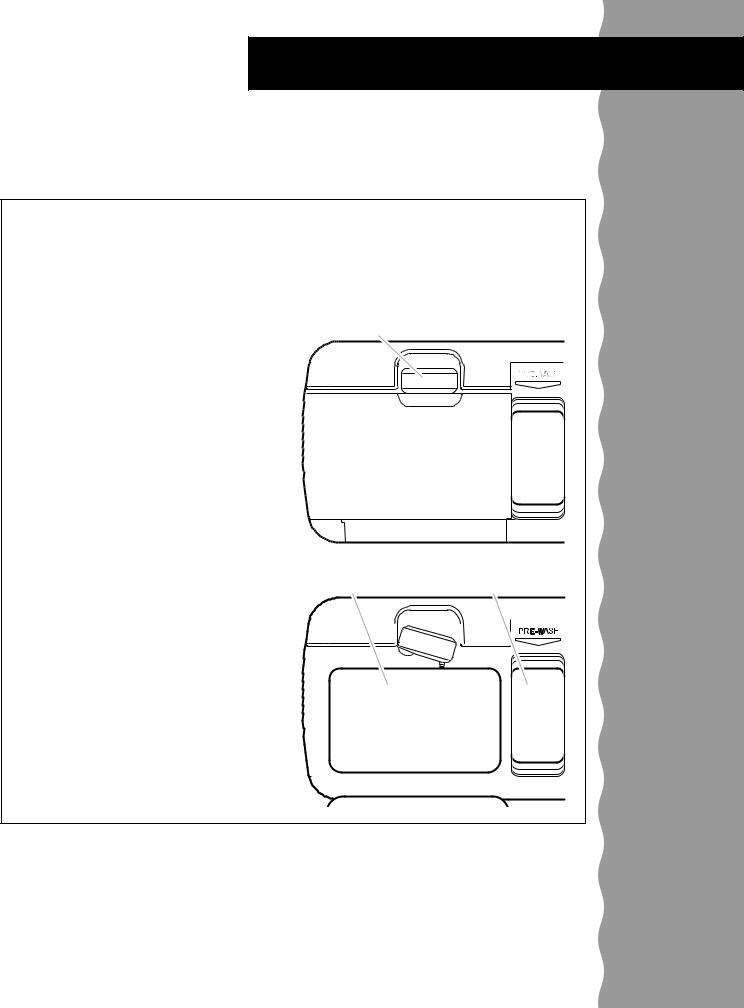
The detergent dispenser
The detergent dispenser has two sections. The smaller Pre-Wash section empties detergent into the dishwasher when you close the door. The larger Main Wash section empties detergent into the dishwasher during the wash cycle.
1.If the dispenser cover is closed, open the cover by rotating the blue button.
2.Fill the Main Wash section with detergent. The amount of detergent needed depends on the amount of food soil on the dishes and water hardness. See the detergent usage chart later in this section.
3.Close the dispenser cover and fill the Pre-Wash section.
NOTE: Do not use detergent with the Rinse Only cycle.
Rotate blue button to open
Main Wash section |
Pre-Wash section |
|||||||||||
|
|
|
|
|
|
|
|
|
|
|
|
|
|
|
|
|
|
|
|
|
|
|
|
|
|
|
|
|
|
|
|
|
|
|
|
|
|
|
|
|
|
|
|
|
|
|
|
|
|
|
|
|
|
|
|
|
|
|
|
|
|
|
|
|
|
|
|
|
|
|
|
|
|
|
|
|
|
|
|
|
|
|
|
|
|
|
|
|
|
|
|
|
|
|
|
|
|
|
|
|
|
|
|
15

U s i n g t h e D i s p e n s e r s
Using the detergent dispenser
Details about detergent
What type of detergent to use
•Use automatic dishwasher detergent only.
NOTE: Never use soap, hand-dishwashing detergent, or laundry detergent. These products will produce excessive suds which could cause flooding and reduce washing performance.
•Follow manufacturer’s instructions when using powdered, liquid, or gel dishwasher detergents. Concentrated (Ultra) powdered detergents usually call for lower usage than do standard powdered detergents.
•Add detergent to the dispenser just before starting the dishwasher.
•Keep detergent container tightly closed in a cool, dry place, out of the reach of children. After opening, a box of detergent should stay fresh for about one month. Detergent exposed to moisture over a period of time might become caked and ineffective.
How much detergent to use
|
WATER HARDNESS |
AMOUNT OF DETERGENT |
|
|
|
|
|
|
Soft to Medium Hard |
For normal loads: |
|
|
Water |
• Partially fill the Main Wash section (2 tablespoons or |
|
|
0 to 6 grains per gallon |
30 grams) |
|
|
|
||
|
|
• Fill the Pre-Wash section (2 tablespoons or 30 grams) |
|
|
|
NOTE: Add only 1 tablespoon or 15 grams of deter- |
|
|
|
gent to the Pre-Wash section if dishes are prerinsed |
|
|
|
or water is very soft. |
|
|
|
For heavily soiled loads: |
|
|
|
• Fill the Main Wash section (3 tablespoons or 45 grams) |
|
|
|
• Fill the Pre-Wash section (2 tablespoons or 30 grams) |
|
|
|
|
|
|
Medium to Hard Water |
For normal and heavily soiled loads: |
|
|
7 to 12 grains per gallon |
• Fill the Main Wash section (3 tablespoons or 45 grams) |
|
|
|
• Fill the Pre-Wash section (2 tablespoons or 30 grams) |
|
|
|
|
|
|
Very Hard Water |
For normal loads: |
|
|
13 grains and above |
• Fill the Main Wash section (3 tablespoons or 45 grams) |
|
|
|
• Fill the Pre-Wash section (2 tablespoons or 30 grams) |
|
|
|
• Turn the rinse agent dispenser to a higher setting. See |
|
|
|
“Using the rinse agent dispenser” later in this section. |
|
|
|
NOTE: Under abnormal water hardness conditions |
|
|
|
(13 grains and above), it may be necessary to use the |
|
|
|
Short Wash cycle for best wash performance. |
|
|
|
|
|
16

U s i n g t h e D i s p e n s e r s
How much detergent to use (cont.)
WATER HARDNESS |
AMOUNT OF DETERGENT |
Very Hard Water |
For heavily soiled loads: |
13 grains and above (cont.) |
• Fill the Main Wash section (3 tablespoons or 45 grams) |
|
• Fill the Pre-Wash section (2 tablespoons or 30 grams) |
|
• Turn the rinse agent dispenser to a higher setting. See |
|
“Using the rinse agent dispenser” later in this section. |
|
NOTE: Under abnormal water hardness conditions |
|
(13 grains and above), it may be necessary to use the |
|
Soak & Scrub cycle for best wash performance. |
Different brands of dishwasher detergent |
NOTE: Water hardness may change over a |
have different amounts of phosphorus for |
period of time. Contact your local water utility |
softening water. If you have hard water and |
or area water softening company to determine |
use a detergent with a phosphorous content |
your water hardness, or order water hardness |
of less than 8.7%, you may need to use |
test strip (Part Number 4171690) through the |
more detergent, or use a detergent with a |
Consumer Assistance Center. |
phosphorous content higher than 8.7%. |
|
• Excessive amounts of detergent combined |
|
with soft water may cause etching of |
|
glassware. |
|
17
U s i n g t h e D i s p e n s e r s
Using the rinse agent dispenser
Use rinse agent for better drying
Adjustable rinse agent dispenser
A rinse agent prevents water from forming droplets that can dry as spots or streaks. It also improves drying by allowing water to drain off the dishes during the final rinse by releasing a small amount of the rinse agent into the rinse water. Your dishwasher is designed to use a liquid rinse agent. Do not use a solid or bar-type rinse agent.
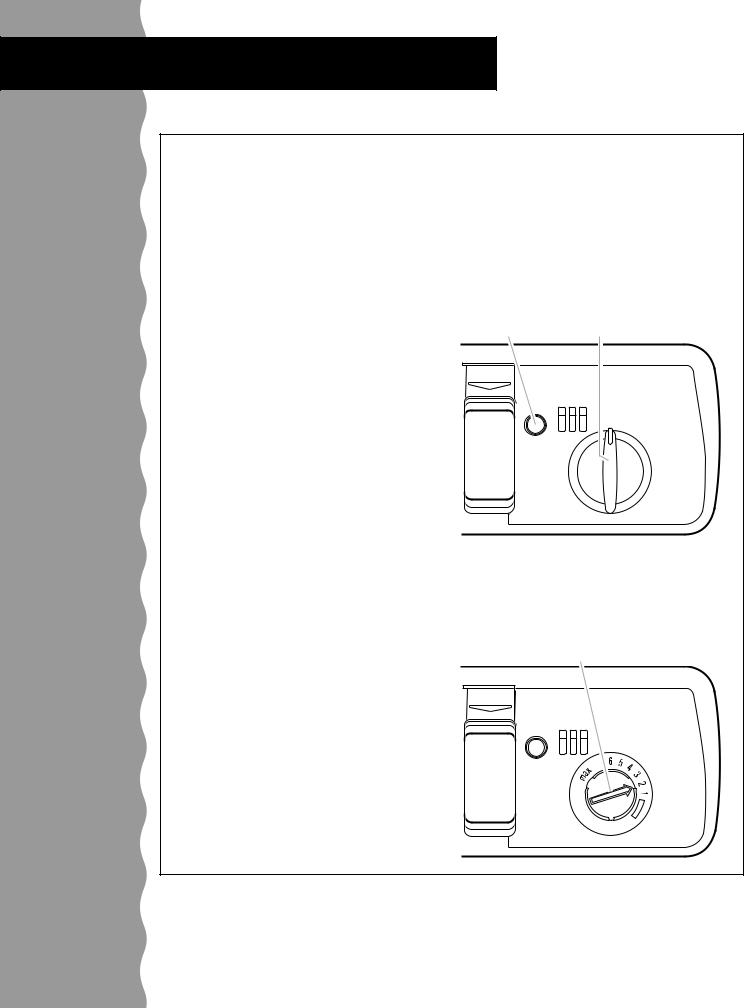
Filling the dispenser
The rinse agent dispenser holds 5.2 fluid ounces (153.7 mL) of rinse agent. Under normal conditions, this will last for about three months. You do not have to wait until the dispenser is empty to refill it. Try to keep it full, but be careful not to overfill it.
1.Make sure the dishwasher door is fully open.
2.Turn the dispenser knob to Open and lift it out.
3.Add rinse agent until the indicator window looks full. If you overfill, the excess rinse agent may overflow the dispenser and cause oversudsing during the wash cycle.
4.Clean up any spilled rinse agent with a damp cloth.
5.Replace the dispenser knob and turn it to Closed.
Indicator Dispenser
window knob
PRE-WASH |
 CLOSED
OPEN
Rinse agent setting
The amount of rinse agent released into the final wash can be adjusted. The factory setting is at 2. For most water conditions set the adjuster to 1 or 2. If there are rings or calcium (hard water) spots on dishes, try a higher setting (4, 5, or 6).
To adjust setting
Remove the dispenser knob, then turn the adjuster inside the dispenser to the desired setting.
Adjuster
PRE-WASH |
 CLOSED
OPEN
18

O p e r a t i n g Y o u r D i s h w a s h e r
This section tells you how to operate the dishwasher. Operating your dishwasher properly enables you to obtain the best possible results.
Cycle selection chart
The dishwasher will wash and dry dishes according to the selections you make on the control panel. The dishwasher remembers the last cycle and option(s) that were completed. You only have to press the Start pad if you want to use the same cycle and option(s). However, if the last cycle you completed was Rinse Only, the dishwasher will run the Normal cycle if you press the Start pad.
|
|
|
A “3” shows what steps are in each cycle. |
|
|
||||||
|
|
|
|
|
|
|
|
|
|
|
|
|
|
|
Main |
|
|
|
|
Time |
Water |
||
CYCLE |
|
|
|
†† |
|
|
Usage |
||||
|
|
|
|
|
|
|
|
|
|||
Pre-Wash |
Rinse |
Wash |
Rinse |
Purge |
Rinse |
Dry |
(minutes) |
(gallons/liters) |
|||
|
|||||||||||
|
|
|
|
|
|
|
|
|
|
|
|
SOAK & |
3 |
3 |
3 |
3 |
|
3 |
3 |
88† |
11.0/41 |
|
|
SCRUB |
|
|
|
|
|
|
|
|
|
|
|
|
|
|
|
|
|
|
|
|
|
|
|
|
Use this cycle for hard-to-clean, heavily soiled loads, and harder than normal |
||||||||||
|
water conditions. |
|
|
|
|
|
|
|
|
||
|
|
|
|
|
|
|
|
|
|
|
|
NORMAL |
3 |
|
3 |
|
3 |
3 |
3 |
75† |
7.0/26 |
|
|
|
|
|
|
|
|
|
|
|
|
|
|
|
Use this cycle for loads with moderate amounts of food soil. (The energy usage |
|
|||||||||
|
label is based on this cycle.) |
|
|
|
|
|
|
||||
|
|
|
|
|
|
|
|
|
|
|
|
SHORT |
3 |
|
3 |
3 |
|
3 |
3 |
69† |
8.8/33 |
|
|
WASH |
|
|
|
|
|
|
|
|
|
|
|
|
|
|
|
|
|
|
|
|
|
|
|
|
Use this cycle for lightly soiled loads, or harder than normal water conditions. |
||||||||||
|
|
|
|
|
|
|
|
|
|
|
|
LIGHT |
3 |
|
3 |
3 |
|
3 |
3 |
65† |
8.8/33 |
|
|
CHINA |
|
|
|
|
|
|
|
|
|
|
|
|
|
|
|
|
|
|
|
|
|
|
|
|
Use this cycle for china, crystal, and other delicate items. |
|
|
||||||||
|
|
|
|
|
|
|
|
|
|
|
|
RINSE |
3 |
|
|
|
|
|
|
7.5 |
2.2/8 |
|
|
ONLY |
|
|
|
|
|
|
|
|
|
|
|
|
|
|
|
|
|
|
|
|
|
|
|
Use this cycle for rinsing dishes, glasses, and silverware that will not be washed right away.
•Do not use detergent with the Rinse Only cycle.
†Expect longer cycle times if water entering the dishwasher is not hot enough.
††A small amount of water is run through the pump to remove soil particles between the main wash and final rinse.
Heavily soiled dishes
Lightly soiled dishes
Delicate items
When washing later
19
O p e r a t i n g Y o u r d i s h w a s h e r
Canceling a cycle
Cancel |
You can cancel a cycle anytime during |
2. Let the dishwasher drain completely. |
|
anytime |
the cycle. |
|
|
|
1. Press the Cancel pad once, then wait. |
|
|
|
|
The Cancel light will glow. There |
|
|
CANCEL |
is a 5-second pause between |
|
|
the time Cancel is pressed and |
|
|
|
|
draining begins. |
|
|
|
|
|
Option selections
Customize |
Press a pad to select an option. If you |
your cycles |
change your mind, press the pad again to |
|
turn the option off. To select a different |
|
option, press another pad. |
HighTemp.Wash
Select this option, and water will heat during
HIGH |
the main wash for better cleaning |
|
of heavily soiled dishes. Water |
||
TEMP. |
||
heating is automatic in the wash |
||
WASH |
||
portions and final rinse of the |
Soak & Scrub cycle, and in the final rinse of the Normal, Short Wash, and Light China cycles.
Energy Saver Dry
Use this option to air dry dishes without heat. For best results, keep the rinse agent dispenser filled. Under certain conditions (hard water, empty rinse agent dispenser,
plastic items in the load, etc.) you might find some water left on plastics, dishes, and silverware.
SANI RINSE* Option
The SANI RINSE option raises the water temperature in the final rinse to approximately 155°F (68°C). SANI RINSE is an option with all cycles except Rinse Only. Depending on
the incoming temperature of your water, cycle times might be longer when you select SANI RINSE.
NOTE: The SANI RINSE cycle raises the temperature of the final rinse to approximately 155°F (68°C), and maintains that temperature for at least 16 minutes. This high temperature rinse sanitizes your dishes and glassware in accordance with the NFS International requirements (#95/480/2480).
Delay Hours
The Delay Hours light glows when the dishwasher has been set for a delayed start. The delay light will turn off when the cycle starts. See “Setting a delay start” later in this section.
20
O p e r a t i n g Y o u r D i s h w a s h e r
Control panel lights
The Cycle Monitor allows you to see what portion of a cycle your dishwasher is in. The Clean light glows when a cycle has finished. All other lights will turn off. The Clean light will turn off when you open the door.
CYCLE MONITOR
WASH |
|
RINSE DRY |
CLEAN |
||||||||||
|
|
|
|
|
|
|
|
|
|
|
|
|
|
|
|
|
|
|
|
|
|
|
|
|
|
|
|
Water Heating Light
The Water Heating light glows while water in the dishwasher is
WATER HEATING heating. Wash or rinse action continues while the water heats.
RinseAid Empty
Fill the rinse agent dispenser when Rinse Aid Empty is lit to
RINSE AID EMPTY improve drying and prevent spots or streaks.
Using child lock
Child Lock Light
Use Child Lock to prevent your dishwasher from being turned on accidentally. No wash selections or options can be selected when
Child Lock is on, and the dishwasher will not start.
To turn Child Lock on
Press Energy Saver Dry for 5 seconds. The Child Lock light will glow for 30 seconds. All other lights will be off. The Child Lock light will turn back on for 30 seconds if any pad
is pressed during this time.
NOTE: You will still be able to open the |
To turn Child Lock off |
dishwasher door. |
Press Energy Saver Dry again for 5 seconds. |
|
The Child Lock light will turn off. |
Changing a setting
During the first 2 minutes of a cycle
Press new Wash Selection and Option pads.
After the first 2 minutes of a cycle
1. Press the Cancel pad to drain any water and to reset the control.
2.Open the door and check the detergent dispenser to be sure it is properly filled for the new cycle.
3.Close the door.
4.Press new Wash Selection and Option pads, then press the Start pad.
NOTE: If the dishwasher will not start, make sure Delay Hours has not been selected.
CANCEL
Safeguard against accidental start up
Select the wrong cycle?
21

|
|
|
||
O p e r a t i n g Y o u r D i s h w a s h e rthe |
door. |
|||
|
Adding dishes during a cycle |
|||
|
You can add an item to the dishwasher |
2. |
Open the door and add the dishes. |
|
|
during the first 10 minutes of the cycle. |
3. |
Close the door. |
|
|
1. Unlatch the door to stop the cycle. Wait a |
4. |
The dishwasher will start automatically |
|
|
few seconds for the spray action to stop |
|
after a 5-second pause when you close |
|
|
before opening the door. |
|
|
|
|
Setting a delay start |
|
|
|
When washing |
To run your dishwasher at a later time, or |
|||
dishes later |
during off-peak hours, you can delay the |
|||
|
start of a cycle for 2, 4, or 6 hours. |
|||
|
To delay the start, follow these steps: |
|||
|
NORMAL |
ENERGY |
DELAY |
START |
|
SAVER |
|||
|
HOURS |
|||
|
|
DRY |
|
|
|
|
|
|
|
|
Example for delayed Normal cycle with |
|||
|
Energy Saver Dry |
|
|
|
1.Press a Wash Selection pad for the desired cycle. See “Cycle selection chart” earlier in this section for cycle descriptions.
2.Press a pad to select an option. If you change your mind, press the pad again to turn the option off. To select a different option, just press another pad. See “Option selections” earlier in this section.
3.Press the Delay Hours pad once for a 2-hour delay start, twice for 4 hours, or three times for 6 hours.
The number above the Delay Hours pad will glow and the dishwasher will start the cycle in the amount of hours you have selected.
4.Press the Start pad to begin the delay cycle.
NOTE: To turn Delay Hours off, press the pad until no number is lit above the pad.
IMPORTANT:
•Operate your dishwasher only when you are at home.
•If your home is equipped with a water softener, make sure the dishwasher is not timed to start during regeneration of the softener.
Drying system
During drying, vapor escapes through the vent at the upper left corner of the door. This is normal. The vapor is the result of moisture in the dishwasher being removed during drying.
IMPORTANT: The vapor is hot. Do not touch the vent during drying.
22

O p e r a t i n g Y o u r D i s h w a s h e r
Quiet operating tips
To avoid thumping and clattering noises during operation:
•Make sure lightweight load items are secured in the rack.
•Make sure pot lids and handles, pizza pans, cookie sheets, etc., do not touch the dishwasher sides or interfere with the spray arm rotation.
•Where possible, load items so they do not touch one another.
NOTE: Keep sink drain plugs inserted during dishwasher operation to prevent noise transfer through drains.
Normal operating sounds
Some normal sounds you might hear while the dishwasher is running:
•The fill valve opening or closing and the sound of water entering the dishwasher.
•Food soil being ground up in the food disposer.
•Water being pumped out during drain portion of a cycle.
•Pump motor starting.
•Wash/rinse action of water spray. To minimize noise of water circulating on dishes, see the “Loading Your Dishwasher” section.
• Detergent cup opening.
Energy saving tips
Set your home water heater to provide a minimum of 120°F (49°C) incoming water to the dishwasher.
To check water temperature:
1.Run hot water at the faucet closest to your dishwasher. Set a cup under the faucet, and place a candy or meat thermometer in it.
2.Run hot water for at least one minute into
the cup, allowing the water to overflow. Check the temperature. If the water temperature is below 120°F (49°C), have a qualified person raise the
thermostat setting on your water heater.
•Run the dishwasher only with a full load.
•Use only the cycle and options that you need.
•Run the dishwasher during off-peak hours if your utility company offers reduced rates on electricity during specific times of day.
•Run the dishwasher at night during the summer to reduce daytime heat buildup in your home.
•Do not rinse dishes before loading.
•Use the Energy Saver Dry option.
23
C a r i n g f o r Y o u r D i s h w a s h e r
Water filtered for cleaner dishes
Your new dishwasher is designed to give you many years of dependable service. However, there are a few things you are expected to do in order to maintain your dishwasher properly. This section tells you how to clean and care for your dishwasher.
HYDRO SWEEP* Wash System
The HYDRO SWEEP Wash System in your dishwasher provides excellent cleaning results. The wash water is continuously filtered by a triple filtration and soil collector system to prevent food particles from redepositing on clean dishes.
The filter
The filter continuously filters the wash water and traps the food particles that have been removed from the dishes. A small amount of water will always remain under the filter to keep the pump seal moist.
4-way HYDRO SWEEP spray arm
Coarse strainer
(not removable)
The water jets
The food particles are removed from the Ultra-Fine filter by 2 water jets that are located underneath the 4-way HYDRO SWEEP spray arm.
The coarse strainer
A coarse strainer will prevent bones, pits, and other large objects from entering the pump system. You should periodically check the strainer for such items that may have mistakenly entered the dishwasher.
Overflow protection float
The overflow protection float in the front right |
Check under |
corner of the dishwasher tank prevents the |
overflow |
dishwasher from overflowing. The float must |
protection float |
|
|
be in place for the dishwasher to operate. |
|
Check under the float for objects that may |
|
prevent the float from moving up or down. |
|
24
Loading...