


kia, tthe ccompany
Now that you are the owner of a Kia Vehicle, you’ll probably be
asked a lot of questions about your vehicle and the company like
“What is a Kia?,” “Who is Kia?,” “What does ‘Kia’ mean?”
Here are some answers. First, Kia is the oldest car company in
Korea. It’s a company that has thousands of employees focused
on building high-quality vehicles at affordable prices.
The first syllable, Ki, in the word “Kia” means “to arise from to
the world” or “to come up out of to the world.” The second syllable, a, means “Asia.” So, the word Kia, means “to arise from”
or “to come up out of Asia to the world.”
Enjoy your Vehicle!

i
Thank you for choosing a Kia vehicle.
When you require service, remember that your dealer
knows your vehicle best. Your dealer has factory-trained
technicians, recommended special tools, genuine Kia
replacement parts and is dedicated to your complete satisfaction.
Because subsequent owners require this important information as well, this publication should remain with the
vehicle if it is sold.
This manual will familiarize you with operational, maintenance and safety information about your new vehicle. It
is supplemented by a Warranty and Maintenance book
that provides important information on all warranties
regarding your vehicle. If your vehicle is equipped with
an audio system, you will also have a Kia Integrated
Audio System manual explaining its operation. We urge
you to read these publications carefully and follow the
recommendations to help assure enjoyable and safe operation of your new vehicle.
Kia offers a great variety of options, components and features for its various models.
Therefore, the equipment described in this manual, along
with the various illustrations, may not all be applicable to
your particular vehicle.
The information and specifications provided in this manual were accurate at the time of printing. Kia reserves the
right to discontinue or change specifications or design at
any time without notice and without incurring any obligation. If you have questions, always check with your
Kia Dealer.
We assure you of our continuing interest in your motoring pleasure and satisfaction in your Kia vehicle.
© 2006 Kia Motors Corp.
All rights reserved. Reproduction by any means, elec-
tronic or mechanical, including photocopying, recording,
or by any information storage and retrieval system or
translation in whole or part is not permitted without written authorization from Kia Motors Corporation.
Printed in Korea
Foreword

ii
1
2
3
4
5
6
7
8
9
Introduction
Your vehicle at a glance
Knowing your vehicle
Driving your vehicle
Driving tips
In case of an emergency
Maintenance
Specifications
Index
table of contents

1
2
3
4
5
6
7
8
9
How to use this manual / 1-2
Vehicle break-in process / 1-3
Introduction

Introduction
21
1
2
3
4
5
6
7
8
9
We want to help you get the greatest
possible driving pleasure from your
vehicle. Your Owner’s Manual can
assist you in many ways.We strongly recommend that you read the
entire manual. Especially, in order to
prevent death or injury, at the very
least, you must read the WARNING
and CAUTION sections spread
throughout the manual, which are
easily recognized by their special
markings listed.
Illustrations complement the words
in this manual to best explain how to
enjoy your vehicle. By reading your
manual, you learn about features,
important safety information, and
driving tips under various road conditions.
The general layout of the manual is
provided in the Table of Contents. A
good place to start is the index;it has
an alphabetical listing of all information in your manual.
Sections:This manual has eight sections plus an index. Each section
begins with a brief list of contents so
you can tell at a glance if that section
has the information you want.
You’ll find various WARNING’s,
CAUTION’s, and NOTICE’s in this
manual. These WARNING’s,
CAUTION’s and NOTICE’s were prepared to enhance your personal
safety and continued satisfaction
with Kia vehicle.You should carefully
read and follow ALL procedures and
recommendations provided in these
WARNING’s, CAUTION’s and
NOTICE’s.
✽✽
NOTICE
A NOTICE indicates a situation in
which damage to your vehicle could
result if the notice is ignored.
HOW TO USE THIS MANUAL
WARNING
A WARNING indicates a situation
in which serious bodily injury or
death could result if the warning
is ignored.
CAUTION
A CAUTION indicates a situation
in which personal injury, perhaps
severe, could result if the caution
is ignored.

13
1
2
3
4
5
6
7
8
9
Introduction
VEHICLE BREAK-IN
PROCESS
No special break-in period is needed.By f ollo wing a f ew simple precautions for the first 1,000 km (600
miles) you may add to the performance, economy and life of your vehicle.
• Do not race the engine.
• Do not maintain a single speed for
long periods of time, either fast or
slow. Varying engine speed is
needed to properly break-in the
engine.
• Avoid hard stops, except in emergencies, to allow the brakes to seat
properly .
• Avoid full-throttle starts.

1
2
3
4
5
6
7
8
9
Exterior overview / 2-2
Interior overview / 2-3
Your vehicle at a glance

Your vehicle at a glance
22
1
2
3
4
5
6
7
8
9
EXTERIOR OVERVIEW
1. Hood
2. Headlights
3.Wiper
4. Door
5. Side gate/Rear gate
6.Tire
7.Window
8. Antenna
1PUB0001
23
1
2
3
4
5
6
7
8
9
Your vehicle at a glance
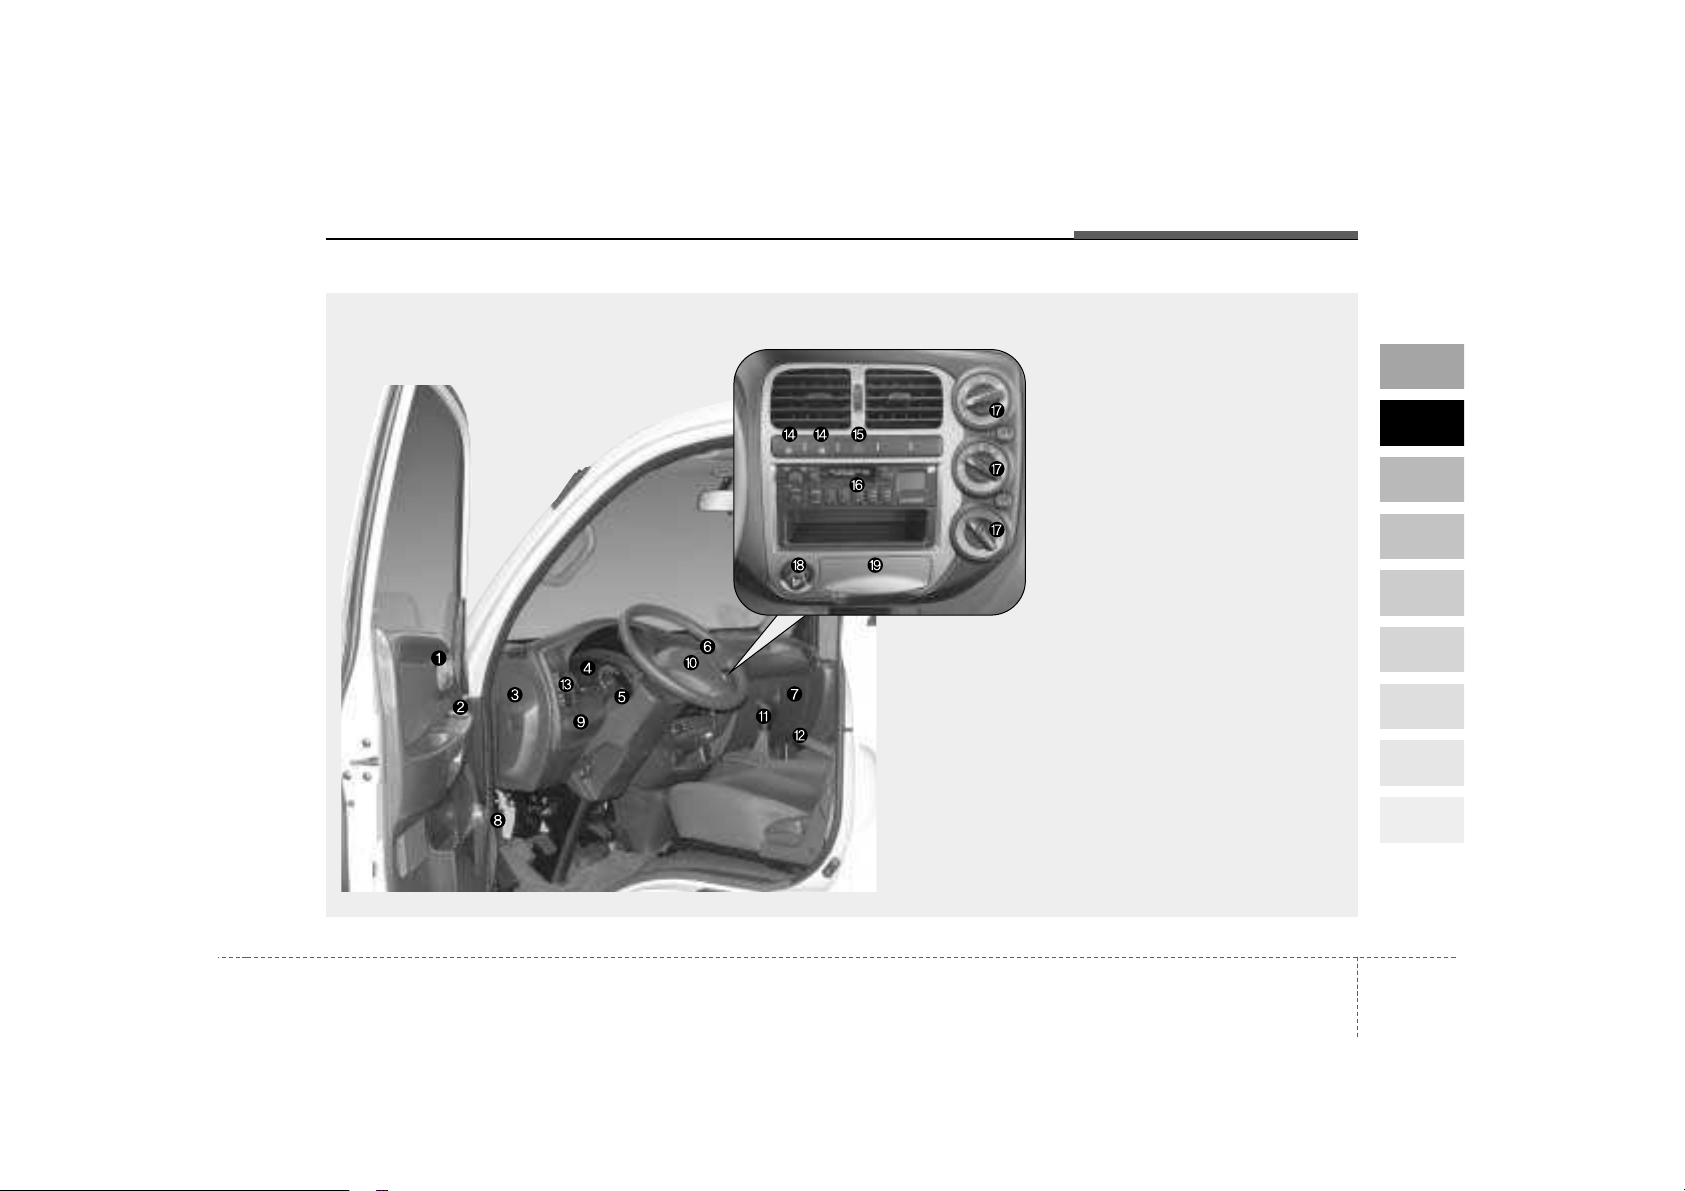
INTERIOR OVERVIEW
1. Door lock/unlock button
2. Power window switches *
3. Brake/clutch fluid
4. Instrument cluster
5. Light control/Turn signals
6.Wiper/Washer
7. Glove box
8. Hood release lever
9. Headlight leveling device *
10. Steering wheel
11. Shift lever
12. Parking brake
13.Vent controls
14. Fog light *
15. Hazard
16. Audio *
17. Climate control system *
18. Cigar lighter
19. Ashtray
* : if equipped
1PUA0002/1PUB0003

1
2
3
4
5
6
7
8
9
Keys / 3-2
Door locks / 3-3
Window / 3-6
Seat / 3-8
Safety belts / 3-16
Hood / 3-30
Rear gate / 3-32
Side gate / 3-33
Fuel filler / 3-34
Mirrors / 3-35
Interior lights / 3-36
Storage compartment / 3-37
Interior features / 3-39
Antenna / 3-42
Exterior tool box (For 1.4 ton only) / 3-42
Knowing your vehicle
Knowing your vehicle
23
1
2
3
4
5
6
7
8
9
CAUTION
Use only Kia original parts for
the ignition key in your vehicle.
If an aftermarket key is used, the
ignition switch may not return
to ON after START. If this happens, the starter will continue to
operate causing damage to the
starter motor and possible fire
due to excessive current in the
wiring.
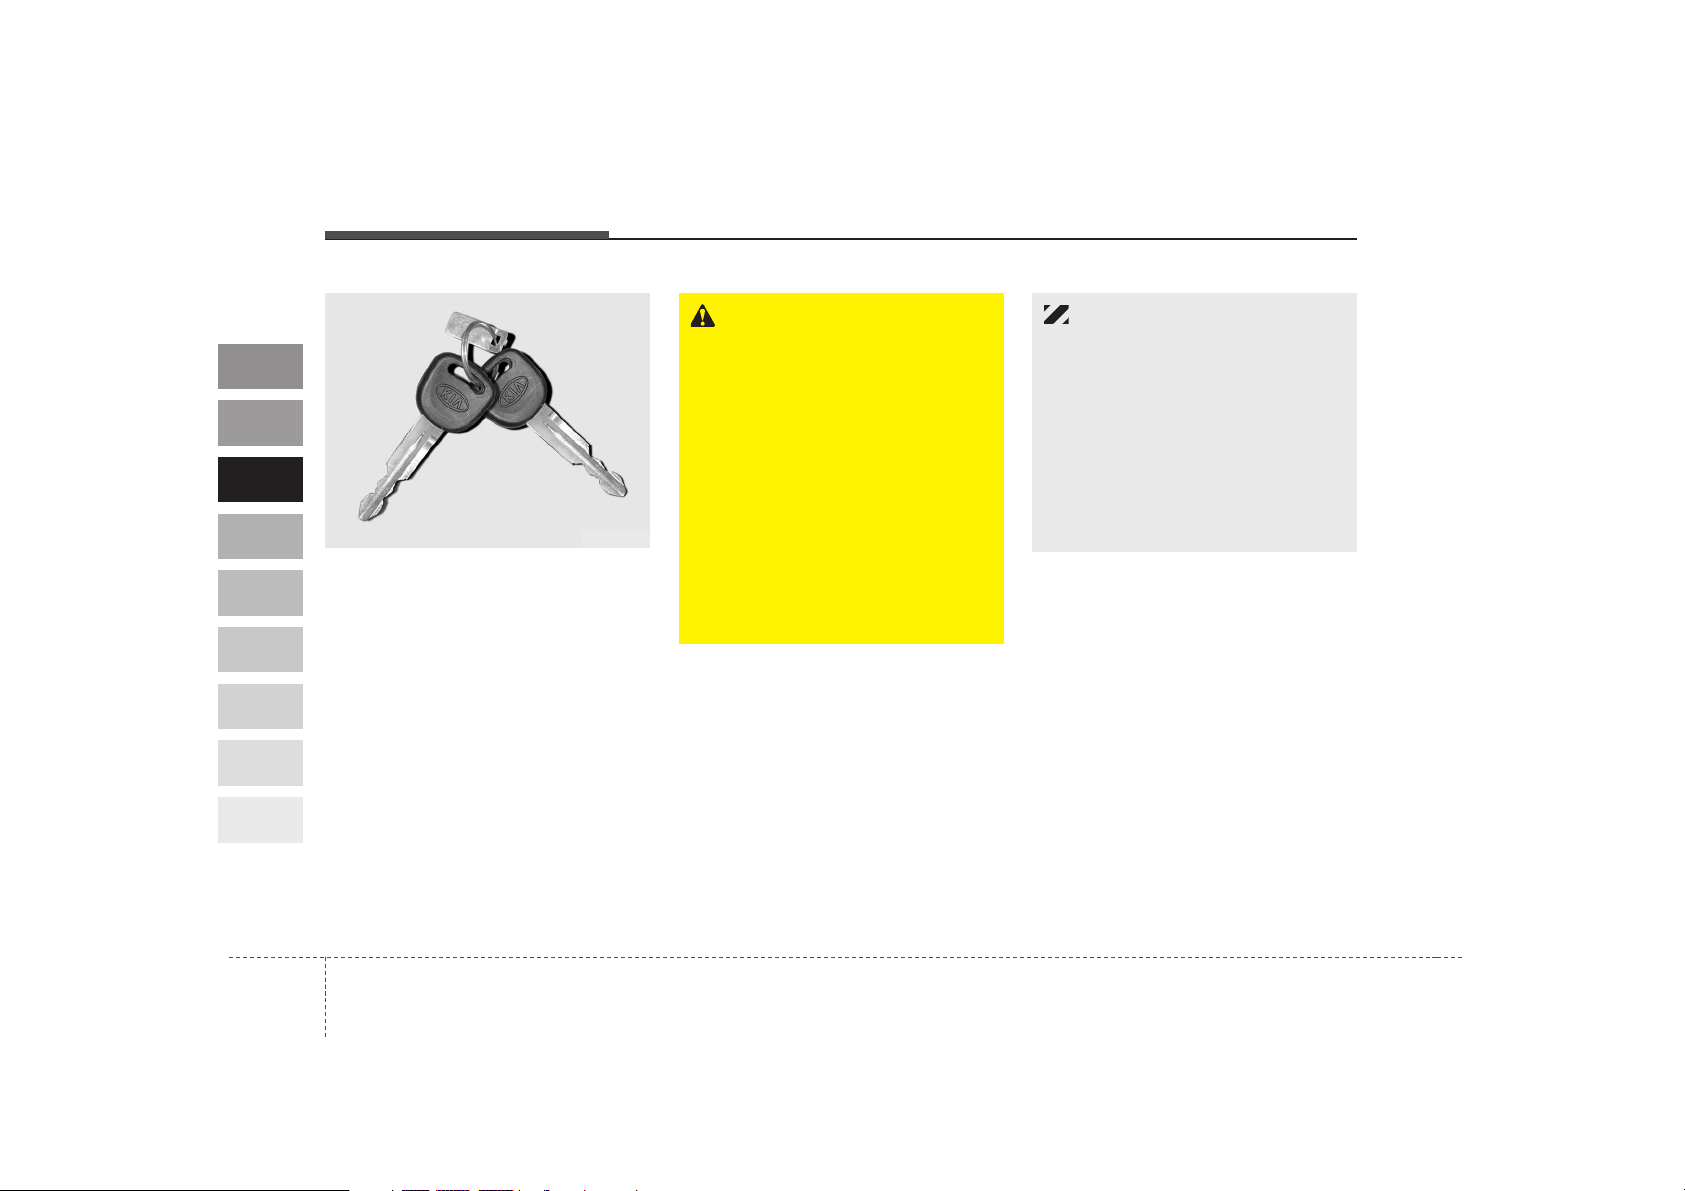
The key code number is stamped on
the plate attached to the key set.
Should you lose your keys, this number will enable an authorized Kia
Dealer to duplicate the keys easily.
Remove the plate and store it in a
safe place. Also, record the code
number and keep it in a safe and
handy place, but not in the vehicle.
KEYS
1CTA2001
WARNING - Ignition key
Leaving children unattended in
a vehicle with the ignition key is
dangerous even if the key is not
in the ignition. Children copy
adults and they could place the
key in the ignition. The ignition
key would enable children to
operate power windows or other
controls, or even make the vehicle move, which could result in
serious bodily injury or even
death. Never leave the keys in
your vehicle with unsupervised
children.
33
1
2
3
4
5
6
7
8
9
Knowing your vehicle
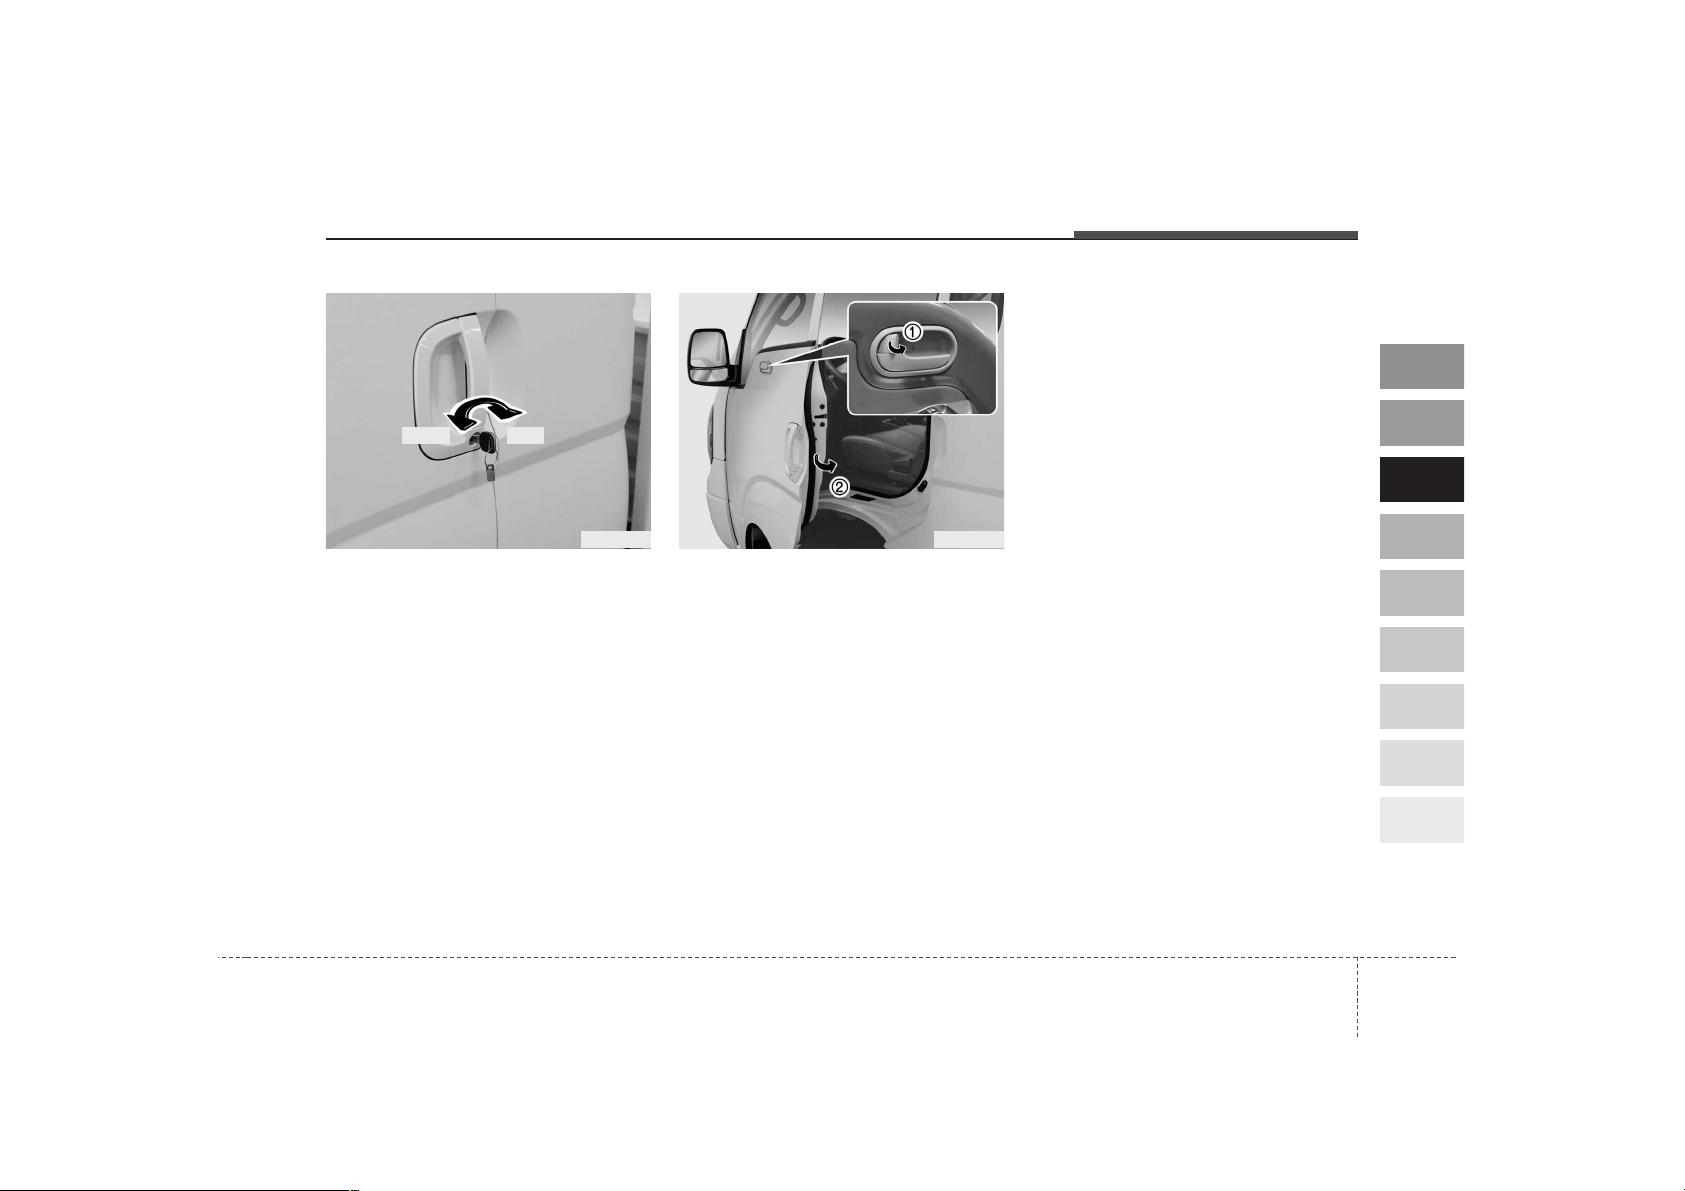
Operating door locks from
outside the vehicle
• Turn the key toward rear of vehicle
to lock and toward front of vehicle
to unlock.
• Once the doors are unlocked, it
may be opened by pulling the door
handle.
• When closing the door, push the
door by the hand. Make sure that
doors are closed securely.
To lock a door without the key, push
the inside door lock button (
➀
) to the
“Lock” position and close the door
(➁).
✽✽
NOTICE
Always remove the ignition key,
engage the parking brake, close all
windows and lock all doors when
leaving your vehicle unattended.
✽
✽
NOTICE
If the door is locked/unlocked multiple times in rapid succession with
either the vehicle key or door lock
button, the system may stop operating temporarily in order to protect
the circuit and prevent damage to
system components.
DOOR LOCKS
1PUA2004
Lock
Unlock
1PUA2005
Knowing your vehicle
43
1
2
3
4
5
6
7
8
9
CAUTION
• The doors should always be
fully closed and locked while
the vehicle is in motion to prevent accidental opening of the
door. Locked doors will also
discourage potential intruders
when the vehicle stops or
slows.
• Be careful when opening
doors and watch for vehicles,
motorcycles, bicycles or
pedestrians approaching the
vehicle in the path of the door.
Opening a door when something is approaching can
cause damage or injury.
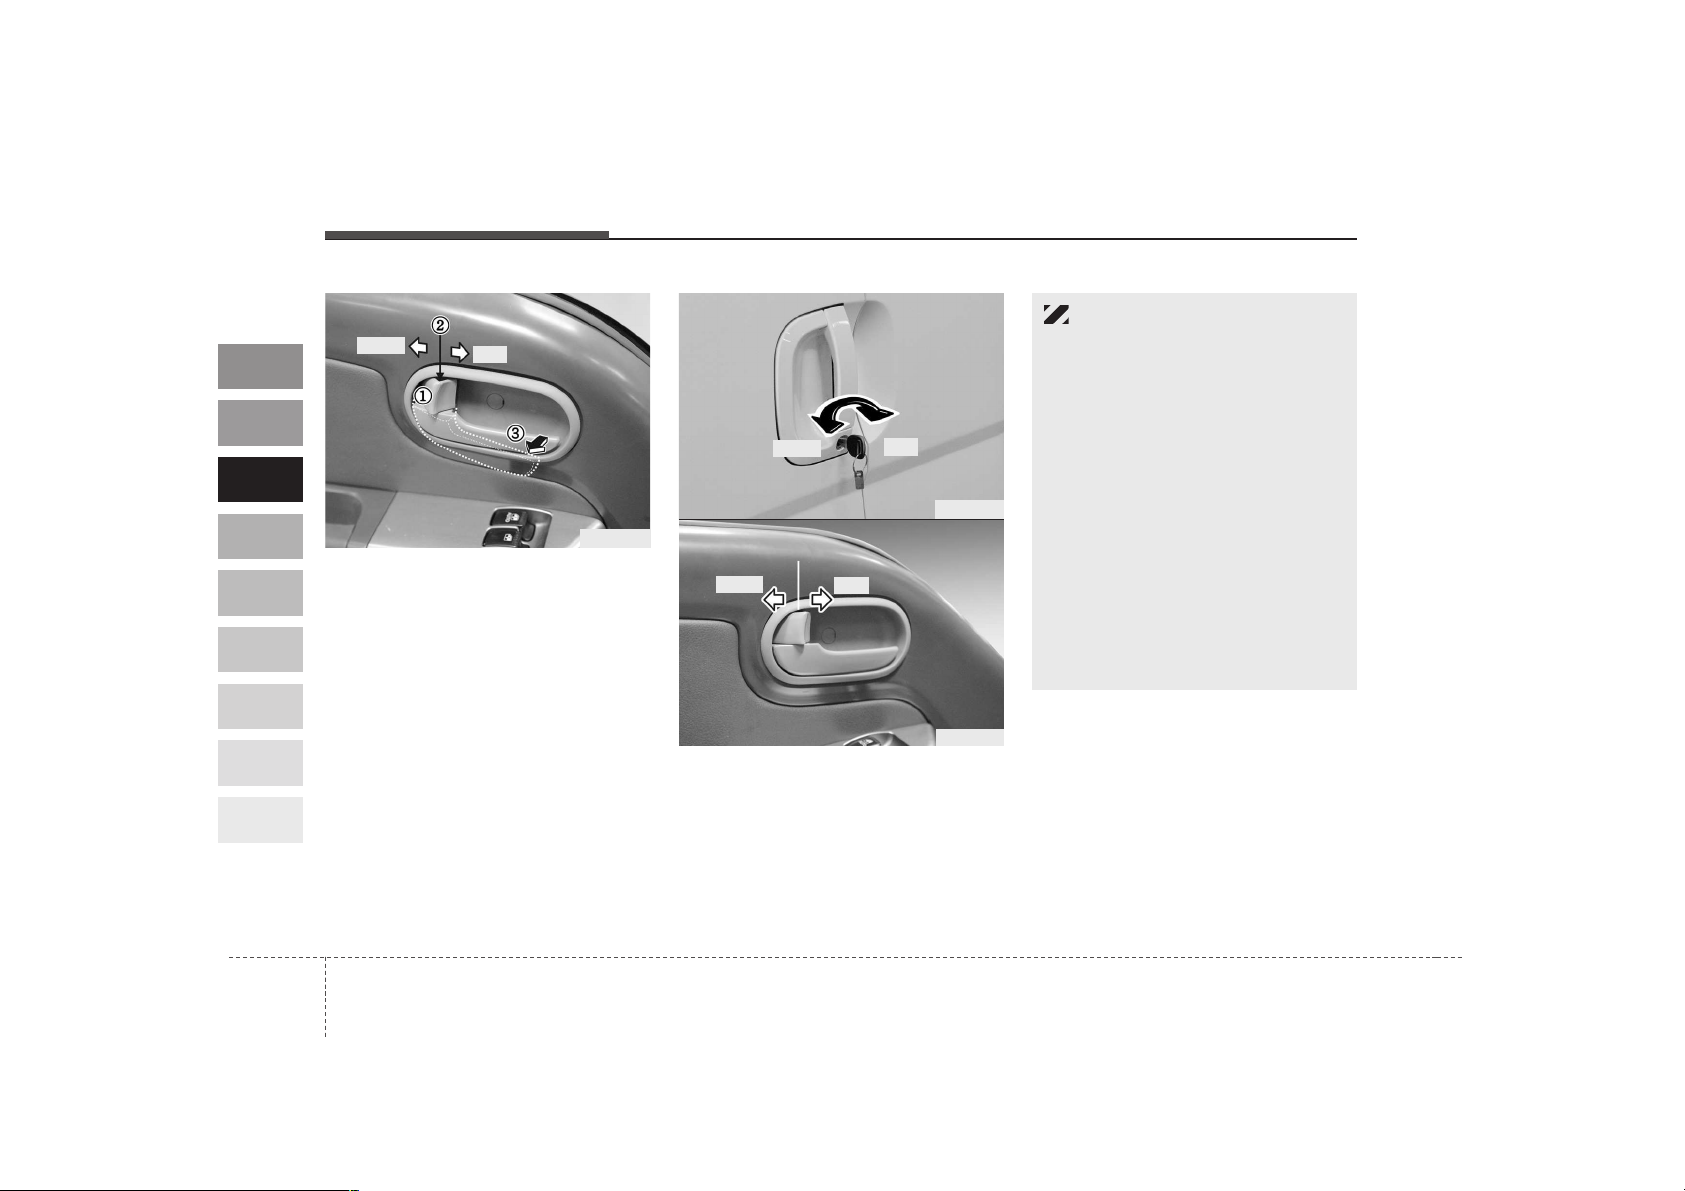
Operating door locks from
inside the vehicle
• To unlock a door, push the door
lock button to the “Unlock” position.
• To lock a door, push the door lock
button (
➀
) to the “Lock” position. If
the door is locked, red part (➁) of
the knob becomes invisible.
• To open a door, pull the door handle (
➂
).
Central door lock system
(if equipped)
If you lock/unlock the driver’s door
with a key or door lock button, front
doors will lock/unlock automatically.
1PUA2006
Lock
Unlock
1PUA2007
1PUA2004
Lock
Unlock
Lock
Unlock
35
1
2
3
4
5
6
7
8
9
Knowing your vehicle
WARNING
Leaving your vehicle unlocked
can invite theft or possible harm
to you or others from someone
hiding in your vehicle while you
are gone. Always remove the
ignition key, engage the parking
brake, close all windows and
lock all doors when leaving your
vehicle unattended.
WARNING - Unattended
children
An enclosed vehicle can
become extremely hot, causing
death or severe injury to unattended children or animals who
cannot escape the vehicle.
Furthermore, children might
operate features of the vehicle
that could injure them, or they
could encounter other harm,
possibly from someone gaining
entry to the vehicle. Never leave
children or animals unattended
in your vehicle.

Knowing your vehicle
63
1
2
3
4
5
6
7
8
9
CAUTION
• Make sure heads and hands
are safely out of the way
before closing a window.
• Do not allow children to play
with the power windows.
Serious injury can result from
unintentional window operation by the child.
• Do not extend face or arms
outside through the window
opening while driving.
• Always double check to make
sure all arms, hands and other
obstructions are safely out of
the way before closing a window.
Manual windows (if equipped)
Use the window crank to open and
close each window.
✽✽
NOTICE
If you notice buffeting and pulsation
(wind shock) with either side window open, you should open the
opposite window slightly to reduce
the condition.
Power windows (if equipped)
The ignition switch must be in the ON
position for power windows to operate. Front doors have a power window switch that controls that door’s
window.
✽✽
NOTICE
To prevent the power window system from the possibility of damage,
do not open or close two windows at
the same time. This will also ensure
the longevity of the fuse.
WINDOWS
3FDA2015
Close
Open
37
1
2
3
4
5
6
7
8
9
Knowing your vehicle
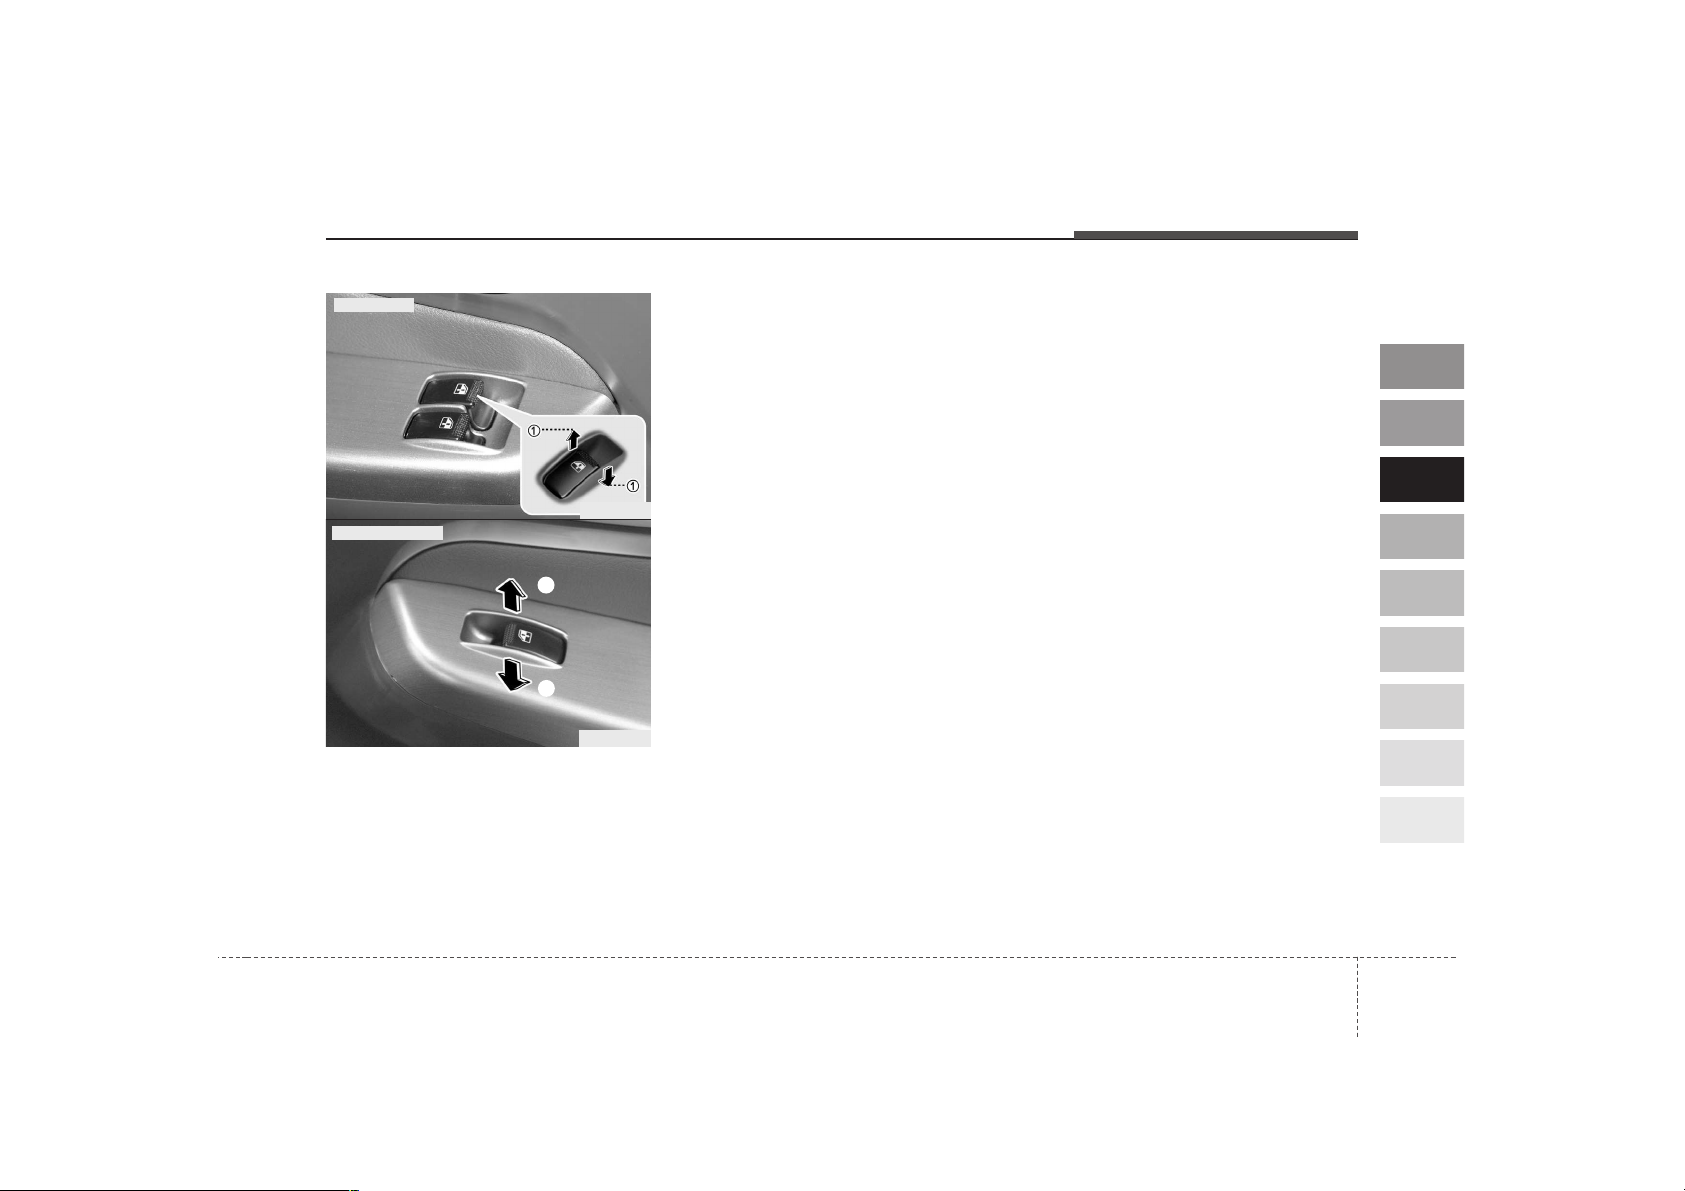
Window opening and closing
The driver’s door has a master power
window switch that controls the front
windows in the vehicle. To open or
close a window, press down (➀) or
pull up (➀) the front portion of the
corresponding switch.
Power window timer (if equipped)
The power windows can be operated
for approximately 30 seconds after
the ignition key is removed or turned
to the ACC or LOCK position.
However, if the front doors are
opened, the power windows cannot
be operated even within the 30 seconds after the ignition key removal.
1PUA2010
1PUB2003
Driver’s door
Passenger’s door
➀
➀
Knowing your vehicle
83
1
2
3
4
5
6
7
8
9
Front seat adjustment
Adjust the seat before driving, and
make sure the seat is locked securely by trying to move forward and
backward without using the control
lever. If the seat moves, it is not
locked properly.
SEAT
WARNING
• Loose objects in the driver’s
foot area could interfere with
the operation of the foot pedals, possibly causing an accident. Loose objects might
interfere with the seat slide
mechanism. Do not place anything under the front seats.
• Children should never be left
unattended in the car.
WARNING - Driver’s seat
• Never attempt to adjust seat
while the vehicle is moving.
This could result in loss of
control, and an accident causing death, serious injury, or
property damage.
• Do not allow anything to interfere with the normal position
of the seatback. Storing items
against a seatback or in any
other way interfering with
proper locking of a seatback
could result in serious or fatal
injury in a sudden stop or collision.
• Always drive and ride with
your seatback upright and the
lap portion of the safety belt,
or lap belt, snug and low
across the hips. This position
puts your safety belts in the
best position to protect you in
case of an accident.
39
1
2
3
4
5
6
7
8
9
Knowing your vehicle
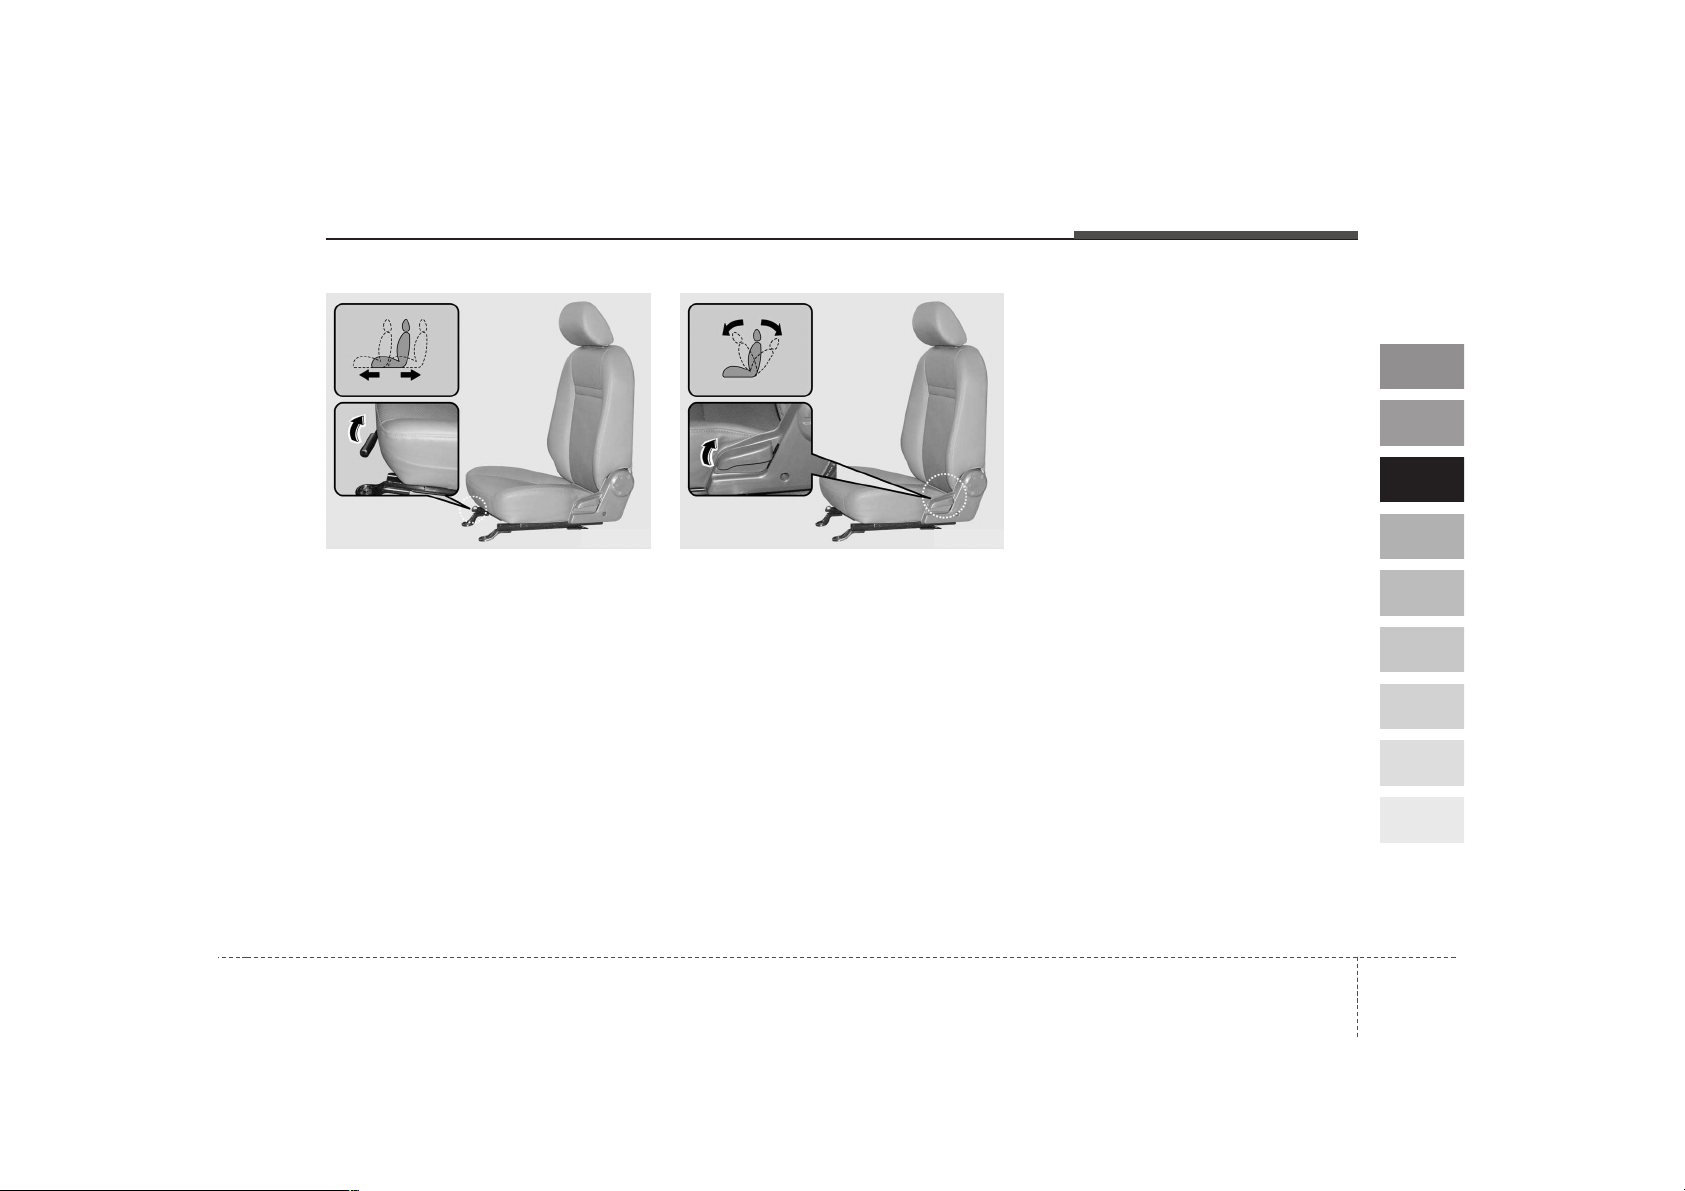
Adjusting the seat forward and
backward (driver’s seat)
To move the seat forward or backward:
1. Pull the seat slide adjustment
lever under the front edge of the
seat cushion up and hold it.
2. Slide the seat to the position you
desire.
3. Release the lever and make sure
the seat is locked in place.
Adjusting the seatback recliner
(if equipped)
To recline the seatback:
1. Lean forward slightly and lift up on
the seatback recline lever located
on the outside of the seat, at the
rear.
2. Carefully lean back on the seat
and adjust the seatback to the
position you desire.
3. Release the lever and make sure
the seatback is locked in place.
(The lever MUST return to its original position for the seatback to
lock.)
1PUA20211PUA2020
Knowing your vehicle
103
1
2
3
4
5
6
7
8
9
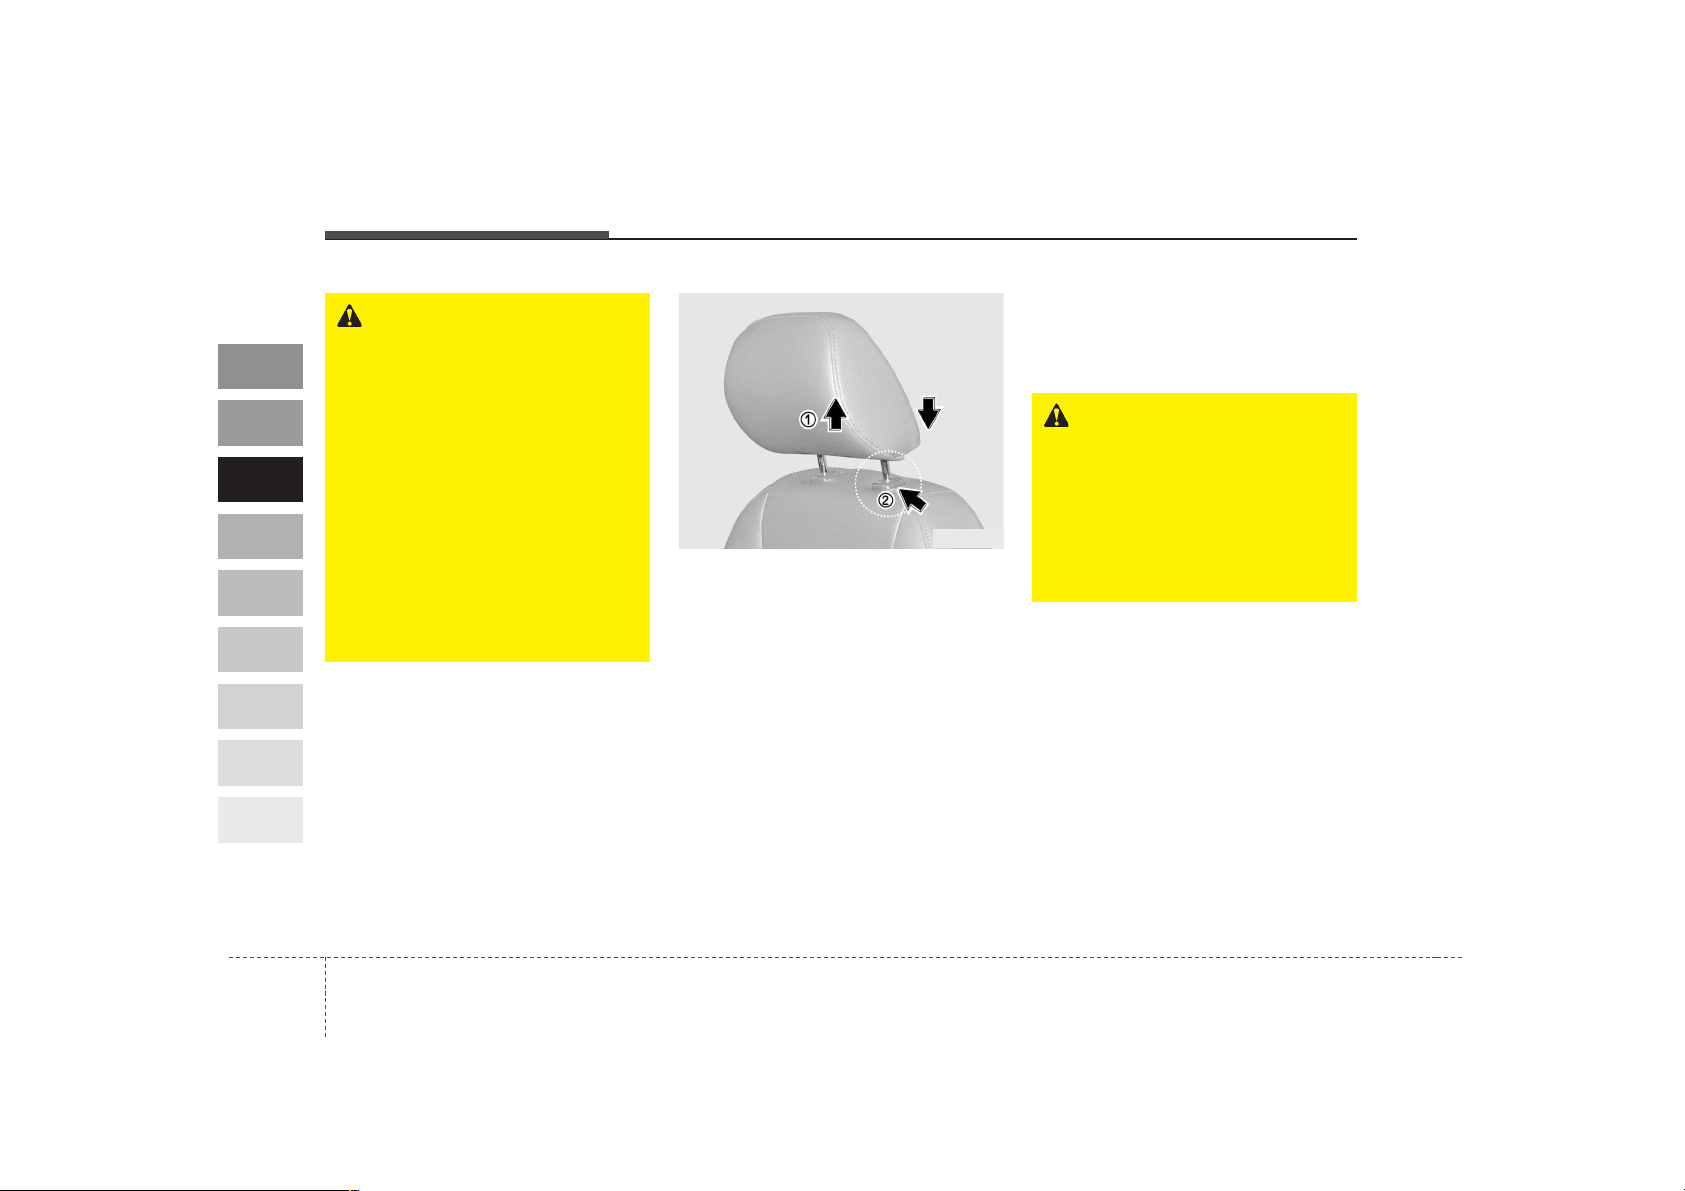
Headrest adjustment
Adjusting the height up and down
The headrest not only provides comfort for the driver and passengers,
but also helps to protect the head
and neck in the event of a collision.
To raise the headrest, pull it up to the
desired position. To lower the headrest, push and hold the release button on the headrest support and
lower the headrest to the desired
position. For best protection, adjust
the headrest so its center is as high
as your ears.
Removal
To remove the headrest, raise it as
far as it can go then press the
release button while pulling upward.
1PUA2023
WARNING
Driving or riding in a vehicle
with a front seatback reclined
could lead to serious or fatal
injury in an accident. If a front
seat is reclined during an accident, the occupant’s hips may
slide under the lap portion of
the safety belt applying great
force to the unprotected
abdomen or neck. Serious or
fatal internal injuries could
result. Keep the seatbacks in a
comfortably upright position
whenever the vehicle is in
motion.
WARNING
To reduce the risk of head and
neck injuries, do not drive the
vehicle with the headrest
removed or improperly positioned.
Do not adjust the driver’s headrest while driving.

311
1
2
3
4
5
6
7
8
9
Knowing your vehicle
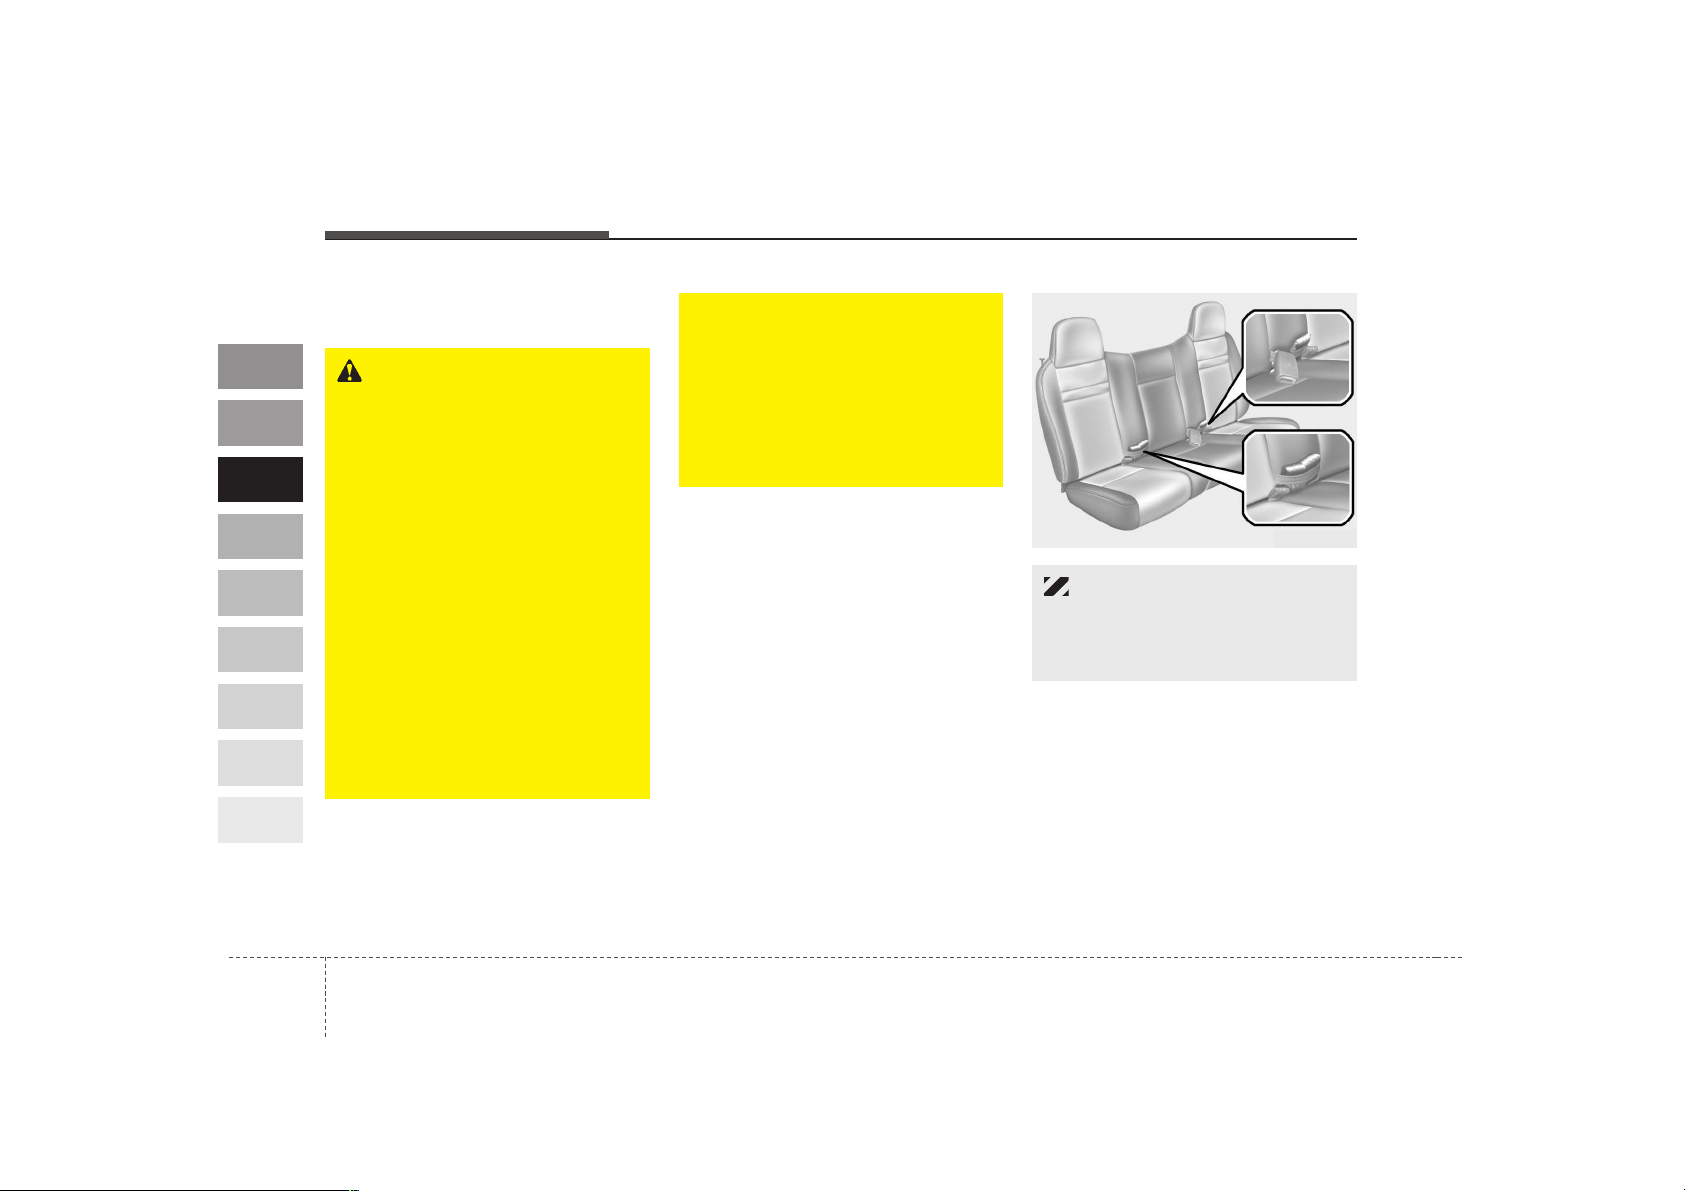
Center seat
To use it by console box, push down
the release lever beside the seat and
fold the seatback forward.
To use it by seat, push down the
release lever beside the seat and
stand the seatback upright.
1PUA2026 1PUA2025
CAUTION
When you fold the center seatback, put the center safety belt
into the parking brake lever
cover. Doing so can prevent the
safety belt from being damaged
by the center seatback.
Knowing your vehicle
123
1
2
3
4
5
6
7
8
9
Rear seat adjustment
(for DOUBLE CAB model)
WARNING - Rear
seatback
• The rear seatback must be
securely latched. If not, passengers and objects could be
thrown forward and suffer
serious injury or death in the
event of a sudden stop or collision.
• Passengers should not ride in
the cargo area or sit or recline
on folded seatbacks while the
vehicle is in motion.
• When resetting the seatback
to the upright position, make
sure it is securely latched by
pushing it forward and rearward.
(Continued)
(Continued)
• Objects carried on the foldeddown seatback should not
extend higher than the top of
the front seats. This could
allow cargo to slide forward
and cause injury or damage
during sudden stops.
B110A01HR
CAUTION
Before folding the seatback,
place the rear seat safety belt in
the band on the seatback.

313
1
2
3
4
5
6
7
8
9
Knowing your vehicle
Folding the rear seatback
The rear seatback folds forward to
provide additional cargo space.
To unlock the seatback, pull up the
seatback locking knobs on both
sides and fold forward the seatback.
To return the seatback to its upright
position, pull up the seatback until it
locks into position.
Rear seat cushion under box
There is multipurpose receipt space
under the rear seat cushion.
1. Unsnap the clasps at the front of
the seat cushion.
2. Raise up the seat cushion at the
rear of the seat cushion.
HHR2050 HHR2051
B110B01HR
HHR2052

Knowing your vehicle
143
1
2
3
4
5
6
7
8
9
Engine room access
Driver’s seat
To access the engine room behind
the driver’s seat,
1. Slide the seat forward as far as it
can go.
2. Fold the seatback forward.
3. Remove the mat behind the front
seats.
4. Remove the bolts on the cover and
remove the cover.
Front passenger’s seat
To access the engine room under the
front passenger’s seat,
1. Fold the passenger’s seatback
and center seatback.
2. Unsnap the clasps (
➀
) at the front
of the seat cushion.
1PUB2004 1CTA2046
WARNING
When you return the seat cushion to its original position, make
sure the safety belts are in position to be accessible and to
function properly.

315
1
2
3
4
5
6
7
8
9
Knowing your vehicle
3. Insert the free end of the support
rod into the slot.
WARNING
Do not leave gloves, rags or any
other combustible material in
the engine compartment. Doing
so may cause a heat-induced
fire.
WARNING - 2.5L Engine
Never work on injection system
with engine running or within 30
seconds after shutting off
engine. High-pressure pump,
rail, injectors and high-pressure
pipes are subject to high pressure even after the engine
stopped. The fuel jet produced
by fuel leaks may cause serious
injury, if it touches the body.
People using pacemakers
should not move than 30cm
closer to the ECU or wiring harness within the engine room
while engine is running, since
the high currents in the electronic engine control system
produce considerable magnetic
fields.
1PUA2027
Knowing your vehicle
163
1
2
3
4
5
6
7
8
9
Safety belt restraint system
We strongly recommend that the
driver and all passengers be properly restrained at all times by using the
safety belts provided with the vehicle. Proper use of the safety belts
decreases the risk of severe injury or
death in accidents or sudden stops.
Front seats have lap/shoulder belts.
Inertial locks in the safety belt retractors allow all of the lap/shoulder safety belts to remain unlocked during
normal vehicle operation. This allows
the occupants some freedom of
movement and increased comfort
while using the safety belts. If a force
is applied to the vehicle, such as a
strong stop, a sharp turn, or a collision, the safety belt retractors will
automatically lock the safety belts.
Since the inertial locks do not require
a collision in order to lock up, you
may become aware of the safety
belts locking while braking or going
around sharp corners.
SAFETY BELTS
WARNING - Safety belts
To minimize the risk of serious
or fatal injury in an accident, the
driver and all passengers
should use the appropriate
safety restraints for their age
and size.
317
1
2
3
4
5
6
7
8
9
Knowing your vehicle
Safety belts provide the best restraint
when:
• The seatback is upright.
• The occupant is sitting upright (not
slouched).
• The lap belt is snug across the hips.
• The shoulder belt is snug across
the chest.
• The knees are straight forward.
To help you remember to fasten your
safety belt, a warning light will come
on. See Safety Belt Warning Light on
page 3-19.
WARNING - After a colli-
sion
• Lap/shoulder belt assemblies
may be stretched or damaged
when subjected to the stress
and forces of a collision.
• The entire restraint system
should be inspected following
any collision. All belts, retractors, anchors and hardware
damaged by a collision should
be replaced before the vehicle
is operated again.
WARNING - Cargo area
Passengers should never be
allowed to ride in the cargo area
of a vehicle. No safety belts are
provided for the cargo area.
Persons riding in the vehicle
without a fastened safety belt
are much more likely to suffer
serious bodily injury or death
during an accident.
WARNING - Twisted belts
A twisted or jammed safety belt
cannot restrain you properly. If
you cannot untwist or unjam the
safety belt, have an authorized
Kia dealer correct it immediately. Never drive or ride with a
twisted or jammed safety belt.

Knowing your vehicle
183
1
2
3
4
5
6
7
8
9
WARNING - Safety belt
care
• A damaged belt may not give
you the protection you need in
an accident.
• Inspect your safety belts periodically for excessive wear or
damage. Pull out each belt
fully and look for fraying, cuts,
burns or other damage. Pull
the safety belt out and let it
retract a number of times.
Make sure that the lap/shoulder belts return smoothly and
easily into the retractor.
• Check the latches to make
sure they latch and release
without interference or delay.
• Never close the doors on any
part of the lap or shoulder
belt.
• Any belt not in good condition
or in good working order
should be promptly replaced.
WARNING - Belt use
Safety belts must be used correctly to work properly in an
accident. Each seating position
in your vehicle has a specific
safety belt assembly that
includes a buckle and tongue
designed to be used together.
For greatest effectiveness, follow these guidelines in using
safety belts:
• Use the shoulder portion of
the safety belt on the outside
shoulder only. Never wear the
shoulder portion under the
arm.
• Never swing the safety belt
around your neck to fit over
the inside shoulder.
• Never wear the shoulder portion of the safety belt across
the neck or face.
(Continued)
(Continued)
• Wear the lap portion as low as
possible. Be sure that the lap
belt fits snugly around the
hips. Never wear a lap portion
of a lap/shoulder belt over
your waist; it should always
go over the stronger area of
your hips.
• Never use a single safety belt
for more than one person.
• The front seatbacks should
always remain in a comfortable, upright position when
the vehicle is moving.
319
1
2
3
4
5
6
7
8
9
Knowing your vehicle
Safety belt warning light
As a reminder to the driver and passenger, safety belt warning light will
blink for approximately 6 seconds
each time you turn the ignition switch
ON.
1GQA2083
CAUTION
Never close the doors on any
part of the lap or shoulder belt.
It can damage the safety belt or
buckle which could increase the
risk of injury in case of an accident.
CAUTION
When you fold the center seatback, put the center safety belt
into the parking brake lever
cover. Doing so can prevent the
safety belt from being damaged
by the center seatback.
1PUA2025
Knowing your vehicle
203
1
2
3
4
5
6
7
8
9
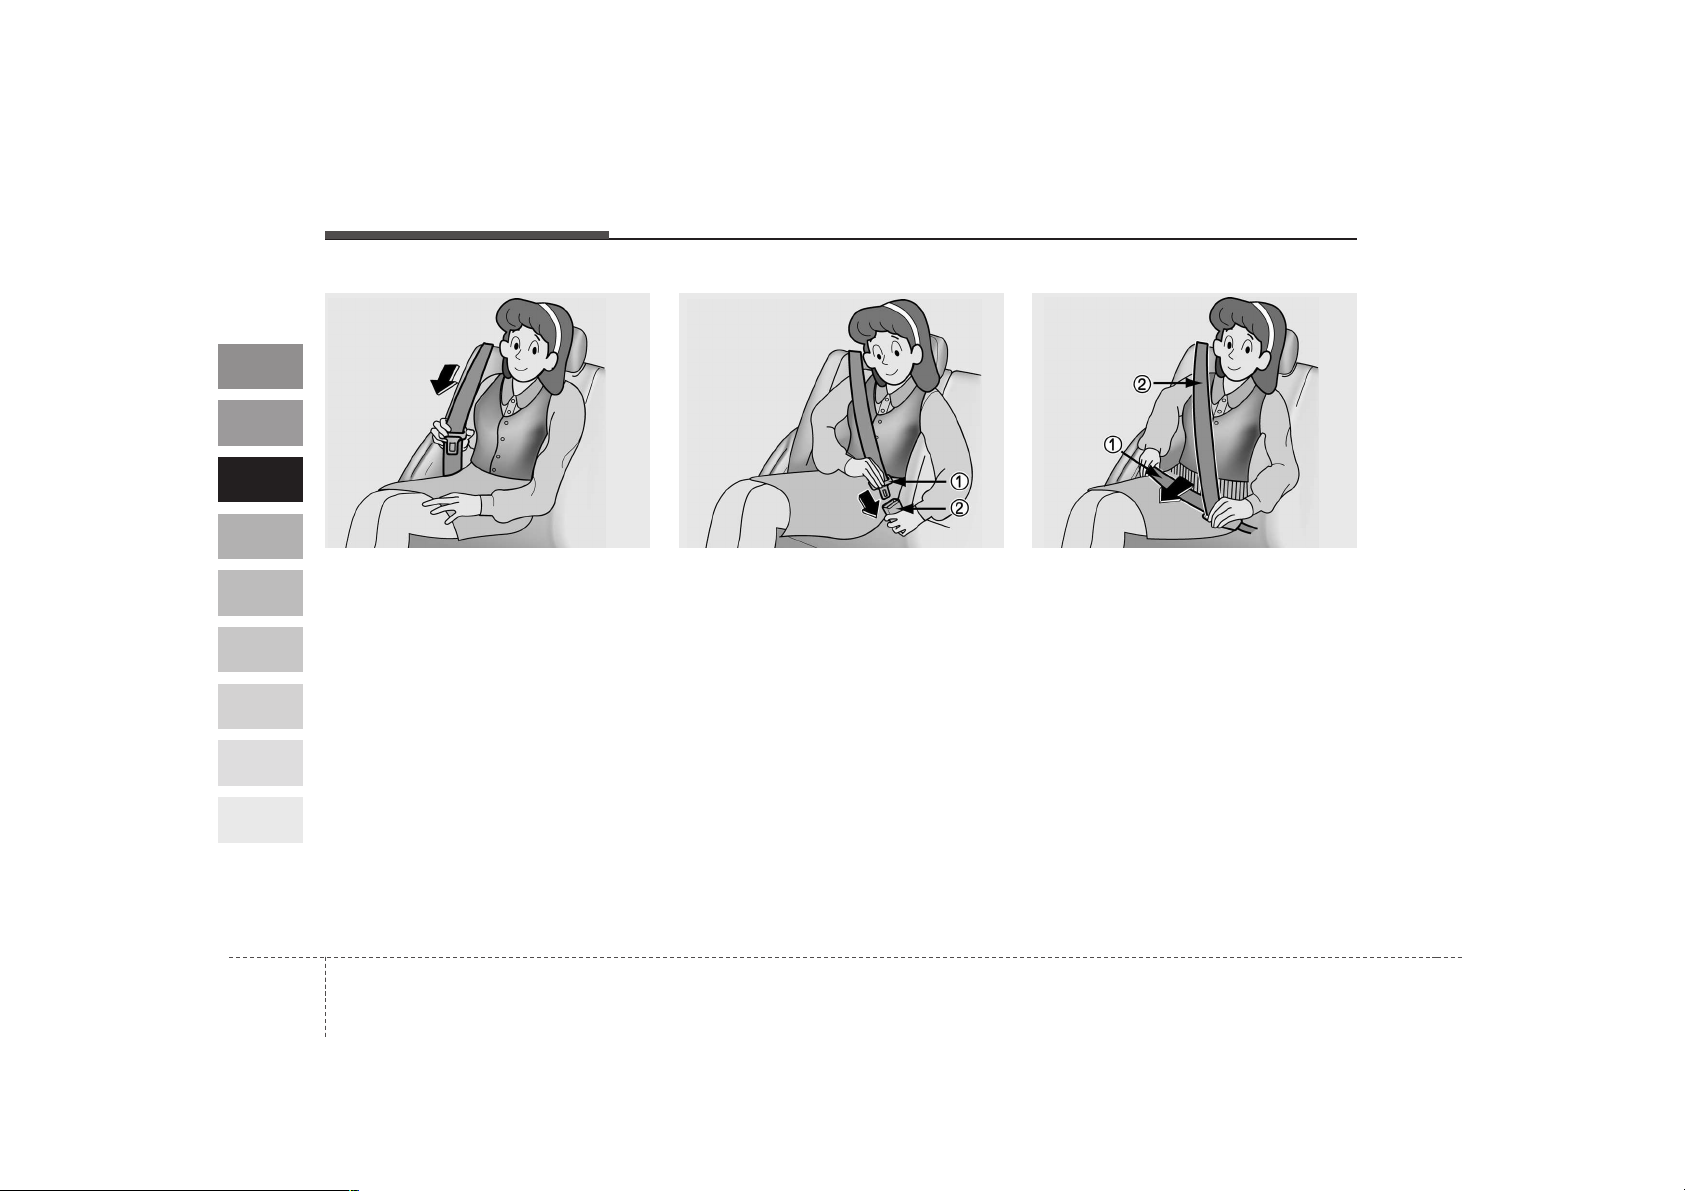
Lap/shoulder belt
To fasten the front lap/shoulder
belt:
1. Grasp the buckle and tongue
plate.
2. Slowly pull the lap/shoulder belt
out from the retractor.
3. Insert the tongue plate (➀) into the
open end of the buckle (➁) until an
audible “click” is heard, indicating
the belt is locked in the buckle.
4. Position the lap portion (➀) of the
belt across your lap as LOW ON
THE HIPS as possible to reduce
the risk of sliding under it during
an accident. Adjust the belt to a
SNUG FIT by pulling up on the
shoulder portion (➁) of the safety
belt. The belt retractor is designed
to take up excess webbing automatically and to maintain tension
on the belt. For your safety, do not
put any excess slack into the safety belt at any location.
1GHA2263 1GHA22641GHA2262
321
1
2
3
4
5
6
7
8
9
Knowing your vehicle
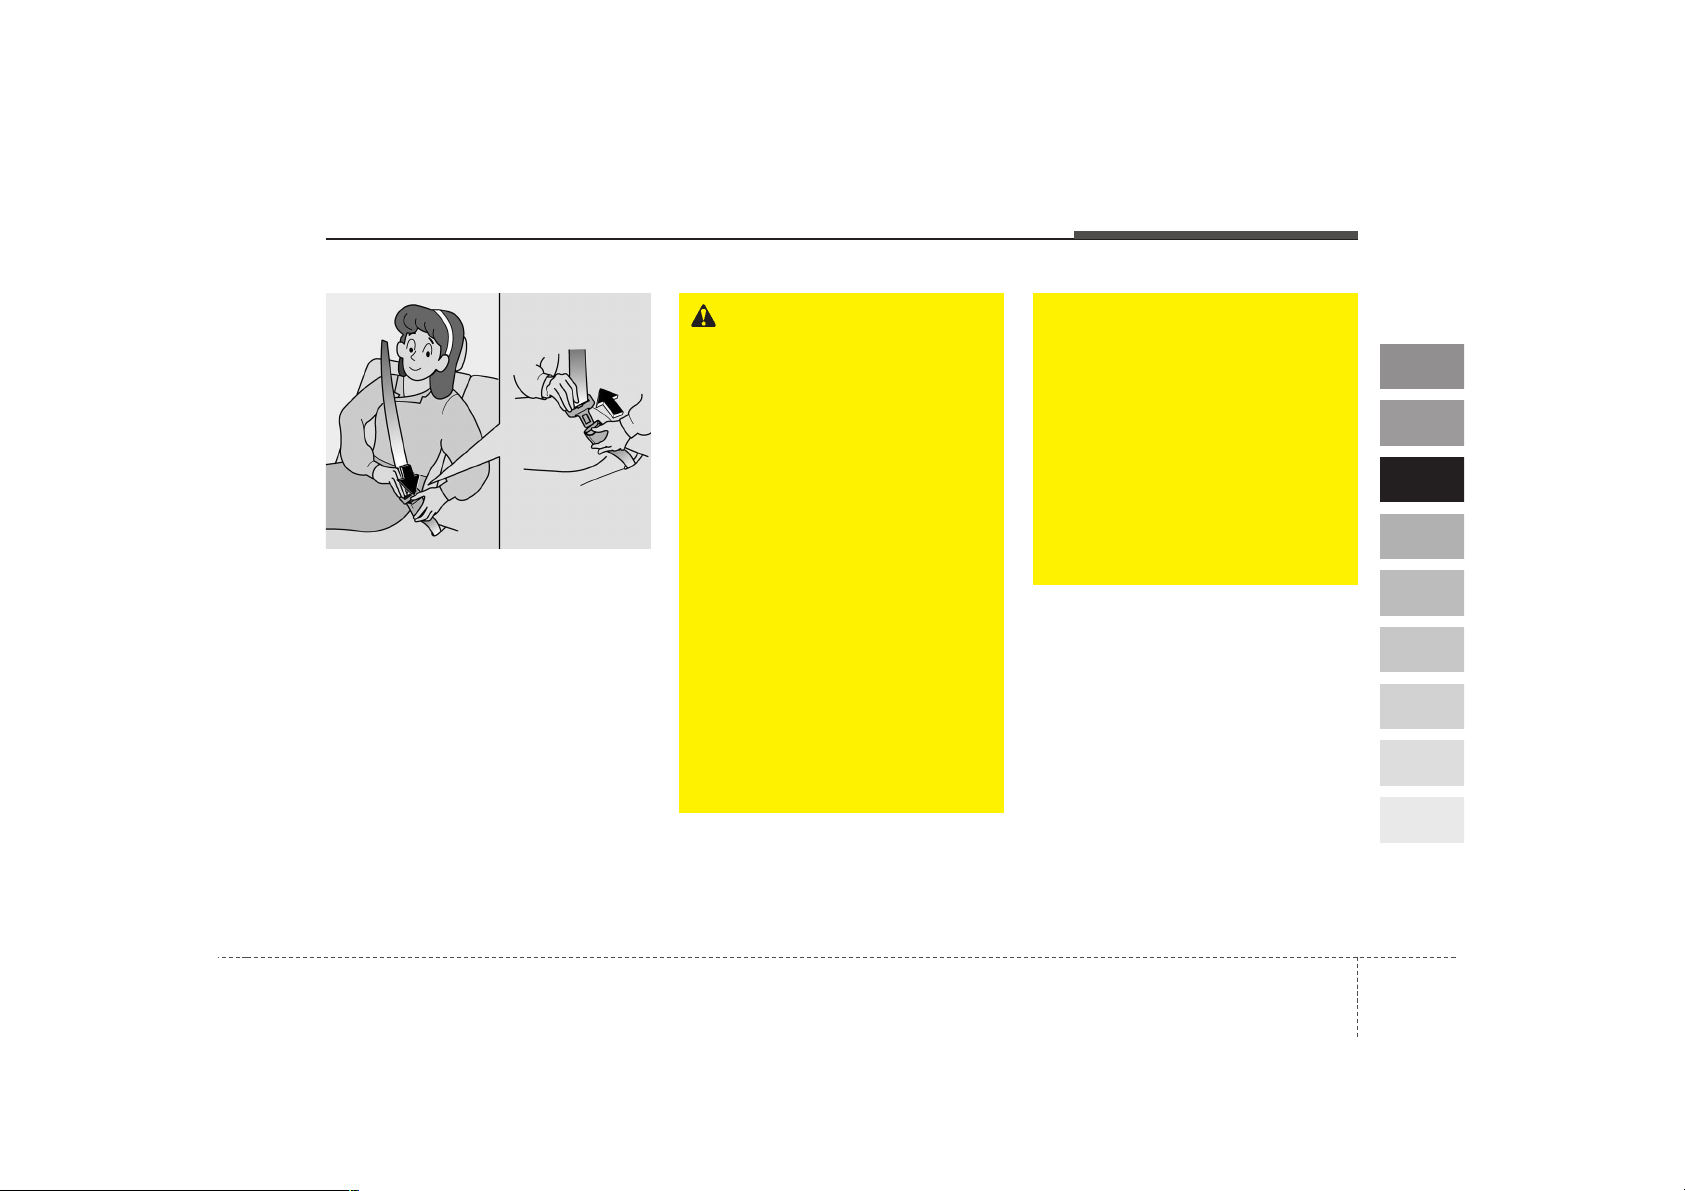
To unfasten the front lap/shoulder
belt:
Press the release button on the
buckle and allow the belt to slowly
retract.
1GHA2263A
WARNING
• The seatbacks should always
remain in a comfortable,
upright position while the
vehicle is in motion. The safety belt system will provide the
most protection with the seatbacks in an upright position.
• Never wear the shoulder portion of the safety belt under
the outside arm or behind the
back.
• Never wear the shoulder portion of the safety belt across
the neck or face.
• Wear the lap portion of the
safety belt as low on the hips
as possible. Be sure the lap
belt fits snugly around the
hips. Never wear the lap belt
over your waist.
(Continued)
(Continued)
• Never drive or ride with a
twisted or jammed safety belt.
If you cannot untwist or unjam
the safety belt, see the nearest
Kia dealer immediately.
• Never use a single belt to
restrain more than one person
at a time.
Failure to follow these warnings
will increase the risk and severity of injury in an accident.

Knowing your vehicle
223
1
2
3
4
5
6
7
8
9
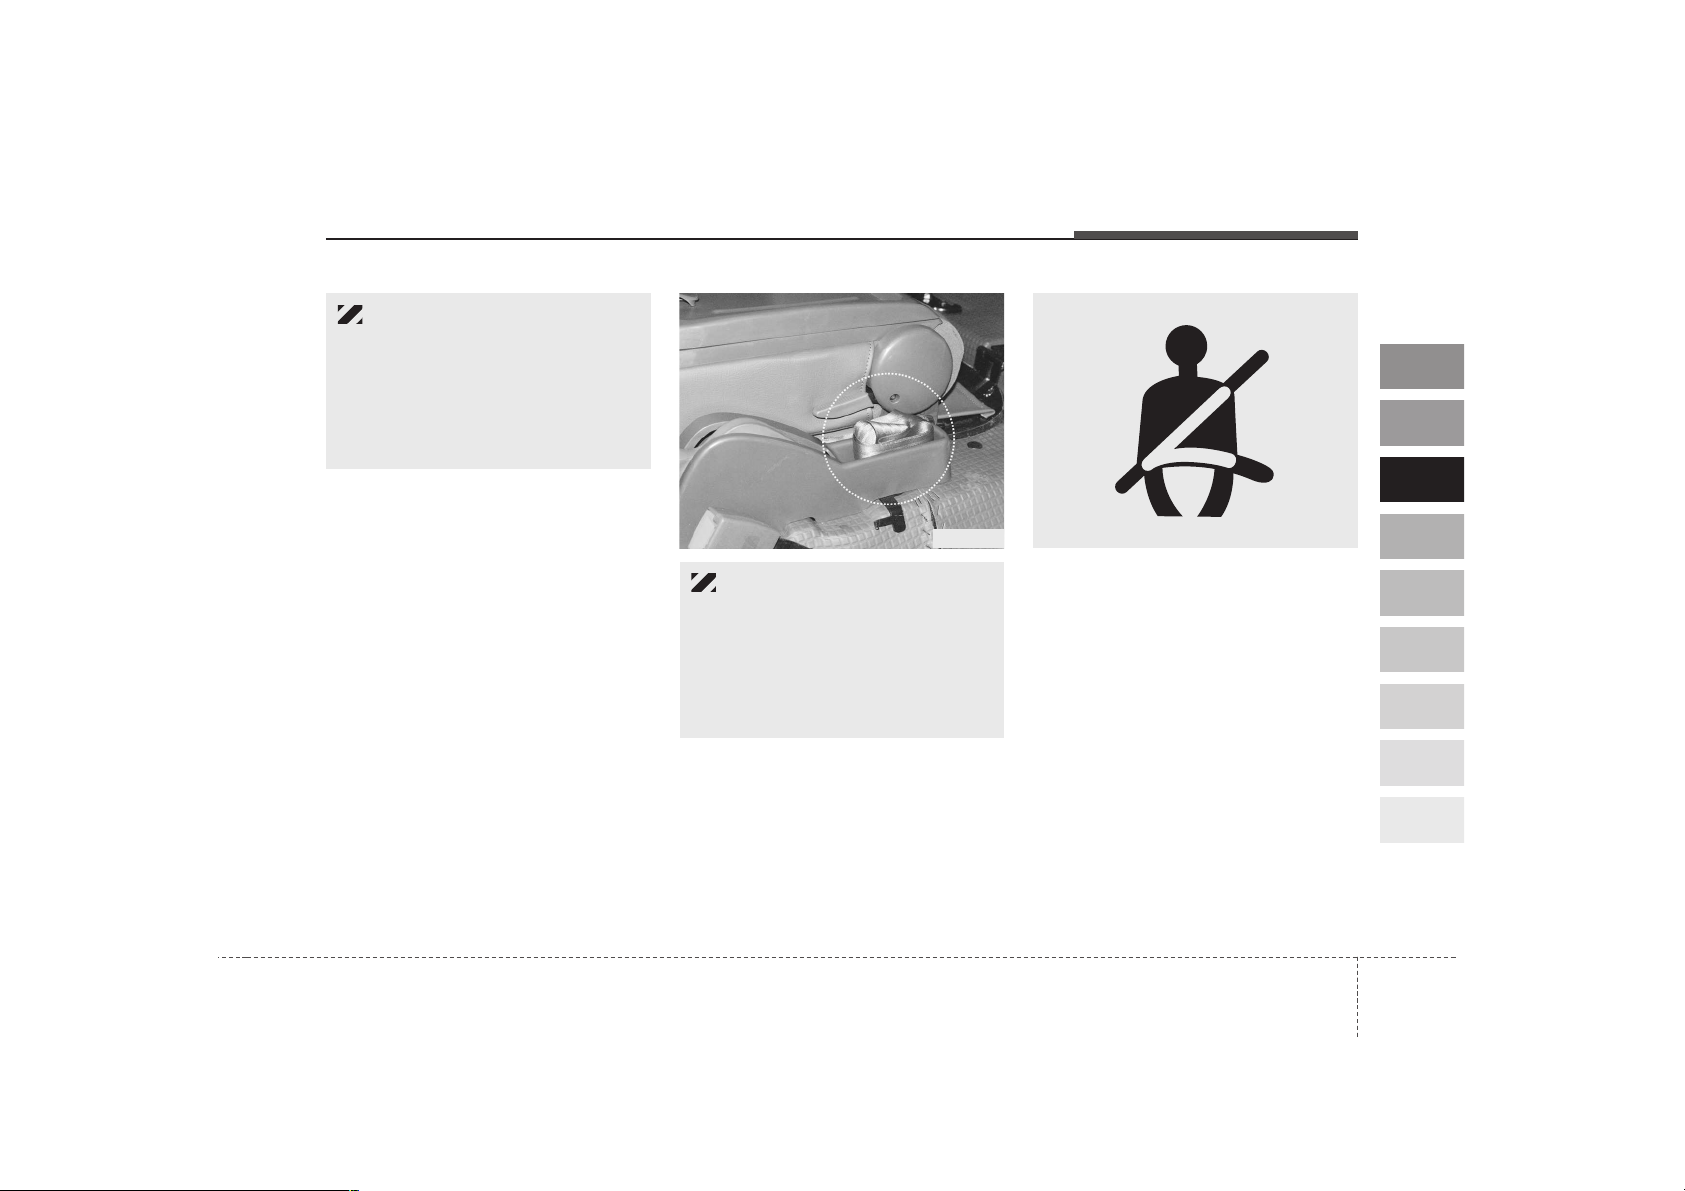
Rear seat safety belt
(for DOUBLE CAB model)
Lap belt (if equipped)
To fasten the lap belt:
1. Grasp the tongue plate end and
pull it low over the abdomen.
2. Insert the tongue plate (➀) into the
open end of the buckle (➁) until an
audible “click” is heard, indicating
the latch is locked. Make sure the
belt is not twisted.
1GHA2265
Lengthen
1CTA2048
➀
➁
1PUA2090
WARNING
When you do not fasten the
safety belts on the outsides of
the rear seats, keep the buckle
in an upright position towards
the back of the seat to maintain
it safely.
Doing so can prevent the buckle
from being damaged causing
serious or fatal injuries in an
accident.

323
1
2
3
4
5
6
7
8
9
Knowing your vehicle
3. Grasp the free portion of the belt
webbing and pull until the belt is
snug over the hips and lower
abdomen. If it becomes necessary
to lengthen or shorten the belt,
hold the latch plate tongue at right
angles to the webbing and pull.
4. Make sure that the belt is placed
as LOW ON THE HIPS as possible.
To unfasten the lap belt:
Press the release button (➀) on
buckle.
1CTA2049 1CTA2050
Adjust to a snug fit
Keep as low on hip
bone as possible
Too high
1CTA2051
WARNING - Lap belt
Be sure the lap belt is positioned snugly around the hips,
and not on the waist. Failure to
position the lap belt snugly
around the hips will increase
the chance and severity of
injury in the event of a collision.
➀

Proper use and care of the
safety belt system
To ensure that the safety belts provide the maximum protection, please
follow these instructions:
• Use the belts at all times - even on
short trips.
• If the safety belt is twisted,
straighten it prior to use.
• Keep sharp edges and damaging
objects away from the belts.
• Periodically inspect belt webbing,
anchors, buckles and all other
parts for signs of wear and damage. Replace damaged, excessively worn or questionable parts
immediately.
• To clean the belt webbing, use a
mild soap solution recommended
for cleaning upholstery or carpets.
Follow the instructions provided
with the soap.
• Do not make modifications or additions to the safety belt.
• After wearing a safety belt, make
sure it fully retracts to the stowed
position. Do not allow the belt to
get caught in the door when you
close it.
Restraint of pregnant women
Pregnant women should wear
lap/shoulder belt assemblies whenever possible according to specific
recommendations by their doctors.
The lap portion of the belt should be
worn AS SNUGLY AND LOW AS
POSSIBLE.
Knowing your vehicle
243
1
2
3
4
5
6
7
8
9
WARNING - Pregnant
women
Pregnant women must never
place the lap portion of the safety belt over the area of the
abdomen where the fetus is
located or above the abdomen
where the belt could crush the
fetus during an impact.
WARNING
Do not bleach or dye the webbing because this may weaken
the webbing fibers and allow
them to fail when loaded in a
collision.

325
1
2
3
4
5
6
7
8
9
Knowing your vehicle
Restraint of infants and small
children
To increase their safety, infants and
young children should always be
restrained by a restraint system
approved for their age and size.
Never allow a child to stand or kneel
on the seat of a moving vehicle.
Never allow a safety belt to be placed
around both a child and an adult or
around two children at the same
time.
It is best for children to be seated in
the rear seat.
Many companies manufacture child
restraint systems (often called child
seats) for infants and small children.
An acceptable child restraint system
must always satisfy the Safety
Standards of your country. Make
sure that any child-restraint system
you use in your vehicle is labelled as
complying with those safety standards.
The child-restraint system should be
chosen to fit both the size of the child
and the size of the vehicle seat. Be
sure to follow any instructions provided by the child-restraint system manufacturer when installing the childrestraint system.
WARNING - Children on
laps
Never hold a child on your lap or
in your arms in a moving vehicle.
Even a very strong person cannot hold onto a child in the
event of even a minor collision.
CAUTION - Hot metal
parts
Safety belts and seats can
become hot in a vehicle that has
been closed during warm/hot
weather; they could burn a
child. Check seat covers and
buckles before you place a child
anywhere near them.

Knowing your vehicle
263
1
2
3
4
5
6
7
8
9
Restraint of larger children
As children grow, they may need to
use new child-restraint systems,
including larger child seats or booster seats, which are appropriate for
their increased size.
A child who has outgrown available
child-restraint systems should use
the belts provided in the vehicle.
When seated in the rear outboard
seats, the child should be restrained
by the lap/shoulder belt.
If the shoulder belt portion slightly
touches the child’s neck or face, try
placing the child closer to the center
of the vehicle. If the shoulder belt still
touches their face or neck they may
need to be returned to a child
restraint system. In addition, aftermarket devices are available from
independent manufacturers which
help pull the shoulder belt down and
away from the child’s face or neck.
Installation on the rear seats
WARNING - Shoulder
belts on small children
• Never allow a shoulder belt to
be in contact with a child’s
neck or face while the vehicle
is in motion.
• If safety belts are not properly
worn and adjusted, there is a
risk of death or serious injury
to such a child.
WARNING
• Before installing the child
restraint system, read the
instructions supplied by the
child restraint system manufacturer.
• Failure to observe this manual
instructions regarding child
restraint system and the
instructions provided with the
child restraint system could
increase the chance and/or
severity of injury in an accident.
• If the child restraint seat is not
anchored properly, the risk of
a child being seriously injured
or killed in a collision greatly
increases.

327
1
2
3
4
5
6
7
8
9
Knowing your vehicle
Installing a child restraint system by
lap/shoulder belt (on the outboard
rear seat)
To install a child restraint system on
the outboard rear seat, do the following:
1. Place the child restraint system in
the desired position.
2. Extend the shoulder/lap belt from
its retractor.
3. Route the lap/shoulder belt
through the restraint according to
the seat manufacturer’s instructions.
4. Buckle the seat belt and allow the
seat belt to take up any slack. After
installation of the child restraint
system, try to move it in all directions to be sure the child restraint
system is securely installed.
E2MS103005 MMSA3030E2BLD310

Knowing your vehicle
283
1
2
3
4
5
6
7
8
9
If you need to tighten the belt, pull
more webbing toward the retractor.
When you unbuckle the seat belt and
allow it to retract, the retractor will
automatically revert back to its normal seated passenger emergency
locking usage condition.
Installing a child restraint system by
lap belt (on the center rear seat)
(if equipped-Except Europe)
To install a child restraint system on
the center rear seats, do the following:
1. Place the child restraint system on
the center rear seat.
2. Extend the latch plate tongue of
the lap belt.
3. Route the lap belt through the
restraint according to the seat
manufacturer’s instructions.
4. Buckle the seat belt and adjust the
lap belt for a snug hold on the child
restraint by pulling on the loose
end of the belt. After installation of
the child restraint system, try to
move it in all directions to be sure
the child restraint system is
securely installed.
E2BLD347

329
1
2
3
4
5
6
7
8
9
Knowing your vehicle
Child seat restraint suitability for seat position - For Europe
Use child safety seats that have been officially approved and are appropriate
for your children. When using the child safety seats, refer to the following
table.
X : Seat position not suitable for children in this mass group
UF: Suitable for forward-facing "universal" category restraints approved for
use in this mass group
Seating Position
Age group
0 : Up to 10 kg
XXUFX
(0 to 9 months)
0+ : Up to 13 kg
XXUFX
(0 to 2 years)
I : 9 kg to 18 kg
XXUFX
(9 months to 4 years)
II&III : 15 kg to 36 kg
XXUFX
(4 to 12 years)
1st row
passenger
1st row
center
2nd row
outboards
2nd row
center

Knowing your vehicle
303
1
2
3
4
5
6
7
8
9
Opening the hood:
1. Pull the release lever on the lower
left side of the instrument panel to
unlatch the hood. The hood should
pop open slightly.
2. Go to the front of the vehicle, raise
the hood slightly, pull the secondary latch inside of the hood center
and lift the hood.
3. Lift the hood and hold it open with
the support rod by inserting the
free end of the rod into the slot.
HOOD
1PUA2014
1PUA2015 1PUA2016

331
1
2
3
4
5
6
7
8
9
Knowing your vehicle
Closing the hood
1. Before closing the hood, check the
following:
• All filler caps in the under hood
area must be correctly installed.
• Jack must be secured in its
retainer to prevent it from rattling
(for 1Ton only).
2. Secure the support rod in its clip.
3. Lower the hood to about 30 cm
(12 inches) height and then let it
drop to properly lock in place.
Make sure the hood is properly
locked before driving.

Knowing your vehicle
323
1
2
3
4
5
6
7
8
9
Opening the rear gate
1. Lift up the rear gate handle, push
it inside and pull it toward you.
2. Lower the rear gate slowly with it
received on both arms.
Closing the rear gate
Lift the rear gate up and lock the rear
gate handle in place.
Make sure the rear gate is properly
locked before driving.
REAR GATE
1PUB2005 1PUA2019
WARNING
When the rear combination
lamps are hidden, other road
users should be warned by
means of warning triangle or
other devices.
WARNING
• Do not open the rear gate,
while the vehicle is in motion.
• Fasten rope into the rope
hook securely not to loosen
the rope while the vehicle is in
motion.

333
1
2
3
4
5
6
7
8
9
Knowing your vehicle
Opening the side gate
1. With the rear gate opened, pull up
the knob to release the support
bar down.
2. Remove the side gate handle from
the hook after pulling it up.
3. Lower the side gate slowly with it
received on both arms.
Closing the side gate
1. Lift the side gate up and lock the
side gate handle in place.
2. Push the knob down to lock the
side gates.
SIDE GATE
1PUB2006 1PUA2018
WARNING
When locking the side gate handle, be careful not to get your
fingers into the chink in the handle.

Knowing your vehicle
343
1
2
3
4
5
6
7
8
9
WARNING - Refueling
• If pressurized fuel sprays out,
it can cause serious injuries.
Always remove the fuel cap
carefully and slowly. If the cap
is venting fuel or if you hear a
hissing sound, wait until the
condition stops before completely removing the cap.
• Fuel vapor is very hazardous
and can explode. When refueling, always stop the engine.
Never allow sparks or open
flames near the filler neck.
Always put out cigarettes and
other smoking materials
before refueling.
1. Stop the engine.
2. Insert the key and turn the key
counterclockwise (if equipped).
3. To remove the cap, turn the fuel
tank cap counterclockwise.
4. Refuel as needed.
5. To install the cap, turn it clockwise
until it “clicks”. This indicates that
the cap is securely tightened.
✽✽
NOTICE
• Make sure to refuel with diesel
fuel only for the diesel engine vehicles.
• Check to make sure the fuel filler
cap is securely closed after refueling.
• If the fuel filler cap requires
replacement, use only a genuine
Kia cap or the equivalent specified
for your vehicle. An incorrect fuel
filler cap can result in a serious
malfunction of the fuel system or
emission control system. Correct
replacement caps are available at
authorized Kia dealers.
• Do not spill fuel on the exterior
surfaces of the vehicle. Any type of
fuel spilled on painted surfaces
may damage the paint.
FUEL FILLER
1PUA2013

335
1
2
3
4
5
6
7
8
9
Knowing your vehicle
Outside rearview mirror
Be sure to adjust mirror angles
before driving.
Your vehicle is equipped with both
left-hand and right-hand outside
rearview mirrors. The mirror heads
can be folded back to prevent damage during an automatic car wash or
when passing in a narrow street.
✽✽
NOTICE
Do not scrape ice off the mirror
face; this may damage the surface of
the glass. If ice should restrict movement of the mirror, do not force the
mirror for adjustment. To remove
ice, use a deicer spray, or a sponge
or soft cloth with very warm water.
Manual remote control
To adjust an outside mirror, move the
mirror.
MIRRORS
CAUTION
• The outside rearview mirror is
convex. Objects seen in the
mirror are closer than they
appear.
• Use your interior rearview mirror or direct observation to
determine the actual distance
of following vehicles when
changing lanes.
1PUA2034

Knowing your vehicle
363
1
2
3
4
5
6
7
8
9
Folding the outside rearview
mirror
To fold outside rearview mirror, grasp
the housing of mirror and then fold it
toward the rear of the vehicle.
Day/Night rearview mirror
(if equipped)
Make this adjustment before you
start driving and while the day/night
lever is in the day position.
Pull the day/night lever toward you to
reduce glare from the headlights of
vehicles behind you during night
driving.
Remember that you lose some
rearview clarity in the night position.
INTERIOR LIGHTS
➀
ON - The light turns on and
stays on even when the
doors are all closed.
➁
OFF - The light stays off even
when a door is open.
➂
DOOR - The light turns on or off
when a door is opened or
closed.
1PUA2036 1PUB2007 1PUA2056
Day
Night
Day/Night lever

337
1
2
3
4
5
6
7
8
9
Knowing your vehicle
These compartments can be used to
store small items required by the
driver or passengers.
✽✽
NOTICE
• To avoid possible theft, do not
leave valuables in the storage compartment.
• Since stored items may move while
driving, be sure to position them
in the storage compartment so
that they do not make noise or
cause a potential safety hazard
when the vehicle is moving.
Glove box
To open the glove box, pull the handle and the glove box will automatically open. Close the glove box after
use.
For your convenience, a tissue holder is located in the glove box cover.
STORAGE COMPARTMENT
WARNING
Do not store cigarette lighters,
propane cylinders, or other
flammable/explosive materials
in the vehicle. These items may
catch fire and/or explode if the
vehicle is exposed to hot temperatures for extended periods.
1PUB2008
CAUTION
To reduce the risk of injury in
case of an accident or sudden
stop, always keep the glove box
door closed while driving.

Knowing your vehicle
383
1
2
3
4
5
6
7
8
9
Center seatback console tray
The tray is used for storing cassette
tapes or small articles.
To open the tray lid, press the hook in
the lid’s grip and pull up the lid.
Net pocket (if equipped)
It can be used for storing documents
or papers etc.
Do not keep pens or small items in
the net pocket. It can go in the pocket and would not come out. Also, it
can cause noise while driving.
WARNING
Do not keep sharp-pointed
objects in the net pocket. These
can be thrown forward during a
sudden stop or on uphill slope.
A driver or passengers could be
severely injured.
1PUB2009 1PUA2078

339
1
2
3
4
5
6
7
8
9
Knowing your vehicle
Cigarette lighter
To operate the cigarette lighter, press
it in and release it. When it is heated,
it automatically pops out ready for
use.
If the engine is not running, the ignition switch must be in the ACC position for the lighter to operate.
✽✽
NOTICE
• Do not hold the lighter in after it is
already heated because it will
overheat.
• Only a genuine Kia lighter should
be used in the cigarette lighter
socket. The use of plug-in accessories (shavers, hand-held vacuums, and coffee pots, for example)
may damage the socket or cause
electrical failure.
• If the lighter does not pop out
within 30 seconds, remove it to
prevent overheating.
Ashtrays
To remove the ashtray to empty or
clean, push the tab (➀) and pull it all
the way out.
INTERIOR FEATURES
WARNING
Never attempt to adjust the
cigar lighter while the vehicle is
moving.This could result in loss
of control, and an accident
causing death, serious injury, or
property damage.
1PUA2072 1PUA2073
WARNING - Ashtray use
• Do not use the vehicle’s ashtrays as waste receptacles.
• Putting lit cigarettes or matches in an ashtray with other
combustible materials may
cause a fire.

Knowing your vehicle
403
1
2
3
4
5
6
7
8
9
Cup holder (if equipped)
To use the cup holder, press the front
face and release it to allow the cup
holder to slowly extend from center
panel.
The cup holder is used for holding
cups and cans.
✽✽
NOTICE
Do not place heavy cups or cans in
cup holder. Cup holder could be
damaged.
1PUA2080 1PUA2081
WARNING - Hot liquids
• Do not place uncovered cups
of hot liquid in the cup holder
while the vehicle is in motion.
If the hot liquid spills, you
could be burned. Such a burn
to the driver could cause a
loss of control of the vehicle.
• To reduce the risk of personal
injury in the event of sudden
stop or collision, do not place
uncovered or insecure bottles, glasses, cans, etc., in the
cup holder while the vehicle is
in motion.

341
1
2
3
4
5
6
7
8
9
Knowing your vehicle
Sunvisor
Use the sunvisor to shield direct light
through the front or side windows.
To use a sunvisor, pull it downward.
To use a sunvisor for a side window,
pull it downward, unsnap it from the
bracket (
➀
) and swing it to the side.
Digital clock
Whenever the battery terminals, or
memory fuse are disconnected, you
must reset the time.
When the ignition switch is in the
ACC or ON position, the clock buttons operate as follows:
• HOUR:
Turn the knob to the left (H), will
advance the time displayed by one
hour.
• MINUTE:
Turn the knob to the right (M), will
advance the time displayed by one
minute.
• RESET:
To clear away minutes, press the
knob with your finger. Then the
clock will be set precisely on the
hour.
For example, if the knob is pressed
while the time is between 9:01 and
9:29, the display will be reset to
9:00.
9:01~9:29 ➾ 9:00
9:30~9:59 ➾ 10:00
✽✽
NOTICE
Do not turn the knob excessively to
prevent knob damage.
WARNING
Never attempt to adjust the digital clock while the vehicle is
moving.This could result in loss
of control, and an accident
causing death, serious injury, or
property damage.
1PUB2010 1PUA2083

Knowing your vehicle
423
1
2
3
4
5
6
7
8
9
ANTENNA
Your car uses a manual stainless
steel antenna to receive both AM
and FM broadcast signals. Pull up
the antenna using your fingers.
✽✽
NOTICE
• If the antenna is dirty, be sure to
clean it in order to avoid an operation malfunction.
• Before entering an automatic car
wash or a place with a low height
clearance, be sure that the antenna is fully retracted.
The exterior tool box is located
behind the rear tire on right side to
store jack.
To open it pull up the clamp lever and
unhook the clamp.
To fix the jack, use the rubber band.
1PUA2082
WARNING
Never attempt to adjust the
antenna while the vehicle is
moving.This could result in loss
of control, and an accident
causing death, serious injury, or
property damage.
EXTERIOR TOOL BOX
(FOR 1.4 TON ONLY)
(IF EQUIPPED)
1PUB2011

1
2
3
4
5
6
7
8
9
Ignition switch / 4-2
Starting the engine / 4-4
Manual transmission / 4-7
Limited slip differential / 4-8
Brake system / 4-8
Steering wheel / 4-13
Instrument cluster / 4-16
Gauges / 4-18
Warnings and indicators / 4-21
Lighting / 4-27
Wipers and washers / 4-31
Defroster - for middle east / 4-33
Hazard warning flasher / 4-33
Climate control system / 4-34
Windshield defrosting and defogging / 4-44
Four-wheel drive (4WD) / 4-47
Driving your vehicle

Driving your vehicle
24
1
2
3
4
5
6
7
8
9
Ignition switch and anti-theft
steering column lock
Ignition switch position
LOCK
The steering wheel locks to protect
against theft. The ignition key can be
removed only in the LOCK position.
When turning the ignition switch to
the LOCK position, push the key
inward at the ACC position and turn
the key toward the LOCK position.
ACC (Accessory)
The steering wheel is unlocked and
electrical accessories are operative.
ON
The warning lights can be checked
before the engine is started. This is
the normal running position after the
engine is started.
Do not leave the ignition switch ON if
the engine is not running to prevent
battery discharge.
START
Turn the ignition key to the START
position to start the engine. The
engine will crank until you release
the key; then it returns to the ON
position. The brake warning lamp
can be checked in this position.
If difficulty is experienced in turning
the ignition key to the START position, turn the steering wheel right
and left to release the tension and
then turn the key.
IGNITION SWITCH
1GHA3201A

43
1
2
3
4
5
6
7
8
9
Driving your vehicle
WARNING - Ignition key
• Never turn the ignition switch
to LOCK or ACC while the
vehicle is moving. This would
result in loss of directional
control and braking function,
which could cause an immediate accident.
• The anti-theft steering column
lock is not a substitute for the
parking brake. Before leaving
the driver’s seat, always make
sure the shift lever is engaged
in 1
st
gear, set the parking
brake fully and shut the
engine off. Unexpected and
sudden vehicle movement
may occur if these precautions are not taken.
(Continued)
(Continued)
• Never reach for the ignition
switch, or any other controls
through the steering wheel
while the vehicle is in motion.
The presence of your hand or
arm in this area could cause a
loss of vehicle control, an
accident and serious bodily
injury or death.
• Do not place any movable
objects around the driver’s
seat as they may move while
driving, interfere with the driver and lead to an accident.

Driving your vehicle
44
1
2
3
4
5
6
7
8
9
To start the diesel engine when the
engine is cold, it has to be pre-heated before starting the engine and
then have to be warmed up before
starting the driving.
1. Make sure the parking brake is
applied.
2. Manual Transmission - Depress
the clutch pedal fully and shift the
transmission into the Neutral.
Keep the clutch pedal depressed
while cranking the engine.
3. Turn the ignition switch ON position to pre-heat the engine. Then
the glow indicator light will illuminate.
4. If the glow indicator light goes out,
turn the ignition switch to START
and hold it there until the engine
starts (a maximum of 10 seconds), then release the key.
✽✽
NOTICE
If the engine were not started within
10 seconds after the preheating is
completed, turn the ignition key
once more to the LOCK position
during 30 seconds, and then to the
ON position, in order to pre-heat
again.
STARTING THE ENGINE
W-60
Glow indicator light
CAUTION
Do not keep the starter engaged
for more than 10 seconds. If the
engine stalls or falters in starting, wait 30 seconds before
reengaging the starter; otherwise you may damage it.
If the engine cannot be started,
have the ignition system
checked immediately by an
Authorized Kia Dealer.
WARNING
Always wear appropriate shoes
when operating your vehicle.
Unsuitable shoes (high heels,
ski boots,etc.) may interfere
with your ability to use the
brake and accelerator pedal,
and the clutch (if equipped).

45
1
2
3
4
5
6
7
8
9
Driving your vehicle
✽✽
NOTICE
Whether the engine is warm or cold,
it should be started without first
depressing the accelerator pedal.
However, if the engine is unusually
difficult to restart when it is warm
(fails to start after repeated at
tempts without depressing the accelerator pedal), start it while depressing the accelerator pedal about
halfway.
Starting the cold engine
(for 2.7L / 3.0L engine only)
1. If the glow indicator light goes out,
start the engine.
2. Pull the warm-up switch out and
turn it clockwise after starting the
engine.
3. Turn the warm-up switch OFF by
rotating it counterclockwise and
depressing it in place if the engine
temperature gauge moves slightly.
If you do not use the warm-up switch,
your vehicle may have the excessive
fuel consumption and be damaged in
the emission system.
✽✽
NOTICE
If you drive with turning the warmup switch ON, the fuel consumption
will be increased excessively. Also,
this could the failure of engine.
1PUA3020

Driving your vehicle
64
1
2
3
4
5
6
7
8
9
Starting and stopping the
engine for turbo charger
intercooler (for 2.5L engine
only)
1. Do not race or accelerate the
engine immediately after starting.
If the engine is cold, allow the
engine to idle for several seconds
before it is driven to ensure sufficient lubrication of the turbo
charger unit.
2. After high speed or extended driving, requiring a heavy engine load,
the engine should be allowed to
idle, as shown in the chart below,
before turning it off.
This idle time will allow the turbo
charger to cool prior to shutting
the engine off.
WARNING
Do not turn the engine off immediately after it has been subjected to a heavy load. Doing so
may cause severe damage to
the engine or turbo charger unit.
Driving Condition Required Idle Time
Normal driving Not necessary
High speed Up to 80 km/h About 20 seconds
driving Up to 100 km/h About 1 minute
Steep mountain slopes or
continued driving in excess About 2 minutes
of 100 km/h

47
1
2
3
4
5
6
7
8
9
Driving your vehicle
Manual transmission operation
The manual transmission has five
forward gears.
Press the clutch pedal down fully
while shifting, then release it slowly.
A special safety feature prevents
inadvertent shifting from 5 (Fifth) to
R (Reverse).The gearshift lever must
be returned to the neutral position
before shifting into R (Reverse).
Make sure the vehicle is completely
stopped before shifting into R
(Reverse).
Never operate the engine with the
tachometer (rpm) in the red zone.
✽✽
NOTICE
To avoid premature clutch wear and
damage, do not drive with your foot
resting on the clutch pedal. Also,
don’t use the clutch to hold the vehicle stopped on an upgrade, while
waiting for a traffic light, etc.
Downshifting
When you must slow down in heavy
traffic or while driving up steep hills,
downshift before the engine starts to
“labor’’. Downshifting reduces the
chance of stalling and gives better
acceleration when you again need to
increase your speed. When the vehicle is traveling down steep hills,
downshifting helps maintain safe
speed and prolongs brake life.
MANUAL TRANSMISSION
1LDA3018
WARNING - Manual trans-
mission
Before leaving the driver’s seat,
always set the parking brake
fully and shut the engine off.
Then make sure the transmission is shifted into 1st gear
when the vehicle is parked on a
level or uphill grade, and shifted
into R (Reverse) gear on a
downhill ground. Unexpected
and sudden vehicle movement
can occur if these precautions
are not followed in the order
identified.

Driving your vehicle
84
1
2
3
4
5
6
7
8
9
A limited slip differential, if equipped,
is for the rear wheel differential only.
The features of this limited slip differential are described below;
Just as with conventional differential,
the wheel on one side is allowed to
turn at a different speed from the
wheel on the other side when the
vehicle is cornering.
The difference between the limited
slip differential and a conventional
differential is that if the wheel on one
side of the vehicle loses traction, a
greater amount of torque is applied
to the rear wheel on the other side to
improve traction.
Power brakes
Your vehicle has power-assisted
brakes that adjust automatically
through normal usage.
In the event that the power-assisted
brakes lose power because of a
stalled engine or some other reason,
you can still stop your vehicle by
applying greater force to the brake
pedal than you normally would. The
stopping distance, however, will be
longer.
When the engine is not running, the
reserve brake power is partially
depleted each time the brake pedal
is applied. Do not pump the brake
pedal when the power assist has
been interrupted.
Pump the brake pedal only when
necessary to maintain steering control on slippery surfaces.
LIMITED SLIP DIFFERENTIAL (IF EQUIPPED)
WARNING
To avoid injury, never run the
engine with one wheel off the
ground, such as when changing
a tire.
BRAKE SYSTEM

49
1
2
3
4
5
6
7
8
9
Driving your vehicle
In the event of brake failure
If service brakes fail to operate while
the vehicle is in motion, you can
make an emergency stop with the
parking brake. The stopping distance, however, will be much greater
than normal.
(Continued)
• Wet brakes may result in the
vehicle not slowing down at
the usual rate and pulling to
one side when the brakes are
applied. Applying the brakes
lightly will indicate whether
they have been affected in this
way. Always test your brakes
in this fashion after driving
through deep water. To dry the
brakes, apply them lightly
while maintaining a safe forward speed until brake performance returns to normal.
WARNING - Brakes
• Do not drive with your foot
resting on the brake pedal.
This will create abnormal high
brake temperatures, excessive brake lining and pad
wear, and increased stopping
distances.
• When descending a long or
steep hill, shift to a lower gear
and avoid continuous application of the brakes. Continuous
brake application will cause
the brakes to overheat and
could result in a temporary
loss of braking performance.
(Continued)
WARNING - Parking brake
Pulling the parking brake while
the vehicle is moving at normal
speeds can cause a sudden
loss of control of the vehicle. If
you must use the parking brake
to stop the vehicle, use great
caution in applying the brake.

Driving your vehicle
104
1
2
3
4
5
6
7
8
9
Disc brakes wear indicator
Your vehicle has front disc brakes.
When your front brake pads are worn
and it's time for new pads, you will
hear a high-pitched warning sound
from your front brakes.You may hear
this sound come and go or it may
occur whenever you depress the
brake pedal.
Please remember that some driving
conditions or climates may cause a
brake squeal when you first apply (or
lightly apply) the brakes. This is normal and does not indicate a problem
with your brakes.
✽✽
NOTICE
To avoid costly brake repairs, do not
continue to drive with worn brake
pads.
Rear drum brakes
Your rear drum brakes do not have
wear indicators. Therefore, have the
rear brake linings inspected if you
hear a rear brake rubbing noise. Also
have your rear brakes inspected
each time you change or rotate your
tires and when you have the front
brakes replaced.
WARNING - Brake wear
This brake wear warning sound
means your vehicle needs service. If you ignore this audible
warning, you will eventually lose
braking performance, which
could lead to a serious accident.
CAUTION
Always replace front brake pads
or rear brake linings as complete front or rear axle sets.

411
1
2
3
4
5
6
7
8
9
Driving your vehicle
Parking brake
To apply the parking brake, pull the
parking brake handle fully and firmly
upward while applying the service
brake.
To release the parking brake, pull the
handle up slightly and push the
release button, then lower the handle
to the released position while holding
the button in.
WARNING - Parking brake
• To prevent unintentional
movement when stopped and
leaving the vehicle, do not use
the gearshift lever in place of
the parking brake. Set the
parking brake AND make sure
the gearshift lever is securely
positioned in 1st (First) gear
or R (Reverse).
• Never allow a person who is
unfamiliar with the vehicle or
children to touch the parking
brake. If the parking brake is
released unintentionally, serious injury may occur.
CAUTION
Driving with the parking brake
applied will cause excessive
brake pad/lining and brake rotor
wear.
1PUA3041 1PUA3042

Driving your vehicle
124
1
2
3
4
5
6
7
8
9
Check the brake warning light by
turning the ignition switch ON (do not
start the engine). This light will be
illuminated when the parking brake is
applied with the ignition switch in the
START or ON position.
Before driving, be sure the parking
brake is fully released and the brake
warning light is off.
If the brake warning light remains on
after the parking brake is released,
there may be a malfunction in the
brake system. Immediate attention is
necessary.
If at all possible, cease driving the
vehicle immediately. If that is not possible, use extreme caution while
operating the vehicle and only continue to drive the vehicle until you
can reach a safe location or repair
shop.
Parking on curbed streets
• When parking your vehicle on an
uphill grade, park as close to the
curb as possible and turn the front
wheels away from the curb so that
the front wheels will contact the
curb if the vehicle moves backward.
• When parking your vehicle on a
downhill grade, park as close to the
curb as possible and turn the front
wheels toward the curb so that the
front wheels will contact the curb if
the vehicle moves forward.
W-75

413
1
2
3
4
5
6
7
8
9
Driving your vehicle
Power steering (if equipped)
Power steering uses energy from the
engine to assist you in steering the
vehicle. If the engine is off or if the
power steering system becomes
inoperative, the vehicle may still be
steered, but it will require increased
steering effort.
Should you notice any change in the
effort required to steer during normal
vehicle operation, have the power
steering checked by an Authorized
Kia Dealer.
✽✽
NOTICE
• Never hold the steering wheel
against a stop (extreme right or
left turn) for more than 5 seconds
with the engine running. Holding
the steering wheel for more than 5
seconds in either position may
cause damage to the power steering pump.
• If the power steering drive belt
breaks or if the power steering
pump malfunctions, the steering
effort will greatly increase.
✽
✽
NOTICE
If the vehicle is parked for extended
periods outside in cold weather
(below -10 °C/14 °F), the power
steering may require increased
effort when the engine is first started. This is caused by increased fluid
viscosity due to the cold weather and
does not indicate a malfunction.
When this happens, increase the
engine RPM by depressing accelerator until the RPM reaches 1,500 rpm
then release or let the engine idle for
two or three minutes to warm up the
fluid.
STEERING WHEEL

Driving your vehicle
144
1
2
3
4
5
6
7
8
9
Tilt steering (if equipped)
A tilt steering wheel allows you to
adjust the steering wheel before you
drive.You can also raise it to the
highest level to give your legs more
room when you exit and enter the
vehicle.
The steering wheel should be positioned so that it is comfortable for
you to drive, while permitting you to
see the instrument panel warning
lights and gauges.
1. Pull the lever upward and hold it to
unlock.
2. Raise or lower the steering wheel
to the desired position.
3. After adjust, release the lever.
Be sure to adjust the steering
wheel to the desired position
before driving.
WARNING
• Never adjust the angle of
steering wheel while driving.
You may lose your steering
control and cause severe personal injury or accidents.
• After adjusting, push the
steering wheel both up and
down to be certain it is locked
in position.
1PUA2031

415
1
2
3
4
5
6
7
8
9
Driving your vehicle
Horn
To sound the horn, press the horn
symbol on your steering wheel.
Check the horn regularly to be sure it
operates properly.
CAUTION
• To sound the horn, press the
area indicated by the horn
symbol on your steering
wheel (see illustration). The
horn will operate only when
this area is pressed.
• Do not strike the horn severely
to operate it, or hit it with your
fist. Do not press on the horn
with a sharp-pointed object.
1PUA2032

Driving your vehicle
164
1
2
3
4
5
6
7
8
9
INSTRUMENT CLUSTER
1. Engine temperature gauge
2. Turn signal indicators
3. Headlight high beam indicator
4. Speedometer
5. Fuel gauge
6. Warning and indicator lights
7. Tripmeter mode/reset button
8. Odometer / Tripmeter
1PUB2012
Without tachometer
Type B
Type A
Type C

417
1
2
3
4
5
6
7
8
9
Driving your vehicle
1. Engine temperature gauge
2. Turn signal indicators
3. Headlight high beam indicator
4. Speedometer
5. Fuel gauge
6. Warning and indicator lights
7. Tripmeter mode/reset button
8. Odometer / Tripmeter
9. Tachometer
1PUB2013
With tachometer
Type A
Type B
Type C

Driving your vehicle
184
1
2
3
4
5
6
7
8
9
Speedometer
The speedometer indicates the forward speed of the vehicle.
Odometer/Tripmeter
You can choose the odometer, tripmeter A and tripmeter B by pressing
the tripmeter mode button.
Odometer
The odometer indicates the total distance the vehicle has been driven.
GAUGES
1PUA2037A1PUB2014 1PUB2015

419
1
2
3
4
5
6
7
8
9
Driving your vehicle
Tripmeter
TRIP A: Tripmeter A
TRIP B: Tripmeter B
The tripmeter indicates the distance
of individual trips selected by the
driver. Tripmeter A and B can be
reset to 0 by pressing the reset button for 1 second or more, and then
releasing.
Tachometer (if equipped)
The tachometer indicates the
approximate number of engine revolutions per minute (rpm).
Use the tachometer to select the correct shift points and to prevent lugging and/or over-revving the engine.
The tachometer pointer may move
slightly when the ignition switch is in
ACC or ON position with the engine
OFF. This movement is normal and
will not affect the accuracy of the
tachometer once the engine is running.
✽✽
NOTICE
Do not operate the engine within the
tachometer's red zone.
This may cause severe engine damage.
1PUB2016 1PUB2017

Driving your vehicle
204
1
2
3
4
5
6
7
8
9
Engine temperature gauge
This gauge shows the temperature
of the engine coolant when the ignition switch is ON.
Do not continue driving with an overheated engine. If your vehicle overheats, refer to “Overheating” in the
Index.
✽✽
NOTICE
If the gauge pointer moves beyond
the normal range area toward the
“H” position, it indicates overheating that may damage the engine.
Fuel gauge
The fuel gauge indicates the approximate amount of fuel remaining in the
fuel tank.
Fuel tank capacity - 60 liters (15.9
US gal.).
The fuel gauge is supplemented by a
low fuel warning light, which will illuminate when the fuel level has
dropped to about 8 liters (2.1 US
gal.).
1PUB2018 1PUB2019
With tachometer
With tachometer
Without tachometer
Without tachometer

421
1
2
3
4
5
6
7
8
9
Driving your vehicle
Warning lights / audible indicators
Checking operation
All warning lights are checked by
turning the ignition switch ON (do not
start the engine). Any light that does
not illuminate should be checked by
an Authorized Kia Dealer.
After starting the engine, check to
make sure that all warning lights are
off. If any are still on, this indicates a
situation that needs attention. When
releasing the parking brake, the
brake system warning light should go
off. The fuel warning light will stay on
if the fuel level is low.
Engine oil pressure
warning
This warning light indicates the
engine oil pressure is low.
If the warning light illuminates while
driving:
1. Drive safely to the side of the road
and stop.
2. With the engine off, check the
engine oil level. If the level is low,
add oil as required.
If the warning light remains on after
adding oil or if oil is not available, call
an Authorized Kia Dealer.
✽✽
NOTICE
If the engine is not stopped immediately, severe damage could result.
Charging system
warning
This warning light indicates a malfunction of either the generator or
electrical charging system.
If the warning light comes on while
the vehicle is in motion:
1. Drive to the nearest safe location.
2. With the engine off, check the generator drive belt for looseness or
breakage.
3. If the belt is adjusted properly, a
problem exists somewhere in the
electrical charging system. Have
an Authorized Kia Dealer correct
the problem as soon as possible.
WARNINGS AND INDICATORS

Driving your vehicle
224
1
2
3
4
5
6
7
8
9
Safety belt warning
As a reminder to the driver and passenger, safety belt warning light will
blink for approximately 6 seconds
each time you turn the ignition switch
ON.
If the driver’s lap/shoulder belt is not
fastened when the key is turned ON
or if it is unfastened after the key is
ON, the safety belt warning light
blinks for 6 seconds. If the system
does not operate as described, see
an Authorized Kia Dealer for assistance.
Parking brake & brake
fluid warning
Parking brake warning
This light is illuminated when the
parking brake is applied with the ignition switch in the START or ON position. The warning light should go off
when the parking brake is released.
Low brake fluid level warning
If the warning light remains on, it may
indicate that the brake fluid level in
the reservoir is low.
If the warning light remains on:
1. Drive carefully to the nearest safe
location and stop your vehicle.
2. With the engine stopped, check
the brake fluid level immediately
and add fluid as required. Then
check all brake components for
fluid leaks.
3. Do not drive the vehicle if leaks
are found, the warning light
remains on or the brakes do not
operate properly. Have it towed to
any Authorized Kia Dealer for a
brake system inspection and necessary repairs.
To check bulb operation, check
whether the parking brake and brake
fluid warning light illuminates when
the ignition switch is in the ON position.

423
1
2
3
4
5
6
7
8
9
Driving your vehicle
Low brake vacuum pressure warning (if equipped)
If the brake warning light remains on
after adding brake fluid and the brake
pedal becomes heavier or harder, it
may indicate that the brake vacuum
pump has any problem. Therefore
you should avoid high speed driving
or sudden stop, and you should
depress the brake pedal deeper and
harder than usual in braking. Make
sure to have the brake system
checked and repaired by an authorized Kia dealer.
Low fuel level
warning
This warning light indicates the fuel
tank is nearly empty. When it comes
on, you should add fuel as soon as
possible. Driving with the fuel level
warning light on or with the fuel level
below “E” can cause the engine to
misfire and damage the catalytic
converter.
Door ajar warning
This warning light illuminates when a
door is not closed securely with the
ignition in any position.
Headlight high beam
indicator
This indicator illuminates when the
headlights are on and in the high
beam position or when the turn signal lever is pulled into the Flash-toPass position.
WARNING
Driving the vehicle with a warning light on is dangerous. If the
brake warning light remains on,
have the brakes checked and
repaired immediately by an
Authorized Kia Dealer.

Driving your vehicle
244
1
2
3
4
5
6
7
8
9
Turn signal indicator
The blinking green arrows on the
instrument cluster show the direction
indicated by the turn signals. If the
arrow comes on but does not blink,
blinks more rapidly than normal, or
does not illuminate at all, a malfunction in the turn signal system is indicated.
Make sure to have the turn signal
system checked and repaired by an
authorized Kia dealer.
Malfunction indicator
(if equipped)
This indicator light is part of the
Engine Control System which monitors various emission control system
components. If this light illuminates
while driving, it indicates that a
potential problem has been detected
somewhere in the emission control
system.
Generally, your vehicle will continue
to be drivable and will not need towing, but have the system checked by
an Authorized Kia Dealer as soon as
possible.
CAUTION
• Prolonged driving with the
Emission Control System
Malfunction Indicator Light
( ) illuminated may cause
damage to the emission control systems which could
effect drivability and/or fuel
economy.
•
If the
Emission
Control System
Malfunction Indicator Light
( ) begins to flash ON and
OFF, potential catalytic converter damage is possible
which could result in loss of
engine power. Have the Engine
Control System inspected as
soon as possible by an
Authorized Kia Dealer.

425
1
2
3
4
5
6
7
8
9
Driving your vehicle
Glow indicator
This light is turned on during warmup and turned off after it.
✽✽
NOTICE
If the glow indicator continues to
illuminate after the engine has
warmed up or while driving, check
the system by an Authorized Kia
Dealer or other competent repair
shop as soon as possible.
Fuel filter warning
The light comes on if water in the fuel
filter is accumulated more than normal. Drain water if the light is turned
on. Driving with the light on may
damage the engine.
4WD indicator light
(if equipped)
When the key is turned to the ON
position, the 4WD indicator light will
come on and then go off in a few seconds.
The 4WD indicator light will illuminate when the transfer shift lever is
set to 4H or 4L position.

Driving your vehicle
264
1
2
3
4
5
6
7
8
9
Safety belt warning chime
(if equipped)
If the driver's seat belt is not fastened
when the ignition key is turned “ON”
or if it is disconnected after the key is
ON, the safety belt warning chime
will sound for approximately 6 seconds.
Key reminder warning chime
(if equipped)
If the driver’s door is opened and the
ignition key is left in the ignition
switch in the LOCK or ACC position,
the key reminder warning chime will
sound. This is to prevent you from
locking your keys in the vehicle.
Parking start warning sound
(if equipped)
If the vehicle driven at 10km/h
(6mph) for more 2~3 than seconds,
the warning chime will sound continuously when the parking brake
engaged.
Overspeed warning chime
(if equipped)
If you drive with the speed of 120
km/h (75 mph) or more, the overspeed warning chime will sound. This
is to prevent you from driving your
vehicle with overspeed.

427
1
2
3
4
5
6
7
8
9
Driving your vehicle
Battery saver function
(if equipped)
• The purpose of this feature is to
prevent the battery from being discharged. The system automatically
turns off the small light when the
driver removes the ignition key and
opens the driver- side door.
• With this feature, the parklight will
be turned off automatically if the
driver parks on the side of road at
night.
If necessary, to keep the lights on
when the ignition key is removed,
perform the following :
1) Open the driver-side door.
2) Turn the parklights off and on
again using the light switch on the
steering column.
Lighting control
The light switch has a Headlight and
a Taillight position.
To operate the lights, turn the knob at
the end of the control lever to one of
the following positions:
➀
OFF position
➁
Taillight position
➂
Headlight position
Taillight position ( )
When the light switch is in the taillight
position (1st position), the tail, position, license and instrument panel
lights are on.
Headlight position ( )
When the light switch is in the headlight position (2nd position), the
head, tail, position, license and
instrument panel lights are on.
✽✽
NOTICE
The ignition must be in the ON
position for headlights to operate.
LIGHTING
1PUA2048

Driving your vehicle
284
1
2
3
4
5
6
7
8
9
High - beam operation
To turn on the high beam headlights,
push the lever away from you. Pull it
back for low beams.
The high-beam indicator will light
when the headlight high beams are
switched on.
Flashing headlights
To flash the headlights, pull the lever
towards you. It will return to the normal (low-beam) position when
released. The headlight switch does
not need to be on to use this flashing
feature.
Turn signals
The ignition switch must be on for the
turn signals to function. To turn on
the turn signals, move the lever up or
down. Green arrow indicators on the
instrument panel indicate which turn
signal is operating. They will selfcancel after a turn is completed. If
the indicator continues to flash after
a turn, manually return the lever to
the OFF position.
1PUA2050 1PUA2051 1PUA2049
Right
Left

429
1
2
3
4
5
6
7
8
9
Driving your vehicle
Lane change signals
To signal a lane change, move the
turn signal lever slightly and hold it in
position. The lever will return to the
OFF position when released.
If an indicator stays on and does not
flash or if it flashes abnormally, one
of the turn signal bulbs may be
burned out and will require replacement.
✽✽
NOTICE
If an indicator flash is abnormally
quick or slow, bulb may be burned
out or have a poor electrical connection in the circuit.
Rear fog light (if equipped)
To turn the rear fog lights on, turn the
headlight switch to the headlight on
position and press the rear fog light
button.
To turn the rear fog lights off, press
the rear fog light button again or turn
the headlights off.
Front fog light (if equipped)
Fog lights are used to provide
improved visibility and avoid accidents when visibility is poor due to
fog, rain or snow etc. The fog lights
will turn on when fog light button is
pressed after the taillight is turned
on.
To turn off the fog lights, press the
button again or turn the taillights off.
1PUB2020 1PUB2021

Driving your vehicle
304
1
2
3
4
5
6
7
8
9
✽✽
NOTICE
When in operation, the fog lights
consume large amounts of vehicle
electrical power. Only use the fog
lights when visibility is poor or
unnecessary battery and generator
drain could occur.
Daytime running light
(if equipped)
Daytime Running Lights (DRL) can
make it easier for others to see the
front of your vehicle during the day.
DRL can be helpful in many different
driving conditions, and it is especially helpful after dawn and before sunset.
The DRL system will make your lowbeam headlights turn OFF when:
1. The head light switch is on.
2. The taillight switch is on.
3. Engine stops.
Headlight leveling device
(if equipped)
This manual system is provided to
avoid obstructing oncoming drivers
vision with your headlights. The
headlight level can be adjusted by
rotating the thumb-wheel switch in
accordance with the following settings.
Switch setting:
1PUB2022
Position
Loading on
Frt. seats Luggage
0 driver only -
1 driver Full load

431
1
2
3
4
5
6
7
8
9
Driving your vehicle
Windshield wipers
Operates as follows when the ignition switch is turned ON.
: For a single wiping cycle, push
the lever forward and release it
with the lever in the OFF position. The wipers will operate
continuously if the lever is
pushed upward and held.
OFF : Wiper is not in operation
INT : Wiper operates intermittently
at the same wiping intervals.
Use this mode in a light rain or
mist.
LO : Normal wiper speed
HI : Fast wiper speed
✽✽
NOTICE
If there is heavy accumulation of
snow or ice on the windshield,
defrost the windshield for about 10
minutes, or until the snow and/or ice
is removed before using the windshield wipers to ensure proper operation.
Variable intermittent wipers
(if equipped)
Set the lever to the INT position and
choose the desired wiper interval by
turning the ring.
WIPERS AND WASHERS
1PUA2052 1PUA2053

Driving your vehicle
324
1
2
3
4
5
6
7
8
9
✽✽
NOTICE
• To prevent possible damage to the
wipers or windshield, do not operate the wipers when the windshield is dry.
• To prevent damage to the wiper
blades, do not use gasoline,
kerosene, paint thinner, or other
solvents on or near them.
• To prevent damage to the wiper
arms and other components, do
not attempt to move the wipers
manually.
Windshield washers
In the OFF position, pull the lever
gently toward you to spray washer
fluid on the windshield and to run the
wipers 1-3 cycles.
Use this function when the windshield is dirty.
The spray and wiper operation will
continue until you release the lever.
If the washer does not work, check
the washer fluid level. If the fluid level
is not sufficient, you will need to add
appropriate non-abrasive windshield
washer fluid to the washer reservoir.
✽✽
NOTICE
To prevent possible damage to the
washer pump, do not operate the
washer when the fluid reservoir is
empty.
1PUA2054

433
1
2
3
4
5
6
7
8
9
Driving your vehicle
The defroster heats the window to
remove frost, fog and thin ice from
the interior and exterior of the rear
window, while engine is running.
To activate the rear window
defroster, press the rear window
defroster button located in the center
console switch panel. The indicator
in the instrument cluster illuminates
when the defroster is ON.
If there is heavy accumulation of
snow on the rear window, brush it off
before operating the rear defroster.
The rear window defroster automatically turns off after 20 minutes or
when the ignition switch is turned off.
To turn off the defroster, press the
rear window defroster button again.
✽✽
NOTICE
• To prevent damage to the conductors bonded to the inside surface
of the rear window, never use
sharp instruments or window
cleaners containing abrasives to
clean the window.
• To prevent the battery from being
discharged, operate the defroster
only while the engine is running.
• If you want to defrost and defog
on the front windshield, refer to
“Windshield Defrosting and
Defogging” in this section.
The hazard warning flasher causes
the rear tail lights and front turn signal lights to flash on and off, which
serves as a warning to other drivers
to exercise caution when approaching or passing your vehicle.
To activate the flasher, depress the
hazard warning flasher switch. This
switch operates in any ignition switch
position.
To turn the flashers off, depress the
switch again.
DEFROSTER - FOR MIDDLE EAST (IF EQUIPPED)
1PUB20231PUB2023M
HAZARD WARNING FLASHER

Driving your vehicle
344
1
2
3
4
5
6
7
8
9
CLIMATE CONTROL SYSTEM (IF EQUIPPED)
1. Mode selection knob
2. Fan speed control knob
3. Temperature control knob
4. Air intake control button
5. Air conditioning button (if equipped)
1PUA2063

435
1
2
3
4
5
6
7
8
9
Driving your vehicle
Fan speed control knob
Four (4) adjustable fan speeds are
provided which increase as the number increases. The ignition switch
must be in the ON position for fan
operation.
0 - Fan off
1 - Low speed
2 - Medium speed
3 - High speed
4 - Maximum speed
Temperature control knob
The temperature control knob allows
you to control the temperature of the
air flowing from the ventilation system. To change the air temperature in
the passenger compartment turn the
knob to the right for warm and hot air
or left for cooler air.
1PUA2067 1PUA2065

Driving your vehicle
364
1
2
3
4
5
6
7
8
9
Face position
Air flow is directed toward
the upper body and face.
Additionally, each outlet
can be controlled to direct
the air discharged from
the outlet.
(outlet port: , )
Face - floor position
Air flow is directed towards
the face and the floor. The
air to the floor is warmer
than the air to the face
(except when the temperature control is set to the
extreme cold position).
(outlet port: , , )
1PUA2064
A D
A C D
Mode selection knob
The mode selection knob controls the direction of the air flow through the
ventilation system.

437
1
2
3
4
5
6
7
8
9
Driving your vehicle
Floor position
Most of the air flow is
directed to the floor, with a
small amount of the air
being directed to the windshield and side window
defroster.
(outlet port: , , )
Floor - defrost position
Most of the air flow is
directed to the floor and
the windshield with a
small amount directed to
the side window
defrosters.
The outside (fresh) air and
air conditioning will be
selected automatically.
(outlet port: , , )
Defrost position
Most of the air flow is
directed to the windshield
with a small amount of air
directed to the side window defrosters.
The outside (fresh) air and
air conditioning will be
selected automatically.
(outlet port: , )
Air intake control button
This is used to select outside (fresh)
air position or recirculated air position.
To change the air intake control position, push the control button.
B C
D
B
C
D
B
D
1PUA2066

Driving your vehicle
384
1
2
3
4
5
6
7
8
9
Recirculated air position
The indicator light on the
button is illuminated when
the recirculated air position is selected.
With the recirculated air
position selected, air from
passenger compartment
will be drawn through the
heating system and heated or cooled according to
the function selected.
Outside (fresh) air position
The indicator light on the
button is not illuminated
when the outside (fresh)
air position is selected.
With the outside (fresh) air
position selected, air
enters the vehicle from
outside and is heated or
cooled according to the
function selected.
✽✽
NOTICE
It should be noted that prolonged
operation of the heating in recirculated air position will cause fogging
of the windshield and side windows
and the air within the passenger
compartment will become stale.
In addition, prolonged use of the air
conditioning with the “recirculated
air position” selected, will result in
excessively dry air in the passenger
compartment.

439
1
2
3
4
5
6
7
8
9
Driving your vehicle
Air conditioning button
(if equipped)
Push the A/C button to turn the air
conditioning system on (indicator
light will illuminate). Push the button
again to turn the air conditioning system off.
WARNING
• Continued climate control
system operation in the recirculated air position may allow
humidity to increase inside
vehicle which may fog the
glass and obscure visibility.
• Do not sleep in a vehicle with
air conditioning or heating
system on. It may cause serious harm or death due to a
drop in the oxygen level
and/or body temperature.
• Continued climate control
system operation in the
reciruclated air position can
cause drowsiness or sleepiness, and loss of vehicle control. Set the air intake control
to the outside (fresh) air position as much as possible
while driving.
1PUA2068

Driving your vehicle
404
1
2
3
4
5
6
7
8
9
System operation
Ventilation
1. Set the mode to the position.
2. Set the air intake control to the
outside (fresh) air position.
3. Set the temperature control to the
desired position.
4. Set the fan speed control to the
desired speed.
Heating
1. Set the mode to the position.
2. Set the air intake control to the
outside (fresh) air position.
3. Set the temperature control to the
desired position.
4. Set the fan speed control to the
desired speed.
5. If dehumidified heating is desired,
turn the air conditioning system (if
equipped) on.
• If cool air is desired at face level for
bi-level operation, set the mode to
the position.
• If the windshield fogs up, set the
mode to the
,
position.
Air conditioning (if equipped)
All Kia Air Conditioning Systems are
filled with environmentally friendly
R-134a refrigerant which is not damaging to the ozone layer.
1. Start the engine. Push the air conditioning button.
2. Set the mode to the position.
3. Set the air intake control to the
outside air or recirculated air position.
4. Set the temperature control knob
to the desired position.
5. Set the fan speed control to the
desired speed.
6. Adjust the fan speed control and
temperature control to maintain
maximum comfort.

441
1
2
3
4
5
6
7
8
9
Driving your vehicle
• If warmer air is desired at floor
level for bi-level operation, set the
mode to the position and
adjust the temperature control to
maintain maximum comfort.
• When maximum cooling is desired,
set the temperature control to the
extreme left position, set the air
intake control to the recirculated air
position, then set the fan speed
control to the highest speed.
✽✽
NOTICE
• When using the air conditioning
system, monitor the temperature
gauge closely while driving up
hills or in heavy traffic when outside temperatures are high. Air
conditioning system operation
may cause engine overheating.
Continue to use the blower fan but
turn the air conditioning system
off if the temperature gauge indicates engine overheating.
• When opening the windows in
humid weather air conditioning
may create water droplets inside
the vehicle. Since excessive water
droplets may cause to damage to
electrical equipment, air conditioning should only be run with
the windows closed.
Air conditioning system
operation tips
• If the vehicle has been parked in
direct sunlight during hot weather,
open the windows for a short time
to let the hot air inside the vehicle
escape.
• To help reduce moisture inside of
windows on rainy humid days,
decrease the humidity inside the
vehicle by operating the air conditioning system.
• During air conditioning system
operation, you may occasionally
notice a slight change in engine
speed at idle as the air conditioning compressor cycles on. This is
a normal system operation characteristics.
• Use the air conditioning system
every month if only for a few minutes to ensure maximum system
performance.

Driving your vehicle
424
1
2
3
4
5
6
7
8
9
• When using the air conditioning
system, you may notice clear water
dripping (or even pudding) on the
ground under the passenger side
of the vehicle.This is a normal system operation characteristics.
• The air conditioning system
includes a function that automatically turns the air conditioning
compressor off if engine coolant
temperature approaches an over
heating level. The air conditioning
compressor operation will resume
once engine coolant temperature
returns to the normal range. Also,
the air conditioning compressor is
automatically turned off for a few
seconds when the accelerator is
fully depressed (wide open throttle).
• When operating the air conditioning system use the outside (fresh)
air position.
• Operating the air conditioning system in the recirculated air position
does provide maximum cooling,
however, continual operation in this
mode may cause the air inside the
vehicle to become stale.
Checking the amount of air
conditioner refrigerant and
compressor lubricant
When the amount of refrigerant is
low, the performance of the air conditioning is reduced. Overfilling also
has a bad influence on the air conditioning system.
Therefore, if abnormal operation is
found, have the system inspected by
an authorized Kia dealer.

443
1
2
3
4
5
6
7
8
9
Driving your vehicle
Air conditioner refrigerant and
compressor lubricant
✽✽
NOTICE
When the performance of the air
conditioning system is reduced it is
important that the correct type and
amount of oil and refrigerant is
used. Otherwise, damage to the
compressor and abnormal system
operation may occur.
CAUTION
The air conditioning system
should be serviced by an
authorized Kia dealer. Improper
service may cause serious
injury.

Driving your vehicle
444
1
2
3
4
5
6
7
8
9
WINDSHIELD DEFROSTING
AND DEFOGGING
To defog inside windshield
1. Select any fan speed except “0”.
2. Select desired temperature.
3. Select the or position.
4. The outside (fresh) air and air conditioning will be selected.
To defrost outside windshield
1. Set the fan speed to the “3” or “4”
position.
2. Set the temperature to the
extreme hot position.
3. Select the position.
4. The outside (fresh) air and air conditioning will be selected.
1PUA2069
1PUA2070
CAUTION
Do not use the or position during cooling operation in
extremely humid weather. The
difference between the temperature of the outside air and that
of the windshield could cause
the outer surface of the windshield to fog up, causing loss of
visibility. In this case, set the
mode selection knob to the
position and fan speed control
knob to the lower speed.
➀ ➁
➂
➃
➀ ➁
➂
➃

445
1
2
3
4
5
6
7
8
9
Driving your vehicle
• For maximum defrosting, set the
temperature control to the extreme
right/hot position and the fan speed
control to the highest speed.
• If warm air to the floor is desired
while defrosting or defogging, set
the mode to the floor-defrost position.
• Before driving, clear all snow and
ice from the windshield, rear window, outside rear view mirrors, and
all side windows.
• Clear all snow and ice from the
hood and air inlet in the cowl grill to
improve heater and defroster efficiency and to reduce the probability of fogging up inside of the windshield.
Defogging logic
To reduce the probability of fogging
up the inside of the windshield, the
air intake control is set to the outside
(fresh) air position automatically if
any of following occur.
• The mode is selected to the ,
or
while the system is acti-
vated.
• The ignition switch is turned on
while the mode is selected to the
or .
In this case, the air conditioning will
automatically operate if the mode is
selected to the or .
If you don’t want the air-conditioning
or outside (fresh) air position, press
the corresponding button to cancel
the operation.
How to cancel or return defogging
logic of manual climate control system
1. Turn the ignition switch to the “ON”
position.
2. Turn the fan speed control knob to
the “0” position.
3. Turn the mode selection knob to
the defrost position ( ).
4. Push the air intake control button
( ) at least 5 times within 3
seconds.
1PUA2070A
➀ ➁
➂
➃

Driving your vehicle
464
1
2
3
4
5
6
7
8
9
Then the indicator light in the air
intake control button will blink 3 times
with 0.5 second of interval. It indicates that the defogging logic is canceled or returned to the programmed
status.
If the battery has been discharged or
disconnected, it is reset as the defog
logic status.

447
1
2
3
4
5
6
7
8
9
Driving your vehicle
You can send your engine’s driving
power to all front and rear wheels for
maximum power.
4WD is useful when you drive in
snow, mud, ice or sand where good
traction is required or when your
wheels lose traction or when your
wheels lose traction using 2WD.
Transfer lever position
✽✽
NOTICE
• Do not select 4WD mode on flat
and normal roads.
• Four-wheel driving on flat roads
for a long period causes poor fuel
economy and noise, and it also
causes tires to wear faster.
• Four-wheel driving on flat and
normal roads can result in a severe
binding and chattering condition
when turning the steering wheel.
• Four-wheel driving on flat roads
for a long period can also cause
the differential oil temperature to
increase, resulting in damage to
parts in the power train.
• When the vehicle shifts into 4WD
mode, a slight mechanical sound
and vibration may be felt and does
not indicate a problem with the
system.
FOUR-WHEEL DRIVE (4WD) (IF EQUIPPED)
1PUA3027
WARNING
When shifting the transfer lever
into the 4WD positions (4H and
4L), make sure the lever is fully
engaged in the gear setting.
Failure to fully engage the gear
could allow the transfer lever to
slip out of gear causing loss of
power to the drive wheels. This
could cause a loss of vehicle
control and could possibly
result in a serious accident.

Driving your vehicle
484
1
2
3
4
5
6
7
8
9
This is used to set different positions.
2H (Two-wheel drive high speed)
This mode is used, when driving on
normal roads and highway.
4H (Four-wheel drive high speed) :
maximum speed 80km/h
This mode is used, when driving offroads, wet or snow covered roads
with normal speed.
The 4WD indicator light ( ) will be
turned on to remind you that you are
in the 4H mode.
4L (Four-wheel drive low speed) :
maximum speed 40km/h
Use 4L for climbing or descending
hills, off-roads driving and towing the
vehicle, especially when increased
power is required.
The 4WD indicator light ( ) will be
turned on to remind you that you are
in the 4L mode.
1AWA302

449
1
2
3
4
5
6
7
8
9
Driving your vehicle
Transfer lever operation
■■
2H
⇔
⇔
4H
Shift the transfer lever from the 2H
mode to 4H mode (or from the 4H
mode to 2H mode) at speed below
60 km/h (37 mph).
It is not necessary to depress the
clutch pedal.
■
■
2H
⇔
⇔
4L, 4H
⇔⇔
4L
1. Stop the vehicle.
2. Depress the clutch pedal fully and
shift the transfer lever.
For safe four-wheel drive
operation
• Your vehicle allows you to drive in
on road and off-road conditions.
• However, do not try to drive in deep
standing water or mud, or over
steep hills.
• When you are driving up or down
hills, drive as close to straight up
and down the hills as possible. Use
extreme caution in going up or
down steep hills, since you can flip
your vehicle over depending on the
grade, terrain and water/mud conditions.
CAUTION
In extremely cold weather
(below -15°C, or in case of the
cold engine), when shifting the
transfer lever from the 2H mode
to 4H mode be sure to stop your
vehicle or shift the transfer lever
at low speed while driving.
CAUTION
• If the vehicle moves while the
transfer shift is in process, the
gearbox may be damaged.
• Do not over speed (above
40 km/h) in the 4L position.
This may cause severe transfer damage.
 Loading...