


INSTRUCTION MANUAL
K100SP
MP3/WMA CD PLAYER
WITH AM/FM RADIO

Before operating the unit, please read this
BEFORE USE
pg ,p
manual thoroughly and retain it
for future reference
1. OPERATING INSTRUCTIONS --------------------------------------------- Page 03
2. GENERAL ------------------------------------------------------------------------ Page 04
3. ANTI-THEFT SECURITY CODE -------------------------------------------- Page 09
4. RADIO ----------------------------------------------------------------------------- Page 11
5. CD PLAYER --------------------------------------------------------------------- Page 12
6. HANDLING COMPACT DISCS
---------------------------------------------
Page 18
7. LCD DISPLAY FOR CD PLAYER ERROR ------------------------------ Page 19
8. PRODUCT AND WARRANTY SERVICE -------------------------------- Page 20
9. MP3/WMA INFORMATION AND NOTICE ------------------------------- Page 21
1
0
. WARNING AND PRECAUTIONS---------------------------------------- P
age
22
0G CUOS
age
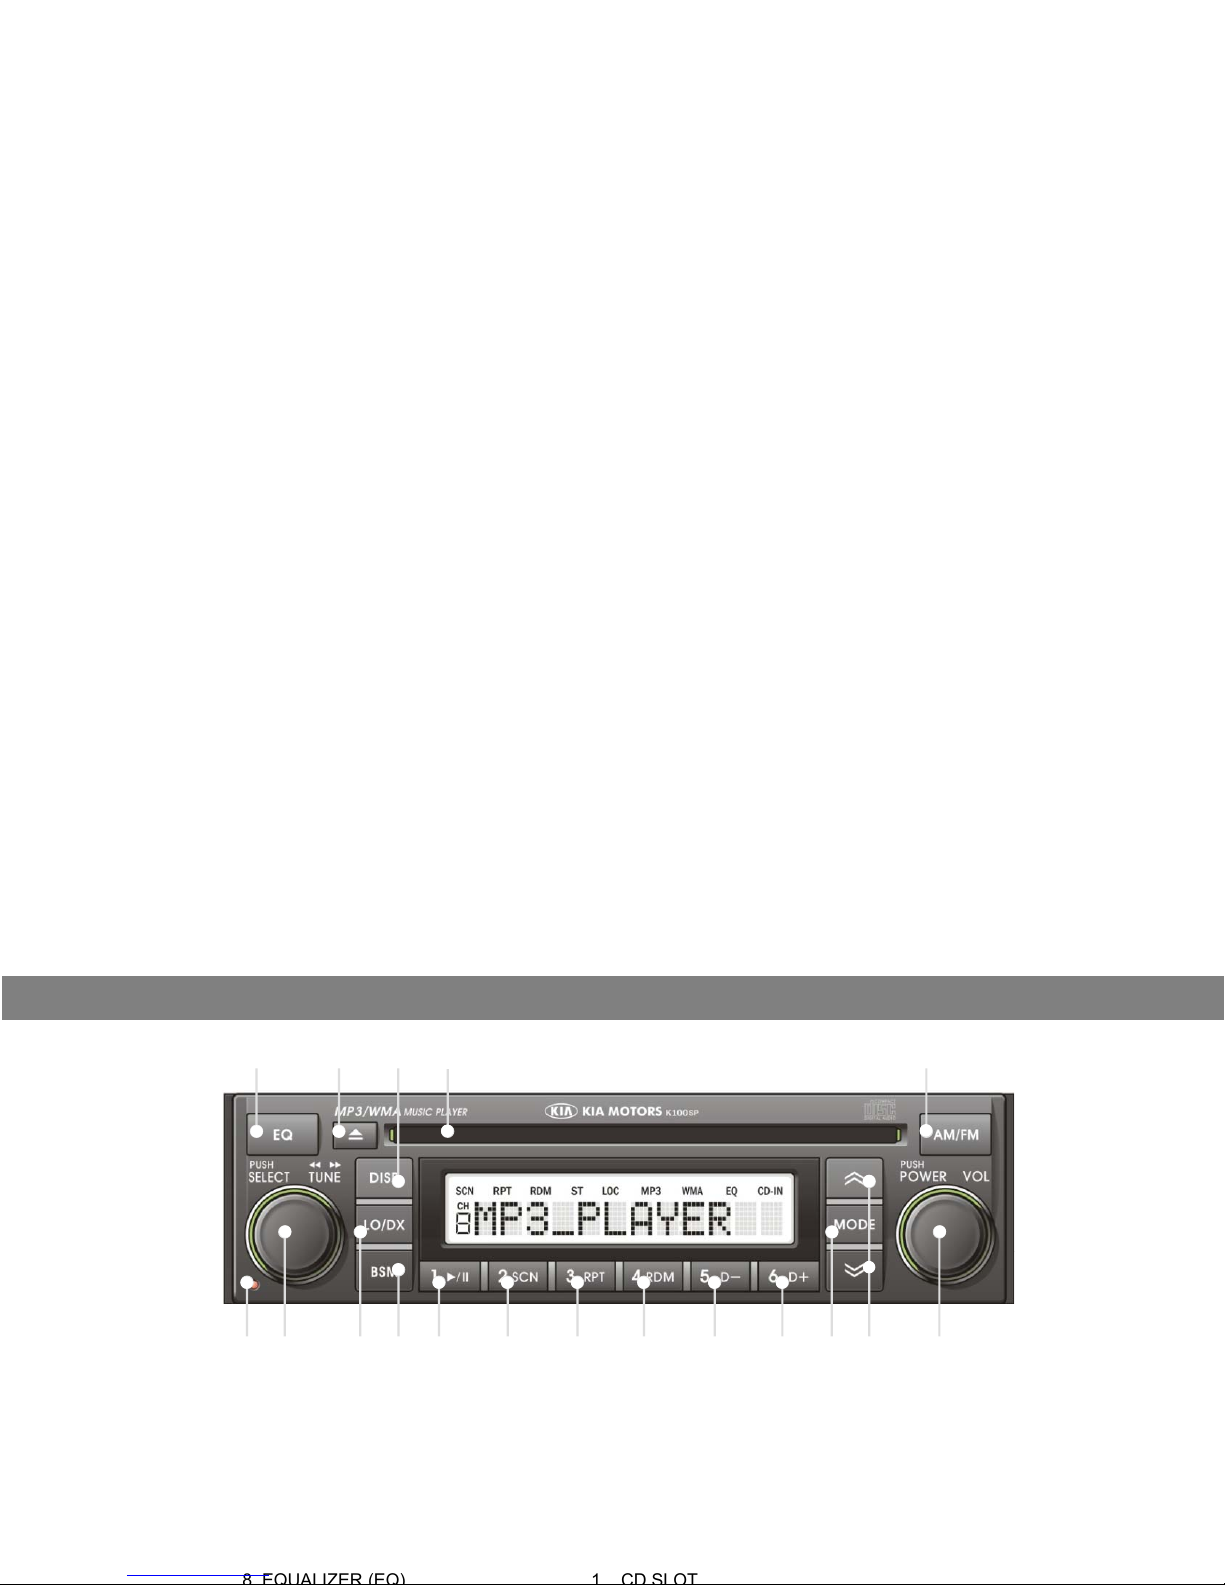
OPERATING INSTRUCTIONS
⑧ ⑯ ③ ⑰ ⑨
1. POWER (ON / OFF / Volume) 10. PRESET 1 MEMORY (▶/∥- Pause Play)
⑱ ② ④⑤⑩⑪⑫⑬⑭⑮⑥⑦①
2. AUDIO SETTING SELECT / TUNING
11. PRESET 2 MEMORY (
SCN –
S
can Mode
)
3. DISPLAY MODE 12. PRESET 3 MEMORY (RPT – Repeat Mode)
4. LOCAL-DISTANCE Control (LO/DX) 13. PRESET 4 MEMORY (RDM – Random Mode)
5. BEST STATION MEMORY 14. PRESET 5 MEMORY (DIRECTORY DOWN)
6. MODE (RADIO BAND/CDP) 15. PRESET 6 MEMORY (DIRECTORY UP)
7. TUNE / SEEK 16. EJECT
GENERAL
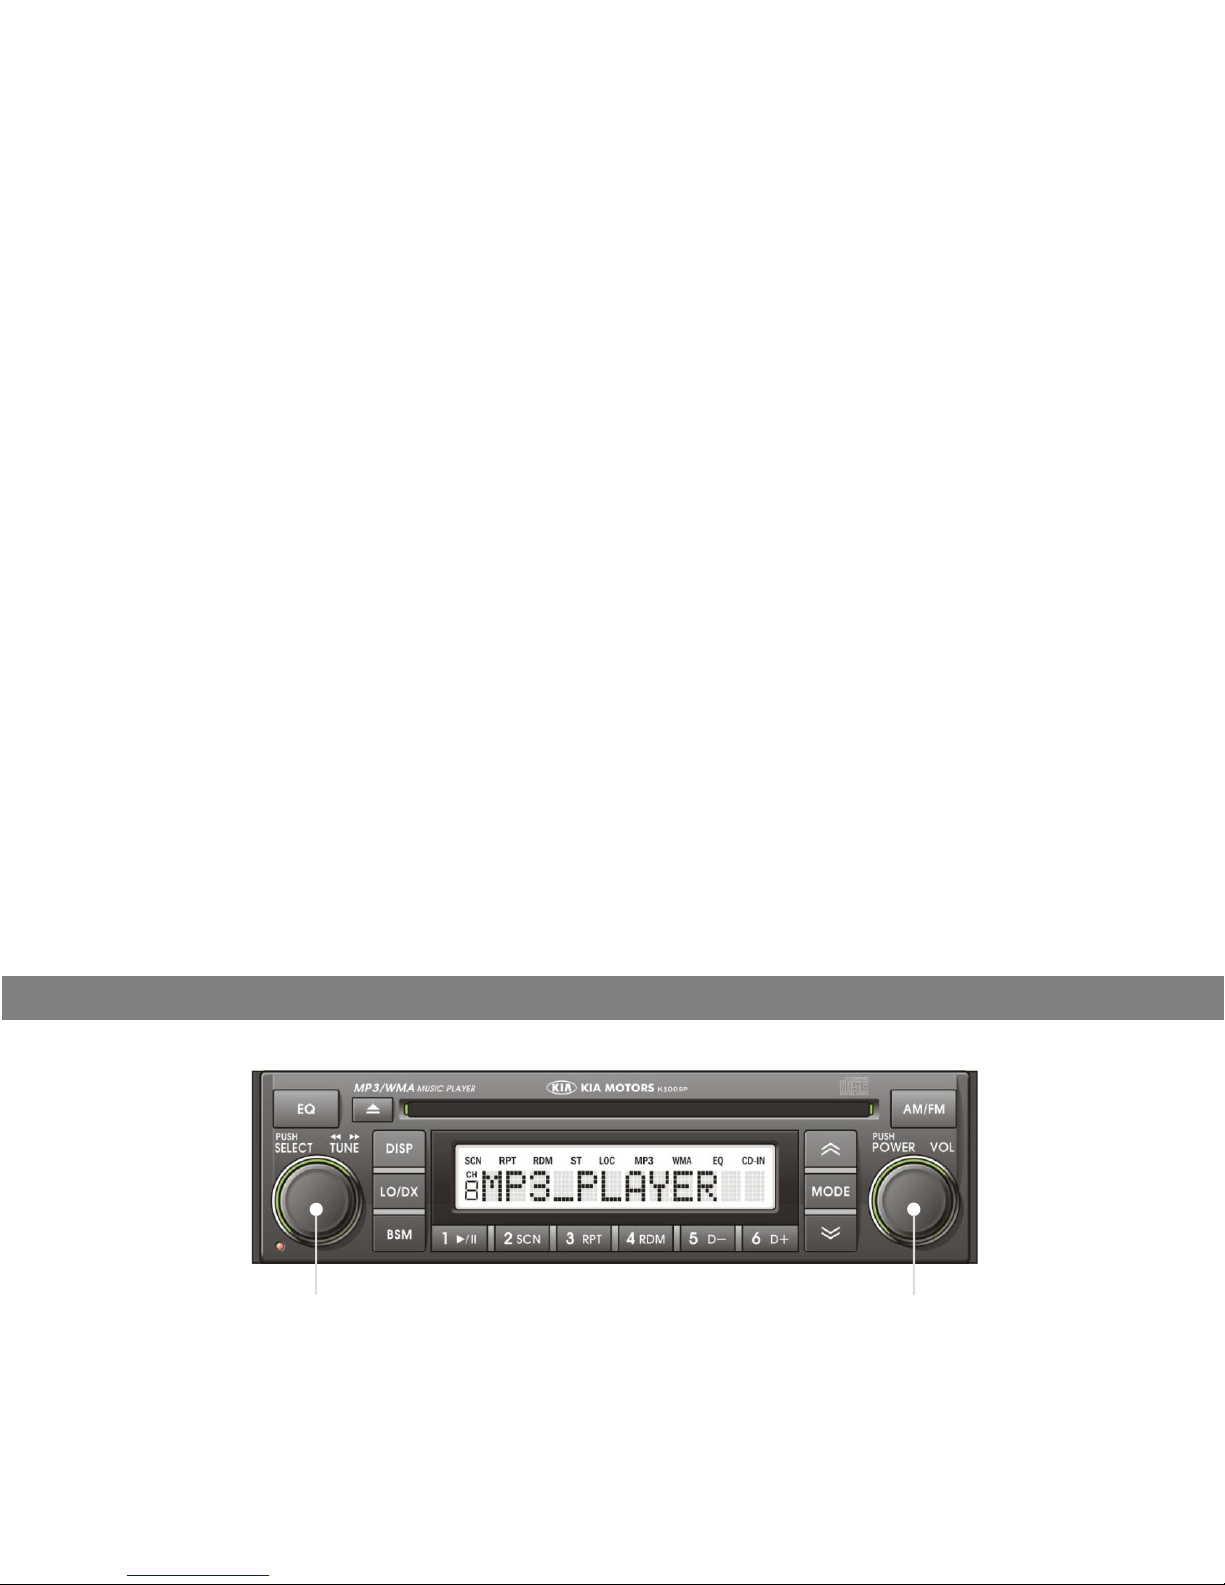
① POWER ON/OFF BUTTON
Press button ① momentarily to turn the set on or off. When the set is next switched on, the previous mode and disc
② ①
play position will be restored
.
① VOLUME UP/DOWN CONTROL
Turn button ① right to increase the volume level. The level will be shown as “VOLUME xx” on the display panel.
Turn button ① left to decrease the volume level. After 5 seconds the display will return to the previous mode.
① START-UP VOLUME LEVEL SET UP
Start-up volume is the volume level the set will play at when next turned on. To adjust the start-up volume, press and

GENERAL
② SOUND SETTING SELECTION
This
button
istoadjust
the
sound
.
Each
time
you
momentary
press
button
②
,
LCD
displays
each
mode
as
follows
:
BASS → MIDDLE → TREBLE → BAL L=R → FADER F=R → BEEP 2ND → LOUD ON
On each setting, the level can be controlled by turning button ②. The display will automatically return to the previous
mode 5 seconds after the last adjustment is made.
Note
:
When
theEQmode
is
activated,
the
BASS,
MIDDLE,
TREBLE
and
LOUD
modes
are
not
displayed
.
② BASS CONTROL (1STsetting)
To adjust the bass tone level, first select the bass mode by pressing button ② until “BASS” appears on the display panel.
Within 5 seconds of selecting the BASS mode, turn button ② right or left to adjust the bass level as desired. The bass
level will be shown on the display panel from a minimum of “BASS –10” to a maximum of “BASS+10”. The display will
automatically return to the normal indication in 5 seconds after the last adjustment, or when another function is activated.
nd
②
MIDDLE
CONTROL
(2setting)
To adjust the mid tone level, first select the middle mode by pressing button ② until “MIDDLE” appears on the display
panel.
Within 5 seconds of selecting the middle mode, turn button ② right or left to adjust the mid level as desired. The mid
level will be shown on the display panel from a minimum of “MIDDLE -10” to a maximum of “MIDDLE +10”. The display
will automatically return to the normal indication in 5 seconds after the last adjustment or, when another function is
activated.
rd
GENERAL
② BALANCE CONTROL (4thsetting)
To adjust the left-right speaker balance, first select the Balance mode by pressing the Select button ② until the “BAL”
indication appears on the display panel. Within 5 seconds of choosing the Balance mode, turn right/left to adjust the
⑱⑧② ④
⑥
balance as desired. The balance position will be shown by the bars on the displaypanel from “BAL 10L” (full left) to “BAL
10R”(full right).
When the volume level between the left and right speakers is equal, “BAL L=R” will be shown on the display panel. The
display will automatically return to the normal indication in 5 seconds after the last adjustment or when another function is
activated.
② FADER CONTROL (5thsetting)
To adjust the front-rear speaker balance, first select the Fader mode by pressing the Select button ② until the “FADER”
indication
appears
on
the
display
panel
.
Within
5
seconds
of
choosing
the
Fader
mode
,
turn
right/left
to
adjust
the
front
-

GENERAL
② BEEP CONTROL (6thsetting)
To adjust the Beepmode, first select the Beepmode b
y
p
ressingthe Select button ② until “BEEP” appears on the
jpp
y
pg
pp
display panel. The Beep mode will be shown on the display panel from “BEEP 2ND”, “BEEP OFF” and “BEEP ON”. The
display will automatically return to the normal indication in 5 seconds after the last adjustment or when another function
is activated. Select “BEEP ON” when you wish to hear the “BEEP” sound whenever any function button is pressed.
Select “BEEP 2ND” when you wish to hear the “BEEP” sound whenever any Tuner Pre-set button and/or Track cue or
review buttons are pressed. Once the desired setting is displayed, press button ② to save your selected setting
.
② LOUDNESS CONTROL (7thsetting)
When listening to music at low volume levels, this feature will boost the bass and treble response. This action will
compensatefo
r
th
ereductioninbass an
d
trebl
eperformance experienceda
t
l
ow volume.Toselec
t
theloud
nessfeature,
press button ② until “LOUD ON” or “LOUD OFF” is displayed, then turn button ② left or right to activate or deactivate
loudness.
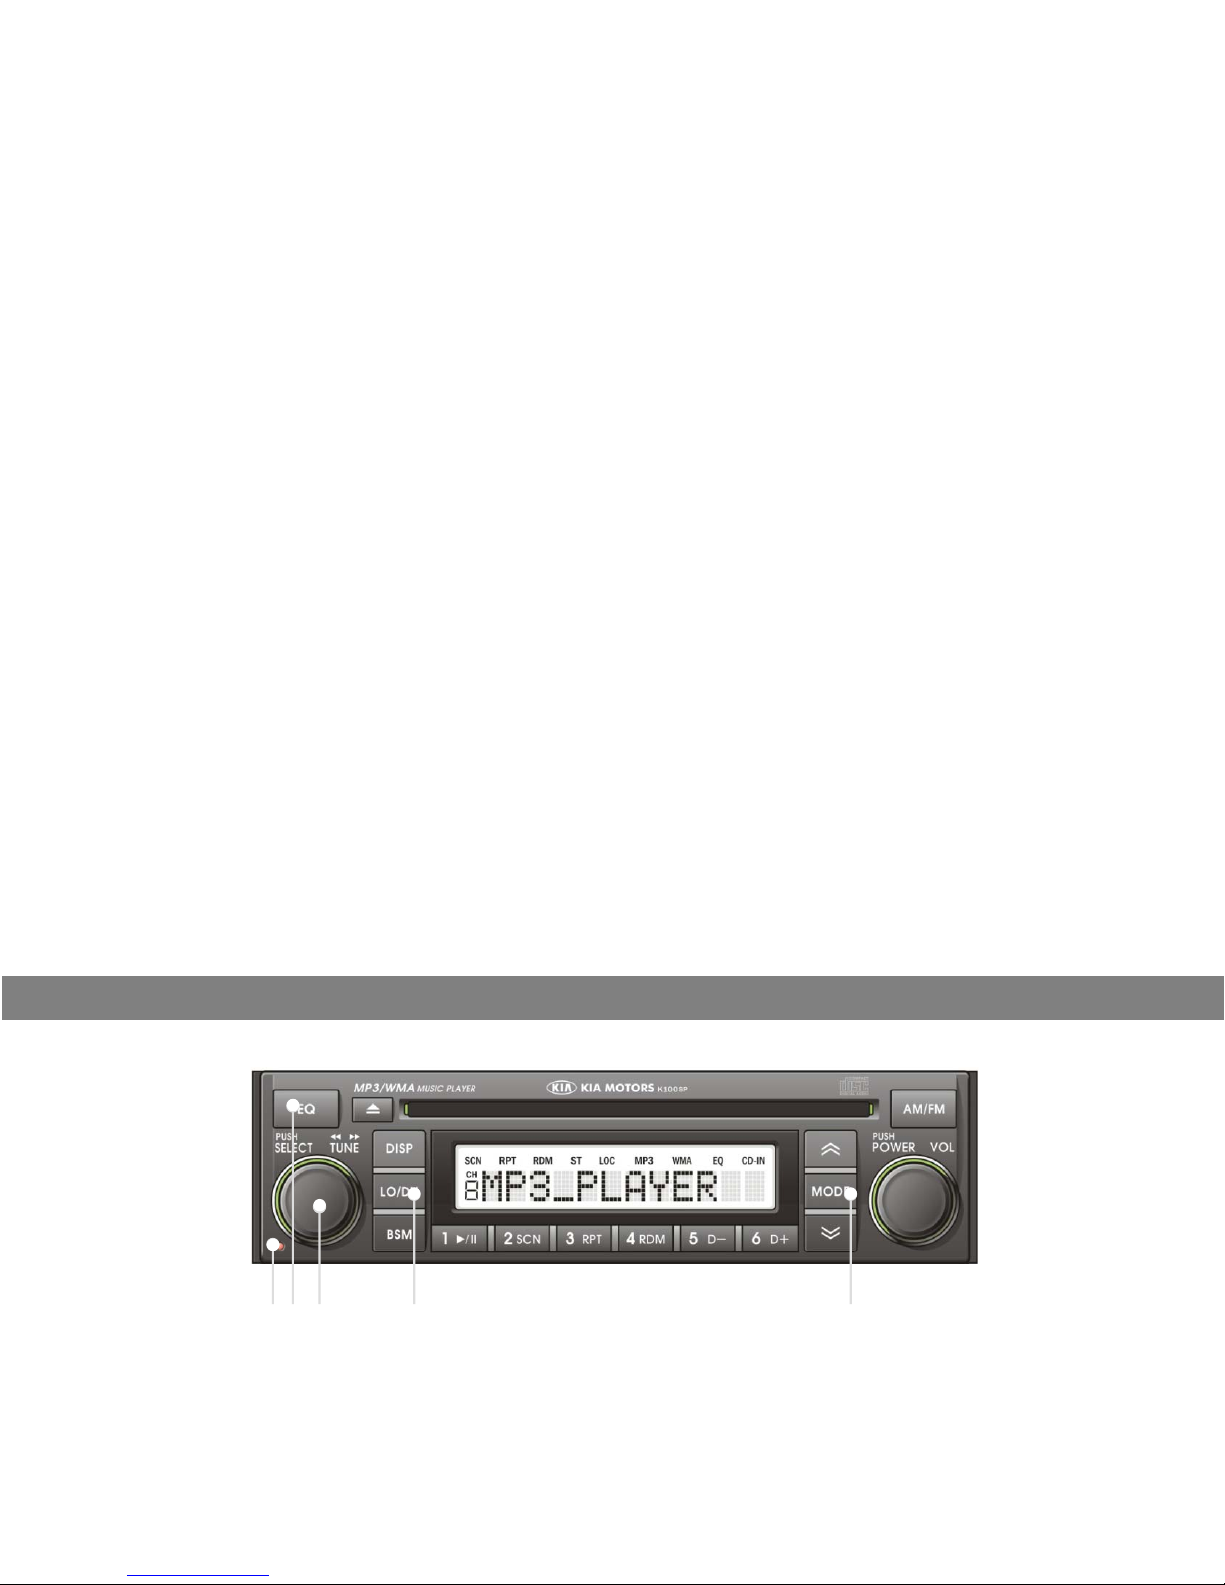
⑥ MODE BUTTON
Press MODE button ⑥ to select each radio band or CD player.
⑧ EQUALIZER (EQ)
You
can
select
an
equalizer
curve
for4music
types
(CLASSIC
,
POP,ROCK
,
JAZZ)
.
Press
EQ
button
⑧
repeatedly
until the desired equalizer effect is displayed. Each time you press this button, LCD displays each mode as follows :
CLASSIC → POP → ROCK → JAZZ → EQ OFF
Note: Bass, middle, treble and loudness will be ignored when the EQUALIZER function is active.

GENERAL
④ LOCAL-DISTANCE CONTROL (LO/DX)
Pressingbutton ④ momentarilyalters the search sensitivityof the radio. In local sensitivitymode, the radio will select
gyy
y
only local strong stations in station search mode. In distant sensitivity mode, the radio will select strong local stations
and weaker distant stations in station search mode. When in local sensitivity mode, the display panel shows LOC in
smaller characters constantly at the top of the LCD display. To change the sensitivity mode between local and distant
mode, press button ④.
Note: If the desired radio station is not found during station search in either local or distant mode, try manually tuning
to the frequency of the desired station by turning button ②.
⑱
WARNING LED
This LED lamp blinks every 1 second when the ignition is turned OFF.
 Loading...