


SM338x-68
|
|
Trainingsund Bedienungsanleitung |
deutsch |
Training and Operating Instructions |
english |
Mode d’emploi et instructions d‘entraînement |
française |
Trainingsen bedieningshandleiding |
nederlands |
Instrucciones de entrenamiento y manejo |
español |
Istruzioni per l'allenamento e per l’uso |
italiano |
Instrukcja treningowa i instrukcja obsługi |
polski |
Návod na trénink a obsluhu |
čeština |
Instruções de treino e utilização |
português |
Træningsog betjeningsvejledning |
dansk |
Uputa za treniranje i upravljanje |
hrvatski |
Instrucţiuni de antrenament şi utilizare |
română |
Navodila za vadbo in uporabo |
slovensko |
Рекомендации по проведению тренировок и руководство |
Русский |
по эксплуатации |
|
POLO M
VITO M

Trainingsund Bedienungsanleitung
Inhaltsverzeichnis
Sicherheitshinweise |
2 |
|
• |
Service |
2 |
• |
Ihre Sicherheit |
2 |
Kurzbeschreibung |
3-5 |
|
• |
Funktionsbereich / Tasten |
3 |
• |
Anzeigebereich / Display |
4-5 |
Schnellstart (Zum Kennenlernen) |
6 |
|
• |
Trainingsbereitschaft |
6 |
• |
Trainingsbeginn |
6 |
• |
Trainingsende |
6 |
• |
Schlummermodus |
6 |
Training |
7 |
|
ohne Vorgaben |
7 |
|
mit Vorgaben |
7 |
|
• |
Zeit |
7 |
|
|
|
Mit Brustgurt |
9 |
|
• |
Strecke |
7 |
|
|
|
Mit Handpuls |
9 |
|
• |
Energie (KJoule/kcal) |
7 |
|
|
• |
Störungen beim Computer |
9 |
|
• |
Alterseingabe (10-99) |
7 |
|
|
Trainingsanleitung |
9 |
||
• |
Alarmton einstellen (ja/nein) |
7 |
|
|
• |
Ausdauertraining |
9 |
|
• |
Zielpulsauswahl (FA 65%/FI 75%) |
7 |
|
|
• |
Belastungsintensität |
9 |
|
• |
Zielpulseingabe (40-199) |
7 |
|
|
• |
Belastungsumfang |
10 |
|
• |
Trainingsunterbrechung/-ende |
8 |
|
|
Glossar |
10 |
||
• |
Trainingswiederaufnahme |
8 |
|
|
|
|
|
|
• |
Recovery (Erholpulsmessung) |
8 |
|
|
|
G |
|
|
Allgemeine Hinweise |
9 |
|
|
|
|
|
||
|
|
|
|
|
|
|||
• |
Systemtöne |
9 |
|
|
|
Zeichen gibt in der Anleitung |
|
|
Dieses |
|
|||||||
• |
Recovery |
9 |
|
|
einen Hinweis auf das Glossar. Dort |
|
||
• |
Durchschnittswertberechnung |
9 |
|
|
wird der jeweilige Begriff erklärt. |
|
||
|
|
|
|
|
|
|||
• |
Hinweise zur Pulsmessung |
9 |
|
|
|
|
|
|
|
Mit Ohrclip |
9 |
|
|
|
|
|
|
|
|
|
|
|
|
|
|
|
Sicherheitshinweise
Beachten Sie folgende Punkte zu Ihrer eigenen Sicherheit:
•Die Aufstellung des Trainingsgerätes muß auf einem dafür geeigneten, festen Untergrund erfolgen.
•Vor der ersten Inbetriebnahme und zusätzlich nach ca. 6 Betriebstagen sind die Verbindungen auf festen Sitz zu überprüfen.
•Um Verletzungen infolge Fehlbelastung oder Überlastung zu verhindern, darf das Traningsgerät nur nach Anleitung bedient werden.
•Eine Aufstellung des Gerätes in Feuchträumen ist, auf Dauer gesehen, wegen der damit verbundenen Rostbildung nicht zu empfehlen.
•Überzeugen Sie sich regelmäßig von der Funktionsfähigkeit und dem ordnungsgemäßen Zustand des Trainingsgerätes.
•Die sicherheitstechnischen Kontrollen zählen zu den Betreiberpflichten und müssen regelmäßig und ordnungsgemäß durchgeführt werden.
•Defekte oder beschädigte Bauteile sind umgehend auszutauschen.
Verwenden Sie nur Original KETTLER Ersatzteile.
•Bis zur Instandsetzung darf das Gerät nicht benutzt werden.
•Das Sicherheitsniveau des Gerätes kann nur unter der Voraussetzung gehalten werden, dass es regelmäßig auf Schäden und Verschleiß geprüft wird.
Zu Ihrer Sicherheit:
•Lassen Sie vor Aufnahme des Trainings durch Ihren Hausarzt klären, ob Sie gesundheitlich für das Training mit diesem Gerät geeignet sind. Der ärztliche Befund sollte Grundlage für den Aufbau Ihres Trainingsprogrammes sein. Falsches oder übermäßiges Training kann zu Gesundheitsschäden führen.
2 D

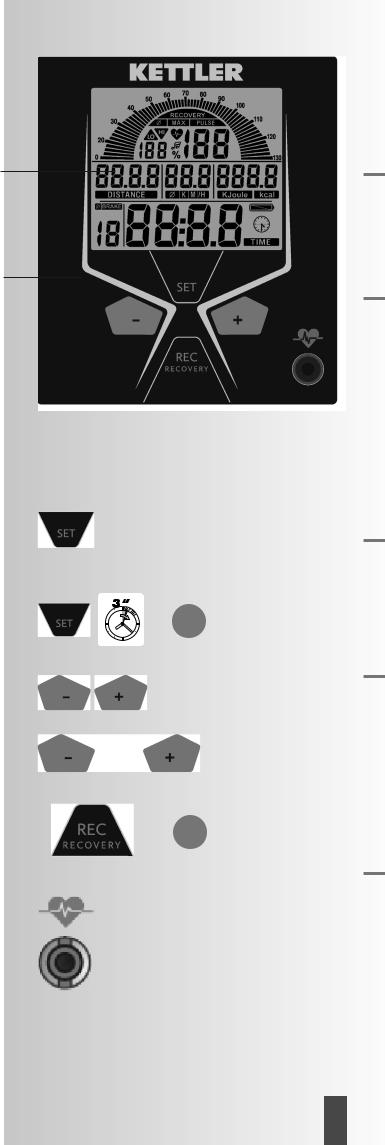
Kurzbeschreibung
Die Elektronik hat einen Funktionsbereich mit Tasten und einen Anzeigebereich (Display) mit veränderlichen Symbolen und Grafik.
Anzeigebereich
Display
Funktionsbereich
Tasten
Kurzanleitung
Funktionsbereich
Die vier Tasten werden im Folgenden kurz erklärt.
Die genauere Anwendung wird in den einzelnen Kapiteln erläutert. In diesen Beschreibungen werden die Namen der Funktionstasten auch so verwendet.
SET (kurz drücken)
Mit dieser Funktionstaste werden Eingaben aufgerufen. Die eingestellten Daten werden übernommen.
Reset (SET länger drücken)
Die aktuelle Anzeige wid gelöscht für einen Neustart.
Minus – / Plus +
Mit diesen Funktionstasten werden vor dem Training in den verschiedenen Eingaben Werte verändert
•längeres Drücken > schneller Wertedurchlauf
•“Plus” und “Minus” zusammen gedrückt: Werteeingabe springt auf Aus (OFF)
RECOVERY
Mit dieser Funktionstaste wird die Erholungspulsfunktion gestartet.
Pulsmessung
Die Pulsmessung kann über 3 Quellen erfolgen:
1.Ohrclip –
Der Stecker wird in die Buchse eingesteckt;
2.Handpuls
Der Anschluß befindet sich auf der Rückseite der Anzeige;
3Brustgurt (Zubehör)
Bitte dortige Anleitung beachten
G
G
3 D

Trainingsund Bedienungsanleitung
Kurzanleitung
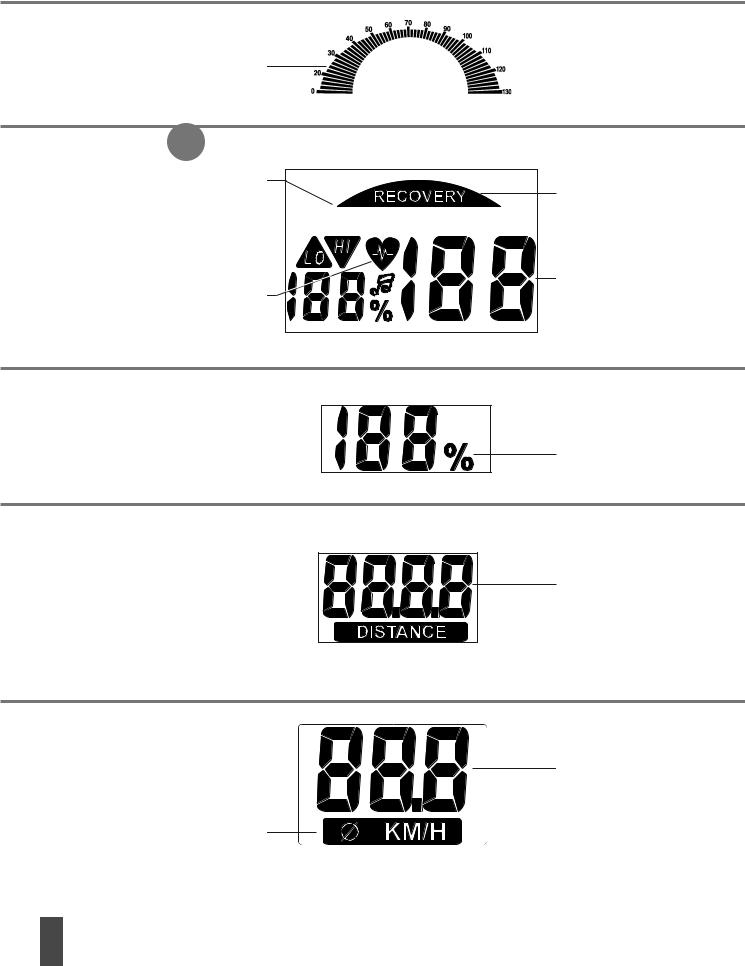
Anzeigebereich / Display
Der Anzeigebereich (Display genannt) informiert über die verschiedenen Funktionen.
Trittfrequenz (RPM)
|
14 -130 [1/min ] |
|
|
|
1 Segment = 2 [1/min] |
|
|
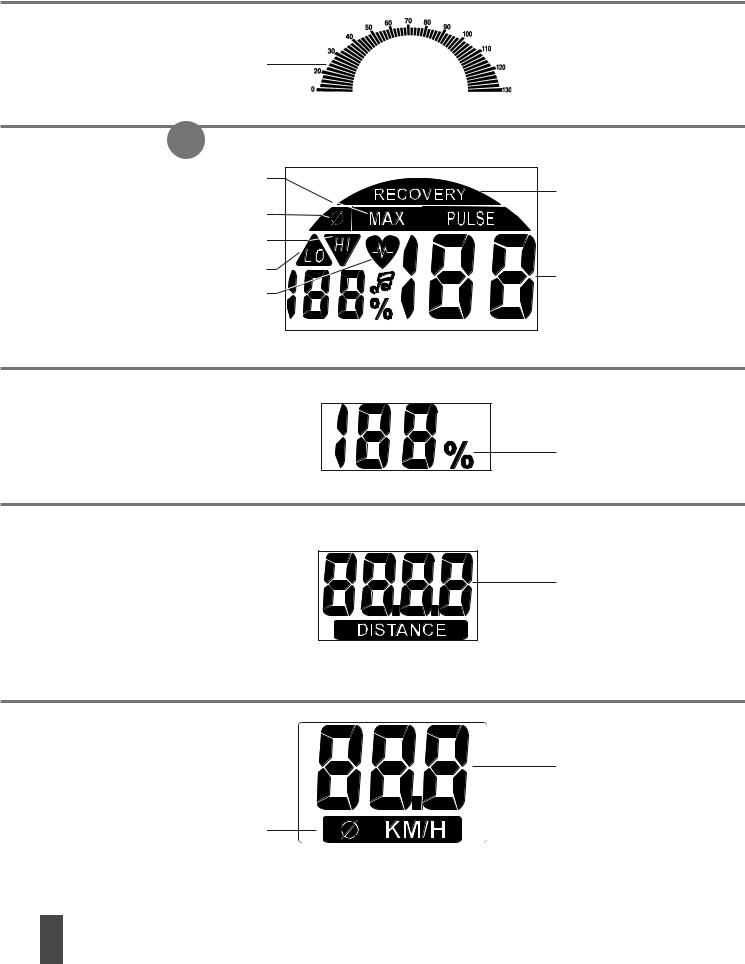
Puls (PULSE) |
G |
|
|
|
Maximal Puls |
Erholpulsfunktion |
|
Warnung (blinkt) Max.Puls +1 |
|||
RECOVERY |
|||
Durchschnittswertanzeige |
|||
|
|||
Zielpulsgrenze überschritten +11 |
|
||
Zielpulsgrenze unterschritten –11 |
Pulsanzeige |
||
|
Herzsymbol (blinkt) |
40 – 199 [1/min] |
|
|
|
||
Prozentpuls |
|
|
|

 Warnton EIN/AUS
Prozentwert
Vergleich Istpuls/Max. Puls
Entfernung (DISTANCE)
Wert 0,00 – 99,99
Geschwindigkeit
Wert 0 – 99,9
Durchschnittswertanzeige
4 D
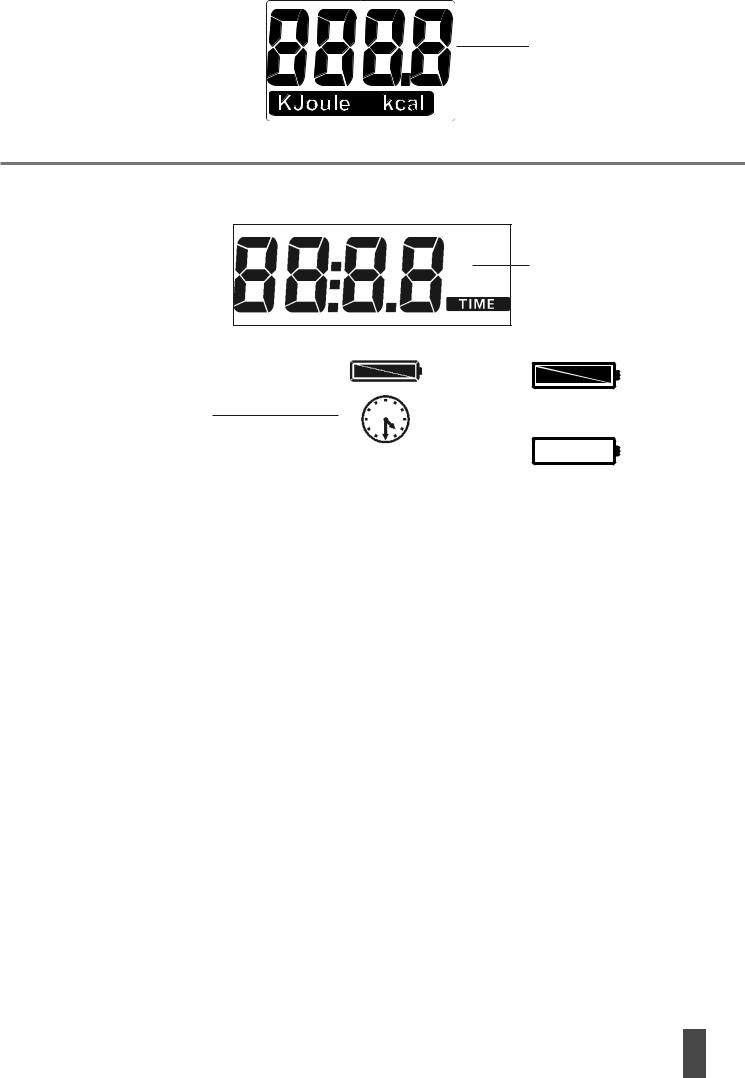
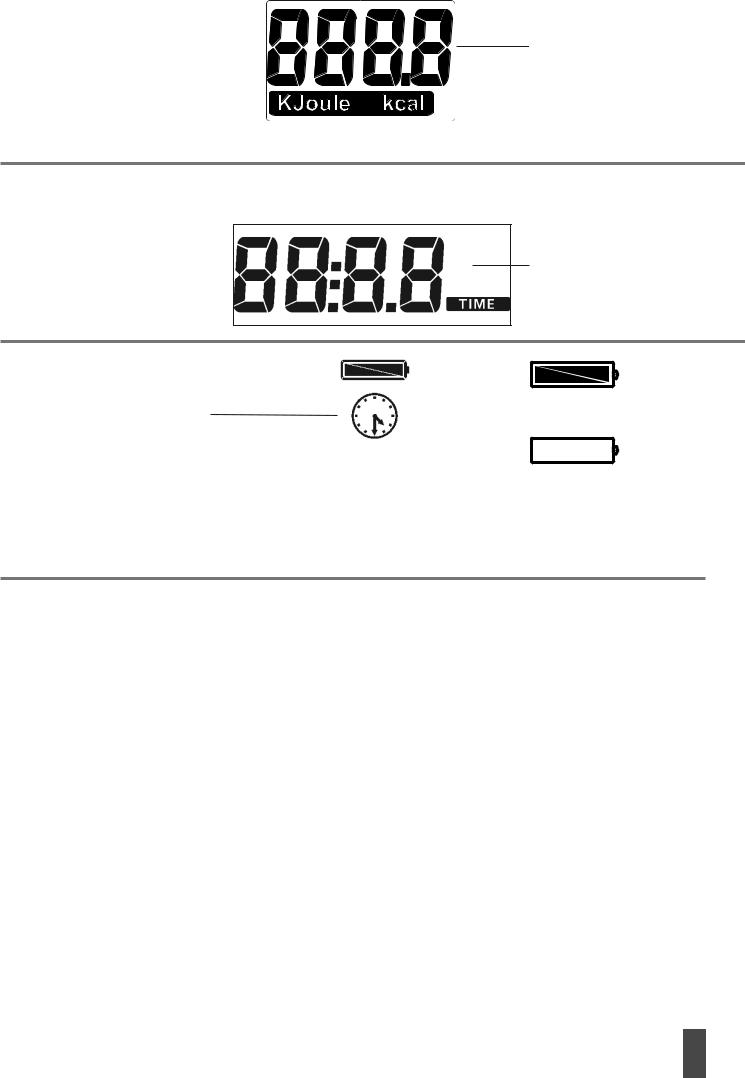
Energieverbrauch
Wert: 0 – 9999
Odo-Wert > Gesamt k(m)
Zeit (TIME)
Wert: 0:00 – 99:59
Batterieladung
Uhrsymbol
Anzeigewerte
Die Beispielanzeigen zeigen den Betrieb als Heimtrainer.
Bei übereinstimmender Drehzahl mit den Beispielanzeigen liegen die Werte für Geschwindigkeit und Entfernung bei Crosstrainern niedriger.
Bei 60 min-1 (RPM) Heimtrainer: = 21,3 km/h Crosstrainer: = 9,5 km/h
Batteriespannung ausreichend für Pulsmessung.
Batteriespannung nicht mehr ausreichend zur Pulsmessung. Batterie wechseln.
5 D

Trainingsund Bedienungsanleitung
Schnellstart (Zum Kennenlernen)
ohne besondere Einstellungen
• Drücken Sie eine Taste
Anzeige
• Alle Segmente werden kurz angezeigt. (Segmentetest)
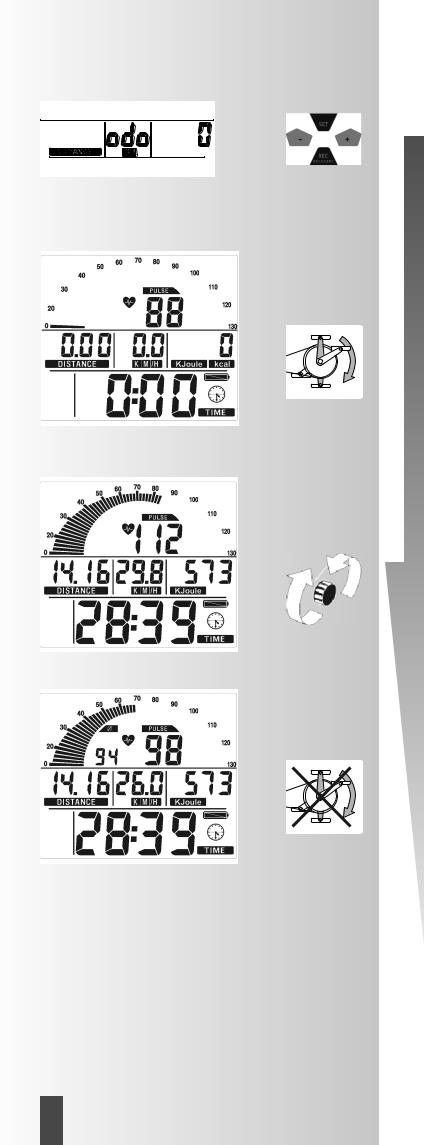
• Die Gesamtkilometer werden kurz angezeigt. Danach Wechsel in die Anzeige “Trainingsbereitschaft”
Trainingsbereitschaft
Anzeige
Alle Bereiche zeigen “Null” außer Puls (falls aktiv).
Trainingsbeginn durch Pedaltreten
Trainingsbeginn
Anzeige
• Pedalumdrehungs-Segmente, Entfernung, Geschwindigkeit, Energie und Zeit zählen hoch.
• Puls (falls aktiv)
Bremsverstellung Stufe 1-10
• Durch Drehen nach rechts wird die Bremsstufe erhöht und nach links vermindert.
Trainingsunterbrechung oder -ende
Bei Trainingsunterbrechung oder -ende werden Durchnittswerte der letzten Trainingseinheit mit dem Ø -Symbol angezeigt.
Anzeige
• Durchschnittswerte (Ø):
Pedalumdrehungs-Segmente, Geschwindigkeit und Puls (falls aktiv)
• Gesamtwerte
Entfernung, Energie und Zeit
Schlummermodus
Gerät schaltet 4 Minuten nach Trainingsende in denSchlummermodus. Beliebige Taste drücken Anzeige beginnt wieder mit Segmentetest, Odometer und Trainingsbereitschaft.
6 D
Training
1. Training ohne Vorgaben
• Eine beliebige Taste drücken
und / oder
• Pedaltreten (wie unter “Schnellstart“)
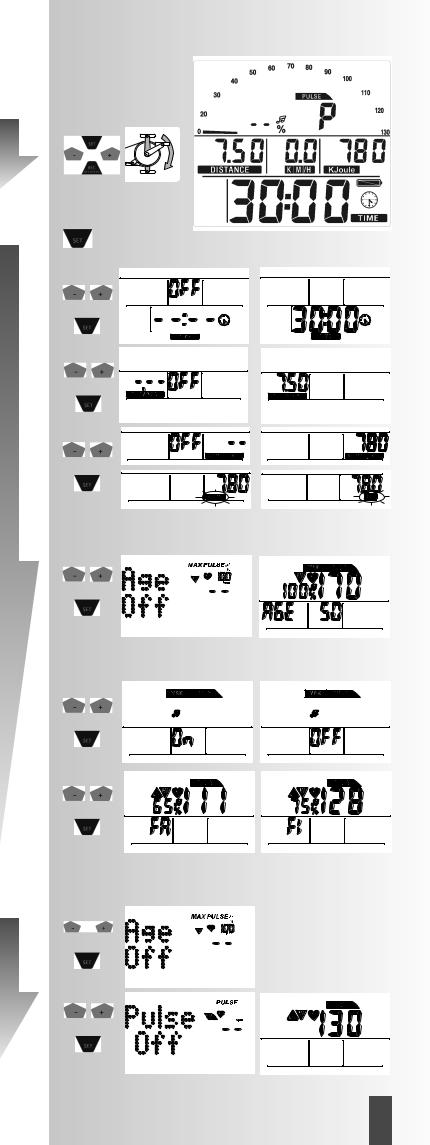
2. Training mit Vorgaben
Anzeige: “Trainingsbereitschaft”
• “SET” drücken: Vorgabenbereich
Zeitvorgabe (TIME)
•Mit “Plus” oder “Minus” Werte eingeben (z.B. 30:00) Mit “SET” bestätigen.
Anzeige: nächstes Menü ”STRECKE”
Streckenvorgabe (DISTANCE)
•Mit “Plus” oder “Minus” Werte eingeben (z.B. 7,50) Mit “SET” bestätigen.
Anzeige: nächstes Menü “ENERGIE”
Energievorgabe (KJoule/kcal)
•Mit “Plus” oder “Minus” Werte eingeben (z.B. 780) Mit “SET” bestätigen.
•Mit “Plus” oder “Minus” Einheit KJoule oder kcal wählen.
Mit “SET” bestätigen.
Anzeige: nächstes Menü “Alterseingabe“
Alterseingabe (AGE)
die Eingabe des Alters dient zur Ermittllung und zur Überwachung des Maximalpulses (Symbol HI , Warnton falls aktiviert).
•Mit “Plus” oder “Minus” Werte eingeben (z.B. 50). Daraus errechnet sich bei der Eingabe nach der Beziehung (220 - Alter) der Maximalpuls von 170
Mit “SET” bestätigen.
Anzeige: nächstes Menü ”Alarmton”
Alarmton bei Maximalpulsüberschreitung
•Mit Plus” oder “Minus” Funktion auswählen. Mit “SET” bestätigen.
Anzeige: nächstes Menü Zielpulsauswahl “FA 65%”
Zielpulsüberwachung FA 65%/FI 75%
•Mit “Plus” oder “Minus” Auswahl treffen
•Fettverbrennung 65%, Fitness 75% vom Maximalpuls
Mit “SET” bestätigen (Vorgabenmodus beendet) Anzeige: Trainingsbereitschaft mit den Vorgaben
Oder
Zielpulseingabe
die Eingabe 40 - 199 dient zur Festlegung und Überwachung eines altersunabhängigen Trainingspulses (Symbol HI , Warnton falls aktiviert, keine Maximalpulsüberwachung). Dazu muß die Alterseingabe auf “OFF” stehen.
•Mit “Plus” und “Minus” die Maximalpuls Überwachung abwählen. Anzeige: “AGE OFF”
Mit “SET” bestätigen.
Anzeige: nächste Vorgabe “Zielpuls” (Pulse)
•Mit “Plus” oder “Minus” Wert eingeben (z.B. 130)
Mit “SET” bestätigen (Vorgabenmodus beendet) Anzeige: Trainingsbereitschaft mit den Vorgaben
7 D
Trainingsund Bedienungsanleitung
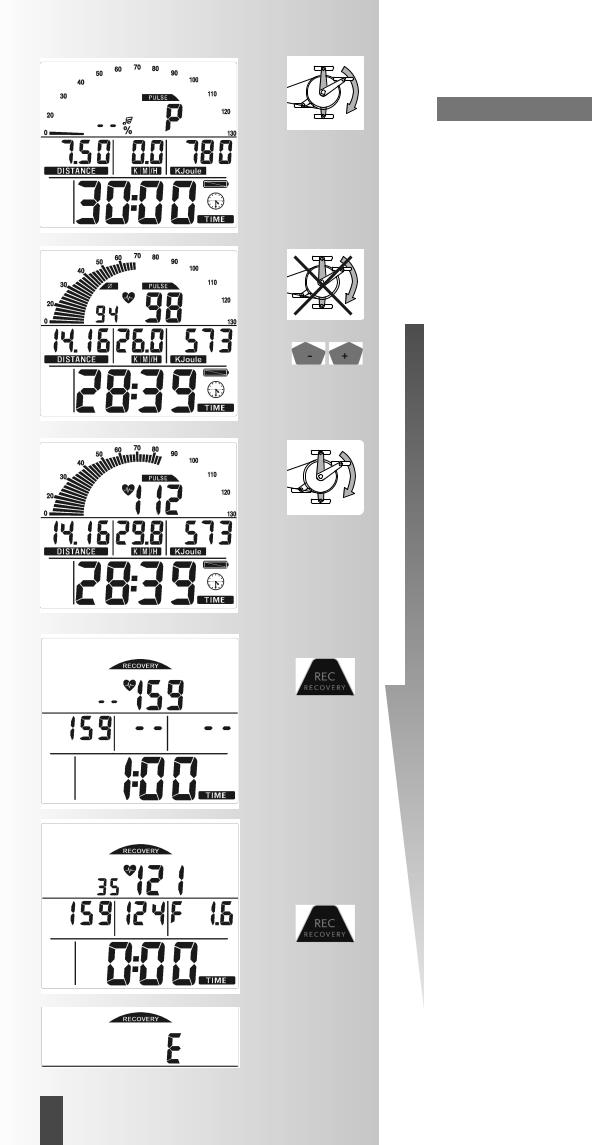
• Pedaltreten
Bei Vorgaben wird abwärts gezählt.
Bemerkung:
• Die Vorgaben gehen bei einem “Reset” verloren.
Trainingsunterbrechung oder –ende
Bei weniger als 14 Pedalumdrehungen/min erkennt die Elektronik eine Trainingsunterbrechung. Die erreichten Trainingsdaten werden angezeigt. Umdrehungen, Puls und Geschwindigkeit werden als Durchschnittswerte mit Ø - Symbol dargestellt.
Mit “Minus” oder “Plus” Wechsel in die aktuelle Anzeige.
Die Trainingsdaten werden für 4 Minuten angezeigt. Drükken Sie in dieser Zeit keine Tasten und trainieren nicht, schaltet die Elektronik in den Schlummermodus.
Trainingswiederaufnahme
Bei Fortsetzung des Trainings innerhalb von 4 Minuten werden die letzten Werte weiteroder heruntergezählt.
RECOVERY – Funktion
Erholungspulsmessung
Bei Trainingsende “RECOVERY” drücken.
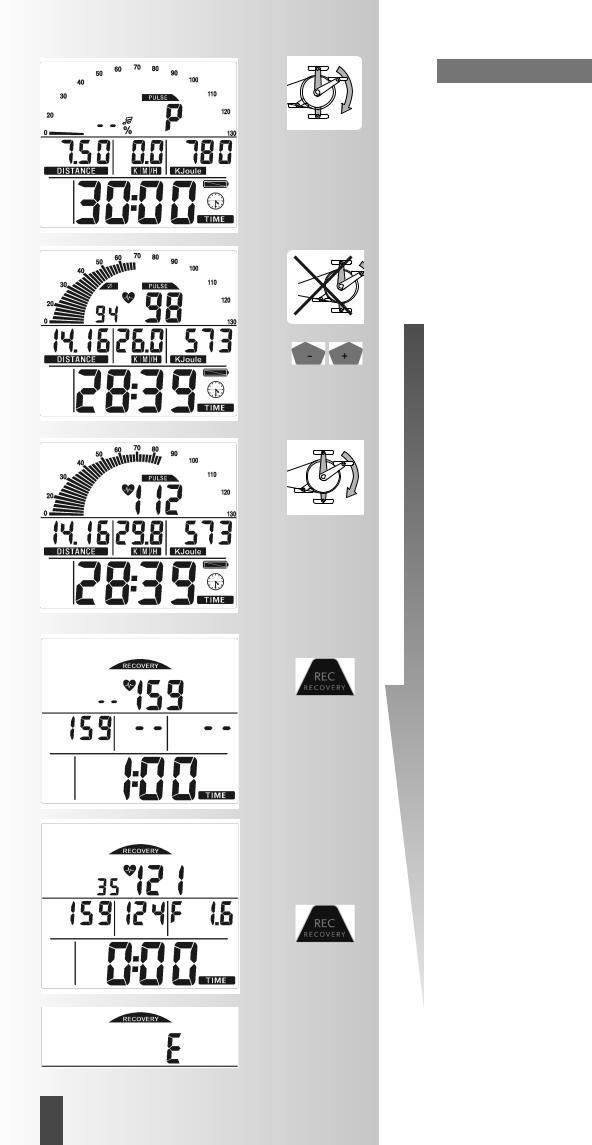
Anzeige
• RECOVERY
Die Elektronik misst 60 Sekunden rücklaufend Ihren Puls.
Über “DISTANCE” wird der aktuelle und über “KM/H” wird der Pulswert nach 60 Sekunden gespeichert.
Neben “% Puls” wird die Differenz beider Werte gezeigt. Daraus wird eine Fitnessnote (im Beispiel F 1.6) ermittelt. Die Anzeige wird nach 20 Sekunden beendet.
“RECOVERY” unterbricht die Erholpuls-Funktion oder Fit- nessnoten-Anzeige.
Wird zu Beginn oder Ende des Zeitrücklaufs kein Puls erfasst, erscheint die Fehlermeldung “E”.
8 D

Allgemeine Hinweise
Systemtöne
Einschalten
Beim Einschalten, während des Segmenttests wird ein Ton ausgegeben.
Vorgaben
Bei Erreichen von Vorgaben bei Zeit, Entfernung und KJoule/kcal wird ein kurzer Ton ausgeben.
Maximalpulsüberschreitung
Wird der eingestellte Maximalpuls um einen Pulsschlag überschritten, so werden für die Zeit 2 kurze Töne ausgegeben.
Recovery
Berechnung der Fitnessnote (F): |
|
|
|
Note (F) = 6.0 – ( |
10 x (P1–P2) |
) |
2 |
P1 |
|
||
P1 Belastungspuls, |
P2 = Erholungspuls |
||
F1.0 = sehr gut, |
F6.0 = ungenügend |
||
Durchschnittswertberechnung
Die Durschnittswertberechnungen beziehen sich auf zurückliegende Trainingseinheiten bis zu einem Reset oder zum Schlummermodus.
Hinweise zur Pulsmessung
Die Pulsberechnung beginnt, wenn das Herz in der Anzeige im Takt Ihres Pulsschlages blinkt.
Mit Ohrclip
Der Pulssensor arbeitet mit Infrarotlicht und misst die Veränderungen der Lichtdurchlässigkeit Ihrer Haut, die von Ihrem Pulsschlag hervorgerufen werden. Bevor Sie den Pulssensor an Ihr Ohrläppchen klemmen, reiben Sie es zur Durchblutungssteigerung 10 mal kräftig.
Vermeiden Sie Störimpulse.
•Befestigen Sie den Ohrclip sorgfältig an Ihrem Ohrläppchen und suchen Sie den günstigsten Punkt für die Abnahme (Herzsymbol blinkt ohne Unterbrechnung auf).
•Trainieren Sie nicht direkt unter starkem Lichteinfall z.B. Neonlicht, Halogenlicht, Spot - Strahler, Sonnenlicht.
•Schließen Sie Erschütterungen und Wackeln des Ohrsensors inklusive Kabel vollkommen aus. Stecken Sie das Kabel immer mittels Klammer an Ihrer Kleidung oder noch besser an einem Stirnband fest.
Mit Brustgurt
Beachten Sie die dazugehörige Anleitung.
Mit Handpuls
Eine durch díe Kontraktion des Herzens erzeugte Kleinstspannung wird durch die Handsensoren erfasst und durch die Elektronik ausgewertet
•Umfassen Sie die Kontaktflächen immer mit beiden Händen
•Vermeiden Sie ruckartiges Umfassen
•Halten Sie die Hände ruhig und vermeiden Sie Kontraktionen und Reiben auf den Kontaktflächen
Bemerkung:
Es ist nur eine Art der Pulsmessung möglich: entweder mit Ohrclip oder mit Handpuls oder mit Brustgurt. Befindet sich kein Ohrclip bzw. Einsteckempfänger in der Pulsbuchse, so ist die Handpulsmessung aktiviert. Wird ein Ohrclip bzw. Einsteckemp-
fänger in der Pulsbuchse eingesteckt, so wird die Handpulsmessung automatisch deaktiviert. Es ist nicht erforderlich, den Stekker der Handpulssensoren herauszuziehen.
Störungen beim Trainingscomputer
Drücken Sie die SET –Taste länger (Reset)
Trainingsanleitung
Sportmedizin und Trainingswissenschaft nutzen die FahrradErgometrie u.a. zur Überprüfung der Funktionsfähigkeit von Herz, Kreislauf und Atmungssystem.
Ob Ihr Training nach einigen Wochen die gewünschten Auswirkungen erzielt hat, können Sie folgendermaßen feststellen:
1.Sie schaffen eine bestimmte Ausdauerleistung mit weniger Herz–/Kreislaufleistung als vorher
2.Sie halten eine bestimmte Ausdauerleistung mit der gleichen Herz–/Kreislaufleistung über eine längere Zeit durch.
3.Sie erholen sich nach einer bestimmten Herz–/Kreislauflei- stung schneller als vorher.
Richtwerte für das Ausdauertraining
Maximalpuls: Man versteht unter einer maximalen Ausbelastung das Erreichen des individuellen Maximalpulses. Die maximal erreichbare Herzfrequenz ist vom Alter abhängig.
Hier gilt die Faustformel: Die maximale Herzfrequenz pro Minute entspricht 220 Pulsschläge minus Lebensalter.
Beispiel: Alter 50 Jahre -> 220 – 50 = 170 Puls/Min.
Belastungsintensität
Belastungspuls: Die optimale Belastungsintensität wird bei 65– 75% (vgl. Diagramm) des Maximalpulses erreicht. In Abhängigkeit vom Alter verändert sich dieser Wert.
Puls |
|
|
|
|
|
|
Pulsdiagramm |
|||||||||||
|
|
|
|
|
Fitness und Fettverbrennung |
|||||||||||||
220 |
|
|
|
|
|
|||||||||||||
|
|
|
|
|
|
|
|
|
|
|
|
|
|
|
|
|
|
|
|
|
|
|
|
|
|
|
|
|
|
|
|
|
|
|
|
|
|
200 |
|
|
|
|
|
|
Maximalpuls |
|
|
|
|
|
|
|||||
|
|
|
|
|
|
(220 minus Alter) |
|
|
|
|
|
|
||||||
180 |
|
|
|
|
|
|
|
|
|
|
|
|
|
|
|
|
|
|
|
|
|
|
|
|
|
|
|
|
|
|
|
|
|
|
|
|
|
160 |
|
|
|
|
|
|
|
|
|
|
|
|
|
|
|
|
|
|
|
|
|
|
|
|
Fitnesspuls |
|
|
|
|
|
|
|
|
||||
|
|
|
|
|
|
|
|
|
|
|
|
|
||||||
140 |
|
|
|
|
|
(75% vom Max.Puls) |
|
|
|
|
|
|
|
|||||
|
|
|
|
|
|
|
|
|
|
|
|
|
|
|
|
|
|
|
|
|
|
|
|
|
|
|
|
|
|
|
|
|
|
|
|
|
|
120 |
|
|
|
|
|
|
|
|
|
|
|
|
|
|
|
|
|
|
|
|
|
|
|
|
|
|
|
|
|
|
|
|
|
|
|
|
|
100 |
|
|
|
|
|
|
|
|
|
|
|
|
|
|
|
|
|
|
|
|
|
Fettverbrennungspuls |
|
|
|
|
|
|
|
|
|
|
|||||
80 |
|
|
|
|
|
|
|
|
|
|
|
|||||||
|
|
|
(65% vom Max.Puls) |
|
|
|
|
|
|
|
|
|||||||
|
|
|
|
|
|
|
|
|
|
|
|
|
||||||
|
|
|
|
|
|
|
|
|
|
|
|
|
|
|
|
|
|
|
20 25 30 35 40 45 50 55 60 65 70 75 80 90 Alter
Belastungsumfang
Dauer einer Trainingseinheit und deren Häufigkeit pro Woche:
Der optimale Belastungsumfang ist gegeben, wenn über einen längeren Zeitraum 65–75% der individuellen Herz–/Kreislauflei- stung erreicht wird.
Faustregel:
|
Trainingshäufigkeit |
Trainingsdauer |
|
|
täglich |
10 min |
|
|
2–3 x wöchentlich |
20–30 min |
|
|
1–2 x wöchentlich |
30–60 min |
|
|
|
|
|
Anfänger sollten nicht mit Trainingseinheiten von 30-60 Minuten beginnen.
Das Anfängertraining kann in den ersten 4 Wochen folgender-
9 D

Trainingsund Bedienungsanleitung
maßen konzipiert sein:
|
Trainingshäufigkeit |
Umfang einer Trainingseinheit |
||
|
|
|
|
|
|
|
|
1. Woche |
|
|
3 x wöchentlich |
2 Minuten Training |
||
|
|
1 |
Minute Pause für Gymnastik |
|
|
|
2 |
Minuten Training |
|
|
|
1 |
Minute Pause für Gymnastik |
|
|
|
2 |
Minuten Training |
|
|
|
|
|
|
|
|
|
2. Woche |
|
|
3 x wöchentlich |
3 Minuten Training |
||
|
|
1 |
Minute Pause für Gymnastik |
|
|
|
3 |
Minuten Training |
|
|
|
1 |
Minute Pause für Gymnastik |
|
|
|
2 |
Minuten Training |
|
|
|
|
|
|
|
|
|
3. Woche |
|
|
3 x wöchentlich |
4 Minuten Training |
||
|
|
1 |
Minute Pause für Gymnastik |
|
|
|
3 |
Minuten Training |
|
|
|
1 |
Minute Pause für Gymnastik |
|
|
|
3 |
Minuten Training |
|
|
|
|
|
|
|
|
|
4. Woche |
|
|
3 x wöchentlich |
5 Minuten Training |
||
|
|
1 |
Minute Pause für Gymnastik |
|
|
|
4 |
Minuten Training |
|
|
|
1 |
Minute Pause für Gymnastik |
|
|
|
4 |
Minuten Training |
|
Vor und nach jeder Trainingseinheit dient eine ca. 5-minütige Gymnastik dem Aufwärmen bzw. dem Cool-down. Zwischen zwei Trainingseinheiten sollte ein trainingsfreier Tag liegen, wenn Sie im späteren Verlauf das 3 mal wöchentliche Training von 20-30 Minuten bevorzugen. Ansonsten spricht nichts gegen ein tägliches Training.
Glossar
Alter
Eingabe zur Berechnung des Maximalpulses.
Dimension
Einheiten zur Anzeige von km/h oder mph, Kjoule oder kcal.
Fettverbrennung(s)-puls
Errechneter Wert von: 65% MaxPuls
Fitnesspuls
Errechneter Wert von: 75% MaxPuls
Glossar
Eine Ansammlung von Erklärungsversuchen.
HI-Symbol
Erscheint “HI” ist ein Zielpuls um 11 Schläge zu hoch. Blinkt HI ist der Max-Puls überschritten. “HI” - Überwachung ist immer aktiv.
LO-Symbol
Erscheint “LO” ist ein Zielpuls um 11 Schläge zu niedrig. “LO” - Überwachung ist aktiv, wenn im Training der Zielpuls erreicht wurde.
MaxPuls(e)
Errechneter Wert aus 220 minus Lebensalter
Menü
Anzeige in der Werte eingegeben oder ausgewählt werden sollen.
Puls
Erfassung des Herzschlages pro Minute
Recovery
Erholpulsmessung zum Trainingsende. Aus Anfangsund Endpuls einer Minute wird die Abweichung und eine Fitnessnote daraus ermittelt. Bei gleichem Training ist die Verbesserung dieser Note ein Maß für Fitnesssteigerung.
Reset
Löschen des Anzeigeinhaltes und Neustart der Anzeige.
Zielpuls
Durch Eingabe bestimmter Pulswert, der überwacht werden soll.
10 D
Leistungtabelle
|
|
P 1 |
P 2 |
Belastungs- |
Zeit |
Entfernung |
Energie- |
Fitness- |
Datum |
Ruhepuls |
Belastungspuls |
Erholungspuls |
stufe |
(min.) |
(km) |
verbrauch |
note |
|
|
|
|
|
|
|
|
|
|
|
|
|
|
|
|
|
|
|
|
|
|
|
|
|
|
|
|
|
|
|
|
|
|
|
|
|
|
|
|
|
|
|
|
|
|
|
|
|
|
|
|
|
|
|
|
|
|
|
|
|
|
|
|
|
|
|
|
|
|
|
|
|
|
|
|
|
|
|
|
|
|
|
|
|
|
|
|
|
|
|
|
|
|
|
|
|
|
|
|
|
|
|
|
|
|
|
|
|
|
|
|
|
|
|
|
|
|
|
|
|
|
|
|
|
|
|
|
|
|
|
|
|
|
|
|
|
|
|
|
|
|
|
|
|
|
|
|
|
|
|
|
|
|
|
|
|
|
|
|
|
|
|
|
|
|
|
|
|
|
|
|
|
|
|
|
|
|
|
|
|
|
|
|
|
|
|
|
|
|
|
|
|
|
|
|
|
|
|
|
|
|
|
|
|
|
|
|
|
|
|
|
|
|
|
|
|
|
|
|
|
|
|
|
|
|
|
|
|
|
|
|
|
|
|
|
|
|
|
|
|
|
|
|
|
|
|
|
|
|
|
|
|
|
|
|
|
|
|
|
|
|
|
|
|
|
|
|
|
|
|
|
|
|
|
|
|
|
|
|
|
|
|
|
|
|
|
|
|
|
|
|
|
|
|
|
|
|
|
|
|
|
|
|
|
|
|
|
|
|
|
|
|
|
|
|
|
|
|
|
|
|
|
|
|
|
|
|
|
|
|
|
|
|
|
|
|
|
|
|
|
|
|
|
|
|
|
|
|
|
|
|
|
|
|
|
|
|
|
|
|
|
|
|
|
|
|
|
|
|
|
|
|
|
|
|
|
|
|
|
|
|
|
|
|
|
|
|
|
|
|
|
|
|
|
|
|
|
|
|
|
|
|
|
|
|
|
|
|
|
|
|
|
|
|
|
|
|
|
|
|
|
|
|
|
|
|
|
|
|
|
|
|
|
|
|
|
|
|
|
|
|
|
|
|
|
|
|
|
|
|
|
|
|
|
|
|
|
|
|
|
|
|
|
|
|
|
|
|
|
|
|
|
|
|
|
|
|
|
|
|
|
|
|
|
|
|
|
|
|
|
|
|
|
|
|
|
|
|
|
|
|
|
|
|
|
|
|
|
|
|
|
|
|
|
|
|
|
|
|
|
|
|
|
|
|
|
|
|
|
|
|
|
|
|
|
|
|
|
|
|
|
|
|
|
|
|
|
|
|
|
|
|
|
|
|
|
|
|
|
|
|
|
|
|
|
|
|
|
|
|
|
|
|
|
|
|
|
|
|
|
|
|
|
|
11 D

Training and Operating Instructions
Table of contents
Safety instructions
•Service
•Your safety
Short description
•Functions and keys
•Display range and display
Quick start (for introduction)
•Ready for training
•Start of training
•End of training
•Sleep mode
Training
•without presetting
•with presetting
12 |
|
• |
Time |
17 |
|
• |
Distance |
17 |
|
12 |
|
|||
|
• |
Energy (KJoule/kcal) |
17 |
|
12 |
|
|||
|
• |
Age input (10-99) |
17 |
|
12 |
|
|||
|
• |
Set alarm signal (yes/no) |
17 |
|
13-15 |
|
|||
|
• |
Target pulse selection (FA 65%,/FI |
|
|
13 |
|
|
||
|
|
75%) |
17 |
|
14-15 |
|
|
||
|
• |
Target pulse input (40-199) |
17 |
|
16 |
|
|||
|
• |
Ready for training |
17 |
|
16 |
|
|||
|
• |
Training interruption/end of training |
||
16 |
|
|||
|
|
18 |
|
|
16 |
|
• |
Resumption of training |
18 |
16 |
|
• |
Recovery measurement |
18 |
17-18 |
|
General instructions |
19 |
|
17 |
|
• |
System signals |
19 |
17 |
|
• |
Recovery |
19 |
|
|
|
|
|
• |
Calculation of average value |
19 |
• |
Instructions for pulse measurement |
19 |
|
with ear clip |
19 |
|
with breast belt |
19 |
|
with hand pulse |
19 |
• |
Computer errors |
19 |
Training instructions |
19 |
|
• |
Stamina training |
19 |
• |
Load intensity |
20 |
• |
Extent of load |
20 |
Glossary |
20 |
|
G
This sign in the instructions refers to the glossary, where the respective term will be explained.
Safety instructions
Please observe the following instructions for your own safety:
•The training device must be set up on an appropriate and firm surface.
•Inspect the connections for firm fitting before initial operation and additionally after approximately six operation days.
•In order to prevent injuries caused by wrong stress or overstress, the training device may only be used in accordance with the instructions.
•It is not recommended to permanently set up the device in humid rooms due to the resulting corrosion development.
•Assure yourself regularly that the training device functions properly and that it is in duly condition.
•The operator is responsible for the safety controls, which have to be carried out on a regular and proper basis.
•Defective or damaged parts must be exchanged immediately. Only use original KETTLER spare parts.
•The device may not be used until after repairs are completed.
•The safety level of the device can only be maintained provided that it is regularly inspected for damage and wear and tear.
For your safety:
•Please clarify with your general practitioner before you start with the training, whether or not your health condition allows you to train with this device. The diagnostic findings should be the basis for the determination of your training programme. Wrong or excessive training can cause damage to your health.
12 GB
Short description
The electronics assembly is equipped with functions with keys and a display range (display) with variable symbols and graphics.
display range
display
functions
keys
Quick reference guide
Functions
The four keys will be described in short below.
A detailed application description can be found in the respective chapters. The names of the function keys in the chapters correspond to the names used in this quick reference guide.
SET (press shortly)
Input data are accessed with this function key. The set data are accepted.
Reset (press SET longer)
The current display is deleted for a reset.
Minus – / Plus +
With these function keys, you can change the values in the different input data before the start of the training.
-press longer > fast run through the values
-press “Plus” and “Minus” together: value input skips to
OFF
RECOVERY
You can start the recovery pulse function with this function key.
Pulse measurement
Pulse measurement can be achieved via three sources:
1.ear clip – connect the plug with the plug socket
2.hand pulse – the connection is situated at the back of the display
3.breast belt (accessories) – please observe the corresponding instructions
G
G
13 GB
Training and Operating Instructions
Quick reference guide
Display range/display
The display range (display) informs you about the different functions.
Pedal frequency (RPM)
14-130 [1/min]
1 segment = 2 [1/min]
Pulse (PULSE) |
G |
maximum pulse warning (blinks) max. pulse +1
display of average value 

target pulse limit exceeded +11 
 target pulse limit undershot –11
heart symbol (blinks)
recovery function
pulse display
40 – 199 [1/min]
Percentage pulse

 warning signal ON/OFF
percentage value
comparison actual pulse/ max pulse
Distance (DISTANCE)
value 0.00 – 99.99
Speed
value 0 – 99.9
display of average values
14 GB

Energy consumption
value: 0 – 9999
odometer value > total k(m)
Time(TIME)
value 0:00 – 99:59
battery charge
clock symbol |
Battery charge sufficient for |
pulse measurement. |
|
|
Battery charge not sufficient |
|
anymore for pulse measure- |
|
ment, change battery. |
Display values
The example displays show the operation as home trainer.
If the revolutions per minute correspond to the example displays the values for speed and distance are lower for cross trainers.
At 60 min-1 (RPM)
Home trainers: = 21,3 km/h Cross trainers: = 9,5 km/h
15 GB

Training and Operating Instructions
Quick start (for introduction)
Without special settings
• press a key
Display
• All segments are shortly displayed (segment test).
• The total kilometres are shortly displayed.
Subsequently change to the display “Reading for training”.
Ready for training
Display
All segments display “Zero”, except for pulse (if activated)
Start training by pedalling.
Start of training
Display
• Pedal rotation segments, distance, speed, energy and time increase.
• Pulse (if activated).
Brake setting levels 1-10
• Turn hand wheel to the right to increase the brake level; turn hand wheel to the left to decrease the brake level.
Training interruption/end of training
If you interrupt or complete your training, average values of the last training unit are displayed with the Ø symbol.
Display
• Average values Ø:
pedal rotation segments, speed and pulse (if activated).
• Total values:
distance, energy and time.
Sleep mode
Four minutes after the end of training, the device switches into the sleep mode. If you press a key, the display starts again with the segment test, odometer and ready for training.
16 GB

Training
1. Training without presetting
• Press a key.
and/or
• Start pedalling (as in “Quick start”).
2. Training with presetting
Display: “Ready for training”.
• Press “SET”: presetting segment
Time setting (TIME)
•Enter values using “Plus” or “Minus” (e.g. 30:00), confirm with “SET”.
Display: next menu “DISTANCE”.
Distance setting (DISTANCE)
•Enter values using “Plus” or “Minus” (e.g. 7.50), confirm with “SET”.
Display: next menu “ENERGY”.
Energy setting (KJoule/kcal)
•Enter values using “Plus” or “Minus” (e.g. 780), confirm with “SET”.
•Select unit KJoule or kcal using “Plus” or “Minus”, confirm with “SET”.
Display: next menu “Age input”.
Age input (AGE)
The input of the age serves for the calculation and the monitoring of the maximum pulse (symbol HI; warning signal, if activated).
•Enter values using “Plus” or “Minus” (e.g. 50). Upon input, the maximum pulse is calculated with the formula (220 – age), here: maximum pulse of 170. Confirm with “SET”.
Display: next menu “Alarm signal”.
Alarm signal, if maximum pulse is exceeded
•Select function using “Plus” or Minus”, confirm with “SET”.
Display: next menu target pulse selection “FA 65%”.
Target pulse monitoring FA 65%/FI 75%
•Make your choice using “Plus” or “Minus”.
•Fat burning 65%, fitness 75% of maximum pulse, confirm with “SET” (presetting mode completed).
Display: ready for training with the presetting.
Or
Target pulse input
The input 40 – 199 serves for the determination and monitoring of a training pulse independent of the age (symbol HI; warning signal, if activated; no maximum pulse monitoring). Note that that the age input has to be set to “OFF”.
•Switch off maximum pulse monitoring using “Plus” and “Minus”. Display: “AGE OFF”, confirm with “SET”.
Display: next presetting “Target pulse” (pulse).
•Enter values using “Plus” or “Minus” (e.g. 130), confirm with “SET” (presetting mode completed).
Display: ready for training with the presetting.
• Pedalling
17 GB

Training and Operating Instructions
Decreases with presetting.
Comment:
• The presetting entries are lost with a “Reset”.
Training interruption/end of training
With less than 14 pedal rotations per minute, the electronics assembly of the device identifies a training interruption. The achieved training data are displayed. Rotations, pulse and speed are displayed as average values with the symbol Ø.
You can switch to the current display using “Plus” or “Minus”.
The training data are displayed for four minutes. If you do not press any key nor train during this period of time, the electronics assembly of the device switches to sleep mode.
Resumption of training
If you resume training within four minutes, the last values continue to be increased or decreased.
RECOVERY function
Recovery pulse measurement
Press “RECOVERY” at the end of training.
Display
• RECOVERY
The electronics assembly of the device measures your pulse 60 seconds in reverse.
The current pulse value is saved under “DISTANCE”; the pulse value after 60 seconds is saved under “KM/H”.
Next to “% Puls”, the difference between the two values is displayed. From this difference, a fitness mark (in this example F 1.6) is calculated. The display switches off after 20 seconds.
“RECOVERY” interrupts the recovery pulse function or the fitness mark display.
If no pulse is measured in the beginning or at the end of the reverse counting, the error message “E” is displayed
18 GB

General instructions
System signals
Activation of the device
If you activate the device, a signal is emitted during the segment test.
Presetting
A short signal is emitted, if you reach a presetting like time, distance and KJoule/kcal.
Exceeding of maximum pulse
If the set maximum pulse is exceeded by one pulse beat, two short signals are emitted for the time of exceedance.
Recovery
Calculation of the fitness mark (F):
mark (F) = 6.0 – ( |
10 x (P1–P2) |
) |
2 |
|
P1 |
|
|||
P1 stress pulse |
P2 = recovery pulse |
|||
F1.0 = very good |
F6.0 = insufficient |
|||
Calculation of average value
The calculations of the average values refer to training units in the past until a reset or the sleep mode.
Instructions for pulse measurement
The pulse measurement starts as soon as the heart in the display blinks in time with your pulse beat.
With ear clip
The pulse sensor works with infrared light and measures the variations in translucence in your skin, which are produced by your pulse beat. Rub your ear ten times strongly to activate the blood circulation before attaching the pulse sensor to your earlobe.
Avoid disturbing pulses.
•Attach the ear clip properly to your earlobe and look for the best point for the measurement (heart symbol blinks without interruption).
•Do not train directly under strong incidence of light, e.g. neon light, halogen light, spotlight, sun light.
•Completely eliminate any shocks or bounces of the ear sensor and the cable. Always attach the cable with a clip at your clothing or, even better, at your headband.
With breast clip
Please observe the corresponding instructions.
With hand pulse
An extra-low voltage caused by the contractions of your heart is registered by the hand sensors and evaluated by the electronics assembly of the device.
•Always grab the contact faces with both hands.
•Avoid jerky grasping.
•Hold your hands calmly and avoid contractions and rubbing on the contact faces.
Comment:
Only one way of pulse measurement is possible: either with ear clip or with hand pulse or with breast belt. If no ear clip or plug recipient is located in the pulse plug, hand pulse measurement is activated. If you insert an ear clip or a plug recipient in the pulse plug, hand pulse measurement is automatically deactivated. It is not necessary to disconnect the plug of the hand pulse
measurement.
Failures with the training computer
Press the “SET” key for a longer period of time (reset).
Training Instructions
Sports medicine and training science use cycle ergometry, among other things, for the examination of the functional capability of heart, circulation and respiratory system.
You can find out whether or not you have achieved the desired effect from your training after several weeks using the following method:
1.You manage a particular endurance performance with less heart / circulation performance than previously
2.You sustain a particular endurance performance with the same heart / circulation performance over a longer period.
3.You recover more quickly than previously after a particular heart / circulation performance.
Guide values for the endurance training
Maximum pulse: maximum strain means the reaching of the individual maximum pulse. The maximum achievable heart rate is dependant on age.
Here, the following empirical formula applies: the maximum heart rate per minute corresponds to 220 heart beats minus age in years.
Example: age 50 years -> 220 – 50 = 170 pulse / min.
Load Intensity
Load pulse: the optimum intensity of load is reached at 65–75% (see also diagram) of the maximum pulse. This value changes depending on age.
Pulse |
|
|
|
Pulsediagramm |
|||||||||||||
|
|
|
Fitness and Fat Burner |
||||||||||||||
220 |
|
|
|
|
|
|
|||||||||||
|
|
|
|
|
|
|
|
|
|
|
|
|
|
|
|
|
|
|
|
|
|
|
|
|
|
|
|
|
|
|
|
|
|
|
|
200 |
|
|
|
|
|
|
Maximalpulse |
|
|
|
|
|
|
||||
|
|
|
|
|
|
(220 minus Age) |
|
|
|
|
|
|
|||||
180 |
|
|
|
|
|
|
|
|
|
|
|
|
|
|
|
|
|
|
|
|
|
|
|
|
|
|
|
|
|
|
|
|
|
|
|
160 |
|
|
|
|
|
|
|
|
|
|
|
|
|
|
|
|
|
|
|
|
|
|
|
Fitnesspulse |
|
|
|
|
|
|
|
|
|||
|
|
|
|
|
|
|
|
|
|
|
|
|
|||||
140 |
|
|
|
|
|
(75% of Max.Pulse) |
|
|
|
|
|
|
|
||||
|
|
|
|
|
|
|
|
|
|
|
|
|
|
|
|
|
|
|
|
|
|
|
|
|
|
|
|
|
|
|
|
|
|
|
|
120 |
|
|
|
|
|
|
|
|
|
|
|
|
|
|
|
|
|
|
|
|
|
|
|
|
|
|
|
|
|
|
|
|
|
|
|
100 |
|
|
|
|
|
|
|
|
|
|
|
|
|
|
|
|
|
|
|
|
Fat combustion pulse |
|
|
|
|
|
|
|
|
||||||
80 |
|
|
|
|
|
|
|
|
|
|
|||||||
|
|
|
|
(65% of Max.Pulse) |
|
|
|
|
|
|
|
|
|||||
|
|
|
|
|
|
|
|
|
|
|
|||||||
|
|
|
|
|
|
|
|
|
|
|
|
|
|
|
|
|
|
20 25 30 35 40 45 50 55 60 65 70 75 80 90 Age
Extent Of Load
Duration of a training unit and its frequency per week:
The optimum extent of load is attained, if 65–75% of the individual heart / circulation performance is achieved over a longer period.
Empirical Formula:
|
Training frequency |
Duration of training |
|
|
daily |
10 minutes |
|
|
2–3 times a week |
20–30 minutes |
|
|
1–2 times a week |
30–60 minutes |
|
|
|
|
|
Beginners should not begin with training units of 30-60 minutes.
The beginner’s training can be planned as follows in the first 4 weeks:
19 GB

Training and Operating Instructions
Training frequency |
Extent of training session |
|||
|
|
|
|
|
|
|
|
1st week |
|
3 times a week |
2 minutes of training |
|||
|
|
Break of 1 minute for physical exercises |
||
|
|
2 |
minutes of training |
|
|
|
Break of 1 minute for physical exercises |
||
|
|
2 |
minutes of training |
|
|
|
|
|
|
|
|
2nd week |
||
3 times a week |
3 minutes of training |
|||
|
|
Break of 1 minute for physical exercises |
||
|
|
3 |
minutes of training |
|
|
|
Break of 1 minute for physical exercises |
||
|
|
2 |
minutes of training |
|
|
|
|
|
|
|
|
|
3rd week |
|
3 times a week |
4 minutes of training |
|||
|
|
Break of 1 minute for physical exercises |
||
|
|
4 |
minutes of training |
|
|
|
Break of 1 minute for physical exercises |
||
|
|
3 |
minutes of training |
|
|
|
|
|
|
|
|
|
4th week |
|
3 times a week |
5 minutes of training |
|||
|
|
Break of 1 minute for physical exercises |
||
|
|
4 |
minutes of training |
|
|
|
Break of 1 minute for physical exercises |
||
|
|
4 |
minutes of training |
|
|
|
|
|
|
It is recommended that you perform approx. 5 minutes of exercises before and after every training unit, in order to warm up and cool down. There should be a training-free day between each two consecutive training units, if you prefer training sessions of 20-30 minutes 3 times a week later on in your training. Otherwise, there is no reason why you should not train daily.
Glossary
Age
Input for the calculation of the maximum pulse.
Dimension
Units for the display of km/h or mph, KJoule or kcal.
Fat burning pulse
Calculated value of: 65% maximum pulse.
Fitness pulse
Calculated value of: 75% maximum pulse.
Glossary
An accumulation of attempts at explanation.
HI symbol
If “HI” is displayed, the target pulse is too high by 11 beats. If “HI” blinks, the maximum pulse is exceeded. “HI” monitoring is always activated.
LO symbol
If “LO” is displayed, the target pulse is too low by 11 beats. “LO” monitoring is activated, if the target pulse is reached during training.
Maximum pulse(s)
Value calculated from 220 minus age.
Menu
Display, in which values can be entered or selected.
Pulse
Registration of the heart beat per minute.
Recovery
Recovery pulse measurement at the end of training. The difference between start pulse and end pulse of a minute is calculated. With the help of this difference, a fitness mark is determined. If you train regularly, the improvement of this mark is an indication for your fitness progression.
Reset
Deletes the display contents and resets the display.
Target pulse
Input of a particular pulse value, which is be monitored.
20 GB
|
|
|
|
|
|
Performance table |
Date |
Restpulse |
Stress pulse Recovery pulse |
Slope |
Time |
Distance |
Energy consumptionFitness Mark |
|
|
|
|
(min) |
(km) |
(Kcal) |
|
|
|
|
|
|
|
|
|
|
|
|
|
|
|
|
|
|
|
|
|
|
|
|
|
|
|
|
|
|
|
|
|
|
|
|
|
|
|
|
|
|
|
|
|
|
|
|
|
|
|
|
|
|
|
|
|
|
|
|
|
|
|
|
|
|
|
|
|
|
|
|
|
|
|
|
|
|
|
|
|
|
|
|
|
|
|
|
|
|
|
|
|
|
|
|
|
|
|
|
|
|
|
|
|
|
|
|
|
|
|
|
|
|
|
|
|
|
|
|
|
|
|
|
|
|
|
|
|
|
|
|
|
|
|
|
|
|
|
|
|
|
|
|
|
|
|
|
|
|
|
|
|
|
|
|
|
|
|
|
|
|
|
|
|
|
|
|
|
|
|
|
|
|
|
|
|
|
|
|
|
|
|
|
|
|
|
|
|
|
|
|
|
|
|
|
|
|
|
|
|
|
|
|
|
|
|
|
|
|
|
|
|
|
|
|
|
|
|
|
|
|
|
|
|
|
|
|
|
|
|
|
|
|
|
|
|
|
|
|
|
|
|
|
|
|
|
|
|
|
|
|
|
|
|
|
|
|
|
|
|
|
|
|
|
|
|
|
|
|
|
|
|
|
|
|
|
|
|
|
|
|
|
|
|
|
|
|
|
|
|
|
|
|
|
|
|
|
|
|
|
|
|
|
|
|
|
|
|
|
|
|
|
|
|
|
|
|
|
|
|
|
|
|
|
|
|
|
|
|
|
|
|
|
|
|
|
|
|
|
|
|
|
|
|
|
|
|
|
|
|
|
|
|
|
|
|
|
|
|
|
|
|
|
|
|
|
|
|
|
|
|
|
|
|
|
|
|
|
|
|
|
|
|
|
|
|
|
|
|
|
|
|
|
|
|
|
|
|
|
|
|
|
|
|
|
|
|
|
|
|
|
|
|
|
|
|
|
|
|
|
|
|
|
|
|
|
|
|
|
|
|
|
|
|
|
|
|
|
|
|
|
|
|
|
|
|
|
21 GB

Mode d’emploi et instructions d‘entraînement
ITable des matières |
22 |
|
Consignes de sécurité |
22 |
|
• |
Entretien |
22 |
• |
Votre sécurité |
22 |
Brève description |
23-25 |
|
• |
Zone de fonctions / touches |
23 |
• |
Zone d’affichage / écran |
24-25 |
Démarrage rapide (pour découvrir) |
||
|
26 |
|
• |
Mode « prêt à l’entraînement » |
26 |
• |
Démarrage de l’entraînement |
26 |
• |
Interruption ou fin de l’entraînement26 |
|
• |
Mode veille |
26 |
Entraînement |
27-28 |
|
• |
Sans préréglages |
27 |
• |
Avec préréglages |
27 |
• |
Temps |
27 |
• |
Distance |
27 |
• |
Energie (kJ/kcal) |
27 |
• |
Age (10 à 99) |
27 |
•Réglage du signal sonore (oui/non)27
•Sélection du pouls visé (FA 65% / FI
|
75%) |
27 |
• |
Saisie du pouls visé (40 à 199) |
27 |
• |
Mode « prêt à l’entraînement » |
27 |
• |
Interruption/fin de l’entraînement |
28 |
• |
Reprise de l’entraînement |
28 |
• |
Recovery (mesure du pouls de récupé- |
|
|
ration) |
28 |
Consignes générales |
29 |
|
• |
Signaux sonores |
29 |
• |
Récupération |
29 |
• |
Calcul des valeurs moyennes |
29 |
• |
Consignes pour la mesure du pouls |
|
|
Avec clip-oreille |
29 |
|
Avec ceinture pectorale |
29 |
|
Avec capteurs au guidon |
29 |
• |
Dysfonctionnement de la console |
29 |
Instructions d’entraînement |
30 |
|
• |
Endurance |
30 |
• |
Intensité de l’effort |
30 |
• |
Envergure de l’effort |
30 |
Glossaire |
31 |
|
G
Dans le mode d’emploi, ce signe indique un renvoi au glossaire qui explique le terme en question..
Consignes de sécurité
Veuillez tenir compte des points suivants pour votre propre sécurité :
•Veuillez poser l’appareil d’entraînement sur un support solide et approprié.
•Veuillez vérifier que les raccords sont solidement fixés avant la première mise en service, ensuite environ tous les 6 jours de fonctionnement.
•Afin d’éviter les blessures à la suite d’une sollicitation inappropriée ou d’une surcharge, il est interdit d’utiliser l’appareil avant d’avoir lu le mode d’emploi.
•Il est déconseillé de placer l’appareil dans une salle humide car à long terme, il pourrait se corroder.
•Vérifiez régulièrement que l’appareil fonctionne correctement et qu’il est en bon état.
•L’exploitant est tenu de procéder à des contrôles techniques de la sécurité régulièrement et en bonne et due forme.
•Les pièces défectueuses ou endommagées doivent être immédiatement remplacées.
•Veuillez n’utiliser que des pièces de rechange d’origine KETTLER.
•Il est interdit d’utiliser l’appareil avant qu’il n’ait été remis en état.
•Le maintien du niveau de sécurité de l’appareil est conditionné par le contrôle régulier de l’absence de dommages et d’usure.
Pour votre sécurité :
•Avant de commencer l’entraînement, consulter votre médecin traitant afin de déterminer si votre état de santé vous permet d’utiliser cet appareil. Les résultats médicaux devraient servir de base pour l’établissement de votre programme d’entraînement. Un entraînement inapproprié ou excessif peut nuire à la santé.
22 F

Brève description
Le système électronique est composé d’une zone de fonctions munie de touches et d’une zone d’affichage (écran) caractérisée par des symboles et des graphiques variables.
Zone d’affichage
écran
Zone de fonctions
touches
Mode d’emploi succinct
Zone de fonctions
Les quatre touches sont expliquées dans ce qui suit.
Leur application est décrite en détail dans les chapitres séparés. Les touches de fonctions portent les noms suivants dans les descriptions.
SET (pression brève)
Cette touche de fonction sert à appeler des données saisies. Elle permet également de valider les données réglées.
Reset (pression plus long de la touche SET)
L’affichage actuel est effacé pour permettre un nouveau |
G |
départ. |
|
Moins - / plus +
Ces touches de fonctions permettent de modifier les valeurs des différentes données avant de commencer l’entraînement :
•Pression longue > défilement rapide des valeurs
•Pression simultanée du « plus » et du « moins » : la saisie de valeurs passe à Arrêt (OFF).
RECOVERY
Cette touche de fonction permet de démarrer la fonction pouls de récupération.
G
Mesure du pouls
Il existe 3 méthodes de mesure du pouls :
1.Clip-oreille
La fiche est enfichée dans la prise.
2.A la main
Le raccordement se situe au dos de l’affichage.
3.Ceinture pectorale (accessoire)
Veuillez suivre les instructions de la ceinture.
23 F
Mode d’emploi et instructions d‘entraînement
Brève description
La zone d’affichage (appelée écran) informe sur les différentes fonctions.
Fréquence de pédalage (RPM)
14 – 130 [1/min]
1 segment = 2 [1/min]
Pouls (PULSE) |
G |
|
Pouls maximal |
Avertissement (clignote) pouls max. + 1 |
|
Affichage de la valeur moyenne |
|
Pouls supérieur au pouls limite visé + 11 |
|
Pouls inférieur au pouls limite visé – 11 |
|
Le symbole du cœur clignote |
|
fonction pouls de récupération RECOVERY
affichage du pouls 40 – 190 [1/min]
Pouls en pourcentage

 Signal sonore marche/arrêt
Valeur en pourcentage Comparaison du pouls réel/pouls max.
Distance (DISTANCE)
Valeur 0,00 – 99,99
Vitesse
Valeur 0 – 99,99
Affichage de la valeur moyenne
24 F
Consommation énergétique
Valeur : 0 – 9999
Valeur odomètre > total k(m)
Temps (TIME)
Valeur: 0:00 – 99:59
Charge de la pile
Symbole de l’horloge
Tension de la pile suffisante pour la mesure du pouls
Tension de la pile insuffisante pour la mesure du pouls. Remplacez la pile.
Valeurs affichées
Les exemples d’affichage montrent le fonctionnement en tant que home-trainer.
Pour un même régime, le fonctionnement en tant que cross-trai- ner indiquera des valeurs d’exemple d’affichage plus faibles pour la vitesse et la distance.
Pour 60 min -1 (RPM) Home-Trainer = 21,3 km/h Cross-Trainer = 9,5 km/ h
25 F
Mode d’emploi et instructions d‘entraînement
Démarrage rapide (pour découvrir)
(sans réglages particuliers)
• Pressez une touche Affichage
• Tous les segments sont brièvement affichés (test)
• Le kilométrage total est brièvement affiché.
Ensuite, l’affichage passe au mode «prêt à l’entraînement».
Prêt à l’entraînement
Affichage
•Tous les champs sont à zéro sauf le pouls (si activé). Pour commencer l’entraînement, pédalez.
Démarrage de l’entraînement
Affichage
• Les segments de tours de pédale, la distance, la vitesse, l’énergie et le temps comptent.
• Le pouls (si activé)
Réglage du freinage niveau 1 à 10
• En tournant vers la droite, vous augmentez le niveau de freinage, vers la gauche, vous le diminuez.
Interruption ou fin de l’entraînement
Lors de l’interruption ou à la fin de l’entraînement, les valeurs moyennes de la dernière séance d’entraînement sont affichées avec le symbole Ø.
Affichage
• Valeurs moyennes (Ø) :
Segments de tours de pédale, vitesse et pouls (si activé).
• Valeurs totales:
Distance, énergie et temps
Mode veille
L’appareil passe en mode veille 4 minutes après la fin de l’entraînement. Pressez une touche quelconque et l’affichage est réactivé avec le test, l’odomètre et le mode « prêt à l’entraînement ».
Entraînement
1.Entraînement sans préréglage
• Pressez n’importe quelle touche
Et / ou
• Pédalez (comme pour le démarrage rapide)
26 F

2. Entraînement avec préréglage
Affichage « prêt à l’entraînement »
• Pressez sur « SET » : entrez dans l’écran des réglages
Réglage du temps (TIME)
•Saisissez la durée au moyen des touches « plus » et « moins » (p.ex. 30:00).
Validez avec la touche « SET ».
Affichage: menu suivant « DISTANCE »
Réglage de la distance (DISTANCE)
•Saisissez la distance au moyen des touches « plus » et « moins » (p.ex. 7,50).
Validez avec la touche « SET ».
Affichage: menu suivant « ENERGIE »
Réglage de l’énergie (kilojoule/kcal)
•Saisissez l’énergie au moyen des touches « plus » et « moins » (p.ex. 780).
Validez avec la touche « SET ».
•Avec les touches « plus » et « moins », choisissez l’unité en kilojoule ou kcal.
Validez avec la touche « SET ».
Affichage : menu suivant « AGE »
Réglage de l’âge (AGE)
•Laisissez l’âge au moyen des touches « plus » et « moins » (p.ex. 50). De cette valeur est calculé le pouls maximal de 170 selon la formule 220 – âge.
Validez avec la touche « SET ».
Affichage : menu suivant « Signal sonore »
Le signal sonore retentit lorsque le pouls maximal est dépassé.
•Sélectionnez cette fonction au moyen des touches « plus » et « moins ».
Validez avec la touche « SET ».
Affichage : menu suivant, sélection du pouls visé « FA 65%
Surveillance du pouls visé FA 65 %/FI 75 %
•Faites votre choix au moyen des touches « plus » et « moins ».
•Consommation de graisse 65 %, mise en forme 75 % du pouls maximal.
Validez avec la touche « SET »
Affichage : «prêt à l’entraînement» avec les préréglages
OU
Saisie du pouls visé
La saisie 40 - 199 sert à déterminer et surveiller le pouls d’entraînement quel que soit l’âge de l’utilisateur (symbole HI, signal sonore si activé, pas de surveillance du pouls maximal).
Pour cela, il faut mettre l’âge sur OFF.
•Désélectionnez la surveillance du pouls maximal au moyen des touches « plus » et « moins ». Affichage : «Age OFF».
Validez avec la touche « SET ».
Affichage : réglage suivant « pouls visé » (Pulse)
•Saisissez le pouls au moyen des touches «plus» et «moins». (p.ex. 130)
Validez avec la touche «SET». (mode réglage terminé)
Affichage : mode «prêt à l’entraînement» avec les préréglages
• Pédaler
Avec les préréglages l’appareil décompte.
27 F
Mode d’emploi et instructions d‘entraînement
Remarque:
• Les préréglages sont perdus lors d’un « Reset ».
Interruption ou fin de l’entraînement
Lorsque le nombre de tours de pédales est inférieur à 14 à la minute, le système électronique détecte une interruption de l’entraînement. Les données obtenues lors de l’entraînement sont alors affichées. Les valeurs moyennes des tours, du pouls et de la vitesse sont indiquées avec le symbole .
Passez à l’affichage actuel au moyen des touches « plus » ou « moins ».
Les données de l’entraînement sont affichées pendant 4 minutes. Si pendant ce laps de temps vous ne pressez aucune touche et ne vous entraînez pas, alors le système électronique commute automatiquement en mode veille.
Reprise de l’entraînement
En cas de reprise de l’entraînement au cours des 4 minutes suivant la fin de l’entraînement précédent, le compte ou décompte des dernières valeurs se poursuit.
Fonction RECOVERY
Mesure du pouls de récupération
A la fin de l’entraînement pressez la touche RECOVERY.
Affichage
• RECOVERY
Le système électronique mesure votre pouls en décomptant 60 secondes.
Dans le champ de la « DISTANCE » est affiché le pouls actuel, et dans celui de la vitesse « KM/H » le pouls au bout de 60 secondes. La différence entre ces deux valeurs est indiquée à côté de « % pouls ». De ce résultat est calculé la note de forme (fitness note, p.ex. F 1.6). L’affichage s’éteint au bout de 20 secondes.
« RECOVERY » interrompt la fonction pouls de récupération ou l’affichage de la note de forme.
Si au début ou à la fin du décompte du temps, aucun pouls n’est mesuré, alors le message d’erreur « E » apparaît.
28 F

Consignes générales
Signaux sonores du système
Mise en marche
Lors de la mise en marche un signal sonore est émis pendant le test.
Préréglages
Lorsque les préréglages du temps, de la distance et de l’énergie kJ/kcal sont atteints, un bref signal sonore retentit.
Dépassement du pouls maximal
Si le pouls maximal réglé est dépassé d’une pulsation, alors 2 signaux sonores brefs retentissent pendant ce laps de temps.
Recovery
Calcul de la note de forme (F) :
Note (F) = 6.0 – ( 10 x (P1–P2))2 P1
P1 = pouls pendant entraînement P2 = pouls de récupération
F1.0 = très bon |
F6.0 = insuffisant |
Calcul de la valeur moyenne
Le calcul des valeurs moyennes se base sur les unités d’entraînement restantes jusqu’à un « reset » ou le passage au mode veille.
Consignes pour la mesure du pouls
Le calcul du pouls commence lorsque le cœur à l’écran clignote en cadence avec votre pouls.
Avec un clip-oreille
Le capteur de pulsations fonctionne à la lumière infrarouge et mesure les modifications de la transparence de votre peau qui sont provoquées par votre pouls. Avant de pincer le clip-oreille à votre lobe, frottez-le vigoureusement une dizaine de fois pour stimuler la circulation sanguine.
Evitez les impulsions perturbatrices.
•Attachez minutieusement le clip-oreille à votre lobe et cherchez le point le plus favorable pour la mesure du pouls. (le symbole du cœur clignote de manière continue)
•Ne vous entraînez pas directement dans un fort rayonnement lumineux, p.ex. lumière au néon, halogène, spot, soleil.
•Disposez le capteur-oreille et le câble de manière à empêcher toute secousse et tout choc. Attachez toujours le câble à vos vêtements à l’aide de la pince, ou encore mieux, à un bandeau.
Avec la ceinture pectorale
Veuillez tenir compte du mode d’emploi de la ceinture.
Avec les capteurs du guidon
La faible tension produite par la contraction du cœur est mesurée par les capteurs du guidon et évaluée par le système électronique.
•Saisissez toujours les surfaces de contact avec les deux mains.
•Evitez de saisir le guidon de manière discontinue.
•Gardez vos mains calmes et évitez de contracter et de frotter les surfaces de contact.
Remarque :
Il est seulement possible d’utiliser une seule méthode de mesure
du pouls à la fois : soit avec le clip-oreille, soit les capteurs du guidon, soit la ceinture pectorale. Si aucun clip-oreille ou récepteur enfichable n’est enfiché dans la prise du pouls, alors la mesure par les capteurs du guidon est activée. Si un clip-oreille ou un récepteur enfichable est enfiché dans la prise du pouls, la mesure par les capteurs du guidon est automatiquement désactivée. Il n’est pas nécessaire de débrancher les capteurs du guidon.
Dysfonctionnement de la console
Pressez la touche SET longtemps (reset).
Instructions d’entraînement
La médecine de sport et la science de l’entraînement se sert de l’ergométrie à vélo pour vérifier, entre autres, le fonctionnement du cœur, de la circulation sanguine et du système respiratoire.
Vous pouvez constater si votre entraînement fournit les résultats désirés après quelques semaines :
1.Vous obtenez une certaine endurance avec moins de performance cardio-vasculaire.
2.Vous obtenez une certaine endurance avec la même performance cardio-vasculaire pendant un laps de temps prolongé.
3.Vous rattraper plus vite qu’auparavant après une certaine performance cardio-vasculaire.
Valeurs indicatives pour l’entraînement d’endurance
Pouls maximum: On entend par sollicitation maximale l’obtention du pouls maximum individuel. La fréquence cardiaque maximale accessible dépend de l’âge.
En règle générale : La fréquence cardiaque maximale à la minute est de 220 battements moins l’âge.
Exemple : Âge 50 ans > 220 – 50 = 170 pouls/min
Intensité à l’effort
Pouls à l’effort: L’intensité optimale à l’effort est atteinte à 65 – 75 % de la performance cardio-vasculaire individuelle (voir diagramme). Cette valeur change en fonction de l’âge.
Pouls |
|
|
|
|
|
Diagramme du pouls |
||||||||||||
|
|
|
|
Fitness et Combustion des graisses |
||||||||||||||
220 |
|
|
|
|
||||||||||||||
|
|
|
|
|
|
|
|
|
|
|
|
|
|
|
|
|
|
|
|
|
|
|
|
|
|
|
|
|
|
|
|
|
|
|
|
|
|
200 |
|
|
|
|
|
|
Pouls maximum |
|
|
|
|
|
|
|||||
|
|
|
|
|
|
(220 moins l’Čge) |
|
|
|
|
|
|
||||||
180 |
|
|
|
|
|
|
|
|
|
|
|
|
|
|
|
|
|
|
|
|
|
|
|
|
|
|
|
|
|
|
|
|
|
|
|
|
|
160 |
|
|
|
|
|
|
|
|
|
|
|
|
|
|
|
|
|
|
|
|
|
|
|
Pouls fitness |
|
|
|
|
|
|
|
|
|
||||
|
|
|
|
|
|
|
|
|
|
|
|
|
||||||
140 |
|
|
|
|
|
(75 % du pouls max.) |
|
|
|
|
|
|
|
|||||
|
|
|
|
|
|
|
|
|
|
|
|
|
|
|
|
|
|
|
|
|
|
|
|
|
|
|
|
|
|
|
|
|
|
|
|
|
|
120 |
|
|
|
|
|
|
|
|
|
|
|
|
|
|
|
|
|
|
|
|
|
|
|
|
|
|
|
|
|
|
|
|
|
|
|
|
|
100 |
|
|
|
|
|
|
|
|
|
|
|
|
|
|
|
|
|
|
|
|
|
|
Pouls combustion des graisses |
|
|
|
|
|
|||||||||
80 |
|
|
|
|
|
|
|
|
|
|||||||||
|
|
|
|
|
(65 % du pouls max.) |
|
|
|
|
|
||||||||
|
|
|
|
|
|
|
|
|||||||||||
|
|
|
|
|
|
|
|
|
|
|
|
|
|
|
|
|
|
|
20 25 30 35 40 45 50 55 60 65 70 75 80 90 Age
Envergure de l’effort
Durée d’une unité d’entraînement et de sa fréquence par semaine :
Le volume d’effort optimal est atteint dès que l’on obtient 65 à 75 % de la performance cardio-vasculaire individuelle pendant un laps de temps prolongé.
Principe:
|
Fréquence d’entraînement |
Durée de l’entraînement |
|
|
Tous les jours |
10 minutes |
|
|
2 – 3 x par semaine |
20 – 30 minutes |
|
|
1 – 2 x par semaine |
30 – 60 minutes |
|
|
|
|
|
29 F

Mode d’emploi et instructions d‘entraînement
Les débutants ne devraient pas commencer avec des unités d’entraînement de 30 à 60 minutes.
Pour les débutants, le programme d’entraînement des 4 premières semaines pourrait être le suivant :
Fréquence d’entraînement Unité d’entraînement
|
1re semaine |
3 x par semaine |
2 minutes d’entraînement |
|
1 minute de pause gymnastique |
|
2 minutes d’entraînement |
|
1 minute de pause gymnastique |
|
2 minutes d’entraînement |
|
|
|
2e semaine |
3 x par semaine |
3 minutes d’entraînement |
|
1 minute de pause gymnastique |
|
3 minutes d’entraînement |
|
1 minute de pause gymnastique |
|
2 minutes d’entraînement |
|
|
|
3e semaine |
3 x par semaine |
4 minutes d’entraînement |
|
1 minute de pause gymnastique |
|
3 minutes d’entraînement |
|
1 minute de pause gymnastique |
|
3 minutes d’entraînement |
|
|
|
4e semaine |
3 x par semaine |
5 minutes d’entraînement |
|
1 minute de pause gymnastique |
|
4 minutes d’entraînement |
|
1 minute de pause gymnastique |
|
4 minutes d’entraînement |
Avant et après chaque unité d’entraînement, 5 minutes de gymnastique serviront au réchauffement et au Cool-down. Entre deux unités d’entraînement, vous devriez prévoir une journée sans entraînement, si vous décidez de choisir le programme d’entraînement de 20 à 30 minutes 3 fois par semaine. En cas contraire, vous pouvez vous entraîner tous les jours.
Glossaire
Age
L’entrer pour calculer le pouls maximal.
Dimension
Unités pour l’affichage en km/h ou mph, kj ou kcal.
Pouls pour brûler les graisses
Valeur calculée équivalant à 65% du pouls maximal.
Pouls de forme
Valeur calculée équivalant à 75% du pouls maximal.
Glossaire
Liste de termes expliqués
Symbole HI
Le symbole HI apparaît lorsque le pouls visé est trop grand de 11 pulsations. HI clignote lorsque le pouls maximal est dépassé. La surveillance HI est toujours activée.
Symbole LO
Le symbole LO apparaît lorsque le pouls visé est trop bas de 11 pulsations. La sur veillance LO est activée lorsque le pouls visé est atteint pendant l’entraînement.
Pouls maximal (MaxPulse)
Valeur calculée par la soustraction de l’âge à 220.
Menu
Affichage qui permet d’entrer ou de sélectionner des valeurs.
Pouls
Mesure des battements du cœur par minute.
Recovery (récupération)
Mesure du pouls de récupération à la fin de l’entraînement. L’écart entre le pouls au début et à la fin d’une minute est calculé. Ces deux pouls servent également à calculer une note de forme. Au cours d’un même entraînement, l’amélioration de cette note de forme indique le gain de forme.
Reset
Effacer le contenu de l’affichage et redémarrage de l’affichage.
Pouls visé
Défini en entrant une certaine valeur qui est surveillée.
30 F
 Loading...