


Kenwood KCA-WL100 Manual [es]
KCA-WL100
Wireless Display Adapter
INSTRUCTION MANUAL
Adaptateur d'affichage sans fil
MODE D’EMPLOI
Adaptador inalámbrico de pantalla
MANUAL DE INSTRUCCIONES
Take the time to read through this instruction manual.
Familiarity with installation and operation procedures will help you obtain the best performance from your new Wi-Fi Display Adapter.
For your records
Record the serial number, found on the back of the unit, in the spaces designated on the warranty card, and in the space provided below. Refer to the model and serial numbers whenever you call upon your Kenwood dealer for information or service on the product.
Model KCA-WL100 Serial number
US Residents Only
Register Online
Register your Kenwood product at www.Kenwoodusa.com
© 2015 JVC KENWOOD Corporation |
B5A-0789-10 (K) |

Contents |
|
Before Use ............................................................................ |
2 |
WARNINGS........................................................................................................... |
2 |
CAUTIONS............................................................................................................ |
3 |
Maintenance ....................................................................................................... |
3 |
Trademarks and licenses ................................................................................ |
3 |
Connection/Installation ...................................................... |
4 |
Connecting the adapter ................................................................................. |
4 |
Operating a device using wireless connection ................. |
5 |
Checking compatible devices ...................................................................... |
5 |
Mirroring the Android device screen to the AV receiver |
|
—Miracast mode............................................................................................... |
5 |
Playing content of the Android device on the AV receiver |
|
—Wireless Link mode...................................................................................... |
6 |
To switch the connection mode on the adapter................................... |
8 |
Resetting the adapter...................................................................................... |
8 |
References............................................................................ |
8 |
Troubleshooting................................................................................................ |
8 |
Specifications...................................................................................................... |
9 |
Updated information (the latest Instruction Manual, system updates, new functions, etc.) is available from <http://www. kenwood.com/cs/ce/>.
Before Use
IMPORTANT
To ensure proper use, please read through this manual before using this product. It is especially important that you read and observe WARNINGS and CAUTIONS in this manual. Please keep the manual in a safe and accessible place for future reference.
WARNINGS
To prevent accidents and damage
•DO NOT install any adapter or wire any cable in a location where;
–it may obstruct the steering wheel and gearshift lever operations.
–it may obstruct the operation of safety devices such as air bags.
–it may obstruct visibility.
•DO NOT operate the smartphone while driving.
For connection and installation
•If you connect the ignition wire (red) of the power supply box to the car chassis (ground), you may cause a short circuit, that in turn may start a fire. Always connect such wires to the power source running through the fuse box.
•Do not cut out the fuse from the ignition wire (red) of the power supply box. The power supply must be connected to the wires via the fuse.
•Do not install the adapter in a location enclosed with metallic materials. Otherwise, the reception via Wi-Fi connection may become poor.
•This adapter has been designed exclusively for use with Kenwood AV receivers. Do not use this adapter with any other AV receiver.
2

Before use
CAUTIONS
For connection and installation
•Mounting and wiring this product requires skills and experience. For best safety, leave the mounting and wiring work to professionals.
•Make sure to ground the power supply box to a negative 12 V DC power supply.
•Do not install the adapter in a spot exposed to direct sunlight or excessive heat or humidity. Also avoid places with too much dust or the possibility of water splashing.
•If the fuse blows, first make sure the wires are not touching to cause a short circuit, then replace the old fuse with one with the same rating.
For safety
Stop the car before performing any complicated operations.
Temperature inside the car...
•If you have parked the car for a long time in hot or cold weather, wait until the temperature in the car becomes normal before using the adapter.
Maintenance
•Do not use any solvents (for example, thinner, benzine, etc.), detergents, or insecticides. Doing so may damage the adapter.
•Changes or modifications not approved by us may void the user’s authority to operate the equipment.
Trademarks and licenses
•Android and Google Play are trademarks of Google Inc.
•The Wi-Fi CERTIFIED Logo is a certification mark of the Wi-Fi Alliance.
•The terms HDMI and HDMI High-Definition Multimedia Interface, and the HDMI logo are trademarks or registered trademarks of HDMI Licensing LLC in the United States and other countries.
ENGLISH 3

Connection/Installation
Connecting the adapter
When connecting the adapter to the AV receiver, refer also to the instruction manual supplied with the AV receiver.
1 Connect the power supply box to the adapter.
Power supply box (supplied)
Adapter
2Connect the adapter to the HDMI input terminal on the AV receiver.
 HDMI input terminal on the AV receiver
Adapter
3Fix the adapter and the connector of the power supply box using the soft tape to protect the adapter and its connection.
Adapter
Power supply box (supplied)
Soft tape (supplied)
4 Connect the power supply box to the vehicle.
Red (ignition wire)


 To ignition key switch (ACC)
5A fuse 


Power supply box  To car chassis (ground) Black (ground wire)
(supplied)
4
Operating a device using wireless connection
Checking compatible devices |
2 Switch the connection mode to “Wireless Mirroring”. |
|
• If you cannot select the connection mode on the AV receiver, |
||
|
||
You can use the following devices with the adapter. |
perform the operation on the adapter. (Page 8) |
|
• For Wireless Mirroring mode (see below): Android devices |
• If the connection mode is “Wireless Mirroring”, go to step 3. |
|
compatible with Wireless Mirroring function (Android 4.2 or later). |
On the AV receiver: |
|
– You can display the same screen displayed on the Android |
||
Connection mode |
||
device on the AV receiver. |
||
|
||
• For Wireless Link mode (see pages 6 and 7): Android |
|
|
devices compatible with Wireless Link |
|
|
– You can play content stored on the Android device on the AV |
|
|
receiver. |
|
|
– With the Wireless Link mode, you can also display content from |
|
|
the Internet by using another device as an access point. |
|
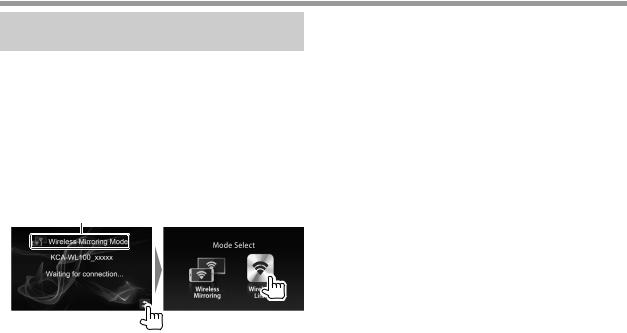
Mirroring the Android device screen to the AV receiver—Wireless Mirroring mode
1Turn on the AV receiver and select the HDMI input for the source on the AV receiver.
3Operate the Android device to activate Wireless Mirroring, and then select “KCA-WL100_XXXXX (identification number)” as the adapter to use.
•Wireless Mirroring may be called Wireless Display, Screen Mirroring, AllShare Cast, etc., depending on the manufacturer.
•The settings on the Android device differ depending on the device type. For details, refer to the instruction manual supplied with your Android device.
When the connection is established, “Ready to display” is displayed on the AV receiver.
The same screen is displayed on the both the Android device and the AV receiver.
ENGLISH 5
Operating a device using wireless connection
Playing content of the Android device on the AV receiver—Wireless Link mode
To play content stored on the Android device on the AV receiver
1Turn on the AV receiver and select the HDMI input for the source on the AV receiver connected with the adapter.
2Switch the connection mode to “Wireless Link”.
•If you cannot select the connection mode on the AV receiver, perform the operation on the adapter. (Page 8)
•Once the connection is established between the Android device and the adapter, you can also switch the connection mode from the Android device. (Page 7)
•If the connection mode is “Wireless Link”, go to step 3.
On the AV receiver:
Connection mode
3Operate the Android device to connect the device with “KCA-WL100_XXXXX (identification number)” via Wi-Fi.
• Enter the password if required (initial: “12345678”).
4Operate the Android device to start an application compatible with UPnP (Universal Plug and Play), then play the content.
•For applications compatible with UPnP, search on Google Play.
The playback screen is displayed on the AV receiver.
6

Operating a device using wireless connection
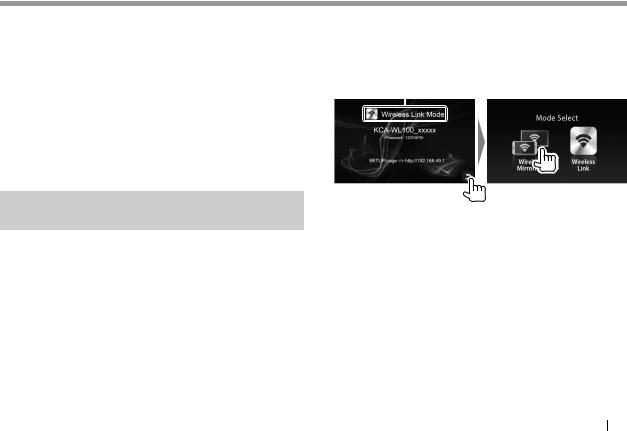
To display content from the Internet
You can display content from Internet using an Android device by connecting the adapter to the access point.
•You need an access point (such as a device other than the Android device connected via Wi-Fi with tethering activated) to use the Internet.
1Perform steps 1 to 3 in “To play content stored on the Android device on the AV receiver” (Page 6) to connect the device to the AV receiver via Wi-Fi.
2Open the browser on the connected device and access <http://192.168.49.1>.
The setting screen is displayed.
3 Touch the |
icon. |
The access point search screen is displayed.
4Select “Scan” to display the available AP SSID (access point) list, then select the AP SSID to use.
•Enter the password if required.
•When the connection is established...
–On the AV receiver: “Connected to AP” is displayed on the AV receiver.
–On the Android device: The selected AP SSID is added to the
“Saved Access Points” list and “Connected” is displayed.
To change the password
You can change the password for connecting the Android device with the adapter.
1Perform steps 1 to 3 in “To play content stored on the Android device on the AV receiver” (Page 6) to connect the device to the AV receiver via Wi-Fi.
2Open the browser on the connected device and access <http://192.168.49.1>.
The setting screen is displayed.
3Enter the password in the input area beside the  icon, then select “Submit”.
To switch the connection mode on the Android device
You can switch the connection mode between “Wireless Link” and “Wireless Mirroring” from the Android device.
1Perform steps 1 to 3 in “To play content stored on the Android device on the AV receiver” (Page 6) to connect the device to the AV receiver via Wi-Fi.
2Open the browser on the connected Android device and access <http://192.168.49.1>.
The setting screen is displayed.
3Touch the  icon.
icon.
Each time you touch the icon, the connection mode is switched.
ENGLISH 7
Operating a device using wireless connection
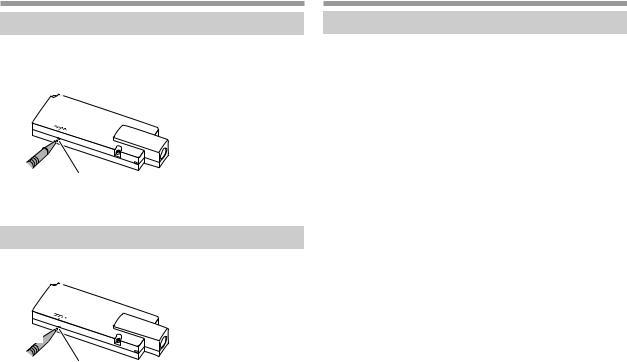
To switch the connection mode on the adapter
For some AV receivers, the connection mode cannot be selected on the AV receiver. Use the mode switch/reset button on the adapter to switch the connection mode between “Wireless Mirroring” and “Wireless Link”.
Mode switch/reset button
• Each time you press the button, the connection mode is switched.
Resetting the adapter
If the adapter fails to operate properly, press and hold the mode switch/reset button.
Hold 
Mode switch/reset button
The settings are initialized. (The password is reset to “12345678”.)
References
Troubleshooting
What appears to be trouble is not always serious. Check the following points before calling a service center.
•For operations with the Android devices connecting via Wi-Fi, refer also to the instruction manuals supplied with the devices.
The playback screen is unstable.
•Check whether there is any obstructions between the adapter and the Android device.
•Shorten the distance between the adapter and the Android device.
“No Signal” is displayed on the AV receiver.
•Connect the adapter to the AV receiver firmly.
•Connect the power supply box to the adapter firmly.
The connection between the Android device and adapter is disconnected during playback.
•Energy save function is working on the connected Android device. Deactivate the energy save function.
The adapter cannot be found on the Wi-Fi or AP SSID list.
• Shorten the distance between the adapter and the device.
You cannot connect to the Internet.
•For some Android devices, Internet connection via Wi-Fi or 3G network cannot be established while connecting to the adapter.
You forgot the password for connection.
•Try the initial password “12345678.”
•Reset the adapter. (See the left column.)
8

References
Specifications
Wi-Fi Section
IEEE Standard |
802.11 a/b/g/n |
|
Frequency Range |
Dual Band (2.4 GHz/5 GHz ) |
|
Channels |
|
|
|
2.4 GHz |
Auto (1–11 ch) |
|
5 GHz |
Auto (149, 153, 157, 161, 165 ch) |
|
|
|
|
Transfer rates (MAX) |
11a: 54 Mbps/ 11b: 11 Mbps/ |
|
|
11g: 54 Mbps/11n: 65 Mbps |
|
Output Power |
11a: 13 dBm±1.5 dB/ |
|
|
11b: 16 dBm±1.5 dB/ |
|
|
11g: 15 dBm±1.5 dB/ |
|
|
11n: 14 dBm±1.5 dB |
HDMI
Connector Type |
Type A |
|||
Version |
1.3a |
|||
Maximum Resolution |
1920 x 1080p |
|||
USB I/F Section |
|
|
|
|
Maximum Power Supply Current |
DC 5 V |
|
500 mA |
|
|
||||
General |
|
|
|
|
Operating Voltage |
14.4 V (10.5 V to 16 V allowable) |
|||
Maximum Current Consumption |
250 mA |
|||
Dimensions (W × H × D) |
99 mm x 32 mm x 11 mm |
|||
|
|
(3-15/16" x 1-5/16" x 7/16") |
||
|
|
|
|
|
|
Operational Temperature Range |
–10°C to +60°C |
||
Weight |
|
|
|
|
|
Main unit |
54 g (0.12 lbs) |
||
Design and specifications are subject to change without notice.
ENGLISH 9
 Loading...