

Page 1

DMX7018DABS
DMX7018BTS
MONITOR WITH RECEIVER
INSTRUCTION MANUAL
ÉCRAN AVEC RÉCEPTEUR
MODE D'EMPLOI
• Updated information (the latest Instruction Manual, etc.) is available
from
<http: //www.ke nwood.co m/cs/ce />.
• Des informations actualisées (le dernier mode d'emploi, etc.) sont
disponibles sur le site
<http: //www.ke nwood.co m/cs/ce />.
B5A-2247-10 (E)© 2018 JVC KENWOOD Corporation
Page 2

Contents
Before Use 4
Precautions ................................................................... 4
How to read this manual ......................................... 4
Basic Operations 5
Functions of the Buttons on the Front Panel ... 5
Turning on the Unit ................................................... 5
Initial Settings .............................................................. 6
Adjusting the volume ............................................... 7
Touch screen operations ......................................... 7
HOME screen descriptions ...................................... 8
Source selection screen descriptions .................. 8
Source control screen descriptions ...................10
Popup menu ..............................................................11
List screen ...................................................................12
APPS-Android Auto™/
Apple CarPlay 13
Apple CarPlay Operation .......................................13
Android Auto™ Operation .....................................14
iPod/iPhone 15
Preparation .................................................................15
iPod/iPhone Basic Operation ...............................15
Search Operation ......................................................16
Radio 20
Radio Basic Operation ............................................20
Memory Operation ..................................................21
Selecting Operation ................................................21
Traffic Information ...................................................22
Radio Setup ................................................................22
DAB 23
DAB Basic Operation ...............................................23
Storing Service in Preset Memory ......................24
Selecting Operation ................................................24
Traffic Information ...................................................25
DAB Setup ...................................................................26
Bluetooth Control 27
Information for using Bluetooth® devices .......27
Register from the Bluetooth device ...................28
Bluetooth Setup ........................................................28
Playing Bluetooth Audio Device .........................29
Using Hands-Free Unit ............................................31
Other External Components 35
View Camera ..............................................................35
External audio/video players—AV-IN ...............36
USB 17
Connecting a USB device ......................................17
USB Basic Operation ................................................17
Search Operation ......................................................19
2
Page 3

Setting Up 37
Monitor Screen Setup .............................................37
System Setup .............................................................37
User Interface Setup ................................................38
Special Setup .............................................................38
Display Setup .............................................................39
AV Setup ......................................................................40
Controlling Audio 41
Speaker/ X’over setup .............................................41
Controlling General Audio ....................................42
Equalizer Control ......................................................43
Volume Offset ............................................................44
Sound Effect ...............................................................44
Listening Position/ DTA ..........................................45
Remote control 46
Functions of the Remote control Buttons .......46
Connection/Installation 47
Before Installation ....................................................47
Installing the unit .....................................................48
Troubleshooting 52
Problems and Solutions .........................................52
Error Messages ..........................................................52
Appendix 53
Playable Media and Files........................................53
Specifications .............................................................54
About this Unit ..........................................................56
3English
Page 4
Before Use
Before Use
Precautions
# WARNINGS
Ñ To prevent injury or fire, take
the following precautions:
• To prevent a short circuit, never put or leave
any metallic objects (such as coins or metal
tools) inside the unit.
• Do not watch or fix your eyes on the unit’s
display when you are driving for any extended
period.
• If you experience problems during installation,
consult your KENWOOD dealer.
Ñ Precautions on using this unit
• When you purchase optional accessories,
check with your KENWOOD dealer to make
sure that they work with your model and in
your area.
• You can select language to display menus,
audio file tags, etc. See User Interface Setup
(P.38).
• The Radio Data System or Radio Broadcast
Data System feature won’t work where the
service is not supported by any broadcasting
station.
Ñ Protecting the monitor
• To protect the monitor from damage, do not
operate the monitor using a ball point pen or
similar tool with the sharp tip.
Ñ Cleaning the unit
• If the faceplate of this unit is stained, wipe it
with a dry soft cloth such as a silicon cloth.
If the faceplate is stained badly, wipe the
stain off with a cloth moistened with neutral
cleaner, then wipe it again with a clean soft
dry cloth.
NOTE
• Applying spray cleaner directly to the unit may
affect its mechanical parts. Wiping the faceplate
with a hard cloth or using a volatile liquid such
as thinner or alcohol may scratch the surface or
erase screened print.
Ñ How To Reset Your Unit
• If the unit or the connected unit fails to
operate properly, reset the unit.1 Press the
<Reset> button.The unit returns to factory
settings.
Reset button
NOTE
• Disconnect the USB device before pressing the
<Reset> button. Pressing the <Reset> button
with the USB device connected can damage
the data stored in the USB device. For how to
disconnect the USB device, see Disconnect the
USB device (P.17 ).
• When the unit is turned on after resetting, the
Initial SETUP screen appears. See Initial setup
(P.6).
How to read this manual
• The screens and panels shown in this manual are
examples used to provide clear explanations of the
operations.
For this reason, they may be different from the actual
screens or panels used, or some display patterns may
be different.
• Indication language: English indications are used
for the purpose of explanation. You can select the
indication language from the [SETUP] menu. See
User Int erface Setu p (P.38).
4
Page 5

Basic Operations
Basic Operations
Functions of the Buttons on the Front Panel
1
2
3
4
5
6
NOTE
• The panels shown in this guide are examples
used to provide clear explanations of the
operations. For this reason, they may be different
from the actual panels.
Name
• Motion
Remote Sensor
1
• Receives the remote control signal.
S, R(Volume)
2
• Adjusts volume.
The volume will go up until 15 when you
keep pressing R.
HOME
3
• Displays the HOME screen (P.8).
• Pressing for 1 second turns the power off.
• When the power off, turns the power on.
MENU
4
• Displays the popup menu screen.
• Pressing for 1 second turns the screen off.
5
• Displays the APP (CarPlay/ Android Auto)
screen.
• Pressing for 1 second displays the Voice
Recognition screen (P. 32).
Reset
6
• If the unit or the connected unit fails to
operate properly, the unit returns to initial
settings when this button is pressed.
Turning on the Unit
The method of turning on is different
depending on the model.
Press the [HOME] button.
1
The unit is turned on.
● To turn off the unit:
Press the [HOME] button for 1 second.
1
NOTE
• If it is your first time turning the unit on af ter
installation, it will be necessary to perform Initial
setup (P. 6).
5English
Page 6
Basic Operations
Initial Settings
Initial setup
Perform this setup when you use this unit first
time.
Set each item as follows.
1
■ Language
Select the language used for the control
screen and setting items. Default is “British
English(en)”.
1Touch [Language].
2Touch [Language Select].
3Select the desired language.
4Touch [
For detailed operation, see User Interface
Setup (P.38).
■ Clock
Adjusts clock.
For detailed operation, see Calendar/clock
settings (P.7).
■ Display
Set the image on the screen.
1Touch [Display.
2Touch [Background].
3Select the image.
4Touch [
For detailed operation, see Display Setup
(P. 39).
].
].
■ Camera
Set the parameters for the camera.
1Touch [Camera].
2Set each item and touch [
For detailed operation, see Camera Setup
(P. 35).
■ DEMO
Set the demonstration mode. Default is “ON”.
1Touch [DEMO] and set ON or OFF.
Touch [Finish].
2
NOTE
• These settings can be set from the SETUP menu.
See Set ting Up (P.37).
].
6
Page 7

Basic Operations
Calendar/clock settings
Press the [MENU] button.
1
Popup menu appears.
Touch [SETUP].
2
SETUP Menu screen appears.
Touch [User Interface].
3
User Interface screen appears.
Touch [Clock Adjust].
4
Adjust the date, then adjust the time.
5
Adjusting the volume
To adjust the volume (0 to 40),
Press [R] to increase, and press [S] to decrease.
Holding [R] increases the volume continuously
to level 15.
Touch screen operations
To perform operations on the screen, you need
to touch, touch and hold, flick or swipe to select
an item, display setting menu screen or to
change the page, etc.
● Touch
Touch the screen gently to
select an item on the screen.
● Touch and hold
Touch the screen and keep
your finger in place until the
display changes or a message
is displayed.
● Flick
Slide your finger quickly to
the left or right on the screen
to change the page.
You can scroll the list screen
by flicking the screen up/
down.
● Swipe
Slide your finger up or down
on the screen to scroll the
screen.
Touch [Set].
6
NOTE
• Deactivate [RDS CT] before adjusting the clock.
See Radi o Setup (P.22).
7English
Page 8

Basic Operations
HOME screen descriptions
Most functions can be performed from the
HOME screen.
1 2
3
4
5 6
• Displays the control screen of current source.
1
• Widget
2
– You can change the widget by touching
[
]/[ ] or flicking left or right on the
widget area.
– Touch the widget to display the detailed
screen.
• Current source information
3
• Displays the source selection screen. (P.9)
4
• Short-cut playback source icons (P. 9)
5
• Displays the Hands Free screen. (P. 31)
6
• When connecting as Apple CarPlay or
Android Auto, it works as a phone provided
in Apple CarPlay or Android Auto.
Source selection screen descriptions
You can display all playback sources and options
on the source selection screen.
1
3 5
• Changes the playback source.
1
For playback sources, see P.9.
2
• Changes the page. (Touch [ ]/[ ].)
You can also change the page by flicking left
or right on the screen.
• Returns to previous screen.
3
• Page indication
4
• Displays the SETUP Menu screen. (P. 37)
5
4
2
Display the HOME
Press the [HOME] button.
1
HOME screen appears.
8
Page 9

Basic Operations
Select the playback source
Touch [ ] on the HOME screen.
1
From the screen, you can select the
following sources and functions.
• Switches to the Android Auto/ Apple
CarPlay screen from the connected
iPhone/Android device.*1 (P. 13)
• Switches to the Radio broadcast.
(P. 20)
• Switches to the DAB broadcast. (P. 23)
• Plays a Bluetooth audio player. (P. 27)
• Plays an iPod/iPhone. (P. 15)
• Plays files on a USB device. (P. 17)
• Switches to an external component
connected to the AV-IN input terminal.
(P. 36)
• Displays the Audio screen. (P. 41)
• Puts the unit in standby. (P. 10)
To select the playback source on the
HOME screen
The 3 items displayed on the source selection
screen as the large icons are shown on the
HOME screen.
You can change items displayed on this area
by customizing the source selection screen.
(P.10)
To select the playback source on the
source control screen
*1 When iPhone compatible with CarPlay is
connected, [Apple CarPlay] is displayed.
When an Android device compatible with
Android Auto is connected, [Android Auto]
is displayed.
Display source selection buttons by touching [
]/[ ] or flicking left or right on the source control
screen, then select a playback source.
9English
Page 10
Basic Operations
Put the unit in standby
Touch [ ] on the HOME screen.
1
Touch [STANDBY].
2
Customize Short-cut buttons on
HOME screen
You can arrange the position of the source icons
as you like.
Touch [ ] on the HOME screen.
1
Touch and hold the icon which you want
2
to move to go into the customizing
mode.
Drag it where you want to move.
3
Source control screen descriptions
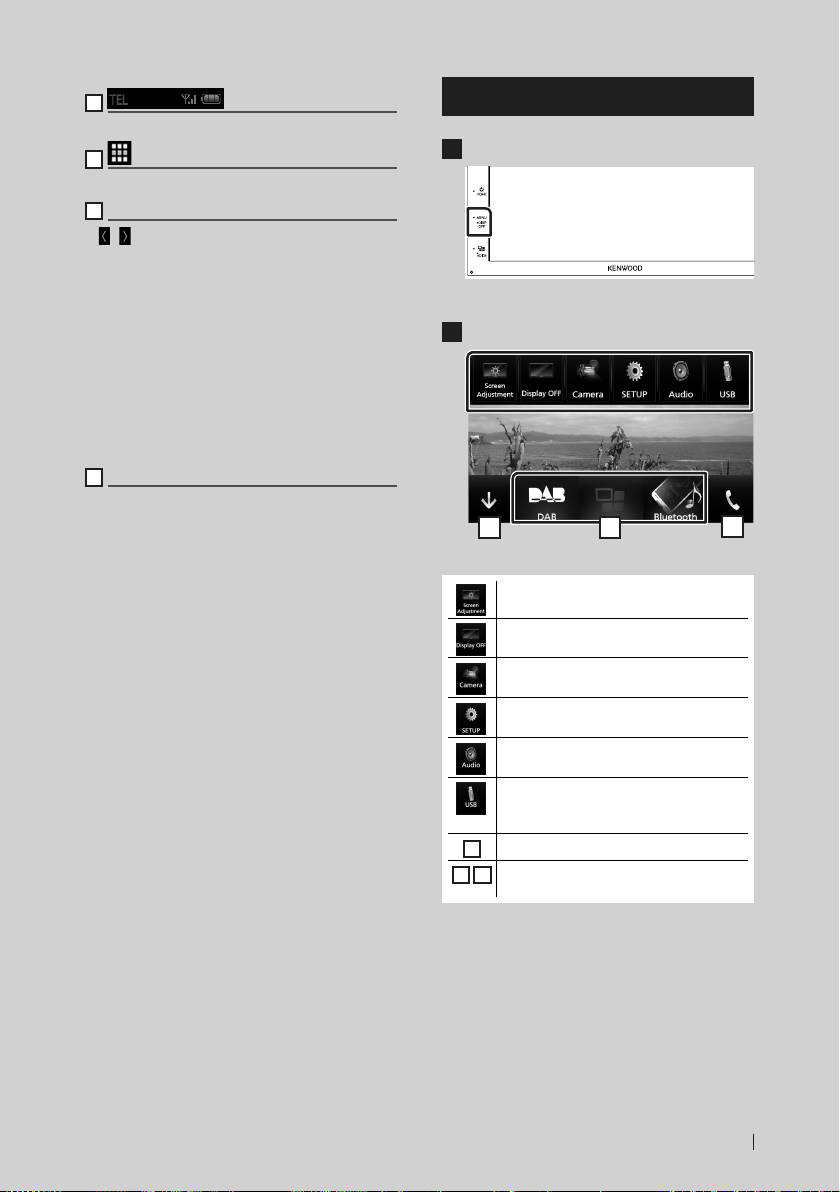
There are some functions which can be
operated from most screens.
Indicators
1
2 3 4
Short-cut buttons
10
Page 11
Basic Operations
1
Connected Bluetooth device information.
2
All sources icon
Displays all sources.
3
Secondary screen
]/[ ] : The Secondary screen changes every
• [
time you touch it. You can also change the
Secondary screen by flicking left or right on
the screen.
• Indicators: Displays the current source
condition and so on.
– ATT: The attenuator is active.
– LOUD: The loudness control function is on.
• Short-cut buttons: The source changes to the
one you have set as a short-cut. For the shortcut setting, refer to Customize Short-cut
buttons on HOME screen (P.10).
4
[Û]
Touch to display the Hands Free screen.
(P.31)
When connecting as Apple CarPlay or Android
Auto, it works as a phone provided in Apple
CarPlay or Android Auto.
Popup menu
Press the [MENU] button.
1
Popup menu appears.
Touch to display the popup menu.
2
1
The contents of the menu are as follows.
• Displays the Screen Adjustment screen.
(P. 37)
• Turns the display off. (P. 12)
• Displays the view camera. (P.35)
2
3
• Displays the SETUP Menu screen.
(P. 37)
• Displays the Audio Control Menu screen.
(P. 41)
• Displays the control screen of current
source. Icon feature differs depending on
the source.
• Close the popup menu.
1
• See HOME screen descriptions
2 3
(P. 8).
11English
Page 12
Basic Operations
Turn off the screen
Select [Display OFF] on the pop-up
1
menu.
● To turn on the screen
Touch the display.
1
List screen
There are some common function keys in the
list screens of most sources.
61 2
3 4 5
1
Displays list type selection window.
2
Displays music/movie file list.
3
Text scroll
Scrolls the displayed text.
4
etc.
Keys with various functions are displayed here.
: Plays all tracks in the folder containing
•
the current track.
• [
: Moves to the upper hierarchy.
5
[ ] / [ ] / [ ] / [ ] Page scroll
You can change the page to display more items
by pressing [
]/[ ] : Displays the top or bottom page.
• [
]/[ ].
12
6
Return
Returns to previous screen.
NOTE
• Buttons which cannot be activated from the list
screen are not displayed.
Page 13

APPS-Android Auto™/Apple CarPlay
APPS-Android Auto™/Apple CarPlay
Apple CarPlay Operation
CarPlay is a smarter, safer way to use your
iPhone in the car. CarPlay takes the things
you want to do with iPhone while driving and
displays them on the screen of the product. You
can get directions, make calls, send and receive
messages, and listen to the music from iPhone
while driving. You can also use Siri voice control
to make it easier to operate iPhone.
For details about CarPlay, visit https://ssl.apple.
com/ios/carplay/.
Compatible iPhone devices
You can use CarPlay with the following iPhone
models.
• iPhone 7 Plus
• iPhone 7
• iPhone SE
• iPhone 6s Plus
• iPhone 6s
• iPhone 6 Plus
• iPhone 6
• iPhone 5s
• iPhone 5c
• iPhone 5
Ñ Preparation
1 Connect iPhone using KCA-iP103 via USB
terminal. (P. 51)
When iPhone compatible with CarPlay
is connected to the USB terminal, the
Bluetooth smartphone currently connected
is disconnected.
2 Unlock your iPhone.
Ñ Operation buttons and
available Apps on the home
screen of CarPlay
You can use the Apps of the connected iPhone.
The items displayed and the language used on
the screen differ among the connected devices.
To enter CarPlay mode, touch [Apple CarPlay]
icon in the source selection screen. ( P.9)
2
1
1
[ ]
• Displays the home screen of CarPlay.
• Touch and hold to activates Siri.
2
Application buttons
Starts the application.
3
[HOME]
Exits the CarPlay screen and displays the Home
screen.
To exit the CarPlay screen
1 Press the [HOME] button.
Ñ Use Siri
You can activate Siri.
1 Press the [ ] button for 1 second.
Press for 1 second
2 Talk to Siri.
To deactivate
1 Press the [ ] button.
Ñ Switch to the Apple CarPlay
screen while listening to
another source
1 Press the [ ] button.
3
13English
Page 14

APPS-Android Auto™/Apple CarPlay
NOTE
• If sound is output using Apple CarPlay when the
Apple CarPlay screen is displayed, the source is
switched to Apple CarPlay.
Android Auto™ Operation
Android Auto enables you to use functions of
your Android device convenient for driving. You
can easily access route guidance, make calls,
listen to music, and access convenient functions
on the Android device while driving.
For details about Android Auto, visit https://
www.android.com/auto/ and https://
support.google.com/androidauto.
Compatible Android devices
You can use Android Auto with Android devices
of Android version 5.0 (Lollipop) or later.
NOTE
• Android Auto may not be available on all devices
and is not available in all countries or regions.
Ñ Preparation
1 Connect an Android device via USB
terminal. (P. 51)
To use the hands-free function, connect the
Android device via Bluetooth.
When an Android device compatible
with Android Auto is connected to the
USB terminal, the device is connected via
Bluetooth automatically, and the Bluetooth
smartphone currently connected is
disconnected.
2 Unlock your Android device.
Ñ Operation buttons and
available Apps on the Android
Auto screen
You can perform the operations of the Apps of
the connected Android device.
The items displayed on the screen differ among
the connected Android devices.
To enter Android Auto mode, touch [Android
Auto] icon in the source selection screen.
(P.9)
1
1
Application/information buttons
Starts the application or displays information.
To exit the Android Auto screen
1 Press the [HOME] button.
Ñ Using voice control
1 Press the [ ] button for 1 second.
Press for 1 second
To cancel
1 Press the [ ] button.
Ñ Switch to the Android Auto
screen while listening to
another source
1 Press the [ ] button.
NOTE
• If sound is output using Android Auto when the
Android Auto screen is displayed, the source is
switched to Android Auto.
14
Page 15
iPod/iPhone
iPod/iPhone
Preparation
Ñ Connectable iPod/iPhone
The following models can be connected to this
unit.
Made for
• iPhone 7 Plus
• iPhone 7
• iPhone SE
• iPhone 6s Plus
• iPhone 6s
• iPhone 6 Plus
• iPhone 6
• iPhone 5s
• iPhone 5c
• iPhone 5
• iPod touch (6th generation)
• iPod touch (5th generation)
NOTE
• By connecting your iPod/iPhone to this unit with
an optional accessory iPod connection cable
KCA-iP103, you can supply power to your iPod/
iPhone as well as charge it while playing music.
However, the power of this unit must be on.
• If you start playback after connecting the iPod,
the music that has been played by the iPod is
played first.
1 Connect the iPod/iPhone using KCA-
iP103. (P. 51)
2 Press the [HOME] button.
3 Touch [ ].
4 Touch [iPod]. ( P.9)
● To disconnect the iPod/iPhone connected
with the cable:
1 Detach the iPod/iPhone.
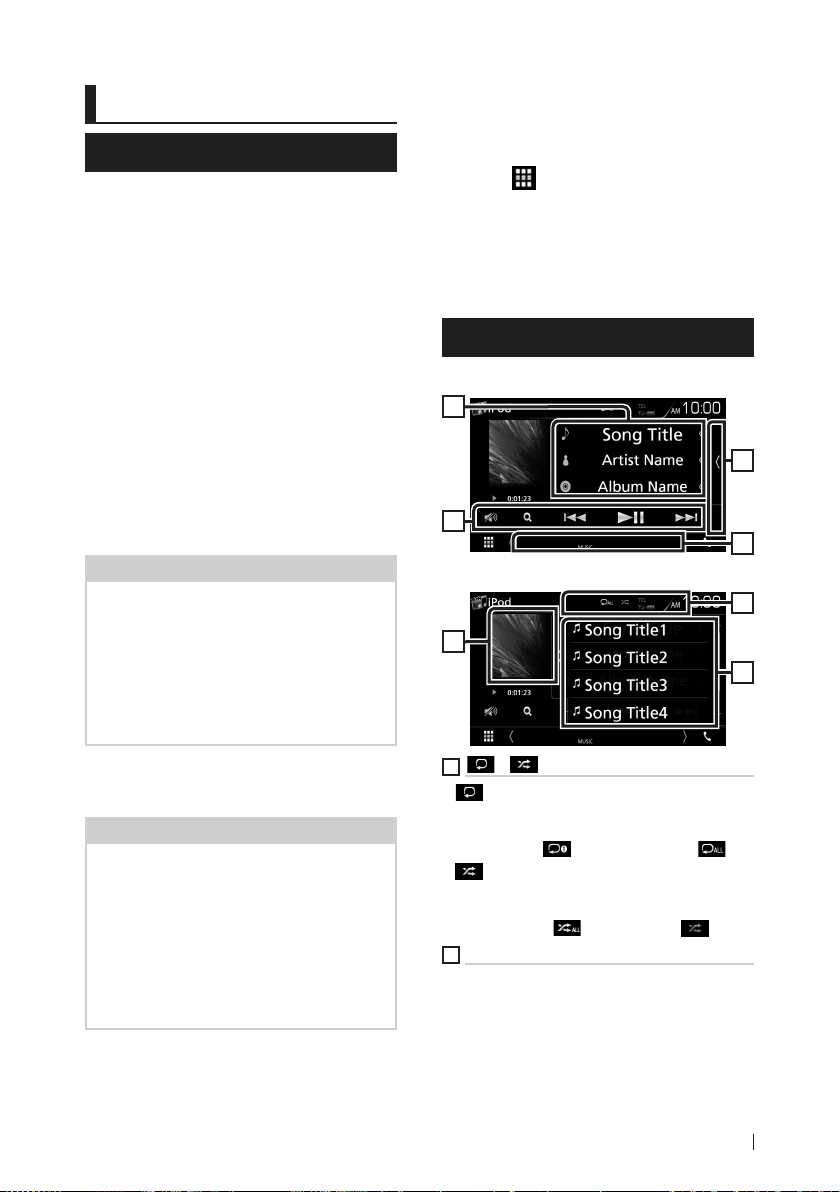
iPod/iPhone Basic Operation
Control screen
2
4
3
5
Open the drawer
1
6
4
Ñ Connect iPod/iPhone
Preparation
• Connect an iPod/iPhone with the KCA-iP103
(optional accessory) while CarPlay is not
connected.
• With a CarPlay-capable iPhone, turn off CarPlay
by operating the iPhone at functional setup
before connecting iPhone. For details of the
setup method, contact the manufacturer of the
terminal.
• Only one iPod/iPhone can be connected.
1
[ ] / [ ]
] : Repeats the current track/album. Each
• [
time you touch the key, repeat mode switches
in the following sequence;
Song repeat (
] : Randomly plays all tracks in current
• [
album. Each time you touch the key, random
mode switches in the following sequence;
Song random (
2
Track information
• Displays the information of the current file.
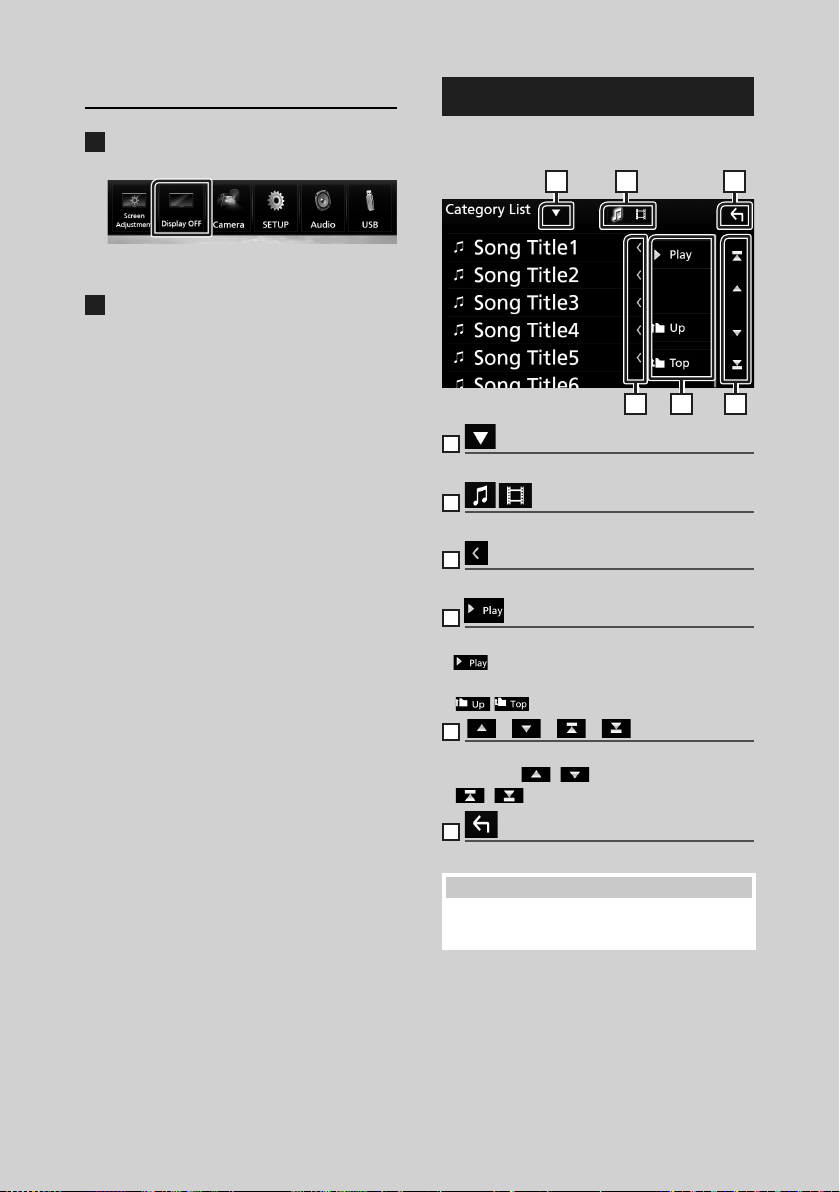
• Touch to display the category list screen. See
Category search (P.16).
), All songs repeat ( )
), Random off ( )
15English
Page 16

iPod/iPhone
3
[Operation keys
• 1] : Searches track/file. For details on search
operation, see Search Operation (P.16).
• E] [F] : Searches the previous/next track/
file. Touch and hold to fast forward or fast
backward.
• [DH] : Plays or pauses.
•
: Touch to attenuates/restores the sound.
4
Content list
Touch on the right side of the screen to display
the Content list. Touch again to close the list.
Displays the playing list. When you touch a
track/file name on the list, playback will start.
5
Indicator Items
• MUSIC: Identifies the music file.
6
Artwork/ Play mode indicator/ Playing
time
The jacket of the currently playing file is
displayed.
• D, B, etc.: Current play mode indicator
The meanings of each icon are as follows;
D (play), B (fast forward), A (fast
backward), H (pause).
Search Operation
You can search music files by the following
operations.
1 Touch [1].
2 Touch [S].
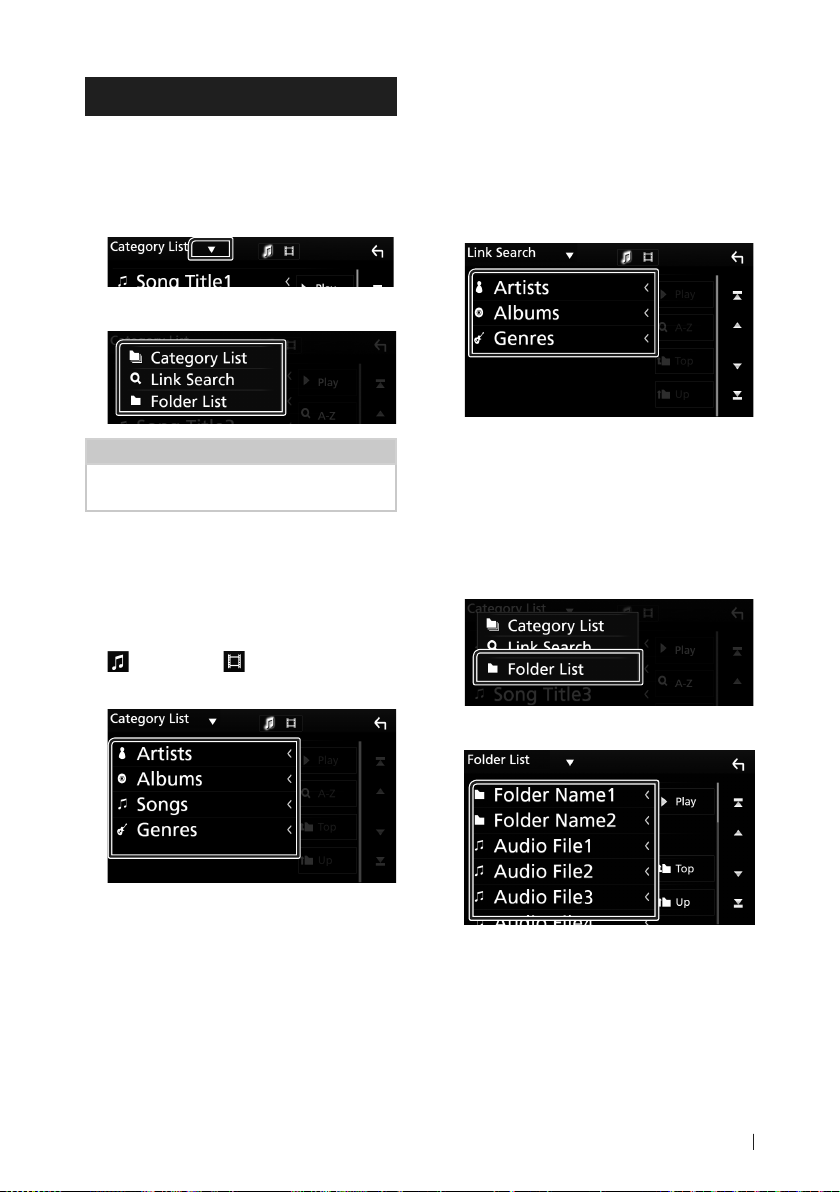
Ñ Category search
You can search a file by selecting category.
1 Touch [Category List].
2 Touch the desired category.
The list corresponding to your selection
appears.
3 Touch to select desired item in the list.
Repeat this step until you find the desired
file.
Ñ Link search
You can search a file of same artist/album/
genre/composer as the current track.
1 Touch [Link Search].
2 Touch the desired tag type. You can select
from artist, album, genre and composer.
3 Select the list type.
NOTE
• For operations in the list screen, see List scr een
(P.12).
16
The list corresponding to your selection
appears.
3 Touch desired item from the content list.
Page 17

USB
USB
Connecting a USB device
1 Connect the USB device with the USB
cable. (P. 50)
2 Press the [HOME] button.
3 Touch .
4 Touch [USB]. (P. 9)
Ñ Disconnect the USB device
1 Press the [HOME] button.
2 Touch a source other than [USB].
3 Detach the USB device.
Ñ Usable USB device
You can use a mass-storage-class USB device on
this unit.
The word “USB device” appearing in this manual
indicates a flash memory device.
● About file system
The file system should be the one of the
following.
• FAT16 • FAT32 • NTFS
NOTE
• Install the USB device in the place where it will
not affect safe driving.
• You cannot connect a USB device via a USB hub
and Multi Card Reader.
• Take backups of the audio files used with this
unit. The files can be erased depending on the
operating conditions of the USB device.
We shall have no compensation for any damage
arising from any erased data.
USB Basic Operation
Most functions can be controlled from the
source control screen and playback screen.
Control screen
1
7
4
3
Open the drawer
4
1
[ ] / [ ]
] : Repeats the current track/folder. Each
• [
time you touch the key, repeat mode switches
in the following sequence;
File repeat (
Repeat all (
] : Randomly plays all tracks in current
• [
folder. Each time you touch the key, random
mode switches in the following sequence;
File random (
• When a high-resolution source is played, its
format information is displayed.
2
Track information
Displays the information of the current file.
Only a file name and a folder name are
displayed if there is no tag information.
), Folder repeat ( ),
)
), Random off ( )
5
2
5
6
17English
Page 18

USB
3
[Operation keys
• 1] : Searches track/file. For details on search
operation, see Search Operation (P.19).
• E] [F] : Searches the previous/next track/
file.
Touch and hold to fast forward or fast
backward.
• [D]H : Plays or pauses.
•
: Touch to attenuates/restores the sound.
4
Function panel
Touch on the left side of the screen to display
the function panel. Touch again to close the
panel.
• [
] [ ] : Searches previous/next folder.
• Aspect: Select screen mode.
Full: Changes the aspect ratio of video and
displays fully on the screen.
Normal: Display with 4:3 ratio.
Auto: Displays video fully on vertical or
horizontal with no ratio change.
5
Content list
Touch on the right side of the screen to display
the Content list. Touch again to close the list.
Displays the playing list. When you touch a
track/file name on the list, playback will start.
6
Indicator Items
• VIDEO: Identifies the video file.
• MUSIC: Identifies the music file.
7
Artwork/ Play mode indicator/ Playing
time
The jacket of the currently playing file is
displayed.
• D, B, etc.: Current play mode indicator
The meanings of each icon are as follows;
D (play), B (fast forward), A (fast
backward), H (pause).
Video screen
9
Key display area (Video file only)
Touch to display the control screen.
9
8
Searching file area (Video file only)
Touch to search the next/previous file.
18
88
Page 19
USB
Search Operation
You can search music or video files by the
following operations.
1 Touch [1].
2 Touch [S].
3 Select the list type.
NOTE
• For operations in the list screen, see List scr een
(P.12).
Ñ Category search
You can search a file by selecting category.
1 Touch [Category List].
2 Select whether you search by audio files
or video files .
3 Touch the desired category.
Ñ Link search
You can search a file of same artist/album/genre
as the current track.
1 Touch [Link Search].
2 Touch the desired tag type. You can select
from artist, album and genre.
The list corresponding to your selection
appears.
3 Touch desired item from the content list.
Ñ Folder search
You can search a file according to hierarchy.
1 Touch [Folder List].
The list corresponding to your selection
appears.
4 Touch to select desired item in the list.
Repeat this step until you find the desired
file.
2 Touch the desired folder.
When you touch a folder its contents are
displayed.
3 Touch to select desired item in the list.
Repeat this step until you find the desired
file.
19English
Page 20

Radio
Radio
Radio Basic Operation
Most functions can be controlled from the
source control screen.
To enter Radio source, touch [Radio] icon in the
source selection screen. (P.9)
Control screen
1
2
5
6
3
Open the drawer
5
1
Information display
Displays the information of the current station:
Frequency
Touching [ ] allows you to switch between
Content A and Content B.
Content A: PS name, Radio Text, PTY Genre
Content B: Radio Text plus, Title Artist
Preset#: Preset number
2
Seek mode
Switches the seek mode in the following
sequence; [AUTO1], [AUTO2], [MANUAL].
• [AUTO1]: Tunes in a station with good
reception automatically.
• [AUTO2]: Tunes in stations in memory one
after another.
• [MANUAL]: Switches to the next frequency
manually.
3
Operation keys
• [E] [F] : Tunes in a station. The method of
frequency switching can be changed (see 2
in table).
•
: Touch to attenuates/restores the sound.
4
Preset list
• Touch on the right side of the screen to
display the Preset list. Touch again to close
the list.
• Recalls the memorized station.
4
4
7
• When touched for 2 seconds, stores the
current receiving station in memory.
5
Function panel
Touch on the left side of the screen to display
the function panel. Touch again to close the
panel.
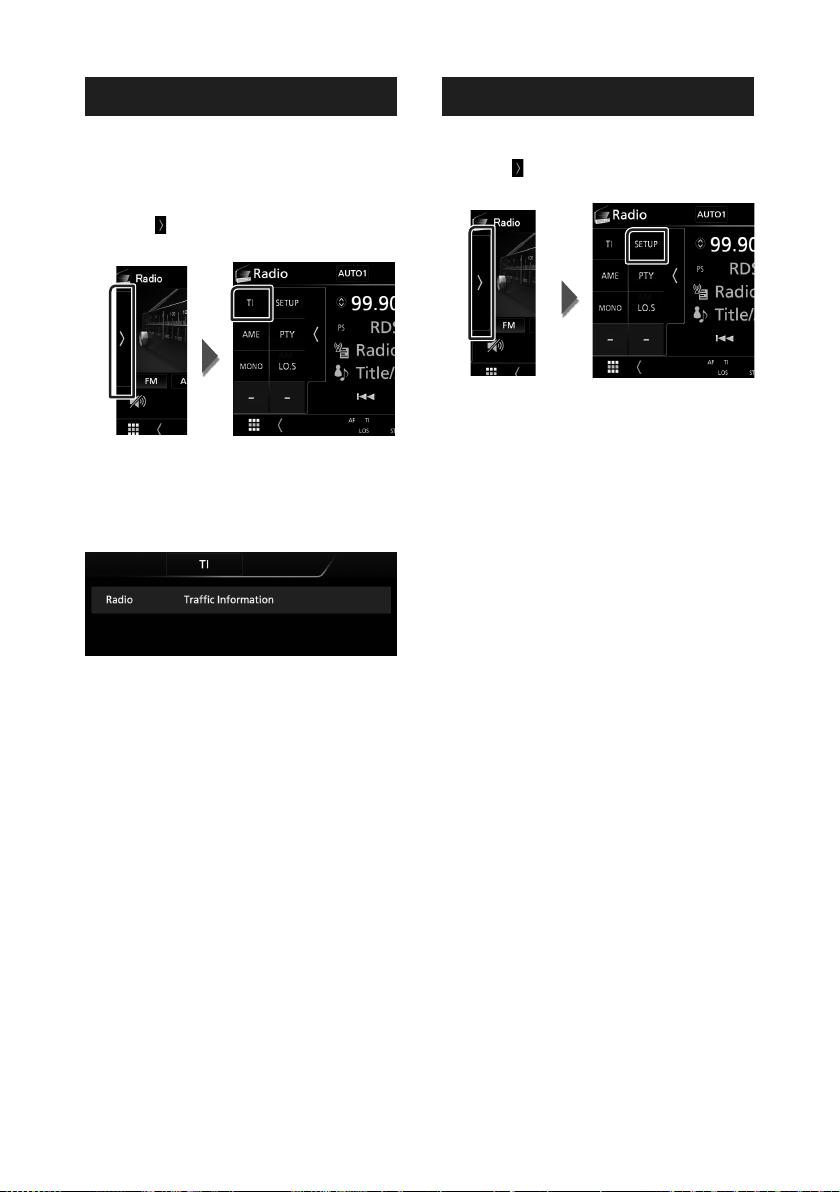
• TI] (FM only): Sets the traffic information
mode on. For details, see Traffic Information
(P. 22).
• [SETUP: Displays the TUNER SETUP screen. For
details, see Radio Setup (P.22).
• [AME]: Presets stations automatically. For
details, see Auto memor y (P.21).
• [PTY] (FM only): Searches a program by setting
program type. For details, see Search by
program type (P.21).
• [MONO] (FM only): Select the Monaural
reception.
• [LO.S] (FM only): Turns the Local Seek function
on or off.
6
[FM] [AM]
Switches the band.
7
Indicator Items
• ST: A stereo broadcast is being received.
• MONO: The forced monaural function is on.
• AF: The AF search function is on.
• LOS: The Local Seek function is on.
• RDS: Indicates the state of the Radio Data
System station when the AF function is on.
White: Radio Data System is being received.
Orange: Radio Data System is not being
received.
20
Page 21

Radio
• TI: Indicates the reception state of traffic
information.
White: TP is being received.
Orange: TP is not being received.
Memory Operation
Ñ Auto memory
You can store stations with good reception in
memory automatically.
1 Touch desired band key.
2 Touch [ ] on the left side of the screen.
Touch [AME].
Selecting Operation
Ñ Preset select
You can list and select memorized station.
1 Touch [ ] on the right side of the screen.
Select a station from the list.
Ñ Search by program type
(FM only)
You can tune to a station with a specific
program type when listening to FM.
1 Touch [ ] on the left side of the screen.
Touch [PTY].
Auto memory starts.
Ñ Manual memory
You can store the current receiving station in
memory.
1 Select a station you wish to store in
memory.
2 Touch [FM#] (#:1-24) or [AM#] (#:1-12) in
which you want to store the station for 2
seconds until a beep sounds.
PTY Search screen appears.
2 Select a program type from the list.
3 Touch [Search].
You can search a station of the selected
program type.
21English
Page 22
Radio
Traffic Information (FM only)
You can listen and watch the traffic information
automatically when a traffic bulletin starts.
However, this feature requires a Radio Broadcast
Data System that includes the TI information.
1 Touch [ ] on the left side of the screen.
Touch [TI].
Traffic information mode is set.
Ñ When the traffic bulletin starts
The Traffic Information screen appears
automatically.
Radio Setup
You can set tuner related parameters.
1 Touch [ ] on the left side of the screen.
Touch [SETUP].
Radio SETUP screen appears.
2 Set each item as follows.
■ AF
When station reception is poor, automatically
switches to the station that is broadcasting
the same program over the same Radio Data
System network. Default is “ON”.
■ RDS CT
Synchronizing the Radio Data System station
time data and this unit’s clock.
“ON” (Default), “OFF”
22
Page 23

DAB
DAB
(DMX7018DABS)
DAB Basic Operation
Most functions can be controlled from the
source control screen.
To enter DAB source, touch [DAB] icon in the
source selection screen. (P.9)
Control screen
2
3
4
7
5
Open the drawer
7
1
Indicator display
Displays the received signal strength.
2
Information display
Displays the information of the current station:
Service Name
Touching [ ] allows you to switch between
Content A, Content B and Content C.
Content A: Ensemble name, PTY Genre
Content B: Song Title, Artist Name, DLS
Content C: Now Playing, Next Program, Audio
Quality
3
Seek mode
Switches the seek mode in the following
sequence; [AUTO1], [AUTO2], [MANUAL].
• [AUTO1]: Tunes in a ensemble with good
reception automatically.
• [AUTO2]: Tunes in ensemble in memory one
after another.
• [MANUAL]: Switches to the next ensemble
manually.
4
Artwork area
6
1
6
8
The picture data is displayed if available from
current content.
Touch to switch between the Control and
Information screen.
P#: Preset number
CH#: Channel display
5
Operation keys
• [1] : Displays the Service List screen. For details
on search operation, see Service search
(P. 25).
• [E] [F] : Tunes in a ensemble, service, and
component. The seek mode switching can be
changed. (see 3 in table).
•
: Touch to attenuates/restores the sound.
6
Preset list
• Touch on the right side of the screen to
display the Preset list. Touch again to close
the list.
• Recalls the memorized service.
• When touched for 2 seconds, stores the
current service in memory.
7
Function panel
Touch on the left side of the screen to display
the function panel. Touch again to close the
panel.
• [TI]: Sets the traffic information mode on. For
details, see Traffic Information (P.25).
• [SETUP]: Displays the DAB SETUP screen. For
details, see DAB Setup (P.26).
• [PTY] (Live mode only): Searches a program by
setting program type. For details, see Search
by program type (P.24).
• [DLS]: Display the Dynamic Label Segment
screen.
23English
Page 24

DAB
8
Indicator Items
• DAB: Digital Radio is being received.
• RDS: Radio Data System is being received.
• MC: Receiving service is displayed.
White: Primary Component is received.
Orange: Secondary Component is received.
Storing Service in Preset Memory
You can store the current receiving service in
memory.
1 Select a service you wish to store in
memory.
2 Touch [ ] on the right side of the screen.
3 Touch [P#] (#:1-10) in which you want to
store the station for 2 seconds until a
beep sounds.
Selecting Operation
Ñ Search by program type
You can tune to a station with a specific
program type when listening to Digital Radio.
1 Touch [ ] on the left side of the screen.
Touch [PTY].
PTY Search screen appears.
2 Select a program type from the list.
3 Touch [Search].
24
You can search a station of the selected
program type.
Page 25

DAB
Ñ Service search
You can select a service from a list of all services
received.
1 Touch [1].
2 Select the desired content from the list.
■ [ ]
Touch and hold to find the latest service list.
■ [1A-Z]
Displays the keyboard screen.
Jump to the letter you entered (alphabet
search).
Traffic Information
You can listen and watch the traffic information
automatically when a traffic bulletin starts.
However, this feature requires a Digital Radio
that includes the TI information.
1 Touch [ ] on the left side of the screen.
Touch [TI].
Traffic information mode is set.
Ñ When the traffic bulletin starts
The Traffic Information screen appears
automatically.
25English
Page 26

DAB
DAB Setup
You can set Digital Radio related parameters.
1 Touch [ ] on the left side of the screen.
Touch [SETUP].
DAB SETUP screen appears.
2 Set each item as follows.
■ [Priority]
If the same service is provided by Digital
Radio during Radio Data System reception,
automatically switches to Digital Radio. If
the same service is provided by Radio Data
System when reception of the service being
provided by Digital Radio becomes poor,
automatically switches to Radio Data System.
■ [Announcement Select]
Switches to the set Announcement service.
For details, see Announcement setup
(P. 26).
■ [Related Service]
When you select ON, the unit switches to a
related service (if exists) when a DAB service
network is not available.
Default is “OFF”.
■ [Antenna Power
Sets power supply to the Digital Radio
antenna. Set to “ON” when the Digital Radio
antenna in use is equipped with a booster.
Default is “ON”.
Ñ Announcement setup
When the service for which ON is selected
starts, switches from any source to
Announcement to receive it.
1 Touch [Announcement Select] in the DAB
SETUP screen.
The Announcement Select screen
appears.
2 Touch each Announcement list and set
on or off.
NOTE
• The volume setting during reception of
Announcement service is automatically stored.
The next time the Announcement ser vice is
received, this unit recalls the volume setting
automatically.
26
Page 27

Bluetooth Control
Bluetooth Control
Using the Bluetooth function, various functions
can be used: listening to the audio file, making/
receiving a call.
Information for using Bluetooth® devices
Bluetooth is a short-range wireless radio
communication technology for mobile devices
such as mobile phones, portable PCs, and other
devices.
Bluetooth devices can be connected without
cables and communicate with each other.
NOTE
• While driving, do not perform complicated
operations such as dialing numbers, using the
phone book, etc. When you perform these
operations, stop your car in a safe place.
• Some Bluetooth devices may not connect to
this unit depending on the Bluetooth version of
the device.
• This unit may not work for some Bluetooth
devices.
• Connecting conditions may vary depending on
your environment.
• For some Bluetooth devices, the device is
disconnected when the unit is turned off.
Ñ About the cell-phone and
Bluetooth audio player
This unit conforms to the following Bluetooth
specifications:
Version
Bluetooth Ver. 4.1
Profile
Cell-phone:
HFP (Hands Free Profile)
SPP (Serial Port Profile)
PBAP (Phonebook Access Profile)
Audio player:
A2DP (Advanced Audio Distribution Profile)
AVRCP (Audio/Video Remote Control Profile)
Sound codec
SBC, AAC
NOTE
• The units supporting the Bluetooth function
have been certified for conformity with the
Bluetooth Standard following the procedure
prescribed by Bluetooth SIG.
• However, it may be impossible for such units to
communicate with your cell-phone depending
on its type.
27English
Page 28
Bluetooth Control
Register from the Bluetooth device
It is necessary to register the Bluetooth audio
player or cell-phone to this unit before using the
Bluetooth function.
You can register up to 7 Bluetooth devices.
NOTE
• Up to 7 Bluetooth devices can be registered. If
an attempt is made to register the 8th Bluetooth
device, the Bluetooth device connected on the
earliest date will be deleted to register the 8th
one.
• This unit is compatible with the Apple Easy
Pairing func tion. When an iPod touch or iPhone
is connected to this unit, an authentication
dialog appears. Performing operation for
authentication on this unit or iOS smartphone
registers the smartphone as a Bluetooth device.
1 Turn on the Bluetooth function on your
smartphone/cell-phone.
2 Search the unit (“DMX****”) from your
smartphone/cell-phone.
3 Operate your smartphone/cell-phone
according to the displayed messages.
■ Confirm the request on the
smartphone/cell-phone.
Bluetooth Setup
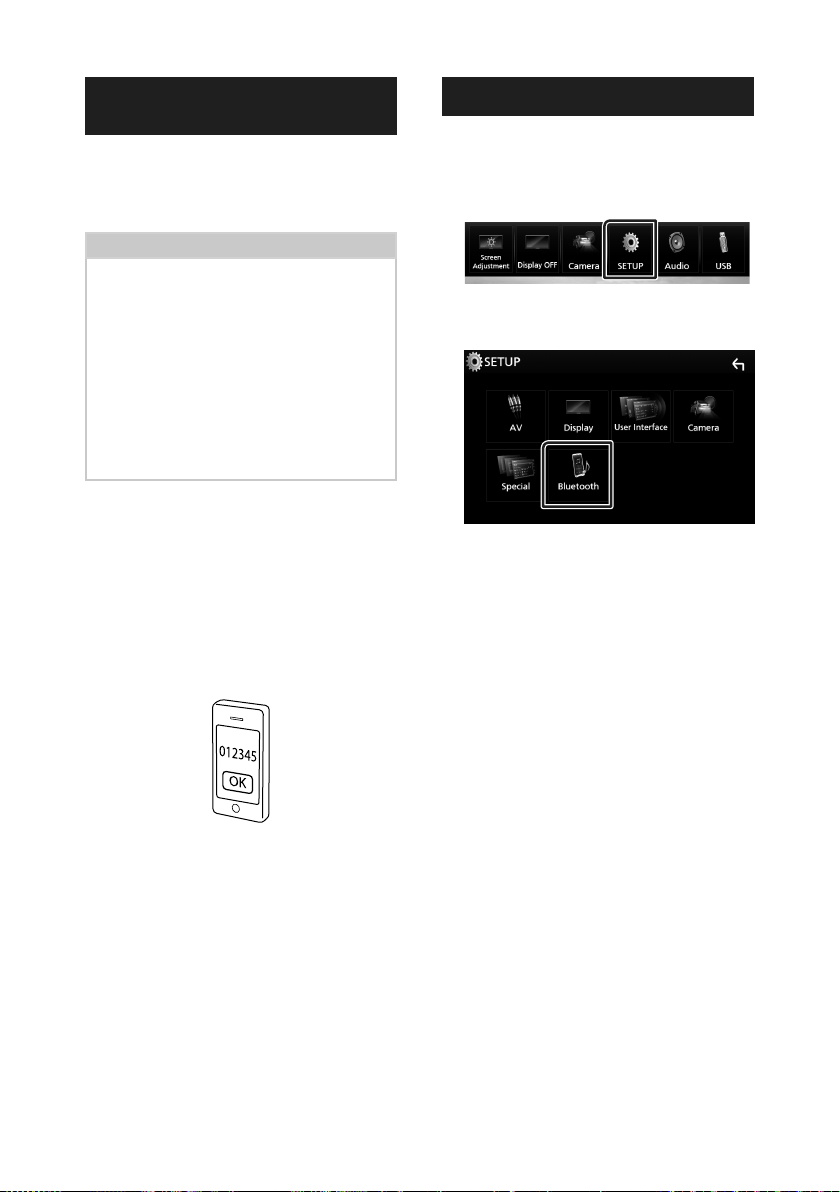
1 Press the [MENU] button.
Popup menu appears.
2 Touch [SETUP].
SETUP Menu screen appears.
3 Touch [Bluetooth].
Bluetooth SETUP screen appears.
See the following section for each
setting.
• Connect the Bluetooth device (P. 29)
■ If a PIN code is required, enter the PIN
code (“0000”).
When data transmission and connection
have completed, the Bluetooth connection
icon appears on the screen.
28
Page 29

Bluetooth Control
Ñ Connect the Bluetooth device
1 Touch [Select Device] in the Bluetooth
SETUP screen.
2 Touch the device name you want to
connect.
NOTE
• If the icon is lighted, it means that the unit will
use that device.
To delete the registered Bluetooth
device
1 Touch [Delete].
2 Touch [Delete].
Confirmation message appears.
3 Touch [Yes ].
Playing Bluetooth Audio Device
Most function can be controlled from the
source control screen.
To enter Bluetooth source, touch [Bluetooth]
icon in the source selection screen. ( P.9)
Ñ Bluetooth basic operation
Control screen
1
5
4
3
1
Device name/ [ ] / [ ]
• Connected device name.
] : Repeats the current track/folder. Each
• [
time you touch the key, repeat mode switches
in the following sequence; File repeat (
Folder repeat (
Repeat off (
] : Randomly plays all tracks in current
• [
folder. Each time you touch the key, random
mode switches in the following sequence;
All random (
• Operations and display indications may
differ according to their availability on the
connected device.
2
Information display *
Displays the name of the track information.
3
[Operation keys *
• [1]: Searches file. See File search (P.30).
• [E] [F]: Searches the previous/next
content. Touch and hold to fast forward or fast
backward.
• [D]: Plays.
• [H]: Pauses.
: Touch to attenuates/restores the sound.
•
), All songs repeat ( ),
)
), Random off ( )
2
),
29English
Page 30

Bluetooth Control
4
Function panel
Touch on the left side of the screen to display
the function panel. Touch again to close the
panel.
• BT DEVICE CHANGE] : Selects the device to
connect via Bluetooth audio (A2DP) or APP
(SPP). See Connect the Bluetooth audio
(P.30).
5
Play mode indicator/ Playing time
D, H: Current play mode indicator
The meanings of each icon are as follows;
D (play), B (fast forward), A (fast backward),
H (pause).
* These items appear only when the audio
player which supports AVRCP profile is
connected.
NOTE
• If the operation keys do not appear, operate
from the player.
• Depending on your cell-phone or audio player,
audio may be heard and controlled but text
information may not appear.
• If the volume is too low, raise it on your cell-
phone or audio player.
Ñ Connect the Bluetooth audio
Selects the device to connect via Bluetooth
audio (A2DP) or APP (SPP).
1 Touch on the left side of the screen.
Touch [BT DEVICE CHANGE].
2 Touch the device name you want to
connect.
3 Touch [Close].
Ñ File search
1 Touch [1].
2 Touch the desired file or folder.
When you touch a folder its contents are
displayed.
3 Touch desired item from the content list.
Playback starts.
NOTE
• For operations in the list screen, see List scr een
(P.12).
30
Page 31

Bluetooth Control
Using Hands-Free Unit
You can use telephone function by connecting
the Bluetooth telephone to this unit.
NOTE
• While Apple CarPlay or Android Auto is being
connected, Bluetooth Hands-Free function and
two Bluetooth devices connections cannot
be used. Only Apple CarPlay or Android Auto
Hands-Free function can be used.
Ñ Make a call
1 Touch [Û].
Hands Free screen appears.
NOTE
• If your mobile phone supports PBAP, you can
display the phone book and call lists on the
touch panel screen when the mobile phone is
connected.
– Phone book: up to 1000 entries
– Up to 20 entries including dialed calls,
received calls, and missed calls
● Bluetooth SETUP
1) Touch [
Bluetooth SETUP screen appears.
NOTE
• The status icons such as battery and antenna
displayed may differ from those displayed on the
cell-phone.
• Setting the cell-phone in the private mode can
disable the hands-free function.
].
Call using call records
1 Touch [ ].
2 Select the phone number from the list.
Call by entering a phone number
1 Touch [ ].
2 Enter a phone number with number keys.
2 Select a dialing method.
• [ ]: Call using call records
• [
]: Call using the phonebook
• [
]: Call using the preset number
• [
]: Call by entering a phone number
• [
]: Voice Recognition ( P.32)
3 Touch [ ].
31English
Page 32

Bluetooth Control
Call using the preset number
1 Touch [ ].
2 Touch the Name or phone number.
Call using the phonebook
1 Touch [ ].
2 Select the person you want to call from
the list.
Ñ Voice Recognition
You can access the voice recognition function of
the cell-phone connected to this unit. You can
search the cell-phone phonebook by voice. (The
functionality depends on the cell-phone.)
1 Press the [ ] button for 1 second.
Press for 1 second
Voice Recognition screen appears.
2 Start speaking.
NOTE
• You can use voice recognition func tion by
touching [
] on the Hands Free screen.
3 Select the phone number from the list.
NOTE
• If no Phonebook has been downloaded,
touching [Download Phonebook Now] will
start downloading the Phonebook.
32
Page 33

Bluetooth Control
Ñ Receive a call
1 Touch [ ] to answer a phone call or
[
] to reject an incoming call.
NOTE
• While monitoring the view camera, this screen
does not appear even if a call comes in. To
display this screen, press the [TEL] button or
return the shift knob of car to the driver position.
To end call
1 While talking, touch [ ].
Ñ Operations during a call
● Adjust the receiver volume
Press the [S] or [R] button.
● Output the dial tone
Touch [DTMF] to display the tone input screen.
You can send tones by touching desired keys on
the screen.
● Switching the speaking voice output
Touching [
speaking voice output between cell-phone and
speaker.
● Call-waiting
When you receive a call while talking on another
call, you can answer the newly received call by
touching [
Each time you touch [
When you touch [
and switch to the call in hold.
]/ [ ] each time switches the
]. The current call is on hold.
], the caller will change.
], the current call will end
33English
Page 34
Bluetooth Control
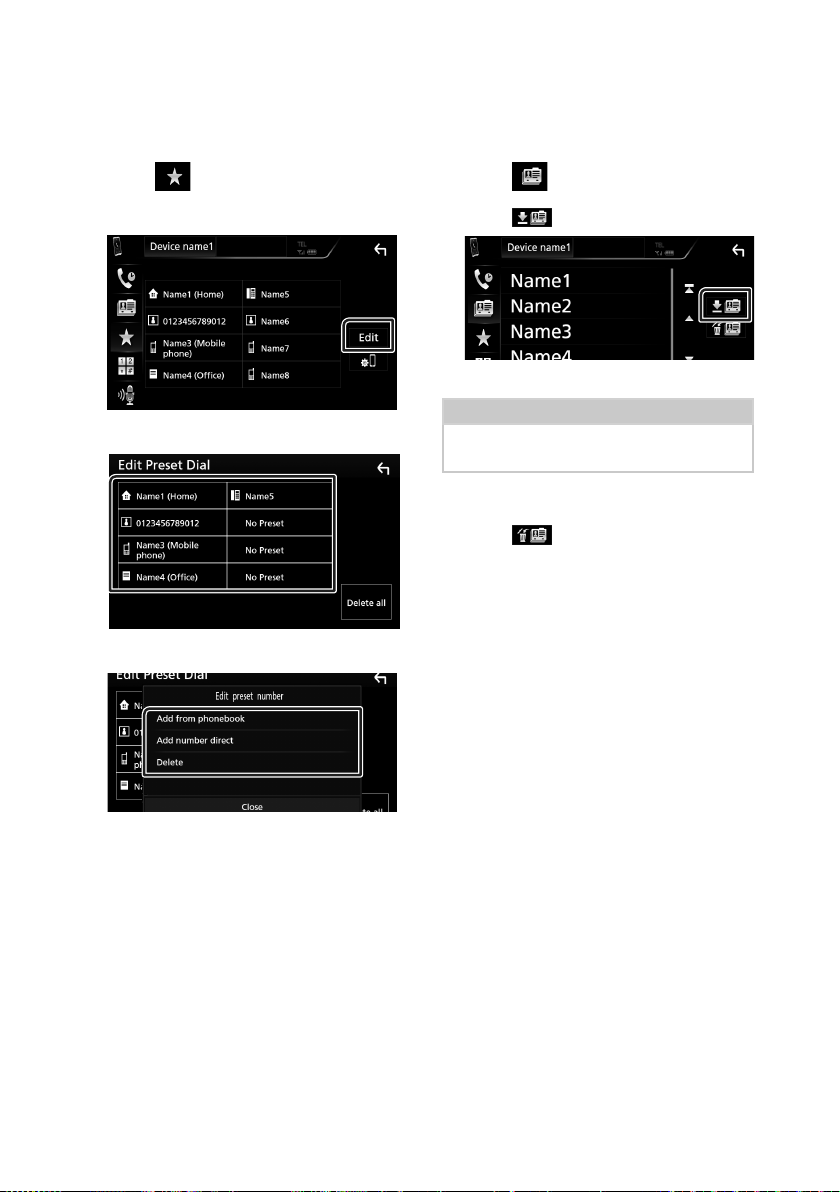
Ñ Phone number preset
You can register frequently used phone
numbers to this unit.
1 Touch [ ].
2 Touch [Edit].
3 Select where to preset.
4 Select how to preset.
Ñ Phonebook transfer
You can transfer the phonebook in your
Bluetooth smartphone via PBAP.
1 Touch [ ].
2 Touch [ ].
The phonebook data transmission starts.
NOTE
• If the Phonebook contains more than 1000
entries, Phonebook data cannot be transferred.
Phonebook deletion
1 Touch [ ].
Confirmation message appears.
2 Touch [Yes ].
■ [Add number from phonebook]
Select the number to preset from the
phonebook. See Call using the phonebook
(P. 32).
■ [Add number direct]
Enter the telephone number directly and
touch [SET]. See Call by entering a phone
number (P.31).
■ [Delete]
To delete a preset number, touch [Delete]
and then touch [OK] on the confirmation
screen.
34
Page 35

Other External Components
Other External Components
View Camera
NOTE
• To connect a camera, see P. 50.
• To use a rear view camera, a REVERSE lead
connection is required. (P. 50)
• The rear view screen is displayed when you shift
the gear to the reverse (R) position.
Ñ Display the camera screen
1 Press the [MENU] button.
Popup menu appears.
2 Touch [Camera].
View camera screen appears.
3 Adjust each item as follows.
Ñ Camera Setup
1 Press the [MENU] button.
Popup menu appears.
2 Touch [SETUP].
SETUP Menu screen appears.
3 Touch [Camera].
Camera screen appears.
4 Set each item as follows.
■ Parking Guidelines
You can display parking guidelines to enable
easier parking when you shift the gear to the
reverse (R) position.
Default is “ON”.
■ Guidelines SETUP
If you select [ON] for [Parking Guidelines],
adjust the parking guidelines. See To adjust
the parking guidelines (P.36).
1
1
Camera off
Touch to exit the camera screen.
35English
Page 36

Other External Components
To adjust the parking guidelines
NOTE
• Install the rear view camera in the appropriate
position according to the instructions supplied
with the rear view camera.
• When adjusting the parking guidelines, make
sure to use the parking brake to prevent the car
from moving.
1 Touch [ON] of [Parking Guidelines] in the
Camera screen. (P. 35)
2 Touch [Guidelines SETUP] in the Camera
screen.
3 Adjust the parking guidelines by
selecting the
mark.
4 Adjusting the position of the selected
mark.
External audio/video players— AV-IN
1 Connect an external component to the
AV-IN input terminal. (P. 50)
2 Select [AV-IN] as the source. (P. 9)
3 Turn on the connected component and
start playing the source.
A
C
B
Make sure that A and B are horizontally
parallel, and that C and D are the same
length.
NOTE
• Touch [Initialize] and after touch [Yes] to set all
the
marks to the initial default position.
36
D
Page 37

Setting Up
Setting Up
Monitor Screen Setup
You can adjust image quality in video screen.
1 Press the [MENU] button.
Popup menu appears.
2 Touch [Screen Adjustment].
Screen Control screen appears.
3 Adjust each item as follows.
■ Contrast / Brightness / Colour / Tint
Adjusts each item.
NOTE
• Adjusting items are different depending on the
current source.
System Setup
NOTE
• Each operation in this section can be star ted
from the multi function menu.
1 Press the [MENU] button.
Popup menu appears.
2 Touch [SETUP].
See the following section for each
setting.
• Set up AV (P. 40)
• Set up display (P.39)
• Set up the user interface ( P.38)
• Set up camera (P.35)
• Set up special (P.38)
• Set up Bluetooth (P.28)
37English
Page 38

Setting Up
User Interface Setup
You can setup user interface parameters.
1 Press the [MENU] button.
Popup menu appears.
2 Touch [SETUP].
SETUP screen appears.
3 Touch [User Interface].
User Interface screen appears.
4 Set each item as follows.
■ Beep
Turns the key touch tone on or off.
Default is “OFF”.
■ Language
Selects a language.
■ Steering Remote Controller
Sets the desired function in the steering
remote controller. (Contact your KENWOOD
dealer for details.)
■ Clock Adjust
Adjust the date and time manually. (P. 7)
Special Setup
You can setup Special parameters.
1 Press the [MENU] button.
Popup menu appears.
2 Touch [SETUP].
SETUP screen appears.
3 Touch [Special].
Special screen appears.
4 Set each item as follows.
■ DEMO
Set the demonstration mode. Default is “ON”.
■ Software Information
Check the software version of this unit.
(P. 38)
■ Open Source Licenses
Displays the open source licenses.
■ Initialize
Touch [Initialize] and then touch [Yes ] to set
all the settings to the initial default settings.
Ñ Software Information
Check the software version of this unit.
1 Touch [Software Information] in the
Special screen.
2 Confirm the software version.
38
Page 39
Setting Up
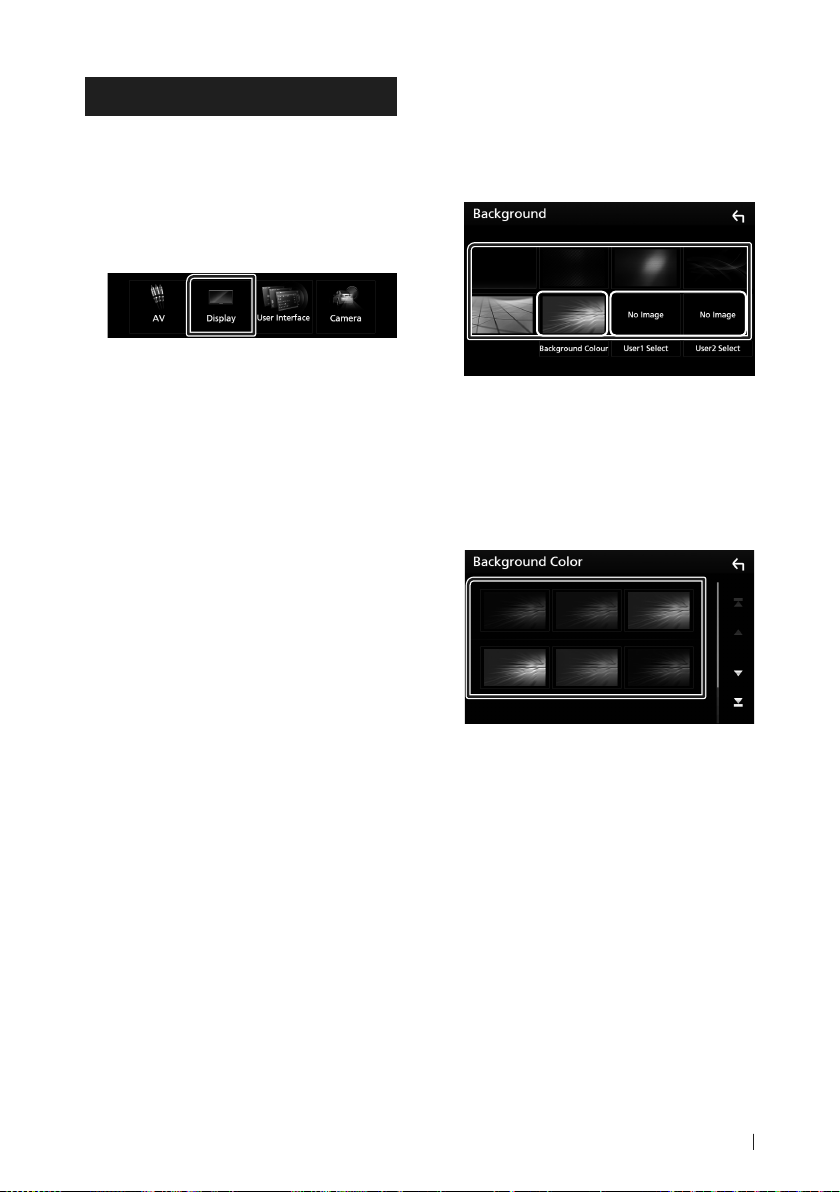
Display Setup
1 Press the [MENU] button.
Popup menu appears.
2 Touch [SETUP].
SETUP screen appears.
3 Touch [Display].
Display screen appears.
4 Set each item as follows.
■ Dimmer
Select dimmer mode.
OFF: The display and buttons do not dim.
ON: The display and buttons dim.
SYNC (Default): Turns the dimmer function
on or off when the vehicle light control
switch is turned on or off.
■ Screen Adjustment
Displays the Screen Adjustment screen.
(P. 37)
■ Background
Changing background image or color.
(P. 39)
Ñ Change background image or
color
1 Touch [Background] in the Display screen.
2 Select an image.
1
*
*1 Select a background color in advance.
2
*
Select an original image in advance.
To select background color
2
*
1 Touch [Background Color] in the
Background screen.
2 Select a background color.
39English
Page 40

Setting Up
To register original image
You can load an image from the connected USB
device and set it for the background image.
Before operating this procedure, it is necessary
to connect the device which has the image to
load.
1 Touch [User1 Select] or [User2 Select] in
the Background screen.
2 Select the image to load.
3 Touch [Enter].
AV Setup
You can set AV parameters.
1 Press the [MENU] button.
Popup menu appears.
2 Touch [SETUP].
SETUP screen appears.
3 Touch [AV].
AV screen appears.
4 Set each item as follows.
■ AV-OUT
Specify whether to output the current source
signal from the AV OUTPUT terminal.
“ON”/ “OFF” (Default)
NOTE
• Images can be output only from the AV IN
and USB (video file) source.
• If display of the rear view camera image is
selected when the AV-IN source is being
played, no image is output from the AV
OUTPUT terminal.
The selected image is loaded and the
display returns to the Background
screen.
NOTE
• Touching [ ] rotates counter clockwise.
• Touching [
• Picture files: JPEG (.jpg, .jpeg), PNG (.png), BMP
(.bmp)
] rotates clockwise.
40
■ CarPlay Sidebar
Select the position of the control bar (left or
right) shown on the touch panel.
“Left” (Default)/ “Right”
NOTE
• The setting is available when an iPhone is
disconnected.
■ AV Color Adjust
You can adjust image quality in video screen.
(P. 37)
NOTE
• Adjusting items are different depending on
the current source.
Page 41

Controlling Audio
Controlling Audio
NOTICE
• Each operation in this section can be star ted
from the multi function menu.
You can adjust the various settings such as
audio balance or subwoofer level.
1 Press the [MENU] button.
Popup menu appears.
2 Touch [Audio].
See the following section for each
setting.
• Set up speaker/ X’over (P. 41)
• Controlling equalizer (P. 43)
• Set listening position/ DTA (P. 45)
• Controlling general audio (Fader /
Balance) (P. 42)
• Set volume offset (P. 44)
• Set sound effect (P.44)
Speaker/ X’over setup
1 Press the [MENU] button.
Popup menu appears.
2 Touch [Audio].
Audio screen appears.
3 Touch [Speaker/Xʼover].
4 Select a car type.
You can setup the car type and speaker
network, etc.
If your car type is selected, the Delay Time
Alignment is set automatically (for timing
adjustment of sound output for each
channel) to have the highest surround
effects.
5 Touch the speaker (1) you wish to adjust
and set each item (2) as follows.
1
2
■ Speaker
You can select a speaker type and its size to
get the best sound effects.
When the speaker type and size are set,
the speaker crossover network is set
automatically.
■ Location (Only for Front, Rear)
Select the speaker position you have fixed.
41English
Page 42

Controlling Audio
■ Tweeter (Only for Front)
You can set the tweeter when you are
selecting front speakers.
None, Small, Medium, Large
■ X’over
Displays the speaker crossover setup screen.
You can adjust the crossover setup that was
set automatically when you selected the
speaker type.
For details, see Crossover network setup
(P. 42)
Ñ Crossover network setup
You can set a crossover frequency of speakers.
1 Touch [Xʼover].
2 Touch the speaker to set.
3 Set each item as follows.
■ TW (Tweeter) Gain *
Adjusts the tweeter level. (When front is
selected on Speaker Select screen)
■ Phase Inversion*
Sets the phase of subwoofer output.
Check [Phase Inversion] to shift the phase
180 degrees. (When subwoofer is selected
on Speaker Select screen)
1
*
Only when “LPF FREQ”/“HPF FREQ” is set to
a mode other than “Through” in [Xʼover].
2
*
Only when “Tweeter” is set to “Small”,
“Medium”, “Large” in [Speaker Setup].
3
*
Only when “Subwoofer” is set to a mode
other than “None” in [Speaker Setup].
2
3
Controlling General Audio
1 Press the [MENU] button.
Popup menu appears.
2 Touch [Audio].
Audio screen appears.
3 Touch [Fader / Balance].
■ HPF FREQ
High Pass Filter adjustment. (When front or
rear speaker is selected on Speaker Select
screen)
■ LPF FREQ
Low Pass Filter adjustment. (When subwoofer
is selected on Speaker Select screen)
1
■ Slope*
Sets a crossover slope.
■ Gain
Adjusts the front speaker, rear speaker, or
subwoofer level.
42
4 Set each item as follows.
■ Fader / Balance
Adjust the volume balance around the
touched area.
[C] and [D] adjust the right and left volume
balance.
[R] and [S] adjust the front and rear volume
balance.
■ [Center]
Clear the adjustment.
Page 43
Controlling Audio
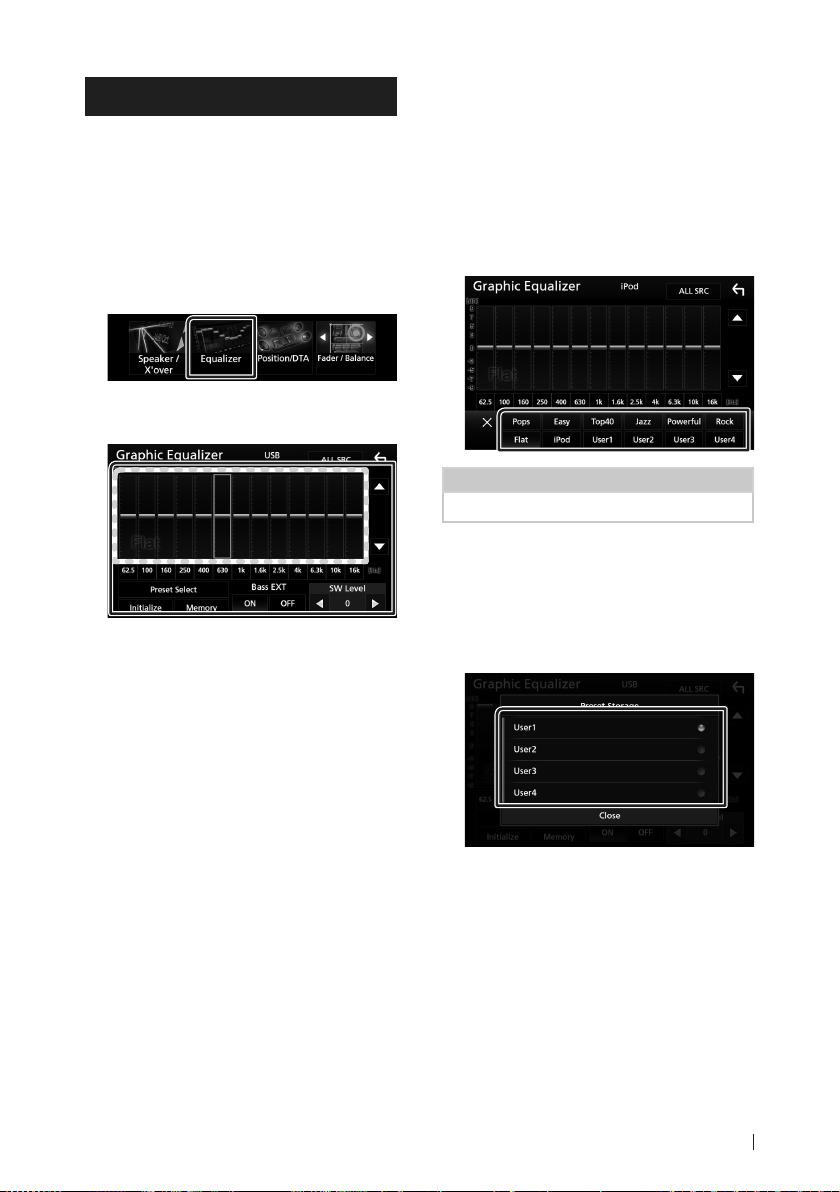
Equalizer Control
You can adjust equalizer by selecting the
optimized setting for each category.
1 Press the [MENU] button.
Popup menu appears.
2 Touch [Audio].
Audio screen appears.
3 Touch [Equalizer].
4 Touch the screen and set the Graphic
Equalizer as desired.
■ Gain level (dotted frame area)
Adjust the gain level by touching the each
frequency bar.
You can select frequency bar and adjust its
level by [R], [S].
■ Preset Select
Displays the screen to recall the preset
equalizer curve.
■ Memory
Saves the adjusted equalizer curve from
“User1” to “User4”.
■ Initialize
The current EQ curve returns to flat.
■ ALL SRC
Apply the adjusted equalizer to all sources.
Touch [ALL SRC] and then touch [OK] on the
confirmation screen.
■ Bass EXT (Bass Extend Settings)
When turned on, the frequency lower than
62.5 Hz is set to the same gain level as 62.5
Hz.
■ SW Level
Adjusts the subwoofer volume. This setting
is not available when subwoofer is set to
“None”. See Speaker/ X’over setup (P.41).
Ñ Recall the EQ curve
1 Touch [Preset Select].
2 Select EQ curve.
NOTE
• [iPod] is available only during iPod source.
Ñ Save the EQ curve
1 Adjust the EQ curve.
2 Touch [Memory].
3 Select where to save.
43English
Page 44

Controlling Audio
Volume Offset
Finely adjust the volume of the current source
to minimize the difference in volume between
different sources.
1 Press the [MENU] button.
Popup menu appears.
2 Touch [Audio].
Audio screen appears.
3 Touch [Volume Offset].
4 Touch [+] or [−] to adjust the level.
■ Initialize
Returns to the initial settings.
* If you have increased the volume first, then
reduced the volume using the “Volume
Offset”, the sound generated if you suddenly
switch to another source may be extremely
loud.
Sound Effect
You can set sound effects.
1 Press the [MENU] button.
Popup menu appears.
2 Touch [Audio].
Audio screen appears.
3 Touch [Sound Effect].
4 Set each item as follows.
■ Bass Boost
Sets the amount of bass boost among “OFF”/
“1”/ “2”/ “3”.
■ Loudness
Sets the amounts of boost of low and high
tones.
“OFF”, “Low”, “High”
44
Page 45

Controlling Audio
Listening Position/ DTA
Adjust the sound delay time as nearer speakers
to the selected seat have more delay time,
so that the sound from each speaker arrive a
listener at the same time.
1 Press the [MENU] button.
Popup menu appears.
2 Touch [Audio].
Audio screen appears.
3 Touch [Position/DTA].
4 Select listening position from [Front R]
(Right front), [Front L] (Left front),
[Front All] (All front), and [All].
Position DTA control
You can fine-adjust your listening position.
1 Touch [Adjust].
2 Touch [Delay].
3 Touch [T] or [U] to adjust the delay time of
the selected speaker.
4 Touch [Level].
5 Touch [T] or [U] to adjust the sound level
of the selected speaker.
NOTE
• To return to the initial setting of Delay and Level,
touch [Initialize] and [YES] in the confirmation
screen.
45English
Page 46

Remote control
Remote control
This unit can be operated using the remote
control KNA-RCDV331 (optional accessory).
Ñ Switch the operation mode
Turn its operation mode switch to “DVD.”
AUD
•
DVD
•
•
T V
•
NAV
Functions of the Remote control Buttons
• Aim the remote control directly at the remote
sensor on the faceplate.
• DO NOT expose the remote sensor to bright
light (direct sunlight or artificial lighting).
1
2
3
5
6
1 SRC
L
2
Û
3
4 VOL R S
5 FM+
AM–
E
6
F
7 ATT
– Other
Switches to the source to be
played.
Plays or pauses.
When a call comes in, answers
the call.
Adjusts the volume.
Selects the folder to be played.
During tuner source, select FM/
AM band to be received.
Selects the track or file to be
played.
During tuner source, switches to
broadcast stations received by
the unit.
Mutes/restores the sound
Not used.
4
7
46
Page 47

Connection/Installation
Connection/Installation
Before Installation
Before installation of this unit, please note the
following precautions.
# WARNINGS
• If you connect the ignition wire (red) and
the battery wire (yellow) to the car chassis
(ground), you may cause a short circuit, that
in turn may start a fire. Always connect those
wires to the power source running through
the fuse box.
• Do not cut out the fuse from the ignition wire
(red) and the battery wire (yellow). The power
supply must be connected to the wires via
the fuse.
# CAUTION
• Install this unit in the console of your vehicle.
Do not touch the metal part of this unit during
and shortly after the use of the unit. Metal part
such as the heat sink and enclosure become
hot.
NOTE
• Mounting and wiring this product requires
skills and experience. For best safety, leave the
mounting and wiring work to professionals.
• Make sure to ground the unit to a negative 12V
DC power supply.
• Do not install the unit in a spot exposed to
direct sunlight or excessive heat or humidity.
Also avoid places with too much dust or the
possibility of water splashing.
• Do not use your own screws. Use only the
screws provided. If you use the wrong screws,
you could damage the unit.
• If the power is not turned ON (“There is an
error in the speaker wiring. Please check
the connections.” is displayed), the speaker
wire may have a short-circuit or touched
the chassis of the vehicle and the protection
function may have been activated. Therefore,
the speaker wire should be checked.
• If your car’s ignition does not have an ACC
position, connect the ignition wires to a power
source that can be turned on and off with the
ignition key. If you connect the ignition wire
to a power source with a constant voltage
supply, such as with battery wires, the battery
may be drained.
• If the console has a lid, make sure to install the
unit so that the front panel will not hit the lid
when closing and opening.
• If the fuse blows, first make sure the wires
aren’t touching to cause a short circuit, then
replace the old fuse with one with the same
rating.
• Insulate unconnected wires with vinyl tape
or other similar material. To prevent a short
circuit, do not remove the caps on the ends of
the unconnected wires or the terminals.
• Connect the speaker wires correctly to the
terminals to which they correspond. The unit
may be damaged or fail to work if you share
the ¤ wires or ground them to any metal part
in the car.
• When only two speakers are being connected
to the system, connect the connectors either
to both the front output terminals or to both
the rear output terminals (do not mix front
and rear). For example, if you connect the ¢
connector of the left speaker to a front output
terminal, do not connect the ¤ connector to
a rear output terminal.
• After the unit is installed, check whether the
brake lamps, blinkers, wipers, etc. on the car
are working properly.
• Mount the unit so that the mounting angle is
30° or less.
• Do not press hard on the panel surface when
installing the unit to the vehicle. Otherwise
scars, damage, or failure may result.
• Reception may drop if there are metal objects
near the Bluetooth antenna.
Bluetooth antenna unit
47English
Page 48
Connection/Installation
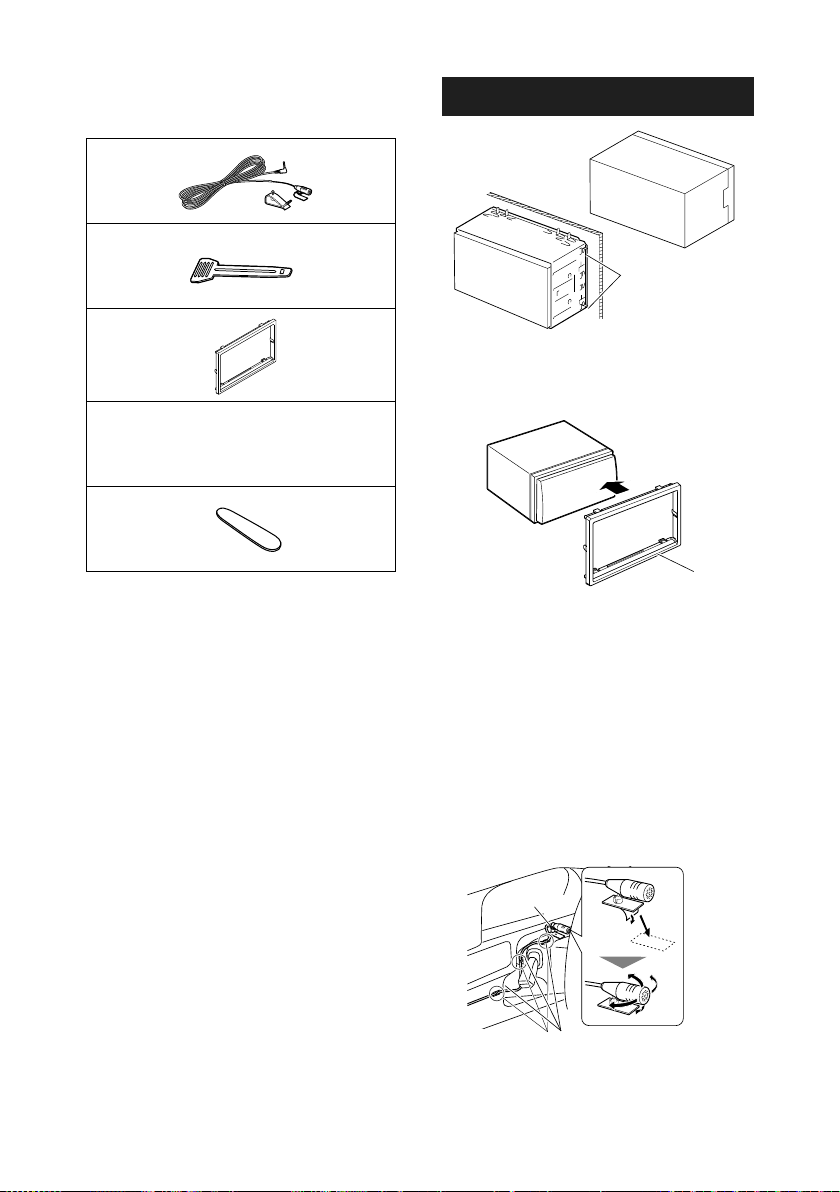
Ñ Supplied accessories for
installation
1
2
3
4
5
(3 m)
Parking Extention cable (2m)
Ñ Installation procedure
1) To prevent a short circuit, remove the key
from the ignition and disconnect the ¤
terminal of the battery.
2) Make the proper input and output wire
connections for each unit.
3) Connect the ISO connector to the unit.
4) Install the unit in your car.
5) Reconnect the ¤ terminal of the battery.
6) Perform the Initial Setup.
See Initial setup (P.6).
Installing the unit
x1
Bend the tabs of the
x2
x1
x1
x1
Ñ Trim plate
1) Attach accessory 3 to the unit.
mounting sleeve
with a screwdriver
or similar utensil and
attach it in place.
3
Ñ Microphone unit
1) Check the installation position of the
microphone (accessory 1).
2) Clean the installation surface.
3) Remove the separator of the microphone
(accessory 1), and stick the microphone to
the place shown below.
4) Wire the microphone cable up to the unit
with it secured at several positions using tape
or other desired method.
5) Adjust the direction of the microphone
(accessory 1) to the driver.
48
1
Fix a cable with a commercial item of tape.
Page 49

Connection/Installation
NOTE
• Swap the clips if necessary.
Ñ Removing the trim plate
1) Use the extraction key (accessory 5 to lever
out the four tabs (two on the left part, two on
the right part).
5
2) Pull the trim plate forward.
Ñ Removing the unit
1) Remove the trim plate by referring to step 1
in “Removing the trim plate”.
2) Insert the extraction key (accessory 2)
deeply into the slot as shown. (The protrusion
at the tip of the extraction key must face
toward the unit.)
2
3) With the inserted extraction key secured,
insert the other extraction key into the slot.
4) Pull out the unit halfway.
NOTE
• Be careful to avoid injury from the catch
pins on the extraction key.
5) Pull the unit all the way out with your hands,
being careful not to drop it.
49English
Page 50

Connection/Installation
Ñ Connecting wires to terminals
Light Blue/Yellow (Steering remote control wire)
To steering remote
To use the steering wheel remote control
STEERING
WHEEL
REMOTE
INPUT
feature, you need an exclusive remote
adapter (not supplied) matched to your car.
Light Green (Parking sensor wire)
Accessory 4:Parking Extention cable
For best safety, be sure to
Connect to the vehicle’s
parking brake detection
switch harness.
Purple/White (Reverse sensor wire)
PRK SW
connect the parking sensor.
Connect to vehicle’s steering remote
harness.
Contact your KENWOOD dealer for details.
STEERING
REMOTE
INPUT
USB terminal
5V=1.5A
[1]
(1 m)
USB device
Cap
Accessory 1
MIC
Bluetooth
Microphone
[2]
REVERSE
Connect to vehicle’s
reverse lamp harness
when using the
optional rear view
camera.
1 3 5 7
2 4 6 8
1 3 5 7
2 4 6 8
ISO Connector
[1]
USB maximum power supply current :
DC 5 V = 1.5 A
[2]
Sold separately
[3]
Optional accessory
Connector B
Connector A
Fuse (15A)
M4x6
CAM IN
FRONTOUTREAROUT
VIDEOOUT VIDEOINCAMIN
Subwoofer Preout
SUB
WOOFER
FM/AM antenna
AV IN
FRONT OUTREAR OUT
L
VIDEO OUT VIDEO IN
R
ANT
Φ 6.5 mm (maximum)
DAB antenna CX-DAB1
DMX7018DABS only.
! CAUTION
Use of a CX-DAB1 (optional accessory)
as a DAB antenna is recommended.
When using a commercially available
DAB antenna, the diameter of the SMB
connector must be Φ6.5 mm or less.
Rear Audio Preout
(Left; White, Right; Red)
Front Audio Preout
AVIN
(Left; White, Right; Red)
AV-IN audio input
(Left; White, Right; Red)
AV-IN visual input (Yellow)
Visual Output (Yellow)
Rear view camera input (Yellow)
Cap
[3]
50
Page 51

Connection/Installation
Ñ ISO Connector function guide
Pin Color and function
A-4 Yellow Batter y
A-5 Blue/White
A-6 Orange/White Illumination
A-7 Red Ignition (ACC)
A-8 Black Earth (Ground)
B-1/ B-2 Purple (+) /
Purple/Black (–)
B-3/ B-4 Gray (+) /
Gray/Black (–)
B-5/ B-6 White (+) /
White/Black (–)
B-7/ B-8 Green (+) /
[1]
Green/Black (–)
Max. 300mA, 12V
• Speaker Impedance: 4-8 Ω
! CAUTION
Before you connect the commercially
available ISO connectors to the unit, check the
following condition:
• Make sure that the pin assignment of the
connector matches with the KENWOOD unit.
• Take extra notice of the power wire.
• In case battery wire and ignition wire are not
corresponding then change them accordingly.
• In case the car does not have an ignition wire,
use a commercially available interface.
[1]
Power Control
Connection
Rear Right
Front Right
Front Left
Rear Left
Ñ Connecting an iPod/iPhone/
Android
Micro USB to USB
[2]
cable
KCA-iP103 (0.8m)
Cap
[1]
iPod/iPhone maximum power supply current :
DC 5 V = 1.5 A
[2]
Sold separately
[3]
Optional accessory
Android smartphone
iPod/iPhone
Lightning connector
[3]
USB terminal
M4x6
[1]
5V=1.5A
FRONT OUTREAR OUT
[2]
(0.8 m)
AV IN
L
R
[2]
51English
Page 52

Troubleshooting
Troubleshooting
Problems and Solutions
If any trouble occurs, first check the following
table for possible problems.
NOTE
• Some functions of this unit may be disabled by
some settings made on this unit.
• What might seem to be a malfunction in your
unit may just be the result of slight misoperation
or miswiring.
Ñ About settings
• Cannot set u p the subwoofer.
• Cannot set u p subwoofer phas e.
• No output from the subwoofer.
• Cannot set u p the low pass filter.
• Cannot set u p the high pass filt er.
Subwoofer is not set to on.
Set the subwoofer to on. See Speaker/ X’over
set up (P. 41).
Ñ About audio operations
Radio reception is poor.
The car antenna is not extended.
Pull out the antenna all the way.
The antenna control wire is not connected.
Connect the wire correctly. See Con necting wir es
to terminals (P.50).
Cannot select a folder.
The random play function is enabled.
Turn off the random function.
The sound skips w hen an audio file is b eing
played.
The recording condition is bad.
Record the file again or use another USB memory.
Error Messages
When you fail to operate the unit correctly, the
cause of the failure appears as the message on
the screen.
No Device (USB device)
The USB device is selected as a source although no
USB device is connected.
Change the source to any source other than USB/
iPod. Connect a USB device, and change the source
to USB again.
Disconnected (iPod, Bluetooth audio player)
The iPod/Bluetooth audio player is selected as a
source although no iPod/Bluetooth audio player is
connected.
Change the source to any source other than iPod/
Bluetooth. Connect an iPod/Bluetooth audio
player, and change the source to iPod/Bluetooth
again.
No Media file
The connec ted USB device contains no playable audio
file. Media was played that doesn’t have data recorded
that the unit can play.
See Playable Media and Files (P.53) and try
another USB device.
Ñ Other
The Touch Sensor Tone doesn’t sound.
The preout jack is being used.
The Touch Sensor Tone cannot be output from the
preout jack.
52
Page 53

Appendix
Appendix
Playable Media and Files
You can play various kinds of media and files on this unit.
Ñ About files
The following audio and video files are supported.
■ Playable Audio files
Format Bit rate Sampling frequency Bit count
AAC-LC (.m4a) MPEG2/4 AAC LC
MP3 (.mp3) MPEG 1/2 Audio Layer 3 8 – 320kbps, VBR 16 – 48 kHz 16 bit
WMA (.wma) Windows Media Audio
Linear PCM
(WAVE) (.wav)
FLAC (.flac) flac – 16 – 192 kHz 16/ 24 bit
Vorbis (.ogg) vorbis VBR 16 – 48 kHz 16 bit
HE-AAC(V1,V2)
Standard L3 profile
(Version 7,8,9)
RIFF waveform Audio
Format
NOTE
• WMA and AAC of which is covered with DRM cannot be played.
• Although the audio files are complied with the standards listed above, the play may be impossible depending
on the types or conditions of media or device.
8 – 320kbps, VBR 16 – 48 kHz 16 bit
8 – 320kbps 16 – 48 kHz 16 bit
–
16 – 192 kHz 16/ 24 bit
■ Acceptable Video files
Profile Max. Picture size Max. bit rate Audio format
MPEG-1 (.mpg, .mpeg) – 352 × 240, 352 × 288 1.5 Mbps MPEG Audio Layer 2
MPEG-2 (.mpg, .mpeg) MP@ML 720 × 480, 720 × 576 8 Mbps MPEG Audio Layer 2
H.264/MPEG-4 AVC
(.mp4, .m4v, .avi, .flv)
MPEG-4 (.mp4, .avi) Advanced Simple
WMV (.wmv) Main Profile 1920 × 1080 (30 fps) 8 Mbps WMA
MKV (.mkv) Video Format follows H.264/MPEG-4 AVC, MPEG-4 MP3, AAC
Baseline Profile,
Main Profile
Profile
1920 × 1080 (30 fps) 8 Mbps MP3, AAC
1920 × 1080 (30 fps) 8 Mbps MP3, AAC
■ Limitation of structure for the file and the folder
USB device
Maximum number of folder layers 8
Maximum number of files (per folder) 999
Maximum number of folders (per folder) 9999
Maximum number of folders (per device) –
NOTE
• You can enter a folder name and file name with 255 or fewer single -byte characters.
• Files in the folder whose folder name begins with a dot (.) cannot be played.
53English
Page 54

Appendix
Specifications
■ Monitor section
Picture Size
: 6.75 inches (diagonal) wide
: 151.8 mm (W) × 79.7 mm (H)
Display System
: TN LCD panel
Drive System
: TFT active matrix system
Number of Pixels
: 1,152,000 (800H x 480V x RGB)
Effective Pixels
: 99.99 %
Pixel Arrangement
: RGB striped arrangement
Back Lighting
: LED
■ USB interface section
USB Standard
: USB 2.0 High Speed
File System
: FAT 16/ 32, NTFS
Maximum Power Supply Current
: DC 5 V
1.5 A
D/A Converter
: 24 bit
Audio Decoder
: MP3/ WMA/ AAC/ WAV/ FLAC
Video Decoder
: MPEG1/ MPEG2/ MPEG4/ WMV/ H.264/ MKV
Frequency Response
• 192 kHz : 20 – 20,000 Hz
• 96 kHz : 20 – 20,000 Hz
• 48 kHz : 20 – 20,000 Hz
• 44.1 kHz : 20 – 20,000 Hz
Total Harmonic Distortion
: 0.0001 % (1 kHz)
S/N Ratio (dB)
: 88 dB
Dynamic Range
: 87 dB
■ Bluetooth section
Technology
: Bluetooth Ver.4.1
Frequency
: 2.402 – 2.480 GHz
Output Power
: +4dBm (MAX), 0dBm (AVE), Power Class2
Maximum Communication range
: Line of sight approx. 10m (32.8 ft)
Audio Codec
: SBC/ AAC
Profile (Multi Profile support)
• HFP (Hands Free Profile)
• SPP (Serial Port Profile)
• A2DP (Advanced Audio Distribution Profile)
• AVRCP (Audio/ Video Remote Control Profile)
• PBAP (Phonebook Access Profile)
■ DSP section
Graphics equalizer
Band: 13 Band
Frequency (BAND1 – 13)
: 62.5/ 100/ 160/ 250/ 400/ 630/ 1k/ 1.6k/ 2.5k/ 4k /
6.3k/ 10k / 16k Hz
Gain
: -9/-8/-7/-6/-5/-4/-3/-2/-1/0/1/2/3/4/5/6/7/8/9 dB
2Way X'Over
High pass filter
Frequency: Through, 30/ 40/ 50/ 60/ 70/ 80/ 90/
100/ 120/ 150/ 180/ 220/ 250 Hz
Slope: -6/-12/-18/-24 dB/Oc t.
Low pass filter
Frequency: 30/ 40/ 50/ 60/ 70/ 80/ 90/ 100/ 120/
150/ 180/ 220/ 250 Hz, Through
Slope: -6/-12/-18/-24 dB/Oc t.
Position
Front / Rear /Subwoofer Delay
: 0 – 6.1 m (0.01 m Step)
Gain
: -8 – 0 dB
Subwoofer level
: -40 – +6 dB
■ DAB section (DMX7018DABS)
Frequency Range
BAND III: 174.928 – 239.200 (MHz)
Sensitivity
: -98 dBm
S/N Ratio (dB)
: 82 dB
54
Page 55

Appendix
■ Digital Antenna Connector section
(DMX7018DABS)
Connector type
: SMB
Output Voltage (11 – 16V)
: 14.4 V
Maximum Current
: < 100 mA
■ FM tuner section
Frequency Range (step)
: 87.5 MHz – 108.0 MHz (50 kHz)
Usable Sensitivity (S/N : 26 dB)
: 13.2 dBf (1.3 μV/75 Ω)
Quieting Sensitivity (S/N : 46 dB)
: 19.2 dBf (2.5 μV/75 Ω)
Frequency Response
: 30 Hz – 15 kHz
S/N Ratio (dB)
: 70 dB (MONO)
Selectivity (± 400 kHz)
: Over 80 dB
Stereo Separation
: 37 dB (1 kHz)
■ AM tuner section
Frequency Range (step)
MW: 531 – 1611 kHz (9 kHz)
Usable Sensitivity
MW: 4 4.7μV
■ Video section
Color System of External Video Input
: N TSC /PAL
External Video Input Level (RCA jack)
: 1 Vp-p/ 75 Ω
External Audio Max Input Level (RCA jack)
: 2 V/ 25 kΩ
Video Output Level (RCA jacks)
: 1 Vp-p/ 75 Ω
■ Audio section
Maximum Power (Front & Rear)
: 50 W × 4
Typical Power Output (Front & Rear)
Full Bandwidth Power (at less than 1% THD)
: 21 W × 4
Output frequency band
: 20 – 20,000 Hz
Preout Level (V)
: 4 V/ 10 kΩ
Preout Impedance
: ≤ 1.3 kΩ
Speaker Impedance
: 4 – 8 Ω
■ General
Operating Voltage
: 14.4 V (10.5 – 16 V allowable)
Maximum Current Consumption
: 15 A
Installation Dimensions (W × H × D)
: 182 × 112 × 75 mm
Operational Temperature Range
: -10 °C – +60 °C
Weight
: 1.3 kg
NOTE
• Although the effective pixels for the liquid
crystal panel is given as 99.99% or more, 0.01% of
pixels may not light or may light incorrectly.
Specifications subject to change without
notice.
55English
Page 56

Appendix
About this Unit
■ Copyrights
• The Bluetooth® word mark and logos are registered
trademarks owned by Bluetooth SIG, Inc. and any
use of such marks by JVC KENWOOD Corporation is
under license. Other trademarks and trade names are
those of their respective owners.
• The “AAC” logo is a trademark of Dolby Laboratories.
• Use of the Made for Apple badge means that an
accessory has been designed to connect specifically
to the Apple product(s) identified in the badge, and
has been certified by the developer to meet Apple
performance standards. Apple is not responsible for
the operation of this device or its compliance with
safety and regulatory standards. Please note that the
use of this accessory with an Apple product may
affect wireless performance.
• Apple, iPhone, iPod, iPod touch, and Lightning are
trademarks of Apple Inc., registered in the U.S. and
other countries.
• Apple, Siri, Apple CarPlay and Apple CarPlay logo are
trademarks of Apple Inc., registered in the U.S. and
other countries.
• Android, Android Auto, Google Play and other marks
are trademarks of Google Inc.
• THIS PRODUCT IS LICENSED UNDER THE AVC
PATENT PORTFOLIO LICENSE FOR THE PERSONAL
USE OF A CONSUMER OR OTHER USES IN WHICH IT
DOES NOT RECEIVE REMUNERATION TO (¡)ENCODE
VIDEO IN COMPLIANCE WITH THE AVC STANDARD
(“AVC VIDEO”) AND/OR (¡¡)DECODE AVC VIDEO
THAT WAS ENCODED BY A CONSUMER ENGAGED
IN A PERSONAL ACTIVITY AND/OR WAS OBTAINED
FROM A VIDEO PROVIDER LICENSED TO PROVIDE
AVC VIDEO. NO LICENSE IS GRANTED OR SHALL
BE IMPLIED FOR ANY OTHER USE. ADDITIONAL
INFORMATION MAY BE OBTAINED FROM MPEG LA,
L.L.C. SEE HTTP://WWW.MPEGLA.COM
• THIS PRODUCT IS LICENSED UNDER THE MPEG4 VISUAL PATENT PORTFOLIO LICENSE FOR
THE PERSONAL AND NON-COMMERCIAL USE
OF A CONSUMER FOR (¡) ENCODING VIDEO IN
COMPLIANCE WITH THE MPEG-4 VISUAL STANDARD
(“MPEG-4 VIDEO”) AND/OR (¡¡) DECODING MPEG4 VIDEO THAT WAS ENCODED BY A CONSUMER
ENGAGED IN A PERSONAL AND NON-COMMERCIAL
ACTIVITY AND/OR WAS OBTAINED FROM A VIDEO
PROVIDER LICENSED BY MPEG LA TO PROVIDE
MPEG-4 VIDEO. NO LICENSE IS GRANTED OR SHALL
BE IMPLIED FOR ANY OTHER USE. ADDITIONAL
INFORMATION INCLUDING THAT RELATING TO
PROMOTIONAL, INTERNAL AND COMMERCIAL USES
AND LICENSING MAY BE OBTAINED FROM MPEG LA,
LLC. SEE HTTP://WWW.MPEGLA.COM.
• THIS PRODUCT IS LICENSED UNDER THE VC-1 PATENT
PORTFOLIO LICENSE FOR THE PERSONAL AND NONCOMMERCIAL USE OF A CONSUMER TO ( i ) ENCODE
VIDEO IN COMPLIANCE WITH THE VC-1 STANDARD
(“VC-1 VIDEO”) AND/OR ( ii ) DECODE VC-1 VIDEO
THAT WAS ENCODED BY A CONSUMER ENGAGED
IN A PERSONAL AND NON-COMMERCIAL ACTIVITY
AND/OR WAS OBTAINED FROM A VIDEO PROVIDER
LICENSED TO PROVIDE VC-1 VIDEO. NO LICENSE IS
GRANTED OR SHALL BE IMPLIED FOR ANY OTHER
USE. ADDITIONAL INFORMATION MAY BE OBTAINED
FROM MPEG LA, L.L.C. SEE HTTP://WWW.MPEGLA.
COM
• libFLAC
Copyright (C) 2000,2001,2002,2003,2004,2005,2006,2
007,2008,2009 Josh Coalson
Redistribution and use in source and binary forms,
with or without modification, are permitted provided
that the following conditions are met:
– Redistributions of source code must retain the
above copyright notice, this list of conditions and
the following disclaimer.
– Redistributions in binary form must reproduce the
above copyright notice, this list of conditions and
the following disclaimer in the documentation
and/or other materials provided with the
distribution.
– Neither the name of the Xiph.org Foundation
nor the names of its contributors may be used to
endorse or promote products derived from this
software without specific prior written permission.
THIS SOFTWARE IS PROVIDED BY THE COPYRIGHT
HOLDERS AND ONTRIBUTORS ``AS IS’’ AND ANY
EXPRESS OR IMPLIED WARRANTIES, INCLUDING,
BUT NOT LIMITED TO, THE IMPLIED WARRANTIES OF
MERCHANTABILITY AND FITNESS FOR A PARTICULAR
PURPOSE ARE DISCLAIMED. IN NO EVENT SHALL THE
FOUNDATION OR CONTRIBUTORS BE LIABLE FOR ANY
DIRECT, INDIRECT, INCIDENTAL, SPECIAL, EXEMPLARY,
OR CONSEQUENTIAL DAMAGES (INCLUDING, BUT
NOT LIMITED TO, PROCUREMENT OF SUBSTITUTE
GOODS OR SERVICES; LOSS OF USE, DATA, OR
PROFITS; OR BUSINESS INTERRUPTION) HOWEVER
CAUSED AND ON ANY THEORY OF LIABILITY,
WHETHER IN CONTRACT, STRICT LIABILITY, OR TORT
(INCLUDING NEGLIGENCE OR OTHERWISE) ARISING
IN ANY WAY OUT OF THE USE OF THIS SOFTWARE,
EVEN IF ADVISED OF THE POSSIBILITY OF SUCH
DAMAGE.
• libvorbis
Copyright (c) 2002-2008 Xiph.org Foundation
Redistribution and use in source and binary forms,
with or without modification, are permitted provided
that the following conditions are met:
– Redistributions of source code must retain the
above copyright notice, this list of conditions and
the following disclaimer.
– Redistributions in binary form must reproduce the
above copyright notice, this list of conditions and
the following disclaimer in the documentation
and/or other materials provided with the
distribution.
– Neither the name of the Xiph.org Foundation
56
Page 57

Appendix
nor the names of its contributors may be used to
endorse or promote products derived from this
software without specific prior written permission.
THIS SOFTWARE IS PROVIDED BY THE COPYRIGHT
HOLDERS AND CONTRIBUTORS ``AS IS’’ AND ANY
EXPRESS OR IMPLIED WARRANTIES, INCLUDING,
BUT NOT LIMITED TO, THE IMPLIED WARRANTIES OF
MERCHANTABILITY AND FITNESS FOR A PARTICULAR
PURPOSE ARE DISCLAIMED. IN NO EVENT SHALL THE
FOUNDATION OR CONTRIBUTORS BE LIABLE FOR ANY
DIRECT, INDIRECT, INCIDENTAL, SPECIAL, EXEMPLARY,
OR CONSEQUENTIAL DAMAGES (INCLUDING, BUT
NOT LIMITED TO, PROCUREMENT OF SUBSTITUTE
GOODS OR SERVICES; LOSS OF USE, DATA, OR
PROFITS; OR BUSINESS INTERRUPTION) HOWEVER
CAUSED AND ON ANY THEORY OF LIABILITY,
WHETHER IN CONTRACT, STRICT LIABILITY, OR TORT
(INCLUDING NEGLIGENCE OR OTHERWISE) ARISING
IN ANY WAY OUT OF THE USE OF THIS SOFTWARE,
EVEN IF ADVISED OF THE POSSIBILITY OF SUCH
DAMAGE.
• libogg
Copyright (c) 2002, Xiph.org Foundation
Redistribution and use in source and binary forms,
with or without modification, are permitted provided
that the following conditions are met:
– Redistributions of source code must retain the
above copyright notice, this list of conditions and
the following disclaimer.
– Redistributions in binary form must reproduce the
above copyright notice, this list of conditions and
the following disclaimer in the documentation
and/or other materials provided with the
distribution.
– Neither the name of the Xiph.org Foundation
nor the names of its contributors may be used to
endorse or promote products derived from this
software without specific prior written permission.
THIS SOFTWARE IS PROVIDED BY THE COPYRIGHT
HOLDERS AND CONTRIBUTORS ``AS IS’’ AND ANY
EXPRESS OR IMPLIED WARRANTIES, INCLUDING,
BUT NOT LIMITED TO, THE IMPLIED WARRANTIES OF
MERCHANTABILITY AND FITNESS FOR A PARTICULAR
PURPOSE ARE DISCLAIMED. IN NO EVENT SHALL THE
FOUNDATION OR CONTRIBUTORS BE LIABLE FOR ANY
DIRECT, INDIRECT, INCIDENTAL, SPECIAL, EXEMPLARY,
OR CONSEQUENTIAL DAMAGES (INCLUDING, BUT
NOT LIMITED TO, PROCUREMENT OF SUBSTITUTE
GOODS OR SERVICES; LOSS OF USE, DATA, OR
PROFITS; OR BUSINESS INTERRUPTION) HOWEVER
CAUSED AND ON ANY THEORY OF LIABILITY,
WHETHER IN CONTRACT, STRICT LIABILITY, OR TORT
(INCLUDING NEGLIGENCE OR OTHERWISE) ARISING
IN ANY WAY OUT OF THE USE OF THIS SOFTWARE,
EVEN IF ADVISED OF THE POSSIBILITY OF SUCH
DAMAGE.
■ Information on Disposal of Old
Electrical and Electronic Equipment
and Batteries (applicable for EU
countries that have adopted separate
waste collection systems)
Products and batteries with the symbol (crossed-out
wheeled bin) cannot be disposed as household waste.
Old electrical and electronic equipment and batteries
should be recycled at a facility capable of handling
these items and their waste byproducts.
Contact your local authority for details in locating a
recycle facility nearest to you.
Proper recycling and waste disposal will help conserve
resources whilst preventing detrimental effects on our
health and the environment.
Notice: The sign “Pb” below the symbol for batteries
indicates that this battery contains lead.
■ ילמשח דויצ לש הפשאל הכלשה רבדב עדימ
תונידמל יטנוולר( תוללוס ןכו ןשי ינורטקלאו
.)תדרפומ הפשא ףוסיא תכרעמב תושמתשמש
X םע הפשא חפ( ןומיסה םע תוללוסו םירצומ ךילשהל ןתינ אל
.הליגר תיתיב הפשאכ )וילע
ןקתמב תוללוס ןכו ןשי ינורטקלאו ילמשח דויצ רזחמל שי
.םהלש יאוולה ירצותבו הלאכ םיטירפב לפטל לגוסמה
ןקתמ תודוא םיטרפ תלבקל תימוקמה תושרה םע רשק ורצ
ורזעי םיתואנ הפשאל הכלשהו רוזחימ .םכילא בורקה רוזחימה
לעו ונתואירב לע תוילילש תועפשה עונמלו םיבאשמ רמשל
.הביבסה
ןייצמ תוללוס רובע ןומיסל תחתמש Pb ןומיסה :בל ומיש
.תרפוע הליכמ הללוסהש
57English
Page 58

Table des matières
Avant l'utilisation 60
Précautions .................................................................60
Comment lire ce manuel .......................................60
Utilisation de base 61
Fonctions des boutons en façade ......................61
Mise en marche de l'appareil ...............................61
Paramètres initiaux ..................................................62
Réglage du volume ..................................................63
Fonctionnement tactile .........................................63
Descriptions de l'écran d'ACCUEIL .....................64
Descriptions de l'écran de sélection
de source .....................................................................64
Descriptions de l'écran de commande
de source .....................................................................66
Menu contextuel ......................................................67
Écran des listes ..........................................................68
APPS-Android Auto™/
Apple CarPlay 69
Utilisation d'Apple CarPlay ....................................69
Utilisation d'Android Auto™ ..................................70
iPod/iPhone 71
Préparation .................................................................71
Fonctionnement de base de l'iPod/iPhone ....71
Recherche ...................................................................72
USB 73
Connecter un périphérique USB .........................73
Utilisation de base USB ..........................................73
Recherche ...................................................................75
Radio 76
Utilisation de base de la radio .............................76
Utilisation de la mémorisation ............................77
Utilisation de la sélection ......................................77
Trafic routier
(syntoniseur FM uniquement) .............................78
Configuration radio .................................................78
Radiodiffusion numérique 79
Utilisation de base de DAB ....................................79
Mémorisation des services dans la
mémoire préréglée ..................................................80
Utilisation de la sélection ......................................80
Infos-trafic ...................................................................81
Configuration DAB ...................................................82
Utilisation du Bluetooth 83
Informations pour l'utilisation de
périphériques Bluetooth® .....................................83
Enregistrez depuis le
périphérique Bluetooth .........................................84
Configuration Bluetooth ........................................84
Utilisation d'un appareil audio
Bluetooth en lecture ...............................................85
Utilisation du module mains-libres ....................87
Autres appareils externes 91
Caméra de vision ......................................................91
Lecteur audio/vidéo extérieur—AV-IN .............92
58
Page 59

Configuration générale 93
Configuration d'écran du moniteur ...................93
Configuration système ...........................................93
Configuration de l'interface utilisateur ............94
Configuration spéciale ...........................................94
Configuration de l'affichage .................................95
Configuration de AV ................................................96
Contrôle de l'audio 97
Configuration de l'enceinte/du répartiteur ....97
Contrôle de l’audio en général ............................98
Contrôle d'égaliseur ................................................99
Décalage du volume ............................................ 100
Effet sonore..............................................................100
Position d'écoute/DTA ......................................... 101
Télécommande 102
Fonctions des boutons de la
télécommande ....................................................... 102
Connexion/Installation 103
Avant l'installation ................................................ 103
Installation de l'appareil ...................................... 104
Dépannage 108
Problèmes et solutions ........................................ 108
Messages d'erreur ................................................. 108
Annexes 109
Supports et fichiers pouvant être lus ............. 109
Spécifications .......................................................... 110
À propos de cet appareil .....................................112
59Français
Page 60

Avant l'utilisation
Avant l'utilisation
Précautions
#AVERTISSEMENTS
Ñ Pour éviter toute blessure
ou incendie, prenez les
précautions suivantes :
• Pour éviter un court-circuit, ne mettez ni ne
laissez jamais d'objets métalliques (comme
des pièces de monnaie ou des outils en métal)
à l'intérieur de l'appareil.
• Ne regardez pas ni ne fixez votre regard
sur l'affichage de l'appareil trop longtemps
pendant la conduite.
• Si vous rencontrez des problèmes pendant
l'installation, consultez votre revendeur
KENWOOD.
Ñ Précautions d'utilisation de
l'appareil
• Lorsque vous achetez des accessoires en
option, vérifiez auprès de votre revendeur
KENWOOD qu'ils fonctionneront avec votre
modèle et dans votre région.
• Vous avez le choix de la langue dans laquelle
s'affichent les menus, les balises des fichiers
audio, etc. Voir Configuration de l'interface
utilisateur (p.94).
• Les fonctions Radio Data System ou Radio
Broadcast Data System sont inopérantes dans
les zones où le service n'est pris en charge par
aucune station de radiodiffusion.
Ñ Protection du moniteur
• Ne touchez pas le moniteur avec un stylo à
bille ou tout autre outil pointu. Cela pourrait
l'endommager.
Ñ Nettoyage de l'appareil
• Si la façade de l'appareil est tâchée, essuyez-la
avec un chiffon doux et sec comme un chiffon
en silicone. Si la façade est très sale, essuyezla avec un chiffon imbibé d'un produit de
nettoyage neutre, puis essuyez-la à nouveau
avec un chiffon doux et sec propre.
60
REMARQUE
• La pulvérisation directe de produit de nettoyage
sur l'appareil risque d'endommager les pièces
mécaniques. Si vous nettoyez la façade avec
un chiffon trop rugueux ou un liquide volatil,
comme un solvant ou de l'alcool, vous risquez
d'en rayer la surface ou d'effacer les caractères
sérigraphiés.
Ñ Comment réinitialiser votre
appareil
• Si l'appareil ou l'appareil raccordé ne
fonctionne pas correctement, réinitialisez
l'appareil. 1 Appuyez sur le bouton <Reset>.
L'appareil revient aux réglages d'usine.
Bouton de réinitialisation
REMARQUE
• Débranchez le périphérique USB avant d'appuyer
sur le bouton < Reset >. Le fait d'appuyer sur
le bouton < Reset > avec le périphérique
USB branché risque d'endommager les
données stockées dans ce dernier. 'Pour savoir
comment débrancher le périphérique USB, voir
Déconnec ter le périphérique USB (p.73).
• Lorsque l'appareil est mis sous tension après
une réinitialisation, l'écran de CONFIGURATION
initiale s'affiche. Voir Configuration initiale
(p.62).
Comment lire ce manuel
• Les écrans et façades illustrés dans le présent manuel
sont des exemples destinés à fournir des explications
plus claires des opérations.
C'est pourquoi il est possible qu'ils soient différents
des écrans effectivement affichés ou de la façade de
l'appareil, ou que certaines séquences d'affichage
soient différentes.
• Langue des indications : Les indications en
anglais sont utilisées dans un but explicatif. Vous
pouvez choisir la langue des indications à partir du
menu [SETUP]. Voir Config uration de l' interface
utilisateur (p.94).
Page 61
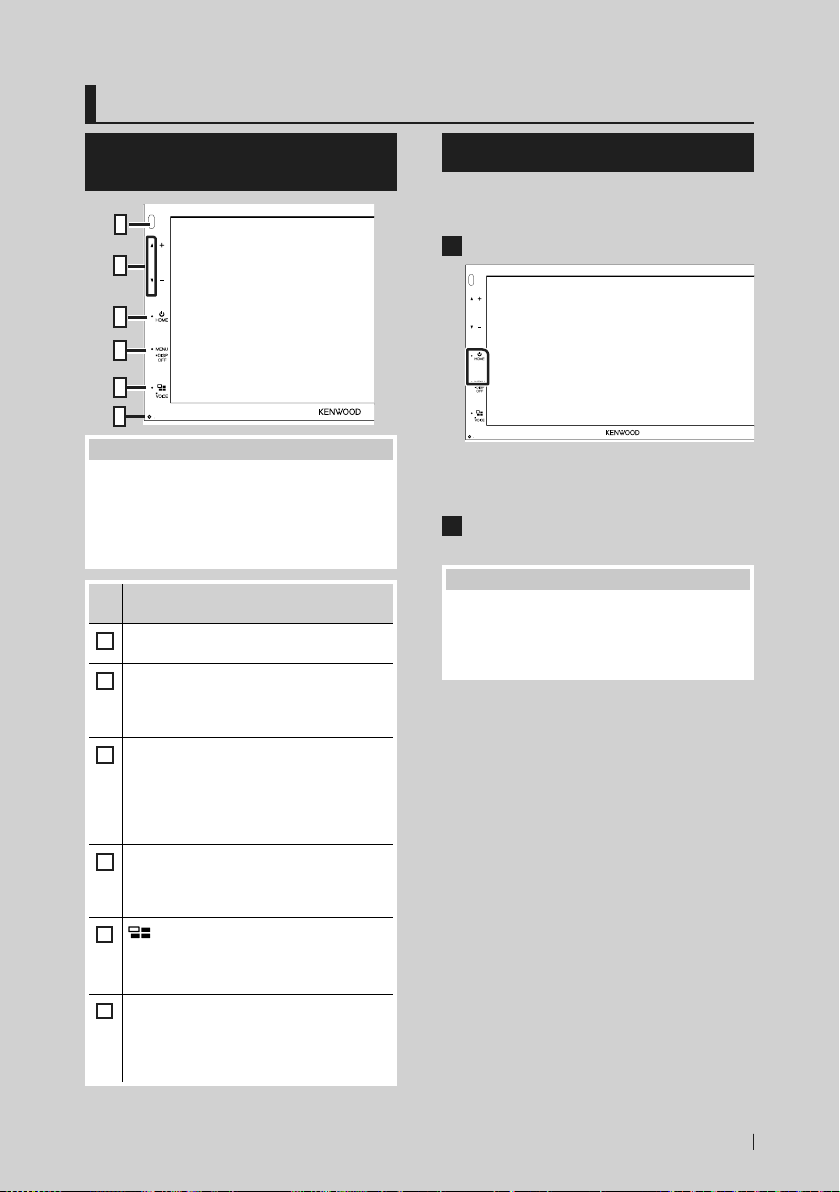
Utilisation de base
Utilisation de base
Fonctions des boutons en façade
1
2
3
4
5
6
REMARQUE
• Les écrans illustrés dans le présent guide sont
des exemples destinés à fournir des explications
plus claires des opérations. Pour cette raison,
il peut arriver qu'ils soient différents de ceux
rencontrés dans la réalité.
Désignation
• Mouvement
Capteur à distance
1
• Reçoit le signal de la télécommande.
S, R(Volume)
2
• Règle le volume.
Le volume augmentera jusqu'à 15 tant que
vous maintiendrez R enfoncé.
HOME
3
• Affiche l'écran d'ACCUEIL (p.64).
• Appuyez pendant 1 seconde pour éteindre
l'appareil.
• Permet de mettre l'appareil en marche
lorsqu'il est éteint.
MENU
4
• Affiche l'écran du menu contextuel.
• Appuyez pendant 1 seconde pour éteindre
l'écran.
5
• Affiche l'écran APP (CarPlay/ Android Auto).
• Appuyez pendant 1 seconde pour afficher
l'écran de Reconnaissance Vocale (p.88).
Réinitialisation
6
• Si l'appareil ou l'appareil qui y est connecté
ne fonctionne pas correctement, appuyez
sur ce bouton pour que l'appareil retrouve
les réglages initiaux.
Mise en marche de l'appareil
La méthode d'allumage est différente selon le
modèle.
Appuyez sur le bouton [HOME].
1
L'appareil se met en marche.
● Pour éteindre l'appareil :
Appuyez sur le bouton [HOME] pendant 1
1
seconde.
REMARQUE
• Si c'est la première fois que vous mettez en
marche l'appareil après son installation, il
vous faut procéder à la Configuration initiale
(p.62).
61Français
Page 62
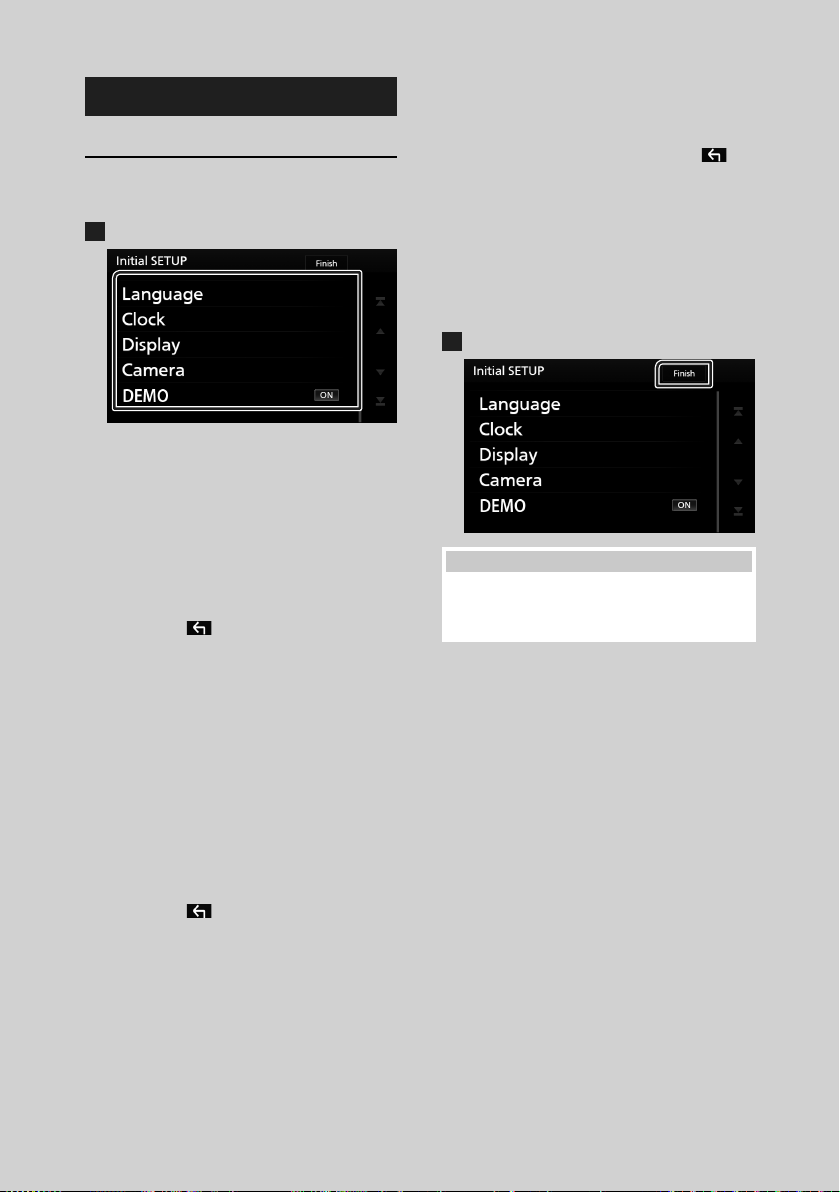
Utilisation de base
Paramètres initiaux
Configuration initiale
Effectuez cette configuration lors de la première
utilisation de cet appareil.
Réglez chaque option comme suit.
1
■ Language
Sélectionne la langue utilisée sur l'écran
de commande et sur les éléments de
configuration. La langue sélectionnée par
défaut est “British English (en)”.
1Touchez [Language].
2Touchez [Language Select].
3Sélectionnez la langue désirée.
4Touchez [
Pour les explications détaillées, voir
Configuration de l'interface utilisateur
(p.94).
■ Clock
Règle l'horloge.
Pour les explications détaillées, voir Réglages
du calendrier/horloge (p.63).
■ Display
Réglez l'image à l'écran.
1Touchez [Display.
2Touchez [Background].
3Sélectionnez l'image.
4Touchez [
Pour les explications détaillées, voir
Configuration de l'affichage (p.95).
].
].
■ Camera
Configurez les paramètres de caméra.
1Touchez [Camera].
2Réglez chaque option et touchez [
Pour les explications détaillées, voir
Configuration des caméras (p.91).
■ DEMO
Permet de paramétrer le mode de
démonstration. Le choix par défaut est “ON”.
1Touchez [DEMO] et placez sur MARCHE
ou ARRÊT.
Touchez [Finish].
2
REMARQUE
• Ces réglages sont paramétrables depuis le menu
de configuration. Voir Configuration générale
(p.93).
].
62
Page 63
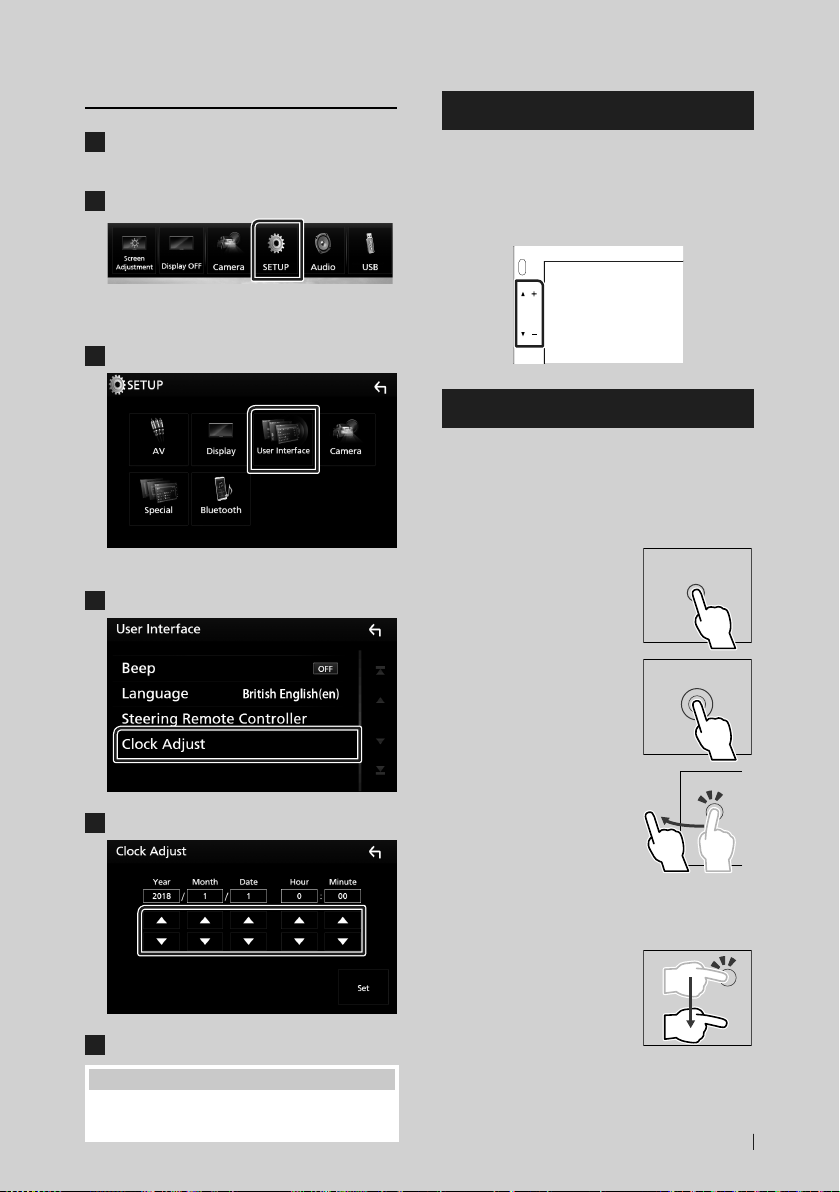
Utilisation de base
Réglages du calendrier/horloge
Appuyez sur le bouton [MENU].
1
Le menu contextuel s'affiche.
Touchez [SETUP].
2
L'écran de menu de configuration
s'affiche.
Touchez [User Interface].
3
L'écran d'interface utilisateur s'affiche.
Touchez [Clock Adjust].
4
Réglez la date puis l'heure.
5
Touchez [Set].
6
Réglage du volume
Pour régler le volume (0 à 40),
Appuyez sur [R] pour augmenter, et appuyez sur
[S] pour réduire.
Maintenez [R] enfoncé pour augmenter le
volume de façon continue jusqu'au niveau 15.
Fonctionnement tactile
Pour réaliser des opérations sur l'écran, vous
devez toucher, toucher longuement, feuilleter
ou défiler pour sélectionner un élément, afficher
l'écran de menu de réglage, changer la page,
etc.
● Toucher
Touchez légèrement l'écran
pour sélectionner un élément
sur l'écran.
● Toucher longuement
Touchez l'écran et gardez
votre doigt sur l'écran jusqu'à
ce que l'affichage change ou
qu'un message soit affiché.
● Feuilleter
Faites glisser votre doigt
rapidement vers la gauche ou
vers la droite sur l'écran pour
changer de page.
Vous pouvez faire défiler
l'écran de la liste en le faisant
défiler au doigt vers le haut
ou vers le bas.
● Défiler
Faites glisser votre doigt vers
le haut ou le bas pour faire
défiler l'écran.
REMARQUE
• Désactivez [RDS CT] avant de régler l'horloge.
Voir Con figuration ra dio (p.78).
63Français
Page 64

Utilisation de base
Descriptions de l'écran d'ACCUEIL
La plupart des fonctions sont accessibles depuis
l'écran ACCUEIL.
1 2
3
4
5 6
• Affiche l'écran de contrôle de la source en
1
cours.
• Widget (élément graphique)
2
– Vous pouvez changer le widget en
touchant [
gauche ou la droite sur la zone du widget.
– Touchez le widget afin d'afficher l'écran
détaillé.
• Informations sur la source actuelle
3
• Affiche l'écran de sélection de la source.
4
(p.65)
• Icônes de raccourci de source de lecture
5
(p.65)
• Affiche l'écran Mains libres. (p.87)
6
• Lorsque vous vous connectez avec Apple
CarPlay ou Android Auto, le mode de
fonctionnement est le même que sur un
téléphone fourni dans Apple CarPlay ou
Android Auto.
]/[ ] ou en feuilletant vers la
Descriptions de l'écran de sélection de source
Vous pouvez afficher toutes les sources de
lecture et les options sur l'écran de sélection de
source.
1
3 5
• Change la source de lecture.
1
Pour les sources de lectures, voir p.65.
2
• Change la page. (Touchez [ ]/[ ].)
Vous pouvez aussi changer la page en
feuilletant vers la gauche ou la droite sur
l'écran.
• Revient à l'écran précédent.
3
• Indication de la page
4
• Affiche l'écran de menu CONFIGURATION.
5
(p.93)
4
2
Affiche l'écran d'ACCUEIL.
Appuyez sur le bouton [HOME].
1
L'écran d'ACCUEIL apparaît.
64
Page 65

Utilisation de base
Sélectionnez la source de lecture
Touchez [ ] sur l'écran d'ACCUEIL.
1
Depuis cet écran, vous pouvez sélectionner
les sources et fonctions suivantes.
• Bascule vers l'écran Android Auto/Apple
CarPlay de l'appareil iPhone/Android
connecté.*1 (p.69)
• Commute sur la réception radio. (p.76)
• Commute sur la réception DAB. (p.79)
• Lit les fichiers sur un lecteur audio
Bluetooth. (p.83)
• Lit les fichiers sur un iPod/iPhone.
(p.71)
• Lit les fichiers sur un périphérique USB.
(p.73)
• Commute sur l'appareil extérieur
connecté à la borne d'entrée AV-IN.
(p.92)
• Affiche l'écran audio. (p.97)
• Met l'appareil en veille. (p.66)
Pour sélectionner la source de lecture
sur l'écran ACCUEIL
Les 3 éléments affichés sur l'écran de sélection
de source comme grandes icônes apparaissent
sur l'écran d'ACCUEIL.
Vous pouvez changer les éléments affichés
dans cette zone en personnalisant l'écran de
sélection de source. (p.66)
Pour sélectionner la source de lecture
sur l'écran de commande de la source
*1 Quand un iPhone compatible avec CarPlay
est connecté, [Apple CarPlay] est affiché.
Quand un périphérique Android compatible
avec Android Auto est connecté, [Android
Auto] est affiché.
Affichez les boutons de sélection de la source
en touchant [
]/[ ] ou en faisant défiler sur la
gauche ou la droite sur l'écran de commande de
la source, puis sélectionnez la source de lecture.
65Français
Page 66

Utilisation de base
Mettez l'appareil en veille
Touchez [ ] sur l'écran d'ACCUEIL.
1
Touchez [STANDBY].
2
Personnalisez les boutons de
raccourcis sur l'écran ACCUEIL
Vous pouvez disposer les pictogrammes des
sources comme bon vous semble.
Touchez [ ] sur l'écran d'ACCUEIL.
1
Touchez et maintenez le pictogramme
2
que vous souhaitez déplacer pour passer
en mode de personnalisation.
Faites-le glisser à l'emplacement
3
souhaité.
Descriptions de l'écran de commande de source
Certaines fonctions sont accessibles depuis la
plupart des écrans.
Indicateurs
1
2 3 4
Boutons de raccourcis
66
Page 67

Utilisation de base
1
Informations concernant les périphériques
Bluetooth connectés.
2
Icône de toutes les sources
Affiche toutes les sources.
3
Écran secondaire
]/[ ] : L'écran secondaire change à chaque
• [
fois que vous le touchez. Vous pouvez aussi
changer l'écran secondaire en faisant défiler
vers la gauche ou la droite sur l'écran.
• Indicateurs : Affiche l'état actuel de la source
et ainsi de suite.
– ATT: L'atténuateur est actif.
– LOUD: La fonction de réglage du volume est
active.
• Boutons de raccourcis : La source change pour
celle que vous avez définie comme raccourci.
Pour le réglage du raccourci, consultez
Personnalisez les boutons de raccourcis
sur l'écran ACCUEIL (p.66).
4
[Û]
Touchez pour afficher l'écran mains-libres.
(p.87)
Lorsque vous vous connectez avec Apple
CarPlay ou Android Auto, le mode de
fonctionnement est le même que sur un
téléphone fourni dans Apple CarPlay ou Android
Auto.
Menu contextuel
Appuyez sur le bouton [MENU].
1
Le menu contextuel s'affiche.
Appuyez pour afficher le menu
2
contextuel.
1
Le menu contient les options suivantes.
• Affiche l'écran de réglage de l'écran.
(p.93)
• Éteint l'affichage. (p.68)
• Affiche la vue caméra. (p.91)
2
3
• Affiche l'écran de menu CONFIGURATION.
(p.93)
• Affiche l'écran du Menu de contrôle
audio. (p.97)
• Affiche l'écran de contrôle de la source
en cours. Les fonctionnalités attachées au
pictogramme varient selon les sources.
• Fermez le menu contextuel.
1
• Voir Descriptions de l'écran d'ACCUEIL
2 3
(p.64).
67Français
Page 68

Utilisation de base
Mettez l'écran hors tension
Sélectionnez [Display OFF] dans le menu
1
déroulant.
● Pour allumer l'écran
Appuyez sur l'affichage.
1
Écran des listes
Certaines touches de fonction sont communes
aux écrans de liste de la plupart des sources.
61 2
3 4 5
1
Affiche la fenêtre de sélection de type liste.
2
Affiche la liste des fichiers de musique ou de
film.
3
Défilement du texte
Fait défiler le texte affiché.
4
etc.
Les touches ayant plusieurs fonctions s'affichent
ici.
: Joue toutes les pistes dans le dossier
•
contenant la piste actuelle.
• [
: Remonte au niveau hiérarchique
supérieur.
5
[ ] / [ ] / [ ] / [ ] Défilement de la
page
Vous pouvez changer de page pour afficher
plus d'éléments en appuyant sur [
]/[ ] : Affiche la page du haut ou la
• [
page du bas.
]/[ ].
68
6
Retour
Revient à l'écran précédent.
REMARQUE
• Les boutons qui ne peuvent pas être activés
depuis la liste ne sont pas affichés.
Page 69

APPS-Android Auto™/Apple CarPlay
APPS-Android Auto™/Apple CarPlay
Utilisation d'Apple CarPlay
CarPlay est une façon plus intelligente et sûre
d'utiliser votre iPhone en voiture. CarPlay
sélectionne les choses que vous désirez faire
avec votre iPhone en conduisant et les affiche
sur l'écran du produit. Vous pouvez consulter
des itinéraires, passer des appels, envoyer et
recevoir des messages et lire de la musique à
partir de votre iPhone tout en conduisant. Vous
pouvez également utiliser la commande vocale
Siri pour simplifier l'utilisation de votre iPhone.
Pour de plus amples détails concernant CarPlay,
visitez https://ssl.apple.com/ios/carplay/.
Périphériques compatibles avec l'iPhone
Vous pouvez utiliser CarPlay avec les modèles
d'iPhone suivants.
• iPhone 7 Plus
• iPhone 7
• iPhone SE
• iPhone 6s Plus
• iPhone 6s
• iPhone 6 Plus
• iPhone 6
• iPhone 5s
• iPhone 5c
• iPhone 5
Ñ Préparation
[Apple CarPlay] dans l'écran de sélection de
source. (p.65)
2
1
1
[ ]
• Affiche l'écran d'accueil de CarPlay.
• Touchez et maintenez enfoncé pour activer
Siri.
2
Touches d'application
Lance l'application.
3
[ HOME ]
Sort de l'écran CarPlay et affiche l'écran Accueil.
Pour sortir de l'écran CarPlay
1 Appuyez sur le bouton [HOME].
Ñ Utilisez Siri
Vous pouvez activer Siri.
1 Appuyez sur le bouton [ ] pendant 1
seconde.
3
1 Connectez l'iPhone à l'aide du KCA-iP103
via la borne USB. (p.107)
Lorsque l'iPhone compatible avec CarPlay
est connecté à la borne USB, le smartphone
Bluetooth actuellement connecté est
déconnecté.
2 Déverrouillez votre iPhone.
Ñ Boutons de commande et
applications disponibles sur
l'écran d'accueil de CarPlay
Vous pouvez utiliser les applications de l'iPhone
connecté.
Les éléments affichés et la langue utilisée
sur l'écran diffèrent entre les périphériques
connectés.
Pour accéder au mode CarPlay, touchez l'icône
Appuyez pendant 1 seconde
2 Parlez à Siri.
Pour désactiver
1 Appuyez sur le bouton [ ].
Ñ Basculez vers l'écran Apple
CarPlay pendant l'écoute d'une
autre source
1 Appuyez sur le bouton [ ].
69Français
Page 70
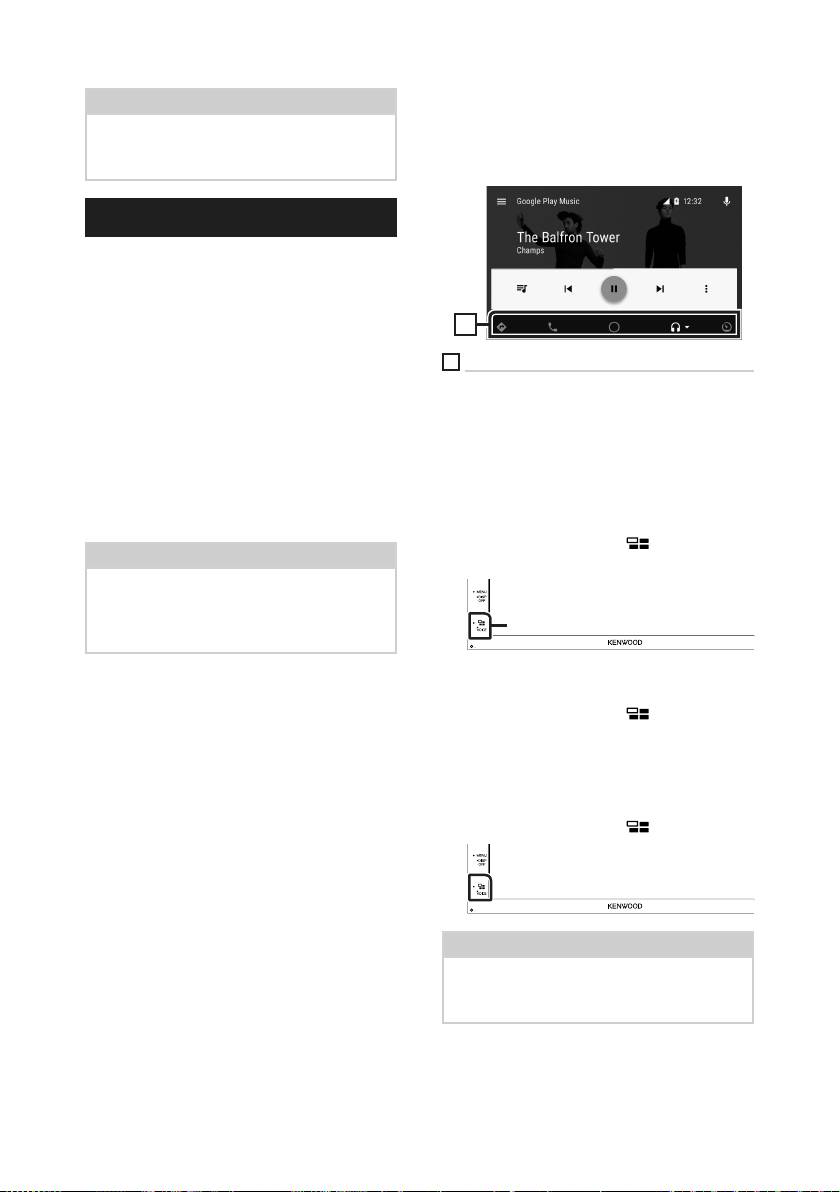
APPS-Android Auto™/Apple CarPlay
REMARQUE
• Si le son est émis à l'aide de Apple CarPlay
lorsque l'écran Apple CarPlay est affiché, la
source bascule sur Apple CarPlay.
Utilisation d'Android Auto™
Android Auto vous permet d'utiliser les
fonctions de votre périphérique Android
permettant une conduite pratique. Vous pouvez
facilement accéder au navigateur, passer des
appels, écouter de la musique et accéder à
des fonctions pratiques sur votre périphérique
Android tout en conduisant.
Pour de plus amples détails concernant Android
Auto, visitez https://www.android.com/auto/
et https://support.google.com/androidauto.
Périphériques Android compatibles
Vous pouvez utiliser Android Auto avec les
périphériques Android de la version Android 5.0
(Lollipop) ou ultérieure.
REMARQUE
• Il est possible qu'Android Auto ne soit pas
disponible sur tous les périphériques et il n'est
pas disponible dans tous les pays ni toutes les
régions.
Les éléments affichés sur l'écran diffèrent selon
les périphériques Android connectés.
Pour passer en mode Android Auto, touchez
l'icône [Android Auto] de l'écran de sélection
de la source. (p.65)
1
1
Boutons d'applications/informations
Lance l'application ou affiche les informations.
Pour sortir de l'écran Android Auto
1 Appuyez sur le bouton [HOME].
Ñ Utilisation de la commande
vocale
1 Appuyez sur le bouton [ ] pendant 1
seconde.
Appuyez pendant 1 seconde
Ñ Préparation
1 Connectez un périphérique Android à
l'aide d'une borne USB. (p.107)
Pour utiliser la fonction mains libres,
connectez le périphérique Android par
Bluetooth.
Lorsqu'un périphérique Android
compatible avec Android Auto est
connecté à la borne USB, le périphérique
est connecté automatiquement via
Bluetooth et le smartphone Bluetooth
actuellement connecté est déconnecté.
2 Déverrouillez votre périphérique Android.
Ñ Boutons de commande et
applications disponibles sur
l'écran d'Android Auto
Vous pouvez lancer les applications de votre
périphérique Android connecté.
70
Pour annuler
1 Appuyez sur le bouton [ ].
Ñ Basculez vers l'écran Android
Auto pendant l'écoute d'une
autre source
1 Appuyez sur le bouton [ ].
REMARQUE
• Si le son est émis à l'aide de Android Auto
lorsque l'écran Android Auto est affiché, la
source bascule sur Android Auto.
Page 71

iPod/iPhone
iPod/iPhone
Préparation
Ñ iPod/iPhone connectables
Les modèles suivants peuvent être reliés à cet
appareil.
Convient pour
• iPhone 7 Plus
• iPhone 7
• iPhone SE
• iPhone 6s Plus
• iPhone 6s
• iPhone 6 Plus
• iPhone 6
• iPhone 5s
• iPhone 5c
• iPhone 5
• iPod touch (6e génération)
• iPod touch (5e génération)
REMARQUE
• En branchant votre iPod/iPhone sur cet appareil
à l'aide d'un câble de connexion KCA-iP103
d'iPod en option, votre iPod/iPhone lit la
musique, tout en étant alimenté et rechargé.
Cependant, cet appareil doit être sous tension.
• Si vous démarrez la lecture après avoir connecté
l'iPod, la musique qui a été lue par l'iPod est
jouée en premier.
1 Connectez l'iPod/iPhone à l'aide du KCA-
iP103. (p.107)
2 Appuyez sur le bouton [HOME].
3 Touchez [ ].
4 Touchez [iPod]. (p.65)
● Pour débrancher l’iPod/iPhone connecté
avec le câble :
1 Débranchez l'iPod/l'iPhone.
Fonctionnement de base de l'iPod/iPhone
Écran de contrôle
2
4
3
5
Ouvrez le tiroir
1
6
4
Ñ Connectez un iPod/iPhone
Préparation
• Connectez un iPod/iPhone avec le KCA-iP103
(accessoire en option) lorsque CarPlay n'est pas
connecté.
• Avec un iPhone prenant en charge CarPlay,
éteignez CarPlay en faisant fonctionner l'iPhone
en configuration fonctionnelle avant de
connecter l'iPhone. Pour des détails concernant
la méthode de configuration, veuillez contacter
le fabricant de la borne.
• Seule un iPod/iPhone peut être connecté.
1
[ ] / [ ]
] : Répète la piste/l'album en cours. Chaque
• [
fois que vous touchez la touche, le mode de
répétition change dans l'ordre suivant ;
Répétition du morceau (
tous les morceaux (
] : Lit aléatoirement toutes les plages de
• [
l'album actuel. Chaque fois que vous touchez
la touche, le mode aléatoire change dans
l'ordre suivant ;
Morceau au hasard (
(
)
2
Informations sur la piste
• Affiche les informations concernant le fichier
en cours.
• Touchez pour afficher l'écran de la liste des
catégories. Voir Recherche par catégorie
(p.72).
), Répétition de
)
), Fonction sur arrêt
71Français
Page 72

iPod/iPhone
3
[Touches d'opération
• 1] : Fait une recherche de piste/fichier.
Pour plus de détails sur les recherches, voir
Recherche (p.72).
• E] [F] : Recherche la piste/fichier
précédent/suivant. Touchez et maintenez
enfoncé pour effectuer une avance ou un
retour rapide.
• [DH] : Lit ou met en pause.
•
: Touchez pour diminuer/restaurer le son.
4
Liste des contenus
Touchez le côté droit de l'écran pour afficher
la Liste de contenu. Touchez de nouveau pour
fermer la liste.
Affiche la liste de lecture. Lorsque vous appuyez
sur un nom de fichier/piste dans la liste, la
lecture démarre.
5
Éléments indicateurs
• MUSIC: Identifie le fichier musical.
6
Illustration/Indicateur du mode de
lecture/du temps de lecture
La pochette du fichier en cours de lecture
s'affiche.
• D, B, etc.: Indicateur du mode de lecture
en cours
Chaque pictogramme a la signification
suivante :
D (jouer), B (avance rapide), A (retour
rapide), H (pause).
Recherche
Vous pouvez rechercher des fichiers musicaux
en procédant comme suit.
1 Touchez [1].
2 Touchez [S].
REMARQUE
• Pour l'utilisation de l'écran de liste, voir Écran
des lis tes (p.68).
Ñ Recherche par catégorie
Vous pouvez rechercher un fichier par sélection
de sa catégorie.
1 Touchez [Category List].
2 Touchez la catégorie de votre choix.
La liste correspondant à votre choix
s'affiche.
3 Touchez pour sélectionner l'élément de
votre choix dans la liste. Répétez cette
étape jusqu'à ce que vous ayez trouvé le
fichier voulu.
Ñ Recherche par lien
Vous pouvez rechercher un fichier du même
artiste/album/genre/compositeur que la piste
en cours.
1 Touchez [Link Search].
2 Touchez le type d'étiquette souhaité.
Vous avec le choix entre l'artiste, l'album,
le genre et le compositeur.
3 Choisissez le type de liste.
72
La liste correspondant à votre choix
s'affiche.
3 Touchez l'élément de votre choix dans la
liste des contenus.
Page 73

USB
USB
Connecter un périphérique USB
1 Branchez le périphérique USB avec le
câble USB. (p.106)
2 Appuyez sur le bouton [HOME].
3 Touchez .
4 Touchez [USB]. (p.65)
Ñ Déconnectez le périphérique
USB
1 Appuyez sur le bouton [HOME].
2 Sélectionnez une source autre que [USB].
3 Débranchez le périphérique USB.
Ñ Périphérique USB utilisable
Vous pouvez utiliser sur cet appareil une clé USB
de mémoire de masse.
Le terme « USB device » indique dans ce manuel
un dispositif mémoire flash.
● À propos du système de fichiers
Le système de fichiers doit être l'un des suivants.
• FAT16 • FAT32 • NTFS
REMARQUE
• Installer la périphérique USB de façon à ce
que cela ne vous empêche pas de conduire
prudemment.
• Vous ne pouvez pas connecter de périphérique
USB au moyen d'un hub USB et d'un lecteur
multi-cartes.
• Faites des sauvegardes des fichiers audio
utilisés avec cet appareil. Les fichiers peuvent
être effacés en fonction des conditions de
fonctionnement du périphérique USB.
Nous ne proposons pas d'indemnisations pour
les pertes dues à l'effacement de données.
Utilisation de base USB
La plupart des fonctions sont utilisables depuis
l'écran de contrôle de la source et depuis l'écran
de lecture.
Écran de contrôle
1
7
4
3
Ouvrez le tiroir
4
1
[ ] / [ ]
] : Répète la piste/le dossier en cours.
• [
Chaque fois que vous touchez la touche,
le mode de répétition change dans l'ordre
suivant ;
Répétition de fichier (
dossier (
• [
morceaux du dossier en cours. Chaque fois
que vous touchez la touche, le mode aléatoire
change dans l'ordre suivant ;
Fichier au hasard (
(
2
Informations sur la piste
Affiche les informations concernant le fichier
en cours.
Seuls les noms de fichier et de dossier sont
affichés s'il n'y a pas d'information de balise.
), Répétition de tous ( )
] : Lit de manière aléatoire tous les
), Fonction sur arrêt
)
5
), Répétition de
2
5
6
73Français
Page 74
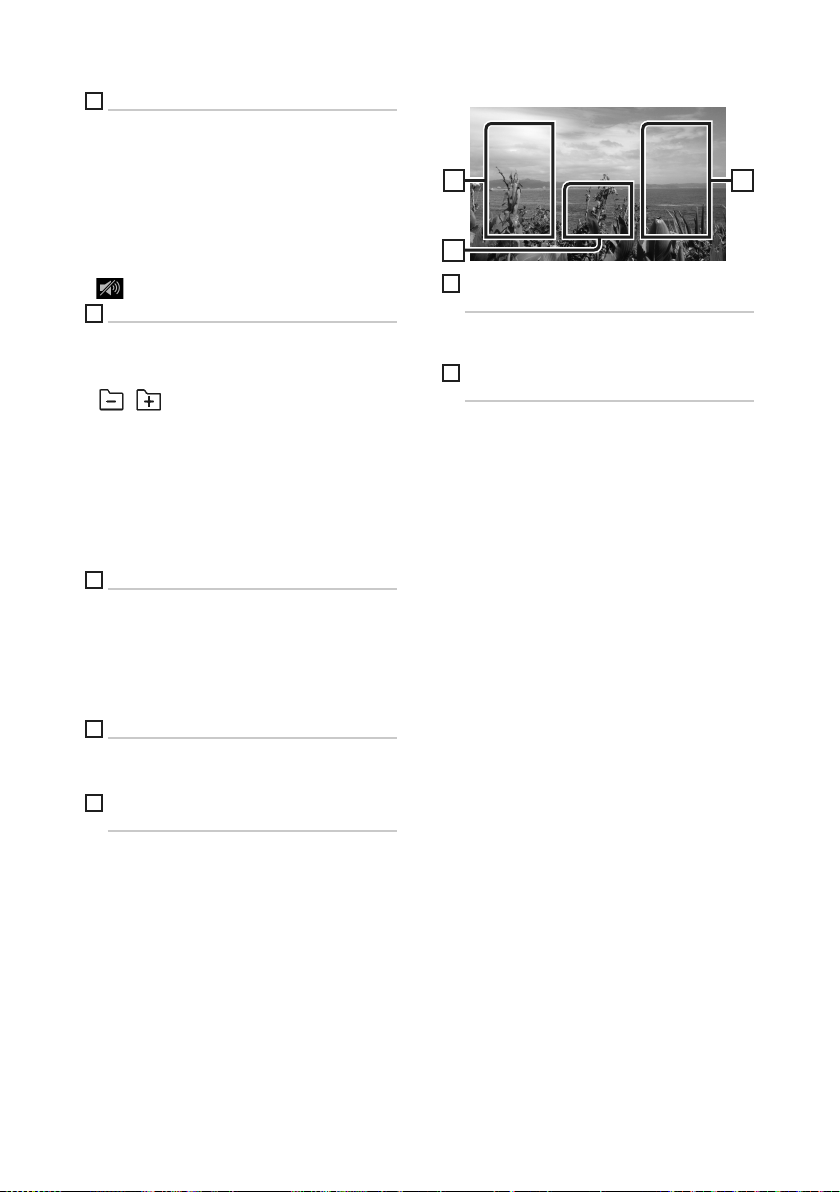
USB
3
[Touches d'opération
• 1] : Fait une recherche de piste/fichier.
Pour plus de détails sur les recherches, voir
Recherche (p.75).
• E] [F] : Recherche la piste/fichier
précédent/suivant.
Touchez et maintenez enfoncé pour effectuer
une avance ou un retour rapide.
• [D]H : Lit ou met en pause.
•
: Touchez pour diminuer/restaurer le son.
4
Panneau de fonction
Appuyez sur le côté gauche de l'écran pour
afficher le panneau de fonction. Appuyez de
nouveau pour fermer le panneau.
• [
] [ ] : Recherche le dossier précédent/
suivant.
• Aspect: Sélectionnez le mode d'écran.
Full: Modifie le rapport d'aspect de la vidéo et
affiche en plein écran.
Normal: Affichage avec le rapport 4:3.
Auto: Affiche les vidéos en plein écran
verticalement ou horizontalement sans
modification de rapport.
5
Liste des contenus
Touchez le côté droit de l'écran pour afficher
la Liste de contenu. Touchez de nouveau pour
fermer la liste.
Affiche la liste de lecture. Lorsque vous appuyez
sur un nom de fichier/piste dans la liste, la
lecture démarre.
6
Éléments indicateurs
• VIDEO: Identifie le fichier vidéo.
• MUSIC: Identifie le fichier musical.
7
Illustration/Indicateur du mode de
lecture/du temps de lecture
La pochette du fichier en cours de lecture
s'affiche.
• D, B, etc.: Indicateur du mode de lecture
en cours
Chaque pictogramme a la signification
suivante :
D (jouer), B (avance rapide), A (retour
rapide), H (pause).
Écran vidéo
9
8
Zone de recherche des fichiers
(fichier vidéo uniquement)
Touchez pour faire une recherche du fichier
suivant/précédent.
9
Zone d'affichage des touches
(fichier vidéo uniquement)
Touchez pour afficher l'écran de contrôle.
88
74
Page 75
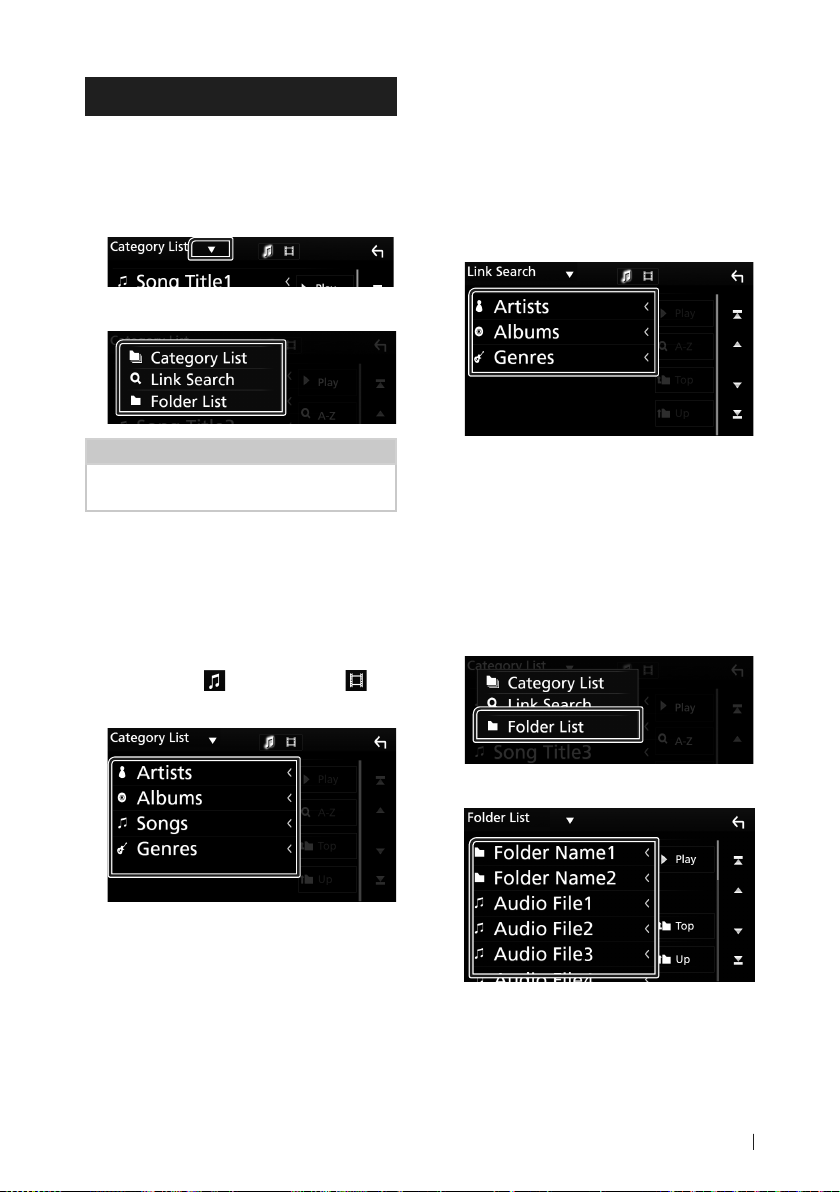
USB
Recherche
Vous pouvez rechercher des fichiers de musique
ou vidéo en procédant comme suit.
1 Touchez [1].
2 Touchez [S].
3 Choisissez le type de liste.
REMARQUE
• Pour l'utilisation de l'écran de liste, voir Écran
des lis tes (p.68).
Ñ Recherche par catégorie
Vous pouvez rechercher un fichier par sélection
de sa catégorie.
1 Touchez [Category List].
2 Sélectionnez le mode de recherche par
fichiers audio ou fichiers vidéo .
3 Touchez la catégorie de votre choix.
Ñ Recherche par lien
Vous pouvez rechercher un fichier du même
artiste/album/genre que la piste en cours.
1 Touchez [Link Search].
2 Touchez le type d'étiquette souhaité.
Vous avez le choix entre l'artiste, l'album
et le genre.
La liste correspondant à votre choix
s'affiche.
3 Touchez l'élément de votre choix dans la
liste des contenus.
Ñ Recherche de dossier
Vous pouvez rechercher un fichier en fonction
de la hiérarchie.
1 Touchez [Folder List].
La liste correspondant à votre choix
s'affiche.
4 Touchez pour sélectionner l'élément de
votre choix dans la liste. Répétez cette
étape jusqu'à ce que vous ayez trouvé le
fichier voulu.
2 Touchez le dossier de votre choix.
Le contenu d'un dossier est affiché lorsque
vous touchez celui-ci.
3 Touchez pour sélectionner l'élément de
votre choix dans la liste. Répétez cette
étape jusqu'à ce que vous ayez trouvé le
fichier voulu.
75Français
Page 76

Radio
Radio
Utilisation de base de la radio
La plupart des fonctions sont utilisables depuis
l'écran de contrôle des sources.
Pour passer sur la source radio, touchez l'icône
[Radio] sur l'écran de sélection de la source.
(p.65)
Écran de contrôle
1
2
5
6
3
Ouvrez le tiroir
5
1
Affichage des informations
Affiche les informations concernant la station en
cours : Fréquence
Toucher [ ] vous permet de basculer entre le
Contenu A et le Contenu B.
Contenu A : Nom du PS, texte radio, genre PTY
Contenu B : Texte radio plus, titre de l'artiste
Préréglage # : Numéro de préréglage
2
Mode de recherche
Sélectionne successivement les modes
d'exploration des fréquences, dans l'ordre
suivant : [AUTO1], [AUTO2], [MANUAL].
• [AUTO1]: Syntonise automatiquement sur une
station offrant une bonne réception.
• [AUTO2]: Syntonise les stations en mémoire
les unes après les autres.
• [MANUAL] : Commute sur la fréquence
suivante manuellement.
4
4
7
3
Touches d'opération
• [E] [F] : Syntoniser sur une station. Il est
possible de changer de méthode de sélection
des fréquences (voir 2 dans le tableau).
•
: Touchez pour diminuer/restaurer le son.
4
Liste des présélections
• Touchez le côté droit de l'écran pour afficher la
Liste de préréglage. Touchez de nouveau pour
fermer la liste.
• Rappelle la station mémorisée.
• En le touchant pendant 2 secondes, il
mémorise la station en cours de réception.
5
Panneau de fonction
Appuyez sur le côté gauche de l'écran pour
afficher le panneau de fonction. Appuyez de
nouveau pour fermer le panneau.
• TI] (FM uniquement) : Active le mode infostrafic. Pour plus de détails, voir Trafic routier
(p.78).
• [SETUP: Affiche l'écran de CONFIGURATION
DU SYNTONISEUR. Pour plus de détails, voir
Configuration radio (p.78).
• [AME]: Prédéfinit automatiquement les
stations. Pour plus de détails voir Mémoire
automatique (p.77).
• [PTY] (FM uniquement) : Recherche un
programme en spécifiant un type de
programme. Pour plus de détails, voir
Recherche par type de programme
(p.77).
• [MONO] (FM uniquement) : Sélectionne la
réception en mono.
• [LO.S] (FM uniquement) : Active ou désactive
la fonction de recherche locale.
6
[FM] [AM]
Change la bande.
7
Éléments indicateurs
• ST: Indique que l´émission stéréo est
actuellement reçue.
• MONO: Indique que la fonction
monophonique forcée est active.
• AF: Indique que la fonction recherche AF est
active.
76
Page 77

Radio
• LOS: Indique que la fonction recherche locale
est active.
• RDS: Indique l'état de la station Radio Data
System lorsque la fonction AF est sur ON.
Blanc : Le Radio Data System est
actuellement reçu.
Orange : Le Radio Data System n'est pas reçu.
• TI: Indique l´état de réception des
informations routières.
Blanc : Le signal TP est reçu.
Orange : Le signal TP n'est pas reçu.
Utilisation de la mémorisation
Ñ Mémoire automatique
Vous pouvez mémoriser automatiquement les
stations offrant une bonne réception.
1 Touchez la touche de la bande de votre
choix.
2 Touchez [ ] sur le côté gauche de l'écran.
Touchez [AME].
Utilisation de la sélection
Ñ Sélection de préréglage
Vous pouvez lister et sélectionner la station
mémorisée.
1 Touchez [ ] sur le côté droit de l'écran.
Sélectionnez une station dans la liste.
Ñ Recherche par type de
programme
(syntoniseur FM uniquement)
Vous pouvez syntoniser une station avec un
programme spécifique lorsque vous écoutez la
radio FM.
1 Touchez [ ] sur le côté gauche de l'écran.
Touchez [PTY].
La mémorisation automatique se lance.
Ñ Mémoire manuelle
Vous pouvez mémoriser la station que vous êtes
en train de recevoir.
1 Sélectionnez la station que vous
souhaitez mémoriser.
2 Touchez [FM#] (#:1-24) ou [AM#] (#:1-12)
dans lequel vous souhaitez enregistrer
la station pendant 2 secondes jusqu'à ce
que vous entendiez un bip.
L'écran de recherche PTY apparaît.
2 Sélectionnez dans la liste le type de
programme de votre choix.
3 Touchez [Search].
Vous pouvez rechercher une station dont
le type de programme correspond à la
sélection.
77Français
Page 78
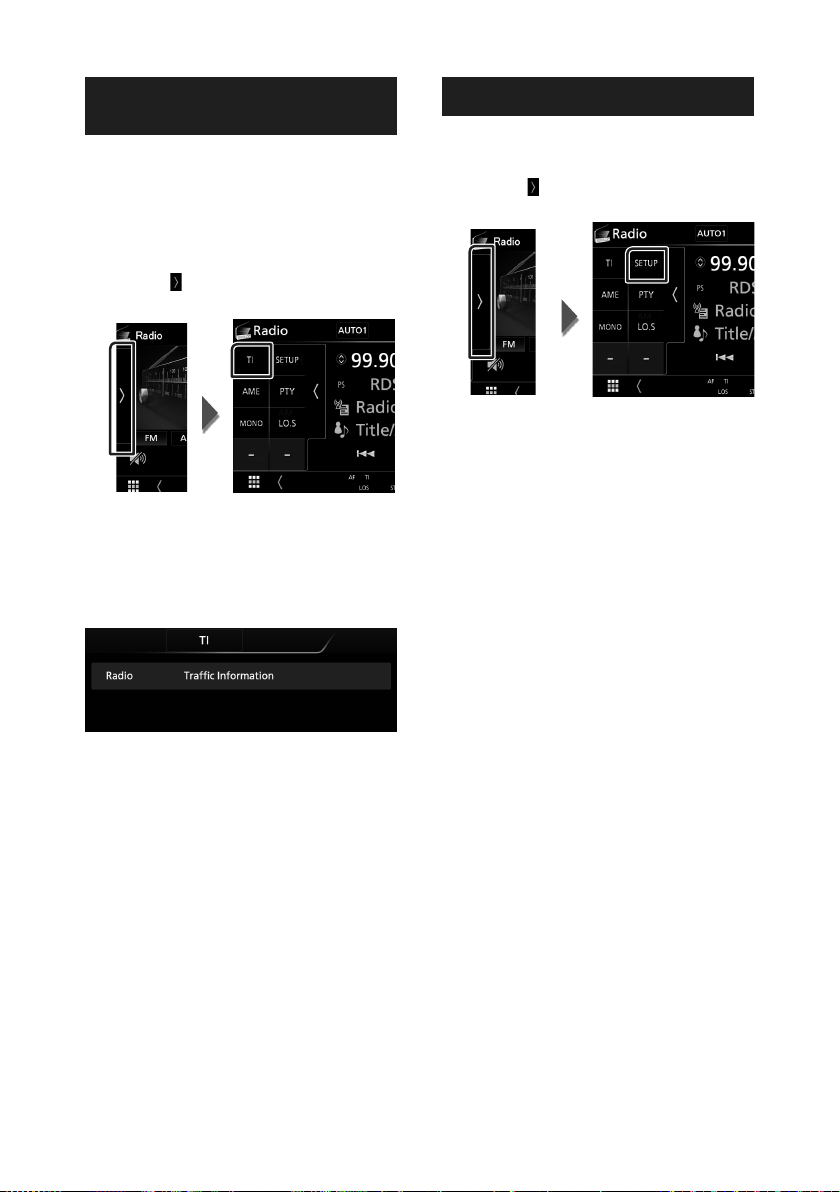
Radio
Trafic routier
(syntoniseur FM uniquement)
Vous pouvez écouter et lire les informations de
circulation routière automatiquement, à l'instant
ou l'appareil reçoit un bulletin d'infos-trafic.
Cependant, cette fonction nécessite un Système
de données de diffusion radio qui contient les
informations TI.
1 Touchez [ ] sur le côté gauche de l'écran.
Touchez [TI].
Le mode d'infos-trafic est activé.
Ñ Lorsqu'un bulletin d'infos-trafic
est reçu
L'écran d'informations routières apparaît
automatiquement.
Configuration radio
Vous pouvez régler les paramètres du
syntoniseur.
1 Touchez [ ] sur le côté gauche de l'écran.
Touchez [SETUP].
L'écran de configuration de la radio
s'affiche.
2 Réglez chaque option comme suit.
■ AF
Lorsque la réception de la station est
médiocre, sélectionne automatiquement
une station diffusant le même programme
sur le même réseau Radio Data System. Le
choix par défaut est “ON”.
■ RDS CT
Synchroniser les données de temps de la
station Radio Data System et l'horloge de cet
appareil.
« ON » (marche) (par défaut), « OFF » (arrêt)
78
Page 79
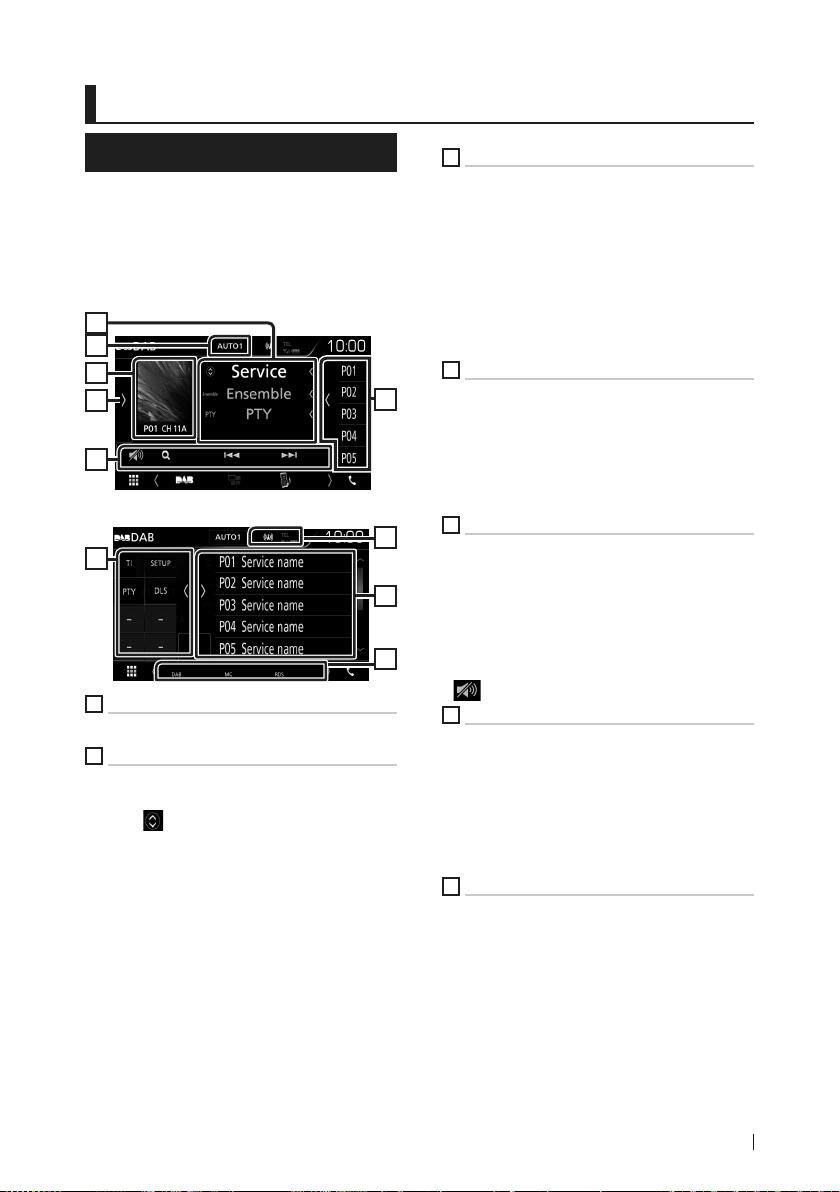
Radiodiffusion numérique
Radiodiffusion numérique
Utilisation de base de DAB
La plupart des fonctions sont utilisables depuis
l'écran de contrôle des sources.
Pour passer sur la source DAB, touchez l'icône
[DAB] sur l'écran de sélection de la source.
(p.65)
Écran de contrôle
2
3
4
7
5
Ouvrez le tiroir
7
1
Affichage de l'indicateur
Affiche la force du signal reçu.
2
Affichage des informations
Affiche les informations concernant la station en
cours : Nom du service
Toucher [ ] vous permet de basculer entre le
Contenu A, le Contenu B et le Contenu C.
Contenu A : Nom de l'ensemble, Genre PTY
Contenu B : Titre de la chanson, Nom de l'artiste,
DLS
Contenu C : Lecture en cours, programme
suivant, qualité audio
6
1
6
8
(DMX7018DABS)
3
Mode de recherche
Sélectionne successivement les modes
d'exploration des fréquences, dans l'ordre
suivant : [AUTO1], [AUTO2], [MANUAL].
• [AUTO1]: Syntonise automatiquement sur un
ensemble offrant une bonne réception.
• [AUTO2]: Syntonise les ensembles en
mémoire les uns après les autres.
• [MANUAL] : Commute sur l'ensemble suivant
manuellement.
4
Zone jaquette d'album
Les informations de l'image disponibles dans le
fichier actuel s'affichent.
Touchez pour sélectionner successivement
l'écran de contrôle ou d'information.
P# : Numéro de préréglage
CH# : Affichage du canal
5
Touches d'opération
• [1] : Affiche l'écran de liste des services.
Pour plus de détails sur les recherches, voir
Recherche de service (p.81).
• [E] [F] : Syntonisation sur un ensemble, un
service et un composant. Le mode recherche
de commutation peut être modifié. (voir 3
dans le tableau).
•
: Touchez pour diminuer/restaurer le son.
6
Liste des présélections
• Touchez le côté droit de l'écran pour afficher la
Liste de préréglage. Touchez de nouveau pour
fermer la liste.
• Rappelle le service mémorisé.
• Lorsque vous avez appuyé pendant 2
secondes pour garder la station actuelle en
mémoire.
7
Panneau de fonction
Appuyez sur le côté gauche de l'écran pour
afficher le panneau de fonction. Appuyez de
nouveau pour fermer le panneau.
• [TI]: Active le mode infos-trafic. Pour plus de
détails, voir Infos-trafic (p.81).
• [SETUP]: Affiche l'écran CONFIGURATION DAB.
Pour plus de détails, voir Configuration DAB
(p.82).
79Français
Page 80

Radiodiffusion numérique
• [PTY] (mode en direct uniquement) :
Recherche un programme en spécifiant un
type de programme. Pour plus de détails,
voir Recherche par t ype de programme
(p.80).
• [DLS]: Afficher l'écran de segment d'Étiquette
Dynamique.
8
Éléments indicateurs
• DAB: La radio numérique est actuellement
reçue.
• RDS: Le Radio Data System est actuellement
reçu.
• MC: Le service de réception est affiché.
Blanc : le composant principal est reçu.
Orange : le composant secondaire est reçu.
Mémorisation des services dans la mémoire préréglée
Vous pouvez mémoriser le service que vous êtes
en train de recevoir.
1 Sélectionnez le service que vous
souhaitez mémoriser.
2 Touchez [ ] sur le côté droit de l'écran.
Utilisation de la sélection
Ñ Recherche par type de
programme
Vous pouvez syntoniser une station avec un
programme spécifique lorsque vous écoutez la
radio numérique.
1 Touchez [ ] sur le côté gauche de l'écran.
Touchez [PTY].
L'écran de recherche PTY apparaît.
2 Sélectionnez dans la liste le type de
programme de votre choix.
3 Touchez [Search].
3 Touchez [P#] (# :1-10) dans lequel vous
souhaitez enregistrer la station pendant
2 secondes jusqu'à ce que vous entendiez
un bip.
80
Vous pouvez rechercher une station dont
le type de programme correspond à la
sélection.
Page 81

Radiodiffusion numérique
Ñ Recherche de service
Vous pouvez sélectionner un service dans la
liste de tous les services reçus.
1 Touchez [1].
2 Sélectionner la catégorie voulue dans la
liste.
■ [ ]
Maintenez-le enfoncé pour trouver la
dernière liste de service.
■ [1A-Z]
Affiche l'écran de clavier.
Passez à la lettre que vous avez saisie
(recherche alphabétique).
Infos-trafic
Vous pouvez écouter et lire les informations de
circulation routière automatiquement, à l'instant
ou l'appareil reçoit un bulletin d'infos-trafic.
Cependant, cette fonction nécessite une Radio
numérique qui contient les informations TI.
1 Touchez [ ] sur le côté gauche de l'écran.
Touchez [TI].
Le mode d'infos-trafic est activé.
Ñ Lorsqu'un bulletin d'infos-trafic
est reçu
L'écran d'informations routières apparaît
automatiquement.
81Français
Page 82

Radiodiffusion numérique
Configuration DAB
Vous pouvez régler les paramètres de la Radio
Numérique.
1 Touchez [ ] sur le côté gauche de l'écran.
Touchez [SETUP].
L'écran de configuration DAB s'affiche.
2 Réglez chaque option comme suit.
■ [Priority]
Si le même service est fourni par la Radio
Numérique durant la réception Radio Data
System, la sélection se fait automatiquement
sur Digital Radio. Si le même service est
fourni par Radio Data System alors que la
réception du service Digital Radio s'affaiblit,
la sélection se fait automatiquement sur
Radio Data System.
■ [Announcement Select]
Permet de passer au service d'annonce
défini. Pour plus de détails, reportez-vous
à la section Configuration de l'annonce
(p.82).
■ [Related Service]
Lorsque vous sélectionnez MARCHE,
l'appareil commute sur un service semblable
(s'il existe) lorsqu'un réseau service DAB n'est
pas disponible.
Le choix par défaut est “OFF”.
■ [Antenna Power
Règle l'alimentation sur l'antenne de la Radio
Numérique. Règle sur “ON” lorsque l'antenne
de la Radio Numérique en cours d'utilisation
est équipée d'un amplificateur.
Le choix par défaut est “ON”.
Ñ Configuration de l'annonce
Lorsque le service réglé sur “ON” démarre, passe
de n'importe quelle source à l'annonce pour la
recevoir.
1 Touchez [Announcement Select] sur
l'écran CONFIGURATION DAB.
L'écran de sélection de l'annonce
s'affiche.
2 Touchez chaque liste d'annonces et
activez-la ou désactivez-la.
REMARQUE
• Le volume auquel est réglé le son pendant
la réception du service d'annonce est
automatiquement mémorisé. Lors de la
réception du service d'annonce, l'appareil rétablit
automatiquement le volume sonore.
82
Page 83

Utilisation du Bluetooth
Utilisation du Bluetooth
Plusieurs fonctions sont utilisables par le biais
du module Bluetooth : écouter un fichier audio,
passer un appel téléphonique et en recevoir.
Informations pour l'utilisation de périphériques Bluetooth®
Bluetooth est une technologie de
communication radio à courte distance pour
les appareils portables tels que les téléphones
portables, les ordinateurs portables,etc.
Les périphériques Bluetooth peuvent être
connectés sans câble et communiquer les uns
avec les autres.
REMARQUE
• Pendant que vous conduisez, ne réalisez
pas d'opérations compliquées telles que la
composition d'un numéro, l'utilisation du
répertoire téléphonique, etc. Pour réaliser ces
opérations, arrêtez votre voiture dans un endroit
sûr.
• Il se peut que certains périphériques Bluetooth
ne puissent pas être connectés à cet appareil
en fonction de la version Bluetooth du
périphérique.
• Cet appareil peut ne pas fonctionner avec
certains périphériques Bluetooth.
• Les conditions de connexion peuvent varier en
fonction des circonstances autour de vous.
• Pour certains périphériques Bluetooth, le
périphérique est déconnecté quand l'appareil
est mis hors tension.
Ñ À propos du téléphone mobile
et du lecteur audio Bluetooth
Cet appareil est conforme aux caractéristiques
techniques suivantes de la norme Bluetooth :
Version
Bluetooth Ver. 4.1
Profil
Téléphone mobile :
HFP (Profil mains libres)
SPP (Profil port série)
PBAP (Profil d'accès au répertoire
téléphonique)
Lecteur audio :
A2DP (Profil de distribution audio avancée)
AVRCP (Profil de télécommande audio/vidéo)
Codec son
SBC, AAC
REMARQUE
• Les appareils disposant de la fonction Bluetooth
sont certifiés conformes à la norme Bluetooth
d'après la procédure prescrite par Bluetooth SIG.
• Cependant, il est possible que ces appareils ne
puissent pas communiquer avec cer tains types
de téléphones portables.
83Français
Page 84

Utilisation du Bluetooth
Enregistrez depuis le périphérique Bluetooth
Il est indispensable de déclarer à l'appareil le
lecteur audio ou le téléphone mobile Bluetooth
avant de pouvoir utiliser la fonction Bluetooth.
Vous pouvez enregistrer jusqu'à 7 périphériques
Bluetooth.
REMARQUE
• Vous pouvez enregistrer jusqu'à 7 périphériques
Bluetooth. Si vous essayez d'enregistrer un
8ème périphérique Bluetooth, le périphérique
Bluetooth connecté à la date la plus ancienne
sera effacé pour pouvoir enregistrer le 8ème.
• L'appareil est compatible avec la fonction
Easy Pairing (Appairage Facile) d'Apple.
Lorsqu'un iPod touch ou un iPhone est
branché sur cet appareil, une boîte de dialogue
d'authentification apparaît. L'authentification
sur cet appareil ou sur un smartphone iOS
permet d'enregistrer le smar tphone en tant que
périphérique Bluetooth.
1 Activer la fonction Bluetooth sur votre
smartphone/téléphone portable.
2 Recherchez l'appareil (« DMX**** ») à
partir de votre smartphone/téléphone
portable.
3 Utilisez votre smartphone/téléphone
portable en fonction des messages
affichés.
■ Confirmez la requête sur le
smartphone/téléphone portable.
Configuration Bluetooth
1 Appuyez sur le bouton [MENU].
Le menu contextuel s'affiche.
2 Touchez [SETUP].
L'écran de menu de configuration
s'affiche.
3 Touchez [Bluetooth].
L'écran de configuration Bluetooth
s'affiche.
Consultez la section qui suit pour
chaque option.
• Connectez le périphérique Bluetooth
(p.85)
■ Si un code PIN est requis, entrez le code
PIN (« 0000 »).
Lorsque la transmission et la connexion
des données sont terminées, l'icône de
connexion au Bluetooth apparaît sur l'écran.
84
Page 85

Utilisation du Bluetooth
Ñ Connectez le périphérique
Bluetooth
1 Touchez [Select Device] sur l'écran de
CONFIGURATION du Bluetooth.
2 Touchez le nom de l'appareil que vous
souhaitez connecter.
REMARQUE
• Si le pictogramme est en surbrillance, cela
indique que l'appareil correspondant sera utilisé.
Pour supprimer le périphérique
Bluetooth enregistré
1 Touchez [Delete].
2 Touchez [Delete].
Le message de confirmation s'affiche.
3 Touchez [Yes ].
Utilisation d'un appareil audio Bluetooth en lecture
La plupart des fonctions sont utilisables depuis
l'écran de contrôle des sources.
Pour passer sur la source Bluetooth, touchez
l'icône [Bluetooth] sur l'écran de sélection de la
source. (p.65)
Ñ Utilisation de base du module
Bluetooth
Écran de contrôle
1
5
4
3
1
Nom du périphérique/ [ ] / [ ]
• Nom du périphérique connecté.
] : Répète la piste/le dossier en cours.
• [
Chaque fois que vous touchez la touche,
le mode de répétition change dans l'ordre
suivant : Répéter fichier (
(
), Répéter toutes les chansons ( ),
Répétition désactivée (
] : Lit de manière aléatoire tous les
• [
morceaux du dossier en cours. Chaque fois
que vous touchez la touche, le mode aléatoire
change dans l'ordre suivant ;
Tout aléatoire (
désactivée (
• Certains indicateurs de fonctionnement et
d'affichage peuvent différer en fonction de
leur disponibilité sur l'appareil connecté.
2
Affichage des informations *
Affiche les informations de piste.
3
[Touches d'opération *
• [1]: Recherche le fichier. Voir Recherche de
fichier (p.86).
• [E] [F] : Recherche le contenu précédent/
suivant. Touchez et maintenez enfoncé pour
effectuer une avance ou un retour rapide.
• [D] : Lecture.
• [H] : Pause.
: Touchez pour diminuer/restaurer le son.
•
), Lecture aléatoire
)
), Répéter dossier
)
2
85Français
Page 86

Utilisation du Bluetooth
4
Panneau de fonction
Appuyez sur le côté gauche de l'écran pour
afficher le panneau de fonction. Appuyez de
nouveau pour fermer le panneau.
• BT DEVICE CHANGE] : Sélectionne le
dispositif à connecter via l'audio Bluetooth
(A2DP) ou APP (SPP). Voir Connectez l'audio
Bluetooth (p.86).
5
Indicateur du mode de lecture/du temps
de lecture
D, H : Indicateur du mode de lecture en cours
Chaque pictogramme a la signification suivante :
D (jouer), B (avance rapide), A (retour
rapide), H (pause).
* Ces éléments ne sont affichés que lorsque le
lecteur audio connecté prend en charge le
profil AVRCP.
REMARQUE
• Si les touches de commande ne sont pas
affichées, utilisez celles du lecteur.
• Selon le téléphone mobile ou le lecteur audio
utilisé, il peut arriver que les informations texte
ne soient pas affichées alors que l'audio est
audible et que vous pouvez agir dessus.
• Si le volume est trop bas, augmentez-le sur votre
téléphone mobile ou sur votre lecteur audio.
Ñ Connectez l'audio Bluetooth
Sélectionne le dispositif à connecter via l'audio
Bluetooth (A2DP) ou APP (SPP).
1 Touchez sur le côté gauche de l'écran.
Touchez [BT DEVICE CHANGE].
2 Touchez le nom de l'appareil que vous
souhaitez connecter.
3 Touchez [Close].
Ñ Recherche de fichier
1 Touchez [1].
2 Touchez le fichier ou le dossier de votre
choix.
Le contenu d'un dossier est affiché lorsque
vous touchez celui-ci.
3 Touchez l'élément de votre choix dans la
liste des contenus.
La lecture commence.
REMARQUE
• Pour l'utilisation de l'écran de liste, voir Écran
des lis tes (p.68).
86
Page 87

Utilisation du Bluetooth
Utilisation du module mainslibres
Vous pouvez utiliser la fonction téléphone
de l'appareil en lui connectant un téléphone
Bluetooth.
REMARQUE
• Lorsqu'Apple CarPlay ou Android Auto est
connecté, la fonction mains-libres Bluetooth et
deux connexions de périphériques Bluetooth
ne peuvent pas être utilisées. Seule la fonction
mains-libres d'Apple CarPlay ou d'Android Auto
peut être utilisée.
Ñ Effectuez un appel
1 Touchez [Û].
L'écran mains-libres s'affiche.
REMARQUE
• Si votre téléphone portable est compatible
avec PBAP, vous pouvez afficher le répertoire
téléphonique et les listes d'appel sur l'écran
tactile lorsque le téléphone portable est
connecté.
– Répertoire téléphonique : jusqu'à 1 000
entrées
– Jusqu'à 20 entrées, y compris appels
composés, appels reçus et appels manqués
2 Sélectionnez une méthode de
numérotation.
• [
]: Appel depuis un numéro
présélectionné
• [
]: Appel en saisissant un numéro de
téléphone
• [
]: Reconnaissance vocale (p.88)
● Configuration Bluetooth
1) Touchez [ ].
L'écran de configuration Bluetooth s'affiche.
REMARQUE
• Les pictogrammes d'état affichés, notamment
ceux représentant une batterie et une antenne,
peuvent être différents de ceux affichés sur le
téléphone portable.
• Le fait de configurer le téléphone portable au
mode privé peut désactiver la fonction mains
libres.
Appel depuis l'historique des appels
1 Touchez [ ].
2 Sélectionnez dans la liste le numéro de
téléphone.
Appel par entrée d'un numéro de
téléphone
1 Touchez [ ].
2 Utilisez les touches numériques pour
entrer un numéro de téléphone.
• [ ]: Appel depuis l'historique des appels
• [
]: Appel depuis le répertoire
téléphonique
3 Touchez [ ].
87Français
Page 88

Utilisation du Bluetooth
Appel depuis un numéro présélectionné
1 Touchez [ ].
2 Touchez le nom ou le numéro de
téléphone.
Appel depuis le répertoire téléphonique
1 Touchez [ ].
2 Sélectionnez la personne que vous
souhaitez appeler dans la liste.
Ñ Reconnaissance vocale
Vous pouvez accéder à la fonction de
reconnaissance vocale du téléphone portable
branché sur cet appareil. Vous pouvez effectuer
une recherche dans le répertoire téléphonique
par la voix. (La fonctionnalité dépend du
modèle de votre téléphone portable.)
1 Appuyez sur le bouton [ ] pendant 1
seconde.
Appuyez pendant 1 seconde
L'écran de reconnaissance vocale
apparaît.
2 Commencez à parler.
REMARQUE
• Vous pouvez utiliser la fonc tion de
reconnaissance vocale en touchant [
l'écran mains libres.
] sur
3 Sélectionnez dans la liste le numéro de
téléphone.
REMARQUE
• Si aucun répertoire n'a été téléchargé, toucher
[Download Phonebook Now] va commencer
le téléchargement du répertoire.
88
Page 89
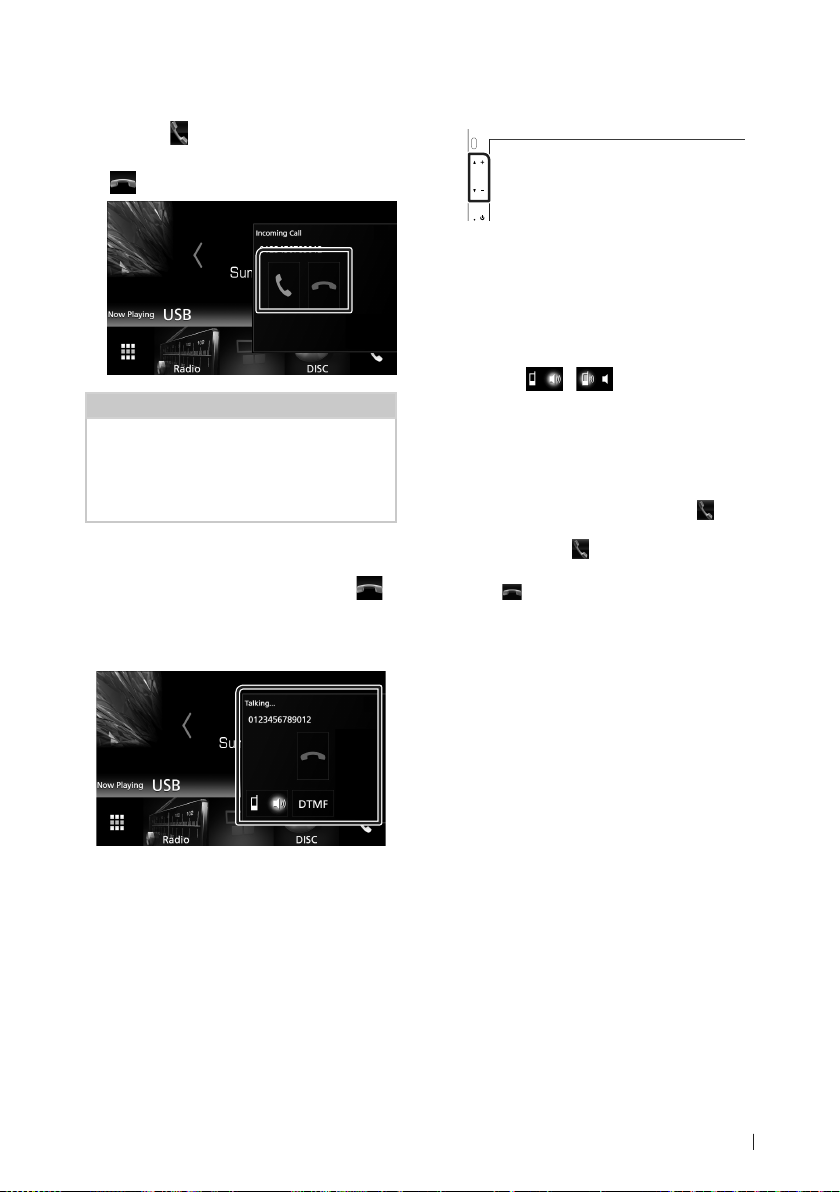
Utilisation du Bluetooth
Ñ Réception d'un appel
1 Touchez [ ] pour répondre à un appel
téléphonique ou
[
] pour rejeter un appel entrant.
REMARQUE
• Lorsque l'affichage est déjà occupé par la caméra
de vision, cet écran ne s'affiche pas même si un
appel est reçu. Pour afficher cet écran, appuyez
sur le bouton [TEL] ou remettez le sélecteur de
vitesses de la voiture en position de marche.
Pour mettre fin à l'appel
1 Pendant une conversation, touchez [ ].
Ñ Actions possibles pendant un
appel
● Régler le volume de réception
Appuyez sur le bouton [S] ou [R].
● Envoyer la tonalité de numérotation
Touchez [DTMF] pour afficher l'écran de saisie
des tonalités.
Vous pouvez envoyer des tonalités en touchant
les touches voulues à l'écran.
● Sélection de la sortie vocale
En touchant [
bascule systématiquement entre le téléphone
portable et le haut-parleur.
● Attente d'appel
Lorsque vous recevez un appel alors que vous
êtes en cours de conversation, vous pouvez
répondre à l'appel entrant en touchant [
L'appel en cours est alors mis en attente.
À chaque appui sur [
correspondant.
Touchez [
et passer sur l'appel en attente.
]/ [ ], la sortie vocale
].
], vous changez de
] pour mettre fin à l'appel en cours
89Français
Page 90
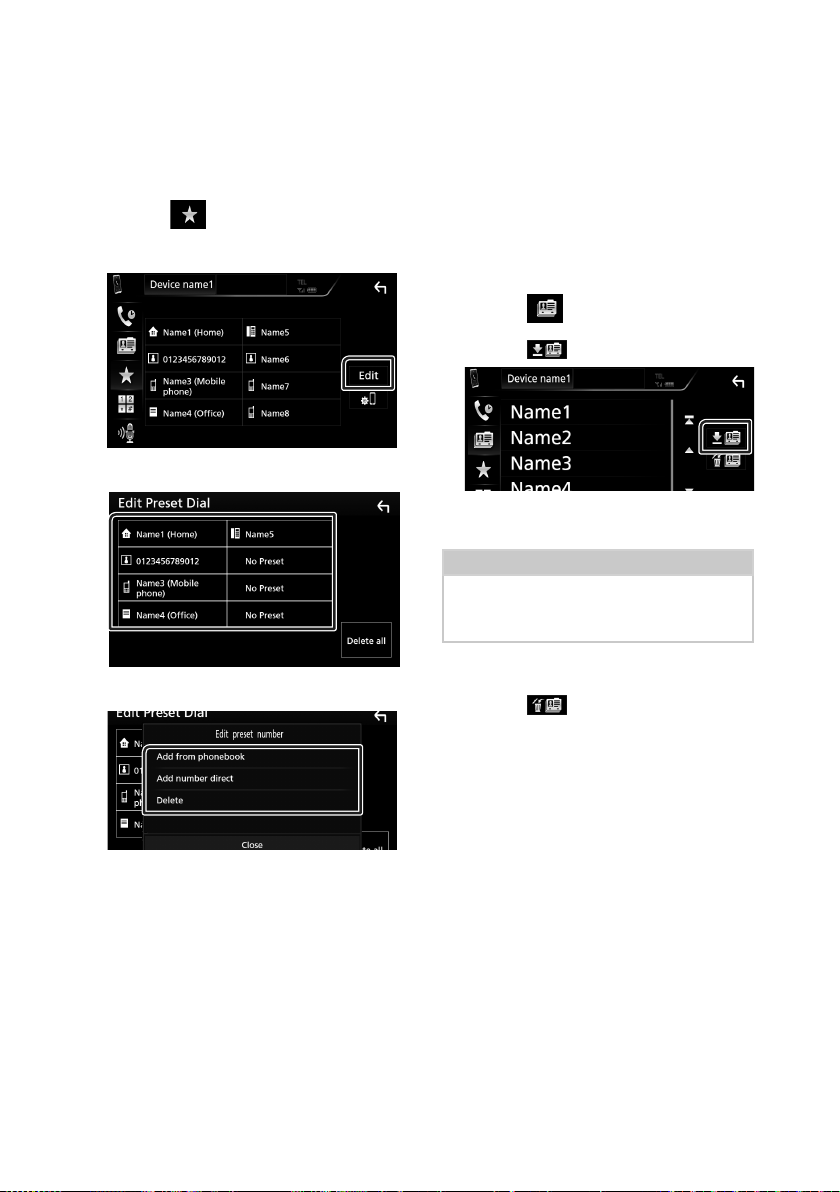
Utilisation du Bluetooth
Ñ Préréglage de numéros de
téléphone
Vous pouvez enregistrer dans l'appareil les
numéros de téléphone que vous utilisez
souvent.
1 Touchez [ ].
2 Touchez [Edit].
3 Sélectionnez où prédéfinir.
■ [Delete]
Pour supprimer un numéro préréglé, touchez
[Delete] puis touchez [OK] sur l'écran de
confirmation.
Ñ Transfert vers le répertoire
téléphonique
Vous pouvez transférer le répertoire
téléphonique de votre smartphone Bluetooth
vi a P B AP.
1 Touchez [ ].
2 Touchez [ ].
La transmission des données du
répertoire téléphonique démarre.
REMARQUE
• Si le répertoire téléphonique contient plus
de 1 000 entrées, les données du réper toire
téléphonique ne peuvent pas être transférées.
4 Sélectionnez comment prédéfinir.
■ [Add number from phonebook]
Sélectionnez le numéro à prérégler à
partir du répertoire téléphonique. Voir
Appel depuis le répertoire téléphonique
(p.88).
■ [Add number direct]
Saisissez directement le numéro de
téléphone et touchez [SET]. Voir Appel
par entrée d'un numéro de téléphone
(p.87).
90
Suppression du répertoire téléphonique
1 Touchez [ ].
Le message de confirmation s'affiche.
2 Touchez [Yes ].
Page 91
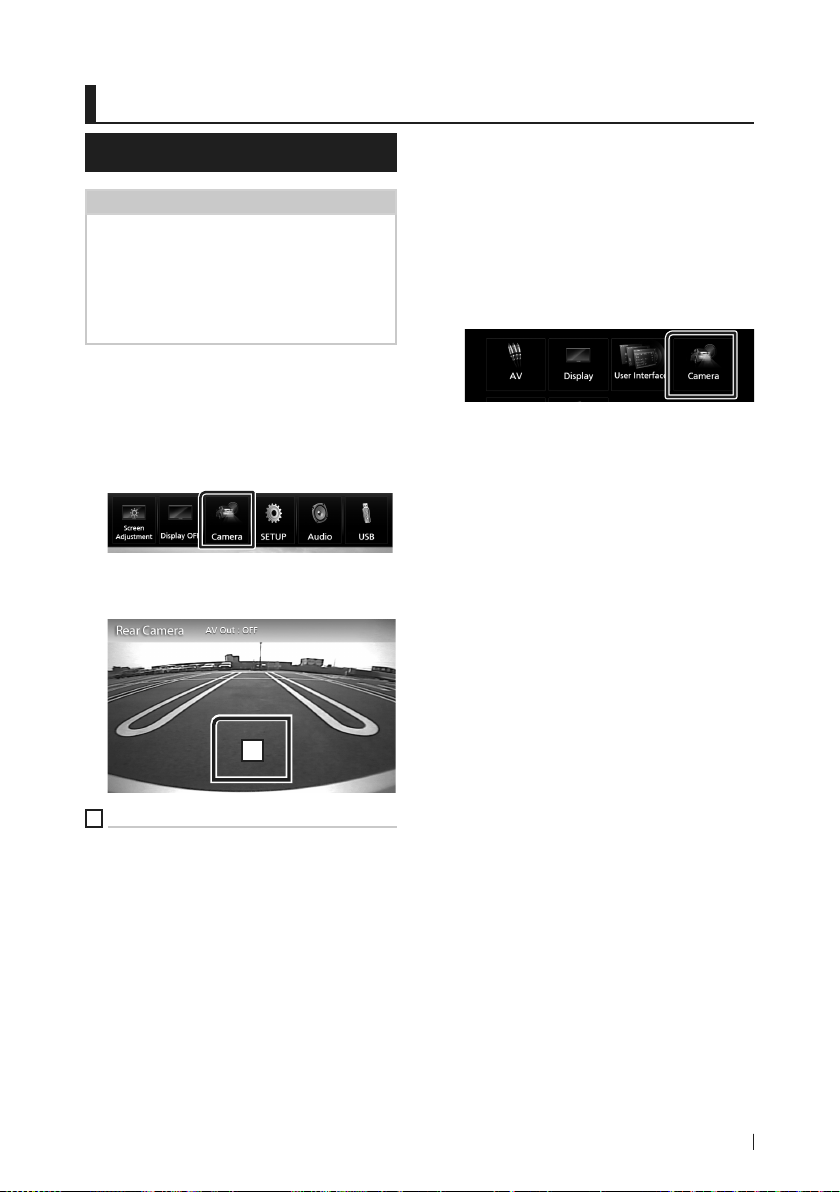
Autres appareils externes
Autres appareils externes
Caméra de vision
REMARQUE
• Pour la connexion d'une caméra, voir p.106.
• Pour utiliser la caméra de recul, la connexion du
fil REVERSE est requise. (p.106 )
• L'écran de vue arrière est affiché lorsque vous
changez de vitesse pour la position de marche
arrière (R).
Ñ Affichez l'écran de la caméra
1 Appuyez sur le bouton [MENU].
Le menu contextuel s'affiche.
2 Touchez [Camera].
L'écran de la caméra de vision s'affiche.
3 Réglez chaque option comme suit.
Ñ Configuration des caméras
1 Appuyez sur le bouton [MENU].
Le menu contextuel s'affiche.
2 Touchez [SETUP].
L'écran de menu de configuration
s'affiche.
3 Touchez [Camera].
L'écran de la caméra apparaît.
4 Réglez chaque option comme suit.
■ Parking Guidelines
Vous pouvez afficher les directives
de stationnement pour faciliter le
stationnement lorsque vous changez le
rapport dans la position marche arrière (AR).
Le choix par défaut est “ON”.
■ Guidelines SETUP
Si vous sélectionnez [ON] pour [Parking
Guidelines], ajustez les instructions de
parking. Voir Pour régler les instructions de
parking (p.92).
1
1
Arrêt de la caméra
Touchez pour quitter l'écran de la caméra.
91Français
Page 92

Autres appareils externes
Pour régler les instructions de parking
REMARQUE
• Installez la caméra de recul dans la position
appropriée en fonction des instructions fournies
avec la caméra de recul.
• Lors de l'ajustement des lignes de guidage de
stationnement, assurez-vous d'utiliser le frein de
stationnement pour éviter que la voiture bouge.
1 Touchez [ON] de [Parking Guidelines]
dans l'écran de la Caméra. (p.91)
2 Touchez [Guidelines SETUP] dans l'écran
de la Caméra.
3 Réglez les directives de stationnement en
sélectionnant le repère
.
4 Réglage de la position du repère
sélectionné.
Lecteur audio/vidéo
extérieur—AV-IN
1 Connectez un appareil extérieur à la
borne d'entrée AV-IN. (p.106)
2 Choisissez [AV-IN] comme source. (p.65)
3 Mettez l'appareil connecté sous tension
et démarrez la lecture de la source.
A
C
B
Assurez-vous que A et B sont parallèles
horizontalement, et que C et D ont la
même longueur.
REMARQUE
• Touch ez [Initialize] puis touchez [Yes] pour
régler toutes les marques
initiales par défaut.
92
D
sur les positions
Page 93
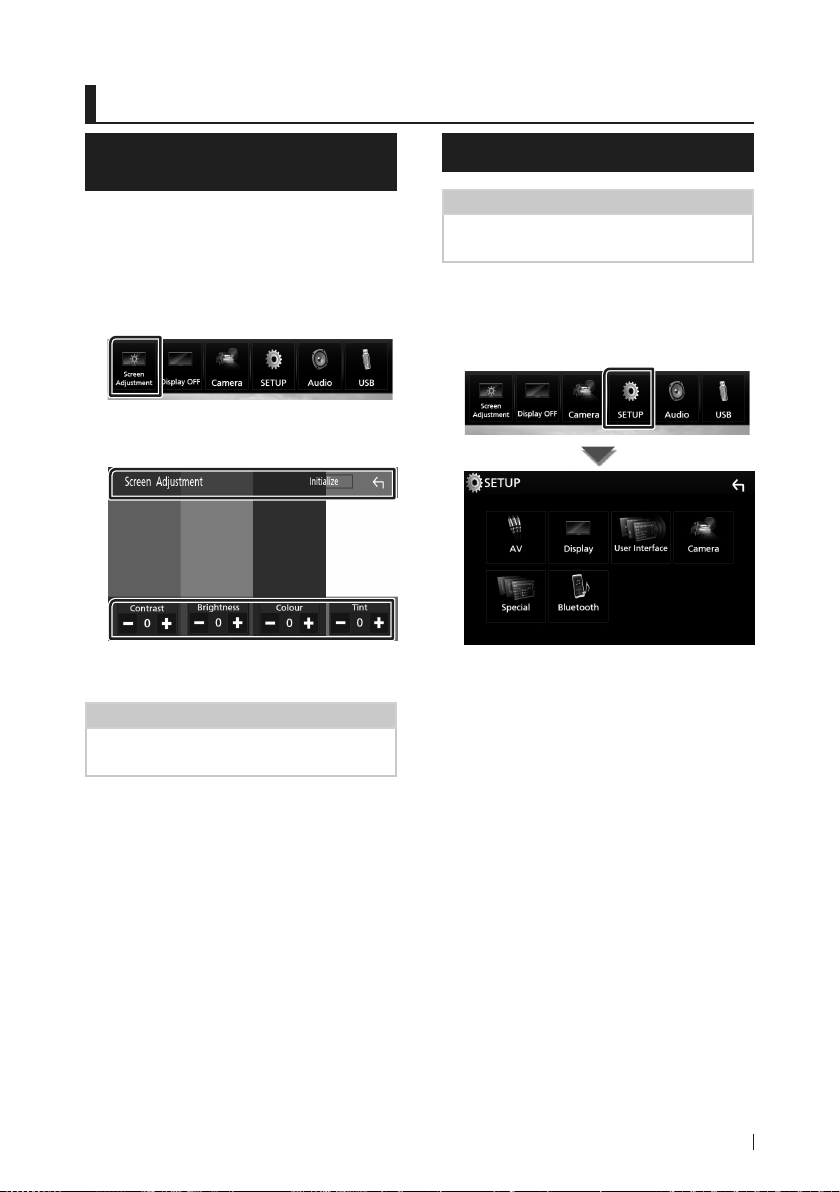
Configuration générale
Configuration générale
Configuration d'écran du
moniteur
Vous pouvez régler la qualité d'image dans
l'écran vidéo.
1 Appuyez sur le bouton [MENU].
Le menu contextuel s'affiche.
2 Touchez [Screen Adjustment].
L'écran de contrôle d'écran s'affiche.
3 Réglez chaque option comme suit.
■ Contrast / Brightness / Colour / Tint
Réglez chaque option.
REMARQUE
• Les options de réglage varient selon la source
en cours.
Configuration système
REMARQUE
• Chacune des actions décrites dans cet te section
est accessible depuis le menu multifonctions.
1 Appuyez sur le bouton [MENU].
Le menu contextuel s'affiche.
2 Touchez [SETUP].
Consultez la section qui suit pour
chaque option.
• Configurer AV (p.96)
• Configuration de l'affichage (p.95)
• Configurer l'interface utilisateur (p.94)
• Configuration de la caméra (p.91)
• Configuration spéciale (p.94)
• Configuration Bluetooth (p.84)
93Français
Page 94
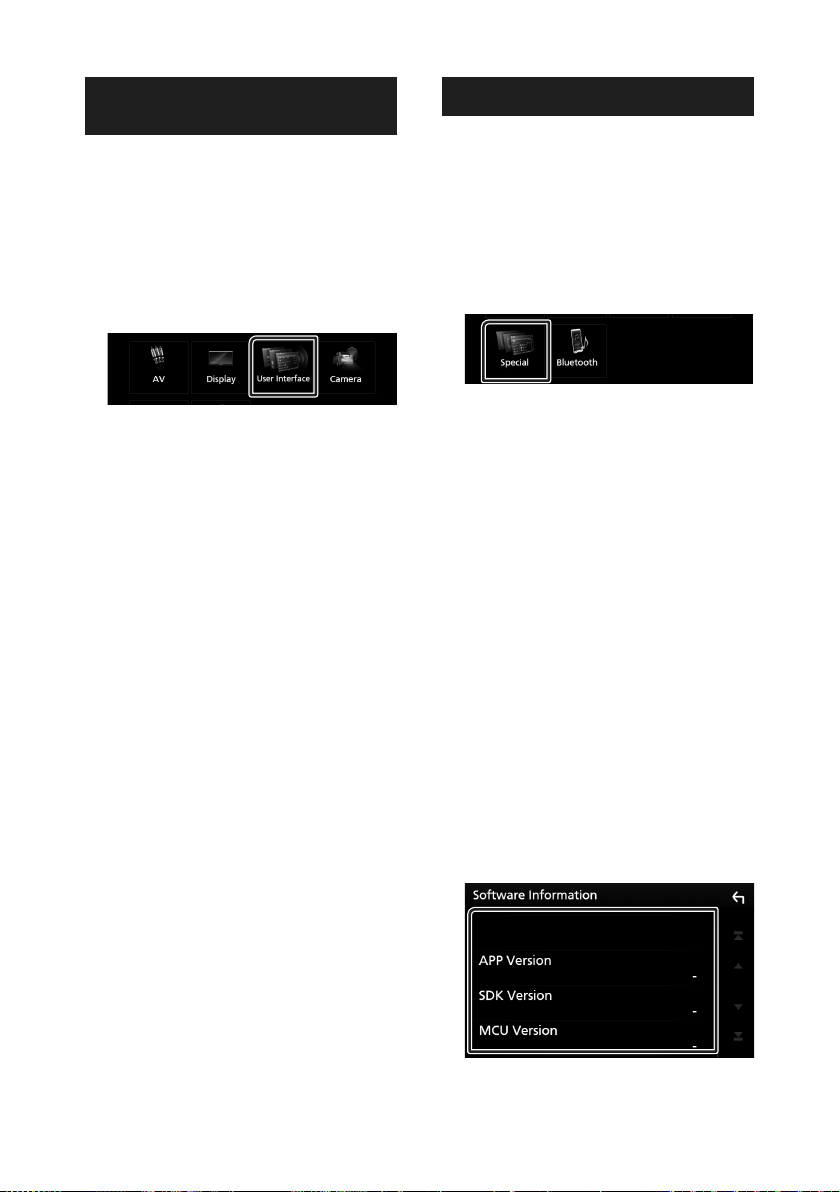
Configuration générale
Configuration de l'interface
utilisateur
Vous pouvez configurer les paramètres de
l'interface utilisateur.
1 Appuyez sur le bouton [MENU].
Le menu contextuel s'affiche.
2 Touchez [SETUP].
L'écran de CONFIGURATION s'affiche.
3 Touchez [User Interface].
L'écran d'interface utilisateur s'affiche.
4 Réglez chaque option comme suit.
■ Beep
Active ou désactive la touche de verrouillage.
Le choix par défaut est “OFF”.
■ Language
Sélectionne une langue.
■ Steering Remote Controller
Configure la fonction souhaitée dans la
commande au volant. (Contactez votre
revendeur Kenwood pour plus de détails.)
■ Clock Adjust
Réglez la date et l'heure manuellement.
(p.63)
Configuration spéciale
Vous pouvez configurer des paramètres
spéciaux.
1 Appuyez sur le bouton [MENU].
Le menu contextuel s'affiche.
2 Touchez [SETUP].
L'écran de CONFIGURATION s'affiche.
3 Touchez [Special].
L'écran spécial apparaît.
4 Réglez chaque option comme suit.
■ DEMO
Permet de paramétrer le mode de
démonstration. Le choix par défaut est “ON”.
■ Software Information
Vérifier la version logicielle de cet appareil.
(p.94)
■ Open Source Licenses
Affiche les licences open source.
■ Initialize
Touchez [Initialize] puis touchez [Yes ] pour
ramener tous les réglages aux réglages
initiaux par défaut.
Ñ Informations logicielles
Vous pouvez vérifier la version logicielle de
l'appareil.
1 Touchez [Software Information] dans
l'écran spécial.
2 Confirmez la version logicielle.
94
Page 95
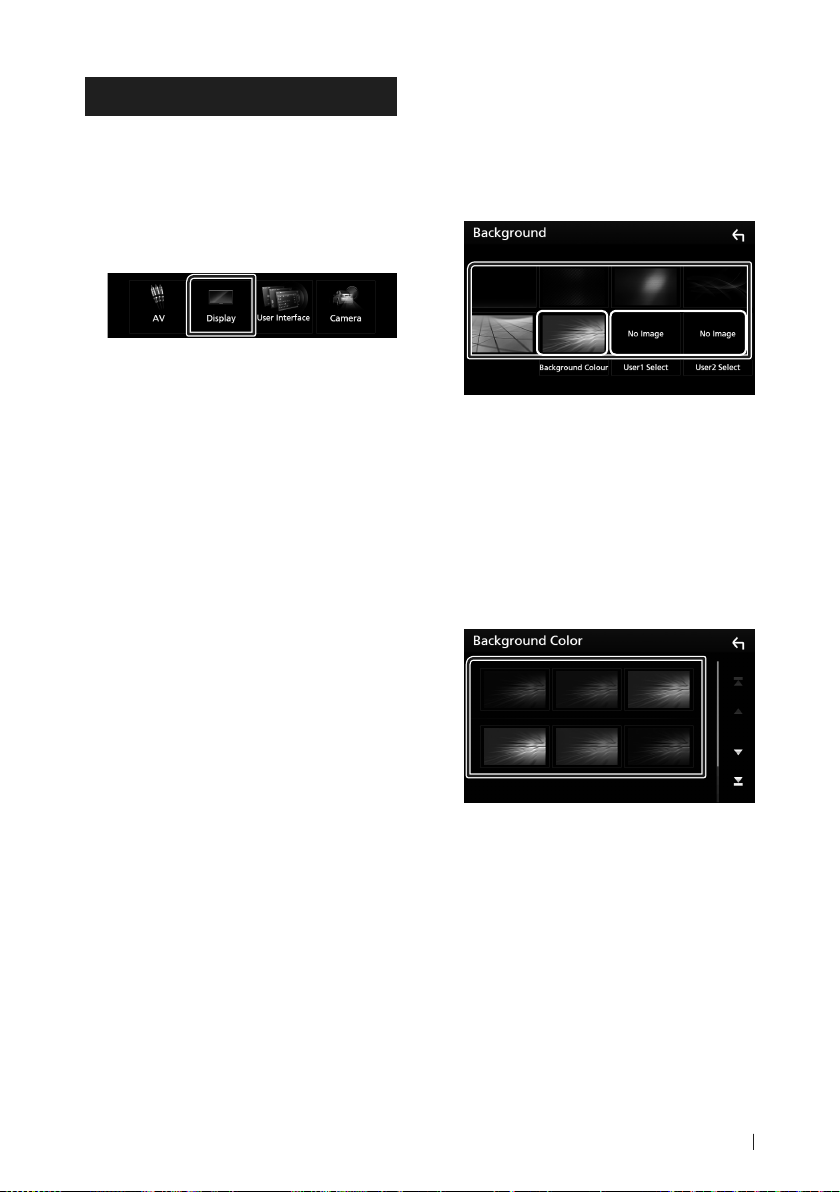
Configuration générale
Configuration de l'affichage
1 Appuyez sur le bouton [MENU].
Le menu contextuel s'affiche.
2 Touchez [SETUP].
L'écran de CONFIGURATION s'affiche.
3 Touchez [Display].
L'écran d'affichage apparaît.
4 Réglez chaque option comme suit.
■ Dimmer
Sélectionnez le mode à appliquer pour
l'atténuation de l'éclairage.
OFF: L'affichage et les boutons ne baissent
pas en intensité d'éclairage.
ON: L'affichage et les boutons baissent en
intensité d'éclairage.
SYNC (par défaut) : Synchronise l'atténuation
de l'éclairage avec la mise sur marche
ou sur arrêt du sélecteur d'éclairage du
véhicule.
■ Screen Adjustment
Affiche l'écran de réglage de l'écran.
(p.93)
■ Background
Changer l'image ou la couleur en arrièreplan. (p.95)
Ñ Changez l'image ou la couleur
en arrière-plan
1 Touchez [Background] dans l'écran
d'affichage.
2 Sélectionnez une image.
1
*
*1 Sélectionnez à l'avance une couleur
d'arrière-plan.
2
*
Sélectionnez tout d'abord une image
originale.
Pour sélectionner une couleur d'arrièreplan
2
*
1 Touchez [Background Color] dans l'écran
d'arrière-plan.
2 Sélectionnez une couleur d'arrière-plan.
95Français
Page 96

Configuration générale
Pour enregistrer une image originale
Vous pouvez charger une image à partir d'un
périphérique USB connecté et la choisir comme
arrière-plan.
Avant d'entamer cette procédure, il vous faut
brancher le périphérique contenant l'image à
charger.
1 Touchez [User1 Select] ou [User2 Select]
dans l'écran d'arrière-plan.
2 Sélectionnez l'image à charger.
3 Touchez [Enter].
L'image sélectionnée est chargée et
l'affichage revient à l'écran d'arrièreplan.
REMARQUE
• Touch ez [ ] pour faire tourner dans le sens
antihoraire.
• Touch ez [
horaire.
• Fichiers image : JPEG (.jpg, .jpeg), PNG (.png),
BMP (.bmp)
] pour faire tourner dans le sens
Configuration de AV
Vous pouvez configurer les paramètres AV.
1 Appuyez sur le bouton [MENU].
Le menu contextuel s'affiche.
2 Touchez [SETUP].
L'écran de CONFIGURATION s'affiche.
3 Touchez [AV].
L'écran AV apparaît.
4 Réglez chaque option comme suit.
■ AV-OUT
Spécifiez s'il faut émettre ou non la source
actuelle de signal à partir de la borne AV
OUTPUT.
« ON » / « OFF » (par défaut)
REMARQUE
• Les images peuvent uniquement être émises
à partir de la source AV IN et USB (fichier
vidéo).
• Si l'affichage de l'image de la caméra de
vue arrière est sélectionné lorsque la source
AV-IN est en cours de lecture, aucune
image n'est émise par la borne de sortie AV
OUTPUT.
■ CarPlay Sidebar
Sélectionnez la position de la barre de
contrôle (gauche ou droite) affichée sur le
panneau tactile.
« Left » (gauche) (par défaut)/ « Right »
(droite)
REMARQUE
• Le réglage est disponible lorsqu'un iPhone
est déconnecté.
96
■ AV Color Adjust
Vous pouvez régler la qualité d'image dans
l'écran vidéo. (p.93)
REMARQUE
• Les options de réglage varient selon la
source en cours.
Page 97

Contrôle de l'audio
Contrôle de l'audio
NOTA
• Chacune des actions décrites dans cet te section
est accessible depuis le menu multifonctions.
Vous pouvez agir sur les différents paramètres,
comme la balance audio ou le niveau du caisson
de graves par exemple.
1 Appuyez sur le bouton [MENU].
Le menu contextuel s'affiche.
2 Touchez [Audio].
Consultez la section qui suit pour
chaque option.
• Configuration de l'enceinte/X'over
(p.97)
• Contrôler l'égaliseur (p.99)
• Configurer la position d'écoute/DTA
(p.101)
• Contrôle de l'audio général (équilibre
avant et arrière/balance) (p.98)
• Configurer la compensation de volume
(p.100)
• Réglage des effets sonores (p.100)
Configuration de l'enceinte/du
répartiteur
1 Appuyez sur le bouton [MENU].
Le menu contextuel s'affiche.
2 Touchez [Audio].
L'écran audio s'affiche.
3 Touchez [Speaker/Xʼover].
4 Choisissez un type de voiture.
Vous pouvez configurer le type de la
voiture et le réseau de haut-parleurs, etc.
Dès lors qu'un type de voiture est sélectionné, la
temporisation des canaux est automatiquement
configurée (pour corriger la synchronisation
en sortie de chaque canal) pour que les effets
surround soient les plus marqués.
5 Touchez le haut-parleur (1) que vous
souhaitez paramétrer et configurez
chaque option (2) comme suit.
1
2
■ Speaker
Vous pouvez sélectionner un type de hautparleur ainsi que son diamètre afin d'obtenir
le meilleur rendu sonore.
Lorsque le type et le diamètre des hautparleurs sont définis, le réseau de répartition
entre haut-parleurs est automatiquement
paramétré.
97Français
Page 98

Configuration générale
■ Location (uniquement pour l'avant,
l'arrière)
Sélectionnez l'emplacement de l'enceinte
vous avez fixée.
■ Tweeter (uniquement pour l'avant)
Vous pouvez régler le tweeter quand vous
sélectionnez les haut-parleurs avant.
Arrêt, petit, moyen, grand
■ X’over
Affiche l'écran de configuration de
répartition entre haut-parleurs.
Vous pouvez modifier la configuration de
répartition qui a été automatiquement
paramétrée lorsque vous avez sélectionné le
type de haut-parleur.
Pour plus de détails, voir Configuration du
réseau de répartition (p.98)
Ñ Configuration du réseau de
répartition
Vous pouvez définir une fréquence de
recouvrement entre haut-parleurs.
1 Touchez [Xʼover].
2 Touchez l'enceinte pour la configurer.
1
■ Slope*
Configure la pente de recouvrement.
■ Gain
Règle le niveau du haut-parleur frontal,
du haut-parleur arrière ou du niveau du
subwoofer.
■ TW (Enceinte d'aigus) Gain *
Règle le niveau de l'enceinte d'aigus.
(Lorsque le haut-parleur avant est
sélectionné dans l'écran de sélection des
haut-parleurs.)
■ Phase Inversion*
Configure la phase de sortie du subwoofer.
Cochez [Phase Inversion] pour changer
la phase à 180 degrés. (Lorsque le caisson
de graves est sélectionné dans l'écran de
sélection des haut-parleurs)
1
*
Uniquement lorsque « LPF FREQ »/« HPF
FREQ » est réglé sur un mode autre que
« Through » dans [Xʼover].
2
*
Uniquement quand l'option « Tweeter » est
réglée sur « Small », « Medium », « Large »
dans [Speaker Setup].
3
*
Uniquement quand « Subwoofer » est
réglé sur un mode autre que « None » dans
[Speaker Setup].
3
2
Contrôle de l’audio en général
3 Réglez chaque option comme suit.
■ HPF FREQ
Ajustement du filtre passe-haut. (Lorsque le
haut-parleur avant ou arrière est sélectionné
dans l'écran de sélection des haut-parleurs)
■ LPF FREQ
Ajustement du filtre passe-bas. (Lorsque
le caisson de graves est sélectionné dans
l'écran de sélection des haut-parleurs)
98
1 Appuyez sur le bouton [MENU].
Le menu contextuel s'affiche.
2 Touchez [Audio].
L'écran audio s'affiche.
3 Touchez [Fader / Balance].
Page 99

Contrôle de l'audio
4 Réglez chaque option comme suit.
■ Fader / Balance
Réglez la balance en agissant sur les touches
périphériques.
[C] et [D] permettent de régler la balance
droite/gauche.
[R] et [S] permettent de régler la balance
avant/arrière.
■ [Center]
Annulez le réglage.
Contrôle d'égaliseur
Vous pouvez régler l'égaliseur en sélectionnant
le réglage optimal pour chaque catégorie.
1 Appuyez sur le bouton [MENU].
Le menu contextuel s'affiche.
2 Touchez [Audio].
L'écran audio s'affiche.
3 Touchez [Equalizer].
■ Niveau de gain (zone de cadre pointillé)
Réglez le niveau de gain en touchant
chacune des barres de fréquences.
Vous pouvez sélectionner la barre de
fréquence et ajuster son niveau en utilisant
[R], [S].
■ Preset Select
Affiche l'écran pour présenter à nouveau la
courbe prédéfinie de l'égaliseur.
■ Memory
Enregistre la courbe d'égaliseur ajustée de «
User1 » à « User4 ».
■ Initialize
La courbe EQ actuelle est revenue en
position linéaire.
■ ALL SRC
Appliquer l'égaliseur réglé pour toutes les
sources. Touchez [ALL SRC] puis touchez
[OK] sur l'écran de confirmation.
■ Bass EXT (Paramètres étendus des graves)
Lorsque cette fonction est active, toute
fréquence inférieure à 62,5 Hz est configurée
sur le même niveau de gain que la fréquence
62,5 Hz.
■ SW Level
Règle le volume du caisson de graves. Ce
réglage n'est pas disponible quand l'option
du caisson de graves est réglée sur “None”
(Aucun). Voir Configuration de l'enceinte/
du répartiteur (p.97).
Ñ Réaffiche la courbe de
l'égaliseur
4 Touchez l'écran pour configurer
l'égaliseur graphique comme vous le
souhaitez.
1 Touchez [Preset Select].
2 Sélectionnez la courbe de l'égaliseur.
REMARQUE
• [iPod] est disponible si l'iPod est la source
sélectionnée.
99Français
Page 100
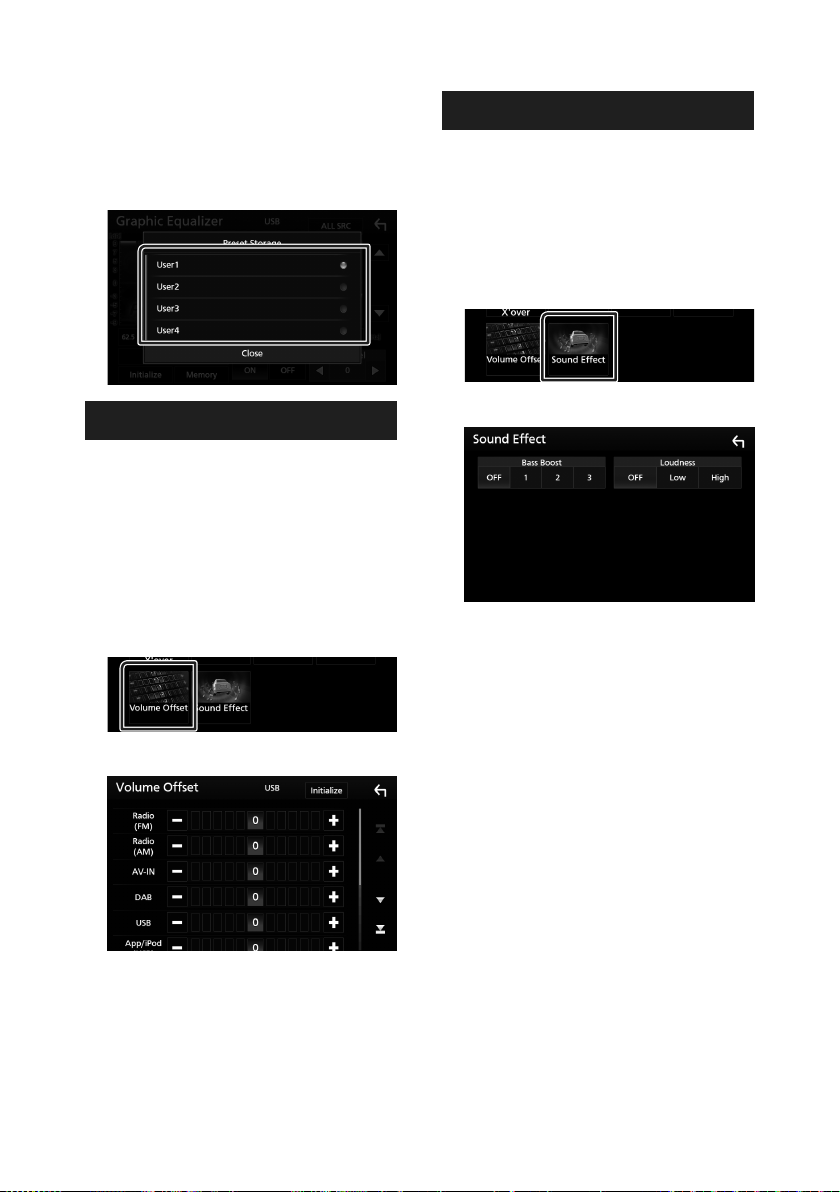
Contrôle de l'audio
Ñ Enregistrez la courbe de l'égaliseur
1 Réglez la courbe de l'égaliseur.
2 Touchez [Memory].
3 Sélectionnez l'emplacement de sauvegarde.
Décalage du volume
Réglez finement le volume de la source
actuellement sélectionnée pour minimiser la
différence de volume entre les différentes sources.
1 Appuyez sur le bouton [MENU].
Le menu contextuel s'affiche.
2 Touchez [Audio].
L'écran audio s'affiche.
3 Touchez [Volume Offset].
4 Touchez [+] ou [−] pour régler le niveau.
Effet sonore
Vous pouvez paramétrer les effets sonores.
1 Appuyez sur le bouton [MENU].
Le menu contextuel s'affiche.
2 Touchez [Audio].
L'écran audio s'affiche.
3 Touchez [Sound Effect].
4 Réglez chaque option comme suit.
■ Bass Boost
Règle le niveau d'amplification des graves
entre les choix « OFF » (arrêt)/« 1 »/« 2 »/« 3 ».
■ Loudness
Définit les niveaux d'amplification des graves
et des aigus.
“OFF”, “Low” (Bas), “High” (Haut)
■ Initialize
Revient aux paramètres initiaux.
* Si vous avez d'abord monté le volume, puis
réduit avec la fonction "Volume Offset"
(Décalage du volume), le niveau sonore
peut être extrêmement élevé si vous passez
brusquement sur une autre source.
100
 Loading...