

Page 1

DMX100BT
MONITOR WITH RECEIVER
INSTRUCTION MANUAL
MONITOR CON RECEPTOR
MANUAL DE INSTRUCCIONES
• Updated information (the latest Instruction Manual, etc.) is
available from
<http://www.kenwood.com/cs/ce/>.
• La información actualizada (el Manual de instrucciones más
actualizado, etc.) está disponible desde
<http://www.kenwood.com/cs/ce/>.
B5A-1692-00 (E/R)© 2016 JVC KENWOOD Corporation
Page 2
Contents
Before use ....................................................................................2
How to read this manual .......................................................................................2
Precautions .................................................................................................................... 2
Getting Started ..........................................................................3
Clock settings ............................................................................................................... 3
Touch panel adjustment .......................................................................................3
Basics .............................................................................................4
Functions of the Buttons on the Front Panel .......................................... 4
Common operations ...............................................................................................4
TOP MENU screen descriptions ........................................................................ 5
Source control screen descriptions ...............................................................5
USB .................................................................................................6
Preparation .....................................................................................................................6
Playback operations .................................................................................................6
iPod/iPhone ................................................................................8
Preparation .....................................................................................................................8
Playback operations .................................................................................................8
Radio ........................................................................................... 10
Radio Basic Operation..........................................................................................10
Presetting stations ................................................................................................. 10
FM RDS features ....................................................................................................... 10
Tuner Setup ..................................................................................................................11
External Components ........................................................... 11
Using external audio/video players .............................................................11
Rear view camera .....................................................................................................11
Bluetooth smartphone .........................................................12
Register your smartphone to the unit ...................................................... 12
Receive a phone call ............................................................................................. 12
Make a phone call ................................................................................................... 13
Playing Bluetooth Audio Device ................................................................... 14
Controlling Audio ...................................................................15
Controlling General Audio ................................................................................ 15
Equalizer Control ..................................................................................................... 15
Subwoofer settings ............................................................................................... 15
Remote control ........................................................................16
How to install the battery.................................................................................. 16
Functions of the Remote control Buttons .............................................. 16
Installation .................................................................................17
Before Installation ....................................................................................................17
Installing the unit .................................................................................................... 18
About this Unit ........................................................................ 22
More information .................................................................................................... 22
Troubleshooting ...................................................................................................... 22
Copyrights ................................................................................................................... 23
Specifications ............................................................................................................ 24
Before use
Precautions
#WARNING
Ñ To prevent injury or re, take the
following precautions:
• To prevent a short circuit, never put or leave any
metallic objects (such as coins or metal tools) inside
the unit.
• Do not watch or fix your eyes on the unit’s display
when you are driving for any extended period.
• If you experience problems during installation,
consult your KENWOOD dealer.
Ñ Precautions on using this unit
• When you purchase optional accessories, check
with your KENWOOD dealer to make sure that they
work with your model and in your area.
• The Radio Data System or Radio Broadcast Data
System feature won’t work where the service is not
supported by any broadcasting station.
Ñ Protecting the monitor
• To protect the monitor from damage, do not
operate the monitor using a ballpoint pen or similar
tool with the sharp tip.
Ñ Cleaning the Unit
If the front panel of this unit is stained, wipe it with
a dry soft cloth such as a silicon cloth. If the front
panel is stained badly, wipe the stain off with a cloth
moistened with neutral cleaner, then wipe it again
with a clean soft dry cloth.
! CAUTION
• Applaying spray cleaner directly to the unit may affect
its mechanical parts. Wiping the front panel with a
hard cloth or using a volatile liquid such as thinner
or alcohol may scratch the surface or erase screened
print.
Ñ How to reset your unit
If the unit or the connected unit fails to operate
properly, reset the unit.
How to read this manual
• The panels shown in this guide are examples used to
provide clear explanations of the operations. For this
reason, they may be different from the actual panels.
• In operation procedures, bracket shape indicates the
key or button you should control.
< >: indicates the name of panel buttons.
[ ]: indicates the name of touch keys
2
Reset button
Page 3
Getting Started
1 Turn the ignition key of your car to ACC.
The unit is turned on.
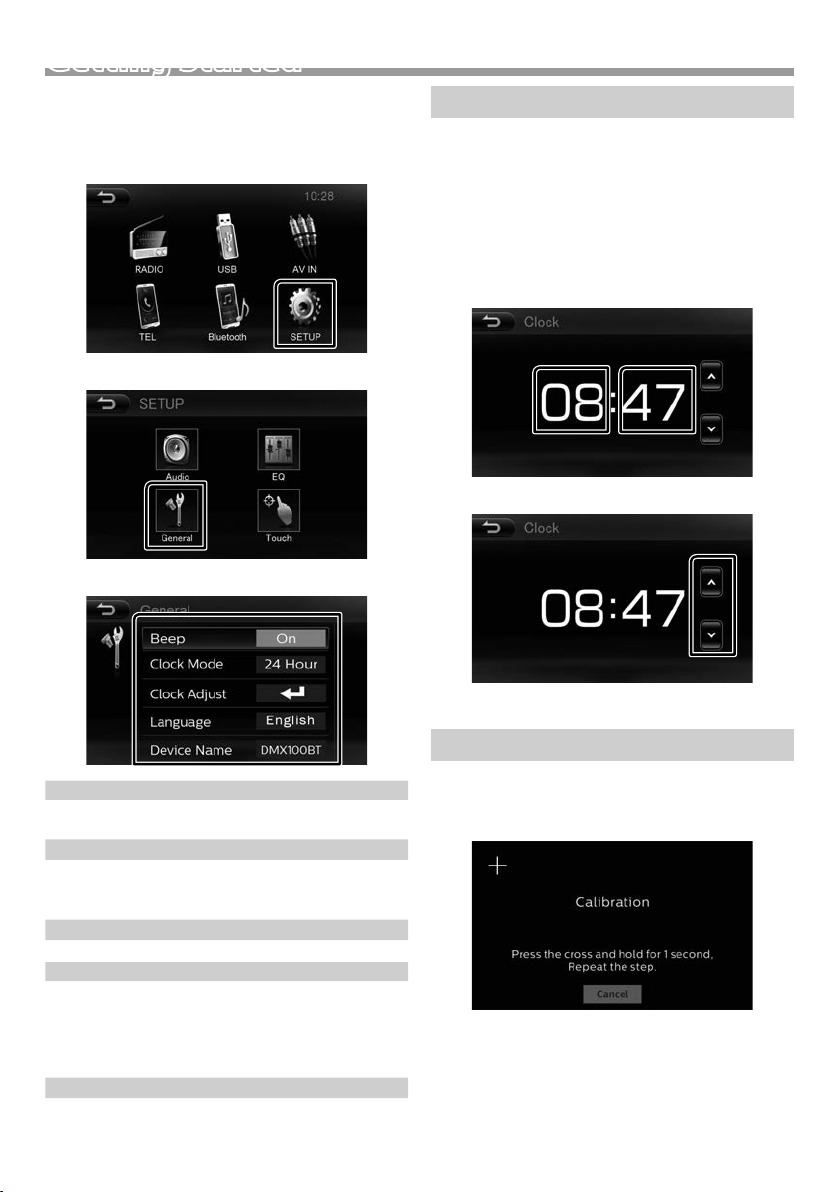
2 Press the <MENU> button.
3 Touch [SETUP].
4 Touch [General].
5 Touch the corresponding key and set the value.
Clock settings
Ñ Synchronizing the clock time with FM RDS
Activate [RDS Clock Sync]. See “Tuner Setup”
(P. 11).
Ñ Adjusting the clock manually
1 Touch [Clock Adjust] on the General screen.
Clock screen appears.
2 Select the hour or minute.
3 Set the clock time.
Beep
Activates or deactivates the key-touch tone.
“ON” (Default), “OFF”
Clock Mode
Selects time format.
“12 Hour” (Default : Latin America sales area only)
“24 Hour” (Default : Europe sales area only)
Clock Adjust
Adjust the clock time. See “Clock settings” (P. 3).
Language
Select the language used for the control screen and
setting items. Default is “English”.
1) Touch [Language].
2) Select the desired language.
3) Touch [ 6 ].
Device Name
Displays the Device Name.
6 Touch [6].
4 Touch [6].
Touch panel adjustment
1 Touch [Touch] on the SETUP screen.
2 Follow the instruction on the screen and touch
the center of each +.
• To cancel the touch panel adjustment, touch
[Cancel].
English |
3
Page 4
BasicsBasics
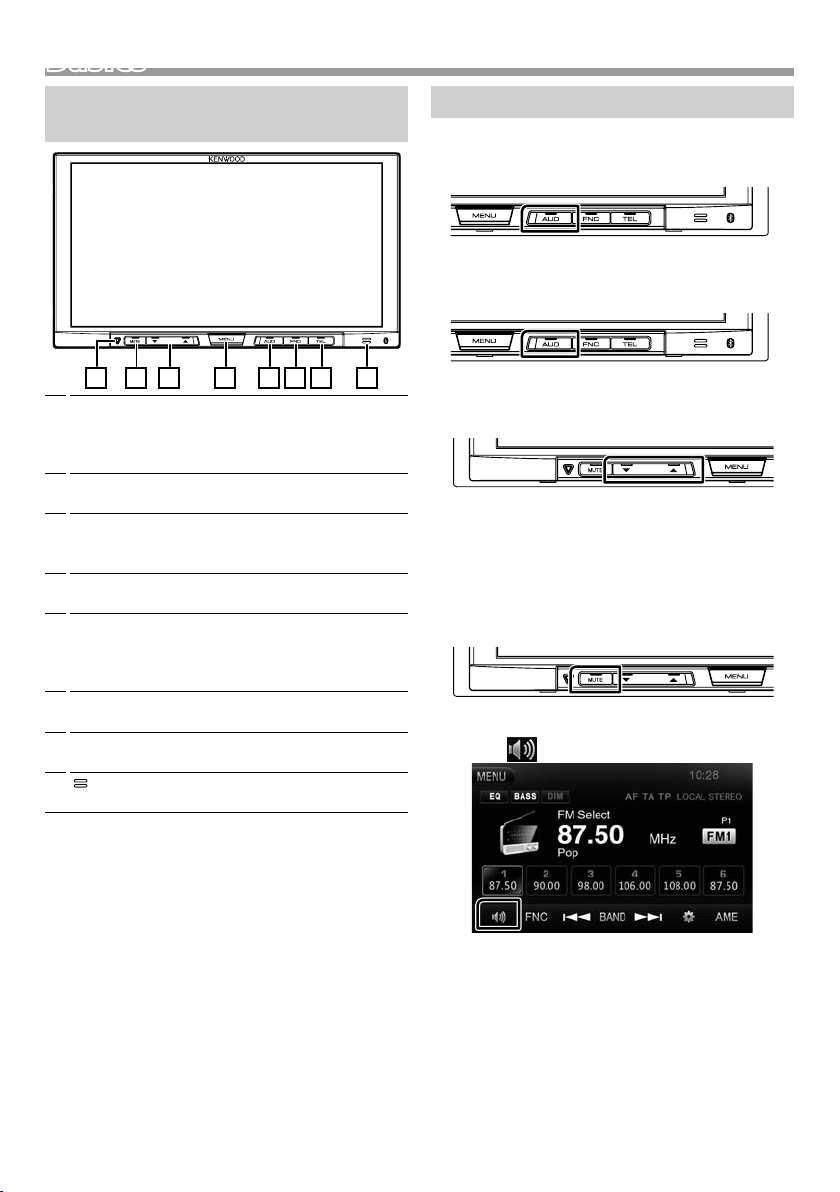
Functions of the Buttons on the Front Panel
1 2 3 4 5 6 7 8
s (Reset)
1
• If the unit or the connected unit fails to operate
properly, the unit returns to factory settings when
this button is pressed.
MUTE
2
• Mutes the sound.
R , S (Volume)
3
• Adjusts volume. The volume will go up until 15
when you keep pressing [ R ].
MENU
4
• Displays the TOP MENU screen. (P. 5)
AUD
5
• Displays the Equalizer screen. (P.15)
• Pressing for 1 second turns the power off.
• When the power off, turns the power on.
FNC
6
• Displays the Function screen of current source.
TEL
7
• Displays the Hands Free screen. (P.13).
(Remote Sensor)
8
• Receives the remote control signal.
Common operations
Ñ Turning on the power
1 Press the <AUD> button.
Ñ Turning o the power
1 Press and hold the <AUD> button.
Ñ Adjusting the volume
1 Press the <S> or <R> button.
✎ NOTE
• The volume will go up until 15 when you keep
pressing [ R ].
Ñ Mutes the sound
On the monitor panel:
1 Press the <MUTE> button.
On the source control screen:
1 Touch [ ].
To restore the sound, touch the button again, or
adjust the volume.
4
Page 5
Basics
1
25364
7
2
3
4
5
1
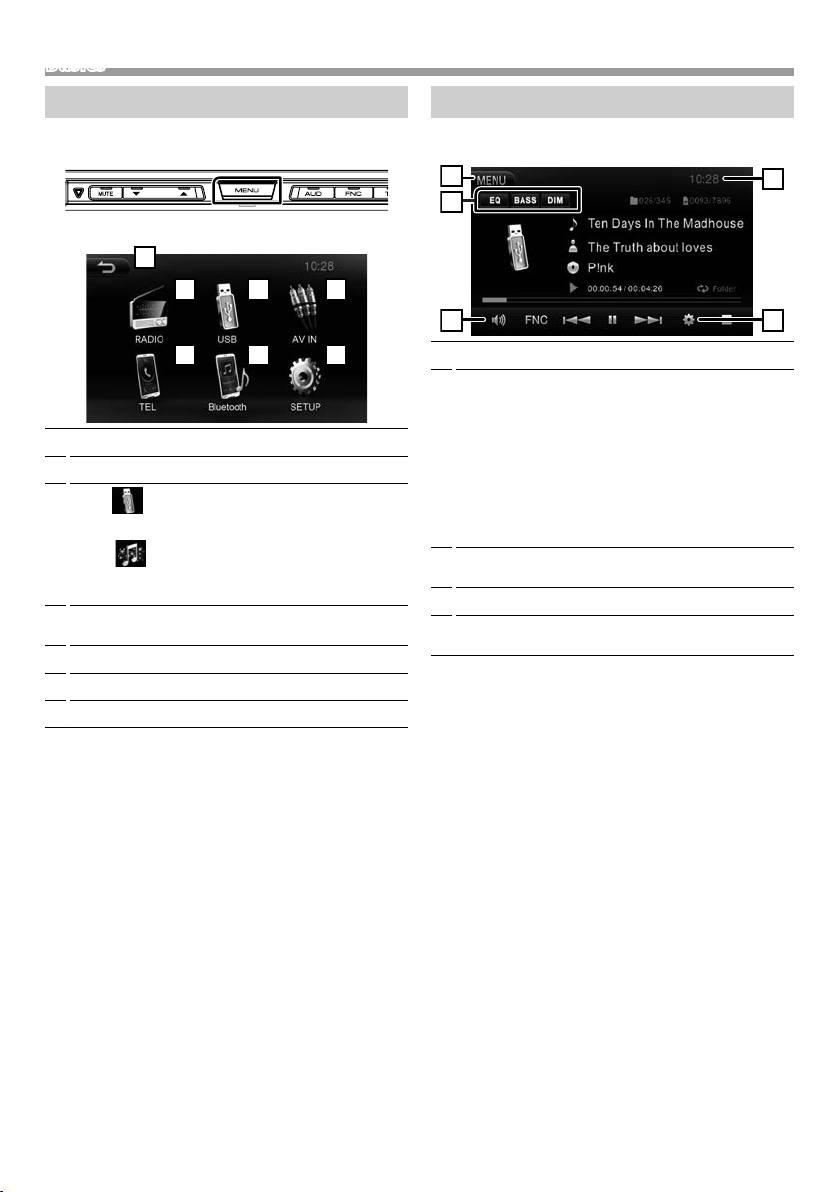
TOP MENU screen descriptions
1 Press the <MENU> button.
TOP MENU screen appears.
Returns to previous screen.
1
Switches to the radio broadcast. (P.10)
2
3
[USB]
Plays files on a USB device. (P.6)
[iPod]
Plays an iPod/iPhone. (P.8)
• When iPod/iPhone is connected.
Switches to an external component connected to
4
the AV-IN input terminal. (P.11)
Displays the Hands Free screen. (P.13)
5
Plays a Bluetooth audio player. (P.14)
6
Displays the SETUP screen. (P. 3)
7
Source control screen descriptions
You can perform source playback operations on the
source control screen.
Displays the TOP MENU screen.
1
[EQ]
2
Displays the Equalizer screen. (P.15)
[BASS]
Sets the amount of bass boost among “OFF” (gray)/
“ON” (white).
[DIM]
Select dimmer mode.
OFF: The display do not dim.
ON: The display dim.
Mutes the sound.
3
Touch the button again, or adjust the volume.
Displays the SETUP screen. (P. 3)
4
Clock display
5
Touch to displays the Clock screen.
English |
5
Page 6
USBUSB
4
1
6
3
2
5
4
3
2
2
1
Preparation
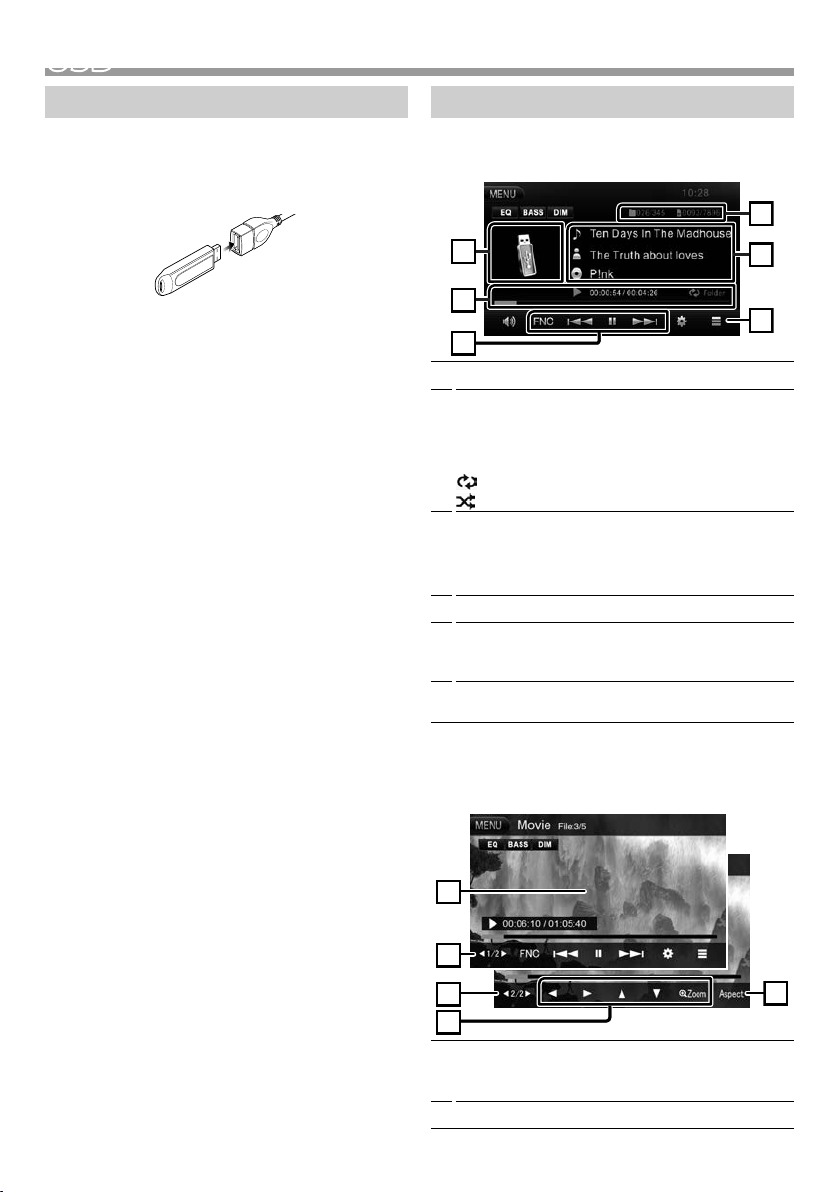
Ñ Connecting a USB device
1 Remove the cap of the USB terminal.
2 Connect the USB device with the USB cable.
The unit reads the device and playback starts.
Ñ To disconnect the USB device:
1 Press the <MENU> button.
2 Touch a source other than [USB].
3 Detach the USB device.
Ñ Usable USB device
This unit can play MPEG1/ MPEG2/ MPEG4/ MP3/
WMA/ AAC/ JPEG les stored in a USB mass storage
class device. (P. 22)
• File system: FAT16/ FAT32
• This unit can recognize a total of 9 999 files and 999
folders (a maximum of 9 999 files per folder).
• The maximum number of characters:
– Folder names : 50 characters
– File names : 50 characters
– Tag : 30 characters
✎ NOTE
• When the USB device is connected to this unit, it can
be charged through the USB cable.
• Install the USB device in the place where it will not
affect safe driving.
• You cannot connect a USB device via a USB hub and
Multi Card Reader.
• Take backups of the audio files used with this unit.
The files can be erased depending on the operating
conditions of the USB device.
We shall have no compensation for any damage
arising from any erased data.
• No USB device comes with this unit. You need to
purchase a commercially available USB device.
• Cap the USB terminal whenever not using.
Playback operations
Ñ Control the music you are listening to on
the source control screen.
The jacket of the currently playing file is displayed.
1
D, etc. : Playback status
2
##:##:## : Playing time/ Total playing time
Play time bar : Touch to change the playing
position.
: Repeat playback mode indicator
: Random playback mode indicator
D H : Plays or pauses.
3
[E] [F] : Searches the previous/next content.
Touch and hold to fast forward or fast backward.
[FNC] : Displays the Function screen. ( P.7)
Searches file. (P.7)
4
Displays the information of the current file.
5
Only a file name and a folder name are displayed if
there is no tag information.
Current playback item information (folder no./file
6
no.).
Ñ For Video playback
1 When the operation buttons are not displayed on
the screen, touch the display.
The operation buttons disappear when 1 is
1
touched or when no operation is done for about 5
seconds.
To switch the operation buttons.
2
6
Page 7
USB
[Zoom] : Select the zoom ratio.
3
“Off”, “x2”, “x3”, “x4”, “1/2”, “1/3”, “1/4”
[R] [S] [T] [U] : Scrolls the screen.
Select the screen mode. 16:9 ratio, 4:3 ratio
4
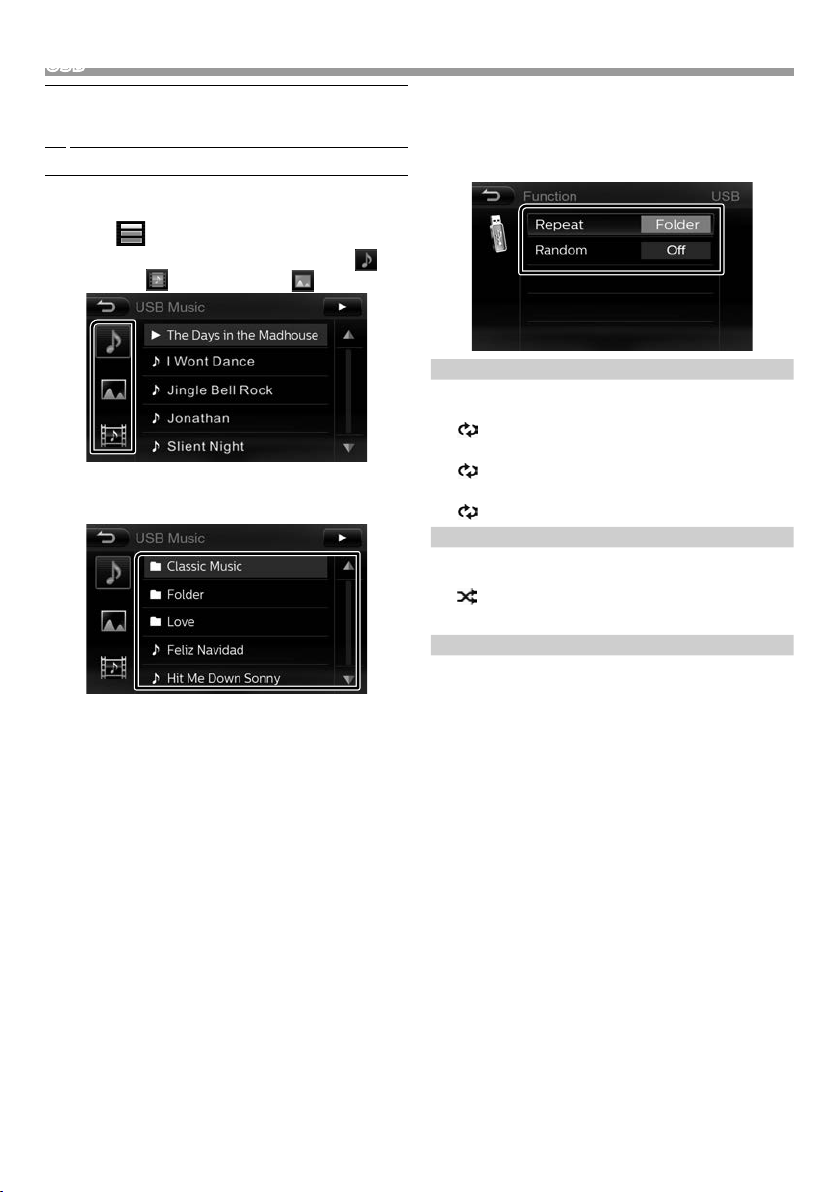
Ñ Selecting a track in a list
1 Touch [ ].
2 Select whether you search by audio files [ ],
video files [ ] or picture files [ ].
3 Touch [6] to moves to the upper hierarchy.
4 Touch the desired folder.
When you touch a folder its contents are displayed.
5 Touch desired item from the content list.
Playback starts.
• Touch [6] to moves to the upper hierarchy.
✎ NOTE
• The source control screen appears when you touch
[6] at the top hierarchy.
Ñ Function menu
1 Touch [ FNC].
Function screen appears.
2 Set each item as follows.
1
Repeat *
Selects Repeat playback mode.
All (Default): Repeats all files in the USB device.
(
All indicator lights up.)
One: Repeats the current file.
(
One indicator lights up.)
Folder: Repeats all files in the current folder.
(
Folder indicator lights up.)
Random (Audio le only) *
Selects Random playback mode.
On: Randomly plays all files.
(
All indicator lights up.)
O (Default): Normal playback.
Video Setting (Video/ picture le only)
You can adjust image quality in video screen.
[Brightness]: Adjusts the brightness. (00 to 08)
[Contrast]: Adjusts the contrast. (00 to 08)
[Color]: Adjusts the color. (00 to 08)
[Reset]: To clear the adjustment.
*1 You cannot activate repeat mode and random mode
at the same time.
1
3 Touch [6].
English |
7
Page 8
iPod/iPhoneiPod/iPhone
4
1
6
3
2
5
Preparation
Ñ Connecting iPod/iPhone
• For Lightning connector models: Use USB Audio
cable for iPod/iPhone—KCA-iP103 (optional
accessory).
• For details about connecting iPod/iPhone, see page
21 .
1 Remove the cap of the USB terminal.
2 Connect the iPod/iPhone.
The unit reads the device and playback starts.
Ñ To disconnect the iPod/iPhone
1 Press the <MENU> button.
2 Touch a source other than [iPod].
3 Detach the iPod/iPhone.
Ñ Connectable iPod/iPhone
The following models can be connected to this unit.
Made for
• iPhone 6s Plus
• iPhone 6s
• iPhone 6 Plus
• iPhone 6
• iPhone 5s
• iPhone 5c
• iPhone 5
• iPod touch (6th generation)
• iPod touch (5th generation)
✎ NOTE
• If you start playback after connecting the iPod, the
music that has been played by the iPod is played first.
In this case, “Reading” is displayed without displaying
a folder name, etc. Changing the browse item will
display a correct title, etc.
• Cap the USB terminal whenever not using.
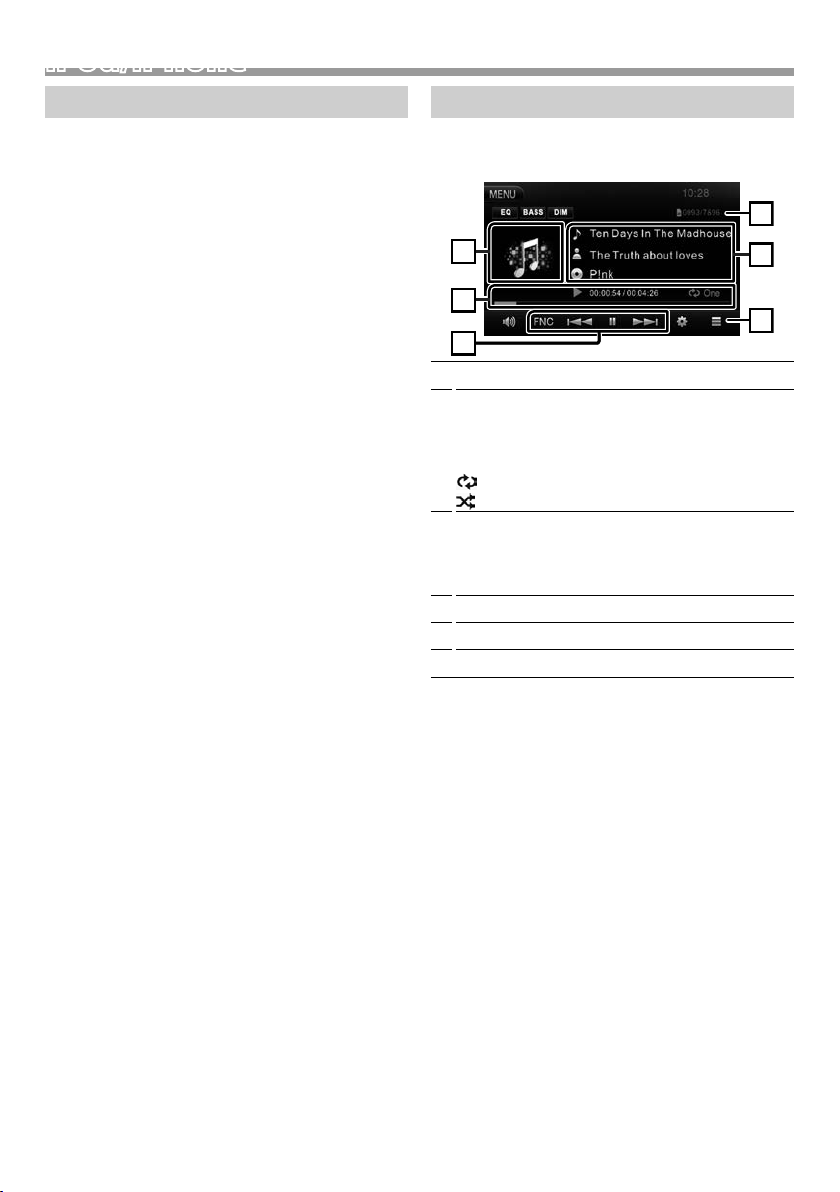
Playback operations
Ñ Control the music you are listening to on
the source control screen.
Artwork (Shown if the track contains artwork)
1
D, etc. : Playback status
2
##:##:## : Playing time/ Total playing time
Play time bar : For confirmation of current playing
position
: Repeat playback mode indicator
: Random playback mode indicator
D H : Plays or pauses.
3
[E] [F] : Searches the previous/next content.
Touch and hold to fast forward or fast backward.
[FNC] : Displays the Function screen. ( P.9)
Searches content. (P.9)
4
Displays the information of the current file.
5
Current playback item information.
6
8
Page 9
iPod/iPhone
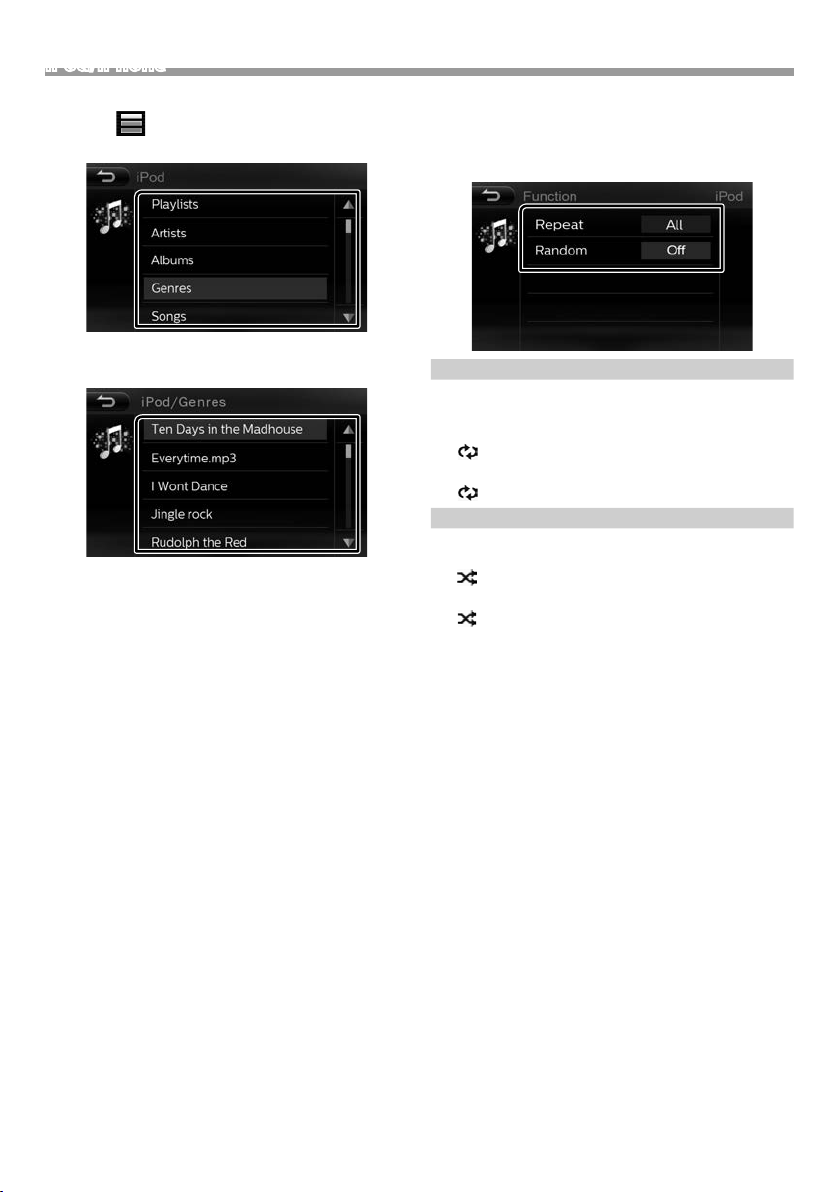
Ñ Selecting a content in a list
1 Touch [ ].
2 Touch the desired category.
Ñ Function menu
1 Touch [ FNC].
Function screen appears.
2 Set each item as follows.
The list is sorted by selected category.
3 Touch desired item.
Playback starts.
• Touch [6] to moves to the upper hierarchy.
✎ NOTE
• The source control screen appears when you touch
[6] at the top hierarchy.
1
Repeat *
Selects Repeat playback mode.
O: Repeat off
One: Functions the same as Repeat One.
(
One indicator lights up.)
All (Default): Functions the same as Repeat All.
(
All indicator lights up.)
Random *
Selects random playback mode.
Songs: Functions the same as Shuffle Songs.
Albums: Functions the same as Shuffle Albums.
O (Default): Random off
*1 You cannot activate repeat mode and random mode
at the same time.
1
(
Songs indicator lights up.)
(
Albums indicator lights up.)
3 Touch [6].
English |
9
Page 10
Radio
4
1
3
2
5
Radio
Radio Basic Operation
1 Press the <MENU> button.
2 Touch [Radio].
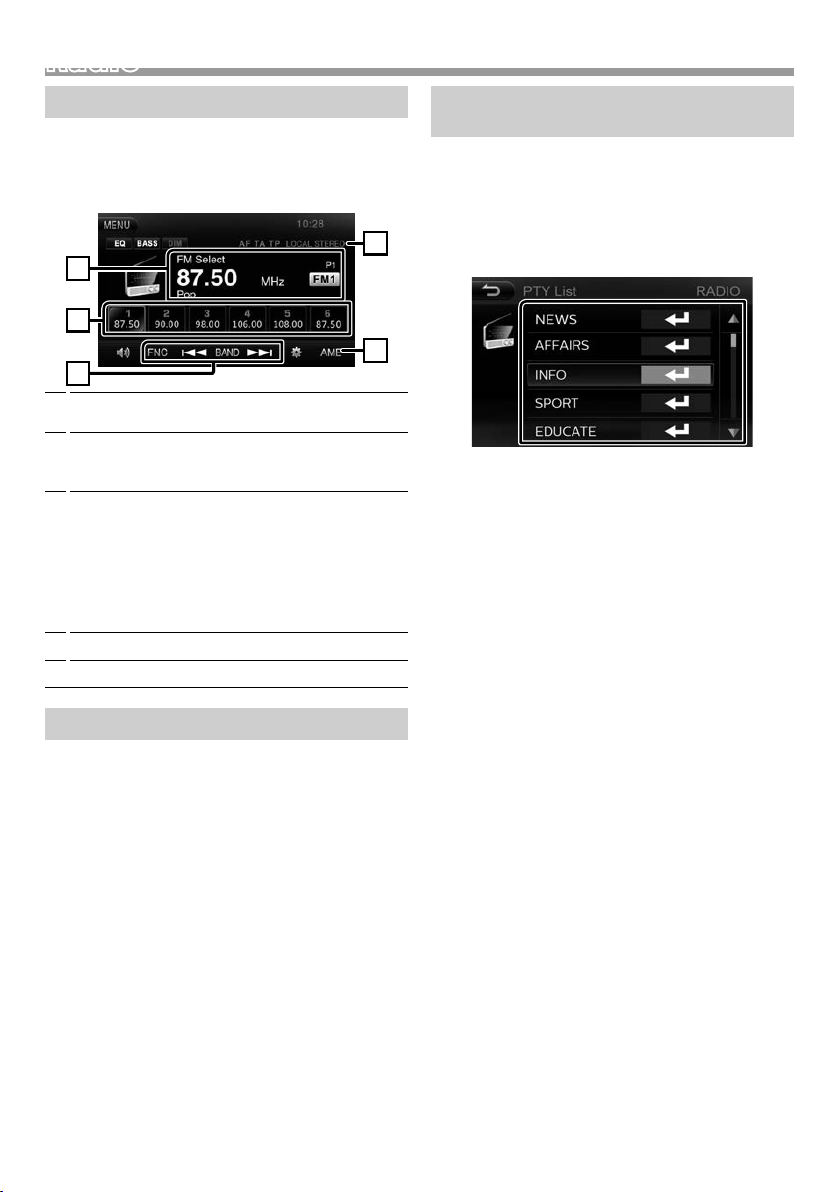
Ñ Source control screen
Displays the information of the current station:
1
PS name, Frequency, PTY Genre, Preset number
Recalls the memorized station.
2
When touched for 2 seconds, stores the current
receiving station in memory.
[BAND] : Switches the band.
3
“FM1”, “FM2 ”, “FM3”, “AM1”, “AM2”
[E] [F] : Tunes in a station with good
reception automatically. “Auto Seek” appears.
Touch and hold to the next frequency manually.
“Manual Seek” appears.
[FNC] : Displays the Function screen.
Presets stations automatically
4
Indicator Items
5
FM RDS features
(Europe sales area only)
Ñ Search by program type
1 Touch [ FNC].
Function screen appears.
2 Touch [PTY List].
3 Select a program type from the list.
PTY Search starts.
Ñ Trac Information
1 Touch [ FNC].
Function screen appears.
2 Touch [ TA].
Traffic information mode is set.
3 Touch [6].
When the trac bulletin starts
The Traffic Information screen appears automatically.
Presetting stations
Ñ Auto memory
You can store stations with good reception in
memory automatically.
1 Touch [BAND] to select the band.
2 Touch [AM E].
Auto memory starts. “Auto Store” appears.
Ñ Manual memory
You can store the current receiving station or service
in memory.
1 Tune in to a station you want to preset.
2 Touch and hold [#] (#:1-6) in which you want to
store the station.
Ñ Recalling the preset station
1 Touch [#] (#:1-6).
10
Page 11
Radio
1
External Components
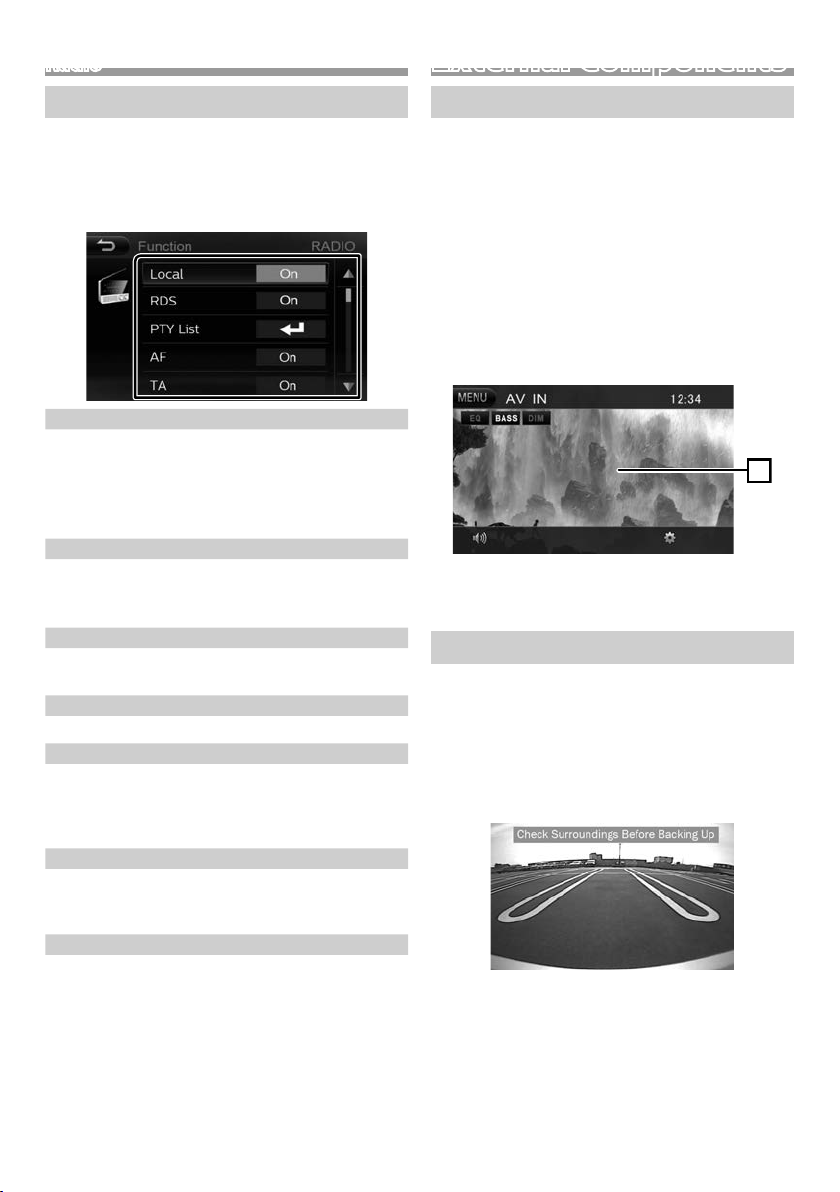
Tuner Setup
Ñ Function menu
1 Touch [ FNC].
Function screen appears.
2 Set each item as follows.
3
Area *
N.America (Default): For North/Central/South
America, AM/FM intervals: 10 kHz/200 kHz.
S.America: For some South American countries, AM/
FM intervals: 10 kHz/50 kHz.
Europe: For Europe, AM/FM intervals: 9 kHz/50 kHz.
Local
ON: Tunes in only to the stations with sufficient signal
strength. (LOCAL indicator lights up.)
OFF (Default): Deactivates the function.
2
RDS *
Turns the RDS function on or off.
“ON” (Default), “OFF”
PTY List *
Select the available Program Type.
AF *
When station reception is poor, automatically switches
to the station that is broadcasting the same program
over the same Radio Data System network.
“ON” (Default), “OFF”
TA *
Switches to the traffic information automatically when
the traffic bulletin starts.
“ON”, “OFF” (Default)
RDS Clock Sync *
Synchronizing the Radio Data System station time
data and this unit’s clock. (CT indicator lights up.)
“ON” (Default), “OFF”
*1 Selectable only when “RDS” is set to “ON”.
*2 Europe sales area only
*3 Latin America sales area only
1 *2
1 *2
1 *2
1
3 Touch [6].
Using external audio/video players
Ñ Starting playback
1 Connect an external component to the AV-IN
input terminal. (P.20)
2 Press the <MENU> button.
3 Touch [AV- IN].
4 Turn on the connected component and start
playing the source.
Ñ For Video playback
1 When the operation buttons are not displayed on
the screen, touch the display.
The operation buttons disappear when 1 is
touched or when no operation is done for about 5
seconds.
Rear view camera
To use a rear view camera, the REVERSE lead
connection is required. For connecting a rear view
camera. (P.20)
Ñ Displaying the picture from the rear view
camera
The rear view screen is displayed when you shift the
gear to the reverse (R) position.
• To erase the caution message, touch the screen.
English |
11
Page 12

Bluetooth smartphoneBluetooth smartphone
Ñ About the Bluetooth smartphone and
Bluetooth audio player
This unit conforms to the following Bluetooth
specications:
Version
Bluetooth Ver.3.0
Prole
Smartphone/ Cell-phone:
HFP (V1.6) (Hands Free Profile)
PBAP (V1.1.1) (Phonebook Access Profile)
Audio player:
A2DP (V1.3) (Advanced Audio Distribution Profile)
AVRCP (V1.5) (Audio/Video Remote Control Profile)
Sound codec
SBC
• appears when the Bluetooth audio player is
connected.
Ñ Disconnecting the device
• Turn off the Bluetooth function from your
smartphone/cell-phone.
• Turn off the ignition switch.
Receive a phone call
1 Touch [Ü].
Ñ About mobile phones compatible with
Phone book Access Prole (PBAP)
If your mobile phone supports PBAP, you can display
the following items on the touch panel screen when
the mobile phone is connected.
• Phone book (up to 1000 entries)
• Dialed calls, received calls, and missed calls (up to 50
entries in total)
Register your smartphone to the unit
You can use your Bluetooth smartphone when paired
to this unit.
• You can pair the device and the unit using SSP (Secure
Simple Pairing) which only requires confirmation.
• Once a device and the unit are paired, the unit is
registered on the device. When you next use the
device with the unit, you can connect the device and
the unit by selecting from the registered device list on
your device.
• One device can be connected at a time.
• When you register a new Bluetooth device, disconnect
the Bluetooth device currently connected and then
register the new device.
1 Turn on the Bluetooth function on your
smartphone/cell-phone.
2 Search the unit (“DMX100BT”) from your
smartphone/cell-phone.
3 Confirm the request on the device
Pairing and connection are established. “Connect
OK” appears.
•
appears when the Bluetooth smartphone is
connected.
• [Ý] : Reject an incoming call.
Ñ Operations during a call
Ending a call
[Ý]
You can send tones by touching desired keys
on the screen.
Switches the speaking voice output between
cell-phone (light off ) and speaker (light on).
Adjust the receiver volume
Press the <S> or <R> button.
12
Page 13
Bluetooth smartphone
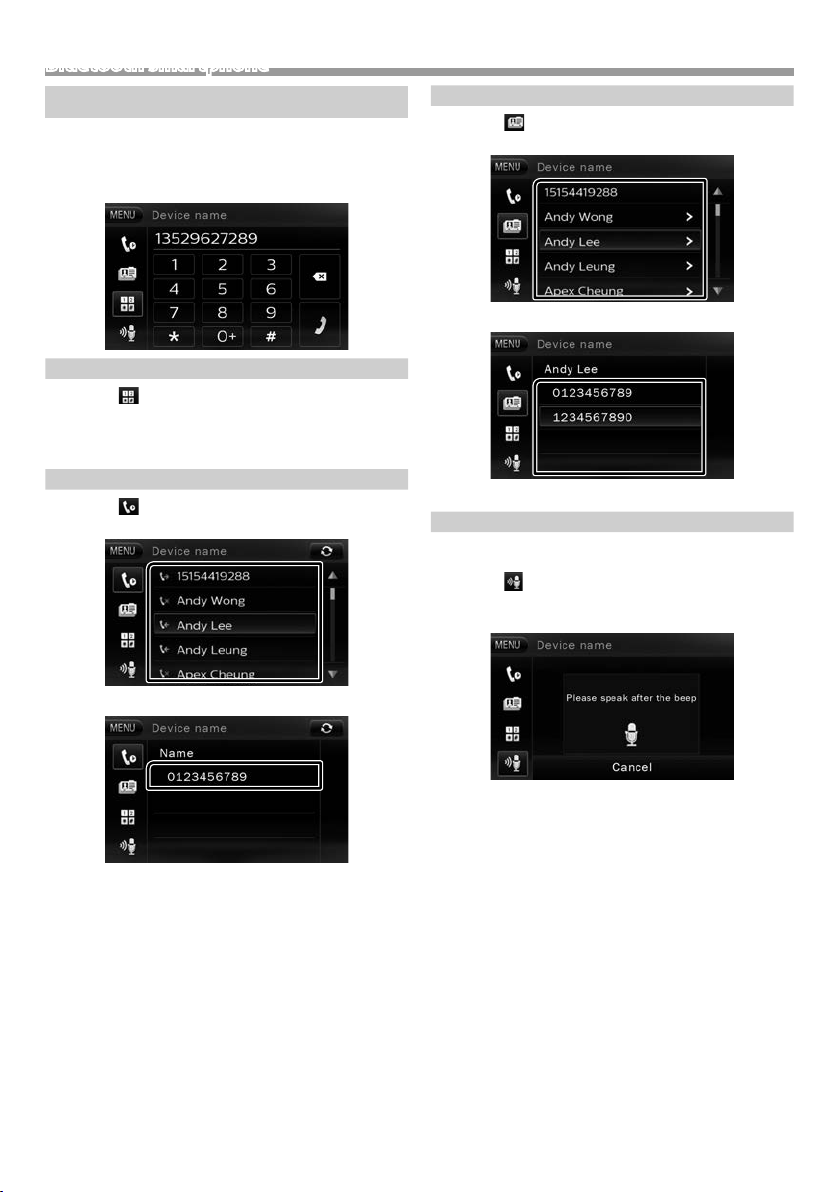
Make a phone call
1 Press the <MENU> button.
2 Touch [ TEL].
3 See the table below for each operation method.
Call by entering a phone number
1) Touch [
2) Enter a phone number with number keys.
3) Touch [Ü].
Make a call
Call using call records
1) Touch [
2) Select the phone number from the list.
].
].
Call using the phonebook
1) Touch [
2) Select the name from the list.
3) Select the number from the list.
Make a call
Call by voice
You can make a voice call using the voice recognition
function of the cell-phone.
1) Touch [
2) Touch [Start Voice control].
3) Pronounce the name registered in the cell-phone.
].
].
3) Touch the phone number.
Make a call
• Touch [Cancel] to cancel voice dialing.
English |
13
Page 14
Bluetooth smartphone
4
1
6
3
2
5
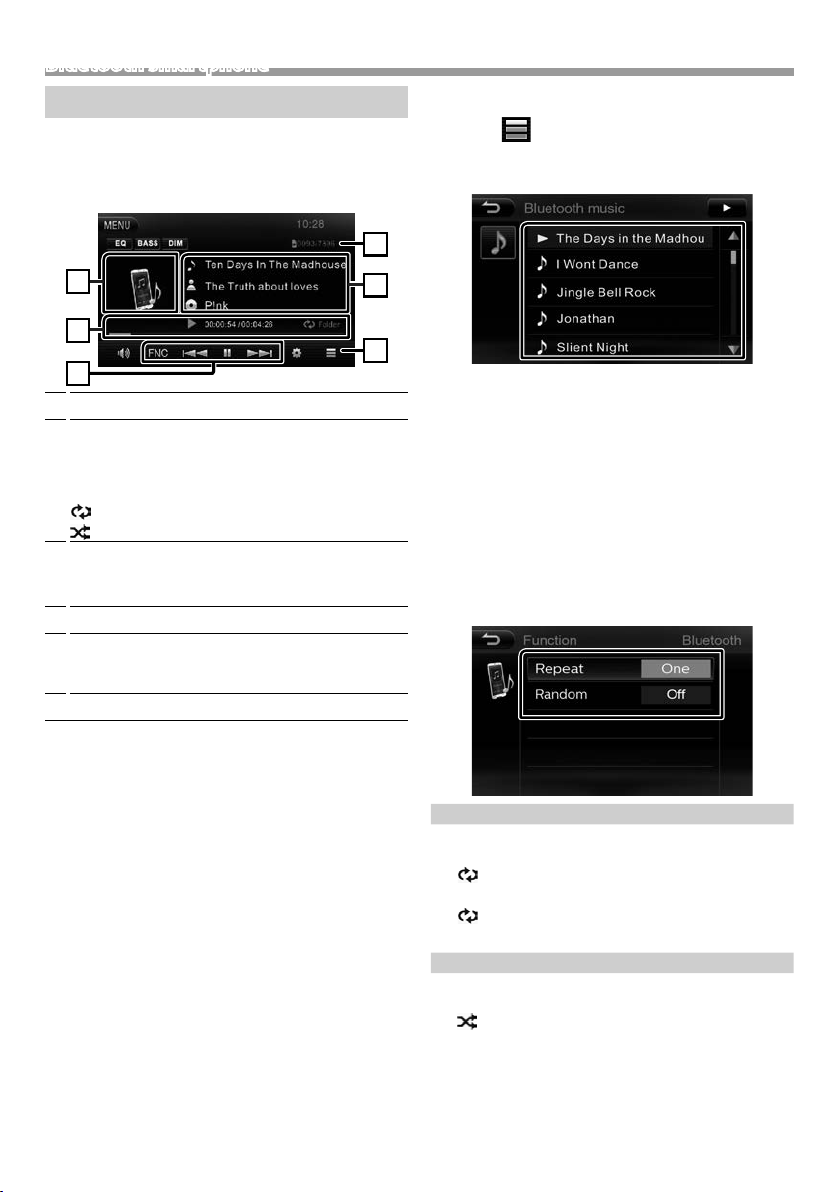
Playing Bluetooth Audio Device
1 Press the <MENU> button.
2 Touch [Bluetooth].
Ñ Source control screen
The jacket of the currently playing file is displayed.
1
D, etc. : Playback status
2
##:##:## : Playing time/ Total playing time
Play time bar : For confirmation of current playing
position
: Repeat playback mode indicator
: Random playback mode indicator
D H : Plays or pauses.
3
[E] [F] : Searches the previous/next content.
[FNC] : Displays the Function screen.
Searches file.
4
Displays the information of the current file.
5
Only a file name and a folder name are displayed if
there is no tag information.
Current playback item information (file no.).
6
Ñ Selecting a track in a list
1 Touch [ ].
2 Touch [6] to moves to the upper hierarchy.
3 Touch the desired folder.
When you touch a folder its contents are displayed.
4 Touch desired item from the content list.
Playback starts.
• Touch [6] to moves to the upper hierarchy.
✎ NOTE
• The source control screen appears when you touch
[6] at the top hierarchy.
Ñ Function menu
1 Touch [ FNC].
Function screen appears.
2 Set each item as follows.
✎ NOTE
• Operations and display indications may differ
according to their availability on the connected
device.
14
Repeat
Selects Repeat playback mode.
All (Default): Repeats all files in the device.
(
All indicator lights up.)
One: Repeats the current file.
(
One indicator lights up.)
O (Default): Normal playback.
Random
Selects random playback mode.
On: Randomly plays all files.
(
All indicator lights up.)
O (Default): Normal playback.
Page 15
1
3
2
Controlling Audio
Controlling General Audio
1 Press the <MENU> button.
2 Touch [SETUP].
3 Touch [Audio].
4 Touch [Speaker].
5 Set each item as follows.
[C] [D]
[R] [S]
[RESET]
Adjust the left and right volume balance. (L12
to R12)
Adjust the front and rear volume balance.
(F12 to R12)
To clear the adjustment.
Ñ Bass boost
1 Displays the any source control screen.
2 Touch [BASS].
Sets the amount of bass boost among “OFF” (gray)/
“ON” (white).
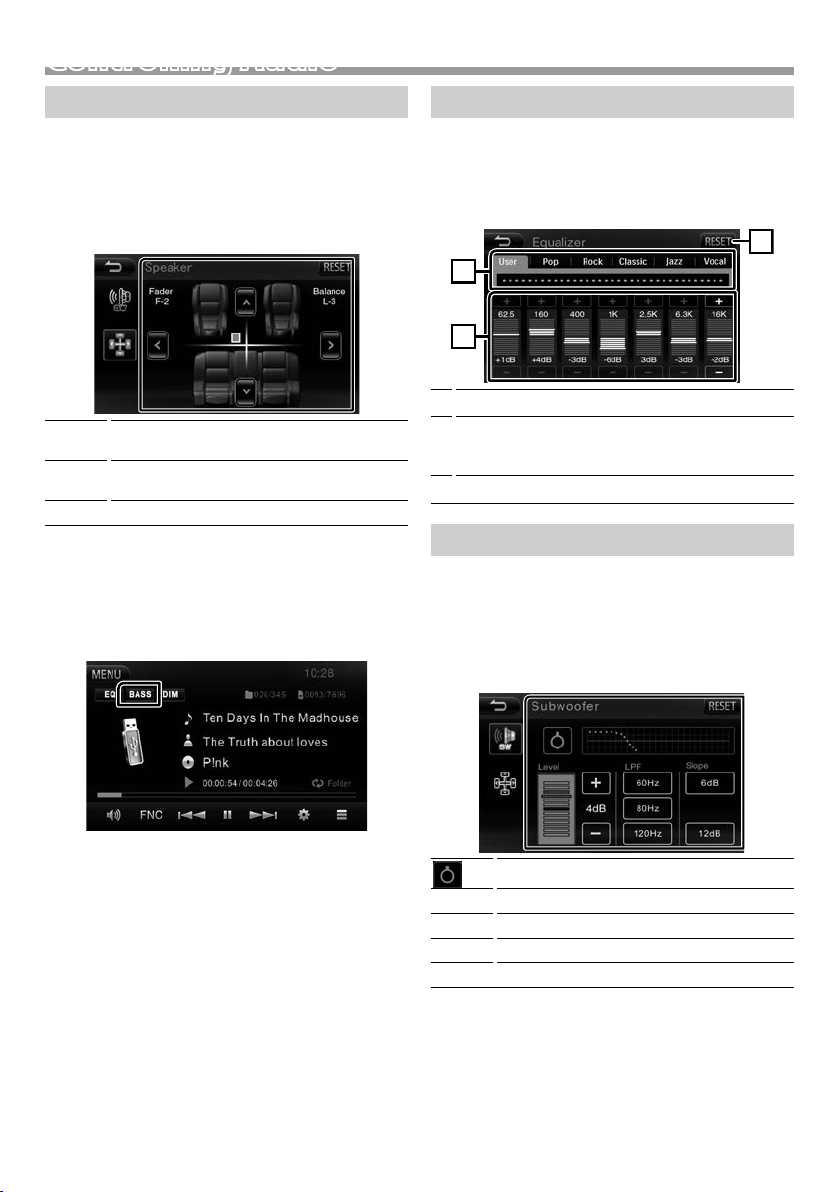
Equalizer Control
1 Press the <MENU> button.
2 Touch [SETUP].
3 Touch [EQ].
4 Set each item as follows.
To recall the preset equalizer curve.
1
You can select frequency bar and adjust its level by
2
[+], [–]. (-9 to +9)
• The adjustments are stored and “User” is activated.
The current EQ curve returns to flat.
3
Subwoofer settings
1 Press the <MENU> button.
2 Touch [SETUP].
3 Touch [Audio].
4 Touch [Subwoofer].
5 Set each item as follows.
Activates of deactivate the subwoofer.
Level
LPF
Slope
[RESET]
Adjusts the subwoofer level. (-6 to +6)
Low Pass Filter adjustment.
Sets a crossover slope.
To clear the adjustment.
English |
15
Page 16

Remote control
This unit can be operated using the remote control.
For Latin America sales area, the remote control is
supplied with the unit.
For Europe sales area, the remote control KNARCDV331 (optional accessory) can be used. Turn its
operation mode switch to “DVD” before use.
! WARNING
• Do not ingest the battery, Chemical Burn Hazard
The remote control supplied with this product
contains a coin / button cell battery. If the coin/button
cell battery is swallowed, it can cause severe internal
burns in just 2 hours and can lead to death.
Keep new and used batteries away from children.
If the battery compartment does not close securely,
stop using the product and keep it away from
children.
If you think batteries might have been swallowed or
placed inside any part of the body, seek immediate
medical attention.
! CAUTION
• Put the remote control in a place where it will
not move during braking or other operations. A
dangerous situation could result, if the remote control
falls down and gets wedged under the pedals while
driving.
• Do not leave the battery near fire or under direct
sunlight. A fire, explosion or excessive heat generation
may result.
• Do not recharge, short, break up or heat the battery
or place it in an open fire. Such actions may cause the
battery to leak fluid. If spilled fluid comes in contact
with your eyes or on clothing, immediately rinse with
water and consult a physician.
How to install the battery
Ñ Common operations
8
SOURCE
VOLUME
+/−
AUDIO
BASS
DISP
MENU
R/ S/ T/
U
ENTER
6
Turns the power on/off.
Selects a source.
Adjusts the volume level.
Displays the Equalizer screen. (P.15)
Activates/deactivate Bass Sound.
Mutes/restores the sound.
Displays on-screen information.
Displays the top menu screen. (P.5)
Displays the item list for the selected
source.
Confirms the selection.
Exits from the menu.
Ñ USB/ iPod/iPhone
E/F
L
LIST
FNC
• Selects a file. (Press)
• Reverse search/forward search. (Hold)
Starts/pauses playback.
Displays the item list for the selected
source.
Displays the function menu for the source.
• If the effectiveness of the remote control decreases,
replace the batteries.
Functions of the Remote control Buttons
• Aim the remote control directly at the remote sensor
on the faceplate.
• DO NOT expose the remote sensor to bright light
(direct sunlight or artificial lighting).
16
Ñ Radio
BAND
E/F
FNC
1 − 6
Selects the band.
• Searches for radio stations automatically.
(Press)
• Searches for radio stations manually.
(Hold)
Displays the function menu for the source.
Specifies preset number.
Page 17

InstallationInstallation
Before Installation
Before installation of this unit, please note the
following precautions.
#WARNINGS
• If you connect the ignition wire (red) and the battery
wire (yellow) to the car chassis (ground), you may
cause a short circuit, that in turn may start a fire.
Always connect those wires to the power source
running through the fuse box.
• Do not cut out the fuse from the ignition wire (red)
and the battery wire (yellow). The power supply must
be connected to the wires via the fuse.
#CAUTION
• Install this unit in the console of your vehicle.
Do not touch the metal part of this unit during and
shortly after the use of the unit. Metal part such as the
heat sink and enclosure become hot.
✎ NOTE
• Mounting and wiring this product requires skills and
experience. For best safety, leave the mounting and
wiring work to professionals.
• Make sure to ground the unit to a negative 12V DC
power supply.
• Do not install the unit in a spot exposed to direct
sunlight or excessive heat or humidity. Also avoid
places with too much dust or the possibility of water
splashing.
• Do not use your own screws. Use only the screws
provided. If you use the wrong screws, you could
damage the unit.
• If the power is not turned ON (“There is an error in
the speaker wiring. Please check the connections.” is
displayed), the speaker wire may have a short-circuit or
touched the chassis of the vehicle and the protection
function may have been activated. Therefore, the
speaker wire should be checked.
• If your car’s ignition does not have an ACC position,
connect the ignition wires to a power source that
can be turned on and off with the ignition key. If you
connect the ignition wire to a power source with a
constant voltage supply, such as with battery wires,
the battery may be drained.
• If the console has a lid, make sure to install the unit so
that the front panel will not hit the lid when closing
and opening.
• If the fuse blows, first make sure the wires aren’t
touching to cause a short circuit, then replace the old
fuse with one with the same rating.
• Insulate unconnected wires with vinyl tape or other
similar material. To prevent a short circuit, do not
remove the caps on the ends of the unconnected
wires or the terminals.
• Connect the speaker wires correctly to the terminals
to which they correspond. The unit may be damaged
or fail to work if you share the ¤ wires or ground
them to any metal part in the car.
• When only two speakers are being connected to
the system, connect the connectors either to both
the front output terminals or to both the rear output
terminals (do not mix front and rear). For example,
if you connect the ¢ connector of the left speaker
to a front output terminal, do not connect the ¤
connector to a rear output terminal.
• After the unit is installed, check whether the brake
lamps, blinkers, wipers, etc. on the car are working
properly.
• Mount the unit so that the mounting angle is 30° or
less.
• Do not press hard on the panel surface when installing
the unit to the vehicle. Otherwise scars, damage, or
failure may result.
• Reception may drop if there are metal objects near
the Bluetooth antenna.
Bluetooth antenna unit
Ñ Supplied accessories for installation
x1
x1
x6
2
4
6
8
[1]
[1]
(3 m)
(M5 × 7 mm)
x2
x1
x6
English |
1
x1
3
[1]
5
[1]
7
(M5 × 6 mm)
[1]
Latin America sales area only
x1
17
Page 18

Installation
Ñ Installation procedure
1) To prevent a short circuit, remove the key from
the ignition and disconnect the ¤ terminal of the
battery.
2) Make the proper input and output wire connections
for each unit.
3) Connect the wire on the wiring harness.
4) Take Connector B on the wiring harness and connect
it to the speaker connector in your vehicle.
5) Take Connector A on the wiring harness and connect
it to the external power connector on your vehicle.
6) Connect the wiring harness connector to the unit.
7) Install the unit in your car.
8) Reconnect the ¤ terminal of the battery.
9) Press the reset button.
Installing the unit
Ñ Non-Japanese cars
Ñ Trim pla te
1) Attach accessory 1 to the unit.
1
Ñ Microphone unit
1) Check the installation position of the microphone
(accessory 4).
2) Clean the installation surface.
3) Remove the separator of the microphone (accessory
4), and stick the microphone to the place shown
below.
4) Wire the microphone cable up to the unit with it
secured at several positions using tape or other
desired method.
5) Adjust the direction of the microphone (accessory 4)
to the driver.
Bend the tabs of the
mounting sleeve with
a screwdriver or similar
utensil and attach it in
place.
✎ NOTE
• Make sure that the unit is installed securely in place. If
the unit is unstable, it may malfunction (eg, the sound
may skip).
Ñ Japanese cars (Latin America sales area
only)
7 or 8
18
Car Bracket
7 or 8
4
Fix a cable with a commercial item of tape.
✎ NOTE
• Swap the clips if necessary.
Page 19

Installation
Ñ Removing the trim plate
1) Use the extraction key (accessory 3) to lever out the
four tabs (two on the upper part, two on the lower
part).
3
2) Pull the trim plate forward.
Ñ Removing the unit
1) Remove the trim plate by referring to step 1 in
“Removing the trim plate”.
2) Insert the two extraction key (accessory 2) deeply
into the slots on each side, as shown. (The protrusion
at the tip of the extraction key must face toward the
unit.)
2
3) Pull out the unit halfway.
✎ NOTE
• Be careful to avoid injury from the catch pins on the
extraction key.
4) Pull the unit all the way out with your hands, being
careful not to drop it.
English |
19
Page 20

Installation
Ñ Connecting wires to terminals
USB device
[2]
Accessory 4:
Bluetooth Microphone
Subwoofer Preout
USB terminal
Cap
Cap
[1]
(0.8 m)
5V=1A
MIC
SUB
WOOFER
Light Green
(Parking sensor wire)
(Extension cable)
For best safety, be
BRAKE
PARKING
sure to connect the
parking sensor.
Purple/White
(Reverse sensor wire)
Connect to vehicle’s reverse lamp harness
when using the optional rear view camera.
REVERSE
GEAR
SIGNAL
Light Blue/Yellow
(Steering remote control wire)
To steering remote
To use the steering wheel remote control
STEERING
WHEEL
REMOTE
CONTROL
feature, you need an exclusive remote
adapter (not supplied) matched to your car.
Connect to the
vehicle’s parking
brake detection
switch harness.
Connector B
Connector A
1 3 5 7
2 4 6 8
1 3 5 7
2 4 6 8
Fuse (15A)
ISO Connector
Ñ Wiring harness connector function guide
Pin Color and function
A-4 Yellow Battery
A-5 Blue/White Power Control
A-7 Red Ignition (ACC)
A-8 Black Earth (Ground) Connection
B-1/ B-2 Purple (+) / Purple/Black (–) Rear Right
B-3/ B-4 Gray (+) / Gray/Black (–) Front Right
B-5/ B-6 White (+) / White/Black (–) Front Left
B-7/
B-8 Green (+) / Green/Black (–) Rear Left
• Speaker Impedance: 4-8 Ω
! CAUTION
Before you connect the commercially available ISO
connectors to the unit, check the following condition:
• Make sure that the pin assignment of the connector
matches with the KENWOOD unit.
• Take extra notice of the power wire.
• In case battery wire and ignition wire are not
corresponding then change them accordingly.
• In case the car does not have an ignition wire, use a
commercially available interface.
20
FM/AM antenna input
FM/AM antenna
AV-IN audio input
(Left; White, Right; Red)
Rear Audio Preout
(Left; White, Right; Red)
Front Audio Preout
(Left; White, Right; Red)
Visual Output (Yellow)
Rear view camera input (Yellow)
AV-IN visual input (Yellow)
[1]
USB maximum power supply current : DC 5 V = 1 A
[2]
Sold separately
Page 21

Installation
Latin America sales area only
1 3 5 7
2 4 6 8
1 3 5 7
2 4 6 8
Speaker impedance: 4-8 Ω
White
White/Black
Gray
Gray/Black
Green
Green/Black
Purple
Purple/Black
Blue/White
(Power control/ Antenna control wire)
Connect either to the power control
P.CONT
ANT.CONT
terminal when using the optional
power amplifier, or to the power
terminal for the booster amplifier of the
film-type or short pole type antenna.
(Max. 300mA, 12V)
*1 If no connections are made, do not
let the cable come out from the tab.
Accessory 5
Accessory 6
To front left speaker
To front right speaker
To rear left speaker
To rear right speaker
*
Ñ Connecting an iPod/iPhone
[1]
(0.8 m)
[2]
iPod/iPhone
Lightning connector
KCA-iP103 (0.8m)
[3]
USB terminal
5V=1A
Cap
[1]
iPod/iPhone maximum power supply current :
DC 5 V = 1 A
[2]
Sold separately
[3]
1
Optional accessory
Red (Ignition wire)
Yellow (Battery wire)
Black (Ground wire) ¤
(To car chassis)
Ignition key switch
ACC
B+
Car fuse box
Battery
English |
21
Page 22

About this Unit
About this Unit
More information
Ñ Playable Audio les
Audio
format
MP3 (.mp3) 16 – 320kbps,
WMA (.wma 16 – 320kbps 16 – 48 kHz
AAC-LC (.m4a) 16 – 320kbps 16 – 48 kHz
• This unit can show ID3 Tag Version 1.0/1.1/2.2/2.3/2.4
(for MP3).
• The maximum number of characters:
– Tag : 30 characters
Bit rate Sampling frequency
16 – 48 kHz
VBR
✎ NOTE
• WMA and AAC of which is covered with DRM cannot
be played.
• Although the audio files are complied with the
standards listed above, the play may be impossible
depending on the types or conditions of media or
device.
Ñ Acceptable Video les
Video
format
MPEG -1
(.mpg, .mpeg)
MPEG -2
(.mpg, .mpeg)
MPEG-4
(.mp4, .avi)
Ñ Acceptable Picture les
• JPEG (.jpg)
32 x 32 to 8 192 x 7 680 resolution
– It may take time to display the file.
– Progressive JPEG files or lossless JPEG files cannot
be played.
• BMP (.bmp)
32 x 32 to 8 192 x 7 680 resolution
– It may take time to display the file.
Video codec Audio codec
MPEG -1 MPEG Audio Layer 2
MPEG -2 MPEG Audio Layer 2
MPEG-4 MP3, AAC-LC (2ch)
Troubleshooting
What appears to be trouble is not always serious.
Check the following points before calling a service
center.
• For operations with the external components, refer
also to the instructions supplied with the adapters
used for the connections (as well as the instructions
supplied with the external components).
Ñ General
No sound comes out of the speakers.
• Adjust the volume to the optimum level.
• Check the cords and connections.
The unit does not work at all.
• Reset the unit. (P. 2)
The remote controller does not work.
• Replace the battery.
Ñ USB
“Reading” does not disappear from the screen.
• Turn the power off and on again.
While playing a track, sound is sometimes
interrupted.
• The tracks are not properly copied into the USB device.
Copy the tracks again, and try again.
Ñ iPod/iPhone
No sound comes out of the speakers.
• Disconnect the iPod/iPhone, then connect it again.
• Select another source, then reselect “iPod”.
The iPod/iPhone does not turn on or does not
work.
• Check the connecting cable and its connection.
• Update the firmware version.
• Charge the battery.
• Reset the iPod/iPhone.
Sound is distorted.
• Deactivate the equalizer either on this unit or the
iPod/iPhone.
A lot of noise is generated.
• Turn off (uncheck) “VoiceOver” on the iPod/iPhone.
For details, visit <http://www.apple.com>.
Ñ Radio
AME automatic presetting does not work.
• Store stations manually. (P.10)
Static noise while listening to the radio.
• Connect the antenna firmly.
22
Page 23

About this Unit
Ñ AV-IN
No picture appears on the screen.
• Turn on the video component if it is not on.
• Connect the video component correctly.
Ñ Bluetooth
Phone sound quality is poor.
• Reduce the distance between the unit and the
Bluetooth mobile phone.
• Move the car to a place where you can get a better
signal reception.
The sound is interrupted or skipped while using a
Bluetooth audio player.
• Reduce the distance between the unit and the
Bluetooth audio player.
• Turn off, then turn on the unit. (When the sound is not
yet restored) connect the player again.
The connected audio player cannot be controlled.
• Check whether the connected audio player supports
AVRCP (Audio/Video Remote Control Profile).
The Bluetooth device does not detect the unit.
• Search from the Bluetooth device again.
The unit does not pair with the Bluetooth device.
• Turn off, then turn on the Bluetooth device.
• Disconnect the Bluetooth device currently connected
and then register the new device. (P.12)
Ñ Remote control
KNA-RCDV331 (optional accessory) cannot control
the unit.
• Turn its operation mode switch to “DVD.”
Copyrights
• The Bluetooth word mark and logos are owned by
the Bluetooth SIG, Inc. and any use of such marks
by JVC KENWOOD Corporation is under license.
Other trademarks and trade names are those of their
respective owners.
• “Made for iPod” and “Made for iPhone” mean that an
electronic accessory has been designed to connect
specifically to iPod, or iPhone, respectively, and
has been certified by the developer to meet Apple
performance standards.
Apple is not responsible for the operation of this
device or its compliance with safety and regulatory
standards. Please note that the use of this accessory
with iPod, or iPhone may affect wireless performance.
• iPhone, iPod, iPod classic, iPod nano, and iPod touch
are trademarks of Apple Inc., registered in the U.S. and
other countries.
Lightning is a trademark of Apple Inc.
• The “AAC” logo is a trademark of Dolby Laboratories.
• THIS PRODUCT IS LICENSED UNDER THE MPEG4 VISUAL PATENT PORTFOLIO LICENSE FOR THE
PERSONAL AND NON-COMMERCIAL USE OF A
CONSUMER FOR (¡) ENCODING VIDEO IN COMPLIANCE
WITH THE MPEG-4 VISUAL STANDARD (“MPEG-4
VIDEO”) AND/OR (¡¡) DECODING MPEG-4 VIDEO
THAT WAS ENCODED BY A CONSUMER ENGAGED
IN A PERSONAL AND NON-COMMERCIAL ACTIVITY
AND/OR WAS OBTAINED FROM A VIDEO PROVIDER
LICENSED BY MPEG LA TO PROVIDE MPEG-4 VIDEO. NO
LICENSE IS GRANTED OR SHALL BE IMPLIED FOR ANY
OTHER USE. ADDITIONAL INFORMATION INCLUDING
THAT RELATING TO PROMOTIONAL, INTERNAL AND
COMMERCIAL USES AND LICENSING MAY BE OBTAINED
FROM MPEG LA, LLC. SEE HTTP://WWW.MPEGLA.COM.
English |
23
Page 24

About this Unit
Specications
Ñ Monitor section
Picture Size
: 6.75 inches (diagonal) wide
: 151.8 mm (W) × 79.7 mm (H)
Display System
: Transparent TN LCD panel
Drive System
: TFT active matrix system
Number of Pixels
: 1,152,000 (800H x 480V x RGB)
Eective Pixels
: 99.99 %
Pixel Arrangement
: RGB striped arrangement
Back Lighting
: LED
Ñ USB interface section
USB Standard
: USB 2.0
File System
: FAT 16/ 32
Maximum Power Supply Current
: DC 5 V
D/A Converter
: 24 Bit
Audio Decoder
: MP3/ WMA/ AAC
Video Decoder
: MPEG1/ MPEG2/ MPEG4
NOTE
• Although the effective pixels for the liquid crystal
panel is given as 99.99% or more, 0.01% of pixels
may not light or may light incorrectly.
• Specifications subject to change without notice.
24
1 A
Ñ Bluetooth section
Technolog y
: Bluetooth Ver.3.0
Frequency
: 2.402 – 2.480 GHz
Output Power
: +4dBm (MAX), 0dBm (AVE), Power Class2
Maximum Communication range
: Line of sight approx. 10m (32.8 ft)
Audio Codec
SBC
Prole (Multi Prole support)
• HFP (V1.6) (Hands Free Profile)
• A2DP (V1.3) (Advanced Audio Distribution Profile)
• AVRCP (V1.5) (Audio/Video Remote Control Profile)
• PBAP (V1.1.1) (Phonebook Access Profile)
Ñ DSP section
Graphics equalizer
Band: 7 Band
Frequency (BAND1 – 7)
: 62.5/ 160/ 400/ 1k/ 2.5k/ 6.3k/ 16k Hz
Gain
: ±9 dB
Ñ FM tuner section
Frequency Range (step)
: 87.5 MHz – 108.0 MHz (50 kHz)
Usable Sensitivity
: 12.2 dBf
: 1.1 μV/75 Ω
(For Latin America sales area, S/N : 30 dB)
(For Europe sales area, S/N : 26 dB)
Quieting Sensitivity
: 19.2 dBf
: 2.5 μV/75 Ω
(For Latin America sales area, S/N : 50 dB)
(For Europe sales area, S/N : 46 dB)
Frequency Response
: 30 Hz – 14 kHz
S/N Ratio (dB)
: 55 dB (MONO)
Selectivity (± 400 kHz)
: Over 80 dB
Stereo Separation
: 37 dB (1 kHz)
Page 25

About this Unit
Ñ AM tuner section
Frequency Range (step)
MW: 531 – 1611 kHz (9 kHz) (Europe sales area)
MW: 530 – 1700 kHz (10 kHz) (Latin America sales area)
Usable Sensitivity
MW: 29μV
Ñ Video section
Color System of External Video Input
: N TSC /PAL
External Video Input Level (RCA jacks)
: 1.0 Vp-p/ 75 Ω
External Audio Max Input Level (RCA jacks)
: 1.8 V/ 10 kΩ
Video Input Level (RCA jacks)
: 1.0 Vp-p/ 75 Ω
Video Output Level (RCA jacks)
: 1.0 Vp-p/ 75 Ω
Ñ Audio section
Maximum Power (Front & Rear)
: 50 W × 4
Full Bandwidth Power (Front & Rear)
Full Bandwidth Power (at less than 1% THD)
: 21 W × 4
Preout Level (V)
: 2 V/ 10 kΩ
Preout Impedance
: ≤ 600 Ω
Speaker Impedance
: 4 – 8 Ω
Ñ General
Operating Voltage
: 14.4 V (10.5 – 16 V allowable)
Maximum Current Consumption
: 10 A
Installation Dimensions (W × H × D)
: 183 × 112 × 159 mm
Operational Temperature Range
: -10 °C – +60 °C
Weight
: 1.4 kg
Ñ Information on Disposal of Old Electrical
and Electronic Equipment and Batteries
(applicable for EU countries that have
adopted separate waste collection
systems)
Products and batteries with the symbol (crossed-out
wheeled bin) cannot be disposed as household waste.
Old electrical and electronic equipment and batteries
should be recycled at a facility capable of handling
these items and their waste byproducts.
Contact your local authority for details in locating a
recycle facility nearest to you.
Proper recycling and waste disposal will help conserve
resources whilst preventing detrimental effects on our
health and the environment.
Notice: The sign “Pb” below the symbol for batteries
indicates that this battery contains lead.
Ñ ינורטקלאו ילמשח דויצ לש הפשאל הכלשה רבדב עדימ
תכרעמב תושמתשמש תונידמל יטנוולר( תוללוס ןכו ןשי
.)תדרפומ הפשא ףוסיא
X םע הפשא חפ( ןומיסה םע תוללוסו םירצומ ךילשהל ןתינ אל
.הליגר תיתיב הפשאכ )וילע
ןקתמב תוללוס ןכו ןשי ינורטקלאו ילמשח דויצ רזחמל שי
.םהלש יאוולה ירצותבו הלאכ םיטירפב לפטל לגוסמה
ןקתמ תודוא םיטרפ תלבקל תימוקמה תושרה םע רשק ורצ
ורזעי םיתואנ הפשאל הכלשהו רוזחימ .םכילא בורקה רוזחימה
לעו ונתואירב לע תוילילש תועפשה עונמלו םיבאשמ רמשל
.הביבסה
ןייצמ תוללוס רובע ןומיסל תחתמש Pb ןומיסה :בל ומיש
.תרפוע הליכמ הללוסהש
English |
25
Page 26

Contenido
Antes de la utilización .......................................................... 26
Cómo leer este manual ....................................................................................... 26
Precauciones .............................................................................................................. 26
Inicio ........................................................................................... 27
Ajustes del reloj ........................................................................................................27
Ajuste del panel táctil .......................................................................................... 27
Conceptos básicos ................................................................. 28
Funciones de los botones del panel frontal .........................................28
Funciones habituales ........................................................................................... 28
Descripciones de la pantalla MENÚ SUPERIOR ................................... 29
Descripciones de la pantalla de control de fuente .......................... 29
USB .............................................................................................. 30
Preparativos ................................................................................................................ 30
Operaciones de reproducción .......................................................................30
iPod/iPhone ............................................................................. 32
Preparativos ................................................................................................................ 32
Operaciones de reproducción ....................................................................... 32
Radio ........................................................................................... 34
Manejo básico de radio.......................................................................................34
Emisoras preestablecidas ..................................................................................34
Características FM RDS ........................................................................................34
Configuración del sintonizador .....................................................................34
Componentes externos ....................................................... 35
Uso de reproductores de audio/vídeo exteriores .............................35
Cámara de visión trasera ....................................................................................35
Teléfono inteligente Bluetooth ........................................ 36
Registre su teléfono inteligente en la unidad ...................................... 36
Reciba una llamada telefónica .......................................................................36
Realice una llamada telefónica ......................................................................37
Reproducir dispositivos de audio Bluetooth ........................................38
Control del audio ................................................................... 39
Controlar el audio general ................................................................................ 39
Control del ecualizador....................................................................................... 39
Ajustes del subwoofer ......................................................................................... 39
Mando a distancia ................................................................. 40
Cómo instalar la pila ..............................................................................................40
Funciones de los botones del mando a distancia ............................40
Instalación .................................................................................41
Antes de la instalación ......................................................................................... 41
Instalación de la unidad ..................................................................................... 42
Acerca de esta unidad .......................................................... 46
Más información ......................................................................................................46
Resolución de problemas .................................................................................46
Derechos de autor..................................................................................................47
Especificaciones ...................................................................................................... 48
Cómo leer este manual
• Los paneles que se incluyen en este manual son
ejemplos utilizados para ofrecer explicaciones de las
distintas operaciones. Por esta razón, pueden diferir
de los paneles que se visualizan en realidad.
• En los procedimientos operativos, las llaves indican la
tecla o botón que debe emplear.
< >: indica el nombre de los botones del panel.
[ ]: Indica el nombre de las teclas.
26
Antes de la utilización
Precauciones
#ADVERTENCIA
Ñ Para evitar lesiones o incendios, tome las
precauciones siguientes:
• Para evitar un cortocircuito, nunca coloque ni deje
objetos metálicos (como monedas o herramientas
metálicas) dentro de la unidad.
• No mire fijamente la pantalla de la unidad mientras
está conduciendo durante un periodo prolongado
de tiempo.
• Si tiene problemas durante la instalación, consulte
con su distribuidor KENWOOD.
Ñ Precauciones para el uso de esta unidad
• Cuando compre accesorios opcionales, pregunte a
su distribuidor KENWOOD si dichos accesorios son
compatibles con su modelo y en su región.
• La función Radio Data System o Radio Broadcast
Data System no funcionará en lugares donde no
existan emisoras compatibles con este servicio.
Ñ Cómo proteger el monitor
• Para proteger el monitor de posibles daños, no lo
utilice con un bolígrafo con punta de bola o una
herramienta similar con una punta afilada.
Ñ Limpieza de la unidad
Si el panel frontal de esta unidad está manchado,
límpielo con un paño suave y seco, como por
ejemplo, un paño de silicona. Si el panel frontal está
muy manchado, limpie la mancha con un paño
humedecido con un producto de limpieza neutro y,
a continuación, vuelva a limpiarlo con un paño suave,
limpio y seco.
! PRECAUCIÓN
• Aplicar un limpiador en espray directamente sobre la
unidad, puede dañar sus componentes mecánicos.
Limpiar el panel frontal con un paño áspero o con un
líquido volátil, como un disolvente o alcohol, podría
rayar la superficie o borrar las impresiones de la
pantalla.
Ñ Cómo reiniciar la unidad
Si la unidad o la unidad conectada no funcionan
correctamente, reiníciela.
Botón Restablecer
Page 27

Inicio
1 Coloque la llave de encendido del coche en la
posición ACC.
La unidad se pone en marcha.
2 Pulse el botón <MENU>.
3 Toque [SETUP].
4 Toque [General].
Device Name
Muestra el nombre del dispositivo.
6 Toque [ 6 ].
Ajustes del reloj
Ñ Sincronización de la hora del reloj con FM
RDS
Activa [RDS Clock Sync]. Consulte “Configuración
del sintonizador” (P.34).
Ñ Ajuste del reloj manualmente
1 Toque [Clock Adjust] en la pantalla General.
Aparece la pantalla del reloj.
2 Seleccione la hora o el minuto.
5 Toque la tecla correspondiente y establezca un
valor.
Beep
Activa o desactiva el tono de las teclas.
“ON” (Predeterminado), “OFF”
Clock Mode
Selecciona el formato de la hora.
“12 Hour” (Predeterminado: solo área de venta de
América Latina)
“24 Hour” (Predeterminado: solo área de venta de
Europa)
Clock Adjust
Ajuste la hora del reloj. Consulte “Ajustes del reloj” ( P. 27).
Language
Seleccione el idioma utilizado para la pantalla de
control y los elementos de configuración. El idioma
predeterminado es “English”.
1) Toque [Language].
2) Seleccione el idioma deseado.
3) Toque [ 6 ].
3 Ajuste la hora del reloj.
4 Toque [ 6 ].
Ajuste del panel táctil
1 Toque [Touch] en la pantalla CONFIGURACIÓN.
2 Siga las instrucciones en pantalla y toque el
centro de cada +.
• Para cancelar el ajuste del panel táctil, toque
[Cancel].
Español |
27
Page 28

Conceptos básicosConceptos básicos
Funciones de los botones del panel frontal
1 2 3 4 5 6 7 8
s (Restablecer)
1
• Si la unidad o el equipo conectado no funcionan
correctamente, la unidad restablece la
configuración de fábrica al pulsar este botón.
MUTE
2
• Silencia el sonido.
R, R (Volumen)
3
• Ajusta el volumen. Si continúa presionando [ R ]
el volumen aumentará hasta 15.
MENU
4
• Muestra la pantalla MENÚ SUPERIOR. (P. 29)
AUD
5
• Muestra la pantalla Ecualizador. (P. 39)
• Si se pulsa durante 1 segundo, se apaga la unidad.
• Si la unidad está apagada, la enciende.
FNC
6
• Muestra la pantalla Función de la fuente actual.
TEL
7
• Muestra la pantalla Manos libres. (P.37).
(Sensor Remoto)
8
• Recibe la señal del control remoto.
Funciones habituales
Ñ Encendido
1 Pulse el botón <AUD>.
Ñ Apagado
1 Pulse y mantenga pulsado el botón <AUD>.
Ñ Ajuste del volumen
1 Pulse el botón <S> o <R>.
✎ N OTA
• Si continúa presionando [ R ] el volumen aumentará
ha sta 15.
Ñ Silencia el sonido
En el panel del monitor:
1 Pulse el botón <MUTE>.
En la pantalla de control de fuente:
1 Toque [ ].
28
Para restaurar el sonido, toque el botón de nuevo
o ajuste el volumen.
Page 29

Conceptos básicos
1
25364
7
2
3
4
5
1
Descripciones de la pantalla MENÚ SUPERIOR
1 Pulse el botón <MENU>.
Aparece la pantalla MENÚ SUPERIOR.
Regresa a la pantalla anterior.
1
Cambia a la emisión del programa de radio.
2
(P.34)
3
[USB]
Reproduce archivos en un dispositivo USB. (P.30)
[iPod]
Reproduce un iPod/iPhone. (P.32)
• Cuando está conectado un iPod/iPhone.
Cambia a un componente externo conectado a la
4
terminal de entrada AV-IN. ( P. 35)
Muestra la pantalla Manos libres. (P. 37)
5
Reproduce un reproductor de audio Bluetooth.
6
(P.38)
Muestra la pantalla CONFIGURACIÓN. (P.27)
7
Descripciones de la pantalla de control de fuente
Puede realizar una operación de reproducción de la
fuente en la pantalla de control de fuentes.
Muestra la pantalla MENÚ SUPERIOR.
1
[EQ]
2
Muestra la pantalla Ecualizador. (P. 39)
[BASS]
Ajusta la proporción del refuerzo de graves entre
“DESACTIVADO” (gris)/ “ACTIVADO” (blanco).
[DIM]
Selecciona el modo de atenuación.
DESAC TIVADO: La pantalla no se atenúa.
ACTIVADO: La pantalla se atenúa.
Silencia el sonido.
3
Toque el botón de nuevo o ajuste el volumen.
Muestra la pantalla CONFIGURACIÓN. (P.27)
4
Pantalla del reloj
5
Toque para visualizar la pantalla Reloj.
Español |
29
Page 30

USBUSB
4
1
6
3
2
5
4
3
2
2
1
Preparativos
Ñ Conexión de un dispositivo USB
1 Retire la tapa del terminal de USB.
2 Conecte el dispositivo USB con el cable USB.
La unidad lee el dispositivo y se inicia la
reproducción.
Ñ Para desconectar el dispositivo USB:
1 Pulse el botón <MENU>.
2 Toque una fuente distinta de [USB].
3 Desconecte el dispositivo USB.
Ñ Dispositivos USB que pueden utilizarse
Esta unidad puede reproducir archivos MPEG1/
MPEG2/ MPEG4/ MP3/WMA/ AAC/ JPEG guardados
en un dispositivo de clase de almacenamiento masivo
USB. (P. 46)
• Sistema de archivo: FAT16/ FAT32
• Esta unidad puede reconocer un total de 9.999
archivos y 999 carpetas (un máximo de 9.999
archivos por carpeta).
• El número máximo de caracteres:
– Nombres de carpeta: 50 caracteres
– Nombres de archivo: 50 caracteres
– Etiqueta: 30 caracteres
✎ N OTA
• Cuando el dispositivo USB esté conectado a esta
unidad, puede cargarse a través del cable USB.
• Instale el dispositivo USB en un lugar que no
perjudique a una conducción segura.
• No puede conectar un dispositivo USB mediante un
núcleo USB o un lector de tarjetas múltiple.
• Haga copias de seguridad de los archivos de
audio utilizados con esta unidad. Los archivos
pueden borrarse en función de las condiciones de
funcionamiento del dispositivo USB.
No compensaremos en forma alguno los daños
producidos por cualquier dato borrado.
• Esta unidad no se suministra con un dispositivo USB.
Tiene que comprar un dispositivo USB disponible
comercialmente.
• Tape la terminal de USB cuando no se esté utilizando.
Operaciones de reproducción
Ñ Controle la música que está escuchando
en la pantalla de control de fuente.
Se muestra la cubierta de la emisora que se está
1
escuchando en ese momento.
D, etc. : Estado de la reproducción
2
##:##:## : Tiempo de reproducción/ Tiempo de
reproducción total
Barra de tiempo de repetición : Toque para
cambiar la posición de reproducción.
: Indicador del modo de reproducción Repetir
: Indicador del modo de reproducción aleatorio
D H : Inicia la reproducción o hace una pausa.
3
[E] [F] : Busca el contenido anterior/siguiente.
Mantenga pulsado para avanzar o retroceder
rápidamente.
[FNC] : Muestra la pantalla Función. (P.31)
Busca el archivo. (P. 31)
4
Muestra la información del archivo actual.
5
Solamente se visualizan un nombre de archivo y
un nombre de carpeta si no hay información de
etiqueta.
Información del elemento de reproducción actual
6
(n.º de carpeta/n.º de archivo).
Ñ Para la reproducción de video
1 Si los botones de operación no se visualizan en la
pantalla, toque la pantalla.
30
Page 31

USB
Los botones de operación desaparecen cuando se
1
toca 1 o cuando no se realiza ninguna operación
durante 5 segundos.
Para cambiar los botones de operación.
2
[Zoom] : Seleccione la relación de zoom.
3
“Off” (desactivado), “x2”, “x3”, “x4”, “1/2”, “1/3”, “1/4”
[R] [S] [T] [U] : Desplaza la pantalla.
Seleccione el modo de pantalla. Relación de 16:9,
4
relación de 4:3
Ñ Selección de una pista en una lista
1 Toque [ ].
2 Seleccione si buscará por archivos de audio
[ ], archivos de vídeo [ ] o archivos de
imagen [ ].
3 Toque [6] para desplazarse a la jerarquía
superior.
4 Toque la carpeta deseada.
Al tocar una carpeta, se muestran sus contenidos.
5 Toque para seleccionar el elemento en la lista de
contenidos.
La reproducción se inicia.
• Toque [6] para desplazarse a la jerarquía superior.
✎ N OTA
• Aparece la pantalla de control de la fuente cuando
toca [6] en la parte superior de la jerarquía.
Ñ Menú de función
1 Toque [ FNC].
Aparece la pantalla Función.
2 Ajuste cada elemento del modo siguiente.
1
Repeat *
Selecciona el modo de reproducción Repetir.
All (Predeterminado): Repite todos los archivos en el
dispositivo USB.
(
All los indicadores se iluminan).
One: Repite el archivo actual.
(
One indicador se ilumina).
Folder: Repite todos los archivos en la carpeta actual.
(Se ilumina el indicador
Random (Solo archivos de audio) *
Selecciona el Modo de reproducción aleatorio.
On: Reproduce aleatoriamente todos los archivos.
(
All los indicadores se iluminan).
O (predeterminado): Reproducción normal.
Video Setting (Solo archivos de vídeo/ imagen)
Puede ajustar la calidad de imagen en la pantalla de
vídeo.
[Brightness]: Ajusta el brillo. (00 a 08)
[Contrast]: Ajusta el contraste. (00 a 08)
[Color]: Ajusta el color. (00 a 08)
[Reset]: Para eliminar el ajuste.
*1 No puede activar al mismo tiempo el modo
repetición y el modo aleatorio.
Folder).
1
3 Toque [ 6 ].
Español |
31
Page 32

iPod/iPhoneiPod/iPhone
4
1
6
3
2
5
Preparativos
Ñ Conexión de iPod/iPhone
• Para modelos con conector Lightning: Use el
cable de audio USB para iPod/iPhone—KCA-iP103
(accesorio opcional).
• Para obtener detalles acerca de la conexión de un
iPod/iPhone, consulte la página 45 .
1 Retire la tapa del terminal de USB.
2 Conecte el iPod/iPhone.
La unidad lee el dispositivo y se inicia la
reproducción.
Ñ Para desconectar el iPod/iPhone
1 Pulse el botón <MENU>.
2 Toque una fuente distinta de [iPod].
3 Desconecte el iPod/iPhone.
Ñ iPod/iPhone que pueden conectarse
Los siguientes modelos pueden conectarse a esta
unidad.
Fabricados para
• iPhone 6s Plus
• iPhone 6s
• iPhone 6 Plus
• iPhone 6
• iPhone 5s
• iPhone 5c
• iPhone 5
• iPod touch (6.ª generación)
• iPod touch (5.ª generación)
✎ N OTA
• Si empieza la reproducción después de conectar el
iPod, se reproducirá primero la música reproducida
por el iPod.
En este caso, se muestra “Reading” (Leyendo) sin que
se muestre un nombre de carpeta, etc. Cambiar el
elemento de navegación mostrará un título correcto,
etc.
• Tape la terminal de USB cuando no se esté utilizando.
Operaciones de reproducción
Ñ Controle la música que está escuchando
en la pantalla de control de fuente.
Material gráfico (se muestra si la pista contiene
1
material gráfico)
D, etc. : Estado de la reproducción
2
##:##:## : Tiempo de reproducción/ Tiempo de
reproducción total
Barra de tiempo de repetición : Para confirmar la
posición actual de reproducción.
: Indicador del modo de reproducción Repetir
: Indicador del modo de reproducción aleatorio
D H : Inicia la reproducción o hace una pausa.
3
[E] [F] : Busca el contenido anterior/siguiente.
Mantenga pulsado para avanzar o retroceder
rápidamente.
[FNC] : Muestra la pantalla Función. (P.33)
Busca contenido. (P. 33)
4
Muestra la información del archivo actual.
5
Información del elemento de reproducción actual.
6
32
Page 33

iPod/iPhone
Ñ Seleccione un contenido en una lista
1 Toque [ ].
2 Toque la categoría deseada.
Ñ Menú de función
1 Toque [ FNC].
Aparece la pantalla Función.
2 Ajuste cada elemento del modo siguiente.
La lista se ordena en función de la categoría
seleccionada.
3 Toque el elemento deseado.
La reproducción se inicia.
• Toque [6] para desplazarse a la jerarquía superior.
✎ N OTA
• Aparece la pantalla de control de la fuente cuando
toca [6] en la parte superior de la jerarquía.
1
Repeat *
Selecciona el modo de reproducción Repetir.
O: Repetición activada
One: Funciona igual que Repetir Uno.
(
One indicador se ilumina).
All (Predeterminado): Funciona del mismo modo que
Repetir todo.
(Se ilumina el indicador
Random *
Selecciona el modo de reproducción aleatorio.
Songs: Funciona igual que Reproducción aleatoria de
Albums: Funciona igual que Reproducción aleatoria
O (Predeterminado): Aleatorio desactivado
*1 No puede activar al mismo tiempo el modo
repetición y el modo aleatorio.
1
canciones.
(Se ilumina el indicador
de álbumes.
(Se ilumina el indicador
All).
Songs).
Albums).
3 Toque [ 6 ].
Español |
33
Page 34

Radio
4
1
3
2
5
Radio
Manejo básico de radio
1 Pulse el botón <MENU>.
2 Toque [Radio].
Ñ Pantalla de control de fuente
Muestra información sobre la emisora actual:
1
Nombre PS, Frecuencia, Género PTY, Número
preestablecido
Restaura la emisora memorizada.
2
Si se toca durante 2 segundos, almacena en la
memoria la emisora de recepción actual.
[BAND]: Cambia la banda.
3
“FM1”, “FM2 ”, “FM3”, “AM1”, “AM2”
[E] [F] : Sintoniza automáticamente una
emisora con buena recepción. Aparece “Auto
Seek” (buscar automáticamente).
Toque y mantenga hasta la siguiente frecuencia
manualmente. Aparece “Manual Seek” (buscar
manualmente).
[FNC] : Muestra la pantalla Función.
Preestablece emisoras automáticamente
4
Elementos indicadores
5
Ñ Volver a una emisora prejada
1 Toque [#] (#:1-6).
Características FM RDS
(Solo en el área de venta de Europa)
Ñ Buscar por tipo de programa
1 Toque [ FNC].
Aparece la pantalla Función.
2 Toque [PTY List].
3 Seleccione un tipo de programa de la lista.
Comienza la búsqueda PTY.
Ñ Información de tráco
1 Toque [ FNC].
Aparece la pantalla Función.
2 Toque [ TA].
Se activa el modo de información del tráfico.
3 Toque [ 6 ].
Cuando dé comienzo el boletín de tráco
La pantalla de información del tráfico aparece
automáticamente.
Emisoras preestablecidas
Ñ Memoria automática
Puede almacenar automáticamente en memoria las
emisoras con buena recepción.
1 Toque [BAND] para seleccionar la frecuencia.
2 Toque [AME].
Se inicia la memoria automática. Aparece “Auto
Store” (guardar automáticamente).
Ñ Memoria manual
La emisora o servicio que se está recibiendo
actualmente puede almacenarse en la memoria.
1 Sintonice una emisora que desea preestablecer.
2 Mantenga pulsado [#] (#:1-6) en el que desee
guardar la emisora.
34
Conguración del sintonizador
Ñ Menú de función
1 Toque [ FNC].
Aparece la pantalla Función.
2 Ajuste cada elemento del modo siguiente.
Page 35

Radio
1
3
Area *
N.America (Predeterminado): Para América del
Norte/Central/Sur, intervalos AM/FM: 10 kHz/200
kHz.
S.America: Para algunos países Sudamericanos,
intervalos AM/FM: 10 kHz/50 kHz.
Europe: Para Europa, intervalos AM/FM: 9 kHz/50 kHz.
Local
ON: Sintoniza solo las emisoras con una fuerza de
señal suficiente. (Se ilumina el indicador LOCAL).
OFF (Predeterminado): Desactiva la función.
2
RDS *
Activa o desactiva la función RDS.
“ON” (Predeterminado), “OFF”
PTY List *
Seleccione el Tipo de programa disponible.
AF *
Si la recepción de una emisora es deficiente, se cambia
automáticamente a la emisora que esté emitiendo el
mismo programa a través de la misma red de Radio
Data System.
“ON” (Predeterminado), “OFF”
TA *
Cambia a la información de tráfico automáticamente
cuando empieza el boletín de tráfico.
“ON”, “OFF” (predeterminado)
RDS Clock Sync *
Sincronización mediante el Sistema de datos de radio
de los datos horarios de la emisora y el reloj de esta
unidad. (Se ilumina el indicador CT).
“ON” (Predeterminado), “OFF”
*1 Solo seleccionable cuando “RDS” está ajustado en
*2 Solo en el área de venta de Europa
*3 Solo en el área de venta de América Latina
3 Toque [ 6 ].
1 *2
1 *2
1 *2
1
“ON”.
Componentes externos
Uso de reproductores de audio/vídeo exteriores
Ñ Inicio de la reproducción
1 Conecte un componente externo a la terminal de
entrada AV-IN. (P.44)
2 Pulse el botón <MENU>.
3 Toque [AV- IN].
4 Enciende el componente conectado y comienza a
reproducir la fuente.
Ñ Para la reproducción de video
1 Si los botones de operación no se visualizan en la
pantalla, toque la pantalla.
Los botones de operación desaparecen cuando se
toca 1 o cuando no se realiza ninguna operación
durante 5 segundos.
Cámara de visión trasera
Para usar una cámara de visión trasera, se requiere la
conexión del cable de MARCHA ATRÁS. Para conectar
una cámara de visión trasera. (P.44)
Ñ Visualización de la imagen desde la
cámara de visión trasera
Se muestra la pantalla de visión trasera cuando cambia
la palanca de cambios a la posición de marcha atrás (R).
• Para eliminar el mensaje de precaución, toque la
pantalla.
Español |
35
Page 36

Teléfono inteligente BluetoothTeléfono inteligente Bluetooth
Ñ Acerca de los teléfonos inteligentes
Bluetooth y los reproductores de audio
Bluetooth
Esta unidad cumple las siguientes especicaciones
Bluetooth:
Versión
Bluetooth Ver.3.0
Perl
Teléfono inteligente/ Teléfono móvil:
HFP (V1.6) (Perfil de manos libres)
PBAP (V1.1.1) (Perfil de acceso a agenda telefónica)
Reproductor de audio :
A2DP (V1.3) (Perfil avanzado de distribución de audio)
AVRCP (V1.5) (Perfil de mando a distancia de audio/
vídeo)
Códec de sonido
SBC
Ñ Acerca de teléfonos móviles compatibles
con el Perl de acceso a la agenda
telefónica (PBAP)
Si su teléfono móvil es compatible con PBAP, al
conectar el teléfono móvil podrá visualizar los
siguientes elementos en la pantalla del panel táctil.
• Agenda telefónica (hasta 1.000 entradas)
• Llamadas realizadas, llamadas recibidas y llamadas
perdidas (hasta 50 entradas en total)
3 Confirme la petición en el dispositivo
Se establecen el emparejado y la conexión. Aparece
“Connect OK” (Conexión correcta).
•
aparece cuando el teléfono inteligente
Bluetooth está conectado.
•
aparece cuando el reproductor de audio
Bluetooth está conectado.
Ñ Desconexión del dispositivo
• Desactive la función Bluetooth en su teléfono
inteligente/teléfono móvil.
• Apague el interruptor de encendido.
Reciba una llamada telefónica
1 Toque [Ü].
• [Ý] : Rechace una llamada entrante.
Ñ Operaciones durante una llamada
Registre su teléfono inteligente en la unidad
Puede utilizar su teléfono inteligente Bluetooth
cuando esté emparejado con esta unidad.
• Puede emparejar el dispositivo y la unidad usando SSP
(Emparejamiento simple seguro) el cual solo requiere
de confirmación.
• Una vez están emparejados un dispositivo y la unidad,
esta última se registra en el dispositivo. Cuando
use el dispositivo la próxima vez, puede conectar el
dispositivo y la unidad seleccionando desde la lista de
dispositivos registrados en su dispositivo.
• Solo puede conectarse un dispositivo a la vez.
• Cuando registre un nuevo dispositivo Bluetooth,
desconecte el dispositivo Bluetooth conectado
actualmente y, a continuación, registre el nuevo
dispositivo.
1 Active la función Bluetooth en su teléfono
inteligente/teléfono móvil.
2 Busque la unidad (“DMX100BT”) en su teléfono
inteligente/teléfono móvil.
36
Finalización de una llamada
[Ý]
Puede enviar tonos tocando las teclas
correspondientes de la pantalla.
Cambia la salida de voz entre el teléfono móvil
(luz apagada) y el altavoz (luz encendida).
Ajustar el volumen del receptor
Pulse el botón <S> o <R>.
Page 37

Teléfono inteligente Bluetooth
Realice una llamada telefónica
1 Pulse el botón <MENU>.
2 Toque [TEL].
3 Consulte la tabla de abajo para cada método de
funcionamiento.
Llamar introduciendo un número telefónico
1) Toque [
2) Introducir un número de teléfono con las teclas
numéricas.
3) Toque [Ü].
Realice una llamada
Llamar usando datos de llamada almacenados
1) Toque [
2) Seleccione el número de teléfono de la lista.
].
].
Llamar usando la agenda telefónica
1) Toque [
2) Seleccione el nombre de la lista.
3) Seleccione el número de la lista.
Realice una llamada
Call by voice
Puede realizar una llamada de voz utilizando la
función de reconocimiento de voz del teléfono móvil.
1) Toque [
2) Toque [Start Voice control] (Iniciar el control de voz).
3) Pronuncie el nombre registrado en el teléfono
móvil.
].
].
3) Toque el número de teléfono.
Realice una llamada
• Toque [Cancel] (cancelar) para cancelar la
marcación mediante voz.
Español |
37
Page 38

Teléfono inteligente Bluetooth
4
1
6
3
2
5
Reproducir dispositivos de audio Bluetooth
1 Pulse el botón <MENU>.
2 Toque [Bluetooth].
Ñ Pantalla de control de fuente
Se muestra la cubierta de la emisora que se está
1
escuchando en ese momento.
D, etc. : Estado de la reproducción
2
##:##:## : Tiempo de reproducción/ Tiempo de
reproducción total
Barra de tiempo de repetición : Para confirmar la
posición actual de reproducción.
: Indicador del modo de reproducción Repetir
: Indicador del modo de reproducción aleatorio
D H : Inicia la reproducción o hace una pausa.
3
[E] [F] : Busca el contenido anterior/siguiente.
[FNC] : Muestra la pantalla Función.
Busca el archivo.
4
Muestra la información del archivo actual.
5
Solamente se visualizan un nombre de archivo y
un nombre de carpeta si no hay información de
etiqueta.
Información del elemento de reproducción actual
6
(n.º de archivo).
✎ N OTA
• Las operaciones y las indicaciones en pantalla difieren
según su disponibilidad en el dispositivo conectado.
Ñ Selección de una pista en una lista
1 Toque [ ].
2 Toque [6] para desplazarse a la jerarquía
superior.
3 Toque la carpeta deseada.
Al tocar una carpeta, se muestran sus contenidos.
4 Toque para seleccionar el elemento en la lista de
contenidos.
La reproducción se inicia.
• Toque [6] para desplazarse a la jerarquía superior.
✎ N OTA
• Aparece la pantalla de control de la fuente cuando
toca [6] en la parte superior de la jerarquía.
Ñ Menú de función
1 Toque [ FNC].
Aparece la pantalla Función.
2 Ajuste cada elemento del modo siguiente.
Repeat
Selecciona el modo de reproducción Repetir.
All (Predeterminado): Repite todos los archivos en el
dispositivo.
(
All los indicadores se iluminan).
One: Repite el archivo actual.
(Se ilumina el indicador
O (predeterminado): Reproducción normal.
Random
Selecciona el modo de reproducción aleatorio.
On: Reproduce aleatoriamente todos los archivos.
(Se ilumina el indicador
O (predeterminado): Reproducción normal.
One).
All).
38
Page 39

1
3
2
Control del audio
Controlar el audio general
1 Pulse el botón <MENU>.
2 Toque [SETUP].
3 Toque [Audio].
4 Toque [Speaker].
5 Ajuste cada elemento del modo siguiente.
[C] [D]
[R] [S]
[RESET]
Ajuste el balance del volumen izquierdo y
derecho. (L12 a R12)
Ajuste el balance del volumen delantero y
trasero. (F12 a R12)
Para eliminar el ajuste.
Ñ Refuerzo de graves
1 Muestra la pantalla de control de cualquier
fuente.
2 Toque [BASS].
Ajusta la proporción del refuerzo de graves entre
“OFF” (DESACTIVADO) (gris)/ “ON” (ACTIVADO)
(blanco).
Control del ecualizador
1 Pulse el botón <MENU>.
2 Toque [SETUP].
3 Toque [EQ].
4 Ajuste cada elemento del modo siguiente.
Para recuperar la curva del ecualizador
1
preestablecida.
Podrá seleccionar la barra de frecuencia y ajustar su
2
nivel mediante [+], [–]. (-9 a +9)
• Se guardan los ajustes y se activa “User” (Usuario).
La curva EQ actual vuelve a plana.
3
Ajustes del subwoofer
1 Pulse el botón <MENU>.
2 Toque [SETUP].
3 Toque [Audio].
4 Toque [Subwoofer].
5 Ajuste cada elemento del modo siguiente.
Activa o desactiva el subwoofer.
Level
LPF
Slope
[RESET]
Ajusta el nivel del subwoofer. (-6 a +6)
Ajuste del filtro de paso bajo.
Define la pista de crossover.
Para eliminar el ajuste.
Español |
39
Page 40

Mando a distancia
Esta unidad puede manejarse con el mando a
distancia.
Para el área de venta de América Latina, el mando a
distancia está suministrado con la unidad.
Para el área de venta de Europa, se puede utilizar
el mando a distancia KNA-RCDV331 (accesorio
opcional). Gire el interruptor del modo de
funcionamiento a “DVD” antes de su uso.
! ADVERTENCIA
• No ingiera la pila, Peligro de quemaduras por
productos químicos
El mando a distancia suministrado con este
producto contiene una pila de moneda / botón.
Si la pila moneda/botón es ingerida, puede causar
quemaduras internas graves en solo 2 horas y puede
causar la muerte.
Mantenga las pilas nuevas y usadas fuera del alcance
de los niños.
Si el compartimiento de la pila no se cierra con
seguridad, deje de usar el producto y manténgalo
fuera del alcance de los niños.
Si piensa que las pilas pueden haber sido ingeridas o
introducidas en cualquier parte del cuerpo, busque
inmediatamente atención médica.
! PRECAUCIÓN
• Coloque el mando a distancia en un lugar en el
que no se pueda mover en caso de frenado u otras
operaciones. Podría producirse una situación peligrosa
si el mando a distancia se cae y queda atrapado entre
los pedales durante la conducción.
• No deje la batería cerca del fuego o expuesta a la
luz solar directa. Puede producirse un incendio, una
explosión o un calor excesivo.
• No recargue, cortocircuite, rompa ni caliente la pila,
ni la arroje al fuego. Estas acciones podrían provocar
la fuga de líquido de la pila. Si el líquido derramado
entra en contacto con los ojos o la ropa, enjuague
inmediatamente con agua y consulte a un médico.
Cómo instalar la pila
• NO exponga el sensor remoto a luz brillante (luz
directa del sol o luz artificial).
Ñ Funciones habituales
8
SOURCE
VOLUMEN
+/−
AUDIO
BASS
DISP
MENU
R/ S/ T/ U
ENTER
6
Enciende/apaga la alimentación.
Selecciona una fuente.
Ajusta el nivel del volumen.
Muestra la pantalla Ecualizador. (P. 39)
Activa/desactiva el Sonido Bajo.
Silencia/restablece el sonido.
Muestra la información en pantalla.
Muestra la pantalla del menú superior.
(P.29)
Muestra la lista de elementos de la fuente
seleccionada.
Confirma la selección.
Sale del menú.
Ñ USB/ iPod/iPhone
E/F
L
LIST
FNC
• Selecciona un archivo. (Pulse)
• Búsqueda hacia atrás/búsqueda hacia
delante. (Mantenga)
Inicia/pausa la reproducción.
Muestra la lista de elementos de la fuente
seleccionada.
Muestra el menú de función para la fuente.
• Si la efectividad del mando a distancia disminuye,
cambie las pilas.
Funciones de los botones del mando a distancia
• Apunte el mando a distancia directamente al sensor
remoto en la placa frontal.
40
Ñ Radio
BAND
E/F
FNC
1 − 6
Selecciona la banda.
• Busca estaciones de radio
automáticamente. (Pulse)
• Busca estaciones de radio manualmente.
(Mantenga)
Muestra el menú de función para la fuente.
Especifica el número preestablecido.
Page 41

InstalaciónInstalación
Antes de la instalación
Antes de la instalación de esta unidad, tenga en
cuenta las precauciones siguientes.
#ADVERTENCIAS
• Si conecta el cable de encendido (rojo) y el cable de
la batería (amarillo) al chasis del automóvil (tierra),
podría producir un cortocircuito y esto, a su vez, un
incendio. Conecte siempre esos cables a la fuente de
alimentación que pasa por la caja de fusibles.
• No corte el fusible del cable de ignición (rojo) y el
cable de la batería (amarillo). El suministro de energía
debe conectarse a los cables por medio del fusible.
#PRECAUCIÓN
• Instale esta unidad en la consola de su vehículo.
No toque la parte metálica de esta unidad durante e
inmediatamente después del uso de la unidad. Las
partes metálicas, tales como el disipador de calor o la
carcasa, pueden estar muy calientes.
✎ N OTA
• La instalación y el cableado de este producto
requieren habilidad y experiencia. Para mayor
seguridad, deje el trabajo de montaje y cableado en
manos de profesionales.
• Asegúrese de utilizar para la unidad una fuente
de alimentación de 12 V CC con conexión a tierra
negativa.
• No instale la unidad en un sitio expuesto a la luz
directa del sol, o excesivamente húmedo o caluroso.
Además deberá evitar sitios con mucho polvo o con
posibilidad de salpicaduras de agua.
• No utilice sus propios tornillos. Utilice solo los tornillos
suministrados. El uso de tornillos diferentes podría
causar daños en la unidad.
• Si la alimentación no se enciende (se visualiza “There
is an error in the speaker wiring. Please check the
connections.” (Hay un error en el cableado del altavoz.
Por favor, compruebe las conexiones)), puede que el
cable del altavoz haya sufrido un cortocircuito o que
haya tocado el chasis del vehículo y se haya activado
la función de protección. Por lo tanto, el cable del
altavoz debe ser revisado.
• Si el encendido de su automóvil no está provisto de
la posición ACC, conecte los cables de encendido a
una fuente de alimentación que pueda conectarse y
desconectarse con la llave de encendido. Si conecta
el cable de encendido a una fuente de alimentación
con un suministro de voltaje constante, como con los
cables de la batería, la batería puede agotarse.
• Si la consola tiene una tapa, asegúrese de instalar la
unidad de forma que el panel frontal no golpee la
tapa al abrirse o cerrarse.
• Si se funden los fusibles, asegúrese primero de que los
cables no están en contacto pues pueden ocasionar
un cortocircuito, luego reemplace el fusible dañado
por uno nuevo que tenga la misma potencia de
servicio.
• Aísle los cables no conectados con una cinta de
vinilo u otro material similar. Para evitar cortocircuitos,
no retire las tapas de los extremos de los cables o
terminales no conectados.
• Conecte los cables de los altavoces a cada uno de
los terminales correspondientes. La unidad se puede
dañar o no funcionar si comparte los cables ¤ o
los conecta a tierra a cualquier parte metálica del
vehículo.
• Si se han conectado solamente dos altavoces al
sistema, enchufe los conectores a ambos terminales
de salida delanteros o a ambos terminales de salida
traseros (es decir, no mezcle terminales delanteros y
traseros). Por ejemplo, si conecta el conector ¢ del
altavoz izquierdo a un terminal de salida delantero,
no conecte el conector ¤ a un terminal de salida
posterior.
• Después de instalar la unidad, compruebe que
las luces de freno, las luces intermitentes, el
limpiaparabrisas, etc. funcionan satisfactoriamente.
• Instale la unidad en un ángulo de 30˚ o menos.
• No presione con fuerza la superficie del panel al instalar
la unidad en el vehículo. De lo contrario, pueden
producirse marcas, daños o fallos.
• La recepción podría ser baja si existen objetos
metálicos cerca de la antena Bluetooth.
Unidad de antena Bluetooth
Ñ Accesorios suministrados para la instalación
x1
x1
x1
x6
2
4
6
8
(3 m)
[1]
[1]
(M5 × 7 mm)
Español |
x2
x1
x1
x6
1
3
[1]
5
[1]
7
(M5 × 6 mm)
[1]
Solo en el área de venta de América Latina
41
Page 42

Instalación
Ñ Procedimiento de instalación
1) Para evitar cortocircuitos, retire la llave del encendido
y desconecte el terminal ¤ de la batería.
2) Realice de forma adecuada las conexiones de cables
de entrada y salida para cada unidad.
3) Conecte el cable al mazo de conductores.
4) Tome el conector B en el mazo de cables y conéctelo
al conector de altavoz de su vehículo.
5) Tome el conector A en el mazo de cables y conéctelo
al conector de alimentación externa de su vehículo.
6) Conecte el mazo de cables a la unidad.
7) Instale la unidad en el automóvil.
8) Conecte nuevamente el terminal ¤ de la batería.
9) Pulse el botón Restablecer.
Instalación de la unidad
Ñ Coches no japoneses
Ñ Marco
1) Conecte el accesorio 1 a la unidad.
1
Ñ Unidad de micrófono
1) Compruebe la posición de instalación del micrófono
(accesorio 4).
2) Limpie la superficie de instalación.
3) Extraiga el separador del micrófono (accesorio 4) y
fije el micrófono en la posición indicada más abajo.
4) Conecte el cable del micrófono a la unidad de forma
segura en varias posiciones mediante cinta u otro
método.
5) Ajuste la dirección del micrófono (accesorio 4) hacia
el conductor.
Doble las lengüetas del
manguito de montaje
con un destornillador o
similar y fíjelo.
✎ N OTA
• Asegúrese de que la unidad esté firmemente instalada
en su lugar. Si la unidad está en una posición inestable,
es posible que no funcione correctamente (por
ejemplo, el sonido puede interrumpirse).
Ñ Coches japonés (Solo área de venta de
América Latina)
7 o 8
42
Soporte del vehículo
7 o 8
4
Fije un cable con una cinta adhesiva de uso
comercial.
✎ N OTA
• Cambie los clips si es necesario.
Page 43

Instalación
Ñ Retirada del marco
1) Use la tecla de extracción (accesorio 3) para extraer
las cuatro pestañas (dos en la parte superior, dos en la
parte inferior).
3
2) Tire de la placa hacia adelante.
Ñ Retirada de la unidad
1) Retire el marco según las indicaciones del paso 1 de
“Retirar el marco”.
2) Introduzca las dos llaves de extracción (accesorio2)
profundamente en las ranuras de cada lado, tal y
como se muestra. (El saliente en la punta de la tecla
de extracción debe mirar hacia la unidad).
2
3) Saque la unidad hasta la mitad.
✎ N OTA
• Tenga cuidado de no hacerse daño con los
pasadores de bloqueo de la llave de extracción.
4) Termine de sacar la unidad con las manos, prestando
atención para no dejarla caer.
Español |
43
Page 44

Instalación
Ñ Conectar los cables a los terminales
Dispositivo
USB
[2]
Accesorio 4:
Micrófono Bluetooth
Salida previa del
subwoofer
Terminal USB
Tap a
Tap a
[1]
(0,8 m)
5V=1A
MIC
SUB
WOOFER
Luz verde (Cable del sensor
de aparcamiento)
(Cable de extensión)
Para mayor seguridad,
BRAKE
PARKING
asegúrese de
conectar el sensor de
estacionamiento.
Morado/blanco
(Cable del sensor de marcha atrás)
Conecte el mazo de la luz de marcha atrás
del vehículo cuando utilice una cámara de
REVERSE
GEAR
SIGNAL
visión trasera opcional.
Azul claro/Amarillo (cable del mando
a distancia de la dirección)
Al mando a distancia de la dirección
Para utilizar la función de mando a
STEERING
WHEEL
REMOTE
CONTROL
distancia en el volante es necesario
un adaptador remoto exclusivo (no
suministrado) apropiado para su vehículo.
Realice la
conexión en
el arnés del
interruptor
de detección
del freno de
aparcamiento del
vehículo.
Conector B
Conector A
1 3 5 7
2 4 6 8
1 3 5 7
2 4 6 8
Fusible (15A)
Conector ISO
Ñ Guía de funciones de los conectores del
mazo de cables
Patilla Color y función
A-4 Amarillo Batería
A-5 Azul/blanco Control de alimentación
A-7 Rojo Encendido (ACC)
A-8 Negro Conexión a tierra (masa)
B-1/ B-2 Púrpura (+) /
Trasero derecho
Púrpura/Negro (–)
B-3/ B-4 Gris (+) / Gris/Negro (–) Delantero derecho
B-5/ B-6 Blanco (+) /
Delantero izquierdo
Blanco/Negro (–)
B-7/
B-8 Verde (+) / Verde/Negro (–) Trasero izquierdo
• Impedancia del altavoz: 4-8 Ω
! PRECAUCIÓN
Antes conectar los conectores ISO disponibles
comercialmente a la unidad, compruebe la siguiente
condición:
• Asegúrese que la asignación de clavijas del conector
coincide con la unidad KENWOOD.
44
Entrada de antena FM/AM
Antena FM/AM
Entrada de audio AV-IN
(Izquierda; Blanco, Derecha; Rojo)
Salida previa de audio trasera
(Izquierda; Blanco, Derecha; Rojo)
Salida previa de audio delantera
(Izquierda; Blanco, Derecha; Rojo)
Salida de vídeo (Amarillo)
Entrada de la cámara de visión trasera
(Amarillo)
Entrada visual AV-IN (Amarillo)
[1]
Corriente de alimentación máxima del USB :
CC 5 V = 1 A
[2]
Vendida por separado
• Tome precauciones extra con el cable de
alimentación.
• In caso de que el cable de la batería y el cable de
encendido no correspondan, entonces cámbielos
según corresponda.
• En caso de que el coche no tenga un cable
de encendido, use una interfaz disponible
comercialmente.
Page 45

Instalación
Solo en el área de venta de América Latina
1 3 5 7
2 4 6 8
1 3 5 7
2 4 6 8
Accesorio 5
Accesorio 6
Impedancia del altavoz: 4-8 Ω
Blanco
Blanco/Negro
Gris
Gris/negro
Verde
Verde/negro
Morado
Morado/negro
Azul/Blanco (Cable de control de
alimentación/ Control de la antena)
Realice la conexión al terminal de
P.CONT
ANT.CONT
control de alimentación si utiliza el
amplificador de potencia opcional,
o al terminal de alimentación para el
amplificador de refuerzo de la antena
de tipo película o de mástil corto. (Máx.
300 mA, 12 V)
*1 Si no se efectúan las conexiones, no
deje que el cable sobresalga de la
lengüeta.
Rojo (cable de
encendido)
Amarillo (cable de la
batería)
Negro (cable de toma de tierra)
¤ (Al chasis del coche)
Al altavoz delantero
izquierdo
Al altavoz delantero
derecho
Al altavoz trasero
izquierdo
Al altavoz trasero
derecho
1
*
Interruptor de la
llave de encendido
ACC
B+
Caja de fusibles
del coche
Ñ Conexión de un iPod/iPhone
iPod/iPhone
Conector Lightning
KCA-iP103 (0,8 m)
[3]
Terminal USB
(0,8 m)
5V=1A
Tap a
[1]
Corriente de alimentación máxima del iPod/iPhone :
CC 5 V = 1 A
[2]
Se vende por separado
[3]
Accesorio opcional
[2]
[1]
Batería
Español |
45
Page 46

Acerca de esta unidad
Acerca de esta unidad
Más información
Ñ Archivos de audio reproducibles
Formato de
audio
MP3 (.mp3) 16 – 320kbps,
WMA (.wma 16 – 320kbps 16 – 48 kHz
AAC-LC (.m4a) 16 – 320kbps 16 – 48 kHz
• Esta unidad puede mostrar etiquetas ID3 Versión
1.0/1.1/2.2/2.3/2.4 (para MP3).
• El número máximo de caracteres:
– Etiqueta: 30 caracteres
Tasa de bits Frecuencia de
muestreo
16 – 48 kHz
VBR
✎ N OTA
• Los formatos WMA y AAC que están cubiertos con
DRM no pueden reproducirse.
• Aunque los archivos de audio cumplen los estándares
anteriores, puede que no sea posible la reproducción
según los tipos o condiciones del medio o dispositivo.
Ñ Archivos de vídeo aceptados
Formato de
vídeo
MPEG -1
(.mpg, .mpeg)
MPEG -2
(.mpg, .mpeg)
MPEG-4
(.mp4, .avi)
Ñ Archivos de imagen aceptados
• JPEG (.jpg)
Resolución 32 x 32 a 8.192 x 7.680
– Mostrar el archivo puede llevar un tiempo.
– No se pueden reproducir archivos JPEG progresivos
o archivos JPEG sin pérdidas.
• BMP (.bmp)
Resolución 32 x 32 a 8.192 x 7.680
– Mostrar el archivo puede llevar un tiempo.
Códec de vídeo Códec de audio
MPEG -1 MPEG Audio Layer 2
MPEG -2 MPEG Audio Layer 2
MPEG-4 MP3, AAC-LC (2ch)
Resolución de problemas
Lo que parece ser un problema no siempre es serio.
Compruebe los siguientes puntos antes de llamar al
centro de atención al cliente.
• Para el funcionamiento con los componentes externos,
consulte también las instrucciones suministradas con
los adaptadores usados para las conexiones (así como
las instrucciones suministradas con los componentes
externos).
Ñ General
Los altavoces no emiten ningún sonido.
• Ajuste el volumen al nivel óptimo.
• Compruebe las cuerdas y las conexiones.
La unidad no funciona en absoluto.
• Restablezca la unidad. (P.26)
El mando a distancia no funciona.
• Cambie la pila.
Ñ USB
“Reading” (leyendo) no desaparece de la pantalla.
• Desactive y vuelva a activar la alimentación.
Al reproducir una pista, a veces se interrumpe el
sonido.
• Las pistas no se copian adecuadamente en el
dispositivo USB. Copie las pistas de nuevo e inténtelo
de nuevo.
Ñ iPod/iPhone
Los altavoces no emiten ningún sonido.
• Desconecte el iPod/iPhone y, a continuación,
conéctelo de nuevo.
• Seleccione otra fuente y, a continuación, vuelva a
seleccionar “iPod”.
El iPod/iPhone no se enciende o no funciona.
• Compruebe el cable de conexión y su conexión.
• Actualice la versión de firmware.
• Cargue la pila.
• Restablezca el iPod/iPhone.
El sonido está distorsionado.
• Desactive el ecualizador bien en esta unidad o en el
iPod/iPhone.
Se genera mucho ruido.
• Desactive (deseleccione) “VoiceOver” en el iPod/
iPhone. Para obtener más detalles, consulte <http://
www.apple.com>.
46
Page 47

Acerca de esta unidad
Ñ Radio
El preestablecimiento automático AME no
funciona.
• Guarde emisoras manualmente. (P.34)
Ruido estático mientras escucha la radio.
• Conecte la antena firmemente.
Ñ AV-IN
No aparece ninguna imagen en la pantalla.
• Encienda el componente de vídeo si no está
encendido.
• Conecte el componente de vídeo correctamente.
Ñ Bluetooth
La calidad del sonido del teléfono es pobre.
• Reduzca la distancia entre la unidad y el teléfono
móvil Bluetooth.
• Mueva el coche a un lugar en el que tenga una mejor
recepción de señal.
El sonido se interrumpe o salta mientras usa un
reproductor de audio Bluetooth.
• Reduzca la distancia entre la unidad y el reproductor
de audio Bluetooth.
• Apague y, a continuación, vuelva a encender la
unidad. (Cuando el sonido aún no se ha restablecido)
conecte el reproductor de nuevo.
El reproductor de audio no puede ser controlado.
• Compruebe si el reproductor de audio conectado es
compatible con AVRCP (Perfil de control remoto de
Audio/Vídeo).
El dispositivo Bluetooth no detecta la unidad.
• Busque el dispositivo Bluetooth de nuevo.
La unidad no se empareja con el dispositivo
Bluetooth.
• Apague y, a continuación, vuelva a encender el
dispositivo Bluetooth.
• Desconecte el dispositivo Bluetooth conectado
actualmente y, a continuación, registre el nuevo
dispositivo. (P. 36)
Ñ Mando a distancia
El KNA-RCDV331 (accesorio opcional) no puede
controlar la unidad.
• Gire el interruptor del modo de funcionamiento a
“DVD”.
Derechos de autor
• La marca denominativa y los logos de Bluetooth son
propiedad de Bluetooth SIG, Inc. y cualquier uso de
dichas marcas por JVC KENWOOD Corporation está
sujeto a los términos de licencia. El resto de marcas
comerciales y nombres comerciales corresponden a
sus respectivos propietarios.
• “Made for iPod” and “Made for iPhone” mean that an
electronic accessory has been designed to connect
specifically to iPod, or iPhone, respectively, and
has been certified by the developer to meet Apple
performance standards.
Apple is not responsible for the operation of this
device or its compliance with safety and regulatory
standards. Please note that the use of this accessory
with iPod, or iPhone may affect wireless performance.
• iPhone, iPod, iPod classic, iPod nano, and iPod touch
are trademarks of Apple Inc., registered in the U.S. and
other countries.
Lightning is a trademark of Apple Inc.
• The “AAC” logo is a trademark of Dolby Laboratories.
• THIS PRODUCT IS LICENSED UNDER THE MPEG4 VISUAL PATENT PORTFOLIO LICENSE FOR THE
PERSONAL AND NON-COMMERCIAL USE OF A
CONSUMER FOR (¡) ENCODING VIDEO IN COMPLIANCE
WITH THE MPEG-4 VISUAL STANDARD (“MPEG-4
VIDEO”) AND/OR (¡¡) DECODING MPEG-4 VIDEO
THAT WAS ENCODED BY A CONSUMER ENGAGED
IN A PERSONAL AND NON-COMMERCIAL ACTIVITY
AND/OR WAS OBTAINED FROM A VIDEO PROVIDER
LICENSED BY MPEG LA TO PROVIDE MPEG-4 VIDEO. NO
LICENSE IS GRANTED OR SHALL BE IMPLIED FOR ANY
OTHER USE. ADDITIONAL INFORMATION INCLUDING
THAT RELATING TO PROMOTIONAL, INTERNAL AND
COMMERCIAL USES AND LICENSING MAY BE OBTAINED
FROM MPEG LA, LLC. SEE HTTP://WWW.MPEGLA.COM.
Español |
47
Page 48

Acerca de esta unidad
Especicaciones
Ñ Sección del monitor
Tamaño de imagen
: Ancho de 6,75 pulgadas (diagonal)
: 151,8 mm (an.) × 79,7 mm (al.)
Sistema de pantalla
: Panel TN LCD transparente
Sistema de accionamiento
: Sistema de matriz activa TFT
Número de píxeles
: 1.152.000 (800H x 480V x RGB)
Píxeles efectivos
: 99,99 %
Disposición de los píxeles
: Disposición en franjas RGB
Retroiluminación
: LED
Ñ Sección de la interfaz del USB
Estándar USB
: USB 2.0
Sistema de archivos
: FAT 16/ 32
Corriente de alimentación eléctrica máxima
: CC 5 V
Convertidor D/A
: 24 bits
Decodicador de Audio
: MP3/ WMA/ AAC
Decodicador de Vídeo
: MPEG1/ MPEG2/ MPEG4
NOTA
• A pesar de que los píxeles efectivos para el panel
de cristal líquido son del 99,99% o más, es posible
que el 0,01% de los píxeles no se enciendan o no lo
hagan correctamente.
• Las especificaciones se encuentran sujetas a
cambios sin previo aviso.
48
1 A
Ñ Sección de Bluetooth
Tecnol ogía
: Bluetooth Ver. 3.0
Frecuencia
: 2,402 – 2,480 GHz
Potencia de salida
: +4dBm (MAX), 0dBm (AVE), Clase de potencia2
Rango de comunicación máximo
: Línea de visión de aprox. 10 m (32,8 pies)
Códec de audio
SBC
Perl (soporte multiperl)
• HFP (V1.6) (Perfil de manos libres)
• A2DP (V1.3) (Perfil avanzado de distribución de
audio)
• AVRCP (V1.5) (Perfil de mando a distancia de audio/
vídeo)
• PBAP (V1.1.1) (Perfil de acceso a agenda telefónica)
Ñ Sección de DSP
Ecualizador gráco
Banda: 7 Bandas
Frecuencia (BANDA 1 - 7)
: 62,5/ 160/ 400/ 1k/ 2,5k/ 6,3k/ 16k Hz
Ganancia
: ±9 dB
Ñ Sección del sintonizador de FM
Rango de frecuencias (saltos)
: 87.5 MHz – 108.0 MHz (50 kHz)
Sensibilidad útil
: 12,2 dBf
: 1,1 μV/75 Ω
(Solo área de venta de América Latina, S/N : 30 dB)
(Solo área de venta de Europa, S/N : 26 dB)
Sensibilidad de silencio
: 19,2 dBf
: 2,5 μV/75 Ω
(Solo área de venta de América Latina, S/N : 50 dB)
(Solo área de venta de Europa, S/N : 46 dB)
Respuesta de frecuencia
: 30 Hz – 14 kHz
Relación S/N (dB)
: 55 dB (MONO)
Selectividad (± 400 kHz)
: Más de 80 dB
Separación estéreo
: 37 dB (1 kHz)
Page 49

Acerca de esta unidad
Ñ Sección del sintonizador AM
Rango de frecuencias (saltos)
MW: 531 – 1611 kHz (9 kHz) (Área de venta de Europa)
MW: 530 – 1700 kHz (10 kHz) (Área de venta de
América Latina)
Sensibilidad útil
MW: 29μV
Ñ Sección de vídeo
Sistema de color de la entrada externa de vídeo
: N TSC /PAL
Nivel de entrada de vídeo externo (tomas RCA)
: 1,0 Vp-p/ 75 Ω
Nivel de entrada máx. de audio externo (tomas RCA)
: 1,8 V/ 10 kΩ
Nivel de entrada de vídeo (tomas RCA)
: 1,0 Vp-p/ 75 Ω
Nivel de salida de vídeo (tomas RCA)
: 1,0 Vp-p/ 75 Ω
Ñ Sección de audio
Potencia máxima (delantera y trasera)
: 50 W × 4
Potencia completa de todo el ancho de banda
(delantero y trasero)
Potencia completa del ancho de banda (menos del
1 % THD)
: 21 W × 4
Nivel previo (V)
: 2 V/ 10 kΩ
Impedancia de presalida
: ≤ 600 Ω
Impedancia del altavoz
: 4 – 8 Ω
Ñ General
Voltaje de funcionamiento
: 14,4 V (10,5 – 16 V permitido)
Consumo de corriente máximo
: 10 A
Dimensiones de instalación (An × Al × P)
: 183 × 112 × 159 mm
Intervalo de temperaturas de operación
: -10 °C – +60 °C
Peso
: 1,4 kg
Ñ Información acerca de la eliminación de
equipos eléctricos, electrónicos y baterías
al nal de la vida útil (aplicable a los
países de la Unión Europea que hayan
adoptado sistemas independientes de
recogida de residuos)
Los productos y las baterías con el símbolo de un
contenedor con ruedas tachado no podrán ser
desechados como residuos domésticos.
Los equipos eléctricos, electrónicos y baterías al final de
la vida útil, deberán ser reciclados en instalaciones que
puedan dar el tratamiento adecuado a estos productos
y a sus subproductos residuales correspondientes.
Póngase en contacto con su administración local para
obtener información sobre el punto de recogida más
cercano.
Un tratamiento correcto del reciclaje y la eliminación de
residuos ayuda a conservar los recursos y evita al mismo
tiempo efectos perjudiciales en la salud y el medio
ambiente.
Aviso: El símbolo “Pb” debajo del símbolo en baterías
indica que dicha batería contiene plomo.
Español |
49
Page 50

For Europe sales area
Declaration of Conformity with regard to the RE Directive 2014/53/EU
Declaration of Conformity with regard to the RoHS Directive 2011/65/EU
Manufacturer:
JVC KENWOOD Corporation
3-12, Moriyacho, Kanagawa-ku, Yokohama-shi, Kanagawa 221-0022, JAPAN
EU Representative:
JVCKENWOOD NEDERLAND B.V.
Amsterdamseweg 37, 1422 AC UITHOORN, The Netherlands
Para el área de venta de Europa
Declaración de conformidad respecto a la directiva RE 2014/53/EU
Declaración de conformidad con respecto a la Directiva RoHS 2011/65/UE
Fabricante:
JVC KENWOOD Corporation
3-12, Moriyacho, Kanagawa-ku, Yokohama-shi, Kanagawa 221-0022, JAPAN
Representante en la UE:
JVCKENWOOD NEDERLAND B.V.
Amsterdamseweg 37, 1422 AC UITHOORN, Países Bajos
Page 51

English
Hereby, JVC KENWO OD declares that t he radio equipme nt DMX100BT is in
compliance w ith Directiv e 2014/53/EU. The full text o f the EU declaratio n of
conform ity is available at t he following inter net address:
Français
Par la prése nte, JVC KENWOOD déc lare que l’équipement ra dio DMX100BT est
conform e à la directive 2014/53/UE . L’intégralit é de la déclaration d e conformité
UE est disp onible à l’adresse In ternet suivante :
Deutsch
Hiermit er klärt JVC KENWO OD, dass das Funkgerät DM X100BT der Richtlini e
2014/53/EU entspr icht. Der volle Tex t der EU-Konform itätserklär ung steht unter
der folgen den Internetad resse zur Verf ügung:
Nederlands
Hierbij ver klaart JVC KENWO OD dat de radioapp aratuur DMX100BT in
overeens temming is met Rich tlijn 2014/53/EU. De volledige t ekst van de EUverklaring van overeenstemming is te vinden op het volgende inter netadres:
Italiano
Con la prese nte, JVC KENWOOD dichi ara che l’apparecchi o radio DMX100BT
è conform e alla Direttiva 2 014/53/UE. Il tes to integrale della d ichiarazione di
conformità UE è disponibile al seguente indirizzo internet :
Español
Por la prese nte, JVC KENWOOD dec lara que el equipo de r adio DMX100BT cumple
la Direc tiva 2014/53/EU. El texto co mpleto de la declara ción de conformi dad con
la UE está di sponible en la siguie nte dirección de int ernet:
Português
Deste mo do, a JVC KENWOOD dec lara que o equipamen to de rádio DMX100BT
está em co nformidade com a Di retiva 2014/53/UE. O tex to integral da dec laração
de confor midade da UE está di sponível no segu inte endereço de inte rnet:
Polska
Niniejsz ym, JVC KENWOOD dek laruje, że sprzęt r adiowy DMX100BT je st zgodny
z dyrekt ywą 2014/53/UE. Peł ny tekst deklar acji zgodności E U jest dostępn y pod
adresem:
Český
Společn ost JVC KENWOOD tí mto prohlašuje, že rá diové zařízení DMX100 BT
splňuje po dmínky směrnice 2 014/53/EU. Plný text EU prohláš ení o shodě je
dostupný na následující internetové adre se:
Magyar
JVC KENWOOD e zennel kijelent i, hogy a DMX100BT rádió berendezés me gfelel a
2014/53/EU irányelvn ek. Az EU konfor mitási nyilatkoza t teljes szövege az a lábbi
weboldalo n érhető el:
Hrvatski
JVC KENWOOD o vim izjavljuje da je ra dio oprema DMX100BT u sk ladu s
Direkt ivom 2014/53/EU. Cjeloviti tek st deklaraci je Europske unije o usk lađenosti
dostup an je na sljedećoj int ernet adresi:
Svenska
Härmed f örsäkrar JVC KE NWOOD att radio utrustning en DMX100BT är i enlighet
med direk tiv 2014/53 / EU. Den fullst ändiga texten av EU -försäkra n om
överensstämmelse finns på följande Interne tadress :
Suomi
JVC KENWOOD j ulistaa täten, et tä radiolaite D MX100BT on direktii vin 2014/53/
EU mukainen. EU-vaatimustenmukaisuus vakuutus löytyy kokonaisuudessa an
seuraavasta internet-osoitteesta:
Slovensko
S tem JVC KENWO OD izjavlja, da je radij ska oprema DMX100BT v sk ladu z
Direkt ivo 2014/53/EU. Celotno bese dilo direktive EU o s kladnosti je do stopno na
tem spletnem naslovu:
Slovensky
Spoločn osť JVC KENWOOD t ýmto vyhlasuje , že rádiové zariade nie DMX100BT
vyhovu je smernici 2014/53/EÚ. Celý te xt EÚ vyhlásen ia o zhode nájdete na
nasledovnej internetovej adrese:
Dansk
Herve d erklærer JVC KENWO OD, at radioudst yret DMX100BT
er i overenss temmelse med Dir ektiv 2014/53/EU. EUoverensstemmelseserklæringens fulde ordlyd er tilgængelig på følgende
internetadresse:
Norsk
JVC KENWOOD e rklærer herve d at radiouts tyret DMX100BT er i s amsvar med
Direktiv 2014/53/EU. Den fullstendige teksten til EU-konformitetserklæringen er
tilgjengelig på følgende internettaddresse:
Ελληνικά
Με το παρόν, η JVC KE NWOOD δηλώνει ότ ι ο ραδιοεξοπλισ μός DMX100BT
συμμορ φώνεται με τη ν Οδηγία 2014/53/ΕΕ. Το πλήρες κε ίμενο της δήλ ωσης
συμμόρ φωσης της ΕΕ εί ναι διαθέσιμο σ την ακόλουθη δ ιεύθυνση σ το διαδίκτυ ο:
Eesti
Käesol evaga JVC KENWOOD ki nnitab, et DMX100BT ra adiovarustus o n
vastavu ses direktii viga 2014/53/EL. ELi vas tavusdeklarat siooni tervi ktekst on
kättesaadav järgmisel inter netiaadressil:
Latviešu
JVC KENWOOD a r šo deklarē, ka radi o aparatūra DMX100 BT atbilst direk tīvas
2014/53/ES prasī bām. Pilns ES atbi lstības dek larācijas teks ts ir pieejams šā dā
tīmekļa adresē:
Lietuviškai
Šiuo JVC KENWO OD pažymi, kad r adijo įranga DMX100 BT atitinka 2014/53/EB
direkt yvos reikalavi mus. Visą EB direk tyvos atit ikties dekla racijos tekst ą galite
rasti šiu o internetiniu ad resu:
Malti
B’dan, JVC KENWOO D jiddikjara li t-tagħ mir tar-radju DMX100BT h uwa konformi
mad-Dire ttiva 2014/53/UE. It-te st kollu tad-dik jarazzjoni t a’ konformità huw a
disponib bli fl-indiriz z intranet li ġej:
Таким чином, компанія JVC KENWOOD заявляє, що радіообладнання
DMX100BT відповідає Директиві 2014/53/EU. Повний текст декларації про
відпові дність ЄС можна з найти в Інтерне ті за такою адре сою:
Türkçe
Burada, JVC K ENWOOD DMX100BT rad yo ekipmanının 2014/53/AB Direkt ifine
uygun olduğunu bildirir. AB uyumluluk deklarasyonunun tam metni aşağıdaki
internet adresinde mevcuttur.
JVC KENWOOD настоящим заявляет, что радиооборудование DM X100BT
соответствует Дирек тиве 2014/53/EU. Полный текст декларации
соотве тствия ЕС дос тупен по с ледующему ад ресу в сети Инт ернет:
Limba română
Prin prez enta, JVC KENWOOD de clară că echipam entul radio DM X100BT es te
în confor mitate cu Direc tiva 2014/53/UE. Textul in tegral al declar ației de
conform itate UE este disp onibil la urmatoar ea adresă de inter net:
С настоящото JVC KENWOOD декларира, че радиооборудването на
DMX10 0BT е в съот ветствие с Ди ректива 2014/53/ЕС . Пълният текс т на ЕС
декларацията за съ ответствие е достъпен на сле дния интернет адрес:
URL: http://ww w.kenwood.com/cs/ce /eudoc/
Page 52

 Loading...