


PresentAir™ Pro
Bluetooth® 4.0 LE
Presenter
QUICK START GUIDE |
GYORSKALAUZ |
|
GUIDE DE DEMARRAGE |
PŘÍRUČKA ZAČÍNÁME |
|
RAPIDE |
SZYBKI START |
|
KURZANLEITUNG |
||
КРАТКОЕ |
||
|
||
SNELSTARTGIDS |
РУКОВОДСТВО |
|
GUIDA RAPIDA |
ПОЛЬЗОВАТЕЛЯ |
|
MANUAL DE INÍCIO |
||
GUÍA RÁPIDA |
||
RÁPIDO |
||
|
S/N:

Register New Product Now To Activate
Warranty!
Enregistrez votre nouveau produit maintenant pour activer la garantie !
Zum Aktivieren der Garantie neues Produkt gleich registrieren!
Registreer uw nieuwe product nu om de garantie te activeren!
Registrare subito il nuovo prodotto per attivare la garanzia.
¡Registre su nuevo producto ahora para activar la garantía!
Regisztrálja most új termékét a garancia aktiválásához!
Chcete-li aktivovat záruku, zaregistrujte si nový produkt již nyní!
Zarejestruj nowy produkt, aby objąć go gwarancją!
Чтобы активировать гарантию, зарегистрируйте продукт прямо сейчас!
Registe já o novo produto para activar a garantia!
PresentAir™ Pro |
|
Bluetooth® 4.0 LE |
|
Presenter |
|
English.................................... |
4 |
Français................................ |
11 |
Deutsch................................ |
19 |
Nederlands.......................... |
28 |
Italiano................................. |
36 |
Español................................ |
44 |
Magyar.................................. |
52 |
Čeština................................. |
60 |
Polski................................... |
68 |
Русский................................ |
76 |
Português............................. |
85 |
register.kensington.com
English |
|
|
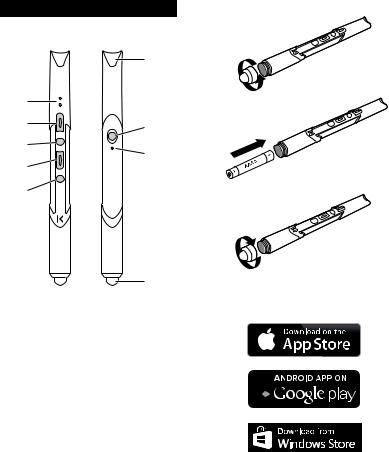
Components |
|
|
|
F |
|
A |
|
|
B |
G |
|
C |
H |
|
D |
||
|
||
E |
|
I
ADual LEDs
BUp Button
CMiddle Button
DDown Button
ELaser Button
FLaser
GMode Button
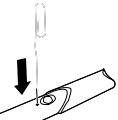
HReset Button
IStylus
4
Getting Started
1
2
3
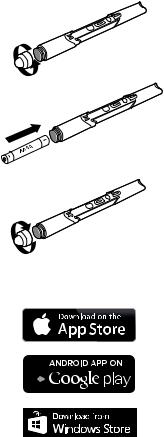
Download and install PresenterWorks™ app
5

Pairing
NOTE: If this is your first time pairing PresentAir™ Pro to your mobile device, follow the instructions below.
1Make sure your mobile device’s Bluetooth is On.
2Open the PresenterWorks™ app.
3Follow the pairing instructions in the app to pair your PresentAir™ Pro to your mobile device.
4When your PresentAir™ Pro is successfully paired, you will see the main screen of the app.
NOTE: if you currently have one mobile device paired with PresentAir™ Pro and want to pair with a new mobile device, un-pair PresentAir™ Pro from the current mobile device first.
If you want to use PresentAir™ Pro without the app, follow the instructions below.
1Make sure your PresentAir™ Pro is not in sleep mode.
2Press and hold the mode button for 3 seconds. The blue LED will blink.
3Go to Bluetooth settings on your mobile device and select PresentAir XXXX to complete pairing.
Power and Battery
•PresentAir™ Pro will go to sleep mode if it’s left on and not being used. Press the Mode Button or Laser Button to wake up PresentAir™ Pro.
6
•Press the mode button for 7 seconds when PresentAir™ Pro is active and it will go to sleep mode.
•Under normal use the battery can last about 6 months.
Mode Switching
PresentAir™ Pro has two default modes and one custom mode configurable via the PresenterWorks™ app.
Presenter Mode:
Press Mode Button and Up Button
Media Mode:
Press Mode Button and Middle Button
Custom Mode:
Press Mode Button and Down Button
Hardware Reset
If the device stops functioning properly or has become unresponsive, performs a hardware reset by pressing the reset button using a small paperclip. The LED indicator will blink blue during reset.
7

Need More?
For additional instructions and disclosures, see the full Instruction Guide online at: www.kensington.com/man/K72448
Technical Support
Technical support is available to all registered users of Kensington products. Technical Support contact information can be found on the back page of this manual.
Web Support
You may find the answer to your problem in the Frequently Asked Questions (FAQ) section of the Support area on the Kensington Website: www.support. kensington.com.
Telephone Support
There is no charge for technical support except long-distance charges where applicable. Please visit www.kensington.com for telephone support hours. In Europe, technical support is available by telephone Monday to Friday 09:00 to 18:00 (Central European time).
Please note the following when calling support:
•Call from a phone where you have access to your device.
•Be prepared to provide the following information:
–Name, address, and telephone number
–Name of the Kensington product
8
–Make and model of your computer
–System software and version
–Symptoms of the problem and what led to them
CLASS 2 LASER SAFETY STATEMENT
|
This laser device complies |
|
with International Standard |
|
IEC/EN 60825-1: ED 2. 2007, |
|
Class 2 Laser Product and also |
|
complies with 21 CFR 1040.10 |
|
and 1040.11, except for |
650+/- 20nm |
deviations pursuant to laser |
|
Notice No. 50, dated June 24, |
|
2007: |
1.Emission of a parallel beam of visible light;
2.Maximum Power of 1 milliwatt CW, wavelength range 650±20 nanometers;
3.Operating temp between 0 ° C (32° F) to 40° C (104° F).
•Do not disassemble the device
•Do not use the device outside of its specified operating temperature range. If the device is exposed to an environment outside of its prescribed operation, turn off the device and allow the temperature to stabilize within the specified operating range before using the device.
FEDERAL COMMUNICATION COMMISSION INTERFERENCE STATEMENT
This device complies with Part 15 of the FCC Rules. Operation is subject to the following two conditions:
(1) This device may not cause harmful interference, and (2) This device must accept any interference received, including interference that may cause undesired operation.
FCC RF RADIATED EXPOSURE STATEMENT
This device has been evaluated to meet general RF exposure requirements. The device can be used in portable exposure conditions without RF restrictions.
Modifications: Modifications not expressly approved by Kensington may void the user’s authority to operate the device under FCC regulations and must not be made.
Shielded Cables: In order to meet FCC requirements, all connections to equipment using a Kensington input device should be made using only the shielded cables.
9
IC STATEMENT
This device has been tested and found to comply with the limits specified in RSS-210. Operation is subject to the following two conditions: (1) This device may not cause interference, and (2) This device must accept any interference, including interference that may cause undesired operation of the device.
IC RF EXPOSURE STATEMENT
This equipment complies with IC radiation exposure limits set forth for an uncontrolled environment. The device can be used in portable exposure conditions without RF restrictions.
CE DECLARATION OF CONFORMITY
Kensington declares that this wireless product model is in compliance with the essential requirements and other relevant provisions of R&TTE directive (1995/5/ EC) and other applicable EC directives.
For Europe, a copy of the Declaration of Conformity for this product may be obtained by clicking on the Compliance Documentation’ link at www.support. kensington.com
INFORMATION FOR EU MEMBER-STATES ONLY
The use of the symbol indicates that this product may not be treated as household
waste. By ensuring this product is disposed of correctly, you will help prevent potential
negative consequences for the environment and human health, which could otherwise be
caused by inappropriate waste handling of this product. For more detailed information about recycling of this product, please contact your local city office, your household waste disposal service, or the shop where you purchased the product.
Kensington and the ACCO name and design are registered trademarks of ACCO Brands. The Kensington Promise is a service mark of ACCO Brands. PresentAir and PresenterWorks are trademarks of ACCO Brands. All other registered and unregistered trademarks are the property of their respective owners.
© 2014 Kensington Computer Products Group, a division of ACCO Brands USA LLC. Any unauthorized copying, duplicating, or other reproduction of the contents hereof is prohibited without written consent from Kensington Computer Products Group. All rights reserved. 08/14
10
Français |
|
|
Composants |
|
|
|
F |
|
A |
|
|
B |
G |
|
C |
H |
|
D |
||
|
||
E |
|
I
ADouble LED
BBouton Haut
CBouton Milieu
DBouton Bas
EBouton Laser
FLaser
GBouton Mode
HBouton Réinitialiser
IStylet
11
Démarrage
1
2
3
Téléchargez et installez l’application PresenterWorks™
Appairage
REMARQUE : Si c’est la première fois que vous appairez PresentAir™ Pro avec votre appareil mobile, suivez les instructions ci-dessous.
1Vérifiez que la fonction Bluetooth de votre appareil mobile est activée.
2Ouvrez l’application PresenterWorks™.
3Suivez les instructions d’appairage de l’application pour appairer PresentAir™ Pro avec votre appareil mobile.
4Une fois PresentAir™ Pro appairé, l’écran principal de l’application s’affiche.
REMARQUE : Si l’un de vos appareils mobiles est déjà appairé avec PresentAir™ Pro et que vous voulez appairer un nouvel appareil, désappairez d’abord PresentAir Pro de l’appareil actuel.
Si vous voulez utiliser PresentAir™ Pro sans l’application, suivez les instructions ci-dessous.
1Vérifiez que PresentAir™ Pro n’est pas en mode Veille.
2Maintenez enfoncé le bouton Mode pendant 3 secondes. La LED bleue clignote.
3Accédez aux paramètres Bluetooth de votre appareil mobile et sélectionnez PresentAir XXXX pour effectuer l’appairage.
12 |
13 |

Alimentation et batterie
•PresentAir™ Pro entre en mode veille s’il reste allumé et inactif. Appuyez sur le bouton Mode ou Laser pour activer PresentAir™ Pro.
•Appuyez sur le bouton Mode pendant 7 secondes lorsque PresentAir™ Pro est actif pour qu’il entre en mode veille.
•En condition d’utilisation normale, la batterie peut durer jusqu’à
6 mois.
Changement de mode
PresentAir™ Pro dispose de deux modes par défaut et d’un mode personnalisé configurable via l’application PresenterWorks™.
Mode Présentation :
Appuyez sur les boutons Mode et Haut
Mode Multimédia :
Appuyez sur les boutons Mode et Milieu
Mode Personnalisé
Appuyez sur les boutons Mode et Bas
Réinitialisation du matériel
Si l’appareil ne fonctionne plus correctement ou s’il ne répond plus, effectuez une réinitialisation en appuyant sur le bouton Réinitialiser au moyen d’un trombone. La LED clignote bleu pendant la réinitialisation.
Besoin d’informations supplémentaires ?
Pour obtenir des informations et des instructions supplémentaires, consultez le guide d’instructions en ligne à l’adresse : www.kensington.com/man/K72448
Assistance technique
Une assistance technique est disponible pour tous les utilisateurs de produits Kensington enregistrés. Les coordonnées de l’assistance technique sont disponibles au dos de ce manuel.
14 |
15 |

Assistance Web
Il se peut que vous trouviez une solution à votre problème dans la Foire aux questions (FAQ) de la zone Assistance du site Web de Kensington : www.support.kensington.com.
Support téléphonique
L’assistance technique est gratuite, à l’exception des coûts d’appel longue distance. Veuillez consulter le site www.kensington.com pour les heures d’ouverture de l’assistance téléphonique. En Europe, l’assistance technique est disponible par téléphone du lundi au vendredi, de 9h00 à 18h00.
Veuillez noter ce qui suit lors d’une demande d’assistance :
•Vous devez avoir accès à votre périphérique lorsque vous appelez l’assistance technique.
•Les informations suivantes vous seront demandées:
–Nom, adresse et numéro de téléphone
–Nom du produit Kensington
–Fabricant et modèle de votre ordinateur
–Logiciel et version de votre système
–Symptômes du problème et faits qui en sont à l’origine
DÉCLARATION DE SÉCURITÉ LASER DE CLASSE 2


 650+/- 20nm
juin 2007 :
Ce périphérique laser est conforme au standard international IEC/EN 60825-1 : ED 2. 2007, produit laser de classe 2 et est également conforme à 21 CFR 1040.10 et 1040.1, sauf pour le manquement concernant la notice du laser nº 50, datée du 24
1.Émission d’un rayon parallèle de lumière visible ;
2.Puissance maximum de 1 milliwatt CW, plage de longueur d’onde 650±20 nanomètres ;
3.Température de fonctionnement comprise entre 0 ° C et 40° C.
•Ne pas désassembler le dispositif
•Ne pas utiliser le dispositif en dehors de la plage de température opérationnelle spécifiée. Si le dispositif est exposé à un environnement en dehors de la plage de température opérationnelle spécifiée, le mettre hors tension et attendre que la température se stabilise dans la plage opérationnelle spécifiée avant d’utiliser le dispositif.
DECLARATION DE LA FCC (FEDERAL COMMUNICATION COMMISSION) SUR LES INTERFERENCES
Cet appareil est conforme à l’article 15 de la réglementation de la FCC. Son utilisation est soumise aux deux conditions suivantes : (1) Cet appareil ne doit pas provoquer d’interférences nuisibles et (2) Cet appareil doit absorber les interférences perçues, y compris celles susceptibles d’entraîner un dysfonctionnement.
DÉCLARATION DE LA FCC SUR L’EXPOSITION AUX RF
Cet appareil a été évalué comme répondant aux exigences d’exposition générales aux RF. Cet appareil peut être utilisé dans des conditions d’exposition à des dispositifs portables sans restrictions RF.
Modifications : Toute modification non expressément approuvée par Kensington peut entraîner, pour l’utilisateur, une interdiction totale d’utiliser l’appareil en vertu de la réglementation de la FCC et est donc formellement interdite.
Câbles blindés : Afin de satisfaire aux exigences de la FCC, tous les raccordements à un équipement utilisant un dispositif d’entrée Kensington doivent exclusivement être effectués au moyen de câbles blindés.
16 |
17 |
DECLARATION IC
Cet appareil a été testé et déclaré conforme aux restrictions établies dans l’article RSS-210. Son utilisation est soumise aux deux conditions suivantes :
(1) Cet appareil ne doit pas provoquer d’interférences nuisibles et (2) Cet appareil doit absorber les interférences perçues, y compris celles susceptibles d’entraîner un dysfonctionnement.
DÉCLARATION DE L’IC SUR L’EXPOSITION AUX RF
Cet équipement est conforme aux limites d’exposition aux RF définies pour un environnement non contrôlé. Cet appareil peut être utilisé dans des conditions d’exposition à des dispositifs portables sans restrictions RF.
DECLARATION DE CONFORMITE DE LA CE
Kensington déclare que ce modèle de produit sans fil est conforme aux impératifs et autres dispositions pertinentes de la directive R&TTE (1995/5/CE) et des autres directives applicables de la Communauté européenne.
Pour l’Europe, il est possible d’obtenir une copie de la Déclaration de conformité de ce produit en cliquant sur le lien Compliance Documentation sur la page www.support.kensington.com
INFORMATIONS APPLICABLES UNIQUEMENT DANS LES PAYS MEMBRES DE L’UNION EUROPEENNE
L’utilisation de ce symbole indique que ce produit ne peut pas être traité comme un
déchet ménager ordinaire. En vous débarrassant de ce produit dans le respect de la réglementation en vigueur, vous
contribuez à éviter les effets négatifs potentiels sur l’environnement et sur la santé humaine. Pour plus d’informations détaillées concernant le recyclage de ce produit, veuillez contacter votre municipalité, votre service de collecte des déchets ménagers ou le magasin où vous avez acheté le produit.
Kensington et le nom et le design ACCO sont des marques déposées d’ACCO Brands. The Kensington Promise est une marque de service d’ACCO Brands. PresentAir et PresenterWorks sont des marques déposées d’ACCO. Toutes les autres marques déposées ou non sont la propriété de leurs détenteurs respectifs.
© 2014 Kensington Computer Products Group, une division d’ACCO Brands. Toute copie, duplication ou autre reproduction non autorisée du contenu de ce manuel est interdite sans le consentement écrit de Kensington Computer Products Group. Tous droits réservés. 08/14
18
Deutsch |
|
|
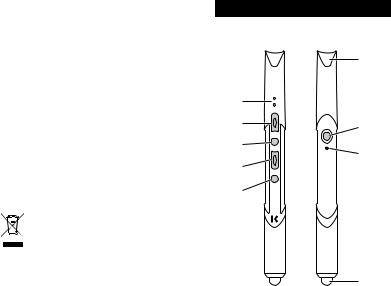
Komponenten |
|
|
|
F |
|
A |
|
|
B |
G |
|
C |
H |
|
D |
||
|
||
E |
|
I
AZwei LEDs
BTaste “Nach oben”
CTaste “Mitte”
DTaste “Nach unten”
ETaste “Laser”
FLaser
GTaste “Modus”
HTaste “Zurücksetzen”
IEingabestift
19
Erste Schritte
1
2
3
Laden Sie die PresenterWorks™- App herunter und installieren Sie sie
Gerätekopplung
HINWEIS: Wenn Sie den PresentAir™ Pro zum ersten Mal mit Ihrem Mobilgerät koppeln, gehen Sie wie folgt vor:
1Vergewissern Sie sich, dass die Bluetooth-Funktion Ihres Mobilgeräts aktiviert ist.
2Starten Sie die PresenterWorks™-App.
3Folgen Sie der Anleitung zur Koppelung in der App, um Ihren PresentAir™ Pro mit Ihrem Mobiltelefon zu koppeln.
4Sobald Ihr PresentAir™ Pro erfolgreich gekoppelt wurde, wird der Hauptbildschirm der App angezeigt.
HINWEIS: Wenn Sie bereits ein Mobilgerät mit dem PresentAir™ Pro gekoppelt haben und ein neues Mobilgerät verwenden möchten, müssen Sie den PresentAir Pro zuerst vom aktuellen Mobilgerät trennen.
Wenn Sie PresentAir™ Pro ohne die App nutzen möchten, gehen Sie wie folgt vor:
1Vergewissern Sie sich, dass sich Ihr PresentAir™ Pro nicht im StandbyModus befindet.
2Halten Sie die Taste “Modus” für 3 Sekunden gedrückt. Die blaue LED auf der Rückseite blinkt.
|
|
20 |
21 |
3Wechseln Sie zu den BluetoothEinstellungen auf Ihrem Mobilgerät und wählen Sie PresentAir XXXX aus, um die Koppelung fertigzustellen.
Stromversorgung und Batterie
•Wenn er eingeschaltet ist und nicht verwendet wird, wechselt der PresentAir™ Pro in den StandbyModus. Drücken Sie die Taste “Modus” oder die Taste “Laser”, um den PresentAir™ Pro wieder zu aktivieren.
•Drücken Sie 7 Sekunden die Taste “Modus”, wenn der PresentAir™ Pro aktiv ist und er wechselt in den Standby-Modus.
•Bei normaler Nutzung hält die Batterie ungefähr 6 Monate.
Moduswechsel
Der PresentAir™ Pro verfügt über zwei Standardmodi und einen benutzerdefinierten Modus, der sich über die PresenterWorks™-App konfigurieren lässt.
Präsentationsmodus:
Drücken Sie die Taste “Modus” und die Taste “Nach oben”.
Medienmodus:
Drücken Sie die Taste “Modus” und die Taste “Mitte”.
Benutzerdefinierter Modus:
Drücken Sie die Taste “Modus” und die Taste “Nach unten”.
22
Zurücksetzen der Hardware
Wenn das Gerät nicht mehr richtig funktioniert oder nicht mehr reagiert, setzen Sie es zurück, indem Sie mit einer kleinen Büroklammer auf die Taste “Zurücksetzen” drücken. Die LED-Anzeige blinkt während dem Zurücksetzen.
Möchten Sie weitere Infos?
Weitere Anleitungen und Beschreibungen finden Sie im vollständigen Bedienungshandbuch unter: www.kensington.com/man/K72448
Technischer Support
Alle registrierten Benutzer von Kensington-Produkten erhalten technische Unterstützung. Die Kontaktinformationen zur technischen Unterstützung sind der Rückseite dieser Bedienungsanleitung zu entnehmen.
23

Unterstützung über das Internet
Viele Probleme lassen sich bereits mithilfe der „Häufig gestellten Fragen“ (Frequently Asked Questions, (FAQ)) im Unterstützungsbereich auf der Kensington-Website lösen: www.support.kensington.com.
Telefonische Unterstützung
Mit Ausnahme von eventuellen Ferngesprächsgebühren entstehen keine Kosten für die technische Unterstützung. Die Geschäftszeiten der telefonischen Unterstützung entnehmen. Sie bitte unserer Website www.kensington.com. In Europa sind wir telefonisch für Sie da: von Montag bis Freitag zwischen 9:00 und 18:00 Uhr.
Beachten Sie hinsichtlich der telefonischen Kontaktaufnahme mit der technischen Unterstützung Folgendes:
•Benutzen Sie für Anrufe ein Telefon, von dem aus Sie Zugriff auf das Gerät haben.
•Bereiten Sie folgende Informationen vor:
–Name, Anschrift, Telefonnummer
–Bezeichnung des KensingtonProdukts
–Hersteller und Modell des Computers
–Systemsoftware und Version
–Symptome des Problems und Ursachen
SICHERHEITSERKLÄRUNG FÜR LASER KLASSE 2
Dieses Lasergerät entspricht dem
internationalen
Standard IEC/EN 60825- 1: ED 2, 2007 als Laserprodukt der Klasse
2 sowie 21 CFR 1040.10
und 1040.11 mit
Ausnahme der
Abweichungen gemäß “Laser Notice” Nr. 50
vom 24. Juni 2007:
1.Emission eines parallelen Strahls sichtbaren Lichts;
2.Leistung nicht höher als 1 Milliwatt CW, Wellenlänge 650±20 Nanometer;
3.Betriebstemperatur zwischen 0 °C (32 °F) und 40 °C (104 °F).
•Nehmen Sie das Gerät nicht auseinander.
•Verwenden Sie das Gerät nicht außerhalb des angegebenen Betriebstemperaturbereichs. Liegt die Umgebungstemperatur außerhalb des zulässigen Bereichs, schalten Sie das
Gerät aus und warten Sie, bis die Betriebstemperatur sich im zulässigen Bereich stabilisiert hat, bevor Sie das Gerät verwenden.
FCC-KONFORMITÄTSERKLÄRUNG
Dieses Gerät erfüllt die Auflagen gemäß Part 15 der FCC-Vorschriften. Der Betrieb erfolgt unter Einhaltung von zwei Bedingungen: (1) Das Gerät darf keine ungünstigen Interferenzen verursachen und (2) das Gerät muss alle eingehenden Interferenzen tolerieren, dies gilt auch für Interferenzen, die Betriebsstörungen verursachen.
INFORMATIONEN ZU FCC-GRENZWERTEN FÜR HOCHFREQUENZSTRAHLUNG
Dieses Gerät entspricht den allgemeinen FCCGrenzwerten für Hochfrequenzstrahlung. Dieses Gerät kann ohne Einschränkungen hinsichtlich Hochfrequenzstrahlung als portables Gerät zum Einsatz gebracht werden.
Änderungen am Gerät: Nicht ausdrücklich durch Kensington genehmigte Änderungen können die Betriebszulassung des Geräts gemäß den FCCVorschriften ungültig werden lassen und müssen unterbleiben.
24 |
25 |

Geschirmte Kabel: Entsprechend den FCC-Vorschriften sind alle Verbindungen zu anderen Geräten mit einem Kensington-Gerät ausschließlich über geschirmte Kabel vorzunehmen.
IC-KONFORMITÄTSERKLÄRUNG
Dieses Gerät erfüllt den Tests zufolge die Auflagen gemäß RSS-210. Der Betrieb erfolgt unter Einhaltung von zweiBedingungen: ((1) Das Gerät darf keine ungünstigen Interferenzen verursachen und (2) das Gerät muss alle eingehendenInterferenzen tolerieren, dies gilt auch für Interferenzen, die Betriebsstörungen verursachen.
INFORMATIONEN ZU GRENZWERTEN VON INDUSTRY CANADA FÜR HOCHFREQUENZSTRAHLUNG
Dieses Gerät entspricht den Grenzwerten für Strahlenbelastung, die von Industry Canada für eine nicht kontrollierte Umgebung festgelegt wurden. Dieses Gerät kann ohne Einschränkungen hinsichtlich Hochfrequenzstrahlung als portables Gerät zum Einsatz gebracht werden.
CE-KONFORMITÄTSERKLÄRUNG
Kensington erklärt, dass diese kabellose Produktversion die wesentlichen Anforderungen und andere zutreffende Bestimmungen der R&TTEDirektive (1995/5/EC) und anderer geltenden EC-Vorschriften erfüllt.
Für Europa finden Sie evtl. eine Kopie der Konformitätserklärung für dieses Produkt, indem Sie unter www.support.kensington.com auf den Link ‘Compliance Documentation’ klicken.
INFORMATIONEN FÜR EU-MITGLIEDSSTAATEN
Die Verwendung des Symbols gibt an, dass dieses Produkt nicht als Hausmüll behandelt
werden darf. Durch das Sicherstellen der
korrekten Beseitigung dieses Produkts tragen Sie dazu bei, mögliche negative Auswirkungen
auf die Umwelt und die Gesundheit von Menschen zu vermeiden, die anderenfalls bei ungeeigneter Beseitigung dieses Produkts hervorgerufen werden können. Detaillierte Informationen zur Wiederverwertung dieses Produkts erhalten Sie bei den örtlichen Behörden, bei dem für Ihren Wohnsitz zuständigen Wertstoffverwerter bzw. dem Geschäft, in dem Sie dieses Produkt erworben haben.
Kensington und der Name ACCO sowie sein Design sind registrierte Handelsmarken von ACCO Brands. „The Kensington Promise“ ist eine Dienstleistungsmarke von ACCO Brands. PresentAir und PresenterWorks sind Marken von ACCO Brands. Alle anderen registrierten und nicht registrierten Handelsmarken sind Eigentum der jeweiligen Unternehmen.
© 2014 Kensington Computer Products Group, ein Bereich von ACCO Brands. Die unerlaubte
Vervielfältigung, Duplizierung oder eine andere Form der Reproduktion von Inhalten hieraus ist ohne schriftliche Genehmigung durch die Kensington Technology Group untersagt. Alle Rechte vorbehalten. 08/14
26 |
27 |

Nederlands |
|
|
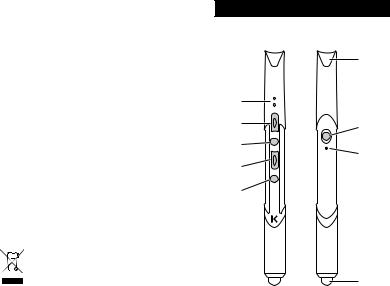
Onderdelen |
|
|
|
F |
|
A |
|
|
B |
G |
|
C |
H |
|
D |
||
|
||
E |
|
I
ADubbele LED’s
BKnop Omhoog
CMiddelste knop
DKnop Omlaag
ELaserknop
FLaser
GModusknop
HResetknop
IStylus
28
Alan de slag
1
2
3
PresenterWorks™-app downloaden en installeren
29
 Loading...