


Concert Performer Series Digital Piano
Owner’s Manual
Model: CP117
II
Alldescriptionsandspecificationsinthismanualaresubjecttochangewithout.notice
Important Safety Instructions |
SAVE THESE INSTRUCTIONS |
INSTRUCTIONS PERTAINING TO A RISK OF FIRE, ELECTRIC SHOCK, OR INJURY TO PERSONS
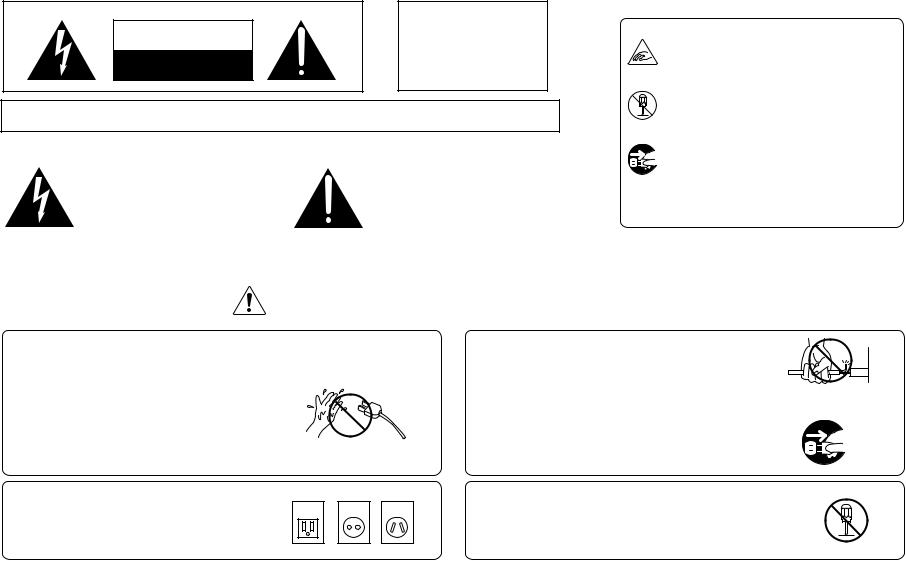
CAUTION |
RISK OF ELECTRIC SHOCK |
DO NOT OPEN |
WARNING
TO REDUCE THE RISK OF FIRE OR ELECTRIC SHOCK, DO NOT EXPOSE THIS PRODUCT TO RAIN OR MOISTURE.
Examples of Picture Symbols
denotes that care should be taken.
The example instructs the user to take care not to allow fingers to be trapped.
denotes a prohibited operation.
AVIS : RISQUE DE CHOC ELECTRIQUE - NE PAS OUVRIR.
TO REDUCE THE RISK OF ELECTRIC SHOCK, DO NOT REMOVE COVER (OR BACK).
NO USER-SERVICEABLE PARTS INSIDE. REFER SERVICING TO QUALIFIED SERVICE PERSONNEL.
The lighting flash with arrowhead symbol, within |
The exclamation point within an equilateral triangle |
an equilateral triangle, is intended to alert the user |
|
to the presence of uninsulated "dangerous voltage" |
is intended to alert the user to the presence of |
within the product's enclosure that may be of |
important operating and maintenance (servicing) |
sufficient magnitude to constitute a risk of electric |
instructions in the leterature accompanying the |
shock to persons. |
product. |
The example instructs that disassembly of the product is prohibited.
denotes an operation that should be carried out.
The example instructs the user to remove the power cord plug from the AC outlet.
Read all the instructions before using the product.
WARNING - When using electric products, basic precautions should always be followed, including the following.
|
WARNING |
Indicates a potential hazard that could result in death |
|
|
or serious injury if the product is handled incorrectly. |
|
Do not use this product near water - for example, near a bathtub, washbowl, kitchen sink, in a wet basement, or near a swimming pool, or the like.
Do not touch the power plug with wet hands. There is a risk of electrical shock. Treat the power cord with care as well. Stepping on or tripping over it can break or short-circuit the wire inside.
The product should be connected to a |
120V |
230V |
240V |
|
power supply only of the type described |
||||
|
|
|
||
in the operatiing instructions or as |
|
|
|
|
marked on the product. |
|
|
|
Pulling the AC power cord itself may damage the cord, causing a fire, electric shock or short-circuit.
When disconnecting the AC power cord's plug, always hold the plug and pull it to remove it.
Do not attempt to service the product beyond that described in the user-maintenance instructions. All other servicing should be reffered to qualified service personnel.
III
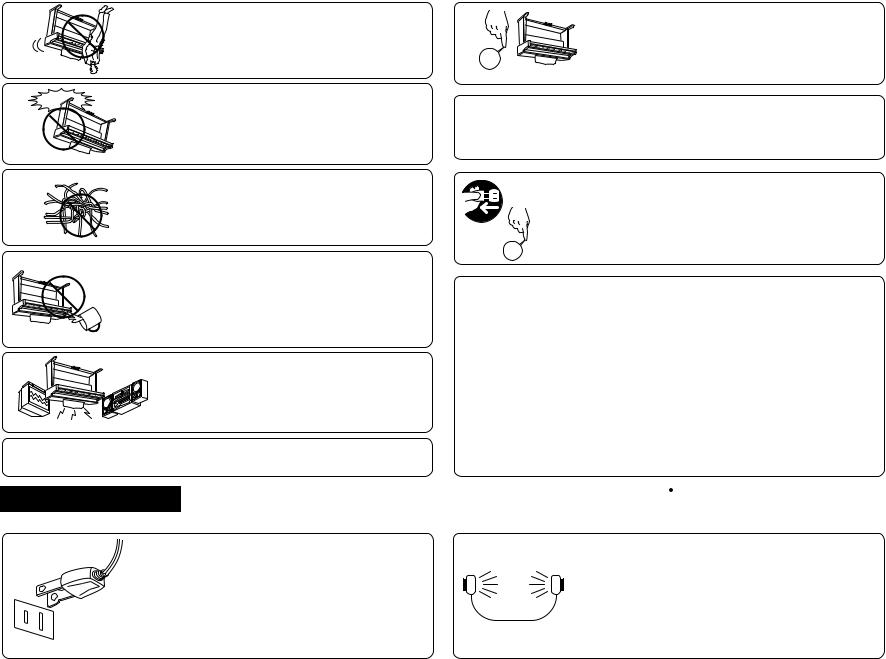
over,resultingin.injury Doingsomaycausetheproducttofall Donotleanagainstthe.keyboard
.breakdown Droppingtheproductmayresultin mustbecarriedbymorethanone.person Pleasenotethattheproductisheavyand Takecarenottodropthe.product
infire,electricshockorshort-.circuit Failuretodosomaydamagethem,resulting othercords,takecarenottogetthem.tangled WhenconnectingtheACpowercordand
placedonthe.product objectsfilledwithliquids,suchasvases,shallbe notbeexposedtodrippingor.splashingNo enclosurethrough.openingsTheproductshall fallandliquidsarenotspilledintothe Careshouldbetakensothatobjectsdonot
.noises fixture,andothersourcesofelectrical motors,neonsigns,fluorescentlight Keeptheinstrumentawayfromelectrical
|
IV |
|
thisproductandother.devices |
|
Failuretodosomaycausebreakdownof |
|
isturned.OFF |
OFF |
thepowertothisproductandotherdevices |
|
Beforeconnectingcords,makesurethat |
|
disconnectedinan.emergency |
andthepowercordpluginapositionsothatitcanreadilybe |
|
ItisagoodpracticetohavetheinstrumentneartheACoutlet |
|
|
foralongperiodof.time |
|
shouldbeunpluggedfromtheoutletwhenleftunused |
|
turned.offThepowersupplycordoftheproduct |
|
thepowersupplyevenwhenthepowerswitchis |
|
.useTheproductisnotcompletelydisconnectedfrom |
OFF |
Alwaysturnthepoweroffwhentheinstrumentisnotin |
|
|
|
.breakdown |
|
Usingtheproductinsuchareasmayresultinproduct |
●Areaswheretheproductisexposedtoexcessivevibrations |
|
|
●Areaswherealargeamountofsandordustispresent |
|
●Extremelyhumidareas |
|
●Extremelycoldareas,suchasoutside |
radiators,heatregisters,orotherproductsthatproduce.heat |
|
|
●Extremelyhotareas,orclosetoheatsourcessuchas |
|
exposedtodirectsunlight |
●Areas,suchasthosenearwindows,wheretheproductis |
|
doesnotinterferewithitsproper.ventilation Theproductshouldbelocatedsothatitslocationorposition
theproductorotherpropertyiftheproductishandled.incorrectly Indicatesapotentialhazardthatcouldresultininjuryordamageto
Donotdefeatthesafetypurposeofthe.plug obsolete.outlet outlet,contactanelectriciantoreplaceyour Ifyouareunabletoinserttheplugintothe isasafety.feature lineplug(onebladewiderthanthe.other)This Thisproductmaybeequippedwithapolarized
Donotusetheproductinthefollowing.areas 
 CAUTION
shouldconsultan.audiologist anyhearinglossorringingintheear,you alevelthatis.uncomfortableIfyouexperience longperiodoftimeatahighvolumelevelorat permanenthearing.lossDonotoperatefora orproducingsoundlevelthatcouldcause andheadphonesorspeakers,maybecapable Thisproductincombinationwithanamplifier

Do not stand on the product or exert excessive force.
Doing so may cause the product to become deformed or fall over, resulting in breakdown or injury.
Do not wipe the product with benzene or thinner. Doing so may result in discoloration or deformation of the product.
When cleaning the product, put a soft cloth in lukewarm water, squeeze it well, then wipe the product.
To reduce the risk of injury, close supervision is necessary when a product is used near children.
This product should be used only with the stand that is provided by the manufacturer.
CAUTION:
To prevent electric shock, match wide blade of plug to wide slot, fully insert.
ATTENTION:
Pour éviter les chocs électriques, introduire la lame la plus large de la fiche dans la borne correspondante de la prise et pousser jusqu'au fond.
The product should be serviced by qualified service personnel when:
●The power supply cord or the plug has been damaged.
●Objects have fallen, or liquid has been spilled into the product.
●The product has been exposed to rain.
●The product does not appear to operate normally or exhibits a marked change in performance.
●The product has been dropped, or the enclosure damaged.
Should an abnormality occur in the product, immediately turn the power OFF, disconnect the power cord plug, and
then contact the shop from which the product was purchased.
FCC Information
This equipment has been tested and found to comply with the limits for a Class B digital device, pursuant to Part 15 of the FCC Rules. These limits are designed to provide reasonable protection against harmful interference in a residential installation. This equipment generates, uses and can radiate radio frequency energy and, if not installed and used in accordance with the instructions, may cause harmful interference to radio communications.
If this equipment does cause harmful interference to radio or television reception, which can be determined by turning the equipment off and on, the user is encouraged to try to correct the interference by one or more of the following measures:
•Reorient or relocate the receiving antenna.
•Increase the separation between the equipment and receiver.
•Connect the equipment into an outlet on a different electrical circuit from the receiver.
•Consult the dealer or an experienced radio/TV technician for help.
Canadian Radio Interference Regulations
This instrument complies with the limits for a class B digital apparatus, pursuant to the Radio Interference
Regulations, C.R.C., c. 1374.
V

KawaiConcertPerformerSeriesDigitalPiano |
VI |
........................53 |
StylePaste....... |
........................52 |
LoopSettings..... |
........................51 |
TrackSettings.... |
........................49 |
Mixer........... |
.......................48 |
Real-timeRecording |
................47 |
AdvancedRecording...... |
..................45 |
Erasingthesong........ |
..................45 |
Savingthesong......... |
..................44 |
PartStatus............. |
................42 |
EasyRecording.......... |
|
RecordingaSong |
................40 |
Harmony............... |
................36 |
SongStylist............. |
..................35 |
StyleLock.............. |
..................31 |
RegistrationGroups..... |
................31 |
Registration............. |
................30 |
1-2Play................ |
..................29 |
BassInversion.......... |
...............28 |
AutoAccompanimentSystem |
..................28 |
Fill-InandVariation..... |
...............26 |
SelectingandPlayingaStyle |
|
UsingaStyle |
................25 |
PianoOnly.............. |
................24 |
Metronome.............. |
................22 |
TransposeandOctaveShift |
..................20 |
EffectPriorityGuidelines. |
..................19 |
EffectTypes............ |
................15 |
Effects.................. |
................13 |
Mixer.................. |
................11 |
SelectingSounds......... |
..................10 |
Splittingthekeyboard.... |
.................9 |
SelectingaParttoPlay.... |
|
BasicControls |
...................8 |
Dial................... |
...................6 |
SelectButtons........... |
...................6 |
LCDScreen............ |
|
Overview |
.................2 |
PartsandNames............ |
|
TableofContents |
Concert.Performer Wehopeyouenjoyeverymomentthatyouspendwithyour
.instrument areferencesothatyoucangetthemostoutofthisincredible .musicPleasereadthismanualthoroughlyandkeepithandyas foranyonewhoisinterestedinlearning,playing,andlisteningto TheConcertPerformerofferstremendousopportunities
anykeyonthe.keyboard createsthethrillofbeingaperformingmusiciansimplybytapping .DriveForthenon-player,Kawai’suniqueConcertMagicfeature features,suchasa16-trackRecorderanda5.3-inchFloppyDisk TheConcertPerformerincorporatesmanyprofessional
thebestsoundsandstyletoperformaparticular.song theSongStylistfeature,youwillneverhavetoworryaboutfinding orchestratedmusicinhundredsofmusical.genresThanksto AccompanimentStylesprovidetheenjoymentofplayingrich,fully rangingfromtraditionalto.contemporaryTheAutodisposal,youwillhavetheflexibilitytoperformanykindofmusic Withover600differentinstrumentanddrumsoundsatyour
digitalmusic.technologies experienceinmakingacousticpianos,alongwithcutting-edge resultingfromthecombinationofKawai’sseventy-plusyears craftedkeyboardinitsclass,theCPisauniquemusicalinstrument Featuringsuperblyrealisticinstrumenttonesandthemostfinely theultimatemusicalexperience,nomatteryourskill.level TheCPSeriespianohasbeendesignedtoprovideyouwith
(CP)SeriesEnsembleDigital.Piano ThankyouforpurchasingtheKawaiConcertPerformer
Introduction

Punch-In Recording . . . . . . . . . . . . . . . . . . . . . . . 54
Song Edit . . . . . . . . . . . . . . . . . . . . . . . . . . . . . . . . 57
Bar Editing . . . . . . . . . . . . . . . . . . . . . . . . . . . . . . 58
Event Edit . . . . . . . . . . . . . . . . . . . . . . . . . . . . . . . 71
Creating Your Own Styles
Conductor . . . . . . . . . . . . . . . . . . . . . . . . . . . . . . 74 Making a Style with Get Phrase from Recorder . 77
Auto-accompaniment System . . . . . . . . . . . . . . . . 81
Making a Style with Phrase Combination . . . . . 83
Editing Sounds
Editing the Preset Effect Settings . . . . . . . . . . . . 86
Playing Songs from a Floppy Disk
About songs on Floppy Disk . . . . . . . . . . . . . . . . 88 Selecting a Song from Disk . . . . . . . . . . . . . . . . . 89 Controlling Playback of a Song . . . . . . . . . . . . . . 91
Playing with Concert Magic
Selecting a Concert Magic Song . . . . . . . . . . . . . 94 Performing a Concert Magic Song . . . . . . . . . . . 95
Concert Magic Song Arrangements . . . . . . . . . . |
. 99 |
Creating a Concert Magic Song . . . . . . . . . . . . |
100 |
System Menu . . . . . . . . . . . . . . . . . . . . . . . . . . . . . . 102
Tuning . . . . . . . . . . . . . . . . . . . . . . . . . . . . . . . . . 104 Touch Curve . . . . . . . . . . . . . . . . . . . . . . . . . . . . . 105 Virtual Voicing . . . . . . . . . . . . . . . . . . . . . . . . . . 106 Resonance . . . . . . . . . . . . . . . . . . . . . . . . . . . . . . 107 Concert Magic Sound . . . . . . . . . . . . . . . . . . . . . 108 Pedal Assign . . . . . . . . . . . . . . . . . . . . . . . . . . . . . 109 Fill-in Mode . . . . . . . . . . . . . . . . . . . . . . . . . . . . . 112 Effect for Sound . . . . . . . . . . . . . . . . . . . . . . . . . . 113 Temperament . . . . . . . . . . . . . . . . . . . . . . . . . . . . 114 MIDI Menu . . . . . . . . . . . . . . . . . . . . . . . . . . . . . . 118 Power Up Settings . . . . . . . . . . . . . . . . . . . . . . . . 123 Soft Reset . . . . . . . . . . . . . . . . . . . . . . . . . . . . . . . 124 Software Version . . . . . . . . . . . . . . . . . . . . . . . . . 125 Screen Hold . . . . . . . . . . . . . . . . . . . . . . . . . . . . . 126
Floppy Disk Operations
Disk Menu . . . . . . . . . . . . . . . . . . . . . . . . . . . . . 128 Saving Data to a Floppy Disk . . . . . . . . . . . . . . 129 Loading Data from a Floppy Disk . . . . . . . . . . 132 Erasing Data from a Floppy Disk . . . . . . . . . . . 135 Formatting a Floppy Disk . . . . . . . . . . . . . . . . . 136
Getting Assistance: Using Help and Demo
Using the Help . . . . . . . . . . . . . . . . . . . . . . . . . . 138
Using the Demonstrations . . . . . . . . . . . . . . . . . 140
Appendices
Preset Sounds . . . . . . . . . . . . . . . . . . . . . . . . . . 142
Preset Styles . . . . . . . . . . . . . . . . . . . . . . . . . . . . 147
Song Stylists . . . . . . . . . . . . . . . . . . . . . . . . . . . . 149
Concert Magic Songs . . . . . . . . . . . . . . . . . . . . . 154
Table of Chord Types . . . . . . . . . . . . . . . . . . . . . 158
Example of Connection . . . . . . . . . . . . . . . . . . . 160
USB . . . . . . . . . . . . . . . . . . . . . . . . . . . . . . . . . . . 162
Program Change Numbers . . . . . . . . . . . . . . . . 164
Drum/SFX Kit Mapping . . . . . . . . . . . . . . . . . . . 170
MIDI Implementation Chart . . . . . . . . . . . . . . . 172
Specifications . . . . . . . . . . . . . . . . . . . . . . . . . . 173
Introduction |
VII |
KawaiConcertPerformerSeriesDigitalPiano |
.P2 |
.stopping |
|
pressthisbuttonwhilethestyeisplayinganendingsectionwillbeplayedbefore |
|
Thesebuttonsareusedtoplayanintrosectionthatleadsintothe.styleIfyou |
|
.15Intro/Ending(page27) |
|
Thisbuttonisusedtostartandstoptheaccompaniment.style |
|
.14Start/Stop(page27) |
|
.Style |
|
onthe.keyboardPressthisbuttonwhileaStyleisplayingtofadeinoroutofthe |
|
Whenactive,theaccompanimentstylewillstartassoonasyouplayanoteorchord |
|
.13Sync/Fadeout(page27) |
|
Thisbuttonisusedtotapinthedesiredtempoforasongor.Style |
|
.12Tap(page24,26) |
|
ThisbuttonisusedtoturntheMetronome.on/off |
|
.11Metronome(page24) |
|
selected.style |
|
Thisbuttonisusedtoautomaticallychooseanappropriatesoundandsetupforthe |
|
.101-2Play(page30) |
|
theAuto-Accompaniment.mode |
|
ThesebuttonsareusedtoturntheAuto-Accompanimentfunctionon/off,andselect |
|
Accompaniment(page28) |
.9 |
ThesebuttonsareusedtoselectanAccompanimentStyletoplayalong.with |
|
Style(page26) |
.8 |
ThesebuttonsareusedtomodifyorcreateyourownAccompaniment.Styles |
|
StyleConductor(page74) |
.7 |
ThisbuttonisusedtoselecttheSongStylist.Registrations |
|
SongStylist(page36) |
.6 |
Thisbuttonisusedtoselectthebuilt-inConcertMagic.songs |
|
ConcertMagic(page94) |
.5 |
Thisbuttonisusedtoselectthebuilt-indemo.songs |
|
Demo(page140) |
.4 |
fromafloppy.diskThissliderdoesnotaffecttheMasterVolumeSlider.setting |
|
AlsousedtoadjustthevolumelevelofasongplayedfromtheCPRecorderordirectly |
|
ThissliderisusedtoadjustthevolumeleveloftheAutoAccompaniment.Styles |
|
Accomp/SongVolumeSlider |
.3 |
Thissliderisusedtoadjusttheoverallvolumeleveloftheinstrument. |
|
MasterVolumeSlider |
.2 |
Turnsthepiano.on/off |
|
Power |
.1 |
19 |
|
|
14 |
13 |
|
|
|
18 |
|
|
|
||
|
17 |
|
|
|
|
|
|
|
|
|
12 |
|
|
|
|
|
|
|
|
|
|
|
16 |
15 |
|
11 |
|
|
|
|
|
1 |
||
|
|
|
|
|
||
|
|
|
|
|
6 |
|
|
|
|
|
|
|
|
|
|
|
10 |
9 |
|
|
|
|
|
|
|
|
|
|
|
|
|
|
5 |
|
|
|
|
|
|
4 |
|
|
21 |
|
8 |
7 |
3 |
2 |
|
|
|
|
|||
|
|
|
|
|
|
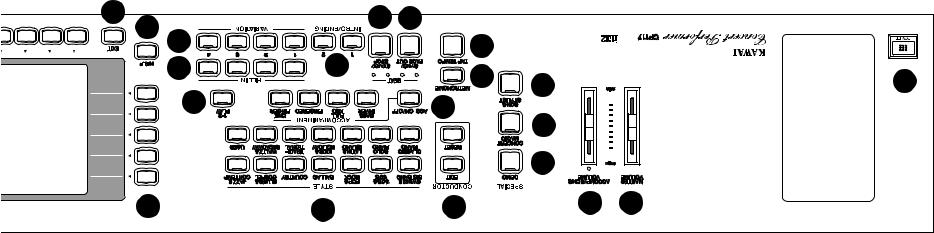
PartsandNames

|
21 |
|
28 |
|
|
40 |
|
24 |
|
|
|
||
|
|
|
|
|
||
|
|
|
|
32 |
|
|
|
|
25 |
|
33 |
|
|
20 |
|
|
|
|
|
|
|
29 |
|
|
|
|
|
|
|
30 |
34 |
|
37 |
|
|
|
26 |
31 |
35 |
36 |
38 |
|
|
|
|
|
|
|
|
23 |
27 |
|
|
|
|
|
|
|
|
|
39 |
|
21 |
22 |
|
|
|
|
|
|
|
|
|
|
||
|
|
|
|
|
|
16. Fill-in (page 28)
These buttons are used to select one of the four short fill-in sections that embellish the style and lead into the different variation sections of the Style.
17. Variation (page 28)
These buttons are used to select one of the four variation sections within the chosen Style.
18. Help (page 138)
These buttons are used to access Help menus which contain explanations of the CP piano’s features.
19. Exit
This button is used to back up to the next-higher screen level. Repeatedly pressing the Exit button from any screen on the CP will bring you back to the CP’s main play screen.
20. LCD Screen
Displays information about the CP’s current sound selections, settings, options, etc.
21. Select Buttons
These buttons are used to select items displayed on the LCD screen.
22. Save Regist
This button is used to save up to 80 of your own favorite panel settings.
23. Regist Groups (page 31)
This button is used to select one of the 10 groups of panel settings.
24 Contrast
Adjusts the contrast of the LCD screen for easier viewing.
25. Tempo/Value Dial (page 8)
This dial is used to adjust tempo, scroll through different selections, and adjust data values for items on the LCD screen.
26. Transpose (page 22)
This button is used to change the overall pitch of the CP in half-note steps.
27. Octave Shift (page 22)
These buttons are used to change the overall pitch of the CP in octave steps.
28. Sound Selection (page 11)
These buttons are used to select the desired sound category. Use the SELECT buttons or the DIAL to select a sound within the category.
29. Part (page 9)
Selects which of the three parts (Left/Split, Right 1, Right 2) are active and ready to be played with the sounds assigned to them.
Basic Controls |
P. 3 |
KawaiConcertPerformerSeriesDigitalPiano |
.P4 |
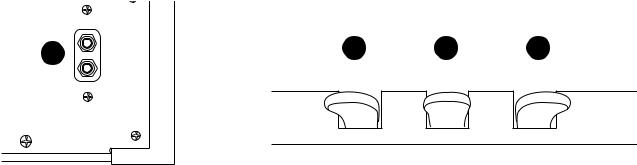
tocontrolother.functions(Seepage109) sustainsthesoundofonlythekeysjust.playedThispedalcanalsobeassigned Depressingthispedalafterplayingthekeyboardandbeforereleasingthekeys .42SostenutoPedal
alsobeassignedtocontrolother.functions(Seepage109) Depressingthispedalsoftensthesoundandreducesits.volumeThispedalcan .41SoftPedal
Readsandwritesdatatoastandard5”.3floppydisk.. .40DiskDrive
Usedtorecordandplaybacka.song .39Recorder(page42)
ThisbuttonisusedtoaccesstheFloppyDiskfunctions.. .38Disk(page88,128)
Thisbuttonisusedtoaccessthesystemsettings.menu .37System(page102)
ThisbuttonisusedtoaccesstheAdvancedRecorder.functions .36AdvancedRecorder(page47)
buttontoselecttheHarmonysettings.menu Thisbuttonturnson/offtheHarmonyfortheinstrument.soundsPressandholdthe .35Harmony(page40)
settings.menu Thisbuttonturnson/offthe.EffectsPressandholdthebuttontoselecttheEffect .34Effects(page18)
settings.menu Thisbuttonturnson/offthe.ChorusPressandholdthebuttontoselecttheChorus .33Chorus(page16)
settings.menu Thisbuttonturnson/offthe.ReverbPressandholdthebuttontoselecttheReverb .32Reverb(page15)
currentlyselectedRegistrationgroup. Thesebuttonsareusedtorecalloneoftheeightpanelsettingsavailableinthe .31Registrations(page31)
.part ThisbuttonisusedtoautomaticallyassigntheConcertGrandsoundtotheRight1 .30PianoOnly(page25)
44 |
43 |
42 |
41 |
|
|
|
|
|
|
BottomView |
Pedals |
|
Rear Terminals
|
|
|
45 |
46 |
|
47 |
48 |
|
||||||||
|
|
|
|
|
|
|
|
|
|
|
|
|
|
|
|
|
|
|
|
|
|
|
|
|
|
|
|
|
|
|
|
|
|
|
|
|
|
|
|
|
|
|
|
|
|
|
|
|
|
|
|
|
|
|
|
|
|
|
|
|
|
|
|
|
|
|
|
|
|
|
|
|
|
|
|
|
|
|
|
|
|
|
|
|
43. Sustain Pedal
Sustains the sound after lifting your hands from the keyboard.
44. Headphone Jacks
There are two jacks for headphones provided at the left end on the bottom of the piano. These jacks are used to connect up to two headphones to the CP piano.
45. MIDI Jacks
These jacks are used to connect external MIDI devices to the CP. Enabled only when the MIDI is selected in the System menu. (See page 119)
46. USB Jack
This jack is used to connect a personal computer to the CP. Enabled only when the USB is selected in the System menu. (See page 119)
47. Line Out Jacks
These jacks are used to provide stereo output of the CP’s sound to amplifiers, tape recorders or similar equipment. The audio signal coming through the LINE IN jacks is also routed to these jacks.
48. Line In Jacks
These jacks are used to connect stereo outputs from other audio equipment or electronic instruments to the CP’s speakers. The audio signal coming through these jacks bypasses the CP’s volume control.
Basic Controls |
P. 5 |

KawaiConcertPerformerSeriesDigitalPiano |
.P6 |
SELECTbuttonmightservetoactivateafeaturerelatedtoFloppy.Disk mightbeusedtoselectaninstrumentsoundononescreen,whileonanotherscreenthesame itemsarecurrentlydisplayednexttothemontheLCD.screenForexample,aSELECTbutton thembecausetheydonothavepredetermined.functionsInstead,theyareusedtoselectwhatever Thereare17SELECTbuttonssurroundingtheLCDscreenthatdonothavelabelsprintednextto
afunctionisinusesothatyoucanquicklyseeifthatfunctionis.active thesebuttonshaveanLEDIndicator(smalllight)on.themThisIndicatorwillbeturnedONwhen thismanual,referencestothesebuttonsarealwaysprintedincapitallettersfor.clarityMostof directlyabovethe.buttonForexample,therearebuttonslabeled1-2PLAY,FILL-IN,andso.onIn wouldliketowork.withInmostcases,thespecificfunctionnameisprintedonthefrontpanel MostofthebuttonsonthefrontpanelareusedtodirectlyselectafunctionontheCPthatyou SelectButtons
displayedatthesametime,allowingfornotonly ConcertPerformercommunicateswith.youThe
wordsbutgraphicstobeshownas.well largedisplaysizeallowsmanyitemstobeclearly TheLCDScreenisthewindowthroughwhichthe
howtomakeyourwaythroughthemisvery.easy everythinglogicalandstraightforwardandbecomingfamiliarwith specifictothat.itemThissystemofmenusandsub-menuskeeps itemfromamenumayaccessanother“sub-menu”ofoptions toyouontheCP’slargedisplay.screenOftentimesselectingan selectedbychoosingthemfromlists,or“menus”,thatarepresented everysingle.oneAsaresult,manyfeaturesandfunctionsare featuresthatitissimplyimpracticaltohaveadedicatedbuttonfor
LCDScreen
intuitiveuser.interfaceHowever,theinstrumenthassomany TheConcertPerformerhasbeendesignedtohaveaneasyand
instrument’s.design importanttounderstandsomeofthebasicideasbehindthe Beforeyoubeginlearninghowtousethespecificfeatures,itis ordertotakefulladvantageoftheConcertPerformer’s.potential Thismanualprovidesyouwithalltheinformationyouwillneedin
Overview
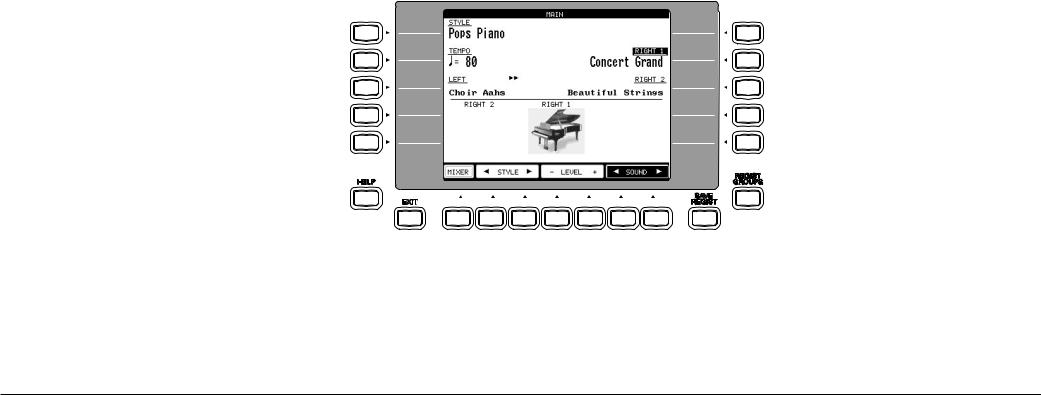
L1 Selects Style. Use the F2,F3 buttons, Style buttons, or the Dial to change the active Style.
L2 Selects Tempo. Use the Dial or the TAP TEMPO button to change the Tempo
L3 Selects the LEFT Part. Use the F6, F7buttons, Sound buttons, or the Dial to change the Sound.
No functions are assigned to the L4 and L5 buttons on this screen.
To keep things simple, this manual will refer to the five SELECT buttons along the left side of the LCD screen as L1-L5. Likewise, the five SELECT buttons along the right side of the screen will be referred to as R1-R5. The seven SELECT buttons along the bottom of the screen, which are also known as function buttons, will be referred to as F1-F7.
In some cases when you see an item displayed on the screen and press the L or R button next to it, that item on the screen will become highlighted (shown in reverse color) to indicate you have selected that item. Sometimes a submenu screen relating to that item will be displayed and present you with further options.
When you press one of the F buttons, the corrosponding function on the LCD screen will be highlighted to indicate that it has been selected.
F1 Takes you to the MIXER settings screen. F2, F3 Selects a Style.
F4, F5 Adjusts the volume level for the Part currently selected. F6, F7 Selects a sound for the selected Part. "Sound" is highlighted
to indicate this graphic button is active.
R2 Selects the RIGHT1 Part. Use the F6, F7 buttons, Sound buttons, or the Dial to change the Sound.
R3 Selects the RIGHT2 Part. Use the F6, F7buttons, Sound buttons, or the Dial to change the Sound.
No functions are assigned to the R1, R4 and R5 buttons on this screen.
"RIGHT 1" is highlighted to indicate that this Part is now selected.
Basic Controls |
P. 7 |

KawaiConcertPerformerSeriesDigitalPiano |
.P8 |
orvalueontheLCD.screen canalsobeusedinsteadoftheL,R,andFbuttonsasanotherwayofselectingorchanginganitem turningtheDialwillallowyoutoquicklyscrollthroughthelistuntilyouarriveatyour.choiceIt (highlighted)willbe.affectedOrinsomecaseswhenthescreenpresentsyouwithalistofchoices, WhenyouturntheDial,youwillnoticethatwhateveritemontheLCDscreeniscurrentlyselected .screen TheDialisusedtochangedatavaluesandscrollthroughoptionsthataredisplayedontheLCD
Dial
Basic Controls
This chapter discusses the basic operations that are used to play the Concert Performer, such as sound selection, Part configuration and effect settings.
Selecting a Part to Play
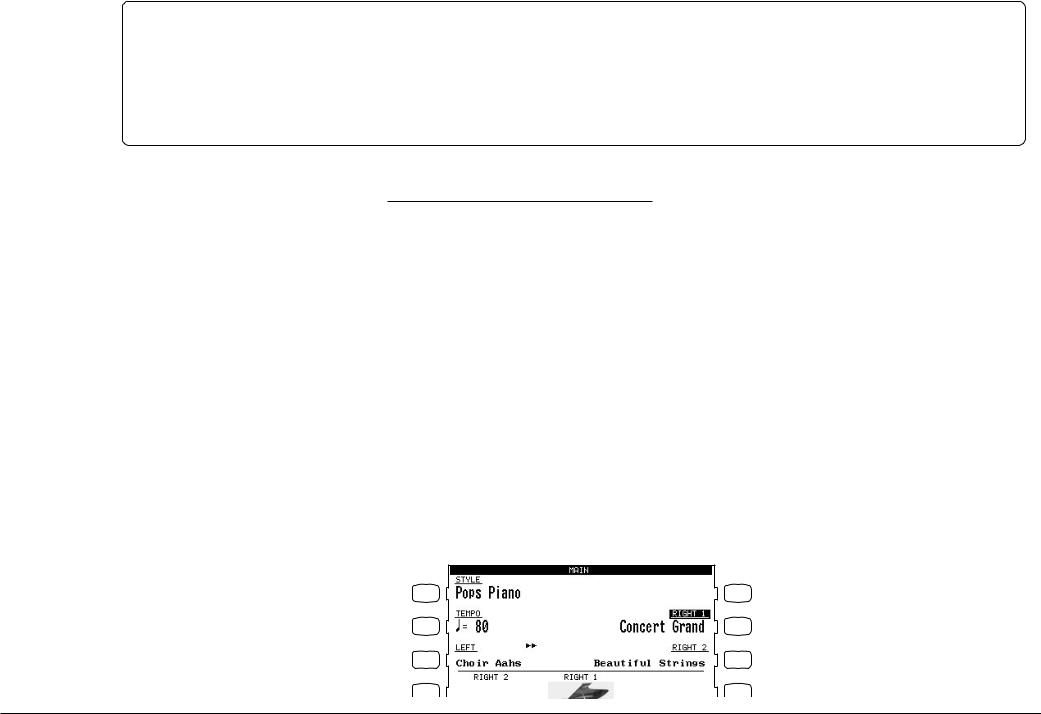
When the CP’s main play screen is displayed (For example, when the CP is first turned on), you are presented with three sound Parts that can be played from the keyboard. These three Parts are named LEFT/SPLIT, RIGHT 1 and RIGHT 2, and each one has an instrument sound assigned to it. You can selectively turn on/off any combination of these three Parts, allowing you to have up to three different sounds at the same time across the keyboard.
Sounds assigned to Parts RIGHT 1 and RIGHT 2 will be layered on top of each other when both Parts are active at the same time. Activating the LEFT/SPLIT Part automatically splits the keyboard so that only the sound that is assigned to the LEFT/SPLIT Part is heard when you play in the lower octave keys. Each Part has a dedicated button on the front panel that selects and turns on/off that Part. You can also select a Part by pressing the appropriate L or R button.
Selecting a Part is easy:
1)Press the PART button for the Part you wish to activate. The PART button LED will light.
2)Press the PART button again to turn that Part off.
•If the LCD screen is currently showing the main play screen, you can tell which Parts are active by looking at the name of the sound assigned to it. If the name of a sound is in large typeface, then the Part it is assigned to is active. If the sound name is displayed in small typeface, then the Part is not active.
This example indicates:
L 1 |
R 1 |
|
RIGHT1 is currently active |
L 2 |
R 2 |
|
RIGHT2, LEFT are inactive. |
L 3 |
R 3 |
L 4 |
R 4 |
Basic Controls |
P. 9 |
KawaiConcertPerformerSeriesDigitalPiano |
.P10 |
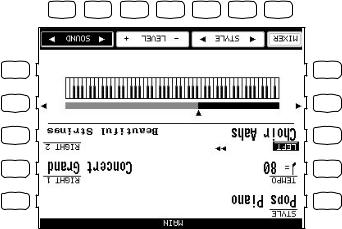
youcancreateathreeallowtheLEFT/SPLIT
partlayeracrosstheentire.keyboard |
|
Parttofunctionasalayerwiththetworighthand.PartsInthismanner |
|
MovingthesplitpointcompletelytotheLEFTendofthekeyboardwill |
• |
F7 |
F6 |
F5 |
F4 |
F3 |
F2 |
F1 |
R5 |
L5 |
Raisesthesplit.point |
R4 |
R4 |
L4 |
Lowersthesplit.point |
L4 |
|
|
R3 |
L3 |
|
|
|
|
R2 |
L2 |
|
|
|
|
R1 |
L1 |
|
|
markerwillmoveacrossthe88notekeyboarddiagramasyoupressthese.buttons |
|
YoumayalsousetheL4andR4buttonstomovethesplit.pointOntheLCDscreenthesplitpoint |
|
thesplitpointare.played |
|
handPartswillplay(RIGHT1and.RIGHT2)TheLEFT/SPLITsoundwillbeheardwhenkeysbelow |
|
thatyouwanttoserveasthesplit.pointThekeyyoupresswillbecomethelowestnotetheRight |
|
PresstheLEFT/SPLITbuttonagain,andwhileholdingitdown,pressthedesiredkeyonthekeyboard |
2) |
andtheLCDscreenwilldisplayadiagramoftheCP’s88note.keyboard |
|
PresstheLEFT/SPLITbuttontoactivatetheLEFT/SPLIT.PartTheLEFT/SPLITbuttonLEDwilllight |
1) |
Tochangethesplitpoint: |
|
splitpointtoanykeyonthe.keyboard |
|
point)onthe.keyboardThedefaultsplitpointisbetweenF2andF#2butyoucanfreelychangethe |
|
soundassignedtotheLEFT/SPLITPartwillbeheardwhenyouplaybelowaspecifiedkey(split |
|
WhentheLEFT/SPLITPartisactivated,theCPautomaticallysplitsthekeyboardandonlythe |
|
Splittingthe.keyboard
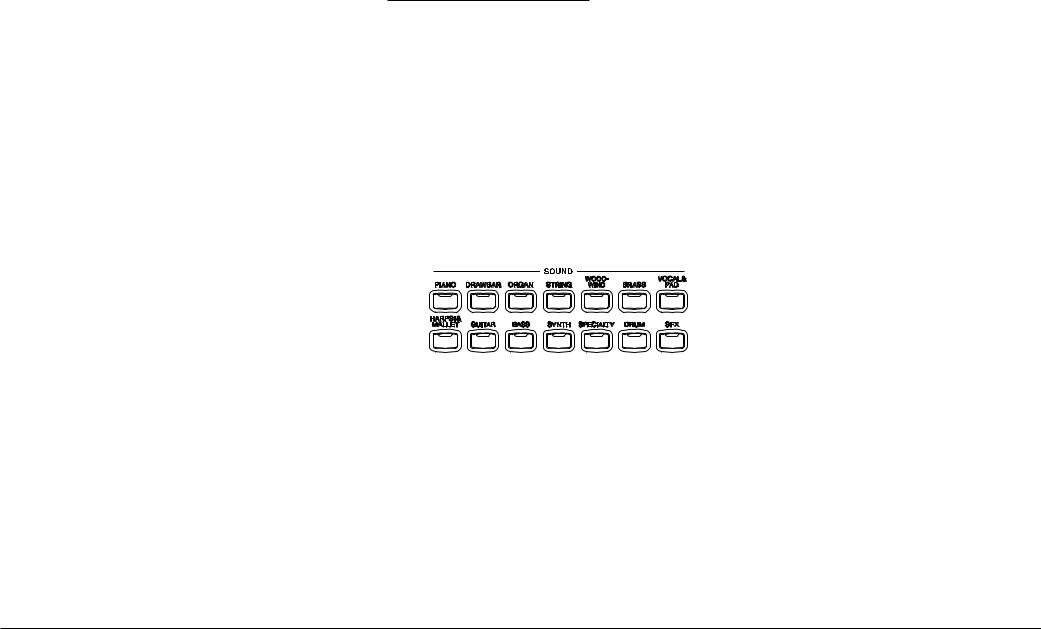
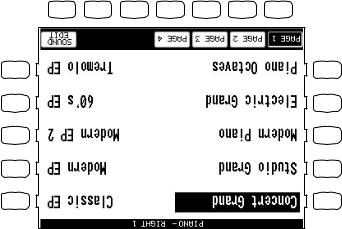
Selecting Sounds
The Concert Performer has over 600 instrument and drum sounds available from the front panel. You can freely assign any of these sounds to the three Parts. Remember that there is always a sound assigned to each of the Parts, even if some of the Parts are not currently active.
The sounds span a tremendous variety of instruments, ranging from traditional acoustic sounds to modern electronic tones. To help you quickly find the sound that you want, the sounds have been organized into 14 categories. Each category has a dedicated Sound Selection button on the front panel.
To select a Sound:
1)In the main play screen, select the Part to which you wish to assign a new sound using the L3, or R2R3 buttons. The selected Part will become highlighted.
2)Press the SOUND button for the sound category that you are interested in. The first page of sounds in that category will be displayed. There are at least three pages of sounds in each category. Use the F1-5 buttons to view the other pages in a category.
3)Select a sound by pressing the L or R button that is next to the displayed name.
4)Press the F1-F5 buttons to show the Sounds on the other pages for the same category.
5)You can also use the Dial to scroll through all of the categories and sounds one by one.
Basic Controls |
P. 11 |
KawaiConcertPerformerSeriesDigitalPiano |
.P12 |
|
|
|
|
onpage.86) |
|
|
TakesyoutotheSoundEdit.menu(See"EditingSounds" |
F7 |
|||||
SelectsthedifferentpagesofSoundswithina.category |
F1-F4 |
|||||
F7 |
F6 |
F5 |
F4 |
F3 |
F2 |
F1 |
|
R5 |
L5 |
|
R4 |
L4 |
|
R3 |
L3 |
|
R2 |
L2 |
UsetheLorRbuttonstoselectyourdesired.Sound |
R1 |
L1 |
|
|
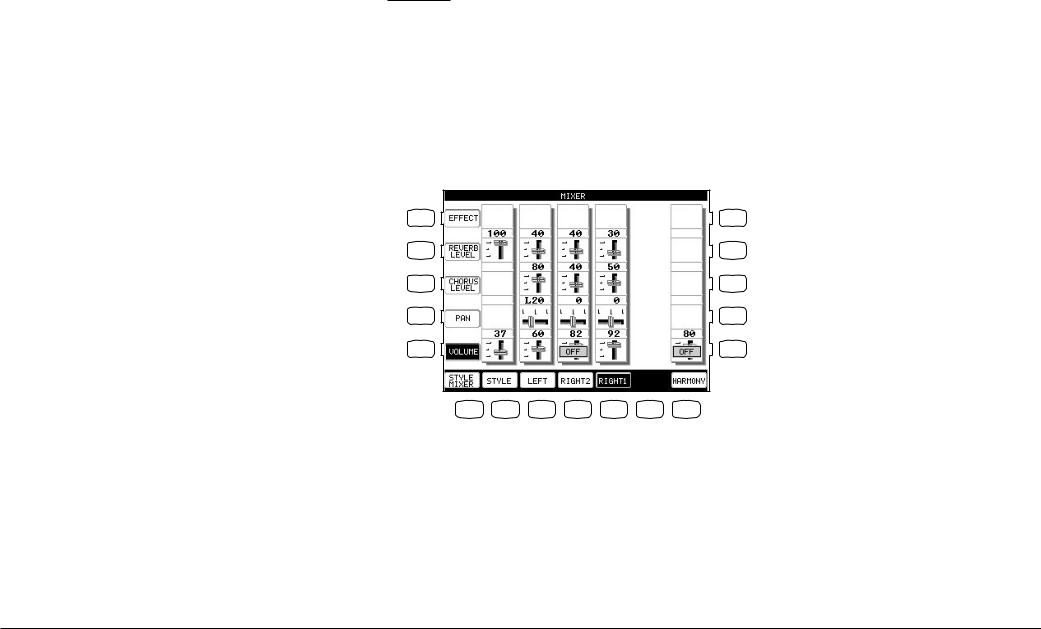
Mixer
This Mixer screen allows you to change the volume, panning, reverb and chorus levels, as well as turn the effect on/off for each Part.
To use the Mixer:
1)Press the MIXER button (F1) while on the main play screen.
2)Use the F2–F5 and F7 buttons to select which Part you wish to adjust.
3)Use the L and R buttons to select a setting to change.
4)Use the Dial to change the value.
L1 Selects the Effect On and Off.
L2 Selects reverb level.
L3 Selects chorus level.
L4 Selects Panning.
L5 Selects volume level.
After you make your desired selection, use the Dial to change the value.
L 1 |
R 1 |
L 2 |
R 2 |
L 3 |
R 3 |
L 4 |
R 4 |
L 5 |
R 5 |
F 1 |
F 2 |
F 3 |
F 4 |
F 5 |
F 6 |
F 7 |
F1 Takes you to the next page of the Mixer.
F2–F5 Selects the part to change.
F7 Adjusts the volume level for the Harmony.
•Volume level can be also adjusted from the main play screen, using the VOLUME buttons (F4, F5).
Basic Controls |
P. 13 |
KawaiConcertPerformerSeriesDigitalPiano |
.P14 |
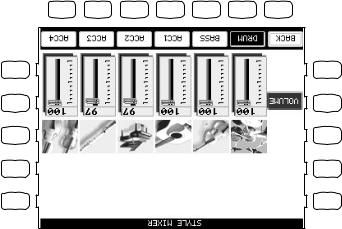
SelectstheSectionthatyouwishto.change |
F7–F2 |
|||||
|
TakesyoutothepreviousMixer.screen |
F1 |
||||
F7 |
F6 |
F5 |
F4 |
F3 |
F2 |
F1 |
R5 |
L5 |
R4 |
L4 |
R3 |
L3 |
R2 |
L2 |
R1 |
L1 |
tothemainplay.screen |
|
PresstheBACKbutton(F1)togobackthepreviousMixerscreen,orpresstheEXITbuttontogoback |
3) |
UsetheF7–F2buttonstochooseaSection,thenusetheDialtochangethe.volume |
2) |
OntheMixerscreen,presstheSTYLEMIXERbutton.(F1)TheStyleMixerscreenwillbe.selected |
1) |
ToadjusttheindividualSectionlevel: |
|
levelsforthe6Sectionswithina.Style |
|
TheMixernotonlyletsyousettheoverallvolumelevelfortheStyle,butsetindividualvolume |
|
Effects
You might have noticed that when you select some of the sounds, the LED indicator for the REVERB, CHORUS, or EFFECTS button is turned on. The reason for this is some of the sounds are set up with one or more of these effects on as part of their initial setting.
Adding an effect to the sound enhances tonal quality and improves acoustical realism. The CP piano is provided with three separate groups of effects. The first is REVERB, the second is CHORUS, and third group EFFECTS contains other useful effects such as Delay, Phaser, Rotary Speaker etc. There is a dedicated button on the front panel for each Effects group and each of the three Effect groups can be turned on/off separately or used in combination for each part. The Concert Performer has a selection of 27 different Reverb, Chorus, and Effect types that can be used to enhance or even dramatically alter the instrument sounds. Each of the over 600 instrument and drum sounds has already been assigned a REVERB and CHORUS setting and an additional EFFECT that suits that particular type of instrument. For example, a moderate Delay effect is used on the Church Organ to recreate the sense of being in a large church, and a Rotary speaker effect is used on the Drawbar organ to give it an authentic, vintage feel.
If you wish, you can change any of these effect settings to suit your tastes separately for each sound save them as the new Preset effect settings for that Sound (See Sound Edit on page 86). In addtion, by setting the Effect For Sound function in the System to “Panel” the CP will ignore the preset effect settings for each Sound (see Effect For Sound on page 113).
(The CP piano can also remember your Effect settings as part of a Registration. See Registration on page 31.)
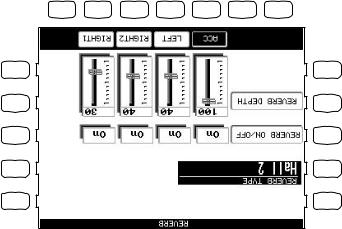
To add Reverb:
1)Press the REVERB button. The REVERB button LED will light.
2)If you wish to edit the settings, hold down the REVERB button for a moment until the Reverb Settings screen is displayed.
3)Use the F3-F6 buttons to select the Part you want to edit.
4)Use the L2-L4 buttons to select the specific setting that you wish to change.
5)Use the Dial to change the value.
6)Press the EXIT button to leave the Reverb Settings menu.
7)If you wish to turn the reverb effect off, press the REVERB button again.
Basic Controls |
P. 15 |
KawaiConcertPerformerSeriesDigitalPiano |
.P16 |
UsetheL4–L2buttonstoselectthespecificsettingthatyouwishto.change |
4) |
UsetheF5–F3buttonstoselectthePartyouwanttoedit |
3) |
screenis.displayed |
|
Ifyouwishtoeditthesettings,holddowntheCHORUSbuttonforamomentuntiltheChorusSettings |
2) |
PresstheCHORUS.buttonTheCHORUSbuttonLEDwill.light |
1) |
|
ToaddChorus: |
inthischapterforanexplanationofEffect.Priority |
|
PartexceptACC(regardlessofeachpart’sEffect.Priority)See“EffectPriorityGuidelines”later |
|
•TheLEDIndicatorontheREVERBbuttonwillbelitwheneverReverbisturnedonfortheany |
|
Simulatesthesoundofametallicplate.reverb |
Plate |
Simulatestheambianceofalivingroomorsmallrehearsal.room |
Room1,Room2 |
Simulatestheambianceofasmallhallorlive.house |
Stage1,Stage2 |
Simulatestheambianceofaconcerthallor.theater |
Hall1,Hall2 |
|
TypeofReverb |
|
|
|
|
|
that.Part |
|
theappropriatebuttonalsoturnstheReverbon/offfor |
|
|||||
SelectsthePartyouwantto.changeRepeatedlypressing |
F6–F3 |
|||||
F7 |
F6 |
F5 |
F4 |
F3 |
F2 |
F1 |
R5 |
L5 |
R4 |
L4 |
R3 |
L3 |
R2 |
L2 |
theReverbdepthfortheselected.Part |
|
SelectsReverb.depthUsetheDialtochange |
L4 |
Reverbon/offfortheselected.Part |
|
SelectsReverb.on/offUsetheDialtoturnthe |
L3 |
oneofthe7Reverb.types |
|
SelectstheReverb.typeUsetheDialtochoose |
L2 |
R1 |
L1 |
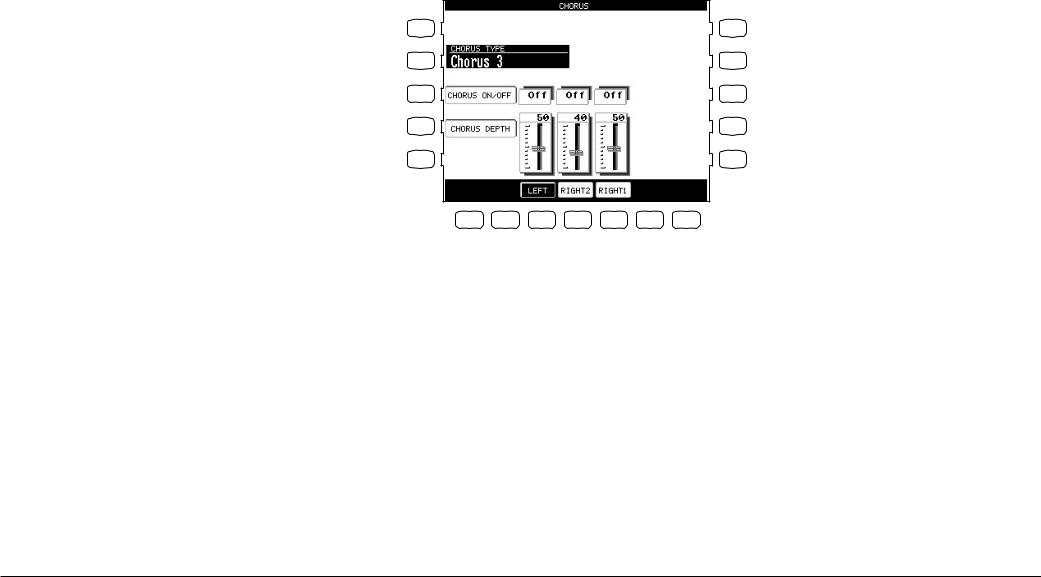
5)Turn the Dial to change the value.
6)Press the EXIT button to leave the Chorus Settings menu.
7)If you wish to turn the chorus off, press the CHORUS button again.
L2 Selects the Chorus type. Use the Dial to choose one of the 4 Chorus types.
L3 Selects Chorus on/off. Use the Dial to turn the Chorus on/off for the selected Part.
L4 Selects Chorus depth. Use the Dial to change the Chorus depth for the selected Part.
L 1
L 2
L 3
L 4
L 5
R 1
R 2
R 3
R 4
R 5
F 1 |
F 2 |
F 3 |
F 4 |
F 5 |
F 6 |
F 7 |
F3–F5 Selects the Part you want to change. Repeatedly pressing the appropriate button also turns the Chorus on/off for that Part.
•The Indicator light on the CHORUS button will be lit only when Chorus is turned on for the active “Priority Part”. See “Effect Priority Guidelines” later in this chapter for an explanation of this.
•You can select from four chorus types when in the Chorus Settings menu. There is a fifth chorus type which is assigned as an Effect from the Effect Settings menu. In this way, you can actually have two chorus effects active if so desired.
Basic Controls |
P. 17 |
KawaiConcertPerformerSeriesDigitalPiano |
.P18 |
|
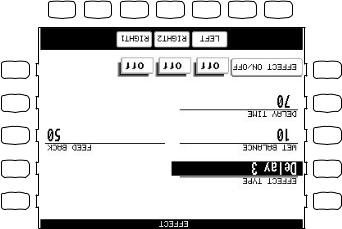
F5–F3TurnstheEffecton/offforeach.Part |
|||||
F7 |
F6 |
F5 |
F4 |
F3 |
F2 |
F1 |
|
|
R5 |
L5 |
changethe.value |
|
R4 |
L4 |
|
|
|
|
eachEffect.typeUsetheDialto |
|
|
|
Selectsadifferenteditablesettingfor |
R3 |
R3 |
L3 |
|
|
R2 |
L2 |
|
|
R1 |
L1 |
.typeUsetheDialtochangethe.value |
|
SelectsadifferenteditablesettingforeachEffect |
L4 |
.value |
|
SelectsWet.BalanceUsetheDialtochangethe |
L3 |
ofthe16Effect.types |
|
SelectsEffect.typeUsetheDialtochooseone |
L2 |
IfyouwishtoturntheEffectoff,pushtheEFFECTSbutton.again |
7) |
PresstheEXITbuttontoleavetheEffectSettings.screen |
6) |
TurntheDialtochangethe.value |
5) |
UsetheL5,–L2R3buttonstoselectthespecificsettingthatyouwishto.change |
4) |
UsetheF5–F3buttontoturnON/OFFtheEffectforeach.part |
3) |
.displayed |
|
Ifyouwishtoeditthesettings,holddownthebuttonforamomentuntiltheEffectSettingsscreenis |
2) |
PresstheEFFECT.buttonTheEFFECTbuttonLEDwill.light |
1) |
ToaddanEffect: |
|

Effect Types
Chorus |
Simulates the rich character of a vocal choir or string ensemble, by layering a |
|
slightly detuned version of the sound over the original to enrich it. |
Flanger |
Creates a shifting comb-filter, which adds motion and a “hollow” tone to the |
|
sound. |
Celeste |
A three-phase chorus without modulation. |
Ensemble |
A three-phase chorus with a slight modulation to each phase. |
Delay 1-3 |
Adds echoes to the sound. The three types differ in the length of time between |
|
the echoes. |
Auto Pan |
Moves the sound left and right across the stereo field at a variable rate. |
Tremolo |
Modulates the volume of the sound. This is a vibrato type effect. |
Tremulant |
A combination of Tremolo and Vibrato. It simulates the tremulant pipes of a |
|
church organ. |
Phaser |
Creates a phase change, adding motion to the sound. |
Rotary 1-2 |
This effect simulates the sound of the Rotary Speaker cabinet commonly used |
|
with electric organs. Rotary 2 adds distortion. The soft pedal is used to change |
|
the speed of the rotor between SLOW and FAST. |
Auto Wah |
Sweeps a tone filter up and down at the beginning of a note, recreating the popular |
|
vintage wah wah pedal sound. |
Enhancer |
Emphasizes high frequencies to make a sound more easily discernible in a mix. |
Distortion |
Adds frequencies that were not present in the original sound, resulting in a “fuzzy” |
|
or warmer tone. |
Basic Controls |
P. 19 |
KawaiConcertPerformerSeriesDigitalPiano |
.P20 |
displayforthat.Part |
|
Youcan,however,turntheeffectonforanyPartbyadjustingtheEffectOn/Offoptioninthe |
• |
bytheDistortionsettingsoftheElectricGuitarthatyou’vejustassignedtotheRIGHT1Part!) |
|
fortheother.Parts(ThisissothatyourFlutesoundonRIGHT2doesn’tsuddenlygeteffected |
|
WhentheEffectsettingschangeforthePiorityPart,theEffectswillbeautomaticallyturnedoff |
• |
.sound |
|
Inthelattercase,thenewEffectsettingswillreflectthePreseteffectsettingsforthenew |
|
PriorityPartbeingactivated/deactivated,oranewsoundisassignedtoanactivePriority.Part |
|
Unleesyouchangethem,theEffectsettingswillonlychangeinresponsetoachangeinthe |
• |
LEFTPart’ssettingswillbeappliedisiftheother2Partsare.inactive |
|
anysoundinanyotherPart,thatyouwanttoaddeffects.toLikewise,theonlytimeanactive |
|
anytimetheRIGHT1Partisactive,itsEffectsettingswillbeused,notonlyforitssoundbutfor |
|
PriorityisgiventothePartsinthefollowingorder:.RIGHT1>RIGHT2>LEFTThismeansthat |
• |
HerearesomeguidelinesforEffectPriority: |
|
willbeignoredandthePartPrioritywillbe.ignored(SeeEffectForSoundonpage.113) |
|
IftheEffectForSoundissetto“Panel”intheSystemthenthePreseteffectsettingsforeachSound |
|
.other(s) |
|
Partsactive,thentheCPwilltreatoneofthemasthePriorityPart,andignorethesettingsofthe |
|
ofwhichPartitis,thepreseteffectsettingsforthatsoundwillbe.usedIfyouhavetwoormore |
|
This“PriorityPart”dependsonthecurrent.situationIfyouonlyhaveonePartactive,regardless |
|
havetheirEffectsautomaticallyturned.off |
|
settingsforthePriorityPartwillbeusedandtheotherPartswilleithersharethesesettingsormay |
|
foreachofthe.PartsThePriorityorderisRIGHT1>RIGHT2>.LEFT/SPLITThepreseteffect |
|
EFFECTsectionchooseswhichEffectsettingstousebaseduponapredeterminedpriorityorder |
|
Inthesecases,theCP’sEffectssectioncanonlyusetheEffectsettingsforoneofthe.PartsThe |
|
more)Partsactive,withentirelydifferentsounds,eachwithadifferentEffectsetting? |
|
turnedonatatime(inadditiontotheREVERBandCHORUS),whathappensifyouhavetwo(or |
|
turnedon/offforeach.partHowever,sincetheCP’sEFFECTsectioncanonlyhaveoneEffect |
|
amountofReverbandChorusappliedto.themInadditionReverbandChoruscanbeindependently |
|
mustsharethesameReverbandChorus.typeHowevereachofthesePartscanhaveadifferent |
|
ReverbandChorusareglobal.effectsInotherwords,allofthePartsandtheAccompanimentStyle |
|
EffectPriorityGuidelines

•The LED Indicator on the EFFECT and CHORUS buttons will be on only when the active Priority Part has these effects turned on.
Example
Assume that your CP is set up according to the following chart:
|
RIGHT1 |
RIGHT 2 |
LEFT |
INDICATOR |
Part |
Inactive |
Active |
Active |
|
Effect |
On |
On |
On |
On |
If you then select a different sound for RIGHT2, the Effect setting for the RIGHT1, LEFT will be turned off automatically. This is because RIGHT2 is the Priority Part (note that the RIGHT1 Part is NOT the Priority Part because it was inactive).
The chart would now look like this:
|
RIGHT1 |
RIGHT 2 |
LEFT |
INDICATOR |
Part |
Inactive |
Active |
Active |
|
Effect |
Off |
On |
Off |
On |
Even if you now assign a new sound to the RIGHT1 Part, the Effect settings for the other Parts won’t change, because RIGHT1 is still inactive, so therefore would not have priority.
Once you make the RIGHT1 Part active, however, it would now be considered the Priority Part. The Effect settings for the other Parts will again be turned off. The Indicator light on the EFFECT button will now reflect the Effect status for the sound assigned to RIGHT1.
|
RIGHT1 |
RIGHT 2 |
LEFT |
INDICATOR |
Part |
Active |
Active |
Active |
|
Effect |
Off |
Off |
Off |
Off |
At this point, if the Effect that has been called up along with the RIGHT1 sound is one that you’d like to use for the other Parts, simply select Effect On in the LCD display for those Parts.
Basic Controls |
P. 21 |

KawaiConcertPerformerSeriesDigitalPiano |
.P22 |
disappearfromthescreen,indicatingthattheselectedPartisbacktoitsnormaloctave.range |
|
Tocanceltheoctaveshift,pressboththeßand†buttonsatthesame.timeThesymbolswill |
3) |
displayedwithan“ß”intheLCD.screen |
|
Presseithertheßor†OCTAVESHIFT.buttonsThenumberofshiftedoctaves(upordown)willbe |
2) |
SelectthePartthatyouwouldliketoapplytheshift.to |
1) |
TousetheOctaveShift: |
|
amountwilldisappearfromtheLCDscreen,indicatingthattheCPisnowbacktoitsoriginal.setting |
|
TocanceltheTransposesetting,pressboththeßand†buttonsatthesame.timeThetranspose |
2) |
thatis5halfsteps.lower |
|
manyhalfstepsupordownyouhavetransposedthe.piano-5,forexample,representsatransposition |
|
Presseithertheßor†TRANSPOSE.buttonsTheLCDscreenshowsyouanumbertellingyouhow |
1) |
ToTranspose: |
|
RIGHT1andRIGHT.2 |
|
wellwithothersoundsinthe.layerOctaveshiftisonlyavailableforthethreeParts:LEFT/SPLIT, |
|
theproperpitchrange,ortosetonesoundinalayertoplayinadifferentoctavesothatitmixes |
|
maywanttousetheoctaveshifttoadjustabasssoundassignedtotheLEFT/SPLITParttoplayin |
|
Octaveshiftcanbeveryusefulwhenyouareplayingmultiplesoundsacrossthe.keyboardYou |
|
availableinthe.CP |
|
playedbackbytheEasy/AdvancedRecorderandanyoftheover600instrumentanddrumsounds |
|
another.keyYoucantransposetheConcertMagicsongs,theAccompanimentStyles,anysongs |
|
another.keyThetransposefeatureallowsyoutoplaythesongintheoriginalkey,buthearitin |
|
Transposecanbeespeciallyusefulwhenyouhavelearnedasonginonekeyandhavetoplayitin |
|
inoctave.increments |
|
TransposeraisesorlowerstheCP’spitchinhalf-teps.incrementsOctaveShiftdoesthesamebut |
|
TransposeandOctaveShift
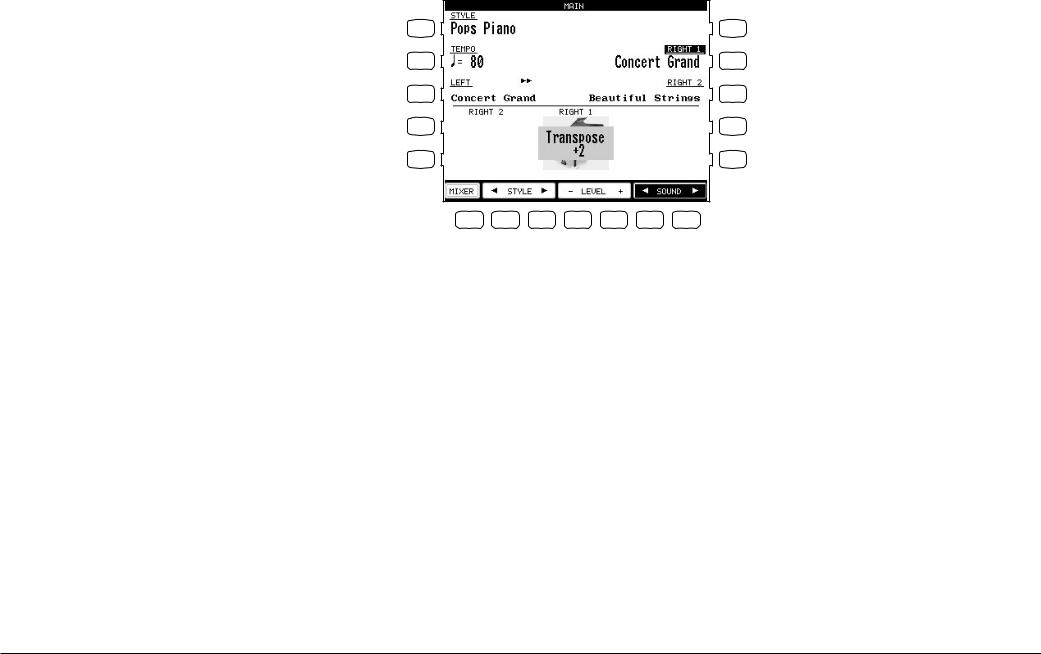
L3 Selects the LEFT Part to be Transposed or Octave Shifted.
L 1 |
R 1 |
L 2 |
R 2 |
L 3 |
R 3 |
L 4 |
R 4 |
L 5 |
R 5 |
F 1 |
F 2 |
F 3 |
F 4 |
F 5 |
F 6 |
F 7 |
R2 Selects the RIGHT1 Part to be Transposed or Octave Shifted.
R3 Selects the RIGHT2 Part to be Transposed or Octave Shifted.
The number of octaves shifted is represented by the number of triangles shown above the sound name for each Part.
Transpose amount is shown at the bottom of the screen.
•The Octave Shift has a range of four octaves in each direction. However, some on board sounds may have a limited range in which they play properly. If you shift too far out of this range, the instrument may sound strange or may not play at all. This has no affect on the CP’s proper function though, and you should feel encouraged to use this feature as a means of getting interesting tonal variations out of the preset Sounds.
Basic Controls |
P. 23 |
KawaiConcertPerformerSeriesDigitalPiano |
|
|
|
|
|
|
.P24 |
|
|
|
|
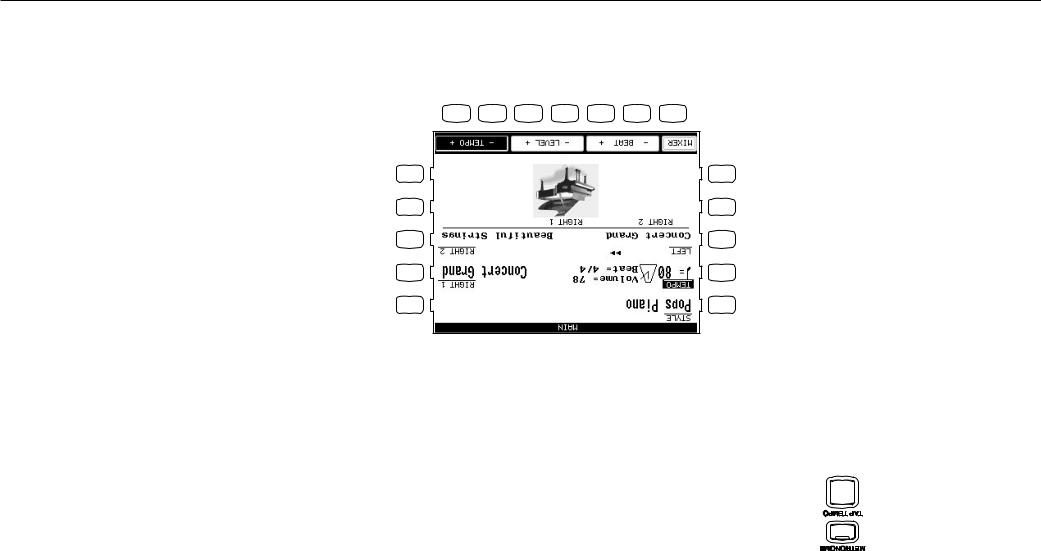
Adjuststhe.tempo |
F6,F7 |
||
|
|
|
Adjuststhevolume.level |
F4,F5 |
|||
|
6/8,7/8,9/8and12/8time.signatures |
|
|||||
Choosefrom1/4,2/4,3/4,4/4,5/4, |
Changesthe.Beat |
F2,F3 |
|||||
|
|
TakesyoutotheMixer.menu |
F1 |
||||
F7 |
F6 |
F5 |
F4 |
F3 |
F2 |
F1 |
|
R5 |
L5 |
R4 |
L4 |
R3 |
L3 |
R2 |
L2 |
R1 |
L1 |
Tostopthemetronome,presstheMETRONOMEbutton.again |
4) |
intoatempovalueonthescreen! |
|
yourfingerthreeormoretimesatthedesiredtempo,andtheCPwillautomaticallytranslatethat |
|
YoucanalsoadjustthetempobytappingontheTAPTEMPO.buttonSimplytaponthebuttonwith |
|
UsetheFbuttons(F2-F7)ortheDialtochangethe.values |
3) |
UsetheBEAT,VOLUME,orTEMPObuttons–(F2F7)toselectthesettingyouwishto.change |
2) |
screennexttotheTempo.value |
|
willseeVolumelevel,Beat(timesignature),aswellastheMetronomeiconappearintheLCD |
|
PresstheMETRONOME.buttonTheCPpianowillstartcountingwithanaudiblesteady.beatYou |
1) |
TousetheMetronome: |
|
toolthathelpsyoutoachievethisbyprovidingasteadybeatforyouplayalong.with |
|
playingthepianoatthecorrecttempoandwithasteady.rhythmTheCPpiano’smetronomeisa |
|
Rhythmisoneofhetmostimportantelementswhenlearning.musicItisimportanttopractice |
|
Metronome
 Loading...