

Page 1
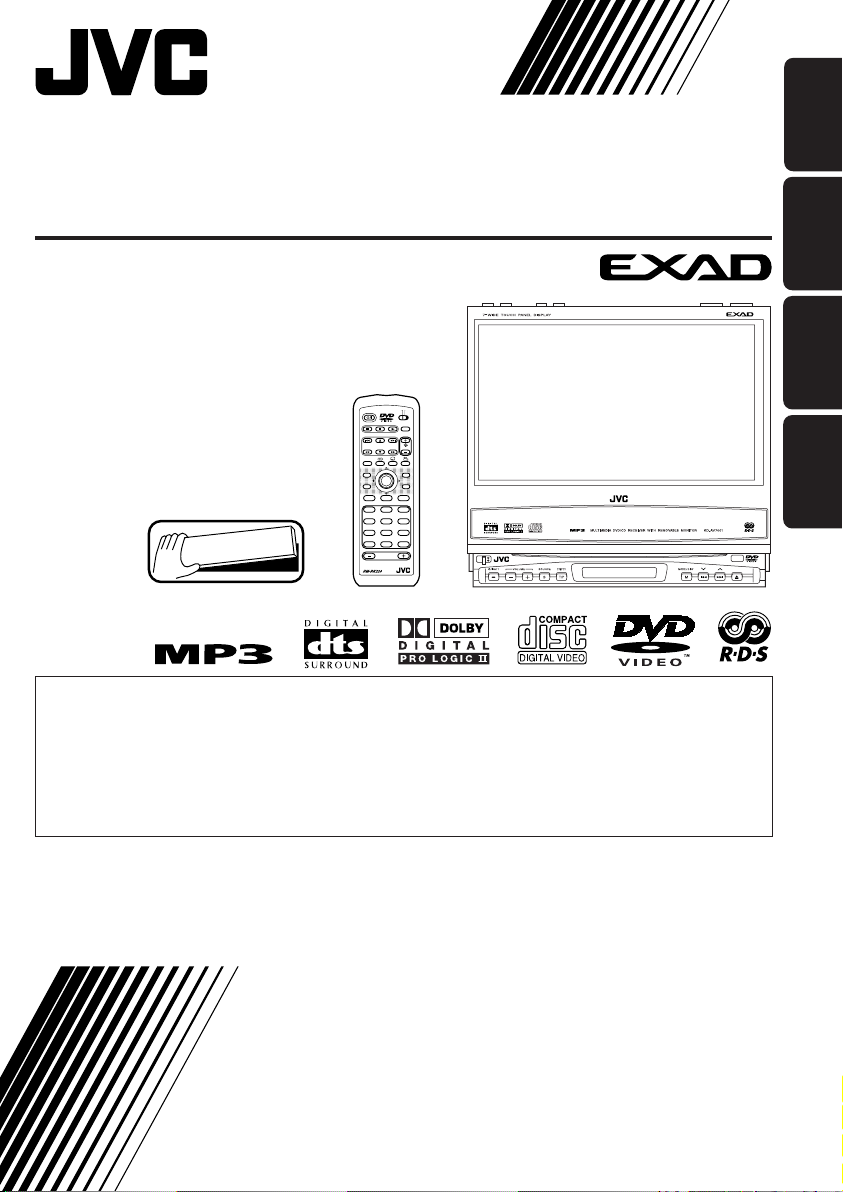
DVD RECEIVER WITH MONITOR
DVD-RECEIVER MiT MONITOR
RECEPTEUR DVD ET MONITOR
DVD-RECEIVER MET MONITOR
ENGLISH
KD-AV7001
MAIN SUB
ATT
ZOOM
DUAL
AVOUT VOL
ASPECT
TOPMENU
MENU
GUI
RETURN
SET UP
TUNER
DISCOKAV
231
564
97
8
11/012
/+1
0
10
Detachable
• This unit is equipped with the display demonstration. To cancel it, see page 14.
• Dieses Gerät ist mit einer Demonstrationsfunktion für das Display ausgestattet. Auf Seite 14
wird beschrieben, wie Sie diese Demonstrationsfunktion deaktivieren können.
• Cet appareil est équipé d’une démonstration des affichages. Pour l’annuler, référez-vous à la
page 14.
• Dit toestel heeft een display-demonstratiefunctie. Zie bladzijde 14 voor het annuleren van deze
functie.
VOLUME
DEUTSCH
FRANÇAIS
NEDERLANDS
For installation and connections, refer to the separate manual.
Für den Einbau und die Anschlüsse siehe das eigenständige Handbuch.
Pour l’installation et les raccordements, se référer au manuel séparé.
Bijzonderheden over de installatie en aansluiting van het apparaat vindt u in de
desbetreffende handleiding.
INSTRUCTIONS
BEDIENUNGSANLEITUNG
MANUEL D’INSTRUCTIONS
GEBRUIKSAANWIJZING
LVT1172-001A
[E]
Page 2
Thank you for purchasing a JVC product.
Please read all instructions carefully before operation, to ensure your complete understanding and
to obtain the best possible performance from the unit.
ENGLISH
IMPORTANT FOR LASER PRODUCTS
1. CLASS 1 LASER PRODUCT
2. CAUTION: Do not open the top cover. There are no user serviceable parts inside the unit;
leave all servicing to qualified service personnel.
3. CAUTION: Visible and invisible laser radiation when open and interlock failed or defeated.
Avoid direct exposure to beam.
4. REPRODUCTION OF LABEL: CAUTION LABEL, PLACED OUTSIDE THE UNIT.
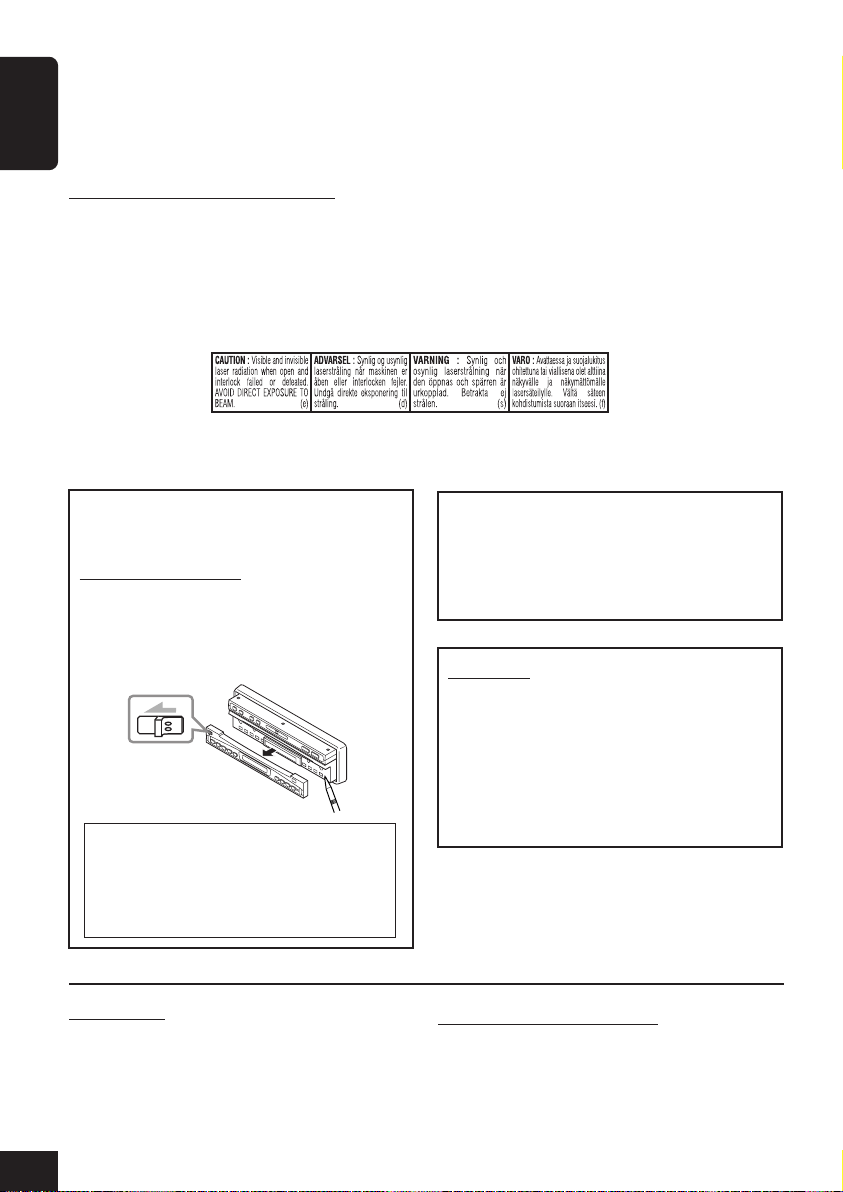
After installing the unit, reset it before use
following the procedure below:
How to reset your unit
Detach the control panel (see page 91), then
press the reset button on the main unit using
a ball-point pen or a similar tool.
This will reset the built-in microcomputer.
Your preset adjustments—such as preset
channels or sound adjustments—will also be
erased.
• The monitor will go into its place if
opened.
For safety....
• Do not raise the volume level too much, as
this will block outside sounds, making
driving dangerous.
• Stop the car before performing any
complicated operations.
For security reasons, a numbered ID card is
provided with this unit, and the same ID
number is imprinted on the unit’s chassis.
Keep the card in a safe place, as it will help
the authorities to identify your unit if stolen.
CAUTIONS:
• Do not insert any disc of unusual shape—
like a heart or flower; otherwise, it will
cause a malfunction.
• Do not expose discs to direct sunlight or
any heat source or place them in a place
subject to high temperature and humidity.
Do not leave them in a car.
Temperature inside the car....
If you have parked the car for a long time in hot
or cold weather, wait until the temperature in
the car becomes normal before operating the
unit.
2
Page 3
WARNINGS
• DO NOT install any unit in locations where;
– it may obstruct the steering wheel and
gearshift lever operations, as this may
result in a traffic accident.
– it may obstruct the operation of safety
devices such as air bags, as this may result
in a fatal accident.
– it may obstruct visibility.
• DO NOT operate any unit while manipulating
the steering wheel, as this may result in a
traffic accident.
• The driver must not watch the monitor while
driving.
If the driver watches the monitor while
driving, it may lead to carelessness and
cause an accident.
• If you need to operate the main unit while
driving, be sure to look ahead carefully or
you may be involved in a traffic accident.
• If the parking brake is not engaged, “DRIVER
MUST NOT WATCH THE MONITOR WHILE
DRIVING.” appears on the monitor, and no
playback picture will be shown.
– This warning appears only when the
parking brake wire is connected to the
parking brake system built in the car (refer
to the Installation/Connection Manual).
CAUTIONS on the monitor
• The monitor built in this receiver has been
produced with high precision, but it may have
some ineffective dots. This is inevitable and
is not malfunction.
• Do not expose the monitor to direct sunlight.
• When the temperature is very cold or very
hot...
– Chemical changes occur inside, causing it
to malfunction.
– Pictures may not appear clearly or may
move slowly. Pictures may not be
synchronized with the sound or the picture
quality may decline in such environments.
ENGLISH
CAUTION on Volume Setting:
Discs produce very little noise compared with other sources. If the volume level is adjusted for
the tuner, for example, the speakers may be damaged by the sudden increase in the output level.
Therefore, lower the volume before playing a disc and adjust it as required during playback.
Important!
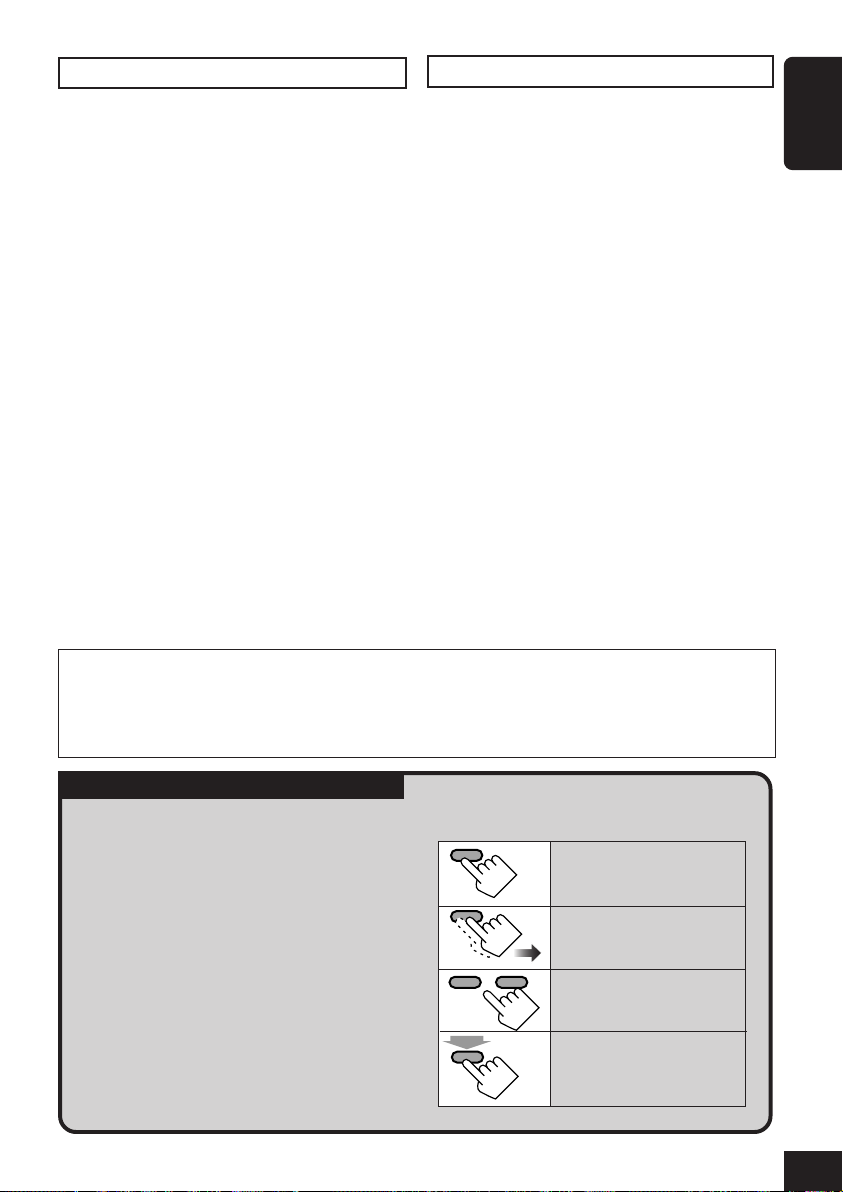
How to read this manual:
• Operations are explained only with the
illustrations as follows:
To make the explanations as simple and
easy-to-understand as possible, we have
adapted the following methods:
Press briefly.
• Some related tips and notes are
explained later in the sections “More
Press repeatedly.
about This Receiver” (see page 81), but
not in the same section explaining the
operations. If you want to know more
Press either one.
about the functions, or if you have a doubt
about the function, go to the section and
you will find the answers.
Hold
Press and hold until your
desired response begins.
3
Page 4

Contents
How to reset your unit ..................................... 2
ENGLISH
Important! (How to read this manual) ............. 3
Introduction—Playable Discs ....................... 5
Quick Guide—How to Use the Controls...... 6
Remote controller ............................................ 6
Main unit (front) .............................................. 8
Preparation (Remote Controller—
RM-RK220) .................................................... 9
Operation Methods ...................................... 10
Basic Operations .......................................... 12
Setting the clock ............................................ 13
Changing the source ...................................... 14
Changing the graphic screen ......................... 14
Changing the touch panel color ..................... 14
Displaying the level meter ............................. 15
Radio Operations ......................................... 16
Listening to the Radio ................................. 17
Storing stations in memory ............................ 18
Displaying the preset list ............................... 19
Searching for your favorite programme—
PTY Search ............................................. 20
Using the Standby Reception ........................ 21
RDS Setup—RDS SET ................................ 23
DVD/VCD Operations ................................. 25
CD/MP3 Operations .................................... 26
Basic Disc Operations ................................. 27
Changing the aspect ratio .............................. 29
Prohibiting disc ejection ................................ 29
Selecting MP3 folders ................................... 29
Operating the disc menu ................................ 30
Replaying the previous scenes ....................... 31
Zooming in .................................................... 31
Selecting subtitles .......................................... 32
Selecting audio languages ............................. 32
Selecting multi-angle views .......................... 33
Locating a folder/track using the list ............. 34
Displaying the disc text information ............. 35
Displaying the time information .................... 35
Selecting playback modes ............................. 35
Searching for scenes or songs ........................ 36
Dual Mode Operations ................................ 38
Selecting the sources ..................................... 38
Adjusting AV OUTPUT volume.................... 39
Surround Mode Operations........................ 40
Introducing surround/DSP mode ................... 41
Turning on and off the surround/DSP mode.... 42
Sound Modes (iEQ) Operations ................. 44
Selecting preset sound modes ........................ 45
Storing your own sound modes ..................... 45
Other Sound Adjustments .......................... 46
Monitor Adjustments .................................. 47
Initial Setup—DVD MENU ........................ 48
Initial Setup—MONITOR .......................... 50
Initial Setup—ON SCREEN ....................... 52
Initial Setup—AUDIO MENU/PSM .......... 54
Other Main Functions ................................. 58
Assigning titles to the sources ....................... 58
Changing the monitor position/angle ............ 60
Removing the monitor ................................... 60
CD Changer Operations ............................. 61
Basic CD Changer Operations ................... 62
Advanced CD Changer Operations ........... 63
Selecting disc/folders/tracks .......................... 63
Locating a disc/folder/track using the list ..... 63
Displaying the disc text information ............. 64
Selecting playback modes ............................. 65
Searching for songs ....................................... 66
External Component Operations ............... 67
TV Tuner Operations .................................. 68
Watching TV programs ................................. 69
Storing stations in memory ............................ 69
Displaying the preset list ............................... 71
DAB Tuner Operations ............................... 72
Listening to the DAB Tuner ........................ 73
Selecting ensembles and services .................. 74
Storing services in memory ........................... 74
Displaying the preset list ............................... 75
Displaying the DAB text ............................... 76
Using the Standby Reception ........................ 76
Using Announcement Standby Reception ..... 77
DAB Setup—DAB SET ............................... 78
Maintenance ................................................. 80
More about This Receiver........................... 81
Troubleshooting ........................................... 86
Additional Information ............................... 88
Specifications................................................ 90
4
Page 5
Introduction—Playable Discs
Discs you can play
You can play back the following discs on this
unit:
• DVD Video: whose video format is PAL or
NTSC and whose region code is “2.”
–DVD-Rs and DVD-RWs recorded in
the DVD-Video format can also be
played (see page 82).
• Video CD (VCD)/Audio CD
• MP3: CD-Rs or CD-RWs including MP3
files with the file extension code
<mp3>. They must be recorded in the
format compliant with ISO 9660 Level
1, ISO 9660 Level 2, Romeo, and Joliet.
On some discs, the actual operations may be
different from what is explained in this
manual.
The following discs cannot be played back
DVD Audio, DVD-ROM, DVD-RAM,
DVD-RW recorded in the DVD-VR format,
CD-ROM, CD-I (CD-I Ready), Photo CD, etc.
• Playing back these discs will generate noise
and damage the speakers.
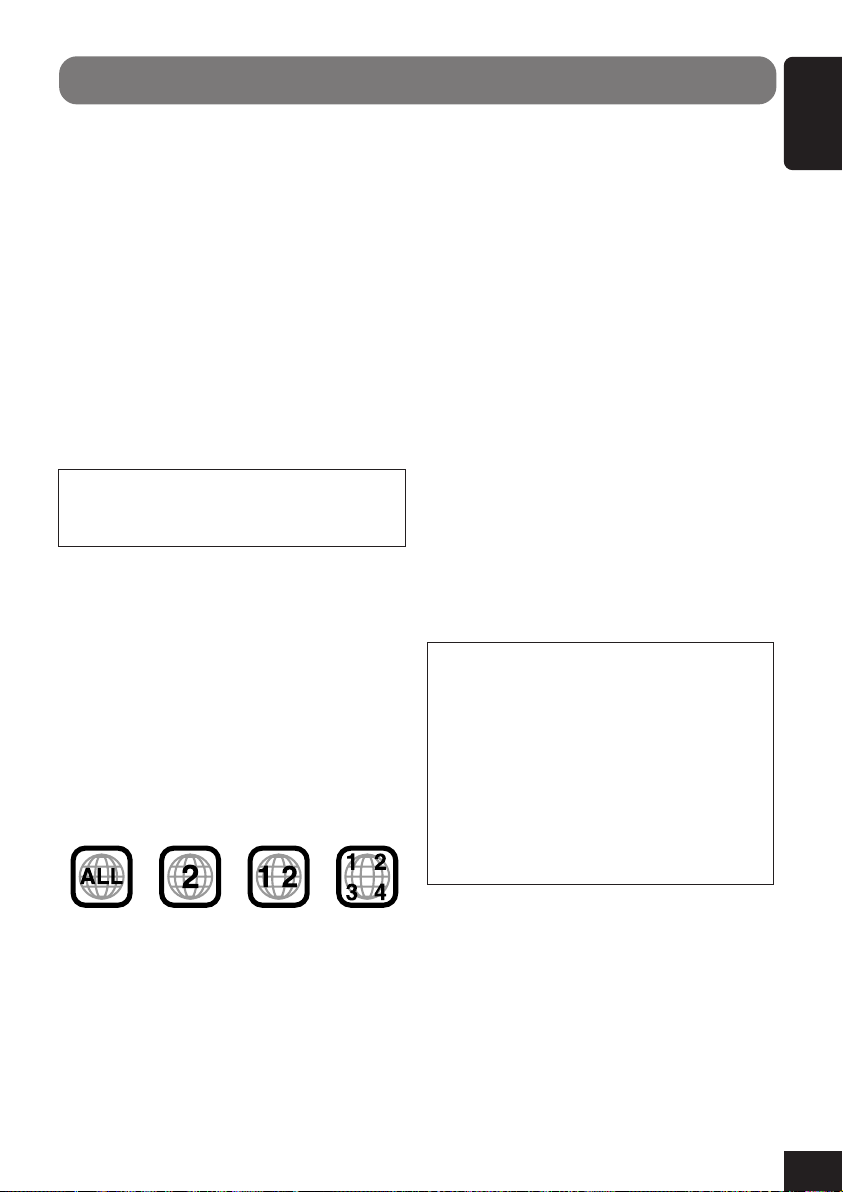
* Note on Region Code
DVD players and DVD Video discs have their
own Region Code numbers. This unit can only
play back DVD discs whose Region Code
numbers include “2.”
DVD Video—digital audio formats
The System can play back the following digital
audio formats.
Linear PCM: Uncompressed digital audio, the
same format used for CDs and most studio
masters.
Dolby Digital *: Compressed digital audio,
developed by Dolby Laboratories, which
enables multi-channel encode to create the
realistic surround sound.
DTS ** (Digital Theater Systems):
Compressed digital audio, developed by Digital
Theater Systems, Inc., which enables multichannel like Dolby Digital. As the compression
ratio is lower than for Dolby Digital, it provides
wider dynamic range and better separation.
MPEG Multichannel: Another compressed
digital audio which also enables multi-channel
encode to create the realistic surround sound.
However, this System downmix the multichannel singnals into 2 channels (decoded
PCM) and play it back.
This product incorporates copyright
protection technology that is protected by
U.S. patents and other intellectual property
rights. Use of this copyright protection
technology must be authorized by
Macrovision, and is intended for home and
other limited viewing uses only unless
otherwise authorized by Macrovision.
Reverse engineering or disassembly is
prohibited.
ENGLISH
Examples:
If you insert a DVD Video disc of an incorrect
Region Code
“REGION CODE ERROR!” appears on the
monitor.
• “DVD Logo” is a trademark of DVD Format/
Logo Licensing Corporation registered in the
US, Japan and other countries.
* Manufactured under license from Dolby
Laboratories. “Dolby”, “Pro Logic”, and
the double-D symbol are trademarks of
Dolby Laboratories.
** “DTS” and “DTS Digital Surround” are
registered trademarks of Digital Theater
Systems, Inc.
5
Page 6
Quick Guide—How to Use the Controls
○○○○○○○○○
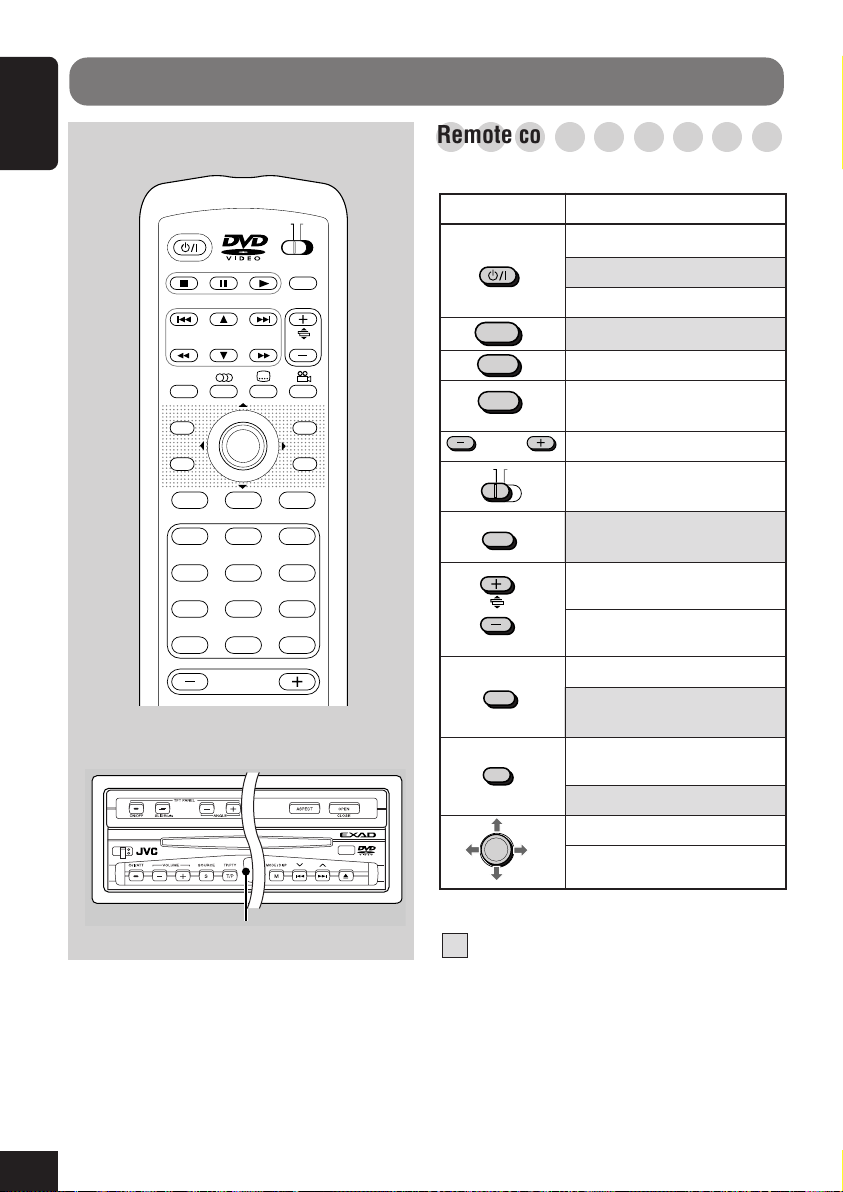
Remote controller
ENGLISH
Remote controller
General operations
Main unit
ATT
ASPECT
MENU
GUI
SET UP
TUNER
10
MAIN SUB
ZOOM
AVOUT VOL
TOPMENU
RETURN
DISCOKAV
231
564
897
11/012
VOLUME
DUAL
/+1
Buttons To do:
AT T
Turn on the main unit.
Turn off the main unit.
Attenuate sounds.
TUNER
DISC
AV
VOLUME
MAIN SUB
ZOOM
DUAL
Select “TUNER” and “DAB.”
Select “DISC” and “CD-CH.”
Select external components:
TV = AV1 = AV2 =
Adjust the volume.
Set the main or suboperation for Dual Mode. *
Turn on/off Dual Mode.
1
Adjust the monitor angle
AVOUT VOL
0
ASPECT
(with MAIN/SUB set MAIN).
Adjust the AV output level
(with MAIN/SUB set SUB).
Change the aspect ratio.
Display the monitor
adjustment screen.
GUI
SET UP
Display and erase GUI
screen.
Display Setup Menus.
Change menu items.
OK
Confirm.
Display
: functions if pressed and held.
*1 When using Dual Mode, the remote controller operates either main or sub source depending on
the MAIN/SUB setting.
*2 Only for MP3
*3 While playing a DVD, chapter is selected; on the other hands, title is selected before or after
playback.
6
Page 7
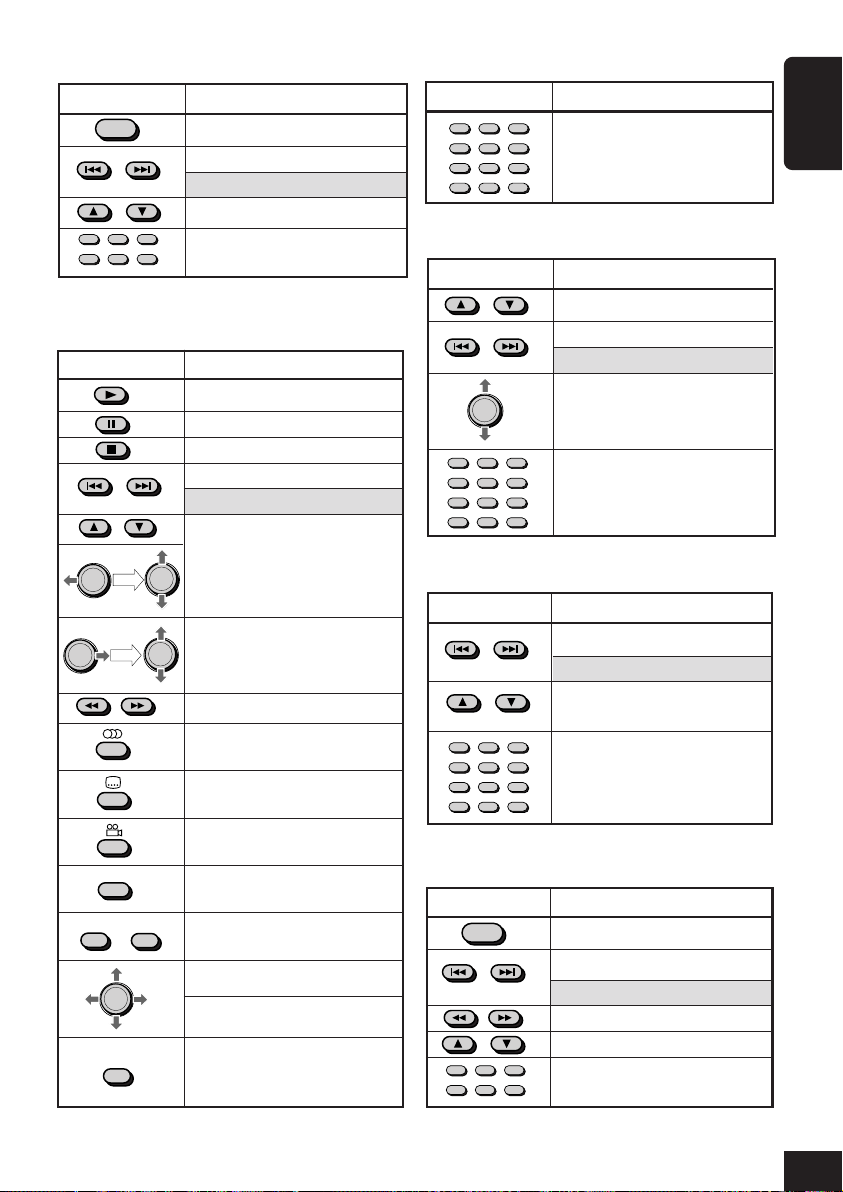
Tuner operations
Buttons To do:
TUNER
Select the band.
Start Auto Search.
Start Manual Search.
Change preset numbers.
231
564
Select preset numbers
directly.
Disc operations
Buttons To do:
Play.
Pause.
Stop.
Select chapters/tracks.
Search.
Disc operations—continued
Buttons To do:
231
10
564
897
11/012
Select title/chapter/track
number. *
/+1
0
CD changer operations
Buttons To do:
Select folders. *
Select tracks.
Search.
10
OK
231
564
897
11/012
Change discs.
Select disc numbers.
/+1
0
3
2
ENGLISH
OK
OK
MENU
then
then
ZOOM
DUAL
TOPMENU
OK
RETURN
Selects folders. *
OK
OK
Select tracks. *
Search.
Select audio language.
Select subtitle language.
Select view angle.
Zoom the picture.
Display disc menu.
Change menu items.
Confirm.
Return to the previous
screen while operating the
disc menu.
2
TV tuner operations
Buttons To do:
2
Start Auto Search.
Start Manual Search.
Change preset channel
numbers.
231
10
564
897
11/012
Select preset channel
numbers.
/+1
0
DAB Tuner operations
Buttons To do:
TUNER
231
564
Select the band.
Start Auto Search.
Start Manual Search.
Select services.
Change preset numbers.
Select preset numbers
directly.
7
Page 8
○○○○○○○○○○○○○○○○○○
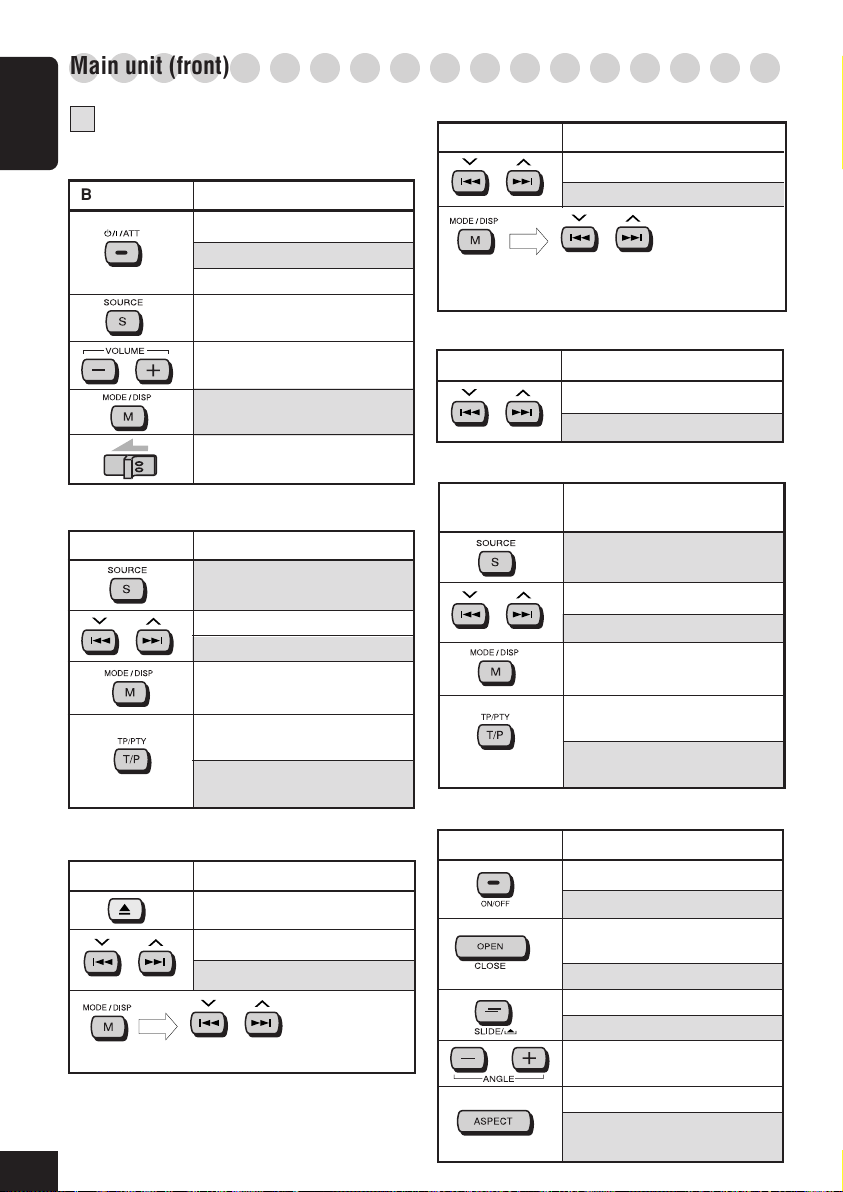
Main unit (front)
: functions if pressed and held.
ENGLISH
General operations
Buttons To do:
Tuner operations
Buttons To do:
Turn on the main unit.
Turn off the main unit.
Attenuate sounds.
Change the sources.
Adjust the volume.
Change the display
information.
Detach the control panel.
Select the band.
Start Auto Search.
Start Manual Search.
Change FM reception
mode.
Turn on/off TA Standby
Reception.
Turn on/off PTY Standby
Reception.
CD changer operations
Buttons To do:
Select tracks.
Search.
then
(once): Display “DISC” = select discs.
(twice): Display “FOLDER” = select folders.*
TV tuner operations
Buttons To do:
Start Auto Search.
Start Manual Search.
DAB Tuner operations
Buttons To do:
Select the band.
Start Auto Search.
Start Manual Search.
Change Search Mode
(Ensemble/Service).
Turn on/off TA Standby
Reception.
Turn on/off PTY Standby
Reception.
Monitor operations
1
Disc operations
Buttons To do:
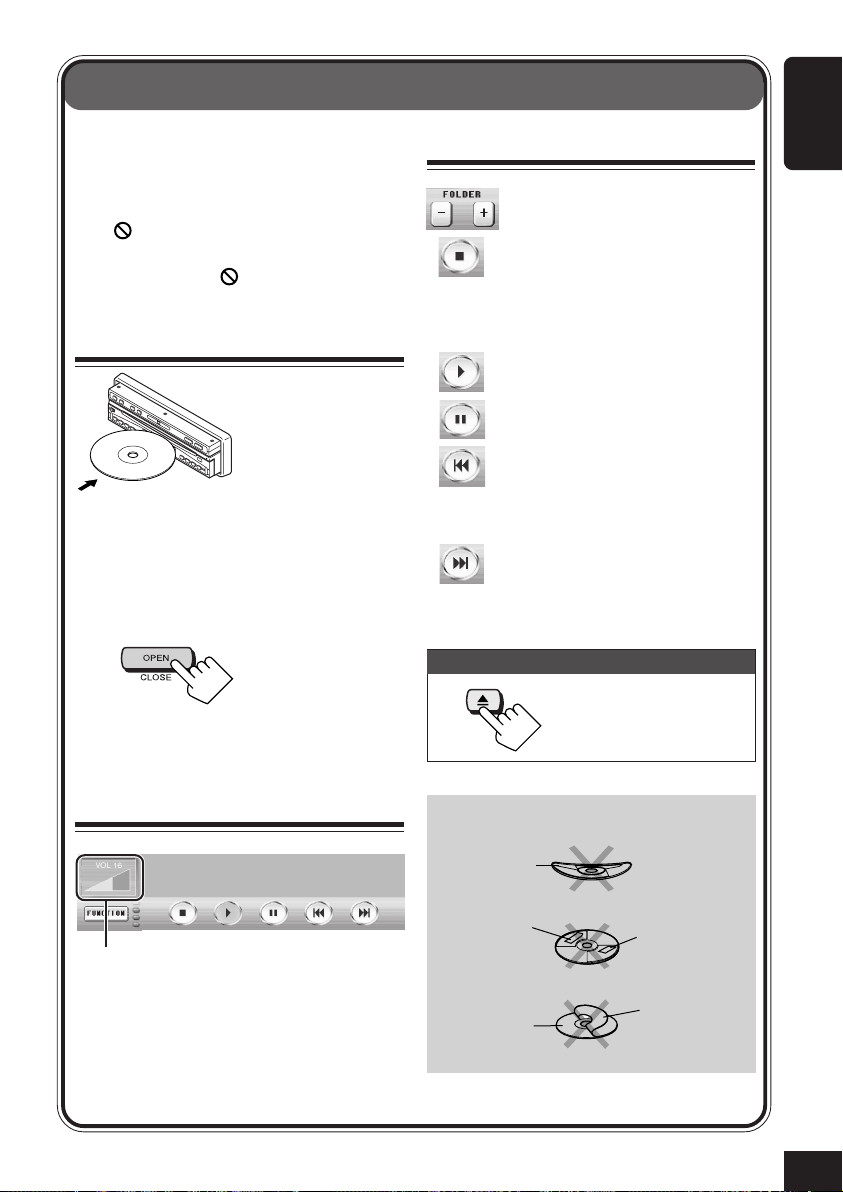
Eject the disc.
Select chapters/tracks.
Search.
then
Display “FOLDER” = select folders. *
*1 Only for MP3
8
Buttons To do:
Turn on the monitor.
Turn off the monitor.
Open the monitor.
(See page 60.)
Close the monitor.
Slide in/out the monitor.
Remove the monitor.
1
Adjust the monitor angle.
(See page 60.)
Change the aspect ratio.
Display the monitor
adjustment screen.
Page 9
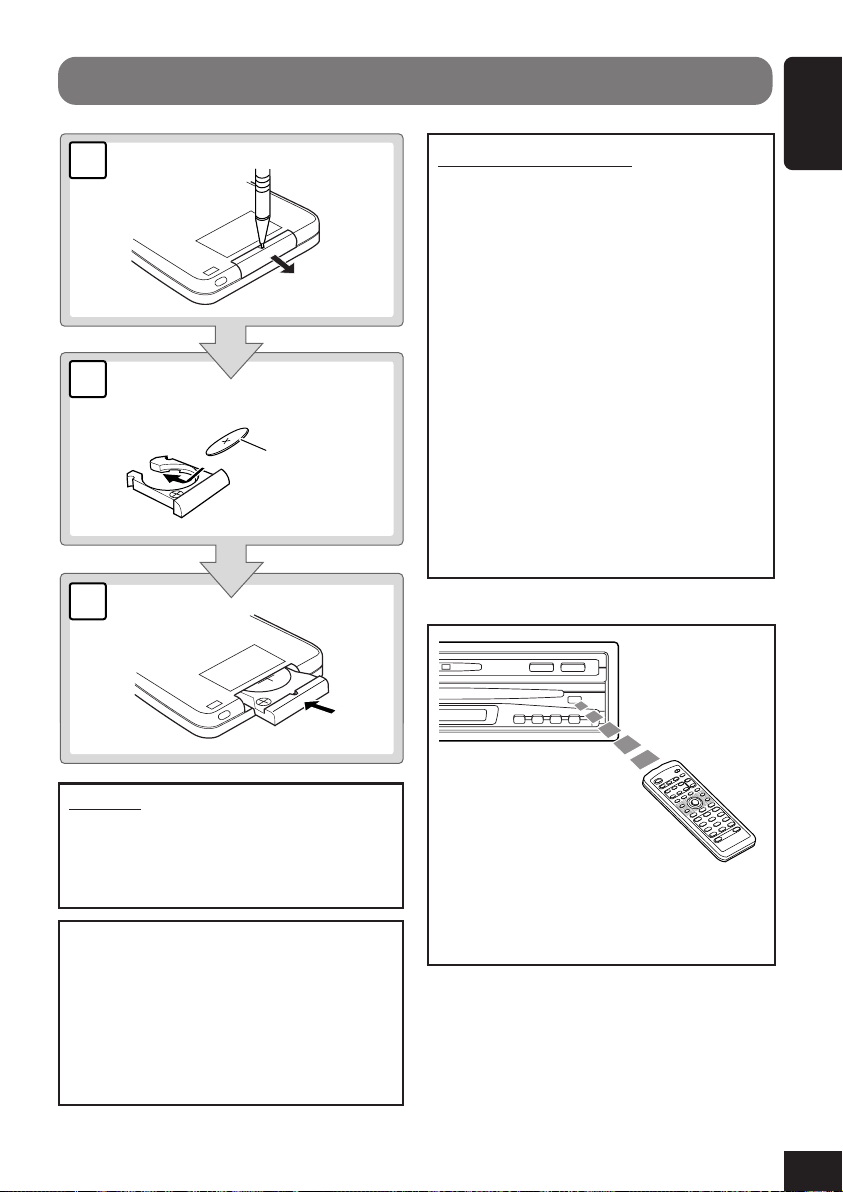
Preparation (Remote Controller—RM-RK220)
1
(back side)
2
With the + side facing upwards
3
Lithium coin battery
(CR2025)
WARNINGS on the battery:
• Store the battery in a place where children
cannot reach. If a child accidentally
swallows the battery, consult a doctor
immediately.
• Do not recharge, short, disassemble, or
heat the battery or dispose of it in a fire.
These behaviors may cause the battery to
be overheated, crack or fire.
• Do not leave the battery with other
metallic materials. Doing this may cause
the battery to give off heat, crack, or start
a fire.
• When throwing away or saving the battery,
wrap it in tape and insulate; otherwise, the
battery may be overheated, crack or fire.
• Do not poke the battery with tweezers or
similar tools. Doing this may cause the
battery to be overheated, crack or fire.
ENGLISH
CAUTION:
DO NOT leave the remote controller in a
place (such as dashboards) exposed to direct
sunlight for a long time. Otherwise, it may
be damaged.
This receiver is equipped with the steering
wheel remote control function.
If your car is equipped with the steering
wheel remote controller, you can operate
this receiver using the controller.
• See the Installation/Connection Manual
(separate volume) for connection to utilize
this function.
DO NOT expose the remote sensor on the
control panel to strong light (direct sunlight
or artificial lighting).
9
Page 10
Operation Methods
You can operate this unit using three types of operation methods.
ENGLISH
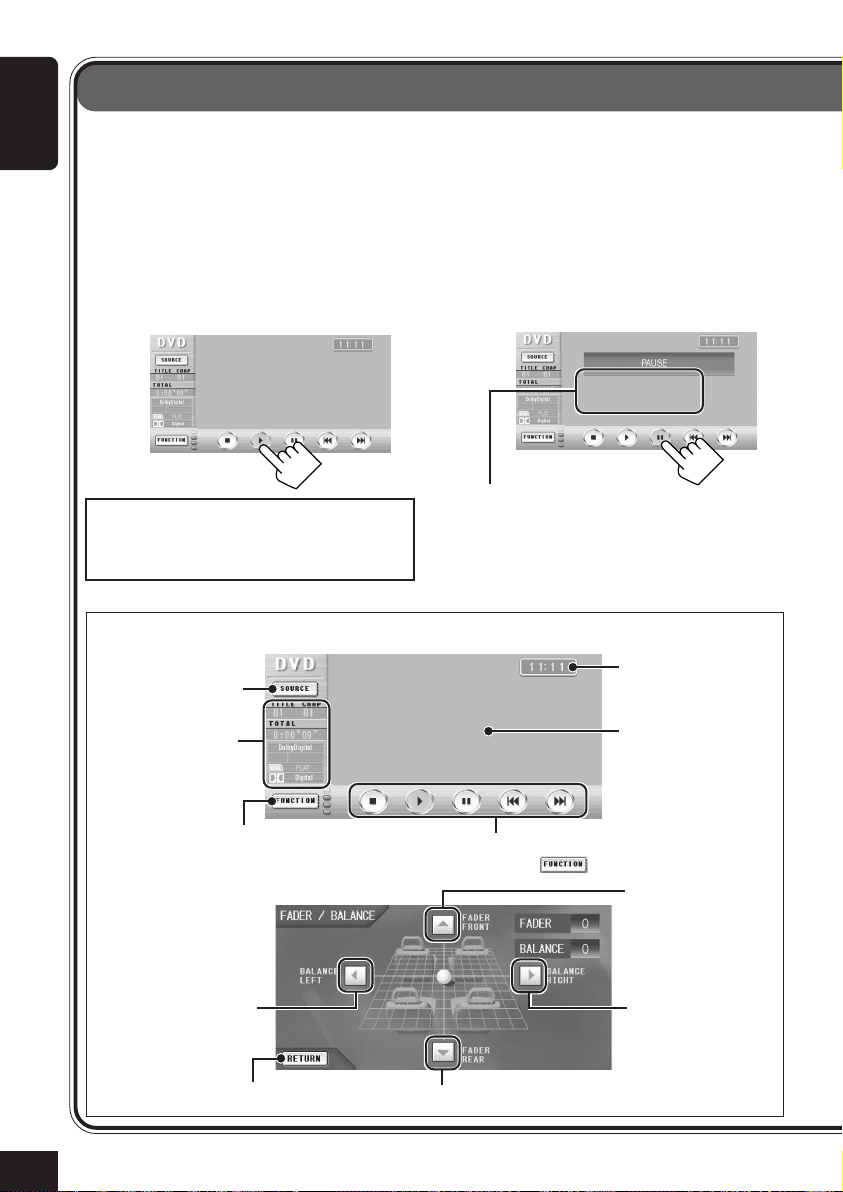
• This instruction manual explains the operations mainly using the Touch Panel Icons shown on
the monitor.
• Using the Touch Panel Icons directly (See “BLIND CONTROL” on page 51.)
Press the Touch Panel Icons with your finger directly (if you wear a glove, take it off).
Examples: The following is just an example. On the actual monitor screen, the playback
picture is shown (while video source is played back).
Do not operate the Touch Panel using a
ball-point pen or similar tool with the
sharp tip (it may damage the Touch Panel).
Ex. DVD playback
Changes the source.
Source and play
mode information
Changes the function modes (icons shown
to the right change accordingly).
Ex. Fader/balance
adjustment
Operation icon
(BALANCE LEFT)
To erase and display the Touch Panel icons
and indications, press the center portion of the
monitor screen.
• You can erase them only while viewing the
playback pictures.
Clock time indication
Picture view window
Icons shown on this column change each
time you press .
Operation icon
(FADER FRONT)
Operation icon
(BALANCE
RIGHT)
10
Returns to the previous screen.
Operation icon (FADER REAR)
Page 11

• Using the Graphic User Interface (GUI) from the remote controller
You can use the Graphic User Interface in the same way as you touch the panel icons.
Examples:
ENGLISH
13
GUI
SET UP
Display GUI on the monitor
(the cursor—yellow frame—
appears around the currently
selected icon).
• While one of the video
sources is selected, the
GUI function turns on and
off at a press of the button.
To exit from GUI operation mode, press GUI again so that the yellow frame disappears.
• Using the buttons and controls directly
Some operations are only performed by pressing the buttons directly.
You can also use the buttons and controls on the main unit and remote controller if they have
the same or similar name or marks as shown on the touch panel.
Examples:
2
OK
Move the cursor to an icon
you want.
OK
Confirm.
To eject a loaded disc.
To eject the monitor or
store it in the
compartment.
11
Page 12
Basic Operations
Hold
CAUTION on the monitor :
ENGLISH
Do not open or close the monitor by hand.
Do not apply any force to the monitor
while it is moving.
Such a behavior may damage the monitor
loading mechanism.
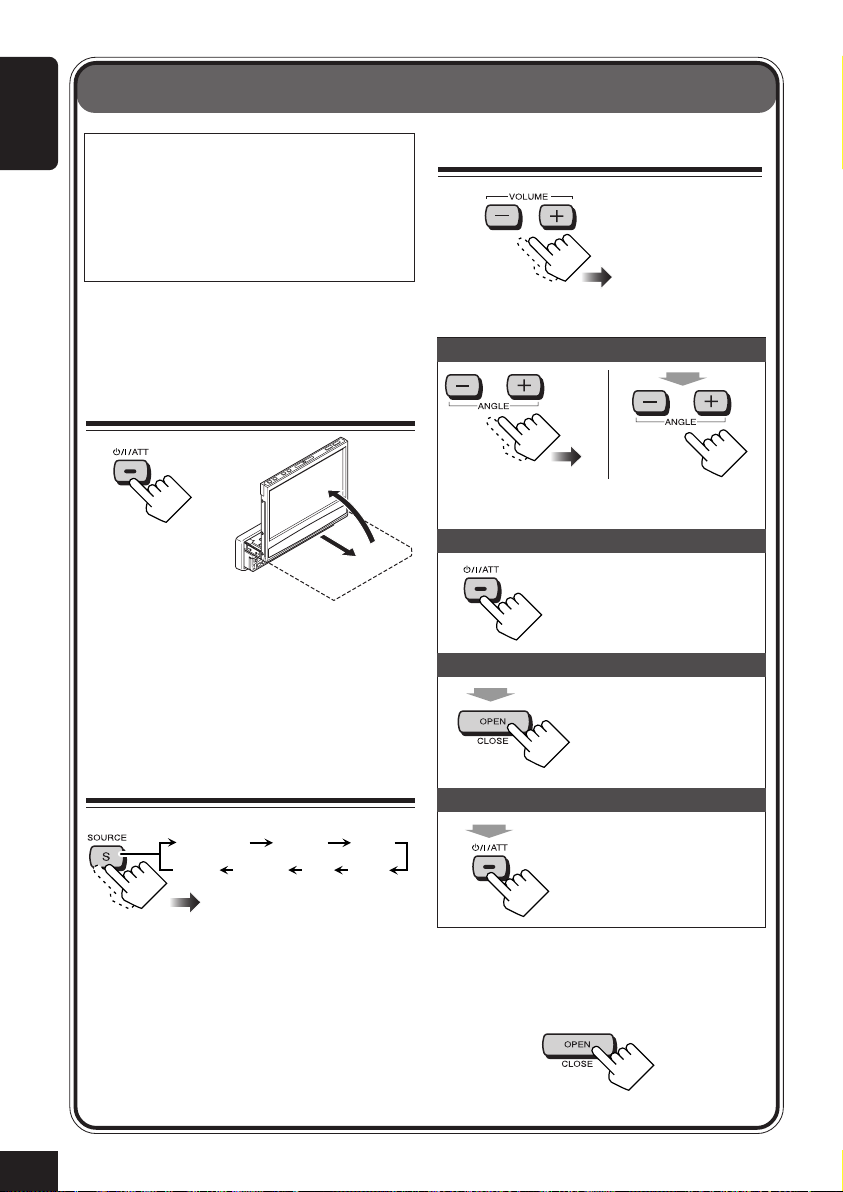
For turning on the power, use the buttons on
the main unit and the remote controller.
1
Turn on the power
“WAITING”
scrolls on the display
of the main unit (and the
monitor comes out *).
• When the monitor comes out, power comes
on to the monitor even if you have turned it
off.
• For the space required for the monitor
ejection, see page 91.
2
Select the source
TUNER DISC AV1
CD-CH
1
3
Adjust the volume
To change the monitor angle:
Hold
2
• See page 60 for details.
To drop the volume in a moment (ATT):
To restore the sound,
press it again.
To store the monitor in place:
• When the unit is
turned off, the power
is temporarily turned
on.
To turn off the power:
Hold
AV2TVDAB
12
• DISC: If a disc is not in the loading slot,
you cannot select “DISC” as the source to
play.
• CD-CH/TV/DAB: Without connecting
each component, you cannot select it for
the source.
* This depends on the “AUTO OPEN/
CLOSE” setting (see page 51).
If the monitor does not come out...
Page 13
○○○○○○○○○
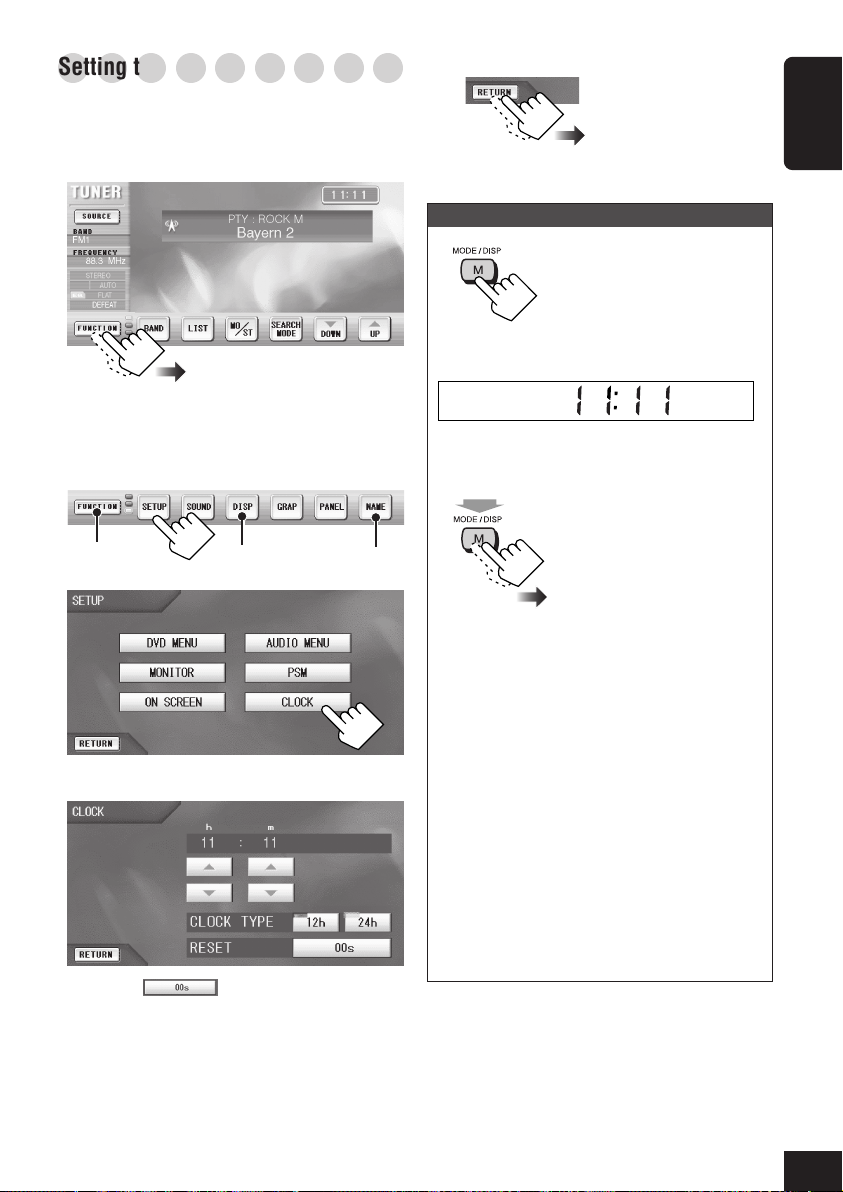
Setting the clock
You can also set the clock system to 24 hours
or 12 hours.
1
While playing any source...
• If the touch panel icons are not shown on
the monitor, touch the center portion of
the monitor screen.
2
1
*
2
*
1
*
3
Set the clock time.
4
• Press to start the clock time
counting exactly from 00 second.
5
Exit
To display the clock time:
When the unit is turned
off, the clock time is
displayed on the display
of the main unit for a
while.
On the main unit
When the unit is turned on...
Hold
Information shown on the display differs
according to the selected source.
TUNER: Frequency = Clock =
DISC: Play time = Clock =
AV1/AV2:Source name = Clock =
TV: Channel = Clock =
CD-CH: Elapsed time = Clock = Disc
DAB: Channel no. = Clock =
1
*
It does not appear for some sources.
2
*
It will be shaded when not available.
Each time you press and
hold the button, the
information shown on the
display of the main unit
changes.
Band&Preset no. =
Title/Chapter/Folder/Track no. =
TV&Preset no. =
no. = Folder/Track no. =
Band&Preset no. =
ENGLISH
13
Page 14
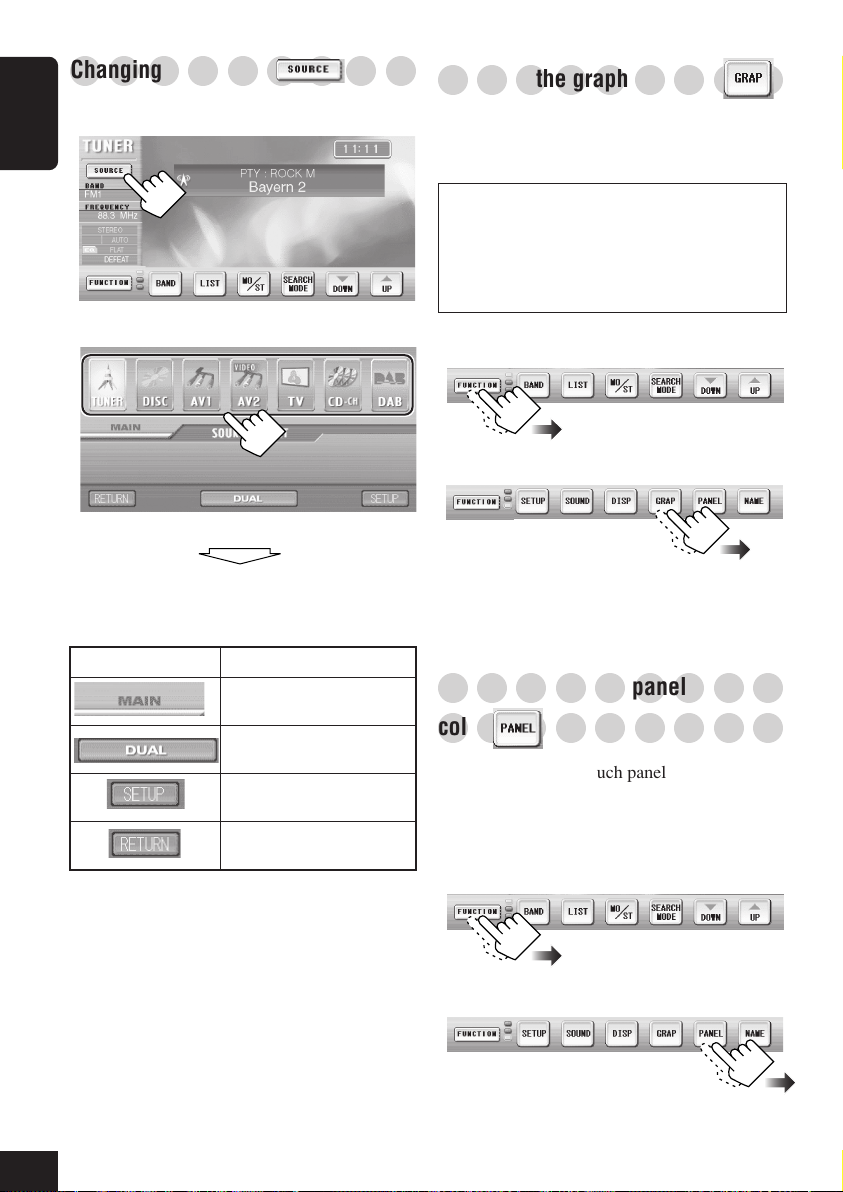
○○○○○○○○○
Changing the source
1
While playing any source...
ENGLISH
2
The current source is highlighted.
○○○○○○○○○
Changing the graphic screen
You can select one of eight graphics in the
picture view window.
• See page 88 for each graphic screen.
When shipped from the factory, display
demonstration has been activated, and starts
automatically when no operations are done for
about 30 seconds (except while playing a DVD/
VCD)..
To cancel it, select one of the graphic screen.
1
While playing any source...
Ex. While listening to FM
broadcast.
2
Newly selected source operation screen
appears.
Other icons Reference pages
See page 38.
See page 38.
See pages 48 – 57.
Returns to the previous
screen.
• To view the playback picture from any video
source, select the screen where the actual
playback pictures are shown.
○○○○○○○○○
Changing the touch panel
○○○○○○○○○
color
You can change the touch panel color
(excluding the picture view window) by
selecting from four preset color—blue, silver,
red, and black.
1
While playing any source...
Ex. While listening to FM
broadcast.
2
14
Page 15
○○○○○○○○○
Displaying the level meter
You can display the level meter on the graphic
screen, by selecting from four preset patterns.
• While viewing the playback picture or
display demonstration, you cannot show the
level meter.
1
While playing any source...
Ex. While listening to FM
broadcast.
2
The following level meters are displayed in
sequence.
Level meter 1
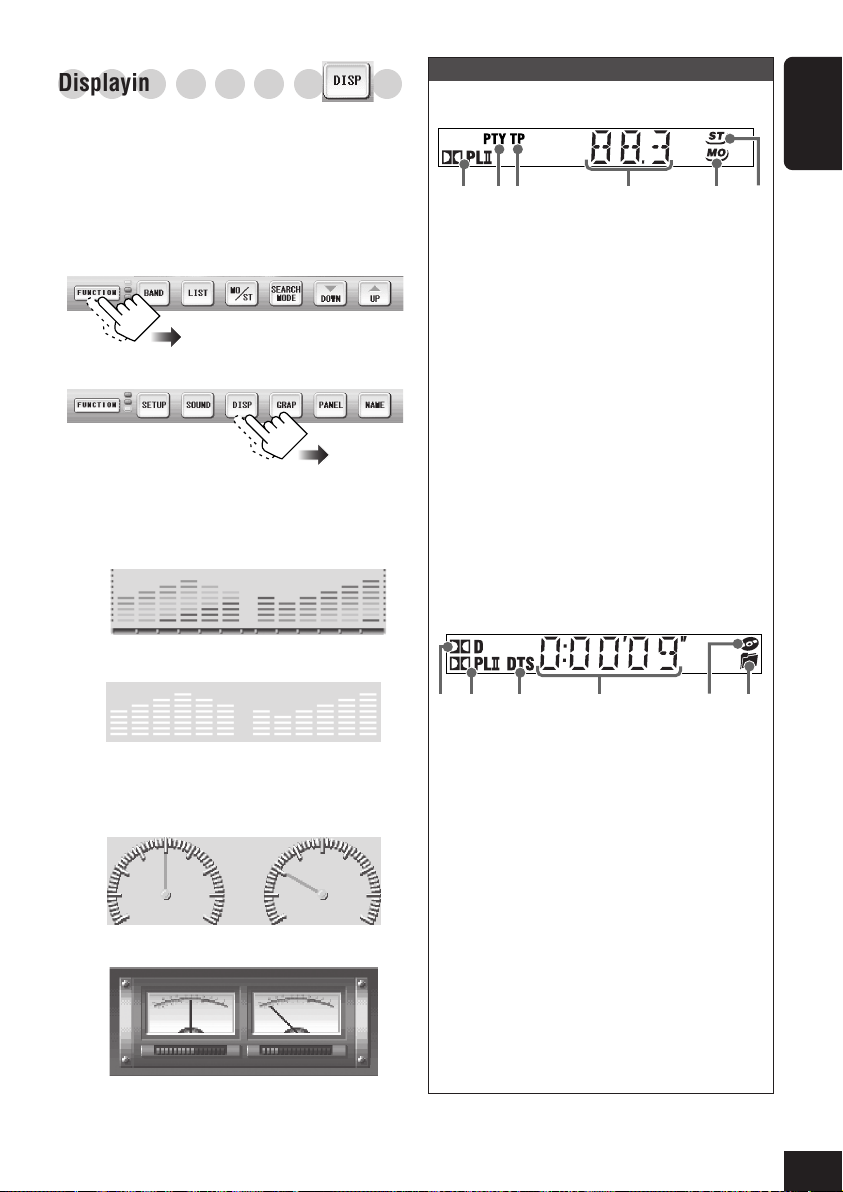
How to read the display of the main unit:
While listening to radio (FM/AM/DAB):
ENGLISH
4561 2 3
1 Lights up when Dolby Pro Logic II is
activated (see page 41).
2 Lights up or flashes when PTY Standby
Reception is in use (see pages 22 and
76).
3 Lights up or flashes when TA Standby
Reception is in use (see pages 21 and
76).
4 Main information—Frequency/Band/
Preset no.
5 MO indicator lights when FM reception
mode is “MONO.”
6 ST indicator lights while receiving an
FM stereo broadcast.
While playing a disc:
Level meter 2
No level meter will appear when no
sound comes in.
Level meter 3
Level meter 4
21 3
1 Lights up when Dolby Digital signal is
detected (see page 41).
2 Lights up when Dolby Pro Logic II is
activated (see page 41).
3 Lights up when DTS signal is detected
(see page 41).
4 Main information—Play time/Title no./
Chapter no./Folder no./Track no.
5 Lights up when the disc is detected.
6 Lights up when an MP3 CD is detected.
• You can dim the display and the buttons
on the front panel.
For details see page 51 and also the
Installation/Connection Manual (separate
volume).
4
5
6
15
Page 16
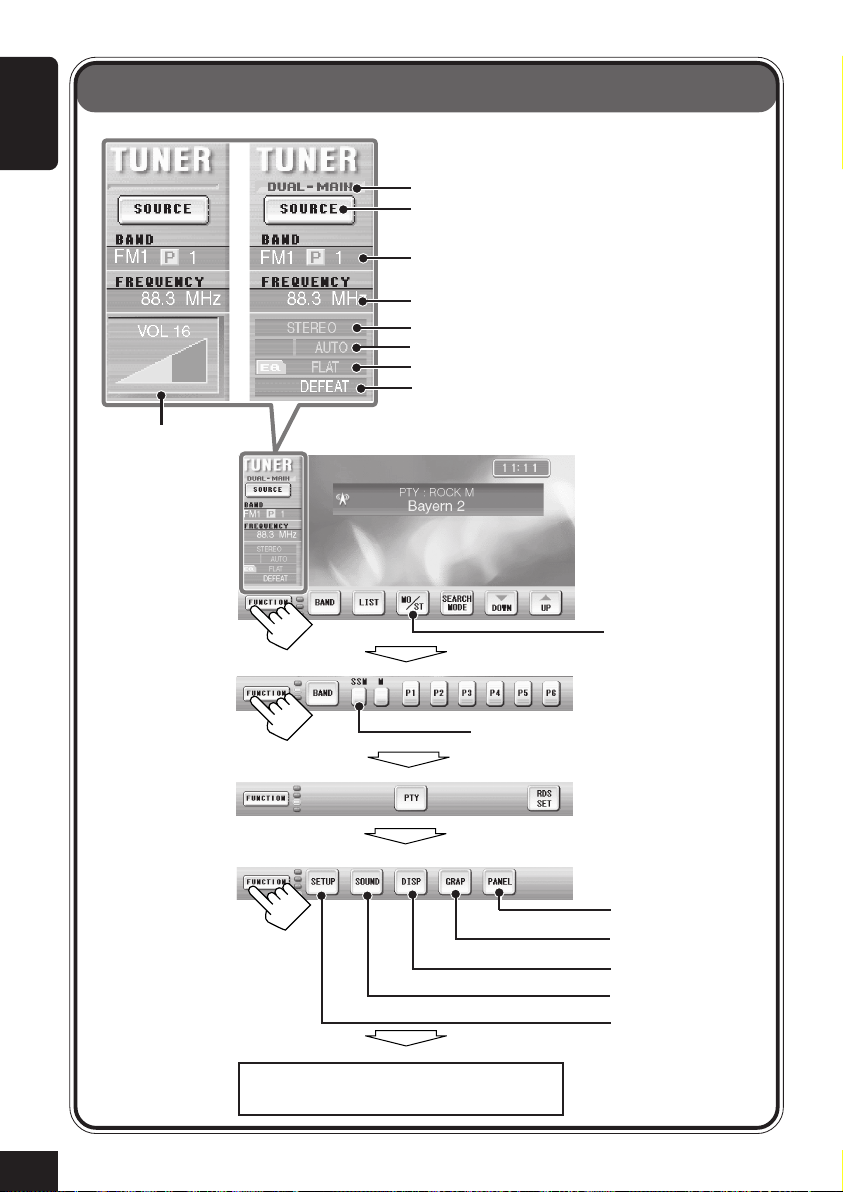
Radio Operations
ENGLISH
Volume level
appears when
adjusted.
Dual Mode indicator (see page 38)
SOURCE icon (see pages 14 and 38)
Current band/Preset no.
Station frequency
FM reception mode
Search mode
Sound mode (see page 44)
Surround/DSP mode (see page 41)
Not available for AM.
16
Available only after pressing “M” (next to
this icon).
See page 14.
See page 14.
See page 15.
See page 44.
See pages 48 – 57.
Back to the beginning
Page 17
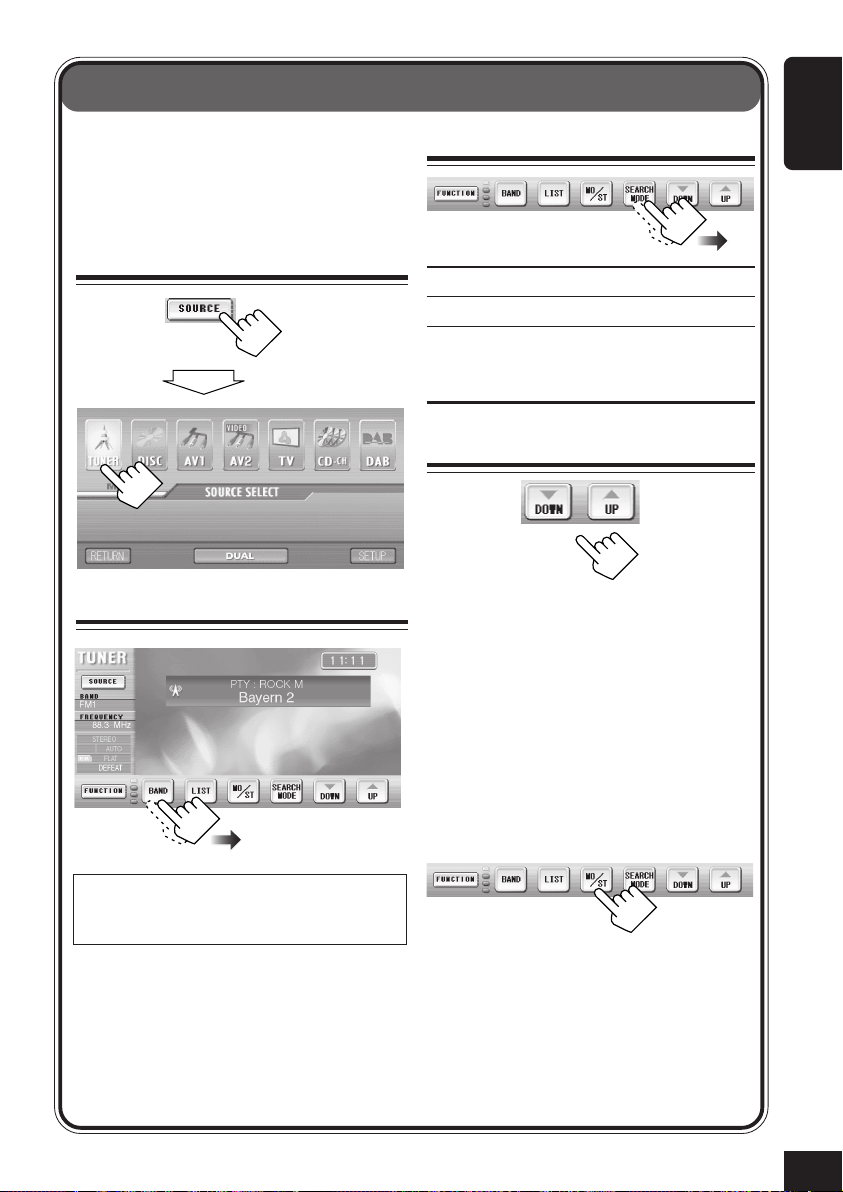
Listening to the Radio
• To tune in to a station using Preset Search,
first store your favorite stations into
memory (6 stations for each band: see page
18).
1
Select the Tuner
then
2
Select the band (FM/AM)
3
Select Search Mode
AUTO: To start Auto Search.
MANUAL: To start Manual Search.
PRESET: To select preset station
numbers (only possible after
storing stations in memory).
4
Tune in to a station
• For Auto Search, press either icon once.
“Auto Search” begins.
When a station is received, searching stops.
• For Manual Search, press either icon
repeatedly (or hold) until a station you
want is selected.
• For Preset Search, press either icon
repeatedly until a preset number you want
is selected.
ENGLISH
This receiver has three FM bands (FM1, FM2,
FM3). You can use any one of them to listen to
an FM broadcast.
When an FM stereo broadcast is hard
to receive:
FM reception mode changes to “MONO.”
Each time you press the icon, monaural
reception mode turns on and off.
• When FM reception mode is “MONO,”
reception improves, but stereo effect will
be lost.
17
Page 18
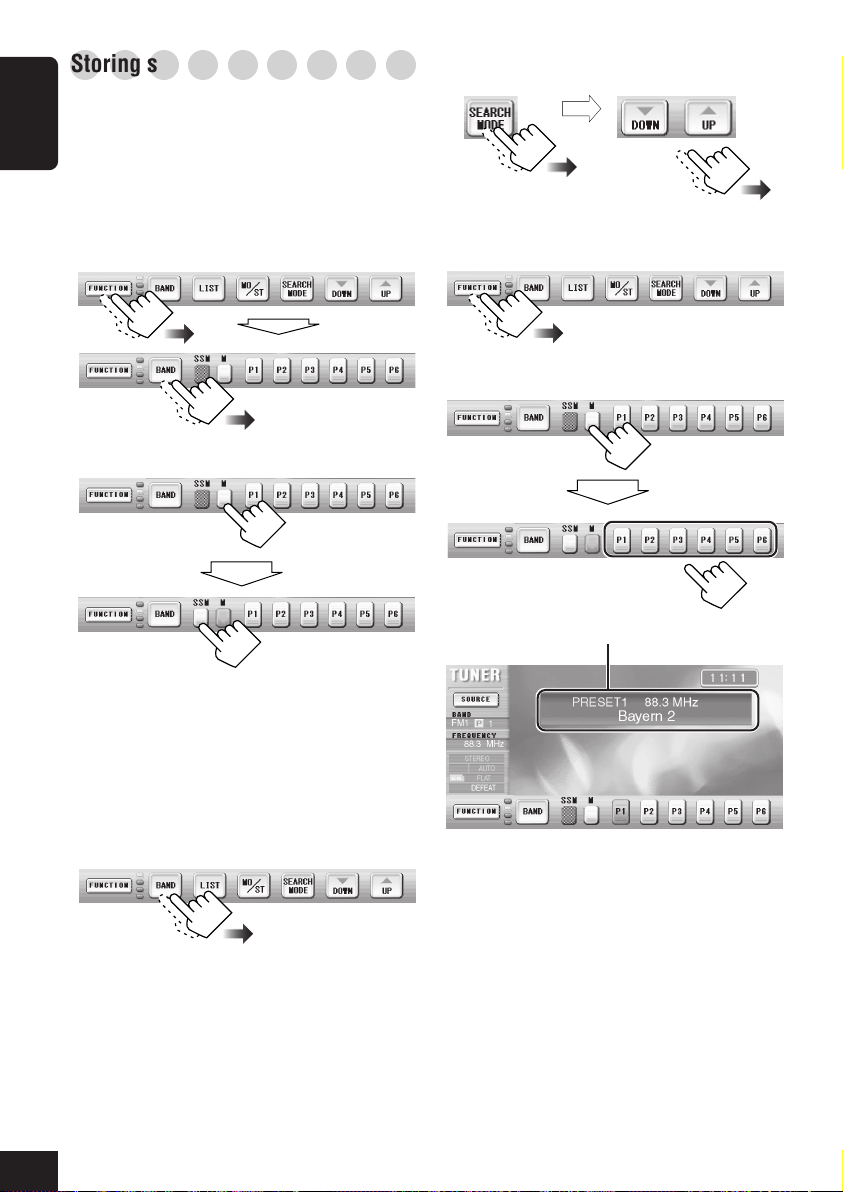
○○○○○○○○○
Storing stations in memory
You can preset 6 stations for each band.
FM station automatic presetting—SSM
ENGLISH
(Strong-station Sequential Memory)
• This functions only for FM bands.
1
Select the FM band (FM1 – FM3) you
want to store FM stations into.
2
Start SSM.
then
2
Tune in to a station.
then
Select “MANUAL”
(or “AUTO”).
3
Store the station into a preset number.
4
then
Preset station information will be displayed.
Local FM stations with the strongest
signals are searched and stored
automatically in the selected FM band.
Manual presetting
1
Select the band (FM1 – FM3, and AM)
you want to store a station into.
18
Page 19

To tune in to a preset station
• See also “Listening to the Radio” on page 17.
1
2
○○○○○○○○○
Displaying the preset list
You can store and select the preset stations
using the preset list on the monitor screen.
To store a station using the preset list
1
Select the band (FM1 – FM3, and AM)
you want to store a station into.
2
Tune into a station.
then
Select “MANUAL”
(or “AUTO”).
3
ENGLISH
To select a preset station using the
preset list
1
2
• Preset numbers, station frequencies and
programme station (PS) names are shown
on the list.
4
Store the station into a preset number.
then
19
Page 20

What you can do with RDS
RDS (Radio Data System) allows FM stations to send an additional signal along with their
regular programme signals. For example, the stations send their station names (PS), as well as
information about what type of programme they broadcast, such as sports or music, etc.
ENGLISH
By receiving the RDS data, this unit can do the following:
• Programme Type (PTY) Search
• Standby Reception of Traffic Announcement (TA) or your favorite programme (PTY)
• Programme Search
• Tracking the same programme automatically—Network-Tracking Reception
○○○○○○○○○
Searching for your favorite
○○○○○○○○○
programme—PTY Search
You can tune in to a station broadcasting your
favorite programme by searching for a PTY
code (see page 22).
1
While listening to an FM station...
then
2
Select a PTY code, and start PTY
Search.
• You can select the PTY code from the
preset list or from the PTY code list.
Preset list
PTY code list
To store your favorite programme types
in the preset list
When shipped from the factory, the following
6 programme types have been stored in the
preset list.
1
Pop M
45
Classics
2
Rock M Easy M
Affairs
3
6
Varied
1
then
2
20
To display the other codes in the PTY code
list
Page 21
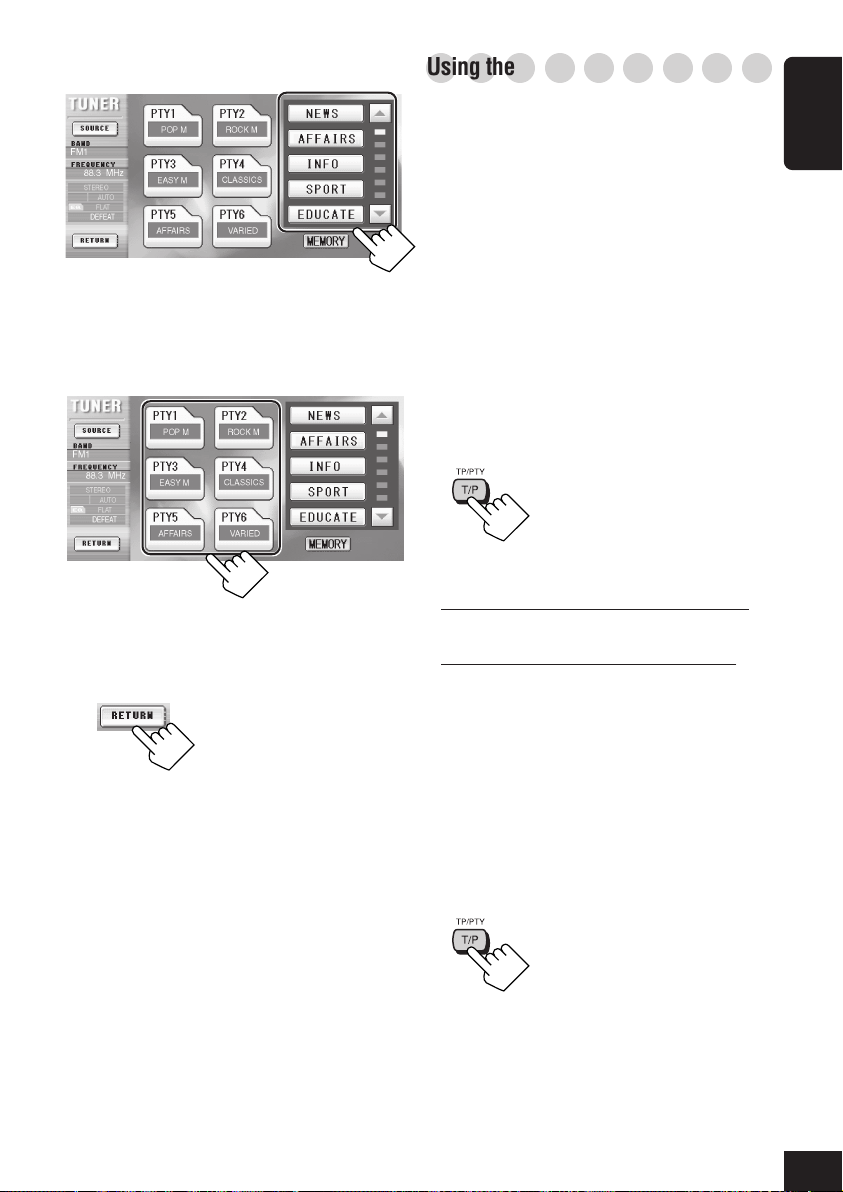
3
Select a PTY code.
• You can display the other PTY codes in
the PTY code list by pressing ∞ or 5.
4
Select the preset number.
5
Repeat Steps 2 to 4 to store other PTY
codes into other preset numbers.
6
○○○○○○○○○
Using the Standby Reception
You can use two types of Standby Reception—
TA Standby Reception and PTY Standby
Reception.
TA Standby Reception
TA Standby Reception allows the unit to switch
temporarily to Traffic Announcement (TA)
from any source other than AM.
• If a station (or a service when the DAB tuner
is connected) starts broadcasting a traffic
announcement, “Traffic Information” appears
on the monitor screen, and this unit
temporarily tunes in to the station (or the
service). The volume changes to the preset
TA volume level (see page 24).
To activate TA Standby Reception:
On the main unit
If the TP indicator lights up on the display,
•
TA Standby Reception is activated.
•
If the TP indicator flashes on the display, TA
Standby Reception is not yet activated. (This
occurs when you are listening to an FM
station or a service without the signals
required for TA Standby Reception.)
To activate TA Standby Reception, tune in to
another station (or service) providing these
signals.
The TP indicator stops flashing and remains
lit.
ENGLISH
To deactivate the TA Standby Reception:
The TP indicator goes off.
On the main unit
21
Page 22
PTY Standby Reception
PTY Standby Reception allows the unit to
switch temporarily to your favorite programme
from any source other than AM.
• When shipped from the factory, “NEWS” is
ENGLISH
selected for your favorite programme type.
To change it to your favorite PTY code, see
page 24.
• If the DAB tuner is connected, Standby
Reception also works for searching a service.
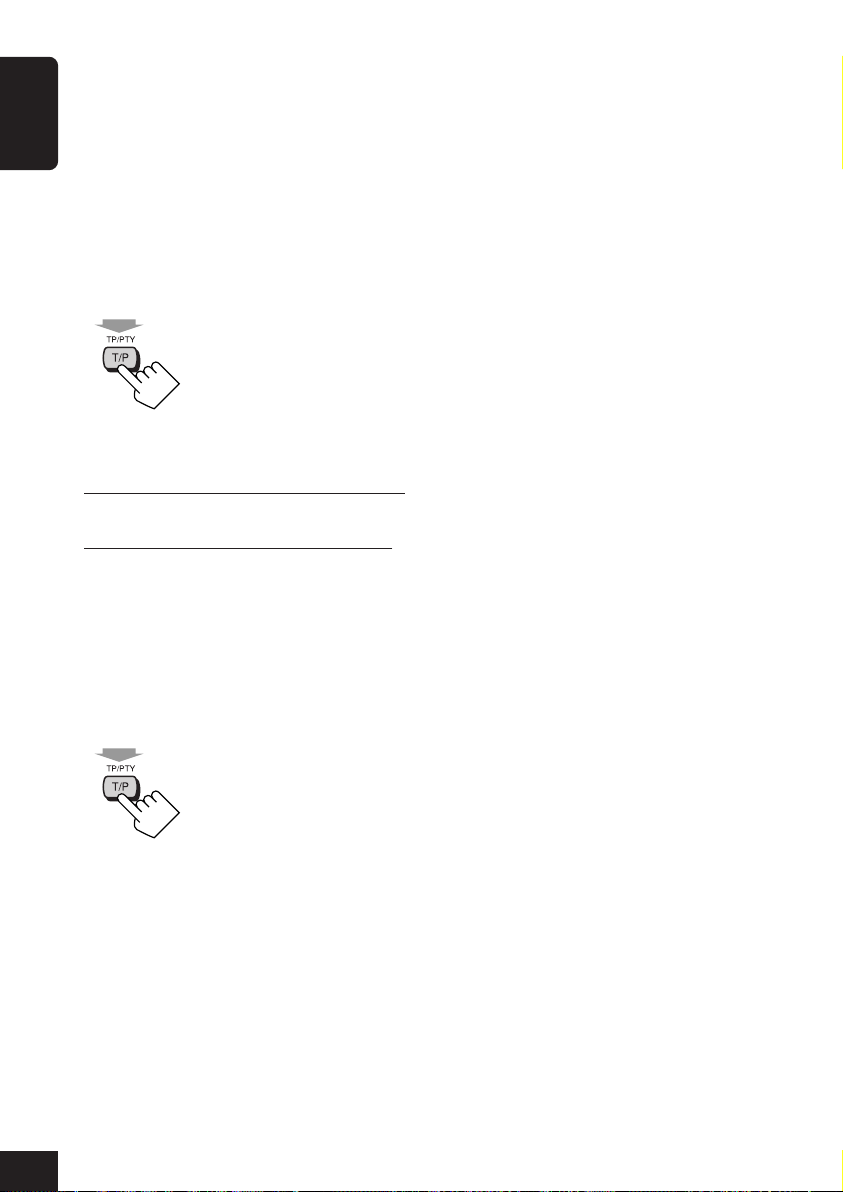
To activate PTY Standby Reception:
Hold
On the main unit
If the PTY indicator lights up on the display,
•
PTY Standby Reception is activated.
If the PTY indicator flashes on the display,
•
PTY Standby Reception is not yet activated.
To activate PTY Standby Reception, tune in
to another station (or service) providing these
signals.
The PTY indicator stops flashing and remains
lit.
To deactivate the PTY Standby Reception:
Hold
The PTY indicator goes off.
On the main unit
PTY codes
NEWS: News
AFFAIRS: Topical programmes
expanding on current news or
affairs
INFO: Programmes which impart
advice on a wide variety of
topics
SPORT: Sport events
EDUCATE: Educational programmes
DRAMA: Radio plays
CULTURE: Programmes on national or
regional culture
SCIENCE: Programmes on natural
science and technology
VARIED: Other programmes like
comedies or ceremonies
POP M: Pop music
ROCK M: Rock music
EASY M: Easy-listening music
LIGHT M: Light music
CLASSICS: Classical music
OTHER M: Other music
WEATHER: Weather information
FINANCE: Reports on commerce,
trading, the stock market, etc.
CHILDREN: Entertainment programmes
for children
SOCIAL: Programmes on social
activities
RELIGION: Programmes dealing with any
aspect of belief or faith, or the
nature of existence or ethics
PHONE IN: Programmes where people
can express their views either
by phone or in a public forum
TRAVEL: Programmes about travel
destinations, package tours,
and travel ideas and
opportunities
LEISURE: Programmes concerned with
recreational activities such as
gardening, cooking, fishing,
etc.
JAZZ: Jazz music
COUNTRY: Country music
NATION M: Current popular music from
another nation or region, in
that country’s language
OLDIES: Classic pop music
FOLK M: Folk music
DOCUMENT: Programmes dealing with
factual matters, presented in
an investigative style
22
Page 23
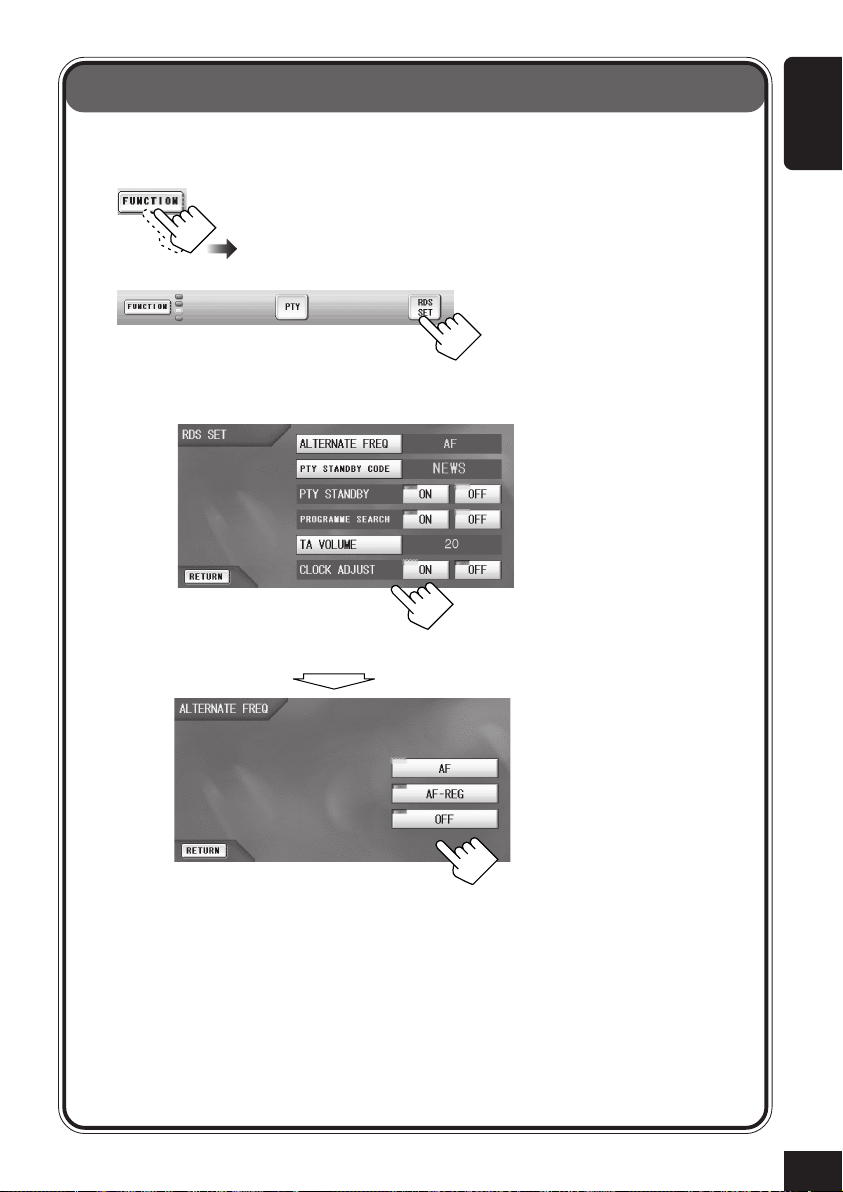
RDS Setup—RDS SET
You can make RDS setting and use some other convenient functions.
1
2
Change the setting or enter the setting screen.
3
• For details, see the following pages.
Ex. When pressing “ALTERNATE FREQ.”
ENGLISH
23
Page 24

ALTERNATE FREQ
When driving in an area where FM reception is
not sufficient enough, this unit automatically
tunes in to another FM RDS station of the
same network, possibly broadcasting the same
ENGLISH
programme with stronger signals—NetworkTracking Reception.
• AF: The unit switches to another
station (the programme may differ
from the one currently received).
• AF-REG: The unit switches to another
station broadcasting the same
programme.
• OFF: Cancels the Reception.
– When DAB Alternative
Frequency is set to “ON” (see
page 79), you cannot select
“OFF.”
PTY STANDBY
You can activate (ON) and deactivate (OFF)
PTY Standby Reception for the FM tuner (and
the DAB tuner if connected).
PROGRAMME SEARCH
When you select a preset number, the station of
the frequency stored in the preset number is
tuned in—(OFF).
However, if the signals from a preset RDS
station are not sufficient enough, this unit tunes
in to another station (which may be
broadcasting the same programme as the
original preset station is broadcasting)—(ON).
TA VOLUME
You can preset the volume level for TA Standby
Reception. When a traffic programme is
received, the volume level automatically
changes to the preset level.
PTY STANDBY CODE
Select the PTY code for PTY Standby
Reception (see page 22).
• For available PTY codes, see page 22.
To deactivate the PTY Standby Reception,
press and hold TP/PTY on the main unit.
24
CLOCK ADJUST
When shipped from the factory (“ON” is
selected), the clock built in this unit is set to be
readjusted automatically using the CT (Clock
Time) data in the RDS signal.
Page 25
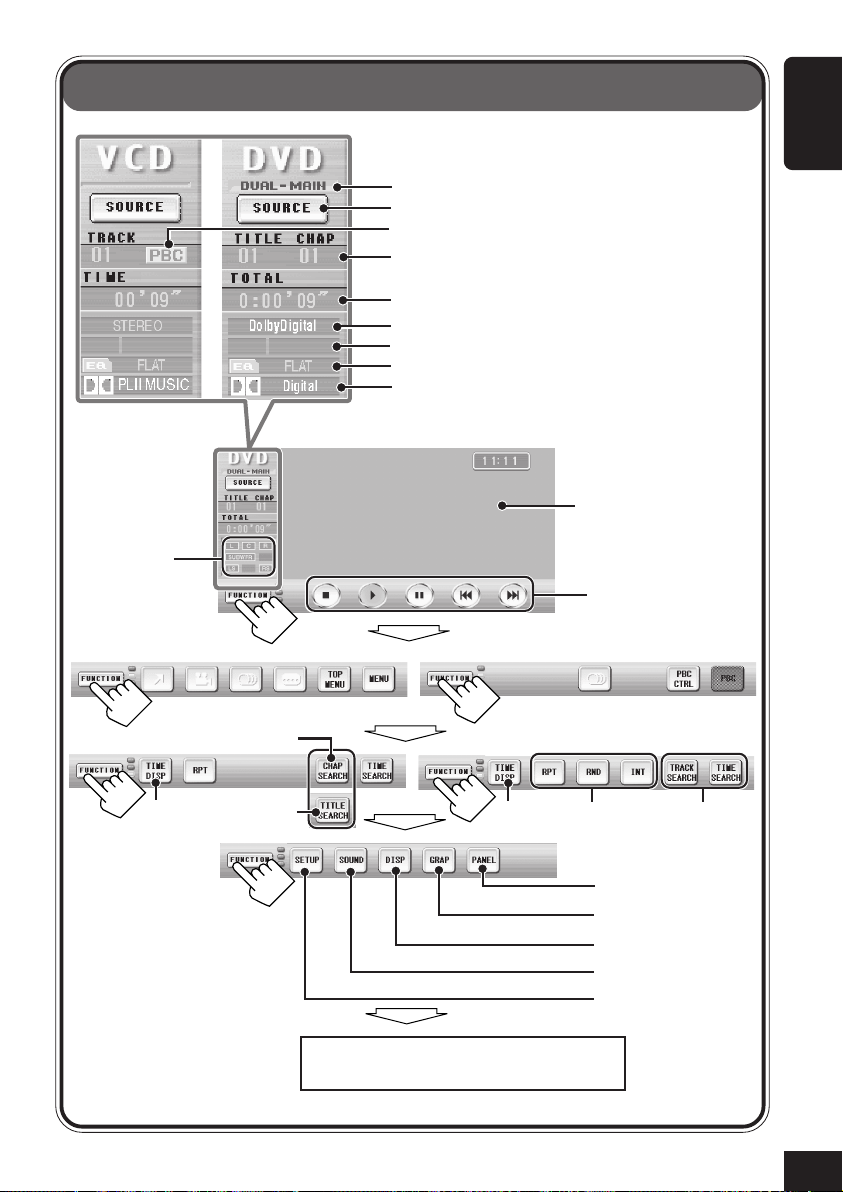
DVD/VCD Operations
Dual Mode indicator (see page 38)
SOURCE icon (see pages 14 and 38)
PBC indicator (for VCD; see page 30)
Current track no. (for VCD)
Current title/chapter no. (for DVD)
Play time information (see page 35)
Audio signal format
Playback mode (see page 35)
Sound mode (see page 44)
Surround/DSP mode (see page 41)
ENGLISH
Input signal
channels are
indicated a few
second after
detected. (See
page 82.)
DVD
While playing
1
Before playing
*
*1Available only while playing.
*2Not available while playing
with PBC activated.
*3Not available while playing
with PBC activated, but
available while not playing.
1
*
Back to the beginning
Playback picture will be
shown in the picture
view window.
Playback buttons
(see page 27)
VCD
2
*
See page 14.
See page 14.
See page 15.
See page 44.
See pages 48 – 57.
3
*
25
Page 26

CD/MP3 Operations
ENGLISH
CD/CD Text
Dual Mode indicator (see page 38)
SOURCE icon (see pages 14 and 38)
Current track no. (for CD)
Current folder/track no. (for MP3)
Play time information (see page 35)
Audio signal format (only for DTS CD)
Playback mode (see page 35)
Sound mode (see page 44)
Surround/DSP mode (see page 41)
Disc text/ID3 tag
information area
Only for MP3
(see page 27)
Playback buttons
(see page 27)
MP3
26
*
Only for CD: See
page 58.
See page 14.
See page 14.
See page 15.
See page 44.
See pages 48 – 57.
Back to the beginning
* Available only while playing.
Page 27
Basic Disc Operations
Before performing any operations, observe
the following...
• For DVD playback, change the Setup
Menu setting (see page 48).
” appears on the monitor, the disc
• If “
cannot accept the operation you have tried.
– In some cases, “
operations will not be accepted.
1
Insert a disc
The unit turns on, then draws the disc, and
starts playback automatically.
• The monitor does not come out from its
compartment if “AUTO OPEN/CLOSE” is
set to “OFF” (see page 51).
If the monitor does not comes out...
• It take several seconds for the unit to detect
a disc type.
• If a disc menu appears, see page 30.
” is not display, but
3
Operate the disc
: Selects the folder (only for
MP3).
: Stops (see “Stopping play” on
page 82).
• VCD/CD/MP3 playback will
continue endlessly until you
stop it.
: Starts playback.
: Pauses. To resume playback,
press 3.
: Goes back to the beginning of
the current chapter/track, then
skips to the previous chapters/
tracks if pressed repeatedly.
: Skips to the following chapters/
tracks if pressed repeatedly.
To stop play and eject the disc:
ENGLISH
2
Adjust the volume
Volume level appears.
Do not use the following discs:
Warped
disc
Sticker
Disc
Sticker
residue
Stick-on
label
27
Page 28
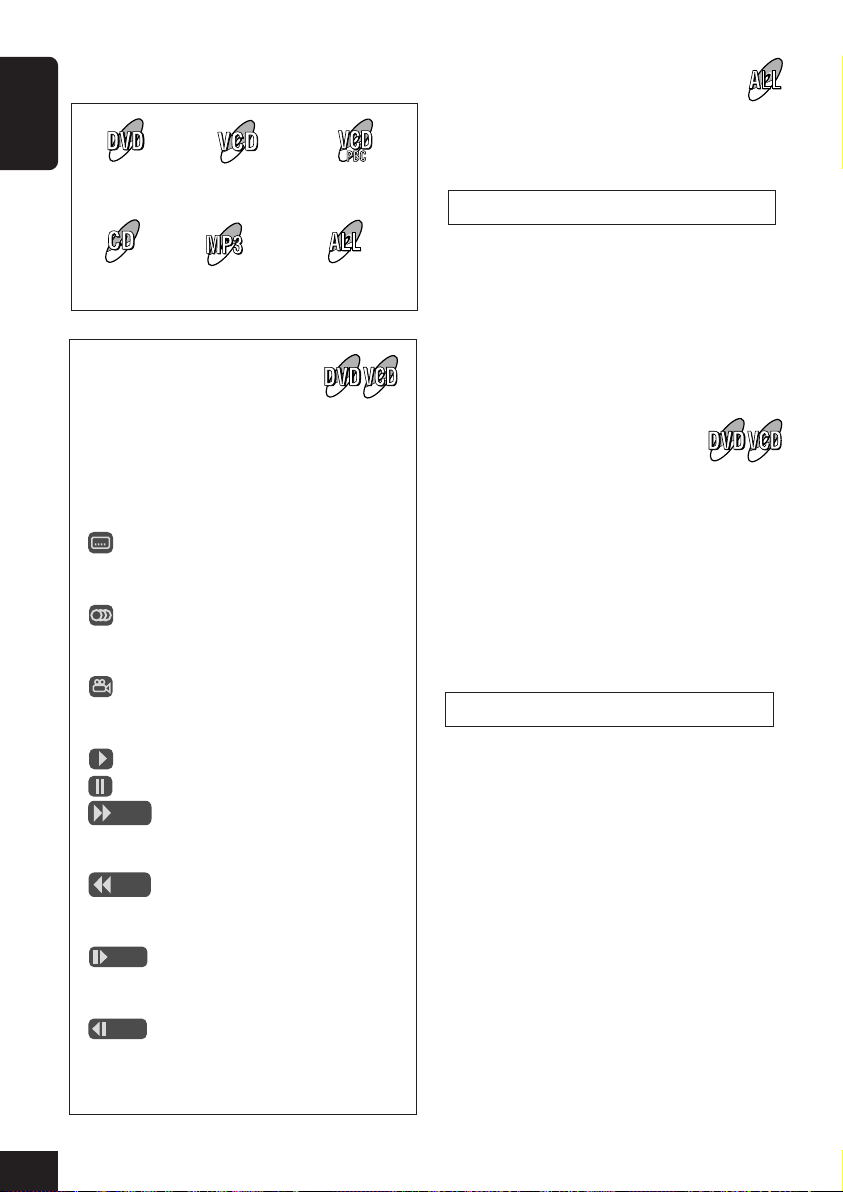
The following marks used in this manual
indicate the playable discs.
ENGLISH
DVD
CD
On-screen guide icons
VCD
with/without PBC
MP3
VCD with
PBC
All playable
discs
To fast-forward or reverse the chapter
or track, press ¡ or 1 on the remote
controller while playing a disc.
Each time you press the button, the search
speed changes as follows:
x2 \ x5 \ x10 \ x20 \ x60*
To resume normal speed, press 3.
If you hold ¢ or 4 while playing a disc,
the search speed changes: x2 \ x10.
• If you release the button, normal speed
playback resumes.
During play, the following guide icons
may appear for a while on the monitor.
• The following guide icons are displayed
when “GUIDE” is set to “ON” (see
page 53).
: Appears at the beginning of a
scene containing multi-subtitle
languages (only for DVD).
: Appears at the beginning of a
scene containing multi-audio
languages (only for DVD).
: Appears at the beginning of a
scene containing multi-angle
views (only for DVD).
: Appears when you press 3.
: Appears when you press 8.
: Appears when you start
forward search (search speed
also appears).
: Appears when you start reverse
search (search speed also
appears).
: Appears when you start
forward slow motion. (Slow
motion speed also appears.)
: Appears when you start reverse
slow motion (slow motion
speed also appears) (only for
DVD).
To play back the still picture
Press 8. A still picture appears.
Frame by Frame Playback—You can advance
the still picture frame by frame by pressing 8
repeatedly.
To resume normal playback, press 3.
Slow Motion Playback—You can advance or
reverse* the still picture in slow motion by
pressing ¡ or 1 on the remote controller.
Each time you press the button, the search
speed changes as follows:
1/32 \ 1/16 \ 1/8 \ 1/4 \ 1/2
To resume normal speed, press 3.
If you hold ¢ or 4 during pause, the slow
motion speed changes: 1/32 \ 1/8.
• If you release the button, normal speed
playback resumes.
* Only for DVD.
28
Page 29
○○○○○○○○○
FOLDER TRACK
then
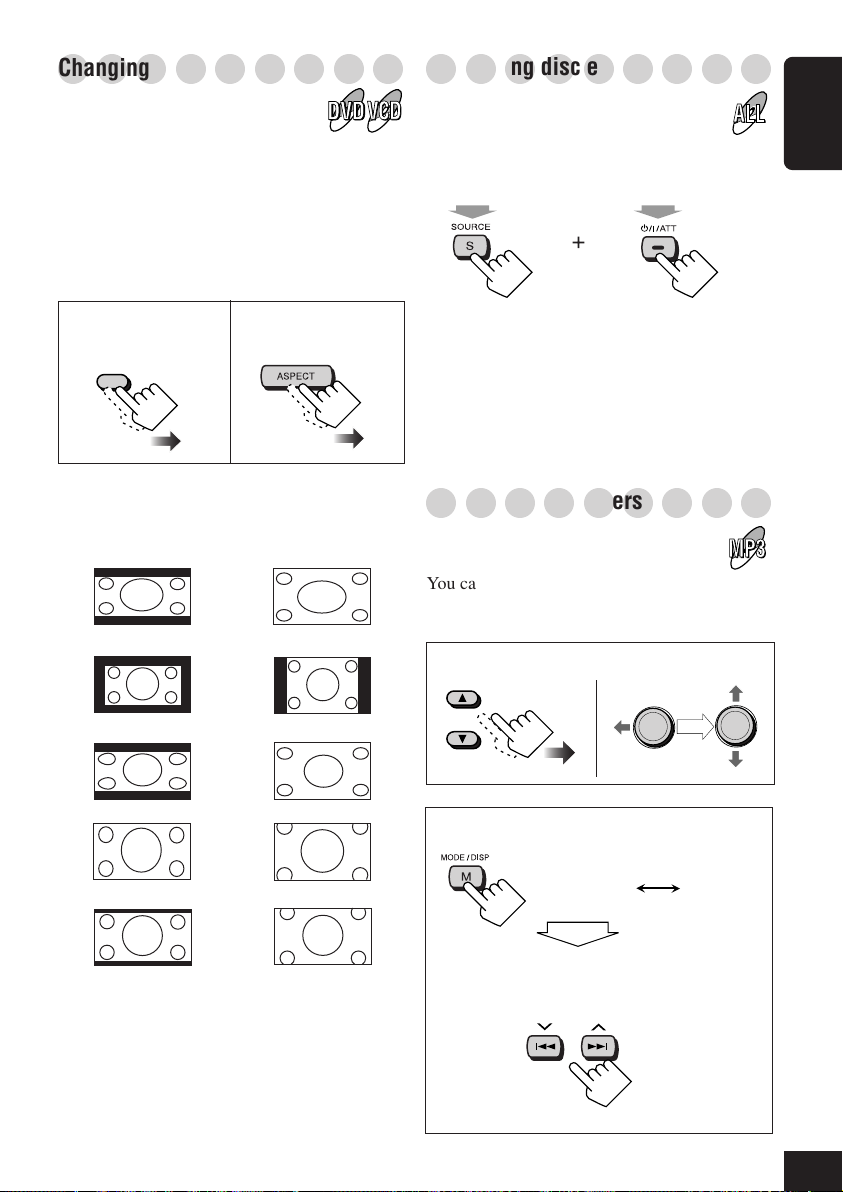
Changing the aspect ratio
○○○○○○○○○
Prohibiting disc ejection
You can change the aspect ratio of the playback
pictures.
• This function is only possible using the
buttons on the main unit or on the remote
controller.
• Aspect ratio cannot be changed while the
GUI operation mode is activated.
On the remote
On the main unit
controller
ASPECT
• When viewing 16:9
video signals:
FULL
NORMAL
• When viewing 4:3
video signals:
FULL
NORMAL
You can lock a disc in the loading slot.
While playing any source...
HoldHold
(at the same time)
“NO EJT” appears on the display of the main
unit, and the disc cannot be ejected.
To cancel the prohibition, press the same
buttons again.
“EJT OK” appears.
○○○○○○○○○
Selecting MP3 folders
You can also select the MP3 folder using the
buttons on the main unit and on the remote
controller.
On the remote controller
then
OK
OK
ENGLISH
WIDE
ZOOM
CINEMA
• When you change the aspect ratio, either
“RECEIVER” or “CRADLE” (see page 38)
appears with the selected aspect ratio. It indicates
where the monitor is now loaded. Aspect ratio
cannot be set separately for “RECEIVER” or
“CRADLE.”
WIDE
ZOOM
CINEMA
On the main unit
While “FOLDER” is displayed on the
display of the main unit:
29
Page 30
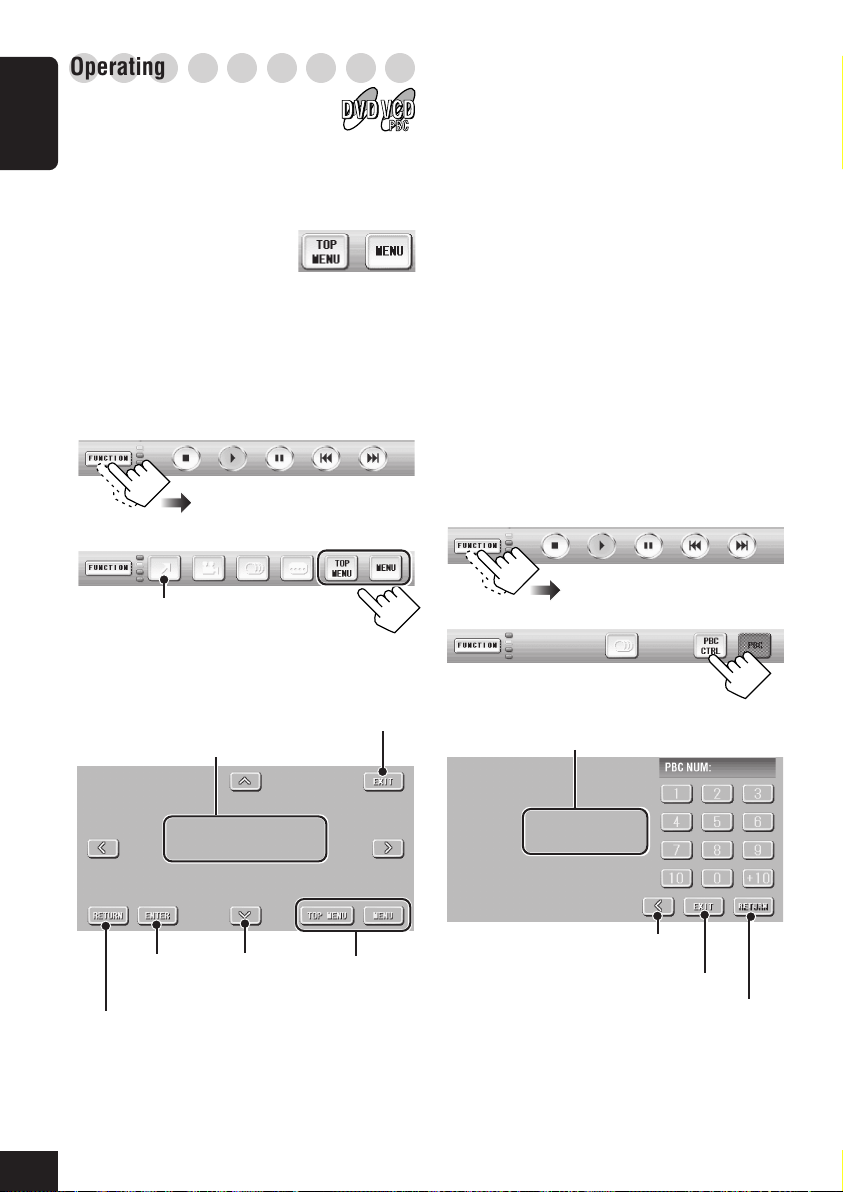
○○○○○○○○○
Operating the disc menu
Menu-driven playback is possible while playing
ENGLISH
back a DVD with menu-driven features or a
VCD with the PlayBack Control (PBC)
function.
While playing a DVD:
DVD discs generally have their own menus or
title lists. A title list (TOP MENU) usually
contains titles of movies and songs recorded.
On the other hand, a menu (MENU) usually
contains various information about the disc and
playback selections.
1
When using the remote controller
1 Press TOPMENU or MENU.
2
Push the cursor controller (OK) up/down/
left/right (5/∞/2/3) to select an item.
3
Press OK to confirm.
While playing a VCD:
The PBC function allows you to operate the
VCD using menus.
When you start playback, a menu will
automatically appear on the monitor.
• A menu may be a list of items, divided
screens, or some moving pictures.
• When a VCD with PBC is detected, the PBC
indicator appears on the monitor.
• When “3” or “SELECT” is displayed on the
monitor, press 3 (or OK on the remote
controller if pressing 3 does not work) to
start playback.
2
If the disc menu appears
automatically, press this.
Select an item, then confirm.
3
Return to the display in Step 2 above.
Erase the operation screen.
Confirm
Return to the previous page of the discs menu.
Select
Go back to the
disc menu.
1
2
Enter a number, then confirm.
3
Erase the operation screen.
Move the superimpose position
to the left.
Return to the display in Step 2 above.
Return to the previous page of the PBC menu.
• To select number 5, press 5.
• To select number 10, press 10.
• To select number 20, press +10, then 10.
30
Page 31

When using the number buttons on the remote
ZOOM
DUAL
controller
• To select number 5, press 5.
• To select number 10, press 10.
• To select number 23, press +10, +10, then 3.
To cancel the PBC playback
You can cancel the menu-driven operations
(PBC function) using the remote controller.
1 Press 7 to stop playback.
2
Press number buttons to select a track.
Playback without PBC starts from the
selected track.
• You can also use Track Search icon (see
page 36) and Time Search icon (see page
37) on the Touch Panel to start playback
without PBC.
To resume the PBC function again, press
TOPMENU or MENU on the remote
controller.
• You can also use PBC icon on the Touch
Panel.
then
○○○○○○○○○
Zooming in
You can zoom into a particular portion of the
picture.
• This function is only possible using the
remote controller.
1
\ x2 \ x4 \ x8 \ x1 \ x2 \ x4 \
x8 \ • • • •
ZOOM x4
2
Move the zoomed-in portion on the
monitor.
ZOOM x4
ENGLISH
○○○○○○○○○
Replaying the previous scenes
You can replay about 10-second portion of the
previous scene while playing a DVD—One
Touch Replay.
OK
To cancel Zoom, press OK or press ZOOM
repeatedly until “ZOOM x1” appears.
31
Page 32

○○○○○○○○○
Selecting subtitles
ENGLISH
While playing a chapter containing subtitles in
different languages, you can select the subtitle
language to display on the monitor.
• You can also select the subtitle language
using SETUP menu (see page 49).
1
○○○○○○○○○
Selecting audio languages
For DVD: While playing a chapter containing
audio languages, you can select the language to
listen to.
• You can also select the audio language using
SETUP menu (see page 49).
For VCD: While playing a track, you can select
the audio channel to play. This is convenient
when playing a Karaoke VCD.
Select a subtitle language you want.
2
Ex.
1/3 ENGLISH
3/3 SPANISH
2/3 FRENCH
1
Select an audio language you want.
2
When playing DVD:
Ex.
1/3 ENGLISH
3/3 SPANISH
2/3 FRENCH
32
Page 33

When playing VCD:
○○○○○○○○○
Selecting multi-angle views
STEREO LEFT RIGHT
• STEREO: To listen to normal stereo (left/
right) playback.
• LEFT: To listen to the left audio channel.
• RIGHT: To listen to the right audio
channel.
While playing a disc containing multi-angle
views, you can view the same scene at different
angles.
1
Select a view angle you want.
2
Ex.
1/3 2/3 3/3
ENGLISH
33
Page 34

○○○○○○○○○
Locating a folder/track using
○○○○○○○○○
the list
To locate a track by displaying the track
list
ENGLISH
To locate a folder by displaying the
folder list
• This functions only for MP3.
1
2
Select a folder you want.
3
Current track name or ID3 Tag
To next/previous
page of the list
1
2
Select a track you want.
3
Current folder name or ID3 Tag (for MP3)
Disc name (for CD) or CD Text
Ex. when playing MP3
To next/previous
page of the list
34
Page 35

○○○○○○○○○
Displaying the disc text
○○○○○○○○○
information
With Auto Scroll or Scroll selected, you can
display the text and scroll it on the monitor if it
is long and cannot be displayed at a time.
1
2
(For CD)
Scroll
• Scroll: Text on the information area
scrolls once.
• Auto Scroll: Text on the information area
scrolls every 5 seconds.
• Off: The information area goes off
(no text information will be
shown).
○○○○○○○○○
Displaying the time information
(For MP3)
Auto Scroll
Off
○○○○○○○○○
1
○○○○○○○○○
Selecting playback modes
You can use only one of the following playback
modes at a time—Repeat Play, Random Play,
and Intro Scan.
• For VCD: While PBC is not in use.
Repeat Play
You can repeat playback.
• Repeat Play can be deactivated only for DVD.
1
2
When playing DVD:
REPEAT PLAY CHAPTER REPEAT PLAY TITLE
REPEAT PLAY OFF
When playing VCD/CD:
REPEAT PLAY TRACK REPEAT PLAY OFF
When playing MP3:
REPEAT PLAY TRACK REPEAT PLAY FOLDER
REPEAT PLAY OFF
ENGLISH
2
• TIME: Elapsed playing time of the current
chapter/track
• REM: Remaining time of the current
chapter/track
• TOTAL: Elapsed title time (for DVD)
Elapsed disc time (for other discs)
• T.REM: Remaining title time (for DVD)
Remaining disc time (for other
discs)
TIME
REM
TOTALT.REM
REPEAT PLAY
• CHAPTER:Repeats the current chapter.
• TITLE: Repeats the current title.
• TRACK: Repeats the current track.
• FOLDER: Repeats the current folder.
• OFF: For DVD: Cancels Repeat Play.
For VCD/CD/MP3:
Repeats the disc.
35
Page 36

Random Play
You can play back tracks at random.
1
ENGLISH
2
When playing VCD/CD:
INTRO SCAN TRACK INTRO SCAN OFF
2
When playing VCD/CD:
RANDOM PLAY DISC RANDOM PLAY OFF
When playing MP3:
RANDOM PLAY FOLDER RANDOM PLAY DISC
RANDOM PLAY OFF
RANDOM PLAY
• DISC: Plays randomly all tracks on the
disc.
• FOLDER: Plays randomly all tracks of the
current folder, then moves to the
next folder and so on.
• OFF: Cancels Random Play.
Intro Scan
You can play back the first 15 seconds of each
track sequentially.
1
When playing MP3:
INTRO SCAN TRACK INTRO SCAN FOLDER
INTRO SCAN OFF
INTRO SCAN
• TRACK: Plays the beginning of all tracks.
• FOLDER: Plays the first tracks of all
folders.
• OFF: Cancels Intro Scan.
○○○○○○○○○
Searching for scenes or songs
You can use various search functions to find
your favorite scenes or songs.
Title/Chapter/Folder/Track Search
• For DVD: Title Search before playing, and
Chapter Search while playing.
• For VCD: During stop when PBC is in use.
1
36
2
(For DVD)
(For VCD/CD)
(For MP3)
Page 37

3
Enter a number, then confirm.
Ex. when playing DVD:
3
Enter a number, then confirm.
Ex. when playing DVD:
ENGLISH
Clear the entry.
When using the number buttons on the remote
controller
• To select number 5, press 5.
• To select number 10, press 10.
• To select number 23, press +10, +10, then 3.
You cannot select folder using the remote
controller.
Time Search
You can start playing a particular point by
specifying the elapsed playing time of the
current title (for DVD) and of the disc (for
VCD/CD).
• For DVD: During play or pause.
(For some DVDs: any time)
• For VCD: While not playing with PBC in
use.
Confirm
1
Clear the entry.
Ex. when playing CD:
Examples (for DVD)
To play back from 2(H):34(M):00(S)
Press number buttons 2, 3, 4, then ENTER.
TIME 2 : 34 :
To play back from 58(M):00(S)
Press number buttons 0, 5, 8, then ENTER.
TIME 0 : 58 :
Example (for VCD/CD)
To play back from 23(M):40(S)
Press number buttons 2, 3, 4, then ENTER.
TIME 23 : 4
• You do not have to press “0” to enter the
trailing zeros.
00
00
0
Confirm
2
37
Page 38

Dual Mode Operations
You can play back two different sources as
ENGLISH
the main source (MAIN) and subsidiary
source (SUB).
You can listen to the main source through the
speakers, while the subsidiary source through
the monitor inserted into the cradle or the
one connected to the AV OUTPUT jacks.
• For connections of the cradle and an
optional monitor, refer to the Installation/
Connection Manual (separate volume).
○○○○○○○○
Selecting the sources
To activate Dual Mode and select the
subsidiary source
1
2
To show the main/subsidiary source
operation screen on the monitor
1
2
To show the main source
operation screen (DUAL–MAIN)
To show the subsidiary source
operation screen (DUAL–SUB)
38
Select the subsidiary source (SUB) you
3
want.
• The current sources for MAIN and
SUB are highlighted.
Dual Mode indicator (DUAL–MAIN or
DUAL–SUB) appears.
Ex. When the subsidiary source operation
screen (DUAL–SUB) is displayed.
To cancel the Dual Mode, press
.
Each time you press the icon, Dual Mode is
turned on and off alternately.
• When Dual Mode is turned off, the main
source screen appears.
Page 39

○○○○○○○○○
Adjusting AV OUTPUT volume
Select an appropriate volume level for the
component connected to the AV OUTPUT
jacks on the hideaway unit.
• This functions without respect to the Dual
Mode setting.
1
When using the remote controller:
• For Dual Mode operations...
– When controlling the monitor connected
to the AV OUTPUT jacks, aim the
remote controller at the remote sensor
on the main unit.
– When controlling the monitor inserted
into the cradle, aim the remote controller
at the remote sensor on the cradle.
ENGLISH
2
1
*
2
*
3
4
Adjust the AV output volume.
1
*
It does not appear for some sources.
2
*
It will be shaded when not available.
On the remote controller
MAIN SUB
then
AVOUT VOL
To activate Dual Mode
Hold
ZOOM
1
*
DUAL
Each time you press and hold the button,
Dual Mode turns on and off.
• When Dual Mode is turned on, the source
selection screen appears on the monitor
(see page 38).
To operate the subsidiary source
1
MAIN SUB
2 Press the source buttons, then the
source operation buttons.
To operate the main source
1
MAIN SUB
While Dual Mode is in use...
• The playback source does not change to
“DISC” though you insert a disc. “DUAL”
flashes on the display of the main unit.
• You can only adjust the volume level for
the subsidiary source (the other sound
adjustments cannot be used for the
subsidiary source).
2 Press the source buttons, then the
source operation buttons.
39
Page 40

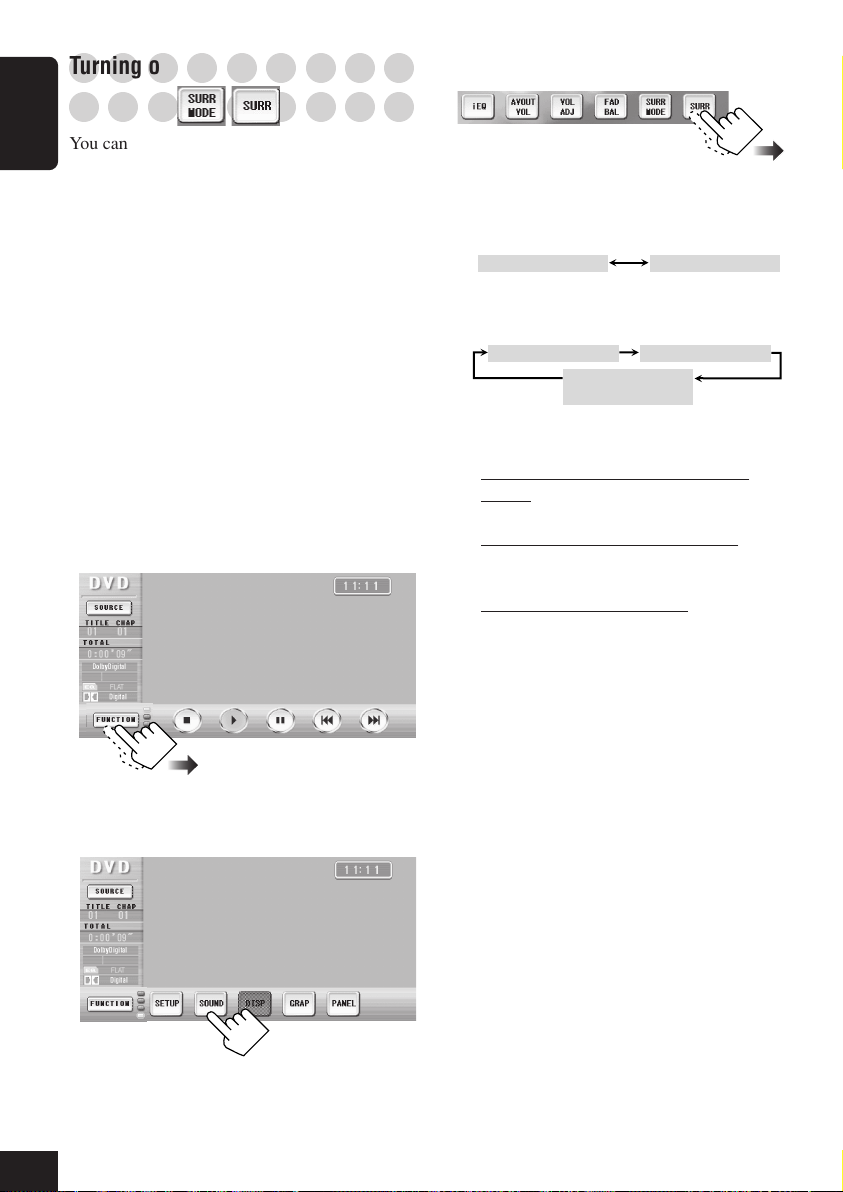
Surround Mode Operations
1
ENGLISH
2
2
1
*
Activate and select the surround mode or DSP mode.
3
4
Make adjustment if you want to.
• If neither surround mode nor DSP mode is activated, you cannot make adjustment.
*
1
*
It does not appear for some sources.
2
*
It will be shaded when not available.
1
*
2
*
See page 46.
See page 46.
See page 39.
See page 44.
40
When surround mode is activated:
When DSP mode is activated:
Page 41

○○○○○○○○○
Introducing surround/DSP mode
Surround modes
Dolby Digital
Dolby Digital is a digital signal compression
method, developed by Dolby Laboratories, and
enables multi-channel encoding and decoding
(1ch up to 5.1ch).
Dolby Digital 5.1 CH
Dolby Digital 5.1 CH encoding method records
and digitally compresses the left front channel,
right front channel, center channel, left
surround channel, right surround channel, and
LFE channel signals (total 6 channels, but the
LFE channel is counted as 0.1 channel.
Therefore, called 5.1 channel).
Dolby Digital enables stereo surround sounds,
and sets the cutoff frequency of the surround
treble at 20 kHz, compared to 7 kHz for Dolby
Pro Logic. As such, the sound movement and
“being there” feeling are enhanced much more
than Dolby Pro Logic.
DTS
DTS is another digital signal compression
method, developed by Digital Theater Systems,
Inc., and enables multi-channel encoding and
decoding (1ch up to 6.1ch).
DTS Digital Surround
DTS Digital Surround is another discrete
5.1-channel digital audio format available on
CD, LD, and DVD software.
Compared to Dolby Digital, the DTS Digital
Surround format has a lower audio compression
rate which enables it to add breadth and depth
to the sounds reproduced. As such, DTS Digital
Surround features natural, solid, and clear
sound.
Dolby Pro Logic II
It is a multi-channel playback format to convert
2-channel software into 5-channel (plus
subwoofer). The matrix-based conversion
method used for Dolby Pro Logic II makes no
limitation for the cutoff frequency of the
surround treble and enables stereo surround
sound.
• This unit provides two types of Dolby Pro
Logic II modes—Pro Logic II “MOVIE” and
Pro Logic II “MUSIC.”
MOVIE: Suitable for playing any Dolby
Surround encoded software.
MUSIC: Suitable for playing any 2-channel
stereo software.
No sound may come out of the subwoofer
(though the subwoofer is activated) with
Dolby Pro Logic II in use. (This depends on
your speaker setting—see page 56).
Digital Signal Processor (DSP) mode—
reproducing the sound field
The sound heard in a concert hall, club, etc.
consists of direct sound and indirect sound—
early reflections and reflections from behind.
Direct sounds reach the listener directly without
any reflection. On the other hand, indirect
sounds are delayed by the distances of the
ceiling and walls. These direct sounds and
indirect sounds are the most important elements
of the acoustic surround effects.
DSP modes can create these important elements,
and give you a real “being there” feeling.
ENGLISH
41
Page 42
○○○○○○○○○
Turning on and off the surround/
○○○○○○○○○
DSP mode
You can use surround or Digital Signal
ENGLISH
Processor (DSP) mode while playing any
source.
However, when playing a multi-channel
encoded disc, you cannot apply DSP mode to
the playback sounds.
• When “AUTO SURROUND” is set to “ON”
(initial setting when shipped from factory), an
appropriate surround mode is automatically
selected without any setting operation (see
page 55).
• To obtain the best possible surround sounds,
set the seat position and speaker size
correctly (see pages 55 and 56). If only rear
speakers are activated (set to “LARGE” or
“SMALL”), surround/DSP mode is
defeated (set to “DEFEAT”) and cannot be
changed.
1
3
• While playing a multi-channel encoded
disc:
Surround On (DSP Off) DEFEAT (Surround Off)
• While playing a 2-channel (stereo) disc:
Surround On (DSP Off) DSP On (Surround Off)
DEFEAT
(Surround/DSP Off)
• Surround On (DSP Off)
While playing a multi-channel Dolby
Digital encoded disc, “Dolby Digital” is
automatically selected.
While playing a multi-channel DTS
encoded disc, “DTS” is automatically
selected.
While playing any other disc, “Dolby Pro
Logic II” is automatically selected.
• You can select either “Dolby Pro Logic
II Movie” or “Dolby Pro Logic II
Music.”
42
• DSP On (Surround Off)
Currently selected DSP mode is activated.
Ex. When playing DVD.
2
• DEFEAT (Surround/DSP Off)
Both surround and DSP mode is
canceled.
• You cannot go to the next step.
Page 43

4
Adjust the selected surround or DSP
mode.
When surround mode is activated:
When DSP mode is activated:
ENGLISH
Ex. When selecting “HALL.”
1 Select one of the DSP modes.
HALL: Reproduces the spatial
feeling of a large shoeboxshaped hall designed
primarily for classical
concerts.
: Selected automatically when multi-
channel DTS signal is detected (while
playing a DVD or a DTS CD). No further
adjustment is allowed.
: Selected automatically when multi-
channel Dolby Digital signal is detected
(while playing a DVD). No further
adjustment is allowed.
: Select either “MOVIE” or
“MUSIC.”
When you select “MUSIC,” you can adjust
the following items.
•
“wraparound” sound effect with side-wall
image. To cancel it, select “OFF.”
•
so it may be heard only from the center
speaker, only from the left/right front
speakers as a “phantom” center image, or
various combinations of these speakers.
As the number increases, the “phantom”
effect becomes stronger. (Normally select
“4.”) To cancel it, select “OFF.”
: Select “ON” to add
: Adjust the center image
LIVE: Reproduces the spatial
feeling of a live music club
with a low ceiling.
CLUB: Reproduces the spatial
feeling of a rocking dance
club.
DOME: Reproduces the spatial
feeling of a stadium with a
high ceiling.
THEATER: Reproduces the spatial
feeling of a theater.
2 Adjust the effect level (from 1 to 5).
As the number increases, the effect
becomes stronger.
43
Page 44

Sound Modes (iEQ) Operations
The following operations are only possible for the main source when using Dual Mode.
ENGLISH
1
2
2
1
*
3
Select one of the preset sound (iEQ) modes (then make adjustment if you want to
4
make your own sound mode).
*
1
*
It does not appear for some sources.
2
*
It will be shaded when not available.
1
*
See page 40.
See page 40.
See page 46.
See page 46.
See page 39.
44
Select sound
modes.
Display the other set
of the sound modes.
Select memory no. to store.
Adjust the level of
each frequency
band.
Store your adjustment
(display the screen
below).
Page 45

○○○○○○○○○
Selecting preset sound modes
You can select a sound mode suitable to the
music genre.
Available sound modes:
• HARD ROCK / R&B / POP / JAZZ /
DANCE / COUNTRY / REGGAE /
CLASSIC
• USER1 / USER2 / USER3
• FLAT (To cancel the sound mode)
1
2
3
Select one of the preset sound (iEQ)
4
modes.
○○○○○○○○○
Storing your own sound modes
You can adjust the sound modes and store your
own adjustments in memory.
1
Repeat steps 1 to 4 on the left column to
select a sound mode you want to adjust.
2
Make adjustments as you like.
3
After adjustment is finished...
4
Select one of the user sound modes
(USER1, USER2, or USER3) you want to
store into.
ENGLISH
Display the other set of the sound modes
(see below).
For details about the preset settings of each sound
mode, see page 88.
45
Page 46

Other Sound Adjustments
Fader/Balance adjustments is only possible for the main source when using Dual Mode.
ENGLISH
1
2
2
1
*
3
Make adjustment as you like.
4
To adjust the input level
This setting is required for each source
except FM.
Once you have made an adjustment, the
volume level will automatically changes
by adjusted level whenever you change
the source.
Adjust to match the input level to the FM
sound level.
*
1
*
It does not appear for some sources.
2
*
It will be shaded when not available.
1
*
See page 40.
See page 40.
See page 39.
See page 44.
46
To adjust fader and balance
Adjust fader—speaker output balance
between the front and rear speakers.
Adjust the balance—speaker output
balance between the left and right
speakers.
Page 47

Monitor Adjustments
When no playback picture from the source is displayed, you can only adjust the brightness.
1
Display SCREEN CONTROL screen.
Hold
On the main unit
2
Select an item to adjust.
1
*
3
Adjust the item.
Hold
ASPECT
On the remote
controller
Adjustable items
: Indicates the current ambient light level.
As this level changes, the monitor adjusts
the brightness automatically to match it to
the current ambient light level.
: Adjust the brightness separately for day
time (
DARK).
• The monitor can memorize the difference
: Adjust the contrast (DOWN/UP).
) and night time ( )—(LIGHT/
between the ambient light level and
adjusted level, and adjusts the brightness
automatically, keeping the level
difference memorized.
ENGLISH
Ex. When adjusting “BRIGHT.”
*1When you adjust the monitor, either
“RECEIVER” or “CRADLE” (see page 38)
appears. It indicates where the monitor is now
loaded. You cannot store your adjustment
separately for “RECEIVER” or “CRADLE.”
: Adjust the tint if the human skin color is
unnatural (RED/GREEN).
: Adjust the color of the picture—thinner
(THIN) or thicker (THICK).
47
Page 48

Initial Setup—DVD MENU
You can preset the initial disc playback conditions.
ENGLISH
• While playing, no change can be made on the DVD Menu.
1
2
1
*
2
*
3
Select the item you want.
4
5
Change the setting.
• For details, see the following pages.
1
*
It does not appear for some sources.
2
*
It will be shaded when not available.
1
*
See page 13.
48
Ex. When setting “MONITOR TYPE.”
Page 49

MENU LANGUAGE
Select the menu language.
AUDIO LANGUAGE
Select the audio language.
SUBTITLE
Select the subtitle language.
To erase the subtitle, select “OFF.”
If the language you want is not listed
for the language menu list
See page 89 to find the language codes.
MONITOR TYPE
Select the monitor type of your TV (connected
to the AV OUTPUT jacks) to play DVD Video
recorded with aspect ratio of 16:9.
• For the removable monitor of this unit, set
this to “16:9 AUTO.”
• 16:9 NORMAL:
Select when the aspect ratio of your TV is
fixed to 16:9 (wide TV).
• 16:9 AUTO:
Select when the aspect ratio of your TV is
16:9 (wide TV), and it is equipped with
aspect ratio adjustment function.
• 4:3 LB (Letter Box):
Select when the aspect ratio of your TV is 4:3
(conventional TV). While viewing a wide
screen picture, the black bars appear on the
top and the bottom of the screen.
• 4:3 PS (Pan Scan):
Select when the aspect ratio of your TV is
4:3. While viewing a wide screen picture, the
black bars do not appear; however, the left
and right edges of the pictures will not be
shown on the screen.
ENGLISH
Move the cursor position.
Confirm
Backspace
(Erase)
When the language you have selected is not
recorded on a disc, the original language is
automatically used as the initial language.
16:9 4:3 LB 4:3 PS
49
Page 50

Initial Setup—MONITOR
You can preset the initial monitor conditions.
ENGLISH
1
2
1
*
2
*
3
Select the item you want.
4
5
Change the setting.
• For details, see the following pages.
1
*
It does not appear for some sources.
2
*
It will be shaded when not available.
1
*
See page 13.
50
Ex. When setting “BEEP TONE” to “OFF.”
Page 51

AUTO OPEN/CLOSE
BEEP TONE
• AUTO: The monitor comes out* or goes in
automatically when you turn on or off
the power.
• OFF: Cancels this function.
* If you close the monitor before turning off the
power, the monitor will not come out next time you
turn on the power.
BLIND CONTROL
• ON: The monitor works as Touch Panel
when playing back pictures on the
monitor.
1
2
– The boundaries cannot be shown on
the monitor screen. This example
is just to teach you where to touch
on the Touch Panel when you
operate on it.
1 Upper/lower portions:
Adjust the volume.
2 Left/right portions:
• Skips the chapters/tracks for
DVD/VCD.
• Searches the chapters/tracks for
DVD/VCD.
• Searches for TV channels for TV.
(see page 68).
3 Center portion:
Turns on and off the on-screen
icons. (This also works even if
“BLIND CONTROL” is set to
“OFF.”)
3
1
2
• ON: Sound beeps when you operate the
unit.
• OFF: Cancels this function.
WIRING CHECK
You can confirm the wiring connection is
correctly done for particular functions.
Indicators
• When the listed wires have been connected
and electrical signals are detected through the
wires, the corresponding indicators light up.
Dimmer function
To use the dimmer function, you need to
connect the ILLUMINATION wire to...
• For Auto Dimmer: Connect it to the car
headlight switch. When you turn on the
car lights, dimmer starts working—Auto
Dimmer.
• For Constant Dimmer: Connect it to the
car battery (constant 12V). Dimmer works
whenever you turn on the power.
• For Dimmer Off: Connect it to nowhere.
• See also the Installation/Connection
Manual (separate volume).
ENGLISH
• OFF: Cancels this function.
51
Page 52

Initial Setup—ON SCREEN
You can preset the initial on-screen conditions.
ENGLISH
1
2
1
*
2
*
3
Select the item you want.
4
5
Change the setting.
• For details, see the following pages.
1
*
It does not appear for some sources.
2
*
It will be shaded when not available.
1
*
See page 13.
Language selection screen
appears.
52
Ex. When setting “CLOCK” to “OFF.”
Page 53

ON SCREEN LANGUAGE
You can select the language for this Setup
Menu and some of the messages displayed on
the monitor.
GUIDE
• ON: On-screen guide icons (see page 28)
are displayed on the monitor while
operating the built-in disc player.
– When the TV tuner unit
(KV-C1001) is connected, its onscreen display will be shown.
• OFF: Cancels this function.
MESSAGE
• ON: Speaker/signal indicators (see page
82) and messages are displayed.
Messages are displayed on the
viewing window of the monitor
screen...
– When selecting repeat mode,
random mode, intro scan, etc.
– When starting Time Search, Title
Search, Chapter Search, and Track
Search.
Ex. One of the messages appears
when selecting repeat mode.
• OFF: Cancels this function.
CLOCK
• ON: Display the clock time on the
monitor.
• OFF: Cancels this function.
ENGLISH
ANIMATION EFFECT
• ON: Source selection screen appears and
disappears as if you open or close the
curtain.
• OFF: Cancels this function.
53
Page 54

Initial Setup—AUDIO MENU/PSM
You can preset the initial audio-related conditions and Preferred Setting Modes (PSM).
ENGLISH
• You cannot select “AUDIO MENU” when the subsidiary source operation screen is
displayed on the monitor (with Dual Mode turned on; see page 38).
1
2
1
*
It does not appear for some sources.
2
*
It will be shaded when not available.
1
*
3
Select the item you want.
4
2
*
1
*
See page 13.
54
5
Change the setting or enter the setting screen.
• For details, see the following pages.
Ex. When entering “SEAT POSITION.”
Appears when TV tuner unit
KV-C1001 is connected.
Page 55

AUTO SURROUND
You can activate an appropriate surround mode
automatically when a loaded disc is detected.
• FRONT LEFT: For the front left seat.
•
FRONT RIGHT
: For the front right seat.
• ALL CENTER: For all front and rear seats.
REAR CENTER:
•
For the rear seats.
ENGLISH
• ON: An appropriate surround/DSP mode is
automatically selected.
While Dolby Digital multi-channel
signals are detected, “Dolby Digital” is
automatically selected.
While DTS multi-channel signals are
detected, “DTS” is automatically
selected.
While Dolby Surround (PL II) signals
are detected, “Dolby Pro Logic II
Movie” is automatically selected.
While Linear PCM signals are detected
(for DVD/CD), “Dolby Pro Logic II
Music” is automatically selected.
While other signals are detected,
Surround mode is defeated.
• OFF:Cancels this function.
Auto Surround does not work for any sources
other than “DISC.” When another source is
selected, the currently selected Surround or DSP
mode is resumed (see page 42).
SEAT POSITION
Select the listening seat position where you
want to locate the sound image.
• Speaker distance and speaker level can be
memorized for each position.
•
: Displays the SPK
DISTANCE screen.
You can adjust the speaker distance from
your listening position in meters or feet.
•
: Displays the SPK
LEVEL screen.
You can adjust the speaker level referring to
the test tone.
Emits the test tone from each
speaker in sequence.
To stop, press again.
Display sub-setting screens.
55
Page 56

D (Dynamic). RANGE COMPRESSION
You can enjoy a powerful sound even at a low
volume level by compressing dynamic range
(difference between the lowest and the highest
frequency sounds).
ENGLISH
• This takes effect for all the playback sources.
• OFF: Select when you want to enjoy
playback with its full dynamic range
(no effect applied).
• MID: Select when you want to reduce the
dynamic range a little.
• MAX: Select when you want to apply the
compress effect fully (useful at a
low volume level).
SPEAKER SIZE
Set speaker information correctly.
• SUBWOOFER:
Select “YES” (connected) or “NO”
(disconnected).
• SUBWOOFER PHASE:
Select either “NORMAL” or “REV.
(reverse)” to obtain better subwoofer
sounds.
• These settings are very related to one another;
therefore, one setting is changed, some other
settings will be changed automatically and
appropriately (see page 87).
• Sound comes out of the subwoofer for Dolby
Pro Logic II only when either the front speakers
or the center speaker is set to “SMALL.”
CROSS OVER
You can select the crossover frequency for the
small speakers used. The signals below the
preset frequency level will be sent to the
subwoofer (or to the “LARGE” speakers when
“SUBWOOFER” is set to “NO”).
• FRONT/CENTER/REAR:
Set the speaker size properly.
– LARGE: If the cone speaker size
is more than 13 cm.
– SMALL: If the cone speaker size
is less than 13 cm.
– NONE: If not used.
56
AMP GAIN
You can change the maximum volume level of
this unit. When the maximum power of the
speakers is less than 50 W, select “LOW”
to prevent them from being damaged.
• HIGH: You can adjust the volume level
from “0” to “50.”
• LOW: You can adjust the volume level
from “0” to “30.”
Page 57

AV2 INPUT SELECT
You can determine the use of AV INPUT 2
jacks on the hideaway unit—select either
“VIDEO” or “CAMERA.”
• When the playback source is “AV2,” this
setting cannot be changed.
FM IF FILTER
In some areas, adjacent stations may interfere
with each other. If this interference occurs,
noise may be heard.
ENGLISH
• AUTO: When this type of interference occurs,
this unit automatically increases the
tuner selectivity so that interference
noise will be reduced. (But the stereo
effect will also be lost.)
• WIDE: Subject to the interference from
adjacent stations, but sound quality
will not be degraded and the stereo
effect will not be lost.
• VIDEO: The source “AV2” works for
viewing the playback picture
through the component
connected to the AV INPUT 2
jacks.
• CAMERA: Select this when connecting the
rear view camera.
– You can set the remaining two
items (BACK GEAR/
CAMERA VIEW).
BACK GEAR
• AUTO: The rear view through the rear view
camera is automatically displayed on
the monitor when you change the
gear to the back position.
• OFF: Cancels this function. To watch the
rear view, select “AV2” for the
source.
CAMERA VIEW
• NORMAL: You can watch the rear view as
the camera takes.
• MIRROR: You can watch the rear view as
reflected on the mirror.
While watching the camera view, you can change
it to the source playback screen by touching the
center portion of the monitor screen. (In this case,
you cannot change the aspect ratio and make
monitor adjustments—see pages 29 and 47.)
TELEPHONE MUTING
This mode works when a cellular phone system
is connected. Select either “MUTING 1” or
“MUTING 2,” whichever mutes the sounds
from this unit.
TV CHANNEL AREA
• This setting appears when the TV tuner unit
KV-C1001 is connected.
When you use the optional TV tuner unit either
in Italy or Indonesia, select the country.
• Normally select “C.C.I.R.”
57
Page 58

Other Main Functions
○○○○○○○○○○○○○○○○○○
Assigning titles to the sources
ENGLISH
Roman alphabet list
Alternates between upper and lower cases.
Moves the cursor position.
Backspace
(Erase the last entry)
Upper cases
Erase all entered character.
Accented characters: Upper cases
Display the other page of the character list of the same type.
Entered name is displayed.
Alternates between Roman alphabet and accented letter lists.
Accented characters: Lower cases
Lower cases
Confirm the entered name.
58
Page 59

You can assign titles to 30 TV stations and 40
CDs (both in this unit and in the CD changer).
Source Maximum character number
TV Stations:10
CDs:32
• You cannot assign a title to CD Text and MP3
discs.
• If you change the “TV CHANNEL AREA”
setting (see page 57), assigned TV station
names are all erased.
If the “DELETE DISC NAME” or
“DELETE STATION NAME” screen
appears
The internal memory is full. Delete unwanted
names before assignment.
ENGLISH
1
Prepare the source.
• For a CD in this unit: Insert a CD.
• For CDs in the CD changer: Select
“CD-CH,” then select a disc number.
• For TV stations: Change “TV,” then
select a TV station.
2
3
4
Enter a name.
5
Confirm.
Ex. When trying a name to a 41st disc.
1
Select an unwanted name.
Ex. When selecting the
first registered name.
2
Delete.
3
Repeat the above steps if you want to
delete more names.
4
Finish.
To next/previous
page of the list
59
Page 60

Hold
○○○○○○○○○
Changing the monitor position/
○○○○○○○○○
angle
You can change the monitor position and the
ENGLISH
monitor angle.
• Once you change them, they are stored. The
monitor opens at the stored position and
angle, next time you eject the monitor.
To change the monitor position
To operate the car switches behind the
monitor, press OPEN once.
The monitor change its angle to the illustrated
position for about 30 seconds.
To return to its
previous angle
within 30 seconds,
press OPEN again.
○○○○○○○○○
Removing the monitor
On the main unit
To change the monitor angle
MAIN SUB
then
AVOUT VOL
On the remote controllerOn the main unit
Each time you press the button, the monitor
changes its angle step by step.
• By holding the button (+/–), you can easily
change the angle to its extreme (+/–).
When detaching and attaching the monitor,
observe the following:
• Be careful not to drop the monitor.
• Be careful not to damage the connectors.
To detach the monitor
1
The monitor goes back into
its compartment if it has
been used, then comes out
halfway.
2
Insert the blind cover to protect the
3
internal mechanism from dust.
To attach the monitor
Insert the monitor into the compartment with
the screen facing down.
60
Page 61

CD Changer Operations
Dual Mode indicator (see page 38)
SOURCE icon (see pages 14 and 38)
Current disc/folder/track no.
Elapsed playing time
Playback mode
Sound mode (see page 44)
Surround/DSP mode (see page 41)
Volume level
appears when
adjusted.
ENGLISH
Disc text/ID3 tag
information area
Only for MP3
MP3CD/CD Text
Back to the beginning
Only for CD: See
page 58.
See page 14.
See page 14.
See page 15.
See page 44.
See pages 48 – 57.
61
Page 62

Basic CD Changer Operations
2
1
ENGLISH
Select “CD-CH”
then
Operate the disc
: Selects the disc.
: Selects the folder (only for
MP3).
: Goes back to the beginning of
the current track, then skips to
the previous tracks if pressed
repeatedly.
Ex. While playing CD/CD Text*
Ex. While playing MP3
It is recommended to use the JVC MP3-compatible CD changer with your unit.
• You can also connect the CH-X series CD changers (except CH-X99 and CH-X100).
However, they are not compatible with MP3 discs, so you cannot play back MP3 discs.
• You cannot use the KD-MK series CD changers with this unit.
Before operating your CD changer:
• Refer also to the Instructions supplied with your CD changer.
• If no discs are in the magazine of the CD changer or the discs are inserted upside down,
“NO DISC” will appear on the monitor. If this happens, remove the magazine and set the
discs correctly.
• If no magazine is loaded in the CD changer, “NO MAGAZINE” will appear on the monitor.
If this happens, insert the magazine in the CD changer.
* Disc text information recorded in the CD
Text can be displayed when a JVC CD Text
compatible CD changer is connected.
: Skips to the following tracks if
pressed repeatedly.
62
Page 63

Advanced CD Changer Operations
○○○○○○○○○
Selecting disc/folders/tracks
You can select the disc, (folder: only for MP3,)
and tracks using the buttons on the main unit.
3
Select a disc you want.
ENGLISH
1
DISC
FOLDER
TRACK
2
When using the remote controller
You can directly select the disc number by
pressing the corresponding number buttons (1 –
12).
○○○○○○○○○
Locating a disc/folder/track using
○○○○○○○○○
the list
To locate a disc by displaying the disc
list
Example: while playing MP3.
1
To next/previous
page of the list
Assigned disc names will be
shown once it is recognized.
To locate a folder by displaying the
folder list
• This functions only for MP3.
• Though you play back the same disc on the
CD changer, its folder list may look
differently from the one you display while
playing it on the main unit. This happens
because CD changer can also list up the
folder in which no MP3 tracks are recorded.
1
2
2
63
Page 64

3
Off
Auto Scroll
Scroll
Select a folder you want.
Current track name or ID3 Tag
○○○○○○○○○
Displaying the disc text
○○○○○○○○○
information
ENGLISH
To next/previous
page of the list
Shaded when no MP3 files are included.
You cannot select this folder.
To locate a track by displaying the track
list
Example: while playing MP3.
1
2
Select a track you want.
3
Current folder name or ID3 Tag (for MP3)
Disc name (for CD) or CD Text
With Auto Scroll or Scroll selected, you can
display the text and scroll it on the monitor if it
is long and cannot be displayed at a time.
1
2
(For CD)
• Scroll: Text on the information area
scrolls once.
• Auto Scroll: Text on the information area
scrolls every 5 seconds.
• Off: The information area goes off
(no text information will be
shown).
(For MP3)
64
To next/previous
page of the list
Page 65

○○○○○○○○○
Selecting playback modes
You can use only one of the following playback
modes at a time—Repeat Play, Random Play,
and Intro Scan.
Repeat Play
You can repeat playback.
• Repeat Play cannot be deactivated.
1
Random Play
You can play back tracks at random.
1
Only for MP3
2
ENGLISH
2
Only for MP3
When playing CD:
REPEAT PLAY TRACK REPEAT PLAY DISC
REPEAT PLAY OFF
When playing MP3:
REPEAT PLAY TRACK REPEAT PLAY FOLDER
REPEAT PLAY DISCREPEAT PLAY OFF
REPEAT PLAY
• TRACK: Repeats the current track.
• FOLDER: Repeats the current folder.
• DISC: Repeats the current disc.
• OFF: Repeats all loaded discs in the
magazine.
When playing CD:
RANDOM PLAY DISC RANDOM PLAY ALL
RANDOM PLAY OFF
When playing MP3:
RANDOM PLAY FOLDER RANDOM PLAY DISC
RANDOM PLAY ALLRANDOM PLAY OFF
RANDOM PLAY
• FOLDER: Plays randomly all tracks of the
current folder, then moves to the
next folder and so on.
• DISC: Plays randomly all tracks on the
current disc.
• ALL: Plays randomly all tracks of all
discs in the magazine.
• OFF: Cancels Random Play.
65
Page 66

Intro Scan
You can play back the first 15 seconds of each
track sequentially.
ENGLISH
1
Only for MP3
2
○○○○○○○○○
Searching for songs
You can use search functions to find your
favorite tracks (for CD/MP3) and folders (for
MP3).
Folder/Track Search
You can select a specific track (for CD/MP3) or
folder (for MP3).
1
When playing CD:
INTRO SCAN TRACK INTRO SCAN DISC
INTRO SCAN OFF
When playing MP3:
INTRO SCAN TRACK INTRO SCAN FOLDER
INTRO SCAN DISCINTRO SCAN OFF
INTRO SCAN
• TRACK: Plays the beginning of all tracks
of the current disc.
• FOLDER: Plays the first tracks of all folders
of the current disc (only for
MP3).
• DISC: Plays the first tracks of all discs
in the magazine.
• OFF: Cancels Intro Scan.
2
(For CD/MP3)
3
Enter a number, then confirm.
Ex. when playing MP3:
Clear the entry.
(For MP3)
Confirm
66
Page 67

External Component Operations
You can connect two video components as
the playback components and an optional TV
tuner unit (KV-C1001).
• When you connect the video camera as a
rear view camera to the AV INPUT 2 jacks
to guide you to back the car, set the usage
of the AV INPUT 2 jacks correctly (see
page 57).
• For connections, see the Installation/
Connection Manual (separate volume).
1
Select the external source
TUNER DISC AV1
CD-CH
• AV 1 : To watch the playback pictures
through the component
connected to the AV INPUT 1
jacks.
• AV 2 : To watch the playback pictures
through the component
connected to the AV INPUT 2
jacks.
Playback picture will be
shown in the picture
view window.
AV2TVDAB
• TV: To watch TV programs through
the TV tuner unit (KV-C1001).
Playback picture will be
shown in the picture
view window.
To use the TV tuner unit (KV-C1001), see
the following pages.
2
Adjust the volume
To change the aspect ratio...
On the remote
controller
ASPECT
On the main unit
ENGLISH
Not available while viewing the
playback picture.
Ex. When “AV1” is selected.
• For details, see page 29.
When you selected “CAMERA” for “AV2
INPUT” (see page 57), you cannot change
the aspect ratio of AV2.
67
Page 68

TV Tuner Operations
ENGLISH
Volume level
appears when
adjusted.
Dual Mode indicator (see page 38)
SOURCE icon (see pages 14 and 38)
Current preset no.
Channel no.
Search mode
Sound mode (see page 44)
Surround/DSP mode (see page 41)
Playback picture will be
shown in the picture
view window.
68
Available only after pressing “M” (next to
this icon).
See page 58.
See page 14.
See page 14.
See page 15.
(Not available while viewing the
playback picture.)
See page 44.
See pages 48 – 57.
Back to the beginning
Page 69

○○○○○○○○○
Watching TV programs
Before watching TV, select the area where you
use the optional TV tuner unit (KV-C1001)—
see page 57.
• To tune in to a station using Preset Search,
first store your favorite TV stations into
memory (12 stations).
3
Tune in to a TV station
ENGLISH
1
Select TV
then
2
Select Search Mode
AUTO: To start Auto Search.
MANUAL: To start Manual Search.
PRESET: To select preset station numbers
(only possible after storing
stations in memory).
• For Auto Search, press either icon once.
“Auto Search” begins.
When a station is received, searching stops.
• For Manual Search, press either icon
repeatedly (or hold) until a station you want
is selected.
• For Preset Search, press either icon
repeatedly until a preset number you want is
selected.
○○○○○○○○○
Storing stations in memory
You can preset 12 TV stations.
• To tune into a preset station, see “Watching
TV programs.”
TV station automatic presetting—Auto
Memory
1
Start Auto Memory.
2
then
Local TV stations with the strongest signals
are searched and stored automatically.
69
Page 70

Manual presetting
1
Tune into a TV station.
ENGLISH
then
To tune in to a preset station
• See also “Watching TV programs” on page
69.
1
Select “MANUAL”
(or “AUTO”).
2
Store the station into a preset number.
then
To select the rest of
the preset stations
Preset station information will be displayed.
Select a preset number.
2
To select the rest of
the preset stations
70
Page 71

○○○○○○○○○
Displaying the preset list
You can store and select the preset station using
the preset list on the monitor screen.
To select a preset station using the
preset list
1
To store a station using the preset list
1
Tune into a TV station.
Select “MANUAL”
(or “AUTO”).
then
ENGLISH
2
To next/previous
page of the list
• Preset numbers, channel numbers and
assigned names (see page 58) of the
preset TV stations are shown on the list.
2
Store the station into a preset number.
3
then
To next/previous
page of the list
71
Page 72

DAB Tuner Operations
ENGLISH
Volume level
appears when
adjusted.
Dual Mode indicator (see page 38)
SOURCE icon (see pages 14 and 38)
Service type (primary or secondary)/
Service label/Current band/Preset no.
Channel no.
Ensemble frequency
TEXT indicator (DLS—DAB radio text)
Search mode
Sound mode (see page 44)
Surround/DSP mode (see page 41)
ANN (Announcement) indicator
Ensemble label/
PTY code/
Service label
Works only while
receiving an
ensemble.
72
1
*
Back to the beginning
*1Available only when DLS is displayed.
See page 14.
See page 14.
See page 15.
See page 44.
See pages 48 – 57.
Page 73

Listening to the DAB Tuner
It is recommended to use DAB (Digital
Audio Broadcasting) tuner KT-DB1000 with
this unit. If you have another DAB tuner,
consult your JVC IN-CAR
ENTERTAINMENT dealer.
• Refer also to the Instructions supplied with
your DAB tuner.
• To tune into a service using Preset Search,
first store your favorite services into
memory (6 stations for each band: see page
74).
1
Select the DAB Tuner
then
2
Select the band
3
Select Search Mode
AUTO: To start Auto Search.
MANUAL: To start Manual Search.
PRESET: To select preset numbers (only
possible after storing services
in memory).
4
Tune in to an ensemble
• For Auto Search, press either icon once.
“Auto Search” begins.
When an ensemble is received, searching
stops.
• For Manual Search, press either icon
repeatedly (or hold) until an ensemble you
want is selected.
• For Preset Search, press either icon
repeatedly until a preset number you want
is selected.
ENGLISH
This receiver has three DAB bands (DAB1,
DAB2, DAB3). You can use any one of them to
listen to a DAB service.
5
Select a service (either primary
or secondary) to listen to
73
Page 74

What is DAB system?
DAB can deliver CD quality sound without
any annoying interference and signal
distortion. Furthermore, it can carry text,
ENGLISH
pictures, and data. In contrast to FM
broadcast, where each programme is
transmitted on its own frequency, DAB
combines several programmes (called
“services”) to form one “ensemble.” In
addition, each “service”—called “primary
service”—can also be divided into its
components (called “secondary service”). A
typical ensemble has 6 or more programmes
(services) broadcast at the same time.
○○○○○○○○○
Storing services in memory
You can preset 6 services for each band.
1
Select the band (DAB1 – DAB3) you
want to store a service into.
2
Tune into a service.
then
○○○○○○○○○
Selecting ensembles and services
You can also select the ensembles and services
using the buttons on the main unit.
On the main unit
ENSE
(Ensemble)
then
SERV
(Service)
Select “MANUAL”
(or “AUTO”).
3
Store the service into a preset number.
4
then
Preset service information will be displayed.
74
Page 75

To tune in to a preset service
• See also “Listening to the DAB Tuner” on
page 73.
1
2
○○○○○○○○○
Displaying the preset list
To store a service using the preset list
1
Select the band (DAB1 – DAB3) you
want to store a service into.
2
Tune into a service.
then
Select “MANUAL”
(or “AUTO”).
3
ENGLISH
You can store and select the preset services
using the preset list on the monitor screen.
To select a preset service using the
preset list
1
2
• Preset numbers and service labels are
shown on the list.
4
Store the service into a preset number.
then
75
Page 76

○○○○○○○○○
Displaying the DAB text
You can change the initial display—label
information (ensemble label/service label/PTY
ENGLISH
code) to the DAB radio text information—
Dynamic Label Segment (DLS).
• This function is available only when DLS is
received. If the current service provides DLS,
the TEXT indicator appears on the monitor
screen.
1
2
To erase the DLS
While DLS is displayed on the monitor...
• Each time you press the icon, the DLS
comes on and goes off.
○○○○○○○○○
Using the Standby Reception
You can use two types of Standby Reception—
TA Standby Reception and PTY Standby
Reception.
TA Standby Reception
See page 21.
• Operations are exactly the same as explained
on page 21 for FM RDS stations.
76
• Each time you press the icon, the label
information and DLS alternate on the
screen.
PTY Standby Reception
You can search for any one of the PTY codes
(either Dynamic or Static).
• Operations are exactly the same as explained
on page 22 for FM RDS stations.
• You cannot store PTY codes separately for
the DAB tuner and for the FM tuner.
To store your favorite programme (service)
types, see page 24 or 79.
To search for your favorite programme
(service) type, see page 22, 24 or 79.
Page 77

○○○○○○○○○
Using Announcement Standby
○○○○○○○○○
Reception
Announcement Standby Reception allows the
unit to switch temporarily to your favorite
service (announcement type) from any source
except FM and AM.
1
2
Select an announcement type.
To display the other announcement types
Once you select an announcement type,
Announcement Standby Reception is
activated.
TRAVEL: Programmes about travel
destinations, package tours, and
travel ideas and opportunities
WARNING: Warnings about earthquakes,
tsunami, etc.
NEWS: News
WEATHER: Weather information
EVENT: Information about events,
concerts, etc.
SPECIAL: Special programmes expanding
on current news or affairs
RADIO INFO
SPORTS: Sport events
FINANCIAL
To deactivate the Announcement Standby
Reception, select “OFF” for the currently
selected announcement type.
:Radio information
: Reports on commerce, trading,
the stock market, etc.
ENGLISH
If the ANN indicator lights up on the monitor
•
screen, Announcement Standby Reception is
activated.
If the ANN indicator flashes on the monitor
•
screen, Announcement Standby Reception is
not yet activated.
To activate Announcement Standby
Reception, tune in to another service
providing these signals.
The ANN indicator stops flashing and
remains lit.
77
Page 78

DAB Setup—DAB SET
You can make DAB setting and use some other convenient functions.
ENGLISH
1
2
Change the setting or enter the setting screen.
3
• For details, see the following pages.
Ex. When pressing “DAB BAND RANGE.”
78
Page 79

DAB BAND RANGE
DAB ensembles are broadcast on the following
bands:
• Band III: 174.928 MHz to 239.200 MHz
• L-Band: 1452.960 MHz to 1490.624 MHz
In some areas, both bands are used, and in other
areas only one of them is used.
Select the proper band for your area.
NOTICE: If you change the DAB band range
after presetting the services, they will be
erased.
DAB AF
You can keep listening to the same programme
using DAB Alternative Frequency—by
selecting “ON.”
• While receiving a DAB service:
When driving in an area where a service
cannot be received, this unit automatically
tunes in to another ensemble or FM RDS
station broadcasting the same programme.
• While receiving an FM RDS station:
When driving in an area where a DAB
service is broadcasting the same programme
as the FM RDS station is broadcasting, this
unit automatically tunes in to the DAB
service.
PTY STANDBY CODE
Select the PTY code for PTY Standby
Reception (see also page 24).
ENGLISH
• You cannot select a different PTY code
separately for the DAB tuner and for the FM
tuner.
PTY STANDBY
You can activate (ON) and deactivate (OFF)
PTY Standby Reception both for the DAB
tuner and for the FM tuner.
• You cannot use PTY Standby Reception
separately for the DAB tuner and for the FM
tuner.
DAB DRC
While driving, surrounding sounds will
interfere with your listening. Especially the low
level sounds will be hard to listen.
If this happens, you can reinforce the low level
sounds to improve your listening if the
currently received service provides Dynamic
Range Control (DRC) signals.
• The higher the number is, the stronger the
reinforcement becomes.
• To cancel this effect, select “OFF.”
79
Page 80

Maintenance
How to clean the monitor
ENGLISH
When removing stains or dust on the surface,
turn off the monitor, then wipe with dry soft
cloth.
• Be careful not to scratch the surface when
wiping it.
• Do not use the following materials to clean
the monitor:
– Wet cloth
– Volatile substance such as benzine and
thinner
– Acid detergent, alkaline detergent, and
detergent composed of organic substance
• When using chemically processed duster, read
its precautions carefully.
How to clean the connectors
Frequent detachment of the monitor will
deteriorate the connectors.
To minimize this possibility, periodically wipe
the connectors with a cotton swab or cloth
moistened with alcohol, being careful not to
damage the connectors.
• Attach the blind cover to the main unit
whenever the monitor is removed to protect
the internal mechanism from dust.
Moisture condensation
Moisture may condense on the lens inside the
disc player in the following cases:
• After starting the heater in the car.
• If it becomes very humid inside the car.
Should this occur, the disc player may
malfunction. In this case, eject the disc and
leave the unit turned on for a few hours until the
moisture evaporates.
How to handle discs
When removing a disc from
its case, press down the center
holder of the case and lift the
disc out, holding it by the
edges.
• Always hold the disc by the edges. Do not
touch its recording surface.
When storing a disc into its case, gently insert
the disc around the center holder (with the
printed surface facing up).
• Make sure to store discs into the cases after
use.
To keep discs clean
A dirty disc may not play
correctly.
If a disc does become dirty, wipe
it with a soft cloth in a straight
line from center to edge.
• Do not use any solvent (for example,
conventional record cleaner, spray, thinner,
benzine, etc.) to clean discs.
To play new discs
New discs may have some rough spots around
the inner and outer edges. If
such a disc is used, this unit
may reject the disc.
To remove these rough spots,
rub the edges with a pencil or
ball-point pen, etc.
Center holder
80
Page 81

More about This Receiver
○○○○○○○○○
Operation Methods
• Touch Panel screen goes off if no operations
are made on it for about 30 seconds while
viewing the playback picture.
○○○○○○○○○
Basic Operations
Turning off the power
• If you turn off the power while listening to a
disc, disc play will start automatically, next
time you turn on the power.
Changing the graphic screen
• If you select one of the graphic screens while
playing a video source, no playback picture
can be viewed.
• When you change the playback source to one
of the video sources, the currently selected
graphic screen is temporarily canceled in
order to show the playback picture on the
picture view window.
○○○○○○○○○
Radio Operations
Storing stations in memory
• When SSM is carried out for a band...
– All stations previously stored for the band
are erased and stations are stored newly.
– Received stations are preset in No.1 (lowest
frequency) to No.6 (highest frequency).
When SSM is over, the station stored in
No.1 will be automatically tuned in.
• When storing a station manually, a previously
preset station is erased when a new station is
stored in the same preset number.
• Preset stations are erased when the power
supply to the memory circuit is interrupted
(for example, during battery replacement). If
this occurs, preset the stations again.
○○○○○○○○○
Basic Disc Operations
General
• In this manual, words “track” and “file” are
interchangeably used when referring to MP3
files and their file names.
• When a disc has been already loaded,
selecting “DISC” for the playback source
starts disc play.
Inserting a disc
• When a disc is inserted upside down, the disc
automatically ejects.
Playing a disc
• After loading an MP3 disc, this unit will take
a long readout time. This readout time varies
among the disc depending on its recording
conditions.
• When playing an MP3 disc, sound
interruption or skipping may occur. This is
caused by the disc played back—its recording
condition (missing data, etc.)
• When playing a DVD/VCD, no sound comes
out during x5, x10, x20, and x60* Search
(* only for DVD).
• Reverse Search stops automatically when it
reaches the beginning of the disc. Playback
resumes at normal speed.
• For some DVD/VCDs, changing the subtitle
language and audio language (or audio
channel) without using the disc menu is
prohibited.
• One Touch Replay works only within the
same title. (For some DVDs, this function
does not work.)
• While zoomed in, the picture may look
coarse.
ENGLISH
81
Page 82

• This unit cannot play back the files which
have the data such as WMA, WAVE,
ATRAC3, MPEG 2.5, etc.
• The speaker/signal indicators appear in the
following cases (for DVD/CD):
ENGLISH
– When a different type of the digital signal is
detected, or
– When you start playback or resume
playback from pause.
Signal indicatorsSpeaker indicators
SUBWFR SUBWFR
– The speaker indicators—frames of “L,”
“C,” “R,” “LS,” and “RS” light up, when
the corresponding speakers are set to
“LARGE” or “SMALL” (see page 56).
Sounds come out of the speakers whose
speaker indicators is lit on the display.
– The
“SUBWOOFER” is set to “YES” (see page
56).
– The signal indicators changes its color from
white to yellow to indicate the incoming
signals—L (front left) / R (front right) / C
(center) / LFE (low frequency effect) / LS
(left surround) / RS (right surround) / S
(monaural surround).
Changing the source
• If you change the source, playback also stops
(without ejecting the disc).
Next time you select “DISC” for the playback
source, disc play will start automatically.
indicator lights up when
Stopping play
• Except for MP3 discs: This unit can
remember the end point (until the disc is
ejected), and when you start playback again,
playback begins from where it has been
stopped (Resume play).
• For MP3 discs: This unit can remember the
last playing track (until the disc is ejected),
and when you start playback again, playback
begins from the beginning of the same track.
Ejecting a disc
• If the ejected disc is not removed within 15
seconds, the disc is automatically inserted
again into the loading slot to prevent it from
dust. (Disc will not play this time.)
Displaying the disc text information
• For MP3: If no ID3 tag is recorded, folder
and track names are displayed instead.
Notes on Recordable (R) and Rewritable (RW)
discs
• Use only “finalized” discs.
• For DVD-R/DVD-RW: This unit can play
back only discs recorded in the DVD-Video
format. (Discs recorded in the DVD-VR
format cannot be played.)
• For CD-R/CD-RW: This unit can play back
only audio CD (CD-DA) files if a disc
includes both audio CD (CD-DA) files and
MP3 files.
• This unit can play back multi-session discs;
however, unclosed sessions will be skipped
while playing.
82
Page 83

• Some discs may not play back on this unit
because of their disc characteristics, and for
the following causes:
– Discs are dirty or scratched.
– Discs are kept in a place where temperature
becomes extremely high.
– Moisture condensation on the lens inside
the unit.
– The pickup lens inside the unit is dirty.
– Discs on which the files are written with
“Packet Write” method.
– There are improper recording conditions
(missing data, etc.) or media conditions
(stain, scratch, warp, etc.)
• Rewritable discs may require a longer readout
time since the reflectance of rewritable discs
is lower than that of regular DVD/CDs.
• Do not use following discs:
– Discs with stickers, labels, or protective
seal stuck to the surface.
– Discs on which labels can be directly
printed by an ink jet printer.
Using these discs under high temperatures or
high humidity may cause malfunctions or
damage to discs.
Notes on MP3 files
• This unit can play back MP3 files only with
the extension code <.mp3> (regardless of the
letter case—upper/lower).
• This unit cannot play back the files encoded
in the following formats—MP3i, MP3 PRO,
Layer 1, Layer 2 format.
• This unit can show the names of albums,
artists (performer), and tracks of ID3 Tag
(Version 1.0 and 1.1).
• This unit can show up to 64 characters on the
monitor screen.
• This unit can handle only one-byte
characters. Any other characters cannot be
correctly displayed.
• This unit can play back MP3 files meeting the
conditions below:
– Bit rate: 8 kbps – 320 kbps
– Sampling frequency:
48 kHz, 44.1 kHz, 32 kHz (for MPEG-1)
24 kHz, 22.05 kHz, 16 kHz (for MPEG-2)
– Disc format:
ISO 9660 Level 1/ Level 2, Romeo, Joliet,
Windows long file name.
• The maximum number of characters for file/
folder names varies among the disc format
used (includes 4 extension characters—
<.mp3>).
– ISO 9660 Level 1: 12
– ISO 9660 Level 2: 31
– Romeo/Windows long file name: 128
– Joliet: 64
• This unit can recognize 99 folders and 150
files in each folder, which recorded in 10
hierarchies.
• This unit can play back the files recorded in
VBR (variable bit rate).
The files recorded in VBR have a discrepancy
in elapsed time display, and do not show the
actual elapsed time. Especially, after
performing the search function, this
difference becomes noticeable.
• Playlist is not available on this unit.
• The search function works but search speed is
not constant during search.
ENGLISH
83
Page 84

• When an optional monitor is connected to the
AV OUTPUT terminal, you can view the
following MP3 CONTROL screen on the
optional monitor.
ENGLISH
1
MP3 CONTROL REPEAT TRACK
Folder : 01 / 10
spring
sumer
fall
winter
sea
Title :
Begonia
Artist :
Annie Lim
Album :
Flowers
4
1 Currently activated play mode
2 Elapsed playing time of the current track
3 Cursor (highlighted position): Indicates your
selection.
4 ID3 Tag information
5 Folder column—folder names
(Ex. The first folder is selected out of 10
folders.)
• Only 5 folders can be listed at a time.
6 Track column—track names
(Ex. The first track is selected out of 30 tracks
in the current folder. 128 tracks are included
in the disc.)
• Only 12 tracks can be listed at a time.
• Only the first 32 characters can be
displayed on the monitor.
5
2
Time : 00:03:08
Track : 01 / 30 (Total 128)
begonia.mp3
german chamomile.mp3
kiwi fruit.mp3
orchard grass.mp3
petunia.mp3
north pole.mp3
begonia2.mp3
german chamomile2.mp3
kiwi fruit2.mp3
orchard grass2.mp3
petunia2.mp3
north pole2.mp3
– While playing a CD, the current track
and playback mode information is
displayed on the optional monitor.
3
6
○○○○○○○○○
Dual Mode Operations
Adjusting AV OUTPUT volume
• This adjustment does not affect the volume
level of the monitor inserted into the optional
cradle (KV-CR100/KV-CR101).
○○○○○○○○○
Surround Mode Operations
• Dolby Digital disc is not always encoded as
multi-channel source. If it is not multichannel encoded, “Dolby Digital” cannot be
selected for surround mode.
○○○○○○○○○
Sound Mode (iEQ) Operations
• If you do not want to store your current
adjustment, but only to apply the adjustment
to the current playback source, press
RETURN on the monitor screen to go back to
the operation screen of the current source.
Adjustment you made remains effective until
you select a sound mode.
○○○○○○○○○
Other Sound Adjustments
• If fader or balance has been set close to its
extreme, appropriate surround/DSP effect
may not be obtained.
• If you are using a two-speaker system, set the
fader level to “0.”
• You cannot adjust the input level—Volume
Adjustment—of the FM stations. If the
source is FM, Volume Adjustment will not be
used.
84
Page 85

○○○○○○○○○
Monitor Adjustments
○○○○○○○○○
Other Main Functions
• You may not able to adjust the brightness in
the following case:
– You cannot make it brighter when the
ambient light is very bright.
– You cannot make it darker when the
ambient light is very dark.
○○○○○○○○○
Initial Setup—DVD MENU
MENU/AUDIO/SUBTITLE LANGUAGE
• When the language you have selected is not
recorded on a disc, the original language is
automatically used as the initial language. In
addition, for some discs, the initial languages
settings will not work as you set due to their
internal disc programming.
• Language setting change cannot be effective
while playing (or pausing). After you change
the language setting, eject the disc and insert
it (or another disc) again so that your setting
takes effect.
MONITOR TYPE
• When you select “16:9 NORMAL” for a
picture whose aspect ratio is 4:3, the picture
slightly changes due to the process for
converting the picture width.
• Even if “4:3 PS” is selected, the screen size
may become “4:3 LB” with some DVDs.
This depends on how they are recorded.
○○○○○○○○○
Initial Setup—AUDIO MENU/PSM
• If you change the “AMP GAIN” setting from
“HIGH” to “LOW” while the volume level is
set higher than “30,” the unit automatically
changes the volume level to “30.”
Assigning titles to the sources
• When the CD changer is connected, you can
assign titles to CDs in the CD changer. These
titles can also be shown on the display if you
insert the CDs in this unit.
○○○○○○○○○
TV Tuner Operations
Storing stations in memory
• When Auto Memory is carried out...
– All TV stations previously stored are erased
and TV stations are stored newly.
– Received TV stations are preset in No.1
(lowest frequency) to No.12 (highest
frequency). When Auto Memory is over,
the TV station stored in No.1 will be
automatically tuned in.
• When storing a TV station manually, a
previously preset TV station is erased when a
new TV station is stored in the same preset
number.
• Preset TV stations are erased when the power
supply to the memory circuit is interrupted
(for example, during battery replacement). If
this occurs, preset the stations again.
○○○○○○○○○
DAB Tuner Operations
• PTY Standby Reception works for the DAB
tuner only using a Dynamic PTY, but not a
Static PTY.
• TA Standby Reception and PTY Standby
Reception works for both DAB services and
FM RDS stations.
ENGLISH
85
Page 86

Troubleshooting
What appears to be trouble is not always
ENGLISH
serious. Check the following points before
calling a service center.
General
• Sound is sometimes interrupted.
] You are driving on rough roads.
Stop playback while driving on rough
roads.
] Disc is scratched.
• Sound cannot be heard from the speakers.
] Connections are incorrect.
• No sound comes out of the subwoofer
(though it is activated—set to “YES”).
] If Pro Logic II is activated with the front/
center/rear speaker size all set to
“LARGE,” no sound comes out.
• Surround/DSP mode is defeated and
cannot be activated.
] It is fixed to “DEFEAT” if only rear
speakers are activated (set to “LARGE” or
“SMALL”).
FM/AM broadcast
• SSM automatic presetting does not work.
] Signals are too weak. Store stations
manually.
• Static noise is generated while listening to
the radio.
] The antenna is not connected firmly.
Disc playback—DVD/VCD
• You cannot watch the playback pictures on
the additionally purchased monitor
(KV-MAV7001) in the optional cradle
(KV-CR100/KV-CR101).
] If the original monitor is not removed
from the main unit, you cannot watch the
playback picture while driving.
• You cannot change the aspect ratio.
] While the GUI operation is in use, you
cannot change the aspect ratio.
• The left and right edges of the picture are
missing on the screen.
] “4:3 PS” is selected when viewing on a
conventional TV (aspect ratio 4:3). Select
“4:3 LB.”
• Audio language or subtitle language
cannot be changed.
] For some DVDs and VCDs, changing the
language without using the disc menu is
prohibited.
Disc playback—CD/CD-R/CD-RW
• Sounds are skipped or playback stops
suddenly.
] Disc is warped or sticker on the disc
comes off. Do not play such a disc.
• Disc cannot be played back.
] Disc is inserted upside down.
• Tracks on the CD-R/CD-RW cannot be
skipped.
] CD-R/CD-RW is not finalized.
• Disc cannot be ejected.
• Disc is not recognized.
] Disc is locked. Unlock the disc (see page
29).
] The main unit may function incorrectly.
Press SOURCE and 0 at the same time
for more than 2 seconds to eject the disc.
Disc playback—MP3
• Disc cannot be played back.
] MP3 tracks do not have the extension
code—<.mp3>.
] MP3 tracks are not recorded in the format
compliant with ISO 9660 Level 1, ISO
9660 Level 2, Romeo, or Joliet.
86
Page 87

• Noise is generated.
] The current track is not an MP3 file
(although it has the extension code—
<.mp3>).
• Elapsed playing time is not correct.
] This sometimes occurs during play. This is
caused by how the tracks are recorded on
the disc.
• Correct characters are not displayed.
] This unit can only display a limited
number of special characters (see the
tables on page 58).
Initial setup—AUDIO MENU/PSM
• “SPEAKER SIZE” settings change.
] Speaker size settings are very much
related to one another. For example, if you
set the FRONT speakers to “NONE,” you
cannot select “NONE” for the REAR
speakers.
• Rear view does not appear when you
change the gear lever to the back position.
] “BACK GEAR” is to “OFF.” In this case,
you have to select “AV2” for the source to
watch the rear view.
] “BACK GEAR” is to “AUTO,” but the
back gear wire is not connected to the
back lamp. To check whether the wiring is
correctly done or not, see page 51.
TV tuner operations
• TV tuner unit does not work at all.
] Press the reset button of the TV tuner unit.
• “TV IS NOT CONNECTED” appears on
the monitor.
] TV tuner unit is disconnected. Connect it
again.
• Auto Memory does not work.
] Signals are too weak. Store TV stations
manually.
• TV stations cannot be received.
] “TV CHANNEL AREA” setting is not
correct, see page 57.
• The TV’s main power does not shut off
automatically when you change the source
from TV to another.
] TV is connected to the TV tuner unit.
Connect it to the hideaway unit.
Remember that audio/video signals are
always transmitted to the TV while it is
on.
• “RESET 8” appears on the display of the
main unit.
] This unit is not connected to a TV tuner
unit correctly. Connect this unit and the
TV tuner unit correctly and press the reset
button of the TV tuner unit.
CD changer operations
• “CD CHANGER IS NOT CONNECTED”
appears on the monitor.
] CD changer is disconnected. Connect it
again.
• “NO MAGAZINE” appears on the
monitor.
] Magazine is not loaded in the CD
changer.
• “NO FILES” appears on the monitor.
] Playable files are not recorded in the disc.
• “NO DISC” appears on the monitor.
] No discs are in the magazine or the discs
are inserted upside down.
• “RESET 1” — “RESET 7” appears on the
display of the main unit.
] The built-in microcomputer in the CD
changer is malfunctioning. Press the reset
button of the CD changer.
• “RESET 8” appears on the display of the
main unit.
] This unit is not connected to a CD
changer correctly. Connect this unit and
the CD changer correctly and press the
reset button of the CD changer.
DAB tuner operations
• “DAB IS NOT CONNECTED” appears on
the monitor.
] DAB tuner is disconnected. Connect it
again.
ENGLISH
87
Page 88

Additional Information
Preset iEQ mode
ENGLISH
The table below shows the preset frequency level settings for each iEQ mode.
Sound Preset equalizing values
Mode 100 Hz 300 Hz 1 kHz 3 kHz 10 kHz
FLAT 0000000000
HARD ROCK +03 +02 00 +01 +01
R&B +03 +02 00 +01 +03
POP 00 +01 00 +01 +02
JAZZ +03 +02 +01 +02 +02
DANCE +04 +01 –02 00 +01
COUNTRY +02 +01 00 +01 +02
REGGAE +03 00 +01 +02 +03
CLASSIC +02 +02 00 +01 00
USER1 00 00 00 00 00
USER2 00 00 00 00 00
USER3 00 00 00 00 00
Graphic screens
You can select one of the following graphic screens. For details, see page 14.
You can activate the display
demonstration. To cancel it, select any
other graphic screen.
Playback picture will be
shown in the picture
view window.
While playing a video source (except
DVD/VCD), select no graphic screen (in
other words, select the actual playback
screen); otherwise, you cannot view the
playback pictures.
88
Page 89

LANGUAGE CODES
Code Language
AA Afar
AB Abkhazian
AF Afrikaans
AM Ameharic
AR Arabic
AS Assamese
AY Aymara
AZ Azerbaijani
BA Bashkir
BE Byelorussian
BG Bulgarian
BH Bihari
BI Bislama
BN Bengali, Bangla
BO Tibetan
BR Breton
CA Catalan
CO Corsican
CS Czech
CY Welsh
DA Danish
DZ Bhutani
EL Greek
EO Esperanto
ET Estonian
EU Basque
FA Persian
FI Finnish
FJ Fiji
FO Faroese
FY Frisian
GA Irish
GD Scots Gaelic
GL Galician
GN Guarani
GU Gujarati
HA Hausa
HI Hindi
HR Croatian
HU Hungarian
HY Armenian
IA Interlingua
IE Interlingue
IK Inupiak
IN Indonesian
IS Icelandic
IW Hebrew
JI Yiddish
JW Javanese
Code Language
KA Georgian
KK Kazakh
KL Greenlandic
KM Cambodian
KN Kannada
KO Korean (KOR)
KS Kashmiri
KU Kurdish
KY Kirghiz
LA Latin
LN Lingala
LO Laothian
LT Lithuanian
LV Latvian, Lettish
MG Malagasy
MI Maori
MK Macedonian
ML Malayalam
MN Mongolian
MO Moldavian
MR Marathi
MS Malay (MAY)
MT Maltese
MY Burmese
NA Nauru
NE Nepali
NL Dutch
NO Norwegian
OC Occitan
OM (Afan) Oromo
OR Oriya
PA Panjabi
PL Polish
PS Pashto, Pushto
PT Portuguese
QU Quechua
RM Rhaeto-Romance
RN Kirundi
RO Rumanian
RU Russian
RW Kinyarwanda
SA Sanskrit
SD Sindhi
SG Sangho
SH Serbo-Croatian
SI Singhalese
SK Slovak
SL Slovenian
SM Samoan
Code Language
SN Shona
SO Somali
SQ Albanian
SR Serbian
SS Siswati
ST Sesotho
SU Sundanese
SV Swedish
SW Swahili
TA Tamil
TE Telugu
TG Tajik
TH Thai
TI Tigrinya
TK Turkmen
TL Tagalog
TN Setswana
TO Tonga
TR Turkish
TS Tsonga
TT Tatar
TW Twi
UK Ukrainian
UR Urdu
UZ Uzbek
VI Vietnamese
VO Volapuk
WO Wolof
XH Xhosa
YO Yoruba
ZU Zulu
ENGLISH
89
Page 90

Specifications
○○○○○○○○○
Main unit
ENGLISH
AUDIO AMPLIFIER SECTION
Maximum Power Output:
Front: 50 W per channel
Rear: 50 W per channel
Center: 35 W
Continuous Power Output (RMS):
Front: 19 W per channel into 4 Ω, 40 Hz
to 20 000 Hz at no more than
0.8% total harmonic distortion.
Rear: 19 W per channel into 4 Ω, 40 Hz
to 20 000 Hz at no more than
0.8% total harmonic distortion.
Center: 15 W into 4 Ω, 40 Hz to 20 000
Hz at no more than 0.8% total
harmonic distortion.
Load Impedance: 4 Ω (4 Ω to 8 Ω allowance)
Equalizer Control Range:
Frequencies: 100 Hz, 300 Hz, 1 kHz, 3 kHz,
10 kHz
Level: ±10 dB
Frequency Response: 40 Hz to 20 000 Hz
Signal-to-Noise Ratio: 70 dB
TUNER SECTION
Frequency Range:
FM: 87.5 MHz to 108.0 MHz
AM: (MW) 522 kHz to 1 620 kHz
(LW) 144 kHz to 279 kHz
[FM Tuner]
Usable Sensitivity: 11.3 dBf (1.0 µV/75 Ω)
50 dB Quieting Sensitivity: 16.3 dBf (1.8 µV/75 Ω)
Alternate Channel Selectivity (400 kHz): 65 dB
Frequency Response: 40 Hz to 15 000 Hz
Stereo Separation: 30 dB
Capture Ratio: 1.5 dB
[MW Tuner]
Sensitivity: 20 µV
Selectivity: 35 dB
[LW Tuner]
Sensitivity: 50 µV
DVD/CD PLAYER SECTION
Signal Detection System: Non-contact optical
pickup (semiconductor laser)
Number of channels: 2 channels (stereo)
Frequency Response:
DVD, fs=48 kHz: 16 Hz to 22 000 Hz
DVD, fs=96 kHz: 16 Hz to 44 000 Hz
VCD, CD, MP3: 16 Hz to 20 000 Hz
Dynamic Range: 96 dB
Signal-to-Noise Ratio:98 dB
Wow and Flutter: Less than measurable limit
MP3 Recording Format:
MPEG 1/2 Audio Layer 3
Max. Bit rate: 320 kbps
REMOVABLE MONITOR
Screen Size: 7 inch wide liquid crystal display
Number of Pixel: 336 960 pixels
(480 vertical × 234 horizontal × 3)
Drive Method:
TFT (Thin Film Transistor) active
matrix format
Color System: PAL/NTSC
Aspect Ratio: 16:9 (wide)
Allowable Storage Temperature:
–10°C to +60°C
Allowable Operating Temperature:
0°C to +40°C
Dimensions (W × H × D):
170 mm × 141 mm × 15 mm
Mass: 475 g
90
Page 91

GENERAL
Power Requirement:
Operating Voltage: DC 14.4 V
(11 V to 16 V allowance)
Grounding System: Negative ground
Allowable Operating Temperature:
0°C to +40°C
Dimensions (W × H × D):
Installation Size:
• With sleeve-mounting plate Type B
(standard)
182 mm × 52 mm × 165 mm
• With sleeve-mounting plate Type A
182 mm × 52 mm × 160 mm
Panel Size: 188 mm × 58 mm × 14 mm
Mass: 2.25 kg (including monitor)
Required space for the monitor
ejection
○○○○○○○○○
Hideaway unit
Input Terminals:
AV INPUT 1/2:
Audio: 0.5 Vrms (Left/Right)
Video (composite): 1 Vp-p/75 Ω
Output Terminals (Level/Impedance):
AV OUTPUT:
Audio: 2.0 V/20 kΩ load (full scale)
Video (composite): 1 Vp-p/75 Ω
PRE OUT:
Audio: 2.0 V/20 kΩ load (full scale)
Other Terminals:
System integration (TO MAIN UNIT)
FM/AM antenna (FM/AM ANTENNA)
AV bus (AV BUS)
CD changer (TO CHANGER)
Rear view camera/Center speaker
(BACKCAMERA REMOTE/CENTER SPEAKER)
Power cord (POWER)
Dimensions (W × H × D):
230 mm × 35 mm × 181 mm
Mass: 1.3 kg
ENGLISH
177
143.3
105˚
60˚
15
12.2
51.8
mm
CAUTION: When ejecting the monitor,
keep an open space for the monitor to come
out. If not, the monitor may obstruct the
steering wheel and gearshift lever
operations, as this may result in a traffic
accident.
Design and specifications are subject to
change without notice.
About mistracking:
Mistracking may result from driving on
extremely rough roads. This does not
damage the unit and the disc, but will be
annoying.
It is recommended to stop disc play while
driving on such rough roads.
Removing the control panel
To detach
To attach
91
Page 92

Herzlichen Glückwunsch zum Kauf dieses JVC-Produkts.
Bitte lesen Sie alle Bedienungsanweisungen vor dem Betrieb gründlich durch, um richtiges
Verständnis des Geräts zu gewährleisten und die beste Leistung mit dem Gerät zu erzielen.
WICHTIG FÜR LASER-PRODUKTE
1. LASER-PRODUKT DER KLASSE 1
2. ACHTUNG: Die obere Abdeckung nicht öffnen. Das Gerät enthält keine Teile, die vom
Benutzer gewartet werden können. Wartungen nur von qualifziertem Fachpersonal durchführen
DEUTSCH
lassen.
3. ACHTUNG: Sichtbare und unsichtbare Laserstrahlung bei offenem Gerät und Defekt oder
Umgehen der Verriegelung. Setzen Sie sich dem Strahl nicht direkt aus.
4. ANBRINGEN DES ETIKETTS: WARNHINWEIS-ETIKETT, AUSSEN AM GERÄT
ANGEBRACHT.
Nach dem Einbau des Geräts stellen Sie es
zurück wie unten beschrieben:
Zurücksetzen des Geräts
Nehmen Sie zunächst das Bedienfeld ab
(siehe Seite 91) und drücken Sie die
Rückstelltaste am Gerät mit einem
Kugelschreiber oder ähnlichen Gegenstand.
Dadurch wird der eingebaute
Mikrocomputer zurückgesetzt.
Ihre aktuellen Voreinstellungen—wie
Festsender oder Klangeinstellungen—
werden ebenfalls gelöscht.
• Falls geöffnet, fährt der Monitor in seine
Ausgangsstellung zurück.
Zur Sicherheit....
• Stellen Sie die Lautstärke nicht zu hoch ein,
da dadurch Außengeräusche blockiert und das
Fahren gefährlich werden kann.
• Stoppen Sie das Fahrzeug, bevor Sie
komplizierte Vorgänge ausführen.
Aus Sicherheitsgründen wird eine
nummerierte ID-Karte mit diesem Gerät
mitgeliefert, und die gleiche ID-Nummer ist
auf dem Chassis des Geräts aufgedruckt.
Die Karte muss an sicherer Stelle
aufbewahrt werden, da sie den Behörden bei
der Identifikation des Geräts im Falle eines
Diebstahls helfen kann.
ACHTUNG:
• Verwenden Sie keine Disks mit
unregelmäßigen Formen (z.B. Herzen oder
Blumen); andernfalls können
Fehlfunktionen auftreten.
• Setzen Sie Disks nicht direktem
Sonnenlicht oder hohen Temperaturen und
Feuchtigkeit aus.
Bewahren Sie Disks nicht im Fahrzeug
auf.
Temperatur im Fahrzeug....
Wenn ein Fahrzeug längere Zeit in heißem oder
kaltem Wetter geparkt wurde, warten Sie, bis
sich die Temperatur im Innenraum normalisiert
hat, bevor Sie das Gerät betreiben.
2
Page 93

WARNUNGEN
• Wählen Sie für das Gerät KEINESFALLS
einen Einbauort, wo
– es die Handhabung von Lenkrad und
Schalthebel behindern kann, da sonst die
Gefahr von Verkehrsunfällen droht.
– es die Funktion von
Sicherheitseinrichtungen wie etwa
Airbags behindern kann, da sonst die
Gefahr von tödlichen Unfällen droht.
– es die freie Sicht beeinträchtigen kann.
• Bedienen Sie KEINESFALLS ein Gerät beim
Lenken des Fahrzeugs, da sonst die Gefahr
von Verkehrsunfällen droht.
• Der Fahrer darf während der Fahrt
keinesfalls den Monitor betrachten.
Andernfalls droht Unfallgefahr durch
Unachtsamkeit.
• Muss das Gerät während der Fahrt bedient
werden, so halten Sie dabei wegen der
Unfallgefahr den Blick auf das
Verkehrsgeschehen gerichtet.
• Ist die Feststellbremse nicht angezogen, so
erscheint die Meldung „FAHRER DARF
MONITOR NICHT BEIM FAHREN
BETRACHTEN.“ auf dem Display und es
erfolgt keine Bildwiedergabe.
– Diese Warnung erscheint nur dann, wenn
das Kabel der Feststellbremse mit dem
Feststellbremssystem des Fahrzeugs
verbunden ist (siehe hierzu die Einbau/
Anschlußanleitung).
ACHTUNGSHINWEISE zum Monitor
• Der in diesem Receiver eingebaute Monitor
wurde mit hoher Präzision hergestellt, aber es
lässt sich nicht ausschließen, dass dennoch
fehlerhafte Bildpunkte vorhanden sind. Das
ist unvermeidbar und keine Fehlfunktion.
• Setzen Sie den Monitor keinesfalls direkter
Sonneneinstrahlung aus.
• Bei extrem niedrigen oder hohen
Temperaturen...
– Chemische Veränderungen im
Geräteinneren führen zu Fehlfunktionen.
– Unter Umständen ist die Bildwiedergabe
verschwommen oder verlangsamt. Unter
solchen Umständen sind Bild- und
Tonwiedergabe asynchron oder die
Bildqualität beeinträchtigt.
DEUTSCH
ACHTUNG bei der Lautstärkeeinstellung:
Disks erzeugen im Vergleich zu anderen Quellen sehr wenig Rauschen. Bei der Einstellung der
Tuner-Lautstärke z.B. können die Lautsprecher durch einen abrupten Anstieg des Ausgangspegels
beschädigt werden. Daher ist vor dem Abspielen einer Disk die Lautstärke zu senken und dann
während der Wiedergabe entsprechend einzustellen.
Wichtig!
Wie diese Anleitung gelesen wird:
• Tastenfunktionen werden ausschließlich
mit den folgenden Abbildungen erläutert:
Um die Erklärungen so einfach und
leichtverständlich wie möglich zu halten,
haben wir die folgenden Methoden
Kurz drücken.
angewandt:
• Manche zugehörigen Tipps und
Hinweise werden später in den
Wiederholt drücken.
Abschnitten „Weitere Informationen zu
Ihrem Receiver“ (siehe Seite 81)
gegeben, aber nicht in dem Abschnitt,
der die Bedienung beschreibt. Wenn Sie
Weiteres über die Funktionen wissen
wollen oder Fragen zur Funktion haben,
schlagen Sie in diesem Abschnitt nach.
Hold
Eine davon drücken.
Gedrückt halten, bis die
gewünschte Reaktion
beginnt.
3
Page 94

Inhalt
Zurücksetzen des Geräts .................................. 2
Wichtig! (Wie diese Anleitung gelesen
wird) .......................................................... 3
Einführung—Abspielbare Disks .................. 5
Kurzanleitung—Nutzung der Bedienteile ... 6
Fernbedienung ................................................. 6
Gerät (Frontplatte) ........................................... 8
DEUTSCH
Vorbereitung
(Fernbedienung—RM-RK220) .................. 9
Bedienverfahren........................................... 10
Grundlegende Bedienung ........................... 12
Einstellung der Uhr ....................................... 13
Umschalten der Quelle .................................. 14
Umschalten des Grafikschirms ...................... 14
Wechsel der Farbe des Sensorschirms ........... 14
Anzeige des Pegelmessers ............................. 15
Bedienung des Tuners .................................. 16
Rundfunkempfang ....................................... 17
Speichern von Sendern .................................. 18
Aufrufen der Festsenderliste.......................... 19
Suche nach bevorzugten Sendungen
—PTY-Suchlauf ...................................... 20
Verwenden des Standbyempfangs ................. 21
RDS-Einstellung—RDS SET ...................... 23
DVD-/VCD-Bedienung ................................ 25
CD-/MP3-Bedienung ................................... 26
Grundlegende Disk-Bedienung .................. 27
Umschalten des Bildseitenverhältnisses ........ 29
Auswurfsperre ............................................... 29
Wahl von MP3-Ordnern ................................ 29
Bedienung über das Disk-Menü .................... 30
Erneutes Abspielen vorheriger Szenen .......... 31
Zoom-Funktion .............................................. 31
Wählen von Untertiteln ................................. 32
Wählen der Audiosprachen............................ 32
Wählen einer von mehreren
Ansichten einer Szene ............................. 33
Suchen nach Ordnern Titeln
anhand der Liste ...................................... 34
Anzeigen der Disk-Textinformationen .......... 35
Anzeigen der Zeitinformationen.................... 35
Auswählen von Wiedergabemodi .................. 35
Suchen nach Szenen oder Musikstücken ....... 36
Dual-Modus-Betrieb .................................... 38
Auswählen der Quellen ................................. 38
Einstellen der AV-Ausgangslautstärke ........... 39
Surround-Modus-Betrieb ........................... 40
Beschreibung des Surround-/DSP-Modus ..... 41
Ein- und Ausschalten des Surround-/DSP-
Modus ...................................................... 42
4
Nutzung der Klangmodi (iEQ) ................... 44
Wählen der vorgegebenen Klangmodi .......... 45
Speichern Ihrer eigenen Klangmodi .............. 45
Weitere Klangeinstellungen ........................ 46
Monitor-Einstellungen ................................ 47
Anfangseinstellung—DVD-MENÜ ............ 48
Anfangseinstellung—MONITOR .............. 50
Anfangseinstellung
—BUILDSCHIRMMENÜ ....................... 52
Anfangseinstellung
—AUDIO-MENÜ/PSM ............................ 54
Weitere Hauptfunktionen ........................... 58
Zuweisung von Namen zu den Quellen......... 58
Verstellen von Monitorposition/-
anstellwinkel............................................ 60
Abnehmen des Monitors ............................... 60
Betriebs des CD-Wechslers ......................... 61
Grundlegende CD-Wechsler-Funktionen ...
Erweiterte CD-Wechsler-Funktionen ........ 63
Wählen von Disk/Ordnern/Titeln .................. 63
Suchen nach Disk/Ordner/Titel anhand der
Liste ......................................................... 63
Anzeigen der Disk-Textinformationen .......... 64
Auswählen von Wiedergabemodi .................. 65
Suchen nach Musikstücken ........................... 66
Betrieb von externen Komponenten .......... 67
TV-Tuner-Funktionen ................................. 68
Empfang von TV-Programmen ...................... 69
Speichern von Sendern .................................. 69
Aufrufen der Festsenderliste.......................... 71
DAB-Tuner-Funktionen .............................. 72
DAB-Tuner-Empfang .................................. 73
Wählen von Ensembles und Diensten ........... 74
Speichern von DAB-Diensten ....................... 74
Aufrufen der Festsenderliste.......................... 75
Anzeige des DAB-Texts ................................ 76
Verwenden des Standbyempfangs ................. 76
Nutzen des Standbyempfangs........................ 77
DAB-Einstellung—DAB SET ..................... 78
Wartung........................................................ 80
Weitere Informationen zu Ihrem
Receiver ...................................................... 81
Störungssuche .............................................. 86
Zusätzliche Information .............................. 88
Technische Daten ......................................... 90
62
Page 95

Einführung—Abspielbare Disks
Disks zum Abspielen
Dieses Gerät eignet sich zur Wiedergabe der
folgenden Disks:
• DVD-Video: mit dem Videoformat PAL oder
NTSC und mit Regionalcode „2“.
– im DVD-Video-Format bespielte
DVD-Rs und DVD-RWs können
ebenfalls abgespielt werden (siehe
Seite 82).
• Video-CD (VCD)/Audio-CD
• MP3: CD-Rs oder CD-RWs mit MP3-
Dateien mit Dateierweiterung <mp3>.
Das Aufzeichnungsformat muss ISO
9660 Level 1, ISO 9660 Level 2,
Romeo und Joliet entsprechen.
Bei manchen Disks können die tatsächlichen
Bedienverfahren von den Erläuterung in
dieser Anleitung abweichen.
Die folgenden Disks sind nicht abspielbar
DVD-Audio, DVD-ROM, DVD-RAM, DVDRW bespielt im DVD-VR-Format, CD-ROM,
CD-I (CD-I Ready), Photo CD, usw.
• Das Abspielen solcher Disks führt zu
Rauschen und Beschädigung der
Lautsprecher.
* Hinweis zum Regionalcode
DVD-Spieler und DVD-Videodisks sind durch
spezifische Regionalcode-Nummern
gekennzeichnet. Dieses Gerät kann nur DVDDisks mit Regionalcode-Nummer „2“
wiedergeben.
Beispiele:
DVD-Video—digitale Audioformate
Das System ist zur Wiedergabe der folgen
digitalen Audioformate ausgelegt.
Linear PCM: Nicht komprimiertes digitales
Audioformat, das bei CDs und den meisten
Studio-Masterbändern üblich ist.
Dolby Digital *: Von Dolby Laboratories
entwickeltes komprimiertes digitales
Audioformat, das Multikanalcodierung zur
Erzeugung eines realistisch wirkenden
Surroundklangs ermöglicht.
DTS ** (Digital Theater Systems): Von
Digital Theater Systems, Inc. entwickeltes
komprimiertes digitales Audioformat, das
Multikanalverfahren wie Dolby Digital
ermöglicht. Aufgrund der niedrigeren
Kompressionsrate als bei Dolby Digital ist ein
breiterer Dynamikbereich und damit eine
bessere Kanaltrennung gewährleistet.
MPEG Multichannel: Weiteres komprimiertes
digitales Audioformat, ebenfalls für einen
realistischen Surroundklang durch
Multikanalcodierung. Die Anlage mischt das
Mehrkanalsignal in 2 Kanäle ab (decodiertes
PCM) und spielt es ab.
Dieses Produkt beinhält urheberrechtlich
geschützte Technik mit dem Schutz von
U.S.-Patenten und anderen intellektuellen
Eigentumsrechten. Der Gebrauch dieser
urheberrechtlich geschützten Technik ist
durch Macrovision genehmigen zu lassen
und nur für den Heimgebrauch und die
Betrachtung in begrenztem Ausmaß
vorgesehen, soweit nicht ausdrücklich von
Macrovision genehmigt. Rückwärtige
Entwicklung oder Zerlegung ist verboten.
DEUTSCH
Bei Einlegen einer DVD-Videodisk mit einem
unzulässigem Regionalcode
Die Meldung „REGION CODE ERROR!“
erscheint auf dem Display.
• „DVD Logo“ ist ein eingetragenes
Warenzeichen von DVD Format/Logo
Licensing Corporation in den USA, Japan
und anderen Ländern.
* In Lizenz von Dolby Laboratories
hergestellt. „Dolby“, „Pro Logic“ und das
Doppel-D-Symbol sind Warenzeichen der
Dolby Laboratories.
** „DTS“ und „DTS Digital Surround“ sind
eingetragene Warenzeichen von Digital
Theater Systems, Inc.
5
Page 96

Kurzanleitung—Nutzung der Bedienteile
TUNER
○○○○○○○○○
Fernbedienung
DEUTSCH
Gerät
ATT
ASPECT
MENU
GUI
SET UP
TUNER
10
MAIN SUB
DISCOKAV
231
564
897
11/012
VOLUME
Anzeige
ZOOM
DUAL
AVOUT VOL
TOPMENU
RETURN
/+1
0
Fernbedienung
Allgemeine Bedienung
Tasten Funktion:
AT T
DISC
AV
VOLUME
MAIN SUB
ZOOM
DUAL
AVOUT VOL
ASPECT
GUI
SET UP
OK
Zum Einschalten des Geräts.
Zum Ausschalten des
Geräts.
Zum Dämpfen des Tons.
Zur Auswahl von „TUNER“
und „DAB“.
Zur Auswahl von „DISC“
und „CD-CH“.
Zur Auswahl von externen
Komponenten:
TV = AV1 = AV2 =
Zur Einstellung der
Lautstärke.
Zum Einstellen des DualModus auf MAIN oder
SUB. *
Zum Ein-/Ausschalten des
Dual-Modus.
Zum Einstellen des
Monitoranstellwinkels (bei
MAIN/SUB auf MAIN).
Zum Einstellen des AVAusgangspegels (bei MAIN/
SUB auf SUB).
Zum Ändern des
Bildseitenverhältnisses.
Zur Anzeige des
Monitoreinstellschirms.
Anzeigen und Löschen des
GUI-Schirmbilds.
Zur Anzeige des Einstellmenüs.
Zum Wechseln von
Menüoptionen.
Bestätigen.
1
6
: arbeitet, wenn gedrückt gehalten.
*1 Bei Verwendung des Dual-Modus steuert die Fernbedienung entweder die Haupt- oder
Nebenquelle, je nach der Einstellung von MAIN/SUB.
*2 Nur bei MP3
*3 Während der DVD-Wiedergabe wird ein Kapitel ausgewählt; andererseits erfolgt vor oder nach
der Wiedergabe die Auswahl eines Stücks.
Page 97

Bedienung des Tuners
Tasten Funktion:
TUNER
231
564
Zum Wählen des
Frequenzbands.
Zum Starten des
automatischen Suchlaufs.
Zum Starten des manuellen
Suchlaufs.
Zum Wechseln der
Festsender.
Zur direkten Eingabe der
Festsendernummern.
Bedienung der Disk—Fortsetzung
Tasten Funktion:
231
10
564
897
11/012
Zur Auswahl von Stück-/
Kapitel-/Titelnummer. *
/+1
0
Bedienung des CD-Wechslers
Tasten Funktion:
Zur Auswahl der Ordner. *
Zur Auswahl der Titel.
Suchlauftasten.
3
2
DEUTSCH
Bedienung der Disk
Tasten Funktion:
Wiedergabe.
Pause.
Stopp.
Zur Auswahl von Kapiteln/
Titeln.
Suchlauftasten.
Zur Auswahl der Ordner. *
dann
dann
ZOOM
DUAL
TOPMENU
OK
RETURN
OK
Zur Auswahl der Titel. *
OK
Suchlauftasten.
Zur Auswahl der Audiosprache.
Zur Auswahl der
Untertitelsprache.
Zur Auswahl des
Betrachtungswinkels.
Zum Zoomen des Bilds.
Zur Anzeige des Diskmenüs.
Zum Wechseln von
Menüoptionen.
Bestätigen.
Zum Zurückschalten auf den
vorhergehenden Schirm bei
aktiviertem Diskmenü.
OK
OK
MENU
Zum Wechseln der Disks.
Zur Eingabe der
Disknummern.
/+1
0
10
OK
231
564
897
11/012
Bedienung des TV-Tuners
Tasten Funktion:
Zum Starten des
automatischen Suchlaufs.
2
Zum Starten des manuellen
Suchlaufs.
Zum Wechseln der
2
10
231
564
897
11/012
Festkanalnummern.
Zur Eingabe der
Festkanalnummern.
/+1
0
Bedienung des DAB-Tuners
Tasten Funktion:
TUNER
Zum Wählen des
Frequenzbands.
Zum Starten des
automatischen Suchlaufs.
Zum Starten des manuellen
Suchlaufs.
Dienste wählen.
Zum Wechseln der
Festsendernummern.
231
564
Zur direkten Eingabe der
Festsendernummern.
7
Page 98

○○○○○○○○○○○○○○○○○○
Gerät (Frontplatte)
: arbeitet, wenn gedrückt gehalten.
Allgemeine Bedienung
Tasten Funktion:
Zum Einschalten des
Geräts.
Zum Ausschalten des
DEUTSCH
Geräts.
Zum Dämpfen des Tons.
Zum Wechseln der Quelle.
Zur Einstellung der
Lautstärke.
Zum Ändern der DisplayInformation.
Zum Abnehmen des
Bedienfelds.
Bedienung des Tuners
Tasten Funktion:
Zum Wählen des
Frequenzbands.
Zum Starten des
automatischen Suchlaufs.
Zum Starten des manuellen
Suchlaufs.
Zum Wechseln des UKWEmpfangsmodus.
Zum Ein-/Ausschalten des
TA-Standbyempfangs.
Zum Ein-/Ausschalten des
PTY-Standbyempfangs.
Bedienung der Disk
Tasten Funktion:
Zum Auswerfen der Disk.
Zur Auswahl von Kapiteln/
Titeln.
Suchlauftasten.
dann
Anzeigen von „FOLDER“ = Wählen von
8
Ordnern. *
Bedienung des CD-Wechslers
Tasten Funktion:
Zur Auswahl der Titel.
Suchlauftasten.
dann
(
einmal): Anzeigen von „DISC“
(
zweimal): Anzeigen von „FOLDER“ =Wählen von
=
Wählen von Disks
Ordnern.
.
1
*
Bedienung des TV-Tuners
Tasten Funktion:
Zum Starten des
automatischen Suchlaufs.
Zum Starten des manuellen
Suchlaufs.
Bedienung des DAB-Tuners
Tasten Funktion:
Zum Wählen des
Frequenzbands.
Zum Starten des
automatischen Suchlaufs.
Zum Starten des manuellen
Suchlaufs.
Zum Wechseln des Suchlaufmodus
(Ensemble/Service).
Zum Ein-/Ausschalten des
TA-Standbyempfangs.
Zum Ein-/Ausschalten des
PTY-Standbyempfangs.
Bedienung des Monitors
Tasten Funktion:
Zum Einschalten des Monitors.
Zum Ausschalten des Monitors.
Zum Öffnen des Monitors.
(Siehe Seite 60).
Zum Schließen des Monitors.
Zum Einziehen/Ausfahren
des Monitors.
Zum Abnehmen des Monitors.
Zum Einstellen des
Monitoranstellwinkels.
(Siehe Seite 60).
1
Zum Ändern des
Bildseitenverhältnisses.
Zur Anzeige des
Monitoreinstellschirms.
*1 Nur bei MP3
Page 99

Vorbereitung (Fernbedienung
—RM-RK220)
1
(Rückseite)
2
Mit der + Seite nach oben weisend
Lithiumknopfbatterie
(CR2025)
3
WARNUNGEN zur Batterie:
• Legen Sie die Batterie an einem Ort ab,
wo sie außer Reichweiter kleiner Kinder
ist. Falls ein Kind versehentlich die
Batterie verschluckt, sofort einen Arzt
rufen.
• Die Batterie nicht aufladen, kurzschließen,
zerlegen, erhitzen oder in ein Feuer
werfen. Dadurch kann sich die Batterie
stark erhitzen, bersten oder explodieren.
• Die Batterie nicht zusammen mit anderen
Metallgegenständen ablegen. Dadurch
kann sich die Batterie stark erhitzen,
bersten oder explodieren.
• Beim Entsorgen oder Aufbewahren der
Batterie diese mit Klebeband umwickeln;
andernfalls kann sich die Batterie stark
erhitzen, bersten oder explodieren.
• Die Batterie nicht mit Pinzetten oder
ähnlichen Werkzeugen anstoßen. Dadurch
kann sich die Batterie stark erhitzen,
bersten oder explodieren.
DEUTSCH
ACHTUNG:
Lassen Sie die Fernbedienung NICHT an
einem Ort (wie etwa auf dem
Armaturenbrett) liegen, wo sie längere Zeit
direktem Sonnenlicht ausgesetzt ist.
Andernfalls kann sie beschädigt werden.
Dieser Receiver verfügt über eine
Lenkradfernbedienfunktion.
Wenn Ihr Fahrzeug mit einer
Lenkradferndienung ausgestattet ist, können
Sie damit diesen Receiver steuern.
• Siehe Einbau/Anschlußanleitung (separate
Druckschrift) bzgl. der Aktivierung dieser
Funktion.
Setzen Sie den Fernbedienungssensor am
Bedienfeld KEINEM intensiven Licht
(direkte Sonneneinstrahlung oder künstliches
Licht) aus.
9
Page 100

Bedienverfahren
Dieses Gerät lässt sich nach drei verschiedenen Verfahren bedienen.
• Diese Anleitung erläutert vor Allem die Bedienung über die Sensorschirmflächen auf dem
Monitor.
• Direkte Nutzung der Sensorschirmflächen (Siehe „BLINDSTEUERUNG“ auf Seite 51).
Drücken Sie direkt mit dem Finger (immer ohne Handschuhe) auf die Sensorschirmflächen.
DEUTSCH
Beispiele: Im Folgenden wird dafür ein Beispiel beschrieben. Auf dem tatsächlichen
Monitorschirm wird das Wiedergabebild angezeigt (bei Wiedergabe einer Videoquelle).
Drücken Sie keinesfalls mit einem
Kugelschreiber oder ähnlich spitz
zulaufenden Gegenstand auf den
Sensorschirm (da er sonst beschädigt
werden kann).
Beispiel: DVD-Wiedergabe
Zum Wechseln der
Quelle.
Informationen
über Quelle und
Wiedergabemodus
Zum Umschalten der Funktionsmodi (die rechts
gezeigten Symbole wechseln entsprechend).
Beispiel: Einstellung
von Fader/Balance
Sensorfläche
(BALANCE LEFT)
Zum Löschen und Anzeigen der
Sensorschirmflächen und anzeigen, drücken
Sie auf den mittleren Bereich des
Monitorschirms.
• Sie können sie nur löschen, während Sie die
Wiedergabebilder betrachten.
Uhrzeitanzeige
Bildanzeigefenster
Die Symbole in dieser Leiste wechseln bei
jedem Drücken von .
Sensorfläche
(FADER FRONT)
Sensorfläche
(BALANCE
RIGHT)
10
Zum Rückschalten zum
vorhergehenden Schirm.
Sensorfläche (FADER REAR)
 Loading...